[email protected] www.inselife.com


NOTE
Warranty
THIS WARRANTY TERM GIVES YOU SPECIFIC LEGAL RIGHTS, AND YOU
MAY ALSO HAVE OTHER RIGHTS WHICH VARY FROM STATE TO STATE.
- Only apply to eligible purchases made directly from the inse authorized distributors.
- Warranty coverage applies to the original owner and to the original product only and is
not transferable.
- This warranty provides, at no extra cost to you, all parts necessary to ensure your
machine is in proper operating condition during the warranty period.
Warranty & Lifetime Customer Support
- If your appliance operates improperly while in use under normal household conditions
within the warranty period, please contact our customer support
- Please inform us your model name/number (On rating plate/boxing), purchase date,
order number, machine problem and your requirement.
How to initiate a warranty claim
If you have any questions about your inse appliance, please contact us through our
official email with your order number and details of where/when you bought the appliance.
Most questions can be solved over email by one of our trained inse Customer Support
Team members.
INSE CUSTOMER CARE

Contents
Important Safety Instructions
Battery Safety
Warning
Product Parts List and Schematic
Accessory Instructions
Product Overview
Product Installation
Product Storage
Charging Mode
Demolition Instructions
Daily Maintenance Attention
Technical Specification
Troubleshooting
1
2
3
4
5
6
7
9
10
12
15
15
16
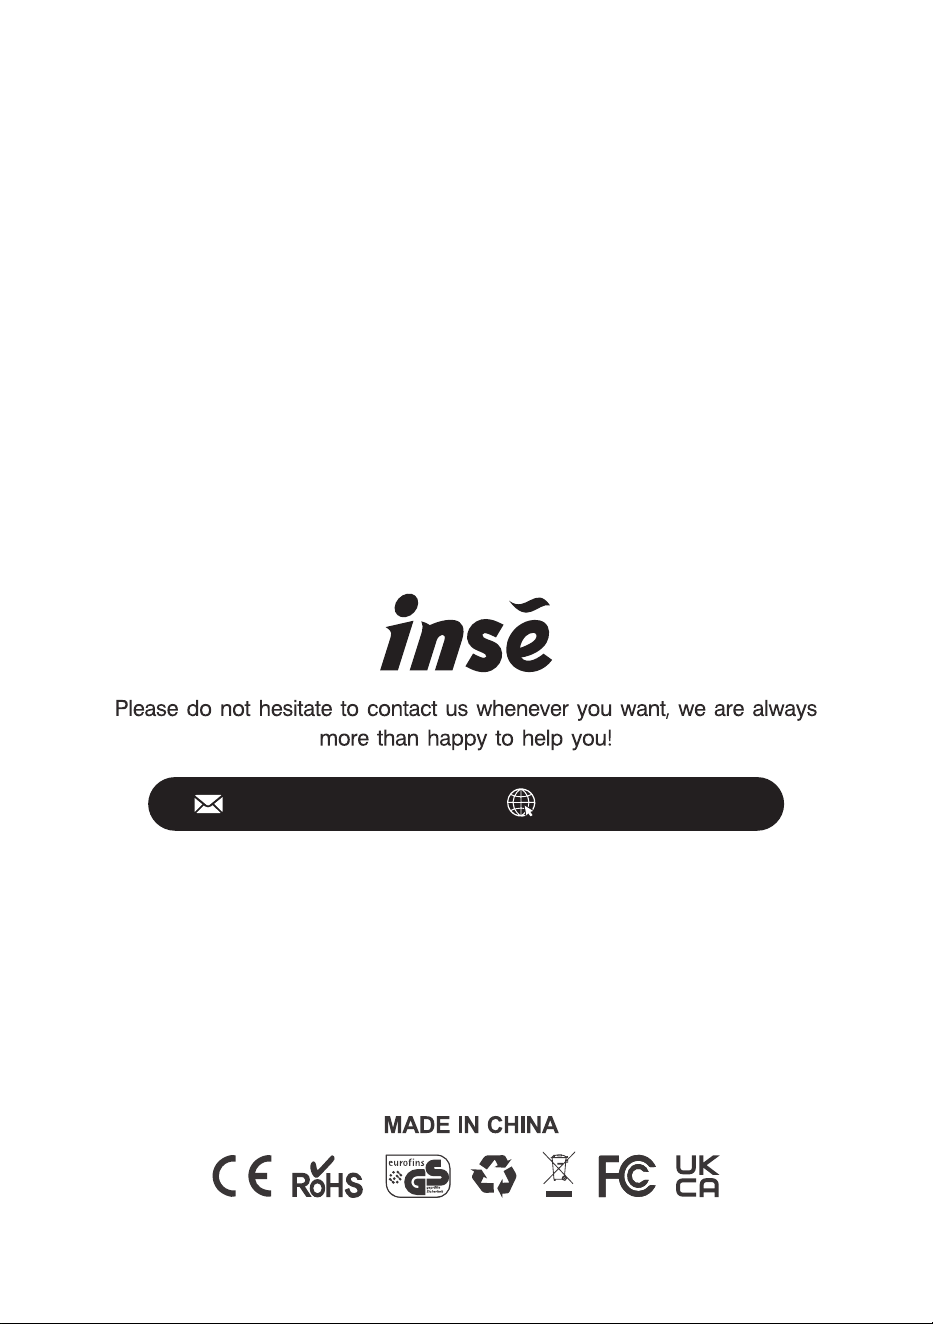
Important Safety Instructions
BEFORE USING THIS MACHINE READ ALL INSTRUCTIONS AND CAUTIONARY MARKINGS
IN THIS MANUAL AND ON THE MACHINE
When using an electrical appliance, basic precautions should always be followed,
including the following:
Do not pick up
burning objects
Do not put hands near the brush
bar when the machine is in use
Do not place on or
near the cooker
Do not use near
open flames
Do not pick up
water or liquids
Do not store near
heat sources
- Do not use it to pick up water or any other liquid, as this may cause electric shock.
- Do not use it to pick up sharp objects such as glass or screws, etc.
- Do not use the appliance to pick up flammable liquid, matches, cigarette ends, hot ashes, or any
hot, burning, or smoking objects.
- Do not use it if any of its openings are blocked.
- Do not use without the dustbin and filter in place.
- Do not store the appliance in direct sunlight or in high humidity conditions.
- Do not install, charge or use this appliance outdoors, in a bathroom, or within 3 meters (10 feet)
of a pool.
- Do not use any damaged accessories or adaptors.
- Do not use any parts/accessories or adaptors other than those supplied with this appliance, as
this may cause damage.
- Do not use the appliance for anything other than its intended use.
- Do not use the appliance if it has been dropped or if there are visible signs of damage.
- Do not use the adaptor to recharge non-rechargeable batteries.
- Do not remove the adaptor from the mains power supply by pulling the cord; switch off and
remove the plug by hand.
- Do not expose the appliance to rain.
- Do not operate the appliance with wet hands.
- Do not immerse the appliance in water or any other liquid.
- Only use with provided power adapter.
- Use of an extension power cord is not allowed.
- Always ensure that the appliance has cooled fully after use before performing any cleaning or
user maintenance.
- Switch off the appliance and disconnect it from the mains power supply before changing or fitting
accessories.
01

● If the battery pack becomes exhausted, it should be removed from the product to avoid leakage.
● In the event of the battery pack leaking, do not allow any liquid to come into contact with the skin or
eyes.
● If contact has been made, wash the affected area with copious amounts of water and seek medical
advice.
● Keep the battery pack out of the reach of children.
● Secondary battery packs need to be charged before use. After extended periods of storage, it may
be necessary to charge and discharge the batteries several times to obtain maximum performance.
● Do not leave battery packs on charge for prolonged periods of time.
● Do not use any charger other than that specifically provided for use with the product.
● The supply terminals are not to be short-circuited.
● Do not store above 60℃. Avoid storing in direct sunlight.
● Do not use any battery packs that are not designed for use with the product.
● Do not dispose of the battery pack in a fire.
● Do not crush, puncture, dismantle or otherwise damage the battery pack.
● Do not dismantle, open or shred battery packs.
● Do not expose the battery pack to heat or fire as it may explode.
● Do not subject the battery pack to mechanical shock.
● Do not dispose of the exhausted battery pack in household waste.
● To dispose of the exhausted battery pack, take it to a local recycling station.
● Contact the local government offices for further details.
● This appliance is fitted with a 22.2V 2500mAh Li-ion rechargeable battery.
- Take care when equipping accessories with rotating parts as this could cause entrapment.
- This appliance is intended for domestic use only. It should not be used for commercial purposes.
- Keep the appliance away from other heat-emitting appliances.
- Keep the appliance away from heat or sharp edges that could cause damage.
- Keep away from children aged below 8.
- Improper repairs may put the user in danger.
- If any part is damaged due to human error, only a qualified electrician can repair it. Please note the
appliance is not under warranty in this case.
- This appliance is not a toy.
- Children should be supervised to ensure that they do not play with the appliance.
- Children aged 8 years and above, people with reduced physical, sensory or mental capabilities or
lack of experience and knowledge can use this appliance, only if they have been given supervision or
instruction concerning using the appliance in a safe way and understand the hazards involved.
- Check the voltage indicated on the rating plate and confirm you connect the appliance to the power
supply with the correct voltage.
02
Battery Safety

03
WARNING
Read all safety warnings and instructions. Failure to follow the warnings and instructions
may result in electric shock, fire or serious injury.
1. Prevent unintentional starting ensure the switch is in the off-position before connecting the pack,
picking up, or carrying the appliance.
Carrying the appliance with your finger on the switch or energizing appliances that have the
switch on invites accidents.
2. Disconnect the battery pack from the appliance before making any adjustments changing
accessories or storing the appliance.
Such preventive safety measures reduce the risk of starting the appliance accidentally.
3. Recharge only with the charger specified by the manufacturer. A charger that is suitable for one
type of battery pack may create a risk of fire when used with another battery pack.
4. Use appliances only with specifically designated battery packs.
The Use of any other battery packs may create a risk of injury and fire.
5. When the battery pack is not in use, keep it away from other metal objects, like paper clips,
coins, keys, nails, screws, or other small metal objects, that can make a connection from one
terminal to another.
Shorting the battery terminals together may cause burns or fire.
6. Under abusive conditions, liquid may be ejected from the battery; avoid contact.
If contact accidentally occurs, flush with water.
If liquid contacts the eyes, additionally seek medical help.
Liquid ejected from the battery may cause irritation or burns.
7. Do not use a battery pack or appliance that is damaged or modified.
Damaged or modified batteries may exhibit unpredictable behavior resulting in fire, explosion, or
risk of injury.
8. Do not expose a battery pack or appliance to fire or excessive temperature.
Exposure to fire or temperature above 130℃ may cause an explosion. The temperature of 130℃
can be replaced by a temperature of 265 °F.
9. Follow all charging instructions and do not charge the battery pack or appliance outside of the
temperature range specified in the instructions.
Charging improperly or at temperatures outside of the specified range may damage the battery
and increase the risk of fire.
10. Have servicing performed by a qualified repair person using only identical replacement parts.
This will ensure that the safety of the product is maintained.
11. Do not modify or attempt to repair the appliance or the battery pack (as applicable) except as
indicated in the instructions for use and care.

04
* If you receive a package that is missing any accessories or want additional such as HEPA,
batteries, or adapters, please feel free to contact us to reissue them freely.
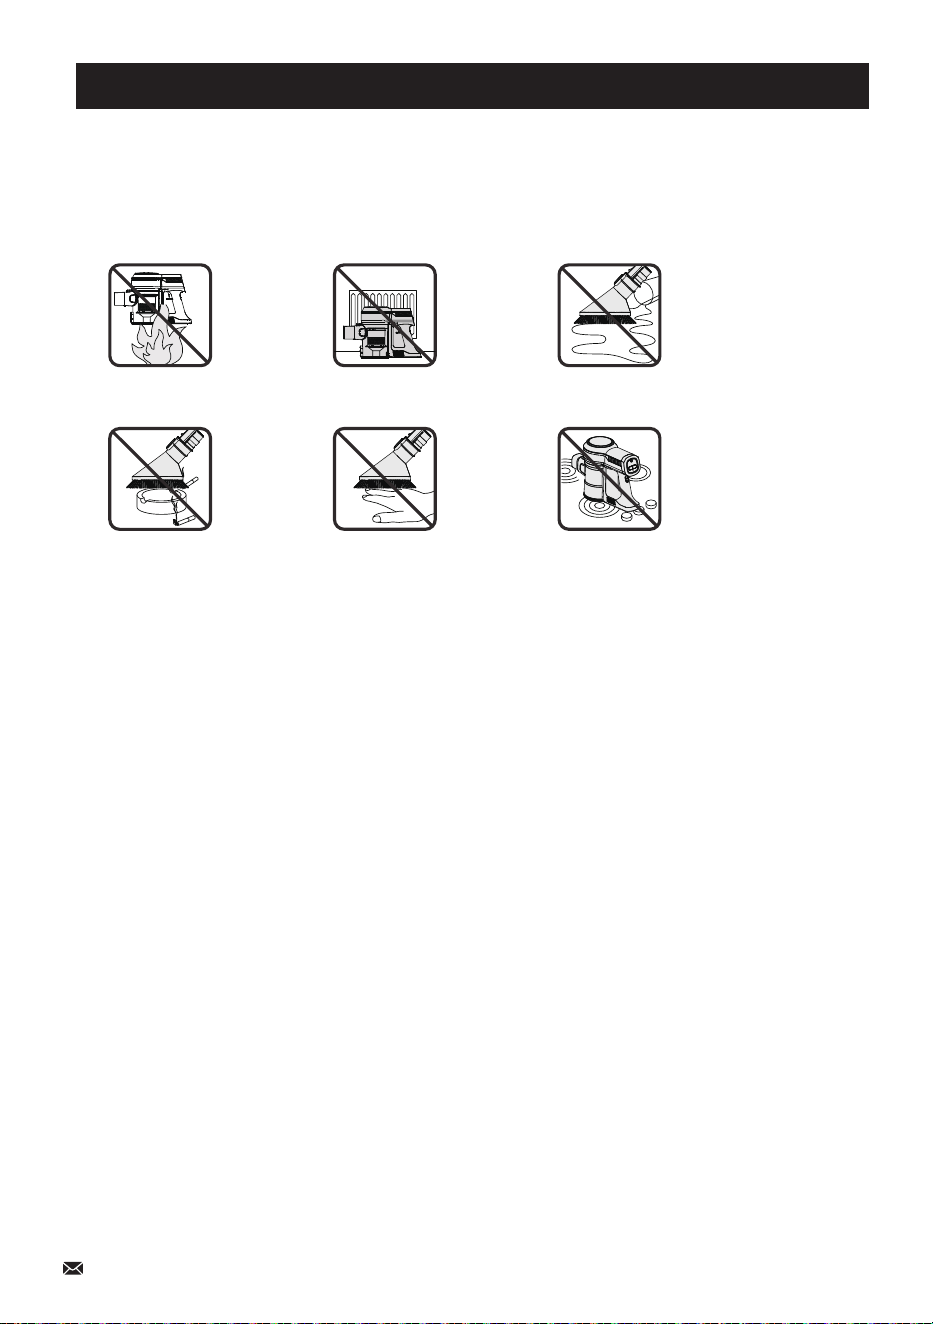
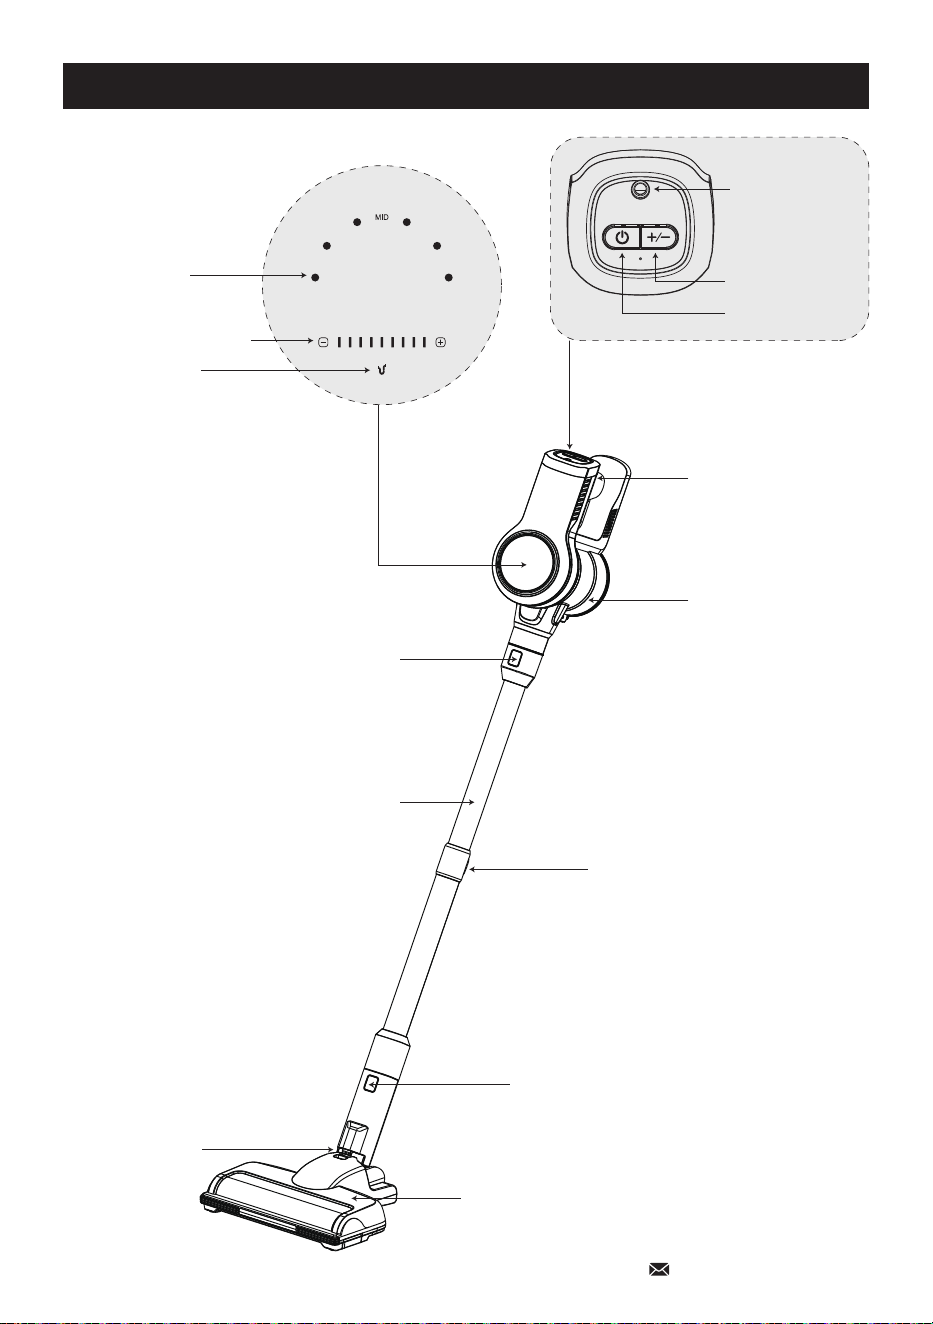
Product Parts List and Schematic
Main Motor with Dustbin LED Motorized Cleaner Brush Retractable Metal Tube
Detachable Battery Long Crevice Tool Dust Brush
Wall Bracket with Screws Extra HEPA-Filter Cleaning Gadget
Power Adapter User Manual
05
Motorized Cleaner Head
Can be connected to the metal tube for daily cleaning on the
floor or low pile carpet, or to the main motor for cleaning the
car trunk, stair
Retractable Metal Tube
Can be installed into the cleaner head; performs better for
corners or high places that are not easy to clean up
Long Crevice
For comers and other hard-to-reach places; can be connect-
ed to the metal tube to clean spider webs on the ceiling
Dust Brush
Can be switched into a brush or a wide crevice; suitable for
fabric surfaces and bookcases, stairs, keyboards, and so on
2-in-1 Cleaning Gadget
The blade end can be used to cut off hair that is wrapped
around the roller brush, the other brush end can be used to
clean the dirt inside the dustbin, strainer, HEPA filter, or brush
head
Wall Mount
Used to store vacuum cleaners and some accessories such
as Long Crevice & Dust Brush
Accessory Instructions
06
Product Overview
LED Display
Dust Cup
Main Motor Release Button
Retractable Metal Tube
Motorized Brush Release Button
Stand Lock
Motorized Brush
Power Indicator
Suction Power Indicator
Clog Reminders
LOW HIGH
Battery
Release Button
Retractable Metal Tube
Release Button
On/Off Button
Speed Button
Charging Socket
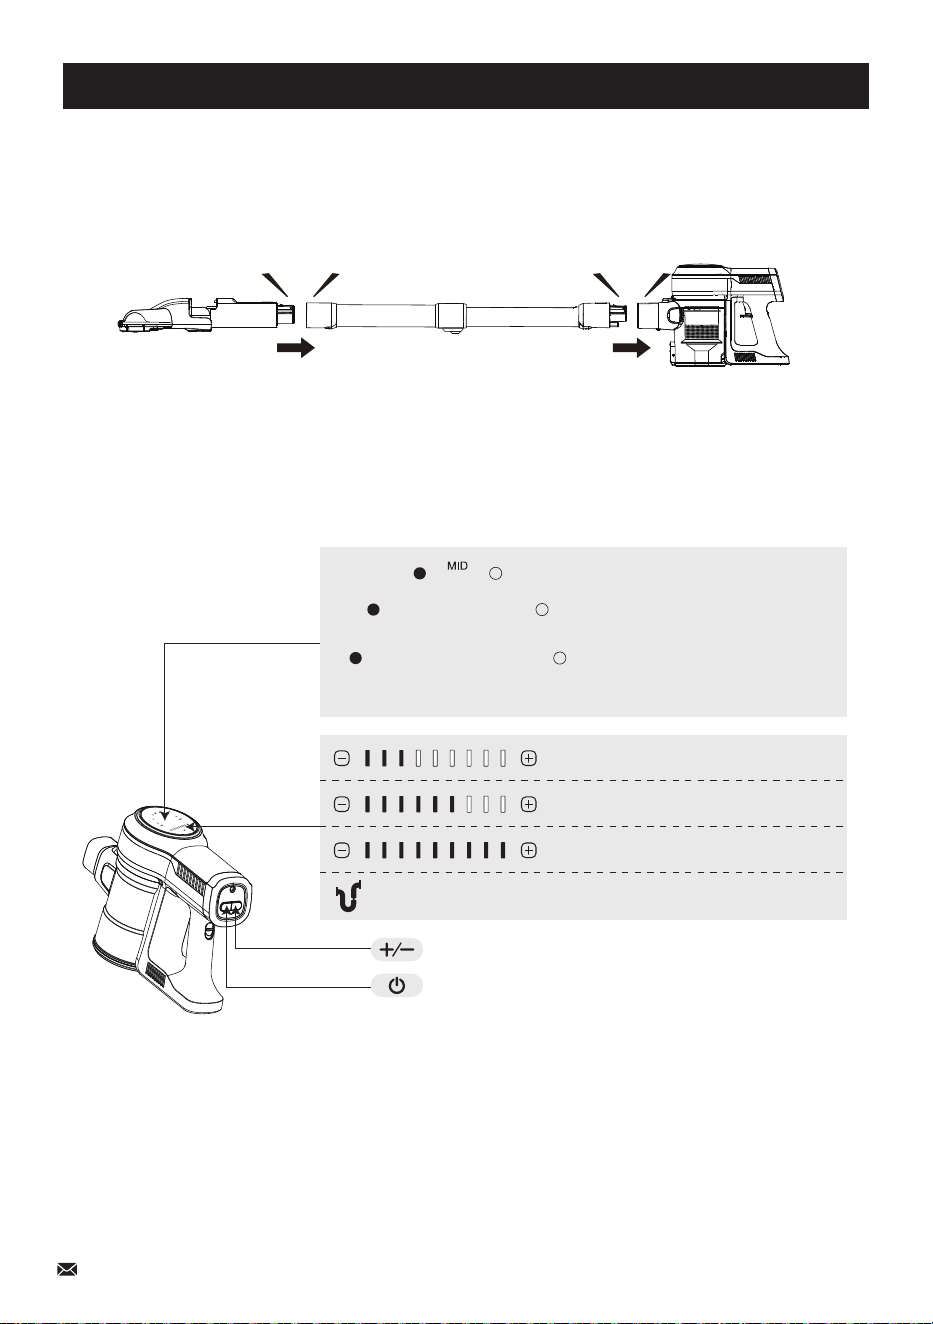
Product Installation
a) Press the Speed Button, the machine will work at High Suction Level, switch to Low and
Middle Suction Level by pressing Speed Button again.
b) When the machine is working at any suction level, press the ON/OFF button, the machine
will stop working.
I. Use as stick vacuum cleaner
1. Insert the metal tube into the body until you hear a "click".
Insert the motorized brush to the head of the metal tube until you hear a "click".
2. Press the On/Off Switch Button to turn on the vacuum cleaner, the machine will start working at
Middle Suction Level.
click
click
On/Off Switch Button
Speed Button
07
Low Suction Level
Middle Suction Level
High Suction Level
Please Clean Brush Roller, Metal Tube,
Dustbin, HEPA-Filter
Battery Indicator
(Low, Mid, High)
LOW HIGH
08
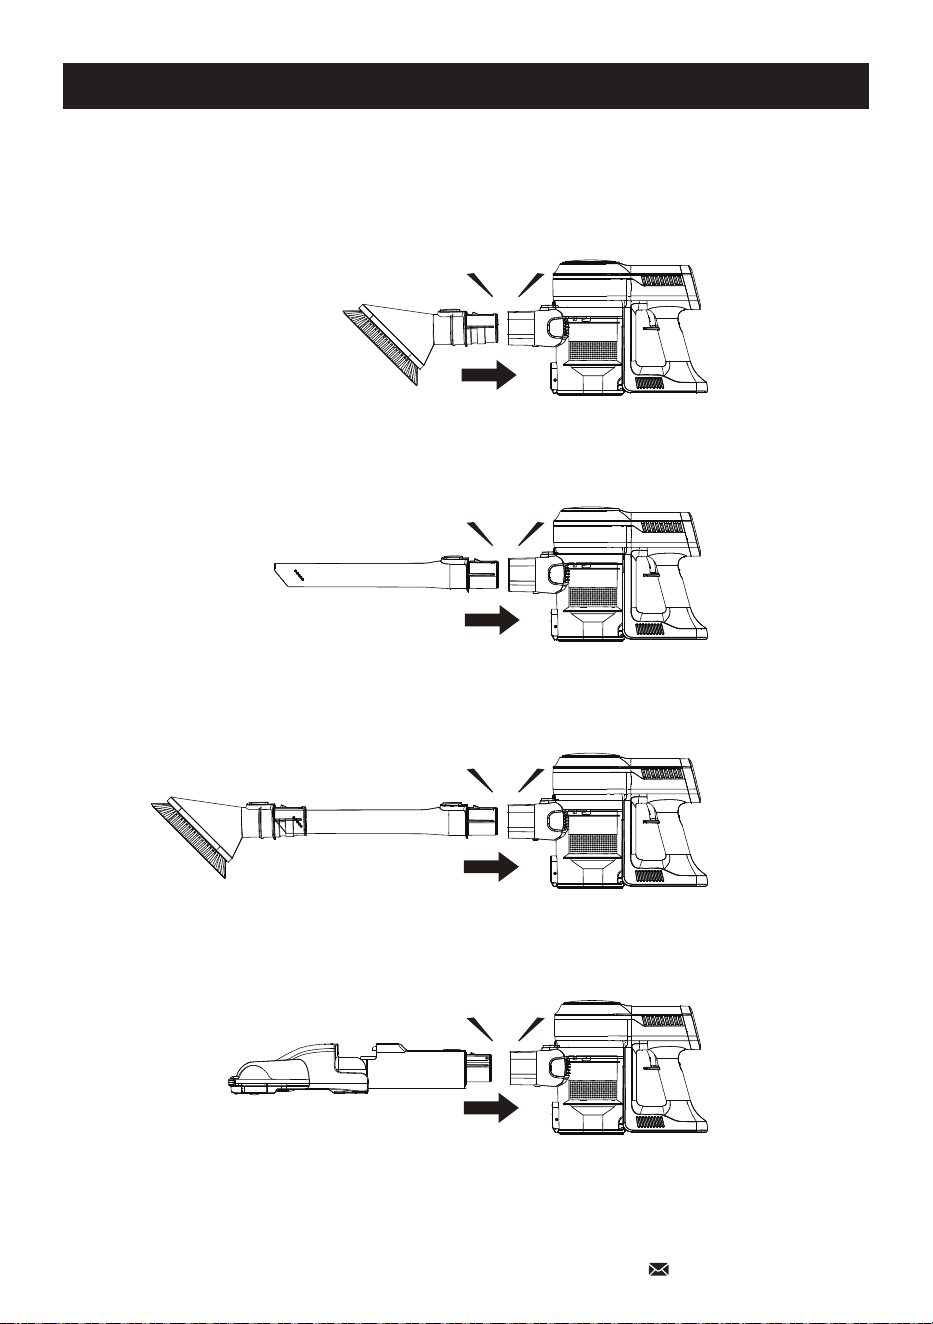
Product Installation
II. Use as handheld vacuum cleaner
Insert the accessory to body until you hear a "click".
click
click
click
click
09
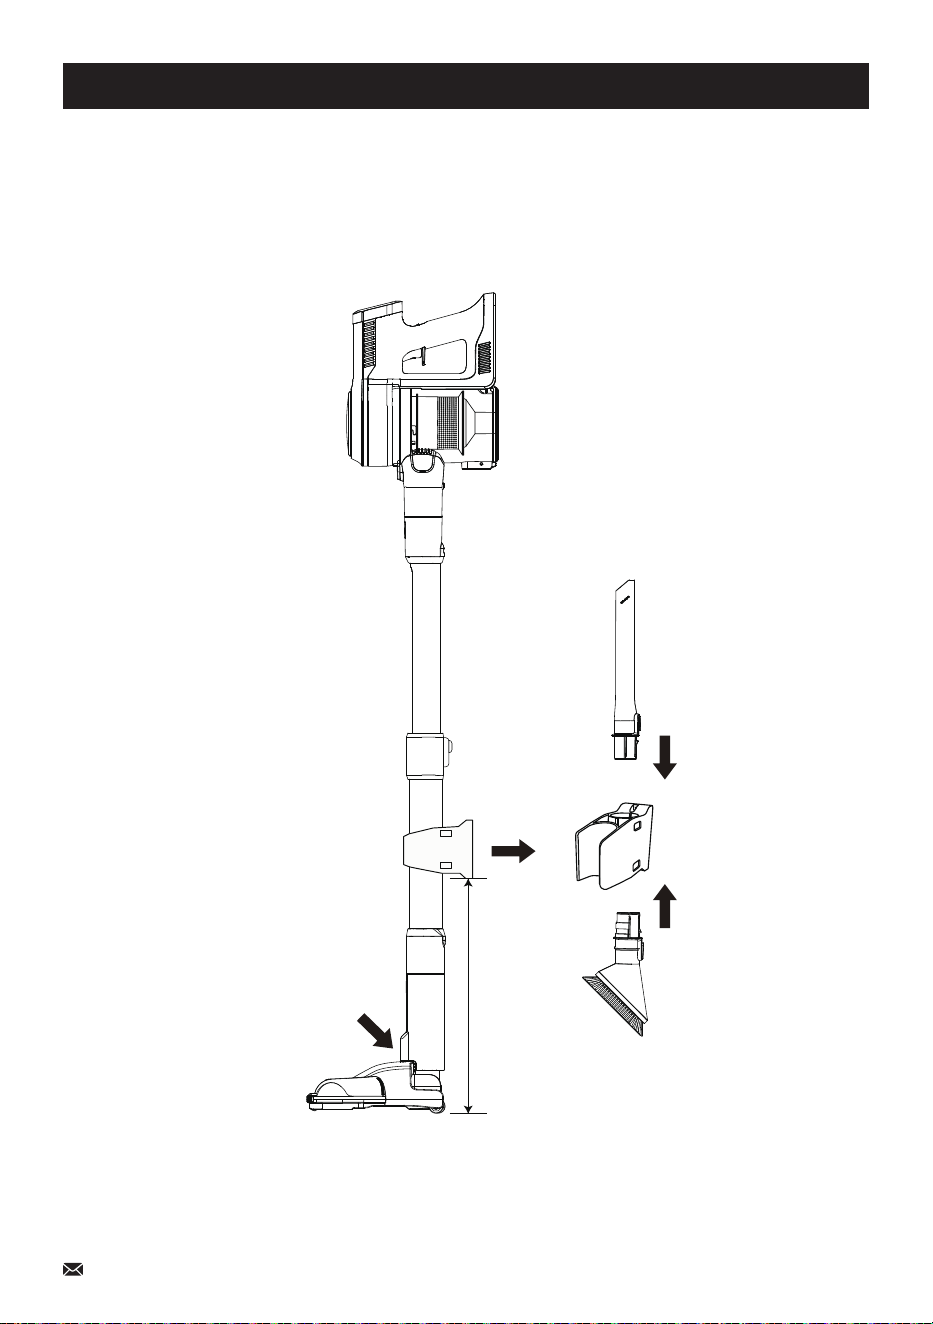
Product Storage
1. Fix the wall mount to the wall with screws, the wall mount installs about 15 inches above the ground;
2. Lock the floor brush and fix the machine to the wall mount;
3. Attach cleaning accessories (Long Crevice & Dust Brush) to wall mount.
Stand Locked
15 inch
10
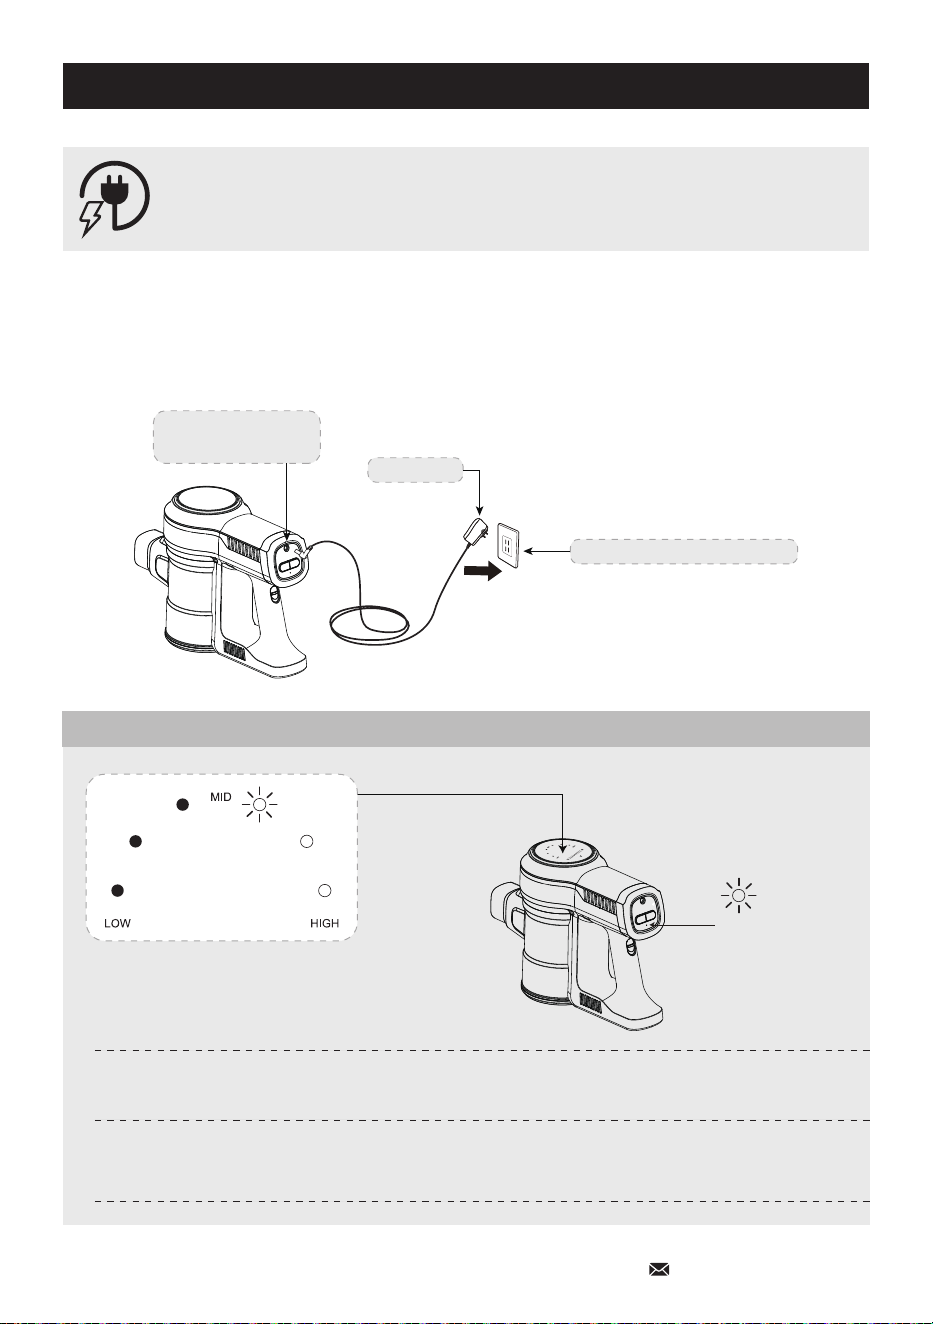
Charging Mode
Charging Mode 1:
Directly insert into the charging socket of the host battery pack to charge.
Host Battery Pack
Charging Socket
Adaptor
Household Power Socket
* For safety, the battery was charged up to 30% battery capacity before shipping.
Please fully charge the battery before first use.
* It takes about 5 hours to fully charge the battery from flat status.
The single light of the battery indicator on the display
and the red light of the battery pack blinks slowly
Charging
All light of battery indicators on the display are always on,
the red light of the battery pack turns green and is always on
Charging Complete
Light of the
Battery Pack
Battery Indicator
Charging Mode
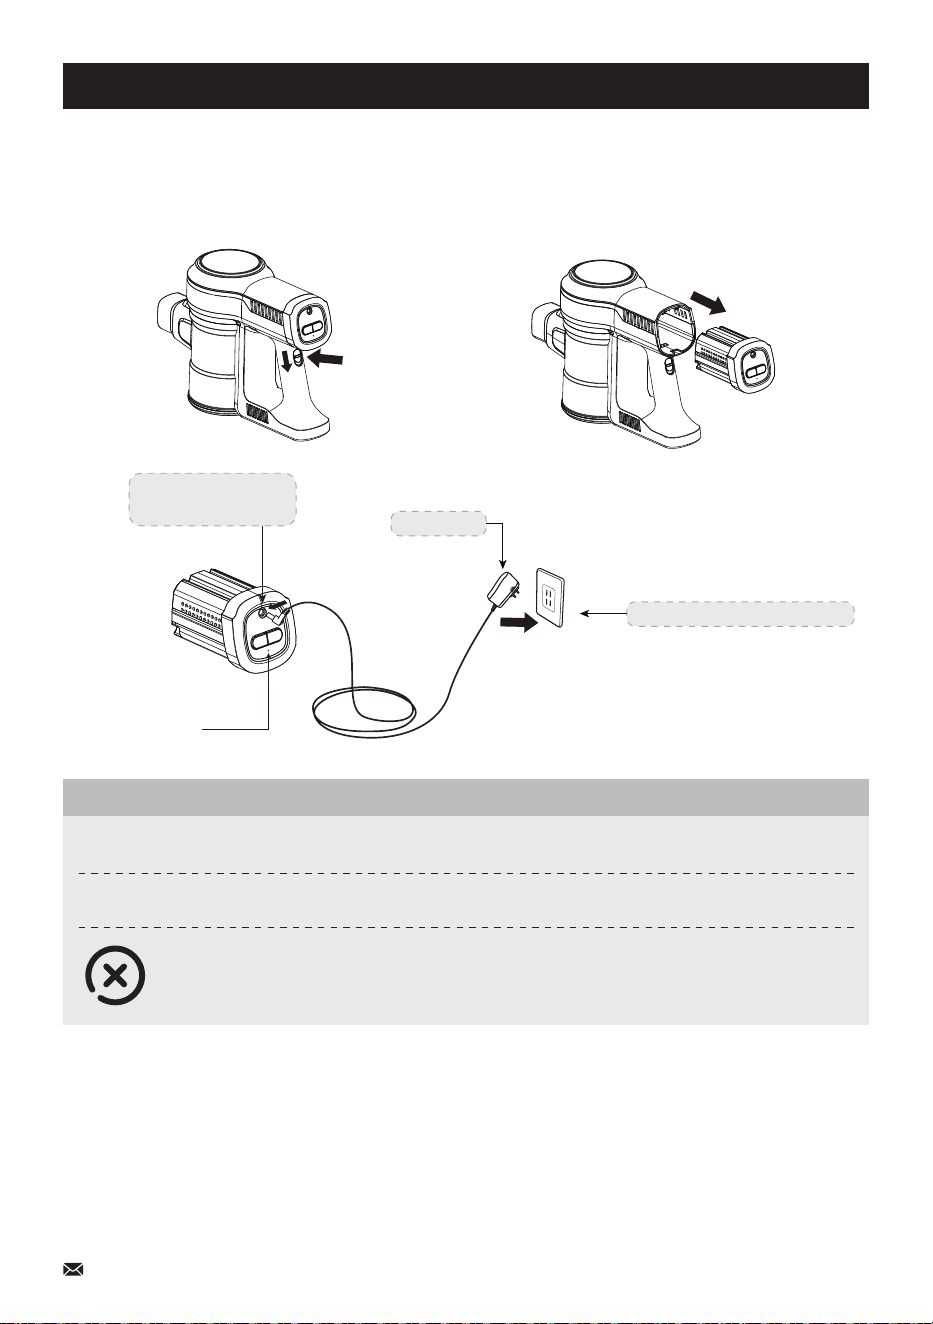
Charging Mode 2:
Charging socket of the single battery pack.
Slide down the battery pack release button, and pull out the battery pack.
Battery Pack
Release Button
Note:
* The machine cannot be turned on during charging.
* Charge the battery only with the adaptor (26.5V) provided by inse
* When you won't use the battery for a long time, please store it in a cool dry place. In this situation,
please ensure that the battery has been half charged (Middle Level).
* If you need an additional battery, please purchase from an authorized distributor of inse or contact
the customer support.
Host Battery Pack
Charging Socket
Adaptor
Household Power Socket
Light of the
Battery Pack
Charging
The red light of the battery pack blinks slowly
Charging Complete
The red light of the battery pack turns green and is always on
-All light of battery indicators on the display and the red light of the battery pack
blinks swiftly in 10 seconds then lights off:
Incorrect Adapter
Battery Indicator
11
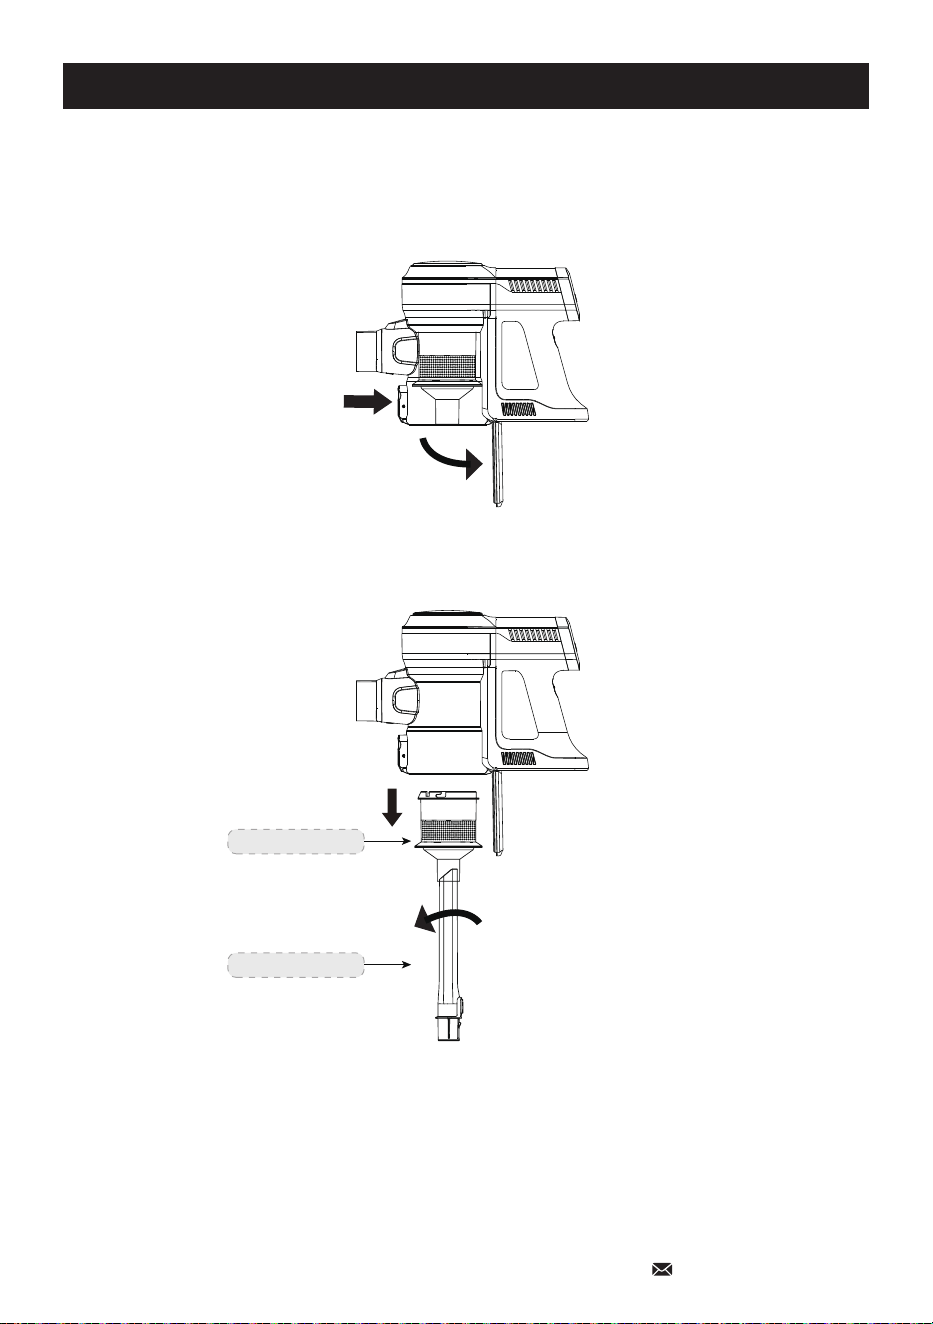
Demolition Instructions
How to empty the dust cup
1) Press the dust release button above the trashbin emptying the trash.
2) Insert & rotate Long Crevice to remove Metal Filter as below.
Metal Filter
Long Crevice
12
13
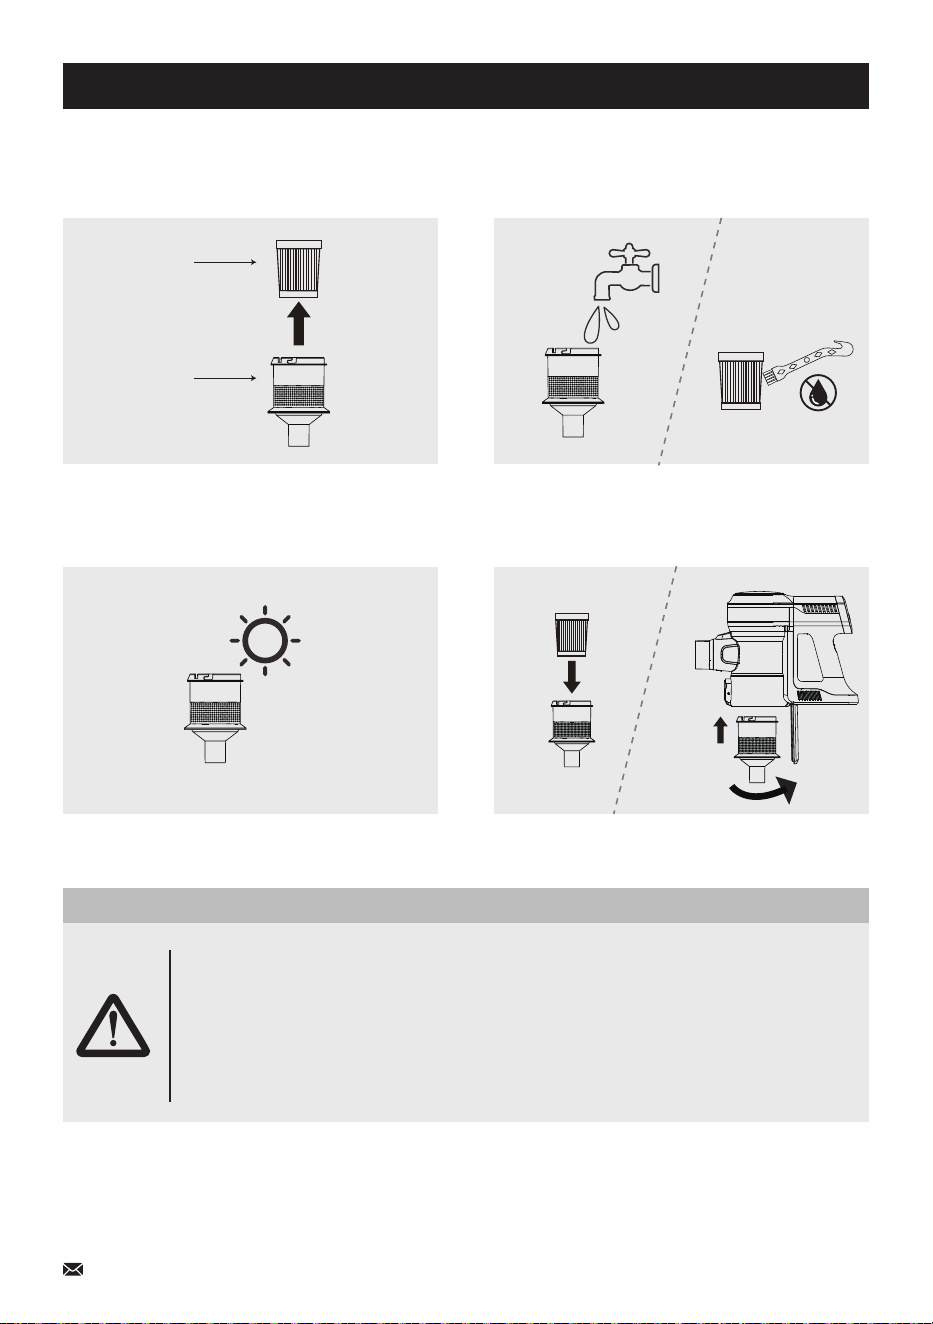
Demolition Instructions
3) Take out the HEPA from the Metal Filter
as below.
4) Wash the Metal Filter with cool water, and
clean the HEPA with the 2-in-1 Cleaning
Gadget.
5) Ensure the Metal Filter and the HEPA are
completely dry before refitting.
6) Put the HEPA & Metal Filter back into the
dust cup and lock in place.
Metal Filter
HEPA
IMPORTANT!
1. Please check and clean the Metal Filter and High Efficiency HEPA regularly;
2. Please clean the filter in time if the suction performance decline;
3. Please replace the Metal Filter/HEPA if it's broken or it cannot maintain the
suction performance of the vacuum cleaner.
4. Please do not bend or squeeze the HEPA.
Clean Metal Filter and High Efficiency HEPA

14
Demolition Instructions
Removal method of roller brush
1) Disconnect the power supply and slide the
brush lock to the right as shown in the figure
3) Take out the roller brush and clean the hair
and other foreign matters with 2-in-1 Cleaning
Gadget
2) Slide the brush latch to the unlocked state
4) Wash the roller brush with water
5) Dry the roller brush for 3 hours 6) Install the roller brush back into the floor brush
and slide the lock to the left until it is locked

Daily Maintenance Attention
Crapets or Hard Floors
* This vacuum cleaner is suitable for hard floors and low-pile carpets, not for medium and high-pile
carpets.
* Before vacuuming highly polished floors, such as wood or linoleum, first check that the underside
of the floor tool and its brushes are free from foreign objects that could cause marking.
Vacuuming
* Fine dirt such as plaster dust or flour should only be vacuumed in very small amounts.
* Do not use the machine to pick up sharp hard objects, small toys, pins, paperclips, etc, which may
damage the machine.
* When vacuuming, certain carpets may generate small static charges in the dustbin or wand. These
are harmless and won't cause any electrical hazards. To minimize any effect from this, do not put
your hand or insert any object into the dustbin unless you have first emptied it. Clean the dustbin with
a damp cloth only.
Emptying & Cleaning the Dustbin
* To make emptying the dustbin easier, it is advisable to remove the tube and brush roller.
* To minimize dust/allergen contact when emptying, encase the dustbin tightly in a plastic bag to empty.
* Ensure the machine is disconnected from the charger before removing the dustbin, remove the tube
and brush roller, then clean the dustbin with a damp cloth only.
* Do not use detergents, polishes, or air fresheners to clean the dustbin.
* Do not put the dustbin in a dishwasher.
Washable Parts
* Wash the Metal Filter at least once a month.
* The Metal Filter unit may require more frequent washing if vacuuming fine dust or frequent used.
15
Technical Specification
Battery
Charging Period
Weight
Input
Motor Power
Package Dimensions
22.2V/2500mAh
5 hours
8.1 Ibs
DC 26.5V/500mA
250W+15W
17.32*13.38*7.09 in
Troubleshooting
Run for like 5 mins then shuts off just received
Problem
Solutions
The battery was charged up to 30% battery capacity before shipping for safety.
Please fully charge the battery before first use.
Turn on for about 10s then shuts off even though it have been chargingProblem
Solutions
Please detach the metal tube and motorized brush, test the vacuum motor ONLY and
see if it works properly.
1. If the vacuum motor works, please connect the motorized brush with the vacuum
motor directly to check if the brush spins.
2. If the vacuum motor doesn't work, send us a video, and we'll further confirm.
How to make the video?
1. Charge the battery fully
(over 5 hours)
2. Clean the filter which is
inside the dustbin
3. Disassemble the metal tube
and the motorized brush
4. Just press once on the ON trigger and trigger the motor
head (along with the dustbin and the battery)
5. Take a video for the
light status
Roller brush stops spinning
Problem
Solutions
1. Please check whether the roller brush is tangled by hair.
2. Please detach the metal tube, and connect the motorized brush with the vacuum
motor directly to check if the brush works.
If the motorized brush spins and the LED light is on, then it's the problem of the
metal tube.
If the LED light is on but the motorized brush doesn't spin, then it's the problem
of the motorized brush.
Weak Suction PowerProblem
Solutions
1. Check whether the battery needs charging.
2. Check if the dustbin, Metal Filter, or HEPA is full of dust.
3. Check if the Filters were installed correctly.
4. Check if there is any blockage in the tube, or roller brush that is tangled by hair.
Please empty the dustbin, wash the Metal Filter with cool water, and clean the
HEPA with the cleaning gadget, replace the HEPA if necessary.
Abnormal motor soundProblem
Solutions
Check if the blockage and whether the Metal Filter and HEPA are not installed correctly.
Battery cannot bechargedProblem
Solutions
1. Use the correct adaptor offered by inse
2. Make sure the power cord is plugged tightly
If the solutions above cannot solve the problem, or the issue you met is not listed, please feel free to
contact us via email for further support.
Email : [email protected]
16
