Loading ...
Loading ...
Loading ...

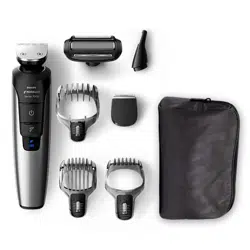
A Bodygroom Shaver
B Nose Trimmer
C Detail Trimmer
D Full Size Metal Trimmer
E Handle
F On/Off Button
G Turbo Button
H Turbo Status Indicator
I Battery Status Indicator
J Oil
K Small Appliance Plug
L Adapter
M Body Comb
N Stubble Comb
O Hair Comb
Storage Pouch (not shown)
Full 2-Year Warranty
45-Day Money-Back Guarantee
This symbol on the product
indicates that the Groomer
can be used in the bath
or shower.
Registration
Congratulations on your purchase and
welcome to Philips Norelco!
To fully benefit from the support that Philips
Norelco offers, register your product at
www.norelco.com/register
Put It To The Test
Like many new products, your Philips Norelco
Multigroom may take a little getting used to. If
you are using an electric Groomer for the first
time, or if you’ve been using a different brand,
take the time to acquaint yourself with your
new Grooming Kit.
Your Multigroom features head to toe styling
with a Bodygroom shaver and powerful battery
combined with all the attachments to make
trimming facial hairs or hair clipping goof proof.
Throw your scissors away and put your new
Multigroom to the test. We guarantee precise,
professional results or Philips Norelco will
refund you the full purchase price as long as the
request is received within 45 days of purchase.
Before Using
Before using, check foil, cutters and trimmers
for wear or damage. If foil, cutters or
trimmers show signs of wear or damage, do
not use Groomer as injury may occur. Do not
use Groomer until foils, cutters or trimmers
have been replaced.
To Charge/Recharge
Fully charge Groomer before using for the
first time or after non-use for a long period
of time.
1
/
8
-
25
/
32
in
3-20mm
A
B
O
1
/
8
-
15
/
32
in
3-12mm
M
L
K
C
D
E
F
G
H
I
J
3
/
64
-
15
/
32
in
1-12mm
N
Features
16
1
17
1
2
2
20
3
1
2
2
1
4
1
2
18
5
19
6
2
1
7
24
8
25
9
27
10
3 - 20
11
2
3 - 20
1
12
13 14
3 - 20
1
3
2
15
1
2
22 23
28
29
30
26
Charging, recharging or using Groomer at
temperatures below 40ºF (4,5ºC) or higher
than 95ºF (35ºC) adversely affects lifespan of
the battery.
If the Groomer is subjected to a major change
in temperature, pressure or humidity, let the
Groomer acclimatize for 30 minutes before
using.
1 Be certain Groomer is OFF.
2 Connect small plug to Groomer and plug
the adapter into any 120V AC outlet (fig. 1).
Use only the cord provided.
An adaptor plug may be necessary for power
cord usage in some foreign countries. Use an
attachment plug adaptor of the proper
configuration for the power outlet.
3 It will take approximately 1 hour to fully
charge the Groomer for a cordless trimming
time of up to 60 minutes.
4 The Battery Status Indicator will blink white
to indicate the Groomer is charging.
5 If the battery runs low (approximately 10
minutes of grooming time left) the Battery
Status Indicator will light up orange
indicating the Groomer needs to be
(re)charged.
NOTE: You can also quick charge the Groomer.
A 5-minute charge will give you approximately
5 minutes of cordless grooming time.
6 Disconnect the cord and unplug from
electrical outlet.
Turbo Power
Simply press the Turbo Button for a turbo
power boost for fast results and the Turbo
indicator will light up blue. The memory
function will remember the last used setting.
Loading ...
Loading ...
Loading ...