Multigroom
4222 002 8730 1
Full Two-Year Warranty
Philips Electronics North America Corporation warrants each new
Philips Norelco product, Model QG3398/69 (except cutters, combs
and foil) against defects in materials or workmanship for a period of
two years from the date of purchase, and agrees to repair or replace
any defective product without charge.
IMPORTANT: This warranty does not cover damage resulting
from accident, misuse or abuse, lack of reasonable care, the affixing
of any attachment not provided with the product or loss of parts
or subjecting the product to any but the specific voltage.* NO
RESPONSIBILITY IS ASSUMED FOR ANY SPECIAL,
INCIDENTAL OR CONSEQUENTIAL DAMAGES.
In order to obtain warranty service, simply go to www.philips.com/
norelco or call 1-800-243-3050 for assistance. It is suggested that for
your protection you return shipments of product by insured mail,
insurance prepaid. Damage occurring during shipment is not covered
by this warranty. NOTE: No other warranty, written or oral, is
authorized by Philips Electronics North America Corporation. This
warranty gives you specific legal rights, and you may also have other
rights which vary from state to state. Some states do not allow the
exclusion or limitation of incidental or consequential damages, so the
above exclusion and limitations may not apply to you.
*Read enclosed instructions carefully.
Manufactured for:
Philips Consumer Lifestyle
A division of Philips Electronics North America Corporation
P.O. Box 10313, Stamford, CT 06904
This symbol on the product’s nameplate means it is
listed by Underwriters’ Laboratories, Inc.
Norelco is a registered trademark of Philips Electronics
North America Corporation.
PHILIPS is a registered trademark of Koninklijke Philips N.V.
© 2016 Philips Electronics North America Corporation. All rights reserved.
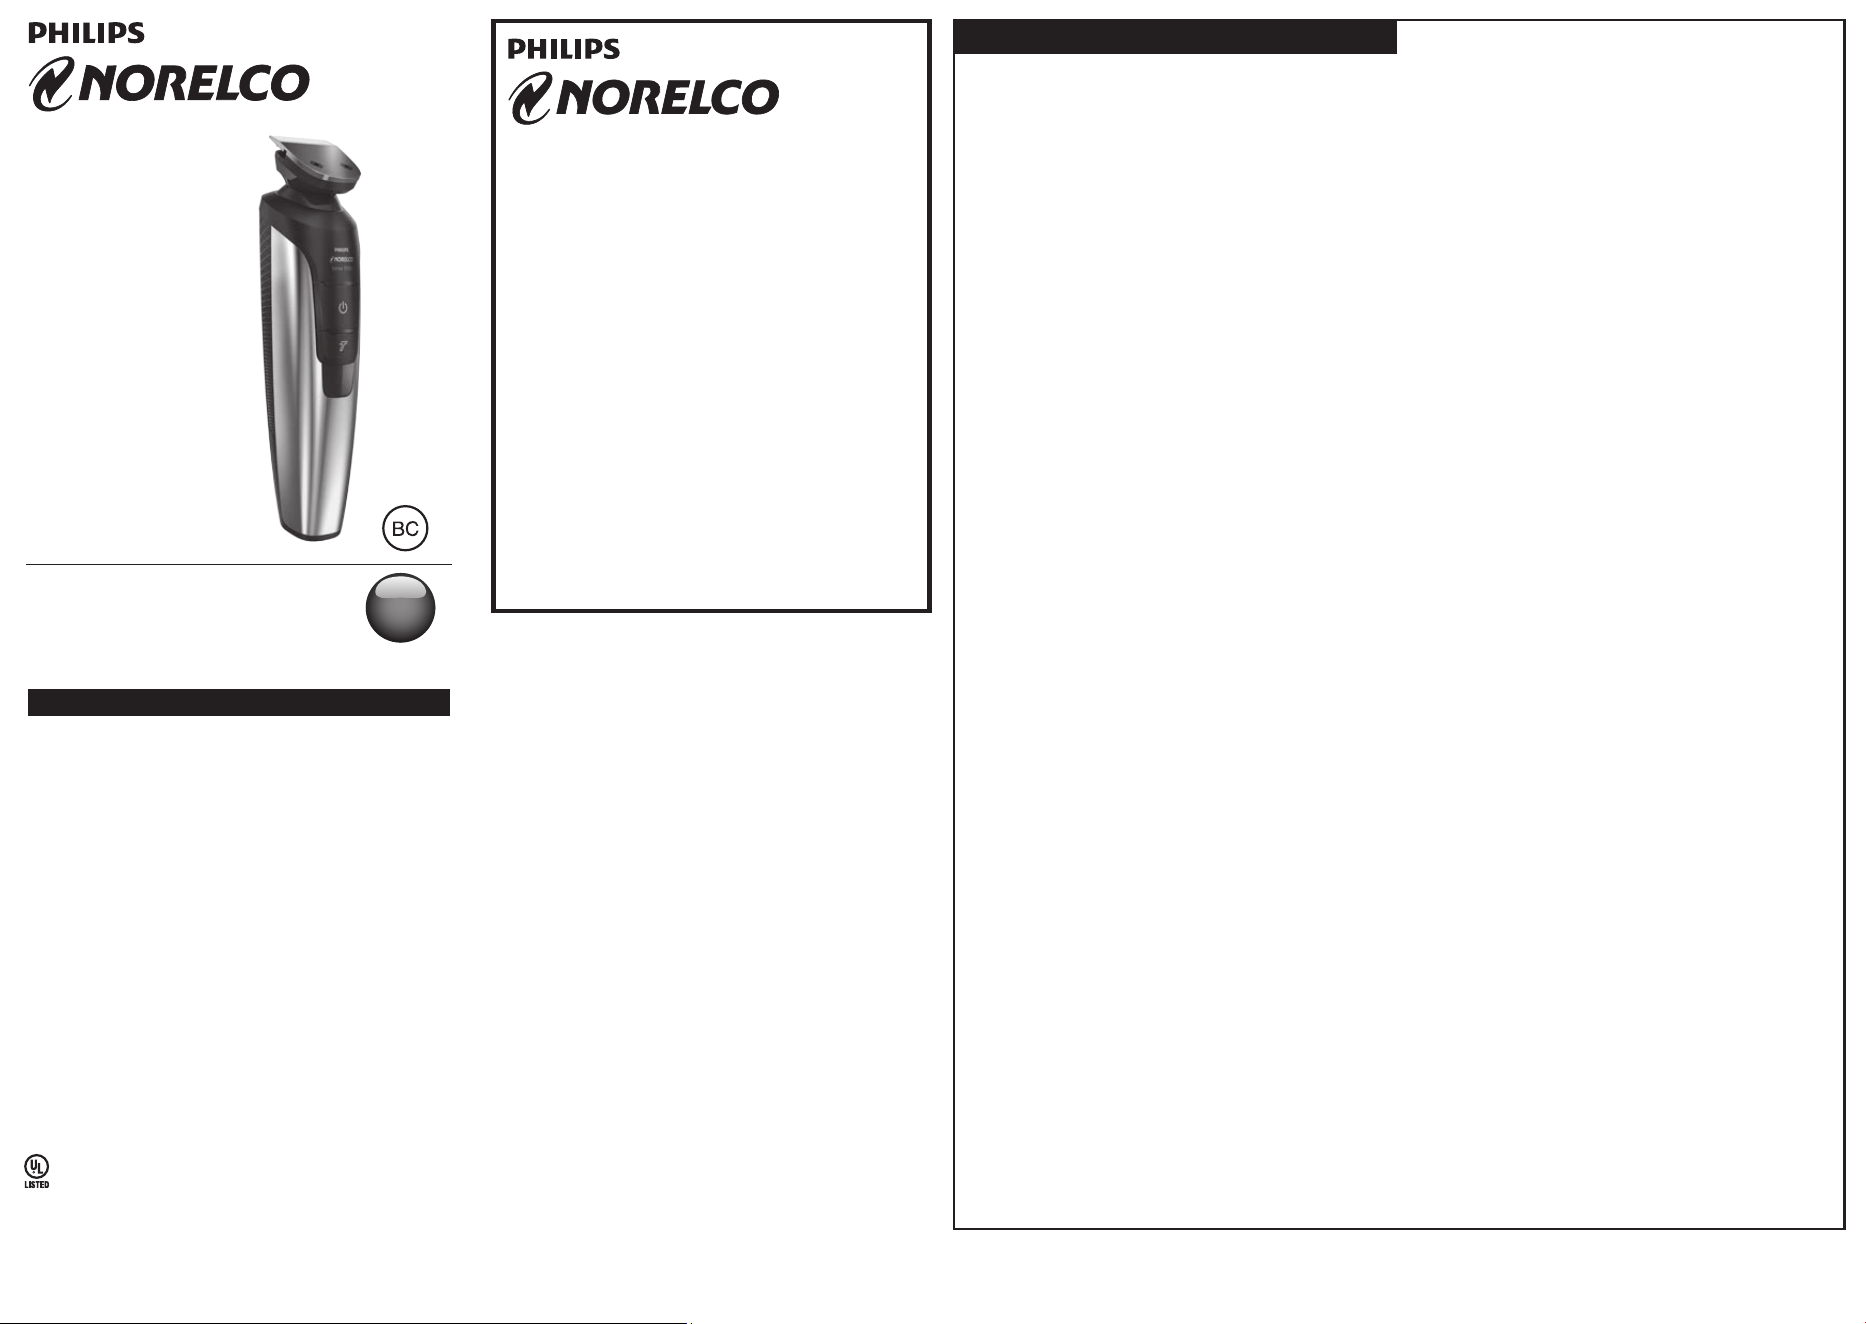
QG3398/69
Rechargeable Cordless
Electric Groomer
Always here to help you
Question?
Contact
Philips
Norelco
Question?
Contact
Philips
Norelco
Register your product and get support at
www.norelco.com/register
45-DAY MONEY-
BACK GUARANTEE
If you are not fully satisfied with your Philips Norelco
Groomer send the product back and we’ll refund you
the full purchase price.
The Groomer must be shipped prepaid by
insured mail, insurance prepaid, have the original
sales receipt, indicating purchase price and date
of purchase, and the money-back guarantee
return authorization form enclosed. We cannot
be responsible for lost mail.
The Groomer must be postmarked no later
than 45 days after the date of purchase. Philips
Norelco reserves the right to verify the purchase
price of the product and limit refunds not to
exceed suggested retail price.
To obtain money-back guarantee return
authorization form, call 1-800-243-3050 for
assistance.
Delivery of refund check will occur 6–8 weeks AFTER
receipt of returned product.
IMPORTANTE
SEGURIDAD
INSTRUCCIONES
Cuando utilice un artefacto eléctrico siempre
tome medidas de seguridad básicas, entre las que
se incluyen:
Lea las instrucciones antes de utilizar este
producto.
PELIGRO
Para reducir el riesgo de descarga
eléctrica:
1. No toque una afeitadora conectada que haya
caído al agua. Desenchúfela inmediatamente.
2. El conector y los accesorios conectados a él
no deben sumergirse ni usarse en la ducha.
3. No utilice el artefacto con un cable de
extensión.
4. Desenchufe siempre la afeitadora de la toma
eléctrica inmediatamente después de usarla,
excepto durante la recarga.
5. Antes de limpiarla, desenchufe y retire el
cable de alimentación de la afeitadora.
6. Si no se manipulan correctamente, las
baterías que este dispositivo utiliza podrían
generar peligro de incendio o quemaduras
químicas. No las desarme, no las exponga a
temperaturas superiores a 100°C (212°F) ni
las queme.
ADVERTENCIA
Para reducir el riesgo de quemaduras,
incendios, descargas eléctricas o lesiones:
1. Es necesaria una estricta supervisión cuando
el artefacto es utilizado por personas con
discapacidad y por niños o cerca de ellos.
2. Utilice esta afeitadora para el uso doméstico
al cual está destinada según se describe
en este manual. No use accesorios no
recomendados por Philips Electronics North
America Corporation.
3. Nunca utilice esta afeitadora si el cable o
el conector están dañados, si no funciona
correctamente, si se cayó o está dañada
o si se sumergió en agua mientras estaba
conectada. Para solicitar asistencia,
comuníquese al 1-800-243-3050.
ESPAÑOL
4. Mantenga la afeitadora, el cable, el conector
y todos los accesorios lejos de superficies
que irradien calor.
5. No deje caer ni introduzca ningún objeto en
las aberturas.
6. No utilice el adaptador en o cerca de una
toma de corriente eléctrica que contiene
un ambientador para evitar daños en el
adaptador.
7. No utilice, cargue, limpie ni enchufe la unidad
al aire libre o en lugares donde se utilicen
aerosoles (spray) o se administre oxígeno.
8. Siempre verifique el estado de la hoja, las
cuchillas, la unidad de corte, los peines y los
recortadores antes de usar la unidad. Para
evitar lesiones, no utilice el sistema si alguno
de estos elementos se encuentra dañado.
9. Enchufe siempre el conector primero a la
afeitadora y después a una toma de corriente.
Para desconectar, coloque la afeitadora en la
posición de apagado y retire el enchufe de la
toma de corriente.
10. Para evitar dañar el cable de red, no lo
enrolle alrededor de la afeitadora.
11. Nunca exponga la afeitadora a la luz
solar directa ni la guarde en lugares con
temperaturas superiores a 140°F (60°C).
12. Esta afeitadora solo es apta para uso en seres
humanos. No lo utilice para otros
fines.
13. La afeitadora es impermeable y puede
enjuagarse con agua del grifo o utilizarse en
la ducha. No la sumerja en agua.
14. No intente abrir el artefacto para cambiar
la batería.
15. Por razones de higiene, la afeitadora sólo
debe ser utilizado por una sola persona.
16. Utilice únicamente el conector de
alimentación y los accesorios suministrados
con el artefacto.
CONSERVE ESTAS
INSTRUCCIONES
IMPORTANTE: el conector de
alimentación contiene un transformador.
Para evitar situaciones de riesgo, no lo
sustituya por otro.

Multigroom
4222 002 8730 1
Full Two-Year Warranty
Philips Electronics North America Corporation warrants each new
Philips Norelco product, Model QG3398/69 (except cutters, combs
and foil) against defects in materials or workmanship for a period of
two years from the date of purchase, and agrees to repair or replace
any defective product without charge.
IMPORTANT: This warranty does not cover damage resulting
from accident, misuse or abuse, lack of reasonable care, the affixing
of any attachment not provided with the product or loss of parts
or subjecting the product to any but the specific voltage.* NO
RESPONSIBILITY IS ASSUMED FOR ANY SPECIAL,
INCIDENTAL OR CONSEQUENTIAL DAMAGES.
In order to obtain warranty service, simply go to www.philips.com/
norelco or call 1-800-243-3050 for assistance. It is suggested that for
your protection you return shipments of product by insured mail,
insurance prepaid. Damage occurring during shipment is not covered
by this warranty. NOTE: No other warranty, written or oral, is
authorized by Philips Electronics North America Corporation. This
warranty gives you specific legal rights, and you may also have other
rights which vary from state to state. Some states do not allow the
exclusion or limitation of incidental or consequential damages, so the
above exclusion and limitations may not apply to you.
*Read enclosed instructions carefully.
Manufactured for:
Philips Consumer Lifestyle
A division of Philips Electronics North America Corporation
P.O. Box 10313, Stamford, CT 06904
This symbol on the product’s nameplate means it is
listed by Underwriters’ Laboratories, Inc.
Norelco is a registered trademark of Philips Electronics
North America Corporation.
PHILIPS is a registered trademark of Koninklijke Philips N.V.
© 2016 Philips Electronics North America Corporation. All rights reserved.
QG3398/69
Rechargeable Cordless
Electric Groomer
Always here to help you
Question?
Contact
Philips
Norelco
Question?
Contact
Philips
Norelco
Register your product and get support at
www.norelco.com/register
45-DAY MONEY-
BACK GUARANTEE
If you are not fully satisfied with your Philips Norelco
Groomer send the product back and we’ll refund you
the full purchase price.
The Groomer must be shipped prepaid by
insured mail, insurance prepaid, have the original
sales receipt, indicating purchase price and date
of purchase, and the money-back guarantee
return authorization form enclosed. We cannot
be responsible for lost mail.
The Groomer must be postmarked no later
than 45 days after the date of purchase. Philips
Norelco reserves the right to verify the purchase
price of the product and limit refunds not to
exceed suggested retail price.
To obtain money-back guarantee return
authorization form, call 1-800-243-3050 for
assistance.
Delivery of refund check will occur 6–8 weeks AFTER
receipt of returned product.
IMPORTANTE
SEGURIDAD
INSTRUCCIONES
Cuando utilice un artefacto eléctrico siempre
tome medidas de seguridad básicas, entre las que
se incluyen:
Lea las instrucciones antes de utilizar este
producto.
PELIGRO
Para reducir el riesgo de descarga
eléctrica:
1. No toque una afeitadora conectada que haya
caído al agua. Desenchúfela inmediatamente.
2. El conector y los accesorios conectados a él
no deben sumergirse ni usarse en la ducha.
3. No utilice el artefacto con un cable de
extensión.
4. Desenchufe siempre la afeitadora de la toma
eléctrica inmediatamente después de usarla,
excepto durante la recarga.
5. Antes de limpiarla, desenchufe y retire el
cable de alimentación de la afeitadora.
6. Si no se manipulan correctamente, las
baterías que este dispositivo utiliza podrían
generar peligro de incendio o quemaduras
químicas. No las desarme, no las exponga a
temperaturas superiores a 100°C (212°F) ni
las queme.
ADVERTENCIA
Para reducir el riesgo de quemaduras,
incendios, descargas eléctricas o lesiones:
1. Es necesaria una estricta supervisión cuando
el artefacto es utilizado por personas con
discapacidad y por niños o cerca de ellos.
2. Utilice esta afeitadora para el uso doméstico
al cual está destinada según se describe
en este manual. No use accesorios no
recomendados por Philips Electronics North
America Corporation.
3. Nunca utilice esta afeitadora si el cable o
el conector están dañados, si no funciona
correctamente, si se cayó o está dañada
o si se sumergió en agua mientras estaba
conectada. Para solicitar asistencia,
comuníquese al 1-800-243-3050.
ESPAÑOL
4. Mantenga la afeitadora, el cable, el conector
y todos los accesorios lejos de superficies
que irradien calor.
5. No deje caer ni introduzca ningún objeto en
las aberturas.
6. No utilice el adaptador en o cerca de una
toma de corriente eléctrica que contiene
un ambientador para evitar daños en el
adaptador.
7. No utilice, cargue, limpie ni enchufe la unidad
al aire libre o en lugares donde se utilicen
aerosoles (spray) o se administre oxígeno.
8. Siempre verifique el estado de la hoja, las
cuchillas, la unidad de corte, los peines y los
recortadores antes de usar la unidad. Para
evitar lesiones, no utilice el sistema si alguno
de estos elementos se encuentra dañado.
9. Enchufe siempre el conector primero a la
afeitadora y después a una toma de corriente.
Para desconectar, coloque la afeitadora en la
posición de apagado y retire el enchufe de la
toma de corriente.
10. Para evitar dañar el cable de red, no lo
enrolle alrededor de la afeitadora.
11. Nunca exponga la afeitadora a la luz
solar directa ni la guarde en lugares con
temperaturas superiores a 140°F (60°C).
12. Esta afeitadora solo es apta para uso en seres
humanos. No lo utilice para otros
fines.
13. La afeitadora es impermeable y puede
enjuagarse con agua del grifo o utilizarse en
la ducha. No la sumerja en agua.
14. No intente abrir el artefacto para cambiar
la batería.
15. Por razones de higiene, la afeitadora sólo
debe ser utilizado por una sola persona.
16. Utilice únicamente el conector de
alimentación y los accesorios suministrados
con el artefacto.
CONSERVE ESTAS
INSTRUCCIONES
IMPORTANTE: el conector de
alimentación contiene un transformador.
Para evitar situaciones de riesgo, no lo
sustituya por otro.

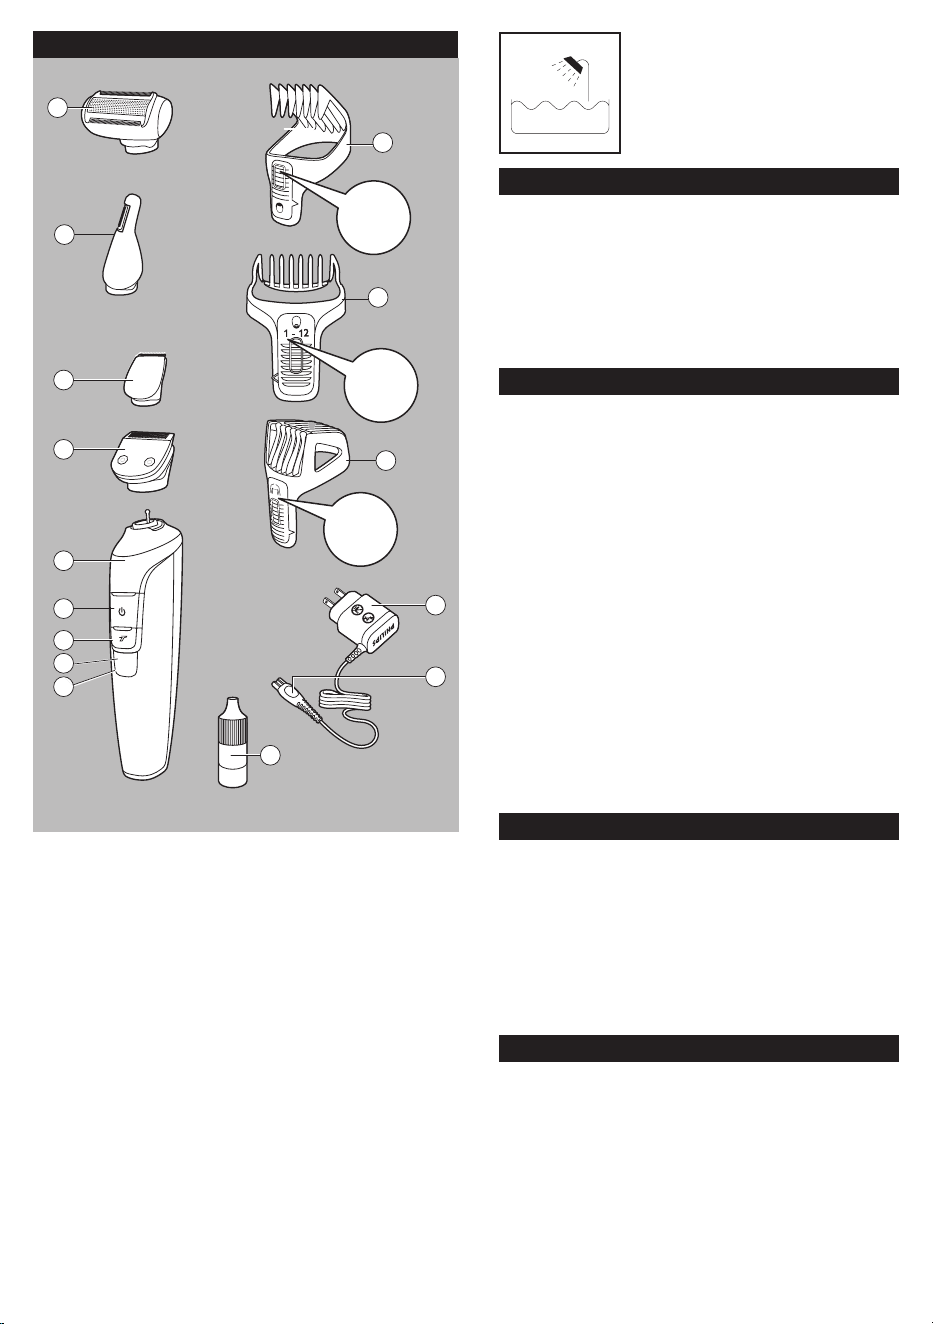
A Afeitadora Bodygroom
B Recortador para nariz
C Recortador de detalle
D Recortador metálico de tamaño completo
E Mango
F Botón de encendido/apagado
G Botón Turbo
H Indicador de estado de Turbo
I Indicador de estado de la batería
J Aceite
K Conector pequeño de aparato
L Adaptador
M Peine para cuerpo
N Peine para rastrojo
O Peine para el cabello
Funda para guardar (no se muestra)
Garantía total por 2 años
Garantía de devolución del importe
de 45 días
Este símbolo indica que la
afeitadora se puede utilizar
en el baño o en la ducha.
Registro
Bienvenido a Philips. Felicitaciones por su
compra.
Para acceder a los servicios de asistencia téc-
nica de Philips, registre su producto en
www.norelco.com/register
Compruébelo usted misma
Como muchos productos nuevos, su afeitadora
Multigroom Philips Norelco requiere de tiempo
para acostumbrarse a su uso. Si es la primera
vez que utiliza una afeitadora eléctrica o si ha
estado utilizando una de otra marca, tómese su
tiempo para familiarizarse con su afeitadora.
Con el afeitadora Multigroom podrá dar estilo
de pies a cabeza, gracias a una afeitadora
corporal, una potente batería y todos los
accesorios que necesita para recortar sin
problemas el vello facial y el cabello.
Olvídese de las tijeras y pruebe su nuevo
afeitadora Multigroom. Le aseguramos
resultados precisos y profesionales, de lo
contrario, Philips Norelco le devolverá su dinero
si recibe la solicitud dentro de los 45 días
posteriores a la compra.
Antes de utilizarla
Antes de utilizarla, compruebe si la hoja, las
cuchillas y los recortadores están gastados o
dañados. Si alguno de ellos muestra signos de
desgaste o deterioro, no utilice la afeitadora,
ya que podría lesionarse. No utilice la afeita-
dora hasta haber sustituido la hoja, las cuchil-
las o los recortadores.
1
/
8
-
25
/
32
in
3-20mm
A
B
O
1
/
8
-
15
/
32
in
3-12mm
M
L
K
C
D
E
F
G
H
I
J
3
/
64
-
15
/
32
in
1-12mm
N
Características
16
1
17
1
2
2
20
3
1
2
2
1
4
1
2
18
5
19
6
2
1
7
24
8
25
9
27
10
3 - 20
11
2
3 - 20
1
12
13 14
3 - 20
1
3
2
15
1
2
22 23
28
29
30
26
Carga y recarga
Cargue totalmente la afeitadora antes de usarla
por primera vez o si no la ha utilizado durante
un largo período.
La carga, la recarga o el uso de la afeitadora en
zonas con temperaturas inferiores a los 4,5°C
o superiores a los 35°C afecta negativamente
el período de vida útil de la batería.
Si la afeitadora queda expuesta a un cambio
radical de temperatura, presión o humedad,
espere 30 minutos antes de utilizarla.
1 Verifique que la afeitadora esté apagada.
2 Enchufe el conector pequeño a la afeitadora
y el adaptador a cualquier tomacorriente de
120 V CA (figura 1). Use únicamente el cable
proporcionado.
En algunos países puede ser necesario el uso
de un adaptador para el cable de alimentación.
Utilice un adaptador apropiado para el tipo de
tomacorriente.
3 La unidad tarda aproximadamente 1 hora en
cargarse por completo y ofrece un tiempo de
uso sin cable de 60 minutos.
4 El indicador de estado de batería destellará
en blanco para indicar que se está cargando.
5 Si la batería se descarga (cuando quedan
aproximadamente 10 minutos de
funcionamiento) el indicador de estado
de batería se encenderá en naranja para
indicar que la afeitadora se debe (re)cargar.
NOTA: Usted puede tambien cargar la afeitadora.
Una carga de 5 minutos le proporcionara aproxi-
madamente 5 minutos de afeitado tiempo.
6 Desconecte el cable y desenchúfelo del
tomacorriente.

Corte con el peine para el cabello
1 Coloque el recortador en el mango de la
afeitadora (1) y gírelo hacia la derecha (2)
(figura 2).
2 Deslice el peine para el cabello en las mues-
cas guía a ambos lados del mango de la afeita-
dora (figura 11).
3 Presione el selector de longitud de corte (1)
y deslice el peine hacia el ajuste de longitud
deseado (2) (figura 12).
El peine para el cabello corta a una longitud de
1/8 pulgadas - 25/32 pulgadas / 3-20 mm.
4 El largo seleccionado aparecerá en la parte
posterior de la unidad.
Si es la primera vez que corta, comience con la
máxima longitud de corte (25/32 pulgadas/20 mm)
para familiarizarse con el artefacto y evitar cortar
demasiado accidentalmente. Una vez que se
familiarice con los ajustes, configure el selector de
longitud de corte según el largo deseado. Oirá un
clic cuando el selector se acomode en la posición
correspondiente a cada ajuste.
5 Encienda la afeitadora en la posición ON
(figura 5).
6 La parte plana del peine siempre debe estar
en pleno contacto con el cuero cabelludo
para obtener un resultado uniforme
(figura 13).
7 Mueva la unidad lentamente desde la coro-
nilla en diferentes direcciones para obtener
un resultado parejo (figura 14).
8 Siempre mueva el aparato en dirección con-
traria al crecimiento del cabello.
9 Vuelva a pasar la afeitadora por las zonas ya
recortadas para asegurarse de cortar todo el
pelo que desea.
10 Apague la afeitadora y extraiga el peine de
recorte para el cabello a menudo para soplar
o sacudir el cabello acumulado.
RECUERDE: debe volver a configurar el ajuste
del selector de longitud de corte cada vez que
reemplace el peine de recorte para el cabello.
SUGERENCIA: anote las posiciones de longitud de
corte que ha utilizado para poder volver a crear el
mismo estilo de corte en futuras ocasiones.
Potencia turbo
Simplemente presione el botón Turbo para
obtener una potencia turbo, que le ofrece
resultados más rápidos, y el indicador Turbo
se encenderá en azul. La función de memoria
recordará la última configuración utilizada.
Recorte del vello corporal
Utilice este sistema integral de afeitado corpo-
ral para el uso doméstico que se describe en
este manual.
Asegúrese de que la afeitadora esté totalmente
cargada antes de empezar a recortar.
Asegúrese de que el cabello esté limpio y seco,
ya que el cabello húmedo tiende a adherirse al
cuerpo.
Tómese su tiempo y no mueva la afeitadora
demasiado rápido. Haga movimientos suaves y
lentos.
1 Cargue según las instrucciones. Desenchufe la
afeitadora del tomacorriente y saque el cable.
2 Presione el botón de encendido/apaga-
do para colocarlo en ON y comenzar a
recortar.
3 Si la batería se descarga, el indicador de
estado de batería se encenderá en naranja.
4 Enchufe el conector del artefacto a la afeita-
dora. Una carga rápida de 5 minutos le entre-
ga 5 minutos de tiempo de uso.
Recorte del vello corporal con el peine
para cuerpo
Use siempre el peine para cuerpo en las áreas
delicadas.
1 Coloque el recortador en el mango de la
afeitadora (1) y gírelo hacia la derecha (2)
(figura 2).
2 Deslice el peine para cuerpo por las ranuras
de guía situadas a ambos lados del mango
(figura 3).
3 Presione el selector de longitud de corte (1)
y deslice el peine hacia el ajuste deseado (2)
(figura 4).
El peine para cuerpo corta a un largo de
1/8 - 15/32 pulgadas/3-12 mm.
4 El largo seleccionado aparecerá en la parte
posterior de la unidad.
Si es la primera vez que recorta, use el peine
en la longitud de corte máxima (15/32 pulga-
das/12 mm) para evitar recortar demasiado
accidentalmente. Una vez que se familiarice con
los ajustes, configure el selector de longitud
de corte según el largo deseado. Oirá un clic
cuando el selector se acomode en la posición
correspondiente a cada ajuste.
5 Encienda la afeitadora en la posición ON
(figura 5).
6 Para lograr un mejor recorte, mueva la
afeitadora lentamente en dirección contraria
al crecimiento del vello (figura 6). La
superficie del peine debe estar siempre
en contacto con la piel.
NOTA: ya que no todo el vello crece en la misma
dirección, puede probar diferentes posiciones de
recorte (es decir, hacia arriba, hacia abajo o en
diagonal). La práctica es la mejor manera para
obtener buenos resultados.
Si se acumula mucho vello en el peine, retire el
peine y sóplelo o sacúdalo para eliminarlo.
RECUERDE: debe volver a configurar el ajuste
del selector de longitud de corte cada vez que
reemplace el peine de la unidad.
El ajuste de longitud es equivalente al largo del
vello que quedará después de recortar.
7 Apague la afeitadora (figura 5). Enjuague el
peine después de cada uso.
Afeitado corporal con la
afeitadora Bodygroom
No utilice esta unidad para afeitarse la cara o
la cabeza. La afeitadora se debe utilizar única-
mente en zonas del cuerpo bajo el cuello.
Al afeitar zonas sensibles, puede sentir una
sensación desagradable, irritación o enrojeci-
miento de la piel. Esto es normal, ya que la piel
necesita tiempo para acostumbrarse al afeitado.
Si el largo del vello es superior a 10 mm, en
primer lugar recórtelo con el peine recortador
para cuerpo para obtener un mejor resultado
final.
Para usar la afeitadora en seco, la piel debe
estar limpia y seca.
Para uso en húmedo, puede preparar la piel
con jabón o espuma de afeitar antes de utilizar
la afeitadora.
Para evitar lesiones, no use la afeitadora si la
hoja o las cuchillas están dañadas.
Asegúrese de que la hoja esté en total con-
tacto con la piel para una mejor afeitada y un
mínimo desgaste de la hoja.
No ejerza presión excesiva para evitar irritar la
piel.
Practique para obtener óptimos resultados.
1 Coloque la afeitadora Bodygroom en el
mango (1) y gírela hacia la derecha (2)
(figura 7).
2 Encienda la afeitadora en la posición “ON”
(figura 5).
3 Estire la piel con la otra mano y presione la
afeitadora con suavidad, moviéndola lenta y
suavemente con la hoja en total contacto con
la piel (figura 8). No presione con demasiada
fuerza. Una presión excesiva podría deformar
la lámina e irritar la piel.
SUGERENCIA: estirar la piel puede ayudar a que los
vellos queden en posición vertical y disminuir así al
máximo la irritación.
4 Siempre mueva la unidad en sentido con-
trario a la dirección de crecimiento del vello
(figura 9).
5 Apague la afeitadora en la posición “OFF”
(figura 5). Limpie la afeitadora corporal
después de cada uso.
Corte del cabello
Verifique que la unidad esté completamente
cargada antes de comenzar a cortar el cabello.
Si recorta el cabello de otra persona, asegúrese
de que la cabeza quede al mismo nivel que su
pecho para que todas las zonas sean clara-
mente visibles y se encuentren dentro de su
alcance.
Asegúrese de que el cabello esté seco y limpio.
Antes de comenzar, peine el cabello según el
sentido de crecimiento (figura 10).
Para obtener resultados óptimos en el corte,
siempre mueva el artefacto lentamente por la
cabeza, en sentido contrario al crecimiento del
cabello.

Después de cada uso:
1 Asegúrese de que la unidad esté apagada en
la posición “OFF” y desenchufada de la toma
eléctrica.
2 Retire todos los accesorios y peines.
3 Sople o sacuda los cabellos que puedan
haberse acumulado en el peine o los acceso-
rios.
4 Enjuague los peines, accesorios y la unidad
con agua tibia del grifo.
5 Elimine el exceso de agua de los peines y
accesorios y déjelos secar completamente.
6 Vuelva a colocar el accesorio nuevamente en
el mango de la unidad.
NOTA: Para mantener el rendimiento óptimo de
corte, lubrique los dientes del recortador metálico
de tamaño, el recortador de detalle y el recorta-
dor para nariz con unas gotas de aceite de la
botella suministrado cada tres meses y después de
la limpieza (figura 26).
Limpieza de la afeitadora corporal
1 Retire la unidad de afeitado de la afeitadora
corporal (figura 27).
2 Sople o sacuda cualquier exceso de vello que
pueda haberse acumulado en la afeitadora
corporal (figura 28).
3 Limpie la afeitadora corporal y la unidad de
afeitado con agua tibia corriente (figura 29).
La hoja de afeitado es muy delicada y no debe
manipularse.
Si la hoja de afeitado se daña, deje de usar la
afeitadora corporal. No presione la
hoja de afeitado.
4 Elimine el exceso de agua de la afeitadora
corporal y la unidad de afeitado y déjelas
secar completamente.
No seque la unidad de afeitado con toallas para
evitar dañarla.
5 Aplique una gota de aceite de la botella
que suministran a la lámina cada tres meses
y después de la limpieza.
3 Para eliminar el vello no deseado, mueva
lentamente la punta del recortador hacia
dentro y hacia fuera realizando movimientos
circulares. Para obtener mejores resultados,
presione el costado de la punta del recorta-
dor contra la piel. De esta forma, reducirá el
cosquilleo durante el recorte del vello nasal.
4 Apague la unidad. Enjuague los accesorios
después de cada uso.
Recorte del vello de las orejas
Limpie el área externa de la oreja y el canal
auditivo para eliminar todos los restos de cera.
Coloque el recortador para nariz en la unidad.
1 Encienda la afeitadora y mueva la punta
suavemente sobre los bordes de la oreja para
eliminar el vello que sobresale (figura 24).
2 Introduzca suavemente la punta del
recortador en la parte externa del canal
auditivo (figura 25).
PRECAUCIÓN: no inserte la punta más
de 3/16 pulgadas / 5 mm en la oreja para
evitar dañar el tímpano.
3 Apague la unidad. Enjuague los accesorios
después de cada uso.
Limpieza
Enjuague los accesorios después de cada uso.
Siempre apague la afeitadora y desenchufe el
cable de alimentación de la afeitadora y de la
toma eléctrica antes de limpiarla.
No utilice aire comprimido, productos de limp-
ieza abrasivos o que rayen ni líquidos agresivos
como alcohol, benceno, blanqueadores o ace-
tona para limpiar la unidad y los accesorios.
Nunca limpie, reemplace ni extraiga los acceso-
rios de la unidad si está encendida.
No ejerza presión sobre las cuchillas.
No toque las cuchillas con objetos duros, ya
que podría dañarlas.
Durante el uso:
Para extraer el cabello recortado que se acu-
mula en el peine, sóplelo o sacúdalo. Recuerde
ajustar el largo de recorte a la posición
deseada cuando reemplace el peine de la uni-
dad.
Recorte de barba incipiente con
el peine de rastrojo
Utilice el peine de rastrojo para cortar su
barba a diferentes longitudes.
El peine de rastrojo corta el vello a un largo de
3/64 – 15/32 in. (1-12 mm).
1 Coloque el recortador en el mango de la
afeitadora (1) y gírelo hacia la derecha (2)
(Fig. 2).
2 Deslice el peine de rastrojo en las ranuras
guía de la afeitadora (Fig. 20).
3 Presione el selector de ajuste (1) y deslice el
peine hacia el ajuste de longitud deseado (2)
(Fig. 21).
4 Encienda la afeitadora (Fig. 5).
5 Para cortar de la forma más eficaz, mueva
la afeitadora en la dirección contraria a la del
crecimiento del vello. No mueva la afeitadora
demasiado rápido. Haga movimientos suaves
y lentos y asegúrese de que la superficie del
peine de recorte esté siempre en contacto
con la piel.
Recorte de vello de nariz y orejas
1 Verifique que la cortadora está en la posición
de apagado (OFF).
2 Retire el recortador girándolo hacia la izqui-
erda y tirándolo para extraerlo del mango de
la unidad.
3 Coloque el recortador para nariz en el
mango de la unidad (1) y gírelo hacia la
derecha (2) (figura 22).
Recorte del vello de la nariz
Asegúrese de que las fosas nasales estén
limpias.
1 Coloque el recortador para nariz en el
mango de la unidad (1) y gírelo hacia la
derecha (2) (figura 22).
2 Encienda la afeitadora en la posición ON e
introduzca la punta del recortador en la fosa
nasal (figura 23).
PRECAUCIÓN: no introduzca la punta del
recortador más de 3/16 pulgadas / 5 mm
en la fosa nasal.
Modelado sin el peine de recorte para
el cabello
Use la afeitadora sin un peine para recortar
el cabello al ras (3/64 pulgadas/1 mm) o para
modelar el área de la nuca y el contorno de las
orejas.
1 Pulse el selector de longitud de corte (1) y
deslice el peine hacia arriba (2) para retirarlo.
Extráigalo de la unidad (figura 15).
Tenga cuidado cuando utilice la unidad sin el peine,
porque la afeitadora cortará todo el cabello que
toque.
2 Antes de modelar la zona alrededor de las
orejas, peine las puntas del cabello sobre las
orejas.
3 Cuando modele el contorno de las orejas,
incline la afeitadora para que solo un borde
de las cuchillas de corte toque las puntas del
cabello (figura 16).
Tenga cuidado de no recortar demasiado. La línea
del cabello debe quedar cerca de la oreja.
4 Para modelar la nuca o las patillas, gire la
afeitadora y muévala hacia abajo (figura 17).
5 Mueva la unidad de forma lenta y suave,
siguiendo la línea de nacimiento natural del
cabello.
Recorte
Modelado y perfilado con el recortador
de detalle
Use el recortador de detalle para dar forma a
la barba o al cabello.
Utilice el recortador de detalle cuidadosa-
mente, ya que elimina todo el vello con el que
entra en contacto.
1 Coloque el recortador de detalle en el
mango de la afeitadora (1) y gírelo hacia la
derecha (2) (figura 20).
2 Mueva el recortador de detalle con cuidado y
de forma controlada.
3 Para obtener mejores resultados, mueva el
recortador de detalle en sentido contrario a
la dirección de crecimiento del vello y veri-
fique que siempre esté en contacto pleno
con la piel (figura 21).

Ayuda
Para obtener asistencia, ingrese a nuestro sitio web:
www.philips.com/support
o llame al número gratuito:
1-800-243-3050
La información en línea se encuentra disponible las
24 horas del día, los 7 días de la semana.
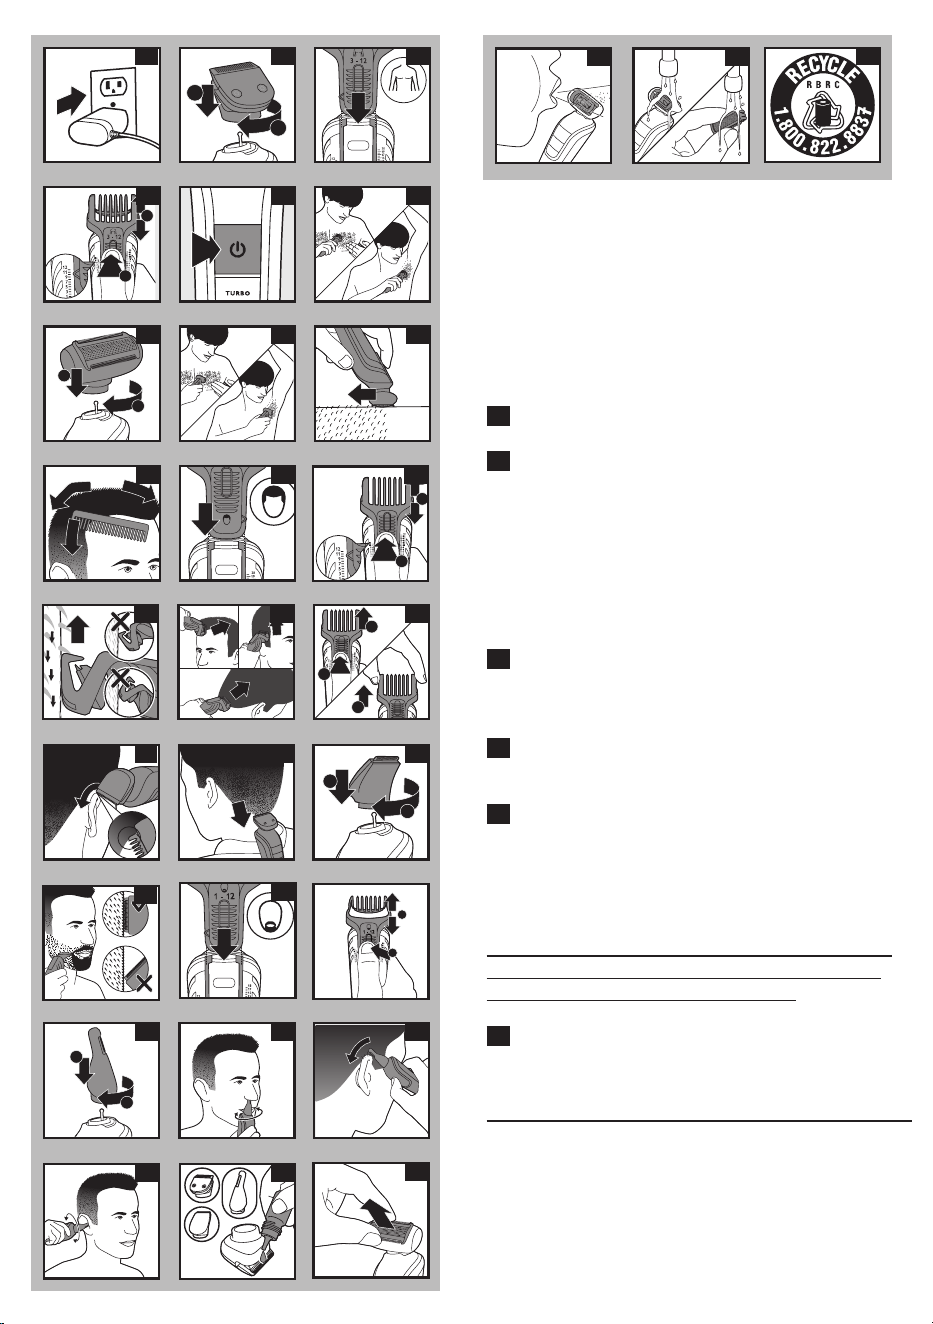
Eliminación
Esta afeitadora Philips contiene un batería
recargable de iones de litio recargable que
deben ser desechadas correctamente
(figura 30).
Para obtener información sobre los
lugares apropiados para desechar la batería,
comuníquese con las autoridades locales, llame
al 1-800-822-8837 o visite el sitio web
www.rbrc.com.
Su producto ha sido diseñado y fabricado
con materiales y componentes de alta calidad,
que pueden ser reciclados y reutilizados. Para
obtener información sobre reciclaje, contacte
las facilidades de gestión de residuos locales
o visite a www.recycle.philips.com.
Para obtener asistencia, visite nuestro sitio
Web: www.philips.com/support o llame al
número gratuito: 1-800-243-3050.
Reemplazo de la hoja de afeitado
de la afeitadora BodyGroom
Si la unidad de afeitado y las cuchillas están
desgastadas o dañadas, no continúe utilizando
la afeitadora Bodygroom. Reemplace la unidad
de afeitado inmediatamente.
Le aconsejamos que reemplace la unidad de
afeitado cada año.
Reemplace la unidad de afeitado dañada o des-
gastada únicamente con una hoja de afeitado
original Philips, modelo BG2000, disponible en
el sitio web de Philips, www.philips.com/sup-
port o comuníquese al 1-800-243-3050 para
solicitar asistencia.
La hoja de afeitado es una pieza de precisión.
Manéjela con cuidado.
1 Antes de reemplazar la hoja de afeitado,
siempre apague la afeitadora y retire el cable
de alimentación del tomacorriente.
2 Tire del cabezal de la unidad de afeitado para
extraerla.
3 Coloque el nuevo cabezal de afeitado en la
unidad presionándolo hasta que encaje en su
sitio (oirá un “clic”).
Después de sustituir el cabezal de afeitado y antes
de utilizar la unidad, compruebe que el cabezal
esté bien colocado.
Este producto no contiene ninguna otra pieza que
pueda ser reparada por el usuario. Para solicitar
asistencia, comuníquese al 1-800-243-3050.
Almacenamiento
La afeitadora debe estar apagada. Desenchufe el
cable del tomacorriente y de la afeitadora antes
de guardarla en un lugar seguro y seco, donde
no se aplaste, golpee ni pueda sufrir daños.
Guarde la afeitadora y los accesorios en la
funda para evitar daños.
No enrolle el cable alrededor de la unidad.
Guarde el cable en un lugar seguro donde no
sufra cortes ni daños.
No coloque ni guarde la afeitadora en un lugar
donde pueda caerse en la bañera, el lavabo, el
agua o en otro tipo de líquidos mientras está
enchufada.
IMPORTANT
SAFETY
INSTRUCTIONS
When using an electric appliance, basic safety
precautions should always be followed, including
the following:
Read all instructions before using this
appliance.
DANGER
To reduce the risk of electric shock:
1. Do not reach for a corded groomer that has
fallen into water. Unplug immediately.
2. Power plug and the accessories connected
to it are not for immersion or for use in
shower.
3. Do not use an extension cord with this
appliance.
4. Always unplug the groomer from the
electrical outlet immediately after use, except
when groomer is (re)charging.
5. Unplug and remove power supply cord from
groomer before cleaning.
6. The batteries used in this device may present
a fire or chemical burn hazard if mistreated.
Do not disassemble, heat above 100°C
(212°F) or incinerate.
WARNING
To reduce the risk of burns, fire, electric
shock or injury to persons:
1. Close supervision is necessary when
this appliance is used by, on, or near children
or invalids.
2. Use this groomer for its intended household
use as described in this manual. Do not use
attachments not recommended by Philips
Electronics North America Corporation.
3. Never operate this groomer if it has a
damaged cord or plug, if it is not working
properly, if it has been dropped, damaged, or
dropped into water while plugged in.
For assistance call 1-800-243-3050.
4. Keep the groomer, cord, charging plug and
any attachments away from heated
surfaces.
ENGLISH
5. Never drop or insert any object into any
opening.
6. Do not use the adapter in or near a power
outlet that contains an electric air freshener
to prevent damage to the adapter.
7. Do not operate, charge, clean or plug in
groomer outdoors or where aerosol (spray)
products are being used or where oxygen is
being administered.
8. Always check foil, cutters, cutting unit, combs
and trimmers before using the groomer. Do
not use the groomer if foil, cutters, cutting
unit, combs or trimmers are damaged, as
injury may occur.
9. Always attach plug to groomer first, then
to outlet. To disconnect, turn groomer “OFF”,
then remove plug from outlet.
10. To prevent possible damage to the cord, do
not wrap cord around the groomer.
11. Never put groomer in direct sunlight or
store at a temperature above 140°F (60°C).
12. This groomer is for use on human hair only.
Do not use this groomer for any other
purpose.
13. Groomer is water-safe and can be rinsed
under running tap water or used in the
shower. Do not submerge groomer in water.
14. Do not attempt to open the appliance to
replace the battery.
15. For hygienic reasons, the groomer should
only be used by one person.
16. Only use the power plug and other
accessories supplied with the appliance.
SAVE THESE
INSTRUCTIONS
IMPORTANT: The power plug contains
a transformer. Do not cut off the power
plug to replace it with another plug as this
will cause a hazardous condition.

Ayuda
Para obtener asistencia, ingrese a nuestro sitio web:
www.philips.com/support
o llame al número gratuito:
1-800-243-3050
La información en línea se encuentra disponible las
24 horas del día, los 7 días de la semana.
Eliminación
Esta afeitadora Philips contiene un batería
recargable de iones de litio recargable que
deben ser desechadas correctamente
(figura 30).
Para obtener información sobre los
lugares apropiados para desechar la batería,
comuníquese con las autoridades locales, llame
al 1-800-822-8837 o visite el sitio web
www.rbrc.com.
Su producto ha sido diseñado y fabricado
con materiales y componentes de alta calidad,
que pueden ser reciclados y reutilizados. Para
obtener información sobre reciclaje, contacte
las facilidades de gestión de residuos locales
o visite a www.recycle.philips.com.
Para obtener asistencia, visite nuestro sitio
Web: www.philips.com/support o llame al
número gratuito: 1-800-243-3050.
Reemplazo de la hoja de afeitado
de la afeitadora BodyGroom
Si la unidad de afeitado y las cuchillas están
desgastadas o dañadas, no continúe utilizando
la afeitadora Bodygroom. Reemplace la unidad
de afeitado inmediatamente.
Le aconsejamos que reemplace la unidad de
afeitado cada año.
Reemplace la unidad de afeitado dañada o des-
gastada únicamente con una hoja de afeitado
original Philips, modelo BG2000, disponible en
el sitio web de Philips, www.philips.com/sup-
port o comuníquese al 1-800-243-3050 para
solicitar asistencia.
La hoja de afeitado es una pieza de precisión.
Manéjela con cuidado.
1 Antes de reemplazar la hoja de afeitado,
siempre apague la afeitadora y retire el cable
de alimentación del tomacorriente.
2 Tire del cabezal de la unidad de afeitado para
extraerla.
3 Coloque el nuevo cabezal de afeitado en la
unidad presionándolo hasta que encaje en su
sitio (oirá un “clic”).
Después de sustituir el cabezal de afeitado y antes
de utilizar la unidad, compruebe que el cabezal
esté bien colocado.
Este producto no contiene ninguna otra pieza que
pueda ser reparada por el usuario. Para solicitar
asistencia, comuníquese al 1-800-243-3050.
Almacenamiento
La afeitadora debe estar apagada. Desenchufe el
cable del tomacorriente y de la afeitadora antes
de guardarla en un lugar seguro y seco, donde
no se aplaste, golpee ni pueda sufrir daños.
Guarde la afeitadora y los accesorios en la
funda para evitar daños.
No enrolle el cable alrededor de la unidad.
Guarde el cable en un lugar seguro donde no
sufra cortes ni daños.
No coloque ni guarde la afeitadora en un lugar
donde pueda caerse en la bañera, el lavabo, el
agua o en otro tipo de líquidos mientras está
enchufada.
IMPORTANT
SAFETY
INSTRUCTIONS
When using an electric appliance, basic safety
precautions should always be followed, including
the following:
Read all instructions before using this
appliance.
DANGER
To reduce the risk of electric shock:
1. Do not reach for a corded groomer that has
fallen into water. Unplug immediately.
2. Power plug and the accessories connected
to it are not for immersion or for use in
shower.
3. Do not use an extension cord with this
appliance.
4. Always unplug the groomer from the
electrical outlet immediately after use, except
when groomer is (re)charging.
5. Unplug and remove power supply cord from
groomer before cleaning.
6. The batteries used in this device may present
a fire or chemical burn hazard if mistreated.
Do not disassemble, heat above 100°C
(212°F) or incinerate.
WARNING
To reduce the risk of burns, fire, electric
shock or injury to persons:
1. Close supervision is necessary when
this appliance is used by, on, or near children
or invalids.
2. Use this groomer for its intended household
use as described in this manual. Do not use
attachments not recommended by Philips
Electronics North America Corporation.
3. Never operate this groomer if it has a
damaged cord or plug, if it is not working
properly, if it has been dropped, damaged, or
dropped into water while plugged in.
For assistance call 1-800-243-3050.
4. Keep the groomer, cord, charging plug and
any attachments away from heated
surfaces.
ENGLISH
5. Never drop or insert any object into any
opening.
6. Do not use the adapter in or near a power
outlet that contains an electric air freshener
to prevent damage to the adapter.
7. Do not operate, charge, clean or plug in
groomer outdoors or where aerosol (spray)
products are being used or where oxygen is
being administered.
8. Always check foil, cutters, cutting unit, combs
and trimmers before using the groomer. Do
not use the groomer if foil, cutters, cutting
unit, combs or trimmers are damaged, as
injury may occur.
9. Always attach plug to groomer first, then
to outlet. To disconnect, turn groomer “OFF”,
then remove plug from outlet.
10. To prevent possible damage to the cord, do
not wrap cord around the groomer.
11. Never put groomer in direct sunlight or
store at a temperature above 140°F (60°C).
12. This groomer is for use on human hair only.
Do not use this groomer for any other
purpose.
13. Groomer is water-safe and can be rinsed
under running tap water or used in the
shower. Do not submerge groomer in water.
14. Do not attempt to open the appliance to
replace the battery.
15. For hygienic reasons, the groomer should
only be used by one person.
16. Only use the power plug and other
accessories supplied with the appliance.
SAVE THESE
INSTRUCTIONS
IMPORTANT: The power plug contains
a transformer. Do not cut off the power
plug to replace it with another plug as this
will cause a hazardous condition.
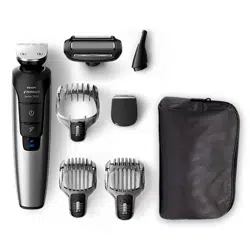
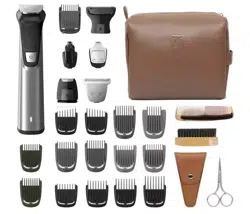
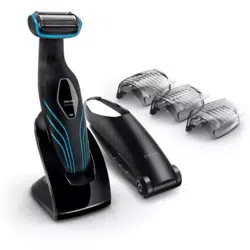
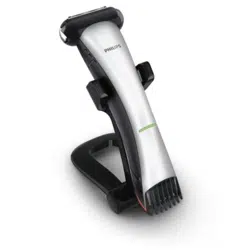
A Bodygroom Shaver
B Nose Trimmer
C Detail Trimmer
D Full Size Metal Trimmer
E Handle
F On/Off Button
G Turbo Button
H Turbo Status Indicator
I Battery Status Indicator
J Oil
K Small Appliance Plug
L Adapter
M Body Comb
N Stubble Comb
O Hair Comb
Storage Pouch (not shown)
Full 2-Year Warranty
45-Day Money-Back Guarantee
This symbol on the product
indicates that the Groomer
can be used in the bath
or shower.
Registration
Congratulations on your purchase and
welcome to Philips Norelco!
To fully benefit from the support that Philips
Norelco offers, register your product at
www.norelco.com/register
Put It To The Test
Like many new products, your Philips Norelco
Multigroom may take a little getting used to. If
you are using an electric Groomer for the first
time, or if you’ve been using a different brand,
take the time to acquaint yourself with your
new Grooming Kit.
Your Multigroom features head to toe styling
with a Bodygroom shaver and powerful battery
combined with all the attachments to make
trimming facial hairs or hair clipping goof proof.
Throw your scissors away and put your new
Multigroom to the test. We guarantee precise,
professional results or Philips Norelco will
refund you the full purchase price as long as the
request is received within 45 days of purchase.
Before Using
Before using, check foil, cutters and trimmers
for wear or damage. If foil, cutters or
trimmers show signs of wear or damage, do
not use Groomer as injury may occur. Do not
use Groomer until foils, cutters or trimmers
have been replaced.
To Charge/Recharge
Fully charge Groomer before using for the
first time or after non-use for a long period
of time.
1
/
8
-
25
/
32
in
3-20mm
A
B
O
1
/
8
-
15
/
32
in
3-12mm
M
L
K
C
D
E
F
G
H
I
J
3
/
64
-
15
/
32
in
1-12mm
N
Features
16
1
17
1
2
2
20
3
1
2
2
1
4
1
2
18
5
19
6
2
1
7
24
8
25
9
27
10
3 - 20
11
2
3 - 20
1
12
13 14
3 - 20
1
3
2
15
1
2
22 23
28
29
30
26
Charging, recharging or using Groomer at
temperatures below 40ºF (4,5ºC) or higher
than 95ºF (35ºC) adversely affects lifespan of
the battery.
If the Groomer is subjected to a major change
in temperature, pressure or humidity, let the
Groomer acclimatize for 30 minutes before
using.
1 Be certain Groomer is OFF.
2 Connect small plug to Groomer and plug
the adapter into any 120V AC outlet (fig. 1).
Use only the cord provided.
An adaptor plug may be necessary for power
cord usage in some foreign countries. Use an
attachment plug adaptor of the proper
configuration for the power outlet.
3 It will take approximately 1 hour to fully
charge the Groomer for a cordless trimming
time of up to 60 minutes.
4 The Battery Status Indicator will blink white
to indicate the Groomer is charging.
5 If the battery runs low (approximately 10
minutes of grooming time left) the Battery
Status Indicator will light up orange
indicating the Groomer needs to be
(re)charged.
NOTE: You can also quick charge the Groomer.
A 5-minute charge will give you approximately
5 minutes of cordless grooming time.
6 Disconnect the cord and unplug from
electrical outlet.
Turbo Power
Simply press the Turbo Button for a turbo
power boost for fast results and the Turbo
indicator will light up blue. The memory
function will remember the last used setting.

6 Make sure that the flat part of the comb is
always in full contact with the scalp to obtain
an even result (fig. 13).
7 Move the appliance slowly over the crown
from different directions to achieve an even
result (fig. 14).
8 Always move the appliance against the
direction of hair growth. Press lightly.
9 Make overlapping passes over the head to
ensure that all hair that should be cut has
been cut.
10 Turn the Groomer off and remove the hair
comb often to blow and/or shake out hair
that has accumulated.
REMEMBER: You must reset the hair length
selector back to your desired setting every
time you replace the hair comb on the
appliance.
TIP: Write down the settings you have used to create
a certain hairstyle as a reminder for future clipping
sessions.
Contouring without the hair comb
Use the Groomer without a comb to clip hair
very close to the skin (3/64in./1mm) or to
contour the neckline and area around the ears.
1 Remove the hair comb by pressing the Hair
Length Setting Selector (1) and slide the
comb upwards (2). Pull comb off Groomer
(fig. 15).
Be careful when you are clipping without a comb
attachment as when the Clipper is turned on it
will remove every hair it touches.
2 To contour the hairline around the ears,
comb the hair ends over the ears.
3 Tilt the Groomer in such a way that only
one edge of the cutter blades touches the
hair ends when you shape the contours
around the ears (fig. 16).
Be careful not to trim too much. The hairline
should be close to the ear.
4 To contour the nape of the neck or
sideburns, turn the Groomer and make
downward strokes (fig. 17).
5 Move the Groomer slowly and smoothly
following the natural hairline.
shaving foil is in full contact with the skin
(fig. 8). Do not press too hard. Too much
pressure can distort the foil and cause skin
irritation.
TIP: Stretching your skin can help hairs stand upright
and minimize the chance of skin irritation.
4 Always move the Groomer against the
direction of hair growth (fig. 9).
5 Turn OFF Groomer (fig. 5). Clean the
body shaver after each use.
Hair Clipping
Make sure that the appliance is fully charged
before you start clipping hair.
Before you start clipping, make sure that the
head of the person whose hair you are cutting
is at the same level as your chest so that all
parts of his/her head are clearly visible and
within easy reach.
Make sure the hair is clean and dry.
Before you begin, comb the hair in the direction
of growth (fig. 10).
To achieve optimal clipping results, always move
the appliance slowly through the hair against
the direction of hair growth.
Clipping with hair comb
1 Put the trimmer on Groomer handle (1) and
turn clockwise (2) (fig. 2).
2 Slide the hair comb into the guiding grooves
on both sides of Groomer handle (fig. 11).
3 Press the Hair Length Setting Selector (1)
and slide the comb to the desired setting (2)
(fig. 12).
The hair comb cuts hair to a length of 1/8 in -
25/32 in / 3-20mm.
4 The setting selected is shown on the back
of the Groomer.
When you are clipping for the first time,
start at the maximum clipping length setting
(25/32in/20mm) to familiarize yourself with the
appliance and prevent accidentally trimming
hairs too short. As you become familiar with the
settings, adjust the Hair Length Setting Selector
to desired trimming length. Selector will ‘click’ into
position at each setting.
5 Turn the Groomer ON (fig. 5).
6 To trim in the most effective way, move the
Groomer slowly against the direction of hair
growth (fig. 6). Make sure the surface of the
comb always stays in contact with the skin.
NOTE: Since all hairs do not grow in the same
direction, you may want to try different trimming
positions (i.e., upwards, downwards, or across).
Practice is best for optimum results.
If a lot of hair has accumulated in the comb,
remove the comb and blow and/or shake the
hair out of the comb.
REMEMBER: You must reset the hair length
setting selector back to your desired setting
every time you replace the comb on the
appliance.
The length setting is equal to the hair length
that will remain after trimming.
7 Turn off Groomer (fig. 5). Rinse the comb
clean after each use.
Body Shaving with Bodygroom
Shaver
Do not use this Groomer to shave facial or
scalp hair. The Groomer should only be used
on skin below the neckline.
When shaving sensitive areas, you may feel
some discomfort, irritation or reddening of the
skin. This is normal as your skin needs time to
adjust to shaving.
If your hair is longer than 13/32in / 10mm,
trim hair with the body comb first for optimum
shaving results.
For dry use, be certain your skin is clean and
dry before using the Groomer.
For wet use, you may prepare your skin with
lathered soap or shaving foam before using the
Groomer.
Do not use the shaver if foil or cutters are
damaged or broken as injury may occur.
Make sure the shaving foil is in complete
contact with your skin for the closest shave
and minimum foil wear.
Pressing too hard may cause skin irritation.
Practice is best for optimum results.
1 Put the Bodygroom Shaver on the Groomer
handle (1) and turn clockwise (2) (fig. 7).
2 Turn the Groomer ON (fig. 5).
3 Stretch your skin taut with your free hand
and gently press Groomer to skin and move
it slowly and smoothly, making sure the
Body Trimming
Use this Groomer for its intended household
use as described in this manual.
Make sure that the Groomer is fully charged
before you start trimming.
Make sure hair is clean and dry as wet hair
tends to stick to the body.
Take your time and do not move the Groomer
too fast. Make smooth and gentle movements.
1 Charge according to directions. Unplug
groomer from outlet and remove cord.
2 Press ON/OFF button ON to begin trimming.
3 If the charge runs low, the battery status
indicator will light up orange.
4 Connect appliance plug to Groomer. A quick
charge for 5 minutes gives you 5 minutes of
trimming time.
Body Trimming with Body Comb
Always use the body comb when trimming
sensitive areas.
1 Put the trimmer on the Groomer handle
(1) and turn clockwise (2) (fig. 2).
2 Slide the body comb into the guiding grooves
on both sides of the handle (fig. 3).
3 Press the Hair Length Setting Selector (1)
and slide the comb to the desired setting (2)
(fig. 4).
The body comb cuts hair to a length of 1/8 -
15/32in / 3-12mm.
4 The setting selected is shown on the back
of the Groomer.
If you are trimming for the first time, start
by using the comb at the maximum trimming
length setting (15/32in / 12mm) to prevent
accidentally trimming hairs too short. As you
become familiar with the settings, adjust Hair
Length Setting Selector to desired trimming
length. Selector will ‘click’ into position at each
setting.
5 Turn the Groomer ON (fig. 5).

5 Apply a drop of oil from the bottle supplied
to the foil every three months and after
cleaning.
Replacing the Bodygroom Shaver
Shaving Foil Head
If the shaving unit is worn or damaged, do not
continue using the Bodygroom shaver. Replace
the shaving unit immediately.
It is recommended that you replace your
shaving unit once a year.
A worn or damaged shaving unit should only
be replaced with an original Philips Norelco
shaving foil, model BG2000, which is
available on the Philips Norelco website,
www.philips.com/support or call
1-800-243-3050 for assistance.
The foil is a precision part. Handle with care.
1 Always switch Groomer OFF and remove
Groomer plug from outlet before
replacing shaving unit.
2 Remove the shaving unit head by pulling it off
the appliance.
3 Place the new shaving unit head on the
Groomer by snapping it into place.
You will hear a “click”.
After replacing the shaving unit head, check that
the shaving head is firmly attached before using
Groomer.
This Groomer has no other user-serviceable
parts. For assistance call 1-800-243-3050.
Storage
Be sure Groomer is turned OFF. Remove cord
from outlet and Groomer before storing in a
safe, dry location where it will not be crushed,
banged, or subject to damage.
Store the Groomer and attachments in the
pouch to prevent damage.
Do not wrap cord around Groomer when
storing.
Store cord in a safe location where it will not
be cut or damaged.
Do not place or store Groomer where it can
fall or be pulled into a tub or sink, water or
other liquid while plugged in.
During Use:
If cut hairs have accumulated in the comb area,
remove hairs by shaking or blowing. Remember
to adjust the trimming length back to your
selected setting when you replace the comb on
Groomer.
After Each Use:
1 Make sure the Groomer is switched OFF
and disconnected from the electrical outlet.
2 Remove any comb or attachment.
3 Blow and/or shake out any hair that may
have accumulated in the comb or attachment.
4 Rinse combs, attachments and appliance
under warm tap water.
5 Shake excess water from combs and
attachments and allow to air dry thoroughly.
6 Place the attachment back on the Groomer
handle.
NOTE: To maintain optimal trimming
performance, lubricate the teeth of the full-size
metal trimmer, the detail trimmer and the nose
trimmer with a few drops of oil from the bottle
supplied every three months and after cleaning
(fig. 26).
Cleaning the Body Shaver
1 Pull the shaving unit out of the body shaver
(fig. 27).
2 Blow and/or shake out any hair that may have
accumulated inside the body shaver (fig. 28).
3 Clean the body shaver and shaving unit
under warm tap water (fig 29).
The shaving foil is very delicate and should not
be handled.
If foil becomes damaged, do not continue
using the body shaver. Do not apply pressure
to shaving foil.
4 Shake excess water from body shaver and
shaving unit and allow to air dry thoroughly.
Do not use a towel to dry the shaving unit as
damage could occur.
Trimming Nose Hair
Make sure nasal passages are clean.
1 Put the nose trimmer on the Groomer
handle (1) and turn clockwise (2) (fig. 22).
2 Turn the Groomer ON and insert the tip
of the attachment into one nostril (fig. 23).
CAUTION: Do Not insert the tip more
than 3/16 in./5mm into your nostril.
3 Slowly move the tip in and out while
turning it around at the same time in order
to remove unwanted hair. For best results,
make sure the side of the tip is firm against
skin. This will reduce the tickling effect that
can occur during trimming of nose hair.
4 Turn off Groomer. Rinse attachment clean
after each use.
Trimming Ear Hair
Clean outer area of ear and ear canal. Make
sure it is free of wax.
Nose trimmer should be on the Groomer.
1 Turn the Groomer ON and move the tip
softly around the edge of ear to remove hairs
extending beyond the outer ear (fig. 24).
2 Carefully insert the tip into outer ear canal
(fig. 25).
CAUTION: Do not insert the tip further
than 3/16 in./5mm into the ear as this
could cause damage to the eardrum.
3 Turn off Groomer. Rinse attachment clean
after each use.
Cleaning
Clean the attachments after each use.
Always switch Groomer OFF, unplug
and remove power supply cord from
Groomer before cleaning.
Do not use compressed air, abrasive cleaning
agents, scourers or liquids such as alcohol,
benzene, bleach or acetone to clean the
Groomer and attachments.
Never clean, replace or remove Groomer
attachments with motor ON.
Do not apply pressure to cutters.
Do not touch cutters with hard objects as this
may damage them.
Trimming
Styling/Contouring with Detail
Trimmer
Use the detail trimmer to cut shapes in beard
hair or scalp hair.
Be careful when using the detail trimmer as it
removes every hair it touches.
1 Put the detail trimmer on the Groomer
handle (1) and turn clockwise (2) (fig. 18).
2 Make careful and controlled movements with
the detail trimmer.
3 For best results, move the detail trimmer
against the direction of hair growth making
sure it is in full contact with the skin (fig. 19).
Stubble Trimming With Stubble Comb
Use the stubble comb to trim your stubble to
different lengths.
The stubble comb cuts hair to a length of 3/64
– 15/32 in. (1-12 mm).
1 Put the trimmer on Groomer handle (1) and
turn clockwise (2) (Fig. 2).
2 Slide the stubble comb into the guiding
grooves, on both sides of Groomer handle
(Fig. 20).
3 Press the Hair Length Setting Selector (1)
and slide the comb to the desired setting (2)
(Fig. 21).
4 Turn the Groomer ON (Fig, 5).
5 To trim the most effective way, move the
Groomer against the direction of hair
growth. Do not move the Groomer too fast.
Make smooth and gentle movements and
make sure the surface of the detail comb
always stays in contact with the skin.
Grooming Nose/Ear Hair
1 Be certain the Groomer is in the OFF
position.
2 Remove the trimmer by turning counter-
clockwise and pulling it off the Groomer
handle.
3 Put the nose trimmer on the Groomer
handle (1) and turn clockwise (2) (fig. 22).

Assistance
For assistance visit our website:
www.philips.com/support
or call toll free: 1-800-243-3050
Online information is available 24 hours a day,
7 days a week.
Disposal
This Philips Norelco Groomer contains a
rechargeable lithium-ion battery, which must be
disposed of properly (fig. 30).
Contact your local town or city officials for
batteries disposal information or call
1-800-822-8837 or www.rbrc.com for
drop-off locations.
Your product is designed and manufactured
with high quality materials and components,
which can be recycled and reused. For
recycling information, please contact your
local waste management facilities or visit
www.recycle.philips.com.
For assistance, visit our website:
www.philips.com/support or
call toll free: 1-800-243-3050.