
QUICK START GUIDE
ATTENTION
For Returns or Support you MUST contact
DefenderCameras.com/Support

TABLE OF CONTENTS
WARRANTY
Activate Your Warranty..........................................................................................................3
Extend Your Warranty ...........................................................................................................3
ABOUT DEFENDER VISION
What You’ll Need .................................................................................................................... 4
What’s Included ...................................................................................................................... 4
Regulatory Information ......................................................................................................... 4
BASIC SETUP
Device Setup & Proper Camera Placement ........................................................................5
DVR Activation ........................................................................................................................ 7
DVR Setup Wizard ..................................................................................................................8
Setting up Remote Viewing .................................................................................................. 9
ADVANCED SETTINGS
Customize Channel Name ..................................................................................................13
Vision Modes ........................................................................................................................14
Setting up Event Notications ............................................................................................15
Motion Detection ..........................................................................................................15
App Setting - Motion Detection ...................................................................................16
Detection Area ...............................................................................................................17
AI Customization ...........................................................................................................17
Notication Schedule .................................................................................................... 18
Set Up Recording Schedule .................................................................................................19
Add Additional Users ...........................................................................................................20
Live View Panel Explanation ...............................................................................................21
USING THE APP ..........................................................................................................................22
FREQUENTLY ASKED QUESTIONS ...........................................................................................23

3
ACTIVATE YOUR WARRANTY
EXTEND YOUR WARRANTY
PROTECT
Covered for the
unexpected
SUPPORT
Receive videos, tips &
updates for your product
VALUE
Exclusive access to
special oers
Don’t forget to protect your purchase and ease your mind by extending your
included 1 year manufacturer warranty to 2 or 3 years. If something goes wrong,
our team of Security Experts will get you back up and running fast!
Extended Warranties can be purchased up to 60 days after your product’s purchase.
2 Year Warranty
Extend your peace of mind to two years
◊ Product Defects
◊ Advanced Replacements
◊ Free Return Shipping in Year 2
3 Year Warranty
Extend your peace of mind to three years
◊ Product Defects
◊ Advanced Replacements
◊ Free Return Shipping
Open your camera & scan this QR code,
or visit: DefenderCameras.com/Warranty
Open your camera & scan this QR code, or visit:
DefenderCameras.com/pages/extended-warranties

Need Help? Visit DefenderCameras.com/support
4
WHAT’S INCLUDED
REGULATORY INFORMATION
FCC STATEMENT: This device complies with part 15 of the FCC Rules. Operation is subject to the following two conditions: (1) This device may not cause
harmful interference. (2) This device must accept any interference received, including interference that may cause undesired operation. This equipment
complies with FCC radiation exposure limits set forth for an uncontrolled environment. This equipment should be installed and operated with a minimum
distance of 20cm between the radiator and any part of your body.
FCC WARNING: This equipment has been tested and found to comply with the limits for a Class B digital device, pursuant to Part 15 of the FCC Rules. These
limits are designed to provide reasonable protection against harmful interference in a residential installation. This equipment generates, uses and can radiate
radio frequency energy and, if not installed and used in accordance with the instructions,may cause harmful interference to radio communications. However,
there is no guarantee that interference will not occur in a particular installation. If this equipment does cause harmful interference to radio or television
reception, which can be determined by turning the equipment o and on, the user is encouraged to try to correct the interference by one or more of the
following measures:
• Reorient or relocate the receiving antenna.
• Increase the separation between the equipment and the receiver.
• Connect the equipment into an outlet dierent from that to which the receiver is connected.
• Consult the dealer or an experienced radio/TV technician for help.
IC STATEMENT / DÉCLA RATION IC: This device contains licence-exempt transmitter(s)/receiver(s) that comply with Innovation, Science and Economic
Development Canada’s licence-exempt RSS(s). Operation is subject to the following two conditions: (1)This device may not cause interference. (2)This device
must accept any interference, including interference that may cause undesired operation of the device. L’émetteur/récepteur exempt de licence contenu
dans le présent appareil est conforme aux CNR d’Innovation, Sciences et Développement économique Canada applicables aux appareils radio exempts de
licence. L’exploitation est autorisée aux deux conditions suivantes :(1)L’appareil ne doit pas produire de brouillage; (2)L’appareil doit accepter tout brouillage
radioélectrique subi, même si le brouillage est susceptible d’en compromettre le fonctionnement. This equipment complies with IC RSS-102 radiation
exposure limits set forth for an uncontrolled environment. This equipment should be installed and operated with minimum distance 20cm between the
radiator and your body. Cet équipement est conforme aux limites d’exposition aux radiations IC CNR-102 établies pour un environnement non contrôlé.
Cet équipement doit être installé et utilisé avec une distance minimale de 20 cm entre le radiateur et votre corps.
Changes or modications not expressly approved by the party responsible for compliance could void the user’s authority to operate the equipment.
WHAT YOU’LL NEED
• Monitor/TV
• Hammer Drill & Appropriate Bit
• Phillips (#2) Screwdriver
• Ladder (if required)
• Cable Protectors (if required)
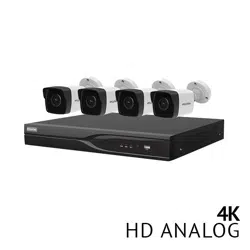
4CH MODEL
• 1 x DVR with 1TB HDD
• 4 x 4K Analog HD Cameras
• 4 x 60ft BNC Cables
• 1 x Camera Power Adapter
• 1 x 4-Way Power Splitter
• 1 x HDMI Cable
• 1 x Ethernet Cable
• 1 x DVR Power Supply
• 1 x USB Mouse
• 4 x Camera Mounting Hardware
• 1 x Quick Start Guide
• 1 x Window Warning Sticker
• 4 x Drilling Template
• Lifetime Live Chat Support
8CH MODEL
• 1 x DVR with 1TB HDD
• 8 x 4K Analog HD Cameras
• 8 x 60ft BNC Cables
• 2 x Camera Power Adapter
• 2 x 4-Way Power Splitter
• 1 x HDMI Cable
• 1 x Ethernet Cable
• 1 x DVR Power Supply
• 1 x USB Mouse
• 8 x Camera Mounting Hardware
• 1 x Quick Start Guide
• 1 x Window Warning Sticker
• 8 x Drilling Template
• Lifetime Live Chat Support
16CH MODEL
• 1 x DVR with 2TB HDD
• 16 x 4K Analog HD Cameras
• 16 x 60ft BNC Cables
• 4 x Camera Power Adapter
• 4 x 4-Way Power Splitter
• 1 x HDMI Cable
• 1 x Ethernet Cable
• 1 x DVR Power Supply
• 1 x USB Mouse
• 16 x Camera Mounting Hardware
• 1 x Quick Start Guide
• 1 x Window Warning Sticker
• 16 x Drilling Template
• Lifetime Live Chat Support

Need Help? Visit DefenderCameras.com/support
5
DEVICE SETUP
PLEASE READ FIRST!
You must connect the DVR to a monitor/TV to complete the setup. We recommend verifying all accessories and
completing the DVR setup before installing the cameras. For the best viewing experience, we recommend using a
4K monitor/TV to view your footage.
1. CONNECT THE MONITOR, USB MOUSE, CAMERAS, MODEM/ROUTER, AND POWER SUPPLY TO THE DVR
BASED ON THE COLOR AND IMAGE LABELS:
A
Camera and BNC Cable: Connect the red and yellow BNC connectors to the camera. Attach the second
yellow connector to the DVR. Tip: When connecting the BNC connection, twist right to lock the metal
connection in place.
B
Camera Power: Connect the second red power connector from the BNC cable to the 4-way splitter and
power supply. Connect the 4-way power splitter and the camera power adapter to a power outlet.
*Repeat for 8 or 16 channel setups.
C
Monitor/TV: Connect the monitor/TV to the DVR with the HDMI cable.
D
USB Mouse: Connect the USB mouse to the DVR.
E
Modem/Router: Connect the Ethernet cable to the DVR and modem/router.
(NOTE: Wired Ethernet connection required. The DVR cannot connect to the modem/router via Wi-Fi)
F
DVR Power: Connect the DVR power cable to a power outlet.
G
USB Port
H
Audio Ports: Add audio recording to select cameras by connecting an external audio recording device (not
included). IMPORTANT: Vision AI cameras do not come with a built-in microphone.
Monitor/TV
(not included)
3
4
1
2
7
8
5
6
B
E
F
G
H
D
C
A
Power LED: Indicates the DVR is on.
B
Record LED: Data is being read or written to HDD.
C
Network LED: DVR is connected to a network.
D
USB Port
B D
A C
Camera Tip: When installing the camera,
loosen the screws on the adjustable arm
and position the camera to ensure the best
possible camera angle. Tighten the screws
when nished.
A
Need Help? Visit DefenderCameras.com/support
6
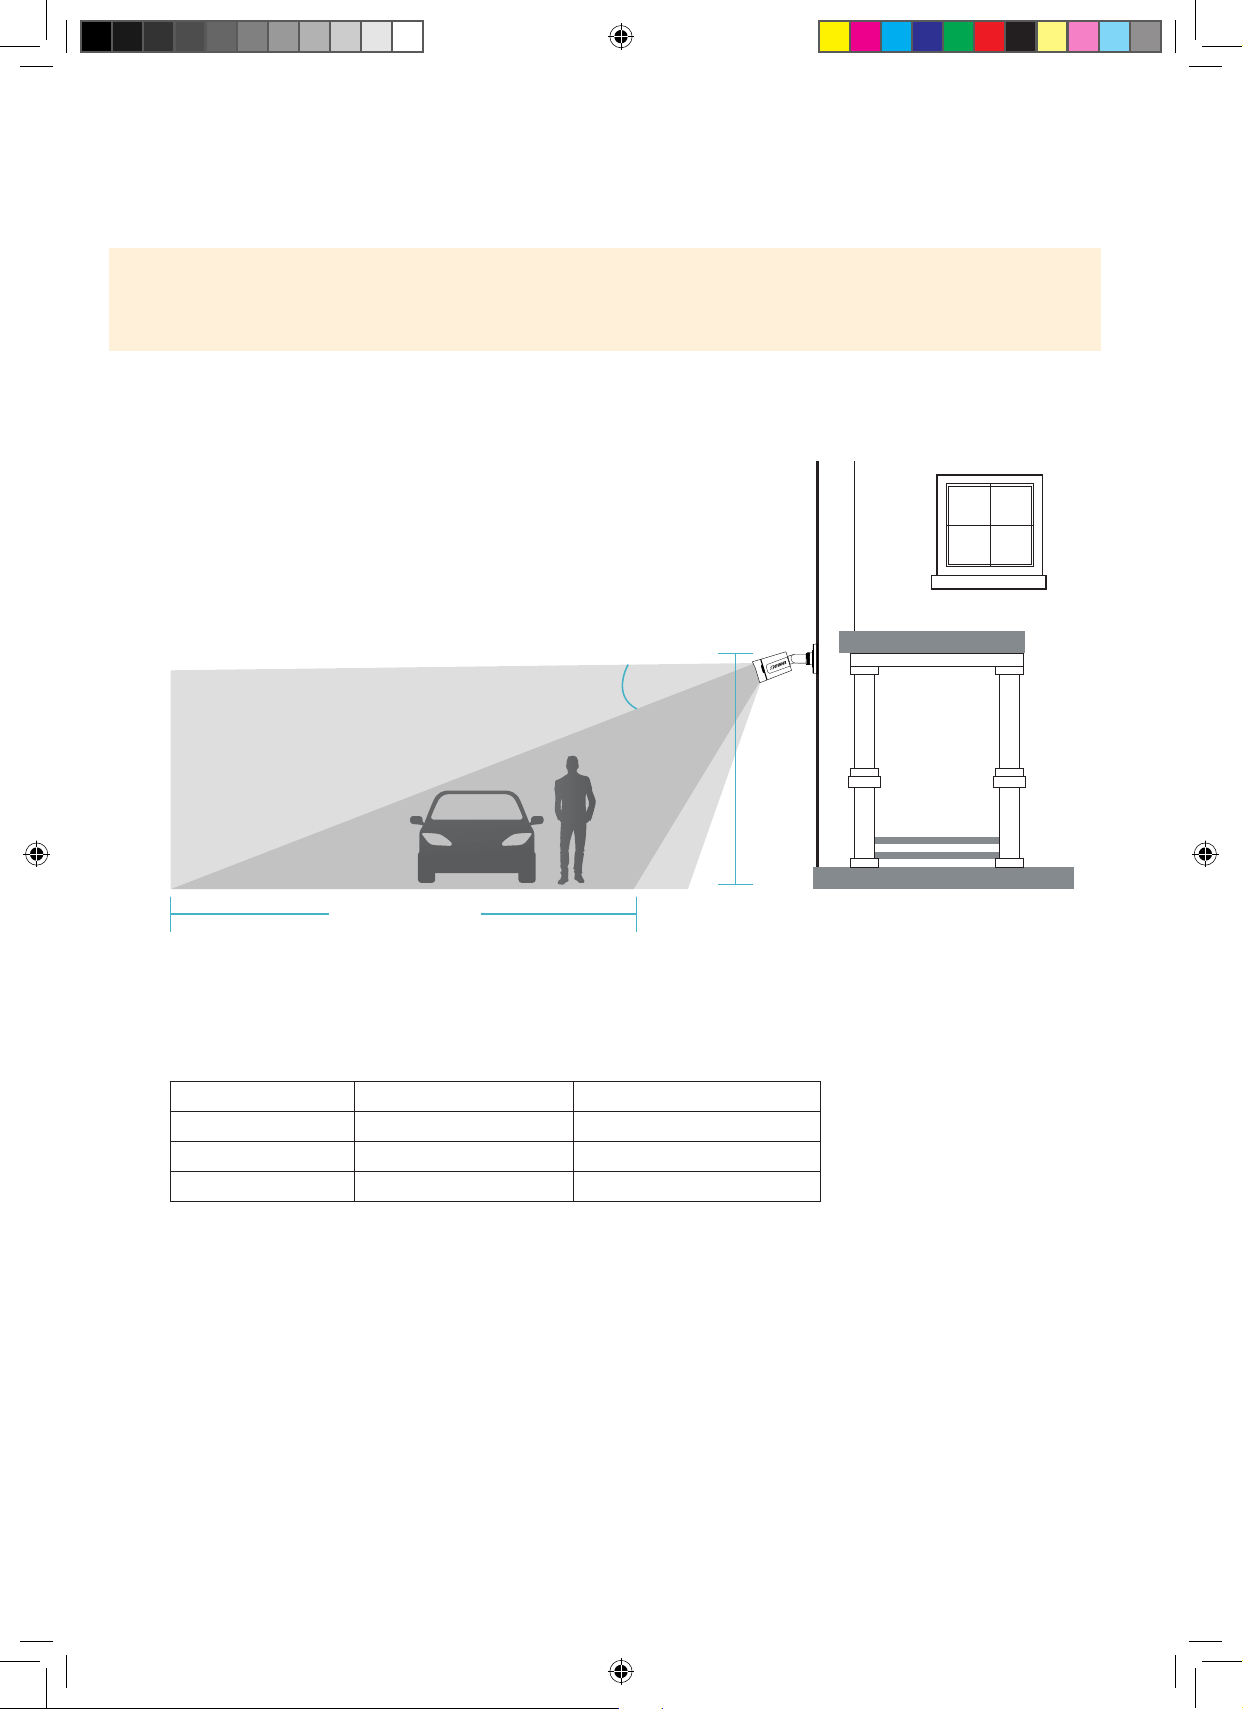
2. PROPER AI CAMERA INSTALLATION AND PLACEMENT
Defender Vision AI supports Articial Intelligence (AI) to better detect humans and vehicles to deliver more relevant
notications.
Please Note: The accuracy of human and vehicle detection will be inuenced by multiple factors such as, distance
from the camera, the size of the human/vehicle, the height, angle and direction of the camera, and your night
vision settings.
For optimal performance, follow the recommended guidelines below and set your night vision to Double LED.
(See “Vision Modes” to customize your settings.)
8-11 ft
(2.5-3.5 m)
Optimal Motion
Detection Zone
15°
Camera Field
Of View
Up to 20 ft (6.1 m)
Camera Height Minimum Distance Maximum Distance
8.2 ft (2.5 m) 2.8 ft (0.86 m) 20 ft (6.12 m)
9.8 ft (3 m) 4.5 ft (1.39 m) 19.7 ft (6.03 m)
11.5 ft (3.5 m) 6.3 ft (1.93 m) 19.3 ft (5.90 m)
Optimal Human and Vehicle Detection Zone
The following measurements apply when the camera is pointed 15 degrees below horizontal
• Angle the camera so that objects in the camera’s eld of view appear
in the bottom 2/3 of the camera image.
• Choose a location where objects of interest will be no further than
20ft (6.1m) from the camera.
Need Help? Visit DefenderCameras.com/support
7
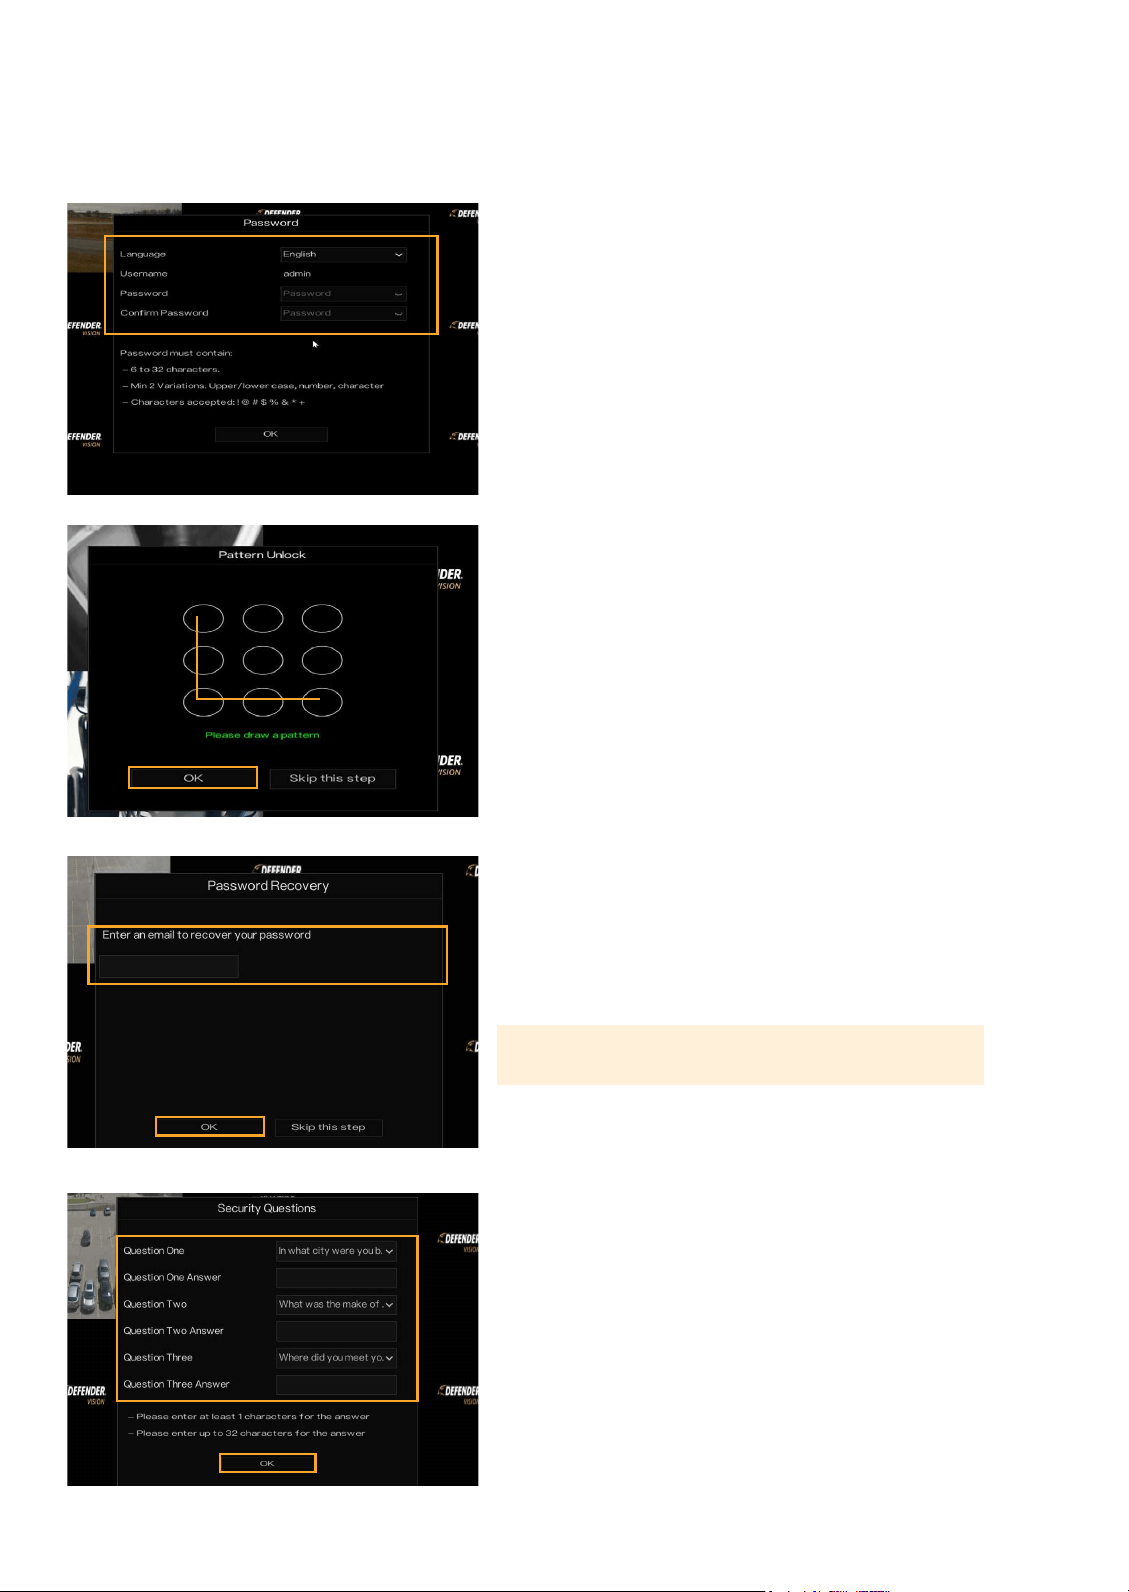
ADMIN PASSWORD
1. Select your language.
2. Create a password – PLEASE REMEMBER YOUR PASSWORD!
3. Conrm the password.
4. Click “OK”.
PATTERN UNLOCK
Draw an unlock pattern to access your system in place of a
password. If you do not wish to create a pattern, skip this step.
1. Click & drag to draw a pattern – you must connect at least
4 dots.
2. Re-enter the unlock pattern to conrm.
3. Click “OK”.
PASSWORD RECOVERY
1. Enter your email address and click “OK”.
Please Note: We do not recommend skipping this step.
SECURITY QUESTIONS
Security questions are used to reset a forgotten password.
1. Select 3 security questions and enter your answers.
2. Click “OK”.
REMEMBER YOUR ANSWERS! We recommend writing your
questions and answers down and keeping them in a safe
place for future reference.
DVR ACTIVATION
Need Help? Visit DefenderCameras.com/support
8
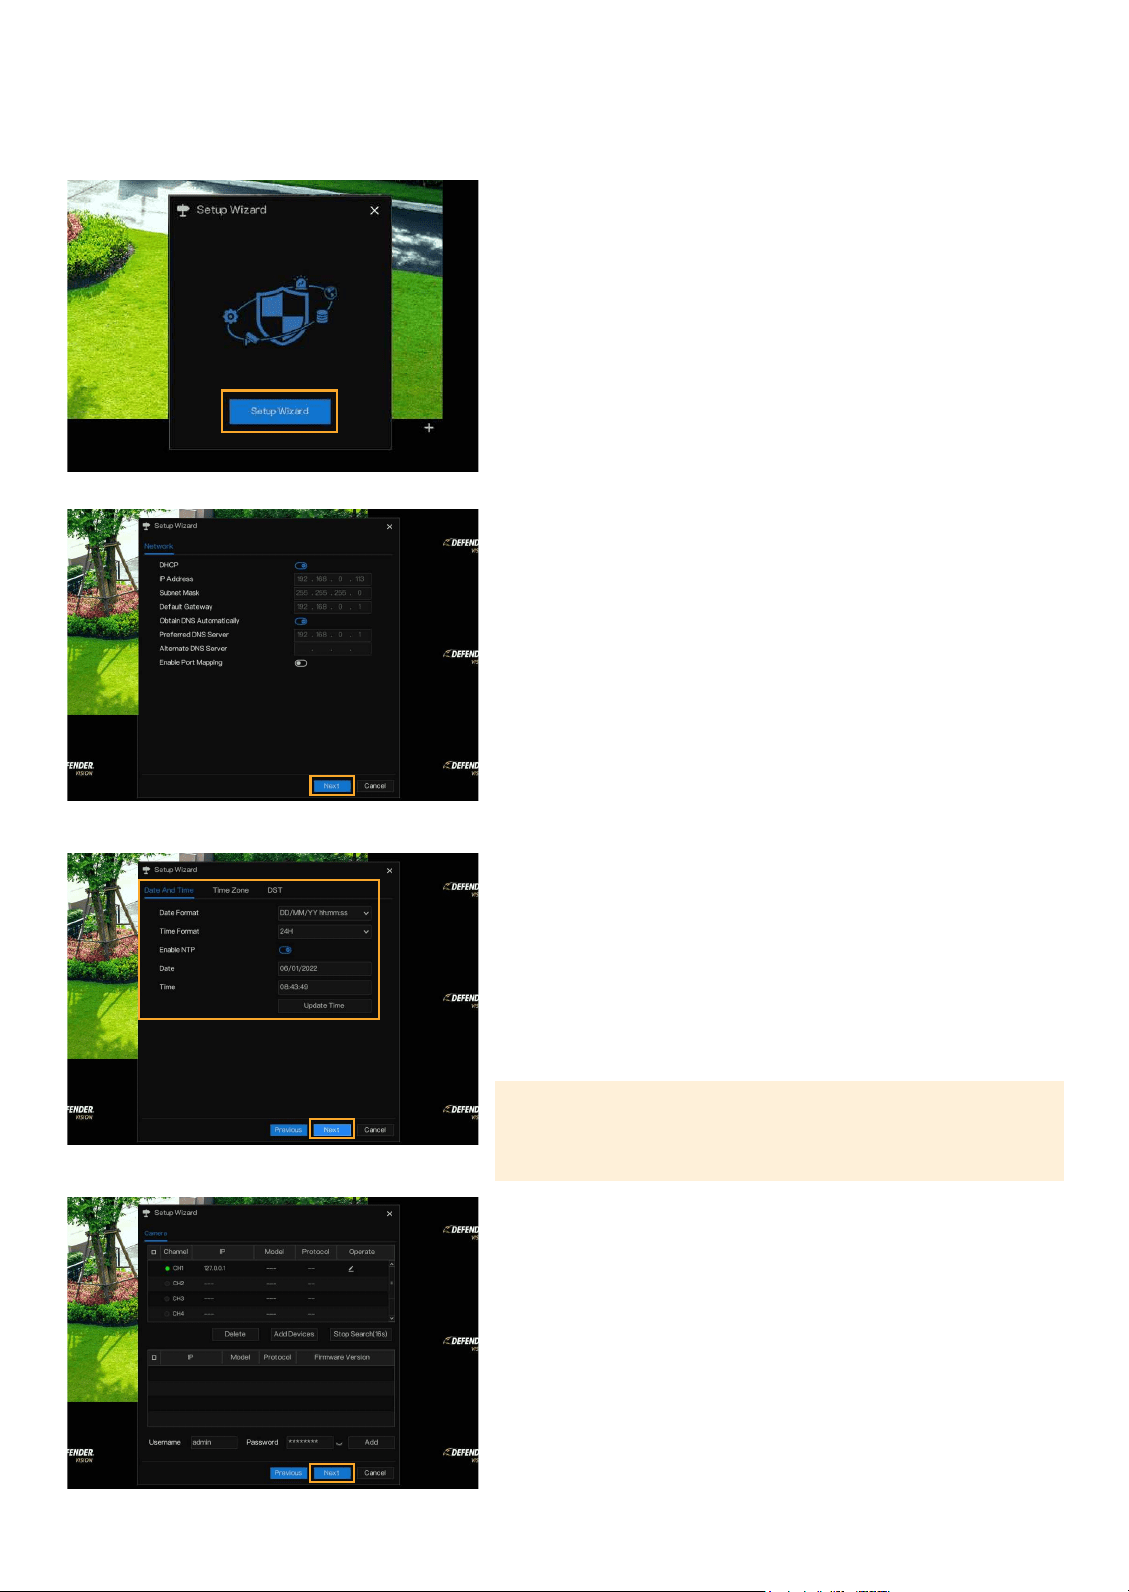
DVR SETUP WIZARD
SETUP WIZARD
1. Click “Setup Wizard” to start your DVR setup.
NETWORK
1. If you have a static IP address, make all necessary
changes otherwise, no change is required.
2. Click “Next”.
DATE AND TIME
1. Select your Date and Time format.
2. Select Enable NTP to automatically synchronize your date and
time to your selected time zone. To manually enter your date
and time, toggle o Enable NTP.
3. Select your Time Zone.
4. Schedule your DST (Day Light Savings). This is optional.
5. Click “Next”.
Please Note: The Sync function will only work when your DVR is
connected to the Internet. We recommend making no change to
the NTP Server or Sync Time Frequency.
CAMERA
1. Displays the cameras available to connect to the DVR. No
change is required.
2. Click “Next”.
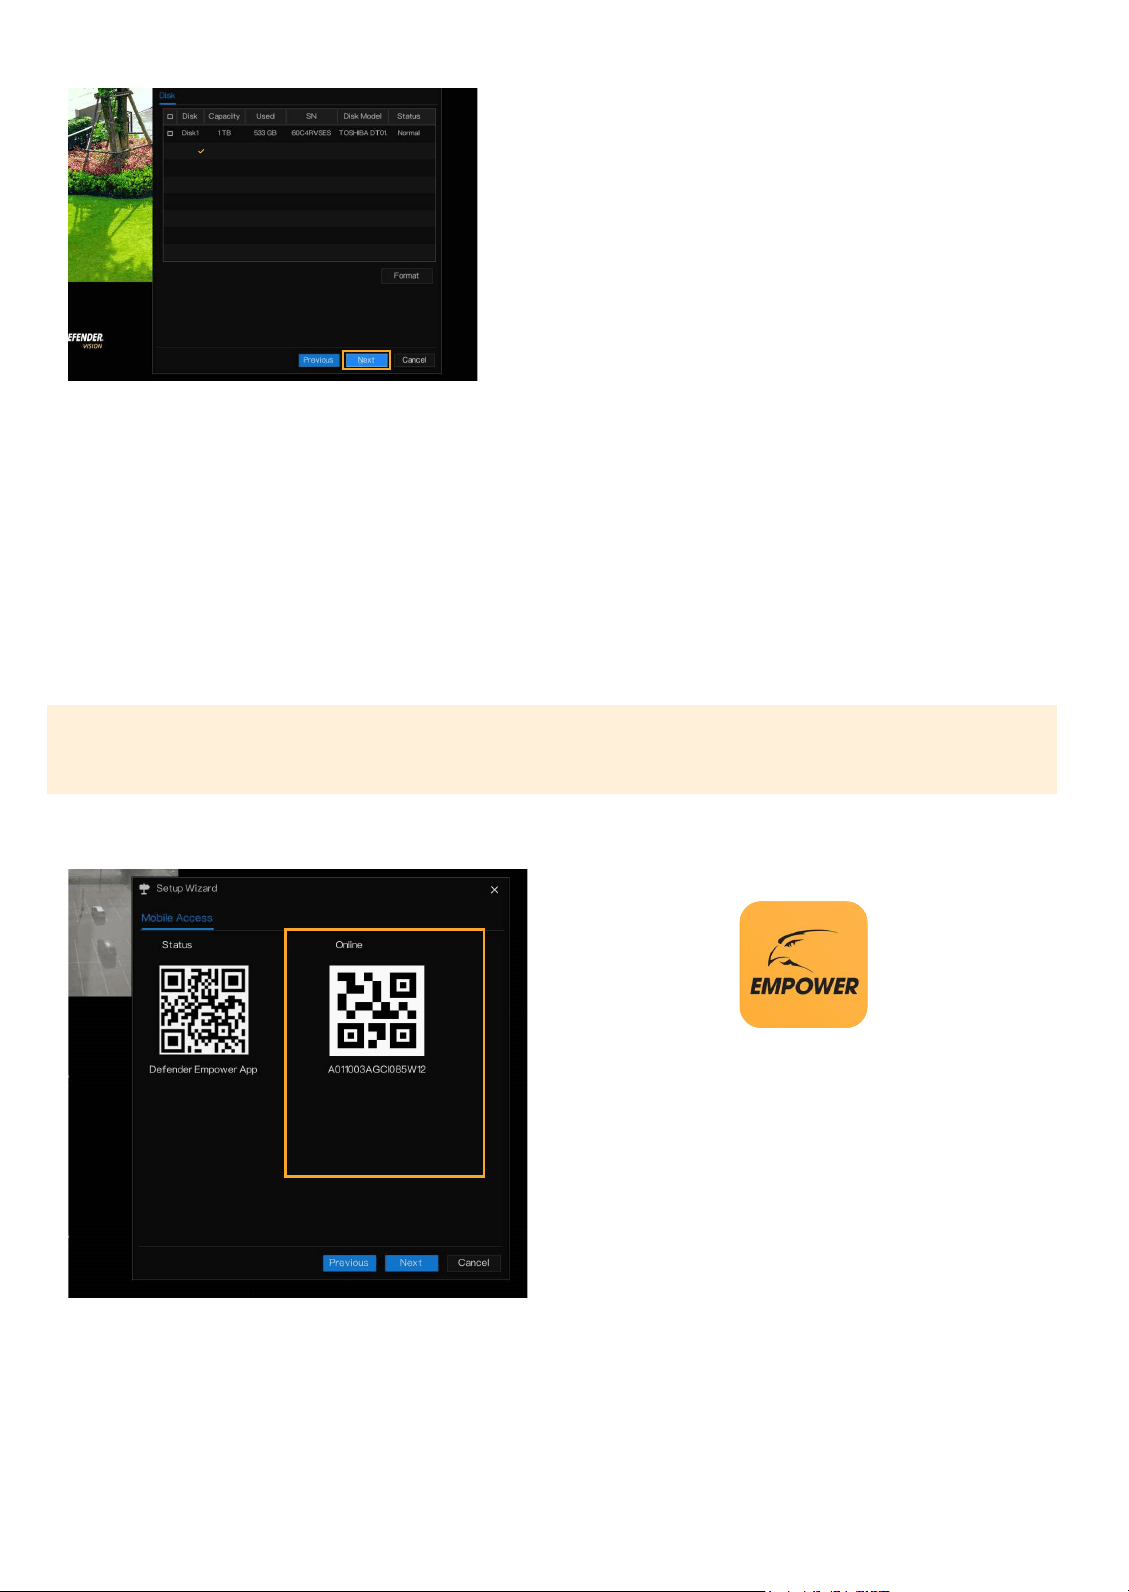
DISK
1. Your DVR comes pre-formatted.
2. Click “Next”.
SETUP WIZARD – MOBILE ACCESS
For remote viewing, the DVR must be connected to the Internet via an Ethernet Cable.
Please Note: The Device ID QR Code can only be scanned within the Defender Empower App. You will be prompted to
do this in the next section “Account Setup”.
SETTING UP REMOTE VIEWING
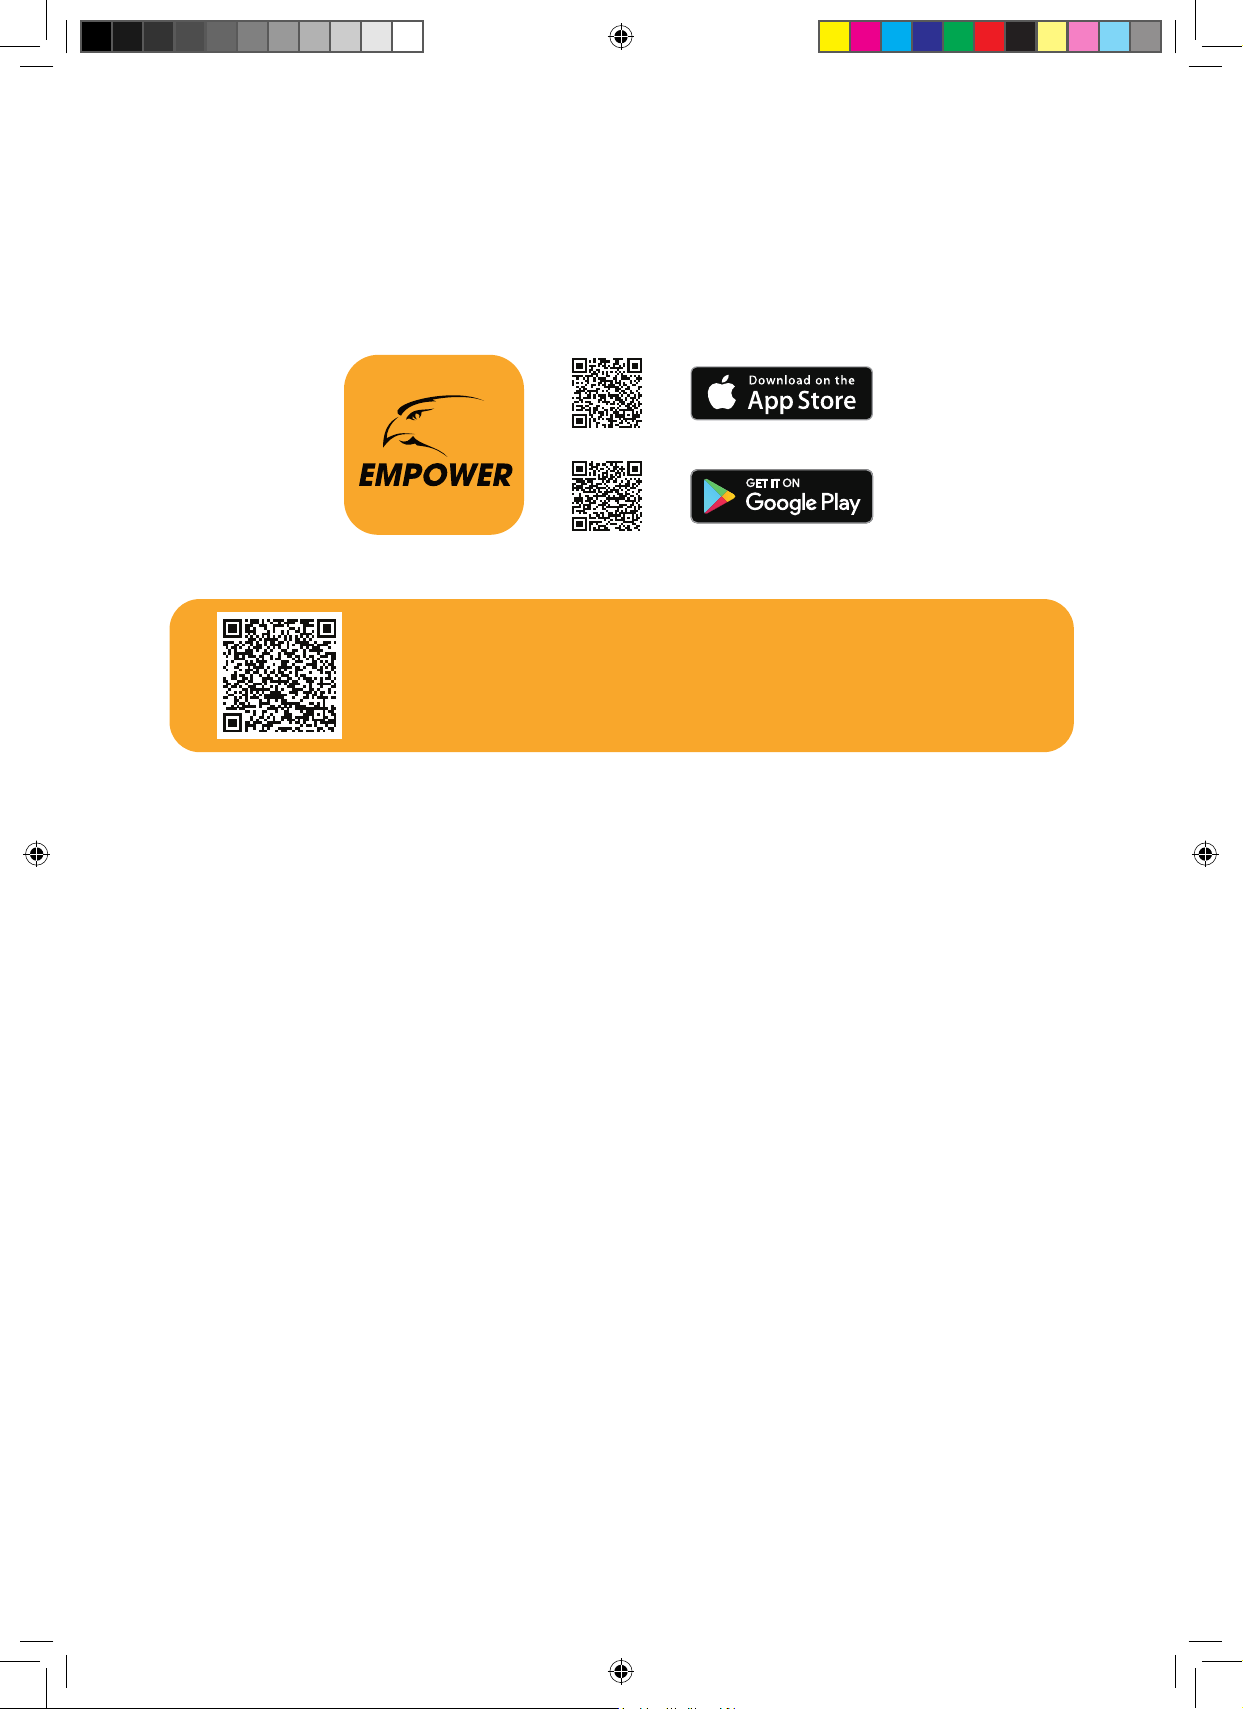
1. Open your camera and scan the DEFENDER EMPOWER
APP QR Code on your monitor/TV screen to download
the App.
2. If you are unable to scan the QR code, search Defender
Empower in the App Store or the Google Play Store.
Scan to Download
the Defender
Empower App
Device ID: Scan from
your monitor/TV
Need Help? Visit DefenderCameras.com/support
9
10
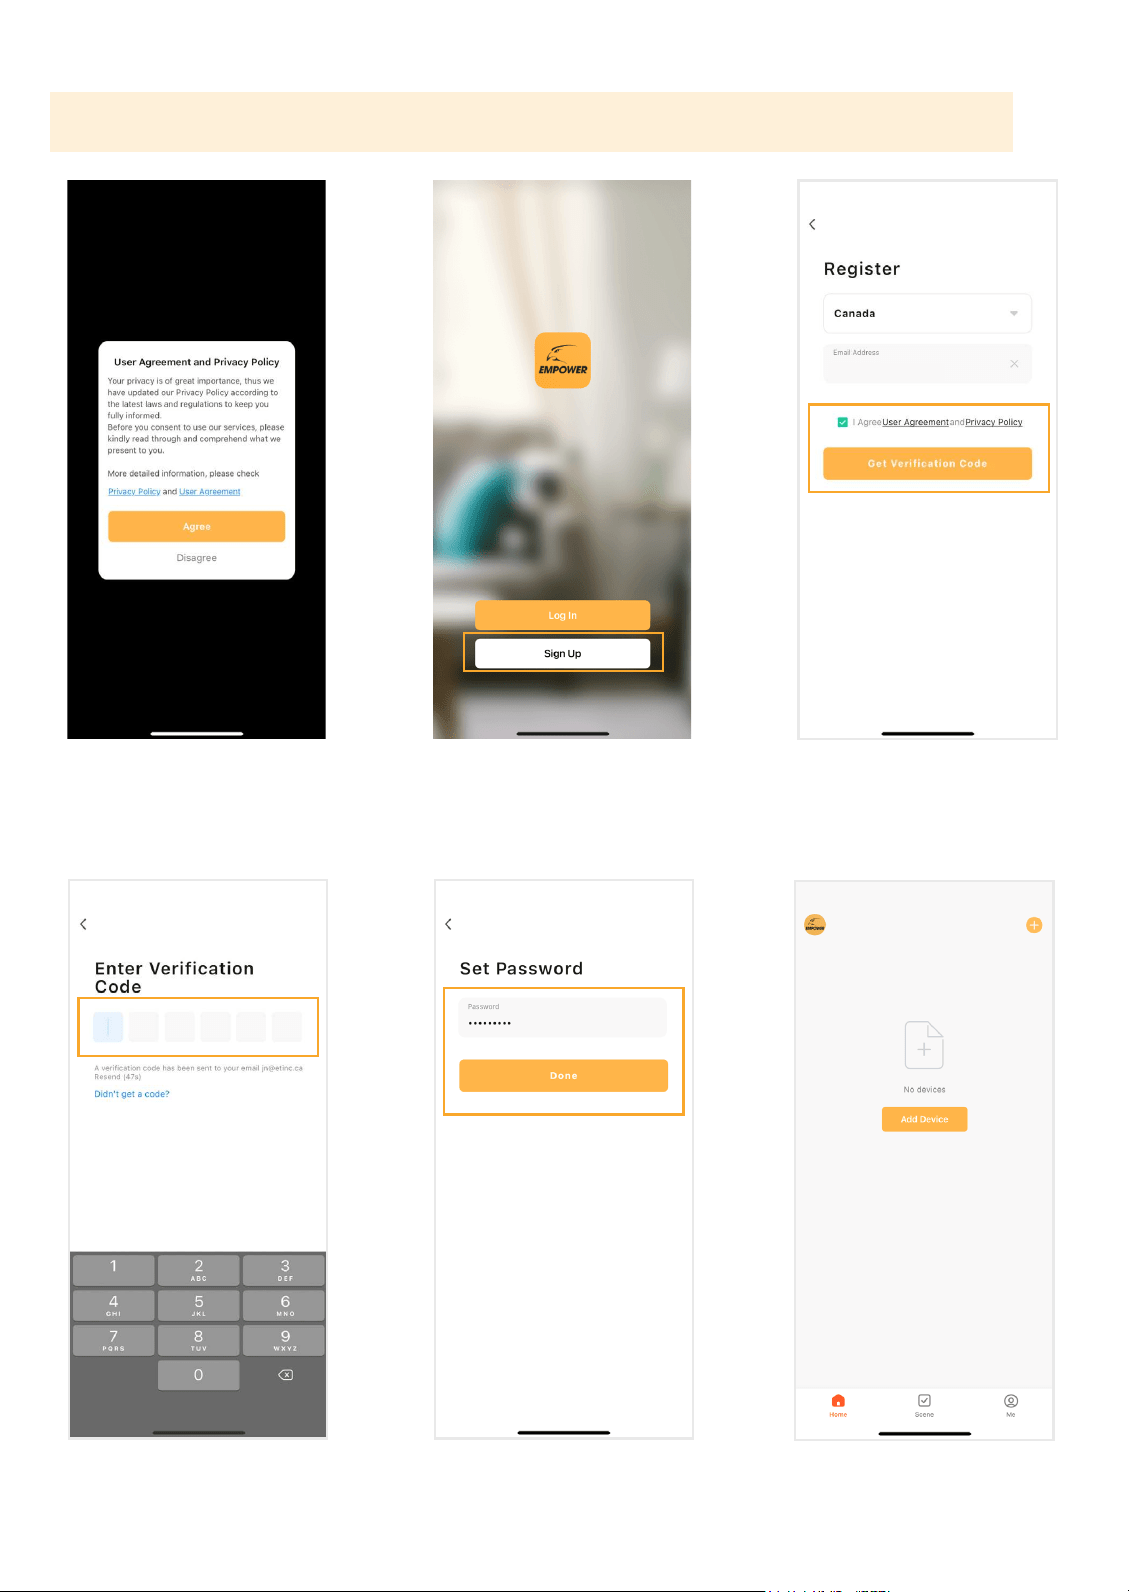
Tap ‘Sign Up’ to register your account.
Review and agree to the User
Agreement and Privacy Policy.
Select your region, enter your
email address, and agree to User
Agreement and Privacy Policy. Tap
‘Get Verication Code’.
ACCOUNT SETUP
Enter the Verication Code sent to
your email address. This may take
up to 5 minutes to receive.
Create a new password and tap
‘Done’.
Tap ‘Add Device’. Defender Would
like you to use Bluetooth, Tap ‘OK’.
Please Note: All App screens & steps may vary slightly. Refer to page 22 “USING THE APP” for further reference.
11
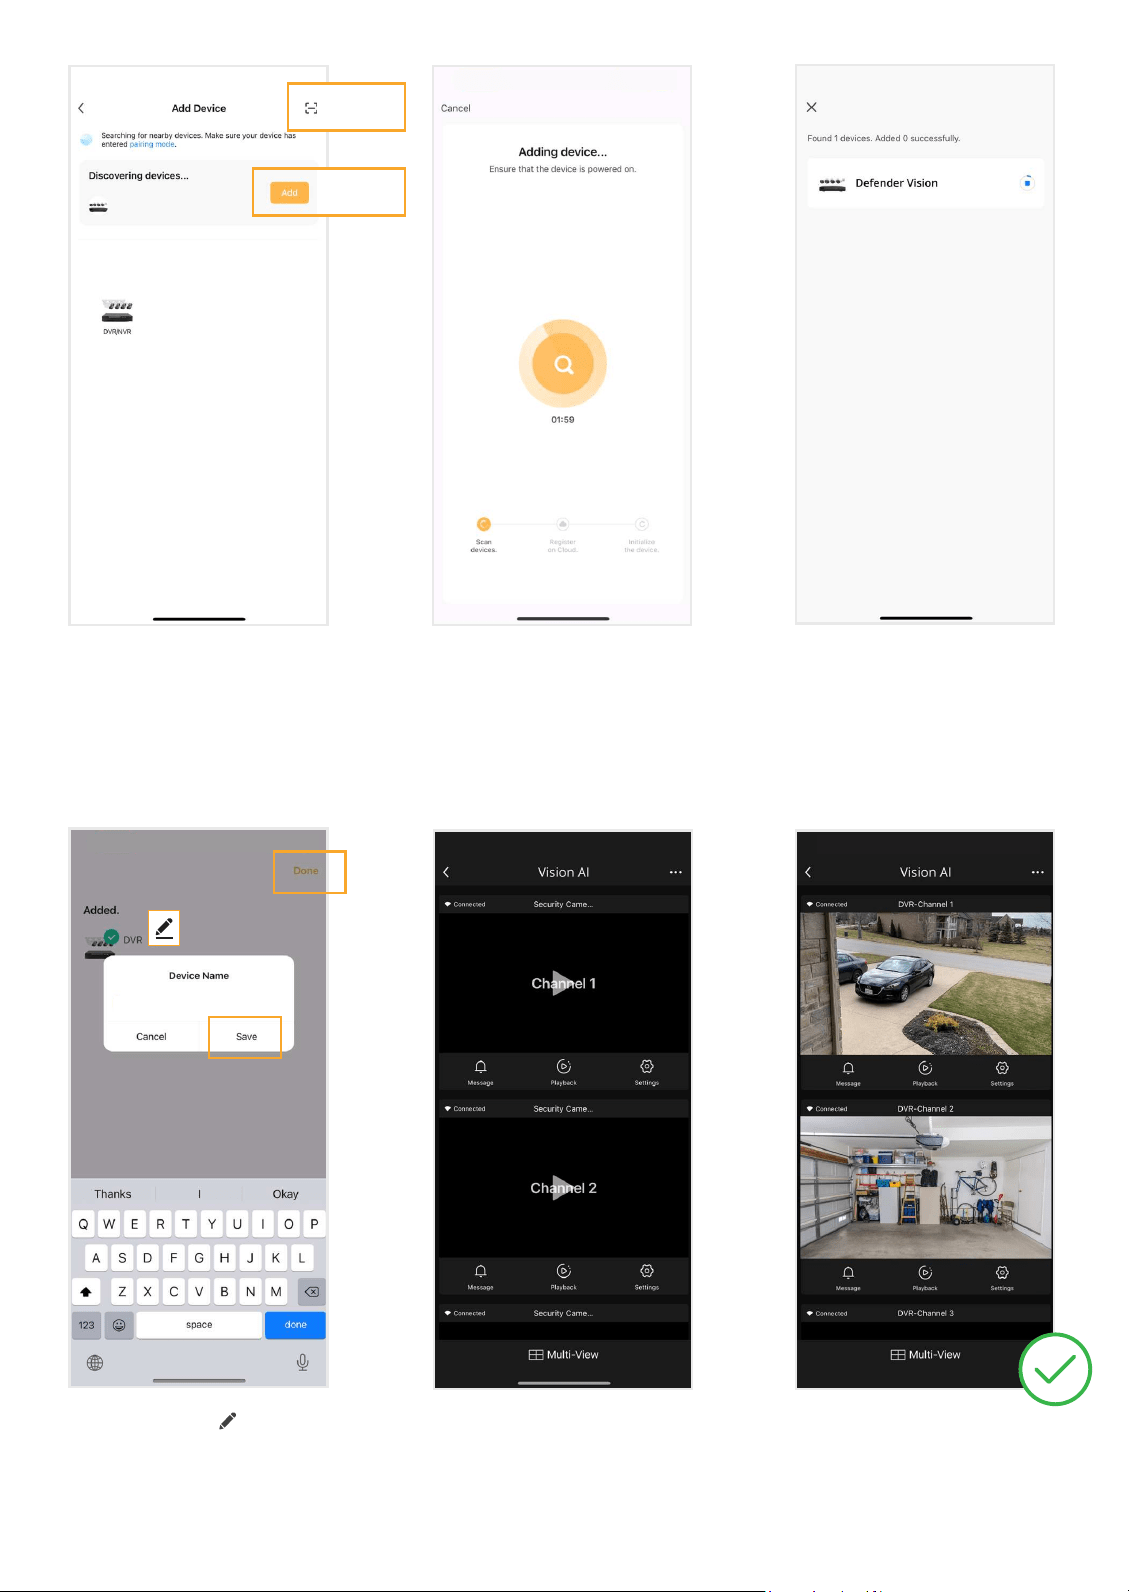
Option 1:
Scan the ‘Device ID’ QR code located
on the Setup Wizard - Mobile Access
screen of your DVR.
Select the edit icon
to change
your device name.
Enter a Device name, tap ‘Save’
and ‘Done’
The Mobile App setup is complete.
Return to the DVR to nalize setup.
Tap each channel to load the
camera footage.
Option 2:
Wait for the Adding Device process
to nish. Do not leave this screen.
Once your device is successfully
added, tap ‘Next’.
Vision AI
Option 1: Tap the Scan icon [ - ]
located on the top right.
Option 2: Wait for your App to
discover nearby devices. Tap ‘Add’
to discover devices.
Option 2
Option 1
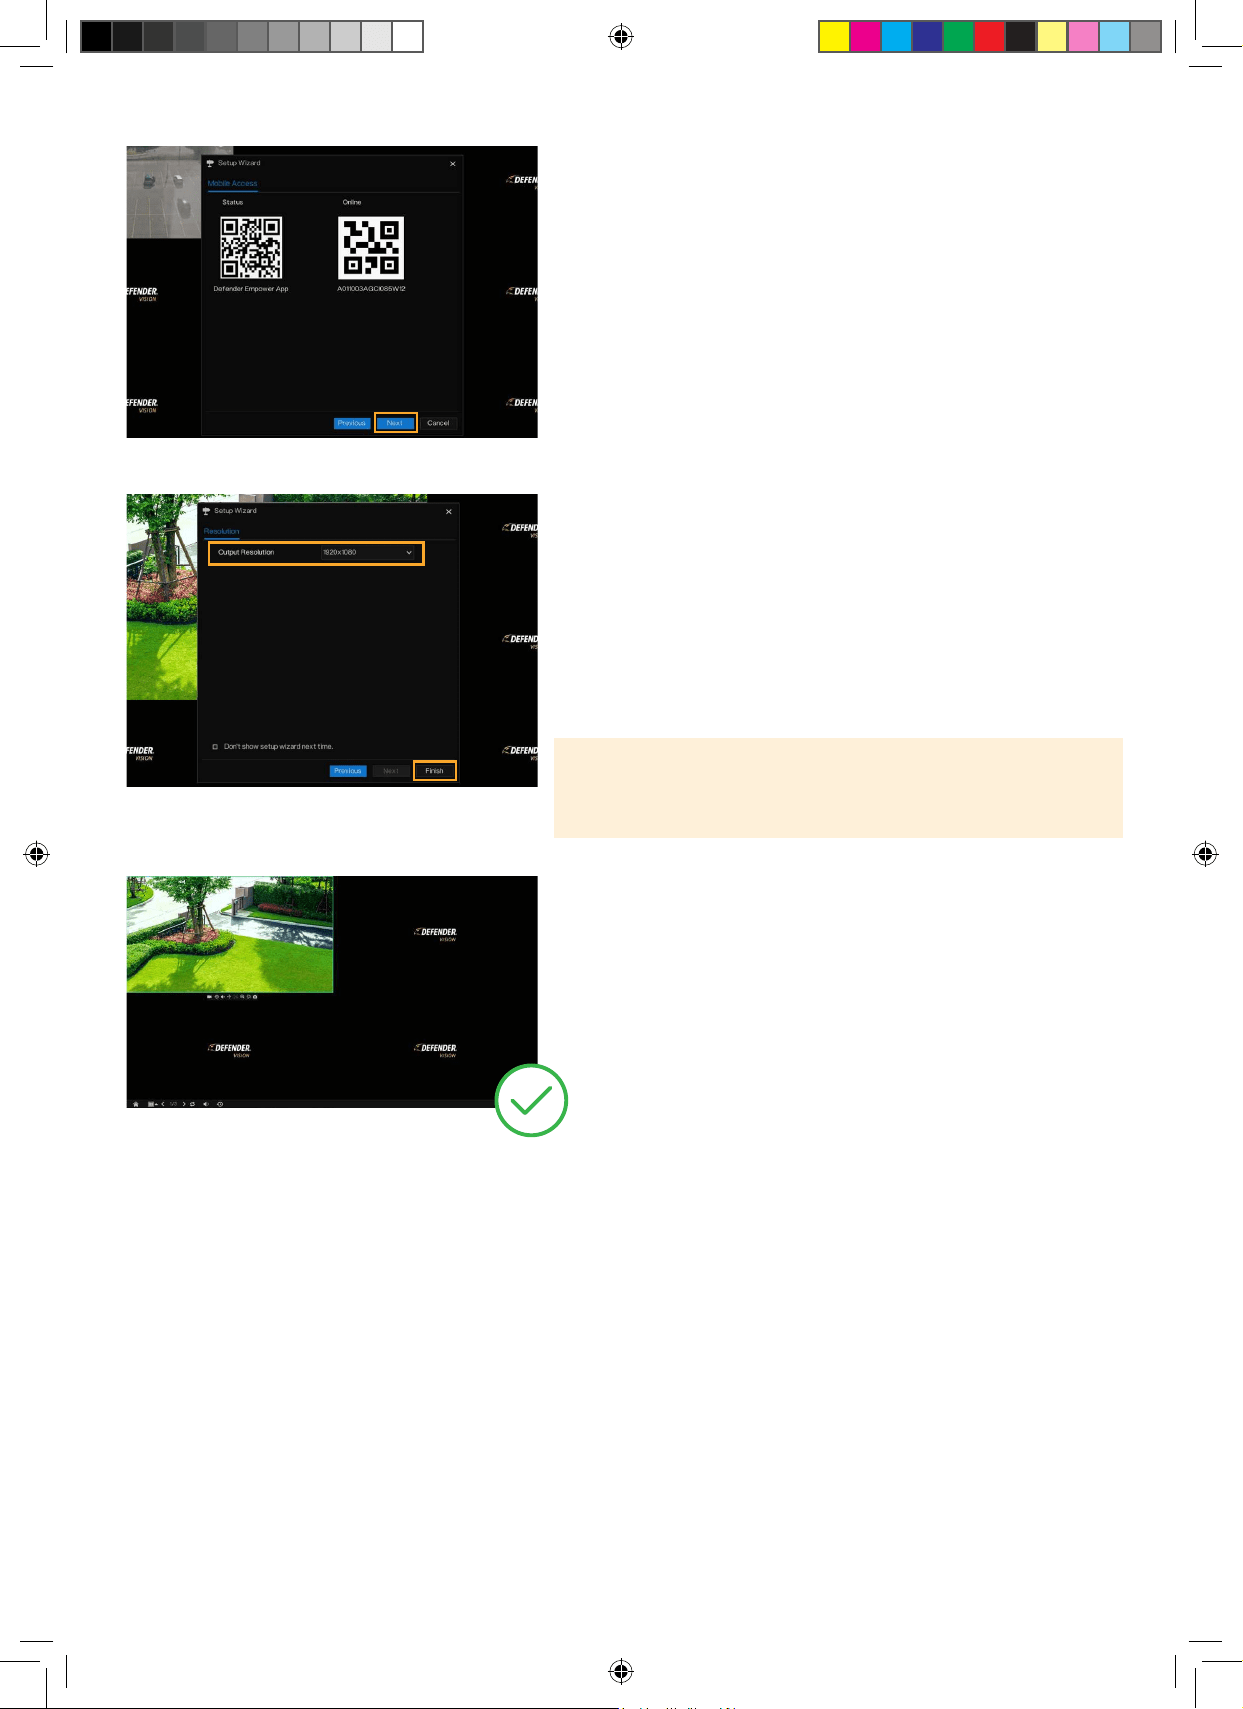
OUTPUT RESOLUTION
We recommend setting the output resolution to match the
resolution of the monitor/TV. For the best viewing experience,
we recommend using a 4K monitor/TV.
1. Select the Output Resolution. When using a 4K monitor/TV
select “3840x2160”
2. Click “Finish”.
Please Note: When a higher output resolution than the monitor/
TV is selected, the DVR will automatically default to the max
output resolution of your screen.
Success! Your DVR is ready for use.
DVR SETUP CONTINUED
1. Your DVR is now added to the Defender Empower App
for remote viewing.
2. Select “Next”.
Need Help? Visit DefenderCameras.com/support
12
Need Help? Visit DefenderCameras.com/support
13
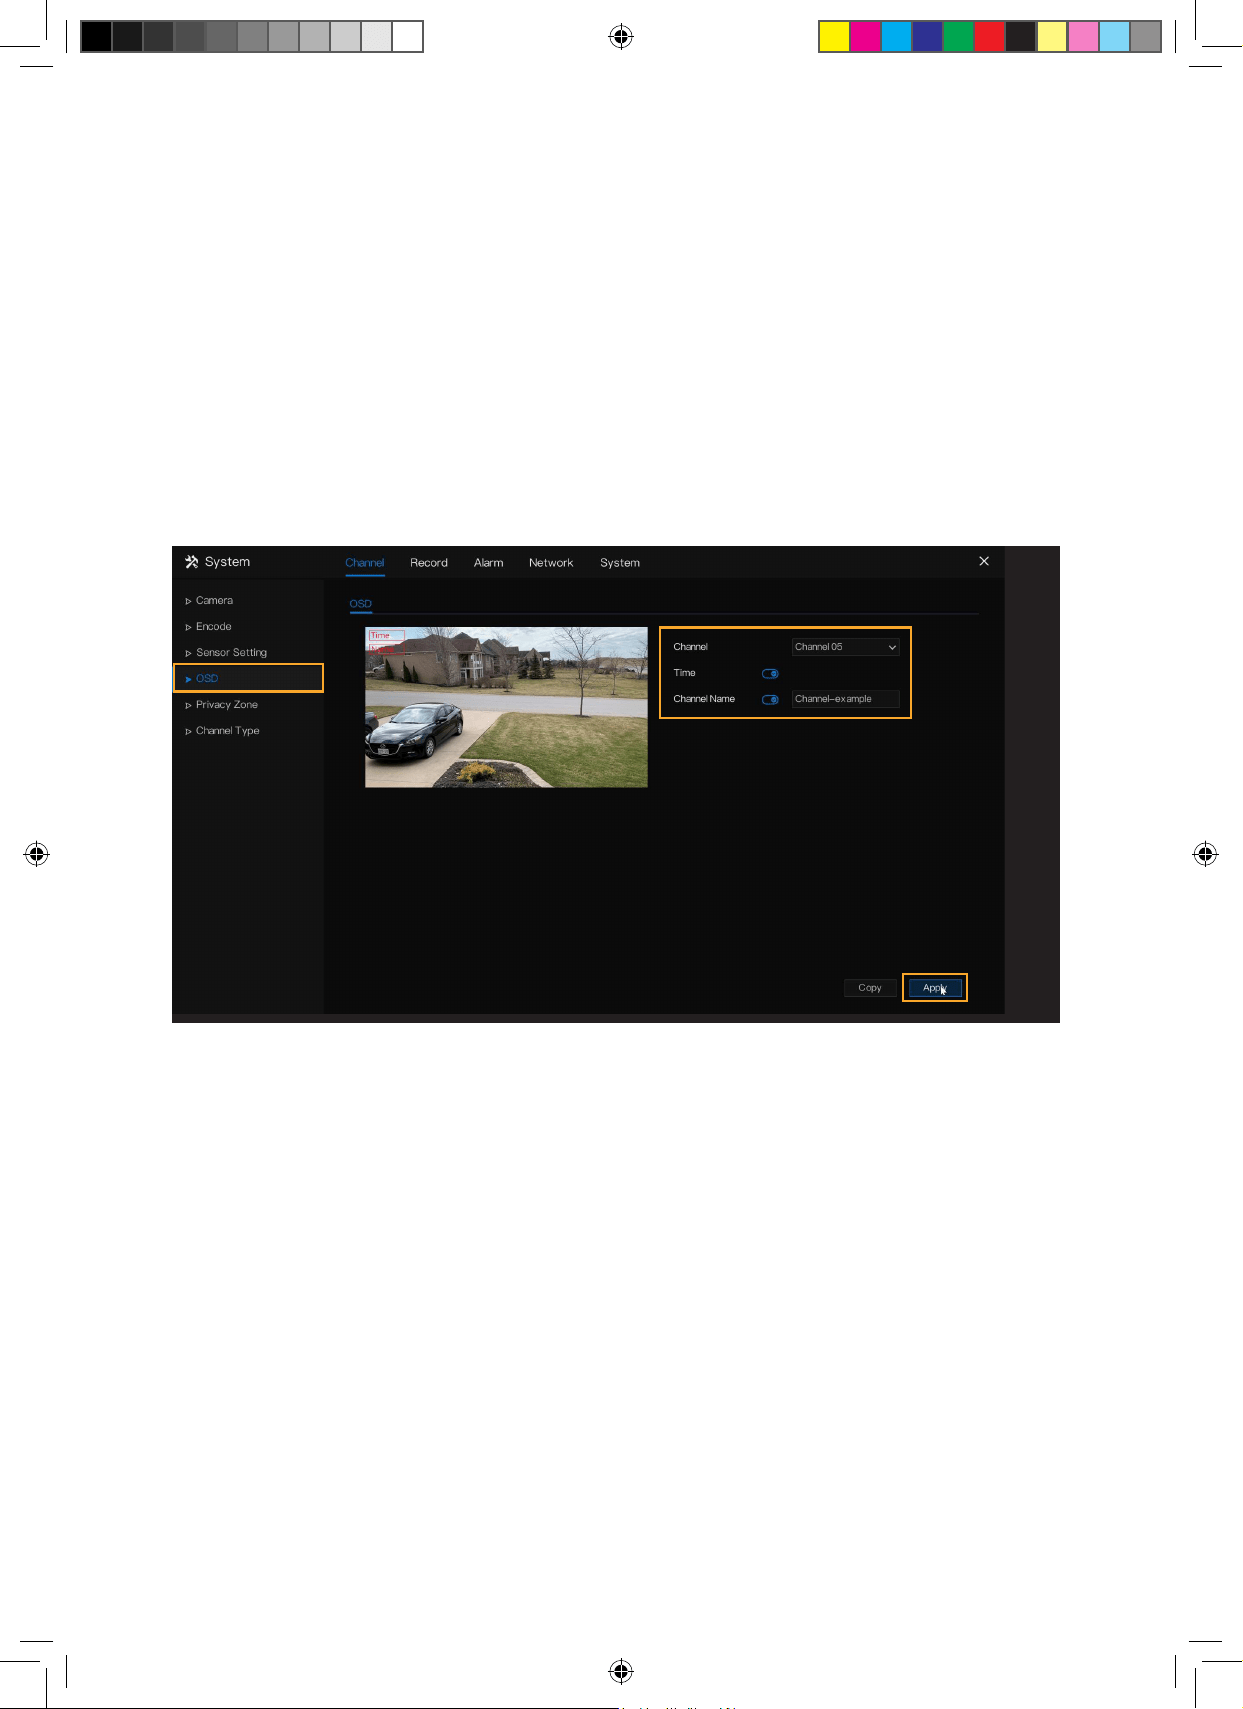
CUSTOMIZE CHANNEL NAME
Customize each channel name to your preference.
1. Right click to view the Main Menu > Select OSD under Channel.
2. Select the channel and enter a customized Channel Name.
3. Toggle on/o “Time” and “Channel Name” to your preference to display this information in the camera footage.
4. Select “Apply”.
5. Repeat for each channel or to duplicate the channel name for other channels, select “Copy” and apply to the
desired channel(s). Select “OK” and “Apply”.
6. Right click to return to the main menu.
7. Right click to return to live view.
Need Help? Visit DefenderCameras.com/support
14
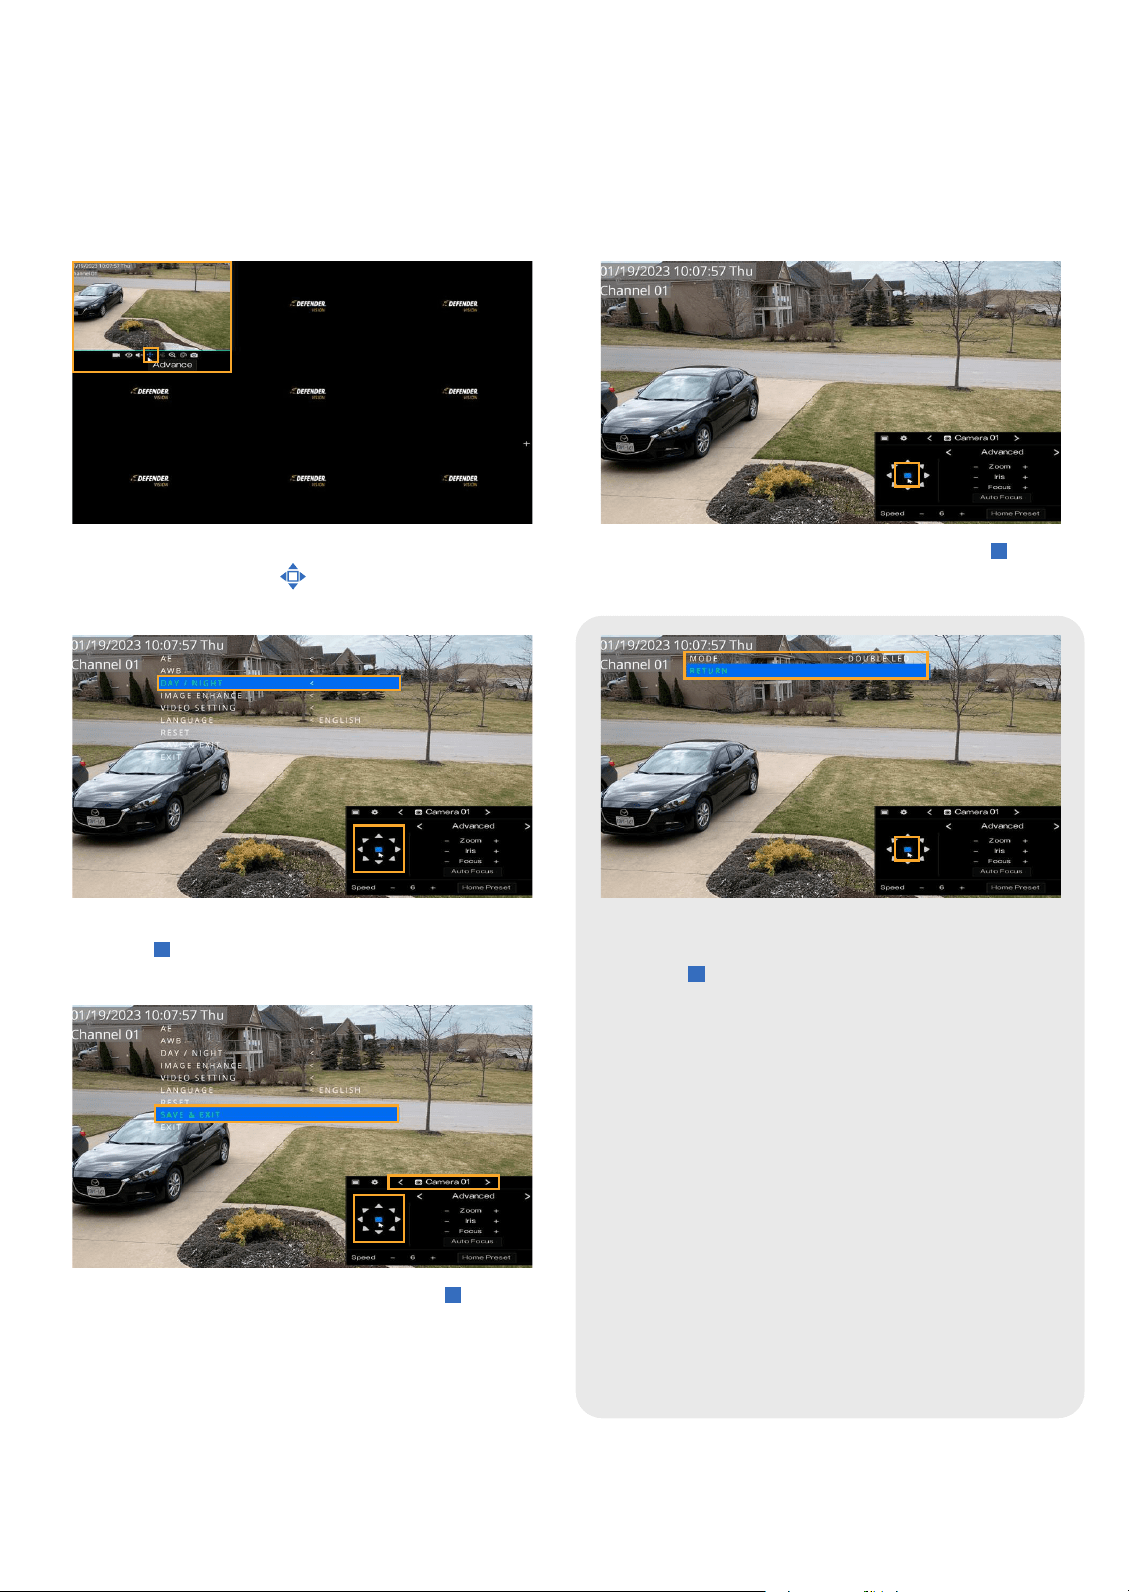
VISION MODES
You have the option to customize each channel to one of four vision modes.
From the live view, left-click on the channel you wish to
change > Select Advance
Using the navigation arrows, select Day/Night,
then OK.
Navigate down to Save & Exit and select OK.
• Repeat for each channel by navigating to the next
channel.
• Right click to view the main menu
• Double left click to return to your set camera view
layout.
Enter the vision mode settings by pressing OK.
Select your preferred vision mode using the left and
right navigation arrows > navigate down to return >
select OK.
DOUBLE LED - The camera will record in full color during the
day and black and white at night until motion is detected.
When motion is detected, the spotlight will turn on for up to
60 seconds or as long as motion is detected, enabling color night
recording during that duration.
Please note: “Spotlight” linkage must be enabled in motion
detection. See Setting Up Event Notications to enable.
IR - The camera will record full color during the day and black
and white at night.
FULL COLOR - The camera will always record in color. At night,
the spotlight will remain on to enable full color recording.
CLOSE - The camera will record in color during the day. At night,
the camera’s recording color will be dependent on ambient
lighting.
Need Help? Visit DefenderCameras.com/support
15
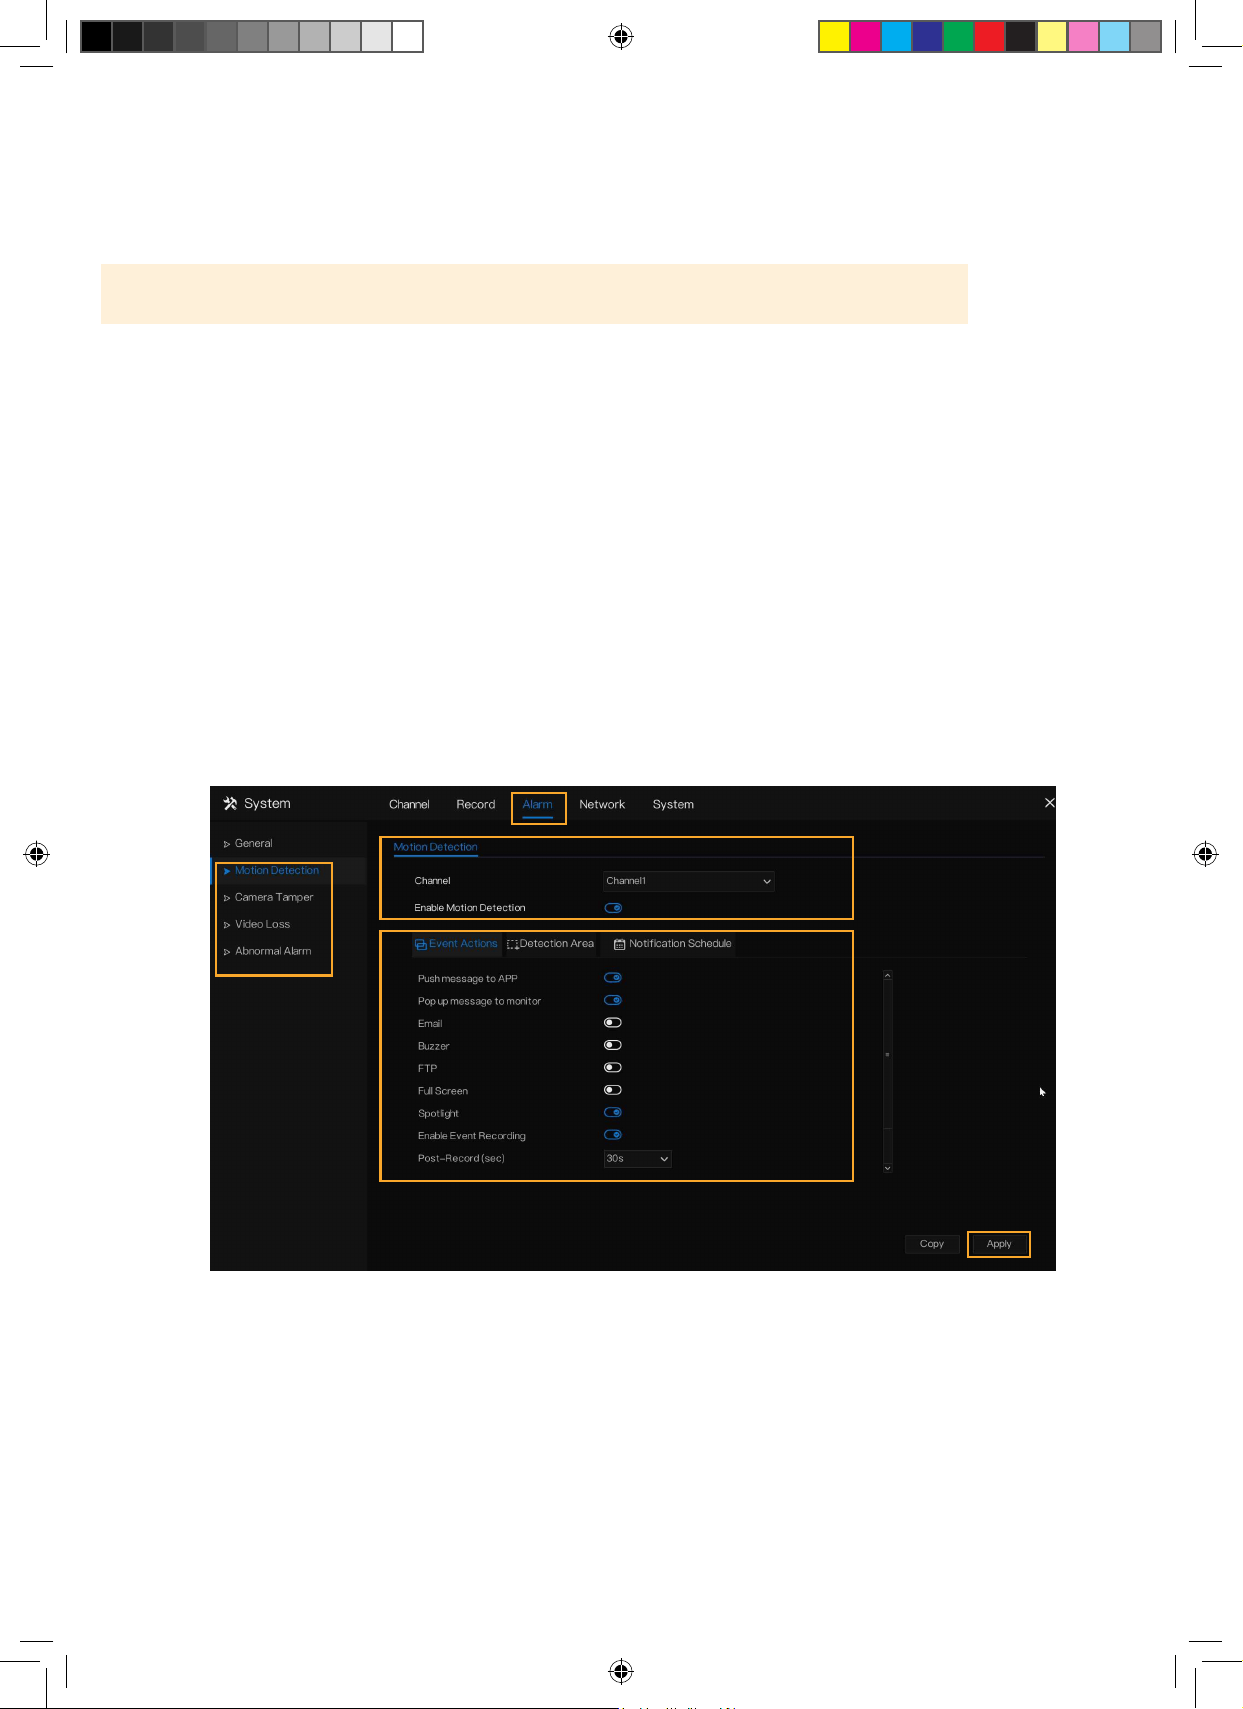
SETTING UP EVENT NOTIFICATIONS
MOTION DETECTION
IMPORTANT: Toggle spotlight on in motion detection when using “Double LED” vision mode.
1. Right click to view the Main Menu > Select Motion Detection under Alarm.
2. Select the channel you wish to customize your notications for.
3. Toggle “Enable Motion Detection” on/o based on your preference.
4. Toggle on/o as many Event Actions as desired. For immediate notication, we recommend toggling on “Push
message to APP”. Please Note: For email notications, follow setup instructions found in our support center
support.defendercameras.com.
5. Select “Apply”.
6. Repeat for each channel or to duplicate the “Event Action” notication settings for other channels, select “Copy”
and apply to the desired channel(s). Select “OK” and “Apply”.
7. Right click to return to the main menu.
8. Right click to return to live view.

16
APP SETTING - MOTION DETECTION
Please Note: Motion Detection settings MUST be enabled/changed in your DVR and in your Defender Empower App.
Repeat for each channel.
Open the App and select your device. Tap ‘Settings’.
Tap ‘Detection Alarm Settings’. Turn on Motion Detection Alarm and
Select your ‘Alarm Sensitivity Level’.
We recommend medium.
17
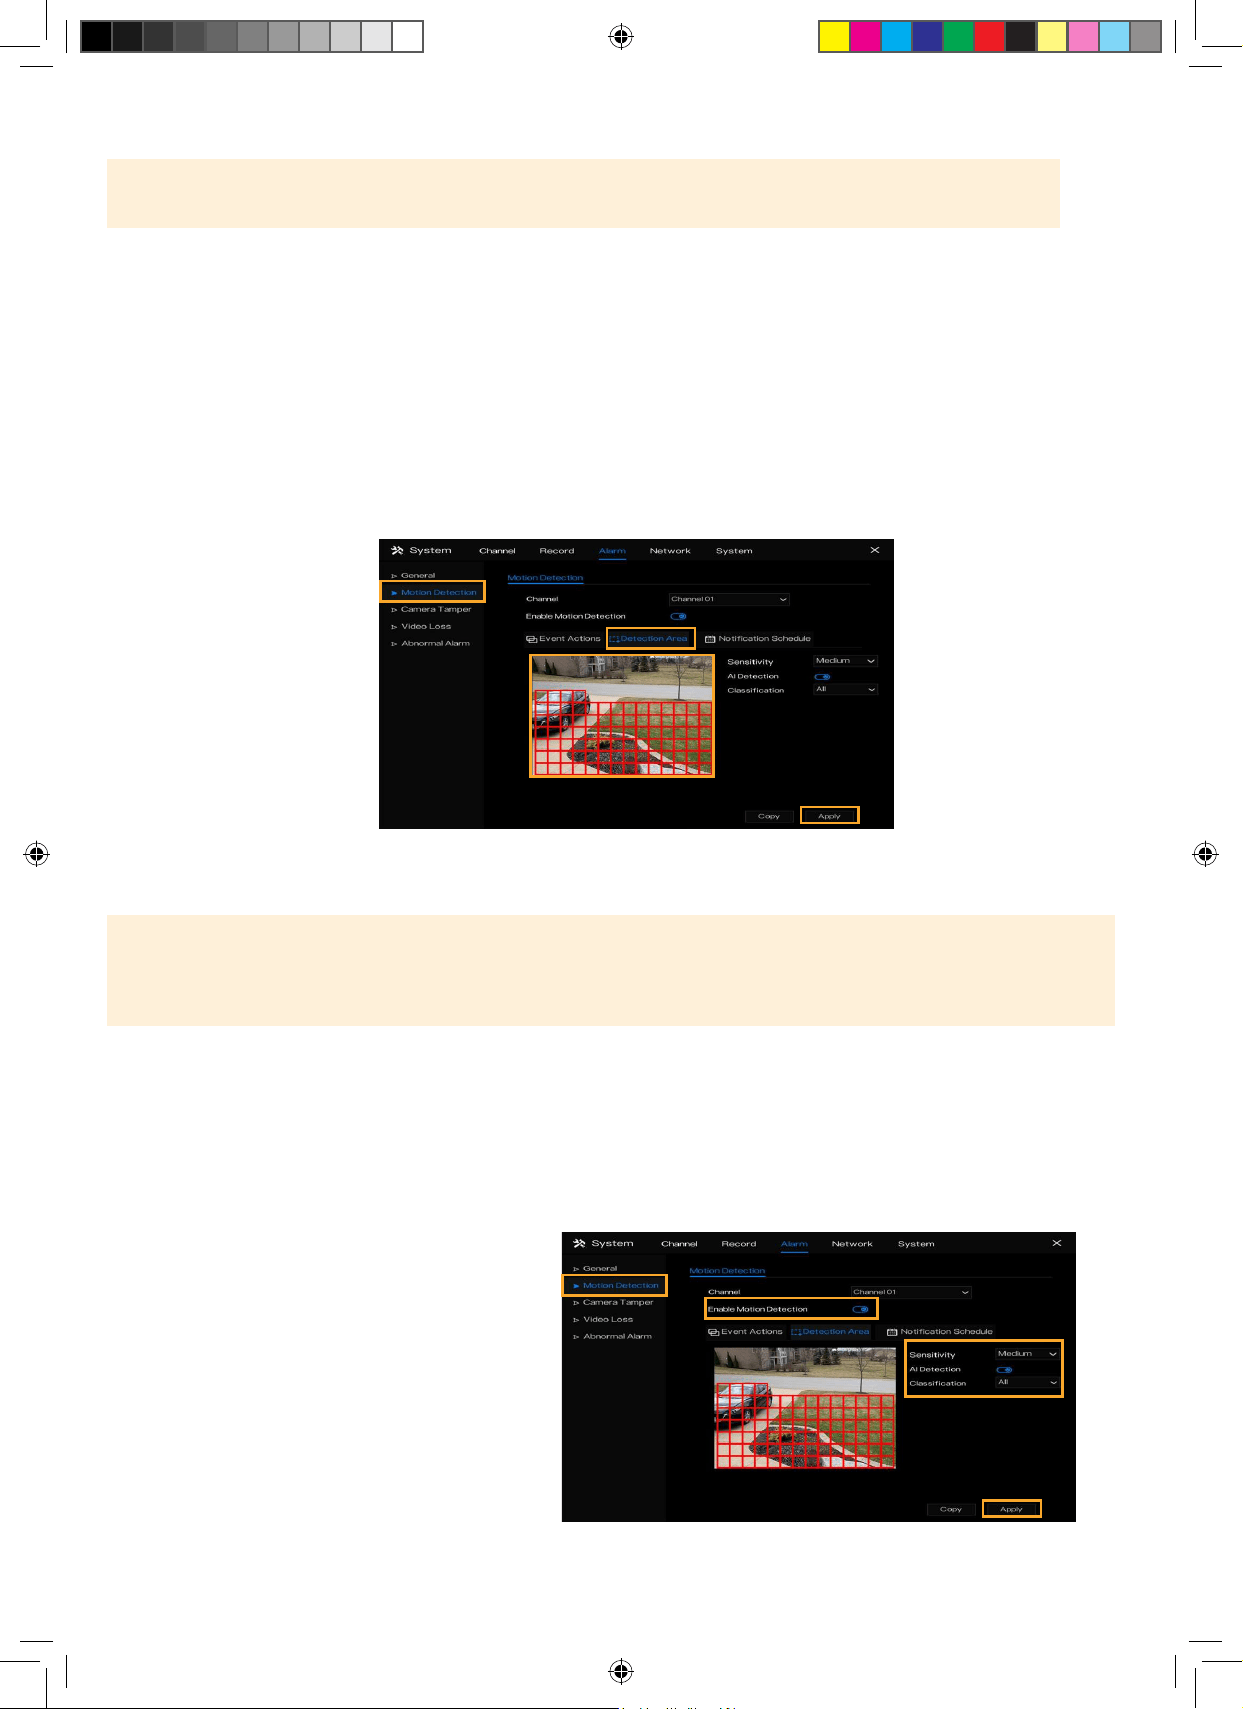
DETECTION AREA
Please Note: This setting is only available when “Enable Motion Detection” is selected in “Setting Up Event
Notications”.
Detection Area allows the system to notify you only when motion is detected in the selected regions. If you wish to be
notied of all motion in the cameras eld of view, skip this step.
1. Right click to view the Main Menu > Select Motion Detection under Alarm > Select Detection Area
2. Select the channel you want to adjust the detection area for. Keep “Enable Motion Detection” selected.
3. Left click and drag your mouse over the areas you wish to select or deselect. (Red gridded area is your active
detection area)
4. Select “Apply”.
5. Repeat for each channel or to duplicate the detection area setting for other channels, select “Copy” and apply to
the desired channel(s). Select “OK” and “Apply”.
6. Right click to return
to the main menu.
7. Right click to return
to live view.
AI CUSTOMIZATION
Please Note: AI default setting is on, “Classication All”. This setting identies both human and vehicle motion at a
medium sensitivity level. If this is your preferred setting, skip this step.
*Sensitivity level settings applies to motion detection with or without AI Detection turned on.
1. Right click to view the Main Menu > Select Motion Detection under Alarm > Select Detection Area
2. Select the channel you want to adjust the AI customization for. Keep “Enable Motion Detection” selected.
3. To receive notications on all motion detected, toggle o AI Detection.
4. Select your sensitivity level preference. We recommend medium.
5. With AI Detection on, select your AI Classication reference.
• All (detects human and vehicle)
• Only Human
• Only Vehicle
6. Select “Apply”
7. Repeat for each channel or to duplicate
the AI customization and notication setting
for other channels, select “Copy” and apply
to the desired channel(s). Select “OK” and
“Apply”.
8. Right click to return to the main menu.
9. Right click to return to live view.
Need Help? Visit DefenderCameras.com/support
18
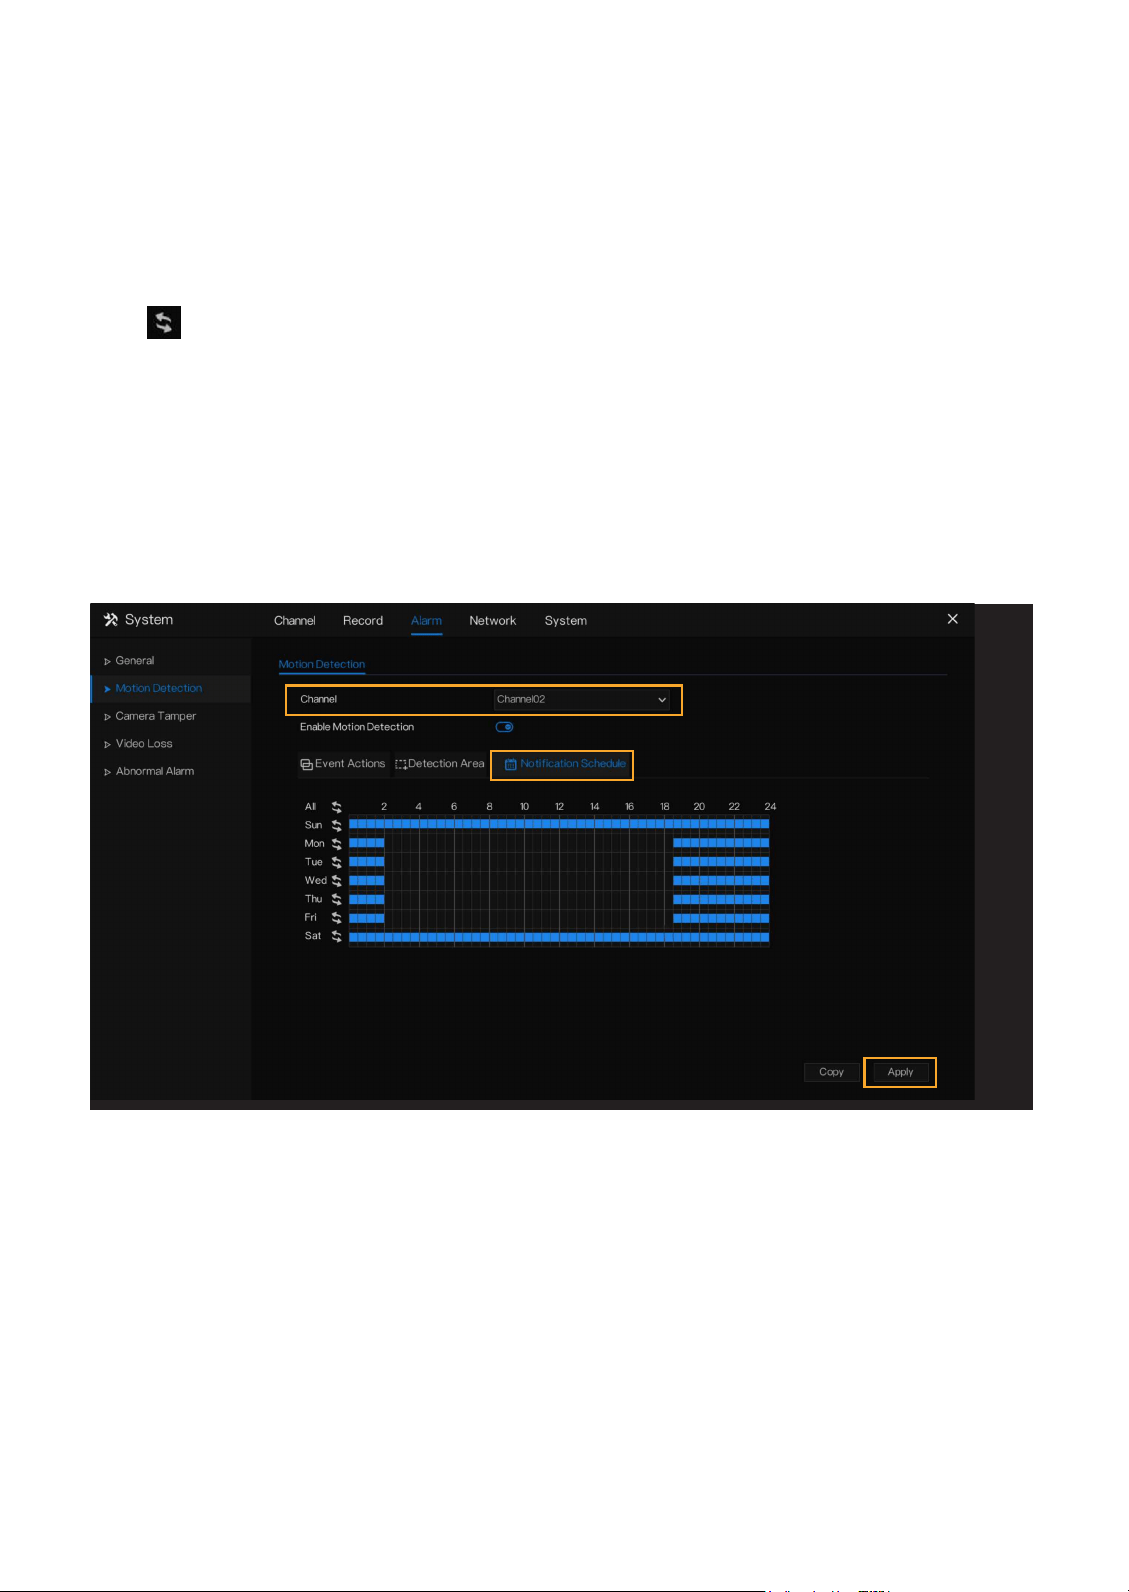
NOTIFICATION SCHEDULE
By default, you will receive motion notications 24/7. If this is your preferred setting, skip this step.
To be notied when motion is detected only during certain times of the day, customize your notication schedule.
1. Right click to view the Main Menu > Select Motion Detection under Alarm > Select Notication Schedule.
2. Select the channel you want to create a notication schedule for.
3. Left Click and drag over the time of day you do not want to receive notications. To deselect/select the entire day,
click
.
4. Select “Apply”.
5. Repeat for each channel or to duplicate the notication schedule setting for other channels, select “Copy” and
apply to the desired channel(s). Select Select “Ok” and “Apply”.
6. Right click to return to the main menu.
7. Right click to return to live view.

Need Help? Visit DefenderCameras.com/support
19
SET UP RECORDING SCHEDULE
Customize your recording preference for each channel. Record continuously, when motion is detected, or a
combination.
Please Note: By default, the DVR will record continuously ( ). If this is your preferred setting, skip this step.
1. Right-click to access the main menu > select Record Schedule under Record
2. Select the channel you wish to edit the recording schedule for.
3. Select your preferred recording type (Continuous or Motion ).
4. Hold and drag your mouse over the time and day you wish to record using your desired recording type. To edit or
delete a setting, drag over the time again. To deselect/select the entire day, click
.
5. Click “Apply”.
6. Repeat for each channel(s). To duplicate the recording schedule for other channels, select “Copy” and apply to the
desired channel(s). Select “Ok” and “Apply”.
7. Right click to return to the main menu.
8. Right click to return to live view.
Please Note: “Enable Record Audio” is not supported by Vision AI cameras. This function can only be used when an
external microphone is connected to the audio port and installed with the camera.
”Alarm” is intended for professional use. To use this function, an external sensor must be connected to the DVR.
Need Help? Visit DefenderCameras.com/support
20
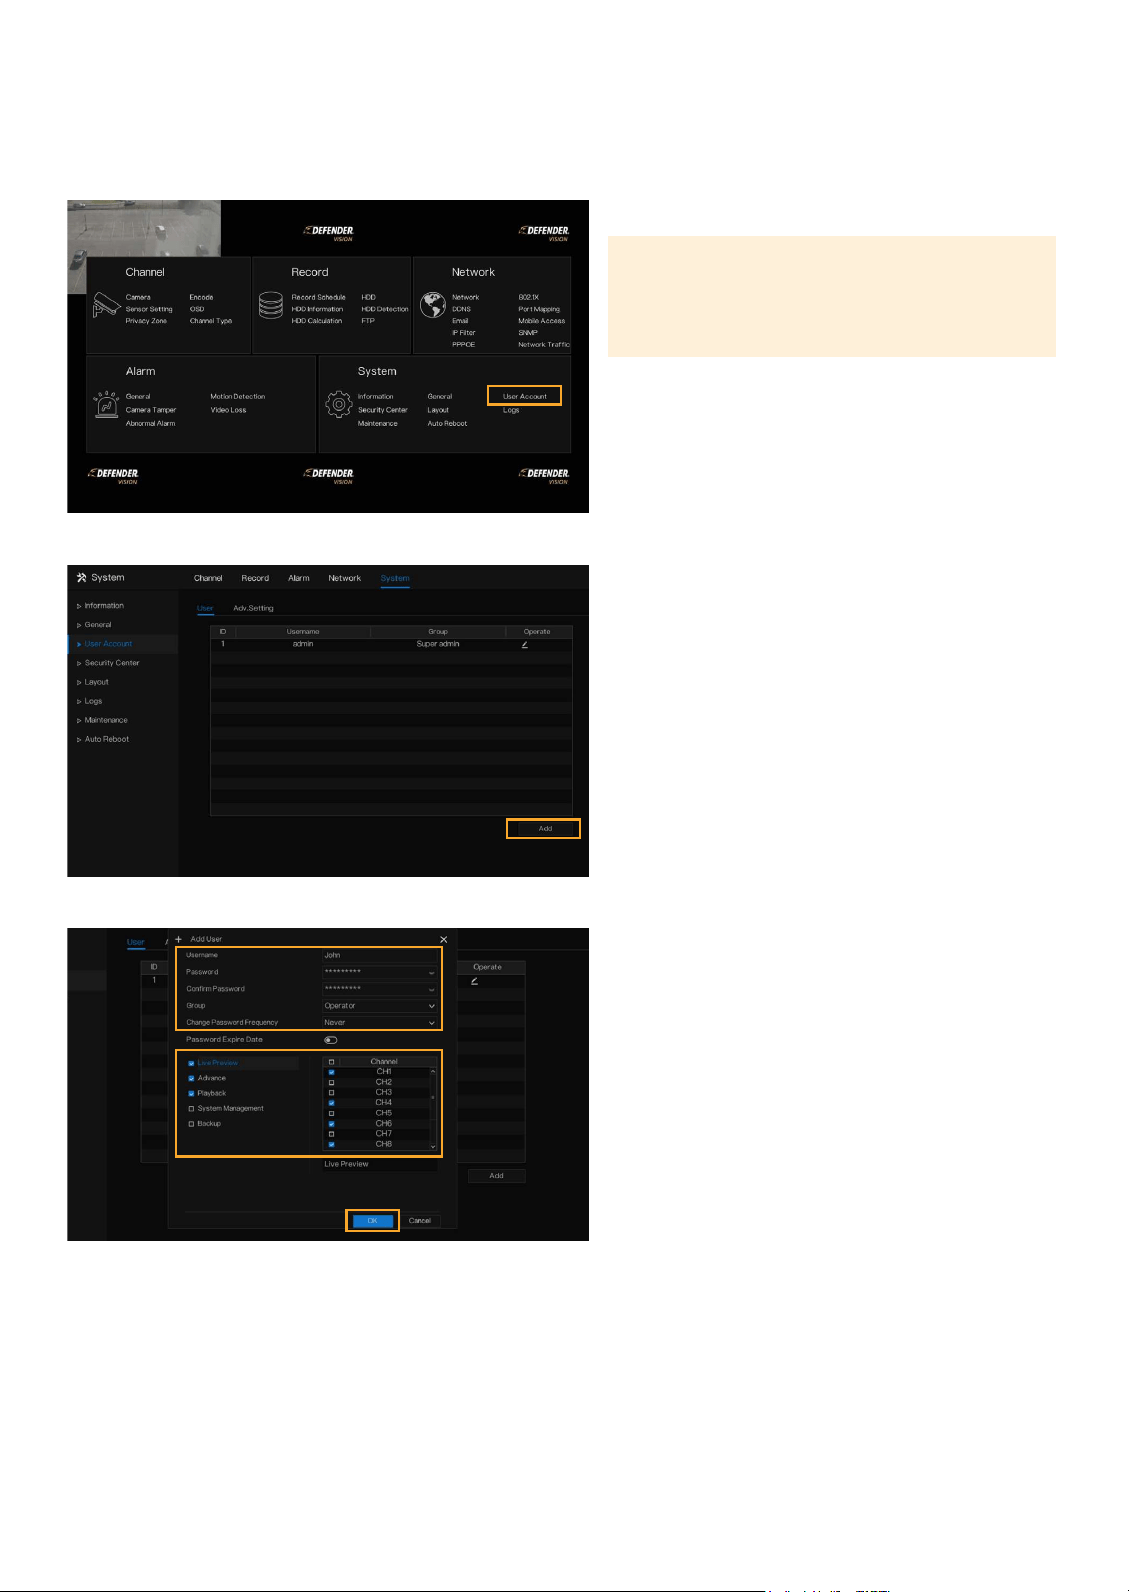
ADD ADDITIONAL USERS
1. To setup additional logins to the DVR for
authorized users, right-click to access the main
menu > Select User Account under System.
2. Click “Add”.
3. Create a username and password.
4. Conrm the password.
5. Select the Group the user will be part of.
Each Group has unique access.
6. Click “OK”.
7. Right click to return to the main menu.
8. Right click to return to live view.
Please Note: To share access via the Empower
App only, an additional user does not need
to be created. Refer to “Share App Access” to
share remote access.
Need Help? Visit DefenderCameras.com/support
21
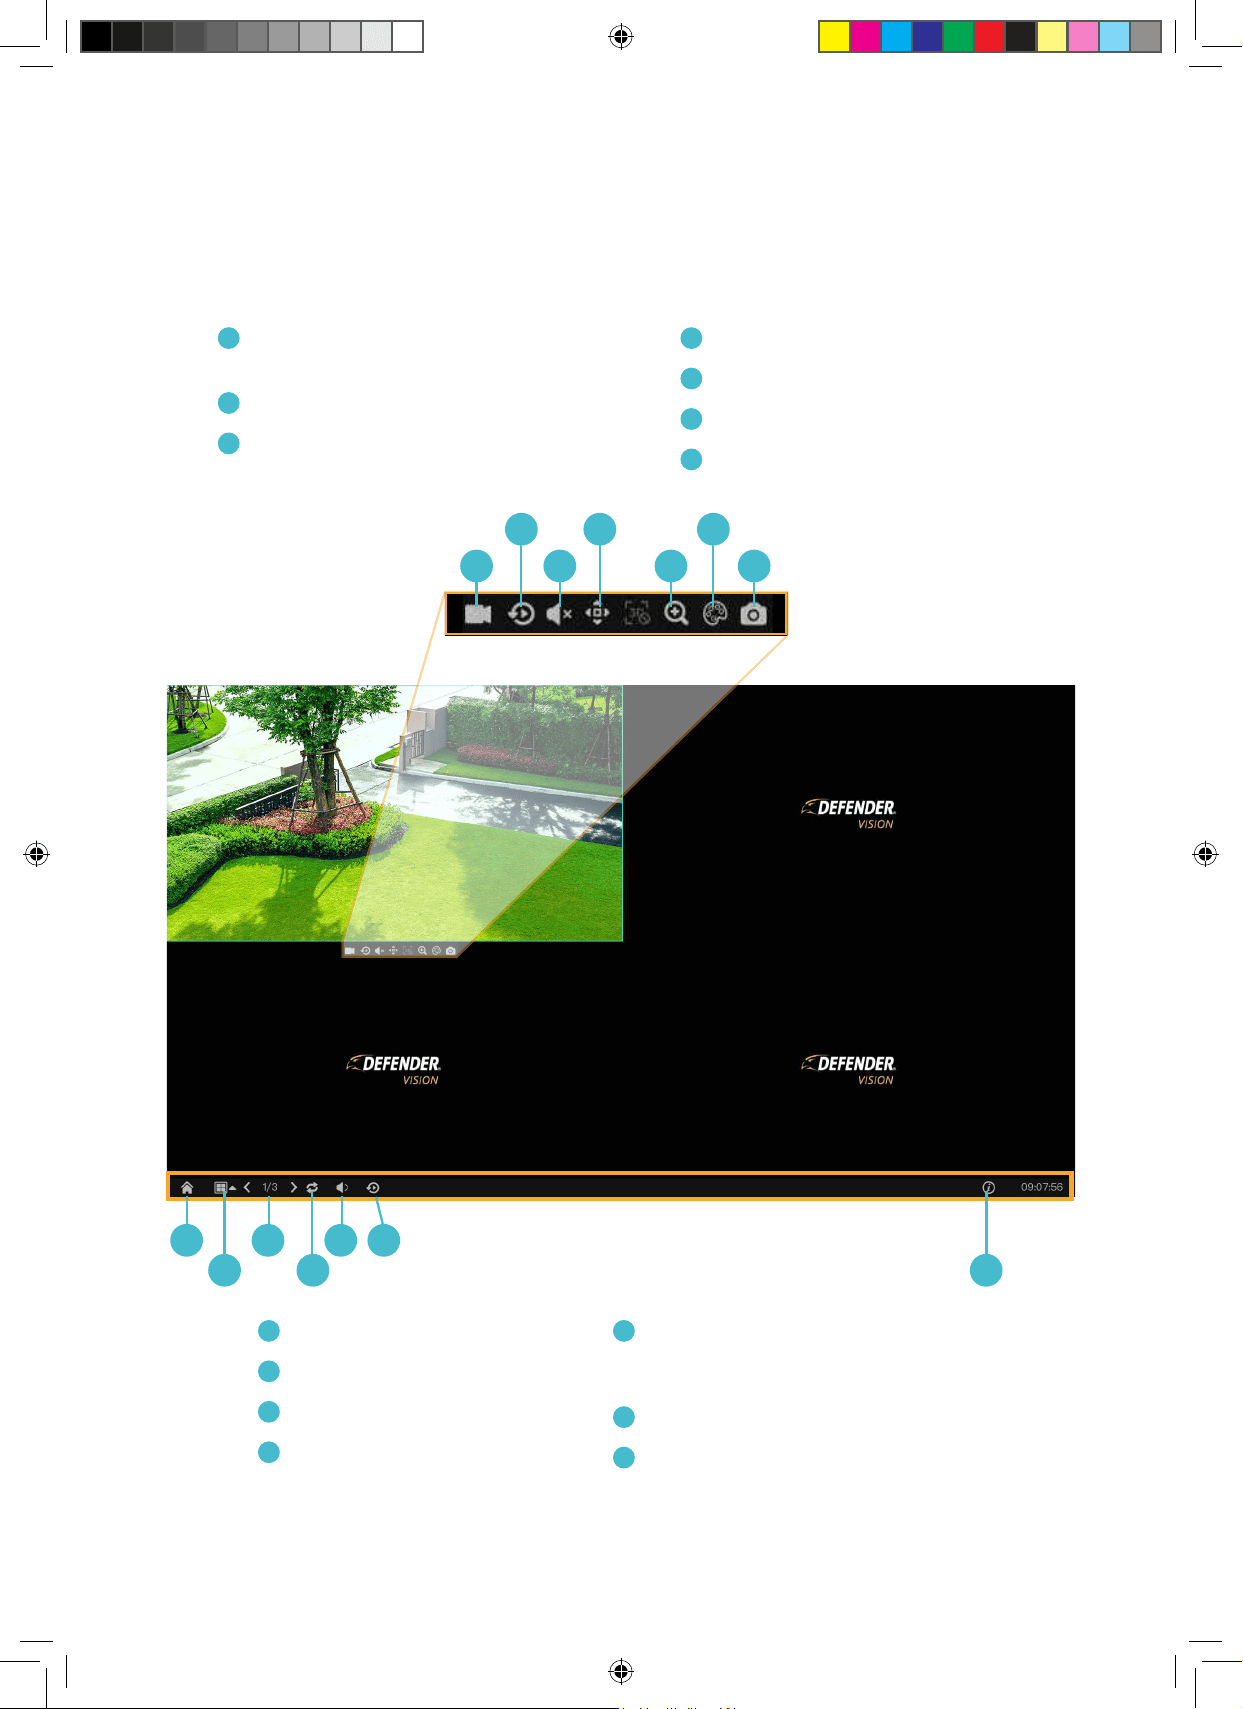
LIVE-VIEW PANEL EXPLANATION
A C
B D F
G
Home Button
H
Camera View Layout
I
Current Live View Page
J
Auto Sequence
A
Instant Record
(Record settings will be temporarily overwritten)
B
Instant Playback
C
Audio (Note: Must install an external microphone
and/or speaker to live view with audio)
G I K L
H J M
K
Volume (External microphone (not supported by Vision AI
cameras) and speakers or monitor/TV must be installed to live
view with audio.)
L
Playback
M
System Information
D
Advance (Note: some features are not supported)
E
Zoom In
F
Image Settings
F
Snapshot
A
B
C E G
D F
USING THE APP
The Defender Empower App allows you to remotely view live video or playback recorded footage, save and share
recordings, share App access and receive customized notications.
Open your camera & scan this QR code to access
the Defender Empower App Quick Start Guide.
Need Help? Visit DefenderCameras.com/support
22

Need Help? Visit DefenderCameras.com/support
23
FREQUENTLY ASKED QUESTIONS
Can I allow other people to view my DVR remotely?
Yes. You can share your Defender Empower App access with up to 20 additional users. Each user must
download the Defender Empower App and create their own account before sharing access.
Is Vision AI compatible with other Defender Camera security system?
No, Vision AI is not compatible with other Defender security systems. If replacing or adding additional
cameras or DVR, check compatibility.
Can I view my live or recorded footage from a web browser?
No, we do not oer web viewing. You can view the footage from the free Defender Empower App with
compatible iOS/Android smart phones/tablets, and through a TV or monitor connected to the DVR.
Can I Extend My Camera’s BNC Cable?
Yes, you can extend each camera to a maximum of 180 feet. We recommend using Defender’s certied
authentic and genuine BNC cable when doing so.
How can I change the length of time before I am automatically signed out of my DVR?
From the DVR, right click to access the main menu > select User Account under System > select Adv.Setting
> toggle on “Enable Auto Login” or change Auto Logout Time (min) to 0 or your preferred duration > select
Apply.
How can I disable the Setup Wizard?
From the DVR, right click to access the main menu > select User Account under System > select Adv.Setting
> toggle o “Enable Setup Wizard” > select Apply.

Visit our website to view set-up videos or
contact our Support Team.
DefenderCameras.com/Support
Defender is continuously enhancing our products to bring customers the best user experience. For the most
up to date Quick Start Guide, please visit defendercameras.com.
DEFENDER
®
does not endorse any DEFENDER
®
products for illegal activities. DEFENDER
®
is not responsible
or liable in any way for any damage, vandalism, theft or any other action that may occur while a DEFENDER
®
product is in use by the purchaser. We reserve the right to change models, conguration, or specications
without notice or liability. Product may not be exactly as shown.
©2023 DEFENDER
®
. All rights reserved. DEFENDER
®
, the DEFENDER
®
logo and other DEFENDER
®
marks may
be registered. All other Trademarks are the property of their respective owners.
REV04 08162023
DVAI-QSG2
8 42751 00435 3