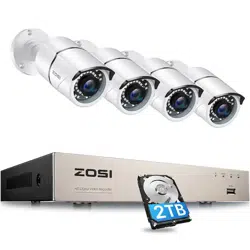

Digital Video Recorder
Quick Start Guide
For more information of your new system, please refer to www.zositech.com
V2.D.02.Z

Enlish
Español
1 - 17
18 - 34
Contents
1
1
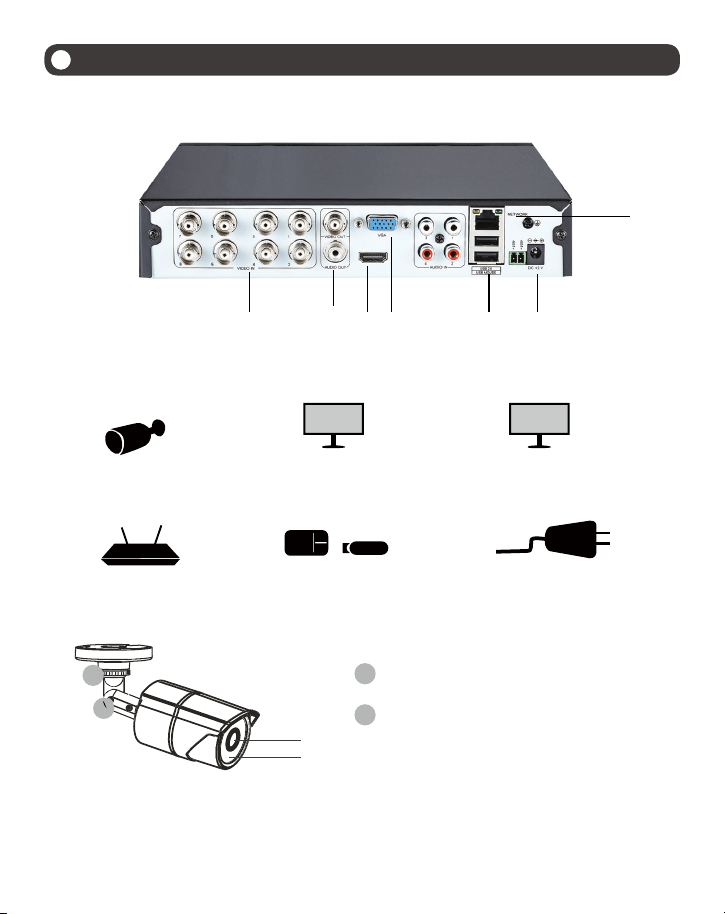
Introduction of System
1.1 DVR
1.2 Camera
① ② ③
④
⑤ ⑥
Salida de
video & audio
⑦ ⑧
HD lens LEDs IR 24pcs, 5mm
Adjust to the desired position.
The neck of the bracket is connected to
the mounting base. Rotate the bracket by
loosening the radial joint locking ring. Adjust
the position to the appropriate position and
tighten the locking ring.
A
B
⑦
⑧
A
B
①
④ ⑤ ⑥
② ③
Camera
Router Mouse Power Port
Monitor/Power(VGA)Monitor/Power(HDMI)
2
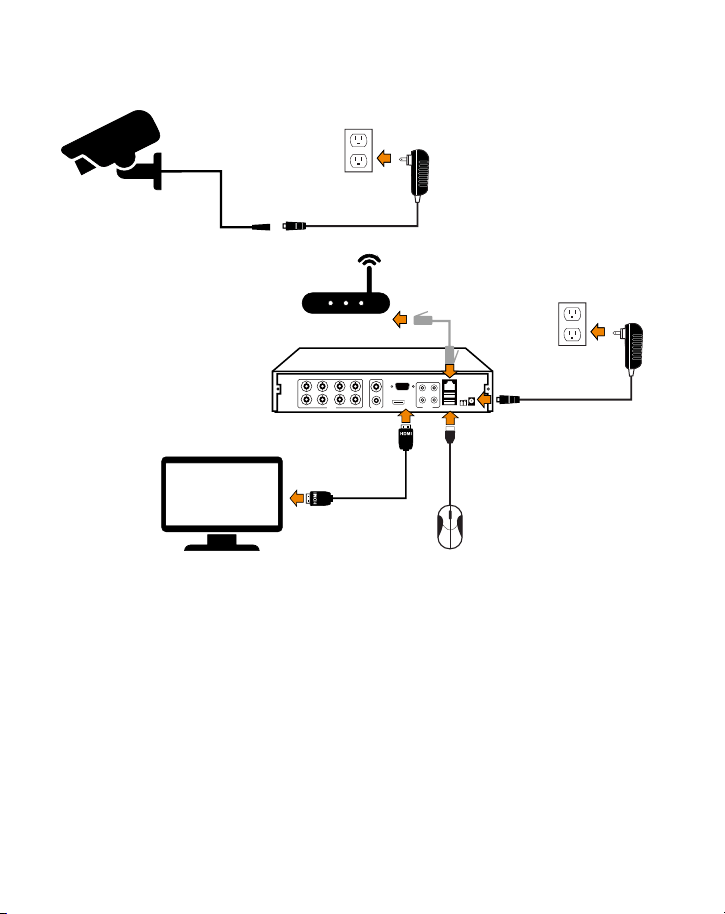
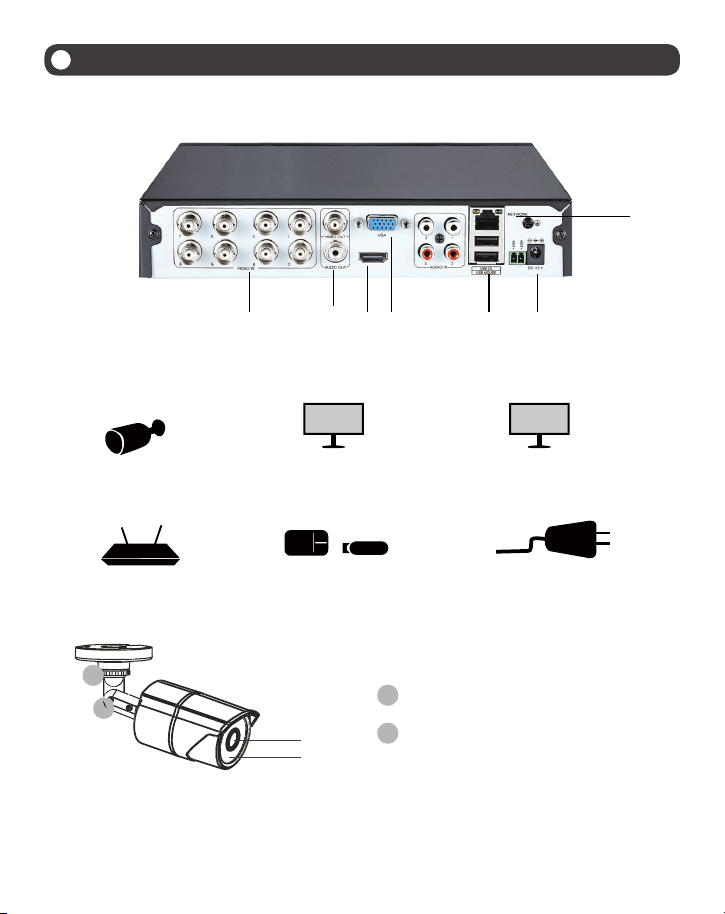
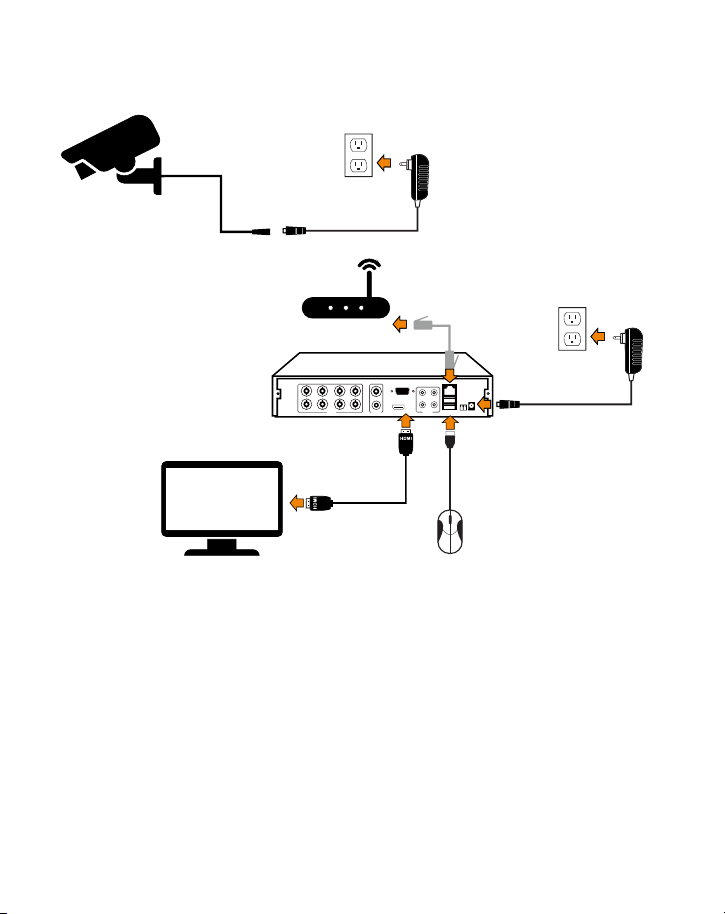
1.3 Connect the System
①Connect the Camera to DVR and Plug Camera to power.
②Connect monitor to the DVR with HDMI,VGA,BNC port.
③Connect the DVR to Router with an Ethernet cable.
④Plug the mouse to the USB port.
⑤Plug DVR to power.
8 channel configuration shown. 4/16 channel will have the respective number of video inputs.
VIDEO IN AUDIO OUT
VIDEO OUT
VGA
HDMI
AUDIO IN
USB 2.0 DC 12V
RG 45
3
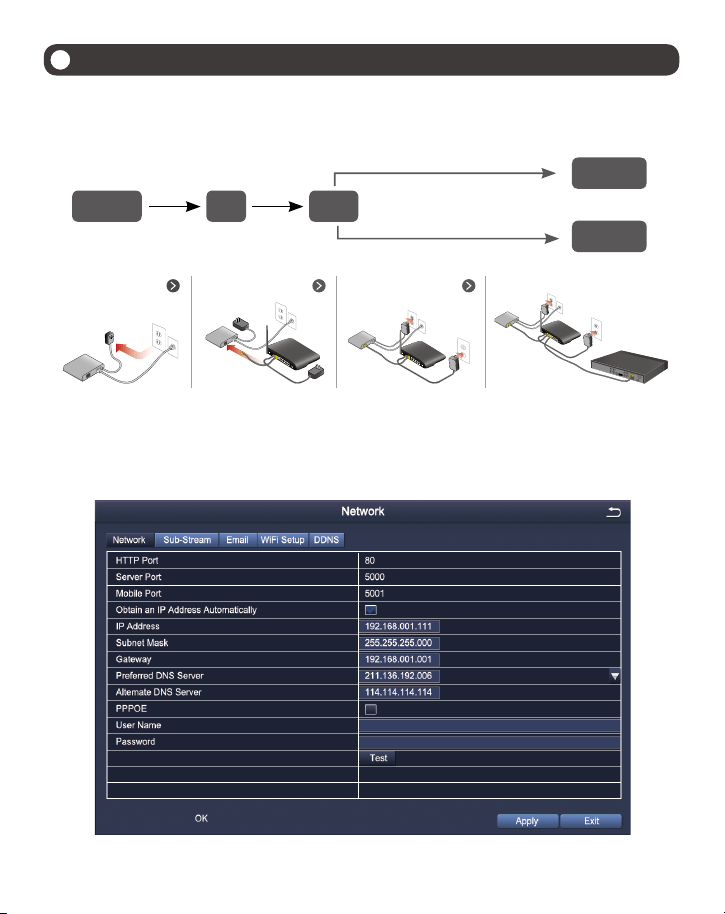
A:How to connect DVR to the LAN?
B:How to test the network status of the DVR?
(1)Right click Mouse > Go to Main Menu > Setup > Network
(2)Tick 'Obtain IP address automatically'
(3)Click 'Test', if 'OK' is displayed, the network is connected successfully.
Note: Please ensure DHCP in your router is open.
2
View on Smartphone (Add Device - Video Playback)
2.1 Connect the DVR to the Internet
Fibre Optic DSL
Router
DVR/NVR
PC
RJ45 cable
WIFI or RJ45 Cable
DSL/CABLE
modem
DSL/CABLE
modem
DSL/CABLE
modem
DSL/CABLE
modem
ROUTER
ROUTER
ROUTER
DVR
4
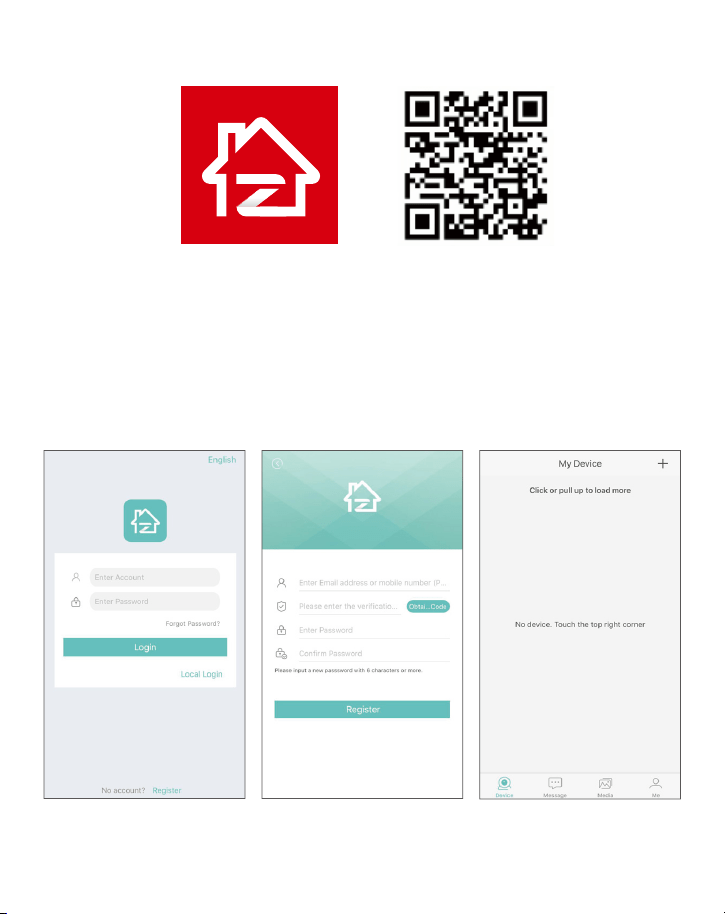
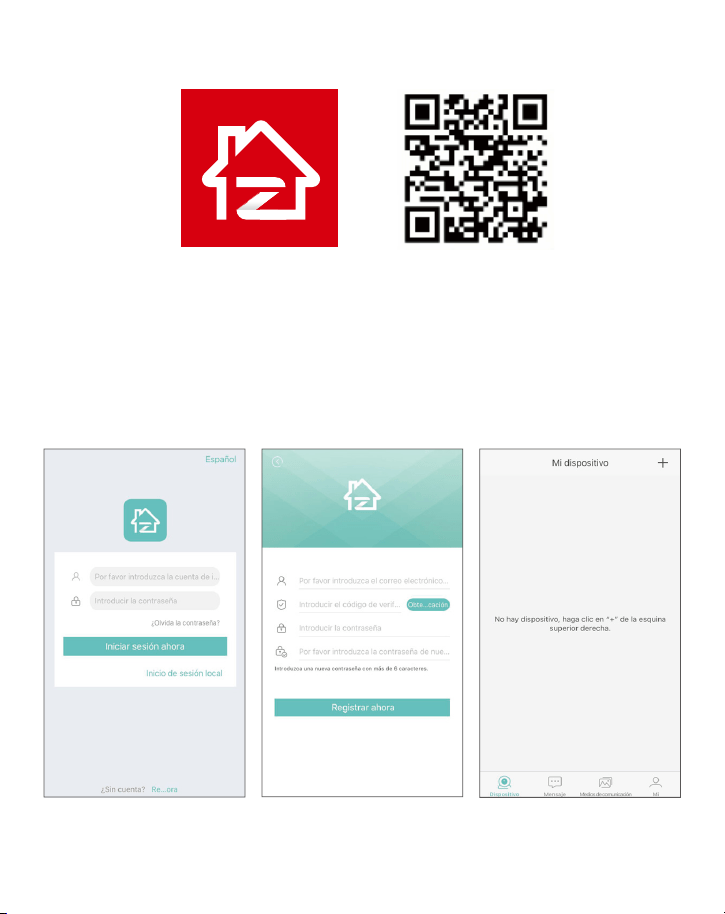
2.2 Download App
2.3 Run the App
A: Install the free Zosi Smart App.
B: Tap Register and input your email box to get validation code, click next to set up password,then
save it, registration completed.
C: Login the App,get into the main interface (My Device), click”+”in the upper right corner to add
devices.
Zosi Smart App (IOS/Android)
Open the App Registration click “+” to add devices
5
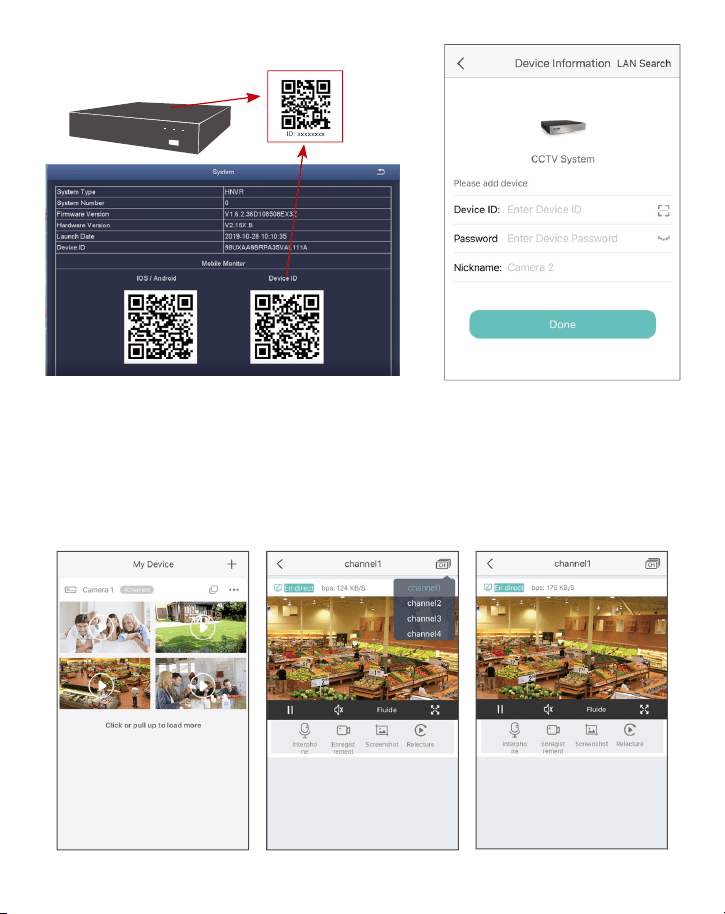
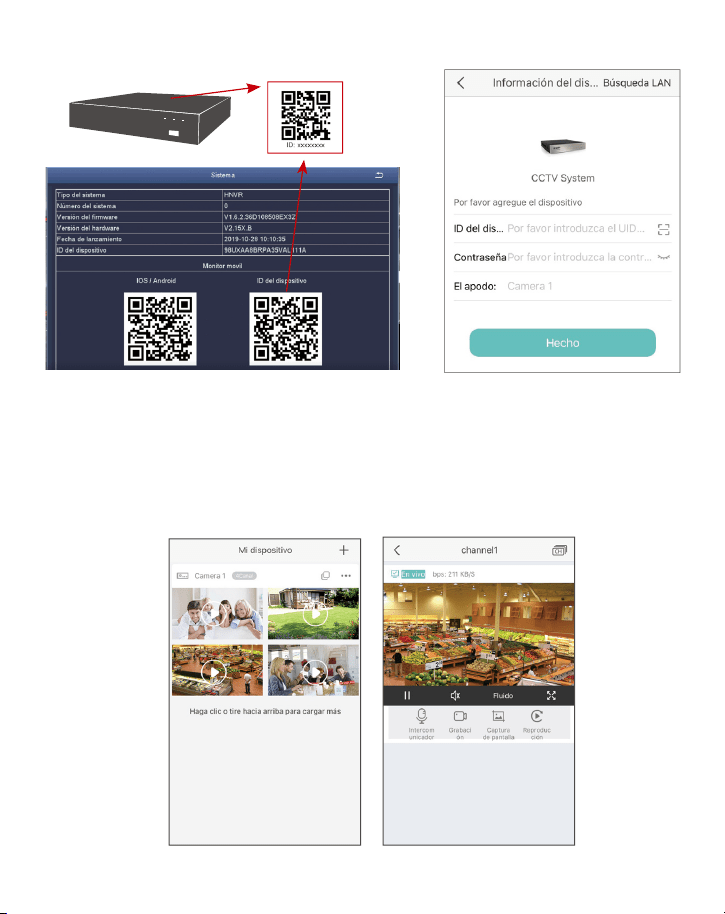
D: Enter the device uid by scanning code or hand-typing.
Enter the device password (the password is set by the device, and if the password is blank, it is no
need to enter the password.)
Enter the device name;
Click Finish to enter the device page and perform device operations (added devices are at the top of
the device page).
E: Then will back to the Device list > Tap the device > Tap “+” to select channel(all selected) > Tap
Confirm to start preview.

6
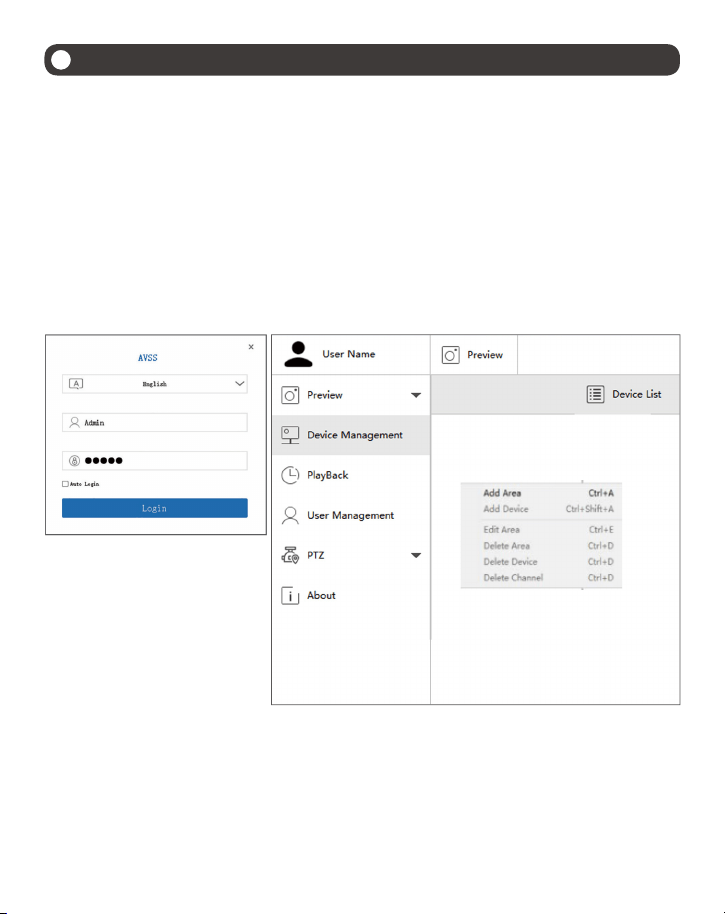
PC client AVSS is applied to DVR/NVR/IPC preview with real-time viewing, device management,
remote video playback and more functions.
3.1 Login
3.2 Device Management (Add Devices After Adding the Area)
Install the PC client, double-click the icon AVSS to open, select the language and click Login.
Note: You can log in with the default username and password, or register a new account. The account
registered by the mobile app can also be used here.
① Click the Device Management> Add Area.
3
View on PC Client Software
② Add area: in the blank area of the device list > click the right mouse button > Add area and enter
the name of the area.
Note: The name of the area is used to name the monitored area.
7
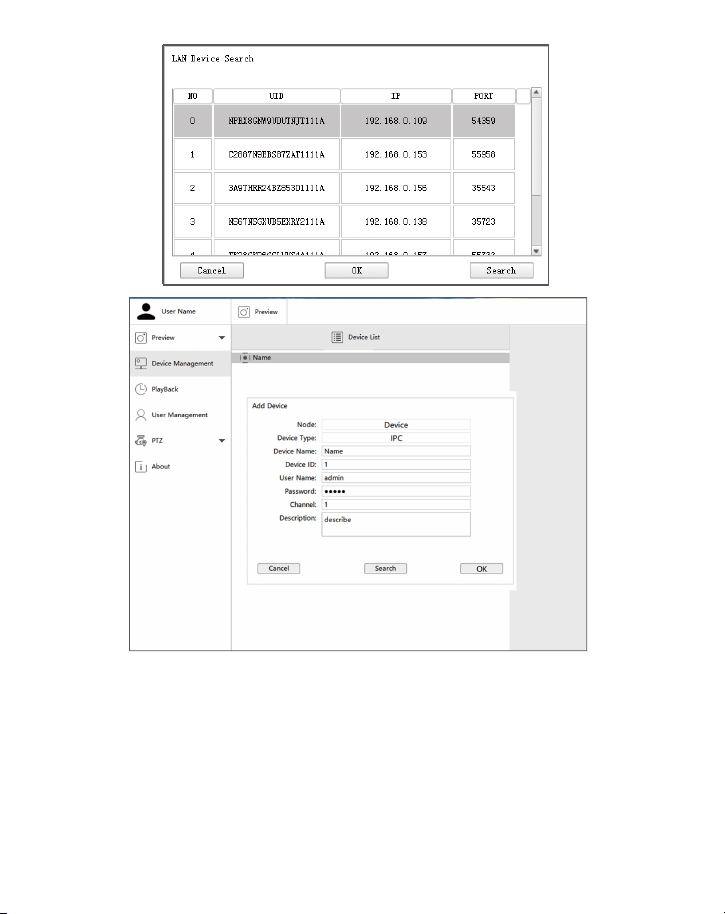
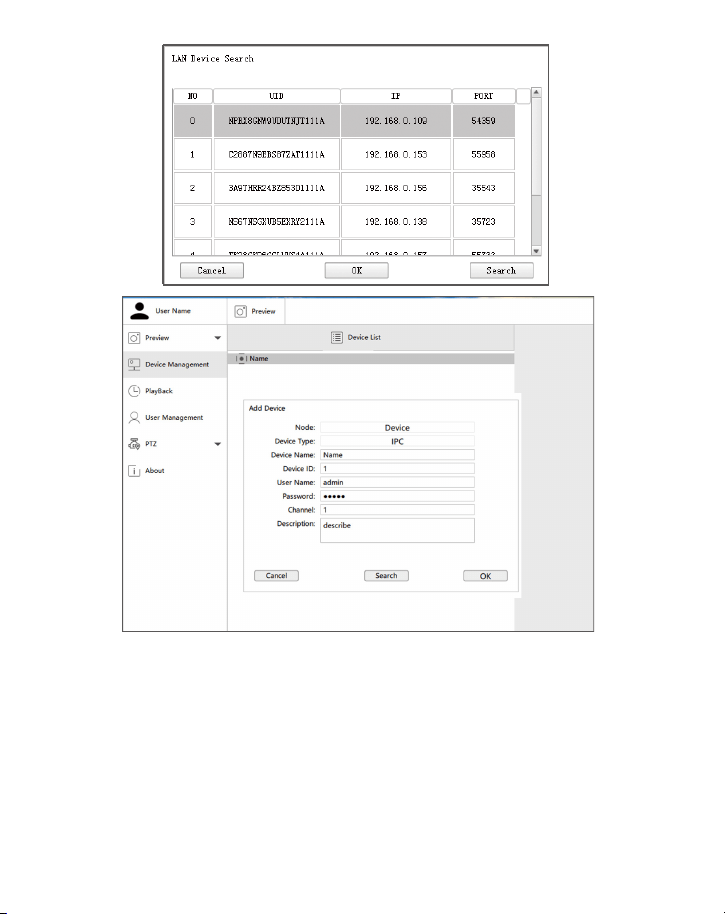
③ Add device: Select the area corresponding to the Device List > right click to add device > select
Device Type > enter Device Name, Device ID, User Name, Device Password and Channel Number >
click OK.
Note: ① Default User name is admin. ② When the computer and device are connected to the
same router, you can click “Search” to add the device.
3.3 Preview
Click "Preview" > Device List > select corresponding device > click the right mouse button > select
"Play All", "Stop All" in the menu to complete the video preview display and close.
8
①
③
②
④
5
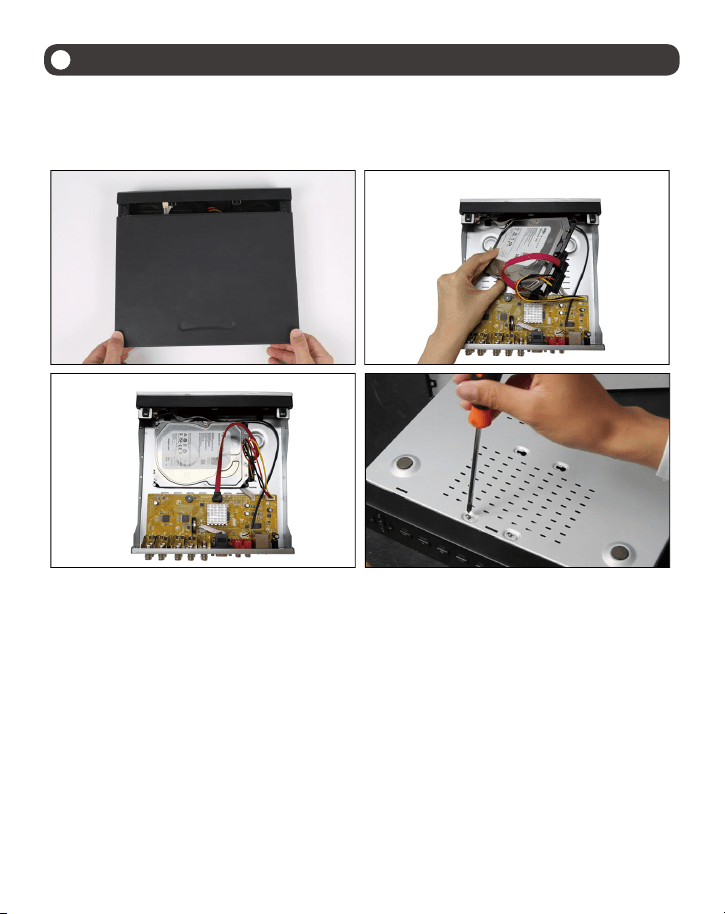
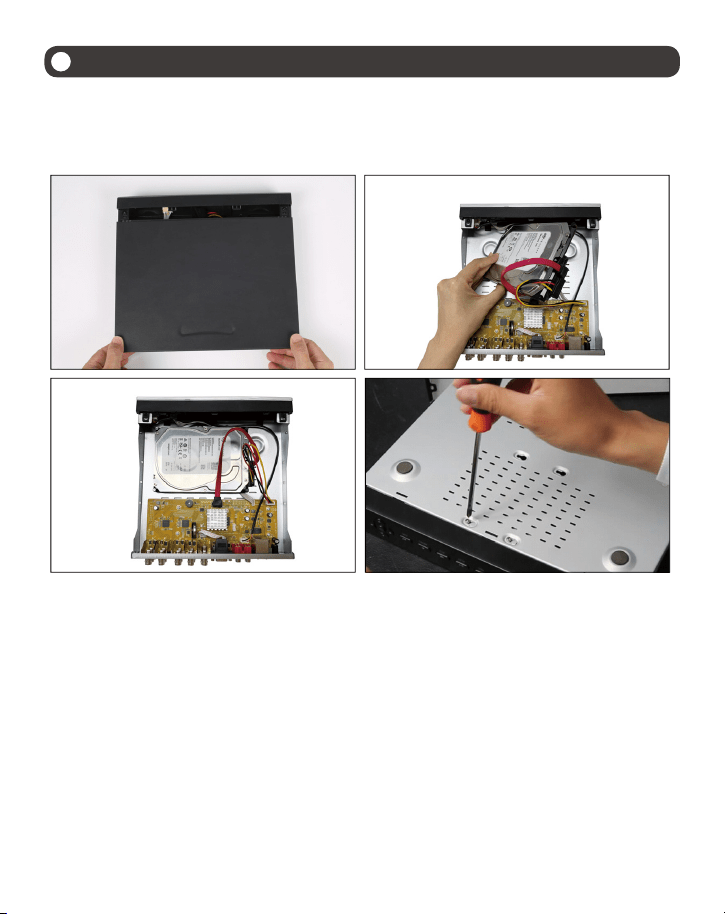
Install a Hard Disk
The system may not include Hard Disk, it’s depending on the kit you selected. This system works with
most 3.5” SATA Hard Disk or 2.5” SATA Hard Disk.
Note: if your system has preinstalled hard disk, please skip this step.
Note:
After installing a hard disk, you need to first format the Hard Disk before recording.
Right click the mouse > go to Main Menu > Disk Management > Select the Hard Disk > Click Format >
Apply.
① Unplug your DVR from power, unscrew and remove the top cover.
② Connect the SATA power and data cables from the DVR to the corresponding ports on your hard
disk as shown.
③ Place the hard disk into the DVR. Any cable should cross up over the hard disk.
④ Holding the hard disk and the DVR, gently turn it over and line up the holes on the hard disk
with the holes on the DVR. Using a Phillips screwdriver, screw the provided screws into the holes.
Assemble the cover.
9
Right click mouse > Go to Main Menu > Setup > Record
You shall see the record settings for all channels. Change the record setting according to your preference and apply
the changes.
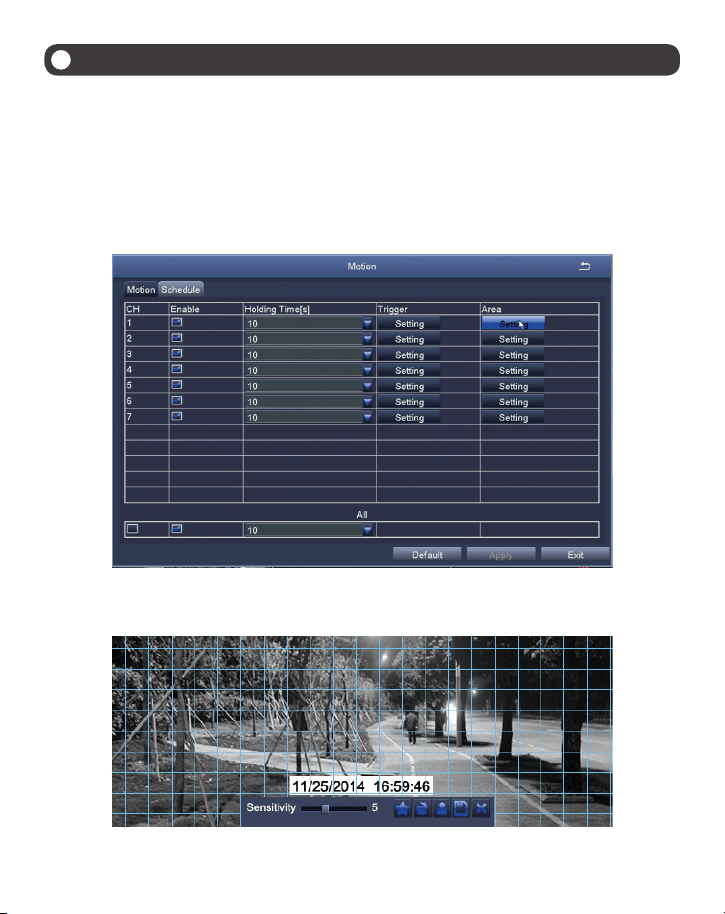
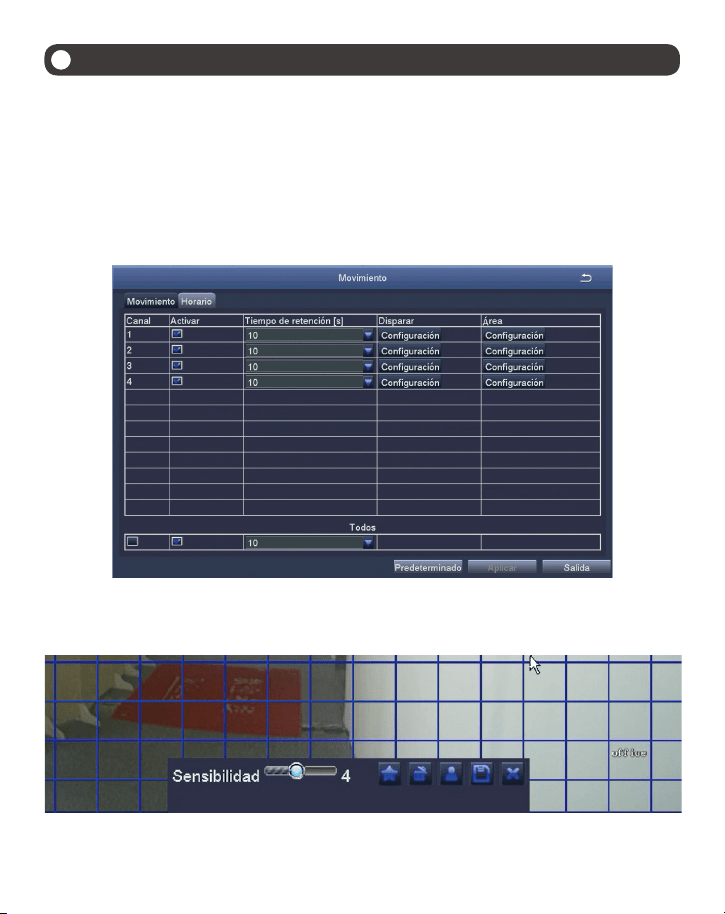
6.1 Motion Detection
Set motion Detection,DVR will record only when motion or movement is detected. Right click mouse > Main Menu >
Setup > Alarm > Motion > Motion detection.
The system starts recording when motion is detected by the camera, and the monitoring picture will show at the
bottom left corner.
Select Camera. Tick the Channel you want to record on motion detection.
Area: It is allowed to set sensitivity area of camera viewing range.
6
Video Record
10
Click STAR to make the whole viewing range as sensitivity
Click Trash Box to remove sensitivity area
Click to save setting
Click to exit
As Color and luminance is important for sensitivity, so it's necessary to adjust its value at specific conditions. The
default value is 6 while value range is from 1 to 8.
Right click mouse to show or hide control menu at screen bottom.
Test the setting by moving something or some one walk through grid area within camera view range. If DVR detects
movement within grid area, a red hunanoid figure would be presented in the screen. The grid shall not cover flag,
trees or some other flying objects in the wind to avoid false alerts.
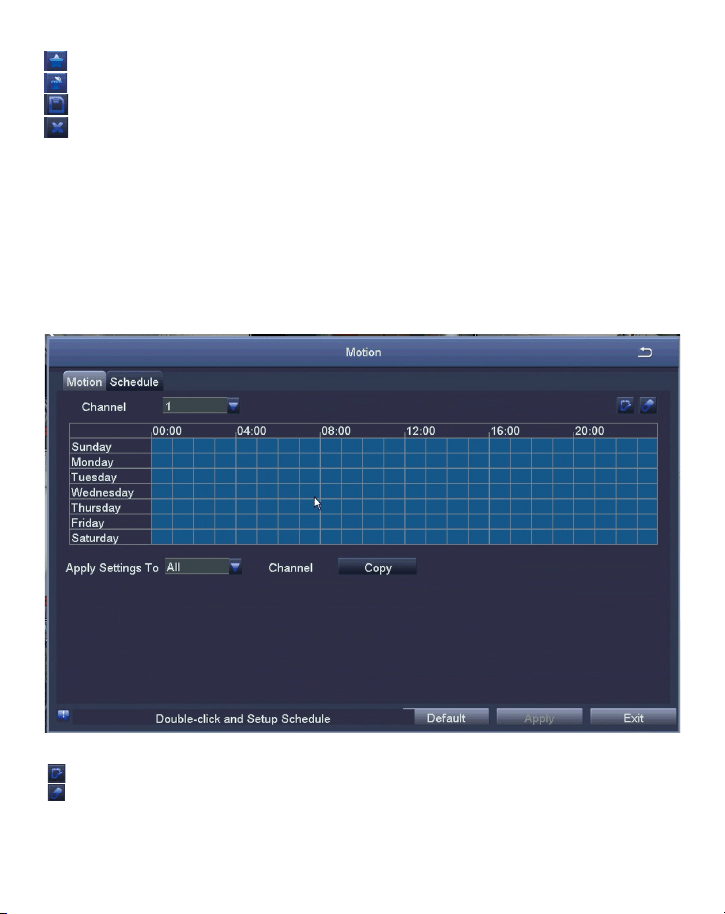
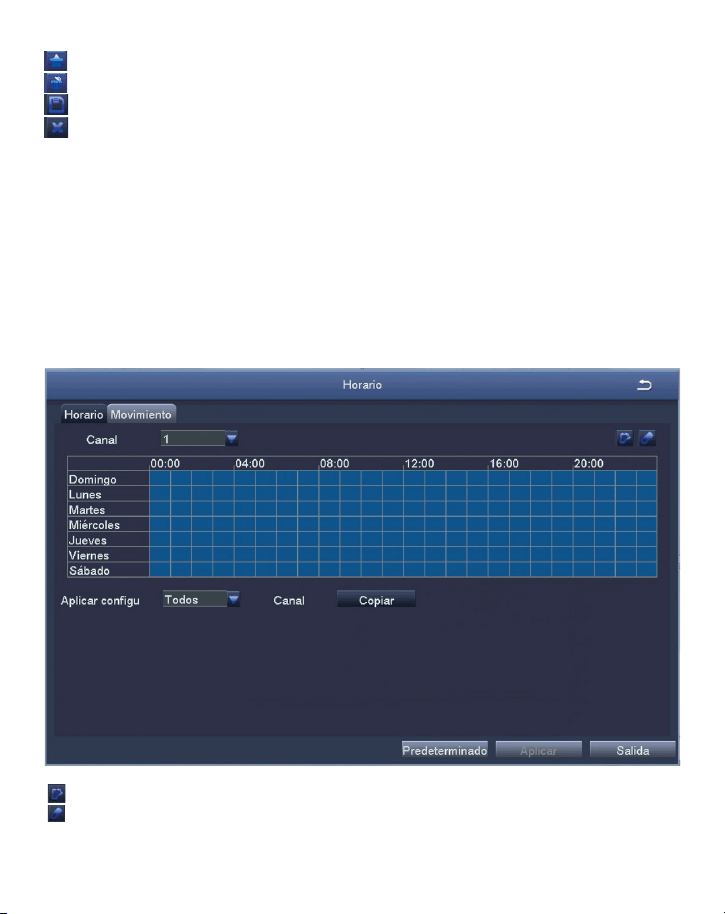
6.2 Scheduled Record
6.2.1 Set Time scheduled record, you may configure each channel to record at specific times based on time of day.
Right click the mouse > go to Main Menu >Setup > Schedule
Using the pencil tool to highlight the individual hours for specific days.
Using the adjacent eraser tool removes the highlighting in a block.
Settings can be copied and applied to any or all of the channels and to any other day.

11
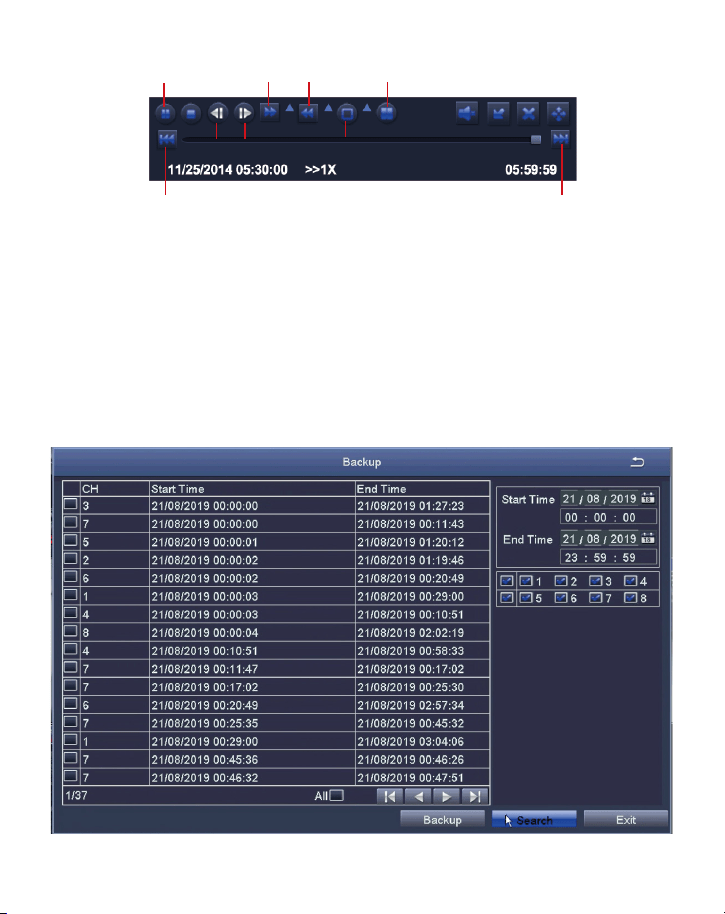
6.3 Video Playback
Get into system Main Menu > Search, system presents as following:
6.2.2 Blocks of time to be recorded can also be set up by double clicking on a field adjacent to a day. Multiple
schedules can be created and saved with start and stop times down to the minute. These can then be applied to
multiple days and cameras.
Search the video you want via time or Event, then play it.
12
Previous Record: Move to last recorded event
Next Record: Move to next recorded event
Fast Forward: video can be played at different speed, from 1/4 times to 16 times.
Rewind: Video play can be rewinded at 1 time, 8 times, 16 times and 32 times.
Screen Display Mode: Both single-screen and multi-screen are available. You can choose how many channels you
want to playback one time.Channel without records presents blank screen.
6.4 Video Backup
① Plug an USB flash disk into your DVR’s USB port
② Right click the mouse > Main Menu > Backup > choose the channel and time period > Search > Choose the video
clips you want to backup > Click Backup
Previous Record Next Record
Rewind
Fast
Forward
Play/Pause
Next frame
Previous
frame
Single-screen display
Multi-screen display
13
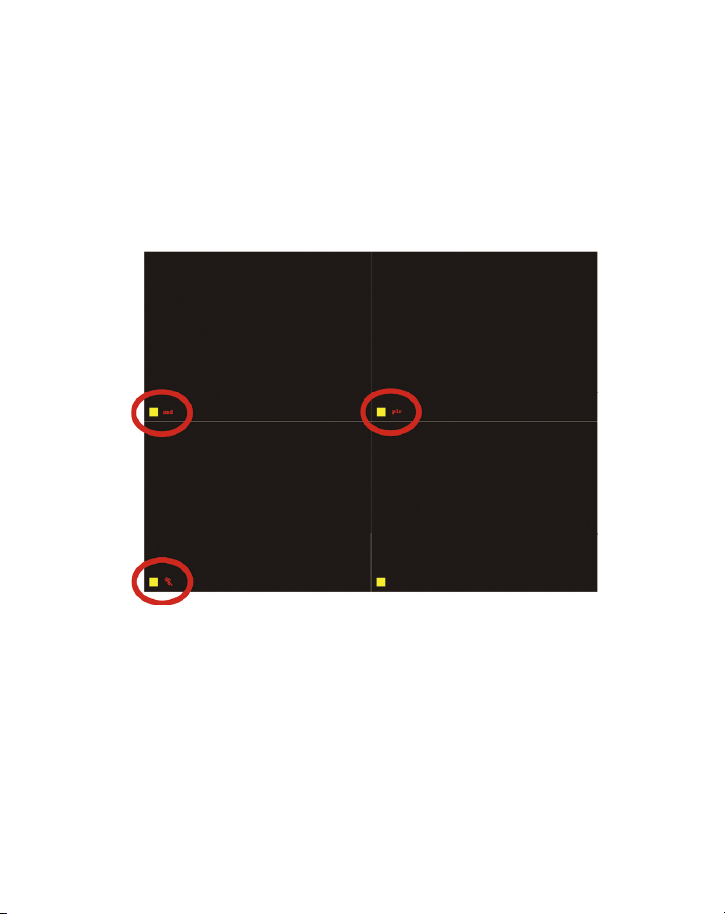
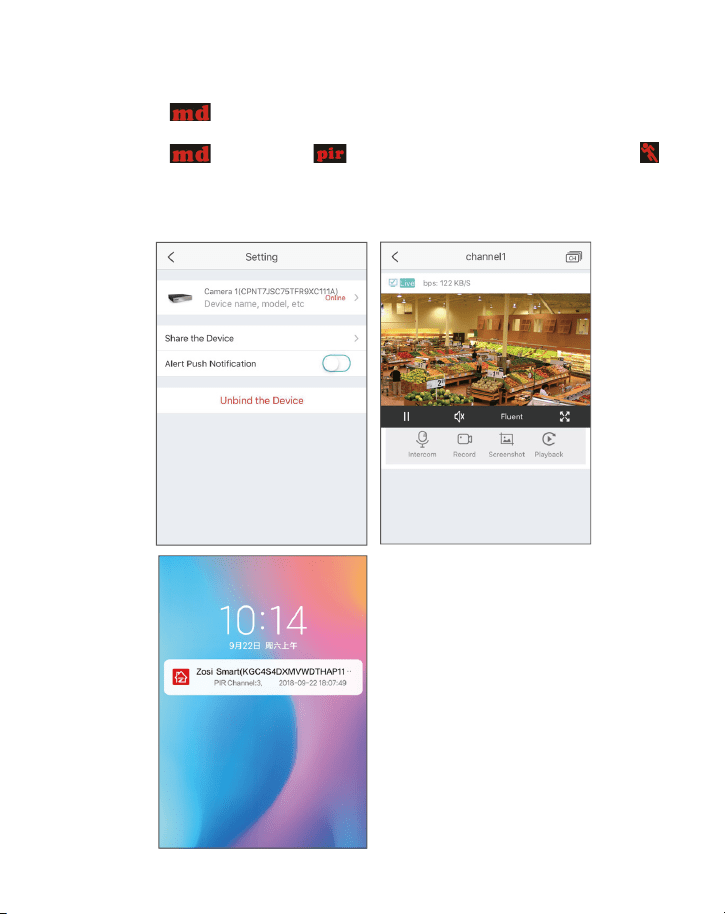
6.5 PIR Detection (applicable to cameras with PIR features)
After setting the PIR motion detection mode, the DVR will only start recording when moving objects
with temperature about 37 degrees are detected.
Right Click > Main Menu > Setup > Alarm > PIR Detection.
When moving objects with temperature about 37 degrees are captured by the camera, the system
will start recording and will be displayed in the lower left corner of the screen.
Note: The PIR feature is fully enabled when motion detection mode and PIR detection mode are
both turned on. When is displayed in the lower left corner of the screen, it indicates that motion
detection and PIR detection are both triggered, which means moving objects with temperature
about 37 degrees being captured by the cameras.
Note: Figure 1 indicates only motion detection is triggered; figure 2 indicates only PIR detection is
triggered; figure 3 indicates motion detection and PIR detection are both triggered at the same time.
Select Camera: Tick the channel you want to set PIR detection mode.
Holding Time: Set recording time length after motion stops.
Trigger: Multi-channels can be set to record when moving objects with temperature are detected
by one of cameras. For example, when camera 1 detects motion, camera 2 and camera 3 can be
triggered to record as well.
Schedule recording: Set the time period for turning PIR detection mode on and off (same as
scheduled recording operation).
Alarm setting: When the device triggers an alarm, you can turn the DVR's buzzer alarm or email
notification settings on and off.
Note: The above operations apply to the situation when both motion detection mode and PIR
detection mode are turned on.
14
6.6 App Alarm Settings
There are two types of DVR alarm notification:
6.3.1 When motion
detection is triggered, DVR will send the alarm through email or mobile
phone notification.
6.3.2 When motion
ddetection and PIR detection are both triggered, alarm signal
will be displayed in the lower left corner of the screen and DVR will send the alarm through email or
mobile phone notification.
App alarm notification settings and effects are shown below:
15
7
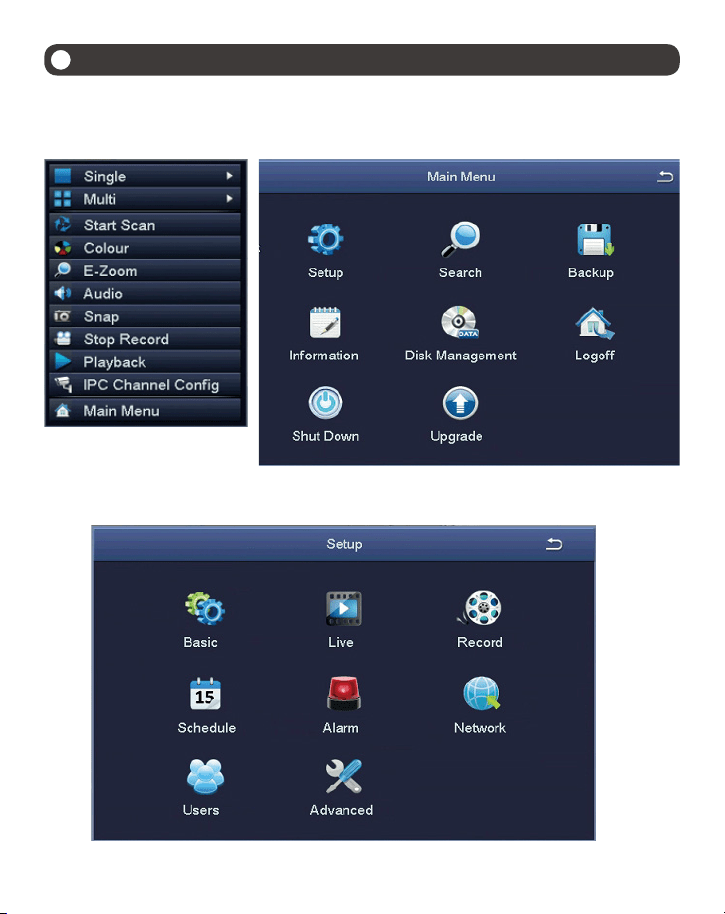
User settings or change password
7.1 In the live viewing screen, right click the mouse, the option shown as below, click Main Menu
7.2 Click Setup to enter the function menu options.
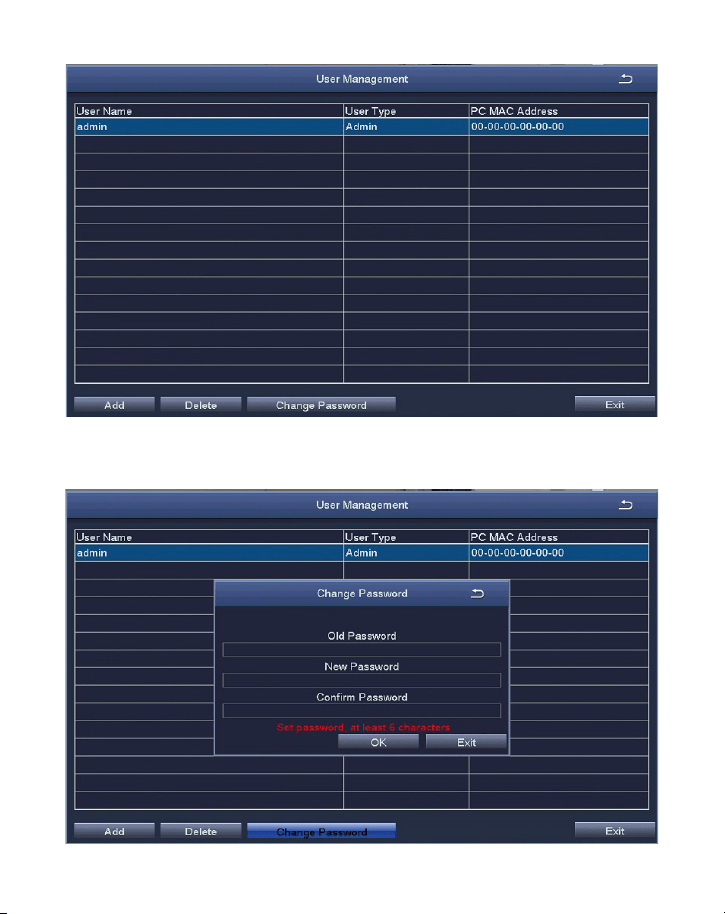
7.3 Click Users to enter the user management interface.
16
7.4 Click Change Password to enter the password setup page.
7.5 Set or change the password, please make sure both the input passwords are consistent, and no
less than six characters.
Please keep firmly in mind your password!

17
8
FAQs
Q: Why can't I search for devices when adding?
A: Make sure that the device and the mobile device are on the same LAN, otherwise please enter the
device ID manually;
Q: Why can't my device connect to the network?
A: Please check
· Is the device connected to the Internet?
· Is the router working properly?
· Is the router's DHCP server open?
Q: Why can't I find the video files?
A: Please check
· Is the hard drive broken?
· Is the search period valid?
· Whether the equipment system time is correct
Q: Why the monitor screen cannot display for some channels?
A: Please check
· Has the camera been added to the DVR?
· Is the camera too far away from the DVR?
· Is there a metal mesh or thick wall near the camera?
· It is recommended to use an extended antenna to bypass obstacles
Do not ingest battery, Chemical Burn Hazard.
This product contains a coin / button cell battery. If the coin / button cell battery is swallowed, it can cause
severe internal burns in just 2 hours and can lead to death.
Keep new and used batteries away from children.
If the battery compartment does not close securely, stop using the product and keep it away from children.
If you think batteries might have been swallowed or placed inside any part of the body, seek immediate
medical attention.
CAUTION:
Risk of explosion if the battery is replaced by an incorrect type.
WARNING
18
1
Introducción del sistema
1.1 DVR
1.2 Cámara
① ② ③
④
⑤ ⑥
Salida de
video & audio
⑦
⑧
A
B
①
④ ⑤ ⑥
② ③
Entrada de cámara
Puerto LAN Puerto del ratón Puerto del adaptador
Salida de video VGA Salida de video HDMI
⑦ ⑧
HD Lente 5mm Luz Infrarroja
Ajuste la cámara al ángulo que quiera.
El cuello del soporte se conecta con la
base de instalación. Relaje el anillo y gire
el soporte a la posición que quiera, luego
apriete el anillo nuevamente.
A
B
19
1.3 Diagrama de conexión del sistema
VIDEO IN AUDIO OUT
VIDEO OUT
VGA
HDMI
AUDIO IN
USB 2.0 DC 12V
RG 45
Ejemplar de 8 canales, los 4/16 canales tendrán el número respectivo de entradas de video.
①Conecte las cámaras al DVR, y conecte la cámara a la potencia.
②Conecte el DVR a una pantalla vía el puerto VGA, BNC o HDMI.
③Conecte el DVR al enrutador vía un cable de red.
④Inserte el ratón al puerto USB.
⑤Enchufe el DVR a la potencia.

20
A:¿Cómo conectar el grabador DVR a LAN?
B:¿Cómo probar la red del grabador?
(1)Haga clic derecho del ratón > Menú principal > Configuración > Red
(2)Marque ‘Obtener una dirección IP automáticamente’
(3)Haga clic en ‘Prueba’, si se muestra ‘OK’, la red se conecta con éxito
Nota: asegúrese de que el DHCP en su enrutador esté abierto.
2
Ver en el móvil
2.1 Conectar el grabador a Internet
Fibra óptica DSL
Enrutador
DVR/NVR
PC
Cable RJ45
WIFI o Cable RJ45
DSL/CABLE
MODEM
DSL/CABLE
MODEM
DSL/CABLE
MODEM
DSL/CABLE
MODEM
Enrutador
Enrutador
DVR
21
2.2 Descargar la aplicación
2.3 Ejecutar la aplicación
A: Instale la aplicación gratis Zosi Smart;
B: Haga clic en ‘Registrar' e ingrese su Email para obtener el código de validación, luego configure su
contraseña y completa el registro;
C: Inicie sesión en la aplicación, ingrese a la interfaz principal (Mi dispositivo), haga clic en ‘+' de la
esquina superior derecha. Luego haga clic en ‘Agregar el dispositivo’.
Zosi Smart App (iOS/Android)
22
D: ①Introduzca la ID del dispositivo escaneando el código OR o introduzca manualmente.
②Introduzca la contraseña del dispositivo(la contraseña es configurada en el grabador, si no hay la
contraseña, por favor déjela en blanco).
③Introduzca un nombre para el dispositivo.
④Haga clic en “Hecho”, y luego vaya a la página “Mi dispositivo” para ver las imágenes(El dispositivo
agregado está en la parte superior de la página).
E: Luego volverá a la lista de dispositivo > haga clic en el dispositivo > haga clic en ‘+’ y luego seleccione
todos los canales > haga clic en ‘Confirmar’ para iniciar la vista previa.
23
El software de PC AVSS se aplica a la vista previa de DVR / DVR / IPC, con vista previa en tiempo real,
administración de dispositivos, reproducción remota de video y más.
3.1 Iniciar sesión
Instale AVSS, seleccione el idioma e inicie sesión.
Nota: Puede iniciar sesión con el nombre de usuario y contraseña predeterminados, o registrar un
nuevo usuario. La cuenta registrada por la aplicación móvil también se puede utilizar aquí.
3
Ver en el PC
3.2 Gestión del dispositivo
① Haga clic en ‘Device Management’ para crear un área
② Crear un área: haga clic derecho en el área vacía debajo de ‘Device List'> Add Area> introduzca
el nombre del área.
Nota: El nombre del área se usa para nombrar el área monitoreada.
24
③ Agregar el dispositivo: seleccione el área correspondiente en ‘Device List' > haga clic derecho >
Add Device > seleccione ‘DVR' en ‘Device Type'> introduzca el nombre del dispositivo(Device Name),
ID del dispositivo(Device ID), contraseña del dispositivo(Password) y número de canal(Channel) > y
haga clic en ‘OK';
Nota: ① El nombre de usuario predeterminado(User Name) es admin; ② Cuando el PC y el
dispositivo están conectados al mismo enrutador, puede hacer clic en ‘Search’ para agregar el
dispositivo.
3.3 Vista previa
Haga clic en "Preview" > seleccione el dispositivo debajo de 'Device List' > haga clic derecho del ratón
> seleccione "Play ALL" o "Stop ALL" para ver o detener la imagen.
25
①
③
②
④
5
Instalación del disco duro
Es posible que el sistema no incluya el disco duro, según el kit que seleccionó. Este sistema funciona
con la mayoría de los discos duros con SATA 3.5’’ o discos duros con SATA 2.5".
Nota: si su sistema tiene un disco duro preinstalado, omita este paso;
Nota: Después de instalar un disco duro, debe formatear el disco duro antes de grabar. Haga clic
derecho del ratón> Menú principal> Administración de disco> Seleccione el disco duro> Haga clic en
Formato> Aplicar.
① Desenchufe la fuente de alimentación del DVR, desenrosque los tornillos y retire la cubierta
superior.
② Conecte el cable de alimentación y de datos del disco duro a los puertos correspondientes del
grabador DVR (como se muestra).
③ Coloque el disco duro en el DVR. Cualquier cable debe cruzarse sobre el disco duro.
④ Sujetando el disco duro y el DVR, déle la vuelta suavemente y alinee los orificios del disco
duro con los orificios del DVR. Con un destornillador Phillips, atornille los tornillos provistos en los
orificios. Monte la cubierta superior.
26
Haga clic derecho del ratón > Menú Principal > Configuración > Grabar
Puede ver el ajuste de grabación para todos los canales. Cambie la configuración de grabación a su gusto y haga clic
en 'Aplicar'.
6.1 Detección de movimiento
Al configurar la detección de movimiento, DVR grabará solo cuando se detecte movimiento.
Haga clic derecho del ratón> Menú principal> Configuración> Alarma> Movimiento> Detección de movimiento,
El sistema graba cuando la cámara detecta movimiento. Se muestra un icono en la esquina inferior izquierda de la
pantalla cuando se detecta movimiento.
Seleccione la cámara: marque el canal que desea grabar la detección de movimiento.
Área: se permite configurar el área de sensibilidad del rango de visión de la cámara.
6
Ajustes de grabación
27
Haga clic para hacer que todo el rango de visualización sea un área de sensibilidad.
Haga clic para eliminar el área de sensibilidad.
Guardar la configuración
Salir
Como el color y la luminancia son importantes para la sensibilidad, es necesario ajustar el valor en condiciones
específicas. El valor predeterminado es 6, mientras que el rango de valores es de 1 a 8(1 es el más sensible).
Haga clic derecho del ratón para mostrar u ocultar el menú de control en la parte inferior de la pantalla.
Pruebe la configuración moviendo algo o alguien a lo largo del área de la cuadrícula dentro del rango de vista de la
cámara. Si el DVR detecta movimiento dentro del área de la cuadrícula, se presentará una figura de humano rojo en la
pantalla. La cuadrícula no pudo cubrir banderas, árboles u otros objetos de flujo en el viento para evitar falsas alertas.
6.2 Plan de grabación
6.2.1 Establecer la grabación horaria, puede configurar cada canal para grabar en horas específicas según la hora del
día.
Haga clic derecho del ratón> Menú principal> Configuración> Horario
La grabación horaria se puede configurar de dos maneras.
Al resaltar las horas específicas de algún día usando la herramienta de lápiz.
Haga clic para eliminar las horas.
Las configuraciones se pueden copiar y aplicar a todos los canales y a cualquier otro día.
28
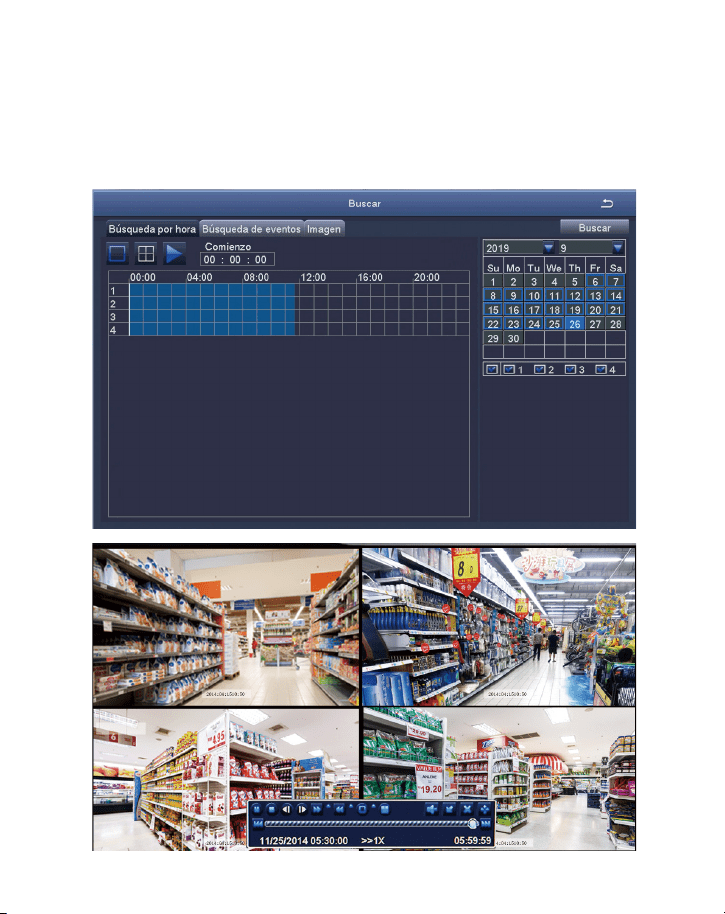
6.3 Reproducción de grabación
Ingrese al menú principal del sistema> Buscar, el sistema presenta la imagen de la siguiente manera.
6.2.2 Los bloques tiempo para grabar también se pueden configurar haciendo doble clic en un campo adyacente a un
día. Se pueden crear y guardar múltiples programaciones con tiempos de inicio y finalización hasta el minuto. Estos
se pueden aplicar a varios días y cámaras.
Busque el video que desea a través del tiempo o evento, luego reprodúzcalo.
29
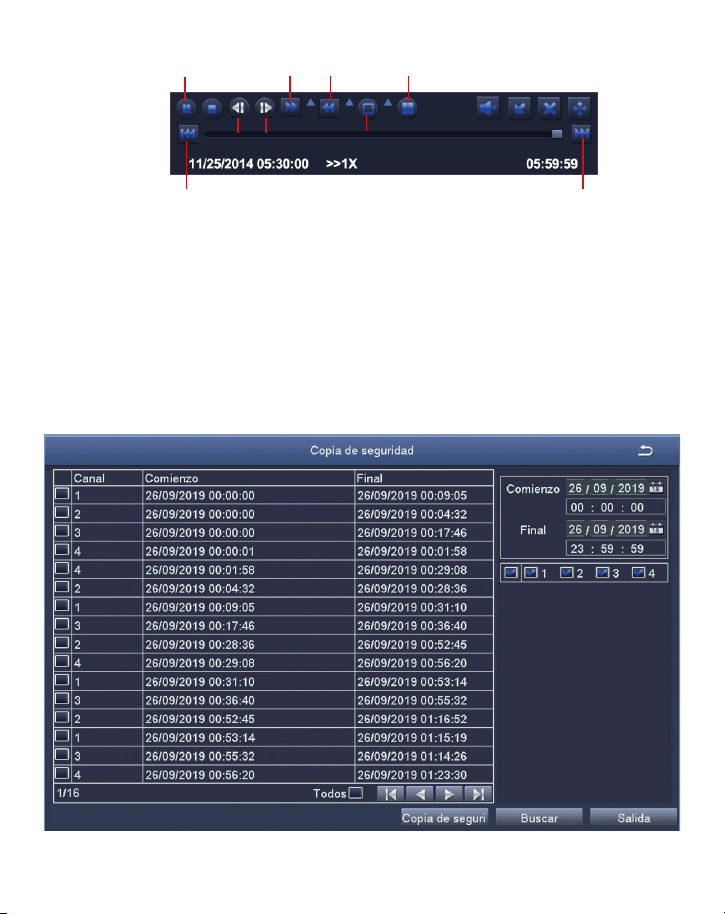
Vídeo anterior: Mover al último evento grabado
Vídeo siguiente: Mover al siguiente evento grabado
Avance rápido: El video se puede reproducir a diferentes velocidades, de 1/4 a 16 veces.
Rebobinar: La reproducción de vídeo se puede rebobinar 1 vez, 8 veces, 16 veces y 32 veces.
Modo de visualización de pantalla: Tanto la pantalla única como la pantalla múltiple están disponibles. Puede elegir
cuántos canales desea reproducir una vez. El canal sin récord presenta una pantalla en blanco.
6.4 Copia de seguridad
① Conecte una memoria USB al puerto USB de su grabador DVR.
② Haga clic derecho del ratón> Menú principal> Copia de seguridad> elija el canal y el período de tiempo> Buscar>
Elija los videos que desea copiar> Haga clic en Copia de seguridad.
Vídeo anterior Vídeo siguiente
Rebobinar
Avance
rápido
Reproducir/
pausar
Foto siguiente
Foto
anterior
Pantalla única
Pantalla multipantalla
30
6.5 Detección PIR (aplicable a las cámaras con característica PIR)
Haga clic derecho del ratón - Menú principal - Configuración - Alarma - PIR.
Después de configurar el modo de detección de movimiento PIR, el DVR solo comenzará a grabar
cuando se detectan objetos con una temperatura de aproximadamente 37 grados y se mostrará el
icono
en la esquina inferior izquierda de la pantalla.
Nota: la función PIR solo está habilitada cuando el modo de detección de movimiento y el modo
de detección PIR están activados simultáneamente. Un icono
se muestra en la esquina inferior
izquierda de la pantalla, indica que detección de movimiento y detección PIR están activados.
También significa que las cámaras capturan objetos en movimiento con una temperatura de
alrededor de 37 grados.
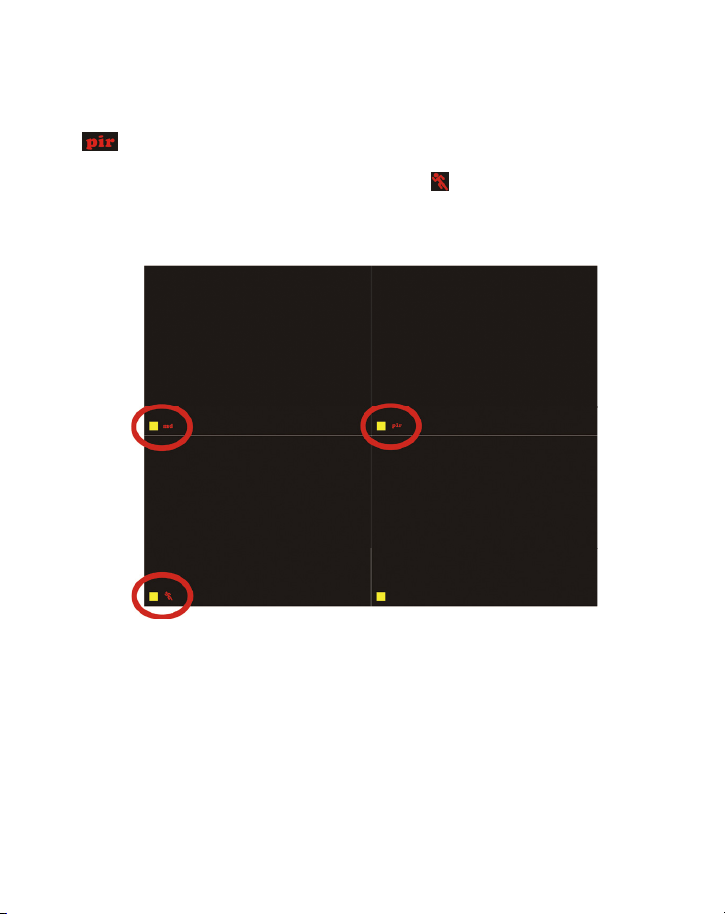
Nota:
Figura 1: solo se activa la detección de movimiento; Figura 2: solo se activa la detección PIR;
Figura 3: la detección de movimiento y la detección PIR se activan al mismo tiempo.
Seleccione las cámaras: Marque los canales que desea configurar el modo de detección PIR.
Tiempo de retención: La duración de grabación después de parar el movimiento.
Disparar: Los canales se pueden configurar para grabar cuando detecta el movimiento por una de las
cámaras. Por ejemplo, cuando la cámara 1 detecta el movimiento, la cámara 2 y la cámara 3 pueden
activarse para grabar también.
Grabación PIR programada: Establezca el período de tiempo de detección PIR (igual que la operación
de grabación horaria).
Configuración de alarma: Cuando el dispositivo activa una alarma, puede activar y desactivar la
alarma o la notificación por correo electrónico.
31
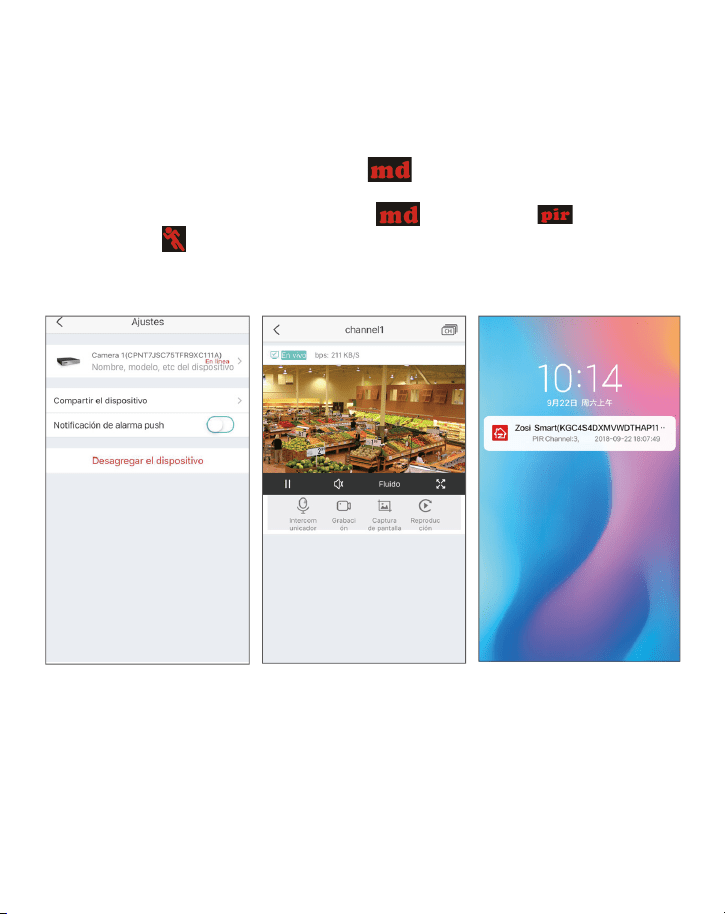
6.6 Configuración de la alarma de la aplicación
Nota: Las operaciones anteriores se aplican a la situación cuando tanto el modo de detección de
movimiento como el modo de detección PIR están activados.
Hay dos tipos de notificación de alarma:
6.6.1 Cuando se activa la detección de movimiento
, el DVR enviará la alarma a través de un
correo electrónico o notificación de App.
6.6.2 Cuando se activan la detección de movimiento
y la detección PIR
simultáneamente,
se mostrará en la esquina inferior izquierda de la pantalla y DVR enviará la
alarma a través de un correo electrónico o notificación de App.
Los ajustes y efectos de la notificación de alarma de App se muestran a continuación:
32
7
Configurar o cambiar la contraseña
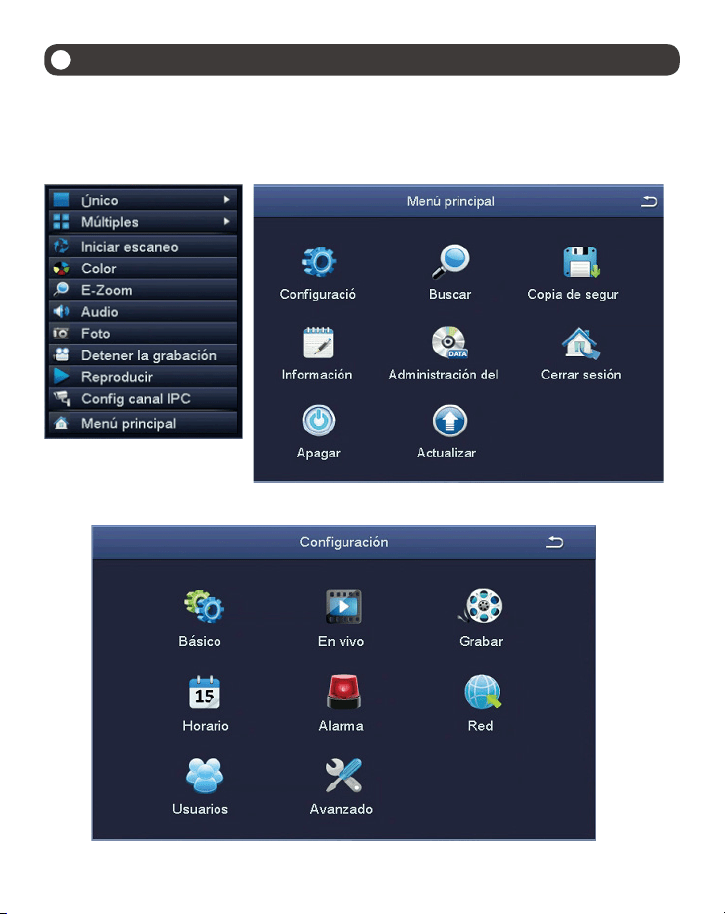
7.1 Vaya a la página del dispositivo, haga clic derecho del ratón - Menú principal.
7.2 Haga clic en Configuración.
7.3 Haga clic en Usuarios.
33
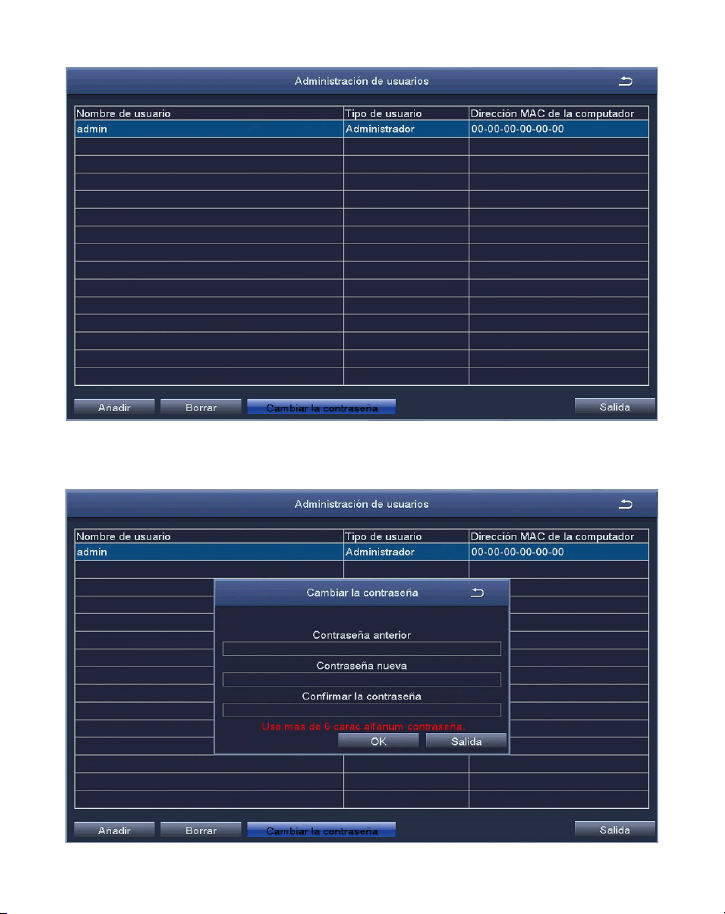
7.4 Haga clic en Cambiar Contraseña.
7.5 Configure o cambie su contraseña, que debe tener más de 6 caracteres.
¡Recuerda su contraseña por favor!

34
8
Preguntas frecuentes
Pregunta: ¿Por qué no se puede conectar al Internet?
Respuesta: por favor revise
·Si el dispositivo está conectado a Internet
·Si el enrutador funciona correctamente
·Si el servidor DHCP del enrutador está abierto
Pregunta: ¿Por qué no se puede buscar el archivo de grabación?
Respuesta: por favor revise
·Si el disco duro está roto
·Si el período de búsqueda es válido
·Si la hora del sistema del dispositivo es correcta
No ingiera la batería, peligro de quemaduras químicas.
Este producto contiene una pila de botón. Si se traga la pila de botón, puede provocar quemaduras internas
graves en solo 2 horas y puede provocar la muerte.
Mantenga las baterías nuevas y usadas fuera del alcance de los niños.
Si el compartimento de la batería no cierra bien, deje de usar el producto y manténgalo fuera del alcance de
los niños.
Si las baterías ya se han tragado o colocado dentro de una parte del cuerpo, consulte a un médico de
inmediato.
PRECAUCIÓN:
Riesgo de explosión si la batería se reemplaza por un tipo incorrecto.
ADVERTENCIA

www.zositech.com
All rights reserved. No part of this publication may be reproduced by any means without written
permission from ZOSI. The information in this publication is believed to be accurate in all respects.
ZOSI cannot assume responsibility for any consequences resulting from the use thereof. The
information contained herein is subject to change without notice. Revisions or new editions to this
publication may be issued to incorporate such changes.
F921114Z3003040
