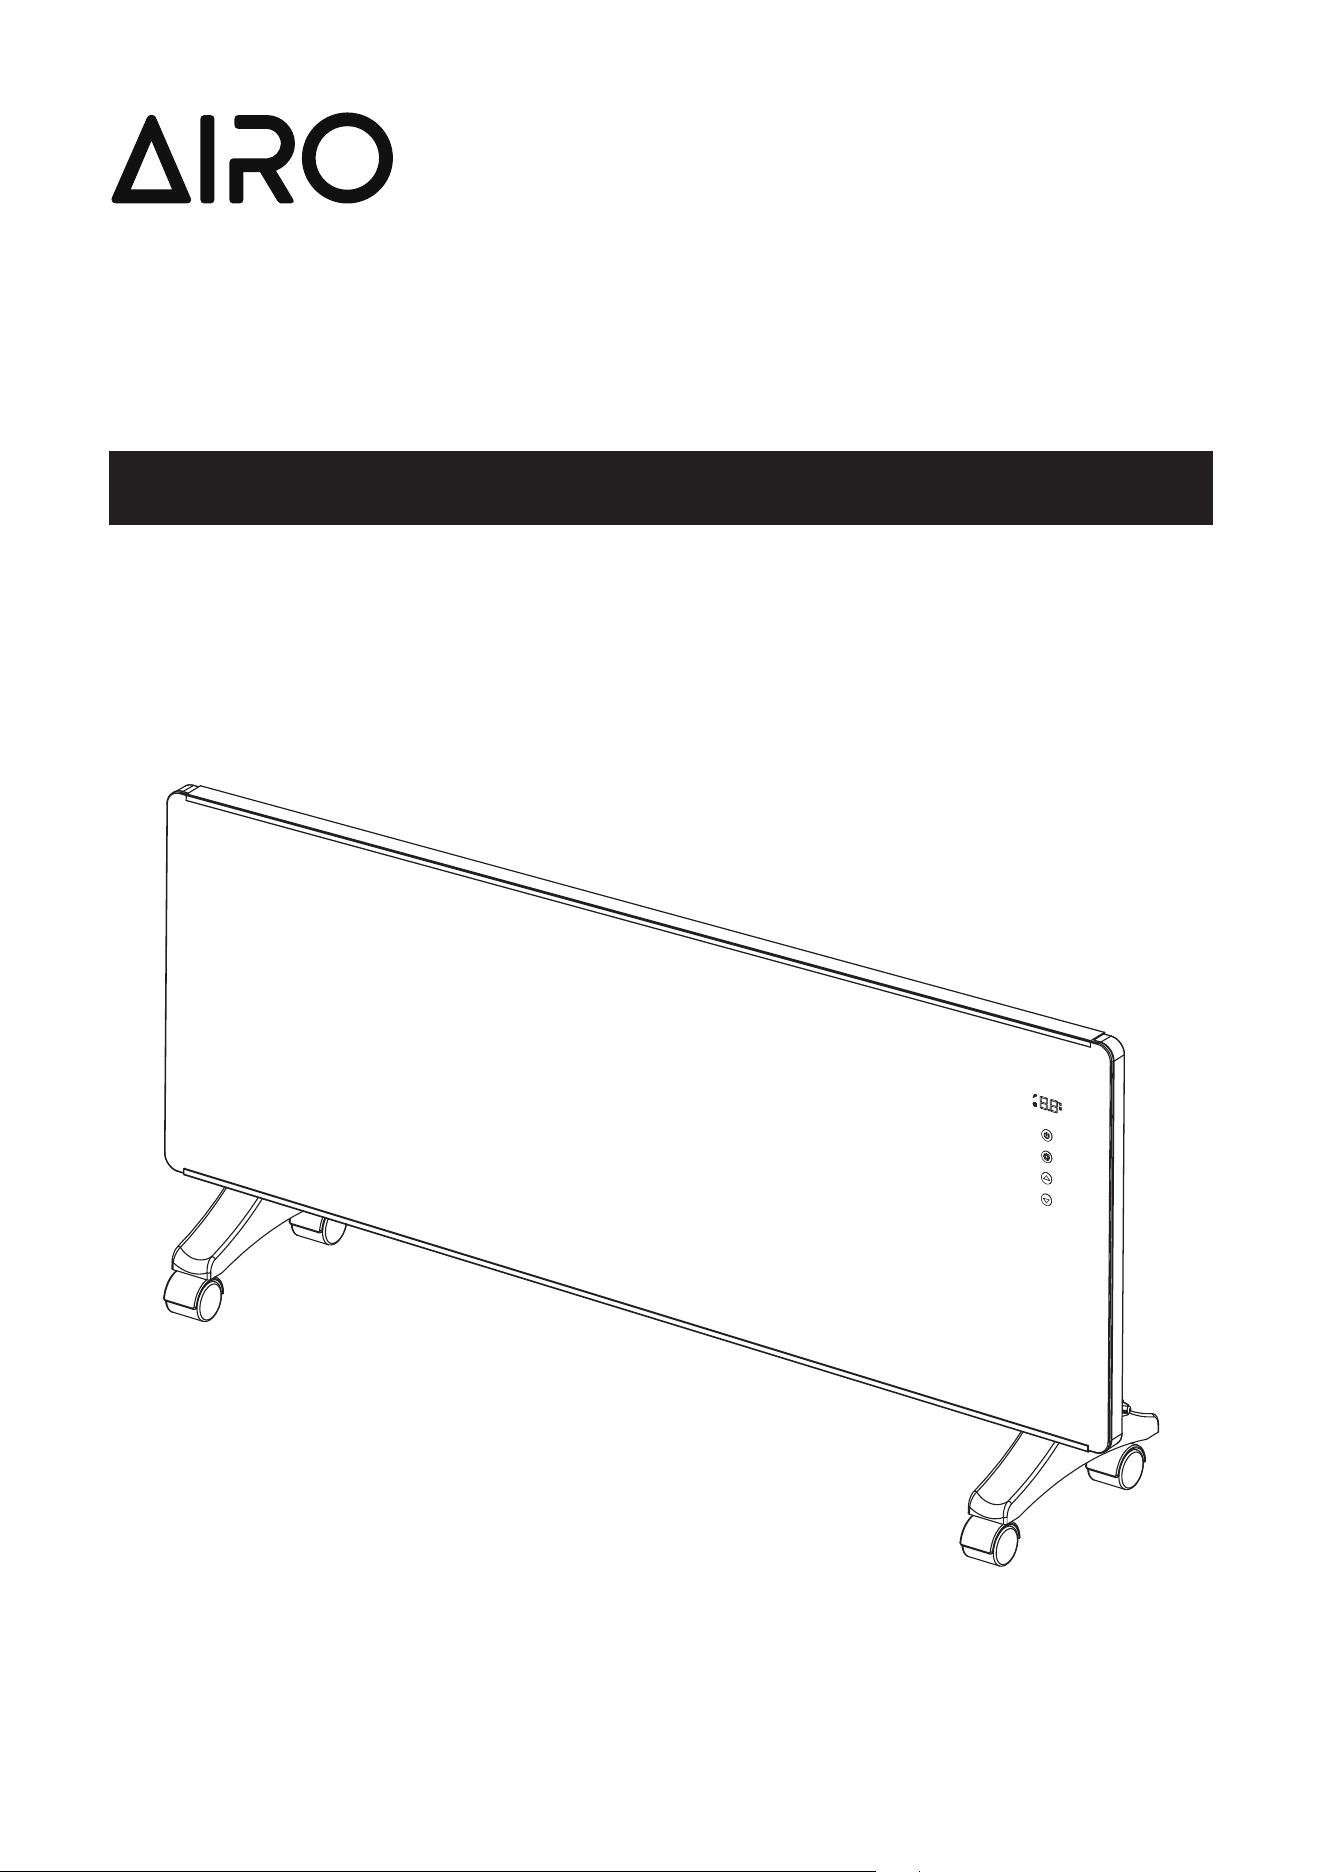
Electric Panel Heater
APH10E, APH15E, APH22E
Operation & Installation Manual APH10E APH15E APH22E
Airo 2 Electric Panel Heater OIM
This appliance must be installed in accordance with:
• Manufacturer’s Installation Instructions
• Current AS/NZS 3000
• Local Regulations and Municipal Building Codes
including local OH&S requirements
For continued safety of this appliance it must be installed
and maintained in accordance with the manufacturer’s
instructions.
Before proceeding with the operation or installation of your
new heater, please read this manual thoroughly and gain a
full understanding of the requirements, features and
operation of your new appliance.
Congratulations on the purchase of this Electric Panel Heater. We trust you will have many years of comfort and
enjoyment from your appliance.

Airo 3 Electric Panel Heater OIM
TABLE OF CONTENTS
Warnings and Important Information 4
About Your Electric Panel Heater 7
Unpacking The Appliance ����������������������������������������������������������������������������������������������������������������������������������� 7
What’s In The Box ���������������������������������������������������������������������������������������������������������������������������������������������� 7
Features ������������������������������������������������������������������������������������������������������������������������������������������������������������� 7
Specications ����������������������������������������������������������������������������������������������������������������������������������������������������� 7
How To Operate Your Heater / General Design Layout �������������������������������������������������������������������������������������� 8
Connecting The Power ��������������������������������������������������������������������������������������������������������������������������������������� 9
Operation ������������������������������������������������������������������������������������������������������������������������������������������������������������ 9
Delay O Timer Operation �������������������������������������������������������������������������������������������������������������������������������� 10
Anti-Frost Protection Function �������������������������������������������������������������������������������������������������������������������������� 11
Electronic Lock Function ���������������������������������������������������������������������������������������������������������������������������������� 11
Tilt Switch ��������������������������������������������������������������������������������������������������������������������������������������������������������� 11
Care & Maintenance 12
Care Of The Heater ������������������������������������������������������������������������������������������������������������������������������������������ 12
Error Codes ������������������������������������������������������������������������������������������������������������������������������������������������������ 12
Service And Repair ������������������������������������������������������������������������������������������������������������������������������������������� 12
Disposal ������������������������������������������������������������������������������������������������������������������������������������������������������������ 12
Installation 13
General ������������������������������������������������������������������������������������������������������������������������������������������������������������� 13
Wall Installation ������������������������������������������������������������������������������������������������������������������������������������������������ 13
Terms of Warranty – Australia 16
Contacts 20
Airo 4 Electric Panel Heater OIM
IMPORTANT
READ ALL INSTRUCTIONS BEFORE USING THE APPLIANCE.
Always comply with the following precautions to avoid dangerous situations and to ensure
optimum performance.
Failure to carefully read and follow all instructions in this manual can result in equipment
malfunction, property damage, personal injury and/or death.
DANGER: Indicates an imminently hazardous situation which, if not avoided, will result in
personal injury or death.
WARNINGS: Indicates a potentially hazardous situation which, if not avoided, could result in
personal injury or death.
CAUTIONS: Indicates a potentially hazardous situation which, if not avoided, could result
in minor or moderate injury or damage to the appliance. It may also be used to alert against
unsafe practices.
WARNING
REGULATORY / INSTALLATION
This appliance shall be installed in accordance with:
• Manufacturer’s Installation Instructions.
• Current AS/NZ 3000.
It is important that the following precautions are followed to minimise the risk of overheating, re,
electric shock and injury:
Handle the appliance with care, avoid vibrations and knocks. Unpack the appliance and check for
damage. DO NOT INSTALL A DAMAGED APPLIANCE. If the appliance is damaged or defective,
contact your supplier for advice, the appliance may ONLY be serviced by the manufacturer or the
manufacturer’s agent or similarly qualied person.
DO NOT install or use the appliance if the power cord is damaged. If it is damaged or requires
replacing, it MUST be replaced by the manufacturer or the manufacturer’s agent or similarly qualied
person.
Ensure that the voltage and frequency of the power supply correspond to the ratings on the data plate
of the appliance.
The heater is tted with an Australian exible cord and 3 pin plug intended for connection to an
Australian 10 Amp socket outlet. It is not suitable for connection in other countries or alternative power
supplies. Ensure that the voltage and frequency of the power supply correspond to the ratings on the
dataplate of the appliance.
DO NOT use power boards or double adaptors for this appliance.
This heater MUST not be located immediately directly in front of a socket-outlet.
DO NOT connect the appliance to the mains power until it has been installed in its nal location and
adjusted to the position it will be used in.
The installation MUST BE equipped with an all-pole disconnection mechanism in accordance with
wiring rules.
If used as a portable heater, DO NOT use in the immediate surroundings of a bath, a shower or a
swimming pool.
If used as a portable heater, unplug and allow to cool before placing in storage.
If used as a portable heater, DO NOT move whilst it is turned on.
DO NOT handle any parts of the heater, including the plug and exible cord, with wet or damp hands.
DO NOT immerse the appliance, exible cord and plug in water or any other liquid.
DO NOT place containers of any liquid or wax on top of the heater.
WARNINGS AND IMPORTANT INFORMATION

Airo 5 Electric Panel Heater OIM
WARNING
Turn o the appliance and unplug from the power socket outlet when not in use.
This appliance is suitable for indoor use only.
Never dismantle the appliance. Tampering with electrical connections and components is highly
dangerous and may cause appliance malfunction.
The exible cord and plug MUST not be modied. If the cord or plug are damaged, they MUST be
replaced by Rinnai or a Rinnai appointed service agent.
The electrical cord MUST NOT come into contact with the heated parts of the appliance. DO NOT
unplug the appliance by pulling on the exible cord.
DO NOT coil or bundle the electric cord to reduce its length as overheating of the cord may occur
which could result in a re hazard.
This appliance MUST NOT be installed where curtains or other combustible materials could come into
contact or in close proximity with it. In some cases curtains may need restraining.
DO NOT place articles or on or against this appliance any parts of this heater, to avoid overheating.
DO NOT sit on this heater.
DO NOT place any items of clothing, hand towels or similar over the appliance to dry.
DO NOT spray aerosols in the vicinity of this appliance whilst the appliance is operating. Most aerosols
contain ammable gas, which can be a re hazard if used near the appliance when it is in use.
DO NOT use or store ammable materials, liquids, etc. near this appliance. Combustible materials
MUST not be placed where the appliance could ignite them.
DO NOT use the appliance in areas where the presence of ammable dust particulates may cause
an explosion.
DO NOT use the appliance, in a green house, barn or stable or on a on a building site or where
ammable dust may be present.
DO NOT use this appliance in the place of animal propagating areas.
DO NOT use the appliance as a sauna heater.
DO NOT leave the appliance unattended whilst in operation.
CAUTION when being operated the surfaces of this appliance will get VERY HOT - DO NOT TOUCH
ANY PART OF THE APPLIANCE WHILE IT IS TURNED ON. To avoid burns, DO NOT touch the
any surface of the appliance with any body part. The appliance MUST be located in a position that
prevents contact by any person (including accidental).
The appliance will retain signicant heat for a period after shut down. To avoid burns, DO NOT touch
the any surface of the appliance with any body part during this period.
This appliance is not intended for use by persons (including children) with reduced physical, sensory
or mental capabilities or lack of experience and knowledge, unless they have been given supervision
or instruction concerning use of the appliance by a person responsible for their safety and have the
capacity to follow those instructions.
The appliance is not intended for use by young children or inrm persons without supervision.
Young children should be supervised when in the vicinity of this appliance while it is in operation to
ensure they DO NOT play with the appliance.
DO NOT allow children or persons with reduced physical, sensory or mental capabilities to sleep
directly in front of the heater.
DO NOT allow children to ‘post articles’ into the louvres of the heater.
NO USER SERVICEABLE PARTS - NEVER dismantle the appliance. Tampering with electrical
connections and components is highly dangerous and can result in equipment malfunction, property
damage, personal injury and/or death.
DO NOT modify this appliance. Modifying from original specications may create a dangerous
situation and will void your warranty.
WARNINGS AND IMPORTANT INFORMATION

Airo 6 Electric Panel Heater OIM
WARNING
DO NOT use this heater if it has been dropped.
DO NOT use if there are visible signs of damage to the heater.
Use this heater on a horizontal and stable surface, or x it to the wall, as applicable.
DO NOT use this heater in small rooms when they are occupied by persons not capable of leaving the
room on their own, unless constant supervision is provided.
To reduce the risk of re, keep textiles, curtains, or any other ammable material a minimum distance of
1 m from the air outlet.
IMPORTANT
MANDATORY INSPECTION PRIOR TO INSTALLATION
Immediately report any damage or discrepancies to your appliance supplier. This appliance has been
inspected and tested at the time of manufacture and packaging, and was released for transportation
without known damage. Upon receipt, inspect the exterior for evidence of rough handling in shipment.
Ensure that the appliance is labelled correctly for the gas and electrical supply it is intended to be
connected to.
For safety and warranty purposes, appliances that may be damaged or incorrect MUST not be installed
or operated under any circumstances. No responsibility will be accepted for installation or operation of
damaged or incorrect appliances. Installation of damaged or incorrect appliances may also contravene
local regulations.
NOTE
A NOTE ON ILLUSTRATIONS
The illustrations used in this manual are for explanatory purposes only and the shape of your unit may
vary slightly from that which is shown in this manual.
WARNINGS AND IMPORTANT INFORMATION
Airo 7 Electric Panel Heater OIM
UNPACKING THE APPLIANCE
If any damage is evident DO NOT INSTALL or OPERATE and contact your supplier for advice.
WHAT’S IN THE BOX
The package should contain:
•
Heater tted with exible cord and plug.
•
A plastic bag containing the Operating and Installation Instructions, wall mounting screws and mounting
brackets.
•
A box containing four castors, two castor feet and a screwdriver.
FEATURES
This heater incorporates the following design features.
DIY Installation
This heater is suitable for Do It Yourself installation.
Silent Operation
Electric element operation eliminates fan noise.
Draft Free
Non fan operation also means no drafts.
Delay O Timer Function
Equipped with delay o timer, see page 9 for details.
Low Maintenance
No moving parts makes for virtually maintenance free operation.
Tilt Switch
This heater is tted with a tilt switch that automatically places the heater into standby mode if the appliance tilts
more than 45°.
'Tamper Resistant' Operation
Includes a Lock function designed to prevent accidental operation and small children from altering the heater
settings.
Operation
The heater uses electricity as the heating medium. It operates on the ‘natural convection’ principle where air
from the room is drawn into the ‘air inlet’ louvres at the base of the appliance, is heated inside the appliance
and expelled through the ‘air outlet’ louvres at the top of the appliance without the use of fans. A sophisticated
thermostatic system keeps the room close to the selected temperature.
SPECIFICATIONS
Model APH22E APH15E APH10E
Rated power 2200 Watt 1500 Watt 1000 Watt
Rated voltage 240V ~ 50Hz
Water Resistance (IP) Rating / Electrical Protection Class IP24 / Class I
Heater
Dimensions
(mm)
Height 550 550 550
Width 1060 800 640
Depth 260 260 260
Unit Weight (kg) 11 8.6 7.2
Installation options Wall or Freestanding
* Heating effectiveness will be reduced if appliance is mounted at greater heights.
ABOUT YOUR ELECTRIC PANEL HEATER
Airo 8 Electric Panel Heater OIM
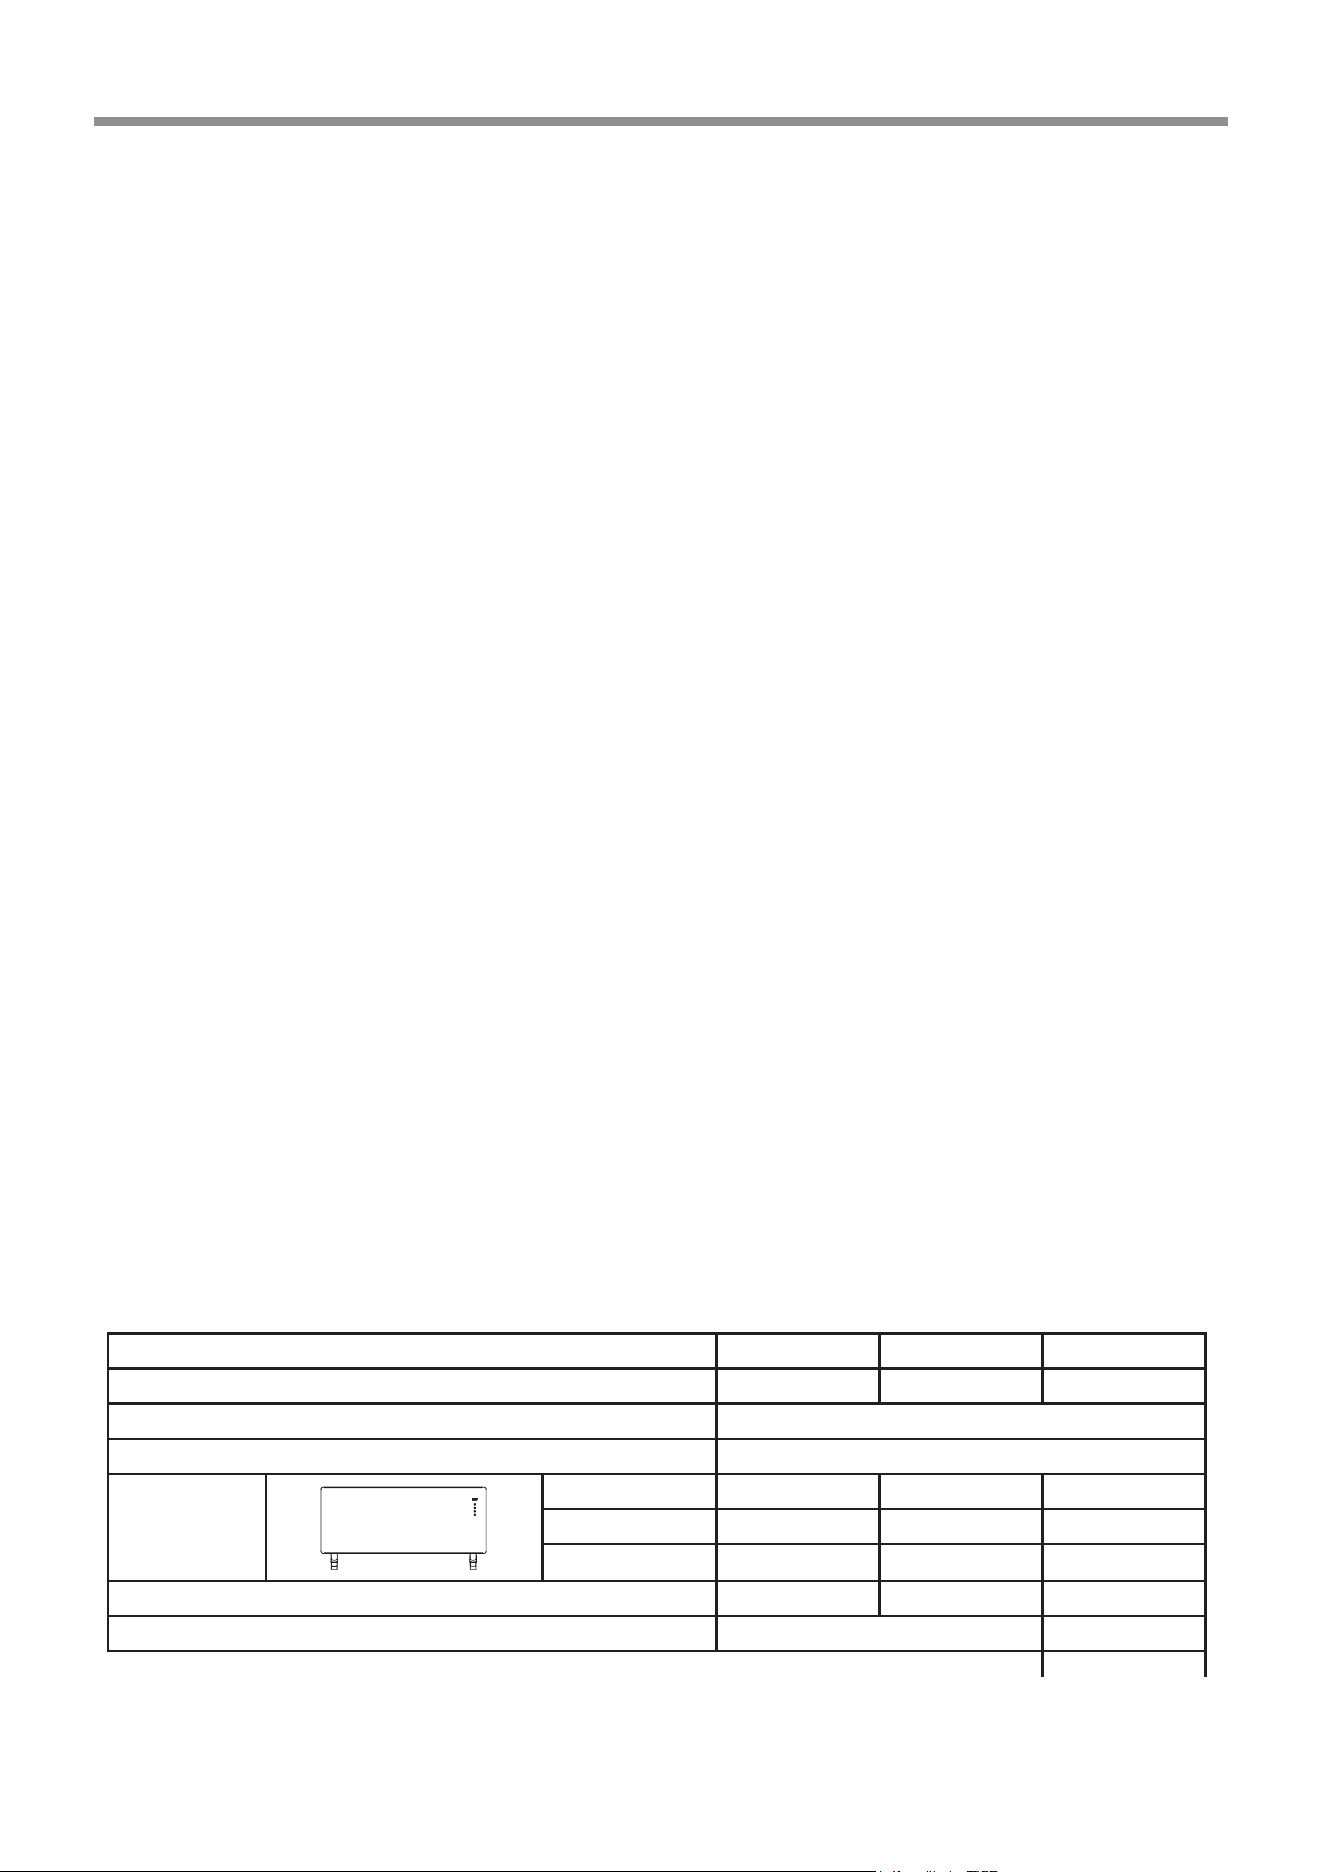
HOW TO OPERATE YOUR HEATER / GENERAL DESIGN LAYOUT
A
Control panel console
B
Digital LED display
1
POWER `ON´ / `OFF´ button
2
MODE button, temperature/timer setting
3
`UP´ button
4
`DOWN´ button
5
Temperature / Timer display
6
Power indicator
7
Heater Operation indicator (Red)
8
Delay O Timer Set indicator (Green)
9
Constant Frost protection indicator
10
Lock indicator
11
Degrees celsius indicator (illuminates when the digital display is showing temperature related settings)
12
Time indicator (illuminates when digital the display is showing delay timer related settings)
13
30min interval digit for timer
14
Vent, warm air discharge
15
240 Volt power cord & plug
16
Air inlets
17
Optional castors for oor mounting (see "Installation" on page 13 for installation options)
18
Optional brackets for wall mounting (see "Installation" on page 13 for installation options)
NOTE
This heater features audible chimes. On start up a set of rising chimes will sound, while on shut
down a set of falling chimes will sound, there is also a chime for each button press.
2
8
4
1
3
97
10
11
12
13
B
15
17
16
14
18
18
18
A
5
6
ABOUT YOUR ELECTRIC PANEL HEATER
Airo 9 Electric Panel Heater OIM
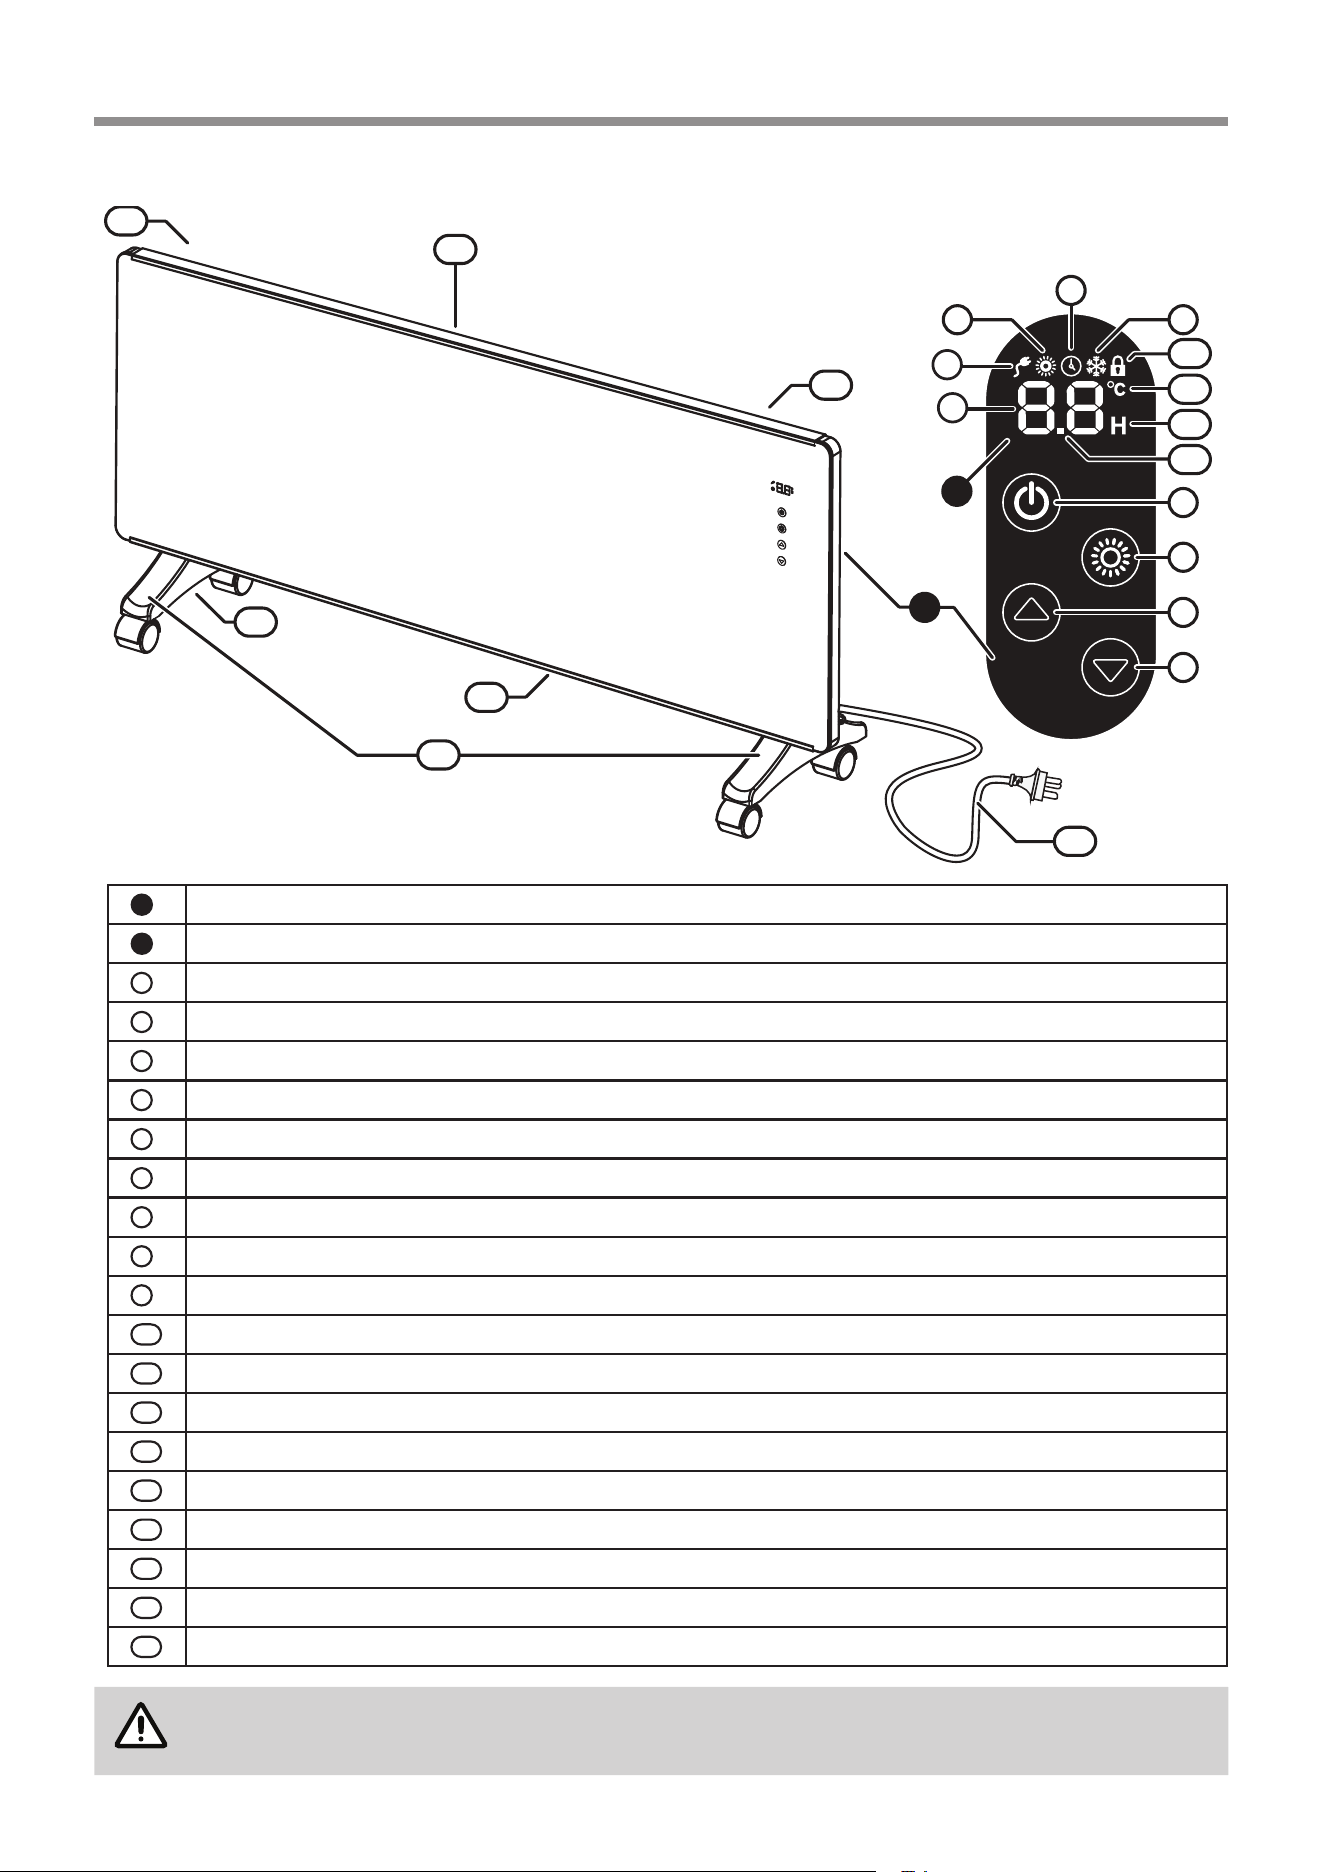
CONNECTING THE POWER
Plug the heater into a power outlet and turn the power outlet on. Once power is connected the rising start up chime
will sound and the power indicator
6
will illuminate on the Digital LED display
B
to show the heater is now in
standby mode.
OPERATION
1. Press the POWER button
1
on the control panel console
A
once to start heating operation, a second rising
chime will sound. The two digits
5
on the display panel will now show the programmed temperature setting.
The factory temperature setting for the heater is 21°C. If this is above that of the current room temperature
the red operation indicator
7
will illuminate and the heater will begin to heat the room.
2. To change the temperature setting press the MODE button
2
once. The °C (temperature) indicator
11
on
the display panel will ash.
NOTE
If after 5 seconds no buttons are pressed the °C indicator will stop ashing and the display will
revert back to the current operating setting. Simply press the MODE button to re-enter temperature
setting operation.
Press the ‘Up’
3
or ‘Down’
4
buttons to increase or decrease the temperature setting. The available temperature
setting range is from 5°C to 30°C.
3. To exit the temperature setting operation either press the MODE button
2
twice or wait 5 seconds. The
selected temperature will now be set and displayed.
If the selected temperature is above that of the current room temperature the red operation indicator
7
will
illuminate and the heater will begin to heat the room.
If the selected temperature is less than that of the current room temperature the red operation indicator
7
will go out and the heater will go into a standby state until the room temperature has fallen below the set
temperature, when the heater will then automatically switch on and heat the room.
4. To stop heater operation completely press POWER button
1
, the shutdown falling chime will sound, the
power indicator
6
will remain illuminated to show that the heater has returned to standby mode.
IMPORTANT
During the initial burning in period or after long periods of non use some light grey smoke or
smell may be experienced. This is normal and is caused by dust that may have settled on the
heating element. During this period the space being heated should be well ventilated.
2
4
1
3
7
11
B
15
A
5
6
ABOUT YOUR ELECTRIC PANEL HEATER
Airo 10 Electric Panel Heater OIM
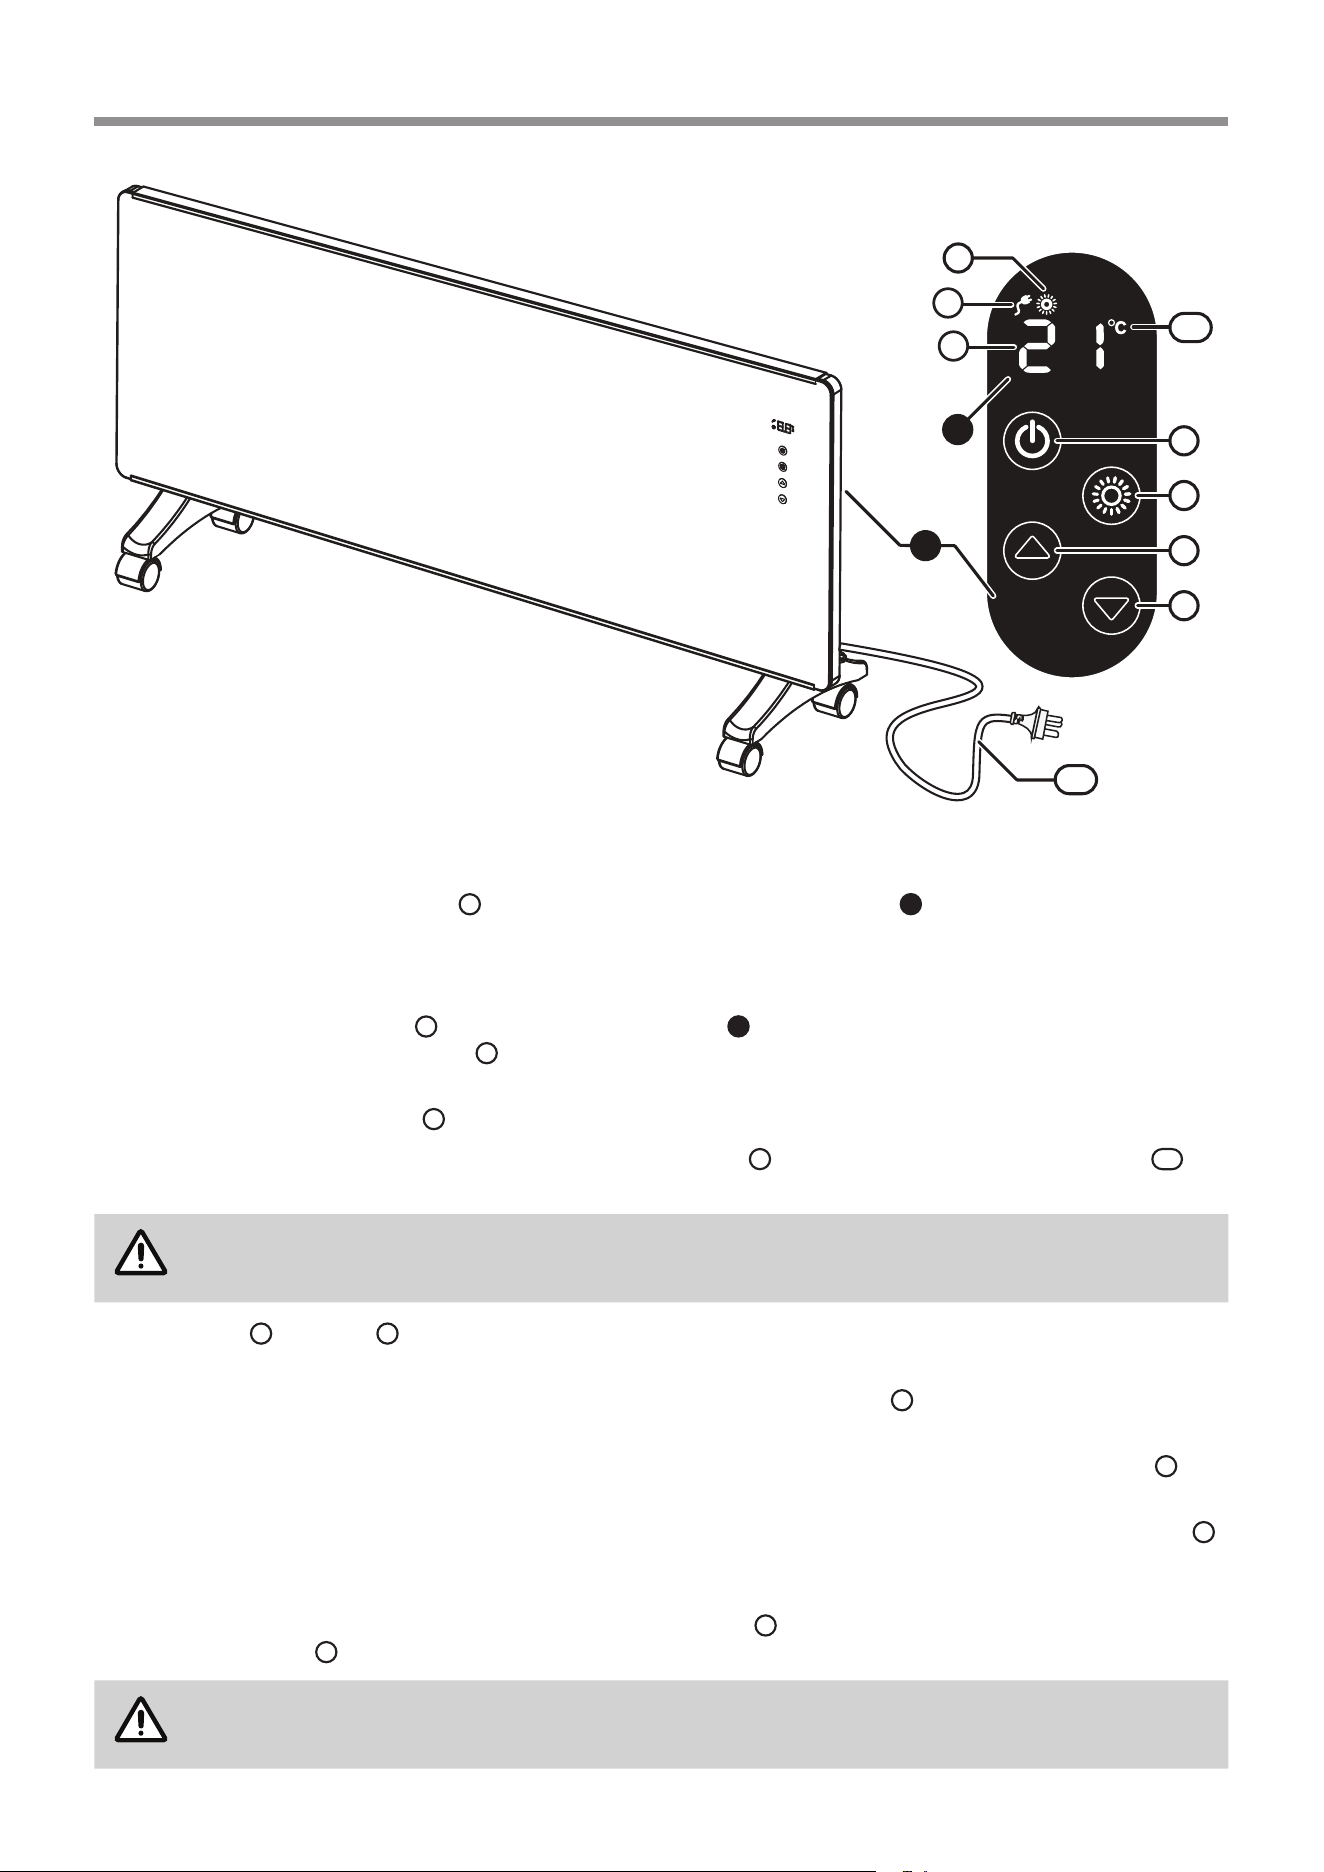
DELAY OFF TIMER OPERATION
In addition to temperature controlled operation the heater can also be operated via the use of a delay o timer.
This allows the user to program the heater to operate for a set time period, after which the heater will be returned
back to standby mode.
1. Set the desired operating temperature as per steps 1 through 3 “CONNECTING THE POWER” on page 9.
2. After setting the desired temperature press the MODE button
2
twice. The two digits
5
on the display panel
will now display 0.0 and both the Delay O Set indicator
8
and the H (time) indicator
12
will begin to ash.
NOTE
If after 5 seconds no buttons are pressed the 0.0 display will revert back to the current operating
setting. Simply press the MODE button
2
twice to re-enter the timer setting operation.
3. Press the ‘Up’
3
or ‘Down’
4
buttons to set the required timer operation period.
The delay o timer can be set in 30 minute (
.5) increments up to 9.5 hours and then in 1 hour increments to
a maximum of 24 hours.
4. To exit the delay o timer setting operation either press the MODE button
2
once or wait 5 seconds.
The Delay O Timer Set indicator
8
will illuminate steady to indicate that the heater is now in delay o timer
operation.
If the selected temperature is above that of the current room temperature the red operation indicator
7
will
illuminate and the heater will begin to heat the room.
If the selected temperature is less than that of the current room temperature the red operation indicator
7
will go out and the heater will go into a standby state until the room temperature has fallen below the set
temperature, when the heater will then automatically switch on and heat the room.
The two digits
5
on the display panel will alternate every 5 seconds between displaying the set temperature
and the time remaining of the set delayed o timer period.
5. To cancel delay o timer and return manual operation press ‘Up’ button
3
for 5 seconds.
6. To stop heater operation completely press POWER button
1
, a shutdown falling chime will be heard and the
power indicator
6
will remain illuminated to show that the heater has returned to standby mode.
2
8
4
1
3
7
12
13
B
15
A
5
6
ABOUT YOUR ELECTRIC PANEL HEATER

Airo 11 Electric Panel Heater OIM
ANTI-FROST PROTECTION FUNCTION
If the set temperature
5
is set to 5 °C then the constant frost protection program will be activated and the constant
frost protection (snowake symbol) indicator
9
will be illuminated.
This is useful during winter in alpine areas where the ambient temperature is likely to fall below 5° C.
ELECTRONIC LOCK FUNCTION
The Lock function is designed to prevent accidental operation and small children from altering the heater settings.
To Activate the Lock
Press the ‘Up’
3
and ‘Down’
4
buttons simultaneously until the padlock symbol
10
is displayed. All control
functions are now locked and none of the buttons on the control will work.
To Deactivate the Lock
To deactivate the lock, repeat locking step above to return to normal operation
NOTE
The Lock function is also deactivated if the heater is switched ‘o’ via the mains power.
TILT SWITCH
As a safety feature this heater is tted with a tilt switch that automatically places the heater into standby mode if
the appliance tilts more than 45°.
When the heater is returned to an upright position, normal operation will then be resumed.
2
4
1
3
97
13
B
15
A
5
6
ABOUT YOUR ELECTRIC PANEL HEATER
Airo 12 Electric Panel Heater OIM
CARE OF THE HEATER
Due to the ‘natural convection’ operating principle it is normal that some dust and u may build up at the air
inlet and air outlet louvres over time. This will reduce operating eectiveness and may result in the appliance
overheating if left for too long.
DO NOT use solvents to clean any parts.
To remove dust and clean the appliance:
1. Unplug the electric plug of the heater from the socket outlet before commencing cleaning.
2. Allow to cool down.
3. Use a vacuum cleaner to remove any dust and u from the inlet and outlet louvres.
4. All parts of the heater can be cleaned using a soft, damp cloth with some mild detergent (such as dishwashing
liquid) if required.
5. Ensure the heater is dry before reconnecting to the electricity supply.
ERROR CODES
Your Airo panel heater has a self diagnostic capability. If a fault occurs, an Error Code will ash on the two digits
5
of Digital LED display
B
, a repeating chime will also sound and the appliance will be prevented from operating.
Please quote the error code displayed when enquiring about service, for example:
Error Code E 0 - Temperature sensor disconnection.
SERVICE AND REPAIR
If the electric power cord or plug are damaged, they must be replaced by Airo or a Airo appointed service agent.
There are no user serviceable parts inside the appliance. All service and repair work must be carried out by
persons competent and permitted by law to do so.
If the heater requires service or repair contact your supplier or Airo.
DISPOSAL
Electrical appliances may contain materials which, if handled or disposed o incorrectly, present a hazard to
humans or the environment.
DO NOT dispose of your old appliance with your household waste. Dispose of your old appliance at your local
community waste collection / recycling centre and ensure it presents no danger to children whilst being stored for
disposal.
CARE & MAINTENANCE
Airo 13 Electric Panel Heater OIM
GENERAL
This heater is suitable for Do It Yourself installation. It can be either wall mounted (xed installation) or freestanding
by mounting castors in accordance with these instructions. A phillips head screwdriver is included for freestanding
installation. For wall installation other tools and hardware may be required, depending on the wall material.
WALL INSTALLATION
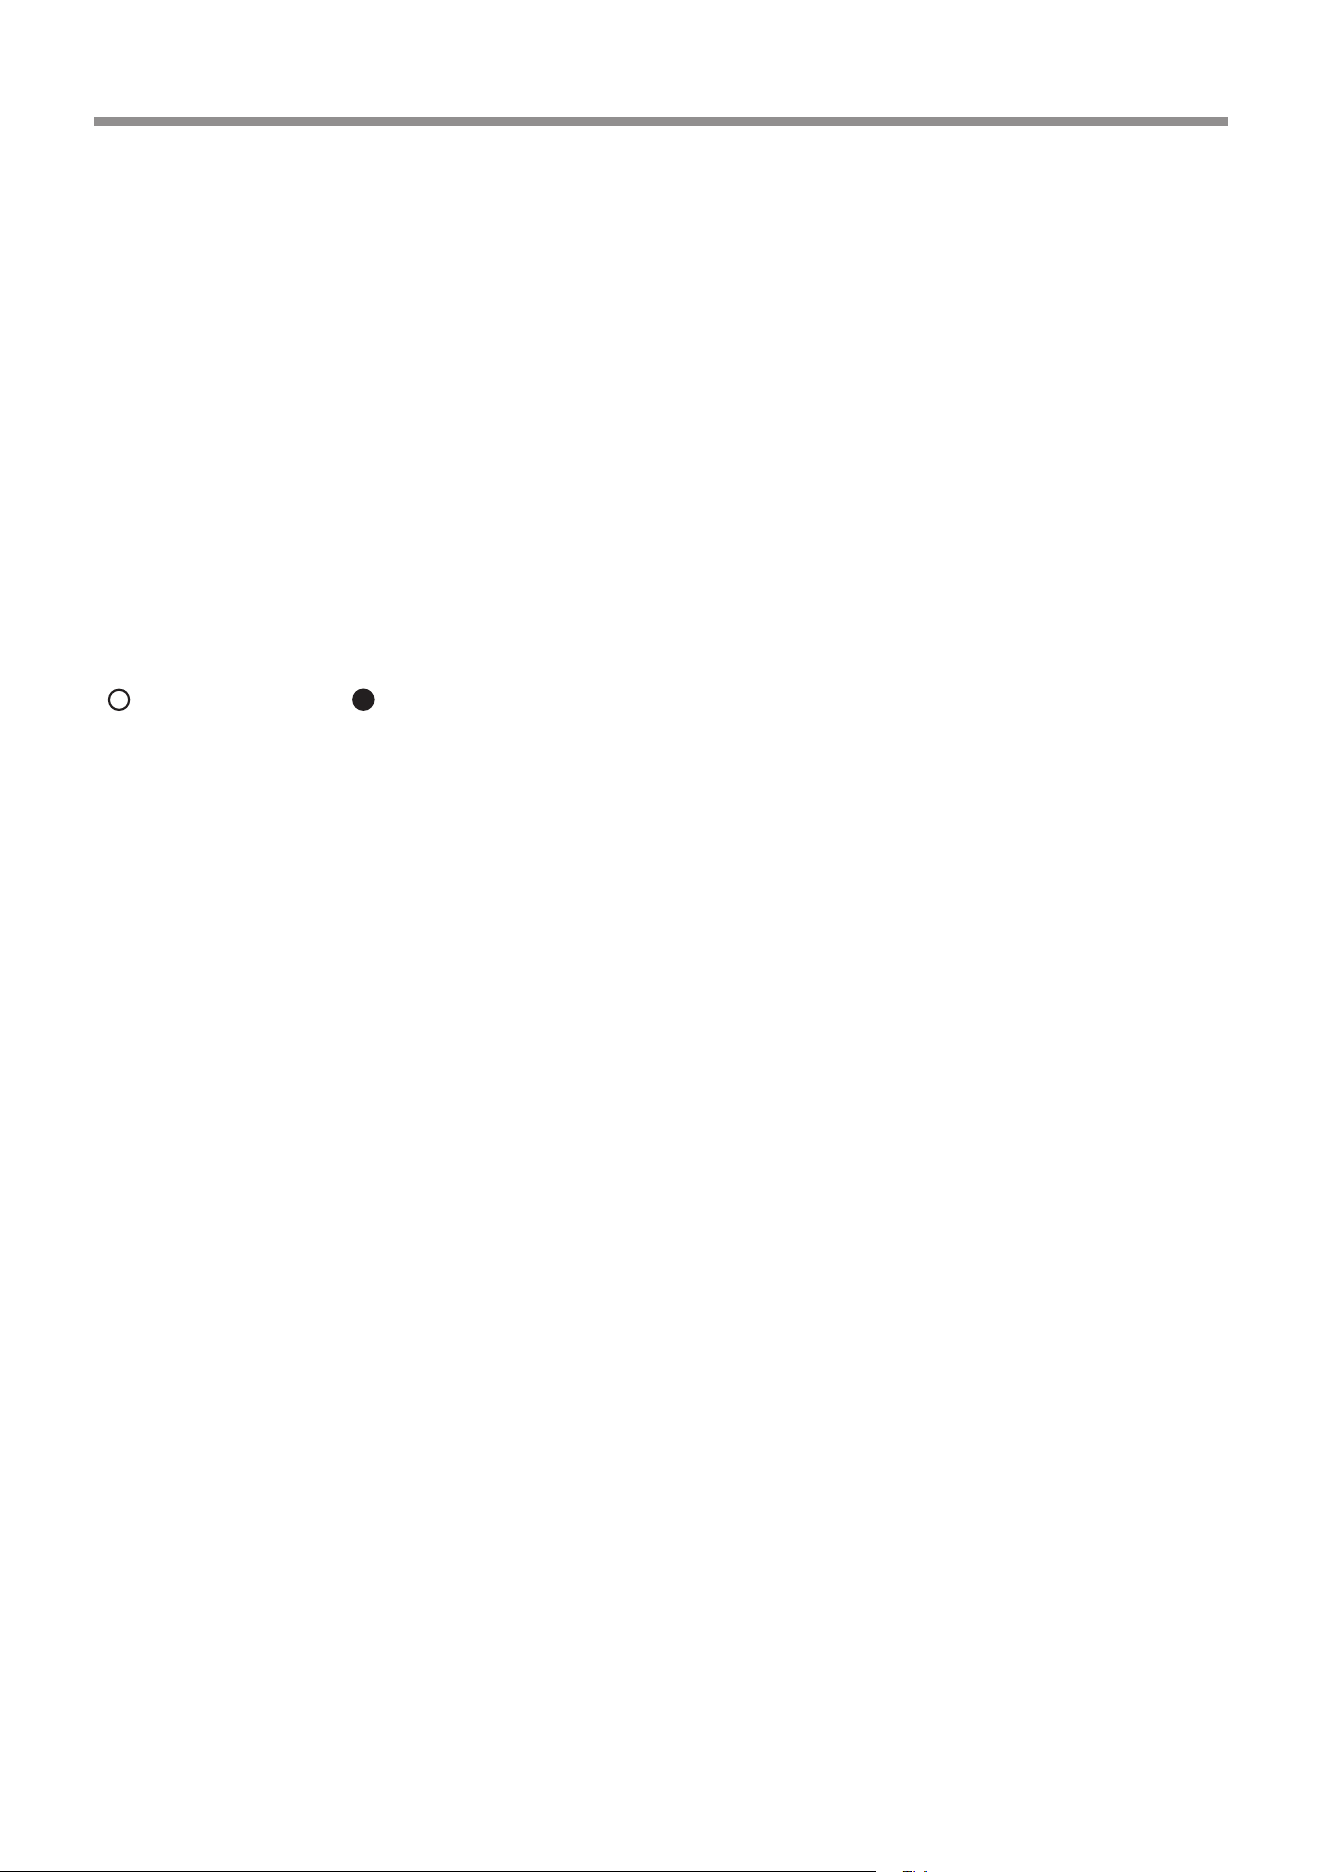
The clearance from the sides and front of the heater MUST BE at least 100mm and the clearance above the heater
MUST BE 300mm as shown in the diagram below.
ecnaraelC ecnaraelC
muminiM muminiM
mm 001 mm 001
Minimum
Clearance
Above
300 mm
Minimum
Clearance
Below
100 mm
Minimum
Clearance
to sides
100 mm
tnorf ot tnorf ot
IMPORTANT
• This heater MUST NOT be located immediately below a socket-outlet.
• This heater MUST be positioned within one metre of a socket-outlet to ensure the exible cord
and plug can reach it.
• This heater is NOT designed to be built in.
• DO NOT attach the castors to the heater base for wall installations.
• The heater is suitable for installation in non-communal baths and shower areas or bathrooms.
It is to be installed such that switches and other controls cannot be touched by a person in
the bath or shower. Consult your licensed electrical trades person for installation in communal
baths and shower areas or bathrooms.
1. Ensure the heater is unplugged from the power socket outlet before commencing wall mounting.
2. Mount the supplied wall mounting hooks using the following dimensions to the wall using appropriate xings,
ensuring that the brackets are level and the minimum clearances as described above are observed.
Minimum
Height above
W
floor 435mm
Wall
mounting
hooks
W = 374mm for 1000W
W = 534mm for 1500W
W = 794mm for 2200W
INSTALLATION
Airo 14 Electric Panel Heater OIM
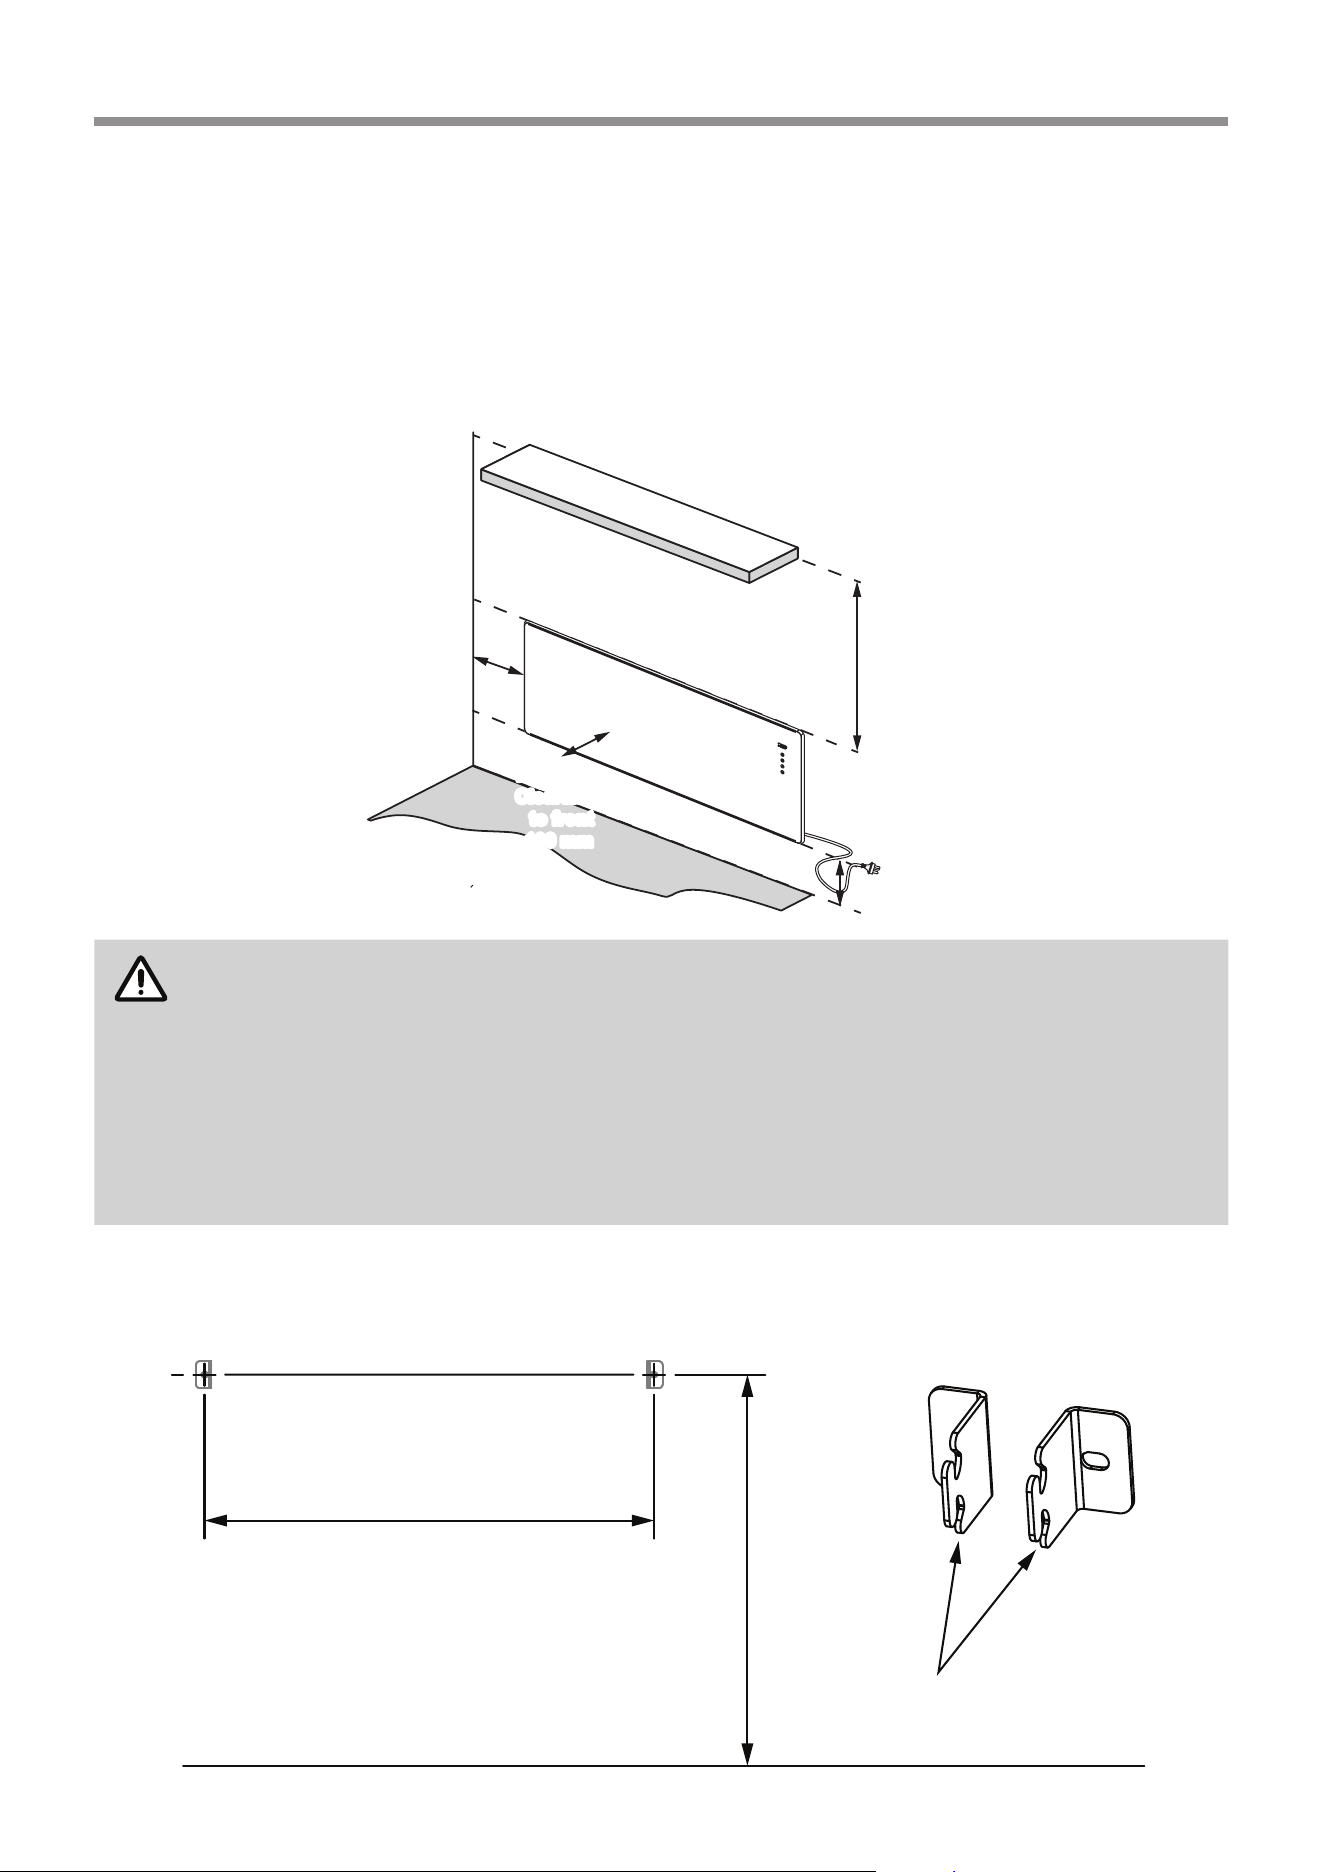
3. Attach the supplied right angle mounting brackets to the bottom of the heater (front hole of bracket) using the
rear most of the pre-installed case screws as shown below.
4. Hang the heater using the slots located on the back of the appliance and secure the right angle mounting
brackets to the wall with appropriate ttings as shown.
5. Remove the cable tie from the exible cord, then insert the power plug of the heater directly into a power
socket outlet.
IMPORTANT
DO NOT bundle or coil the exible cord to reduce the length as overheating and subsequent re
hazard could result.
6. The heater is now ready to be used as a free standing appliance. Refer to the operation section at the front
of this manual for full instructions on how to use the heater.
Slots for mounting the heater
to the wall mounting hooks
Screw to wall
Use the rear most of the
pre-installed case screws
Install right angle
mounting bracket
using the front hole
INSTALLATION
Airo 15 Electric Panel Heater OIM
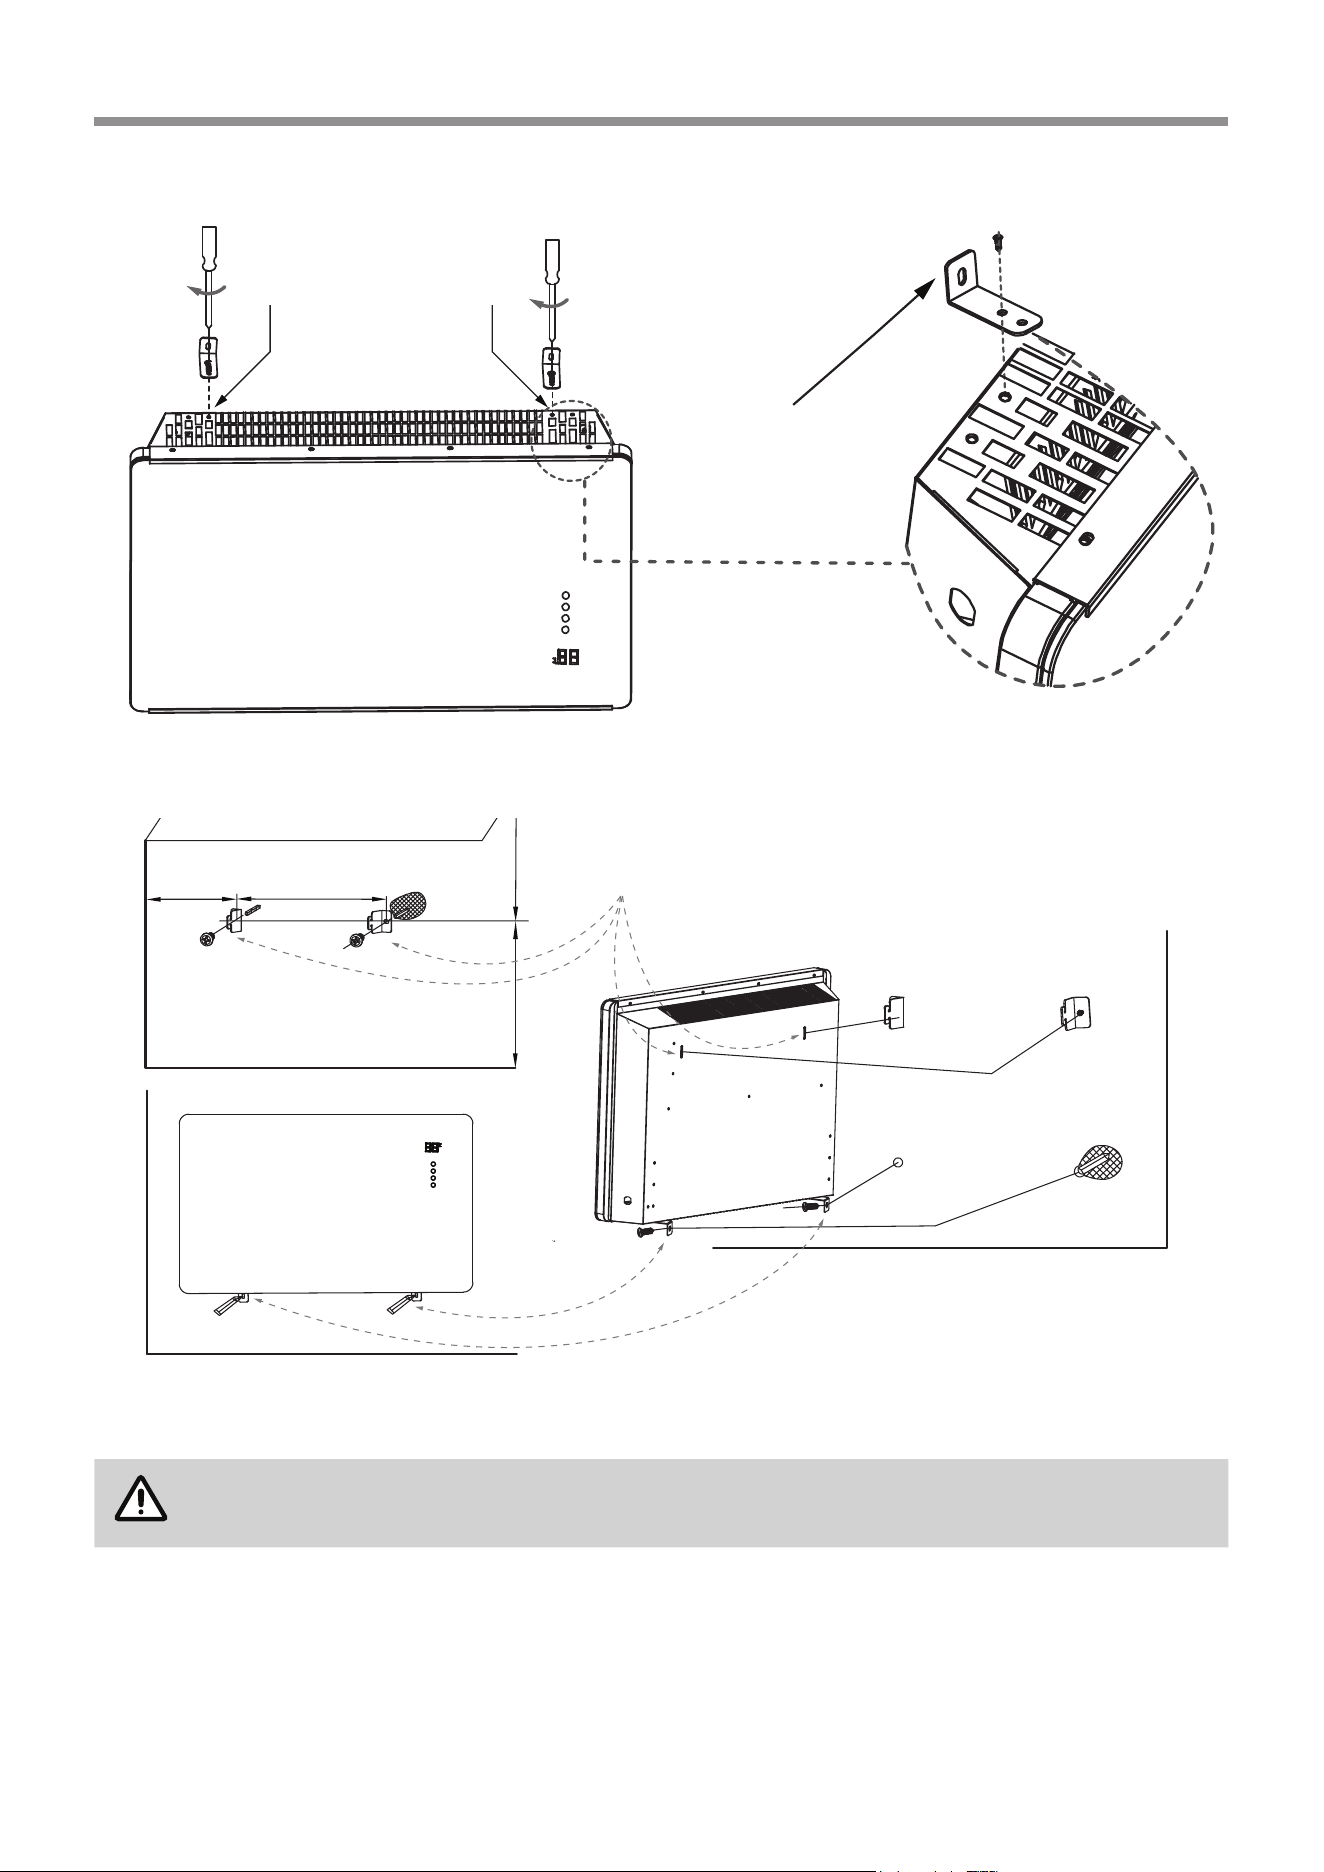
1. Be sure heater is unplugged before attempting to install the castor components.
2. Assemble the 2 castors (A) to the each castor foot (B) by pushing the metal shaft fully home.
3. Place the heater in an ‘upside down’ position with the back of the heater facing you.
4. Remove the two of the pre-installed case screws (C) from the base of the appliance (D).
5. With the front end of the castor assembly pointed towards the front of the heater, align the two holes (E) in
the castor foot with the two holes in the base the appliance (D) and x in place with the screws (C) removed
in step 4.
6. Repeat steps 4 and 5 to install the second castor assembly.
7. Rotate the heater back to the upright position and remove the cable tie from the exible cord, then insert the
power plug of the heater directly into a power socket outlet.
IMPORTANT
DO NOT bundle or coil the exible cord to reduce the length as overheating and subsequent re
hazard could result.
8. The heater is now ready to be used as a free standing appliance. Refer to the operation section at the front
of this manual for full instructions on how to use the heater.
A
B
Front of
castor
assembly
E
A B
C
C
A B
Back of heater
D
D
INSTALLATION
Airo 16 Electric Panel Heater OIM
Rinnai Australia Pty. Ltd. ABN 74 005 138 769, 100 Atlantic Drive, Keysborough VIC 3173.
NOTICE TO CONSUMERS UNDER AUSTRALIAN CONSUMER LAW
Our goods and services come with guarantees that cannot be excluded under the Australian Consumer Law.
For a major failure with a good, you are entitled to a replacement or refund and compensation for any other
reasonable foreseeable loss or damage. If the failure does not amount to a major failure and if the goods fail
to be of acceptable quality, you are also entitled to have the goods repaired or replaced.
For a major failure with the service, you are entitled to cancel your service contract with us and obtain a refund
for the unused portion, or to compensation for its reduced value. You are also entitled to be compensated for
any other reasonably foreseeable loss or damage. If the failure does not amount to a major failure you are
entitled to have problems with the service rectied in a reasonable time and, if this is not done, to cancel your
contract and obtain a refund for the unused portion of the contract.
The benets provided by this Warranty are in addition to any other rights and remedies available to a consumer
under the Australian Consumer Law and any other law which may apply to the goods and or services.
1 DEFINITIONS
The terms listed below shall have the following meanings:
1 “Authorised Service Representative” means an independent service contractor authorised by Rinnai or
Rinnai service personnel.
2 “Rinnai” means Rinnai Australia Pty Ltd (ABN 74 005 138 769) and any related company.
3 “Certicate(s) of Compliance” means certicate(s) issued by licensed personnel (including plumbers,
refrigeration mechanics, electricians or other relevant tradespeople) to certify that any prescribed works comply
with applicable regulatory requirements.
4 “Certicate(s) of Occupancy” means certicate(s) issued by the local government authority (or similar
organisation) which certies that a home can be occupied.
5 “Installation Site” means the site at which the Product is originally installed.
6 “Normal Business Hours” means 8:30am to 5:00pm Monday to Friday, excluding public holidays.
7 “Operating/Installation Instructions” means the user manual or other documentation which provides
detailed instructions on the proper operation and maintenance of the Product.
8 “Other Applications” means any Product used for purposes other than Residential & Light Commercial
Applications. Other Applications may include but are not limited to factory, IT/Server room, telephone exchange,
processing area (e.g. bakery, kitchen, warehouse, swimming pool, agricultural facilities such as a nursery).
Any Product which has been installed, for whatever purpose, as a retrot component to an existing system, will
also be classed as being part of an “Other Application” regardless of the purpose of use of the existing system
into which such product has been installed.
9 “Purchaser” means the end user of the Product, the person named as owner in the Warranty certicate, the
holder of the Proof of Purchase or the holder of a property transfer document where the Product is included
as part of the chattels.
10 “Product” means the equipment purchased by the Purchaser and described in Section 2 of this document.
11 “Proof of Purchase” means a Tax Invoice or Receipt in respect of the Product. In the case of new constructions,
a Certicate of Occupancy or a Certicate of Compliance that details the date of installation or commissioning
will suce.
12 “Qualied Installer” means the qualied installation contractor who is responsible for performing the
installation work in the manner prescribed by local and statutory regulations, including compliance with any
relevant and to Rinnai specications, including Australian Standards.
13 “Residential & Light Commercial Applications” means any Product for use in residential or light commercial
applications where
a) the Product is solely used for the purpose of human comfort; and
b) the ambient temperature of the space the Product is intended to heat or cool is inuenced solely or
primarily by natural exterior weather conditions rather than by man-made or mechanical heat sources.
Examples of Residential & Light Commercial Applications include, homes, oces, hotels, apartments,
nursing homes, hospitals, health care premises, shopping centres, and retail stores.
TERMS OF WARRANTY – AUSTRALIA
Airo 17 Electric Panel Heater OIM
2 TERMS OF WARRANTY
2.1 Subject to the Terms of Warranty set out in this document, eective from the date of purchase by the Purchaser,
the Product is warranted to be free from defects in materials & factory workmanship for the period set out in
table below:
Residential and Light Commercial
PRODUCT GROUPS PARTS LABOUR
Evaporative Coolers & Ducted Gas Heaters (excluding
Compact Classic Series)
5 Years
*Extended 4
Years Option
5 Years
*Extended 4
Years Option
Ducted Gas Heaters - Compact Classic Series 3 Years 3 Years
Refrigerated Airconditioning Products 5 Years 5 Years
Ducted Gas Heaters - Heat Exchangers and Burners
Evaporative Coolers - Structural components only
10 Years N/A
Portable Air Conditioning / Dehumidier / Air Purier 2 Years N/A
Wi-Fi Devices 1 Year 1 Year
Other Applications All Product Groups 2 Years 1 Year
After Market Spare Parts 1 Year N/A
2.2 Rinnai will determine in its sole discretion, which classication the Product ts into and the corresponding
Warranty that shall apply.
2.3 An Authorised Service Representative will repair or replace, at its option, the Product or any part of the
Product that its examination shows to be defective. The repair or replacement shall be performed during
Normal Business Hours by an Authorised Service Representative. Repair by persons other than an Authorised
Service Representatives may void the Warranty.
2.4 Alternatively to clause 2.3 above, Rinnai can at its discretion elect to pay you an amount equivalent to the cost
of repairing or replacing the Product.
2.5 If Rinnai provides you with either the replacement costs or replacement product, ownership of the original
Product shall immediately transfer to Rinnai.
2.6 Rinnai is responsible for reasonable costs associated with legitimate warranty claims, including call-out of an
Authorised Service Representative to inspect the Product. Rinnai is not responsible for:
a) costs for tradespeople engaged by you that are not Rinnai Authorised Service Representatives.
b) any costs, including call out costs for a Rinnai Authorised Service Representatives, associated with a
Product which is determined upon inspection not to be covered by this warranty.
2.7 Rinnai will reimburse any reasonable costs associated with making a legitimate warranty claim against Rinnai
which are not otherwise specied above.
2.8 The Warranty of the Product requires that, in addition to all other conditions, the Purchaser conducts regular
and/or preventative maintenance as may be specied by the Operating/Installation Instructions or otherwise
directed by Rinnai and required by the level of usage and the usage environment, including the use of
correct and uncontaminated refrigerants and lubricants. Refrigeration, plumbing and electrical works must be
undertaken by licensed personnel.
2.9 Where a Product or failed component is replaced under warranty, the time remaining on the original Product
warranty period will continue to apply and the replacement product or part will be subject to the original
warranty period only.
TERMS OF WARRANTY – AUSTRALIA

Airo 18 Electric Panel Heater OIM
3 CONDITIONS OF WARRANTY
3.1 The Purchaser may only obtain the benet of the Warranty if the Purchaser:
a) maintains and has the Product serviced in accordance with the instructions set out in the service section
of the relevant Service or Owner’s Manual;
b) complies with clause “7 Purchaser’s Responsibilities” on page 19;
c) noties Rinnai within 30 days of a defect occurring or, in the case of a latent defect, becoming apparent,
that a claim is being made under this Warranty; and
d) provides, in support of the claim made under this Warranty, a Proof of Purchase.
3.2 This document (and any statutory consumer guarantees) represents the only Warranty given by Rinnai in
respect of the Product. No other person or organisation is authorised to oer any alternative warranty on
behalf of Rinnai.
3.3 If the date of purchase cannot be established to Rinnai’s satisfaction, the date shall be deemed to be 2
months after the date of manufacture or the date of sale by Rinnai, whichever is the latter.
3.4 This warranty applies to Products which are manufactured on or after the date of publication of this warranty
but before the next date of publication of this warranty.
4 EXCLUSIONS
4.1 This Warranty does NOT cover:
a) damage, problems or failure resulting from improper operation and/or inadequate maintenance by the
Purchaser (refer Purchaser’s Responsibilities section below);
b) damage, problems or failure resulting from improper or faulty installation. The Product must be installed
by a Qualied Installer in accordance with applicable regulations. Where applicable, Certicate(s)
of Compliance must be obtained by the purchaser from the Qualied Installer and presented to the
Authorised Service Representative;
c) damage, problems or failure caused by factors external to the Product including, but not limited to, faulty
or poor external electrical wiring, incorrect or faulty power supply, voltage uctuations, over voltage
transients or electromagnetic interference, inadequate or faulty gas, drainage services, or water services,
including water pressure, and non-potable water;
d) damage, problems or failure caused by acts of God, re, wind, lightning, ood, storm, hail storm fallout,
vandalism, earthquake, war, civil insurrection, misuse, abuse, negligence, accident, pests, animals, pets,
vermin, insects, spiders/bugs or entry of foreign objects or matter into the Product such as dirt, debris,
soot or moisture;
e) damage, problems or failure caused by environmental conditions including, but not limited to, excessive
moisture, salt or other corrosive substances or atmospheric conditions;
f) Product which has been installed in a portable or mobile building, structure or application including, but
not limited to, a caravan, boat or trailer;
g) Product which has been re-installed at a location other than the original site;
h) any consumable item supplied with the Product including, but not limited to, an air lter, battery, fan belt,
igniter or cooler pad;
i) installation of third-party components that may be attached to the Product. These include, but are
not limited to, control wiring, ducting, return air lter(s) grille, register, diuser, zone motors, controls/
thermostats, pipe work and fabricated or added components. These items remain solely the responsibility
of the Qualied Installer;
j) installations where electrics/electronics may be subjected to moisture/chemicals (e.g. swimming pools
or nurseries);
k) any repair, which is needed as a result of an accident, misuse, abuse or negligence;
l) Product that is utilised in an environment (indoor and outdoor) outside its specied operating range; and
m) fair wear and tear to the Product.
n) On-site labour warranty on portable (non-xed installation) Products – In respect of such Products the
Purchaser must return the Product to the supplier for repair or replacement).
TERMS OF WARRANTY – AUSTRALIA

Airo 19 Electric Panel Heater OIM
5 LIMITATIONS
5.1 Third parties are often involved in providing advice to consumers about the climate control solutions best
suited to the consumer’s needs. Any advice or recommendations given by such parties, including advice
about Product tness for purpose and overall system design, sizing and application are not the responsibility
of Rinnai. This includes but is not limited to the heat load calculations, airow and system balancing.
5.2 This Warranty does not apply to any Product installed at an Installation Site which is outside Australia.
5.3 Except where inconsistent with the purchaser’s statutory rights and the rights given by this Warranty, all
liabilities of Rinnai for any direct, special, indirect or consequential loss or damage, any damage or expense
for personal injury or any loss or destruction of property, arising directly or indirectly from the use or inability
to use the Product or any of its parts and/or servicing the Product, are expressly excluded.
6 TRAVEL, TRANSPORT & ACCESS COSTS
6.1 The Purchaser must pay freight charges, in-transit insurance expenses and travelling costs for repairs/
replacements under this Warranty, that are required to be performed 50km from the nearest Rinnai branch or
Authorised Service Representative.
6.2 Subject to clause 6.3, Rinnai will pay freight charges, in-transit insurance expenses and travelling costs for
repairs/replacements that are required to be performed less than 50km from the nearest Rinnai branch or
Authorised Service Representative, subject to the following:
a) Rinnai will arrange for such repairs/replacements and make any payment directly to the third party to
provide the freight, in-transit insurance or travel services; or
b) if Rinnai considers appropriate, it will authorise the Purchaser in writing to pay for the relevant freight
charges, in-transit insurance expenses or travelling costs and then, upon provision by the Purchaser to
Rinnai of a tax invoice showing those costs have been incurred, reimburse the Purchaser for such costs
which are within the terms of the authorisation. If the Purchaser pays for the relevant freight charges,
in-transit insurance expenses or travelling costs without written authorisation from Rinnai, Rinnai will not
reimburse the Purchaser for such costs.
6.3 The Purchaser must pay all costs and expenses in respect of:
a) any service call out fee if the Product is not accessible for service
b) making the Product accessible for service, for example, restricted access or working at heights, or the
labour cost for an additional person due to OHS requirements.
c) providing a safe working environment for installation, service, maintenance or repair of the Product;
d) any surcharge applicable in respect of supplying replacement parts outside Normal Business Hours; and
e) any other costs and expenses in relation to claiming the Warranty that is not covered by clause 6.2.
7 PURCHASER’S RESPONSIBILITIES
7.1 The Purchaser must operate and maintain the Product in accordance with the Operating Instructions and
service maintenance schedule, including conducting an appropriate number of services to the unit during the
Warranty period, based on usage and the usage environment including but not limited to;
a) regularly cleaning the air lter(s) and replacing them where necessary;
b) replacing expired batteries or other consumables as required;
c) ensuring that the condensate drain is kept clean and clear of obstructions.
HOW TO MAKE A WARRANTY CLAIM:
If you wish to make a warranty claim in respect of any Portable Product, please return it to the place of purchase,
or if that is not possible, contact Rinnai to enquire about alternative arrangements.
If you wish to make a warranty claim in respect of any xed Product, please contact Rinnai on the details set out
below to make arrangements for an Authorised Service Representative to inspect the product.
As per clause 2.6 of the Terms and Conditions of Warranty, purchasers are responsible for the costs of any repair
and/or call out fee where, on inspection, the alleged defect is found by Rinnai’s Authorised Service Representative
not to be covered by this warranty or any statutory consumer guarantee applicable to the Product.
The Terms and Conditions of Warranty contain important information about your rights and obligations under this
warranty. Please read them fully and carefully before making a claim.
TERMS OF WARRANTY – AUSTRALIA

Airo 20 Electric Panel Heater OIM Issue 1 - December 2020
CONTACTS
Rinnai Australia Pty Ltd
ABN 74 005 138 769 | AU45204
100 Atlantic Drive, Keysborough, Victoria 3173
P.O. Box 460, Braeside, Victoria 3195
Tel: (03) 9271 6625
Fax: (03) 9271 6622
National Help Line
Tel: 1300 555 545* Fax: 1300 555 655
Monday to Friday, 8.00 am to 5.00 pm EST.
*Cost of a local call higher from mobile or public phones.
For further information visit www.rinnai.com.au
or email [email protected]
Rinnai has a Service and Spare Parts network with
personnel who are fully trained and equipped to give
the best service on your Rinnai appliance. If your
appliance requires service, please call our National
Help Line.
With our policy of continuous improvement, we
reserve the right to change, or discontinue at any time,
specifications or designs without notice.