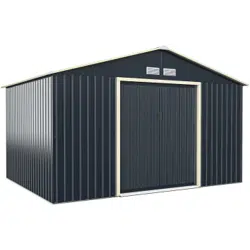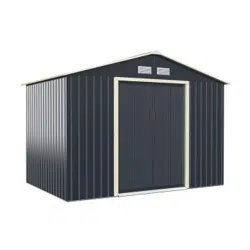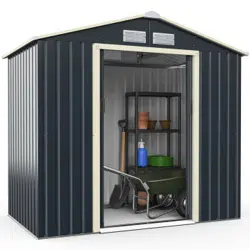

GT4195
Outdoor Storage Shed
Abri de Rangement pour l'Extérieur
If you're having difficulty, our friendly
customer team is always here to help.
USA office: Fontana
AUS:cs.au@costway.com
GBR:cs.uk@costway.com
FRA:cs.fr@costway.com
GBR office: FDS Corporation Limited,Unit 4, Blackacre Road, Great Blakenham,Ipswich, Ip6 0FL,United Kingdom
AUS office: Truganina FRA office: Saint Vigor d'Ymonville
THIS INSTRUCTION BOOKLET CONTAINS IMPORTANT SAFETY INFORMATION.
PLEASE READ AND KEEP FOR FUTURE REFERENCE.
Before You Start
Please read all instructions carefully.
Retain instructions for future reference.
Separate and count all parts and hardware.
Read through each step carefully and follow the proper order.
We recommend that, where possible, all items are assembled near to the area in
which they will be placed in use, to avoid moving the product unnecessarily once
assembled.
Always place the product on a flat, steady and stable surface.
Keep all small parts and packaging materials for this product away from babies
and children as they potentially pose a serious choking hazard.
FR
Veuillez lire attentivement toutes les instructions.
Conservez les instructions pour vous y référer ultérieurement.
Vérifiez toutes les pièces et les accessoires.
Lisez attentivement chaque étape et suivez l'ordre correct.
Nous recommandons que, dans la mesure du possible, tous les produits
soient assemblés à proximité de la zone où ils seront utilisés, afin d'éviter tout
déplacement inutile du produit une fois assemblé.
Placez toujours le produit sur une surface plane et stable.
Conservez toutes les petites pièces de ce produit et les matériaux d'emballage
hors de portée des bébés et des enfants, car ils pourraient présenter un risque
d'étouffement.
Avant de Commencer
EN
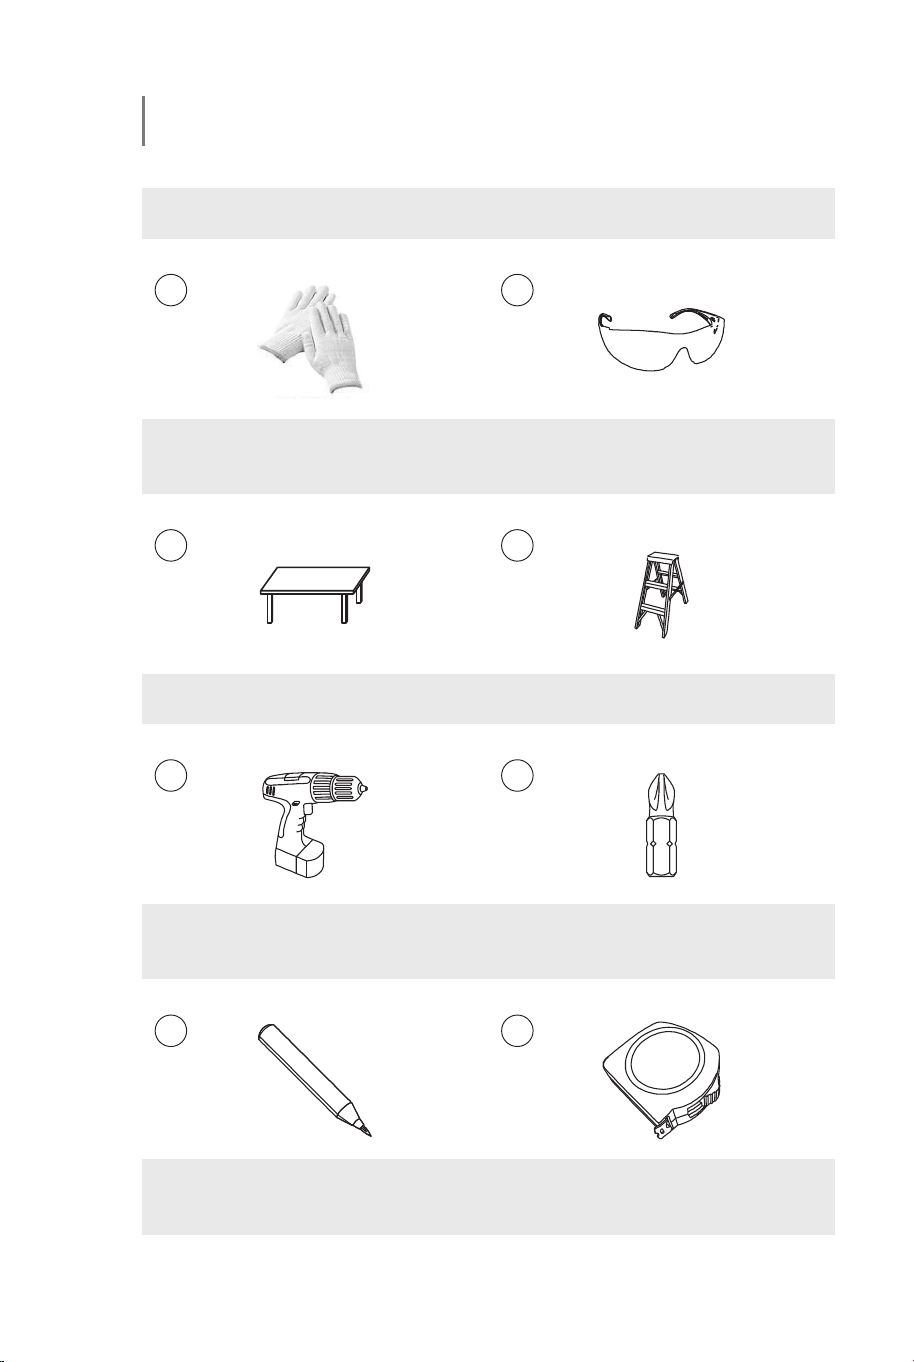
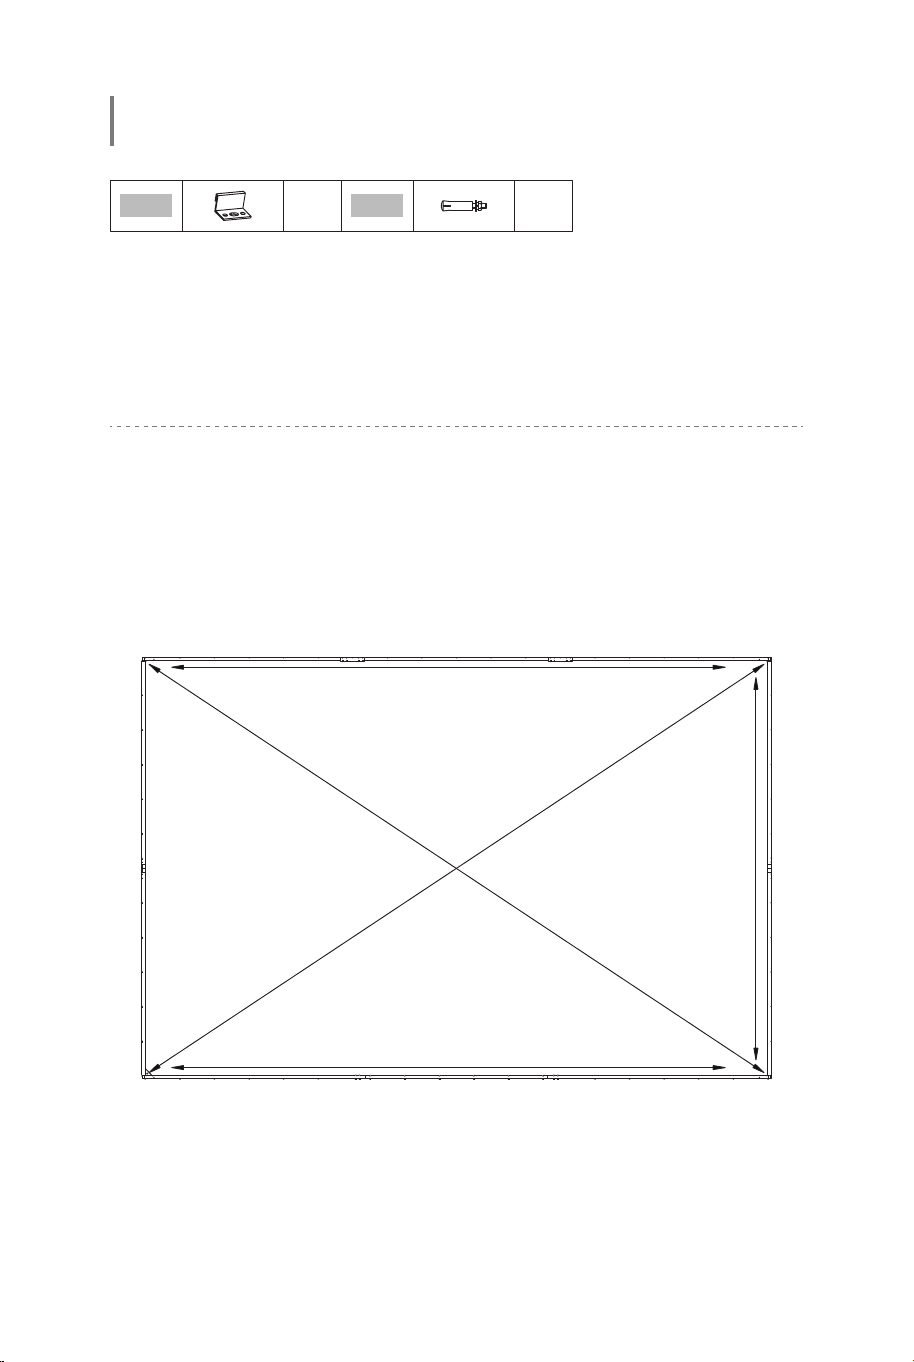
Required tools /Outils nécessaires :
5 6
Power drill
/Perceuse électrique
Screw drive
/Tournevis
x 1 x 2
7 8
Pencil
/Crayon
Tape Measure
/Ruban à mesurer
x 2 x 3
1 2
Gloves
/Gants
Safety Glasses
/Lunettes de sécurité
x 1 x 1
3 4
Table /Table Ladder /Échelle
x 1 x 1
Tools /Outils
02 03
Before You Start
Please read all instructions carefully.
Retain instructions for future reference.
Separate and count all parts and hardware.
Read through each step carefully and follow the proper order.
We recommend that, where possible, all items are assembled near to the area in
which they will be placed in use, to avoid moving the product unnecessarily once
assembled.
Always place the product on a flat, steady and stable surface.
Keep all small parts and packaging materials for this product away from babies
and children as they potentially pose a serious choking hazard.
FR
Veuillez lire attentivement toutes les instructions.
Conservez les instructions pour vous y référer ultérieurement.
Vérifiez toutes les pièces et les accessoires.
Lisez attentivement chaque étape et suivez l'ordre correct.
Nous recommandons que, dans la mesure du possible, tous les produits
soient assemblés à proximité de la zone où ils seront utilisés, afin d'éviter tout
déplacement inutile du produit une fois assemblé.
Placez toujours le produit sur une surface plane et stable.
Conservez toutes les petites pièces de ce produit et les matériaux d'emballage
hors de portée des bébés et des enfants, car ils pourraient présenter un risque
d'étouffement.
Avant de Commencer
EN
Required tools /Outils nécessaires :
5 6
Power drill
/Perceuse électrique
Screw drive
/Tournevis
x 1 x 2
7 8
Pencil
/Crayon
Tape Measure
/Ruban à mesurer
x 2 x 3
1 2
Gloves
/Gants
Safety Glasses
/Lunettes de sécurité
x 1 x 1
3 4
Table /Table Ladder /Échelle
x 1 x 1
Tools /Outils
02 03

Tips /Conseils :
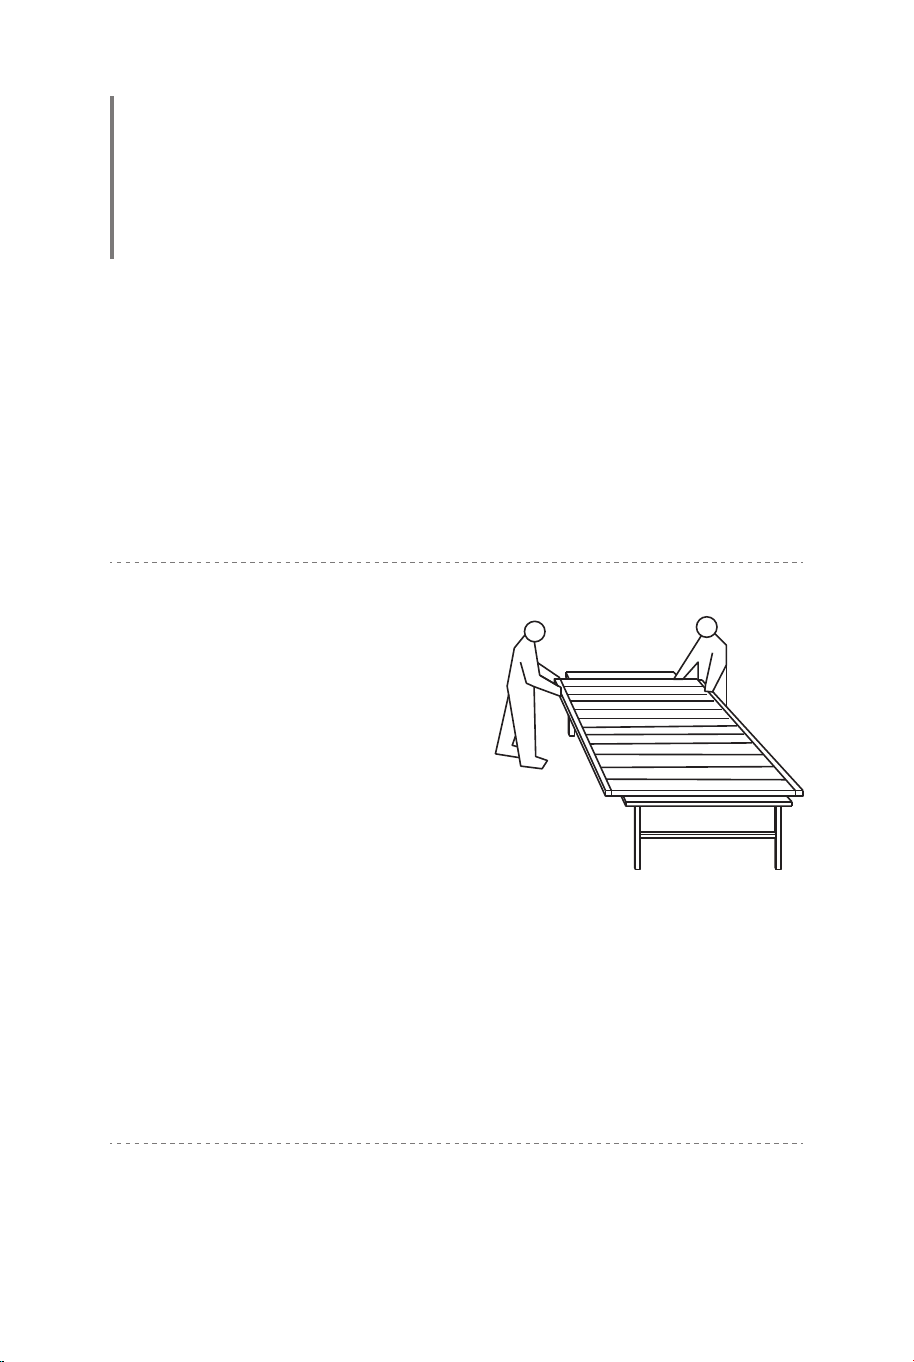
1. Clear a working area to allow access on 4 sides. A raised work
surface will make assembly easier,It is easier to install the wall panel
on the table.
2. All parts are identified so when working through the instructions
page by page the diagrams show where each part is positioned.
3. Most pre-punched holes need to be fixed with self-tapping
screws,and a few holes need to use self-drilling screws.
4. Before starting, to avoid any accidental injury, we recommend the
use of gloves to protect your hands, safety glasses to protect your
eyes and shoes or boots to protect your feet.
5. Please keep children away from your construction site.
6. Most assembly can be completed by one person, assistance may
be needed when you reach the erection stage.
7. Please note: Some local government authorities have rules &
regulations on shed installation and you may need approval to erect
this shed.
1. Dégagez un espace de travail pour permettre l'accès sur les 4
côtés. Une surface de travail surélevée facilitera l'assemblage, il est
plus facile d'installer le panneau mural sur la table.
2. Toutes les pièces sont identifiées, de sorte que lorsque vous lisez
les instructions page par page, les diagrammes indiquent la position
de chaque pièce.
3. La plupart des trous pré-perforés doivent être fixés à l'aide de vis
autotaraudeuses, et quelques trous doivent être fixés à l'aide de vis
autoperceuses.
4 Avant de commencer, pour éviter toute blessure accidentelle, nous
vous recommandons de porter des gants pour protéger vos mains,
des lunettes de sécurité pour protéger vos yeux et des chaussures ou
des bottes pour protéger vos pieds.
5. Veuillez tenir les enfants à l'écart de votre chantier de construction.
6. la plupart des opérations d'assemblage peuvent être réalisées par
une seule personne, mais une assistance peut être nécessaire
lorsque vous atteignez le stade de l'érection.
7. Veuillez noter que certaines autorités locales ont des règles et des
réglementations concernant l'installation des cabanons et qu'il se peut
que vous ayez besoin d'une autorisation pour ériger ce cabanon.
Steps /Étapes:
1. Unpack all components from the carton and lay outside your work
area and check parts against the part list.
2. Work through assembly instructions page by page.
3. When assembly completed, place the shed in position and fix
anchor to the ground.
4. Clean up all metal pieces and screws.
1. Déballez tous les composants du carton et placez-les à l'extérieur
de votre zone de travail, puis vérifiez les pièces par rapport à la liste
des pièces.
2. Lisez les instructions d'assemblage page par page.
3. Une fois l'assemblage terminé, placez l'abri en position et fixez
l'ancrage au sol.
4. Nettoyez toutes les pièces métalliques et les vis.
04 05

Tips /Conseils :
1. Clear a working area to allow access on 4 sides. A raised work
surface will make assembly easier,It is easier to install the wall panel
on the table.
2. All parts are identified so when working through the instructions
page by page the diagrams show where each part is positioned.
3. Most pre-punched holes need to be fixed with self-tapping
screws,and a few holes need to use self-drilling screws.
4. Before starting, to avoid any accidental injury, we recommend the
use of gloves to protect your hands, safety glasses to protect your
eyes and shoes or boots to protect your feet.
5. Please keep children away from your construction site.
6. Most assembly can be completed by one person, assistance may
be needed when you reach the erection stage.
7. Please note: Some local government authorities have rules &
regulations on shed installation and you may need approval to erect
this shed.
1. Dégagez un espace de travail pour permettre l'accès sur les 4
côtés. Une surface de travail surélevée facilitera l'assemblage, il est
plus facile d'installer le panneau mural sur la table.
2. Toutes les pièces sont identifiées, de sorte que lorsque vous lisez
les instructions page par page, les diagrammes indiquent la position
de chaque pièce.
3. La plupart des trous pré-perforés doivent être fixés à l'aide de vis
autotaraudeuses, et quelques trous doivent être fixés à l'aide de vis
autoperceuses.
4 Avant de commencer, pour éviter toute blessure accidentelle, nous
vous recommandons de porter des gants pour protéger vos mains,
des lunettes de sécurité pour protéger vos yeux et des chaussures ou
des bottes pour protéger vos pieds.
5. Veuillez tenir les enfants à l'écart de votre chantier de construction.
6. la plupart des opérations d'assemblage peuvent être réalisées par
une seule personne, mais une assistance peut être nécessaire
lorsque vous atteignez le stade de l'érection.
7. Veuillez noter que certaines autorités locales ont des règles et des
réglementations concernant l'installation des cabanons et qu'il se peut
que vous ayez besoin d'une autorisation pour ériger ce cabanon.
Steps /Étapes:
1. Unpack all components from the carton and lay outside your work
area and check parts against the part list.
2. Work through assembly instructions page by page.
3. When assembly completed, place the shed in position and fix
anchor to the ground.
4. Clean up all metal pieces and screws.
1. Déballez tous les composants du carton et placez-les à l'extérieur
de votre zone de travail, puis vérifiez les pièces par rapport à la liste
des pièces.
2. Lisez les instructions d'assemblage page par page.
3. Une fois l'assemblage terminé, placez l'abri en position et fixez
l'ancrage au sol.
4. Nettoyez toutes les pièces métalliques et les vis.
04 05
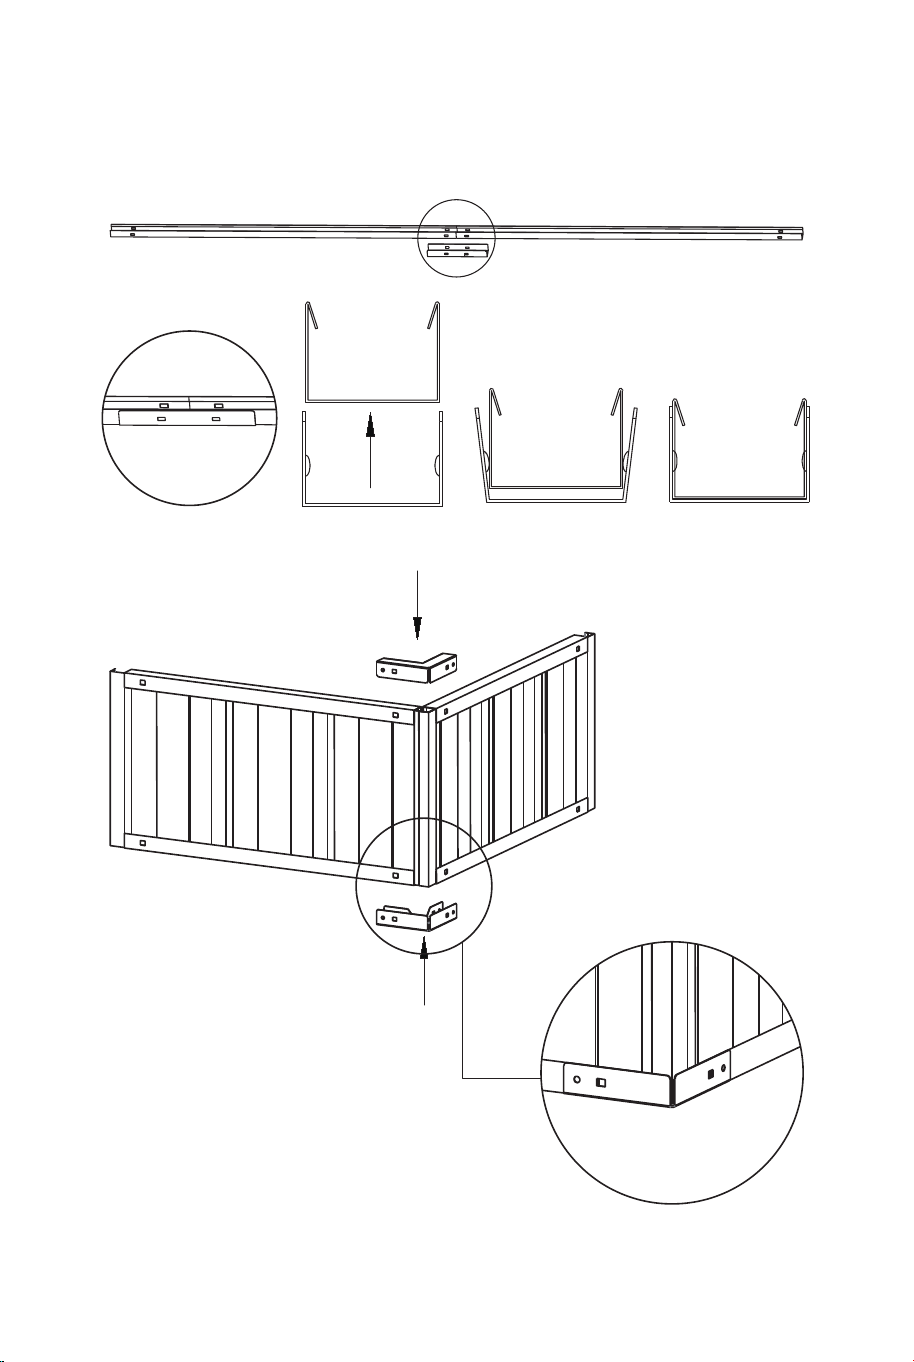
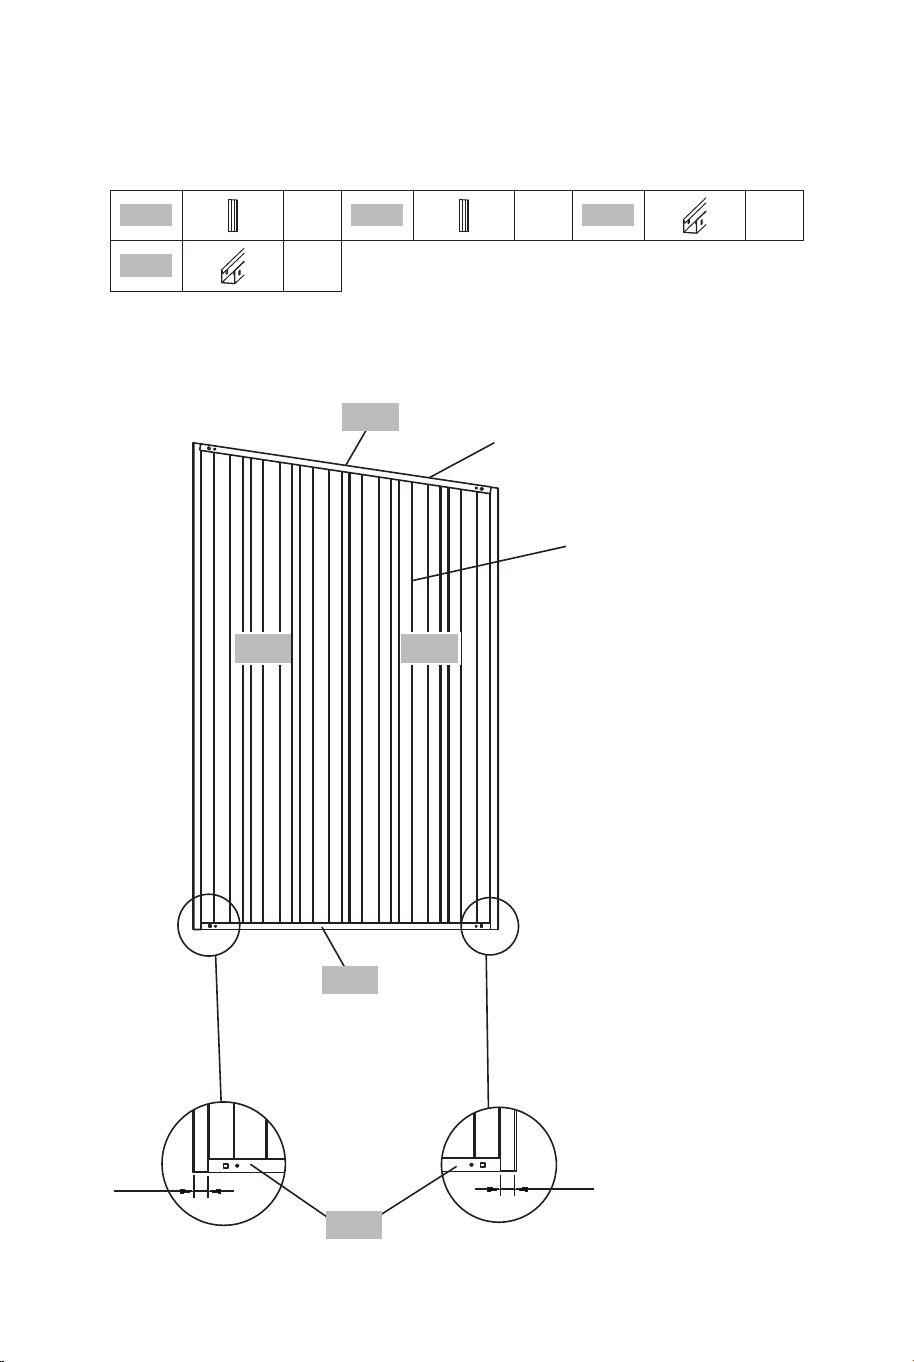
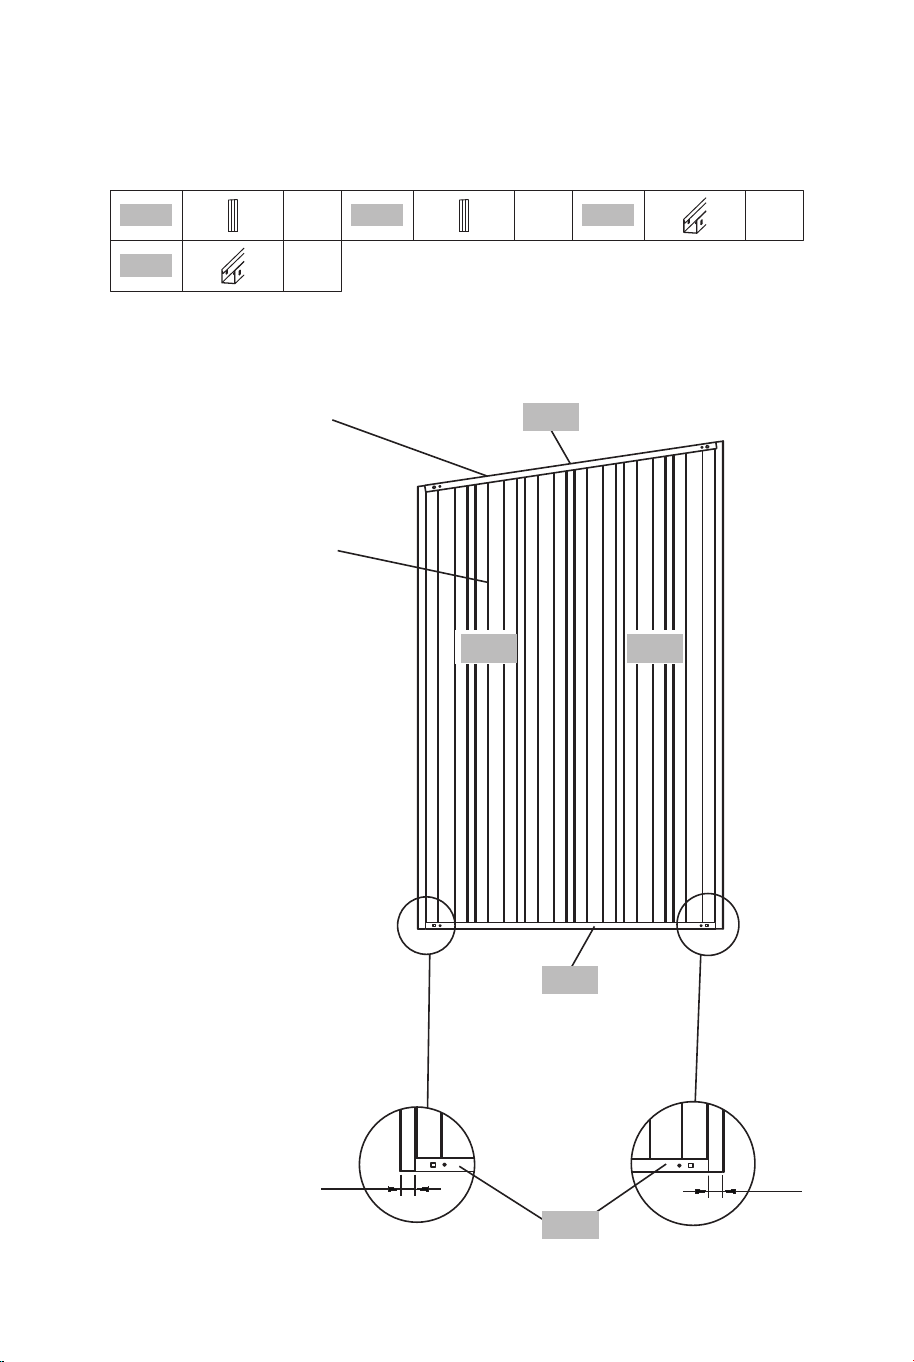
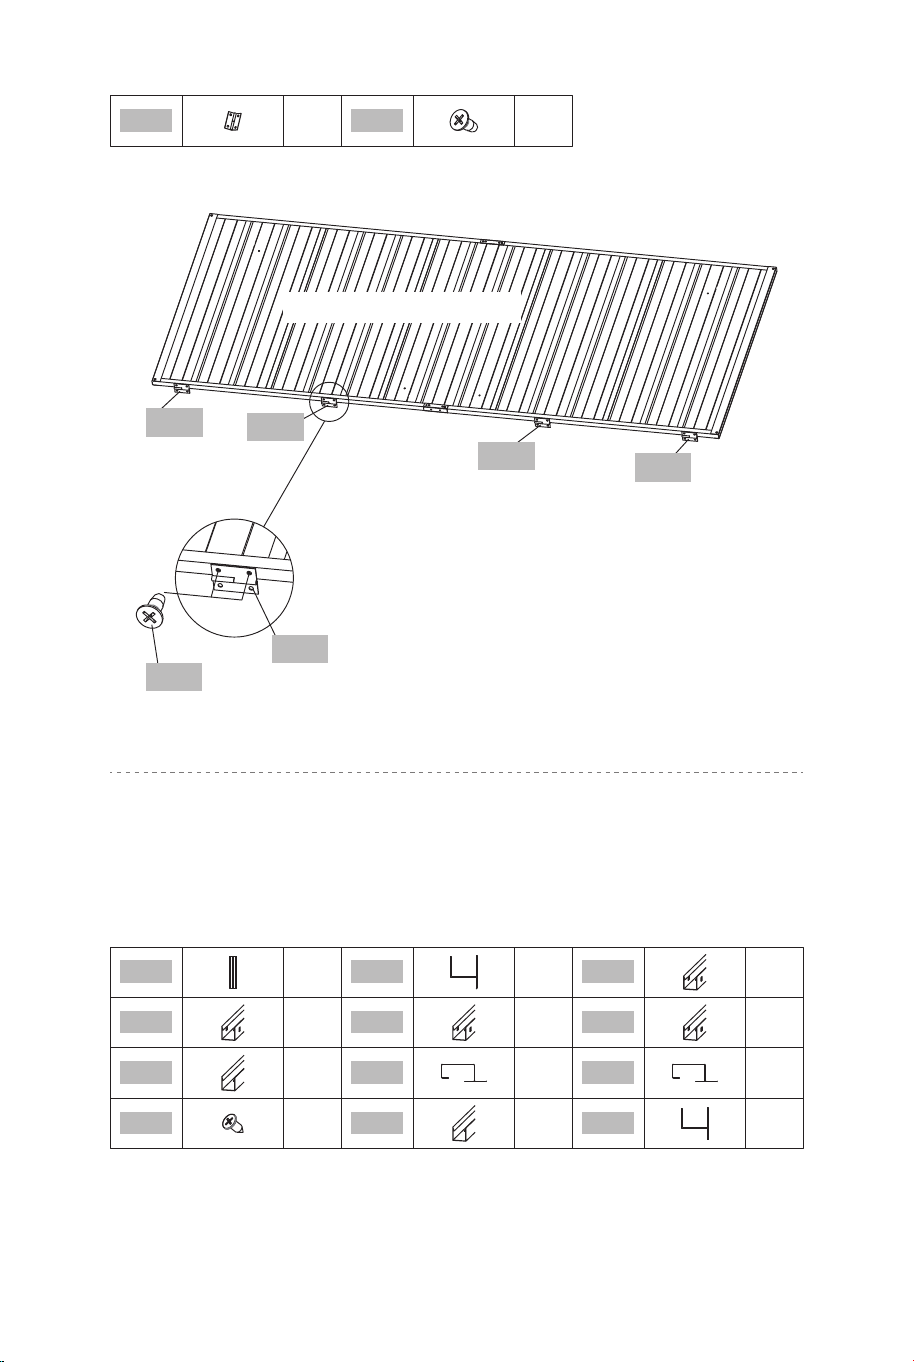
BEFORE YOU START - HOW PANELS
ARE JOINED
/AVANT DE COMMENCER - COMMENT
LES PANNEAUX SONT ASSEMBLÉS
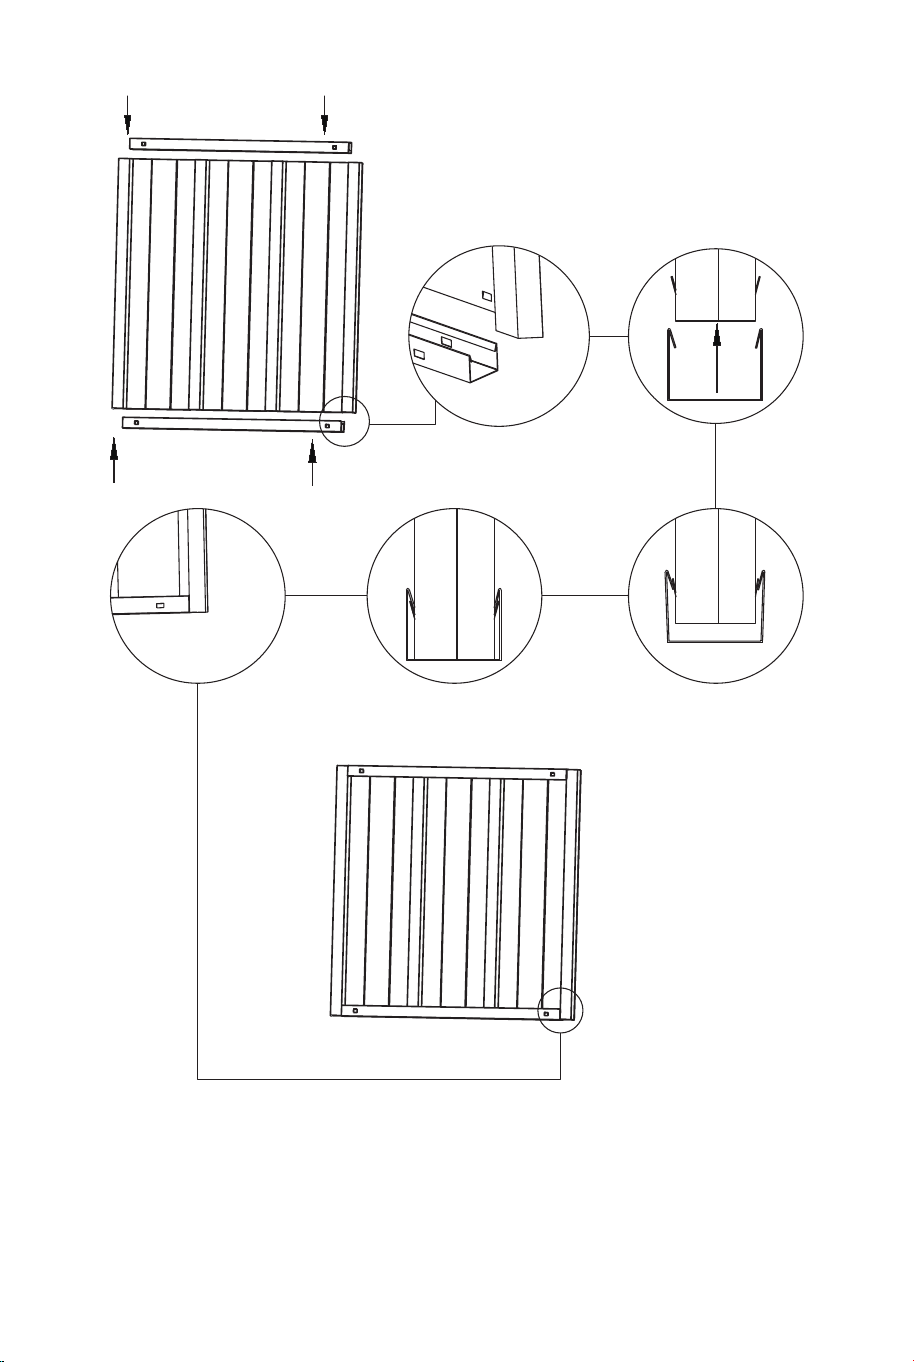
Position the U channel over one end of the joined sheets, working
from one end push channel down to clip onto sheets, and continue to
the end of the channel pushing as you go.
/Placez le profilé en U sur l'une des extrémités des feuilles jointes, en
commençant par une extrémité, poussez le profilé vers le bas pour le
clipser sur les feuilles, et continuez jusqu'à l'extrémité du profilé en
poussant au fur et à mesure.
If you need to remove U channels from the panels, pull the channel
along the panel from opposing ends. You may need someone to help
with this.
/Si vous devez retirer les profilés en U des panneaux, tirez le profilé le
long du panneau à partir des extrémités opposées. Il se peut que
vous ayez besoin de l'aide d'une autre personne.
A raised platform will make
assembly easier
/Une plate-forme surélevée
facilitera l'assemblage.
A raised
platform will
make assembly
easier
/Une
plate-forme
surélevée
facilitera
l'assemblage.
PUSH
06 07
BEFORE YOU START - HOW PANELS
ARE JOINED
/AVANT DE COMMENCER - COMMENT
LES PANNEAUX SONT ASSEMBLÉS
Position the U channel over one end of the joined sheets, working
from one end push channel down to clip onto sheets, and continue to
the end of the channel pushing as you go.
/Placez le profilé en U sur l'une des extrémités des feuilles jointes, en
commençant par une extrémité, poussez le profilé vers le bas pour le
clipser sur les feuilles, et continuez jusqu'à l'extrémité du profilé en
poussant au fur et à mesure.
If you need to remove U channels from the panels, pull the channel
along the panel from opposing ends. You may need someone to help
with this.
/Si vous devez retirer les profilés en U des panneaux, tirez le profilé le
long du panneau à partir des extrémités opposées. Il se peut que
vous ayez besoin de l'aide d'une autre personne.
A raised platform will make
assembly easier
/Une plate-forme surélevée
facilitera l'assemblage.
A raised
platform will
make assembly
easier
/Une
plate-forme
surélevée
facilitera
l'assemblage.
PUSH
06 07
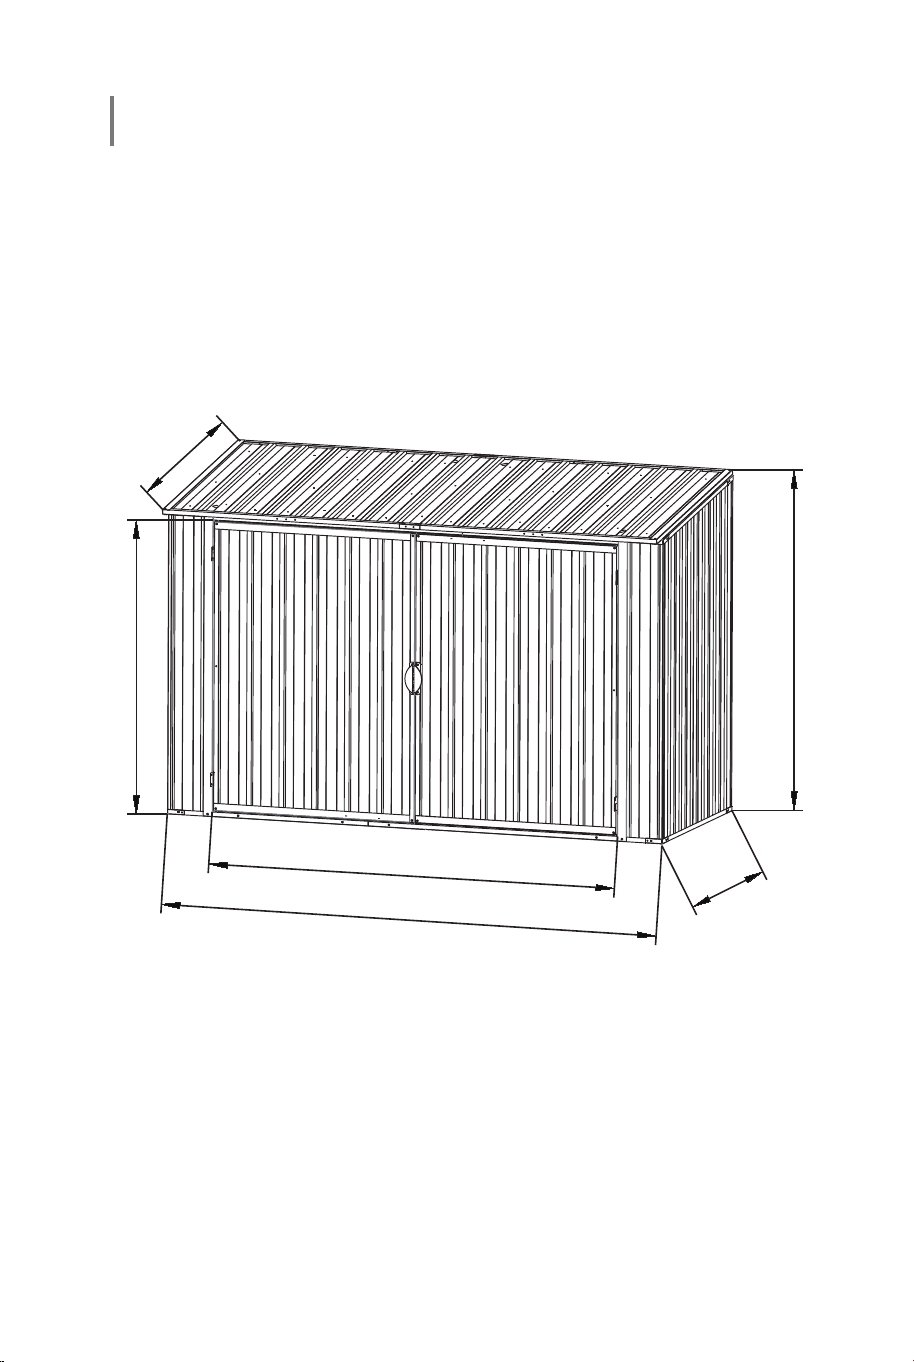
Size Drawing /Schéma des Dimensions
HOW TO JOIN CHANNELS (where needed)
/COMMENT JOINDRE LES CANALISATIONS (si nécessaire)
CHANNEL
/CANAL
CHANNEL
/CANAL
CHANNEL
/CANAL
2.5'
5.1'
6.3'
4.1'
3.7'
2.6'
08 09
Size Drawing /Schéma des Dimensions
HOW TO JOIN CHANNELS (where needed)
/COMMENT JOINDRE LES CANALISATIONS (si nécessaire)
CHANNEL
/CANAL
CHANNEL
/CANAL
CHANNEL
/CANAL
2.5'
5.1'
6.3'
4.1'
3.7'
2.6'
08 09
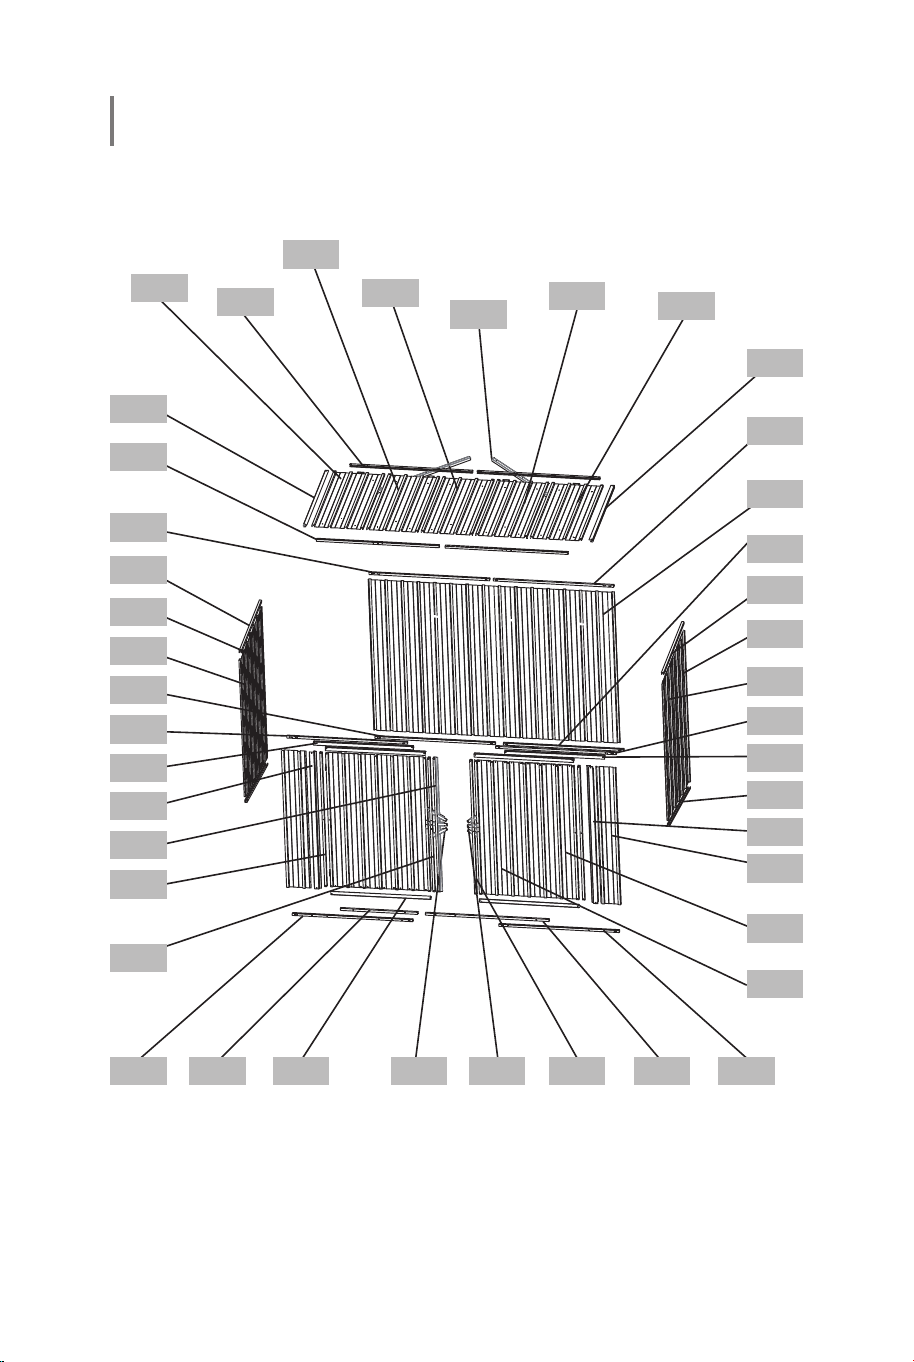
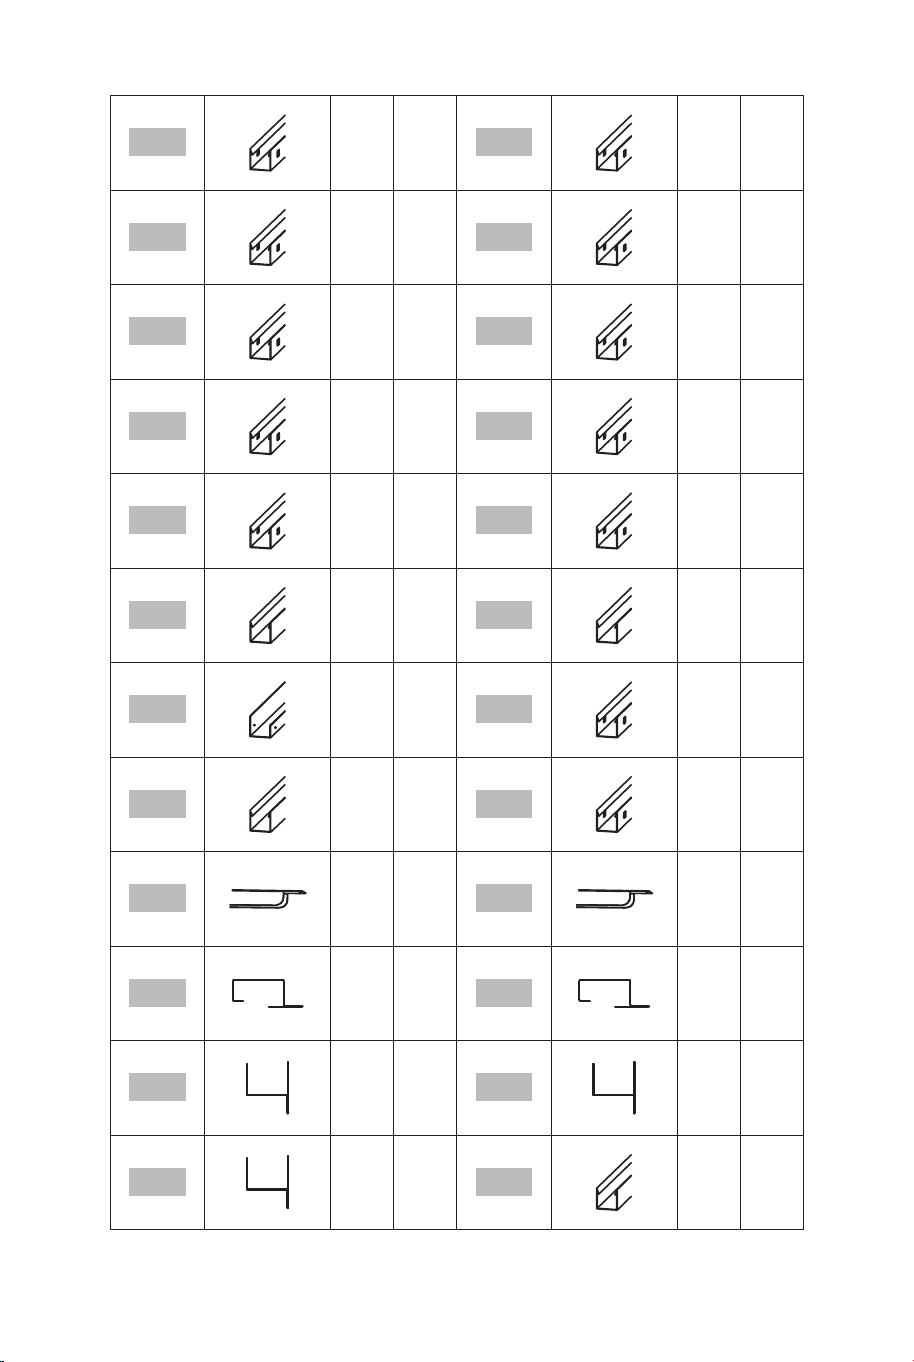
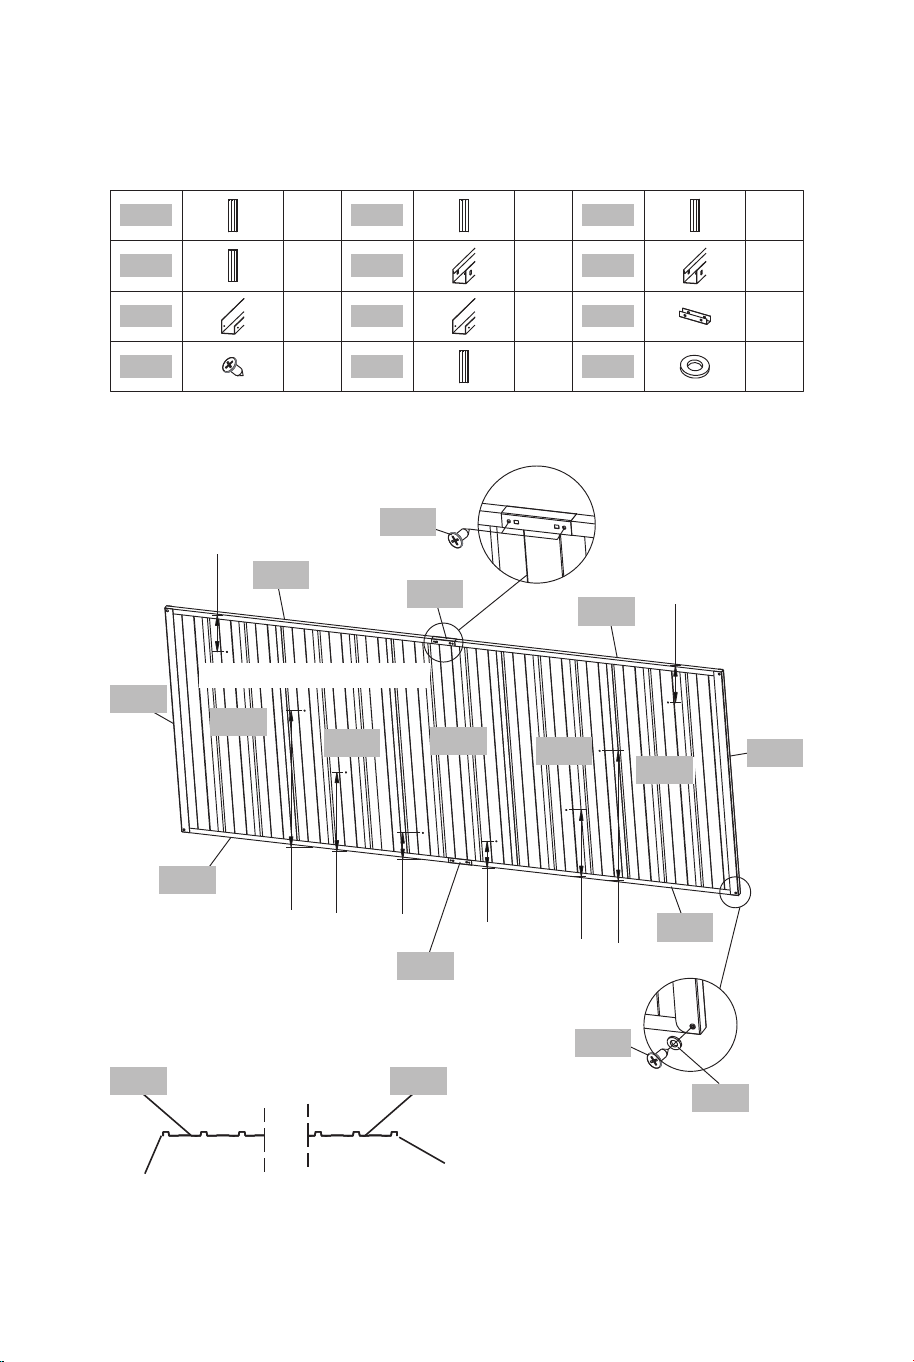
Exploded drawing /Figure éclatée Part List /Liste des Pièces
TP1
TF7
TF3
UF1
UF6
P7
P6
BF1
UF5
T3
T1
T5
DF2
DF3
BF4 BF5 DF1 DF4 DF5 DF6 BF6 BF3
TF1
TP2
TP3
TF5
TP5
TP4
TF6
UF2
P1
BF7
UF3
P2
P3
UF4
T4
BF2
T2
P4
DP1
DP2
x2
x2
x5
x2
x2
x2
x2
x4 x4 x2
x2
x2
x1
TP1
x1
TP2
x1
TP3
x1
TP4
x5
P1
x1
P2
x1
P3
x1
P6
x1
P7
x2
P4
x2
DP2
x2
DP1
x1
TP5
x2
TF3
x1
DF6
x2
TF5
x1
TF6
x1
TF7
10 11
x1
UF1
x1
UF2
x1
UF3
x1
UF4
x1
UF5
x1
UF6
x1
BF1
x2
BF2
x1
BF3
x1
BF4
x1
BF5
x1
BF6
x4
DF1
x2
DF2
x1
DF3
x2
TF1
x4
DF4
x2
DF5
x1
T1
x1
T2
x1
T4
x1
T3
x1
T5
x1
BF7
x4
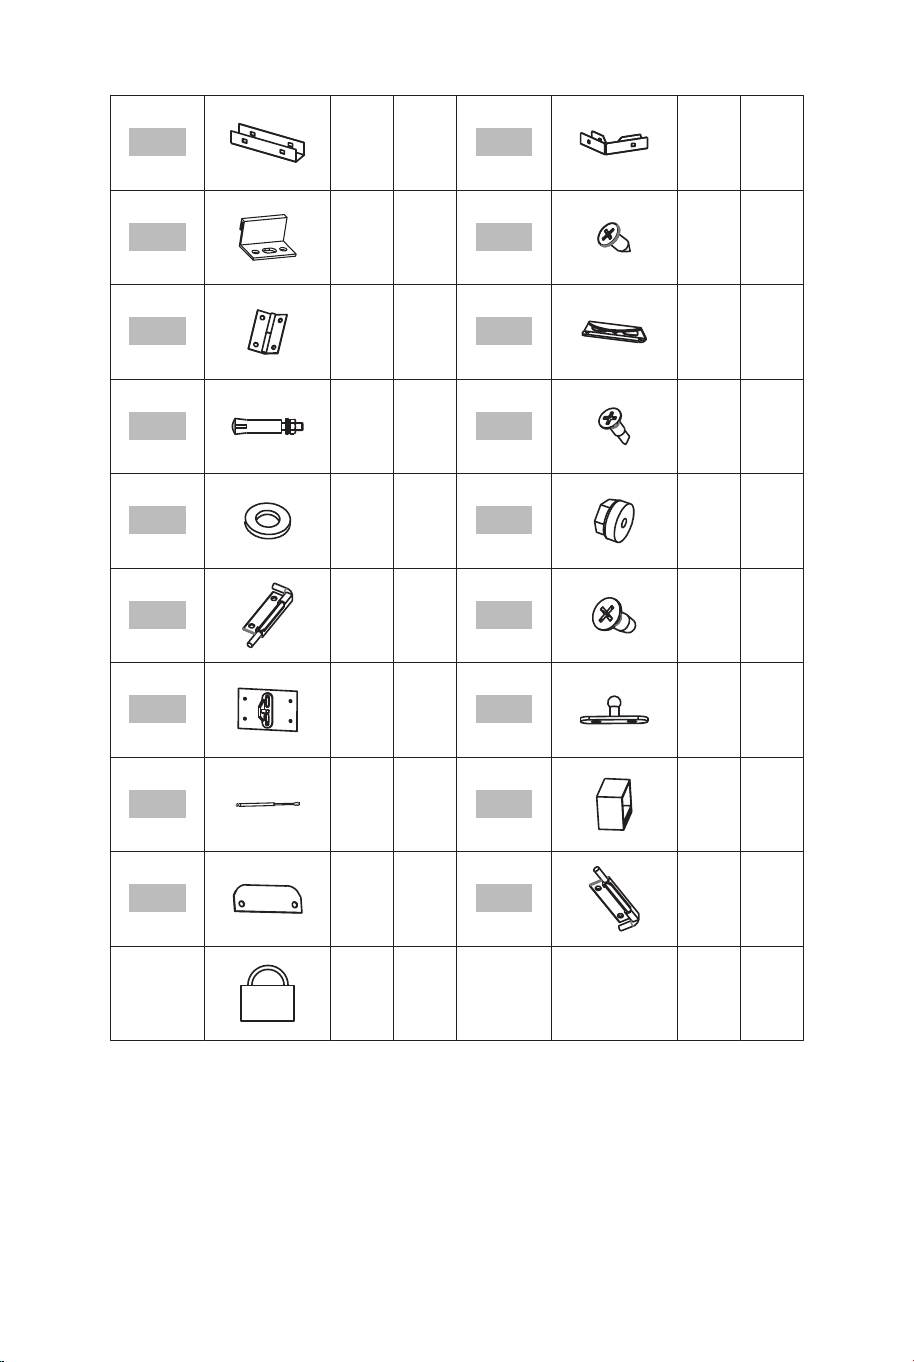
EJ1
x8
EG1
x6
C7
x110
S18
x8
SH3
x2
EH1
x6
S11
x4
S16
x38
S5
x16
L3
x1
H3
x32
S19
x2
01
x2
GS2
x2
GS3
x4
L1
x1
ED3
x1
H2
x1LOCK
12 13
x1
UF1
x1
UF2
x1
UF3
x1
UF4
x1
UF5
x1
UF6
x1
BF1
x2
BF2
x1
BF3
x1
BF4
x1
BF5
x1
BF6
x4
DF1
x2
DF2
x1
DF3
x2
TF1
x4
DF4
x2
DF5
x1
T1
x1
T2
x1
T4
x1
T3
x1
T5
x1
BF7
x4
EJ1
x8
EG1
x6
C7
x110
S18
x8
SH3
x2
EH1
x6
S11
x4
S16
x38
S5
x16
L3
x1
H3
x32
S19
x2
01
x2
GS2
x2
GS3
x4
L1
x1
ED3
x1
H2
x1LOCK
12 13
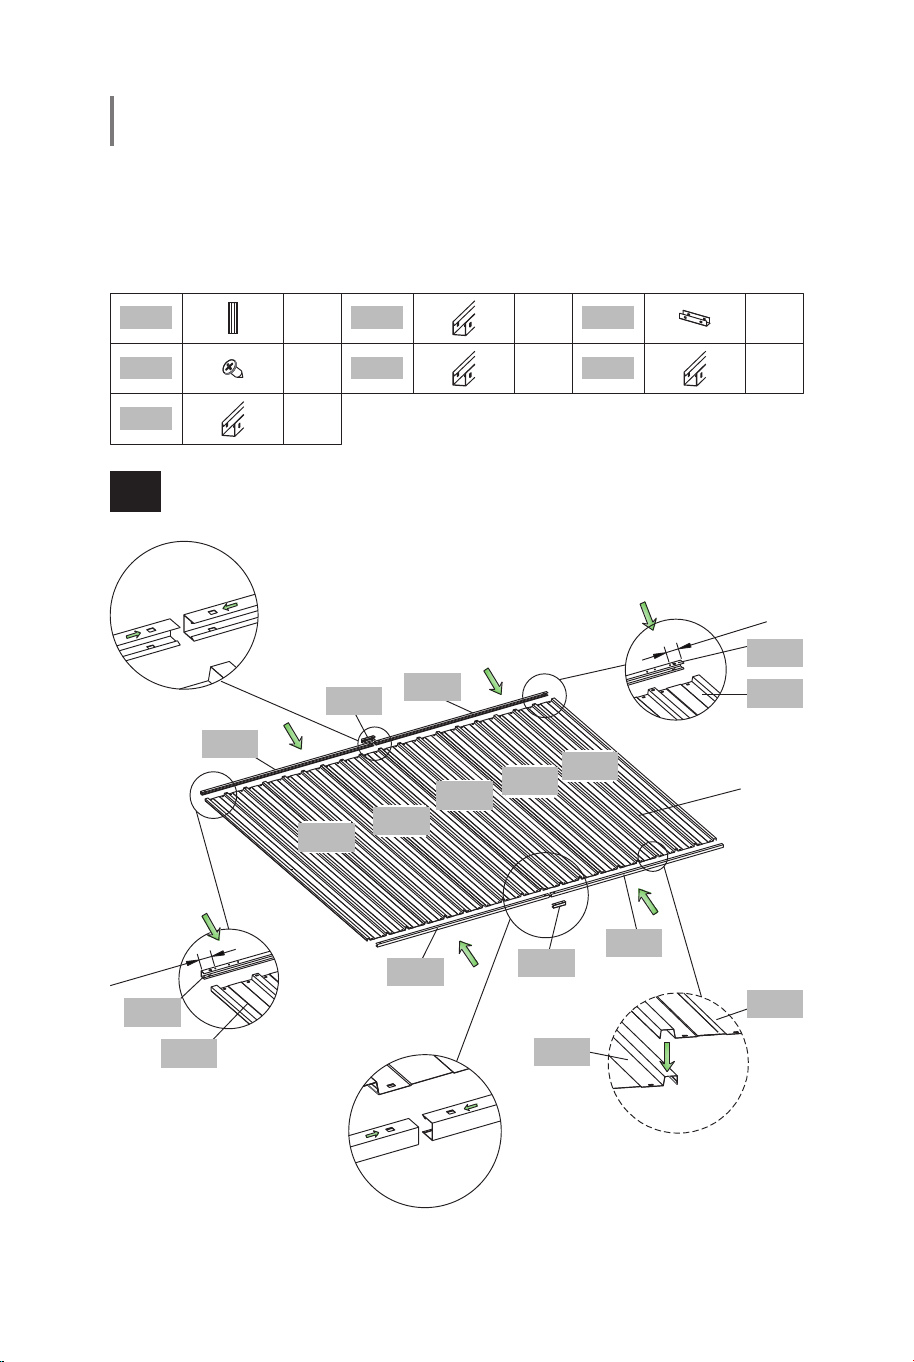
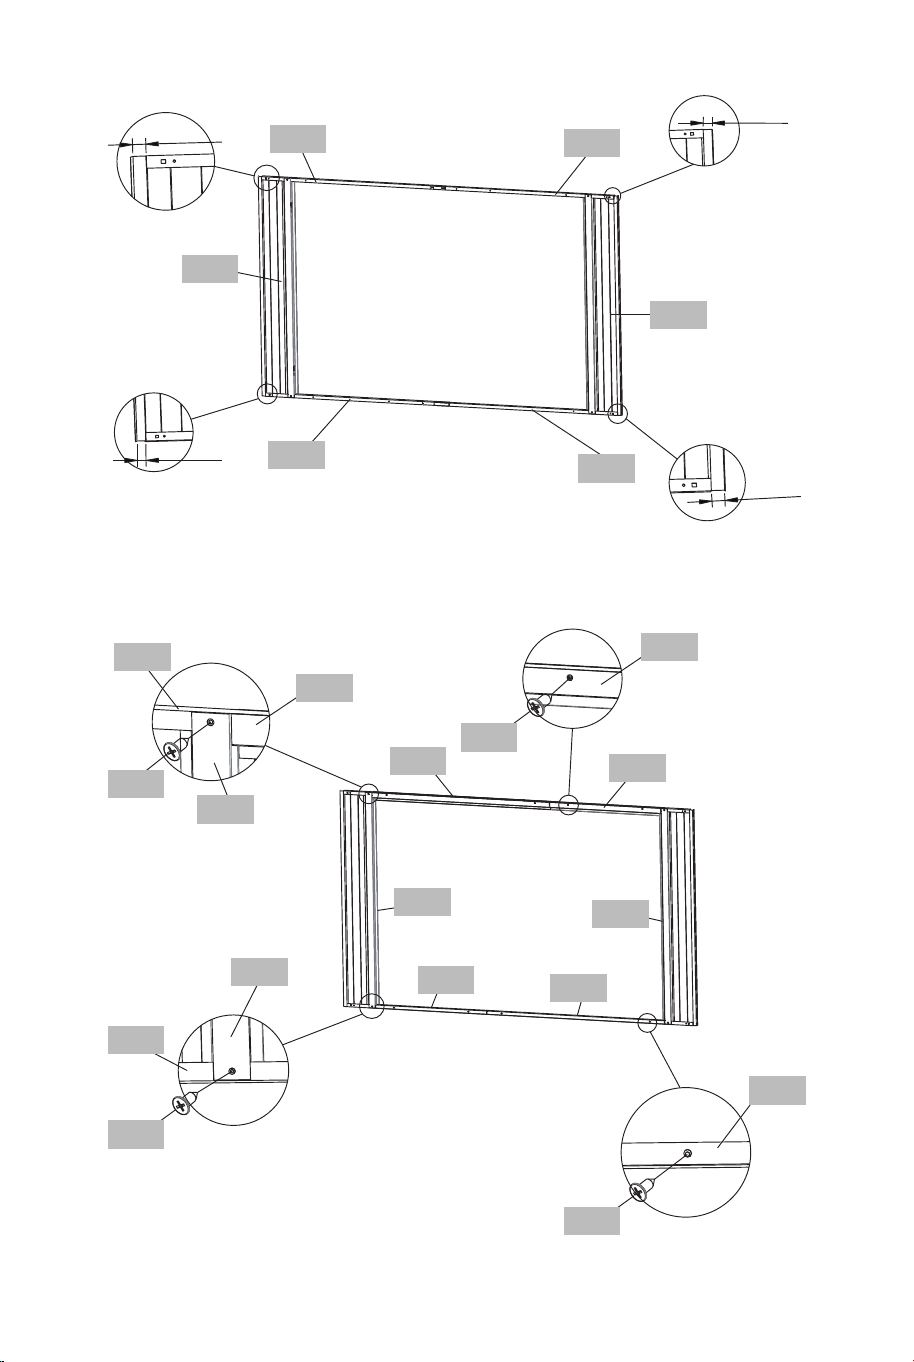
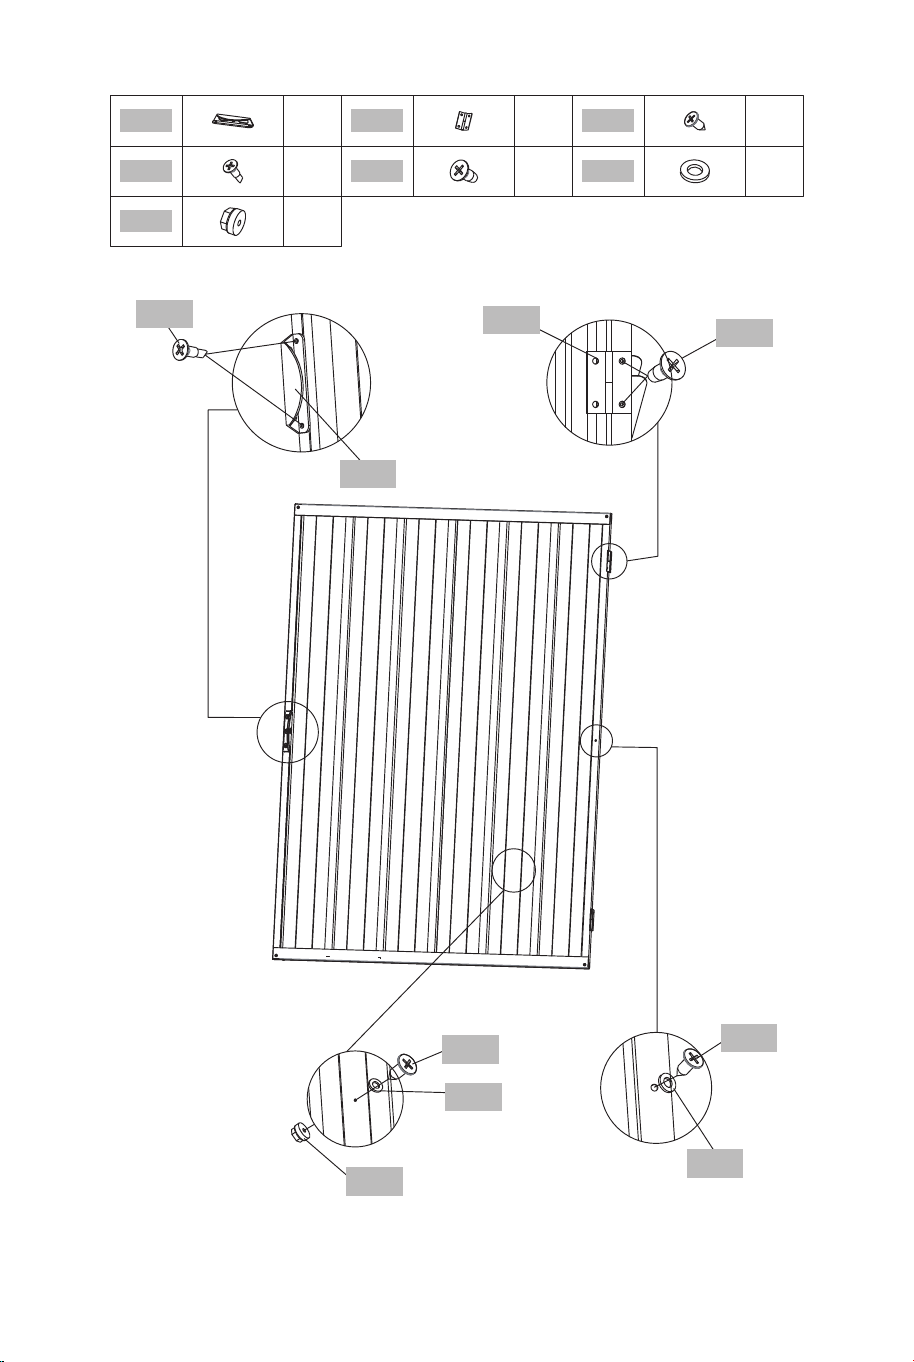
Wall Assembly /Assemblage Mural
Rear Wall Assembly
/Assemblage de la Paroi Arrière
x2
EJ1
x1
UF1
x5
P1
x1
BF1
x1
BF7
x4
S18
x1
UF2
1
2
UF2
P1
3
7
.
5
m
m
BF7
P1
P1
P1
P1
P1
UF2
EJ1
UF1
EJ1
BF1
P1
P1
P1
UF1
3
7
.
5
m
m
Make sure the arrow labels opposite.
/Assurez-vous que les étiquettes
fléchées sont opposées.
Colorside
/Côté coloré
Make sure the arrow
labels opposite.
/Assurez-vous que les
étiquettes
fléchées sont opposées.
1
8
m
m
1
8
m
m
1
8
m
m
S18
BF1
BF7
S18
UF1
UF2
Upside /Haut
14 15
x1
BF2
x1
P6
x1
P7
x1
UF6
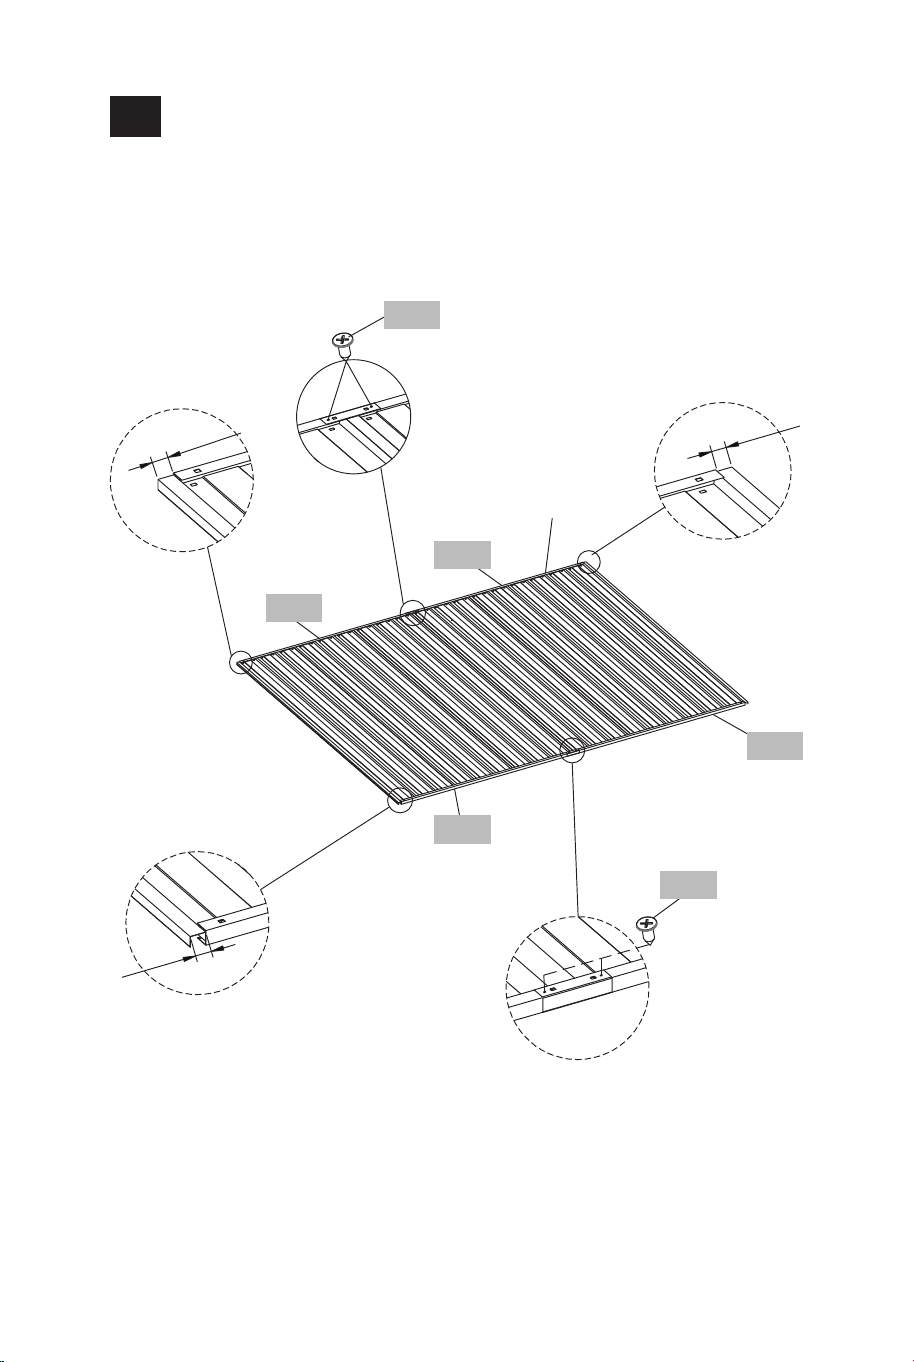
Left Wall Assembly
/Assemblage de la paroi gauche
Right Wall Assembly
/Assemblage du mur droit
x1
BF2
x1
P2
x1
P3
x1
UF3
18mm 18mm
BF2
BF2
UF6
P7 P6
Facing inward with mounting holes
/Face vers l'intérieur avec les trous
de montage
Colorside
/Côté coloré
18mm 18mm
BF2
BF2
UF3
P3 P2
Facing inward with mounting holes
/Face vers l'intérieur avec les trous
de montage
Colorside
/Côté coloré
16 17
x1
BF2
x1
P6
x1
P7
x1
UF6
Left Wall Assembly
/Assemblage de la paroi gauche
Right Wall Assembly
/Assemblage du mur droit
x1
BF2
x1
P2
x1
P3
x1
UF3
18mm 18mm
BF2
BF2
UF6
P7 P6
Facing inward with mounting holes
/Face vers l'intérieur avec les trous
de montage
Colorside
/Côté coloré
18mm 18mm
BF2
BF2
UF3
P3 P2
Facing inward with mounting holes
/Face vers l'intérieur avec les trous
de montage
Colorside
/Côté coloré
16 17
x1
TP3
x1
TP2
x1
TP1
x2
TF3
x2
TF1
x1
TP4
x2
EJ1
x1
TF7
x1
TF6
x8
S5
x1
TP5
x8
S18
x4
L1
x2
TF5
x2
01
x8
S5
x20
S18
x8
L3
Roof Door Assembly
/Assemblage de la porte du toit
468mm
342mm
90mm
90mm
342mm
468mm
140mm
140mm
TF3
EJ1
S18
TF3
TF6
TF7
S5
S18
TF1
EJ1
TF1
TP4
TP5
TP3
TP2
TP1
TP4 TP1
Right angled side
/Côté à angle droit
Right angled side
/Côté à angle droit
Colorside /Côté coloré
L1 TF5 L1
L3
S18
S5
L3
S18
S5
01
TF5
TF5
S18
S5
Point to outside /Point vers l'extérieur
18 19
x1
TP3
x1
TP2
x1
TP1
x2
TF3
x2
TF1
x1
TP4
x2
EJ1
x1
TF7
x1
TF6
x8
S5
x1
TP5
x8
S18
x4
L1
x2
TF5
x2
01
x8
S5
x20
S18
x8
L3
Roof Door Assembly
/Assemblage de la porte du toit
468mm
342mm
90mm
90mm
342mm
468mm
140mm
140mm
TF3
EJ1
S18
TF3
TF6
TF7
S5
S18
TF1
EJ1
TF1
TP4
TP5
TP3
TP2
TP1
TP4 TP1
Right angled side
/Côté à angle droit
Right angled side
/Côté à angle droit
Colorside /Côté coloré
L1 TF5 L1
L3
S18
S5
L3
S18
S5
01
TF5
TF5
S18
S5
Point to outside /Point vers l'extérieur
18 19
x8
S19
x4
SH3
Colorside /Côté coloré
SH3
SH3
SH3
SH3
SH3
S19
x1
UF5
x1
T4
x2
P4
x1
BF3
x1
BF4
x1
UF4
x1
T2
x1
T1
x1
BF6
x1
T3
x1
BF5
x14
S18
Front Wall Assembly
/Assemblage de la paroi avant
18mm
18mm
18mm
18mm
BF3
BF4
P4
UF4
UF5
P4
T4
S18
T3
T3
UF5
S18
T1
T1
BF4
S18
BF6
S18
BF6
T2
T1
BF5
T4
20 21
x8
S19
x4
SH3
Colorside /Côté coloré
SH3
SH3
SH3
SH3
SH3
S19
x1
UF5
x1
T4
x2
P4
x1
BF3
x1
BF4
x1
UF4
x1
T2
x1
T1
x1
BF6
x1
T3
x1
BF5
x14
S18
Front Wall Assembly
/Assemblage de la paroi avant
18mm
18mm
18mm
18mm
BF3
BF4
P4
UF4
UF5
P4
T4
S18
T3
T3
UF5
S18
T1
T1
BF4
S18
BF6
S18
BF6
T2
T1
BF5
T4
20 21
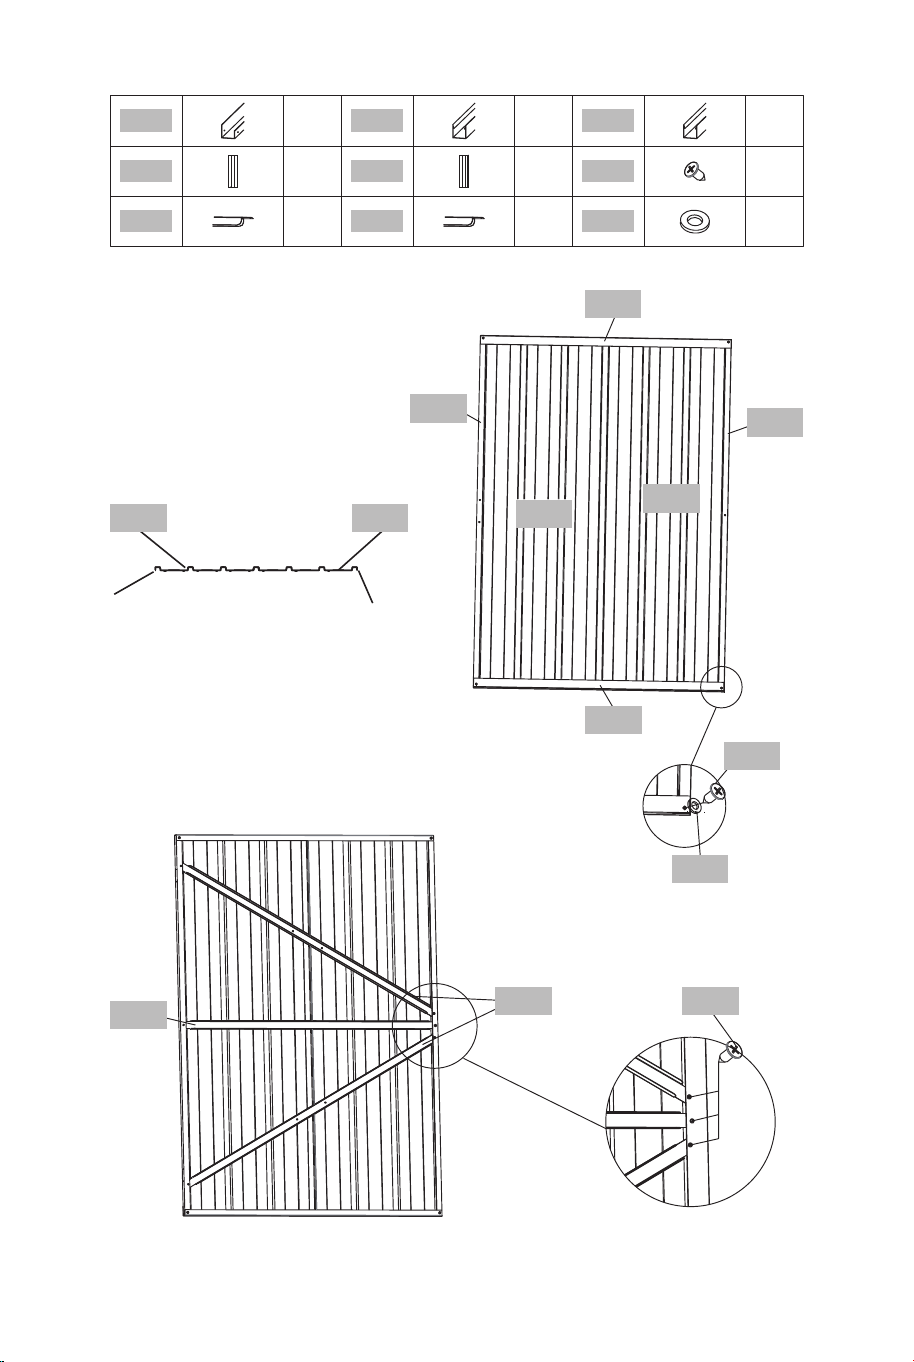
x19
S18
x1
DF5
x2
DF4
x2
SH3
x1
EH1
x1
H2
x2
S16
x1
H3
x4
S19
x9
S5
x4
L3
Front Door Assembly - Left Door
/Assemblage de la porte avant - Porte
gauche
Front Side /Côté avant
x1
DF3
x1
DF2
x2
DF1
x4
S18
x1
DP2
x1
DP1
x4
S5
x1
T5
DF1
DF2
DF3
DF1
S18
S5
DP1
DP2
T5
S18
DP1 DP2
Right
angled side
/Côté à
angle droit
Right angled side
/Côté à angle droit
S18
H3
S18
S18
S5
DF4
DF5
S18
S18
H2
S5
S16
EH1
S5
S18
L3
S5
S18
SH3
S19
22 23
x1
DF6
x1
DF2
x2
DF1
x14
S18
x1
DP2
x1
DP1
x4
S5
x1
DF5
x2
DF4
x5
S18
x2
SH3
x1
EH1
x5
S5
x4
S19
x2
S16
x4
L3
DF5
DF4 S18
DP1
DP2
DF1
DF2
DF6
DF1
S5
S18
DP2 DP1
Right
angled side
/Côté à
angle droit
Right angled side
/Côté à angle droit
S16
EH1
SH3
S19
S18
S5
S18
S5
L3
24 25
x1
DF6
x1
DF2
x2
DF1
x14
S18
x1
DP2
x1
DP1
x4
S5
x1
DF5
x2
DF4
x5
S18
x2
SH3
x1
EH1
x5
S5
x4
S19
x2
S16
x4
L3
DF5
DF4 S18
DP1
DP2
DF1
DF2
DF6
DF1
S5
S18
DP2 DP1
Right
angled side
/Côté à
angle droit
Right angled side
/Côté à angle droit
S16
EH1
SH3
S19
S18
S5
S18
S5
L3
24 25
x2
GS2
x20
S18
x8
EG1
x8
S19
S19
Top Door /Porte supérieure
S18
GS2
EG1
S18
S18
EG1
S18
EG1
EG1
EG1
EG1
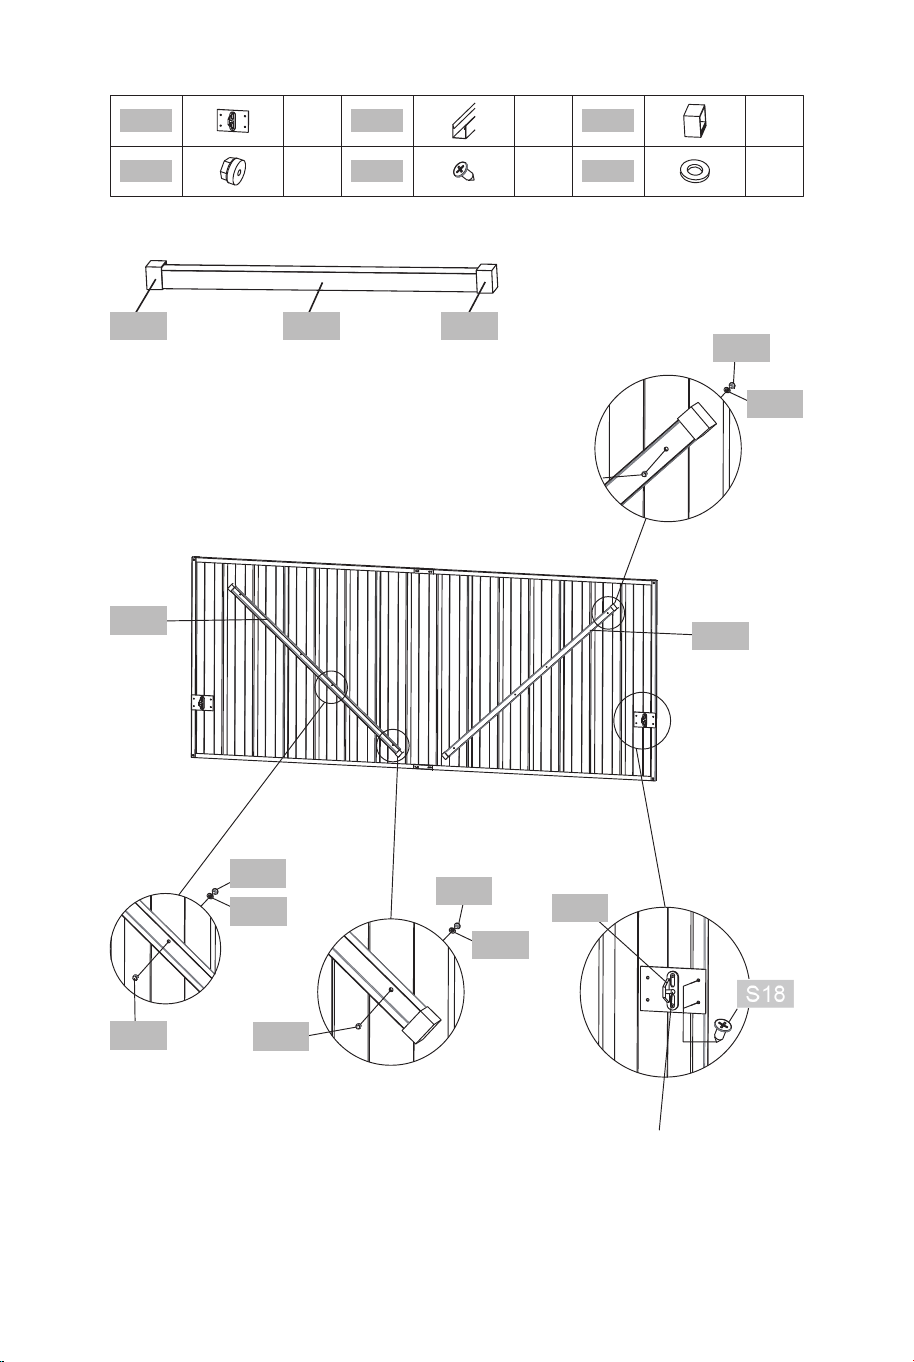
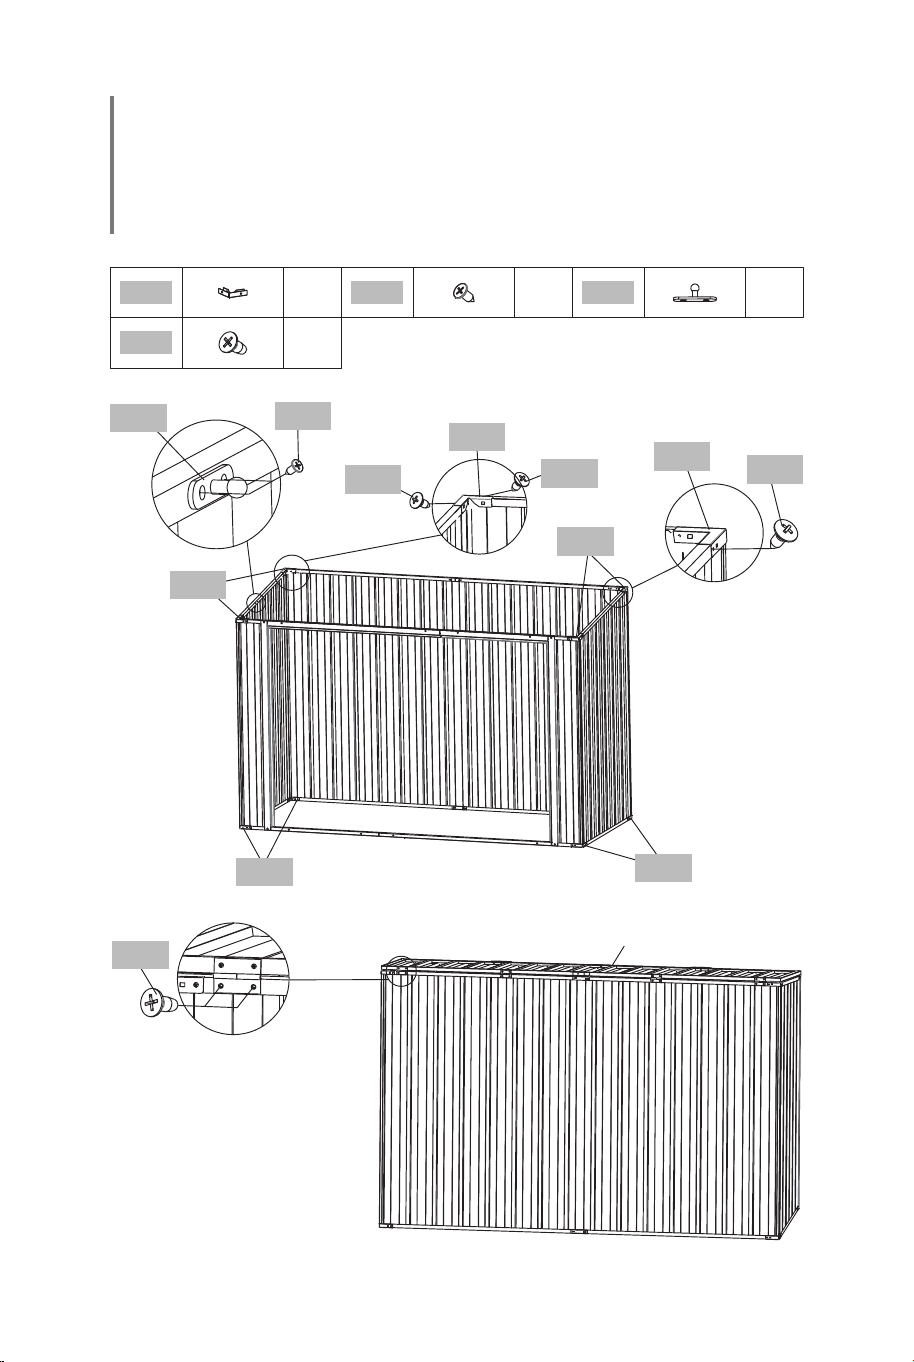
Shed Assembly - Joining Walls
/Assemblage de l'abri - Assemblage
des murs
x2
GS3
x8
S19
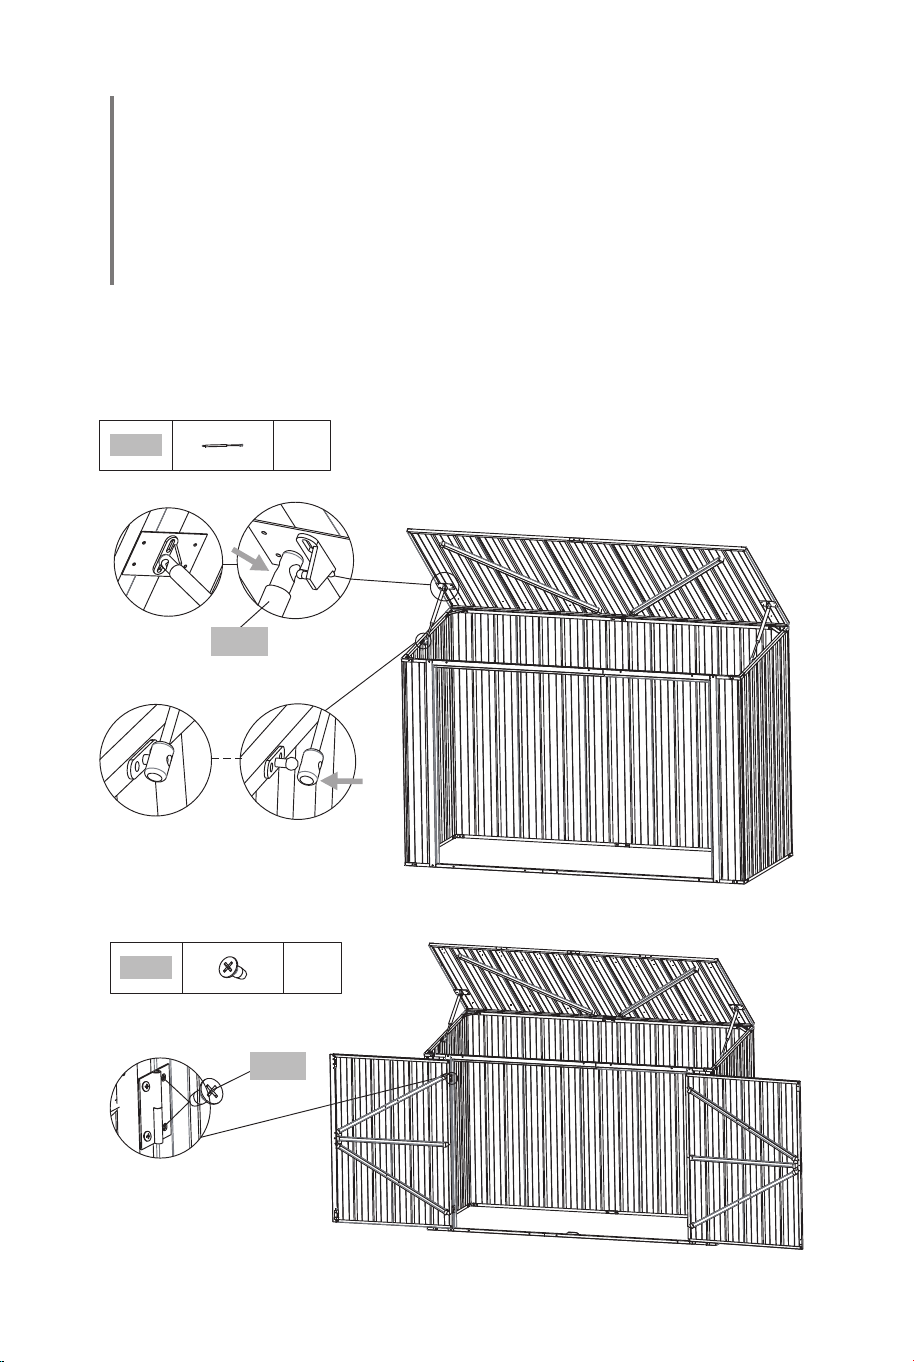
Shed Assembly - Fixing Gas Struts and
Hanging Front Doors
/Assemblage de l'abri - Fixation des
vérins à gaz et suspension des portes
avant
Positioning of Gas Struts (GS1,GS2 &GS3)
/Positionnement des vérins à gaz (GS1, GS2 et GS3)
GS3
S19
26 27
x2
GS2
x20
S18
x8
EG1
x8
S19
S19
Top Door /Porte supérieure
S18
GS2
EG1
S18
S18
EG1
S18
EG1
EG1
EG1
EG1
Shed Assembly - Joining Walls
/Assemblage de l'abri - Assemblage
des murs
x2
GS3
x8
S19
Shed Assembly - Fixing Gas Struts and
Hanging Front Doors
/Assemblage de l'abri - Fixation des
vérins à gaz et suspension des portes
avant
Positioning of Gas Struts (GS1,GS2 &GS3)
/Positionnement des vérins à gaz (GS1, GS2 et GS3)
GS3
S19
26 27
x2
S18
x1
ED3
Shed Assembly /Assemblage de l'abri ANCHORING SHED /ANCRAGE DE L'ABRI
ED3 S18
x6
S11
x6
C7
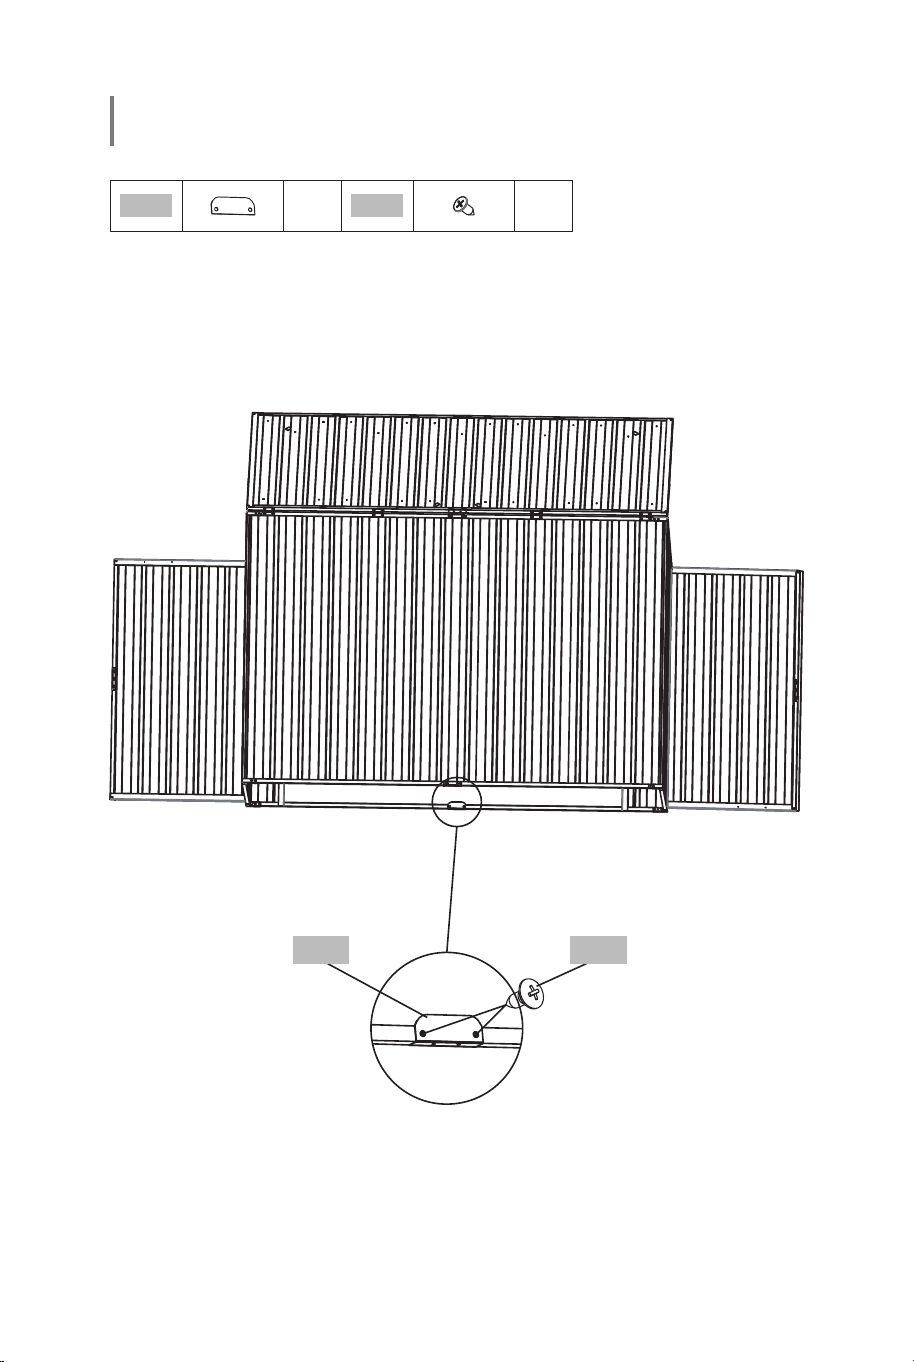
The shed is now free standing. It is critical at this stage to ensure the
shed is leveled.
Then measure the diagonal distance and make sure the four side
walls are squared to 90 degrees.
L'abri est maintenant autonome. Il est essentiel à ce stade de
s'assurer que l'abri est de niveau.
Mesurez ensuite la distance diagonale et assurez-vous que les quatre
murs latéraux sont équarris à 90 degrés.
C
H
E
C
K
D
I
A
G
O
N
A
L
S
F
O
R
S
Q
U
A
R
E
V
ÉR
I
F
I
C
A
T
I
O
N
D
E
S
D
I
A
G
O
N
A
L
E
S
P
O
U
R
L
E
C
A
R
R
E
28 29
x2
S18
x1
ED3
Shed Assembly /Assemblage de l'abri ANCHORING SHED /ANCRAGE DE L'ABRI
ED3 S18
x6
S11
x6
C7
The shed is now free standing. It is critical at this stage to ensure the
shed is leveled.
Then measure the diagonal distance and make sure the four side
walls are squared to 90 degrees.
L'abri est maintenant autonome. Il est essentiel à ce stade de
s'assurer que l'abri est de niveau.
Mesurez ensuite la distance diagonale et assurez-vous que les quatre
murs latéraux sont équarris à 90 degrés.
C
H
E
C
K
D
I
A
G
O
N
A
L
S
F
O
R
S
Q
U
A
R
E
V
ÉR
I
F
I
C
A
T
I
O
N
D
E
S
D
I
A
G
O
N
A
L
E
S
P
O
U
R
L
E
C
A
R
R
E
28 29
Instructions De Retour / Réclamation De Dommages
Dans le cas où un retour est requis, l'article doit être retourné dans sa boîte
d'origine. Sans cela, votre retour ne sera pas accepté.
NE PAS jeter la boîte/l'emballage d'origine.
Prenez une photo des marquages de la boîte.
Prenez une photo des dommages (le cas échéant).
Envoyez-nous un e-mail avec les images demandées.
Une photo des marquages (texte) sur le côté de la boîte est requise au cas où
une pièce serait nécessaire pour le remplacement. Cela aide notre personnel à
identifier votre numéro de produit pour s'assurer que vous recevez les bonnes
pièces.
Une photo des dommages est toujours requise pour déposer une réclamation et
obtenir rapidement votre remplacement ou votre remboursement. Assurez-vous
d'avoir la boîte même si elle est endommagée.
Envoyez-nous un e-mail directement depuis le marché où votre article a été
acheté avec les images ci-jointes et une description de votre réclamation.
FR
In case a return is required, the item must be returned in original box. Without this
your return will not be accepted.
DO NOT discard the box / original packaging.
Take a photo of the box markings.
Take a photo of the damaged part (if applicable).
Send us an email with the images requested.
A photo of the markings (text) on the side of the box is required in case a part is
needed for replacement. This helps our staff identify your product number to
ensure you receive the correct parts.
A photo of the damage is always required to file a claim and get your replacement
or refund processed quickly. Please make sure you have the box even if it is
damaged.
Email us directly from marketplace where your item was purchased with the
attached images and a description of your claim.
EN
Return / Damage Claim Instructions
Instructions De Retour / Réclamation De Dommages
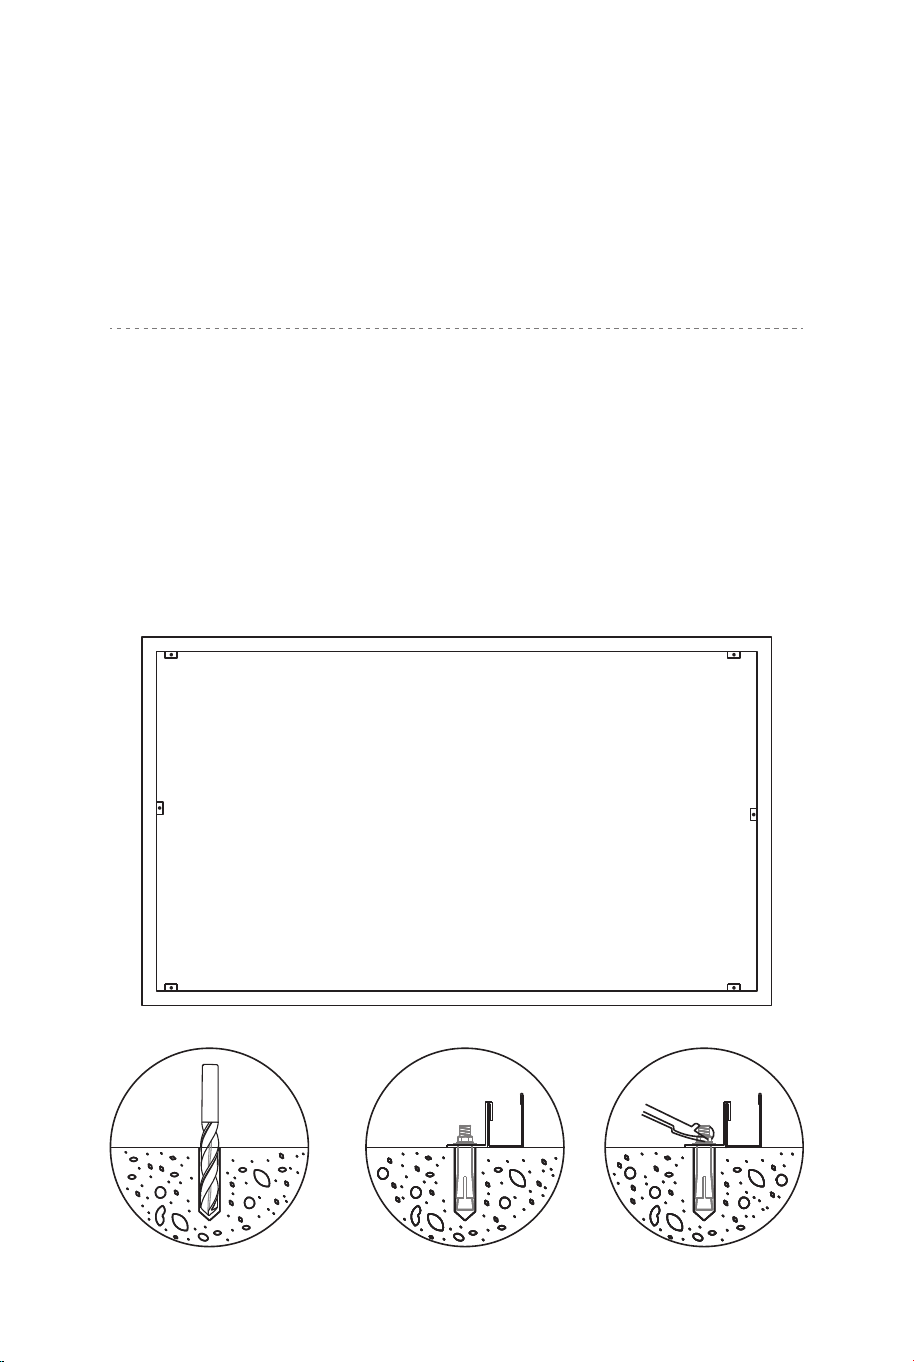
Fastening the anchor kit onto a concrete pad
1. Mark the spot of the anchor clamps on the ground.
2. Use 12mm/0.39”concrete drill bit and drill holes 60mm/2.4”deep.
3. Tap concrete fixing bolts into the hole, place anchor clamps, add
washer and nut and fasten.
Fixation du kit d'ancrage sur un socle en béton
1. Marquez l'emplacement des pinces d'ancrage sur le sol.
2. Utilisez une mèche à béton de 12 mm/0,39" et percez des trous de
60 mm/2,4" de profondeur.
3. Tapez les boulons de fixation du béton dans le trou, placez les
pinces d'ancrage, ajoutez la rondelle et l'écrou et fixez.
30 31
Instructions De Retour / Réclamation De Dommages
Dans le cas où un retour est requis, l'article doit être retourné dans sa boîte
d'origine. Sans cela, votre retour ne sera pas accepté.
NE PAS jeter la boîte/l'emballage d'origine.
Prenez une photo des marquages de la boîte.
Prenez une photo des dommages (le cas échéant).
Envoyez-nous un e-mail avec les images demandées.
Une photo des marquages (texte) sur le côté de la boîte est requise au cas où
une pièce serait nécessaire pour le remplacement. Cela aide notre personnel à
identifier votre numéro de produit pour s'assurer que vous recevez les bonnes
pièces.
Une photo des dommages est toujours requise pour déposer une réclamation et
obtenir rapidement votre remplacement ou votre remboursement. Assurez-vous
d'avoir la boîte même si elle est endommagée.
Envoyez-nous un e-mail directement depuis le marché où votre article a été
acheté avec les images ci-jointes et une description de votre réclamation.
FR
In case a return is required, the item must be returned in original box. Without this
your return will not be accepted.
DO NOT discard the box / original packaging.
Take a photo of the box markings.
Take a photo of the damaged part (if applicable).
Send us an email with the images requested.
A photo of the markings (text) on the side of the box is required in case a part is
needed for replacement. This helps our staff identify your product number to
ensure you receive the correct parts.
A photo of the damage is always required to file a claim and get your replacement
or refund processed quickly. Please make sure you have the box even if it is
damaged.
Email us directly from marketplace where your item was purchased with the
attached images and a description of your claim.
EN
Return / Damage Claim Instructions
Instructions De Retour / Réclamation De Dommages
Fastening the anchor kit onto a concrete pad
1. Mark the spot of the anchor clamps on the ground.
2. Use 12mm/0.39”concrete drill bit and drill holes 60mm/2.4”deep.
3. Tap concrete fixing bolts into the hole, place anchor clamps, add
washer and nut and fasten.
Fixation du kit d'ancrage sur un socle en béton
1. Marquez l'emplacement des pinces d'ancrage sur le sol.
2. Utilisez une mèche à béton de 12 mm/0,39" et percez des trous de
60 mm/2,4" de profondeur.
3. Tapez les boulons de fixation du béton dans le trou, placez les
pinces d'ancrage, ajoutez la rondelle et l'écrou et fixez.
30 31

GT4195
Outdoor Storage Shed
Abri de Rangement pour l'Extérieur
If you're having difficulty, our friendly
customer team is always here to help.
USA office: Fontana
AUS:cs.au@costway.com
GBR:cs.uk@costway.com
FRA:cs.fr@costway.com
GBR office: FDS Corporation Limited,Unit 4, Blackacre Road, Great Blakenham,Ipswich, Ip6 0FL,United Kingdom
AUS office: Truganina FRA office: Saint Vigor d'Ymonville
THIS INSTRUCTION BOOKLET CONTAINS IMPORTANT SAFETY INFORMATION.
PLEASE READ AND KEEP FOR FUTURE REFERENCE.