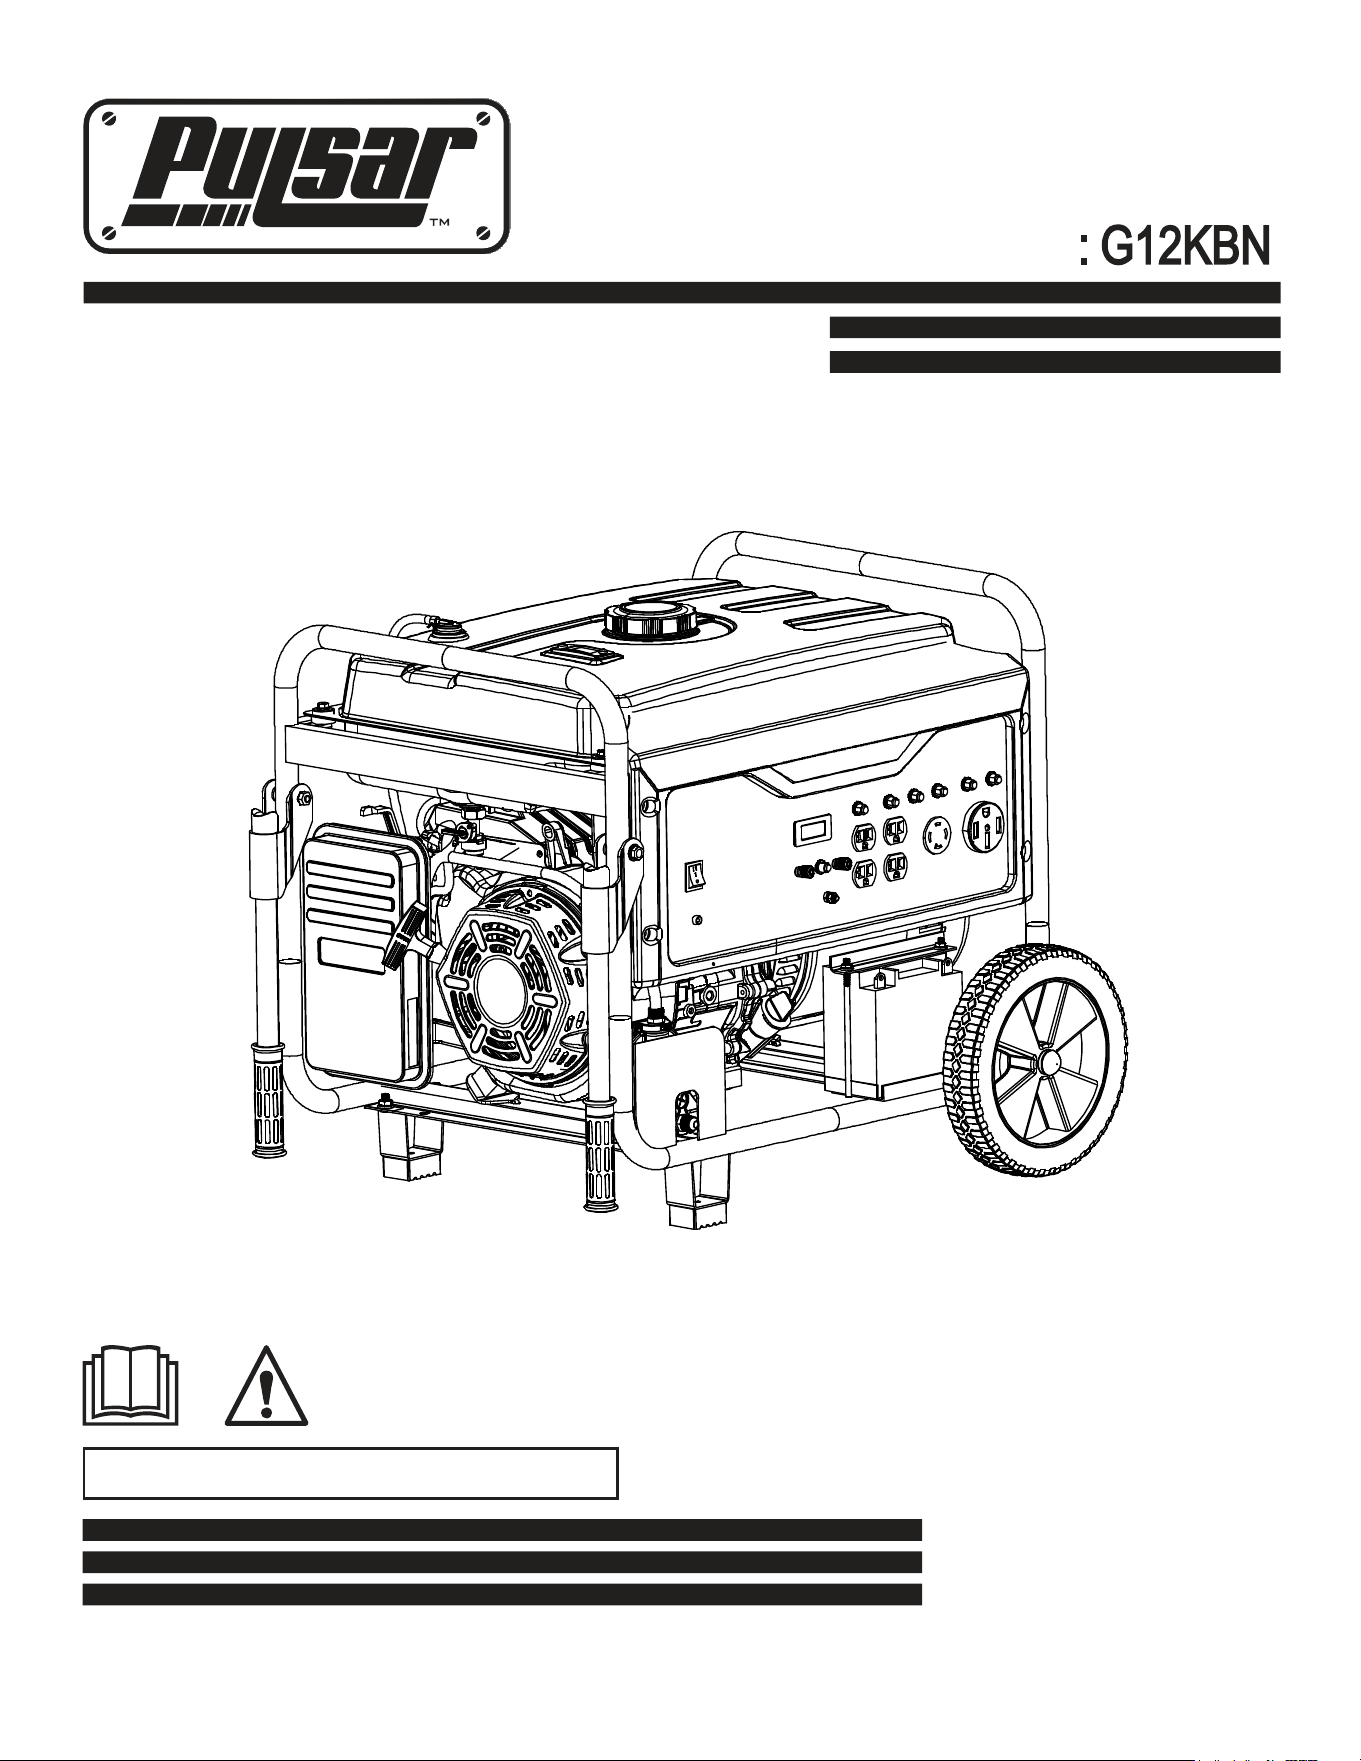
Generator
www.pulsar-products.com
OPERATOR’S MANUAL
Warning:TheEngineExhaustfromthisproductcontainschemicalsknownto
theStateofCaliforniatocausecancer,birthdefectsorotherreproductiveharm.
Model

Introduction. NNNNNNNNNNNNNNNNNNNNNNNNNNNNNNNNNNNNNNNNNNNNNNNNNNNNNNNNNNNNNNNNNNNNNNNNNNNNNNNNNNNNNNNNNNNNNNNNNNNNNNNNNNNNNNNNNNNNNNNNNNNNNNNNNNNNNNNNNNNNNNNNNNNNNNNNNNNNNNNNNNNNNNNNNNNN3
PartsOrdering/CustomerService. NNNNNNNNNNNNNNNNNNNNNNNNNNNNNNNNNNNNNNNNNNNNNNNNNNNNNNNNNNNNNNNNNNNNNNNNNNNNNNNNNNNNNNNNNNNNNNNNNNNNNNNNNNNNNNNNNNNNNNNNNNNNN3
ProductSpecifications. NNNNNNNNNNNNNNNNNNNNNNNNNNNNNNNNNNNNNNNNNNNNNNNNNNNNNNNNNNNNNNNNNNNNNNNNNNNNNNNNNNNNNNNNNNNNNNNNNNNNNNNNNNNNNNNNNNNNNNNNNNNNNNNNNNNNNNNNNNNNNNNN3
Safety Rules. NNNNNNNNNNNNNNNNNNNNNNNNNNNNNNNNNNNNNNNNNNNNNNNNNNNNNNNNNNNNNNNNNNNNNNNNNNNNNNNNNNNNNNNNNNNNNNNNNNNNNNNNNNNNNNNNNNNNNNNNNNNNNNNNNNNNNNNNNNNNNNNNNNNNNNNNNNNNNNNNNNNNNNNNNNN 4
SafetySymbols. NNNNNNNNNNNNNNNNNNNNNNNNNNNNNNNNNNNNNNNNNNNNNNNNNNNNNNNNNNNNNNNNNNNNNNNNNNNNNNNNNNNNNNNNNNNNNNNNNNNNNNNNNNNNNNNNNNNNNNNNNNNNNNNNNNNNNNNNNNNNNNNNNNNNNNNNNNN 4
SafetyInstructions.NNNNNNNNNNNNNNNNNNNNNNNNNNNNNNNNNNNNNNNNNNNNNNNNNNNNNNNNNNNNNNNNNNNNNNNNNNNNNNNNNNNNNNNNNNNNNNNNNNNNNNNNNNNNNNNNNNNNNNNNNNNNNNNNNNNNNNNNNNNNNNNNNNNNN 4
Features.NNNNNNNNNNNNNNNNNNNNNNNNNNNNNNNNNNNNNNNNNNNNNNNNNNNNNNNNNNNNNNNNNNNNNNNNNNNNNNNNNNNNNNNNNNNNNNNNNNNNNNNNNNNNNNNNNNNNNNNNNNNNNNNNNNNNNNNNNNNNNNNNNNNNNNNNNNNNNNNNNNNNNNNNNNNNNNNNNNN 7
Assembly NNNNNNNNNNNNNNNNNNNNNNNNNNNNNNNNNNNNNNNNNNNNNNNNNNNNNNNNNNNNNNNNNNNNNNNNNNNNNNNNNNNNNNNNNNNNNNNNNNNNNNNNNNNNNNNNNNNNNNNNNNNNNNNNNNNNNNNNNNNNNNNNNNNNNNNNNNNNNNNNNNNNNNNNNNNNNNNN 9
Unpacking.NNNNNNNNNNNNNNNNNNNNNNNNNNNNNNNNNNNNNNNNNNNNNNNNNNNNNNNNNNNNNNNNNNNNNNNNNNNNNNNNNNNNNNNNNNNNNNNNNNNNNNNNNNNNNNNNNNNNNNNNNNNNNNNNNNNNNNNNNNNNNNNNNNNNNNNNNNNNNNNNNNN 9
PackingList. NNNNNNNNNNNNNNNNNNNNNNNNNNNNNNNNNNNNNNNNNNNNNNNNNNNNNNNNNNNNNNNNNNNNNNNNNNNNNNNNNNNNNNNNNNNNNNNNNNNNNNNNNNNNNNNNNNNNNNNNNNNNNNNNNNNNNNNNNNNNNNNNNNNNNNNNNNNNNNN Y
R S B ..........................................................................................................................................10
AttachingWheels NNNNNNNNNNNNNNNNNNNNNNNNNNNNNNNNNNNNNNNNNNNNNNNNNNNNNNNNNNNNNNNNNNNNNNNNNNNNNNNNNNNNNNNNNNNNNNNNNNNNNNNNNNNNNNNNNNNNNNNNNNNNNNNNNNNNNNNNNNNNNNNNNNNNNN10
AddingOil/Checkingengineoil NNNNNNNNNNNNNNNNNNNNNNNNNNNNNNNNNNNNNNNNNNNNNNNNNNNNNNNNNNNNNNNNNNNNNNNNNNNNNNNNNNNNNNNNNNNNNNNNNNNNNNNNNNNNNNNNNNNNNNNNNNNNNNNNNNN12
AddingFuel. NNNNNNNNNNNNNNNNNNNNNNNNNNNNNNNNNNNNNNNNNNNNNNNNNNNNNNNNNNNNNNNNNNNNNNNNNNNNNNNNNNNNNNNNNNNNNNNNNNNNNNNNNNNNNNNNNNNNNNNNNNNNNNNNNNNNNNNNNNNNNNNNNNNNNNNNNNNNNNN13
ConnectingGeneratortoanElectricalSystem. NNNNNNNNNNNNNNNNNNNNNNNNNNNNNNNNNNNNNNNNNNNNNNNNNNNNNNNNNNNNNNNNNNNNNNNNNNNNNNNNNNNNNNNNNNNNNNNNNNNNNNNN13
Operation NNNNNNNNNNNNNNNNNNNNNNNNNNNNNNNNNNNNNNNNNNNNNNNNNNNNNNNNNNNNNNNNNNNNNNNNNNNNNNNNNNNNNNNNNNNNNNNNNNNNNNNNNNNNNNNNNNNNNNNNNNNNNNNNNNNNNNNNNNNNNNNNNNNNNNNNNNNNNNNNNNNNNNNNNNNNNN 14
HowtoStopEngine. NNNNNNNNNNNNNNNNNNNNNNNNNNNNNNNNNNNNNNNNNNNNNNNNNNNNNNNNNNNNNNNNNNNNNNNNNNNNNNNNNNNNNNNNNNNNNNNNNNNNNNNNNNNNNNNNNNNNNNNNNNNNNNNNNNNNNNNNNNNNNNNNNN 15
GroundingtheGenerator.
HowtoStartEngine.
NNNNNNNNNNNNNNNNNNNNNNNNNNNNNNNNNNNNNNNNNNNNNNNNNNNNNNNNNNNNNNNNNNNNNNNNNNNNNNNNNNNNNNNNNNNNNNNNNNNNNNNNNNNNNNNNNNNNNNNNNNNNNNNNNNNNNNNNNNNN14
ReceptaclesandExtensionCords.NNNNNNNNNNNNNNNNNNNNNNNNNNNNNNNNNNNNNNNNNNNNNNNNNNNNNNNNNNNNNNNNNNNNNNNNNNNNNNNNNNNNNNNNNNNNNNNNNNNNNNNNNNNNNNNNNNNNNNNNNNNNN 15
Don’tOverloadGenerator.NNNNNNNNNNNNNNNNNNNNNNNNNNNNNNNNNNNNNNNNNNNNNNNNNNNNNNNNNNNNNNNNNNNNNNNNNNNNNNNNNNNNNNNNNNNNNNNNNNNNNNNNNNNNNNNNNNNNNNNNNNNNNNNNNNNNNNNNNN 16
WattageReferenceGuide. NNNNNNNNNNNNNNNNNNNNNNNNNNNNNNNNNNNNNNNNNNNNNNNNNNNNNNNNNNNNNNNNNNNNNNNNNNNNNNNNNNNNNNNNNNNNNNNNNNNNNNNNNNNNNNNNNNNNNNNNNNNNNNNNNNNNNNNNN 17
ColdWeatherOperation. NNNNNNNNNNNNNNNNNNNNNNNNNNNNNNNNNNNNNNNNNNNNNNNNNNNNNNNNNNNNNNNNNNNNNNNNNNNNNNNNNNNNNNNNNNNNNNNNNNNNNNNNNNNNNNNNNNNNNNNNNNNNNNNNNNNNNNNNNNN 18
Maintenance . NNNNNNNNNNNNNNNNNNNNNNNNNNNNNNNNNNNNNNNNNNNNNNNNNNNNNNNNNNNNNNNNNNNNNNNNNNNNNNNNNNNNNNNNNNNNNNNNNNNNNNNNNNNNNNNNNNNNNNNNNNNNNNNNNNNNNNNNNNNNNNNNNNNNNNNNNNNNNNNNNNNNNNNNNN19
MaintenanceSchedule. NNNNNNNNNNNNNNNNNNNNNNNNNNNNNNNNNNNNNNNNNNNNNNNNNNNNNNNNNNNNNNNNNNNNNNNNNNNNNNNNNNNNNNNNNNNNNNNNNNNNNNNNNNNNNNNNNNNNNNNNNNNNNNNNNNNNNNNNNNNNN 19
EngineMaintenance.NNNNNNNNNNNNNNNNNNNNNNNNNNNNNNNNNNNNNNNNNNNNNNNNNNNNNNNNNNNNNNNNNNNNNNNNNNNNNNNNNNNNNNNNNNNNNNNNNNNNNNNNNNNNNNNNNNNNNNNNNNNNNNNNNNNNNNNNNNNNNNNNN 21
MaintainingFuelValve. NNNNNNNNNNNNNNNNNNNNNNNNNNNNNNNNNNNNNNNNNNNNNNNNNNNNNNNNNNNNNNNNNNNNNNNNNNNNNNNNNNNNNNNNNNNNNNNNNNNNNNNNNNNNNNNNNNNNNNNNNNNNNNNNNNNNNNNNNNNNNN 22
ChangingOil. NNNNNNNNNNNNNNNNNNNNNNNNNNNNNNNNNNNNNNNNNNNNNNNNNNNNNNNNNNNNNNNNNNNNNNNNNNNNNNNNNNNNNNNNNNNNNNNNNNNNNNNNNNNNNNNNNNNNNNNNNNNNNNNNNNNNNNNNNNNNNNNNNNNNNNNNNNNN 20
Howto Store. NNNNNNNNNNNNNNNNNNNNNNNNNNNNNNNNNNNNNNNNNNNNNNNNNNNNNNNNNNNNNNNNNNNNNNNNNNNNNNNNNNNNNNNNNNNNNNNNNNNNNNNNNNNNNNNNNNNNNNNNNNNNNNNNNNNNNNNNNNNNNNNNNNNNNNNNNNN 23
Troubleshooting . NNNNNNNNNNNNNNNNNNNNNNNNNNNNNNNNNNNNNNNNNNNNNNNNNNNNNNNNNNNNNNNNNNNNNNNNNNNNNNNNNNNNNNNNNNNNNNNNNNNNNNNNNNNNNNNNNNNNNNNNNNNNNNNNNNNNNNNNNNNNNNNNNNNNNNNNNNNNNNNNNN 24
Diagrams.NNNNNNNNNNNNNNNNNNNNNNNNNNNNNNNNNNNNNNNNNNNNNNNNNNNNNNNNNNNNNNNNNNNNNNNNNNNNNNNNNNNNNNNNNNNNNNNNNNNNNNNNNNNNNNNNNNNNNNNNNNNNNNNNNNNNNNNNNNNNNNNNNNNNNNNNNNNNNNNNNNNNNNNNNNNNNNNN 25
TABLE OF CONTENTS
Warranty .NNNNNNNNNNNNNNNNNNNNNNNNNNNNNNNNNNNNNNNNNNNNNNNNNNNNNNNNNNNNNNNNNNNNNNNNNNNNNNNNNNNNNNNNNNNNNNNNNNNNNNNNNNNNNNNNNNNNNNNNNNNNNNNNNNNNNNNNNNNNNNNNNNNNNNNNNNNNNNNNNNNNNNNNNNNNNNNN26
Installingsupportleg NNNNNNNNNNNNNNNNNNNNNNNNNNNNNNNNNNNNNNNNNNNNNNNNNNNNNNNNNNNNNNNNNNNNNNNNNNNNNNNNNNNNNNNNNNNNNNNNNNNNNNNNNNNNNNNNNNNNNNNNNNNNNNNNNNNNNNNNNNNNNNNNNNN10
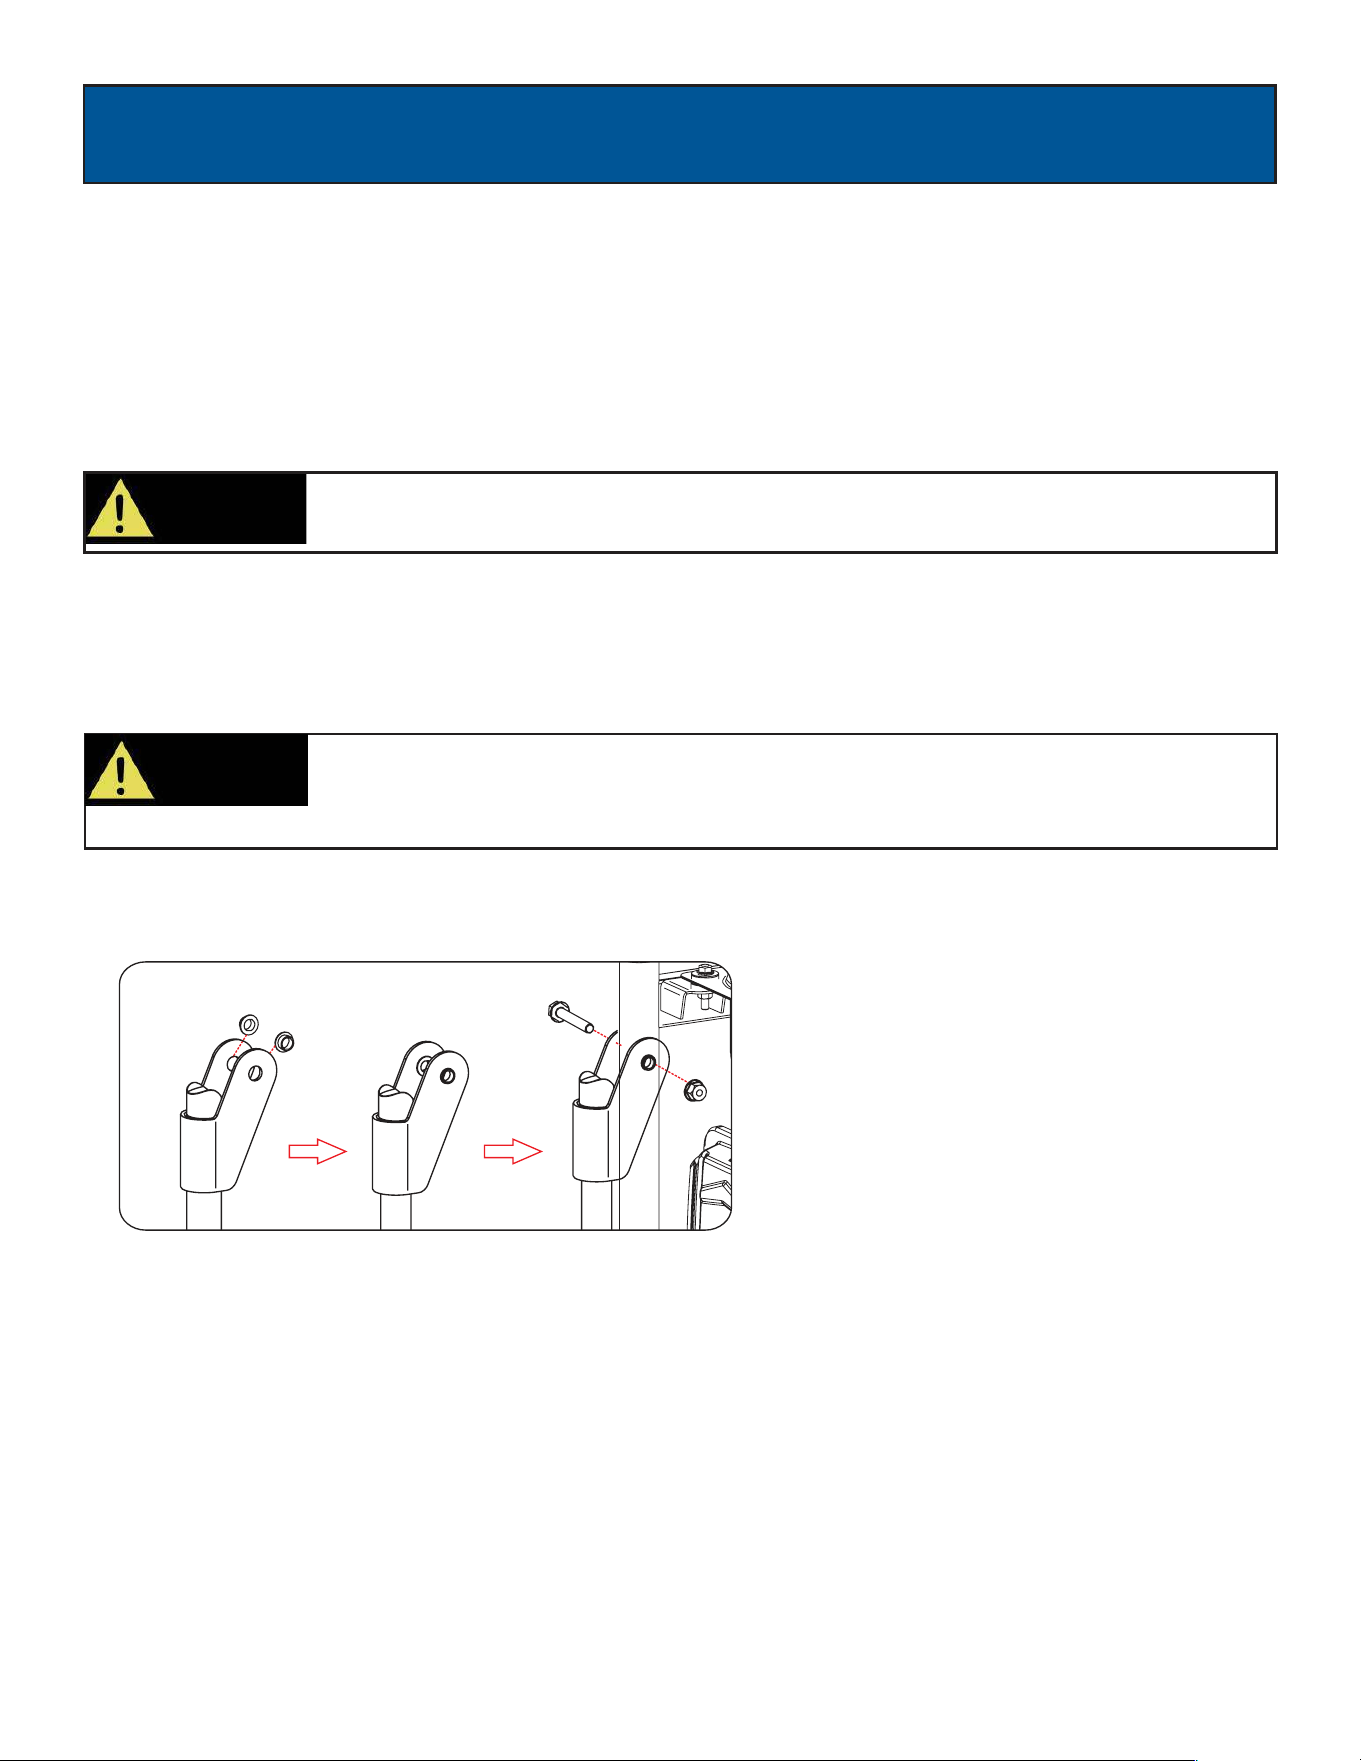
Installingthehandles NNNNNNNNNNNNNNNNNNNNNNNNNNNNNNNNNNNNNNNNNNNNNNNNNNNNNNNNNNNNNNNNNNNNNNNNNNNNNNNNNNNNNNNNNNNNNNNNNNNNNNNNNNNNNNNNNNNNNNNNNNNNNNNNNNNNNNNNNNNNNNNNNNN11
Attachingbatterycable
NNNNNNNNNNNNNNNNNNNNNNNNNNNNNNNNNNNNNNNNNNNNNNNNNNNNNNNNNNNNNNNNNNNNNNNNNNNNNNNNNNNNNNNNNNNNNNNNNNNNNNNNNNNNNNNNNNNNNNNNNNNNNNNNNNNNNNNNNNNNNN11
NNNNNNNNNNNNNNNNNNNNNNNNNNNNNNNNNNNNNNNNNNNNNNNNNNNNNNNNNNNNNNNNNNNNNNNNNNNNNNNNNNNNNNNNNNNNNNNNNNNNNNNNNNNNNNNNNNNNNNNNNNNNNNNNNNNNNNNNNNNNNNNNNN 14
3
INTRODUCTION
DateofPurchase:
ModelNumber:
SerialNumber:
Thank you for purchasing this superior quality portable generator from Pulsar
P
roducts
I
Inc. When operating and
maintaining this product as instructed in this manual, your generator will give you many years of reliable service.
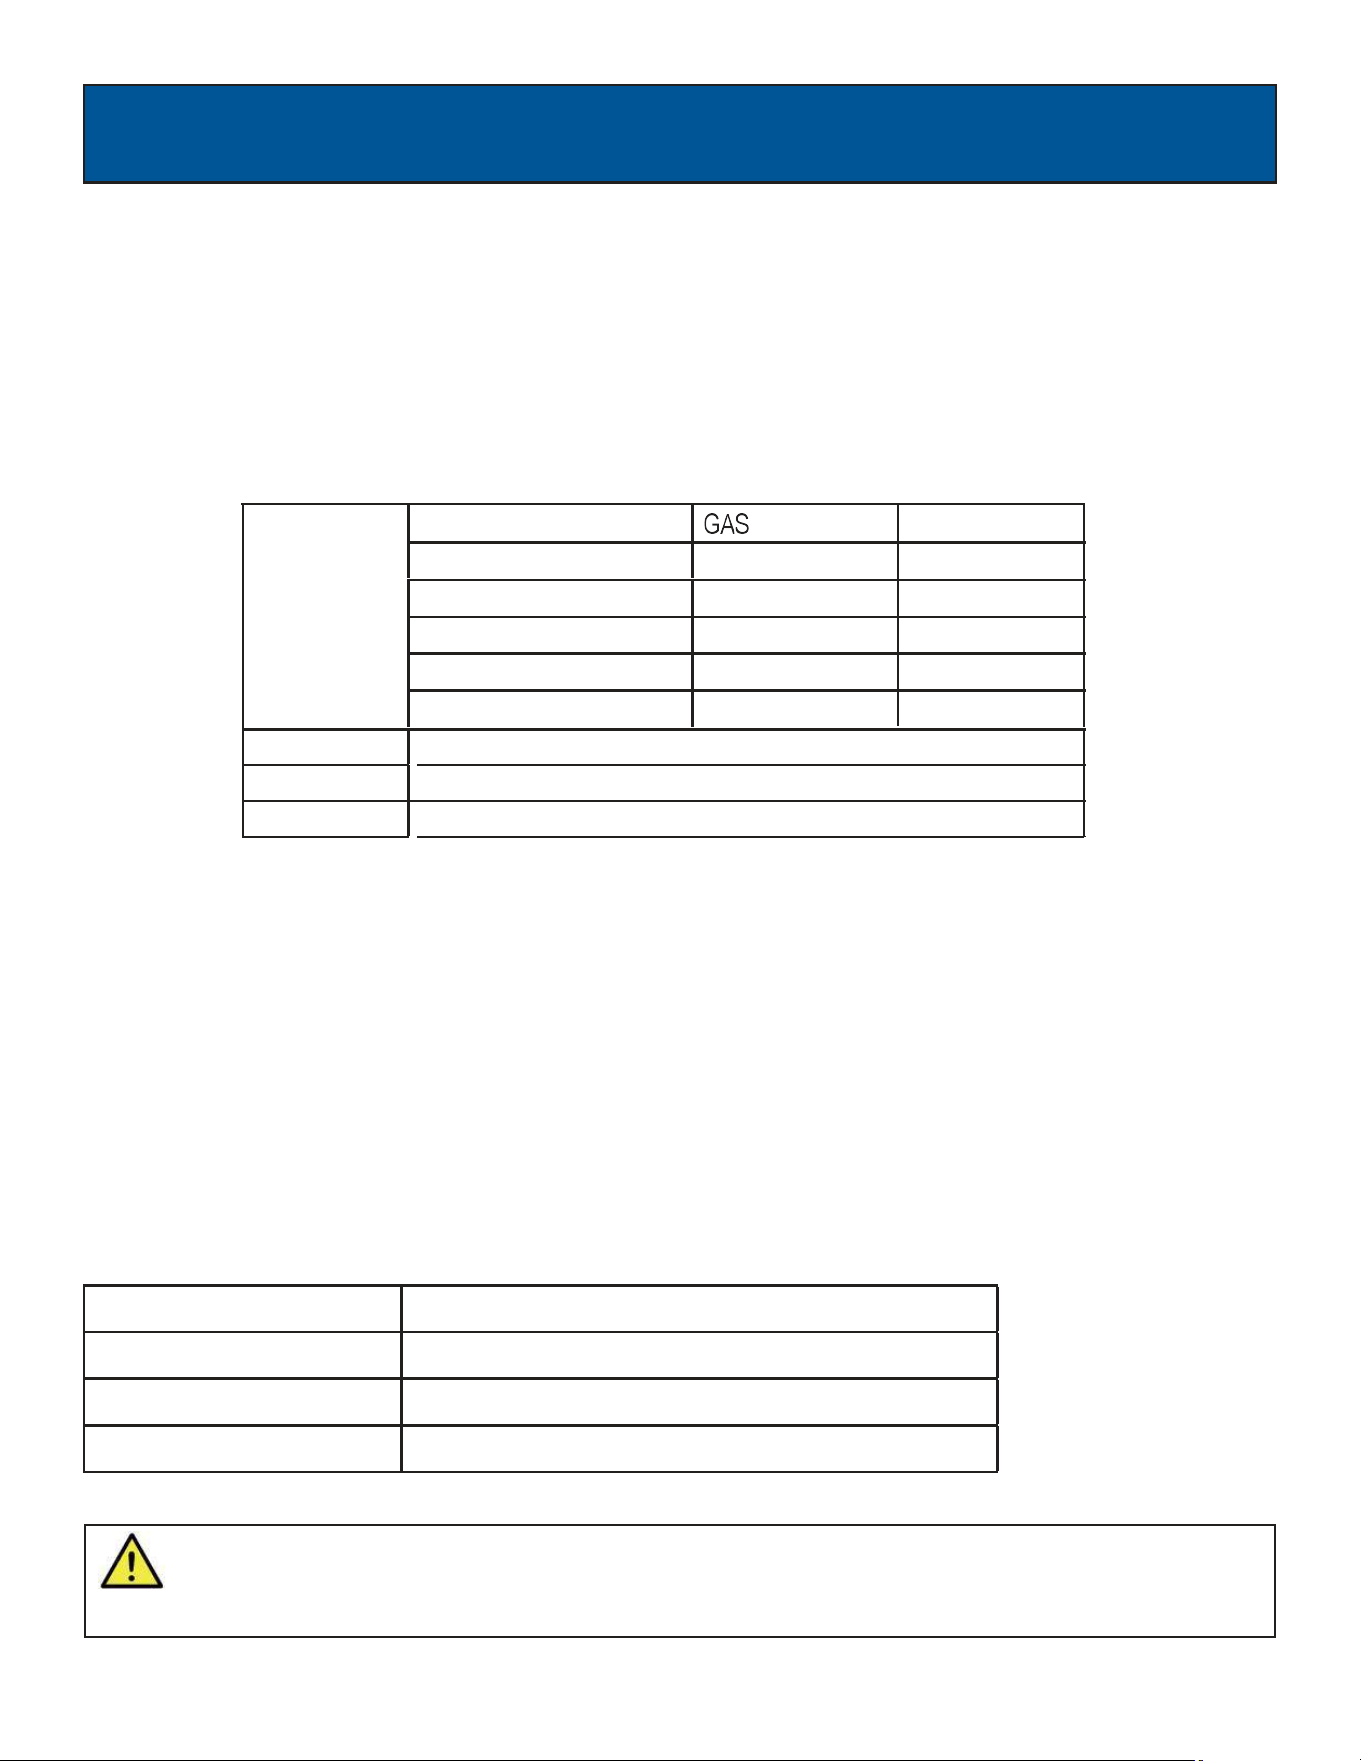
Product Specifications:
Thisgeneratorisanengine-driven,revolvingfield,alternatingcurrent(AC)portablegenerator.Itisdesignedtosupply
electricalpowertooperatetools,appliances,campingequipment,lighting,orserveasabackuppowersourceduring
poweroutages.
TheemissionscontrolsystemforthisgeneratoriscompliantwithallstandardssetbytheU.S.Agency.
How to contact us:
Toorderparts,receivewarrantyassistance,orotherservicesinquiries,youcancontactusbyinternetatwww.pulsar-
products.comorwritetousat:
ACOutput
RatedWattage 9500W(9.5kW)
RatedVoltage 120V/240V
RatedFrequency 60Hz
RatedAmpere 79A/39.5A
MaximumOutput 9.5kVA
Recordthefollowinginformationbellowforserviceorwarrantyassistance.
PULSARPRODUCTSINC
5721E.SANTAANAAVE.
ONTARIO.91761
SAVE THIS MANUAL FOR FUTURE REFERENCE
Thismanualcontainsimportantinformationregardingsafety,operation,andmaintenance.
Engine 457ccOHV,4Stroke,AirCooled
EngineOil 10W30-38oz(1.1L)
FuelTank 8.0Gal(31L)UnleadedGasoline
ItemNumber:
LPG
8550W(8.55kW)
120V/240V
60Hz
71.25A/35.6A
8.5kVA
1-866-591-8921
4
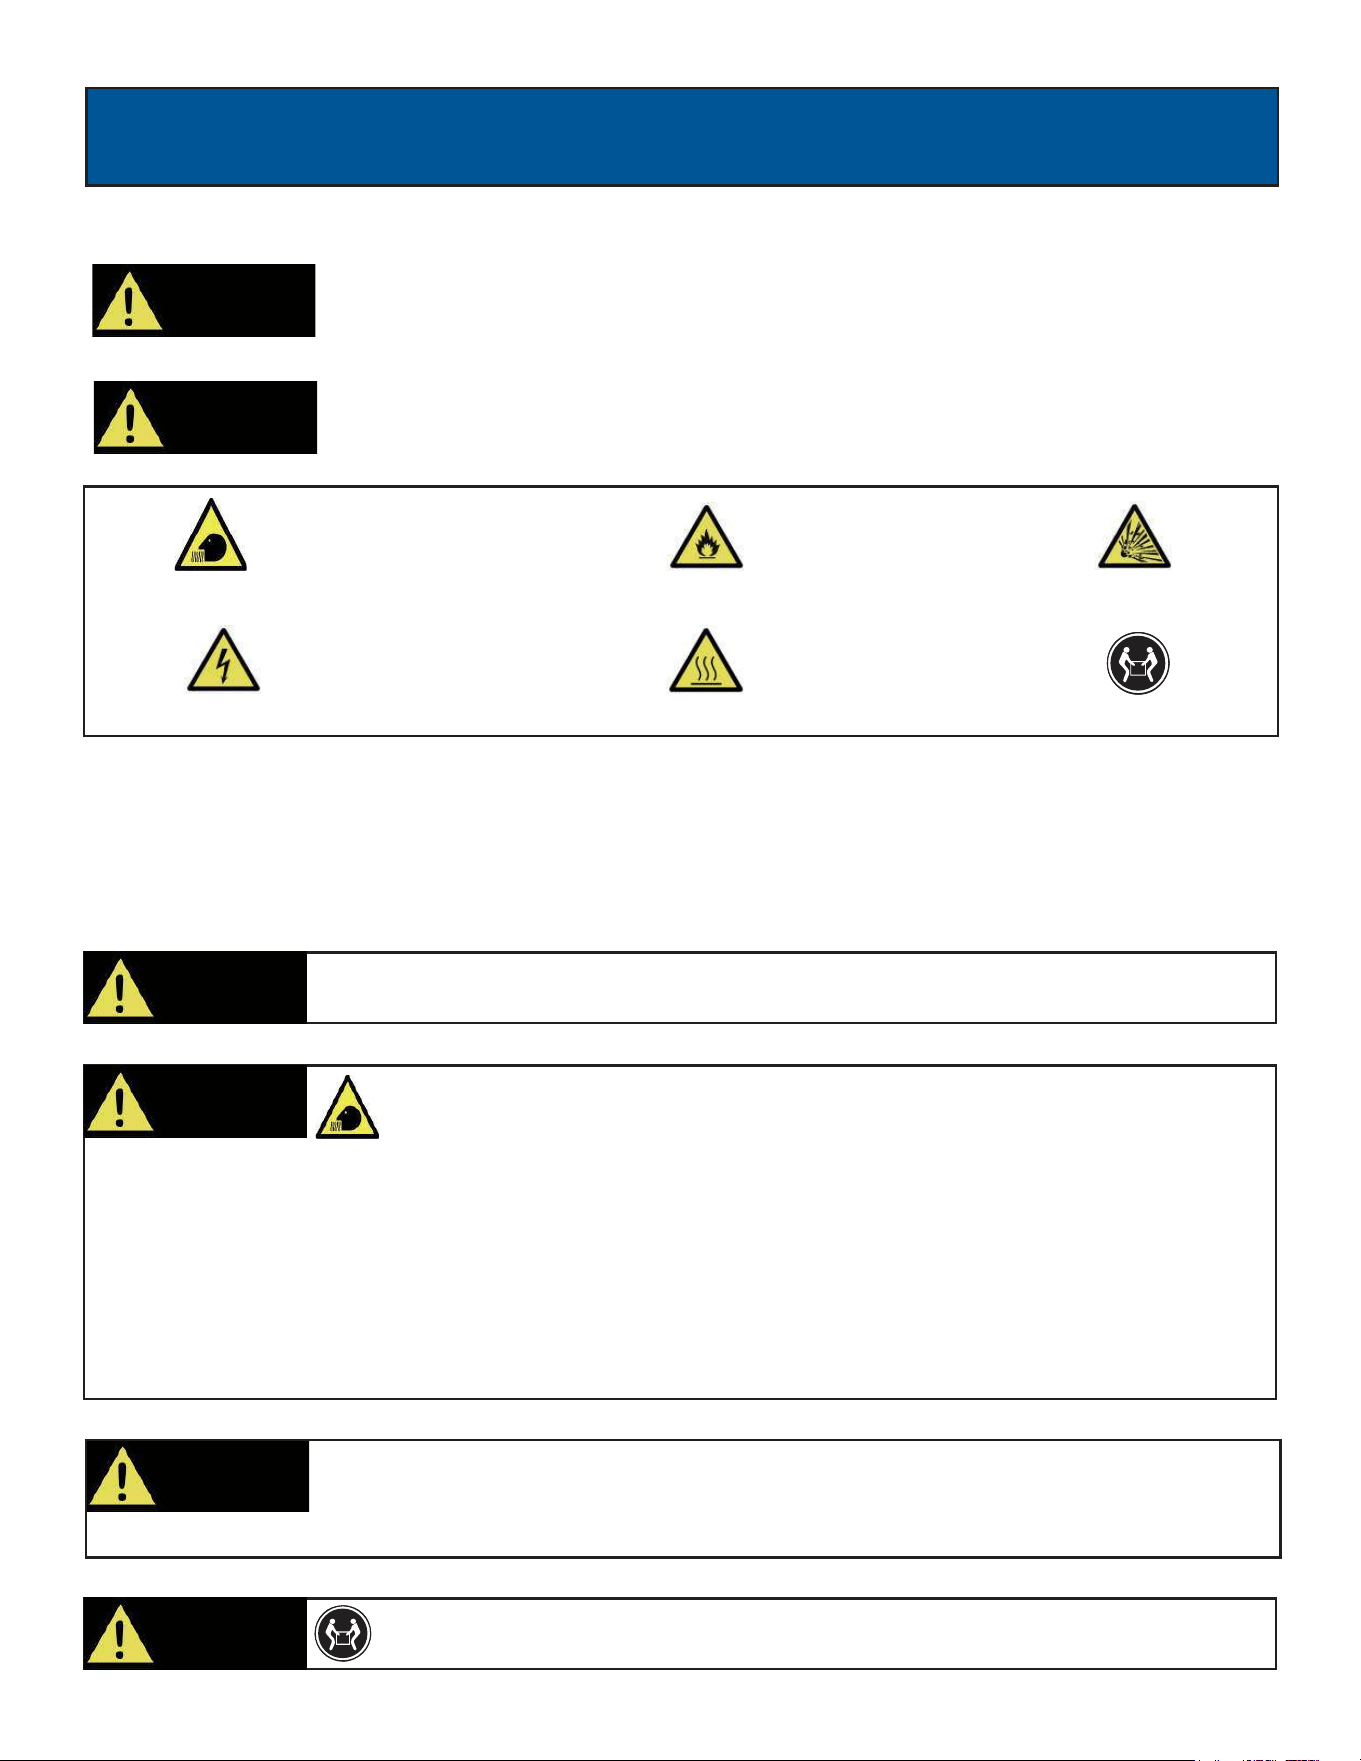
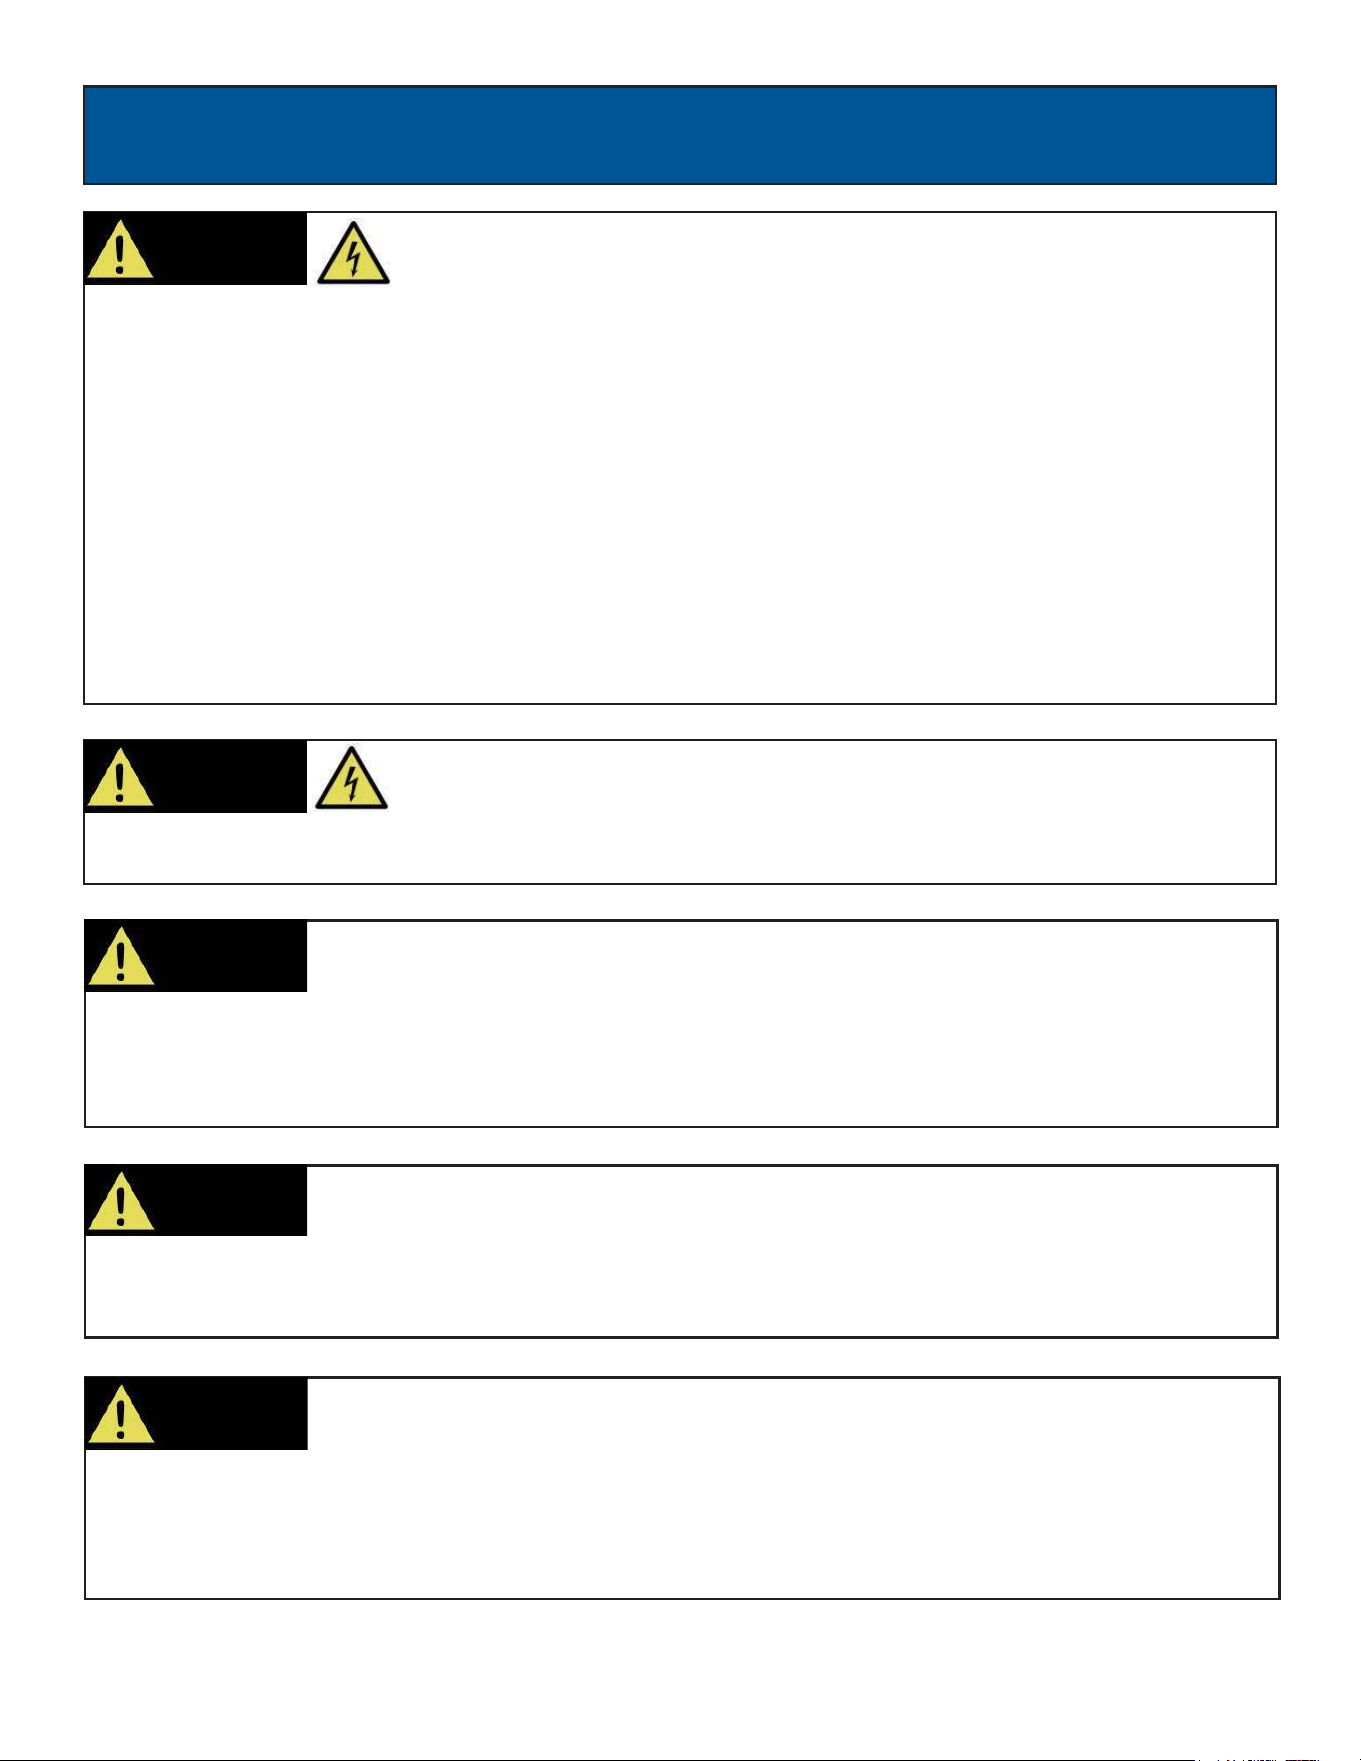
Indicates a potentially hazardous
situation which could result in
seriousinjuryordeathifnotavoided.
ToxicFumes Riskoffire Riskofexplosion
Liftinghazard
Riskofelectricshock Hotsurface
WARNING!
CAUTION!
Indicates a potentially hazardous
situation which could result in
damagetoequipmentorproperty.
Themanufacturercannotanticipateeverypossiblehazardouscircumstancethattheusermayencounter.Therefore,the
warningsinthismanual,ontags,andonaffixeddecalsarenotall-inclusive.Toavoidaccidents,theusermustunderstand
andfollowallmanualinstructionsandusecommonsense.
Safety Symbols
Read and understand this manual in its entirety before operating this generator. Improper
use of this generator could result in serious injury or death.
WARNING!
To reduce the risk of serious injury, avoid attempting to lift the generator alone.
WARNING!
Safety Instructions
• UsingageneratorindoorsWILL KILL YOU IN MINUTES!
• Carbonmonoxidegasisapoisonous,odorlessgasthatcancauseheadache,confusion,fatigue,nausea,fainting,
Neveruseindoors,inacoveredarea,orinaconfinedspace,evenifdoorsandwindowsareopen.
Keepexhaustfromthisunitfromenteringaconfinedareathroughwindows,doors,vents,orotheropenings.
sickness,seizures,ordeath.Ifyoustarttoexperienceanyofthesesymptoms,IMMEDIATELYgetfreshairandseek
medicalattention.
•
• Installabatteryoperatedcarbonmonoxidealarmnearbedrooms.
•
• Whenworkinginareaswherevaporscouldbeinhaled,usearespiratormaskaccordingtoallofitsinstructions.
WARNING!
Do not operate indoors or in a confined space preventing dangerous carbon
monoxide gas from dissipating.
SAFETY RULES
•
Alwayswashhandsafterhandlinggenerator.
WARNING!
Engine exhaust contains chemicals that lead to cause cancer and birth defects.

5
SAFETY RULES
• Donotwearlooseclothingorgloves.
• Removejewelryoranythingelsethatcouldbecaughtinmovingparts.
• Tiebackorwearprotectiveheadcoveringtocontainlonghair.
WARNING!
Starter and other moving parts can catch on clothing, jewelry, and hair.
Keep engine away from flammable objects and other hazardous materials.
•
death.
Thefuelanditsvaporsusedtopowerthisunitarehighlyflammableandcouldexploderesultinginseriousinjuryor
Neverfillordrainfueltankindoors.
Neveroverfillfueltank.Iffuelspills,movetheunitatleast30feetawayfromthespillandwipeupanyremainingfuel
•
•
ontheunitbeforestartingtheengine.
• Neversmokewhileoperatingorfuelingthisunit.
Neveroperateorstorethisunitnearanopenflame,heat,oranyotherignitionsource.
•
• Generatorshouldhaveatleast5feetofclearancefrombuildingsorotherequipmentduringoperation.
Keepenginefreeofgrass,leaves,orgreasewhichareflammable.
•
• Whenaddingordrainingfuel,unitshouldbeturnedoffforatleast2minutestocoolbeforeremovingfuelcap.Ifunit
hasbeenrunningthenthefuelcapisunderpressure,removeslowly.
• Tokeepfuelfromspilling,secureunitsoitcannottipwhileoperatingortransporting.
• Whentransportingunit,disconnectthesparkplugwireandmakesurethefueltankisemptywiththefuelshutoffvalve
turnedtotheoffposition.
WARNING!
Never exceed generator’s wattage / amperage capacity. This could damage the generator
and / or connected electrical devices.
WARNING!
Checkoperatingvoltageandfrequencyrequirementsofallelectricaldevicespriortopluggingthemintothegenerator.
• Toavoidrecoil,pullstartercordslowlyuntilresistanceisfelt,thenpullrapidly.
WARNING!
Pull cord recoils rapidly and pulls arm towards engine faster than you can let go which
could result in injury.
• Alwaysstarttheengineandletitstabilizebeforeconnectinganyelectronicdevices.
• Disconnectallelectronicdevicesbeforestoppingtheengine.
WARNING!
Never start or stop engine with electrical devices plugged in to the receptacles. Failure to do
so could damage the generator and / or connected electrical devices.
•
• Allowhotcomponentstocoolbeforetouching.
Usecautionaroundthemuffler,cylinder,andotherenginepartsastheycanbeextremelyhot.
WARNING!
Avoid contacting hot areas of this unit.
6
• Impropertreatmentofgeneratorcandamagetheunitandshortenit’slife.
Alwaysrepairthisunitasspecifiedinthismanual.Ifyouhaveanyquestionscontactyourdealerorconsultaqualified
Shutgeneratoroffifelectricaloutputismissing,unitvibratesexcessivelyorbeginstosmoke,sparkoremitflames.
•
servicecenter.
•
WARNING!
• Donotbypassanysafetydevice.Movingpartsarecoveredwithguards.Makesureallprotectivecoversareinplace.
• Nevertransportormakeadjustmentstothisunitwhileitisrunning.
• Neverinsertobjectsthroughcoolingslots.
WARNING!
Never operate this unit if there are any broken or missing parts and only use Ford Power
Equipment replacement parts specifically designed for this unit.
Only use this unit as intended or serious injury or death could result.
SAFETY RULES
• Increasinggoverningspeedisdangerouswhichcanresultinpersonalinjuryand/ordamagedequipment.
• Decreasinggoverningspeedaddsanexcessiveloadandcandamageequipment.
• Onlywhenoperatingatthepresetgoverningspeedwillthisgeneratorwillsupplythecorrectratedfrequencyand
voltage.
WARNING!
Never modify this unit in any way or modify governed speed.
• Onlyoperategeneratoronalevelsurface.
• Alwaysconnectthenutandgroundterminalontheframetoanappropriategroundsource.
WARNING!
Generator must be properly grounded to prevent electrocution.
• Neverhandlethegenerator,electronicdevices,oranycordwhilestandinginwater,whilebarefoot,orwhenhands
orfeetarewet.
• Alwayskeepthegeneratordry.Neveroperategeneratorinrainorunderwetconditions.
• Useagroundfaultcircuitinterrupter(GFCI)inadamporhighlyconductivearea,suchasmetaldeckingorsteel
work.
• Neverplugelectronicdevicesintogeneratorhavingfrayed,worn,orbarewires.Nevertouchbarewiresormake
Neverpermitachildorunqualifiedpersontooperategenerator.Keepchildrenaminimumof10feetawayfromthe
contactwithreceptacles.
•
generatoratalltimes.
• Ifusingthegeneratorforbackuppower,notifytheutilitycompany.
Ifconnectinggeneratortoabuilding’selectricalsystemforstandbypower,youmustuseaqualifiedelectricianto
installatransferswitch.Failuretoisolatethegeneratorfromthepowerutilitycouldresultinseriousinjuryordeathto
electricutilityworkers.
•
WARNING!
This generator produces a very high voltage which could result in burns or
electrocution causing serious injury or death.
PROP 65 WARNING: ThisproductcontainschemicalsknowntothestateofCaliforniatocausecancerandbirthdefectsor
otherreproductiveharm.
7
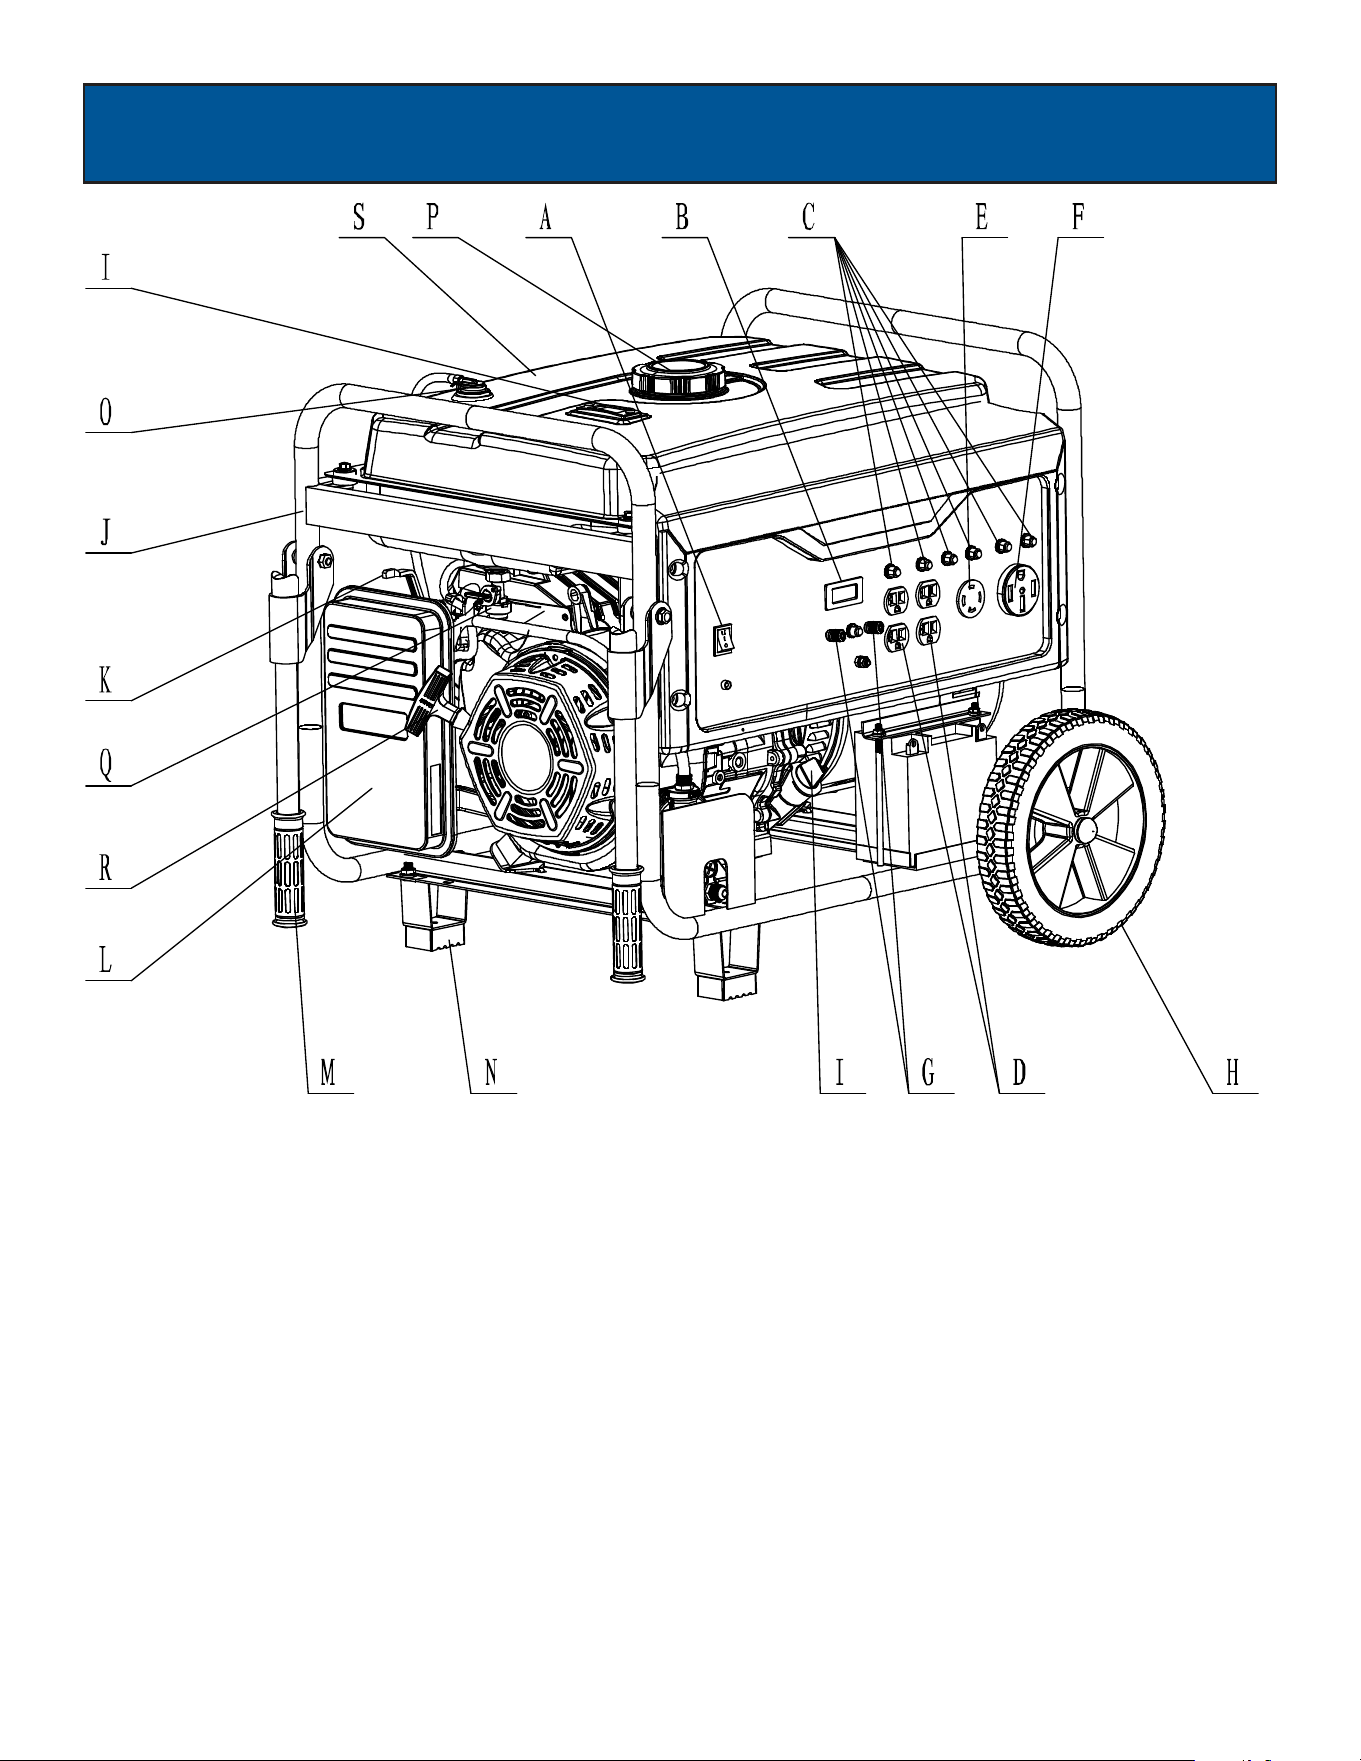
FEATURES
A-START/ON/OFF Switch
B-HourMeter
C-CircuitProtector
D-Two120VlotAC,20AmpReceptacles
E-120/240VoltAC,30Amptwistlock
receptacle(NEMAL14-30)
F-120/240VoltAC,50Ampreceptacle
(NEMAL14-50R)
G-12Volt8.3AmpOutput(Forcharging
batteriesonly)
H-NoFlatFoamFilledTires
I-FuelTankVaporVentJ-FuelGauge
J-GeneratorFrame
K-ChokeLever
L-AirFilter
M-Handles&Grip
N-SupportLeg(Foot)
O-FuelTankVaporVent
P-FuelFillCap
Q-FuelValve(ON/OFF)
R-RecoilStarterGrip
S-OilFill(Dipstick)
8
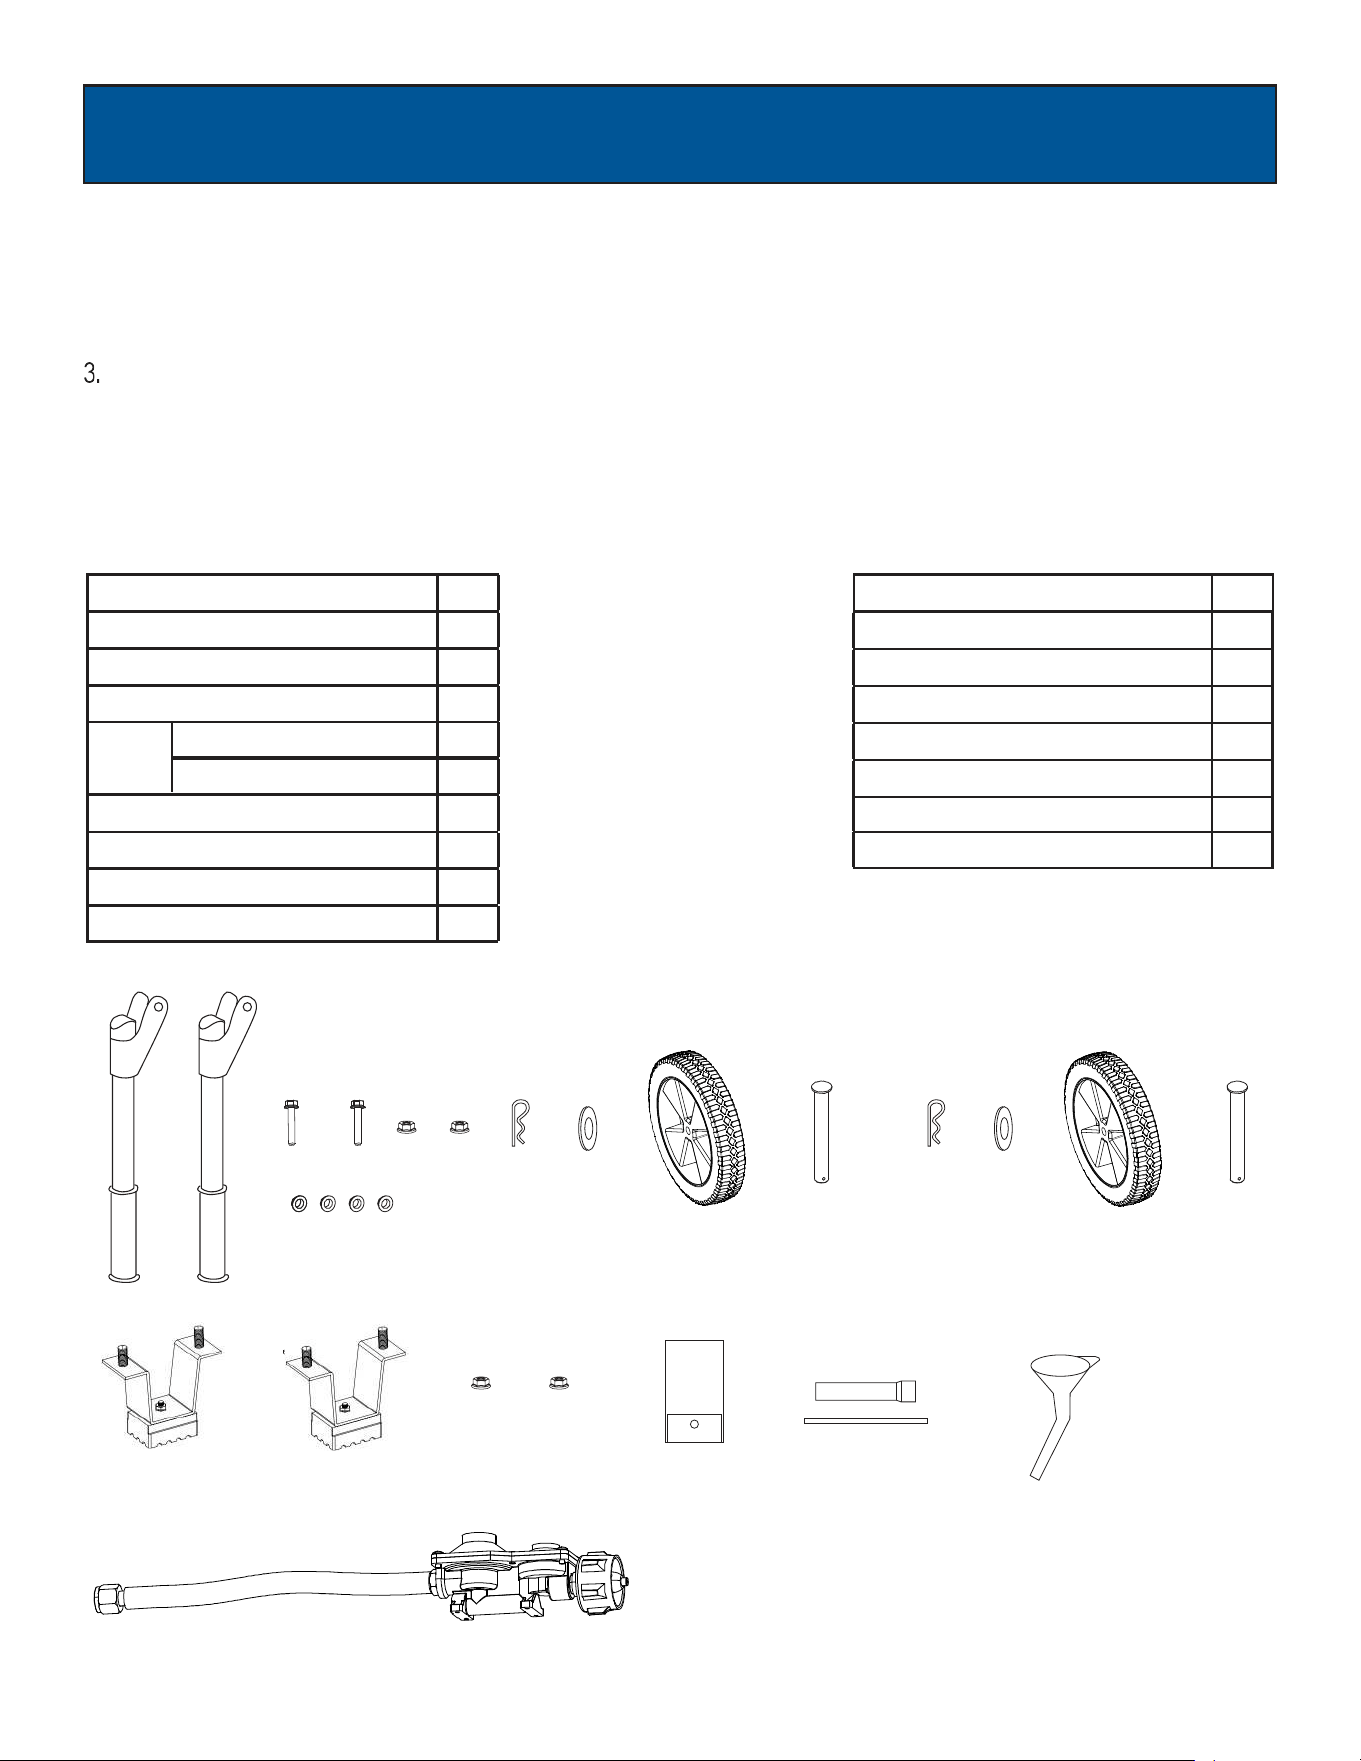
ASSEMBLY
Description Qty
Wheel
Axle
2
SupportingLeg
2
Hairpin 2
Screw
2
Unpacking
1. Placeboxonalevelsurface.
2. Removeallitemsfromboxexceptthegenerator.Makesureallitemslistedonthepackinglistareincludedandnot
damaged.
Cut down the sides of box being careful to avoid hitting the generator.
4. Leave generator on box to install wheel assembly.
Packing List
Checkallloosepartstothefollowinglist.Contactyourdealerifanyloosepartsarenotincluded.
Description Qty
Generator 1
Operator 'sManual 1
ProductsWarrantyCard
Toolkit
SparkPlugWrench
CombinationWrench
1
1
2
2
Washer 2
Funnel 1
(
)
Handles
2
Bushings(Flanged) 4
1
Nuts 2
One stage regulator
++ + + + +
+ ++ + ++ +
+ + +
+
+
9
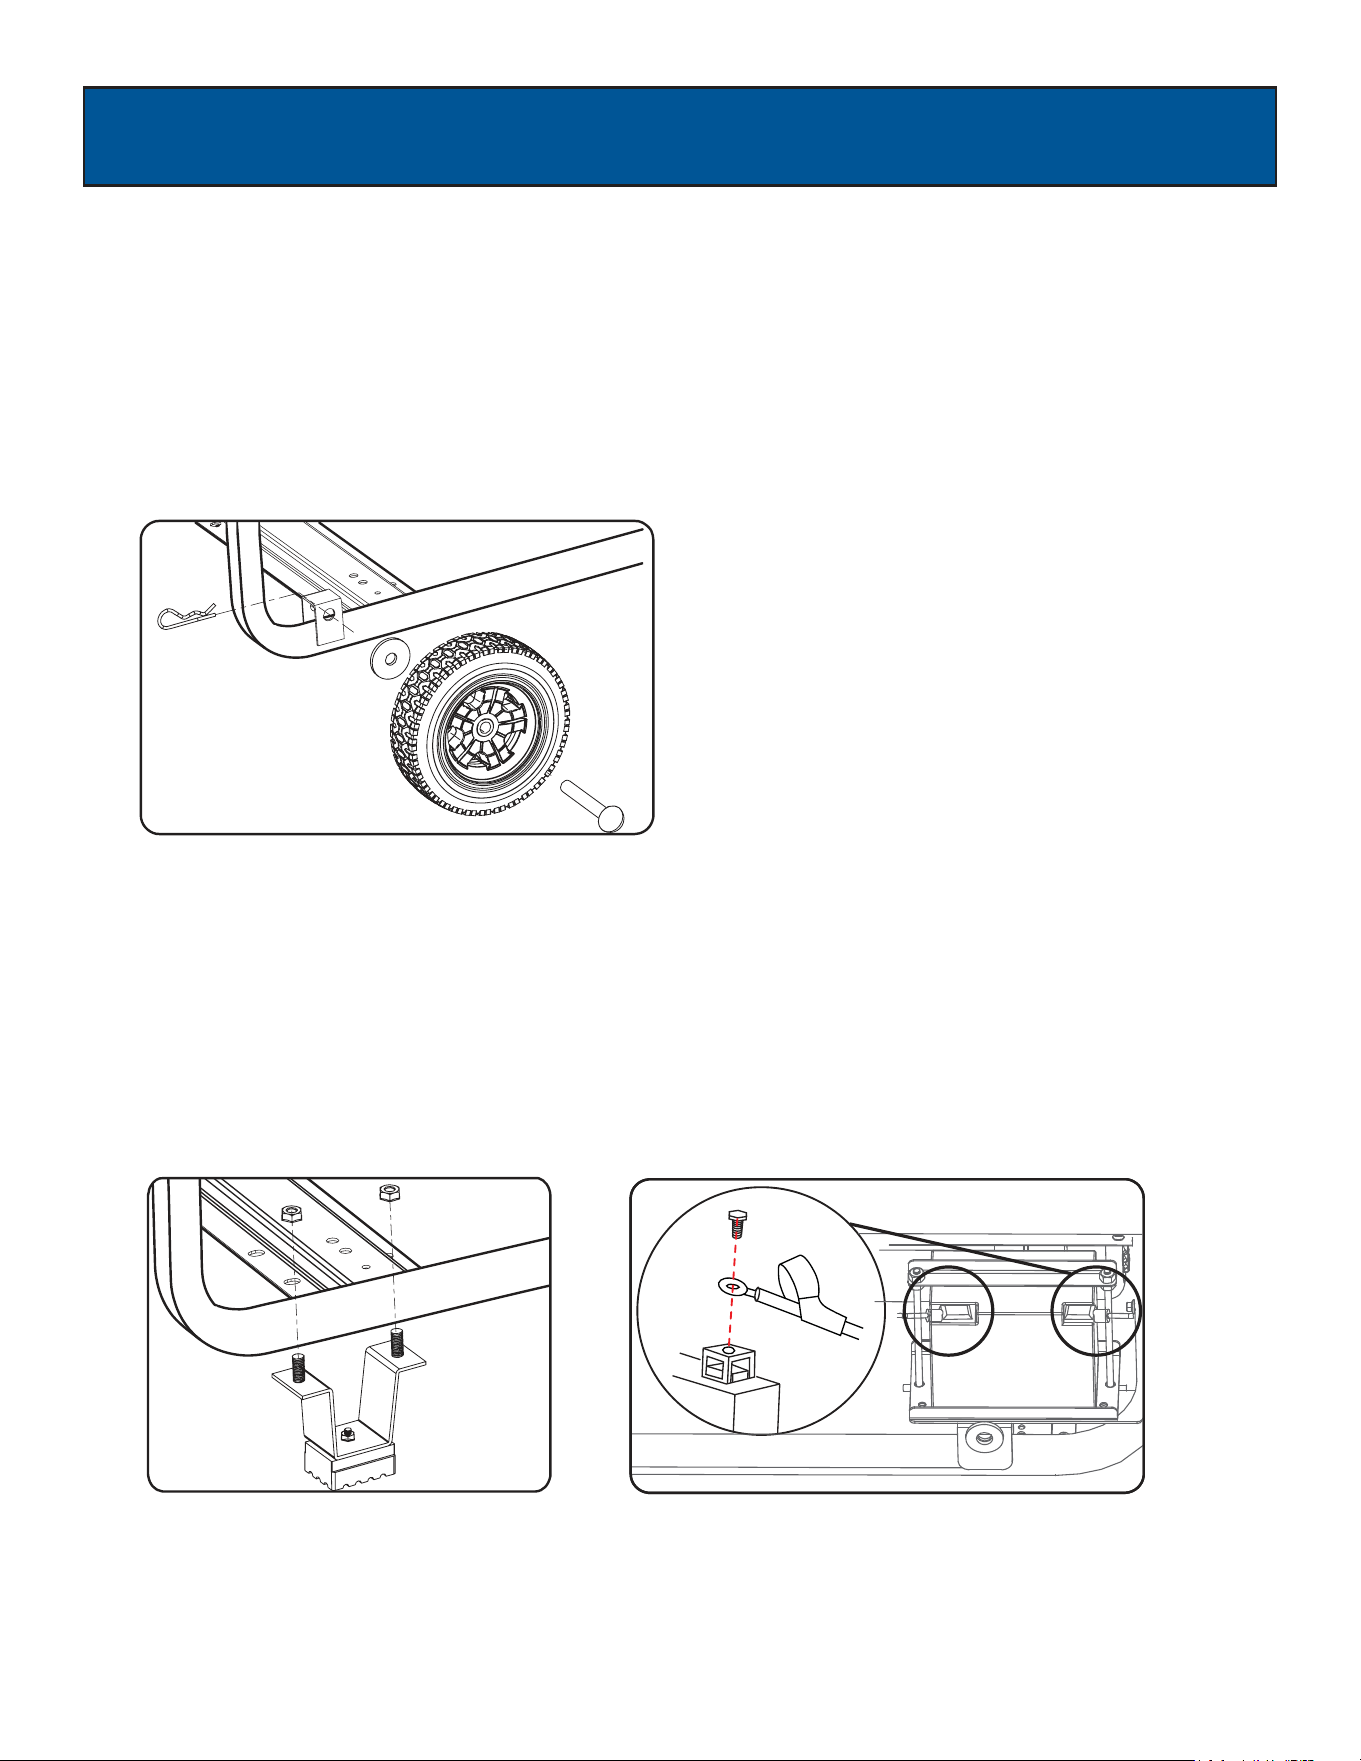
ASSEMBLY
• Parts needed - Support leg & M8 screw (2) and 2 nuts.
Raise the front end of the generator high enough to gain access to the bottom of the frame. Securely position props
underneath to support.
•
• Line up holes on the support leg bracket to the holes on the front of the generator frame.
• Attach the support leg using M8 screws (2) and nuts.
Installing Support Leg (See fig 2)
• Parts needed - 2 wheels, 2 axles, 2 hair pins, and 2 washers.
• Raise or tilt generator so you can slide the wheel axle pin into the wheel, the washer, the wheel mounting hole located
on the side of the frame.
• Secure the wheel assembly by reinserting a hair pin through hole at the end of the wheel axle and pressing until it locks
into place.
• Repeat process on the other side of the generator to install the second wheel.
Attaching Wheels (See fig 1)
Fig 1
Fig 2
Fig 3
10
ASSEMBLY
• Partsneeded-BlackandRedbatterycable
• TheRed(+)Connectorshouldbeattachedtothebatteryfirst.
Removethescrewfromthebatteryterminal.
•
• Placethescrewthroughtheeyeletandtightenthescrewandmakesuretheterminalwillnottouchanypartoftheframe.
InstalltheRedprotectionboot.
•
• RepeatthesestepsfortheBlack(-)Terminal.
Attaching Battery Cable (See fig 3)
Fig4
Intalling The Handles (See fig 4)
Covertheterminalswiththerubbercovers
Whenremovingthebatteryforreplacement:Removethenutandboltfirstfromthenegative(Black)post,thenfromthe
positive(Red)post,beingcarefulnottoshortacrosstheterminals.Alwaysabidebythesafetywarningsprovidedwiththe
battery.Removethebatteryanddisposeofitaccordingtoyourlocalandstateregulations.
Be careful not to short across the terminals when installing. Shorting the terminals together
can cause sparks, damage to the battery or generator, or even burns or explosions.
CAUTION!
• Alwayswashhandsaftertouchingbattery.
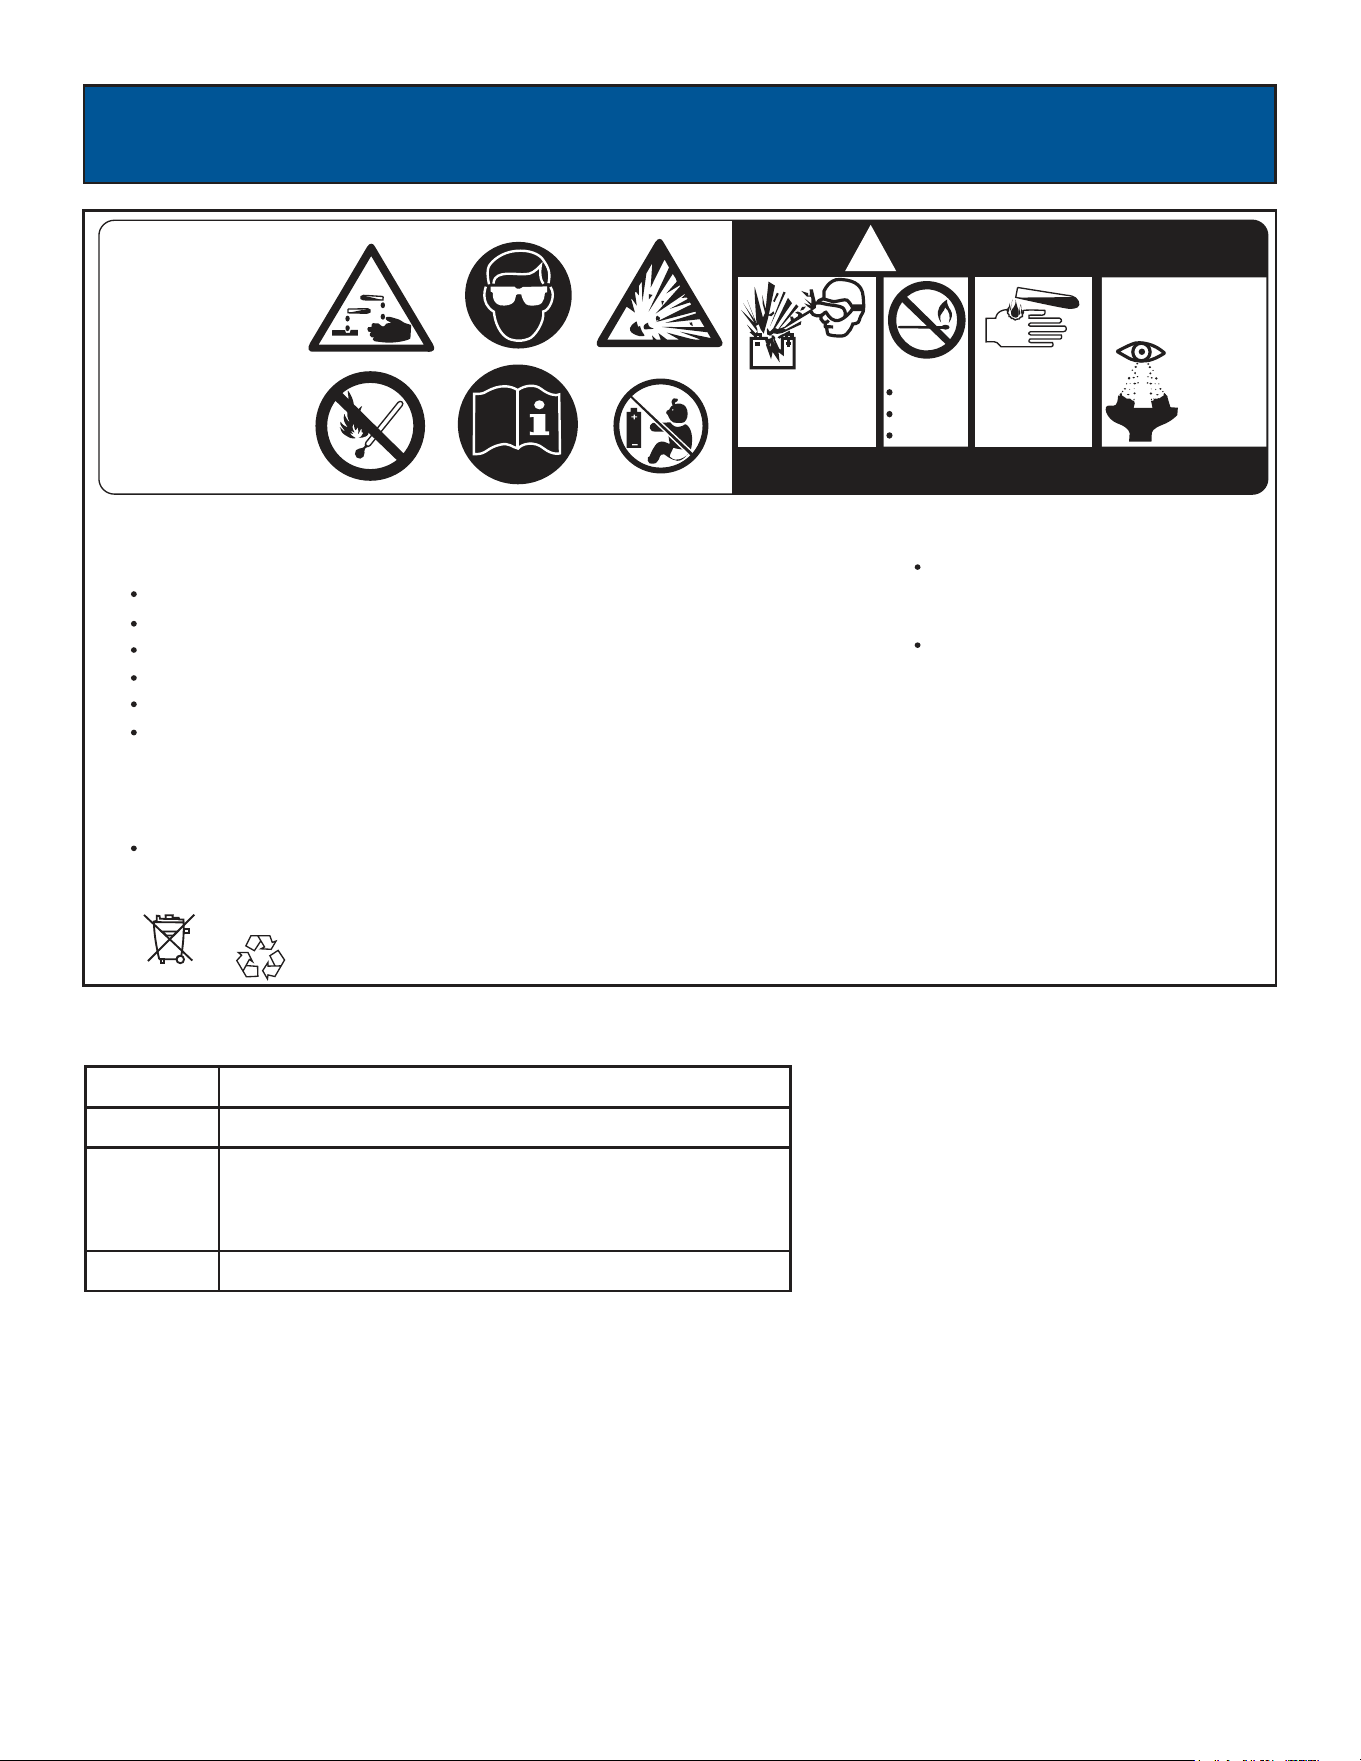
WARNING!
Battery posts, terminals, and accessories contain lead and lead compounds known to cause
cancer and reproductive harm.
11
ASSEMBLY
NON-SPILLABLE
SEALED BATTERY
This is a ready filled,
activated sealed battery.
Never remove strip.
Refer to owner’s manual
or instruction sheet for
charging procedures.
l
!
DANGER/POISON
SHIELD
EYES.
EXPLOSIVE
GASES CAN
CAUSE BLINDNESS
OR INJURY
NO
SPARKS
FLAMES
SMOKING
SULFURIC
ACID
CAN CAUSE
BLINDNESS OR
SEVERE BURNS
FLUSH EYES
IMMEDIATLEY
WITH WATER
GET
MEDICAL
HELP
FAST
WARNING!
PR OP O SITION 6 5
WAR NI NG
Battery posts,terminals,and related
accessories contain lead and lead
compounds,chemicals known to the
State of California to cause c ancer and
reproductive harm.
Wash hands after handling.
Wear Eye Protection
Never Reverse Pole Connections
Never turn the battery upside down
DO NOT Smoke near the battery
If electrolyte contact the skin wash the area immediately with clean water
If you get electrolyte contact with your eye,rinse immediately with clean water
and seek medical attention
NOTICE:
If the Generator is stored for over six months the battery will need to be removed
and charged
Pb
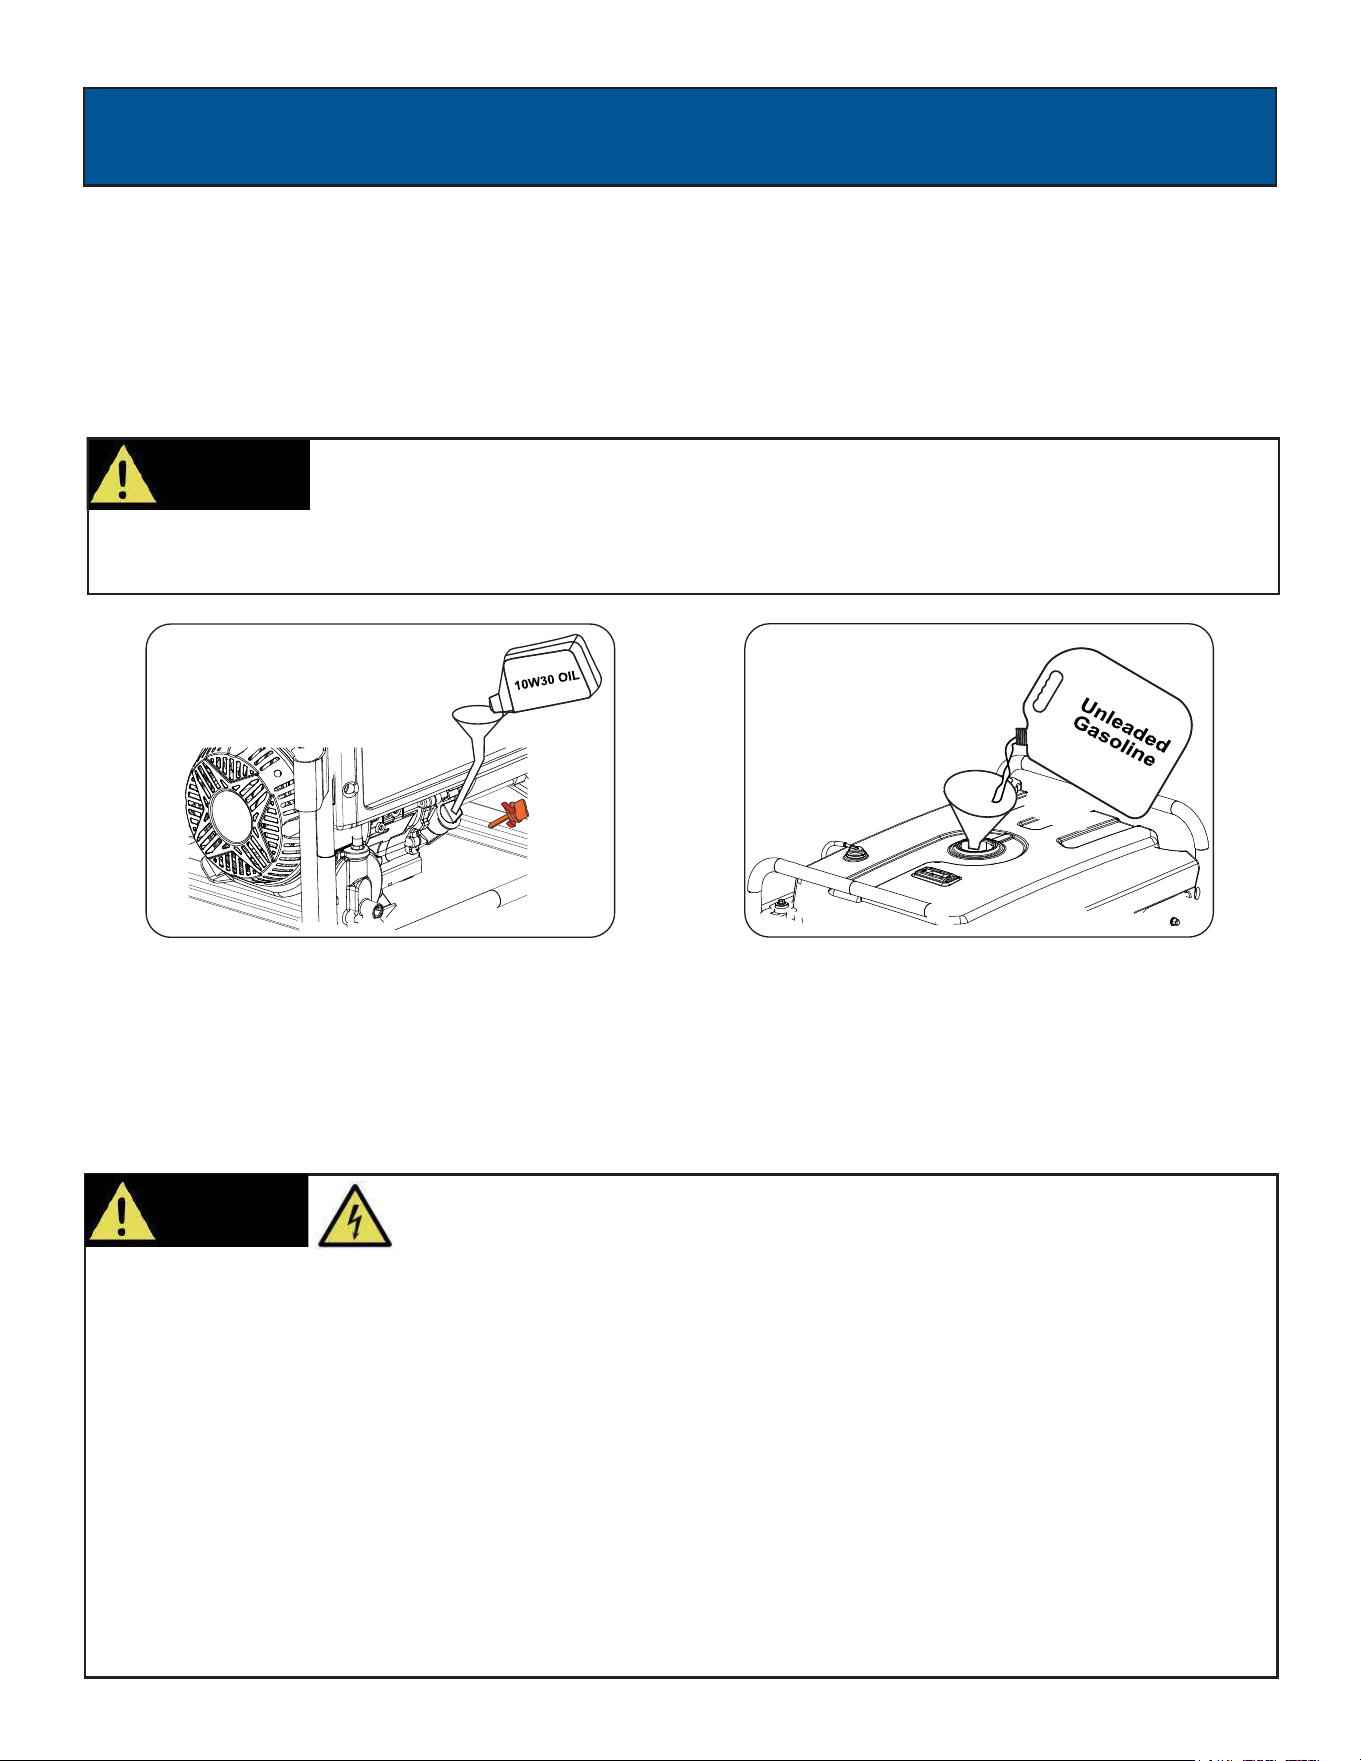
• Placegeneratoronalevelsurface.
Removethecrankcasedipsticktoensureyoudonotoverfilltheengine.
•
• Insertafunnelintothecrankcasedipstickholdandcarefullyadd4-Cycleengineoil(SAE10W-30)toemptyreservoir
untiloilreachestheouteredgeoftheoilfillhole(crankcasedipstickhole).
• Besuretoreplacedipstickbeforeattemptingtostarttheengine.
• Tocheckoil,setgeneratoronalevelsurface,wipedipstickclean,thenreinsertdipstickwithoutrethreading.
Adding / Checking Engine Oil (See fig 5)
Antidotesforbatteryacid
CONTACT TREATMENT
External Flushwithwater.
Internal Drinklargequantitiesofmilkorwater,followedbymilkof
magnesia,vegetableoilorbeateneggs.Getimmediate
medicalattention.
Eyes Flushwithwater.Getimmediatemedicalattention.
12
ASSEMBLY
• Neverhandlethegenerator,electronicdevices,oranycordwhilestandinginwater,whilebarefoot,orwhenhandsor
feetarewet.
• Alwayskeepthegeneratordry.Neveroperategeneratorinrainorunderwetconditions.
• Useagroundfaultcircuitinterrupter(GFCI)inadamporhighlyconductivearea,suchasmetaldeckingorsteel
work.
• Neverplugelectronicdevicesintogeneratorhavingfrayed,worn,orbarewires.Nevertouchbarewiresormake
Neverpermitachildorunqualifiedpersontooperategenerator.Keepchildrenaminimumof10feetawayfromthe
contactwithreceptacles.
•
generatoratalltimes.
• Ifusingthegeneratorforbackuppower,notifytheutilitycompany.
Ifconnectinggeneratortoabuilding’selectricalsystemforstandbypower,youmustuseaqualifiedelectricianto
•
installatransferswitch.Failuretoisolatethegeneratorfromthepowerutilitycouldresultinseriousinjuryordeathto
electricutilityworkers.
WARNING!
This generator produces a very high voltage which could result in burn or
electrocution causing serious injury or death.
Connecting Generator to an Electrical System
•
atransferswitch.Thepowerfromthegeneratormustbeisolatedfromthecircuitbreakeroralternativepowersource.
Ifconnectinggeneratortoabuilding’selectricalsystemforstandbypower,youmustuseaqualifiedelectriciantoinstall
Theconnectionmustcomplywithallelectricalcodesandapplicablelaws.
Fig6Fig5
You must add oil before first operating this generator. Always check oil level before each
operation.
DO NOT USE E15 OR E85 FUEL IN THIS UNIT. IT IS A VIOLATION OF FEDERAL LAW AND
WILL DAMAGE THE UNIT AND VOID YOUR WARRANTY.
CAUTION!
• Setgeneratoronacleanandlevelsurfaceinanareathatiswellventilated.
• Removefuelcap.
• Insertafunnelintothefueltankandcarefullypourgasolineintothetankuntilfuellevelreaches1½inchesbelowthe
topoftheneck.Becarefulnottooverfillthetanktoprovidespaceforfuelexpansion.
Adding Fuel (See fig 6)
OPERATION
13
• Onlyoperategeneratoronalevelsurface.
• Alwaysconnectthenutandgroundterminalontheframetoanappropriategroundsource.
WARNING!
Generator must be properly grounded to prevent electrocution.
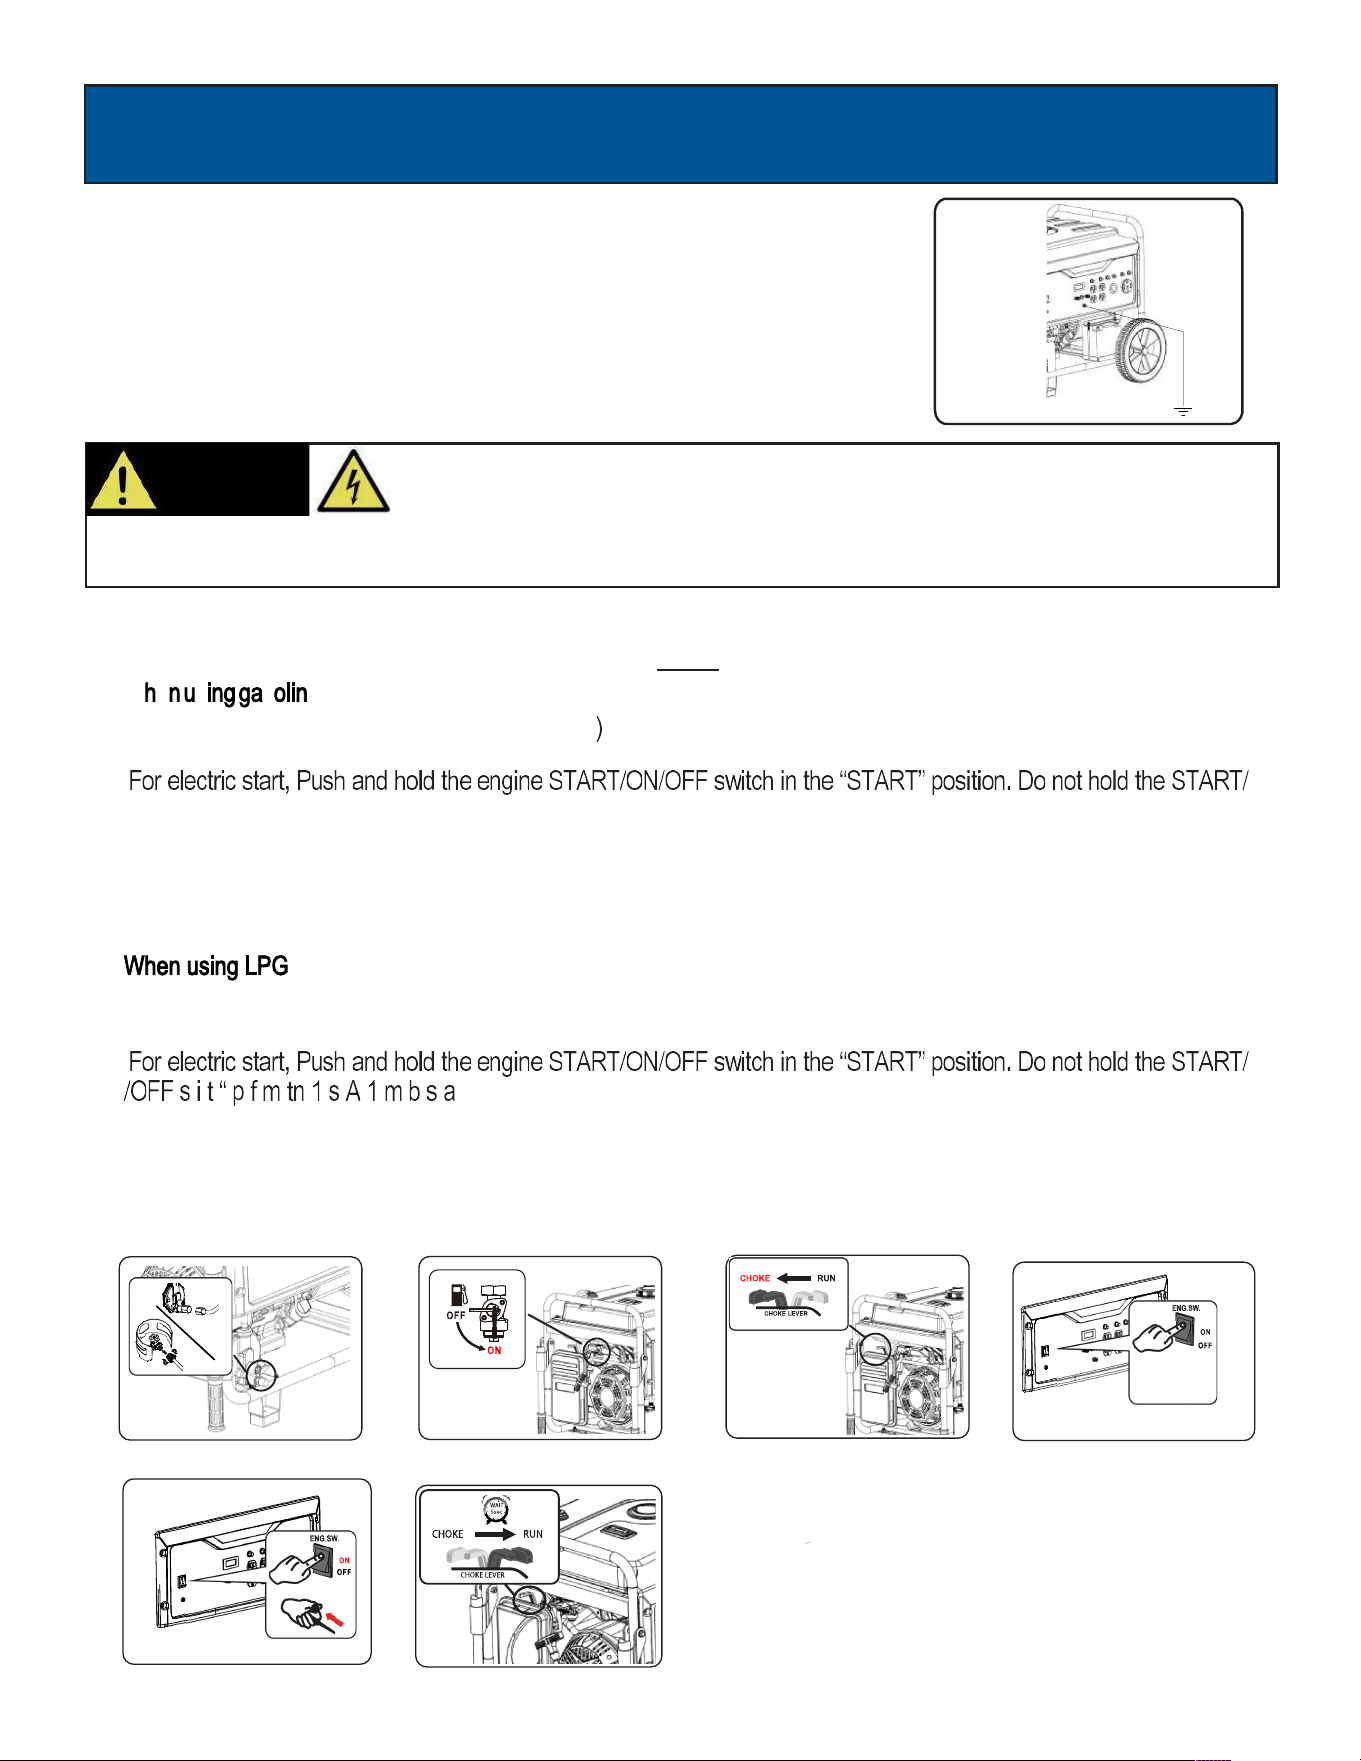
How to Start Engine (See fig 8-14 )
Fig9
Fig12ElectricStart
Fig14
Fig11
SKIPTHISIFTHEENGINEIS
WARMORHOT.
Thegroundterminallocatedonthebackofthegeneratorframemustalwaysbeused
toconnectgeneratortoadrivengroundrod.Connectthegroundterminaltothedriven
groundrodwithaNo8AWG(AmericanWireGauge)copperwire.Thewireconnects
totheterminalbetweenthelockwasherandnut.Tightenthenutsecurelytoensure
properconnection.Groundingthegeneratorprotectsyoufromelectricshockthat
resultsfromabuildupofstaticelectricityorundetectedgroundfaults.
Fig7
Grounding the Generator (See fig 7)
Fig13RecoilStart
START
• Placegeneratoronalevelsurface.AllelectricalloadsMUSTbedisconnectedfromgenerator.
W e s s e
• Turnfuelvalvetothe“ON”position.(Seefig9
• Slidethe chokelever tothe“Choke”position.(Seefig11)SKIP THIS IF THE ENGINE IS WARM OR HOT.
•
ON/OFFswitchinthe“Start”positionformorethan15seconds.Allow1minutebetweenstartingattempts.(Seefig12)
• Formanualstart,turntheengine ON/OFFswitchtothe“ON”position.Pulltherecoilhandle(starter
cord)slowlyuntilresistanceisfelt,thenpullrapidly.(Seefig13)
• Letenginerunforseveralsecondsandthengradually,asenginewarmsup,slidethechokelevertowardsthe“RUN”
positionuntilthechokeisfullyslidtothe“RUN”position.(Seefig14)
• Connect the gas pipe to the intake nozzle of regulator ; Open the valve of LPG bottle (Seefig8)
• Slidethe chokelever tothe“Choke”position.(Seefig11)SKIP THIS IF THE ENGINE IS WARM OR HOT.
•
N N
• Formanualstart,turntheengine ON/OFFswitchtothe“ON”position.Pulltherecoilhandle(starter
cord)slowlyuntilresistanceisfelt,thenpullrapidly.(Seefig13)
• Letenginerunforseveralsecondsandthengradually,asenginewarmsup,slidethechokelevertowardsthe“RUN”
positionuntilthechokeisfullyslidtothe“RUN”position.(Seefig14)
Fig8
(Seefig12)
START
OPERATION
14
• Toavoidrecoil,pullstartercordslowlyuntilresistanceisfelt,thenpullrapidly.
WARNING!
Pull cord recoils rapidly and pulls arm towards engine faster than you can let go which
could result in injury.
• Alwaysstarttheengineandletitstabilizebeforeconnectinganyelectronicdevices.
• Disconnectallelectronicdevicesbeforestoppingtheengine.
WARNING!
Never start or stop engine with electrical devices plugged in to the receptacles. Failure to
do so could damage the generator and / or connected electrical devices.
Receptacles and Extension Cords
Onlyusehighquality,well-insulated,groundedextensioncordsingoodconditionwithgeneratorreceptacles.Followeach
loadmanufacturer’spowerratingrecommendationwhenselectingreceptacleandextensioncord.
This generator is equipped with the following receptacles:
Battery Charger for Electric Starter
Keepthegeneratorbatteryfullychargedandreadytousetoavoidtheneedtousetherecoilstartertostartthegenerator
manually.
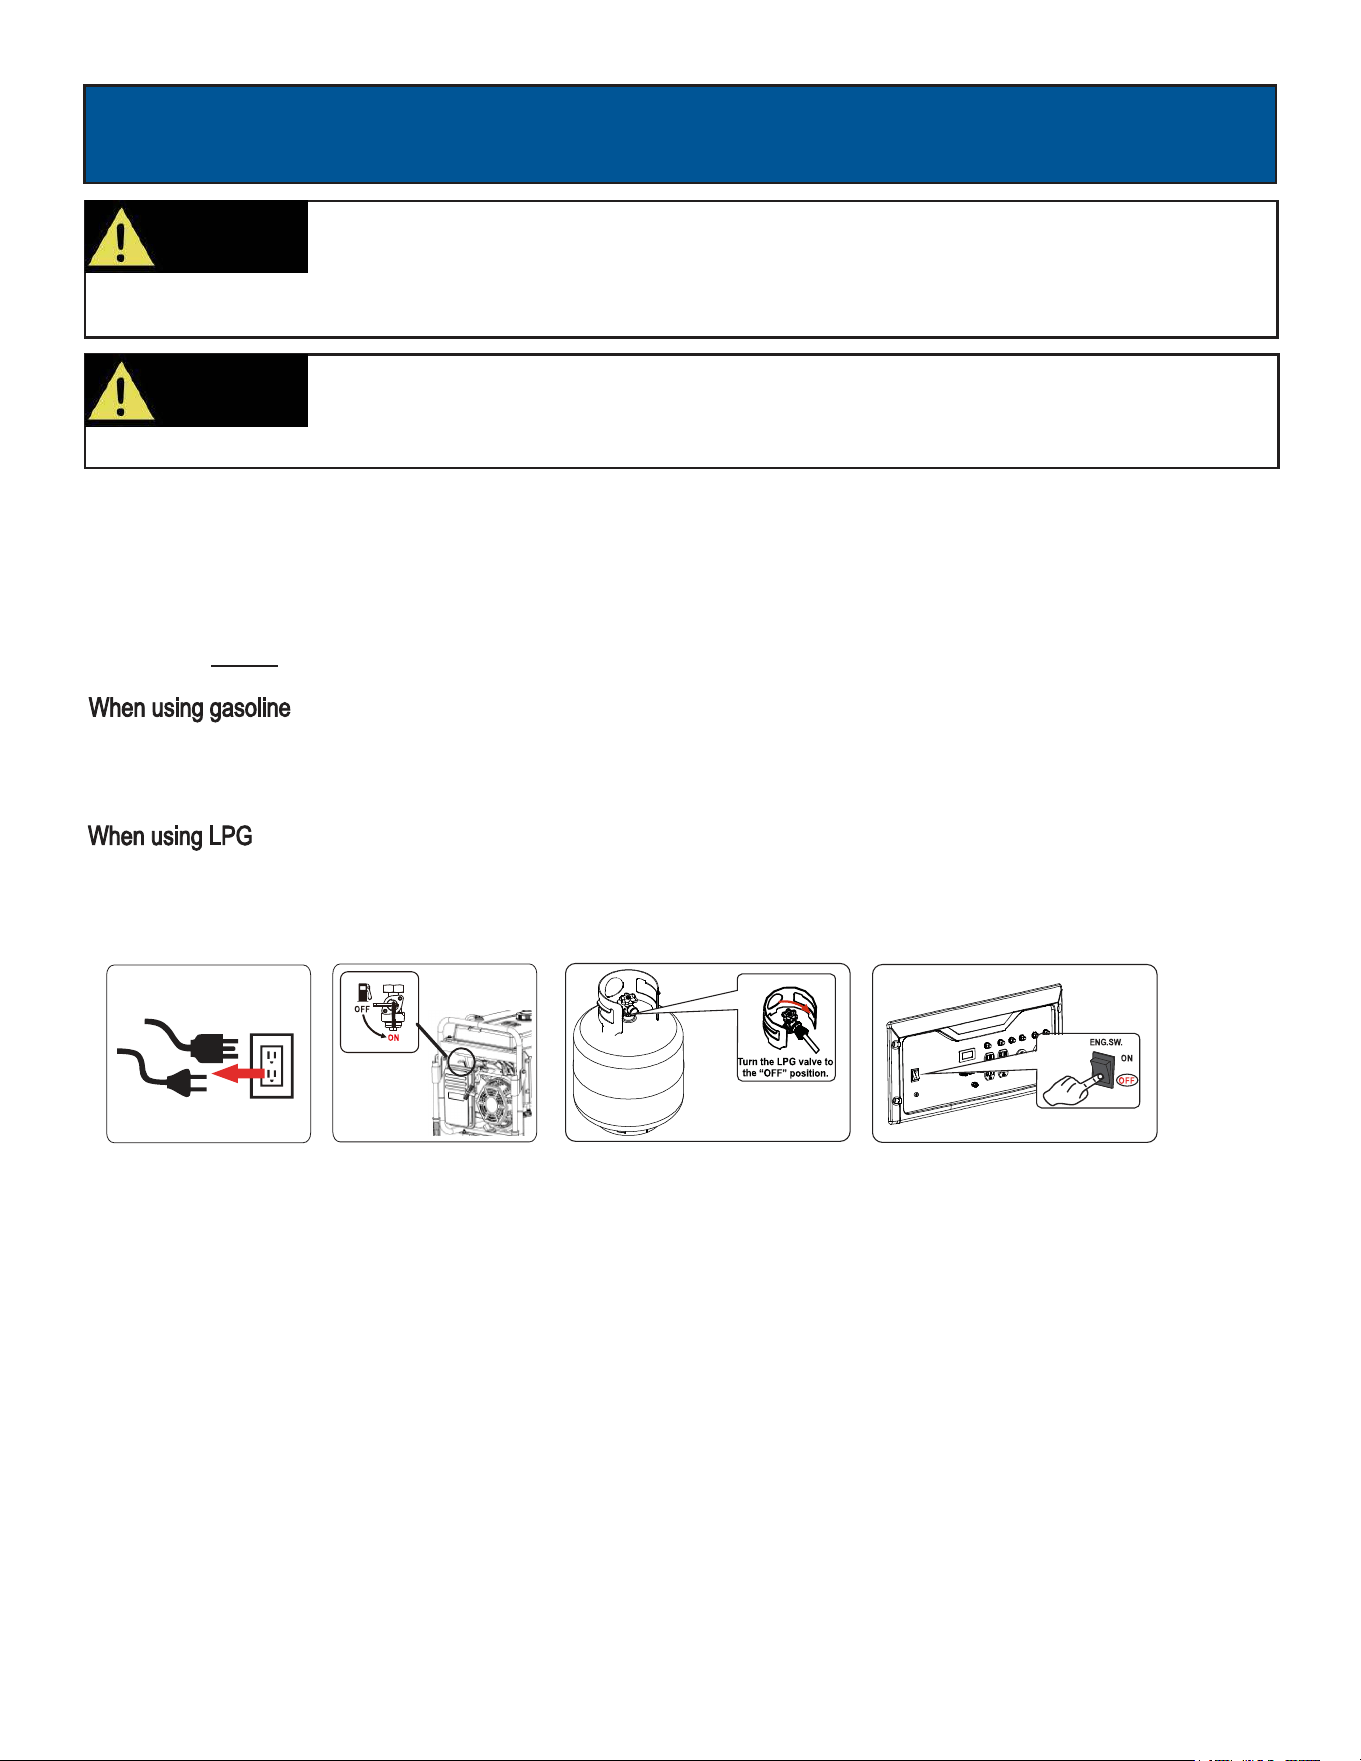
How to Stop Engine (See fig 15-18))
• Allloads MUST bedisconnectedfromthegenerator.Neverstartorstoptheenginewithelectricaldevicespluggedinto
thereceptacles.(Seefig15)
1.TurntheengineSTART/ON/OFFswitchtothe“OFF”position.(Seefig18)
2.TurnthefuelvalveleverbacktotheOFFposition.(Seefig16)
1.TurntheengineSTART/ON/OFFswitchtothe“OFF”position.(Seefig18)
2.TrunoffLPGbottle.(Seefig17)
Fig15 Fig16 Fig17
Fig18
• Four 120 Volt AC, 20 Amp receptacles.
• 120/240Volt AC, 50 Amp receptacle (NEMA L14-50R).
• 120 / 240 Volt AC, 30 Amp twist lock receptacle (NEMA L14-30).
• 12 Volt 8.3 Amp Output (For charging batteries only)
120 Volt AC, 20 Amp receptacle
• This receptacle has a 20 Amp push-to reset circuit breaker to protect against overload.
• Each socket is rated to operate 120 Volt, AC, single phase, 60Hz loads requiring up to 2400 watts (2.4 kW) at 20 Amps.
• Use extension cords having a minimum rating of 125 Volts AC, 20 Amps.
OPERATION
15
Do not connect 3-phase loads to generator.
CAUTION!
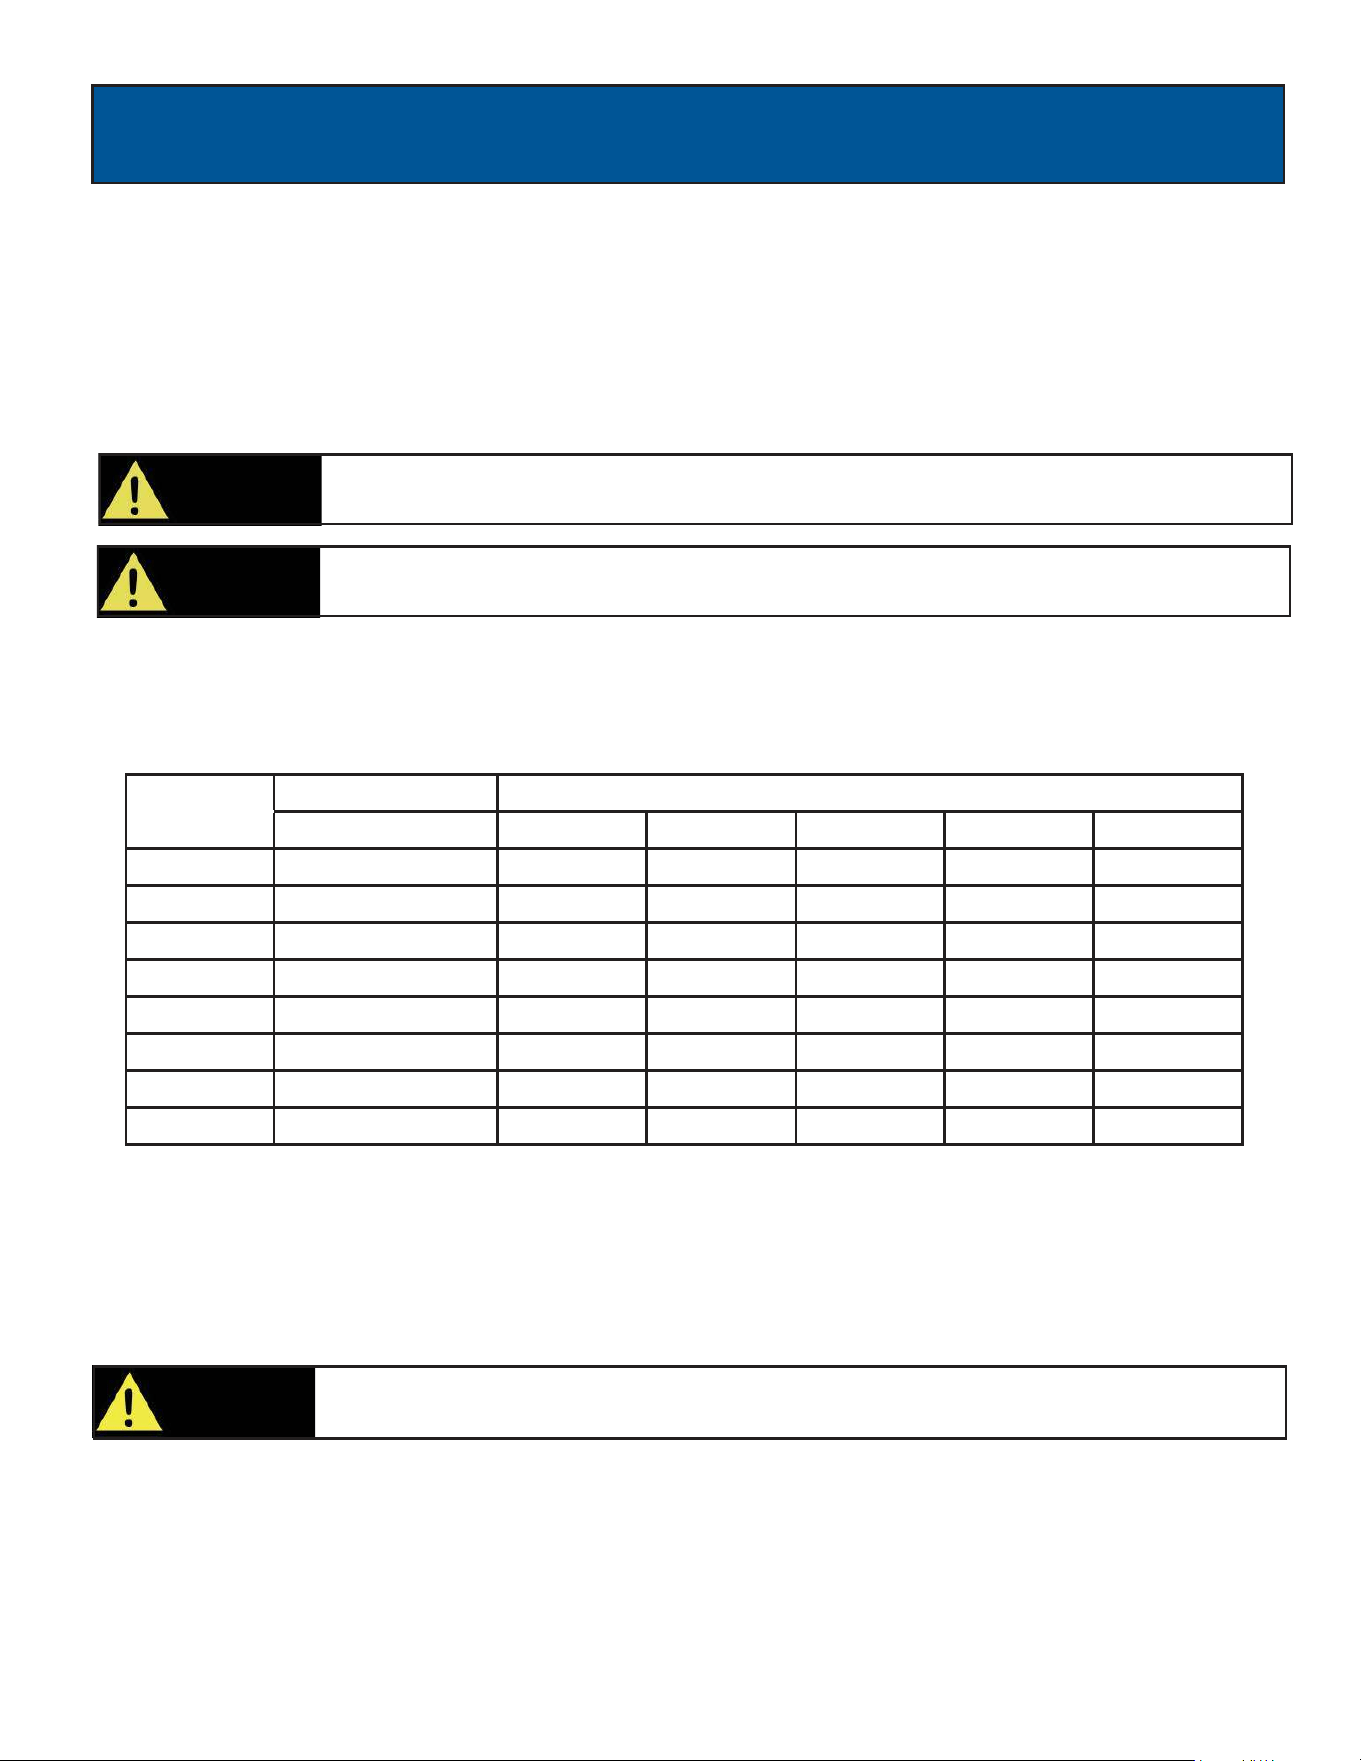
Extension Cord Selection
Refertothebelowtabletoensuretheextensioncordusedhasthecapacitytocarrytherequiredload.Ifthesizeofthe
cableisinadequateitcancauseavoltagedrop,whichcandamagetheelectricaldeviceandcord.
Current
(Amps)
Load(Watts)
MaximumCordLength
230V #8Wire #10Wire #12Wire #14Wire #16Wire
2.5 600 X 1000ft. 600ft. 375ft. 250ft.
5 1200 X 500ft. 300ft. 200ft. 125ft.
7.5 1800 X 350ft. 200ft. 125ft. 100ft.
10 2400 X 250ft. 150ft. 100ft. 50ft.
15 3800 X 150ft. 100ft. 65ft. X
20 4800 175ft. 125ft. 75ft. X X
25 6000 150ft. 100ft. X X X
30 7200 125ft. 65ft. X X X
Moving the Generator
• Disconnectanyelectronicdevicesfromgeneratorthenturngeneratoroff.
• Turnfuelvalvetothe“OFF”position.
• Tiltgeneratoruntilitbalancesonwheels.Rollmachinetodesiredlocation.
• Ifthegeneratormustbecarried,foldhandletothedownposition.Neverliftorcarrygeneratorbyitshandle.
CAUTION!
Thisproductisheavyandrequiresseveralpeopletolift.Liftandlowerwithyourlegsbybending
attheknees,notyourback,toavoidinjury.
Don’t Overload Generator
Makesureyoucansupplyenoughratedwattsandsurgewattsforallelectronicdevicesconnectedtothegenerator.Rated
wattsrefertothepowerageneratormustsupplytokeepadevicerunning.Surgewattsrefertothepoweragenerator
mustsupplytostartanelectronicdevice.Thispowersurgeforstartingadeviceusuallylastsbetween2-3secondsbutthis
additionaloutputmustbetakenintoaccountwhenselectingtheelectronicdevicesyouplantoattachtothegenerator.To
preventoverloadingthegeneratortakethefollowingsteps:
120 / 240 Volt AC, 30 Amp locking receptacle
• Thisreceptaclehasa30Amppush-toresetcircuitbreakertoprotectagainstoverload.
• Thisreceptacleisratedtooperate120Volt,AC,singlephase,60Hzloadsrequiringupto3600watts(3.6kW)at30
Amps.Itisalsoratedtooperate240VoltAC,singlephase,60Hzloadsrequiringupto7,200watts(7.2kW).
• UseaNEMAL14-30plugwiththisreceptacle.
• Usea4-wirecordratedfor240VoltsAC,30Ampstotheplug.Youcanusethesame4-wirecordtooperatea120
Voltload.
12 Volt 8.3 Amp Output is for charging batteries only!
WARNING!

OPERATION
Never exceed generator’s wattage / amperage capacity. This could damage the generator
and / or connected electrical devices.
WARNING!
Checkoperatingvoltageandfrequencyrequirementsofallelectricaldevicespriortopluggingthemintothegenerator.
16
Bathroom Rated Watts Surge Watts
HairDryer 1250 0
CurlingIron 1500 0
Family Room
Home Office
X-BoxorPlayStation 40 0
AM/FMRadio 100 100
VCR 100 100
ColorTV(27”) 500 500
FaxMachine 65 0
PersonalComputer(17”Monitor) 800 0
LaserPrinter 950 0
CopyMachine 1600 0
Power Tools
1000WQuartzHalogenWorkLight 1000 0
AirlessSprayer(
⅓
HP) 600 1200
ReciprocatingSaw 960 0
CircularSaw(7¼”) 1400 2300
MiterSaw(10”) 1800 1800
Table/RadialArmSaw 2000 2000
ElectricDrill(½HP,5.4Amps) 600 900
HammerDrill 1000 3000
AirCompressor 1600 4500
Other
HomeSecuritySystem 500 500
GarageDoorOpener(
⅓
HP) 750 750
Essentials Rated Watts Surge Watts
75WLightBulbs 75each 75each
18CUFtRefrigerator/Freezer 800 2200
FurnaceFan(
⅓
HP) 800 2350
SumpPump(
⅓
HP) 1000 2000
WaterPump(
⅓
HP) 1000 3000
Heating/Cooling
650 800
TableFan
Dehumidifier
800 2000
WindowAC(10kBTU) 1200 3600
CentralAir(10kBTU) 1500 6000
ElectricBlanket 400 400
SpaceHeater 1800 1800
Kitchen
Blender 300 900
Toaster(2slice) 1000 1600
CoffeeMaker 1500 1500
ElectricRange(1element) 1500 1500
Dishwasher 1500 3000
ElectricOven 3410 3410
ElectricWaterHeater 4000 4000
Laundry Room
Iron 1200 1200
WashingMachine 1150 3400
GasClothesDryer 700 2500
ElectricClothesDryer 5400 6750
Wattage Reference Guide
(Wattageslistedarejustapproximations.Checkelectronicdeviceforactualwattage)
Operatingvoltageandfrequencyrequirementofallelectronicequipmentshouldbecheckedpriortopluggingthemintothis
generator.Damagemayresultiftheequipmentisnotdesignedtooperatewithina+/-10%voltagevariation,and+/-3Hz
frequencyvariationfromthegeneratornameplateratings.Toreducetheriskofdamage,alwayshaveanadditionalload
pluggedintothegeneratorifsolidstateequipment(suchastelevisionset)isused.Apowerlineconditionerisrecommended
forsomesolidstateapplications.
1. Addupthetotalratedwattageofallelectronicdevicesthatwillbeconnectedtothegeneratorsimultaneously.
2. Estimatesurgewattsbyaddingtheitem(s)withthehighestoutput(itisunnecessarytocalculatethesurgeoutputforall
devicesastheyshouldbeconnectedoneatatime).
3. AddtheSurgeWattstothetotalRatedWattsinstep1.Keeptotalloadwithingenerator’spowercapacity.
OPERATION
17
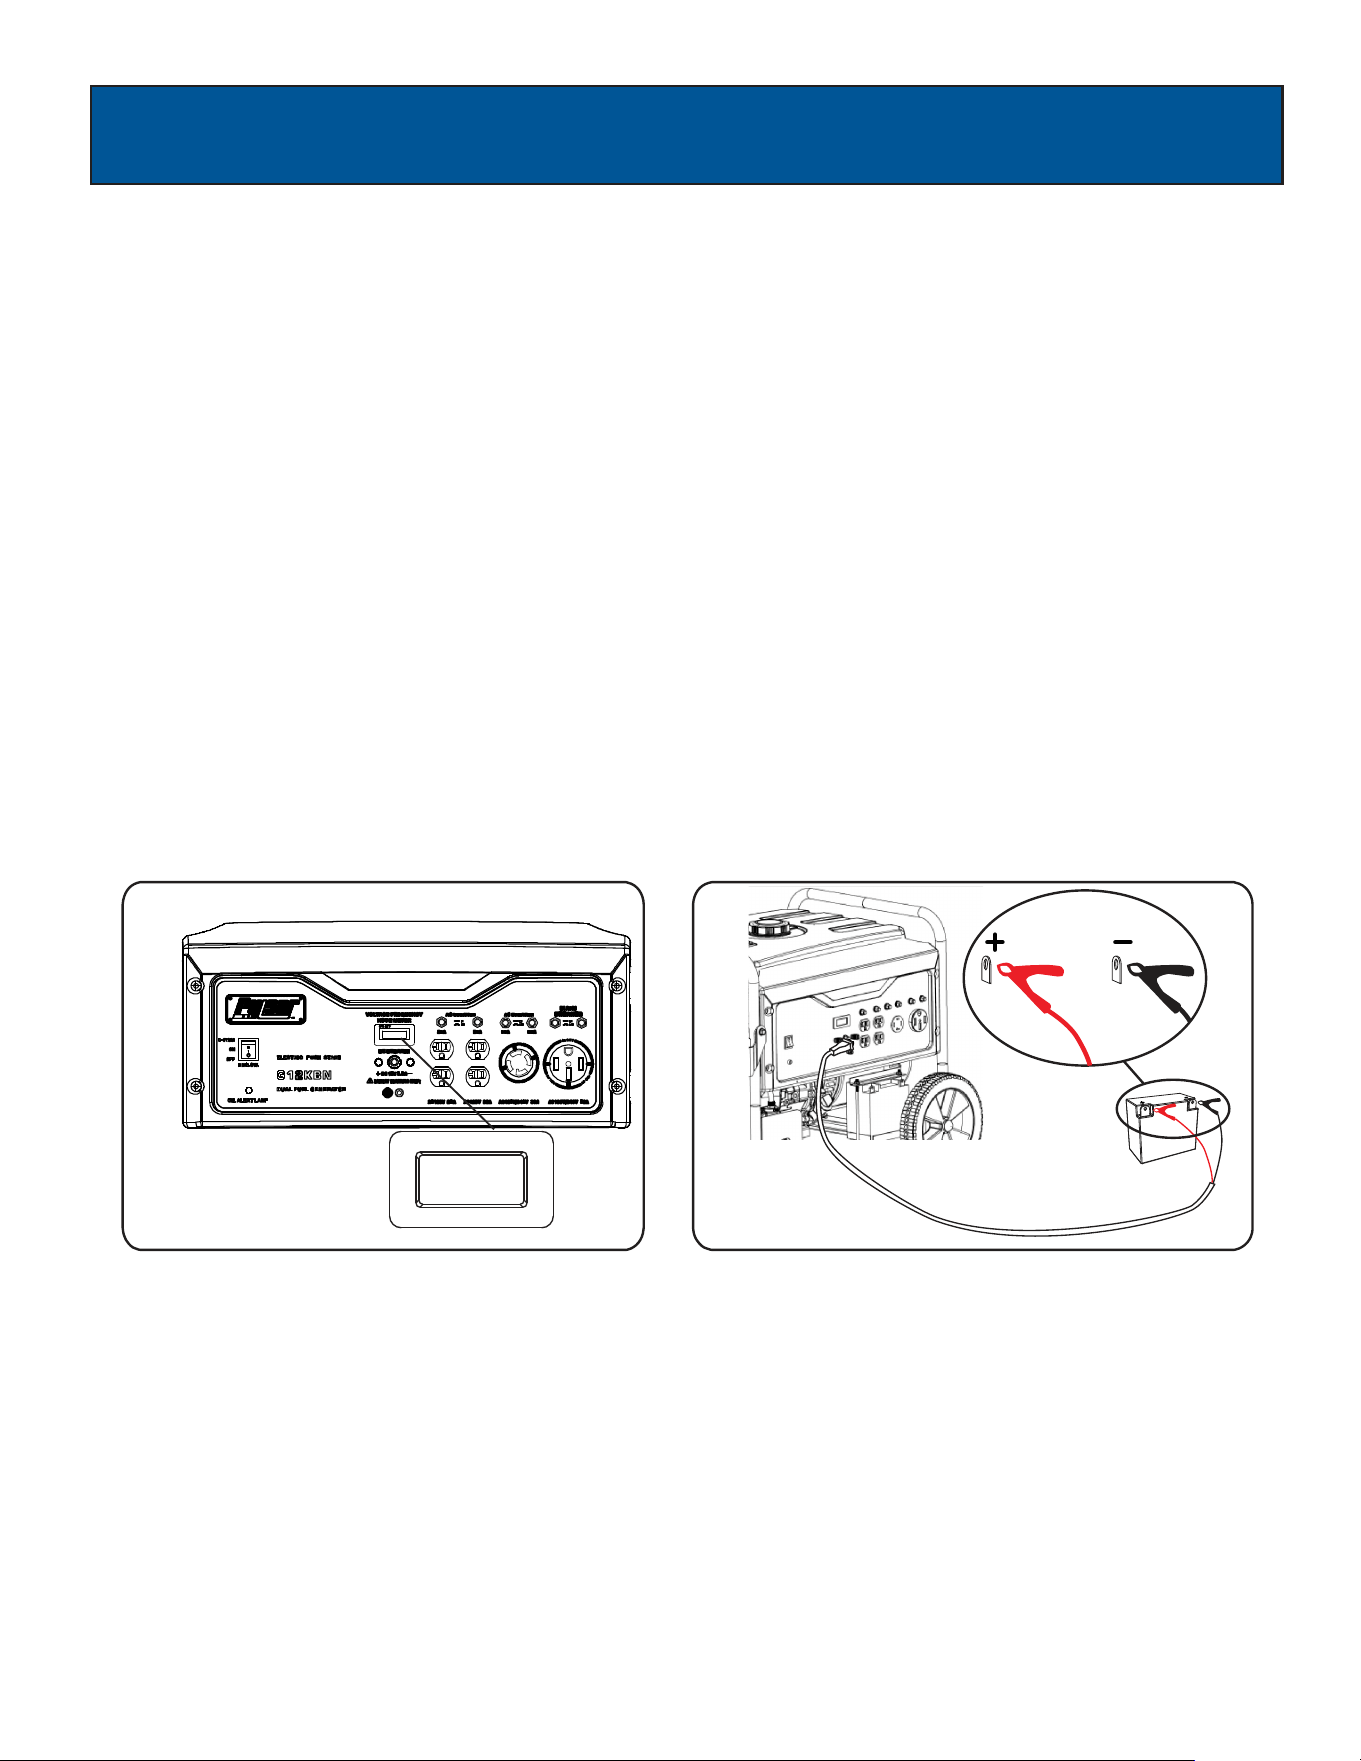
Hour Meter (See Fig 19)
Use this meter along with the manual to determine when and what type of service on the unit is needed. The display will
show the word “LUBE” at the first 25 hours of operation and again at every 100 hours of operation after.
Power Management
Start engine without anything connected to generator.
When engine has stabilized, plug in and turn on first load. It is strongly recommended to plug in devices with the largest
output first and the smallest output last to help prevent overloading the generator.
Allow generator output to stabilize (engine and attached devices run evenly) before plugging in the next load.
•
•
•
Charging a 12 Volt Battery (See Fig 20)
This generator can be used to charge a 12 volt automotive or storage battery by taking the following steps:
Inspect fluid level of the battery cells.
Add ONLY distilled water to any cell where fluid level is low. Never add tap water.
Use a wire brush to clean battery terminals if corroded.
Connect the Battery Charging Cable Connection Plug to the 12 Volt D.C. Receptacle.
Connect the red cable clamp to the positive (+) battery terminal.
Connect the black cable clamp to the negative (-) battery terminal.
Start generator engine. Let engine run while battery charges.
Battery is considered fully charged when the gravity of its fluid is 1.260 or higher when measured by a hydrometer. It is
strongly recommended to use a hydrometer to test for battery charge and condition. Be careful to follow the hydrometer
manufacturer’s instruction.
Fig 20Fig 19
•
•
•
•
•
•
•
•
Cold Weather Operation
Under humid conditions where temperatures drop to 40ºF (4ºC) the carburetor and/or crankcase breather system may begin
to freeze. To prevent icing take the following steps:
1. Replace any old fuel with clean, fresh fuel.
2. Use synthetic 5W-30 or SAE 5W-30 engine oil. Check oil daily or after every 8 hours of use.
3. Turn fuel valve to the open position.
4. Ensure generator is serviced according to the maintenance schedule under “Maintenance” section of manual.
5. Shelter unit from elements.

MAINTENANCE
18
Regularmaintenancewillextendthelifeofthisgeneratorandimproveitsperformance.Thewarrantydoesnotcoveritems
thatresultfromoperatornegligence,misuse,orabuse.Toreceivefullvaluefromthewarranty,operatormustmaintainthe
generatorasinstructedinthismanual,includingproperstorage.
Before inspecting or servicing this machine, make sure the engine is off and no parts are
moving. Disconnect the spark plug wire and move it away from the spark plug.
Pre-Operation Steps
Beforestartingtheengine,performthefollowingpre-operationsteps:
• Checktheleveloftheengineoilandthefueltanklevel.
Makesuretheairfilterisclean.
Removeanydebristhathascollectedonthegeneratorandaroundthemufflerandcontrols.Useavacuumcleanerto
pickuploosedebris.Ifdirtiscakedon,useasoftbristlebrush.
•
•
• Inspecttheworkareaforhazards.
After Each Use
Followthefollowingprocedureaftereachuse:
• Shutoffengine.)
• Storeunitinacleananddryarea.
WARNING!
After First 5 Hours ChangeOil
After 8 Hours or Daily CleanDebris
CheckEngineOilLevel
Annually (25 hr Use) CheckandCleanAirCleaner
ChangeEngineOil(Servicemoreoftenunderdirtyordustyconditions)
CheckMufflerandSparkArrester
Annually (100 hr Use) ServiceSparkPlug(ReplacewithNGKBP6ES,ChampionN9YCorequivalent)
ServiceFuelValve
InspectMufflerandSparkArrester
CheckandCleanAirCleaner,ReplaceAirFilter
CleanCoolingSystem
Maintenance Schedule
Creating a Temporary Cold Weather Shelter
Inanemergency,theoriginalshippingcartoncanbeusedasatemporaryshelter.Thesheltershouldholdenoughheat
createdbythegeneratortopreventicing.
1.
2.
Cutoffallflaps.
Slidecartonovergenerator.Ifnecessary,removethewheelassemblyforfit.
Cutoffoneofthelongsidesofthecartontoexposetheunitsmufflerandexhaust.Donotenclosethemuffler/exhaust
sideofthegenerator.
3.
4. Maintain5feetofclearancebetweentheopensideofboxandotherobjects.Theexposedsideoftheboxshouldface
awayfromthewindandelements.
5. Removeshelterwhentemperaturesreach40ºF(4ºC).
MAINTENANCE
19
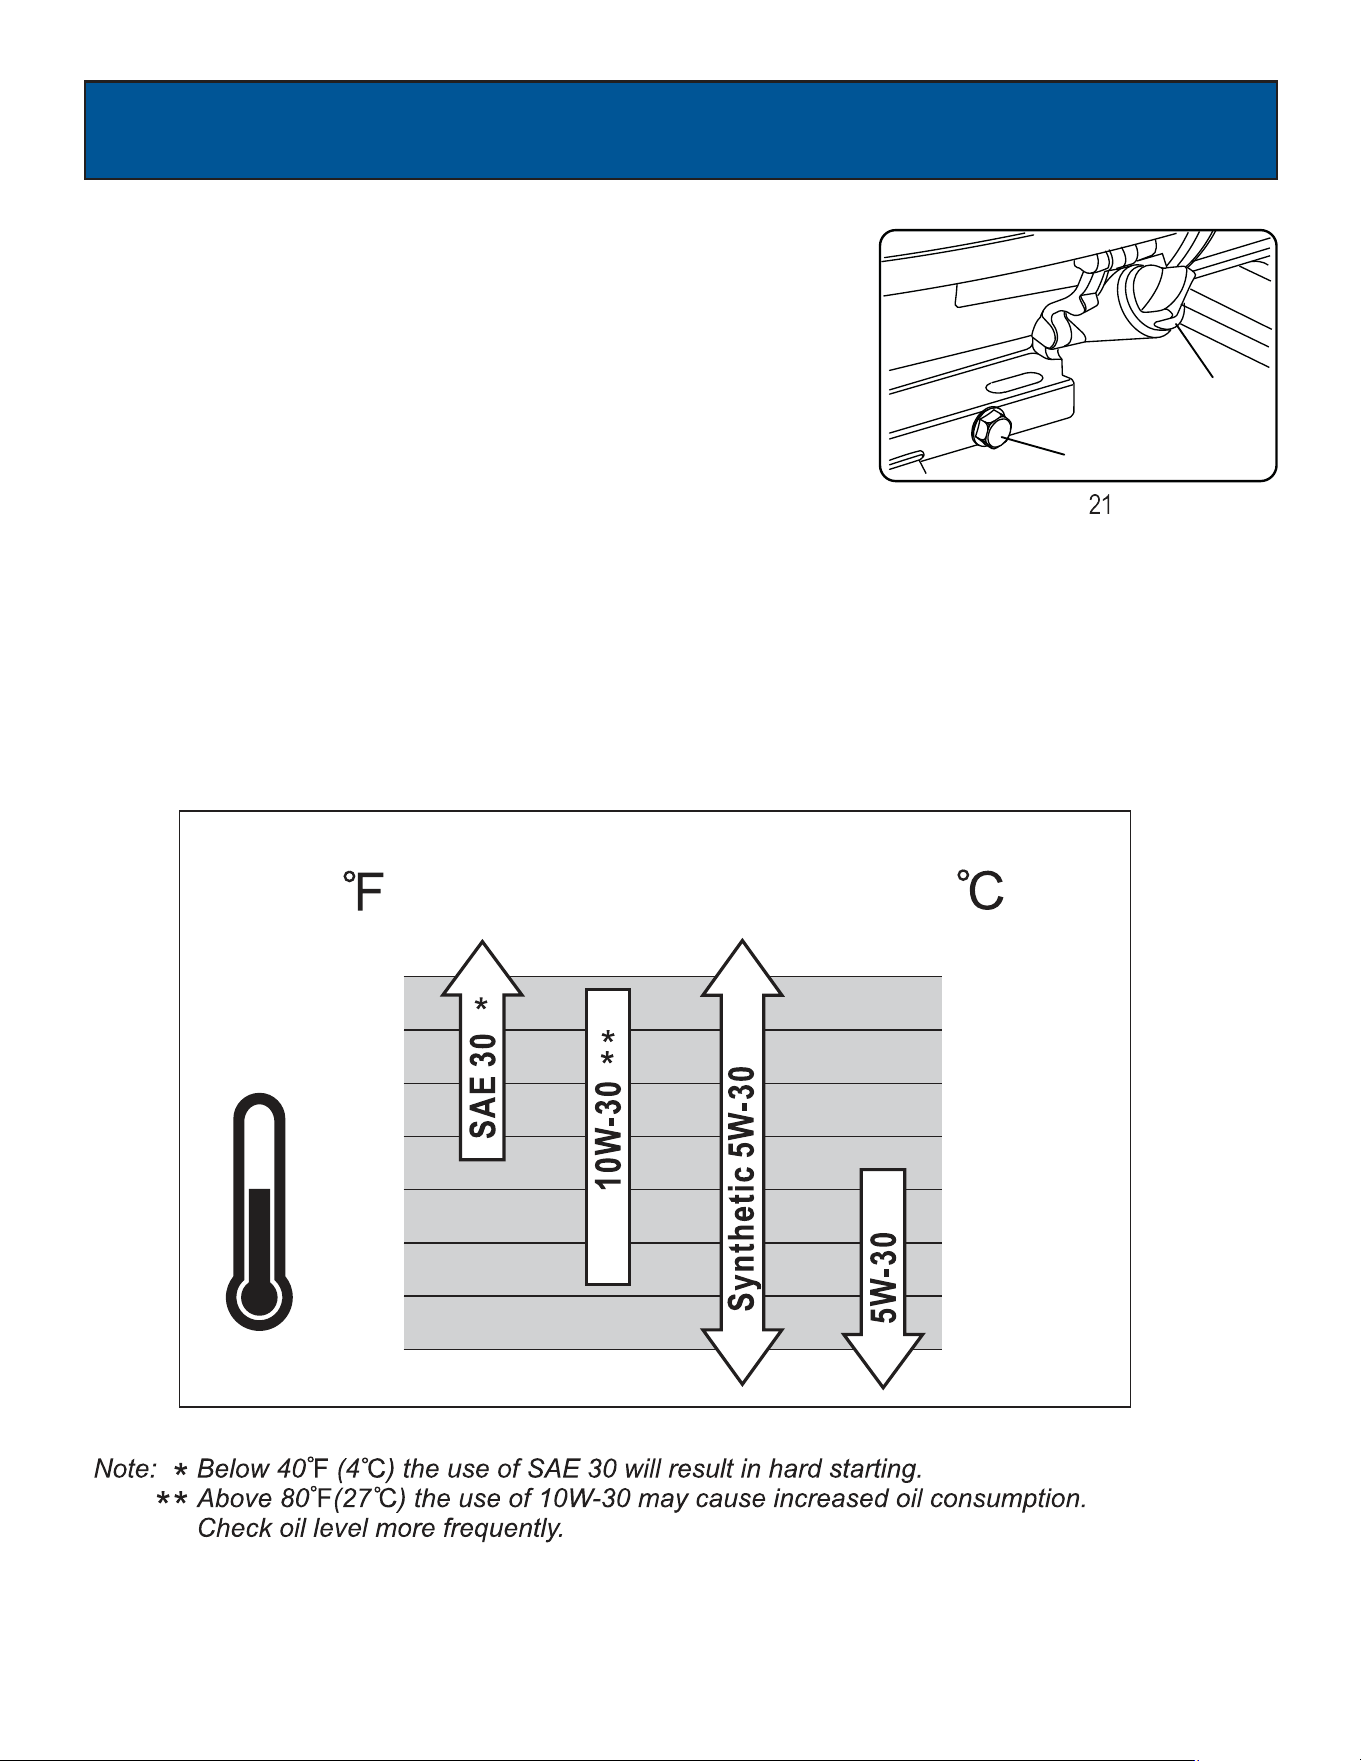
Oil Recommendations
•
•
Changing Oil (See Fig 21)
• Placegeneratoronalevelsurface.
• RuntheGeneratoruntiltheEngineiswarm.
• Removethecrankcasedipstick.
• Placeanoilpanunderneaththeoildrainagebolttocollectusedoil.
• Removetheoildrainageplugandallowoiltodraincompletely.
• Reinstalloildrainageplug,tightensecurely.
Donotusespecialadditives.
Outdoortemperaturesdeterminetheproperoilviscosityfortheengine.Usethecharttoselectthebestviscosityforthe
outdoortemperaturerangeexpected.
•
CarefullyaddSAE10W-30toemptyreservoiruntiltheoilreachesthe
outeredgeoftheoilfillhole(CrankcaseDipstickhole).
• Replacecrankcasedipstick.
Oildrainageplug
Fig
OilFill&Dipstick
-22
-4
14
32
50
68
86
104
-30
-20
-10
0
10
20
30
40
Used oil should be disposed of at an approved disposal site. See your local oil retailer for
more information.
CAUTION!
MAINTENANCE
20
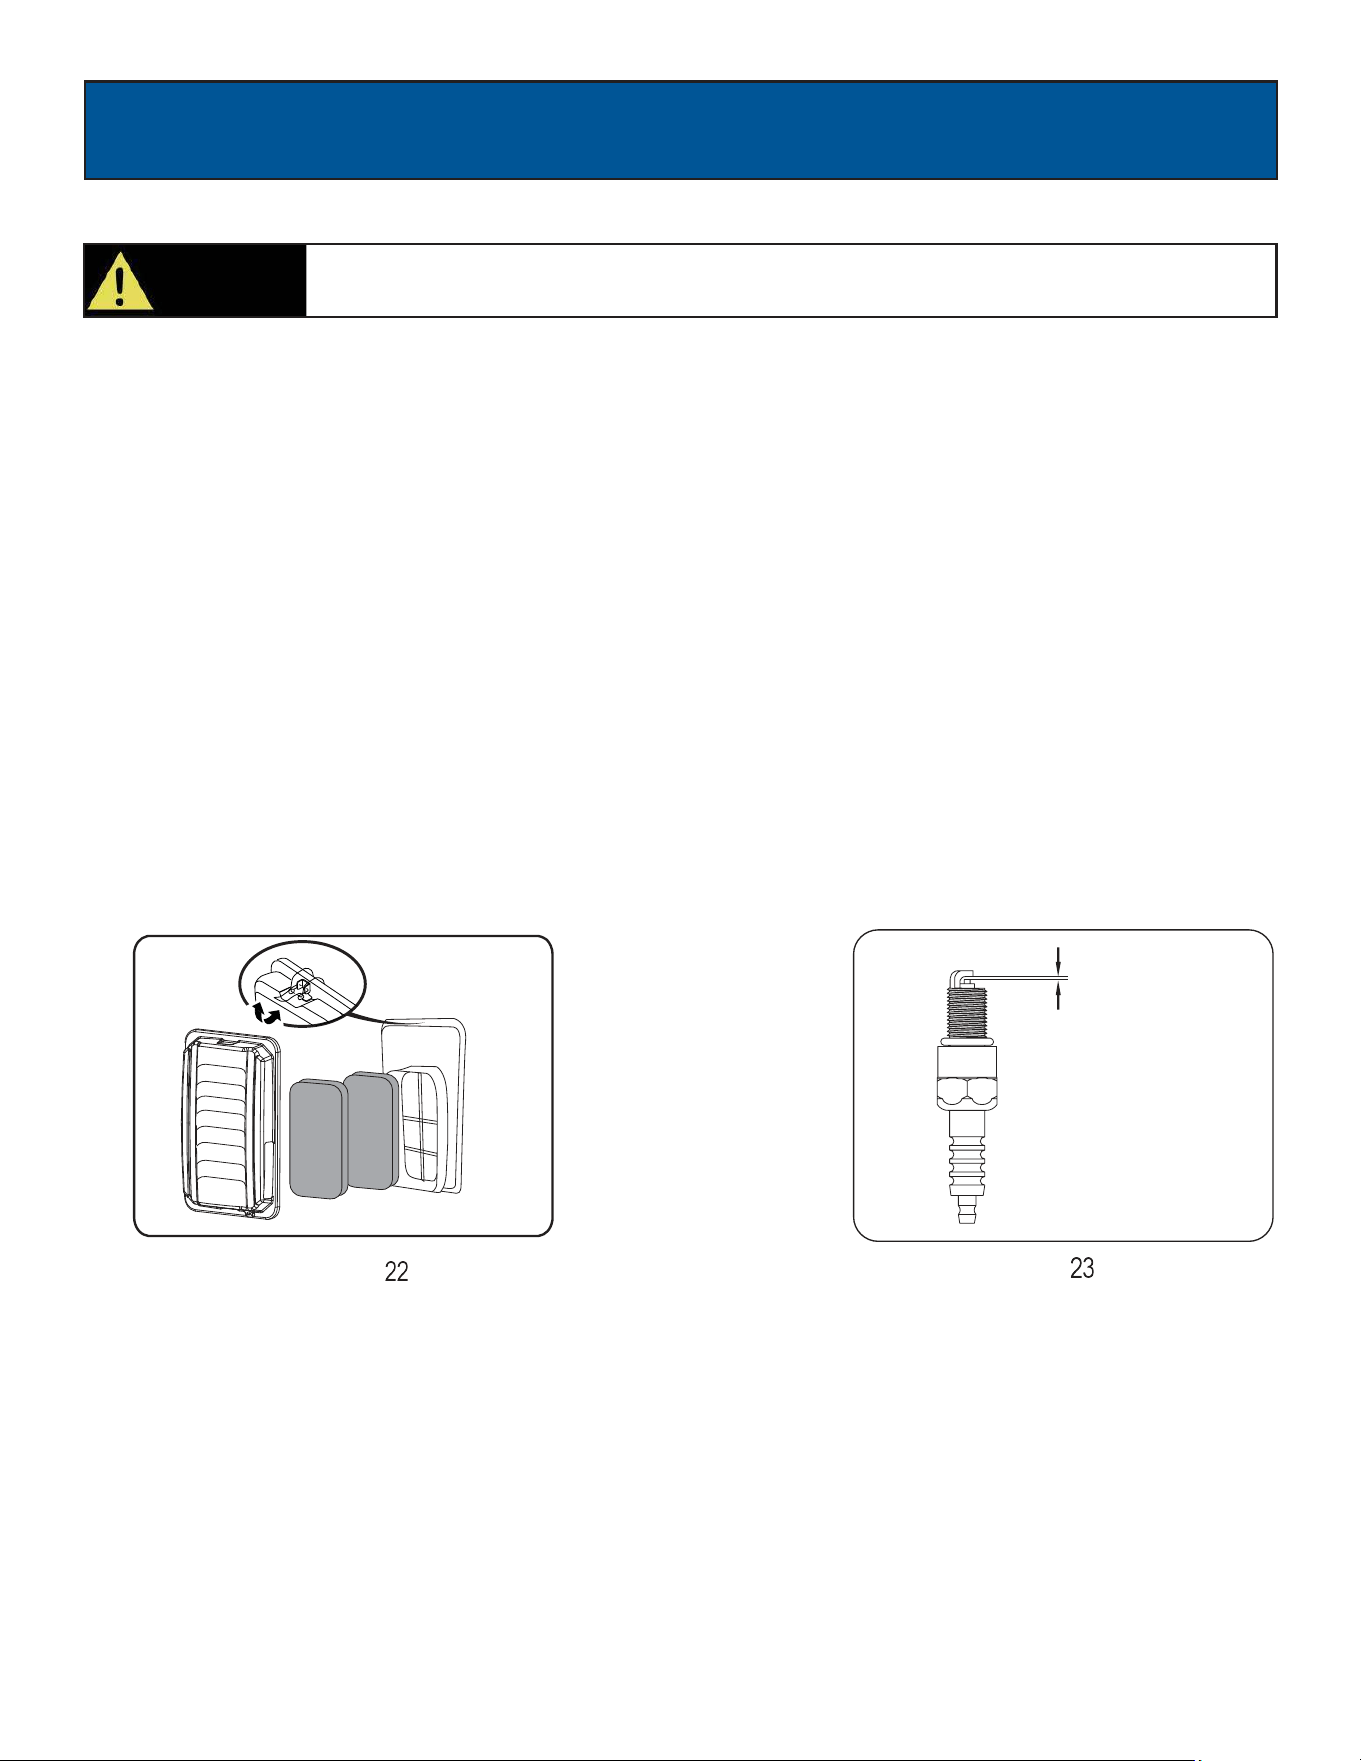
Air Filter (See Fig 22)
•
•
•
•
Checking Spark Plug (See Fig 23)
• Disconnectthesparkplugwirefromthesparkplug.
• Beforeremovingthesparkplug,cleantheareaarounditsbasetopreventdebrisfromenteringtheengine.
• Cleancarbondepositsofftheelectrodewithawirebrush.
• Checktheelectrodegapandslowlyadjustto.700mm-.80mm(.028-.031")ifnecessary.
• ReinstallsparkplugandtightentoTorque22.0–26.9Nm(16-20ft-lb).
• Reconnectsparkplugwire.
• Ifsparkplugiswornreplaceonlywithanequivalentreplacementpart.Sparkplugshouldbereplacedannually.
(BOSCHF7TC,NGKBP6ES,CHAMPIONN9YCorEquivalent)
Toclean,removetheairfiltercover.
Carefullypulltheairfilteroutbyliftingupalongtheedges.
Removedirtfromfilterbytappingonitorhavingitblownout.Replacewithnewfilterannually.
Reinstallairfiltersothatitsealsandreplaceairfiltercover.
Adirtyairfilterwillreducethelifespanoftheengine,makeitdifficulttostarttheengine,andreducetheunit’sperformance.
Fig
.700-.800mm
Fig

MAINTENANCE
21
Draining Fuel Tank and Carburetor
Tohelppreventgumdepositsinthefuelsystem,drainthefuelfromthetankandcarburetorbeforestoringtheunitfor
longperiodsoftime.Thiswillhelppreventstartingproblemsinthefuture.Iftheunitisstoredwithfuelandthefuel
becomesstaleorturnsgummyortovarnishthewarrantydoesnotcoverthisrepairorservice.
Draining the fuel tank
• TurntheengineOFF.
• TurnthefuelvalvetotheOFFposition.
• Whenthefuelhasdrainedfromthetank,closethefuelvalveandreinstallfuellinesecurelyonpetcock.
• Removethefuellinethatleadstothecarburetorfromthepetcockbysqueezingtheendsofthehoseclampsand
slidingthefuellineoff.
• Ifneeded,installafuelhosethatwillextendtoasuitablefuelcontainerlargeenoughtocatchthefuelbeingdrained
fromthetank.
•
TurnthefuelvalvetotheONposition.
Athighaltitude,thestandardcarburetorair/fuelmixturewillbetoorich.Performancewilldecrease,andfuelconsumption
willincrease.Averyrichmixturewillalsofoulthesparkplugandcausehardstarting.Operationatanaltitudethatdiffers
fromthatatwhichthisenginewascertified,forextendedperiodsoftime,mayincreaseemissions.Highaltitude
performancecanbeimprovedbyspecific
modificationstothecarburetor.Ifyoualwaysoperateyourgeneratorataltitudesabove5,000feet
(1,500meters),haveyourdealerperformthiscarburetormodification.Thisengine,whenoperatedathighaltitudewiththe
carburetormodificationsforhighaltitudeuse,willmeeteachemissionstandardthroughoutitsusefullife.Evenwith
carburetormodification,enginehorsepowerwilldecreaseabout3.5%foreach1,000-foot(300-meter)increaseinaltitude.
Theeffectofaltitudeonhorsepowerwillbegreaterthanthisifnocarburetormodificationismade.
MAINTENANCE
22
Draining the carburetor
• TurntheengineOFF.
• TurnthefuelvalvetotheOFFposition.
• Positionasuitablecontainerunderthecarburetordrainscrewtocatchfuel;loosenthescrew.
• Allowfueltodraincompletelyintocontainer.
• Retightendrainscrew.
Consult your local hazardous waste management in your area for the proper way to dispose
of used fuel.
CAUTION!
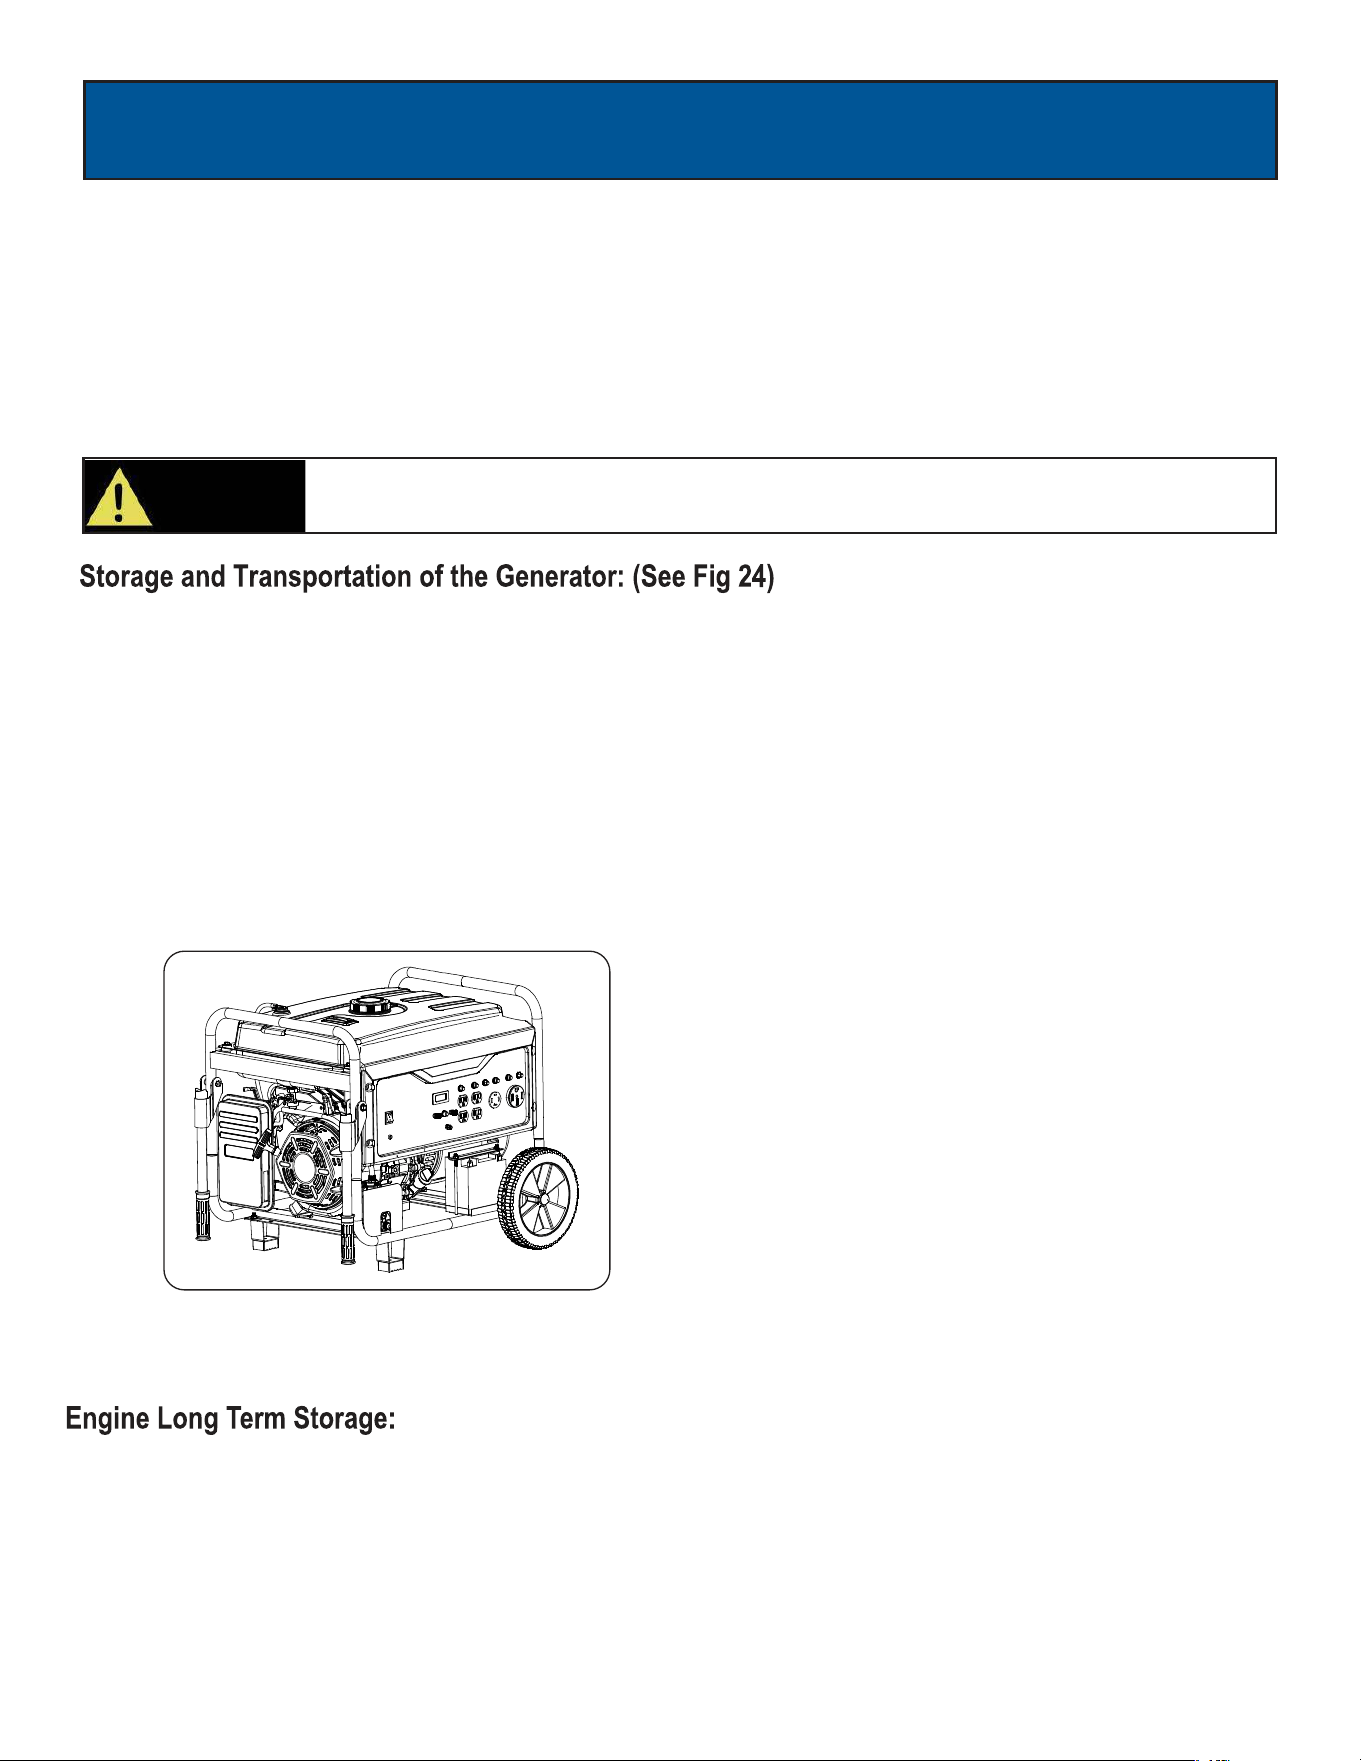
Fig24
•
Removethesparkplugandpourabout1teaspoonof10W30Engineoilintothesparkplughole.Reinstallthesparkplug.
WiththeON/OFFswitchintheOFFpositionpulltherecoilstartercordseveraltimetocoatthecylinderwallswithoil.
•
SlowlypulltherecoilStarteruntilyoufeeltheenginebuildcompression(Whenyoufeelresistance).LeavetheEnginein
thisstateasthiswillpreventanycorrosiononthecylinderwallsifstoredforalongperiodoftime.
•
Removeanydebristhathascollectedonthegeneratorandaroundthemufflerandcontrolpanel.Useabrushorvacuum
to remove loose dirt.
• Inspectaircoolingslots.Removeanydebrisifobstructed.
• Forshort-termstorage,startgeneratoronceevery7days.
•
Forsemi-longtermstorage,addfuelstabilizertopreventstalefuelfromcausingacidandgumdepositsinthefuelsystem
andcarburetor.
• Forlong-termstorage,drainthefuel.
• Storethegeneratorindoorstopreventfreezing.
• ThegeneratormustbeShipped,RunandStoredintheuprightpositionasseeninthisimage.

TROUBLESHOOTING
23
Problem Cause Solution
Engineisrunning,butACoutputisnot
available
1. Opencircuitbreaker
2. Poorconnection
3. Defectivecordset
4. Connecteddeviceisfaulty
5. Faultingenerator
1. Resetcircuitbreaker
2. Checkandrepair
3. Checkandrepair
4. Connectadevicethatisworking
properly
5. Contactservicedepartment
Enginerunswellwithoutloadbutbogs
downwhenloadsareconnected
1. Shortcircuitinconnecteddevice
2. Generatorisoverloaded
3. Cloggedfuelfilter
4. Enginespeedistooslow
5. Shortcircuitingenerator
1. Disconnectdevice
2. Seepg15“Don’toverload
generator”
4. Contactservicedepartment
3. Cleanorreplacefuelfilter
5. Contactservicedepartment
Enginewillnotstart,shutsdownduring
operation,orstartsandrunsrough.
1. ON/OFFswitchsetto“OFF”
2. DirtyAirfilter
3. Cloggedfuelfilter
4. Stalefuel
5. Sparkplugwiredisconnectedfrom
sparkplug
6. Badsparkplug
7. Waterinfuel
8. Fuelvalveisin“OFF”position
9. Overchoking
10. Lowoillevel
11. Richfuelmixture
12. Intakevalvestuckopenorclosed
13. Lossofenginecompression
14. Deadbattery
15. Enginehasflooded
1. Turnswitchto“ON”
2. ReplaceAirfilter
3. Cleanorreplacefuelfilter
4. Replacefuel
5. Reconnectsparkplugwire
6. Replacesparkplug
7. Drainfueltankandreplacefuel
8. Turnfuelvalveto“ON”position
9. Turnoffchoke
10. Fillcrankcasetoproperoillevel&
placegeneratoronalevelsurface
11. Contactservicedepartment
12. Contactservicedepartment
13. Contactservicedepartment
14. Rechargeorreplacebattery
15. Wait5minutesandrecrankengine
Enginelackspower 1. Generatorisoverloaded
2. Cloggedfuelfilter
3. DirtyAirfilter
4. Engineneedsservicing
Engine“hunts”orfalters 1. Chokewasremovedtoosoon
2. Cloggedfuelfilter
3. Carburetorisrunningtoorichortoo
1. Movechoketomiddlepositionuntil
2. Cleanorreplacefuelfilter
enginerunsevenly
3. Contactservicedepartment
lean
1. Seepg15“Don’toverload generator”
2. Cleanorreplacefuelfilter
3. ReplaceAi
4. Contactservicedepartment
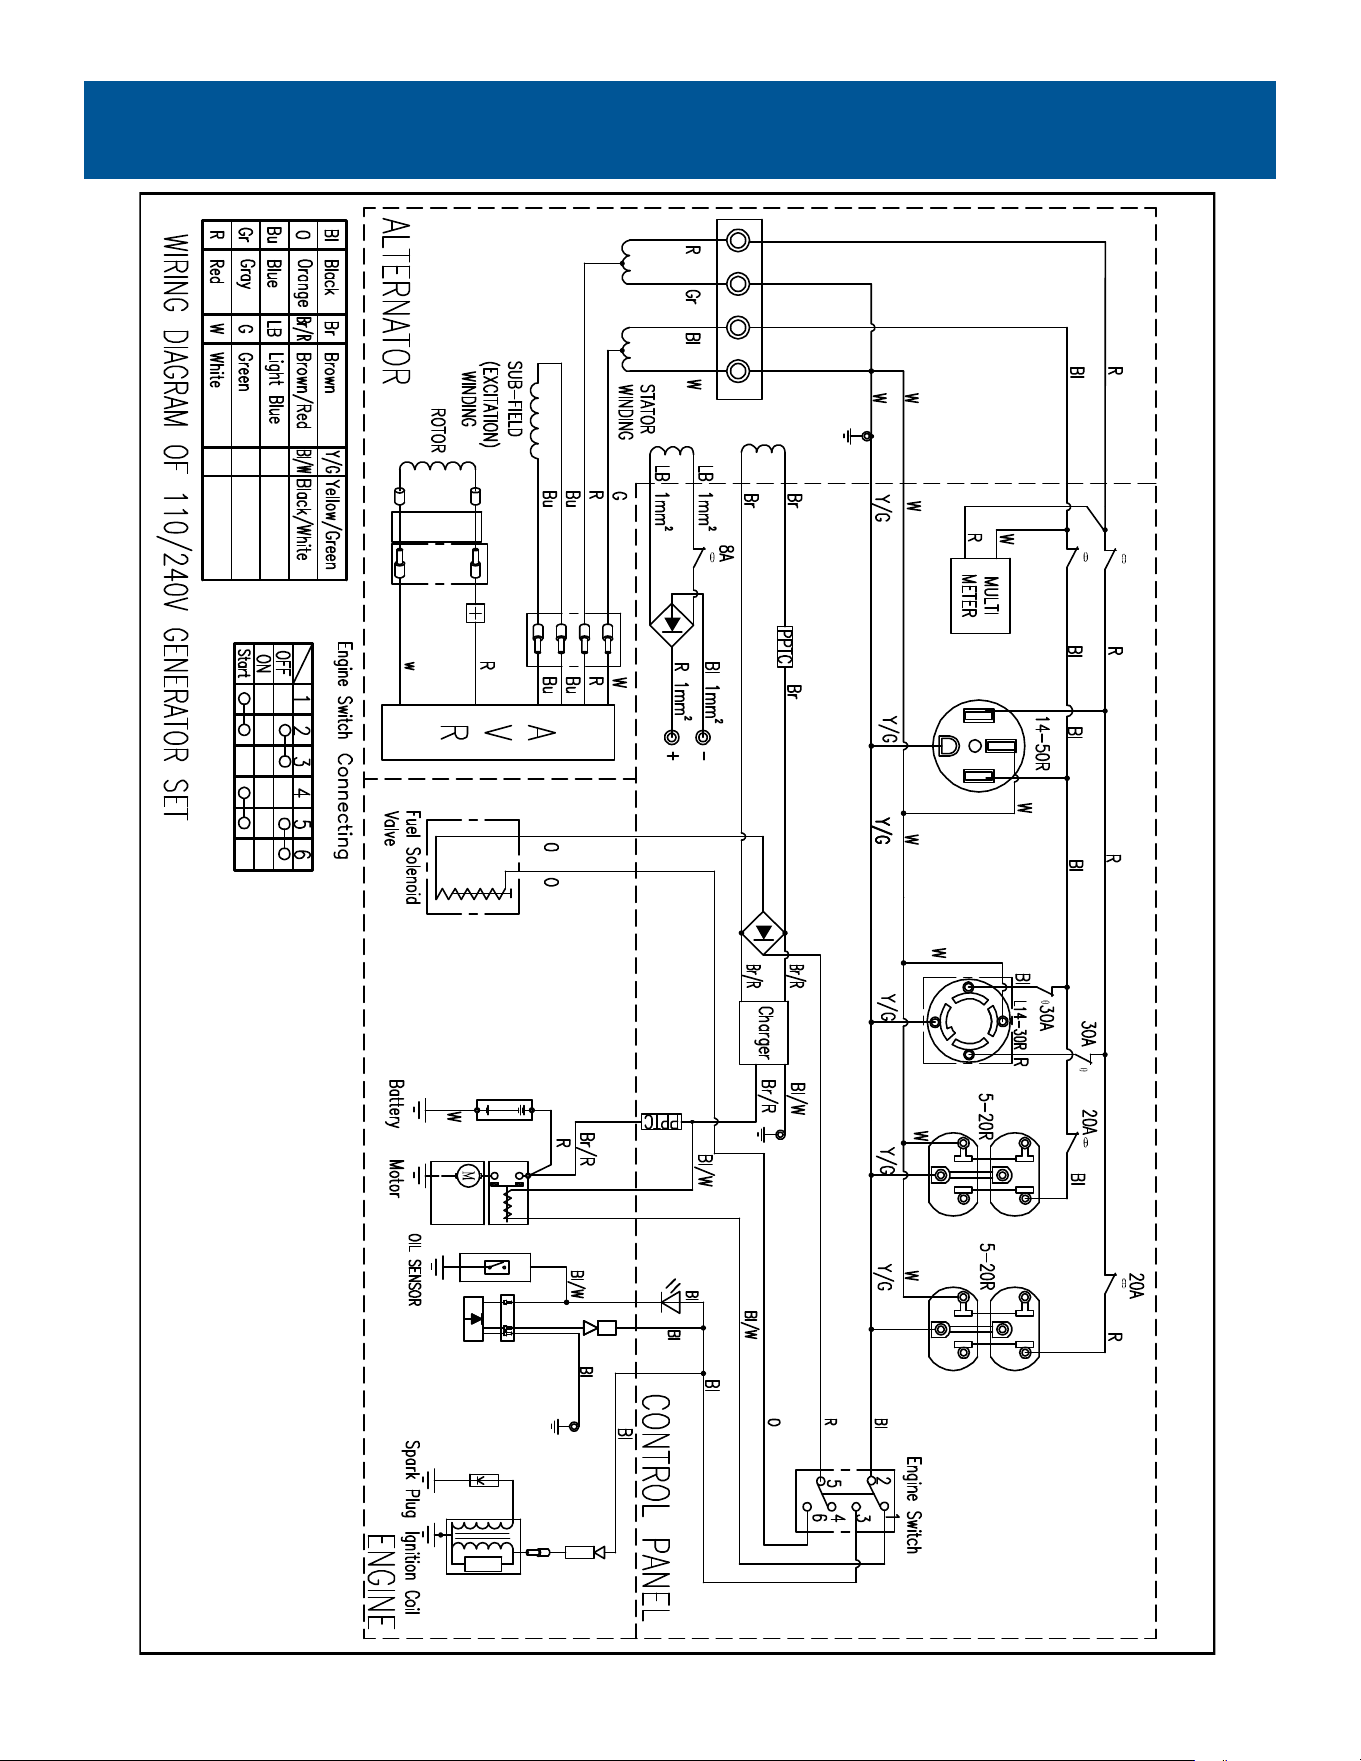
DIAGRAMS
24

WARRANTY
25
Pulsar Products Inc. Limited 2 Year Warranty:
From the date of original purchase, Pulsar Products Inc. warrants to the original purchaser that each portable generator
sold, shall be free from defect in material and workmanship for the items and time period set forth below. Pulsar Products
Inc., at its discretion, agrees to repair or replace any defective part that upon examination, inspection, and testing by
a Pulsar Products Inc. authorized service dealer, is found to be defective within the original warranty period. Pulsar
Products Inc. will also decide upon the use of new or rebuilt parts or comparable product. Any part or product that is replaced
will be retained by Pulsar Products Inc.. This warranty period shall not be extended and any repaired product shall be
warranted for the remaining period of the original warranty. The consumer is responsible, and shall prepay all transportation
costs, including returning items to the factory or warehouse. This warranty is non-transferable and proof of purchase must
be presented for requesting warranty service. If a proof-of-purchase receipt is not provided, the product’s shipping date by
the manufacturer will be used to determine the warranty period.
Length of Warranty:
Personal use applications of this portable generator are warranted for two (2) years or 500 hours which ever comes first.
Proof of purchase and of maintenance must be provided.
• Year 1 - Limited coverage on generator engine and alternator components parts and labor.
• Year 2 - Limited coverage on generator engine components, parts only.
“Personal use” means personal residential household use or recreational use by the retail consumer. “Commercial use”
means all other uses including commercial, construction, or other income producing purposes. Once a generator has been
used for commercial purposes, it shall thereafter be considered as a “commercial use” generator for the purposes of this
warranty. Any portable generator used for commercial use, as rental equipment or for the purpose of primary power in place
of utility, will not be covered under this warranty.
Consumer Responsibilities:
• Consumer is responsible for carefully reading and following all instructions in the owner’s manual. Any product that is
damaged due to misuse or abuse will not be covered by this warranty.
• Consumer is responsible for all transportation costs to an authorized Pulsar Products Inc. Service Center. Unless
otherwise requested, ground shipping will be applied for part shipment and customer will pay any additional charges for
expedited shipments.
• Consumer is responsible for labor costs associated with warranted repairs twelve (12) months after the purchase date.
Consumer is responsible for maintaining generator as specified in the owner’s manual. Documentation of this
Labor rates will only be based on normal working hours.
•
maintenance may be required to cover warranty requests.
• Consumer is responsible for presenting any problems with the generator to an authorized Pulsar Products Inc.
Service Center as soon as the problem exists. Warranted repairs will be completed in a reasonable period of time, not
to exceed 30 days.

WARRANTY
26
Rev.A
What this Warranty Does Not Cover:
• Normal wear: This warranty excludes normal wear items such as filters, spark plugs, gaskets, O-rings, adapter cord
sets, wheels, and starting batteries.
• Maintenance: This warranty does not apply to tune-ups or routine maintenance and does not cover any adjustments or
repairs not performed by an authorized repair facility.
• Misuse: This warranty does not apply if your product has failed due to abuse, misuse, neglect, using incorrect fuels or
operated in any way contrary to the instructions found in the products owner’s manual.
damage claims to this product caused by shipment must be filed with freighter.
number has been removed. Refurbished, used, demonstration or floor models are not covered by this warranty.
lubricants, overloading, overspeeding, improper maintenance, improper storage, unapproved modifications, or has been
• Adverse conditions: This warranty does not apply if your product has failed due to freezing, accident or natural
disasters.
• Product shipment: This warranty does not apply to damage resulting from shipping, handling, or warehousing. Any
• Other exclusions: This warranty does not apply if your product has been sold “as is” or where the factory applied serial
Where Warranty is Valid:
For warranty coverage, this product must be purchased from an authorized Pulsar Products Inc. dealer and the warranty
only extends to the original purchaser in the United States, Canada, or Mexico. Refurbished, used, demonstration, or floor
models are not covered by this warranty. Products purchased from on-line auction websites, such as ebay, are not covered
under this warranty. Products used for commercial use are not covered under this warranty.
How to Obtain Warranty Service:
Take the original receipt and product to the place of purchase or mail the original receipt and product to the address found
on the web site if purchased on-line. You can also locate your nearest Pulsar Products Inc. dealer for service or warranty
questions by calling toll free at 1-866-591-8921. Pulsar Products Inc. recommends you retain all of your receipts
covering the purchase and maintenance of your Portable Generator, but will not deny you warranty coverage as long as
proof of purchase or service can be obtained.
Pulsar Products Inc.’s obligation under this warranty is exclusively limited to product repair or replacement and
shall not be liable for any incidental or consequential damages including, but not limited to, the expense of
delivering product to and from a repair center, loss or damage to personal property, loss of revenue, telephone
charges, loss of time, or inconvenience. Some states, provinces or jurisdictions do not allow the exclusion or
limitation of incidental damages, so the above limitation may not apply to you. The warranty gives you specific
legal rights, and you may also have other rights which vary from state to state or province to province.
Image of products may slightly differ due to continued improvement of product.
