STEAM GENERATOR
This is the original instruction, please read all manual instructions carefully before
operating. VEVOR reserves clear interpretation of our user manual. The
appearance of the product shall be subject to the product you received. Please
forgive us that we won't inform you again if there is any technology or software
updates on our product.

1
Caution in Steam Bath
Elders,pregnant women,patients with heart disease / hyper tension / sugar
diabetes and others with health problems who are not suitable for Steam Bath can
not use the machine,besides under doctor's instruction.
Smoking / doing exercises / drinking alcoholic beverages is prohibited.
If feeling uncomfortable, sick or exhausted,please get out as soon as possible.
Take care of children.Do not leave them alone when using the machine.
A small vent for fresh air of Steam Room is necessary.
1.0 Technical Information of Generator and Control Panel
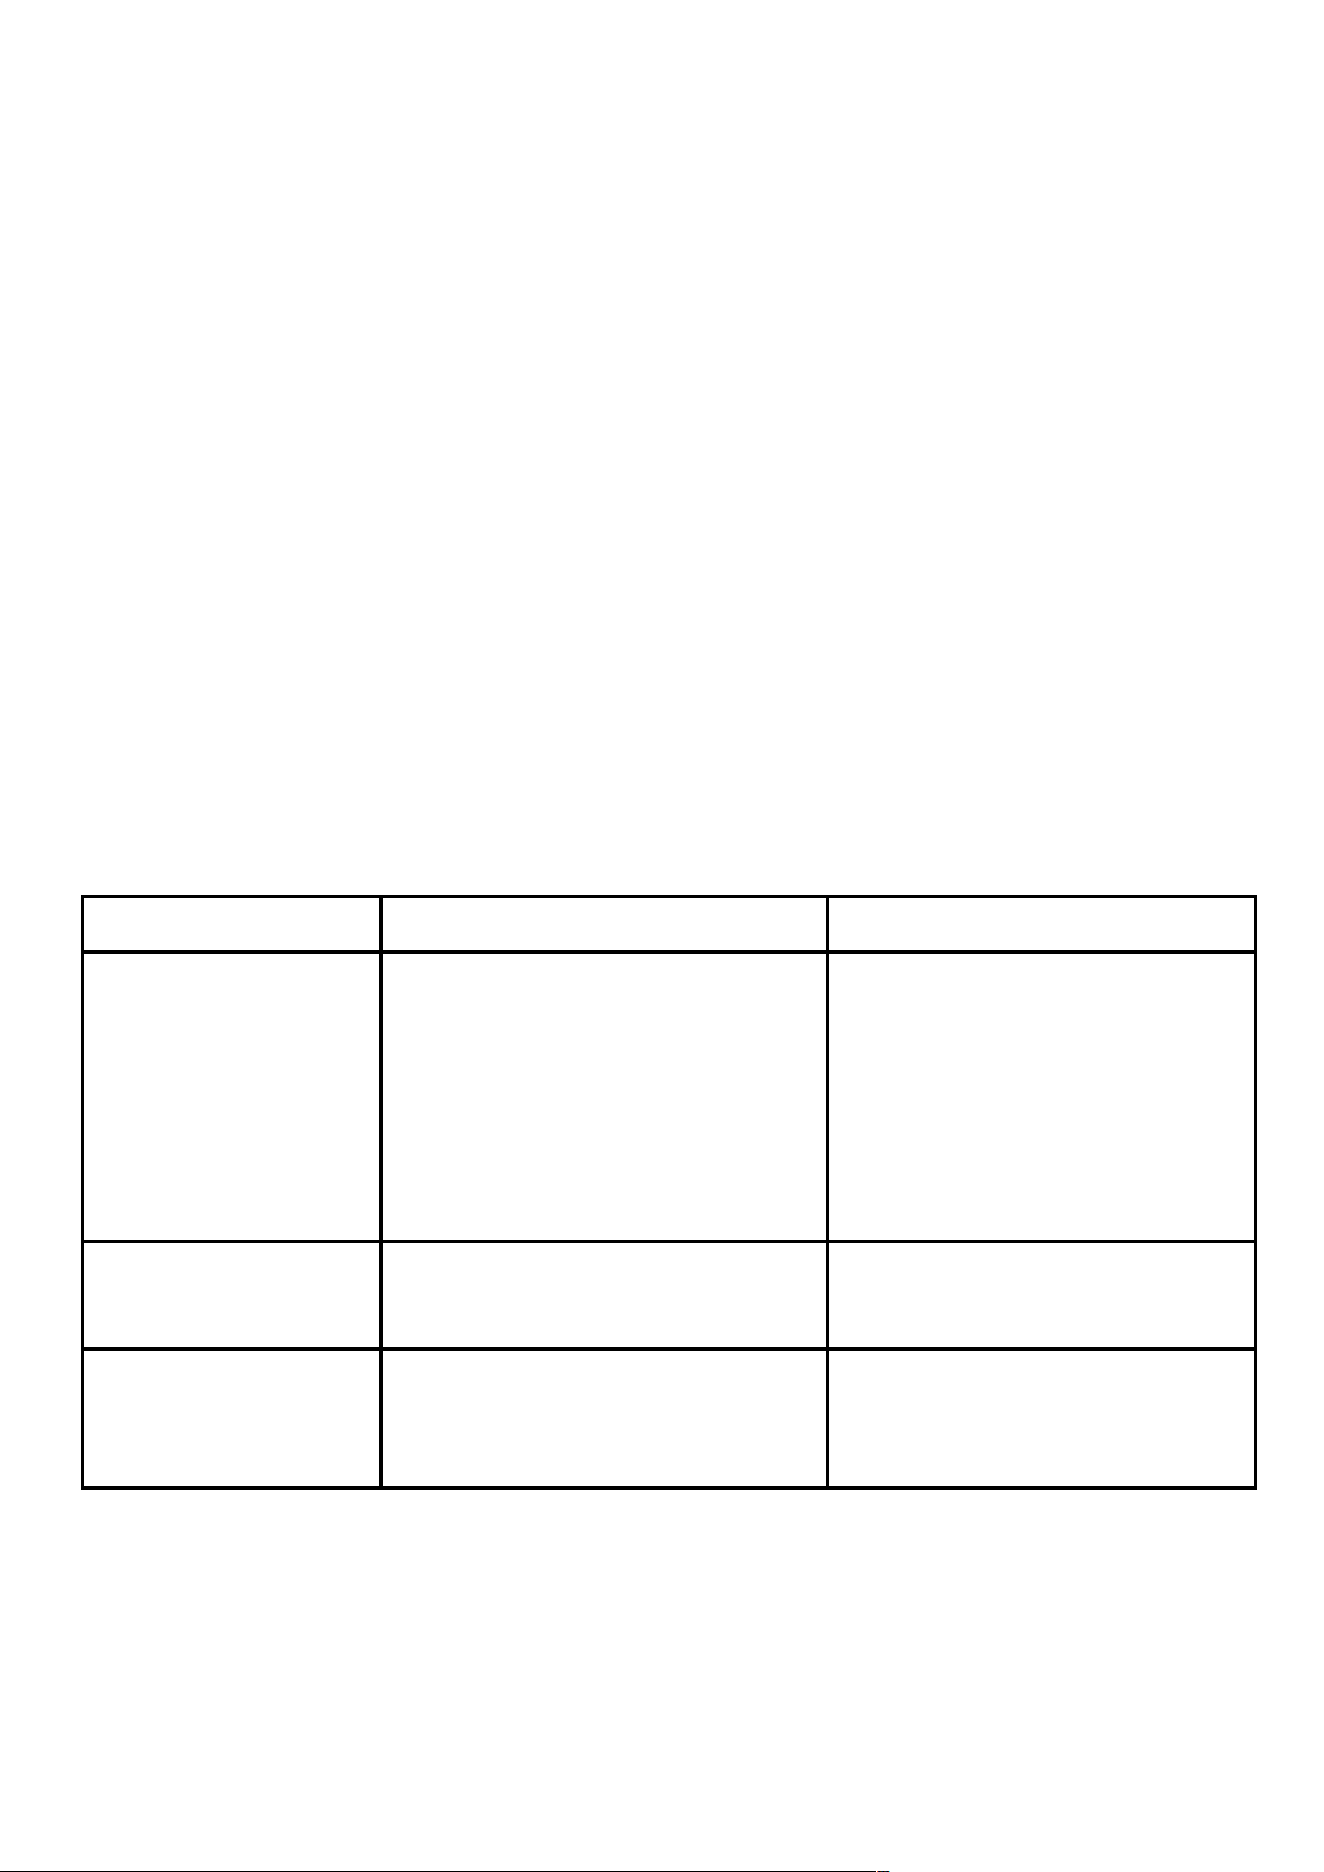
1.Technical Information of YCS-90 Steam Generator (Form 1 ):
Model Power(Kw) Voltage
Specification
(L*W*H,mm)
Cables to
220-240V
Fuse
(A)
YCS-90 9 220V 445*182*313 7AWG ≥54
2. Technical Information of YCS Steam Generator (Form 2 ):
Model Controllable
Time(minutes)
Controllable temperature
(35-55℃ is suggested)
Specification(L*W*H)
TC-03 2-60 35-55℃ 170*110*55mm
2
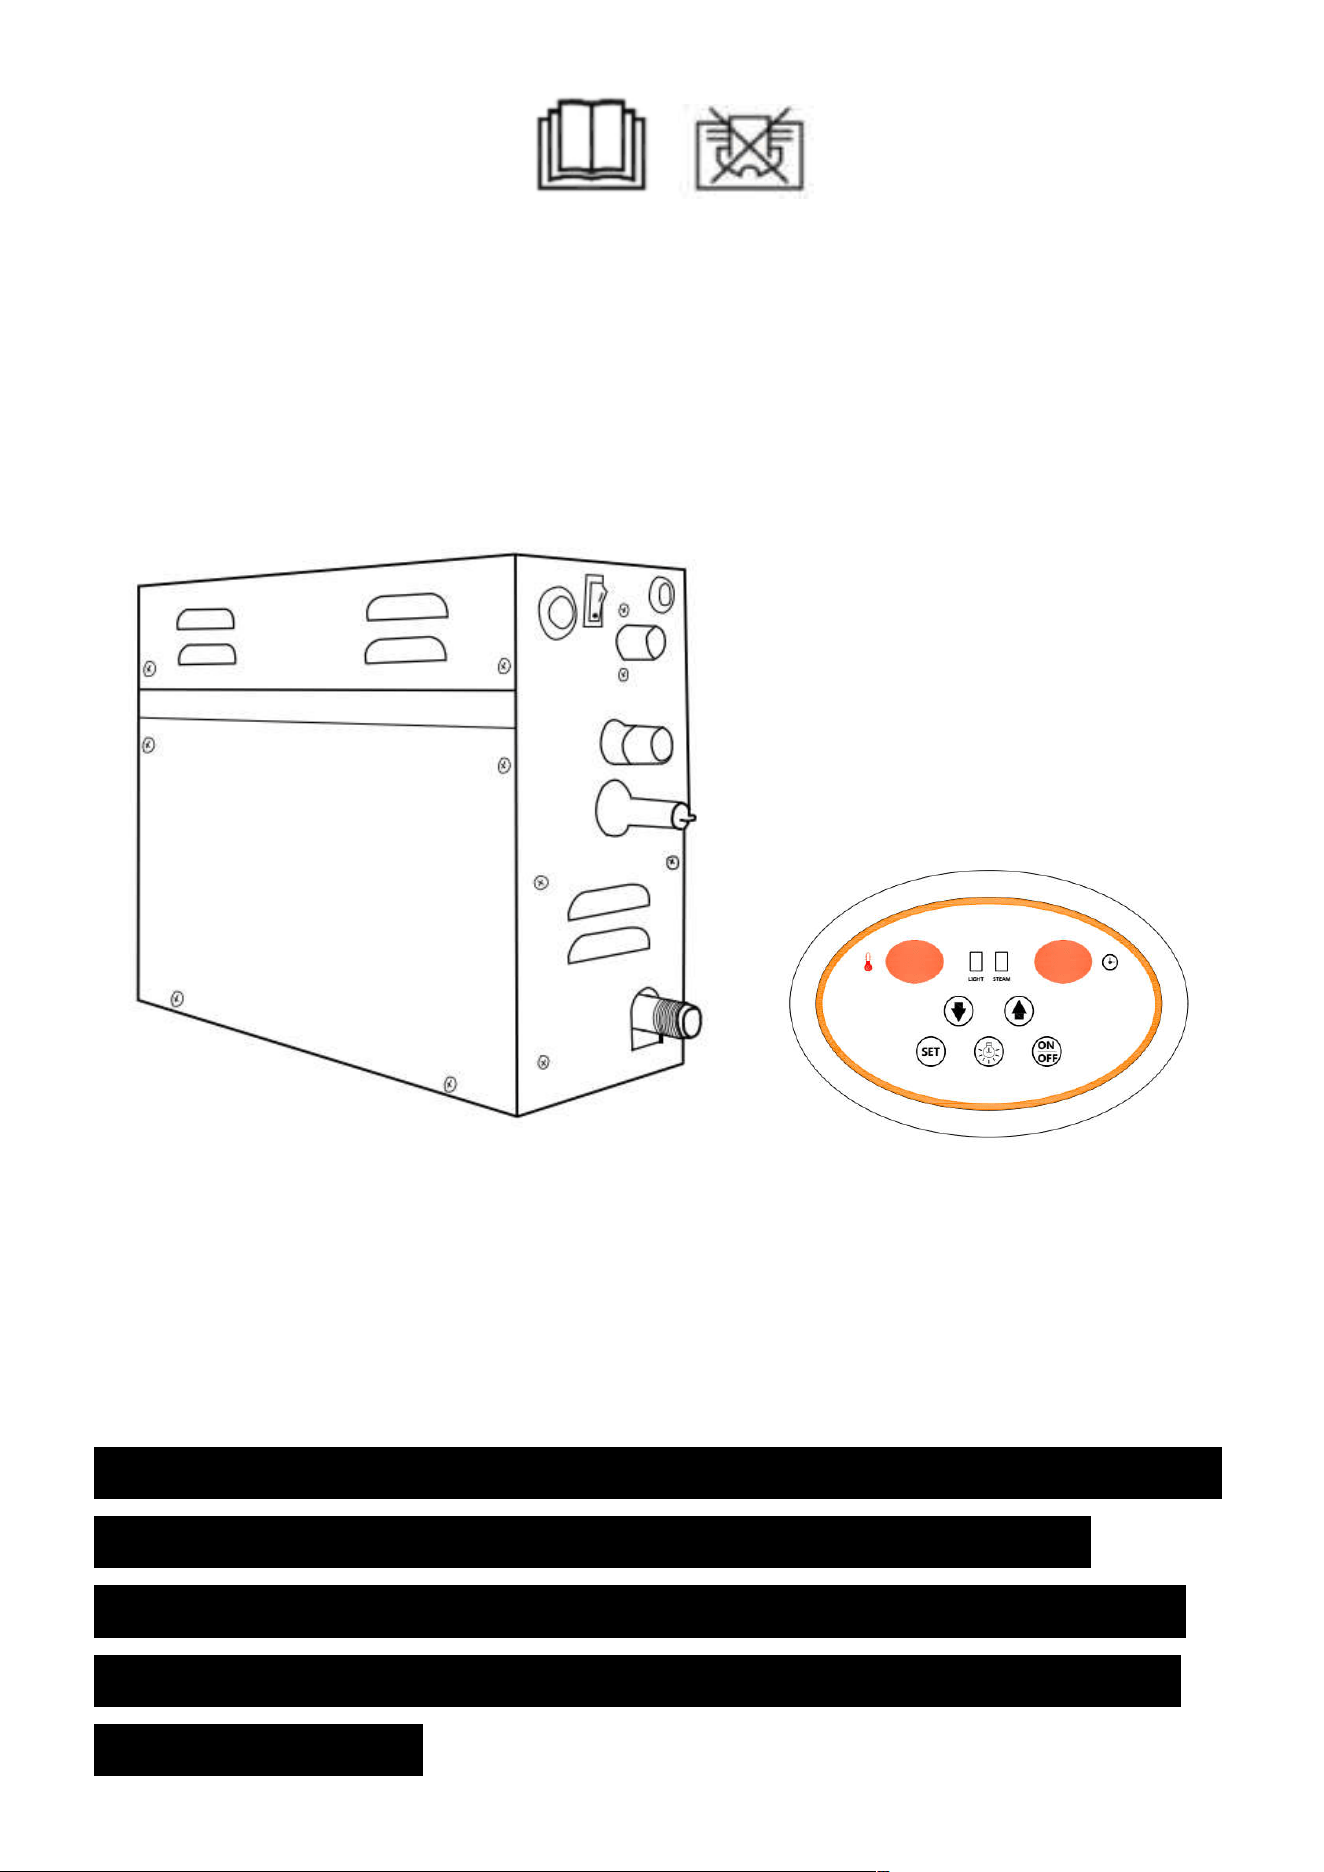
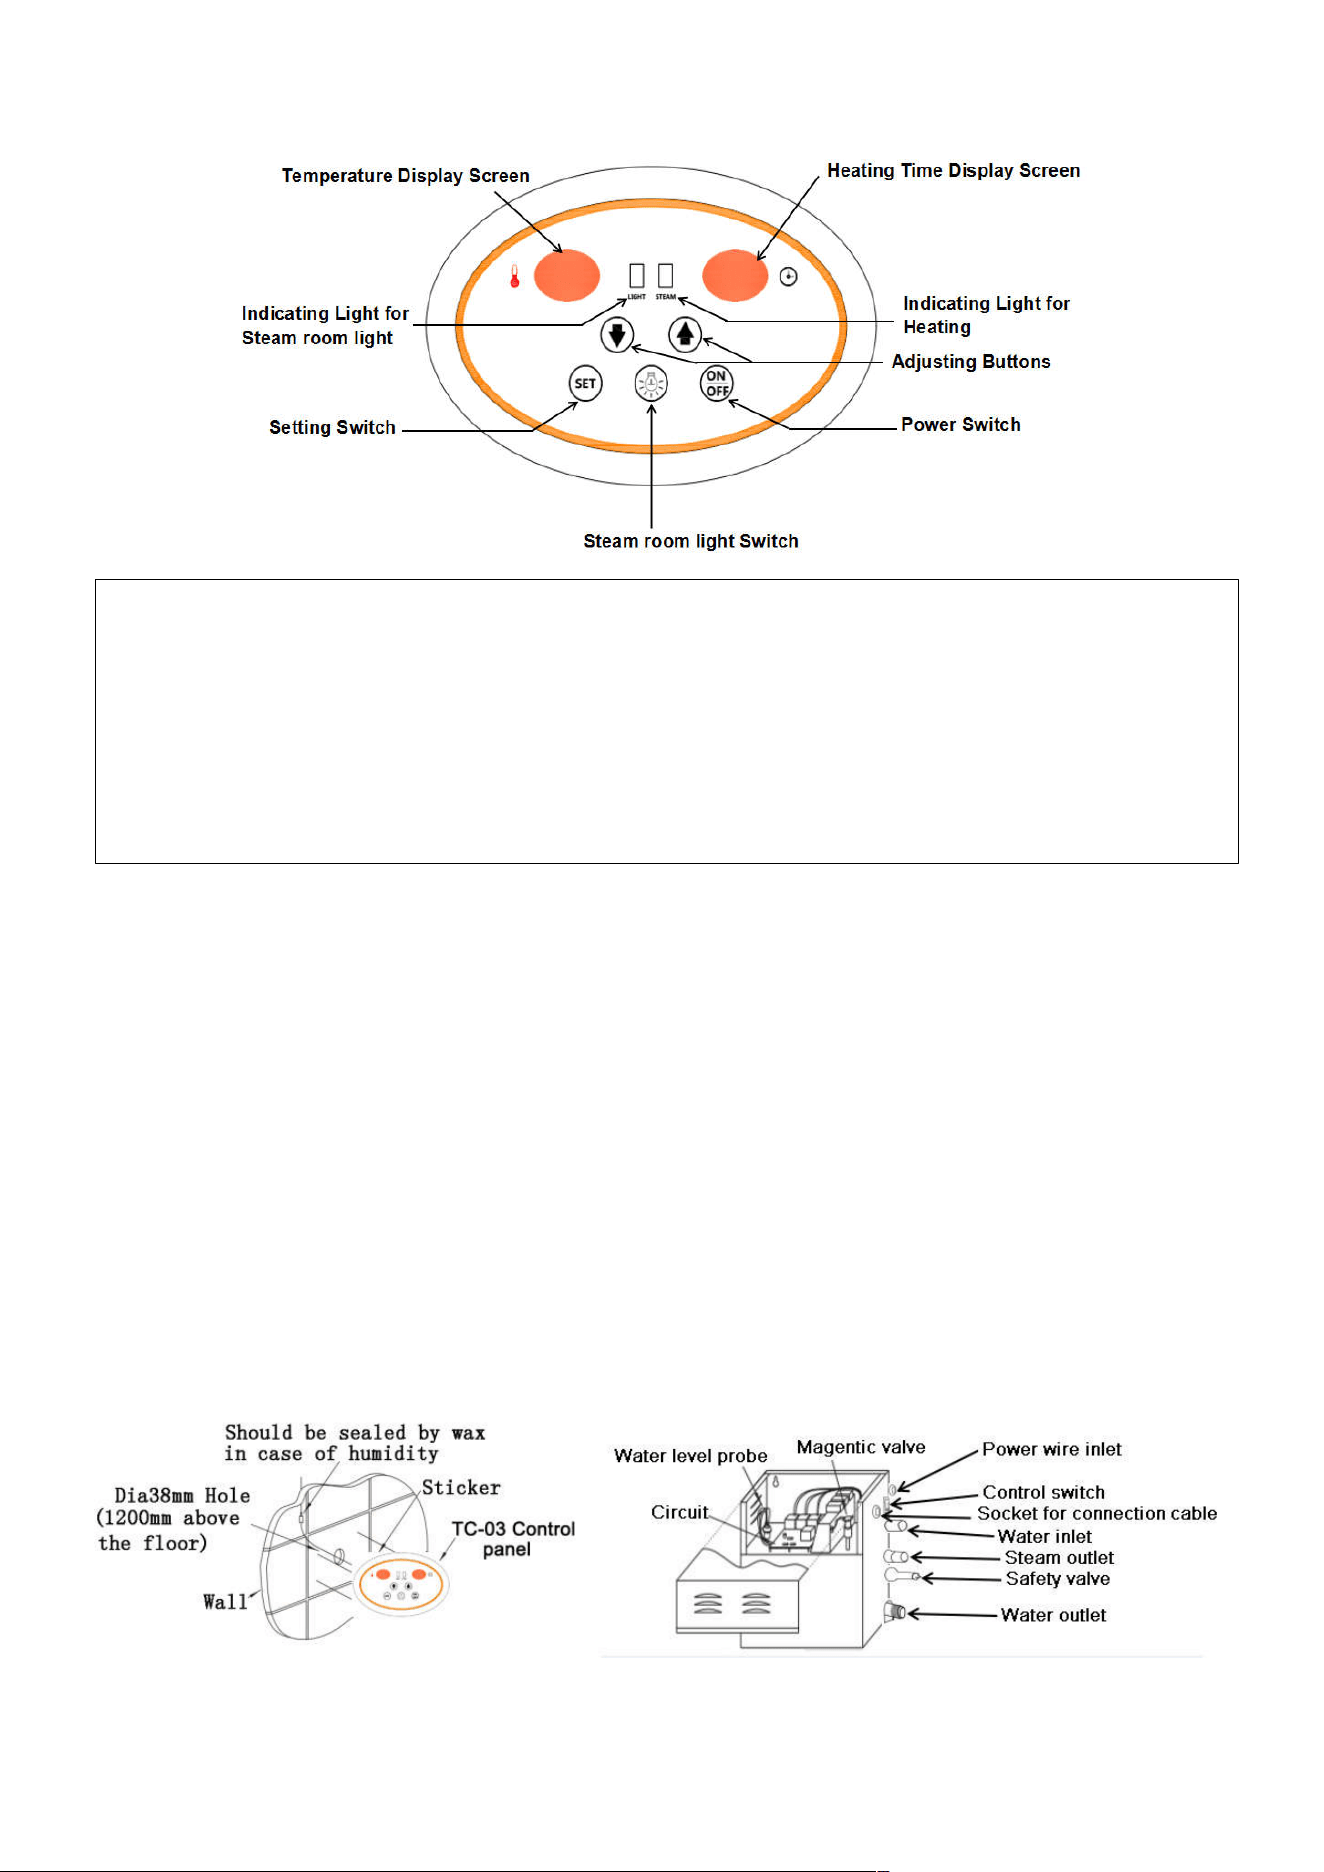
2.0 Installation and Operation of TC-03 Control Panel
2.1.Position
Outside Steam Room The height of 1.2m is recommended to install the Control
Panel.A hole with 38mm’s diameter in the wall is needed to install for the Control
Panel.The connection cable should go through the joint’s protective cover in case
of being buried in the wall.(Figure 2 )
After installation and inspection of Control Panel,start the machine.
2.2. Installation of Control Panel and Connection cable
Figure 2 Installation of TC-03 Control panel Figure 3 YCS steam generator
Slightly touching the POWER button starts the generator's operation,touching
that button again,stops the generator's operation and the indicating light turns off.
User could adjust the heating time of steam generator through this control panel.
If it arrive the heating time,the operation will stop automatically.

3
Plug the connection cable’s plug into the matching socket on Steam
Generator(Figure 3 ).Tear the sticker from the Panel’s back, stick the Panel on the
wall,and seal the Panel’s edge on the wall with silica gel.
2.3. Wiring
Wire through the right hole in the wall.Do properly protect the wire when going
through the wall.Be careful of extreme bending, sharp wooden fibers and nails.If
necessary,the wire can go through a pipe for renewal.
2.4.Operating an Testing Generator and Control Panel
After installation of piping system and circuitry,turn on the water valve and power
switch.Slightly touching the POWER button.After arriving the preset time,Steam
Generator stops working automatically, and the light turns off.
Operation without water is prohibited!
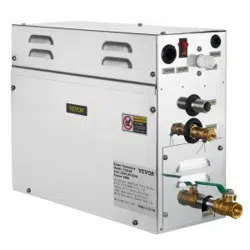
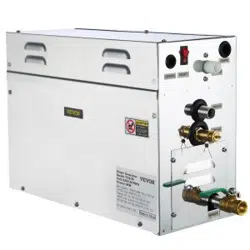
3.0 Installation of Steam Generator and Piping System
ALL machines manufactured in our factory have been rightly assembled and
carefully tested.
Shut off all electric switches and make sure that Generator suits Steam Room
before installation Refer to Form3.
Model
Room being
heated
(CBM)
Power(Kw) Voltage
Specification
(L*W*H,mm)
Connection thread
size(Water-inlet,
Steam-outlet,
Water-outlet)
YCS-90 10-12 9 220V 445*182*313 1/2''BSP
Form 3 Technical Information
4
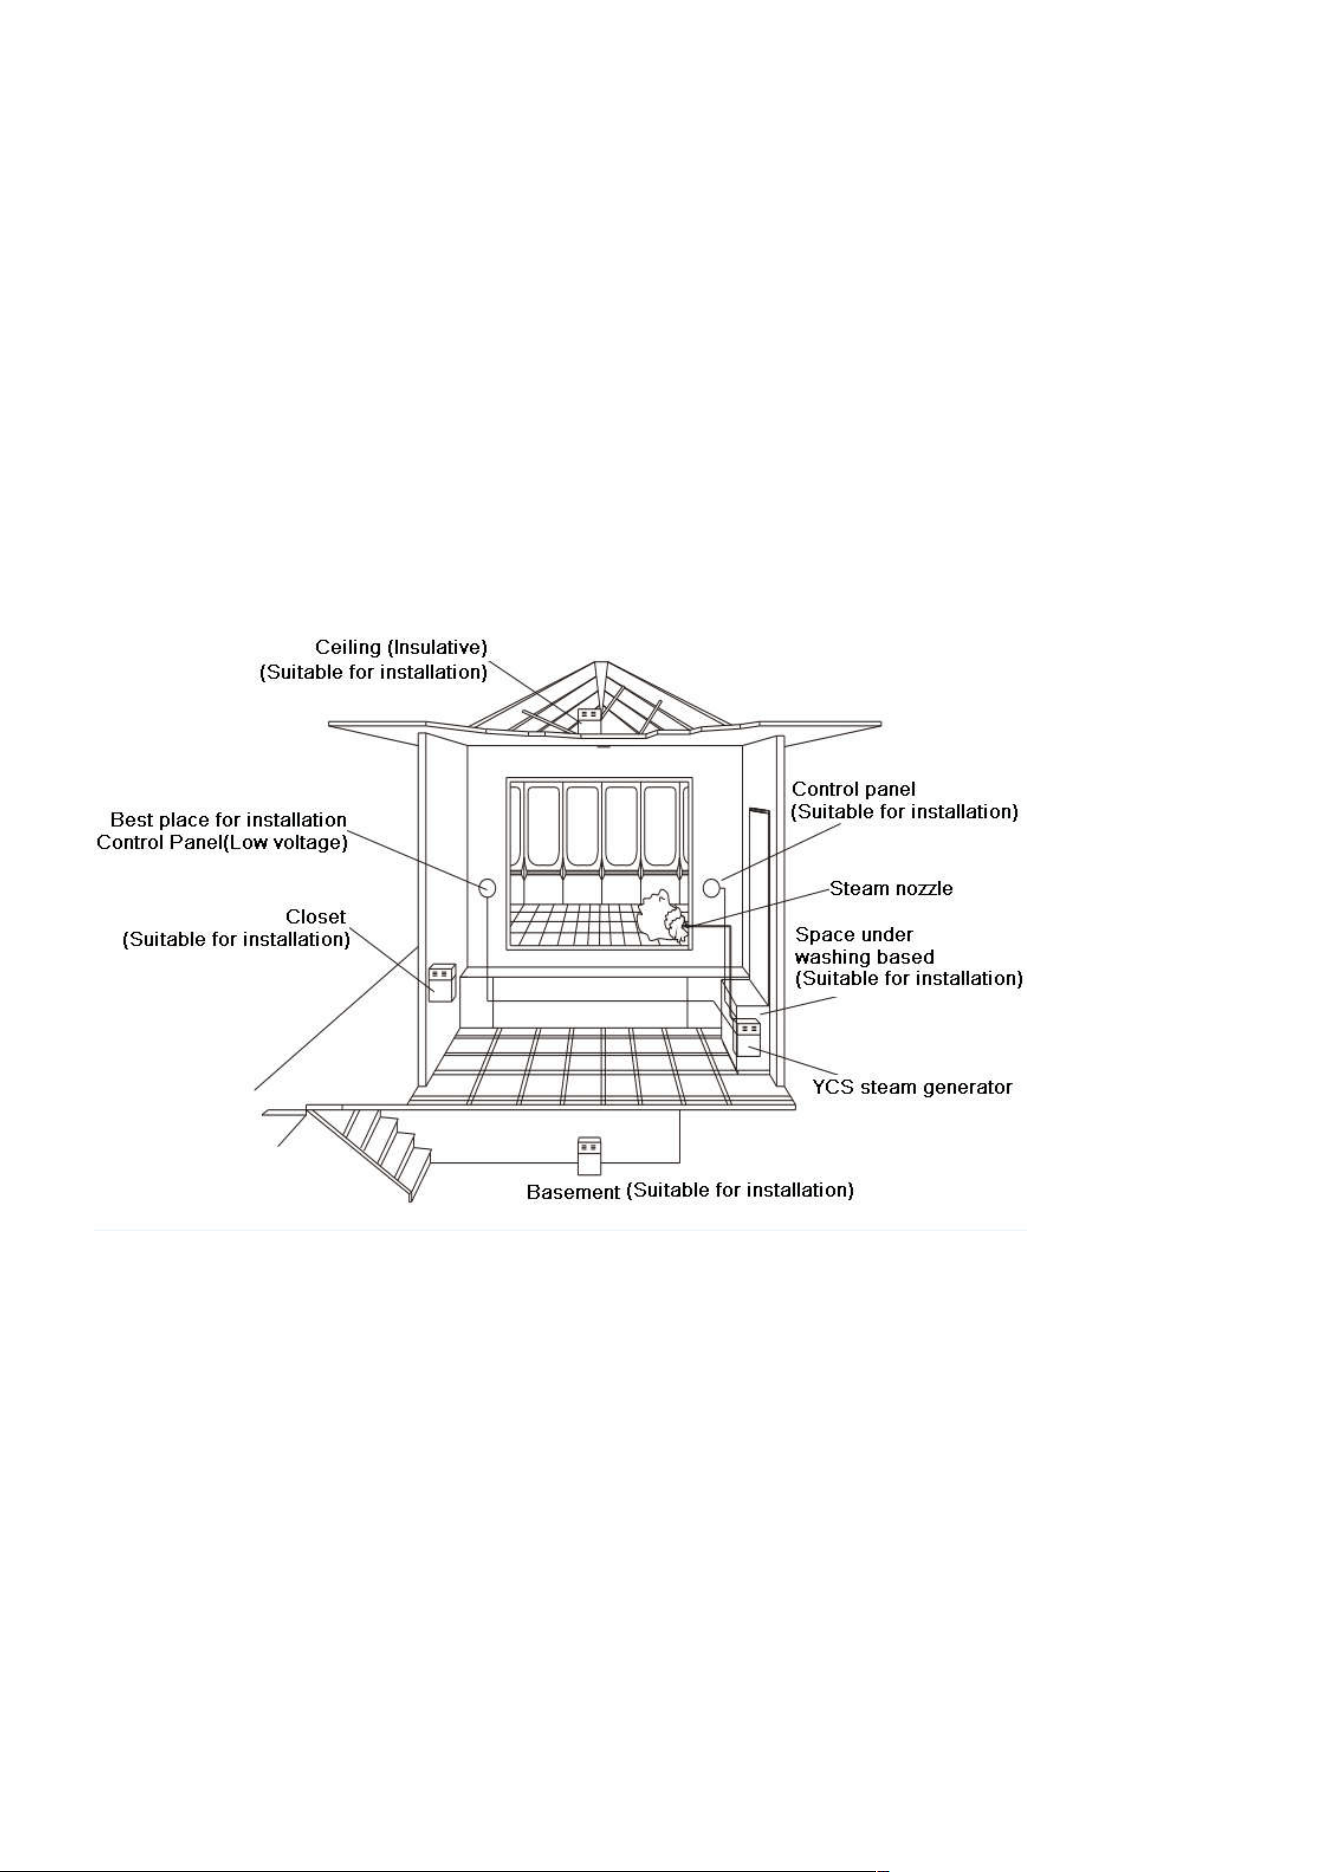
Installation of Steam Generator
1.Firmly install it on the wall or at dry places near bathtub/bath room.Place the
machine vertically.Loosen screws on machine’s top cover.Take away the top
cover.Fix the machine by fastening the left and right back.The suitable installing
position is closet/room on top floor/basement near bath areas.
For easy repair,the nameplate should be seen apparently and the machine
should be placed where it is convenient for after-sale services.Refer to Installation
Suggestion(Figure 4 )
Figure 4 Installation of Steam Generator
2.Don’t install Generator outdoors/in humidity/in hot places/where it is easy to
get frozen or rotted/ near paints,thinner or petrol.During operation,be careful of
steam piping system and safety valve in case of being burnt.
3.Steam Generator must be vertically placed.
5
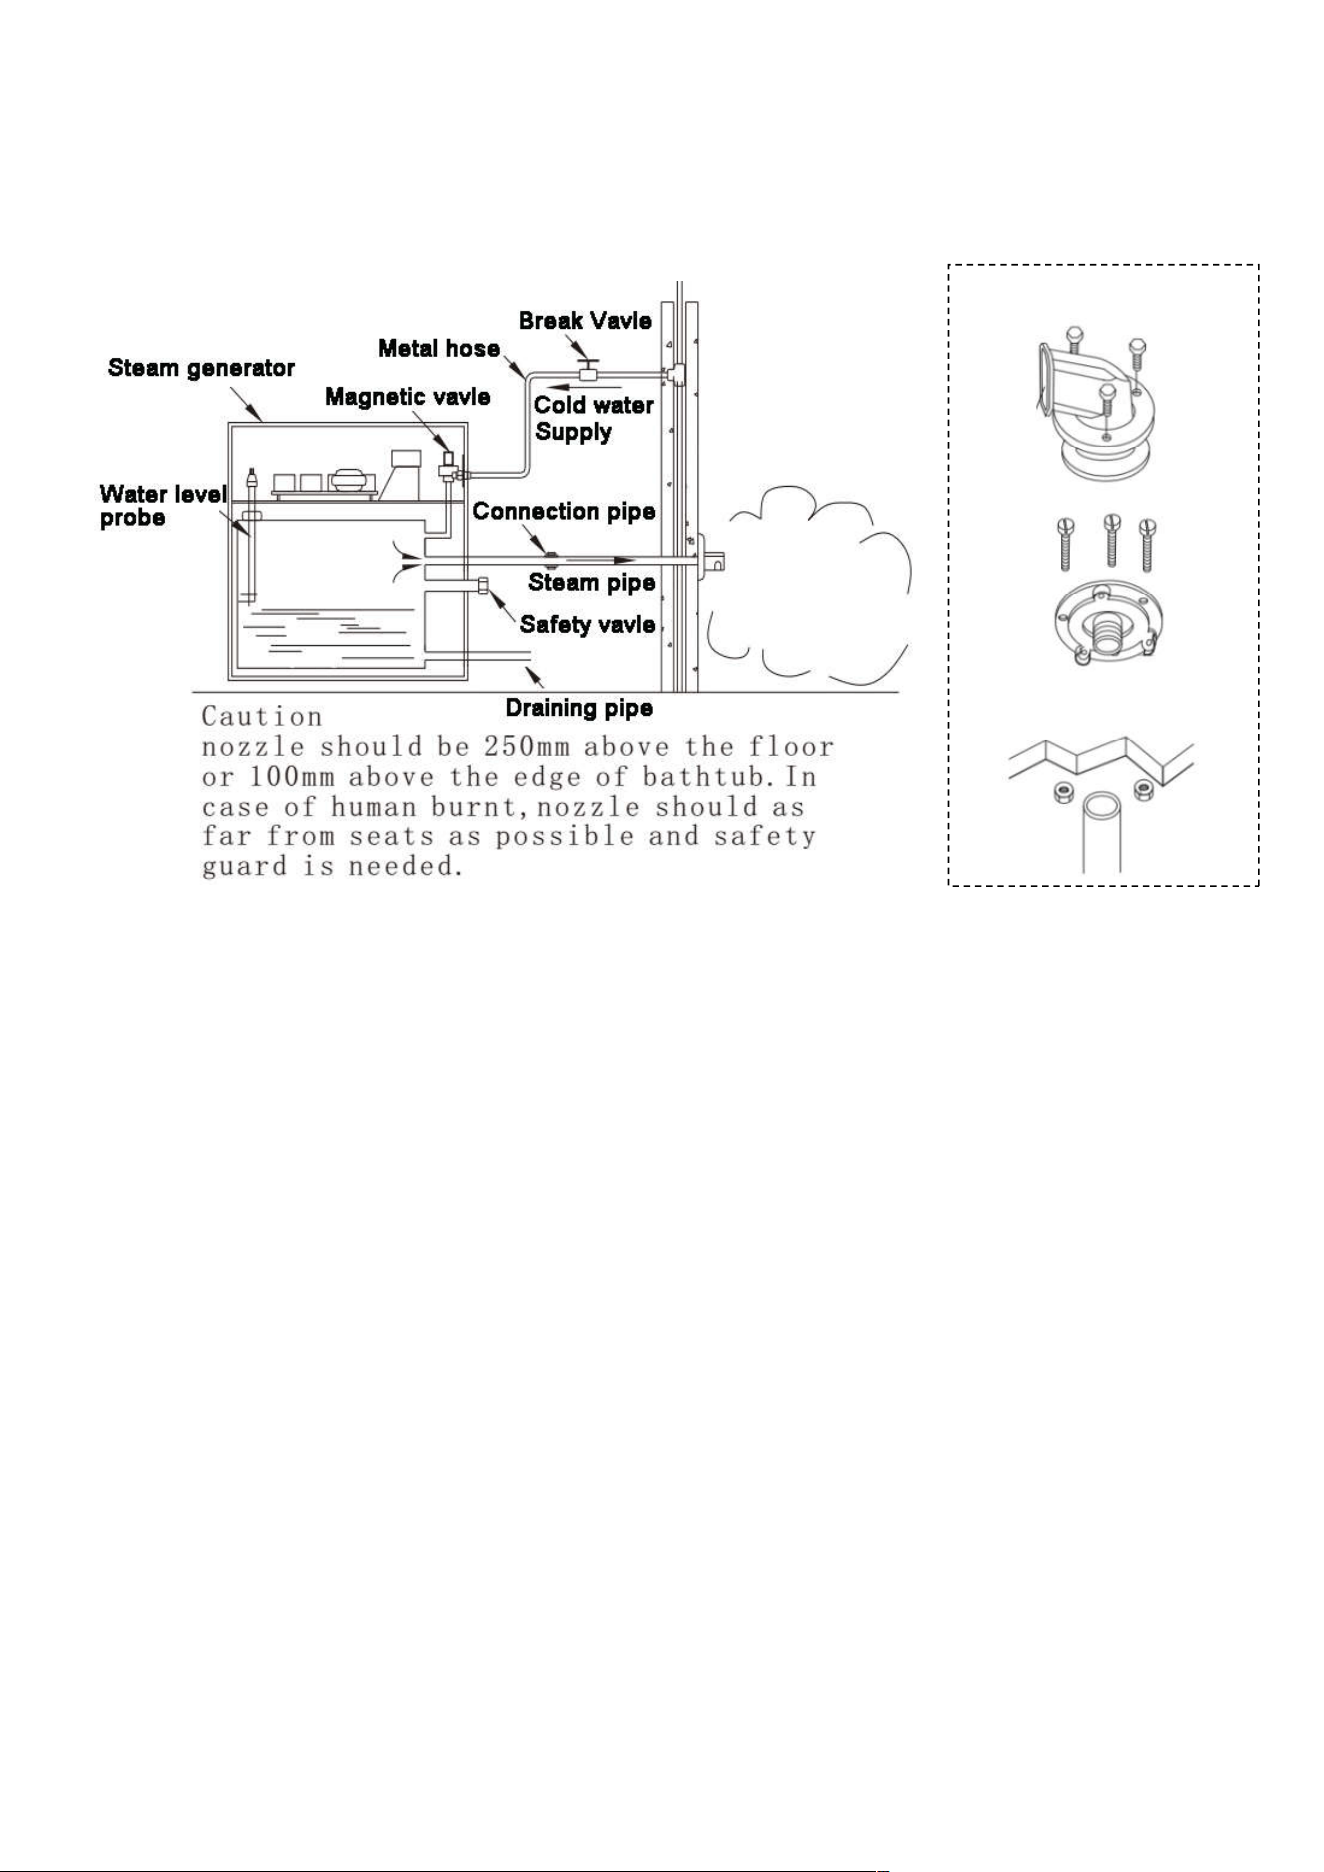
Installation of Piping System
Water Supplying Piping System and Steam Piping System must be installed
according to national standards and regulations before sealing the wall.
Figure 5 Installation of Steam Generator Piping System
1.The water inlet pipe,metal hose of 0.5 inch’s diameter,connects Generator’s
water inlet and water supplying system’s valve.(Figure 5 )
2.The diameter of steam outlet copper pipe should be no less than 0.5inch.
(Black metal pipe or galvanized pipe is prohibited to use in case of rusting and
dirtying the wall.)The steam pipe should be no more than 3 meters long.If it is more
than 3 meters,some special works for heat preservation should be done.(Figure 5 )
3.The draining pipe should be connected to a pipe whose diameter is no less
than 3 inches in case of damaging Steam Room during draining.
4.Steam Nozzle should be installed inside Room.Connect decorative cover to
steam pipe joint,seal it with gel and screw steam nozzle on.Control the strength
properly in case of destroying the decorative cover and nozzle.The outlet of nozzle
must be downwards.
Assemble of Steam-outlet

6
Caution:
A.If Generator is installed where it is hard for users to arrive,the water supplying
valve should be installed where it is easy to arrive in emergency.
B.The pressure magnetic valve can stand is 1 kg/cm².If the water pressure is too
high,turn the water supplying valve down or install a pressure reducing valve in
water supplying pipe.
C.Saddle valve or needle-shape valve is not suitable to be in drain pipe.
Completely dredge and rinse the pipe before connection.
D.Don’t install Generator outdoors but vertically install it where it’s easy for
maintenance service with arrows pointing up.
E.The piping system must be of copper pipes.Otherwise,it may damage the
machine. All joints/gap must be completely sealed in case of machine’s damage by
leaking steam.If the hot water in water tank goes into Steam Room,it may cause
human burn or Room damage.Please install some proper protective devices
according to practical situation.
4.0 Installation of Steam Generator's Circuitry
Power Installation of Steam Generator
1. Make sure of proper voltage Refer to the nameplate of machine or Form 1.
2. Fuse or breaker must be installed according to Form 3.Some relative protective
devices against electricity leakage are also needed.
3. Use the wire with proper model by the local requirement.If necessary,install a
socket bear Steam Generator.The plug and socket must match.(Refer to the
Specific instruction) After sealing the gap/hole in the wall, connect Generator and
Control Panel with wire.
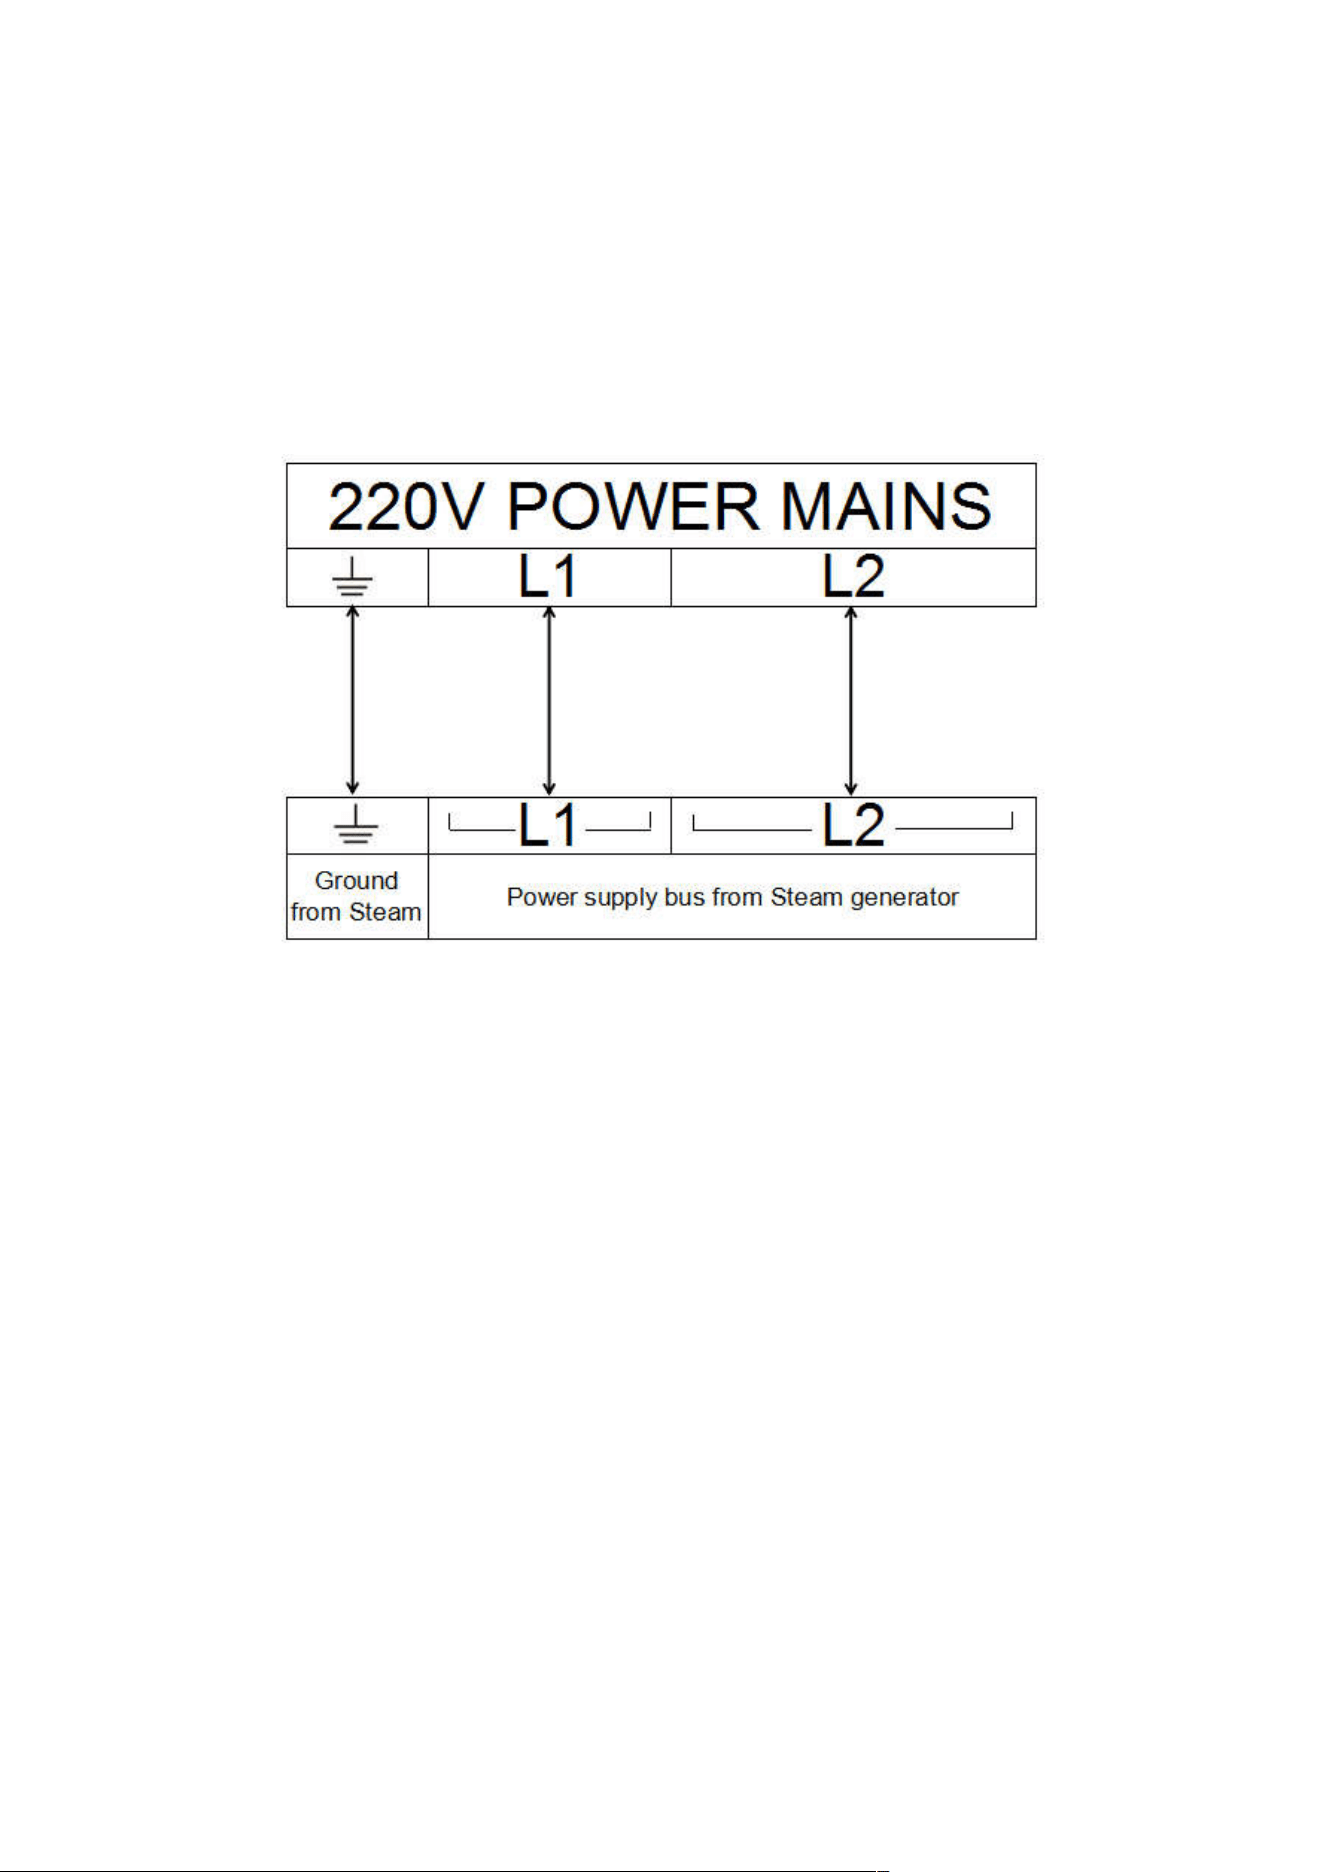
7
4. Plug the power wire and connection cable to Control Panel into matching
sockets in Generator.After fixing Generator’s cover and Control Panel,turn
Generator’s Power switch on.Turn Control Panel’s switch on.Now the machine
starts working.
5. The following diagram shows the method of wiring.
Inspection
Do inspection as the following before Generator’s Operation.
1.Connect the machine to the earth with proper wire whose diameter should be
more than 4mm.
2.Use Generator with proper model.If not,the presetting temperature may not
reach inside Steam Room.
3.Ensure the proper voltage for Generator. If Generator of 220V works under
380 voltage,its heating elements and circuit maybe damaged.
4.Place Generator vertically.
5.Use wires,breakers and protective devices against electricity leakage with
proper models.

8
Caution:
Shut off all power switches before installation,maintenance and repair. Don’t add
any other electrical devices to Generator and Control Panel. Don’t use Generator
and Control Panel as power device for other machines. Make sure of the normal
operation of earth wire and power wire. Installation,operation,maintenance and
repair,please strictly use spare parts appointed by Manufacturer so as to ensure
the machine’s safe and continuous operation.
5.0 Maintenance and Repair of Steam Generator
A.Maintenance
1.Check Generator,steam nozzle,spare parts and piping joints regularly in case of
water leakage and machine damage.
2.Its important to rinse and discharge deposits in water tank .This work should be
daily done or frequently done according to the local water quality and steam usage
frequency.
3.Be careful about over-heating at any circumstance.Check the firmness of all
electric joints.
B.Repair
1.replace heating elements: Shut off power,discharge the water out from water
tank,take off the top cover and heating elements cover,mark the places where the
wires are connected,remove the wire,and take heating elements out. Wear a gum
ring around the joints of heating elements,eliminate water fur from water thank,and
properly place new heating elements and tighten them.(Press the gum ring tightly
without turning it out from inside)
9
2.connect wires again,check the joints in case of water leakage,and place all
covers back.
3.replace circuit: Shut off power and water,remove the front cover,and mark the
place of water level probe.Remove the wires from the probe and circuit, place a
new probe,and screw it to the normal position. Connect the wire to the probe.
Caution:
Shut off power switches before maintenance and repair.
Normally operate the machine once after maintenance and repair as a test.
6.0 Trouble shooting
Symptom Possible cause Remedy
No steam while
controller has been
pressed the
"POWER" position
1. steam generator hasn't been
connected to the water supply
2. The controller fails to function
3. The steam generator fails to
function
4. Drain pipe valve hasn't been
shut off
1.At least 10 minutes wait after
the controller opened
2.Check if the power is on and
the water supply valve is open
3.Check if the Drain pipe valve
of generator is closed
Still produces steam
when the controller
has been turned off.
1. The controller fails to function.
2. The steam generator fails to
function.
1. Switch off the circuit
protector
Water flows out from
the steam head
The steam generator fails to
function
1.Switch off the circuit
protector.
2. Shut off water supply valve
10
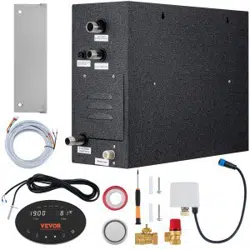
7.0 Before installation
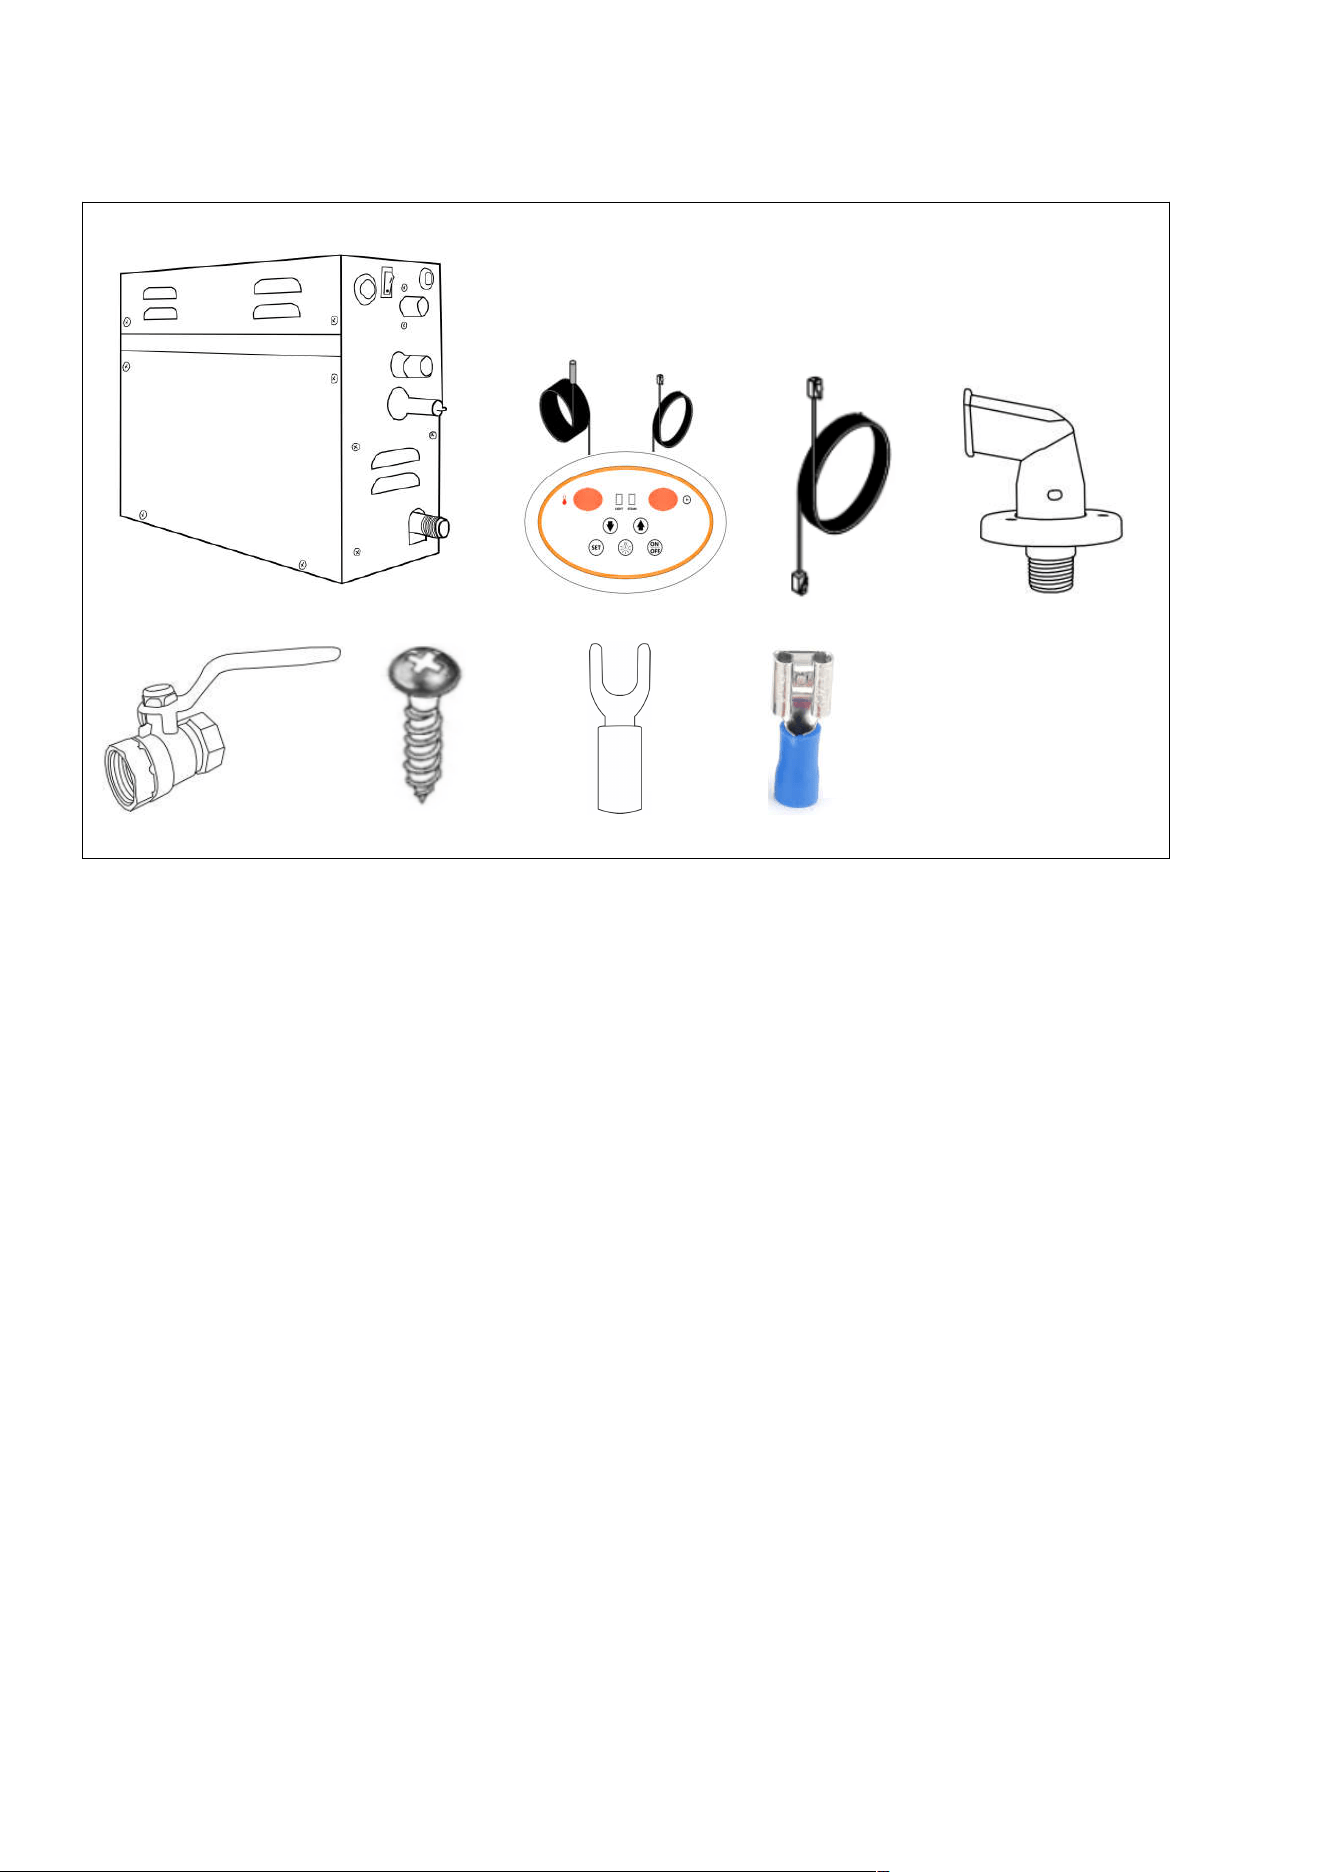
Check that the following parts are included in the packaging:
1.Steam generator
2.Control (with temperature sensor cable)
3.Connection cable (between control and steam generator)
4.Steam nozzle
5.Drain pipe valve
6.Bracket screws x 2 (6*40mm)
7.Fork terminal x 3 (Power connection)
8.Female terminal x 2 (220V Room light connection)
1
2
3
4
5
7
8
6

11
Manufacturer:
QINGYUAN FENLE SAUNA & POOL EQUIPMENTS CO., LTD.
Address:
M1-10, YINGFU INDUSTRIAL PARK, HIGH & NEW TECHNOLOGY INDUSTRIAL
DEVELOPMENT ZONE, CN