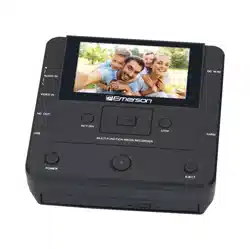
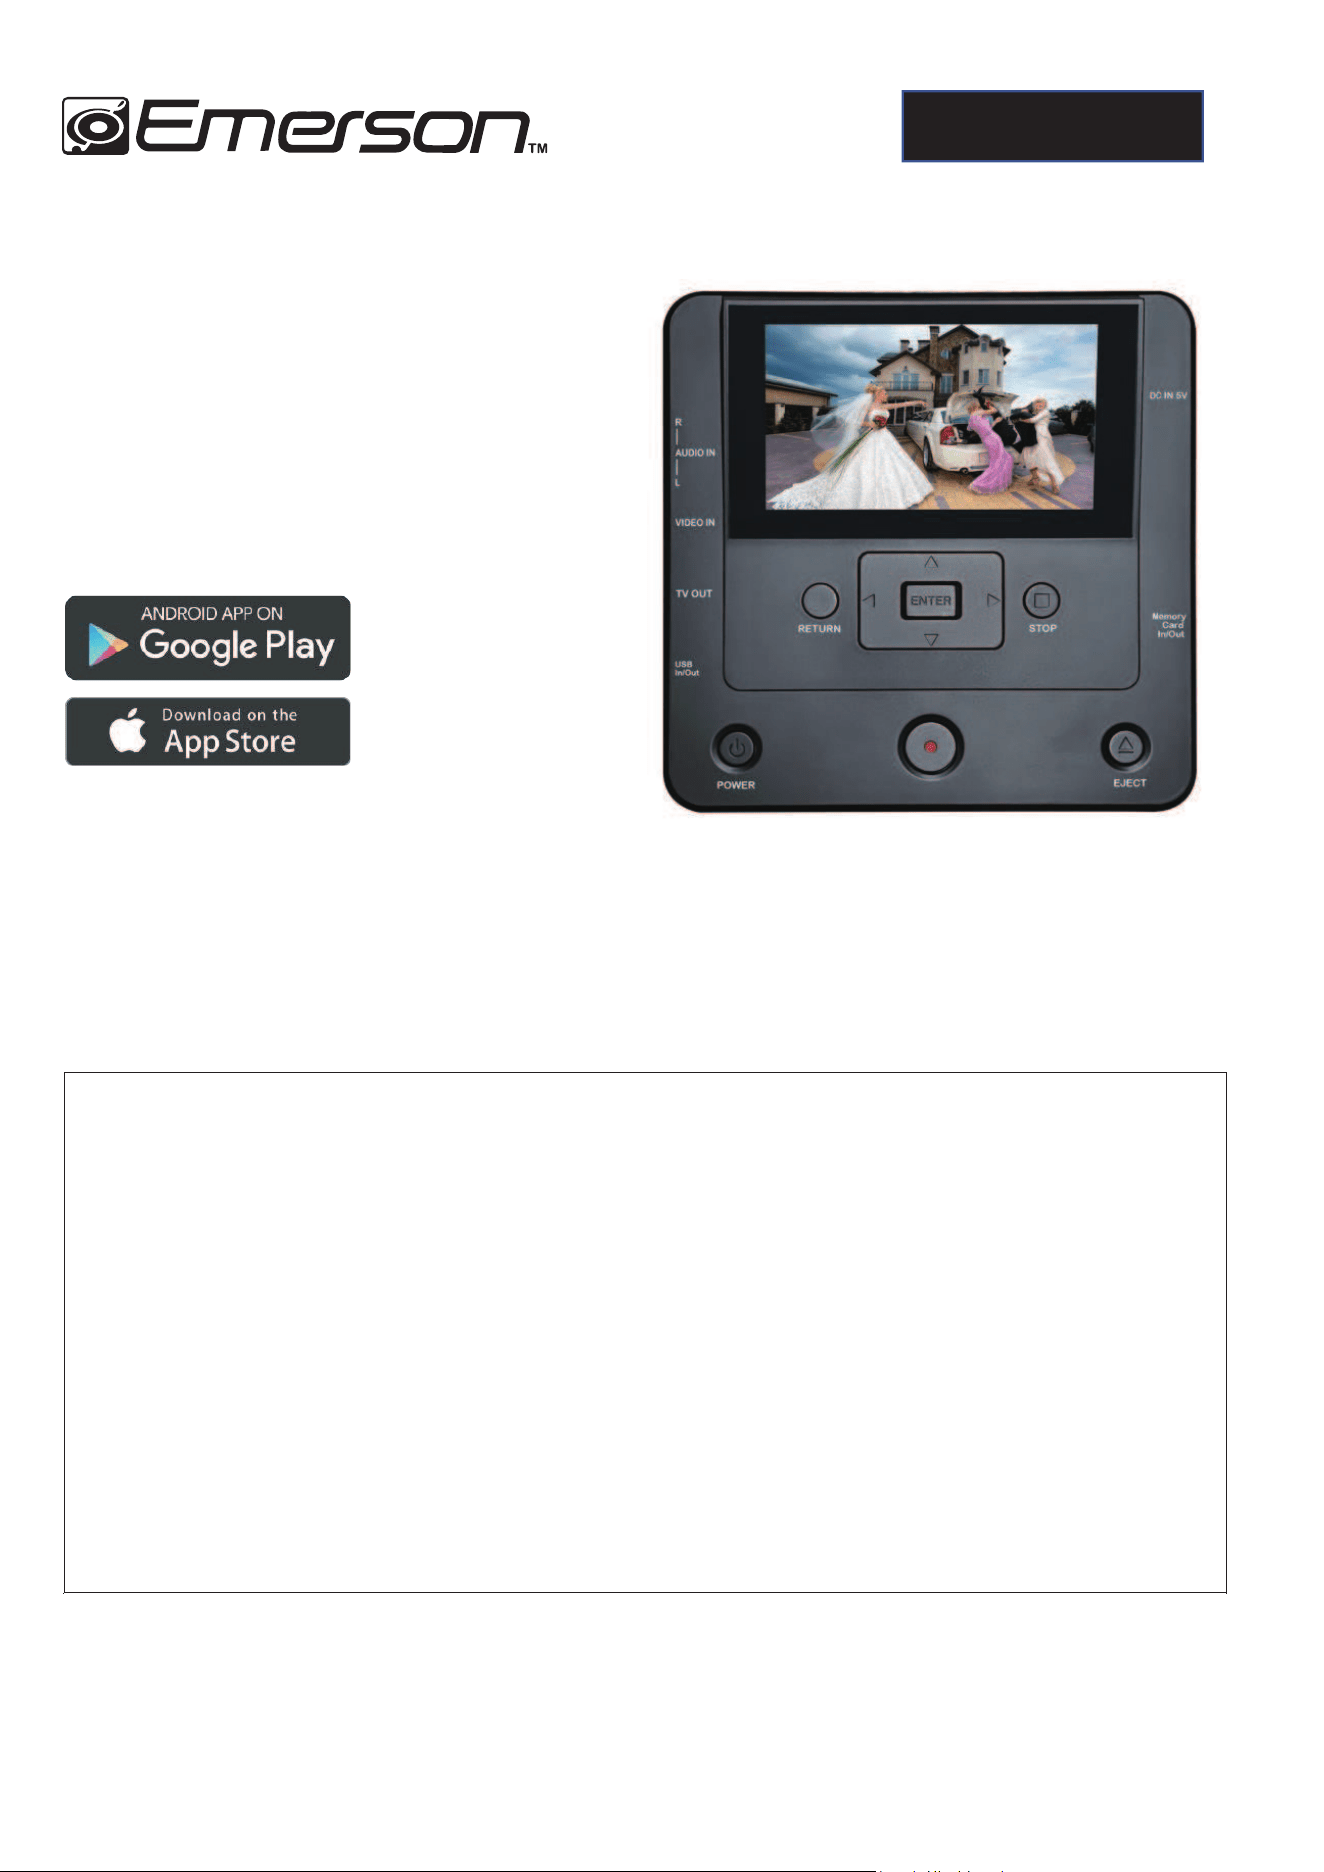
EMT-1200
Media Recorder
User Manual
Please read these instructions carefully before any use and retain them in a safe
place for your future reference
This device can be used by children over the age of 8
and by individuals with reduced physical, sensory or
mental abilities with limited experience or knowledge,
as long as they are correctly supervised or if they have
been safely given the device operating instructions
and if the involved risks have been fully taken into
account. Children should not play with the device.
User cleaning and maintenance should not be carried
out by a child unsupervised.
ENGLISH

1
IMPORTANT SAFETY GUIDLELINES
Whenever using electrical devices, you should always observe certain basic precautions.
Precautions to be observed:
1. Read the instructions - Read all safety and usage guidelines before using the device.
2.
Retain the instructions - Retain the safety and usage guidelines in case of any need for future
reference.
3. Observe warnings - You must adhere to all warnings featuring on the device and in the manual.
4. Follow the instructions - You must observe all usage guidance and information.
5. Cleaning - Unplug the device from the wall outlet before cleaning. Refrain from using any liquid or
aerosol cleaning agents.
6. Accessories - Refrain from using accessories that are not recommended by the manufacturer as
they could present a possible risk.
7. Water and humidity - Avoid exposing the device to water and humidity. Protect this device from
water and all other liquids; no object containing water, such as a vase, should be placed on this
device.
8. Positioning - Place the device on a stable surface before any use. If poorly positioned, the device
could fall and suffer damage. Its fall could also seriously injure a child or adult.
9. Transport - This device should be moved carefully to avoid any risk of damage or injury..
10. Power supply - This device should only ever be connected to a power supply which conforms to
the information detailed on the data plate.
11. Protection of electric cables - The power cables must be protected against any risk of
becoming
tangled, stamped on or pinched.
12. Overloading - Do not overload the wall plug or extension cables as this will lead to a risk of fire
and
electrocution.
13. Insertion of objects or liquids - Refrain from inserting any objects into the device openings as
they
could come into contact with live electrical components or cause a short circuit and there would
be a
risk of electrocution or fire.
14. Repairs - Refrain from attempting to repair the device yourself as by opening or removing parts
from the case you expose yourself to a risk of electrocution and other dangers. Refer to qualified,
professional assistance in the event of needing to carry out repairs.
15. Deterioration requiring repairs - Unplug the device from the wall and hire a qualified
professional
to carry out the repair in the following cases:
a. If the power cord or plug becomes damaged.
b. If any liquid or objects fall into the device.
c. If the device has been exposed to the rain or has come into contact with water.
d. If the device is not functioning properly even after you have followed the troubleshooting guidance
in the manual.
e. If the device has fallen or suffered any damage and no longer functions as before.
16. Replacement parts - If a part needs to be replaced, ensure that the technician uses the
replacement part specified by the manufacturer or a part with the same characteristics as the original
part. The replacement of any parts with unauthorized parts can result in fire, electrocution or other
dangers.
2
17. Safety check - After any maintenance operations or repairs are carried out on the device, ask the
technician to carry out safety checks in order to ensure that the device is in sound working order.
18. Heat - This device must be placed away from sources of heat such as radiators, hot air outlets,
ovens and other devices (including amplifiers) that produce heat.
PRECAUTIONS TO BE OBSERVED
TO PREVENT FIRE OR SHOCK HAZARD, DO NOT USE THIS PLUG WITH AN EXTENSION
CORD, RECEPTACLE OR OTHER UNLESS THE BLADES CAN BE FULLY INSERTED TO
PREVENT BLADE EXPOSURE.
1. To completely turn off the device, unplug the power cord from the wall outlet. You must always
unplug the device if it is to remain unused for a prolonged period of time.
2. Incorrect use of the command and settings buttons or using the device in a way different to that
specified in the present manual can expose you to dangerous radiation.
3. If this device is not in good working order, cease all use and contact the appropriate after-sales
service department.
BEFORE ALL USE, READ THE PRECAUTIONS BELOW:
1. Ensure a stable placement and avoid placing the device anywhere exposed to direct sunlight or
near to a source of heat.
2. Avoid placing the device anywhere it could be exposed to vibrations, dust cold or humidity.
3. Do not place the device close or on top of other stereo equipment’s that radiate too much heat.
4. Once the record player is positioned, ensure that the plug is located near to the device and is
easily accessible. Fit this chain in ord
er to be able to immediately unplug the power supply from the
source outlet in the event of a problem.
5. Do no open the device as doing so would risk electrocution. If a foreign object accidentally
becomes inserted into the device, contact your vendor.
6. In order to disconnect the device power supply, pull on the plug, NOT the cable.
7. To completely turn off the device, unplug the power cord from the wall outlet.
8. Before using the turn table, che
ck that its operating voltage is identical to that of the local supply
Copyright
Certain TV programs, films, videos, CDs and other materials are under copyright protection.
Recording of these materials in question without approval is in violation of the copyright law.
Furthermore, the use or the product with CATV transmission devices shall be approved by the CATV
transmitter and/or the program owner
SPECIFICATIONS
Input:
100-240V 50/60HZ 0.8A
Output
5V 3A 15.0W
Internal storage
8GB in total (2GB reserved for system software + 6GB for storage using
Memory card
supported:
SD card - For MicroSD, Micro SDHC, MicroSDXC please use an adapter
DVD type supported
DVD-5 (4.7G) included DVD-R, DVD-RW
CD type supported
CD-R, CD-RW
Working temperature
0-40 ℃
3
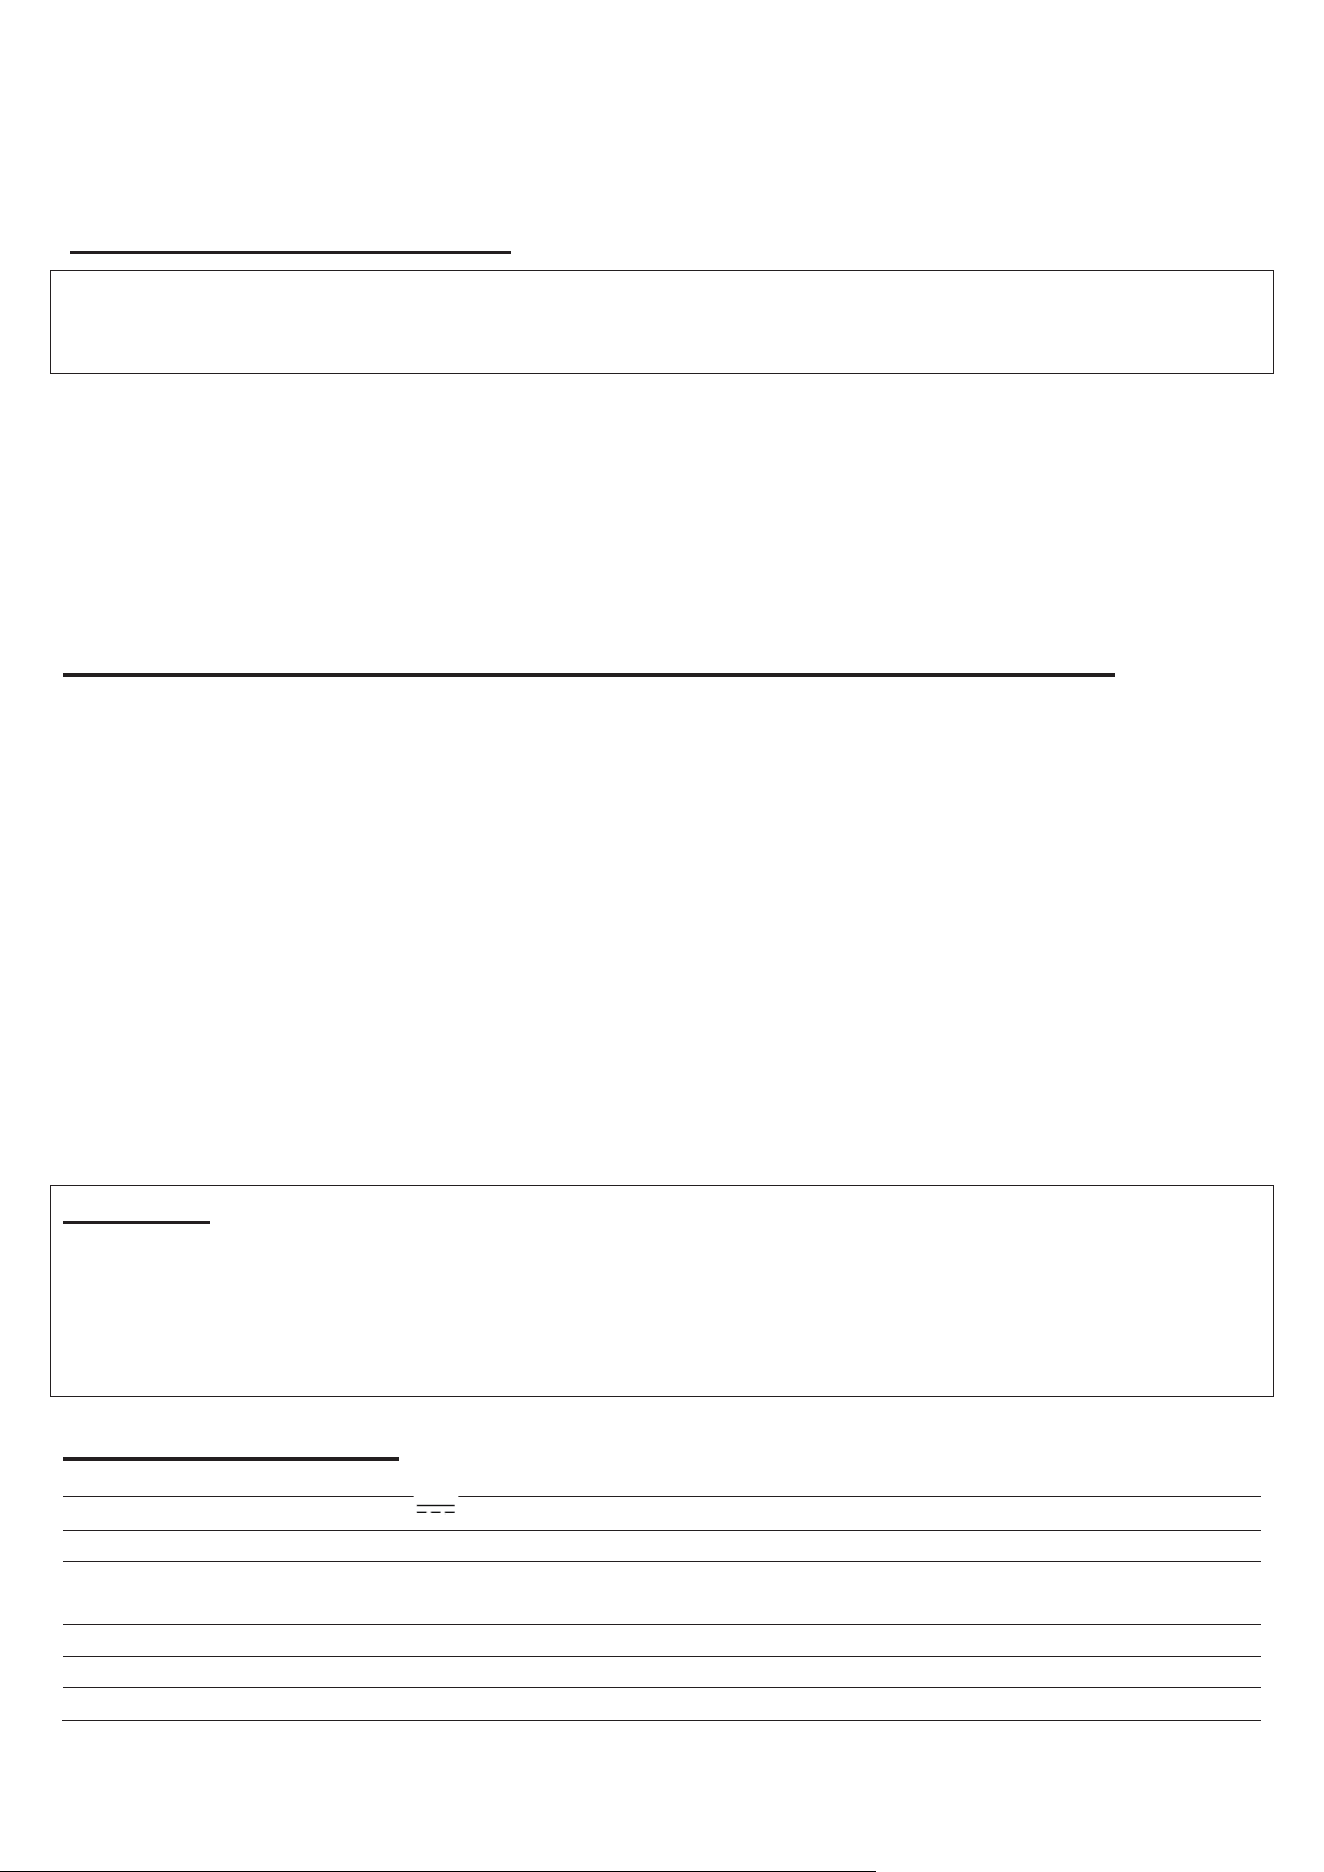
Product description
1
Audio IN R/L
8
LEFT
15
DC IN
2
Video IN
9
REC record button
16
Card slot
3
HD port
10
DOWN
17
DVD Rom
4
USB Port
11
ENTER Button (to confirm the selection)
18
AC adaptor
5
POWER button
12
RIGHT
19
AV cable
6
RETURN Button
13
STOP button
7
UP
14
EJECT button
Operating instruction
- Power on: connect the adaptor to recorder, plug the power cord into a power socket, press
[POWER] button for 3 seconds
- Power off: press [POWER] button for 3 seconds to shut down the recorder, unplug the power cord
NOTE: DO NOT unplug the recorder before it totally shuts down.
I. System setting
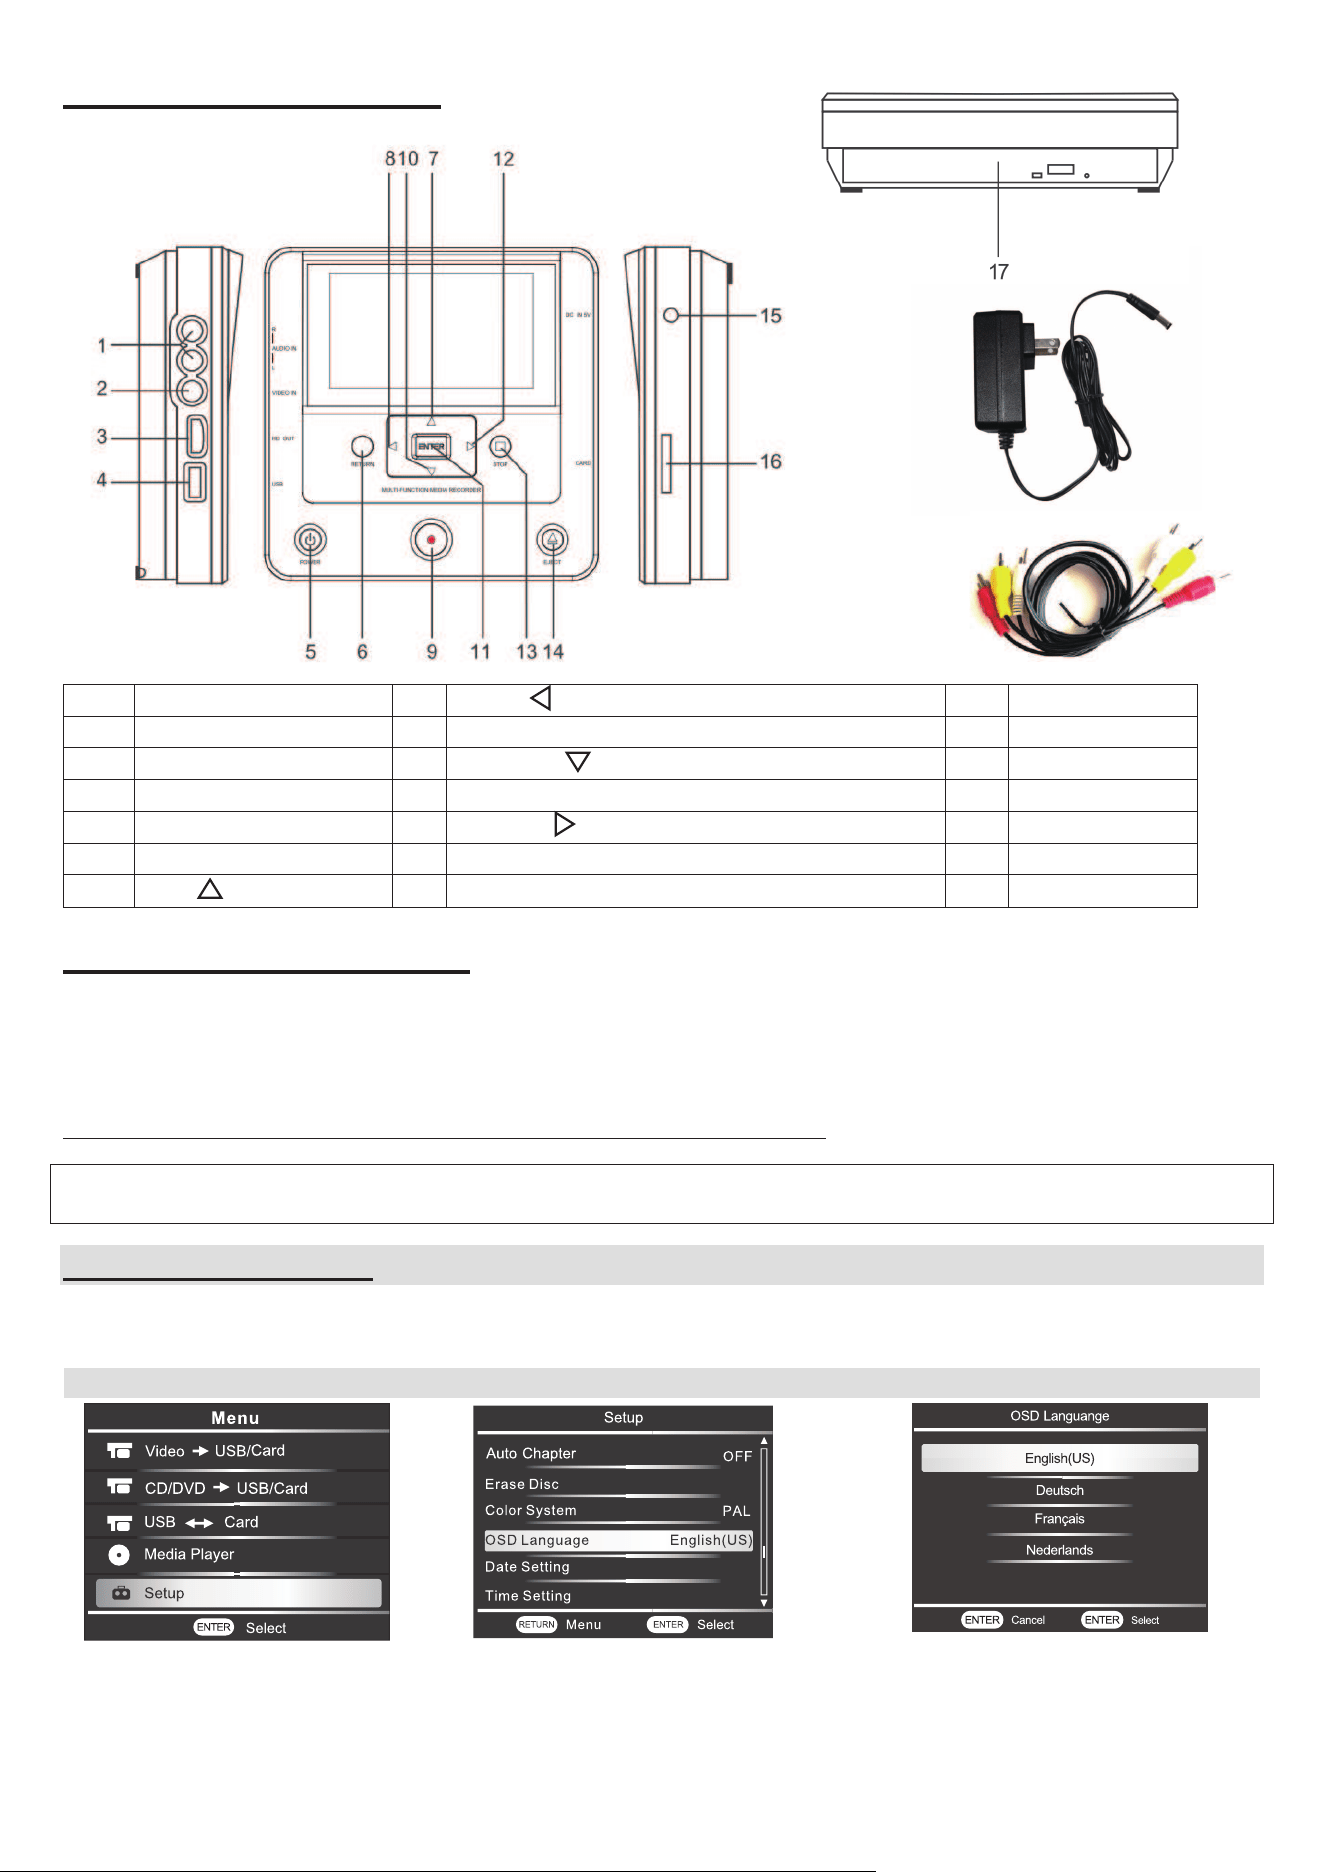
1.1 Language setting
The default system language is English, and you can also choose German, French,
Dutch, Spanish
by following below steps:
1
2
3
choose the Setup on main
menu, then press [ENTER]
confirm the selection.
Choose OSD Language, press
[ENTER] to confirm the selection
Choose the language, press
[ENTER] to confirm the selection.
Español
188
19
4
1.2 Date setting:
- Choose the Setup on main menu, then press [ENTER] to confirm the selection.
- Choose Date Setting and press [ENTER] to confirm.
DATE format: YYYY : MM : DD
-Press or to choose the correct Year, once finish press to pass to the setup of Month
and Day. Then press [ENTER] to confirm the setting.
1.3 Time setting:
Time format : 12 hours
AM/PM : Hour : Minute
The same procedure of Date setting.
Menu Setup Time Setting
Select AM/PM then set the HOUR and MINUTE.
Note: if the recorder isn’t used for more than 7 days, please reset again the date and time.
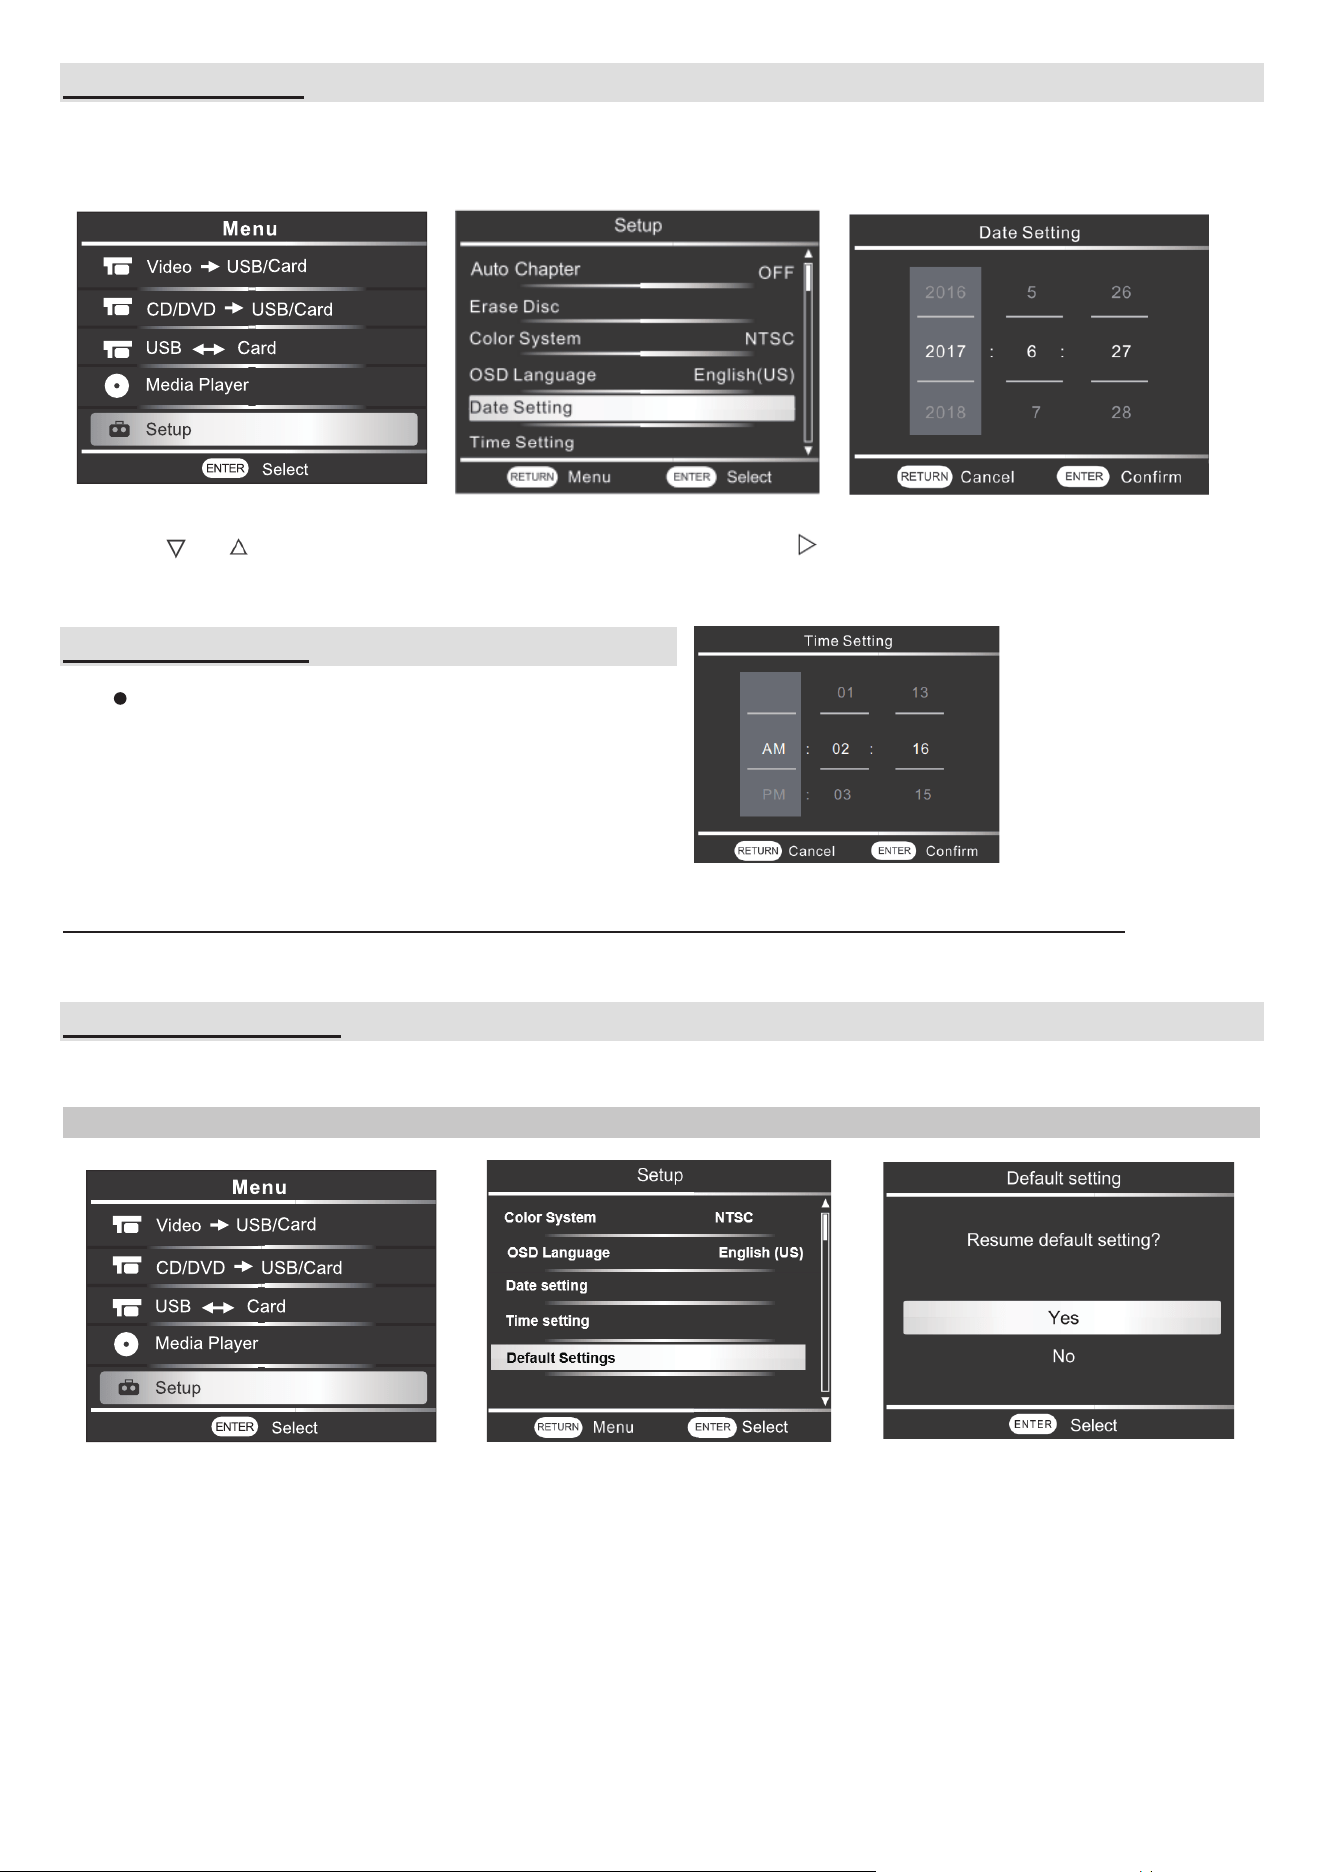
1.4 Default setting:
This function allows user to resume to the factory setting and all customized setting will be deleted.
1
2
Choose Setup on main menu Choose ‘Default Settings’
Choose YES to resume the
setting.
Choose NO to cancel and back
to main menu.
5
II. Video/USB/SD card DVD
Video USB/Card
DVD USB/Card
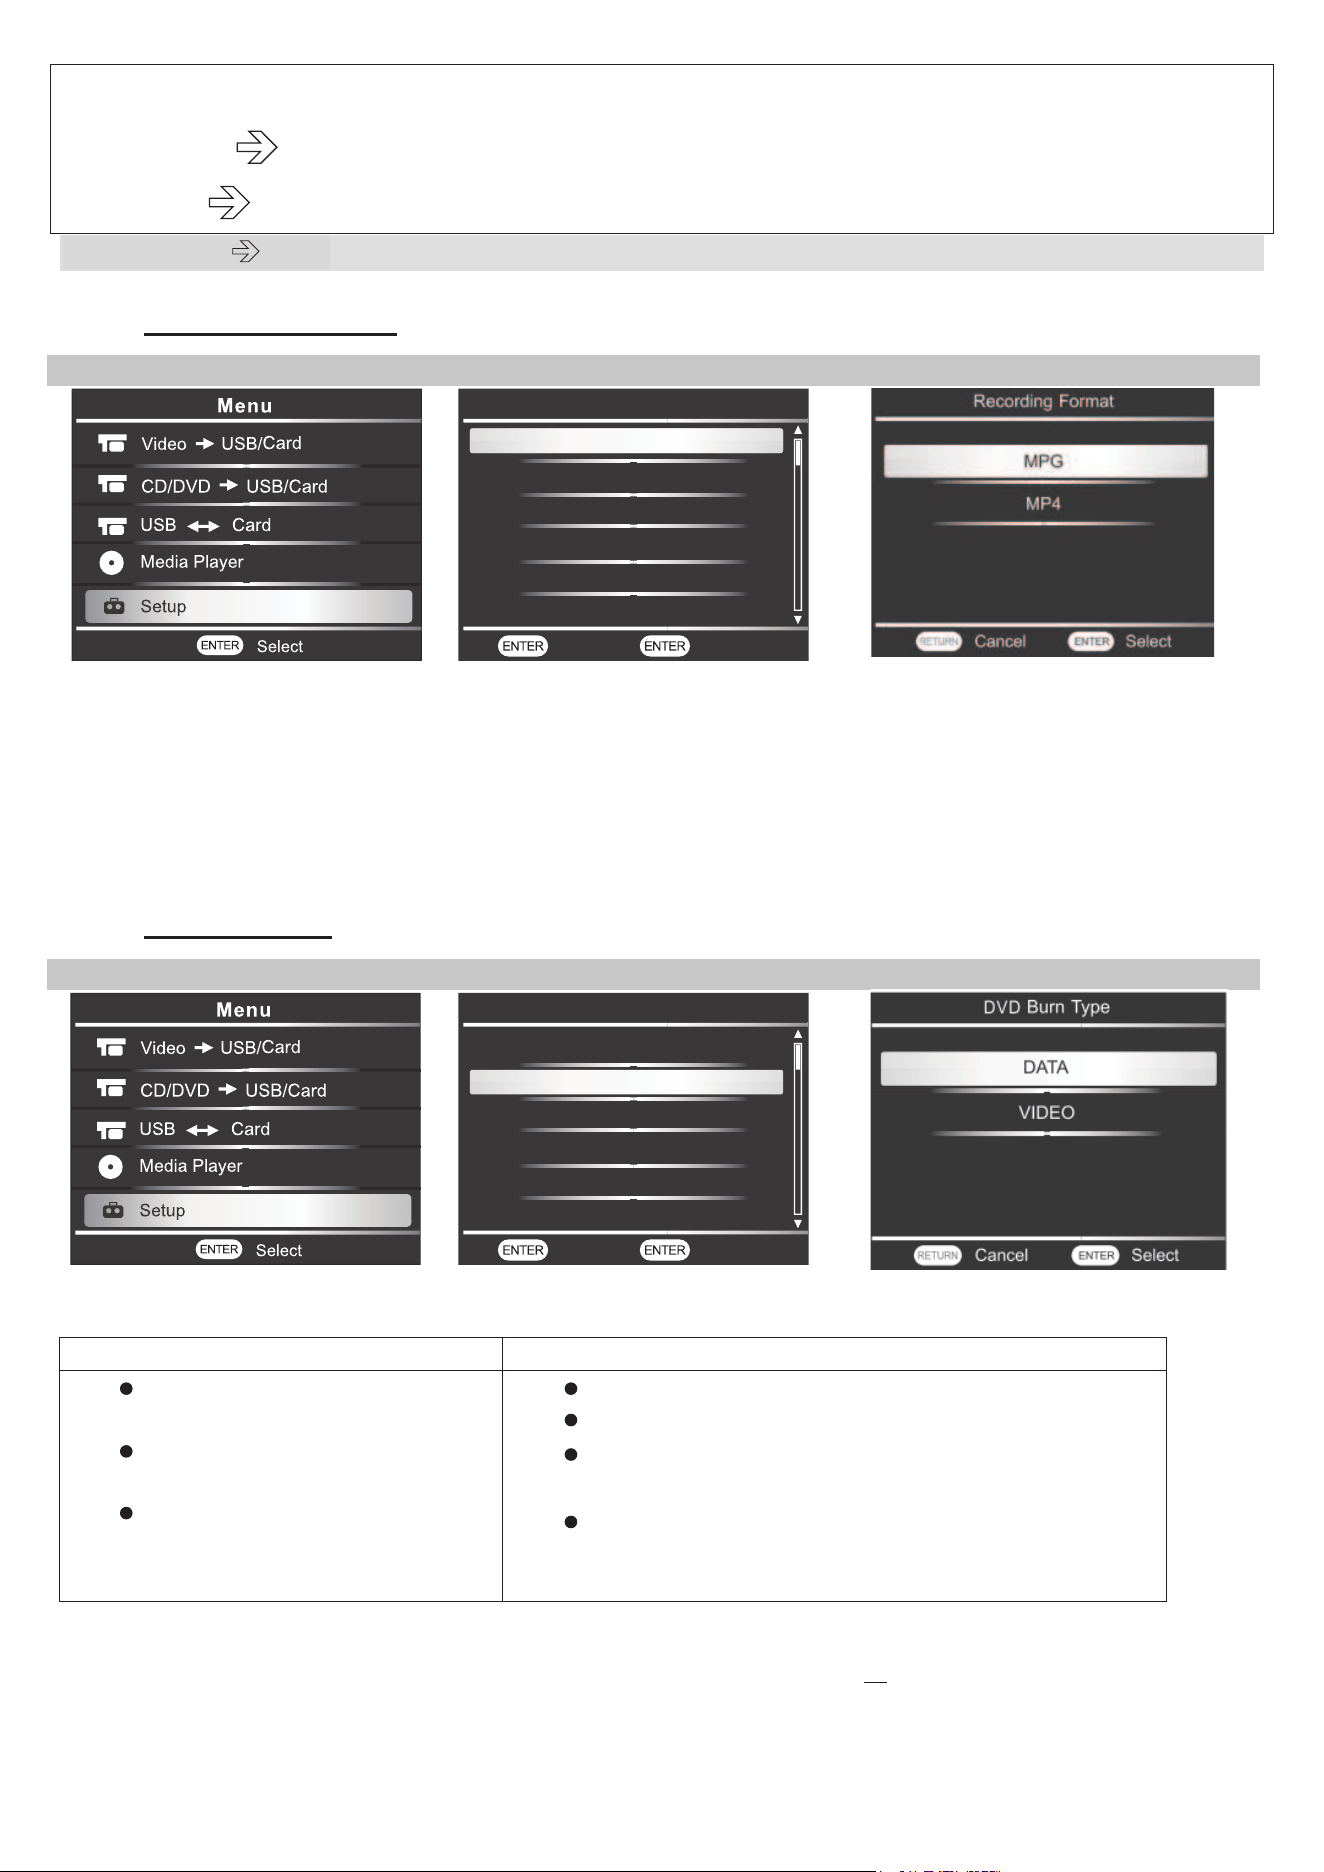
2.1 Video DVD
Setting to do before starting the recording, please follow below setup:
a. DVD burning format
1
2
3
Choose Setup on main menu
Choose ‘Recording Format’
MPG format for Standard DVD
player
MP4 Format for Blu-ray player
*MP4 format can be easily
uploaded to PC to share on social
media.
b. DVD Burn type
1
2
3
Choose Setup on main menu
Choose ‘DVD Burn type’
Choose the type needed
Data
Video
Video, picture, music,
documents can be burnt
Can be played and edited
on computer
Extra content can be added
later
Only Video can be burnt
same format as the DVD disk you bought.
Be played in a DVD player or a computer with
a DVD drive.
It has menus and chapters. You can skip
around the video to suit your specific needs.
NOTE :
- If you choose VIDEO as burning type, you must use a blank disc or format the disc before
recording (refer to chapter 8. Erase Disc function). Only single recording is allowed.
Recording Format
MPG
DVD Bum Type
D
Low Quality
ATA
Record Quality
Erase disc
Auto Stop Timer
OFF
Auto Chaper
OFF
Setup
Menu Select
Recording Format
MPG
DVD Bum Type
D
Low Quality
ATA
Record Quality
Erase disc
Auto Stop Timer
OFF
Auto Chaper
OFF
Setup
Menu Select
6
c. Recording quality
1
2
Choose Setup on main menu
Choose ‘Record quality’
Record quality include:
QUALITY MODE
Length of recording time
High Quality
Approx. 1 hour
Medium Quality
Approx. 1 hour 30 minutes
Low Quality
Approx. 2 hours 45 minutes
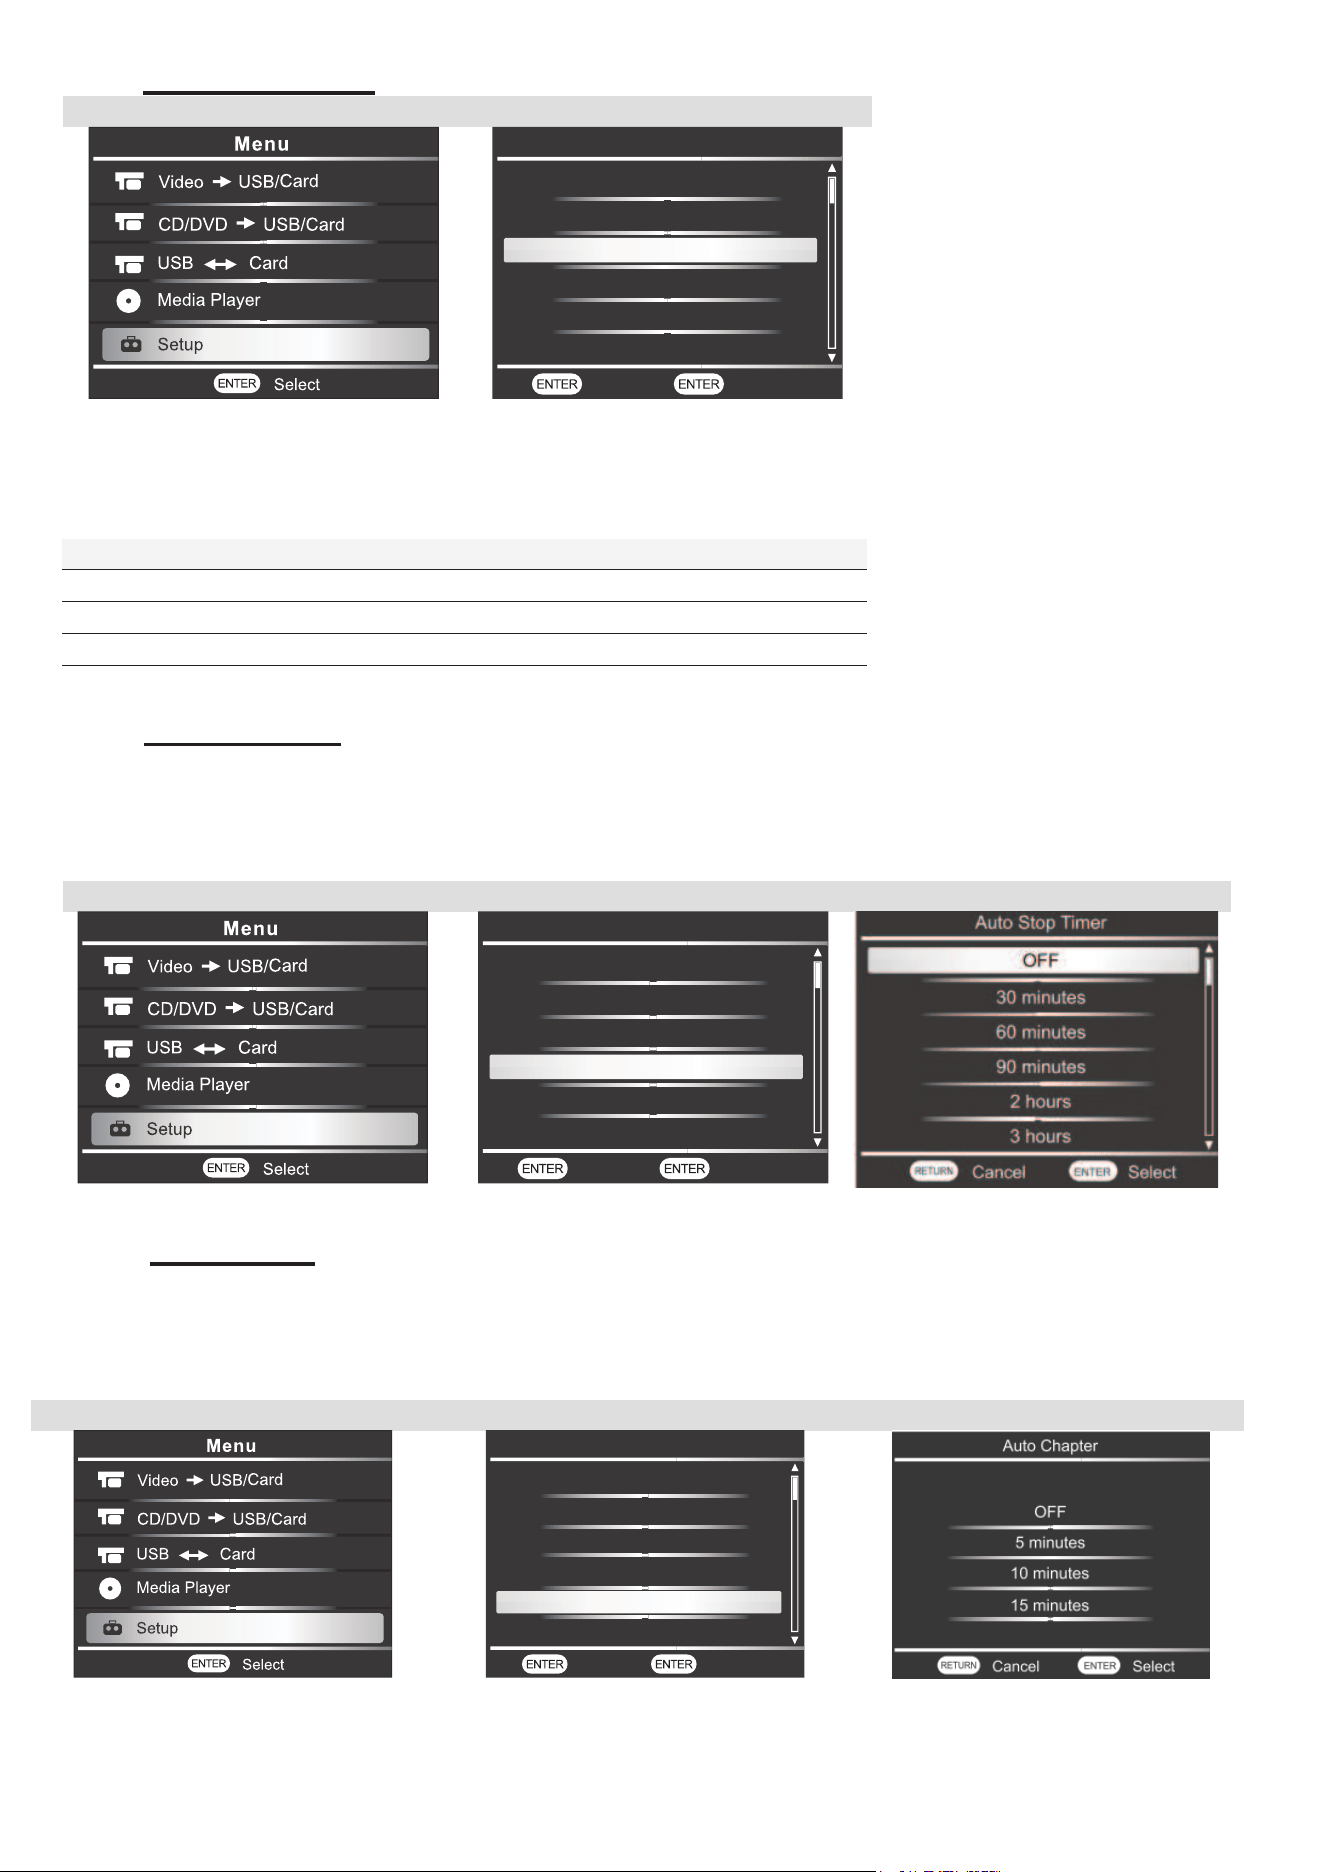
d. Auto stop timer
This function allows user to automatically stop the recording after the preset time selected.
This function can be applied to
- VideoDVD
- Video USB or SD card
1
2
3
Choose Setup on main menu
Choose ‘Auto Stop Timer’
Select the time you wish
e. .Auto chapter
This function allows to create the interval time of each chapter.
This function can be applied to
- Vide
DVD
- Video USB or SD card
1
2
3
Choose Setup on main menu
Choose ‘Auto Chapter.
Select the time you wish.
Recording Format
MPG
DVD Bum Type
D
Low Quality
ATA
Record Quality
Erase disc
Auto Stop Timer
OFF
Auto Chaper
OFF
Setup
Menu Select
Recording Format
MPG
DVD Bum Type
D
Low Quality
ATA
Record Quality
Erase disc
Auto Stop Timer
OFF
Auto Chaper
OFF
Setup
Menu Select
Recording Format
MPG
DVD Bum Type
D
Low Quality
ATA
Record Quality
Erase disc
Auto Stop Timer
OFF
Auto Chaper
OFF
Setup
Menu Select
7
Chapter timer include:
Timer
Recording time
OFF
No chapter mark is inserted
5 Minutes
Inserts chapter marks at approximately 5 minutes intervals
10 Minutes
Inserts chapter marks at approximately 10 minutes intervals
15 Minutes
Inserts chapter marks at approximately 15 minutes intervals
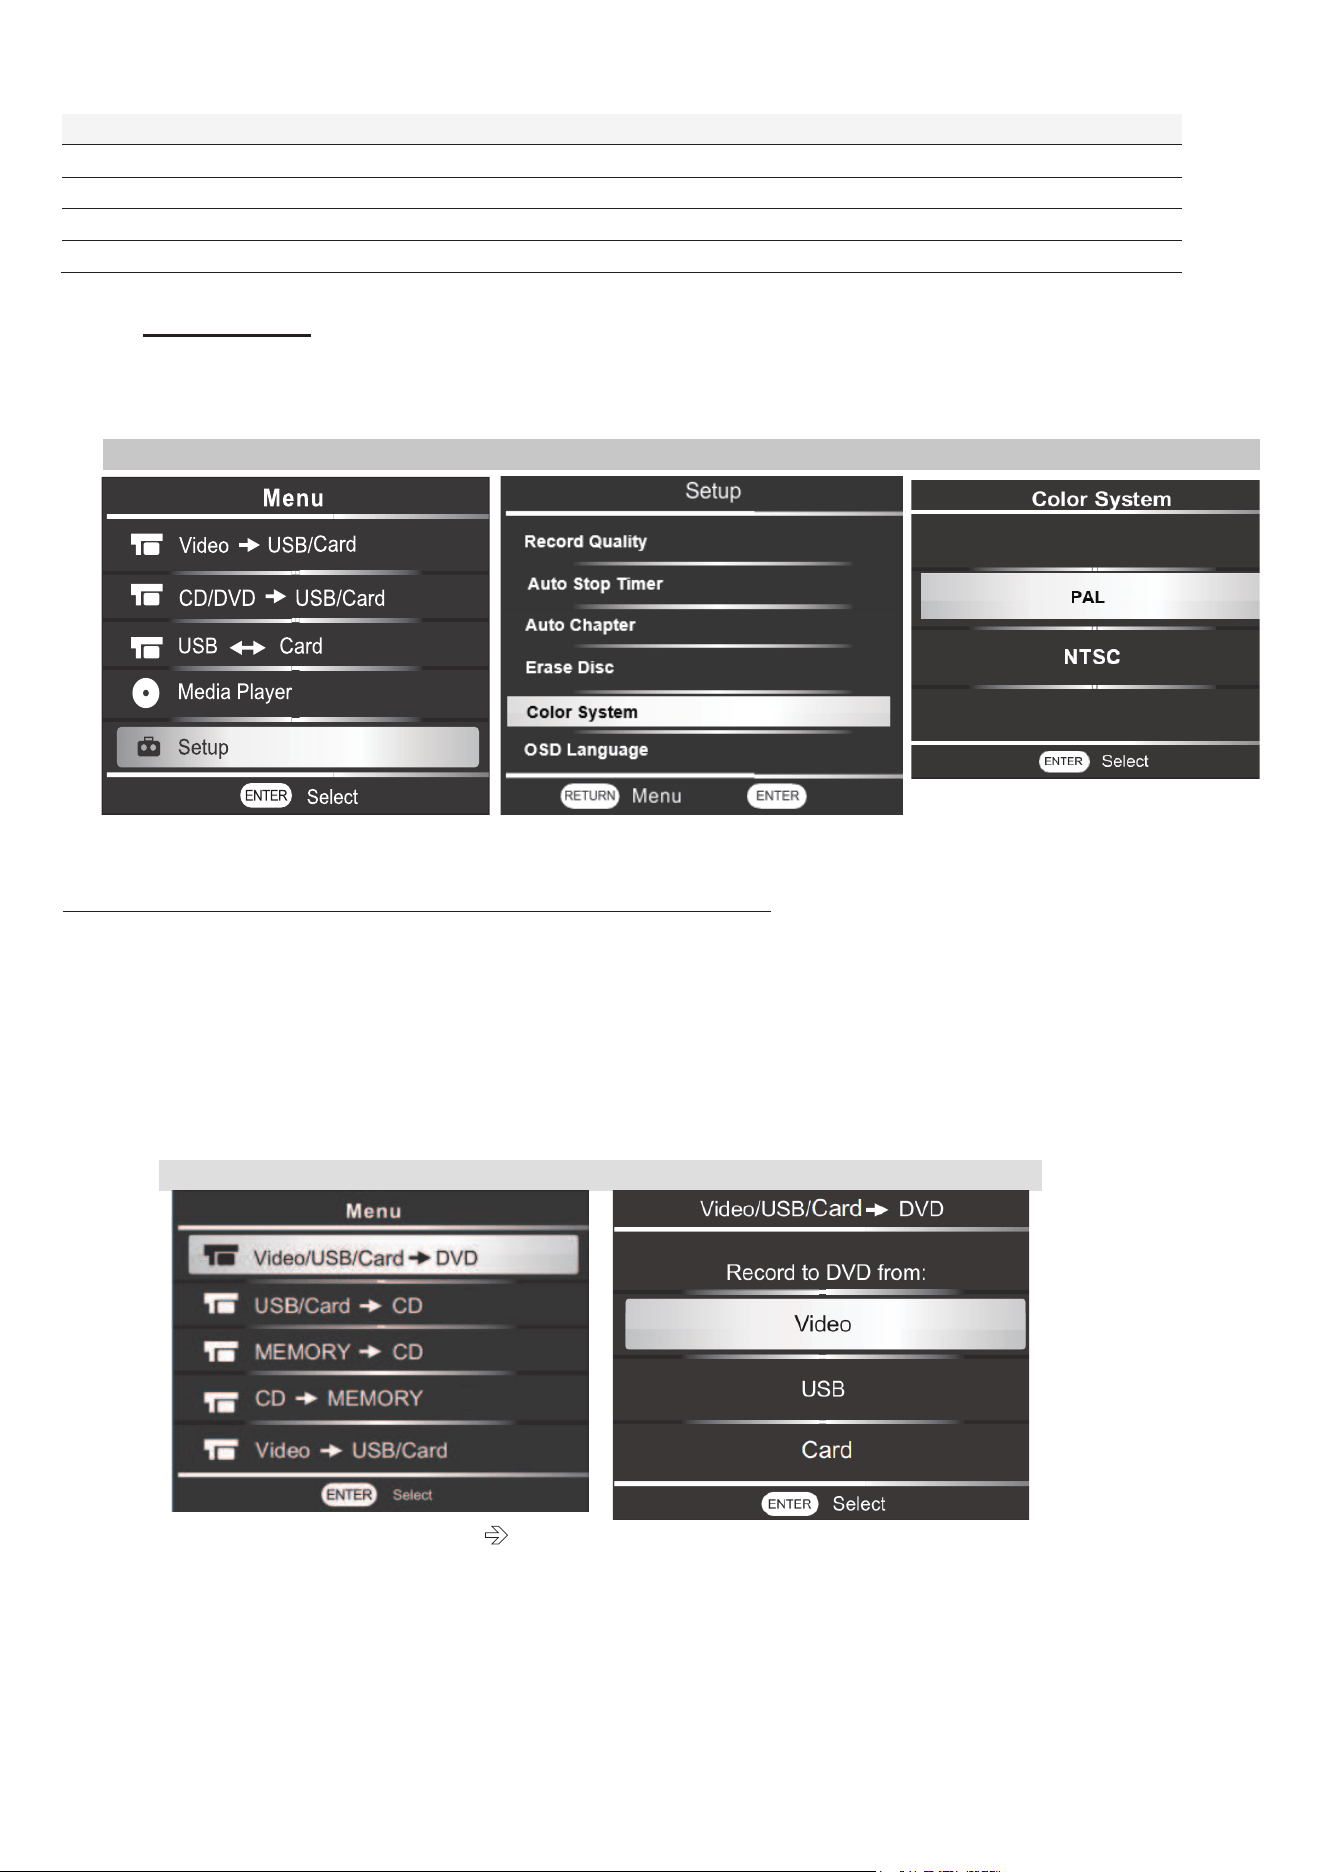
f. Color system
NTSC and PAL are both color encoding systems for analog televisions
- PAL = suitable for European countries
- NTSC= suitable for United states, Japan
1
2
3
Choose Setup on main menu
Choose ‘Color System’.
Note : if you change this setting, please restart the recorder.
After all is setting up, you can now start the recoding video by following steps:
1- Connect the AV cable from Video Source device to Media Recorder. Make sure that you
respect the color coding of cable to each end of devices and the video is ready for recording.
2- Insert a blank DVD disc into DVD ROM, wait 15 seconds to allow the recorder to read the disc.
3- Then follow the steps as shown on below photos.
1
2
Choose ‘Vidéo/USB/Card DVD’
Choose ‘Video’
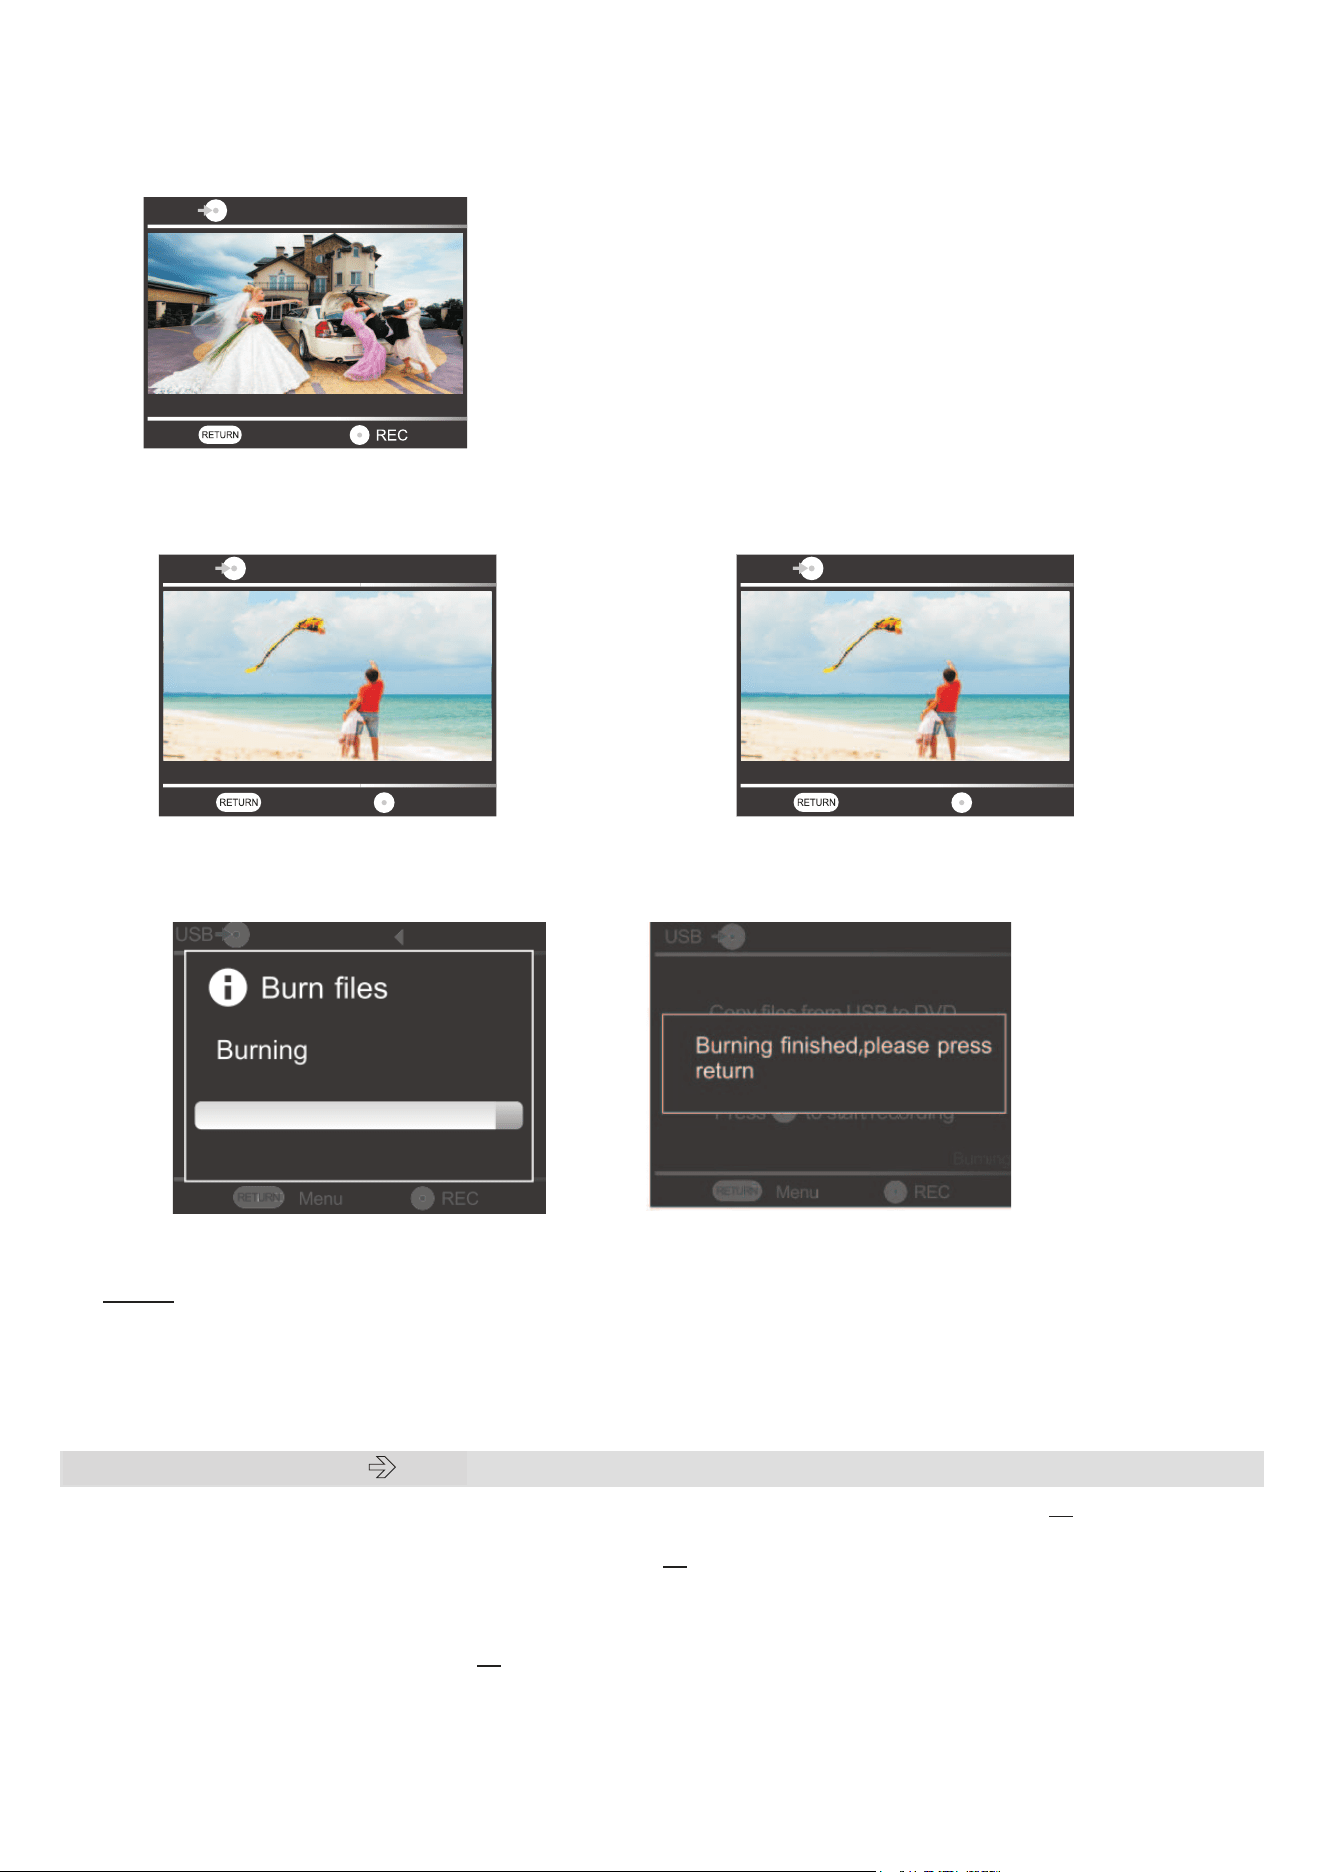
4- Now the image of video source device will be doubling on recorder’s screen. You can watch
the video while recording and below information will be shown on screen:
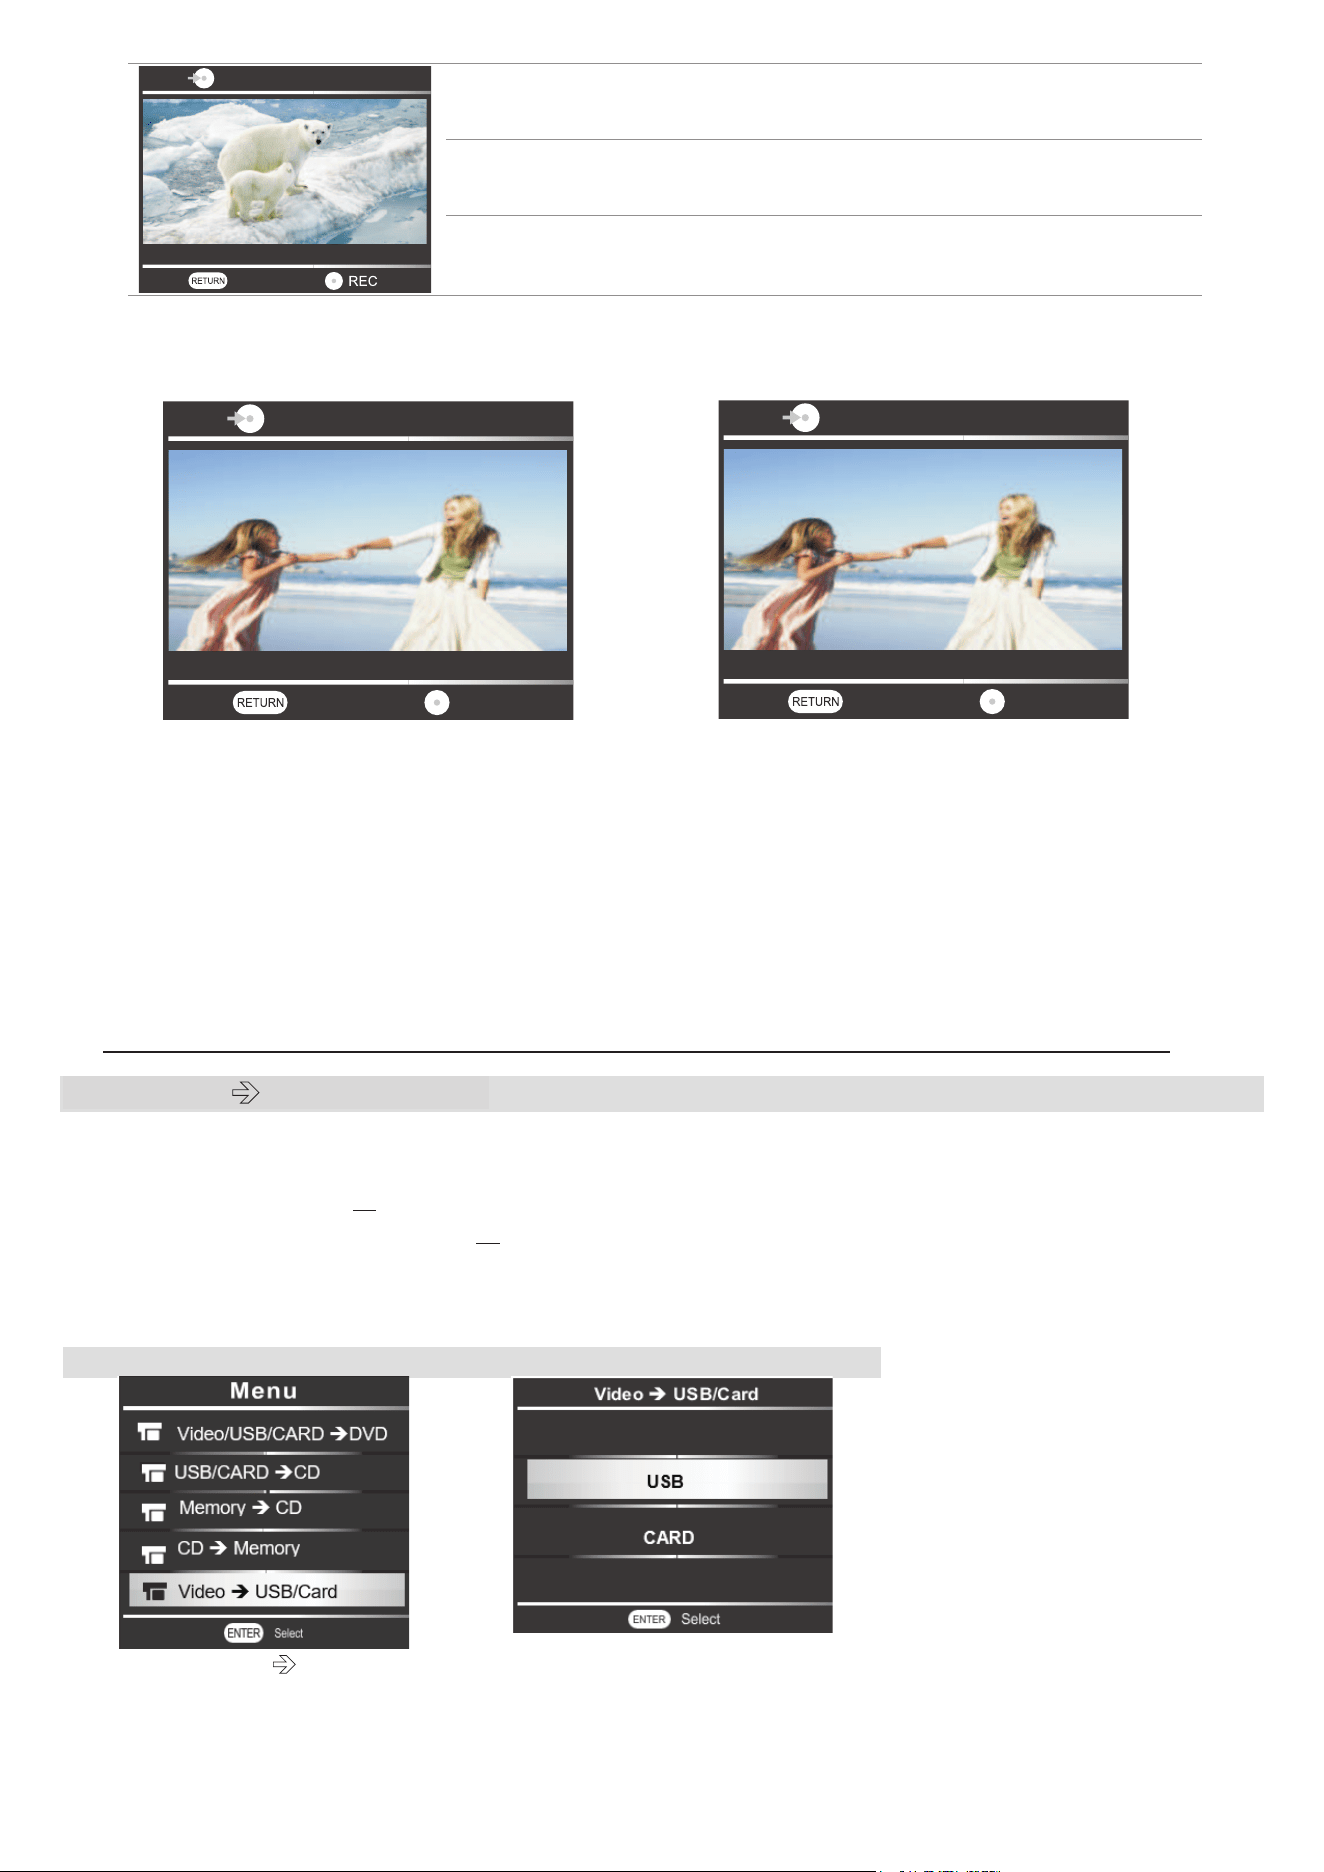
8
On the top left side: Recording type: Video DVD
On the bottom left side:
Recording quality: HQ, HSP …
On the bottom right
side:
Time remaining
5- Press [REC] button to start recording.
To skip a part of video during the recording, press [REC] to pause, then press [REC] again to
continue.
To stop the recording, press [STOP] button. If an Auto-stop timer has been set, the recording
will stop automatically at preset time. Then burning will start automatically.
A message ‘burning ,wait for CD pop up’ will appear on the right bottom side of recorder’s
screen.
Once burning is finished, the disc will be automatically ejected.
6- When disc is ejected, press repeatedly [RETURN] button to back to main menu.
Note : If an Auto-chapter has been set
, chapters will be created with interval time selected.
2.2 Video USB or SD Card
Before recording, make sure the capacity of USB or SD card is big enough for recording.
1- Prepare the USB or SD card and video source device.
2- Plug the USB into USB port or insert the SD card into card slot.
3- Connect the AV cable from Video Source device to Recorder.
Make sure that you respect the color coding of cable to each end of device and the video is
ready for recording. Then follow the steps as shown below:
1
2
Choose ‘ Video
USB/Card’
*If you choose to record the video to
a SD card, choose CARD here
Video
Low Quality
Remaining 01:16:06
Menu
Video
Low Quality
Menu
Continue
Recording 01:16:06
Video
Low Quality
Menu
Pause
Recording 01:16:06
9
4- Now the image of video source device will be doubling on recorder’s screen. You can watch
the video while recording and below information will be shown on screen:
On the top left side: Recording type: Video DVD
On the bottom left side: Recording quality: HQ, HSP …
On the bottom right side: Time remaining
5- Press [REC] button to start recording.
To skip a part of video during the recording, press [REC] to pause, then press [REC] again to
continue.
To stop the recording, press the [STOP] button. If an Auto-stop timer has been set, the
recording will stop automatically at preset time. Then burning will start automatically.
6- Press [RETURN] repeatedly to back to main menu.
Note :
- If an Auto-chapter has been set, chapters will be created with interval time selected.
- Video recorded will be saved in ‘‘MT-ROOT/Record’’ which created automatically
during recording in USB or SD Card.
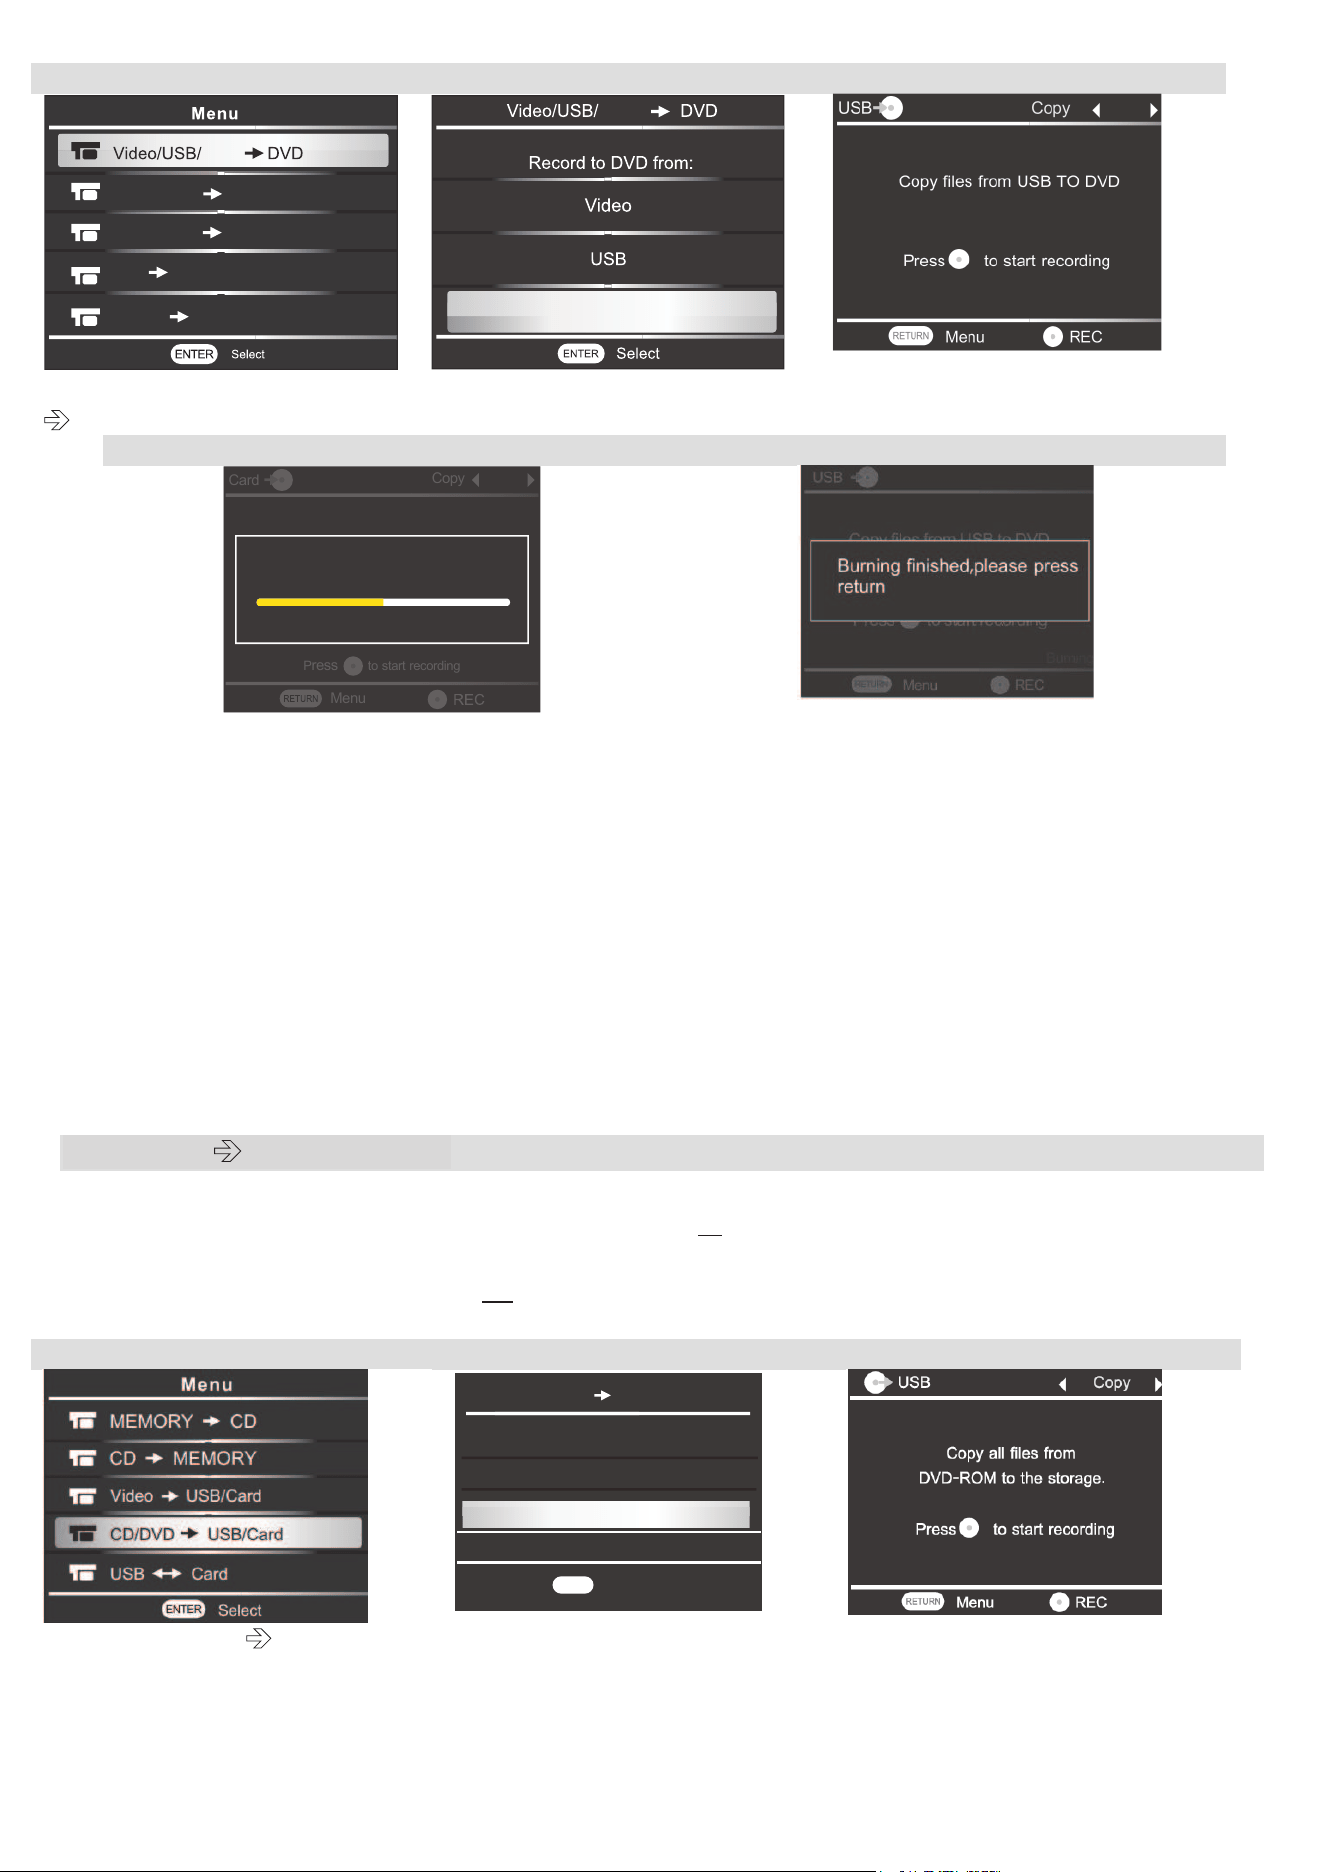
2.3 USB or SD card DVD
Before recording, make sure that DVD capacity is big enough for all file on USB or SD card.
1- Put the media files you wish to burn in USB or SD Card
2- Insert a DVD+R or DVD-RW disc into DVD ROM, wait 15 seconds to allow the recorder to
read the disc.
3- Plug the USB into USB port or insert the SD Card to card slot.
4- Then follow the steps as shown below:
Low Quality
Remaining 01:16:06
Menu
Video USB
Low Quality
Recording 01:16:06
Menu
Video USB
Pause
Low Quality
Recording 01:16:06
Menu
Video USB
Continue
10
1
2
3
Chooe ‘Video/USB/Card
DVD’
*If you record from a SD card,
please choose CARD
Press the [REC] button to start
recording
4
5
When burning is finished, the disc will be
automatically ejected.
5- Remove the disc, close the DVD ROM, then press repeatedly the [RETURN] button to back
the main menu.
*Saving Path on DVD: /mnt/cdrom
Note:
- If the space of DVD-RW disc isn’t fully used during the 1
st
recording, you can add others
new content into the same discs by following upward steps, the existing files WILL NOT
be covered / deleted.
- The content in USB or SD card will be fully copied to DVD. Make sure that each time,
the total size of content won’t exceed t
he capacity of DVD disc.
2.4 DVD USB / SD Card
Before recording, make sure that USB or SD card capacity is big enough for all file from DVD.
1- Prepare the DVD you wish to record and USB or SD card
2- Insert the DVD into DVD rom, wait for 15 seconds to allow the recorder to read the disc.
3- Plug the USB into USB port or insert the SD Card into card slot. Then follow the steps as
shown below:
1
2
3
Chooe ‘CD/DVD DVD’
*If you choose to copy to a SD
Card, choose CARD
Press the [REC] button to start
recording
USB/Card CD
MEMORY CD
CD MEMORY
Card
Video USB/Card
Card
Card
Card
Copy
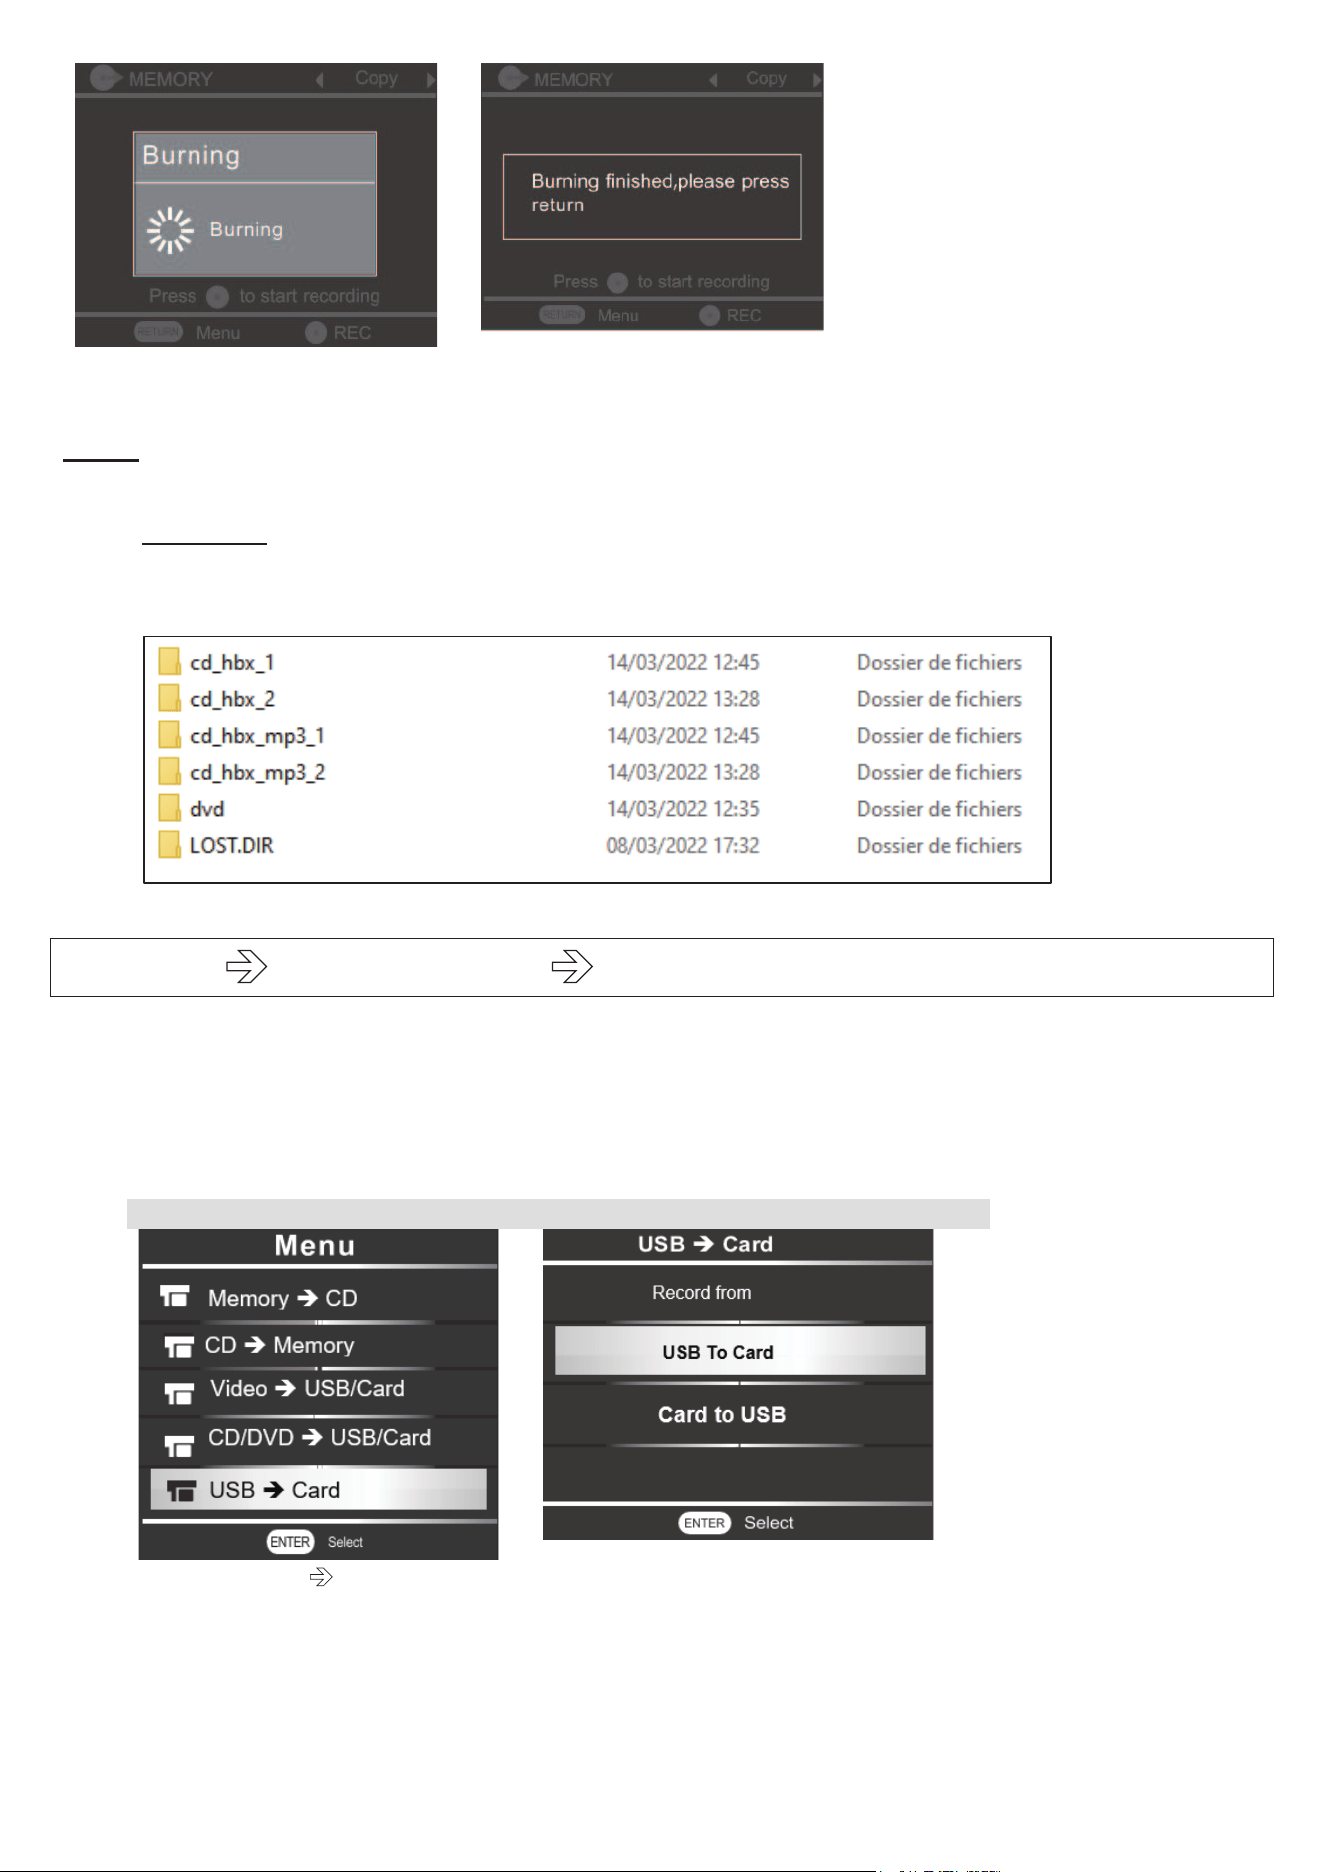
Press
to start recording
Menu
Burning
50%
50/100
Select
ENTER
CD/DVD USB/Card
ENTER
Select
Record from CD/DVD to:
Card
USB
11
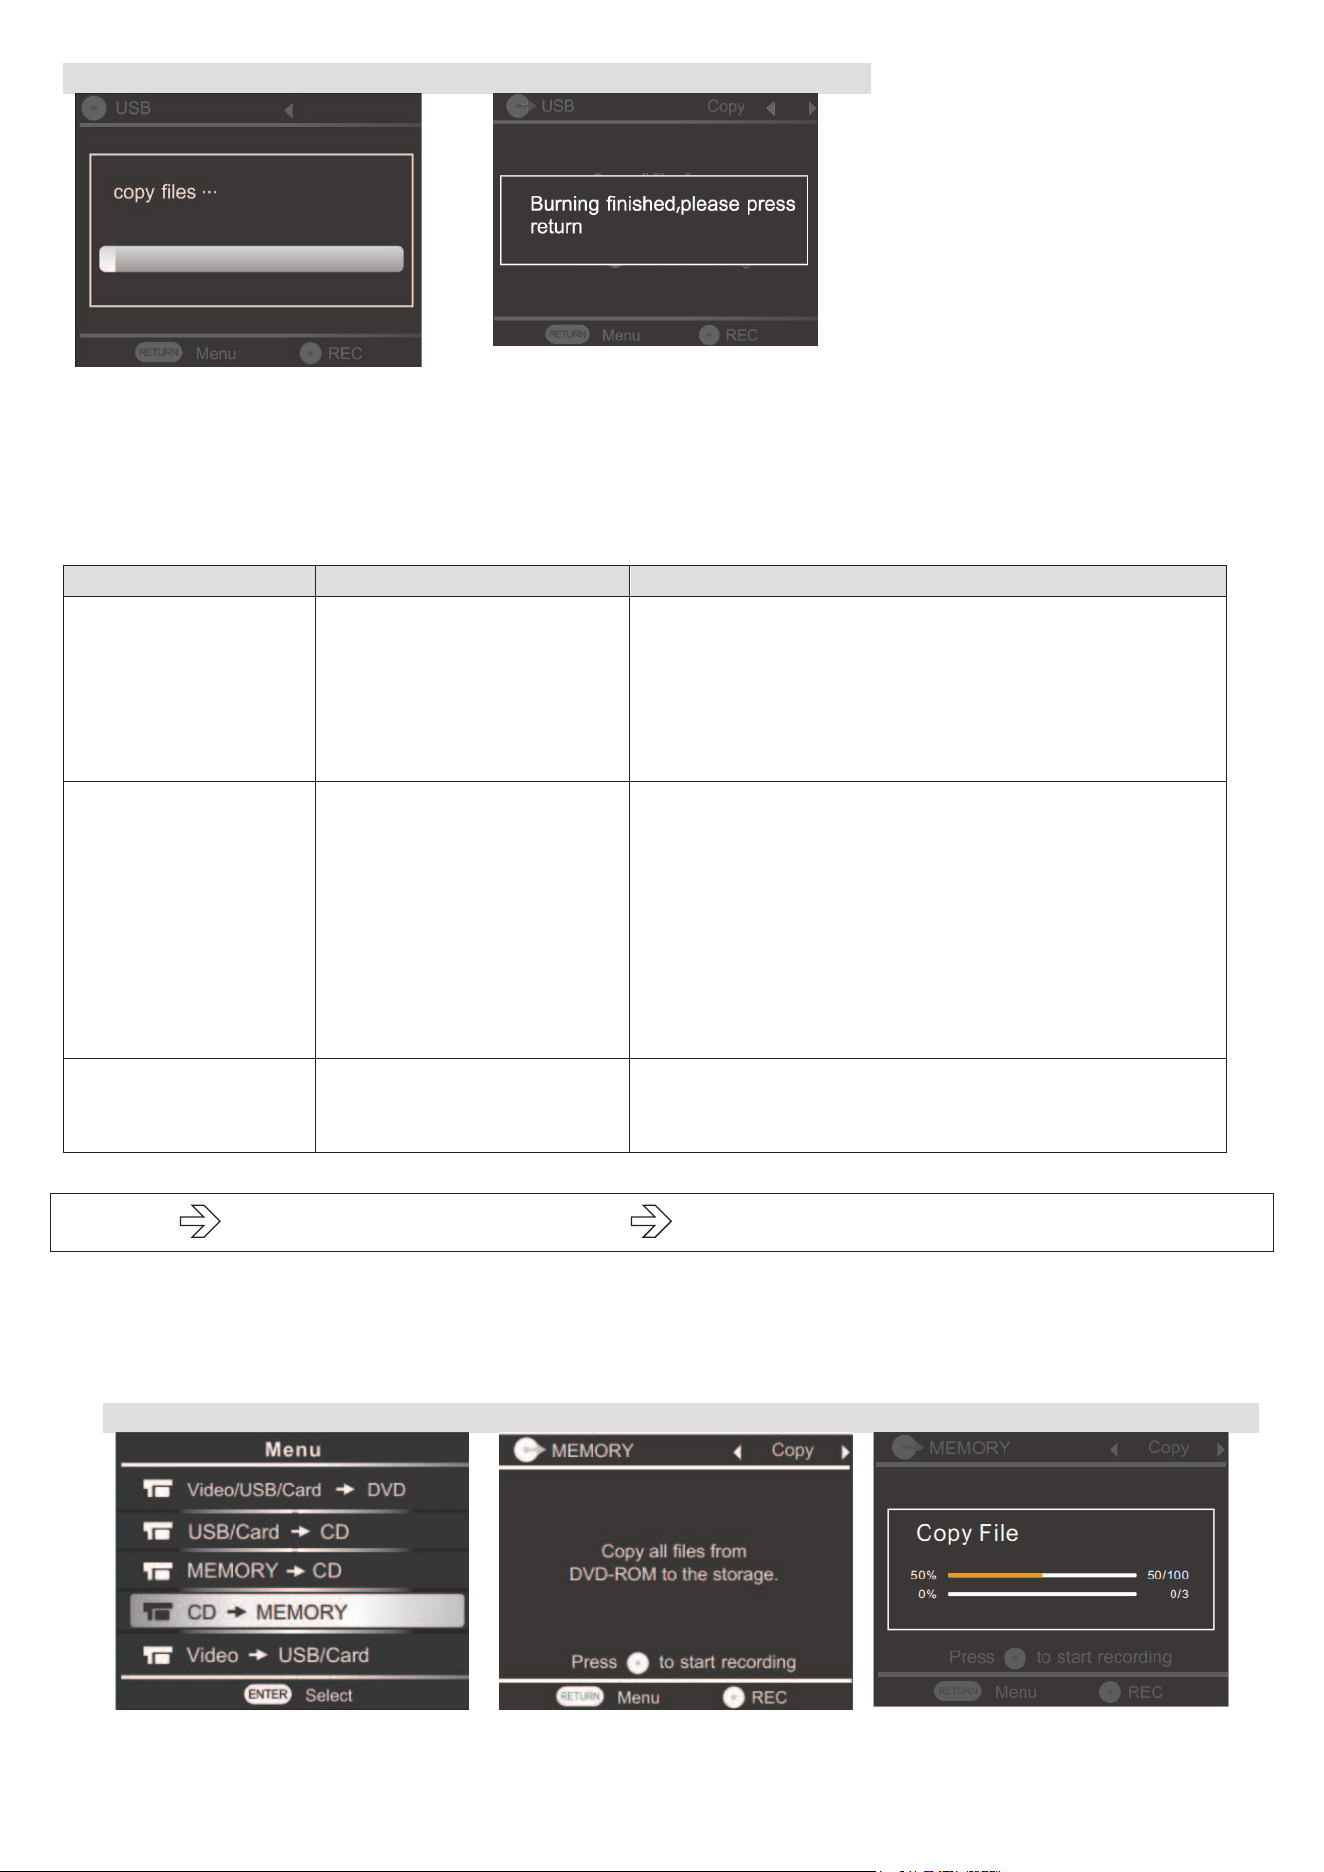
4
5
4- Once the burning is finished, press repeatedly [RETURN] to back to the main menu.
5- If the original DVD has chapters, the chapters will be copied as it was in the original DVD.
*Saving path on USB: / 8_4/video_ts
*Saving path on SD card : /dvd/video_ts
Note: Errors messages
Error message
Description
Solution
No storage
Disc/USB/SD Card not
found
For disc: sort out the DVD/CD, and insert
again, then wait for 15 seconds. If error appears
again, please change a new disc.
For USB/SD card: make sure the USB or SD
card is well plugged or insert, If error appears
again, please change a new one.
AV is not ready
Or
USB is not ready
Or
Card is note ready
AV signal source / USB
is not correctly
connected
SD card is not correctly
insert or fully insert
Unplug the AV or USB, then plug again. Pay
attention to AUDIO IN and AUDIO out for AV
function.
Take the SD card out from card slot, insert
again correctly or fully.
Change the USB or SD card if error message
appears serval times.
Not enough space
Size of Content you
wish to burn exceed the
DVD’s capacity
Lower the quality of files or change a larger
capacity disc.
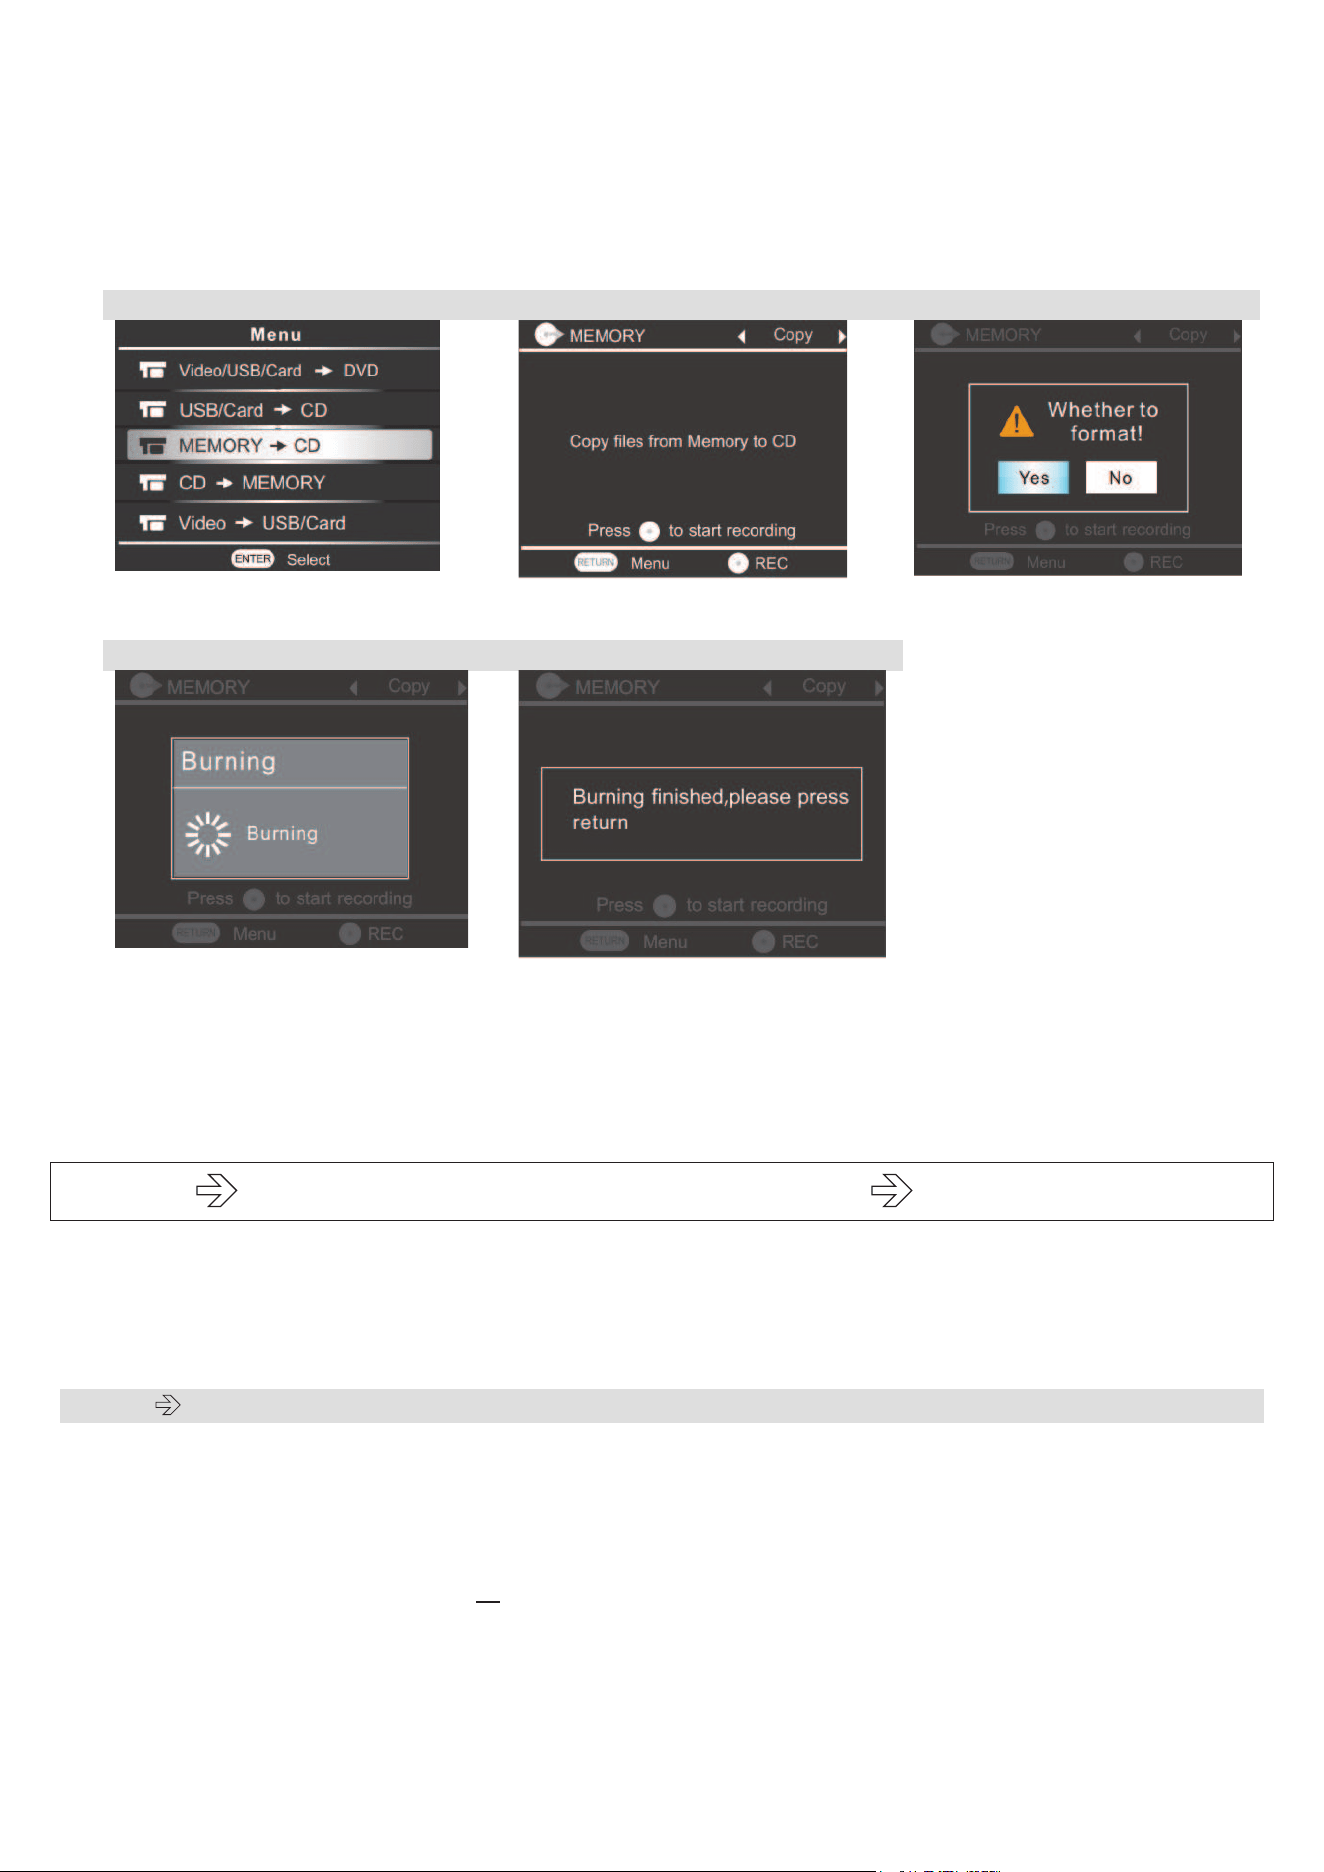
III.CDMemory + Memory CD
This function allows to user to copy the content from a CD to another CD-R or CD-RW.
1- Prepare the CD to record and a blank CD.
2- Insert the CD to record into DVD ROM
3- Follow the steps as shown below:
1
2
3
12
4- Once the copy is finish, ‘copy finish’ message appears, press repeatedly [RETURN] to back
to main menu, press [EJECT] button to sort out the CD.
The content of CD is saved temporary into the internal storage.
5- Place a new blank CD-R or CD-RW into DVD ROM and wait 15 seconds till the recorder reads
the CD, then follow the steps as below:
1
2
3
choose YES by pressing
[ENTER] button
4
5
6- Once the burning is finished, the CD will be automatically ejected, press repeatedly [RETURN]
to back to main menu.
Note:
- Content saved into internal storage can be burnt several times to different CDs
- When you burn new files to internal storage, previous files will be covered.
IV. CD
USB/SD Card + USB/SD Card CD
This function allows users to
- copy the content from a CD to a USB or SD card
- copy the content from a CD to USB/SD card, then copy the content from USB/SD card
to a CD.
4.1 CD USB or SD card
Before recording, make sure the capacity of USB or SD Card is bigger than the CD.
1- Prepare the CD to record and USB or SD card
2- Insert the CD into DVD-Rom and wait 15 seconds till the recorder reads the CD.
3- Plug the USB into USB port or insert the SD card to card slot, then follow the steps as shown
below

13
1
2
3
Choose ‘CD/DVD USB/Card’
*If you choos to copy the CD to
a SD card, choose CARD
4
5
4- Then press repeatedly [RETURN] to back to main menu.
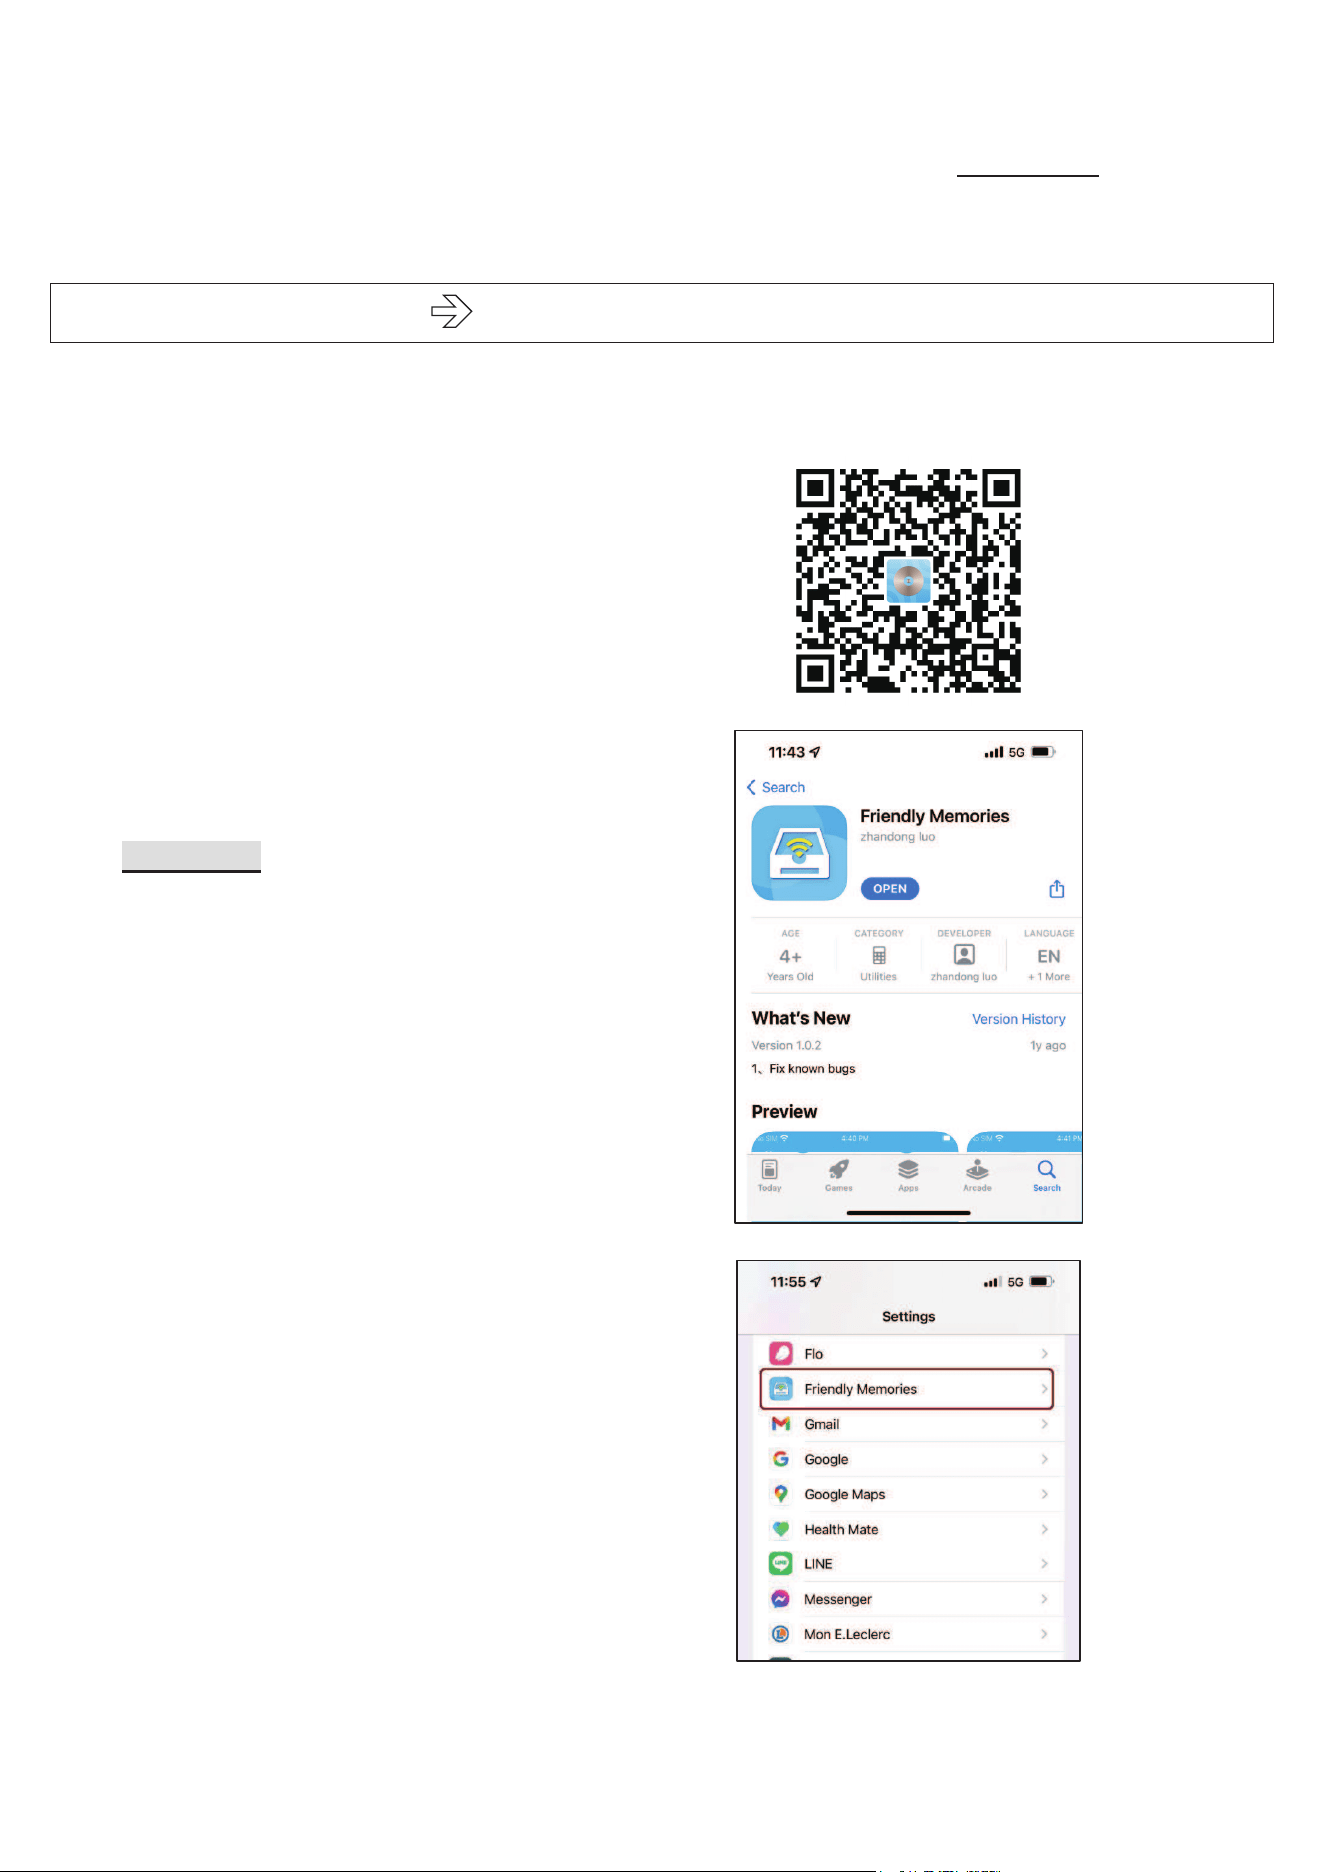
Note: When you copy a CD to a USB or SD card, 2 formats of music will be created: .mp3 and .wav.
*saving path : /cd_hbx_1 =.wav format
/cd_hbx_mp3_1 = mp3 format
4.2 USB / SD a New CD
Before recording,
- Make sure the content in USB or SD card is copied from an original CD by following
steps above.
- Make sure that capacity of CD-R or CD-RW is big enough for storing all music files in
USB or SD Card.
1- Plug in the USB into USB port or insert the SD card from card slot.
2- Insert a blank CD-R or CD-RW into DVD-Rom and wait 15 seconds till the recorder reads the
CD. Then follow the steps as shown below
1
2
3
If you choose to copy from a SD
card to CD, please choose CARD
here
14
3- Once the burning is finished, the CD will be automatically ejected, press repeatedly [RETURN]
to back to main menu.
Note :
- When you copy the CD to USB or SD Card, both .mp3 and .wav formats will be created, but
only .WAV format will be copied to the new CD-R.
- It’s possible to copy several CDs into a USB or SD card, files’ name will be created as
cd_hbx_1, cd_hbx_2 as below photos
But only the first CD (cd_hbx_1) copied will be burnt to the new CD
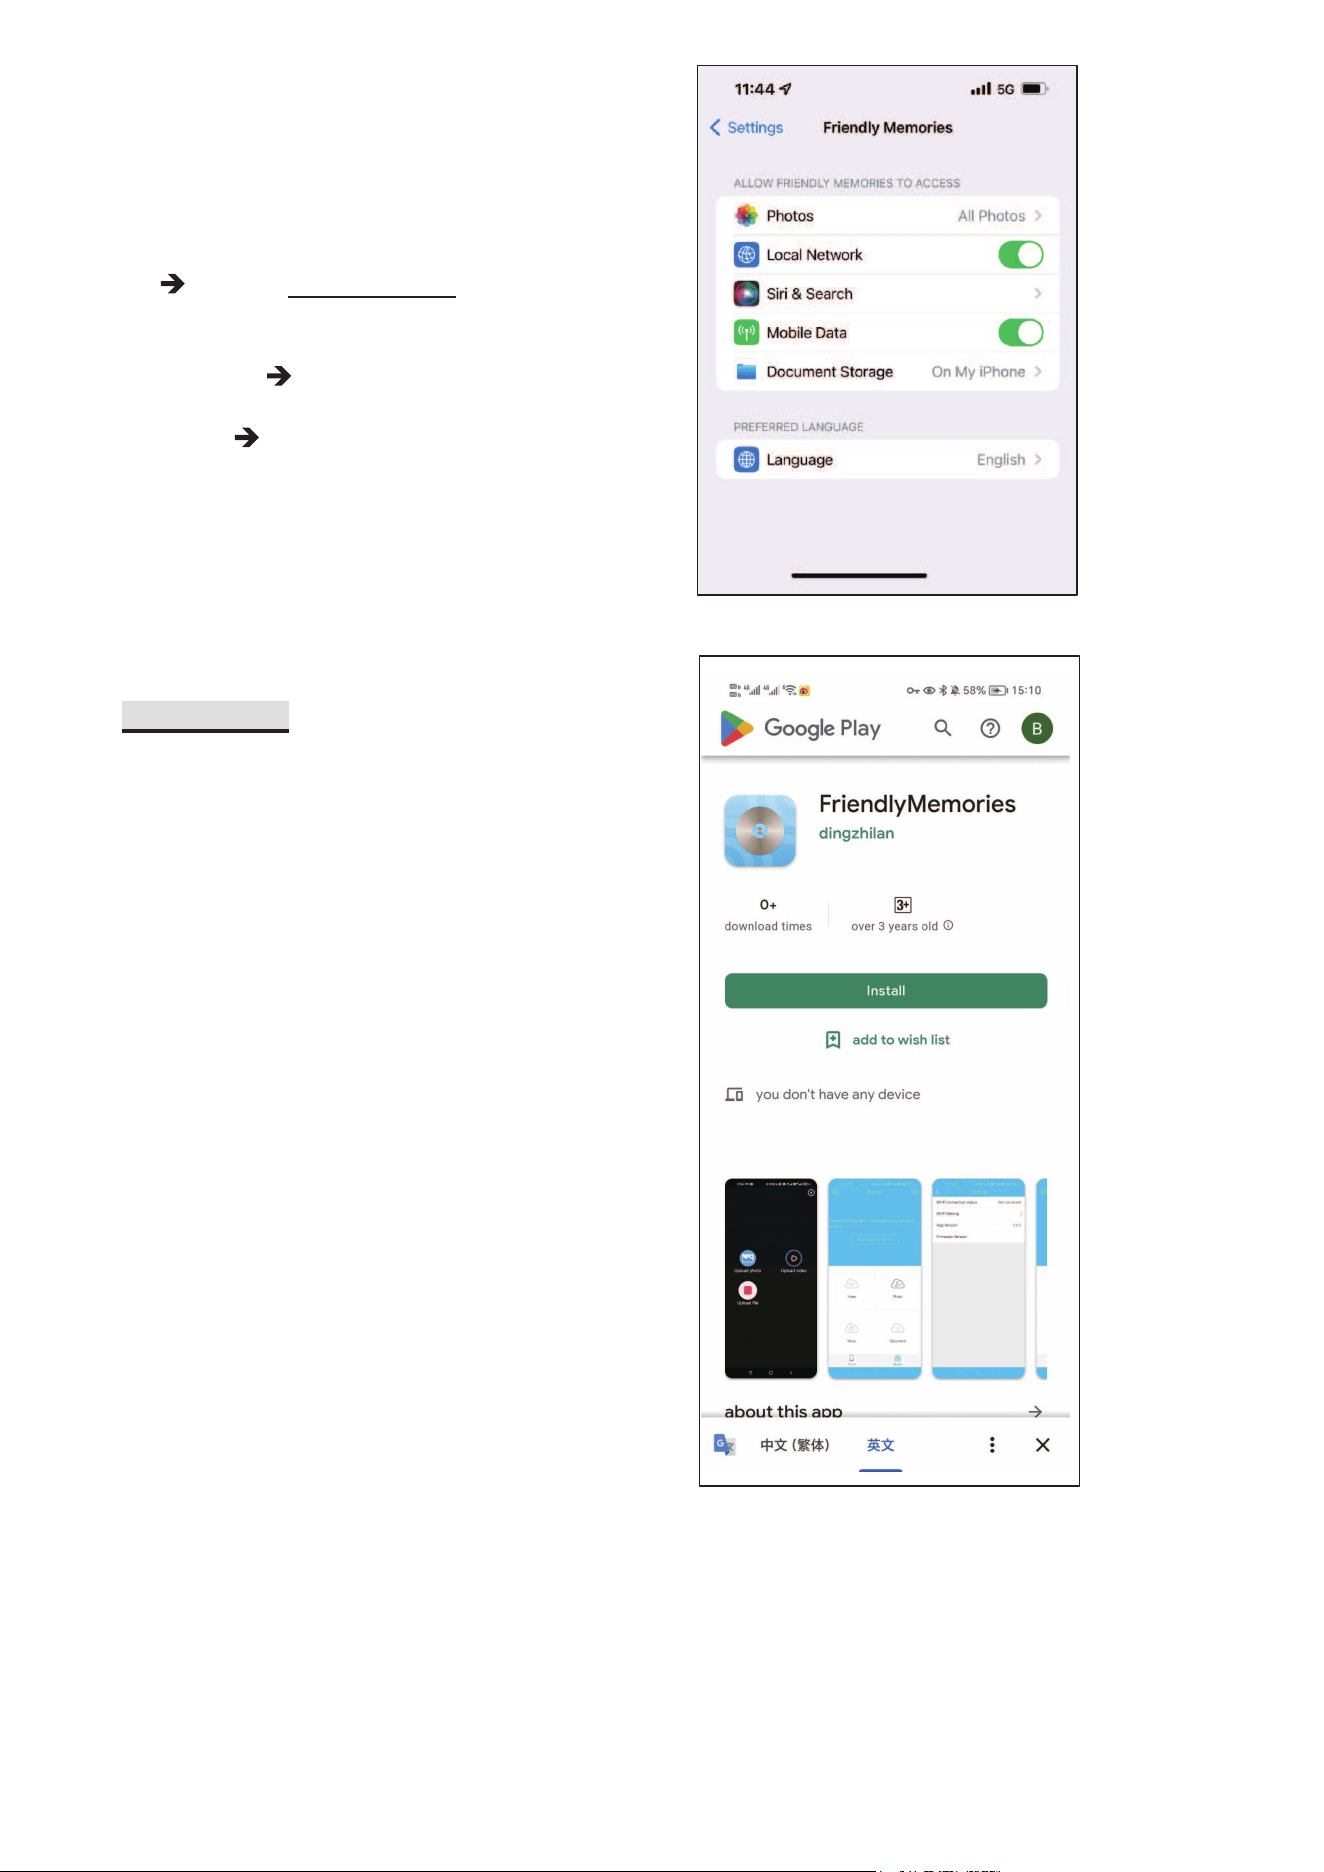
V. USB
Card + Card USB
1. Put the files you wish to copy into USB or SD card.
2. Prepare
- SD Card if you copy from USB
- Or USB if you copy from SD card.
3. Insert in the USB and the SD card. And follow the steps shown as below:
1
2
Choose ‘USB
Card’ from main
menu
Choose’ Card To USB ‘here if you
wish to copy files from SD card to
USB.
4. A message ‘copy all files from USB to CARD’ or ‘Copy all files from Card to USB’ will
appears
15
5. Press [REC] button to start recording
6. Message ‘Burning finished, please press [RETUN]’ will appear when the copy is finished.
Note: Transfer between USB and SD card, maximum total size allowed for one transfer is 64GB, if
total size of files exceeds 64GB, please spile the files and make several transfers.
VI. Mobile phone USB / Card /DVD via Wifi
This function allows users to transfer files from mobile phone to USB or SD card or DVD disc.
6.1App download
For Apple user
Go to SETTING on your phone, find the
‘FriendlyMemory’ application
Then enter
a) Please scan the QR code, you can download
app from app store directly.
16
APP access setting
Photo
choose ALL PHOTOS to allow
application to access your phone photo album
Local Network
ON
Mobile Data
on
For Android user
o
nce the downloading is finished, choose ‘open’ the download file for installing.
An alert message will be shown as below, choose ‘Setting’, then select ‘Allow app installs’
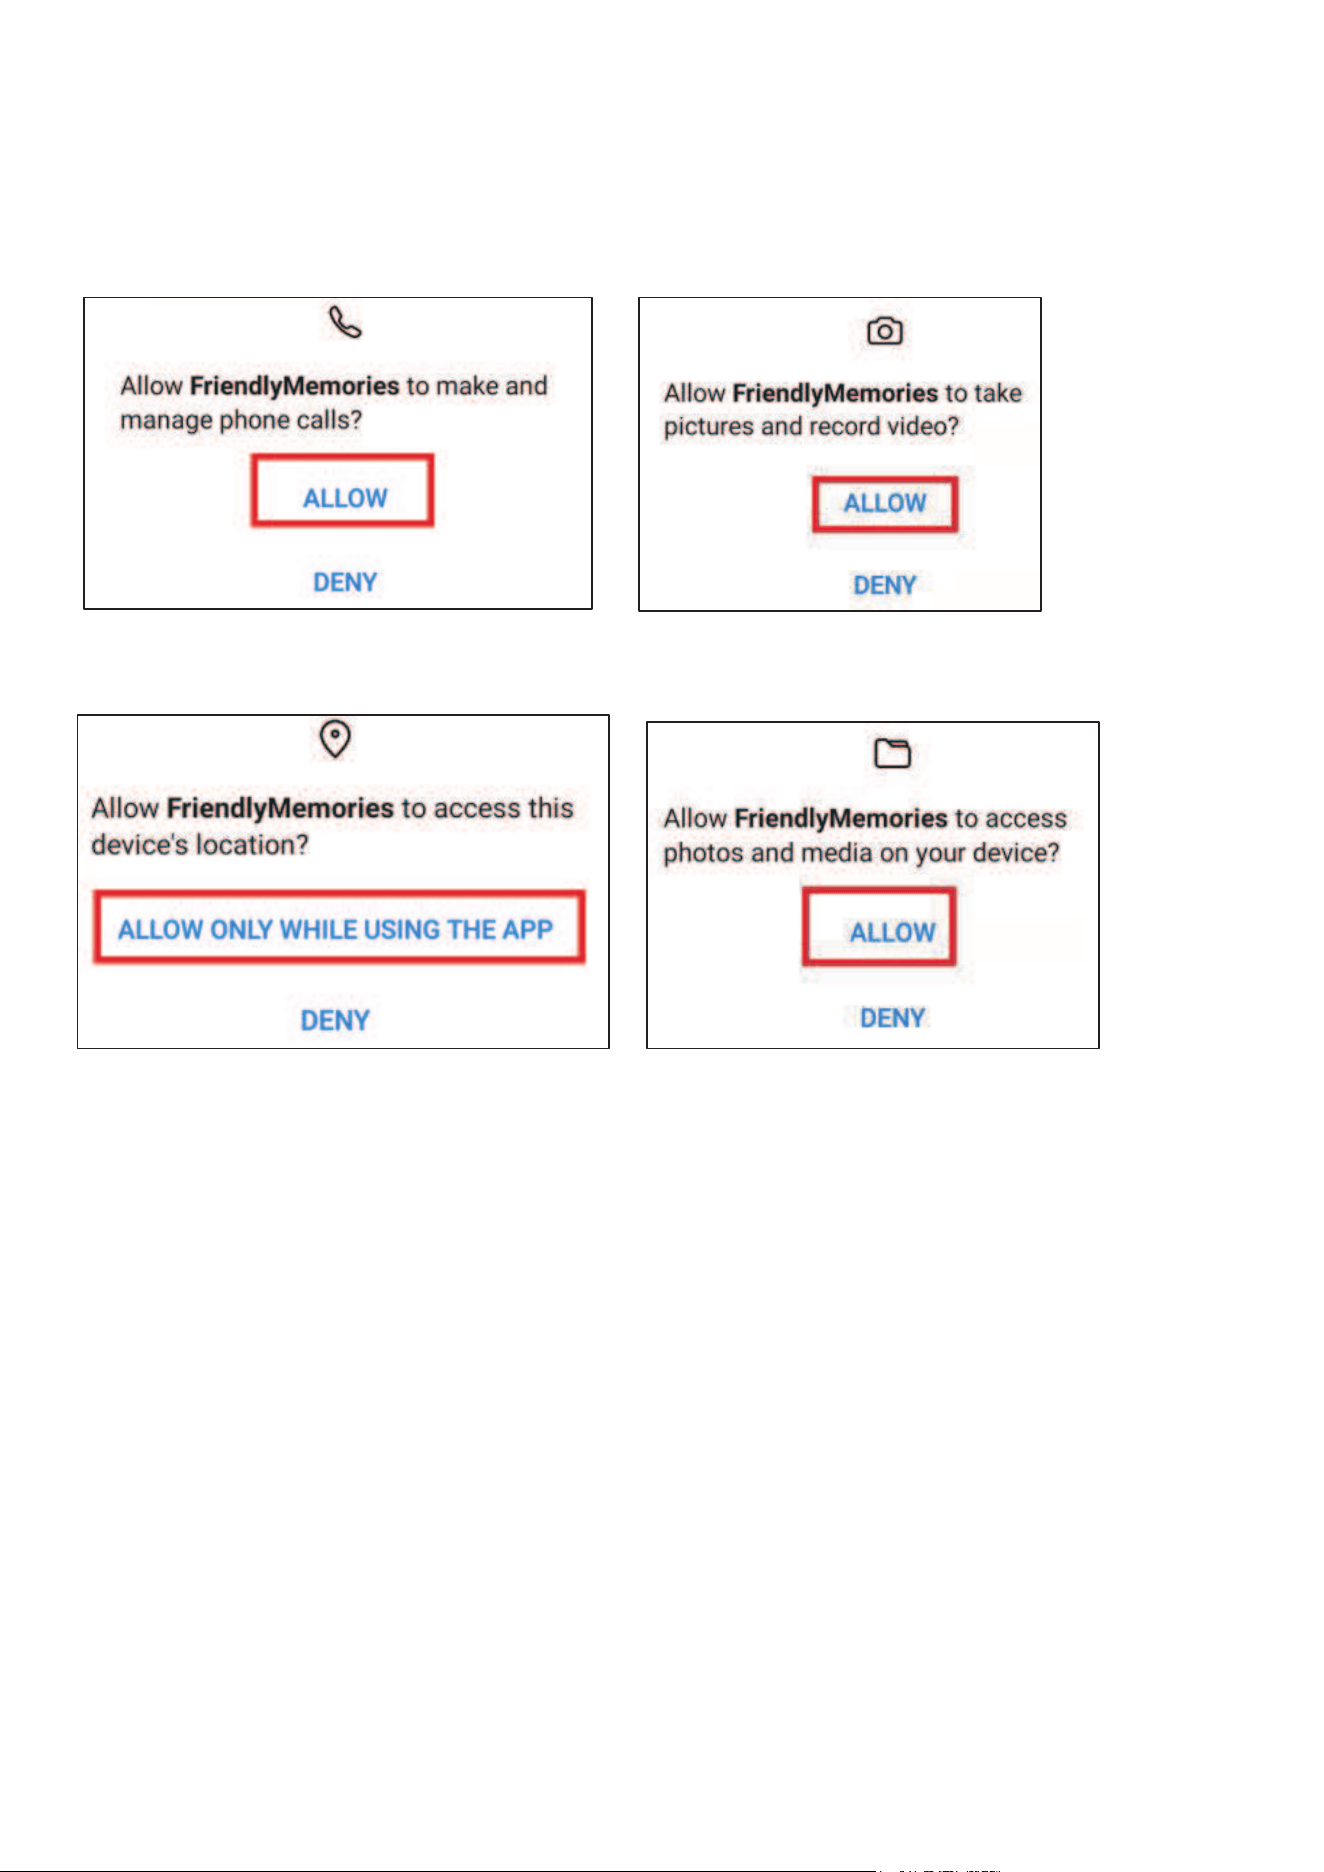
17
install the app, once the installing is finished, choose ‘OPEN’
allow acces of your phone below
And now the App is well installed.
b) Go to Apple store or google store, search" FriendlyMemories", then downlaod app.
Same setting steps as above.(When we search for the APP, we have to search it as
"FriendlyMemories" as one word and no space in between. )
18
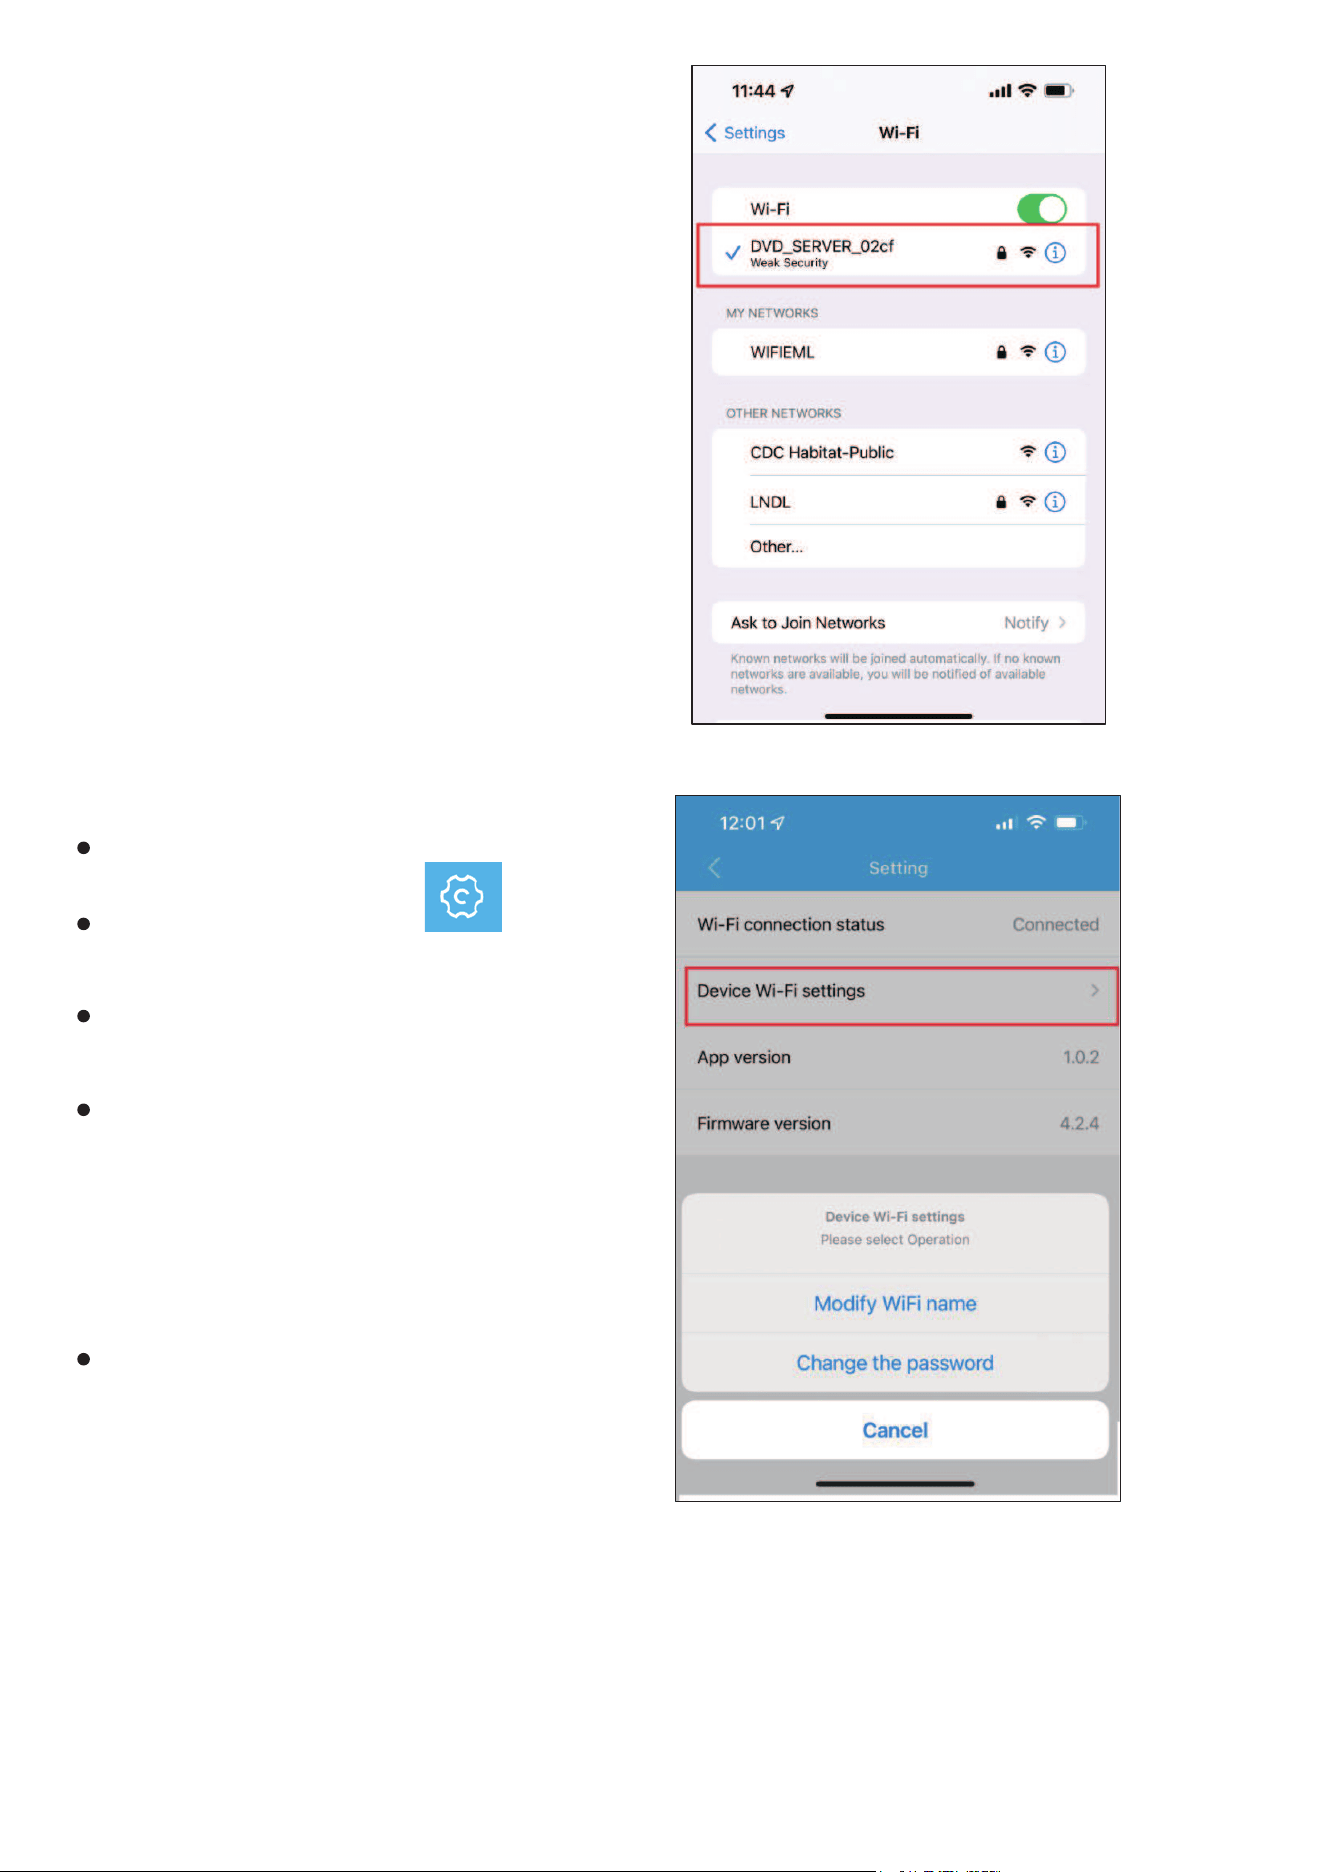
6.2 connection to recorder:
After downloading the app, go to WIFI
SETTING on your phone.
Record will create automatically a Wifi WIFI
‘DVD_SERVER_XXXX’ while it’s power on
Connect this wifi, initial password is
12345678
It’s possible to change the wifi name and
password, please see step 6.3 Friendly SD
application setting.
6.3 Friendly Memory application setting
Open the application
Click on the setting button on left top
side
On the setting menu, you can see the wifi
connection status
choose ‘Device Wifi setting’, then
- Choose Modify WIFI name to change the
recorder WIFI name
- Choose Change the password to change
the initial password.
Restart the recorder to save your
modifications
Note: If customized password is forgotten,
please resume to default setting (refer to
chapiter 1.4)
6.4 Display files on USB/SD card/DVD on App
Once the recorder WIFI is connected and setting has been done, insert a Memory card or USB or
DVD to recorder, then go on the application Friendly Memories.
<
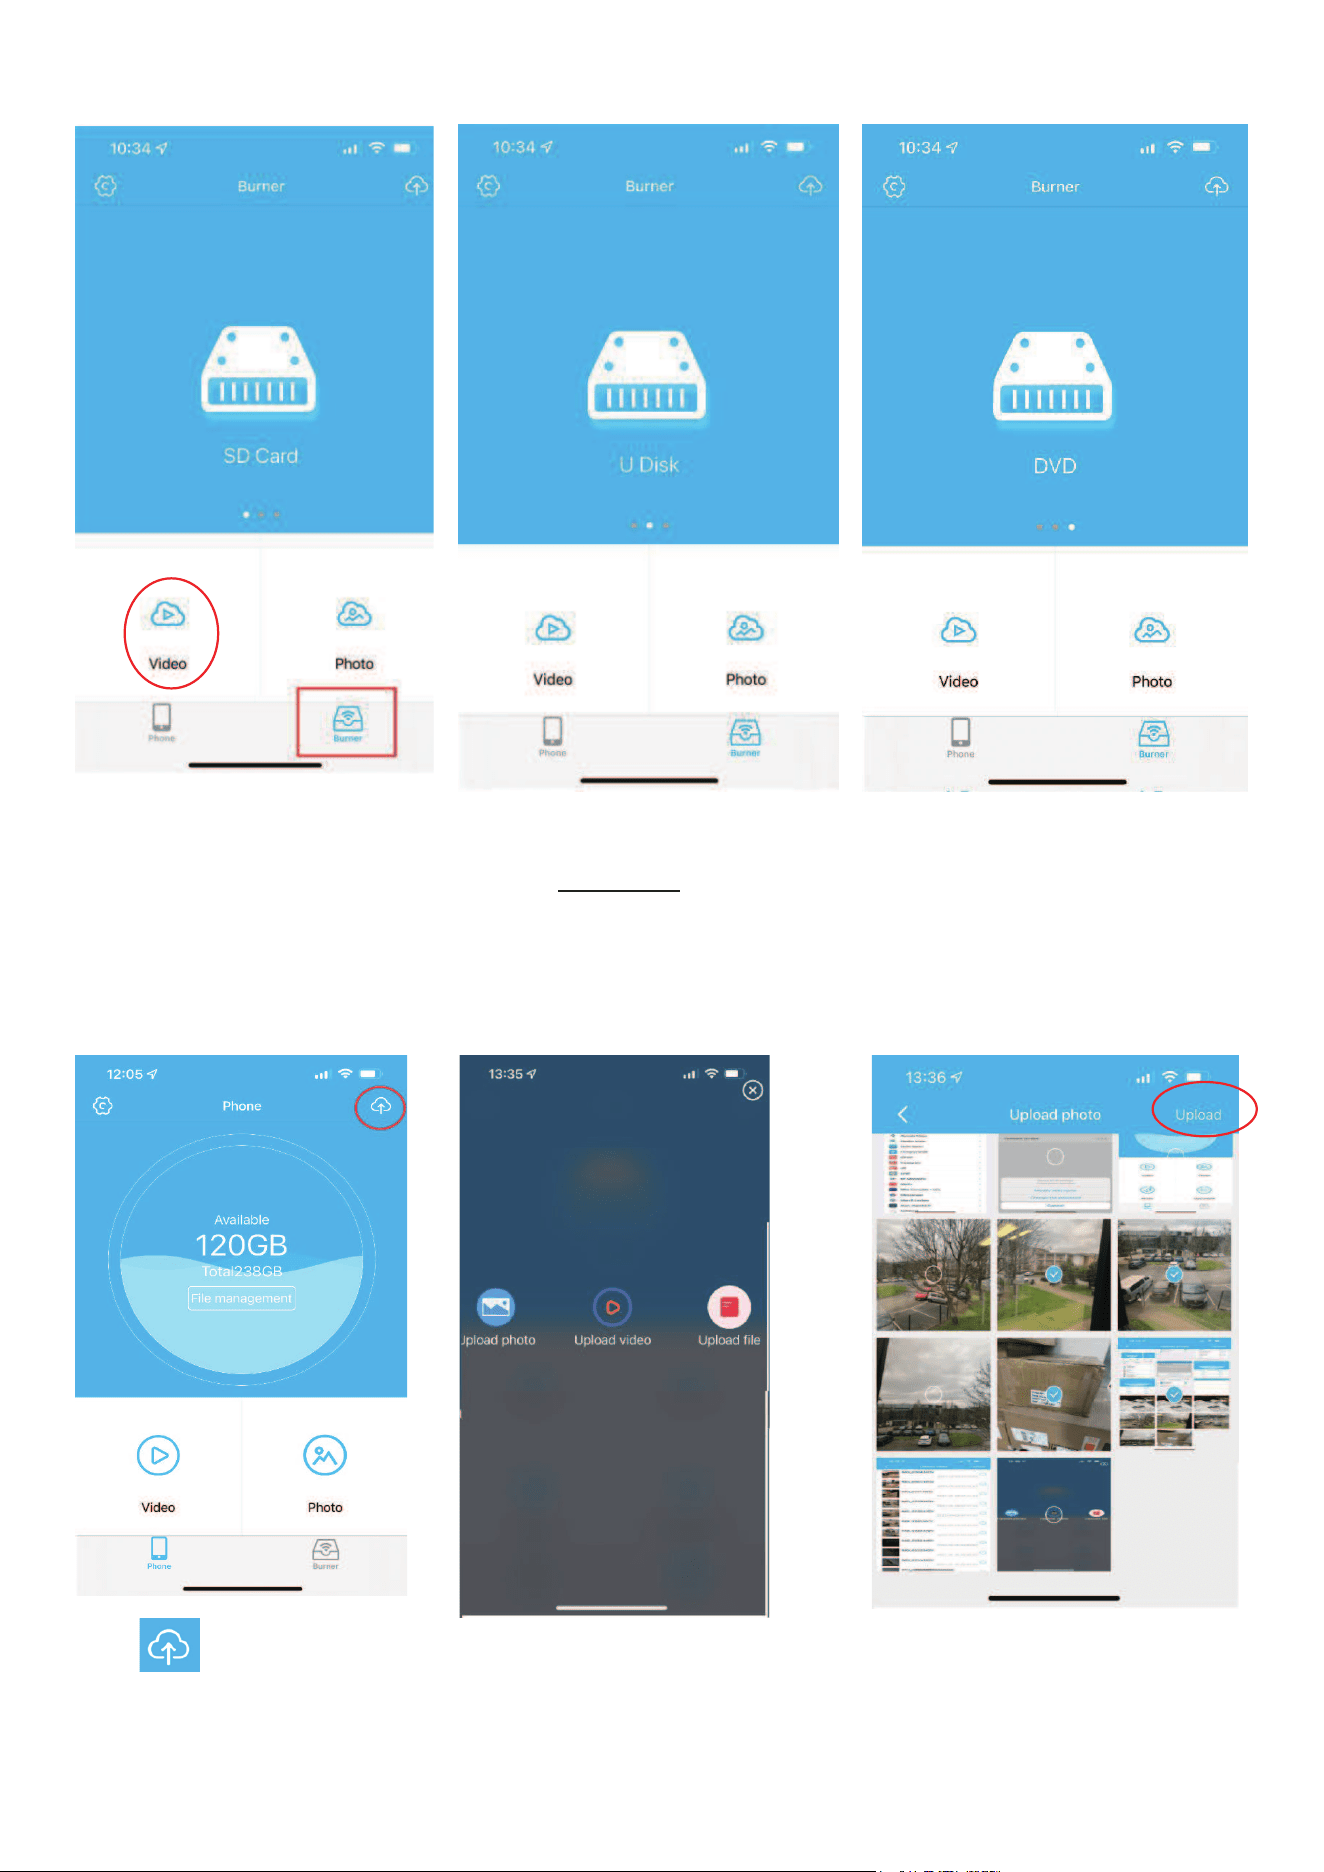
19
Choose Burner, then you can display on your phone the Video/Photo/Music/Document on the SD
Card/USB/DVD
Note:
- For the phone privacy and security, App CAN NOT display the pictures, Music, documents on your
phone.
- CD content can’t be displayed via App.
6.5 Upload the files from mobile phone to USB/SD Card / DVD
Choose Phone on the bottom.
Click on upper right
corner
Choose to upload Photo –
video – files
Selection files you wish you
copy, then click UPLOAD.
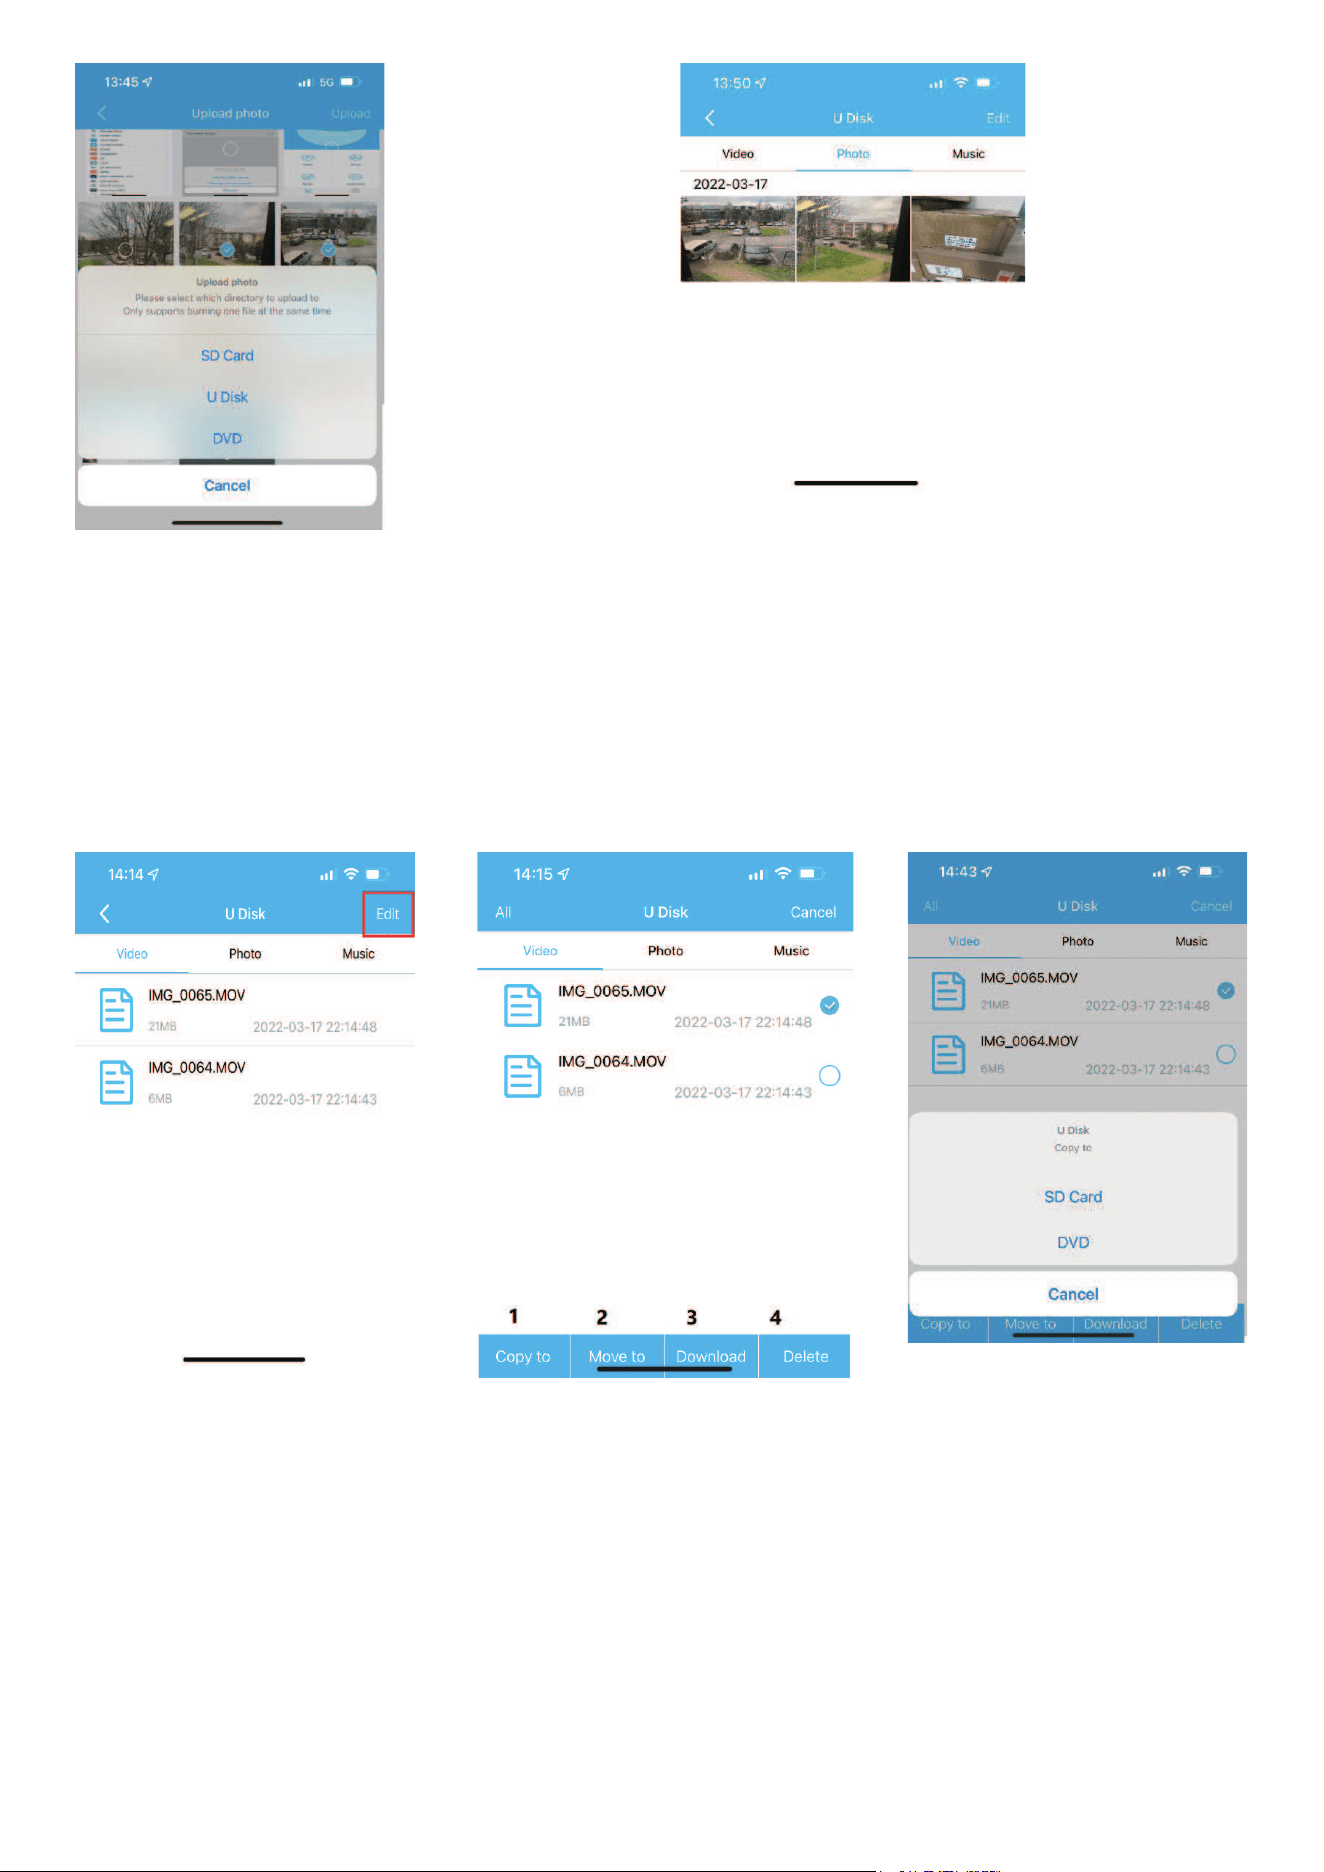
20
Select upload directory, SD
CARD, USB or DVD.
Once the upload has finished, back to the main menu of APP,
choose BURNER – select the directory you chose in previous
step, then you can see the files uploaded.
Note :
- If you upload the files from your phone device to DVD, once the burning has finished, the
DVD will be ejected automatically.
- If you wish to upload files from phone device to DVD, you can only select 1 file each time.
6.6. Transfer files between USB/SD Card /DVD
This function allows users to transfer freely and quickly the files between the storages.
Choose the directories and type
of files you wish to transfer,
then click EDIT
Select the files, then choose
1.copy to: copy to a new storage
2.Move to: move the files from one storage to another
3.Download: download the file to phone device.
4.Delete: delete the file from storage
If choose to COPY TO or MOVE TO, you have to choose the
new storage.
21
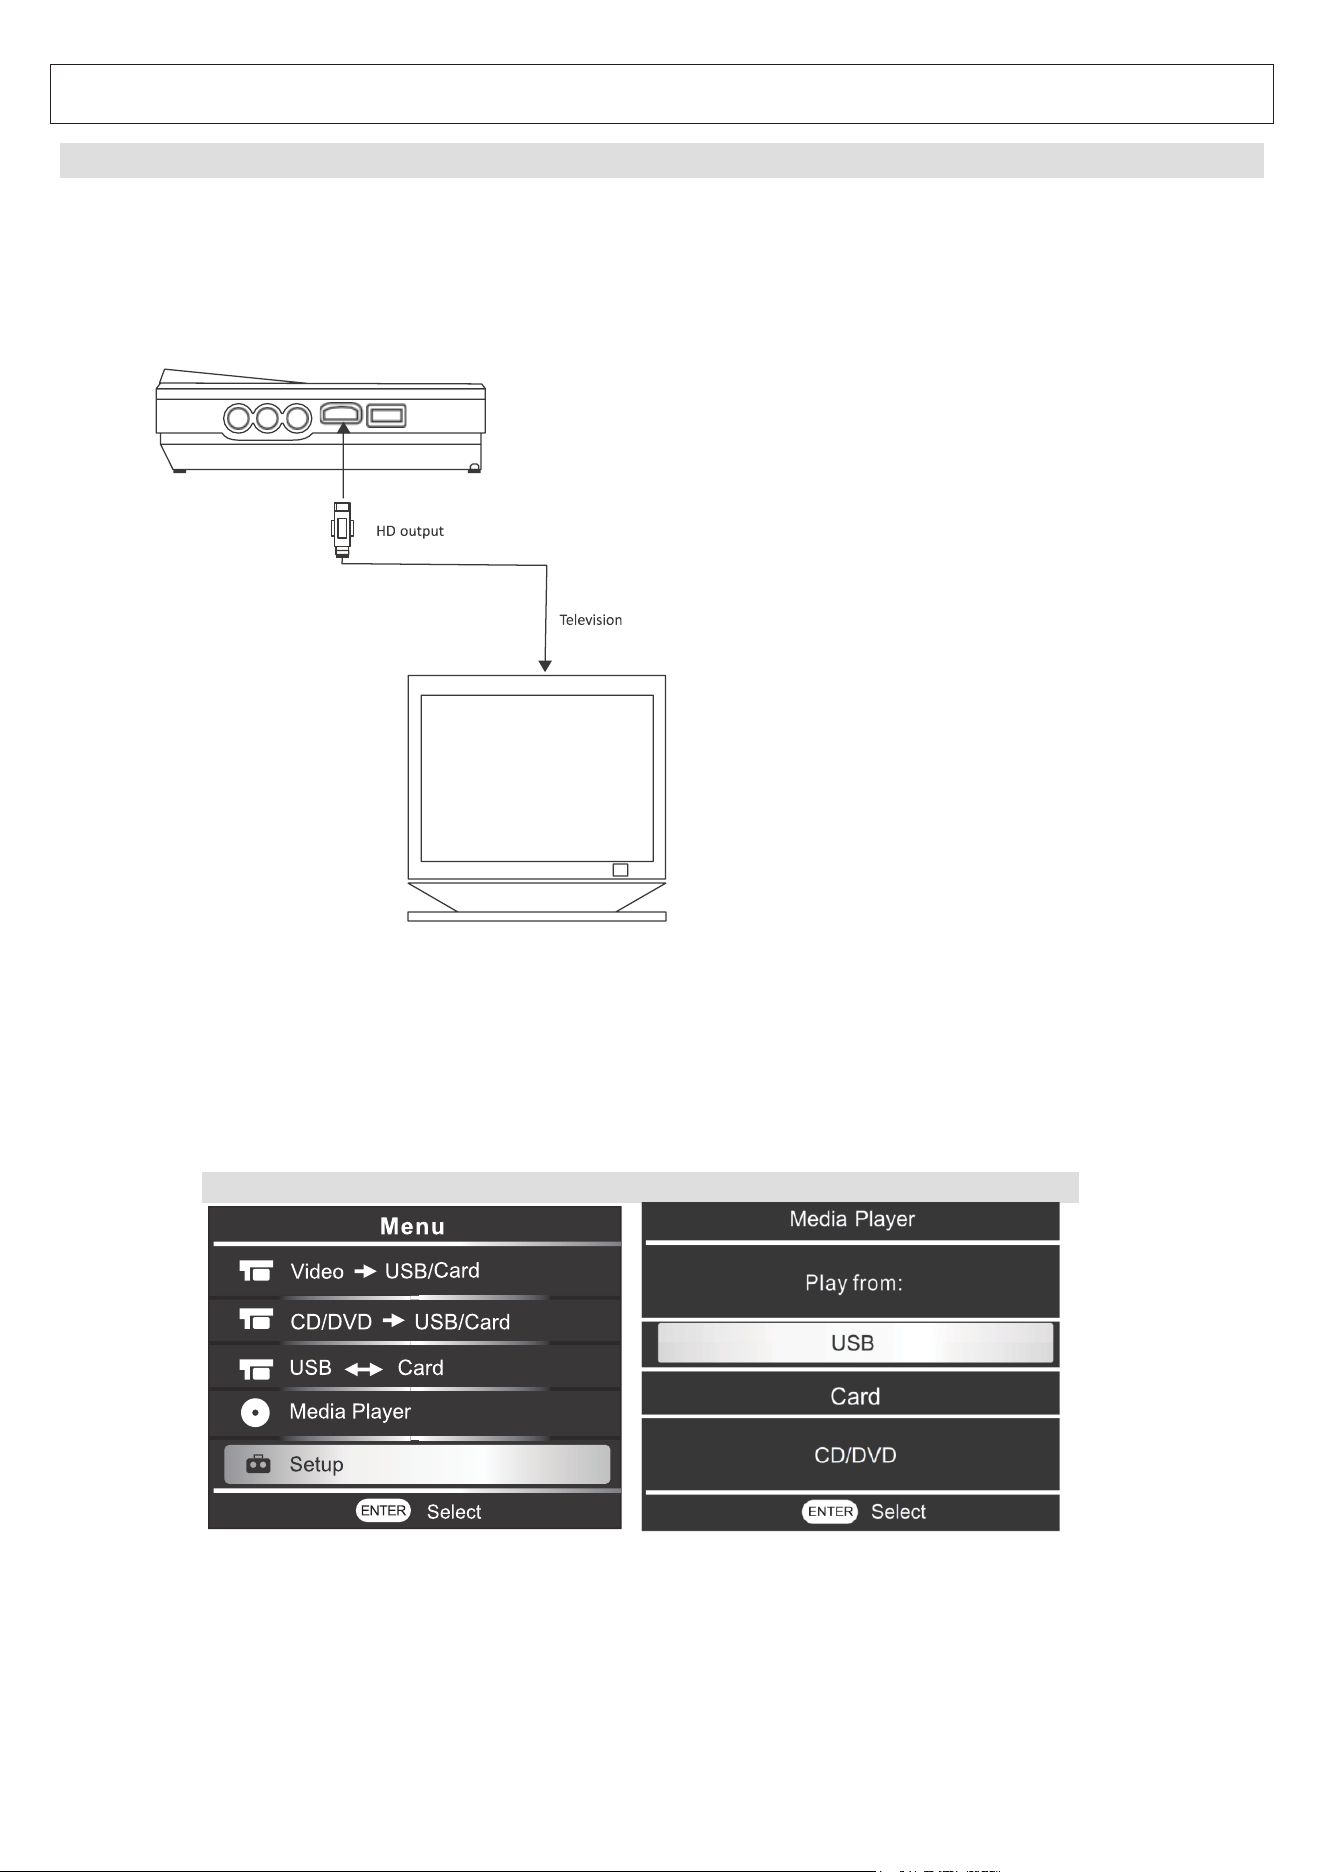
VII. Media Player + HD-Media Output
7.1 HD-Media Output
Recorder can be used as a multimedia player and connect to a video display machine via HD
cable, such as TV, screen which has HD port
1- Prepare a HD Cable (not included), then plug in the HD cable to both end of recorder and
video display machine.
2- Now the main menu of recorder will be doubling on the display machine.
3- we can display the files on USB / SD Card / CD/ DVD
- plug the USB to USB port
- or insert the SD card to card slot
- or
insert the CD or DVD into DVD rom
4- go on the main menu, choose Media Player, then choose to play from USB or Card or
CD/DVD, then choose the file you wish to play on screen.
1
2

22
7.2 Media player
We can also display directly the files on USB/SD card/ DVD/CD on recorder by following steps below:
1
2
3
Choose Media Player.
*Choose CARD to display from
files in SD card
*Choose DVD to display from
files in DVD
The contents will show on screen
Press button to select the
file
Picture Display
Press for next picture, press to back to previous photo
Supported format: JPEG, BMP, PNG
Music Display
Press [ENTER] to play, press [ENTER] again to pause
Press [RETURN] to exit
Supported format: MP3, OGG, WMA, AAC, FLAC
Video Display
Press for volume up
Press for volume down
Press [RETURN] to exit
Supported format: AVI, MOV, WMV, MKV, TS, M2TS, MPG, RM,
RMVB
Delete the file
Choose the file to delete
Press [ENTER] for 5 seconds, message below will show up.
- Choose Delete to confirm the delecte.
- Choose Cancel to back to previous step.
23
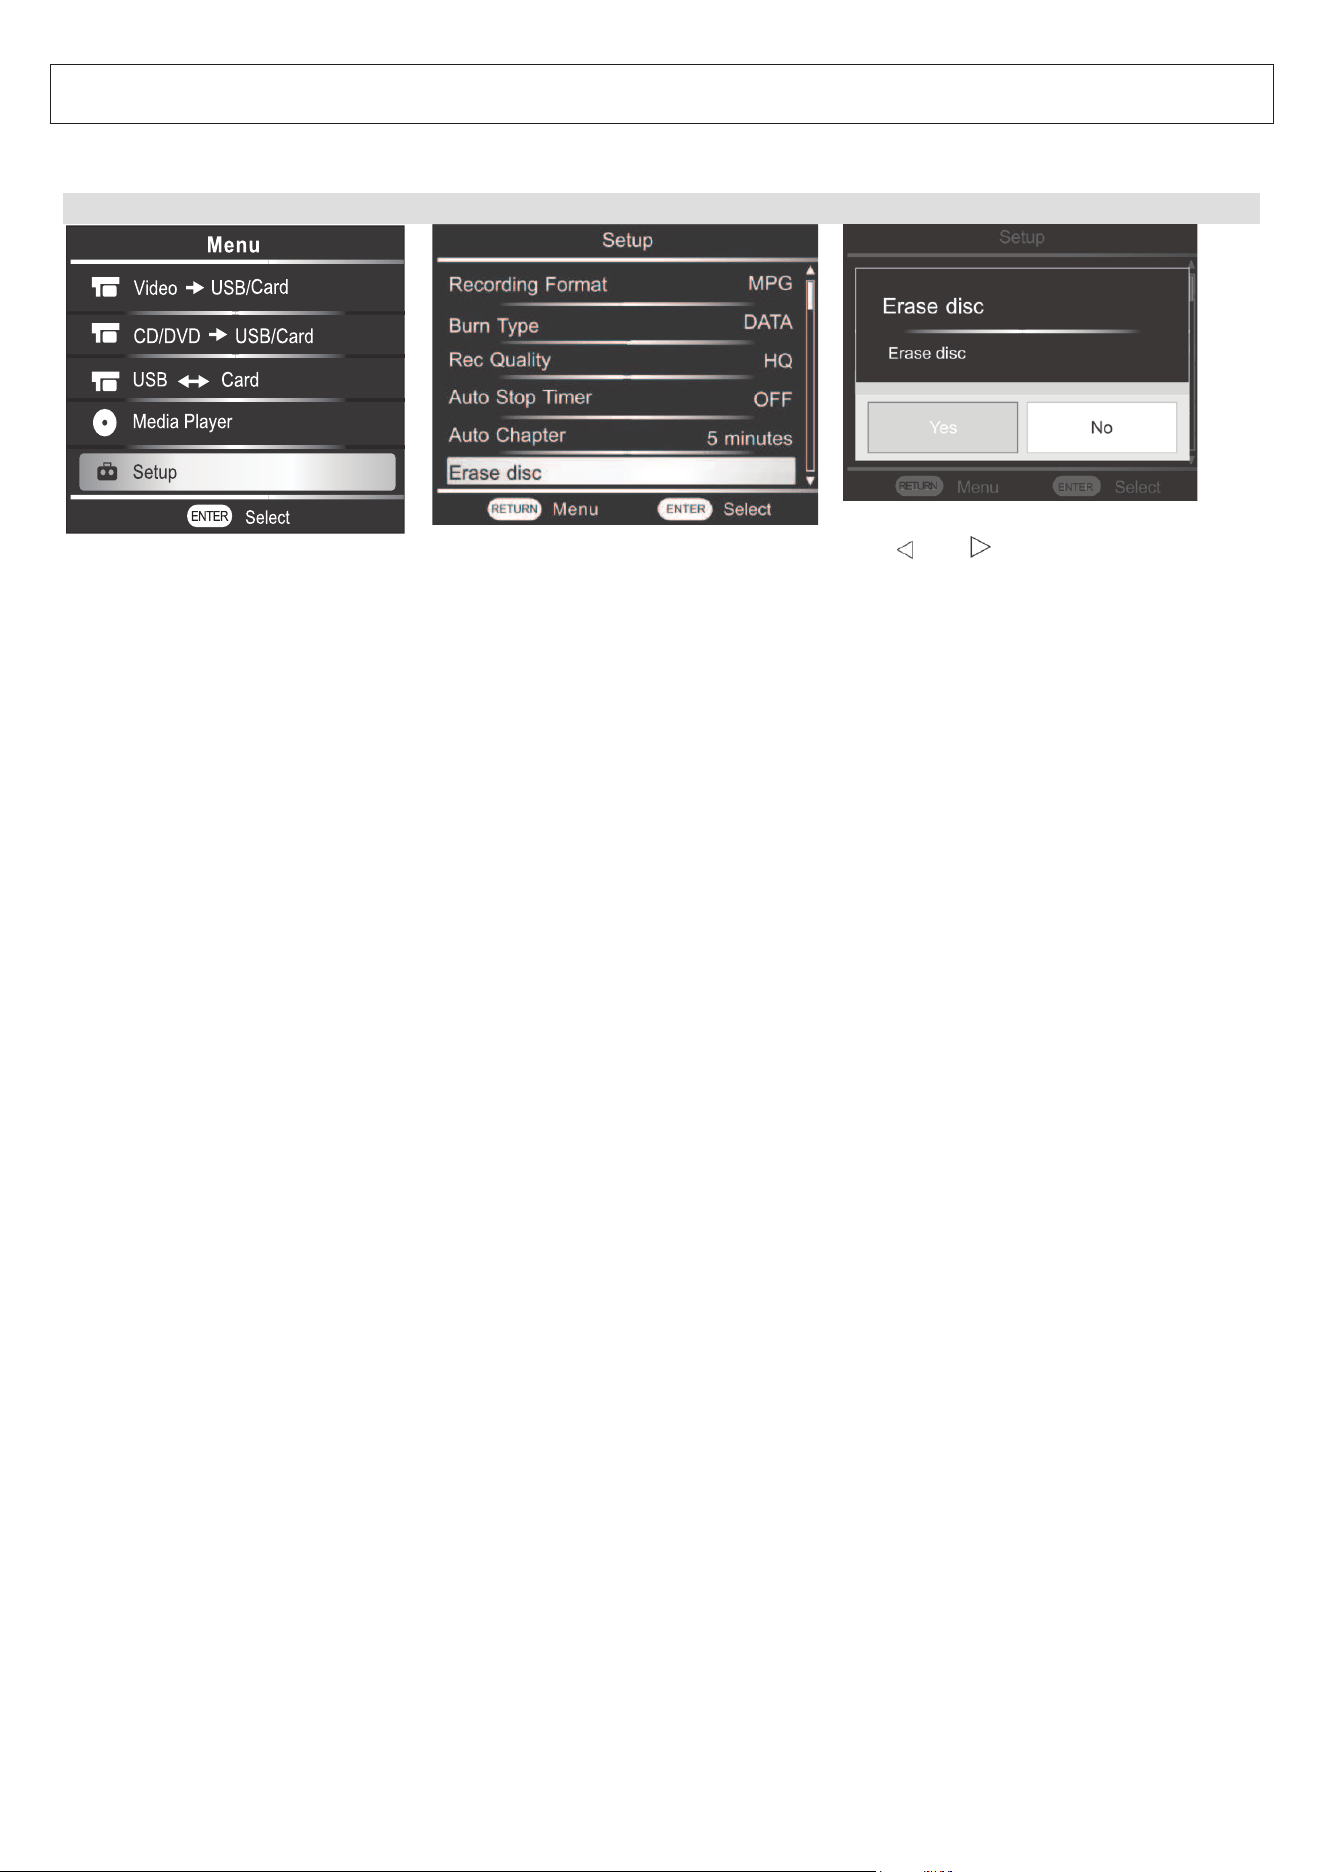
VIII. Erase Disc
FCC Notice
This function allows user to format the CD-RW or DVD-RW directly.
1
2
3
Choose Setup in Main menu
Choose Erase Disc
Use and to choose:
- YES: format the disc
- NO : back to previous menu
Once the operation is finished, message ‘Erasing disc finished, please press RETURN’ appears.
The Disc will be ejected automatically.
This device complles with Part 15 of the FCC Rules.
Operation is subject to the following two conditions:
(1) this device may not cause harmful interference,and
(2) this device must accept any interference received,
including interference that may cause undesired operation.
CAUTION ON MODIFICATIONS
Any changes or modications not expressly approved by the grantee of this device may void the
authority granted by the FCC to operate the equipment.
Note: This equipment has been tested and found to comply with the limits for a class B digital
device,pursuant to part 15 of the FCC RulesThese limits are designed to provide reasonable
protection against harmful interference in a residential installation. This equipment generates,uses
and can radiate radiate radio frequency energy and,if not installed and used in accordance with
the instructions,may cause harmful interference to radio communications.However, there is on
quarantee that interference, will not occur in a particular installation.if this equipment does cause
harmful interference to radio or television reception reception.which can be-termined by turning
the equipment off and on,the user is encouraged to try to correct the interference by one or more
of the following measures:
- Reorient or relocate the receiving antenna.
- Increase the separation between the equip-ment and receiver.
- Connect the equipment into an outlet on a circuit different from that to which the receiver is
connected.
- Consult the dealer or an experienced radio/TV technician for help.

24
Support
If you have problems with your device, please consult the instructions in this manual. Please also
visit us on the web at www.emersonaudio.com to get up to the minute news, alerts, and documen-
tation for your device. For additional assistance,please contact Emerson Technical Support.
Emerson Technical Support
2320 East 49th St.
Vernon,CA 90058
Email:[email protected]
MADE IN CHINA