English/Espanol/日本語/中文
122mmX130mm
70g
Element 3
User Manual
Voice-Controlled 3 Channel Dash Cam
20230427
更新内容:
更新APP
20230504修改预录功能
20230707日本站修改灯的描述


Hey, find us here:
www.vantrue.net/contact
facebook.com/vantrue.live
V4

CONTENTS
VERZEICHNIS
CONTENU
SPIS TREŚCI
5
49
Installation
Comenzando
取り付け方法
安装及使用说明
3.
94
135
43
89
130
169
Warranty & Support
Garantía y soporte
保証とアフターサービス
售后服务
6.
41
87
128
167
Specifications
Especificaciones
製品仕様
产品规格参数
5.
Camera Overview
Descripción de la cámara
E3ドラレコの概要
E�机身解说
2
45
91
133
2.
17
62
106
146
Basic Operation
Operación básica
機能紹介
功能亮点
4.
1
44
90
132
What's in the box?
Was ist in der Box?
同梱内容
盒内物品清单
1.
- 1 -
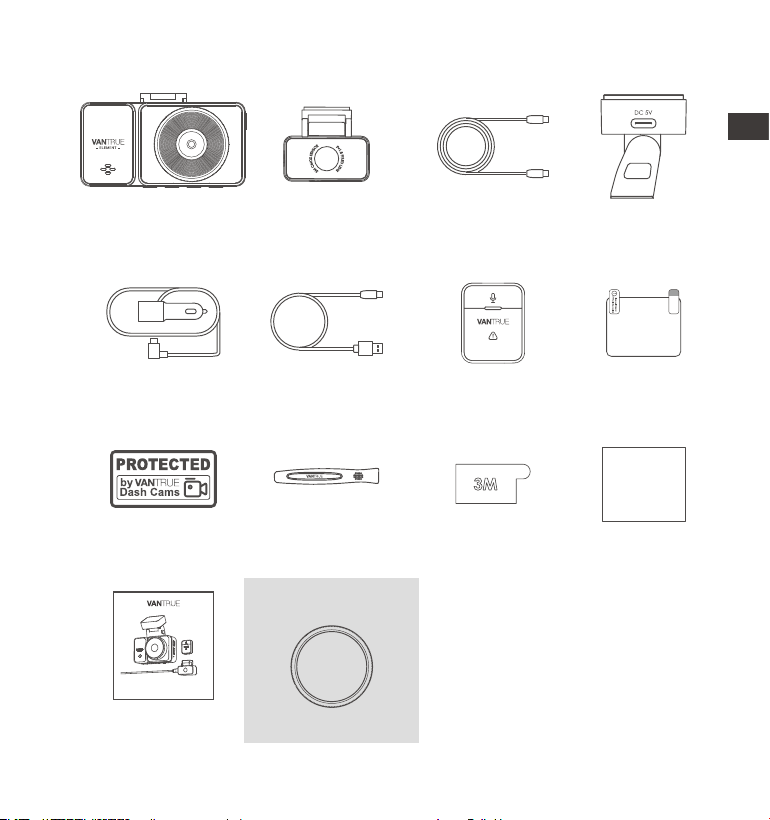
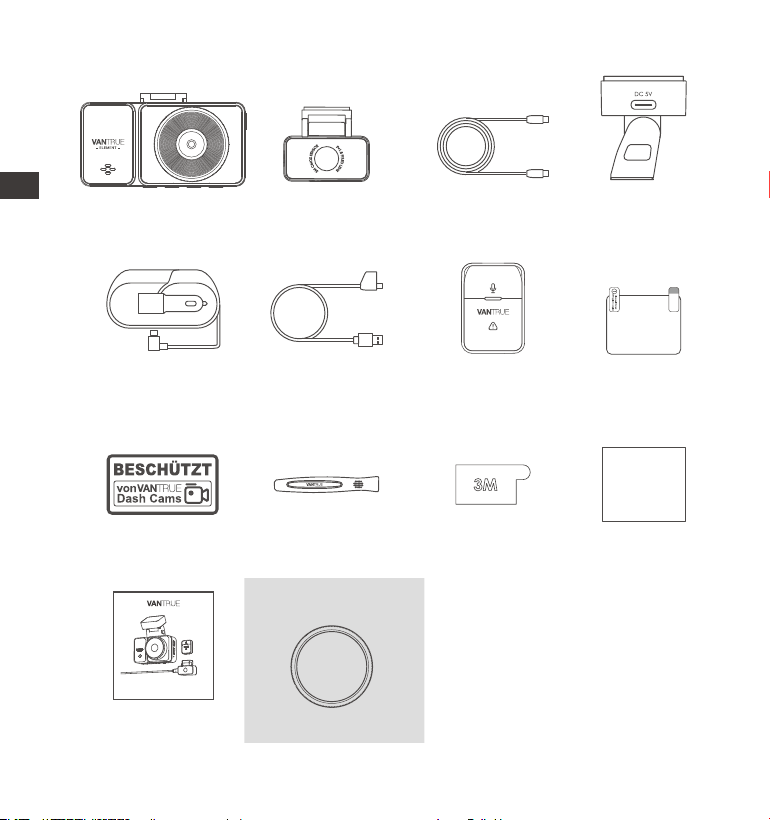
1. What’s in the Box?
H.
dust-free
cloth*1
Warning
Stickers *2
L.
CPL Filter
A.
VANTRUE
®
E3
Dash Cam
E.
Type-C Rear
Camera Cable
(20ft)
I.
User Manual
M. N.
B.
Rear
Camera
G.
Crowbar*1
K.
D.
GPS Adhesive
Mount
C.
VANTRUE
®
Wireless
Remote Controller
F.
Type-C USB Data
Cable (3ft, for
data transfer only)
Car Charger with
Built-in Type-C
Cable (11.4 ft)
3M Adhesive
Stickers
J.
Electrostatic
stickers *2
Optional Accessories
Element 2
User Manual
Voice-Controlled Dual Dash Cam
EN
EN
EN
EN
- 2 -
ENEN
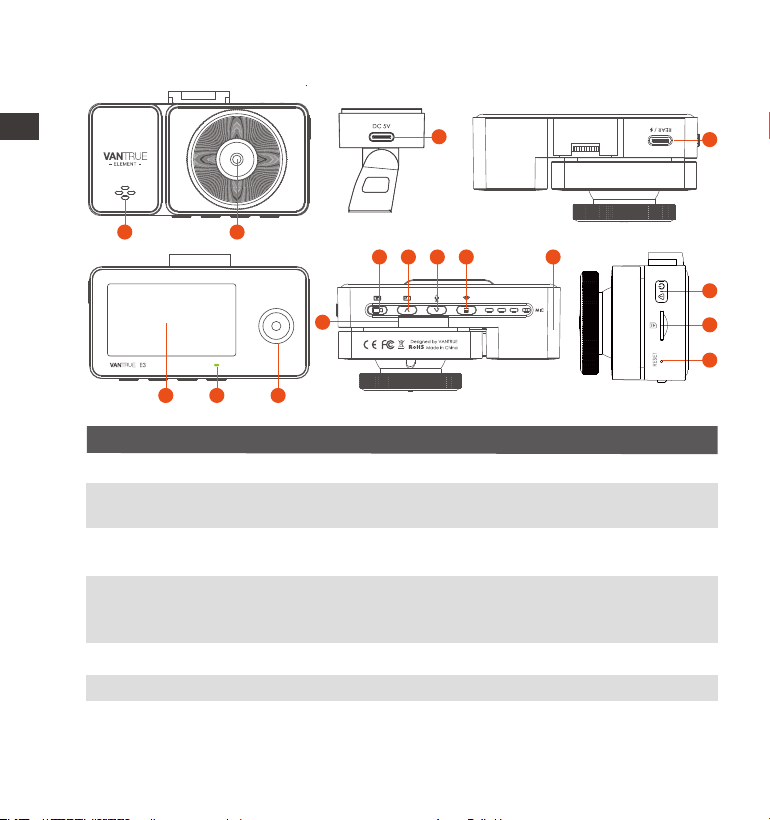
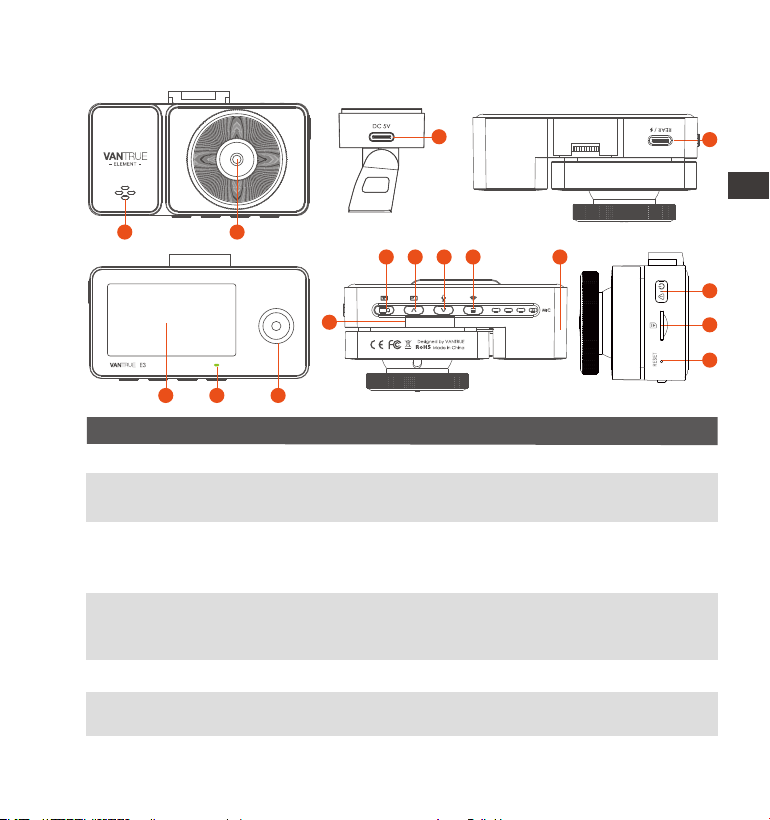
2. Camera Overview
14
15
16
3
4
21
5 6 7
8
131211
10
9
VTJE1210130
NO. DescriptionName
1
Front Facing Camera for video recording road
Events;
2 Front Camera
Delivers sound during video playback;
3
Speaker
Connect to Type C cable or car charger for
external power supply;
Power Port
Type-C USB port for charging or transferring data;
Video stream port for streaming rear camera's
recording;
4 Type-C USB /
Rear Cam Port
2.45 inch LCD Display Screen;5 Screen
Camera for in-car video recording; 7 Interior Camera
Steady green light means the camera is connecting;
6 REC

- 3 -
EN
EN
EN
EN
EN
EN
EN
EN
Records clear audio with the video footage;
8
Microphone
Serial Number for warranty registration.
13
Serial Number
9
During video recording, long press to turn off the
screen and short press to stop recording; In standby
state, short press to confirm the action; In playback
mode, short press to stop/Start the video Recording;
12
Button
During video recording, short press will lock the
current file and capture a picture, long press for
power off;In standby status, short press will capture
a picture, long press will shut down;In WiFi state,
short press to exit WiFi, long press to power off;
14
Button
During video recording and standby, short press to
switch the video window; In menu setting and file
browsing, short press to display the previous option,
long press to scroll up to display options; in
playback mode, short press to fast forward; In WiFi
mode, press any key to exit WiFi;
10
Button
During video recording and standby, long press to
quickly enter parking mode, and short press to turn
on/off the microphone; In menu settings, long press
to scroll through menu options, and short press to
display the next menu option; During file browsing,
long press to scroll to display file, short press to
display the next file; In playback mode, short press
to pop up the delete file menu; In WiFi mode, press
any key to exit WiFi;
11
Button
In the recording mode, long press to turn on/off
WiFi; In the standby state, short press to enter/exit
the setup menu, and long press to turn on/off WiFi;
In the WiFi mode, press any key to exit WiFi;
Button
- 4 -
ENEN
15
MicroSD Card
Slot
16 Reset Button Press to force reset the device;
Provides expandable storage (up to 512GB in
FAT32, U3 or higher).
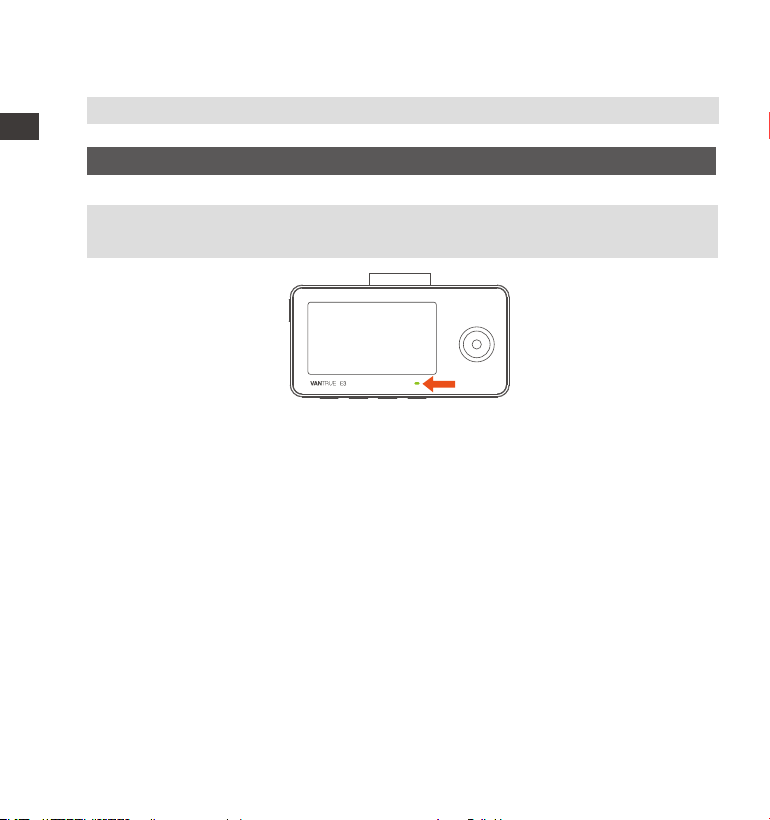
LED Indicator
DescriptionLED
Steady green light Instandbystatus
Camera is recording
LED Status
REC
Blinking green light
- 5 -
EN
EN
EN
EN
14:39:07 02-10-2023
00:00:37
MP/H
35
1440P+1080P+1080P 30FPS
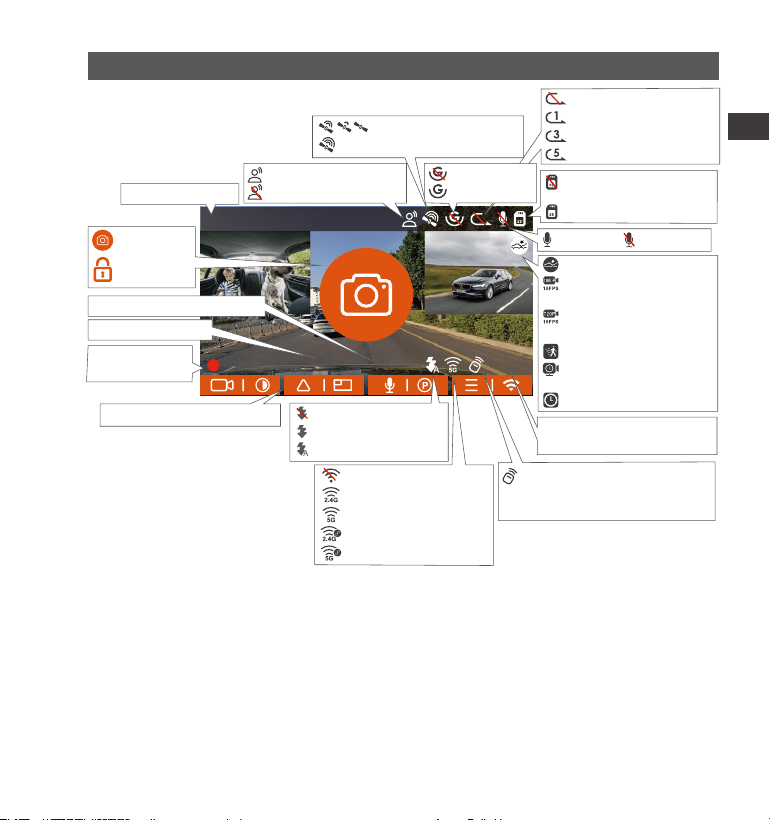
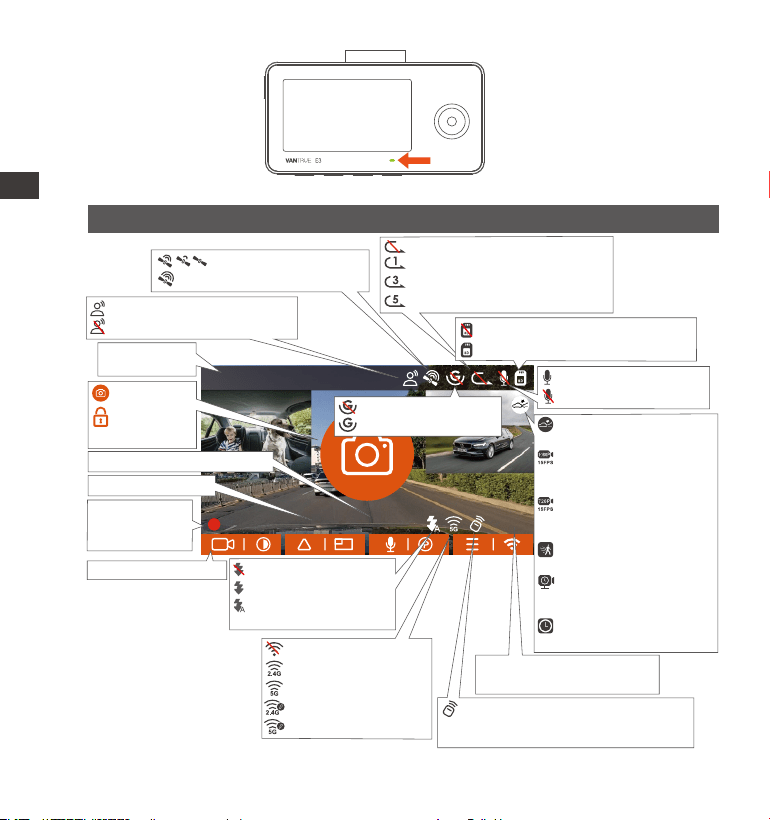
Screen Overview
3. Installation
3.1 Installing a Memory Card (Recommended: Vantrue U3 high-speed
microSD card).
Please insert a memory card (memory card capacity: 32GB-512GB, card
speed: U3/Class10/A2). The dashcam has certain requirements on the
card speed of the memory card. For reliable operation, we recommend
using a VANTRUE SD card(sold separately).
Loop recording OFF
Loop recording for 1 min
Loop recording for 3 min
Loop recording for 5 min
MIC is ON MIC is OFF
NO Memory card
inserted
G-Sensor OF
G-Sensor ON
Recorded driving
speed (KMH or MPH)
Video Resolution
GPS Signal Connecting
GPS Signal Locked
Voice Assistant is ON
Voice Assistant is OFF
MP/H
35
Memory card inserted
Icons for Indicating Buttons
Remote control is connected
Blinking means the remote
control is not connected
IR LED OFF
IR LED ON
IR LED AUTO ON/OFF
Recording Time
(Current Clip
Current Time (24H)
Snapshot
Emergency
File Locked
Current Date (MM/DD/YY)
Collision Detection ON
1080P Low Bitrates
Recording ON
720P Low Bitrates
Recording ON
Motion Detection ON
Low Framerate Parking
Mode
Time Lapse On
Wi-Fi OFF
2.4G Wi-Fi ON
5G Wi-Fi ON
2.4G Wi-Fi Connected
5G Wi-Fi Connected
- 6 -
ENEN
If the camera is recording, please press the button to pause the
recording, then press the button to enter the menu, then enter
“System Setup,” select the format, and confirm to format the memory
card until it prompts "Formatted successfully''.
After inserting the memory card, if the screen prompts "Card error,
please format" (please note that the recorder does not record at this
time), please directly press the button to enter the menu and start
the formatting process.
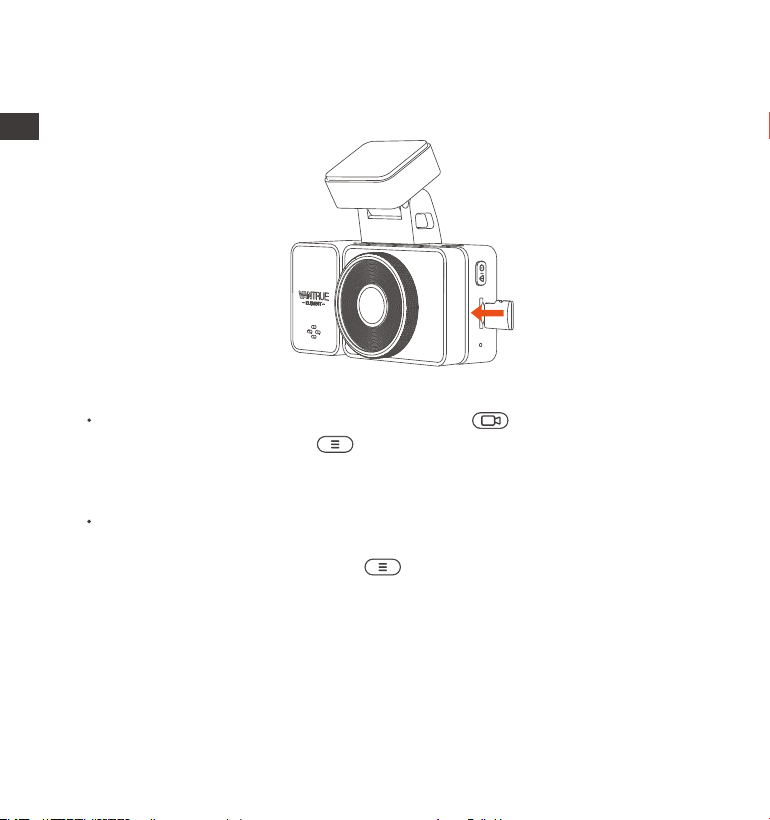
Memory Card Installation: There is an icon indicating the insertion direction
of the memory card. Please push the memory card into the card slot
according to the direction indicated by this icon, until a "click" sound is
heard in the card slot, indicating that the memory card is inserted properly.
The microSD card should be formatted once a month to maximize the
lifetime of the memory card.
Pleasedonottakethecardoutwhenthecameraisrecordingincase
theimportantvideofilesmissing.
REMINDER:
1.
2.
Before using this card, please follow the steps below to format it properly:
- 7 -
EN
EN
EN
EN
3.
4.
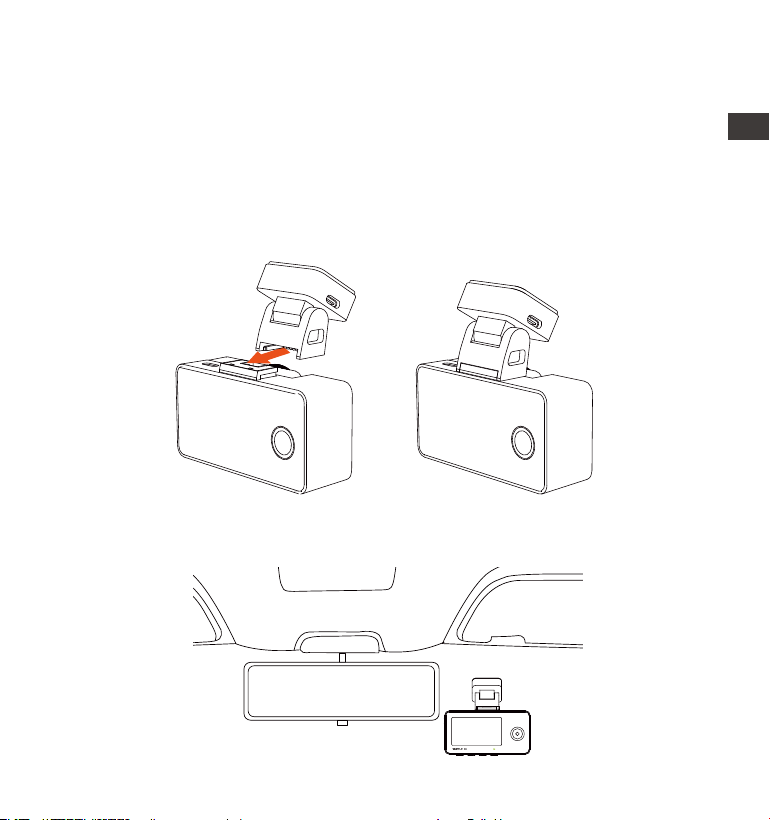
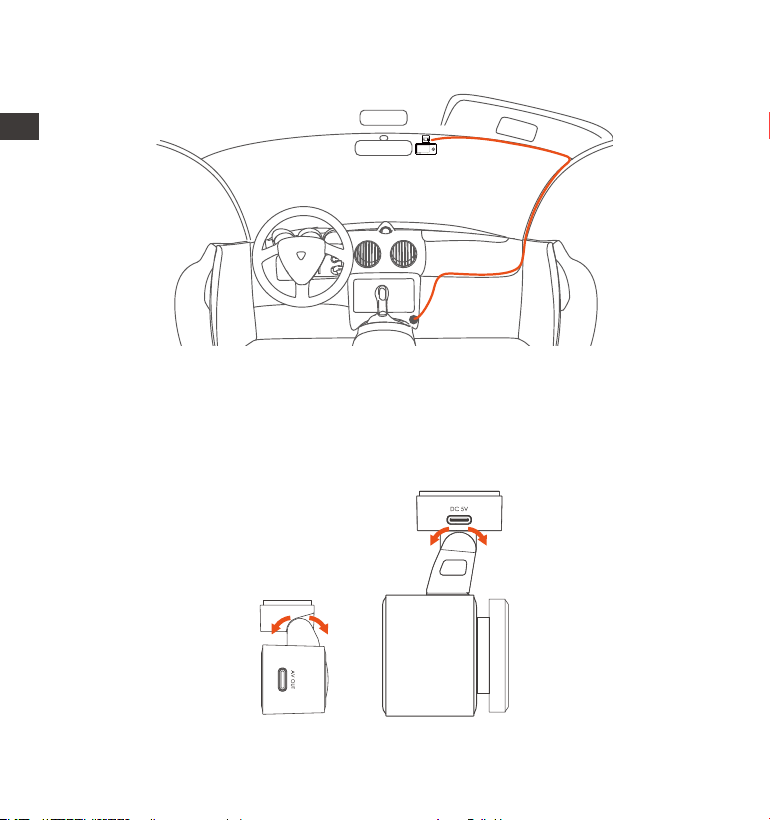
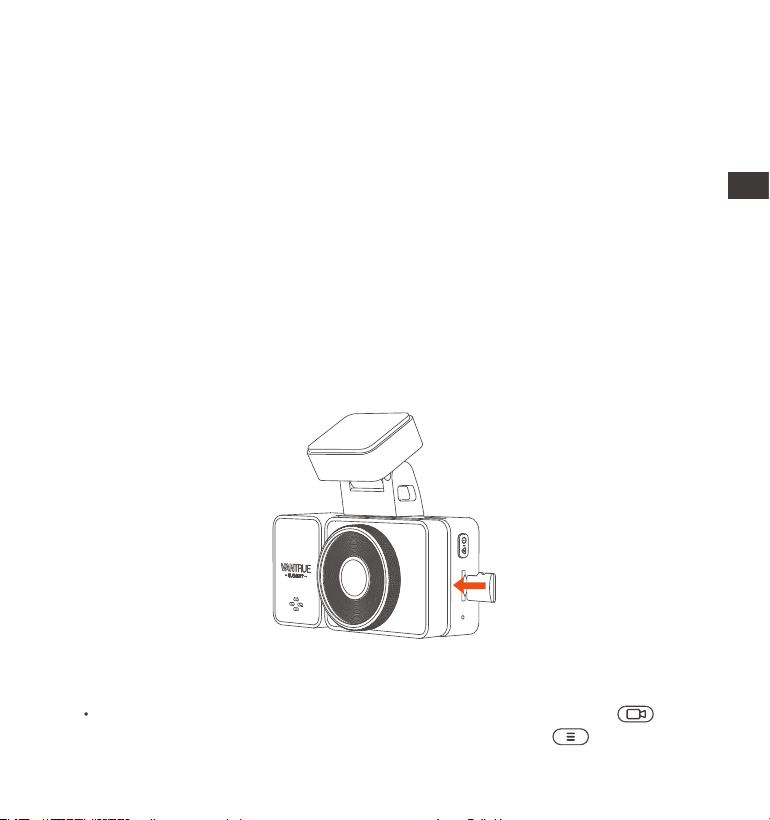
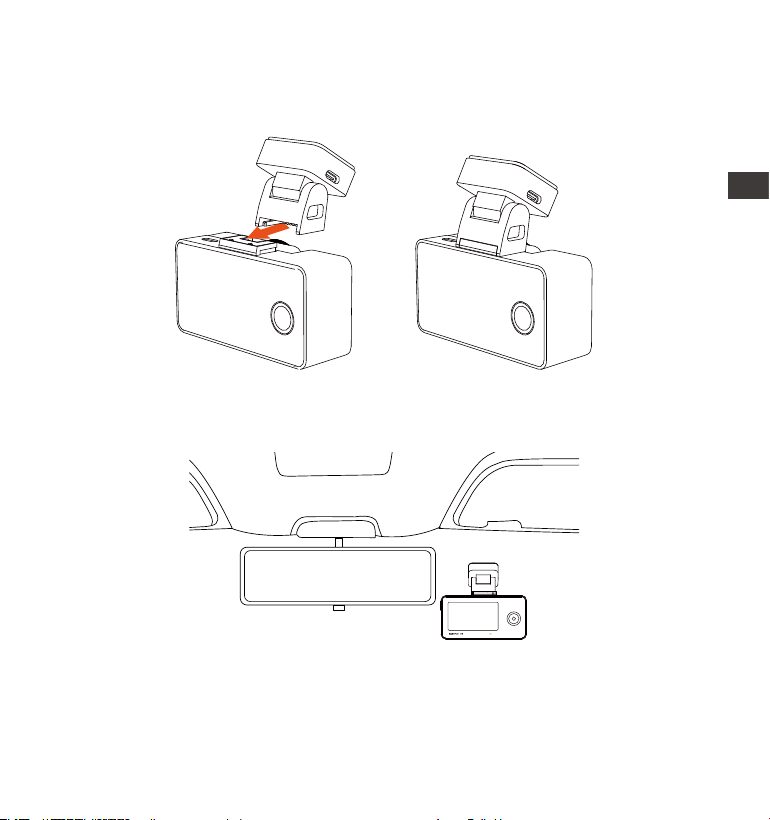
3.2 Installing the camera onto your windshield
Align the mount with the dash cam mount interface then push in until
the mount is installed.
1.
Before installation, please power on the dash cam and check whether
the shooting angle of the front and interior lens are appropriate through
the recording view.
2.
Please do not use bad cards or low-speed cards on the dash cam, as it
is easy to stop or lose the recording due to the failure of a memory card.
Before formatting the memory card, please check the event video
folder in the SD card to see if there are any videos that need to be
saved separately, so as not to delete important videos by mistake.
- 8 -
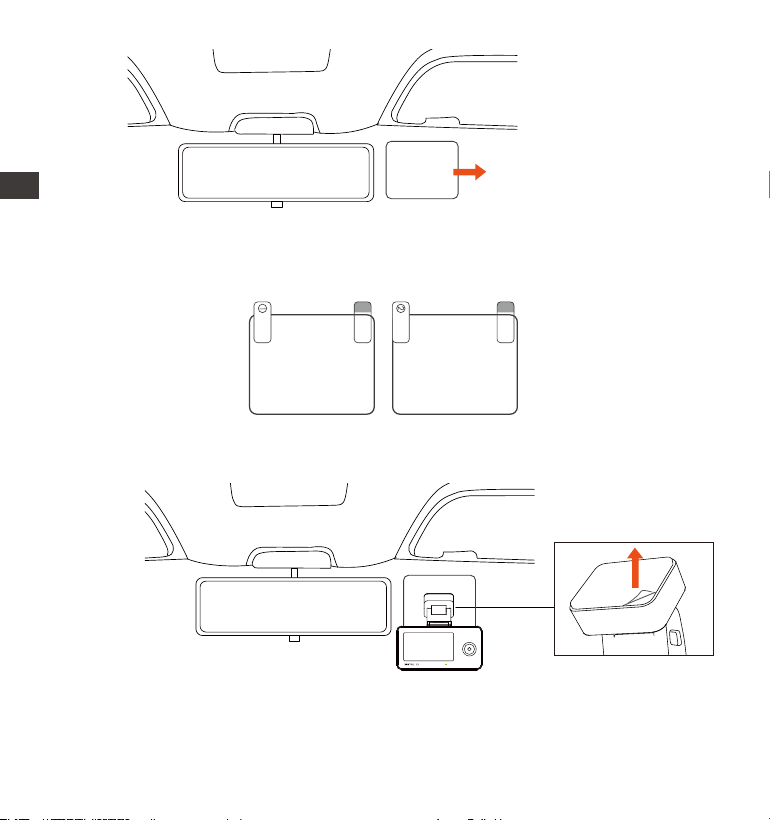
Thoroughly clean the windshield with water or alcohol, then wipe it with
a dry cloth. Stick the electrostatic sticker behind the rear-view mirror,
which is the recommended position to prevent blocking your view while
driving.
Note: The electrostatic stickers with two-sided protective film. Please
remove the protective film from No. 1, paste the electrostatic sticker
on the windshield, and then remove the protective film from No.2.
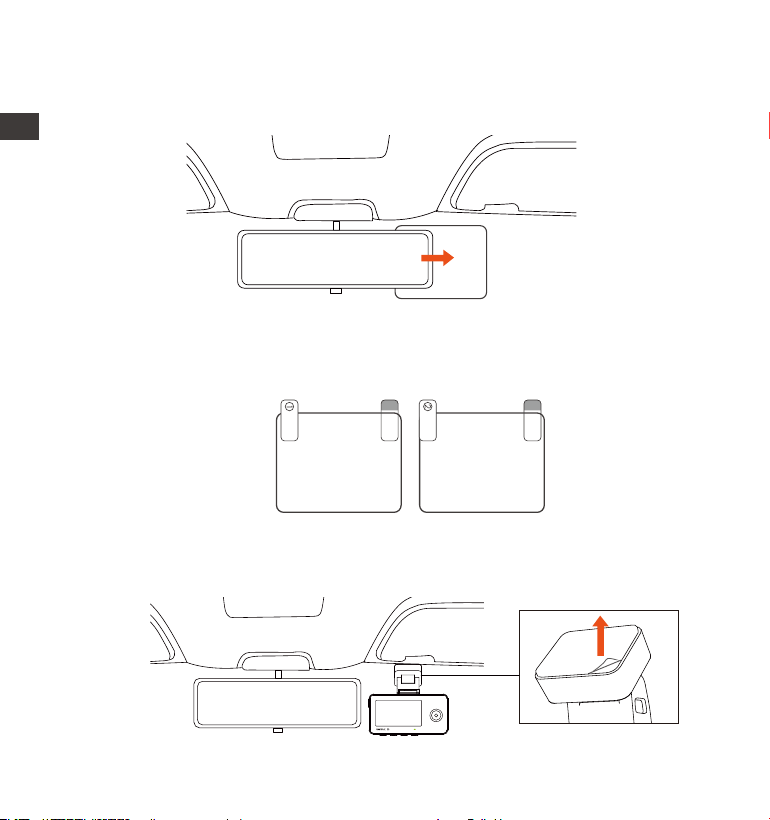
3.
Remove the 3M tape from the mount, then fix the mount and camera
on the electrostatics stickers.
4.
Electrostatic sticker
Please peel off this mask
AFTER application completed
Please peel off this
mask BEFORE application
ENEN
- 9 -
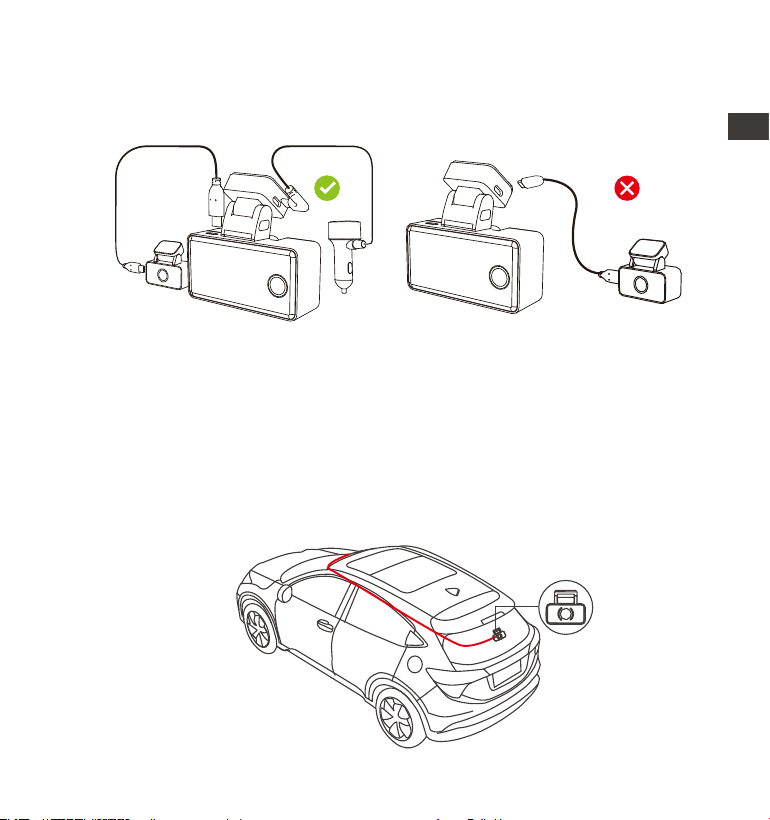
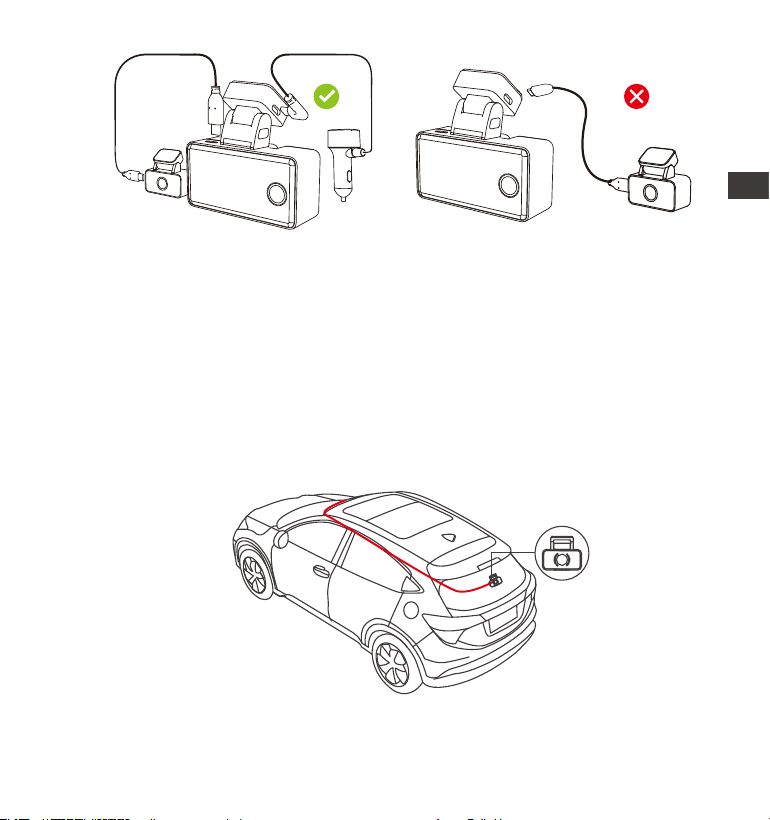
Take out the rear camera cable, connect the main camera and the
rear camera, and take out the car charger to connect it. After the
camera is powered on, choose a suitable location and install it.
5.
Rear Camera Installation: Please select the installation position on the
rear windshield. We recommend that you select a position close to the
center of the rear windshield, and avoid the defogging line on the rear
windshield, so as not to affect the video effect. Remove the protection
film of the sticky pad and rear camera lens. Fix the rear camera in the
selected position and adjust the angle, then use the rear camera cable
to connect the rear camera with the main front camera.
6.
(Correct wiring method) (Wrong wiring method)
EN
EN
EN
EN
- 10 -
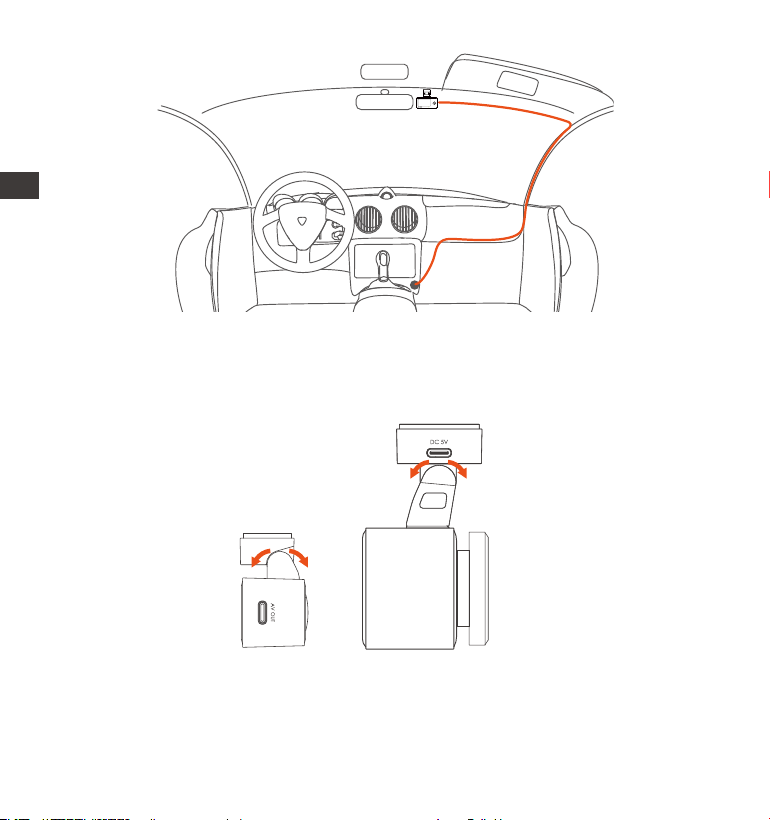
Carefully store the car charger cable in the direction shown in the
picture.
7.
The angle of the window glass of each model is different, please adjust
the recording angle of the main camera and rear camera up and
down according to actual needs.
Note: Only the front camera can be rotated and adjusted, the cabin
camera is fixed.
8.
ENEN

- 11 -
EN
EN
EN
EN
3.3 APP Download
Please scan the QR code for the relevant version below to download the
app and install it. Search for the "Vantrue" app in App Store or Google
Play Store to find the app and then download and install it on your
phone.
Note: After this camera is successfully connected to your mobile phone
through WiFi, it can perform real-time video preview, change camera
settings, download files without internet connection, and play back
videos on the mobile phone. However, the GPS track playback and video
sharing functions will depend on the internet or telecom value-added
services (requires you to turn off/disconnect the camera WiFi).
- 12 -
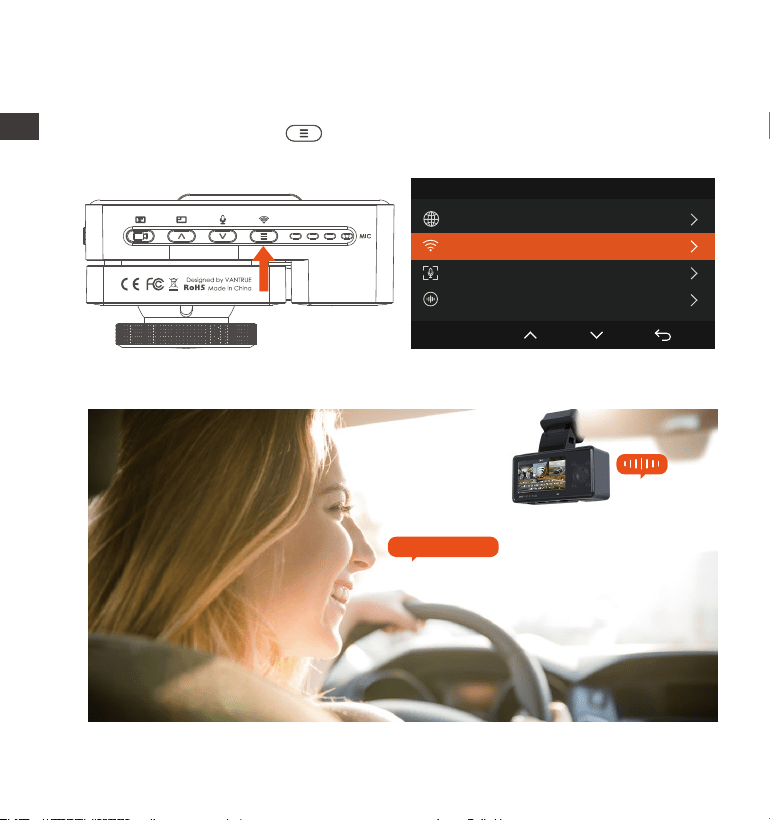
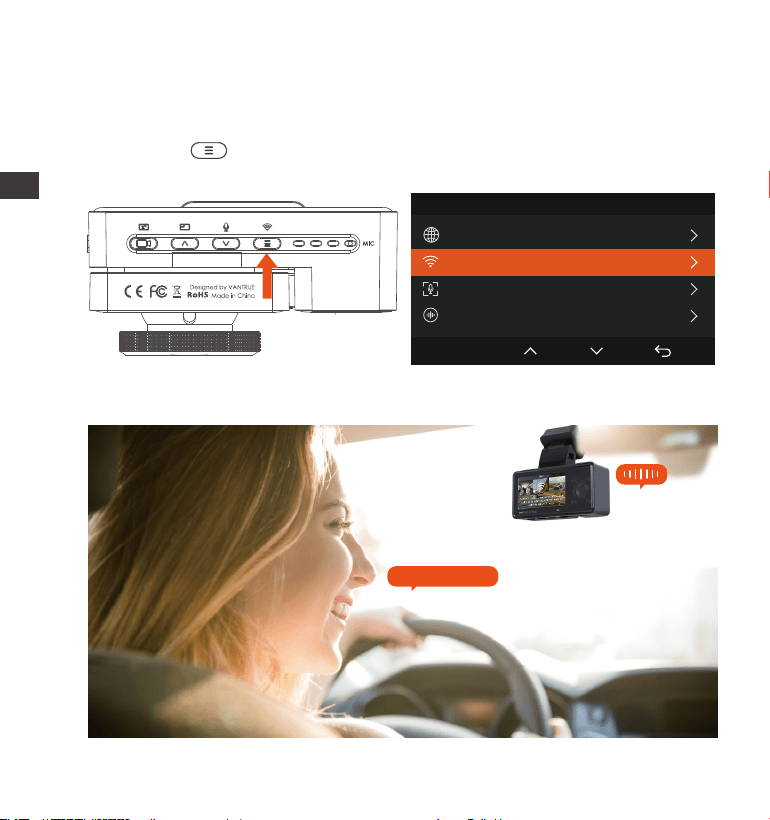
3.4 WiFi Connection
There are 3 ways to turn on the Wi-Fi of the camera.
VTJE1210130
Turn on WiFi
ENEN
Long press the menu button
for 2 seconds.
Go to dash cam System Settings
then turn on the Wi-Fi.
3. Use the "Turn on Wi-Fi" voice command to turn it on.
1. 2.
System Setup 2/14
Language
Wi-Fi
Voice Control
Voice Content
OK

- 13 -
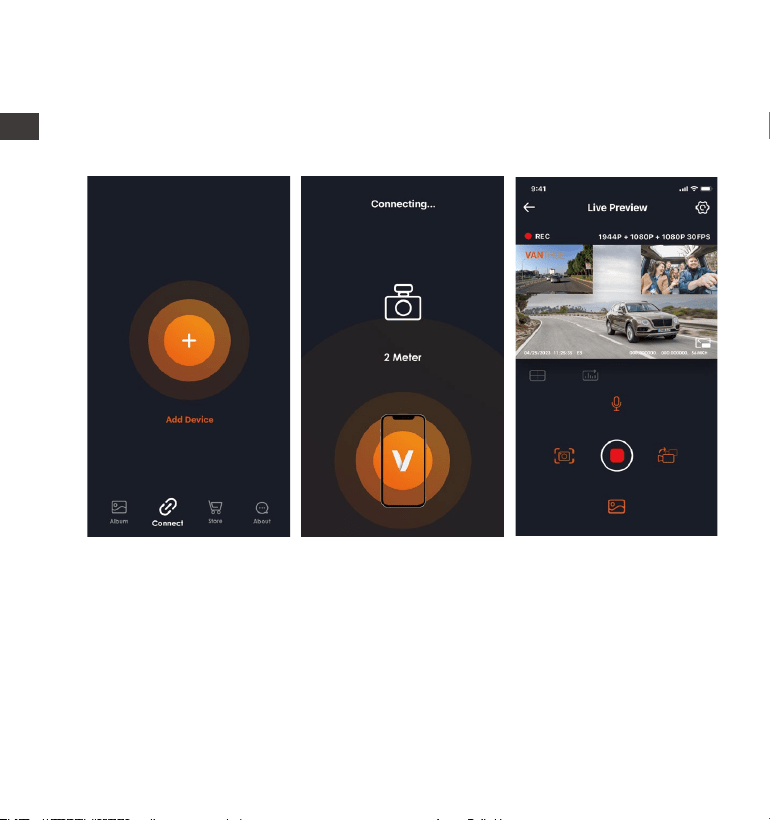
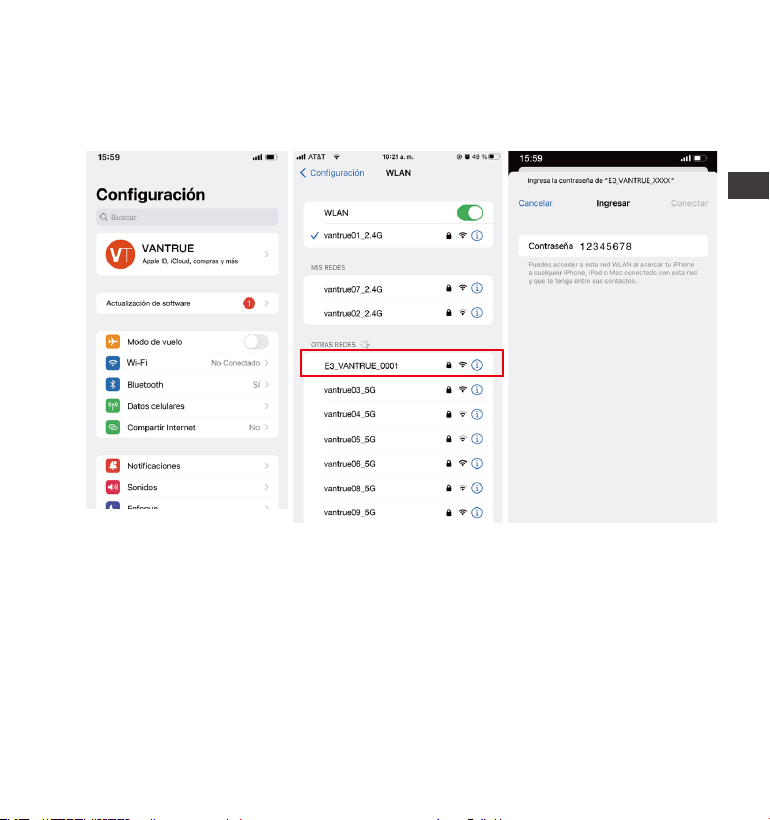
After Turning on the WiFi function of the camera, enter the WiFi settings of
the mobile phone, then find the WiFi name, such as E3_VANTRUE_XXXX,
and enter the WiFi default password: 12345678 to connect to WiFi.
EN
EN
EN
EN
- 14 -
ENEN
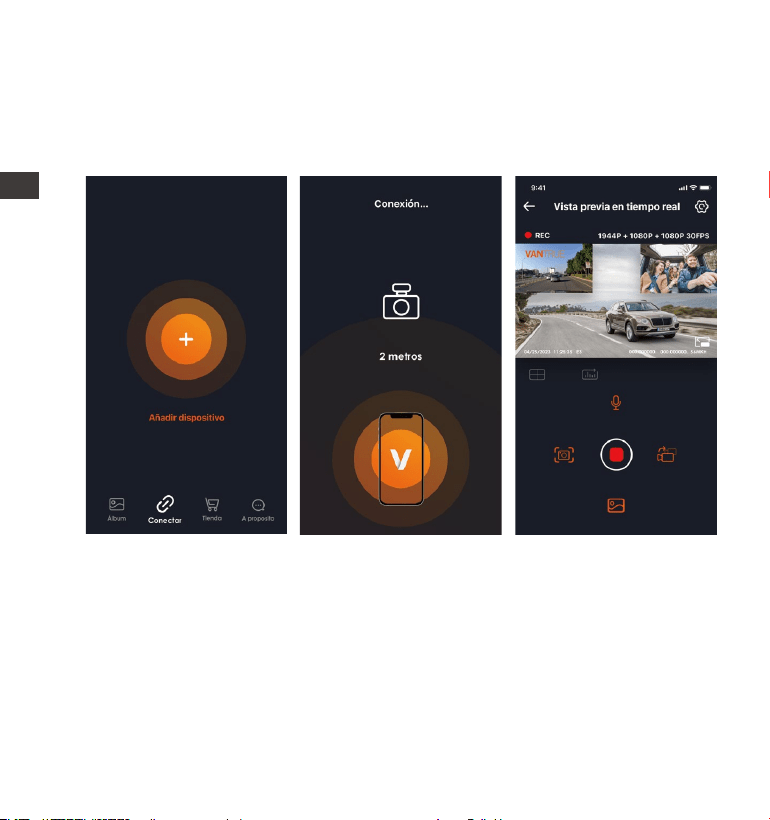
After the WiFi connection is successful, click "+" when opening the app
for the first time, add the camera model, and then the app will automati-
cally connect to the camera and display the current real-time recording
situation of the camera.
3.5 APP Connection
Note:
If you do not connect to WiFi before opening the app, the app will
prompt you by saying "Please connect to WiFi first", and will automati-
cally jump to the WiFi settings. Please complete the steps to connect to
WiFi first.
If the WiFi is already connected, but the app jumps to the application
permissions of the APP after selecting the model, please check whether
the wireless network permission of the app is turned on.
1.
2.
- 15 -
EN
EN
EN
EN
3.
4.
5.
6.
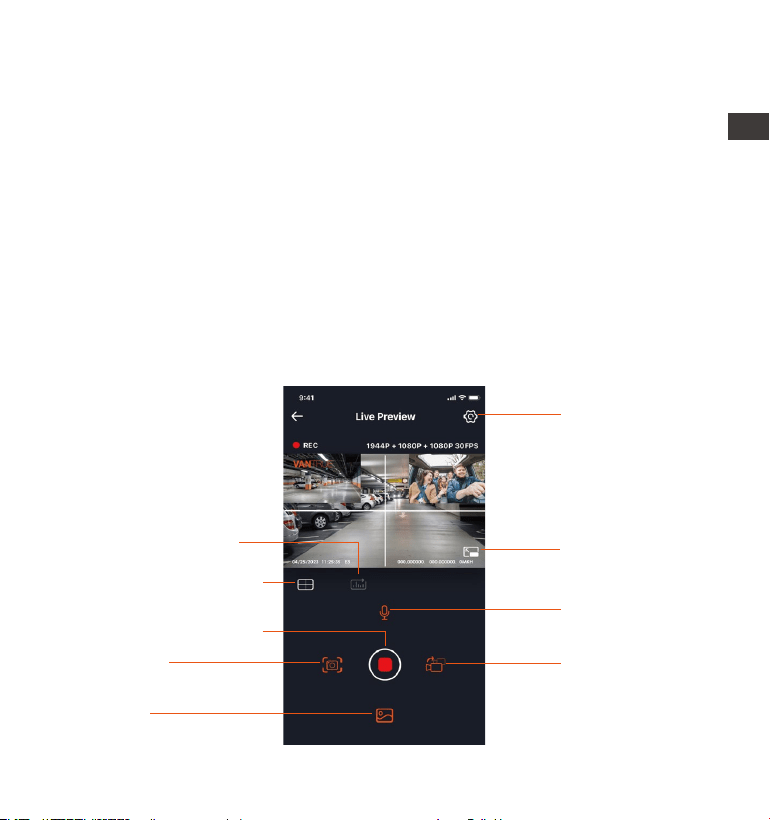
3.6 App Operation
The initial password for this device is only used for initial login. In order
to prevent potential security risks, please be sure to change the initial
password after the initial login to prevent others from logging into your
device without authorization or other adverse consequences.
If you forget the WiFi password, you can restore the default setting of
the device, and the Wi-Fi password of the device will also be restored
to the default password(12345678).
If the connected WiFi name does not match your dash cam model,
the app will prompt you: "Please select the correct model" and
automatically jump back to the model selection interface.
If there is no connection with the mobile phone after the WiFi is turned
on, the camera will automatically turn off the WiFi and return to the
recording interface after 10 minutes.
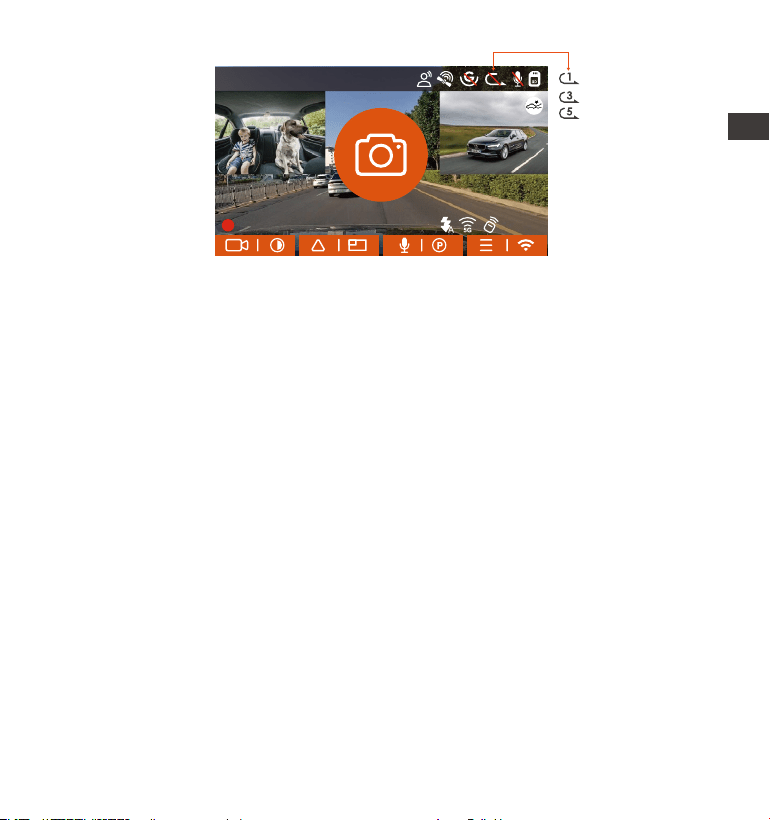
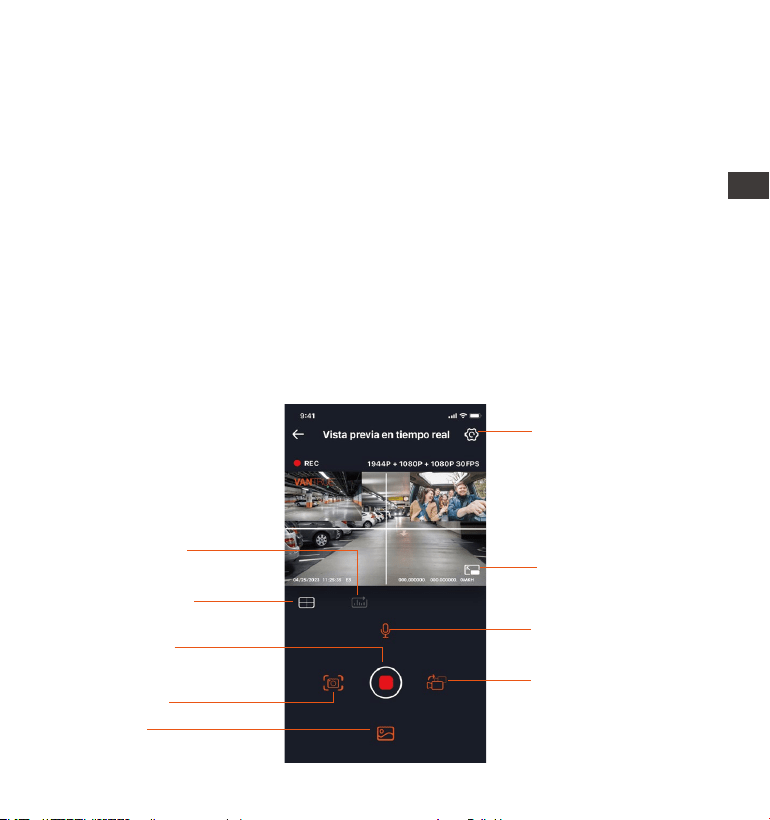
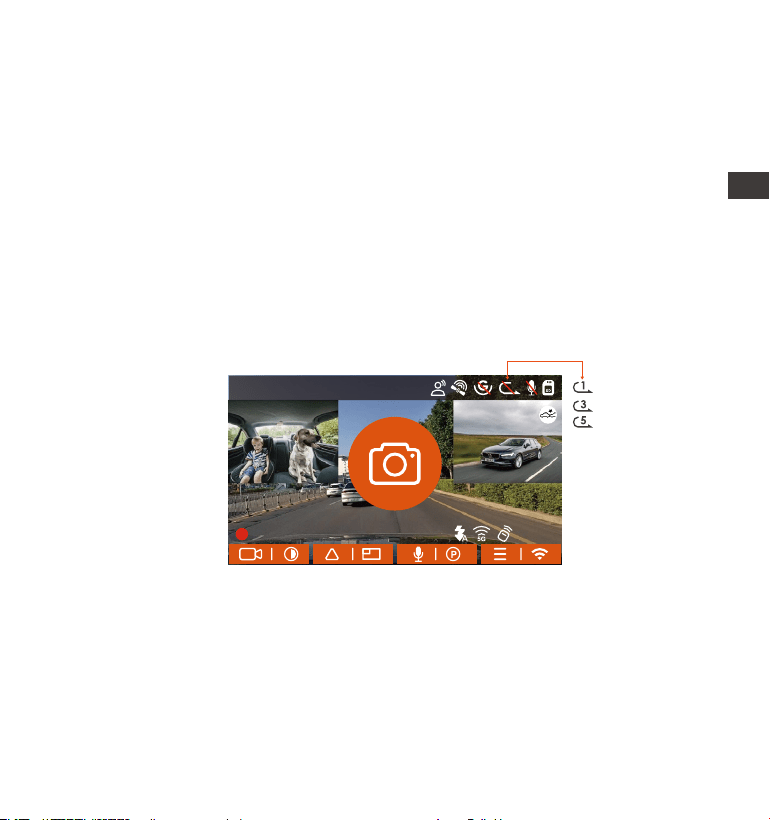
Camera Setting
Full-Screen icon
Front Rear and
Cabin Display
Switch
Snapshot
Album
Stop Recording icon
Microphone on/
off setting
Mileage Statistics
Lens Correction Line

- 16 -
After the app is successfully connected to the camera, you can perform
the following operation:
Video Preview: In the real-time preview interface, you can switch to the
full-screen preview mode by clicking the full-screen icon or placing the
phone horizontally, clicking the window switch icon to switch video
windows only multi-channel recording can use this feature.
Video playback: The video and photo files recorded on the SD card can
be viewed in the app, and the video can be played back after clicking
the file.
Video download: You can select the video or picture you want to
download in the SD card browsing interface or in the video playback
area. After downloading the video, if you play it in the local file of the
app interface, you can view the GPS track of the video.
Video snapshot: You can capture the current screen in the real-time
preview interface of the app.
Mileage Statistics: Users can click to download mileage information as
required, and the mileage information will be saved in the APP as a
picture or PDF file.
Lens correction line: Correct the lens balance via accurate crosshair so
that the video screen will not be skewed.
ENEN
- 17 -
EN
EN
EN
EN
EN
EN
EN
EN
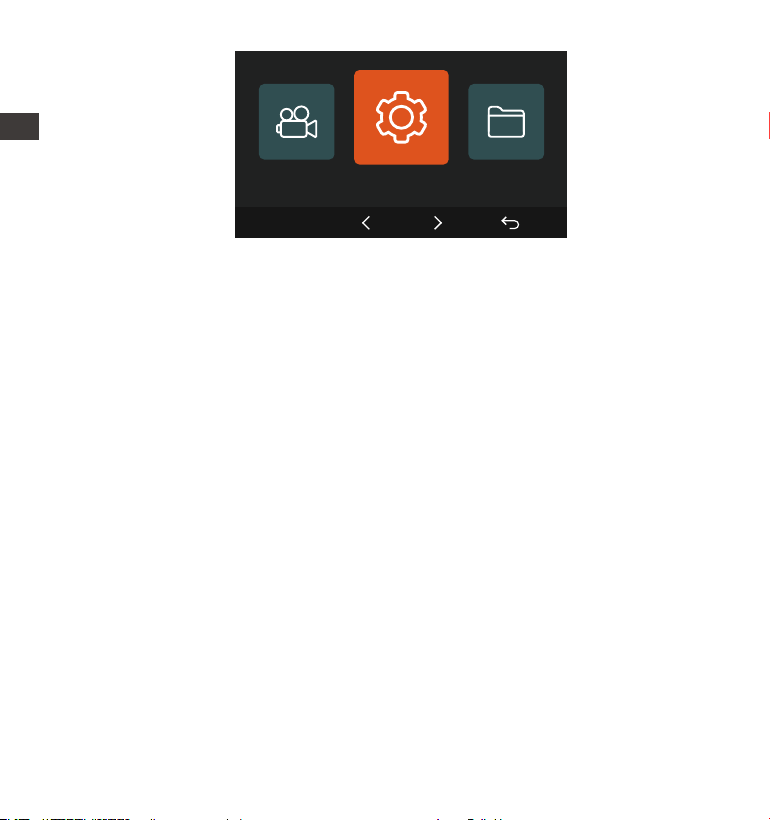
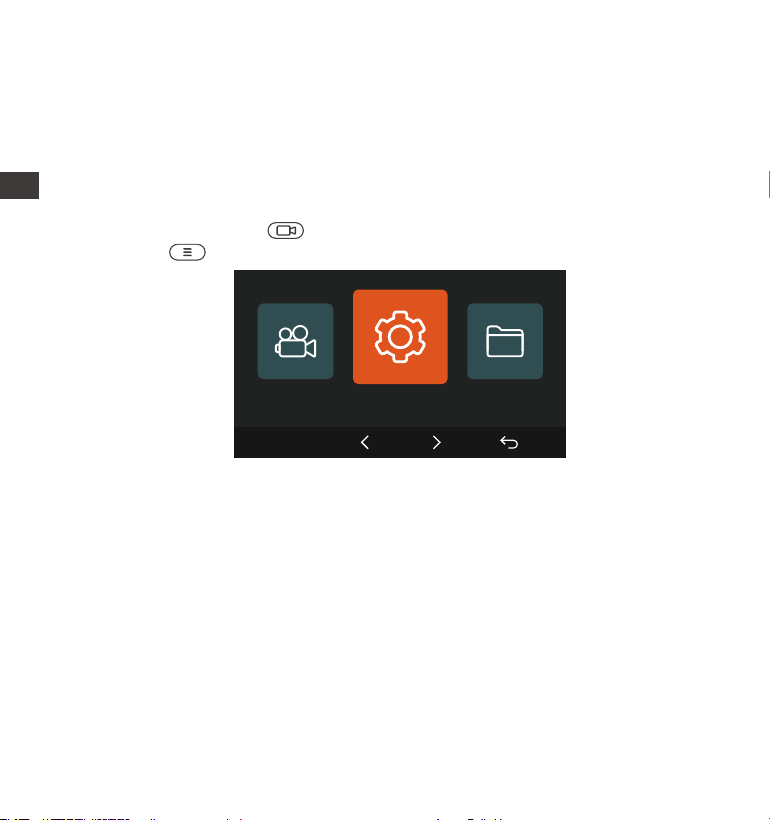
The E3 dash cam has 3 function menus, which are: record settings, system
settings, and file browsing. You can set your dash cam according to your
requirements with these function setting.
Press the button, pause the video first, then press the button to
enter the menu settings.
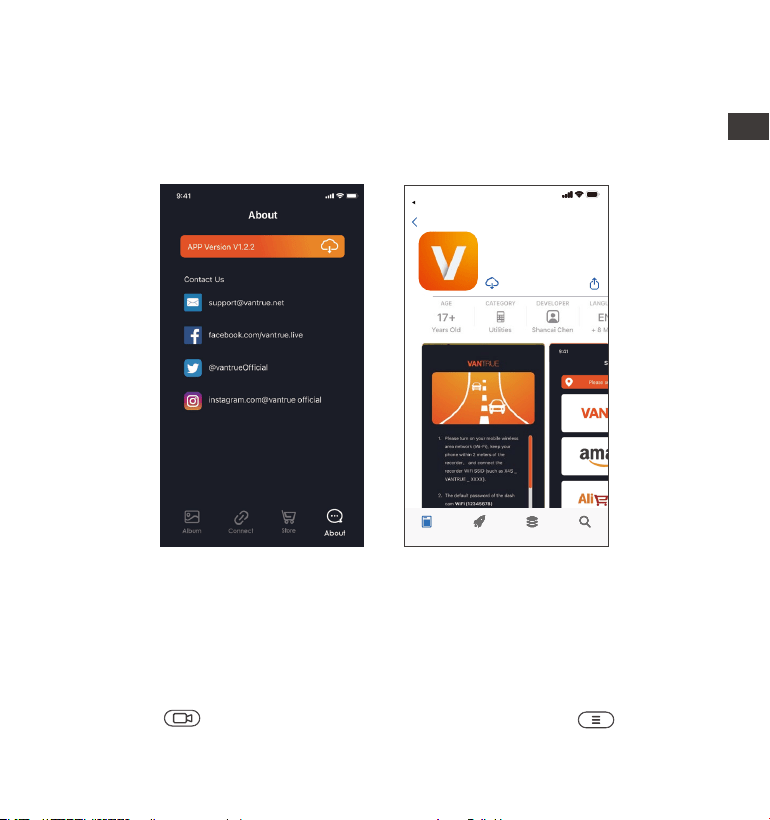
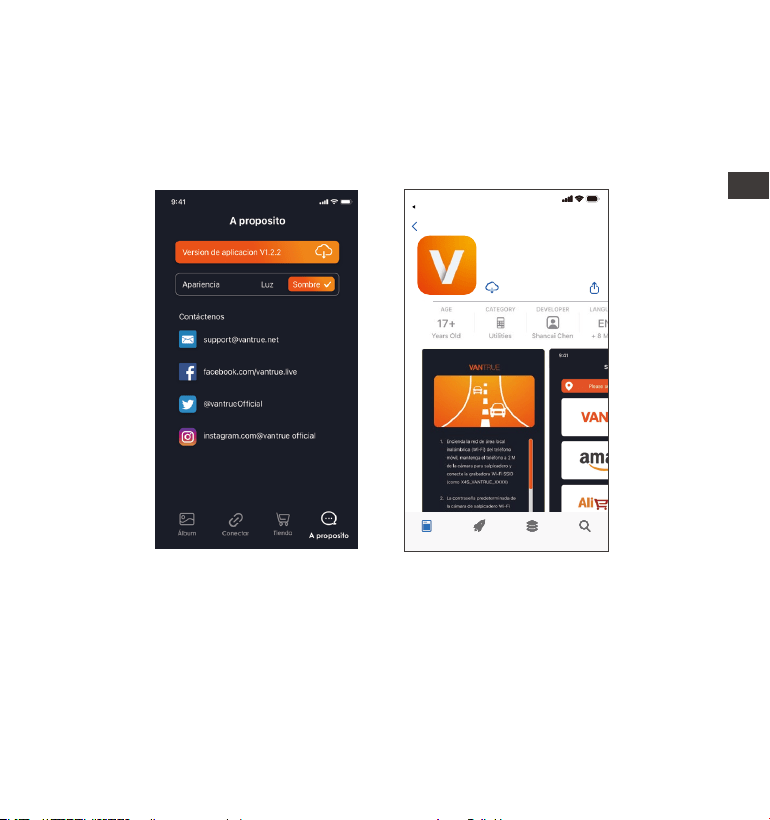
3.7 APP Upgrade
Open the "Vantrue" App, connect to the Wi-Fi, and enter "Settings>
About> Detect New Version". The App will automatically detect whether
its version is the latest version. If there is a new version of the app, follow
the prompts and upgrade the version.
4.1 Menu Settings
Vantrue Ltd.
Vantrue
Vantrue
9:41
Today Games Apps Search
Back
4. Basic Operation
- 18 -
ENEN
A.Record Setup
-Resolution: The E3 camera has 4 resolution modes: Front+ Cabin+ Rear/
Front+ Cabin/ Front+ Rear/Single Front;
Front+ Cabin+ Rear Recording: 1944P+1080P+1080P 30FPS;
1440P+1080P+1080P 30FPS; 1080P+1080P+1080P 30FPS; 1440P+1080P+720P
30FPS; 1440P+720P+720P 30FPS; 1080P+1080P+720P 30FPS;
1080P+720P+720P 30FPS; 720P+720P+720P 30FPS;
Front+ Cabin Recording: 1944P+1080P 30FPS; 1440P+1080P 30FPS;
1080P+1080P 30FPS; 1080P+720P 30FPS; 720P+1080P 30FPS; 720P+720P
30FPS;
Front + Rear recording: 1944P+1080P 30FPS; 1440P+1080P 30FPS;
1080P+1080P 30FPS; 1080P+720P 30FPS; 720P+1080P 30FPS; 720P+720P
30FPS;
Front recording: 2592x1944P 30FPS; 2560x1440P 30FPS; 1920x1080P 30FPS;
1280x720P 30FPS.
-Loop Recording: Default setting is 3 min. You can choose the options
among 1/3/5 min and OFF.
-IR LEDs: Default setting is Auto. You can select auto, on, or off.
-G-Sensor: Select the level of G-sensor you need, then you can set 3
directions (Front + Rear/Left + Right/Up + Down). The G-sensor value in
each direction can be selected as 1/2/3/4/5/Off. The higher the sensitivity
level, the easier it is to trigger event recording. G-sensor is most sensitive
when set to 5.
System Setup
OK

- 19 -
EN
EN
EN
EN
EN
EN
EN
EN
-Audio Recording: The default is ON. Set recording to on or off.
-Exposure: The default value is +0.0. Adjust the exposure of the lens.
-REC Status Light: Default setting is ON. You can choose to turn on/off the
recording status light.
-WDR: Default is ON. For a better-balanced video effect, you can choose
to turn it off. This function is only for front and interior lenses.
-Rear HDR: The default is ON. Set recording to on or off.
-Rotate Display: Default is off. You can choose to flip the video screen up
and down(180 degrees).
-Cabin Mirror: The default is ON. If you turn it on, the internal recording
screen is displayed in mirror mode.
-Rear Mirror: The default is ON. If you turn it on, the rear recording screen is
displayed in mirror mode
-Number Plate: Select the number or letter to be set. After setting, your
license plate number can be displayed in the recorded video.
-Stamp: Enable or disable the watermark stamp on video and photos. The
watermark stamp includes time and date label, VANTRUE label, license
plate number, GPS location information, and speed label. All enabled by
default.
-Time Lapse: The default value is disabled. You can choose to enable
1FPS/5FPS/10FPS/15FPS.
-Parking Mode: You can choose the parking mode you need, including
Collision Detection/Motion Detection/Low Bitrate Recording/Low Framer-
ate Mode/OFF.
-Low-light Night Vision in Parking Mode: Default is on. When turned on, it
can optimize the recording effect of videos in parking mode.
-Mileage statistics: The default is on, and the GPS mileage information will
be stored in the memory card, and customers can view it on the comput-
er or export the file through the mileage statistics function in the APP.
-GPS Settings: GPS is enabled by default. GPS ON/OFF settings, speed unit
settings, and GPS information are all set here.

- 20 -
ENEN
B. System Setup
-Language: Available languages are Engish/Français/Español/Deutsch/I-
taliano/简体中文/русский/日本語/Polski.
-WiFi: The default is automatically to turn off wifi after 10 minutes without a
connection. Under this function, you can set Wi-Fi to automatically turn on
or off and turn off after 10 minutes, and view Wi-Fi information.
-Voice Control: The default sensitivity is Standard. Voice commands can
be recognized after the option is turned on. You can choose options such
as low sensitivity/high sensitivity/standard/off.
-Voice Content: Voice recognition commands. You can use different
commands to remote control the camera to work.
-Format Memory Card: Format all data on the memory card.
-Format Reminder Setup: Select the reminder options: 15 Days, 1 Month,
and Off. Default is off.
To prevent you from forgetting to format the memory card regularly, we
have added a format reminder time setting. You can choose to be
reminded after 15 days or 1 month, and calculate 15 days or 1 month
from the set date. When the time is up, you can choose "OK" to format, or
choose "Next."
Note: If you changing the format reminder option, the timing will restart as
soon as the option is changed.
-Date&Time: There are two ways to set the time and date: 1. GPS
automatic update, 2 Manual date/time setting. GPS automatic update is
enabled by default.
GPS automatically updates the date and time based on your time zone,
so you need to select the correct time zone first; you can also choose to
turn off GPS automatic update, turn on Manual date/time setting, and
manually correct date and time.
The date format and time zone settings can also be set under this menu.
-Auto LCD Off: Set the time to automatically turn off the LCD display after
no operation.
- 21 -
EN
EN
EN
EN
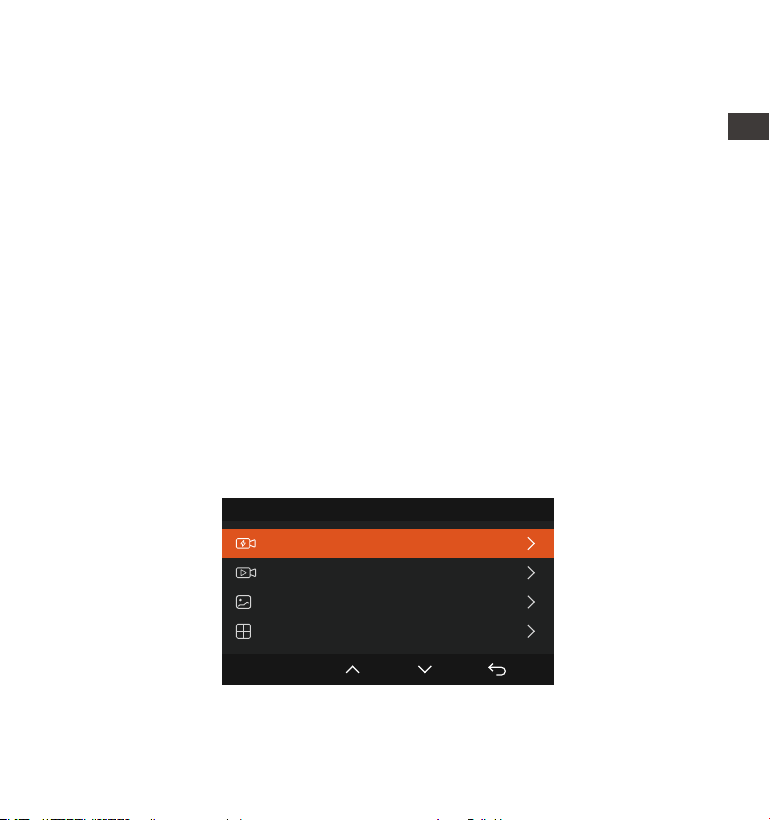
Files 1/4
Event Video
Normal Video
Photo
All Files
OK
-Event: Critical event videos detected by G-Sensor activity or manually
locked by user.
The file name format is
20300128_140633_0008_E_A.MP4
20300128_140633_0008_E_B.MP4
20300128_140633_0008_E_C.MP4
-Normal: Standard videos recorded. This folder saves loop recording
video, parking mode video, and time-lapse video.
The file name format of Loop Recording video is:
20300128_140633_0008_N_A.MP4;
The file name format of Parking Mode video is:
20300128_140633_0007_P_A.MP4;
The file name format of Time-Lapse video is:
20300128_140633_0006_T_A.MP4.
-Photo: Photos files.
-All: All the standard videos and critical event videos recorded.
Note: The suffix A represents the files recorded by the front camera, the
suffix B represents the files recorded by the cabin camera, and the suffix
C represents the files recorded by the rear camera.
If you set the Auto LCD Off to 3 min, the camera’s LCD screen will auto
light off after 3 min but recording will continue. If the setup is Off, the
screen will not turn off. You can choose the options among 30s, 1Min,
3Min and OFF.
-Device Sound: Set the volume of the device. The default volume level is
3, the lowest is 0, and the highest is 5.
-Prompt Tone: According to different situations, the dash cam is set with 5
kinds of prompt tones, which are power-on/off sound, keys sound, file
locked sound, format sound, and abnormal stop recording reminder. All
prompt tones are turned on by default.
-Frequency: Different countries have different frequencies. In order to
avoid affecting the video, you can choose 50Hz or 60Hz frequency
according to different regions.
-System Info: Check the current model, firmware version, and the
Vantrue official website.
-Certifications: You can view the certification information of E3 camera.
-Default Settings: Reset the device back to factory settings.
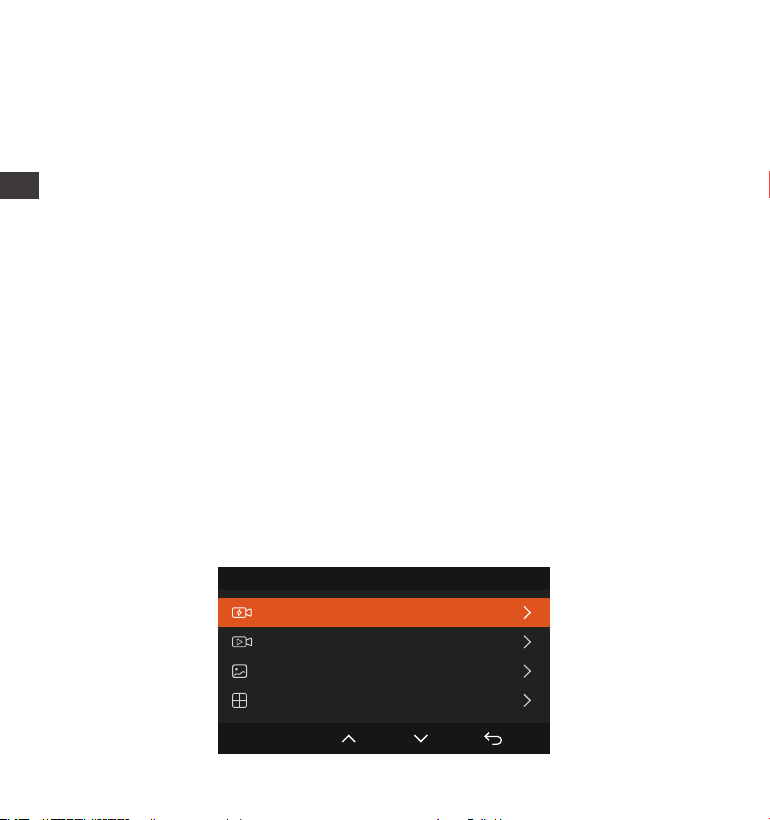
C. Files
Review the video and photo files recorded by the camera.

- 22 -
ENEN
-Event: Critical event videos detected by G-Sensor activity or manually
locked by user.
The file name format is
20300128_140633_0008_E_A.MP4
20300128_140633_0008_E_B.MP4
20300128_140633_0008_E_C.MP4
-Normal: Standard videos recorded. This folder saves loop recording
video, parking mode video, and time-lapse video.
The file name format of Loop Recording video is:
20300128_140633_0008_N_A.MP4;
The file name format of Parking Mode video is:
20300128_140633_0007_P_A.MP4;
The file name format of Time-Lapse video is:
20300128_140633_0006_T_A.MP4.
-Photo: Photos files.
-All: All the standard videos and critical event videos recorded.
Note: The suffix A represents the files recorded by the front camera, the
suffix B represents the files recorded by the cabin camera, and the suffix
C represents the files recorded by the rear camera.
4.2.1 Loop Recording
After inserting the memory card and connecting the power, the E3 dash
cam will automatically turn on and enter loop recording. The duration of
each recorded video will be saved based on the loop recording time
you set, saved in the normal video folder.
When the capacity of the normal video folder reaches 70% of the total
capacity, the new loop recording file will automatically overwrite the
original loop recording files. After this function is enabled, the video file
will automatically overwrite the loop, so as not to stop recording during
the driving process.
4.2 Specifications
- 23 -
EN
EN
EN
EN
14:39:07 02-10-2023
00:00:37
MP/H
35
1440P+1080P+1080P 30FPS
Note:
<1> The normal operation of the loop recording function is very depen-
dent on the speed of the memory card, so please format the memory
card regularly to avoid problems such as excessive memory card files
and card aging that affect the normal loop recording.
<2> Please check the loop recording video regularly to avoid the
necessary videos being overwritten by loop.
<3> When Loop Recording is turned off, the video lock function will no
longer work.
<4> After the loop recording is turned off, the duration of each video will
be 20 mins, and the recording will stop when the memory card capacity
is full.
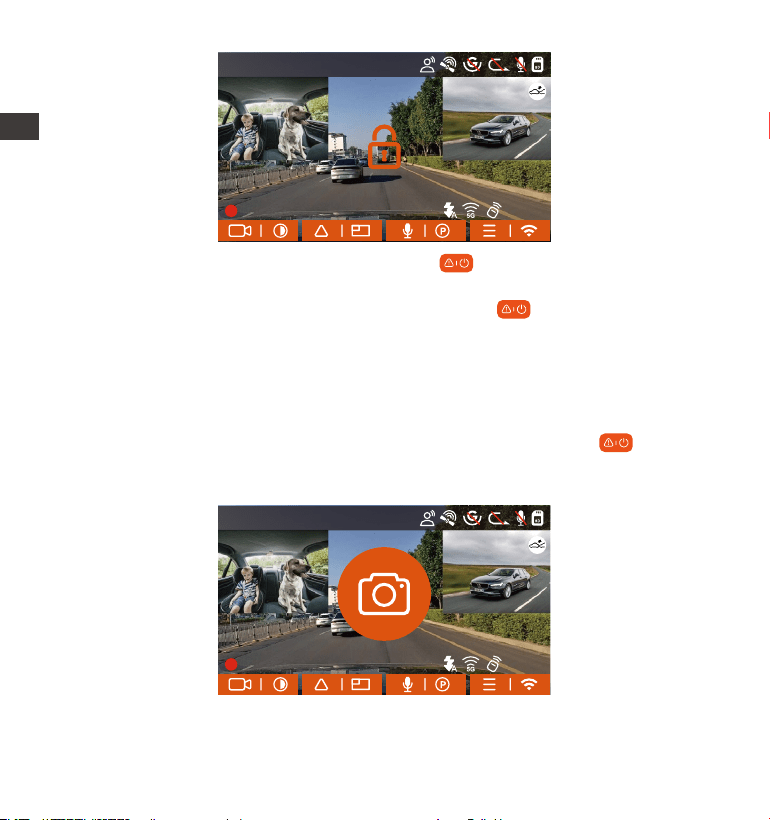
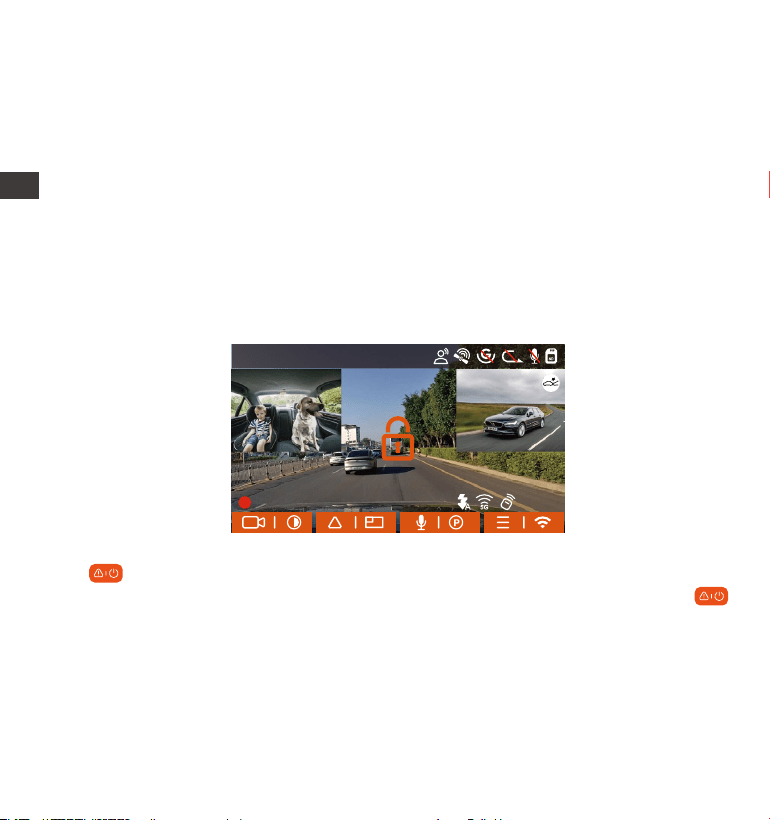
4.2.2 Event Recording
Event video is triggered by the G-sensor(Gravity Sensor), which can be
automatically triggered or manually locked. During driving, in case of
special circumstances, the camera will automatically lock for event
recording or you can manually lock it for event recording.
- 24 -
ENEN
14:39:07 02-10-2023
00:00:37
MP/H
35
1440P+1080P+1080P 30FPS
To manually lock the video, just press the button to lock the current
video and capture it.
During the lock video period, you can press the button to capture
multiple times. After recording, the video will be automatically saved in
the event video folder, and the photo will be saved in the photo folder.
Automatic locking event video is triggered when the car is hit/shaken.
The dash cam detects the vibration and automatically locks the current
video, which is saved in the event video folder.
During the locked recording period, you can also press the button to
take a picture. After the event video recording ends, the video will be
saved in the event video folder, and the photo will be saved in the photo
folder.
14:39:07 02-10-2023
00:00:37
MP/H
35
1440P+1080P+1080P 30FPS
- 25 -
EN
EN
EN
EN
EN
Note:
<1> The sensitivity of the automatic locking video trigger is determined by
the sensitivity of the collision. The higher the sensitivity setting, the greater
the probability of being triggered.
<2> The total capacity of the event video file accounts for 30% of the total
capacity of the current memory card. When the event video file reaches
the upper limit, the new event video file will automatically overwrite the
old event video file. It is recommended to periodically check and save
your event video files to avoid loss.
<3 > Lock recording will not trigger in either of the following situations:
Loop recording is off or Time lapse recording is on.
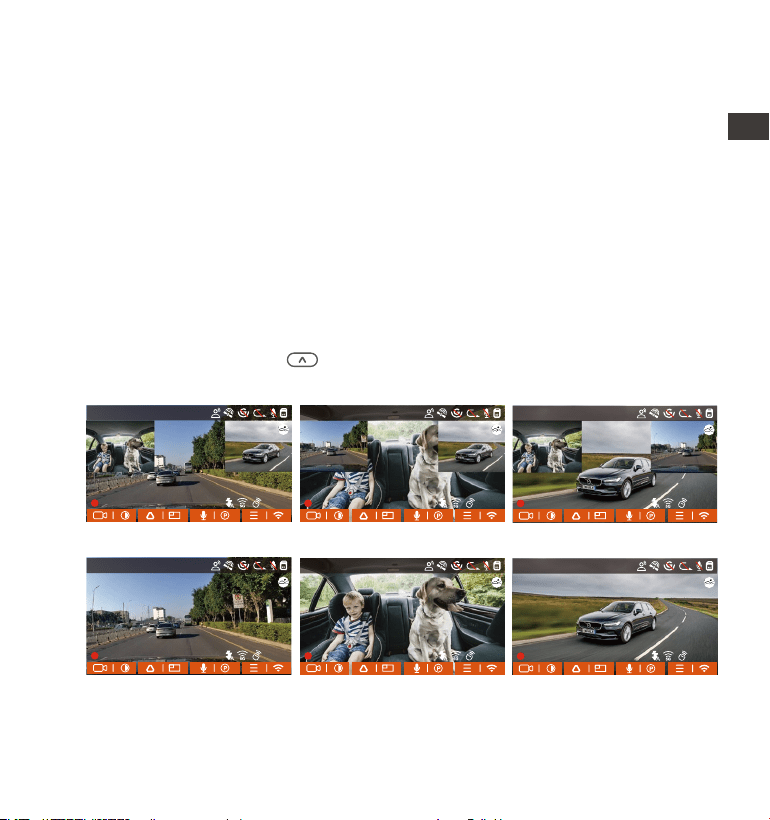
4.2.3 Switch the front and rear camera window display
You can click press the button to switch display to make the front,
inside and rear camera shows bigger on the LCD.
Front Camera Bigger Inside Camera Bigger Rear Camera Bigger
Single Front
Recording Display
Single Inside
Recording Display
Single Rear
Recording Display
14:39:07 02-10-2023
00:00:37
MP/H
35
1440P+1080P+1080P 30FPS
14:39:07 02-10-2023
00:00:37
MP/H
35
1440P+1080P+1080P 30FPS
14:39:07 02-10-2023
00:00:37
MP/H
35
1440P+1080P+1080P 30FPS
14:39:07 02-10-2023
00:00:37
MP/H
35
1440P+1080P+1080P 30FPS
14:39:07 02-10-2023
00:00:37
MP/H
35
1440P+1080P+1080P 30FPS
14:39:07 02-10-2023
00:00:37
MP/H
35
1440P+1080P+1080P 30FPS
- 26 -
ENEN
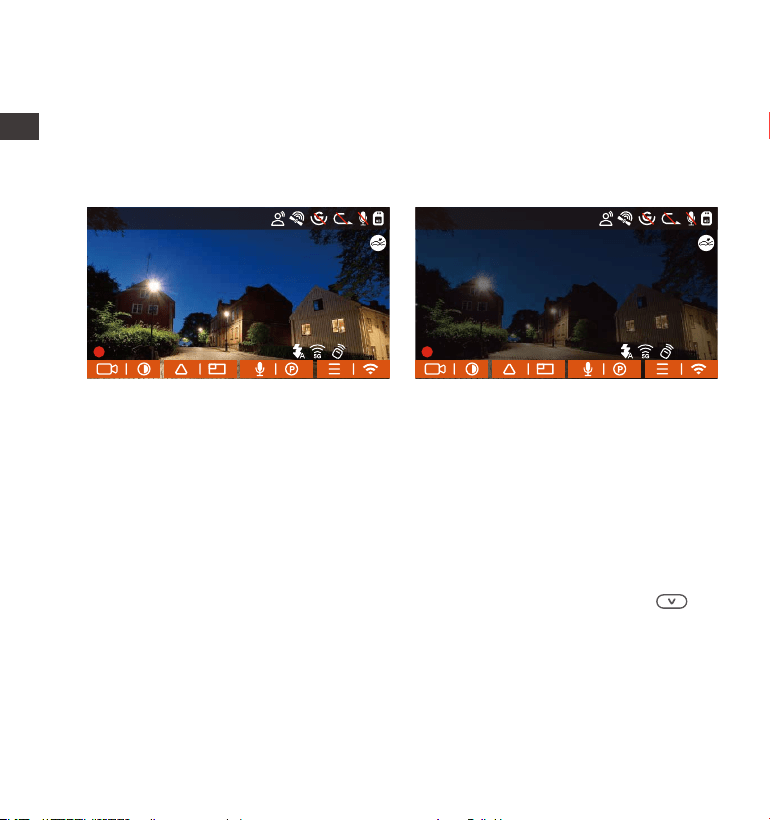
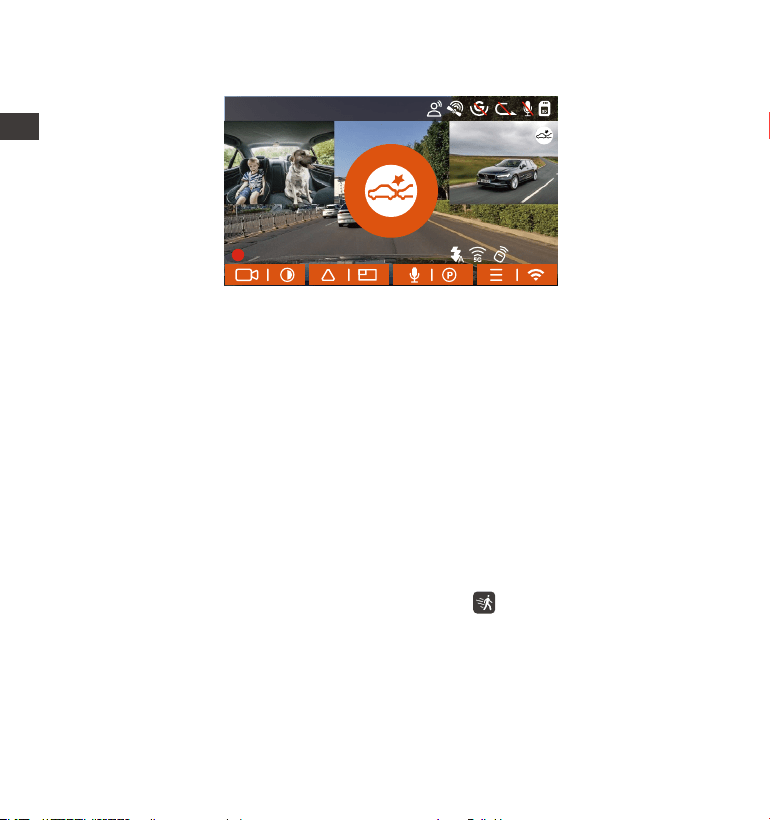
4.2.4 Low-light Night Vision in Parking Mode
In order to enhance the safety of parking at night, we make full use of the
lens performance combined with low-light night vision technology to
improve the night vision effect in parking mode. This function is in the open
mode by default. It will be triggered only after entering the parking mode
and will not affect normal recording.
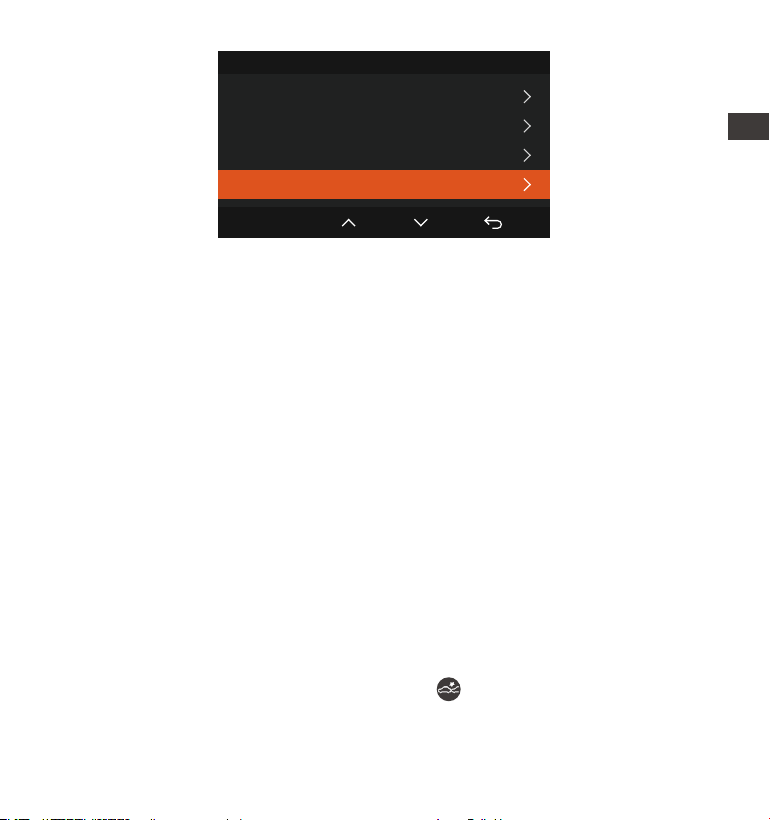
4.2.5 Parking Mode(When the parking mode is turned on, the time-lapse
recording will not work. These two functions cannot run at the same time)
Parking Mode operates as a sentry function under different situations. You
can switch to different parking monitoring modes according to different
parking situations.
After the parking mode is turned on, there are three ways to record: 1.
You can wait for 5 minutes to start automatically. 2. long press the
button to begin manually. 3. Install the ACC hardwire kit and the dash
cam will directly enter after the car is stopped the engine (the ACC
hardwire kit needs to buy separately).
Low-light Night Vision OffLow-light Night Vision On
14:39:07 02-10-2023
00:00:37
MP/H
35
1440P+1080P+1080P 30FPS
14:39:07 02-10-2023
00:00:37
MP/H
35
1440P+1080P+1080P 30FPS
- 27 -
EN
EN
EN
EN
Note:
To ensure the camera works properly in park mode, please use the
hardwire kits or other stable and continuous power supply to power the
dash cam.
The best working environment temperature of E3 is -4-158°F(-20°C to
70°C). We recommend using collision detection within this temperature
range, so once the temperature exceeds the normal working tempera-
ture range, it will automatically shut down. If the temperature is high,
please turn off the camera when parking.
Time-lapse video recording and parking mode (including collision
detection, motion detection, low bitrate recording, and low framerate
mode) can only be enabled one at a time. When one is enabled, the
other will be automatically disabled.
All videos recorded in parking mode(Collision Detection, Motion
Detection, Low Bitrate Recording, Low Framerate mode) will be saved
in the normal video folder. In order to prevent the video in parking
mode from being overwritten in a loop, please check and save the
required files in time to prevent loss.
1.
2.
3.
4.
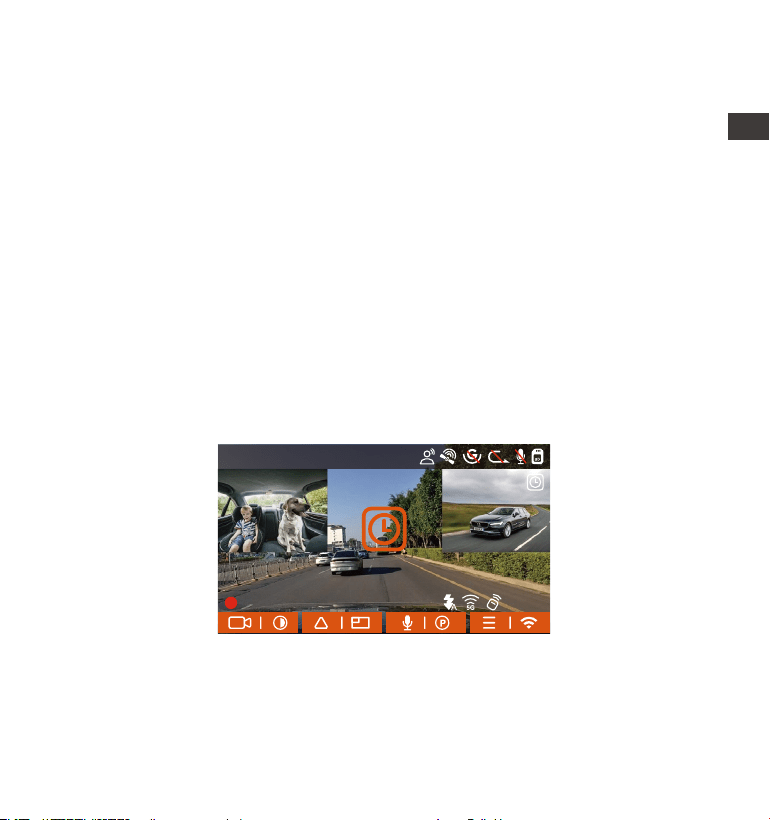
Collision Detection
When collision detection is enabled, the icon will be displayed on the
recording interface, indicating that the recorder is currently using collision
detection mode. Collision detection sensitivity can be adjusted from 1 to
Parking Mode
Collision Detection
Motion Detection
Low Bitrate Mode
OK
Low Framerate Mode
- 28 -
ENEN
When the Collision Detection is turned on, and no movement is detected
after 5 minutes of recording (5-minute entry mechanism for short), then
Collision Detection is activated with a Collision Detection icon at the top
right corner of the screen, and the camera automatically turns off. When
the dash cam is turned off, it will start to record for 1 minute after being
shaken, then turn off the dash cam again.
Note:
If the dash cam continues to be hit during the collision detection record-
ing, it will exit the collision detection mode and enter normal recording,
restarting the 5-minute entry mechanism.
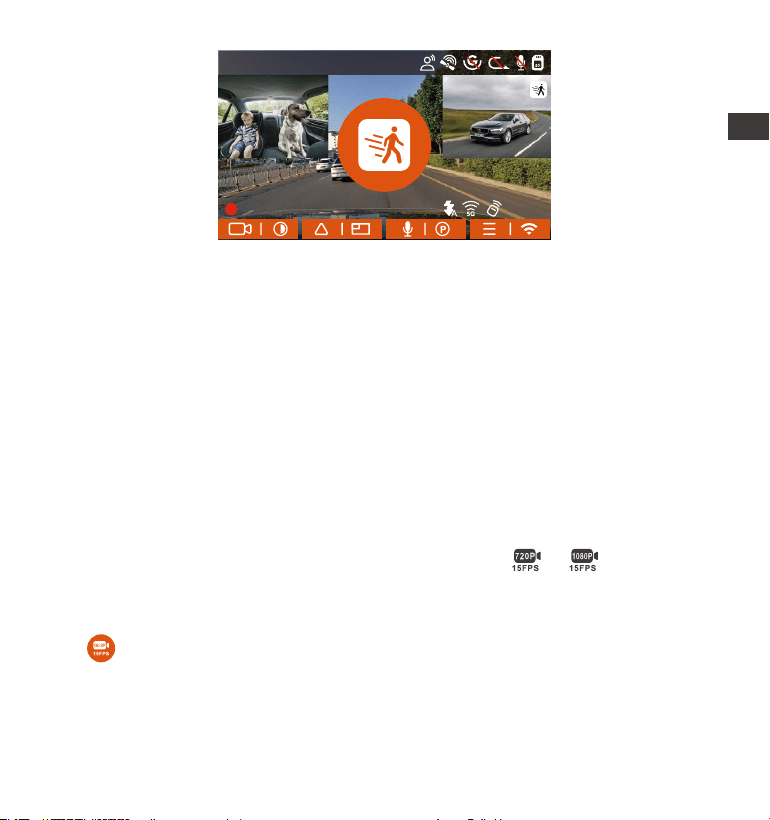
Motion Detection
When the motion detection is turned on, the icon will be displayed on
the recording interface, indicating that the dash cam is currently in motion
detection mode. Motion detection has three levels: low/medium/high
that can be adjusted, and the corresponding detection ranges for motion
detection is 6.6ft/13ft/19.7ft.
5 levels. You can adjust according to your habits, as well as the surround-
ings of the car.
14:39:07 02-10-2023
00:00:37
MP/H
35
1440P+1080P+1080P 30FPS
- 29 -
EN
EN
EN
EN
EN
EN
EN
EN
14:39:07 02-10-2023
00:00:37
MP/H
35
1440P+1080P+1080P 30FPS
When the motion Detection is turned on, and no movement is detected
after 5 minutes of recording, then an orange icon will appear in the
center of the screen, and the screen will turn off after 3 minutes.
When the camera detects object movement, it will automatically trigger
video recording for 30 seconds. after the motion detection recording
ends, the camera will load a 15s pre-recorded video into the 30 motion
detection video and save the 45s video to the normal folder.
Note:
Motion detection mode can only be engaged when the camera is
turned on. Once the camera is turned off, the motion detection mode
will not work.
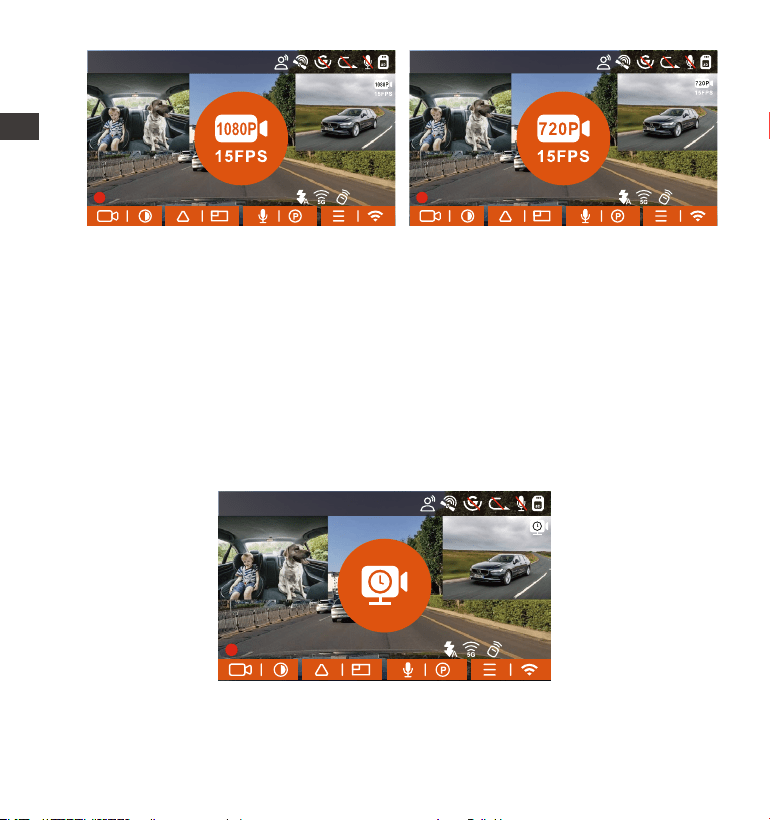
Low Bitrate Recording
When Low Bitrate recording is enabled, the icons or will be
displayed in the lower right corner of the screen, depending on whether
you choose 1080P 15FPS or 720P 15FPS.
If no movement is detected after 5 minutes of recording, there will be a
icon that appears in the center of the screen. The resolution of all
current video will be automatically switched to 1080P 15FPS or 720P 15FPS
for recording, and the recording duration will be determined according
to the currently set loop recording duration. When the camera is vibrates
or is moved, it will automatically exit, wait 5 minutes, and enter again.
- 30 -
ENENENEN
[Normal Recording Time = Time Lapse Recording Time (Sec) x Recording
Frame Rate FPS/Time Lapse Option]
(Time should be converted into seconds)
Note:
Low Bitrate recording can only be engaged when the camera is turned
on. Once the camera is turned off, the Low Bitrate recording will not work.
Low Framerate mode
When the low framerate mode is selected, the camera will record
according to your selection among 1FPS/5FPS/10FPS/15FPS.
For example, if you select 1FPS and the current video resolution frame rate
is 30FPS, the camera will generate a 30FPS video per second. Low
framerate mode can greatly preserve the integrity of the video and save
space on the memory card.
14:39:07 02-10-2023
00:00:37
MP/H
35
1440P+1080P+1080P 30FPS
14:39:07 02-10-2023
00:00:37
MP/H
35
1440P+1080P+1080P 30FPS
14:39:07 02-10-2023
00:00:37
MP/H
35
1440P+1080P+1080P 30FPS
- 31 -
4.2.6 Time Lapse
When time lapse is selected, the camera will record according to your
selection of 1FPS/5FPS/10FPS/15FPS.
For example, if you select 1FPS and the current video resolution framerate
is 30FPS, the recorder will generate a 30FPS video per second. Low frame
rate mode can greatly preserve the integrity of the video and save
space on the memory card.
The time unit of the calculation formula is seconds, so the final normal
recording time calculated is also in seconds. If you need to convert it
into other time units, please check the units and convert by yourself.
The low framerate mode is similar to the time-lapse recording function,
but the difference is that there is no 5-minute entry mechanism for
time-lapse recording, which will be directly turned on after setting.
In low framerate mode, the camera also needs a stable power supply.
Once the power is off or exhausted, the camera will shut down.
1.
2.
3.
Note:
The formula for calculating video duration is:
[Normal Recording Time = Time Lapse Recording Time (Sec) x Recording
Frame Rate FPS/Time Lapse Option]
(Time should be converted into seconds)
EN
EN
EN
EN
14:39:07 02-10-2023
00:00:37
MP/H
35
1440P+1080P+1080P 30FPS
- 32 -
4.2.7 GPS Function
The GPS function is one of the important functions of the dash cam. GPS
is enabled by default, and the camera receives GPS signals through the
GPS mount. It can automatically calibrate the time and date in your
area, recording the location where the video was taken and the speed
of the car at the time.
40
46
39
43
48
GPS Information
The GPS connection will be completed within 1 minute after you turn
on the device. If the GPS connection is not successful within 1 minute,
please check whether the DEVICE has turned on the GPS function,
whether the GPS bracket is properly connected, and whether your
environment (underground parking lot, densely populated residential
area, subway, tunnel, etc.)is affecting the reception of GPS signal.
GPS information is recorded along with the video. To view it, please
download and install the VANTRUE App and VANTRUE GPS Player
(available for download at www.vantrue.net).
Note:
1.
2.
4.2.8 Automatic Correct the Time via GPS
The GPS automatic correction time setting for the E3 dash cam is turned
on by default. You can select GMT-08:00 by selecting your time zone,
such as Los Angeles. If you do not know the time zone of your location,
you can use WIFI to connect to the Vantrue App, and confirm that the
automatic time adjustment function in the App is turned on.
ENEN

- 33 -
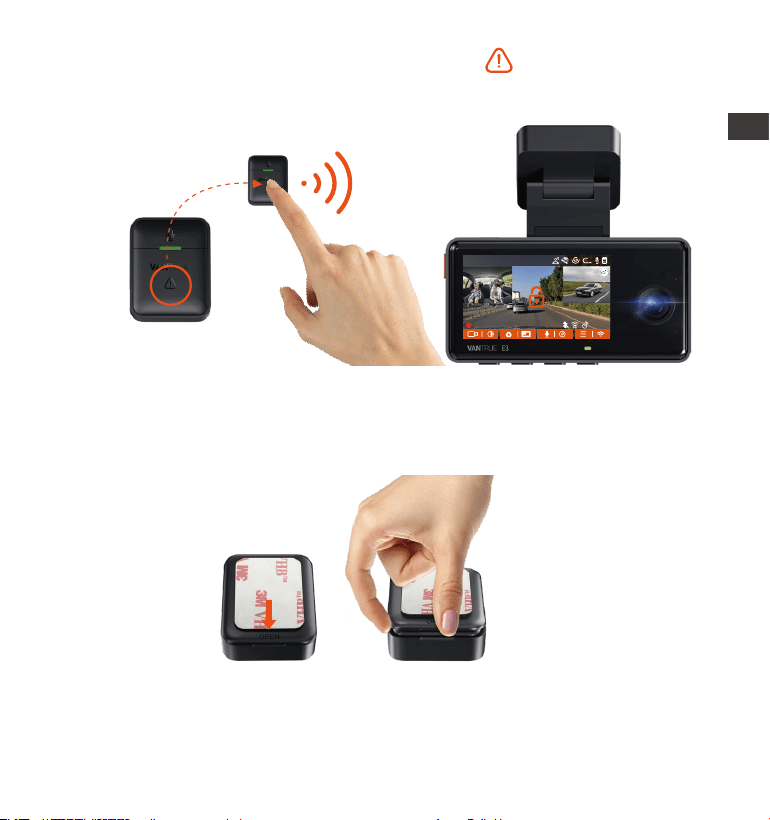
Installation of the remote control:
After the remote control is matched with the camera, please select a
EN
EN
EN
EN
Time & Date
GPS Automatic Update
Manually Set Date / Time
Date Style
Time Zone
OK
EN
EN
EN
EN
14:39:07 02-10-2023
00:00:37
MP/H
35
1440P+1080P+1080P 30FPS
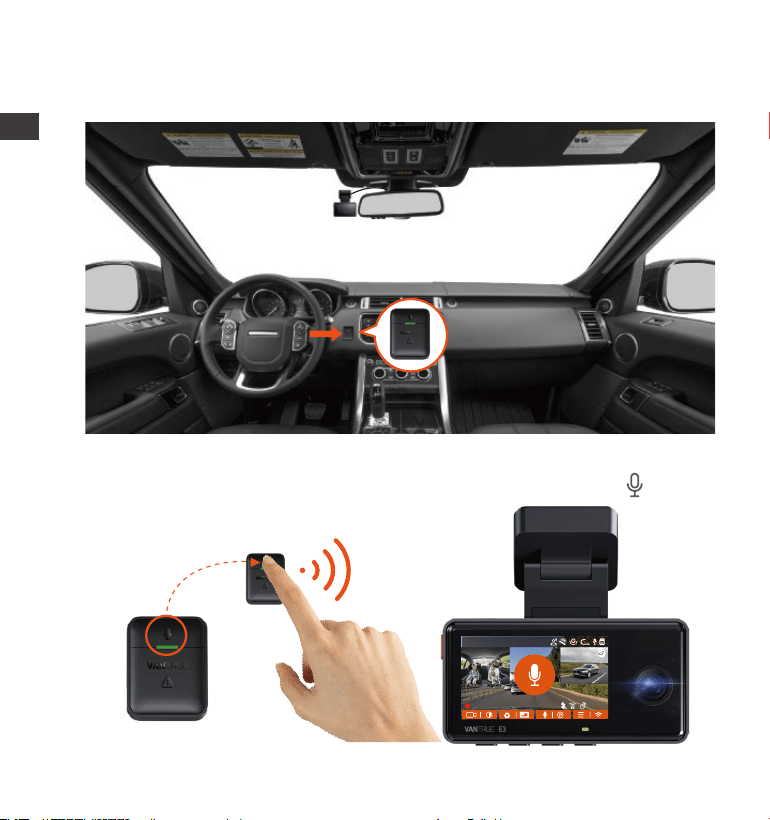
4.2.9 Wireless Remote Control
The camera is equipped with a remote control, which can be used to
quickly control the camera to snapshot, take event video, set audio
on/off and perform other functions.
Remote control connection:
Remove the insulating strip on the remote control, and the camera will
automatically match the remote control. No manual pairing with the
dash cam is required.
When the icon appears on the screen, it means that the remote
control has been successfully matched.
- 34 -
After the remote control is successfully connected, press the button
to enable or disable audio.
1.
Functions of the remote control:
suitable location on your car, then tear off the adhesive sticker from the
remote control and stick it to your selected location. (Note: The remote
control needs to be installed in a position that does not affect safe driving)
ENEN
14:39:07 02-10-2023
00:00:37
MP/H
35
1440P+1080P+1080P 30FPS
- 35 -
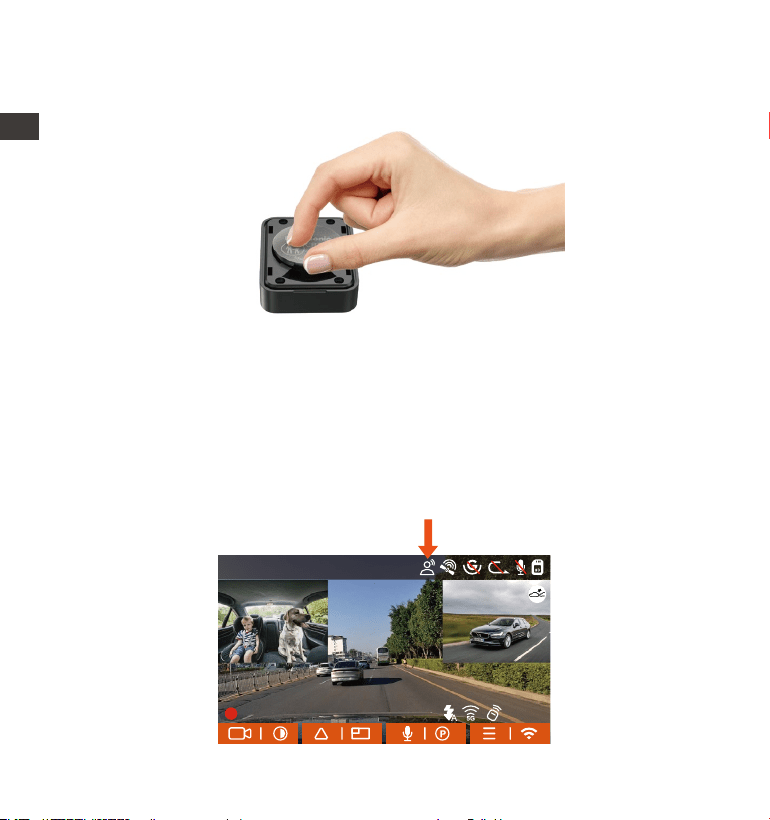
Replacing the remote control battery:
After successful connection, short press the button to lock the
current file and take a snapshot; continue to short press during the
locked video, and continue to capture the photo.
2.
After opening, gently pry the battery open from the groove in the front
of the battery compartment, then take out the old battery, put the new
battery in, and cover the back cover of the remote control.
2.
There is an "OPEN" mark on the bottom of the remote control, please
slowly pry open the surrounding gap along the groove position of this
mark to open.
1.
EN
EN
EN
EN
14:39:07 02-10-2023
00:00:37
MP/H
35
1440P+1080P+1080P 30FPS
- 36 -
4.2.10 Voice Assistant
In addition to controlling the camera with the remote control, you can
also control the camera with voice command. Currently supported
languages are English, Japanese, Russian, and Chinese. For more detailed
voice commands, please check System Settings > Voice Content.
The default setting is standard sensitivity. Voice recognition has options
such as low sensitivity/standard/high sensitivity/off. You can control the
camera with voice commands.
Note:
When the power is low, the battery needs to be replaced(The battery
model of the remote control is a CR2032 battery). It does not support
charging.
ENEN
14:39:07 02-10-2023
00:00:37
MP/H
35
1440P+1080P+1080P 30FPS
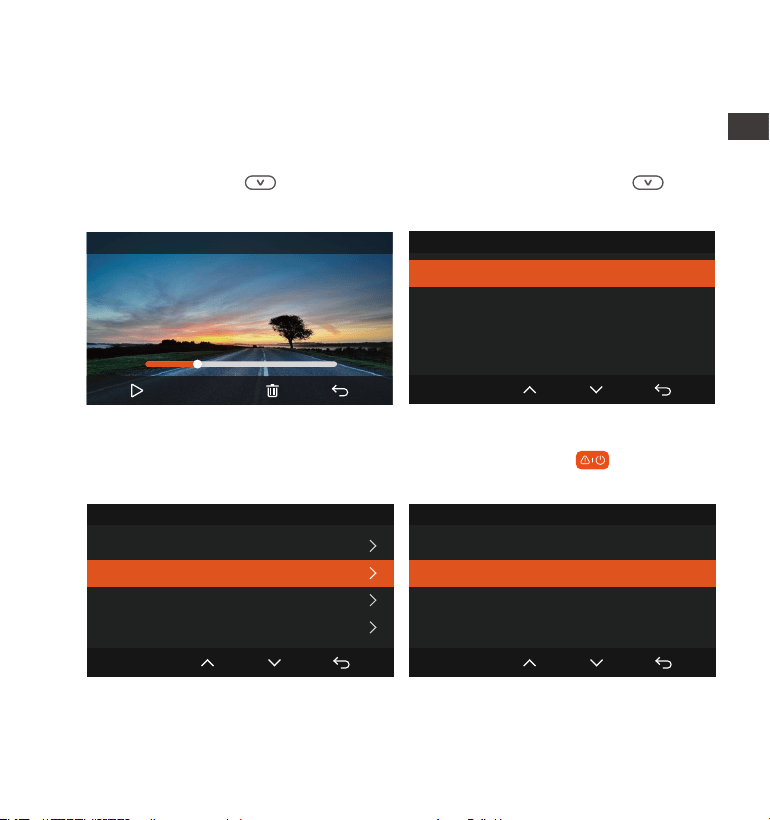
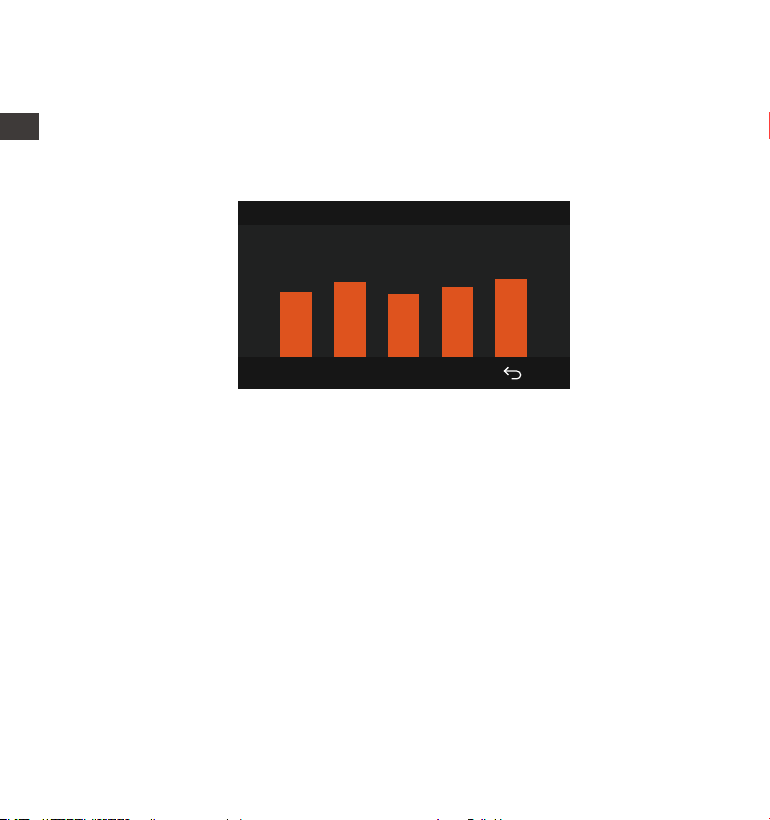
4.2.11 Viewing and Deleting Video/Photos
a.Viewing and Deleting files on the Camera
-Playback Files
After clicking "Files", enter any folder, and after opening the video folder,
you can press the button to select the next file, or press the button
to delete the file during playback.
-Deleting Files
Go to "Files", choose a video on the dash cam, press the button in the
file browsing interface to pop up the delete Menu.
- 37 -
EN
EN
EN
EN
Event Video
Delete This File?
Delete All Files?
OK
00:30
01:07
20230210_140633_0002_E_B.MP4
1X
Event Video
20230210_140633_0001_E_B.MP4
20230210_140633_0002_E_B.MP4
20230210_140633_0003_E_B.MP4
20230210_140633_0004_E_B.MP4
2/5
OK
Event Video
Delete This File?
Delete All Files?
OK
- 38 -
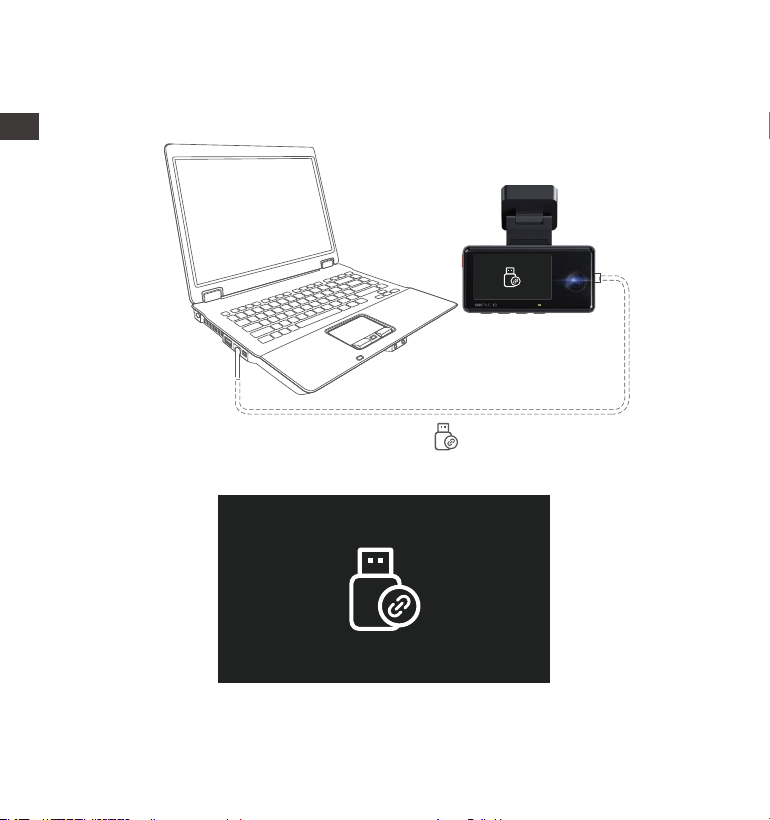
Connect the included TYPE-C USB data cable to the camera and the
computer.
b.Viewing and Deleting files a Computer
1.
After the connection is successful, the icon will appear on the display
of the camera to transfer data, and then you can view the video files in
the computer folder.
2.
Depending on the computer systems of different users, after the camera
is connected to the computer, it will be displayed as a removable drive
or a removable folder.
3.
ENEN
- 39 -
Note:
For video playback in the app, or downloads to SD card, there will be
no network traffic consumption.
1.
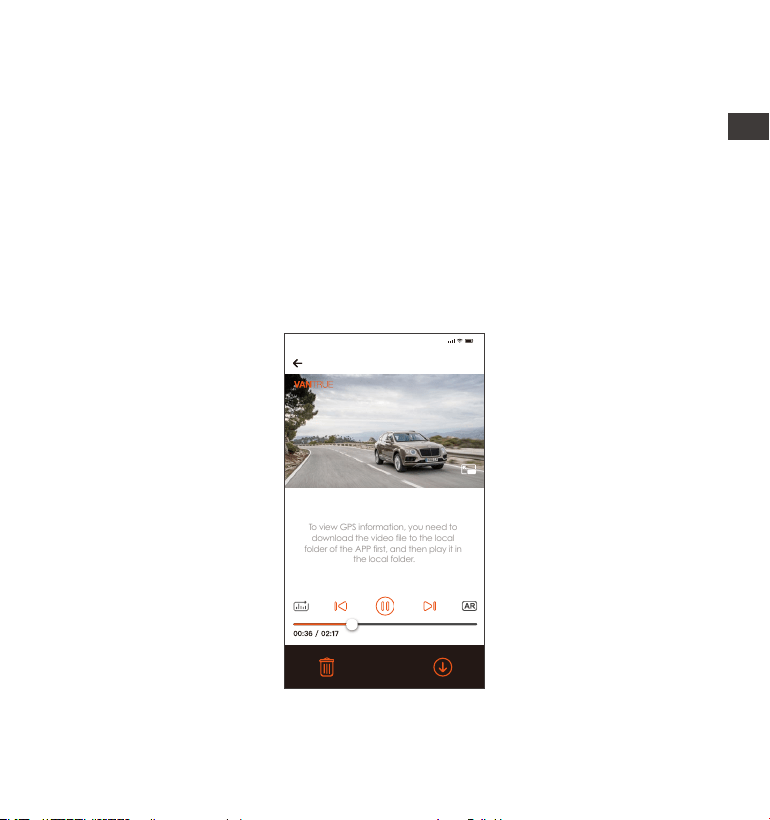
c.Viewing and Deleting on the ”Vantrue” App
After the camera is successfully connected to the mobile phone through
WiFi, it can play back, download and delete files in the mobile app.
EN
4.
5.
6.
To view the files on the computer, you can directly access, right-click
to open the menu and delete them.
You can also use a USB card reader to read the memory card informa-
tion.
To ensure a stable power supply, please check whether the computer
interface is a USB3.0 interface. When connecting to a desktop comput-
er, it is recommended to use the USB port on the back of the host
computer.
EN
EN
EN
EN
20230210_115036_0079_N_A.MP4
02/10/2023 11:5:35 E3 000.000000. 000.000000. 36MK/H
To view GPS information, you need to
download the video file to the local
folder of the APP first, and then play it in
the local folder.
Note:
9:41
- 40 -
2.
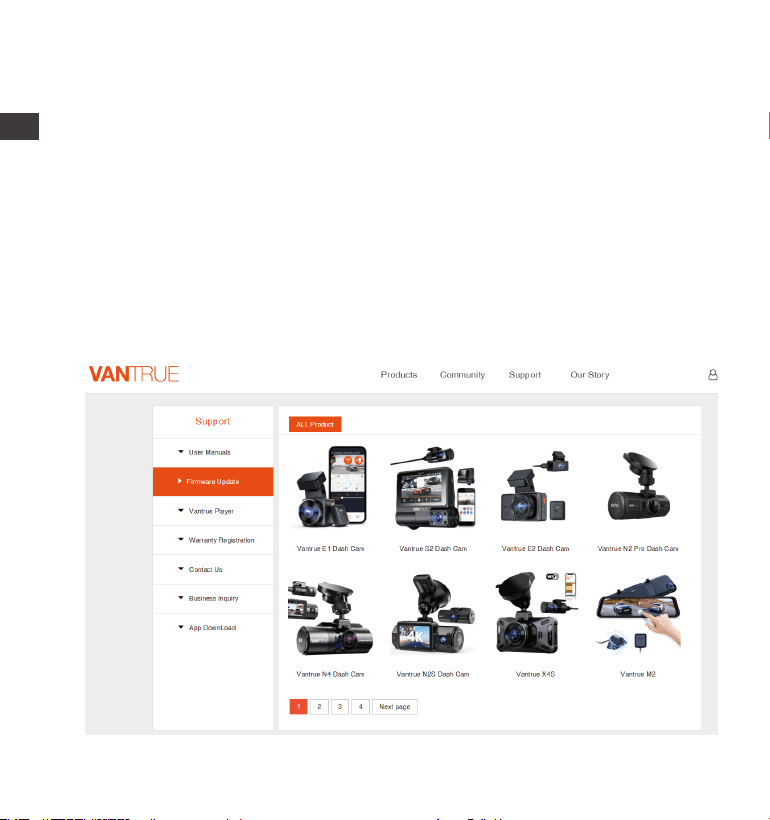
4.2.12 Upgrading the Firmware
The system will automatically update with the Micro SD card the firmware
upgrade file. The camera will restart once the upgrade has been
completed.
The latest firmware version is always available at the official VANTRUE
website (www.vantrue.net). We strongly recommend registering your
product (www.vantrue.net/register) to receive a notification email when
a new firmware update is available.
You can view GPS track information only after the video file is down-
loaded and played back locally. At the same time, you need to
disconnect the WIFI of the dash cam, otherwise the map information
will be blank.
ENEN

- 41 -
4.2.13 Working Temperature
The camera is designed to operate in temperatures from -4 to 140°F (-20
to 60°C). Temperatures outside this range risk degrading the camera’s
performance work and causing damage.
To avoid damage
In hot weather, do not expose the camera directly to the sun when the
car is parked.
In extreme winter conditions, i.e. -4°F (-20°C) or lower, detach the
camera from the windshield when not in use, and store in the glove box.
5. Specifications
E3Model
Front: F/1. 8 wide aperture;
Inside: F/2.0 wide aperture;
Rear: F/1. 8 wide aperture;
Engish/Français/Español/Deutsch/Italiano/简体
中文/русский/ 日本語/Polski
Novatek high-performance processor
Sony CMOS Sensor
Built-in triaxial sensor
Built-in 2.4GHz&5GHz
2.45’’ IPS Screen
The specifications of this product may change without prior notice due to
product improvements.
Chips
Image Sensor
Screen
WiFi
Front: 160° wide viewing angle;
Inside: 165° wide viewing angle;
Rear: 160° wide viewing angle;
Aperture
Languages
Camera Angle
Screen
EN
EN
EN
EN

- 42 -
Video Resolution
Front + Inside + Rear Mode:
1944P+1080P+1080P 30FPS;
1440P+1080P+1080P 30FPS;
1080P+1080P+1080P 30FPS; 1440P+1080P+720P
30FPS; 1440P+720P+720P 30FPS;
1080P+1080P+720P 30FPS; 1080P+720P+720P
30FPS; 720P+720P+720P 30FPS;
Front + Inside Mode: 1944P+1080P 30FPS;
1440P+1080P 30FPS; 1080P+1080P 30FPS;
1080P+720P 30FPS; 720P+1080P 30FPS;
720P+720P 30FPS;
Front + Rear Mode: 1944P+1080P 30FPS;
1440P+1080P 30FPS; 1080P+1080P 30FPS;
1080P+720P 30FPS; 720P+1080P 30FPS;
720P+720P 30FPS;
Single Front Mode: 2592x1944P 30FPS;
2560x1440P 30FPS; 1920x1080P 30FPS;
1280x720P 30FPS;
MP4
JPEG
Built-in microphone and speaker
Video File Format
Image Format
Audio
Memory Storage
Type C
Built-in super capacitor
DC 5V 2.4A
6W
USB Port
Power Source
Supply voltage current
Power
External: 32GB-512GB Micro SD Card, U3, Class
10(not included in the package)
-4°F to 140°F(-20°C to 60°C)
-4°F to 158°F(-20°C to 70°C)
Working Temperature
Storage Temperature
ENEN

- 43 -
Warranty
The VANTRUE
®
Element 3 Dash Cam comes with a full 12 months warranty.
If you register your product on our official site (www.vantrue.net/register),
you can extend the warranty to 18 months.
Support
If you have any questions regarding your product, please do not hesitate
to contact us via Amazon or drop us an email at [email protected].
Queries are typically answered within 12-24 hours.
Your opinion matters
VANTRUE
®
is firmly committed to always improving our products, services,
and user experience. If you have any thoughts on how we can do even
better, we welcome your constructive feedback and suggestions.
Connect with us today at [email protected].
THANK YOU for choosing
6. Warranty & Support
EN
EN
EN
EN
EN
EN
EN
EN
- 44 -
1. What’s in the Box?
H.
Paño de
limpieza *1
Pegatinas de
advertencia *2
L.
Filtro CPL
A.
Dashcam
VANTRUE
®
E3
E.
Cable de
cámaratrasera
tipo C (6m)
I.
Manual de
usuario
M. N.
B.
Cámara trasera
G.
Palanquilla *1
K.
D.
Montura
adhesiva de
GPS
C.
Control remoto
inalámbrico
VANTRUE
®
F.
Cable de datos
Tipo C (1m, solo
para transferencia
de archivos)
Cargador de
auto con cable
Tipo C incorporado
(3.5m)
Pegatinas
adhesivas 3M
J.
Pegatinas
electroestáticas
*2
Accesorios opcionales
Element 2
User Manual
Voice-Controlled Dual Dash Cam
ENES
- 45 -
2. Descripción de la cámara
Nro. DescripciónNombre
1
Cámara delantera para grabar videos de
eventos en la vía.
2 Cámara
delantera
Provee sonido durante la reproducción de video.
3
Altavoz
Conecte a un cable Tipo C o cargador de
automóvil para cargar como fuente de
alimentación externa.
Puerto de
alimentación
Puerto USB Tipo C para cargar y transferir datos;
puerto de transmisión de video para la
grabación de la cámara trasera.
4 Puerto Tipo C
para la cámara
trasera
Pantalla LCD de 2.45 pulgadas.5 Pantalla
Una luz verde fija significa que la cámara está
grabando.
6 REC
EN
EN
EN
ES
14
15
16
3
4
21
5 6 7
8
131211
10
9
VTJE1210130

Cámara para grabación de video dentro del
automóvil.
7 Cámara interior
8
9
Durante la grabación de video y modo de
espera, presione brevemente el botón para
cambiar la ventana de video; en el menú de
ajustes y explorador de archivos, presione
brevemente para mostrar la opción anterior,
manténgalo presionado para desplazarse hacia
arriba y mostrar las opciones; en el modo de
reproducción, presiónelo brevemente para
adelantar; en el modo WiFi, presione cualquier
tecla para salir del Modo WiFi.
10
Durante la grabación de video y modo de
espera, mantenga presionado el botón para
entrar al modo de estacionamiento, y presione
brevemente el botón para encender/apagar el
micrófono; en el menú de ajustes, mantenga
presionado el botón para desplazarse a través de
las opciones del menú, y presione el botón
brevemente para mostrar la siguiente opción del
menú; durante la exploración de archivo,
mantenga presionado el botón para desplazarse
al archivo de visualización, presione el botón
brevemente para ver el siguiente archivo; en el
11
Botón
Botón
Botón
Número de serial para el registro de la garantía.Número de serial
Durante la grabación de video, mantenerlo
presionado apagará la pantalla y presionarlo
brevemente detendrá la grabación; en el modo
de espera, presionarlo brevemente confirma la
acción; en el modo de reproducción, una
pulsación breve inicia/detiene la grabación de
video.
ENES
- 46 -
modo de reproducción, presione el botón
brevemente para que aparezca el menú de
eliminar archivo; en el Modo Wi-Fi, presione
cualquier tecla para salir del modo WiFi.

- 47 -
Provee sonido durante la reproducción de video.
Durante la grabación de video y modo de
espera, mantenga presionado el botón para
entrar al modo de estacionamiento, y presione
brevemente el botón para encender/apagar el
micrófono; en el menú de ajustes, mantenga
presionado el botón para desplazarse a través de
las opciones del menú, y presione el botón
brevemente para mostrar la siguiente opción del
menú; durante la exploración de archivo,
mantenga presionado el botón para desplazarse
al archivo de visualización, presione el botón
brevemente para ver el siguiente archivo; en el
12
Durante la grabación de video, presionarlo
brevemente bloqueará el archivo actual y
capturará una fotografía, manténgalo presionado
para apagar el dispositivo; en el modo de espera,
una pulsación breve capturará una imagen,
mantenerlo presionado apagará el dispositivo; en
el estado WiFi, una pulsación corta saldrá del WiFi
y mantenerlo presionado apagará el dispositivo.
14
Altavoz
Botón
Luz indicadora LED
DescripciónLED
Luz verde estática En modo de espera
La cámara está grabando
Estatus de luz LED
REC
Luz verde parpadeante
13
16 Botón de reinicio
Provee almacenamiento expandible (hasta
512GB en FAT32, U3 o mayor).
Presiónelo brevemente para reiniciar la cámara.
15
Ranura de
tarjeta microSD
EN
EN
EN
ES
Durante la grabación de video y modo de
espera, manténgalo presionado para encend-
er/apagar el WiFi, presione brevemente el botón
para entrar al menú o volver, y manténgalo
presionado para encender o apagar el WiFi; en el
Modo WiFi, presione cualquier tecla para salir del
Modo WiFi.
Botón
modo de reproducción, presione el botón
brevemente para que aparezca el menú de
eliminar archivo; en el Modo Wi-Fi, presione
cualquier tecla para salir del modo WiFi.
14:39:07 10-02-2023
00:00:37
MP/H
35
1440P+1080P+1080P 30FPS
- 48 -
Descripción de la pantalla
Grabación en bucle apagado;
Grabación en bucle por 1 min;
Grabación en bucle por 3 mins;
Grabación en bucle por 5 mins;
Sensor G encendido;
Sensor G apagado;
Resolución de
video;
Conectando señal GPS;
Señal GPS bloqueada;
Asistente de voz encendido;
Asistente de voz apagado;
El control remoto está conectado;
Que parpadee significa que el
control remoto no está conectado;
Luz Ir Apagada;
Luz Ir Encendida.
Hora actual (24H);
Fotografía;
Archivo de
emergencia
bloqueado;
Fecha actual (MM/DD/AA);
Micrófono encendido;
Micrófono apagado;
Tarjeta de memoria no insertada;
Tarjeta de memoria insertada;
Tiempo de
grabación
(Video actual);
Luz Ir Automática
Encendida/apagada;
ENES
Detección de colisión
encendido
Modo de fotogramas
bajos en 1080p
encendido;
Modo de fotogramas
bajos en 720p
encendido;
Detección de
movimiento encendido;
Modo de estaciona-
miento con fotogramas
bajos;
Lapso de tiempo
encendido
Velocidad de conducción
registrada (KPH or MPH);
Wi-Fi desactivado
Wi-Fi 2.4G activado
Wi-Fi 5G activado
Wi-Fi 2.4G conectado
Wi-Fi 5G conectado
Indicación de botón
- 49 -
3. Comenzando
3.1 Instalar una tarjeta de memoria (se recomienda la tarjeta microSD de alta
velocidad U3 de Vantrue).
Por favor inserte una tarjeta de memoria compatible (capacidad de la
tarjeta de memoria: 32GB-512GB, velocidad de la tarjeta:
U3/Clase10/A2), debido a que la cámara tiene ciertos requerimientos
para la velocidad de la tarjeta de memoria. Para una operación
confiable, nosotros recomendamos usar la tarjeta SD VANTRUE (se vende
por separado).
Instalación de la tarjeta de memoria: Hay un ícono indicando la dirección
de inserción de la tarjeta de memoria. Por favor introduzca la tarjeta de
memoria en la ranura de tarjeta de acuerdo a la dirección indicada por
el ícono, hasta que un “clic” audible sea escuchado en la ranura de la
tarjeta, indicando que la tarjeta de memoria fue insertada apropiada-
mente.
Antes de usar esta tarjeta, por favor siga los siguientes pasos para
formatearla apropiadamente:
Si la cámara está grabando, por favor presione el botón de para
pausar la grabación, entonces presione el botón de para acceder
EN
EN
EN
ES

- 50 -
La tarjeta microSD debe ser formateada una vez al mes para maximi-
zar el la vida útil de la tarjeta de memoria.
No quite ni inserte la tarjeta de memoria durante grabaciones para
evitar la pérdida de videos importantes.
Por favor no utilice en la cámara tarjetas malas o tarjetas de baja
velocidad, ya que así es fácil que la grabación se detenga o se pierda
debido fallos en la tarjeta de memoria..
Antes de formatear la tarjeta de memoria, por favor revise el archivo
de videos de emergencia en la tarjeta SD para ver si hay algún video
que deba ser guardado en otro lado, para así no perder videos
importantes por error
RECORDATORIO:
1.
2.
3.
4.
al menú, entonces entre a “Sistema”, seleccione la opción de Formatear
la tarjeta SD, y confirme el formateo de la tarjeta de memoria hasta que
vea en pantalla “Formateo exitoso”.
Después de insertar la tarjeta de memoria, si aparece en pantalla “error
de tarjeta, por favor formatee” (tenga en cuenta que así no se puede
grabar), por favor presione directamente el botón de para acceder
al menú y comenzar el proceso de formateo.
ENES
- 51 -
3.2 Instalar la cámara en su parabrisas
Alinee la montura con la interfaz de montura de la cámara, entonces
empuje hacia adentro hasta que la montura esté alineada.
1.
Antes de la instalación, por favor encienda la dashcam y verifique si el
ángulo de grabación de la lente frontal e interior son apropiadas a
través de la visualización de grabación.
2.
Limpie exhaustivamente el parabrisas con agua o alcohol, entonces
pásele un paño seco. Ponga la pegatina electroestática detrás del
retrovisor, la cual es la posición recomendada para evitar que se
bloquee su vista mientras conduce.
3.
EN
EN
EN
ES
- 52 -
Quite la cinta 3M de la montura, entonces fije la montura y la cámara
en las pegatinas electroestáticas.
4.
Saque el cable de la cámara trasera, conecte la cámara principal y la
cámara trasera, y saque el cargador del automóvil para conectarla.
Después de que la cámara esté encendida, elija una ubicación
apropiada e instálela.
5.
Nota: Hay pegatinas electroestáticas con lámina protectora doble faz.
Por favor remueva la lámina protectora Nro. 1 y pegue la pegatina
electroestática en el parabrisas, y entonces quite la lámina protectora
Nro. 2.
Pegatinas electroestáticas
Please peel off this mask
AFTER application completed
Please peel off this
mask BEFORE application
ENES
- 53 -
DE
Cuidadosamente guarde el cable del cargador de auto en la
dirección mostrada en la imagen.
7.
Instalación de la cámara trasera (opcional): Por favor seleccione la
posición de instalación en el parabrisas trasero. Nosotros recomenda-
mos que seleccione una posición cerca del centro del parabrisas
trasero y evite la línea de desempañamiento en el parabrisas trasero,
para no afectar la calidad del video. Remueva la lámina protectora de
la almohadilla adhesiva y lente de la cámara trasera. Fije la cámara
trasera en la posición seleccionada y ajuste el ángulo, entonces utilice
el cable de la cámara trasera para conectar la cámara trasera con la
cámara delantera principal.
6.
(Método de cableado correcto) (Método de cableado incorrecto)
EN
EN
EN
ES
- 54 -
El ángulo del cristal de la ventana de cada modelo es diferente, por
favor ajuste el ángulo de grabación de la página principal y cámara
trasera hacia arriba y abajo de acuerdo a sus necesidades
8.
Nota: Solo la cámara frontal puede ser rotada y ajustada, la cámara
interior es fija.
ENES

- 55 -
3.3 Descargar la APP
Por favor escanee la versión del código QR relevante abajo para descar-
gar e instalar la APP.
Busque la app “Vantrue” en la App Store o la Google Play Store para
encontrar la app, y entonces descárguela e instálela en su teléfono móvil.
Nota: Después de que esta cámara haya sido satisfactoriamente
conectada al teléfono móvil a través de WiFi, puede previsualizar video
en tiempo real, cambiar los ajustes de la cámara, descargar archivos sin
conexión a Internet y reproducir videos en el teléfono móvil. Sin embargo,
las funciones de reproducción de rastreo GPS y compartir video depend-
erán de los servicios de Internet o telecomunicaciones (requiere que
usted apague/desconecte la cámara WiFi).
EN
EN
EN
ES
Mantenga presionado el botón
de menú por 2 segundos.
- 56 -
3.4 Conexión WiFi
EHay 3 formas de encender el Wi-Fi en la cámara.
VTJE1210130
Turn on WiFi
ENES
Diríjase a los ajustes de sistema de
la dashcam, entonces encienda
el Wi-Fi.
Utilice el comando de voz “Encender Wi-Fi” (Turn on Wi-Fi) para
encenderlo.
2. 1.
3.
Configuración del sistema 2/14
Idioma
Wi-Fi
Reconocimiento de voz
Contenido de voz
OK
- 57 -
EN
EN
EN
DE
Después de encender la función WiFi en la cámara, entre a los ajustes
WiFi del teléfono móvil, entonces encuentre el nombre del WiFi, como
por ejemplo E3_VANTRUE_XXXX, e introduzca la contraseña predetermi-
nada de WiFi: 12345678 para conectarse al WiFi.
EN
EN
EN
ES
- 58 -
ENDE
3.5 Conexión con la app
Después de que la conexión WiFi sea establecida con éxito, haga clic en
“+” cuando abra la app por primera vez, añada el modelo de cámara y
entonces la app se automáticamente conectará a la cámara y mostrará
la grabación en tiempo real de la cámara.
Si no se conecta al WiFi antes de abrir la app, la app le mostrará “Por
favor conéctese al WiFi primero”, y automáticamente le llevará a los
ajustes de WiFi. Por favor complete los pasos para conectarse primero
al WiFi
Si ya está conectado al WiFi, pero la app le lleva a la ventana de
permisos de aplicación después de seleccionar el modelo, por favor
verifique si el permiso de red inalámbrica de la app está habilitado.
Nota:
1.
2.
ENES
- 59 -
Ustawienie
Przycisk
pełnoekranowy
Przełącznik przedniej
i tylnej szyby
Migawka
Album
Przycisk zatrzymania
nagrywania
Przełącznik mikrofonu
Estadísticas de
kilometraje
Línea de corrección
de la lente:
La contraseña inicial de este dispositivo es solo usada para el acceso
inicial. Para poder prevenir potenciales riesgos de seguridad, por favor
asegúrese de cambiar la contraseña inicial después del acceso inicial
para evitar que otros accedan a su dispositivo sin autorización o que
ocurran otras consecuencias adversas.
Si se le olvida la contraseña WiFi, puede restaurar el ajuste predetermi-
nado del dispositivo, y la contraseña Wi-Fi del dispositivo también será
restaurada a la contraseña predeterminada (12345678).
Si el nombre del WiFi conectado no coincide con el modelo de su
cámara, la app le mostrará: “Por favor seleccione el modelo correcto”
y automáticamente le llevará a la interfaz de selección de modelo.
Si no hay conexión con el teléfono móvil después de que el WiFi esté
encendido, la cámara automáticamente apagará el WiFi y volverá a
la interfaz de grabación después de 10 minutos.
2.
3.
4.
5.
3.6 Operación de la app
EN
EN
EN
ES

- 46 -
- 60 -
Después de acceder a la previsualización en tiempo real de la app,
puede realizar las siguientes operaciones:
Previsualización de video: Después de que la app haya sido conectada
satisfactoriamente a la cámara, acceda a la página de previsualización
en tiempo real, haga clic en el botón de pantalla completa o ponga el
teléfono móvil en posición horizontal, y la pantalla en tiempo real
cambiará automáticamente al modo de previsualización en pantalla
completa. Haga clic en el botón de cambiar de ventana para cambiar
entre las ventanas de video delantero y trasero, pero solo las cámaras
de múltiples lentes pueden usar esta función.
Reproducción de video: Los archivos de video y fotografía guardados
en la tarjeta SD pueden ser vistos en la app, y el video puede ser
reproducido después de hacer clic en el archivo.
Descarga de video: Puede seleccionar el video o imagen que quiere
descargar en la tarjeta SD navegando en la interfaz o en la reproduc-
ción de video. Después de descargar el video, si lo reproduce en el
archivo local de la app, puede visualizar el rastreo GPS del video.
Captura de video: Puede realizar una captura en la pantalla actual en
la interfaz de previsualización en tiempo real de la app.
Estadísticas de kilometraje: los usuarios pueden hacer clic para descar-
gar la información de kilometraje según sea necesario, y la información
de kilometraje se guardará en la aplicación como un imagen o archivo
PDF.
Línea de corrección de la lente: Corrija el equilibrio de la lente a través
de una cruz precisa para que la pantalla de video no se sesgue.
ENES
- 61 -
EN
EN
EN
DE
3.7 Actualización de la app
Abra la app “Vantrue”, conéctese al Wi-Fi y entre a “Configuración >
Acerca > Detectar nueva versión". La app automáticamente detectará si
la versión de la app es la versión más reciente. Si hay una nueva versión
de la app, siga las instrucciones y actualice la versión.
EN
EN
EN
ES
Vantrue Ltd.
Vantrue
Vantrue
9:41
Atrás
Hoy Juego App Buscar
- 62 -
DE
4. Operación básica
4.1 Menú de ajustes
La dashcam E3 tiene 3 menús de funciones, los cuales son: configura-
ciones de grabación, configuraciones de sistema y navegador de
archivos. Usted puede configurar su cámara de acuerdo a sus requer-
imientos en esta configuración de funciones.
Presione el botón de , pause el video primero, entonces presione el
botón de para acceder al menú de configuraciones.
Configuración del sistema
OK
A.Configuración de grabación
-Resolución: La cámara E3 tiene 4 modos de resolución: Delantera +
Interna + Trasera/Frontal + Interna/ Delantera + Trasera/Solo Delantera.
Grabación Delantera + Interna + Trasera: 1944P+1080P+1080P 30FPS;
1440P+1080P+1080P 30FPS; 1080P+1080P+1080P 30FPS; 1440P+1080P+720P
30FPS; 1440P+720P+720P 30FPS; 1080P+1080P+720P 30FPS;
1080P+720P+720P 30FPS; 720P+720P+720P 30FPS;
Grabación Delantera + Trasera: 1944P+1080P 30FPS; 1440P+1080P 30FPS;
1080P+1080P 30FPS; 1080P+720P 30FPS; 720P+1080P 30FPS; 720P+720P
30FPS;
Grabación Delantera + Trasera: 1944P+1080P 30FPS; 1440P+1080P 30FPS;
1080P+1080P 30FPS; 1080P+720P 30FPS; 720P+1080P 30FPS; 720P+720P
30FPS;
ENES

- 63 -
EN
EN
EN
DE
Solo delantera: 2592x1944P 30FPS; 2560x1440P 30FPS; 1920x1080P 30FPS;
1280x720P 30FPS.
-Grabación en bucle: La configuración predeterminada es de 3 min.
Usted puede elegir opciones de 1/3/5 min y apagado.
-LED IR: La configuración predeterminada es automático. Puede
seleccionar automático, encendido o apagado.
-Sensor G: Seleccione el nivel del sensor G que necesite, y puede
configurar 3 direcciones (Delantera + Trasera/Izquierda + Derecha/Arriba
+ Abajo). El valor del sensor G en cada dirección puede ser configurado
como 1/2/3/4/5/apagado. Entre más alto sea el nivel de sensibilidad,
más fácil es activar la grabación de emergencia. El sensor G es más
sensible cuando está configurado en 5.
-Grabación de audio: La configuración predeterminada es encendido.
Puede configurar la grabación de audio como encendida o apagada.
-Exposición: El valor predeterminado es +0.0. Configura la exposición de
la lente.
-Luz indicadora de grabación: La configuración predeterminada es
encendido, y puede seleccionar el encender/apagar la luz de estatus
de grabación.
-WDR: La opción predeterminada es encendido. Para un mejor efecto
de video balanceado, puede elegir apagarla. Esta función es solo para
la lente delantera e interior.
-HDR trasero: La opción predeterminada es encendido. Se establece
como encendido o apagado en la grabación.
-Girar pantalla: La configuración predeterminada es apagado. Usted
puede elegir entre rotar la pantalla hacia arriba y abajo (180 grados).
-Espejo interior: La configuración predeterminada es encendido; la
pantalla de grabación interna se visualiza en el modo espejo.
-Espejo trasero: La configuración predeterminada es encendido. Si lo
enciende, la pantalla de grabación trasera será mostrada en el modo
espejo
-Número de placa: Seleccione el número o letra que desea establecer.
EN
EN
EN
ES

- 64 -
Después de configurarlo, su número de placa aparecerá en el video
grabado.
-Sello: Habilita o deshabilita el sello de marca de agua de los videos y
fotografías. El sello de marca de agua incluye etiqueta de fecha y hora,
etiqueta VANTRUE, número de placa, información de ubicación GPS y
etiqueta de velocidad. Todo está habilitado por defecto.
-Lapso de tiempo: El valor predeterminado es deshabilitado. Usted
puede decidir habilitar 1FPS/5FPS/10FPS/15FPS.
-Modo de estacionamiento: Usted puede elegir el modo de estaciona-
miento que necesite, incluyendo Detección de colisiones/Detección de
movimiento/Modo de Tasa de Bits Baja/Modo de velocidad de
fotogramas baja/Apagado.
-Visión nocturna con luz baja en el Modo de estacionamiento: La opción
predeterminada es encendido. Cuando esté encendido, puede
optimizar el efecto de grabación de los videos en el modo de estaciona-
miento.
-Estadísticas de kilometraje: El valor predeterminado está activado, y la
información de kilometraje del GPS se almacenará en la tarjeta de
memoria, y los clientes pueden verla en la computadora o exportar el
archivo a través de la función de estadísticas de kilometraje en la
aplicación.
-Configuración de GPS: El GPS está habilitado por defecto. Aquí se
configura el encendido/apagado de GPS, los ajustes de unidad de
velocidad e información del GPS.
B. Configuración del sistema
- Idiomas: Los idiomas disponibles son Engish/Français/Español/Deutsch/I-
taliano/简体中文/русский/日本語/Polski.
-WiFi: El valor predeterminado es apagar automáticamente el wifi
después de 10 minutos sin conexión. Con esta función, puede configurar
el Wi-Fi para que se encienda o apague automáticamente y se apague
después de 10 minutos, y vea la información de Wi-Fi.
ENES

-Asistente de voz: La sensibilidad predeterminada es estándar. Los
comandos de voz pueden ser reconocidos después de que la opción es
encendida. Puede elegir opciones como Baja sensibilidad/Alta sensibili-
dad/Estándar/Apagado.
-Contenido de voz: Comandos de reconocimiento de voz. Puede usar
diferentes comandos para controlar de forma remota la cámara.
-Formatear la tarjeta SD: Formatea todos los datos en la tarjeta de
memoria.
-Configuración de recordatorio de formateo: Selecciona las opciones de
recordatorio: 15 días, 1 mes y apagado. La configuración por defecto es
apagado.
Para evitar que olvide formatear la tarjeta de memoria regularmente,
hemos añadido una configuración de recordatorio de formateo. Usted
puede elegir recordatorios de 15 días o 1 mes, y calcular 15 días o 1 mes
desde la fecha establecida. Cuando acabe el tiempo, puede seleccio-
nar “OK” para formatear o puede seleccionar “Siguiente”.
Nota: Si va a cambiar la opción de recordatorio de formateo, el tiempo
se reiniciará tan pronto la opción sea cambiada.
-Fecha y hora: Hay dos formas de configurar la hora y la fecha: 1.
Actualización automática de GPS; 2. Establecer manualmente la
fecha/hora. La actualización automática del GPS está habilitada por
defecto.
El GPS actualiza automáticamente la fecha y hora basado en su zona
horaria, así que necesita seleccionar primero la zona horaria correcta.
Puede elegir el apagar Actualización automática de GPS; el encender
Establecer manualmente la fecha/hora, el encender Configuración
manual de fecha/hora y el corregir manualmente la fecha y la hora.
La configuración de formato de fecha y zona horaria también puede ser
establecida en este menú.
-Apagado automático de LCD: Configura la hora para apagar automáti-
camente la pantalla LCD después de no detectar ningún comando.
Si usted configura Apagado automático de LCD en 3 min, la pantalla
- 65 -
EN
EN
EN
ES
- 66 -
Archivos 1/4
Video del evento
Video normal
Foto
Todos los archivos
OK
LCD de la cámara se apagará automáticamente después de 3 min
pero continuará grabando. Si lo configura como Apagado, la pantalla
no se apagará. Presione el botón de arriba para elegir la opción que
quiera: 30s, 1min, 3min y Apagado.
-Sonido del dispositivo: Establece el volumen del dispositivo. El nivel de
volumen por defecto es 3, el más bajo es 0, y el más alto es 5.
-Tono de advertencia: De acuerdo a diferentes situaciones, la cámara
está configurada con 5 tonos de advertencia, los cuales son: Sonido de
encendido/apagado, Sonido de teclas, Bloquear tono, Formatear
sonido y Tono de grabación anormal. Todos los tonos de advertencia
están encendidos de forma predeterminada.
-Frecuencia: Diferentes países tienen diferentes frecuencias para evitar
que el video se vea afectado, puede elegir una frecuencia de 50Hz o
60Hz de acuerdo a las diferentes regiones.
-Información del sistema: Revisa el modelo actual, versión de software y
la página web oficial de Vantrue.
-Certificaciones: Usted puede ver la información de certificación de la
Cámara E3.
-Configuración por defecto: Reinicia el dispositivo de vuelta a la
configuración por defecto.
C. Archivos
Revisa los archivos de video y foto grabados por la cámara.
ENES
- 67 -
DE
DE
4.2 Especificaciones
La operación normal de la función de grabación en bucle es muy
dependiente de la velocidad de la tarjeta de memoria, así que por
favor formatee la tarjeta de memoria regularmente para evitar
problemas, como por ejemplo archivos excesivos y deterioración de
la tarjeta, que afecten la grabación en bucle normal.
Por favor revise el video de grabación en bucle regularmente para
evitar que cualquier video que necesite sea sobrescrito por el bucle.
4.2.1 Grabación en bucle
Después de insertar la tarjeta de memoria y conectar la alimentación, la
cámara E3 se encenderá automáticamente y accederá al modo de
Grabación en bucle. La duración de cada video grabado estará
basada en el tiempo de grabación en bucle que haya establecido,
guardados en el archivo de Video normal.
Cuando la capacidad del archivo de Video normal alcanza 70% de la
capacidad total, el nuevo archivo de grabación en bucle automática-
mente sobrescribirá el archivo de grabación en bucle original. Después
de que esta función es habilitada, el archivo de video sobrescribirá
automáticamente el bucle, para que así la grabación no se detenga
mientras conduce.
Nota:
1.
2.
EN
EN
EN
ES
14:39:07 10-02-2023
00:00:37
MP/H
35
1440P+1080P+1080P 30FPS
- 68 -
3.
4.
Para bloquear manualmente el video, simplemente presione el botón de
para bloquear el video actual y capturarlo.
Durante el periodo de video bloqueado, puede presionar el botón de
para realizar capturas múltiples veces. Después de grabar, el video será
automáticamente guardado en la carpeta de videos de eventos, y las
fotos serán guardadas en la carpeta de fotos.
El bloqueo automático de video de eventos es activado cuando el
automóvil es impactado/sacudido, la cámara detecta la vibración y
automáticamente bloquea el video actual, el cual es guardado en la
carpeta de video de eventos.
4.2.2.Grabación de evento
El video de evento es activado por el sensor G (sensor de gravedad),
que puede ser activado automáticamente o bloqueado manualmente.
Al conducir, dependiendo de circunstancias especiales, la cámara se
bloqueará automáticamente para grabaciones de emergencia o usted
puede bloquearla manualmente para grabaciones de eventos.
Cuando la Grabación en bucle esté apagada, la cámara grabará
video de 5 minutos por cada clip, pero no sobrescribirá los antiguos
videos cuando la tarjeta de almacenamiento esté llena.
Después de que la grabación en bucle esté apagada, la duración de
cada video será 20 mins, y la grabación se detendrá cuando la
capacidad de la tarjeta de memoria esté llena.
ENES
14:39:07 10-02-2023
00:00:37
MP/H
35
1440P+1080P+1080P 30FPS
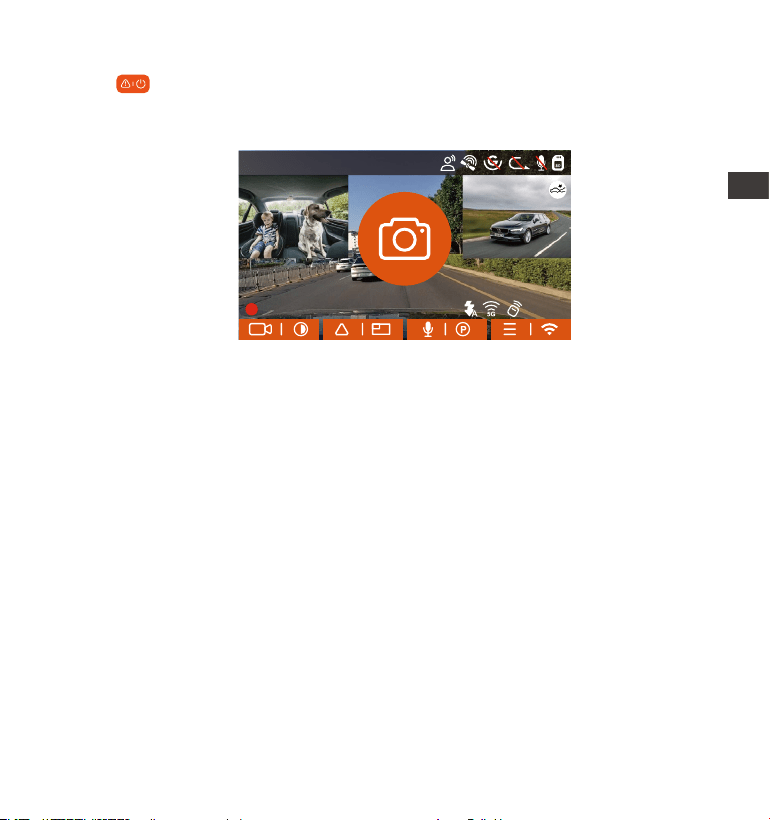
- 69 -
Notiz:
La sensibilidad del bloqueo automático de activación de video es
determinada por la sensibilidad de la colisión. Entre más alta la
configuración de sensibilidad, mayor será la probabilidad de ser
activado.
La capacidad total del archivo de video de evento contabiliza el 30%
de la capacidad total de la tarjeta de memoria actual. Cuando el
archivo de video de evento alcanza su límite, un nuevo archivo de
video de evento automáticamente sobrescribirá el archivo de video
de evento original. Se recomienda revisar y guardar periódicamente
sus archivos de video de eventos para evitar pérdidas.
1.
2.
Durante el periodo de grabación bloqueada, puede presionar el botón
de para tomar una fotografía. Después de que termine la grabación
del video de emergencia, el video será guardado en la carpeta de
videos de emergencia, y las fotografías serán guardadas en la carpeta
de fotos.
EN
EN
EN
ES
14:39:07 10-02-2023
00:00:37
MP/H
35
1440P+1080P+1080P 30FPS
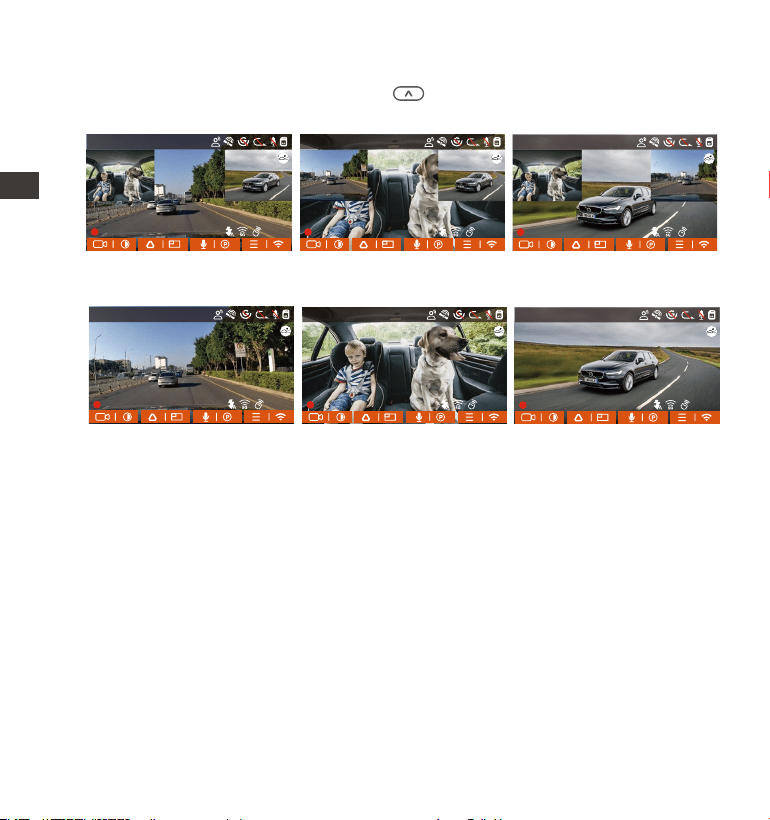
4.2.3 Cambiar la visualización de cámara delantera y trasera
Usted puede presionar el botón de para cambiar pantalla y hacer
que la cámara delantera o trasera se vea más grande en la pantalla LCD.
- 70 -
Cámara delantera
más grande
Cámara interior más
grande
Cámara trasera más
grande
Visualización de
grabación delantera
individual
Visualización de
grabación interior i
ndividual
Visualización de
grabación
trasera individual
ENES
14:39:07 10-02-2023
00:00:37
MP/H
35
1440P+1080P+1080P 30FPS
14:39:07 10-02-2023
00:00:37
MP/H
35
1440P+1080P+1080P 30FPS
14:39:07 10-02-2023
00:00:37
MP/H
35
1440P+1080P+1080P 30FPS
14:39:07 10-02-2023
00:00:37
MP/H
35
1440P+1080P+1080P 30FPS
14:39:07 10-02-2023
00:00:37
MP/H
35
1440P+1080P+1080P 30FPS
14:39:07 10-02-2023
00:00:37
MP/H
35
1440P+1080P+1080P 30FPS
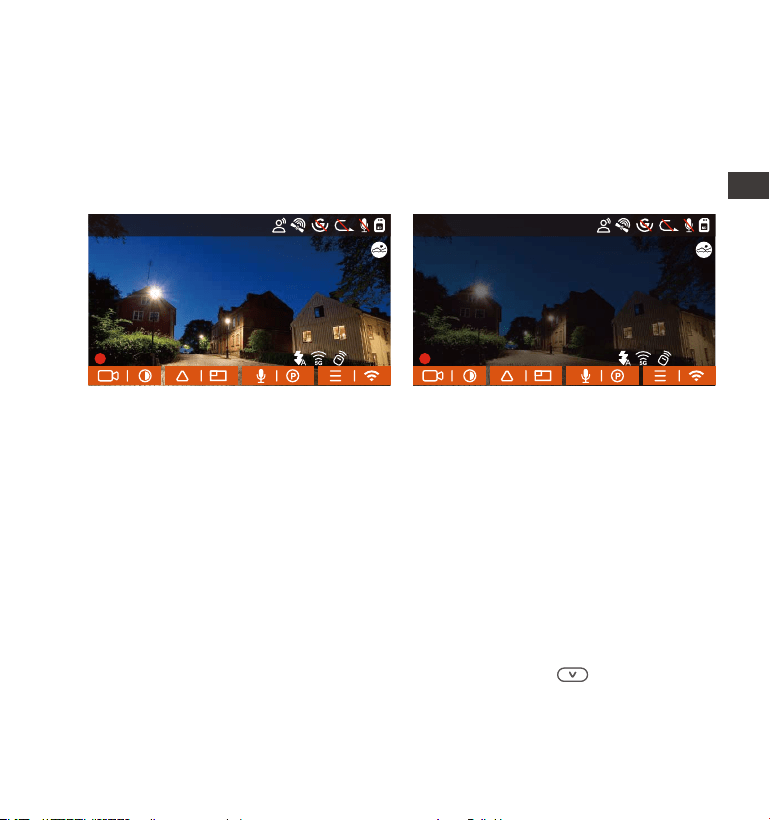
- 71 -
EN
EN
EN
DE
4.2.4 Visión nocturna estacionado en luz baja
Para poder mejorar la seguridad del estacionamiento de noche,
aprovechamos completamente el desempeño de la lente en combi-
nación con la tecnología de visión nocturna en luz baja para mejorar el
efecto de visión nocturna en el modo de estacionamiento. Esta función
está habilitada por defecto, y será activada solo después de acceder al
modo de estacionamiento, y no afectará la grabación normal.
Apague la visión nocturna
de estacionamiento con poca luz
Encienda la visión nocturna
de estacionamiento con poca luz
4.2.5 Modo de estacionamiento (cuando el modo de estacionamiento
está encendido, la función de lapso de tiempo no funcionará. Estas dos
funciones no pueden funcionar al mismo tiempo)
El Modo de estacionamiento funciona como vigilancia en diferentes
situaciones. Puede cambiar entre diferentes modos de monitoreo de
estacionamiento de acuerdo a las diferentes situaciones de estaciona-
miento.
Después de que el modo de estacionamiento es encendido, hay tres
formas de grabar: 1. Puede esperar 5 minutos para comenzar automáti-
camente; 2. Puede mantener presionado el botón de para comenzar
manualmente. 3. Puede instalar el kit de cableado ACC y la dashcam
directamente entrará a este modo después de apagar el motor (el kit de
cableado ACC debe ser comprado aparte).
EN
EN
EN
ES
14:39:07 10-02-2023
00:00:37
MP/H
35
1440P+1080P+1080P 30FPS
14:39:07 10-02-2023
00:00:37
MP/H
35
1440P+1080P+1080P 30FPS
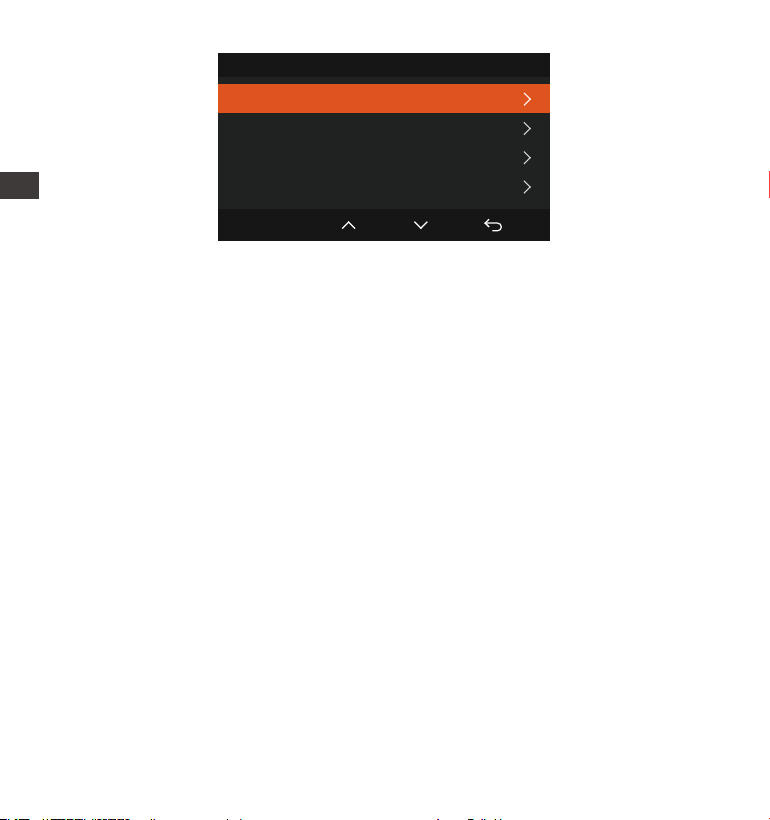
- 72 -
ENDE
Notiz:
ENES
Para garantizar que la cámara funcione apropiadamente en el modo
de estacionamiento, por favor utilice kits de hardware u otras fuentes
de alimentación estables y continuas para potenciar la cámara.
La mejor temperatura de funcionamiento es -20°C a 60°C (-4 a -158°F).
Nosotros recomendamos usar la detección de colisiones dentro de
este rango de temperatura, para que así, una vez que la temperatura
exceda el rango de temperatura de funcionamiento normal, la
cámara se apague automáticamente. Si la temperatura es alta, por
favor apague la cámara cuando se estacione.
La grabación de video de lapso de tiempo y el modo de estaciona-
miento (incluyendo los modos de detección de colisiones, detección
de movimiento, grabación de tasa baja de bits y modo de velocidad
baja de fotogramas) solo pueden ser habilitados uno a la vez. Cuando
uno esté habilitado, el otro automáticamente se deshabilitará.
Todos los videos grabados en el modo de estacionamiento (detección
de colisiones, detección de movimiento, grabación de tasa baja de
bits y modo de velocidad baja de fotogramas) serán guardados en la
carpeta de videos normales. Para prevenir que el video en el modo de
estacionamiento sea sobrescrito en un bucle, por favor revise y guarde
los archivos requeridos a tiempo para prevenir pérdidas.
Modo de estacionamiento
Detección de colisiones
Detección de movimiento
Low Bit Raw
OK
Modo de velocidad de fotogramas baja
1.
2.
3.
4.

- 73 -
Detección de colisiones
Cuando la detección de colisiones está habilitada, el ícono de detección
de colisiones aparecerá en la interfaz de grabación, indicando que
la grabadora actualmente está usando el modo de detección de
colisiones. La sensibilidad de detección de colisiones puede ser ajustada
de nivel 1 al 5, pudiendo ajustarla de acuerdo a sus hábitos, al igual que
por lo que rodee al automóvil.
Cuando la detección de colisiones esté encendida y no se detecte
movimiento después de 5 minutos de grabación (mecanismo de entrada
de 5 minutos, para abreviar), la detección de colisiones se activará con
un ícono de detección de colisiones en la esquina inferior derecha de la
pantalla, pero la cámara se apagará automáticamente. Cuando la
cámara esté apagada, comenzará a grabar por 1 minuto después de ser
sacudida, entonces se apagará nuevamente.
Nota:
Si la cámara continúa siendo impactada durante la grabación de
detección de colisiones, saldrá del modo de detección de colisiones y
entrará a la grabación normal, reiniciando el mecanismo de entrada de
5 minutos.
EN
EN
EN
ES
14:39:07 10-02-2023
00:00:37
MP/H
35
1440P+1080P+1080P 30FPS
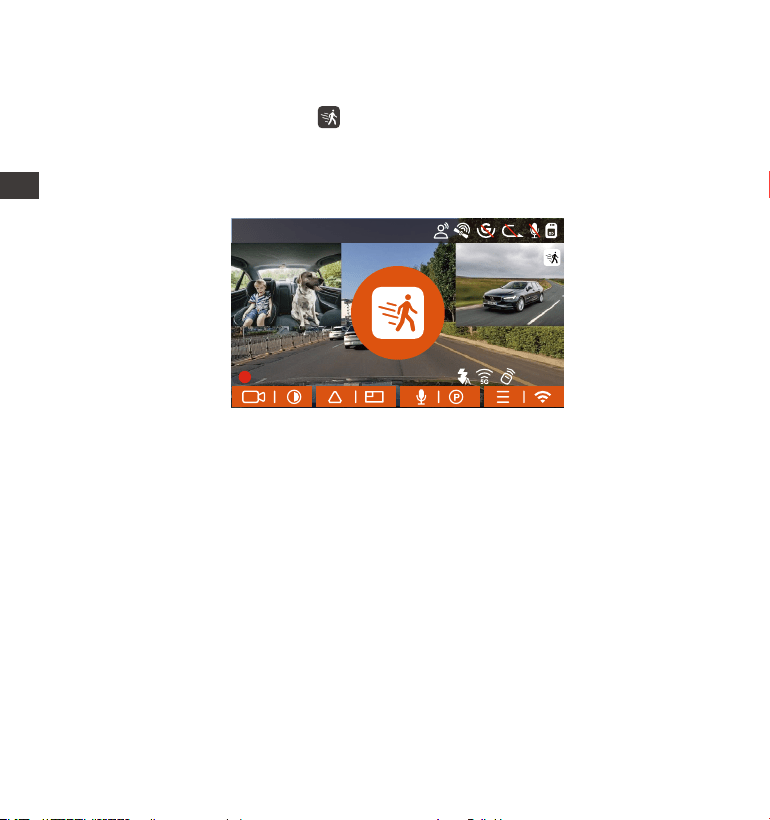
Detección de movimiento
Cuando la detección de movimiento esté encendida, el ícono de
detección de movimiento aparecerá en la interfaz de grabación,
indicando que la cámara está actualmente en el modo de detección de
movimiento. La detección de movimiento tiene tres niveles, Bajo/Medi-
o/Alto, que pueden ser ajustados, y el rango de detección de movimien-
to es 2m/4m/6m.
Cuando la detección de movimiento está activada y no se detecte
movimiento después de 5 minutos de grabación, un ícono anaranjado
aparecerá en el medio de la pantalla, y la pantalla se apagará después
de 3 minutos.
Cuando la cámara frontal detecta el movimiento del objeto, comenzará
a grabar automáticamente por 45 segundos y guardará la grabación en
la carpeta Normal.
Nota:
El modo de detección de movimiento debe ser utilizado cuando la
cámara esté encendida. Una vez que la cámara se apague, el modo de
detección de movimiento no funcionará.
- 74 -
ENES
14:39:07 10-02-2023
00:00:37
MP/H
35
1440P+1080P+1080P 30FPS
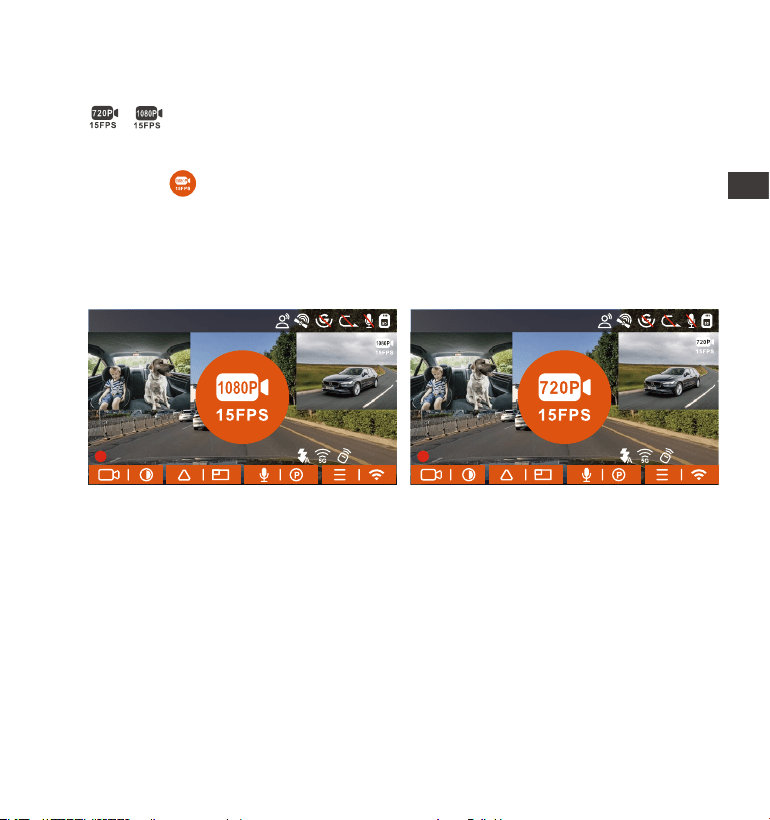
Grabación con tasa de bits baja
Cuando la grabación con tasa de bits baja esté habilitada, el ícono de
o aparecerá en la esquina inferior derecha de la pantalla,
dependiendo de si elige 1080P 15FPS o 720P 15FPS.
Si no se detecta movimiento después de 5 minutos de grabación, el
ícono de aparecerá en el centro de la pantalla. La resolución del
video actual cambiará automáticamente a 1080P 15 FPS o 720P 15 FPS
para grabación, y la duración de la grabación estará determinada por
la duración establecida de la grabación en bucle. Cuando la cámara
vibre o sea movida, se saldrá automáticamente, espere 5 minutos e
inténtelo de nuevo.
- 75 -
EN
EN
EN
DE
Nota:
La grabación con tasa de bits baja necesita ser realizada cuando la
cámara esté encendida. Una vez que la cámara esté apagada, la
grabación con tasa de bits baja no funcionará.
Modo de tasa baja de fotogramas
Cuando el modo de tasa baja de fotogramas es seleccionado, la cámara
grabará de acuerdo a la selección de 1FPS/5FPS/10FPS/15FPS.
Por ejemplo, si usted selecciona 1FPS y la tasa de fotogramas del video
actual es de 30FPS, la grabadora generará un video de 30FPS. El modo de
tasa baja de fotogramas puede preservar bien la integridad del video y
ahorrar espacio en la tarjeta de memoria.
EN
EN
EN
ES
14:39:07 10-02-2023
00:00:37
MP/H
35
1440P+1080P+1080P 30FPS
14:39:07 10-02-2023
00:00:37
MP/H
35
1440P+1080P+1080P 30FPS
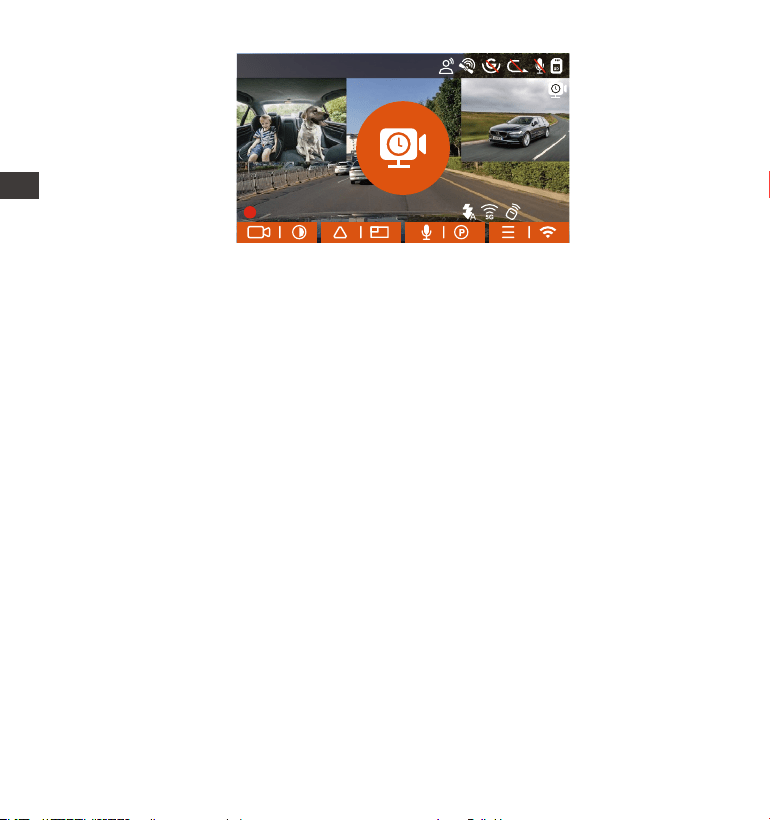
- 76 -
DEENES
[Tiempo de grabación normal = Tiempo de grabación de lapso de tiempo
(seg) x Tasa de fotogramas de la grabación x opción de lapso de tiempo]
(El tiempo debe ser convertido en segundos)
Nota:
La unidad de tiempo de la fórmula de cálculo es segundos, así que el
tiempo de grabación normal final calculado también es en segundos.
Si necesita convertirlo en otras unidades de tiempo, por favor realice
la conversión usted mismo.
El modo de tasa baja de fotogramas es similar a la función de
grabación de lapso de tiempo, pero la diferencia es que no hay un
mecanismo de entrada de 5 minutos para la grabación de lapso de
tiempo, la cual se encenderá directamente después de configurarla.
En el modo de tasa baja de fotogramas, la cámara también necesita
una fuente de alimentación estable. Una vez que se agote la energía,
la cámara se apagará.
1.
2.
3.
4.2.6 Lapso de tiempo
Cuando el lapso de tiempo es seleccionado, la cámara grabará de
acuerdo a la selección de 1FPS/5FPS/10FPS/15FPS.
Por ejemplo, si usted selecciona 1 FPS y la tasa de fotogramas del video
actual es de 30FPS, la cámara generará un video de 30FPS. El modo de
tasa baja de fotogramas puede preservar mucho la integridad del video
y ahorrar espacio en la tarjeta de memoria.
14:39:07 10-02-2023
00:00:37
MP/H
35
1440P+1080P+1080P 30FPS
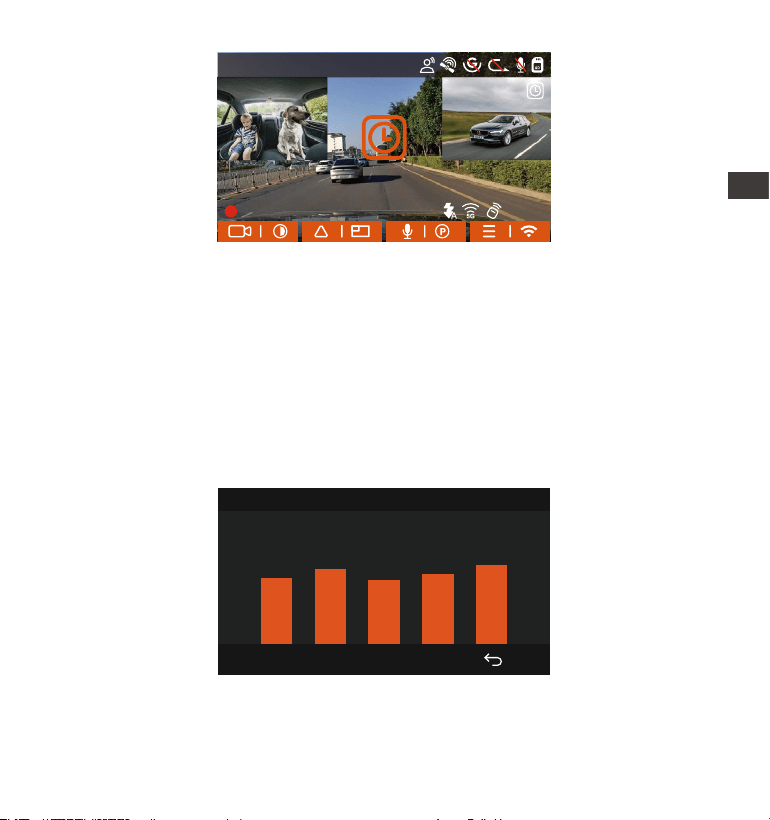
- 77 -
DE
EN
EN
EN
DE
Nota:
La conexión GPS será completada en menos de 1 minuto después de
que encienda el dispositivo. Si la conexión GPS no es exitosa en menos
de 1 minuto, por favor revise si el DISPOSITIVO tiene la función de GPS
1.
La fórmula para calcular la duración del video es:
[Tiempo de grabación normal = Tiempo de grabación de lapso de tiempo
(seg) x Tasa de fotogramas de la grabación x opción de lapso de tiempo]
(El tiempo debe ser convertido en segundos).
4.2.7 Función de GPS
La función de GPS también es una de las funciones importantes de la
dashcam. El GPS está habilitado por defecto, y la cámara recibe señales
GPS a través de la montura de GPS. Puede corregir automáticamente la
fecha y la hora en su área, guardando al mismo tiempo la ubicación
donde el video fue grabado y la velocidad del automóvil.
40
46
39
43
48
Información GPS
EN
EN
EN
ES
14:39:07 10-02-2023
00:00:37
MP/H
35
1440P+1080P+1080P 30FPS
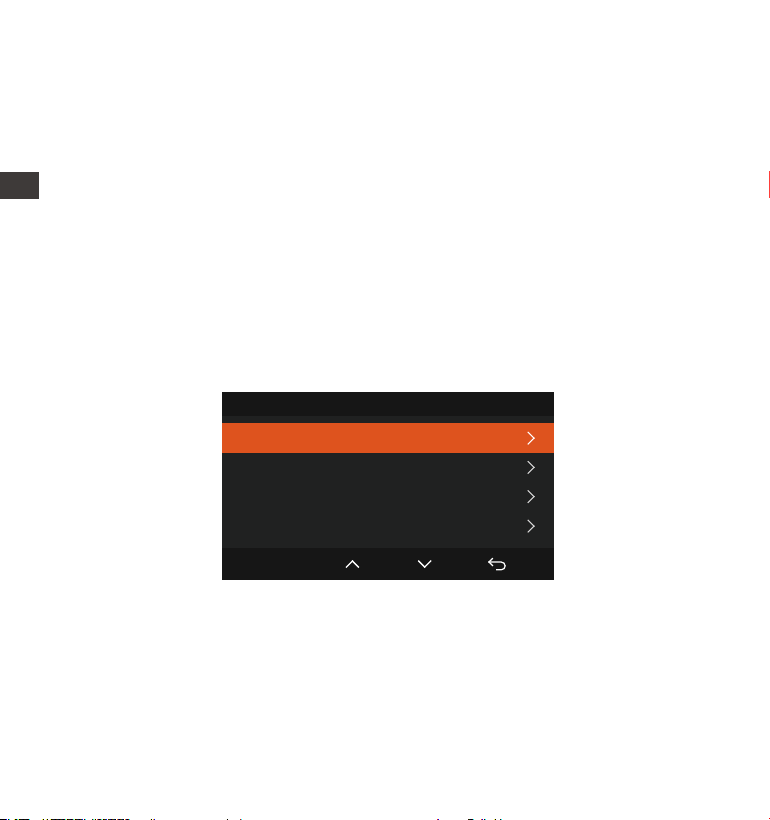
- 78 -
2.
4.2.8 Hora automática mediante GPS
La configuración de corrección automática de hora mediante GPS de la
dashcam E3 está habilitada por defecto. Usted puede seleccionar la
hora eligiendo su zona horaria, por ejemplo GMT-08:00 Los Ángeles. Si no
sabe la zona horaria de su ubicación, puede usar el WiFi para conectarse
a la app de Vantrue, y confirmar que la función de ajuste automático de
hora en la app está encendida.
4.2.9 Control remoto inalámbrico
La cámara está equipada con un control remoto que puede ser usado
para controlar rápidamente la cámara y tomar fotos, grabar videos de
emergencia, encender/apagar la grabación y otras funciones.
Conexión del control remoto:
Remueva el espaciador de las baterías en el control remoto, la cámara
Hora Fecha
Actualización automática de GPS
Establecer manualmente la fecha / hora
Estilo de fecha
Zona horaria
OK
encendida, si el soporte del GPS está conectado apropiadamente y
su ambiente (estacionamiento subterráneo, área residencial densa-
mente poblada, metro, túnel, etc.) también afectará la recepción de
la señal GPS.
La información del GPS es guardada en el video que haya grabado.
Para verlo, por favor descargue e instale la app VANTRUE y VANTRUE
GPS Player (disponibles en www.vantrue.net).
ENES
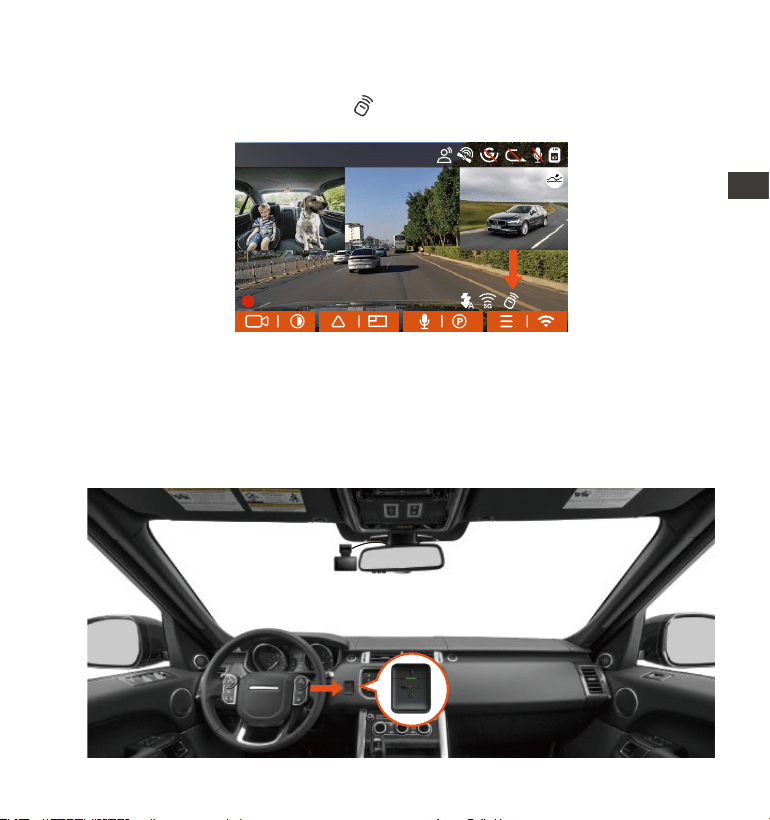
automáticamente se sincronizará con el control remoto. No se requiere
una sincronización manual con la cámara.
Cuando aparezca el ícono de en la pantalla, significa que el control
remoto ha sido conectado satisfactoriamente.
- 79 -
Instalación del control remoto:
Después de que el control remoto esté conectado a la cámara, por
favor seleccione la ubicación apropiada en su automóvil, entonces
remueva la pegatina adhesiva del control remoto y péguela en la
ubicación seleccionada. (Nota: El control remoto debe ser instalado en
una posición que no afecte la conducción segura)
EN
EN
EN
ES
14:39:07 10-02-2023
00:00:37
MP/H
35
1440P+1080P+1080P 30FPS
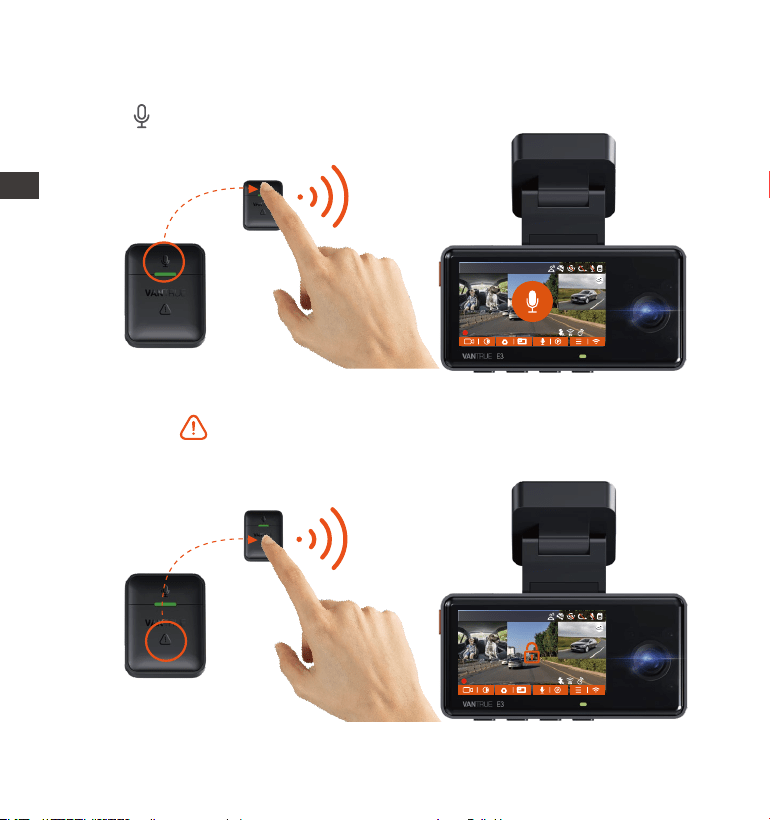
- 80 -
Después de que el control remoto esté conectado, presione el botón
de para habilitar o deshabilitar el audio.
1.
2.
Funciones del control remoto:
Después de que la conexión sea exitosa, cuando presiona brevemente
el botón , la cámara bloqueará el archivo actual y grabará un video;
continúe presionándolo brevemente durante el video bloqueado para
capturar fotografías.
ENES
14:39:07 10-02-2023
00:00:37
MP/H
35
1440P+1080P+1080P 30FPS
14:39:07 10-02-2023
00:00:37
MP/H
35
1440P+1080P+1080P 30FPS
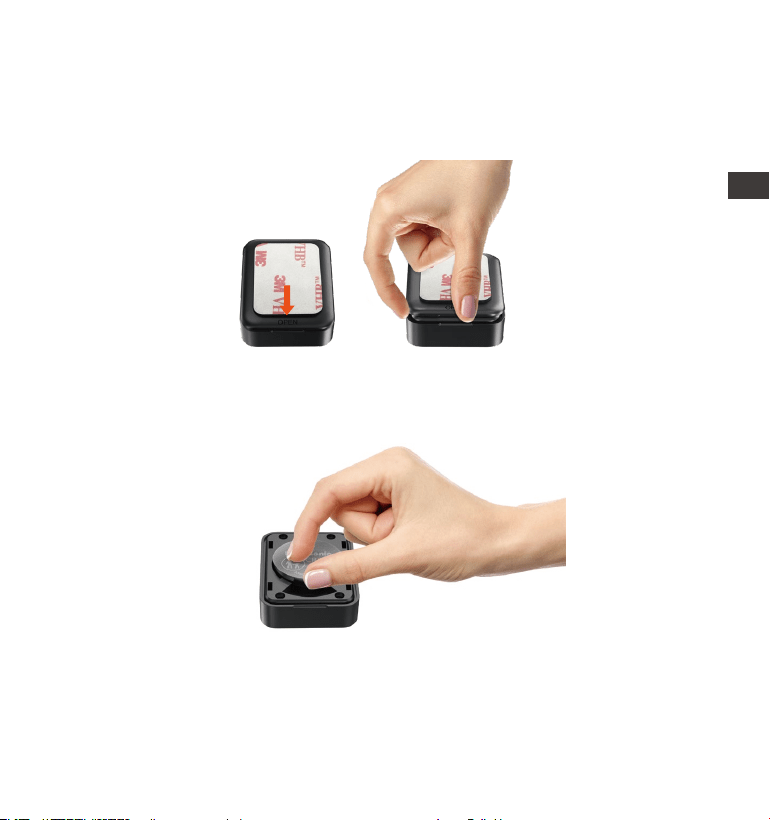
- 81 -
DE
DE
Reemplazar la batería del control remoto:
Hay una marca de “OPEN” (Abrir) en la parte inferior del control
remoto, por favor, haga palanca lentamente en el hueco que rodea
la brecha de la ranura de esta marca para abrirlo.
1.
2. Después de abrirlo, delicadamente retire la batería de la ranura al
frente del compartimiento de la batería, entonces reemplace la
batería por una nueva, y ponga de vuelta la tapa trasera del control
remoto.
Nota:
Cuando tiene poca energía, la batería debe ser reemplazada (el modelo
de la batería del control remoto es CR2032). No es compatible con
cargado.
EN
EN
EN
ES
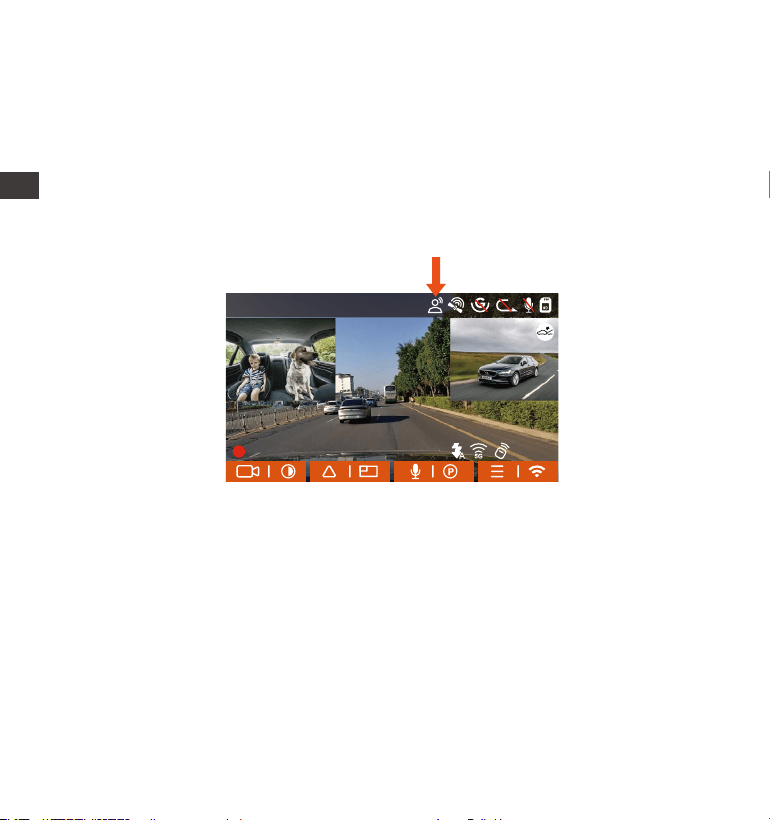
- 82 -
4.2.10 Asistente de voz
Además de controlar la cámara con el control remoto, también puede
controlar la cámara con comandos de voz. Actualmente los idiomas
soportados son inglés, japonés, ruso y chino. Para obtener información
más detallada, por favor revise Configuración de sistema > Contenido
de voz.
La configuración por defecto es sensibilidad estándar. El reconocimiento
de voz tiene opciones como Baja sensibilidad/Estándar/Alta sensibili-
dad/Apagado. Puede controlar la cámara con comandos de voz.
ENES
14:39:07 2023-02-10
00:00:37
MP/H
35
1440P+1080P+1080P 30FPS
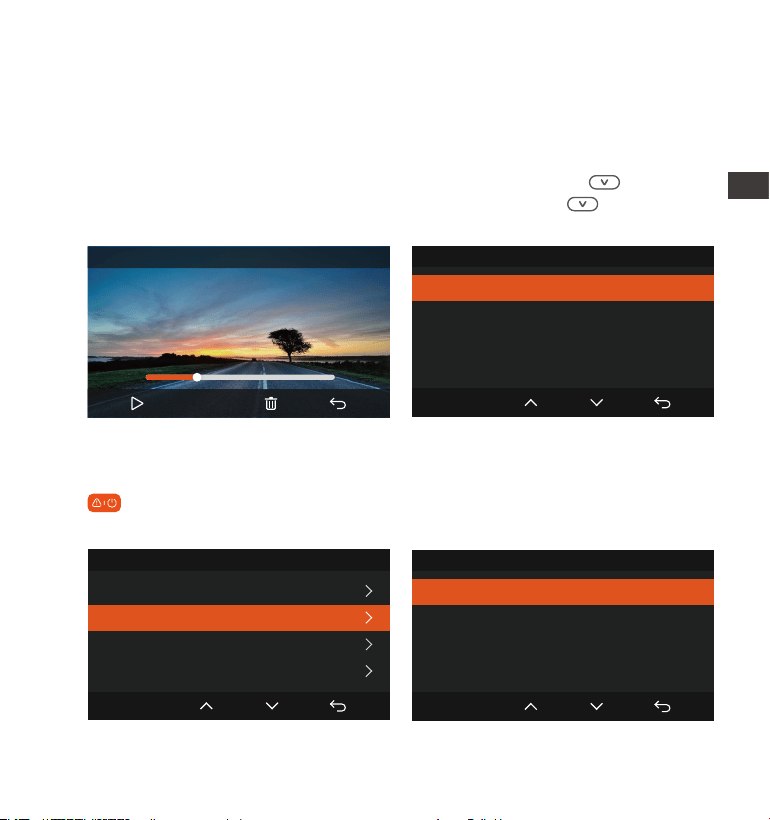
-Eliminar archivos
Diríjase a “Archivos”, elija un video en la dashcam, y presione el botón de
en la interfaz de exploración de archivos para que aparezca el menú
de eliminación.
- 83 -
4.2.11 Visualización y eliminación de fotos/videos
a.Visualizar archivos en la cámara
-Reproducir archivos
Después de acceder a “Archivos”, entre a cualquier carpeta, y después
de abrir el archivo de video, puede presionar el botón de para
seleccionar el siguiente archivo, o presione el botón de para eliminar
el archivo durante su reproducción.
Video del evento
¿Eliminar este archivo?
¿Borrar todos los archivos?
OK
Notfallvideo
¿Eliminar este archivo?
¿Borrar todos los archivos?
OK
00:30
01:07
20230210_140633_0002_E_B.MP4
1X
Video del evento
20230210_140633_0001_E_B.MP4
20230210_140633_0002_E_B.MP4
20230210_140633_0003_E_B.MP4
20230210_140633_0004_E_B.MP4
2/5
OK
EN
EN
EN
ES
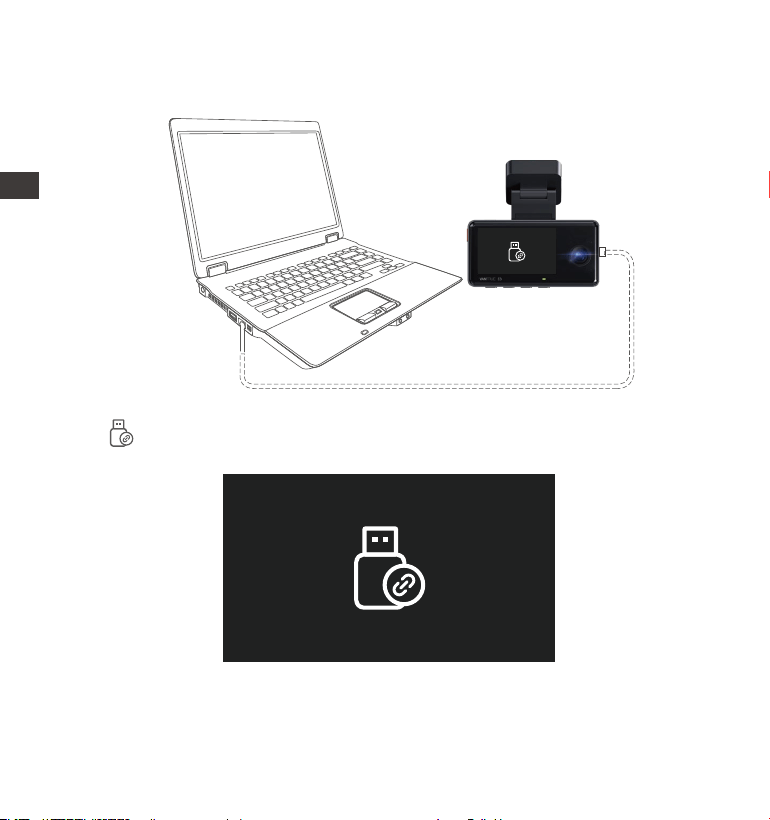
- 84 -
a.Visualizar y eliminar archivos en una computadora
1. Conecte el cable de datos USB TIPO-C a la cámara y la computadora.
Después de que la conexión haya sido exitosa, aparecerá el ícono de
en la pantalla de la cámara para transferir datos, y entonces puede
ver los archivos de video en una carpeta de computadora.
2.
Dependiendo del sistema de la computadora de los diferentes usuarios,
después de que la cámara esté conectada a la computadora,
aparecerá como un disco removible o una carpeta removible en la
computadora.
3.
ENES
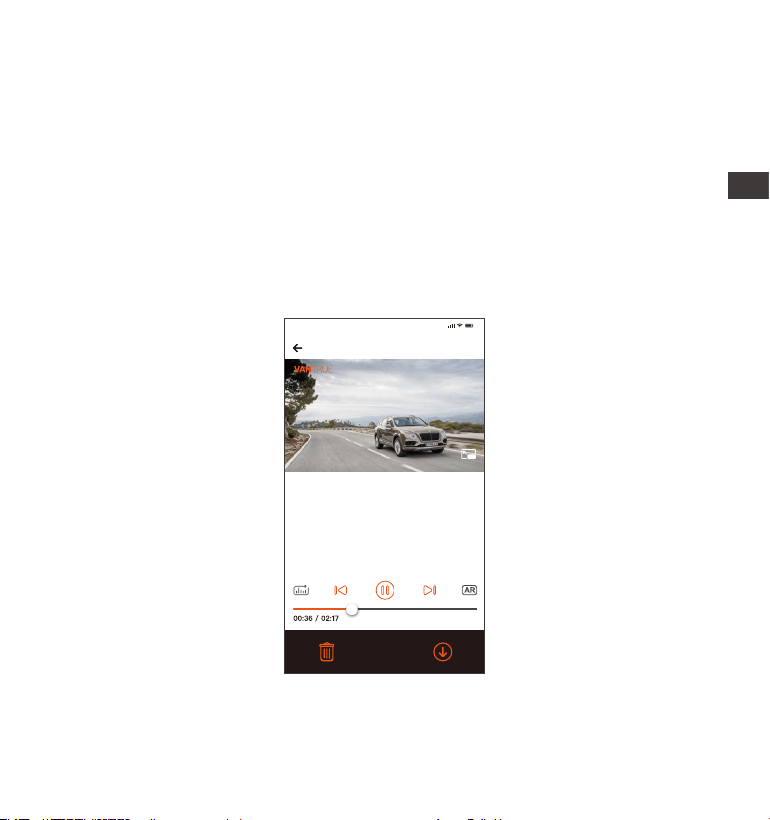
- 85 -
EN
EN
EN
DE
b.Visualizar y eliminar en la app “Vantrue”
Después de que la cámara está satisfactoriamente conectada al
teléfono móvil por WiFi, puede reproducir, descargar y eliminar videos en
la app móvil.
4.
5.
6.
No habrá consumo de tráfico de red al reproducir videos en la app o
descargarlos hacia una tarjeta SD.
Notiz:
1.
Para ver el archivo en la computadora, puede hacer clic derecho
directamente para abrir el menú y borrarlo.
También puede usar un lector USB de tarjetas para leer la información
de la tarjeta de memoria.
Para garantizar un suministro de energía estable, por favor verifique si
la interfaz de la computadora es USB 3.0. Cuando se conecte a una
computadora de escritorio, es recomendado que utilice el puerto USB
en la parte trasera de la computadora.
20230210_115036_0079_N_A.MP4
2023/02/10 11:5:35 E3 000.000000. 000.000000. 36MK/H
Nota:
9:41
Para mostrar la información del GPS,
primero debe descargar el archivo de
video a la carpeta local de la APLICACIÓN
y luego reproducirlo en la carpeta local.
EN
EN
EN
ES
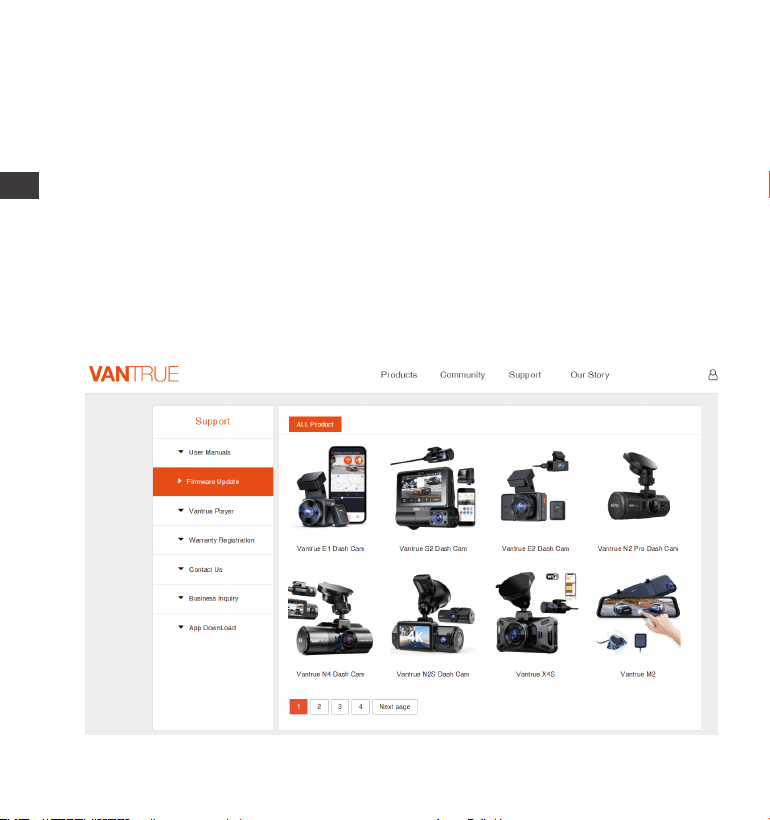
- 86 -
ENDE
4.2.12 Actualizar el firmware
El sistema se actualizará automáticamente si el archivo de actualización
está en la tarjeta micro SD. La cámara se reiniciará una vez que la
actualización haya sido completada.
La versión de firmware más reciente siempre estará disponible en la
página web oficial de VANTRUE (www.vantrue.net). Nosotros le recomen-
damos registrar su producto (www.vantrue.net/register) para recibir un
correo electrónico de notificación cuando haya una nueva actual-
ización de firmware disponible.
2.
Usted puede ver información de rastreo GPS solo después de que el
archivo de video es descargado y reproducido localmente. Al mismo
tiempo, debe desconectar el WiFi en la cámara, de otra forma la
información de ubicación estará en blanco.
ENES

- 87 -
5. Especificaciones
E3Modelo
Delantera: Apertura amplia F/1.8
Interior: Apertura amplia F/2.0;
Trasera: Apertura amplia F/1.8
Engish/Français/Español/Deutsch/Italiano/
简体中文/русский/ 日本語/Polski
Procesador Novatek de alto rendimiento
Sensor CMOS Sony
Sensor triaxial incorporado
2.4GHz y 5GHz incorporados
Pantalla táctil IPS de 2.45”
Las especificaciones de este producto pueden cambiar sin previo aviso
debido a mejoras del producto.
Chips
Sensor de imagen
Sensor G
WiFi
Pantalla
Ángulo de la cámara
Delantero: Ángulo de visión amplio de 160°;
Interior: Ángulo de visión amplio de 165°;
Trasero: Ángulo de visión amplio de 160°;
Apertura
Idiomas
4.2.13 Temperatura de funcionamiento
La cámara está diseñada para operar en temperaturas de -20 a 60°C
(-4 a 140°F), temperaturas fuera de este rango pueden degradar del
rendimiento de la cámara y pueden causar daños.
Para evitar daños
En clima caliente, no exponga la cámara directamente al sol cuando el
automóvil esté estacionado. En condiciones congelantes extremas, p.e.,
-20°C (-4°F) o inferiores, desacople la cámara del parabrisas cuando no
esté en uso y guárdela en la guantera.
EN
EN
EN
ES

- 88 -
JPEG
Micrófono y altavoz incorporados
Bildformat
Audio
Memoria de
almacenamiento
Tipo C
Súper capacitador incorporado
DC 5V 2.4A
6W
Puerto USB
Fuente de alimentación
Corriente de alimentación
Alimentación
Externa: Tarjeta Micro SD U3 Clase 10 de
32GB-512GB (no incluida en el paquete)
Modo de grabación delantera + interior +
trasera: 1944P+1080P+1080P 30FPS;
1440P+1080P+1080P 30FPS;
1080P+1080P+1080P 30FPS; 1440P+1080P+720P
30FPS; 1440P+720P+720P 30FPS;
1080P+1080P+720P 30FPS; 1080P+720P+720P
30FPS; 720P+720P+720P 30FPS;
Modo de grabación delantera + interior:
1944P+1080P 30FPS; 1440P+1080P 30FPS;
1080P+1080P 30FPS; 1080P+720P 30FPS;
720P+1080P 30FPS; 720P+720P 30FPS;
Modo de grabación delantera + trasera:
1944P+1080P 30FPS; 1440P+1080P 30FPS;
1080P+1080P 30FPS; 1080P+720P 30FPS;
720P+1080P 30FPS; 720P+720P 30FPS;
Modo de grabación delantera individual:
2592x1944P 30FPS; 2560x1440P 30FPS;
1920x1080P 30FPS; 1280x720P 30FPS;
Resolución de video
Formato de archivo
de video
MP4
Temperatura de
funcionamiento
De -20°C a 60°C (De -4°F a 140°F)
ENES

- 89 -
Garantía
La Dashcam VANTRUE
®
Element 3 viene con una garantía completa de
12 meses. Si usted registra su producto en nuestra página oficial
(www.vantrue.net/register), puede extender la garantía a 18 meses.
Soporte
Si tiene preguntas relacionadas a su producto, por favor no dude en
contactarnos en Amazon o envíenos un correo electrónico a
[email protected]. Las consultas son normalmente respondidas en
12-24 horas.
Su opinión importa
VANTRUE
®
está firmemente comprometido a siempre mejorar nuestros
productos, servicio y experiencia de usuario. Si tiene alguna sugerencia
sobre cómo podemos ser inclusive mejores, nos encantaría recibir su
crítica constructiva. Contáctenos ahora en [email protected].
GRACIAS por elegir a
6. Garantía y soporte
Temperatura de
almacenamiento
De -20°C a 70°C (De -4°F a 158°F)
EN
EN
EN
ES
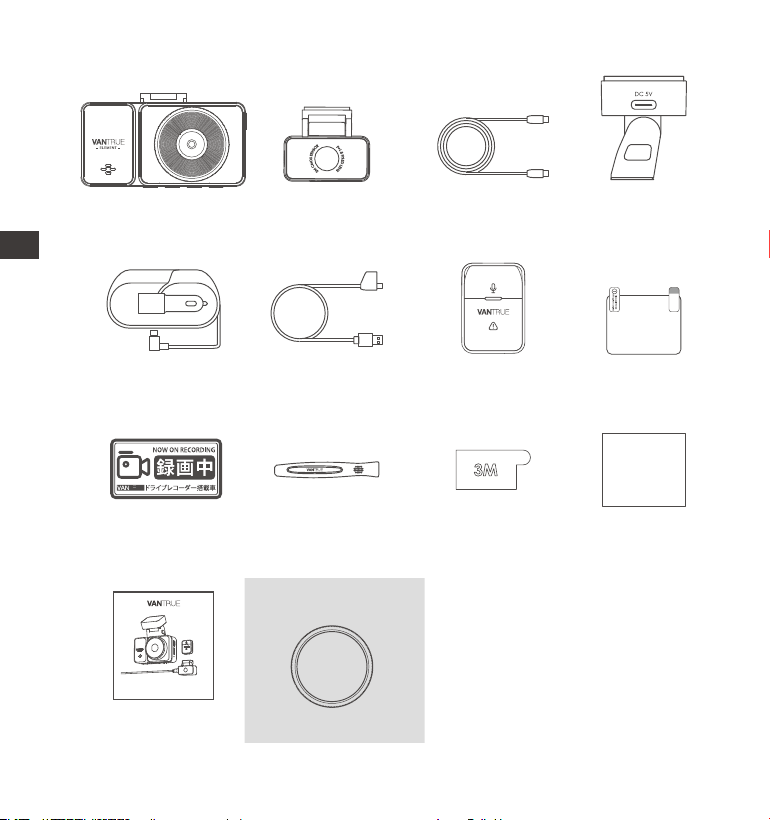
- 90 -
1. 同梱内容
H.
無塵布ドライブレコー
ダーステッカー
(2枚)
L.
CPLフィルター
A.
VANTRUEE3
ドライブレコー
ダー本体
E.
リアカメラケー
ブル(Type-C型、
6ⅿ)
I.
取扱説明書
M. N.
B.
リアカメラ
G.
内張りはがし
K.
D.
GPSマウント
C.
VANTRUE
リモコン
F.
Type-C型USBケー
ブル(1m、デー
タ転送用)
Type-C型シガー
ソケットケーブル
(3.5m)
予備品3M両面テ
ープ(マウント/リ
アカメラ/リモコン
に各1枚)
J.
静電気接着シ
ート(2枚)
オプション品
Element 2
User Manual
Voice-Controlled Dual Dash Cam
JP
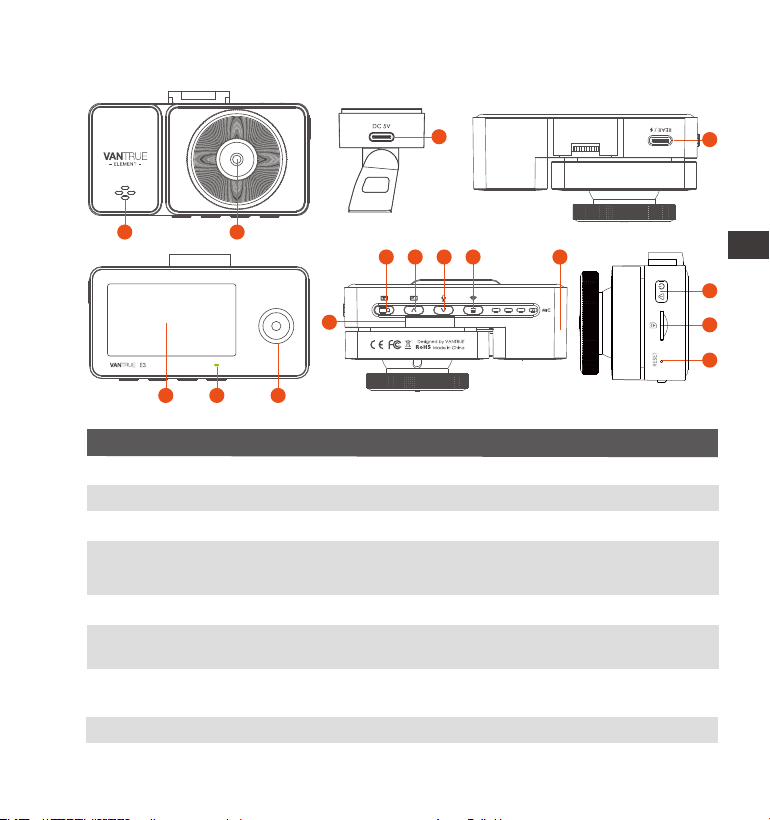
- 91 -
8
保証登録用
シリアル番号
2. E3ドラレコの概要
No.
はたらき名称
1
前方の状況を記録します。
2 フロントカメラ
動画再生中、音の出口です。
3
スピーカー
電源の入力端子です。
電源の入力端子
本体と接続用端子、PCと接続するとデーターの読み
取りの状態になります。
4 リアカメラの
Type-C端子
2.45インチのIPS液晶画面
5
スクリーン
車内の状況を記録します。赤外線暗視モードに切り
替えることが可能です。
7 車内カメラ
青色は通電中と示します。
6
録画インジケ
ーター
JP
14
15
16
3
4
21
5 6 7
8
131211
10
9
VTJE1210130

- 92 -
EN
EN
EN
FR
音声記録
録画中/待機中、長押しでWiFiのオン/オフをします。
録画待機中、短押してメニューに入り、または前の
画面に戻ります。
9
録画中/待機中―短押しで画面を切り替えます。メ
ニュー画面で短押しで画面の上方へ移動します。メ
ニュー画面で長押しで画面の上方へスクロールしま
す。動画再生中、短押しで早送りします。
10
録画中/待機中、短押しでマイクをオン/オフにしま
す。録画中/待機中、長押しで駐車モードに入りま
す。
メニュー画面で短押しで画面の下方へ移動します。
メニュー画面で長押しで画面の下方へスクロールし
ます。
ファイルを閲覧中、短押しで次のファイルへ移動し
ます。
ファイルを閲覧中、長押しで下方のファイルへスク
ロールします。
動画再生中、短押しで再生中の動画ファイルを削除
します。
11
12
長押しで本体の電源をオン/オフにします。録画中、
短押しで当時の動画ファイルをロック(緊急録画)
して写真を撮ります。
14 ボタン
マイク
ボタン
ボタン
ボタン
ボタン
13
向きを確認してmicroSDHCカードを挿入します。
(最大512GBのカードまでサポートします)
15 メモリーカード
挿入口
録画中、長押しでモニター画面をオン/オフにしま
す。録画中、1回短押しで録画を開始/停止します。
メニューで選択肢を確認します。映像を再生中、短
押しで再生を停止/再開します。
JP

- 93 -
LEDインジケーターの意味
LEDインジケーターの状態
待機中;或いは録画インジケーターがオンに
設定しています
動作
緑色インジケーターが点灯中
録画中緑色インジケーターが点滅中
16 リセットボタン
ドラレコを再起動します
JP
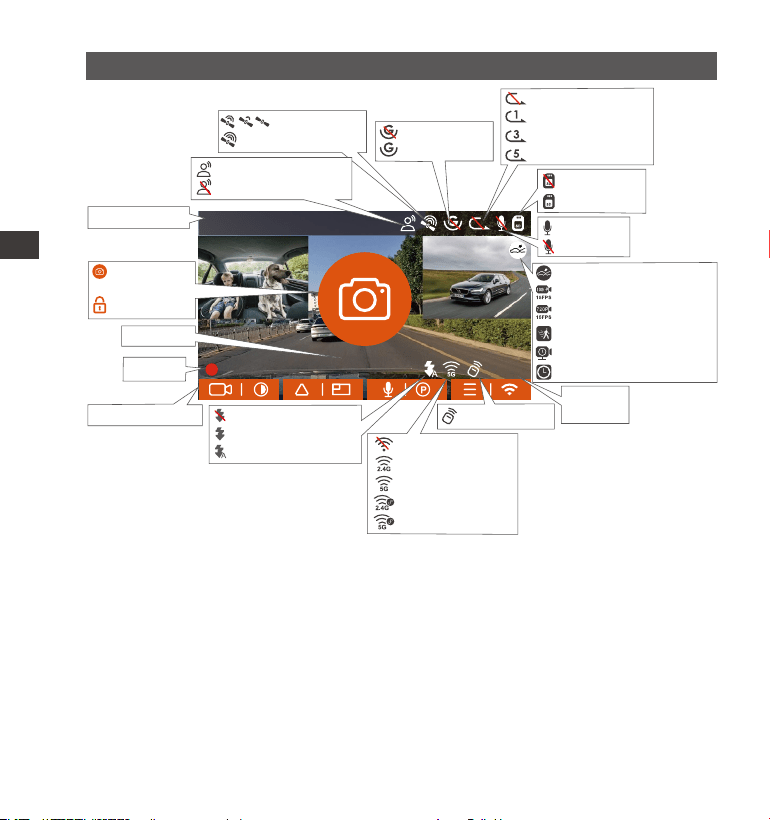
- 94 -
スクリーンの概要
3. 取り付け方法
3.1 メモリーカードの取り付け( VANTRUE U3 Micro SDカードをお勧めです。)
C10/U3/A2以上の32GB〜512GB microSDカードを使ってください。64GB、
128GB、256GB、512GBのカードをサポートします。VANTRUEドラレコはメモ
リーカードの書き込み速度に要求が高いため、VANTRUE MicroSDカードをお勧
めです(別売)。
挿入: microSDメモリーカードの端子面と本機の背面が同じ向きになるようにし
て、カチッと音がするまでmicroSDメモリーカード挿入口へ差し込みます。
取出し: microSDメモリーカードを1回押すと取り出すことができます。
JP
14:39:07 2023-02-10
00:00:37
MP/H
35
1440P+1080P+1080P 30FPS
GセンサーOFF
GセンサーON
車速
設定中の解像度
衝撃検知
低ビットレート録画1080P
低ビットレート録画720p
動体検知
駐車監視タイムラプス録画
タイムラプス撮影
GPS信号捕捉中
GPS接続済み
音声コントロールON
音声コントロールOFF
MP/H
35
操作ボタンの表示
リモコン接続中
赤外線ライトOFF
赤外線ライトON
赤外線ライト「自動」
日付と時刻
スナップショ
ット(写真)
緊急録画中
マイクON
マイクOFF
SDカードなし
SDカードあり
録画時間
ループ録画オフ
ループ録画1分間
ループ録画3分間
ループ録画5分間
Wi-Fiオフ
2.4GWi-Fiオン
5GWi-Fiオン
2.4GWi-Fi接続済み
5GWi-Fi接続済み
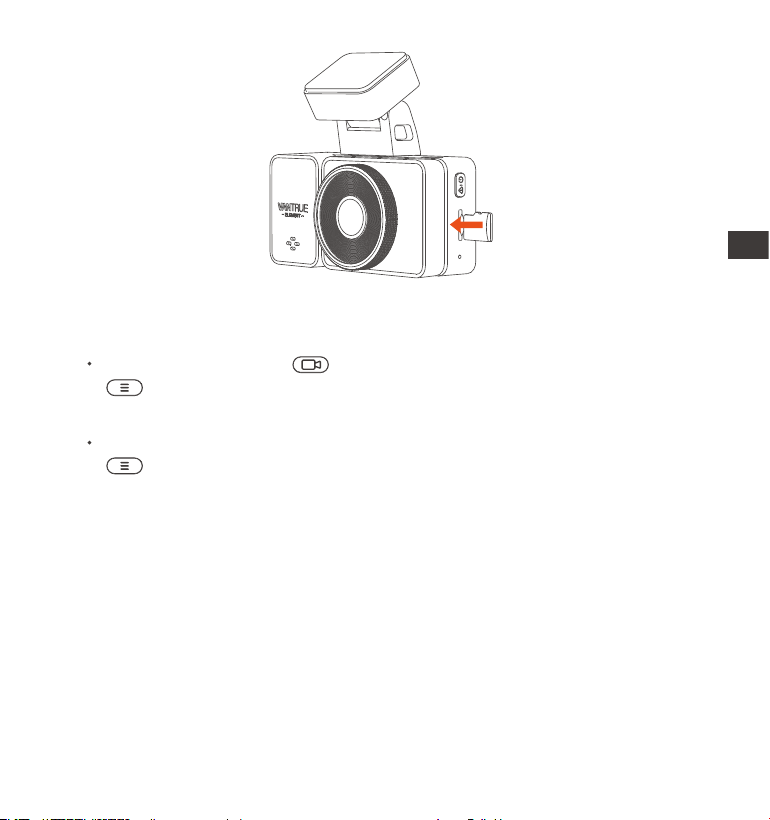
- 95 -
もし本体が録画中なら、ボタンを押して録画を停止してください。そして
ボタンを押してメニュー画面に入ります。その後、「システム」>>「
フォーマット」を選択してSDカードのフォーマットを実行してください。
「カードエラー、SDカードをフォーマットしてください」と表示される場合
、 ボタンを押して「システム」>>「フォーマット」を選択してSDカード
のフォーマットを実行してください。
ご注意: microSDカードの使用前に必ず本機でフォーマットしてください。ぜひ
microSDカードは消耗品です。メモリーカードの寿命を延長するため、1ヶ月
経過したら、メモリーカードをフォーマットしてください。
電源がONの状態でmicroSDカードの抜き差しをしないでください。microSD
カード本体やデータ破損の原因となります。必ず電源OFF後、ランプが3秒以
上消灯したことを確認しmiciroSDカードの抜き差しを行ってください。
VANTRUEMicroSDカードをおすすめです。安定性が弱いメモリカードがドラ
イブレコーダーの運行に悪い影響があるので、ご了承ください。(例えば
:Sandisk、Transcend、シリコン、TEAM)
ご注意:
1.
2.
3.
JP

- 96 -
4.
事故発生時は記録された録画ファイルが上書きされないように、必ず電源を
OFFにしてからmicroSDカードを取り出し保管してください。
3.2 ドライブレコーダーの取り付け
下記画像の指示通りにマウントを本機のマウント接続口に、カチッと音がす
るまで差し込んで取り付けてください。
1.
ドラレコ本体をフロントカメラに取り付ける前にまずは本体に通電してフロ
ントカメラの撮影角度と車内カメラの撮影角度を確認してください。最適な
撮影角度を確認して取り付け位置を決めてください。
2.
JP
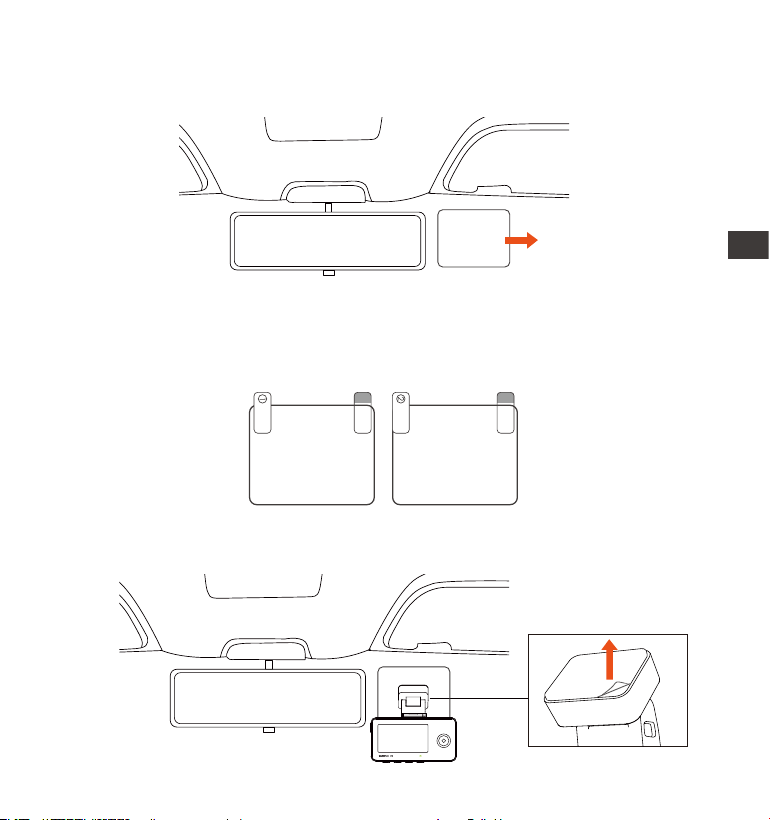
- 97 -
静電気接着シートの貼り付けが終了した後、本体を水平方向で静電気接着シ
ートに貼り付けてください。
4.
フロントガラスに取り付けたい場所を水で、またはアルコールでキレイにし
てください。そして静電気接着シートを取り付けたいところに貼り付けてく
ださい。
3.
ご注意:静電気接着シートの両側に2枚の保護フィルムを付いています。ま
ずは番号①の保護フィルムを剥がし、フロントガラスに静電気接着シートを
決められた場所に貼り付けてください。そして、番号②の保護フィルムを剥
がしてから、ドラレコ本体を静電気接着シートに貼り付けてください。
静電気接着シート
Please peel off this mask
AFTER application completed
Please peel off this
mask BEFORE application
JP
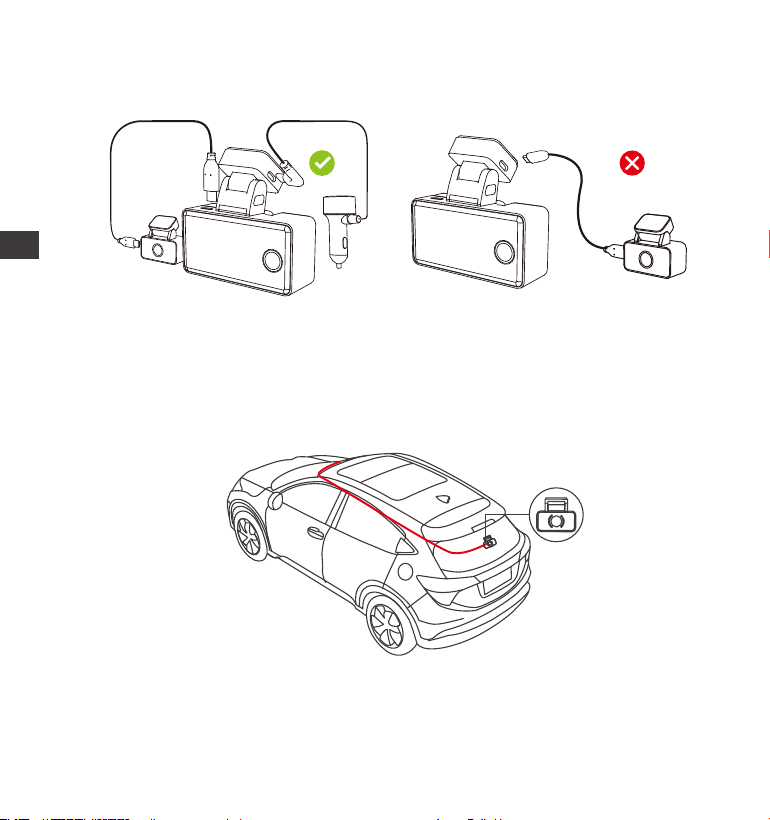
- 98 -
下図に示すように、リアカメラを本体と接続してください。接続端子を間違
いないよう、ご注意ください。
5.
下図に示すようにシガーソケットケーブルをフロントガラスの周りに隠して
ください。
7.
リアカメラの取り付け:
同様にリアカメラに装着したい場所を水で、またはアルコールでキレイにし
てください。良い映像を撮れるようにリアカメラをリアガラスの真ん中のと
ころに貼り付けることを勧めます。取り付け完了した後、リアカメラの角度
を最適に調整してください。
6.
JP
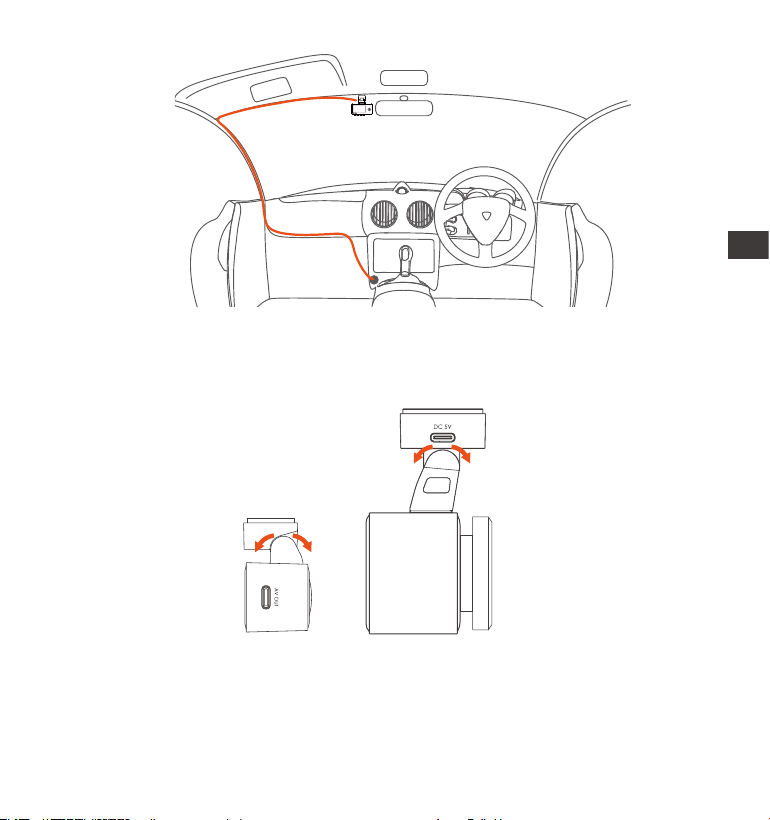
- 99 -
取り付けが終了した後、再度フロントカメラとリアカメラの角度を確認して
最適な角度に調整してください。
8.
※ご注意:E3ドラレコの車内カメラは本体に固定されていますが、フロントカ
JP

- 100 -
3.3 APPのインストール
下記のQRコードをスキャンしてまたはアプリStoreとGooglePlayで「Vantrue」
を検索して専用アプリをインストールしてください。インストールが成功しま
したら、アプリを開いて指示通りに登録を行ってください。
※ご注意:ドラレコから映像をスマホにダウンロードする場合、スマホのデータ
通信料は発生しません。ぜひご安心ください。なお、スマホでGPS情報を再生す
る場合、また動画を共有したい場合はスマホとドラレコの接続を切ってスマホ
をインターネットに接続する必要があります。この場合には、スマホのデータ
通信料が発生します。
JP
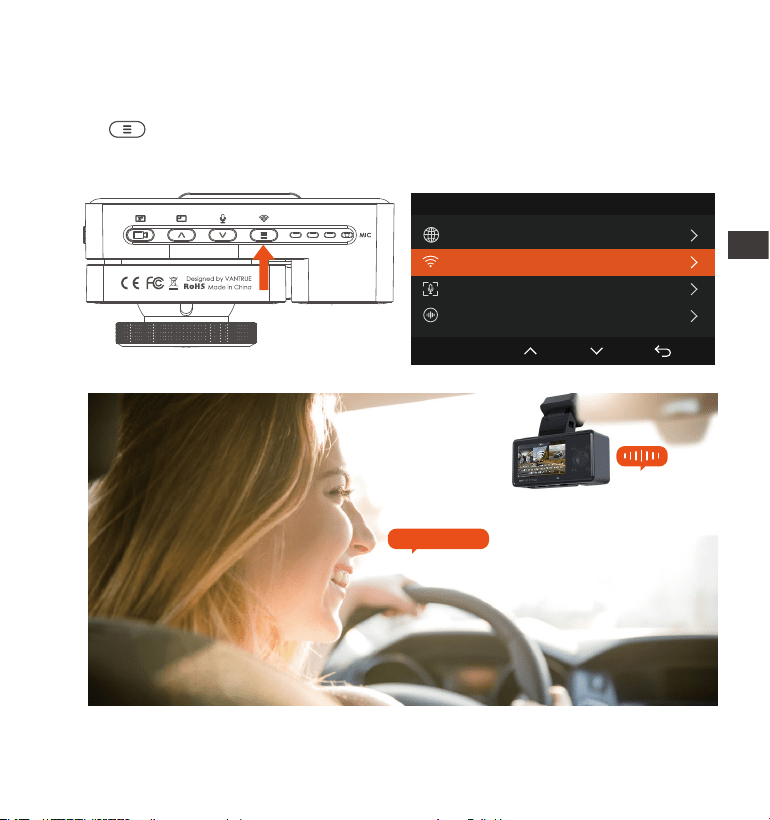
システム設 定 2/14
言語
Wi-Fi
音 声 コントロー ル
音声認識コマンド
OK
①ボタンを2秒長押しする。
E3ドラレコのWiFi機能を開きます。
- 101 -
3.4 WiFi の接続
VTJE1210130
WiFiを開く
JP
②システム設定>WiFi設定のメニュー
でWiFiをONにする。
③音声コマンドでWiFiを開きます。
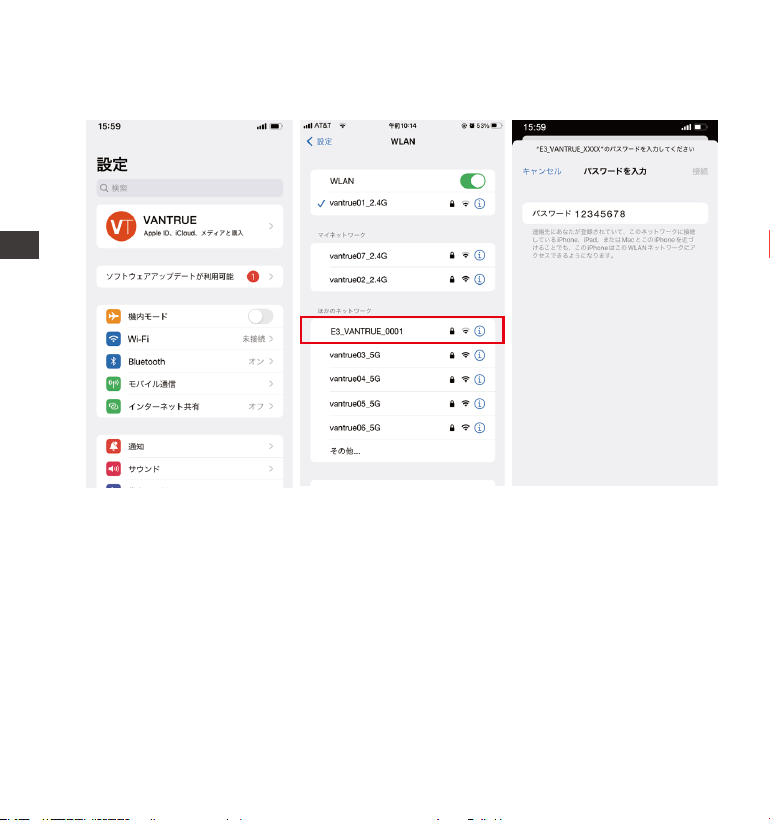
- 102 -
E3ドラレコのWiFi機能をオンにした後、またスマホのWLAN設定でE3ドラレコ
のWiFi信号(例:E3VANTRUEXXXX)を見つけて初期パスワード:12345678を入力
して接続を行ってください。
JP
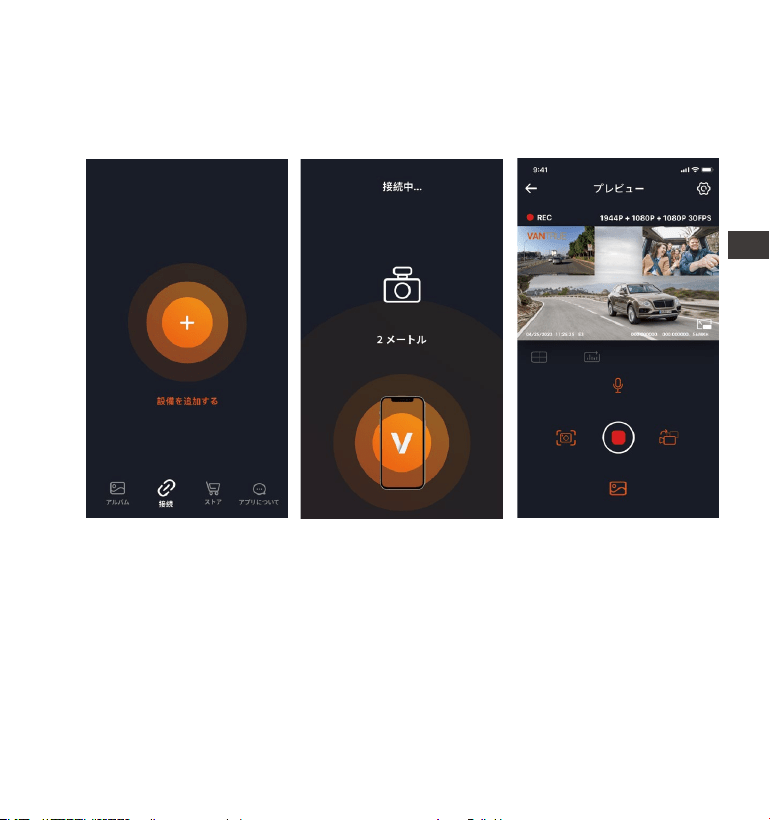
- 103 -
スマホをドラレコのWiFiに接続成功した後、APPを開いて「+」のアイコンをタ
ッチしてドラレコの型番を追加してください。そうすればAPPが自動的にドラ
レコに接続して、スマホでリアルタイムに映像を確認できます。
3.5 アプリの接続
※ご注意:
1.
2.
3.
アプリを開く前にWiFiが接続されていなかった場合に、「WiFiを接続してく
ださい。」と表示され、自動的にWiFiの設定画面に切り替えます。その際、
ぜひWiFiの接続を実行してください。
接続設定が完了し、アプリで型番を選んだ後、アプリの権限が要求された場
合はぜひ権限を許可してください。
本製品の初期パスワードは「12345678」となっています。アプリでパス
ワードを変更できます。安全のため、初回の接続後、パスワードを変更する
ことを勧めます。
JP
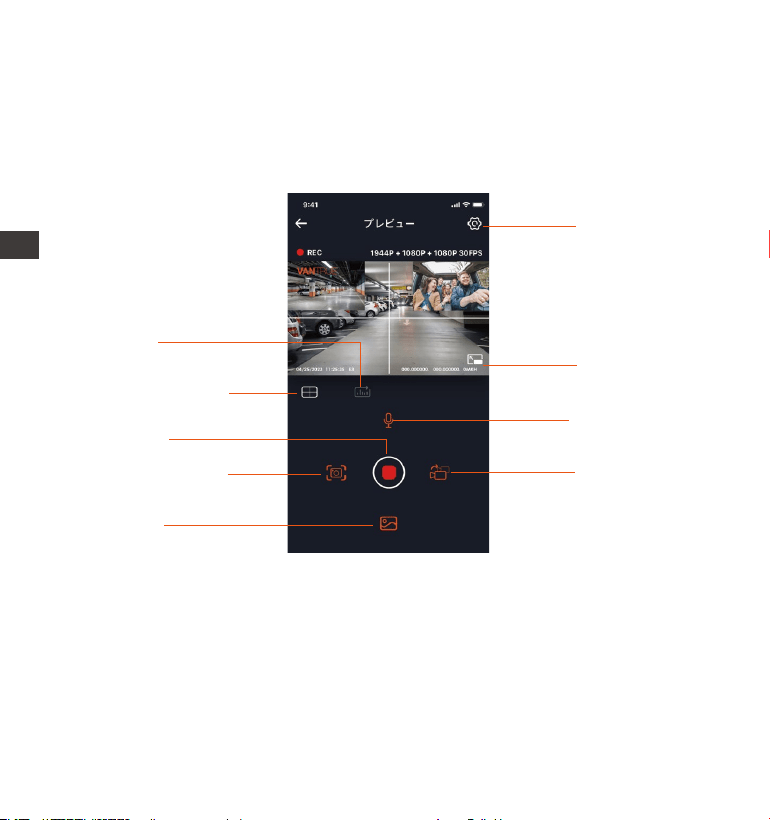
- 104 -
4.
5.
3.6 アプリの使用
万が一、パスワードを忘れた場合は本機を初期化処理すればパスワードが初
期パスワードに戻ります。
本機と違った型番を選んだ場合、「正しい型番を選んでください。」と表示
され、自動的に型番を選ぶ画面に戻ります。
設定
走行距離
レンズ方向補正線
フルスクリーン
画面切り替え
スナップショット
アルバム
再生/停止
マイクON/OFF
ライブストリーミング:WiFiでスマホとドラレコを接続した後、アプリを開い
て、録画中の映像をアプリでリアルタイムに確認可能。フルスクリーンアイコ
ンをタッチすれば動画は画面全体に表示されます。
動画の再生: アプリでドラレコに装着しているSDカードの中の動画と写真を再
生できます。
動画のダウウンロード: アプリでドラレコから映像ファイルや写真をスマホに
ダウンロードすることが可能です。スマホにダウンロードされた映像を再生す
ると走行線路も地図で表示されます。
JP
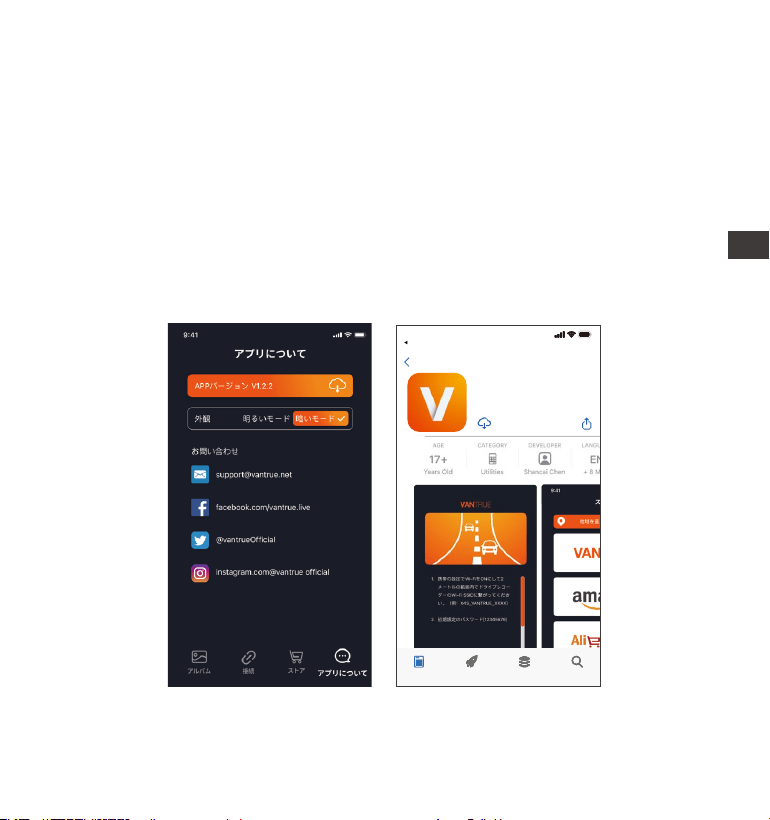
- 105 -
スナップショット: アプリの「スナップショット」ボタンをタッチすれば静止
画を撮ります。
走行距離 (里程統計): ユーザーが走行距離データをダウンロードすると、走行
距離データが写真またはPDFファイルの形式でAPPに保存されます。
レンズ方向補正線: カメラの方向を調整する時、十字線を参考して最適な撮影
画角に調整できます。
専用アプリを開いてWiFiを接続した後、「設定」>>「アプリについて」>>
「アプリバージョン」>>「バージョンアップ」をタッチしてください。新し
いバージョンがあればアプリが自動でアップデートを行います。
3.7 アプリのアップデート
JP
Vantrue Ltd.
戻る
Vantrue
Vantrue
9:41
トーディ ゲーム アプリ サーチ

- 106 -
E3ドライブレコーダーのメニューには「録画設定」、「システム設定」と「フ
ァイル」の三つの部分があります。本体を起動した後、ご希望の機能を設定し
てください。
ボタンを押して録画を停止した後、またボタンを押してメニューに
入ってご希望の様々な機能を設定してください。
4. 機能紹介
4.1 メニューの設定
A. 録画設定
a.解像度:
フロント+車内+リア:
1944P+1080P+1080P30FPS;1440P+1080P+1080P30FPS;1080P+1080P+1080P
30FPS;1440P+1080P+720P30FPS;1440P+720P+720P30FPS;1080P+1080P+720P
30FPS;1080P+720P+720P30FPS;720P+720P+720P30FPS
フロント+車内:1944P+1080P30FPS;1440P+1080P30FPS;1080P+1080P30FPS;
1080P+720P30FPS;720P+1080P30FPS;720P+720P30FPS
フロント+リア:1944P+1080P30FPS;1440P+1080P30FPS;1080P+1080P30FPS;
1080P+720P30FPS;720P+1080P30FPS;720P+720P30FPS
フロント:2592x1944P30FPS;2560x1440P30FPS;1920x1080P30FPS;1280x720P
30FPS
システム設定
OK
JP

- 107 -
b.ループ録画:1個ファイルあたりの記録時間を「1分」「2分」「3分」「4分」
「5分」を設定できます。初期設定は「3分」です。この機能をオフにした場
合、SDカードが一杯になった際に上書き録画ができない状態になりますのでご
注意ください。
c.赤外線ライト:E3ドラレコの車内カメラには赤外線ライト暗視機能が搭載され
ています。この機能を「自動」、「オフ」と「オン」に設定できます。
d. G-センサー:G-センサーの感度を「前後」、「左右」と「上下」それぞれの方
向の感度を設定できます。感度は1/2/3/4/5/オフの6つの選択肢があります。初
期設定の感度は3です。
e.録画音声:初期設定はオンです。オン/オフが選択できます。
f.露光指数:三つのカメラの露光指数をそれぞれに調整できます。初期設定値は
+0.0です。
g. 録画インジケーター:初期設定はオンです。オン/オフが選択できます。
h.WDR:フロントカメラと車内カメラのWDR機能をオン/オフに設定できま
す。初期設定はオンです。
i.リアカメラHDR機能:初期設定はオンです。オン/オフが選択できます。
j.画面上下反転表示:初期設定はオフです。フロントと車内の表示、またはリア
カメラの表示をそれぞれに上下反転の表示に設定できます。
k.車内カメラ鏡像:初期設定はオフです。オンを選択すれば、画面を上下に反転
します(180度)。
l.リアカメラ鏡像:初期設定はオンです。オンに設定した場合、リアカメラの表
示が鏡像になります。
m.車両登録番号:車両番号を設定します。ダウンボタンを押し、正確な番号を選
択して確認ボタンを押してください。
n.スタンプ設定:全てのスタンプ(日付と時刻、VANTRUEロゴ、車両登録番号、
速度、GPSの情報)を録画ファイルに表示します。スタンプを表示させたくない
場合、スタンプをオフに選択してください。
o.タイムラプス撮影:初期設定はオフです。1FPS/5FPS/10FPS/15FPSが選択でき
ます。
JP

- 108 -
p.駐車モード:初期設定はオフです。衝撃検知/動体検知/低ビットレート録画/タ
イムラプス録画が選択できます。駐車モードを「オフ」に設定する場合は、本
体はずっと録画し続けるので、ご注意ください。
q.駐車低照度暗視機能:初期設定はオンです。オンに設定すると、駐車監視の暗
視機能が向上されます。
r.走行距離 (里程統計): 初期設定はオンです、走行距離データがメモリーカード
に保存されます。MircroSDカードに走行距離データを確認して、或いはAPP経
由で走行距離データをダウンロードします。
s.GPS設定: 初期設定がオンです。GPSのオン/オフ、速度単位、GPS情報を設定
できます。
B. システム設定
a.言語: Engish/Français/Español/Deutsch/Italiano/简体中文/русский/日本
語/Polski.
b.WiFi:この機能では、Wi-Fi自動起動機能のオン/オフ/10分間後オフを設定でき
ます。またWi-Fi情報も確認できます。Wi-Fi自動起動機能の初期設定は10分間後
オフです。初期設定によって、本体をオンにしたら、Wi-Fi機能も自動に起動し
ます。無接続の状態で10分間後、WiFi機能が自動にオフになります。
c.音声コントロール:初期設定は標準感度です。他に低感度と高感度が選択でき
ます。
d.音声認識コマンド:運転中で音声でドラレコをコントロールできます。「シス
テム設定」>「音声認識コマンド」経由で詳細なコマンドを確認できます。
e.フォーマット: microSDメモリーカードのフォーマットを行います。全てのフ
ァイルに保存されたデータはなくなります。
f.フォーマットアラーム:初期設定は「オフ」です。「15日」と「一ヶ月」に設
定できます。例えば、15日に設定する場合、15日後本体が起動した後「SDカー
ドをフォーマットしますか」と表示されます。こうして、SDカードを常にフォ
ーマットします。
g.日付と時刻:時間の設定/調整は二つの方法があります。①手動で時刻を設定す
JP
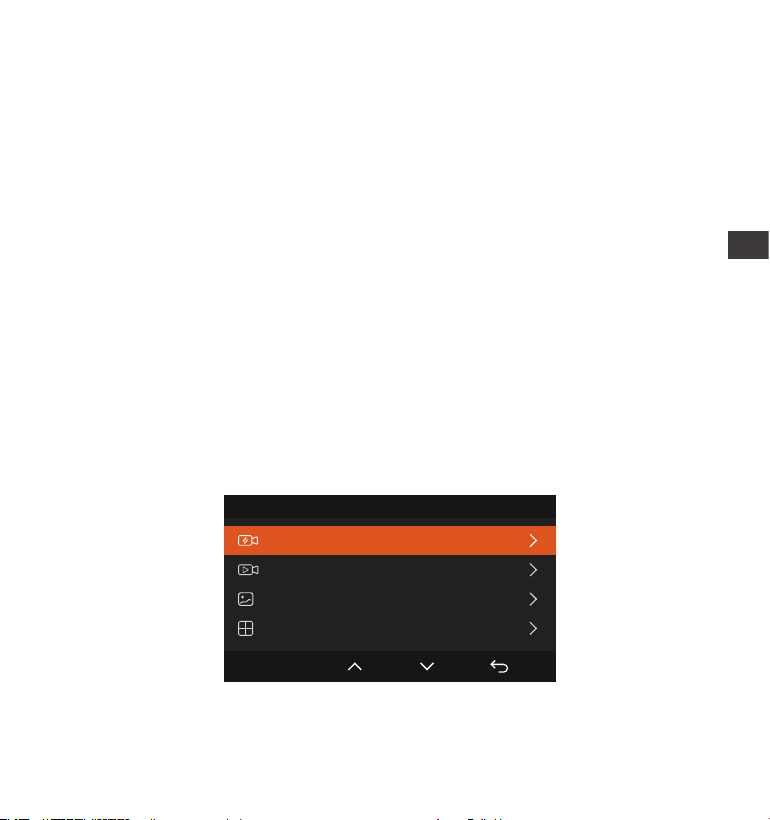
- 109 -
る。②GPS自動時刻補正。GPSが受信すると日付・時刻がタイムゾーンで設定さ
れた時刻に補正されます。GPS自動時刻補正機能はオン/オフに設定できます。
なお、日付/時刻設定に日付形式とGMT設定を行います。日本のタイムゾーンは
「+9」となっております。
h.モニター点灯時間:自動/30秒/3分間/5分間の選択肢から選べます。初期設定は
「自動」で駐車監視モードに入る時以外、常に点灯する状態です。
i.デバイス音量:初期設定は3です。0〜5から選べます。
j.音声:初期設定はオンです。起動音、ボタン音、ロック録画の音、フォーマッ
トの音、録画異常停止の警告音のオン/オフをします。
k.周波数:日本国内では、50Hzと60Hzの地域があり、一般に静岡県の富士川を境
に、東日本は50Hz、西日本は60Hzとなっています。
l.システム情報:本体の型番、ファームウェアのバージョン、公式サイトを確認
できます。
m.認証情報:E3ドラレコの認証情報を確認できます。
n..初期設定:全ての設定をお買い上げ時の状態に戻します。
C. ファイル
ここでは撮影したビデオと画像を確認できます。
フィル ム管 理 1/4
イベント
ノーマル
写真
全てのファイル
OK
a.イベント:イベントビデオ(自動で/手動でロックされたビデオ)が保存されます。
イベント録画のファイル名の格式は下記の通りです。
203001281406330008EA.MP4
JP
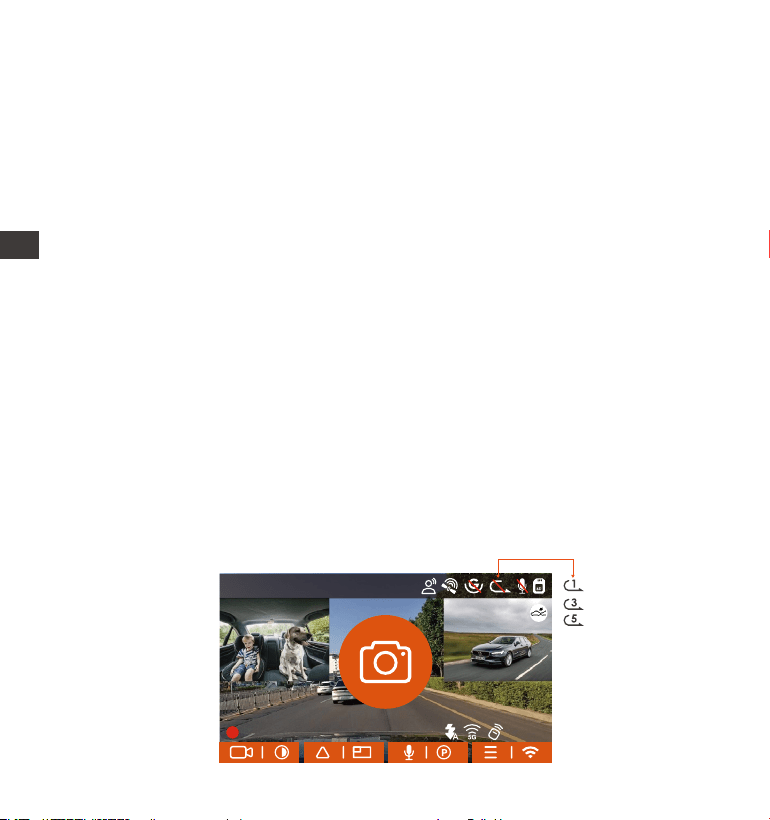
- 110 -
203001281406330008EB.MP4
203001281406330008EC.MP4
b.ノーマル:通常録画のビデオはこのフォルダーに保存されます。
ループ録画のファイル名の格式は203001281406330008NA.MP4です。
駐車監視録画のファイル名の格式は203001281406330007PA.MP4です。
タイムラプス撮影のファイル名の格式は203001281406330006TA.MP4です。
c.写真:全ての写真がここに保存されます。
d.全て:ここではすべての映像と写真を確認できます。
※ご注意:映像のファイル名に「A」が付いているのはフロントの映像で、
「B」が付いているのは車内の映像、また「C」が付いているのはリアカメラの
映像です。
4.2. 重要な機能の紹介
4.2.1 ループ録画
microSDカードが挿入されている状態で電源を入れると、本機が自動的にオン
になり、設定された時間間隔でループ録画を行います。電源が入っていない場
合は本体は起動しません。
ループ録画の映像ファイルは「ノーマル」と言うフォルダーに保存されます。
「ノーマル」のフォルダーの容量はSDカードの総容量の70%となっています。
「ノーマル」の動画の容量がSDカードの総容量の70%になると古い録画ファイ
ルから順次上書きされます。
JP
14:39:07 2023-02-10
00:00:37
MP/H
35
1440P+1080P+1080P 30FPS

- 111 -
ループ録画はSDカードの書き込み速度に頼っているため、書き込み速度を高
いレベルに維持するため、定期的に(月に一回)SDカードをフォーマットす
ることを勧めます。
貴重な映像ファイルが上書きされないように、保存したい映像があればお早
めに他のデバイスにご保存ください。
ループ録画をオフにすると、緊急録画機能が作動しなくなります。
ループ録画をオフにした場合、映像の長さが20分間になり、SDカードがいっ
ぱいになった後、録画が自動で停止します。
4.2.2 緊急録画
Gセンサーにより、緊急時にロックされた映像と衝撃を検知した映像は自動的
にイベントフォルダに保存されます。Gセンサー感度の設定によって、検知で
きる衝撃の感度には違いがあります。緊急時にロックされた映像と衝撃を検知
した映像は自動的にイベントフォルダに保存されます。G-Sensor感度の設定に
よって、検知できる衝撃の感度には違いがあります。
※ご注意:
1.
2.
3.
4.
録画中、手動でボタンを押しても動画をロックできます。動画をロックし
た後、ボタンを押し続けると、写真を撮ることになります。
JP
14:39:07 2023-02-10
00:00:37
MP/H
35
1440P+1080P+1080P 30FPS
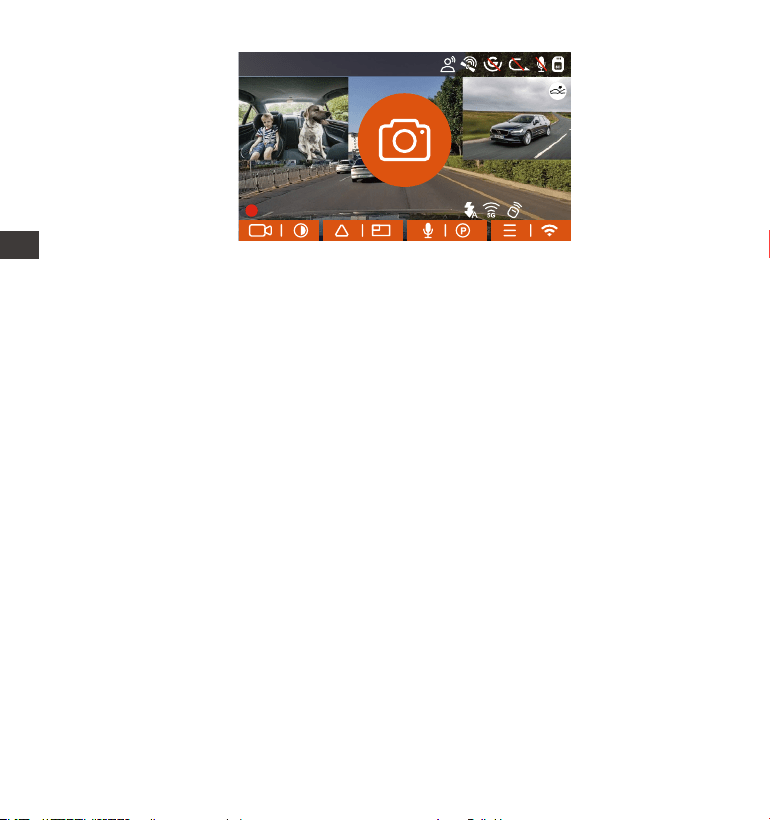
- 112 -
G-センサーの感度に低く設定された場合、映像がロックされない場合があり
ます。
「イベント」のフォルダーはSDカードの総容量の30%となっています。
「イベント」のフォルダーがいっぱいになると同じく古い録画ファイルから
順次上書きされますので、ご注意ください。
ループ録画がオンに設定された場合、またタイムラプス撮影がオンに設定さ
れた場合、「緊急録画」の機能は作動しません。
※ご注意:
1.
2.
3.
4.
JP
14:39:07 2023-02-10
00:00:37
MP/H
35
1440P+1080P+1080P 30FPS
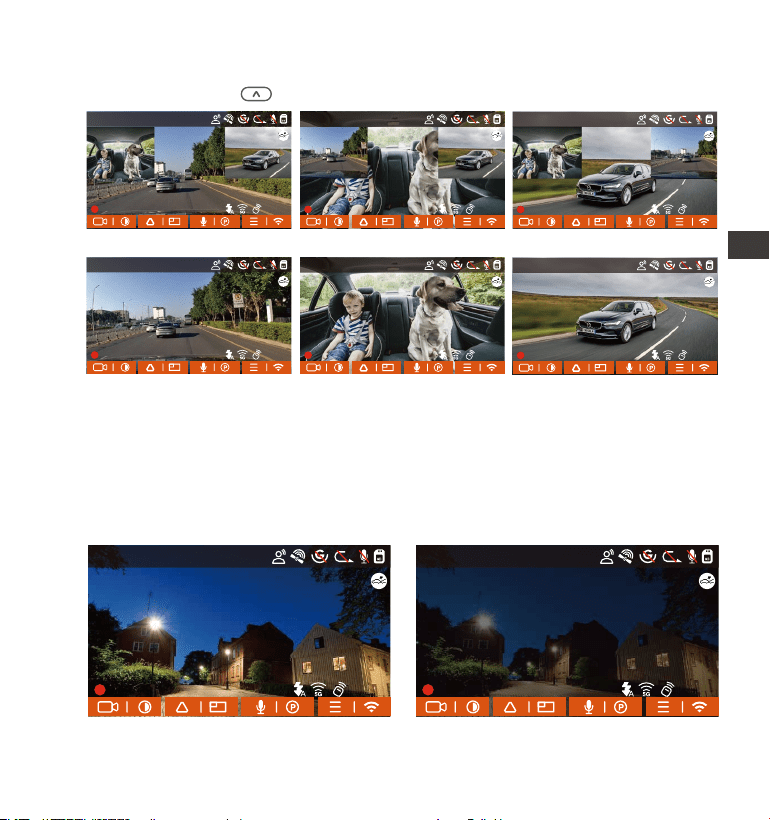
- 113 -
4.2.3 画面の切り替え
E3ラレコは録画中、ボタンで画面の表示形式を切り替えます。
4.2.4 駐車低照度暗視機能
夜間の駐車監視で撮影した映像をより鮮明にするため、レンズの性能と低照度
暗視技術を合わせて暗視機能を大幅に向上しました。初期設定はオンです。こ
の機能はドラレコ本体が駐車監視モードに入った時のみ機能しますので、通常
録画の際は機能しません。
フロントカメラを真ん中に表示
車内カメラを真ん中に表示 リアカメラを真ん中に表示
フロントのみ表示 車内カメラのみ表示 リアカメラのみ表示
駐車低照度暗視機能OFF駐車低照度暗視機能ON
JP
14:39:07 2023-02-10
00:00:37
MP/H
35
1440P+1080P+1080P 30FPS
14:39:07 2023-02-10
00:00:37
MP/H
35
1440P+1080P+1080P 30FPS
14:39:07 2023-02-10
00:00:37
MP/H
35
1440P+1080P+1080P 30FPS
14:39:07 2023-02-10
00:00:37
MP/H
35
1440P+1080P+1080P 30FPS
14:39:07 2023-02-10
00:00:37
MP/H
35
1440P+1080P+1080P 30FPS
14:39:07 2023-02-10
00:00:37
MP/H
35
1440P+1080P+1080P 30FPS
14:39:07 2023-02-10
00:00:37
MP/H
35
1440P+1080P+1080P 30FPS
14:39:07 2023-02-10
00:00:37
MP/H
35
1440P+1080P+1080P 30FPS
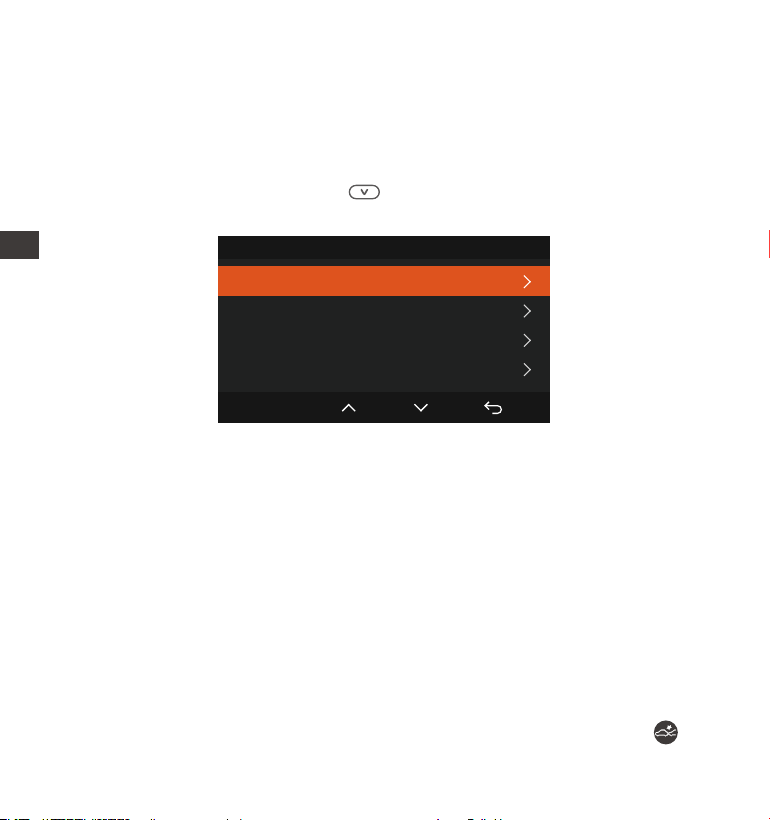
- 114 -
4.2.5 駐車監視モード(給電が必要です)
駐車モードを使用する前に、駐車監視を開いてください。駐車モードはドラレコ
の大事な機能の一つで、駐車の際車から離れていてもきちんとご愛車を守りま
す。異なる環境によって適合性の高い駐車モードを設定できます。
録画中、約5分間車両への振動を検知せず「駐車中」と判断し、本体が自動で駐
車監視モードに入ります。なお、ボタンを長押ししても手動で直ぐに駐車監
視モードに入ることができます。
駐車監視モード
衝撃検知
動体検知
低ビットレート録画
OK
タイムラプス録画
駐車監視機能をご利用するには、別売の駐車監視ケーブル(VANTRUE専用の直
結電源ケーブル)が必要となります。
夏のような高温環境の場合、「衝撃検知」の駐車モードのご利用を勧めます。
車内温度が60°以上になった場合、ドラレコが故障しないように電源をオフ
にすることを勧めます。
タイムラプス撮影がオンの状態では、駐車モードは作動しません。この二つの
機能を同時に利用できません。)
駐車監視で記録された動画はすべて「ノーマル」のフォルダーに保存されるた
め、駐車監視の動画がループ録画で上書きされないように常に駐車監視の映像
ファイルをチェックすることを勧めます。
※ご注意:
1.
2.
3.
4.
衝撃検知
駐車モードに衝撃録画を選択すれば、画面の右下角に衝撃検知のマークが表
JP
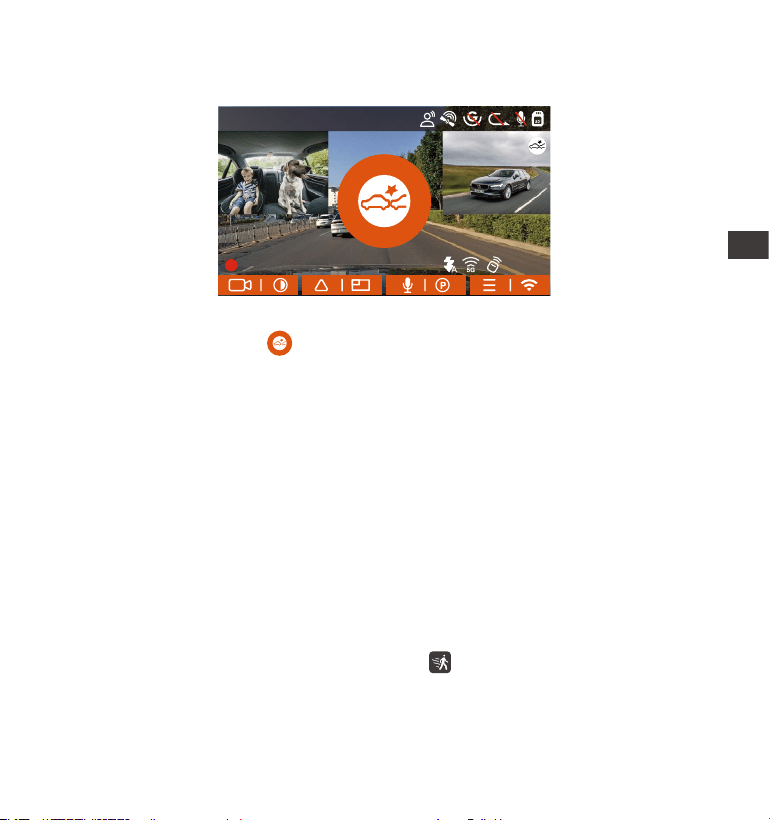
録画中、約5分間車両への振動を検知せず衝撃検知録画と判断すると、画面の
中央に衝撃検知のマークが表示されます。本体も自動にオフになります。揺
れや衝撃を発生した場合、本体がオンにして、1分間の録画を開始します。1分
間録画した後、ドラレコ本体はまた自動で電源オフになります本体が自動にオ
フになります。
ご注意:
- 115 -
停車中連続で衝撃を検出した場合、ドラレコは駐車モードを退出して常時録
画モードに戻ります。
衝撃検知の駐車モードで録画された映像ファイルは「ノーマル」のフォル
ダーに保存されます。貴重な映像データが上書きされないようにお早めに衝
撃検知の映像データをパソコンに保存することを勧めます。
1.
2.
動体検知
動体検知を設定すると、モニター画面にはのアイコンが表示され、動体検知
をご利用中と示します。動体検知は「高、中、低」の三つの感度を設定でき、
6m/4m/2mの検知距離をそれぞれ意味します。
JP
14:39:07 2023-02-10
00:00:37
MP/H
35
1440P+1080P+1080P 30FPS
示されます。「衝撃検知」の感度は1から5まで設定でき、車の環境によって適
合の感度を選んでください。
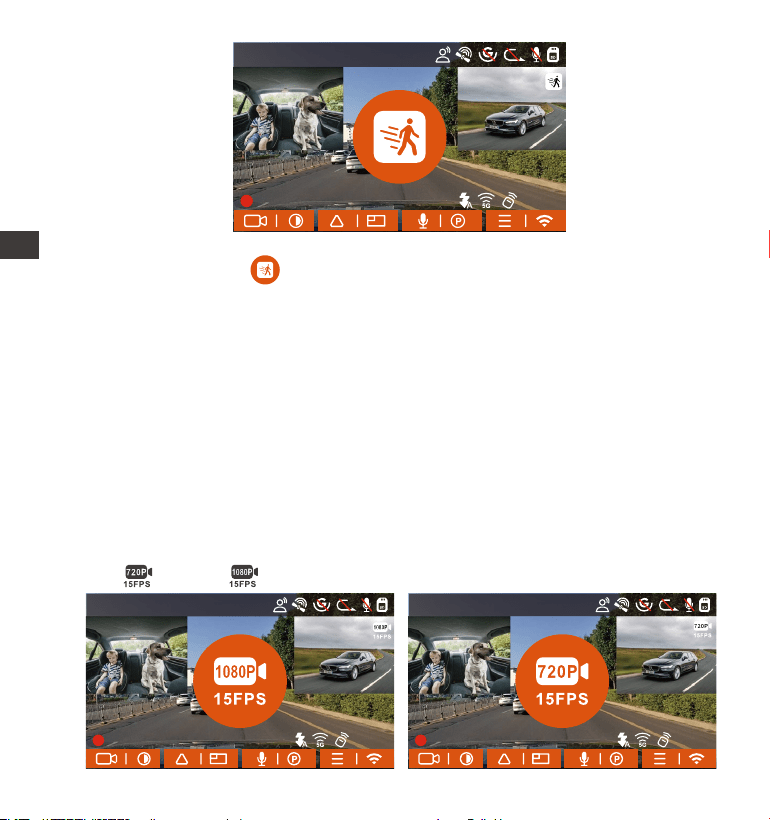
- 116 -
低ビットレート録画
低ビットレート録画モードを設定すると、お選んだ解像度によりモニター画面
には或いはのアイコンが表示されます。
録画中、約5分間車両への振動を検知せず衝撃+動体検知中と判断すると、画面
の中部にオレンジのマークが表示されます。駐車監視待機状態に入り、3分
後モニターがオフになります。動きを検知してから、自動的に30秒の録画を開
始します。動体検知の信頼性を高めるために、プリレコード録画機能が搭載さ
れております。検知前15秒程度の動画と動体検知後の30秒の動画を合わせて、
45秒の動画が記録されてSDカードに保存されます。
動体検知の駐車モードは本体が電源オンのまましか作動しません。
1944Pと1440P/HDRの解像度はプレレコード機能に対応していないため、動
体検知を選択すると解像度は自動的に1440Pに変更されます。
※ご注意:
1.
2.
JP
14:39:07 2023-02-10
00:00:37
MP/H
35
1440P+1080P+1080P 30FPS
14:39:07 2023-02-10
00:00:37
MP/H
35
1440P+1080P+1080P 30FPS
14:39:07 2023-02-10
00:00:37
MP/H
35
1440P+1080P+1080P 30FPS
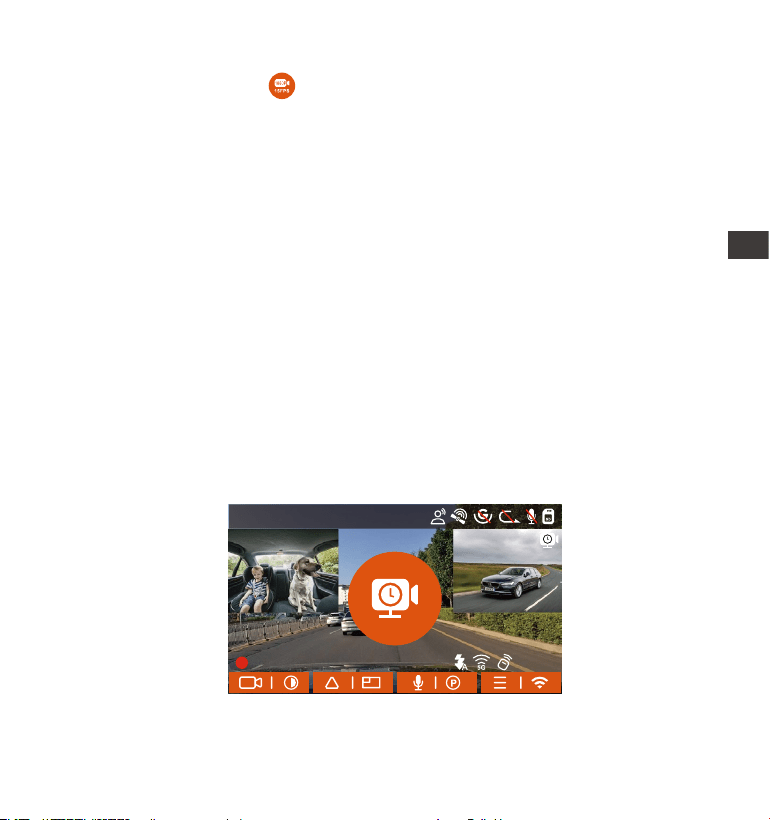
- 117 -
停車後、5分間内動きを検知しない場合、低ビットレート録画駐車モードに入
ります。画面の中部にオレンジのマークが表示されます。本機は1080P
15FPSまたは720P15FPSの解像度で録画します。動きや衝撃を検知する場合、
「解像度設定」に設定された解像度で常時録画に戻ります。その後、また「5
分間」のルールで低ビットレートの録画モードに戻ります。
ご注意:低ビットレート録画の駐車モードも本体の電源がオンの状態でしか利用
できません。
タイムラプス録画
他の駐車モードと同じ、停車後5分間内動き/衝撃を検出しなかった場合自動で
タイムラプス録画モードに入ります。タイムラプス録画はフレームレートを
1FPS/5FPS/10FPS/15FPSに設定できます。例えば1FPSに設定すると、録画のフ
レームレートは30FPSのため、1秒の映像が30フレームが必要するため、1FPS
の場合は1秒の映像は30秒の録画が必要となります。つまり、1FPSに設定する
場合、30秒の映像は1秒に短くされます。
車が動き出すとタイムラプス録画駐車モードは自動的に解除になります。本体
は通常のループ録画に戻ってまた「5分間のルール」でタイムラプス録画の駐
車モードに入ります。
通常録画時間=タイムラプス撮影時間(Sec)x録画フレームレートFPSxタイムラ
プス総撮影時間
JP
14:39:07 2023-02-10
00:00:37
MP/H
35
1440P+1080P+1080P 30FPS
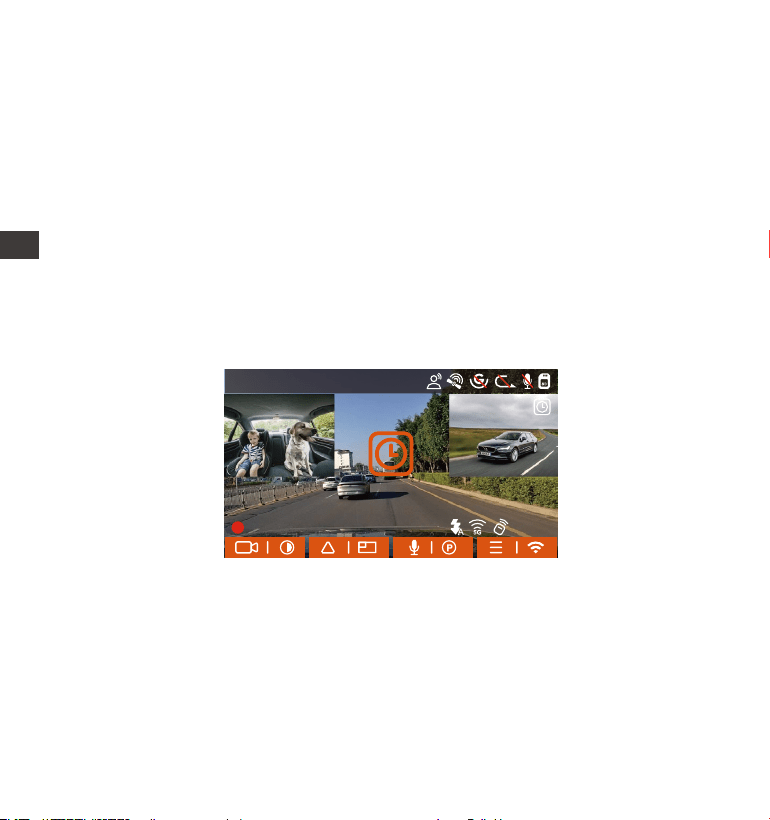
- 118 -
通常録画時間=タイムラプス撮影時間(Sec)x録画フレームレートFPSxタイムラプ
ス総撮影時間
4.2.7 GPS機能
付属のマウントにはGPS受信機が内蔵されております。初期設定ではGPS機能は
「オン」に設定されています。付属のマウントと接続して本体の電源がオンに
なった後、広い場所でGPS信号が直ぐに捕られます。GPS情報は録画中、撮られ
た映像に記録されます。
駐車監視のタイムラプス録画とタイムラプス撮影は同じく映像を短く撮影し
ますが、タイムラプス撮影には「5分間のルール」はありません。
タイムラプス録画の駐車モードも本体の電源がオンの状態でしか作動しませ
ん。
※ご注意:
1.
2.
4.2.6 タイムラプス撮影
初期設定はオフです。1FPS/5FPS/10FPS/15FPSに設定できます。タイムラプス
撮影モード:一定の間隔を空けて画像を撮影し、連続して再生させることで長
時間の映像を短時間で確認できる微速度撮影です。
タイムラプス撮影は1FPSを選択すると、毎秒1つの写真を撮ります、本機の録
画速度は30fpsです。タイムラプス撮影1秒で8時間連続録画をすると、16分
(=8x60x60/30/60)の動画を作成します。
JP
14:39:07 2023-02-10
00:00:37
MP/H
35
1440P+1080P+1080P 30FPS
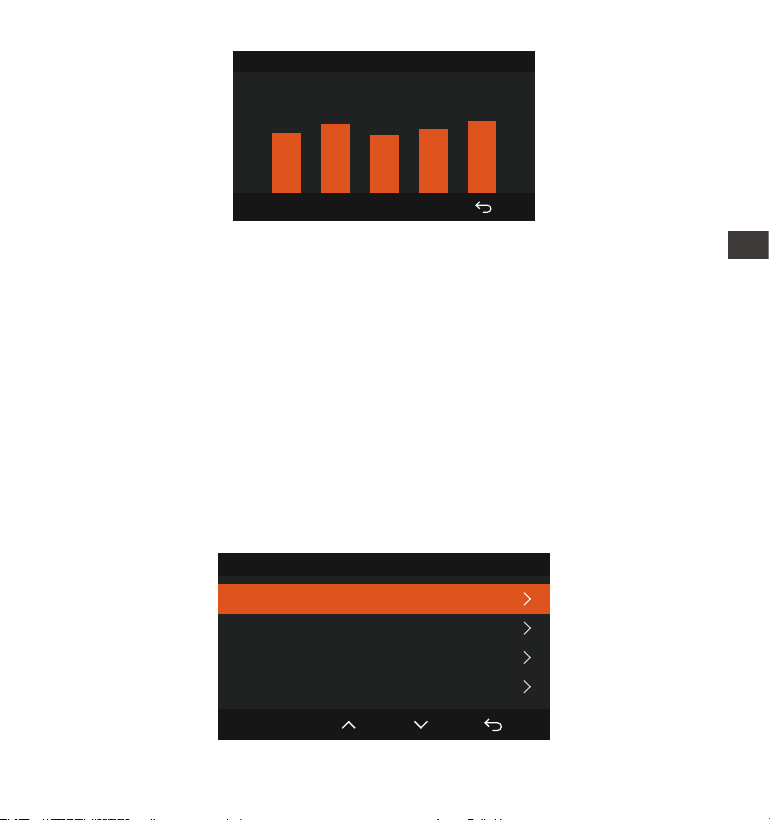
- 119 -
4.2.8 GPS自動時刻補正
GPS自動時刻補正機能の初期設定はオンです。GPSが受信すると日付・時刻がタ
イムゾーンで設定された時刻に補正されます。GPS自動時刻補正機能はオン/オ
フに設定できます。
なお、日付/時刻設定に日付形式とGMT設定を行います。日本のタイムゾーンは
「+9」となっております。
密集した住宅地、地下駐車場、トンネルなどでは、GPS信号の受信に影響が
出る場合があります。
弊社の専用アプリ「Vantrue」で、または弊社の専用「VantrueGPSPlayer」
で映像を再生すれば、GPS情報も同時に再生されます。(ダウンロードリンク:
www.vantrue.net)
※ご注意:
1.
2.
40
46
39
43
48
GPS受信強度
日付/時刻
GPS自動時刻補正
手動で時刻設定
日付形式
GMT設定
OK
JP
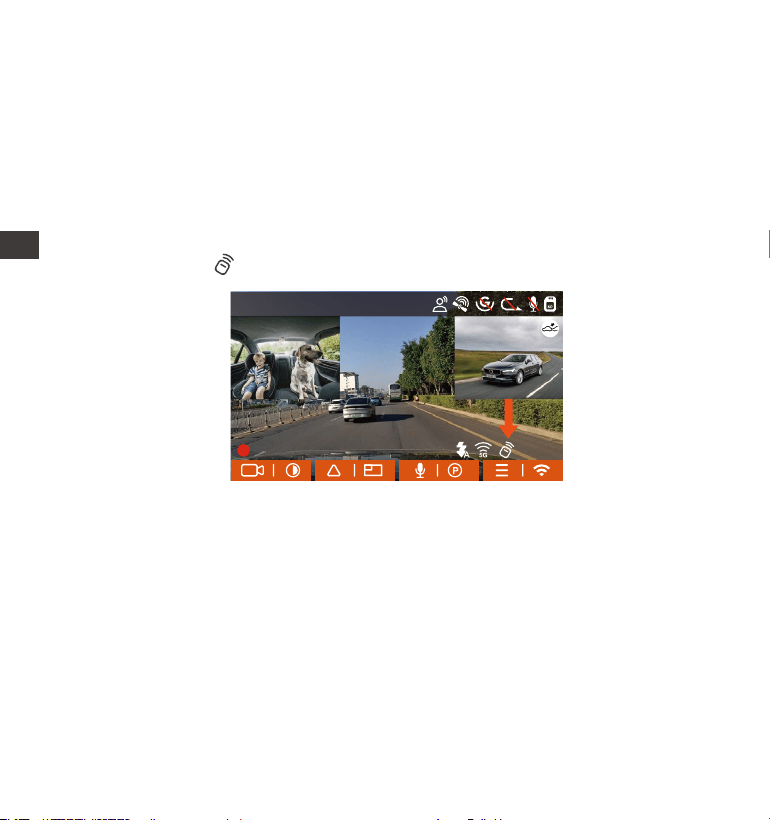
- 120 -
4.2.9 リモコン
操作の便利性を高めるため、E3ドラレコにはリモコンでコントロールする機能も
追加されています。リモコンで本体のスナップショット、音声のオン/オフ、録
画のロックなどの機能をコントロールできます。
リモコンの接続:
リモコンにあるバッテリーの絶縁シートを取り出すと、リモコンは自動的にドラ
レコと接続します。手動でペアリングの必要がありません。本体と接続したら、
モニター画面にアイコンが表示されます。
リモコンの取り付け:
ドラレコに接続した後、最適な取り付け位置を決め、リモコンの剥離フィルム
を剥がして決められた場所にに取り付けてください。
(運転の安全性のため、運転に影響がない位置に設置してください。)
JP
14:39:07 2023-02-10
00:00:37
MP/H
35
1440P+1080P+1080P 30FPS
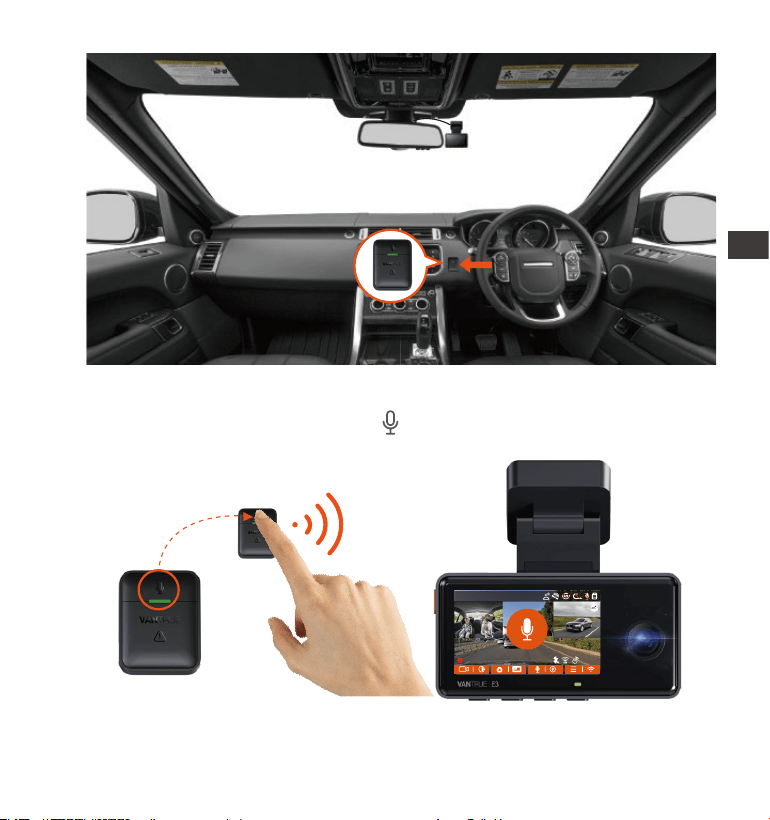
- 121 -
リモコンをドラレコに接続したら、ボタンを押して、録音をオン/オフにす
ることができます。
1.
リモコンの働き:
JP
14:39:07 2023-02-10
00:00:37
MP/H
35
1440P+1080P+1080P 30FPS
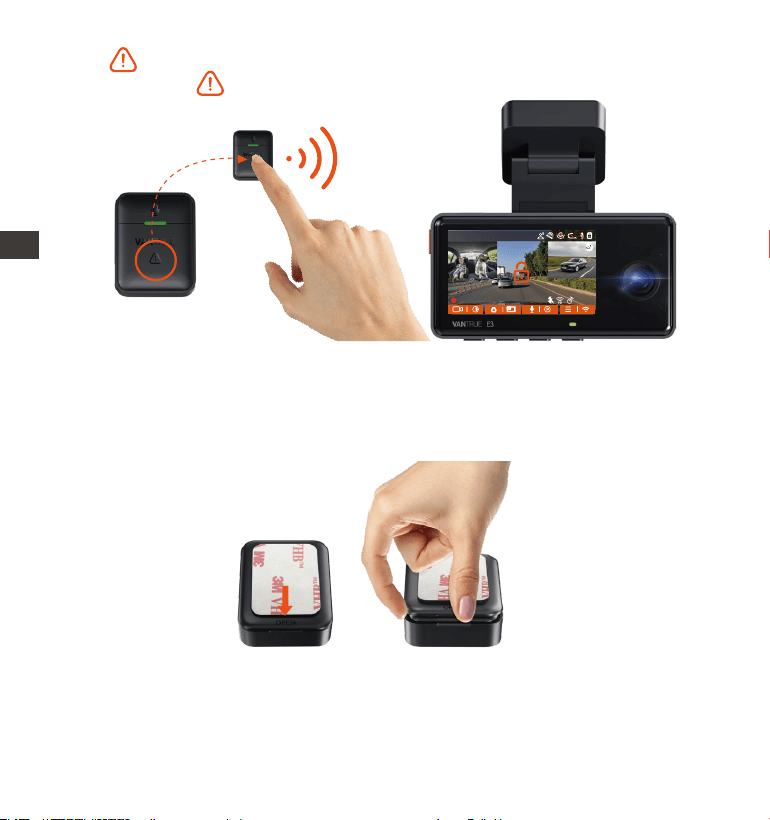
- 122 -
2.
ボタンを押して、動画をロックして、同時に写真を撮ります。ロック録
画中、またボタンを押すと、写真を撮り続けます。
リモコンのバッテリーの交換:
リモコンの底部に「OPEN」のマークがあります。マイナスドライバーもしく
は付属の内張りはがしで「OPEN」マークの側にある溝に沿ってふたを開きま
す。
1.
2.
リモコンに入っているボタン電池を外し、同じ型番の新しい電池と交換しま
す。電池交換後、電池カバーを閉めてください。
JP
14:39:07 2023-02-10
00:00:37
MP/H
35
1440P+1080P+1080P 30FPS
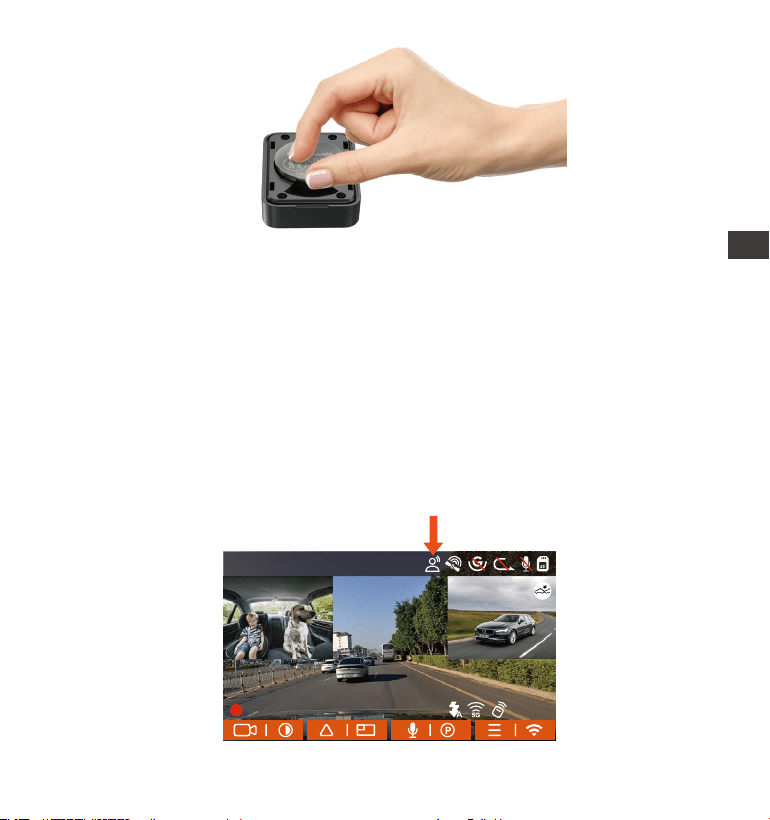
- 123 -
FR
FR
ご注意:
電池残量が不足していると、お早めに新しい電池に交換してください。付属の
電池は充電に対応していません。リモコンに内蔵している電池の型番はCR2032
です。
4.2.10 音声コントロール
運転中で音声でドラレコをコントロールできるので、安心して運転できます。
例えば:写真を撮る、ビデオをロックなどの言葉でドラレコをコントロールでき
ます。「システム設定」>「音声認識コマンド」を選択して、詳細な音声認識
コマンドを確認できます。
初期設定は標準感度です。低感度、標準感度、高感度、オフが選択できます。
JP
14:39:07 2023-02-10
00:00:37
MP/H
35
1440P+1080P+1080P 30FPS
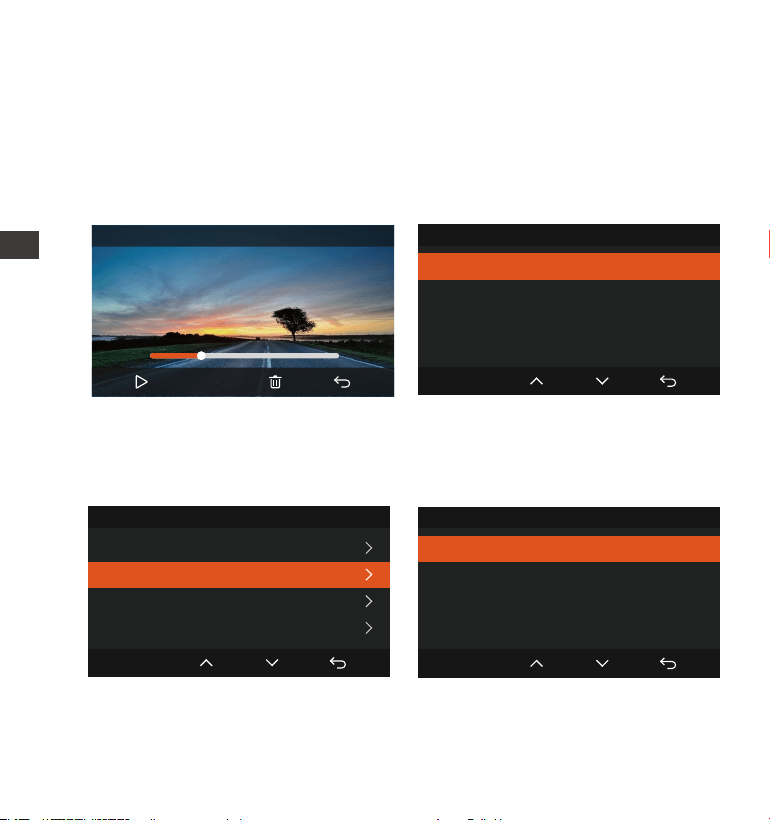
- 124 -
- 動画の削除
本体で動画を削除します。ファイル一覧画面に電源/緊急録画ボタンを押して、
ファイルを削除できます。
EN
EN
EN
DE
4.2.11 映像の再生と削除
a.本体での再生と削除
- 動画の再生
メニュー画面で、【ファイル】>【ノーマル】/【イベント】/【全て】を選択
して動画を選択し、確認ボタンを押して再生します。ビデオの再生中に、ダウ
ンボタンを押すとビデオを削除できます。
イベント
この映像を削除しますか?
全ての映像を削除しますか?
OK
イベント
この映像を削除しますか?
全ての映像を削除しますか?
OK
00:30
01:07
20230210_140633_0002_E_B.MP4
1X
イベント
20230210_140633_0001_E_B.MP4
20230210_140633_0002_E_B.MP4
20230210_140633_0003_E_B.MP4
20230210_140633_0004_E_B.MP4
2/5
OK
JP
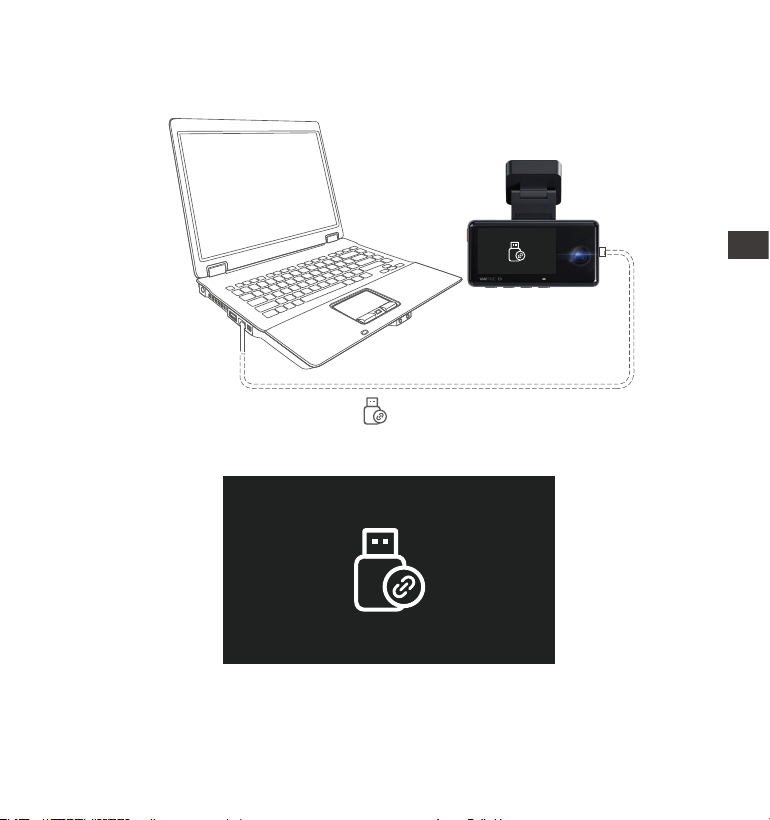
- 125 -
b.PCで再生と削除
1.付属のUSBケーブルでカメラ本体のUSBポートと接続してください。
パソコンと接続した後、画面にというアイコンが表示されます。USB接続
中に本体での操作は受け付けずコンピューター側でのみデータを読み取るこ
とができます。正常に接続されるとコンピューターでビデオを再生/削除でき
ます。
2.
3.
カードリーダーを使用してSDカードをパソコンと繋がって映像を再生/削除
することも可能です。
JP

- 126 -
c.アプリで再生/削除
WiFi経由でスマホをドラレコに接続した後、専用アプリ「Vantrue」で映像ファ
イルを再生/ダウンロード/削除できます。
ドラレコから映像をスマホにダウンロードする場合、スマホのデータ通信料
は発生しません。ぜひご安心ください。
スマホでGPS情報を再生する場合や、動画を共有したい場合には、スマホが
ドラレコとの接続を切ってインターネットに接続する必要があります。この
場合には、スマホのデータ通信料が発生します。
※ご注意:
1.
2.
4.2.12 本機のアップデート
最新のファームウェアはVANTRUE公式サイトwww.vantrue.netに公開されま
す。バージョンアップしたい場合、ぜひ公式サイトから最新のファームウェア
とバージョンアップの方法をダウンロードください。
20230210_115036_0079_N_A.MP4
2023/02/10 11:5:35 E3 000.000000. 000.000000. 36MK/H
ご注意
9:41
GPS情報も同時に再生したい場合、
ぜひ映像ファイルをダウンロード
してまた再生してください。
JP
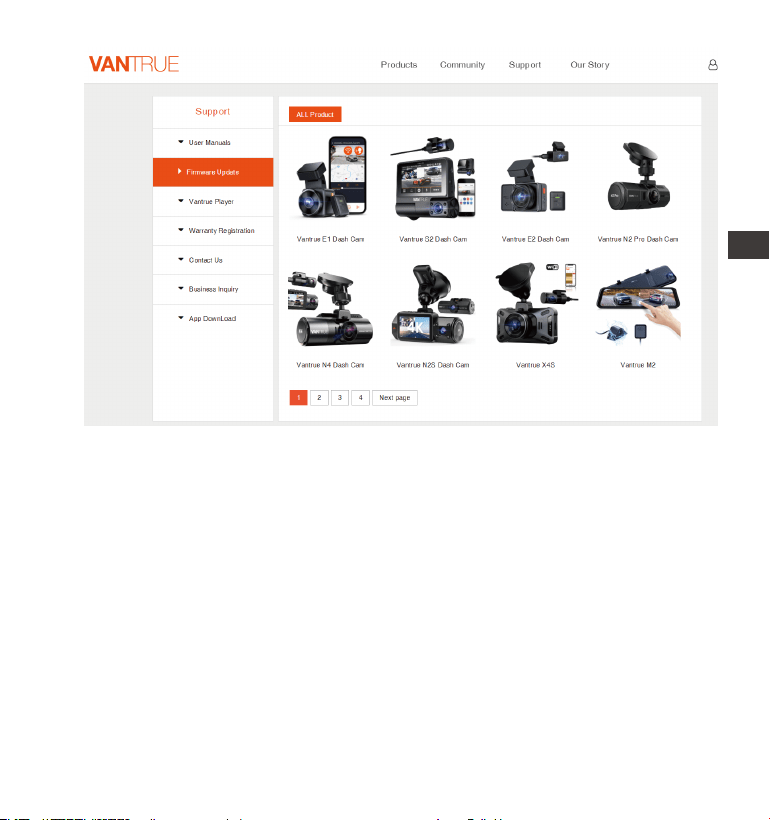
- 127 -
EN
EN
EN
FR
ご注意:アップデート中は必ず電源を切らないでください。アップデート中、電
源が切れると、本機が不具合になる可能性があります。万が一、アップデート
が失敗した場合、ぜひ弊社のサポートセンターまでお問い合わせください。
弊社のサポートが対応させていただきます。
4.2.13 動作環境温度
本機の動作環境温度範囲は-20℃~60℃です、動作環境温度範囲を超える場合、
動作や本体の寿命に影響を及ぼす可能性があります。
夏場など車内が非常に高温になることが見込まれる際は長時間放置しないでく
ださい。温度が上がりすぎると保護機能により、温度が下がるまで本製品は動
作を停止します。
①高温環境で駐車監視機能をご利用する場合、「衝撃検知」の駐車モードを使
用することを勧めます。
JP

- 128 -
5. 製品仕様
E3型番
フロントカメラ: F1.8
車内カメラ: F2.0
リアカメラ: F1.8
Engish/ Français/ Español/ Deutsch/
Italiano/简体中文/русский/ 日本語/ Polski
フロント+車内+リア:
1944P+1080P+1080P 30FPS
1440P+1080P+1080P 30FPS
1080P+1080P+1080P 30FPS
1440P+1080P+720P 30FPS
1440P+720P+720P 30FPS
1080P+1080P+720P 30FPS
1080P+720P+720P 30FPS
720P+720P+720P 30FPS
Novatek高性能プロセッサー
SONY CMOS センサー
三軸加速度センサー内蔵
2.4GHz&5GHz
2.45インチIPS液晶画面
本製品の仕様及び外観は、改良のため予告なく変更することがあります。予めご
了承ください。
チップ
イメージセンサー
Gセンサー
WiFi
スクリーン
解像度
言語
絞り値
レンズ フロント:160°広視野角
車内: 165°広視野角
リア:160°広視野角
フロント+車内:
1944P+1080P 30FPS
1440P+1080P 30FPS
1080P+1080P 30FPS
1080P+720P 30FPS
720P+1080P 30FPS
720P+720P 30FPS
フロント+リア:
1944P+1080P 30FPS
1440P+1080P 30FPS
1080P+1080P 30FPS
1080P+720P 30FPS
720P+1080P 30FPS
720P+720P 30FPS
フロント:
2592x1944P 30FPS
2560x1440P 30FPS
1920x1080P 30FPS
1280x720P 30FPS
②気温が-20℃以下になるような冬期に本機を使用しない場合、駐車中はフロン
トガラスから取り外しグローブボックス等に保管してください。
JP

- 129 -
フロント+車内+リア:
1944P+1080P+1080P 30FPS
1440P+1080P+1080P 30FPS
1080P+1080P+1080P 30FPS
1440P+1080P+720P 30FPS
1440P+720P+720P 30FPS
1080P+1080P+720P 30FPS
1080P+720P+720P 30FPS
720P+720P+720P 30FPS
MP4
JPEG
マイク/スピーカー内蔵
フロント+車内:
1944P+1080P 30FPS
1440P+1080P 30FPS
1080P+1080P 30FPS
1080P+720P 30FPS
720P+1080P 30FPS
720P+720P 30FPS
フロント+リア:
1944P+1080P 30FPS
1440P+1080P 30FPS
1080P+1080P 30FPS
1080P+720P 30FPS
720P+1080P 30FPS
720P+720P 30FPS
フロント:
2592x1944P 30FPS
2560x1440P 30FPS
1920x1080P 30FPS
1280x720P 30FPS
ビデオ形式
画像形式
オーディオ
データの保存形式
Type-C
スーパーキャパシタ
DC5V2.4A
約6W
-4~140℉(-20℃~60℃)
-4~158℉(-20℃~70℃)
microSDカード(32GB〜512GB、書き込み速度
がU3以上のカードに対応)
USB端子
バッテリー種類
動作電流
電力消費
動作温度
保存温度
JP

- 130 -
保証について
VANTRUE
®
OnDash E3ドライブレコーダーは12ヶ月の保証期間があります。
18ヶ月の延長保証をご希望の際は、購入日から6ヶ月以内弊社の公式ウェブサ
イトで(www.vantrue.net/register)ご購入いただいた商品のご登録をお願い致
します。
サポートについて
製品に何のご質問・問題がございましたら、いつでもお気軽にLINE経由(LINE
ID:vantruecam)でお問い合わせいただくかあるいは[email protected]ま
でお問い合わせください。営業日の場合、弊社はなるべく24時間以内にご返信
を差し上げます。
ご意見
当社は製品とサービスの品質、ユーザーエクスペリエンスを向上させるため日
夜全力で取り組んでいます。製品を改善するうえでの貴重な御意見やアドバイ
スがございましたらご遠慮なく弊社までご連絡をお願いいたします。お客様か
らのお声を期待しております。
お問合せ先:
LINE ID:vantruecam
メール:suppo@vantrue.net
VANTRUEをご選択いただき、誠にありがとうございます。
6. 保証とアフターサービス
JP
- 131 -
JP
製品をご購入頂き、誠にありがとうございます。
お問い合わせ:
www.vantrue.net/contact
facebook.com/vantrue.live
LINE ID:vantruecam
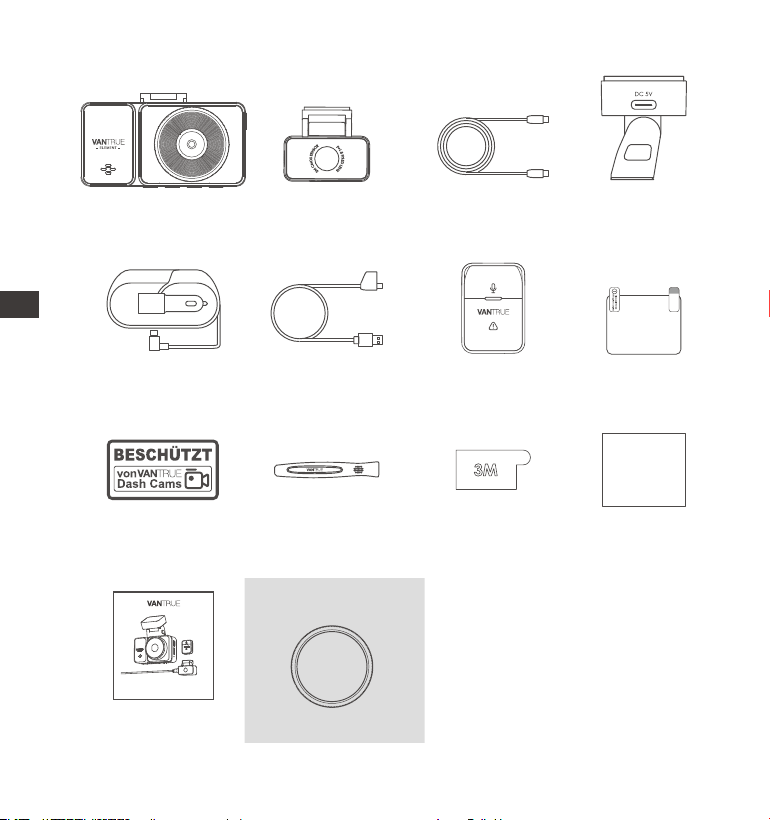
- 132 -
�. 盒内物品清单
H.
无尘布(�张)警示贴(�张)
L.
CPL滤镜(选配)
A.
VANTRUE E�
记录仪
E.
后镜头线
(双TYPE-C接口,
�米)
I.
说明书
M. N.
B.
后镜头
G.
撬棒(�个)
K.
D.
GPS黏胶支架
C.
VANTRUE
无线遥控器
F.
TYPE-C数据线
(�米,仅用于
数据传输)
Type-c车充
(�.�米)
备用�M胶(支架/
后镜头/遥控器
各�张)
J.
静电贴(�张)
选配配件
Element 2
User Manual
Voice-Controlled Dual Dash Cam
ENCN
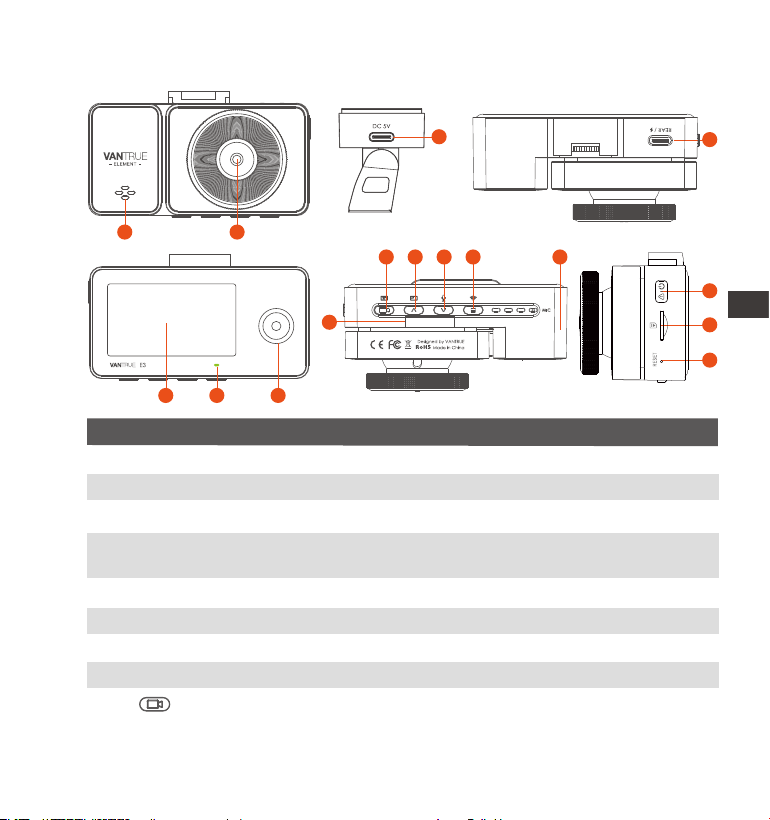
- 133 -
�
�
录影键
产品售后追溯凭证
序列号
录影中可长按熄灭屏幕,短按可停止录影,进入待机
状态;在菜单中可确认选择的选项;回放文件时,可
播放/暂停播放文件
�. E�机身解说
序号
功能名称
�
记录仪前镜头,用于录制车前行车情况
� 前镜头
播放视频文件的声音
�
喇叭
使用后镜头线与后镜头连接起来;当与电脑连接时,
会展示为U盘模式
后镜头接口
电源接口
支架电源接口
�
�.��寸IPS显示屏
� 屏幕
车内镜头带有红外灯,可设置自动切换夜市模式
� 车内镜头
绿灯亮表示通电
� 录影指示灯
EN
EN
EN
CN
14
15
16
3
4
21
5 6 7
8
131211
10
9
VTJE1210130

- 134 -
EN
EN
EN
FR
收录行驶过程中的声音
录影状态和待机状态,短按可切换视频窗口;菜单
设置和文件浏览中,短按显示上一个选项,长按滚
动向上显示选项;回放模式中,短按快进;WiFi模
式中,按任意键退出WiFi
�� 录影状态和待机状态,短按可开启或者关闭麦克风,
长按可进入停车监控;菜单设置中,短按下一个选
项,长按向下滚动显示选项;文件浏览模式,短按下
一个文件,长按向下滚动显示文件;回放模式中,短
按删除文件;WiFi模式中,按任意键退出WiFi
��
��
录影状态中,短按会加锁当前文件并抓拍一张图片,
长按关机;待机状态中,短按会抓拍图片,长按会关
机;WiFi状态中,短按退出WiFi,长按关机
�� 开关机&
麦克风
向上键
向下键
灯光说明
绿灯恒亮,处于待机状态中,或者是录影指示灯设置为关闭状态
绿灯闪烁,处于录影状态中
��
�� 复位键
内存卡安装位置
按下后,重启记录仪
�� 内存卡卡槽
紧急录影键
ENCN
录影状态中,长按可开启或者关闭WiFi;待机状态中,
短按进入菜单或者是返回,长按可开启或者关闭WiFi;
WiFi模式中,按任意键退出WiFi
菜单键
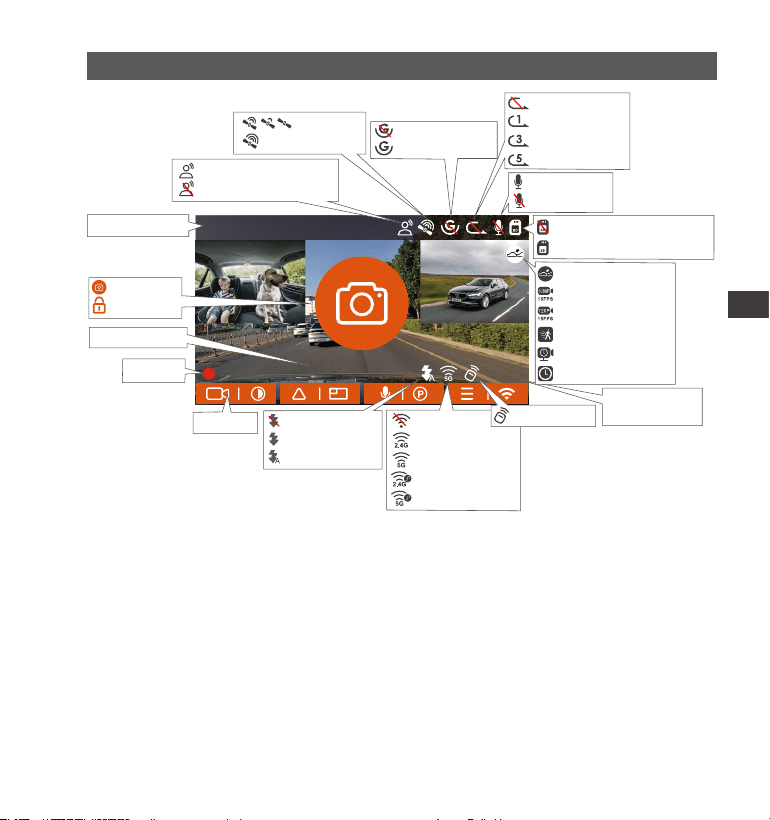
14:39:07 2023-02-10
00:00:37
MP/H
35
1440P+1080P+1080P 30FPS
- 135 -
屏幕图标说明
�. 安装及使用说明
�.� 安装内存卡
请您插入一张内存卡(内存卡容量:��GB-���GB,卡速:U�/Class��/A�),因
为记录仪录影对内存卡的卡速有一定的要求,为了您使用顺利,我们向您推荐
VANTRUE定制高速内存卡(但是需要您另行选购)。
内存卡安装方法:卡槽位置有内存卡插入方向图标,请根据图标指示方向,将内
存卡推入卡槽内,直到卡槽内发出“咔哒”声音后,表示内存卡已经插好。
G-sensor已关闭
G-sensor已打开
车速显示
当前录影分辨率
碰撞侦测
低比特率模式����P
低比特率模式���p
移动侦测
低帧率模式
缩时录影
GPS定位中
GPS已定位
语音识别已打开
语音识别已关闭
MP/H
��
按键指示
红外灯关闭
红外灯常开模式
红外灯自动模式
当前日期和时间
抓拍中
锁定录影中
麦克风已开启
麦克风已关闭
无卡或者内存卡没有被识别
内存卡正常使用中
录影时间
循环录影已关闭
循环录影�分钟
循环录影�分钟
循环录影�分钟
EN
EN
EN
CN
Wi-Fi已关闭
�.�G Wi-Fi已开启
�G Wi-Fi已开启
�.�G Wi-Fi已连接
�G Wi-Fi已连接
遥控器已连接
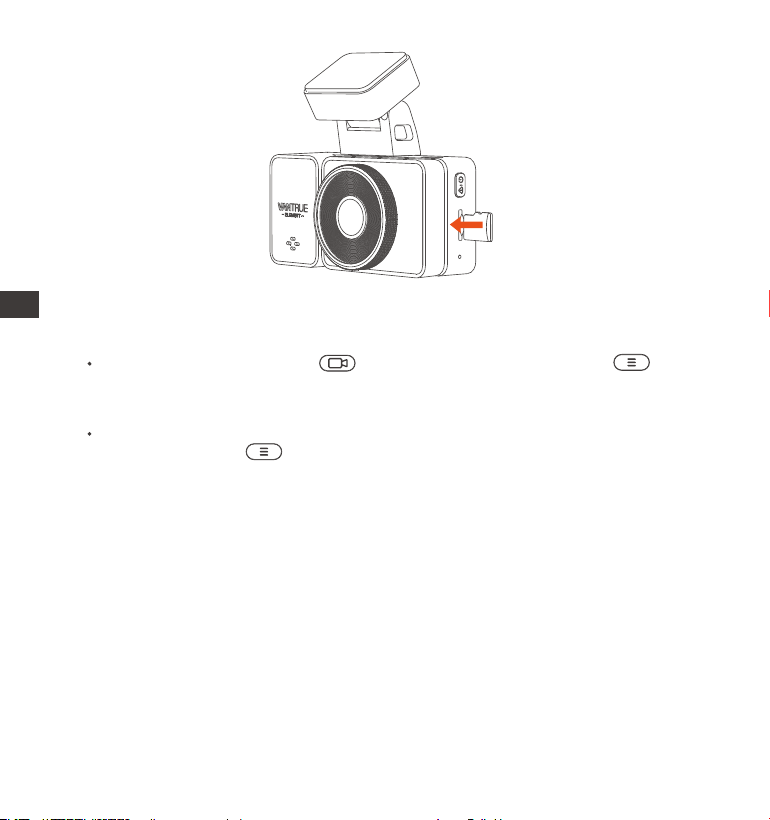
- 136 -
记录仪如在录影中,请按“ ”录影按键暂停录影,然后按“ ”菜单
键进入菜单,进入“系统设置”菜单,选择“格式化”,确定格式化内存卡,
直到提示“格式化成功”即可。
如您插入内存卡后,提示“卡错误,请格式化”,这时候记录仪是不会录影
的,可直接按下“ ”菜单键进入,开始格式化流程。
当内存卡插入后,为了保证记录仪正常使用,建议您将内存卡格式化,格式化内
存卡的方法如下
内存卡使用时,建议一个月格式化一次,可以保证记录仪的正常使用;
录影中,请勿直接插拔内存卡,以免丢失重要的录影视频
请勿在记录仪上使用不良卡或者是低速卡,会容易因为内存卡故障,导致停
录、漏录视频等问题出现。
格式化卡前,请检查SD卡内的紧急录影文件夹,是否有需要另外保存的视频,
以免误删除重要的视频。
注意:
�.
�.
�.
�.
ENCN
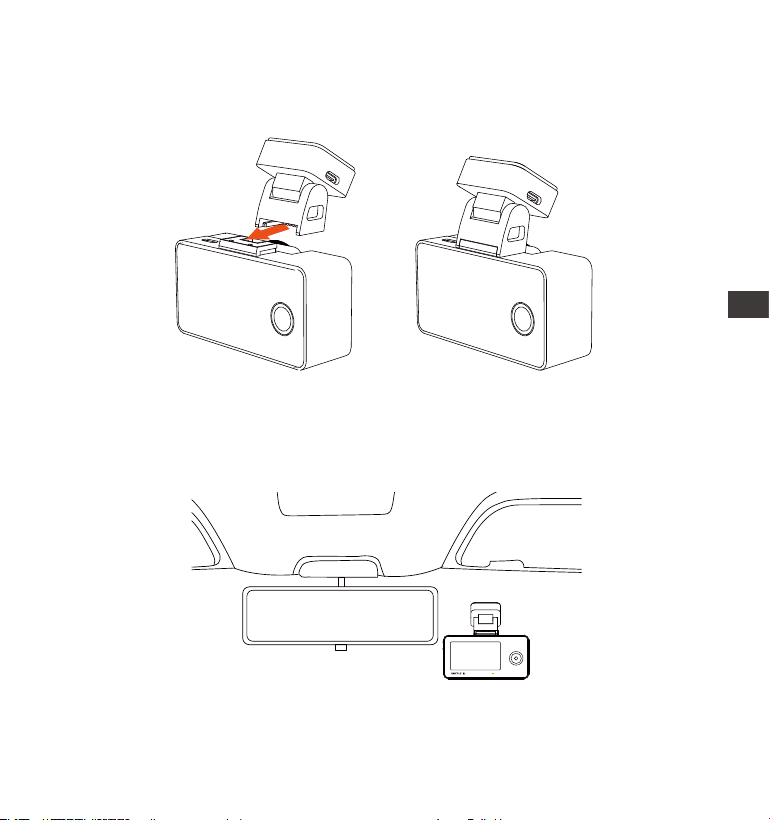
- 137 -
�.� 安装记录仪
将支架对准记录仪支架接口推入,直至支架安装完毕。
�.
开机观察安装位置:
E�安装前,请通电开机,通过E�屏幕观察车前镜头与车内镜头拍摄角度是否合
适。
�.
EN
EN
EN
CN
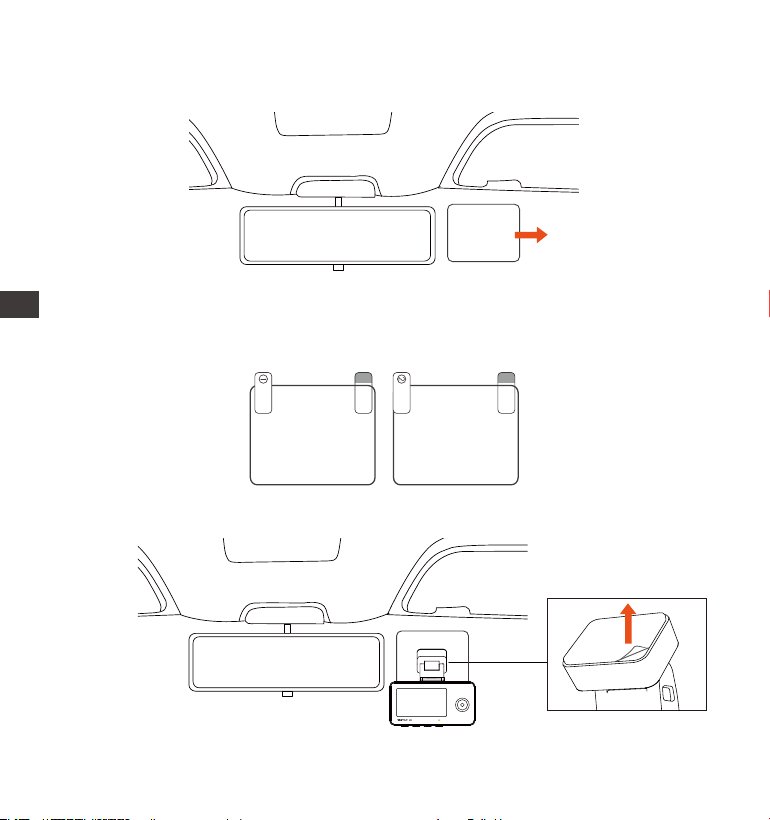
- 138 -
安装E�,静电贴安装完毕后,撕下E�支架黏胶贴纸,粘贴在静电贴上。�.
注意:请在挡风玻璃上选择合适的位置,并清洁干净,请先将➀面保护膜撕掉
后,贴在挡风玻璃上,再撕下➁面保护膜。
Please peel off this mask
AFTER application completed
Please peel off this
mask BEFORE application
静电贴安装:
在安装E�前,请先安装静电贴,避免二次拆卸后,在挡风玻璃上留下痕迹。
�.
静电贴
ENCN
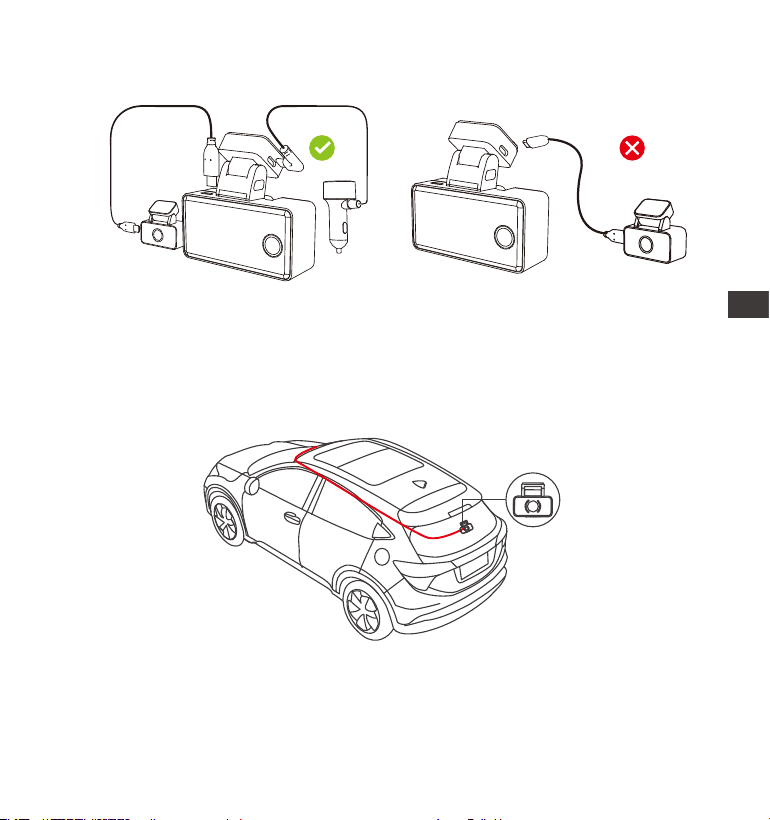
- 139 -
取出车后镜头线,分别连接E�与车后镜头,安装时,请注意接线方式。
�.
车后镜头安装:
请在后车窗玻璃上选择安装位置,建议选择靠近后车窗中央位置,并且避开后
车窗上的除雾线,以免影响录影效果。车后镜头粘贴好后,可以上下调整角
度,并且请将车后镜头线沿着车顶装饰缝隙塞入。
�.
EN
EN
EN
CN
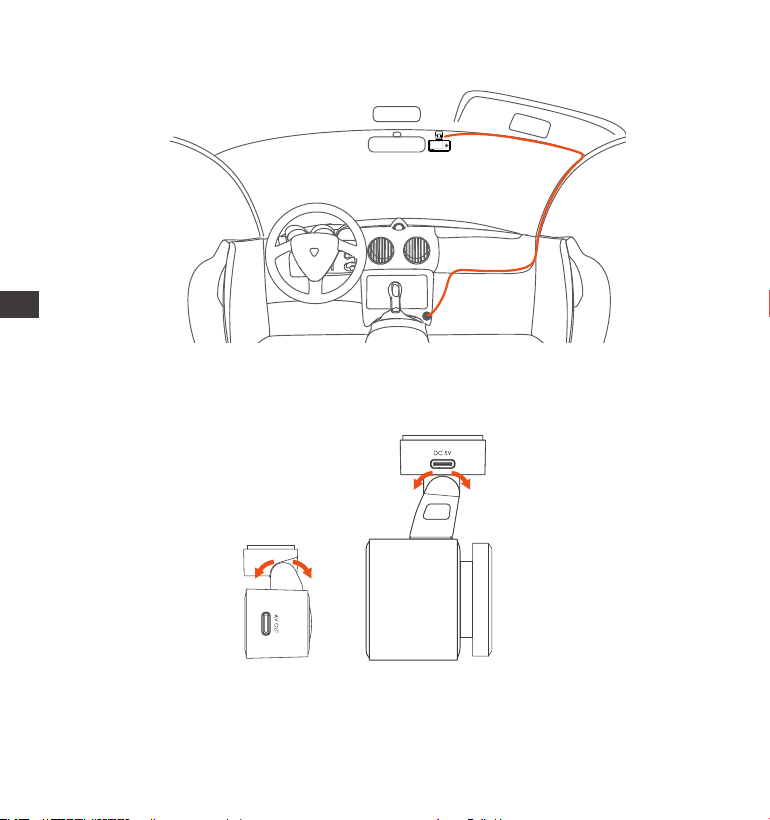
- 140 -
将车充线沿图示方向收纳好后。
�.
镜头角度调整:
因为每款车型的车窗玻璃角度不一致,请根据实际需要,调整镜头的录影角度。
�.
注意:E�车内镜头角度是固定的,车前镜头角度可旋转调整。
ENCN

➀长按 菜单键�秒快捷打开
- 141 -
�.� APP下载
请用手机扫描下方的二维码,下载并安装VANTRUE APP,并根据提示完成安装。
注意:本产品可通过WiFi连接手机后,实现录影实时预览、更改记录仪设置、文
件�流量下载、手机回放视频等功能,但是GPS轨迹回放、视频分享功能将依赖于
互联网或者是电信增值服务(需要关闭记录仪WiFi)。
打开记录仪WiFi有�种方式:
�.� WiFi连接
VTJE1210130
EN
EN
EN
CN
➁进入系统设置>Wi-Fi打开。
➂语音识别指令“打开Wi-Fi”打开。
系统设置 2/14
语言
Wi-Fi
语音识别
语音内容
OK
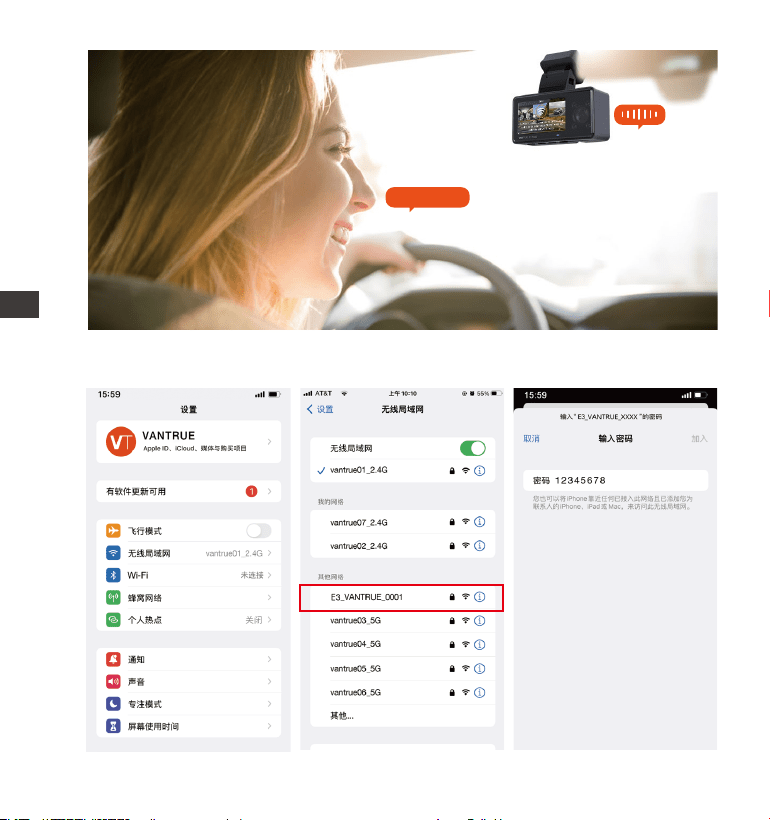
- 142 -
然后打开手机WiFi设置,找到WiFi名称如:E3VANTRUEXXXX,输入WiFi默认
密码:12345678,即可连接到WiFi。
打开WiFi
ENCN
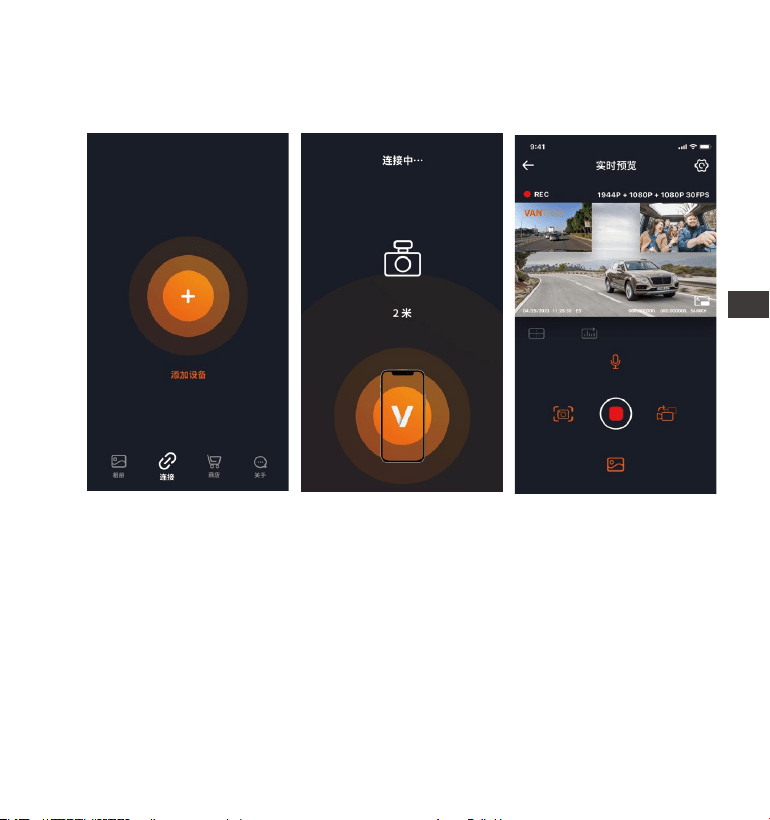
- 143 -
WiFi连接成功后,首次打开APP点击“+”,添加记录仪型号,然后APP将会自动
连接到记录仪,并显示出记录仪镜头当前实时录影情况。
�.� APP连接
注意:
�.
�.
�.
�.
�.
若您打开APP前没有连接WiFi,APP将提示您“请先连接WiFi”,并会自动跳
转到WiFi设置中,请您先完成连接WiFi的步骤。
若您WiFi已经连接,但是APP选择机型后跳转到APP的应用权限,请您检查一
下APP的无线网络权限是否打开
本设备的初始密码仅供初次登录使用。为杜绝安全隐患,请您务必在初次登录
后及时修改初始密码,以防他人未经授权登录您的设备或其他不良后果。
若您忘记WiFi密码,可以选择恢复记录仪默认出厂设置,设备的Wi-Fi密码也
将恢复默认密码��������。
若连接的WiFi名称与机型不匹配,APP会提示“请选择正确的机型”,并跳回
EN
EN
EN
CN
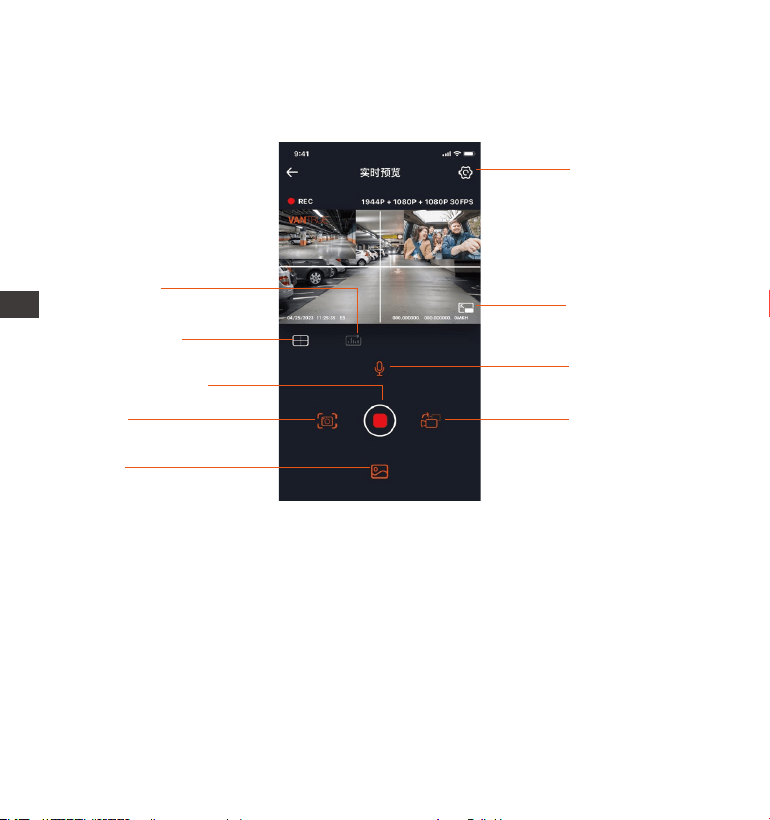
- 144 -
�.
�.
�.
�.
�.
�.� APP使用
到选择机型界面
若您打开WiFi后没有与手机连接,记录仪会在��分钟后关闭WiFi,并回到录影
界面。
设置
里程统计
镜头校正线
全屏
切换镜头画面开关
抓拍
相册
开始/暂停录影
麦克风开关
进入APP实时预览后,可以进行以下操作
视频预览:APP连接记录仪成功后,记录仪进入实时预览页面,点击全屏按钮
或者手机横放,实时画面自动切换到全屏预览模式。点击窗口切换按钮切换前
后路视频窗口,但是只有多镜头记录仪可使用此功能。
回放视频:APP内可查看SD卡已录制的视频或者照片文件,点击文件后可进行
视频回放。
视频下载:在SD卡浏览文件界面或者在视频回放中可选择下载视频或者图
片。下载视频后,在App本地文件内播放,可查看视频GPS轨迹。
视频抓拍:App实时预览界面可抓拍当前画面。
ENCN
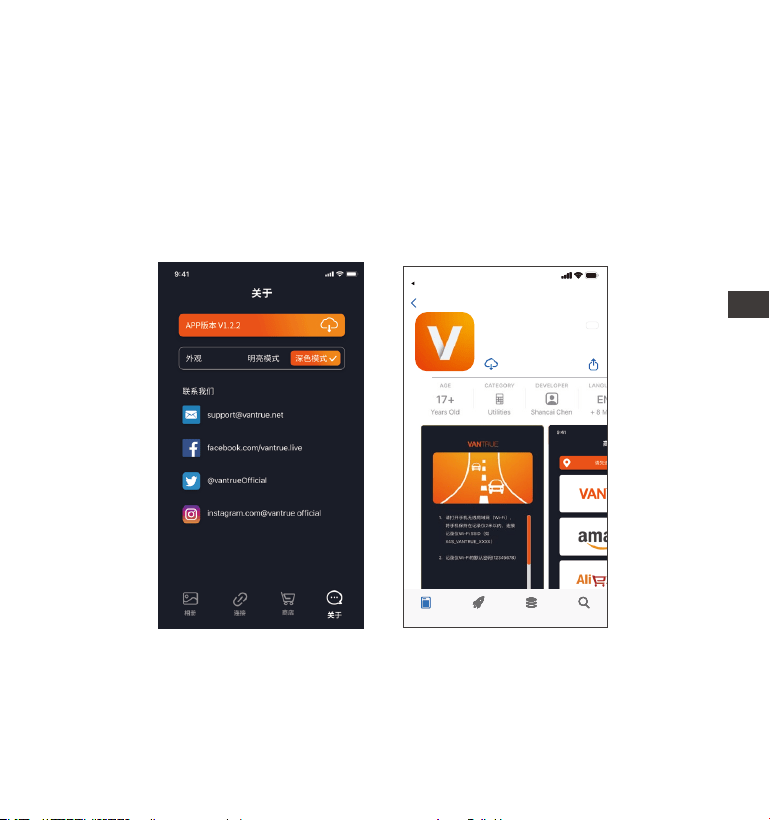
- 145 -
�.
�.
打开“Vantrue”App,连接记录仪Wi-Fi,进入“设置>关于>检测新版本“,
App会自动检测App版本是否是最新版本。如App有新版,根据App提示操作,
升级版本既可。
�.� APP升级
EN
EN
EN
CN
Vantrue Ltd.
返回
Vantrue
Vantrue
9:41
Today
游戏
App
搜索
里程统计:用户根据需要点击下载行驶里程信息,里程信息会以图片或者PDF
的文件形式保存在APP内。
镜头校正线:通过精准的十字线校正镜头平衡,使得录影画面不会歪斜。

- 146 -
E�记录仪有三大功能菜单,分别是录影设置、系统设置、文件浏览。您可以在这
三大功能设置中选择您喜欢的组合设置来运行您的记录仪。
按 录影按键,暂停录影后,再按下 菜单键进入菜单设置。
�. 功能亮点
�.� E�主要功能
A. 录影设置包括:
a. 分辨率:
系统设置
OK
车前+车内+车后分辨率:
����P+����P+����P ��FPS
����P+����P+����P ��FPS
����P+����P+����P ��FPS
����P+����P+���P ��FPS
����P+���P+���P ��FPS
����P+����P+���P ��FPS
����P+���P+���P ��FPS
���P+���P+���P ��FPS
车前+车内分辨率:
����P+����P ��FPS
����P+����P ��FPS
����P+����P ��FPS
����P+���P ��FPS
���P+����P ��FPS
���P+���P ��FPS
车前+车后分辨率:
����P+����P ��FPS
����P+����P ��FPS
����P+����P ��FPS
����P+���P ��FPS
���P+����P ��FPS
���P+���P ��FPS
车前分辨率:
����x����P ��FPS
����x����P ��FPS
����x����P ��FPS
ENCN

- 147 -
b.循环录影:默认�分钟,此功能包含了�个选项,分别是关闭、�分钟、�分钟、
�分钟。
c.红外灯设置:E�车内镜头带有红外灯模式,默认为自动,可设置自动/关/开。
d.碰撞灵敏度:选择您需要的碰撞灵敏度等级,分别有三个方向(前后/左右/上
下),六个等级选项�/�/�/�/�/关闭选择,默认�等级。
e.录影音频:默认开,这里可设置录音开/关。
f.曝光补偿:可以分别设置车前/车内/车后的曝光值,默认+�.�,通过此选项可以
调整镜头的曝光度高低。
g.录影指示灯:默认开启,调整录影指示灯开启或者关闭。
h.WDR:默认打开,更好的平衡录影效果,可以选择关闭。E�的WDR功能仅调
整车前与车内镜头的效果。
i.车后HDR:默认开启,根据需要调整开启或者关闭。
j.旋转显示:默认关闭,可以分别开启车前+车内或者是车后的旋转显示。
k.车内镜像:默认开启,开启后,车内镜头画面显示为镜像模式。
l.车后镜像:默认开启,开启后,车后镜头画面显示为镜像模式。
m.车牌号设置:可设置�位车牌号,可在录影视频的水印中查看。
n.标签戳: 在录影视频中显示时间日期、VANTRUE品牌名称、车牌号、GPS位
置信息、车速,默认全部开启。
o.缩时录影:默认关闭,您可以选择开启�FPS/�FPS/��FPS/��FPS。
p.停车监控:在这里可设置您所需要的停车模式,分别有碰撞侦测/移动侦测/低
比特率录影/低帧率录影/关,默认关闭。
q.停车微光夜视:默认打开,打开后可优化停车模式的录影效果。
r.里程统计:里程统计功能默认打开,在记录仪内存卡中保存GPS里程信息,客
户可以在SD卡内查看或者在APP内里程统计功能导出文件。
s.GPS设置:GPS默认开启,GPS开关、速度单位设置、GPS信息都在此功能
下。
EN
EN
EN
CN

- 148 -
B. 系统设置包括:
a.语言:可设置语言有英语、法语、西班牙语、德语、意大利语、简体中文、俄
语、日语、波兰语
b.Wi-Fi:默认WiFi开机后启动,��分钟后自动关闭。此功能下还可设置开机后
WiFi一直开启,或者关闭WiFi开机启动,注意关闭WiFi开机启动后,需要手动按
键或者语音唤醒去开启WiFi功能。在Wi-Fi功能下还可以查看Wi-Fi信息。
c.语音识别:默认标准灵敏度,打开后可识别语音指令,有低灵敏/高灵敏/关闭
选项。
d.语音内容:语音识别指令,用户可以通过不同的指令去遥控记录仪工作。
e.格式化:格式化内存卡所有数据。
f.格式化提醒设置:默认关闭,可选择��天或者�个月后提醒,根据设定当天起计
算��天或者是�个月,到达时间后,可选择“确定”进行格式化,或者选择“下
一次”,若您选择“下一次”后,会重新计算时间。
g.日期/时间:日期与时间有两种设定方式,
➀GPS自动更新,默认打开GPS自动更新,GPS自动更新日期时间是根据您所在
的时区进行的,所以需要选择正确的时区;
➁手动设置日期/时间,可以选择关闭GPS自动更新,打开手动设置日期/时间,
手动校正日期时间。另外,日期格式、时区设置也是在此菜单内。
h.屏保设置:屏保设置默认是关闭状态,您可以选择��秒、�分钟、�分钟屏保时
间。
i.音量:默认音量大小是�档,最低是�档,最高是�档。
j.提示音:根据不同的情况,记录仪设定了�种提示音,分别是开关机声音、按键
音、加锁提示音、格式化提醒音、异常录音提示音。所有提示音默认打开。
k.光源频率:不同国家有不同的光源频率,为了避免影响录影,根据不同的地区
选择��Hz或者��Hz的光源频率。
l.系统信息:查看机器型号、软件版本号、VANTRUE官网网址。
ENCN
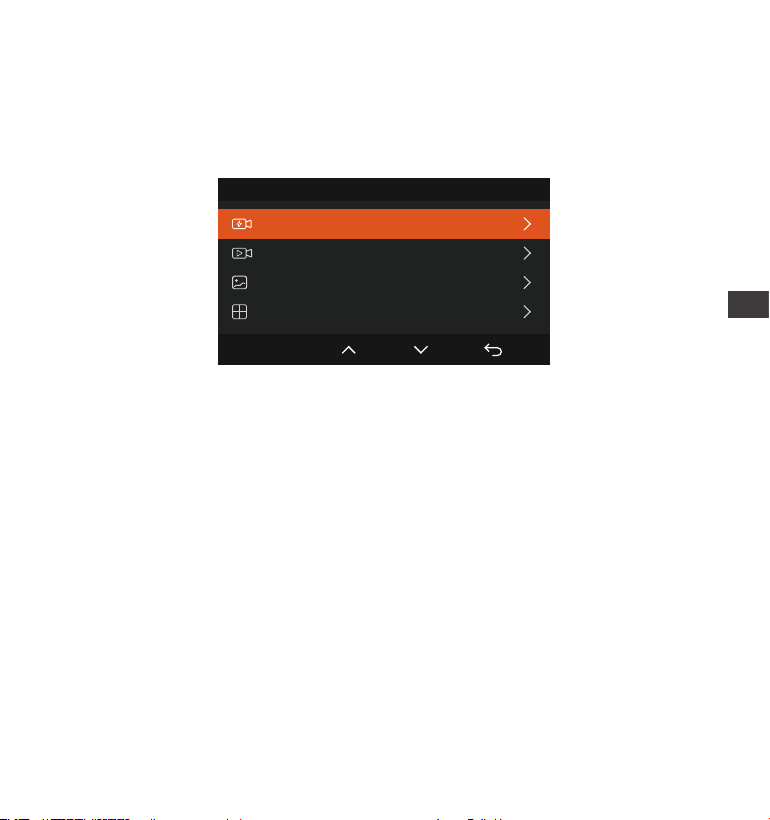
- 149 -
C. 文件浏览包括:
在此功能下,您可以查看记录仪记录的视频文件和照片文件。
文件浏览 1/4
紧急视频
普通视频
照片
所有
OK
a.紧急视频:此文件夹内保存紧急录影文件,文件名格式为
��������_������_����_E_A.MP�
��������_������_����_E_B.MP�
��������_������_����_E_C.MP�
b.普通视频:此文件夹内保存循环录影视频、停车模式视频、缩时录影视频。
循环录影文件名为��������_������_����_N_A.MP�;
停车模式视频文件名为��������_������_����_P_A.MP�;
缩时录影文件名为��������_������_����_T_A.MP�。
c.照片:照片文件存放在此文件夹内
d.所有:所有文件都可以查看。
注意:文件名后缀中的”A”表示是车前镜头录影的视频,”B”表示车内镜头录
影的视频,”C”表示车后镜头录影视频。
m.认证信息:可查看E�的认证信息。
n.默认设置:恢复系统默认设置。
EN
EN
EN
CN
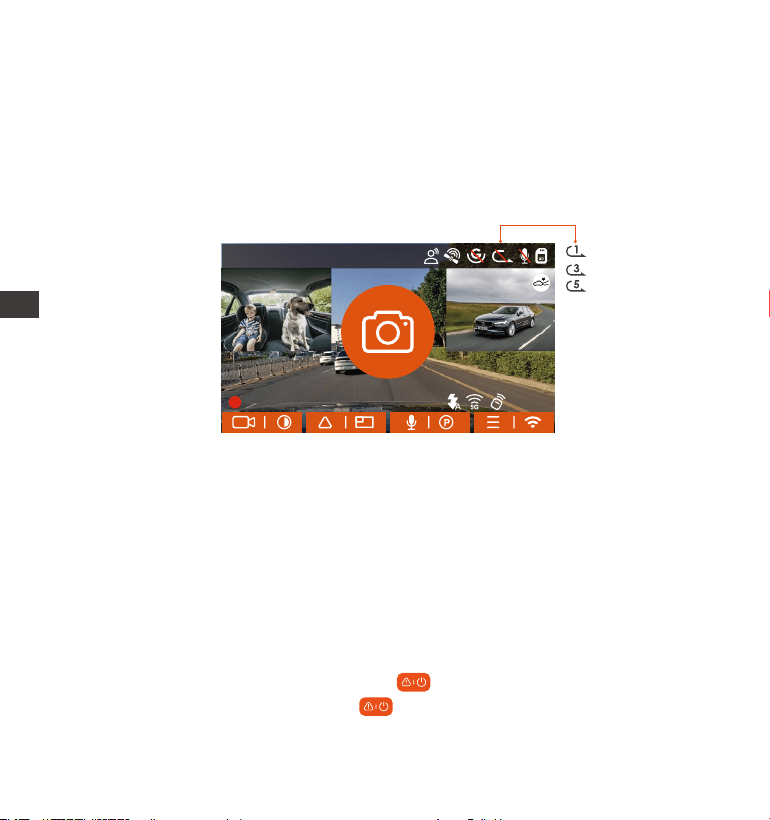
- 150 -
�.� E�重要功能介绍
�.�.� 循环录影
记录仪在开机后会自动进入循环录影模式,录影视频将以预先设定的循环录时长
进行保存,保存在普通视频文件夹中。普通视频文件夹占用总内存的��%容量,
当文件夹容量达到总容量��%后,新的循环录影文件会自动覆盖最初一段循环录
影文件。该功能开启后,视频文件自动覆盖循环,以免在行驶过程中卡满停录。
�.�.� 紧急录影
在行驶过程中,如遭遇特殊情况,您可手动锁定或者是记录仪自动锁定进行紧急
录影。手动锁定只需按下紧急录影按键 ,即可锁定当前录影并抓拍,并且,
在锁定录影期间,您可以通过按下 紧急录影按键,多次抓拍。录影结束后,
视频会自动保存在紧急视频文件夹内,照片会保存在照片文件夹内。
循环录影功能的正常运行非常依赖内存卡的卡速,所以请您定期进行内存卡格
式化,以免内存卡文件过多、卡片老化等问题影响循环录影。
请您定期检查循环录影视频,避免有必要保留的视频被循环覆盖。
如您关闭循环录影后,锁定视频功能将不再起效
关闭循环录影后,每段影片时间为��分钟,录制到卡满后,记录仪会停止录
影,并且提示“卡满!”
注意:
�.
�.
�.
�.
ENCN
14:39:07 2023-02-10
00:00:37
MP/H
35
1440P+1080P+1080P 30FPS
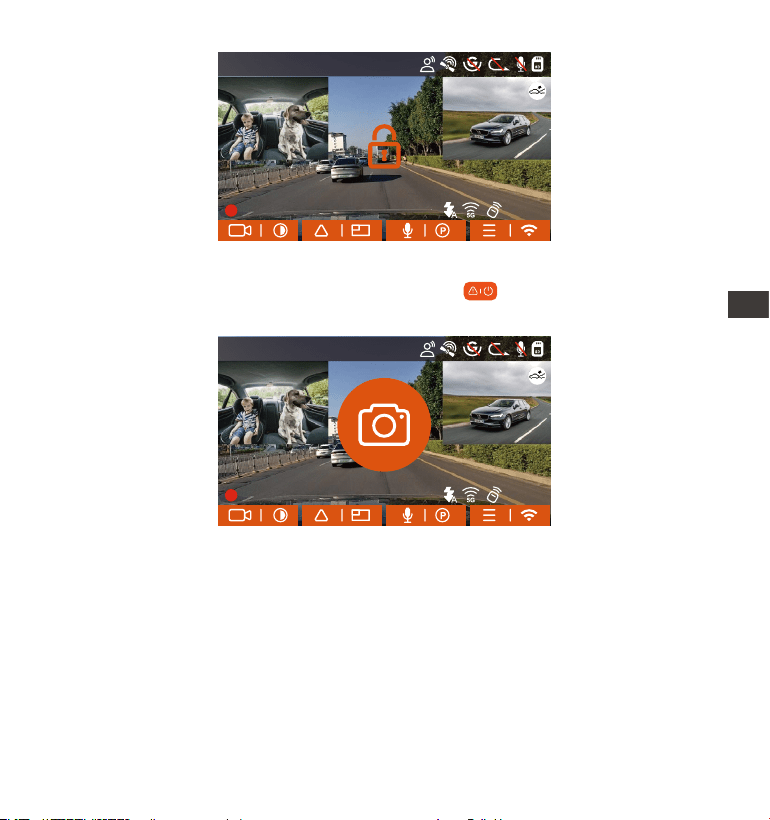
- 151 -
自动锁定紧急录影触发,当汽车遭到碰撞或者震动后,记录仪感应到震动自动触
发锁定当前视频,在锁定录影期间,您也可以按 紧急录影按键,抓拍图片。
紧急录影结束后,视频会保存在紧急视频文件夹内,照片会保存在照片文件夹内。
自动锁定触发的灵敏度由碰撞灵敏度决定,灵敏度越高,触发的几率越大
紧急视频文件的总容量占当前内存卡总容量��%,当紧急视频文件达到容量上
限后,新的紧急视频文件会自动覆盖最初的一段紧急视频文件,建议定期查看
并另外保存您的紧急视频文件,以免丢失。
锁定录影在以下两种情况中均不会触发,关闭循环录影/开启缩时录影。关闭循
环录影/开启缩时录影只能抓拍图片。
注意:
�.
�.
�.
EN
EN
EN
CN
14:39:07 2023-02-10
00:00:37
MP/H
35
1440P+1080P+1080P 30FPS
14:39:07 2023-02-10
00:00:37
MP/H
35
1440P+1080P+1080P 30FPS
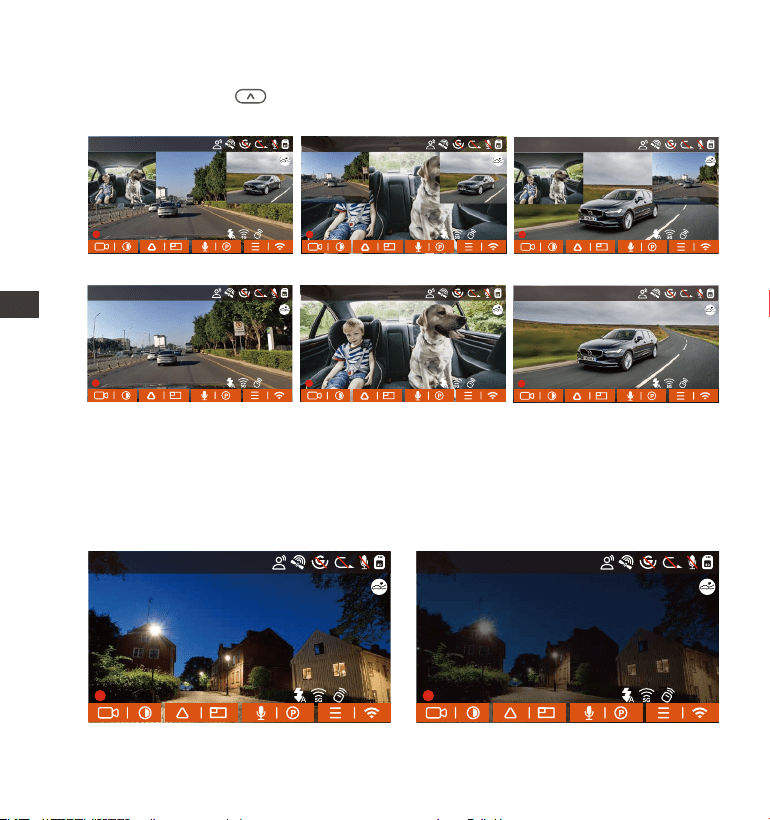
- 152 -
�.�.� 切换镜头显示画面
E�可以通过向上键 切换镜头显示模式,如画中画显示,单车前画面显示、单
车内画面显示,单车后画面显示。
车前画中画显示 车内画中画显示 车后画中画显示
单车前画面显示 单车内画面显示 单车后画面显示
�.�.� 停车微光夜视
为了增强夜晚停车的安全性,我们充分利用镜头性能联合微光夜视技术,提升了
停车模式下的夜视效果。此功能默认为打开模式,只有进入停车模式后才会被触
发,不会对正常录影造成影响。
关闭停车微光夜视开启停车微光夜视
ENCN
14:39:07 2023-02-10
00:00:37
MP/H
35
1440P+1080P+1080P 30FPS
14:39:07 2023-02-10
00:00:37
MP/H
35
1440P+1080P+1080P 30FPS
14:39:07 2023-02-10
00:00:37
MP/H
35
1440P+1080P+1080P 30FPS
14:39:07 2023-02-10
00:00:37
MP/H
35
1440P+1080P+1080P 30FPS
14:39:07 2023-02-10
00:00:37
MP/H
35
1440P+1080P+1080P 30FPS
14:39:07 2023-02-10
00:00:37
MP/H
35
1440P+1080P+1080P 30FPS
14:39:07 2023-02-10
00:00:37
MP/H
35
1440P+1080P+1080P 30FPS
14:39:07 2023-02-10
00:00:37
MP/H
35
1440P+1080P+1080P 30FPS
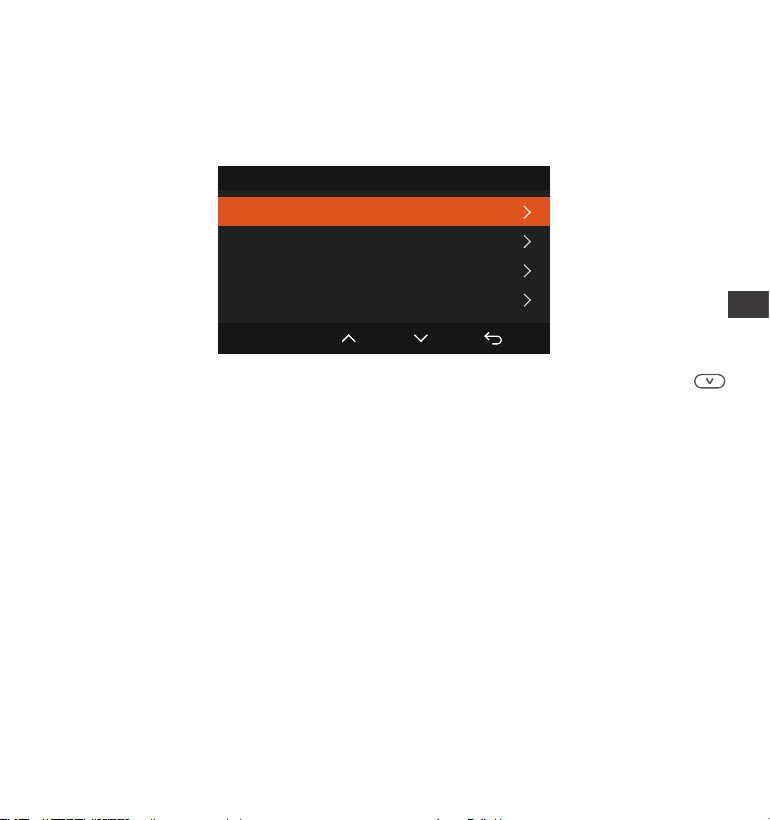
- 153 -
�.�.� 停车模式(开启停车模式后,缩时录影功能将无法工作,两个功能不能同时
运行。)
停车模式是记录仪重要的功能之一,它肩负着汽车停放时安全监控的重要职责。您
可以根据不同的停车情况,切换不同的停车监控模式。
停车模式开启后,进入方式有�种:➀停车后等待�分钟自动进入;➁选择长按
向下键手动进入;➂安装ACC降压线,停车熄火后直接进入(ACC降压线为选配配
件,需自行购买)。
停车监控
碰撞侦测
移动侦测
低比特率录影
OK
低帧率录影
为了确保记录仪能正常使用停车模式,请使用降压线或者是其他稳定持续的电
源给记录仪供电。
在夏季高温的暴晒环境下,我们建议您使用碰撞侦测模式。当车内环境温度高
达��℃时,建议您关闭记录仪,以免高温导致记录仪工作异常。
缩时录影与停车模式(包含碰撞侦测、移动侦测、低比特率录影、低帧率模式)
两者只能开启其中一个,开启其中一个会自动关闭另外一个。
停车模式(含碰撞侦测、移动侦测、低比特率录影、低帧率模式)录影的文件全
部会保存在普通文件夹中,因此为了避免停车模式文件被循环覆盖,请定期查
看,以免遗失。
注意:
�.
�.
�.
�.
EN
EN
EN
CN
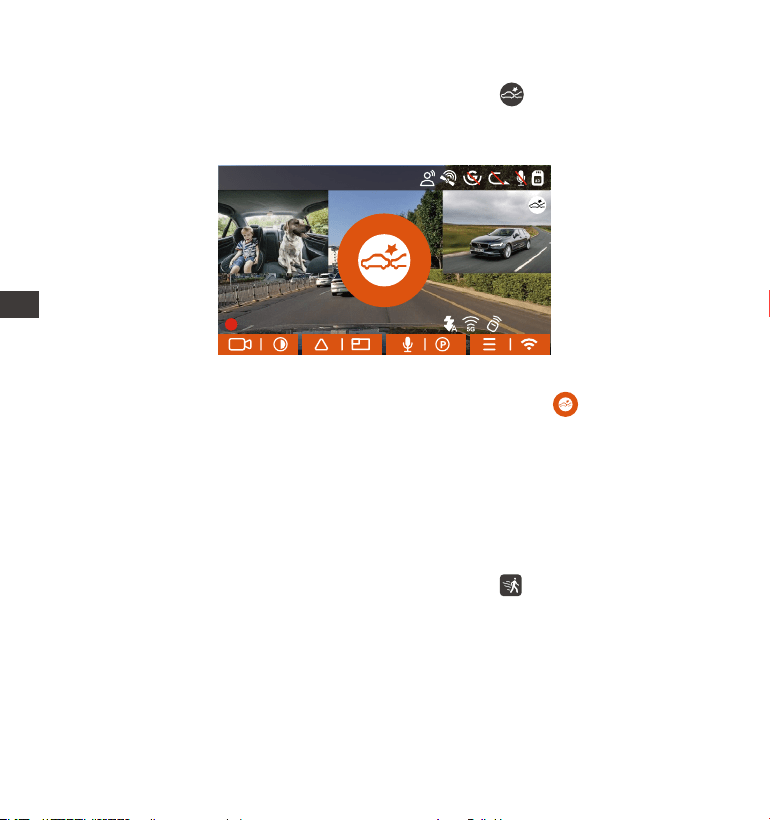
- 154 -
当记录仪的G-sensor检测到汽车在�分钟内没有发生移动或是振动(简称�分钟进
入机制),碰撞侦测模式自动进入,记录仪屏幕中间会显示 碰撞侦测图标,随
后记录仪自动关机。记录仪关机后,当G-sensor检测到汽车发生振动或者移动,
自动开机录影�分钟,随后关机。
注意:如果记录仪在碰撞侦测录影过程中持续遭到碰撞,将会退出碰撞侦测模
式,进入正常录影,重新开始�分钟进入机制。
移动侦测
当移动侦测打开后,在录影界面会显示移动侦测图标 ,表示记录仪当前已开启
移动侦测模式。移动侦测有低/中/高三档调节,分别对应移动侦测�米/�米/�米的
侦测范围。
衝撃検知
当碰撞侦测打开后,在录影界面会显示碰撞侦测图标 ,表示记录仪当前使用
的是碰撞侦测模式。碰撞侦测灵敏度有�到�档灵敏度可调节,您可以根据自身习
惯,以及汽车状况自行调节。
ENCN
14:39:07 2023-02-10
00:00:37
MP/H
35
1440P+1080P+1080P 30FPS
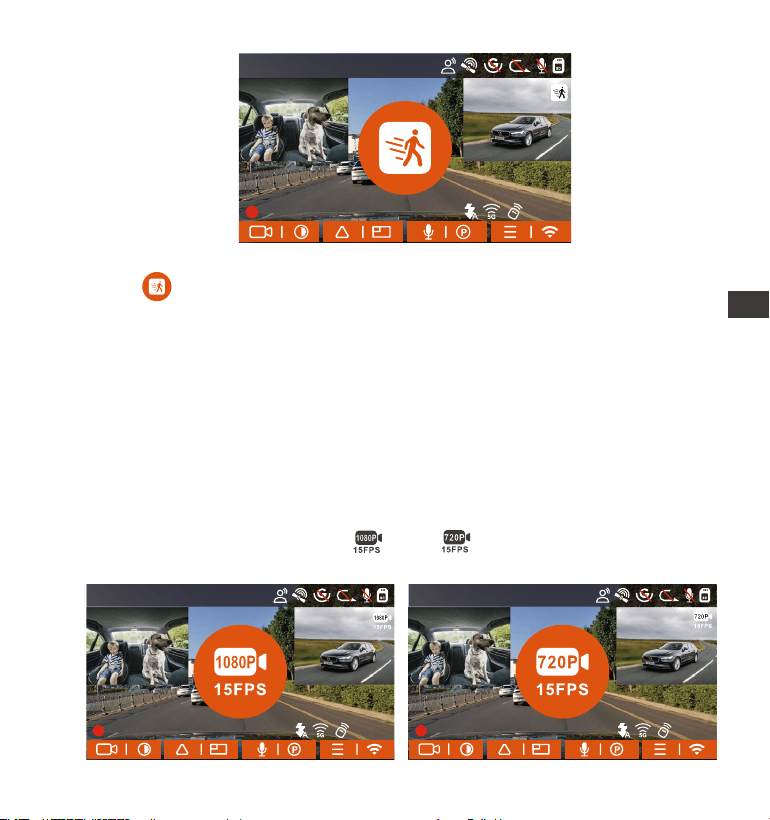
停车后,记录仪会开启�分钟进入机制,移动侦测模式自动进入,记录仪屏幕中间
会显示 图标。记录仪进入待机状态,�分钟后屏幕熄灭。为了增加移动侦测的
可靠性,我们新增了预录功能,把移动侦测前��秒的画面一起放入移动侦测视频
中。
录影过程:当记录仪检测到物体移动或者是感受到汽车震动,将会自动触发录影,
E�带有预录��秒的功能,所以当移动侦测录影结束后,记录仪会将移动侦测触发前
��秒的视频内容与移动侦测触发的��秒内容,组成一段��秒的停车移动侦测视频。
注意:移动侦测模式需要在开机的情况下进行,记录仪一旦关闭,移动侦测模式将
不会起作用。
低比特率录影
低比特率录影开启后,屏幕会显示 或者是 的图标,根据您选择是����P
��FPS或是���P ��FPS选项而定。
EN
EN
EN
CN
- 155 -
14:39:07 2023-02-10
00:00:37
MP/H
35
1440P+1080P+1080P 30FPS
14:39:07 2023-02-10
00:00:37
MP/H
35
1440P+1080P+1080P 30FPS
14:39:07 2023-02-10
00:00:37
MP/H
35
1440P+1080P+1080P 30FPS
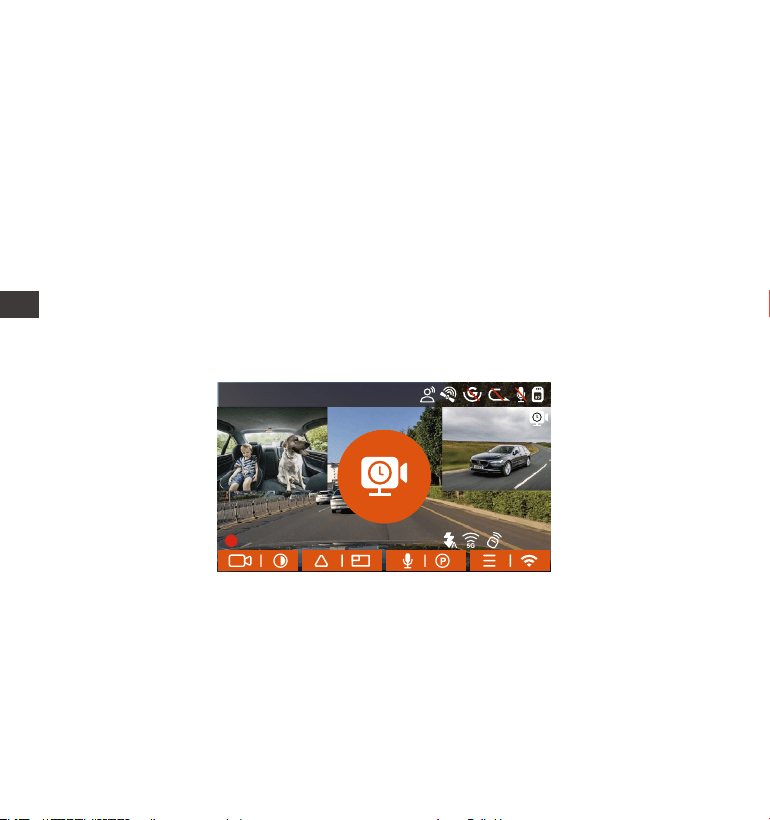
停车后,记录仪会开启�分钟进入机制,低比特率模式会自动进入,屏幕中央会显
示低比特率图标(表示进入低比特率模式),当前所有镜头的分辨率会自动切换
为����P ��FPS或是���P ��FPS进行录影,录影时长是按照当前设定的循环录影
时长决定。当机子受到振动或者是移动后会自动退出,等待五分钟后再次进入。
注意:低比特率模式需要在开机的情况下进行,记录仪一旦关闭,低比特率模式
将不会起作用。
低帧率模式
当选择开启低帧率模式后,记录仪将会根据选择�FPS/�FPS/��FPS/��FPS进行录
影。例如,您选择的�FPS,当前视频分辨率帧数为��FPS,记录仪将会每秒产生
一段��FPS的视频。
停车后,记录仪会开启�分钟进入机制,低帧率模式会自动进入。缩时录影视频可
以很大程度保存视频的完整性,以及节省内存卡空间。
ENCN
- 156 -
计算公式的时间单位是秒,所以计算得到的最后的正常录影时间也是秒,如需
换算成其他时间单位,请自行查询后换算。
低帧率模式与缩时录影功能相似,两者区别在于�分钟进入机制,缩时录影没
有�分钟进入机制,设定后会直接开启。
注意:
�.
�.
视频时长的计算公式为:缩时录影文件时长*缩时录影帧数/分辨率帧数=录制文件
实际时长(时间须换算成秒)
14:39:07 2023-02-10
00:00:37
MP/H
35
1440P+1080P+1080P 30FPS
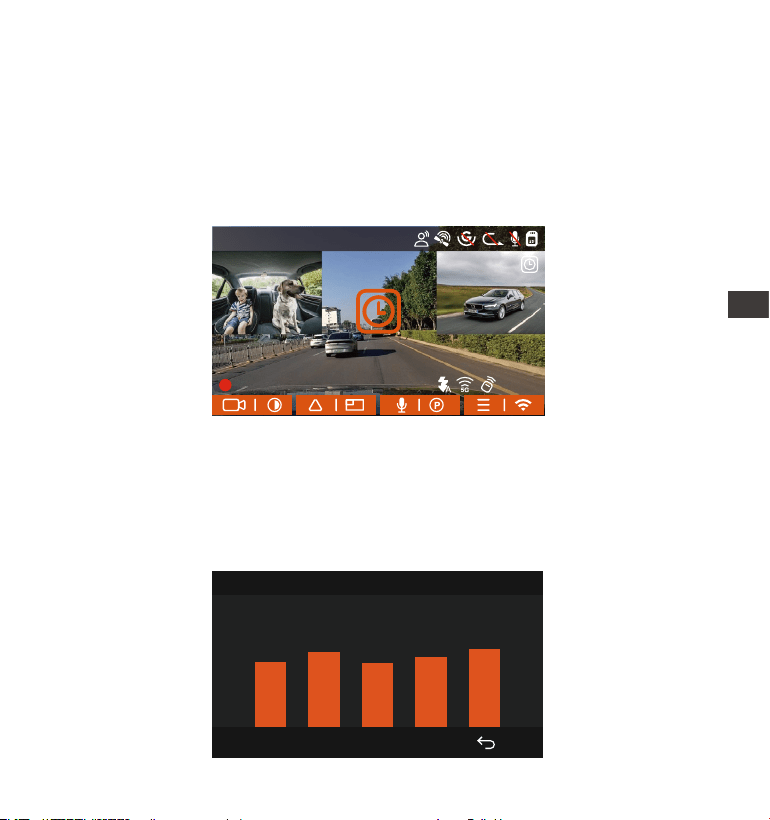
- 157 -
视频时长的计算公式为:缩时录影文件时长*缩时录影帧数/分辨率帧数=录制文件
实际时长(时间须换算成秒)
�.�.� GPS功能
GPS功能也是记录仪重要的功能之一,GPS默认为打开,并且通过GPS支架接收
GPS信号。它可以自动校正您所在的地区的时间日期,记录视频所在的位置、车
速信息。
�.
�.�.� 缩时录影
当选择开启缩时录影后,记录仪将会根据选择�FPS/�FPS/��FPS/��FPS进行循
环录影。例如,您选择的�FPS缩时录影(当前视频分辨率帧数为��FPS,循环录
影时间为�分钟),记录仪将会每秒产生一段��FPS的视频。
40
46
39
43
48
GPS信息
低帧率模式下,记录仪也需要有稳定电源供电,一旦电源关闭或者是耗尽,记
录仪将会关机。
EN
EN
EN
CN
14:39:07 2023-02-10
00:00:37
MP/H
35
1440P+1080P+1080P 30FPS
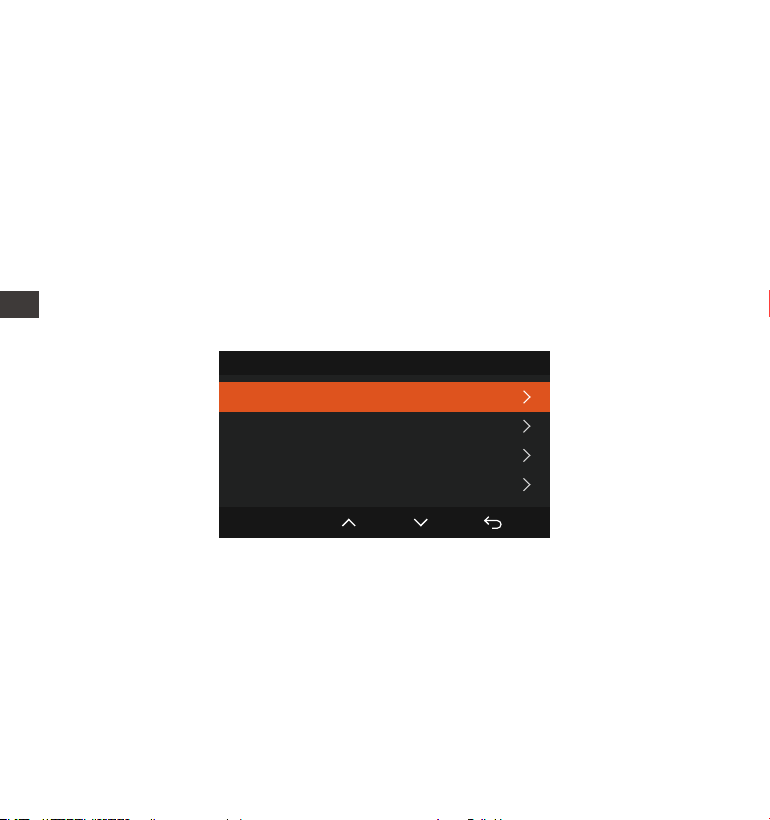
- 158 -
�.�.�.GPS自动校正时间
E�记录仪默认打开GPS自动校正时间,您可以通过选择您所在的时区,如您所在地
区是洛杉矶,可选择GMT-��:��。如不了解自己所在位置的时区,可用WIFI连接
Vantrue APP,确认APP中的自动校时功能开启,连接成功后,会根据您手机的时
区,强制修正记录仪的时区。
GPS会在您开机后的�分钟内完成连接,若您超过�分钟内还没连接成功,请检
查设备是否已经打开GPS功能、是否连接GPS支架,以及您所在的环境(地下
停车场,楼房密集居民区、地铁、隧道等地区会影响GPS信号的接收)。
GPS信息是记录在您录制的视频内,如需查看,请下载并安装VANTRUE APP和
VANTRUE GPS播放器。
注意:
�.
�.
日期/时间
GPS自动更新
手动设置日期/时间
日期格式
时区选择
OK
注意:GPS自动校正时间需要设定正确的时区,可参考每个时区之后代表性城市。
�.�.�.遥控器
记录仪出厂配备了遥控器,可以通过遥控器快速操作抓拍、紧急录影、录音开启/
关闭等功能。
遥控器连接:
拆除包装后,取出遥控器,取下遥控器上的电池绝缘片,记录仪会自动与遥控器
ENCN

- 159 -
遥控器安装:
遥控器与记录仪匹配后,请在您车上选取一个合适的位置,然后将遥控器的黏胶
贴纸撕下,粘贴在选择的位置上。(注意:遥控器需安装在不影响安全驾驶的位
置上)
匹配,不需要手动与行车记录仪配对。当屏幕显示出现 图标后,表示遥控器
已匹配成功。
EN
EN
EN
CN
14:39:07 2023-02-10
00:00:37
MP/H
35
1440P+1080P+1080P 30FPS
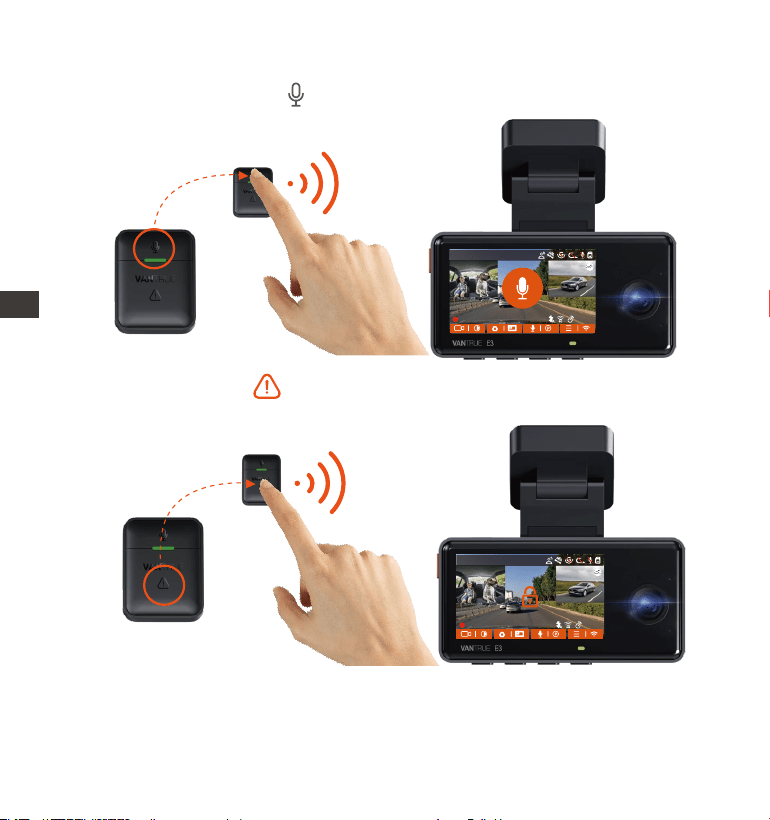
- 160 -
遥控器连接成功后使用 录音键,可以开启或者关闭录音。�.
遥控器功能:
2.
连接成功后,使用 SOS按键短按一下,加锁当前文件并抓拍;加锁录影中
继续短按,会继续抓拍照片
ENCN
14:39:07 2023-02-10
00:00:37
MP/H
35
1440P+1080P+1080P 30FPS
14:39:07 2023-02-10
00:00:37
MP/H
35
1440P+1080P+1080P 30FPS
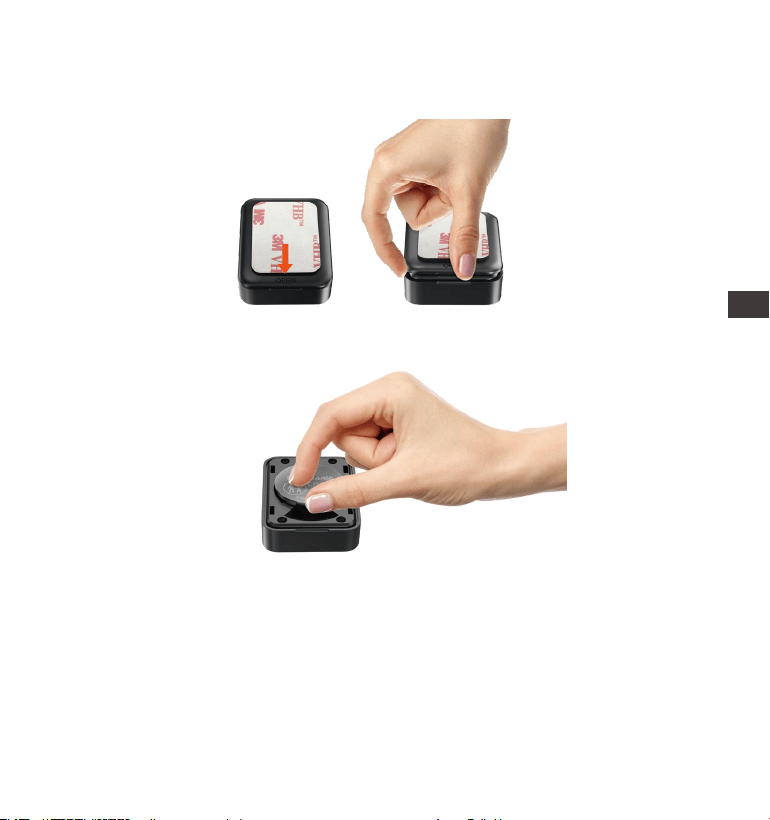
- 161 -
遥控器更换电池:
在遥控器底部有一个“OPEN”标志,请沿着此标志的凹槽位置往周围缝隙慢
慢撬开即可打开。
�.
�. 打开后,电池仓前面的凹槽轻轻的把电池撬开,然后取出旧电池,再把新电池
放入,把遥控器后盖盖好。
注意:遥控器电量不足时请更换电池,遥控器不支持充电。遥控器电池的型号是
CR����纽扣电池。
EN
EN
EN
CN
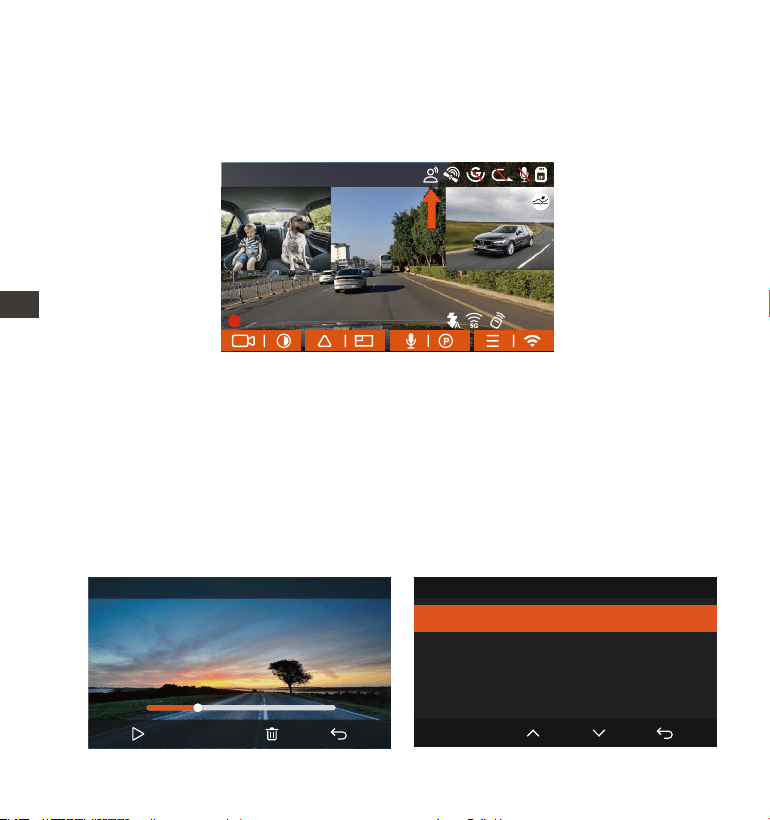
- 162 -
EN
EN
EN
DE
紧急视频
刪除这个文件?
刪除所有文件?
OK
00:30
01:07
20230210_140633_0002_E_B.MP4
1X
语音识别有低灵敏/标准/高灵敏/关闭等选项,默认为标准灵敏度,您可以通过语
音指令遥控记录仪。
�.�.��.回放、删除文件的途径
a.记录仪上操作
---回放视频
进入文件浏览后,任意选择文件夹进入,打开视频文件后,可以按下键选择下一
段文件,播放中可选择删除文件。
�.�.��.语音识别
除了遥控器操控记录仪外,您还可以通过语言助手给记录仪下达语音指令,如抓
拍图片、开始录影、打开/关闭WiFi,视频加锁等等。目前支持语种有英语、日
语、俄语、中文,更加详细的语音指令请查看系统设置>语音内容
ENCN
14:39:07 2023-02-10
00:00:37
MP/H
35
1440P+1080P+1080P 30FPS
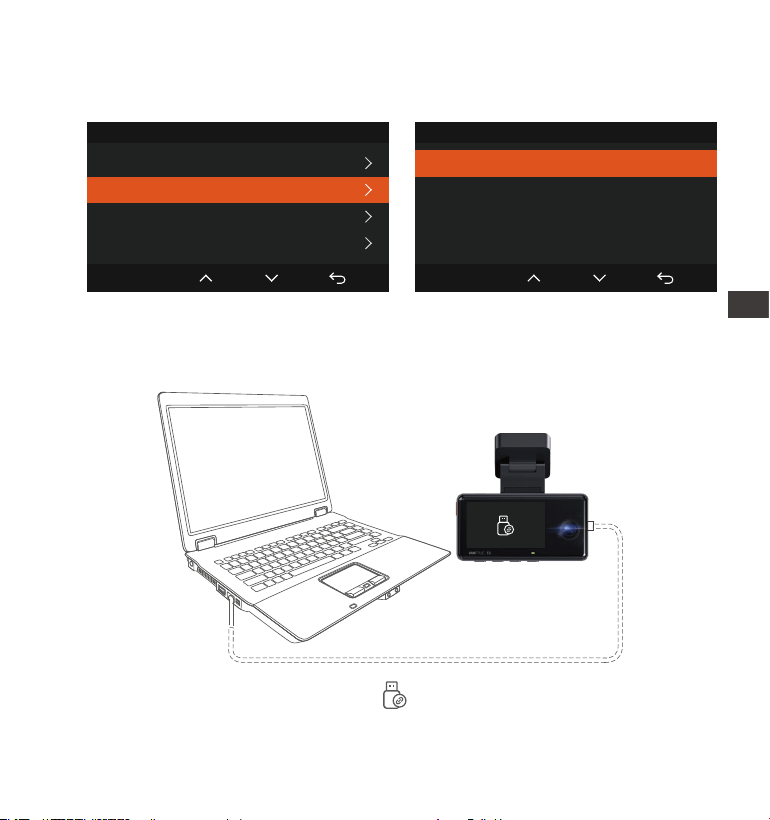
连接成功后,记录仪显示屏中会 “ ”图标,随后即可在电脑文件夹中查看
得到视频文件。
- 163 -
---删除视频
记录仪上删除视频,在文件浏览界面,按紧急录影按键可弹出删除菜单。
紧急视频
刪除这个文件?
刪除所有文件?
OK
紧急视频
20230210_140633_0001_E_B.MP4
20230210_140633_0002_E_B.MP4
20230210_140633_0003_E_B.MP4
20230210_140633_0004_E_B.MP4
2/5
OK
b.在电脑上回放、删除文件
1. 使用Type-C USB数据线插入电脑,使得记录仪与电脑连接在一起。
2.
EN
EN
EN
CN
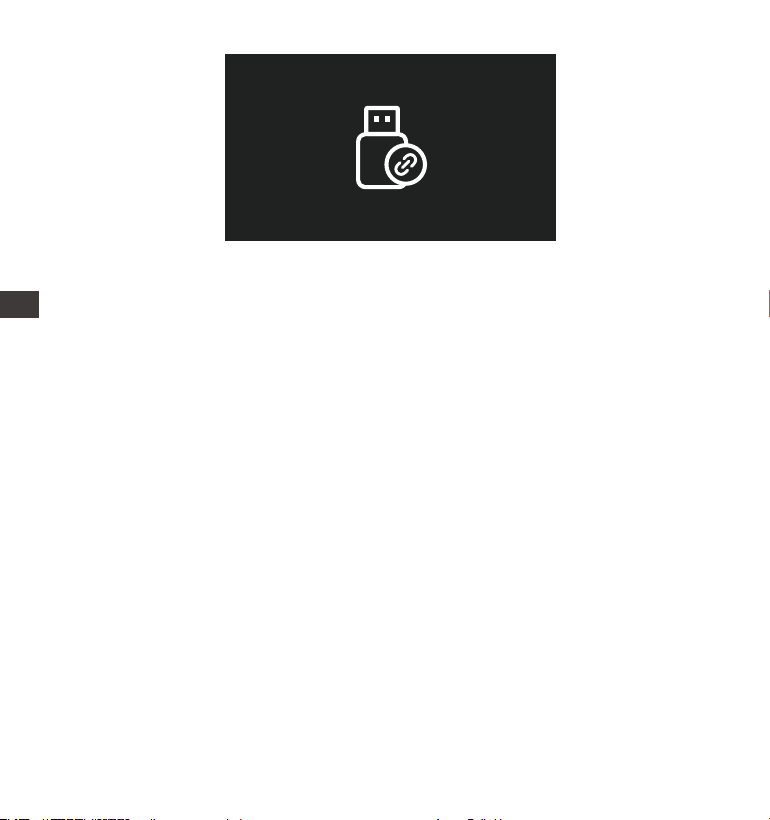
- 164 -
3.
4.
5.
6.
根据用户的电脑系统,记录仪连接电脑后会在电脑中显示为可移动驱动器或者
是可移动文件夹。
电脑查看文件可直接右键打开菜单进行删除即可
也可使用USB读卡器读取内存卡信息。
为了保证连接电脑时供电稳定,可检查电脑接口是否是USB�.�接口,使用台
式电脑连接时,建议使用台式电脑E�背后的USB接口。
ENCN
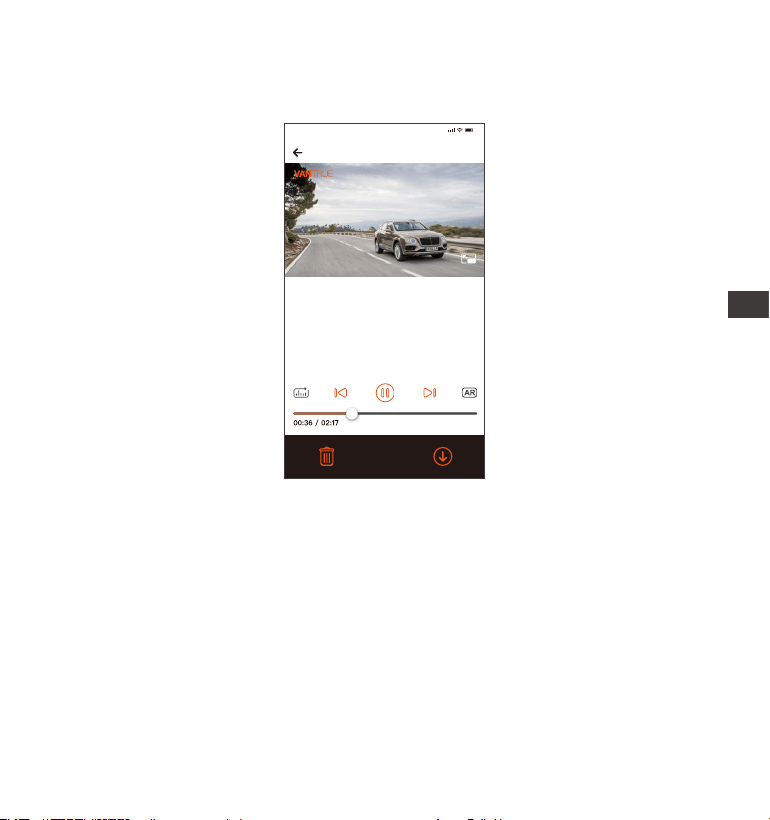
- 165 -
c.在APP内回放、删除文件
记录仪通过WiFi与手机连接后,可以在手机APP内相机文件夹中回放、下载、删
除文件。
APP内回放、下载SD卡文件,不会产生数据流量的消耗。
视频文件下载至本地后回放,可以查看GPS轨迹信息,但是需要您断开记录仪
WIFI,否者地图信息会显示空白。
注意:
�.
�.
20230210_115036_0079_N_A.MP4
2023/02/10 11:5:35 E3 000.000000. 000.000000. 36MK/H
注意:
9:41
要显示GPS信息,您必须先将视频
文件下载到APP的本地文件夹,然
后在本地文件夹播放。
EN
EN
EN
CN
- 166 -
注意:记录仪在升级过程中,请勿断电,否则会导致记录仪升级不成功或损坏记
录仪。若突发断电导致升级失败,您可以联系我们客服人员,会有专人为您解决
问题。
�.�.��.升级记录仪软件
为了达到更好的用户体验,我们会不定期的更新记录仪软件,您可以通过联系我
们客服人员或者是登录我们官方网站去下载最新的软件版本。软件下载后,请根
据官网提示进行升级即可。
ENCN

- 167 -
在炎热高温的环境长时间停车时,请使用碰撞侦测模式或者是暂停使用记录仪。
在极端严寒的环境中,记录仪电池的活性会降低,如若长时间不需要使用记录仪
时,请把记录仪取下放置在扶手箱内,以保证记录仪正常使用。
�.
�.
�. 产品规格参数
E�
型号
车前镜头F�.�
车内镜头F�.�
车后镜头F�.�
English、简体中文、日本語、Deutsch、Italiano、
Español、Français、Русский язык、Polski
联咏高性能处理器
Sony Sensor
内置三轴传感器
�.�GHz&�GHz
�.��"IPS显示屏
为了您更好的产品体验,我们会对产品进行升级,产品规格可能会改变,恕不另行
通知。
芯片处理器
图像传感器
G-sensor
WIFI
屏幕
镜头角度
语言
光圈
车前镜头���°广角
车内镜头���°广角
车后镜头���°广角
EN
EN
EN
CN
�.�.��.记录仪工作环境
行车记录仪正常的工作环境为-��℃到��℃,超出此温度范围工作会影响记录仪
的性能,长此以往会损害记录仪的使用寿命。
因此,我们建议您:

- 168 -
车前+车内+车后分辨率:
����P+����P+����P ��FPS
����P+����P+����P ��FPS
����P+����P+����P ��FPS
����P+����P+���P ��FPS
����P+���P+���P ��FPS
����P+����P+���P ��FPS
����P+���P+���P ��FPS
���P+���P+���P ��FPS
分辨率
视频格式
图片格式
音频
储存方式
USB接口
电池类型
供电电流
功率
工作温度
存储温度
MP�
JPEG
内置麦克风和扬声器
Micro SD卡(支持��GB-���GB,U�或更高卡速的内存卡)
Type-C
超级电容
DC �V �.�A
�W
-�℉至���℉(-��℃至��℃)
-�℉至���℉(-��℃至��℃)
车前+车内分辨率:
����P+����P ��FPS
����P+����P ��FPS
����P+����P ��FPS
����P+���P ��FPS
���P+����P ��FPS
���P+���P ��FPS
车前+车后分辨率:
����P+����P ��FPS
����P+����P ��FPS
����P+����P ��FPS
����P+���P ��FPS
���P+����P ��FPS
���P+���P ��FPS
车前分辨率:
����x����P ��FPS
����x����P ��FPS
����x����P ��FPS
����x���P ��FPS
ENCN

VANTRUE品牌保修服务周期为��个月,如果您有任何关于产品的问题,可以通过
以下�种方式解决:➀打开VANTRUE APP,在关于>常见问题中找到解答;➁联
系您购买渠道的客服人员;➂发送邮件至我们官方邮箱support@vantrue. net,
我们将会有专门人员在��-��小时内回复问题。
VANTRUE®品牌一直坚定不移地致力于不断改进产品,提高服务以及用户体验。
如果您对于我们如何能做的更好有任何的想法,欢迎您在我们的官方邮箱
[email protected]留下宝贵的意见及建议。
感谢您选择VANTRUE®
�. 售后服务
EN
EN
EN
CN
- 169 -

京东旗舰店
https://vantrue.jd.com/
联系我们:
微信号: vantrue���
微信小管家