
FH10063
Weight Bench
Hantelbank
Banc de Musculation
Banco de Pesas
Panca con Pesi
Ławka treningowa
DEU office: FDS GmbH, Neuer Höltigbaum 36, 22143 Hamburg, Deutschland
ITA office: Milano
FRA office: Saint Vigor d'Ymonville
POL office: GdańskGBR office: IpswichAUS office: TruganinaUSA office: Fontana
THIS INSTRUCTION BOOKLET CONTAINS IMPORTANT SAFETY INFORMATION. PLEASE READ AND KEEP FOR FUTURE REFERENCE.
Before You Start
Please read all instructions carefully.
Retain instructions for future reference.
Separate and count all parts and hardware.
Read through each step carefully and follow the proper order.
We recommend that, where possible, all items are assembled near to the area in
which they will be placed in use, to avoid moving the product unnecessarily once
assembled.
Always place the product on a flat, steady and stable surface.
Keep all small parts and packaging materials for this product away from babies
and children as they potentially pose a serious choking hazard.
EN
DE
Bitte lesen Sie alle Anweisungen sorgfältig durch.
Bewahren Sie die Anweisungen zum zukünftigen Verwendung auf.
Überprüfen Sie, ob alle Teile und Zubehörteile vorhanden sind.
Lesen Sie jeden Schritt sorgfältig durch und befolgen Sie die richtige Reihenfolge.
Wir empfehlen, alle Teile möglichst in der Nähe des Aufstellungsortes zu
montieren, um unnötige Bewegungen nach der Montage zu vermeiden.
Stellen Sie den Artikel immer auf eine ebene, feste und stabile Fläche.
Halten Sie alle kleinen Teile und Verpackungsmaterialien fern von Babys und
Kindern, ansonsten besteht Erstickungsgefahr.
Vor dem Beginnen
FR
Veuillez lire attentivement toutes les instructions.
Conservez les instructions pour vous y référer ultérieurement.
Vérifiez toutes les pièces et les accessoires.
Lisez attentivement chaque étape et suivez l’ordre correct.
Nous recommandons que, dans la mesure du possible, tous les produits soient
assemblés à proximité de la zone où ils seront utilisés, afin d’éviter tout
déplacement inutile du produit une fois assemblé.
Placez toujours le produit sur une surface plane et stable.
Conservez toutes les petites pièces de ce produit et les matériaux d’emballage
hors de portée des bébés et des enfants, car ils pourraient présenter un risque
d’étouffement.
Lea atentamente todas las instrucciones.
Conserve las instrucciones para futuras consultas.
Separe y cuente todas las piezas y los accesorios.
Lea detenidamente cada paso y siga el orden correcto.
Recomendamos que, siempre que sea posible, todos los elementos se monten
cerca de la zona en la que se van a utilizar, para evitar mover el producto
innecesariamente una vez montado.
Coloque siempre el producto sobre una superficie plana, estable y firme.
Mantenga todas las piezas pequeñas y los materiales de embalaje de este
producto lejos de los bebés y los niños, ya que pueden representar un grave
riesgo de asfixia.
ES
Avant de Commencer
Antes de Empezar
02 03

Si prega di leggere attentamente tutte le istruzioni.
Conservare le istruzioni per riferimento futuro.
Separare e contare tutte le parti e gli accessori.
Leggere attentamente ogni passo e seguire l'ordine corretto.
Si consiglia, ove possibile, di assemblare tutti gli articoli vicino alla zona in cui
verranno posti in uso, per evitare di spostare inutilmente il prodotto una volta
assemblato.
Posizionare sempre il prodotto su una superficie piana, stabile.
Tenere tutte le piccole parti e i materiali di imballaggio di questo prodotto lontano
dalla portata di neonati e bambini, in quanto possono costituire un serio pericolo
di soffocamento.
Zapoznaj się z instrukcją.
Zachowaj instrukcję do wglądu.
Posortuj części i upewnij się, że zestaw jest kompletny.
Zapoznaj się ze sposobem montażu i postępuj zgodnie z instrukcją.
Zalecamy, aby montaż odbywał się możliwie najbliżej miejsca docelowego
położenia produktu, aby uniknąć niepotrzebnego przesuwania.
Upewnij się, że produkt znajdzie się na płaskiej i stabilnej po wierzchni.
Upewnij się, że materiały wykorzystane podczas pakowania produktu.
oraz jego elementy znajdują się poza zasięgiem dzieci.
IT
PL
Prima di Iniziare
Zanim Zaczniesz
Safety Tips
1. Safety precautions and warnings
Note: Please read the instructions carefully before use,
and pay attention to the following safety precautions:
◆ Be sure to consult with a specialist before using it when
you are receiving medical treatment or the following patients.
(1) Those who are currently suffering from back pain or those
who have been injured in the legs, waist and neck in the past,
and those who have numbness in the legs, waist, neck and
hands (those with chronic diseases such as intervertebral
disc herniation, spondylolisthesis, cervical spondylosis, etc.).
(2) Those who have deformed arthritis, rheumatism and gout.
(3) Those with abnormalities such as osteoporosis.
(4) Those with circulatory system disorders (heart disease,
vascular disorders, hypertension, etc.).
(5) Those with respiratory disorders.
(6) Those who are using artificial heart rhythm regulators who
have implanted internal medical electronic devices.
(7) Those with malignant tumor.
(8) Those with thrombosis, severe lipoma, acute
steatolipoma, and other blood circulation disorders or various
skin infections.
(9) Persons with perceptual impairment caused by high
peripheral circulatory disorder caused by diabetes, etc.
(10) Those with trauma to the skin.
(11) Those who have a high fever (38°C or more) due to illness,
etc.
(12) Those with abnormal back bones or curved back bones.
EN
04 05

(13) Those who are pregnant or may be pregnant or are
menstruating.
(14) Those who feel abnormal in their body and need to rest.
(15) Those who are obviously in poor physical condition.
(16) Users for rehabilitation purposes.
(17) In addition to the above-mentioned situations, those who
feel that there is an abnormality in their body.
◆ If you feel lower back pain, numbness in legs and feet,
dizziness, heartbeat, etc. different from usual pain or
coordination sensation or abnormality during exercise, stop
using it immediately and consult a doctor.
◆ Do not let children use this product, and do not let children
play around this product.
- Risk of injury if not followed.
◆ Children's guardian should be careful not to let children
play with this product.
- Risk of injury if not followed.
◆ Be sure to confirm that there are no people or pets around
(the back, bottom, and front of the product) during use, when
loading and unloading the product, or when sliding it.
Prohibit!
◆ Do not use or store in damp places such as outdoors or
near bathrooms or places exposed to water droplets.
◆ Do not use or store in high temperature places such as
around stoves, in direct sunlight, or on heating appliances
such as electric heating carpets.
- Otherwise it may cause fire.
◆ Do not use it with 2 or more people at the same time, and be
careful not to let people around you approach it during use.
- Otherwise, accident or injury may occur due to falling.
◆ Do not use it if you can't express your consciousness or
you can't operate it yourself.
-Accident or injury may occur.
Do not disassemble!
◆ It is absolutely forbidden to dismantle, repair and
re-selection.
- Risk of injury due to mechanical failure.
Prohibit!
◆ People who don't usually exercise should not suddenly do
intense exercise.
◆ Do not use it after eating, when you are tired, when you
have just exercised or when your physical state is abnormal.
- May cause damage to health.
◆ This product is suitable for home use, not for schools,
gymnasiums and a large number of unspecified users.
- There is a risk of injury.
◆ Do not use it while eating or doing other activities.
◆ Do not use after drinking until you feel dull.
-Accident or injury may occur.
06 07
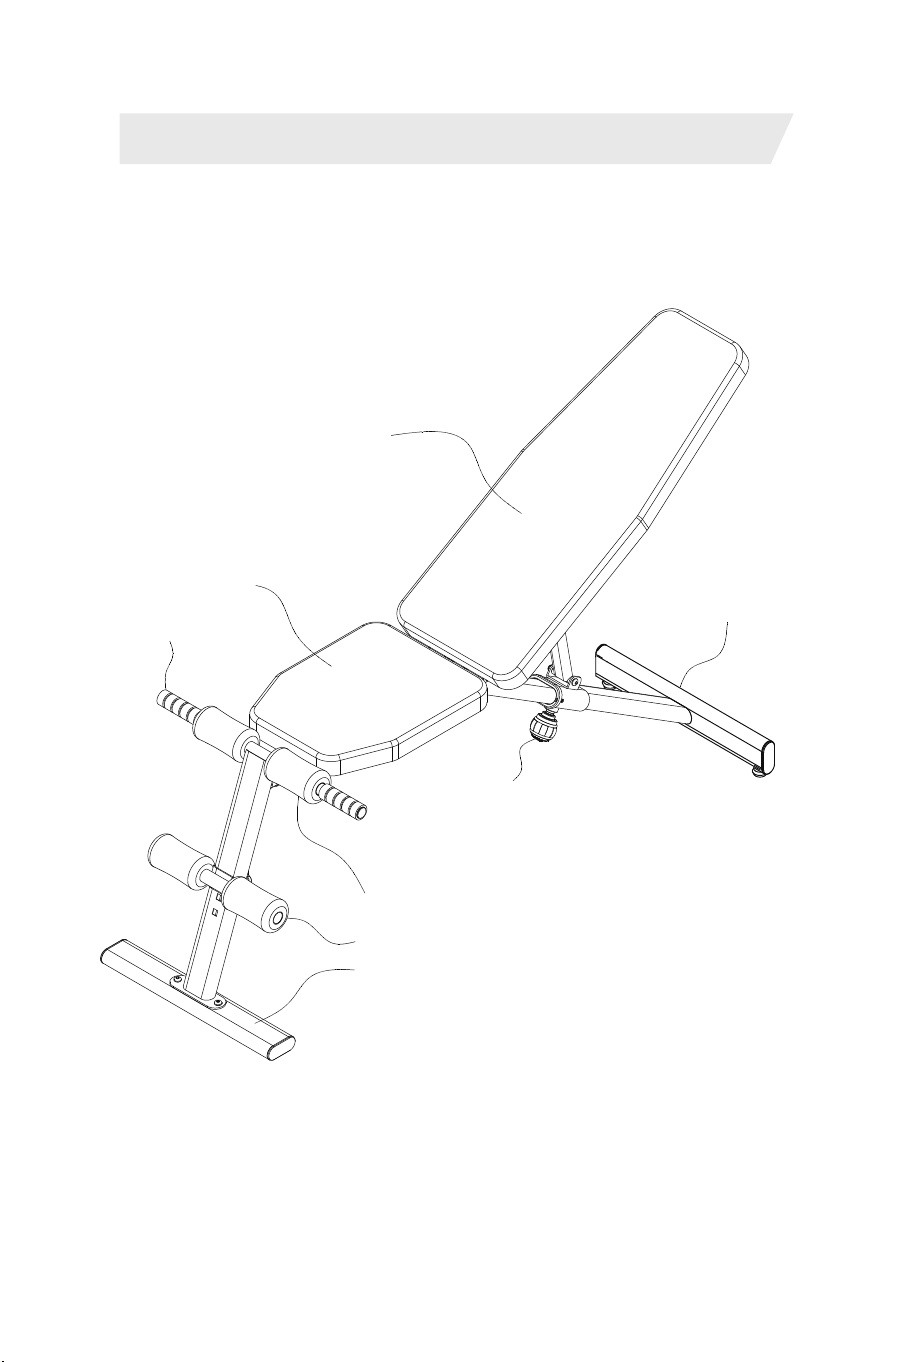
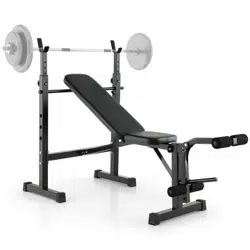
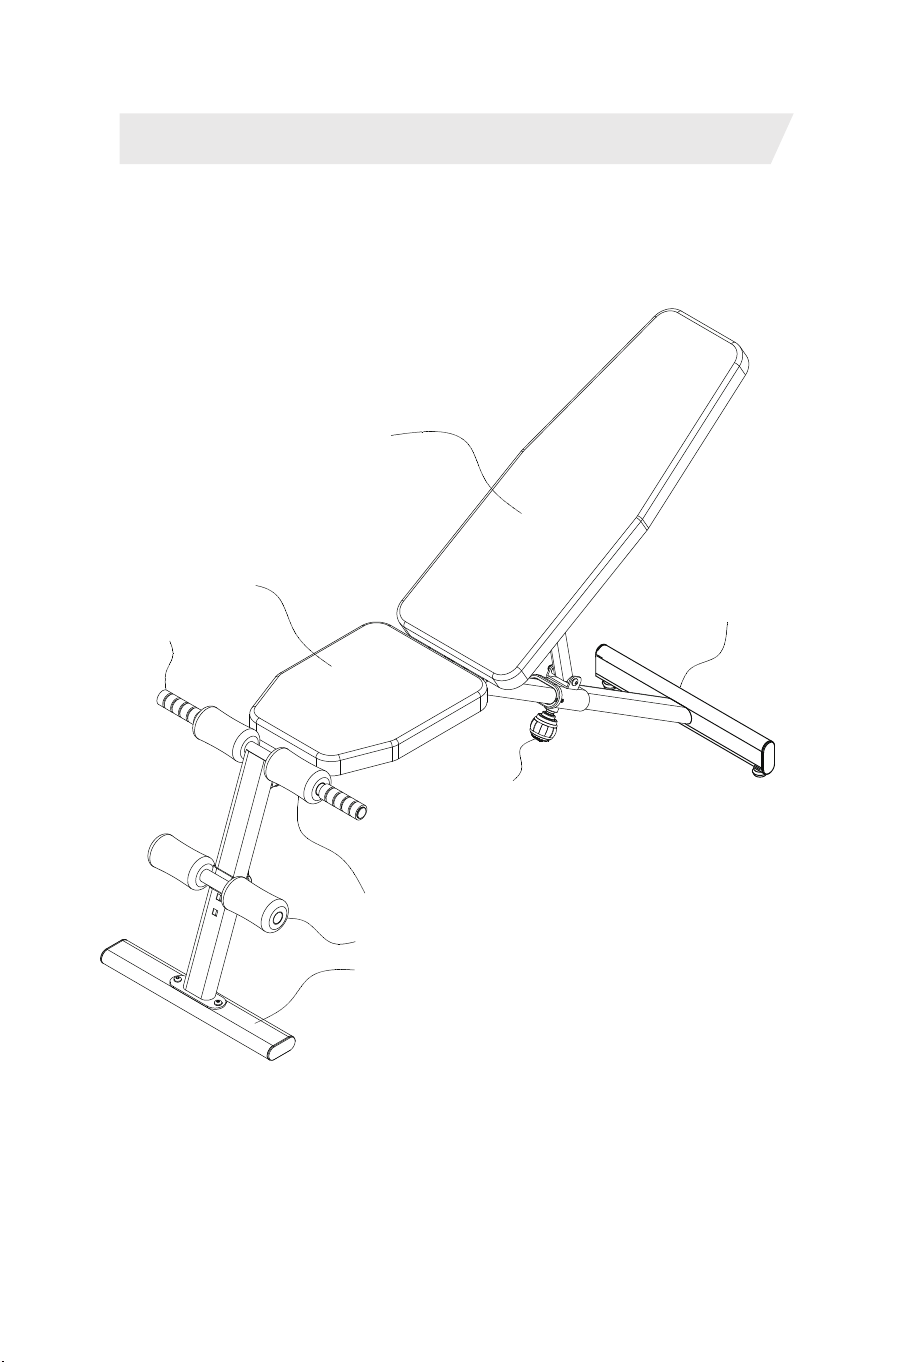
2. Product Information
Product Information
Back
Seat
Grip
Rear Leg
Fixing Part
Foot Support
Front Leg
Product Information
Specifications:
Package Lists:
Weight Capacity
Size
Net Weight
Gross Weight
150 kg/331 lbs
12.5 kg/27.5 lbs
14.5 kg/32 lbs
Number
1
2
3
4
5
6
7
8
9
10
11
12
13
14
15
16
17
18
Name
Seat
Back
Front Support Pipe
Foot Support
Front Leg
Rear Leg
Grip
Fixing Part
Foam
Knob
M8*15 Screw
M8*55 Screw
M8*45 Bolt
M8 Nut
Φ9 Flat Washer
5 mm Spanner
13-15 Spanner
Instruction,Certification
QTY
1
1
1
1
1
1
2
1
4
1
2
2
4
4
4
1
1
2
Remark
1 Instruction &
1 Certification
08 09
(132.4-149.6) x 52.4 x (52.3-122.2) cm (L x W x H)
/(52-59) x 20.6 x (20.6-48) inch(L x W x H)
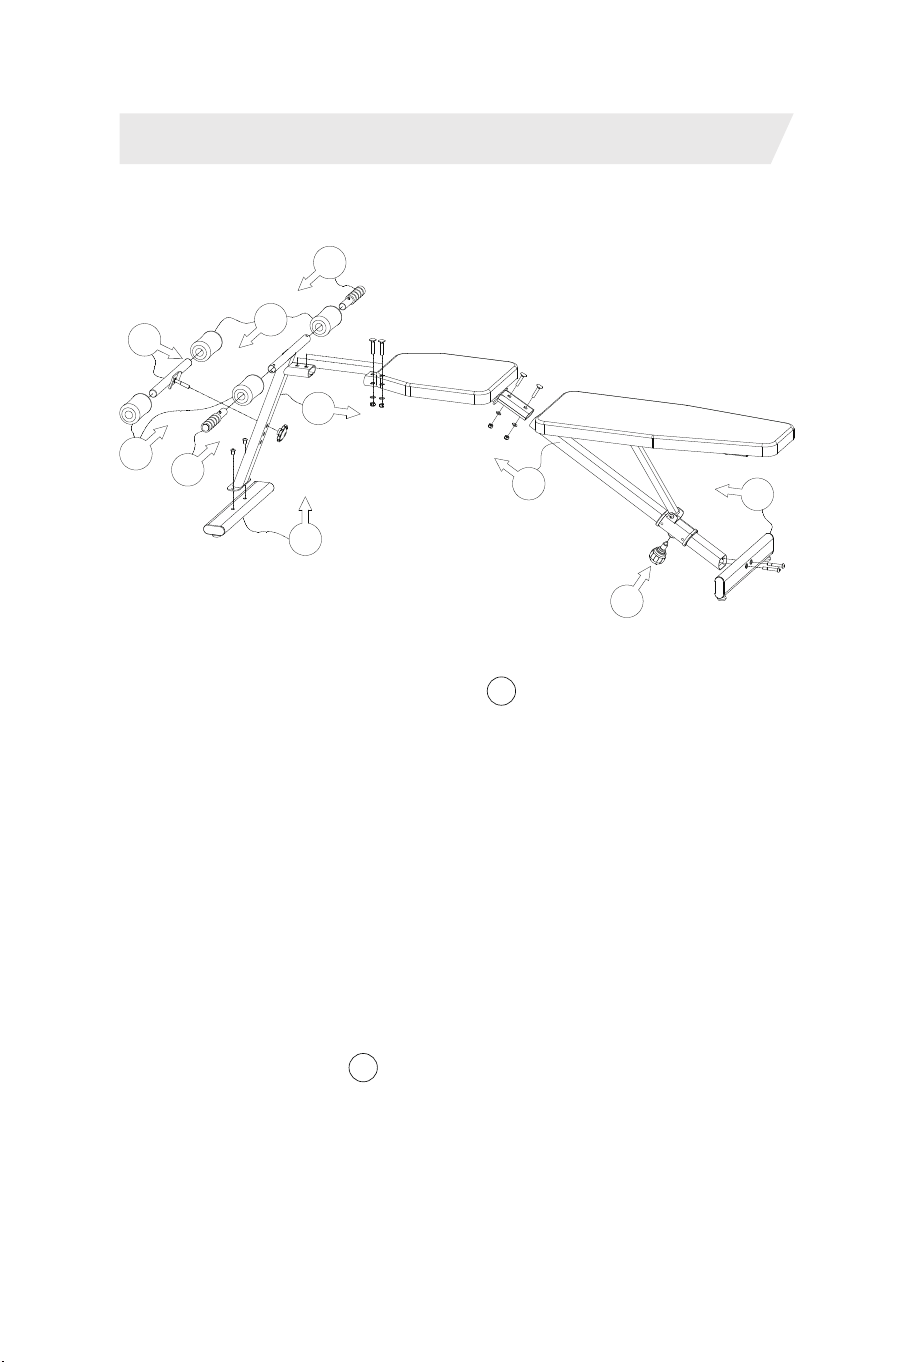
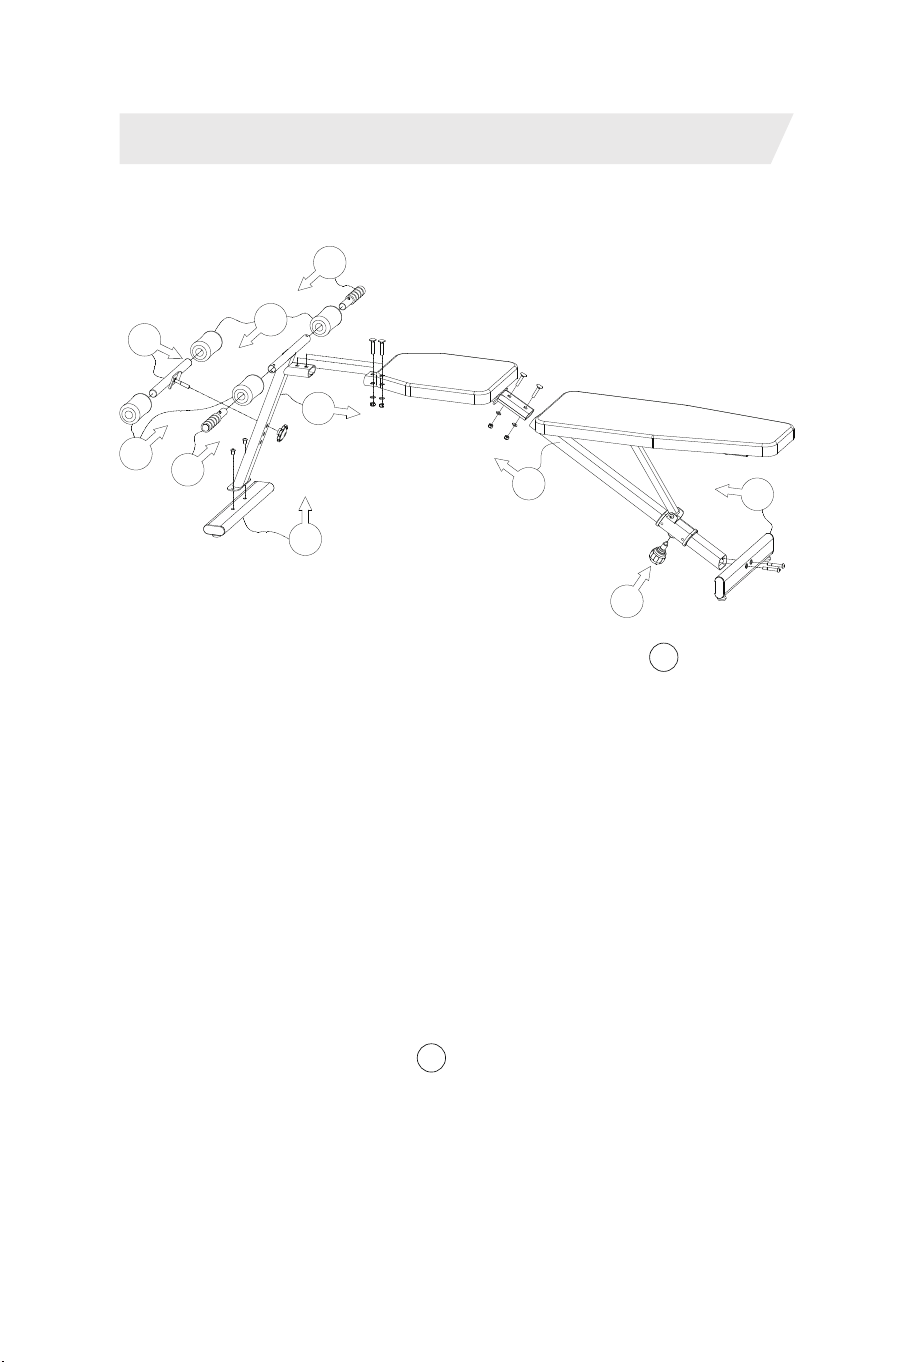
1. Take the main unit out of the box and place it on a carpet
or soft cushion. As shown in step above, screw the "fixing
part" into the corresponding position of the main frame in the
direction shown in the figure. At this time, grab the "rear leg"
with one hand and lift the "back" upwards with the other hand
until hearing a "click". At this time, it means that the "fixing
part" has been inserted into the corresponding hole of the
main unit. After that, you can directly pull the "fixing part"
outward, and then move the "back" to the desired direction,
and release the "fixing part", and then change the angle of
the back appropriately until you hear a "click";
2. As shown in step above, use 2 M8X55 screws to fix the
rear leg to the corresponding position of the main frame. It
should be noted that the direction of the label on the rear leg
should be towards the upper and front of the main unit, and
the 2 circular foot pads should face down, otherwise the
screws cannot be screwed in.
Assembly Instructions
3. Assembly Steps
2
1
4
3
5
6
7
8
3. As shown in step above, insert the "front leg" into the
front end of the "seat", insert 2 "M8X45 bolts" from the top,
then insert 2 "Ф9 flat washers" at the lower end, and screw in
the "M8 hexagon lock nut";
4. As shown in step above, fasten the "front leg" to the
corresponding position of the "front support pipe" with 2
"M8X15 screws" ;
5. As shown in step above, remove the "M10 knob"that
was previously screwed into the "Foot Support", insert the
assembly into the corresponding square hole of the "Front
Support Pipe" in the direction shown in the figure, and use "
Screw the "M10 knob" into the exposed screw rod of the
"Foot Support", and then tighten the "M10 knob";
6. As shown in step above, insert the 4 foams into the
"Foot Support" and "Front Support Pipe" respectively.
7. As shown in step above, insert the "handle" into the
corresponding part of the "front leg" according to the direction
shown in the figure. First set the exposed bump of the "snap
hook" in the "handle" tube against the the "front leg", and
then use your thumb and index finger to press the exposed
bump of the "snap hook" into the tube until it is inserted
smoothly, until the exposed protruding point of the "snap
hook" is inserted into the socket of the "front leg", otherwise it
will cause a safety hazard;
8. As shown in step figure, to insert the "seat" into the
"back", 2 M8X45 bolts" need to be inserted from the top, the
lower end of each into 2 "Ф9 flat washer" and then screw into
the "M8 nut";
Note: If the weight bench is unstable before use, please
adjust the foot pads to ensure stability.
After assembly, please double check that all bolts are
tightened.
10 11
1
2
3
4
5
6
6
7
7
8

Product maintenance
Only regular inspection and maintenance can ensure the
safety and integrity of the product. It is the responsibility of
the user or owner to ensure that the equipment is regularly
serviced. Worn or broken parts should be replaced
immediately before continuing to use the product.
1. To prevent dust accumulation, please wipe the weight
bench regularly
2. Only use a wet rag on plastic parts; Steel parts can only
be wiped with dry rags.
3. If necessary, clean the parts of the product
4. Avoid using cleaners that contain acidic chlorine or
abrasive particles, which may scratch and damage the
equipment.
5. Periodically check to ensure all parts are secure and in
working order. If a part is damaged, do not use it until it is
repaired
1. Align the screw with
the screw hole and begin
to turn the screw in
clockwise
2. Use a proper
screwdriver
1. Turn the screw
in the wrong
direction
2. A screwdriver is
not used
3. The screws are
not aligned with the
holes
The
screws are
not
tightened
Check the parts before
unpacking and do not
discard the packaging
until the product is fully
assembled
Maybe inside the
package or behind
a package
No
hardware
found
1. Please refer to the
instruction manual to
ensure complete and
correct assembly
2. Re-tighten the screws
3. Ask qualified
technician for help.
There is
strange
sound.
Unstable.
Ask qualified technician
for help.
1. Maybe lost
during shipping 2.
Maybe accidentally
thrown away during
assembly
Hardware
missing
Common faults and solutions
1. Assembly failure
caused by incorrect
assembly
sequence 2. Maybe
the screw is not
tightened
SolutionsCausesFaults
12 13

(12) Personen mit abnormen oder gekrümmten Rückgraten.
(13) Diejenigen, die schwanger sind oder schwanger sein
könnten oder menstruieren.
(14) Diejenigen, die sich in ihrem Körper unnormal fühlen und
sich ausruhen müssen.
(15) Diejenigen, die offensichtlich in schlechter körperlicher
Verfassung sind.
(16) Benutzer für Rehabilitationszwecke.
(17) Zusätzlich zu den oben genannten Situationen
diejenigen, die das Gefühl haben, dass es eine Anomalie in
ihrem Körper gibt.
◆Wenn Sie Schmerzen im unteren Rückenbereich,
Taubheitsgefühl in Beinen und Füßen, Schwindel, Herzschlag
usw. verspüren, die sich von den üblichen Schmerzen oder
Koordinationsempfindungen oder Anomalien während des
Trainings unterscheiden, stellen Sie die Verwendung sofort
ein und konsultieren Sie einen Arzt.
◆ Lassen Sie Kinder dieses Produkt nicht benutzen und nicht
in der Nähe dieses Produkts spielen.
- Verletzungsgefahr bei Nichtbeachtung.
◆Erziehungsberechtigte sollten darauf achten, dass Kinder
nicht mit diesem Produkt spielen.
- Verletzungsgefahr bei Nichtbeachtung.
◆Stellen Sie sicher, dass sich während des Gebrauchs, beim
Be- und Entladen des Produkts oder beim Verschieben keine
Personen oder Haustiere in der Nähe (hinten, unten und
vorne am Produkt) befinden.
Verbieten!
◆ Verwenden oder lagern Sie das Gerät nicht an feuchten
Orten wie im Freien oder in der Nähe von Badezimmern oder
an Orten, die Wassertropfen ausgesetzt sind.
◆ Verwenden oder lagern Sie es nicht an Orten mit hohen
Temperaturen, wie z. B. in der Nähe von Öfen, in direktem
Sonnenlicht oder auf Heizgeräten, wie z. B. elektrischen
Heizteppichen.
- Andernfalls kann es zu einem Brand kommen.
Sicherheitstipps
1. Sicherheitsvorkehrungen und Warnungen
Hinweis: Bitte lesen Sie die Anweisungen vor Gebrauch
sorgfältig durch und beachten Sie die folgenden
Sicherheitsvorkehrungen:
◆ Konsultieren Sie unbedingt einen Spezialisten, bevor Sie
es verwenden, wenn Sie in ärztlicher Behandlung oder bei
den folgenden Patienten sind.
(1) Personen, die derzeit unter Rückenschmerzen leiden oder
Personen, die in der Vergangenheit an Beinen, Taille und
Nacken verletzt wurden, und Personen mit Taubheitsgefühl in
Beinen, Taille, Nacken und Händen (Personen mit
chronischen Erkrankungen wie z Bandscheibenvorfall,
Spondylolisthese, zervikale Spondylose usw.).
(2) Diejenigen, die deformierte Arthritis, Rheuma und Gicht
haben.
(3) Personen mit Anomalien wie Osteoporose.
(4) Personen mit Erkrankungen des Kreislaufsystems
(Herzerkrankungen, Gefäßerkrankungen, Bluthochdruck
usw.).
(5) Personen mit Atemwegserkrankungen.
(6) Diejenigen, die künstliche Herzrhythmusregler verwenden,
die interne medizinische elektronische Geräte implantiert
haben.
(7) Personen mit bösartigem Tumor.
(8) Personen mit Thrombose, schwerem Lipom, akutem
Steatolipom und anderen Durchblutungsstörungen oder
verschiedenen Hautinfektionen.
(9) Personen mit Wahrnehmungsbeeinträchtigung, verursacht
durch hohe periphere Durchblutungsstörung, verursacht
durch Diabetes etc.
(10) Diejenigen mit einem Trauma der Haut.
(11) Diejenigen, die aufgrund von Krankheit usw. hohes
Fieber (38°C oder mehr) haben.
DE
14 15

◆ Verwenden Sie es nicht mit 2 oder mehr Personen
gleichzeitig und achten Sie darauf, dass sich Personen in
Ihrer Umgebung während des Gebrauchs nicht nähern.
- Andernfalls kann es durch Stürze zu Unfällen oder
Verletzungen kommen.
◆ Verwenden Sie es nicht, wenn Sie Ihr Bewusstsein nicht
ausdrücken oder es nicht selbst bedienen können.
-Es kann zu Unfällen oder Verletzungen kommen.
Nicht auseinanderbauen!
◆Demontage, Reparatur und Neuauswahl sind strengstens
verboten.
- Verletzungsgefahr durch mechanisches Versagen.
Verbieten!
◆Menschen, die normalerweise keinen Sport treiben, sollten
nicht plötzlich intensiv Sport treiben.
◆ Verwenden Sie es nicht nach dem Essen, wenn Sie müde
sind, gerade trainiert haben oder wenn Ihr körperlicher
Zustand nicht normal ist.
- Kann Gesundheitsschäden verursachen.
◆Dieses Produkt ist für den Heimgebrauch geeignet, nicht
für Schulen, Turnhallen und eine große Anzahl nicht näher
bezeichneter Benutzer.
- Es besteht Verletzungsgefahr.
◆ Verwenden Sie es nicht beim Essen oder bei anderen
Aktivitäten.
◆ Verwenden Sie es nicht nach dem Trinken, bis Sie sich
matt fühlen.
-Es kann zu Unfällen oder Verletzungen kommen.
2. Produktinformation
Produktinformation
Rücken
Sitz
Griff
Hinteres Bein
Befestigungsteil
Fußstütze
Vorderes Bein
16 17

Produktinformation
Spezifikationen:
Paketlisten:
Gewichtskapazität
Größe
Nettogewicht
Bruttogewicht
150 kg
(132,4-149,6) x 52,4 x (52,3-122,2) cm (L x B x H)
12.5 kg
14.5 kg
Nummer
1
2
3
4
5
6
7
8
9
10
11
12
13
14
15
16
17
18
Name
Sitz
Rücken
Vorderes Stützrohr
Fußstütze
Vorderes Bein
Hinteres Bein
Griff
Befestigungsteil
Schaum
Knopf
M8*15 Schraube
M8*55 Schraube
M8*45 Bolzen
M8 Mutter
Φ9 Flache Unterlegscheibe
5 mm Schlüssel
13-15 Schlüssel
Handbuch, Zertifizierung
Menge
1
1
1
1
1
1
2
1
4
1
2
2
4
4
4
1
1
2
Anmerkung
1 Handbuch &
1 Zertifizierung
1. Nehmen Sie das Hauptgerät aus dem Karton und legen
Sie es auf einen Teppich oder ein weiches Kissen. Wie in
Schritt oben gezeigt, schrauben Sie das "Befestigungsteil"
in die entsprechende Position des Hauptrahmens in der in
der Abbildung gezeigten Richtung. Greifen Sie nun mit einer
Hand das "hintere Bein" und heben Sie mit der anderen Hand
den "Rücken" nach oben, bis Sie ein "Klicken" hören. Dies
bedeutet, dass das "Befestigungsteil" in das entsprechende
Loch der Haupteinheit eingeführt wurde. Danach können Sie
das "Befestigungsteil" direkt nach außen ziehen und dann die
"Rückseite" in die gewünschte Richtung bewegen, das
"Befestigungsteil" loslassen und dann den Winkel der
Rückseite entsprechend ändern, bis Sie ein "Klicken" hören;
2. Wie in Schritt oben gezeigt, verwenden Sie 2 M8X55
Schrauben, um das hintere Bein an der entsprechenden
Position des Hauptrahmens zu befestigen. Beachten Sie,
dass die Richtung des Etiketts auf dem hinteren Bein zur
Oberseite und zur Vorderseite des Hauptgeräts zeigt und
dass die beiden runden Fußpads nach unten zeigen, da die
Schrauben sonst nicht eingedreht werden können;
Montageanleitungen
3. Montageschritte
2
1
18 19
1
2
3
4
5
6
6
7
7
8

4
3
5
6
7
8
3. Wie in Schritt oben gezeigt, setzen Sie das "vordere Bein"
in das vordere Ende des "Sitzes" ein, setzen Sie 2
"M8X45-Schrauben" von oben ein, setzen Sie dann 2 "Ф
9-Unterlegscheiben" am unteren Ende ein und schrauben Sie
die "M8-Sechskantmutter" ein;
4. Wie in Schritt oben gezeigt, befestigen Sie das "vordere
Bein" an der entsprechenden Position des "vorderen Stützrohrs"
mit 2 "M8X15 Schrauben";
5. Wie in Schritt oben gezeigt, entfernen Sie den
"M10-Knopf", der zuvor in die "Fußstütze" geschraubt wurde,
setzen Sie die Baugruppe in das entsprechende quadratische
Loch des "vorderen Stützrohrs" in der in der Abbildung
gezeigten Richtung ein und verwenden Sie " Schrauben Sie den
"M10-Knopf" in die freiliegende Schraubenstange der
"Fußstütze" und ziehen Sie dann den "M10-Knopf" fest;
6. Wie in Schritt oben gezeigt, setzen Sie die 4 Schaumstoffe
in die "Fußstütze" bzw. das "vordere Stützrohr" ein.
7. Wie in Schritt oben gezeigt, setzen Sie den "Griff" in den
entsprechenden Teil des "vorderen Beins" ein, entsprechend der
in der Abbildung gezeigten Richtung. Setzen Sie zunächst die
freiliegende Erhebung des "Karabinerhakens" im "Griff"-Rohr
gegen das "vordere Bein" und drücken Sie dann mit Daumen
und Zeigefinger die freiliegende Erhebung des
"Karabinerhakens" in das Rohr, bis er reibungslos eingesetzt ist,
bis die freiliegende, hervorstehende Spitze des
"Karabinerhakens" in die Fassung des "vorderen Beins"
eingesetzt ist, da dies sonst ein Sicherheitsrisiko darstellt;
8. Wie in Schritt Abbildung gezeigt, müssen zum Einsetzen
des "Sitzes" in den "Rücken" 2 "M8X45-Schrauben" von oben
eingesetzt werden, das untere Ende jeder Schraube in 2 "Ф 9
Unterlegscheiben" und dann in die "M8-Mutter" geschraubt
werden;
Hinweis: Wenn die Hantelbank vor dem Gebrauch instabil
ist, passen Sie bitte die Fußpolster an, um die Stabilität zu
gewährleisten.
Nach der Montage überprüfen Sie bitte, ob alle Schrauben
fest angezogen sind.
1. Richten Sie die Schraube
am Schraubenloch aus und
beginnen Sie, die Schraube
im Uhrzeigersinn
hineinzudrehen
2. Verwenden Sie einen
geeigneten
Schraubendreher
1. Drehen Sie die
Schraube in die
falsche Richtung
2. Es wird kein
Schraubendreher
verwendet
3. Die Schrauben
sind nicht mit den
Löchern ausgerichtet
Die
Schrauben
sind nicht
angezogen
Überprüfen Sie die Teile
vor dem Auspacken und
werfen Sie die
Verpackung nicht weg,
bis das Produkt
vollständig
zusammengebaut ist
Vielleicht im Paket
oder hinter einem
Paket
Keine
Hardware
gefunden
1. Bitte beachten Sie die
Bedienungsanleitung, um
eine vollständige und
korrekte Montage
sicherzustellen
2. Ziehen Sie die
Schrauben wieder fest
3. Bitten Sie einen
qualifizierten Techniker um
Hilfe.
Es gibt ein
seltsames
Geräusch.
Instabil.
Bitten Sie einen
qualifizierten Techniker
um Hilfe.
1. Möglicherweise
während des
Transports
verloren. 2.
Möglicherweise
während der
Montage
versehentlich
weggeworfen
Hardware
fehlt
Common faults and solutions
1. Montagefehler
durch falsche
Montagereihenfolg
e 2.
Möglicherweise ist
die Schraube nicht
angezogen
LösungUrsacheFehler
20 21

Produktpflege
Nur eine regelmäßige Inspektion und Wartung kann die
Sicherheit und Unversehrtheit des Produkts gewährleisten.
Es liegt in der Verantwortung des Benutzers oder
Eigentümers sicherzustellen, dass das Gerät regelmäßig
gewartet wird. Abgenutzte oder defekte Teile sollten sofort
ersetzt werden, bevor Sie das Produkt weiter verwenden.
1. Um Staubansammlungen zu vermeiden, wischen Sie die
Hantelbank bitte regelmäßig ab.
2. Verwenden Sie für Kunststoffteile nur einen feuchten
Lappen; Stahlteile dürfen nur mit trockenen Lappen
abgewischt werden.
3. Reinigen Sie bei Bedarf die Teile des Produkts.
4. Vermeiden Sie die Verwendung von Reinigungsmitteln,
die saures Chlor oder scheuernde Partikel enthalten, die
das Gerät zerkratzen und beschädigen können.
5. Überprüfen Sie regelmäßig, ob alle Teile sicher und
funktionsfähig sind. Wenn ein Teil beschädigt ist,
verwenden Sie es nicht, bis es repariert ist.
Conseils de Sécurité
1. Précautions de sécurité et avertissements
Remarque : Veuillez lire attentivement les instructions
avant utilisation et prêter attention aux précautions de
sécurité suivantes :
◆ Assurez-vous de consulter un spécialiste avant de l'utiliser
lorsque vous recevez un traitement médical ou les patients
suivants.
(1) Ceux qui souffrent actuellement de maux de dos ou ceux
qui ont été blessés aux jambes, à la taille et au cou dans le
passé, et ceux qui ont des engourdissements dans les
jambes, la taille, le cou et les mains (ceux qui ont des
maladies chroniques telles que les hernie discale,
spondylolisthésis, spondylose cervicale, etc.).
(2) Ceux qui ont déformé l'arthrite, les rhumatismes et la
goutte.
(3) Ceux qui ont des anomalies telles que l'ostéoporose.
(4) Ceux qui ont des troubles du système circulatoire
(maladies cardiaques, troubles vasculaires, hypertension,
etc.).
(5) Ceux qui ont des troubles respiratoires.
(6) Ceux qui utilisent des régulateurs de rythme cardiaque
artificiels qui ont implanté des appareils électroniques
médicaux internes.
(7) Ceux qui ont une tumeur maligne.
(8) Ceux qui ont une thrombose, un lipome sévère, un
stéatolipome aigu et d'autres troubles de la circulation
sanguine ou diverses infections cutanées.
(9) Personnes ayant une déficience perceptuelle causée par
un trouble circulatoire périphérique élevé causé par le
diabète, etc.
(10) Ceux qui ont un traumatisme cutané.
FR
22 23

(11) Ceux qui ont une forte fièvre (38°C ou plus) due à une
maladie, etc.
(12) Ceux dont la colonne vertébrale est anormale ou la
colonne vertébrale incurvée.
(13) Celles qui sont enceintes ou susceptibles de l'être ou qui
ont leurs règles.
(14) Ceux qui se sentent anormaux dans leur corps et ont
besoin de repos.
(15) Ceux qui sont manifestement en mauvaise condition
physique.
(16) Utilisateurs à des fins de réadaptation.
(17) En plus des situations mentionnées ci-dessus, ceux qui
sentent qu'il y a une anomalie dans leur corps.
◆ Si vous ressentez des douleurs dans le bas du dos, des
engourdissements dans les jambes et les pieds, des
étourdissements, des battements de cœur, etc. différents de
la douleur habituelle ou de la sensation de coordination ou de
l'anomalie pendant l'exercice, arrêtez immédiatement de
l'utiliser et consultez un médecin.
◆ Ne laissez pas les enfants utiliser ce produit et ne laissez
pas les enfants jouer autour de ce produit.
- Risque de blessure en cas de non-respect.
◆ Le tuteur des enfants doit veiller à ne pas laisser les
enfants jouer avec ce produit.
- Risque de blessure en cas de non-respect.
◆ Assurez-vous de confirmer qu'il n'y a pas de personnes ou
d'animaux domestiques autour (à l'arrière, au bas et à l'avant
du produit) pendant l'utilisation, lors du chargement et du
déchargement du produit ou lors de son glissement.
Interdire!
◆ Ne pas utiliser ou stocker dans des endroits humides tels
qu'à l'extérieur ou à proximité de salles de bain ou d'endroits
exposés à des gouttelettes d'eau.
◆ Ne pas utiliser ou stocker dans des endroits à haute
température comme autour des poêles, à la lumière directe
du soleil ou sur des appareils chauffants tels que des tapis
chauffants électriques.
- Sinon, cela pourrait provoquer un incendie.
◆ Ne l'utilisez pas avec 2 personnes ou plus en même temps
et veillez à ne pas laisser les personnes autour de vous s'en
approcher pendant l'utilisation.
- Sinon, un accident ou une blessure peut survenir en raison
d'une chute.
◆ Ne l'utilisez pas si vous ne pouvez pas exprimer votre
conscience ou si vous ne pouvez pas l'utiliser vous-même.
- Un accident ou une blessure peut survenir.
Ne pas désassembler!
◆ Il est absolument interdit de démonter, réparer et
resélectionner.
- Risque de blessure dû à une défaillance mécanique.
Interdire!
◆ Les personnes qui ne font habituellement pas d'exercice
ne devraient pas soudainement faire de l'exercice intense.
◆ Ne l'utilisez pas après avoir mangé, lorsque vous êtes
fatigué, lorsque vous venez de faire de l'exercice ou lorsque
votre état physique est anormal.
- Peut nuire à la santé.
◆ Ce produit convient à un usage domestique, pas aux
écoles, aux gymnases et à un grand nombre d'utilisateurs
non spécifiés.
- Il y a un risque de blessure.
◆ Ne l'utilisez pas en mangeant ou en faisant d'autres
activités.
◆ Ne pas utiliser après avoir bu jusqu'à ce que vous vous
sentiez terne.
- Un accident ou une blessure peut survenir.
24 25
2. Informations du Produit
Informations du Produit
Dossier
Siège
Poignée
Pied arrière
Pièce de fixation
Support de pied
Pied avant
Informations du Produit
Spécifications:
Liste des Packages :
Capacité de poids
Taille
Poids net
Poids brut
150 kg
(132,4-149,6) x 52,4 x (52,3-122,2) cm (L x l x H)
12,5 kg
14,5 kg
Numéro
1
2
3
4
5
6
7
8
9
10
11
12
13
14
15
16
17
18
Nom
Siège
Dossier
Tuyau de support avant
Support de pied
Pied avant
Pied arrière
Poignée
Pièce de fixation
Mousse
Bouton
Vis M8*15
Vis M8*55
Boulon M8*45
Écrou M8
Rondelle plate Φ9
Clé de 5 mm
Clé 13-15
QTÉ
1
1
1
1
1
1
2
1
4
1
2
2
4
4
4
1
1
2
Remarque
1 Manuel d'instructions
et 1 Certification
26 27
Manuel d'instructions,
Certification
1. Sortez l'unité principale de la boîte et placez-la sur un tapis
ou un coussin moelleux. Comme indiqué à l'étape ci-dessus,
vissez la « pièce de fixation » dans la position correspondante
du cadre principal dans la direction indiquée sur la figure. À ce
moment, saisissez le « pied arrière » d'une main et soulevez le
« dossier » vers le haut avec l'autre main jusqu'à ce que vous
entendiez un « clic ». À ce moment, cela signifie que la « pièce
de fixation » a été insérée dans le trou correspondant de l'unité
principale. Après cela, vous pouvez directement tirer la « pièce
de fixation » vers l'extérieur, puis déplacer le « dossier » dans la
direction souhaitée et relâcher la « pièce de fixation », puis
modifier l'angle du dossier de manière appropriée jusqu'à ce
que vous entendiez un « clic » ;
2. Comme indiqué à l'étape ci-dessus, utilisez 2 « vis
M8X55 » pour fixer le pied arrière à la position correspondante
du cadre principal. Il convient de noter que la direction de
l'étiquette sur le pied arrière doit être vers le haut et l'avant de
l'unité principale, et les 2 coussinets de pied circulaires doivent
être orientés vers le bas, sinon les vis ne peuvent pas être
vissées.
Instructions de Montage
3. Étapes de Montage
2
1
4
3
5
6
7
8
3. Comme indiqué à l'étape ci-dessus, insérez le « pied avant
» dans l'extrémité avant du « siège », insérez 2 « boulons
M8X45 » par le haut, puis insérez 2 « rondelles plates Ф9 » à
l'extrémité inférieure et vissez le « écrou de blocage
hexagonal M8 » ;
4. Comme indiqué à l'étape ci-dessus, fixez le « pied
avant » à la position correspondante du « tuyau de support
avant » avec 2 « vis M8X15 » ;
5. Comme indiqué à l'étape ci-dessus, retirez le « bouton
M10 » qui était précédemment vissé dans le « support de
pied », insérez l'ensemble dans le trou carré correspondant du
« tuyau de support avant » dans la direction indiquée sur la
figure, et vissez le « bouton M10 » dans la tige de vis exposée
du « support de pied », puis serrez le « bouton M10 » ;
6. Comme indiqué à l'étape ci-dessus, insérez les 4
mousses dans le « support de pied » et le « tuyau de support
avant » respectivement.
7. Comme indiqué à l'étape ci-dessus, insérez la « poignée
» dans la partie correspondante du « pied avant » selon la
direction indiquée sur la figure. Placez d'abord la bosse
exposée du « mousqueton » dans le tube de la « poignée »
contre le « pied avant », puis utilisez votre pouce et votre index
pour appuyer sur la bosse exposée du « mousqueton » dans le
tube jusqu'à ce qu'il soit inséré en douceur, jusqu'à ce que le
point saillant exposé du « mousqueton » soit inséré dans la
douille du « pied avant », sinon cela entraînera un risque pour
la sécurité ;
8. Comme indiqué à l'étape ci-dessus, pour insérer le « siège »
dans le « dossier », 2 « boulons M8X45 » doivent être insérés
par le haut, l'extrémité inférieure de chacun dans 2 « rondelle
plate Ф9 » puis visser le « écrou M8 » ;
Remarque : Si le banc de musculation est instable avant
utilisation, veuillez ajuster les coussinets de pied pour
assurer la stabilité.
Après le montage, veuillez vérifier que tous les boulons
sont bien serrés.
28 29
1
2
3
4
5
6
6
7
7
8

Entretien du Produit
Seules une inspection et un entretien réguliers peuvent
garantir la sécurité et l'intégrité du produit. Il est de la
responsabilité de l'utilisateur ou du propriétaire de
s'assurer que l'équipement est régulièrement entretenu.
Les pièces usées ou cassées doivent être remplacées
immédiatement avant de continuer à utiliser le produit.
1. Pour éviter l'accumulation de poussière, veuillez
essuyer régulièrement le banc de musculation.
2. Utilisez uniquement un chiffon humide sur les pièces en
plastique ; les pièces en acier ne peuvent être essuyées
qu'avec des chiffons secs.
3. Si nécessaire, nettoyez les pièces du produit.
4. Évitez d'utiliser des nettoyants contenant du chlore
acide ou des particules abrasives, qui pourraient rayer et
endommager l'équipement.
5. Vérifiez périodiquement pour vous assurer que toutes
les pièces sont sécurisées et en bon état de
fonctionnement. Si une pièce est endommagée, ne l'utilisez
pas tant qu'elle n'est pas réparée.
1. Alignez la vis avec le
trou de vis et commencez
à tourner la vis dans le
sens des aiguilles d'une
montre.
2. Utilisez un tournevis
approprié.
1. Tournez la vis
dans le mauvais
sens.
2. Un tournevis
n'est pas utilisé.
3. Les vis ne sont
pas alignées avec
les trous.
Les vis ne
sont pas
serrées.
Vérifiez les pièces avant
de déballer et ne jetez
pas l'emballage tant que
le produit n'est pas
entièrement assemblé.
Peut-être à
l'intérieur du colis
ou derrière un
colis.
Aucun
accessoire
trouvé
1. Veuillez vous référer
au manuel d'instructions
pour assurer un
assemblage complet et
correct.
2. Resserrez les vis.
3. Demandez de l'aide à
un technicien qualifié.
Il y a un
son
étrange.
Instable.
Demandez de l'aide à un
technicien qualifié.
1. Peut-être perdu
lors de l'expédition.
2. Peut-être
accidentellement
jeté lors du
montage.
Accessoire
manquant.
Défauts Courants et Solutions
1. Échec de
l'assemblage causé
par une séquence
d'assemblage
incorrecte.
2. Peut-être que la
vis n'est pas serrée.
SolutionsCausesDéfauts
30 31

(10) Aquellos con traumatismos en la piel.
(11) Los que tienen fiebre alta (38°C o más) debido a una
enfermedad, etc.
(12) Los que tienen huesos de espalda anormales o
curvados.
(13) Las que estén embarazadas o puedan estarlo o estén
menstruando.
(14) Aquellos que sientan algo anormal en su cuerpo y
necesiten descansar.
(15) Los que evidentemente están en malas condiciones
físicas.
(16) Los usuarios con fines de rehabilitación.
(17) Además de las situaciones mencionadas, los que sienten
que hay una anormalidad en su cuerpo.
◆ Si durante el ejercicio siente dolor lumbar, entumecimiento
de piernas y pies, mareos, latidos del corazón, etc. diferentes
a los habituales o sensación de coordinación o anormalidad,
deje de usarlo inmediatamente y consulte a un médico.
◆ No deje que los niños usen este producto, y no deje que
los niños jueguen alrededor de este producto.
- Riesgo de lesiones si no se respeta.
◆ El tutor de los niños debe tener cuidado de no dejar que
los niños jueguen con este producto.
- Riesgo de lesiones si no se respeta.
◆ Asegúrese de confirmar que no hay personas o mascotas
alrededor (la parte trasera, inferior y frontal del producto)
durante el uso, al cargar y descargar el producto, o al
deslizarlo.
¡Prohibido!
◆ No utilice ni almacene el producto en lugares húmedos
como el exterior o cerca de baños o lugares expuestos a
gotas de agua.
Consejos de Seguridad
1. Precauciones y Advertencias de Seguridad
Nota: Por favor, lea atentamente las instrucciones antes
de usar el producto y preste atención a las siguientes
precauciones de seguridad:
◆ Asegúrese de consultar con un especialista antes de
utilizar el producto cuando esté recibiendo un tratamiento
médico o sean los siguientes pacientes.
(1) Los que actualmente sufren de dolor de espalda o los que
se han lesionado en las piernas, la cintura y el cuello en el
pasado, y los que tienen entumecimiento en las piernas, la
cintura, el cuello y las manos (los que tienen enfermedades
crónicas como hernia de disco intervertebral,
espondilolistesis, espondilosis cervical, etc.).
(2) Los que tienen artritis deformante, reumatismo y gota.
(3) Los que tienen anomalías como la osteoporosis.
(4) Los que tienen trastornos del sistema circulatorio
(enfermedades cardíacas, trastornos vasculares,
hipertensión, etc.).
(5) Las personas con trastornos respiratorios.
(6) Los que utilizan reguladores artificiales del ritmo cardíaco
y tienen dispositivos electrónicos médicos internos
implantados.
(7) Los que tienen un tumor maligno.
(8) Los que padecen trombosis, lipoma grave, esteatolipoma
agudo y otros trastornos de la circulación sanguínea o
diversas infecciones cutáneas.
(9) Las personas con alteraciones perceptivas causadas por
un trastorno circulatorio periférico elevado provocado por la
diabetes, etc.
ES
32 33

◆ No utilice ni almacene el producto en lugares con altas
temperaturas, como alrededor de estufas, a la luz directa del
sol o sobre aparatos de calefacción, como alfombras
eléctricas.
- De lo contrario, podría provocar un incendio.
◆ No lo utilice con 2 o más personas al mismo tiempo, y
tenga cuidado de que no se acerquen personas a su
alrededor durante el uso.
- De lo contrario, puede producirse un accidente o una lesión
debido a una caída.
◆ No lo utilice si no puede expresar su conciencia o no
puede manejarlo usted mismo.
- Puede producirse un accidente o una lesión.
¡No lo desmonte!
◆ Está absolutamente prohibido desmontar, reparar y volver
a seleccionar.
- Riesgo de lesiones debido a un fallo mecánico.
¡Prohibido!
◆ Las personas que no suelen hacer ejercicio no deben
realizarlo repentinamente de forma intensa.
◆ No lo utilice después de comer, cuando esté cansado,
cuando acabe de hacer ejercicio o cuando su estado físico
sea anormal.
- Puede causar daños a la salud.
◆ Este producto es adecuado para uso doméstico, no para
escuelas, gimnasios y un gran número de usuarios no
especificados.
- Existe riesgo de lesiones.
◆ No lo utilice mientras come o realiza otras actividades.
◆ No lo use después de beber hasta que se sienta
embotado.
- Puede producirse un accidente o una lesión.
2. Información del Producto
Información del Producto
Respaldo
Asiento
Mango
Pata trasera
Pieza de fijación
Soporte de pie
Pata delantera
34 35
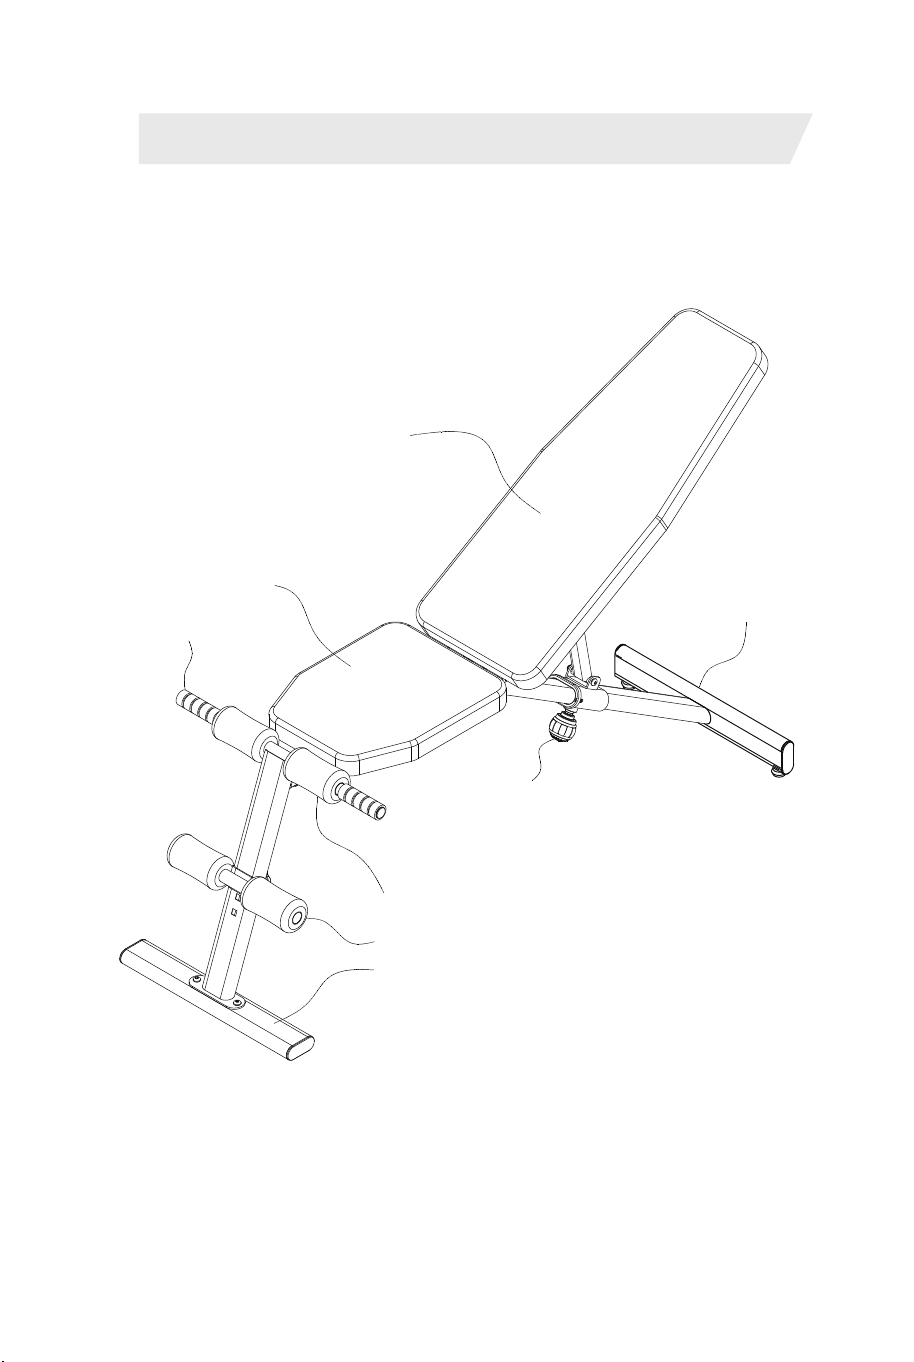

Información del Producto
Especificaciones:
Lista de Paquete:
Capacidad de carga
Tamaño
Peso neto
Peso bruto
150 kg
(132,4-149,6) x 52,4 x (52,3-122,2) cm (L x AN x AL)
12,5 kg
14,5 kg
Número
1
2
3
4
5
6
7
8
9
10
11
12
13
14
15
16
17
18
Nombre
Asiento
Respaldo
Tubo de soporte delantero
Soporte para pies
Pata delantera
Pata trasera
Mango
Pieza de fijación
Espuma
Perilla
Tornillo M8*15
Tornillo M8*55
Perno M8*45
Tuerca M8
Arandela plana Φ9
Llave 5 mm
Llave 13-15
Cantidad
1
1
1
1
1
1
2
1
4
1
2
2
4
4
4
1
1
2
Nota
1 Manual de instrucciones
y 1 Certificación
Manual de instrucciones,
Certificación
1. Saque la unidad principal de la caja y colóquela sobre una
alfombra o un cojín suave. Como se muestra en el paso
anterior, atornille la "pieza de fijación" en la posición
correspondiente del marco principal en la dirección indicada
en la figura. En este momento, agarre la "pata trasera" con
una mano y levante el "respaldo" hacia arriba con la otra
mano hasta oír un "clic". En este momento, significa que la
"pieza de fijación" se ha introducido en el agujero
correspondiente de la unidad principal. Después, puede tirar
directamente de la "pieza de fijación" hacia fuera, y luego
despliegue el "respaldo" a la dirección deseada, y suelte la
"pieza de fijación", y luego cambie el ángulo del respaldo
adecuadamente hasta que oiga un "clic".
2. Como se muestra en el paso anterior, utilice 2 tornillos
M8x55 para fijar la pata trasera a la posición correspondiente
del marco principal. Hay que tener en cuenta que la dirección
de la etiqueta de la pata trasera debe ser hacia la parte
superior y frontal de la unidad principal, y las 2 almohadillas
circulares de pies deben estar orientadas hacia abajo, de lo
contrario los tornillos no podrán atornillarse.
Instrucciones de Montaje
3. Pasos de Montaje
2
1
36 37
1
2
3
4
5
6
6
7
7
8
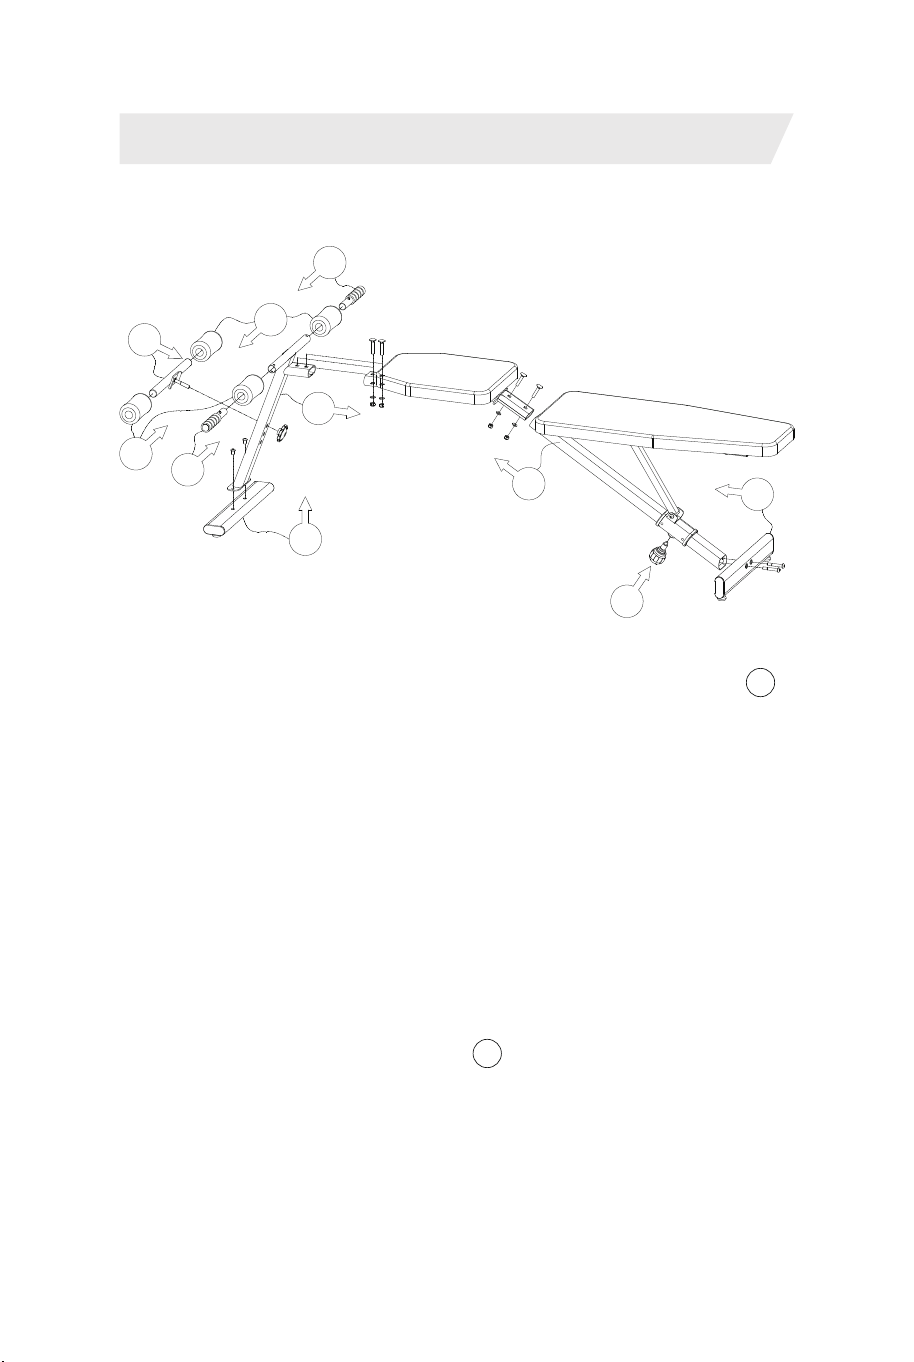

4
3
5
6
7
8
3. Como se muestra en el paso anterior, inserte la "pata
delantera" en el extremo frontal del "asiento", inserte 2
pernos M8x45" desde la parte superior, luego inserte 2
arandelas planas Ф9 en el extremo inferior, y atornille la
tuerca de seguridad hexagonal M8.
4. Como se muestra en el paso anterior, fije la "pata
delantera" a la posición correspondiente del "tubo de soporte
delantero" con 2 tornillos M8x15.
5. Como se muestra en el paso anterior, retire la "perilla M10"
que se atornilló previamente en el "soporte para pies", inserte el
conjunto en el agujero cuadrado correspondiente del "tubo de
soporte delantero" en la dirección mostrada en la figura, y atornille
la "perilla M10" en la varilla de tornillo expuesta del "soporte para
pies", y luego apriete la "perilla M10".
6. Como se muestra en el paso anterior, inserte las 4
espumas en el "soporte para pies" y en el "tubo de soporte
delantero" respectivamente.
7. Como se muestra en el paso anterior, inserte el
"mango" en la parte correspondiente de la "pata delantera"
según la dirección mostrada en la figura. Primero ajuste la
protuberancia expuesta del "gancho de presión" en el tubo
del "mango" contra la "pata delantera", y luego use el pulgar
y el dedo índice para presionar la protuberancia expuesta del
"gancho de presión" en el tubo hasta que se inserte
suavemente, hasta que la punta sobresaliente expuesta del
"gancho de presión" se inserte en la toma de la "pata
delantera", de lo contrario causará un peligro de seguridad.
8. Como se muestra en el paso anterior, para insertar el
"asiento" en el "respaldo", es necesario insertar 2 pernos
M8x45 desde la parte superior, el extremo inferior de cada uno
en 2 arandelas planas Ф9 y luego atornille en la tuerca M8.
Nota: Si el banco de pesas es inestable antes de su uso,
por favor, ajuste las almohadillas de los pies para
asegurar la estabilidad.
Después del montaje, por favor, vuelva a comprobar que
todos los tornillos están apretados bien.
1. Alinee el tornillo con el
agujero del tornillo y
comience a girar el tornillo
en el sentido de las agujas
del reloj.
2. Utilice un destornillador
adecuado.
1. El tornillo se ha
girado en la
dirección incorrecta.
2. No se utiliza un
destornillador.
3. Los tornillos no
están alineados con
los agujeros.
Los
tornillos no
están
apretados.
Compruebe las piezas
antes de desembalar y no
deseche el embalaje
hasta que el producto
esté completamente
montado.
Tal vez dentro del
paquete o detrás
de un paquete.
No se
encuentran
los
accesorios.
1. Consulte el manual de
instrucciones para
garantizar un montaje
completo y correcto.
2. Vuelva a apretar los
tornillos.
3. Pida ayuda a un
técnico cualificado.
Hay un
sonido
extraño y
es
inestable.
Pida ayuda a un técnico
cualificado.
1. Tal vez se haya
perdido durante el
envío.
2. Tal vez se haya
tirado
accidentalmente
durante el montaje.
Falta el
accesorio.
Problemas Comunes y Soluciones
1. Fallo de montaje
causado por una
secuencia de
montaje incorrecta.
2. Tal vez el tornillo
no está apretado.
SoluciónCausaProblema
38 39

Mantenimiento del Producto
Solo la inspección y el mantenimiento regulares pueden
garantizar la seguridad y la integridad del producto. Es
responsabilidad del usuario o del propietario asegurarse
de que el equipo reciba un mantenimiento regular. Las
piezas desgastadas o rotas deben ser sustituidas
inmediatamente antes de seguir utilizando el producto.
1. Para evitar la acumulación de polvo, limpie el banco de
pesas regularmente.
2. Utilice solo un trapo húmedo en las piezas de plástico;
las piezas de acero solo pueden limpiarse con trapos
secos.
3. Si es necesario, limpie las piezas del producto.
4. Evite utilizar limpiadores que contengan cloro ácido o
partículas abrasivas, que pueden rayar y dañar el equipo.
5. Compruebe periódicamente para asegurarse de que
todas las piezas son seguras y están en funcionamiento. Si
una pieza está dañada, no utilice el equipo hasta que sea
reparada.
Consigli di Sicurezza
1.Precauzioni di sicurezza e avvertenze
Nota: Leggere attentamente le istruzioni prima dell'uso e
prestare attenzione alle seguenti precauzioni di
sicurezza:
◆Assicurarsi di consultare uno specialista prima dell'uso,
quando si è in trattamento o i seguenti pazienti,
(1) Coloro che attualmente soffrono di mal di schiena o coloro
che sono stati feriti alle gambe, alla vita e al collo in passato,
e coloro che hanno intorpidimento alle gambe, alla vita, al
collo e alle mani (quelli con malattie croniche come l'ernia del
disco intervertebrale, la spondilolistesi, la spondilosi
cervicale, ecc.).
(2) Coloro che hanno artrite deformata, reumatismi e gotta.
(3) Quelli con anomalie come l'osteoporosi.
(4) Quelli con disturbi del sistema circolatorio (malattie
cardiache, disturbi vascolari, ipertensione, ecc.).
(5) Quelli con disturbi respiratori.
(6) Coloro che utilizzano regolatori del ritmo cardiaco
artificiali che hanno impiantato dispositivi medici elettronici
interni.
(7) Quelli con tumore maligno.
(8) Quelli con trombosi, lipoma grave, steatolipoma acuto e
altri disturbi della circolazione sanguigna o varie infezioni
della pelle.
(9) Persone con compromissione percettiva causata da disturbo
circolatorio periferico elevato causato da diabete, ecc.
(10) Quelli con traumi alla pelle.
(11) Coloro che hanno la febbre alta (38 ° C o più) a causa di
malattia, ecc.
(12) Quelli con ossa posteriori anormali o ossa posteriori
curve.
IT
40 41

(13) Coloro che sono in gravidanza o possono essere incinta
o hanno le mestruazioni.
(14) Coloro che si sentono anormali nel loro corpo e hanno
bisogno di riposare.
(15) Coloro che sono evidentemente in cattive condizioni
fisiche.
(16) Utilizzatori a fini riabilitativi.
(17) Oltre alle situazioni sopra menzionate, coloro che
ritengono che vi sia un'anomalia nel loro corpo.
◆Se senti dolore lombare, intorpidimento alle gambe e ai
piedi, vertigini, battito cardiaco, ecc. Diverso dal solito dolore
o sensazione di coordinazione o anomalia durante l'esercizio,
smetti di usarlo immediatamente e consulta un medico.
◆Non lasciare che i bambini usino questo prodotto e non
lasciare che i bambini giochino intorno a questo prodotto.
- Rischio di lesioni se non seguito.
◆Il tutore dei bambini dovrebbe fare attenzione a non
lasciare che i bambini giochino con questo prodotto.
- Rischio di lesioni se non seguito.
◆Assicurarsi di confermare che non ci sono persone o
animali domestici in giro (la parte posteriore, inferiore e
anteriore del prodotto) durante l'uso, durante il carico e lo
scarico del prodotto o quando lo si fa scorrere.
Vietato!
◆Non utilizzare o conservare in luoghi umidi come all'aperto
o vicino a bagni o luoghi esposti a goccioline d'acqua.
◆Non utilizzare o conservare in luoghi ad alta temperatura
come intorno alle stufe, alla luce diretta del sole o su
apparecchi di riscaldamento come i tappeti elettrici di
riscaldamento.
- Altrimenti potrebbe causare incendi.
◆Non usarlo con 2 o più persone contemporaneamente e fai
attenzione a non lasciare che le persone intorno a te si
avvicinino durante l'uso.
- In caso contrario, potrebbero verificarsi incidenti o lesioni a
causa di cadute.
◆Non usarlo se non puoi esprimere la tua coscienza o non
puoi gestirla da solo.
-Possono verificarsi incidenti o lesioni.
Non smontare!
◆È assolutamente vietato smontare, riparare e riselezionare.
- Rischio di lesioni dovute a guasti meccanici.
Vietato!
◆Le persone che di solito non si esercitano non dovrebbero
improvvisamente fare esercizi intensi.
◆Non usarlo dopo aver mangiato, quando sei stanco,
quando ti sei appena esercitato o quando il tuo stato fisico è
anormale.
- Può causare danni alla salute.
◆Questo prodotto è adatto per l'uso domestico, non per
scuole, palestre e un gran numero di utenti non specificati.
- C'è il rischio di lesioni.
◆Non usarlo mentre mangi o fai altre attività.
◆Non usare dopo aver bevuto fino a quando non ti senti
noioso.
-Possono verificarsi incidenti o lesioni.
42 43

2. Informazioni sul Prodotto
Informazioni sul Prodotto
Schienale
Sedile
Manubrio
Gamba Posteriore
Parte di Fissaggio
Supporto di Piede
Gamba Anteriore
Informazioni sul Prodotto
Specificazioni:
Liste dei Pacchetti:
Capacità di Carico
Dimensione
Peso Netto
Peso Lordo
150 kg
(132.4-149.6) x 52.4 x (52.3-122.2) cm (L x P x A)
12.5 kg
14.5 kg
Numero
1
2
3
4
5
6
7
8
9
10
11
12
13
14
15
16
17
18
Nome
Sedile
Schienale
Tubo di Supporto Antoriore
Supporto di Piede
Gamba Anteriore
Gamba Posteriore
Manubrio
Parte di Fissaggio
Schiuma
Manopola
Vite M8*15
Vite M8*55
Perno M8*15
Bullone M8
Rondella Piatta M8
Chiave 5 mm
Chiave 13-15
Instruzioni,Certificazione
Quantità
1
1
1
1
1
1
2
1
4
1
2
2
4
4
4
1
1
2
Nota
1 Instruzioni &
1 Certificazione
44 45

1.Estrarre l'unità principale dalla scatola e posizionarla su un
tappeto o un cuscino morbido. Come mostrato al punto (1)
precedente, avvitare la "parte di fissaggio" nella posizione
corrispondente del telaio principale nella direzione mostrata
nella figura. In questo momento, afferra la "gamba posteriore"
con una mano e solleva la "schiena" verso l'alto con l'altra
mano fino a sentire un "clic". In questo momento, significa
che la "parte di fissaggio" è stata inserita nel foro
corrispondente dell'unità principale. Successivamente, è
possibile tirare direttamente la "parte di fissaggio" verso
l'esterno, quindi spostare la "parte posteriore" nella direzione
desiderata e rilasciare la "parte di fissaggio", quindi
modificare l'angolo della parte posteriore in modo appropriato
fino a quando non si sente un "clic";
2. Come mostrato nel passaggio (2) sopra, utilizzare 2 viti
M8X55 per fissare la gamba posteriore alla posizione
corrispondente del telaio principale. Va notato che la
direzione dell'etichetta sulla gamba posteriore dovrebbe
essere verso la parte superiore e anteriore dell'unità
principale, e i 2 cuscinetti circolari del piede dovrebbero
essere rivolti verso il basso, altrimenti le viti non possono
essere avvitate.
Istruzioni di Montaggio
3. Passi di Assemblaggio
3. Come mostrato nel passaggio (3) sopra, inserire la "gamba
anteriore" nell'estremità anteriore del "sedile", inserire 2
bulloni "M8X45" dall'alto, quindi inserire 2 rondelle piatte "Ф
9" all'estremità inferiore e avvitare il "dado di blocco
esagonale M8";
4. Come mostrato nel passaggio (4) sopra, fissare la "gamba
anteriore" alla posizione corrispondente del "tubo di supporto
anteriore" con 2 "viti M8X15" ;
5.Come mostrato nel passaggio (5) sopra, rimuovere la
"manopola M10" che è stata precedentemente avvitata nel
"Supporto del piede", inserire l'assieme nel foro quadrato
corrispondente del "Tubo di supporto anteriore" nella
direzione mostrata nella figura e utilizzare "Avvitare la
"manopola M10" nell'asta della vite esposta del "Supporto di
Piede", quindi stringere la "Manopola M10";
6. Come mostrato nel passaggio (6) sopra, inserire le 4
schiume rispettivamente nel "Supporto di Piede" e nel "Tubo
di Supporto Antoriore".
7. Come mostrato nel passaggio (7) sopra, inserire la
"maniglia" nella parte corrispondente della "gamba anteriore"
secondo la direzione mostrata nella figura. Per prima cosa
impostare la protuberanza esposta del "moschettone" nel
tubo "maniglia" contro la "gamba anteriore", quindi utilizzare
il pollice e l'indice per premere la protuberanza esposta del
"moschettone" nel tubo fino a quando non viene inserito
senza intoppi, fino a quando il punto sporgente esposto del
"moschettone" viene inserito nella presa della "gamba
anteriore", altrimenti causerà un pericolo per la sicurezza;
8. Come mostrato nella figura del passo (8), per inserire il
"sedile" nella "parte posteriore", è necessario inserire 2
bulloni M8X45 dall'alto, l'estremità inferiore di ciascuno in 2
"Ф 9 rondella piatta" e quindi avvitare il "dado M8";
Nota: Se la panca con pesi è instabile prima dell'uso, si
prega di regolare i cuscinetti per garantire la stabilità.
Dopo il montaggio, ricontrollare che tutti i bulloni siano
serrati.
46 47
1
2
3
4
5
6
6
7
7
8

Manutenzione del prodotto
Solo ispezioni e manutenzioni regolari possono garantire la
sicurezza e l'integrità del prodotto. È responsabilità
dell'utente o del proprietario assicurarsi che
l'apparecchiatura sia regolarmente sottoposta a
manutenzione. Le parti usurate o rotte devono essere
sostituite immediatamente prima di continuare a utilizzare
il prodotto.
1. Per evitare l'accumulo di polvere, pulire regolarmente il
banco pesi
2. Utilizzare solo uno straccio bagnato su parti in plastica;
Le parti in acciaio possono essere pulite solo con stracci
asciutti.
3. Se necessario, pulire le parti del prodotto
4. Evitare l'uso di detergenti che contengono cloro acido o
particelle abrasive, che potrebbero graffiare e danneggiare
l'apparecchiatura.
5. Controllare periodicamente per garantire che tutte le
parti siano sicure e funzionanti. Se una parte è
danneggiata, non utilizzarla fino a quando non viene
riparata
1. Allineare la vite con il
foro della vite e iniziare a
ruotare la vite in senso
orario
2. Utilizzare un cacciavite
adeguato
1. Ruotare la vite
nella direzione
sbagliata
2. Non viene
utilizzato un
cacciavite
3. Le viti non sono
allineate con i fori
Le viti non
sono
serrate
Controllare le parti prima
di disimballare e non
scartare l'imballaggio fino
a quando il prodotto non
è completamente
assemblato
Magari all'interno
del pacco o dietro
un pacco
Nessun
accessorio
trovato
1. Si prega di fare
riferimento al manuale di
istruzioni per garantire un
montaggio completo e
corretto
2. Stringere nuovamente
le viti
3. Chiedi aiuto a un
tecnico qualificato.
C'è un
suono
strano.
Instabile.
Chiedere aiuto a un
tecnico qualificato.
1. Forse perso
durante la
spedizione
2. Magari gettato
via accidentalmente
durante il
montaggio
Accessorio
mancanto
Errori e soluzioni comuni
1. Errore di
assemblaggio
causato da una
sequenza di
assieme errata 2.
Forse la vite non è
serrata
Soluzioni CauseErrori
48 49

(11) Jeśli masz wysoką gorączkę (powyżej 38° C) na skutek
choroby.
(12) Jeśli stwierdzono u ciebie jakąkolwiek wadę postawy lub
skrzywienie kręgosłupa.
(13) Jeśli jesteś w ciąży lub w trakcie menstruacji.
(14) Jeśli jesteś w złym stanie zdrowotnym i potrzebujesz
odpoczynku.
(15) Jeśli jesteś w złym stanie fizycznym.
(16) Jeśli produkt będzie użytkowany w celach
rehabilitacyjnych.
(17) Jeśli stwierdzisz jakiekolwiek nieprawidłowości związane
ze swoim stanem zdrowia.
◆ Jeśli odczuwasz ból w plecach, drętwienie kończyn,
zawroty głowy, przyspieszone bicie serca lub zauważysz u
siebie inne nieprawidłowości podczas ćwiczeń, natychmiast
zakończ trening i skonsultuj się z lekarzem.
◆Nie pozwalaj dzieciom na użytkowanie produktu ani
zabawę w jego pobliżu.
- Nieprzestrzeganie powyższego ostrzeżenia może
doprowadzić do powstania obrażeń.
◆Obowiązkiem osoby dorosłej jest upewnienie się, że dzieci
nie bawią się produktem.
- Nieprzestrzeganie poniższych ostrzeżeń może doprowadzić
do powstania obrażeń.
◆Upewnij się, że żadne osoby trzecie ani zwierzęta nie
znajdują się w pobliżu produktu podczas jego użytkowania,
montażu, podnoszenia lub przesuwania.
Czynności zabronione!
◆Nie używaj ani nie przechowuj produktu na zewnątrz ani w
innych miejscach o dużej wilgotności powietrza, np. w pobliżu
łazienki.
Ostrzeżenia
1. Środki ostrożności i ostrzeżenia
Uwaga: Przed użyciem zapoznaj się z instrukcją, a w
szczególności z poniższymi ostrzeżeniami:
◆ Przed rozpoczęciem programu treningowego skonsultuj się
z lekarzem, jeśli jesteś w trakcie leczenia lub wystąpiły u
ciebie jakiekolwiek z niżej opisanych objawów.
(1)Jeśli występują u ciebie bóle kręgosłupa, drętwienie
kończyn, migreny; kiedykolwiek doświadczyłeś urazu
kończyn, kręgosłupa lub głowy; jesteś w trakcie leczenia
przewlekłych urazów (np. przepuklina krążka
międzykręgowego, kręgozmyk, dyskopatia).
(2)Jeśli stwierdzono u ciebie reumatoidalne zapalenie
stawów, reumatyzm lub dnę moczanową.
(3) Jeśli stwierdzono u ciebie jakiekolwiek choroby kości, np.
osteoporozę.
(4) Jeśli stwierdzono u ciebie jakiekolwiek zaburzenia pracy
układu krążenia (choroby sercowo-naczyniowe).
(5) Jeśli stwierdzono u ciebie jakiekolwiek zaburzenia pracy
układu oddechowego.
(6) Jeśli masz wszczepiony rozrusznik serca lub inne
elektroniczne stymulatory.
(7) Jeśli w twoim organizmie stwierdzono obecność guzów
złośliwych.
(8) Jeśli stwierdzono u ciebie zakrzepicę, miażdżycę,
tętniaka, inne choroby żył lub różnego rodzaju infekcje skóry.
(9) Jeśli stwierdzono u ciebie cukrzycę i odczuwasz
jakiekolwiek związane z nią dolegliwości dotyczące krążenia
obwodowego.
(10) Jeśli w ostatnim czasie doświadczyłeś jakichkolwiek
urazów skóry.
PL
50 51

◆Nie wystawiaj produktu na bezpośrednie działanie światła
słonecznego ani nie przechowuj go w miejscach o wysokiej
temperaturze powietrza, np.w pobliżu pieców, grzejników.
- Nieprzestrzeganie powyższego ostrzeżenia może prowadzić
do pożaru.
◆Nie używaj produktu jednocześnie z innymi osobami.
Uważaj, aby inne osoby nie zbliżały się do produktu w czasie
twojego treningu.
- Nieprzestrzeganie powyższego ostrzeżenia może prowadzić
do wypadku oraz powstania obrażeń.
◆Nie używaj produktu, jeśli nie jesteś w stanie prawidłowo
ocenić sytuacji lub nie możesz obsługiwać produktu
samodzielnie.
- Nieprzestrzeganie powyższego ostrzeżenia może prowadzić
do wypadku lub powstania obrażeń.
Nie demontuj produktu samodzielnie!
◆ Demontaż, samodzielna naprawa oraz wymiana części są
zabronione!
- Nieprzestrzeganie powyższego ostrzeżenia może prowadzić
do powstania obrażeń.
Czynności zabronione!
◆Nie przystępuj do obciążającego, długotrwałego treningu,
jeśli nie ćwiczysz regularnie.
◆Nie używaj produktu po posiłku, jeśli jesteś zmęczony lub
jeśli źle się czujesz.
- Nieprzestrzeganie powyższego ostrzeżenia może mieć
negatywny wpływ na twoje zdrowie.
◆ Produkt jest przeznaczony wyłącznie do użytku w domu.
Zabrania się użytkowania w miejscach publicznych, takich jak
siłownie lub kluby fitness.
- Nieprzestrzeganie powyższego ostrzeżenia może prowadzić
do powstania obrażeń.
◆Nie używaj produktu podczas jedzenia lub wykonywania
innych czynności.
◆Nie używaj produktu po spożyciu alkoholu.
- Nieprzestrzeganie powyższego ostrzeżenia może prowadzić
do powstania obrażeń.
2. O produkcie
O produkcie
Oparcie
Siedzisko
Uchwyt
Tylna noga
Część mocująca
Poprzeczka
Przednia noga
52 53

O produkcie
Specyfikacja:
Lista części:
Maksymalne obciążenie
Wymiary
Waga netto
Waga brutto
150 kg
132,4-149,6 x 52,4 x 52,3-122,2 cm (dł. x szer. x wys.)
12,5 kg
14,5 kg
Numer
1
2
3
4
5
6
7
8
9
10
11
12
13
14
15
16
17
18
Nazwa
Siedzisko
Oparcie
Przednia rura nośna
Poprzeczka
Przednia noga
Tylna noga
Uchwyt
Część mocująca
Piankowa osłona
Pokrętło
Śruba M8x15
Śruba M8x55
Śruba M8x45
Nakrętka M8
Podkładka Φ9
Klucz 5 mm
Klucz 13-15
Instrukcja, certyfikacja produktu
Ilość
1
1
1
1
1
1
2
1
4
1
2
2
4
4
4
1
1
2
Uwagi
1 Instrukcja i
1 Certyfikacja
1.Wyjmij produkt z opakowania i połóż go na dywanie lub
innym miękkim podłożu. Przymocuj część mocującą do ramy
głównej, tak jak pokazano na rysunku ( ). Przytrzymaj
tylną nogę jedną ręką i unieś oparcie drugą ręką, aż
usłyszysz kliknięcie. Kliknięcie oznacza, że część mocująca
prawidłowo zablokowała się w ramie głównej. Pociągnij część
mocującą do siebie, aby odchylić oparcie w wybranym
kierunku. Po ustawieniu oparcia w wybranej pozycji zwolnij
część mocującą, a następnie wyreguluj kąt nachylenia
oparcia, aż usłyszysz kliknięcie.
2.Przymocuj tylną nogę w odpowiednim miejscu ramy głównej
za pomocą 2 śrub M8x55 ( ). Etykieta na tylnej nodze
powinna być skierowana do wewnątrz, a podstawki powinny
znaleźć się w dolnej części nogi. W przeciwnym razie nie
będzie można wkręcić śrub.
Instrukcja montażu
3. Etapy montażu
2
1
54 55
1
2
3
4
5
6
6
7
7
8

4
3
5
6
7
8
3.Przymocuj przednią rurę nośną do siedziska za pomocą 2
śrub M8x45, 2 podkładek Ф9 i 2 nakrętek M8 ( ).
4.Przymocuj przednią nogę w odpowiednim miejscu przedniej
rury nośnej za pomocą 2 śrub M8x15 ( ).
5.Odkręć pokrętło M10, które jest przymocowane do
poprzeczki, a następnie przymocuj poprzeczkę do przedniej
rury nośnej, dokręcając pokrętło M10, tak jak pokazano na
rysunku ( ).
6. Nałóż 4 piankowe osłony na końce obu poprzeczek, tak jak
pokazano na rysunku ( ).
7. Zamocuj uchwyty na górnej poprzeczce, tak jak pokazano
na rysunku ( ). Wyrównaj zatrzask sprężynowy z otworem
w poprzeczce. Następnie wciśnij zatrzask sprężynowy i wsuń
uchwyt do poprzeczki, tak aby zatrzask sprężynowy
zablokował się w otworze w poprzeczce. Sprawdź, czy
zatrzask sprężynowy prawidłowo zablokował się w otworze (w
przeciwnym razie może dojść do wypadku!). Powtórz ten
krok, aby zamocować drugi uchwyt.
8. Przymocuj siedzisko do oparcia za pomocą 2 śrub M8x45,
2 podkładek Ф 9 i 2 nakrętek M8, tak jak pokazano na
rysunku ( ).
Uwaga: Przed użyciem sprawdź, czy ławka treningowa
stoi stabilnie. W razie potrzeby wyreguluj podstawki pod
nóżki.
Po zakończeniu montażu sprawdź, czy wszystkie śruby są
odpowiednio dokręcone.
1. Wyrównaj śruby z
otworami i dokręć je
zgodnie z ruchem
wskazówek zegara.
2. Dokręć śruby za pomocą
odpowiedniego śrubokrętu.
1.Śruby zostały
dokręcone w złym
kierunku.
2.Śruby nie
zostały dokręcone
za pomocą
odpowiedniego
śrubokrętu.
3. Śruby nie
zostały wyrównane
z otworami.
Śruby nie
są
dokręcone.
Sprawdź, czy w zestawie
znajdują się wszystkie
części. Nie wyrzucaj
materiałów
opakowaniowych, dopóki
produkt nie zostanie
całkowicie zmontowany.
Części montażowe
mogą znajdować
się w opakowaniu z
innymi częściami,
luzem w
kartonowym
opakowaniu lub na
zewnątrz
opakowania.
Trudności ze
znalezieniem
części
montażowych.
1. Zapoznaj się z
instrukcją, aby upewnić
się, że części zostały
zmontowane w
prawidłowej kolejności.
2. Dokręć śruby.
3. Skontaktuj się ze
specjalistą.
Dziwne
odgłosy.
Produkt jest
niestabilny.
Skontaktuj się ze
specjalistą.
1.Części montażowe
zagubiły się podczas
transportu.
2.Części montażowe
zostały wyrzucone
wraz z materiałami
opakowaniowymi.
Brak części
montażowyc
h w
zestawie.
Rozwiązywanie problemów
1. Części zostały
zmontowane w
nieprawidłowej
kolejności.
2. Śruby nie są
prawidłowo
dokręcone.
RozwiązaniePrzyczynaProblem
56 57

In case a return is required, the item must be returned in original box. Without this
your return will not be accepted.
DO NOT discard the box / original packaging.
Take a photo of the box markings.
Take a photo of the damaged part (if applicable).
Send us an email with the images requested.
A photo of the markings (text) on the side of the box is required in case a part is
needed for replacement. This helps our staff identify your product number to
ensure you receive the correct parts.
A photo of the damage is always required to file a claim and get your replacement
or refund processed quickly. Please make sure you have the box even if it is
damaged.
Email us directly from marketplace where your item was purchased with the
attached images and a description of your claim.
Falls eine Rücksendung erforderlich ist, muss der Artikel in der
Originalverpackung zurückgeschickt werden. Andernfalls wird Ihre Rücksendung
nicht angenommen.
Werfen Sie den Karton / die Originalverpackung NICHT weg.
Machen Sie ein Foto von der Beschriftung des Kartons.
Machen Sie ein Foto des beschädigten Teils (falls zutreffend).
Schicken Sie uns eine E-Mail mit dem gewünschten Foto.
Für den Fall, dass ein Ersatzteil benötigt wird, benötigen wir ein Foto der
Beschriftung (Text) auf der Seite des Kartons. So können unsere Mitarbeiter Ihre
Artikelnummer identifizieren und sicherstellen, dass Sie die richtigen Teile
erhalten.
Ein Foto des beschädigten Teils ist immer erforderlich, um eine Reklamation
einzureichen und eine schnelle Bearbeitung Ihres Ersatzteils oder Ihrer
Rückerstattung zu gewährleisten. Bitte stellen Sie sicher, dass Sie den Karton
haben, auch wenn er beschädigt ist.
Schicken Sie uns eine E-Mail direkt vom Marktplatz, auf dem Sie den Artikel
gekauft haben, mit den angehängten Fotos und einer Beschreibung Ihrer
Reklamation.
EN
DE
Return / Damage Claim Instructions
Rücksendung / Beschädigung Anweisungen
Konserwacja produktu
Tylko regularna kontrola i konserwacja części może
zapewnić bezpieczne użytkowanie produktu. Obowiązkiem
użytkownika/właściciela produktu jest jego regularna
konserwacja. Bezzwłocznie wymieniaj wszystkie zużyte lub
uszkodzone części. W przypadku uszkodzenia części nie
używaj produktu do czasu naprawy/wymiany.
1. Aby zapobiec gromadzeniu się kurzu, regularnie
przecieraj ławeczkę treningową za pomocą ściereczki.
2. Do czyszczenia części plastikowych używaj wyłącznie
zwilżonej ściereczki. Do czyszczenia części metalowych
używaj wyłącznie suchej ściereczki.
3. W przypadku zabrudzenia części wytrzyj je za pomocą
ściereczki.
4. Nie używaj ściernych środków czyszczących ani żadnych
środków chemicznych, ponieważ mogą one uszkodzić
powierzchnię produktu.
5. Regularnie sprawdzaj, czy wszystkie części są
prawidłowo zamocowane oraz sprawne. W przypadku
uszkodzenia części nie używaj produktu do czasu
naprawy/wymiany.
58 59
Instructions De Retour / Réclamation De Dommages
Dans le cas où un retour est requis, l'article doit être retourné dans sa boîte
d'origine. Sans cela, votre retour ne sera pas accepté.
NE PAS jeter la boîte/l'emballage d'origine.
Prenez une photo des marquages de la boîte.
Prenez une photo des dommages (le cas échéant).
Envoyez-nous un e-mail avec les images demandées.
Une photo des marquages (texte) sur le côté de la boîte est requise au cas où une
pièce serait nécessaire pour le remplacement. Cela aide notre personnel à
identifier votre numéro de produit pour s'assurer que vous recevez les bonnes
pièces.
Une photo des dommages est toujours requise pour déposer une réclamation et
obtenir rapidement votre remplacement ou votre remboursement. Assurez-vous
d'avoir la boîte même si elle est endommagée.
Envoyez-nous un e-mail directement depuis le marché où votre article a été
acheté avec les images ci-jointes et une description de votre réclamation.
Instrucciones de Devolución / Reclamación de Daños
En caso de que se requiera una devolución, el artículo debe ser devuelto en la
caja original. Sin esto su devolución no será aceptada.
NO deseche la caja/embalaje original.
Tome una foto de las marcas de la caja.
Tome una foto de los daños (si procede).
Envíenos un correo electrónico con las imágenes solicitadas.
Se requiere una foto de las marcas (texto) en el lado de la caja en caso de que se
necesite una pieza para reemplazarla. Esto ayuda a nuestro personal a identificar
su número de producto para asegurarse de que recibe las piezas correctas.
Una foto de los daños es siempre necesaria para presentar una reclamación y
conseguir que su reemplazo o reembolso sea procesado rápidamente. Por favor,
asegúrese de tener la caja aunque esté dañada.
Envíenos un correo electrónico directamente desde el mercado donde se compró
su artículo con las imágenes adjuntas y una descripción de su reclamación.
FR
ES
Nel caso in cui sia richiesto un reso, l'articolo deve essere restituito nella scatola
originale. Senza la scatola originale il tuo reso non sarà accettato.
NON scartare la scatola / confezione originale.
Fare una foto dei contrassegni sulla scatola.
Fare una foto di Danno (se è applicabile).
Inviarci una mail con le immagini richieste.
È necessaria una foto dei contrassegni (testo) sul lato della scatola nel caso in
cui la parte debba essere sostituita. Questo aiuta il nostro staff a identificare il
numero del tuo prodotto per assicurarti di ricevere le parti corrette.
Una foto del danno è sempre necessaria per presentare un reclamo e ottenere
rapidamente la sostituzione o il rimborso. Assicurati di avere la scatola anche se
è danneggiata.
Inviarci un’e-mail direttamente dal mercato in cui è stato acquistato il tuo articolo
con le immagini allegate e una descrizione del tuo reclamo.
Jeśli chcesz zwrócić produkt, musi znajdować się on w oryginalnym opakowaniu.
Towar zwrócony w nieoryginalnym opakowaniu nie zostanie przyjęty.
Nie wyrzucaj oryginalnego opakowania.
Zrób zdjęcie oznaczeń na opakowaniu.
Zrób zdjęcie uszkodzonej części (jeśli dotyczy).
Skontaktuj się z nami.
Jeśli jakakolwiek część wymaga wymiany, zrób zdjęcie oznaczeń kodu produktu,
który znajduje się na opakowaniu. Pozwoli nam to zidentyfikować produkt i
dostarczyć ci właściwą część.
Jeśli chcesz złożyć reklamację, zrób zdjęcie uszkodzonej części. Pozwoli nam to
zatwierdzić reklamację i zlecić zwrot środków na twoje konto. Do złożenia
reklamacji potrzebne będzie oryginalne opakowanie.
Skontaktuj się z nami telefonicznie, mailowo lub poprzez formularz kontaktowy.
Załącz zdjęcia produktu i opis roszczenia.
IT
PL
Istruzioni Per La Restituzione / Reclamo Per Danni
Zwroty i reklamacje
60 61

FH10063
Weight Bench
Hantelbank
Banc de Musculation
Banco de Pesas
Panca con Pesi
Ławka treningowa
DEU office: FDS GmbH, Neuer Höltigbaum 36, 22143 Hamburg, Deutschland
ITA office: Milano
FRA office: Saint Vigor d'Ymonville
POL office: GdańskGBR office: IpswichAUS office: TruganinaUSA office: Fontana
THIS INSTRUCTION BOOKLET CONTAINS IMPORTANT SAFETY INFORMATION. PLEASE READ AND KEEP FOR FUTURE REFERENCE.