
Model: GM3000BE
GRIND & BREW COFFEE
MAKER
*HOME APPLIANCES
USER MANUAL
If you are having problems using this grind & brew coffee maker.
Please email :
service@airmsen.com
or call
1-844-725-2333
for assistance :
www.airmsen.com
To best serve you, our AIRMSEN Representatives are available to answer
your calls from Monday to Friday, 10:30 AM - 6:30 PM EST.
THANK YOU FOR MAKING AIRMSEN APPLIANCES A PART OF YOUR HOME.
* HOME APPLIANCES

THANK YOU FOR MAKING AIRMSEN
APPLIANCES A PART OF YOUR HOME
Take “technology, innovation, health” as its core value, to be the preferred brand
of household products in your healthy and quality life.
AIRMSEN focus on researching, developing and manufacturing various kinds of
household supplies with advanced technologies and the idea of sustainable
development, to promote the evolution and transform of our lifestyle, to make
it more healthy, green, intelligent and with high quality, and to bring a happy,
healthy and eco-friendly home life to around the world.

3
TABLE OF CONTENTS
IMPORTANT SAFEGUARDS 4
THE PARTS OF THE GRIND & BREW COFFEE MACHINE
6
BEFORE THE FIRST USE
6
OPERATING THE COFFEE MAKER
7
Fine Button for Coffee Beans
7
Coarse Button for Coffee Beans
7
Ground Button (Brew with Coffee Grounds)
8
CLEANING AFTER A BREWING
9
Assembly and Disassembly of The Filter Net
9
Assembly and Disassembly of the Coffee Bean Baskett
10
Assembly and Disassembly of the Basket Lid
10
DESCALING 1 1
ENVIRONMENTAL CONSERVATION RECOMMENDATIONS
1 1
CAUTIONS
12
TROUBLESHOOTING
1 3
TWO (2) YEARS LIMITED WARRANTY
14
What Is Covered By This Warranty?
14
What Is Not Covered By This Warranty?
14
How To Get Service?
14

4
IMPORTANT SAFEGUARDS
When operating this electrical appliance, it is essential to adhere to fundamental
safety precautions to reduce the risk of re, electrical shock, and personal injury.
Please carefully review and follow all instructions provided below.
1. Read all instructions before usage.
2.
Do not
touch hot surfaces directly. Please utilize handles or knobs for
handling.
3.
Do not
submerge cords, plugs, or the appliance itself in water or any other
liquid to protect against electric shock.
4. Close supervision is necessary whenever the appliance is operated near or
by children.
5. Before cleaning, or when discontinuing use, please unplug it from the socket.
Allow sufcient time for cooling before installment of parts or cleaning.
6.
Do not
operate the appliance if any malfunctions are detected. Seek
assistance from an authorized service facility for examination, repair, or
adjustment.
7. Use only approved accessories with this appliance to prevent injuries.
8.
Do not
use outdoors.
9.
Do not
let the cord hang over the edge of a table or counter, or touch hot
surfaces.
10. Keep the appliance away from hot gas sources, such as electric burners or
heated ovens.
11.
Do not
use the appliance for anything other than intended use.
12.
WARNING:
To minimize the risk of re or electrical shock, do not remove the
top cover. There are no user-serviceable parts inside. Repairs should be done
by authorized service personnel only.
13. This appliance is not intended for use by individuals (including children) with
reduced physical, sensory, or mental capabilities, or those lacking experience
and knowledge, unless closely supervised and instructed by a responsible
individual regarding safe usage.
14. Unplug the appliance when not in use, before assembling, disassembling, or
cleaning its parts. To unplug, grasp the plug and pull from the outlet. Never
pull on the power cord.
15. Avoid contact with moving parts.
16. The use of attachments, including canning jars, not recommended by the
manufacturer may cause a risk of injury to person(s).
17. During operation, if it becomes necessary to open the top cover, press the
lock located in the middle of the cover. The cover will spring up, and the

5
machine will stop functioning. Proceed to gradually open the top cover to its
maximum angle.
18. If the supply cord is damaged, it is imperative to seek replacement exclusively
from the manufacturer, its authorized service agent, or an equivalently
qualied person(s) to avoid potential hazards.
19. Scalding may occur if the top cover is removed during the brewing cycles.
20.
WARNING:
Do not utilize the appliance if the surface is cracked.
21. This appliance is designed for household and similar applications, including:
• Staff kitchen areas in commercial establishments such as shops, ofces,
and other work environments.
• Farmhouses.
• Use by clients in hotels, motels, and other residential-style
accommodations.
• Bed and breakfast establishments.
SAVE THESE INSTRUCTIONS
6
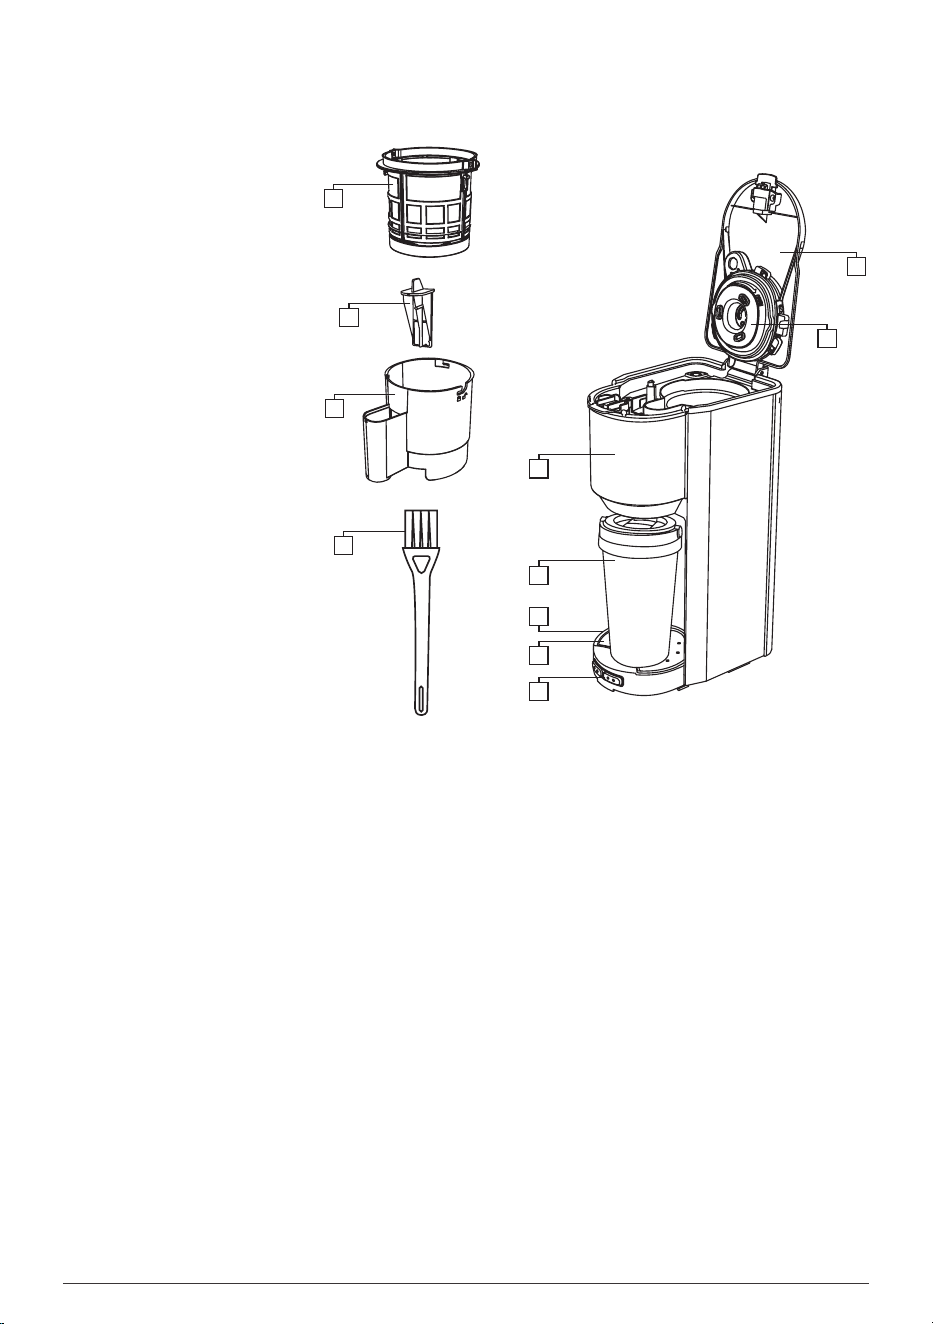
THE PARTS OF THE GRIND & BREW COFFEE MACHINE
1. Top Cover
2. Basket Lid
3. water tank
4. Travel Mug
5. Drip Tray
6. Drip Tray Plate
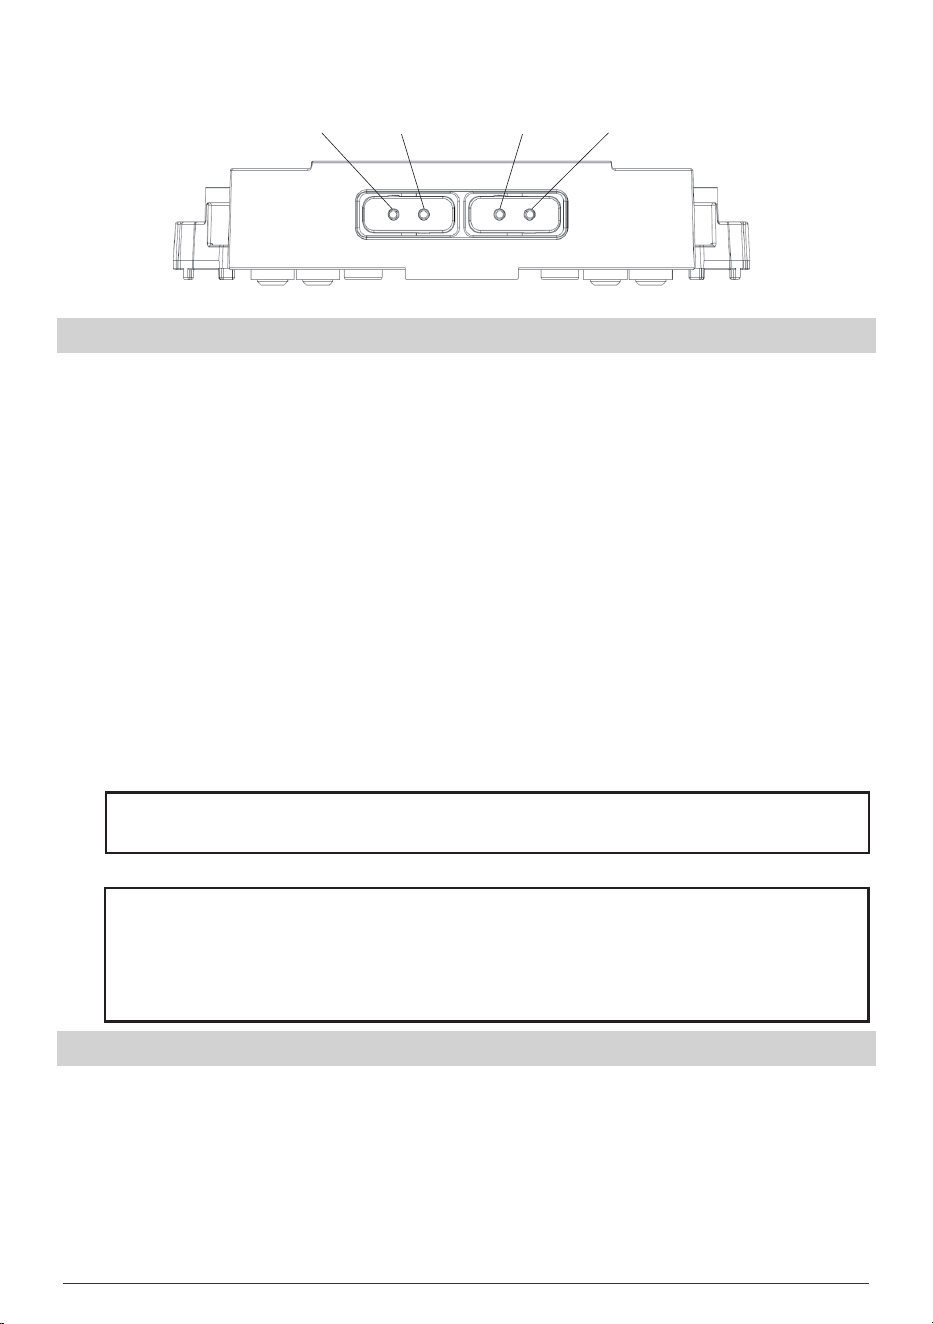
7. Function Button
8. Coffee Bean Basket
9. Filter Net
10. Basket Holder
11. Brush
BEFORE THE FIRST USE
1. Remove all packaging material and stickers from the coffee maker.
2. Wash the water tank, coffee bean basket, basket holder, lter net, and travel
mug in warm, soapy water with a soft cloth. Rinse parts and dry thoroughly.
3. Choose any brewing mode (ne, coarse, or ground) at random and brew
with water only. Once the process is nished, discard the water.
*
Find detailed operation instructions for each button in the
Operating the
Coffee Maker
section.
1
2
3
4
5
6
7
8
9
10
11
*HOUSEHOLD USE ONLY
7
OPERATING THE COFFEE MAKER
Fine Button for Coffee Beans
1. Insert the plug into the socket, all button lights will ash 3 times with 2 beep
sounds, and then the
“ON/OFF”
button light will remain illuminated.
2. Open the top cover and ll the water tank with an appropriate amount of
room-temperature water.
3. Ensure that the amount of water does not exceed the maximum water level
of the tank.
4. Add the coffee beans (up to a maximum of 35g) into the coffee bean basket.
5. Close the top cover and position the travel mug on the drip tray.
6. If the
“ON/OFF”
button lights up, then press the
“FINE”
button, and there
will be an audible beeping sound and the grinding of the coffee beans will
commerce for 25 seconds. The brewing process may vary depending on
the volume of water utilized (at the MAX level, it will take 5 mins and 20 secs).
After the brewing process has concluded, there will be three audible beeping
sounds, and all lights will ash ve times to coincide with the beeping.
7. Remove the travel mug when brewing is nished.
Coarse Button for Coffee Beans
1. Insert the plug into the socket, all button lights will ash 3 times with 2 beep
sounds, and then the
“ON/OFF”
button light will remain illuminated.
2. Open the top cover and ll the water tank with an appropriate amount of
room-temperature water.
3. Ensure that the amount of water does not exceed the maximum water level
of the tank.
Fine(Grind)
Coarsw(Grind)
Ground Coffee ON/OFF
NOTE:
If the machine remains inactive for two hours, an audible buzz will
sound, and the product will go into standby mode, at that time the
“ON/OFF”
button light will turn off. To continue brewing coffee, press the
“ON/OFF”
button with one beep sound. Then, press the desired button to
resume operation.
NOTE:
If the
“ON/OFF”
button does not light up, rst press the
“ON/OFF”
button, then press the
"FINE"
button.

8
4. Add the coffee beans (up to a maximum of 35g) into the lter.
5. Close the top cover and position the travel mug on the drip tray.
6. If the
“ON/OFF”
button lights up, then press the
“COARSE”
button, and there
will be an audible beeping sound and the grinding of the coffee beans will
commerce for 15 seconds. The brewing process may vary depending on the
volume of water utilized (at the MAX level, it will take 5 mins and 20 secs).
After the brewing process has concluded, there will be three audible beeping
sounds, and all lights will ash ve times to coincide with the beeping.
7. Remove the travel mug when brewing is nished.
Ground Button (Brew with Coffee Grounds)
1. Insert the plug into the socket, all button lights will ash 3 times with 2 beep
sounds, and then the
“ON/OFF”
button light will remain illuminated.
2. Open the top cover and ll the water tank with an appropriate amount of
room-temperature water.
3. Ensure that the amount of water does not exceed the maximum water level
of the tank.
4. Add the coffee grounds to the coffee bean basket (up to a maximum of 35g).
5. Close the top cover and position the travel mug on the drip tray.
6. If the
“ON/OFF”
button lights up, then press the
“GROUND”
button, and there
will be an audible beeping sound. The brewing process may vary depending
on the volume of water utilized (at the MAX level, it will take 5 mins and 20
secs). After the brewing process has concluded, there will be three audible
beeping sounds, and all lights will ash ve times to coincide with the
beeping.
7. Remove the travel mug when brewing is nished.
NOTE:
If the
“ON/OFF”
button does not light up, rst press the
“ON/OFF”
button, then press the
"COARSE"
button.
NOTE:
If the
“ON/OFF”
button does not light up, rst press the
“ON/OFF”
button, then press the
"GROUND"
button.
NOTE:
If the machine remains inactive for two hours, an audible buzz will
sound, and the product will go into standby mode, at that time the
“ON/OFF”
button light will turn off. To continue brewing coffee, press the
“ON/OFF”
button with one beep sound. Then, press the desired button to
resume operation.
NOTE:
If the machine remains inactive for two hours, an audible buzz will
sound, and the product will go into standby mode, at that time the
“ON/OFF”
button light will turn off. To continue brewing coffee, press the
“ON/OFF”
button with one beep sound. Then, press the desired button to
resume operation.
9
CLEANING AFTER A BREWING
1. Turn off the power.
2. Don’t pour any further water into the coffee maker.
3. When the coffee bean basket can be disassembled, clean it with water using
the provided brush.
WARNING
• Do not clean the basket vigorously, it may damage the basket.
• Do not place the basket in the dishwasher, which could lead to
deformation of the basket.
4. There are blades within the coffee bean basket, pay attention to them during
cleaning.
5. Wipe the coffee maker with a damp cloth.
6. The travel mug can be washed with a mixture of warm water, detergent, and
the provided brush or it can be washed in the dishwasher.
7. The drip tray can be disassembled and cleaned with water.
8. The lter net can be removed by pulling it upwards from the handle of the
basket holder, or inserted into the handle for reassembly.
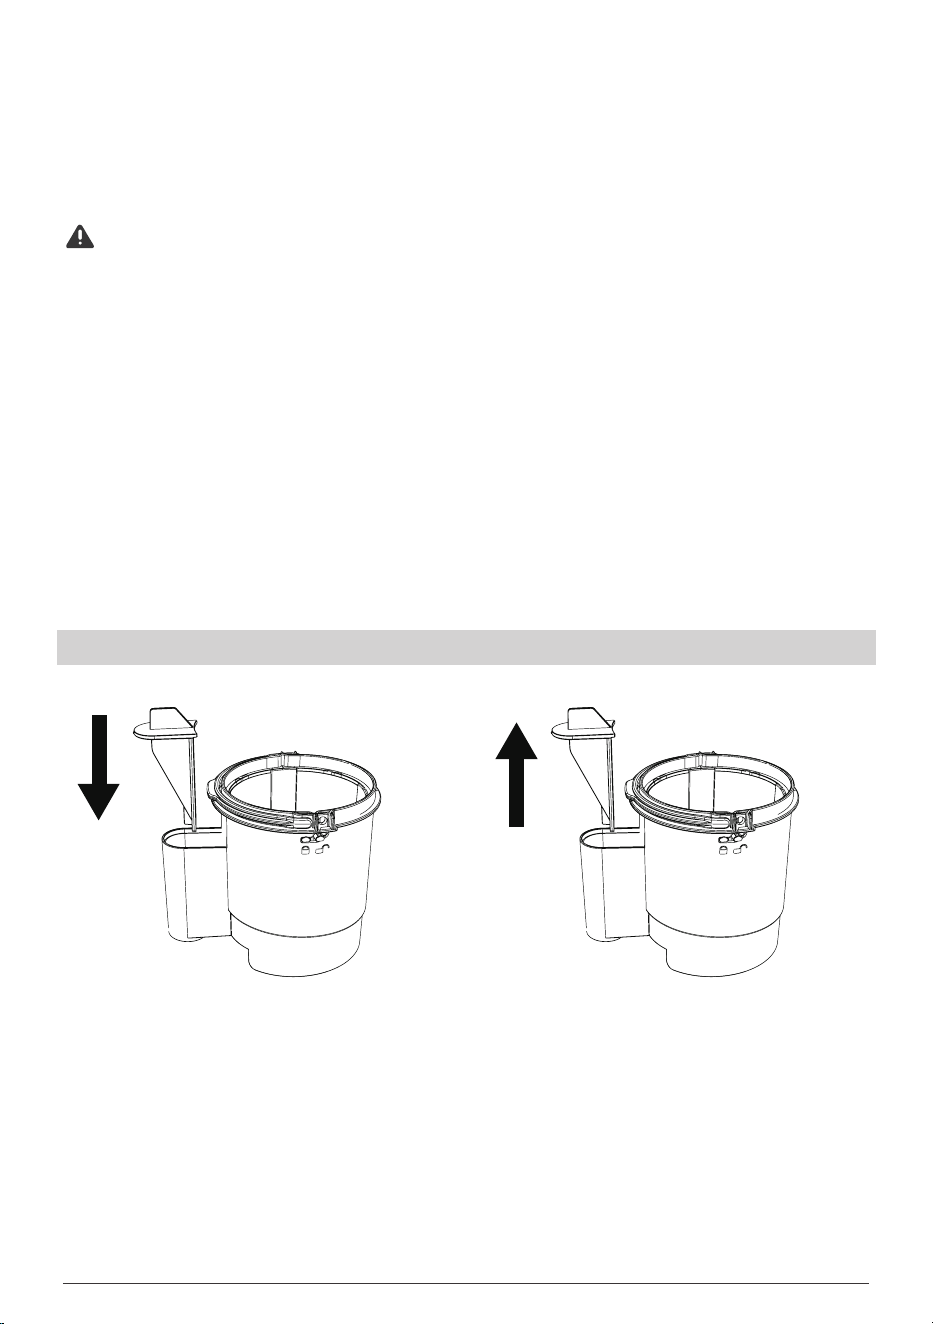
Assembly and Disassembly of The Filter Net
Insert the lter net into the
basket holder.
Gently pull the lter net upward to
detach it from the basket holder.
10
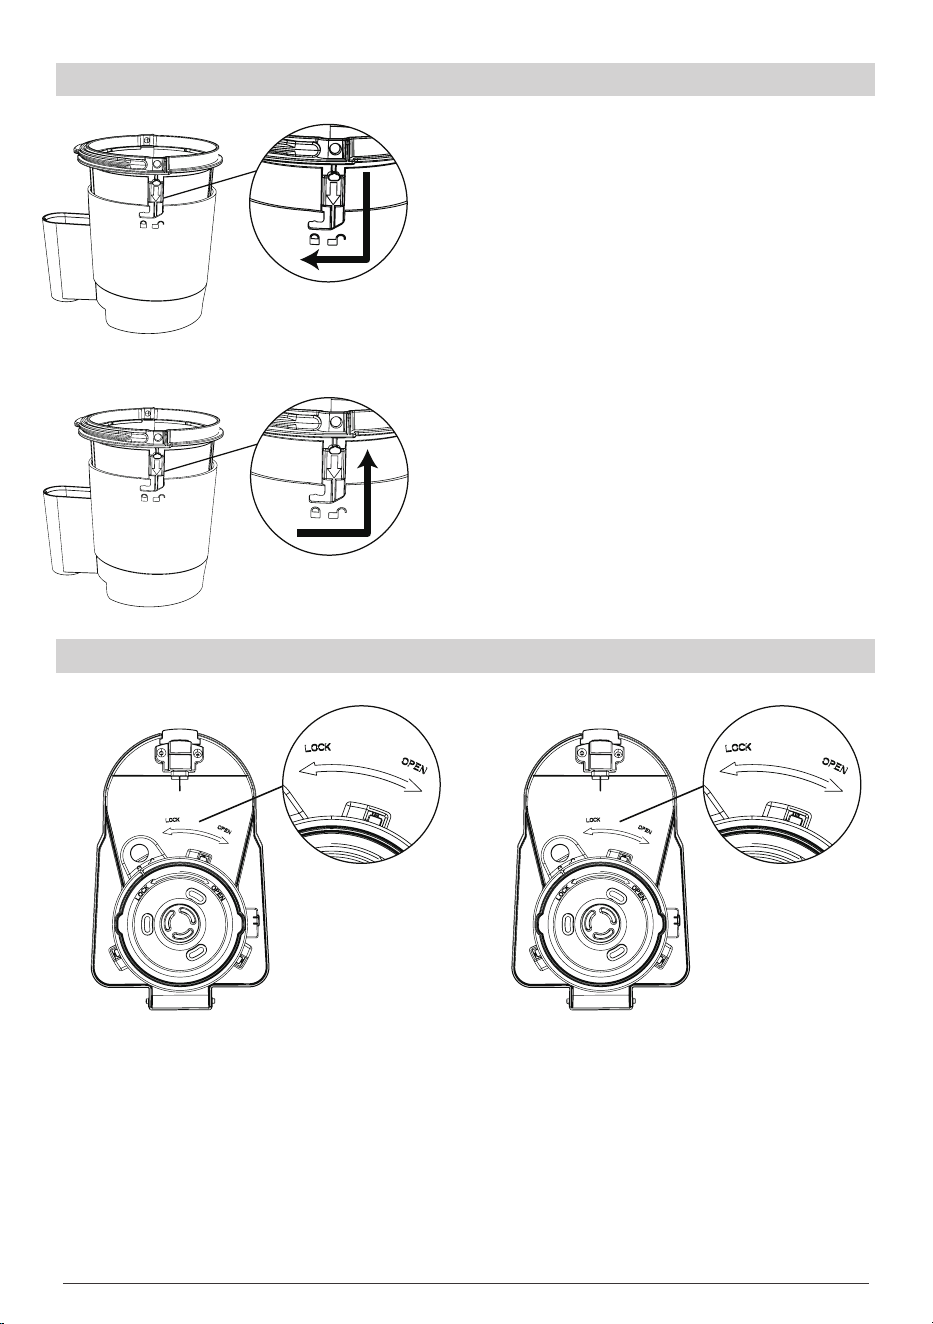
Assembly and Disassembly of the Coffee Bean Basket
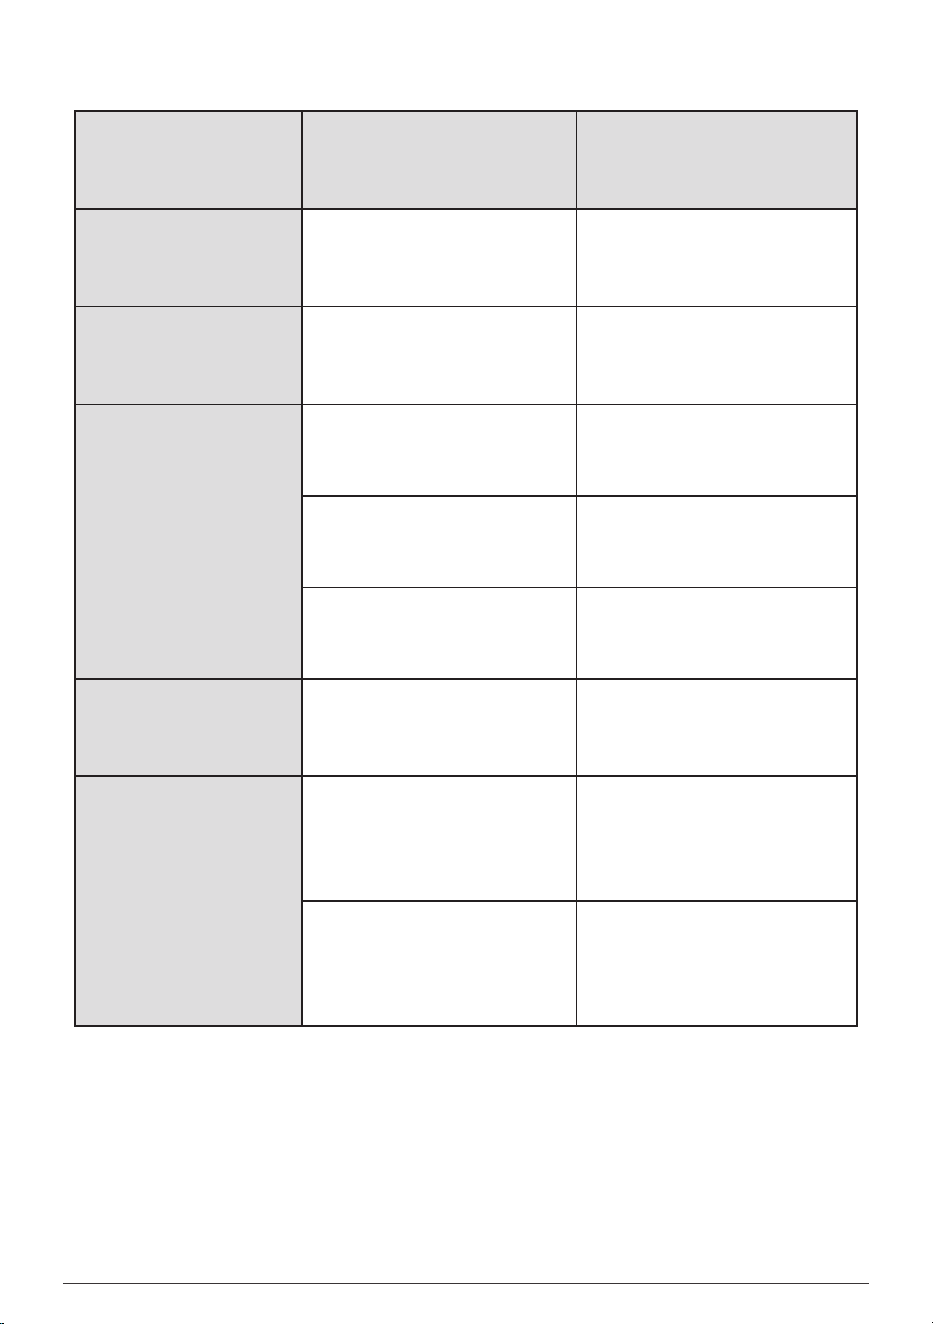
Assembly and Disassembly of the Basket Lid
1. Position the coffee bean basket so that
its protruding alignment tab is aligned
with the corresponding notch on the
basket holder.
2. Rotate the coffee bean basket clockwise
slightly until the alignment tab is
positioned correctly at the marked
locking point.
1. Rotate the coffee bean basket
counterclockwise slightly until the
alignment tab is positioned correctly at
the marked unlocking point.
2. Pull the lter upward to detach it from
the basket holder.
Turn the basket lid
counterclockwise to install it.
Turn the basket lid clockwise
to unlock it.

11
DESCALING
1. Open the top cover and ll it with the appropriate amount of water.
2. Ensure that the amount of water does not exceed the maximum water level
of the tank.
3. Add an appropriate amount of scale remover to the water tank and close the
water tank cover.
4. Make sure the travel mug is in place.
5. Press the
“GROUND”
and
“COARSE”
button simultaneously for 3 seconds;
subsequently, all buttons will illuminate momentarily. (The time duration of
descaling depends on the amount of water) Once the descaling process is
nished, there will be three audible beeping sounds, and all lights will ash
ve times in sync with the beeping. The appliance will then enter standby
mode with the
“ON/OFF”
button staying illuminated.
6. During the descaling mode, other modes cannot be activated. If you need
to stop the descaling process before it’s nished, simply press the
“ON/OFF”
button to exit the descaling mode.
ENVIRONMENTAL CONSERVATION
RECOMMENDATIONS
If your appliance has been damaged and cannot be used, conventional waste
disposal methods may pose risks to the environment. We advise adhering to
local regulations and, if applicable, engaging the services of a certied recycling
company for proper disposal.
NOTE:
Consistently cleaning the coffee maker will allow it to perform optimally.
The frequency of descaling depends on the softness of the water in your area
and how often you use the coffee maker.
1. If you use the coffee maker once or twice a day, you can refer to the
following standards:
• Soft water, descaling every 6 months.
• Medium water, descaling every 2-3 months.
• Hard water, descaling every 6-8 weeks.
2. If you only use the coffee maker occasionally, it is best to be more mindful
of the cleaning process. If the water is hard in your area, you should clean
your coffee maker regularly. If you want to know the quality of water in
your area, please consult the local water company.

12
CAUTIONS
1. The voltage of the appliance is shown on the bottom nameplate of the
appliance.
2. The coffee bean basket contains blades.
3. Only room-temperature water should be used, with a recommendation for
pure water.
4. Place the travel mug on the drip tray before the coffee brewing process.
5. Please close the top cover before running any modes, and do not randomly
open the top cover after starting brewing to avoid burns.
6. When the coffee is almost nished, let the funnel drip for at least 30 seconds
before removing the travel mug to prevent overow from the funnel.
7. After the power is turned off, let the machine cool down for about 5 minutes
before adding water inside.
8. Remember to unplug the machine after the coffee has been prepared.
9. When cleaning the coffee bean basket, pay attention to the blades inside.
10. Disconnect the appliance before cleaning.
11. Keep the travel mug out of the reach of children.
12. Use the four switch buttons to select modes or turn the coffee maker on/off.
13. When all the lights are off, the appliance stops functioning.
14. Keep the appliance and its cord out of the reach of children under 8 years
old.
15. Cleaning and maintenance should not be done by children without
supervision.
16. Children should not play with the appliance.
17. The appliance cannot immersed in any liquids.
18. Do not disassemble the product by yourself. If repairs are needed, please
send the product to a designated repairman for repair.
19. Misuse may cause injury.
20. Parts of this machine that become hot may have some residual heat, please
be mindful of this for your safety.
21. While in use, the coffee maker should not be placed in a cabinet.
22. This appliance has a polarized plug that will t in a polarized outlet in one
way only. If the plug does not t fully in the outlet, please reverse the plug. If it
still does not t, contact a qualied electrician. Do not modify the plug in any
way.
13
TROUBLESHOOTING
Abnormal
phenomenon
Caused by Processing method
The indicator light
doesn't work
Poor contact of power
cord plug
Reattach the plug
The light is on and
the machine is not
responding
No sense of closing the
tank cover
Close the water tank cover
No coffee coming out
The water tank is empty Fill the water tank
The water inlet of the tank
is blocked
Clean the inlet of the water
tank
Scale is not cleaned
regularly
Clean up the scale
The coffee machine
smells bad
Check that the voltage is
used correctly
Use correct voltage to
operate the machine
Coffee spill
Check whether the coffee
bean cup and lter net are
blocked
Clean the coffee bean cup
and lter net
Check the proper use of
coffee beans and grounds
Use the correct coffee
beans and grounds

14
Two (2) YEARS LIMITED WARRANTY
The One-Year Limited Warranty applies to purchases made from the authorized
retailers of AIRMSEN. Warranty coverage applies to the original owner and to the
original product only and is not transferable.
AIRMSEN warrants that the unit shall be free from defects in material and
workmanship for a period of one year from the date of purchase when it is used
under normal household conditions and maintained according to the
requirements outlined in the Owner’s Guide, subject to the following conditions
and exclusions:
What Is Covered By This Warranty?
1. The original unit and/or non-wearable parts deemed defective, in AIRMSEN’s
sole discretion, will be repaired or replaced up to one year from the original
purchase date.
2. In the event a replacement unit is issued, the warranty coverage ends six (6)
months following the receipt date of the replacement unit or the remainder
of the existing warranty, whichever is later. AIRMSEN reserves the right to
replace the unit with one of equal or greater value.
What Is Not Covered By This Warranty?
Normal wear and tear of wearable parts (e.g. coffee bean basket, lter net, and
basket holder), which require regular maintenance and/or replacement to ensure
the proper functioning of your unit, are not covered by this warranty.
You can contact AIRMSEN customer service via
to obtain
replacement parts.
3. Any unit that has been tampered with or used for commercial purposes.
4. Damage caused by misuse, abuse, negligent handling, failure to perform
required maintenance (e.g., failure to keep the well of the motor base clear
of food spills and other debris), or damage due to mishandling in transit
5. Consequential and incidental damage.
6. Defects that are caused by repair persons unauthorized by AlRMSEN.
Specically, these defects include damages caused in the process of
shipping, altering, or repairing the product (or any of its parts) when the
repair is performed by a repair person unauthorized by AIRMSEN.
How To Get Service?
If your appliance fails to operate properly while in use under normal household
conditions within the warranty period, or if you have any questions about coffee
machine, please contact AlRMSEN customer service through

15
For product operation videos,
please subscribe to AIRMSEN’s ofcial Youtube account.
https://www.facebook.com/Airmsen
https://www.youtube.com/@AIRMSEN

CODE NO.: AM-2411US_EN
Printed in China