Loading ...

(2)
Ready H
2
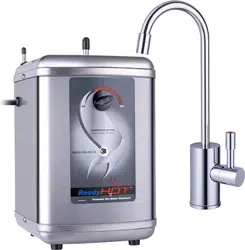
ot® HOT WATER DISPENSER
PRESSURE FREE HOT WATER DISPENSER CONCEPT
Compatible with Reverse Osmosis Systems
Unlike other household water dispensers, this dispenser tank is not pressurized for safety reasons. For a
conventional household water heater, the faucet valve is placed after the heater tank resulting in a pressurized
tank. For a hot water dispenser, the faucet valve is placed before the tank, creating an “open vent” style faucet
and consequently no pressure is built up inside the tank.
COMPONENTS:
When you purchase the Ready Hot Water tank, contents include:
1. Quick-connect fi tting for water inlet tube
2. Tank
3. 1/4” or 3/8” Hose Clamp
4. Connector/Reducer adapter for 1/4” or 3/8” center outlet tubing
TYPE OF FAUCET REQUIRED
Only use an “open vent” faucet with the hot water dispenser. Using a standard or reverse type faucet will
damage the tank and void the warranty.
MATERIAL REQUIRED (NOT PROVIDED)
REVERSE OSMOSIS SYSTEMS
The non-copper waterways of this tank make it ideally suited for reverse osmosis applications. Reverse
osmosis produces the highest quality of water available for residential applications. It produces water that is
very low in total dissolved solids (TDS). In this setting, a tank with copper waterways will leach or dissolve
the copper into the water. As your tank has no copper components, the leaching will not occur, and the RO
water will be safe to drink.
IMPORTANT INFORMATION
This hot water dispenser produces instant hot
water of approximately 200°F (93°C) ±5° as
dispensed from the faucet. This product is
not intended to produce a continuous fl ow of
hot water. This model will produce up to 60
cups of water per hour at approximately 200°F
(93°C) ±5°. Due to high water temperature,
for safety reasons, the tank is not under
pressure. Consequently, there is a slight
delay of water fl ow after the faucet has
been turned on. This is normal and indicates
that the priming chamber is functioning
properly.
1. Shut-off valve and T-union fi tting
2. Two mounting bracket screws and plastic support (if
attaching to dry wall)
3. 1/4” (6.35mm) O.D. inlet tubing (for areas with
freezing climate)
4. Ruler or measuring tape
5. Pliers
6. Hand or electric drill
7. Small drill bit for starter holes
8. 35mm drill bit - if no sink hole exists
9. Gloves
10. Safety glasses
11. Open end wrench
12. Drip pan or bucket
13. Quick Connect fi tting for a cold water supply line
Loading ...
Loading ...
Loading ...
