
SP35202/SP38115
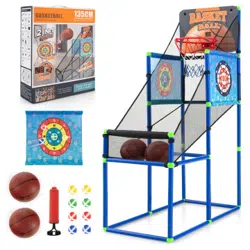
Basketball Arcade Game
Basketball-Arcade-Spiel
Jeu de Basketball Arcade
Máquina de Tiro de Baloncesto
Macchina da Tiro a Canestro
Automat do gry w koszykówkę
Scan QR code for
assembly instructions
THIS INSTRUCTION BOOKLET CONTAINS IMPORTANT SAFETY INFORMATION.
PLEASE READ AND KEEP FOR FUTURE REFERENCE.
DEU office: FDS GmbH, Neuer Höltigbaum 36, 22143 Hamburg, Deutschland
GBR office: FDS Corporation Limited,Unit 4, Blackacre Road, Great Blakenham,Ipswich, Ip6 0FL,United Kingdom
ITA office: Milano
FRA office: Saint Vigor d'Ymonville
POL office: GdańskAUS office: TruganinaUSA office: Fontana
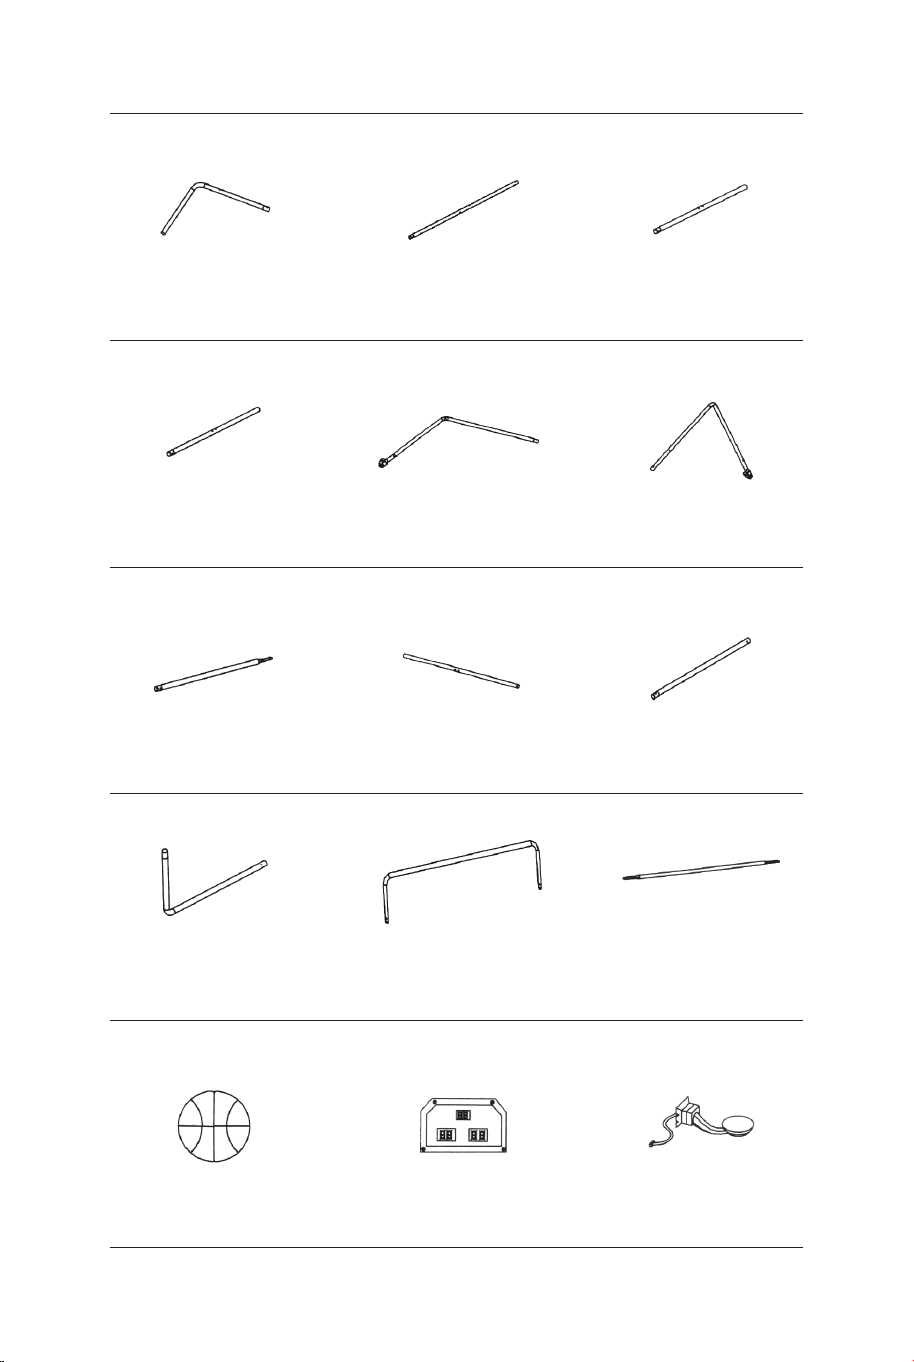
Tube-5
Ø22x755x580mm
Tube-6
Ø22x755x580mmØ22x890mm
Tube-4
Basketball 7" Dia. Electronic Scorer Switch Sensor
Tube-1 Tube-2
Ø22x580x440mm Ø22x685mm Ø22x890mm
Tube-3
1 x2 2 x2 3 x1
4 x1 5 x1 6 x1
13 x4 14 x1 15 x2
Ø22x830mm
Tube-7
Ø22x835mm
Tube-8
Ø22x595mm
Tube-9
7 x2 8 x2 9 x2
Tube-10
Ø22x650x385mm
Tube-11
Ø22x1067x520mm Ø12.7x1090mm
Tube-12
10 x2 11 x1 12 x3
02 03
The product must be installed and used under the supervision of an adult.
Read through each step carefully and follow the proper order.
Remove all packaging, separate and count all parts and hardware.
Please ensure that all parts are correctly installed, incorrect installation can lead to a
danger.
We recommend that, where possible, all items are assembled near the area in which
they will be placed in use, to avoid moving the product unnecessarily once assembled.
Ensure a secure surface during installation, and always place the product on a flat,
steady and stable surface.
Please check and maintain it regularly, and the most important part needs to be
suspended, fixed, or anchored to the ground.
Attention: For home use only.
Attention: Children should use this product under the parental supervision.
Danger: Keep all small parts and packaging materials for this product away from
babies and children, otherwise they may pose a choking hazard.
Danger: Lack of attachment may cause a risk of tipping or falling hazard.
Before You Start
Please read all instructions carefully and keep it for future reference.
EN
General Warnings
Warnings

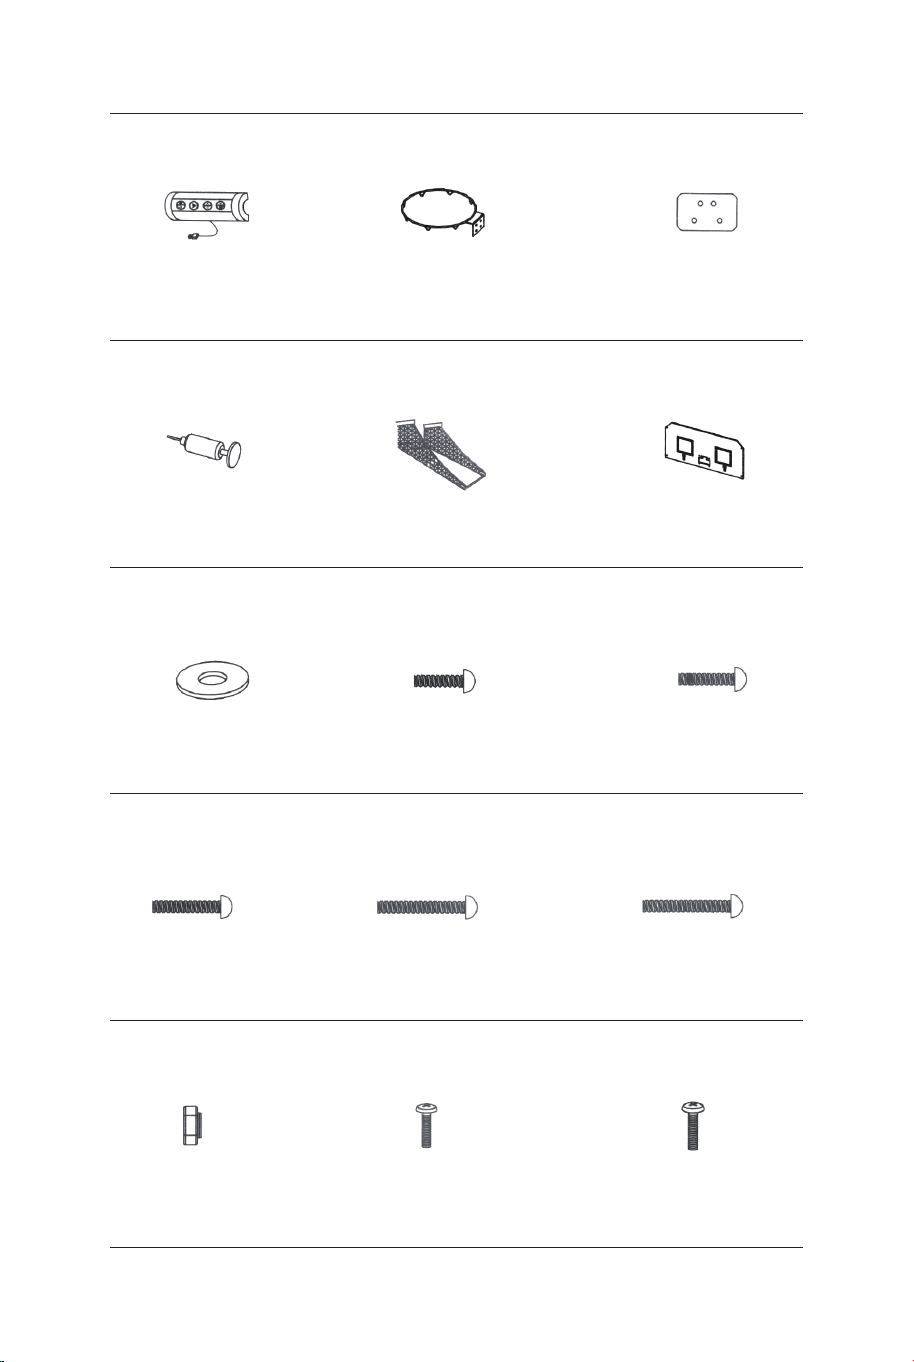
Rim
Rim Support
Plate
Control Box
with Wire
16 x1 17 x2 18 x2
Inflation Pump
with Needle Ball Return Net Backboard
21 x119 x1 20 x1
M6 Washer M6x20mm Bolt M6x29mm Bolt
22 x46 23 x16 24 x6
M6x42mm Bolt M6x50mm Bolt M6x35mm Bolt
25 x4 26 x4 27 x2
4x28mm BoltM6 Nut 3.5x10mm Bolt
28 x32 29 x4 30 x2
Electronic Scorer
Face Plate
31 x1
Wrench
32 x1
Allen Key
33 x1
Self-Stick Strap
34 x2
Net
P1 x2
Spring Lock
P2 x9
Plastic Pole Insert
P3 x2
Lock Pin
P4 x2
PRE-INSTALLED PARTS
1211109876
ASSEMBLY INSTRUCTIONS:
1. Find a clean, level place to begin the assembly of your Basketball
Game. We recommend that two adults work together to assemble this
basketball game.
2. Remove all the parts from the box and verify that you have all of the
listed parts as shown on the Parts list page. Carefully cut or tear the
four corners of the box so that the bottom of the box can be used as
your work surface.
BEFORE ASSEMBLY-Please inspect and layout all
your Poles and parts
54321
04 05

FIG.1 &2
3. Attach the Tubes -2 (#2) to the Tube - 3 and Tube - 4 (#3 & #4)
using spring lock (pre-installed) as shown in FIG.1.
4. Attach the Tubes - 7 (#7) to the Tubes - 8 (#8) using spring lock
(pre-installed) as shown in FIG.2
P2
Spring Lock
P2
Spring Lock
P2
Spring Lock
8
7
8 x2
7 x2
6 x1
5 x1
4
4 x1
3
3 x1
2
2
2 x2
FIG.1
FIG.3
FIG.2
FIG.3
5. Attach the Tube- 5 and Tube - 6 (#5 & #6) together using spring
lock (pre-installed) as shown in FIG.3.
FIG.4
6. Attach the Tube - 5 and Tube - 6 (#5 & #6) to Tube - 3 and Tube
- 4 (#3 & #4) using Bolts (#26), Washers (#22) and Nuts (#28), and
then attach the Tube - 5 and Tube- 6 (#5 & #6) to the Tubes - 8
(#8) using Bolts (#26), Washers (#22) and Nuts (#28) as shown in
FIG.4, 4A and 4B.
7. Attach the Tubes- 7 and Tubes - 8 (#7 & #8) to the Tubes - 2 (#2)
using Bolt (#24), Washers (#22) and Nut (#28) as shown in FIG.4C,
repeat this step for other side. Note: Make sure the spring lock is
facing down.
22 x6
24 x2
26 x4
28 x6
FIG.4A
FIG.4B
FIG.4
FIG.4C
22
22
22
24
26
26
28
28
28
8
8
7
7
6
5
4
3
2
2
06 07

FIG.5
8. Attach the Tube- 12 (#12) to the Tubes - 2 (#2) using Bolts
(#24), Washers (#22) and Nuts (#28) as shown in FIG.5A. And
then insert the Tubes- 1 (#1) to the Tubes - 2 (#2) as shown in
FIG.5.
9. Attach the Tubes - 9 (#9) to Tube- 5 and Tube - 6 (#5 & #6)
using Bolts (#27 ), Washers (#22) and Nuts (#28) as shown in
FIG.5 and 5B.
22 x6
24 x2
27 x2
28 x4
12 x1
9 x2
1 x2
22
22
22
24
27
28
28
12
12
9
9
6
5
2
2
2
1
FIG.5A
FIG.5B
FIG.5
P3
11
11 x1
11
10
10 x2
10
10
9
9
FIG.6
Short
Long
P2
Spring Lock
P2
Spring Lock
FIG.6
10. Attach the Tubes - 10 (#10) to the Tubes - 9 (#9) using
spring lock (pre-installed), and then attach the Tube- 11 (#11) to
the Tubes - 10 (#10) using spring lock (pre-installed) as shown
in FIG 6.
08 09

FIG.5
8. Attach the Tube- 12 (#12) to the Tubes - 2 (#2) using Bolts
(#24), Washers (#22) and Nuts (#28) as shown in FIG.5A. And
then insert the Tubes- 1 (#1) to the Tubes - 2 (#2) as shown in
FIG.5.
9. Attach the Tubes - 9 (#9) to Tube- 5 and Tube - 6 (#5 & #6)
using Bolts (#27 ), Washers (#22) and Nuts (#28) as shown in
FIG.5 and 5B.
22 x6
24 x2
27 x2
28 x4
12 x1
9 x2
1 x2
22
22
22
24
27
28
28
12
12
9
9
6
5
2
2
2
1
FIG.5A
FIG.5B
FIG.5
P3
11
11 x1
11
10
10 x2
10
10
9
9
FIG.6
Short
Long
P2
Spring Lock
P2
Spring Lock
FIG.6
10. Attach the Tubes - 10 (#10) to the Tubes - 9 (#9) using
spring lock (pre-installed), and then attach the Tube- 11 (#11) to
the Tubes - 10 (#10) using spring lock (pre-installed) as shown
in FIG 6.
08 09

FIG.7
21 x1
22 x24
23 x16
28 x16
18 x2
17 x2
15 x2
FIG.7
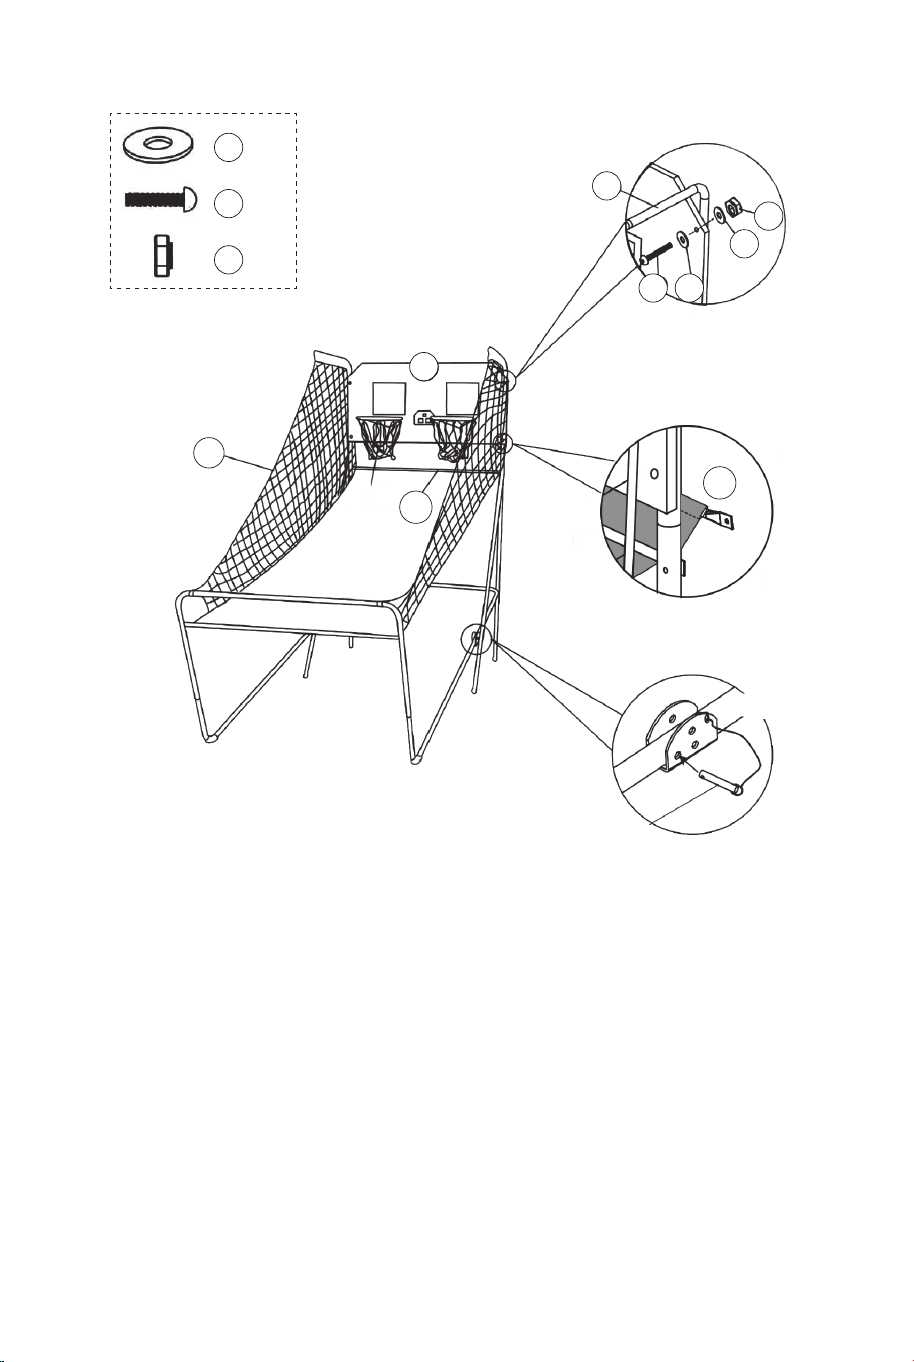
11. Attach the Rim (#17) and Rim Support Plates (#18) to the
Backboard (#21) using the Bolts (#23), washers (#22) and Nuts
(#28). And then attach the Switch Sensors (#15) to the
Backboard (#21) using the Bolts (#23), washers (#22) and Nuts
(#28). Make sure that you use washers on both sides of the
backboard as shown in FIG.7.
28
28
21
22
22
22
23
23
18
18
17
17
15
15
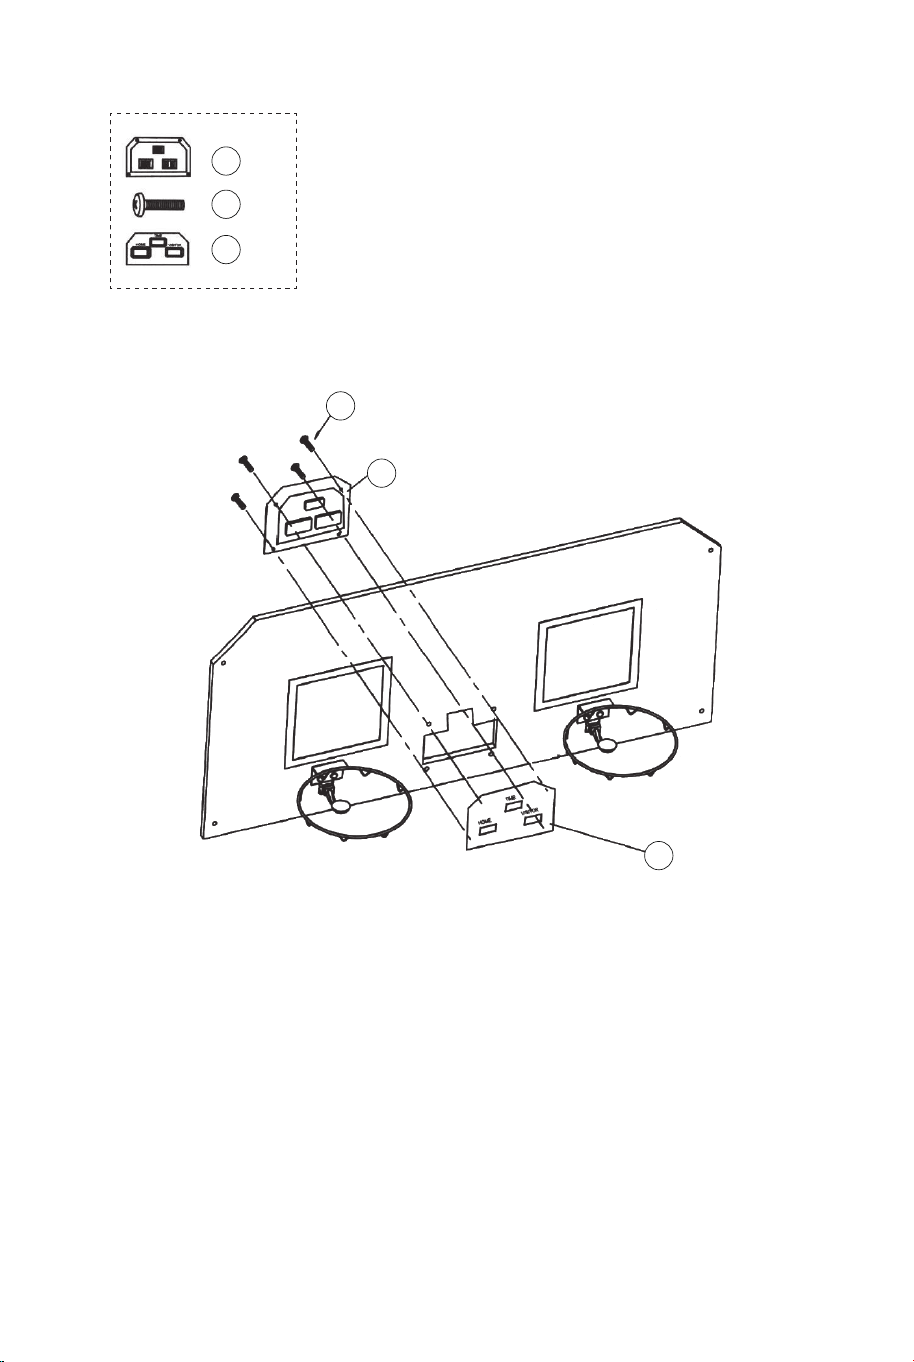
29
29 x4
14
14 x1
FIG.8
31
31 x1
FIG.8
12. Attach the Electronic Scorer Face Plate (#31) to the front of
Backboard and connect with the Electronic Scorer (#14) using
Bolts (#29) as shown in FIG. 8.
10 11

FIG.7
21 x1
22 x24
23 x16
28 x16
18 x2
17 x2
15 x2
FIG.7
11. Attach the Rim (#17) and Rim Support Plates (#18) to the
Backboard (#21) using the Bolts (#23), washers (#22) and Nuts
(#28). And then attach the Switch Sensors (#15) to the
Backboard (#21) using the Bolts (#23), washers (#22) and Nuts
(#28). Make sure that you use washers on both sides of the
backboard as shown in FIG.7.
28
28
21
22
22
22
23
23
18
18
17
17
15
15
29
29 x4
14
14 x1
FIG.8
31
31 x1
FIG.8
12. Attach the Electronic Scorer Face Plate (#31) to the front of
Backboard and connect with the Electronic Scorer (#14) using
Bolts (#29) as shown in FIG. 8.
10 11
22 x2
24 x2
28 x2
20 x1
12 x1
22
22
22
24
24
24
28
28
28
20
20
12
12
12
11
11
FIG.9A
FIG.9
FIG.9D
FIG.9B
P4
Lock Pin
FIG.9
13. Slide elastic straps and sleeve of Ball Return Net (#20) onto
Tubes - 1 (#1) as shown in FIG. 9A& 9B & 9C.
14. Slide the Tube - 12 (#12) through the sleeve on the front of
the Ball Return Net (#20), attach at the left side first using Bolts
(#24), Washers (#22) and Nuts (#28) as shown in FIG. 9D.
Follow the same procedure on the right side.
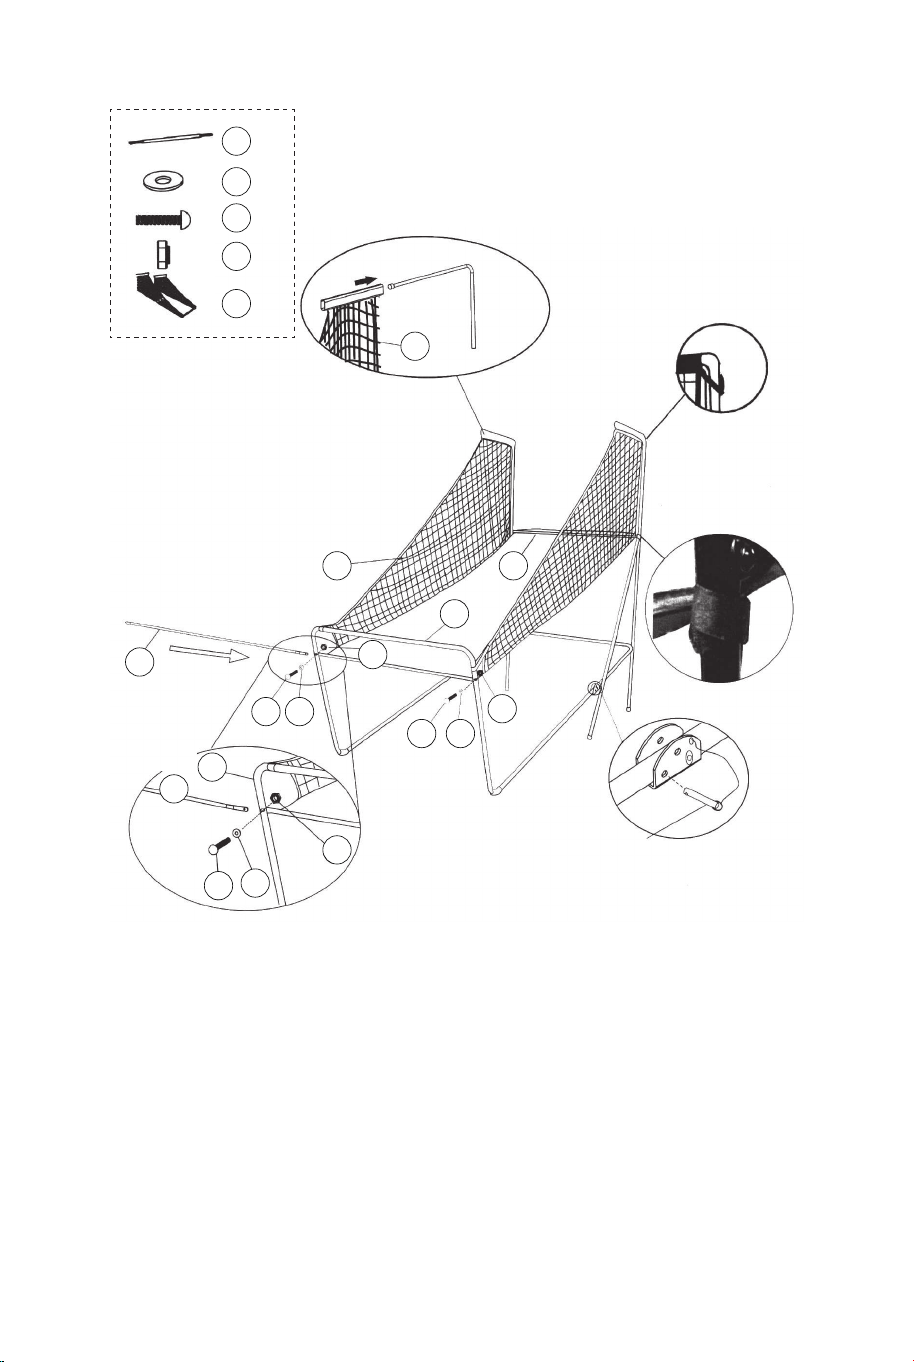
21
22
22
22 x8
25
25 x4
28
28 x4
20
12
12
1
FIG.10
FIG.10C
FIG.10A
P4
Lock Pin
P1
FIG.10
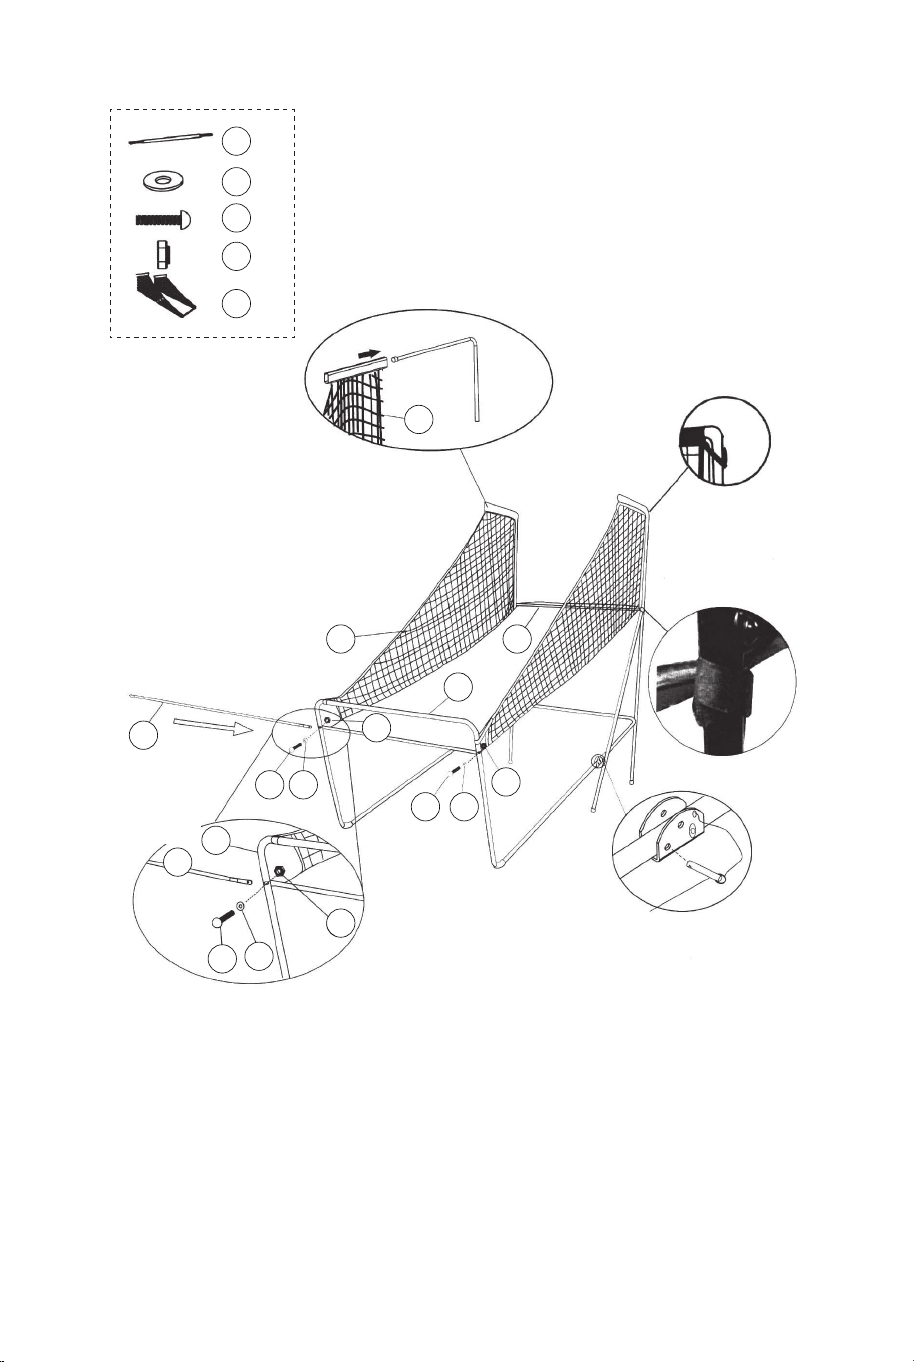
15. With the help of another adult, attach the Backboard (#21) to
Top Tubes 1 (#1) with Bolts (#25), Washers (#22), and Nuts
(#28) as shown in FIG.10A. Slide Tube 12 (#12) through the
sleeve at the back of the Ball Return Net (#20), as shown in
FIG.10B. At each bottom hole of the backboard, attach the left
side first with Bolts (#25), Washers (#22), Nuts (#28) as shown
in FIG.10C. Follow the same procedure for the right side.
16. Connect the Lock Pin (#P4) to the Tube - 5 and Tube- 6 (#5
& #6) and insert it to the Tube - 5 and Tube - 6 (#5 & #6) as
shown in FIG.10C.
FIG.9C
12 13

22 x2
24 x2
28 x2
20 x1
12 x1
22
22
22
24
24
24
28
28
28
20
20
12
12
12
11
11
FIG.9A
FIG.9
FIG.9D
FIG.9B
P4
Lock Pin
FIG.9
13. Slide elastic straps and sleeve of Ball Return Net (#20) onto
Tubes - 1 (#1) as shown in FIG. 9A& 9B & 9C.
14. Slide the Tube - 12 (#12) through the sleeve on the front of
the Ball Return Net (#20), attach at the left side first using Bolts
(#24), Washers (#22) and Nuts (#28) as shown in FIG. 9D.
Follow the same procedure on the right side.
21
22
22
22 x8
25
25 x4
28
28 x4
20
12
12
1
FIG.10
FIG.10C
FIG.10A
P4
Lock Pin
P1
FIG.10
15. With the help of another adult, attach the Backboard (#21) to
Top Tubes 1 (#1) with Bolts (#25), Washers (#22), and Nuts
(#28) as shown in FIG.10A. Slide Tube 12 (#12) through the
sleeve at the back of the Ball Return Net (#20), as shown in
FIG.10B. At each bottom hole of the backboard, attach the left
side first with Bolts (#25), Washers (#22), Nuts (#28) as shown
in FIG.10C. Follow the same procedure for the right side.
16. Connect the Lock Pin (#P4) to the Tube - 5 and Tube- 6 (#5
& #6) and insert it to the Tube - 5 and Tube - 6 (#5 & #6) as
shown in FIG.10C.
FIG.9C
12 13

20
FIG.11
FIG.11A
30 x2
34 x2
34
30
11
16
11
16 x1
Control Box
Control Wire
FIG.11
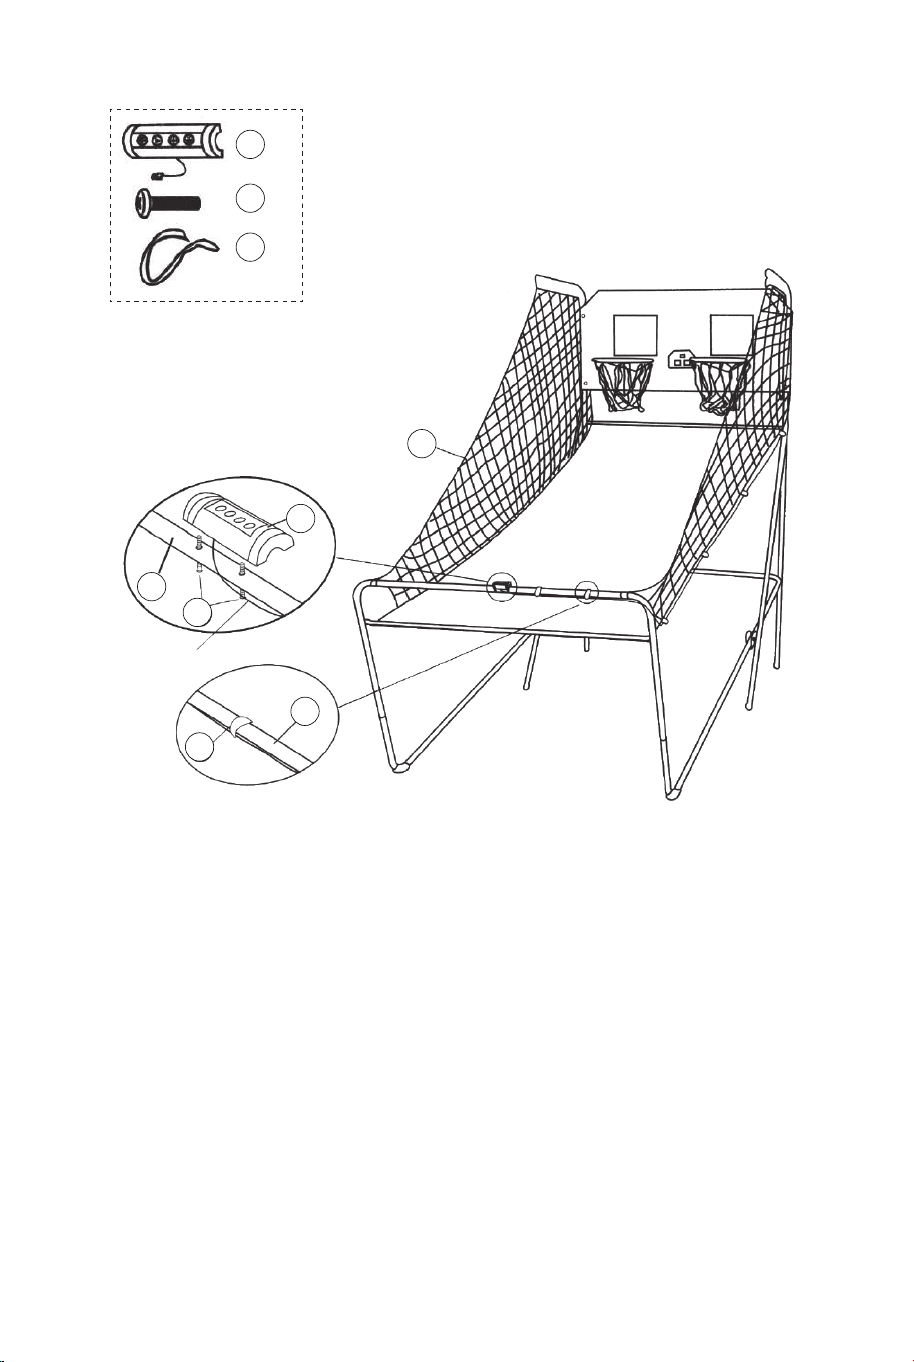
17. Attach the Control Box (#16) to middle of the Tube - 11
(#11) using two Bolts (#30) as shown in FIG.11A.
18. Run the rest of the Control Wire through the loops on the
Ball Return Net (#20). Place the Control Wire on the Tube - 11
(#11) using the Self-Stick Straps (#34) as shown in FIG.11.
14
Control Wire
Electronic Scorer
Sensor wire
Sensor wire
FIG.12
FIG.12
19. Connect the Sensor Wire from Switch Sensor (#15) to the
Electronic Scorer (#14) as shown in FIG. 12. Connect the
Control Wire to the Electronic Scorer (#14) as shown in FIG.12
and 12A.
FIG.12A
CONTROL WIRE
VISITOR ON/OFF
14 15

20
FIG.11
FIG.11A
30 x2
34 x2
34
30
11
16
11
16 x1
Control Box
Control Wire
FIG.11
17. Attach the Control Box (#16) to middle of the Tube - 11
(#11) using two Bolts (#30) as shown in FIG.11A.
18. Run the rest of the Control Wire through the loops on the
Ball Return Net (#20). Place the Control Wire on the Tube - 11
(#11) using the Self-Stick Straps (#34) as shown in FIG.11.
14
Control Wire
Electronic Scorer
Sensor wire
Sensor wire
FIG.12
FIG.12
19. Connect the Sensor Wire from Switch Sensor (#15) to the
Electronic Scorer (#14) as shown in FIG. 12. Connect the
Control Wire to the Electronic Scorer (#14) as shown in FIG.12
and 12A.
FIG.12A
CONTROL WIRE
VISITOR ON/OFF
14 15

FIG.13
FIG.13
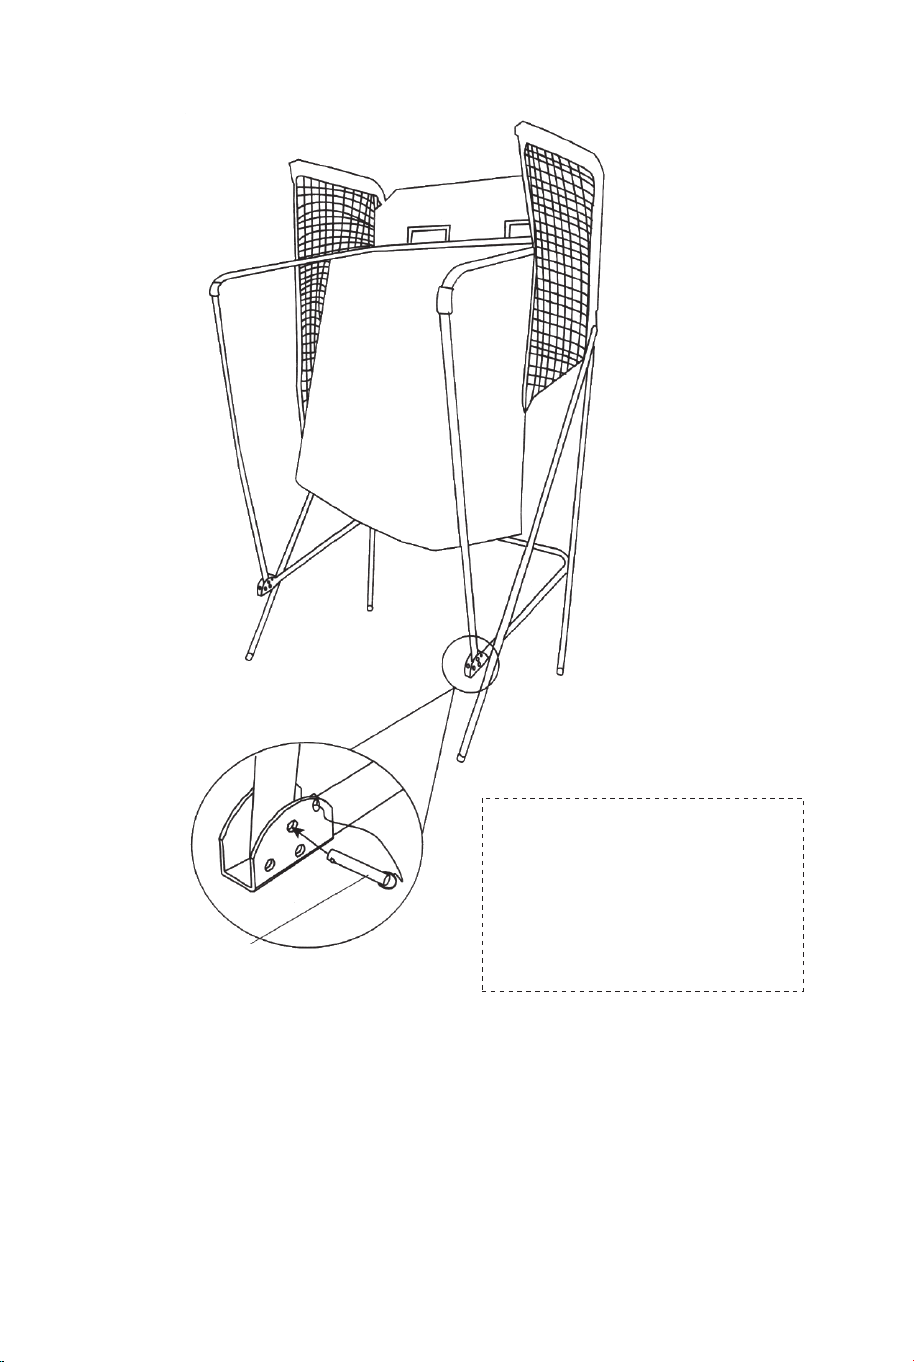
20. Fold the Basketball Arcade Machine when not in use and
insert the Lock Pin (#P4) as shown in FIG.13.
Note: The lock pin (#P4) needs to be removed from its original
position when the machine is being used before insertion to the
new position when folded.
P4
Lock Pin
IMPORTANT!
Make sure to use the
L ock Pin (#P4) when folded.
ELECTRONIC SCORER OPERATION
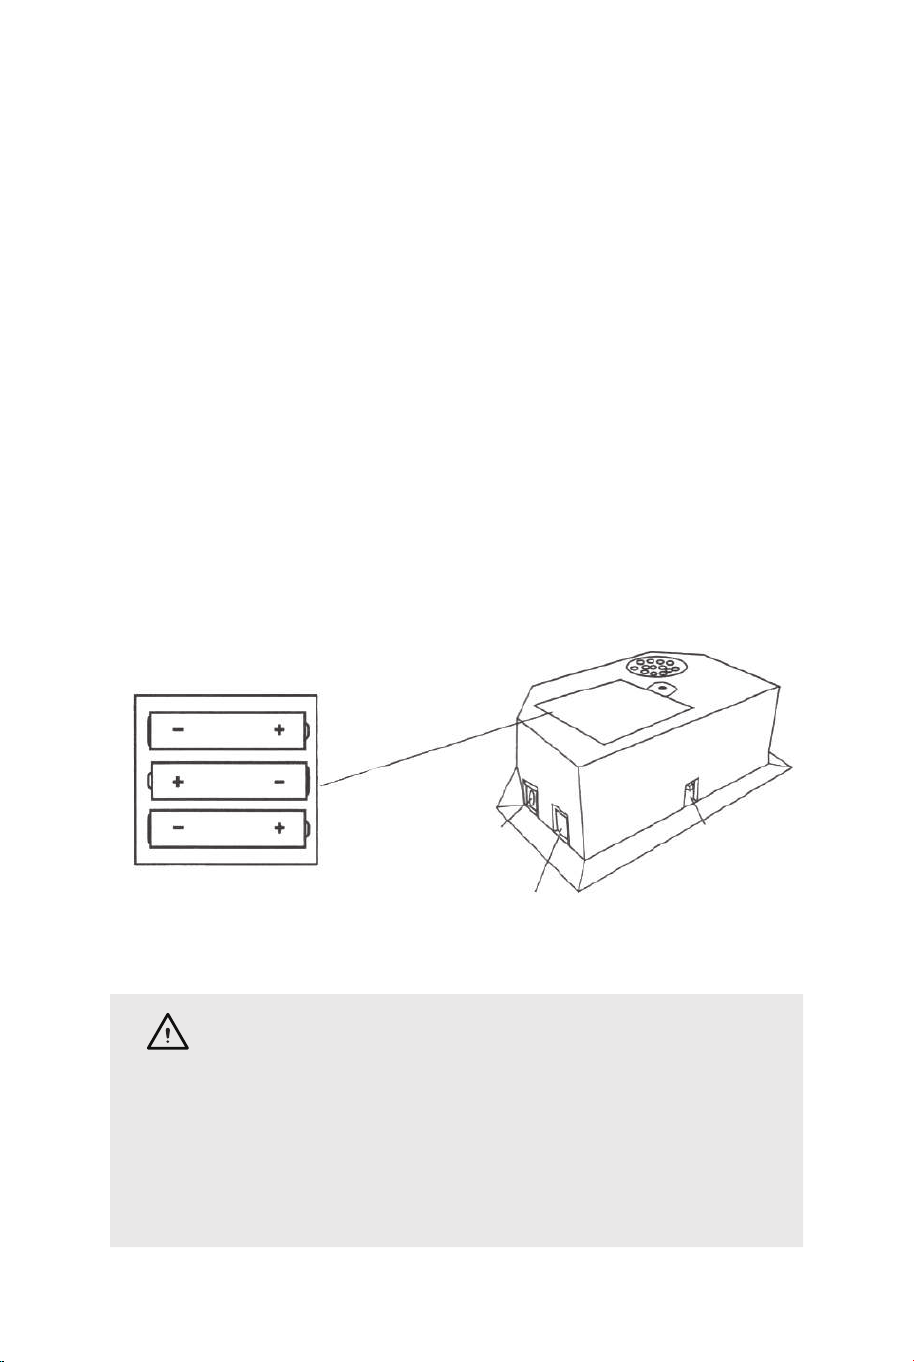
Install Batteries
Battery Box: Unscrew bolt using a screwdriver and open the battery
box. Insert 3 "AA" batteries (not included) in the order of polarity as
shown on the inside cover. Then close the cover using a
screwdriver. Turn the power ON using the ON/OFF switch.
Reminding:
a. Batteries must be installed according to the correct polarization
(+ and -) requires.
b. Please clean the battery contacts and also those of the devices
prior to battery installation.
c. If the game will not be used for a long period of time, we
recommend that the batteries should be removed.
CONTROL WIRE
VISITOR
ON/OFF
WARNING:
1) Requires 3“AA" batteries (not included).
2) DO not mix old and new batteries.
3) Do not mix alkaline, standard (carbon zinc), or
rechangeable (nickel-cadmium) batteries.
16 17
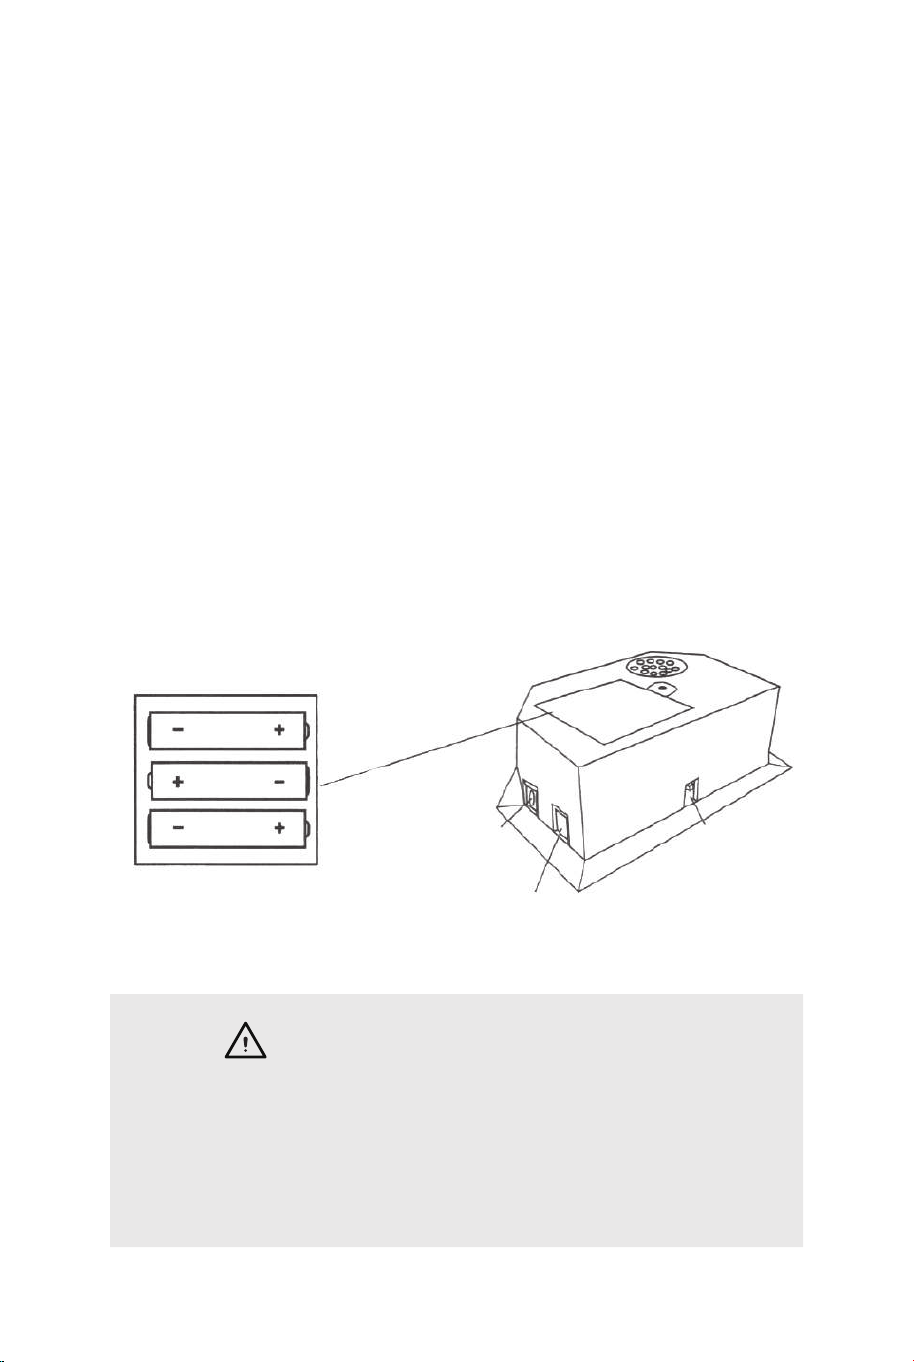
FIG.13
FIG.13
20. Fold the Basketball Arcade Machine when not in use and
insert the Lock Pin (#P4) as shown in FIG.13.
Note: The lock pin (#P4) needs to be removed from its original
position when the machine is being used before insertion to the
new position when folded.
P4
Lock Pin
IMPORTANT!
Make sure to use the
L ock Pin (#P4) when folded.
ELECTRONIC SCORER OPERATION
Install Batteries
Battery Box: Unscrew bolt using a screwdriver and open the battery
box. Insert 3 "AA" batteries (not included) in the order of polarity as
shown on the inside cover. Then close the cover using a
screwdriver. Turn the power ON using the ON/OFF switch.
Reminding:
a. Batteries must be installed according to the correct polarization
(+ and -) requires.
b. Please clean the battery contacts and also those of the devices
prior to battery installation.
c. If the game will not be used for a long period of time, we
recommend that the batteries should be removed.
CONTROL WIRE
VISITOR
ON/OFF
WARNING:
1) Requires 3“AA" batteries (not included).
2) DO not mix old and new batteries.
3) Do not mix alkaline, standard (carbon zinc), or
rechangeable (nickel-cadmium) batteries.
16 17

CONTROL BOX OPERATION
Press "ON/OFF" to activate the scorer.
Scoreboard "HOME" shows "01" (pre- set game 1).
Press "SELECT UP and DOWN" to select a game.
Press "PLAY" to enter selected game mode.
Press "SOUND" to switch sound ON/OFF while playing.
Press "PAUSE" to pause or start time counting.
Press and hold the button "ON/OFF" 3 seconds to turn off
scorer.
Press and hold the button "RESET" 3 seconds to reset the
games.
Note: If no shot is made or no button is pressed in 15 mins,
scorer will be turned off automatically.
CONTROL PANEL
ON/OFF
SOUND
PLAY
PAUSE RESET
CHOOSE FROM 8 DIFFERENT GAME OPTIONS
1. Beat the Time Clock
Press "PLAY" to enter game 1.
Press "UP/Down" to select single/multiple players
(P1/P2/P3/P4).
Press "PLAY" after the number of player is selected.
Press "UP/Down" to select playing time, 30/45/60 seconds.
Press "PLAY" to begin the game.
Scoreboard "HOME" shows Player 1, 3; Scoreboard "VISITOR"
shows Player 2, 4. All shots worth 2 points until last 10 seconds,
each score counts 3 points. Countdown 5 seconds to next
player's turn when one player finishes game. Player with more
points scored wins (LED will flash on player with higher score).
Press "PLAY" to restart this game.
2.3 Point Beat the Time Clock
Press "PLAY" to enter game 2.
Press "UP/Down" to select single/multiple players
(P1/P2/P3/P4).
Press "PLAY" after the number of player is selected.
Press "UP/Down" to select playing time, 30/45/60 seconds.
Press "PLAY" to begin the game.
Scoreboard "HOME" shows Player 1, 3; Scoreboard
"VISITOR" shows Player 2, 4. All shots made count 3 points.
Countdown 5 seconds to next player's turn when one player
finishes game. Player with more points scored wins (LED will
flash on player with higher score). Press "PLAY" to restart this
game.
3. Battle Back
Press "PLAY" to enter game 3.
Press "UP/Down" to select multiple players (P2/P4).
Press "PLAY" to begin the game.
Shot made in "HOME" frame, +2 points scored display on
"HOME" board and -2 points for "VISITOR".
Shot made in "VISITOR" frame, +2 points scored display on
"VISITOR" board and -2 points for "HOME".
Once a player scores 10 points who wins and game is
finished.
Press "PLAY" to restart this game.
4. Horse
a. Press "PLAY" to enter game 4.
b. Press "UP/Down" to select multiple players (P2/P3/P4).
c. Press "PLAY" after the number of player is selected. d.
Player has to make a shot in 2 seconds.
d. Player has to make a shot in 2 seconds.
SELECT
UP
SELECT
DOWN
18 19

e. First player is allowed to shoot at any hoop (Home or
VISITOR). If first player scores in 2 seconds, no letter is
given.
Game continues for next player. Scoreboard will display "next
player (P2P3/P4)" and LED will flash twice in a second.
After flash, next player has to duplicate the shot in the same
hoop selected by first player.
f. If player can't score in 2 seconds, player receives the first
letter "H" which will display on score board. Game remains for
the same player until the player scores. If player keeps
missing, player receives "O" followed by "R", "S", "E".
The letter "E" is given, the player is out.
g. The first player to spell "horse" loses. Players stay in
repeat step d.e.f. till game is finished.
h. The last player to spell "horse" wins.
i. Press "PLAY" to restart this game.
5. Check Point
Press "PLAY" to enter game 5.
Press "UP/Down" to select single/multiple players
(P1/P2/P3/P4).
Press "PLAY" to begin the game.
"HOME" displays "player", "VISITOR" displays "24" points,
pre-set 40 seconds playing time.
Points scored will display on scoreboard "HOME".
Before time is out, once 24/52/68/86 points is scored, playing
time increases 10/20/10/20 seconds respectively.
Countdown 5 seconds to next player's turn when one player
finishes game.
Player with more points scored wins (LED will flash on player
with higher score).
Game is finished when a player scores 98 points.
Press "PLAY" to restart this game.
CHOOSE FROM 8 DIFFERENT GAME OPTIONS
6. Around the World
Use tape to mark the shooting lines.
Press "PLAY" to enter game 6.
Press "UP/Down" to select single/multiple players
(P1/P2/P3/P4).
Press "PLAY" after the number of player is selected.
Scoreboard "HOME" displays Player 1/2/3/4, "VISITOR"
displays scored points.
Once score comes to 10 points or time comes to 99 seconds
countdown 5 seconds to next player's turn when one player
finishes game.
Flayer who finishes the game first wins (LED will flash on
winner).
Press "PLAY" to restart this game.
7. Left and Right Shoot
Press “PLAY" to enter game 7.
Press "UP/Down" to select single/multiple players
(P1/P2/P3/P4).
Press "PLAY" after the number of player is selected.
Press "UP/Down" to select playing time, 30/45/60 seconds.
Press “PLAY" to begin the game.
Scoreboard "HOME" displays Player, "VISITOR" displays
points.
Make a shot in "HOME" frame when LED is flashing on
"HOME", 2 points scored display on "HOME".
Make a shot in "VISITOR" frame when LED is flashing on
"VISITOR", 2 points scored display on "VISITOR".
Countdown 5 seconds to next player's turn when one player
finishes game.
Player with more points scored wins (LED will flash on player
with higher score). Press “PLAY" to restart this game.
20 21

8. One to One
Press "PLAY" to enter game 8.
Press "UP/Down" to select single/multiple players
(P1/P2/P3/P4).
Press "PLAY" after the number of player is selected.
Press "UP/Down" to select playing time, 30/45/60 seconds.
Press "PLAY" to begin the game.
Scoreboard "HOME" shows Player 1, 3; Scoreboard
"VISITOR" shows Player 2, 4. All shots worth 2 points until
last 10 seconds, each score counts 3 points. Countdown 5
seconds to next player's turn when one player finishes
game.
Player with more points scored wins (LED will flash on
player with higher score). Press "PLAY" to restart this
game.
CAUTION !
Changes or modifications not expressly approved by the
party responsible for compliance could void the user's
authority to operate the equipment.
Operation is subject to the following two conditions :
(1) This device may not cause harmful interference.
(2) This device must accept any interference received,
including interference that may cause undesired
operation.
22 23
Allgemeine Achtung
Bevor Sie beginnen
Vorsicht: Nur für den Hausgebrauch.
Vorsicht: Kinder sollten diesen Artikel unter elterlicher Aufsicht benutzen.
Gefahr: Halten Sie alle Kleinteile und Verpackungsmaterialien, die verschluckt werden
können, von Babys und Kindern fern.
Gefahr: Unsachgemäße Montage kann zu Kippgefahr führen.
Bitte sorgfältig lesen und zum späteren Nachschlagen aufbewahren.
DE
Achtung
Der Artikel muss unter der Aufsicht eines Erwachsenen montiert und benutzt werden.
Lesen Sie jeden Schritt sorgfältig durch und befolgen Sie die richtige Reihenfolge.
Entfernen Sie alle Verpackungen, Überprüfen Sie, ob alle Teile und Zubehörteile
vorhanden sind.
Bitte stellen Sie sicher, dass alle Teile richtig montiert sind, eine falsche Montage kann zu
einer Gefahr führen.
Wir empfehlen, alle Teile möglichst in der Nähe des Aufstellungsortes zu montieren, um
unnötige Bewegungen nach der Montage zu vermeiden.
Achten Sie bei der Montage auf einen sicheren Untergrund und stellen Sie den Artikel
immer auf eine ebene, feste und stabile Fläche.
Bitte überprüfen und warten Sie regelmäßig die wichtigsten Teile zur Aufhängung,
Befestigung, Verankerung am Boden.
Rohr-5
Ø22x755x580mm
Rohr-6
Ø22x755x580mmØ22x890mm
Rohr-4
Basketball 17 cm
Durchm.
Elektronischer
Torschütze Schaltsensor
Rohr-1 Rohr-2
Ø22x580x440mm Ø22x685mm Ø22x890mm
Rohr-3
1 x2 2 x2 3 x1
4 x1 5 x1 6 x1
13 x4 14 x1 15 x2
Ø22x830mm
Rohr-7
Ø22x835mm
Rohr-8
Ø22x595mm
Rohr-9
7 x2 8 x2 9 x2
Rohr-10
Ø22x650x385mm
Rohr-11
Ø22x1067x520mm Ø12.7x1090mm
Rohr-12
10 x2 11 x1 12 x3
Korb Korbstützplatte
Steuerkasten
mit Draht
16 x1 17 x2 18 x2
Inflationspumpe
mit Nadel Ballrücklaufnetz Rückwand
21 x119 x1 20 x1
M6 Unterlegscheibe M6x20mm Bolzen M6x29mm Bolzen
22 x46 23 x16 24 x6
M6x42mm Bolzen M6x50mm Bolzen M6x35mm Bolzen
25 x4 26 x4 27 x2
4x28mm BolzenM6 Mutter 3,5x10mm Bolzen
28 x32 29 x4 30 x2
24 25

Elektronische
Trefferanzeige
31 x1
Schlüssel
32 x1
Inbusschlüssel
33 x1
Selbstklebender
Riemen
34 x2
Netz
P1 x2
Federverschluss
P2 x9
Stangeneinsatz
aus Kunststoff
P3 x2
Sicherungsstift
P4 x2
VORINSTALLIERTE TEILE
1211109876
MONTAGEANLEITUNGEN:
1. Finden Sie einen sauberen, ebenen Platz, um mit der Montage
Ihres Basketballspiels zu beginnen. Wir empfehlen, dass zwei
Erwachsene zusammenarbeiten, um dieses Basketballspiel
zusammenzubauen.
2. Nehmen Sie alle Teile aus dem Karton und vergewissern Sie sich,
dass Sie alle aufgelisteten Teile haben, wie auf der Seite mit der
Teileliste gezeigt. Schneiden oder reißen Sie die vier Ecken der
Schachtel vorsichtig ab, sodass der Boden der Schachtel als
Arbeitsfläche verwendet werden kann.
VOR DER MONTAGE - Bitte prüfen und ordnen Sie alle
Ihre Stangen und Teile
54321
ABB.1 &2
3. Befestigen Sie die Rohre -2 (Nr. 2) an Rohr - 3 und Rohr - 4 (Nr.
3 und Nr. 4) mit Federverriegelung (vorinstalliert), wie in ABB. 1
gezeigt.
4. Befestigen Sie die Rohre – 7 (Nr. 7) an den Rohren – 8 (Nr. 8)
mit Federverschluss (vorinstalliert), wie in ABB. 2 gezeigt.
P2
Federverschluss
P2
Federverschluss
P2
Federverschluss
8
7
8 x2
7 x2
6 x1
5 x1
4
4 x1
3
3 x1
2
2
2 x2
ABB.1
ABB.3
ABB.2
ABB.3
5. Befestigen Sie Rohr–5 und Rohr–6 (Nr. 5 und Nr. 6) mit
Federverschluss (vorinstalliert) wie in ABB. 3 gezeigt.
26 27

ABB.4
6. Befestigen Sie Rohr – 5 und Rohr – 6 (Nr. 5 und Nr. 6) an Rohr – 3
und Rohr – 4 (Nr. 3 und Nr. 4) mit Schrauben (Nr. 26),
Unterlegscheiben (Nr. 22) und Muttern (Nr. 28). ) und befestigen Sie
dann die Rohre – 5 und Rohre – 6 (#5 und #6) an den Rohren – 8 (#8)
mit Schrauben (#26), Unterlegscheiben (#22) und Muttern (#28), wie
gezeigt in Fig. 4, 4A und 4B.
7. Befestigen Sie die Rohre 7 und 8 (#7 und 8) an den Rohren 2 (#2)
mit Bolzen (#24), Unterlegscheiben (#22) und Mutter (#28), wie in
ABB. 4C, wiederholen Sie diesen Schritt für die andere Seite.
Hinweis: Stellen Sie sicher, dass die Federverriegelung nach unten
zeigt.
22 x6
24 x2
26 x4
28 x6
ABB.4A
ABB.4B
ABB.4
ABB.4C
22
22
22
24
26
26
28
28
28
8
8
7
7
6
5
4
3
2
2
ABB.5
8. Befestigen Sie das Rohr 12 (Nr. 12) an den Rohren 2 (Nr. 2)
mit Schrauben (Nr. 24), Unterlegscheiben (Nr. 22) und Muttern
(Nr. 28), wie in ABB. 5A gezeigt. Stecken Sie dann die Röhren 1
(Nr. 1) in die Röhren 2 (Nr. 2), wie in ABB. 5 gezeigt.
9. Befestigen Sie die Rohre – 9 (Nr. 9) an Rohr – 5 und Rohr – 6
(Nr. 5 und Nr. 6) mit Schrauben (Nr. 27), Unterlegscheiben (Nr.
22) und Muttern (Nr. 28), wie in ABB. 5 und 5B gezeigt.
22 x6
24 x2
27 x2
28 x4
12 x1
9 x2
1 x2
22
22
22
24
27
28
28
12
12
9
9
6
5
2
2
2
1
ABB.5A
ABB.5B
ABB.5
P3
28 29

ABB.4
6. Befestigen Sie Rohr – 5 und Rohr – 6 (Nr. 5 und Nr. 6) an Rohr – 3
und Rohr – 4 (Nr. 3 und Nr. 4) mit Schrauben (Nr. 26),
Unterlegscheiben (Nr. 22) und Muttern (Nr. 28). ) und befestigen Sie
dann die Rohre – 5 und Rohre – 6 (#5 und #6) an den Rohren – 8 (#8)
mit Schrauben (#26), Unterlegscheiben (#22) und Muttern (#28), wie
gezeigt in Fig. 4, 4A und 4B.
7. Befestigen Sie die Rohre 7 und 8 (#7 und 8) an den Rohren 2 (#2)
mit Bolzen (#24), Unterlegscheiben (#22) und Mutter (#28), wie in
ABB. 4C, wiederholen Sie diesen Schritt für die andere Seite.
Hinweis: Stellen Sie sicher, dass die Federverriegelung nach unten
zeigt.
22 x6
24 x2
26 x4
28 x6
ABB.4A
ABB.4B
ABB.4
ABB.4C
22
22
22
24
26
26
28
28
28
8
8
7
7
6
5
4
3
2
2
ABB.5
8. Befestigen Sie das Rohr 12 (Nr. 12) an den Rohren 2 (Nr. 2)
mit Schrauben (Nr. 24), Unterlegscheiben (Nr. 22) und Muttern
(Nr. 28), wie in ABB. 5A gezeigt. Stecken Sie dann die Röhren 1
(Nr. 1) in die Röhren 2 (Nr. 2), wie in ABB. 5 gezeigt.
9. Befestigen Sie die Rohre – 9 (Nr. 9) an Rohr – 5 und Rohr – 6
(Nr. 5 und Nr. 6) mit Schrauben (Nr. 27), Unterlegscheiben (Nr.
22) und Muttern (Nr. 28), wie in ABB. 5 und 5B gezeigt.
22 x6
24 x2
27 x2
28 x4
12 x1
9 x2
1 x2
22
22
22
24
27
28
28
12
12
9
9
6
5
2
2
2
1
ABB.5A
ABB.5B
ABB.5
P3
28 29

11
11 x1
11
10
10 x2
10
10
9
9
ABB.6
Kurz
Lang
P2
Federverschluss
P2
Federverschluss
ABB.6
10. Befestigen Sie die Rohre – 10 (Nr. 10) an den Rohren – 9
(Nr. 9) mit Federverschluss (vorinstalliert), und befestigen Sie
dann das Rohr – 11 (Nr. 11) an den Rohren – 10 (Nr. 10).
Federverriegelung (vorinstalliert) wie in ABB 6 gezeigt.
ABB.7
21 x1
22 x24
23 x16
28 x16
18 x2
17 x2
15 x2
ABB.7
11. Befestigen Sie die Felge (Nr. 17) und die Felgenstützplatten
(Nr. 18) an der Rückwand (Nr. 21) mit den Schrauben (Nr. 23),
Unterlegscheiben (Nr. 22) und Muttern (Nr. 28). Befestigen Sie
dann die Schaltsensoren (Nr. 15) an der Rückwand (Nr. 21) mit
den Schrauben (Nr. 23), Unterlegscheiben (Nr. 22) und Muttern
(Nr. 28). Stellen Sie sicher, dass Sie Unterlegscheiben auf
beiden Seiten der Rückwand verwenden, wie in ABB. 7 gezeigt.
28
28
21
22
22
22
23
23
18
18
17
17
15
15
30 31

11
11 x1
11
10
10 x2
10
10
9
9
ABB.6
Kurz
Lang
P2
Federverschluss
P2
Federverschluss
ABB.6
10. Befestigen Sie die Rohre – 10 (Nr. 10) an den Rohren – 9
(Nr. 9) mit Federverschluss (vorinstalliert), und befestigen Sie
dann das Rohr – 11 (Nr. 11) an den Rohren – 10 (Nr. 10).
Federverriegelung (vorinstalliert) wie in ABB 6 gezeigt.
ABB.7
21 x1
22 x24
23 x16
28 x16
18 x2
17 x2
15 x2
ABB.7
11. Befestigen Sie die Felge (Nr. 17) und die Felgenstützplatten
(Nr. 18) an der Rückwand (Nr. 21) mit den Schrauben (Nr. 23),
Unterlegscheiben (Nr. 22) und Muttern (Nr. 28). Befestigen Sie
dann die Schaltsensoren (Nr. 15) an der Rückwand (Nr. 21) mit
den Schrauben (Nr. 23), Unterlegscheiben (Nr. 22) und Muttern
(Nr. 28). Stellen Sie sicher, dass Sie Unterlegscheiben auf
beiden Seiten der Rückwand verwenden, wie in ABB. 7 gezeigt.
28
28
21
22
22
22
23
23
18
18
17
17
15
15
30 31
29
29 x4
14
14 x1
ABB.8
31
31 x1
ABB.8
12. Befestigen Sie die Frontplatte des elektronischen
Punktezählers (Nr. 31) an der Vorderseite der Rückwand und
verbinden Sie sie mit dem elektronischen Punktezähler (Nr. 14)
mit den Schrauben (Nr. 29), wie in ABB. 8.
22 x2
24 x2
28 x2
20 x1
12 x1
22
22
22
24
24
24
28
28
28
20
20
12
12
12
11
11
ABB.9A
ABB.9
ABB.9D
ABB.9B
P4
Sicherungsstift
ABB.9
13. Schieben Sie die Gummibänder und die Hülle des
Ballrückführnetzes (Nr. 20) auf die Rohre – 1 (Nr. 1), wie in ABB.
9A & 9B & 9C.
14. Schieben Sie das Rohr – 12 (Nr. 12) durch die Hülse auf der
Vorderseite des Ballrücklaufnetzes (Nr. 20), befestigen Sie es
zuerst auf der linken Seite mit den Schrauben (Nr. 24), den
Unterlegscheiben (Nr. 22) und den Muttern (Nr. 28). ) wie in
ABB. 9D. Gehen Sie auf der rechten Seite genauso vor.
ABB.9C
32 33
21
22
22
22 x8
25
25 x4
28
28 x4
20
12
12
1
ABB.10
ABB.10C
ABB. 10A
ABB. 10B
P4
Sicherungsstift
P1
ABB.10
15. Befestigen Sie mit Hilfe eines anderen Erwachsenen das
Rückenbrett (Nr. 21) an den oberen Rohren 1 (Nr. 1) mit
Schrauben (Nr. 25), Unterlegscheiben (Nr. 22) und Muttern (Nr.
28), wie in ABB. 10A gezeigt. Schieben Sie Rohr 12 (Nr. 12)
durch die Hülse auf der Rückseite des Ballrücklaufnetzes (Nr.
20), wie in ABB. 10B gezeigt. Befestigen Sie an jedem unteren
Loch der Rückwand zuerst die linke Seite mit Schrauben (Nr.
25), Unter-legscheiben (Nr. 22) und Muttern (Nr. 28), wie in ABB.
10C gezeigt. Gehen Sie für die rechte Seite genauso vor.
16. Verbinden Sie den Verschlussstift (#P4) mit dem Rohr – 5
und dem Rohr – 6 (#5 ) und stecken Sie ihn in das Rohr – 5
und das Rohr – 6 (#5 & #6), wie in ABB. 10C.
20
ABB.11
ABB.11A
30 x2
34 x2
34
30
11
16
11
16 x1
Steuerkasten
Steuerdraht
ABB.11
17. Befestigen Sie den Steuerkasten (Nr. 16) mit zwei
Schrauben (Nr. 30) an der Mitte des Rohrs – 11 (Nr. 11), wie
in ABB. 11A gezeigt.
18. Führen Sie den Rest des Steuerdrahts durch die
Schlaufen am Ballrücklaufnetz (Nr. 20). Bringen Sie den
Steuerdraht mit den selbstklebenden Bändern (Nr. 34) an der
Röhre – 11 (Nr. 11) an, wie in ABB. 11 gezeigt.
34 35

14
Steuerdraht
Elektrischer Torschütze
Sensorkabel
Sensorkabel
ABB.12
ABB.12
19. Verbinden Sie das Sensorkabel vom Schaltersensor (Nr. 15)
mit dem elektronischen Punktezähler (Nr. 14), wie in ABB. 12.
Schließen Sie das Steuerkabel an den elektronischen
Punktezähler (Nr. 14) an, wie in ABB. 12 und 12A gezeigt.
ABB.12A
Steuerdraht
Besucher EIN/AUS
P4
Sicherungsstift
ABB.13
ABB.13
20. Klappen Sie den Basketball-Arcade-Automaten zusammen,
wenn er nicht verwendet wird, und setzen Sie den
Verriegelungsstift (#P4) ein, wie in ABB. 13 gezeigt.
Hinweis: Der Verriegelungsstift (#P4) muss aus seiner
ursprünglichen Position entfernt werden, wenn die Maschine
verwendet wird, bevor er im zusammengeklappten Zustand in die
neue Position eingesetzt wird.
WICHTIG!
Achten Sie darauf, den
Sicherungsstift (#P4) zu
verwenden, wenn er
zusammengeklappt ist.
36 37
FUNKTION DES ELEKTRONISCHEN ANZEIGERS
Batterien installieren
Batteriekasten: Schraube mit Schraubendreher lösen und
Batteriekasten öffnen. Legen Sie 3 „AA“-Batterien (nicht im
Lieferumfang enthalten) in der Reihenfolge der Polarität ein, wie
auf der Innenseite des Umschlags gezeigt. Schließen Sie dann die
Abdeckung mit einem Schraubendreher. Schalten Sie das Gerät
mit dem EIN/AUS-Schalter ein.
Erinnerung:
a. Batterien müssen entsprechend der korrekten Polarisierung (+
und -) installiert werden.
b. Bitte reinigen Sie die Batteriekontakte und auch die der Geräte
vor dem Batterieeinbau.
c. Wenn das Spiel längere Zeit nicht benutzt wird, empfehlen wir,
die Batterien zu entfernen.
Steuerdraht
Besucher
EIN/AUS
ACHTUNG
1) Benötigt 3 „AA“-Batterien (nicht im Lieferumfang
enthalten).
2) Alte und neue Batterien nicht mischen.
3) Mischen Sie keine Alkali-, Standard- (Kohlenstoff-Zink)
oder wiederaufladbare (Nickel-Cadmium) Batterien.
BEDIENUNG DES STEUERKASTEN
Drücken Sie "ON/OFF", um den Scorer zu aktivieren.
Anzeigetafel „HOME“ zeigt „01“ (voreingestelltes Spiel 1).
Drücken Sie „SELECT UP and DOWN“, um ein Spiel auszuwählen.
Drücken Sie „PLAY“, um den ausgewählten Spielmodus aufzurufen.
Drücken Sie „SOUND“, um den Ton während des Spielens ein- oder
auszuschalten. Drücken Sie „PAUSE“, um die Zeitzählung
anzuhalten oder zu starten.
Halten Sie die Taste „ON/OFF“ 3 Sekunden lang gedrückt, um den
Scorer auszuschalten.
Halten Sie die Taste "RESET" 3 Sekunden lang gedrückt, um die
Spiele zurückzusetzen. Hinweis: Wenn innerhalb von 15 Minuten
kein Schuss abgegeben oder keine Taste gedrückt wird, wird der
Scorer automatisch ausgeschaltet.
BEDIENFELD
ON/OFF SELECT
UP
SELECT
DOWN
SOUND
PLAY
PAUSE RESET
WÄHLE AUS 8 VERSCHIEDENEN SPIELOPTIONEN
1. Schlagen Sie die Stechuhr
Drücken Sie „SPIELEN“, um Spiel 1 zu starten.
Drücken Sie „UP/Down“, um einzelne/mehrere Spieler
auszuwählen (P1/P2/P3/P4). Drücken Sie „PLAY“, nachdem die
Nummer des Spielers ausgewählt wurde.
Drücken Sie "UP/Down", um die Spielzeit auszuwählen,
30/45/60 Sekunden. Drücken Sie „SPIELEN“, um das Spiel zu
beginnen.
Anzeigetafel „HOME“ zeigt Spieler 1, 3; Anzeigetafel "VISITOR"
zeigt Spieler 2, 4. Alle Schüsse sind bis zu den letzten 10
Sekunden 2 Punkte wert, jedes Ergebnis zählt 3 Punkte.
Countdown von 5 Sekunden bis zum Zug des nächsten Spielers,
wenn ein Spieler das Spiel beendet. Spieler mit mehr erzielten
Punkten gewinnt (LED blinkt bei Spieler mit höherer Punktzahl).
Drücken Sie „PLAY“, um dieses Spiel neu zu starten.
38 39

2.3 Punktschlag gegen die Zeituhr
Drücken Sie „PLAY“, um Spiel 2 zu starten.
Drücken Sie „UP/Down“, um einzelne/mehrere Spieler auszuwählen
(P1/P2/P3/P4). Drücken Sie „PLAY“, nachdem die Nummer des
Spielers ausgewählt wurde.
Drücken Sie "UP/Down", um die Spielzeit auszuwählen, 30/45/60
Sekunden. Drücken Sie „PLAY“, um das Spiel zu beginnen.
Anzeigetafel „HOME“ zeigt Spieler 1, 3; Anzeigetafel „VISITOR“ zeigt
Spieler 2, 4. Alle Schüsse zählen 3 Punkte.
Countdown von 5 Sekunden bis zum Zug des nächsten Spielers,
wenn ein Spieler das Spiel beendet.
Spieler mit mehr erzielten Punkten gewinnt (LED blinkt bei Spieler mit
höherer Punktzahl).
Drücken Sie "PLAY", um dieses Spiel neu zu starten.
3. Kämpfen Sie zurück
Drücken Sie „PLAY“, um Spiel 3 zu betreten.
Drücken Sie „UP/Down“, um mehrere Spieler (P2/P4) auszuwählen.
Drücken Sie „PLAY“, um das Spiel zu beginnen.
Aufnahme im "HOME"-Rahmen, Anzeige der erzielten +2 Punkte auf
der "HOME"-Tafel und -2 Punkte für "VISITOR".
Aufnahme im „VISITOR“-Rahmen, +2 erzielte Punkte werden auf der
„VISITOR“-Tafel angezeigt und -2 Punkte für „HOME“.
Sobald ein Spieler 10 Punkte erzielt, gewinnt er und das Spiel ist
beendet.
Drücken Sie "PLAY", um dieses Spiel neu zu starten.
4. Pferd
a. Drücken Sie "PLAY", um Spiel 4 zu betreten.
b. Drücken Sie „UP/Down“, um mehrere Spieler auszuwählen
(P2/P3/P4).
c. Drücken Sie „PLAY“, nachdem die Nummer des Spielers
ausgewählt wurde.
d. Der Spieler muss in 2 Sekunden einen Schuss machen.
e. Der erste Spieler darf auf jeden Korb schießen (Home oder
VISITOR). Wenn der erste Spieler in 2 Sekunden punktet, wird kein
Buchstabe gegeben.
Das Spiel wird für den nächsten Spieler fortgesetzt. Das
Scoreboard zeigt „nächster Spieler (P2P3/P4)“ an und die LED
blinkt zweimal pro Sekunde.
Nach dem Flash muss der nächste Spieler den Schuss in
demselben Reifen duplizieren, den der erste Spieler ausgewählt hat.
f. Wenn der Spieler in 2 Sekunden kein Tor erzielen kann, erhält
der Spieler den ersten Buchstaben „H“, der auf der Anzeigetafel
angezeigt wird. Das Spiel bleibt für denselben Spieler, bis der
Spieler punktet. Wenn der Spieler weiterhin fehlt, erhält der Spieler
ein „O“, gefolgt von „R“, „S“, „E“.
Der Buchstabe „E“ ist gegeben, der Spieler ist raus.
g. Der erste Spieler, der „Pferd“ buchstabiert, verliert. Die Spieler
bleiben im Wiederholungsschritt d.e.f. bis das Spiel fertig ist.
h. Der letzte Spieler, der „Pferd“ buchstabiert, gewinnt.
i. Drücken Sie "PLAY", um dieses Spiel neu zu starten.
5. Kontrollpunkt
Drücken Sie „PLAY“, um Spiel 5 zu betreten.
Drücken Sie „UP/Down“, um einzelne/mehrere Spieler
auszuwählen (P1/P2/P3/P4). Drücken Sie „PLAY“, um das Spiel zu
beginnen.
„HOME“ zeigt „Spieler“ an, „VISITOR“ zeigt „24“ Punkte an,
voreingestellte 40 Sekunden Spielzeit.
Die erzielten Punkte werden auf der Anzeigetafel „HOME“
angezeigt.
Vor Ablauf der Zeit, sobald 24/52/68/86 Punkte erzielt wurden,
erhöht sich die Spielzeit jeweils um 10/20/10/20 Sekunden.
Countdown von 5 Sekunden bis zum Zug des nächsten Spielers,
wenn ein Spieler das Spiel beendet.
Spieler mit mehr erzielten Punkten gewinnt (LED blinkt bei Spieler
mit höherer Punktzahl).
Das Spiel ist beendet, wenn ein Spieler 98 Punkte erzielt.
Drücken Sie "PLAY", um dieses Spiel neu zu starten.
40 41

WÄHLE AUS 8 VERSCHIEDENEN SPIELOPTIONEN
6. Auf der ganzen Welt
Verwenden Sie Klebeband, um die Schießlinien zu markieren.
Drücken Sie „PLAY“, um Spiel 6 aufzurufen.
Drücken Sie „UP/Down“, um einzelne/mehrere Spieler auszuwählen
(P1/P2/P3/P4). Drücken Sie „PLAY“, nachdem die Nummer des
Spielers ausgewählt wurde. Anzeigetafel „HOME“ zeigt Spieler 1/2/3/4
an, „VISITOR“ zeigt erzielte Punkte an.
Sobald die Punktzahl 10 Punkte erreicht oder die Zeit 99 Sekunden
erreicht, zählt der Countdown 5 Sekunden bis zum nächsten Spieler
an der Reihe, wenn ein Spieler das Spiel beendet.
Flayer, der das Spiel zuerst beendet, gewinnt (LED blinkt beim
Gewinner).
Drücken Sie "PLAY", um dieses Spiel neu zu starten.
7. Links und rechts schießen
Drücken Sie „PLAY“, um Spiel 7 aufzurufen.
Drücken Sie „UP/Down“, um einzelne/mehrere Spieler auszuwählen
(P1/P2/P3/P4).
Drücken Sie „PLAY“, nachdem die Nummer des Spielers ausgewählt
wurde.
Drücken Sie "UP/Down", um die Spielzeit auszuwählen, 30/45/60
Sekunden.
Drücken Sie „PLAY“, um das Spiel zu beginnen.
Anzeigetafel "HOME" zeigt Spieler an, "VISITOR" zeigt Punkte an.
Machen Sie eine Aufnahme im "HOME"-Rahmen, wenn die LED auf
"HOME" blinkt, 2 erzielte Punkte werden auf "HOME" angezeigt.
Machen Sie eine Aufnahme im "VISITOR"-Rahmen, wenn die LED auf
"VISITOR" blinkt, 2 erzielte Punkte werden auf "VISITOR" angezeigt.
Countdown von 5 Sekunden bis zum Zug des nächsten Spielers,
wenn ein Spieler das Spiel beendet.
Spieler mit mehr erzielten Punkten gewinnt (LED blinkt bei Spieler mit
höherer Punktzahl). Drücken Sie „PLAY“, um dieses Spiel neu zu
starten.
8. Eins zu Eins
Drücken Sie „PLAY“, um Spiel 8 zu starten.
Drücken Sie „UP/Down“, um einzelne/mehrere Spieler
auszuwählen (P1/P2/P3/P4).
Drücken Sie „PLAY“, nachdem die Nummer des Spielers
ausgewählt wurde.
Drücken Sie "UP/Down", um die Spielzeit auszuwählen,
30/45/60 Sekunden.
Drücken Sie „PLAY“, um das Spiel zu beginnen.
Anzeigetafel „HOME“ zeigt Spieler 1, 3; Anzeigetafel
"VISITOR" zeigt Spieler 2, 4. Alle Schüsse sind bis zu den
letzten 10 Sekunden 2 Punkte wert, jedes Ergebnis zählt 3
Punkte. Countdown von 5 Sekunden bis zum Zug des
nächsten Spielers, wenn ein Spieler das Spiel beendet.
Spieler mit mehr erzielten Punkten gewinnt (LED blinkt bei
Spieler mit höherer Punktzahl). Drücken Sie "PLAY", um
dieses Spiel neu zu starten.
VORSICHT !
Änderungen oder Modifikationen, die nicht ausdrücklich
von der für die Konformität verantwortlichen Partei
genehmigt wurden, können die Berechtigung des
Benutzers zum Betrieb des Geräts aufheben.
Der Betrieb unterliegt den folgenden zwei Bedingungen:
(1) Dieses Gerät darf keine schädlichen Störungen
verursachen.
(2) Dieses Gerät muss alle empfangenen Störungen
akzeptieren, einschließlich Störungen, die einen
unerwünschten Betrieb verursachen können.
42 43

Tube-5
Ø22x755x580mm
Tube-6
Ø22x755x580mmØ22x890mm
Tube-4
Basketball de
17 cm de diamètre Scoreur électronique
Capteur de
commutateur
Tube-1 Tube-2
Ø22x580x440mm Ø22x685mm Ø22x890mm
Tube-3
1 x2 2 x2 3 x1
4 x1 5 x1 6 x1
13 x4 14 x1 15 x2
Ø22x830mm
Tube-7
Ø22x835mm
Tube-8
Ø22x595mm
Tube-9
7 x2 8 x2 9 x2
Tube-10
Ø22x650x385mm
Tube-11
Ø22x1067x520mm Ø12,7x1090mm
Tube-12
10 x2 11 x1 12 x3
44 45
Attention : Pour l'usage domestique seulement.
Attention : Les enfants doivent utiliser ce produit sous la surveillance de leurs parents.
Danger : Gardez toutes les petites pièces et les matériaux d'emballage de ce produit hors
de portée des bébés et des enfants pour éviter un risque d'étouffement.
Danger : La manque de la fixation pourrait entraîner un risque de basculement ou de chute.
Avant de Commencer
Veuillez lire attentivement toutes les instructions et les conserver pour la référence ultérieure.
FR
Avertissements Généraux
Avertissements
Le produit doit être installé et utilisé sous la surveillance d'un adulte.
Lisez attentivement chaque étape et suivez l'ordre correct.
Retirez tous les emballages, séparez et comptez toutes les pièces et le matériel.
Veuillez vous assurer que toutes les pièces soient correctement installées, une
installation incorrecte peut entraîner un danger.
Nous recommandons que, dans la mesure du possible, tous les articles soient
assemblés à proximité de la zone dans laquelle ils seront utilisés, afin d'éviter de
déplacer inutilement le produit une fois assemblé.
Assurez-vous que la surface soit solide pendant l'assemblage et placez toujours le
produit sur une surface plane et stable.
Veuillez vérifier et entretenir régulièrement les pièces les plus importantes pour la
suspension, la fixation, l'ancrage au sol.

Jante
Plaque de
support de jante
Boîtier de
commande avec fil
16 x1 17 x2 18 x2
Pompe de gonflage
avec aiguille
Filet de retour
de balle
Panneau arrière
21 x119 x1 20 x1
Rondelle M6 Boulon M6x20mm Boulon M6x29mm
22 x46 23 x16 24 x6
Boulon M6x42mm Boulon M6x50mm Boulon M6x35mm
25 x4 26 x4 27 x2
Boulon 4x28mmÉcrou M6 Boulon 3,5x10mm
28 x32 29 x4 30 x2
Plaque frontale de
scoreur électronique
31 x1
Clé
32 x1
Clé Allen
33 x1
Sangle auto
-adhésive
34 x2
Filet
P1 x2
Verrou à ressort
P2 x9
Insertion de poteau
en plastique
P3 x2 P4 x2
PIÈCES PRÉINSTALLÉES
1211109
876
INSTRUCTIONS DE MONTAGE:
1. Trouvez un endroit propre et de niveau pour commencer
l'assemblage de votre jeu de basket. Nous recommandons que deux
adultes travaillent ensemble pour assembler ce jeu de basket-ball.
2. Retirez toutes les pièces de la boîte et vérifiez que vous disposez
de toutes les pièces répertoriées, comme indiqué sur la page Liste
des pièces. Coupez ou déchirez soigneusement les quatre coins de la
boîte afin que le bas de la boîte puisse être utilisé comme surface de
travail.
AVANT L'ASSEMBLAGE - Veuillez inspecter et mettre
en page tous vos poteaux et pièces
54321
Goupille de
verrouillage
46 47
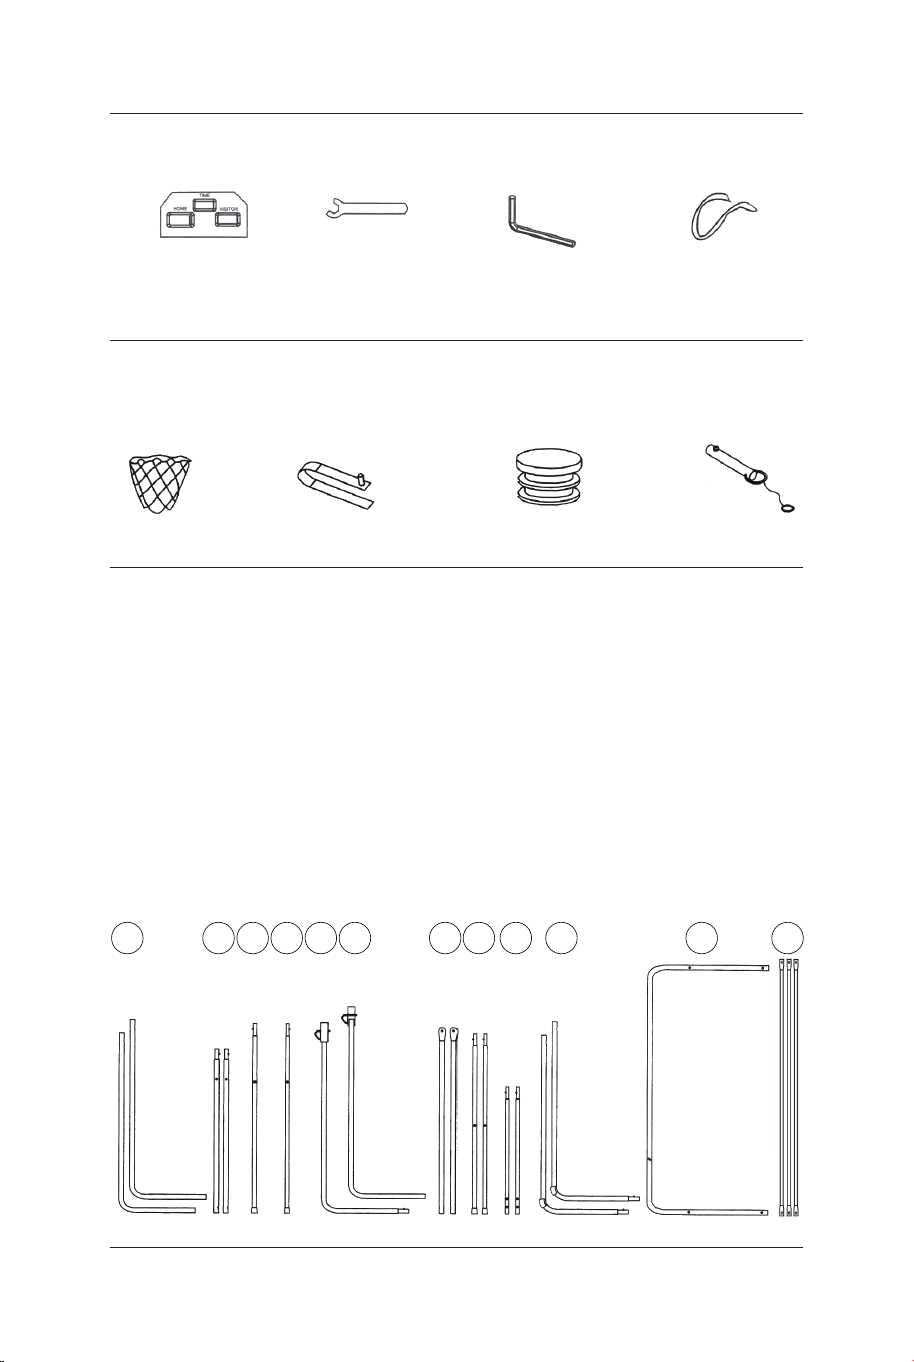

FIG.1 &2
3. Fixez les tubes-2 (#2) au tube-3 et au tube-4 (#3 et #4) à l'aide
d'un verrou à ressort (préinstallé) comme illustré à la FIG.1.
4. Fixez les tubes-7 (#7) aux tubes-8 (#8) à l'aide d'un verrou à
ressort (préinstallé) comme illustré à la FIG.2
P2
Verrou à ressort
P2
Verrou à ressort
P2
Verrou à ressort
8
7
8 x2
7 x2
6 x1
5 x1
4
4 x1
3
3 x1
2
2
2 x2
FIG.1
FIG.3
FIG.2
FIG.3
5. Fixez le tube-5 et le tube-6 (#5 et #6) ensemble à l'aide d'un
verrou à ressort (préinstallé) comme illustré à la FIG.3.
FIG.4
6. Fixez le tube-5 et le tube-6 (#5 et #6) au tube-3 et au tube-4 (#3
et #4) à l'aide des boulons (#26), des rondelles (#22) et des écrous
(#28 ), puis fixez le tube-5 et le tube-6 (#5 et #6) aux tubes-8 (#8) à
l'aide des boulons (#26), des rondelles (#22) et des écrous (#28)
comme indiqué dans FIG.4, 4A et 4B.
7. Fixez les tubes-7 et les tubes-8 (#7 et #8) aux tubes-2 (#2) à
l'aide d'un boulon (#24), des rondelles (#22) et de l'écrou (#28)
comme illustré à la FIG.4C, répétez cette étape pour l'autre côté.
Remarque : Assurez-vous que le verrou à ressort est orienté vers
le bas.
22 x6
24 x2
26 x4
28 x6
FIG.4A
FIG.4B
FIG.4
FIG.4C
22
22
22
24
26
26
28
28
28
8
8
7
7
6
5
4
3
2
2
48 49
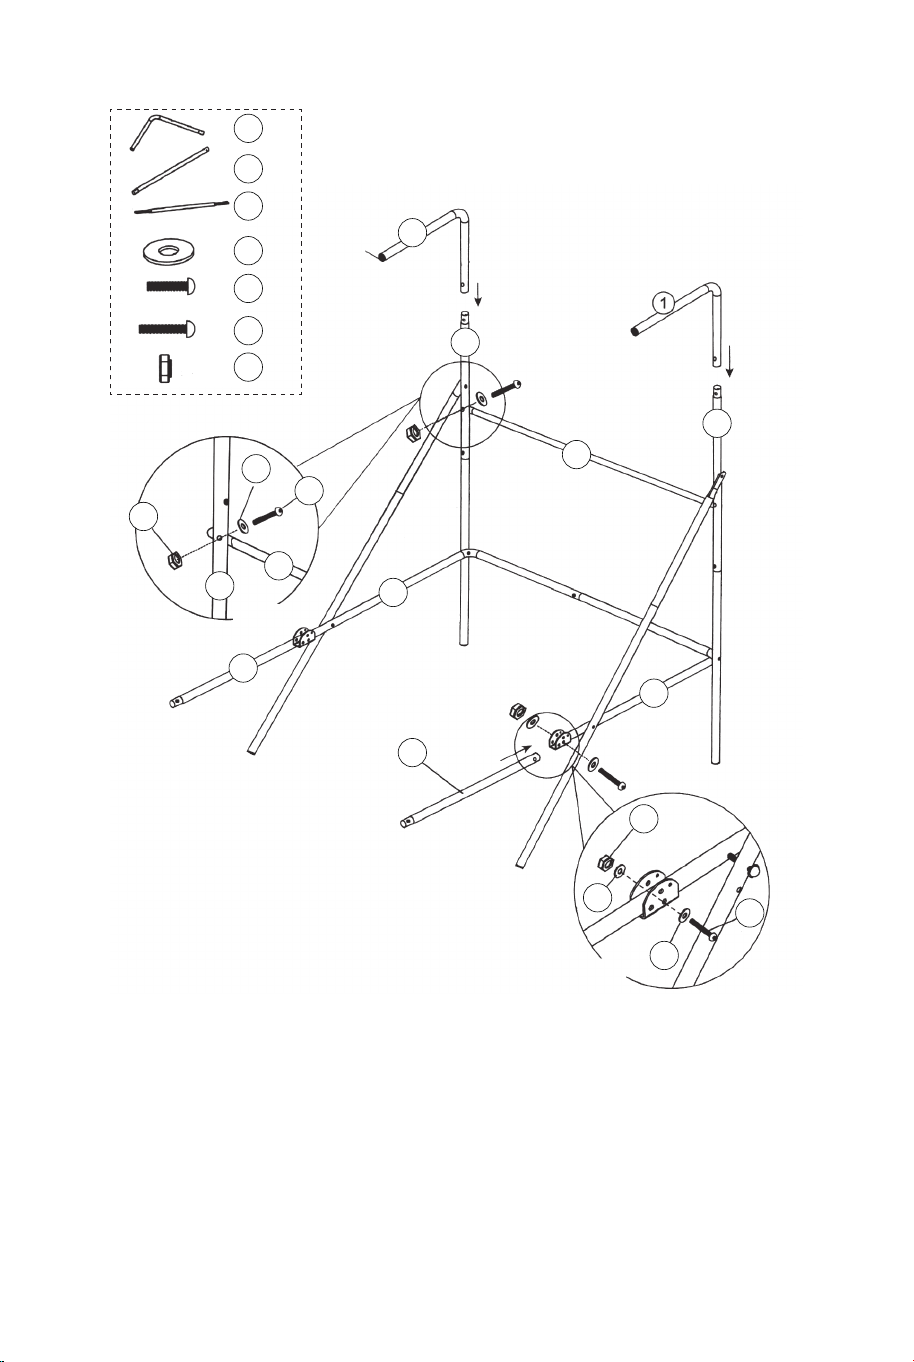
FIG.5
8. Fixez le tube-12 (#12) aux tubes-2 (#2) à l'aide des boulons
(#24), des rondelles (#22) et des écrous (#28) comme illustré à
la FIG.5A. Ensuite, insérez les tubes-1 (#1) dans les tubes-2
(#2) comme illustré à la FIG.5.
9. Fixez les tubes-9 (#9) au tube-5 et au tube-6 (#5 et #6) à
l'aide des boulons (#27), des rondelles (#22) et des écrous (#28)
comme illustré à la FIG.5 et 5B.
22 x6
24 x2
27 x2
28 x4
12 x1
9 x2
1 x2
22
22
22
24
27
28
28
12
12
9
9
6
5
2
2
2
1
FIG.5A
FIG.5B
FIG.5
P3
11
11 x1
11
10
10 x2
10
10
9
9
FIG.6
court
Long
P2
Verrou à ressort
P2
Verrou à ressort
FIG.6
10. Fixez les tubes-10 (#10) aux tubes-9 (#9) à l'aide du verrou
à ressort (préinstallé), puis fixez le tube-11 (#11) aux tubes-10
(#10) à l'aide d'un verrou à ressort (préinstallé) comme illustré à
la FIG.6.
50 51
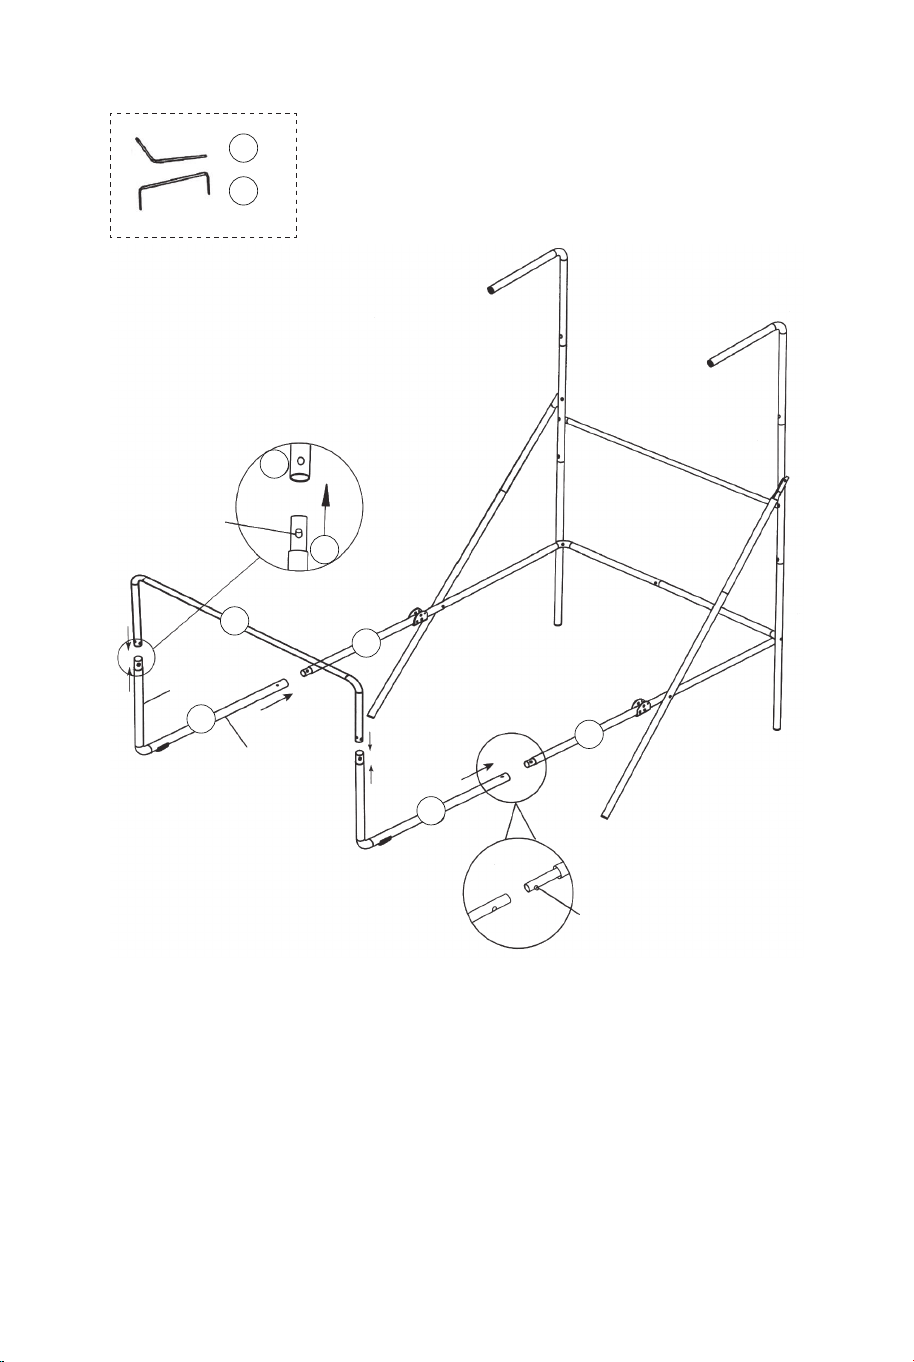
FIG.5
8. Fixez le tube-12 (#12) aux tubes-2 (#2) à l'aide des boulons
(#24), des rondelles (#22) et des écrous (#28) comme illustré à
la FIG.5A. Ensuite, insérez les tubes-1 (#1) dans les tubes-2
(#2) comme illustré à la FIG.5.
9. Fixez les tubes-9 (#9) au tube-5 et au tube-6 (#5 et #6) à
l'aide des boulons (#27), des rondelles (#22) et des écrous (#28)
comme illustré à la FIG.5 et 5B.
22 x6
24 x2
27 x2
28 x4
12 x1
9 x2
1 x2
22
22
22
24
27
28
28
12
12
9
9
6
5
2
2
2
1
FIG.5A
FIG.5B
FIG.5
P3
11
11 x1
11
10
10 x2
10
10
9
9
FIG.6
court
Long
P2
Verrou à ressort
P2
Verrou à ressort
FIG.6
10. Fixez les tubes-10 (#10) aux tubes-9 (#9) à l'aide du verrou
à ressort (préinstallé), puis fixez le tube-11 (#11) aux tubes-10
(#10) à l'aide d'un verrou à ressort (préinstallé) comme illustré à
la FIG.6.
50 51

FIG.7
21 x1
22 x24
23 x16
28 x16
18 x2
17 x2
15 x2
FIG.7
11. Fixez la jante (#17) et les plaques de support de jante (#18)
au panneau arrière (#21) à l'aide des boulons (#23), des
rondelles (#22) et des écrous (#28). Ensuite, fixez les capteurs
de commutateur (# 15) au panneau arrière (#21) à l'aide des
boulons (#23), des rondelles (#22) et des écrous (#28).
Assurez-vous d'utiliser des rondelles des deux côtés du
panneau comme illustré à la FIG.7.
28
28
21
22
22
22
23
23
18
18
17
17
15
15
29
29 x4
14
14 x1
FIG.8
31
31 x1
FIG.8
12. Fixez la plaque frontale du scoreur électronique (#31) à
l'avant du panneau arrière et connectez-la au scoreur
électronique (#14) à l'aide des boulons (#29) comme illustré à la
FIG.8.
52 53

FIG.7
21 x1
22 x24
23 x16
28 x16
18 x2
17 x2
15 x2
FIG.7
11. Fixez la jante (#17) et les plaques de support de jante (#18)
au panneau arrière (#21) à l'aide des boulons (#23), des
rondelles (#22) et des écrous (#28). Ensuite, fixez les capteurs
de commutateur (# 15) au panneau arrière (#21) à l'aide des
boulons (#23), des rondelles (#22) et des écrous (#28).
Assurez-vous d'utiliser des rondelles des deux côtés du
panneau comme illustré à la FIG.7.
28
28
21
22
22
22
23
23
18
18
17
17
15
15
29
29 x4
14
14 x1
FIG.8
31
31 x1
FIG.8
12. Fixez la plaque frontale du scoreur électronique (#31) à
l'avant du panneau arrière et connectez-la au scoreur
électronique (#14) à l'aide des boulons (#29) comme illustré à la
FIG.8.
52 53

22 x2
24 x2
28 x2
20 x1
12 x1
22
22
22
24
24
24
28
28
28
20
20
12
12
12
11
11
FIG.9A
FIG.9
FIG.9D
FIG.9B
P4
Goupille de verrouillage
FIG.9
13. Faites glisser les sangles élastiques et le manchon du filet
de retour de balle (#20) sur les tubes-1 (#1) comme indiqué sur
les FIG.9A, 9B et 9C.
14. Faites glisser le tube-12 (#12) à travers le manchon à l'avant
du filet de retour de balle (#20), fixez-le d'abord sur le côté
gauche à l'aide des boulons (#24), des rondelles (#22) et des
écrous (#28 ) comme illustré à la FIG.9D. Suivez la même
procédure sur le côté droit.
21
22
22
22 x8
25
25 x4
28
28 x4
20
12
12
1
FIG.10
FIG.10C
FIG.10A
P4
Goupille de verrouillage
P1
FIG.10
15. Avec l'aide d'un autre adulte, fixez le panneau arrière (#21)
aux tubes supérieurs 1 (#1) avec des boulons (#25), des
rondelles (#22) et des écrous (#28) comme illustré à la FIG.10A.
Faites glisser le tube 12 (#12) à travers le manchon à l'arrière
du filet de retour de balle (#20), comme illustré à la FIG.10B. À
chaque trou inférieur du panneau arrière, fixez d'abord le côté
gauche avec des boulons (#25), des rondelles (#22), des écrous
(#28) comme illustré à la FIG.10C. Suivez la même procédure
pour le côté droit.
16. Connectez la goupille de verrouillage (#A4) au tube-5 et au
tube-6 (#5 et #6) et insérez-la dans le tube-5 et le tube-6 (#5 et
#6) comme illustré à la FIG.10C.
FIG.9C
54 55

20
FIG.11
FIG.11A
30 x2
34 x2
34
30
11
16
11
16 x1
Boîtier de commande
Fil de commande
FIG.11
17. Fixez le boîtier de commande (#16) au milieu du tube 11
(#11) à l'aide de deux boulons (#30) comme illustré à la
FIG.11A.
18. Faites passer le reste du fil de commande à travers les
boucles du filet de retour de balle (#20). Placez le fil de
commande sur le tube-11 (#11) à l'aide des sangles
auto-adhésives (#34) comme illustré à la FIG.11.
14
Fil de commande
Scoreur électronique
Fil de capteur
Fil de capteur
FIG.12
FIG.12
19. Connectez le fil de capteur du capteur de commutateur (#15)
au scoreur électronique (#14) comme illustré à la FIG.12.
Connectez le fil de commande au scoreur électronique (#14)
comme indiqué sur les FIG.12 et 12A.
FIG.12A
FIL DE COMMANDE
VISITEUR MARCHE/ARRÊT
56 57

FIG.13
FIG.13
20. Pliez le jeu de basketball arcade lorsqu'il n'est pas utilisé et
insérez la goupille de verrouillage (#P4) comme illustré à la
FIG.13.
Remarque : La goupille de verrouillage (#P4) doit être retirée de
sa position d'origine lorsque la machine est utilisée avant de
l'insérer dans la nouvelle position une fois pliée.
P4
Goupille de verrouillage
IMPORTANT!
Assurez-vous d'utiliser la
goupille de verrouillage (#P4)
une fois pliée.
FONCTIONNEMENT DU SCORE ÉLECTRONIQUE
Installer les piles
Boîtier à piles : dévissez le boulon à l'aide d'un tournevis et ouvrez
le boîtier à piles. Insérez 3 piles "AA" (non incluses) dans l'ordre de
polarité indiqué à l'intérieur du couvercle. Fermez ensuite le
couvercle à l'aide d'un tournevis. Allumez l'alimentation à l'aide de
l'interrupteur MARCHE/ARRÊT.
Rappel :
a. Les piles doivent être installées selon la bonne polarisation (+ et
-) requise.
b. Veuillez nettoyer les contacts de la batterie ainsi que ceux des
appareils avant l'installation de la batterie.
c. Si le jeu n'est pas utilisé pendant une longue période, nous vous
recommandons de retirer les piles.
fil de commande
visiteur
MARCHE
/ARRÊT
AVERTISSEMENT :
1) Nécessite 3 piles "AA" (non incluses).
2) Ne mélangez pas les anciennes et les nouvelles piles.
3) Ne mélangez pas des piles alcalines, standard (carbone
zinc) ou rechargeables (nickel-cadmium).
58 59
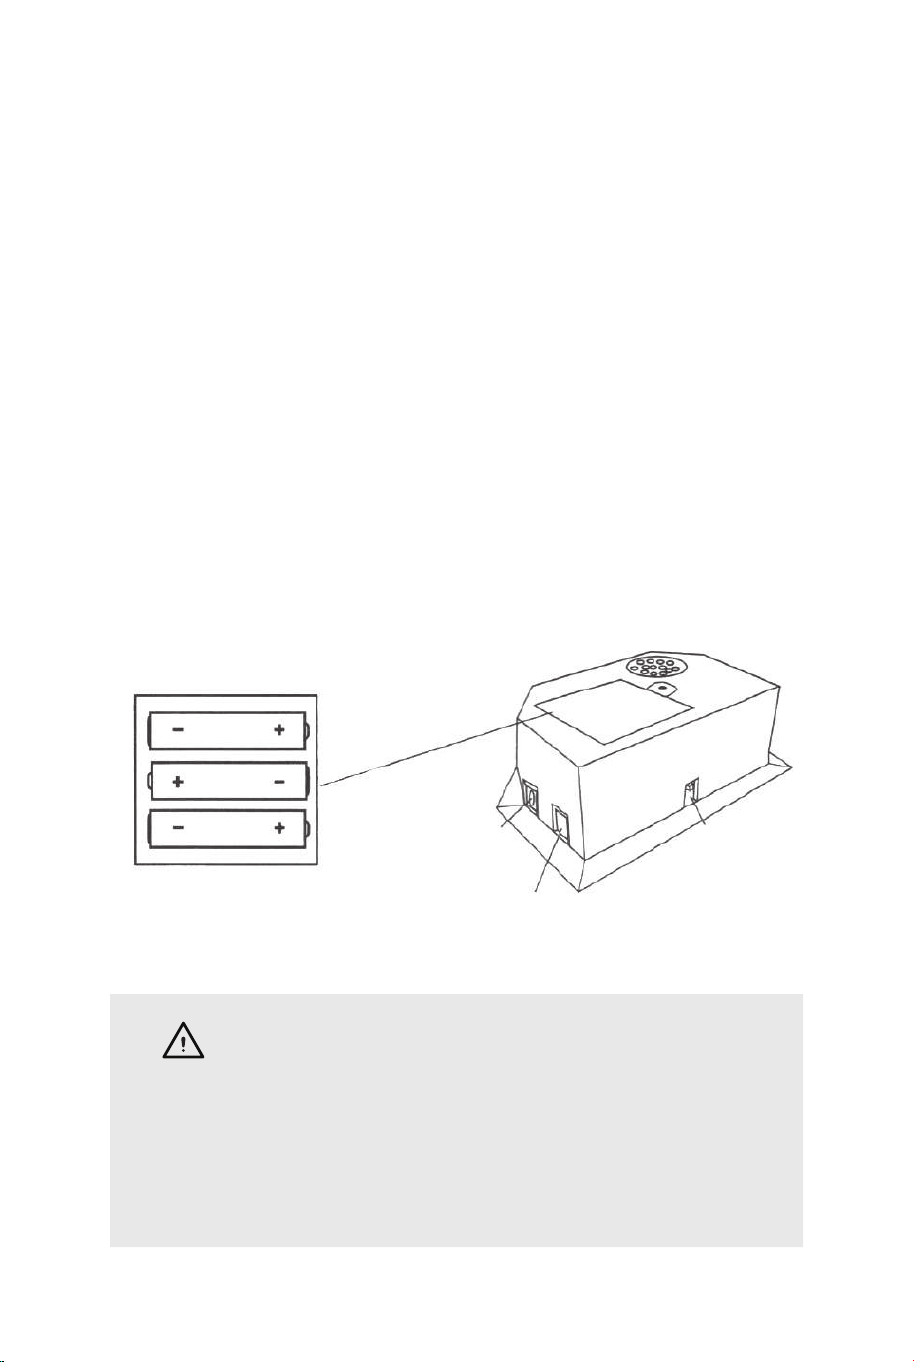
FIG.13
FIG.13
20. Pliez le jeu de basketball arcade lorsqu'il n'est pas utilisé et
insérez la goupille de verrouillage (#P4) comme illustré à la
FIG.13.
Remarque : La goupille de verrouillage (#P4) doit être retirée de
sa position d'origine lorsque la machine est utilisée avant de
l'insérer dans la nouvelle position une fois pliée.
P4
Goupille de verrouillage
IMPORTANT!
Assurez-vous d'utiliser la
goupille de verrouillage (#P4)
une fois pliée.
FONCTIONNEMENT DU SCORE ÉLECTRONIQUE
Installer les piles
Boîtier à piles : dévissez le boulon à l'aide d'un tournevis et ouvrez
le boîtier à piles. Insérez 3 piles "AA" (non incluses) dans l'ordre de
polarité indiqué à l'intérieur du couvercle. Fermez ensuite le
couvercle à l'aide d'un tournevis. Allumez l'alimentation à l'aide de
l'interrupteur MARCHE/ARRÊT.
Rappel :
a. Les piles doivent être installées selon la bonne polarisation (+ et
-) requise.
b. Veuillez nettoyer les contacts de la batterie ainsi que ceux des
appareils avant l'installation de la batterie.
c. Si le jeu n'est pas utilisé pendant une longue période, nous vous
recommandons de retirer les piles.
fil de commande
visiteur
MARCHE
/ARRÊT
AVERTISSEMENT :
1) Nécessite 3 piles "AA" (non incluses).
2) Ne mélangez pas les anciennes et les nouvelles piles.
3) Ne mélangez pas des piles alcalines, standard (carbone
zinc) ou rechargeables (nickel-cadmium).
58 59

FONCTIONNEMENT DU BOÎTIER DE COMMANDE
Appuyez sur "ON/OFF" pour activer le scoreur.
Le tableau de bord "HOME" affiche "01" (jeu prédéfini 1).
Appuyez sur "SELECT UP and DOWN" pour sélectionner un jeu.
Appuyez sur "PL AY" pour entrer dans le mode de jeu
sélectionné.
Appuyez sur "SOUND" pour activer/désactiver le son pendant la
lecture.
Appuyez sur "PAUSE" pour mettre en pause ou démarrer le
comptage du temps. Appuyez et maintenez enfoncé le bouton
"ON/OFF" pendant 3 secondes pour éteindre le marqueur.
Appuyez et maintenez le bouton "RESET" 3 secondes pour
réinitialiser les jeux. Remarque : Si aucun tir n'est effectué ou si
aucun bouton n'est enfoncé dans les 15 minutes, le marqueur
s'éteint automatiquement.
PANNEAU DE COMMANDE
ON/OFF
SOUND
PLAY
PAUSE RESET
CHOISISSEZ PARMI 8 OPTIONS DE JEU
DIFFÉRENTES
1. Course contre la montre
Appuyez sur "PLAY" pour entrer dans le jeu 1.
Appuyez sur « UP/Down » pour sélectionner un/plusieurs
lecteurs (P1/P2/P3/P4).
Appuyez sur "PLAY" après avoir sélectionné le nombre de
joueurs.
Appuyez sur "UP/Down" pour sélectionner le temps de lecture,
30/45/60 secondes. Appuyez sur "PLAY" pour commencer le jeu.
Le tableau de bord "HOME" affiche les joueurs 1, 3 ; Le tableau
de bord "VISITOR" montre les joueurs 2, 4.
Tous les coups valent 2 points jusqu'aux 10 dernières secondes,
chaque score compte 3 points.
Compte à rebours de 5 secondes jusqu'au tour du joueur suivant
lorsqu'un joueur termine la partie.
Le joueur avec plus de points marqués gagne (la LED clignotera
sur le joueur avec le score le plus élevé).
Appuyez sur "PLAY" pour redémarrer ce jeu.
2.3 Point Battre l'horloge
Appuyez sur "PL AY" pour entrer dans le jeu 2.
Appuyez sur « UP/Down » pour sélectionner un/plusieurs
lecteurs (P1/P2/P3/P4).
Appuyez sur "PLAY" après avoir sélectionné le nombre de
joueurs.
Appuyez sur "UP/Down" pour sélectionner le temps de lecture,
30/45/60 secondes. Appuyez sur "PL AY" pour commencer le
jeu.
Le tableau de bord "HOME" affiche les joueurs 1, 3 ; Le tableau
de bord "VISITOR" montre les joueurs 2, 4.
Tous les coups effectués comptent 3 points.
Compte à rebours de 5 secondes jusqu'au tour du joueur suivant
lorsqu'un joueur termine la partie.
Le joueur avec plus de points marqués gagne (la LED clignotera
sur le joueur avec le score le plus élevé).
Appuyez sur "PLAY" pour redémarrer ce jeu.
3. Contre-attaque
Appuyez sur "PLAY" pour entrer dans le jeu 3.
Appuyez sur « UP/Down » pour sélectionner plusieurs lecteurs
(P2/P4).
Appuyez sur "PL AY" pour commencer le jeu.
Prise de vue réalisée dans le cadre "HOME", +2 points marqués
affichés sur le tableau
"HOME" et -2 points pour "VISITEUR".
Prise de vue réalisée dans le cadre "VISITEUR", +2 points
marqués affichés sur le tableau
"VISITEUR" et -2 points pour "MAISON".
Une fois qu'un joueur marque 10 points, qui gagne et le jeu est
terminé.
Appuyez sur "PLAY" pour redémarrer ce jeu.
4. Cheval
a. Appuyez sur "PL AY" pour entrer dans la partie 4.
b. Appuyez sur "UP/Down" pour sélectionner plusieurs joueurs
(P2/P3/P4).
SELECT
UP
SELECT
DOWN
60 61

c. Appuyez sur "PLAY" après avoir sélectionné le nombre de
joueurs.
d. Le joueur doit effectuer un tir en 2 secondes.
e. Le premier joueur peut tirer dans n'importe quel cerceau
(domicile ou visiteur). Si le premier joueur marque en 2
secondes, aucune lettre n'est donnée. Le jeu continue pour le
joueur suivant. Le tableau d'affichage indiquera "joueur
suivant (P2/P3/P4)" et la LED clignotera deux fois en une
seconde. Après le flash, le joueur suivant doit reproduire le tir
dans le même cerceau que celui choisi par le premier joueur.
f. Si le joueur ne peut pas marquer dans les 2 secondes, il
reçoit la première lettre "H" qui s'affiche sur le tableau des
scores. Le jeu reste pour le même joueur jusqu'à ce que le
joueur marque. Si le joueur ne marque pas, il reçoit la lettre
"O" suivie de "R", "S", "E". Si la lettre "E" est donnée, le
joueur est éliminé.
g. Le premier joueur à épeler "cheval" perd. Les joueurs
continuent à répéter les étapes d.e.f. jusqu'à la fin du jeu.
h. Le dernier joueur à épeler "cheval" gagne.
i. Appuyez sur "PLAY" pour recommencer ce jeu.
5. Point de contrôle
Appuyez sur "PLAY" pour entrer dans le jeu 5.
Appuyez sur "UP/Down" pour sélectionner un ou plusieurs
joueurs (P1/P2/P3/P4).
Appuyez sur "PLAY" pour commencer le jeu.
"HOME" affiche "joueur", "VISITOR" affiche "24" points, temps
de jeu préétabli de 40 secondes.
Les points marqués s'affichent sur le tableau d'affichage
"HOME".
Avant que le temps ne soit écoulé, lorsque 24/52/68/86 points
sont marqués, le temps de jeu augmente de 10/20/10/20
secondes respectivement.
Compte à rebours de 5 secondes avant le tour du joueur
suivant lorsqu'un joueur termine le jeu.
Le joueur ayant marqué le plus de points gagne (la LED
clignote sur le joueur ayant le plus de points).
Le jeu est terminé lorsqu'un joueur obtient 98 points.
Appuyez sur "PLAY" pour redémarrer ce jeu.
CHOISISSEZ PARMI 8 OPTIONS DE JEU
DIFFÉRENTES
6. Autour du monde
Utilisez du ruban adhésif pour marquer les lignes de tir.
Appuyez sur "PLAY" pour entrer dans le jeu 6.
Appuyez sur "UP/Down" pour sélectionner un/plusieurs
joueurs (P1/P2/P3/P4).
Appuyez sur "PLAY" après avoir sélectionné le nombre de
joueurs.
Le tableau d'affichage "HOME" affiche les joueurs 1/2/3/4,
"VISITOR" affiche les points marqués.
Une fois que le score atteint 10 points ou que le temps atteint
99 secondes, un compte à rebours de 5 secondes avant le
tour du joueur suivant lorsqu'un joueur termine la partie. Le
joueur qui termine la partie en premier gagne (le LED clignote
sur le gagnant). Appuyez sur "PLAY" pour relancer le jeu.
7. Tir à gauche et à droite
Appuyez sur "PLAY" pour entrer dans le jeu 7.
Appuyez sur « UP/Down » pour sélectionner un/plusieurs
lecteurs (P1/P2/P3/P4).
Appuyez sur "PLAY" après avoir sélectionné le nombre de
joueurs.
Appuyez sur "UP/Down" pour sélectionner le temps de
lecture, 30/45/60 secondes.
Appuyez sur "PLAY" pour commencer le jeu.
Le tableau de bord "HOME" affiche le joueur, "VISITOR"
affiche les points.
Faites un tir dans le cadre "HOME" lorsque LED clignote sur
"HOME", 2 points marqués s'affichent sur "HOME".
Faites une prise de vue dans le cadre "VISITOR" lorsque la
LED clignote sur "VISITOR", 2 points marqués s'affichent sur
"VISITOR".
Compte à rebours de 5 secondes jusqu'au tour du joueur
suivant lorsqu'un joueur termine la partie. Le joueur avec plus
de points marqués gagne (la LED clignotera sur le joueur
avec le score le plus élevé).
Appuyez sur "PLAY" pour redémarrer ce jeu.
62 63

8. Un à un
Appuyez sur "PL AY" pour accéder au jeu 8.
Appuyez sur "UP/Down" pour sélectionner un/plusieurs
lecteurs (P 1/P2/P3/P4).
Appuyez sur "PLAY" après avoir sélectionné le nombre de
joueurs.
Appuyez sur "UP/Down" pour sélectionner le temps de
lecture, 30/45/60 secondes.
Appuyez sur "PLAY" pour commencer le jeu.
Le tableau de bord "HOME" affiche les joueurs 1, 3 ; Le
tableau de bord "VISITEUR" indique Joueur2, 4. Tous les
coups valent 2 points jusqu'aux 10 dernières secondes,
chaque score compte 3 points. Compte à rebours de 5
secondes jusqu'au tour du joueur suivant lorsqu'un joueur
termine la partie. Le joueur avec plus de points marqués
gagne (la LED clignotera sur le joueur avec le score le plus
élevé).
Appuyez sur "PLAY" pour redémarrer ce jeu.
ATTENTION !
Les changements ou modifications non expressément
approuvés par la partie responsable de la conformité
pourraient annuler l'autorité de l'utilisateur à faire
fonctionner l'équipement.
Le fonctionnement est soumis aux deux conditions
suivantes :
(1) Cet appareil ne doit pas causer d'interférences
nuisibles.
(2) Cet appareil doit accepter toute interférence reçue, y
compris les interférences susceptibles de provoquer un
fonctionnement indésirable.
64 65
Atención: Solo para uso doméstico.
Atención: Los niños deben utilizar este producto bajo la supervisión de sus padres.
Peligro: Mantenga todas las piezas pequeñas y los materiales de embalaje de este producto
fuera del alcance de los bebés y los niños, ya que de lo contrario pueden suponer un peligro
de asfixia.
Peligro: La falta de fijación puede provocar un riesgo de vuelco o de caída.
Antes de Empezar
Lea atentamente todas las instrucciones y consérvelas para futuras consultas.
ES
Advertencias Generales
Advertencias
El producto debe instalarse y usarse bajo la supervisión de un adulto.
Lea detenidamente cada paso y siga el orden correcto.
Quite todo el embalaje, separe y cuente todas las piezas y los accesorios.
Asegúrese de que todas las piezas estén instaladas correctamente, una instalación
incorrecta puede provocar un peligro.
Recomendamos que, siempre que sea posible, todos los elementos se monten cerca de
la zona en la que se van a utilizar, para evitar mover el producto innecesariamente una
vez montado.
Asegure una superficie segura durante el montaje, y coloque el producto siempre sobre
una superficie plana, firme y estable.
Por favor, revise y mantenga el producto regularmente, y las piezas más importantes
deben estar suspendidas, fijadas o ancladas bien al suelo.

Tubo-5
Ø22x755x580mm
Tubo-6
Ø22x755x580mmØ22x890mm
Tubo-4
Baloncesto de
17 cm de diámetro Marcador electrónico
Sensor de
interruptor
Tubo-1 Tubo-2
Ø22x580x440mm Ø22x685mm Ø22x890mm
Tubo-3
1 x2 2 x2 3 x1
4 x1 5 x1 6 x1
13 x4 14 x1 15 x2
Ø22x830mm
Tubo-7
Ø22x835mm
Tubo-8
Ø22x595mm
Tubo-9
7 x2 8 x2 9 x2
Tubo-10
Ø22x650x385mm
Tubo-11
Ø22x1067x520mm Ø12,7x1090mm
Tubo-12
10 x2 11 x1 12 x3
Aro
Placa de
soporte de aro
Caja de control
con cable
16 x1 17 x2 18 x2
Bomba de inflado
con aguja
Red de retorno
de baloncesto Tablero trasero
21 x119 x1 20 x1
Arandela M6 Perno M6x20mm Perno M6x29mm
22 x46 23 x16 24 x6
Perno M6x42mm Perno M6x50mm Perno M6x35mm
25 x4 26 x4 27 x2
Perno 4x28mmTuerca M6 Perno 3,5x10mm
28 x32 29 x4 30 x2
66 67

Placa frontal del
marcador electrónico
31 x1
Llave
32 x1
Llave Allen
33 x1
Correa
autoadhesiva
34 x2
Red
P1 x2
Bloqueo de muelle
P2 x9
Inserto de poste
de plástico
P3 x2
Pasador de
bloqueo
P4 x2
PIEZAS PREINSTALADAS
12
11
109876
INSTRUCCIONES DE MONTAJE:
1. Encuentre un lugar limpio y nivelado para comenzar el montaje del
producto. Recomendamos que dos adultos trabajen juntos para
montar este producto.
2. Saque todas las piezas de la caja y verifique que tiene todas las
piezas enumeradas en la página de la lista de piezas. Corte o rasgue
con cuidado las cuatro esquinas de la caja para que el fondo de la
misma pueda ser utilizado como su superficie de trabajo
ANTES DEL MONTAJE - Por favor, inspeccione y
distribuya todos los postes y las piezas.
54321
FIG.1 y 2
3. Fije los tubos-2 (#2) al tubo-3 y al tubo-4 (#3 y #4) utilizando el
bloqueo de resorte (preinstalado) como se muestra en la FIG.1.
4. Fije los tubos-7 (#7) a los tubos-8 (#8) utilizando el bloqueo de
resorte (preinstalado) como se muestra en la FIG.2
P2
Bloqueo
de muelle
P2
Bloqueo
de muelle
P2
Bloqueo de muelle
8
7
8 x2
7 x2
6 x1
5 x1
4
4 x1
3
3 x1
2
2
2 x2
FIG.1
FIG.3
FIG.2
FIG.3
5. Fije el tubo-5 y el tubo-6 (#5 y #6) juntos utilizando el bloqueo
de resorte (preinstalado) como se muestra en la FIG.3.
68 69

FIG.4
6. Fije el tubo-5 y el tubo-6 (#5 y #6) al tubo-3 y al tubo-4 (#3 y #4)
utilizando los pernos (#26), las arandelas (#22) y las tuercas (#28),
y luego fije el tubo-5 y el tubo-6 (#5 y #6) a los tubos-8 (#8)
utilizando los pernos (#26), las arandelas (#22) y las tuercas (#28)
como se muestra en la FIG.4, 4A y 4B.
7. Fije los tubos-7 y los tubos-8 (#7 y #8) a los tubos-2 (#2)
utilizando el perno (#24), la arandela (#22) y la tuerca (#28) como
se muestra en la FIG.4C, repita este paso para el otro lado.
Nota: Asegúrese de que el bloqueo del resorte esté orientado
hacia abajo.
22 x6
24 x2
26 x4
28 x6
FIG.4A
FIG.4B
FIG.4
FIG.4C
22
22
22
24
26
26
28
28
28
8
8
7
7
6
5
4
3
2
2
FIG.5
8. Fije el tubo-12 (#12) a los tubos-2 (#2) utilizando los pernos
(#24), las arandelas (#22) y las tuercas (#28) como se muestra
en la FIG.5A. Y luego inserte los tubos-1 (#1) en los tubos-2
(#2) como se muestra en la FIG.5.
9. Fije los tubos-9 (#9) al tubo-5 y al tubo-6 (#5 y #6) utilizando
los pernos (#27), las arandelas (#22) y las tuercas (#28) como
se muestra en la FIG.5 y 5B.
22 x6
24 x2
27 x2
28 x4
12 x1
9 x2
1 x2
22
22
22
24
27
28
28
12
12
9
9
6
5
2
2
2
1
FIG.5A
FIG.5B
FIG.5
P3
70 71

FIG.4
6. Fije el tubo-5 y el tubo-6 (#5 y #6) al tubo-3 y al tubo-4 (#3 y #4)
utilizando los pernos (#26), las arandelas (#22) y las tuercas (#28),
y luego fije el tubo-5 y el tubo-6 (#5 y #6) a los tubos-8 (#8)
utilizando los pernos (#26), las arandelas (#22) y las tuercas (#28)
como se muestra en la FIG.4, 4A y 4B.
7. Fije los tubos-7 y los tubos-8 (#7 y #8) a los tubos-2 (#2)
utilizando el perno (#24), la arandela (#22) y la tuerca (#28) como
se muestra en la FIG.4C, repita este paso para el otro lado.
Nota: Asegúrese de que el bloqueo del resorte esté orientado
hacia abajo.
22 x6
24 x2
26 x4
28 x6
FIG.4A
FIG.4B
FIG.4
FIG.4C
22
22
22
24
26
26
28
28
28
8
8
7
7
6
5
4
3
2
2
FIG.5
8. Fije el tubo-12 (#12) a los tubos-2 (#2) utilizando los pernos
(#24), las arandelas (#22) y las tuercas (#28) como se muestra
en la FIG.5A. Y luego inserte los tubos-1 (#1) en los tubos-2
(#2) como se muestra en la FIG.5.
9. Fije los tubos-9 (#9) al tubo-5 y al tubo-6 (#5 y #6) utilizando
los pernos (#27), las arandelas (#22) y las tuercas (#28) como
se muestra en la FIG.5 y 5B.
22 x6
24 x2
27 x2
28 x4
12 x1
9 x2
1 x2
22
22
22
24
27
28
28
12
12
9
9
6
5
2
2
2
1
FIG.5A
FIG.5B
FIG.5
P3
70 71

11
11 x1
11
10
10 x2
10
10
9
9
FIG.6
Corto
Largo
P2
Bloqueo
de muelle
P2
Bloqueo
de muelle
FIG.6
10. Fije los tubos-10 (#10) a los tubos-9 (#9) usando el bloqueo
de resorte (preinstalado), y luego fije el tubo-11 (#11) a los
tubos-10 (#10) usando el bloqueo de resorte (preinstalado)
como se muestra en la FIG.6.
FIG.7
21 x1
22 x24
23 x16
28 x16
18 x2
17 x2
15 x2
FIG.7
11. Fije los aros (#17) y las placas de soporte de aro (#18) al
tablero trasero (#21) utilizando los pernos (#23), las arandelas
(#22) y las tuercas (#28). A continuación, fije los sensores de
interruptor (#15) al tablero trasero (#21) utilizando los pernos
(#23), las arandelas (#22) y las tuercas (#28). Asegúrese de
utilizar las arandelas en ambos lados del tablero como se
muestra en la FIG.7.
28
28
21
22
22
22
23
23
18
18
17
17
15
15
72 73
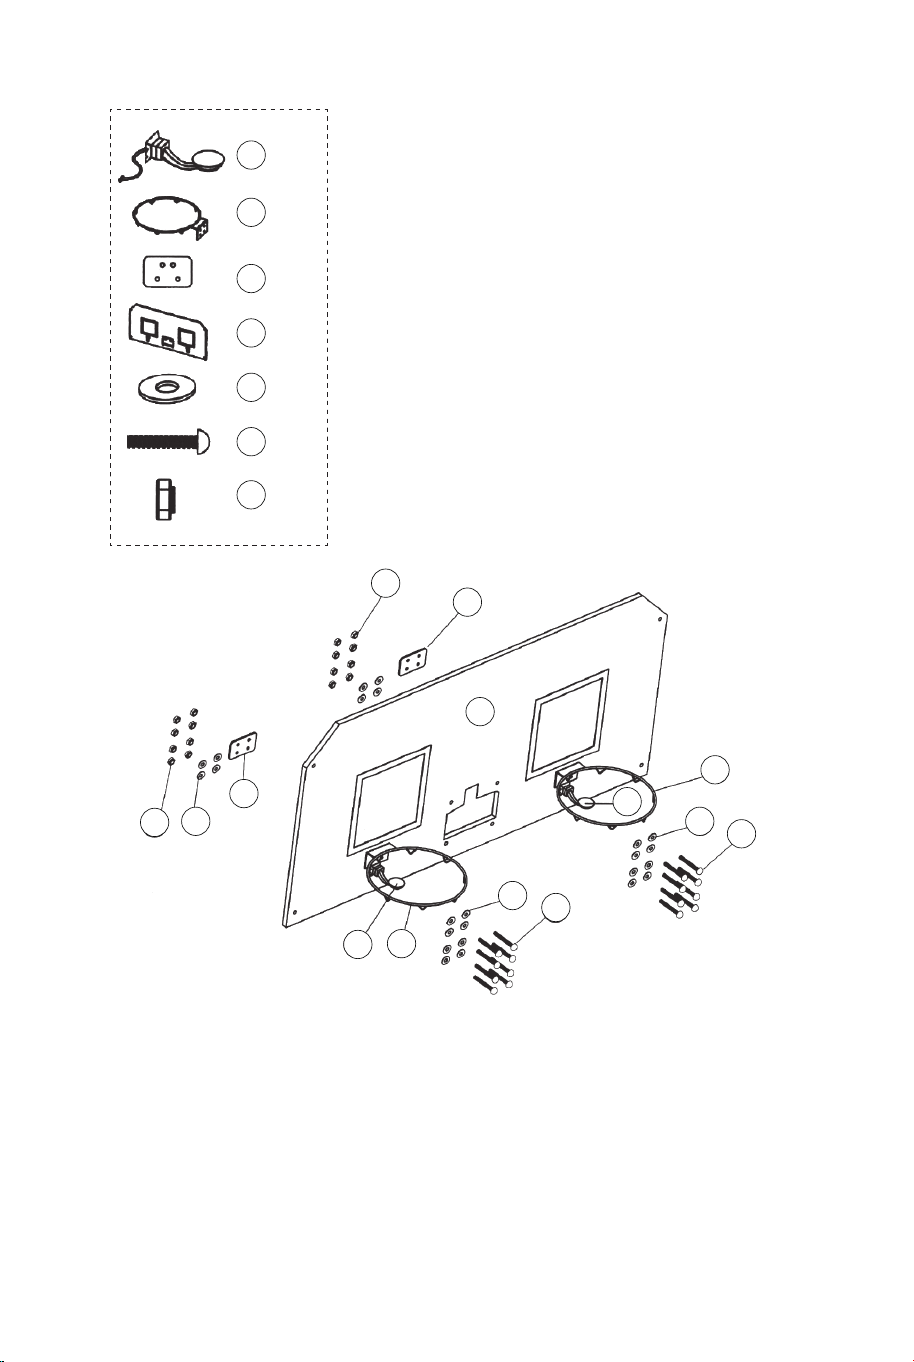
11
11 x1
11
10
10 x2
10
10
9
9
FIG.6
Corto
Largo
P2
Bloqueo
de muelle
P2
Bloqueo
de muelle
FIG.6
10. Fije los tubos-10 (#10) a los tubos-9 (#9) usando el bloqueo
de resorte (preinstalado), y luego fije el tubo-11 (#11) a los
tubos-10 (#10) usando el bloqueo de resorte (preinstalado)
como se muestra en la FIG.6.
FIG.7
21 x1
22 x24
23 x16
28 x16
18 x2
17 x2
15 x2
FIG.7
11. Fije los aros (#17) y las placas de soporte de aro (#18) al
tablero trasero (#21) utilizando los pernos (#23), las arandelas
(#22) y las tuercas (#28). A continuación, fije los sensores de
interruptor (#15) al tablero trasero (#21) utilizando los pernos
(#23), las arandelas (#22) y las tuercas (#28). Asegúrese de
utilizar las arandelas en ambos lados del tablero como se
muestra en la FIG.7.
28
28
21
22
22
22
23
23
18
18
17
17
15
15
72 73
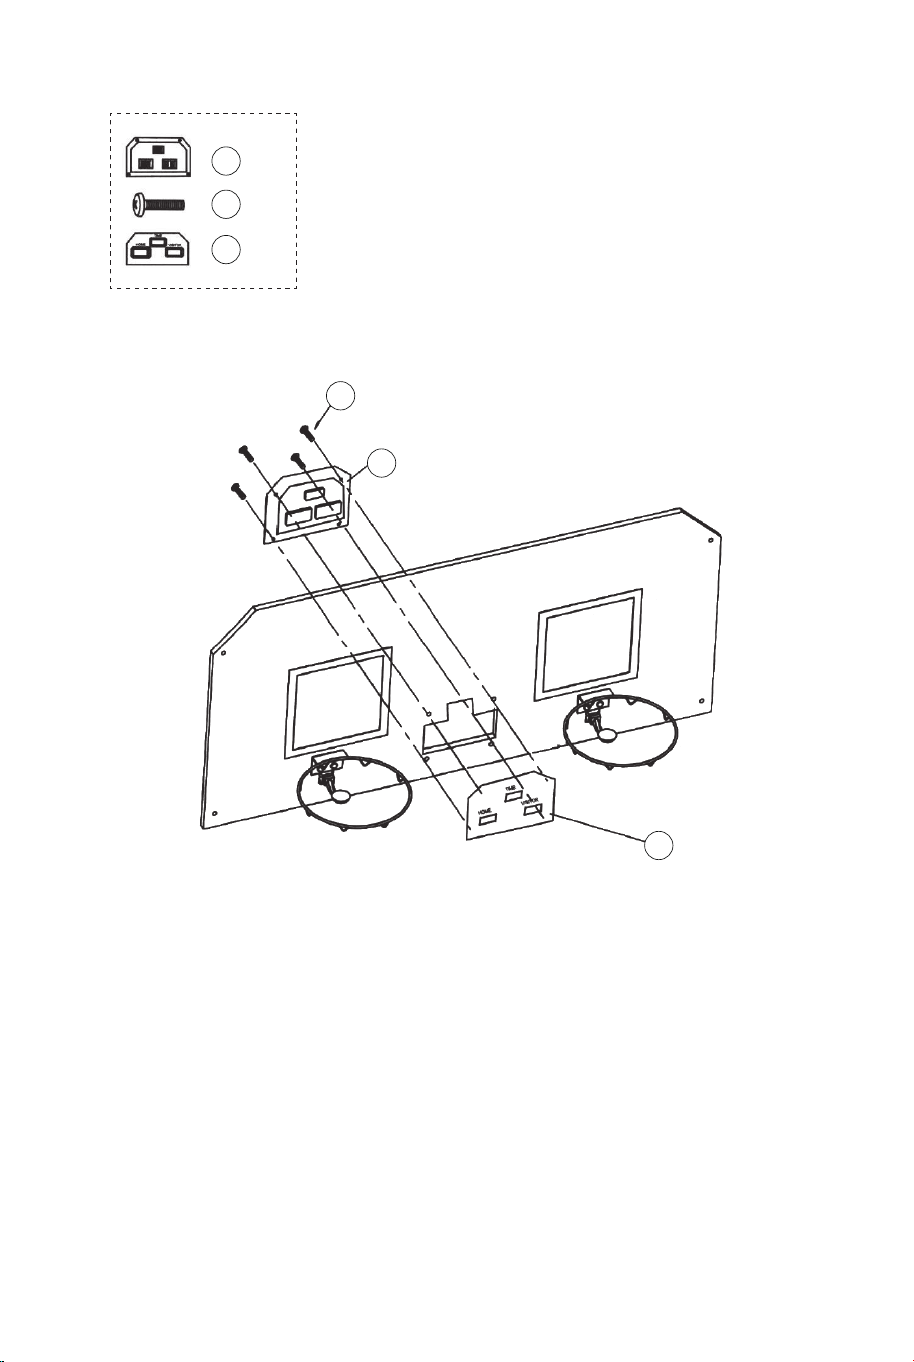
29
29 x4
14
14 x1
FIG.8
31
31 x1
FIG.8
12. Fije la placa frontal del marcador electrónico (#31) a la parte
frontal del tablero trasero y conecte con el marcador electrónico
(#14) usando los pernos (#29) como se muestra en la FIG.8.
22 x2
24 x2
28 x2
20 x1
12 x1
22
22
22
24
24
24
28
28
28
20
20
12
12
12
11
11
FIG.9A
FIG.9
FIG.9D
FIG.9B
P4
Pasador de bloqueo
FIG.9
13. Deslice las correas elásticas y la manga de la red de retorno
de baloncesto (#20) en los tubos-1 (#1) como se muestra en la
FIG.9A, 9B y 9C.
14. Deslice el tubo-12 (#12) a través de la manga en la parte
delantera de la red de retorno de baloncesto (#20), fije en el
lado izquierdo primero usando los pernos (#24), las arandelas
(#22) y las tuercas (#28) como se muestra en la FIG.9D. Siga el
mismo procedimiento en el lado derecho.
FIG.9C
74 75

21
22
22
22 x8
25
25 x4
28
28 x4
20
12
12
1
FIG.10
FIG.10C
FIG.10A
P4
Pasador de bloqueo
P1
FIG.10
15.Con la ayuda de otro adulto, fije el tablero trasero (#21) a los
tubos superiores-1 (#1) usando los pernos (#25), las arandelas
(#22), las tuercas (#28) como se muestra en la FIG.10A. Deslice
el tubo 12 (#12) a través del manguito en la parte posterior de la
red de retorno de baloncesto (#20), como se muestra en la
FIG.10B. En cada uno de los agujeros inferiores del tablero, fije
primero el lado izquierdo con los tornillos (#25), las arandelas
(#22), las tuercas (#28) como se muestra en la FIG.10C. Siga el
mismo procedimiento para el lado derecho.
16. Conecte el pasador de bloqueo (#P4) al tubo-5 y al tubo-6
(#5 y #6) e insértelo en el tubo-5 y en el tubo-6 (#5 y #6) como
se muestra en la FIG.10C.
20
FIG.11
FIG.11A
30 x2
34 x2
34
30
11
16
11
16 x1
Caja de control
Cable de control
FIG.11
17. Fije la caja de control (#16) al centro del tubo-11 (#11)
utilizando dos pernos (#30) como se muestra en la FIG.11A.
18. Pase el resto del cable de control a través de los bucles
de la red de retorno de baloncesto (#20). Coloque el cable de
control en el tubo-11 (#11) utilizando las correas
autoadhesivas (#34) como se muestra en la FIG.11.
76 77
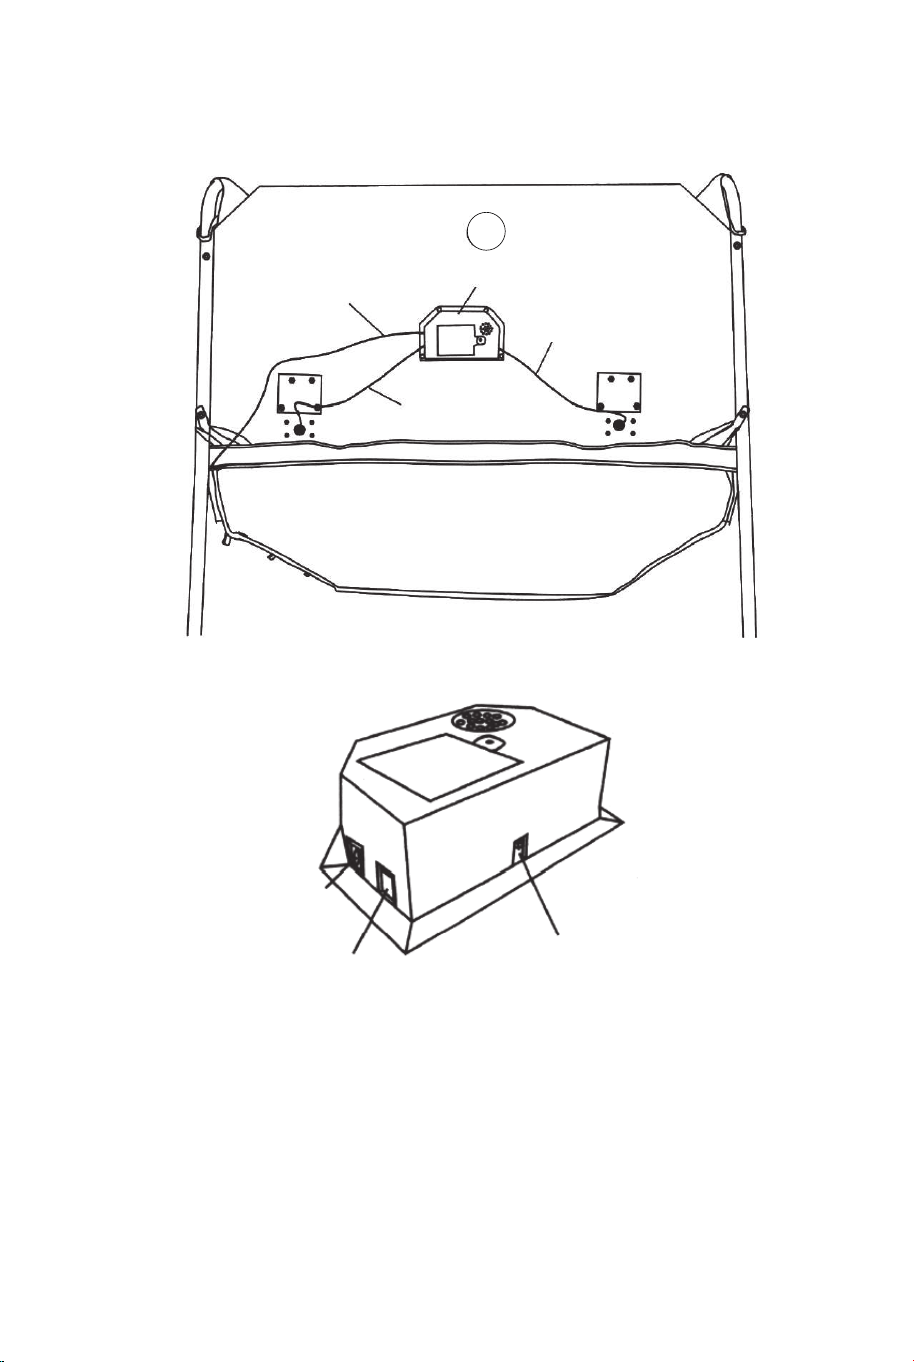
14
Cable de control
Marcador electrónico
Cable de sensor
Cable de sensor
FIG.12
FIG.12
19. Conecte el cable de sensor del sensor de interruptor (#15) al
marcador electrónico (#14) como se muestra en la FIG.12.
Conecte el cable de control al marcador electrónico (#14) como
se muestra en la FIG.12 y 12A.
FIG.12A
CABLE DE
CONTROL
VISITANTE
ENCENDIDO
/APAGADO
FIG.13
FIG.13
20. Pliegue la máquina de tiro de baloncesto cuando no esté en
uso e inserte el pasador de bloqueo (#P4) como se muestra en
la FIG.13.
Nota: El pasador de bloqueo (#P4) debe retirarse de su posición
original cuando la máquina está siendo utilizada antes de
insertarlo en la nueva posición cuando se pliega.
P4
Pasador de bloqueo
¡IMPORTANTE!
Asegúrese de utilizar el
pasador de bloqueo (#P4)
cuando se pliegue.
78 79
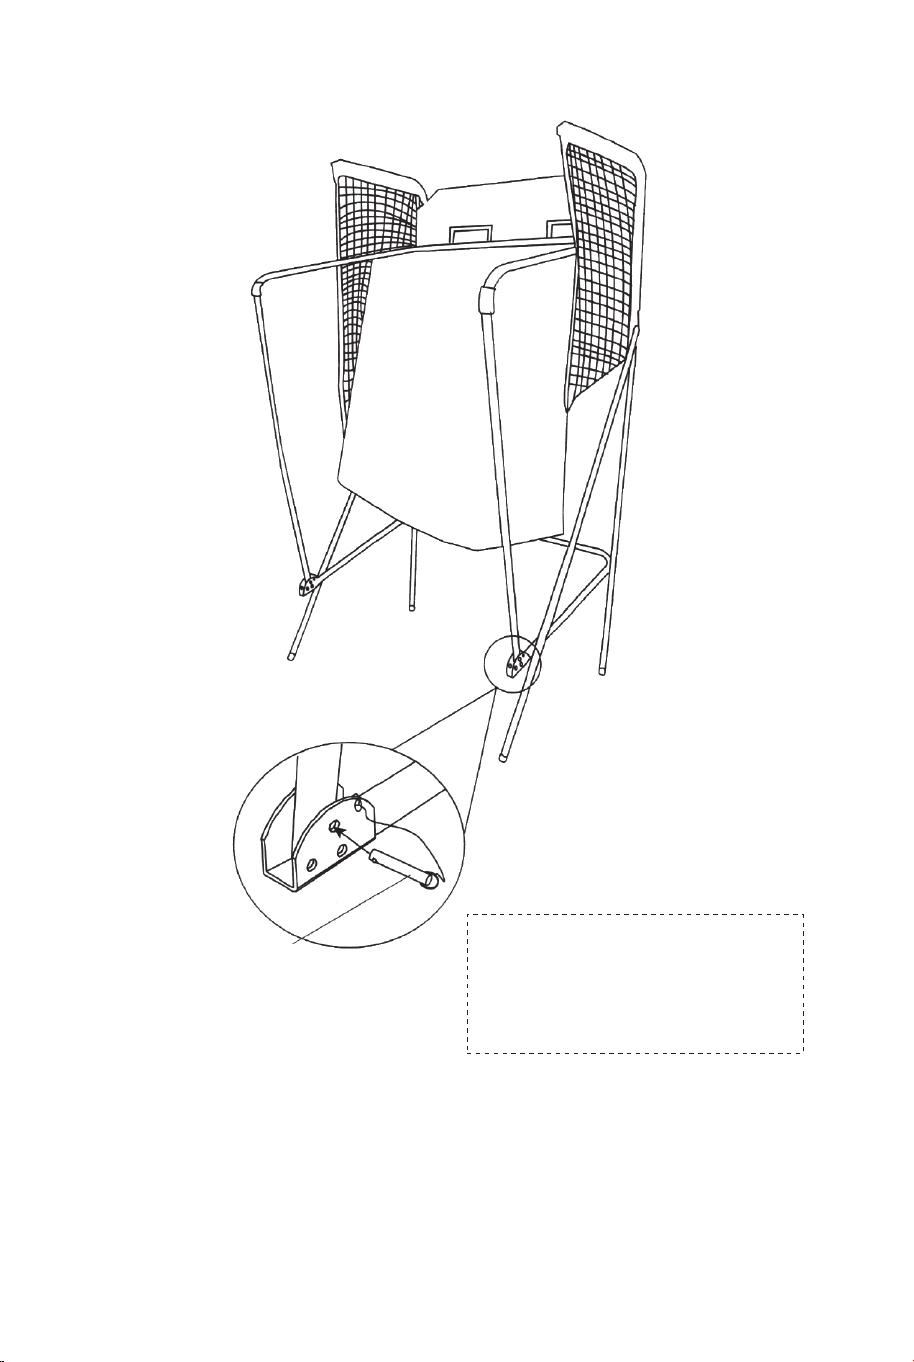

OPERACIÓN DEL MARCADOR ELECTRÓNICO
Instalar Pilas
Caja de Pilas: Desenrosque el perno con un destornillador y abra
la caja de pilas. Inserte 3 pilas "AA" (no incluidas) en el orden de
polaridad indicado en la tapa interior. A continuación, cierre la tapa
con un destornillador. Encienda el producto con el interruptor
ON/OFF (ENCENDIDO/APAGADO).
Recordatorio:
a. Las pilas deben ser instaladas según la polaridad correcta (+ y
-) requerida.
b. Por favor, limpie los contactos de las pilas y también los de los
dispositivos antes de la instalación de las pilas.
c. Si el producto no se va a utilizar durante un largo periodo de
tiempo, recomendamos que se quiten las pilas.
CABLE DE
CONTROL
VISITANTE
ENCENDIDO
/APAGADO
ADVERTENCIA
1) Requiere 3 pilas "AA" (no incluidas).
2) No mezcle pilas viejas y nuevas.
3) No mezcle pilas alcalinas, estándar (carbono-zinc) o
recambiables (níquel-cadmio).
OPERACIÓN DE LA CAJA DE CONTROL
Presione "ON/OFF" ("ENCENDIDO/APAGADO") para activar el marcador.
El marcador "HOME" ("LOCAL") muestra "01" (juego preestablecido 1).
Presione "SELECT UP y DOWN" ("ARRIBA y ABAJO") para seleccionar un
juego.
Presione "PLAY" ("JUGAR") para entrar en el modo de juego seleccionado.
Presione "SOUND" ("SONIDO") para activar/desactivar el sonido durante el
juego. Presione "PAUSE" ("PAUSA") para pausar o iniciar el conteo de
tiempo.
Mantenga presionado el botón "ON/OFF" 3 segundos para apagar el
marcador.
Mantenga presionado el botón "RESET" ("REINICIAR") 3 segundos para
reiniciar los juegos.
Nota: Si no se realiza ningún tiro o no se presiona ningún botón en 15
minutos, el marcador se apagará automáticamente.
PANEL DE CONTROL
ON/OFF
SOUND
PLAY
PAUSE RESET
ELEGIR ENTRE 8 OPCIONES DE JUEGO DIFERENTES
1. Beat the Time Clock (Vencer al Reloj)
Presione "PLAY" para entrar en el juego 1.
Presione "UP/DOWN" para seleccionar uno o varios jugadores
(P1/P2/P3/P4).
Presione "PLAY" después de seleccionar el número de jugadores.
Presione "UP/DOWN" para seleccionar el tiempo de juego,
30/45/60 segundos.
Presione "PLAY" para comenzar el juego.
El marcador "HOME" ("LOCAL") muestra al jugador 1, 3; el
marcador "VISITOR" ("VISITANTE") muestra al jugador 2, 4.
Todos los tiros valen 2 puntos hasta los últimos 10 segundos, cada
tiro cuenta 3 puntos.
Cuenta atrás de 5 segundos para el turno del siguiente jugador
cuando un jugador termina el juego.
El jugador con más puntos anotados gana (el LED parpadeará en
el jugador con más puntos).
Presione "PLAY" para reiniciar el juego.
SELECT
UP
SELECT
DOWN
80 81

2.3-Point Beat the Time Clock (3 Puntos Vencer al Reloj)
Presione "PLAY" para entrar en el juego 2.
Presione "UP/DOWN" para seleccionar uno o varios jugadores
(P1/P2/P3/P4).
Presione "PLAY" después de seleccionar el número de jugadores.
Presione "UP/DOWN" para seleccionar el tiempo de juego,
30/45/60 segundos.
Presione "PLAY" para comenzar el juego.
El marcador "HOME" muestra al jugador 1, 3; el marcador
"VISITOR" ("VISITANTE") muestra al jugador 2, 4. Todos los tiros
realizados cuentan 3 puntos. Cuenta atrás de 5 segundos para el
turno del siguiente jugador cuando un jugador termina el juego. El
jugador con más puntos anotados gana (el LED parpadeará en el
jugador con mayor más puntos). Presione "PLAY" para reiniciar el
juego.
3. Battle Back (Contraatacar)
Presione "PLAY" para entrar en el juego 3.
Presione "UP/DOWN" para seleccionar varios jugadores (P2/P4).
Presione "PLAY" para comenzar el juego.
Si el tiro se realiza en el marco de "HOME", se mostrarán +2
puntos en el tablero de "HOME" y -2 puntos en el de "VISITOR".
Si el tiro se realiza en el marco de "VISITOR", se mostrarán +2
puntos en el tablero de "VISITOR" y -2 puntos en el de "HOME".
Una vez que un jugador anota 10 puntos que gana y el juego está
terminado. Presione "PLAY" para reiniciar el juego.
4. Horse (Caballo)
a. Presione "PLAY" para entrar en el juego 4.
b. Presione "UP/DOWN" para seleccionar varios jugadores
(P2/P3/P4).
c. Presione "PLAY" después de seleccionar el número de
jugador.
d. El jugador tiene que hacer un tiro en 2 segundos.
e. El primer jugador puede tirar a cualquier aro (Home o VISITOR).
Si el primer jugador anota en 2 segundos, no se da ninguna letra.
El juego continúa para el siguiente jugador. El marcador mostrará
"next player (P2/P3/P4)" ("siguiente jugador (P2/P3/P4)") y el LED
parpadeará dos veces en un segundo. Después del parpadeo, el
siguiente jugador tiene que duplicar el tiro en el mismo aro
seleccionado por el primer jugador.
f. Si el jugador no puede anotar en 2 segundos, el jugador recibe la
primera letra "H" que se mostrará en el tablero de puntuación. El
juego se mantiene para el mismo jugador hasta que éste anote. Si
el jugador sigue fallando, el jugador recibe "O" seguida de "R", "S",
"E". Si se da la letra "E", el jugador está fuera.
g. El primer jugador que deletrea "HORSE" pierde. Los jugadores
siguen repitiendo los pasos d.e.f. hasta terminar el juego.
h. El último jugador en deletrear "HORSE" gana.
i. Presione "PLAY" para reiniciar el juego.
5. Check Point (Comprobar el Punto)
Presione "PLAY" para entrar en el juego 5.
Presione "UP/DOWN" para seleccionar uno o varios jugadores
(P1/P2/P3/P4).
Presione "PLAY" para comenzar el juego.
El marcador "HOME" muestra "jugador", el "VISITOR" muestra "24"
puntos, tiempo de juego preestablecido de 40 segundos.
Los puntos anotados se mostrarán en el marcador "HOME".
Antes de que termine el tiempo, una vez que se anoten
24/52/68/86 puntos, el tiempo de juego aumenta 10/20/10/20
segundos respectivamente.
Cuenta atrás de 5 segundos para el turno del siguiente jugador
cuando un jugador termina la partida.
El jugador con más puntos anotados gana (el LED parpadeará en
el jugador con más puntos).
El juego termina cuando un jugador consigue 98 puntos.
Presione "PLAY" para reiniciar el juego.
82 83

6. Around the World (Alrededor del Mundo)
Utilice cinta adhesiva para marcar las líneas de tiro.
Presione "PLAY" para entrar en el juego 6.
Presione "UP/DOWN" para seleccionar uno o varios jugadores
(P1/P2/P3/P4).
Presione "PLAY" después de seleccionar el número de jugador.
El marcador "HOME" muestra los jugadores 1/2/3/4, el "VISITOR"
muestra los puntos conseguidos.
Una vez que la puntuación llega a 10 puntos o el tiempo llega a 99
segundos, cuenta atrás 5 segundos para el turno del siguiente
jugador cuando un jugador termina la partida. El jugador que termine
el juego primero gana (el LED parpadeará en el ganador). Presione
"PLAY" para reiniciar el juego.
7. Left and Right Shoot (Tiro a la Izquierda y a la Derecha)
Presione "PLAY" para entrar en el juego 7.
Presione "UP/DOWN" para seleccionar uno o varios jugadores
(P1/P2/P3/P4).
Presione "PLAY" después de seleccionar el número de jugador.
Presione "UP/DOWN" para seleccionar el tiempo de juego, 30/45/60
segundos.
Presione "PLAY" para comenzar el juego.
El marcador "HOME" muestra el jugador, el "VISITOR" muestra los
puntos.
Realice un tiro en el marco "HOME" cuando el LED esté parpadeando
en "HOME", se mostrarán 2 puntos anotados en "HOME".
Realice un tiro en el marco "VISITOR" cuando el LED esté
parpadeando en "VISITOR", se mostrarán 2 puntos anotados en
"VISITOR".
Cuenta atrás de 5 segundos para el turno del siguiente jugador
cuando un jugador termina el juego.
El jugador con más puntos anotados gana (el LED parpadeará en el
jugador con más puntos).
Presione "PLAY" para reiniciar el juego.
8. One to One (Uno a Uno)
Presione "PLAY" para entrar en el juego 8.
Presione "UP/DOWN" para seleccionar uno o varios jugadores
(P1/P2/P3/P4).
Presione "PLAY" después de seleccionar el número de jugadores.
Presione "UP/DOWN" para seleccionar el tiempo de juego,
30/45/60 segundos.
Presione "PLAY" para comenzar el juego.
El marcador "HOME" muestra al jugador 1, 3; el marcador
"VISITOR" muestra al jugador 2, 4. Todos los tiros valen 2 puntos
hasta los últimos 10 segundos, cada tiro cuenta 3 puntos. Cuenta
atrás de 5 segundos para el turno del siguiente jugador cuando un
jugador termina el juego.
El jugador con más puntos anotados gana (el LED parpadeará en
el jugador con más puntos).
Presione "PLAY" para reiniciar el juego.
¡ATENCIÓN!
Los cambios o modificaciones que no hayan sido
expresamente aprobados por la parte responsable del
cumplimiento podrían anular la autoridad del usuario para
operar el equipo.
La operación está sujeta a las dos condiciones siguientes:
(1) Este dispositivo no debe causar interferencias
perjudiciales.
(2) Este dispositivo debe aceptar cualquier interferencia
recibida, incluidas las interferencias que puedan causar
un funcionamiento no deseado.
84 85

Tubo-5
Ø22x755x580mm
Tubo-6
Ø22x755x580mmØ22x890mm
Tubo-4
Pallacanestro 17 cm
di diametro Tabellone Elettronico
Sensore di
interruttore
Tubo-1 Tubo-2
Ø22x580x440mm Ø22x685mm Ø22x890mm
Tubo-3
1 x2 2 x2 3 x1
4 x1 5 x1 6 x1
13 x4 14 x1 15 x2
Ø22x830mm
Tubo-7
Ø22x835mm
Tubo-8
Ø22x595mm
Tubo-9
7 x2 8 x2 9 x2
Tubo-10
Ø22x650x385mm
Tubo-11
Ø22x1067x520mm Ø12.7x1090mm
Tubo-12
10 x2 11 x1 12 x3
86 87
Il prodotto deve essere installato e utilizzato sotto la supervisione di un adulto.
Leggere attentamente ogni passo e seguire l'ordine corretto.
Rimuovere tutti gli imballaggi, separare e contare tutte le parti e tutti gli accessori.
Si prega di assicurarsi che tutte le parti siano installate correttamente, un'installazione
errata può portare a un pericolo.
Si consiglia, ove possibile, di montare tutti gli articoli vicino alla zona in cui verranno posti
in uso, per evitare di spostare inutilmente il prodotto una volta assemblato.
Garantire una superficie sicura durante il montaggio e posizionare il prodotto sempre su
una superficie piana, stabile.
Si prega di controllare e manutenere regolarmente, le parti più importanti per la
sospensione, il fissaggio, l'ancoraggio a terra.
Attenzione: solo per uso domestico.
Attenzione: I bambini devono usare questo prodotto sotto la supervisione dei genitori.
Pericolo: Tenere tutte le piccole parti e i materiali di imballaggio di questo prodotto lontano
da neonati e bambini, altrimenti potrebbero rappresentare un rischio di soffocamento.
Pericolo: La mancanza di accessorio può causare un rischio di ribaltamento.
Prima di Iniziare
Si prega di leggere attentamente tutte le istruzioni e conservarle per riferimento futuro.
IT
Avvertenze Generali
Avvertenza

Cerchio
Piastra di supporto
di cerchio
Scatola di controllo
con cavo
16 x1 17 x2 18 x2
Pompa di gonfiaggio
con l'ago
Rete di Pallacanestro
di Ritorno
Cruscotto
posteriore
21 x119 x1 20 x1
Rondella M6 Bullone M6x20mm Bullone M6x29mm
22 x46 23 x16 24 x6
Bullone M6x42mm Bullone M6x50mm Bullone M6x35mm
25 x4 26 x4 27 x2
Bullone 4x28mmDado M6 Bullone 3,5x10mm
28 x32 29 x4 30 x2
Mascherina
marcatore
elettronica
31 x1
Chiave
32 x1
Chiave a brugola
33 x1
Cinturino
autoadesivo
34 x2
Rete
P1 x2
Blocco a molla
P2 x9
Inserto palo
in plastica
P3 x2 P4 x2
PARTI PREINSTALLATE
1211109876
ISTRUZIONI DI MONTAGGIO:
1. Trovare un posto pulito e pianeggiante per iniziare ad assemblare il
prodotto. Raccomandiamo che due adulti lavorino insieme per
assemblare questo prodotto.
2. Rimuovere tutte le parti dalla casella e verificare di avere tutte le
parti elencate nella pagina dell'elenco delle parti. Tagliare o strappare
con cura i quattro angoli della scatola in modo che il fondo della
scatola possa essere utilizzato come superficie di lavoro
PRIMA DEL MONTAGGIO - Si prega di ispezionare e
distribuire tutti i pali e le parti.
54321
Perno di
blocco
88 89

FIG.1 &2
3. Collegare i tubi-2 (#2) al tubo-3 e al tubo-4 (#3 e #4) usando il
blocco a molla
(preinstallato) come mostrato in FIG.1.
4. Collegare i tubi-7 (#7) ai tubi-8 (#8) usando il blocco a molla
(preinstallato) come mostrato in FIG.2.
P2
Blocco
a molla
P2
Blocco
a molla
P2
Blocco a molla
8
7
8 x2
7 x2
6 x1
5 x1
4
4 x1
3
3 x1
2
2
2 x2
FIG.1
FIG.3
FIG.2
FIG.3
5. Collegare il tubo-5 e il tubo-6 (#5 e #6) insieme usando il blocco
a molla (preinstallato) come mostrato in FIG.3.
FIG.4
6. Collegare il tubo-5 e il tubo-6 (#5 e #6) al tubo-3 e al tubo-4 (#3
e #4) usando bulloni (#26), rondelle (#22) e dadi (#28), quindi
collegare il tubo-5 e il tubo-6 (#5 e #6) ai tubi-8 (#8) usando bulloni
(#26), rondelle (#22) e dadi (#28) come mostrato in FIG.4, 4A e 4B.
7. Collegare i tubi-7 e i tubi-8 (#7 e #8) ai tubi-2 (#2) usando il
bullone (#24), la rondella (#22) e il dado (#28) come mostrato in
FIG.4C, ripetere questo passaggio per l'altro lato.
Nota: assicurarsi che il blocco a molla sia rivolto verso il basso.
22 x6
24 x2
26 x4
28 x6
FIG.4A
FIG.4B
FIG.4
FIG.4C
22
22
22
24
26
26
28
28
28
8
8
7
7
6
5
4
3
2
2
90 91
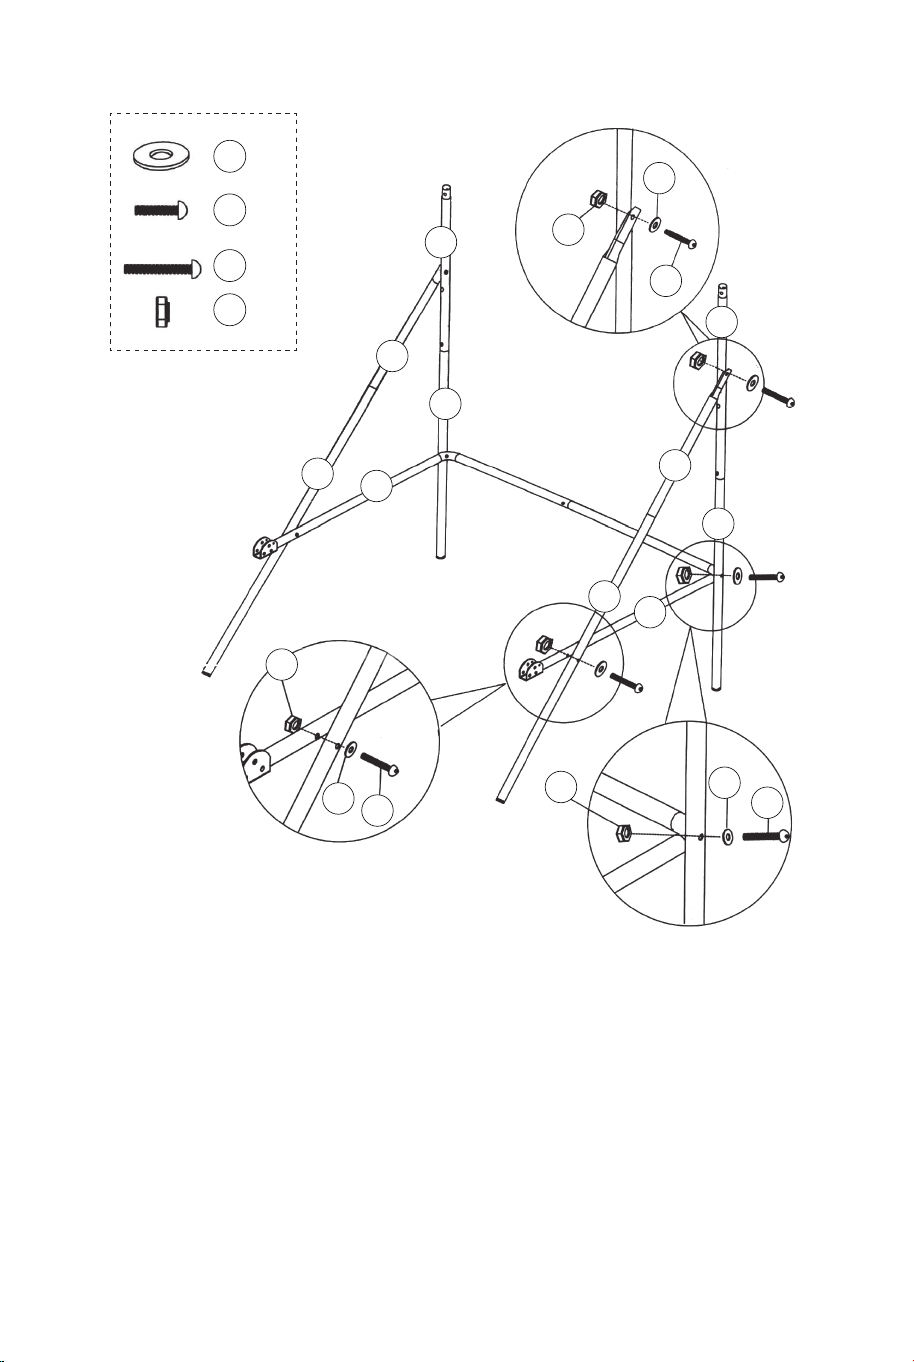

FIG.5
8. Collegare il tubo-12 (#12) ai tubi-2 (#2) usando i bulloni (#24),
le rondelle (#22) e i dadi (#28) come mostrato in FIG.5A. E poi
inserire i tubi-1 (#1) nei tubi-2 (#2) come mostrato in FIG.5.
9. Collegare i tubi-9 (#9) al tubo-5 e al tubo-6 (#5 e #6) usando
bulloni (#27), rondelle (#22) e dadi (#28) come mostrato in FIG.5
e 5B.
22 x6
24 x2
27 x2
28 x4
12 x1
9 x2
1 x2
22
22
22
24
27
28
28
12
12
9
9
6
5
2
2
2
1
FIG.5A
FIG.5B
FIG.5
P3
11
11 x1
11
10
10 x2
10
10
9
9
FIG.6
Corto
Lungo
P2
Blocco a molla
P2
Blocco a molla
FIG.6
10. Collegare i tubi-10 (#10) ai tubi-9 (#9) usando il blocco a
molla (preinstallato), quindi collegare il tubo-11 (#11) ai tubi-10
(#10) usando il blocco a molla (preinstallato) come mostrato in
FIG.6.
92 93
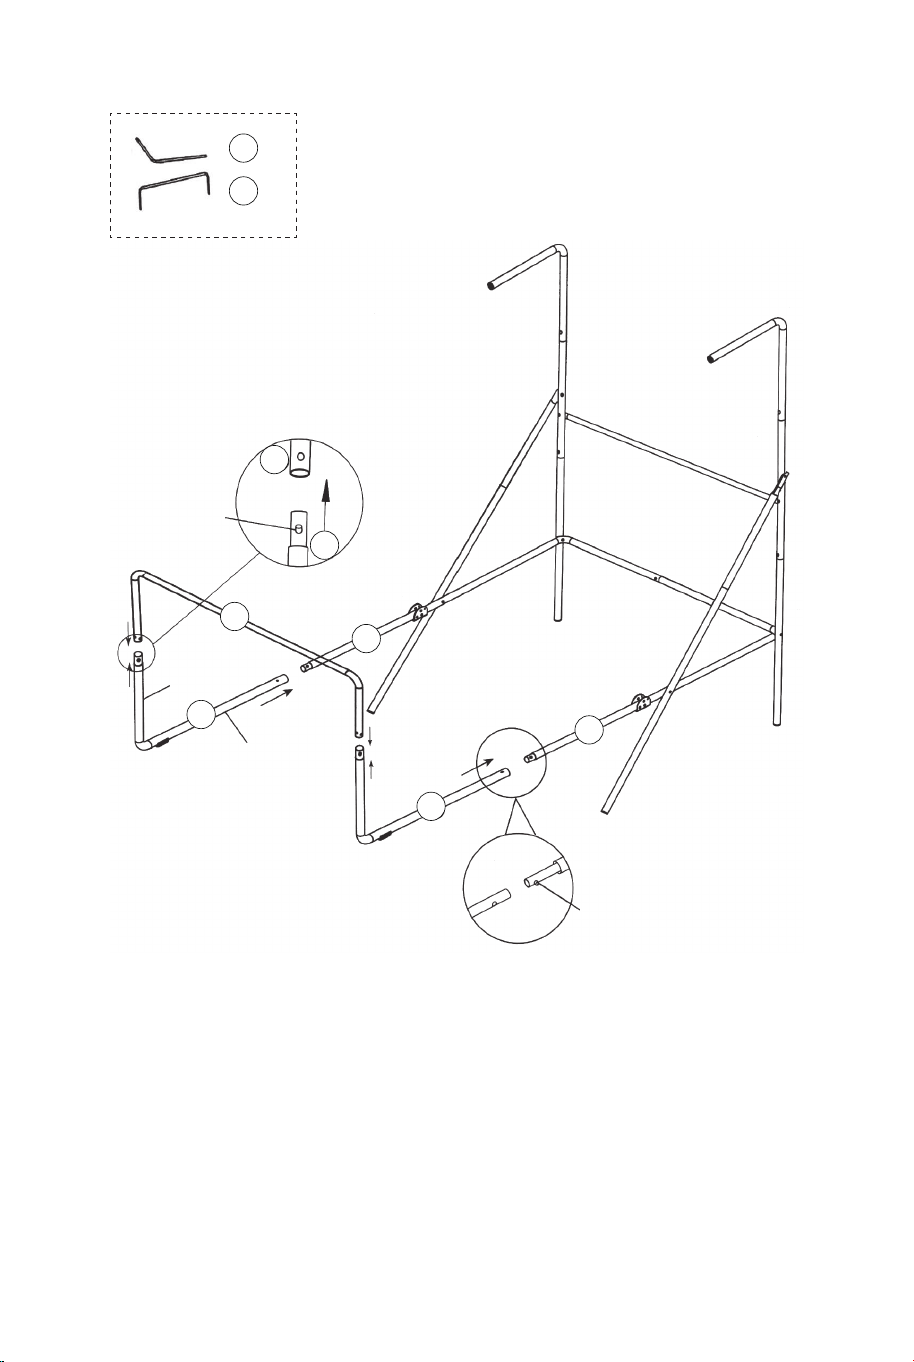
FIG.5
8. Collegare il tubo-12 (#12) ai tubi-2 (#2) usando i bulloni (#24),
le rondelle (#22) e i dadi (#28) come mostrato in FIG.5A. E poi
inserire i tubi-1 (#1) nei tubi-2 (#2) come mostrato in FIG.5.
9. Collegare i tubi-9 (#9) al tubo-5 e al tubo-6 (#5 e #6) usando
bulloni (#27), rondelle (#22) e dadi (#28) come mostrato in FIG.5
e 5B.
22 x6
24 x2
27 x2
28 x4
12 x1
9 x2
1 x2
22
22
22
24
27
28
28
12
12
9
9
6
5
2
2
2
1
FIG.5A
FIG.5B
FIG.5
P3
11
11 x1
11
10
10 x2
10
10
9
9
FIG.6
Corto
Lungo
P2
Blocco a molla
P2
Blocco a molla
FIG.6
10. Collegare i tubi-10 (#10) ai tubi-9 (#9) usando il blocco a
molla (preinstallato), quindi collegare il tubo-11 (#11) ai tubi-10
(#10) usando il blocco a molla (preinstallato) come mostrato in
FIG.6.
92 93

FIG.7
21 x1
22 x24
23 x16
28 x16
18 x2
17 x2
15 x2
FIG.7
11. Attaccare gli anelli (#17) e le piastre di supporto dell'anello
(#18) alla scheda posteriore (#21) usando i bulloni (#23), le
rondelle (#22) e i dadi (#28). Quindi, collegare i sensori
dell'interruttore (# 15) al cruscotto posteriore (# 21) usando i
bulloni (# 23), le rondelle (# 22) e i dadi (# 28). Assicurati di
utilizzare le rondelle su entrambi i lati della tavola come
mostrato in FIG.7.
28
28
21
22
22
22
23
23
18
18
17
17
15
15
29
29 x4
14
14 x1
FIG.8
31
31 x1
FIG.8
12. Fissare la mascherina del marcatore elettronico (#31) alla
parte anteriore del cruscotto posteriore e collegarla al marcatore
elettronico (#14) utilizzando i bulloni (#29) come mostrato in
FIG.8.
94 95
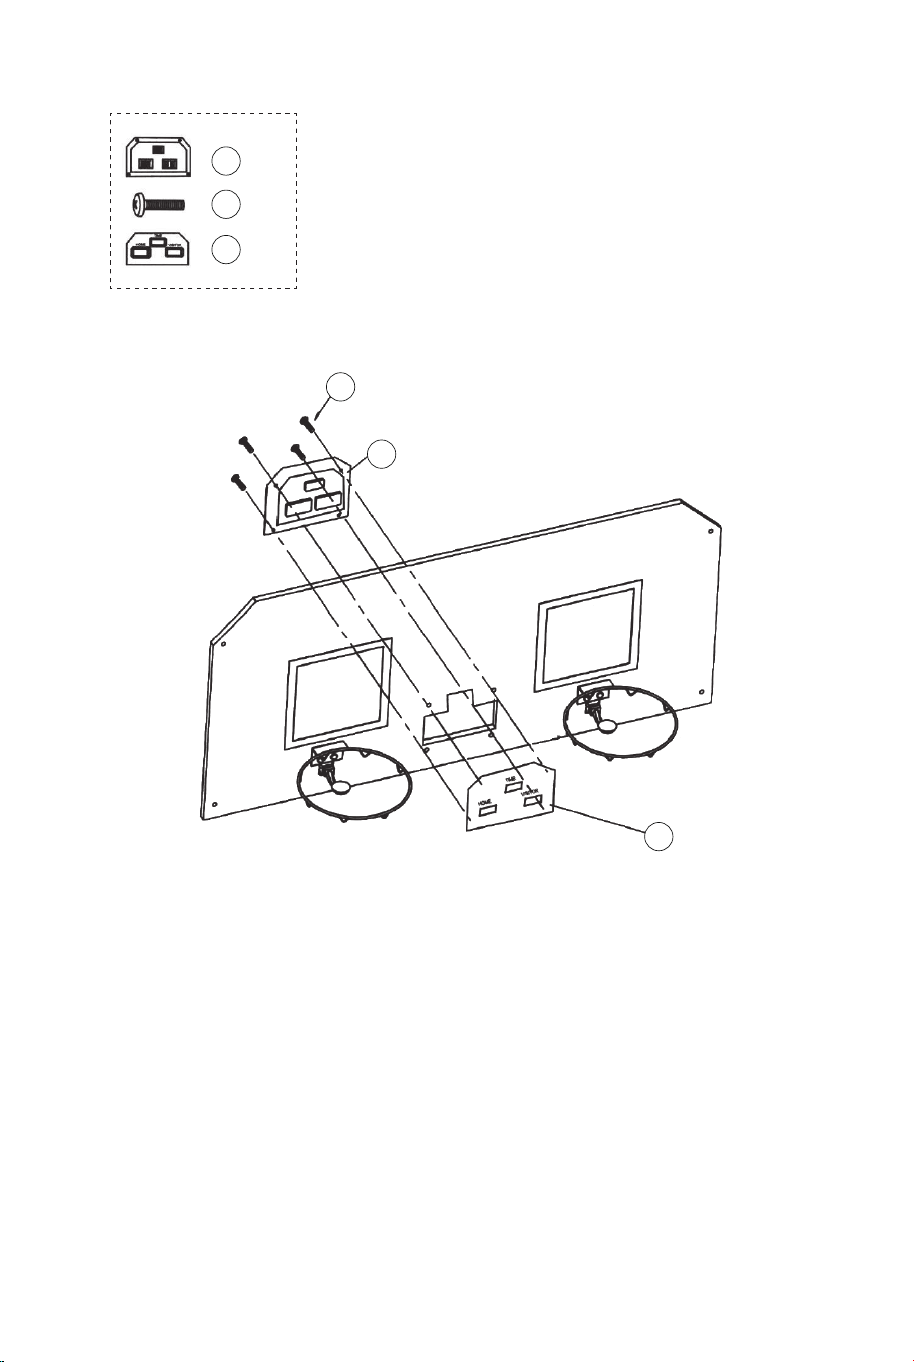
FIG.7
21 x1
22 x24
23 x16
28 x16
18 x2
17 x2
15 x2
FIG.7
11. Attaccare gli anelli (#17) e le piastre di supporto dell'anello
(#18) alla scheda posteriore (#21) usando i bulloni (#23), le
rondelle (#22) e i dadi (#28). Quindi, collegare i sensori
dell'interruttore (# 15) al cruscotto posteriore (# 21) usando i
bulloni (# 23), le rondelle (# 22) e i dadi (# 28). Assicurati di
utilizzare le rondelle su entrambi i lati della tavola come
mostrato in FIG.7.
28
28
21
22
22
22
23
23
18
18
17
17
15
15
29
29 x4
14
14 x1
FIG.8
31
31 x1
FIG.8
12. Fissare la mascherina del marcatore elettronico (#31) alla
parte anteriore del cruscotto posteriore e collegarla al marcatore
elettronico (#14) utilizzando i bulloni (#29) come mostrato in
FIG.8.
94 95
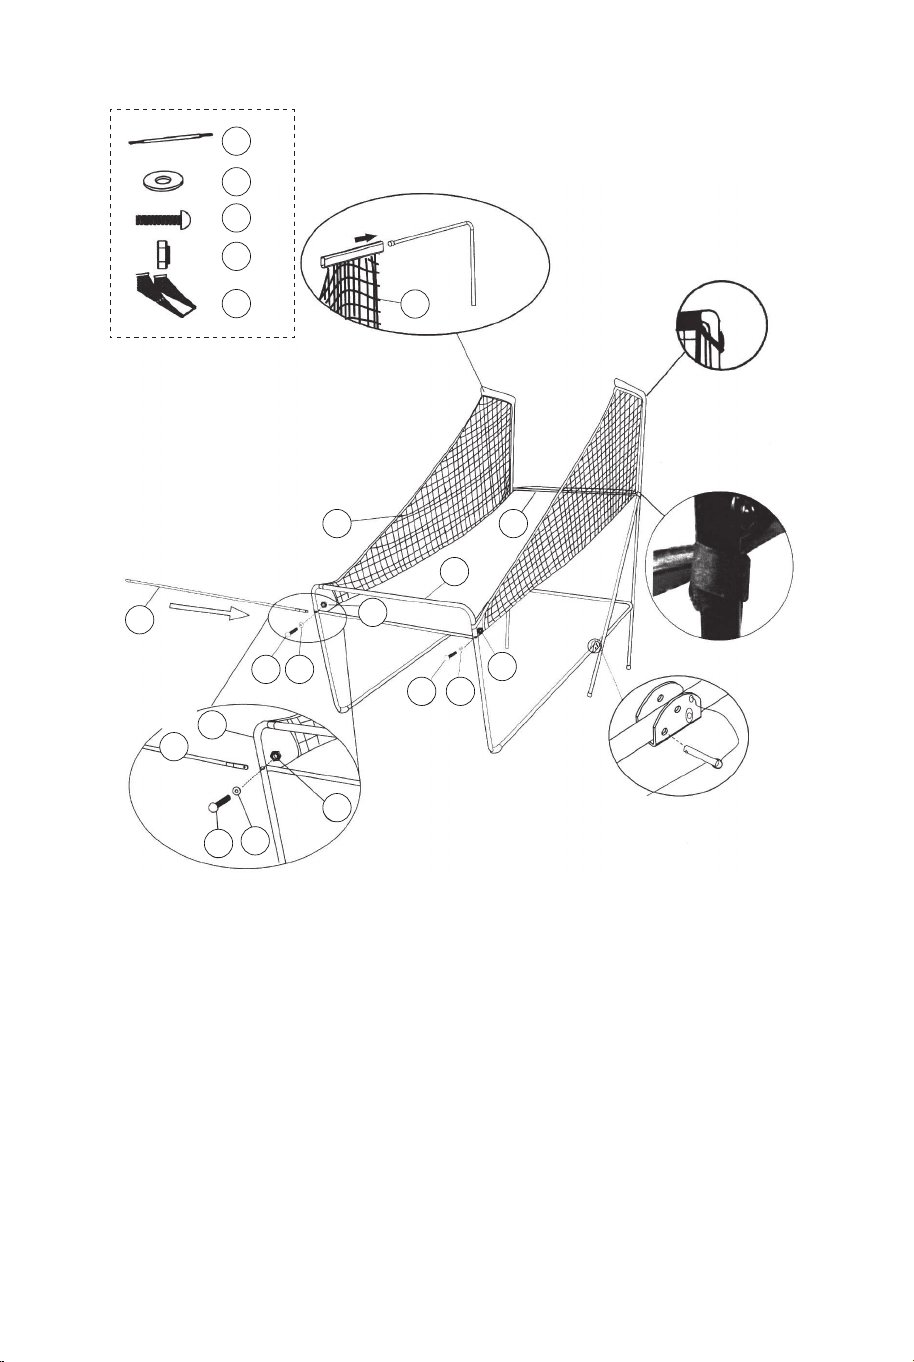
22 x2
24 x2
28 x2
20 x1
12 x1
22
22
22
24
24
24
28
28
28
20
20
12
12
12
11
11
FIG.9A
FIG.9
FIG.9D
FIG.9B
FIG.9C
P4
Perno di blocco
FIG.9
13. Far scorrere le cinghie elastiche e la manica della rete di
ritorno da basket (#20) nei tubi-1 (#1) come mostrato in FIG.9A,
9B e 9C.
14. Far scorrere il tubo-12 (#12) attraverso la manica nella parte
anteriore della rete di ritorno del pallone da basket (#20), fissare
prima sul lato sinistro usando i bulloni (#24), le rondelle (#22) e i
dadi (#28) come mostrato in FIG.9D. Seguire la stessa
procedura sul lato destro.
21
22
22
22 x8
25
25 x4
28
28 x4
20
12
12
1
FIG.10
FIG.10C
FIG.10A
P4
Perno di blocco
P1
FIG.10
15. Con l'aiuto di un altro adulto, attaccare il Pannello Posteriore
(#21) ai Tubi Superiori 1 (#1) con Bulloni (#25), Rondelle (#22) e
Dadi (#28) come mostrato in FIG.10A. Fare scivolare Tubo 12
(#12) attraverso la manica sul retro del Canestro di Ritorno della
Palla (#20), come mostrato in FIG.10B. Ad ogni foro inferiore del
pannello posteriore, attaccare prima il lato sinistro con Bulloni
(#25), Rondelle (#22), Dadi (#28) come mostrato in FIG.10C.
Seguire la stessa procedura per il lato destro.
16. Collegare il perno di bloccaggio (#P4) al tubo-5 e al tubo-6
(#5 e #6) e inserirlo nel tubo-5 e nel tubo-6 (#5 e #6) come
mostrato in FIG.10C.
96 97

20
FIG.11
FIG.11A
30 x2
34 x2
34
30
11
16
11
16 x1
Scatola di controllo
Cavo di controllo
FIG.11
17. Collegare la scatola di controllo (#16) al centro del
tubo-11 (#11) usando due bulloni (#30) come mostrato in
FIG.11A.
18. Passare il resto del cavo di controllo attraverso i loop
della rete di ritorno del basket (#20). Posizionare il cavo di
controllo nel tubo-11 (#11) utilizzando le cinghie autoadesive
(#34) come mostrato in FIG.11.
14
Cavo di controllo
Tabellone elettronico
Cavo sensore
Cavo di sensore
FIG.12
FIG.12
19. Collegare il cavo del sensore dal sensore dell'interruttore
(#15) al marcatore elettronico (#14) come mostrato in FIG.12.
Collegare il cavo di controllo al dialer elettronico (#14) come
mostrato in FIG.12 e 12A.
FIG.12A
CAVO DI
CONTROLLO
VISITATORE
ACCESO/SPENTO
98 99

FIG.13
FIG.13
20. Piegare la macchina da tiro da basket quando non è in uso e
inserire il perno di bloccaggio (#P4) come mostrato in FIG.13.
Nota: il perno di bloccaggio (#P4) deve essere rimosso dalla sua
posizione originale quando la macchina viene utilizzata prima di
essere inserito nella nuova posizione una volta piegato.
P4
Perno di blocco
IMPORTANTE!
Assicurati di utilizzare il perno di
bloccaggio (#P4) quando si piega.
FUNZIONAMENTO DEL QUADRO DI VALUTAZIONE
ELETTRONICO
Installare le Batterie
Vano di Scatola: svitare il bullone con un cacciavite e aprire la
scatola della batteria. Inserire 3 batterie "AA" (non incluse)
nell'ordine di polarità indicato sul coperchio interno. Quindi,
chiudere il coperchio con un cacciavite. Accendere il prodotto con
l'interruttore ON/OFF.
Suggerimento:
a. Le batterie devono essere installate in base alla corretta polarità
(+ e -) richiesta.
b. Si prega di pulire i contatti delle batterie e anche quelli dei
dispositivi prima di installare le batterie.
c. Se il prodotto non deve essere utilizzato per un lungo periodo di
tempo, si consiglia di rimuovere le batterie.
CAVO DI
CONTROLLO
VISITATORE
ACCESO
/SPENTO
AVVERTIMENTO
1) Richiede 3 batterie "AA" (non incluse).
2) Non mescolare batterie vecchie e nuove.
3) Non miscelare batterie alcaline, standard (carbonio-zinco)
o sostituibili (nichel-cadmio).
100 101

FIG.13
FIG.13
20. Piegare la macchina da tiro da basket quando non è in uso e
inserire il perno di bloccaggio (#P4) come mostrato in FIG.13.
Nota: il perno di bloccaggio (#P4) deve essere rimosso dalla sua
posizione originale quando la macchina viene utilizzata prima di
essere inserito nella nuova posizione una volta piegato.
P4
Perno di blocco
IMPORTANTE!
Assicurati di utilizzare il perno di
bloccaggio (#P4) quando si piega.
FUNZIONAMENTO DEL QUADRO DI VALUTAZIONE
ELETTRONICO
Installare le Batterie
Vano di Scatola: svitare il bullone con un cacciavite e aprire la
scatola della batteria. Inserire 3 batterie "AA" (non incluse)
nell'ordine di polarità indicato sul coperchio interno. Quindi,
chiudere il coperchio con un cacciavite. Accendere il prodotto con
l'interruttore ON/OFF.
Suggerimento:
a. Le batterie devono essere installate in base alla corretta polarità
(+ e -) richiesta.
b. Si prega di pulire i contatti delle batterie e anche quelli dei
dispositivi prima di installare le batterie.
c. Se il prodotto non deve essere utilizzato per un lungo periodo di
tempo, si consiglia di rimuovere le batterie.
CAVO DI
CONTROLLO
VISITATORE
ACCESO
/SPENTO
AVVERTIMENTO
1) Richiede 3 batterie "AA" (non incluse).
2) Non mescolare batterie vecchie e nuove.
3) Non miscelare batterie alcaline, standard (carbonio-zinco)
o sostituibili (nichel-cadmio).
100 101
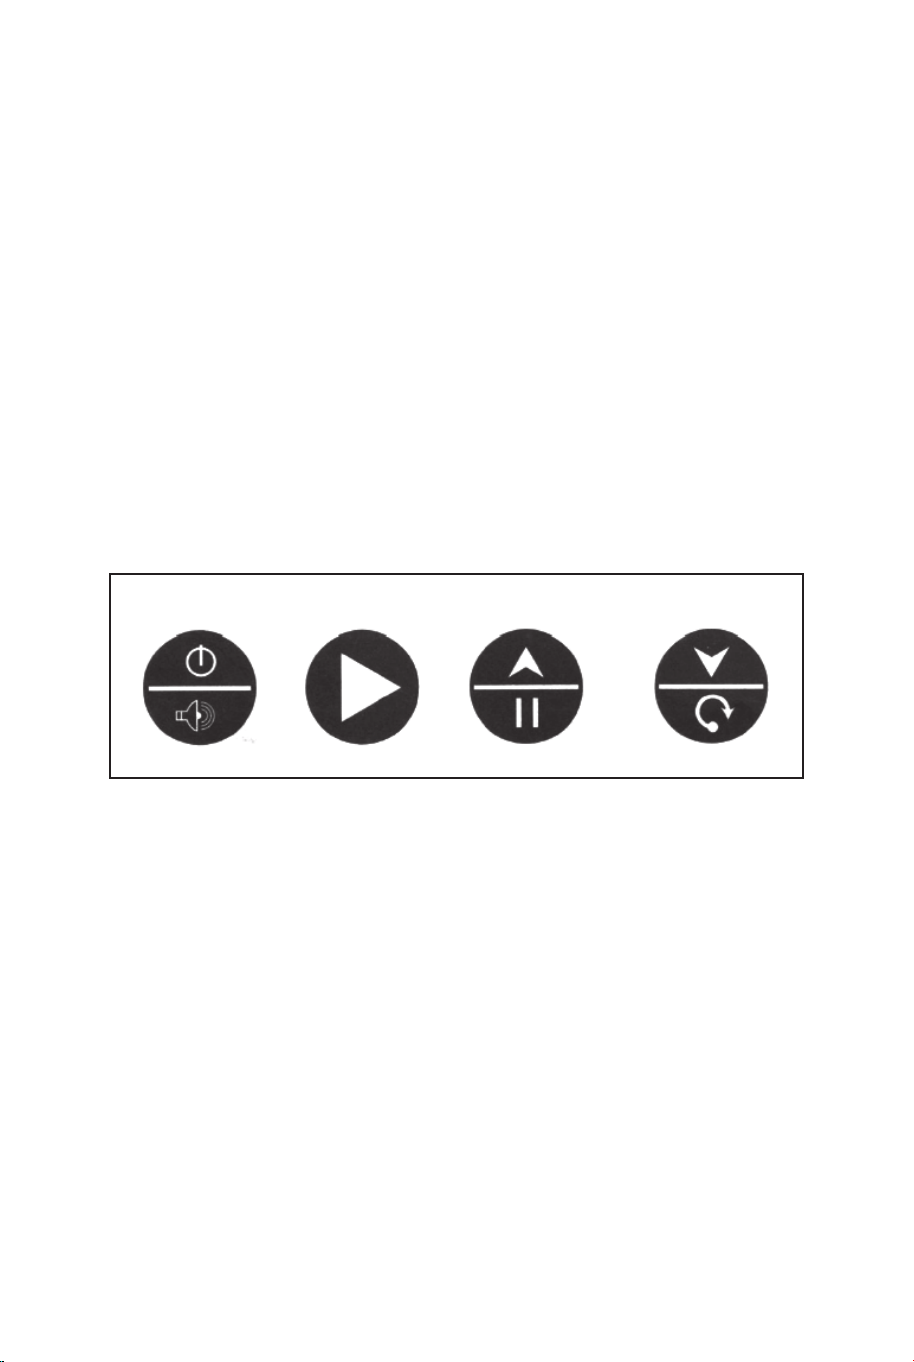
FUNZIONAMENTO DELLA SCATOLA DI CONTROLLO
Premere "ON/OFF" per attivare il dialer.
Il marcatore "HOME" ("LOCAL") visualizza "01" (gioco
preimpostato 1).
Premere "SELEZIONA SU e GIÙ" per selezionare un gioco.
Premere "PLAY" per accedere alla modalità di gioco selezionata.
Premere "SOUND" per attivare / disattivare il suono durante il
gioco.
Premere "PAUSA" per mettere in pausa o avviare il conteggio del
tempo.
Tenere premuto il pulsante "ON / OFF" per 3 secondi per spegnere
il tabellone. Tenere premuto il pulsante "RESET" per 3 secondi per
riavviare i giochi.
Nota: se non viene effettuato alcun colpo o non viene premuto
alcun pulsante entro 15 minuti, il marcatore si spegne
automaticamente.
PANNELLO DI CONTROLLO
ON/OFF
SOUND
PLAY
PAUSE RESET
SCEGLI TRA 8 DIVERSE OPZIONI DI GIOCO
1. Beat the Time Clock
Premi "PLAY" per accedere al gioco 1.
Premere "SU/GIÙ" per selezionare uno o più giocatori (P1/P2/P3/P4).
Premi "PLAY" dopo aver selezionato il numero di giocatori.
Premere "SU / GIÙ" per selezionare il tempo di riproduzione, 30/45/60
secondi.
Premi "PLAY" per avviare il gioco.
Il marcatore "HOME" mostra il giocatore 1, 3; il marcatore
"VISITATORE" mostra il giocatore 2, 4.
Tutti i tiri valgono 2 punti fino agli ultimi 10 secondi, ogni punteggio
conta 3 punti.
Conto alla rovescia di 5 secondi per il turno del giocatore successivo
quando un giocatore termina il gioco.
Il giocatore con il maggior numero di punti segnati vince (il LED
lampeggerà sul giocatore con il punteggio più alto).
Premi "PLAY" per riavviare il gioco.
2.3-Point Beat the Time Clock
Premi "PLAY" per accedere al gioco 2.
Premere "SU/GIÙ" per selezionare uno o più giocatori
(P1/P2/P3/P4).
Premi "PLAY" dopo aver selezionato il numero di giocatori.
Premere "SU / GIÙ" per selezionare il tempo di riproduzione,
30/45/60 secondi.
Premi "PLAY" per avviare il gioco.
Il marcatore "HOME" mostra il giocatore 1, 3; il marcatore
"VISITATORE" mostra il giocatore 2, 4.
Tutti i tiri fatti contano 3 punti.
Conto alla rovescia di 5 secondi per il turno del giocatore
successivo quando un giocatore termina il gioco.
Il giocatore con il maggior numero di punti segnati vince (il LED
lampeggerà sul giocatore con il punteggio più alto).
Premi "PLAY" per riavviare il gioco.
3. Battle Back
Premi "PLAY" per accedere al gioco 3.
Premere "SU/GIÙ" per selezionare più giocatori (P2/P4).
Premi "PLAY" per avviare il gioco.
Se lo scatto viene effettuato nel fotogramma "HOME", verranno
visualizzati +2 punti sulla scheda "HOME" e -2 punti sulla
scheda "VISITOR".
Se lo scatto viene effettuato nel fotogramma "VISITOR",
verranno visualizzati +2 punti sulla scheda "VISITOR" e -2 punti
sulla scheda "HOME".
Una volta che un giocatore segna 10 punti, vince e il gioco è
finito.
Premi "PLAY" per riavviare il gioco.
4. Horse
a. Premi "PLAY" per accedere al gioco 4.
b. Premere "SU/GIÙ" per selezionare più giocatori (P2/P3/P4).
c. Premere "PLAY" dopo aver selezionato il numero del
giocatore.
SELECT
UP
SELECT
DOWN
102 103

d. Il giocatore deve fare un tiro in 2 secondi.
e. Il primo giocatore può lanciare a qualsiasi cerchio (Home o
VISITOR). Se il primo giocatore segna in 2 secondi, non viene data
alcuna lettera.
Il gioco continua per il giocatore successivo. Il tabellone visualizzerà
"prossimo giocatore (P2 / P3 / P4)" e il LED lampeggerà due volte in
un secondo.
Dopo il battito di ciglia, il giocatore successivo deve raddoppiare il tiro
sullo stesso cerchio selezionato dal primo giocatore.
f. Se il giocatore non riesce a segnare in 2 secondi, il giocatore riceve
la prima lettera "H" che verrà visualizzata sul tabellone. Il gioco viene
mantenuto per lo stesso giocatore fino a quando non segna. Se il
giocatore continua a fallire, riceve "O" seguito da "R", "S", "E". Se
viene data la lettera "E", il giocatore è fuori.
g. Il primo giocatore a scrivere "CAVALLO" perde. I giocatori
continuano a ripetere i passaggi d.e.f. fino alla fine del gioco.
h. L'ultimo giocatore a scrivere "CAVALLO" vince.
i. Premi "PLAY" per riavviare il gioco.
5. Check Point
Premi "PLAY" per accedere al gioco 5.
Premere "SU/GIÙ" per selezionare uno o più giocatori (P1/P2/P3/P4).
Premi "PLAY" per avviare il gioco.
Il marcatore "HOME" mostra "player", il "VISITOR" mostra "24" punti,
tempo di riproduzione preimpostato di 40 secondi.
I punti segnati verranno visualizzati sul marcatore "HOME".
Prima che il tempo sia scaduto, una volta segnati 24/52/68/86 punti, il
tempo di gioco aumenta rispettivamente di 10/20/10/20 secondi.
Conto alla rovescia di 5 secondi per il turno del giocatore successivo
quando un giocatore termina il gioco.
Il giocatore con il maggior numero di punti segnati vince (il LED
lampeggerà sul giocatore con il punteggio più alto).
Il gioco termina quando un giocatore ottiene 98 punti.
Premi "PLAY" per riavviare il gioco.
6. Around the World
Utilizzare nastro adesivo per contrassegnare le linee di cottura.
Premi "PLAY" per accedere al gioco 6.
Premere "SU/GIÙ" per selezionare uno o più giocatori
(P1/P2/P3/P4).
Premi "PLAY" dopo aver selezionato il numero del giocatore.
Il tabellone "HOME" mostra i giocatori 1/2/3/4, il "VISITOR" mostra i
punti segnati.
Una volta che il punteggio raggiunge i 10 punti o il tempo raggiunge i
99 secondi, conta 5 secondi per il turno del giocatore successivo
quando un giocatore termina la partita.
Il giocatore che finisce il gioco per primo vince (il LED lampeggerà
sul vincitore).
Premi "PLAY" per riavviare il gioco.
7. Left and Right Shoot
Premi "PLAY" per accedere al gioco 7.
Premere "SU/GIÙ" per selezionare uno o più giocatori
(P1/P2/P3/P4).
Premi "PLAY" dopo aver selezionato il numero del giocatore.
Premere "SU / GIÙ" per selezionare il tempo di riproduzione,
30/45/60 secondi.
Premi "PLAY" per avviare il gioco.
Il marcatore "HOME" mostra il giocatore, il "VISITOR" mostra i punti.
Fai uno scatto nel fotogramma "HOME" quando il LED lampeggia in
"HOME", verranno visualizzati 2 punti segnati in "HOME".
Scatta uno scatto nella cornice "VISITOR" quando il LED lampeggia
in "VISITOR", verranno visualizzati 2 punti segnati in "VISITOR".
Conto alla rovescia di 5 secondi per il turno del giocatore successivo
quando un giocatore termina il gioco.
Il giocatore con il maggior numero di punti segnati vince (il LED
lampeggerà sul giocatore con il punteggio più alto).
Premi "PLAY" per riavviare il gioco.
104 105

8. One to One
Premi "PLAY" per accedere al gioco 8.
Premi "SU/GIÙ" per selezionare uno o più giocatori
(P1/P2/P3/P4).
Premi "PLAY" dopo aver selezionato il numero di giocatori.
Premere "SU / GIÙ" per selezionare il tempo di riproduzione,
30/45/60 secondi.
Premi "PLAY" per avviare il gioco.
Il marcatore "HOME" mostra il giocatore 1, 3; il marcatore
"VISITATORE" mostra il giocatore 2, 4. Tutti i tiri valgono 2
punti fino agli ultimi 10 secondi, ogni punteggio conta 3 punti.
Conto alla rovescia di 5 secondi per il turno del giocatore
successivo quando un giocatore termina il gioco.
Il giocatore con il maggior numero di punti segnati vince (il
LED lampeggerà sul giocatore con il punteggio più alto).
Premi "PLAY" per riavviare il gioco.
ATTENZIONE!
Cambiamenti o modifiche che non sono stati
espressamente approvati dalla parte responsabile della
conformità possono invalidare l'autorità dell'utente di
utilizzare l'apparecchiatura.
L'operazione è soggetta alle seguenti due condizioni:
(1) Questo dispositivo non deve causare interferenze
dannose.
(2) Questo dispositivo deve accettare qualsiasi
interferenza ricevuta, comprese le interferenze che
possono causare operazioni indesiderate.
106 107
Produkt musi być złożony i używany pod nadzorem osoby dorosłej.
Przeczytaj uważnie każdy krok i postępuj we właściwej kolejności.
Usuń opakowanie i upewnij się, że zestaw zawiera wszystkie części i elementy
montażowe.
Upewnij się, że wszystkie części są poprawnie połączone, nieprawidłowa instalacja
może prowadzić do wypadku.
Zalecamy, aby w miarę możliwości wszystkie elementy były montowane w pobliżu
miejsca, w którym będą używane, aby uniknąć niepotrzebnego przenoszenia produktu
po złożeniu.
Zapewnij bezpieczną przestrzeń roboczą podczas montażu i upewnij się, że produkt
znajduje się na płaskiej i stabilnej powierzchni.
Należy regularnie sprawdzać i konserwować najważniejsze części produktu takie jak
mocowania czy zakotwiczenie do podłoża.
Zanim Zaczniesz
Przeczytaj uważnie wszystkie instrukcje i zachowaj je na przyszłość.
PL
Ogólne ostrzeżenia
Uwaga: Produkt wyłącznie do użytku domowego
Uwaga: Dzieci moga używać tego produktu jedynie pod nadzorem dorosłych.
Niebezpieczeństwo: Trzymaj wszystkie małe części i opakowania tego produktu z dala od
niemowląt i dzieci - w przeciwnym razie mogą stwarzać ryzyko zadławienia.
Niebezpieczeństwo: Brak mocowania może spowodować ryzyko przewrócenia lub
upadku.
Uwaga

Rurka-5
Ø22x755x580mm
Rurka-6
Ø22x755x580mmØ22x890mm
Rurka-4
Piłka (średnica 17 cm)
Elektroniczny
licznik trafień Czujnik przełącznika
Rurka-1 Rurka-2
Ø22x580x440mm Ø22x685mm Ø22x890mm
Rurka-3
1 x2 2 x2 3 x1
4 x1 5 x1 6 x1
13 x4 14 x1 15 x2
Ø22x830mm
Rurka-7
Ø22x835mm
Rurka-8
Ø22x595mm
Rurka-9
7 x2 8 x2 9 x2
Rurka-10
Ø22x650x385mm
Rurka-11
Ø22x1067x520mm Ø12.7x1090mm
Rurka-12
10 x2 11 x1 12 x3
Obręcz Płyta nośna obręczy
Skrzynka kontrolna
z przewodem
16 x1 17 x2 18 x2
Pompka z igłą Siatka Tablica
21 x119 x1 20 x1
Podkładka M6 Śruba M6x20 mm Śruba M6x29mm
22 x46 23 x16 24 x6
Śruba M6x42mm Śruba M6x50mm Śruba M6x35mm
25 x4 26 x4 27 x2
Śruba 4x28mmNakrętka M6 Śruba 3,5x10mm
28 x32 29 x4 30 x2
108 109

Płyta
elektronicznego
licznika
31 x1
Klucz
32 x1
Klucz imbusowy
33 x1
Pasek
samoprzylepny
34 x2
P1 x2
Zatrzask
sprężynowy
P2 x9
Plastikowa
zaślepka słupka
P3 x2
Zawleczka
blokująca
P4 x2
CZĘŚCI WSTĘPNIE ZAMOCOWANE
12
11
109876
INSTRUKCJA MONTAŻU:
1. Zmontuj produkt na płaskim, równym i czystym podłożu. Zalecamy,
aby montaż został przeprowadzony przez dwie osoby dorosłe.
2. Wyjmij wszystkie części z opakowania. Następnie zapoznaj się z
listą części w niniejszej instrukcji, aby sprawdzić czy w zestawie
znajdują się wszystkie części. Możesz rozłożyć kartonowe
opakowanie na płasko, aby posłużyło ci jako powierzchnia robocza.
PRZED MONTAŻEM - Wyjmij z opakowania i sprawdź
wszystkie części.
54321
RYS.1 i 2
3. Przymocuj dwie rurki (2) do rurek (3) i (4) za pomocą zatrzasków
sprężynowych (wstępnie zamocowanych), tak jak pokazano na rysunku
1.
4. Przymocuj rurki (7) do rurek (8) za pomocą zatrzasków sprężynowych
(wstępnie zamocowanych), tak jak pokazano na rysunku 2.
P2
Zatrzask
sprężynowy
P2
Zatrzask
sprężynowy
P2
Zatrzask sprężynowy
8
7
8 x2
7 x2
6 x1
5 x1
4
4 x1
3
3 x1
2
2
2 x2
RYS.1
RYS.3
RYS.2
RYS.3
5. Przymocuj rurkę (5) do rurki (6) za pomocą zatrzasku
sprężynowego (wstępnie zamocowanego), tak jak pokazano na
rysunku 3.
Siatka
obręczy
110 111

RYS.4
6. Przymocuj rurki (5 i 6) do rurek (3 i 4) za pomocą śrub (26),
podkładek (22) i nakrętek (28). Następnie przymocuj rurki (5 i 6) do
rurek (8) za pomocą śrub (26), podkładek (22) i nakrętek (28), tak
jak pokazano na rysunkach 4, 4A i 4B.
7. Przymocuj rurki (7 i 8) do rurek (2) za pomocą śrub (24),
podkładek (22) i nakrętek (28), tak jak pokazano na rysunku 4C.
UWAGA: Zatrzask sprężynowy powinien być skierowany w dół.
22 x6
24 x2
26 x4
28 x6
RYS.4A
RYS.4B
RYS.4
RYS.4C
22
22
22
24
26
26
28
28
28
8
8
7
7
6
5
4
3
2
2
RYS.5
8. Przymocuj rurkę (12) do rurek (2) za pomocą śrub (24),
podkładek (22) i nakrętek
(28), tak jak pokazano na rysunku 5A. Następnie przymocuj rurki
(1) do rurek (2), tak jak pokazano na rysunku 5.
9. Przymocuj rurki (9) do rurek (5 i 6) za pomocą śrub (27),
podkładek (22) i nakrętek (28), tak jak pokazano na rysunku 5 i
5B.
22 x6
24 x2
27 x2
28 x4
12 x1
9 x2
1 x2
22
22
22
24
27
28
28
12
12
9
9
6
5
2
2
2
1
RYS.5A
RYS.5B
RYS.5
P3
112 113
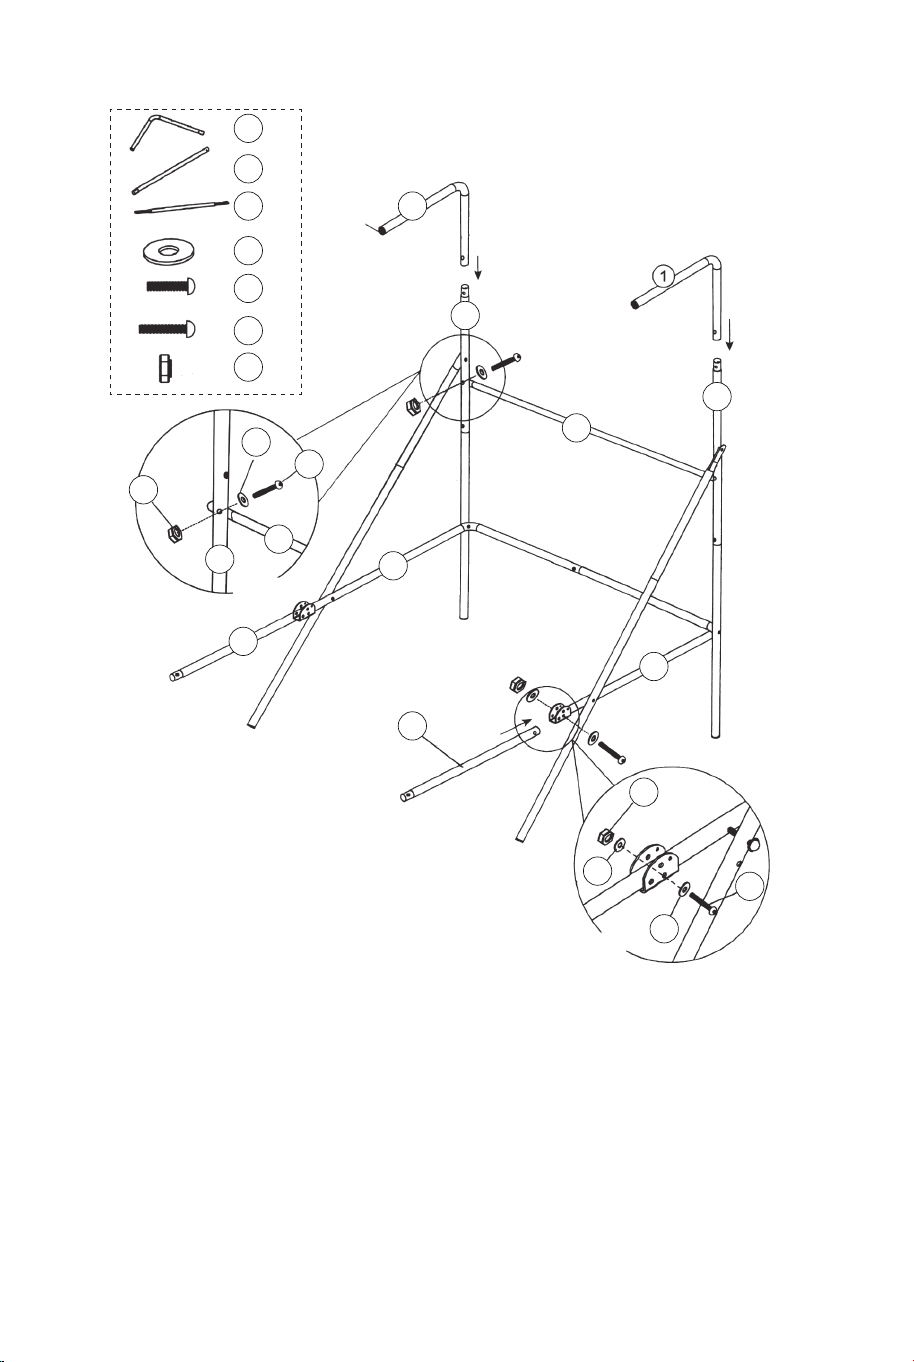
RYS.4
6. Przymocuj rurki (5 i 6) do rurek (3 i 4) za pomocą śrub (26),
podkładek (22) i nakrętek (28). Następnie przymocuj rurki (5 i 6) do
rurek (8) za pomocą śrub (26), podkładek (22) i nakrętek (28), tak
jak pokazano na rysunkach 4, 4A i 4B.
7. Przymocuj rurki (7 i 8) do rurek (2) za pomocą śrub (24),
podkładek (22) i nakrętek (28), tak jak pokazano na rysunku 4C.
UWAGA: Zatrzask sprężynowy powinien być skierowany w dół.
22 x6
24 x2
26 x4
28 x6
RYS.4A
RYS.4B
RYS.4
RYS.4C
22
22
22
24
26
26
28
28
28
8
8
7
7
6
5
4
3
2
2
RYS.5
8. Przymocuj rurkę (12) do rurek (2) za pomocą śrub (24),
podkładek (22) i nakrętek
(28), tak jak pokazano na rysunku 5A. Następnie przymocuj rurki
(1) do rurek (2), tak jak pokazano na rysunku 5.
9. Przymocuj rurki (9) do rurek (5 i 6) za pomocą śrub (27),
podkładek (22) i nakrętek (28), tak jak pokazano na rysunku 5 i
5B.
22 x6
24 x2
27 x2
28 x4
12 x1
9 x2
1 x2
22
22
22
24
27
28
28
12
12
9
9
6
5
2
2
2
1
RYS.5A
RYS.5B
RYS.5
P3
112 113

11
11 x1
11
10
10 x2
10
10
9
9
RYS.6
Krótszy
koniec
Dłuższy
koniec
P2
Zatrzask
sprężynowy
P2
Zatrzask
sprężynowy
RYS.6
10.Przymocuj rurki (10) do rurek (9) za pomocą zatrzasków
sprężynowych (wstępnie zamocowanych). Następnie przymocuj
rurkę (11) do rurek (10) za pomocą zatrzasków sprężynowych
(wstępnie zamocowanych), tak jak pokazano na rysunku 6.
RYS.7
21 x1
22 x24
23 x16
28 x16
18 x2
17 x2
15 x2
RYS.7
11. Przymocuj obręcze (17) i płyty nośne (18) do tablicy (21) za
pomocą śrub (23), podkładek (22) i nakrętek (28). Przymocuj
czujniki przełączników (15) do tablicy (21) za pomocą śrub (23),
podkładek (22) i nakrętek (28).
UWAGA: Zamocuj podkładki po obu stronach tablicy, tak jak
pokazano na rysunku 7.
28
28
21
22
22
22
23
23
18
18
17
17
15
15
114 115

11
11 x1
11
10
10 x2
10
10
9
9
RYS.6
Krótszy
koniec
Dłuższy
koniec
P2
Zatrzask
sprężynowy
P2
Zatrzask
sprężynowy
RYS.6
10.Przymocuj rurki (10) do rurek (9) za pomocą zatrzasków
sprężynowych (wstępnie zamocowanych). Następnie przymocuj
rurkę (11) do rurek (10) za pomocą zatrzasków sprężynowych
(wstępnie zamocowanych), tak jak pokazano na rysunku 6.
RYS.7
21 x1
22 x24
23 x16
28 x16
18 x2
17 x2
15 x2
RYS.7
11. Przymocuj obręcze (17) i płyty nośne (18) do tablicy (21) za
pomocą śrub (23), podkładek (22) i nakrętek (28). Przymocuj
czujniki przełączników (15) do tablicy (21) za pomocą śrub (23),
podkładek (22) i nakrętek (28).
UWAGA: Zamocuj podkładki po obu stronach tablicy, tak jak
pokazano na rysunku 7.
28
28
21
22
22
22
23
23
18
18
17
17
15
15
114 115
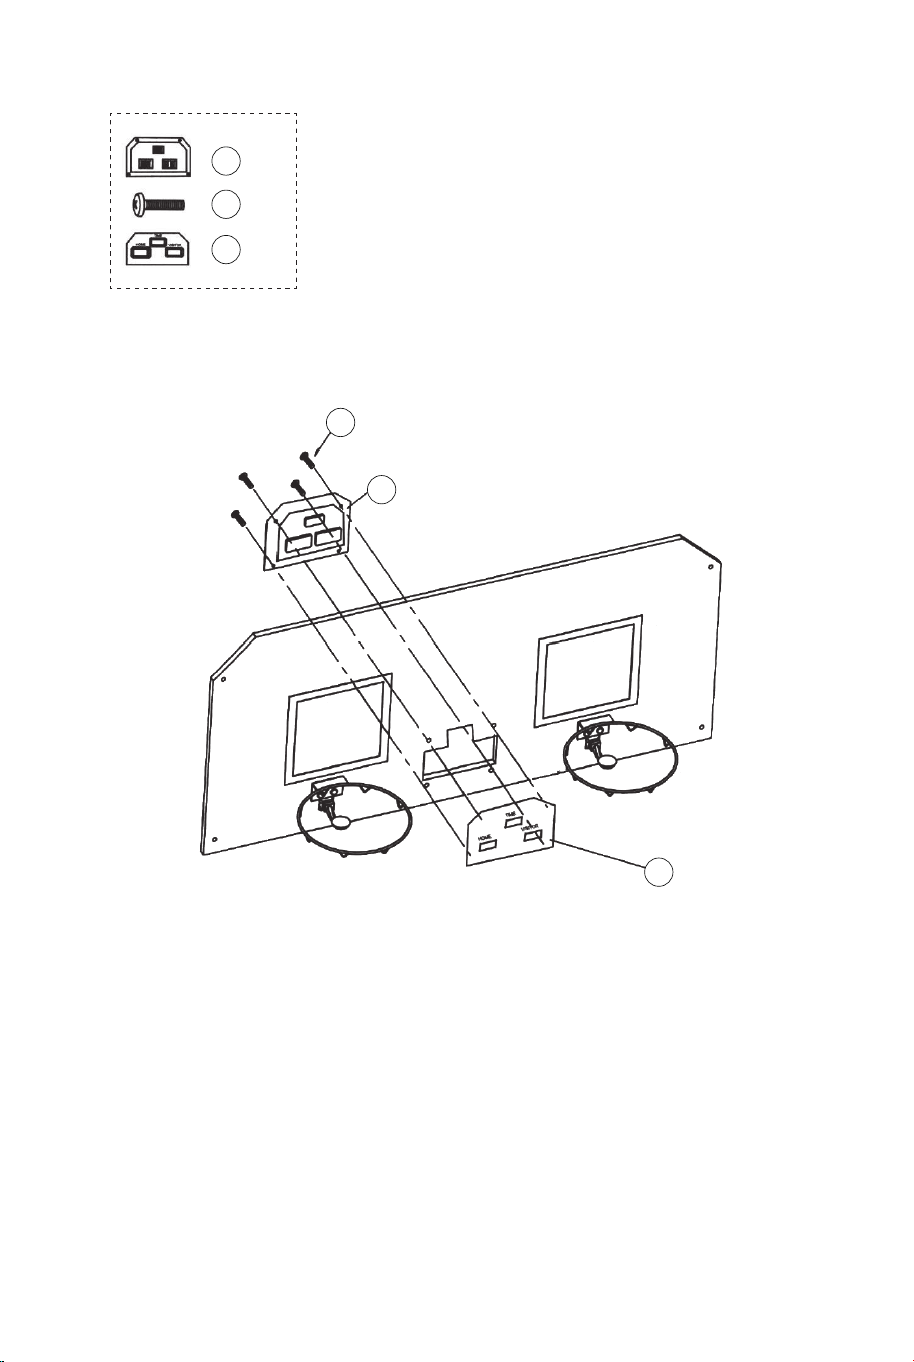
29
29 x4
14
14 x1
RYS.8
31
31 x1
RYS.8
12. Zamocuj płytę licznika (31) w przedniej części tablicy (21) i
podłącz ją do licznika trafień (14) za pomocą śrub (29), tak jak
pokazano na rysunku 8.
22 x2
24 x2
28 x2
20 x1
12 x1
22
22
22
24
24
24
28
28
28
20
20
12
12
12
11
11
RYS.9A
RYS.9
RYS.9D
RYS.9B
RYS.9C
P4
Zawleczka blokująca
RYS.9
13. Nasuń materiałowe rękawy z paskami mocującymi siatki (20)
na rurki (1), tak jak pokazano na rysunkach 9A, 9B i 9C.
14. Przełóż rurkę (12) przez materiałowy rękaw w przedniej
części siatki (20). Najpierw zabezpiecz lewą stronę za pomocą
śrub (24), podkładek (22) i nakrętek (28), tak jak pokazano na
rys. 9D. Powtórz z prawej strony.
116 117
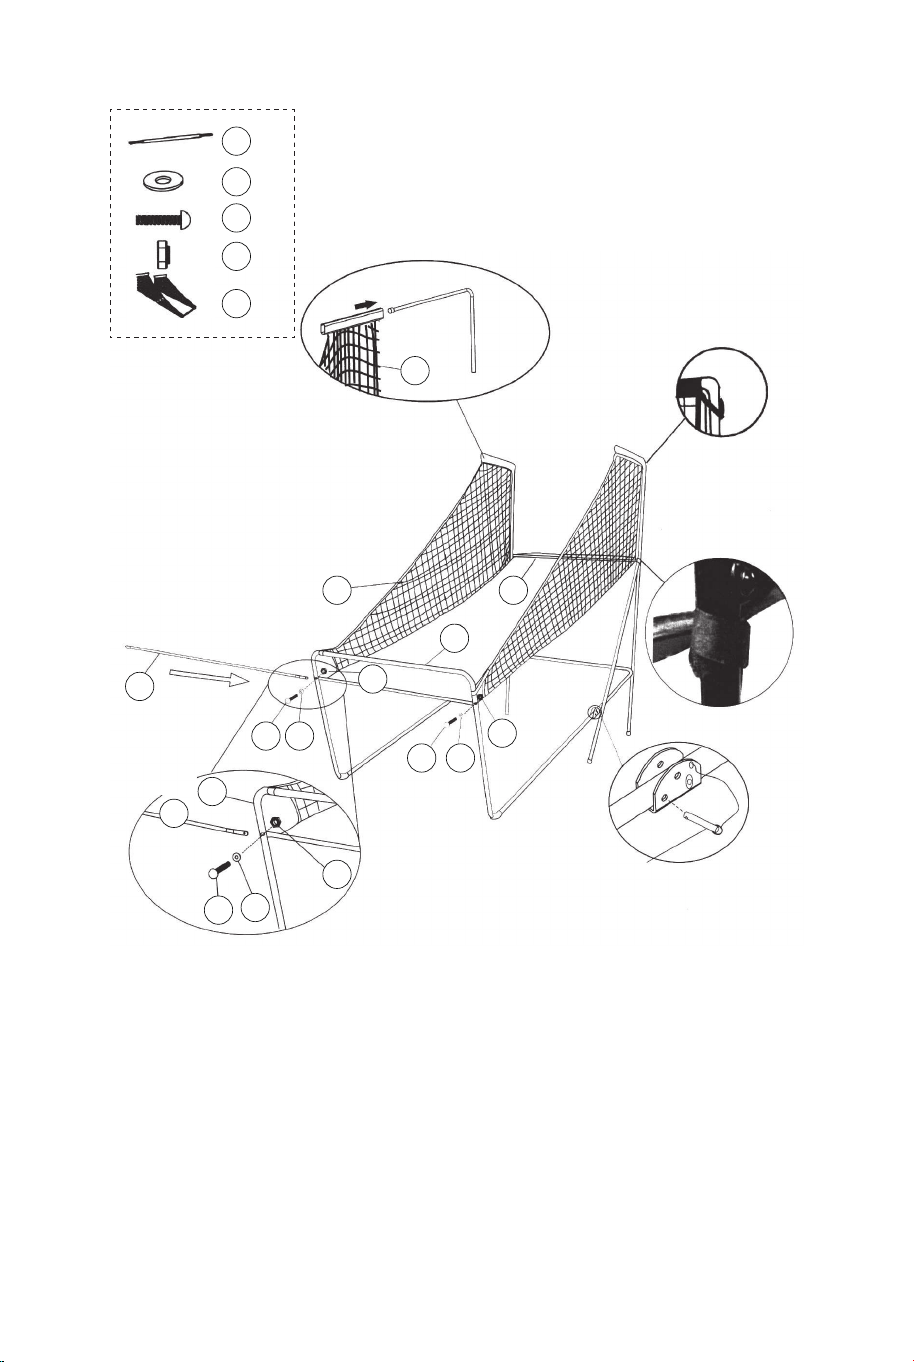

21
22
22
22 x8
25
25 x4
28
28 x4
20
12
12
1
RYS.10
RYS.10C
RYS.10A
P4
Zawleczka blokująca
P1
RYS.10
15. Z pomocą innej osoby dorosłej przymocuj tablicę (21) do
rurek (1) za pomocą śrub (25), podkładek (22) i nakrętek (28),
tak jak pokazano na rysunku 10A. Wsuń rurkę (12) w rękaw
płótna z tyłu siatki (20), jak pokazano na rysunku 10B. Za
pomocą śrub (25), podkładek (22) i nakrętek (28) przymocuj
najpierw lewą stronę, korzystając z otworów montażowych z
dołu tablicy., tak jak pokazano na rys.10C. Powtórz dla prawej
strony.
16. Włóż zawleczki blokujące (P4) do otworów w rurkach (5 i 6),
tak jak pokazano na rysunku 10C.
20
RYS.11
RYS.11A
30 x2
34 x2
34
30
11
16
11
16 x1
Skrzynka kontrolna
Przewód
skrzynki
kontrolnej
RYS.11
17. Przymocuj skrzynkę kontrolną (16) w środkowej części rurki
(11) za pomocą dwóch śrub (30), tak jak pokazano na rys. 11A.
18. Przeprowadź przewód skrzynki kontrolnej przez oczka siatki
(20). Przymocuj przewód do rurki (11) za pomocą pasków
samoprzylepnych (34), tak jak pokazano na rysunku 11.
118 119

14
Przewód skrzynki
kontrolnej
Elektroniczny licznik trafień
Przewód czujnika
Przewód czujnika
RYS.12
RYS.12
19. Podłącz przewód czujnika przełącznika (15) do licznika
trafień (14), tak jak pokazano na rysunku 12. Następnie podłącz
przewód skrzynki kontrolnej do licznika trafień (14), tak jak
pokazano na rysunkach 12 i 12A.
RYS.12A
PRZEWÓD
SKRZYNKI
KONTROLNEJ
WEJŚCIE
CZUJNIKA
ON/OFF
(WŁ./WYŁ.)
RYS.13
RYS.13
20. Złóż produkt, gdy nie jest używany i włóż zawleczki
blokujące (P4), tak jak pokazano na rysunku 13.
Uwaga: Wyjmij zawleczki blokujące (P4) przed przystąpieniem
do składania lub rozkładania produktu.
P4
Zawleczka blokująca
UWAGA!
Pamiętaj, aby po złożeniu
zabezpieczyć produkt przy użyciu
zawleczek blokujących (P4).
120 121

UŻYTKOWANIE LICZNIKA TRAFIEŃ
Instalacja baterii:
Otwórz pokrywę komory baterii, odkręcając śrubę za pomocą
śrubokrętu. Włóż 3 baterie AA (brak w zestawie) z zachowaniem
prawidłowej polaryzacji. Zamknij pokrywę komory baterii i dokręć
śrubę.
Włącz produkt za pomocą włącznika ON/OFF.
Ostrzeżenia:
A. Baterie muszą zostać włożone z zachowaniem prawidłowej
polaryzacji.
B. Przed włożeniem baterii wyczyścić styki baterii i styki komory
baterii.
C. Wyjmij baterie jeśli produkt nie jest używany przez dłuższy czas.
SKRZYNKA KONTROLNA:
Naciśnij przycisk „ON/OFF”, aby włączyć licznik trafień.
Na tablicy „HOME” wyświetli się „01” (gra 1).
Naciśnij przycisk „SELECT UP” lub przycisk „SELECT DOWN”, aby
wybrać grę. Naciśnij „PLAY”, aby zatwierdzić wybór gry.
Naciśnij przycisk „SOUND”, aby włączyć lub wyłączyć dźwięk
podczas gry.
Naciśnij przycisk „PAUSE”, aby rozpocząć lub zatrzymać
odliczanie.
Naciśnij i przytrzymaj przez 3 sekundy przycisk „ON/OFF”, aby
wyłączyć licznik trafień. Naciśnij i przytrzymaj przez 3 sekundy
przycisk „RESET”, aby zresetować grę. Uwaga: Jeśli w ciągu 15
minut nie wykonasz żadnego rzutu do kosza i nie naciśniesz
żadnego przycisku, licznik trafień wyłączy się automatycznie.
PANEL STEROWANIA
ON/OFF
SOUND
PLAY
PAUSE RESET
WYBÓR 1 Z 8 GIER
1. Gra 1: Walka z czasem.
Naciśnij przycisk „PLAY”, aby rozpocząć grę 1.
Naciśnij przycisk „UP” lub „DOWN”, aby wybrać liczbę graczy
(P1/P2/P3/P4).
Po wybraniu liczby graczy naciśnij przycisk „PLAY”.
Naciśnij przycisk „UP” lub „DOWN”, aby wybrać czas gry (30/45/60
sekund).
Naciśnij przycisk „PLAY”, aby rozpocząć grę.
Na tablicy „HOME” wyświetlą się punkty graczy 1 i 3, a na tablicy
„VISITOR” punkty graczy 2 i 4.
Za każde trafienie do kosza gracz otrzymuje 2 punkty. W ostatnich 10
sekundach gry gracz otrzymuje 3 punkty za każde trafienie do kosza.
Po zakończeniu tury jednego gracza rozpoczyna się 5-sekundowe
odliczanie, po którym następuje tura następnego gracza.
Wygrywa gracz, który zdobędzie więcej punktów (dioda LED wskazuje
gracza z większą ilością punktów).
Naciśnij przycisk „PLAY”, aby zrestartować grę.
SELECT
UP
SELECT
DOWN
PRZEWÓD
SKRZYNKI
KONTROLNEJ
WEJŚCIE
CZUJNIKA
ON/OFF
(WŁ./WYŁ.)
OSTRZEŻENIA:
1) Produkt wymaga użycia 3 baterii AA (brak w zestawie).
2) Nie mieszaj baterii starych i nowych.
3) Nie mieszaj różnych typów baterii (baterie alkaliczne,
standardowe i wielokrotnego użytku).
122 123
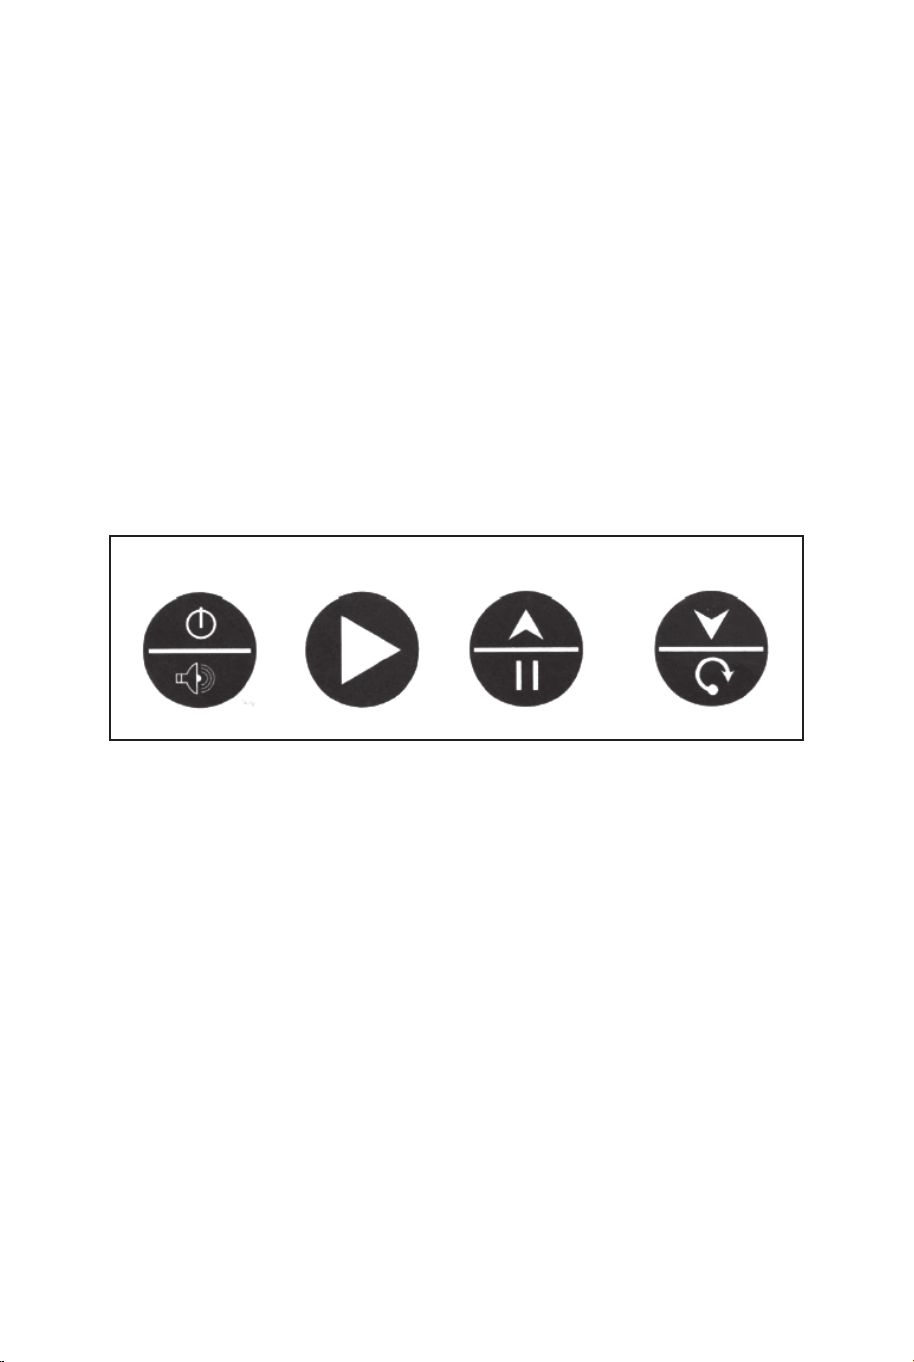

2.Gra 2: Walka z czasem za 3 punkty.
Naciśnij przycisk „PLAY”, aby rozpocząć grę 2.
Naciśnij przycisk „UP” lub „DOWN”, aby wybrać liczbę graczy
(P1/P2/P3/P4).
Po wybraniu liczby graczy naciśnij przycisk „PLAY”.
Naciśnij przycisk „UP” lub „DOWN”, aby wybrać czas gry
(30/45/60 sekund).
Naciśnij przycisk „PLAY”, aby rozpocząć grę.
Na tablicy „HOME” wyświetlą się punkty graczy 1 i 3, a na
tablicy „VISITOR” punkty graczy 2 i 4.
Za każde trafienie do kosza gracz otrzymuje 3 punkty.
Po zakończeniu tury jednego gracza rozpoczyna się
5-sekundowe odliczanie, po którym następuje tura
następnego gracza.
Wygrywa gracz, który zdobędzie więcej punktów (dioda LED
wskazuje gracza z większą ilością punktów).
Naciśnij przycisk „PLAY”, aby zrestartować grę.
3. Gra 3: Pojedynek.
Naciśnij przycisk „PLAY”, aby rozpocząć grę 3.
Naciśnij przycisk „UP” lub „DOWN”, aby wybrać liczbę graczy
(P2/P4).
Po wybraniu liczby graczy naciśnij przycisk „PLAY”.
Za każde trafienie do kosza drużyna „HOME” otrzymuje 2
punkty, a przeciwna drużyna „VISITOR” traci 2 punkty.
Za każde trafienie do kosza drużyna „VISITOR” otrzymuje 2
punkty, a przeciwna drużyna „HOME” traci 2 punkty.
Wygrywa drużyna, która zdobędzie 10 punktów.
Naciśnij przycisk „PLAY”, aby zrestartować grę.
4. Gra 4: HORSE.
A. Naciśnij przycisk „PLAY”, aby rozpocząć grę 4.
B. Naciśnij przycisk „UP” lub „DOWN”, aby wybrać liczbę
graczy (P2/P3/P4).
C. Po wybraniu liczby graczy naciśnij przycisk „PLAY”.
D. Gracz musi trafić do kosza w ciągu 2 sekund.
E. Pierwszy gracz może trafić do dowolnego kosza (kosz
drużyny „HOME” lub kosz drużyny „VISITOR”). Jeśli gracz trafi
do kosza w ciągu 2 sekund, nie wyświetla się żadna litera.
Następuje tura następnego gracza. Na tablicy wyświetla się P2,
P3 lub P4, a dioda LED miga dwukrotnie.
Gdy dioda przestanie migać, następny gracz musi trafić do tego
samego kosza, do którego trafił poprzedni gracz.
F. Jeśli gracz nie trafi do kosza w ciągu 2 sekund, na tablicy
wyświetli się litera H. Tura danego gracza trwa, dopóki nie trafi
on do kosza. Jeśli gracz nie trafi do kosza podczas kolejnych
rzutów, wyświetlą się kolejno litery O, R, S i E. Litera E oznacza
koniec gry dla danego gracza.
G. Przegrywa gracz, który jako pierwszy zdobędzie wszystkie
litery słowa HORSE. Gracze powtarzają kroki d, e oraz f, aż do
zakończenia gry.
H. Wygrywa gracz, który jako ostatni zdobędzie litery słowa
HORSE.
I. Naciśnij przycisk „PLAY”, aby zrestartować grę.
5. Gra 5: Mnóstwo punktów.
Naciśnij przycisk „PLAY”, aby rozpocząć grę 5.
Naciśnij przycisk „UP” lub „DOWN”, aby wybrać liczbę graczy
(P1/P2/P3/P4).
Po wybraniu liczby graczy naciśnij przycisk „PLAY”.
Na tablicy „HOME” wyświetla się numer gracza, a na tablicy
„VISITOR” wyświetla się czas gry, który wynosi 40 sekund.
Zdobyte punkty wyświetlają się na tablicy „HOME”.
Przed upływem czasu gry i po zdobyciu 24/52/68/86 punktów
czas gry wydłuża się kolejno o 10/20/10/20 sekund.
Po zakończeniu tury jednego gracza rozpoczyna się
5-sekundowe odliczanie, po którym następuje tura następnego
gracza.
Wygrywa gracz, który zdobędzie więcej punktów (dioda LED
wskazuje gracza z większą ilością punktów).
Gra kończy się, gdy jeden z graczy zdobędzie 98 punktów.
Naciśnij przycisk „PLAY”, aby zrestartować grę.
124 125

6. Gra 6: Wyścig.
Użyj taśmy do zaznaczenia linii rzutów.
Naciśnij przycisk „PLAY”, aby rozpocząć grę 6.
Naciśnij przycisk „UP” lub „DOWN”, aby wybrać liczbę graczy
(P1/P2/P3/P4).
Po wybraniu liczby graczy naciśnij przycisk „PLAY”.
Na tablicy „HOME” wyświetla się numer gracza (1/2/3/4), a na
tablicy „VISITOR” wyświetla się ilość zdobytych punktów.
Gdy gracz zdobędzie 10 punktów lub upłynie 99 sekund,
rozpocznie się 5-sekundowe odliczanie, po którym nastąpi tura
następnego gracza.
Wygrywa gracz, który zdobędzie więcej punktów w krótszym czasie
(dioda LED wskazuje wygranego gracza).
Naciśnij przycisk „PLAY”, aby zrestartować grę.
7. Gra 7: Rzut z prawej lub lewej strony.
Naciśnij przycisk „PLAY”, aby rozpocząć grę 7.
Naciśnij przycisk „UP” lub „DOWN”, aby wybrać liczbę graczy
(P1/P2/P3/P4).
Po wybraniu liczby graczy naciśnij przycisk „PLAY”.
Naciśnij przycisk „UP” lub „DOWN”, aby wybrać czas gry (30/45/60
sekund).
Naciśnij przycisk „PLAY”, aby rozpocząć grę.
Na tablicy „HOME” wyświetla się numer gracza, a na tablicy
„VISITOR” punkty.
Rzuć piłką do obręczy „HOME”, jeśli miga dioda LED drużyny
„HOME”. Na tablicy „HOME” wyświetlą się 2 punkty.
Rzuć piłką do obręczy „VISITOR”, jeśli miga dioda LED drużyny
„VISITOR”. Na tablicy
„VISITOR” wyświetlą się 2 punkty.
Po zakończeniu tury jednego gracza rozpoczyna się 5-sekundowe
odliczanie, po którym następuje tura następnego gracza.
Wygrywa gracz, który zdobędzie więcej punktów (dioda LED
wskazuje wygranego gracza). Naciśnij przycisk „PLAY”, aby
zrestartować grę.
8. Gra 8: Jeden na jednego.
Naciśnij przycisk „PLAY”, aby rozpocząć grę 8.
Naciśnij przycisk „UP” lub „DOWN”, aby wybrać liczbę graczy
(P1/P2/P3/P4).
Po wybraniu liczby graczy naciśnij przycisk „PLAY”.
Naciśnij przycisk „UP” lub „DOWN”, aby wybrać czas gry
(30/45/60 sekund).
Naciśnij przycisk „PLAY”, aby rozpocząć grę.
Na tablicy „HOME” wyświetlą się punkty graczy 1 i 3, a na
tablicy „VISITOR” punkty graczy 2 i 4. Za każde trafienie do
kosza gracz otrzymuje 2 punkty. W ostatnich 10 sekundach
gry gracz otrzymuje 3 punkty za każde trafienie do kosza.
Po zakończeniu tury jednego gracza rozpoczyna się
5-sekundowe odliczanie, po którym następuje tura
następnego gracza.
Wygrywa gracz, który zdobędzie więcej punktów (dioda LED
wskazuje gracza z większą ilością punktów).
Naciśnij przycisk „PLAY”, aby zrestartować grę.
UWAGA
Zmiany lub modyfikacje, które nie zostały zatwierdzone
przez producenta, mogą unieważnić prawo użytkownika
do obsługi produktu.
Użytkowanie produktu podlega następującym warunkom:
(1) Produkt nie może powodować szkodliwych zakłóceń.
(2) Produkt musi akceptować wszelkie odbierane
zakłócenia, w tym zakłócenia, które mogą powodować
niepożądane działanie.
126 127
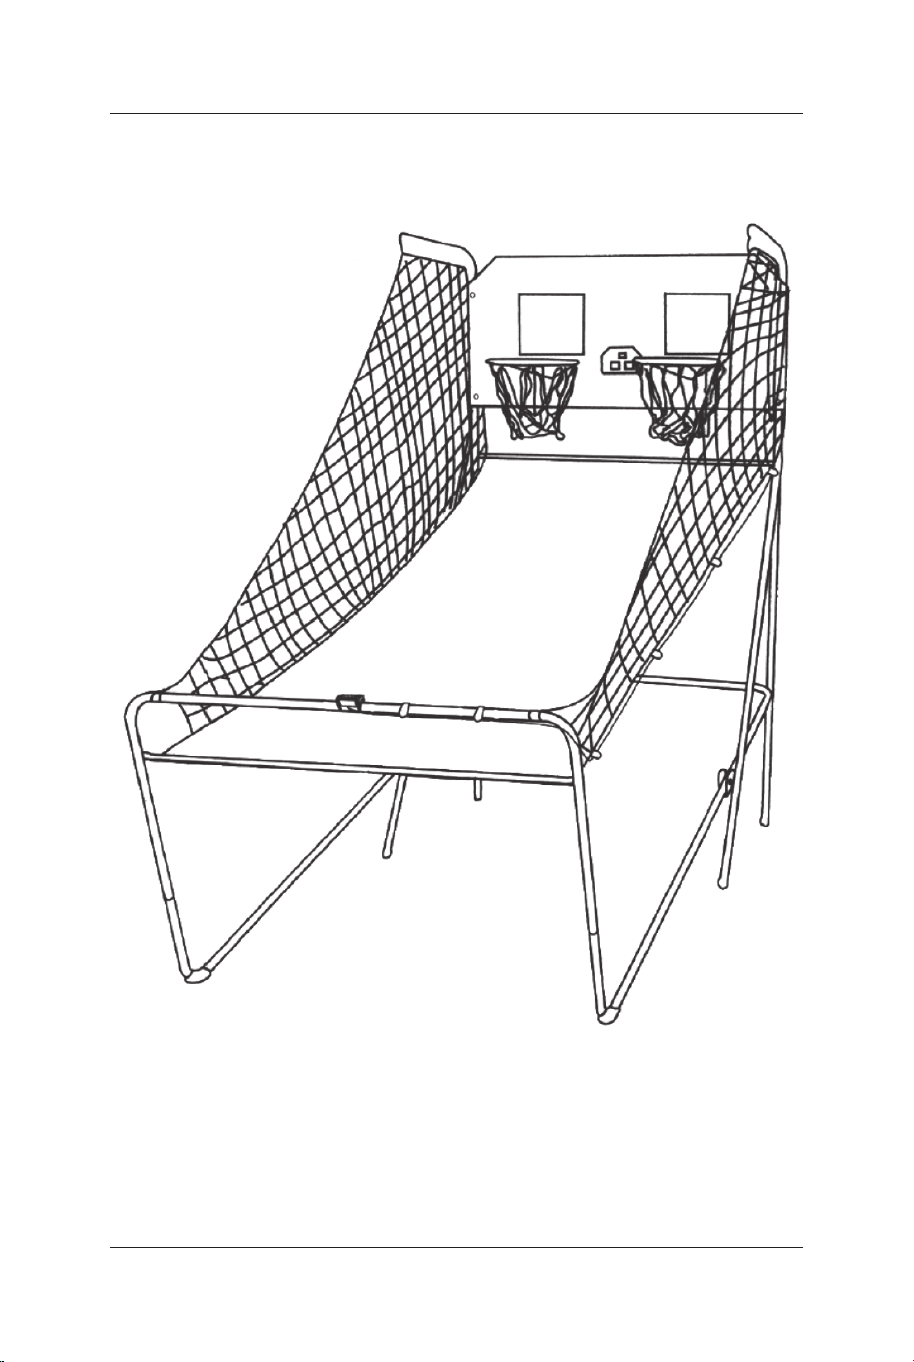
128 129
In case a return is required, the item must be returned in original box. Without this
your return will not be accepted.
DO NOT discard the box / original packaging.
Take a photo of the box markings.
Take a photo of the damaged part (if applicable).
Send us an email with the images requested.
A photo of the markings (text) on the side of the box is required in case a part is
needed for replacement. This helps our staff identify your product number to
ensure you receive the correct parts.
A photo of the damage is always required to file a claim and get your replacement
or refund processed quickly. Please make sure you have the box even if it is
damaged.
Email us directly from marketplace where your item was purchased with the
attached images and a description of your claim.
Falls eine Rücksendung erforderlich ist, muss der Artikel in der
Originalverpackung zurückgeschickt werden. Andernfalls wird Ihre Rücksendung
nicht angenommen.
Werfen Sie den Karton / die Originalverpackung NICHT weg.
Machen Sie ein Foto von der Beschriftung des Kartons.
Machen Sie ein Foto des beschädigten Teils (falls zutreffend).
Schicken Sie uns eine E-Mail mit dem gewünschten Foto.
Für den Fall, dass ein Ersatzteil benötigt wird, benötigen wir ein Foto der
Beschriftung (Text) auf der Seite des Kartons. So können unsere Mitarbeiter Ihre
Artikelnummer identifizieren und sicherstellen, dass Sie die richtigen Teile
erhalten.
Ein Foto des beschädigten Teils ist immer erforderlich, um eine Reklamation
einzureichen und eine schnelle Bearbeitung Ihres Ersatzteils oder Ihrer
Rückerstattung zu gewährleisten. Bitte stellen Sie sicher, dass Sie den Karton
haben, auch wenn er beschädigt ist.
Schicken Sie uns eine E-Mail direkt vom Marktplatz, auf dem Sie den Artikel
gekauft haben, mit den angehängten Fotos und einer Beschreibung Ihrer
Reklamation.
EN
DE
Return / Damage Claim Instructions
Rücksendung / Beschädigung Anweisungen
130 131
Instructions De Retour / Réclamation De Dommages
Dans le cas où un retour est requis, l'article doit être retourné dans sa boîte
d'origine. Sans cela, votre retour ne sera pas accepté.
NE PAS jeter la boîte/l'emballage d'origine.
Prenez une photo des marquages de la boîte.
Prenez une photo des dommages (le cas échéant).
Envoyez-nous un e-mail avec les images demandées.
Une photo des marquages (texte) sur le côté de la boîte est requise au cas où une
pièce serait nécessaire pour le remplacement. Cela aide notre personnel à
identifier votre numéro de produit pour s'assurer que vous recevez les bonnes
pièces.
Une photo des dommages est toujours requise pour déposer une réclamation et
obtenir rapidement votre remplacement ou votre remboursement. Assurez-vous
d'avoir la boîte même si elle est endommagée.
Envoyez-nous un e-mail directement depuis le marché où votre article a été
acheté avec les images ci-jointes et une description de votre réclamation.
Instrucciones de Devolución / Reclamación de Daños
En caso de que se requiera una devolución, el artículo debe ser devuelto en la
caja original. Sin esto su devolución no será aceptada.
NO deseche la caja/embalaje original.
Tome una foto de las marcas de la caja.
Tome una foto de las piezas dañadas (si procede).
Envíenos un correo electrónico con las imágenes solicitadas.
Se requiere una foto de las marcas (texto) en el lado de la caja en caso de que se
necesite una pieza para reemplazarla. Esto ayuda a nuestro personal a identificar
su número de producto para asegurarse de que recibe las piezas correctas.
Una foto de los daños es siempre necesaria para presentar una reclamación y
conseguir que su reemplazo o reembolso sea procesado rápidamente. Por favor,
asegúrese de tener la caja aunque esté dañada.
Envíenos un correo electrónico directamente desde el mercado donde se compró
su artículo con las imágenes adjuntas y una descripción de su reclamación.
FR
ES
Nel caso in cui sia richiesto un reso, l'articolo deve essere restituito nella scatola
originale. Senza la scatola originale il tuo reso non sarà accettato.
NON scartare la scatola / confezione originale.
Fare una foto dei contrassegni sulla scatola.
Fare una foto di Danno (se è applicabile).
Inviarci una mail con le immagini richieste.
È necessaria una foto dei contrassegni (testo) sul lato della scatola nel caso in
cui la parte debba essere sostituita. Questo aiuta il nostro staff a identificare il
numero del tuo prodotto per assicurarti di ricevere le parti corrette.
Una foto del danno è sempre necessaria per presentare un reclamo e ottenere
rapidamente la sostituzione o il rimborso. Assicurati di avere la scatola anche se
è danneggiata.
Inviarci un'e-mail direttamente dal mercato in cui è stato acquistato il tuo articolo
con le immagini allegate e una descrizione del tuo reclamo.
Jeśli chcesz zwrócić produkt, musi znajdować się on w oryginalnym opakowaniu.
Towar zwrócony w nieoryginalnym opakowaniu nie zostanie przyjęty.
Nie wyrzucaj oryginalnego opakowania.
Zrób zdjęcie oznaczeń na opakowaniu.
Zrób zdjęcie uszkodzonej części (jeśli dotyczy).
Skontaktuj się z nami.
Jeśli jakakolwiek część wymaga wymiany, zrób zdjęcie oznaczeń kodu produktu,
który znajduje się na opakowaniu. Pozwoli nam to zidentyfikować produkt i
dostarczyć ci właściwą część.
Jeśli chcesz złożyć reklamację, zrób zdjęcie uszkodzonej części. Pozwoli nam to
zatwierdzić reklamację i zlecić zwrot środków na twoje konto. Do złożenia
reklamacji potrzebne będzie oryginalne opakowanie.
Skontaktuj się z nami telefonicznie, mailowo lub poprzez formularz kontaktowy.
Załącz zdjęcia produktu i opis roszczenia.
IT
PL
Istruzioni Per La Restituzione / Reclamo Per Danni
Zwroty i reklamacje

SP35202/SP38115
Basketball Arcade Game
Basketball-Arcade-Spiel
Jeu de Basketball Arcade
Máquina de Tiro de Baloncesto
Macchina da Tiro a Canestro
Automat do gry w koszykówkę
Scan QR code for
assembly instructions
THIS INSTRUCTION BOOKLET CONTAINS IMPORTANT SAFETY INFORMATION.
PLEASE READ AND KEEP FOR FUTURE REFERENCE.
DEU office: FDS GmbH, Neuer Höltigbaum 36, 22143 Hamburg, Deutschland
GBR office: FDS Corporation Limited,Unit 4, Blackacre Road, Great Blakenham,Ipswich, Ip6 0FL,United Kingdom
ITA office: Milano
FRA office: Saint Vigor d'Ymonville
POL office: GdańskAUS office: TruganinaUSA office: Fontana