Loading ...
Loading ...
Loading ...

10
WARNING:
Follow these instructions in order to avoid injury and to reduce the risk of electric shock or
fire:
• Replace the battery pack or the charger immediately if the battery case or charger cord is damaged.
• Verify that the battery pack is removed before inspecting, adjusting, or performing maintenance on
any part of the power tool. Read, understand, and follow the instructions.
OPERATING INSTRUCTION
WARNING: Prior to cleaning, make sure that the pressure washer is placed safely on level
ground. Wear protective goggles and protective clothing during the cleaning process.
WARNING: Impurities in the water can damage the high pressure pump and accessories.
Please use the cold water. The suitable water temperature is 32℉ -140 ℉(0℃ - 60℃).
ATTACHING THE MULTI-SPRAY NOZZLE
NOTE: When attaching, rotating the nozzle left and right to make sure the nozzle fully seated into
position and gently pulling it to make sure it is locked into position securely.
Turn off the pressure washer and shut off the water supply.
Attaching the multi-spray nozzle as shown in Fig.8.
Discount a nozzle as shown in Fig.9.
USING NOZZLES
Before beginning any cleaning task, determine the best nozzle for the job. Each of the nozzles has
a different spray pattern.
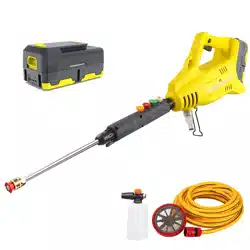
This high pressure washer is equipped with five (5) Quick-Connect nozzles that easily snap onto the
Quick-Connect collar of the spray wand. The nozzle patterns are 45˚ (for gentle cleaning), 25˚ (for
all-purpose cleaning), 15˚ (for tough jobs), 0˚ (for spot cleaning or hard-to-reach areas) and the Soap
nozzle (for detergent application).
CAUTION:
NEVER change nozzles when machine running.
WARNING: High-pressure jets can be dangerous if subject to misuse. The jet must not be
directed at persons, pets, live electrical equipment, or the appliance itself.
Fig.8 Fig.9
Loading ...
Loading ...
Loading ...