Loading ...
Loading ...
Loading ...
6 Section 3— ASSembly & Set-Up
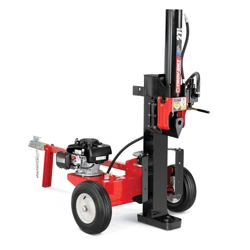
16. Lift and slide the cylinder up to the top of beam
and into the weld brackets. See Figure 3-6.
Cylinder
Weld Brackets
Figure 3-6
17. Attach the dislodger over the wedge assembly
and secure it to the weld brackets with the
previously removed hardware. See Figure 3-4.
NOTE: Lift up on the cylinder when installing
the hex screws.
NOTE: Once the six hex screws are tightened,
there may be a slight gap between the
dislodger and the weld brackets. This gap is
normal.
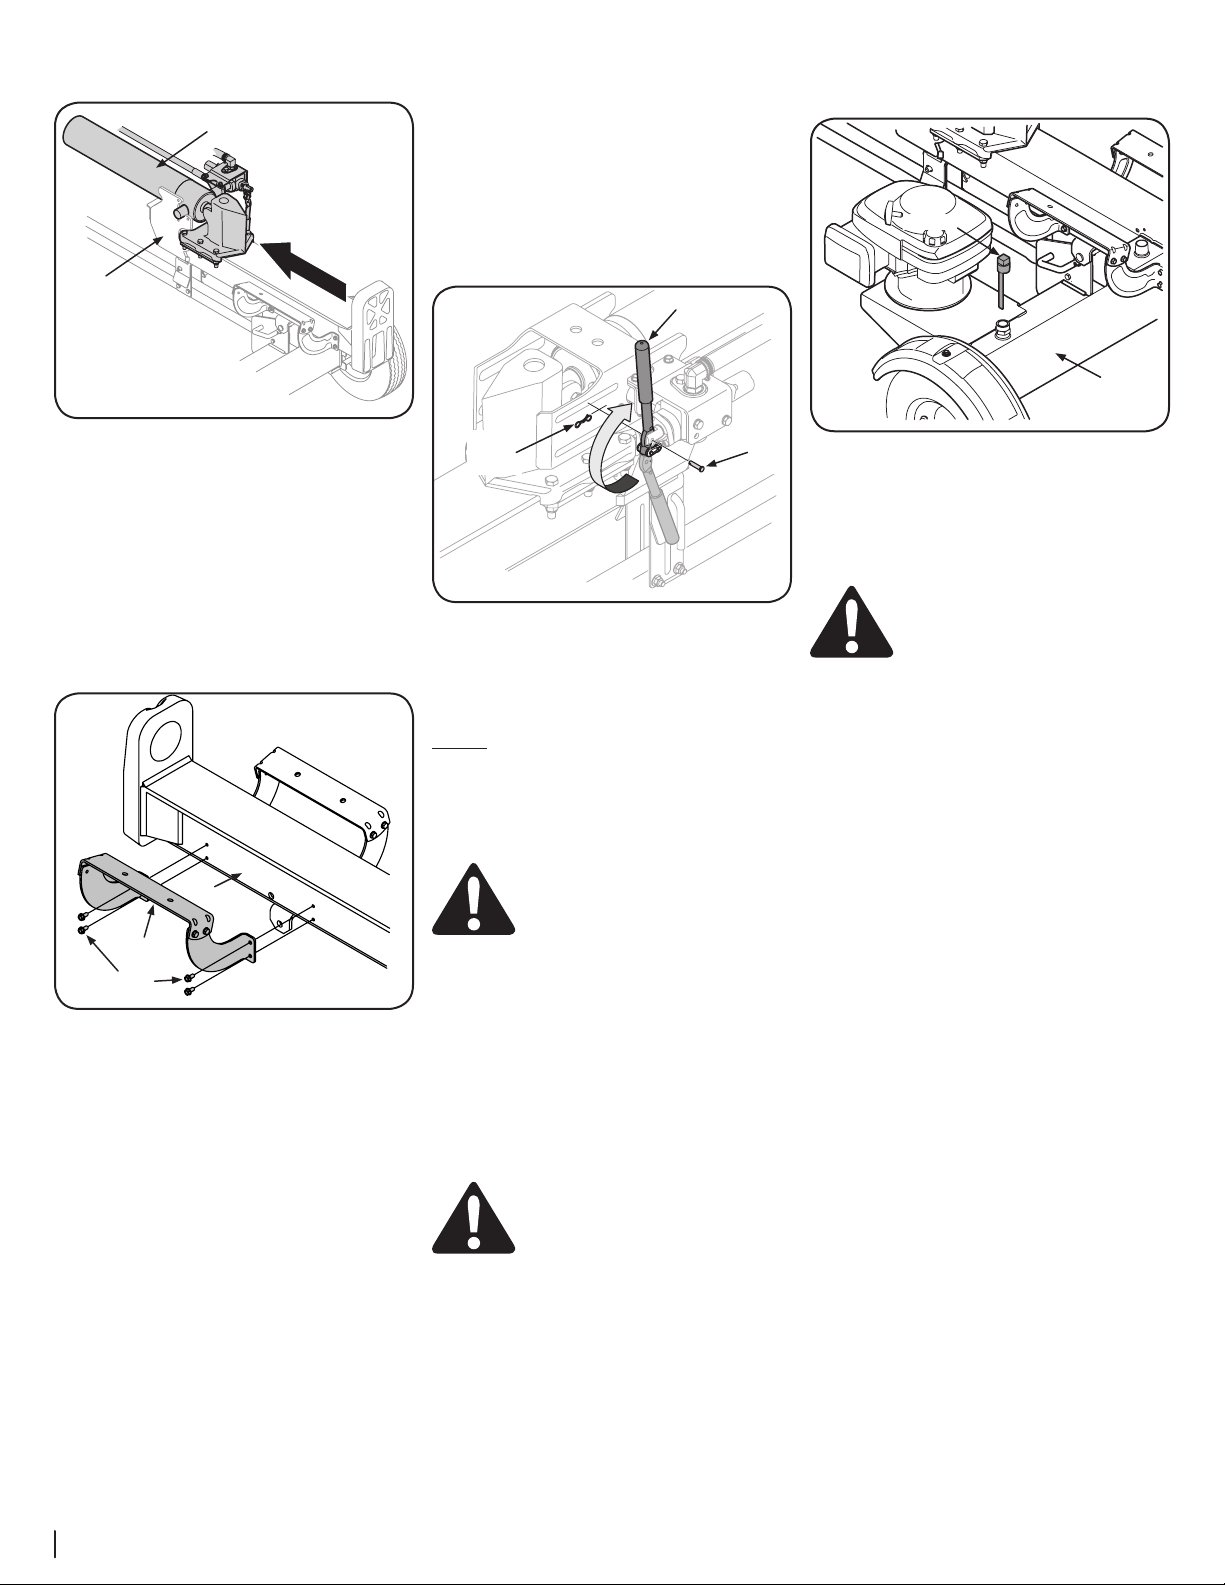
18. Reattach the log tray to the side of the beam
with the control valve, aligning the holes in the
tray with the holes in the beam. See Figure 3-7.
Hex Washer
Screw
Log Tray
Beam
Figure 3-7
19. Check for and remove any staples on the
bottom of the crate that may puncture the
tires.
20. Cut the metal strap securing the log splitter to
the bottom of the crate and remove the wood
under the engine and/or any other wood,
then roll the log splitter off the bottom of the
shipping crate.
21. The control handle is shipped hanging from
the valve on the handle link.
22. Remove the clevis pin and bow-tie cotter pin
from the control handle. See Figure 3-8.
Bow-Tie
Cotter
Pin
Control Handle
Clevis
Pin
Figure 3-8
23. Rotate the control handle into the operating
position and secure with the clevis pin and
bow-tie cotter pin removed in step 1. See
Figure 3-8.
Set-Up
Gas and Oil Fill-Up
Service the engine with gasoline and oil as instructed in
the engine manual packed with your log splitter. Read
the instructions carefully.
WARNING! Use extreme care when
handling gasoline. Gasoline is
extremely flammable and the vapors
are explosive. Never fuel the machine
indoors or while the engine is hot or
running.
NOTE: Your log splitter may be shipped with motor
oil in the engine. You MUST check the oil level before
operating. Be careful not to overfill. Gasoline can be
added to the engine when the log splitter is in either
the horizontal or vertical position. However, it may
be easier when the splitter is in the vertical position.
Tire Pressure
The max recommended operating pressure is 30
psi. Under any circumstances do not exceed the
manufacturer’s recommended psi. Maintain equal
pressure on all tires.
WARNING! Excessive pressure when
seating beads may cause tire/rim
assembly to burst with force sufficient
to cause serious injury.
Preparing the Log Splitter
1. Lubricate the beam area (where the splitting
wedge will slide) with engine oil. Do not use
grease.
2. Remove the vented reservoir dipstick, which
is located in front of the engine on top of the
reservoir tank. See Figure 3-9.
Dipstick
Reservoir
Tank
Figure 3-9
NOTE: The log splitter is filled to the proper
operating level from the manufacturer with
Shell Tellus® S2 M 32 Hydraulic Fluid. However,
you MUST check the fluid level before
operating. If not filled, proceed with the
following steps:
WARNING! Much of the original fluid
has been drawn into the cylinder and
hoses. Make certain to refill the reservoir
to prevent damage to the hydraulic
pump.
3. Check the fluid level using the dipstick. See
Figure 3-9. Do not overfill.
NOTE: Approved fluids include Shell Tellus®
S2 M 32 Hydraulic Fluid, Dexron® III/Mercon®
automatic transmission fluid, Pro-Select™ AW-32
Hydraulic Oil or 10WAW-ISO viscosity grade 32
hydraulic oil. It is not recommended that fluids
be mixed, to top off the reservoir tank during
initial set-up use Shell Tellus® S2 M 32 Hydraulic
Fluid only.
4. Replace the vented dipstick securely,
tightening it until the top of the threads are
flush with top of the pipe.
5. Disconnect the spark plug and prime the pump
by pulling the recoil starter as far as it will go.
Repeat approximately 10 times.
6. Reconnect the spark plug wire and start the
engine following instructions in the Engine
Operator’s manual.
7. Use the control handle to engage the wedge
to the farthest extended position. Then retract
the wedge.
8. Refill the tank as specified on the dipstick if
necessary.
NOTE: Failure to refill the tank will void the
splitter’s warranty.
9. Extend and retract the wedge 12 complete
cycles to remove any trapped air in the system
(the system is “self-bleeding”).
10. Refill the reservoir within the range marked on
the dipstick if necessary.
NOTE: Some fluid may overflow from the vent
plug as the system builds heat and the fluid
expands and seeks a balanced level.
Loading ...
Loading ...
Loading ...