
1
MASTER FORGE and logo design are trademarks or
registered trademarks of LF, LLC. All rights reserved.
Serial Number
Purchase Date
WARNING
FOR YOUR SAFETY:
For Outdoor Use Only!
(outside any enclosure)
WARNING
FOR YOUR SAFETY:
Improper installation, adjustment,
alteration, service or maintenance can
cause injury or property damage. Read
this instruction manual thoroughly
before installing or servicing this
equipment.
WARNING
1. Do NOT store or use gasoline or other
flammable liquids or vapors in the
vicinity of this or any other appliance.
2. When cooking with oil/grease, do not
allow the oil/grease to exceed 350ºF
(176.5ºC). Do not store or use extra
cooking oil in the vicinity of this or
any other appliance.
DANGER
Never operate this appliance unattended.
WARNING
FOR YOUR SAFETY:
DO NOT LEAVE THIS APPLIANCE UN-
ATTENDED WHILE IN USE, ESPECIAL-
LY COOKING THE FATTY MEAT AND
CLOSE THE LID TOO LONG TIME.
WARNING
This product can expose you to
chemicals including carbon monoxide
and soot, which are known to the State
of California to cause cancer and birth
defects or other reproductive harm. For
more information go to
www.P65Warnings.ca.gov.
CBC23032L-RA-ES-OM-F106SG24931
Thank you for purchasing this MASTER FORGE product.
Questions, problems or missing parts?
Before returning, contact us on:
800-963-0211, 8 a.m. - 8 p.m., EST, Monday - Sunday or [email protected].
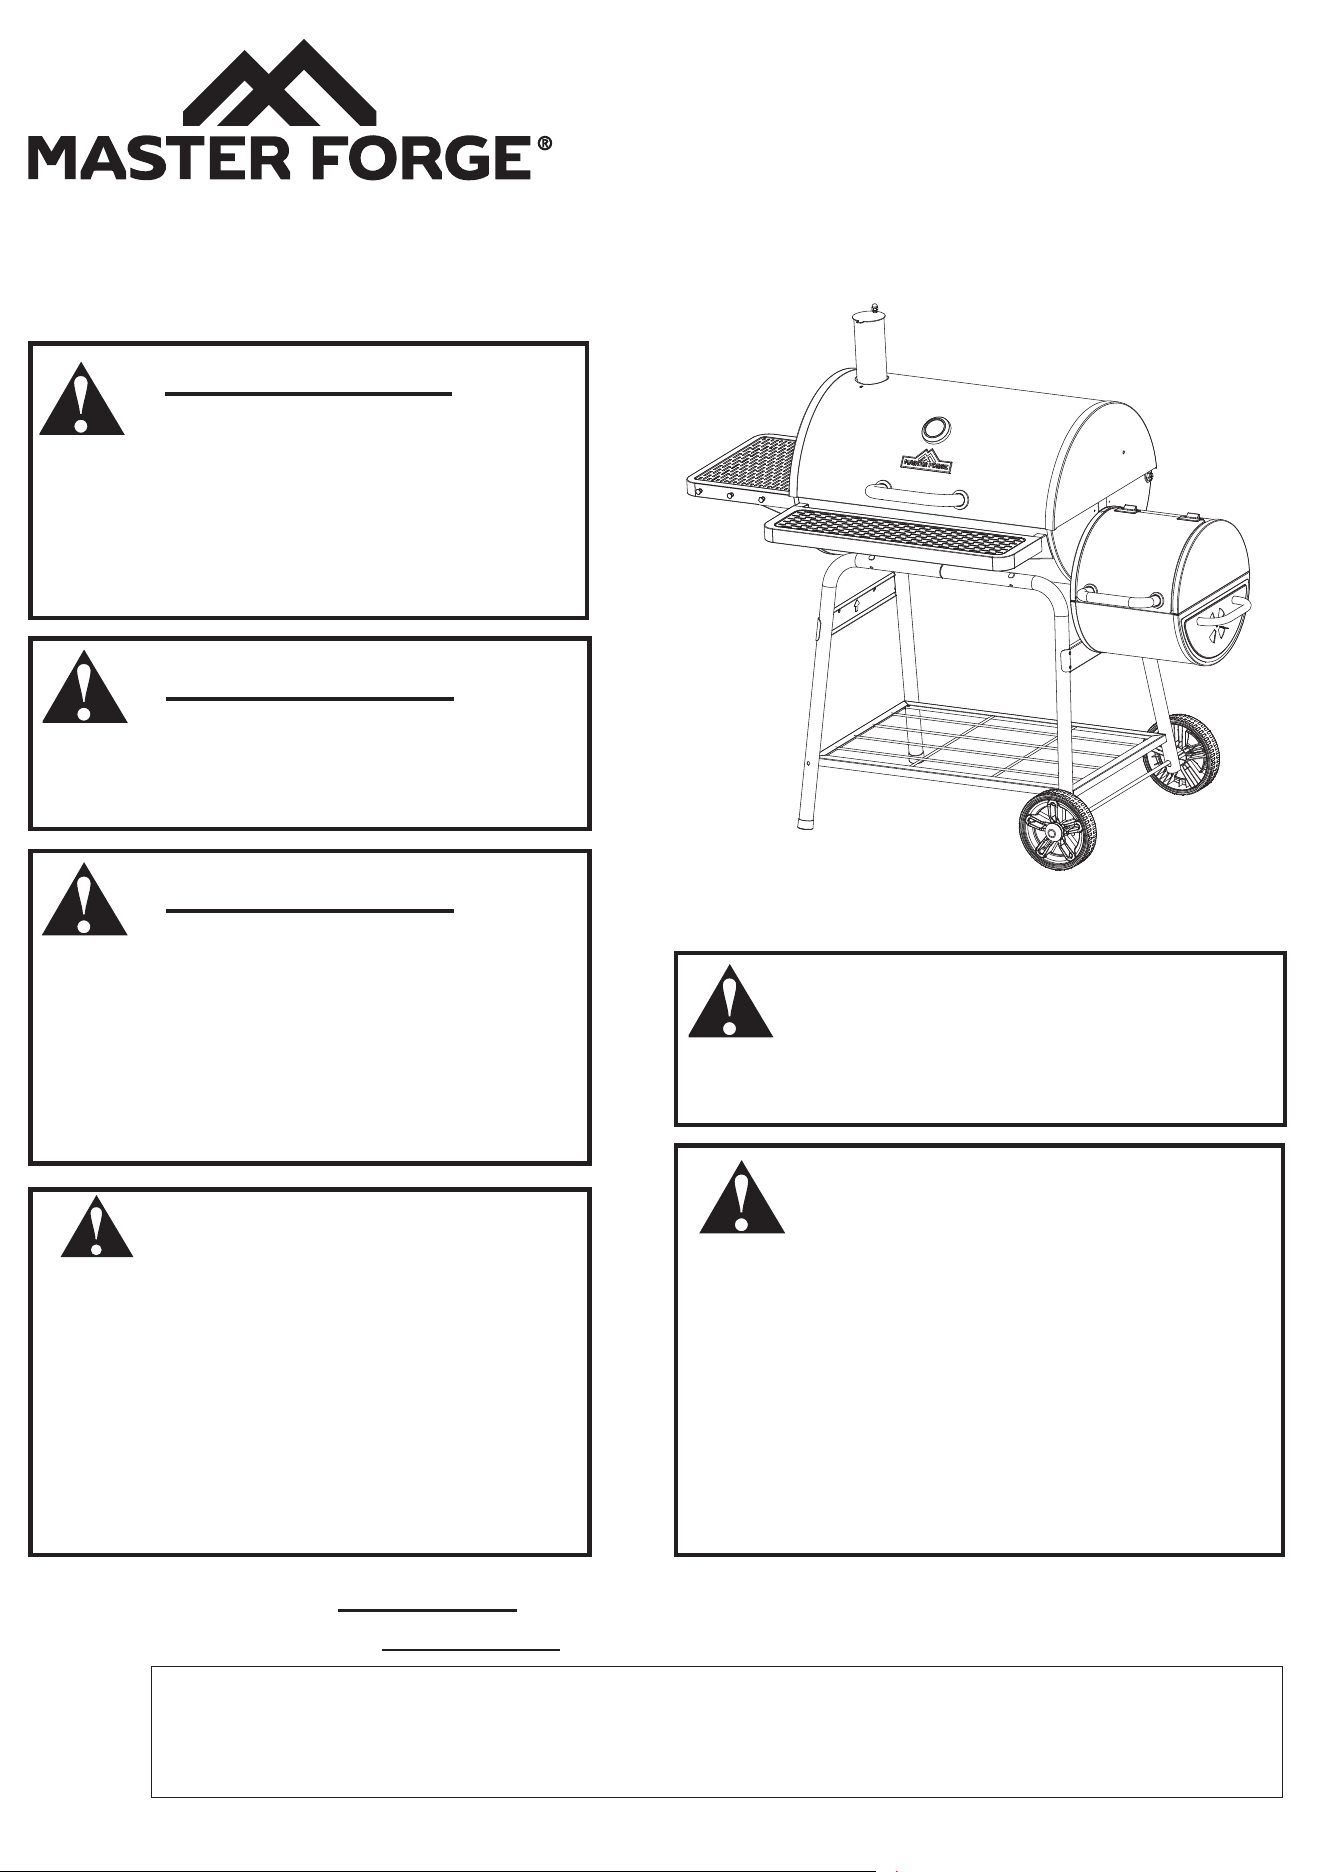
ITEM #5139524
CHARCOAL OFFSET
SMOKER / GRILL
MODEL #CBC23032L
ATTACH YOUR RECEIPT HERE
Español p.29

2
TABLE OF CONTENTS
W This grill is for outdoor use only, and should NOT be used in a building, garage or any other enclosed area.
W Do NOT operate, light or use this appliance within ten feet (3.05 m) of walls, structures or buildings.
W For residential use only. This grill is NOT for commercial use.
W Never use charcoal that has been pre-treated with lighter fluid. Use only a high grade plain charcoal, charcoal/wood
mixture, lump charcoal or cooking wood. The conversion to or attempted use of any other fuel source in this charcoal
grill is dangerous and will void your warranty.
W This grill is NOT intended for and should never be used as a heater. TOXIC fumes can accumulate and cause
asphyxiation.
W Do NOT exceed a temperature of 500°F.
W Do NOT use grill for indoor cooking. TOXIC carbon monoxide fumes can accumulate and cause asphyxiation.
W This grill is safety certified for use in the United States and/or Canada only. Do NOT modify for use in any other
location. Modification will result in a safety hazard and will void your warranty.
W Apartment dwellers: Check with management to learn the requirements and fire codes for using a charcoal grill in your
apartment complex. If allowed, use outside on the ground floor with a ten foot (3.05 m) clearance from any structure.
Do NOT use on or under balconies.
W Minimum clearance from sides and back of unit to combustible construction is 36 inches (91.5 cm). Do NOT use this
appliance under any type of overhang or roof.
W Do NOT use gasoline, kerosene or alcohol for lighting.
W Do NOT use in an explosive atmosphere. Keep grill area clear and free from combustible materials, gasoline and
other flammable vapors and liquids.
W Do NOT store or use gasoline or other flammable liquids or vapors within 25 feet (7.62 m) of this appliance.
W Do NOT block holes in sides or back of grill.
W Inspect grill before each use.
W Do NOT alter grill in any manner. Any alteration will void your warranty.
W Do NOT build this model of grill in any built-in or slide-in construction. Ignoring this warning could cause a fire or an
explosion that can damage property and cause serious bodily injury or death.
W Do NOT use the grill unless it is COMPLETELY assembled and all parts are securely fastened and tightened.
W This grill should be thoroughly cleaned and inspected on a regular basis.
W Use only Lowe's Home Centers LLC-authorized parts. The use of any part that is not factory-authorized can be
dangerous and will void your warranty.
W Do NOT operate this appliance without reading “Operating Instructions” in this manual.
W To avoid burns, do NOT touch metal parts of grill until they have completely cooled, unless you are wearing protective
gear (pot holders, gloves, BBQ mittens, etc.).
W Never touch grids (charcoal, cooking or warming), ashes or coals to see if they are hot.
W DANGER: Failure to follow the dangers, warnings and cautions in this manual may result in serious bodily injury or
death, or in a fire or an explosion causing damage to property.
W WARNINGS:
SAFETY INFORMATION
Safety Information .............................................................................. 2
Preparation.....................................................................................4
Package Contents .............................................................................. 4
Hardware Contents ............................................................................. 5
Assembly Instructions ........................................................................... 6
Operating Instructions .......................................................................... 14
Care and Maintenance.......................................................................... 27
Limited Warranty .............................................................................. 28
Replacement Parts List ........................................................................ 28

3
W Do NOT use on wooden decks, wooden furniture or other combustible surfaces.
W This grill is NOT to be used in or on boats or recreational vehicles.
W Position grill so wind cannot carry ashes to combustible surfaces.
W Do NOT use in high winds.
W Never lean over the grill when lighting.
W Do NOT leave a lit grill unattended. Keep children and pets away from grill at all times.
W Do NOT attempt to move grill when in use. Allow the grill to cool before moving or storing.
W Do NOT leave grill unattended while preheating or burning off food residue.
W When cooking, fire extinguishing materials should be readily accessible. In the event of an oil/grease fire, do NOT
attempt to extinguish with water. Use type BC dry chemical fire extinguisher or smother with dirt, sand or baking
soda.
W Always open grill lid carefully and slowly as heat and steam trapped within grill can severely burn you.
W If grill has not been cleaned, a grease fire can occur that may damage the product.
W Do NOT place empty cooking vessels on the appliance while in operation.
W Use caution when placing anything on the grill while the appliance is in operation.
W Never add lighting fluid to hot or warm coals as a flashback may occur causing serious injury or damage to property.
W Always place your grill on a hard, non-combustible level surface. An asphalt or blacktop surface may not be
acceptable for this purpose.
W Do NOT remove the ashes until they are completely and fully extinguished.
W Live hot briquettes and coals can create a fire hazard.
W Always empty the bottom bowl and grill after each use.
W Do NOT place fuel (charcoal briquettes, wood or lump charcoal) directly into bottom of grill. Place fuel only on the
charcoal pan/grid.
W Do NOT allow charcoal to rest on the walls of grill. Doing so will greatly reduce the life of the metal and finish of your
grill.
W Check to make sure the smoke stack and drawer circle are free of debris and ash before using the grill.
W Extinguished coals and ashes should be placed a safe distance from all structures and combustible materials.
W With a garden hose, completely wet the surface beneath and around grill to extinguish any ashes, coals or embers
that may have fallen during the cooking or cleaning process.
W The use of alcohol, prescription or non-prescription drugs may impair the consumer’s ability to properly assemble
and/or safely operate this grill.
W Always wear protective gloves when adding fuel (charcoal briquettes, wood or lump charcoal) to retain desired heat
level.
W Keep all electrical cords away from a hot grill.
W Always use a meat thermometer to ensure food is cooked to a safe temperature.
W Never cover entire cooking area with aluminum foil. Laying the foil on the grates can restrict the intended air flow
inside the grill, create barriers to the proper flow of grease to the catch pan, which sets the stage for lots of it to build
up on the bottom tray, which in turn, builds the potential for grease fires and flare ups.
W Use protective gloves when assembling this product.
W Do NOT force parts together as this can result in personal injury or damage to the product.
W Do NOT touch ash receiver or ash receiver handle until grill has completely cooled, unless you are wearing protective
gear.
W Do NOT touch SFB side handle or SFB damper until grill has completely cooled, unless you are wearing protective
gear.
W Death, serious injury or damage to property may occur if the above is not followed exactly.
W The maximum charcoal weight of main firebody to be used at once is 6.6 lbs. / 3 kg. The maximum charcoal weight
of side firebody to be used at once is 3.3 lbs. / 1.5 kg.
SAFETY INFORMATION
4
PACKAGE CONTENTS
PREPARATION
A
J
W
X
AB
AA
Z
R
T
S
T
R
K
B
C
D
E
F
G
H
Q
M
I
P
N
O
L
M
Y
U
V
Before beginning assembly of product, make sure all parts are present. Compare parts with package
contents list and hardware contents list. If any part is missing or damaged, do not attempt to assemble
the product.
Estimated assembly time: 25 minutes by two people.
Tools required for assembly: Philips screwdriver (included).
AC

5
AA
II JJ KK LL
HH
BB CC DD EE FF GG
PART DESCRIPTION QUANTITY
A Temperature Gauge 1
B Lid Handle 1
C Smoke Stack 1
D Lid 1
E Warming Rack 1
F Cooking Grid 4
G Charcoal Pan 1
H Left Side Shelf 1
I Bottom Bowl 1
J Charcoal Pan Handle 2
K Cooking Grid Handle 1
L Front Shelf 1
M Leg Brace 2
N Long Leg 2
O Short Leg 2
PART DESCRIPTION QUANTITY
P Foot* 2
Q Bottom Mesh 1
R Hub Cap 2
S Axle 1
T Wheel 2
U SFB Lid 1
V SFB Lid Handle 1
W SFB Body Top 1
X SFB Body 1
Y SFB Cooking Grid 2
Z SFB Charcoal Pan 1
AA SFB Side Handle 1
AB SFB Damper 1
AC Hole Plug 4
M6 x 12
Bolt
Qty. 17
M4 x 10
Screw
Qty. 4
M6 x 20
Bolt
Qty. 14
M6 x 45
Bolt
Qty. 10
Ø16 x 6.2
Washer
Qty. 2
Ø20 x 10.5
Washer
Qty. 2
M6
Nut
Qty. 13
Ø6
Lock Washer
Qty. 2
PACKAGE CONTENTS
HARDWARE CONTENTS
Ø1.4 x 30
Cotter Pin
Qty. 4
M6
Screw
Qty. 3
M8
Screw
Qty. 2
#2 Philips Head
Screwdriver
Qty. 1
* Pre-assembled
6
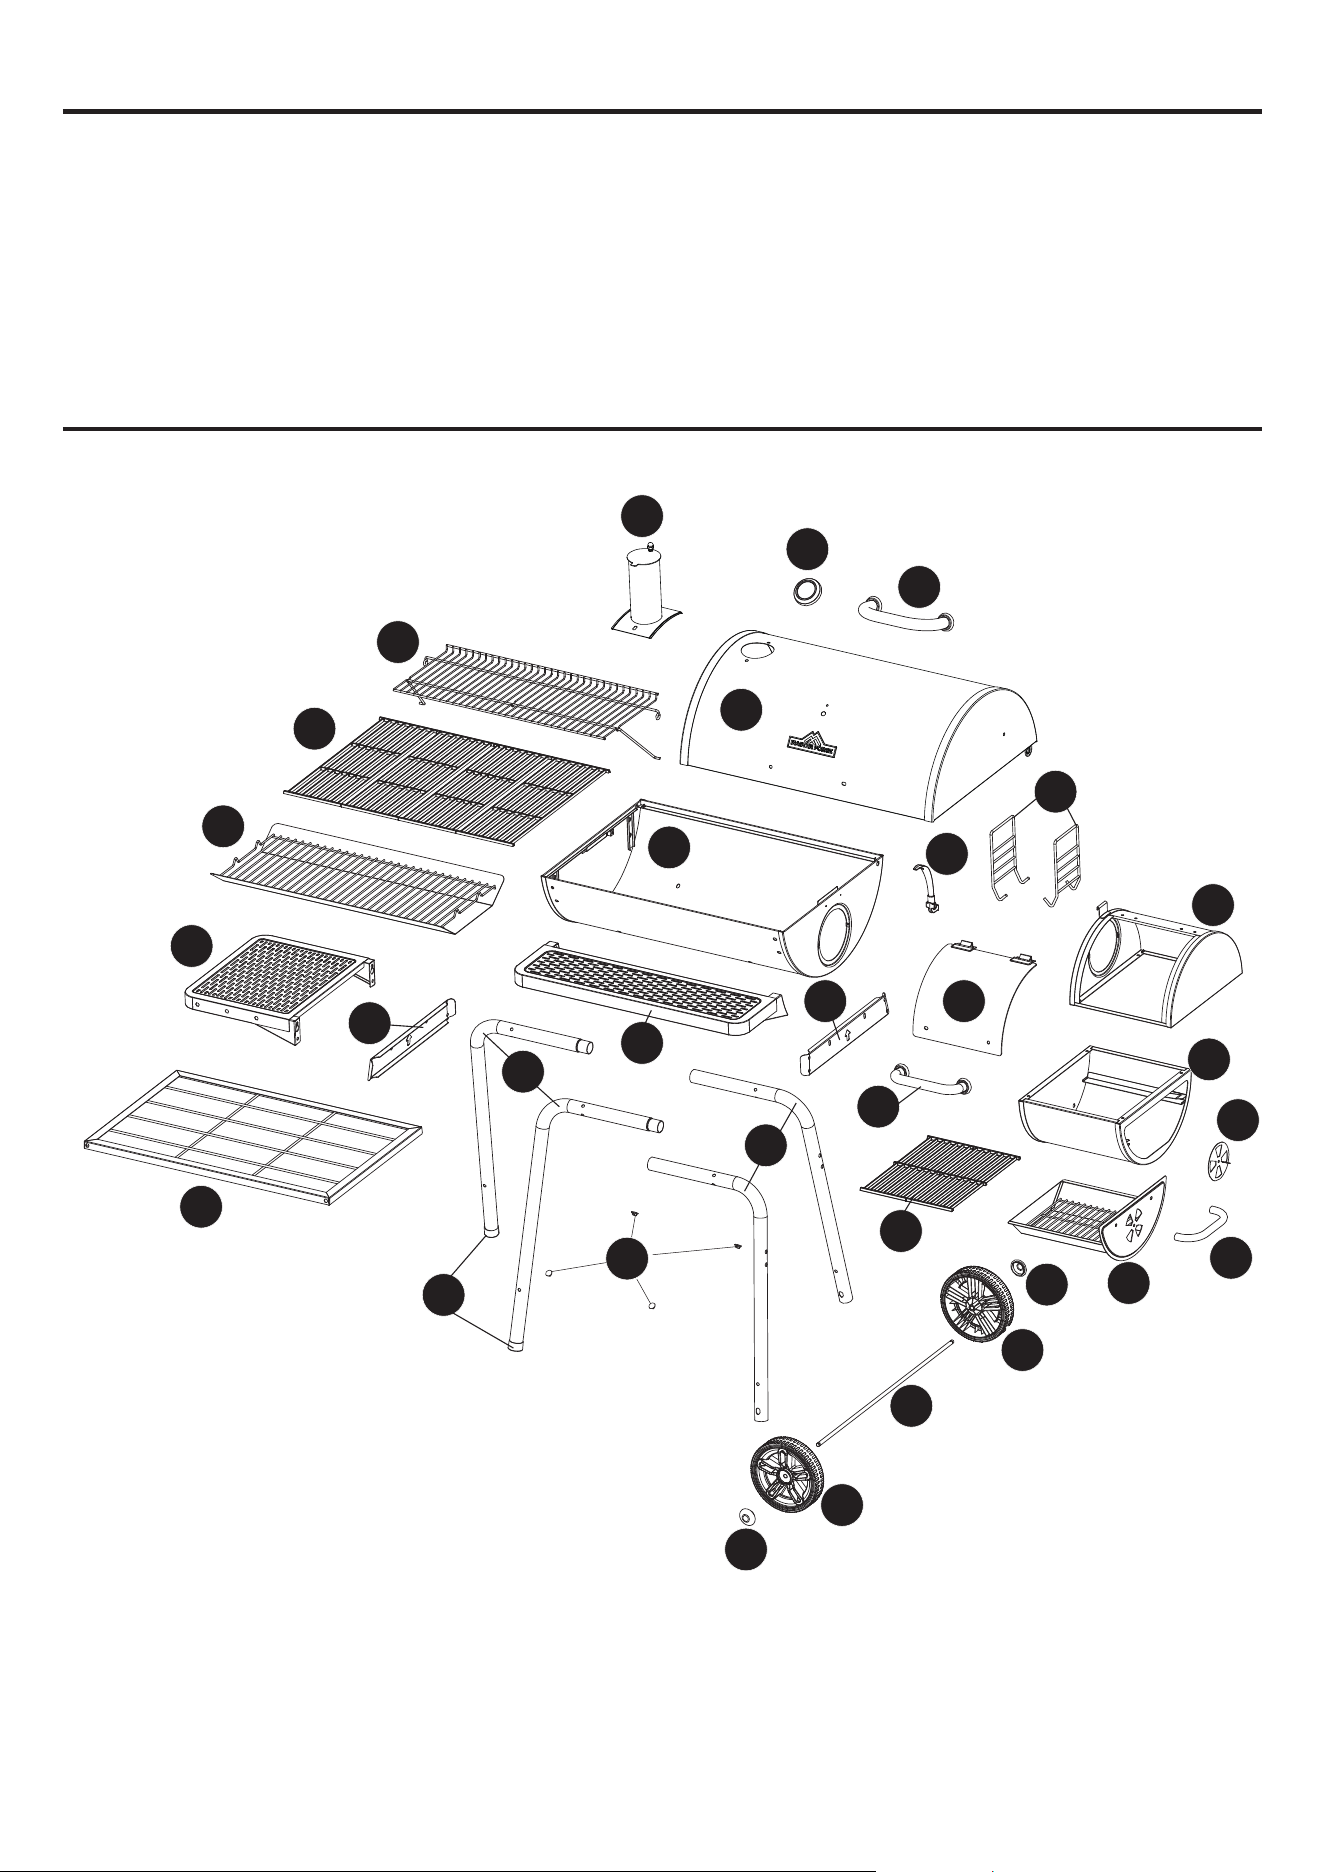
Step 1: Attach Long Legs, Short Legs and Leg
Braces
Align the holes in the long legs (N), short legs (O)
and leg braces (M). Then attach them together
with eight M6 x 20 bolts (CC) show in Fig.1.
Connect the long legs (N) and short legs (O).
NOTE: Install the leg braces according to the
upward arrow.
Hardware Used
Step 2: Attach Bottom Mesh
Align the holes in the the long legs (N), short legs
(O) and bottom mesh (Q). Then insert four M6 x
45 bolts (DD) into the holes shown in Fig.2.
Hardware Used
ASSEMBLY INSTRUCTIONS
DD
M6 x 45
Bolt
x 4
M6 x 20
Bolt
CC
x 8
1
2
First
Third
N
M
Q
O
N
O
Second
7
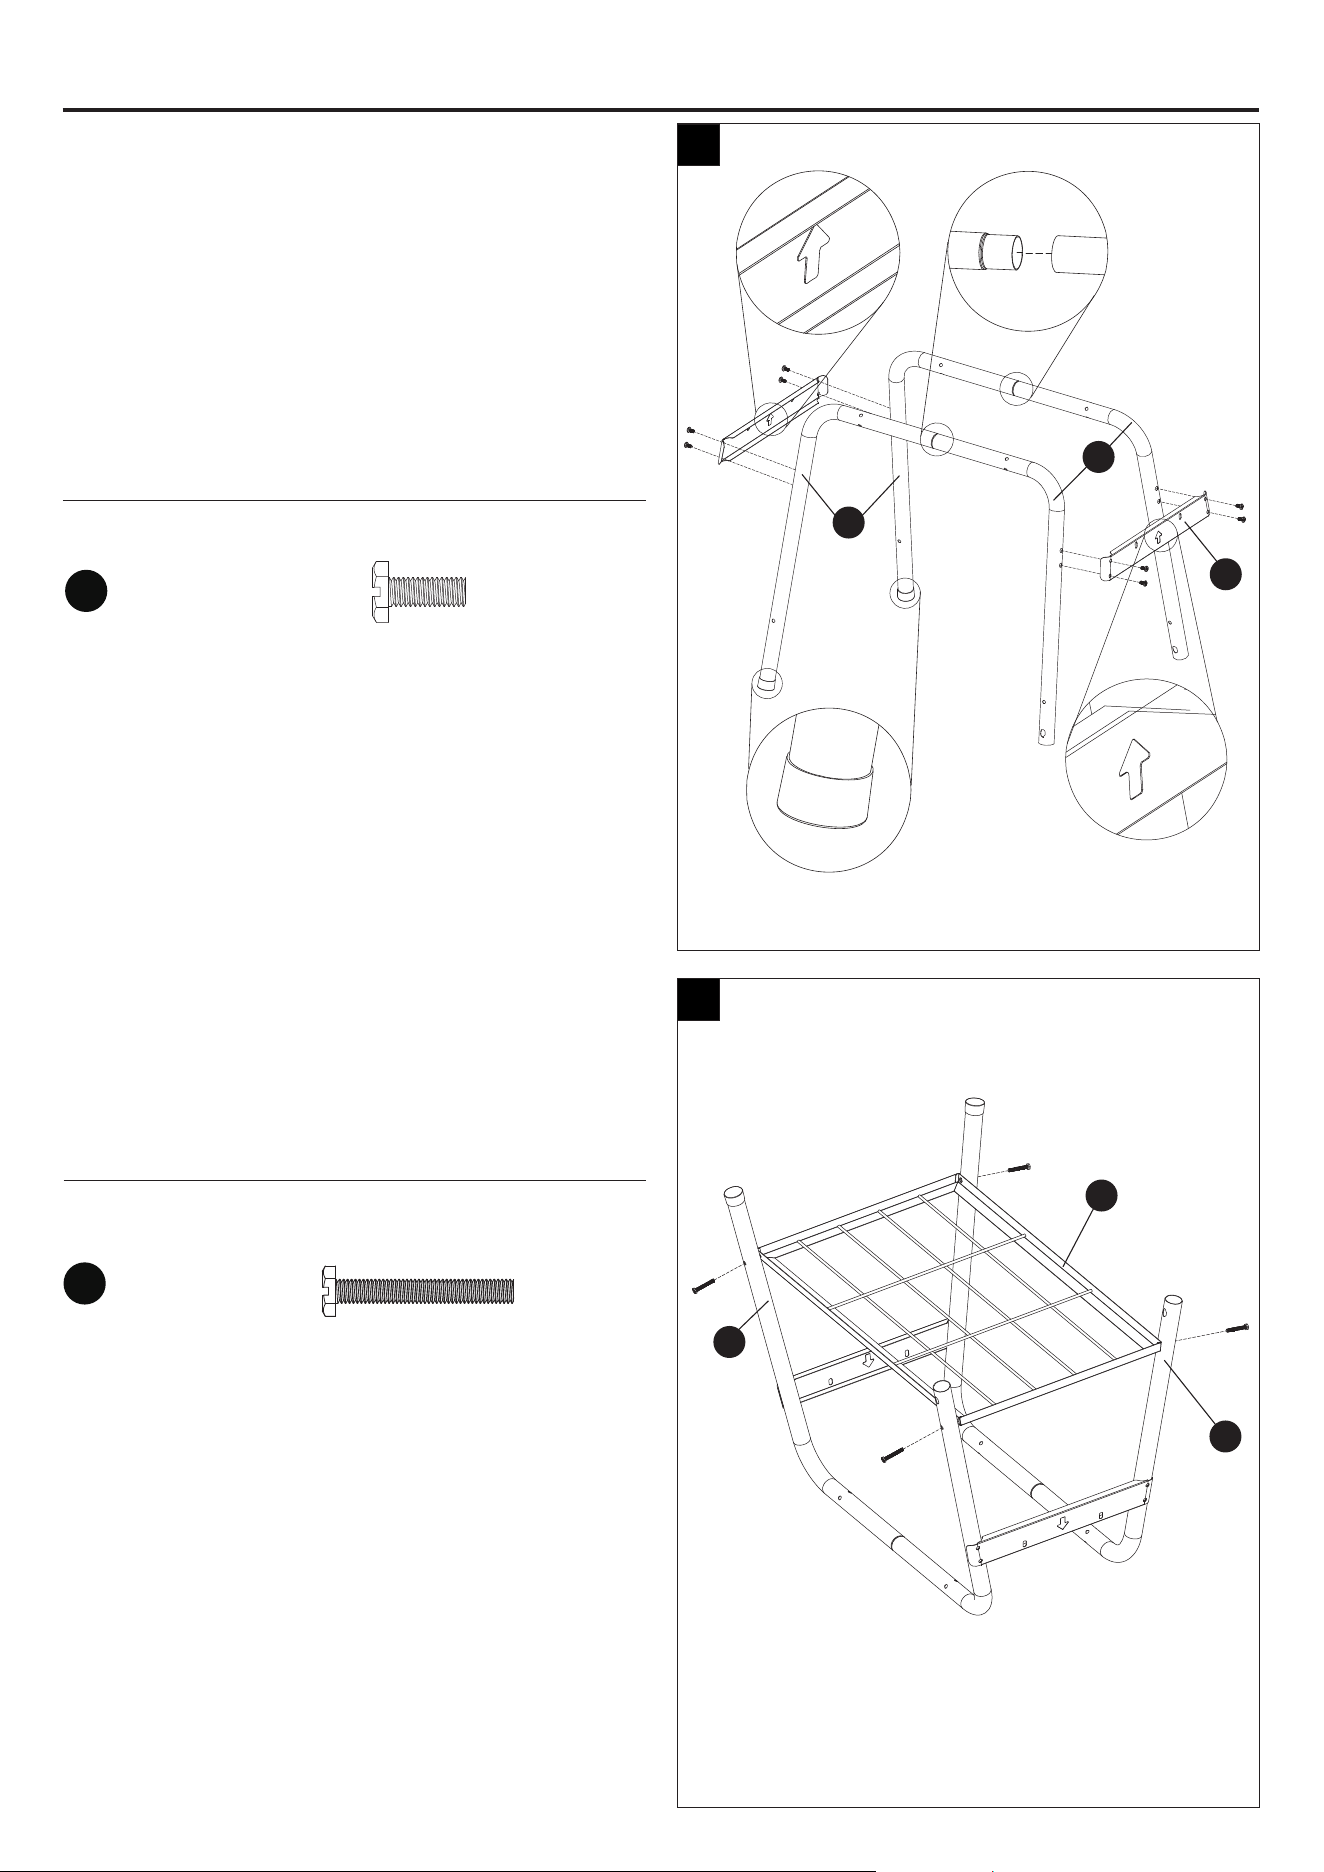
Step 3: Attach Axle, Wheels and Hub Caps
Insert the axle (S) through the short legs (O).
Attach wheels (T) and hub caps (R) onto the axle
(S) with two Ø20 x 10.5 washers (FF) and two
Ø1.4 x 30 cotter pins (II).
Hardware Used
Ø20 x 10.5
Washer
x 2
Step 4: Attach Bottom Bowl
Align the holes in the bottom bowl (I), long legs (N)
and short legs (O). Then attach the bottom bowl
(I) onto the legs with four M6 x 45 bolts (DD) and
four M6 nuts (GG).
Hardware Used
ASSEMBLY INSTRUCTIONS
DD
M6 x 45
Bolt
x 4
M6
Nut
x 4
GG
4
3
R
R
T
T
O
I
N
O
S
FF
Ø1.4 x 30
Cotter Pin
x 2
II
8
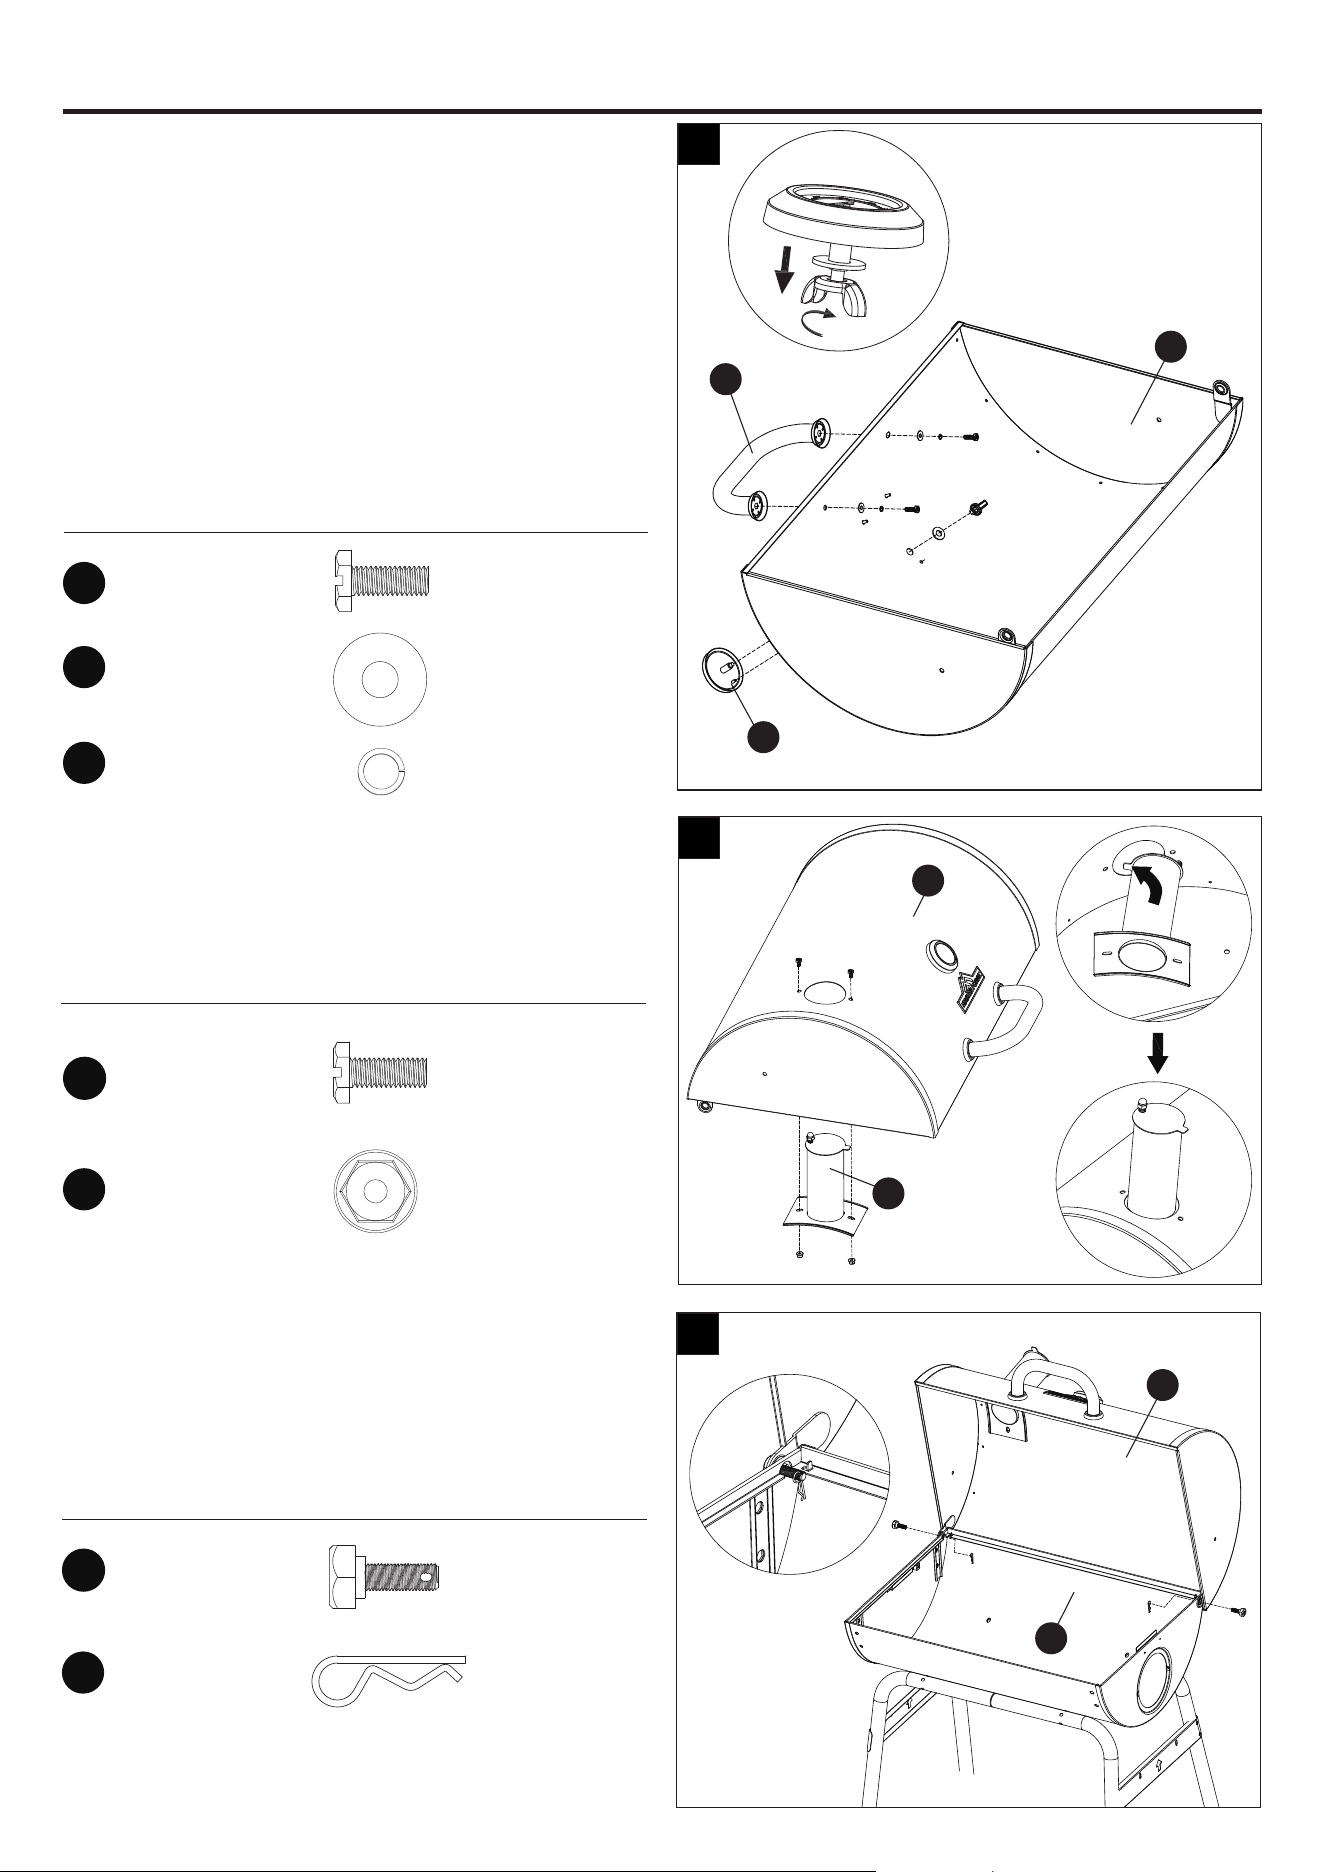
Step 5: Attach Lid Handle and Temperature
Gauge
Remove the nut and washer pre-assembled
on the temperature gauge (A). Then attach the
temperature gauge (A) onto the lid (D) with the
nut and washer.
Attach lid handle (B) onto the lid (D) with two M6
x 20 bolts (CC) and two Ø16 x 6.2 washers (EE)
and two Ø6 lock washers (HH).
Hardware Used
ASSEMBLY INSTRUCTIONS
Ø16 x 6.2
Washer
x 2
Ø6
Lock Washer
x 2
Step 6: Attach Smoke Stack
Attach smoke stack (C) onto the lid (D) with two
M6 x 12 bolts (BB) and two M6 nuts (GG).
Hardware Used
Step 7: Attach Lid
Attach lid (D) onto the bottom bowl (I) with two
M8 screws (KK) and two Ø1.4 x 30 cotter pins
(II).
Hardware Used
M8
Screw
x 2
M6 x 20
Bolt
x 2
CC
KK
M6 x 12
Bolt
x 2
BB
EE
HH
M6
Nut
x 2
GG
5
7
6
B
A
D
I
D
D
C
Ø1.4 x 30
Cotter Pin
x 2
II
9
ASSEMBLY INSTRUCTIONS
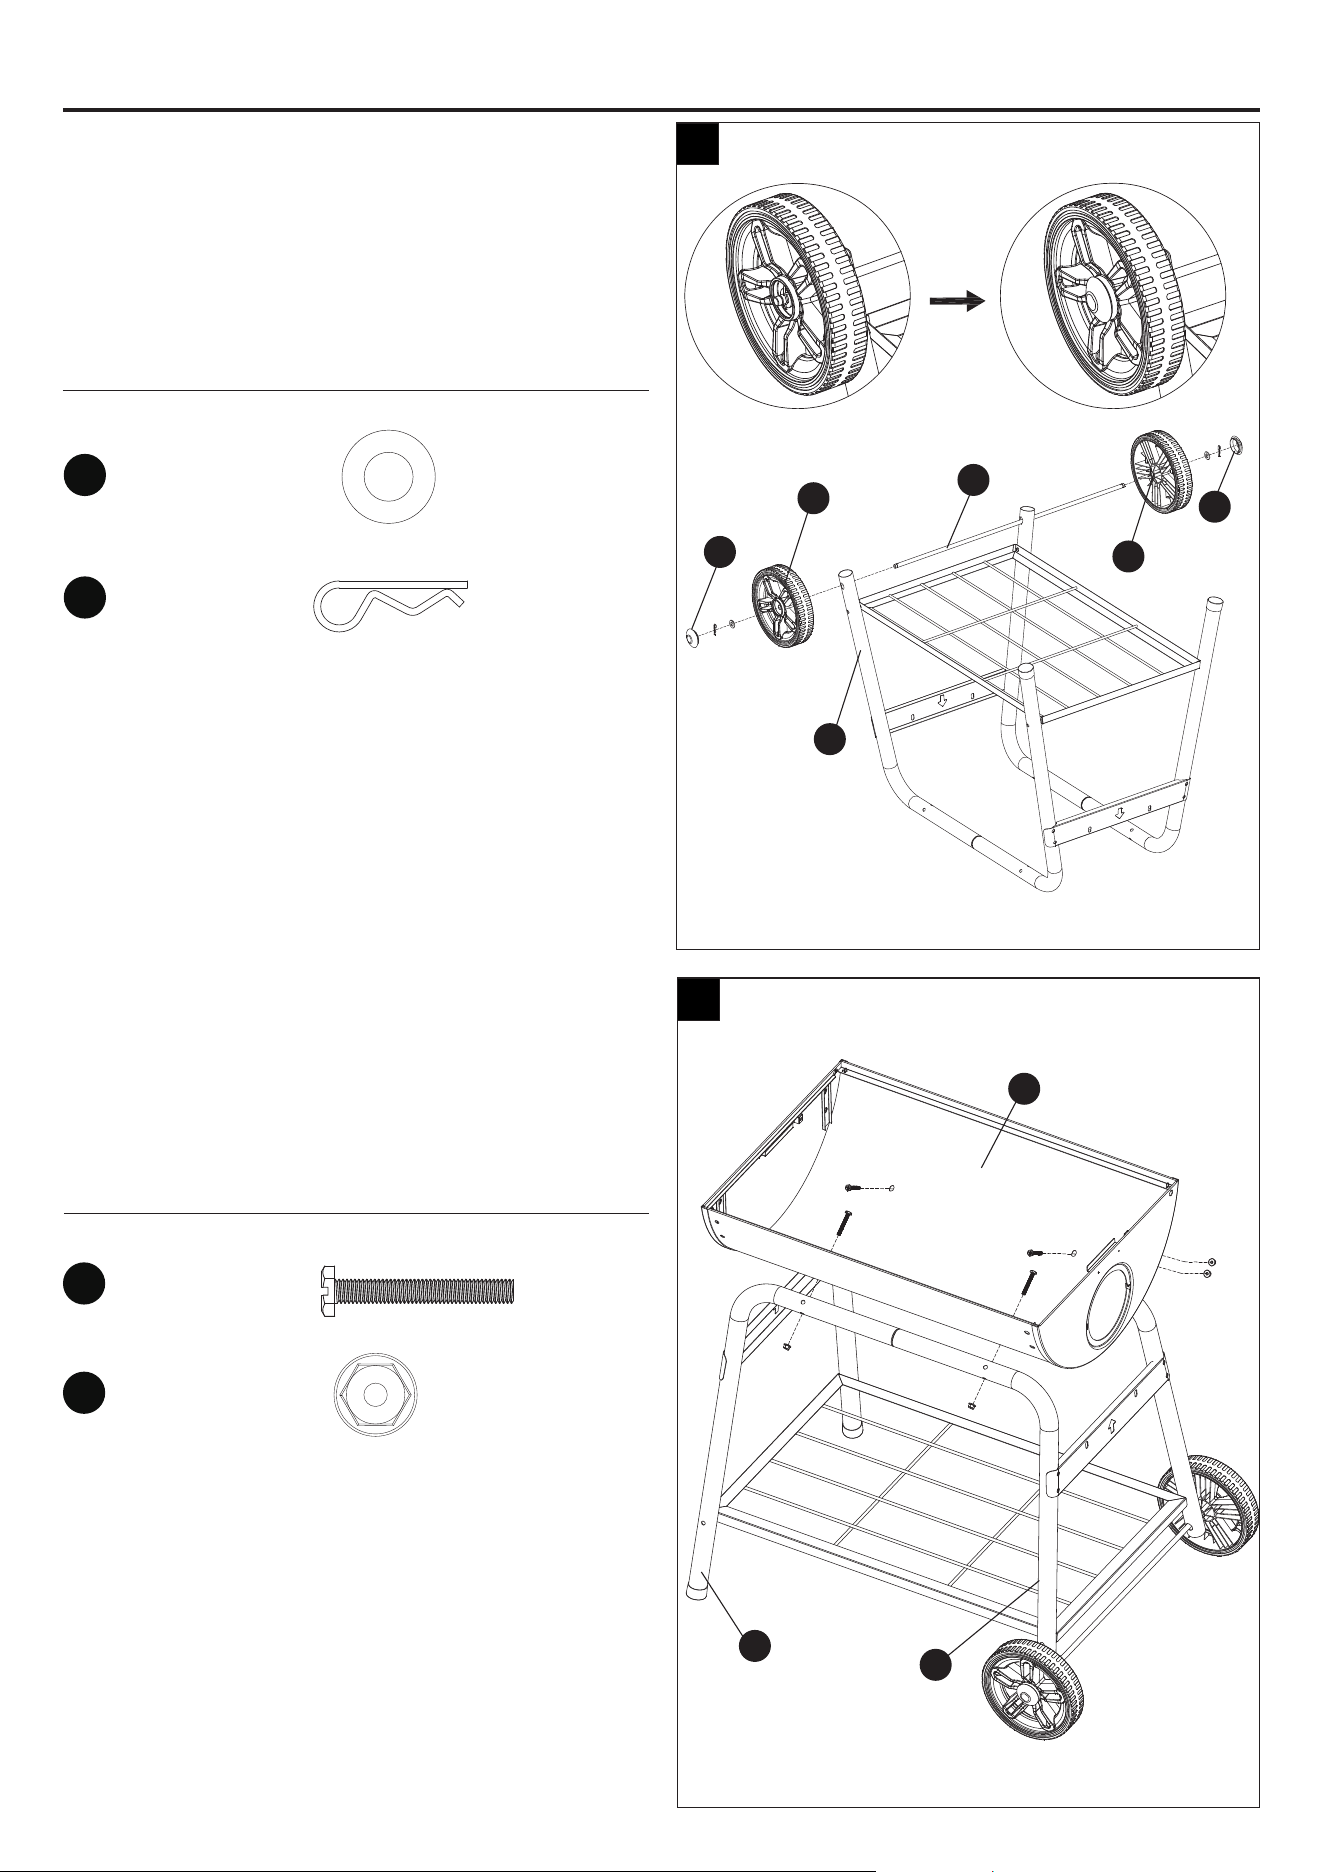
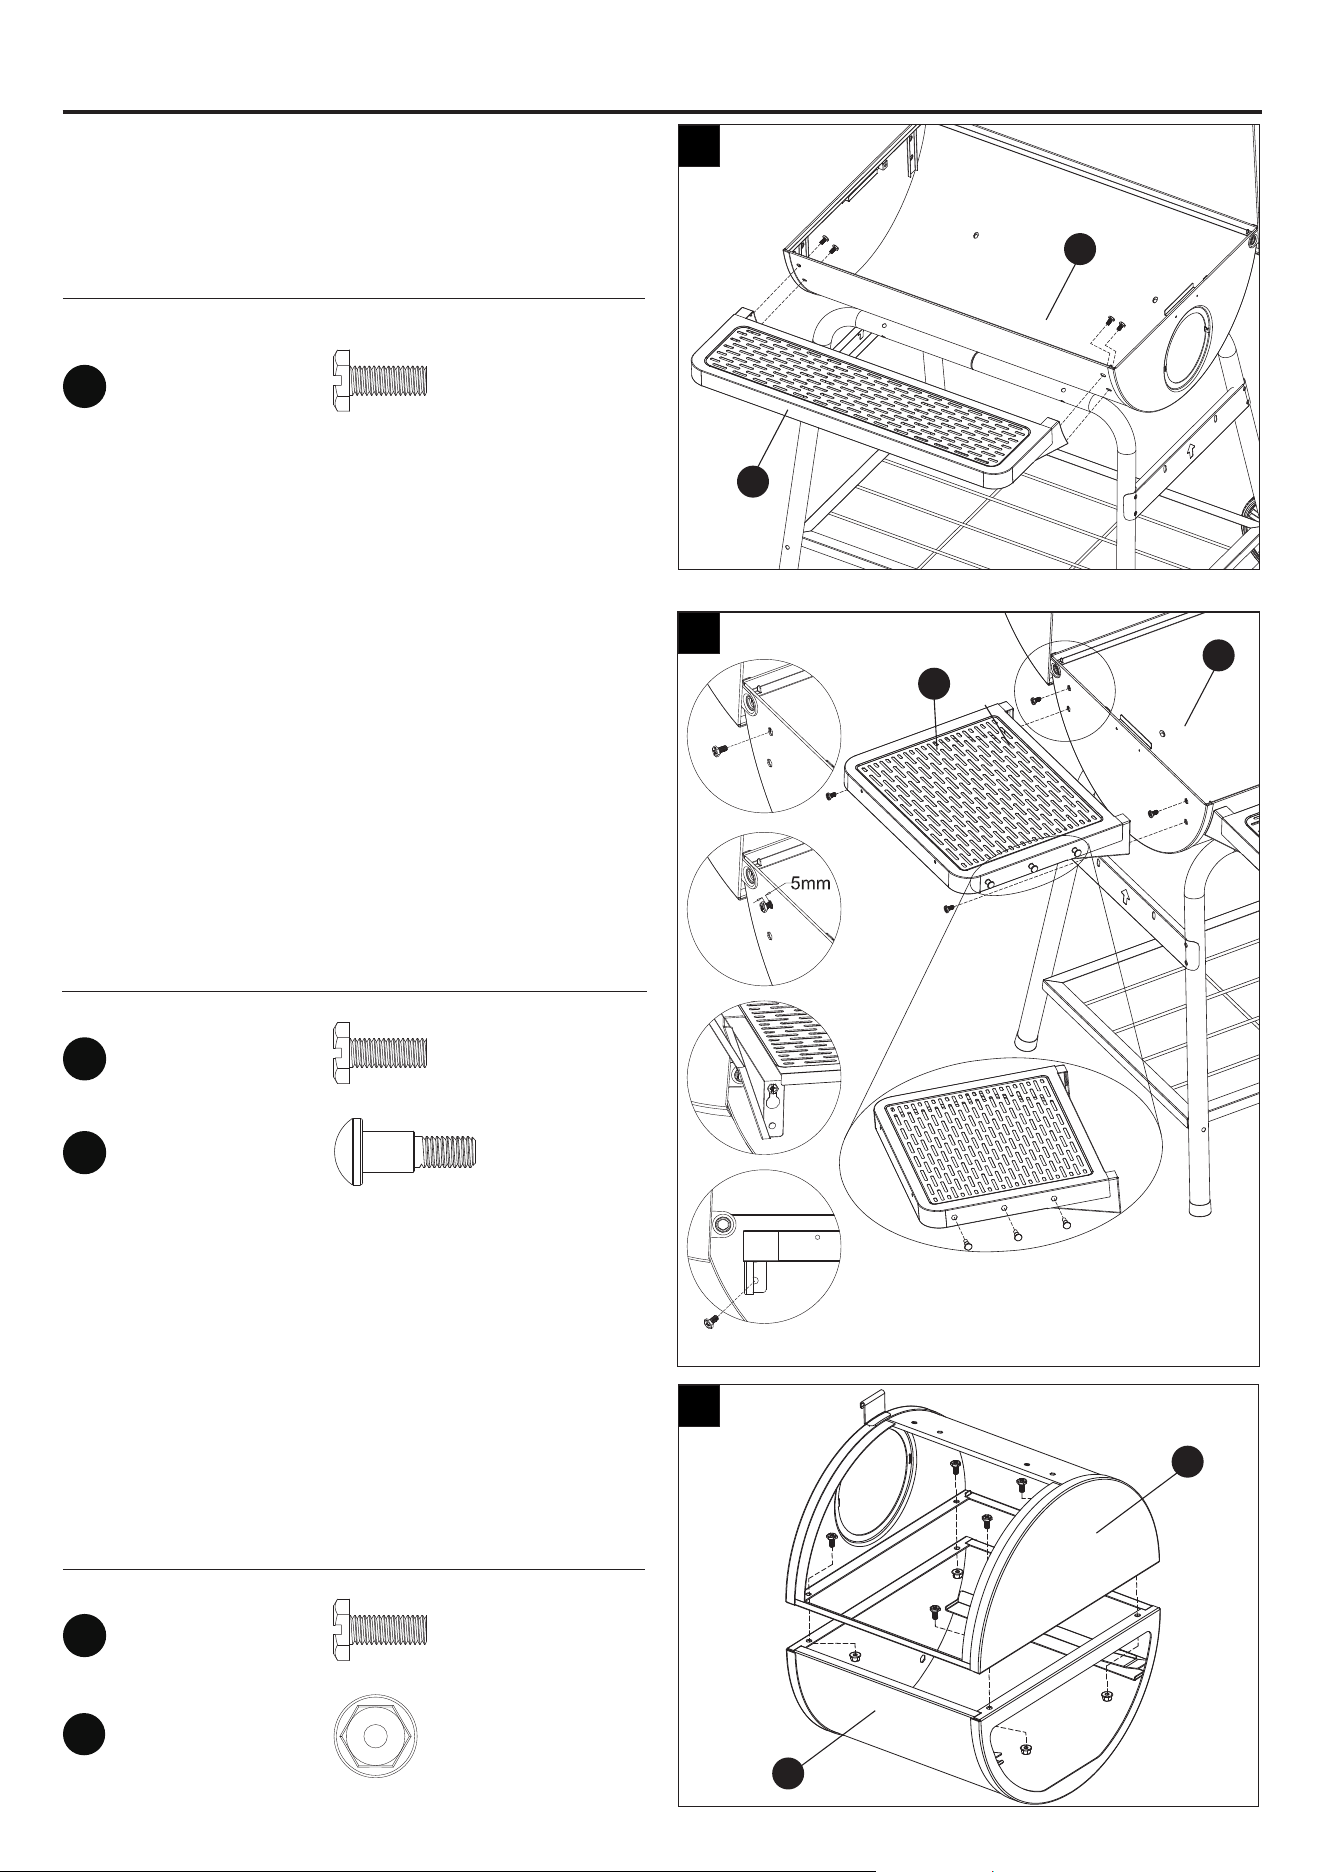
Step 8: Attach Front Shelf
Attach the front shelf (L) to the bottom bowl (I)
with four M6 x 12 bolts (BB).
Hardware Used
Step 9: Attach Left Side Shelf
Attach the left side shelf (H) to the bottom bowl (I)
with four M6 x 12 bolts (BB).
Attach three M6 screws (JJ) onto the left side
shelf (H).
NOTE: Insert two M6 x 12 bolts (BB) into the
upper holes with leaving 5 mm threads exposed.
Hardware Used
M6
Screw
x 3
Step 10: Attach SFB Body Top and SFB Body
Attach SFB body top (W) onto the SFB body (X)
with four M6 x 12 bolts (BB) and four M6 nuts
(GG).
Hardware Used
M6 x 12
Bolt
x 4
BB
M6 x 12
Bolt
x 4
BB
M6 x 12
Bolt
x 4
BB
JJ
First
Second
Third
Fourth
8
9
10
I
I
H
X
W
L
M6
Nut
x 4
GG
10
ASSEMBLY INSTRUCTIONS
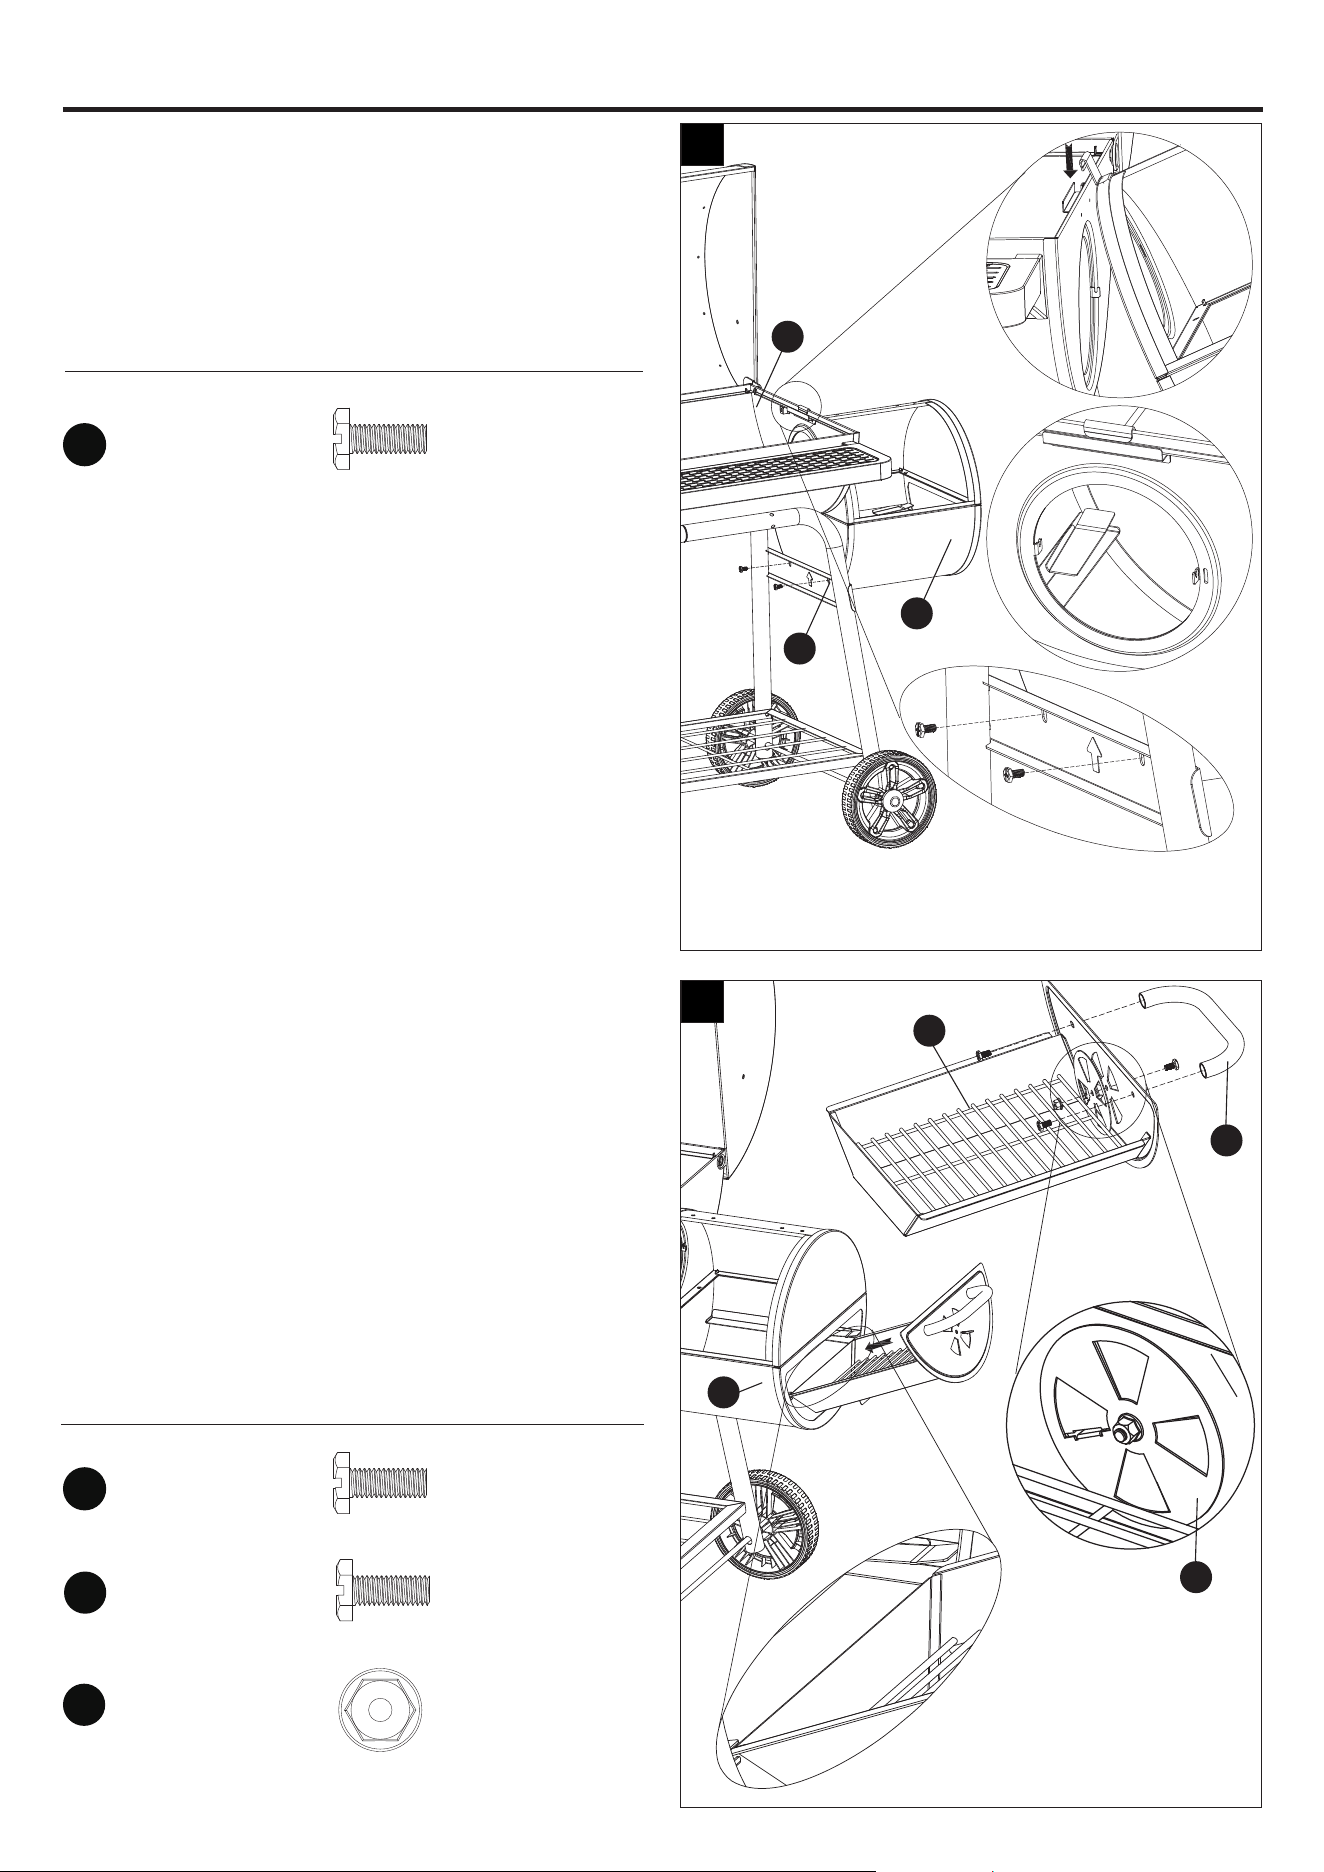
Step 11: Attach SFB
Hang the SFB body top onto the bottom bowl (I).
Attach the SFB body (X) to the Leg Brace (M)
with two M6 x 12 bolts (BB).
Hardware Used
Step 12: Attach SFB Side Handle, SFB Damper
and SFB Charcoal Pan
Attach the SFB side handle (AA) onto the SFB
charcoal pan (Z) with two M6 x 20 bolts (CC).
Attach the SFB damper (AB) onto the SFB
charcoal pan (Z) with one M6 x 12 bolt (BB) and
one M6 nut (GG).
Insert the SFB charcoal pan (Z) to the SFB body
(X).
Hardware Used
M6 x 12
Bolt
x 2
BB
M6 x 12
Bolt
x 1
BB
M6
Nut
x 1
GG
M6 x 20
Bolt
x 2
CC
11
12
First
Second
Third
I
M
X
Z
X
AA
AB
11
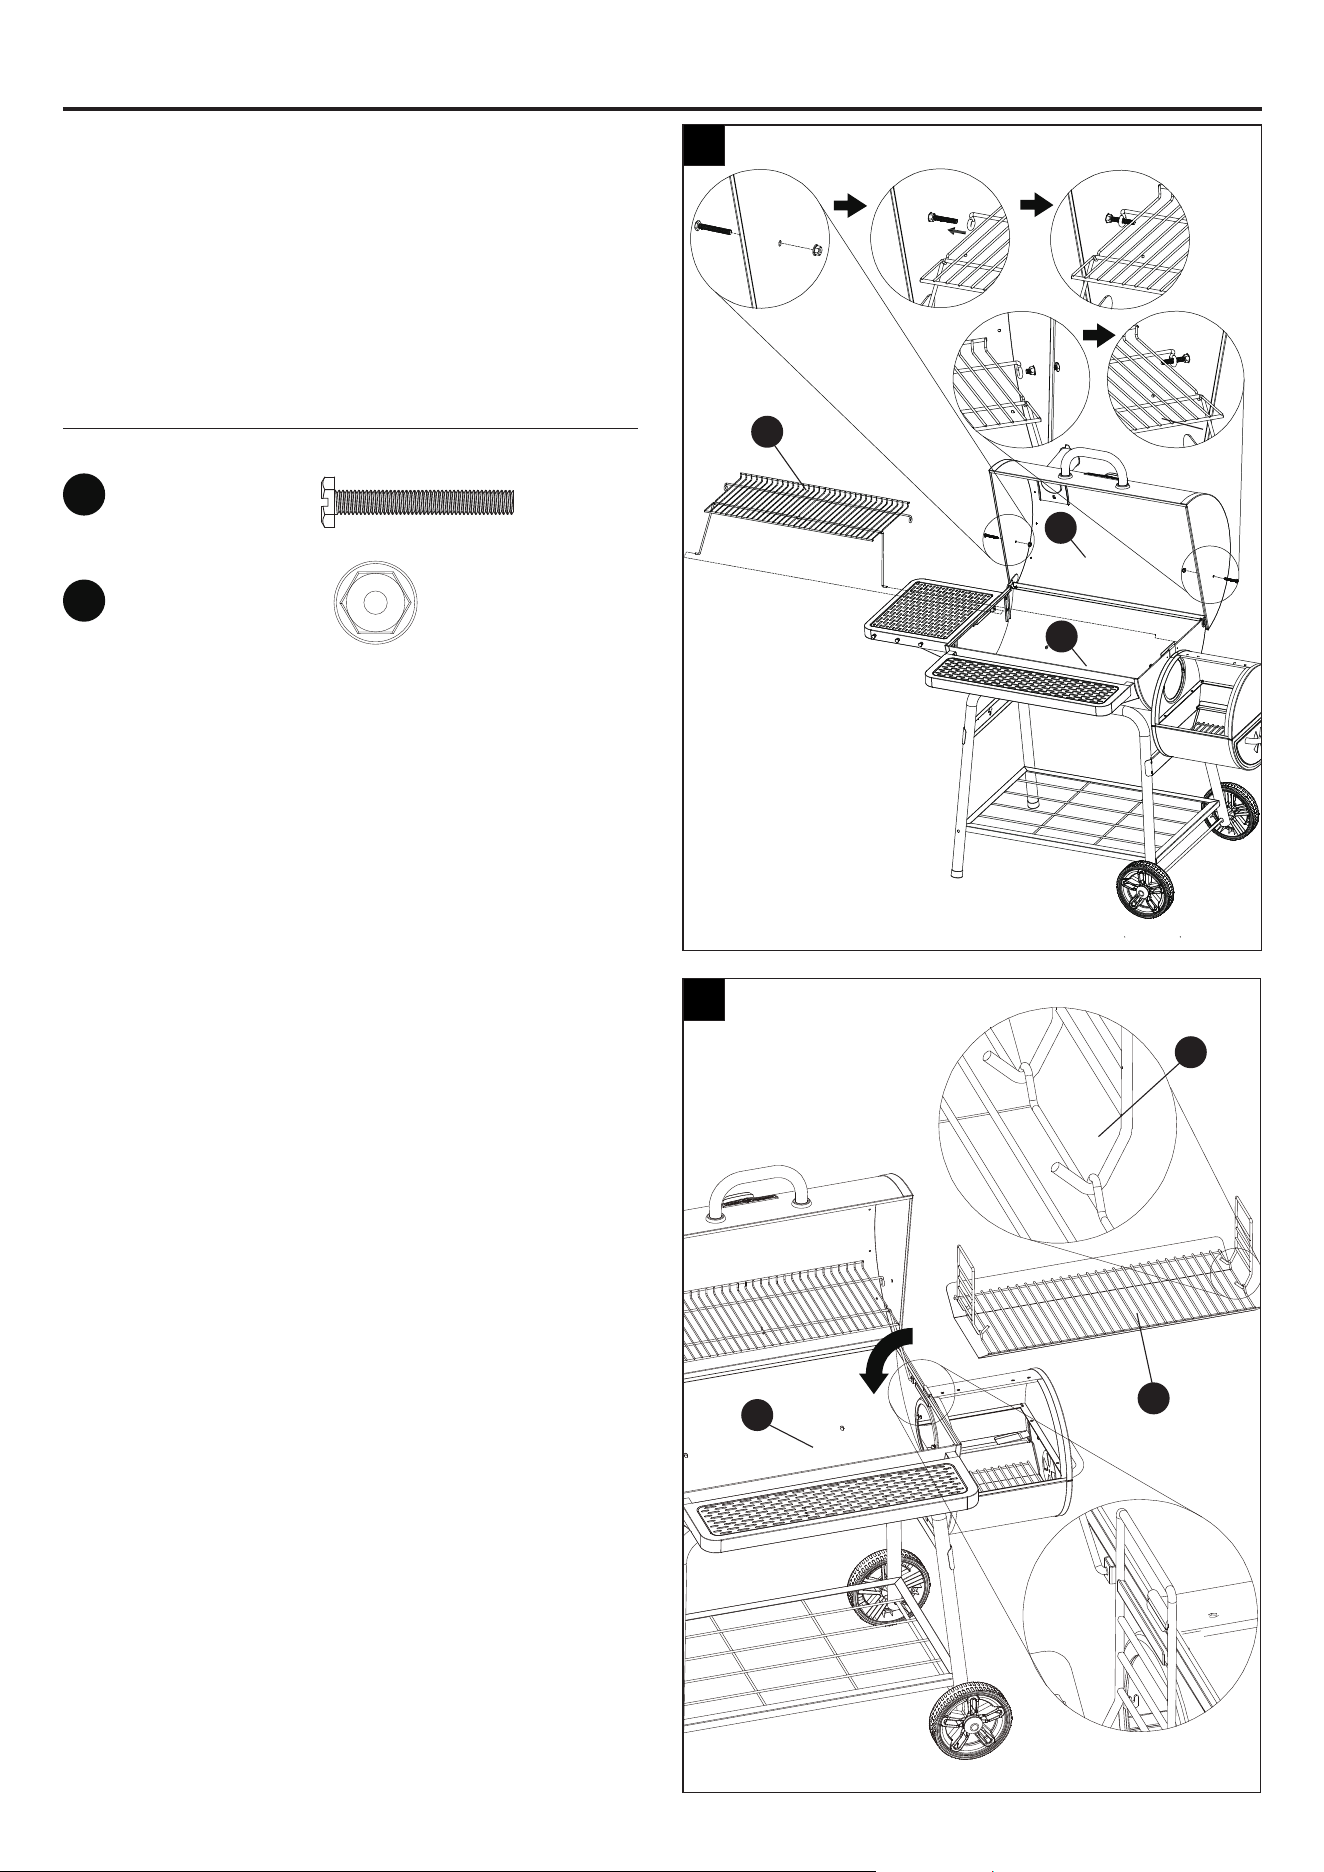
Step 13: Attach Warming Rack
Attach the warming rack (E) onto the lid (D) and
bottom bowl (I) with two M6 x 45 bolts (DD) and
two M6 nuts (GG).
NOTE: Please attach each corner of the
warming rack (E) in order shown in Fig.13.
Hardware Used
ASSEMBLY INSTRUCTIONS
Step 14: Place Charcoal Pan and Charcoal
Pan Handle
Place the charcoal pan (G) and charcoal pan
handle (J) into the bottom bowl (I).
NOTE: Hang the charcoal pan handle (J) on
either side support of the bottom bowl (I).
First
Second
Third
Fourth
1
2
3
4
5
13
14
E
I
J
G
I
D
DD
M6 x 45
Bolt
x 2
M6
Nut
x 2
GG
12
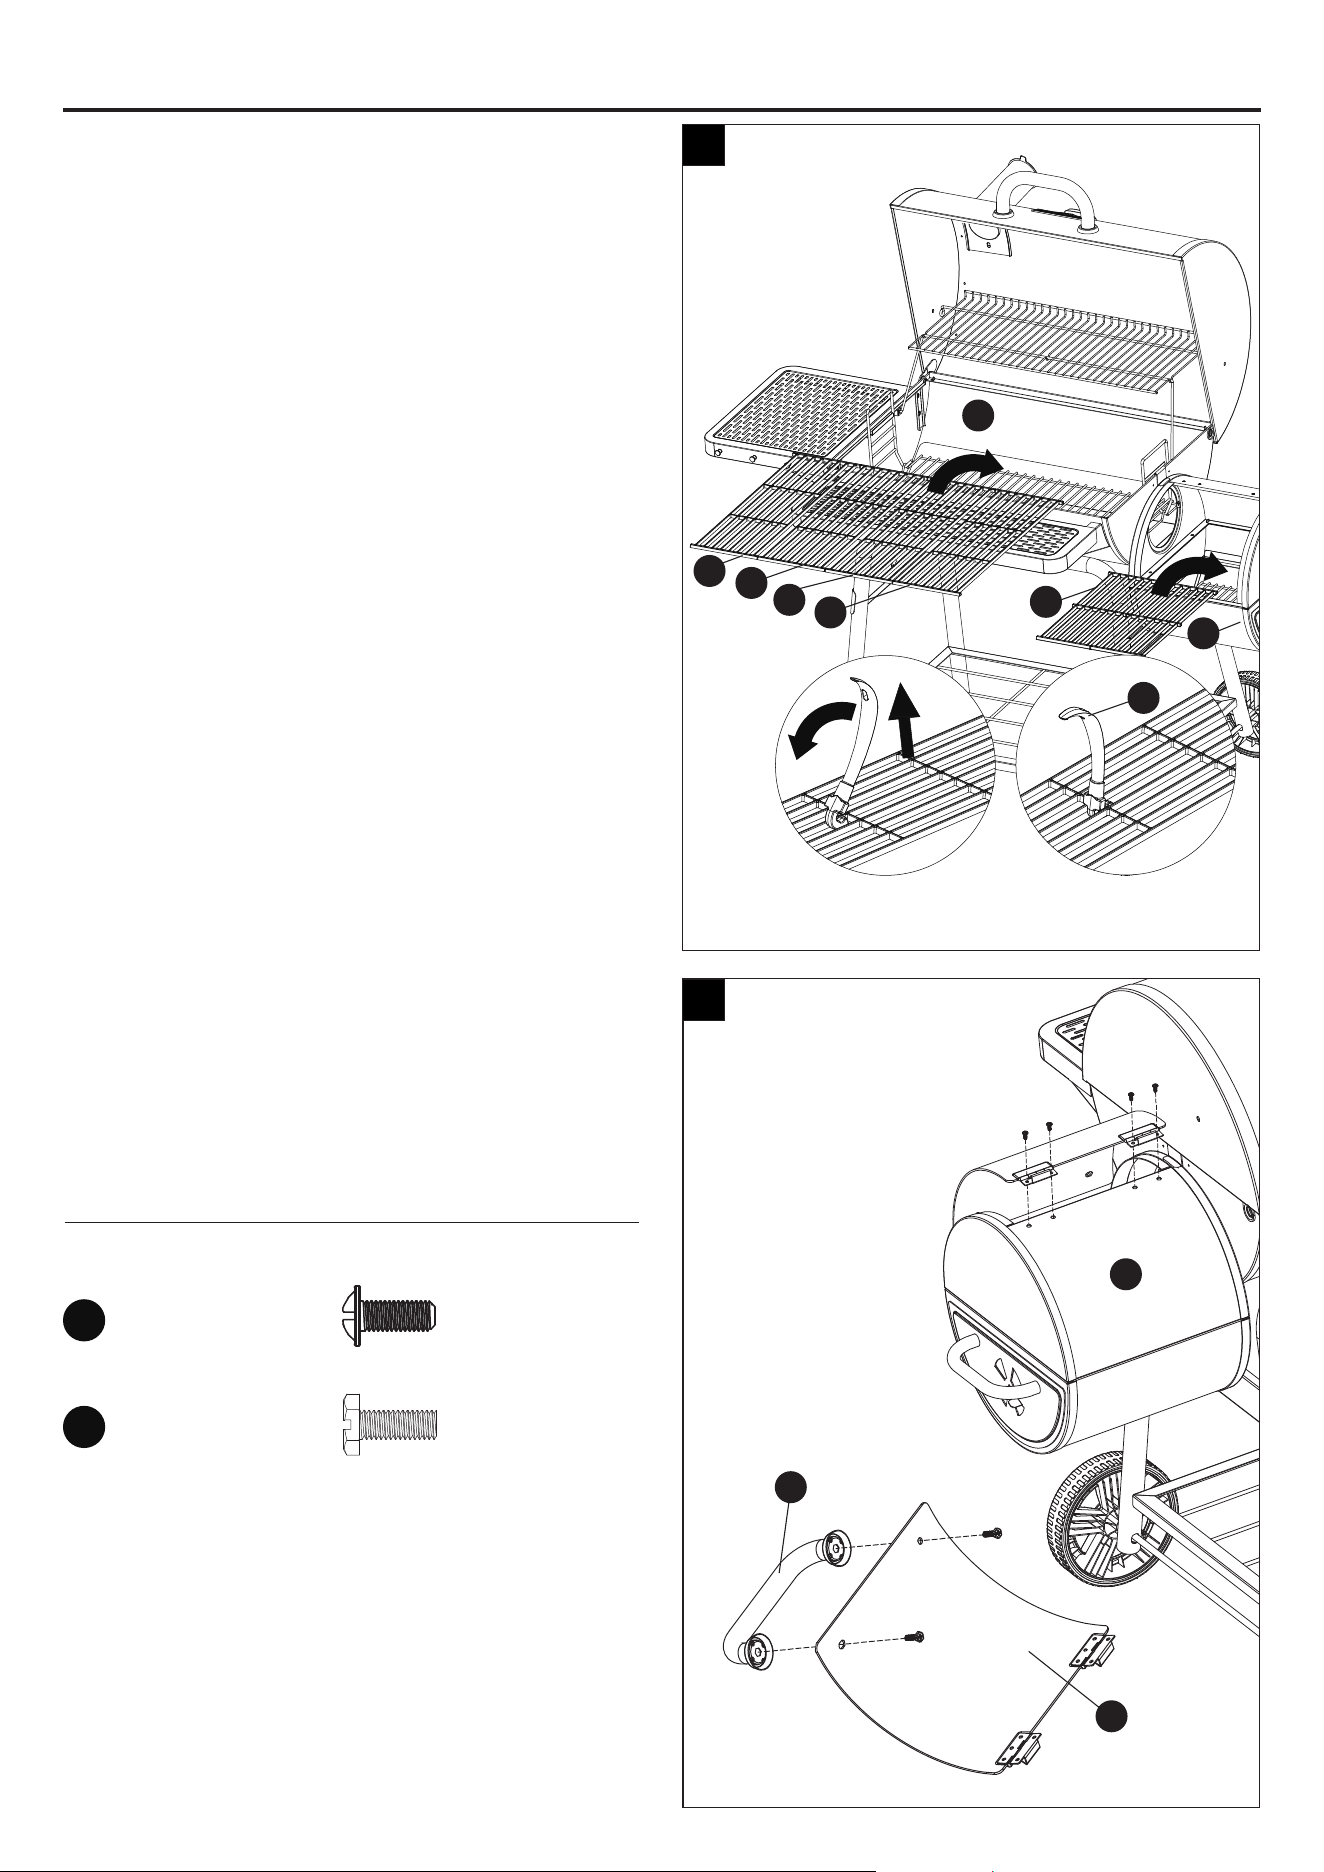
Step 15: Place Cooking Grid and SFB
Cooking Grid
Place the cooking grids (F) onto the bottom bowl
(I) and SFB cooking grids (Y) onto the SFB body
(X).
NOTE: Always lift the cooking grids (F) with the
cooking grid handle (K) shown in Fig.15.
Step 16: Attach SFB Lid Handle and SFB Lid
Attach the SFB lid handle (V) onto the SFB lid (U)
with two M6 x 20 bolts (CC).
Attach the SFB lid (U) onto the SFB body top (W)
with four M4 x 10 screws (AA).
Hardware Used
ASSEMBLY INSTRUCTIONS
M4 x 10
Screw
x 4
16
V
W
U
15
X
Y
K
F
F
F
F
I
M6 x 20
Bolt
x 2
CC
AA
13
ASSEMBLY INSTRUCTIONS
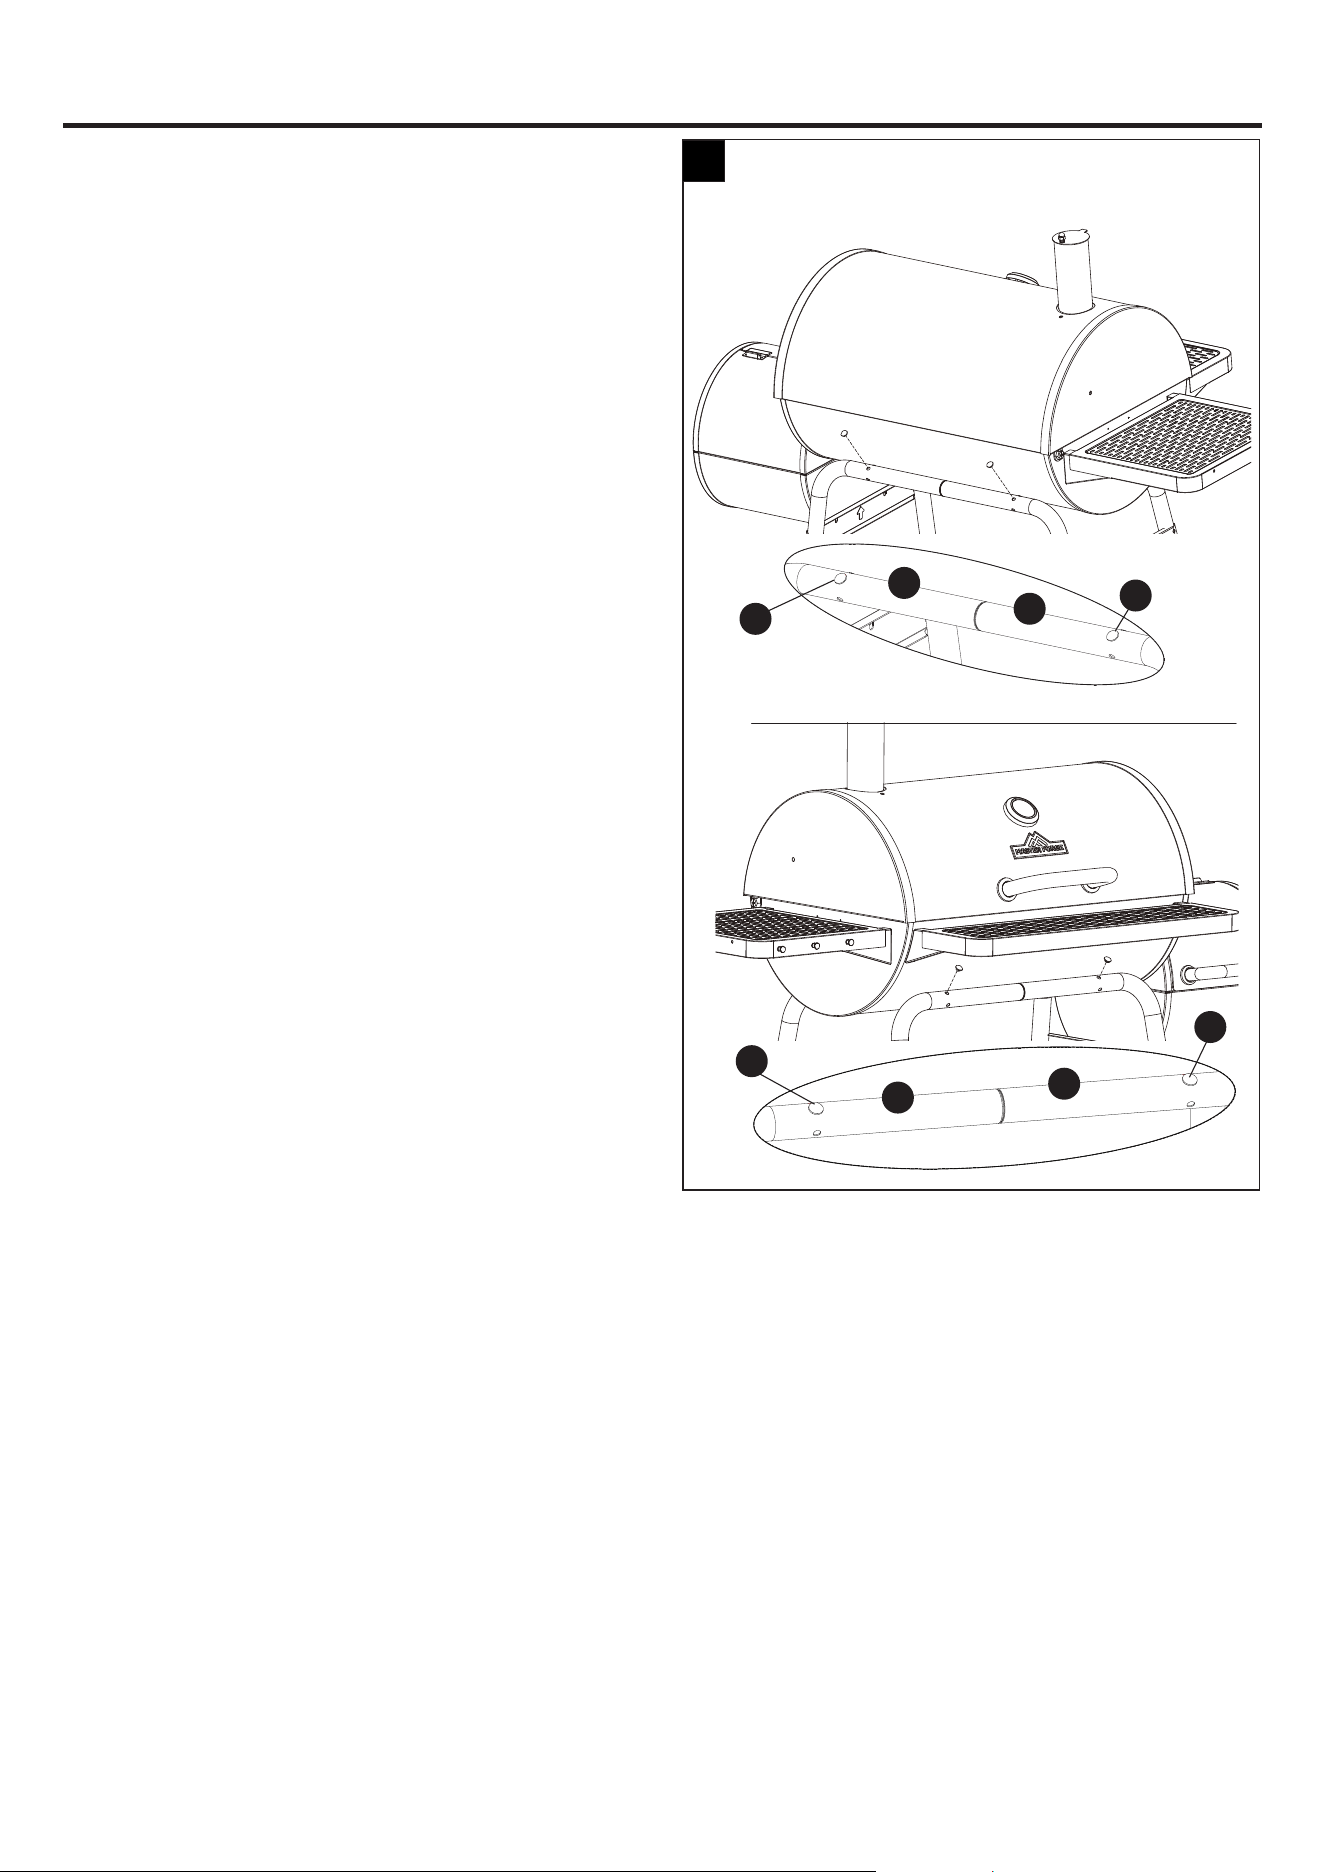
Step 17: Attach Hole Plugs
Press the four hole plugs (AC) onto the long legs
(N) and the short legs (O). Ensure that they are
pressed in tightly to prevent them from easily
falling out.
17
AC
N
O
AC
AC
N
O
AC
W WARNING: NEVER EXCEED 500°F BECAUSE THIS WILL DAMAGE THE FINISH AND CONTRIBUTE TO RUST.
PAINT IS NOT WARRANTED AND WILL REQUIRE TOUCH-UP. THIS UNIT IS NOT WARRANTED AGAINST RUST.
W CAUTION: Never use charcoal that has been pre-treated with lighter fluid. Use only a high grade plain
charcoal, charcoal/wood mixture, lump charcoal or cooking wood.
W CAUTION: Grill will drip oil during this process and for several uses afterwards. This is normal.
W CAUTION: Smoke may escape from areas other than the smoke stack. This should not affect cooking.
W CAUTION: Charcoal is porous and holds moisture. DO NOT leave charcoal in your grill while you are not using
it. Charcoal and ashes left inside the ash pan may reduce the life of your grill.
First Use
1. Make sure all labels, packaging and protective films have been removed from the grill.
2. Remove manufacturing oils before cooking on this grill for the first time, by operating the grill for at least 15 minutes
with the lid closed. This will “heat clean” the internal parts and dissipate odors.
Lighting Instructions
W CAUTION: Keep outdoor cooking appliance area clear and free from
combustible materials, gasoline and other flammable vapors and liquids.
W CAUTION: Check to make sure the smoke stack and drawer circle are free of
debris and ash before using the grill.
W CAUTION: Attempting to light the grill with the lid closed may cause an
explosion.
W CAUTION: When using a liquid starter, always check bottom bowl and ash
receiver before lighting. Fluid can collect in the bottom bowl and/or ash
receiver and could ignite, resulting in a fire.
W CAUTION: Never add lighting fluid to hot or warm coals as flashback may
occur, causing serious injury or damage to property.
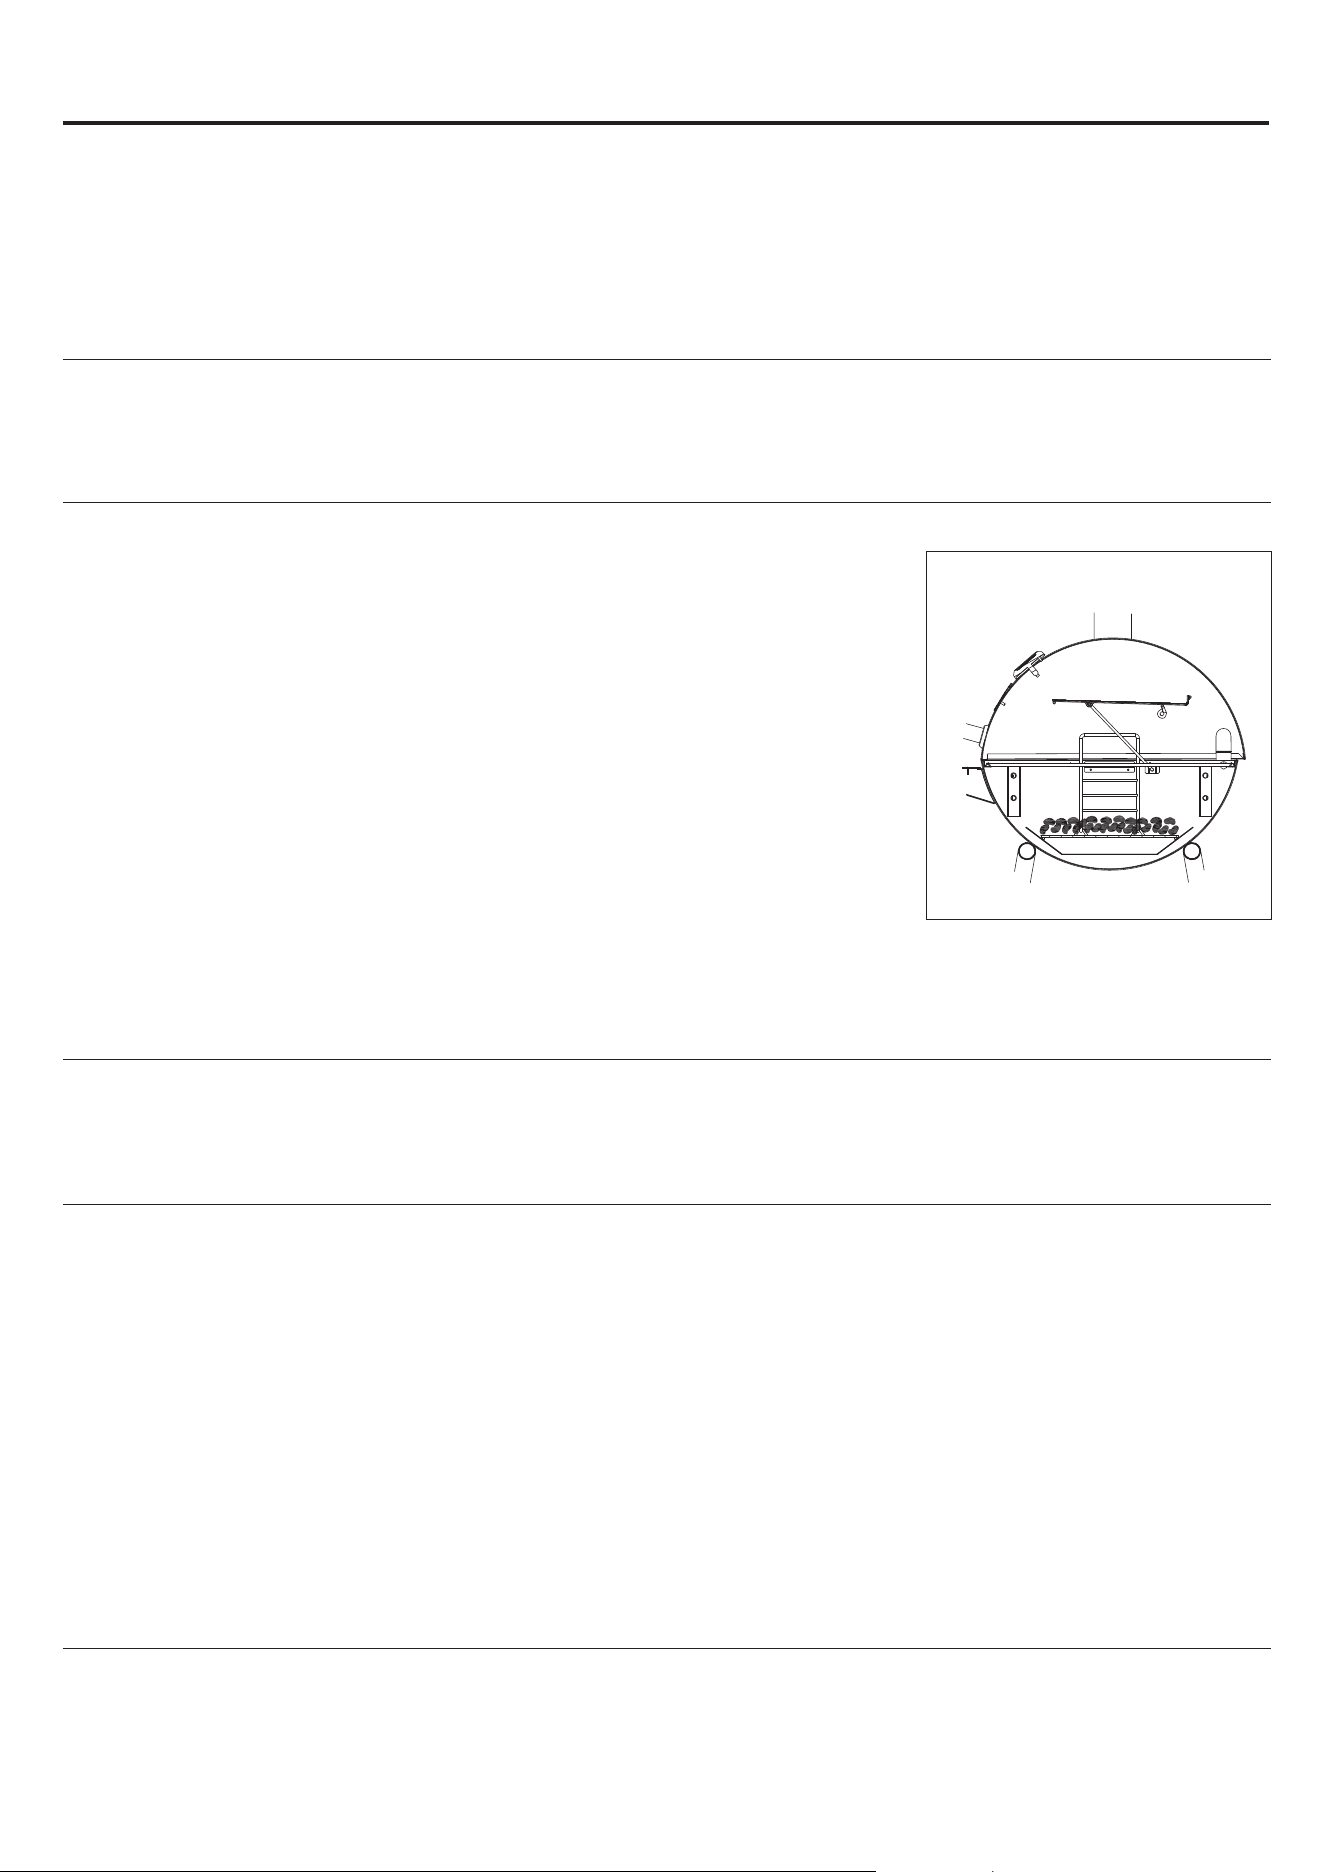
1. Open lid and vents.
2. Make sure ash receiver is empty and secure.
3. Remove cooking grid.
4. Arrange charcoal briquettes or other fuel on the bottom bowl to the “Fill Line” (Figure 1).
5. Light per instructions on fuel package.
6. Allow fuel to become glowing coals before cooking.
Turning Off
1. Allow charcoal to completely extinguish itself.
W WARNING: Do NOT use water to extinguish. This can be dangerous and cause damage.
2. Dispose of the ashes in a proper location.
Controlling Flare-ups:
W CAUTION: Do NOT use water on a grease fire. This can cause the grease to splatter and could result in serious
burns, bodily harm or other damage.
W CAUTION: Do NOT leave grill unattended while preheating or burning off food residue. If grill has not been
cleaned, a grease fire can occur that may damage the product.
W WARNING: When cooking, fire extinguishing materials should be readily accessible. In the event of an oil/
grease fire, use a type BC dry chemical fire extinguisher or smother with dirt, sand or baking soda. Do NOT
attempt to extinguish with water.
Flare-ups are a part of cooking meats on a grill and add to the unique flavor of grilling.
Excessive flare-ups can over-cook your food and be dangerous.
Important: Excessive flare-ups result from the build-up of grease in the bottom of your grill.
If a grease fire occurs, close the lid until the grease burns out. Use caution when opening the lid as sudden flare-ups may
occur.
If excessive flare-ups occur, do NOT pour water onto the flames.
Minimize Flare-ups:
1. Trim excess fat from meats prior to cooking.
2. Cook high fat content meats indirectly.
3. Ensure that your grill is on a hard, level, non-combustible surface.
OPERATING INSTRUCTIONS
14
Figure 1

OPERATING INSTRUCTIONS(CONTINUED)
Controlling Temperature
Controlling the temperature of your grill is all about
controlling the air flow to the fire. MORE AIR = MORE
HEAT. LESS AIR = LESS HEAT. By opening and closing
the top and side dampers, you can easily control the
temperature of your grill. The amount of charcoal used
when grilling can also greatly impact your ability to
control temperature. Dampers may need to be adjusted
during the cook to account for changes in weather like
wind or to accommodate for more or less fuel. When first
learning how to operate your grill, always use the same
amount of charcoal to best learn your grill’s damper
control.
Smoke (Figure 2)
1. Start with dampers 1/4 or less of the way open and
adjust as needed during cook.
2. For best results, start with up to 2 lbs. of charcoal
(30-40 Briquettes) and/or wood fuel.
3. Adjust the charcoal grate to its lowest setting or farthest from the cooking grates.
Grill (Figure 3)
1. Control airflow as needed, by adjusting dampers from 1/3-2/3 of the way open.
2. For best results, start with up to 2 lbs. of charcoal (30-40 Briquettes).
3. Place coals on one half of the charcoal grate - adjust charcoal grate level to the middle.
Sear (Figure 4)
1. For maximum airflow, both dampers should be open all the way with air flowing freely.
2. For best results, start with up to 3 lbs. of charcoal (50-60 Briquettes).
3. Adjust the charcoal grate to its highest setting or closest to the cooking grates.
Seasoning Your Grill
Seasoning is an important first step before you start cooking on your new grill. This process will help protect the interior
and exterior grill finish, reduce food sticking to the grates, reduce unnatural flavors, and help prevent the grates from
rusting. We recommend using flaxseed oil for seasoning your grill but most food grade oils (canola, grapeseed, vegetable,
safflower, etc) will work as well.
Step 1 Lightly coat with oil
1. This grill come pre-coated with vegetable oil. If this is the first time seasoning your grill, move on to Step 2.
2. If re-seasoning your grill, lightly coat ALL interior surfaces (including grates and inside of barrel) of your grill with
flaxseed or other vegetable oil.
Step 2 Heat Up Grill
1. Following the instructions for lighting your charcoal and controlling the temperature (Figure 5), bring your grill to
approximately 450°F.
2. Once at temperature, allow grill surfaces to season for 20 minutes.
3. Place coals on one half of the charcoal grate - adjust charcoal grate level to the middle.
Step 3 Re-Apply Oil To Grates 5 Times
1. After 20 minutes, open your grill and carefully remove your grill grates with a grate lifter.
2. Using a brush, re-coat both sides of your grates with flaxseed or other vegetable oil and return to your grill.
3. Close lid and allow surfaces to season for 20 minutes.
4. Repeat this process up to five times (Add more charcoal to maintain
temperature as needed).
5. Your grill is now ready for use.
NOTE: You can lightly coat the exterior of the grill body (while warm) with
vegetable oil. This will extend the life of the finish, much like waxing a car.
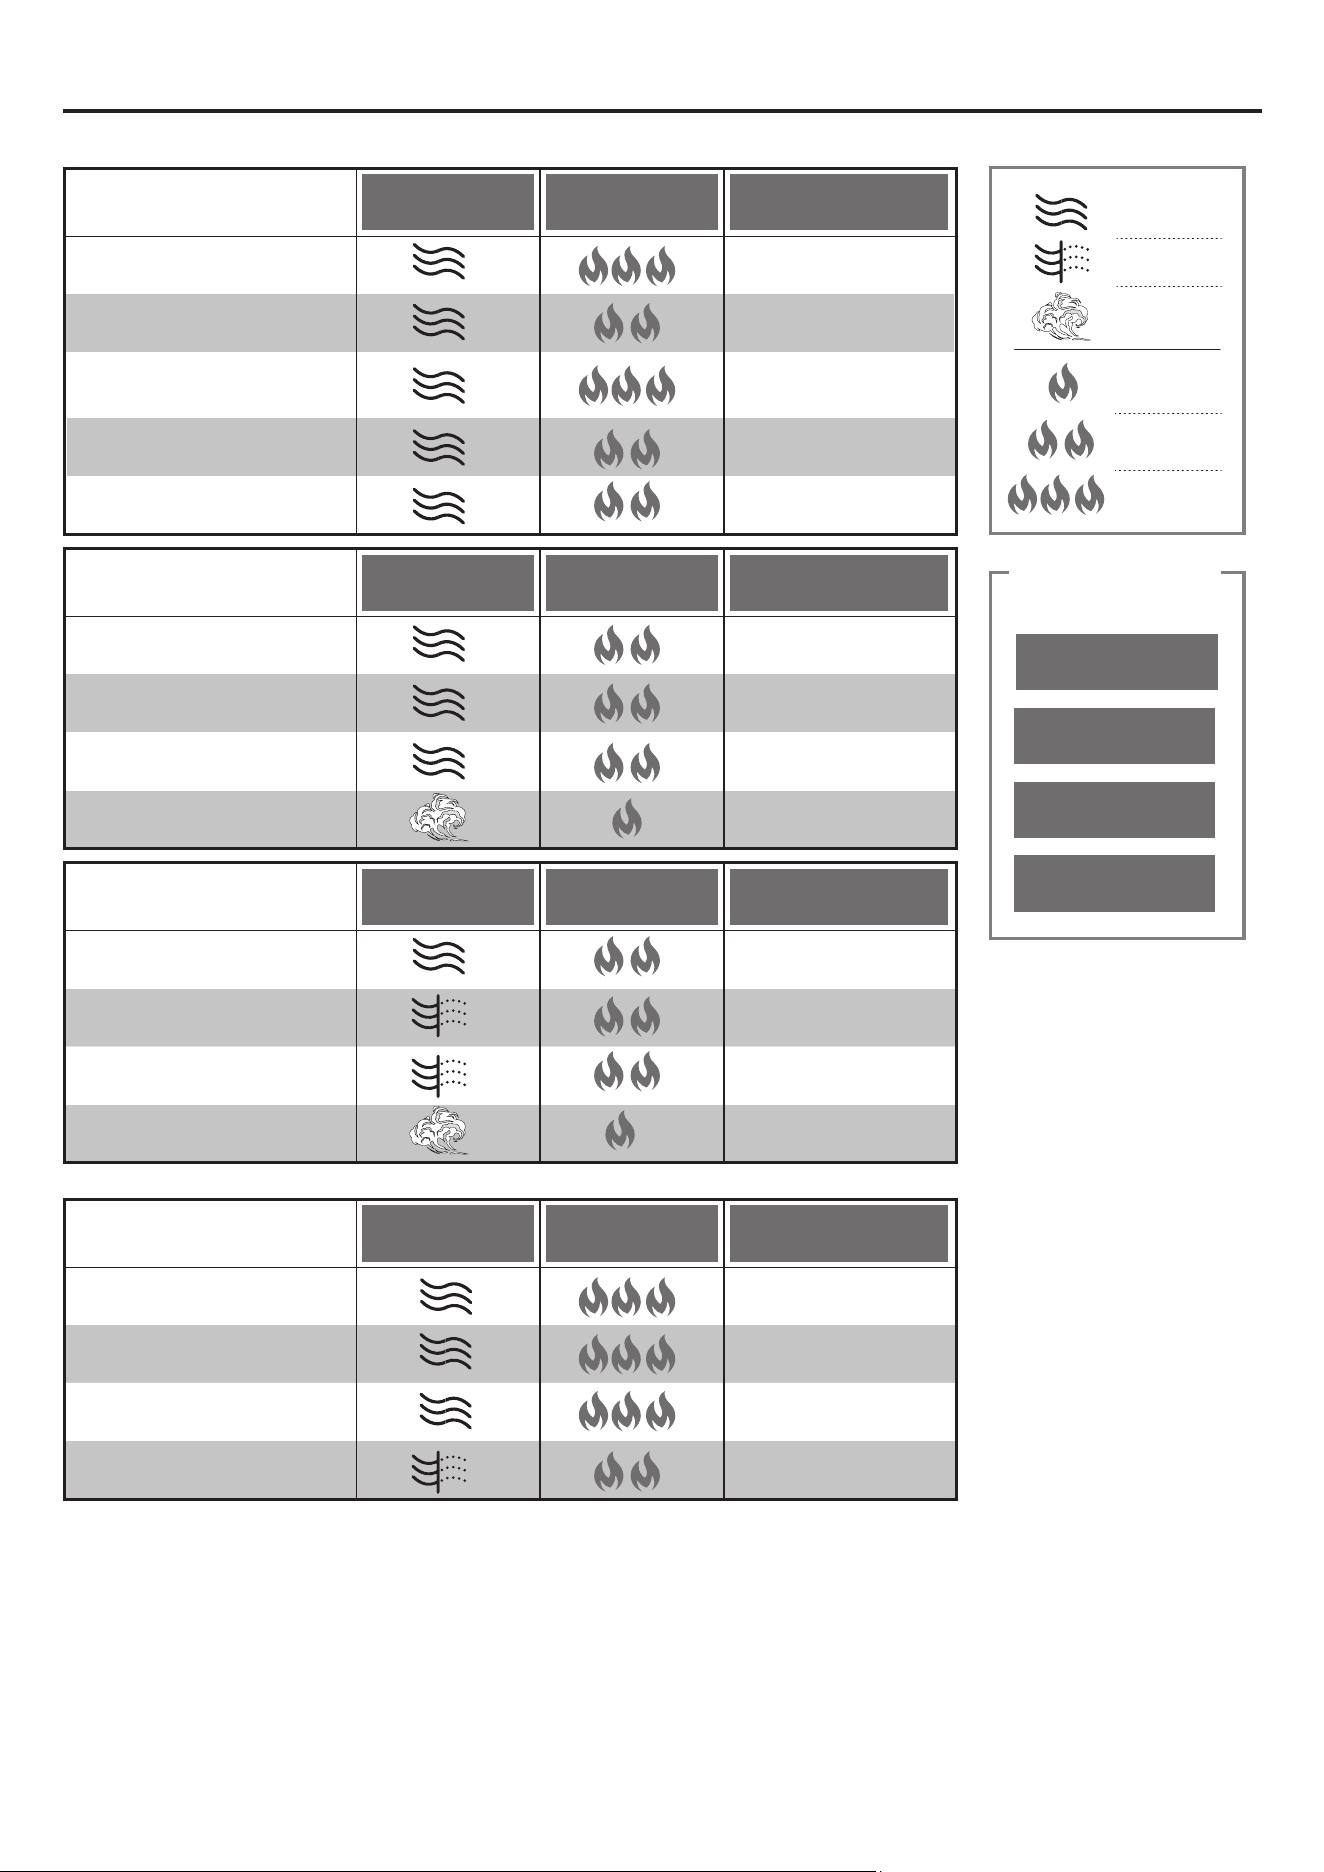
Grilling Styles
This grill can be used to smoke, grill or sear your food. By using temperature
zones, charcoal and wood flavor, you can customize your culinary experience
as desired. The following descriptions provide four of the most common ways
you can cook with your charcoal grill.
Figure 2
SMOKE
150°-250°F
Figure 3
GRILL
300°-450°F
Figure 4
SEAR
450°-500°F
15
Figure 5
Grill (Figure 5)
Cook with direct and indirect heat at medium temperatures (300°-450°F).
Utilize a two zone set up to cook at different speeds and temperatures.
1. Set charcoal grate to medium setting (halfway between grill grates
and grill body) using adjustable charcoal pan handles.
2. Prepare up to 2 lbs. (approximately 30-40 briquettes) of lit charcoal
spread evenly across HALF the charcoal grate creating 2 Cooking
Zones.
3. Once the grill is at the desired temperature, you may begin to cook.
First place food over direct heat, cooking each side as desired. After
initially cooking over direct heat, move to the cool zone (see picture
at right) to bring your food to the desired internal temperature.
NOTE: Wood chips, chunks or split logs may be used in addition to
charcoal to add smoke flavor as desired.
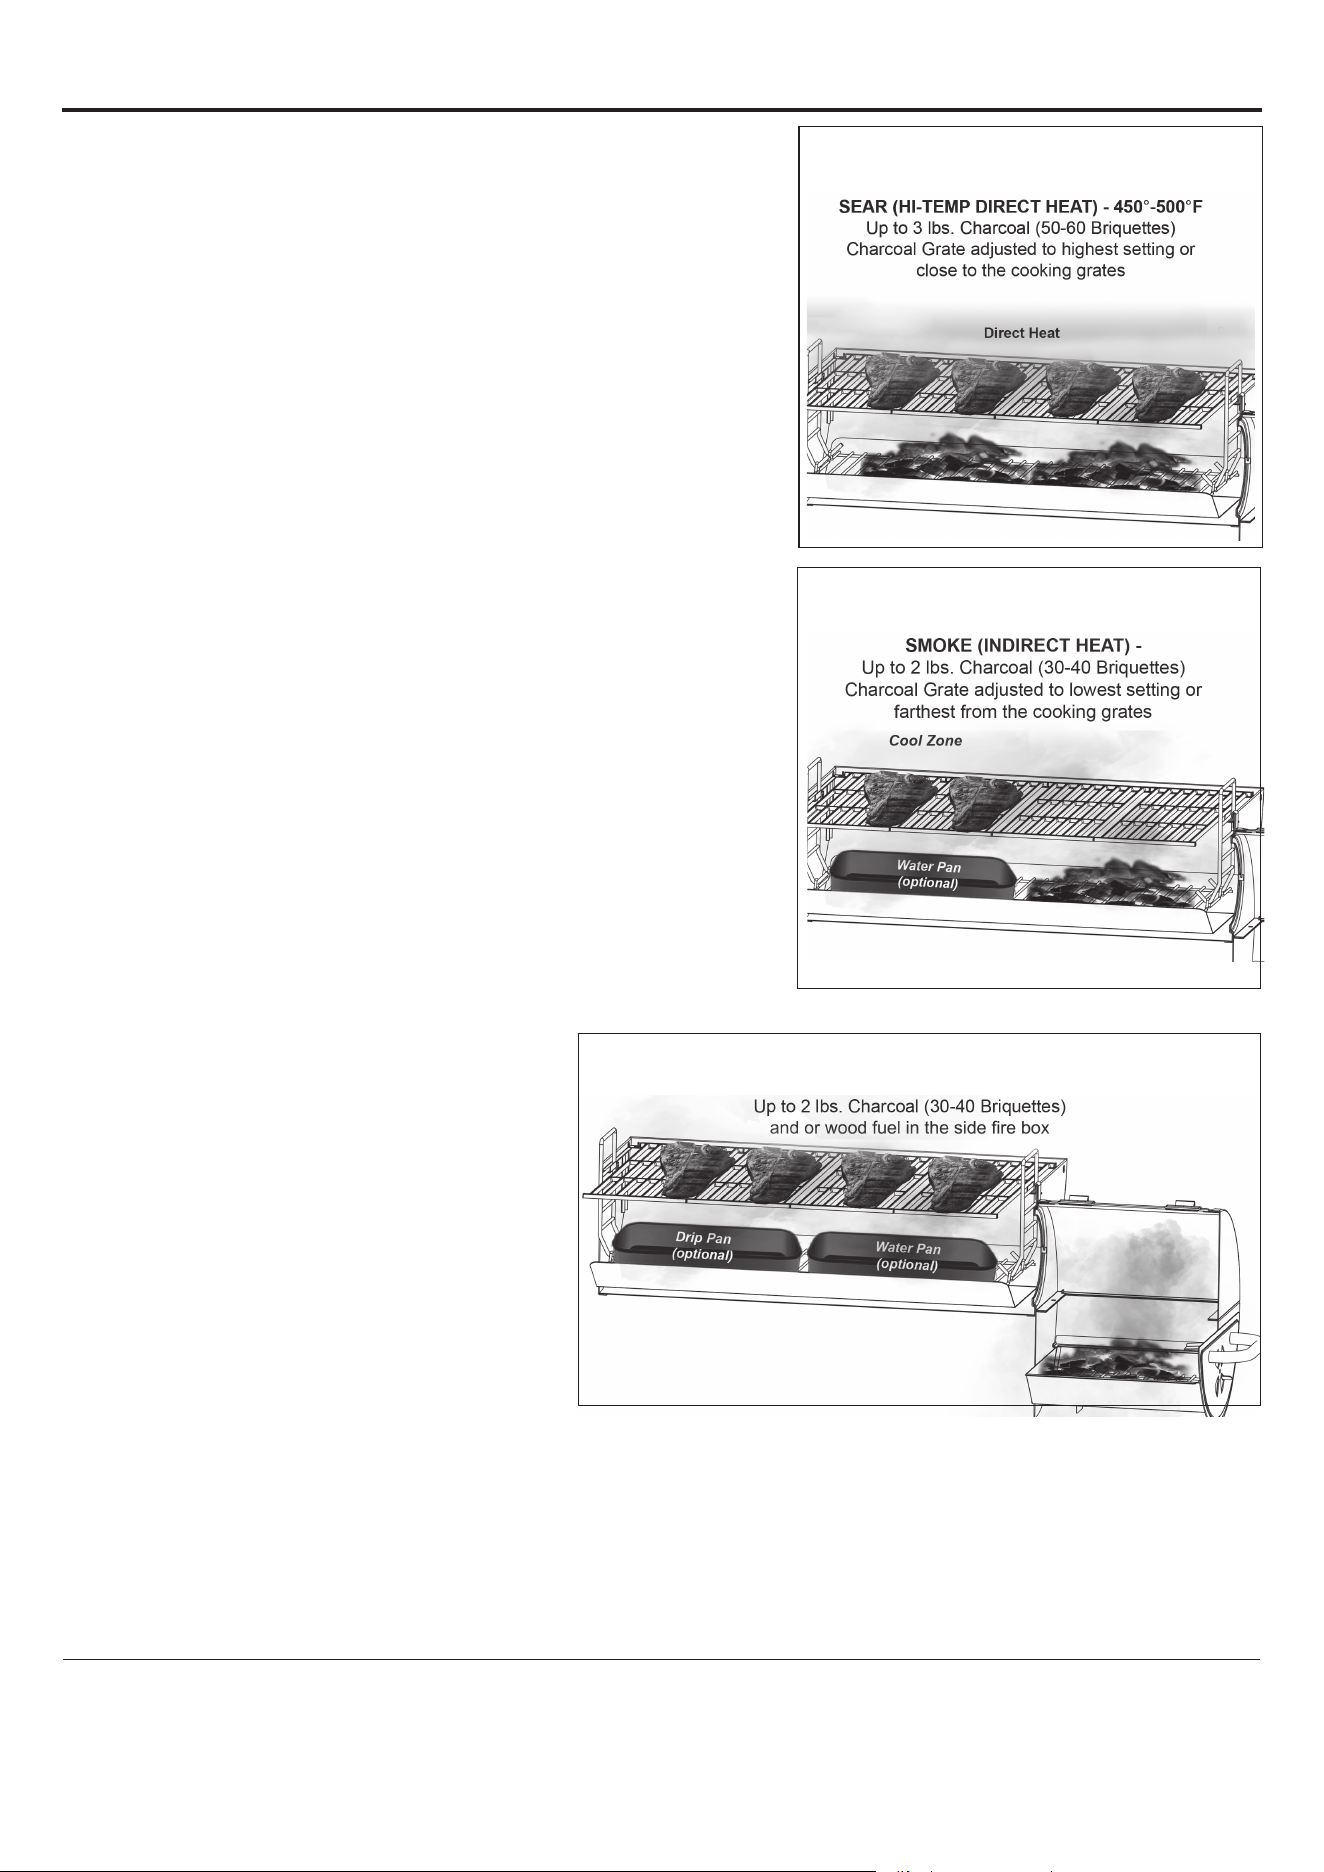
Sear (Figure 6)
Quickly cook with direct heat at high temperatures (450°-500°F).
1. Set charcoal grate to high setting (closest to grill grates) using
adjustable charcoal pan handles.
2. Prepare up to 3 lbs. (approximately 50-60 briquettes) of lit charcoal
spread evenly across charcoal grate.
3. Once the grill is at the desired temperature, you may begin to cook by
placing food directly over the coals.
4. Food will cook quickly. Cook each side 3-4 minutes and then bring to
desired internal temperature.
NOTE: Always sear with the grill lid open to prevent damage to exterior
finish.
NOTE: Wood chips, chunks or split logs may be used in addition to
charcoal to add smoke flavor as desired.
Smoke (Figure 7)
Cook with indirect heat at low temperatures (150°-250° F). Use wood
chips, chunks, split logs or pellets to add smoke flavor.
1. Set charcoal grate to low setting (farthest from grill grates) using adjustable charcoal tray hangers.
2. Prepare up to 2 lbs. (approximately 30-40
briquettes) of charcoal spread evenly across
HALF the charcoal grate creating two cooking
zones.
3. Add wood chips, chunks, or split logs as
desired to add smoke flavor.
4. Once the grill is to desired temperature, you
may begin to cook.
5. Keep food over cool side of grill to cook with
indirect heat over the duration of the cook.
NOTE: Opening the smoking chamber will extend
cooking time.
Offset Smoke (Figure 8)
Cook with indirect heat from the side fire box at low temperatures (150°-250° F). Use split wood logs, chips, chunks, or
pellets to add smoke flavor.
1. Prepare up to 2 lbs. (approximately 30-40 briquettes) of charcoal in the side fire box.
2. Add wood chips, chunks, split logs or pellets as desired to add smoke flavor.
3. Once the grill is at the desired temperature, begin to cook.
4. Food placed closer to the side fire box will cook faster than food placed on the opposite side of the grill.
NOTE: Opening the smoking chamber will extend cooking time.
Grilling Recipes
• Cooking with a MEAT THERMOMETER ensures food is fully cooked. Insert thermometer into the thickest part of the
meat, not touching bone, and allow 1 to 1 1/2 minutes to register temperature.
• USDA Safe Minimal Temperature is 165°F for chicken / poultry.
• USDA Safe Minimal Temperature is 145°F for Beef, Pork, Veal & Lamb (Steaks, chops, roasts).
OPERATING INSTRUCTIONS(CONTINUED)
16
Figure 8
Figure 6
Figure 7

OPERATING INSTRUCTIONS(CONTINUED)
Direct Heat Recipes
GRILLED FLANK STEAK WITH VEGETABLES
A vastly under-appreciated meat, the flank steak can be a flavorful and fast meal for the weeknights. Get dinner on the
table in under 20 minutes and use a charcoal grill to get all the best flavors of summer with this flank steak recipe.
Ingredients: Instructions:
1.5 Pound Flank Steak
1.5 tsp of Smoked Paprika
2 Garlic Cloves, Minced
Salt and Pepper to Taste
4 Ears of Corn
2 Large Zucchini, Cut in Half Lengthwise
1 Pint Cherry Tomatoes
3 Tbsp of Olive Oil
1.5 Tbsp of Fresh Rosemary, Chopped
1 Tbsp of Red Wine Vinegar
2 Garlic Cloves, Minced (Oil Dressing)
2 Tbsp of Canola Oil
1. Season flank steak with paprika and garlic. Rub on all sides and
season with salt and pepper. Brush with canola oil.
2. Brush corn, zucchini, and tomatoes with canola oil and season
with salt and pepper.
3. Preheat the grill to medium high heat.
4. Add flank steak to grill, flip once and cook to desired internal
temperature. About 4 to 6 minutes per side, let rest 5 minutes.
5. Add vegetables to grill and turn occasionally until lightly charred all
over.
6. Whisk olive oil, rosemary, red wine vinegar, garlic and salt and
pepper to taste in a small bowl.
7. Brush steak and drizzle vegetables with olive oil mixture and serve
with steak immediately.
ORIGINAL MARINATED FLANK STEAK
Meat Marinade Ingredients: Instructions:
1/2 cup Olive Oil
1/3 cup Soy Sauce
1/4 cup Red Wine Vinegar
2 tbsp. Lemon Juice
1 tsp. Dry Mustard
1 minced Garlic Clove
1 small Onion, minced
1/4 tsp. Pepper
1. Mix marinade ingredients in nonmetal dish.
2. Let steak stand in marinade for no less than 4 hours.
3. Sear each side over high heat for 5 minutes; cook to desired
internal temperature.
4. Cut steak diagonally across the grain into thin slices before
serving.
QUICK AND EASY GRILLED PORK TENDERLOIN
Need dinner in a hurry? This quick and easy pork tenderloin recipe is a crowd pleaser. Pair with grilled red potatoes and
asparagus for a simple but flavorful dinner!
Ingredients: Instructions:
2 Pork Tenderloins
2 tsp Paprika
1 tsp Garlic Powder
1 tsp Cilantro
1 tsp Oregano
Salt and Pepper to Taste
Olive Oil
1. Blend spices together in a bowl. Rub pork with olive oil and then
season liberally on both sides with spice blend.
2. Set up your Char-Griller for direct cooking. Ignite burners and turn
to medium high.
3. Place pork on the grill and cook for 8 to 10 minutes per side or
until the internal temperature reads 165°F or until desired internal
temperature (USDA Safe Minimal Temperature for Pork is 145°F).
4. Remove from the grill and let rest for 10 minutes.
HAMBURGERS
Season to taste with Steak Seasoning. You may also marinate by allowing to stand in marinade for 1 or 2 hours at room
temperature before cooking, or let stand in covered dish in refrigerator up to 24 hours.
Instructions:
1. Bring to room temperature before cooking.
2. Mix in chopped onions, green peppers, salt, sear 3/4 inch patties on each side.
3. Cook over medium heat with lid down to avoid flare-ups.
4. Cook each side 3 to 7 minutes according to desired temperature.
5. Ground meat will be done when juices run clear (USDA Safe Minimal Temperature for ground meat is 160°F).
6. Burgers can be basted with marinade when turning and/ or other ingredients can be mixed in with the ground beef
such as chili sauce or powder.
17

OPERATING INSTRUCTIONS(CONTINUED)
JUICY LUCY HAMBURGERS
If you think there is no way that the classic hamburger could get better, just wait until you try the Juicy Lucy
Burger. Packed with flavor and melted cheese, these burgers are sure to be a hit this summer.
Ingredients: Instructions:
1.5 lbs. Ground Beef
1/2 Packet of Dry French Onion Soup Mix
1/4 Cup of French Dressing
2 Tbsp of Worcestershire
1/2 tsp of Salt
1/4 tsp of Black Pepper
Block of Cheddar Cheese
1. Slice cheese into blocks approximately ¼ inch thick and 2
inches wide by 2 inches tall.
2. Add French Onion Soup Mix, Salt, Pepper, French Dressing,
and Worcestershire sauce to ground beef and mix well.
3. Take a portion of the meat and form into a patty.
4. Put the cheese block in the middle of the patty and wrap the
cheese completely with the beef. Form a patty with the cheese
inside.
5. Repeat with the remaining beef and cheese.
6. Preheat the grill to 400°F.
7. Cook burgers for 3 minutes on the first side and then flip.
8. Cook the burgers for 6 minutes on the other side. Ground
meat will be done when juices run clear (USDA Safe Minimal
Temperature for ground meat is 160°F).
9. Add desired toppings and enjoy!
SHRIMP (PEELED) & CRAYFISH
Instructions:
1. Place on skewers.
2. Coat with melted butter and garlic salt.
3. Grill 4 minutes on each side or until pink.
Cocktail sauce optional.
HOT DOGS
Instructions:
1. Grill with lid open for approximately 6 minutes.
2. Turn every few minutes.
JALAPENO BACON BLANKET POPPERS
Need and easy to make snack for this big game? These Jalapeno Bacon Blanket Poppers are a crowd pleaser and
are super easy to whip up on the grill. The bacon gets crispy quickly and doesn’t burn easily since it’s just sitting on top of
the cream cheese filling. Easy, delicious and the perfect size for an appetizer, your friends and family will be asking you to
make these again and again!
Ingredients: Instructions:
4 Jalapenos
Char-Griller Steak Rub to Taste
1/3 Cup Cream Cheese
3 Slices of Bacon
Shredded Cheese to Taste
1. Mix cream cheese, shredded cheese, Steak Rub in a bowl and set aside.
2. Slice jalapeños through the middle to make it boat shaped.
3. Using a spoon remove the pith and seeds to create room for the filling.
Tip: If you like heat then leave some seeds behind. Seeds provide the heat.
4. Fill jalapeños with filling.
5. Slice bacon into small strips then lay it over the filling on the jalapeños. the
jalapeños.
6. Sprinkle a small portion of the Steak Rub on top of the bacon.
7. Fire up your grill/ smoker to 400°F.
8. Place Jalapeno Bacon Blanket Poppers in the grill/ smoker and smoke for
30 minutes or when the bacon is golden brown. Remove and enjoy!
18

OPERATING INSTRUCTIONS(CONTINUED)
Indirect Heat Recipes
HASSLEBACK POTATOES
A side dish that can basically be a meal in and of itself, these Hassleback Potatoes can be completely customized with
toppings and types of cheese!
Ingredients: Instructions:
6 Russet Potatoes
1 Pack of Cheddar Cheese Slices
1 Pack of Pepper Jack Slices
Chipotle Powder
Oregano
Salt and Pepper to Taste
Cooked Bacon (Diced)
Chives (Sliced)
Sour Cream
1. Set up your grill for indirect cooking.
2. Cut thin slices in the width of the potatoes, but be careful to not slice
all the way through.
3. Wrap the potatoes in foil and place on the side of the grill away from
the flames. Allow to cook until tender. About 45 minutes to an hour.
4. Remove potatoes from the grill and unwrap.
5. Place alternating slices of cheddar and pepperjack in the potato.
6. Season potatoes with chipotle powder, salt, pepper, and oregano.
7. Place potatoes back on the grill unwrapped for 10 to 12 minutes or
until cheese is melted.
8. Garnish with bacon, chives, sour cream and serve.
GARLIC PARMESAN CHICKEN WINGS
Replicate the signature flavors of your favorite wing spot with this marinated Garlic Parmesan Recipe.
Ingredients: Instructions:
4 lbs. of Chicken Wings
16 oz. Bottle Italian dressing
1 Cup of Shredded Parmesan Cheese
1/2 Tbsp. Onion Salt
1/2 Tbsp. Black Pepper
1 Cup of Butter
1 Tbsp. Oregano
2 Tbsp. Garlic Powder
A pinch of rosemary
1. Marinate wings overnight or at least four hours in Italian dressing.
2. Add charcoal to one side of grill for indirect grilling, or use Smokin’
Stone™ and add flavored wood chips / chunks if desired.
3. Let grill preheat to 275˚F.
4. Place wings on indirect heat side of grill.
5. Smoke wings for 45-60 minutes, until internal temp reaches 170˚F.
6. While wings are smoking, make garlic Parmesan sauce by mixing
Parmesan cheese, garlic powder, onion salt, black pepper, butter,
oregano and rosemary.
7. Remove wings from grill and toss in garlic Parmesan sauce.
CEDAR PLANK SALMON
Think you can’t get the perfect smoked salmon on a gas grill? Think again. With indirect grilling, you can get the perfect
cedar plank soaked salmon every time.
Ingredients: Instructions:
2 Cedar Planks
2 Salmon Filets
Olive Oil
Rosemary
Salt and Pepper to Taste
1. Soak cedar planks in water for at least 8 hours.
2. Set up your grill for Indirect cooking.
3. Add 30 to 40 charcoal briquettes to one side of the grill.
4. Ignite charcoal with gas burners set to medium high.
5. Once charcoal is lit, turn off gas burners and allow to fully ash over.
6. Rub salmon on both sides with olive oil.
7. Season with salt and pepper, rosemary sprigs and slices of lemon.
8. Place salmon on the side of the grill away from the charcoal.
9. Cook salmon for 15 minutes or until flakey.
SWEET CORN IN HUSKS
Instructions:
1. Trim excess silk from end and soak in cold salted water 1 hour before grilling.
2. Grill 25 minutes – turning several times.
19

OPERATING INSTRUCTIONS(CONTINUED)
CHILI-LIME CHICKEN THIGHS
Perfect for tacos, fajitas, nachos, or as a dish all on it’s own, this Chili-Lime Chicken Thighs Recipe, prepared by our
ambassador, BBQFiends, can be quickly cooked on a grill for a weeknight meal or cooked with charcoal on the weekend
to add just the right kick of smokey flavor.
Ingredients: Instructions:
3 Ibs. Chicken Thighs
2 Tbsp Favorite BBQ Chili
Seasoning
1 Lime
Chopped Cilantro for Garnish
1 Lime Juiced (Marinade)
1 - 12 oz Beer (Marinade)
Salt & Pepper to Taste (Marinade)
1. Trim excess fat off chicken thighs and place in a large bowl. Add the
marinade ingredients and let sit in the refrigerator for 1-2 hours before
cooking.
2. Remove chicken from marinade and season with your favorite BBQ chili
seasoning. Get the grill up to 375°F and place the chicken over indirect heat.
*Tip: To get crispier chicken skin flip the chicken over about half-way through the
cook and move to direct heat. Make sure internal temp is at least 165°F before
removing for the grill.*
3. Pull the chicken and garnish with chopped cilantro and a squeeze of lime
over the top.
4. Serve and enjoy!
Smoking Recipes
“CERTIFIED” PORK BUTT
A great pork butt recipe perfect for beginners and pitmasters alike. This slow smoked pork butt recipe is great shredded
and piled high with coleslaw for a sandwich or eaten on it’s own straight out of the pan!
Ingredients: Preparing the Meat: Cooking Directions:
2 Pork Butts
(6-10 lbs.
each)
Apple juice
Your
favorite rub/
seasoning
Mustard
1. Remove the pork butt from the
plastic wrap & pat dry using a
paper towel.
Tip: Choose a pork butt with a full
fat cap. This helps the meat while
it’s smoking for a long period of
time.
2. Trim the excess fat that is loose
and pulls up easily. Score the
fat cap 1/8 to 1/4-inch-deep
diagonally, spaced out 1/2 to 1
inch apart.
Tip: Scoring the meat allows the
seasoning and smoke to penetrate
into the pork butt.
3. Fill the marinade injector with
apple juice and inject into the
top and sides of the meat.
4. Spread a coating of mustard
using a basting brush all over
the pork butt.
Tip: This allows the rub to stick to
the pork butt.
5. Generously season the pork
butt on all sides with your
favorite rub.
6. Tip: After seasoning, wrap in
Saran Wrap and store in the
refrigerator overnight or 8-10
hours. This allows the rubs to
penetrate and apple juice to
tenderize the pork butt.
1. Ignite charcoal and preheat the smoker to 225°F.
2. Add boiling water to the drip pan and place under the grill
grate.
Tip: This will add moisture for the cook and collect the drippings .
3. Smoke the pork butts for 2 hours per pound at 225°F, until
the meat reaches an internal temperature of 160°F.
Tip: Maintain a 225°F temperature, check fire hourly or when
needed. Also spritz with apple juice every time you add fuel to
your fire. Spritzing adds moisture and flavor. It prevents the pork
butt from drying out and helps to create the bark. Monitor the
temperature using a folding probe thermometer and/ or remote
thermometer.
4. Remove the pork butts from the smoker and double wrap in
foil. Before closing the wrap, add 1 Cup of apple juice and 1
stick of butter for each pork butt, more seasoning and BBQ
sauce, to taste.
5. Place back in the smoker and cook until the pork butt
reaches an internal temperature of 199°F, then remove from
the smoker.
Tip: Wrap pork butt in a large towel and place in a cooler or just
set to the side for a minimum of 1-2 hours for resting. This allows
the meat to cook down and stop cooking and is a major key in
the process.
6. After resting, remove the towel and foil. Pull apart the pork
using two forks or meat claws.
7. Make pulled pork sandwiches and endless pulled pork
dishes. Enjoy!
20

OPERATING INSTRUCTIONS(CONTINUED)
BRISKET
The brisket recipe is a traditional take on the smoked classic, promising tender, smoky results.
Ingredients: Instructions:
10 ½ lbs. beef brisket
½ Cup paprika
¼ Cup packed light brown sugar
3 Tbsp. salt
3 Tbsp. coarse black pepper
3 Tbsp. Chili powder
Apple juice
Water
1. Using a sharp knife, trim the fat from the brisket leaving an even, thin layer
on the top..
2. In a medium bowl, combine paprika, light brown sugar, Chili powder, salt
and pepper and mix well to make rub seasoning. Using your hands, or a
shaker, generously apply rub all over.
3. Wrap the brisket in plastic wrap and refrigerate for at least 12 hours.
4. When setting up the grill, add wood chips/chunks to charcoal and add
Smokin’ Stone with an aluminum pan on top. Pour apple juice and water
into the pan, about halfway full. Place a temperature probe at grate level
and heat grill to 220°F.
5. Place brisket on grates, fat side up, and allow to smoke for 5 hours. After
5 hours, wrap the brisket in butcher paper and return to grill at 220°F.
Brisket is done when the internal temperature reaches 195°F. Allow the
brisket to rest for 1 hour.
6. Slice, serve and enjoy!
SMOKED MAC AND CHEESE
An all-time family favorite, this Smoked Mac & Cheese recipe elevates stovetop or oven baked mac & cheese with flavors
sure to keep your smoker fired up.
Ingredients: Instructions:
1 Package of Elbow Macaroni
½ Stick of Butter
¼ Cup of All Purpose Flour
1 Cup of Heavy Cream
1 Cup of Milk
2 Cups of Cheddar Cheese
(Shredded)
1 Cup of Gouda Cheese
(Shredded)
1 Cup of Colby Jack Cheese
(Shredded)
½ Cup of Cream Cheese
2 Tbsp of Black Pepper
1 Tsp of Cayenne Pepper
1 Large Cast Iron Skillet
1. Boil elbow macaroni according to package instructions for al dente.
2. Preheat the smoker to 225°F using a fruity hardwood like apple or cherry in the
Side Fire Box.
Tip: If your grill does not ha ve the Side Fire Box attachment, easily turn it into a
smoker by arranging coals / wood opposite of where you place the mac and cheese
pan. If you place the pan on the right side of the grates, simply place wood on the
right side for an indirect cooking experience.
3. Heat the cast iron skillet over medium heat, then melt butter and whisk in flour.
4. While continuing to whisk, add milk and heavy cream bringing to a boil.
5. Reduce to low-medium heat and whisk in cream cheese until smooth.
6. Whisk in the rest of the cheeses continuing to stir until melted and smooth
7. Turn off the heat then stir in macaroni noodles until thoroughly mixed with cheese
sauce
8. Place the entire skillet in the smoker and cook for 1-2 hours until desired
doneness. Keep in longer for more smoky flavor.
9. Serve hot.
SMOKED CHICKEN PARTS AND HALVES
Instructions:
1. Rinse pieces in cold water and pat dry with paper towels.
2. Brush each piece with Olive Oil and season to taste with salt and pepper.
3. Brown pieces directly above coals with lid open and grill on high or medium heat for several minutes.
4. Then place pieces on cooking grate in indirect cooking area.
5. With the grill on low heat, cook with lid down for 55 to 60 minutes or until done. Do not use Olive Oil or salt and
pepper if using marinade.
21

OPERATING INSTRUCTIONS(CONTINUED)
3-2-1 RIBS
The 3-2-1 rib method might be something you have seen thrown around on social media. It’s a popular technique for
smoking ribs that are tender, juicy, and come clean off thebone. Simple and easy to follow, this is a surefire way to
guarantee your ribs are finger lickin’ good. The 3-2-1 Method is a process that involves smoking the ribs for three hours,
wrapping them in foil and braising for two hours, and the smoking unwrapped for one hour. This
not only helps the ribs cook faster, it ensures an even smoke ring, and more tender meat.
Ingredients: Instructions:
4 Racks of Ribs
2 Cups of Apple Cider,
2 Additional Cups
in Spray Bottle
8 Tbsp of Salted Butter
1 Cup of Favorite BBQ
Sauce
1 Cup Dark Brown
Sugar
Char-Griller Rib Rub
4 Tbsp Honey
1. Prepare your Offset Smoker for smoking by starting half a chimney starter of charcoal
and adding it to the Side Fire Box. Alternatively, prepare your grill for the indirect method
with coals arranged opposite where you plan to place the ribs.
Tip: Add about half a chimney of unlit charcoal to the Side Fire Box close to the barrel before
adding the lit charcoal next to it. The lit charcoal will gradually light the unlit charcoal to help
maintain temperature for longer.
2. Add three to four chunks of Apple Wood and close the lid.
3. Allow the grill to heat up to about 200°F.
4. Remove the membrane from the ribs.
Tip: Start at the narrower end of the rack, carefully work a paring knife under the membrane
to get it started, and remove the membrane using a paper towel.
5. Liberally season both sides of the ribs with Rib Rub.
6. Open the grill and raise the adjustable fire grate to the top level. This ensures even
smoke distribution.
7. Place a drip pan(s) full of water under the grates and on top of the fire grate in the main
barrel.
8. Place ribs bone side down on the grates, close the lid and allow to smoke for three
hours.
Tip: Place the exposed bone side of the rib rack towards the Side Fire Box to get the meat
to pull away from the bone better. If using the indirect method, place ribs opposite the coals.
9. Periodically check the temperature to ensure it is holding steady at 200°F. If you have to
add charcoal, only add lit charcoal.
10. Every 30 minutes, spray the ribs with Apple Cider and move the rib rack that is closest
to the Side Fire Box to the side of the grill that is furthest from the Side Fire Box and
move the other rib racks closer to the Side Fire Box to accommodate. Repeat the spray
and rotate method every 30 minutes.
11. Remove ribs from the grill after three hours.
12. Tear off a large sheet of heavy-duty aluminum foil. (One for each rack of ribs.)
13. Place one rack of ribs bone side up on each piece of aluminum foil.
14. Coat the bone side of ribs with brown sugar, honey, and four pats of butter.
15. Pour over ½ cup of apple cider.
16. Fully crimp the edges of the foil together to cover the ribs.
17. Repeat with the other three racks of ribs.
18. Transfer ribs back to the smoker and increase the temperature to 225°F.
19. Do this by opening the dampers a little more and adding another half a chimney of lit
charcoal if needed.
20. Allow ribs to braise for two hours.
21. Continue to rotate the ribs as outlined in step 8b to ensure that all of the racks get time
close and far away from the fire.
22. Remove the ribs from the grill and foil. Place back on the grill bone side down.
23. Brush ribs with your favorite BBQ sauce and cook for one hour at 225°F.
24. Remove and enjoy!
22

OPERATING INSTRUCTIONS(CONTINUED)
SMOKED TURKEY
Instructions:
1. Empty cavity rinse and pat dry with paper towel.
2. Tuck wing tips under the back and tie legs together.
3. Place in center of cooking grate directly above foil drip pan of water.
4. Smoke for 12 minutes per pound. Allow several extra minutes per pound if stuffed to allow for expansion.
5. Use a meat thermometer for best results (190°F internal).
SMOKED BAKED HAM
You can smoke fully cooked canned ham or smoked and cured whole ham or shank or butt portion.
Ingredients: Instructions:
1 cup of Light Brown Sugar,
firmly packed
1/2 cup Orange Juice
1/2 cup Honey
1. Combine sugar, juice and honey. Let glaze sit for at least 4 hours.
2. Remove rind and score fat diagonally to give a diamond effect.
3. Insert a whole clove into the center of every diamond.
4. Place ham with fat side up in center of cooking grate. Close lid.
5. About 9 minutes per pound is suggested for fully cooked hams. Smoked or cured
ham, which is not fully cooked, should be cooked to an internal temperature of
160°F.
6. Baste with ham glaze 3 or 4 times during last 30 minutes of cooking time.
7. Garnish with pineapple rings about 15 minutes before end of cooking time.
SMOKED VENISON WITH BACON
You can smoke fully cooked canned ham or smoked and cured whole ham or shank or butt portion.
Ingredients: Instructions:
Venison Marinade
1 cup Balsamic or Red Wine Vinegar
1 cup Olive Oil
2 oz. Worcestershire
½ oz. Tabasco
2 Tbsp. Seasoning Salt
1-2 Chopped Jalapeños
3 oz. Soy Sauce
Bacon Marinade
2 oz. Red Wine Vinegar
2 oz. Worcestershire 4 dashes Tabasco
1. Place leg of venison in a container and marinate for 2-4 days, turning
daily.
2. Leave bacon to marinate overnight.
3. Remove leg from refrigerator at least an hour before cooking.
4. Season generously with seasoned salt and coarse ground black pepper.
5. Wrap 1 lb. bacon over the top of the leg, and smoke 20-25 minutes per
pound, or until tender.
6. Do not overcook.
Marinades
CHICKEN MARINADE
Ingredients: Instructions:
½ Cup Soy Sauce
¼ Cup Olive Oil
¼ Cup Red Wine Vinegar
1 Tsp Oregano
½ Tsp Sweet Basil
½ Tsp Garlic Powder with
Parsley
¼ Tsp Pepper
1. Pour over chicken pieces in non-metal dish.
2. Cover and refrigerate overnight, turning occasionally. Use marinade to baste
chicken while cooking.
23

OPERATING INSTRUCTIONS(CONTINUED)
MEAT MARINADE:(FOR STEAKS, CHOPS, AND BURGERS)
Ingredients: Instructions:
¼ Cup Soy Sauce
2 Large Onions
2 Garlic Cloves, crushed
2 Tsp Salt
2 Tsp Paprika
1 Tsp Fresh Ground Pepper
1. Combine ingredients in an electric blender, cover, and process at high speed 1
minute or until mixture is very smooth.
2. Allow meat to stand in marinade at room temperature for 2 hours or refrigerate up
to 24 hours in a covered dish.
3. Bring meat to room temperature before cooking.
SHISH KABOB MARINADE
Ingredients: Instructions:
1 Cup Soy Sauce
½ Cup Brown Sugar
½ Cup White Vinegar
½ Cup Pineapple Juice
2 Tsp Salt
½ Tsp Garlic Powder
1. Mix all ingredients together.
2. Marinate beef in mixture a minimum of 4 hours.
Enhance Flavor
WOOD PAIRING GUIDE
NOTE: Different wood varieties possess different flavors and we recommend pairing your woods with the meats you
intend to cook.
WOOD FLAVOR
ALDER MILD
PECAN MEDIUM
STRONGMESQUITE
MILDMAPLE
MEDIUMOAK
STRONGHICKORY
MEDIUMAPPLE
MILDCHERRY
VEGGIESSEAFOODPOULTRYPORKBEEF
24
25
OPERATING INSTRUCTIONS(CONTINUED)
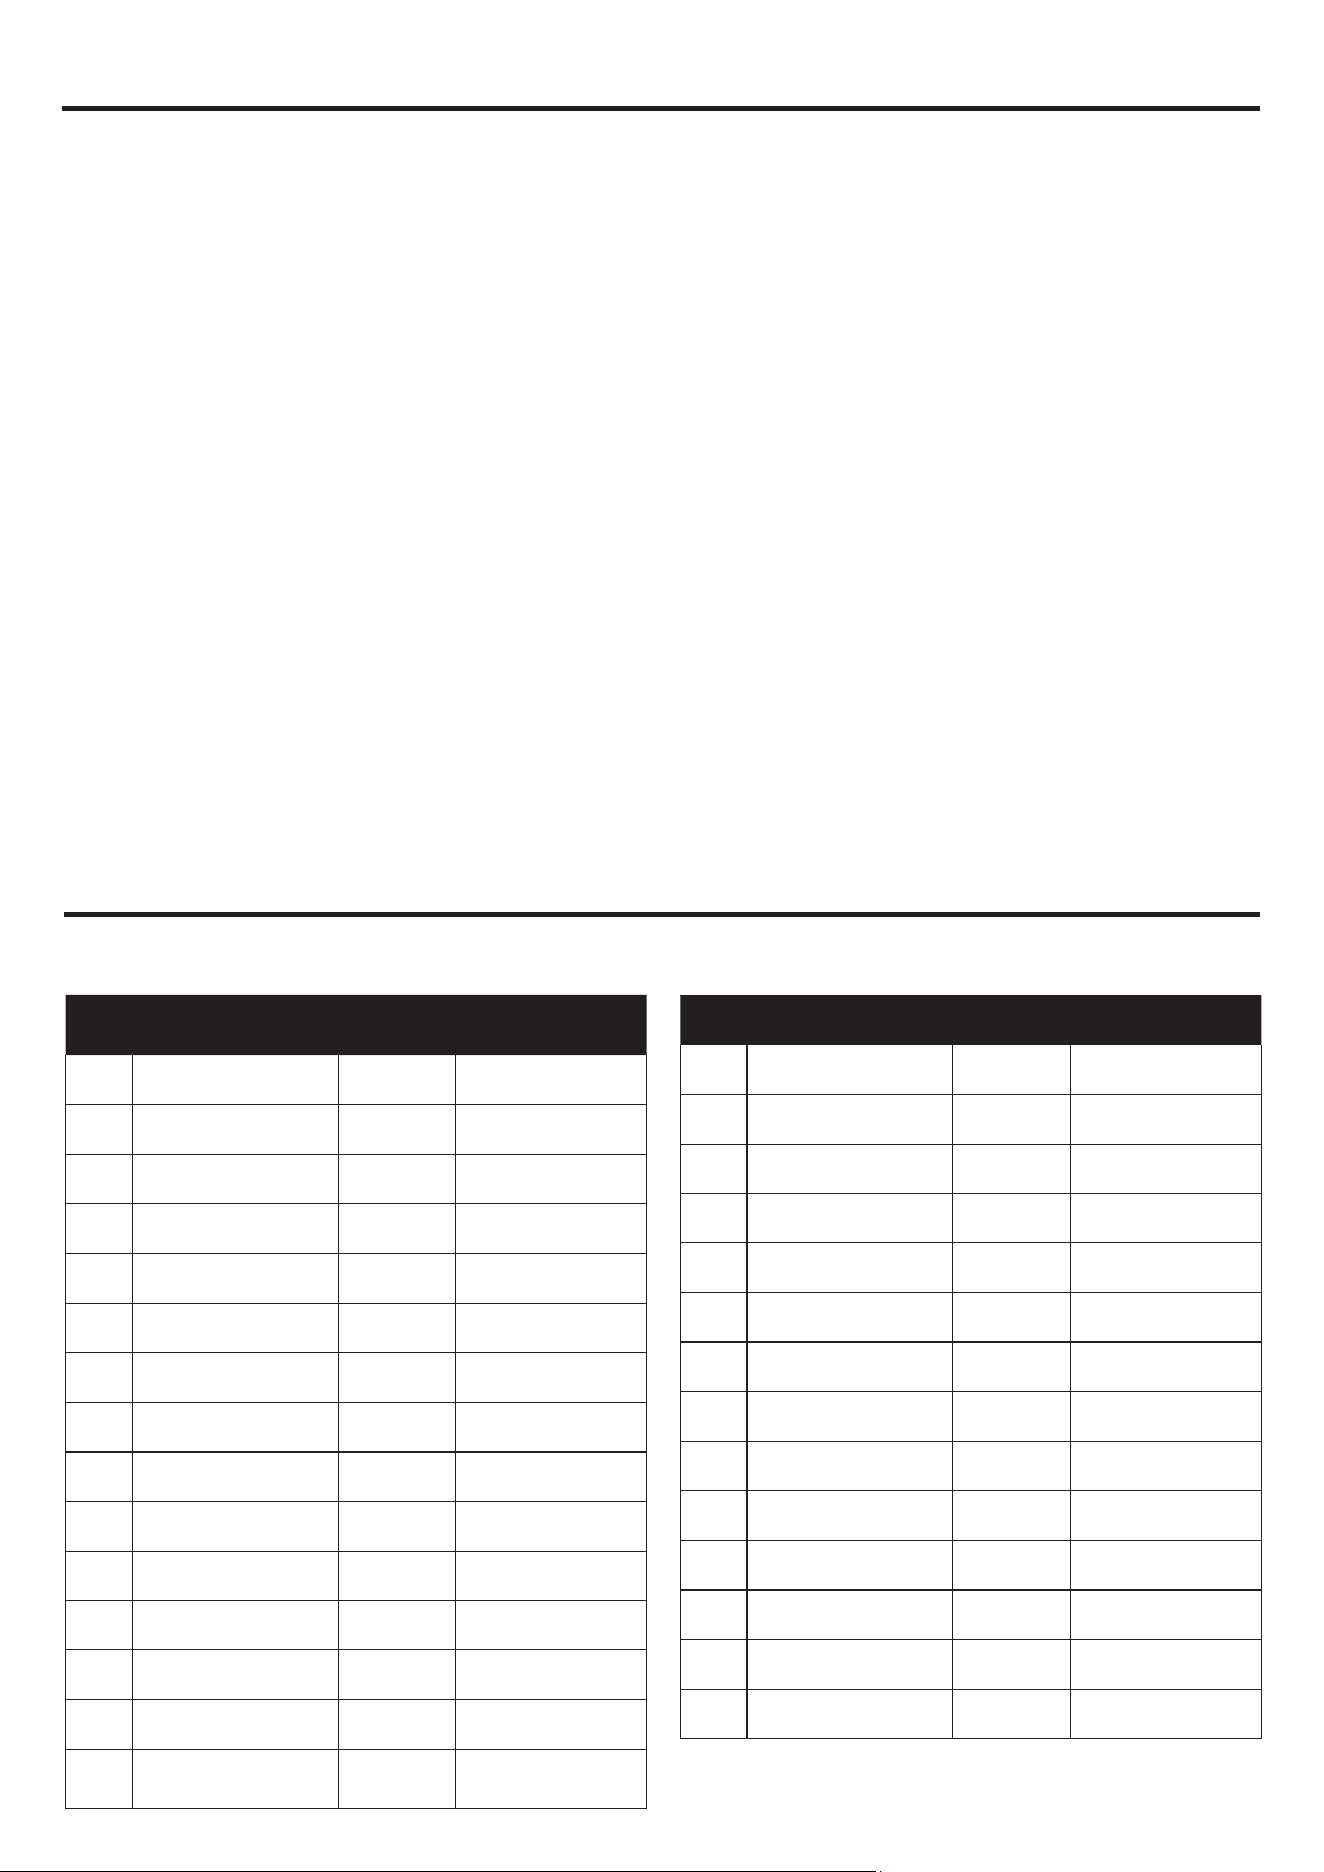
Cooking Guidelines
AVG. COOKING TIMEHEAT LEVELHEAT TYPE
SEAFOOD
LARGE
SHRIMP
4-6 MIN.
1 1/2 OUNCES
SCALLOP
4-6 MIN.
1-INCH THICK
FISH, FILET
5-10 MIN.
1 POUND
FISH, WHOLE
15-20 MIN.
AVG. COOKING TIMEHEAT LEVELHEAT TYPE
CHICKEN
4 OUNCES - BONELESS, SKINLESS
CHICKEN BREAST OR THIGH
8-12 MIN.
3-6 OUNCES - BONE-IN*
CHICKEN THIGH OR LEG
35-45 MIN.
10-12 OUNCES - BONE-IN*
CHICKEN BREAST
35-45 MIN.
8 POUNDS
WHOLE CHICKEN*
3-5 HOURS
AVG. COOKING TIMEHEAT LEVELHEAT TYPE
PORK
1-INCH THICK
PORK CHOP, MEDIUM
8-10 MIN.
8 POUNDS
PORK SHOULDER/BUTT
12 HOURS
3-OUNCE LINK
SAUSAGE
10-13 MIN.
1 POUND
PORK TENDERLOIN
15-20 MIN.
AVG. COOKING TIMEHEAT LEVELHEAT TYPE
BEEF
1-INCH THICK - FILET MIGNON, RIBEYE,
NEW YORK STRIP & PORTERHOUSE
STEAK, MEDIUM
6-8 MIN.
1-INCH THICK
SKIRT STEAK, MEDIUM
4-6 MIN.
3/4 - INCH THICK
BURGER
8-10 MIN.
4 OUNCES
HOT DOG
5-7 MIN.
1-INCH THICK
HANGER STEAK, MEDIUM
8-10 MIN.
*BONE-IN CHICKEN SHOULD INITIALLY BE COOKED OR “BROWNED” OVER DIRECT HEAT FOR SEVERAL MINUTES BEFORE BEING TRANSFERRED TO INDIRECT HEAT.
USDA SAFE MINIMAL
INTERNAL TEMPS
145°F
FISH & SHELLFISH:
160°F
GROUND BEEF OR PORK:
165°F
CHICKEN:
BEEF OR PORK STEAKS
OR CHOPS:
145°F
Cook times outlined in this chart
are general guidelines that may
vary depending or desired
doneness, thickness, amount of
each item being cooked, grill or
grilling style, ambient temperature
and/or weather. We recommends
always using a cooking thermome-
ter to gauge the internal
temperature of all meat products.
DIRECT
HEAT
INDIRECT
HEAT
LOW HEAT
150°-250°F
MEDIUM HEAT
300°-450°F
HIGH HEAT
450°-550°F+
SMOKE
HEAT KEY
APPROX. 90 MIN / LB.

OPERATING INSTRUCTIONS
26
General Grilling Tips & Warnings
Control heat with amount and type of fuel, dual dampers, and adjustable fire grate. Adjust fire grate one end at a time.
Wood burns hotter than charcoal. More airflow helps generate more heat.
Additional charcoal and/or smoking woods may be added while cook is in progress. Wear gloves and apron when
operating your grill.
Only use natural hardwoods intend for cooking. Appropriate selections can typically be found in grocery stores and
outdoor grilling retailers.
When utilizing a water pan, check the water level when cooking more than 4 hours or when you can’t hear the water
simmering. Add water by moving meat over and pouring water through cooking grates into water pan.
To reduce flare-ups, cook with hood in the down position.
When cooking with charcoal, leave the grill hood open during the initial start up and until coals ash over.
The grill hood must remain open anytime the temperature gauge is greater than 500°F.
Always put charcoal on top of the charcoal grate and not directly into the bottom of the grill.
Do not use self-starting charcoal as it will give food an unnatural flavor.
Ashes left in grill too long between uses will absorb moisture and will cause rust. Be sure to empty ash after grill has
cooled. Uncoated steel and cast-iron will rust when not properly cared for.
On the EXTERIOR PAINT, remove rust with wire brush and touch up with a high heat paint, available at
most hardware/auto stores.
Heat gauge may retain moisture, which will steam out during cooking. Gauge can be removed and calibrated in oven.
For a more tightly sealed grill, fill unwanted holes with nuts and bolts (not included).
Attach a metal can to the grease cup holder or on bottom shelf under the hole in the grill to catch drippings.
Smokestack and side dampers will be hot. Only touch using gloves or mitts.
Before you use your grill for the first time you must season the cast iron cooking grates.
After each use, coat the interior grates and bare metal with vegetable oil while warm to reduce the chance of rust. Proper
and regular seasoning will protect against rust and extend the life of your grill and cooking grates.
Grill will drip oil during the seasoning process and for several uses afterwards, this is normal.
Never exceed 500°F because this will damage the finish and contribute to rust.
Paint is not warranted and will require touch up.
This grill is not warranted against rust.
DO NOT use lighter fluid, gasoline, kerosene, alcohol or other accelerant for lighting charcoal. Use of
any of these or similar products could cause an explosion possibly leading to severe bodily injury.
NOTE: Smoke may escape from areas other than the smoke stack. This will not affect cooking.
NOTE: Many variables (outside cooking temperature, amount of charcoal, the number of times the dome lid is
removed, proximity of food to heat source, etc.) will affect actual cooking time. Meat thermometer should be used
as a guide and will vary based on type of cooking (Smoking vs. grilling) and where the charcoal is placed. When
using a meat thermometer, place probe midway into the thickest part of the meat, making sure that it does not
touch any fat or bone. Allow five minutes for the thermometer to properly register temperature.

CARE AND MAINTENANCE
27
W CAUTION:
1. All cleaning and maintenance should be done when grill is cool and with the ashes properly disposed of.
2. Do NOT clean any grill part in a self-cleaning oven. The extreme heat will damage the finish.
Notices
1. This grill should be thoroughly cleaned and inspected on a regular basis.
2. Abrasive cleaners will damage this product.
3. Never use oven cleaner to clean any part of grill.
Finishing Up
When your are finished grilling you can shut down your grill by closing both dampers and allowing the fire to suffocate. Be
patient. This may take an hour or more.
Before Each Use
1. Keep the grill area free and clear from any combustible materials, gasoline, and other flammable vapors and liquids.
2. See below for proper cleaning instructions.
Cleaning Surfaces
1. Wait for grill to fully cool.
2. Wipe surfaces clean with a mild dishwashing detergent or baking soda mixed with water.
3. For stubborn stains, use a citrus-based degreaser and a nylon scrubbing brush.
4. Rinse clean with water.
5. Allow to air dry.
Emptying the Ashes & Ash Pan
W CAUTION: ONLY EMPTY ASHES WHILE GRILL IS NOT IS USE.
After the re is completely extinguished you should wait several hours before emptying the ashes to ensure they are not
still hot and a burn hazard.
1. Knock any ashes that did not fall into the ash pan from the re grate. (If there are pieces of partially burned charcoal
on the re grate you can save them for next time. They are still good).
2. Tap the sides of the re bowl to knock loose any ash that is on the sides.
3. Unclip the ash pan from the bottom of the grill and slide out towards the front.
4. Give the ash pan a few rm taps to loosen any ash that may be stuck.
5. Place the ashes in a metal container and cover with water to ensure there are no lit coals then you can dispose of the
ashes.
IMPORTANT: Charcoal is porous and holds moisture. DO NOT leave charcoal in your grill while you are not using
it. Charcoal and ashes left inside the ash pan may reduce the life of your grill.
Before Storing
1. Wait for grill to fully cool.
2. Clean all surfaces.
3. If storing the grill indoors, cover the grill and store in a cool dry place.
4. If storing the grill outdoors, cover the grill with a grill cover for protection from the weather.
28
Printed in China
REPLACEMENT PARTS LIST
PART DESCRIPTION PART#
COVERED UNDER
WARRANTY
1 Temperature Gauge B0104-M13 YES
2 Lid Handle C3032-070 YES
3 Smoke Stack C2230-010 YES
4 Lid C3032-080 YES
5 Warming Rack C2303-040 YES
6 Cooking Grid C2230-040 YES
7 Charcoal Pan C2230-050 YES
8 Left Side Shelf C2303-050 YES
9 Bottom Bowl C2303-060 YES
10 Charcoal Pan Handle C2230-080 YES
11 Cooking Grid Handle C1681-218 YES
12 Front Shelf C2303-080 YES
13 Leg Brace C2303-090 YES
14 Long Leg C2303-100 YES
15 Short Leg C2303-110 YES
PART DESCRIPTION PART#
COVERED UNDER
WARRANTY
16 Foot* B0305-M00 YES
17 Bottom Mesh C2303-120 YES
18 Hub Cap B0302-020 YES
19 Axle C2303-130 YES
20 Wheel C2303-140 YES
21 SFB Lid C3032-010 YES
22 SFB Lid Handle C3032-090 YES
23 SFB Body Top C3032-020 YES
24 SFB Body C3032-030 YES
25 SFB Cooking Grid C3032-040 YES
26 SFB Charcoal Pan C3032-050 YES
27 SFB Side Handle C3032-060 YES
28 SFB Damper B0105-C00 YES
29 Hole Plug C3032-100 YES
For replacement parts, call the customer service department at 800-963-0211, 8 a.m. - 8 p.m., EST, Monday - Sunday.
You could also contact us at [email protected].
LIMITED WARRANTY
Proof of purchase is required to access this warranty program, which is in effect from the date of purchase. Customers
will be subject to parts, shipping, and handling fees if unable to provide proof of the purchase or after the warranty has
expired.
If you have any questions or problems, you can call our customer service department at 800-963-0211, 8 a.m. - 8 p.m.,
EST, Monday - Sunday. You could also contact us at [email protected].
Limited Warranty
1-Year Warranty on all parts affecting the operation of the grill due to damage.
Warranty Provisions:
This warranty is non-transferable and does not cover failures due to misuse or improper installation or maintenance.
This Warranty is for replacement of defective parts only. We are not responsible for incidental or consequential damages
or labor costs.
This warranty does not cover corrosion or discoloration after the grill is used, or due to lack of maintenance, hostile
environment, accidents, alterations, abuse or neglect.
This warranty does not cover damage caused by heat, abrasive and chemical cleaners, or any damage to other
components used in the installation or operation of the grill.
Some states do not allow the limitation or exclusion of incidental or consequential damages, so the above limitations or
exclusions may not apply to you. This warranty gives you specific legal rights, and you may also have other rights that
vary from state to state.
* Pre-assembled
29
ARTÍCULO #5139524
PARRILLA/AHUMADOR DE
COMPENSACIÓN A CARBÓN
MODELO #CBC23032L
ADJUNTE SU RECIBO AQUÍ
MASTER FORGE y el diseño del logotipo son
marcas comerciales o marcas registradas de
LF, LLC. Todos los derechos reservados.
Número de serie
Fecha de la compra
ADVERTENCIA
PARA SU SEGURIDAD:
¡Solo para uso en exteriores! (fuera de
cualquier estructura exterior)
ADVERTENCIA
PARA SU SEGURIDAD:
La instalación, el ajuste, la alteración,
la reparación o el mantenimiento
inadecuados pueden producir lesiones
o daños materiales. Lea detenidamente
este manual de instrucciones antes de
instalar o reparar este equipo.
ADVERTENCIA
1. NO almacene ni use gasolina u otros
vapores o líquidos inflamables cerca de
este u otro electrodoméstico.
2. Cuando cocine con aceite o grasa, no
permita que supere los 177 °C (350 °F) de
temperatura. No almacene ni utilice aceite
de cocina cerca de este ni de ningún otro
electrodoméstico.
PELIGRO
Nunca deje este electrodoméstico sin
supervisión.
ADVERTENCIA
PARA SU SEGURIDAD:
NO DEJE ESTE ELECTRODOMÉSTICO
SIN SUPERVISIÓN MIENTRAS ESTE
EN USO, ESPECIALMENTE, SI COCINA
CARNE GRASA Y CIERRA LA TAPA
DEMASIADO TIEMPO.
ADVERTENCIA
Este producto puede exponerlo
a productos químicos, incluidos el
monóxido de carbono y el hollín,
reconocidos por el estado de California
como causantes de cáncer y defectos
congénitos u otros daños en el aparato
reproductivo. Para obtener más
información, visite
www.P65Warnings.ca.gov.
CBC23032L-RA-ES-OM-F106
Gracias por comprar este producto Master Forge.
¿Preguntas, problemas o piezas faltantes?
Antes de devolver, contáctenos al:
800-963-0211, de lunes a domingo de 8 a.m. a 8 p.m., hora estándar del Este, o en ascs@lowes.com.
SG24931

30
Información de seguridad ............................................................. 30
Preparación ........................................................................32
Contenido del paquete ............................................................... 32
Aditamentos ....................................................................... 33
Instrucciones de ensamblaje .......................................................... 34
Instrucciones de funcionamiento ....................................................... 42
Cuidado y mantenimiento............................................................. 55
Garantía limitada ................................................................... 56
Lista de piezas de repuesto .......................................................... 56
W Esta parrilla es solo para uso en exteriores y NO se debe usar en edificios, garajes ni en ninguna otra área
cerrada.
W NO opere, encienda ni use este electrodoméstico a menos de 3.04 m (10 pies) de distancia de paredes,
estructuras o edificios.
W Solo para uso residencial. Esta parrilla NO es para uso comercial.
W No utilice carbón que se haya pretratado con líquido encendedor. Use solo carbón puro, mezcla de carbón
y madera, carbón de leña o madera para leña de alta calidad. La conversión o el uso de otra fuente de
combustible en esta parrilla a carbón es peligroso y anulará la garantía.
W Esta parrilla NO está diseñada para usarse como calentador y nunca debe utilizarse como tal. Los gases
TÓXICOS pueden acumularse y causar asfixia.
W NO supere la temperatura de 260 °C (500 °F).
W NO utilice la parrilla para la cocción en interiores. Las emanaciones TÓXICAS de monóxido de carbono
pueden acumularse y causar asfixia.
W Esta parrilla está certificada para utilizarse con seguridad en los EE.UU. y Canadá solamente. NO la
modifique para usarla en otro lugar. Cualquier modificación tendrá como resultado un riesgo para la seguridad
y anulará la garantía.
W Para quienes viven en departamentos: consulte con el administrador los requisitos y códigos de incendio para
usar una parrilla a carbón en su complejo de departamentos. Utilícelo en el exterior, en la planta baja, a una
distancia de 3.04 m (10 pies) de cualquier estructura, en caso de estar permitido. NO lo utilice debajo de
balcones ni sobre estos.
W Debe haber un espacio de separación mínimo de 91.44 cm (36 pulgadas) entre construcciones de material
combustible y los lados y la parte posterior de la unidad. NO utilice este electrodoméstico debajo de ningún
tipo de alero o techo.
W NO use gasolina, queroseno ni alcohol para encender la parrilla.
W NO utilice el electrodoméstico en un entorno explosivo. Mantenga el área de la parrilla libre de materiales
combustibles, gasolina y otros vapores o líquidos inflamables.
W NO almacene ni utilice gasolina ni otros vapores o líquidos inflamables a menos de 7.62 m (25 pies) de
distancia de este electrodoméstico.
W NO bloquee los orificios de los lados ni de la parte posterior de la parrilla.
W Inspeccione la parrilla antes de cada uso.
W NO altere la parrilla de ninguna manera. Cualquier alteración anulará la garantía.
W NO arme este modelo de parrilla sobre una construcción empotrada o deslizante. Si no sigue esta
advertencia, podría provocar un incendio o una explosión que ocasione lesiones personales graves, la muerte
o daños materiales.
W NO use la parrilla a menos que esté COMPLETAMENTE ensamblada y todas las piezas estén bien ajustadas
y apretadas.
W Esta parrilla se debe limpiar e inspeccionar minuciosamente en forma periódica.
W Utilice solo piezas autorizadas por Lowe's Home Centers LLC. El uso de piezas que no estén autorizadas por
la fábrica puede ser peligroso y anulará la garantía.
W PELIGRO: no seguir los avisos de peligro, las advertencias y las precauciones de este manual podría
causar lesiones personales graves o la muerte, o incendios o explosiones que causen
daños materiales.
W ADVERTENCIAS:
INFORMACIÓN DE SEGURIDAD
ÍNDICE

31
W NO use este electrodoméstico sin antes leer las "Instrucciones de funcionamiento" en este manual.
W Para evitar sufrir quemaduras, NO toque las piezas metálicas de la parrilla hasta que se hayan enfriado
completamente, a menos que utilice un equipo de protección (agarraderas, guantes, almohadillas para horno, etc.).
W Nunca toque las rejillas (para el carbón, de cocción o para calentar), las cenizas ni el carbón para comprobar
si están calientes.
W NO use la parrilla sobre plataformas o muebles de madera u otra superficie combustible.
W Esta parrilla NO debe usarse en vehículos recreativos ni en botes.
W Coloque la parrilla de manera tal que el viento no pueda soplar las cenizas hacia superficies combustibles.
W NO use la parrilla si hay viento fuerte.
W Nunca se incline sobre la parrilla al encenderla.
W NO deje la parrilla encendida sin supervisión. Mantenga a los niños y las mascotas alejados de la parrilla en
todo momento.
W NO intente mover la parrilla mientras la está usando. Deje que la parrilla se enfríe antes de moverla
o almacenarla.
W NO deje la parrilla sin supervisión mientras la precalienta o quema residuos de alimentos.
W Cuando cocine, tenga a su alcance materiales para la extinción del fuego. En caso de que se produzca un
incendio por aceite o grasa, NO intente apagarlo con agua. Use un extintor de incendios a base de polvo
químico seco tipo BC o apáguelo con tierra, arena o bicarbonato.
W Siempre abra la tapa de la parrilla lentamente y con cuidado, ya que el calor y el vapor atrapados dentro de
ella pueden causarle quemaduras graves.
W Si la parrilla no se ha limpiado, podría ocurrir un incendio provocado por la grasa que puede dañar el producto.
W NO coloque recipientes de cocción vacíos sobre el electrodoméstico mientras está en funcionamiento.
W Tenga cuidado al colocar objetos sobre la parrilla mientras está en funcionamiento.
W Nunca agregue líquido para encendedor a las cenizas calientes ni tibias, ya que se pueden producir
retrocesos de la llama y ocasionar lesiones graves o daños materiales.
W Siempre coloque la parrilla sobre una superficie sólida, nivelada y no combustible. Una superficie de asfalto
podría no ser apta para este objetivo.
W NO retire las cenizas hasta que se hayan apagado total y completamente.
W Las briquetas y las cenizas encendidas y calientes pueden crear un riesgo de incendio.
W Siempre vacíe la fuente inferior y la parrilla después de cada uso.
W NO coloque combustibles (briquetas de carbón, madera ni carbón de leña) directamente en el fondo de la
parrilla. Coloque combustible solo en la bandeja o rejilla para carbón.
W NO permita que el carbón permanezca en las paredes de la parrilla. Hacerlo reducirá enormemente la vida útil
del metal y acabado de su parrilla.
W Asegúrese de que no haya desechos ni cenizas en el acumulador de humo y el círculo de gaveta antes del
uso de la parrilla.
W Los carbones y cenizas apagados deben colocarse a una distancia segura de todas las estructuras
y materiales combustibles.
W Con una manguera para jardín, moje completamente la superficie debajo y alrededor de la parrilla para extinguir
cualquier ceniza, carbón o brasa que pueda haber caído durante el proceso de cocción o de limpieza.
W El consumo de alcohol o medicamentos recetados o sin receta puede disminuir la capacidad del consumidor
para ensamblar o usar esta parrilla de manera segura y correcta.
W Siempre use guantes de protección cuando agregue combustible (briquetas de carbón, madera o carbón de
leña) para mantener el nivel de calor deseado.
W Mantenga todos los cables eléctricos lejos de la parrilla caliente.
W Siempre use un termómetro para carne para asegurarse de que los alimentos se estén cocinando a una
temperatura segura.
W Nunca cubra completamente el área de cocción con papel de aluminio. Colocar el papel de aluminio sobre las
rejillas puede restringir el flujo de aire previsto dentro de la parrilla y crear barreras para el flujo adecuado de
grasa a la bandeja colectora. Esto permite la acumulación de mucha grasa en la bandeja inferior, lo que, a su
vez, aumenta la posibilidad de que se produzcan llamaradas o llamas producidas por grasa.
W Use guantes de protección cuando ensamble este producto.
W NO una las piezas a la fuerza, ya que podría provocar heridas personales o daños al producto.
W NO toque el receptor de cenizas ni el mango del receptor de cenizas hasta que la parrilla se haya enfriado por
completo, a menos que esté usando un equipo de protección.
W NO toque el mango lateral del SFB ni el regulador de tiro del SFB hasta que la parrilla se haya enfriado por
completo, a menos que esté usando un equipo de protección.
W Si no sigue la instrucción anterior al pie de la letra, podría ocasionar lesiones graves, muerte o daños materiales.
W El peso máximo de carbón que se utilizará a la vez en el cuerpo del fogón principal es de 2.99 kg / 6.6 lb. El
peso máximo de carbón que se puede usar a la vez en el cuerpo del fogón lateral es de 1.49 kg / 3.3 lb.
INFORMACIÓN DE SEGURIDAD
Información de seguridad ............................................................. 30
Preparación ........................................................................32
Contenido del paquete ............................................................... 32
Aditamentos ....................................................................... 33
Instrucciones de ensamblaje .......................................................... 34
Instrucciones de funcionamiento ....................................................... 42
Cuidado y mantenimiento............................................................. 55
Garantía limitada ................................................................... 56
Lista de piezas de repuesto .......................................................... 56
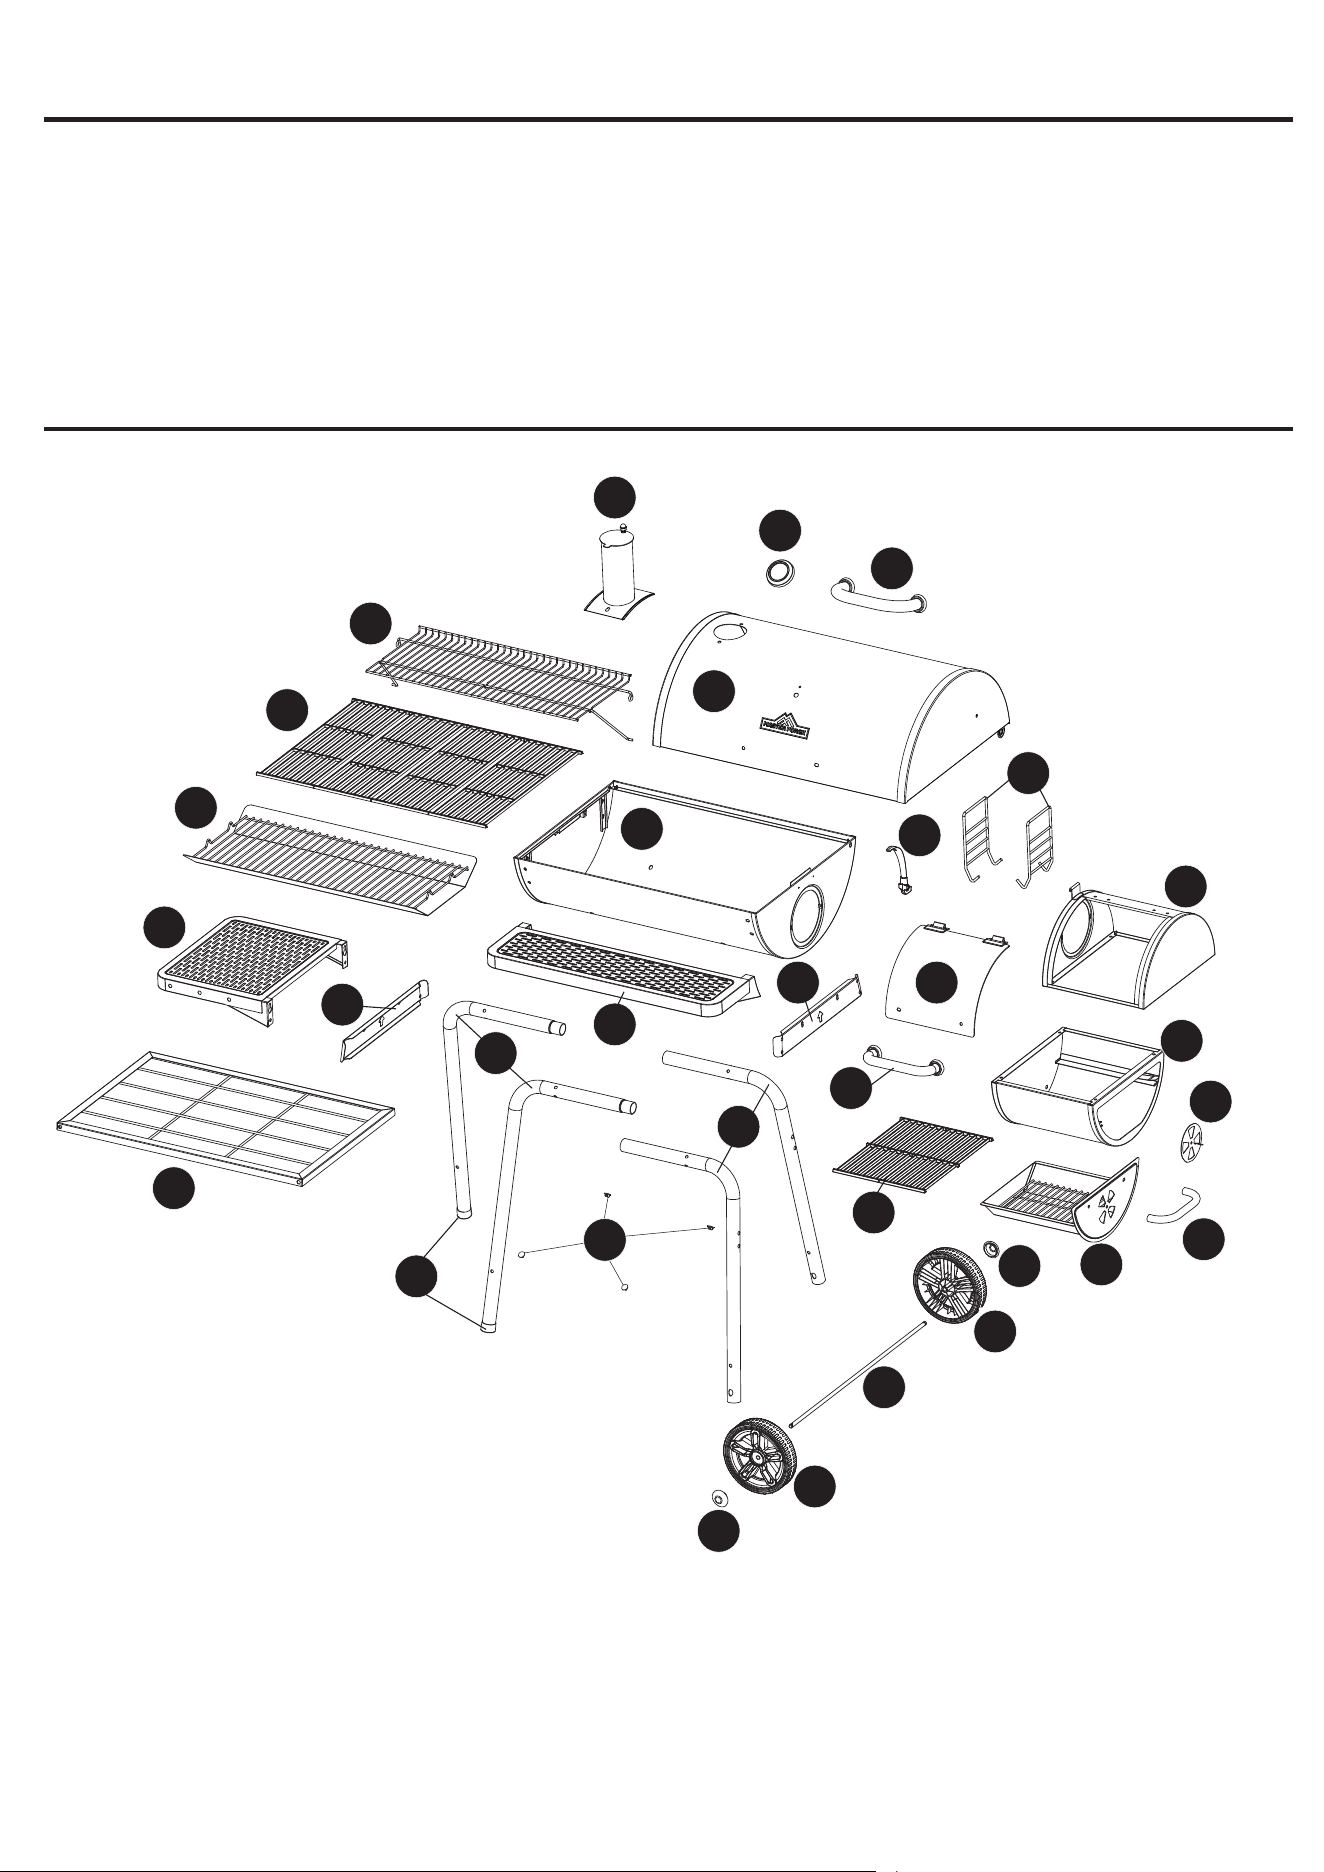
32
CONTENIDO DEL PAQUETE
PREPARACIÓN
Antes de comenzar a ensamblar el producto, asegúrese de tener todas las piezas. Compare las piezas
con la lista del contenido del paquete y la lista de aditamentos. No intente ensamblar el producto si falta
alguna pieza o si estas están dañadas.
Tiempo estimado de ensamblaje: 25 minutos por dos personas.
Herramientas necesarias para el ensamblaje: destornillador Phillips (se incluye).
A
J
W
X
AB
AA
Z
R
T
S
T
R
K
B
C
D
E
F
G
H
Q
M
I
P
N
O
L
M
Y
U
V
AC
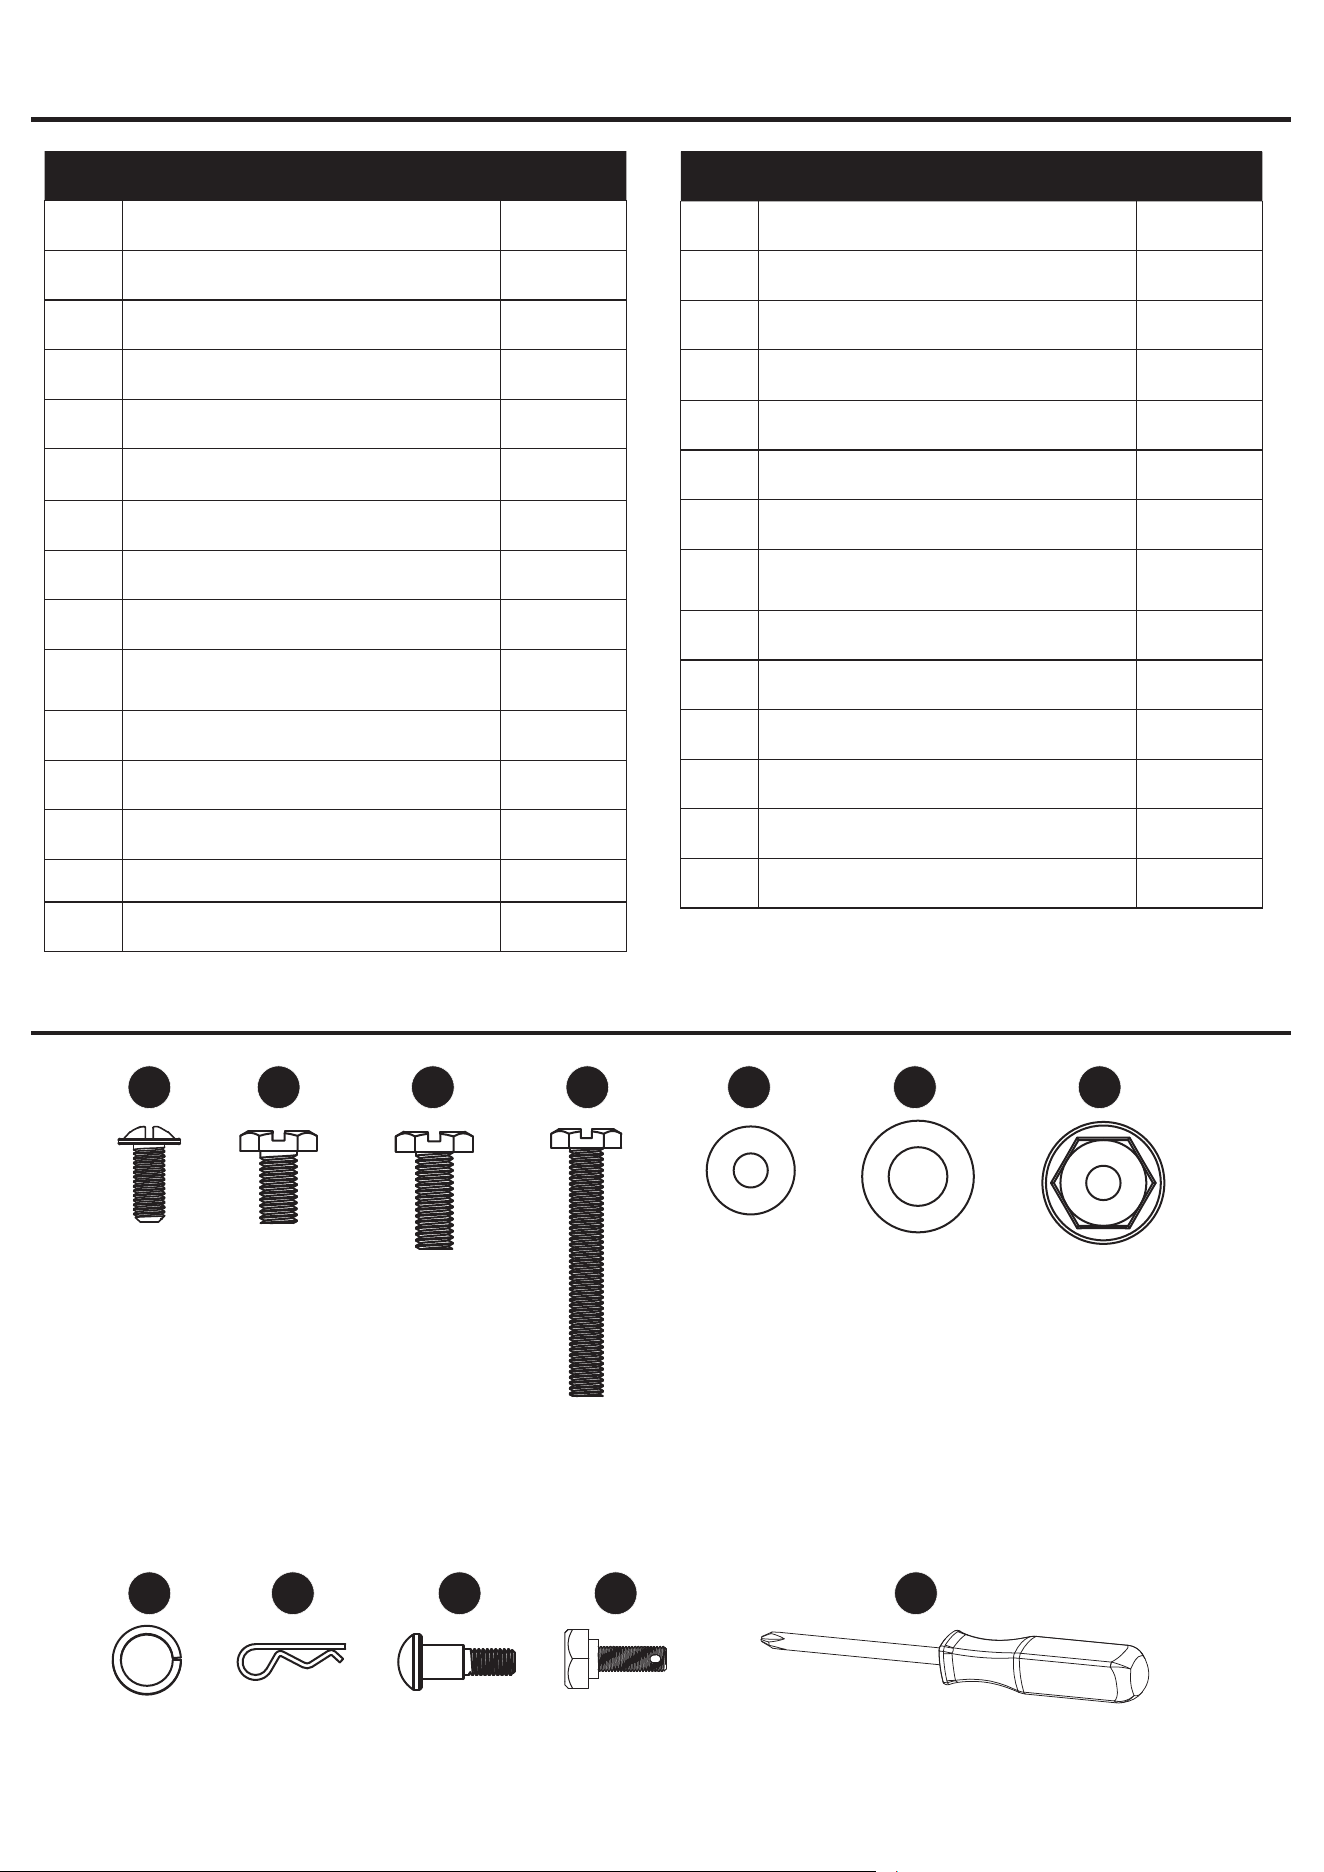
33
PIEZA DESCRIPCIÓN CANTIDAD
A Medidor de temperatura 1
B Manija de la tapa 1
C Acumulador de humo 1
D Tapa 1
E Rejilla para calentar 1
F Rejilla de cocción 4
G Bandeja para carbón 1
H Repisa lateral izquierda 1
I Fuente inferior 1
J
Mango de la bandeja para
carbón
2
K Mango de la rejilla de cocción 1
L Estante frontal 1
M Soporte de la pata 2
N Pata larga 2
O Pata corta 2
PIEZA DESCRIPCIÓN CANTIDAD
P Pata* 2
Q Malla inferior 1
R Tapacubos 2
S Eje 1
T Rueda 2
U Tapa del SFB 1
V Manija de la tapa del SFB 1
W
Parte superior del cuerpo del
SFB
1
X Cuerpo del SFB 1
Y Rejilla de cocción del SFB 2
Z Bandeja para carbón del SFB 1
AA Mango lateral del SFB 1
AB Regulador de tiro del SFB 1
AC Tapón para orificios 4
* Preensamblada
Perno
M6 x 12
Cant. 17
Tornillo
M4 x 10
Cant. 4
Perno
M6 x 20
Cant. 14
Perno
M6 x 45
Cant. 10
Arandela
Ø16 x 6.2
Cant. 2
Arandela
Ø20 x 10.5
Cant. 2
Tuerca
M6
Cant. 13
Arandela de
seguridad Ø6
Cant. 2
CONTENIDO DEL PAQUETE
ADITAMENTOS
Pasador de
chaveta
Ø1.4 x 30
Cant. 4
Tornillo
M6
Cant. 3
Tornillo
M8
Cant. 2
Destornillador
Philips #2
Cant. 1
AA
HH
BB
II
CC
JJ
DD
KK
EE
LL
FF GG
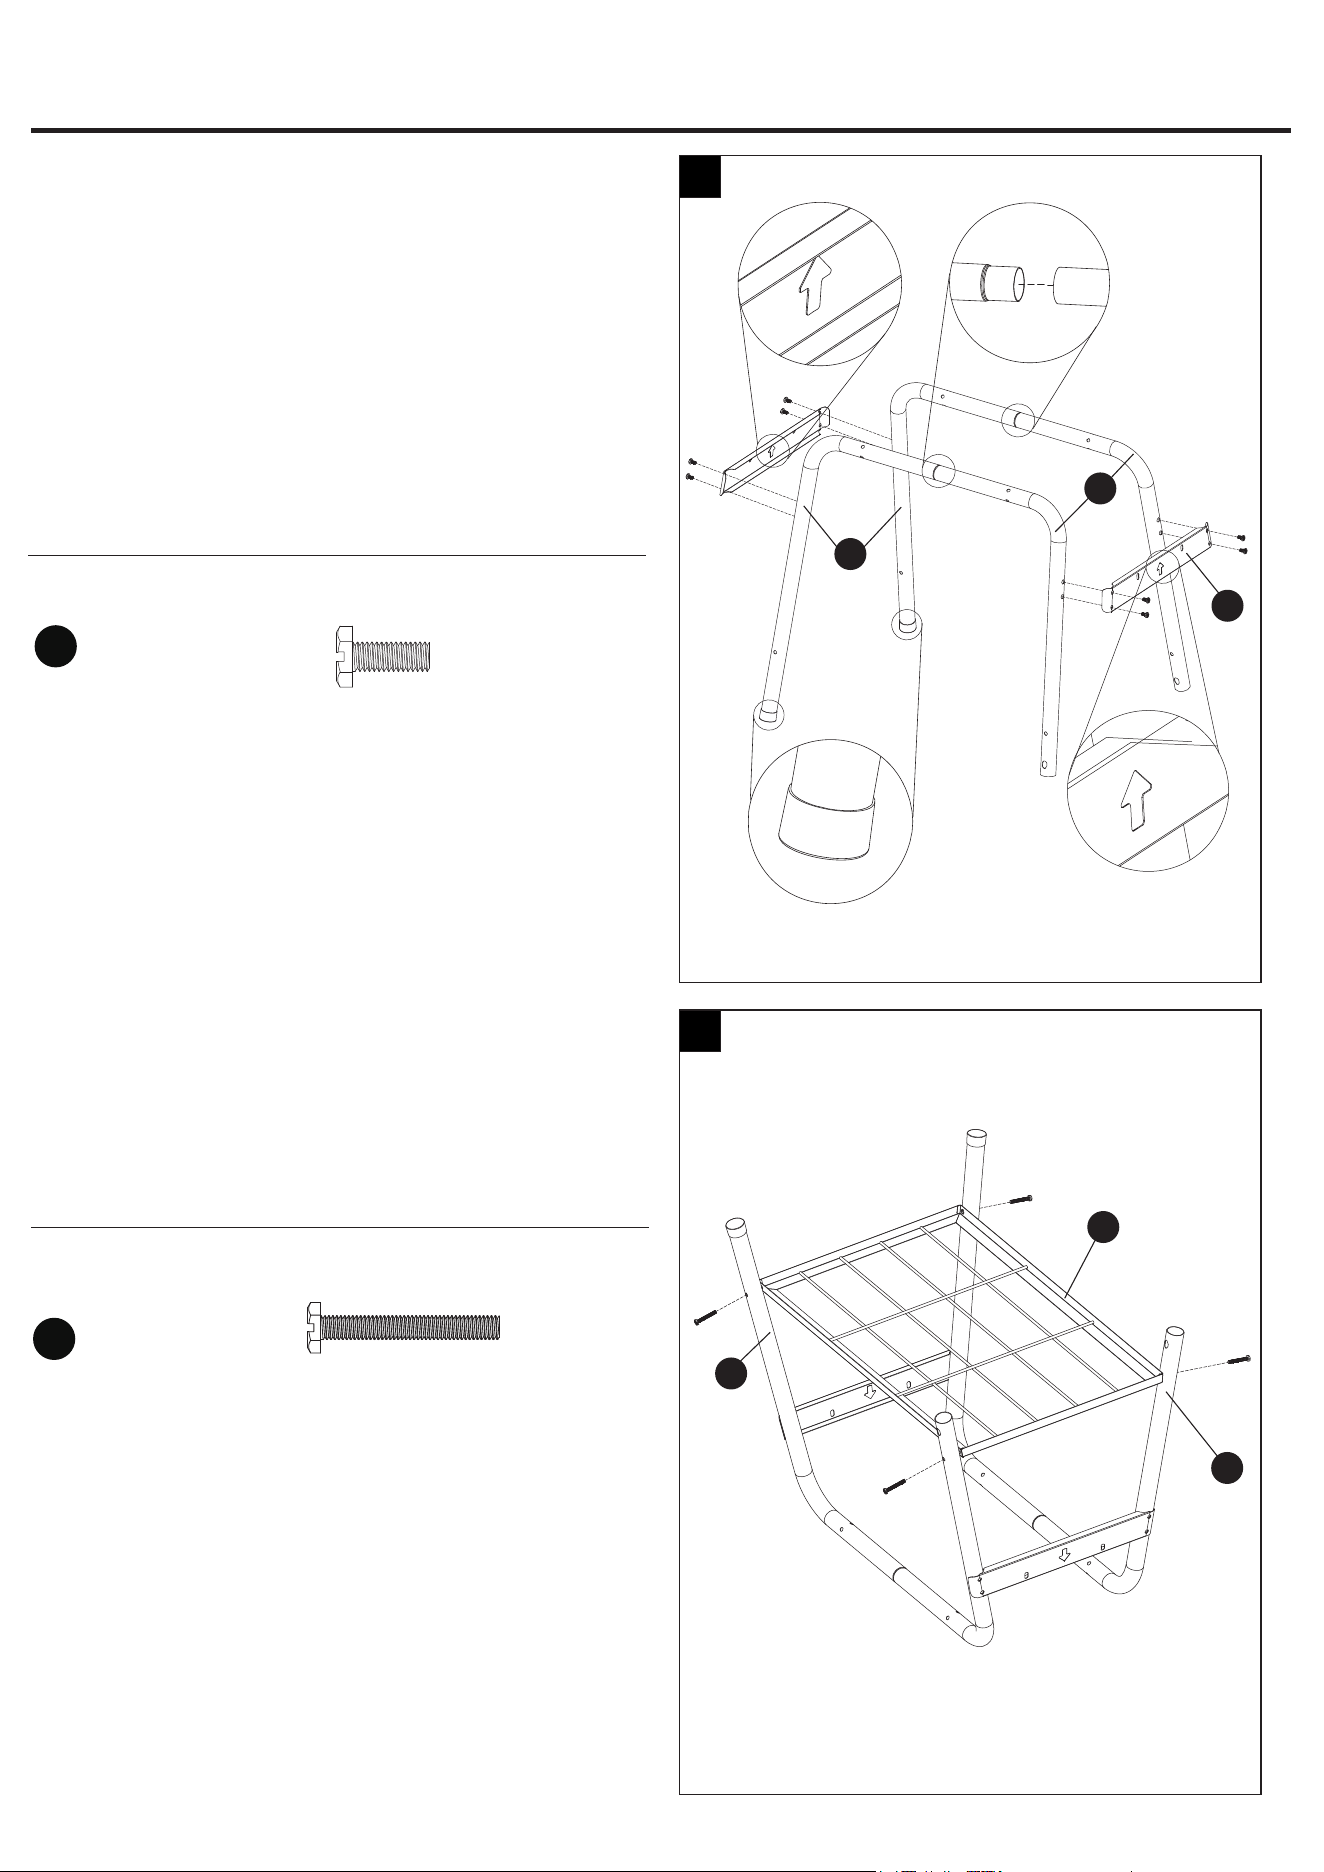
34
Paso 1: je las patas largas, las patas cortas
y los soportes de las patas
Alinee los oricios de las patas largas (N), las
patas cortas (O) y los soportes de las patas (M).
A continuación, sujételos con ocho pernos M6 x 20
(CC) como se muestra en la Fig.1.
Conecte las patas largas (N) y las patas cortas (O).
NOTA: instale los soportes de las patas según la
echa hacia arriba.
Aditamentos utilizados
Perno
M6 x 20
x 8
Paso 2: je la malla inferior
Alinee los oricios de las patas largas (N), las patas
cortas (O) y la malla inferior (Q). Luego, inserte
cuatro tornillos M6 x 45 (DD) en los oricios que se
muestran en la Fig. 2.
Aditamentos utilizados
Perno
M6 x 45
x 4
INSTRUCCIONES DE ENSAMBLAJE
1
2
Primero
Tercero
N
M
Q
O
N
O
Segundo
DD
CC
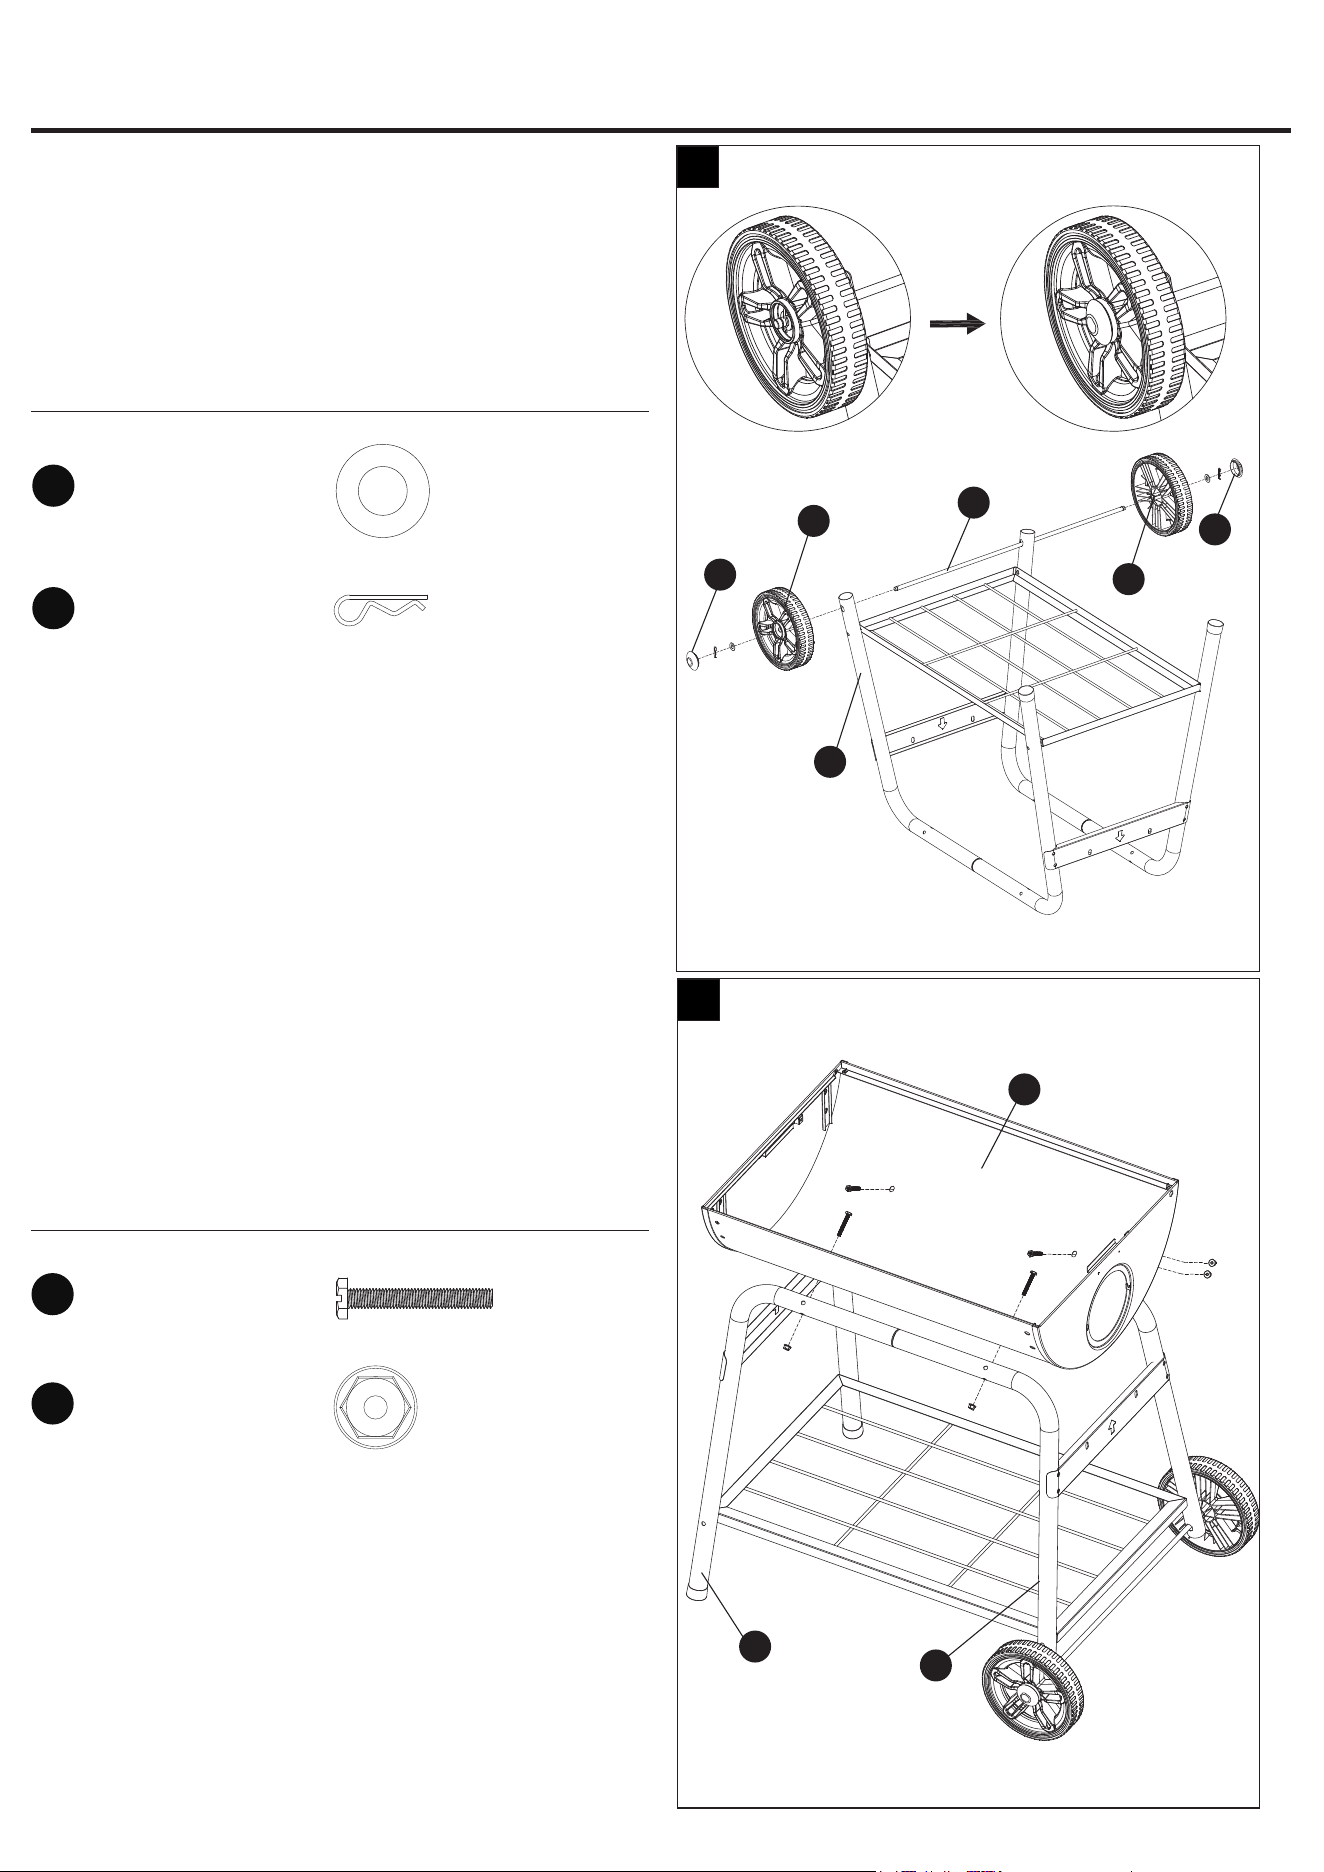
35
Paso 3: je el eje, las ruedas y los tapacubos
Inserte el eje (S) por las patas cortas (O).
Coloque las ruedas (T) y los tapacubos (R) en el
eje (S) con dos arandelas Ø20 x 10.5 (FF) y dos
pasadores de chaveta Ø1.4 x 30 (II).
Aditamentos utilizados
Arandela
Ø20 x1 0.5
x 2
Paso 4: je la fuente inferior
Alinee los oricios de la fuente inferior (I), las patas
largas (N) y las patas cortas (O). A continuación, je
la fuente inferior (I) a las patas con cuatro pernos
M6 x 45 (DD) y cuatro tuercas M6 (GG).
Aditamentos utilizados
Perno
M6 x 45
x 4
INSTRUCCIONES DE ENSAMBLAJE
Pasador de
chaveta
Ø1.4 x 30
x 2
Tuerca
M6
x 4
4
3
R
R
T
T
O
I
N
O
S
DD
GG
FF
II
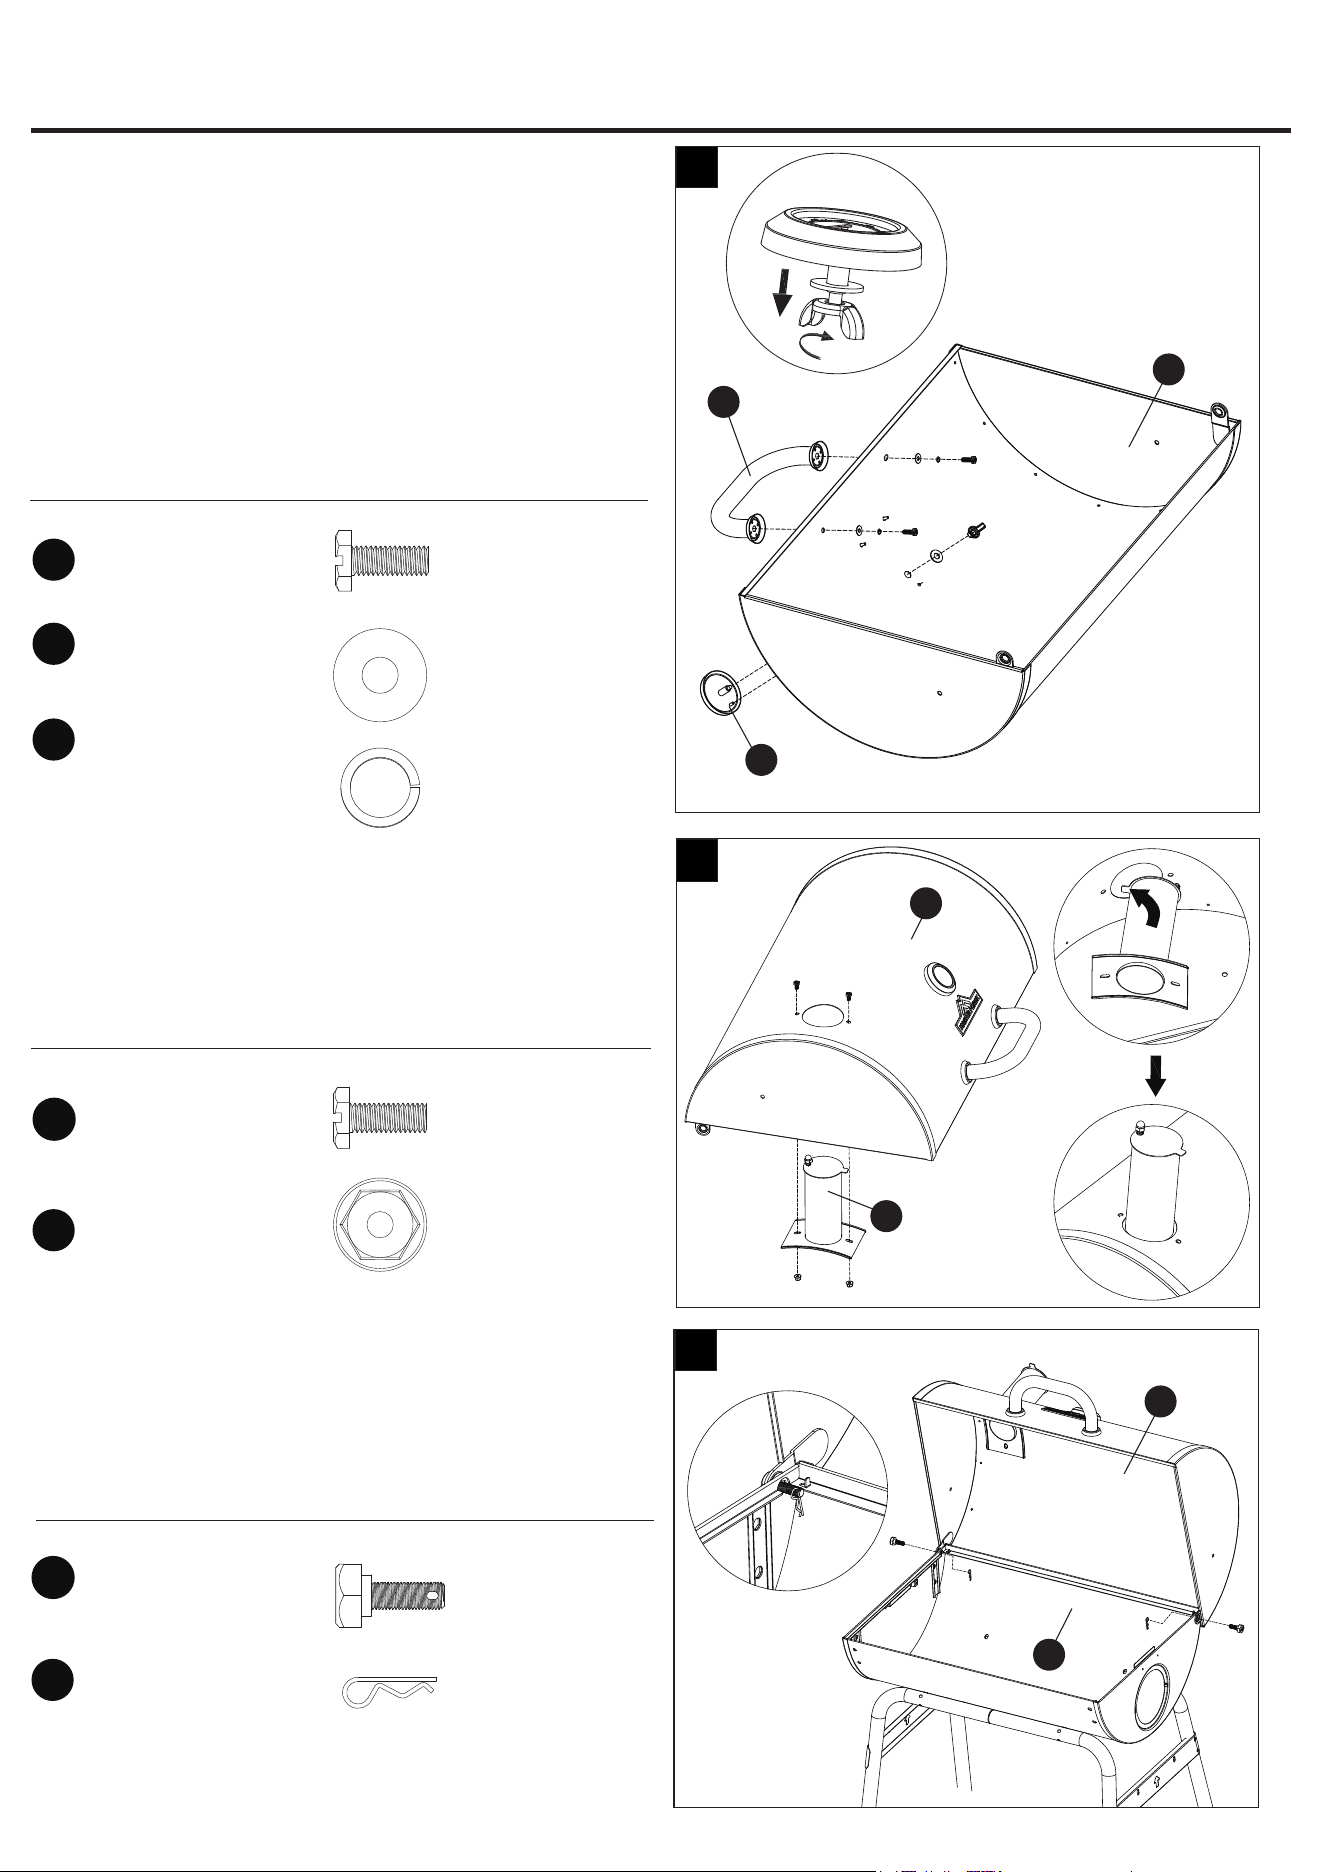
36
Paso 5: je la manija de la tapa y el medidor de
temperatura
Retire la tuerca y la arandela preensambladas en
el medidor de temperatura (A). Luego, coloque el
medidor de temperatura (A) en la tapa (D) con la
tuerca y la arandela.
Coloque la manija de la tapa (B) en la tapa (D) con
dos tornillos M6 x 20 (CC), dos arandelas Ø16 X
6.2 (EE) y dos arandelas de seguridad Ø6 (HH).
Aditamentos utilizados
Perno
M6 x 20
x 2
INSTRUCCIONES DE ENSAMBLAJE
Arandela
Ø16 x 6.2
x 2
Arandela de
seguridad Ø6
x 2
Paso 6: je el acumulador de humo
Coloque el acumulador de humo (C) en la tapa (D)
con dos pernos M6 x 12 (BB) y dos tuercas M6 (GG).
Aditamentos utilizados
Perno
M6 x 12
x 2
Paso 7: je la tapa
Coloque la tapa (D) en la fuente inferior (I) con
dos tornillos M8 (KK) y dos pasadores de chaveta
Ø1.4 X 30 (II).
Aditamentos utilizados
Tuerca
M6
x 2
Pasador de
chaveta
Ø1.4 x 30
x 2
Tornillo
M8
x 2
5
7
6
B
A
D
I
D
D
C
CC
KK
BB
EE
HH
GG
II
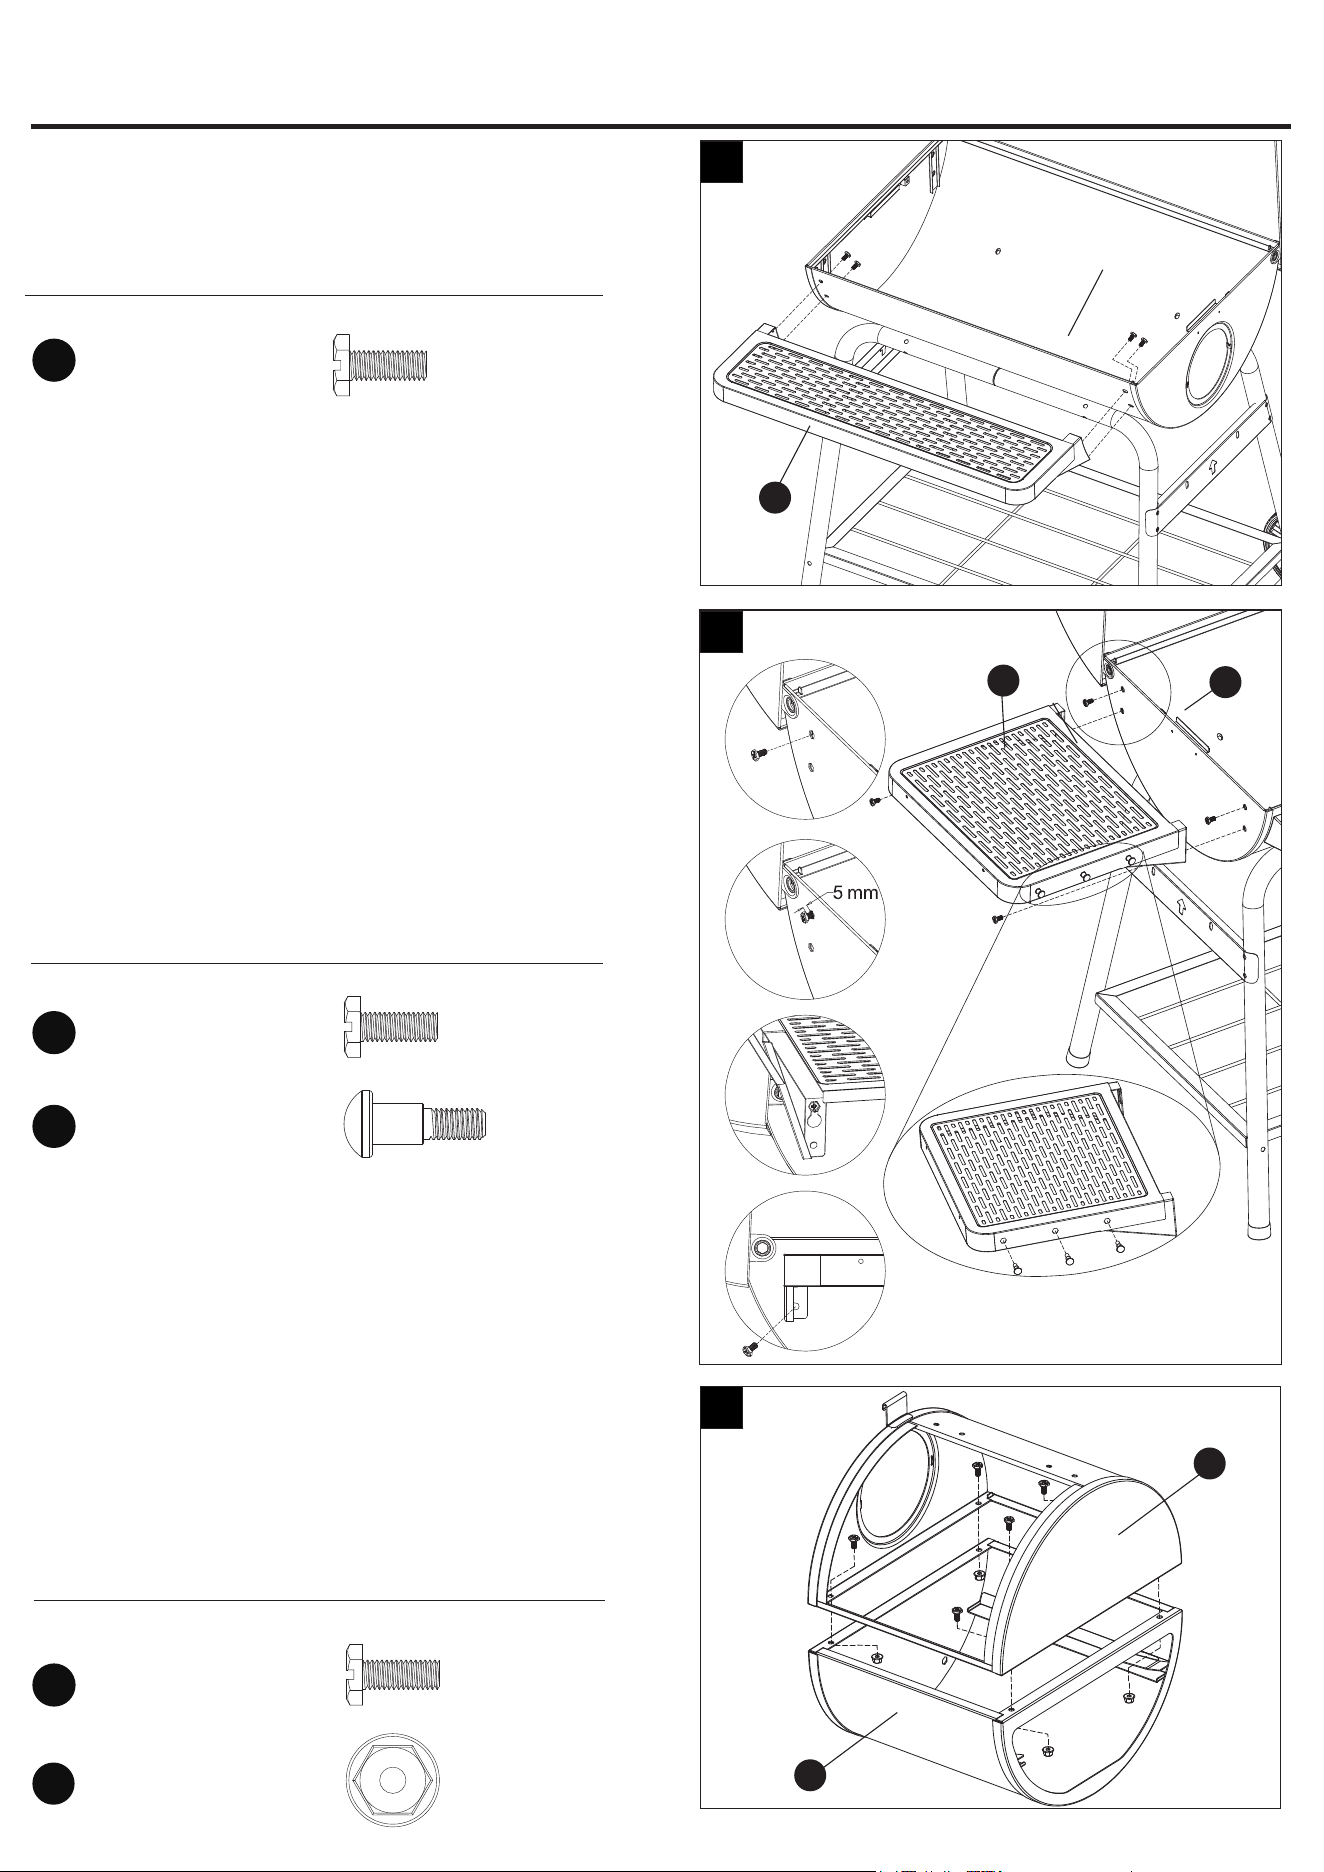
37
INSTRUCCIONES DE ENSAMBLAJE
Paso 8: je el estante frontal
Fije el estante frontal (L) a la fuente inferior (I)
con cuatro pernos M6 x 12 (BB).
Aditamentos utilizados
Perno
M6 x 12
x 4
Perno
M6 x 12
x 4
Paso 9: je la repisa lateral izquierda
Fije la repisa lateral izquierda (H) a la fuente
inferior (I) con cuatro pernos M6 x 12 (BB).
Fije los tres tornillos M6 (JJ) en la repisa lateral
izquierda (H).
NOTA: inserte dos pernos M6 x 12 (BB) en los
oricios superiores y deje expuestos 5 mm de
rosca.
Aditamentos utilizados
Tornillo
M6
x 3
Primero
Segundo
Tercero
Cuarto
Perno
M6 x 12
x 4
Paso 10: je la parte superior del cuerpo del
SFB y el cuerpo del SFB
Fije la parte superior del cuerpo del SFB (W) en
el cuerpo del SFB (X) con cuatro tornillos M6 x 12
(BB) y cuatro tuercas M6 (GG).
Aditamentos utilizados
Tuerca
M6
x 4
8
9
10
I
X
W
L
BB
BB
BB
JJ
GG
H
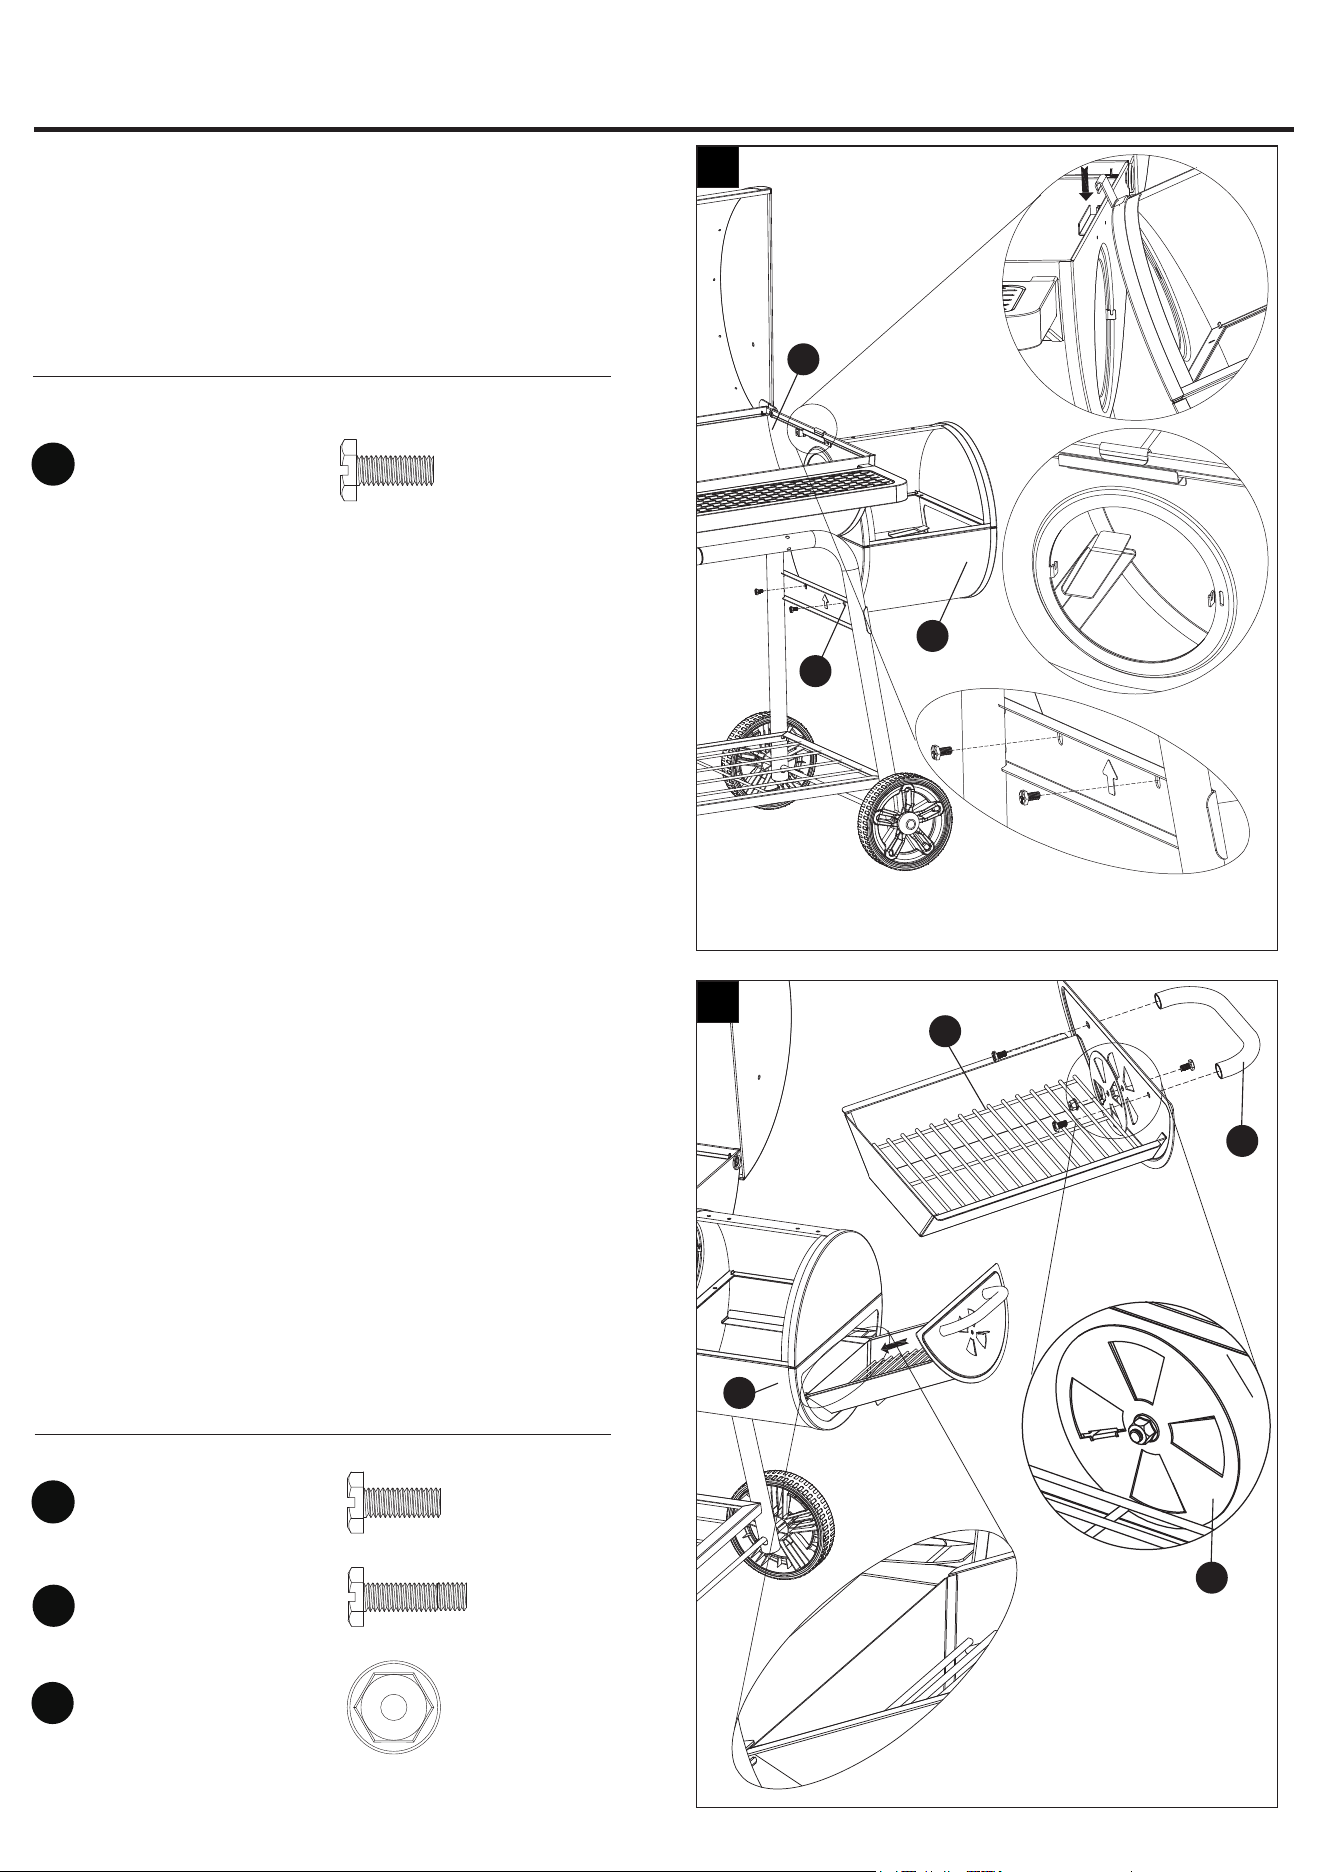
38
INSTRUCCIONES DE ENSAMBLAJE
Paso 11: je el SFB
Cuelgue la parte superior del cuerpo del SFB en
la fuente inferior (I).
Fije el cuerpo del SFB (X) al soporte de la pata
(M) con dos pernos M6 x 12 (BB).
Aditamentos utilizados
Paso 12: je la manija lateral del SFB, el
regulador de tiro del SFB y la bandeja para
carbón del SFB
Fije la manija lateral del SFB (AA) en la bandeja
para carbón del SFB (Z) con dos pernos M6 x 20
(CC).
Fije el regulador de tiro del SFB (AB) en la
bandeja para carbón del SFB (Z) con un perno
M6 x 12 (BB) y una tuerca M6 (GG).
Inserte la bandeja para carbón del SFB (Z) en el
cuerpo del SFB (X).
Aditamentos utilizados
Perno
M6 x 12
x 2
Perno
M6 x 12
x 1
Tuerca
M6
x 1
Perno
M6 x 20
x 2
11
12
Primero
Segundo
Tercero
I
M
X
Z
X
AA
AB
BB
BB
GG
CC
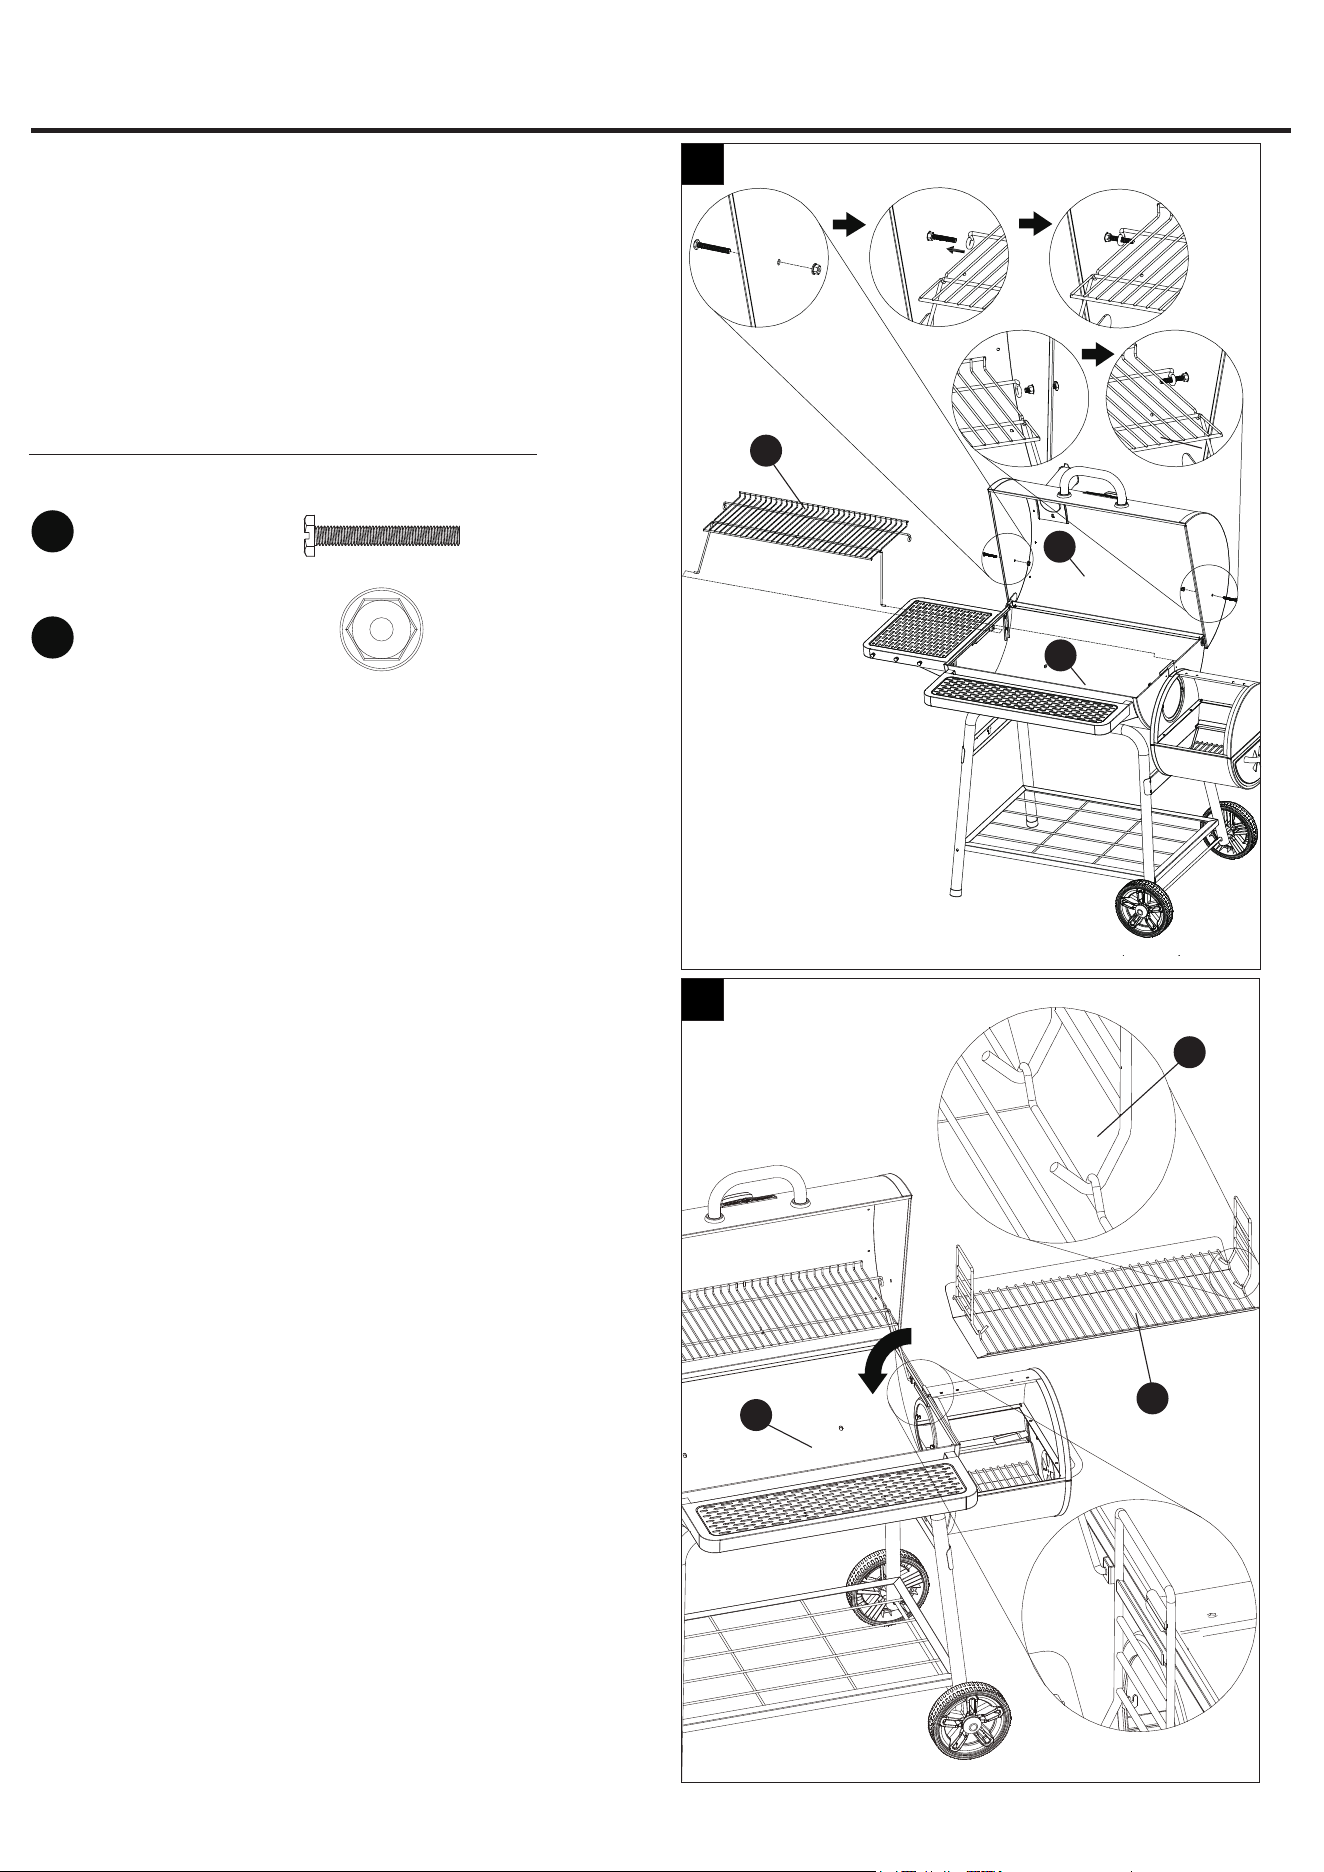
39
Paso 13: je la rejilla para calentar
Coloque la rejilla para calentar (E) en la
tapa (D) y la fuente inferior (I) con dos
pernos M6 x 45 (DD) y dos tuercas M6 (GG).
NOTA: coloque cada esquina de la rejilla para
calentar (E) en el orden que se muestra en la
Fig.13.
Aditamentos utilizados
INSTRUCCIONES DE ENSAMBLAJE
Perno
M6 x 45
x 2
Tuerca
M6
x 2
Paso 14: coloque la bandeja para
carbón y el mango de la bandeja para
carbón
Coloque la bandeja para carbón (G) y el
mango de la bandeja para carbón (J) en la
fuente inferior (I).
NOTA: cuelgue el mango de la bandeja
para carbón (J) en cada soporte lateral de
la fuente inferior (I).
Primero
Segundo
Tercero
Cuarto
1
2
3
4
5
13
14
E
I
J
G
I
D
DD
GG
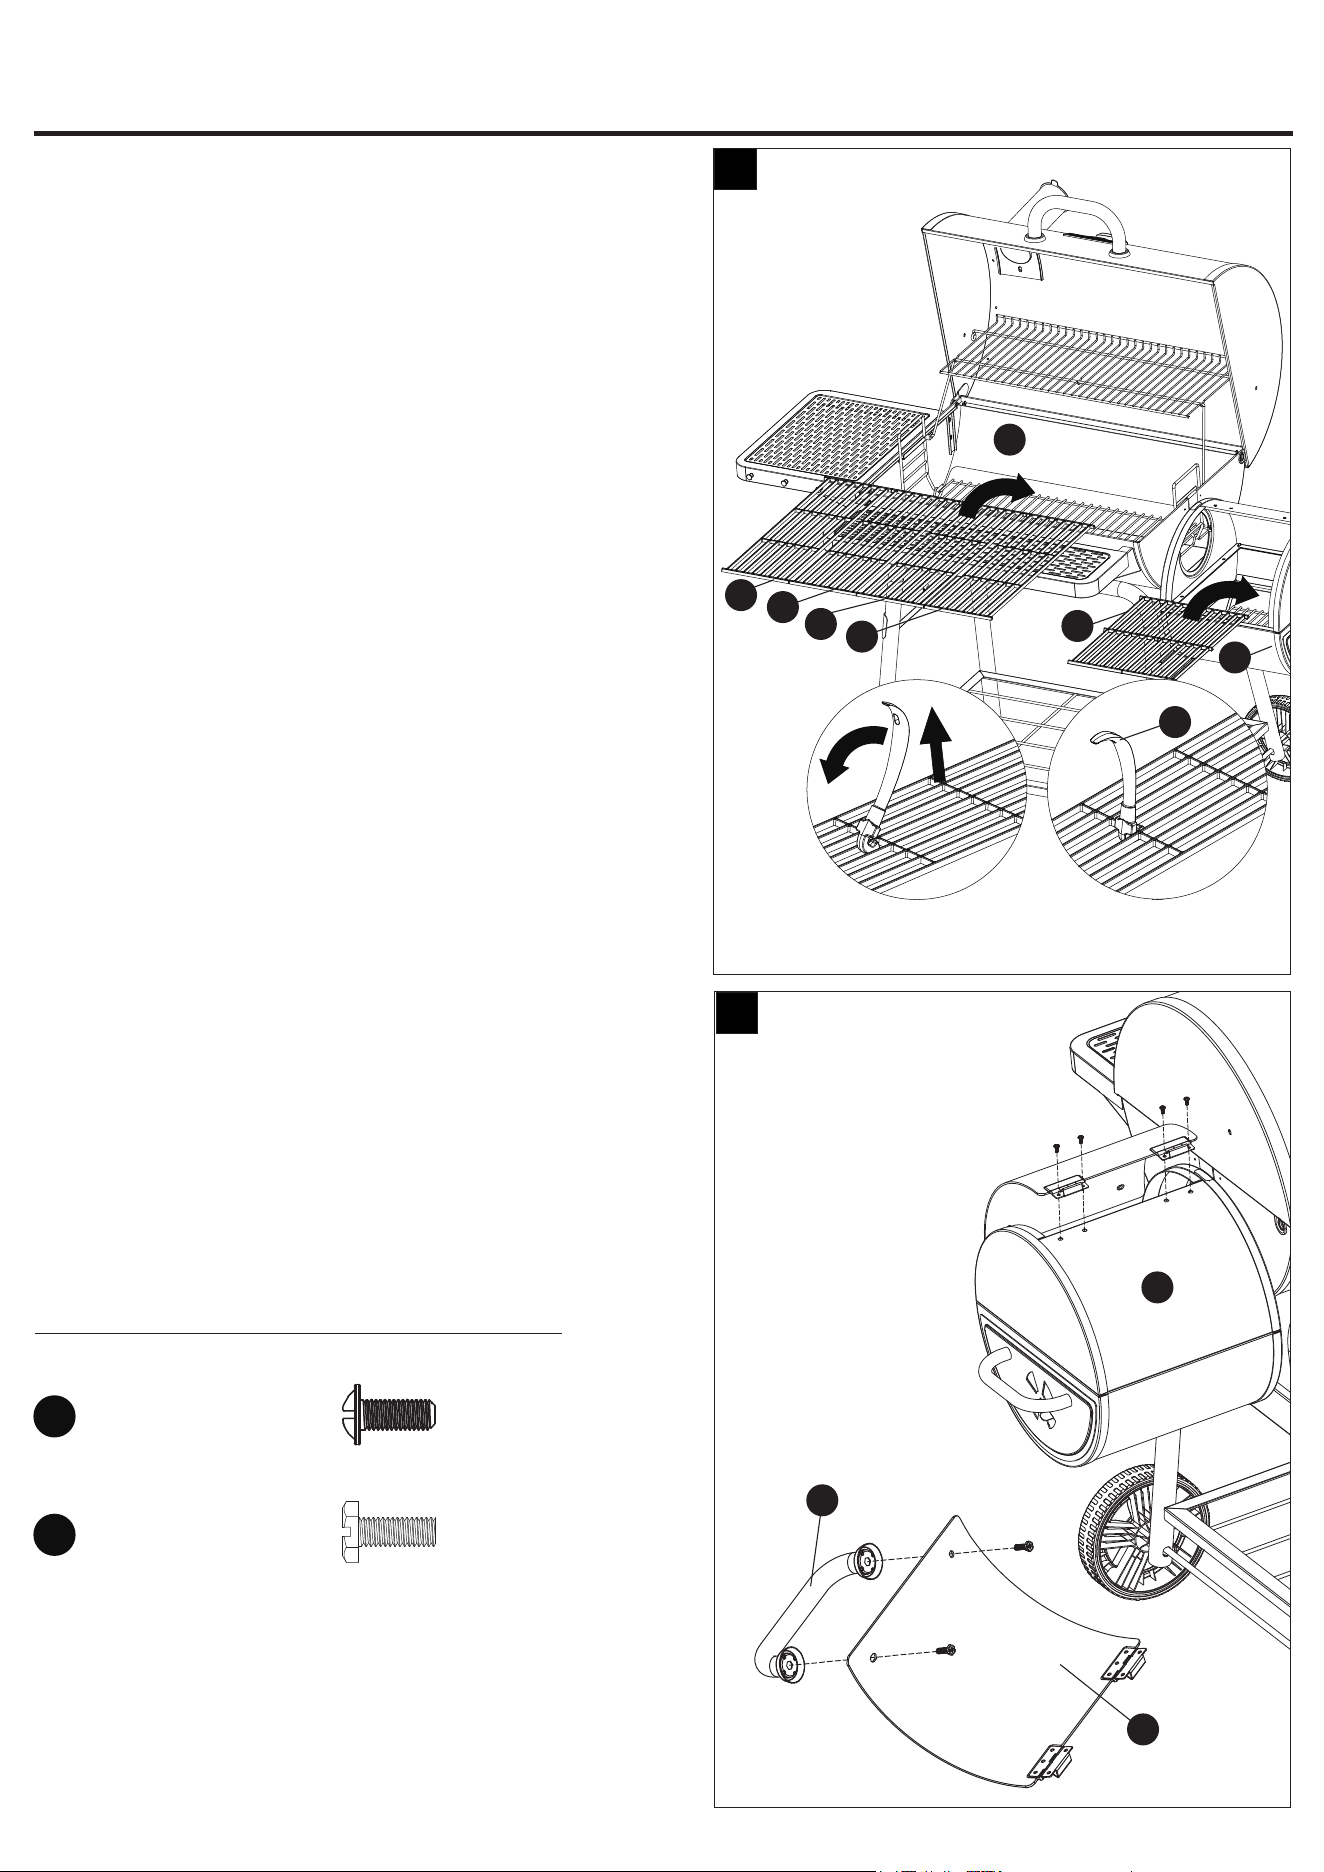
40
Paso 15: coloque la rejilla de cocción y la
rejilla de cocción del SFB
Coloque las rejillas de cocción (F) en la fuente
inferior (I) y las rejillas de cocción del SFB (Y)
en el cuerpo del SFB (X).
NOTA: siempre levante las rejillas de cocción
(F) con su mango (K), que se muestra en la
Fig.15.
Paso 16: je la manija de la tapa del SFB
y la tapa del SFB
Fije la manija de la tapa del SFB (V) en la
tapa del SFB (U) con dos pernos M6 x 20
(CC).
Fije la tapa del SFB (U) en la parte superior
del cuerpo del SFB (W) con cuatro tornillos
M4 x 10 (AA) .
Aditamentos utilizados
INSTRUCCIONES DE ENSAMBLAJE
Tornillo
M4 x 10
x 4
Perno
M6 x 20
x 2
16
V
W
U
15
X
Y
K
F
F
F
F
I
CC
AA
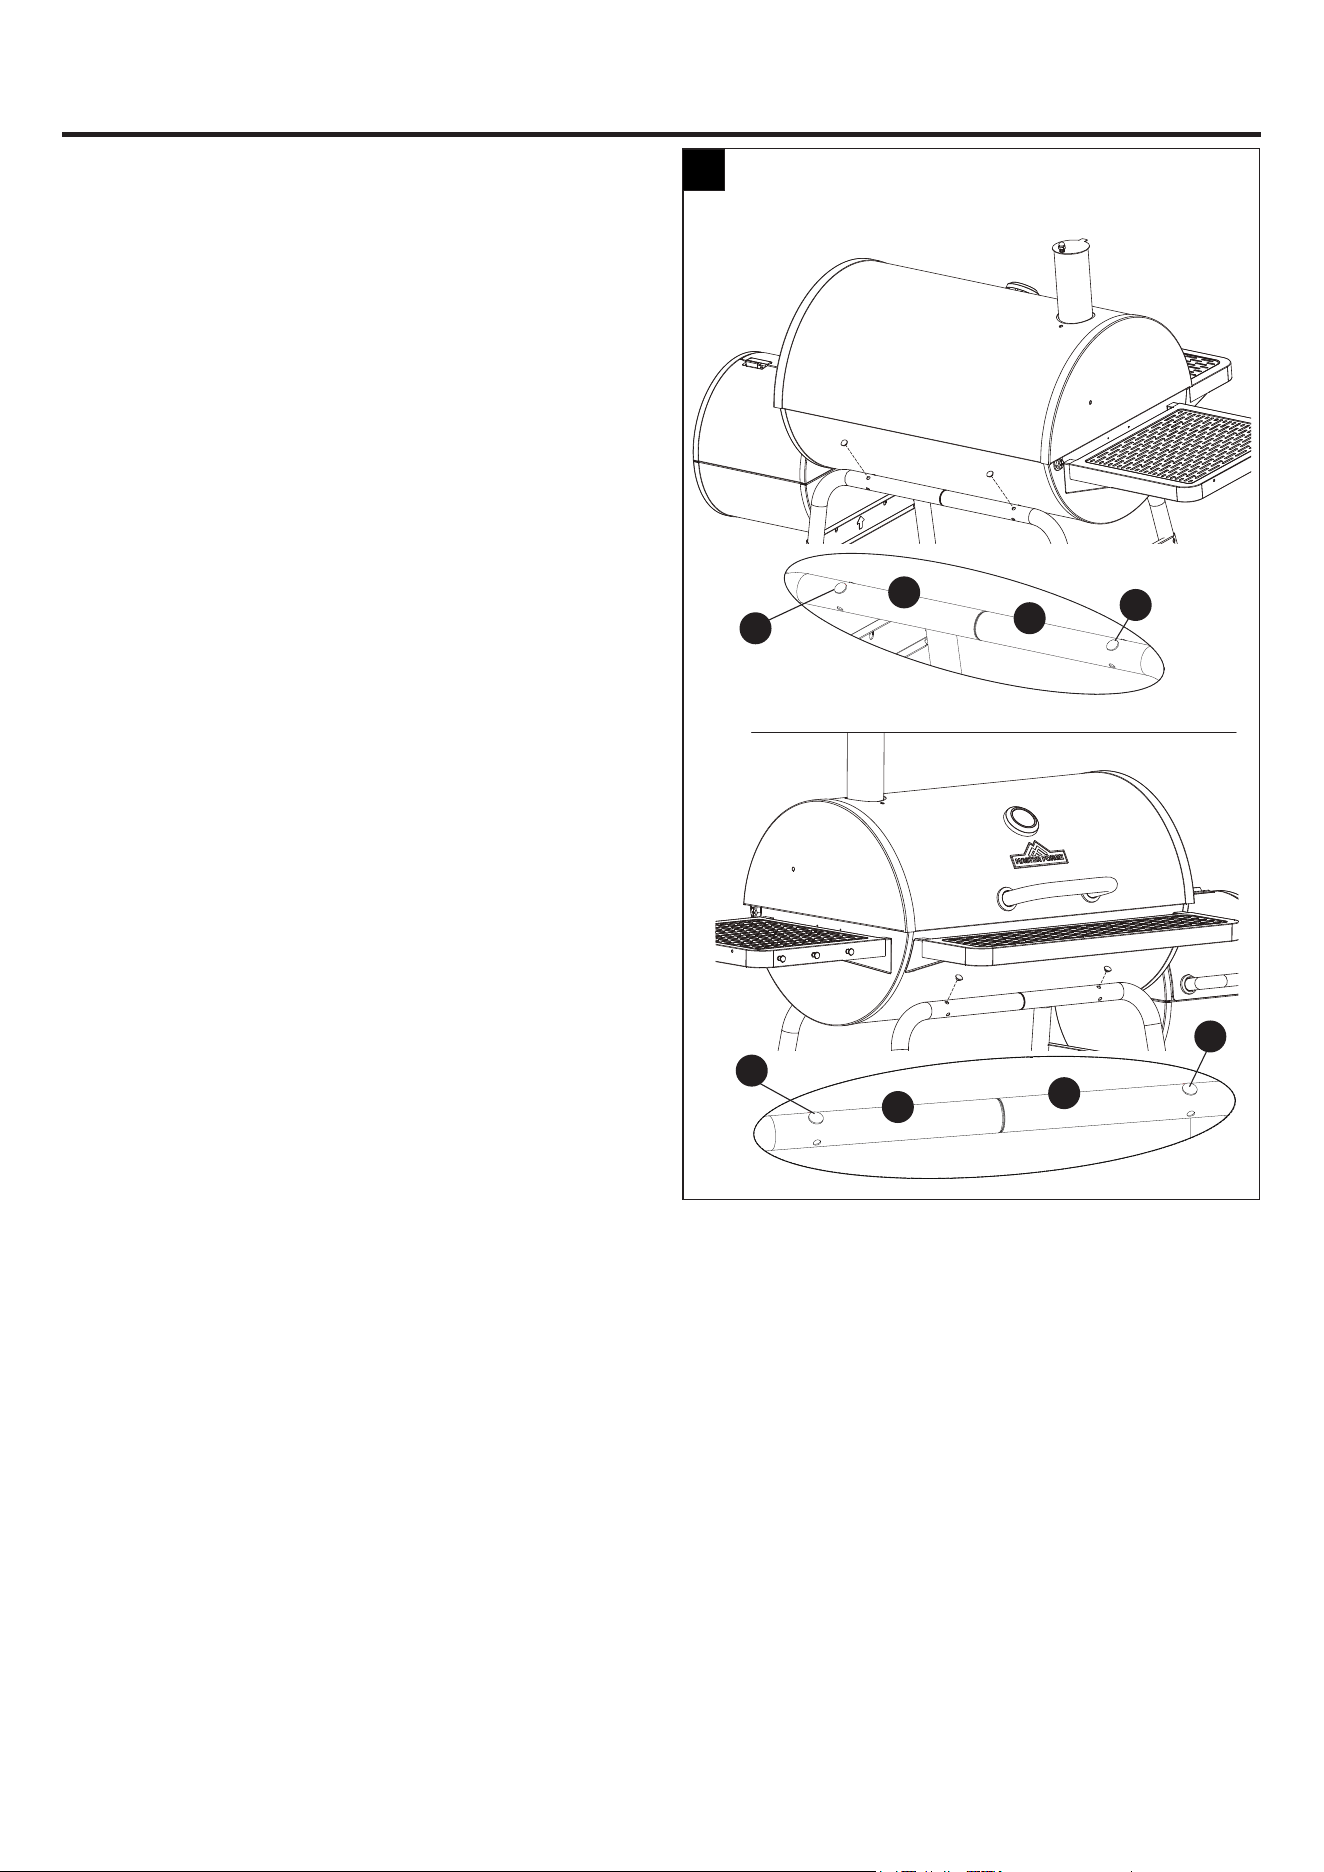
41
INSTRUCCIONES DE ENSAMBLAJE
Paso 17: coloque los tapones para oricios
Presione los cuatro tapones para oricios (AC)
en las patas largas (N) y las patas cortas (O).
Asegúrese de que estén bien presionadas para
evitar que se caigan fácilmente.
17
AC
N
O
AC
AC
N
O
AC
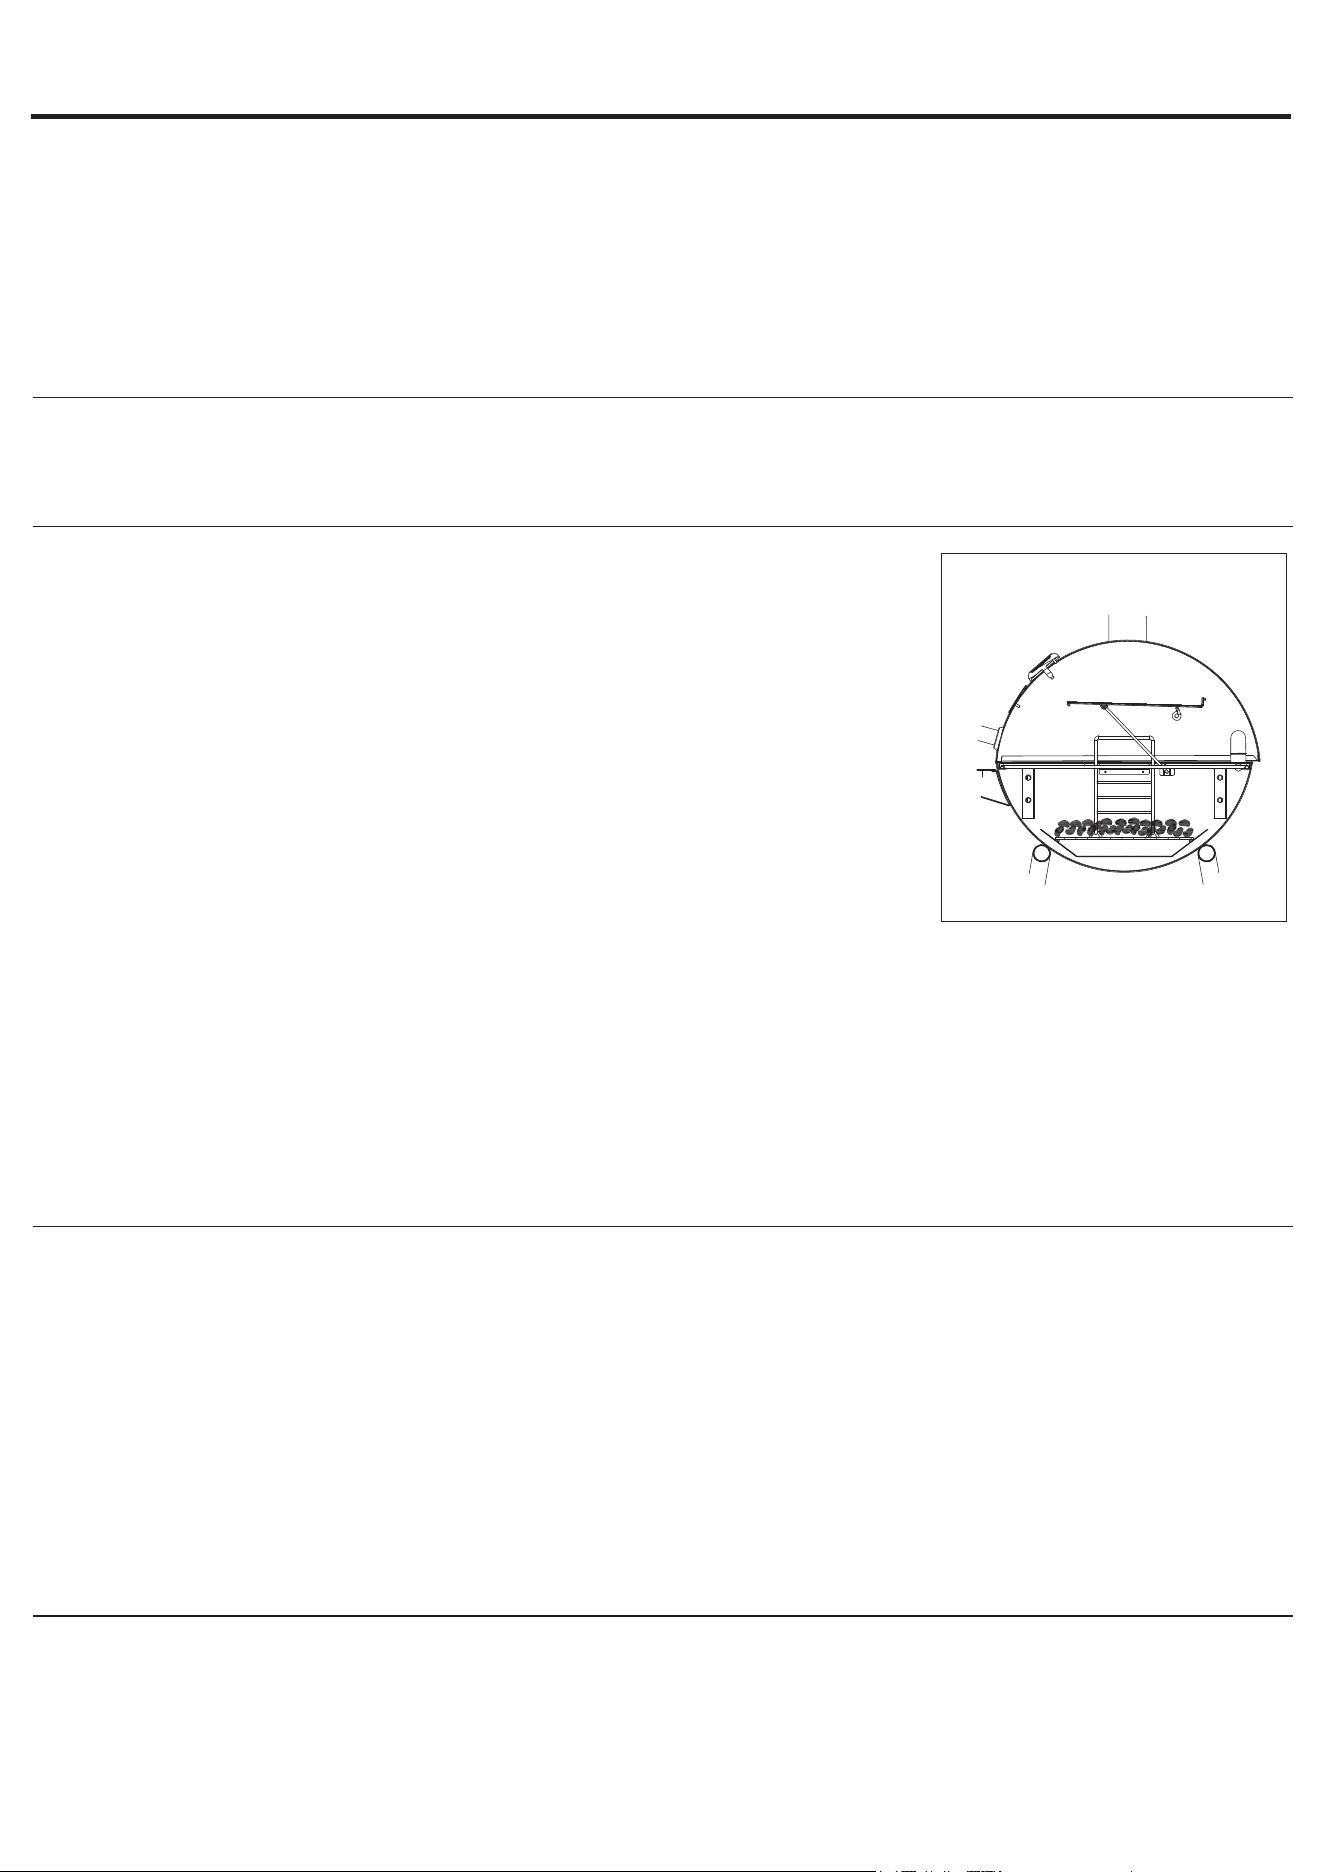
W ADVERTENCIA: NUNCA SUPERE LOS 260 °C PORQUE ESTO DAÑARÁ EL ACABADO Y CONTRIBUIRÁ A LA
OXIDACIÓN. LA PINTURA NO ESTÁ GARANTIZADA Y REQUERIRÁ UN RETOQUE. ESTA UNIDAD NO ESTÁ
GARANTIZADA CONTRA LA OXIDACIÓN.
W PRECAUCIÓN: no utilice carbón que se haya pretratado con líquido encendedor. Use solo carbón puro, mezcla
de carbón y madera, carbón de leña o madera para leña de alta calidad.
W PRECAUCIÓN: la parrilla goteará aceite durante este proceso y durante varios usos posteriores. Esto es normal.
W PRECAUCIÓN: el humo puede salir de otras zonas que no sean el acumulador de humo. Esto no debería afectar
a la cocción.
W PRECAUCIÓN: el carbón es poroso y retiene la humedad. NO deje el carbón en la parrilla mientras no la utiliza. El
carbón y las cenizas que quedan en el interior de la bandeja para cenizas pueden reducir la vida útil de la parrilla.
Primer uso
1. Asegúrese de que se hayan retirado todas las etiquetas, láminas protectoras y de embalaje de la parrilla.
2. Antes de cocinar por primera vez en esta parrilla, manténgala encendida durante al menos 15 minutos con la tapa
cerrada para eliminar los aceites de fabricación. El calor generado limpiará las piezas internas y disipará los olores.
Instrucciones de encendido
W PRECAUCIÓN: no debe haber materiales combustibles, gasolina ni otros
vapores o líquidos inflamables cerca de la zona exterior donde se va a utilizar el
electrodoméstico para cocción a gas.
W PRECAUCIÓN: asegúrese de que no haya desechos ni cenizas en el
acumulador de humo y el círculo de gaveta antes del uso de la parrilla.
W PRECAUCIÓN: intentar encender la parrilla con la tapa cerrada puede causar
una explosión.
W PRECAUCIÓN: siempre revise la fuente inferior y el recibidor de cenizas antes
de encender cuando use un cebador líquido. El fluido se puede acumular en la
fuente inferior o en el colector de cenizas y encenderse, lo que podría provocar
un incendio.
W PRECAUCIÓN: nunca agregue líquido para encendedor a las cenizas calientes
ni tibias, ya que se pueden producir retrocesos de la llama y ocasionar lesiones
graves o daños materiales.
1. Abra la tapa y los orificios de ventilación.
2. Asegúrese de que el colector de cenizas esté vacío y firme en su posición.
3. Retire la rejilla para cocción.
4. Acomode las briquetas de carbón u otro combustible en la fuente inferior hasta la "Línea de llenado" (Figura 1).
5. Encienda siguiendo las instrucciones en el empaque del combustible.
6. Deje que el combustible quede como cenizas al rojo vivo antes de cocinar.
Apagado
1. Deje que el carbón se extinga solo.
W ADVERTENCIA: NO use agua para extinguirlo. Esto puede ser peligroso y causar daños.
2. Deseche las cenizas en un lugar adecuado.
Control de las llamaradas:
W PRECAUCIÓN: NO use agua sobre un incendio provocado por grasa. Esto puede hacer que la grasa salpique
pudiendo ocasionar quemaduras, lesiones corporales u otros daños graves.
W PRECAUCIÓN: NO deje la parrilla sin supervisión mientras la precalienta o quema residuos de alimentos. Si la
parrilla no se ha limpiado, podría ocurrir un incendio provocado por la grasa que puede dañar el producto.
W ADVERTENCIA: cuando cocine, tenga a su alcance materiales para la extinción del fuego. En caso de incendio
provocado por aceite o grasa, use un extintor de incendios a base de polvo químico seco tipo BC o apague el
fuego con tierra, arena o bicarbonato. NO intente extinguirlo con agua.
Las llamaradas son parte de la cocción de carnes en una parrilla y aderezos del sabor único que da asar un alimento.
Las llamaradas en exceso pueden cocinar demasiado la comida y ser peligrosas.
Importante: el exceso de llamaradas es el resultado de la acumulación de grasa en la parte inferior de la parrilla.
Si se produce un incendio por grasa, cierre la tapa hasta que esta se queme completamente. Tenga cuidado al abrir la tapa,
puesto que puede haber llamaradas repentinas.
Si se producen llamaradas en exceso, NO vierta agua a las llamas.
Minimice las llamaradas:
1. Corte el exceso de grasa de las carnes antes de la cocción.
2. Cocine las carnes con un alto contenido de grasa de manera indirecta.
3. Asegúrese de que la parrilla esté sobre una superficie sólida, nivelada y no combustible.
INSTRUCCIONES DE FUNCIONAMIENTO
42
Figura 1
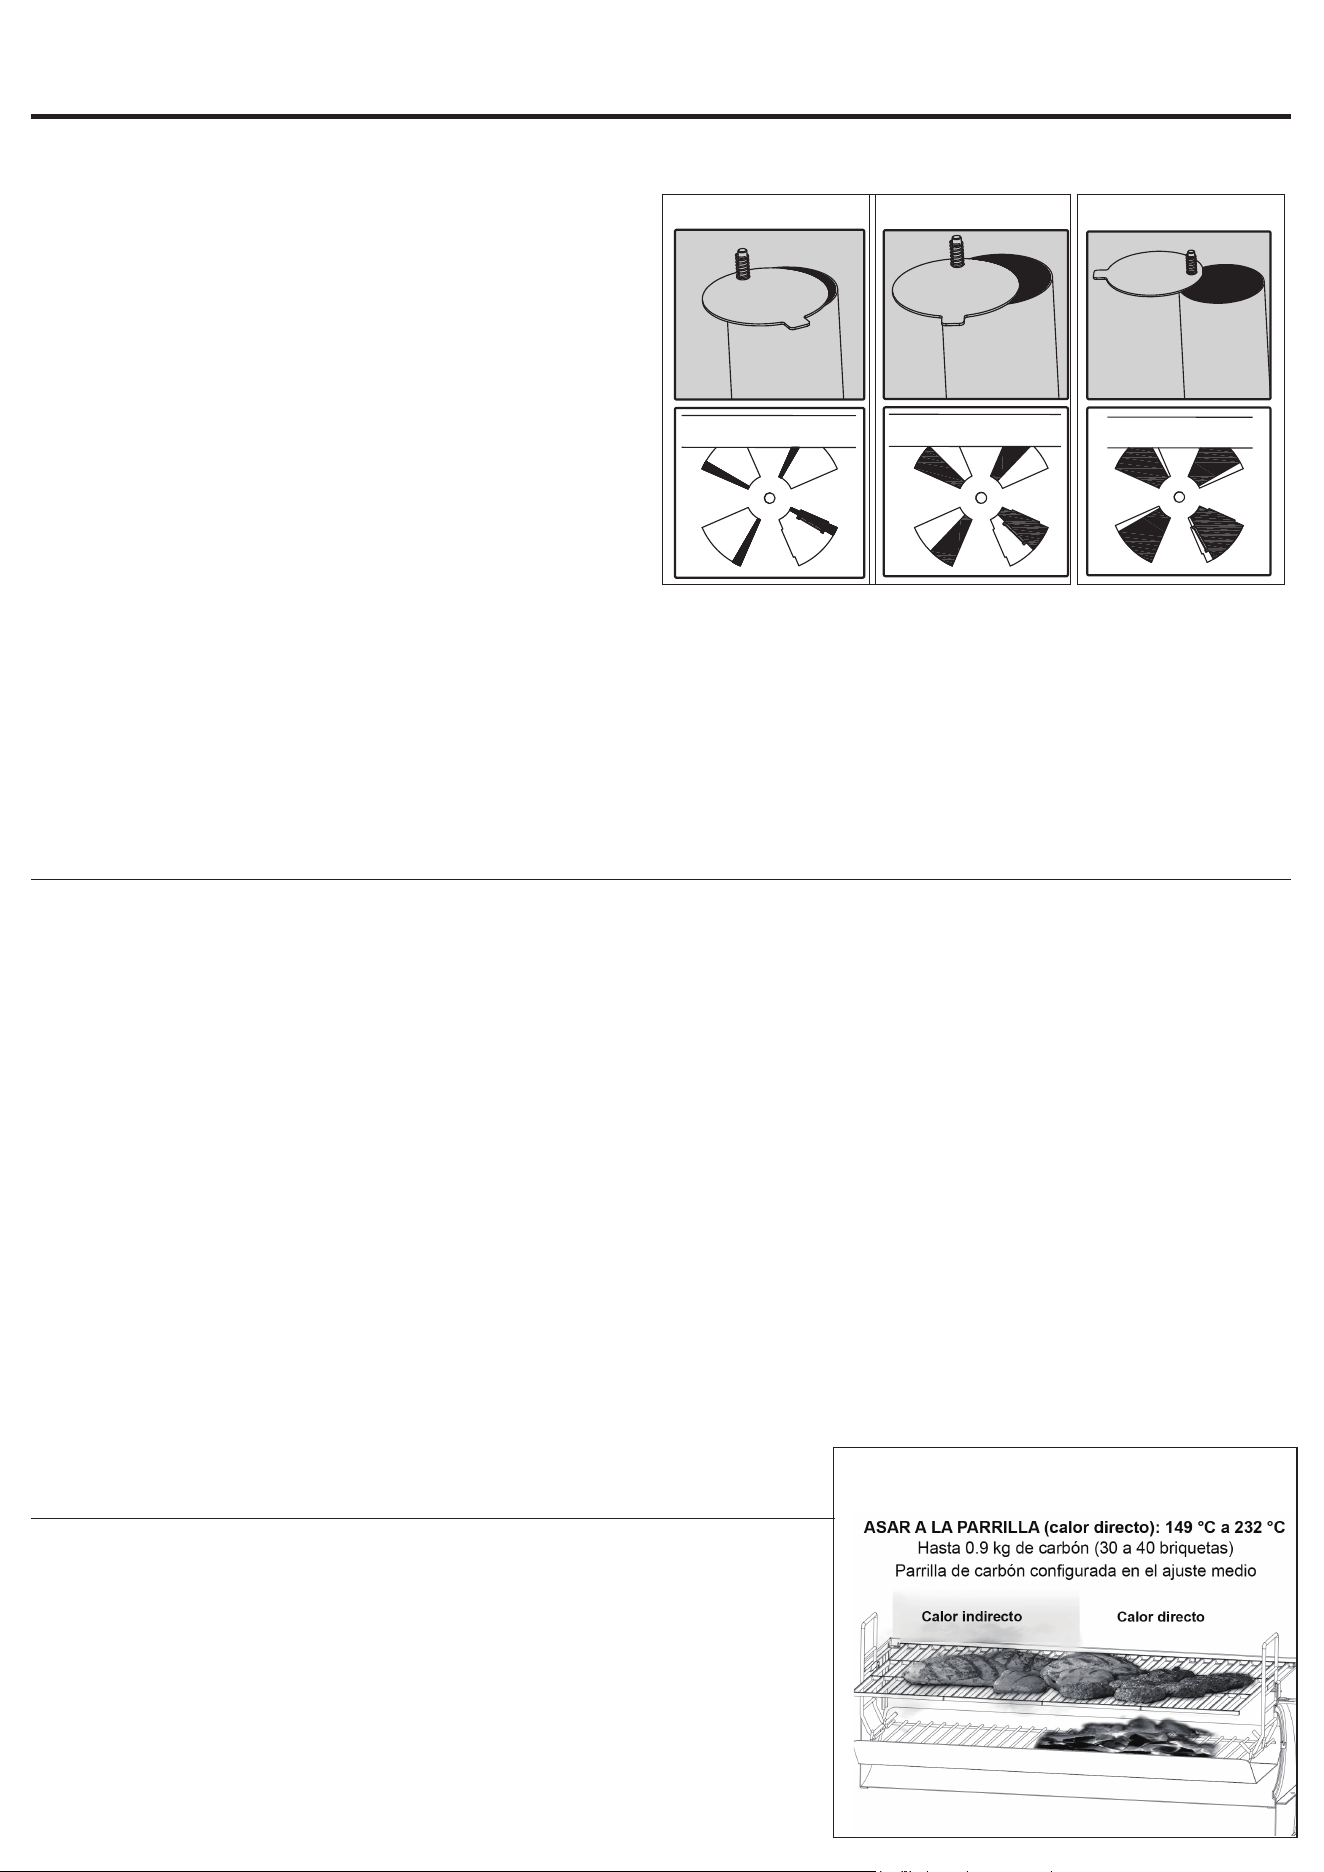
INSTRUCCIONES DE FUNCIONAMIENTO (CONTINUACIÓN)
Controlar las temperaturas
Controlar la temperatura de la parrilla se trata de controlar
el flujo de aire hacia el fuego. MÁS AIRE = MÁS CALOR.
MENOS AIRE = MENOS CALOR. Al abrir y cerrar los
reguladores superior y lateral, puede controlar fácilmente
la temperatura de la parrilla. La cantidad de carbón que se
utiliza al asar a la parrilla también puede afectar en gran
medida su capacidad para controlar la temperatura. Es
posible que sea necesario ajustar los reguladores durante la
cocción para tener en cuenta los cambios climáticos, como
el viento, o para adaptarse a más o menos combustible.
Cuando aprenda por primera vez a operar la parrilla, use
siempre la misma cantidad de carbón para aprender mejor el
control del regulador de tiro de la parrilla.
Ahumar (Figura 2)
1. Comience con los reguladores abiertos a 1/4 o menos
y ajústelos según sea necesario durante la cocción.
2. Para obtener los mejores resultados, comience con
hasta 0.9 kg de carbón (30 a 40 briquetas) o leña.
3. Establezca la rejilla para carbón configurada en su ajuste más bajo o lo más alejada de las rejillas de cocción.
Asar a la parrilla (Figura 3)
1. Controle el flujo de aire según sea necesario al ajustar los reguladores de 1/3 a 2/3 de su apertura.
2. Para obtener los mejores resultados, comience con hasta 0.9 kg de carbón (30 a 40 briquetas).
3. Coloque las brasas en la mitad de la rejilla para carbón; ajuste el nivel de la rejilla para carbón a la posición central.
Dorar (Figura 4)
1. Para obtener el máximo flujo de aire, ambos reguladores deben estar completamente abiertos y el aire debe fluir libremente.
2. Para obtener los mejores resultados, comience con hasta 1.36 kg de carbón (50 a 60 briquetas).
3. Ajuste la rejilla para carbón al ajuste más alto o lo más cercana a las rejillas de cocción.
Precurado de la parrilla
Precurar es un primer paso importante antes de comenzar a cocinar en su parrilla nueva. Este proceso ayudará a proteger
el acabado interior y exterior de la parrilla, reducirá la adherencia de los alimentos a las rejillas, reducirá los sabores no
naturales y ayudará a evitar que las rejillas se oxiden. Recomendamos usar aceite de linaza para precurar la parrilla, pero la
mayoría de los aceites de calidad alimentaria (canola, semilla de uva, vegetal, cártamo, etc.) también funcionarán.
Paso 1 Cubra ligeramente con aceite
1. Esta parrilla viene precubierta con aceite vegetal. Si es la primera vez que va a precurar la parrilla, continúe con el Paso 2.
2. Si vuelve a precurar la parrilla, cubra ligeramente TODAS las superficies interiores (incluidas las rejillas y el interior del
barril) de la parrilla con aceite de linaza u otro aceite vegetal.
Paso 2 Caliente la parrilla
1. Según las instrucciones para encender el carbón y controlar la temperatura (Figura 5), lleve la parrilla a aproximadamente
232 °C.
2. Una vez que esté a temperatura, deje que las superficies de la parrilla se precuren durante 20 minutos.
3. Coloque las brasas en la mitad de la rejilla para carbón; ajuste el nivel de la rejilla para carbón a la posición central.
Paso 3 Vuelva a aplicar aceite a las rejillas 5 veces
1. Después de 20 minutos, abra la parrilla y retire con cuidado las rejillas con un elevador de rejillas.
2. Con un cepillo, vuelva a cubrir ambos lados de las rejillas con aceite de linaza u otro aceite vegetal y vuelva a colocarlas
en la parrilla.
3. Cierre la tapa y deje que las superficies se precuren durante 20 minutos.
4. Repita este proceso hasta cinco veces (agregue más carbón para mantener la temperatura, según sea necesario).
5. Su parrilla está lista para usarse.
NOTA: puede cubrir ligeramente el exterior del cuerpo de la parrilla (mientras
está caliente) con aceite vegetal. Esto prolongará la vida útil del acabado, de
forma muy similar a encerar un automóvil.
Estilos de asado a la parrilla
Esta parrilla se puede utilizar para ahumar, asar a la parrilla o dorar sus
alimentos. Al utilizar zonas de temperatura, carbón y saborizantes de madera,
puede personalizar su experiencia culinaria como desee. Las siguientes
descripciones brindan cuatro de las formas más comunes en las que puede
cocinar con su parrilla a carbón.
Asar a la parrilla (Figura 5)
Cocine con calor directo e indirecto a temperatura media (149 °C a 232 °C).
Utilice una configuración de dos zonas para cocinar a diferentes velocidades
y temperaturas.
Figura 2
AHUMAR
66 °C A 121 °C
Figura 3
ASAR A LA PARRILLA
149 °C A 232 °C
Figura 4
DORAR
232 °C a 260 °C
43
Figura 5
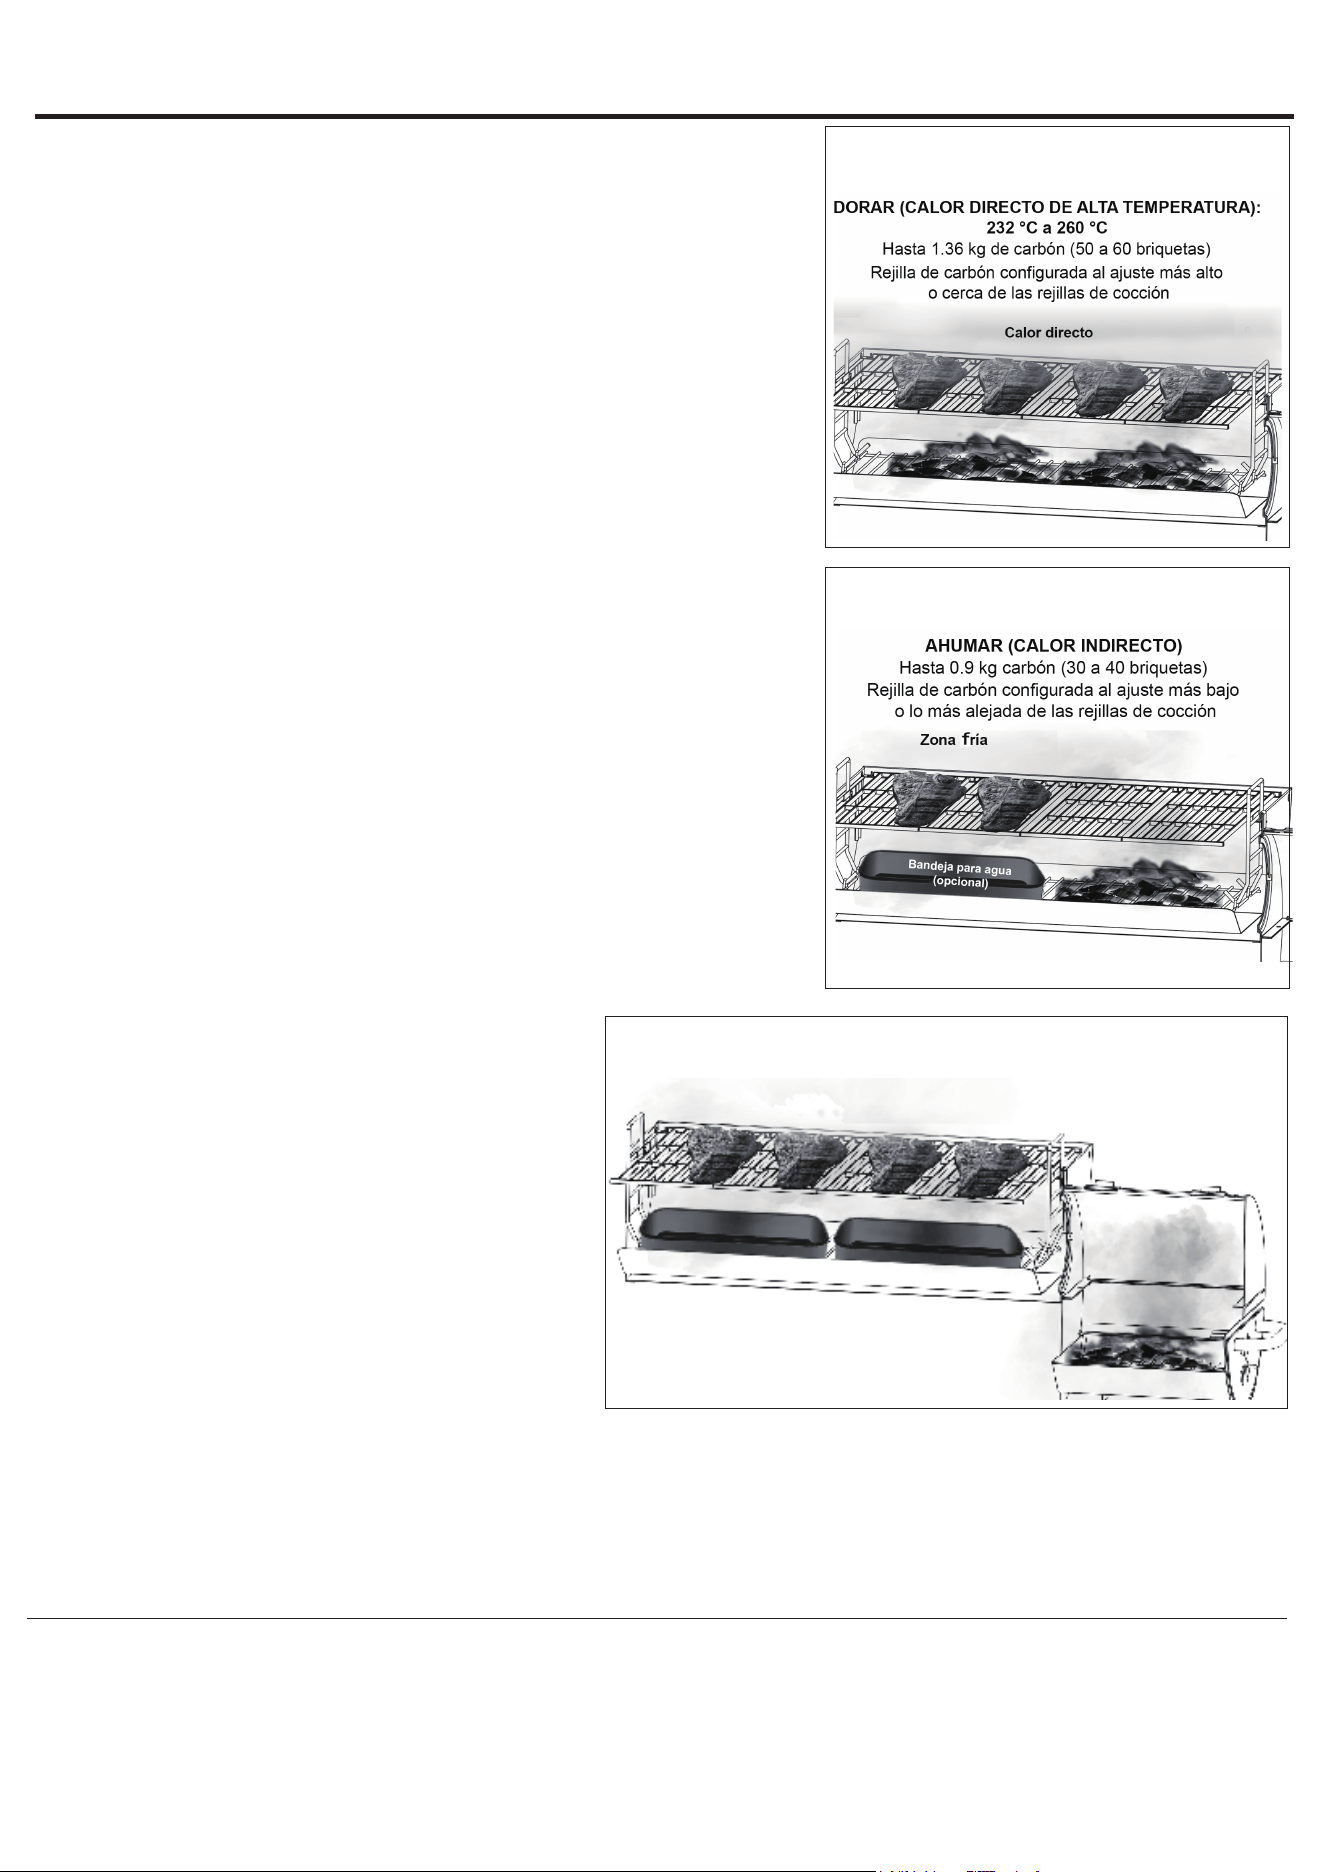
1. Coloque la rejilla para carbón en posición media (a medio camino entre
las rejillas y el cuerpo de la parrilla) con las manijas ajustables de la
bandeja para carbón.
2. Prepare hasta 0.9 kg (aproximadamente 30 a 40 briquetas) de carbón
encendido y distribuya uniformemente sobre la MITAD de la parrilla
a carbón, creando 2 zonas de cocción.
3. Una vez que la parrilla esté a la temperatura deseada, podrá comenzar
a cocinar. Primero coloque los alimentos sobre calor directo, cocinando
cada lado como desee. Después de cocinar inicialmente a calor directo,
pase a la zona fría (consulte la imagen a la derecha) para llevar los
alimentos a la temperatura interna deseada.
NOTA: se pueden usar astillas de madera, trozos o leños partidos además
del carbón para agregar sabor ahumado según se desee.
Dorar (Figura 6)
Cocine rápidamente con calor directo a altas temperaturas (232 °C a 260 °C).
1. Coloque la rejilla para carbón en la posición alta (la más cercana a las
rejillas de la parrilla) con las manijas ajustables de la bandeja para
carbón.
2. Prepare hasta 1.36 kg (aproximadamente 50 a 60 briquetas) de carbón
encendido y distribuya uniformemente sobre la rejilla para carbón.
3. Una vez que la parrilla esté a la temperatura deseada, puede comenzar
a cocinar al colocar los alimentos directamente sobre las brasas.
4. La comida se cocinará rápidamente. Cocine cada lado de 3 a 4 minutos
y luego lleve a la temperatura interna deseada.
NOTA: siempre dore con la tapa de la parrilla abierta para evitar daños al
acabado exterior.
NOTA: se pueden usar astillas de madera, trozos o leños partidos además del
carbón para agregar sabor ahumado según se desee.
Ahumar (Figura 7)
Cocine con calor indirecto a bajas temperaturas (66 °C a 121 °C). Utilice
astillas de madera, trozos, leños partidos o bolitas para agregar sabor
ahumado.
1. Coloque la rejilla para carbón en la posición baja (lo más lejos de las
rejillas de la parrilla) con ganchos ajustables para bandejas para carbón.
2. Prepare hasta 0.9 kg (aproximadamente
30 a 40 briquetas) de carbón repartido
uniformemente sobre la MITAD de la rejilla para
carbón creando dos zonas de cocción.
3. Agregue astillas de madera, trozos, leños partidos
según desee para agregar sabor ahumado.
4. Una vez que la parrilla esté a la temperatura
deseada, podrá comenzar a cocinar.
5. Mantenga los alimentos sobre el lado frío de la
parrilla para cocinarlos con calor indirecto durante
la cocción.
NOTA: abrir la cámara de ahumado extenderá el
tiempo de cocción.
Humo compensado (Figura 8)
Cocine con calor indirecto desde la cámara
de combustión lateral a bajas temperaturas
(66 °C a 121 °C). Utilice leños partidos, astillas, trozos
o pellas para agregar sabor ahumado.
1. Prepare hasta 0.9 kg (aproximadamente 30 a 40 briquetas) de carbón en la cámara de combustión lateral.
2. Agregue astillas de madera, trozos, leños partidos o pellas según desee para agregar sabor ahumado.
3. Una vez que la parrilla esté a la temperatura deseada, comience a cocinar.
4. Los alimentos colocados más cerca de la cámara de combustión lateral se cocinarán más rápido que los alimentos
colocados en el lado opuesto de la parrilla.
NOTA: abrir la cámara de ahumado extenderá el tiempo de cocción.
Recetas para asar a la parrilla
• Cocinar con un TERMÓMETRO PARA CARNES garantiza que los alimentos estén completamente cocinados. Inserte
el termómetro en la parte más gruesa de la carne, sin tocar el hueso, y deje que registre la temperatura durante
1 a 1 1/2 minutos.
• La temperatura mínima segura aprobada por el USDA es 74 °C para pollo/aves.
• La temperatura mínima segura aprobada por el USDA es 63 °C para carne de res, cerdo, ternera y cordero (filetes,
chuletas, asados).
INSTRUCCIONES DE FUNCIONAMIENTO (CONTINUACIÓN)
44
Figura 8
AHUMAR CON COMPENSACIÓN (CALOR INDIRECTO): 66 °C a 121 °C
Hasta 0.9 kg de carbón (30 a 40 briquetas)
o leña en la cámara de combustión lateral
Bandeja de goteo
(opcional)
Bandeja para agua
(opcional)
Figura 6
Figura 7

INSTRUCCIONES DE FUNCIONAMIENTO (CONTINUACIÓN)
Recetas de calor directo
CARNE DE FALDA A LA PLANCHA CON VERDURAS
La carne de falda, una carne muy poco apreciada, puede ser una comida rápida y sabrosa para los días de semana. Prepare
la cena en menos de 20 minutos y use una parrilla a carbón para obtener los mejores sabores del verano con esta receta de
carne de falda.
Ingredientes: Instrucciones:
Carne de falda de 368.38 gramos
1.5 cucharaditas de paprika ahumado
2 dientes de ajo picados
Sal y pimienta a gusto
4 mazorcas de maíz
2 calabacines grandes, cortados por la mitad
a lo largo
1 pinta de tomates cherry
3 cucharadas de aceite de oliva
1.5 cucharadas de romero fresco picado
1 cucharadas de vinagre de vino tinto
2 dientes de ajo picados (aderezo de aceite)
2 cucharadas de aceite de canola
1. Sazone la carne de falda con paprika y ajo. Frote por todos lados
y sazone con sal y pimienta. Unte con aceite de canola.
2. Unte el maíz, el calabacín y los tomates con aceite de canola
y sazone con sal y pimienta.
3. Precaliente la parrilla a fuego medio alto.
4. Agregue la carne de falda a la parrilla, voltee una vez y cocine a la
temperatura interna deseada. Aproximadamente 4 a 6 minutos por
lado, deje reposar 5 minutos.
5. Agregue las verduras a la parrilla y voltéelas ocasionalmente hasta
que estén ligeramente chamuscadas.
6. Bata el aceite de oliva, el romero, el vinagre de vino tinto, el ajo, la sal
y la pimienta al gusto en un recipiente pequeño.
7. Unte la carne y rocíe las verduras con la mezcla de aceite de oliva;
luego, sirva con la carne inmediatamente.
CARNE DE FALDA MARINADA ORIGINAL
Ingredientes del marinado de carne: Instrucciones:
1/2 taza de aceite de oliva
1/3 taza de salsa de soja
1/4 de taza de vinagre de vino tinto
2 cucharadas de jugo de limón
1 cucharadita de mostaza seca
1 diente de ajo picado
1 cebolla pequeña, picada
1/4 cucharadita de pimienta
1. Mezcle los ingredientes del marinado en un plato que no sea de
metal.
2. Deje reposar la carne en el marinado durante al menos 4 horas.
3. Dore cada lado a fuego alto durante 5 minutos; cocine a la
temperatura interna deseada.
4. Corte la carne en diagonal a lo largo de la fibra en rodajas finas antes
de servir.
SOLOMILLO DE CERDO ASADO RÁPIDO Y FÁCIL
¿Necesita cenar con prisa? Esta receta rápida y fácil de solomillo de cerdo agrada a la multitud. Acompáñelo con patatas
rojas asadas y espárragos para una cena sencilla pero sabrosa.
Ingredientes: Instrucciones:
2 solomillos de cerdo
2 cucharaditas de paprika
1 cucharadita de ajo en polvo
1 cucharadita de cilantro
1 cucharadita de orégano
Sal y pimienta a gusto
Aceite de oliva
1. Mezcle las especias en un recipiente. Frote la carne de cerdo con
aceite de oliva y luego sazone generosamente por ambos lados con
una mezcla de especias.
2. Prepare su Char-Griller para cocinar directamente. Encienda los
quemadores y póngalos a fuego medio alto.
3. Coloque la carne de cerdo en la parrilla y cocine de 8 a 10 minutos
por lado o hasta que la temperatura interna sea de 74 °C o hasta
la temperatura interna deseada (La temperatura mínima segura
aprobada por el USDA es 63 °C para cerdo).
4. Retirare de la parrilla y deje reposar durante 10 minutos.
HAMBURGUESAS
Sazone a gusto con condimento para carne. También puede marinar dejándolas reposar en el marinado durante 1 o 2 horas
a temperatura ambiente antes de cocinarlas, o dejarlas reposar en un recipiente tapado en el refrigerador hasta por 24 horas.
Instrucciones:
1. Deje que alcancen la temperatura ambiente antes de cocinarlas.
2. Agregue las cebollas picadas, los pimientos verdes y la sal, dore las hamburguesas de 19.05 mm de cada lado.
3. Cocine a fuego medio con la tapa cerrada para evitar llamaradas.
4. Cocine cada lado de 3 a 7 minutos según la temperatura deseada.
5. La carne molida estará lista cuando salga jugo claro (la temperatura mínima segura del USDA para la carne molida es
71 °C).
6. Las hamburguesas se pueden rociar con marinado al darles la vuelta o se pueden mezclar otros ingredientes con la
carne molida, como salsa de chile o chile en polvo.
45

INSTRUCCIONES DE FUNCIONAMIENTO (CONTINUACIÓN)
HAMBURGUESAS JUICY LUCY
Si cree que no hay manera de que la hamburguesa clásica pueda mejorar, espere a probar la hamburguesa Juicy Lucy.
Llena de sabor y queso derretido, estas hamburguesas seguramente serán un éxito este verano.
Ingredientes: Instrucciones:
680.38 gramos de carne molida
1/2 paquete de mezcla seca para sopa de
cebolla francesa
1/4 taza de aderezo francés
2 cucharadas de salsa worcestershire
1/2 cucharadita de sal
1/4 cucharadita de pimienta negra
Trozo de queso cheddar
1. Corte el queso en trozos de aproximadamente 6.35 mm de grosor
y 5.08 cm de ancho por 5.08 cm de alto.
2. Agregue la mezcla para sopa de cebolla francesa, sal, pimienta,
aderezo francés y salsa worcestershire a la carne molida, y mezcle
bien.
3. Tome una porción de la carne y forme una hamburguesa.
4. Coloque el trozo de queso en el medio de la hamburguesa y envuelva
completamente el queso con la carne. Forme una hamburguesa con
el queso dentro.
5. Repita con la carne y el queso restantes.
6. Precaliente la parrilla a 204 ºC.
7. Cocine las hamburguesas durante 3 minutos por el primer lado
y luego voltéelas.
8. Cocine las hamburguesas durante 6 minutos por el otro lado. La
carne molida estará lista cuando salga jugo claro (la temperatura
mínima segura del USDA para la carne molida es 71 °C).
9. ¡Agregue los ingredientes deseados y disfrute!
CAMARONES (PELADOS) Y CANGREJOS
Instrucciones:
1. Coloque en brochetas.
2. Cubra con mantequilla derretida y sal de ajo.
3. Ase 4 minutos por cada lado o hasta que estén rosados.
Salsa de cóctel opcional.
PERROS CALIENTES
Instrucciones:
1. Ase con la tapa abierta durante aproximadamente 6 minutos.
2. Voltee cada pocos minutos.
JALAPEÑOS RELLENOS CON TOCINO
¿Necesita un refrigerio fácil de preparar para este gran juego? Estos jalapeños rellenos con tocino agradan a la multitud
y son muy fáciles de preparar a la parrilla. El tocino se vuelve crujiente con rapidez y no se quema con facilidad, ya que
simplemente queda encima del relleno de queso crema. Fáciles, deliciosos y del tamaño perfecto para un aperitivo, sus
amigos y familiares le pedirán que los prepare una y otra vez.
Ingredientes: Instrucciones:
4 jalapeños
Aplique adobo para carne Char-Griller a gusto
1/3 taza de queso crema
3 rebanadas de tocino
Queso rallado al gusto
1. Mezcle el queso crema, el queso rallado y el adobo para carne en un
recipiente y apártelo.
2. Corte los jalapeños por la mitad para darles forma de barco.
3. Con una cuchara, retire la médula y las semillas para dejar espacio
para el relleno.
Consejo: si le gusta el picante, deje algunas semillas. Las semillas
proporcionan el picante.
4. Agregue el relleno a los jalapeños.
5. Corte el tocino en tiras pequeñas y luego colóquelo sobre el relleno
de los jalapeños.
6. Espolvoree una pequeña porción de adobo para carne encima del
tocino.
7. Encienda la parrilla o el ahumador a 204 °C.
8. Coloque los jalapeños rellenos con tocino en la parrilla o el ahumador
y ahúmelas durante 30 minutos o cuando el tocino esté dorado.
¡Retire y disfrute!
46

INSTRUCCIONES DE FUNCIONAMIENTO (CONTINUACIÓN)
Recetas de calor indirecto
PAPAS HASSLEBACK
Estas papas Hassleback, una guarnición que básicamente puede ser una comida en sí misma, se pueden personalizar
completamente con aderezos y tipos de queso.
Ingredientes: Instrucciones:
6 papas Russet
1 paquete de queso cheddar en rebanadas
1 paquete de queso Pepper Jack en rebanadas
Chipotle en polvo
Orégano
Sal y pimienta a gusto
Tocino cocido (cortado en cubitos)
Cebollino (en rodajas)
Crema ácida
1. Prepare la parrilla para cocinar indirectamente.
2. Corte rodajas finas del ancho de las papas, pero tenga cuidado de no
cortarlas por completo.
3. Envuelva las papas en papel de aluminio y colóquelas en un lado
de la parrilla, alejadas de las llamas. Deje que se cocinen hasta que
estén tiernas. Aproximadamente entre 45 minutos y una hora.
4. Retire las papas de la parrilla y desenvuélvalas.
5. Coloque rodajas alternas de queso cheddar y pepper jack en la papa.
6. Sazone las papas con chipotle en polvo, sal, pimienta y orégano.
7. Vuelva a colocar las papas en la parrilla sin envolver durante 10 a 12
minutos o hasta que el queso se derrita.
8. Adorne con tocino, cebollino, crema agria y sirva.
ALAS DE POLLO CON AJO Y QUESO PARMESANO
Replique los sabores característicos de su lugar de alitas favorito con esta receta de ajo y queso parmesano marinados.
Ingredientes: Instrucciones:
1.81 kg de alitas de pollo
Botella de aderezo italiano de 473.17 ml
1 taza de queso parmesano rallado
1/2 cucharada de sal de cebolla
1/2 cucharadita de pimienta negra
1 taza de mantequilla
1 cucharadita de orégano
2 cucharaditas de ajo en polvo
Una pizca de romero
1. Marine las alitas durante la noche o al menos cuatro horas en
aderezo italiano.
2. Agregue carbón a un lado de la parrilla para asar indirectamente,
o use Smokin' Stone™ y agregue astillas o trozos de madera con
sabor, si lo desea.
3. Deje que la parrilla se precaliente a 135 ºC.
4. Coloque las alitas en el lado de la parrilla con calor indirecto.
5. Ahúme las alitas durante 45 a 60 minutos, hasta que la temperatura
interna alcance los 77 °C.
6. Mientras las alitas se ahúman, prepare salsa de ajo y parmesano
mezclando queso parmesano, ajo en polvo, sal de cebolla, pimienta
negra, mantequilla, orégano y romero.
7. Retire las alitas de la parrilla y agregue la salsa de ajo y queso
parmesano.
SALMÓN EN PLANCHA DE CEDRO
¿Cree que no puede conseguir el salmón ahumado perfecto en una parrilla a gas? Piensa otra vez. Con el asado indirecto,
puede conseguir el perfecto salmón en plancha de cedro remojada cada vez.
Ingredientes: Instrucciones:
2 planchas de cedro
2 filetes de salmón
Aceite de oliva
Romero
Sal y pimienta a gusto
1. Remoje las planchas de cedro en agua durante al menos 8 horas.
2. Prepare la parrilla para cocinar indirectamente.
3. Agregue de 30 a 40 briquetas de carbón a un lado de la parrilla.
4. Encienda el carbón con quemadores a gas a temperatura media alta.
5. Una vez que el carbón esté encendido, apague los quemadores de
gas y deje que las cenizas se apaguen por completo.
6. Unte el salmón por ambos lados con aceite de oliva.
7. Sazone con sal y pimienta, ramitas de romero y rodajas de limón.
8. Coloque el salmón en el lado de la parrilla alejado del carbón.
9. Cocine el salmón durante 15 minutos o hasta que esté escamoso.
MAÍZ DULCE EN CÁSCARA
Instrucciones:
1. Recorte el exceso de pelos de las puntas y sumérjalas en agua fría con sal 1 hora antes de asarlas.
2. Ase durante 25 minutos, volteándolos varias veces.
47

INSTRUCCIONES DE FUNCIONAMIENTO (CONTINUACIÓN)
MUSLOS DE POLLO CON CHILE Y LIMÓN
Perfecta para tacos, fajitas, nachos o como plato solo, esta receta de muslos de pollo con chile y limón, preparada por nuestro
embajador, BBQFiends, se puede cocinar rápidamente en una parrilla para una comida entre semana o con carbón el fin de
semana con el fin de agregar el toque justo de sabor ahumado.
Ingredientes: Instrucciones:
1.36 kg de muslos de pollo
2 cucharadas de su condimento de chile
BBQ favorito
1 limón
Cilantro picado para decorar
1 jugo de limón (marinado)
29.57 ml a 354.88 ml de cerveza
(marinado)
Sal y pimienta a gusto (marinado)
1. Quite el exceso de grasa de los muslos de pollo y colóquelos en un
recipiente grande. Agregue los ingredientes del marinado y déjelo reposar
en el refrigerador durante 1 a 2 horas antes de cocinar.
2. Retire el pollo del marinado y sazone con su condimento de chile BBQ
favorito. Lleve la parrilla a 191 °C y coloque el pollo en el fuego indirecto.
*Consejo: para obtener una piel de pollo más crujiente, voltee el pollo
aproximadamente a la mitad de la cocción y póngalo a fuego directo. Asegúrese
de que la temperatura interna sea de al menos 74 °C antes de retirarlos para la
parrilla.*
3. Retire el pollo y decore con cilantro picado y un chorrito de limón por
encima.
4. ¡Sirva y disfrute!
Recetas de ahumado
ESPALDA DE CERDO "CERTIFICADA"
Una excelente receta de espalda de cerdo perfecta tanto para principiantes como para expertos. Esta receta de espalda de
cerdo ahumado a fuego lento es deliciosa desmenuzada y apilada con ensalada de col para un sándwich, ¡o se puede comer
sola directamente de la bandeja!
Ingredientes: Preparación de la carne: Instrucciones de cocción:
2 espaldas
de cerdo
(de 2.72 kg
a 4.53 kg cada
una)
Jugo de
manzana
Su aliño
o condimento
favorito
Mostaza
1. Retire la espalda de cerdo del
envoltorio plástico y séquela con
una toalla de papel.
Consejo: elija una espalda de cerdo
con toda la grasa. Esto ayuda a la
carne mientras se ahúma durante un
largo período.
2. Elimine el exceso de grasa que
esté suelto y se levante con
facilidad. Marque la capa de
grasa de 3.17 mm a 6.35 mm de
profundidad en diagonal, con una
separación de 12.7 mm a 2.54 cm.
Consejo: marcar la carne permite que
el condimento y el humo penetren en
la espalda de cerdo.
3. Llene el inyector de marinado con
jugo de manzana e inyecte en la
parte superior y los lados de la
carne.
4. Extienda una capa de mostaza
con una brocha para adobar por
toda la espalda de cerdo.
Consejo: esto permite que el aderezo
se adhiera a la espalda de cerdo.
5. Sazone generosamente la
espalda de cerdo por todos lados
con su aderezo favorito.
6. Consejo: después de sazonar,
envuélvalo en Saran Wrap
y guárdelo en el refrigerador
durante la noche o de
8 a 10 horas. Esto permite que
los aliños penetren y que el jugo
de manzana ablande la espalda
de cerdo.
1. Encienda el carbón y precaliente el ahumador a 107 °C.
2. Agregue agua hirviendo a la bandeja de goteo y colóquela
debajo de la parrilla.
Consejo: esto agregará humedad para la cocción y recogerá los
jugos que gotean.
3. Ahúme las espaldas de cerdo durante 2 horas por cada 0.45
kg a 107 °C, hasta que la carne alcance una temperatura
interna de 71 °C.
Consejo: mantenga una temperatura de 107 °C, verifique el
fuego cada hora o cuando sea necesario. También rocíe con
jugo de manzana cada vez que agregue leña al fuego. Rociar
agrega humedad y sabor. Evita que la espalda de cerdo se
seque y ayuda a crear la corteza. Controle la temperatura con un
termómetro de sonda plegable o un termómetro remoto.
4. Retire la espalda de cerdo del ahumador y envuélvala dos
veces en papel de aluminio. Antes de cerrar la envoltura,
agregue 1 taza de jugo de manzana y 1 barra de mantequilla
por cada espalda, más condimento y salsa BBQ al gusto.
5. Vuelva a colocarla en el ahumador y cocine hasta que la
espalda de cerdo alcance una temperatura interna de 93 °C,
luego retírela del ahumador.
Consejo: envuelva la espalda de cerdo en una toalla grande
y colóquela en una hielera o simplemente déjela a un lado
durante un mínimo de 1 a 2 horas para que repose. Esto permite
que la carne se cocine y deje de cocinarse, y es una clave
importante en el proceso.
6. Después de reposar, retira la toalla y el papel de aluminio.
Separe la carne de cerdo con dos tenedores o pinzas para
carne.
7. Prepare sándwiches de cerdo desmenuzado y un sinfín de
platos de cerdo desmenuzado. ¡Disfrute!
48

INSTRUCCIONES DE FUNCIONAMIENTO (CONTINUACIÓN)
PECHO
La receta de pecho es una versión tradicional del clásico ahumado y promete resultados tiernos y ahumados.
Ingredientes: Instrucciones:
4.76 kg de pecho de res
½ taza de paprika
¼ de taza de azúcar morena clara envasada
3 cucharadas de sal
3 cucharadas de pimienta negra gruesa
3 cucharadas de chile en polvo
Jugo de manzana
Agua
1. Con un cuchillo afilado, retire la grasa del pecho dejando una capa
fina y uniforme en la parte superior.
2. En un tazón mediano, combine la paprika, la azúcar morena clara, el
chile en polvo, la sal y la pimienta, y mezcle bien para condimentar.
Con las manos o con un agitador, aplique generosamente el producto
por todas partes.
3. Envuelva el pecho en una película de plástico transparente y refrigere
durante al menos 12 horas.
4. Al preparar la parrilla, agregue astillas de madera o trozos de carbón
y agregue Smokin' Stone con una bandeja de aluminio encima. Vierta
el jugo de manzana y el agua en la cacerola, hasta la mitad de su
capacidad. Coloque una sonda de temperatura al nivel de la parrilla
y caliente la parrilla a 104 °C.
5. Coloque el pecho sobre las rejillas, con la grasa hacia arriba y déjelo
ahumar durante 5 horas. Después de 5 horas, envuelva pecho en
papel de estraza y vuelva a asar a 104 °C. El pecho estará listo
cuando la temperatura interna alcance los 91 °C. Deje reposar el
pecho durante 1 hora.
6. ¡Corte, sirva y disfrute!
MACARRONES CON QUESO AHUMADOS
Un favorito familiar de todos los tiempos, esta receta de macarrones con queso ahumados eleva los macarrones con queso
horneados en la estufa o en el horno con sabores que seguramente mantendrán su ahumador funcionando.
Ingredientes: Instrucciones:
1 paquete de macarrones de
codo
½ barra de mantequilla
¼ taza de harina común
1 taza de crema espesa
1 taza de leche
2 tazas de queso cheddar
(rallado)
1 taza de queso gouda
(rallado)
1 taza de queso Colby Jack
(rallado)
½ taza de queso crema
2 cucharadas de pimienta
negra
1 cucharadita de pimienta
cayena
1 sartén grande de hierro
fundido
1. Hierva los macarrones con codo según las instrucciones del paquete para que
queden al dente.
2. Precaliente el ahumador a 107 °C con una madera dura frutal como manzano
o cerezo en la cámara de combustión lateral.
Consejo: si su parrilla no tiene el accesorio de la cámara de combustión lateral,
conviértala fácilmente en un ahumador al colocar las brasas o la leña frente a donde
coloca la bandeja para macarrones con queso. Si coloca la bandeja en el lado derecho
de las rejillas, simplemente coloque la leña en el lado derecho para una experiencia de
cocción indirecta.
3. Caliente la sartén de hierro fundido a fuego medio; luego, derrita la mantequilla
y agregue la harina.
4. Mientras continúa batiendo, agregue la leche y la crema espesa hasta que hierva.
5. Reduzca a fuego medio-bajo y agregue el queso crema hasta que quede suave.
6. Agregue el resto de los quesos y continúe revolviendo hasta que se derrita y quede
suave.
7. Apague el fuego y luego agregue los macarrones hasta que estén bien mezclados
con la salsa de queso
8. Coloque toda la sartén en el ahumador y cocine durante 1 a 2 horas hasta el punto
deseado. Manténgalo por más tiempo para obtener un sabor más ahumado.
9. Sirva caliente.
TROZOS Y MITADES DE POLLO AHUMADO
Instrucciones:
1. Enjuague los trozos en agua fría y séquelos con toallas de papel.
2. Unte cada trozo con aceite de oliva y sazone al gusto con sal y pimienta.
3. Dore los trozos directamente sobre las brasas con la tapa abierta y cocine a la
parrilla a fuego alto o medio durante varios minutos.
4. Luego, coloque los trozos sobre la rejilla de cocción en el área de cocción indirecta.
5. Con la parrilla a fuego lento, cocina con la tapa cerrada durante 55 a 60 minutos
o hasta que esté cocido. No use aceite de oliva ni sal y pimienta si usa marinado.
49

INSTRUCCIONES DE FUNCIONAMIENTO (CONTINUACIÓN)
3-2-1 COSTILLAS
El método de costillas 3-2-1 podría ser algo que haya visto en las redes sociales. Es una técnica popular para ahumar
costillas tiernas, jugosas y que se despegan del hueso. Sencilla y fácil de seguir, esta es una manera segura de garantizar
que sus costillas estén para chuparse los dedos. El método 3-2-1 es un proceso que consiste en ahumar las costillas durante
tres horas, envolverlas en papel de aluminio y cocerlas durante dos horas, y ahumarlas sin envolver durante una hora. Esto
no solo ayuda a que las costillas se cocinen más rápido, sino que también garantiza un anillo de humo uniforme y una carne
más tierna.
Ingredientes: Instrucciones:
4 costillas
2 tazas de sidra de
manzana, 2 tazas
adicionales
en botella de rociado
8 cucharadas de
mantequilla salada
1 taza de su salsa BBQ
favorita
1 taza de azúcar
morena oscura
Adobo para costillas
Char-Griller
4 cucharadas de miel
1. Prepare su ahumador de compensación para ahumar al encender medio encendedor para
chimeneas a carbón y agregarlo a la cámara de combustión lateral. Alternativamente,
prepare su parrilla para el método indirecto con brasas dispuestas frente a donde planea
colocar las costillas.
Consejo: agregue aproximadamente media chimenea de carbón apagado a la cámara de
combustión lateral cerca del barril antes de agregar el carbón encendido al lado. El carbón
encendido encenderá gradualmente el carbón apagado para ayudar a mantener la temperatura
por más tiempo.
2. Agregue de tres a cuatro trozos de madera de manzano y cierre la tapa.
3. Deje que la parrilla se caliente hasta aproximadamente 93 °C.
4. Retire la membrana de las costillas.
Consejo: comience en el extremo más estrecho de la rejilla, pase con cuidado un cuchillo de
pelar debajo de la membrana para comenzar y retire la membrana con una toalla de papel.
5. Sazone abundantemente ambos lados de las costillas con Rib Rub.
6. Abra la parrilla y levante la rejilla ajustable hasta el nivel superior. Esto asegura una
distribución uniforme del humo.
7. Coloque bandejas de goteo llenas de agua debajo de las rejillas y encima de la rejilla en el
barril principal.
8. Coloque las costillas con el hueso hacia abajo sobre las rejillas, cierre la tapa y déjelas
ahumar durante tres horas.
Consejo: coloque el lado expuesto del hueso del costillar hacia la cámara de combustión lateral
para que la carne se separe mejor del hueso. Si utiliza el método indirecto, coloque las costillas
en el lado opuesto al de las brasas.
9. Verifique periódicamente la temperatura para asegurarse de que se mantenga estable
a 93 °C. Si tiene que agregar carbón, agregue solo carbón encendido.
10. Cada 30 minutos, rocíe las costillas con sidra de manzana y mueva el costillar más cercano
a la cámara de combustión lateral hacia el lado de la parrilla más alejado de la cámara de
combustión lateral y acerque los otros costillares a la cámara de combustión lateral para
acomodarlos. Repita el método de rociado y rotación cada 30 minutos.
11. Retire las costillas de la parrilla después de tres horas.
12. Prepare una hoja grande de papel de aluminio para trabajo pesado. (una para cada
costillar).
13. Coloque un costillar con el hueso hacia arriba sobre cada trozo de papel de aluminio.
14. Cubra el lado del hueso de las costillas con azúcar morena, miel y cuatro porciones de
mantequilla.
15. Vierta ½ taza de sidra de manzana.
16. Engarce completamente los bordes del papel de aluminio para cubrir las costillas.
17. Repita con los otros tres costillares.
18. Transfiera las costillas nuevamente al ahumador y aumente la temperatura a 107 °C.
19. Haga esto al abrir un poco más las compuertas y agregar otra media chimenea de carbón
encendido si es necesario.
20. Deje que las costillas se cocinen durante dos horas.
21. Continúe girando las costillas como se describe en el paso 8b para asegurarse de que
todos los costillares se acerquen y se alejen del fuego.
22. Retire las costillas de la parrilla y del papel de aluminio. Vuelva a colocarlas en la parrilla
con el hueso hacia abajo.
23. Unte las costillas con su salsa BBQ favorita y cocínelas durante una hora a 107 °C.
24. ¡Retire y disfrute!
50

INSTRUCCIONES DE FUNCIONAMIENTO (CONTINUACIÓN)
PAVO AHUMADO
Instrucciones:
1. Enjuague la cavidad vacía y seque con una toalla de papel.
2. Meta las puntas de las alas debajo de la espalda y ate las patas.
3. Colóquelo en el centro de la rejilla de cocción directamente encima de la bandeja de goteo de aluminio
con agua.
4. Ahúme durante 12 minutos por cada 0.45 kg. Espere varios minutos adicionales por cada 0.45 kg si está
relleno para permitir la expansión.
5. Utilice un termómetro para carne para obtener los mejores resultados (86 °C internos).
JAMÓN AL HORNO AHUMADO
Puede ahumar jamón enlatado completamente cocido o jamón entero ahumado y curado, pierna o parte de la espalda.
Ingredientes: Instrucciones:
1 taza de azúcar morena
clara, bien compactada
1/2 taza de jugo de naranja
1/2 taza de miel
1. Combine el azúcar, el jugo y la miel. Deje reposar el glaseado durante al menos
4 horas.
2. Retire la corteza y corte la grasa en diagonal para darle un efecto de diamante.
3. Inserte un diente entero en el centro de cada diamante.
4. Coloque el jamón con la grasa hacia arriba en el centro de la rejilla de cocción.
Cierre la tapa.
5. Se sugieren aproximadamente 9 minutos por cada 0.45 kg para jamones
completamente cocidos. El jamón ahumado o curado, que no esté completamente
cocido, debe cocinarse a una temperatura interna de 71 °C.
6. Rocíe con glaseado para jamón 3 o 4 veces durante los últimos 30 minutos de
cocción.
7. Adorne con aros de piña unos 15 minutos antes de que finalice el tiempo de cocción.
VENADO AHUMADO CON TOCINO
Puede ahumar jamón enlatado completamente cocido o jamón entero ahumado y curado, pierna o parte de la espalda.
Ingredientes: Instrucciones:
Marinado para venado
1 taza de vinagre balsámico o vinagre
de vino tinto
1 taza de aceite de oliva
59.14 ml de salsa worcestershire
14.78 ml de salsa tabasco
2 cucharadas de sal para condimentar
1 a 2 jalapeños picados
88.72 ml de salsa de soja
Marinado de tocino
59.14 ml de vinagre de vino tinto
59.14 ml de salsa worcestershire,
4 chorritos de salsa tabasco
1. Coloque la pierna de venado en un recipiente y déjela marinar durante
2 a 4 días, volteándola diariamente.
2. Deje marinar el tocino durante la noche.
3. Retire la pierna del refrigerador al menos una hora antes de cocinarla.
4. Sazone generosamente con sal sazonada y pimienta negra molida gruesa.
5. Envuelva 0.45 kg de tocino sobre la parte superior de la pierna y ahúme de
20 a 25 minutos por cada 0.45 kg o hasta que esté tierna.
6. No cocine demasiado.
Marinados
MARINADO DE POLLO
Ingredientes: Instrucciones:
½ taza de salsa de soja
¼ taza de aceite de oliva
¼ de taza de vinagre de vino tinto
1 cucharadita de orégano
½ de albahaca dulce
½ cucharadita de ajo en polvo con perejil
¼ cucharadita de pimienta
1. Vierta sobre los trozos de pollo en un plato que no sea de metal.
2. Cubra y refrigere durante la noche, volteando ocasionalmente. Utilice
el marinado para rociar el pollo mientras lo cocina.
51

INSTRUCCIONES DE FUNCIONAMIENTO (CONTINUACIÓN)
MARINADO DE CARNE: (PARA FILETES, CHULETAS Y HAMBURGUESAS)
Ingredientes: Instrucciones:
¼ taza de salsa de soja
2 cebollas grandes
2 dientes de ajo, machacados
2 cucharaditas de sal
2 cucharaditas de paprika
1 cucharadita de pimienta
molida
1. Combine los ingredientes en una licuadora eléctrica, cubra y procese a alta
velocidad durante 1 minuto o hasta que la mezcla esté muy suave.
2. Deje reposar la carne en el marinado a temperatura ambiente durante 2 horas
o refrigere hasta 24 horas en un plato tapado.
3. Deje que la carne alcance la temperatura ambiente antes de cocinarla.
MARINADO DE SHISH KABOB
Ingredientes: Instrucciones:
1 taza de salsa de soja
½ de taza de azúcar morena
½ taza de vinagre blanco
½ taza de jugo de piña
2 cucharaditas de sal
½ cucharadita de ajo en polvo
1. Mezcle todos los ingredientes.
2. Marine la carne en la mezcla durante un mínimo de 4 horas.
Mejore el sabor
GUÍA DE COMBINACIÓN DE MADERA
NOTA: las diferentes variedades de madera poseen diferentes sabores y recomendamos combinar las maderas con las
carnes que desea cocinar.
MADERA SABOR
ALISO SUAVE
PECANA MEDIO
FUERTEMEZQUITE
SUAVEARCE
MEDIOROBLE
FUERTE
NOGAL
AMERICANO
MEDIOMANZANO
SUAVECEREZO
VEGETALESMARISCOSAVECERDORES
52
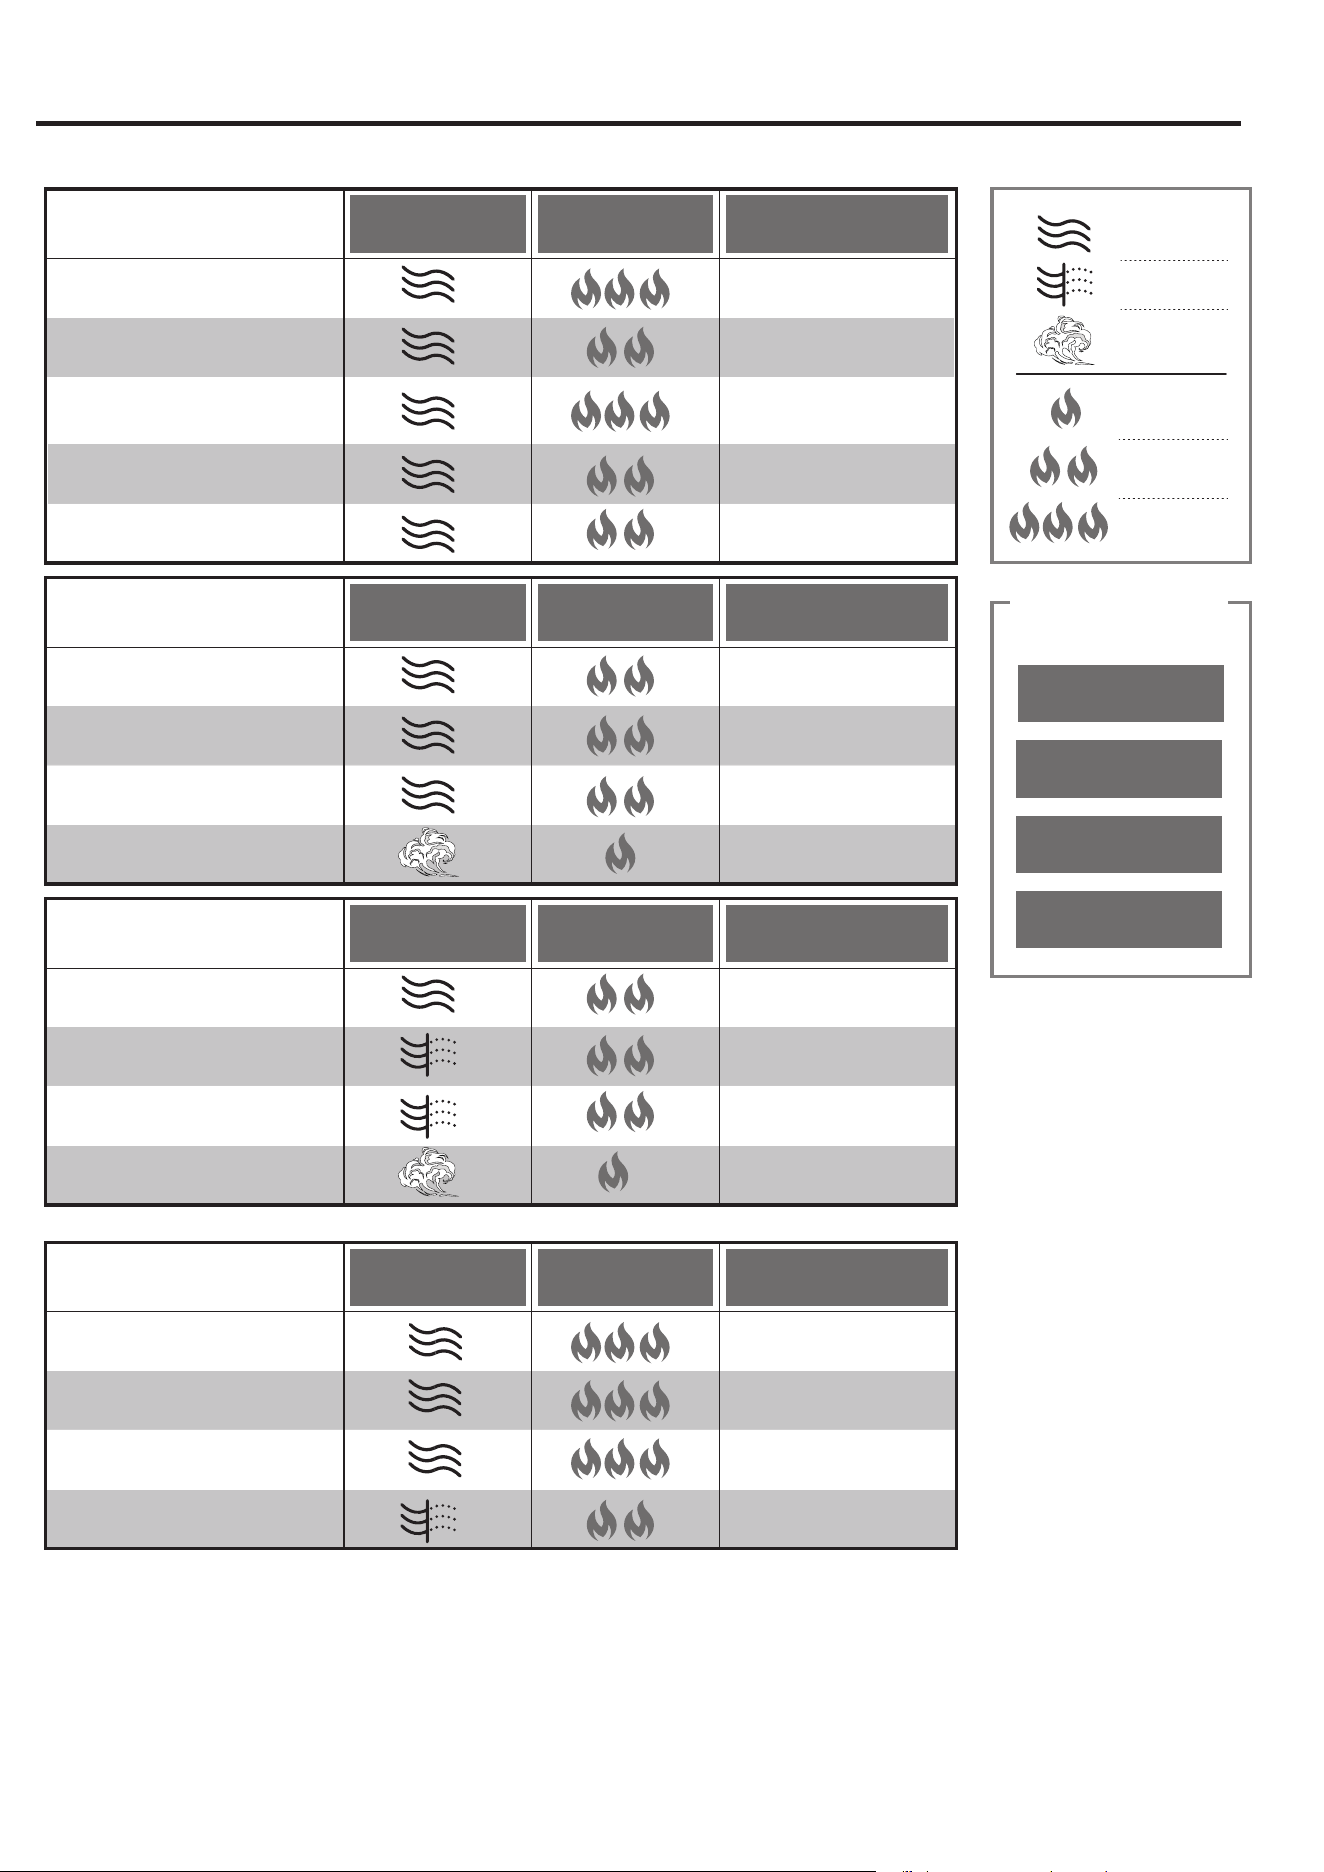
53
INSTRUCCIONES DE FUNCIONAMIENTO (CONTINUACIÓN)
Pautas de cocción
TIEMPO DE COCCIÓN
PROMEDIO
NIVEL DE CALORTIPO DE CALOR
MARISCOS
GRANDE
CAMARONES
4 A 6 MIN.
42.52 G
VIEIRA
4 A 6 MIN.
2.54 CM DE GROSOR
PESCADO, FILETE
5 A 10 MIN.
0.45 KG
PESCADO, ENTERO
15 A 20 MIN.
TIEMPO DE COCCIÓN
PROMEDIO
NIVEL DE CALORTIPO DE CALOR
POLLO
113.39 G - SIN HUESOS, SIN PIEL
PECHUGA O MUSLO DE POLLO
8 A 12 MIN.
85.04 G A 170.09 G - CON HUESO*
MUSLO O PATA DE POLLO
35 A 45 MIN.
283.49 G A 340.19 G - CON HUESO*
PECHUGA DE POLLO
35 A 45 MIN.
3.62 KG
POLLO ENTERO*
3 A 5 HORAS
TIEMPO DE COCCIÓN
PROMEDIO
NIVEL DE CALORTIPO DE CALOR
CERDO
2.54 CM DE GROSOR
CHULETA DE CERDO, MEDIO
8 A 10 MIN.
3.62 KG
LOMO/PALETA DE CERDO
12 HORAS
ENLACE DE 85.04 G
SALCHICHA
10 A 13 MIN.
0.45 KG
SOLOMILLO DE CERDO
15 A 20 MIN.
TIEMPO DE COCCIÓN
PROMEDIO
NIVEL DE CALORTIPO DE CALOR
RES
2.54 CM DE GROSOR - FILET MIGNON, RIBEYE,
NEW YORK STRIP Y PORTERHOUSE
BISTEC, MEDIANO
6 A 8 MIN.
2.54 CM DE GROSOR
FILETE DE FALDA, MEDIANO
4 A 6 MIN.
19.05 MM DE GROSOR
HAMBURGUESA
8 A 10 MIN.
113.39 G
PERRO CALIENTE
5 A 7 MIN.
2.54 CM DE GROSOR
BISTEC COLGADOR, MEDIANO
8 A 10 MIN.
*EL POLLO CON HUESO DEBE COCINARSE O "DORARSE" INICIALMENTE CON CALOR DIRECTO DURANTE VARIOS MINUTOS ANTES DE TRANSFERIRSE A CALOR INDIRECTO.
TEMPERATURAS
INTERNAS MÍNIMAS
SEGURAS DEL USDA
63°C
PESCADOS Y MARISCOS:
71°C
CARNE MOLIDA DE RES
O CERDO:
74°C
POLLO:
FILETES DE CARNE DE
RES O CERDO
O CHULETAS:
63°C
Los tiempos de cocción descritos
en esta tabla son pautas
generales que pueden variar
según el grado de cocción
deseado, el grosor, la cantidad de
cada elemento que se cocina, la
parrilla o el estilo de asado, la
temperatura ambiente o el clima.
Recomendamos utilizar siempre
un termómetro de cocina para
medir la temperatura interna de
todos los productos cárnicos.
CALOR
DIRECTO
CALOR
INDIRECTO
CALOR BAJO
66° C A 121 °C
CALOR
MODERADO
149 °C A 232 °C
CALOR ALTO
232 °C A MÁS
DE 288 °C
HUMO
TECLA DE CALOR
APROX. 90 MIN/0.45 KG

54
INSTRUCCIONES DE FUNCIONAMIENTO (CONTINUACIÓN)
Consejos y advertencias generales para asar a la parrilla
Controle el calor con cantidad y tipo de combustible, compuertas dobles y rejilla de fuego ajustable. Ajuste la rejilla un
extremo a la vez. La madera arde más que el carbón. Un mayor flujo de aire ayuda a generar más calor.
Se puede agregar carbón adicional o leña para ahumar mientras se cocina. Use guantes y delantal cuando opere la
parrilla.
Utilice únicamente maderas duras naturales diseñadas para cocinar. Por lo general, se pueden encontrar selecciones
adecuadas en las tiendas de comestibles y en las tiendas de parrilladas al aire libre.
Al utilizar una bandeja para agua, compruebe el nivel de agua cuando cocine más de 4 horas o cuando no oiga que el
agua hierve a fuego lento. Añada agua moviendo la carne y vertiendo el agua a través de las rejillas de cocción en la
bandeja para agua.
Para reducir las llamaradas, cocine con la campana hacia abajo.
Cuando cocine con carbón, deje la cubierta de la parrilla abierta durante el encendido inicial y hasta que el carbón se
convierta en cenizas.
La cubierta de la parrilla debe permanecer abierta siempre que el medidor de temperatura supere los 260 °C.
Coloque siempre el carbón encima de la rejilla para carbón y no directamente en el fondo de la parrilla.
No utilice carbón de autoencendido, ya que le dará a los alimentos un sabor poco natural.
Las cenizas que se dejan en la parrilla durante demasiado tiempo entre usos absorberán la humedad y provocarán
oxidación. Asegúrese de vaciar las cenizas después de que la parrilla se haya enfriado. El acero y el hierro fundido sin
recubrimiento se oxidarán si no se cuidan adecuadamente.
En la PINTURA PARA EXTERIORES, quite el óxido con un cepillo de alambre y retoque con pintura para altas
temperaturas, disponible en la mayoría de las ferreterías/tiendas de automóviles.
El medidor de calor puede retener humedad, que se vaporizará durante la cocción. El medidor se puede retirar
y calibrar en un horno.
Para lograr una parrilla más hermética, rellene los orificios no deseados con tuercas y pernos (no incluidos).
Coloque una lata de metal en el colector de goteo de grasa o en el estante inferior debajo del orificio de la parrilla para
recolectar los jugos que gotean.
El acumulador de humo y los reguladores laterales estarán calientes. Toque únicamente con guantes protectores.
Antes de usar su parrilla por primera vez, debe precurar las rejillas de hierro fundido.
Después de cada uso, cubra las rejillas interiores y el metal desnudo con aceite vegetal mientras esté caliente para
reducir la posibilidad de oxidación. El precurado adecuado y regular protegerá contra la oxidación y prolongará la vida
útil de su parrilla y las rejillas de cocción.
La parrilla goteará aceite durante el proceso de precurado y durante varios usos posteriores. Esto es normal.
Nunca exceda los 260 °C porque esto dañará el acabado y contribuirá a la oxidación.
La pintura no está garantizada y requerirá retoques.
Esta parrilla no tiene garantía contra la oxidación.
NO utilice líquido encendedor, gasolina, queroseno, alcohol u otro acelerante para encender el carbón. El uso de
cualquiera de estos productos o similares puede causar una explosión y ocasionar lesiones personales graves.
NOTA: el humo puede salir de otras zonas que no sean el acumulador de humo. Esto no afectará a la cocción.
NOTA: muchas variables (temperatura exterior de cocción, cantidad de carbón, cantidad de veces que se retira
la tapa de domo, la proximidad de los alimentos a la fuente de calor, etc.) afectarán los tiempos de cocción
reales. El termómetro para carne debe usarse como guía y variará según el tipo de cocción (ahumar o asar a la
parrilla) y dónde se coloca el carbón. Cuando use un termómetro para carnes, coloque la sonda hasta el medio
de la parte más gruesa de la carne, asegurándose de que no toque grasa ni hueso. Espere cinco minutos para
que el termómetro registre correctamente la temperatura.

W PRECAUCIÓN:
1. La limpieza y el mantenimiento deben realizarse cuando la parrilla está fría y una vez que se hayan quitado
las cenizas correctamente.
2. NO limpie ninguna pieza de la parrilla en un horno con autolimpieza. El calor extremo daña el acabado.
Avisos
1. Esta parrilla se debe limpiar e inspeccionar minuciosamente en forma periódica.
2. Los limpiadores abrasivos dañarán este producto.
3. Nunca use limpiador de hornos para limpiar ninguna pieza de esta parrilla.
Cómo terminar
Cuando haya terminado de asar, puede apagar su parrilla cerrando ambos reguladores de tiro y dejando que el fuego se
extinga. Sea paciente. Esto puede tardar una hora o más.
Antes de cada uso
1. Mantenga el área de la parrilla limpia y libre de materiales combustibles, gasolina y otros vapores o líquidos inflamables.
2. Consulte las instrucciones de limpieza adecuadas a continuación.
Limpieza de superficies
1. Espere a que la parrilla se enfríe por completo.
2. Limpie las superficies con un detergente para vajilla suave o bicarbonato de sodio mezclado con agua.
3. Para las manchas difíciles, use un desengrasante cítrico y una escobilla de nailon.
4. Limpie y enjuague con agua.
5. Deje secar al aire.
Vaciado de las cenizas y la bandeja para cenizas
W PRECAUCIÓN: SOLO VACÍE LAS CENIZAS MIENTRAS LA PARRILLA NO ESTÉ EN USO.
Una vez que el fuego se haya extinguido por completo, debe esperar varias horas antes de vaciar las cenizas para
asegurarse de que no sigan calientes y supongan un peligro de quemadura.
1. Retire de la rejilla las cenizas que no hayan caído en la bandeja para cenizas. (Si hay trozos de carbón parcialmente
quemados en la rejilla del fuego, puede guardarlos para la próxima vez. Aún sirven).
2. Golpee los lados del tazón para desprender las cenizas que se encuentran en los lados.
3. Desenganche la bandeja para cenizas de la parte inferior de la parrilla y deslícela hacia la parte delantera.
4. Dé unos cuantos golpes rmes a la bandeja para cenizas con el n de desprender las cenizas que puedan estar
pegadas.
5. Coloque las cenizas en un recipiente metálico y cúbralas con agua para asegurarse de que no haya brasas encendidas
y luego podrá deshacerse de ellas.
PRECAUCIÓN: el carbón es poroso y retiene la humedad. NO deje el carbón en la parrilla mientras no la utiliza. El
carbón y las cenizas que quedan en el interior de la bandeja para cenizas pueden reducir la vida útil de la parrilla.
Antes de almacenar
1. Espere a que la parrilla se enfríe por completo.
2. Limpie todas las superficies.
3. Si almacena la parrilla en el interior, cúbrala y almacénela en un lugar fresco y seco.
4. Si almacena la parrilla en el exterior, cúbrala con una cubierta para parrilla para protegerla del clima.
CUIDADO Y MANTENIMIENTO
55

56
GARANTÍA LIMITADA
Se requiere un comprobante de compra para acceder a este programa de garantía, que entra en vigencia a partir de la fecha
de compra. Los clientes deberán abonar costos de piezas, envío y manipulación si no pueden proporcionar el comprobante
de compra o una vez vencida la garantía.
Si tiene preguntas o problemas, puede llamar al Departamento de Servicio al Cliente al 800-963-0211, de lunes a domingo de
8 a.m. a 8 p.m., hora estándar del Este. También puede ponerse en contacto con nosotros a través de [email protected].
Garantía limitada
1 año de garantía para todas las piezas que afectan el funcionamiento de la parrilla debido a daños.
Provisiones de la garantía:
Esta garantía no es transferible y no cubre fallas causadas por mal uso, o instalación y mantenimiento inadecuados.
Esta garantía se limita al reemplazo de piezas defectuosas. No nos hacemos responsables de daños accidentales
o resultantes ni de costos de mano de obra.
Esta garantía no cubre la corrosión ni la decoloración una vez utilizada la parrilla, o debido a la falta de mantenimiento, los
entornos adversos, los accidentes, las alteraciones, el abuso ni la negligencia.
Esta garantía no cubre ningún daño causado por el calor, los limpiadores abrasivos y químicos ni ningún daño en otros
componentes utilizados en la instalación u operación de la parrilla.
Algunos estados no permiten la exclusión o limitación de los daños accidentales o resultantes, de modo que las exclusiones
o limitaciones de estos daños pueden no aplicarse en su caso. Esta garantía le otorga derechos legales específicos, pero
podría tener también otros derechos que varían según el estado.
Impreso en China
LISTA DE PIEZAS DE REPUESTO
PIEZA DESCRIPCIÓN PIEZA #
CUBIERTA POR LA
GARANTÍA
1
Medidor de
temperatura
B0104-M13 SÍ
2 Manija de la tapa C3032-070 SÍ
3 Acumulador de humo C2230-010 SÍ
4 Tapa C3032-080 SÍ
5 Rejilla para calentar C2303-040 SÍ
6 Rejilla de cocción C2230-040 SÍ
7 Bandeja para carbón C2230-050 SÍ
8
Repisa lateral
izquierda
C2303-050 SÍ
9 Fuente inferior C2303-060 SÍ
10
Mango de la bandeja
para carbón
C2230-080 SÍ
11
Mango de la rejilla de
cocción
C1681-218 SÍ
12 Estante frontal C2303-080 SÍ
13 Soporte de la pata C2303-090 SÍ
14 Pata larga C2303-100 SÍ
15 Pata corta C2303-110 SÍ
PIEZA DESCRIPCIÓN PIEZA #
CUBIERTA POR LA
GARANTÍA
16 Pata* B0305-M00 SÍ
17 Malla inferior C2303-120 SÍ
18 Tapacubos B0302-020 SÍ
19 Eje C2303-130 SÍ
20 Rueda C2303-140 SÍ
21 Tapa del SFB C3032-010 SÍ
22
Manija de la tapa del
SFB
C3032-090 SÍ
23
Parte superior del
cuerpo del SFB
C3032-020 SÍ
24 Cuerpo del SFB C3032-030 SÍ
25
Rejilla de cocción del
SFB
C3032-040 SÍ
26
Bandeja para carbón
del SFB
C3032-050 SÍ
27 Mango lateral del SFB C3032-060 SÍ
28
Regulador de tiro del
SFB
B0105-C00 SÍ
29 Tapón para orificios C3032-100 SÍ
Para obtener piezas de repuesto, llame al Departamento de Servicio al Cliente al 800-963-0211, de lunes a domingo de 8 a.m. a 8 p.m.,
hora estándar del Este. También puede ponerse en contacto con nosotros a través de [email protected].
* Preensamblada