Operating and Installation
Instructions
Induction Cooktops
It is essential to read the operating and installation instructions be-
fore setup, installation, and commissioning. This prevents both per-
sonal injury and damage to the appliance.
en-US, CA M.-Nr. 12 161 430

Contents
2
IMPORTANT SAFETY INSTRUCTIONS ............................................................ 6
Sustainability and environmental protection .................................................. 16
Overview............................................................................................................. 17
Cooktop............................................................................................................... 17
KM7735FL.................................................................................................... 17
KM7745FL.................................................................................................... 18
KM7755FL.................................................................................................... 19
Controls and display ........................................................................................... 20
Cooking zone data .............................................................................................. 21
Power management system................................................................................ 29
Operation............................................................................................................. 30
Networking .......................................................................................................... 31
Miele@home................................................................................................... 31
Direct connection with the ventilation hood................................................... 31
Functions............................................................................................................. 32
Con@ctivity3.0 .............................................................................................. 32
Permanent pan recognition ............................................................................ 32
Pan and pan size recognition......................................................................... 32
PowerFlex cooking area ................................................................................. 32
Booster........................................................................................................... 32
Stop&Go....................................................................................................... 32
Additional power levels .................................................................................. 32
Auto heat-up .................................................................................................. 32
Timer .............................................................................................................. 32
System lock.................................................................................................... 33
Safety lock...................................................................................................... 33
Keeping warm ................................................................................................ 33
Wipe protection .............................................................................................. 33
Programming.................................................................................................. 33
Demo mode.................................................................................................... 33
Residual heat indicator................................................................................... 33
Safety shut-off................................................................................................ 34
Overheating protection................................................................................... 35
Commissioning.................................................................................................. 36
Unpacking the cooktop....................................................................................... 36
Cleaning the cooktop for the first time................................................................ 36
Switching on the cooktop for the first time ......................................................... 36
Miele@home ........................................................................................................ 37
Installing the Miele app .................................................................................. 37
Setting up Miele@home ................................................................................. 37
Establishing a direct connection with the ventilation hood................................. 41

Contents
3
Operation............................................................................................................ 43
Safety notes for operation................................................................................... 43
Switching the cooktop on ................................................................................... 44
Switching off a cooking zone/the cooktop.......................................................... 44
Positioning cookware .......................................................................................... 44
Power level .......................................................................................................... 46
Setting the power level................................................................................... 46
Setting the power level – extended power level range................................... 46
Changing the power level............................................................................... 46
Manually switching PowerFlex cooking zones on together/separately............... 46
Booster................................................................................................................ 47
Activating the Booster function...................................................................... 47
Deactivating the Booster function.................................................................. 47
Activating/deactivating Stop&Go ...................................................................... 47
Auto heat-up ....................................................................................................... 48
Activating Auto heat-up ................................................................................. 48
Deactivating Auto heat-up ............................................................................. 48
Timer ................................................................................................................... 49
Setting timer durations................................................................................... 49
Setting the kitchen timer ................................................................................ 49
Changing the kitchen timer ............................................................................ 49
Deleting the kitchen timer .............................................................................. 49
Setting the switch-off time ............................................................................. 50
Changing the switch-off time ......................................................................... 50
Deleting the switch-off time ........................................................................... 50
Setting multiple switch-off times.................................................................... 50
Displaying switch-off times ............................................................................ 50
Using both timer functions at the same time ................................................. 51
System lock......................................................................................................... 52
Activating the system lock ............................................................................. 52
Deactivating the system lock ......................................................................... 52
Safety lock........................................................................................................... 52
Activating the safety lock ............................................................................... 52
Deactivating the safety lock ........................................................................... 52
Keeping warm ..................................................................................................... 53
Activating/deactivating the Keeping warm function ...................................... 53
Keeping warm temperatures for various applications.................................... 53
Tips for keeping food warm ........................................................................... 53
Wipe protection ................................................................................................... 53
Activating wipe protection.............................................................................. 53
Deactivating wipe protection.......................................................................... 53

Contents
4
Cooktop data ...................................................................................................... 54
Displaying the model identifier/serial number................................................ 54
Displaying the software version ..................................................................... 54
Activating/deactivating demo mode ................................................................... 54
Setting ranges.................................................................................................... 55
Good to know .................................................................................................... 56
How induction cooktops work ............................................................................ 56
Noises.................................................................................................................. 56
Cookware ............................................................................................................ 57
Customizing settings ........................................................................................ 59
Cleaning and care ............................................................................................. 63
Frequently asked questions ............................................................................. 65
Messages in the display...................................................................................... 65
Unexpected behavior .......................................................................................... 67
Unsatisfactory results.......................................................................................... 69
General problems or technical faults................................................................... 69
Customer Service.............................................................................................. 70
Contact in the event of a fault ............................................................................. 70
Data plate ............................................................................................................ 70
Appliance warranty and product registration ...................................................... 70
Optional accessories ........................................................................................ 71
Installation.......................................................................................................... 72
Safety notes for installation................................................................................. 72
Additional safety notes for proud installation................................................. 74
Additional safety notes for flush installation................................................... 75
Safety distances.................................................................................................. 76
Building-in dimensions for proud installation...................................................... 80
KM7735FL.................................................................................................... 80
KM7745FL.................................................................................................... 81
KM7755FL.................................................................................................... 82
Installation dimensions for flush installation........................................................ 83
KM7735FL.................................................................................................... 83
KM7745FL.................................................................................................... 84
KM7755FL.................................................................................................... 85
Installing a proud cooktop................................................................................... 86
Installing the cooktop flush with the countertop ................................................. 87
Electrical connection ........................................................................................... 88

IMPORTANT SAFETY INSTRUCTIONS
6
This cooktop complies with all relevant local and national safety
requirements. Inappropriate use can, however, lead to personal in-
jury and material damage.
Read the operating and installation instructions carefully before
using the cooktop. They contain important information on safety,
installation, use and maintenance. This prevents both personal in-
jury and damage to the cooktop.
When installing the cooktop, Miele expressly and strongly advises
that you read and follow the instructions under “Installation”, as
well as in the “IMPORTANT SAFETY INSTRUCTIONS”.
Miele cannot be held liable for injury or damage caused by non-
compliance with these instructions.
Keep these instructions in a safe place and pass them on to any
future owner.
Appropriate use
This cooktop is intended for domestic use and use in other similar
environments.
This cooktop is not intended for outdoor use.
The cooktop is intended for domestic use only to prepare food
and keep it warm. Any other use may be dangerous.
Persons (including children) who lack physical, sensory or mental
abilities, or experience with the appliance should not use it without
supervision or instruction by a responsible person.

IMPORTANT SAFETY INSTRUCTIONS
7
Safety with children
Do not leave children unattended: Children should not be alone or
unsupervised in the area where the appliance is installed. Do not al-
low them to sit or stand on the appliance.
Be sure to supervise any children in the vicinity of the cooktop,
and do not let them play with it.
The cooktop gets hot when in use and remains hot for some time
after being turned off. Keep children away from the appliance until it
has cooled down and is no longer a burn hazard.
Danger of burning. Do not store anything which might arouse a
child’s interest in storage areas above or behind the cooktop. Other-
wise they could be tempted to climb onto the cooktop.
Risk of burning or scalding. Turn pot and pan handles inward, so
children cannot pull them down and be burned.
Danger of suffocation. While playing, children may become entan-
gled in packaging material (such as plastic wrapping) or pull it over
their head, presenting the risk of suffocation. Keep packaging mate-
rial away from children.
Activate the system lock to ensure that children cannot turn on the
appliance inadvertently. Use the safety lock when the cooktop is in
use to prevent children from altering the settings selected.

IMPORTANT SAFETY INSTRUCTIONS
8
Technical safety
Proper installation: Make sure that your appliance has been in-
stalled correctly and that it has been grounded by a qualified techni-
cian.
Maintenance by the user: Never repair or replace any part of the
appliance unless the instructions specifically recommend doing so.
Service work should only be performed by a qualified technician.
Unauthorized installation, maintenance, and repairs can cause
considerable danger for the user. Installation, maintenance, and re-
pairs must only be carried out by a Miele authorized technician.
Damage to the cooktop can compromise your safety. Check the
cooktop for visible signs of damage. Do not use the cooktop if it is
damaged.
Temporary or permanent operation on an autonomous power sup-
ply system or a power supply system that is not synchronized with
the grid power supply (e.g., island networks, back-up systems) is
possible. A prerequisite for operation is that the power supply sys-
tem complies with national and local codes.
The function and operation of the protective measures provided in
the domestic electrical installation and in this Miele product must
also be maintained in isolated operation or in operation that is not
synchronized with the grid power supply, or these measures must be
replaced by equivalent measures in the installation.
Be certain your appliance is properly installed and grounded by a
qualified technician. To guarantee the electrical safety of this appli-
ance, continuity must exist between the appliance and an effective
grounding system. It is imperative that this basic safety requirement
be met. If there is any doubt, have the electrical system of the house
checked by a qualified electrician.

IMPORTANT SAFETY INSTRUCTIONS
9
To avoid damaging the cooktop, make sure that the connection
data (voltage and frequency) on the data plate correspond to the
building's power supply before connecting the appliance.
When in doubt, consult a qualified electrician.
Do not connect the appliance to the electrical supply with a power
bar or extension cord. These are a fire hazard and do not guarantee
the required safety of the appliance.
For safety reasons, the cooktop may only be used when it has
been fully installed.
This appliance must not be used in a non-stationary location (e.g.
on a ship).
Any contact with live connections or tampering with the electrical
or mechanical components of the cooktop will endanger your safety
and may lead to appliance malfunctions.
Do not open the casing of the cooktop under any circumstances.
Any repairs not performed by a Miele authorized service techni-
cian will void the warranty.
Defective components should be replaced by Miele original parts
only. Only with these parts can safety of the appliance be assured as
intended by the manufacturer.
The appliance is not intended for use with an external timer switch
or a remote control system.
The cooktop must be connected to the electricity supply by a
qualified electrician (see “Installation – Electrical connection”).
If the power supply cord is damaged, it must be replaced with a
special power supply cord by a qualified electrician (see “Installation
– Electrical connection”).

IMPORTANT SAFETY INSTRUCTIONS
10
The appliance must be completely disconnected from the electric-
ity supply during installation, maintenance and repair work. Ensure
that power is not supplied to the appliance until after it has been in-
stalled or until any maintenance or repair work has been carried out.
Disconnect by
- removing the fuse,
- “tripping” the circuit breaker, or
- unplugging the unit (if equipped with plug). Pull the plug not the
cord.
Danger of electric shock. Do not use the cooktop if it is faulty, or if
the ceramic surface is cracked, chipped, or damaged in any way.
Switch it off immediately. Disconnect the cooktop from the electrical
power supply. Contact Miele Service.
If the cooktop is installed behind a cabinet door, do not close the
door while the cooktop is in operation. Heat and moisture can build
up behind the closed door and cause damage to the cooktop, cabi-
netry, and flooring. Do not close the door until the residual heat indi-
cators go out.

IMPORTANT SAFETY INSTRUCTIONS
11
Correct use
The cooktop gets hot when in use and remains hot for a while af-
ter being turned off. There is a potential hazard until the residual heat
indicator goes out.
Never leave the appliance unattended at high heat settings–
Boilover causes smoking and greasy spillovers that may ignite.
Oil and fat can catch fire if overheated. Never leave the appliance
unattended when cooking with oil and fat. If the oil or fat catches
fire, do not attempt to put the flames out with water.
Turn off the cooktop and smother the flames using a lid or a suitable
fire blanket.
Do Not Use Water on Grease Fires–Smother fire or flame or use
dry chemical or foam-type extinguisher.
Storage in or on the appliance: Flammable materials should not be
stored in an oven or in the vicinity of the appliance.
The flames could set the grease filters of a ventilation hood on fire.
Do not flambé under a ventilation hood.
Spray canisters, aerosols and other inflammable substances can
ignite when heated. Therefore do not store such items or substances
in a drawer under the appliance. Cutlery inserts must be heat-resis-
tant.
Never heat empty cookware.
Do not heat or can food in closed containers, such as tins or
sealed jars, on the cooktop, as pressure will build up in the container
and cause it to explode.
If the cooktop is covered, there is a risk that the material of the
cover will ignite, explode or melt if the cooktop is still hot or if turned
on inadvertently. Never cover the cooktop with a board, cloth or pro-
tective sheet.

IMPORTANT SAFETY INSTRUCTIONS
12
If the cooktop is turned on or accidentally turned on or if it is still
hot, metal objects on the cooktop can heat up. Other items may melt
or catch fire. Damp lids can become attached to the cooktop by
suction. Do not store items on the cooktop! Always turn the cooking
zones off after use!
You could burn yourself on the hot cooktop. Protect your hands
with heat-resistant pot holders or gloves when handling hot pots and
pans. Do not let them get wet or damp, as this causes heat to trans-
fer through the material more quickly with the risk of scalding or
burning yourself.
When using an electrical appliance, e.g. a hand mixer, near the
cooktop, make sure that the power cable does not come into con-
tact with the hot cooktop. The cable's insulation could become dam-
aged.
Grains of salt, sugar and sand (e.g. from cleaning vegetables) can
cause scratches if they get under pan bases. Make sure that the ce-
ramic surface is clean before placing pans on it.
Even a light object can cause damage to the ceramic cooktop in
certain circumstances. Do not drop anything on the ceramic surface.
Do not place hot pans on the sensor buttons and display as this
could cause damage to the electronics underneath. Do not place hot
pans on the area around the display.
Do not allow solid or liquid sugar, or pieces of plastic or aluminum
foil to get onto the cooktop when it is hot, as they can damage the
ceramic surface when it cools down. If this should occur, turn off the
appliance immediately and scrape off all the sugar, plastic or alu-
minum residues while still hot, using a shielded scraper blade. Use
pot holders. Allow the ceramic surface to cool down before cleaning
with a suitable ceramic cleaning agent.
Pans that boil dry can cause damage to the ceramic glass. Do not
leave the appliance unattended while it is being used.

IMPORTANT SAFETY INSTRUCTIONS
13
Pots and pans with bases with pronounced edges or ridges can
scratch the ceramic surface. Only use pots and pans with smooth
bases.
Lift pans into position on the cooktop. Sliding them into place can
cause scuffs and scratches.
Wear Proper Apparel–Loose-fitting or hanging garments should
never be worn while using the appliance.
Because induction heating works so quickly, the temperature can
quickly reach the ignition point of oils and fats. Never leave the
cooktop unattended when it is turned on.
Do not heat oils and fats for longer than 1minute, and never use
the booster.
For people who have a heart pacemaker: Please note that the area
immediately surrounding the cooktop is electromagnetically charged.
It is very unlikely to affect a pacemaker. However, if in any doubt,
consult the manufacturer of the pacemaker or your doctor.
Objects affected by electromagnetic fields, for instance credit
cards, CDs and calculators, should be kept away from the cooktop
when it is on.
Metal utensils stored in a drawer under the cooktop can become
hot if the appliance is used intensively for a long time.
The cooktop is equipped with a cooling fan. If a drawer is located
directly underneath the cooktop, ensure that there is sufficient space
between the drawer and its contents and the underside of the cook-
top in order to ensure sufficient ventilation for the cooktop.
If a drawer is located directly underneath the cooktop, do not
store any pointed or small items, paper, napkins, etc. in the drawer.
They could get in through the ventilation slots or be sucked into the
casing by the fan and damage the fan or impair cooling.

IMPORTANT SAFETY INSTRUCTIONS
14
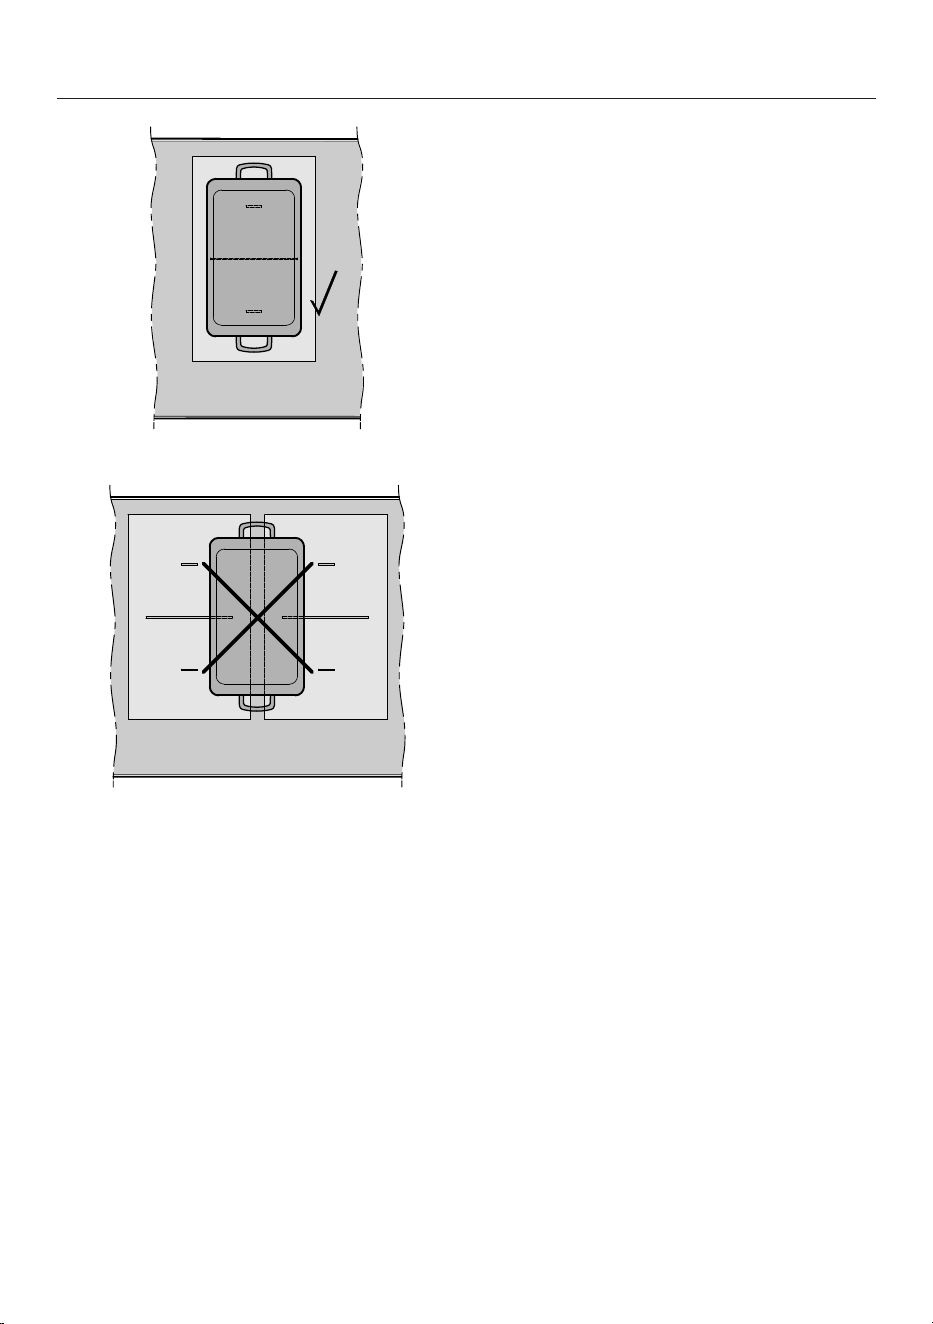
Do not use 2items of cookware on a cooking zone or extended
zone at the same time.
If the cookware only partially covers a cooking zone, the handle
could become very hot.
Always place cookware in the middle of the cooking zone.
Wet sponges or cloths can cause burns due to hot steam if they
are used to wipe spilled food off a hot cooktop. Some cleansers can
emit hazardous vapors if they are applied to a hot surface. Be careful
when cleaning the cooktop.
If the cooktop is damaged, cleansers or spilled food can penetrate
the glass surface and cause a short-circuit. Never cook on a dam-
aged cooktop. Contact an electrician immediately.
If an induction adapter plate is used for cookware, the induction
generators may be damaged or even destroyed. Do not use induc-
tion adapter plates.

IMPORTANT SAFETY INSTRUCTIONS
15
Cleaning and maintenance
Do not use a steam cleaner to clean the cooktop.
The steam may reach electrical components and cause a short cir-
cuit.
Sustainability and environmental protection
16
Energy-saving tips
- Cook in covered pots and pans if
possible. This prevents heat escaping
unnecessarily.
- Cook with as little water as possible.
- Once food has come to a boil or the
pan is hot for frying, reduce the heat
to a lower power level.
- Use a pressure cooker to reduce
cooking durations.
Disposal of the packing mate-
rial
The cardboard box and packing materi-
als protect the appliance during ship-
ping. They have been designed to be
biodegradable and recyclable.
Ensure that any plastic wrappings,
bags, etc. are disposed of safely and
kept out of the reach of children. Dan-
ger of suffocation!
Disposal of your old appliance
Electrical and electronic appliances
contain valuable materials. They also
contain certain substances, compounds
and components which were essential
for the proper functioning and safe use
of the equipment. Handling these mate-
rials improperly by disposing of them in
your household waste can be harmful to
your health and the environment. There-
fore, please do not dispose of your old
appliance with regular household waste
and follow local regulations on proper
disposal.
Consult with local authorities, dealers or
Miele in order to dispose of and recycle
electrical and electronic appliances.
Miele assumes no responsibility for
deleting any personal data left on the
appliance being disposed. Please en-
sure that your old appliance is kept
away from children until removal. Ob-
serve safety requirements for appli-
ances that may tip over or pose an en-
trapment hazard.
Overview
17
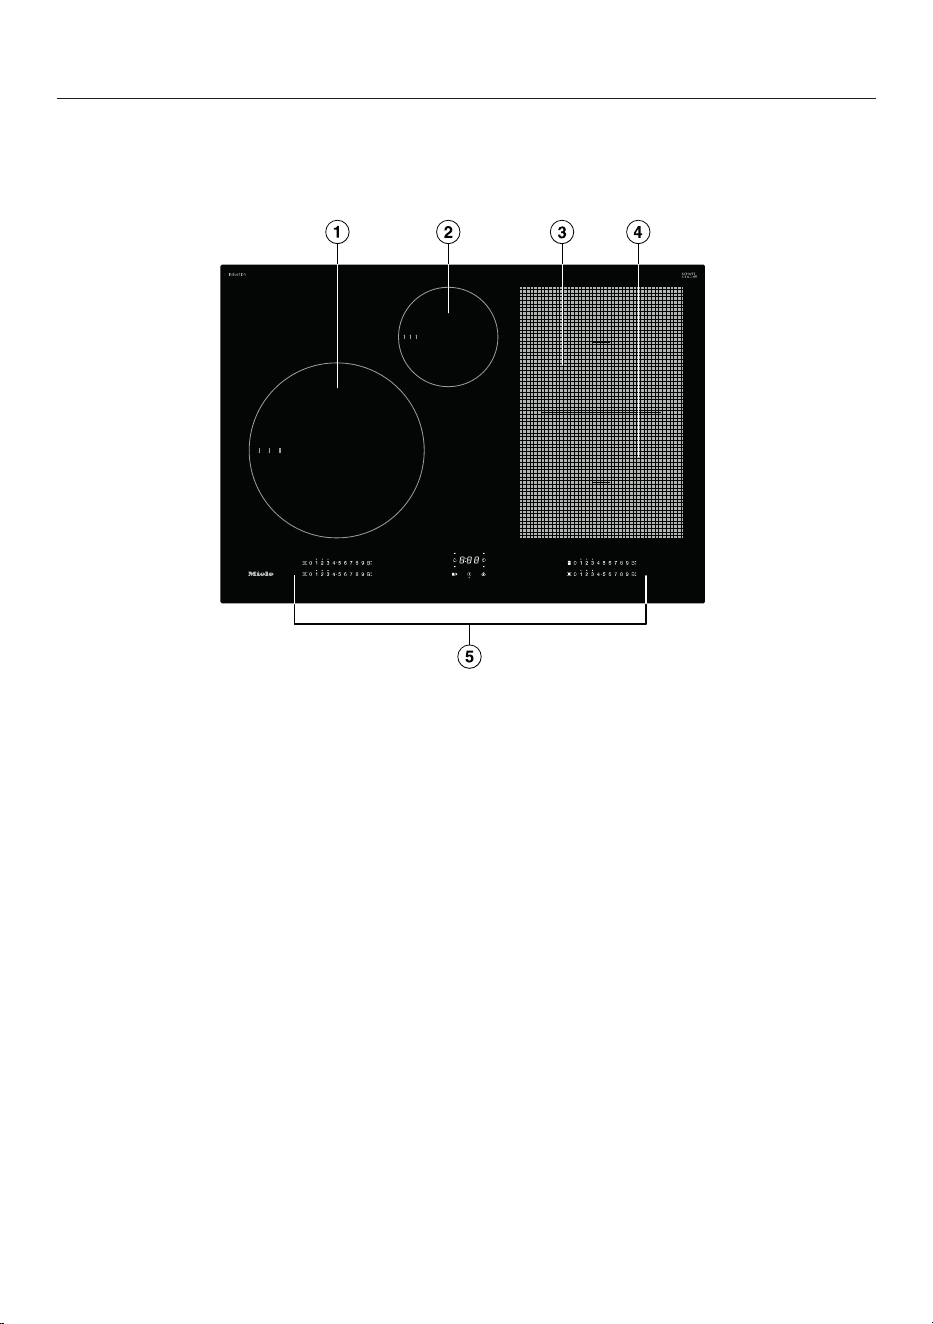
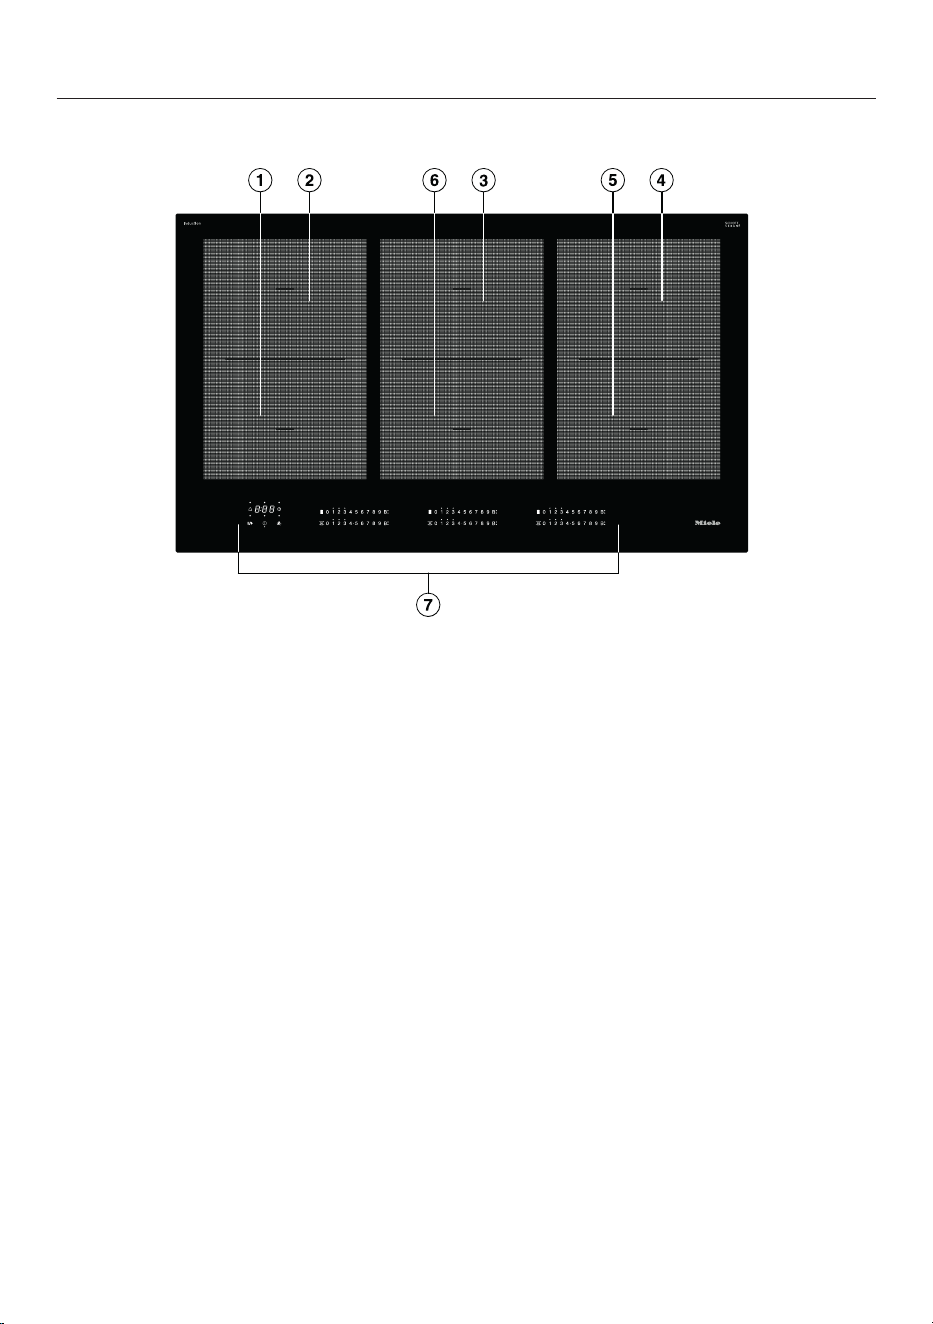
Cooktop
KM7735FL
a
Cooking zone with TwinBooster
b
Cooking zone with TwinBooster
c
PowerFlex cooking zone with TwinBooster
can be combined with PowerFlex cooking zone to form PowerFlex cooking
area
d
PowerFlex cooking zone with TwinBooster
e
Controls and indicators
Overview
18
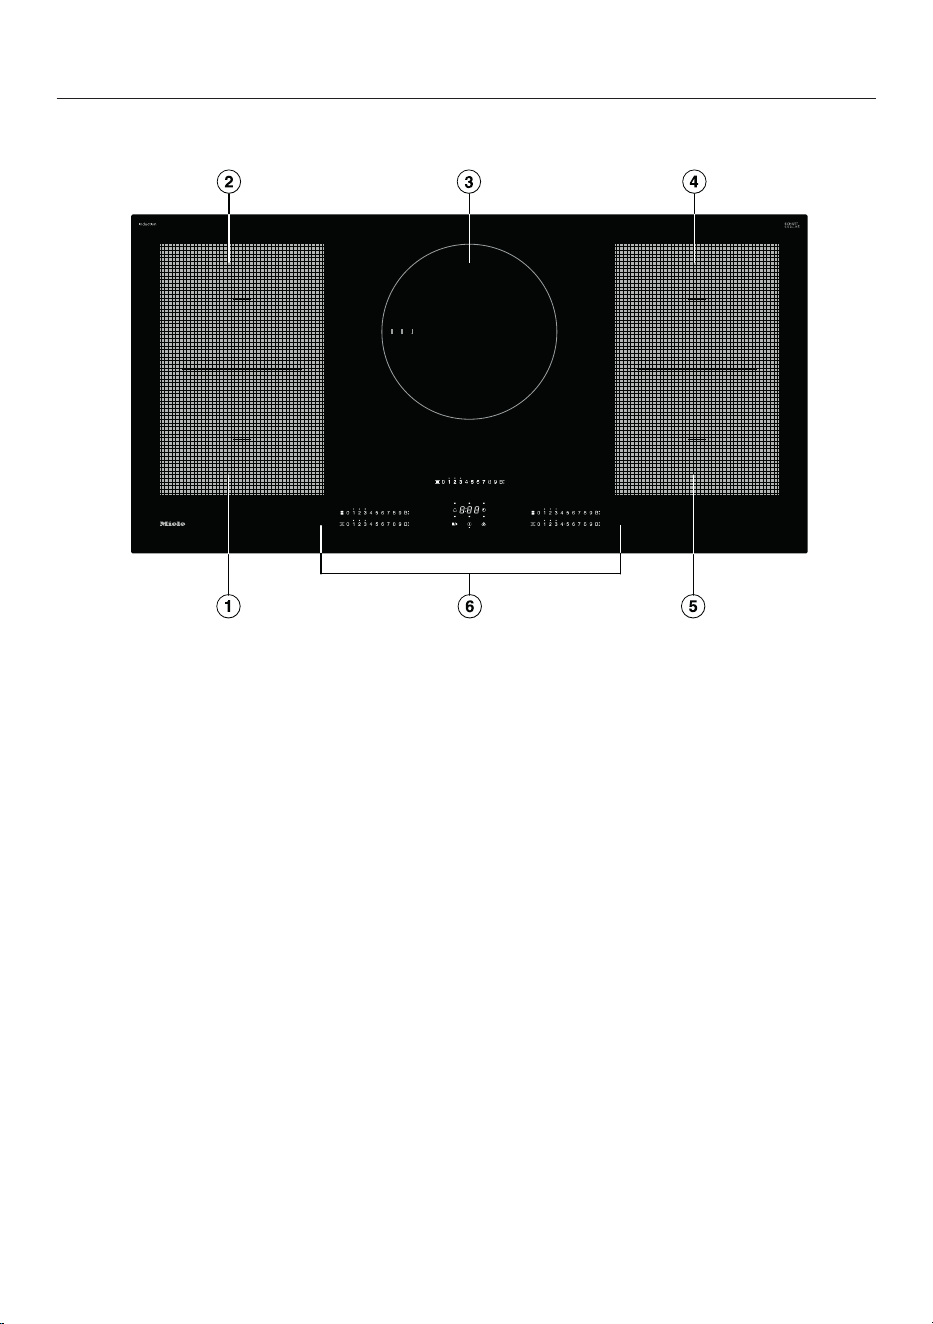
KM7745FL
a
PowerFlex cooking zone with TwinBooster
b
PowerFlex cooking zone with TwinBooster
can be combined with PowerFlex cooking zone to form PowerFlex cooking
area
c
PowerFlex cooking zone with TwinBooster
can be combined with PowerFlex cooking zone to form PowerFlex cooking
area
d
PowerFlex cooking zone with TwinBooster
can be combined with PowerFlex cooking zone to form PowerFlex cooking
area
e
PowerFlex cooking zone with TwinBooster
f
PowerFlex cooking zone with TwinBooster
g
Controls and indicators
Overview
19
KM7755FL
a
PowerFlex cooking zone with TwinBooster
b
PowerFlex cooking zone with TwinBooster
can be combined with PowerFlex cooking zone to form PowerFlex cooking
area
c
Cooking zone with TwinBooster
d
PowerFlex cooking zone with TwinBooster
can be combined with PowerFlex cooking zone to form PowerFlex cooking
area
e
PowerFlex cooking zone with TwinBooster
f
Controls and indicators
Overview
20
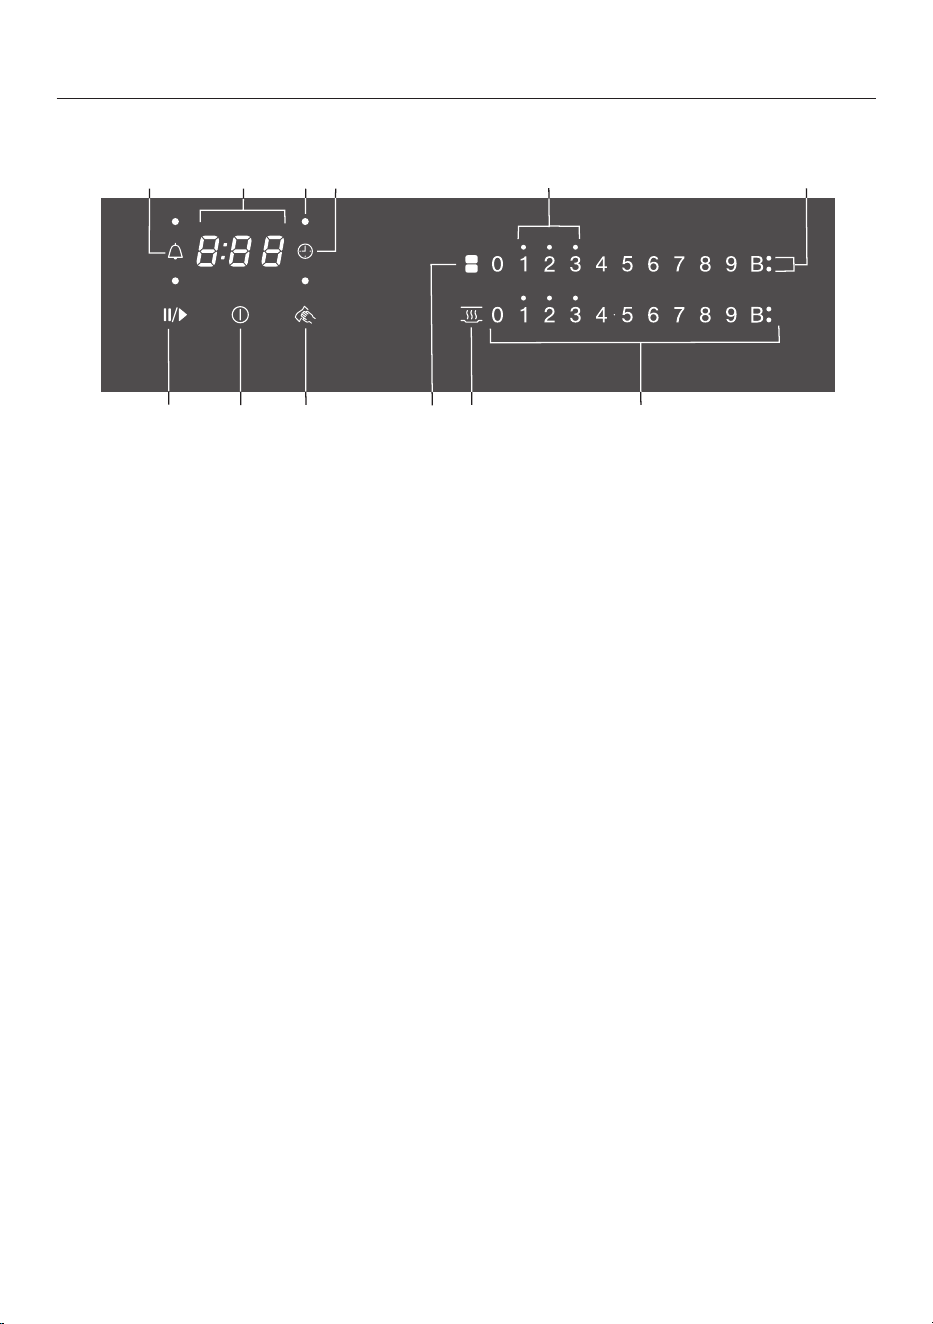
Controls and display
b
a c ed f
i
l
h
j
g
k
a
Stop&Go sensor control
For stopping/starting a cooking process in progress
b
Cooktop On/Offsensor control
c
Wipe protection sensor control
For locking the sensor controls
d
PowerFlex cooking zones sensor control
For manual connection/disconnection of PowerFlex cooking zones
e
Keeping warm sensor control
For activating/deactivating the Keeping warm function
f
Numerical display sensor controls
–For setting the power level
–For setting the times
g
Booster display
Booster function is activated
h
Residual heat indicator lights
i
Safety shut-off sensor control
Switches the cooking zones off automatically
j
Cooking zone allocation safety shut-off indicator light
Safety shut-off for the cooking zone is activated
k
Timer display
to Time in minutes
System lock/safety lock is activated
Demo mode activated
l
Kitchen timer sensor control
Overview
21
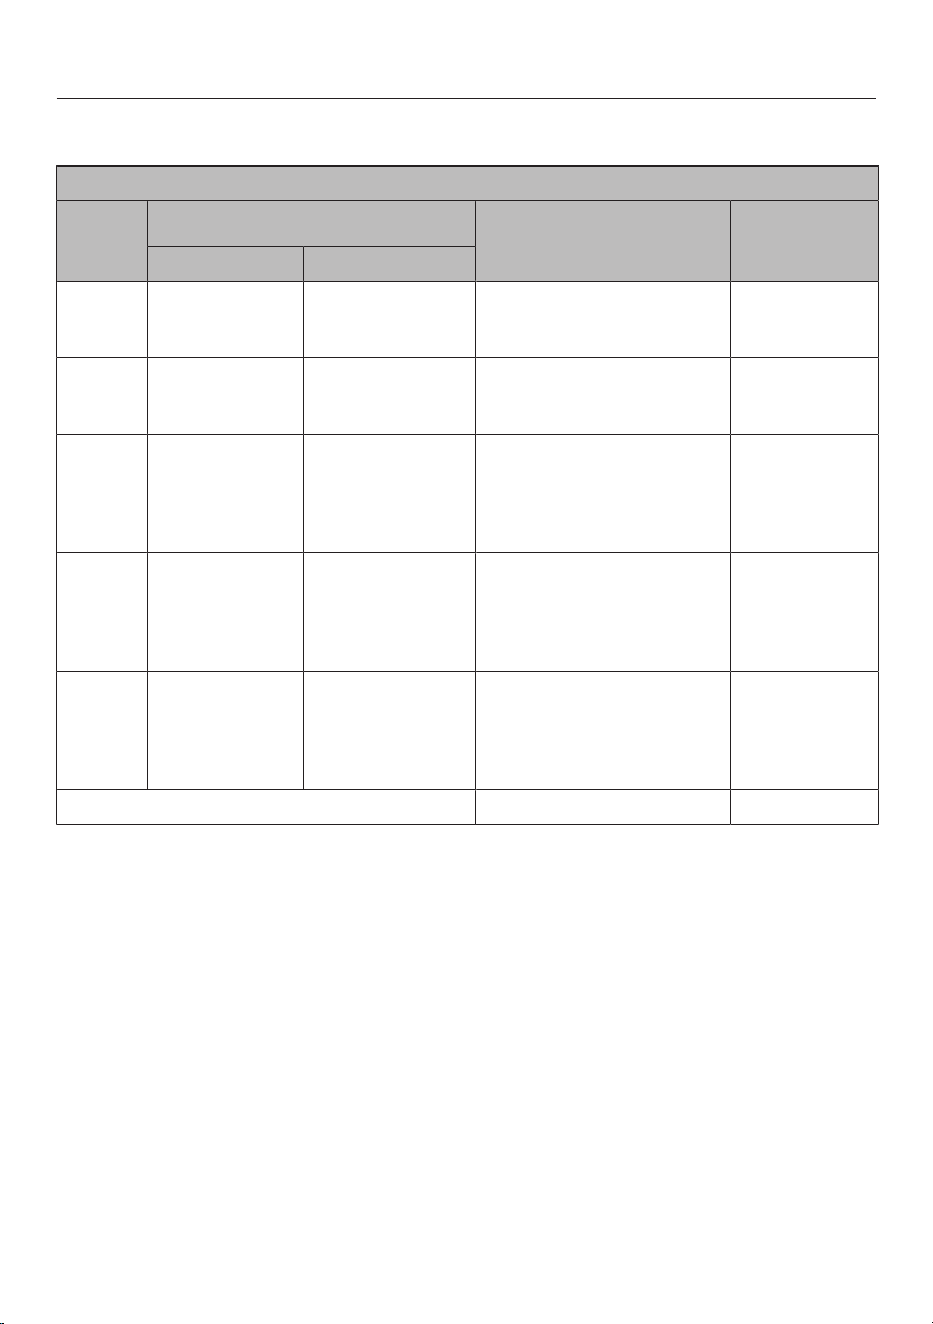
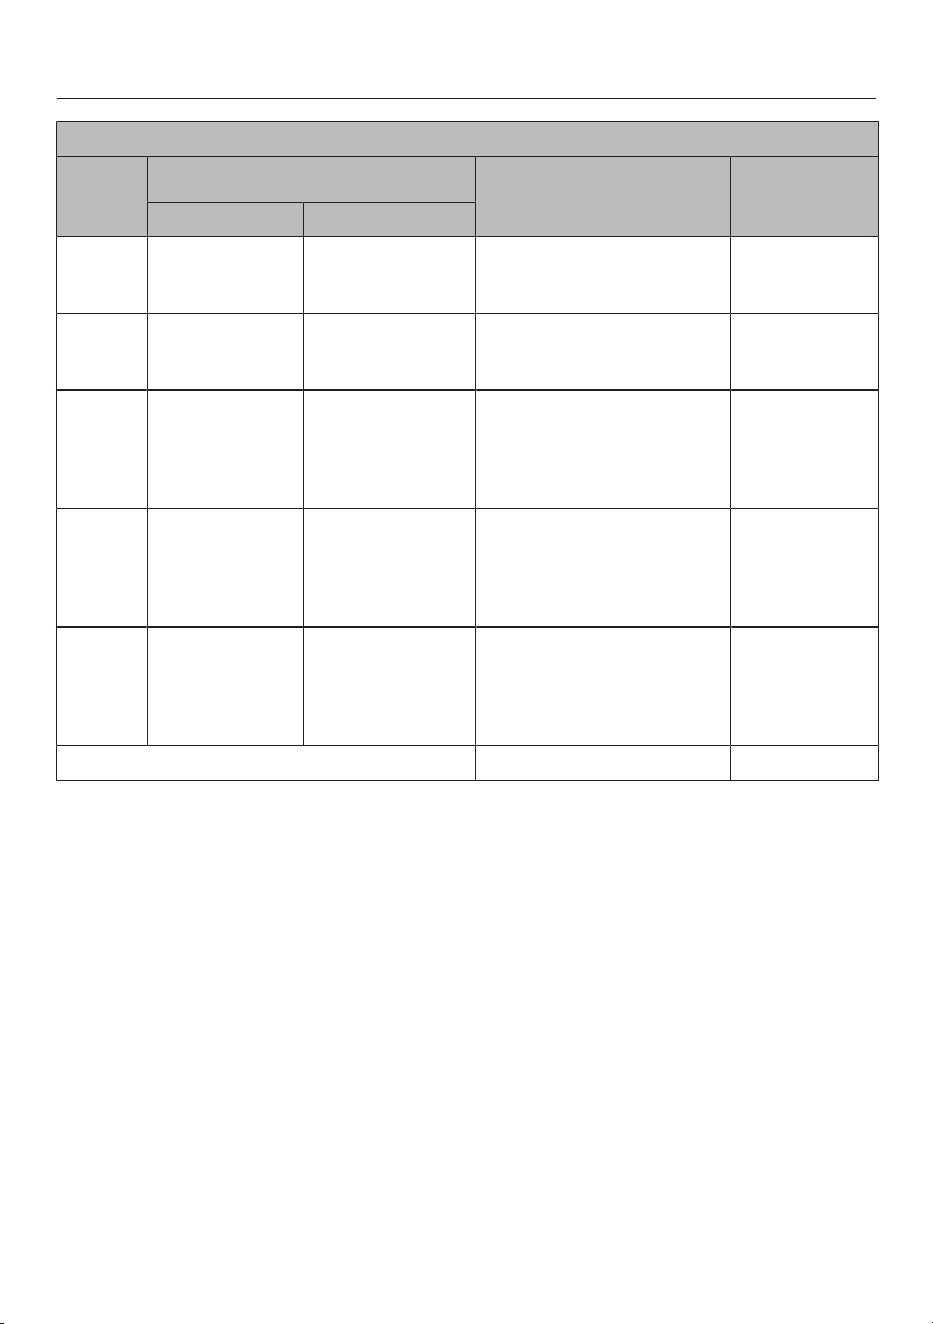
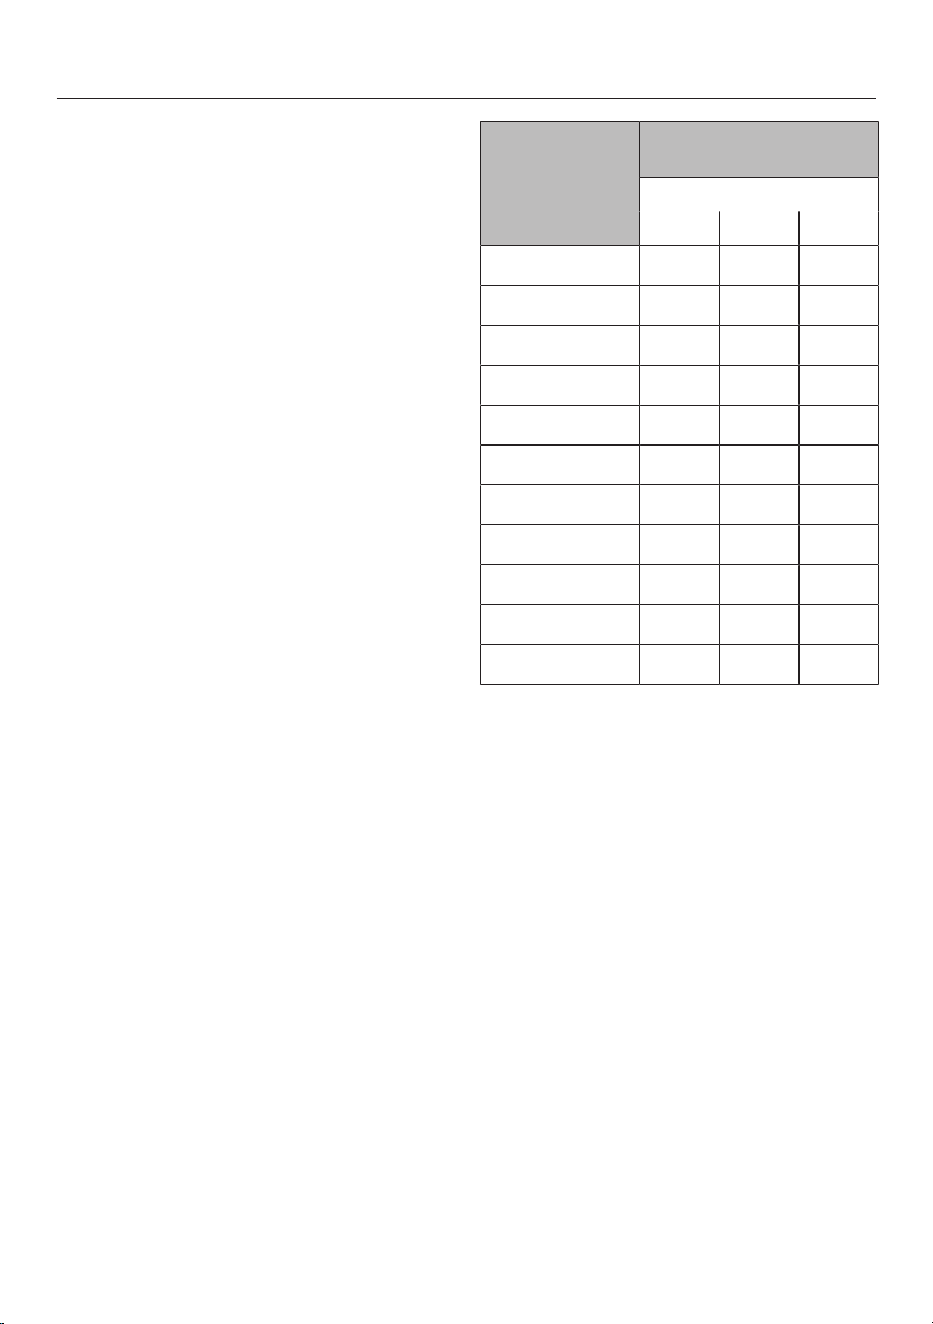
Cooking zone data
KM7735FL
Cooking
zone
Size
1
Max. rating
in watts for 208V
2
Linked cooking
zone
3
Ø
7"–11"
(18–28cm)
–
Normal
TwinBooster, level 1
TwinBooster, level 2
2,400
2,750
3,350
4"–6 1/2"
(10–16 cm)
–
Normal
TwinBooster, level 1
TwinBooster, level 2
1,300
1,550
2,000
5 7/8"–9"
(15-23 cm)
5 7/8" x 5 7/8"
(15 x 15cm)
–
9" x 7 1/2"
(23 x 19cm)
Normal
TwinBooster, level 1
TwinBooster, level 2
1,900
2,750
3,350
5 7/8"–9"
(15-23 cm)
5 7/8" x 5 7/8"
(15 x 15cm)
–
9" x 7 1/2"
(23 x 19cm)
Normal
TwinBooster, level 1
TwinBooster, level 2
1,900
2,750
3,350
+
8 11/16"–9"
(22-23cm)
8 11/16" x 8 11/16"
(22 x 22cm)
–
9" x 15 3/8"
(23 x 39cm)
Normal
TwinBooster, level 1
TwinBooster, level 2
3,100
4,350
6,700
-
Total 6,600
1
Cookware with a base diameter/surface (widthxdepth) within the given range may be used.
2
The power indicated may vary depending on the size and material of the cookware used.
3
The cooking zone is linked to this cooking zone electrically so that the rating can be increased; see
“Overview – Power management system”.
Overview
22
KM7735FL
Cooking
zone
Size
1
Max. rating
in watts for 240V
2
Linked cooking
zone
3
Ø
7"–11"
(18–28cm)
–
Normal
TwinBooster, level 1
TwinBooster, level 2
2,600
3,000
3,700
4"–6 1/2"
(10–16 cm)
–
Normal
TwinBooster, level 1
TwinBooster, level 2
1,400
1,700
2,200
5 7/8"–9"
(15-23 cm)
5 7/8" x 5 7/8"
(15 x 15cm)
–
9" x 7 1/2"
(23 x 19cm)
Normal
TwinBooster, level 1
TwinBooster, level 2
2,100
3,000
3,700
5 7/8"–9"
(15-23 cm)
5 7/8" x 5 7/8"
(15 x 15cm)
–
9" x 7 1/2"
(23 x 19cm)
Normal
TwinBooster, level 1
TwinBooster, level 2
2,100
3,000
3,700
+
8 11/16"–9"
(22-23cm)
8 11/16" x 8 11/16"
(22 x 22cm)
–
9" x 15 3/8"
(23 x 39cm)
Normal
TwinBooster, level 1
TwinBooster, level 2
3,400
4,800
7,400
-
Total 7,600
1
Cookware with a base diameter/surface (widthxdepth) within the given range may be used.
2
The power indicated may vary depending on the size and material of the cookware used.
3
The cooking zone is linked to this cooking zone electrically so that the rating can be increased; see
“Overview – Power management system”.
Overview
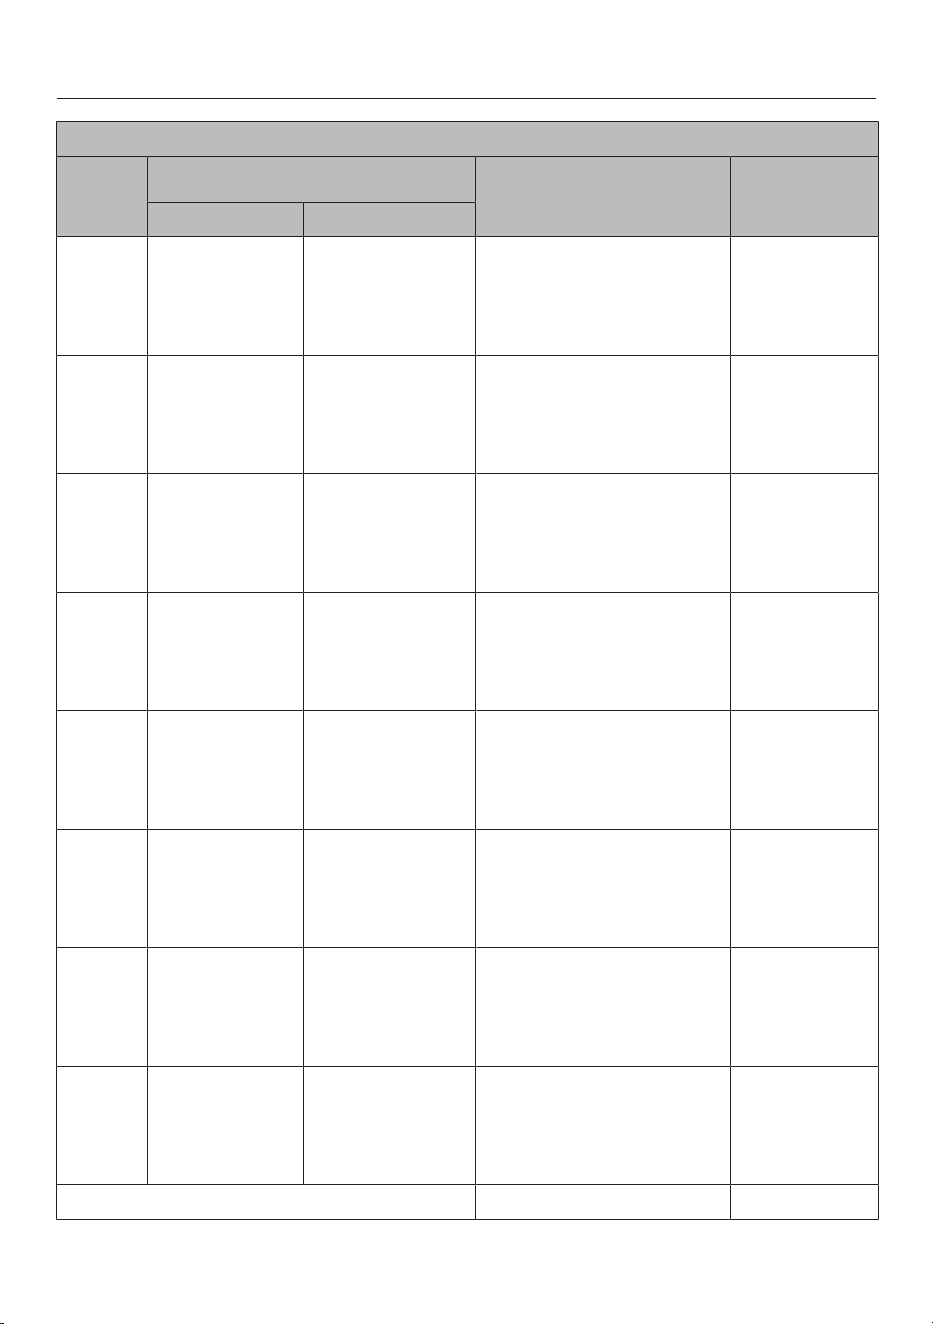
23
KM7745FL
Cooking
zone
Size
1
Max. rating
in watts for 208V
2
Linked cooking
zone
3
Ø
5 7/8"–9"
(15-23 cm)
5 7/8" x 5 7/8"
(15 x 15cm)
–
9" x 7 1/2"
(23 x 19cm)
Normal
TwinBooster, level 1
TwinBooster, level 2
1,900
2,750
3,350
5 7/8"–9"
(15-23 cm)
5 7/8" x 5 7/8"
(15 x 15cm)
–
9" x 7 1/2"
(23 x 19cm)
Normal
TwinBooster, level 1
TwinBooster, level 2
1,900
2,750
3,350
5 7/8"–9"
(15-23 cm)
5 7/8" x 5 7/8"
(15 x 15cm)
–
9" x 7 1/2"
(23 x 19cm)
Normal
TwinBooster, level 1
TwinBooster, level 2
1,900
2,750
3,350
5 7/8"–9"
(15-23 cm)
5 7/8" x 5 7/8"
(15 x 15cm)
–
9" x 7 1/2"
(23 x 19cm)
Normal
TwinBooster, level 1
TwinBooster, level 2
1,900
2,750
3,350
5 7/8"–9"
(15-23 cm)
5 7/8" x 5 7/8"
(15 x 15cm)
–
9" x 7 1/2"
(23 x 19cm)
Normal
TwinBooster, level 1
TwinBooster, level 2
1,900
2,750
3,350
5 7/8"–9"
(15-23 cm)
5 7/8" x 5 7/8"
(15 x 15cm)
–
9" x 7 1/2"
(23 x 19cm)
Normal
TwinBooster, level 1
TwinBooster, level 2
1,900
2,750
3,350
+
8 11/16"–9"
(22-23cm)
8 11/16" x 8 11/16"
(22 x 22cm)
–
9" x 15 3/8"
(23 x 39cm)
Normal
TwinBooster, level 1
TwinBooster, level 2
2,850
3,100
3,350
-
+
+
8 11/16"–9"
(22-23cm)
8 11/16" x 8 11/16"
(22 x 22cm)
–
9" x 15 3/8"
(23 x 39cm)
Normal
TwinBooster, level 1
TwinBooster, level 2
3,100
4,350
6,700
-
Total 9,900

Overview
24
1
Cookware with a base diameter/surface (widthxdepth) within the given range may be used.
2
The power indicated may vary depending on the size and material of the cookware used.
3
The cooking zone is linked to this cooking zone electrically so that the rating can be increased; see
“Overview – Power management system”.

Overview
25
KM7745FL
Cooking
zone
Size
1
Max. rating
in watts for 240V
2
Linked cooking
zone
3
Ø
5 7/8"–9"
(15-23 cm)
5 7/8" x 5 7/8"
(15 x 15cm)
–
9" x 7 1/2"
(23 x 19cm)
Normal
TwinBooster, level 1
TwinBooster, level 2
2,100
3,000
3,700
5 7/8"–9"
(15-23 cm)
5 7/8" x 5 7/8"
(15 x 15cm)
–
9" x 7 1/2"
(23 x 19cm)
Normal
TwinBooster, level 1
TwinBooster, level 2
2,100
3,000
3,700
5 7/8"–9"
(15-23 cm)
5 7/8" x 5 7/8"
(15 x 15cm)
–
9" x 7 1/2"
(23 x 19cm)
Normal
TwinBooster, level 1
TwinBooster, level 2
2,100
3,000
3,700
5 7/8"–9"
(15-23 cm)
5 7/8" x 5 7/8"
(15 x 15cm)
–
9" x 7 1/2"
(23 x 19cm)
Normal
TwinBooster, level 1
TwinBooster, level 2
2,100
3,000
3,700
5 7/8"–9"
(15-23 cm)
5 7/8" x 5 7/8"
(15 x 15cm)
–
9" x 7 1/2"
(23 x 19cm)
Normal
TwinBooster, level 1
TwinBooster, level 2
2,100
3,000
3,700
5 7/8"–9"
(15-23 cm)
5 7/8" x 5 7/8"
(15 x 15cm)
–
9" x 7 1/2"
(23 x 19cm)
Normal
TwinBooster, level 1
TwinBooster, level 2
2,100
3,000
3,700
+
8 11/16"–9"
(22-23cm)
8 11/16" x 8 11/16"
(22 x 22cm)
–
9" x 15 3/8"
(23 x 39cm)
Normal
TwinBooster, level 1
TwinBooster, level 2
3,100
3,400
3,700
-
+
+
8 11/16"–9"
(22-23cm)
8 11/16" x 8 11/16"
(22 x 22cm)
–
9" x 15 3/8"
(23 x 39cm)
Normal
TwinBooster, level 1
TwinBooster, level 2
3,400
4,800
7,400
-
Total 11,200

Overview
26
1
Cookware with a base diameter/surface (widthxdepth) within the given range may be used.
2
The power indicated may vary depending on the size and material of the cookware used.
3
The cooking zone is linked to this cooking zone electrically so that the rating can be increased; see
“Overview – Power management system”.
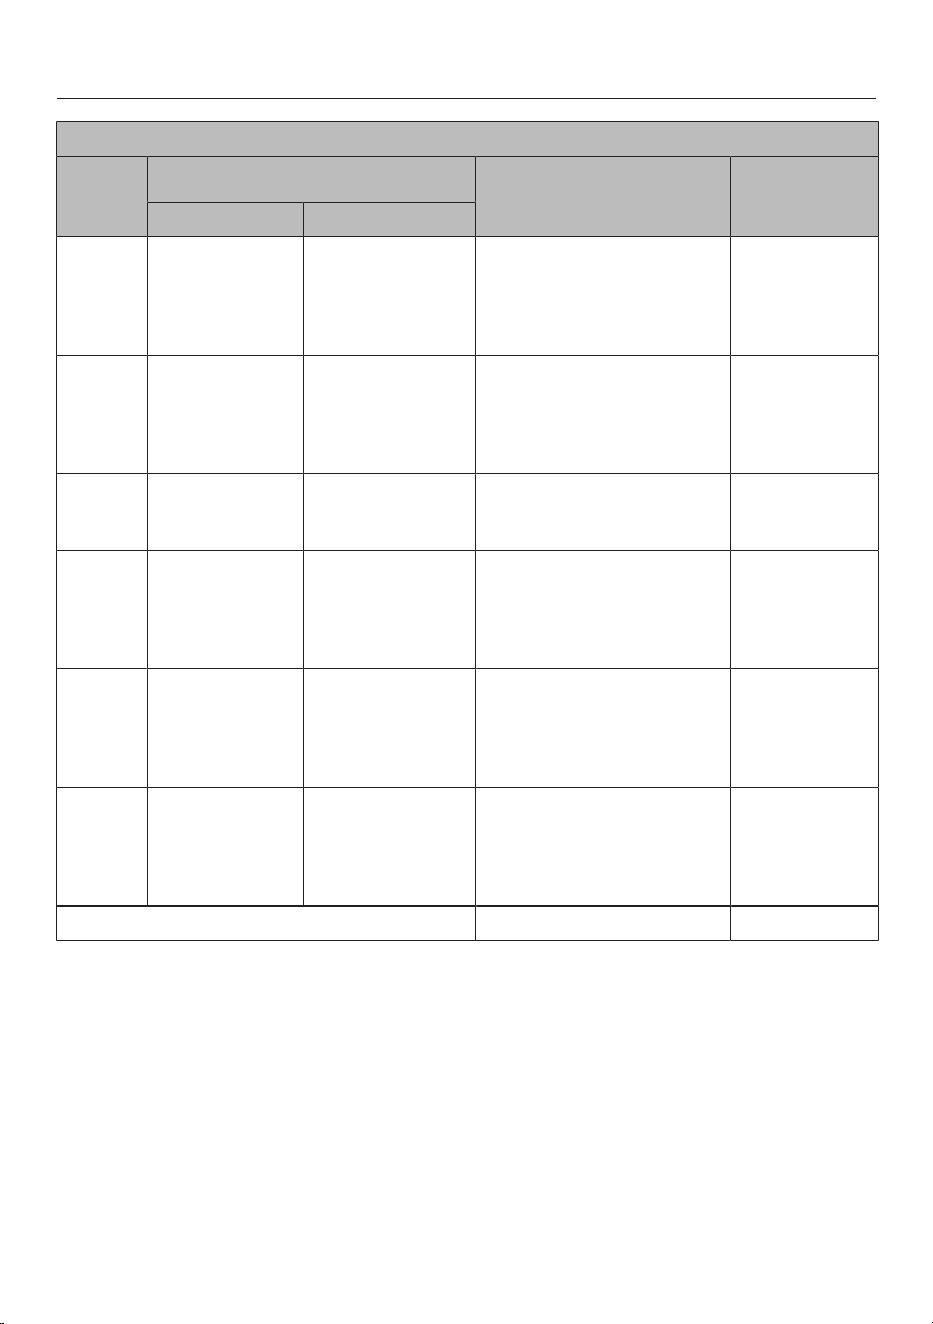
Overview
27
KM7755FL
Cooking
zone
Size
1
Max. rating
in watts for 208V
2
Linked cooking
zone
3
Ø
5 7/8"–9"
(15-23 cm)
5 7/8" x 5 7/8"
(15 x 15cm)
–
9" x 7 1/2"
(23 x 19cm)
Normal
TwinBooster, level 1
TwinBooster, level 2
1,900
2,750
3,350
5 7/8"–9"
(15-23 cm)
5 7/8" x 5 7/8"
(15 x 15cm)
–
9" x 7 1/2"
(23 x 19cm)
Normal
TwinBooster, level 1
TwinBooster, level 2
1,900
2,750
3,350
–
7 1/16–11"
(18–28cm)
–
Normal
TwinBooster, level 1
TwinBooster, level 2
2,400
2,750
3,350
5 7/8"–9"
(15-23 cm)
5 7/8" x 5 7/8"
(15 x 15cm)
–
9" x 7 1/2"
(23 x 19cm)
Normal
TwinBooster, level 1
TwinBooster, level 2
1,900
2,750
3,350
5 7/8"–9"
(15-23 cm)
5 7/8" x 5 7/8"
(15 x 15cm)
–
9" x 7 1/2"
(23 x 19cm)
Normal
TwinBooster, level 1
TwinBooster, level 2
1,900
2,750
3,350
+
+
8 11/16"–9"
(22-23cm)
8 11/16" x 8 11/16"
(22 x 22cm)
–
9" x 15 3/8"
(23 x 39cm)
Normal
TwinBooster, level 1
TwinBooster, level 2
3,100
4,350
6,700
-
Total 9,900
1
Cookware with a base diameter/surface (widthxdepth) within the given range may be used.
2
The power indicated may vary depending on the size and material of the cookware used.
3
The cooking zone is linked to this cooking zone electrically so that the rating can be increased; see
“Overview – Power management system”.

Overview
28
KM7755FL
Cooking
zone
Size
1
Max. rating
in watts for 240V
2
Linked cooking
zone
3
Ø
5 7/8"–9"
(15-23 cm)
5 7/8" x 5 7/8"
(15 x 15cm)
–
9" x 7 1/2"
(23 x 19cm)
Normal
TwinBooster, level 1
TwinBooster, level 2
2,100
3,000
3,700
5 7/8"–9"
(15-23 cm)
5 7/8" x 5 7/8"
(15 x 15cm)
–
9" x 7 1/2"
(23 x 19cm)
Normal
TwinBooster, level 1
TwinBooster, level 2
2,100
3,000
3,700
–
7 1/16–11"
(18–28cm)
–
Normal
TwinBooster, level 1
TwinBooster, level 2
2,600
3,000
3,700
5 7/8"–9"
(15-23 cm)
5 7/8" x 5 7/8"
(15 x 15cm)
–
9" x 7 1/2"
(23 x 19cm)
Normal
TwinBooster, level 1
TwinBooster, level 2
2,100
3,000
3,700
5 7/8"–9"
(15-23 cm)
5 7/8" x 5 7/8"
(15 x 15cm)
–
9" x 7 1/2"
(23 x 19cm)
Normal
TwinBooster, level 1
TwinBooster, level 2
2,100
3,000
3,700
+
+
8 11/16"–9"
(22-23cm)
8 11/16" x 8 11/16"
(22 x 22cm)
–
9" x 15 3/8"
(23 x 39cm)
Normal
TwinBooster, level 1
TwinBooster, level 2
3,400
4,800
7,400
-
Total 11,200
1
Cookware with a base diameter/surface (widthxdepth) within the given range may be used.
2
The power indicated may vary depending on the size and material of the cookware used.
3
The cooking zone is linked to this cooking zone electrically so that the rating can be increased; see
“Overview – Power management system”.

Overview
29
Power management system
Total power
The cooktop has a maximum total per-
mitted power consumption which can-
not be exceeded for safety reasons.
The higher the total permitted power
consumption of the cooktop, the more
power levels/functions can be used on
all cooking zones at the same time.
If the set power levels/functions require
more power than can be provided in ac-
cordance with the total permitted power
consumption, the cooktop will distribute
the maximum permitted power between
the cooking zones.
Distribution of power
Cooking zones can be linked together
in pairs on the cooktop. This allows
power to be transferred from one cook-
ing zone (A) to another (B). As a result,
the power of cooking zone (A) is re-
duced.
Example: The Booster function for
cooking zone (B) is activated.
Cooking zone (B), which requires addi-
tional power, is determined by the most
recent setting on the cooktop.
The values for the maximum total per-
mitted power consumption and which
cooking zones are linked together can
be found in “Overview – Cooking zone
data”.
You can reduce the maximum total
permitted power consumption; see
“Customizing settings”.
Effects of power distribution
If a cooking zone gives power to an-
other zone, this can have the following
effects on the zone giving the power:
- The power level is reduced.
- Auto heat-up will be deactivated.
Cooking continues at the set level. If
the power is not sufficient, the power
level will be reduced again.
- The Booster function is deactivated.
- The cooking zone is switched off.
When the cooking zone stops transfer-
ring power to the other zone, the power
level can be increased again.
Tip: If you wish to cook a large quantity
of food on one cooking zone, switch the
other cooking zones to lower power
levels.
Overview
30
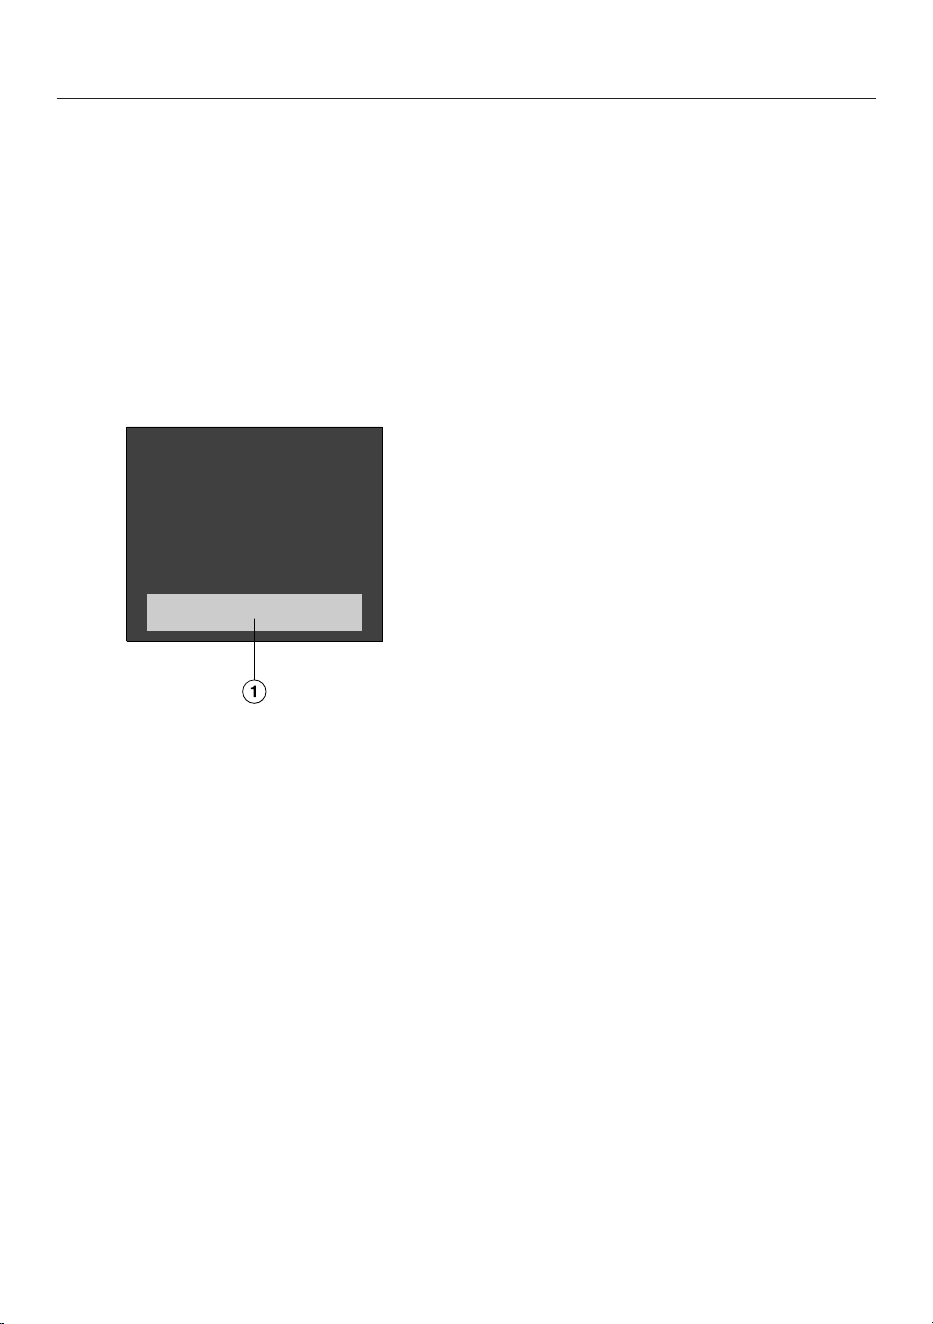
Operation
Cooktop when switched off
When the cooktop is switched off, you
can only see the printed symbols for the
sensor controls and the numerical dis-
play. More sensor controls light up
when the cooktop is switched on.
Operation
a
Sensor controls and indicators
This glass-ceramic cooktop is equipped
with sensor controls which react to fin-
ger contact.
Each time a sensor control is activated,
an audible signal sounds.
For safety reasons, in order to switch
the appliance on, the On/Off sensor
control needs to be touched for a little
longer than the other sensors.

Overview
31
Networking
Your cooktop is equipped with an inte-
grated WiFi module. The cooktop can
be connected to your home WiFi net-
work or simply to your Miele ventilation
hood.
Miele@home
After installing the Miele app on a mo-
bile device, you can do the following:
- call up information on the operating
status of your cooktop
- call up information on the program
sequence of your cooktop
- set up a Miele@home network with
other WiFi-enabled Miele domestic
appliances
- control a connected Miele ventilation
hood automatically via the cooktop
settings (Con@ctivity3.0)
Direct connection with the ventilation
hood
Once you have established a direct
connection with a Miele ventilation
hood, you can do the following:
- control a connected Miele ventilation
hood automatically via the cooktop
settings (Con@ctivity3.0)

Overview
32
Functions
Con@ctivity3.0
Con@ctivity3.0 is the direct communi-
cation system between your cooktop
and a Miele ventilation hood. Communi-
cation is achieved by means of net-
working. Con@ctivity3.0 enables the
ventilation hood to operate automati-
cally depending on the operating status
of your cooktop.
Additional information can be found in
the operating and installation instruc-
tions for your ventilation hood.
Permanent pan recognition
When you place cookware on a cooking
zone, the numerical display for the
cooking zone is activated automatically.
Pan and pan size recognition
The cookware and its size are detected
within a cooking zone. The release of
energy is adapted to the size of the pan.
PowerFlex cooking area
A PowerFlex cooking area joins to-
gether 2 PowerFlex cooking zones,
making it possible to use larger cook-
ware.
The PowerFlex cooking zones combine
automatically to form a PowerFlex
cooking area when you place suffi-
ciently large items of cookware on them
(see “Overview – Cooking zone data”).
The PowerFlex cooking zones can also
be switched on manually.
Booster
When the Booster function is activated,
the power is boosted so that large
quantities can be heated up quickly,
e.g., when boiling water for cooking
pasta.
Stop&Go
When Stop&Go is activated, all power
levels are reduced to 1.
When the function is deactivated, the
appliance switches back to the power
level that was set last.
Tip: Use this function if there is a dan-
ger of food boiling over.
Additional power levels
You can activate additional levels be-
tween the existing power levels. These
intermediate levels allow you to adjust
the power more precisely for the cook-
ware.
Auto heat-up
When Auto heat-up has been activated,
the cooking zone switches on automati-
cally at the highest setting and then
switches to the power level (continued
cooking level) which you have previ-
ously selected.
Timer
The timer can be used for the following
2 functions:
- setting the kitchen timer
- automatically switching a cooking
zone off
You can use the functions simultane-
ously.

Overview
33
Kitchen timer
You can set a timer for activities that are
independent of the cooktop.
Safety shut-off
You can set a time after which the
cooking zone will reduce automatically
to power level1. This function can be
used on all cooking zones at the same
time.
System lock
If the system lock is activated, then the
cooktop cannot be switched on.
Safety lock
The safety lock is activated while the
cooktop is switched on. When the
safety lock is activated, the cooktop
can only be operated under certain
conditions.
Keeping warm
This function enables food to be kept
warm after it has finished cooking.
The maximum duration for keeping food
warm is 2hours.
Wipe protection
The cooktop sensor controls can be
locked for 20seconds, e.g., to remove
soiling. The sensor control is not
locked.
Programming
You can adapt the programming of the
cooktop to your personal needs.
Demo mode
This function enables the cooktop to be
demonstrated in dealer showrooms
without heating up.
Residual heat indicator
If a cooking zone is still hot, the residual
heat indicator will light up after it has
been switched off. Depending on the
temperature, a dot will appear above
power levels 1, 2, and 3.
The dots in the residual heat indicator
go out one by one as the cooking zones
cool down. The last dot only goes out
when the cooking zone is safe to touch.
Overview
34
Safety shut-off
Sensor controls are covered
Your cooktop will turn off automatically
if one or several of the sensor controls
remain covered for longer than 10sec-
onds; for example, by finger contact,
food boiling over, or an object.
flashes briefly above the sensor
control and a tone will sound.
will go out once you have removed
the object and/or cleaned the soiling
and the cooktop will be ready to use
again.
Excessive operating time
The safety shut-off mechanism is trig-
gered automatically if a cooking zone is
heated for an unusually long period of
time. This time depends on the power
level selected. If the time has been ex-
ceeded, the cooking zone switches to
power level1. If you turn the cooking
zone off and on again, it will be ready
for operation again.
You can adjust the safety shut-off by
changing the safety setting (see “Cus-
tomizing settings”).
Power level* Maximum operating time
[h:min]
Safety setting
0** 1 2
1 10:00 8:00 5:00
1. 10:00 7:00 4:00
2/2. 5:00 4:00 3:00
3/3. 5:00 3:30 2:00
4/4. 4:00 2:00 1:30
5/5. 4:00 1:30 1:00
6/6. 4:00 1:00 00:30
7/7. 4:00 00:42 00:24
8 4:00 00:30 00:20
8. 4:00 00:30 00:18
9 1:00 00:24 00:10
* The power levels with a dot after the num-
ber are only available if the power level
range has been extended (see “Setting
ranges”).
** Factory default setting

Overview
35
Overheating protection
In order to prevent the cooktop from
being damaged by excessive tempera-
tures, the overheating protection mech-
anism intervenes in one of the following
ways:
Overheating protection measures
- If the Booster function is switched
on, it will stop.
- The set power level will be reduced.
- A cooking zone will switch off.
will flash alternately with in the
timer display.
- All cooking zones will switch off.
Triggering the overheating protection
mechanism
The overheating protection may be acti-
vated under the following circum-
stances:
- The cookware being heated is empty.
- Fat or oil is being heated on a high
power level.
- There is insufficient ventilation to the
underside of the cooktop.
- A hot cooking zone is turned back on
after a power failure.

Commissioning
36
Unpacking the cooktop
Please stick the extra data plate for
the appliance supplied with this doc-
umentation in the space provided in
the “Customer Service” section of
this manual.
Remove any protective foil and stick-
ers.
Cleaning the cooktop for the
first time
Before using it for the first time, clean
the cooktop with a damp cloth.
Wipe the cooktop dry.
Switching on the cooktop for
the first time
The metal components have a protec-
tive coating. When the cooktop is used
for the first time, this causes a smell
and possibly also vapor. The heating of
the induction coils also causes odors in
the first few hours of operation. With
each subsequent use, the odors are re-
duced until they disappear completely.
The smell and any vapors do not indi-
cate a faulty connection or a defective
appliance and are not harmful to your
health.

Commissioning
37
Miele@home
Installing the Miele app
The ability to use the Miele app de-
pends on the availability of the
Miele@home service in your country.
For information about availability,
please visit www.miele.com.
The Miele app is available free of
charge from the Apple App Store
®
or
from the Google Play Store™.
Install the Miele app on your device.
Setting up Miele@home
The WiFi connection shares a frequency
range with other appliances (including
microwave ovens and remote control
toys). This can give rise to sporadic or
even complete connection failures.
Therefore, the availability of featured
functions cannot be guaranteed.
The cooktop requires max. 2W in net-
worked standby.
There are a number of ways of connect-
ing your cooktop to your WiFi network.

Commissioning
38
Connecting via the Miele app
- A home WiFi network is available.
- The signal of your WiFi network is
sufficiently strong in the place
where your cooktop is installed.
- There is no direct WiFi connection
between the cooktop and a Miele
ventilation hood (Con@ctivity3.0).
- The Miele app is installed on your
device.
Start the Miele app.
Switch the cooktop on.
Touch the 0sensor control on any of
the numerical displays.
Touch the0 and 5 sensor controls at
the same time for 6seconds.
The seconds can be seen counting
down in the timer display. After this time
has elapsed, the code: is displayed
in the timer display for 10seconds.
You now have 10minutes to configure
the WiFi.
Follow the user navigation in the app.
You can use all Miele@home functions.

Commissioning
39
Connecting via WPS
- A home Wi-Fi network is available.
- The signal of your Wi-Fi network is
sufficiently strong in the place
where your cooktop is installed.
- There is no direct Wi-Fi connection
between the cooktop and a Miele
ventilation hood (Con@ctivity3.0).
- You must have a WPS (Wi-Fi pro-
tected setup) compatible router.
Switch the cooktop on.
Touch the 0sensor control on any of
the numerical displays.
Touch the 0 and 6sensor controls at
the same time for 6seconds.
The seconds can be seen counting
down in the timer display. After the time
has elapsed, a progress light appears in
the timer display during the connection
attempt (for max. 120seconds).
The WPS login is active during these
120seconds.
Activate the WPS function on your
Wi-Fi router.
If the connection was successful, the
code: appears in the timer display.
If the connection could not be estab-
lished, the timer display will show the
code:. You have probably not acti-
vated WPS on your router quickly
enough. Repeat the steps above.
Install the Mieleapp.
Follow the user navigation in the app.
You can use all Miele@home functions.
Tip: If your Wi-Fi router does not sup-
port WPS, please connect via the
Mieleapp.

Commissioning
40
Canceling the process
Touch any sensor control.
Resetting settings
Reset the settings if you are disposing
of your cooktop, selling it, or putting a
used cooktop into operation. This is the
only way to ensure that all personal
data has been removed and the previ-
ous owner will no longer be able to ac-
cess the cooktop.
Resetting is not required when replac-
ing the router.
Switch the cooktop on.
Press the 0sensor control on any nu-
merical display.
Touch the0 and 9 sensor controls at
the same time for 6seconds.
The seconds can be seen counting
down in the timer display.
After this time has elapsed, the
code: is displayed in the timer dis-
play for 10seconds.

Commissioning
41
Establishing a direct connec-
tion with the ventilation hood
The cooktop requires max. 2W in net-
worked standby.
Availability of the Wi-Fi connection
The Wi-Fi connection shares a fre-
quency range with other appliances (in-
cluding microwave ovens and remote
control toys). This can cause sporadic
or even complete connection failures.
Therefore, the availability of featured
functions cannot be guaranteed.
Establishing a direct connection with
the ventilation hood
You can find the necessary information
on connecting the ventilation hood in
the associated operating and installa-
tion instructions.
- Miele ventilation hood with
Con@ctivity3.0
- The cooktop is not connected to
your home network (Miele@home)
Switch the cooktop on.
Press the 0sensor control on any nu-
merical display.
Touch the0 and 7 sensor controls at
the same time for 6seconds.
The seconds can be seen counting
down in the timer display. After the time
has elapsed, a progress light appears in
the timer display during the connection
attempt. If the connection was success-
ful, the code: appears in the timer
display. If the connection could not be
established, the timer display will show
the code:. Repeat the steps above.
When successfully connected, 2and
3will light up constantly on the ventila-
tion hood.
Quit connection mode on the ventila-
tion hood by pressing the run-on
button.
Con@ctivity3.0 is now activated.

Commissioning
42
Canceling the process
Touch any sensor control.
Resetting settings
Reset the settings if you are disposing
of your cooktop, selling it, or putting a
used cooktop into operation. This is the
only way to ensure that all personal
data has been removed and the previ-
ous owner will no longer be able to ac-
cess the cooktop.
Resetting is not required when replac-
ing the router.
Switch the cooktop on.
Press the 0sensor control on any nu-
merical display.
Touch the0 and 9 sensor controls at
the same time for 6seconds.
The seconds can be seen counting
down in the timer display.
After this time has elapsed, the
code: is displayed in the timer dis-
play for 10seconds.
Operation
43
Safety notes for operation
Fire hazard due to overheated food.
Unattended food can overheat and ignite.
Do not leave the cooktop unattended while it is being used.
Risk of burning or scalding due to hot cooking zones.
The cooking zones will be hot after use.
Do not touch the cooking zones while the residual heat indicators
are on.
Risk of burning due to hot items.
When the cooktop is switched on either deliberately or by mistake,
or when there is residual heat present, there is the risk of metal
items placed on the cooktop heating up.
Do not store items on the cooktop.
After use, switch the cooktop off with the sensor control.
The cooking result can be negatively affected if food is kept warm
at excessively high temperatures. Food can change color and even
spoil.
Placing hot cookware on the sensor controls and indicators
can damage the electronic underneath.
The sensor controls do not respond.
They may be switched on or off unintentionally.
The cooktop will switch itself off (see “Overview – Safety shut-
off”).
Do not place hot cookware over the sensor controls or indicators.

Operation
44
Switching the cooktop on
Touch the sensor control.
Additional sensor controls will light up.
If no further entry is made, the cook-
top will turn itself off after a few sec-
onds for safety reasons.
Switching off a cooking zone/
the cooktop
Switching off the cooktop
To switch off the cooktop and all the
cooking zones, touch the sensor
control.
Switching off a cooking zone
To switch off a cooking zone, touch
the 0sensor control on the numerical
display for that cooking zone.
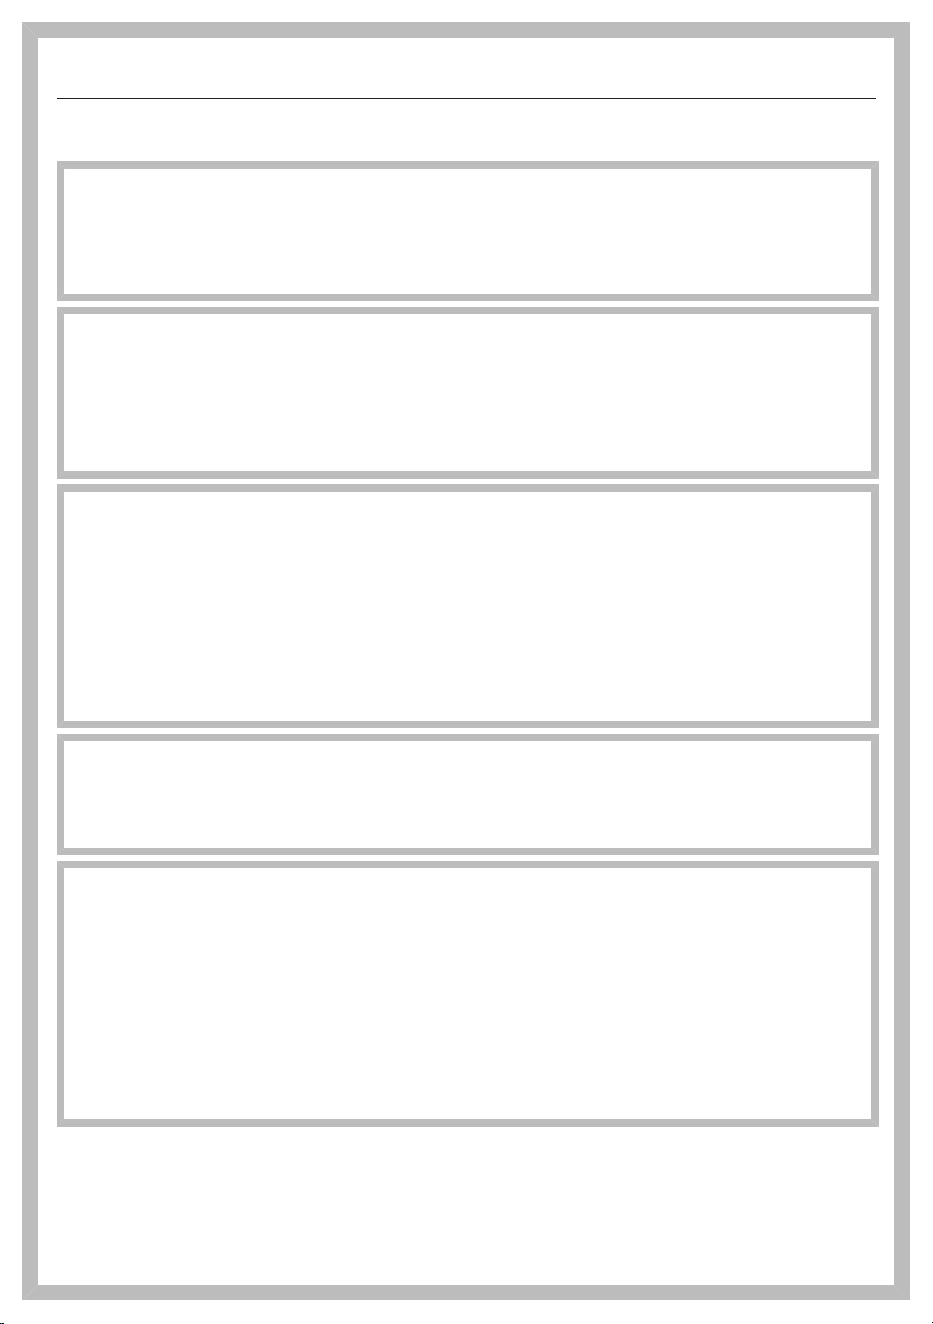
Positioning cookware
Refer to the cooking zone data for your
cooktop model for information about
cookware sizes and the corresponding
positions (see “Overview – Cooking
zone data”).
Position the cookware as shown be-
low:
PowerFlex cooking zone
PowerFlex cooking area
Operation
45
PowerFlex cooking area
PowerFlex cooking area

Operation
46
Power level
Setting the power level
Permanent pan recognition is activated
as standard (see “Customizing set-
tings”). When the cooktop is switched
on and you place an item of cookware
on one of the cooking zones, all the
sensor controls for the numerical dis-
play will light up.
Place the cookware on the cooking
zone you want to use.
Touch the sensor button on the rel-
evant numerical display.
Touch the appropriate sensor control
for the power level you want on the
relevant numerical display.
Setting the power level – extended
power level range
The extended setting range for the
power levels is activated (see “Cus-
tomizing settings”).
Press the numerical display between
the sensor controls.
The numbers to the left and right of the
interim level light up brighter than the
other sensor controls.
Example:
If you have set power level 7., the num-
bers 7 and 8 will be brighter than the
other numbers.
Changing the power level
Touch the appropriate sensor control
for the power level you want on the
numerical display.
Manually switching PowerFlex
cooking zones on together/
separately
To manually connect or disconnect
the PowerFlex cooking zones, touch
the sensor control.

Operation
47
Booster
Activating the Booster function
When the Booster function is activated,
the settings for the linked cooking zone
may be changed (see “Overview –
Power management system”).
For a cooktop with a maximum of
5cooking zones, the Booster function
can be used on a maximum of 2cook-
ing zones or 1PowerFlex cooking area
at the same time.
For a cooktop with 6cooking zones, the
Booster function can be used as fol-
lows:
- on both the middle or right cooking
zones at the same time, and with
1cooking zone on the left or the
PowerFlex cooking area on the left
or
- on the middle or right PowerFlex
cooking area and with 1cooking
zone on the left or the PowerFlex
cooking area on the left
The Booster function is active for a
maximum of 15minutes.
TwinBooster level 1
Place the cookware on the cooking
zone you want to use.
Select a power level, if necessary.
Touch the Bsensor control.
The indicator light for TwinBooster
level 1 lights up.
TwinBooster level 2
Place the cookware on the cooking
zone you want to use.
Select a power level, if necessary.
Touch the Bsensor control twice.
The indicator light for TwinBooster
level 2 lights up.
Deactivating the Booster function
Touch theB sensor control repeat-
edly until the indicator lights go out.
or
Select a different power level.
If you deactivate the Booster function or
the Booster time comes to an end and
- no power level was selected before
activating the Booster function, the
cooking zone will revert automatically
to level9.
- a power level was selected before
activating the Booster function, the
cooking zone will revert automatically
to the previously selected level.
Activating/deactivating
Stop&Go
The power levels and the timer settings
cannot be altered; the cooktop can only
be switched off. The kitchen timer,
switch-off, Booster, and heat-up times
continue to run.
If the function is not deactivated within
1hour, the cooktop will switch off.
Touch the sensor control.
Operation
48
Auto heat-up
The heat-up time depends on which
continued cooking level has been cho-
sen:
Continued cook-
ing level*
Heat-up time
[min:sec]
1 approx. 00:15
1. approx. 00:15
2 approx. 00:15
2. approx. 00:15
3 approx. 00:25
3. approx. 00:25
4 approx. 00:50
4. approx. 00:50
5 approx. 2:00
5. approx. 5:50
6 approx. 5:50
6. approx. 2:50
7 approx. 2:50
7. approx. 2:50
8 approx. 2:50
8. approx. 2:50
9 –
* The continued cooking levels with a dot af-
ter the number are only available if the
power level range has been extended (see
“Customizing settings”).
Activating Auto heat-up
Touch the sensor control for the con-
tinued cooking level you want until a
tone sounds and the sensor control
starts to pulsate.
During the heat-up time (see table) for a
selected:
- continued cooking level, the set con-
tinued cooking level will pulsate
- interim power level, the sensor con-
trols in front of and after the interim
power level will pulsate
Deactivating Auto heat-up
Tap the sensor control of the set con-
tinued cooking level.
or
Select a different power level.

Operation
49
Timer
Setting timer durations
A duration of between 1minute(:)
and 9hours 59minutes(:) can be
set.
Durations of up to 59minutes are
shown in minutes (00:59) and durations
of more than 60minutes are shown in
hours and minutes.
Durations are entered:
- using the left or front left numerical
display (depending on the model) in
the case of a kitchen timer
- using the numerical display of the
cooking zone to be switched off au-
tomatically in the case of a switch-off
time
Enter durations in the order of hours,
followed by minutes in tens and then
units.
Example:
59minutes = 0:59hours,
Enter: 5–9
80minutes = 1:20hours,
Enter: 1–2–0
After the first number has been entered,
the timer display will light up constantly.
After the second number has been en-
tered, the first number will move to the
left. After the third number has been en-
tered, the first and second numbers will
move to the left.
Setting the kitchen timer
Touch the sensor control.
The timer display flashes.
Set the required duration (see “Timer
– Setting timer durations”).
Touch the sensor control or wait
10seconds to start the kitchen timer.
Changing the kitchen timer
Touch the sensor control.
The timer display flashes.
Set the required duration (see “Timer
– Setting timer durations”).
Touch the sensor control or wait
10seconds to start the kitchen timer.
Deleting the kitchen timer
Touch the sensor control.
Touch on the numerical display.

Operation
50
Setting the switch-off time
A cooking zone will switch off when the
maximum operating time has elapsed,
independently of a set switch-off time
(see “Overview – Safety shut-off”).
A power level is set for the desired
cooking zone.
Touch the sensor control.
The timer display flashes.
Set the required duration (see “Timer
– Setting timer durations”).
Touch the sensor control or wait
10seconds to start the switch-off time.
The switch-off time for the cooking
zone elapses and the cooking zone al-
location safety shut-off indicator light
pulsates.
Changing the switch-off time
Touch the sensor control repeat-
edly until the indicator light for the
cooking zone you require pulsates.
The timer display flashes.
Set the required duration (see “Timer
– Setting timer durations”).
Touch the sensor control or wait
10seconds to start the switch-off time.
The switch-off time for the cooking
zone elapses and the cooking zone al-
location safety shut-off indicator light
pulsates.
Deleting the switch-off time
Touch the sensor control repeat-
edly until the indicator light for the
cooking zone you require pulsates.
The timer display flashes.
Touch the sensor control on the nu-
merical display.
Setting multiple switch-off times
To set a switch-off time for another
cooking zone, follow the steps de-
scribed in “Operation – Setting the
switch-off time”.
If more than one switch-off time is pro-
grammed, the shortest time remaining
will be displayed and the corresponding
indicator light will pulsate. The other in-
dicator lights will light up constantly.
Displaying switch-off times
If you want to show the time left for
another cooking zone which is count-
ing down in the background, touch
thesensor control repeatedly until
the indicator light for the desired
cooking zone pulsates.
The rounded time left is displayed for
the required cooking zone.

Operation
51
Using both timer functions at the
same time
If you use both functions simultane-
ously, the shortest time is always dis-
played. The sensor control (kitchen
timer) or the indicator light of the cook-
ing zone with the shortest switch-off
time pulsates.
If you want to show the times left
counting down in the background,
touch the or sensor control.
If a switch-off time has been pro-
grammed for several cooking zones,
touch the sensor control repeat-
edly until the indicator light for the re-
quired cooking zone pulsates.

Operation
52
System lock
Activating the system lock
All sensor controls are locked. A set
kitchen timer will continue to count
down.
Touch the sensor control for
6seconds.
The seconds can be seen counting
down in the timer display. When this
time has elapsed, will appear in the
timer display. The system lock is acti-
vated.
If a disallowed sensor control is
touched whilst the system lock is acti-
vated, will appear in the timer dis-
play for a few seconds and a buzzer will
sound.
The system lock can be programmed
to be activated automatically 5min-
utes after the cooktop has been
switched off (see “Customizing set-
tings”).
Deactivating the system lock
Touch the sensor control for
6seconds.
will appear briefly in the timer dis-
play and then the seconds will count
down. The system lock is deactivated
once the time has elapsed.
Safety lock
Activating the safety lock
When the safety lock is activated:
- the cooking zones and the cooktop
can only be switched off
- a set kitchen timer can be modified
Touch and hold the and sensor
controls at the same time for 6sec-
onds.
The seconds can be seen counting
down in the timer display. When this
time has elapsed, will appear in the
timer display. The safety lock is acti-
vated.
If a disallowed sensor control is
touched while the safety lock is acti-
vated, will appear in the timer dis-
play for few seconds and a buzzer will
sound.
Deactivating the safety lock
Touch and hold the and sensor
controls at the same time for 6sec-
onds.
will appear briefly in the timer dis-
play and then the seconds will count
down. Once the time has elapsed, the
safety lock function is deactivated.
Operation
53
Keeping warm
Activating/deactivating the Keeping
warm function
The Keeping warm function cannot be
used to reheat food that has gone cold.
Touch the sensor control for the
cooking zone you want to use.
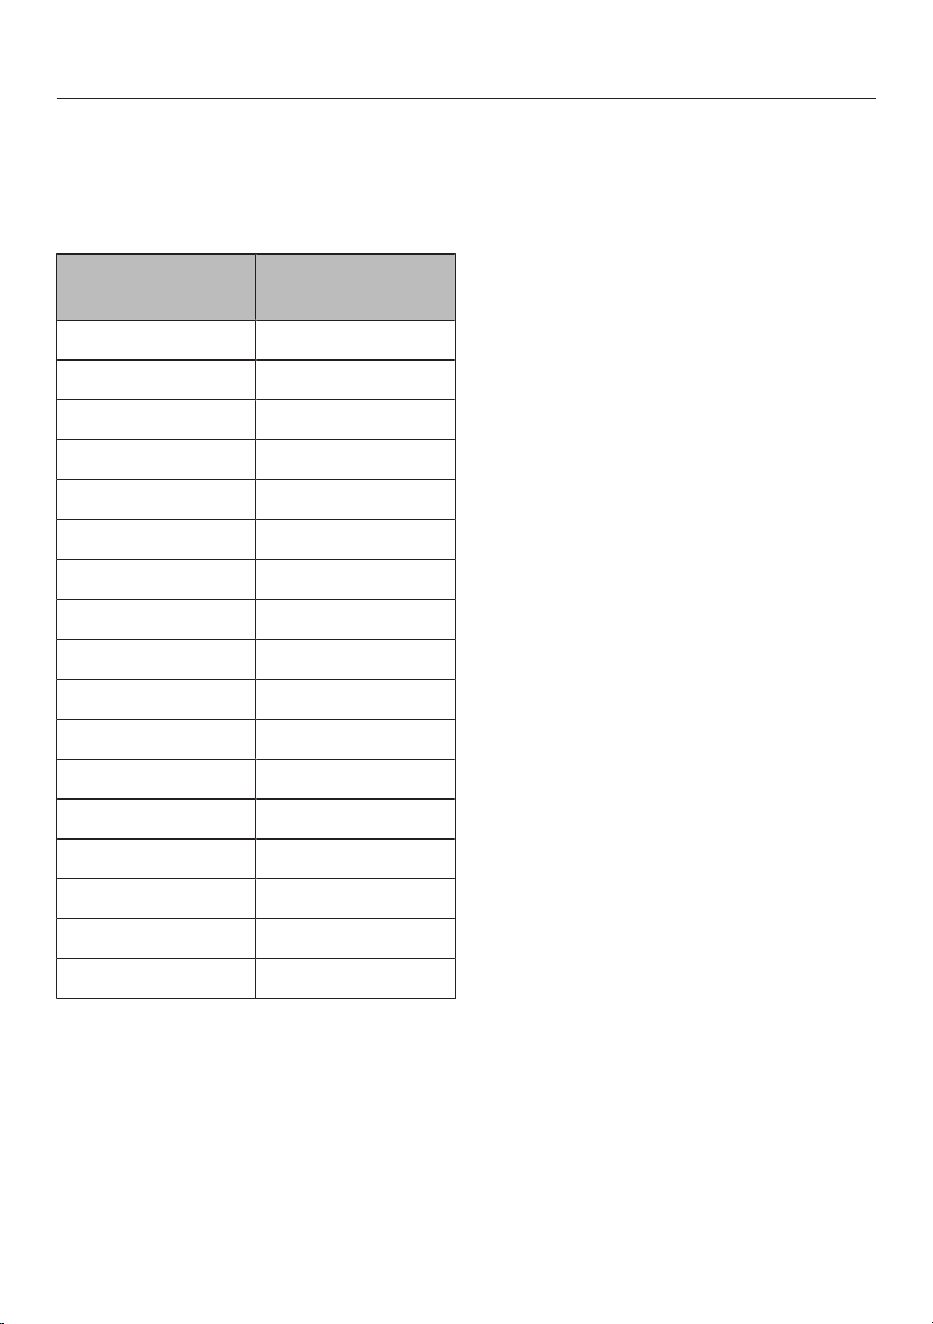
Keeping warm temperatures for vari-
ous applications
A keeping warm temperature of 185°F
(85°C) is set as standard. You can
change the keeping warm temperature
(see “Customizing settings”).
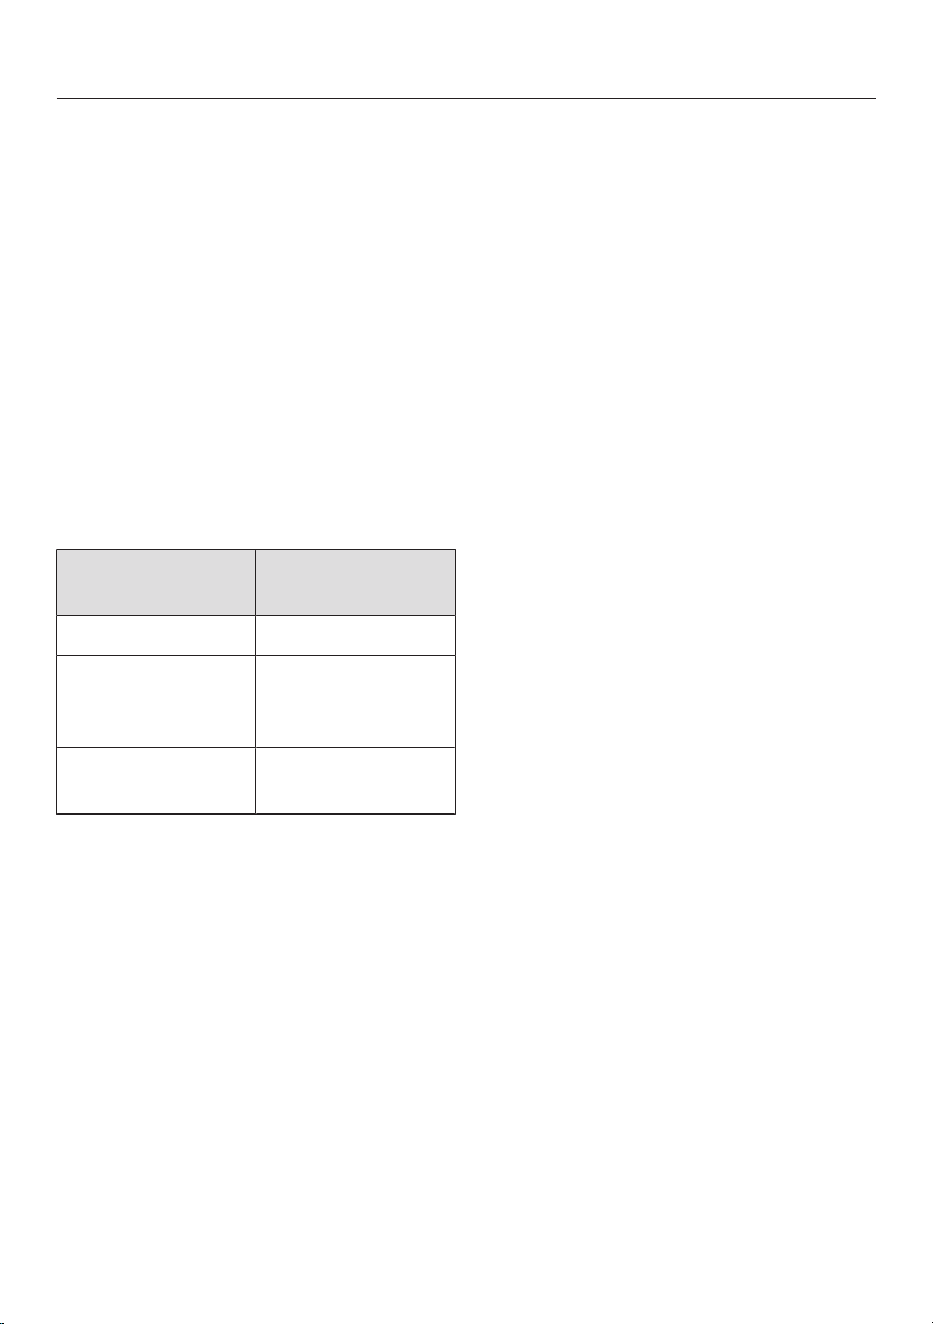
Application Temperature (°F
(°C))
Melting chocolate 120-130 (50–55)
Keeping solid
food and thick liq-
uids warm
150-167 (65–75)
Keeping clear
soups warm
175-195 (80–90)
Tips for keeping food warm
- Only use cookware (pots/pans) for
keeping food warm. Cover the cook-
ware with a lid.
- Stir firm or viscous food (mashed
potatoes, stew) occasionally.
- Foods begin to lose their nutrients
during the cooking process and con-
tinue to do so while being kept warm.
The longer food is kept warm, the
greater the loss of nutrients. Try to
ensure that food is kept warm for as
short a time as possible.
Wipe protection
Activating wipe protection
Touch the sensor control.
The time counts down in the timer dis-
play.
Deactivating wipe protection
Touch the sensor control until the
timer display goes out.

Operation
54
Cooktop data
Displaying the model identifier/serial
number
There must not be any cookware on
the cooktop.
Switch the cooktop on.
Press the 0sensor control on any nu-
merical display.
Press the 0 and 4sensor controls on
the numerical display at the same
time for 6seconds.
Numbers will appear in the timer display
one after another, separated by a dash.
Example: (model identifier
KM1234)– (serial num-
ber)
Displaying the software version
There must not be any cookware on
the cooktop.
Switch the cooktop on.
Press the 0sensor control on any nu-
merical display.
Press the 0 and 3sensor controls on
the numerical display at the same
time for 6seconds.
3numbers appear in the timer display:
Example: = software version1.23.
Activating/deactivating demo
mode
Switch the cooktop on.
Press the 0sensor control on any nu-
merical display.
Press the 0 and 2sensor controls on
the numerical display at the same
time for 6seconds.
The following will flash in the timer dis-
play for a few seconds:
- alternating with (demo mode
activated)
or
- alternating with (demo mode
deactivated)
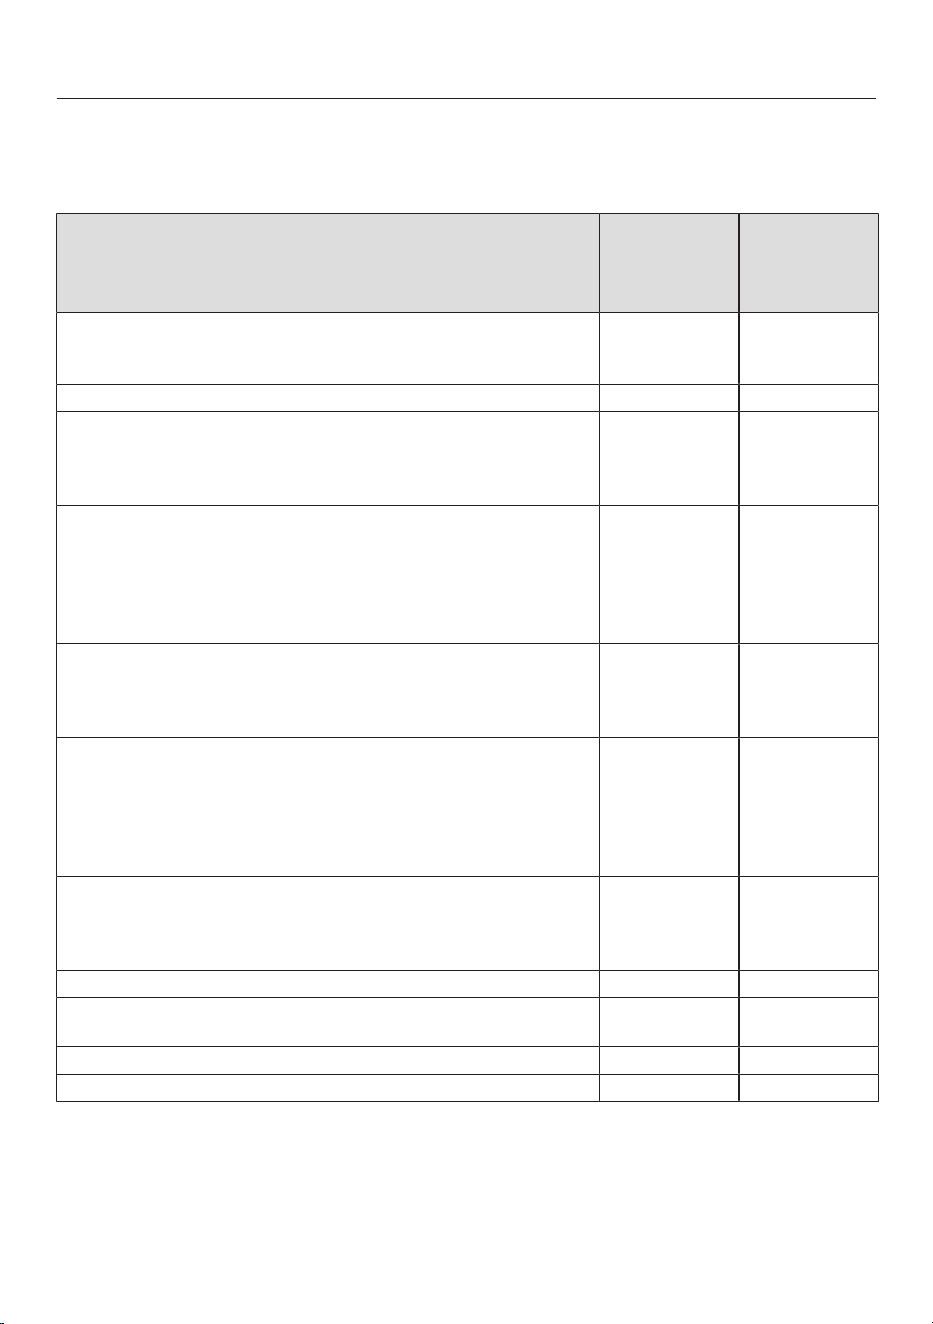
Setting ranges
55
The cooktop is programmed with 9power levels at the factory. If you wish to fine-
tune a setting, you can extend the power level range to 17power levels (see “Cus-
tomizing settings”).
Setting range Extended set-
ting
(17power lev-
els)
Melting butter, chocolate, etc.
Dissolving gelatin
Keeping soups and sauces warm
1–2 1–2.
Making vanilla puddings and other puddings 2 2–2.
Defrosting frozen vegetables (in a block)
Keeping soups and sauces warm and preparing rice
Preparing rolled oats, grits, polenta, risotto, rice pudding, cous-
cous, dulce de leche
2–4 2.–4.
Cooking noodles, matzoh balls, ravioli, gnocchi, and tortellini
Poaching eggs
Heating liquid and semi-solid dishes
Preparing omelettes or fried eggs
Steaming fruit, making compote
Defrosting and heating frozen food
4–5 3.–5.
Steaming vegetables, fish, shellfish, mussels
Gently frying eggs (without overheating the fat)
Frying pancakes
Preparing paella
5–6 4.–6.
Cooking large quantities of food, such as casseroles
Thickening puddings and sauces, such as hollandaise
Simmering for a stew
Toasting nori, tortillas, pita, flat bread, etc.
Toasting nuts
Frying bacon
6–7 5.–7.
Searing meat, chicken, fish, or sausage
Cooking meat (such as hamburger, kebabs, and steak), fish,
and chicken
Frying crêpes, etc.
6–8 6.–8.
Making marmalade and jelly 8 8–8.
Cooking meat, chicken, fish, and vegetables
Cooking at hot temperatures in a wok, stir-frying
7–9 7.–9
Frying, e.g., French fries 9 8.–9
Boiling water or other liquid Booster Booster
These settings should only be taken as a guide. The power of the induction coils will vary
depending on the voltage, size, and material of the cookware base. For this reason, it is
possible that the power levels will need to be adjusted slightly to suit your cookware. As you
use the cooktop, you will get to know which settings suit your cookware best. When using
new cookware that you are not familiar with, set the power to one level below the one spec-
ified.

Good to know
56
How induction cooktops work
An induction coil is located under each
cooking zone. The coil creates a mag-
netic field that reacts directly with the
base of the pan and heats it up. The
cooking zone itself is heated up indi-
rectly by the heat given off by the pan.
An induction cooking zone only works
when a piece of cookware with a mag-
netic base is placed on it (see “Good to
know – Cookware”). The cooktop auto-
matically recognizes the size of the
cookware.
Noises
When you use induction cooking zones,
the following noises may occur, de-
pending on the type and shape of the
cookware base:
On the higher power levels, it might
buzz. This will decrease or cease alto-
gether when the power level is reduced.
Cookware with bases made of different
materials (e.g.,sandwich bases) may
produce a crackling noise.
Whistling might occur if linked cooking
zones (see “Operation – Booster”) are
being used at the same time, and the
cookware items also have bases made
of layers of different materials (e.g.,
sandwich bases).
The electronics may produce a clicking
sound, especially at lower power levels
caused by switching operations.
You may hear a whirring sound when
the cooling fan turns on. It turns on to
protect the electronics when the cook-
top is being used intensively. The fan
may continue to run after the cooktop
has been switched off.

Good to know
57
Cookware
Suitable cookware
- stainless steel with a magnetic base
- enameled steel
- cast iron
The composition of the pan base can
affect the evenness of the cooking re-
sults (e.g., when making pancakes). The
base of the pan must be able to distrib-
ute the heat evenly. Cookware with a
base made from multilayer material (tri-
ply or encapsulated base) is ideal in this
case.
Unsuitable cookware
- Stainless steel without a magnetic
base
- Aluminum or copper
- Glass, ceramics, earthenware,
stoneware
Testing cookware
To test whether a pot or pan is suitable
for use on an induction cooktop, hold a
magnet to the base of the pan. If the
magnet sticks, the cookware is gener-
ally suitable.

Good to know
58
Cookware tips
- Position the cookware as centrally as
possible on the relevant cooking
zone/cooking area.
- To make optimum use of the cooking
zones, choose cookware with a suit-
able base diameter (see “Overview –
Cooking zone data”). If the cookware
is too small it will not be recognized.
- Use only pots and pans with smooth
bases. Rough bases can scratch the
ceramic glass.
- Always lift the cookware to move it.
This will help prevent scratching. If
any scratches do appear as a result
of cookware being pushed around,
this will not affect the function of the
cooktop. These scratches are normal
signs of use and are not grounds for
making a complaint.
- Please note that the pot or pan diam-
eter quoted by manufacturers often
refers to the maximum diameter or di-
ameter of the top rim. The diameter of
the base (generally smaller) is more
important.
- Where possible, use cookware with
vertically straight sides. If pans with
sloped sides are used, the induction
also takes effect around the edges of
the pan. This can cause the edge of
the pan to become discolored or the
coating to peel off.

Customizing settings
59
Accessing programming mode
The sensor control is located ap-
prox. 1/2" (1cm) (index finger width) to
the left of the sensor control.
The cooktop is switched off.
Touch and hold the and sensor
controls until the sensor control
lights up and appears in the timer
display.
After a few seconds : (Program 01)
will flash alternately with : (Code) in
the timer display.
Setting the program
For a two-digit program number you
first need to set the tens position.
While the program is visible in the
display (e.g., :), touch the sen-
sor control repeatedly until the num-
ber for the program you want appears
in the display or touch the appropri-
ate number on the numerical display.
Setting the code
While the code is visible in the display
(e.g., :), touch the sensor con-
trol repeatedly until the number for
the code you want appears in the dis-
play or touch the appropriate number
on the numerical display.
Saving the settings
While the program is visible in the
display (e.g., :), touch the sen-
sor control until the indicators go out.
To avoid saving the settings
While the code is showing in the dis-
play (e.g., :), touch the sensor
control until the indicators go out.
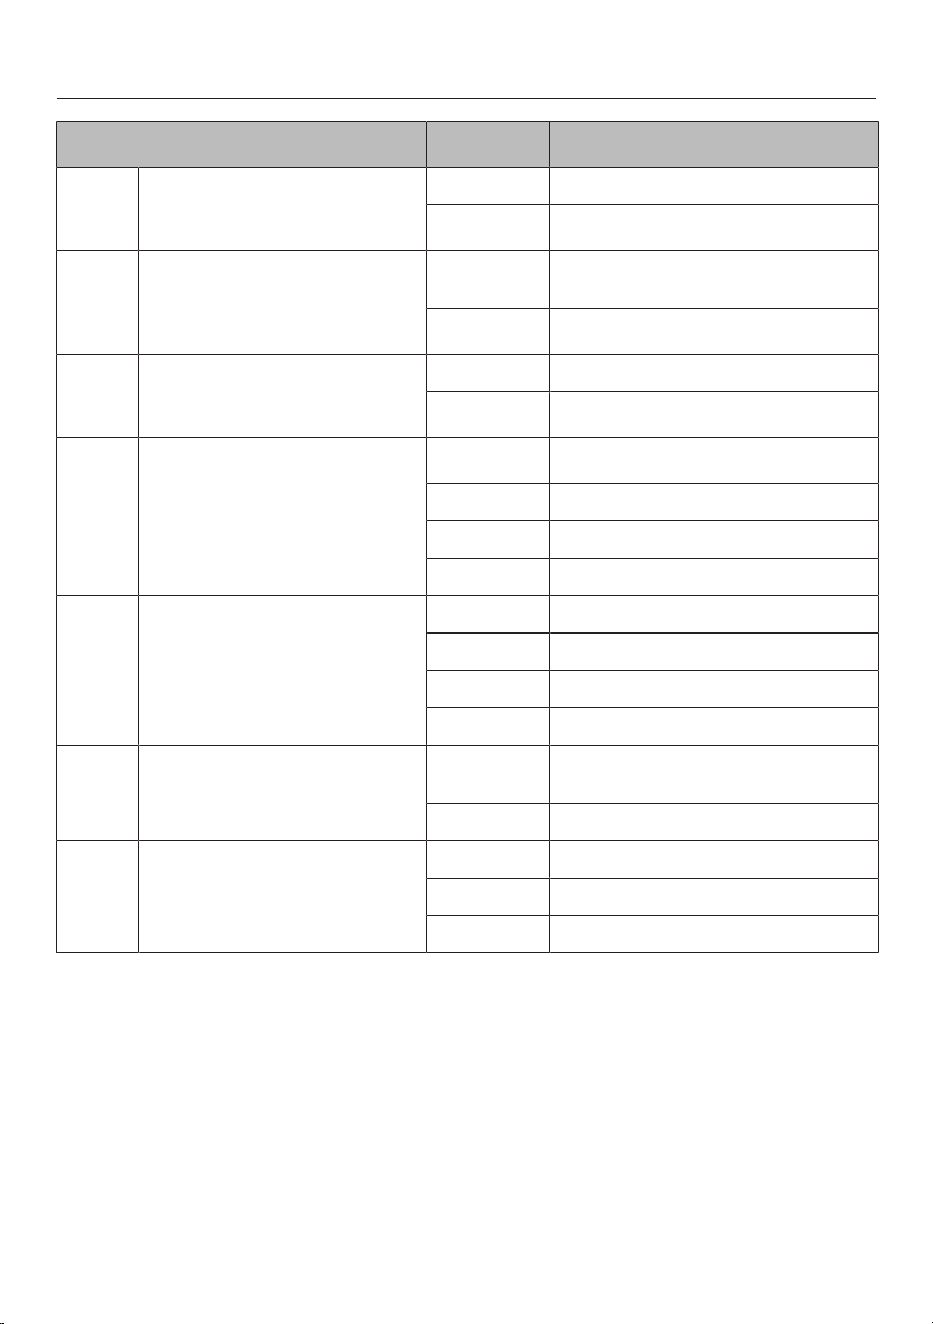
Customizing settings
60
Program
1
Code
2
Settings
P:01
Demo mode
C:00
Demo mode off
C:01
Demo mode on
3
P:03
Factory default
C:00
Do not restore factory default set-
tings
C:01
Restore factory default settings
P:04
Power level setting range
C:00
9power levels + Booster
C:01
17power levels + Booster
4
P:06
Audible tone when a sensor
control is touched
C:00
Off
5
C:01
Quiet
C:02
Medium
C:03
Loud
P:07
Audible signal for timer
C:00
Off
C:01
Quiet
C:02
Medium
C:03
Loud
P:08
System lock
C:00
System lock can only be activated
manually
C:01
System lock activated automatically
P:09
Maximum operating time
C:00
Safety setting0
C:01
Safety setting1
C:02
Safety setting2
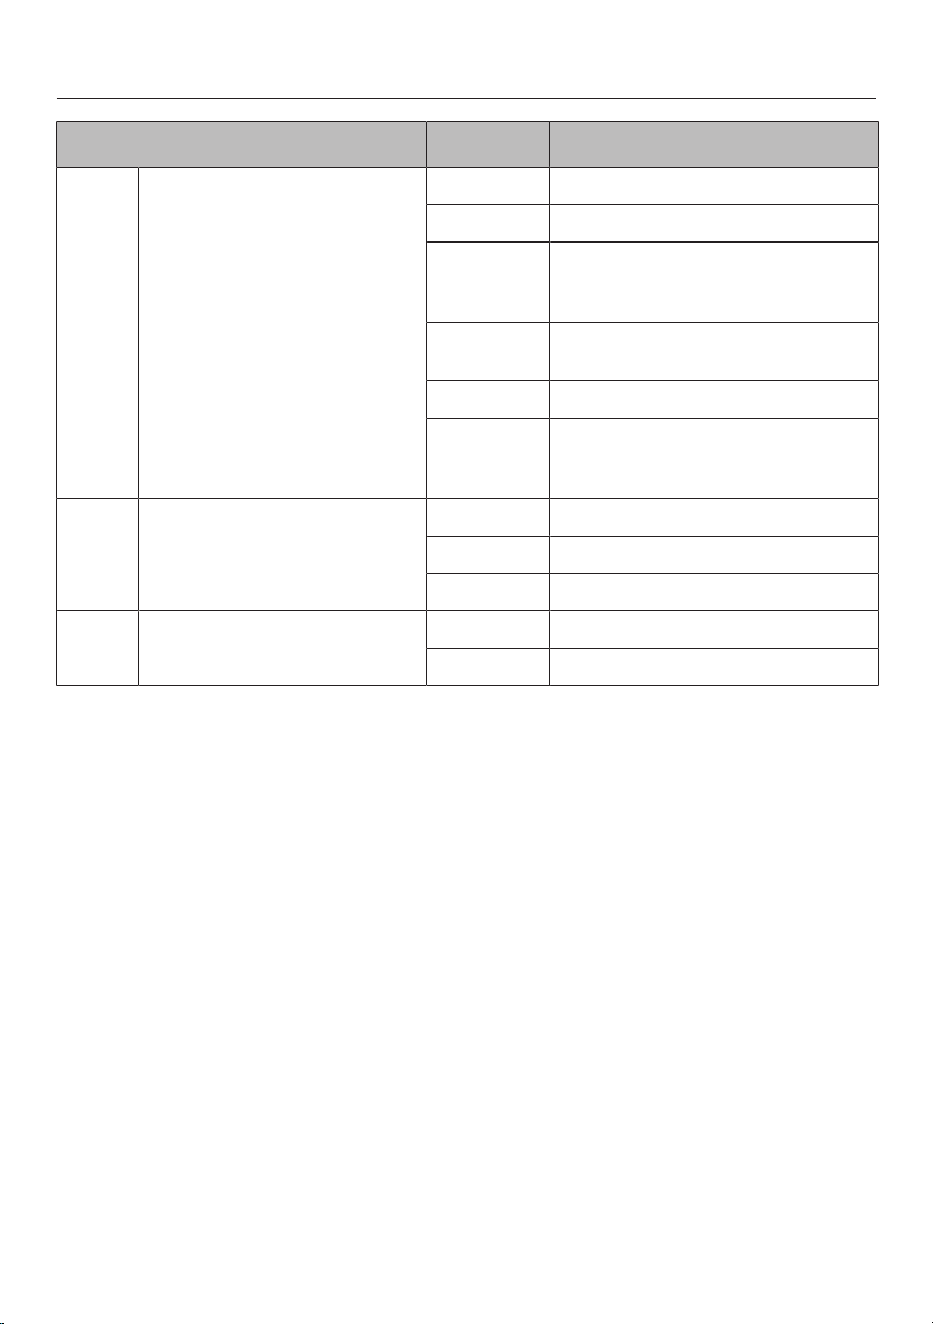
Customizing settings
61
Program
1
Code
2
Settings
P:10
WiFi registration
C:00
Not active/deactivated
C:01
Active but not configured
C:02
Active and configured (cannot be se-
lected; displays whether connection
was successful)
C:03
Connection possible via WPS push
button
C:04 WiFi reset to default (C:00)
C:05
Direct WiFi connection of cooktop
and ventilation hood without Miele
app (Con@ctivity3.0)
P:12
Sensor controls reaction speed
C:00
Slow
C:01
Normal
C:02
Fast
P:15
Permanent pan recognition
C:00
Permanent pan recognition off
C:01
Permanent pan recognition on
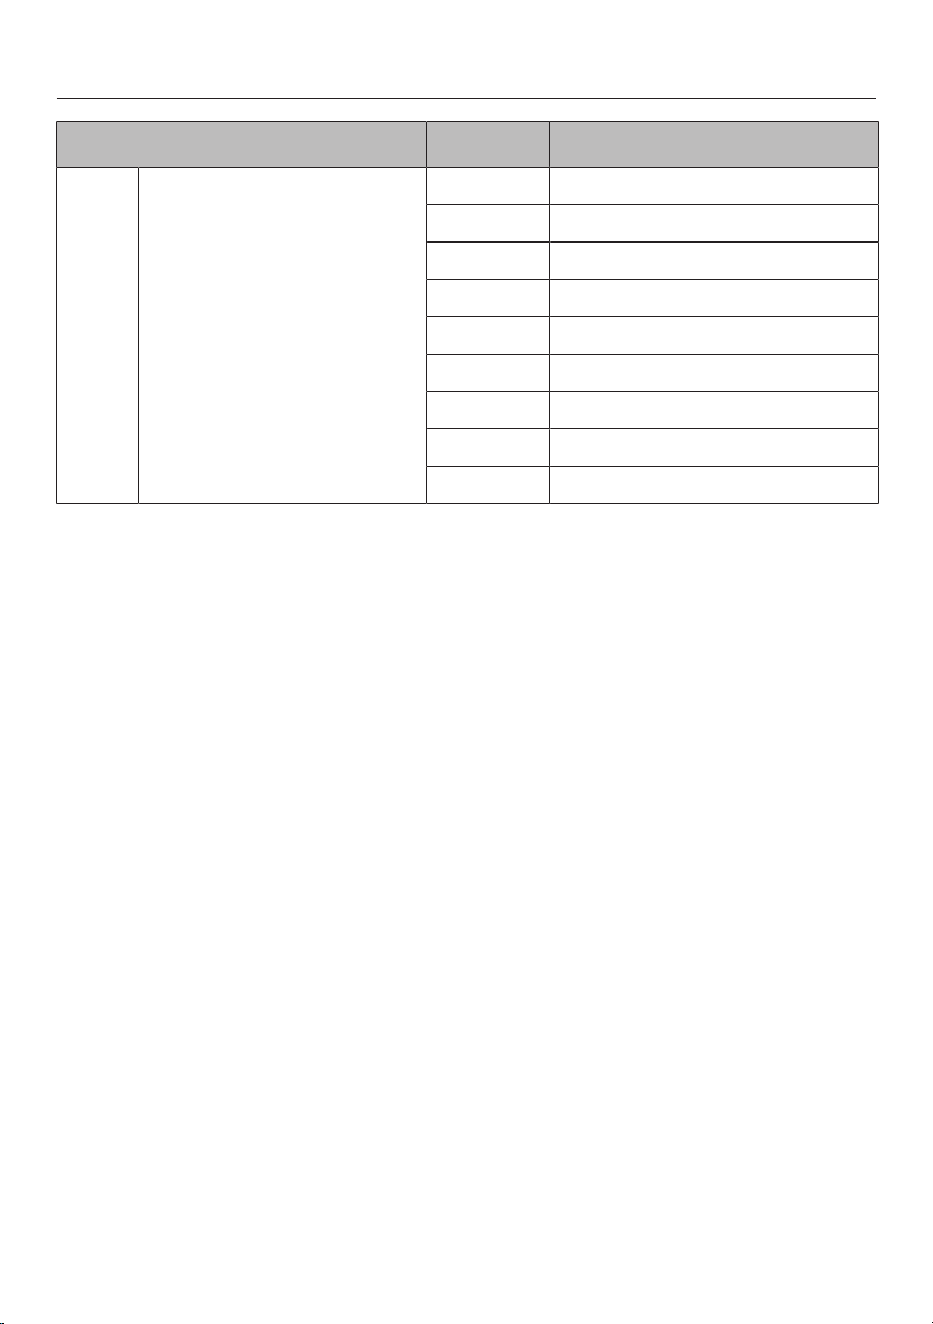
Customizing settings
62
Program
1
Code
2
Settings
P:25
Keeping warm temperature
C:00
120°F (50°C)
C:01
130°F (55°C)
C:02
140°F (60°C)
C:03
150°F (65°C)
C:04
160°F (70°C)
C:05
170°F (75°C)
C:06
175°F (80°C)
C:07
185°F (85°C)
C:08
195°F (90°C)
1
Programs not shown here have no allocation.
2
The factory default setting is shown in bold.
3
After the cooktop has been switched on, appears in the timer display for a few seconds.
4
In the text and tables, the extended power levels are shown with a dot after the number for better un-
derstanding.
5
The confirmation tone of the On/Offsensor control cannot be switched off.

Cleaning and care
63
Safety notes on cleaning and care
Danger of burning due to hot surfaces.
All parts of the cooktop may be hot after use.
Turn off the cooktop.
Allow the cooktop to cool down before cleaning it.
All surfaces could be discolored or damaged if unsuitable cleaning
agents are used or if residues from suitable cleaning agents are
heated on the cooktop. All surfaces are susceptible to scratching.
Allow the surfaces to cool down before cleaning the cooktop.
Remove any residual cleaning agent immediately.
Do not clean with any abrasive cleaning agents or sharp pointed
objects.
Do not use a steam cleaner to clean the cooktop.
Do not use pointed objects for cleaning.

Cleaning and care
64
When to clean
The entire cooktop should be cleaned
after each use.
Removing light soiling
Clean the entire ceramic surface of
the cooktop with a damp, soft cloth
and a solution of water and a little liq-
uid dish soap. Please follow the
cleaning agent manufacturer’s in-
structions.
Removing stubborn soiling
First wipe down the surface with a
damp cloth to loosen soiling, then re-
move stubborn crusting with a glass
scraper.
Clean the glass ceramic surface with
the Miele ceramic and stainless steel
cleaner (see “Optional accessories –
Cleaning and care products”) or with
a proprietary ceramic glass cleaner.
Please follow the cleaning-agent
manufacturer’s instructions.
Finishing the cleaning process
Remove all cleaning agent residues
with a damp cleaning cloth.
Dry the ceramic surface of the cook-
top after cleaning.
Unsuitable cleaning agents
To avoid damaging the surfaces of the
appliance, do not use:
- cleaning agents containing soda, al-
kalis, ammonia, acids, or chlorides
- stain or rust removers
- abrasive cleaning agents, such as
scouring powder, scouring liquid, or
pumice stones
- cleaning agents containing solvents
- dishwasher cleaning agents
- grill and oven sprays
- hard, abrasive brushes
- eraser sponges
- sponges
Frequently asked questions
65
Many malfunctions and faults that can occur in daily operation can be easily reme-
died. You can save time and money in many cases, as you do not need to contact
Miele Customer Service. Information to help you rectify faults yourself can be
found at www.miele.com/service. The following tables are designed to help you to
find the cause of a malfunction or a fault and to resolve it.
Messages in the display
Problem Possible cause and solution
will flash alternately
with in the timer dis-
play and a tone will
sound.
The cooktop is incorrectly connected.
Disconnect the cooktop from the electrical power
supply.
Contact Customer Service. The cooktop must be
connected to the power supply according to the
wiring diagram.
After the cooktop has
been switched on, or af-
ter touching a sensor
control, appears in
the timer display for a
few seconds.
The system lock is activated.
Deactivate the system lock (see “Operation – De-
activating the system lock”).
The safety lock is activated.
Deactivate the safety lock (see “Operation – Deac-
tivating the safety lock”).
After the cooktop has
been switched on,
appears briefly in the
timer display. The cook-
ing zones do not heat
up.
The cooktop is in demo mode.
Press the 0sensor control on any numerical dis-
play.
Then touch the and sensor controls at the
same time until flashes alternately with in
the timer display.
The cooktop has
switched off automati-
cally. When the element
is switched back on,
appears above the
On/Off sensor control.
One or more of the sensor controls are covered, e.g.,
by finger contact, food boiling over, or an object.
Clean off any soiling and/or remove the object (see
“Overview – Safety shut-off”).
will flash alternately
with in the timer
display.
Overheating protection has been triggered.
Allow the cooktop to cool down.
Rectify the causes of the overheating (see “Over-
view – Overheating protection”).
Check that the cooktop works.
If this fault message continues to appear in the
display, contact Miele Customer Service.
Frequently asked questions
66
Problem Possible cause and solution
will flash alternately
with , , or in
the timer display.
The fan is blocked or defective.
Make sure it has not been blocked by an object.
Remove the obstruction.
If this fault message continues to appear in the
display, contact Miele Customer Service.
In the timer display, an
E-number such as E-0
flashes alternately with
, , , , ,
, , or .
The fan is blocked or defective.
Make sure it has not been blocked by an object.
Remove the obstruction.
If this fault message continues to appear in the
display, contact Miele Service.
A message not listed in
this table is appearing
in the timer display.
There is an electronic fault.
Disconnect the power supply to the cooktop for
approx. 1minute.
If the problem persists after the power supply has
been restored, please contact Customer Service.
Frequently asked questions
67
Unexpected behavior
Problem Possible cause and solution
The symbol lights up
or flashes alternately
with the set power level
or in one of the cook-
ing zone indicators.
No cookware is present on the cooking zone.
Unsuitable cookware is present on the cooking zone.
The base diameter of the cookware used is too small.
Suitable dishware has been removed from the cook-
ing zone.
If no cookware or unsuitable cookware is used, the
cooking zone will automatically turn off after 15sec-
onds.
Place a suitable item of cookware on the cooking
zone within 15seconds.
goes out. The cooking process starts/continues
with the previously selected settings.
If you are using a different item of cookware and/or
food, modify the settings.
Power level9 is auto-
matically reduced if you
also set power level9
for the connected cook-
ing zone.
Operating both zones at power level9 exceeds the
permitted maximum power for the two zones.
Use a different cooking zone.
A cooking zone turns it-
self off automatically.
It might have been operated for too long.
Switch the cooking zone back on (see “Overview –
Safety shut-off”).
The cooking zone is not
working in the usual
way with the set power
level.
Overheating protection has been triggered.
Allow the cooktop to cool down.
Rectify the causes of the overheating (see “Over-
view – Overheating protection”).
Check that the cooktop works.
If the problem occurs again, contact Customer
Service.
A cooking zone or the
whole cooktop switches
off automatically.
Overheating protection has been triggered.
Allow the cooktop to cool down.
Rectify the causes of the overheating (see “Over-
view – Overheating protection”).
Check that the cooktop works.
If the problem occurs again, contact Customer
Service.

Frequently asked questions
68
Problem Possible cause and solution
The Booster level has
automatically turned off
early.
Overheating protection has been triggered.
Allow the cooktop to cool down.
Rectify the causes of the overheating (see “Over-
view – Overheating protection”).
Check that the cooktop works.
If the problem occurs again, contact Customer
Service.
Frequently asked questions
69
Unsatisfactory results
Problem Possible cause and solution
Auto Heat-up is turned
on, but the food does
not start cooking.
Large amounts of food are being heated.
Start cooking at the highest power level, then re-
duce the power level manually.
The pan is not conducting heat properly.
Use a different pan that is able to better conduct
heat on an induction cooktop.
General problems or technical faults
Problem Possible cause and solution
Cooktop or cooking
zones cannot be
switched on.
There is no power to the cooktop.
Check if the breaker has tripped. Contact a quali-
fied electrician or Miele Customer Service (for the
minimum fuse rating, see the data plate).
There may be a technical fault.
Disconnect the cooktop from the electricity supply
for approx. 1 minute by
– tripping the relevant breaker or unscrewing the
fuse completely, or
– switching off the residual current device.
If the cooktop will still not switch on after the fuse
or the residual current device has been reset/re-
placed, contact a qualified electrician or Customer
Service.
There is a strange smell
or vapors when the
cooktop is being used
for the first time.
The metal components have a protective coating.
When the cooktop is used for the first time, this
causes a smell and possibly also vapor. The material
from which the induction coils are made also gives
off a smell in the first few hours of operation. With
each subsequent use, the odors are reduced until
they disappear completely. The smell and any vapors
do not indicate a faulty connection or a defective ap-
pliance and are not harmful to your health.
A noise can be heard
after the appliance is
turned off.
The fan will continue running until the cooktop has
cooled down. It will then turn itself off automatically.
Customer Service
70
Information to help you rectify faults yourself and about Miele spare parts can be
found at www.miele.com/service.
Contact in the event of a fault
In the event of a fault which you cannot remedy yourself, please contact your
Miele dealer or Miele Customer Service.
You can book a Miele Service call online at www.miele.com/service.
Contact information for Miele Customer Service can be found at the end of this
document.
Please quote the model identifier and serial number of your appliance (SN) when
contacting Miele Customer Service. These can be found on the data plate or see
“Operation – Cooktop data”.
Data plate
Adhere the extra data plate supplied with the appliance in the space below. Make
sure that the model number matches the one specified on the back cover of this
document.
Appliance warranty and product registration
You can register your product and/or view the manufacturer´s warranty terms and
conditions for Miele appliances and vacuum cleaners at www.mieleusa.com.

Optional accessories
71
Miele offers a range of useful acces-
sories, as well as cleaning and condi-
tioning products for your appliance.
These products can be easily ordered
from the Miele webshop.
Cookware
Miele offers a wide range of cookware.
These have all been optimized for Miele
appliances in terms of functionality and
dimensions. Detailed information can
be found on the Miele website.
Cleaning and care products
Ceramic and stainless steel cleaner
250mL
Removes heavy soiling, lime scale, and
aluminum residue.
Microfiber cloth
Removes finger marks and light soiling.
Installation
*INSTALLATION*
72
Safety notes for installation
Risk of damage caused by incorrect installation.
Incorrect installation can damage the cooktop.
The cooktop must only be installed by a qualified specialist.
Risk of electric shock from voltage.
Incorrect connection to the power supply may result in an electric
shock.
The cooktop must be connected to the electrical supply by a quali-
fied electrician only.
Damage from falling objects.
Take care not to damage the cooktop when installing wall units or
a ventilation hood above it.
Install the wall units and ventilation hood before installing the
cooktop.
Dismantling the cooktop for service purposes may damage the
sealing strip underneath the edge of the cooktop.
Always replace the sealing strip before reinstallation.
Reaching over a hot appliance to access the cabinets can result in
burns. You can reduce the risk of burns by installing a ventilation
hood that extends at least 5" (12cm) past the bottom of the cabi-
nets.
The cooktop must not be installed above refrigerators/freezers,
dishwashers, or washer/dryers.
This cooktop may only be installed above a range or oven if it has
a built-in cooling fan.
Ensure that the power cord cannot be touched after the cooktop
has been installed.

Installation
*INSTALLATION*
73
After the installation of the cooktop, the electrical cord may not
come into contact with any moving kitchen parts (e.g. a drawer) or
be subject to mechanical stress.
The countertop must be heat-resistant (up to 212°F / 100°C), so
that it does not become deformed or the veneer detached. The wall
strips must be heat-resistant as well.
Remember to maintain the minimum safety distances (see “Instal-
lation – Safety distances”).
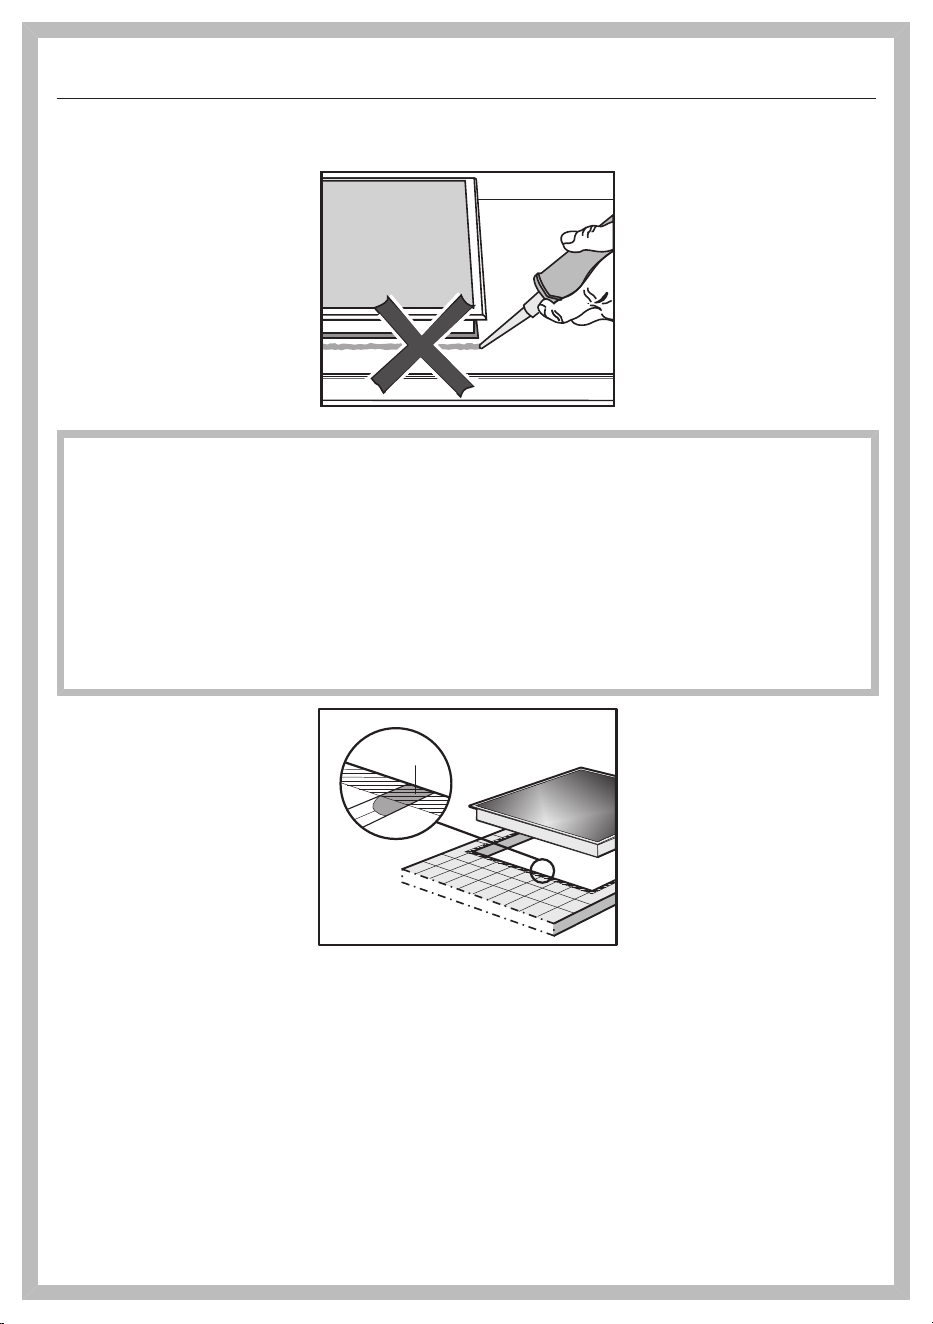
Installation
*INSTALLATION*
74
Additional safety notes for proud installation
Damage caused by incorrect installation.
Using sealant under the cooktop could result in damage to the
cooktop and the countertop if the cooktop ever needs to be re-
moved for servicing.
Do not use sealant between the cooktop and the countertop.
The sealing strip under the edge of the cooktop provides a suffi-
cient seal for the countertop.
a
Grout lines and the hatched area underneath the cooktop
frame must be smooth and even. If they are not, the cooktop will not
sit flush with the countertop and the sealing strip underneath the
cooktop will not provide a good seal between the cooktop and the
countertop.

Installation
*INSTALLATION*
75
Additional safety notes for flush installation
Damage caused by unsuitable sealant.
Unsuitable sealant can damage natural stone.
For natural-stone countertops and natural-stone tiles, only use sili-
cone sealant that is specially formulated for natural stone. Please
follow the manufacturer’s instructions.
The internal width of the base unit underneath the appliance must
be at least as wide as the inner countertop cut-out (see “Installation
– Building-in dimensions for flush installation”), so that the cooktop
is easily accessible from underneath after installation and the casing
can be removed for maintenance. If the underside of the cooktop is
not freely accessible after installation, any sealant used must be re-
moved to enable the cooktop to be lifted out of the cut-out should
this be necessary.
A flush cooktop is suitable only for installation in natural stone
(granite, marble), solid wood, and tiled countertops. When using a
countertop made from any other material, please check first with the
countertop manufacturer that it is suitable for installing a flush cook-
top.
- Natural stone countertops: The cooktop is set directly in the cut-
out.
- Solid wood countertops, tiled countertops: The cooktop is se-
cured inside the cut-out with wooden battens. The frame must be
provided on site and is not supplied with the appliance.
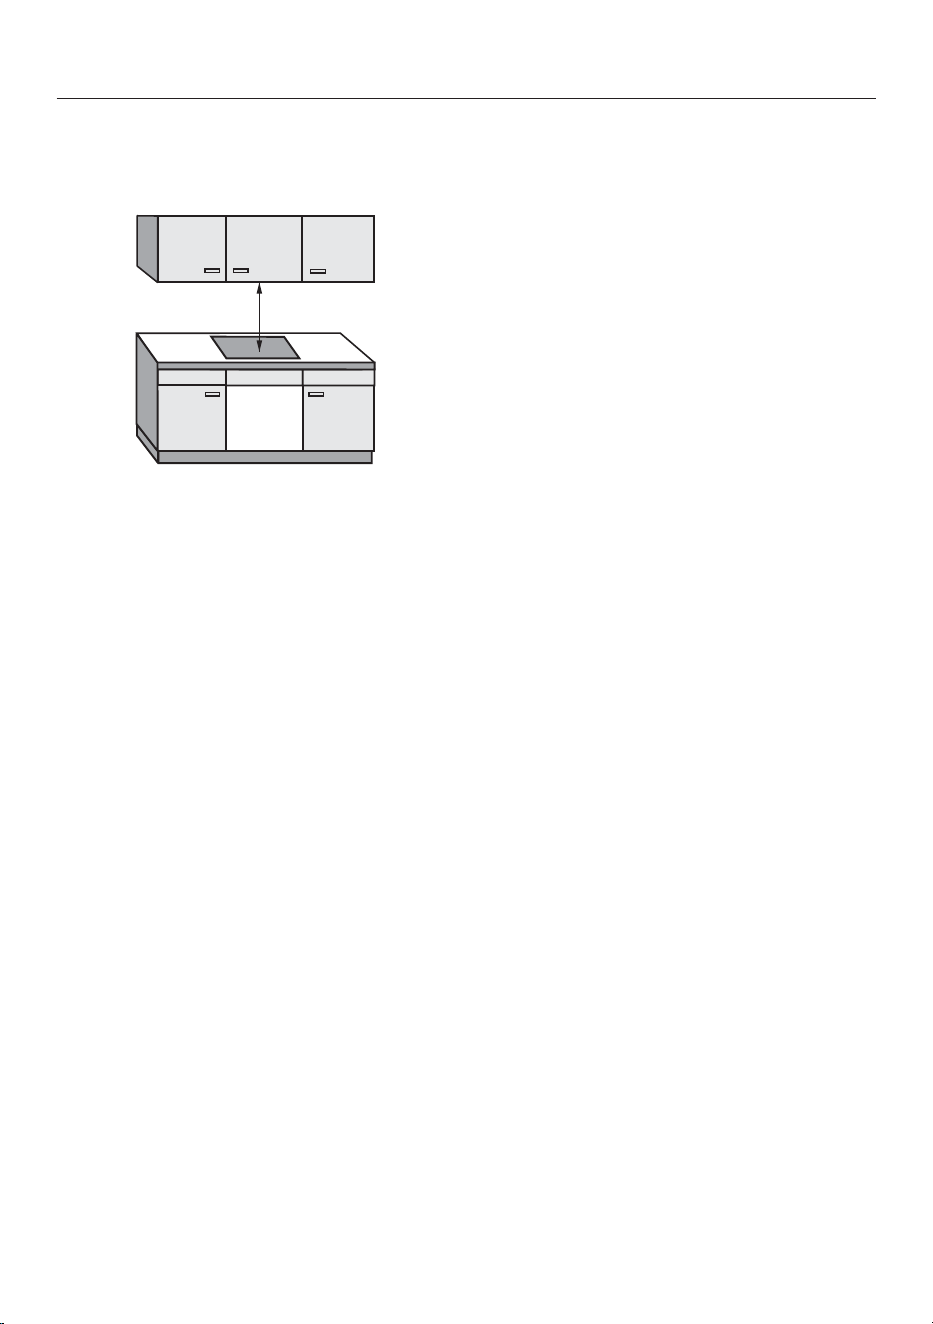
Installation
*INSTALLATION*
76
Safety distances
Safety distance above the cooktop
She safety distance specified by the
manufacturer of the ventilation hood
must be maintained between the cook-
top and the ventilation hood above it.
When two or more appliances which
have different safety distances are in-
stalled together below a ventilation
hood, you should observe the greatest
safety distance.
If combustible objects are installed
above the cooktop (e.g., a suspended
rack), a minimum safety distance of
19 3/4" (500 mm) must be maintained.

Installation
*INSTALLATION*
77
Safety distance behind and to the
side of the cooktop
The minimum safety distances shown
below must be maintained between the
appliance and a tall cabinet or wall:
- between the back of the counter-
top cut-out and the rear edge of the
countertop:
2" (50 mm)
and
- on the right side between the
countertop cut-out and the closest
adjacent piece of furniture (e.g., tall
unit) or a room wall:
2" (50 mm) and on the opposite side
a minimum safety distance of
7 7/8" (200 mm)
or
- on the left side between the coun-
tertop cut-out and the closest adja-
cent piece of furniture (e.g., tall unit)
or a room wall:
2" (50 mm) and on the opposite side
a minimum safety distance of
7 7/8" (200 mm)
Not allowed
Highly recommended
Not recommended
Not recommended
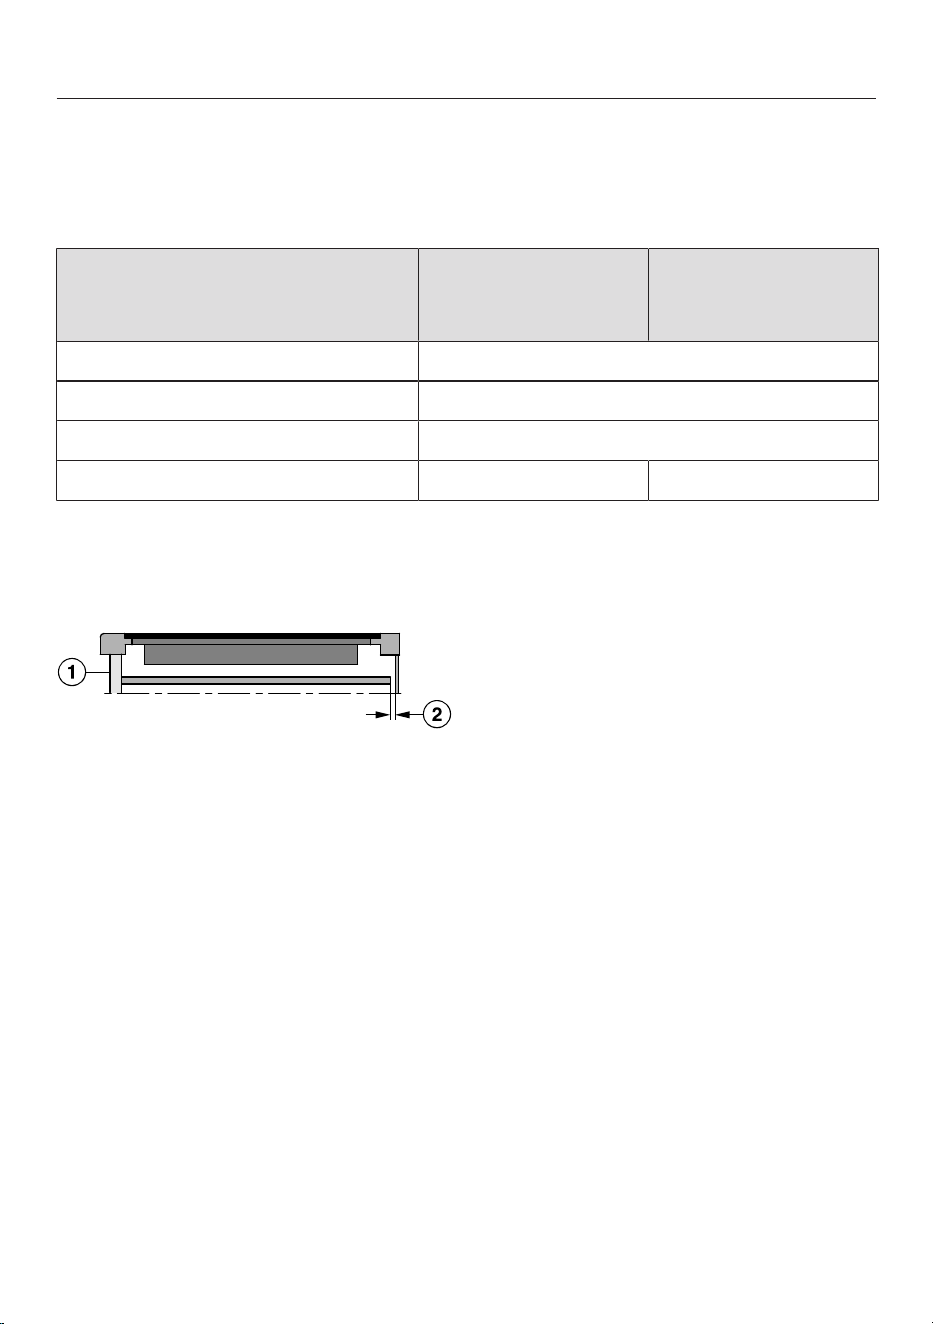
Installation
*INSTALLATION*
78
Minimum safety distance underneath the cooktop
To ensure sufficient ventilation to the cooktop, a minimum safety distance must be
left between the underside of the cooktop and any oven, protective base, or
drawer.
The minimum safety distance
between the underside of the
cooktop and
KM 7735 FL, KM
7755 FL
KM 7745 FL
Upper edge of drawer ≥ 3/16" (5 mm)
Base of drawer ≥ 3" (75 mm)
Upper edge of oven ≥ 9/16" (15 mm)
Upper edge of protective base ≥ 9/16" (15 mm) ≥ 3 3/4" (95 mm)
Protective base
Installation of a protective base under the cooktop is allowed but not required.
Side view
a
Front
b
Rear air gap
Leave a air gap of 3'' (75mm) at the back between the cabinet and the protec-
tive base to accommodate the power supply cord.
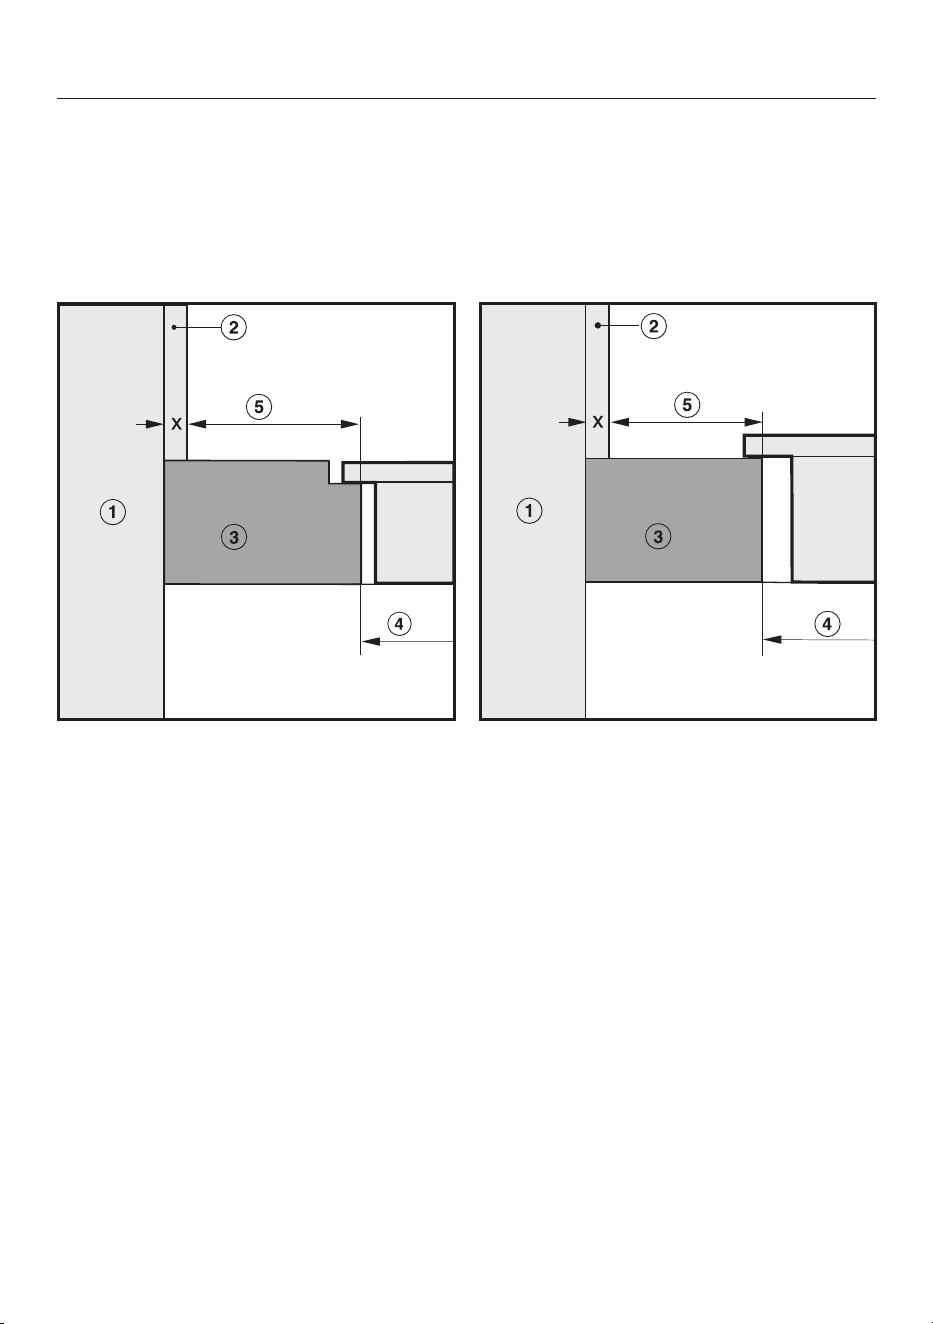
Installation
*INSTALLATION*
79
Safety distance from the wall covering
If a wall covering is installed, a minimum safety distance must be maintained be-
tween the countertop cut-out and the covering. High temperatures can alter or
damage these materials.
Flush installation Proud installation
a
Wall frame
b
Dimensionx= thickness of the wall covering material
c
Countertop
d
Countertop cut-out
e
Minimum safety distance to
combustible materials (e.g., wood) 2" (50mm)
non-combustible materials (e.g., metal, natural stone, ceramic tiles)
2" (50mm) – dimension x
Example: 1/2" (15mm) thick non-combustible wall covering
2" (50mm) – 1/2" (15mm) = minimum safety distance of 1 3/8" (35mm)
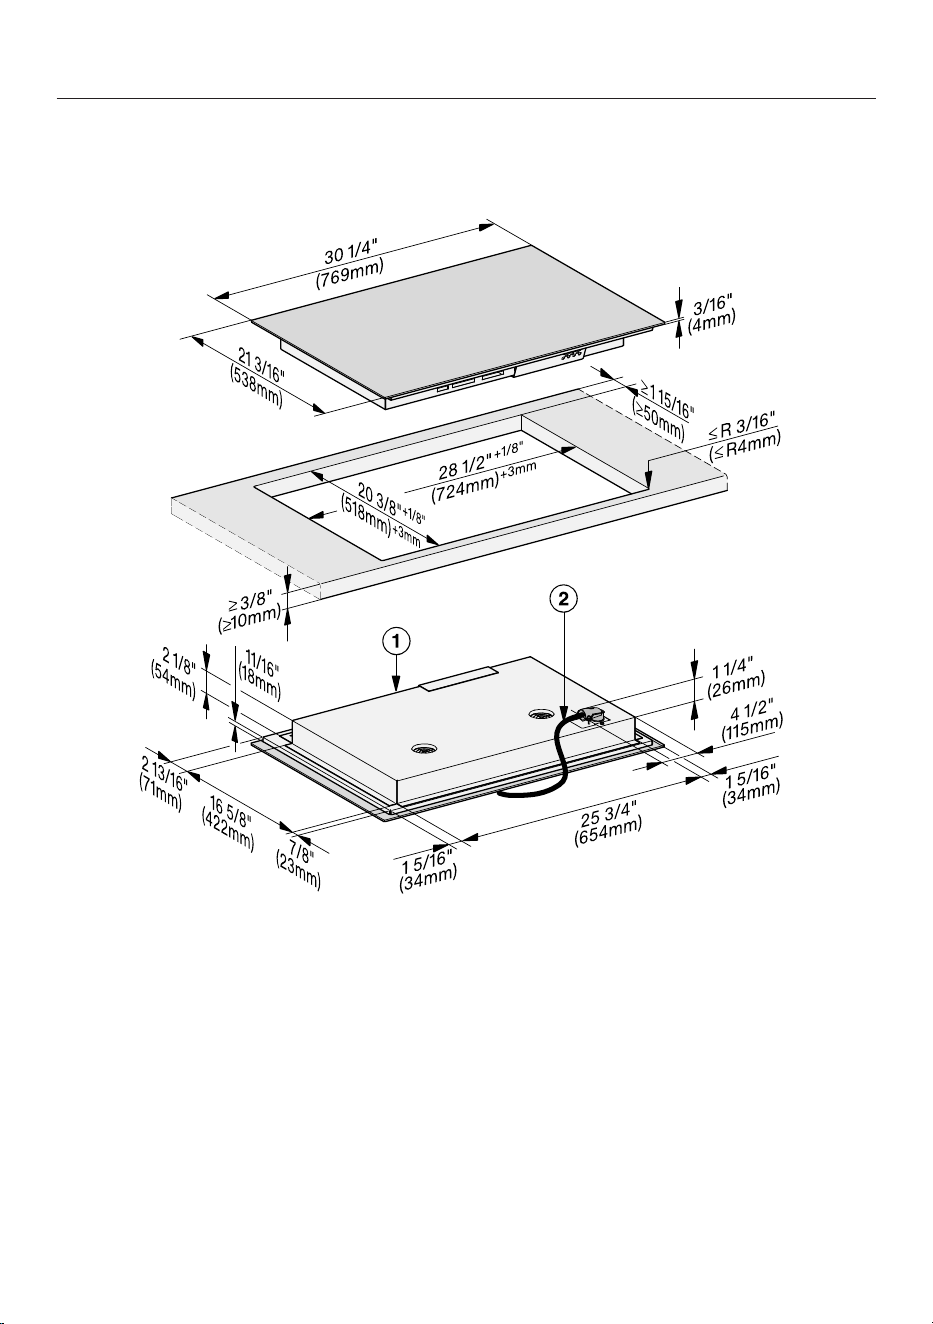
Installation
*INSTALLATION*
80
Building-in dimensions for proud installation
KM7735FL
All dimensions are given in mm and inches. The superscript numbers after the cut-out di-
mensions are the tolerances for the cut-out.
a
Front
b
Flexible metal hose with power cords,
L =4' (1,200mm)
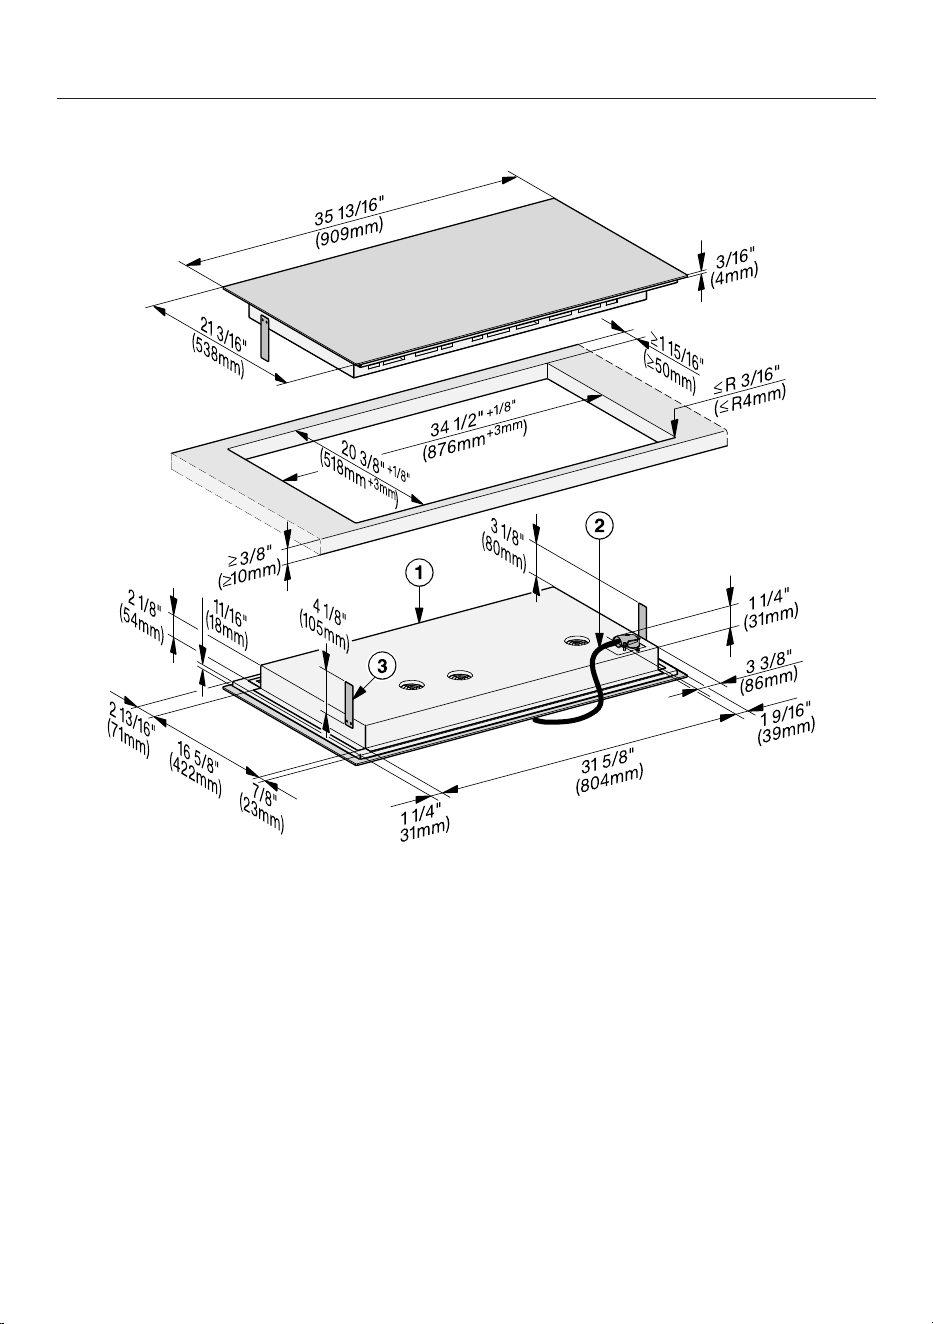
Installation
*INSTALLATION*
81
KM7745FL
All dimensions are given in mm and inches. The superscript numbers after the cut-out di-
mensions are the tolerances for the cut-out.
a
Front
b
Flexible metal hose with power cords,
L =4' (1,200mm)
c
Spacer plate (only required if a protective base is installed)
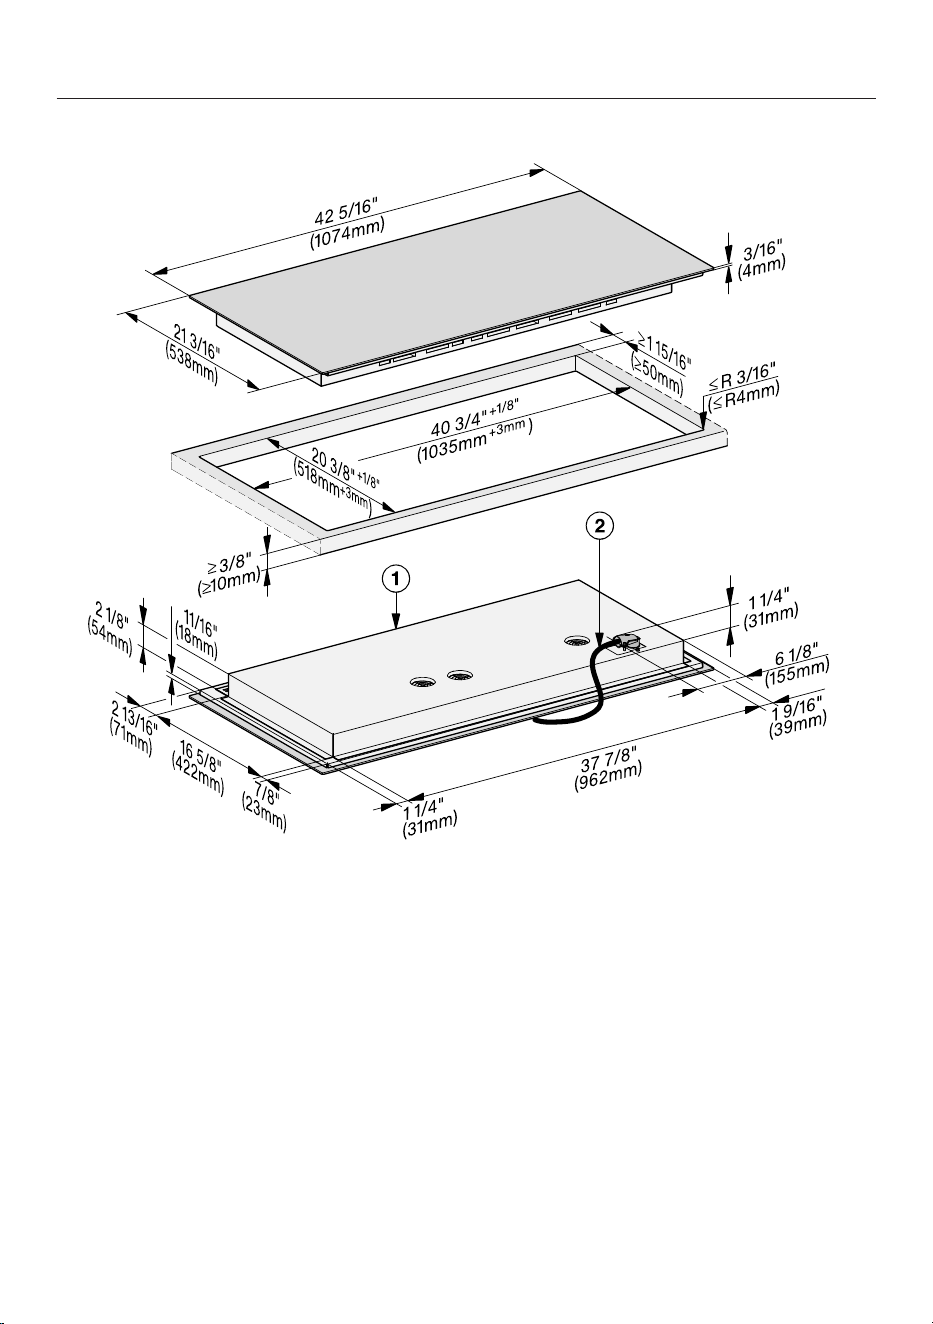
Installation
*INSTALLATION*
82
KM7755FL
All dimensions are given in mm and inches. The superscript numbers after the cut-out di-
mensions are the tolerances for the cut-out.
a
Front
b
Flexible metal hose with power cords,
L =4' (1,200mm)
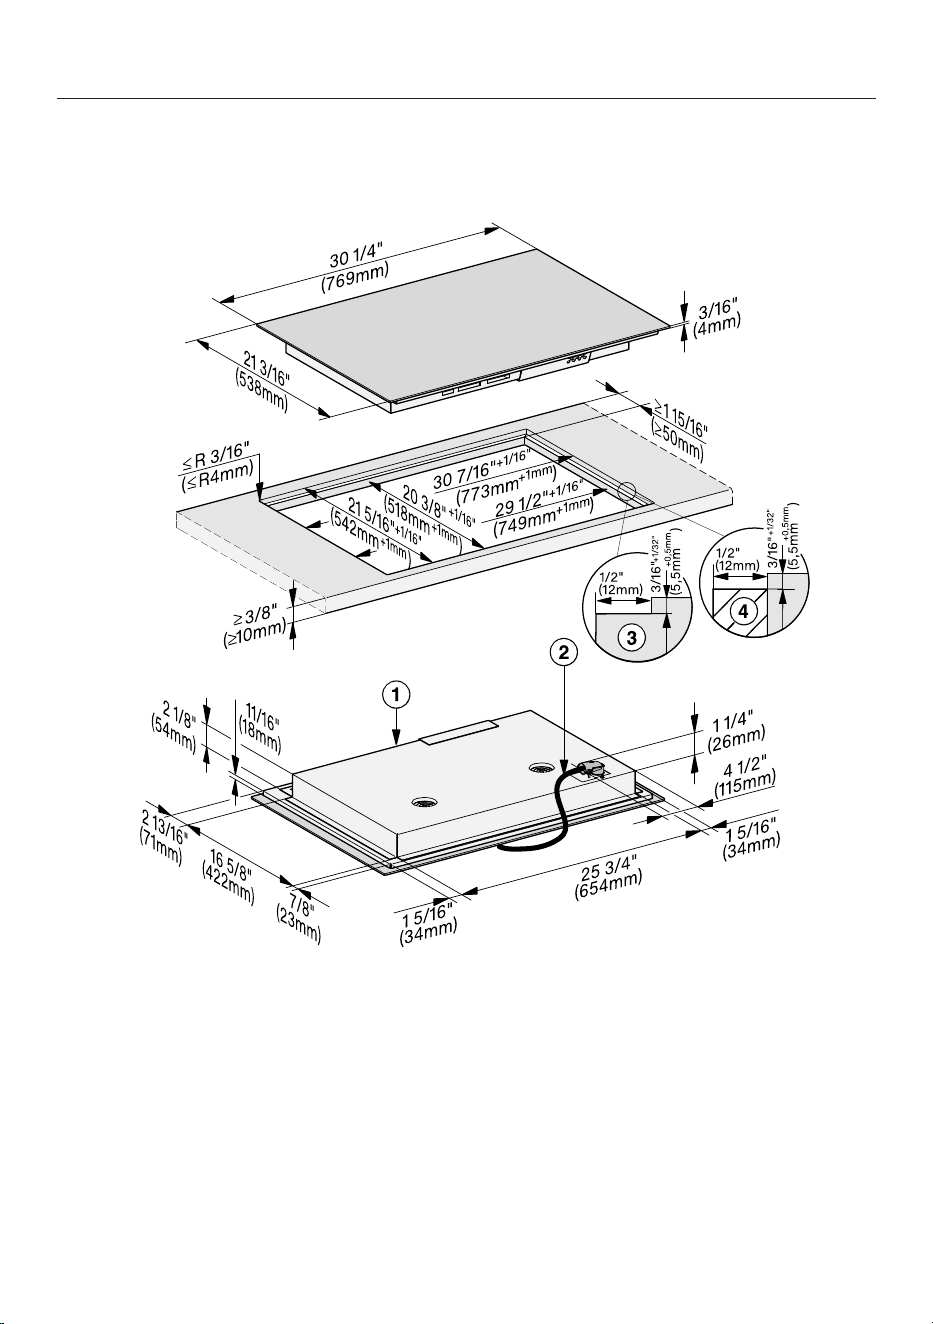
Installation
*INSTALLATION*
83
Installation dimensions for flush installation
KM7735FL
All dimensions are given in mm and inches. The superscript numbers after the cut-out di-
mensions are the tolerances for the cut-out.
a
Front
b
Flexible metal hose with power cords,
L =4' (1,200mm)
c
Stepped cut-out, natural stone countertop
d
Wooden strip 1/2" (12mm) (not supplied)
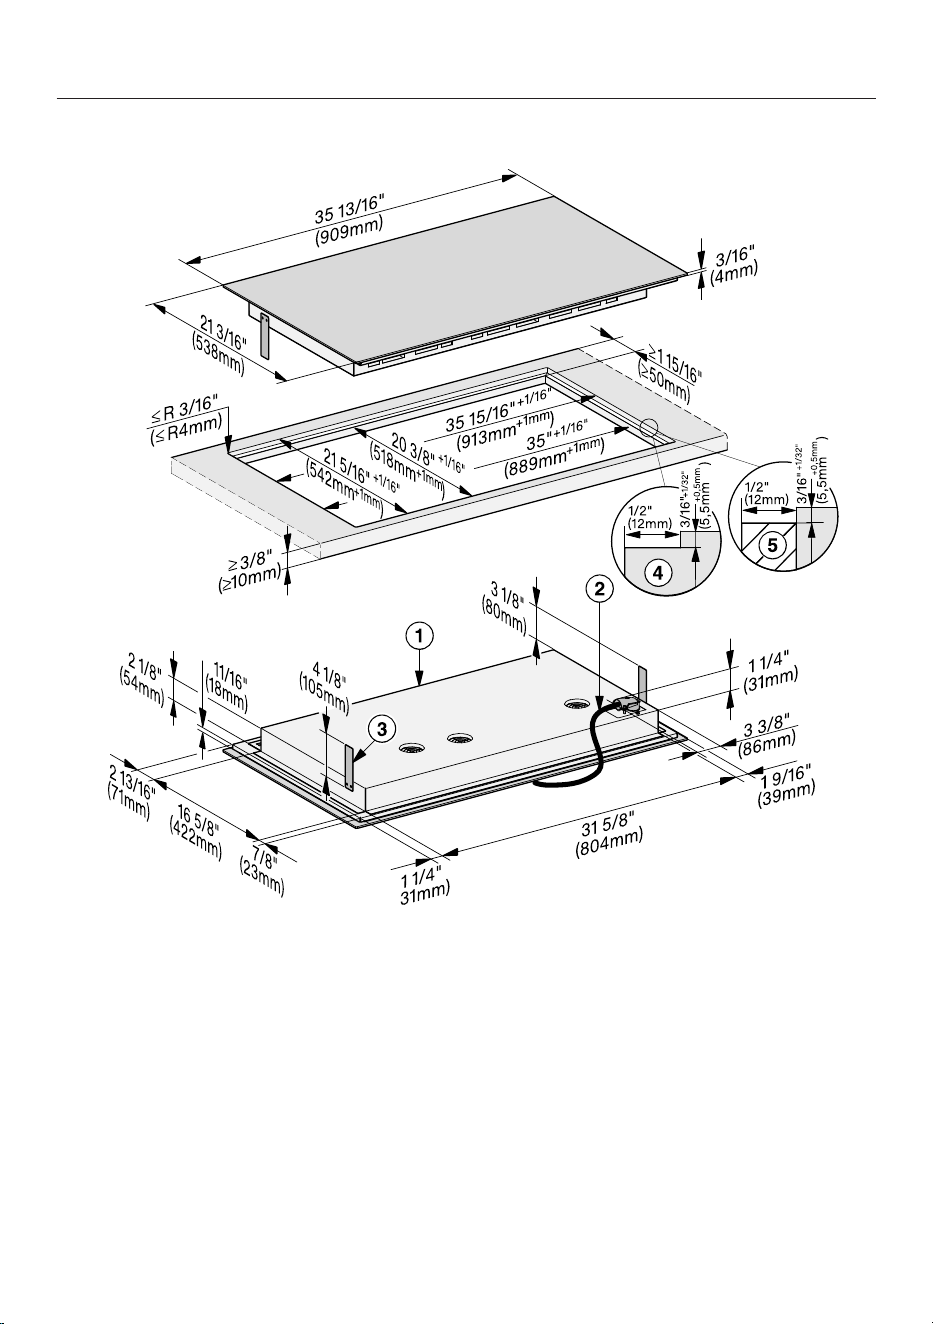
Installation
*INSTALLATION*
84
KM7745FL
All dimensions are given in mm and inches. The superscript numbers after the cut-out di-
mensions are the tolerances for the cut-out.
a
Front
b
Flexible metal hose with power cords,
L =4' (1,200mm)
c
Spacer plate (only required if a protective base is installed)
d
Stepped cut-out, natural stone countertop
e
Wooden strip 1/2" (12mm) (not supplied)
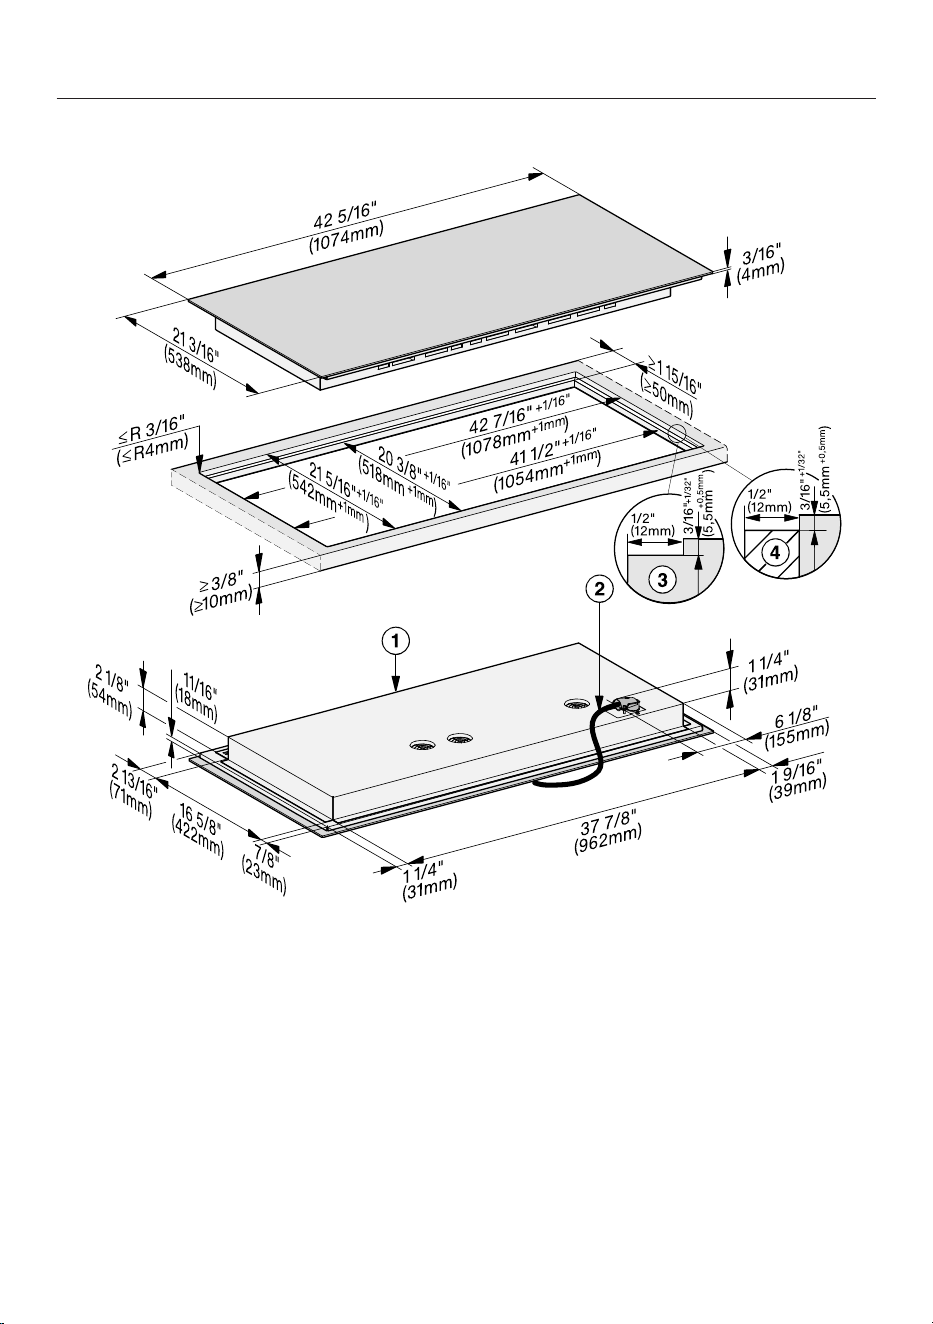
Installation
*INSTALLATION*
85
KM7755FL
All dimensions are given in mm and inches. The superscript numbers after the cut-out di-
mensions are the tolerances for the cut-out.
a
Front
b
Flexible metal hose with power cords,
L =4' (1,200mm)
c
Stepped cut-out, natural stone countertop
d
Wooden strip 1/2" (12mm) (not supplied)

Installation
*INSTALLATION*
86
Installing a proud cooktop
Create the countertop cut-out. Re-
member to maintain the minimum
safety distances (see “Installation –
Safety distances”).
Seal any cut surfaces on wooden
countertops with a special varnish,
silicone rubber, or resin to prevent the
wood from swelling as a result of
moisture. The sealant must be tem-
perature-resistant.
Ensure that the sealant does not get
on the top surface of the countertop.
Attach the sealing strip provided un-
derneath the edge of the cooktop. Do
not apply the sealing strip under ten-
sion.
KM 7745 FL If a protective base is to
be installed, fasten one spacer plate
on both the left and right side of the
cooktop.
Feed the cooktop power supply cord
down through the countertop cut-out.
Place the cooktop centrally in the
cut-out. When doing this, make sure
that the seal of the appliance sits
flush with the countertop on all sides.
This is important to ensure an effec-
tive seal all round.
If the seal does not sit flush with the
countertop in the corners, the corner
radius (≤R4) can be carefully cut to fit
using a jigsaw.
Connect the cooktop to the electrical
power supply.
Check that the cooktop works.
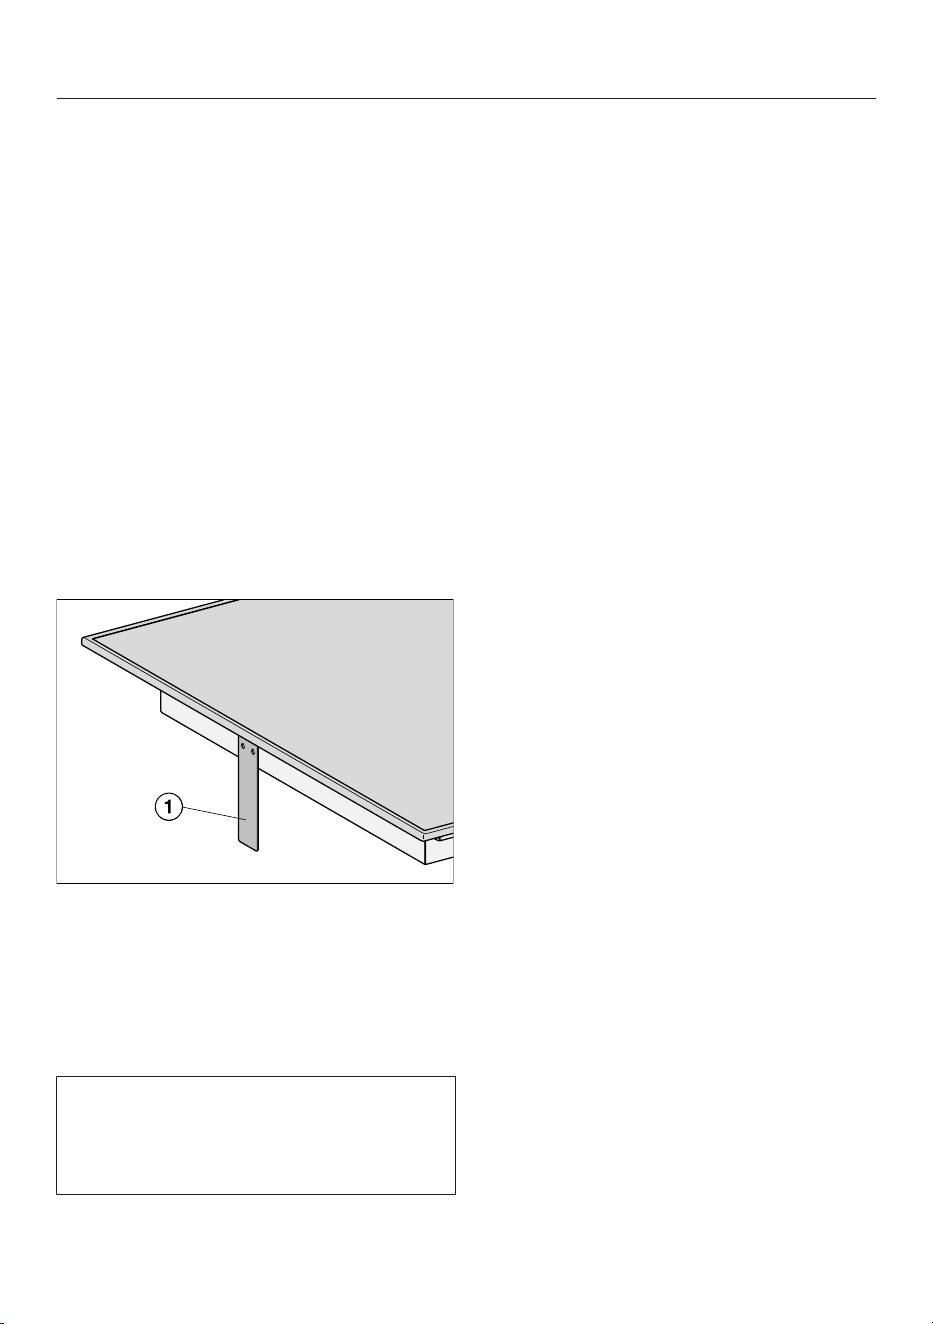
Installation
*INSTALLATION*
87
Installing the cooktop flush
with the countertop
Create the countertop cut-out. Re-
member to maintain the minimum
safety distances (see “Safety dis-
tances”).
Solid wood, tiled, and glass counter-
tops:
Fix a wooden frame 3/16" (5.5mm
below the top edge of the countertop
(see “Installation – Building-in dimen-
sions for flush installation”).
Attach the sealing strip provided un-
derneath the edge of the cooktop. Do
not apply the sealing strip under ten-
sion.
KM 7745 FL If a protective base is to
be installed, fasten one spacer plate
on both the left and right side of the
cooktop.
Feed the cooktop power supply cord
down through the countertop cut-out.
The gap between the ceramic surface
and the countertop must be at least
1/16" (2mm) wide. This is required so
that the cooktop can be sealed.
Center the cooktop in the cut-out.
If an air intake-optimized base panel
is installed, position the cooktop so
that the fans are located above the
cut-outs.
Connect the cooktop to the electrical
power supply.
Check that the cooktop works.
Seal the gap between the cooktop
and countertop with a silicone sealant
that is heat-resistant to at least 320°F
(160°C).
Installation
*INSTALLATION*
88
Electrical connection
Damage through improper work.
Installation, repair, and maintenance
work performed by by unqualified
persons can cause considerable
danger to users.
Miele cannot be held liable for any
damage arising as a result of such
work.
Installation, repair and maintenance
work should only be performed by a
Miele-authorized qualified electrician
in compliance with local regulations
and the ANSI National Electrical
Code/NFPA 70 in the United States
or the Canadian Electric Code, CSA
C22.1-02. in Canada.
Danger of electric shock.
There is a risk of electric shock when
performing installation, repair, and
service work .
Before performing installation, repair,
and service work, disconnect the
power supply by either removing the
fuse, shutting off the main power or
manually “tripping” the circuit
breaker.
Danger of electric shock by
missing or interrupted grounding.
The appliance may be energized.
To guarantee the electrical safety of
this appliance, continuity must exist
between the appliance and an effec-
tive grounding system. It is impera-
tive that this basic safety require-
ment be met. If there is any doubt,
have the electrical system of the
house checked by a qualified electri-
cian.
Damage by incorrect connection.
If the household electrical supply is
not suitrable for the appliance, it can
be damaged.
The voltage and frequency listed on
the data plate must correspond with
the household electrical supply to
prevent damage to the appliance.
Ensure that the connection data on
the data plate match those of your
electrical supply. Consult an electri-
cian if in doubt.
For safety reasons, the cooktop may
only be used when it has been fully
installed into the countertop.
Important –Save these instructions
for the local electrical inspector’s use.

Installation
*INSTALLATION*
89
Connection
Ensure that the connection data on
the data plate (voltage, frequency,
and fuse rating) match those of your
electrical supply.
The data plate is located underneath
the appliance.
The appliance is approved and ready
for connection to a grounded connector
with three connecting wires, sheathed
by a flexible metal hose.
It must be connected to an assigned
line in an approved connecting socket.
The appliance must be able to be dis-
connected from the power supply on all
poles by disconnecting devices. When
turned off, a contact distance of at least
¹/₈" (3mm) must be present. The dis-
connecting devices are overcurrent pro-
tection elements and protective circuit
breakers.
Black: Connect to L1 (hot)
Red: Connect to L2 (hot)
Green: Connect to GND (ground)
KM 7735
208/240V, 60Hz, minimum32A
(select a higher protection level if nec-
essary)
KM 7745, KM 7755
208/240V, 60Hz, minimum48A
(select a higher protection level if nec-
essary)
Make sure that the power outlet is ac-
cessible after the installation of the ap-
pliance.
Further information can be found on the
included data plate.
WARNING:
THIS APPLIANCE MUST BE
GROUNDED

Installation
*INSTALLATION*
90
Declaration of conformity
Supplier's Declaration of Conformity 47CFR§2.1077 Compliance Informa-
tion
Induction Cooktop
Unique Identifier: Miele Model: KM7735; KM7745; KM7755
Responsible Party
Miele, Inc.
National Headquarters
9 Independence Way
Princeton, NJ08540
Phone: 800-843-7232
Fax: 609-419-4298
www.mieleusa.com
FCC Compliance Statement: This device complies with Part 18 of the FCC Rules.
IC Compliance Statement: This device complies with
CAN ICES-001 (B) / NMB-001 (B)
Radio Modules
This device contains the following WiFi module:
FCC ID 2ACUWEK037
IC ID 5669C-EK37
Frequency band 2.412GHz – 2.462GHz
Maximum transmitting power < 0.1W
Compliance Statement
This device complies with Part 15 of the FCC Rules and contains licence-exempt
transmitter(s)/receiver(s) that comply with Innovation, Science and Economic De-
velopment Canada’s licence-exempt RSS Standard(s).
Operation is subject to the following two conditions:
(1) this device may not cause harmful interference, and
(2) this device must accept any interference received, including interference that
may cause undesired operation.
The construction of the device assures that the FCC/IC exposure limits are verifi-
ably met using the integrated radio module.

Installation
*INSTALLATION*
91
Warning!
Any changes or modifications to this unit not expressly approved by the party
responsible for compliance could void the user’s authority to operate the equip-
ment.


9 Independence Way
Princeton, NJ 08540
www.mieleusa.com
U.S.A.
Miele, Inc.
National Headquarters
Please have the model and serial number
of your appliance available when
contacting Customer Service.
Canada
Importer
Miele Limited
Headquarters and Miele Centre
Customer Support
Phone: 888-99-MIELE (64353)
161 Four Valley Drive
Vaughan, ON L4K 4V8
www.miele.ca
Customer Care Centre
Phone:
1-800-565-6435
905-532-2272
International Headquarters
Miele & Cie. KG
Carl-Miele-Straße 29
33332 Gütersloh
Germany

M.-Nr. 12 161 430 / 00en-US, CA
KM7735FL, KM7745FL, KM7755FL


