www.costway.com
THIS INSTRUCTION BOOKLET CONTAINS IMPORTANT SAFETY INFORMATION. PLEASE READ AND KEEP FOR FUTURE REFERENCE.
Visit us: www.costway.com
Follow Costway
Please give us a chance to make it right and do better!
Contact our friendly customer service department for help first.
Replacements for missing or damaged parts will be shipped ASAP!
USER’S MANUAL
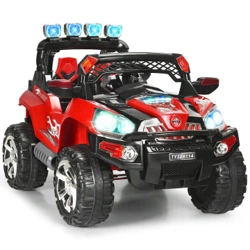
Ride On Car
TY327424
2 3
www.costway.comwww.costway.com
Contact Us!
Do NOT return this item.
Contact our friendly customer service department for help first.
E-mail
US: cs.us@costway.com
UK: cs.uk@costway.com
Before You StartBefore You Start
On the purchase of your new Ride-On.
This ride-on car will provide your child with many miles of riding of enjoyment. To
help assure you and your rider a safe ride we ask you to please read this manual
carefully, and keep it for future reference.
Follow the recommendations in this manual, they are designed to improve
the safety and operation of your ride-on car and it’s rider.
Suitable age 37-96Months Ba ery 12V 7AH*1
or 6v7AH*2
Load capacity 77 LBS Size of car 115*76*75CM
Speed 3-5km/h Power way Charging type
Charge Input:depend on local voltage
Output:DC 12V 1000mA
Average
ba
ery life
Approximately
300 mes
Charge me 8-12 hours Fuse 10A/20A
Please read all instructions carefully and keep it for future reference.
Warnings:
Attention! Use it with protective equipment.
Attention! Not use it in the traffic.
Attention! The product is not suitable for the children under 3 years.
General Warnings:
The product must be installed and used under the supervision of an adult.
Read through each step carefully and follow the proper order.
Remove all packaging, separate and count all parts and hardware.
Please ensure that all parts are correctly installed, incorrect installation can lead to a danger.
We recommend that, where possible, all items are assembled near to the area in which they
will be placed in use, to avoid moving the product unnecessarily once assembled.
Ensure a secure surface during construction, und place the product always on a flat, steady
and stable surface.
Please use the product carefully, as the product requires great skill, avoid accidents by the
user or others, by fall or collision.
Please wear suitable protective equipment during use, e.g. protective helmet, gloves, knee
pads, elbow pads etc.
4
www.costway.com
5
www.costway.com
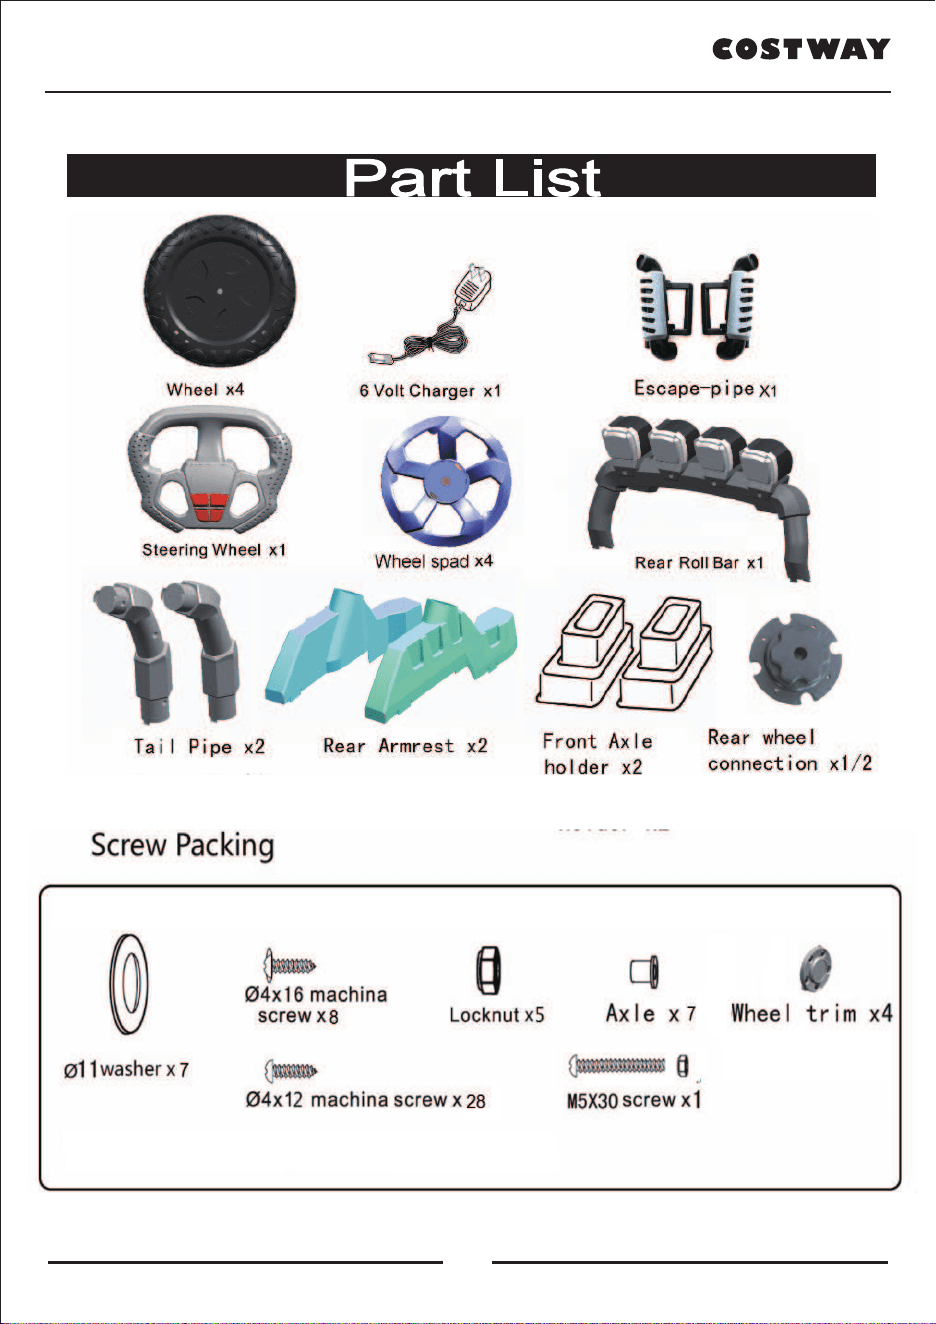
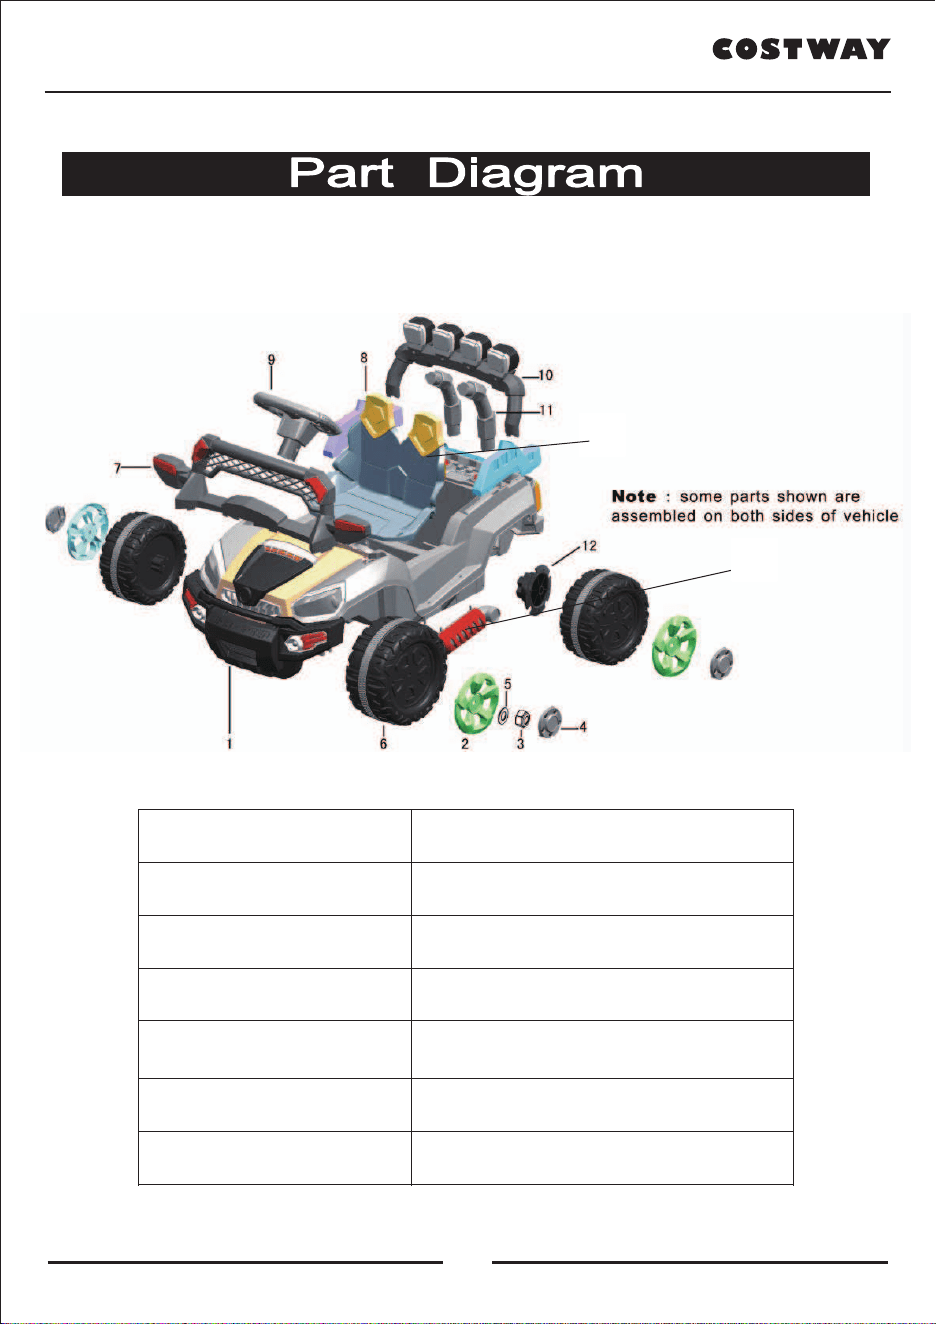
1.Vehicle Body*1 2.Wheel spad*4
3.Locknut*4 4.Wheel trim*4
5.Φ10 Washers*7
6.Wheel*4
7.Dash Board*1 8.Backrest*1
9.Steering Wheel*1 10.Rear Roll Bar*1
11.Tail Pipe*2 12.Real wheel connecon*1/2
13.Vent Pipe 14.Seat
13
14
4
www.costway.com
5
www.costway.com
1.Vehicle Body*1 2.Wheel spad*4
3.Locknut*4 4.Wheel trim*4
5.Φ10 Washers*7
6.Wheel*4
7.Dash Board*1 8.Backrest*1
9.Steering Wheel*1 10.Rear Roll Bar*1
11.Tail Pipe*2 12.Real wheel connecon*1/2
13.Vent Pipe 14.Seat
13
14
6
www.costway.com
7
www.costway.com
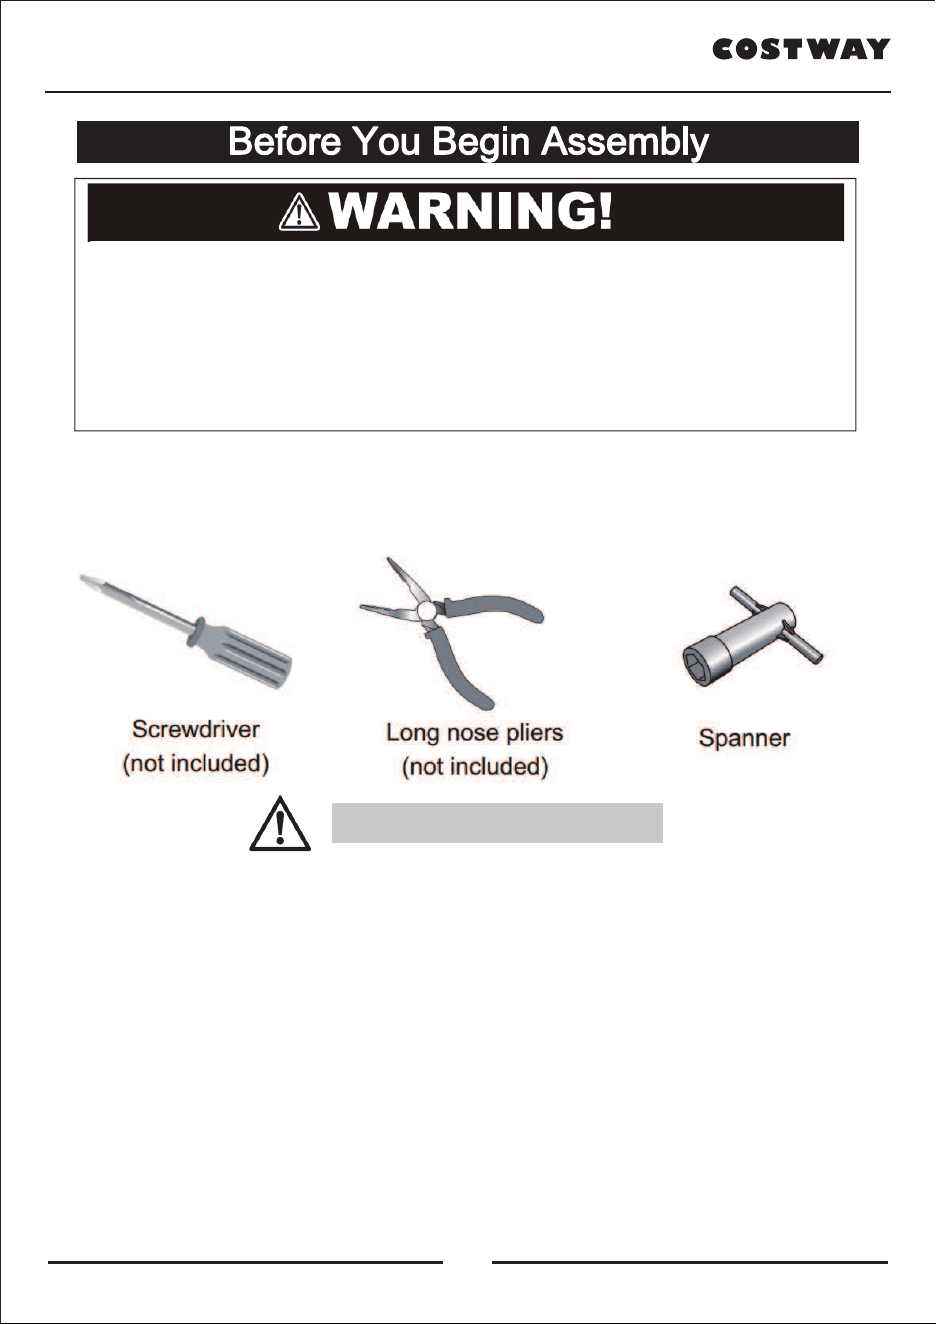
• Make sure that the power switch is turned “OFF” before assembling the rideon.
• Before first time use, charge the battery for at least 4 to 6 hours.
• Assembly tools required:
● Non - rechargeable batteries are not to be recharged.
● If removable rechargeable batteries are used, the are only to be charged under
adult supervision.
● Remove rechargeable batteries from the product before charging.
● Do not mix old and new batteries. Do not mix different types of batteries: alkaline,
standard (carbon-zinc) or rechargeable (nickel-cadmium).
● Insert batteries as in dicated inside the battery compartment, anode to anode,
cathode to cathode.
● Remove batteries during long periods of non-use. Always remove exhausted
batteries from the product. Battery leakage and corrosion can damage this product.
Dispose of batteries safely.
● Never short circuit the battery terminals.
BATTERY INFORMATION!
FOR THE SAFETY OF YOUR CHILD, PLEASE READ ALL WARNINGS AND
ASSEMBLY/USE INSTRUCTIONS.KEEP THIS GUIDE FOR FUTURE REFERENCE.
• ADULT ASSEMBLY REQUIRED. The product contains small parts, which are for
adult assembly only. Keep children away when assembling.
• Always remove protective material and poly bags and dispose before assembly.
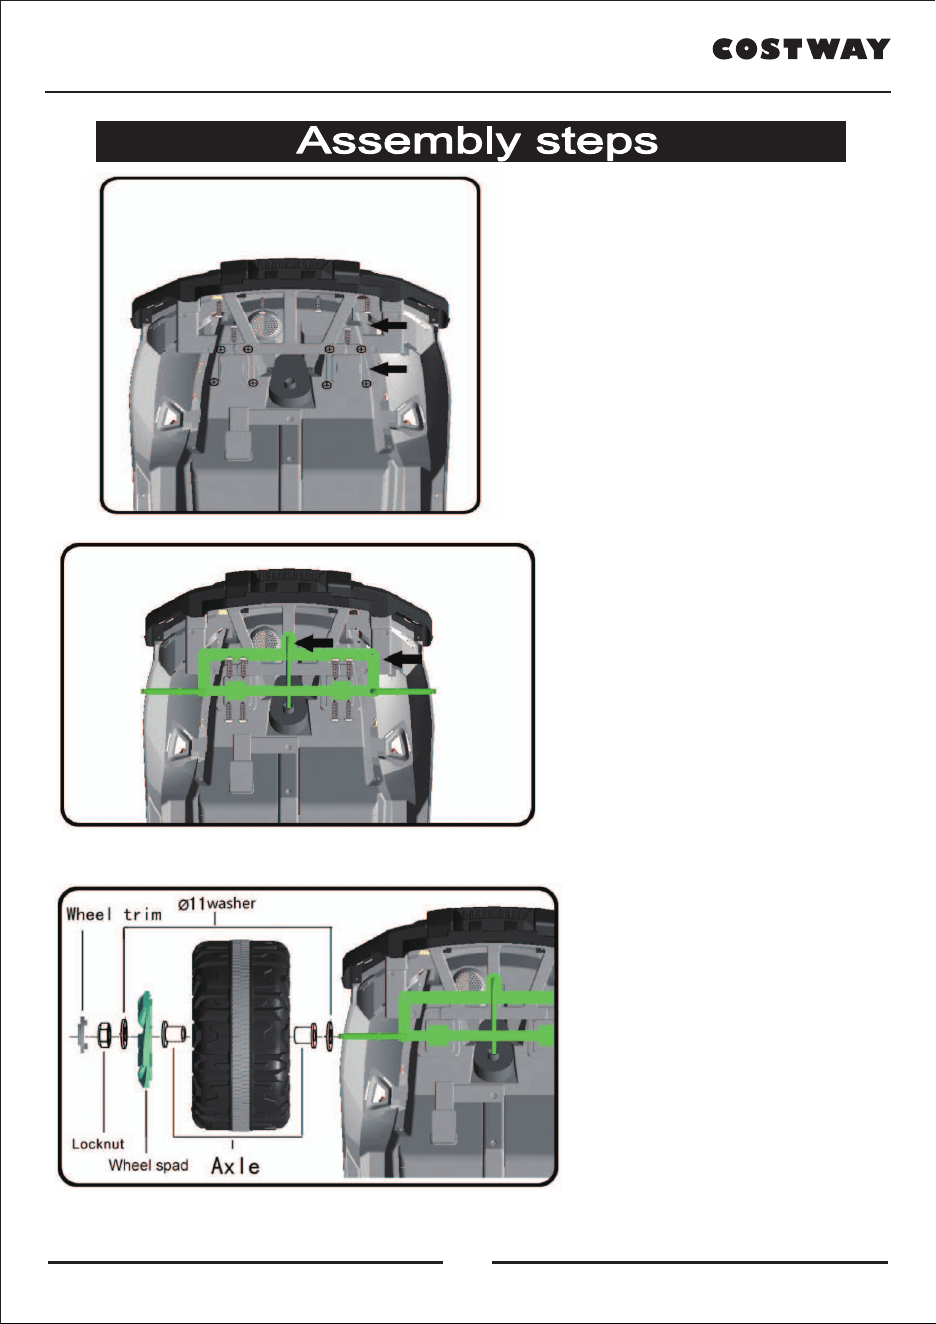
Assemble front axle hoder&front
insurance holder
With 4*16 screws fixed the
front axle holder.
With 6 only 4*12 screws fixed
the front insurance holder
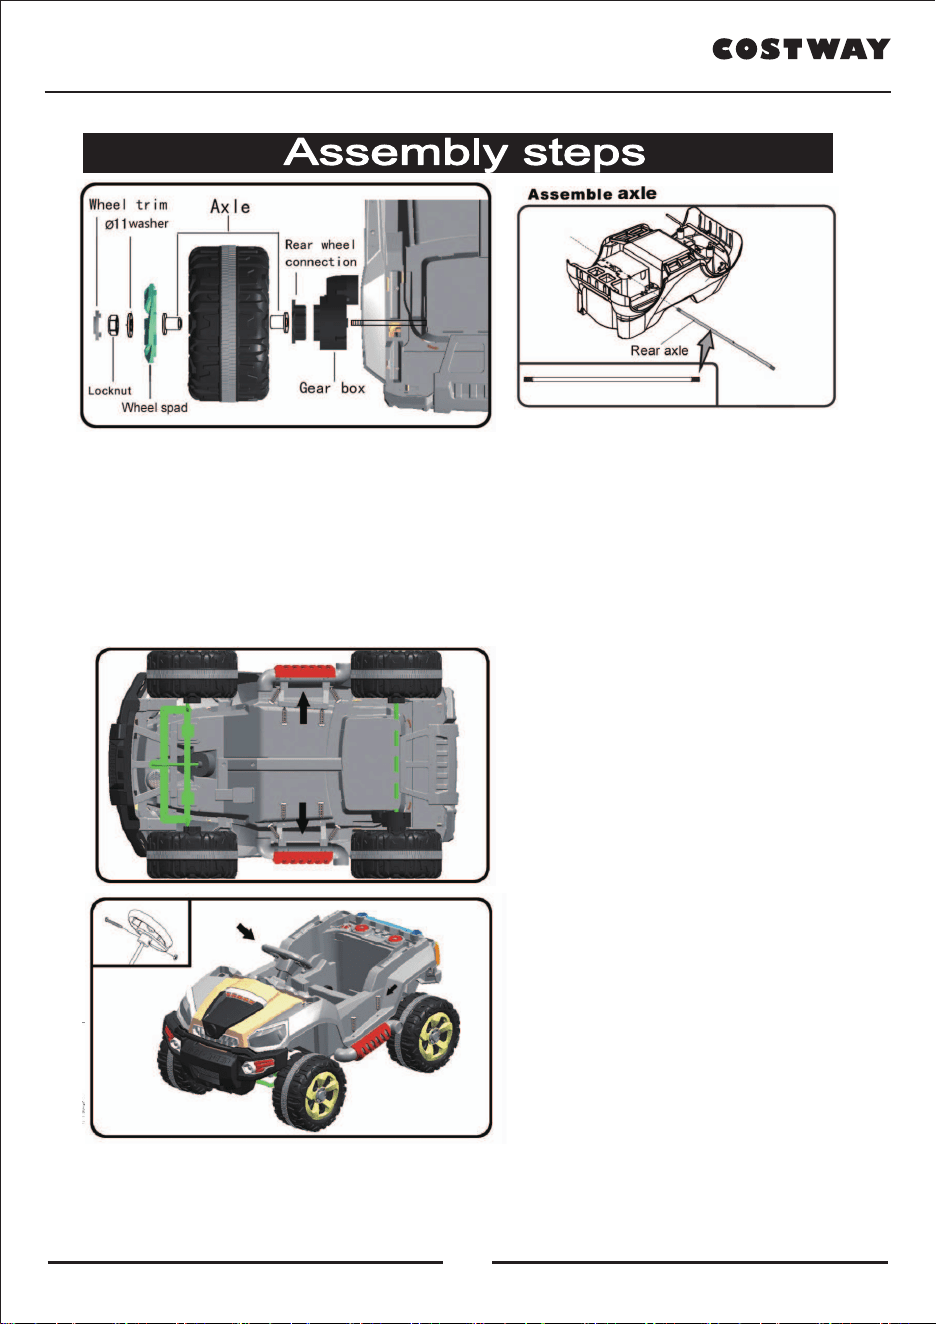
Assemble Wheel:
Screw off the nut from the axle,
take theΦ11 washer and round
bushing out.
Slide the round bushing (ring end
first) onto the axle.
Slide the wheel (ribbed side
first) onto the axle. Slide theΦ
11washer onto the axle.
Fasten the locknut by a spanner,
lastly insert a decoraon cover
into the wheel cover. Remember
to follow the same steps for the
other wheel.
Assemble Steering Rod &Front Axle
Insert the steering end of steering
sha up through the hole on the front
of vehicle body from boom side to
dash board.
Insert the bent end of steering sha
through the hole in the front axle
plate,use 8 pcs 4*12 machine screw to
lock it.
Put a gasket the end of steering rod
and then use M10 machine screw to
lock it.
6
www.costway.com
7
www.costway.com
• Make sure that the power switch is turned “OFF” before assembling the rideon.
• Before first time use, charge the battery for at least 4 to 6 hours.
• Assembly tools required:
● Non - rechargeable batteries are not to be recharged.
● If removable rechargeable batteries are used, the are only to be charged under
adult supervision.
● Remove rechargeable batteries from the product before charging.
● Do not mix old and new batteries. Do not mix different types of batteries: alkaline,
standard (carbon-zinc) or rechargeable (nickel-cadmium).
● Insert batteries as in dicated inside the battery compartment, anode to anode,
cathode to cathode.
● Remove batteries during long periods of non-use. Always remove exhausted
batteries from the product. Battery leakage and corrosion can damage this product.
Dispose of batteries safely.
● Never short circuit the battery terminals.
BATTERY INFORMATION!
FOR THE SAFETY OF YOUR CHILD, PLEASE READ ALL WARNINGS AND
ASSEMBLY/USE INSTRUCTIONS.KEEP THIS GUIDE FOR FUTURE REFERENCE.
• ADULT ASSEMBLY REQUIRED. The product contains small parts, which are for
adult assembly only. Keep children away when assembling.
• Always remove protective material and poly bags and dispose before assembly.
Assemble front axle hoder&front
insurance holder
With 4*16 screws fixed the
front axle holder.
With 6 only 4*12 screws fixed
the front insurance holder
Assemble Wheel:
Screw off the nut from the axle,
take theΦ11 washer and round
bushing out.
Slide the round bushing (ring end
first) onto the axle.
Slide the wheel (ribbed side
first) onto the axle. Slide theΦ
11washer onto the axle.
Fasten the locknut by a spanner,
lastly insert a decoraon cover
into the wheel cover. Remember
to follow the same steps for the
other wheel.
Assemble Steering Rod &Front Axle
Insert the steering end of steering
sha up through the hole on the front
of vehicle body from boom side to
dash board.
Insert the bent end of steering sha
through the hole in the front axle
plate,use 8 pcs 4*12 machine screw to
lock it.
Put a gasket the end of steering rod
and then use M10 machine screw to
lock it.
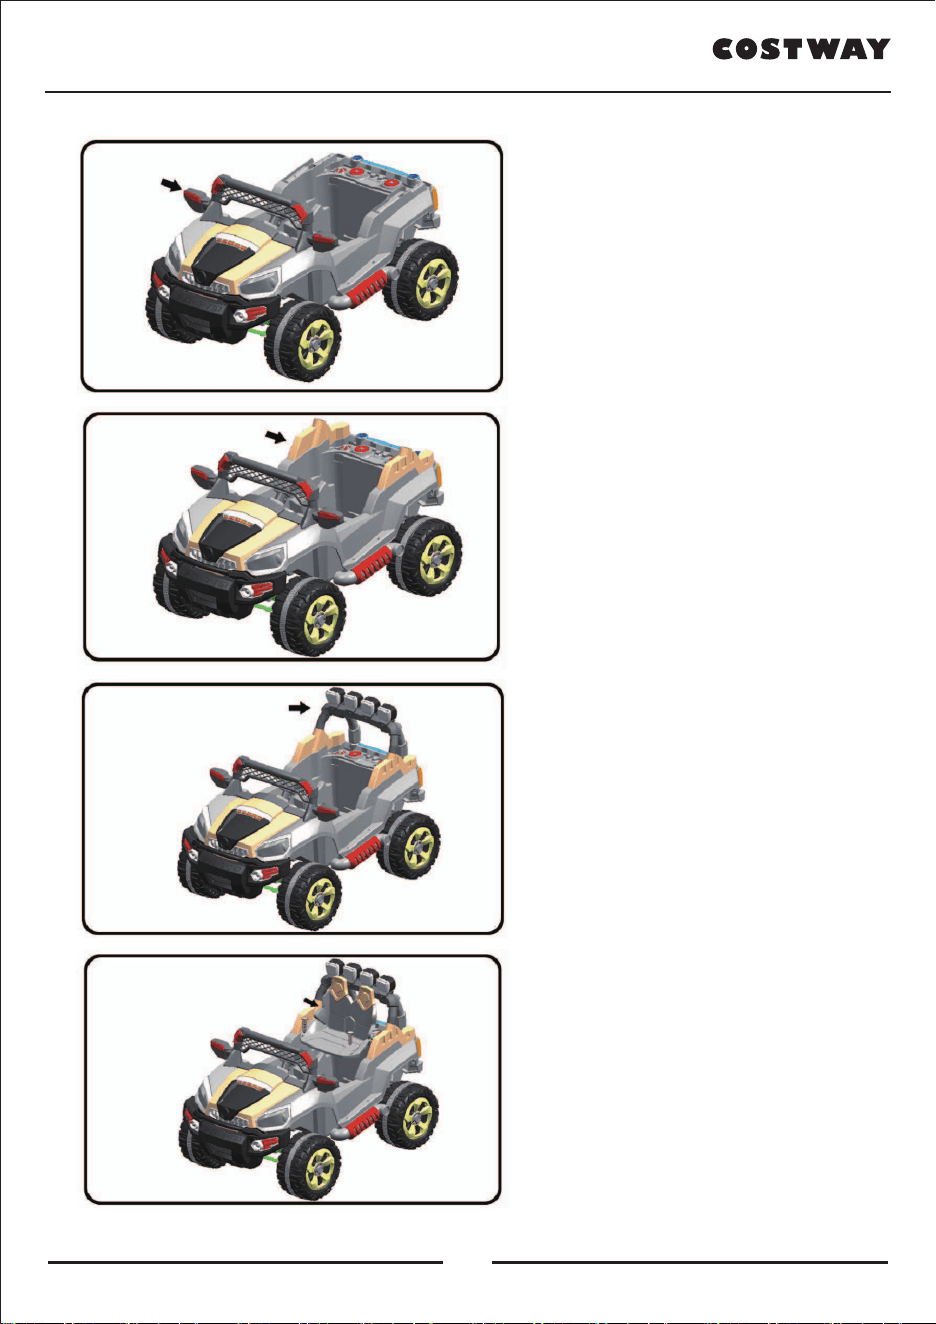
Assemble Dash board
Insert the dash board into the
holes on vehicle.
Assemble Rear Armrest
Insert the rear armrest into the holes
on vehicle.
The light of the line on the right body
through the armrest.
Assemble Rear roll bar
Insert the holder to alarm lamp, then
insert the four feet to car body.
Final,use 2 pcs 4*12 machine screw
to lock it.
CAUTIONI: Before assemble
the holder, connect the alarm
lamp wire with car body wire.
Assembling seat
Cushion before installaon.first connect
the baery of car body line,at the same
me,the line on the gear box and
automobile body line connecon.Insert
the tabs at the back of the seat into the
slots in the vehicle body.
Insert two M4*12 Machine screws,and
ghten with a screwdriver.
8
www.costway.com
9
www.costway.com
Assemble of steering wheel
Screw off the nut from the steering
wheel.Insert the steering wheel
onto the end of the steering
column.Pay aenon to the
steering wheel front and back.
With 4*12 screws 2 to around the
escape-pipe whick the body in turn.
Assemble real driving wheel
First the gear case onto the rear axle.
Connect the cable of the motor and the cable of the car.
Slide the driving wheel onto the rear axle. Make sure the driving wheel inserts onto the
pins in the gear case.
Slide theΦ11 washer onto the rear axle.Fasten locked by a spanner,lastly insert a
decoraon cover into the wheel cover.
Assemble Escape-pipe
Will escape-pipe bracket hole and car
body on the corresponding feet fit
well. Than with 4*12 self-tapping
fixed.
10
www.costway.com
11
www.costway.com
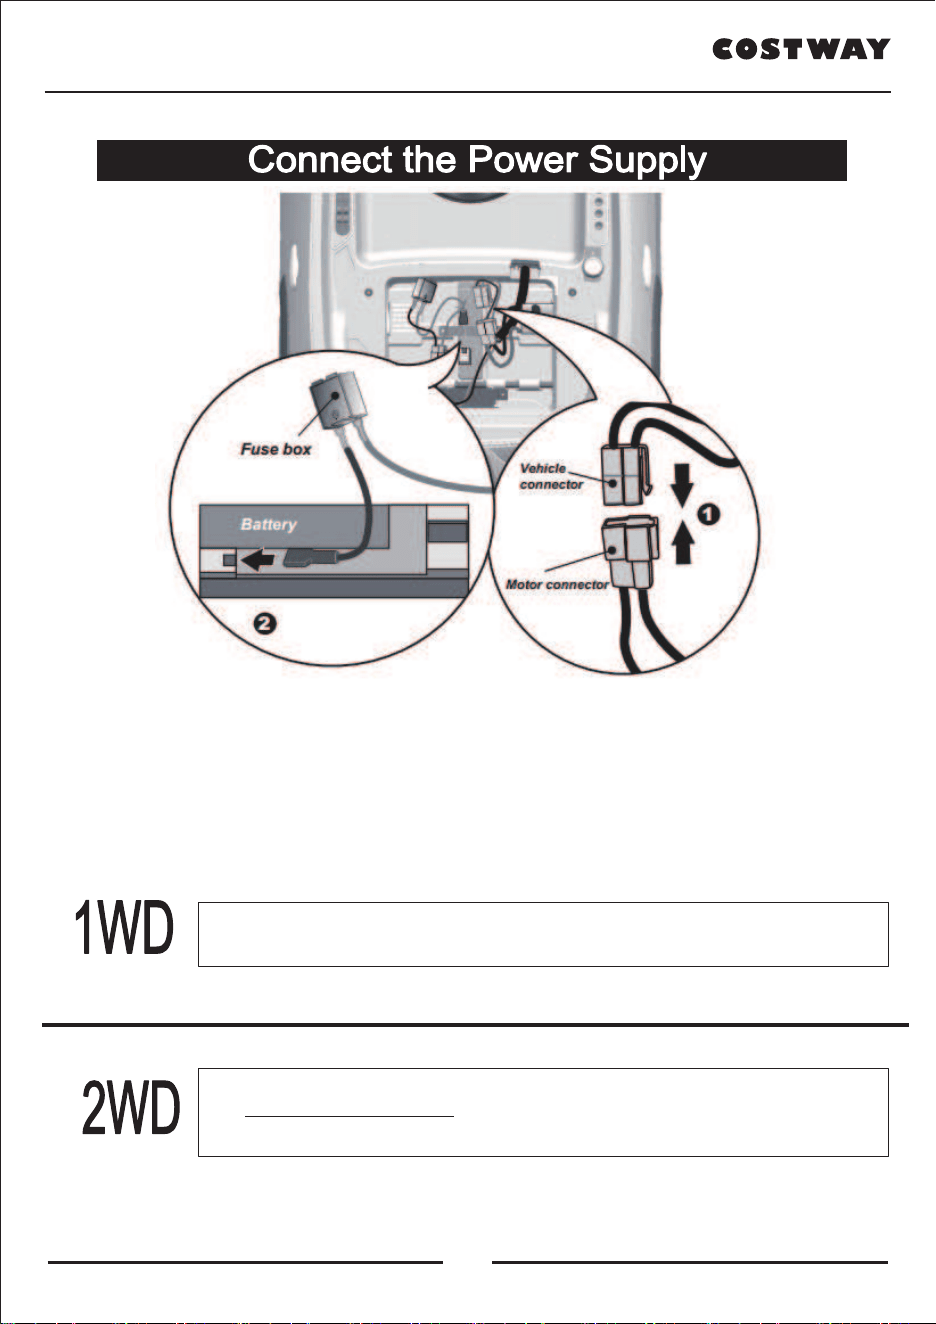
1. Plug the Vehicle Connector into the Motor Connector on body as shown above.
2. Plug the Red fuse connector into the terminal on battery.
1. Plug the Vehicle Connector into the Motor Connector on body as shown above.
2. Plug the Red fuse connector into the terminal on battery.
1. Plug the Vehicle Connector into the Motor Connector on body as shown above.
Repeat for the other side.
2. Plug the Red fuse connector into the terminal on battery.
Rules for Safe Riding
•
This vehicle has adjustable play seat belts. Please instruct children how to tie the safety belt
before using, guarantee the security.
•
Keep Children within Safe Riding Areas:
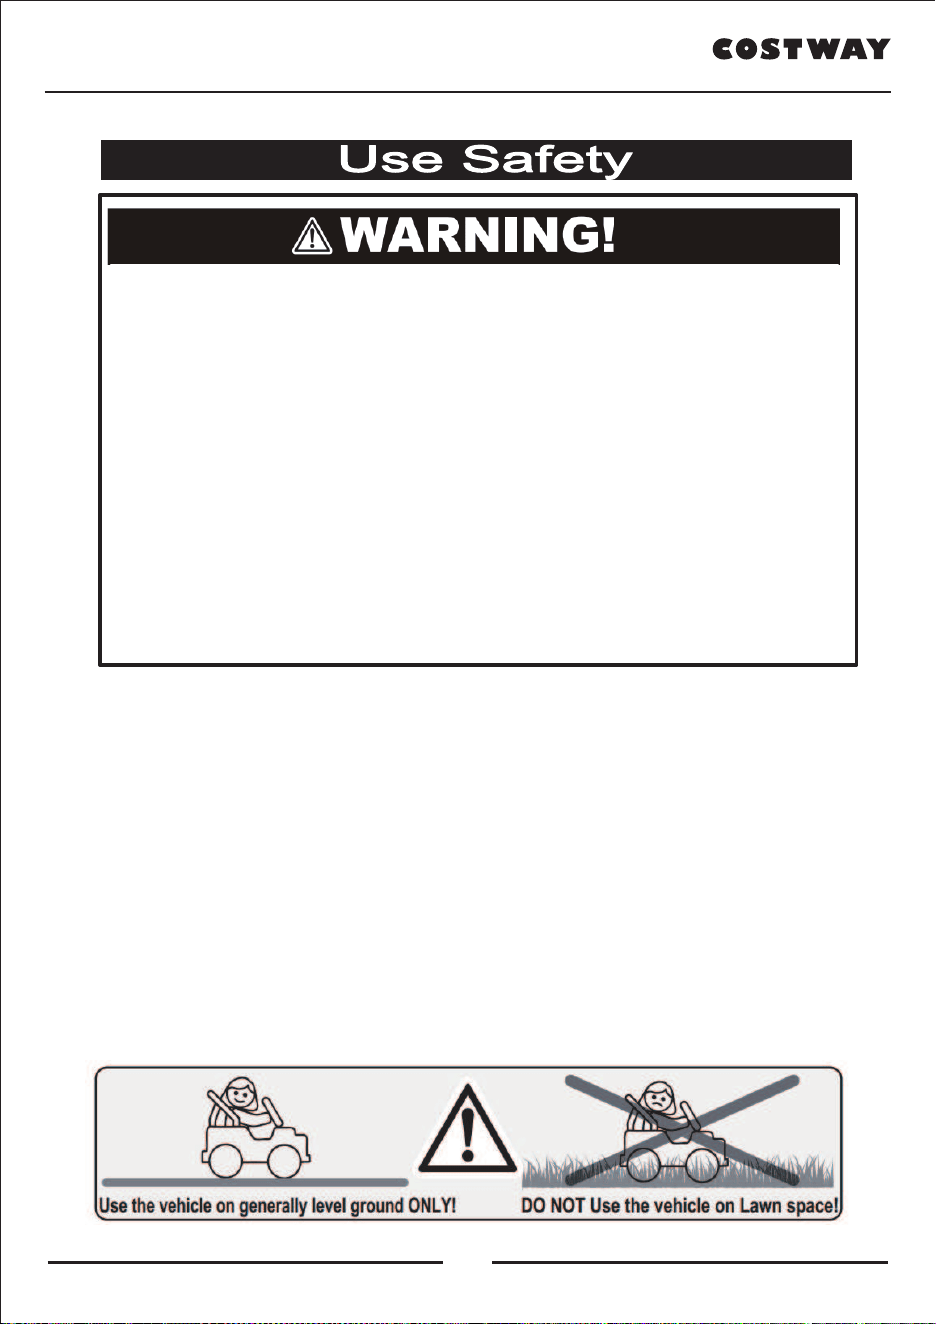
- Never use in roadway, near motor vehicles, on lawn space, on or near steep inclines or steps,
swimming pools or other bodies of water;
• Use the toy only on flat surfaces. Such as inside your house, garden or playground.
• Never use in the dark. A child could encounter unexpected obstacles and have an accident.
Operate the vehicle only in the daytime or a well-lit area.
• It is prohibited to change the circuit or add other electric parts
• Inspect wires and connections of the vehicle periodically.
• Do not let any child touch the wheels or be near them when the car is moving .
• This vehicle has adjustable play seat belts. Please instruct children how to tie the safety belt
before using, guarantee the security.
PREVENT INJURIES AND DEATHS:
• NEVER LEAVE CHILD UNATTENDED. DIRECT ADULT SUPERVISION IS
REQUIRED.
Always keep child in view when child is in vehicle.
• This toy should be used with caution since skill is required to avoid falls or
collisions causing injury to the user or third parties.
• Protective equipment should be worn.
• Never use in roadways, near cars, on or near steep inclines or steps,swimming
pools or other bodies of water.
• Always wear shoes.
• Always sit on the seat.
• Not t
o be used in traffic.
• This toy is unsuitable for children under 37 months due to its maximum speed;
Maximum user weight is 77 lbs.
• This toy has no brake.
10
www.costway.com
11
www.costway.com
1. Plug the Vehicle Connector into the Motor Connector on body as shown above.
2. Plug the Red fuse connector into the terminal on battery.
1. Plug the Vehicle Connector into the Motor Connector on body as shown above.
2. Plug the Red fuse connector into the terminal on battery.
1. Plug the Vehicle Connector into the Motor Connector on body as shown above.
Repeat for the other side.
2. Plug the Red fuse connector into the terminal on battery.
Rules for Safe Riding
•
This vehicle has adjustable play seat belts. Please instruct children how to tie the safety belt
before using, guarantee the security.
•
Keep Children within Safe Riding Areas:
- Never use in roadway, near motor vehicles, on lawn space, on or near steep inclines or steps,
swimming pools or other bodies of water;
• Use the toy only on flat surfaces. Such as inside your house, garden or playground.
• Never use in the dark. A child could encounter unexpected obstacles and have an accident.
Operate the vehicle only in the daytime or a well-lit area.
• It is prohibited to change the circuit or add other electric parts
• Inspect wires and connections of the vehicle periodically.
• Do not let any child touch the wheels or be near them when the car is moving .
• This vehicle has adjustable play seat belts. Please instruct children how to tie the safety belt
before using, guarantee the security.
PREVENT INJURIES AND DEATHS:
• NEVER LEAVE CHILD UNATTENDED. DIRECT ADULT SUPERVISION IS
REQUIRED.
Always keep child in view when child is in vehicle.
• This toy should be used with caution since skill is required to avoid falls or
collisions causing injury to the user or third parties.
• Protective equipment should be worn.
• Never use in roadways, near cars, on or near steep inclines or steps,swimming
pools or other bodies of water.
• Always wear shoes.
• Always sit on the seat.
• Not t
o be used in traffic.
• This toy is unsuitable for children under 37 months due to its maximum speed;
Maximum user weight is 77 lbs.
• This toy has no brake.
12
www.costway.com
13
www.costway.com
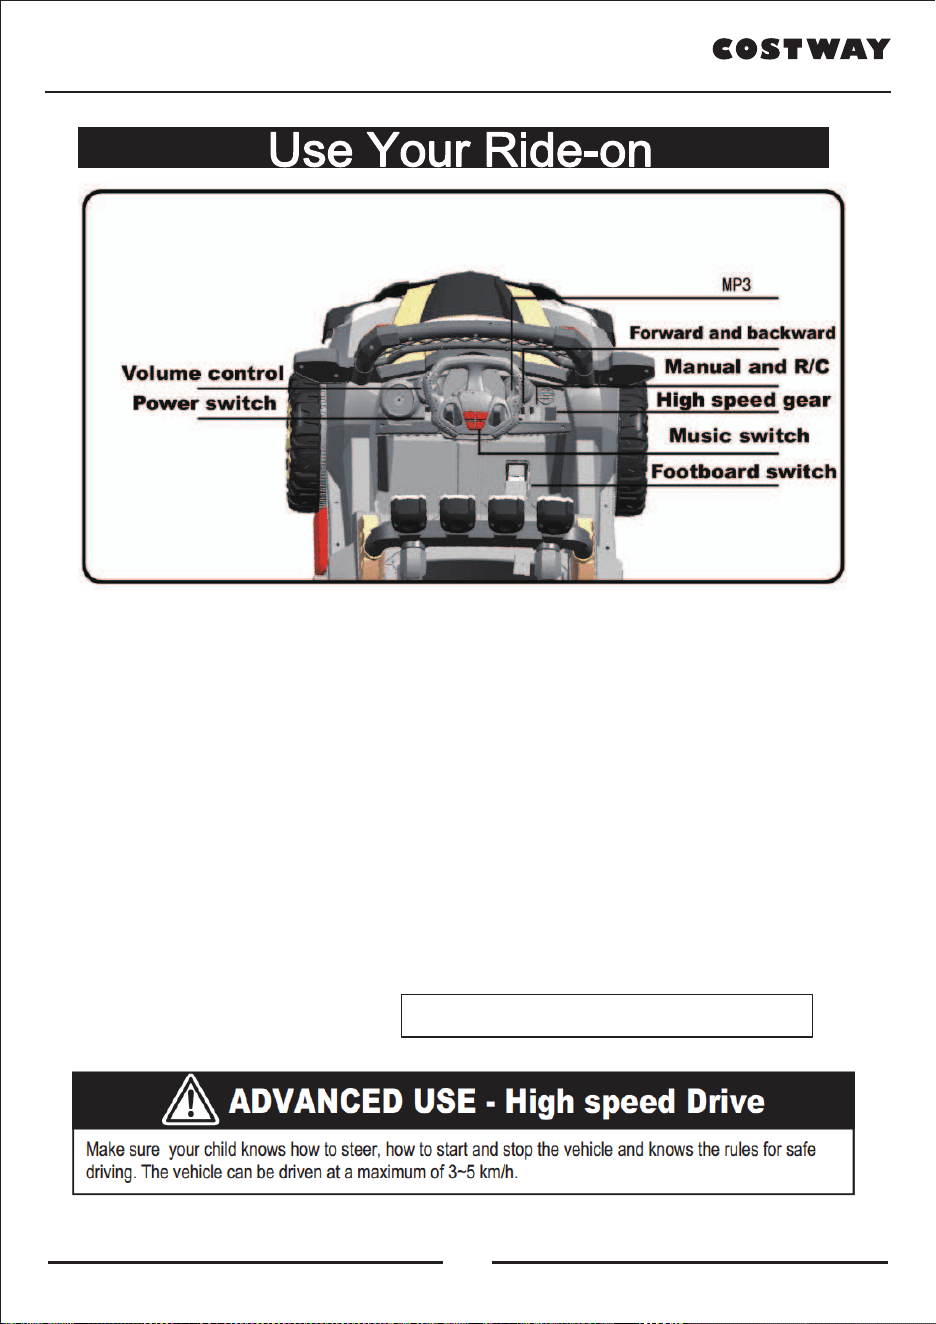
1. Power Switch: Turns the vehicle on and off.
2. Forward/backward switch: Changes the direction that vehicle moves from forward to reverse.
● To move the car forward, rock the switch to “forward” position.
● To move the car backward, rock the switch to “reverse” position.
3. Music switch: Press for sounds playing.
4. Volume knob (OPTIONAL): Turn the knob clockwise to increase the volume; Turn the knob
counterclockwise to decrease the volume.
5. Footboard switch: Applies power (speed) to the vehicle.
● To move the car, press the pedal down.
● To brake or slow down, release pressure from the pedal.
6. 3.5 mm Audio input connector (OPTIONAL)
7. Digital voltmeter (OPTIONAL): See <Charging>
8. High speed button (OPTIONAL): Operates the vehicle to move forward in high speed.
9. Low speed button (OPTIONAL): Operates the vehicle to move forward in low speed.
10. Foot-operating button (OPTIONAL)
11. R/C-operating button (OPTIONAL)
If you buy 2.4G remote control , it don’t have this buon
If you product with a 2.4G REMOTE CONTROLLER, See the next page please.
ASSEMBLY
OPERATION
1. Insert the antenna into the controller by tweak the antenna clockwisely;
2. Lift the battery compartment door on the back of the controller and insert
two AA(LR6) batteries.
NOTE: This product does not include the AA(LR6) batteries.
Follow the battery information on page 4.
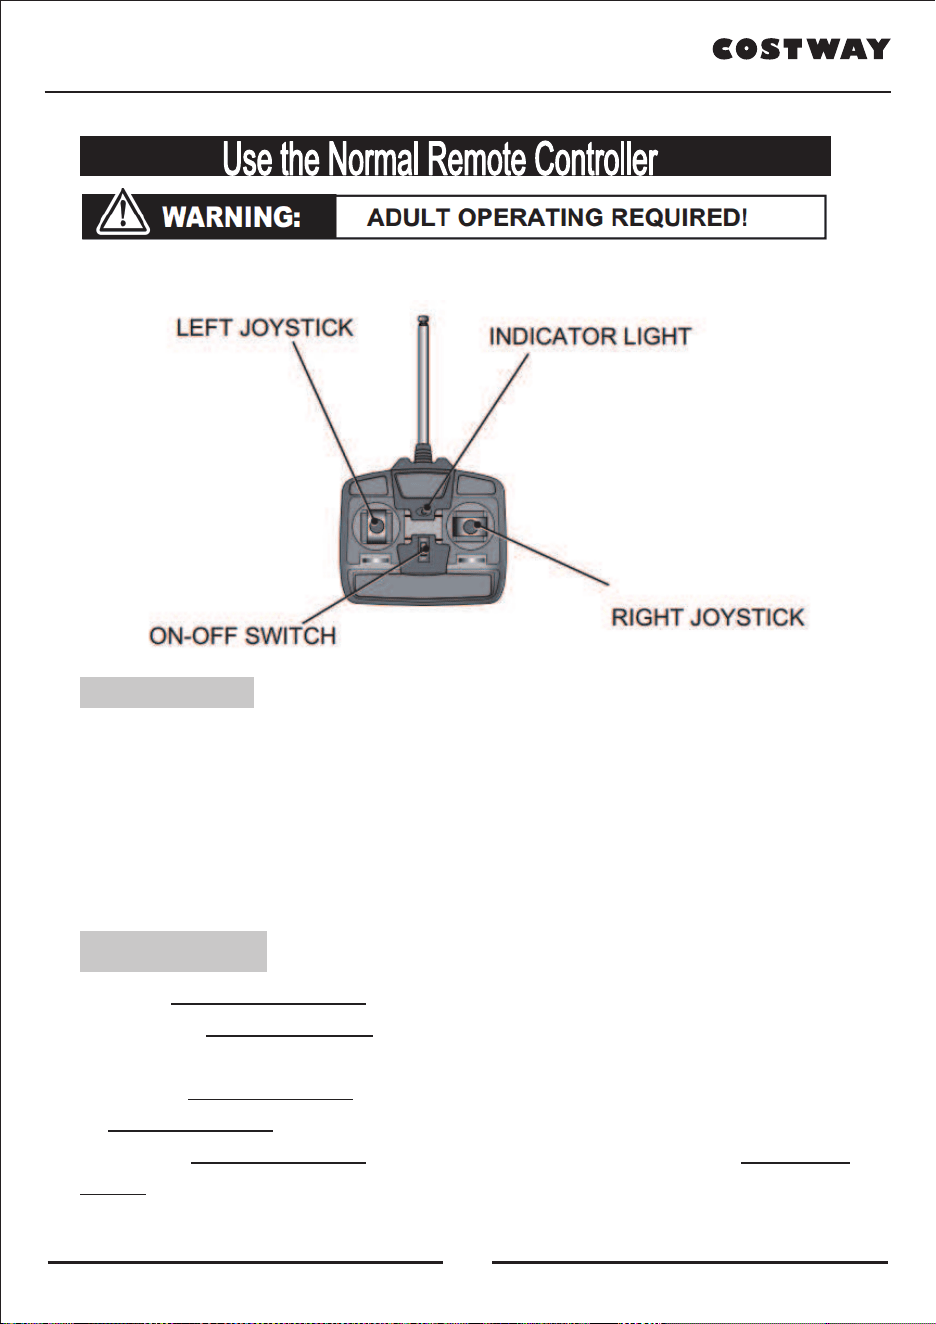
OPERATION
Press the FOOT - R/C SWITCH on the vehicle to the “Remote control” position.
2. Press the ON-OFF SWITCH
on the remote controller to the “ON” position, the
indicator light will be lighting.
3. Push the LEFT JOY STICK
to the front, the vehicle goes forward, pull
the LEFT JOY STICK
to the back, the vehicle goes backward.
4. Push the RIGHT JOY STICK
to the left, the vehicle turn left, push the RIGHT JOY
STICK to the right, the vehicle turns right.
12
www.costway.com
13
www.costway.com
1. Power Switch: Turns the vehicle on and off.
2. Forward/backward switch: Changes the direction that vehicle moves from forward to reverse.
● To move the car forward, rock the switch to “forward” position.
● To move the car backward, rock the switch to “reverse” position.
3. Music switch: Press for sounds playing.
4. Volume knob (OPTIONAL): Turn the knob clockwise to increase the volume; Turn the knob
counterclockwise to decrease the volume.
5. Footboard switch: Applies power (speed) to the vehicle.
● To move the car, press the pedal down.
● To brake or slow down, release pressure from the pedal.
6. 3.5 mm Audio input connector (OPTIONAL)
7. Digital voltmeter (OPTIONAL): See <Charging>
8. High speed button (OPTIONAL): Operates the vehicle to move forward in high speed.
9. Low speed button (OPTIONAL): Operates the vehicle to move forward in low speed.
10. Foot-operating button (OPTIONAL)
11. R/C-operating button (OPTIONAL)
If you buy 2.4G remote control , it don’t have this buon
If you product with a 2.4G REMOTE CONTROLLER, See the next page please.
ASSEMBLY
OPERATION
1. Insert the antenna into the controller by tweak the antenna clockwisely;
2. Lift the battery compartment door on the back of the controller and insert
two AA(LR6) batteries.
NOTE: This product does not include the AA(LR6) batteries.
Follow the battery information on page 4.
OPERATION
Press the FOOT - R/C SWITCH on the vehicle to the “Remote control” position.
2. Press the ON-OFF SWITCH
on the remote controller to the “ON” position, the
indicator light will be lighting.
3. Push the LEFT JOY STICK
to the front, the vehicle goes forward, pull
the LEFT JOY STICK
to the back, the vehicle goes backward.
4. Push the RIGHT JOY STICK
to the left, the vehicle turn left, push the RIGHT JOY
STICK to the right, the vehicle turns right.
14
www.costway.com
15
www.costway.com
If you product with a NORMAL REMOTE CONTROLLER, See the previous page.
The remote control operation always prior to the foot pedal operation.
(The foot pedal won’t working while you opearating the Remote Controller)
ASSEMBLY
Lift the battery compartment door on the back of the controller and insert
two AAA(LR03) batteries.
NOTE: This product does not include the batteries. Battery information see the
page 6
NOTE:
• Leave the remote controller idling for about 10 seconds, it will shut down automatically.
• Repeat step 1 when you replace the batteries of the remote controller.
ONLY AN ADULT CAN CHARGE AND RECHARGE THE BATTERY!
• The POWER SWITCH must be turned in OFF position when charging.
• Before the first use, you should charge the battery for 4-6 hours. Do not recharge
the battery for more than 10 hours to avoid overheating the charger.
• When the vehicle begins to run slowly, recharge the battery.
• After each use or once a month minimum recharge time as 8 to 12 hours, less
than 20 hours at most.
• PREVENT FIRE AND ELECTRIC SHOCK:
- Use the only rechargeable battery and charger supplied with your vehicle. NEVER substitute the
battery or the charger with another brand. Using another battery or charger may cause a fire or
explosion.
- Do not use the battery or charger for any other product. Overheating, fire or explosion could occur.
- NEVER modify the electric circuit system. Tampering with the electric system may cause a shock,
fire or explosion or may permanently damage the system.
- Do not allow direct contact between battery terminals. Fire or explosion can occur.
- Do not allow any type of liquid on the battery or its components.
- Explosive gasses are created during charging. Do not charge near heat or flammable materials.
Charge the battery in a well-ventilated area ONLY.
- NEVER pick up the battery by the wires or charger. Damage can occur to the battery and may
cause a fire. Pick up the battery by the case ONLY.
- Charge the battery in a dry area ONLY.
• Battery posts, terminals and related accessories contain lead and lead compounds, chemicals
known to the State of California to cause cancer and reproductive harm. Wash hands after handling.
• Do not open the battery. Battery contains lead acid and other materials
that are toxic and corrosive.
• Do not open the charger. Exposed wiring and circuitry inside case may cause electric shock.•Only
adults may handle or charge the battery. NEVER allow child to handle or charge the battery. Battery
is heavy and contains lead acid (electrolyte).
• Do not drop the battery. Permanent damage to the battery could occur or cause serious injury.
• Before charging the battery, check for wear or damage to the battery, charger, its supply cord and
the connectors. DO NOT charge the battery if any damage to parts has occurred.
• Do not allow the battery to drain completely. Recharge the battery after each use or once a month if
not used regularly.
• Do not charge battery upside down.
• Always secure the battery with the bracket. Battery can fall out and injure a child if vehicle tips over.
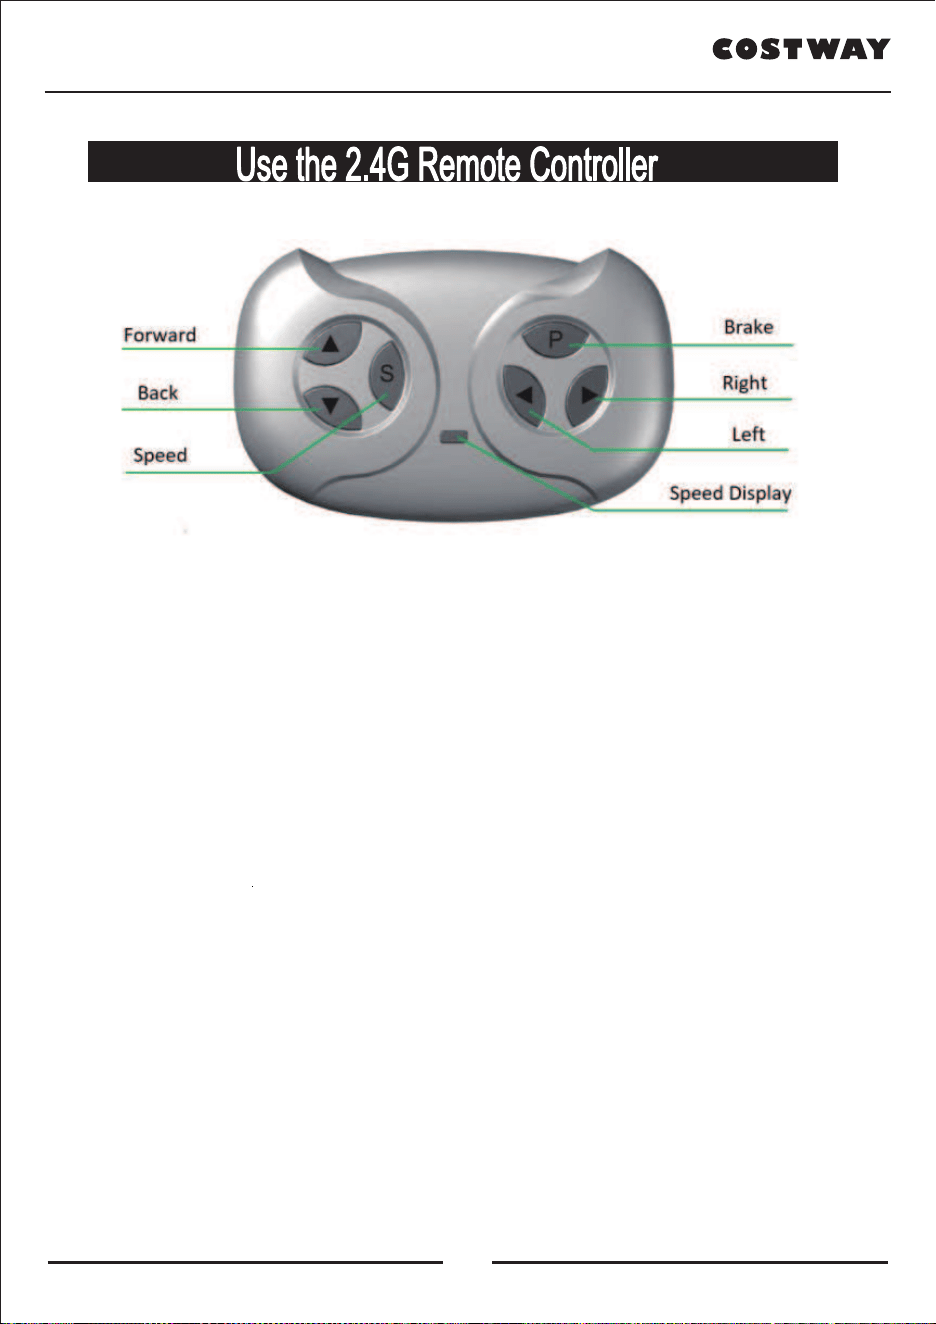
a. First time use need to match code, this product has memory function
c. Turn on the car body power now,The first LED lit up, Match code Success
e. Keys caption :“△ ” Forward,
“ P ” Brake.
d. Remoter 10 seconds not run will be standby ,Press any key wake up
“ ” Back,“ ” Left,
“ ” Right,
“ S ”Speed,
Press “ S ” key set up speed , 1 led lit up is low speed,2 leds lit up is medium speed,
3 leds lit up is high speed, Back a car is only low speed
△
△
△
Press “ P ” key hold the brake, All LED flicker
Replace battery is unnecessary match code
※ The remote controller only can be used with adult's guidance
b. Hold down “▲ ” & “ ” keys for 3 seconds start match code, The first LED flicker
▲
14
www.costway.com
15
www.costway.com
If you product with a NORMAL REMOTE CONTROLLER, See the previous page.
The remote control operation always prior to the foot pedal operation.
(The foot pedal won’t working while you opearating the Remote Controller)
ASSEMBLY
Lift the battery compartment door on the back of the controller and insert
two AAA(LR03) batteries.
NOTE: This product does not include the batteries. Battery information see the
page 6
NOTE:
• Leave the remote controller idling for about 10 seconds, it will shut down automatically.
• Repeat step 1 when you replace the batteries of the remote controller.
ONLY AN ADULT CAN CHARGE AND RECHARGE THE BATTERY!
• The POWER SWITCH must be turned in OFF position when charging.
• Before the first use, you should charge the battery for 4-6 hours. Do not recharge
the battery for more than 10 hours to avoid overheating the charger.
• When the vehicle begins to run slowly, recharge the battery.
• After each use or once a month minimum recharge time as 8 to 12 hours, less
than 20 hours at most.
• PREVENT FIRE AND ELECTRIC SHOCK:
- Use the only rechargeable battery and charger supplied with your vehicle. NEVER substitute the
battery or the charger with another brand. Using another battery or charger may cause a fire or
explosion.
- Do not use the battery or charger for any other product. Overheating, fire or explosion could occur.
- NEVER modify the electric circuit system. Tampering with the electric system may cause a shock,
fire or explosion or may permanently damage the system.
- Do not allow direct contact between battery terminals. Fire or explosion can occur.
- Do not allow any type of liquid on the battery or its components.
- Explosive gasses are created during charging. Do not charge near heat or flammable materials.
Charge the battery in a well-ventilated area ONLY.
- NEVER pick up the battery by the wires or charger. Damage can occur to the battery and may
cause a fire. Pick up the battery by the case ONLY.
- Charge the battery in a dry area ONLY.
• Battery posts, terminals and related accessories contain lead and lead compounds, chemicals
known to the State of California to cause cancer and reproductive harm. Wash hands after handling.
• Do not open the battery. Battery contains lead acid and other materials
that are toxic and corrosive.
• Do not open the charger. Exposed wiring and circuitry inside case may cause electric shock.•Only
adults may handle or charge the battery. NEVER allow child to handle or charge the battery. Battery
is heavy and contains lead acid (electrolyte).
• Do not drop the battery. Permanent damage to the battery could occur or cause serious injury.
• Before charging the battery, check for wear or damage to the battery, charger, its supply cord and
the connectors. DO NOT charge the battery if any damage to parts has occurred.
• Do not allow the battery to drain completely. Recharge the battery after each use or once a month if
not used regularly.
• Do not charge battery upside down.
• Always secure the battery with the bracket. Battery can fall out and injure a child if vehicle tips over.
a. First time use need to match code, this product has memory function
c. Turn on the car body power now,The first LED lit up, Match code Success
e. Keys caption :“△ ” Forward,
“ P ” Brake.
d. Remoter 10 seconds not run will be standby ,Press any key wake up
“ ” Back,“ ” Left,
“ ” Right,
“ S ”Speed,
Press “ S ” key set up speed , 1 led lit up is low speed,2 leds lit up is medium speed,
3 leds lit up is high speed, Back a car is only low speed
△
△
△
Press “ P ” key hold the brake, All LED flicker
Replace battery is unnecessary match code
※ The remote controller only can be used with adult's guidance
b. Hold down “▲ ” & “ ” keys for 3 seconds start match code, The first LED flicker
▲

16
www.costway.com
17
www.costway.com
• If your ride-on with a Digital voltmeter(OPTIONAL), the magnitude of voltage will
tell you how much power is remaining in the battery when you must recharge the
battery. Make sure the vehicle is stop!
BATTERY MAGNITUDE OF VOLTAGE BATTERY STATE
6V4Ahx1, 6V7Ahx1
6V10Ahx1
≥ 6.6The battery is full.
6.5~6.3
The vehicle can work normally.
≤ 6.2The battery needs to be charge.
6V4Ahx2, 12V7Ahx1, ≥ 13.2The battery is full.
13.1~12.6 The vehicle can work normally
≤ 12.5
STOP operating the vehicle, the
battery needs to be charge.
Find the socket as shown 1.
1. Plug the charger port into the input socket. (the socket is below the seat)
2. Plug the charger plug into a wall outlet. The battery will begin charging
Always stop vehicle when changing the speed or direction to avoid damage the gears
and motor.
Make sure your child knows how to steer, how to start and stop the vehicle and knows
the rules for safe driving. The vehicle can be driven at a maximum of 3~5 km/h.
The battery features a thermal fuse with a rest fuse that will automatically trip and cut all power to
the vehicle if the motor, electric system or battery is overloaded. The fuse will reset and power will
be restored after the unit is turned OFF for 20 seconds and then turned ON again. If the thermal
fuse trips repeatedly during normal use, the vehicle may need repair.
Contact your distributor please.
To avoid losing power, follow these guidelines:
● Do not over load the vehicle.
● Do not tow anything behind the vehicle.
● Do not drive up steep slopes.
● Do not drive into fixed objects, which may cause the wheels to spin, causing the motor to overheat.
● Do not drive in very hot weather, components may overheat.
●Do not allow water or other liquids to come in contact with the battery or other electric components.
● Do not tamper with the electric system. Doing so may create a short, causing the fuse to trip.
Battery Replacement and Disposal
The battery will eventually lose the ability to hold a charge. Depending on the amount of use, and
varying conditions, the battery should operate for one to three years. Follow these steps to replace
and dispose the battery:
1. Remove the car seat.
2. Disconnect the battery connectors.
3. Remove the battery bracket.
4. Remove the battery cover.
5. Carefully lift the battery.
● Depending on the condition of the battery (i.e.: leakage) you may want to wear protective gloves
before removal.
● Do not lift the battery by its connecto rs or cables.
6. Place the dead battery
in a plastic bag.
Important! Recycle the dead battery responsibly. The battery contains lead acid (electrolyte) and
must be disposed of properly and legally. It is illegal in most areas to incinerate lead acid batteries
or dispose of them in landfills. Take it to a federal or state-approved lead acid battery recycler, such
as local automotive battery retailer.Do not throw the battery away with your regular household waste!
7. Replace the battery and reconnect
the connectors.
8. Replace the metal battery bracket.
9. Replace the seat
18
www.costway.com
19
www.costway.com
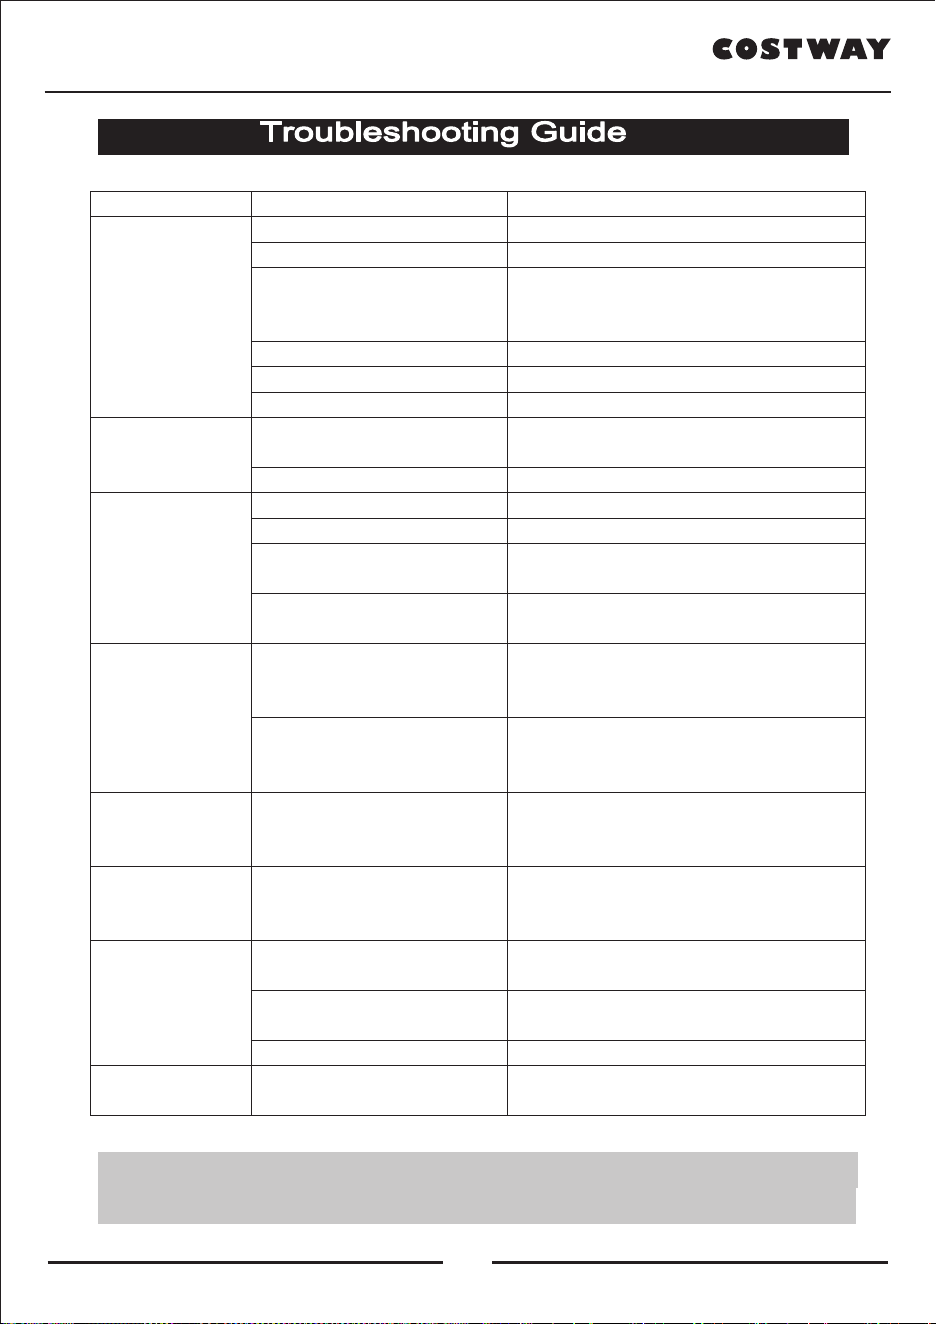
Problem Possible Cause Solution
Vehicle does not run
Battery low on power Recharge battery.
Thermal fuse has tripped Reset fuse, see <Fuse>
Battery connector or wires are loose Check that the battery connectors are firmly plugged
into each other. If wires are loose around the motor
contact your distributor please.
Battery is dead Replace battery, contact your distributor please.
Electrical system is damaged Contact your distributor please.
Motor is damaged Contact your distributor please.
Vehicle does not run
very long
Battery is under charged Check that the battery connectors are firmly plugged
into each other when recharging
Battery is old Replace battery, contact your distributor please.
Vehicle runs sluggishly
Battery low on power Replace battery, contact your distributor please.
Battery is old Replace battery, contact your distributor please.
Vehicle is overload Reduce weight on vehicle. Maximum user weight is
77 lbs.
Vehicle is being used in harsh
conditions
Avoid using vehicle in harsh conditions ,see <Safety>
Vehicle needs a push
to go forward
Poor contact of wires or
connectors
Check that the battery connectors are firmly plugged
into each other. If wires are loose around the motor,
contact your distributor please.
“Dead Spot” on motor A dead spot means the electric power is not being
delivered to the terminal connection and the vehicle
needs repair. Contact your distributor please
Difficult shifting from
forward to reverse or
vice-versa
Attempting to shift while thevehicle is
motion
Completely stop the vehicle and shift, see <Use Your
Ride-On>
Loud grinding or
clicking noises coming
from motor or gear box
Motor or gears are damaged Contact your distributor please.
Battery
will not recharge
Battery connector or adapter
connector is loose
Check that the battery connectors are firmly plugged
into each other.
Charger not plugged in Check that the battery charger is plugged into a
working wall outlet.
Charger is not working Contact your distributor please.
Charger feels warm
when recharging
This is normal and not a cause for
concern
Completely read through this manual and the troubleshooting guide table before
calling. If you still need help resolving the problem Contact your distributor please.
• It is parents' responsibility to check main parts of the toy before using, Must
regularly examine for potential hazard, such as the battery, charge,cable or
cord, plug, screws are fastening enclosure of other parts and that in the event
of such damage, the toy must not be used until that damage had been properly
removed.
• Make sure the plastic parts of the vehicle are not cracked or broken.
• Occasionally use a lightweight oil to lubricate moving parts such as wheels.
• Park the vehicle indoors or cover it with a tarp to protect it from wet weather.
• Keep the vehicle away from sources of heat, such as stoves and heaters.
Plastic parts may melt.
• Recharge the battery after each use. Only an adult can handle the battery.
Recharge the battery at least once a month when the vehicle Raider is not
being used.
• Do not wash the vehicle with a hose. Do not wash the vehicle with soap and
water. Do not drive the vehicle in rainy or snowy weather. Water will damage
the motor, electric system and battery.
• Clean the vehicle with a soft, dry cloth. To restore shine to plastic parts, use a
non-wax furniture polish. Do not use car wax. Do not use abrasive cleaners.
• Do not drive the vehicle in loose dirt, sand or fine gravel which could damage
the moving parts, motors or the electric system.
• When not using, all the electrical source should be turn off. Turn off the power
switch and disconnect the battery connection.
Our products are suitable for
ASTM F963; GB6675; EN71 and EN62115 standard.

18
www.costway.com
19
www.costway.com
Problem Possible Cause Solution
Vehicle does not run
Battery low on power Recharge battery.
Thermal fuse has tripped Reset fuse, see <Fuse>
Battery connector or wires are loose Check that the battery connectors are firmly plugged
into each other. If wires are loose around the motor
contact your distributor please.
Battery is dead Replace battery, contact your distributor please.
Electrical system is damaged Contact your distributor please.
Motor is damaged Contact your distributor please.
Vehicle does not run
very long
Battery is under charged Check that the battery connectors are firmly plugged
into each other when recharging
Battery is old Replace battery, contact your distributor please.
Vehicle runs sluggishly
Battery low on power Replace battery, contact your distributor please.
Battery is old Replace battery, contact your distributor please.
Vehicle is overload Reduce weight on vehicle. Maximum user weight is
77 lbs.
Vehicle is being used in harsh
conditions
Avoid using vehicle in harsh conditions ,see <Safety>
Vehicle needs a push
to go forward
Poor contact of wires or
connectors
Check that the battery connectors are firmly plugged
into each other. If wires are loose around the motor,
contact your distributor please.
“Dead Spot” on motor A dead spot means the electric power is not being
delivered to the terminal connection and the vehicle
needs repair. Contact your distributor please
Difficult shifting from
forward to reverse or
vice-versa
Attempting to shift while thevehicle is
motion
Completely stop the vehicle and shift, see <Use Your
Ride-On>
Loud grinding or
clicking noises coming
from motor or gear box
Motor or gears are damaged Contact your distributor please.
Battery
will not recharge
Battery connector or adapter
connector is loose
Check that the battery connectors are firmly plugged
into each other.
Charger not plugged in Check that the battery charger is plugged into a
working wall outlet.
Charger is not working Contact your distributor please.
Charger feels warm
when recharging
This is normal and not a cause for
concern
Completely read through this manual and the troubleshooting guide table before
calling. If you still need help resolving the problem Contact your distributor please.
• It is parents' responsibility to check main parts of the toy before using, Must
regularly examine for potential hazard, such as the battery, charge,cable or
cord, plug, screws are fastening enclosure of other parts and that in the event
of such damage, the toy must not be used until that damage had been properly
removed.
• Make sure the plastic parts of the vehicle are not cracked or broken.
• Occasionally use a lightweight oil to lubricate moving parts such as wheels.
• Park the vehicle indoors or cover it with a tarp to protect it from wet weather.
• Keep the vehicle away from sources of heat, such as stoves and heaters.
Plastic parts may melt.
• Recharge the battery after each use. Only an adult can handle the battery.
Recharge the battery at least once a month when the vehicle Raider is not
being used.
• Do not wash the vehicle with a hose. Do not wash the vehicle with soap and
water. Do not drive the vehicle in rainy or snowy weather. Water will damage
the motor, electric system and battery.
• Clean the vehicle with a soft, dry cloth. To restore shine to plastic parts, use a
non-wax furniture polish. Do not use car wax. Do not use abrasive cleaners.
• Do not drive the vehicle in loose dirt, sand or fine gravel which could damage
the moving parts, motors or the electric system.
• When not using, all the electrical source should be turn off. Turn off the power
switch and disconnect the battery connection.
Our products are suitable for
ASTM F963; GB6675; EN71 and EN62115 standard.
20
www.costway.com
Welcome to visit our website and purchase our quality products!
this product and giving us valuable feedbacks.
With your inspiring rating, COSTWAY will be more consistent to offer you
EASY SHOPPING EXPERIENCE, GOOD PRODUCTS and EFFICIENT SERVICE!
US office: Fontana, California
UK office: Ipswich
www.costway.com
Reward Points
Exclusive Customer Service
Permanent Shopping Cart
Order History

www.costway.com
THIS INSTRUCTION BOOKLET CONTAINS IMPORTANT SAFETY INFORMATION. PLEASE READ AND KEEP FOR FUTURE REFERENCE.
Visit us: www.costway.com
Follow Costway
Please give us a chance to make it right and do better!
Contact our friendly customer service department for help first.
Replacements for missing or damaged parts will be shipped ASAP!
USER’S MANUAL
Ride On Car
TY327424
