
15m Heavy-Duty RetRactable WateR
Hose Reel Ø13mm ID RubbeR Hose
Model no: WHR1512
thank you for purchasing a sealey product. manufactured to a high standard, this product will, if used according to these
instructions, and properly maintained, give you years of trouble free performance.
IMPORTANT: PLEASE READ THESE INSTRUCTIONS CAREFULLY. NOTE THE SAFE OPERATIONAL REQUIREMENTS, WARNINGS & CAUTIONS. USE
THE PRODUCT CORRECTLY AND WITH CARE FOR THE PURPOSE FOR WHICH IT IS INTENDED. FAILURE TO DO SO MAY CAUSE DAMAGE AND/OR
PERSONAL INJURY AND WILL INVALIDATE THE WARRANTY. KEEP THESE INSTRUCTIONS SAFE FOR FUTURE USE.
1. safety
9 Familiariseyourselfwiththeapplicationandlimitationsofthehosereel,aswellasthespecichazards.
WaRNING!Disconnectthehosereelfromthewatersupplybeforechangingaccessories,servicingorperforminganymaintenance.
9 Maintainthehosereelingoodcondition(useanauthorisedserviceagent).
9 Replaceorrepairdamagedparts.Userecommendedpartsonly.Unauthorisedpartsmaybedangerousandwillinvalidatethe
warranty.
9 Locateandxthehosereelinasuitableworkingarea.
8 Do Notpositionthehoseindirectsunlight,orinareasofextremeheatorcold.
9 Ensurethereisadequatelighting.
WaRNING!Ensuremaximumwaterpressureisnotexceeded.
9 Keepextendedairhoseawayfromheat,oilandsharpedges.Checkhoseforwearbeforeeachuse,andensureallconnectionsare
secure.
9 Maintaincorrectbalanceandfooting.Ensuretheoorisnotslipperyandwearnon-slipshoes.
9 Removeillttingclothing.Removeties,watches,rings,andotherloosejewelleryandcontainand/ortiebacklonghair.
9 Keepchildrenandunauthorisedpersonsawayfromtheworkingarea.
8 Do Notoperatethehosereelifanypartsaredamagedormissingasthismaycausefailureand/orpersonalinjury.
8 Do Notexceedtheratedcapacityofthehosereel.
8 Do Notusethehosereelforanypurposeotherthanthatforwhichitisdesigned.
8 Do Notoperatethehosereelwhenyouaretiredorundertheinuenceofalcohol,drugsorintoxicatingmedication.
9 Whennotinuseensurethewatersupplyisturnedoffandtoolsdisconnected.Disconnectfromwatersupplyandretracthoseinto
case.
WaRNING! Do Notdismantlethehosereelcasing,orattempttoremovethescrewsandcoversonthesides.Todosomayresult
indamagetotheapplianceand/orpersonalinjuryandwillinvalidatethewarranty.Internalmaintenance,whichwillrequirethe
openingofthecasing,mustonlybeundertakenbyanauthorisedserviceagent.
2. INtRoDuctIoN
Heavy-dutydurablesteelcase.FittedwithHeavy-duty15mØ13mmultra-light,super-strongrubberhosewith2mleaderhose.FeaturesMetal
spraygunwith9patternspray/jetnozzle.Fingergripbendrestrictorsforeaseofuse.Handleshotwaterupto90°Candremainsexiblein
coldtemperatureaslowas-40°C.Heavy-dutyratchetmechanismenablessafestorageanduse.Swivelwallmountingbracketincluded.
3. specIfIcatIoN
model No: .............................................................. WHR1512
HoseSize(ID):.......................................................... Ø13mm
length:............................................................................ 15m
4. assembly
WaRNING!Toavoidadangeroussuddenreleaseofpressurethat
cancausesevereinjury,ensurethatthepressuresourceforthe
reelisturnedoffandthesupplyhoseisnotpressurized.
Note: Beforebeginningassembly/installation,purchaseappropriate
hardwareformountingthereel.Themountingbasehasfour1/2”
(12.7mm)holesformountingonasuitableatsurface.
Note: Foroverheadceilingmounting:Installthereelatmost10feet(3m)
abovetheoor.
4.1. assemblING tHe Hose Reel
4.1.1. Prior to mounting the hose reel, ensure that the supply hose
pressuredoesnotexceedthemaximumworkingpressureofthe
hosereel.Alsocheckthatthepressuresourceisturnedoffandthe
supplyhoseforthereelisnotpressurized.
4.1.2. Unpackthereelthencheckthatallpartsarepresentandinspect
fordamage.Checkreelfunctionforsmoothrotation.
Guide Roller Collar
Hose Stopper
Water Hose
Water Inlet Valve
Base Plate
Drum
g.1
WHR1512Issue130/07/19
Original Language Version
©JackSealeyLimited
Refer to
instructions

4.1.3. Fasten themountingplate(g.3)inthedesiredlocation.Reeldimensionsandthepatternofthemountingholesinthebaseare
shownbelow.Tightenallhardwaresecurely.
4.1.4. Theguidearm(g.1)thatguidesthehoseonandoffthereelcanbe
repositionedforbetterfunctionasshowninthepicturebelow.Ifdesired,follow
steps4.1.5through4.1.7torepositionthearm.Otherwisecontinuewith
step4.2.1.
4.1.5. Pulloutthehoseuntilthereellatches.
4.1.6. Removethefoursetsofnutsandwashersholdingtheguidearm(g.1)to
themountingplate(g.3).
4.1.7. Turnthearmtoadesiredposition,aligningthearmmountingholeswiththeholesintheangeofthebase,andre-tightenthenuts
andwashers.
4.2. coNNect tHe Hoses
4.2.1. ApplyTeontapeorpipesealanttothesupplyhosethreadsthenattachittoendttingofthereel’sswivelassembly(behindthe
waterinletvalve)(g.1)andtighten.Ifnotalreadyconnected,theunpressurizedsupplyhosecannowbeconnectedtothesupply
source.Ifthereelwassuppliedwithhosealreadywoundonit,continuewithstep4.2.7.Ifnot,continuewiththenextstep.
4.2.2. Turnthereeldrumbyhanduntiltherewindspringistight,anddrumhaslatched.Asanextraprecautionwhileinstallingthenew
hose,securethedruminitslatchedposition.
4.2.3. Inserttheendofthedeliveryhosethroughguiderollercollar(g.1)andfeeditthroughtheopeninginthedrumange.
4.2.4. UseTeontapeorpipesealantonthehosettingthreadsthenscrewitintothettingoftheshorthoseattachedtothereel’sswivel
assemblyunderthewaterinletvalve(g.1)andtighten.
Note: Toavoiddamagetotheswivel,useawrenchtosupporttheswivelwhiletighteningthehose.
4.2.5. Attachthehosestopper(g.1)totheotherendofdeliveryhose.
4.2.6. Carefullyreleasethedrumlatch,andslowlyallowhosetowindontothereelinacontrolledwaymakingsurethehosewindsin
even,straightturnsonthereel.
4.2.7. ApplyTeontapeorpipesealanttotheoutletttingonthedeliveryhosethenattachittoadesiredtool,ornozzle.Pressurize
thereelandcheckalltheconnectionsforleakage.Alsocheckthehosereelforcorrectrotation/latchingandthatsystempressureis
adequatetoperformtheintendedfunction(seetheOperatingInstructions).
4.2.8. Ifanaladjustmenttothehosestopper(g.1)isrequired,pullthehosefromthereelandallowittolatchatadesiredlength.
Loosenthehosestopperbolts,andslideittoapositionclosetotheguiderollercollar(g.1).Retightenthehosestopperbolts.
5. INstallatIoN
WaRNING! Do Notpositionthereelinareasofextremeheatorcold.
Note: Prolongedexposuretodirectandintensesunlightmayaffecttheintegrityofthepolymerswithinthemouldedcomponents.Avoid,if
possible,positioningthereelindirectsunlight.
5.1. mouNtING tHe Reel
5.1.1. Duetothewaytheretractablehoseoperates,thereelshouldonlybemountedinoneoftwopositionsshownbelow.Thebrackets
suppliedwillenableyoutomountthereelineitherposition.
WaRNING!Ensurethewall,ceilingorotherstructure,towhichthehosereelistobexed,isofsoundconstructionandthatthe
securingpointswillholdtheworkingstrainofthehosewheninuse.
5.1.2. Usingthemountingholestemplate(cutfromboxlid),drillappropriateholesforthedesiredmountingorseediagrambelow.
5.1.3. Whenwallmountedthehoseexitpointshouldnotbemorethan2.4maboveoorlevel.Abovethisheightceilingmountingis
recommended.
5.1.4. Fixonebrackettothechosensurfaceusingxingsthatareappropriatetothesubstrateandstrongenoughtocarrytheweightof
thereelplustheworkingstrainexertedonitwheninuse.Positionthehosereelontotherstbracket,thenproceedtox
thesecondbracketintoplaceandensurethereelissecure.
Guide Arm
Guide Roller Collar
Hose Stopper
Water Hose
Mounting
Plate
g.2
g.3
g.4
WHR1512Issue130/07/19
Original Language Version
©JackSealeyLimited
6. opeRatIoN
6.1. befoRe eacH use
6.1.1. Ensurethatthehosereelisinproperworkingorderbeforeuse.
6.1.2. Inspectthehosereelttings,alignment,hosesandcomponentsperiodicallybeforeuse.Havedamagedorworncomponents
repairedorreplacedbyanauthorizedtechnician.
6.2. opeRatIoN
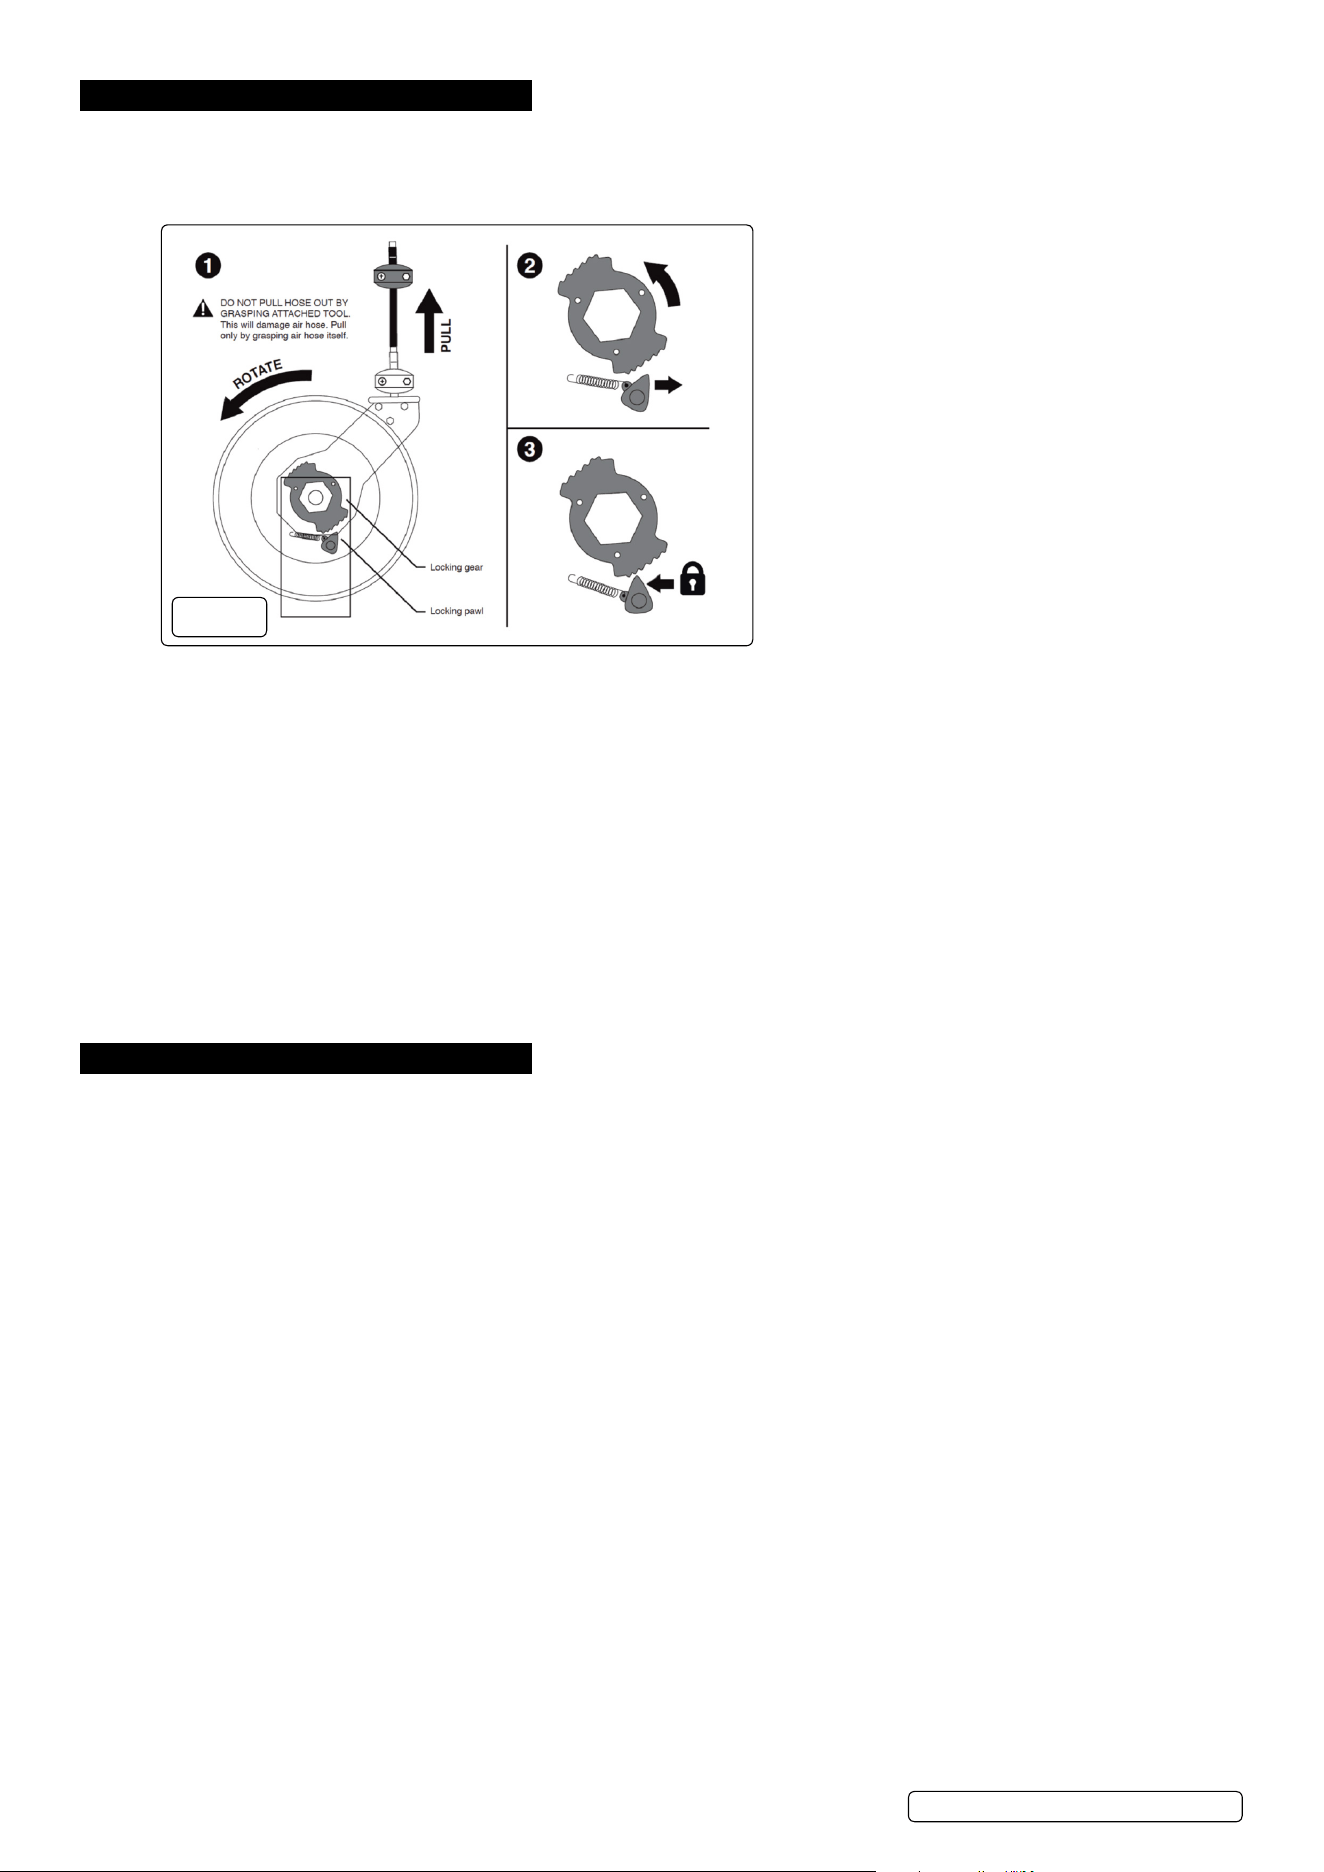
6.2.1. Checkthereelforcorrectoperationbyslowlypullingoutthehose.A“clicking”noisewillbeheardeveryhalfrevolutionofthedrum.
6.2.2. Tolatchthereel,pulloutthehosethenallowittoretractafterhearingtherst,second,third,forth,fth,sixth“click”.
6.2.3. Tounlatchthereel,slowlypulloutthehoseuntilthe“clicking”noisestopsthen,holdingontothehose,letitretractinacontrolled
wayuntilthestop/blockrestsagainstthehoseguide/rollers.
6.2.4. Keepthehoseandair-toolsornozzlesdry,clean,andfreefromoilandgrease.
6.2.5. Periodicallycleanthehosewithaclothdippedinwarmwatertoremovedirtordepositsandensurecorrectwindingonthereel.
8 Do Notusedetergentsorsolventswhichcouldproveincompatiblewithcable-windermaterials.
6.2.6. Alsoperiodicallycheckthehoseconditionforwearordamage,andchecktheswivelttingforleakage.Seethemaintenancesection
fortipstoreplaceanyworn,damaged,orleakingparts.
6.3. Pulloutthehosetotherequiredlength.Aclickingnoisewillbeheardeveryhalfrevolutionofthedrum.
6.4. Tolatchthereel,allowthereeltoslowlyretractafterhearingthe1st,2ndor3rdclick.
6.5. Tounlatchthereel,slowlypulloutthehoseuntiltheclickingnoisestops,thenletthehoseslowlyretractuntilthehosestopperrests
againstthereelmouth.
Note: Removetoolsfromthehosewhentheyarenolongerrequiredforuse.
WaRNING!Topreventinjuryordamageoccurring,Do Notletgoofthehoseduringrewinding.
7. maINteNaNce
7.1. afteR eacH use
7.1.1. Inspectthehosereelttings,alignment,hosesandcomponentsperiodicallyafterusesothatwornordamagedcomponentscan
beorderedandreplacedbeforethenextuse.Havedamagedorworncomponentsrepairedorreplacedbyanauthorized
technician.
7.2. spRING teNsIoN aDjustmeNt
WaRNING!Avoidaccidentallyreleasingthereel’slatchingmechanism.Thereelisundertensionandaccidentalreleasecancause
awildlyspinningreelandpersonalinjury.
Ifnecessary,adjustspringtensiononreelbyaddingorremovingwrapsofhosefromspool,onewrapatatime,untildesired
tensionisobtained.
WaRNING!Whenaddingwrapsofhosetothereel,becarefulnottoexceedthewindingmechanism’sspringcapacity.Addjust
enoughwrapsofhosetoachievethedesiredtension.Damagetothewindingmechanismwillresultifspringisover-tensioned.
7.2.1. Pulloutapproximately6or8feetofhoseandallowthedrumtolatch.
7.2.2. Removehosestopperfromthehoseandpullthehosebackthroughguide/rollers.
7.2.3. Toincreasespringtension,wraptheloosehoseoneextraturnaroundthedrumor,todecreasetension,un-wrapthehoseoneturn
fromdrum.
7.2.4. Re-insertthehosethroughguide/rollersandinstallthehosestopperatthedesireddistancefromthehoseend.
7.2.5. Unlatchthedrumandcheckthetension.Readjustthetensionbyrepeatingthesesteps.
7.3. Hose ReplacemeNt
WaRNING!Toavoidadangeroussuddenreleaseofpressurethatcancausesevereinjury,ensurethatthepressuresourceforthe
reelisturnedoffandthesupplyhoseisnotpressurizedbeforeperforminganymaintenanceoradjustmentonthereel.
WaRNING!Makesurereeldrumissecurelylockedinthenextstepandcannotaccidentallyspin.
7.3.1. Turnoffthepressuresupplytoreelandreleasepressurefromthesysteminacontrolledway.
7.3.2. Pulloutalltheoldhoseandlockthereelinposition.
7.3.3. Takenoteofthehoseconnection,anyhoseclamps,andthepositionofthehosestopper.
7.3.4. Removeanyhoseclampsfromthehose.
7.3.5. Carefullydisconnectthehosefromitsconnectionandremoveit.
7.3.6. Routeanewequivalenttypeandsizehosethroughguide/rollerstotheoldhoseconnectionpoint.
7.3.7. UseTeontapeorpipesealantonthehosettingthreadsthenscrewitintotheconnectionttingonthereel.
Note: Toavoiddamagetoaswivelconnection,useawrenchtosupporttheswivelwhiletighteningthehose.
7.3.8. Re-installanyhoseclampsandthehosestopperasnotedinstep7.2.2.
g.5
WHR1512Issue130/07/19
Original Language Version
©JackSealeyLimited
7.3.9. Carefullyreleasethedrumlatch,andslowlyallowthehosetowindontothereel.
7.3.10. ApplyTeontapeorpipesealanttotheoutletttingonthenewhosethenattachittoadesiredtool,ornozzle.Pressurizethereel
andcheckalltheconnectionsforleakage.
7.3.11. Ifneeded,adjustthespringtension.SeeSpringTensionAdjustmentintheOperationsection.
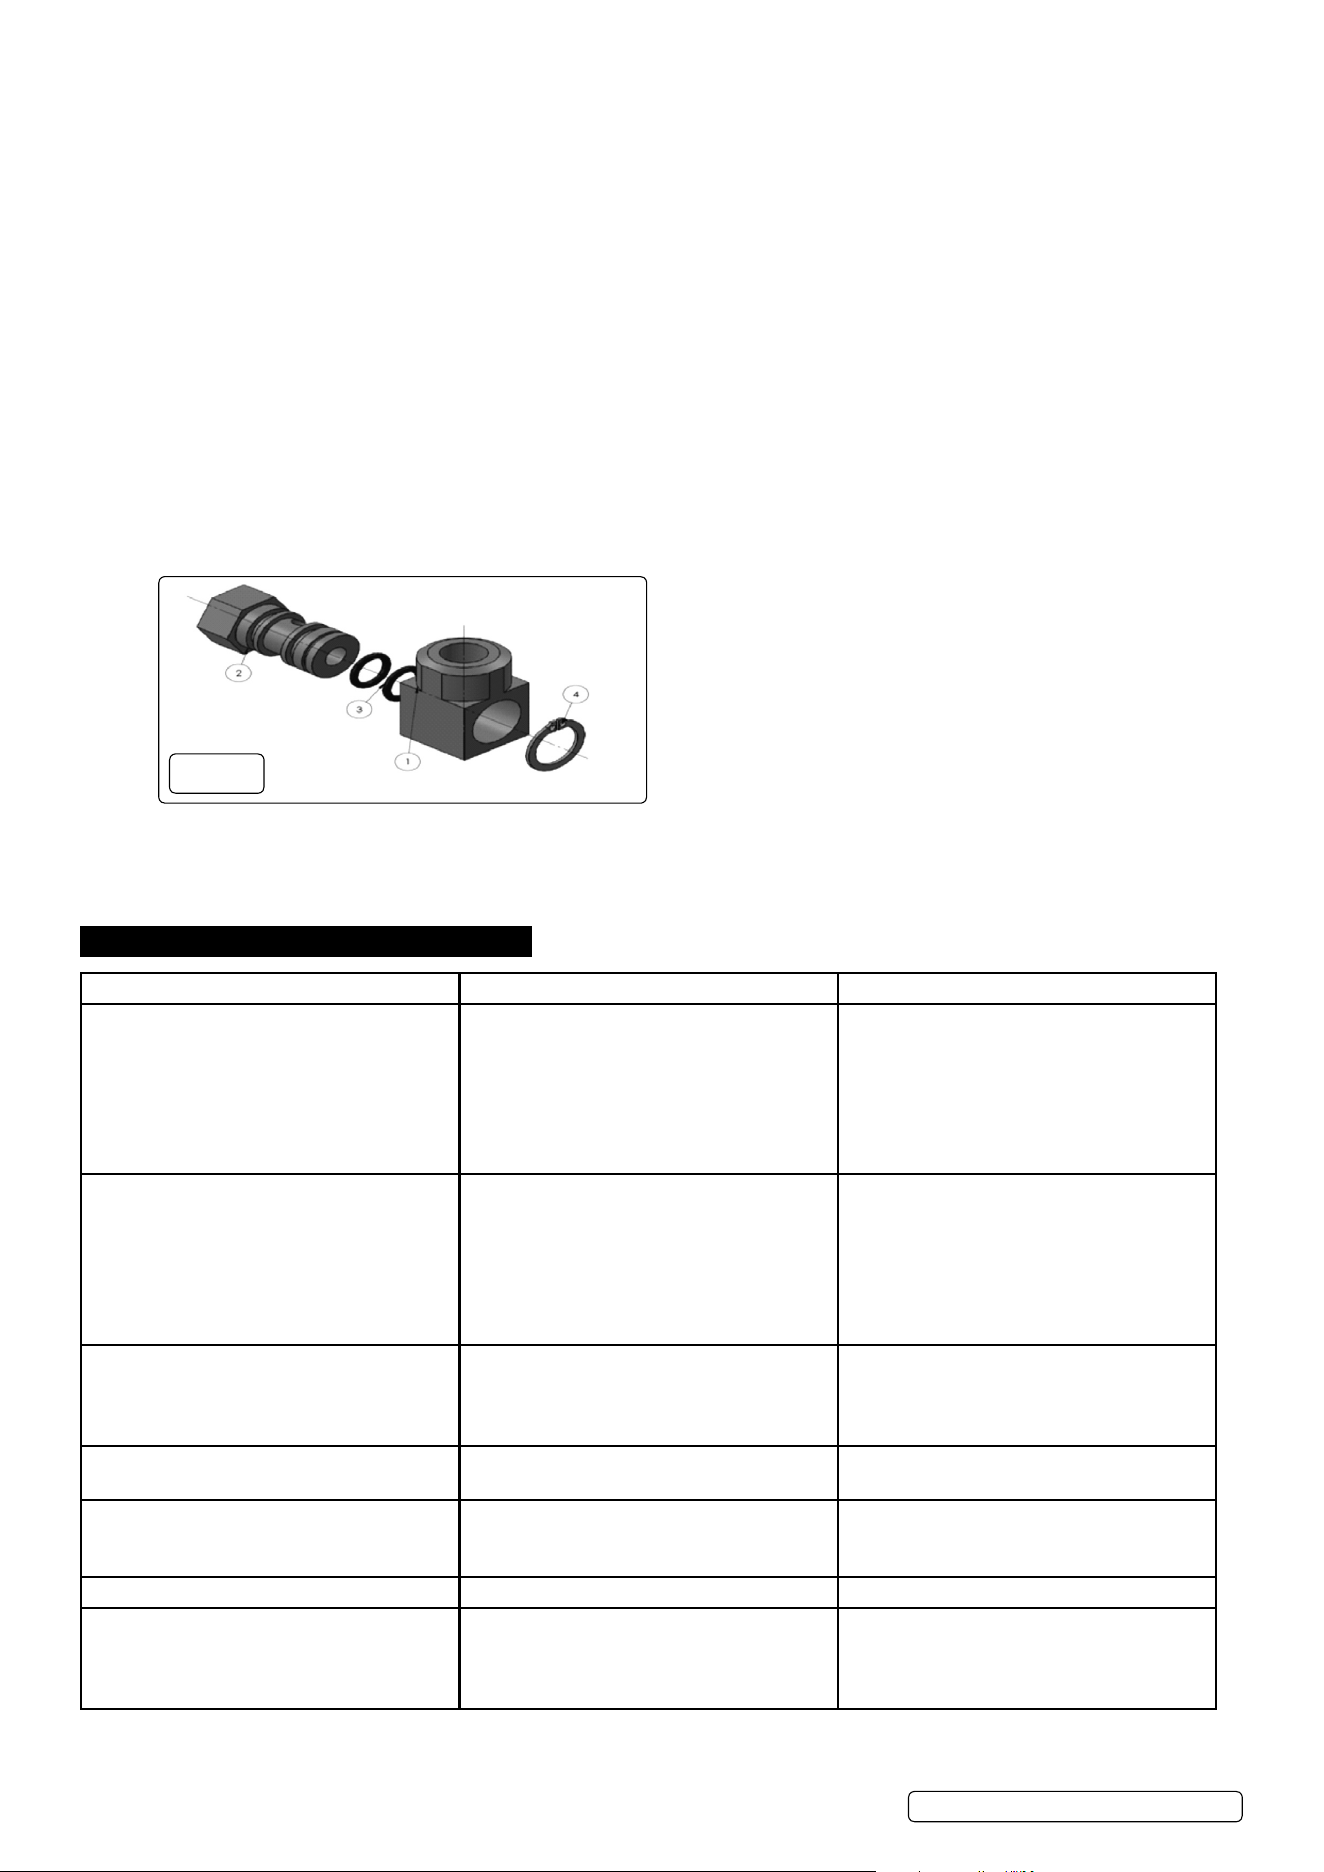
7.4. sWIvel seal ReplacemeNt
7.4.1. Turnoffthepressuresource,releasepressurefromthesystem,andremovethesupplyhoseconnectionfromtheswivel.
7.4.2. Removetheswivelassembly(g.6)fromreelaxle.
Note: Removaloftheswivelisnotabsolutelynecessaryunlessanewswivelisbeinginstalled.
7.4.3. Removethecirclipfromswivel,andtakeitapart.Pleaseseethediagramaboveforreference.
7.4.4. Replacethesealsandreassembletheswivel.
7.4.5. UseTeontapeorthreadsealantontheswivelthreadsandreconnecttheswivelwiththeaxle.
7.4.6. UseTeontapeorthreadsealantontheinletsupplyhosethreadsandreconnectittotheswivel.
7.4.7. Pressurizethesystemandcheckforleaks.
7.5. Thehosereeldoesnotrequirespecialmaintenanceasitislubricatedforlife.Toensurereliableoperation,cleanthehoseand
casingregularly.
8 Do Notsprayorwettheproduct,butcleanwithaclothandwarmwater.
8 Do Notusesolventsordetergents,asthesemaypermanentlydamagetheplastic.
Note: Therearenouserserviceableparts.Allmaintenanceandrepairswhichrequirethecasetobeopenedordismantledshouldbe
carriedoutbyanauthorisedserviceagentonly.
WaRNING! Do Notdismantlethehosereelcasing,orattempttoremovethescrewsandcoversonthesides.Todosomayresult
indamagetotheapplianceand/orpersonalinjuryandwillinvalidatethewarranty.
7.6. stoRaGe
7.6.1. Shouldyouwishtostorethehose,ensureitiscleananddry.Placetheiteminadark,safe,dry,childprooflocation,wherethe
temperaturewillremainreasonablystable.
8 Do Notstoreinanylonorplasticbag,asthiswillencouragecondensation.
8. tRoublesHootING
pRoblems possIble cause solutIoN
Hose will not retract Hosebunchingwithinreel.
Springtensiontootight.
Replacement hose too heavy
Spring has lost all tension or has possibly
broken.
Pullhoseoutofreelandguidebackin.
Havespringtensionadjustedbyauthorised
serviceagent.
Havecorrecthosettedbyauthorised
serviceagent.
ReinstallSpringTension
ReplaceSpringCanister.
Hose will not fully retract outletNozzle,gunortoolistooheavy.
Springisfatigued.
Fieldinstalledhoseistoolong.
Addspringtension.See“SpringTension
Adjustment”.
Addspringtension.See“SpringTension
Adjustment”.Replacespringcanisterif
required.
CalllocalDistributorforcorrectspecied
hoselength.
Reel will not latch The hose has been pulled past the latching
teeth.
Brokenlatchingpawlorpawlspring.
Allowreeltoretractslowlyafterhearing1st,
2ndor3rdclick.
Havenewlatchingpawlorpawlspringtted
byauthorisedserviceagent.
ReelLeaks damagedhose. Havenewhosettedbyauthorisedservice
agent.
FluidleaksfromSwivel Swivelsealsaredamagedorworn.
Inlethoseisnotexible.
Replaceswivelseals.See“SwivelSeal
Replacement.
Caution:BesureleakisnotHosetting!
Hoselocksupwhenfullyextended HoseClampisintheincorrectposition Relocatehoseclamptooptionallocation.
SwivelAssemblyisnotmovingfreelyof
lockingup
Inlethosettinghasbeenover-tightened.
Inlethoseisnotexiblecausing
Sideforceonswivel.
Removeandexamineswivelassemblyfor
damage.Replaceasnecessary.
Properlytighteninlethose.Handlightens
tting,plus1/2tumwithwrench.
g.6
WHR1512Issue130/07/19
Original Language Version
©JackSealeyLimited

sealey Group, Kempson Way, suffolk business park, bury st edmunds, suffolk. Ip32 7aR
01284 757500 01284 703534 sales@sealey.co.uk www.sealey.co.uk
eNvIRoNmeNt pRotectIoN
Recycleunwantedmaterialsinsteadofdisposingofthemaswaste.Alltools,accessoriesandpackagingshouldbesorted,takento
arecyclingcentreanddisposedofinamannerwhichiscompatiblewiththeenvironment.Whentheproductbecomescompletely
unserviceable and requires disposal, drain any fluids (if applicable) into approved containers and dispose of the product and fluids
accordingtolocalregulations.
Note:Itisourpolicytocontinuallyimproveproductsandassuchwereservetherighttoalterdata,specificationsandcomponentpartswithoutprior
notice.
Important:NoLiabilityisacceptedforincorrectuseofthisproduct.
Warranty:Guaranteeis12monthsfrompurchasedate,proofofwhichisrequiredforanyclaim.
WHR1512Issue130/07/19
Original Language Version
©JackSealeyLimited