
Body Camera
User Manual

Iniaves on the Use of Video Products
Thank you for choosing Hikvision products.
Technology aects every aspect of our life. As a high-tech company, we are increasingly aware of
the role technology plays in improving business
eciency and quality of life, but at the same me,
the potenal harm of its improper usage. For example, video products are capable of recording
real, complete and clear images. This provides a high value in retrospect and preserving real-me
facts. However, it may also result in the infringement of a third party's legimate rights and
interests if improper distribuon, use and/or processing of video data takes place. With the
philosophy of "Technology for the Good", Hikvision requests that every end user of video
technology and video products shall comply with all the applicable laws and
regulaons, as well as
ethical customs, aiming to jointly create a
beer community.
Please read the following
iniaves carefully:
●
Everyone has a reasonable expectaon of privacy, and the installaon of video products should
not be in conict with this reasonable expectaon. Therefore, a warning noce shall be given in
a reasonable and eecve manner and clarify the monitoring range, when installing video
products in public areas. For non-public areas, a third party's rights and interests shall be
evaluated when installing video products, including but not limited to, installing video products
only
aer obtaining the consent of the stakeholders, and not installing highly-invisible video
products.
●
The purpose of video products is to record real
acvies within a specic me and space and
under specic condions. Therefore, every user shall rst reasonably dene his/her own rights in
such specic scope, in order to avoid infringing on a third party's portraits, privacy or other
legimate rights.
●
During the use of video products, video image data derived from real scenes will connue to be
generated, including a large amount of biological data (such as facial images), and the data could
be further applied or reprocessed. Video products themselves could not
disnguish good from
bad regarding how to use the data based solely on the images captured by the video products.
The result of data usage depends on the method and purpose of use of the data controllers.
Therefore, data controllers shall not only comply with all the applicable laws and
regulaons and
other normave requirements, but also respect internaonal norms, social morality, good
morals, common pracces and other non-mandatory requirements, and respect individual
privacy, portrait and other rights and interests.
●
The rights, values and other demands of various stakeholders should always be considered when
processing video data that is
connuously generated by video products. In this regard, product
security and data security are extremely crucial. Therefore, every end user and data controller,
shall undertake all reasonable and necessary measures to ensure data security and avoid data
leakage, improper disclosure and improper use, including but not limited to,
seng up access
Body Camera User Manual
i

control, selecng a suitable network environment (the Internet or Intranet) where video
products are connected, establishing and constantly opmizing network security.
●
Video products have made great contribuons to the improvement of social security around the
world, and we believe that these products will also play an
acve role in more aspects of social
life. Any abuse of video products in
violaon of human rights or leading to criminal acvies are
contrary to the original intent of technological
innovaon and product development. Therefore,
each user shall establish an evaluaon and tracking mechanism of their product applicaon to
ensure that every product is used in a proper and reasonable manner and with good faith.
Body Camera User Manual
ii

Legal Informaon
©2021 Hangzhou Hikvision Digital Technology Co., Ltd. All rights reserved.
About this Manual
The Manual includes instrucons for using and managing the Product. Pictures, charts, images and
all other informaon hereinaer are for descripon and explanaon only. The informaon
contained in the Manual is subject to change, without noce, due to rmware updates or other
reasons. Please nd the latest version of this Manual at the Hikvision website ( hps://
www.hikvision.com/ ).
Please use this Manual with the guidance and assistance of professionals trained in
supporng the
Product.
Trademarks
and other Hikvision's trademarks and logos are the properes of
Hikvision in various jurisdicons.
Other trademarks and logos menoned are the properes of their respecve owners.
Disclaimer
TO THE MAXIMUM EXTENT PERMITTED BY APPLICABLE LAW, THIS MANUAL AND THE PRODUCT
DESCRIBED, WITH ITS HARDWARE, SOFTWARE AND FIRMWARE, ARE PROVIDED "AS IS" AND "WITH
ALL FAULTS AND ERRORS". HIKVISION MAKES NO WARRANTIES, EXPRESS OR IMPLIED, INCLUDING
WITHOUT LIMITATION, MERCHANTABILITY, SATISFACTORY QUALITY, OR FITNESS FOR A PARTICULAR
PURPOSE. THE USE OF THE PRODUCT BY YOU IS AT YOUR OWN RISK. IN NO EVENT WILL HIKVISION
BE LIABLE TO YOU FOR ANY SPECIAL, CONSEQUENTIAL, INCIDENTAL, OR INDIRECT DAMAGES,
INCLUDING, AMONG OTHERS, DAMAGES FOR LOSS OF BUSINESS PROFITS, BUSINESS
INTERRUPTION, OR LOSS OF DATA, CORRUPTION OF SYSTEMS, OR LOSS OF DOCUMENTATION,
WHETHER BASED ON BREACH OF CONTRACT, TORT (INCLUDING NEGLIGENCE), PRODUCT LIABILITY,
OR OTHERWISE, IN CONNECTION WITH THE USE OF THE PRODUCT, EVEN IF HIKVISION HAS BEEN
ADVISED OF THE POSSIBILITY OF SUCH DAMAGES OR LOSS.
YOU ACKNOWLEDGE THAT THE NATURE OF THE INTERNET PROVIDES FOR INHERENT SECURITY
RISKS, AND HIKVISION SHALL NOT TAKE ANY RESPONSIBILITIES FOR ABNORMAL OPERATION,
PRIVACY LEAKAGE OR OTHER DAMAGES RESULTING FROM CYBER-ATTACK, HACKER ATTACK, VIRUS
INFECTION, OR OTHER INTERNET SECURITY RISKS; HOWEVER, HIKVISION WILL PROVIDE TIMELY
TECHNICAL SUPPORT IF REQUIRED.
YOU AGREE TO USE THIS PRODUCT IN COMPLIANCE WITH ALL APPLICABLE LAWS, AND YOU ARE
SOLELY RESPONSIBLE FOR ENSURING THAT YOUR USE CONFORMS TO THE APPLICABLE LAW.
ESPECIALLY, YOU ARE RESPONSIBLE, FOR USING THIS PRODUCT IN A MANNER THAT DOES NOT
INFRINGE ON THE RIGHTS OF THIRD PARTIES, INCLUDING WITHOUT LIMITATION, RIGHTS OF
PUBLICITY, INTELLECTUAL PROPERTY RIGHTS, OR DATA PROTECTION AND OTHER PRIVACY RIGHTS.
YOU SHALL NOT USE THIS PRODUCT FOR ANY PROHIBITED END-USES, INCLUDING THE
Body Camera User Manual
iii

DEVELOPMENT OR PRODUCTION OF WEAPONS OF MASS DESTRUCTION, THE DEVELOPMENT OR
PRODUCTION OF CHEMICAL OR BIOLOGICAL WEAPONS, ANY ACTIVITIES IN THE CONTEXT RELATED
TO ANY NUCLEAR EXPLOSIVE OR UNSAFE NUCLEAR FUEL-CYCLE, OR IN SUPPORT OF HUMAN
RIGHTS ABUSES.
IN THE EVENT OF ANY CONFLICTS BETWEEN THIS MANUAL AND THE APPLICABLE LAW, THE LATER
PREVAILS.
Body Camera User Manual
iv

Regulatory Informaon
FCC Informaon
Please take aenon that changes or modicaon not expressly approved by the party responsible
for compliance could void the user's authority to operate the equipment.
FCC compliance: This equipment has been tested and found to comply with the limits for a Class B
digital device, pursuant to part 15 of the FCC Rules. These limits are designed to provide
reasonable
protecon against harmful interference in a residenal installaon. This equipment
generates, uses and can radiate radio frequency energy and, if not installed and used in accordance
with the
instrucons, may cause harmful interference to radio communicaons. However, there is
no guarantee that interference will not occur in a parcular installaon. If this equipment does
cause harmful interference to radio or television
recepon, which can be determined by turning
the equipment o and on, the user is encouraged to try to correct the interference by one or more
of the following measures:
●
Reorient or relocate the receiving antenna.
●
Increase the separaon between the equipment and receiver.
●
Connect the equipment into an outlet on a circuit
dierent from that to which the receiver is
connected.
●
Consult the dealer or an experienced radio/TV technician for help.
FCC
Condions
This device complies with part 15 of the FCC Rules. Operaon is subject to the following two
condions:
1. This device may not cause harmful interference.
2. This device must accept any interference received, including interference that may cause
undesired
operaon.
EU Conformity Statement
This product and - if applicable - the supplied accessories too are marked with "CE"
and comply therefore with the applicable harmonized European standards listed
under the RE Direcve 2014/53/EU, the EMC Direcve 2014/30/EU, the LVD
Direcve 2014/35/EU, the RoHS Direcve 2011/65/EU.
2012/19/EU (WEEE direcve): Products marked with this symbol cannot be
disposed of as unsorted municipal waste in the European Union. For proper
recycling, return this product to your local supplier upon the purchase of
Body Camera User Manual
v

equivalent new equipment, or dispose of it at designated collecon points. For
more informaon see: www.recyclethis.info
2006/66/EC (baery direcve): This product contains a baery that cannot be
disposed of as unsorted municipal waste in the European Union. See the product
documentaon for specic baer y informaon. The baery is marked with this
symbol, which may include
leering to indicate cadmium (Cd), lead (Pb), or
mercury (Hg). For proper recycling, return the
baery to your supplier or to a
designated
collecon point. For more informaon see: www.recyclethis.info
Industry Canada ICES-003 Compliance
This device meets the CAN ICES-3 (B)/NMB-3(B) standards requirements.
This device complies with Industry Canada license-exempt RSS standard(s). Operaon is subject to
the following two
condions:
1. this device may not cause interference, and
2. this device must accept any interference, including interference that may cause undesired
operaon of the device.
Le présent appareil est conforme aux CNR d'Industrie Canada applicables aux appareils
radioexempts de licence.
L'exploitaon est autorisée aux deux condions suivantes:
1. l'appareil ne doit pas produire de brouillage, et
2.
l'ulisateur de l'appareil doit accepter tout brouillage radioélectrique subi, même si le brouillage
est suscepble d'en compromere le fonconnement.
Under Industry Canada regulaons, this radio transmier may only operate using an antenna of a
type and maximum (or lesser) gain approved for the transmier by Industry Canada. To reduce
potenal radio interference to other users, the antenna type and its gain should be so chosen that
the equivalent isotropically radiated power (e.i.r.p.) is not more than that necessary for successful
communicaon.
Conformément à la réglementaon d'Industrie Canada, le présent émeeur radio peut fonconner
avec une antenne d'un type et d'un gain maximal (ou inférieur) approuvé pour l'émeeur par
Industrie Canada. Dans le but de réduire les risques de brouillage radioélectrique à
l'intenon des
autres ulisateurs, il faut choisir le type d'antenne et son gain de sorte que la puissance isotrope
rayonnée équivalente (p.i.r.e.) ne dépasse pas l'intensité nécessaire à l'établissement d'une
communicaon sasfaisante.
This equipment should be installed and operated with a minimum distance of 20 cm between the
radiator and your body.
Cet équipement doit être installé et
ulisé à une distance minimale de 20 cm entre le radiateur et
votre corps.
Body Camera User Manual
vi

Symbol Convenons
The symbols that may be found in this document are dened as follows.
Symbol Descripon
Danger
Indicates a hazardous situaon which, if not avoided, will or could
result in death or serious injury.
Cauon
Indicates a potenally hazardous situaon which, if not avoided, could
result in equipment damage, data loss, performance degradaon, or
unexpected results.
Note
Provides addional informaon to emphasize or supplement
important points of the main text.
Body Camera User Manual
vii

Safety Instrucon
Laws and Regulaons
Use of the product must be in strict compliance with the local laws and regulaons. Please shut
down the device in prohibited area.
Power Supply
●
Use of the product must be in strict compliance with the local electrical safety regulaons.
●
Use the power adapter provided by qualied manufacturer. Refer to the product specicaon for
detailed power requirements.
●
It is recommended to provide independent power adapter for each device as adapter overload
may cause over-heang or a re hazard.
●
Make sure that the power has been disconnected before you wire, install, or disassemble the
device in the authorized way according to the descripon in the manual.
●
To avoid electric shock, DO NOT directly touch exposed contacts and components once the
device is powered up.
●
DO NOT use damaged power supply devices (e.g., cable, power adapter, etc.) to avoid electric
shock,
re hazard, and explosion.
●
DO NOT directly cut the power supply to shut down the device. Please shut down the device
normally and then unplug the power cord to avoid data loss.
●
The socket-outlet shall be installed near the equipment and shall be easily accessible.
●
Make sure the power supply has been disconnected if the power adapter is idle.
●
Connect to earth before
connecng to the power supply.
Transportaon,
Use, and Storage
●
To avoid heat accumulaon, good venlaon is required for a proper operang environment.
●
Store the device in dry, well-venlated, corrosive-gas-free, no direct sunlight, and no heang
source environment.
●
Avoid re, water, and explosive environment when using the device.
●
Install the device in such a way that lightning strikes can be avoided. Provide a surge suppressor
at the inlet opening of the equipment under special
condions such as the mountain top, iron
tower, and forest.
●
Keep the device away from
magnec interference.
●
Avoid device
installaon on vibratory surfaces or places. Failure to comply with this may cause
device damage.
●
DO NOT touch the heat
dissipaon component to avoid burns.
●
DO NOT expose the device to extremely hot, cold, or humidity environments. For temperature
and humidity requirements, see device specicaon.
●
No naked ame sources, such as lighted candles, should be placed on the equipment.
●
DO NOT touch the sharp edges or corners.
Body Camera User Manual
viii

●
To prevent possible hearing damage, DO NOT listen at high volume levels for long periods.
●
The device can only be safely used in the region below 2,000 meters above the sea level.
Maintenance
●
If smoke, odor, or noise arises from the device, immediately turn
o the power, unplug the
power cable, and contact the service center.
●
If the device cannot work properly, contact the store you purchased it or the nearest service
center. DO NOT disassemble or modify the device in the unauthorized way (For the problems
caused by unauthorized modicaon or maintenance, the company shall not take any
responsibility).
●
Keep all packaging aer unpacking them for future use. In case of any failure occurred, you need
to return the device to the factory with the original packaging. Transportaon without the
original packaging may result in damage to the device and the company shall not take any
responsibility.
Network
●
Please enforce the protecon for the personal informaon and the data security as the device
may be confronted with the network security problems when it is connected to the Internet.
Contact us if network security risks occur.
●
Please understand that you have the responsibility to
congure all the passwords and other
security
sengs about the device, and keep your user name and password.
Lens
●
DO NOT touch the lens with ngers directly in case the acidic sweat of the ngers erodes the
surface coang of the lens.
●
DO NOT aim the lens at the strong light such as sun or incandescent lamp. The strong light can
cause fatal damage to the device.
Screen
Clean the screen with so and dry cloth or other substutes to wipe the interior and exterior
surface. DO NOT use alkaline detergents. Protect the screen from scratches.
Baery
●
DO NOT charge the baery connuously more than one week. Overcharging may shorten the
baery life.
●
Baery will discharge gradually if it is not used for a long me. It must be recharged before
using.
●
If the device contains dismountable
baery, store the device and baery separately if it is not
used.
●
The baery must be charged and discharged every three months if it is not used, and recharged
to 60% to 70% power percentage to store.
●
The scrapped
baery should be discarded in compliance with the local laws and regulaons. If
there are no corresponding laws or
regulaons, throw it in a hazardous trash can.
Body Camera User Manual
ix

●
DO NOT pierce the baery or shorten the electrodes, or it may cause explosion or re hazard.
●
DO NOT dispose of the baery into re or a hot oven, or mechanically crush or cut the baery,
which may result in an explosion.
●
CAUTION: Please use the
specic baery supported by the device, or it may cause explosion. If
the
baery is damaged and needs to be changed, contact the device manufacturer or local
distributor.
●
If the device contains buon baery, keep it far away from children.
●
DO NOT expose the
baery pack or baery combinaon to sunlight, re, or similar overheated
environment. DO NOT leave the
baery in an extremely high temperature surrounding
environment or subject the baery to extremely low air pressure, which may result in an
explosion or the leakage of
ammable liquid or gas.
●
Keep new and used
baeries away from children. If the baery compartment does not close
securely, stop using the product and keep it away from children.
Data
DO NOT disconnect the power during formang, uploading, and downloading. Or les may be
damaged.
Laser
: The laser radiaon emied from the device can cause eye injuries, burning of skin, or
inammable substances. Before enabling the laser, make sure no human or inammable
substances are in front.
Body Camera User Manual
x

Contents
Chapter 1 Product Introducon .................................................................................................. 1
1.1 Introducon ........................................................................................................................... 1
1.2 Key Feature ............................................................................................................................ 1
1.3 Default Informaon ............................................................................................................... 1
Chapter 2 Startup and Main Menu ............................................................................................. 3
2.1 Login ...................................................................................................................................... 3
2.2 Startup ................................................................................................................................... 3
2.3 Main Menu ............................................................................................................................ 5
Chapter 3 Storage, Playback, and Backup ................................................................................... 6
3.1 Storage ................................................................................................................................... 6
3.1.1 Release Storage Capacity .............................................................................................. 6
3.1.2 Record ........................................................................................................................... 6
3.1.3 Tape ............................................................................................................................... 6
3.1.4 Capture ......................................................................................................................... 7
3.2 Playback ................................................................................................................................. 7
3.3 Backup ................................................................................................................................... 7
3.4 Set Tag .................................................................................................................................... 8
3.4.1 Set Tag During Recording .............................................................................................. 8
3.4.2 Set Tag
Aer Recording, Taping, or Capturing .............................................................. 8
Chapter 4 Alarm Sengs .......................................................................................................... 10
4.1 Set Auto Alarm ..................................................................................................................... 10
4.2 Set Manual Alarm ................................................................................................................ 10
Chapter 5 Network
Sengs ...................................................................................................... 11
5.1 Dial ....................................................................................................................................... 11
5.2 Connect to Wi-Fi .................................................................................................................. 11
5.3 Connect to Bluetooth Headsets ........................................................................................... 12
Body Camera User Manual
xi

5.4 Connect to Plaorm ............................................................................................................. 13
5.4.1 Connect to EHome Plaorm ....................................................................................... 13
5.4.2 Connect to ISUP
Plaorm ........................................................................................... 13
5.5 Upload to FTP ....................................................................................................................... 14
Chapter 6 Group Intercom ........................................................................................................ 15
Chapter 7 System Sengs ........................................................................................................ 17
7.1 Set Posioning ..................................................................................................................... 17
7.2 Enable Indicator ................................................................................................................... 17
7.3 Enable IR Light ..................................................................................................................... 17
7.4 Set System Sound ................................................................................................................. 18
7.5 Set Screen Brightness ........................................................................................................... 18
7.6 Set Voice Prompt ................................................................................................................. 18
7.7 Set Encoding Parameters ..................................................................................................... 19
7.7.1 Set Video Encoding Type ............................................................................................. 19
7.7.2 Set Video Stream Parameters ..................................................................................... 19
7.7.3 Set Network Stream Parameters ................................................................................. 20
7.7.4 Set Audio Encoding Type ............................................................................................. 20
7.8 Set Capture Parameters ....................................................................................................... 20
7.9 Set
Mul-Line OSD ............................................................................................................... 21
7.10 Set Pre-Record ................................................................................................................... 21
7.11 Set Post-Record .................................................................................................................. 21
7.12 Set
Overwrien Record ...................................................................................................... 21
7.13 Set Record once On ............................................................................................................ 22
7.14 Set PTZ Control .................................................................................................................. 22
7.15 Set Quick Charging Mode .................................................................................................. 22
7.16 Switch USB Mode ............................................................................................................... 23
7.17 Set Read-Only USB Mode ................................................................................................... 23
Chapter 8 Maintenance ............................................................................................................ 24
Body Camera User Manual
xii

8.1 View System Informaon ..................................................................................................... 24
8.2 View Device Informaon ...................................................................................................... 24
8.3 View
Baery Informaon ..................................................................................................... 24
8.4 Enable Password .................................................................................................................. 24
8.5 Edit Password ....................................................................................................................... 24
8.6 Upgrade ............................................................................................................................... 25
8.7 Export Debug Log ................................................................................................................. 25
8.8 Set Serial Port Debug ........................................................................................................... 25
8.9 Set Satellite Time Synchronizaon ....................................................................................... 26
8.10 Restore Basic Sengs ........................................................................................................ 26
8.11 Restore Factory Sengs ..................................................................................................... 26
8.12 Shut down and Sleep ......................................................................................................... 27
8.12.1 Shut down ................................................................................................................. 27
8.12.2 Shut down Forcedly .................................................................................................. 27
8.12.3 Sleep Manually .......................................................................................................... 27
8.12.4 Sleep Automacally .................................................................................................. 27
8.12.5 Wake up .................................................................................................................... 27
Appendix A.
Communicaon Matrix and Device Command ...................................................... 28
Body Camera User Manual
xiii

Chapter 1 Product Introducon
1.1 Introducon
Body camera (hereinaer referred to as device) highly integrates with record, taping, capture,
posioning, etc. It is embedded with posioning module with high sensivity to locate the
occurring posion of events accurately. It can record the process and condion of events
completely via record, taping, and capture. You can also tag the important data for future search.
It is small and light, convenient to carry, and can be worn on the shoulder, sasfying the
requirement of mobile duty and evidence record for single person. It is widely applicable to public
security
protecon, city management, industry and commerce, etc.
1.2 Key Feature
●
Supports record, taping, capture, etc. Capture is available during recording.
●
Supports H.264/H.265 video encoding compression technology, and can save network
transmission bandwidth and storage space.
●
The recorded videos can be uploaded to the central video
plaorm via mobile wireless
communicaon.
●
Embedded with posioning module with high sensivity to locate the occurring posion of
events accurately. Supports GPS, Beidou, and GPS+Beidou. The
locaon informaon can be
uploaded to the command center in real me.
●
Supports IR night vision. Even in the dark scene, the facial features of the persons in the scene
can be recognized clearly.
●
Supports group talk.
●
Tri-proof design to support all-weather
led operaon.
●
Built-in baery with large capacity, supporng longer working hour.
●
Supports mechanical
stabilizaon.
●
Small size, light weight, and convenient to carry.
Note
Funcons vary with dierent models. The actual device prevails.
1.3 Default Informaon
The default informaon of the device is shown as below.
●
Default user name (administrator): admin
●
Default password: 123456
Body Camera User Manual
1

Cauon
For your data safety, change the device password in me.
Body Camera User Manual
2
Chapter 2 Startup and Main Menu
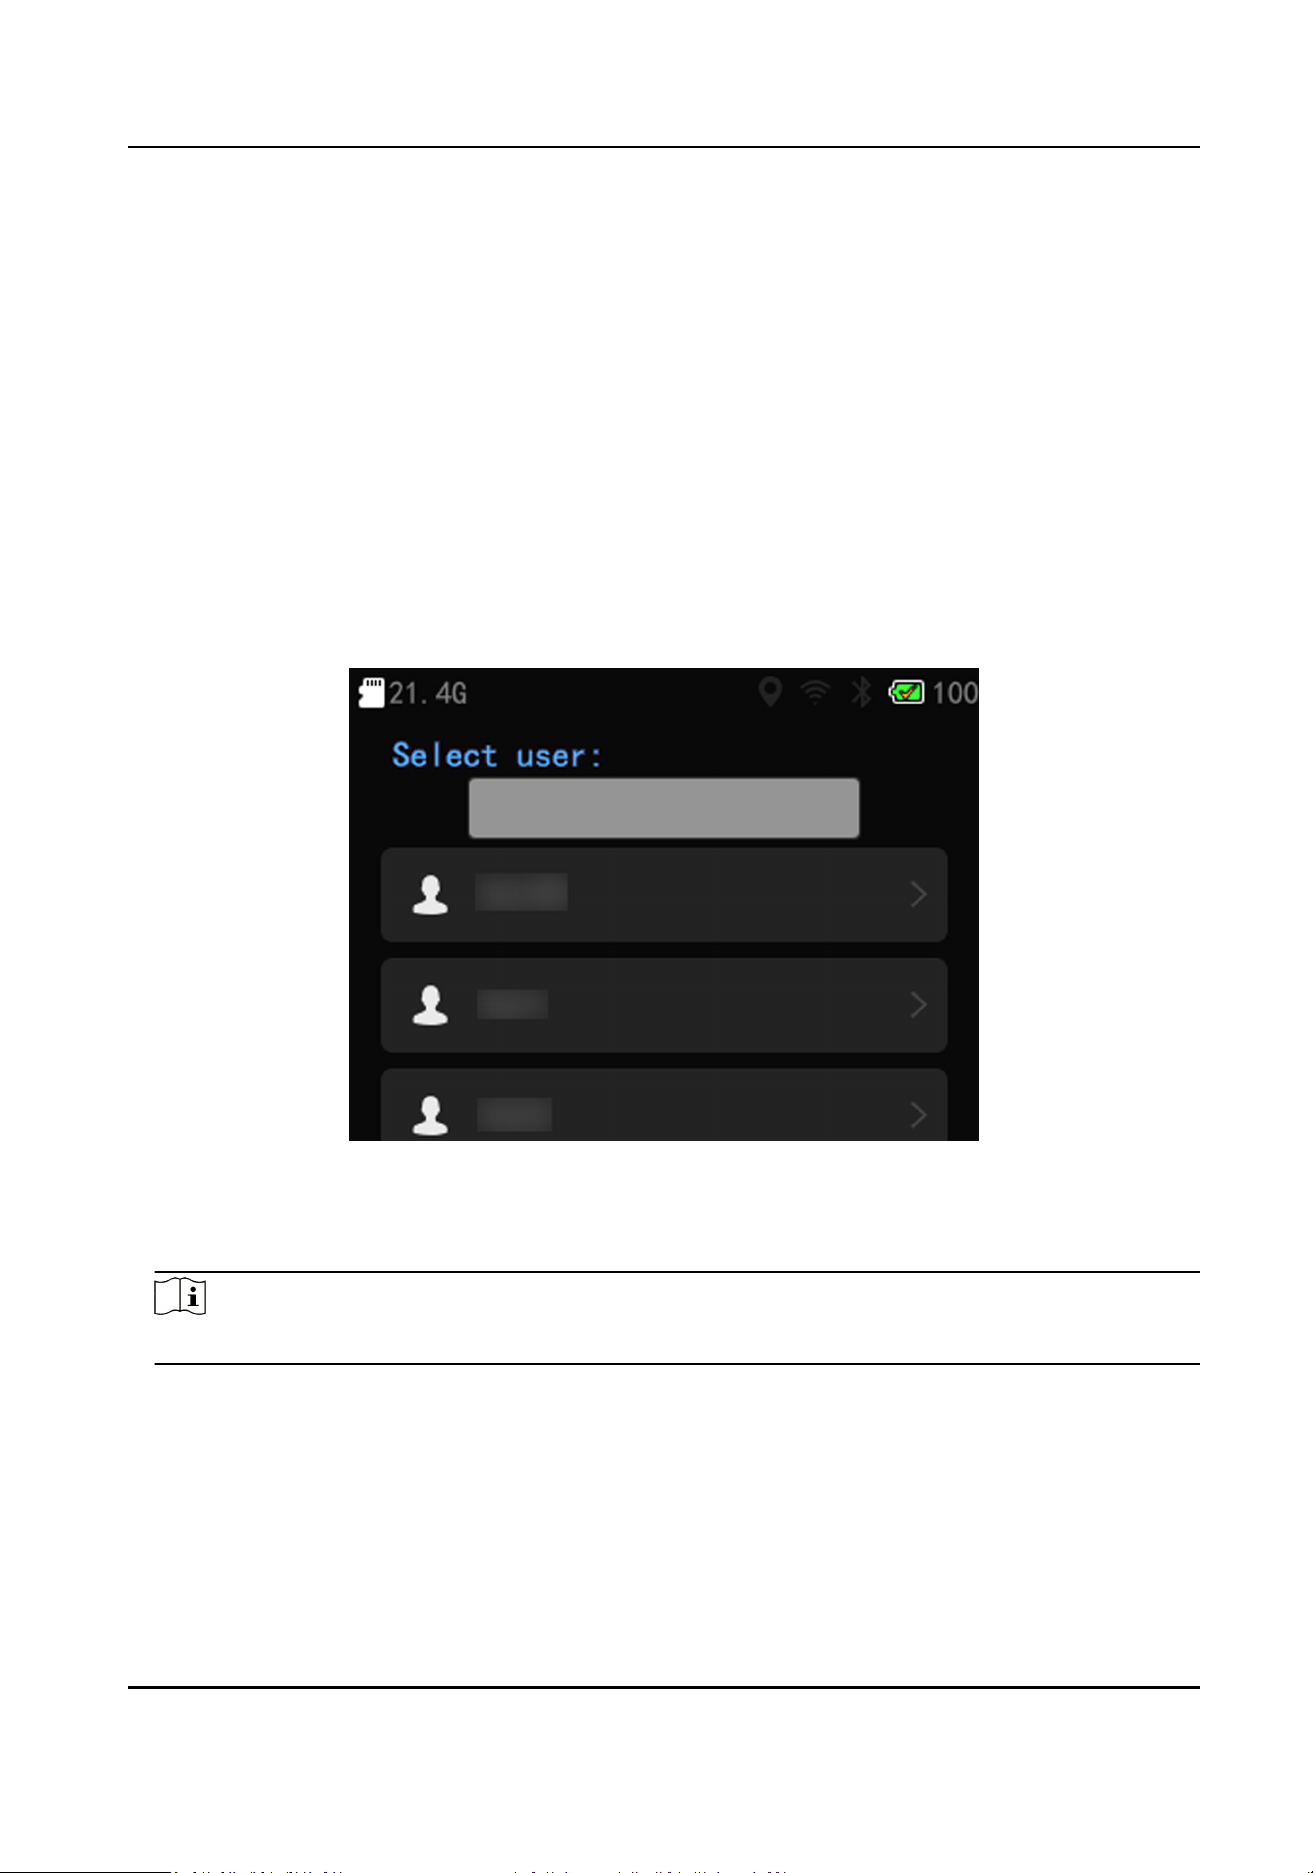
2.1 Login
Mulple users issued by the dock staon or the plaorm can log in to the device. The logged user
can view all the videos, audios, and pictures of all the users.
Before You Start
Set mulple users via the dock staon or the plaorm. Refer to the user manual of the dock staon
or the plaorm for details.
Steps
1.
Start up the device to enter the login page.
Figure 2-1 Login Page
2.
Select the user.
3.
Oponal: If there are mulple users, you can enter the key words of the user name to search.
Note
You can search the user only when there are more than 20 users.
4.
Enter the password of the user.
2.2 Startup
When the device is o, hold the startup/shutdown buon on the device side to start it up. Then
you will enter the following page.
Body Camera User Manual
3
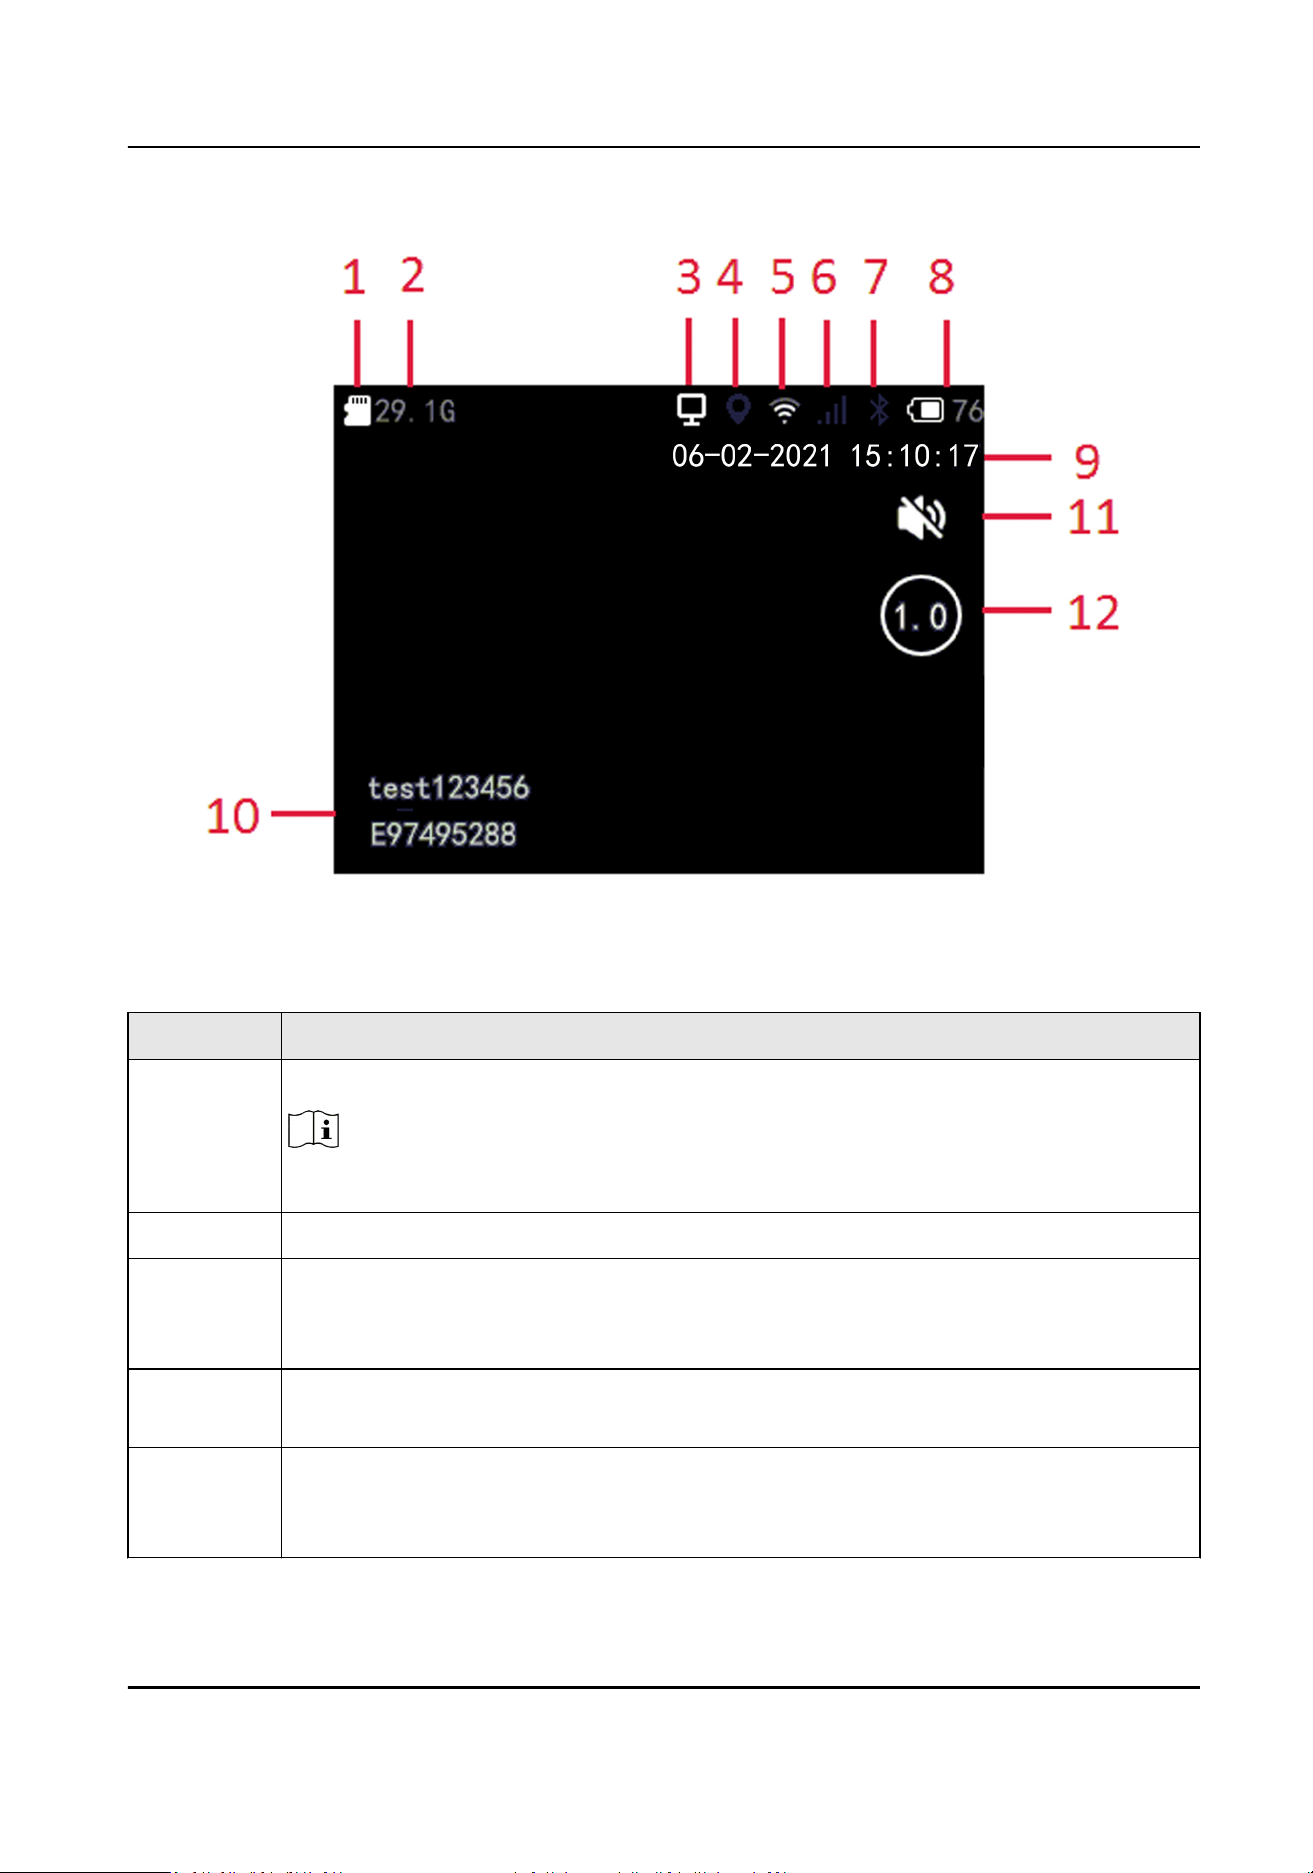
Figure 2-2 Startup Page
Table 2-1 Startup Page
Descripon
No. Descripon
1 The TF card status.
Note
If the TF card is abnormal, there will be an exclamaon mark on the icon.
2 The available memory.
3 Plaorm connecon status: If the device is not connected to the plaorm, or the
connecon fails, the icon will not display. Aer the device is connected to the
plaorm, the icon changes to white.
4 Posioning status: If posioning is not enabled, or is enabled but fails, the icon is
gray. Aer posioning is enabled and succeeds, the icon changes to white.
5 Wi-Fi connecon status: If the device is not connected to Wi-Fi, or the connecon
fails, the icon is gray. Aer the device is connected to Wi-Fi, the icon changes to
white.
Body Camera User Manual
4
No. Descripon
6 Dial connecon status: If the device is not connected to the mobile network or the
connecon fails, the icon is gray. Aer the device is connected to the mobile
network, the icon changes to white.
7 Bluetooth connecon status: If the device is not connected to the bluetooth device,
or the connecon fails, the icon is gray. Aer the device is connected to the
bluetooth device, the icon changes to white.
8 The baery status and remaining baery.
9 The current date and me.
10 The device ID and user ID.
11 Mute. If the system volume is not 0, the icon will not display. If the system volume
is 0, the icon will display.
12 The zooming mulple. For devices with touch screens, you can tap the icon to
adjust the zooming mulple. For devices without touch screens, you can press the
arrow keys below the screens to adjust the zooming mulple.
2.3 Main Menu
Aer the device starts up, it will enter the live view page automacally. Tap or press the main
menu buon below the screen to enter the main menu. The descripon of the main menu is
shown as the table below.
Note
The main menu varies with dierent devices. The actual device prevails.
Table 2-2 Main Menu Descripon
Menu Descripon
File Select it to view the videos, audios, and pictures saved in the device.
GroupTalk Select it to set group intercom parameters and join the group intercom.
Set Select it to set camera, network and system.
Note
If you have enabled Menu Vericaon or Playback Vericaon, you need to enter the device
password when you enter the main menu or File page. Please operate according to the prompt.
Body Camera User Manual
5

Chapter 3 Storage, Playback, and Backup
3.1 Storage
The recorded videos, taped audios, and captured pictures will be stored in the device.
3.1.1 Release Storage Capacity
When the storage capacity is full, you can back up the device data to the computer rst, and then
release the storage capacity.
Steps
1.
Back up
les via USB mode. Refer to "Backup" for details.
2.
Delete the
les backed up under DCIM folder to release the storage capacity.
3.1.2 Record
You can record videos via the device.
Steps
1.
Aer the device starts up, press the recording buon.
Aer the recording starts, the ashing red point and recorded me will appear on the upper le
corner of the live view page, and the remaining available recording me will appear on the
lower right corner of the live view page.
Note
The recording buon varies with dierent devices. The actual device prevails.
2.
Press the recording buon again to stop recording.
3.
Oponal: Select File on the main menu to view the recorded videos.
Note
●
If you want to record a period of me before recording starts, select Set → Camera → Record
Param. → Pre-Record to set pre-record.
●
If you want to record a period of me aer recording ends, select Set → Camera → Record
Param. → Post-Record to set post-record.
3.1.3 Tape
You can tape audios via the device.
Body Camera User Manual
6

Steps
1.
Aer the device starts up, press the taping buon.
Aer the taping starts, the ashing white taping icon and taped me will appear on the upper
le corner of the live view page, and the TF card status and available memory will appear on the
lower right corner of the live view page.
Note
The taping buon varies with dierent devices. The actual device prevails.
2.
Press the taping buon again to stop taping.
3.
Oponal: Select File on the main menu to view the taped audios.
3.1.4 Capture
You can capture pictures via the device.
Steps
1.
Aer the device starts up, press the capture buon.
The device captures a picture.
Note
The capture buon varies with dierent devices. The actual device prevails.
2.
Oponal: Select File on the main menu to view the captured pictures.
3.2 Playback
You can play back videos, audios, and pictures via the device.
Steps
1.
Select File on the main menu.
2.
Select Video, Picture, or Audio.
3.
Select the
le to play or view from the le list.
3.3 Backup
You can switch the device as a USB ash disk and export les to your computer.
Before You Start
Connect the device to the computer via data cable.
Steps
1.
Switch the device to USB mode. Refer to "Switch USB Mode" for details.
2.
Copy the data of the device to the computer.
Body Camera User Manual
7

Note
You can only play the backed up video or audio les via Hikvision player or other players with
Hikvision play plugin.
●
Hikvision Player: If you select Hikvision player to play the les, visit Hikvision ocial website to
download VSPlayer and install it.
●
Hikvision Play Plugin: If you select other players to play the les, visit Hikvision ocial website
to download MFPlugins and install it.
3.4 Set Tag
3.4.1 Set Tag During Recording
Touch-Screen Devices
During recording, press the tag buon to set a tag for the current video. The icon will appear on
the upper
le corner of the live view page. Hold the tag buon again to cancel the tag.
Non-Touch Screen Devices
During recording, hold the OK buon below the screen to set a tag for the current video. The icon
will appear on the upper le corner of the live view page. Hold the OK buon again to cancel
the tag.
Note
The tag buon varies with dierent devices. The actual device prevails.
3.4.2 Set Tag Aer Recording, Taping, or Capturing
Touch-Screen Devices
You can set a tag in two ways:
●
Aer recording, tap File → Video to enter the le folder named aer recording date, and select a
video to play. During playing, tap anywhere on the screen, and then tap
to set a tag for the
current video. Tap the icon again to cancel the tag.
●
Aer recording, taping, or capturing, tap File, and select a certain le from the video, audio, or
picture le list. Hold the folder name to set a tag. The name of the tagged le will be displayed
as red. Hold the le name again to cancel the tag.
Body Camera User Manual
8

Non-Touch Screen Devices
Aer recording, taping, or capture, select File, and select a certain le from the video, audio, or
picture le list. Hold the OK buon to set a tag. The name of the tagged le will be displayed as
red. Hold the OK
buon again to cancel the tag.
Body Camera User Manual
9

Chapter 4 Alarm Sengs
4.1 Set Auto Alarm
The device will detect the storage capacity and baery automacally. When the storage capacity is
full or the baery is low, corresponding prompt will pop up on the live view page to send the auto
alarm. Back up the les and release the storage capacity in me when the storage capacity is full.
Charge the device in me when the device is in low power.
4.2 Set Manual Alarm
In emergency, press the alarm buon on the device side to send the alarm signal to the connected
plaorm.
Note
●
Connect the device to the plaorm rst. Then the alarm signal can be sent.
●
The alarm buon varies with dierent devices. The actual device prevails.
Body Camera User Manual
10

Chapter 5 Network Sengs
5.1 Dial
You can connect the device to the network via SIM card dialing.
Before You Start
Install the SIM card.
Steps
1.
Enable Dial via the below operaons.
Touch-screen
devices
●
Swipe the screen down to open the nocaon center. Tap to enable
dialing.
●
On the main menu, tap Set → Network → Dial to enable Dial.
Non-touch
screen devices
On the main menu, select Set → Network → Dial to enable Dial.
2.
Select Set → Network → Dial → APN to set APN parameters.
Note
Contact the service supplier to get the APN informaon.
3.
Oponal: You can do the below operaons.
View the dial
informaon
Select Set → Network → Dial → Dial Informaon to view the dial
informaon.
View the APN
informaon
Select Set → Network → Dial → APN Informaon to view the APN
informaon.
Result
The white dial icon appears on the status bar, indicang dialing succeeded.
5.2 Connect to Wi-Fi
Set Wi-Fi parameters if you want to connect the device to the network via Wi-Fi.
Steps
1.
Enable the Wi-Fi via the below operaons.
Touch-screen
devices
●
Swipe the screen down to open the nocaon center. Tap to enable
the Wi-Fi.
●
On the main menu, tap Set → Network → Wi-Fi to enable Wi-Fi.
Non-touch
screen devices
On the main menu, select Set → Network → Wi-Fi to enable Wi-Fi.
Body Camera User Manual
11

2.
Select Refresh to search available Wi-Fi.
3.
Select the Wi-Fi to connect, and enter the password.
4.
Oponal: You can do the below operaons.
View the connected Wi-Fi
informaon
Select the connected Wi-Fi to view the informaon.
Set the stac Wi-Fi a. Select Stac Wi-Fi.
b. Enable Connect Stac Wi-Fi.
c. Select Set Stac Wi-Fi to set IP, Mask, and other
parameters.
Result
The white Wi-Fi connecon icon appears on the status bar, indicang the Wi-Fi is connected.
What to do next
For devices with touch screens, you can swipe the screen down
aer the rst successful
connecon, and tap the Wi-Fi icon on the nocaon bar to enable or disenable the Wi-Fi.
5.3 Connect to Bluetooth Headsets
The device can connect to the bluetooth headsets.
Before You Start
Prepare the bluetooth headsets.
Steps
1.
Enable the bluetooth via the below operaons.
Touch-screen
devices
●
Swipe the screen down to open the nocaon center. Tap to enable
the bluetooth.
●
On the main menu, tap Set → Network → Bluetooth to enable
Bluetooth.
Non-touch
screen devices
On the main menu, select Set → Network → Bluetooth to enable
Bluetooth.
2.
Select Refresh to search the nearby bluetooth devices.
3.
Select the bluetooth headsets from the searched list.
4.
Oponal: Select the connected bluetooth device to view the bluetooth informaon.
Result
The white bluetooth icon appears on the status bar, indicang the bluetooth headsets are
connected.
Body Camera User Manual
12

5.4 Connect to Plaorm
5.4.1 Connect to EHome Plaorm
EHome is the plaorm access protocol. You can log in to the device via the plaorm to realize live
view, data management, and so on.
Before You Start
Set the connected
plaorm. Refer to the plaorm user manual for details. Ensure the device can
communicate with the plaorm normally.
Steps
1.
Select Set → Network → EHome
Plaorm .
2.
Enable Plaorm Connecon.
Note
Aer enabling plaorm connecon, reboot the device to take the new sengs into eect.
3.
Select Plaorm to set Address, ID, and other parameters.
Note
The device ID should be the same as the ID set on the plaorm.
4.
Oponal: You can do the below operaons.
Enable Force Sub-Stream
Enable Force Sub-Stream to force the plaorm only to transmit
via the sub-stream.
Enable Pic. Auto Upload Enable Pic. Auto Upload, and the captured pictures will be
automacally uploaded to the plaorm.
View the plaorm
informaon
Select Plaorm Informaon to view the informaon.
5.4.2 Connect to ISUP Plaorm
ISUP is the plaorm access protocol. You can log in to the device via the plaorm to realize live
view, data management, and so on.
Before You Start
Set the connected plaorm. Refer to the plaorm user manual for details. Ensure the device can
communicate with the
plaorm normally.
Steps
1.
Select Set → Network → ISUP .
2.
Enable ISUP Connecon.
Body Camera User Manual
13

Note
Aer enabling plaorm connecon, reboot the device to take the new sengs into eect.
3.
Select ISUP to set IP, Port, and other parameters.
Note
The device ID should be the same as the ID set on the plaorm.
4.
Oponal: You can do the below operaons.
Enable Force Sub-Stream Enable Force Sub-Stream to force the plaorm only to
transmit via the sub-stream.
View the plaorm
informaon
Select ISUP Informaon to view the informaon.
5.5 Upload to FTP
You can upload the video, audio, and picture les stored in the device to the FTP server.
Before You Start
Allocate the FTP server, and ensure the device can communicate normally with the server network.
Steps
1.
Select Set → Network → FTP .
2.
Enable FTP.
3.
Select FTP to set the FTP server parameters.
4.
Enable Video Upload, Pic. Upload or Audio Upload according to your needs.
5.
Oponal: You can do the below operaons.
Automacally
delete local
les
Enable FTP Upload Delete, and the local les will be
automacally deleted aer uploaded to the FTP server.
View the le upload status Select FTP Informaon to view the le upload status.
Body Camera User Manual
14
Chapter 6 Group Intercom
You can realize group intercom via the device.
Before You Start
●
The device is connected to the plaorm.
●
Register the device on the group intercom service conguraon interface via the web browser.
Steps
1.
Select GroupTalk on the main menu.
2.
Set
plaorm parameters.
1) Select Plaorm.
2) Select Group Intercom to choose group intercom mode.
3) Set IP Address, Port, and other parameters.
3.
Go back to the login page, enter the registered User Name and Password on the group intercom
service
conguraon interface, and select Login.
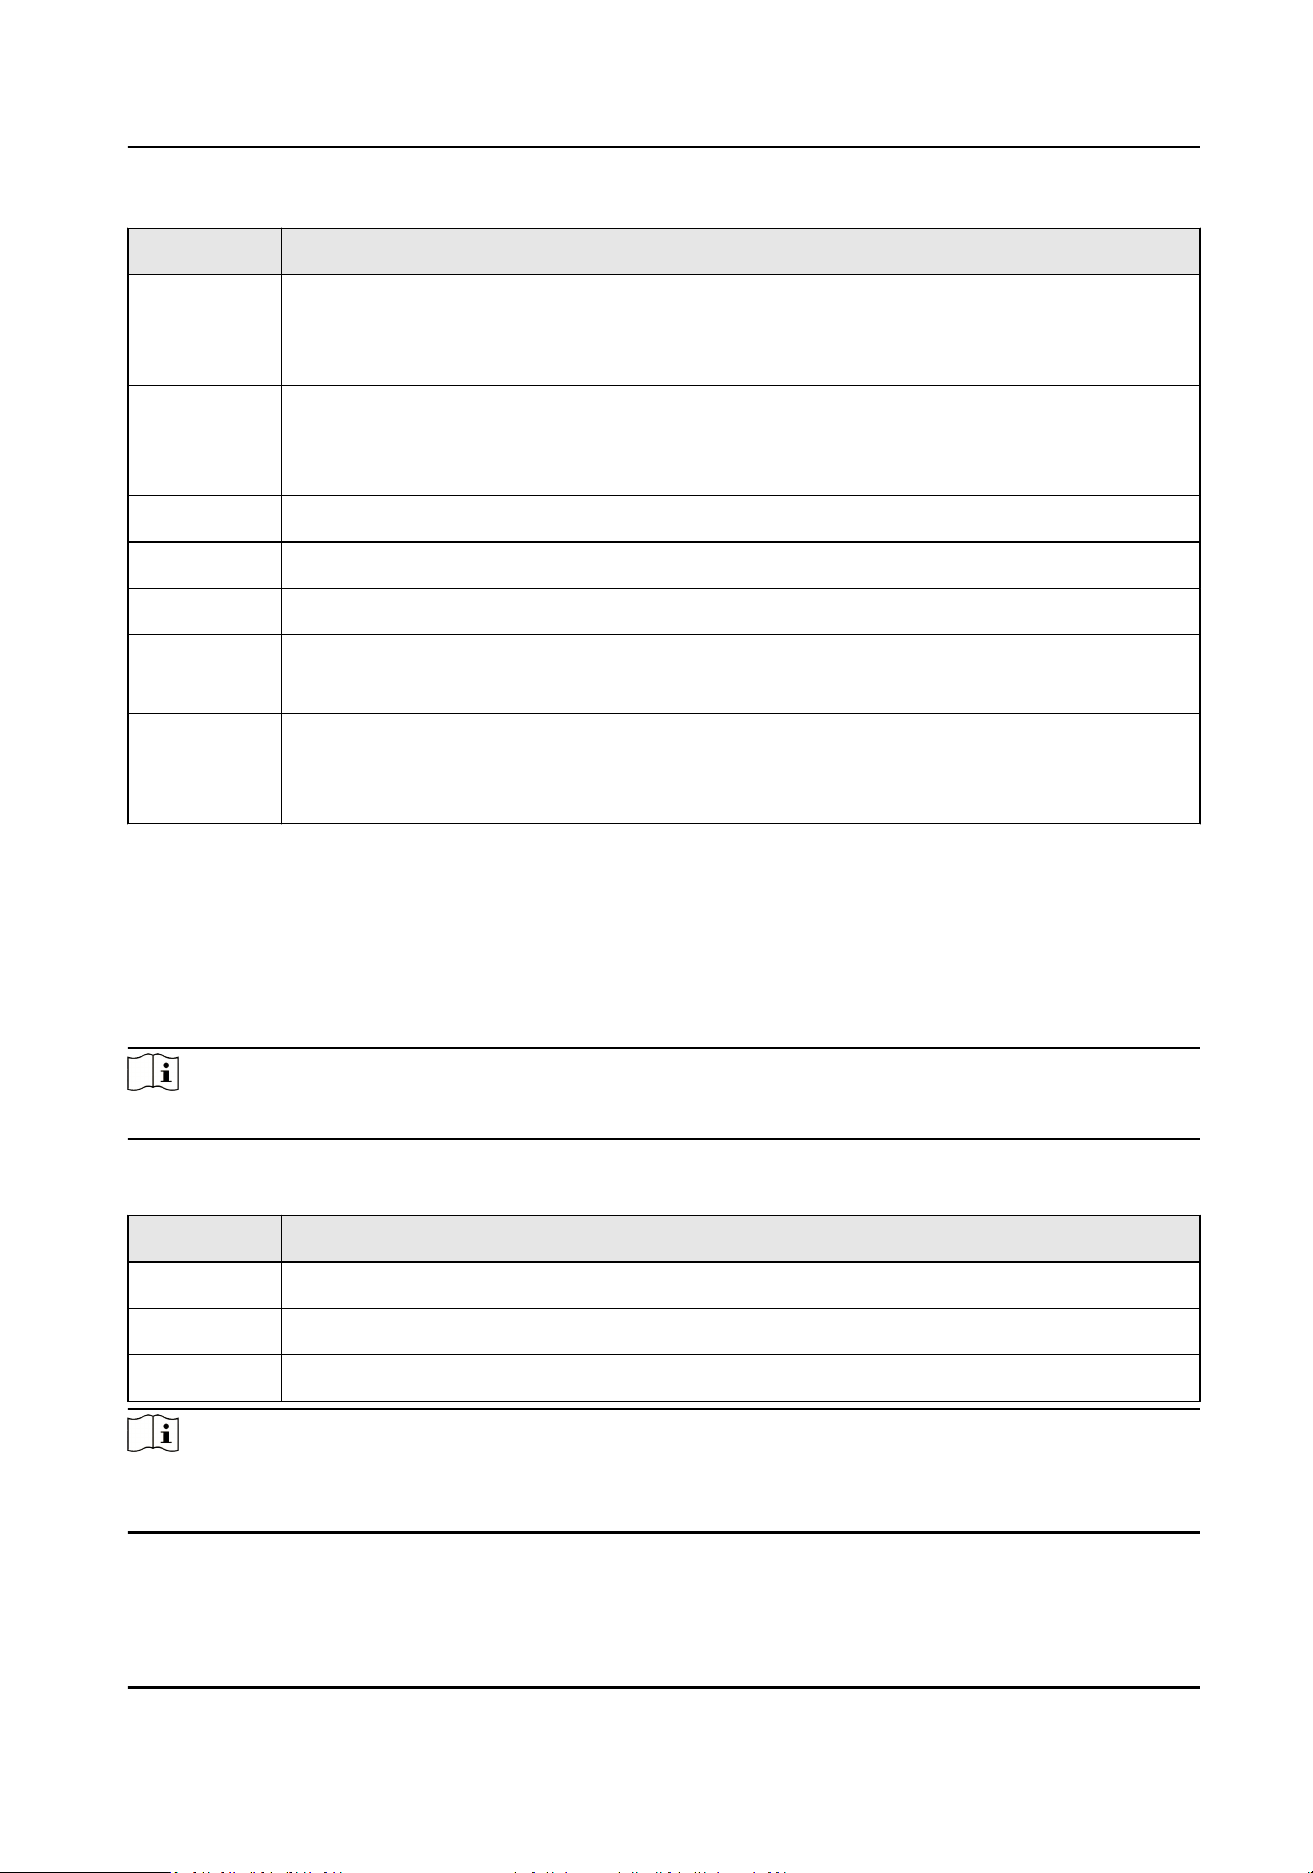
Aer login, you will enter Group List page. The device will show the group list which is managed
by the central plaorm automacally.
Figure 6-1 Group List
4.
Select a group to view group members and status.
5.
You can do the below operaons.
Set current group
On Group Member page, select Set now group., and select OK. Then,
you can see the red Now group yet. prompt.
Make an audio
call
On Group Member page, select an online member, and select Audio Call
to make a full-duplex audio call. Aer the member received, you can
Body Camera User Manual
15

start the audio call. Aer the call is over, you can select Hang Up to end
the audio call.
Receive/hang up
the audio call
When the other member in the group makes an audio call to you, you
can select to receive the audio call, or you can select to hang up.
Switch the
intercogroup
●
When the plaorm sends an ordinary invitaon to join the intercom
group, you can select Yes on the popup window to join the intercom
group, or select No to not join the intercom group.
●
When the
plaorm sends a mandatory invitaon to join the intercom
group, the device will switch the intercom group
automacally, and
the user will directly join the intercom group.
6.
Oponal: On Group List page, select Exit to exit the group intercom.
Body Camera User Manual
16

Chapter 7 System Sengs
7.1 Set Posioning
You can set posioning to locate the posion of the device.
Before You Start
Disable the serial port mode.
Steps
1.
Enable posioning via the below operaons.
Touch-screen
devices
●
Swipe the screen down to open the nocaon center. Tap to enable
the posioning.
●
On the main menu, tap Set → Network → Posioning → Posioning to
select the
posioning mode.
Non-touch
screen devices
On the main menu, select Set → Network → Posioning → Posioning to
select the posioning mode.
2.
Oponal: Select Set → Network → Posioning → GPS Overlay to enable GPS overlay.
The posioning informaon will be overlaid on the live view image.
Result
The white posioning icon appears on the status bar, indicang posioning succeeded.
7.2 Enable Indicator
Enable indicator to indicate the device status.
Steps
1.
Select Set → System .
2.
Enable Led.
Note
Refer to Quick Start Guide for the indicator status and colors.
7.3 Enable IR Light
You can enable IR light to supplement light for record at night or in dim environment.
Steps
1.
Select Set → Camera → Infrared .
2.
Select On, Auto, or O according to your needs.
Body Camera User Manual
17

Auto
IR light will be enabled only when the environment is dim and recording or remote live view
starts.
On
No maer how the environment light is, once you start recording, IR light will be enabled.
7.4 Set System Sound
Touch-Screen Devices
Swipe the screen down to open the nocaon center. Set system sound at . When the sound is
decreased to mute, the icon will display on the live view page.
Non-Touch Screen Devices
On the live view page, press the up buon below the screen to increase the sound, and press the
down buon to decrease the sound. When the sound is decreased to mute, the icon will display
on the live view page.
7.5 Set Screen Brightness
Note
This funcon is only for touch-screen devices.
Swipe the screen down to open the nocaon center. Set screen brightness at .
7.6 Set Voice Prompt
You can enable or disable the voice prompt when you start/stop recording/taping.
Steps
1.
Select Set → System .
2.
Enable or disable Voice Prompt according to your needs.
Result
If you enable the funcon, there will be voice prompt when you start/stop recording/taping.
Body Camera User Manual
18

7.7 Set Encoding Parameters
7.7.1 Set Video Encoding Type
The video encoding type will aect the quality of live view, videos, and captured pictures.
Steps
1.
Select Set → Camera → Encode Type .
2.
Select the video encoding type.
Note
Video bitrate varies with dierent encoding types. Please select according to your needs. H.265
is a new encoding technology. Compared with H.264, it reduces the transmission bitrate under
the same resoluon, frame rate, and image quality.
What to do next
Reboot the device to take the new
sengs into eect.
7.7.2 Set Video Stream Parameters
You can set the video stream parameters when recording.
Steps
1.
Select Set → Camera → Record Param.
2.
Set the parameters below.
Video
Resoluon
The higher the resoluon is, the clearer the image will be. Meanwhile, the network
bandwidth requirement is higher.
Bitrate
Select
relavely large bitrate if you need good image quality and eect, but more storage
spaces will be consumed. Select relavely small bitrate if storage requirement is in priority.
Frame Rate
It is to describe the frequency at which the video stream is updated and it is measured by
frames per second (fps).
Video Clip
The max. recording
duraon of each video.
Video Format
Select PS, and the video les will be packed in PS format. You need to use Hikvision player to
play the les. Visit Hikvision ocial website to download VSPlayer and install it.
Body Camera User Manual
19

Select MP4, and the video les will be packed in MP4 format. You can play the les via the
Windows player or Hikvision player to play the les. Visit Hikvision ocial website to
download VSPlayer and install it.
What to do next
Reboot the device to take the new
sengs into eect.
7.7.3 Set Network Stream Parameters
You can set the network stream parameters when previewing the device via plaorm.
Steps
1.
Select Set → Camera → Net Trans. Param.
2.
Set the parameters below.
Net
Resoluon
The higher the resoluon is, the clearer the image will be. Meanwhile, the network
bandwidth requirement is higher.
Net Bitrate
Select
relavely large bitrate if you need good image quality and eect, but more storage
spaces will be consumed. Select relavely small bitrate if storage requirement is in priority.
Net Frame Rate
It is to describe the frequency at which the video stream is updated and it is measured by
frames per second (fps).
Network Stream
Select transmit video stream or mixed stream.
7.7.4 Set Audio Encoding Type
The audio encoding type will aect the quality of audio.
Steps
1.
Select Set → Camera → Intercom Audio .
2.
Select audio encoding type according to your needs.
What to do next
Reboot the device to take the new sengs into eect.
7.8 Set Capture Parameters
You can set the captured picture resoluon.
Body Camera User Manual
20

Steps
1.
Select Set → Camera → Picture Quality .
2.
Select the picture resoluon.
7.9 Set Mul-Line OSD
You can set the overlay informaon on the videos and pictures.
Steps
1.
Select Set → Camera → Mul-Line OSD .
2.
Enable
Mul-Line OSD.
3.
Select OSD to set OSD informaon.
Result
The OSD informaon will be overlaid on the videos and pictures.
7.10 Set Pre-Record
You can set the me to record before the recording start me.
Steps
1.
Select Set → Camera → Record Param. → Pre-Record .
2.
Select the pre-record duraon.
7.11 Set Post-Record
You can set the me to record aer the recording end me.
Steps
1.
Select Set → Camera → Record Param. → Post-Record .
2.
Select the post-record
duraon.
7.12 Set
Overwrien Record
You can enable overwrien record to keep recording when the available memory is insucient,
and the former recorded videos will be overwrien.
Steps
Cauon
If you enable overwrien record, back up the important data in me, or they will be overwrien.
1.
Select Set → Camera → Record Param.
Body Camera User Manual
21

2.
Enable Overwrite.
3.
Enter the device password.
Result
When the available memory is less then 150 MB, delete video les without a tag unl the available
memory is larger than 1 GB.
7.13 Set Record once On
The device will start recording when startup aer the funcon is enabled.
Steps
1.
Select Set → Camera → Record Param.
2.
Enable or disable Record once On.
7.14 Set PTZ Control
For the device supports video stabilizaon lens, you can select the stabilizaon mode and calibrate
the device.
Steps
Note
This funcon is only for the device supporng video stabilizaon lens.
1.
Select Set → Camera → PTZ Control → Stable Mode .
2.
Select the stabilizaon mode.
Horizontal
In this mode, the lens keeps horizontal and forward. The shakes in the pan and
lt direcons
will be corrected.
FPV
In this mode, the shakes in the pan direcon will be corrected. The shakes in the lt direcon
will not be corrected and kept in the central posion.
3.
Select Camera → PTZ Control → Parameter Calibraon .
4.
Place the device on a horizontal surface and keep it
stac, and select OK on the popup window.
5.
Wait unl the calibraon completes, and select OK.
7.15 Set Quick Charging Mode
You can enable or disable quick charging mode.
Body Camera User Manual
22

Steps
1.
Select Set → System → Power Supply .
2.
Enable or disable Quick Charging Mode according to your needs.
-
Enable the quick charging mode, and all the power consuming
funcons, such as network,
record,
posioning, etc., will be disabled automacally. The fully-charged duraon will be
shorten.
-
Disable the quick charging mode, and the device can be operated normally while being
charged. The fully-charged duraon will be longer than the quick charging mode.
7.16 Switch USB Mode
You can switch the device to USB mode to import or export data.
Before You Start
Connect the device to the computer via a data cable.
Steps
1.
Select Set → System .
2.
Enable Auto USB Mode.
3.
Enter the device password.
7.17 Set Read-Only USB Mode
Aer switching to the USB mode, you can set the video, audio, and picture les to be copied to the
computer only, but cannot be deleted locally.
Steps
1.
Select Set → System .
2.
Enable or disable Readonly USB Mode.
-
Enable the read-only USB mode, and aer switching to the USB mode, the video, audio, and
picture
les can only be copied to the computer, but cannot be deleted locally.
-
Disable the read-only USB mode, and
aer switching to USB mode, the video, audio, and
picture
les can both be copied or cut.
Body Camera User Manual
23

Chapter 8 Maintenance
8.1 View System Informaon
Select Set → System → System → System Informaon to view the system informaon such as
model, serial No., soware version, etc.
8.2 View Device Informaon
Select Set → System → Device Informaon to view device informaon such as person ID, device
ID, etc.
8.3 View
Baery Informaon
Select Set → System → Power Supply → Baery Informaon to view the baery power and
status.
8.4 Enable Password
You can enable password vericaon for playback, entering main menu, and shutdown.
Steps
Note
It is recommended to enable password for data security.
1.
Select Set → System → PWD Vericaon .
2.
Enable or disable Playback Vericaon, Menu Vericaon, and Shutdown Vericaon
according to your needs.
3.
Enter the device password.
8.5 Edit Password
It is recommended to edit device password regularly to raise data security.
Steps
1.
Select Set → System → PWD
Vericaon → Change Password .
2.
Enter the old password and new password, and conrm the new password.
3.
Select Save.
Body Camera User Manual
24

What to do next
Next me you log in to the device, use the new password.
8.6 Upgrade
You can upgrade the device version.
Before You Start
●
Import the upgrade le to the root directory of the device storage media.
●
Ensure the device
baery power is larger than 20%.
Steps
1.
Select Set → System → System → System Update .
2.
Enter the device password.
3.
Select OK.
Result
The device starts to upgrade.
Aer upgrade nishes, the device will reboot automacally.
8.7 Export Debug Log
You can export the device debug log to view the log informaon.
Steps
1.
Select Set → System → System → System Informaon .
2.
Enter the debug log page.
Touch-screen devices
Tap the OK buon below the screen 3 mes connuously.
Non-touch screen devices Press the OK buon below the screen 3 mes connuously.
3.
Enable Debug Log.
Result
The debug log will be
automacally exported to the debuglog directory of the device storage
media. You can switch to USB mode to view the log.
Note
If the debug log is not disabled manually aer enabled, it will be automacally disabled aer the
device works for 7 days by default.
8.8 Set Serial Port Debug
Aer enabling debug log, you can enable serial port mode to debug the device.
Body Camera User Manual
25

Steps
Note
Aer the serial port mode is enabled, the posioning will be not available.
1.
Select Set → System .
2.
Enable Serial Port Mode.
What to do next
Reboot the device to take the new sengs into eect.
8.9 Set Satellite Time Synchronizaon
You can synchronize the device me with the satellite me when the device me is not accurate.
Before You Start
Posioning has been enabled, and posioning succeeded.
Steps
1.
Select Set → Network →
Posioning .
2.
Enable Satellite Time Sync.
8.10 Restore Basic
Sengs
If there is device excepon due to the wrong set parameters, you can restore the basic sengs.
Steps
1.
Select Set → System → System → Restore basic sengs .
2.
Enter the device password.
3.
Select OK on the popup window.
Result
The device will reboot
automacally. The parameters except the network parameters, bluetooth,
device password, etc. will be restored to the factory sengs.
8.11 Restore Factory
Sengs
If there is device excepon due to the wrong set parameters, you can restore factory sengs.
Steps
1.
Select Set → System → System → Restore Factory Param.
2.
Enter the device password.
3.
Select OK on the popup window.
Body Camera User Manual
26

Result
The device will reboot automacally. All the parameters will be restored to the factory sengs,
and the mul-users informaon will be cleared.
8.12 Shut down and Sleep
8.12.1 Shut down
Aer the device starts up, hold the startup/shutdown buon on the device side to shut it down.
8.12.2 Shut down Forcedly
If the device cannot be shut down normally, you can hold the startup/shutdown buon on the
device side for 15 seconds to shut it down forcedly.
8.12.3 Sleep Manually
Aer the device starts up, press the startup/shutdown buon on the device side to sleep the
device.
8.12.4 Sleep
Automacally
You can set the device to sleep automacally to save power if there is no operaon within a certain
me.
Steps
1.
Select Set → System → Power Supply → Auto-Lock .
2.
Select
me.
Note
If you select OFF, the screen will always on no maer if there is operaon or not.
Result
If no operaon is done within the set me, the device will sleep automacally.
8.12.5 Wake up
When the device is sleeping, you can press any buon except the alarm buon and the buons
below the screen to wake it up.
Body Camera User Manual
27
Appendix A. Communicaon Matrix and Device
Command
Scan the QR code below to get the
communicaon matrix of the device.
Scan the QR code below to get the device command.
Body Camera User Manual
28

UD25205B