Body Camera
User Manual

Legal Informaon
About this Document
●
This Document includes instrucons for using and managing the Product. Pictures, charts,
images and all other
informaon hereinaer are for descripon and explanaon only.
●
The
informaon contained in the Document is subject to change, without noce, due to
rmware updates or other reasons. Please nd the latest version of the Document at the
Hikvision website ( hps://www.hikvision.com ). Unless otherwise agreed, Hangzhou Hikvision
Digital Technology Co., Ltd. or its aliates (hereinaer referred to as "Hikvision") makes no
warranes, express or implied.
●
Please use the Document with the guidance and assistance of professionals trained in
supporng the Product.
About this Product
●
This product can only enjoy the aer-sales service support in the country or region where the
purchase is made.
●
If the product you choose is a video product, please scan the following QR code to obtain the
"Iniaves on the Use of Video Products", and read it carefully.
Acknowledgment of Intellectual Property Rights
●
Hikvision owns the copyrights and/or patents related to the technology embodied in the
Products described in this Document, which may include licenses obtained from third pares.
●
Any part of the Document, including text, pictures, graphics, etc., belongs to Hikvision. No part
of this Document may be excerpted, copied, translated, or modied in whole or in part by any
means without
wrien permission.
●
and other Hikvision’s trademarks and logos are the properes of Hikvision in
various
jurisdicons.
●
Other trademarks and logos menoned are the properes of their respecve owners.
LEGAL DISCLAIMER
●
TO THE MAXIMUM EXTENT PERMITTED BY APPLICABLE LAW, THIS DOCUMENT AND THE
PRODUCT DESCRIBED, WITH ITS HARDWARE, SOFTWARE AND FIRMWARE, ARE PROVIDED "AS
IS" AND "WITH ALL FAULTS AND ERRORS". HIKVISION MAKES NO WARRANTIES, EXPRESS OR
Body Camera User Manual
i

IMPLIED, INCLUDING WITHOUT LIMITATION, MERCHANTABILITY, SATISFACTORY QUALITY, OR
FITNESS FOR A PARTICULAR PURPOSE. THE USE OF THE PRODUCT BY YOU IS AT YOUR OWN RISK.
IN NO EVENT WILL HIKVISION BE LIABLE TO YOU FOR ANY SPECIAL, CONSEQUENTIAL,
INCIDENTAL, OR INDIRECT DAMAGES, INCLUDING, AMONG OTHERS, DAMAGES FOR LOSS OF
BUSINESS PROFITS, BUSINESS INTERRUPTION, OR LOSS OF DATA, CORRUPTION OF SYSTEMS, OR
LOSS OF DOCUMENTATION, WHETHER BASED ON BREACH OF CONTRACT, TORT (INCLUDING
NEGLIGENCE), PRODUCT LIABILITY, OR OTHERWISE, IN CONNECTION WITH THE USE OF THE
PRODUCT, EVEN IF HIKVISION HAS BEEN ADVISED OF THE POSSIBILITY OF SUCH DAMAGES OR
LOSS.
●
YOU ACKNOWLEDGE THAT THE NATURE OF THE INTERNET PROVIDES FOR INHERENT SECURITY
RISKS, AND HIKVISION SHALL NOT TAKE ANY RESPONSIBILITIES FOR ABNORMAL OPERATION,
PRIVACY LEAKAGE OR OTHER DAMAGES RESULTING FROM CYBER-ATTACK, HACKER ATTACK,
VIRUS INFECTION, OR OTHER INTERNET SECURITY RISKS; HOWEVER, HIKVISION WILL PROVIDE
TIMELY TECHNICAL SUPPORT IF REQUIRED.
●
YOU AGREE TO USE THIS PRODUCT IN COMPLIANCE WITH ALL APPLICABLE LAWS, AND YOU ARE
SOLELY RESPONSIBLE FOR ENSURING THAT YOUR USE CONFORMS TO THE APPLICABLE LAW.
ESPECIALLY, YOU ARE RESPONSIBLE, FOR USING THIS PRODUCT IN A MANNER THAT DOES NOT
INFRINGE ON THE RIGHTS OF THIRD PARTIES, INCLUDING WITHOUT LIMITATION, RIGHTS OF
PUBLICITY, INTELLECTUAL PROPERTY RIGHTS, OR DATA PROTECTION AND OTHER PRIVACY
RIGHTS. YOU SHALL NOT USE THIS PRODUCT FOR ANY PROHIBITED END-USES, INCLUDING THE
DEVELOPMENT OR PRODUCTION OF WEAPONS OF MASS DESTRUCTION, THE DEVELOPMENT OR
PRODUCTION OF CHEMICAL OR BIOLOGICAL WEAPONS, ANY ACTIVITIES IN THE CONTEXT
RELATED TO ANY NUCLEAR EXPLOSIVE OR UNSAFE NUCLEAR FUEL-CYCLE, OR IN SUPPORT OF
HUMAN RIGHTS ABUSES.
●
IN THE EVENT OF ANY CONFLICTS BETWEEN THIS DOCUMENT AND THE APPLICABLE LAW, THE
LATTER PREVAILS.
© Hangzhou Hikvision Digital Technology Co., Ltd. All rights reserved.
Body Camera User Manual
ii
Symbol Convenons
The symbols that may be found in this document are dened as follows.
Symbol Descripon
Danger
Indicates a hazardous situaon which, if not avoided, will or could
result in death or serious injury.
Cauon
Indicates a potenally hazardous situaon which, if not avoided, could
result in equipment damage, data loss, performance degradaon, or
unexpected results.
Note
Provides addional informaon to emphasize or supplement
important points of the main text.
Body Camera User Manual
iii

Contents
Chapter 1 Product Introducon .................................................................................................. 1
1.1 Introducon ........................................................................................................................... 1
1.2 Key Feature ............................................................................................................................ 1
1.3 Default Informaon ............................................................................................................... 1
Chapter 2 Startup and Main Menu ............................................................................................. 2
2.1 Login ...................................................................................................................................... 2
2.2 Live View Page Introducon ................................................................................................... 2
2.3 Main Menu ............................................................................................................................ 3
Chapter 3 Basic
Operaons ......................................................................................................... 5
3.1 Storage ................................................................................................................................... 5
3.1.1 Release Storage Capacity .............................................................................................. 5
3.1.2 Record ........................................................................................................................... 5
3.1.3 Tape ............................................................................................................................... 6
3.1.4 Capture ......................................................................................................................... 7
3.2 Playback ................................................................................................................................. 7
3.3 Backup ................................................................................................................................... 9
3.4 Set Tag .................................................................................................................................... 9
3.4.1 Set Tag During Recording, Taping, or Capturing ............................................................ 9
3.4.2 Set Tag
Aer Recording, Taping, or Capturing ............................................................ 10
Chapter 4 Network Sengs ...................................................................................................... 11
4.1 Dial-up .................................................................................................................................. 11
4.2 Connect to Wi-Fi .................................................................................................................. 11
4.3 Connect to Bluetooth Earphone .......................................................................................... 12
4.4 Set Hotspot and Tethering ................................................................................................... 13
4.5 Set Airplane Mode ............................................................................................................... 13
4.6 Connect to
Plaorm ............................................................................................................. 14
Body Camera User Manual
iv

4.6.1 Select Video Plaorm ................................................................................................. 14
4.6.2 Connect to ISUP Plaorm ........................................................................................... 14
4.7 Set
Posioning ..................................................................................................................... 15
4.8 Set Network SDK .................................................................................................................. 15
4.9 Set Ping Test ......................................................................................................................... 16
Chapter 5 Media Sengs .......................................................................................................... 17
5.1 Set Record Parameters ......................................................................................................... 17
5.2 Set Network Transmission Parameters ................................................................................ 18
5.3 Set Camera Parameters ........................................................................................................ 18
5.4 Set OSD ................................................................................................................................ 19
5.5 Enable IR Light ..................................................................................................................... 19
5.6 Set USB Camera ................................................................................................................... 20
5.7 Set Two-Way Audio Format ................................................................................................. 20
Chapter 6 System Sengs ........................................................................................................ 21
6.1 Set Voice Prompt ................................................................................................................. 21
6.2 Enable Indicator ................................................................................................................... 21
6.3 Set Volume ........................................................................................................................... 21
6.4 Adjust Screen Brightness ..................................................................................................... 21
6.5 Enable Flashlight .................................................................................................................. 22
6.6 Enable Password .................................................................................................................. 22
6.7 Set Auto Alarm ..................................................................................................................... 22
6.8 Set USB Debug ..................................................................................................................... 23
6.9 Switch USB Mode ................................................................................................................. 23
6.10 Set Auto USB Mode ........................................................................................................... 23
6.11 Set Read-Only USB Mode ................................................................................................... 23
6.12 Set Quick Charging Mode .................................................................................................. 24
6.13 Set Low Power ................................................................................................................... 24
6.14 Set Dropdown
Nocaon Center ..................................................................................... 24
Body Camera User Manual
v

Chapter 7 Maintenance ............................................................................................................ 25
7.1 Upgrade ............................................................................................................................... 25
7.2 Export Log ............................................................................................................................ 25
7.3 Export
Baery Status Informaon ....................................................................................... 25
7.4 Restore Device Sengs ........................................................................................................ 26
7.5 Install Soware .................................................................................................................... 26
7.6 View Applicaon .................................................................................................................. 26
7.7 Set Date and Time ................................................................................................................ 27
7.8 View Device Informaon ...................................................................................................... 27
7.9 Shut down and Sleep ........................................................................................................... 27
7.9.1 Shut down ................................................................................................................... 27
7.9.2 Shut down Forcedly .................................................................................................... 27
7.9.3 Sleep Manually ............................................................................................................ 27
7.9.4 Sleep Automacally .................................................................................................... 27
7.9.5 Wake up ...................................................................................................................... 28
Body Camera User Manual
vi

Chapter 1 Product Introducon
1.1 Introducon
Body camera (hereinaer referred to as device) highly integrates with record, taping, capture,
posioning, etc. It is embedded with posioning module with high sensivity to locate the
occurring posion of events accurately. It can record the process and condion of events
completely via record, taping, and capture. You can also tag the important data for future search.
It is small and light, convenient to carry, and can be worn on the shoulder, sasfying the
requirement of mobile duty and evidence record for single person. It is widely applicable to public
security
protecon, city management, industry and commerce, etc.
1.2 Key Feature
●
2K resoluon recording.
●
The recorded videos can be uploaded to the central video
plaorm via 4G wireless
communicaon.
●
Dual posioning modules of GPS and Beidou. The locaon informaon can be uploaded to the
command center in real
me.
●
Supports IR night vision. Even in the dark scene, the facial features of the persons in the scene
can be recognized clearly.
●
Tri-proof design to support all-weather
led operaon.
●
Built-in
baery with large capacity, supporng longer working hour.
●
Small size, light weight, and convenient to carry.
●
Large recording buon for convenient operaon.
1.3 Default
Informaon
The default informaon of the device is shown as below.
●
Default user name (administrator): admin
●
Default password: 123456
Cauon
For your data safety, change the admin password in me. You need to change the admin password
via the Body Camera Assistant.
Body Camera User Manual
1

Chapter 2 Startup and Main Menu
2.1 Login
Users issued by the dock staon or the plaorm can log in to the device. The logged user can view
all the videos, audios, and pictures of all the users.
Before You Start
●
Set users via the dock staon or the plaorm, and issue the users to the device. Refer to the user
manual of the dock
staon or the plaorm for details.
●
Connect the device to the dock
staon or the plaorm.
Steps
Note
If you have not connected the device to the dock staon or the plaorm, or you have connected
the device to the dock staon or the plaorm, but the users are not issued to the device, the login
page will not appear. You can use the device directly without login.
1.
Start up the device to enter the login page.
2.
Select the user.
3.
Enter the password of the user.
4.
Tap Login.
2.2 Live View Page
Introducon
Aer login, you will enter the live view page.
Body Camera User Manual
2
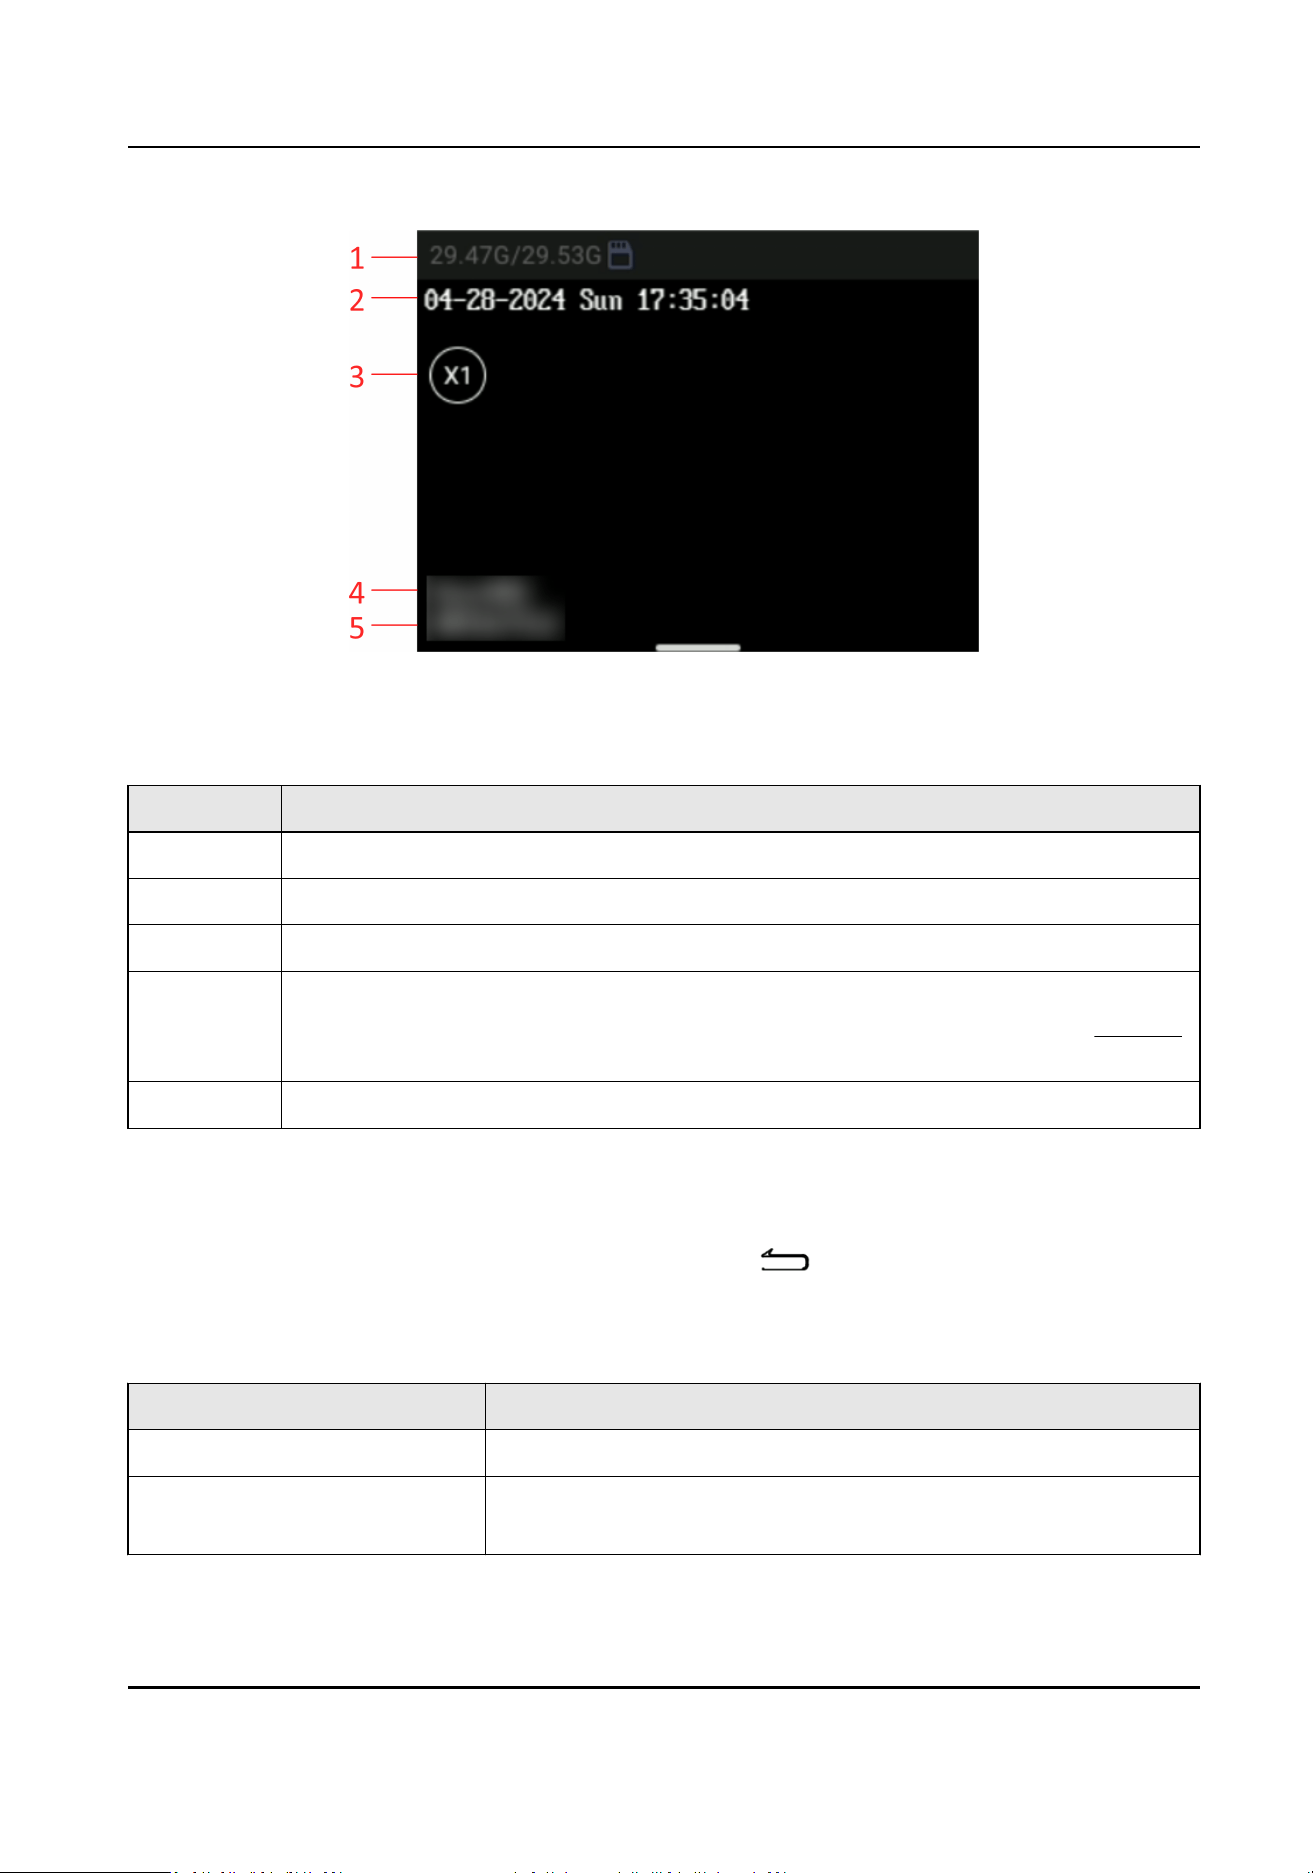
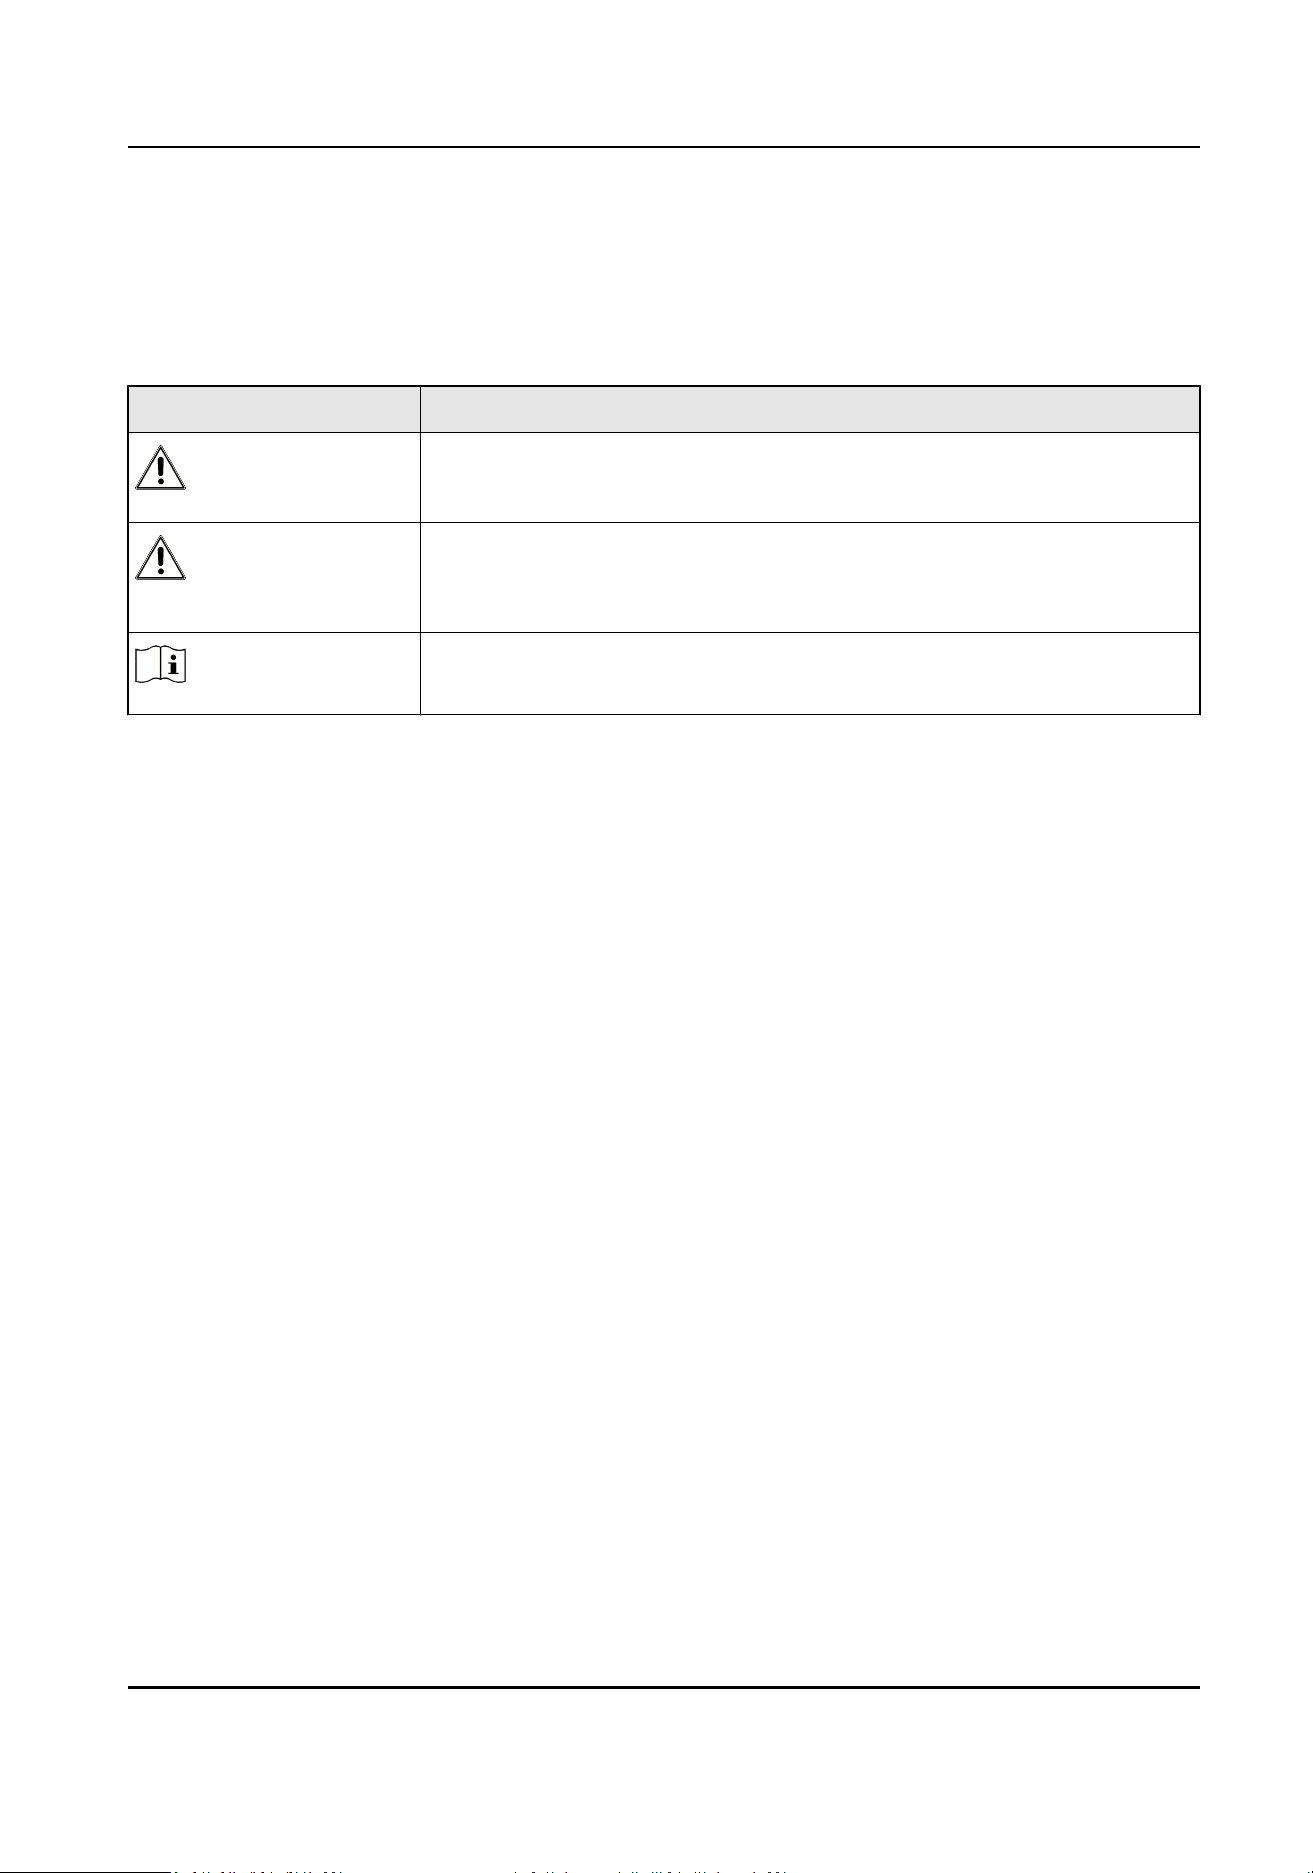
Figure 2-1 Live View Page
Table 2-1 Live View Page Descripon
No. Descripon
1 The TF card available memory/total memory and status.
2 The current date and me.
3 The zooming mulple. Select the icon to adjust the zooming mulple.
4 If you select User Info Opons as User ID, the user ID will display here. If you select
User Info Opons as User Name, the user name will display here. Refer to Set OSD
for details.
5 The device ID.
2.3 Main Menu
Aer login, you will enter Camera page automacally. Tap to enter the main menu. The
descripon of the main menu is shown as the table below.
Table 2-2 Main Menu
Descripon
Menu Descripon
Camera Select it to enter the live view page.
Recorder Select it to enter Recorder page. Press the taping buon on the
device side to start taping.
Body Camera User Manual
3

Menu Descripon
File MGT Select it to enter File MGT page. You can view the videos,
audios, and pictures saved in the device.
Sengs Select it to enter Sengs page. You can set Network, Media,
System, and Device parameters.
Note
If you have enabled password in Sengs → System → Password → Enable Password , you need to
enter the admin password when you enter File MGT page and other sengs page. Please operate
according to the prompt. Hereinaer the operaon of entering password will not be illustrated any
more.
Body Camera User Manual
4

Chapter 3 Basic Operaons
3.1 Storage
The recorded videos, taped audios, and captured pictures will be stored in the device.
3.1.1 Release Storage Capacity
When the storage capacity is full, you can back up the device data to the computer rst, and then
release the storage capacity.
●
Back up les via USB mode. Refer to Backup for details. Delete the les backed up under
PVRFILES folder to release the storage capacity.
●
Enable overwrien record to keep recording when the available capacity is not enough, and the
former recorded videos will be overwrien. Refer to Set Record Parameters for details.
3.1.2 Record
You can record videos via the device.
Steps
1.
Press the recording buon.
Aer the recording starts, if you are on the live view page, the red recording icon and recorded
me will appear on the nocaon bar. If you are on the main menu page, the white recording
icon will appear on the nocaon bar.
Body Camera User Manual
5
Figure 3-1 Record
2.
Press the recording buon again to stop recording.
3.
Oponal: Select File MGT on the main menu to view the recorded videos.
Note
●
If you want to record a period of me before recording starts, select Sengs → Media →
Video → Pre-record to set pre-record me.
●
If you want to record a period of me aer recording ends, tap Sengs → Media → Video →
Post-record to set post-record
me.
3.1.3 Tape
You can tape audios via the device.
Steps
1.
Press the taping buon.
Aer the taping starts, if you are on Recorder page, you can view the taped me. If you are on
the main menu page, the taping icon will appear on the
nocaon bar.
Body Camera User Manual
6

Figure 3-2 Tape
2.
Press the taping buon again to stop taping.
3.
Oponal: Select File MGT on the main menu to view the taped audios.
3.1.4 Capture
You can capture pictures via the device.
Steps
1.
Press the capture buon.
The device captures a picture.
2.
Oponal: Select File MGT on the main menu to view the captured pictures.
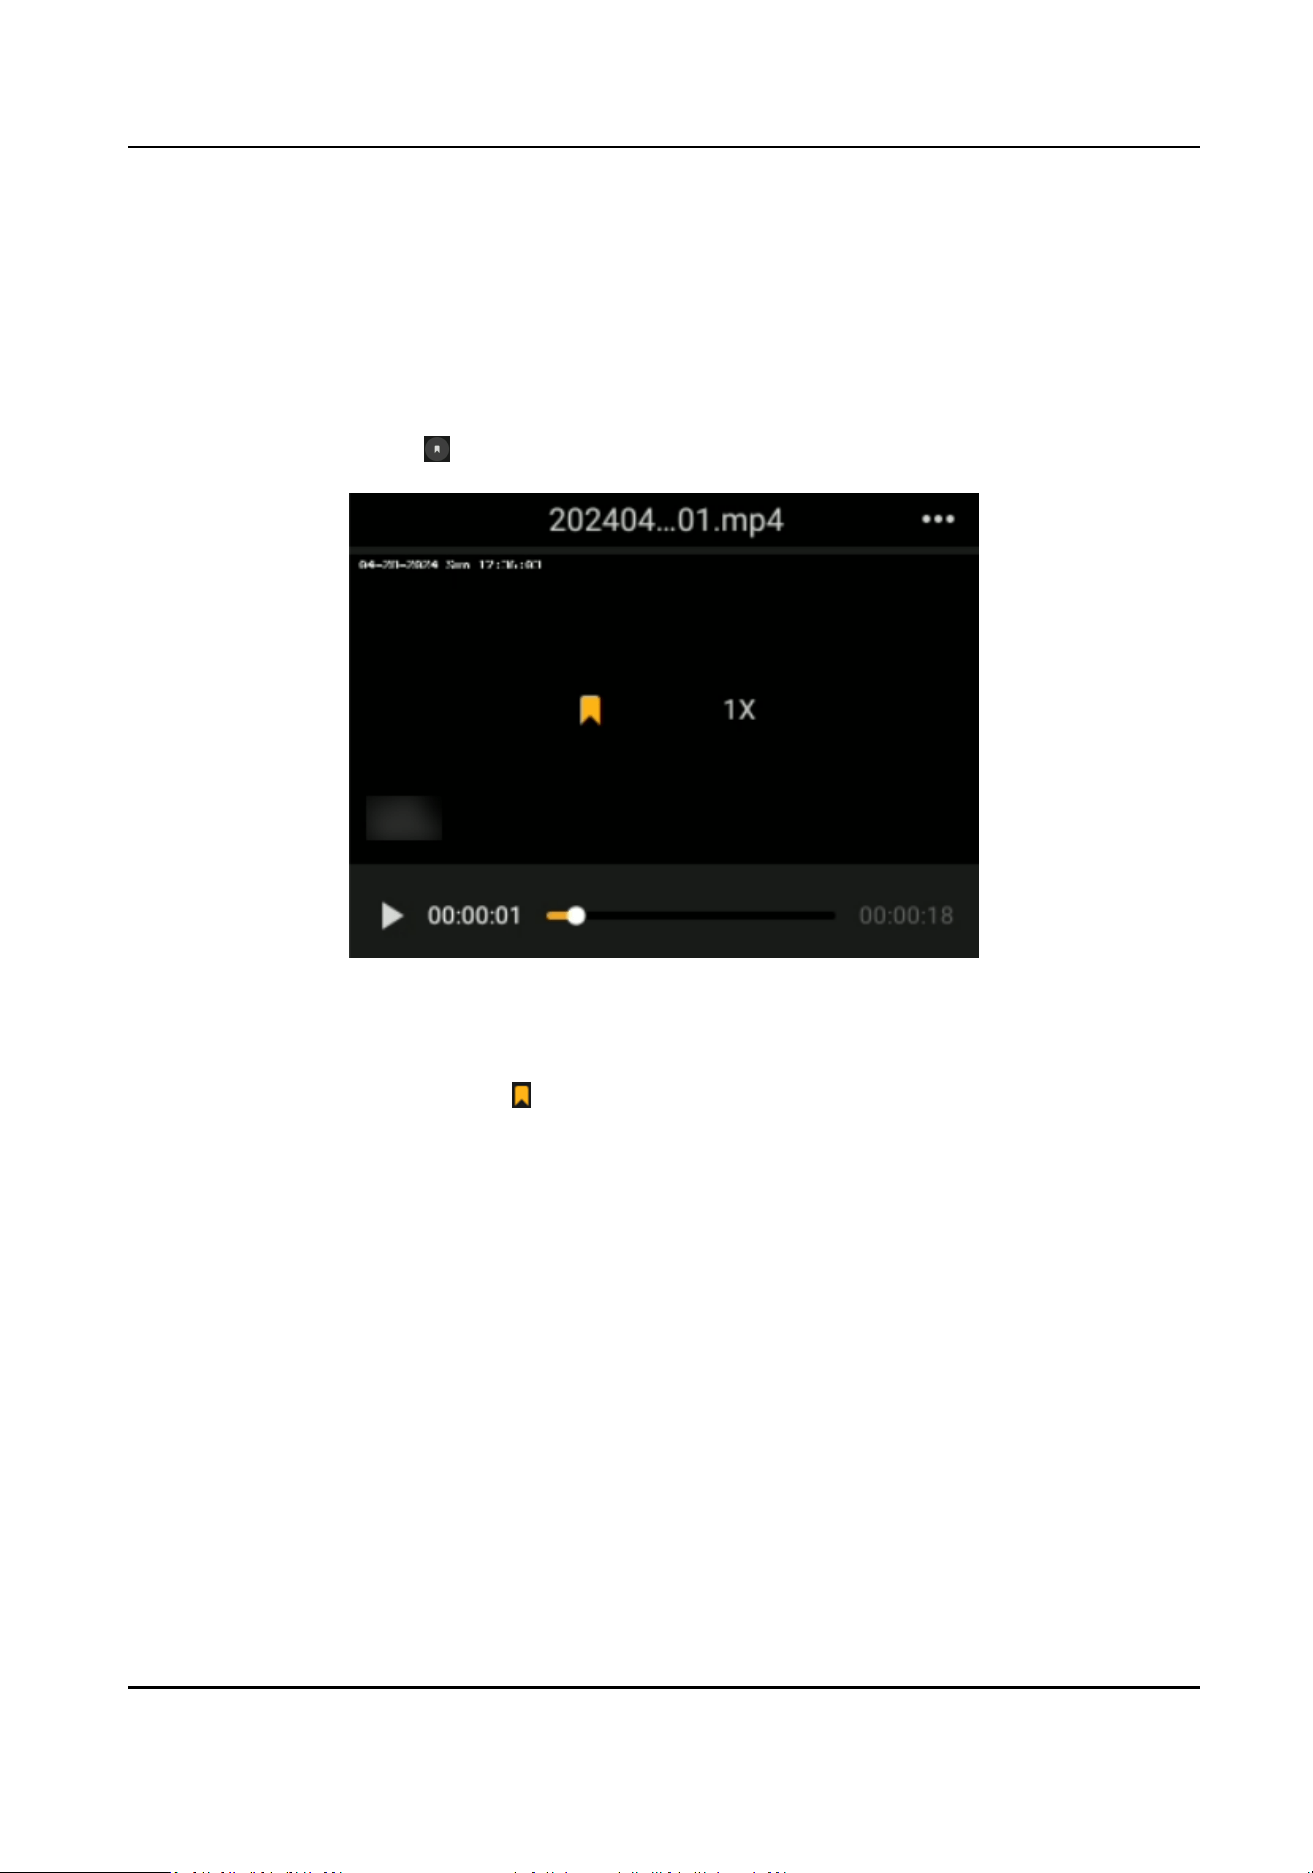
3.2 Playback
You can play back videos, audios, and pictures via the device.
Steps
1.
Select File MGT.
2.
Select Video, Audio, or Picture.
Body Camera User Manual
7
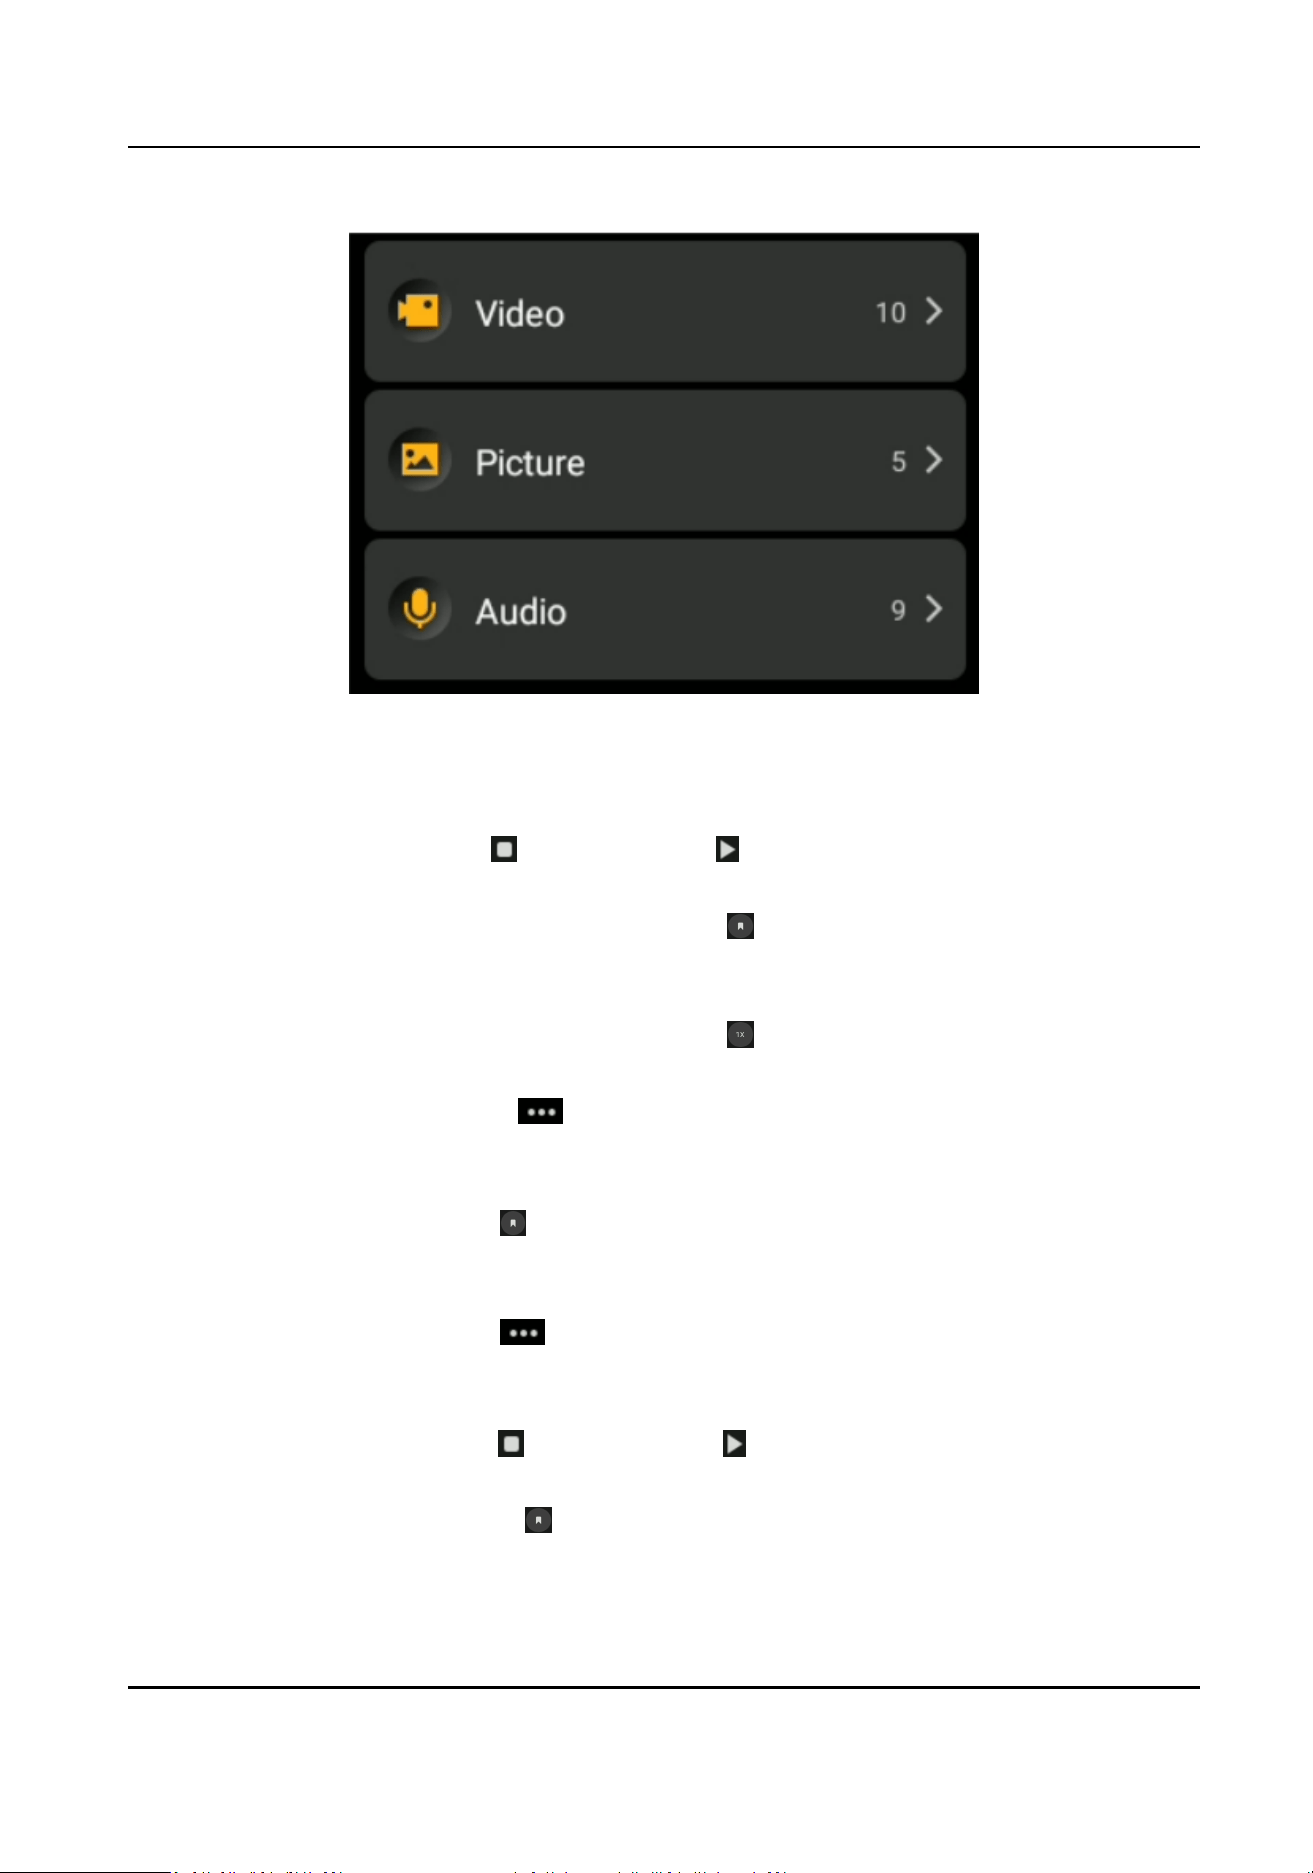
Figure 3-3 Playback
3.
Select the le to play or view from the le list.
4.
During video playback, you can do the following operaons.
Start/Pause video
playback
Tap to pause, and tap to start.
Tag the video Tap the image, and select to set a tag for the current video. Aer
tagging, the icon displays as the yellow color. Select the icon again to
cancel the tag, and the icon displays as the white color.
Adjust the playback
speed
Tap the image, and select to adjust the playback speed. You can
play back the video fast forwards or in the normal speed.
View the video
informaon
Select to view the video informaon including the generaon
me, le size, and resoluon.
5.
During viewing a picture, you can do the following operaons.
Tag the picture
Select to set a tag for the current picture. Aer tagging, the icon
displays as the yellow color. Select the icon again to cancel the tag, and
the icon displays as the white color.
View the picture
informaon
Select to view the picture informaon including the generaon
me, le size, and resoluon.
6.
During audio playback, you can do the following operaons.
Start/Pause audio
playback
Tap to pause, and tap to start.
Tag the audio Select to set a tag for the current audio. Aer tagging, the icon
displays as the yellow color. Select the icon again to cancel the tag,
and the icon displays as the white color.
Body Camera User Manual
8

View the audio
informaon
Select to view the audio informaon including the generaon
me, le size, and duraon.
7.
Oponal: In the picture list page, tap Select or hold a picture. Check the picture(s) and select
to upload the selected picture(s) to the connected plaorm.
3.3 Backup
You can switch the device as a USB ash drive and export les to your computer.
Before You Start
●
Disable quick charging mode.
●
Connect the device to the computer via a data cable.
Steps
1.
Switch the device to USB mode. Refer to
Switch USB Mode for details.
2.
Copy the data of the device to the computer.
Note
●
If you have set Video Pack Format as ps in Sengs → Media → Video , you can only play the
backed up video les via Hikvision player or other players with Hikvision play plugin. Visit
Hikvision ocial website to download VSPlayer and install it. Or visit Hikvision ocial website
to download MFPlugin and install it.
●
If you have set Video Pack Format as mp4 in Sengs → Media → Video , you can play the
backed up video
les via the Windows player or Hikvision player. For Hikvision player, visit
Hikvision ocial website to download VSPlayer and install it.
3.4 Set Tag
3.4.1 Set Tag During Recording, Taping, or Capturing
Set Tag During Recording or Taping
During recording or taping, press Fn buon to set a tag for the current video or audio. Hold it again
to cancel the tag.
Note
The tag is only available to the current video or audio. Aer the video or audio ends, tag also ends.
Set Tag During Capturing
Press Fn buon rst, and then press the capture buon to capture a picture. The captured picture
will be tagged.
Body Camera User Manual
9
3.4.2 Set Tag Aer Recording, Taping, or Capturing
Aer recording, taping, or capturing, you can set tags for the important les for convenient search.
Steps
1.
Select File MGT.
2.
Select the
le type.
3.
Open the le, and select to set a tag.
Figure 3-4 Set Tag (Video for Example)
Result
The tagged le will be marked with in the le list.
Body Camera User Manual
10
Chapter 4 Network Sengs
4.1 Dial-up
You can connect the device to the network via SIM card dialing.
Before You Start
Install the SIM card.
Steps
Note
Dial-up cannot be enabled in USB mode.
1.
Select Sengs → Network → Network and Internet → Mobile Network .
2.
Select the slot with the SIM card, and enable Mobile data.
Note
You can also swipe the screen down and select the Mobile data icon from the nocaon center
to enable mobile data. Aer enabling, the Mobile data icon in the nocaon center is
displayed as yellow color.
3.
Set other parameters if needed.
4.
Set the APN parameters.
1) Select Advanced.
2) Select Access Point Names.
3) Select the available APN from the list. Or contact the service supplier to get the APN, select
→ New APN , and set corresponding parameters. Then select → Save to save the sengs.
Note
Reboot the device to take the sengs into eect.
Result
The icon will appear on the nocaon bar.
What to do next
Aer the rst successful connecon, swipe the screen down and select the Mobile data icon from
the
nocaon center to enable or disable the dial-up.
4.2 Connect to Wi-Fi
You can connect the device to an available Wi-Fi.
Body Camera User Manual
11
Steps
Note
Wi-Fi cannot be enabled in USB mode.
1.
Select Sengs → Network → WLAN .
2.
Enable Wi-Fi.
Note
You can also swipe the screen down and select the Wi-Fi icon from the nocaon center to
enable Wi-Fi. Aer enabling, the Wi-Fi icon in the nocaon center is displayed as yellow color.
3.
Select the Wi-Fi to connect, enter the password, and select CONNECT.
4.
Oponal: Select the connected Wi-Fi to view the informaon.
Result
The icon will appear on the nocaon bar.
What to do next
Aer the rst successful connecon, swipe the screen down and select the Wi-Fi icon from the
nocaon center to enable or disable the Wi-Fi.
4.3 Connect to Bluetooth Earphone
You can connect bluetooth earphone to the device.
Before You Start
Prepare the bluetooth earphone by yourself.
Steps
1.
Select
Sengs → Network → Bluetooth .
2.
Enable bluetooth.
Note
You can also swipe the screen down and select the Bluetooth icon from the nocaon center
to enable bluetooth. Aer enabling, the Bluetooth icon in the nocaon center is displayed as
yellow color.
3.
Select the earphone to pair from the available devices list.
Note
Aer the bluetooth earphone is connected, the earphone will be used for two-way audio with
the plaorm by default if the device has been connected to the plaorm.
Body Camera User Manual
12

Result
Aer the bluetooth earphone is connected successfully, the icon will appear on the nocaon
bar.
4.4 Set Hotspot and Tethering
You can set the device as a hotspot to share network to other devices.
Steps
1.
Select
Sengs → Network → Network and Internet → Hotspot and Tethering .
2.
Select the tethering mode.
-
If you want to share network via Wi-Fi hotspot, select Wi-Fi hotspot to enable the funcon or
swipe the screen down and select the Hotspot icon from the nocaon center to enable the
funcon. Set Hotspot name, Security, and Hotspot password. Then the icon will appear on
the nocaon bar.
-
If you want to share network via USB data cable, enable USB tethering. Then the icon will
appear on the nocaon bar.
-
If you want to share network via bluetooth, enable Bluetooth tethering. Then the
icon will
appear on the
nocaon bar.
What to do next
Aer seng the Wi-Fi hotspot parameters, you can swipe the screen down and select the Hotspot
icon from the nocaon center to enable or disable the hotspot.
4.5 Set Airplane Mode
When airplane mode is enabled, dialing, Wi-Fi, and bluetooth will be disabled automacally.
Steps
1.
Select Sengs → Network → Network and Internet .
2.
Enable or disable Airplane Mode.
Note
●
You can also swipe the screen down and select the Airplane mode icon from the nocaon
center to enable or disable the funcon.
●
When the device is accessed via Body Camera Assistant or it is switched to USB mode,
airplane mode is enabled
automacally. Aer you exit from Body Camera Assistant or USB
mode, airplane mode is disabled
automacally.
Result
The
icon will appear on the nocaon bar.
Body Camera User Manual
13
4.6 Connect to Plaorm
4.6.1 Select Video Plaorm
You can select the video plaorm to connect to the device.
Steps
1.
Select Sengs → Network → Video Plaorm Management .
2.
Select Video
Plaorm Type.
3.
Select the plaorm to connect.
Note
Only ISUP5 plaorm is supported.
What to do next
Reboot the device to take the
sengs into eect.
4.6.2 Connect to ISUP
Plaorm
ISUP is the plaorm access protocol. You can log in to the device via the plaorm to realize live
view, data management, and so on.
Before You Start
●
Set the connected plaorm. Ensure the device can communicate with the plaorm normally.
●
Select Video
Plaorm Type as ISUP5. Refer to Select Video Plaorm for details.
Steps
1.
Select Sengs → Network → Plaorm .
2.
Enable Registraon to enable the plaorm connecon.
Note
You can also swipe the screen down and select the Video Plaorm icon from the nocaon
center to enable the funcon. Aer enabling, the Video Plaorm icon in the nocaon center
is displayed as yellow color.
3.
Set Plaorm IP Address, Plaorm Port, Device ID, and Key.
Note
The device ID should be the same as the ID set on the plaorm.
Result
The
icon will appear on the nocaon bar.
Body Camera User Manual
14
What to do next
●
Aer the device is connected to the plaorm, you can control the device such as uploading
videos, audios, and pictures via the plaorm remotely.
●
Aer the rst successful connecon, swipe the screen down and select the Video Plaorm icon
from the
nocaon center to enable or disable the plaorm connecon.
4.7 Set Posioning
You can set posioning to locate the posion of the device.
Steps
1.
Select Sengs → Network → Posioning Service .
2.
Enable
Posioning Service.
Note
You can also swipe the screen down and select the Locaon icon from the nocaon center to
enable the funcon. Aer enabling, the Locaon icon in the nocaon center is displayed as
yellow color.
3.
Select Mode.
Note
If you switch the posioning mode, it will take eect aer reboong the posioning service.
Result
The icon will appear on the nocaon bar. If you have enabled GPS overlay in Sengs →
Media → OSD → GPS Overlay , the posioning informaon will be overlaid on the videos, pictures,
and remote live view image.
What to do next
Aer the rst posioning sengs, swipe the screen down and select the Locaon icon from the
nocaon center to enable or disable the funcon.
4.8 Set Network SDK
If you want to log in to the device via client, set network SDK.
Steps
1.
Tap Sengs → Network → Network SDK .
2.
Tap Registraon to enable the funcon.
3.
Set Communicaon Port.
What to do next
Reboot the device to take the sengs into eect.
Body Camera User Manual
15

4.9 Set Ping Test
You can check the plaorm network is normal or not via ping test.
Steps
1.
Tap
Sengs → Network → Ping Test .
2.
Enter target host address (IP address or domain name).
3.
Tap START.
4.
Check Enable Info. Auto Scrolling.
The
informaon will scroll to display automacally.
Body Camera User Manual
16

Chapter 5 Media Sengs
5.1 Set Record Parameters
You can set the video stream parameters when recording.
Steps
1.
Select Sengs → Media → Video .
2.
Set the parameters below.
Resoluon
The higher the resoluon is, the clearer the image will be. Meanwhile, the network
bandwidth requirement is higher.
Scheduled Record Length
The max. recording duraon of each video.
Max. Bit Rate
Select relavely large bit rate if you need good image quality and eect, but more storage
spaces will be consumed. Select relavely small bit rate if storage requirement is in priority.
I Frame Interval
It refers to the number of frames between two key frames. The larger the I frame interval is,
the smaller the stream
uctuaon is, but the image quality is not that good.
Video Encoding Type
Video bit rate varies with dierent encoding types. Please select according to your needs. H.
265 is a new encoding technology. Compared with H.264, it reduces the transmission bit rate
under the same
resoluon, frame rate, and image quality.
Video Pack Format
Select ps, and the video les will be packed in PS format. You need to play the video les via
Hikvision player or other players with Hikvision play plugin. Visit Hikvision ocial website to
download VSPlayer and install it. Or visit Hikvision
ocial website to download MFPlugin and
install it.
Select mp4, and the video
les will be packed in MP4 format. You can play the backed up
video les via the Windows player or Hikvision player. For Hikvision player, visit Hikvision
ocial website to download VSPlayer and install it.
Record once Powered up
The device will start recording once it is powered up aer the funcon is enabled.
Overwrien Record
Enable overwrien record to keep recording when the available capacity is not enough, and
the former recorded videos will be overwrien.
Body Camera User Manual
17

Cauon
If you enable overwrien record, back up the important data in me, or they will be
overwrien.
Pre-record
Set the
me to record before the recording start me.
Post-record
Set the me to record aer the recording end me.
5.2 Set Network Transmission Parameters
You can set the network stream parameters when previewing the device via
plaorm.
Steps
1.
Select
Sengs → Media → Network .
2.
Set the parameters below.
Stream Type
Select to transmit video stream or mixed stream.
Resoluon
The higher the resoluon is, the clearer the image will be. Meanwhile, the network
bandwidth requirement is higher.
Frame Rate
It is to describe the frequency at which the video stream is updated and it is measured by
frames per second (fps).
I Frame Interval
It refers to the number of frames between two key frames. The larger the I frame interval is,
the smaller the stream
uctuaon is, but the image quality is not that good.
Max. Bit Rate
Select relavely large bit rate if you need good image quality and eect.
Force Sub-Stream
Enable the funcon to force the plaorm only to transmit via the sub-stream.
5.3 Set Camera Parameters
You can set picture auto upload, camera sound, and image
resoluon.
Before You Start
If you want to upload the captured pictures to the plaorm, connect the device to plaorm rst.
Refer to Connect to ISUP Plaorm for details.
Body Camera User Manual
18

Steps
1.
Select Sengs → Media → Camera .
2.
Set the parameters below.
Picture Auto Upload
The captured pictures will be uploaded to the plaorm automacally.
Enable Camera Sound
There will be sound when you capture pictures.
Image
Resoluon
Select the resoluon of the captured pictures.
5.4 Set OSD
You can set the informaon overlaid on the videos, pictures, and remote live view image.
Steps
1.
Select Sengs → Media → OSD .
2.
Set the parameters below.
GPS Overlay
The
posioning informaon will be overlaid on the videos, pictures, and remote live view
image.
User Info
Opons
Select the user informaon to display on the lower le corner of the live view page.
Device Name
The device name is only used for the plaorm background.
Camera Name
The camera name will be overlaid on the videos and pictures uploaded to the plaorm.
Custom OSD
Enable Custom OSD, and set the OSD informaon. Then aer you have switched the device
to the USB mode, you can view the custom OSD
informaon overlaid on the videos and
pictures copied to the connected computer.
5.5 Enable IR Light
You can enable IR light to supplement light for record at night or in dim environment.
Steps
1.
Select Sengs → Media → IR Switch .
2.
Select Disable, Enable, or Auto according to the actual needs.
Disable
Body Camera User Manual
19

No maer how the environment light is, IR light will be disabled for recording or remote live
view.
Enable
No maer how the environment light is, once you start recording or remote live view, IR light
will be enabled.
Auto
IR light will be enabled only when the environment is dim and recording or remote live view
starts.
5.6 Set USB Camera
If you enable USB camera, the lens component focusing will adopt USB image to avoid the
conict
when adopng Wi-Fi.
Steps
1.
Select
Sengs → Media → USB Camera .
2.
Enable or disable the funcon.
What to do next
Reboot the device to take the sengs into eect.
5.7 Set Two-Way Audio Format
Select the two-way audio encoding format.
Steps
1.
Select Sengs → Media → Two-Way Audio Format .
2.
Select the format according to your needs.
What to do next
Reboot the device to take the
sengs into eect.
Body Camera User Manual
20
Chapter 6 System Sengs
6.1 Set Voice Prompt
You can enable or disable the voice prompt when you record, tape, or set tag.
Steps
1.
Tap Sengs → System → Voice Prompt .
2.
Select Enable or Disable according to the actual needs.
Result
If you enable voice prompt, when you start or stop recording and taping, or when you start or stop
tag, there will be voice prompt.
6.2 Enable Indicator
Enable indicator to indicate the device status.
Steps
1.
Tap Sengs → System → Indicator .
2.
Select Enable.
Note
Refer to "Quick Start Guide" for the indicator status and colors.
6.3 Set Volume
You can adjust the volume of recording, taping, capture, le playback, etc.
Steps
1.
Select Sengs → System → Volume .
2.
Slide the bar to adjust Media Volume and System Volume.
Note
●
If you disable Media Volume, there is no sound when you play back videos and audios.
●
If you disable System Volume, there is no sound when you press buons.
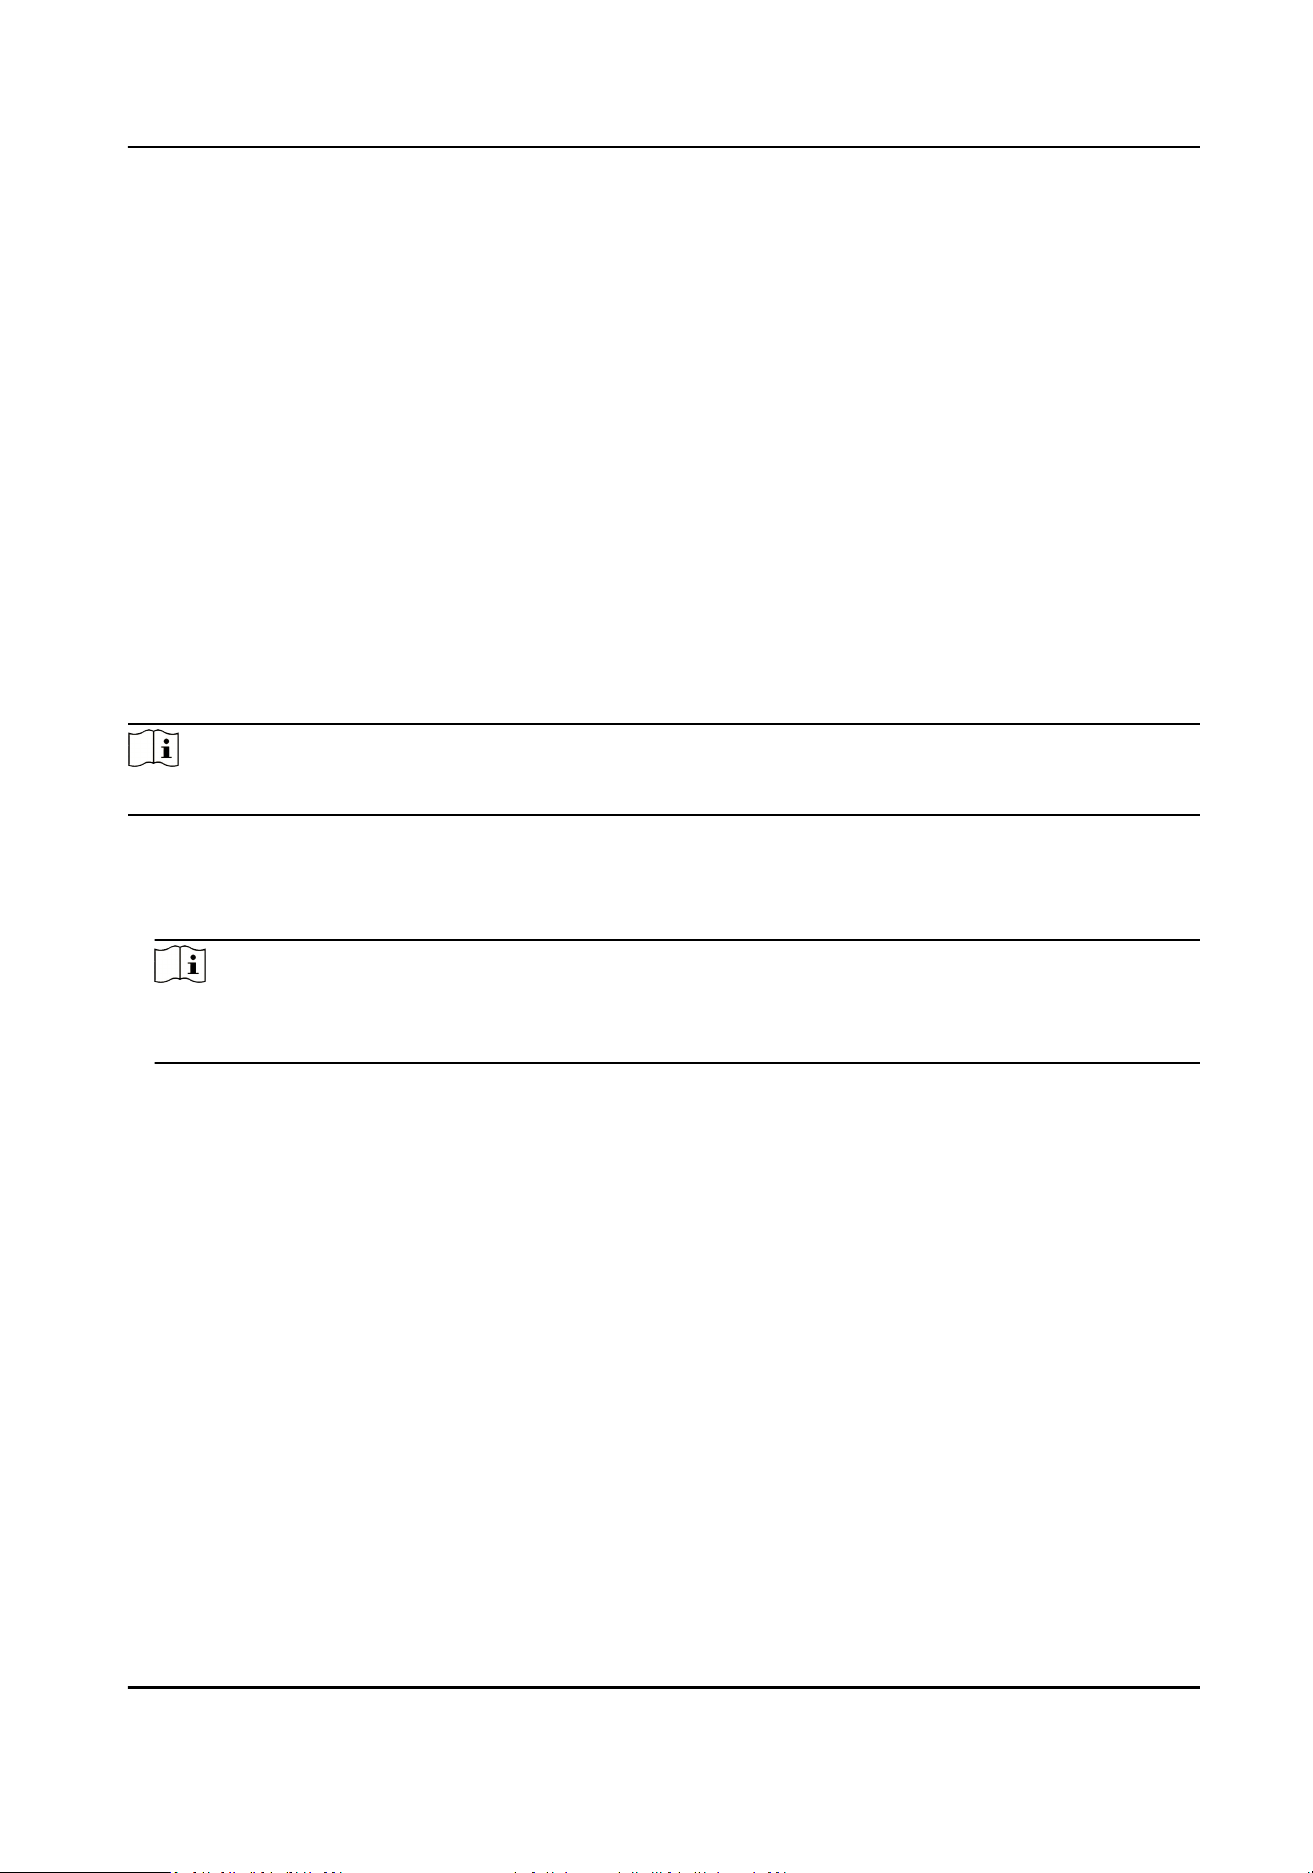
6.4 Adjust Screen Brightness
Swipe the screen down to open the nocaon center. Adjust screen brightness at
.
Body Camera User Manual
21
6.5 Enable Flashlight
You can enable ashlight to supplement light for recording or capturing in dim environment in two
ways.
●
Hold the taping
buon to enable ashlight. Hold it again to disable ashlight.
●
Swipe the screen down to open the nocaon center. Select the Flashlight icon to enable or
disable the ashlight.
6.6 Enable Password
You can enable password
vericaon when playing back les and entering some sengs pages
(such as restoring device sengs). Only aer you enter the correct password, you can get the
permission to do the next
operaon.
Steps
Note
It is recommended to enable password for data security.
1.
Select Sengs → System → Password .
2.
Enable password.
3.
Enter the admin password and select OK to enable the
funcon.
Note
The default admin password is 123456. If you have changed the admin password via the Body
Camera Assistant, the admin password is the changed one.
6.7 Set Auto Alarm
Enable auto alarm, and alarm will be triggered when the device storage capacity is full or the
baery power is low.
Steps
1.
Tap Sengs → System → Alarm Switch .
2.
Select Enable.
Result
Voice alarm will prompt when the device storage capacity is full or the
baery power is low.
Body Camera User Manual
22

6.8 Set USB Debug
If you want to view the debug log, enable USB debug mode.
Steps
1.
Tap Sengs → System → USB Debug .
2.
Select Enable or Disable.
6.9 Switch USB Mode
You can switch the device to USB mode to import or export data.
Before You Start
Connect the device to the computer via a data cable.
Steps
1.
Select
Sengs → System → USB Flash Drive Opons → USB Flash Drive Mode .
2.
Select Enable USB Flash Drive Mode.
What to do next
The device is used as a USB
ash drive, and you can import or export data.
6.10 Set Auto USB Mode
If you enable the auto USB mode, when you connect the device to the computer via the data cable,
the device will switch to the USB mode automacally.
Steps
1.
Select Sengs → System → USB Flash Drive Opons → Auto USB Mode .
2.
Enable or disable the
funcon.
6.11 Set Read-Only USB Mode
Aer switching to the USB mode, you can set the video, audio, and picture les to be copied to the
computer only, but cannot be deleted locally.
Steps
1.
Tap Sengs → System → USB Flash Drive Opons → USB Device Read-Only .
2.
Select Enable or Disable.
Enable
Aer switching to the USB mode, the video, audio, and picture les can only be copied to the
computer, but cannot be deleted locally.
Body Camera User Manual
23

Disable
Aer switching to USB mode, the video, audio, and picture les can both be copied or cut.
6.12 Set Quick Charging Mode
Select Sengs → System → Power Opons → Quick Charging Mode to enable or disable the
funcon. It is disabled by default.
●
Enable the quick charging mode, and all the power consuming
funcons, such as network,
record,
posioning, etc., will be disabled automacally while the device is being charged. The
fully-charged duraon will be shorten.
●
Disable the quick charging mode, and the device can be operated normally while being charged.
The fully-charged duraon will be longer than that in the quick charging mode.
6.13 Set Low Power
When the device baery is lower than the set level, the low power informaon will be uploaded to
the connected plaorm.
Before You Start
Connect the device to the plaorm. Refer to Connect to ISUP Plaorm for details.
Steps
1.
Select Sengs → System → Power Opons → Low Power .
2.
Select the device
baery level below which the low power informaon will be uploaded to the
connected plaorm.
6.14 Set Dropdown
Nocaon Center
You can enable the dropdown nocaon center to set some funcons quickly and view the
nocaons.
Steps
1.
Select
Sengs → System → Dropdown Status Bar .
2.
Enable or disable the funcon.
Body Camera User Manual
24

Chapter 7 Maintenance
7.1 Upgrade
You can upgrade the device version.
Before You Start
●
Import the upgrade le to the device.
●
Ensure the device
baery power is larger than 20%.
Steps
1.
Select
Sengs → Device → System Upgrade .
2.
Select SELECT UPGRADE PACKAGE.
3.
Select the upgrade le from the saved path.
4.
Select Install Now.
Result
The upgrade process will
connue for 1 to 10 minutes. Do not shut down the device. Aer upgrade
nishes, the device will reboot automacally.
7.2 Export Log
You can export log to the local storage.
Steps
1.
Tap Sengs → Device → Export Log .
2.
Select the folder to save the log, and tap EXPORT.
3.
Tap EXPORT on the popup message box.
Result
Log will be exported to the selected folder, and is named as "error_date_log.zip", such as
"error_20191219_log.zip".
7.3 Export
Baery Status Informaon
You can export the baery status informaon to the local storage.
Steps
1.
Tap Sengs → Device → Export Baery Info.
2.
Tap EXPORT to export the baery status informaon.
Body Camera User Manual
25

Result
The "baeryTrack.xls" le will be generated in the root directory of internal SD card.
7.4 Restore Device Sengs
You can restore the device to default sengs or factory sengs.
Steps
1.
Select
Sengs → Device → Param Reset .
2.
Select restoraon mode.
Restore Factory
Select Restore Factory, and select OK to restore all the parameters to the factory
sengs.
Restore Defaults
Select Restore Defaults, and select OK to restore the parameters except network parameters,
bluetooth, admin password, etc. to the factory sengs.
Result
The device will reboot
automacally.
7.5 Install
Soware
The device is embedded with Android system. You can install related applicaon soware on the
device.
Before You Start
Save the apk
le of the soware in the local storage.
Steps
1.
Tap Sengs → Device → Soware Installaon .
2.
Select the soware apk le, and operate according to the prompt.
7.6 View
Applicaon
You can view the informaon of the applicaons installed on the device.
Steps
1.
Tap
Sengs → Device → Applicaon .
2.
Tap the applicaon to view the informaon.
Body Camera User Manual
26

7.7 Set Date and Time
You can set the device me manually or synchronize the device me automacally.
Steps
1.
Select
Sengs → Device → Date and Time .
2.
Select Auto Date & Time.
3.
Select auto
me synchronizaon mode.
-
Select Use Network to synchronize the device
me with the network me if the device has
been connected to the network.
-
Select Use GPS to synchronize the device me with the satellite me if the device has been
enabled GPS.
-
Select Disable to set Data and Time manually.
4.
Select Time Zone to set the me zone.
7.8 View Device
Informaon
Select Sengs → Device → Device Informaon to view the device informaon including the
model, extra informaon, serial No., soware version, kernel version, and status informaon.
7.9 Shut down and Sleep
7.9.1 Shut down
Aer the device starts up, hold the on/o buon to shut it down.
7.9.2 Shut down Forcedly
If the device cannot be shut down normally, you can hold the on/o buon for 15 seconds to shut
it down forcedly.
7.9.3 Sleep Manually
Aer
the device starts up, press the on/o buon to sleep the device.
7.9.4 Sleep
Automacally
You can set the device to sleep automacally to save power if there is no operaon within a certain
me.
Body Camera User Manual
27

Steps
1.
Tap Sengs → System → Power Opons → Sleeping .
2.
Select me.
Note
If you select N.O., the screen will always on no maer if there is operaon or not.
Result
If no operaon is done within the set me, the device will sleep automacally.
7.9.5 Wake up
When the device is sleeping, you can press any buon on the le and right sides of the device to
wake it up. Pressing the
buons below the screen cannot wake the device up.
Body Camera User Manual
28

UD37699B