USER'S MANUAL/HANDBUCH/MANUEL DE L'UTILISATEUR
/MANUALDELUSUARIO/MANUALEUTENTE/INSTRUKCJAOBSŁUGI
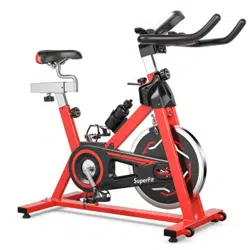
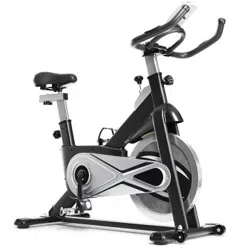
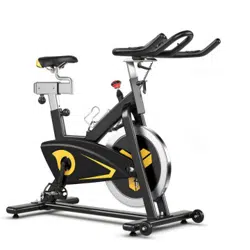
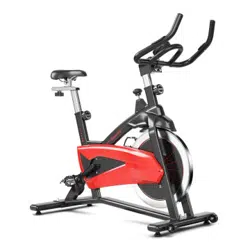
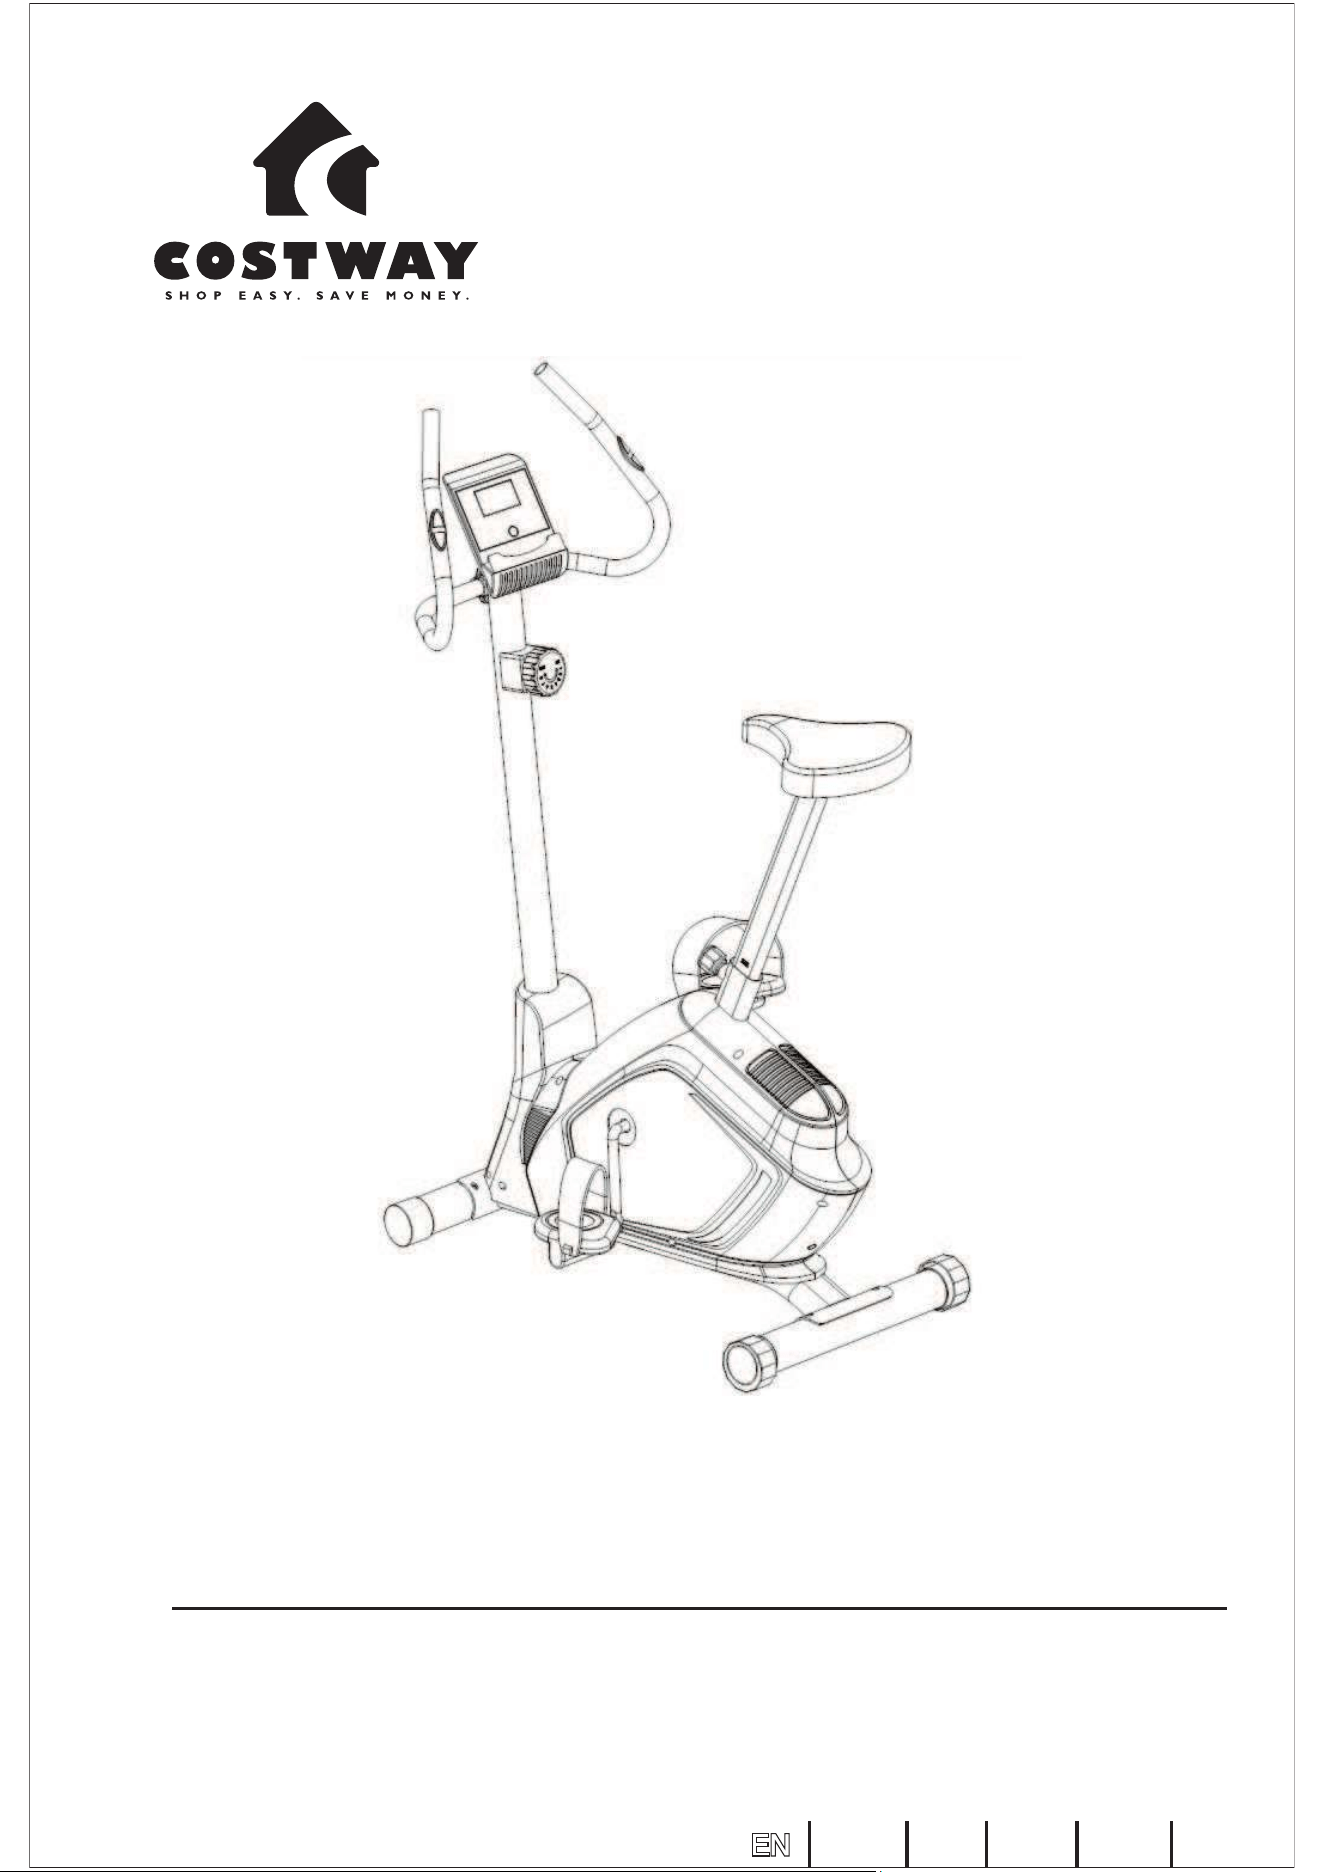
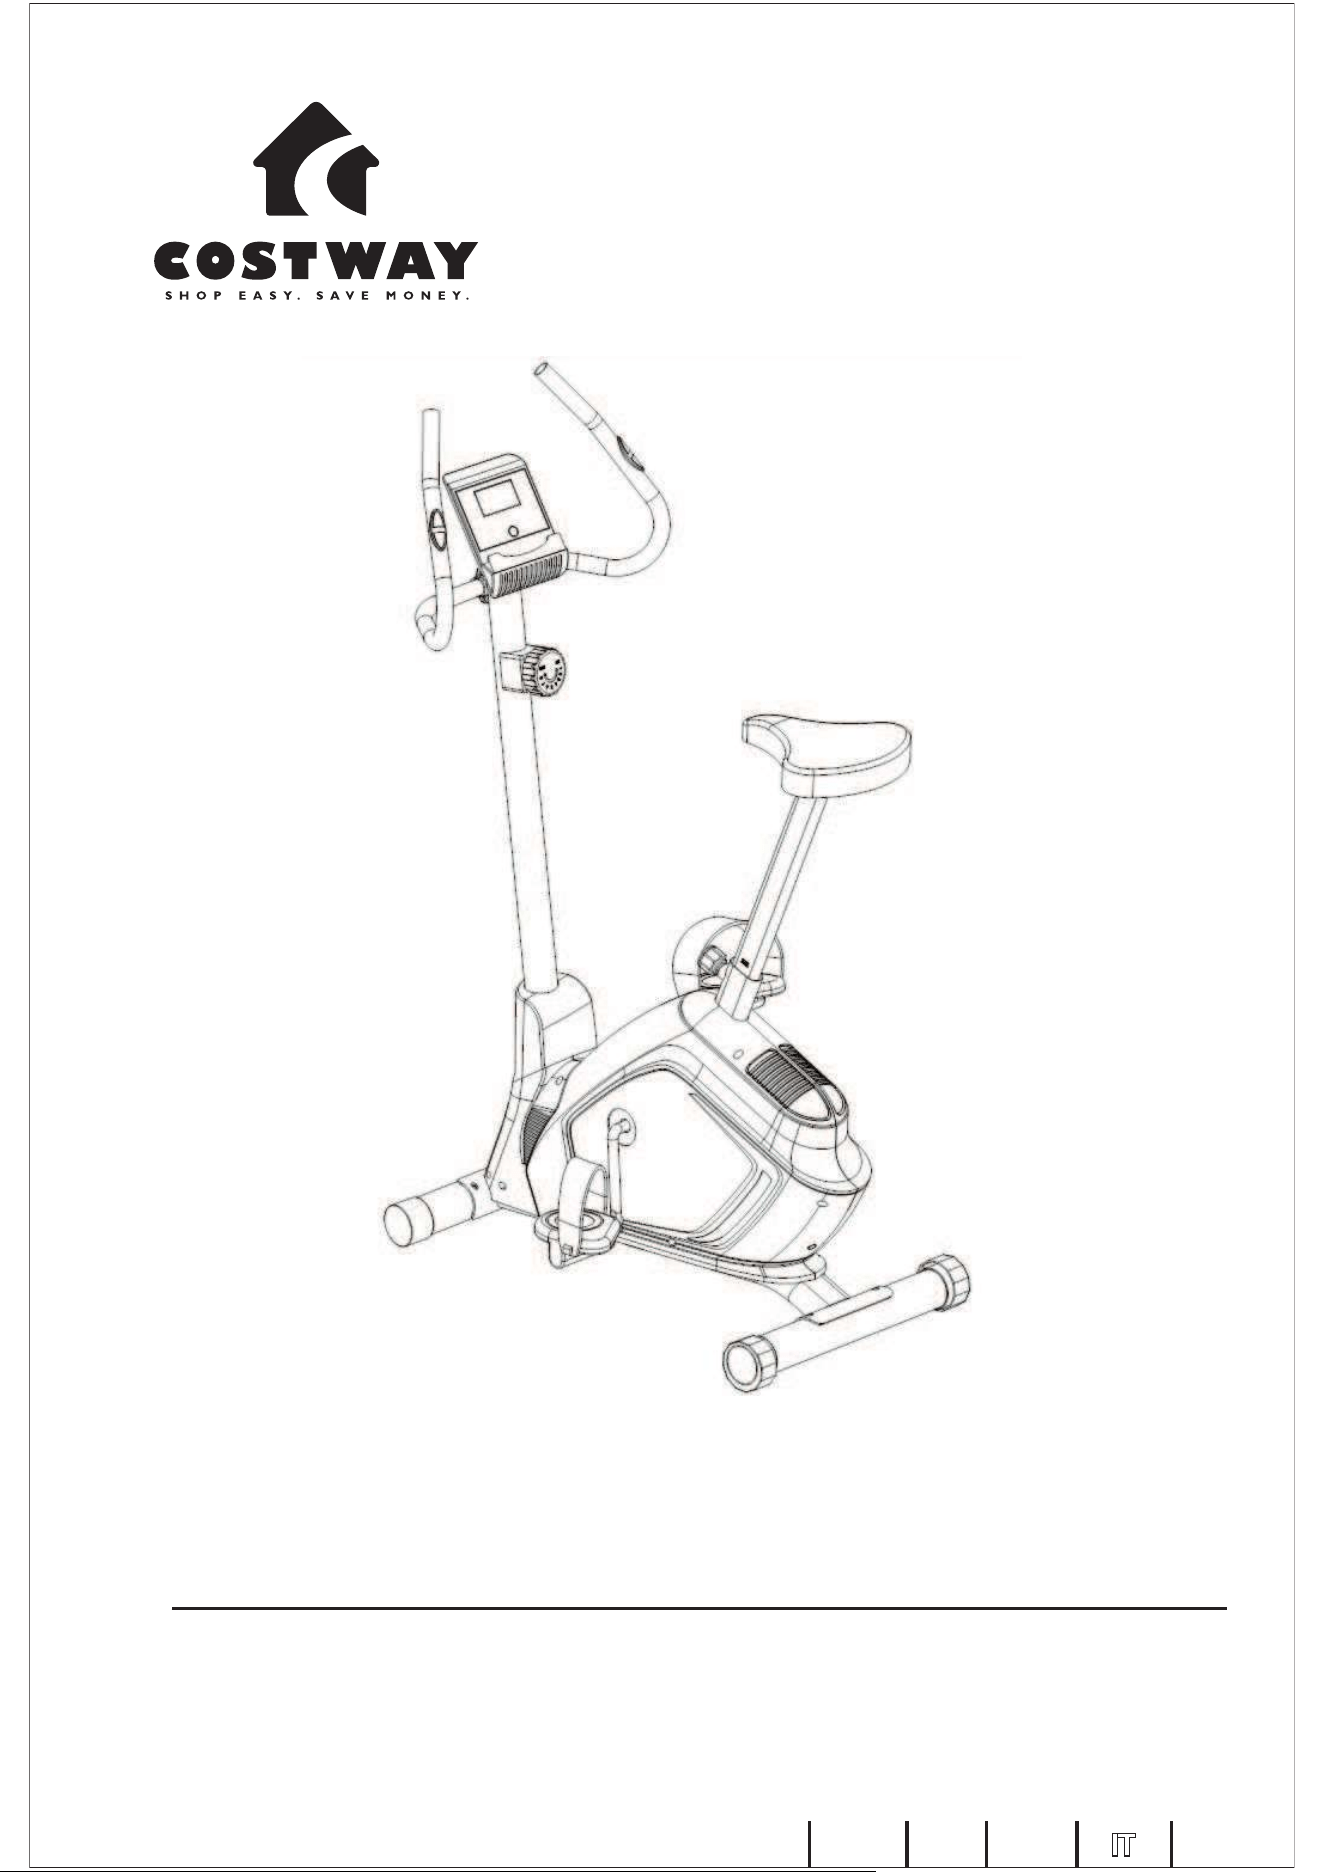
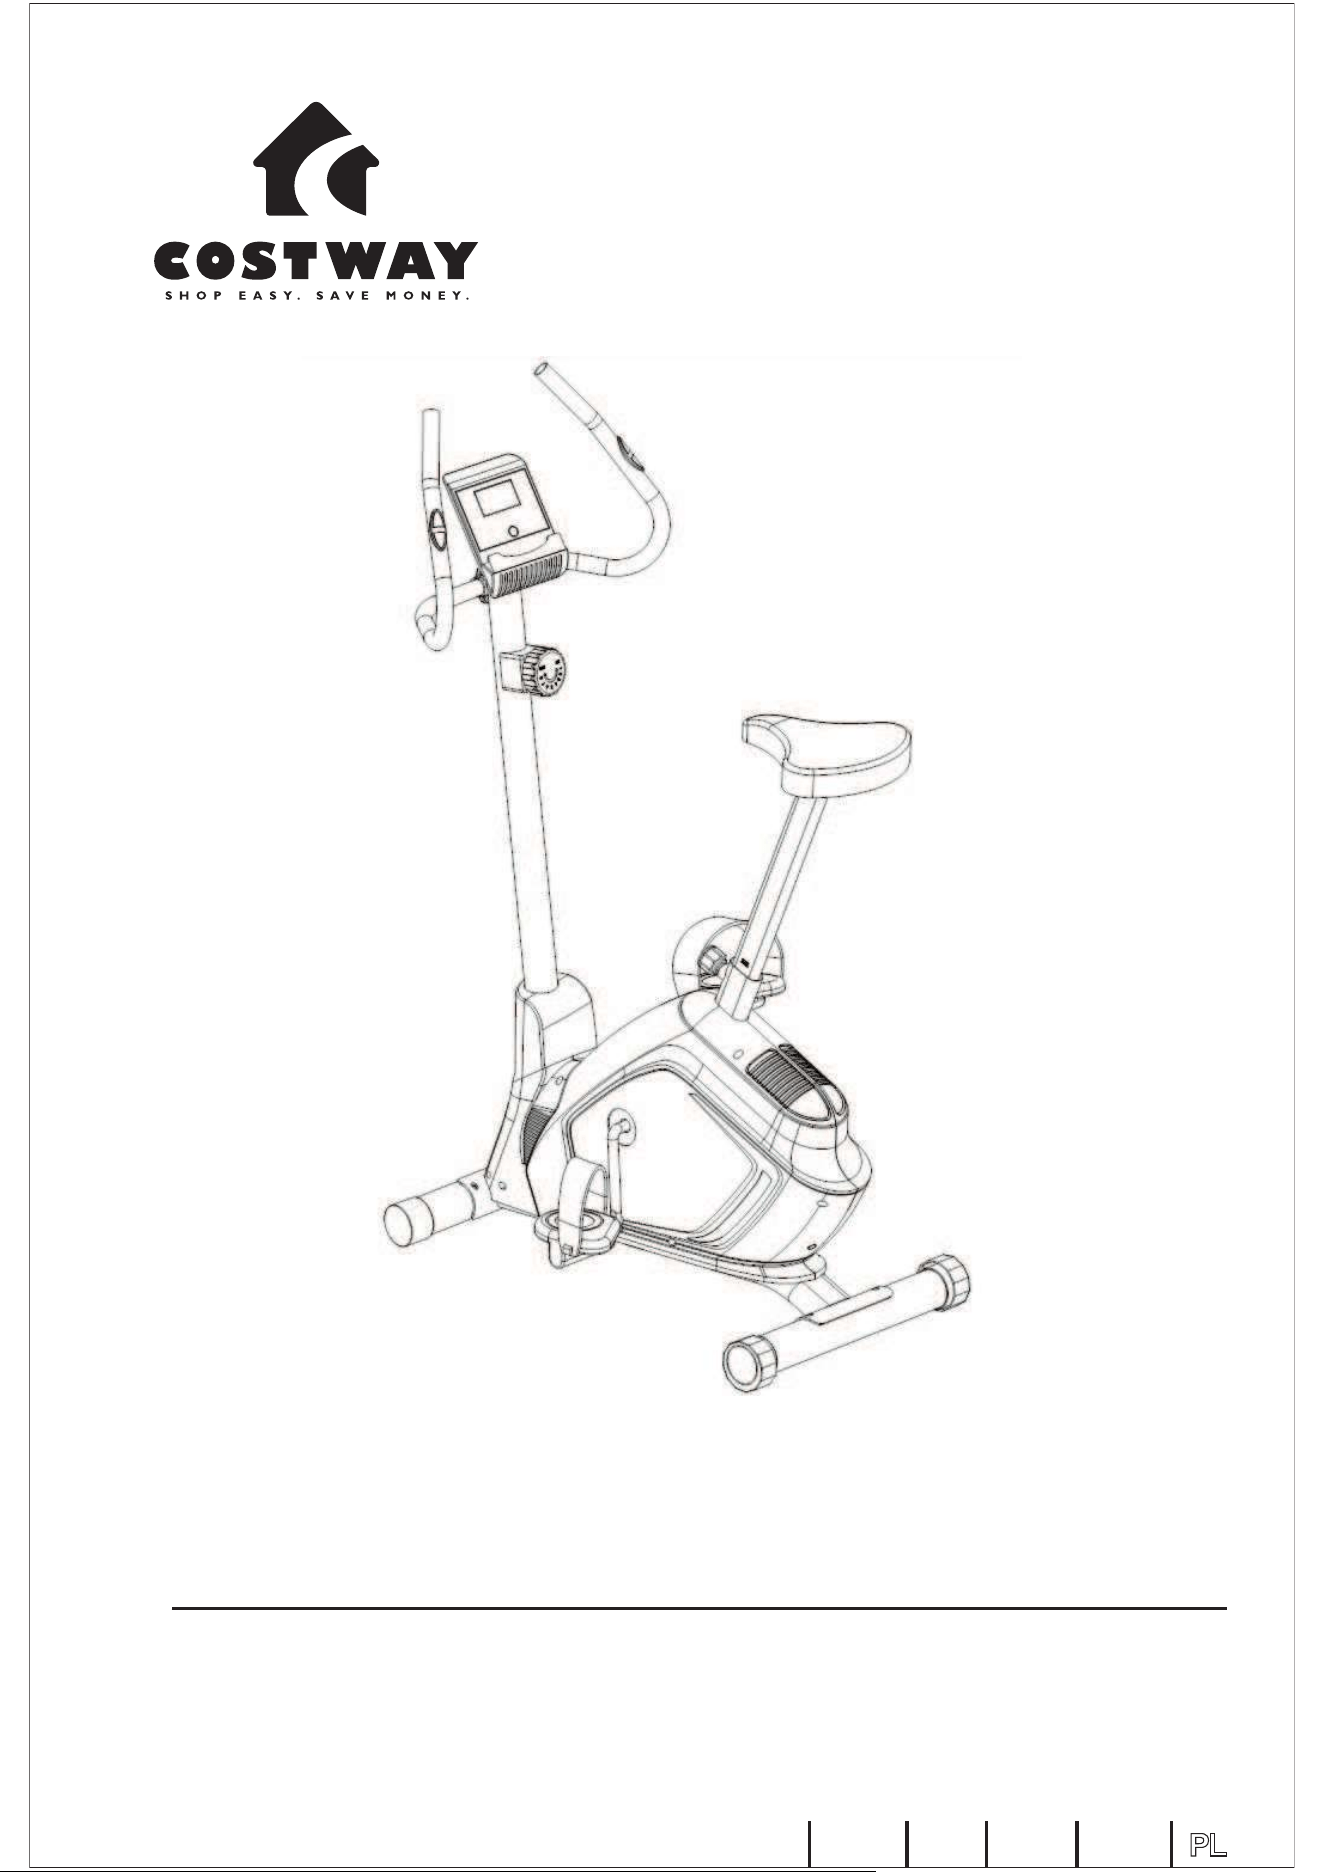
Magnetic Exercise Bike
SP37363
EN DE FR ES IT PL

DEAR CUSTOMER,
PLEASE READ THIS INSTRUCTION VERY CAREFULLY BEFORE USING THE ITEM.
Note the following precaution before assembling or operating the machine.
1 Assemble the machine exactly as the descriptions in the instruction manual.
2 Check all the screws, nuts and other connections before using the machine for the first time and
ensure that the trainer is in the safe condition.
3 Set up the machine in a dry level place and leave it away from moisture and water.
4 Place a suitable base (e.g. rubber mat, wooden board etc.) beneath the machine in the area of
assembly to avoid dirt and etc..
5 Before beginning training, remove all objects within a radius of 2 meters from the machine.
6 Do not use aggressive cleaning articles to clean the machine, Only use the supplied tools or
suitable tools of your own to assemble the machine or repair any parts of machine. Remove drops
of sweat from the machine immediately after finishing training.
7 Your health can be affected by incorrect or excessive training. Consult a doctor before
beginning a training program. He can define the maximum setting (Pulse. Watts. Duration of
training etc) to which you may train yourself and can get precise information during training. This
machine is not suitable for therapeutic purpose.
8 Only do training on the machine when it is in normal working condition. Use only original
spare parts for any necessary repairs.
9 This machine can be used for only one person’s training at a time.
10 Wear training clothes and shoes, which are suitable for fitness training with the machine. Your
training shoes should be appropriate for the trainer.
11 If you have a feeling of dizziness, sickness or other abnormal symptoms, please stop training
and consult a doctor as soon as possible.
12 People such as children and handicapped persons should only use the machine in the presence
of another person who can give aid and advice.
13 The power of the machine increases as the speed increases, and vice versa. The machine is
equipped with adjustable knob, which can adjust the resistance. Reduce the resistance by turning
the adjusting knob for the resistance setting towards stage 1. Increase the resistance by turning the
adjusting knob for the resistance setting towards stage 8. The maximum user’s weight is 110kgs
14 Care must be taken when lifting or moving the equipment so as not to injure your back.
Always use proper lifting techniques and/or use assistance.
IMPORTANT SAFETY NOTICE:
02
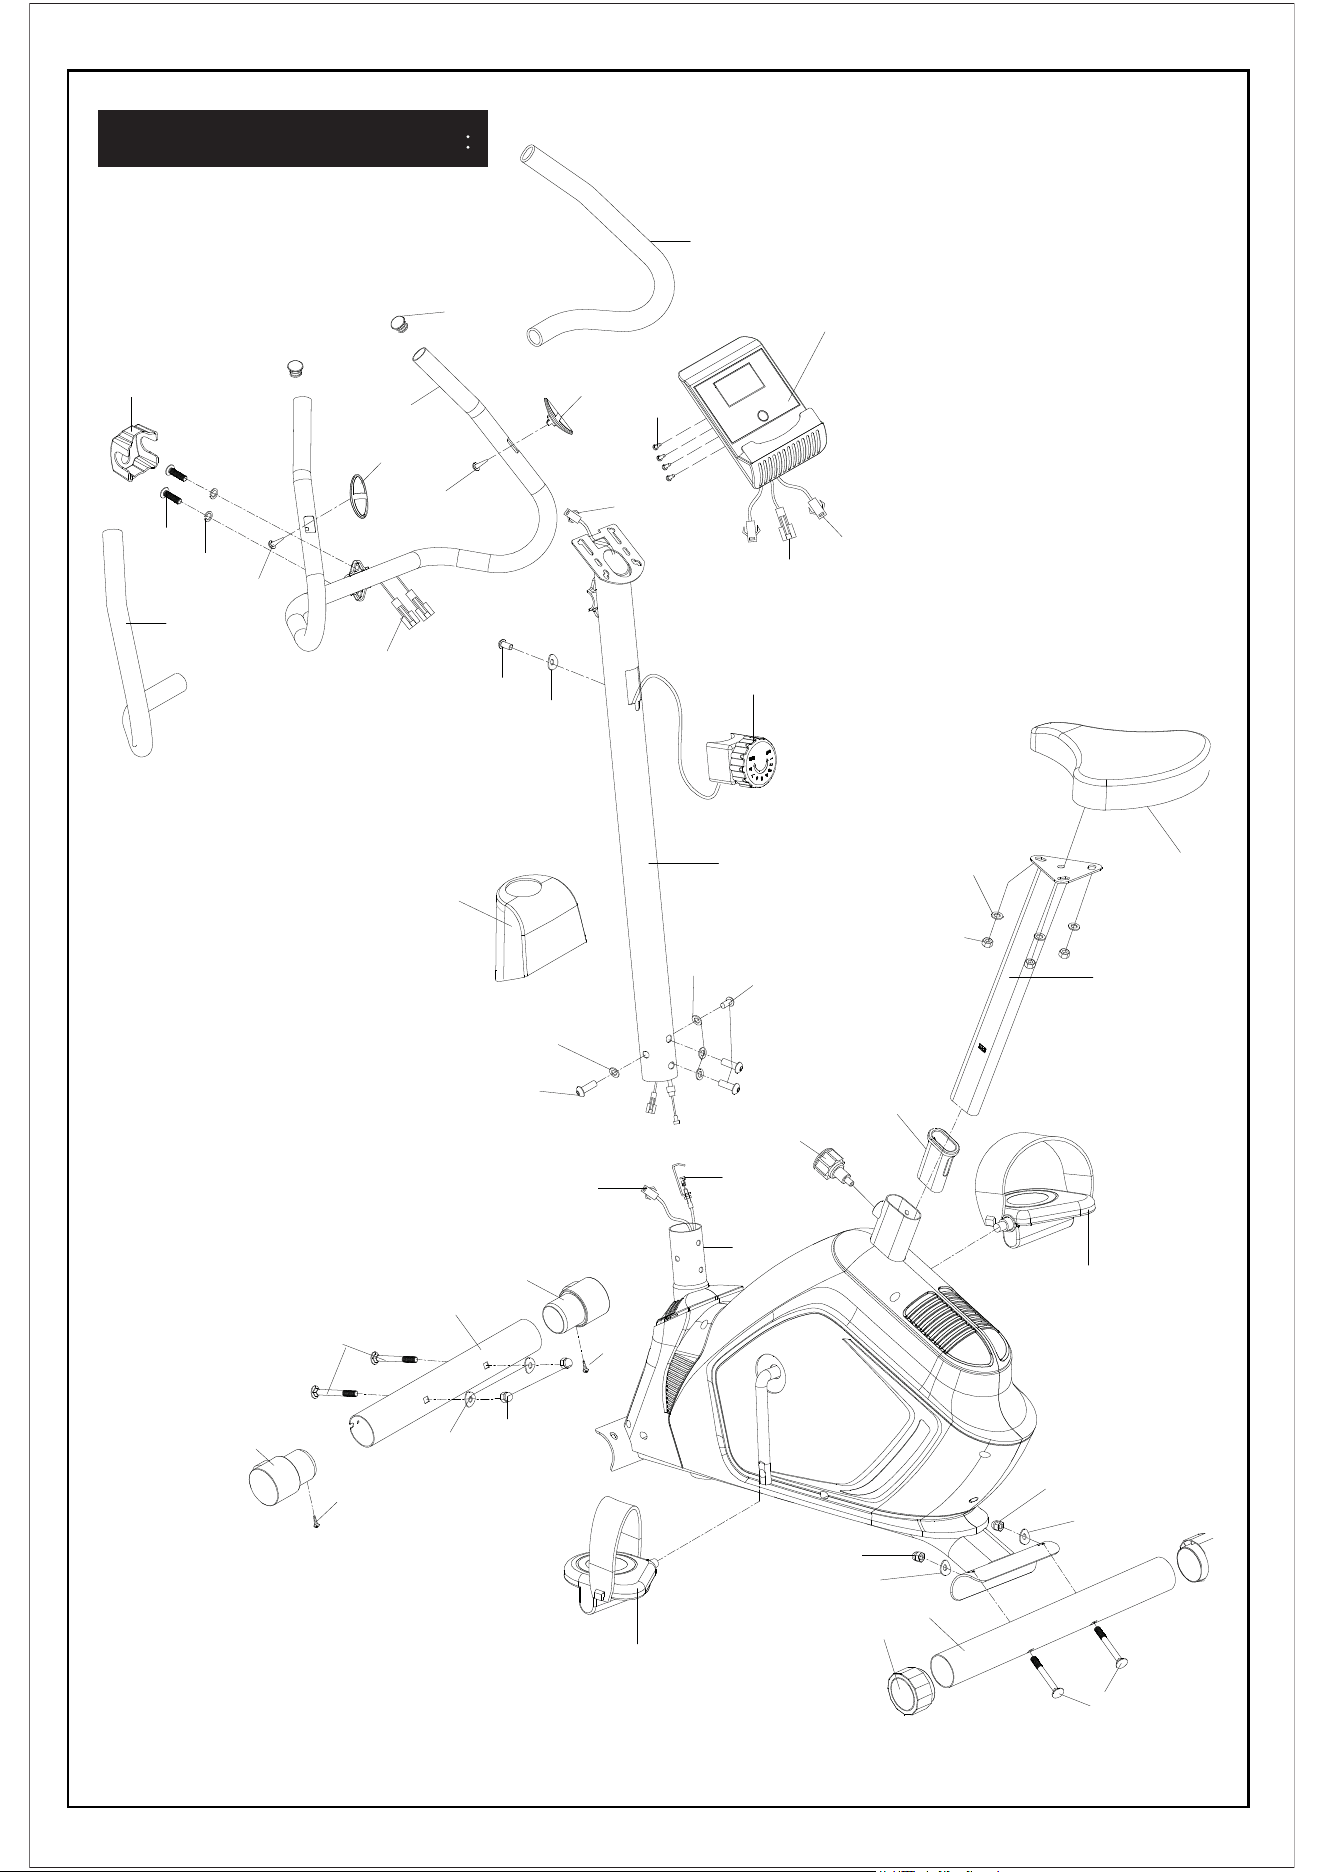
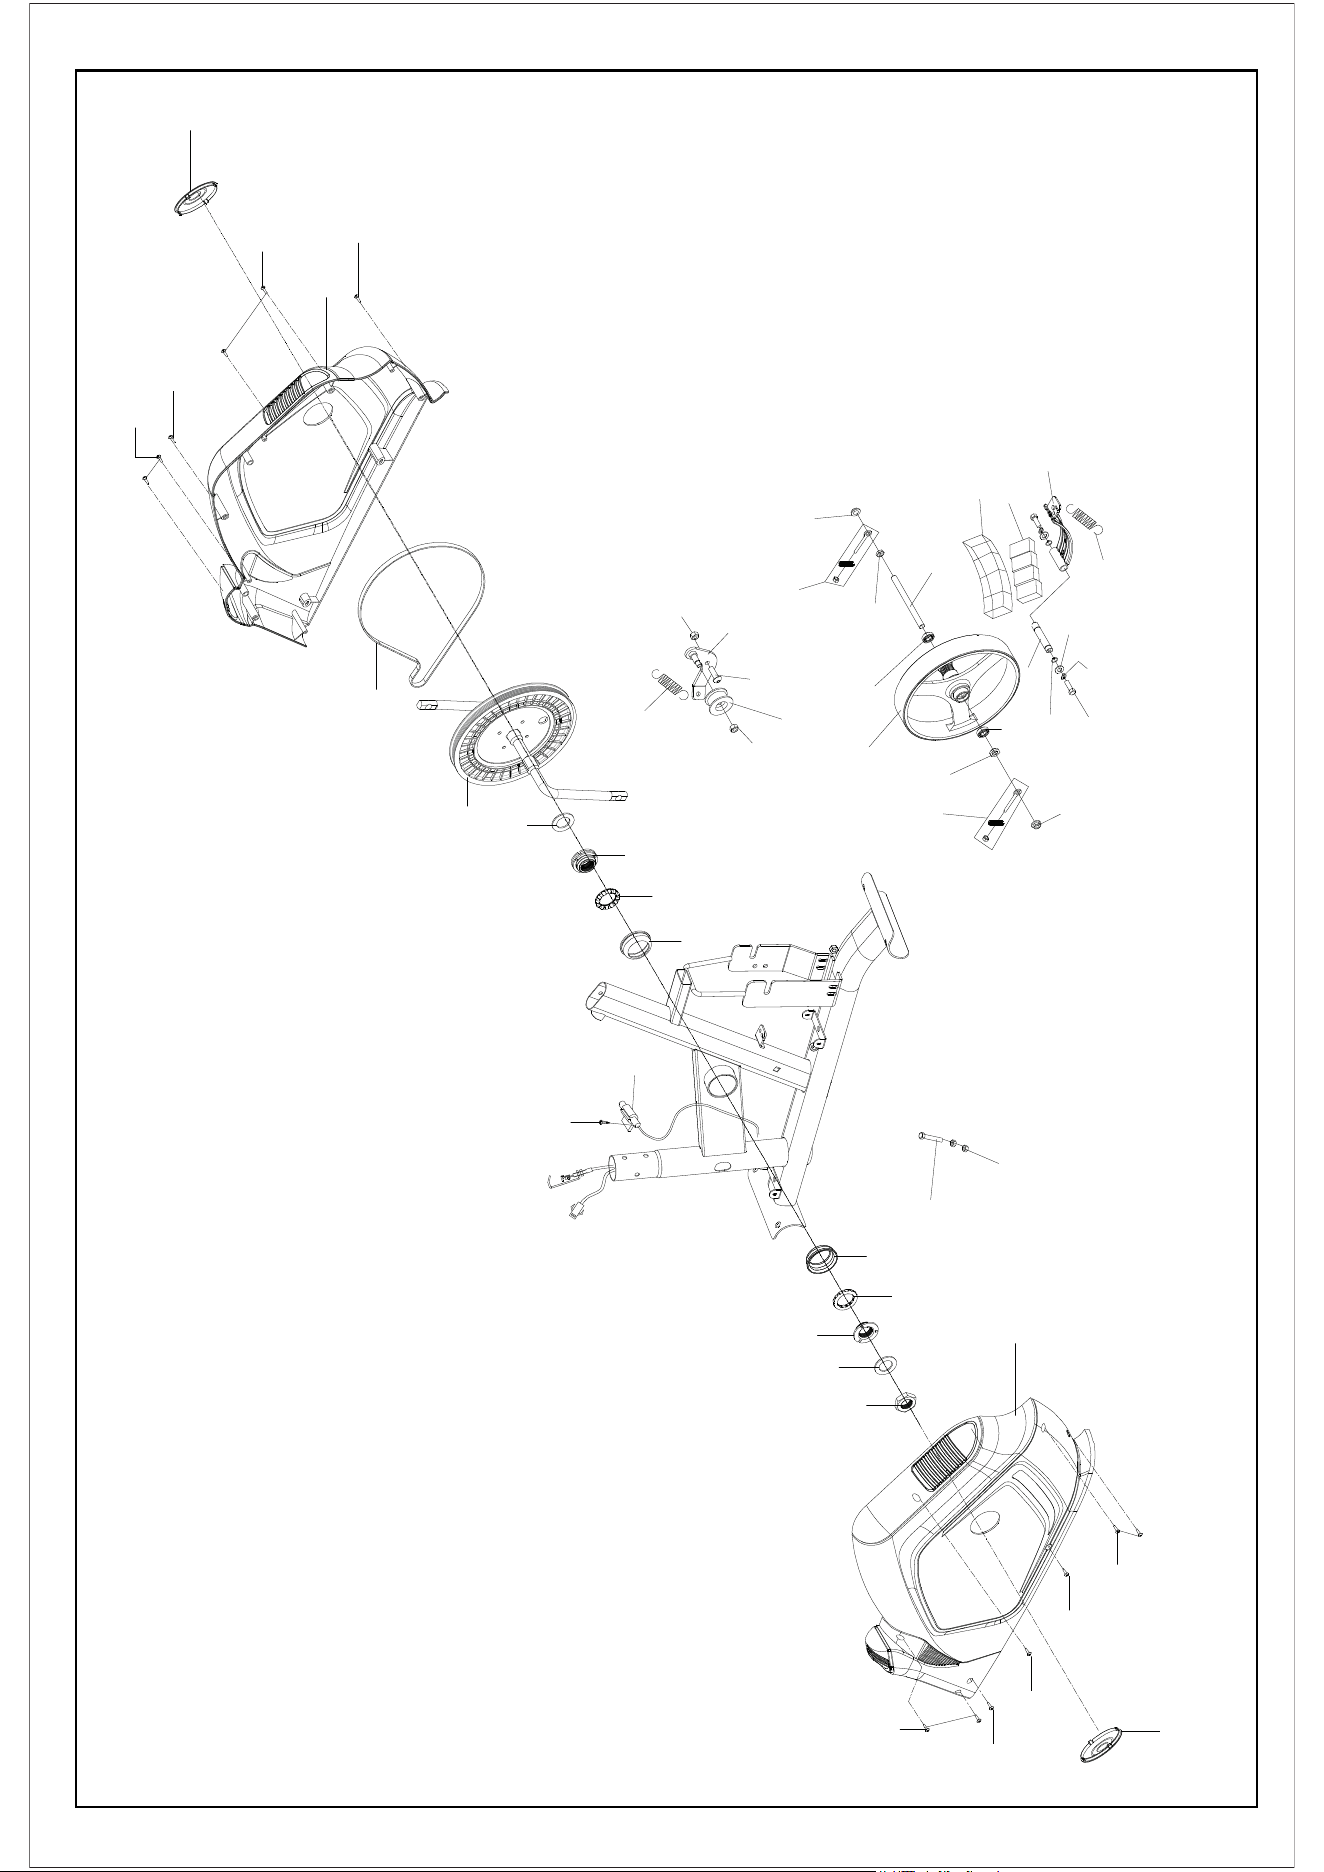
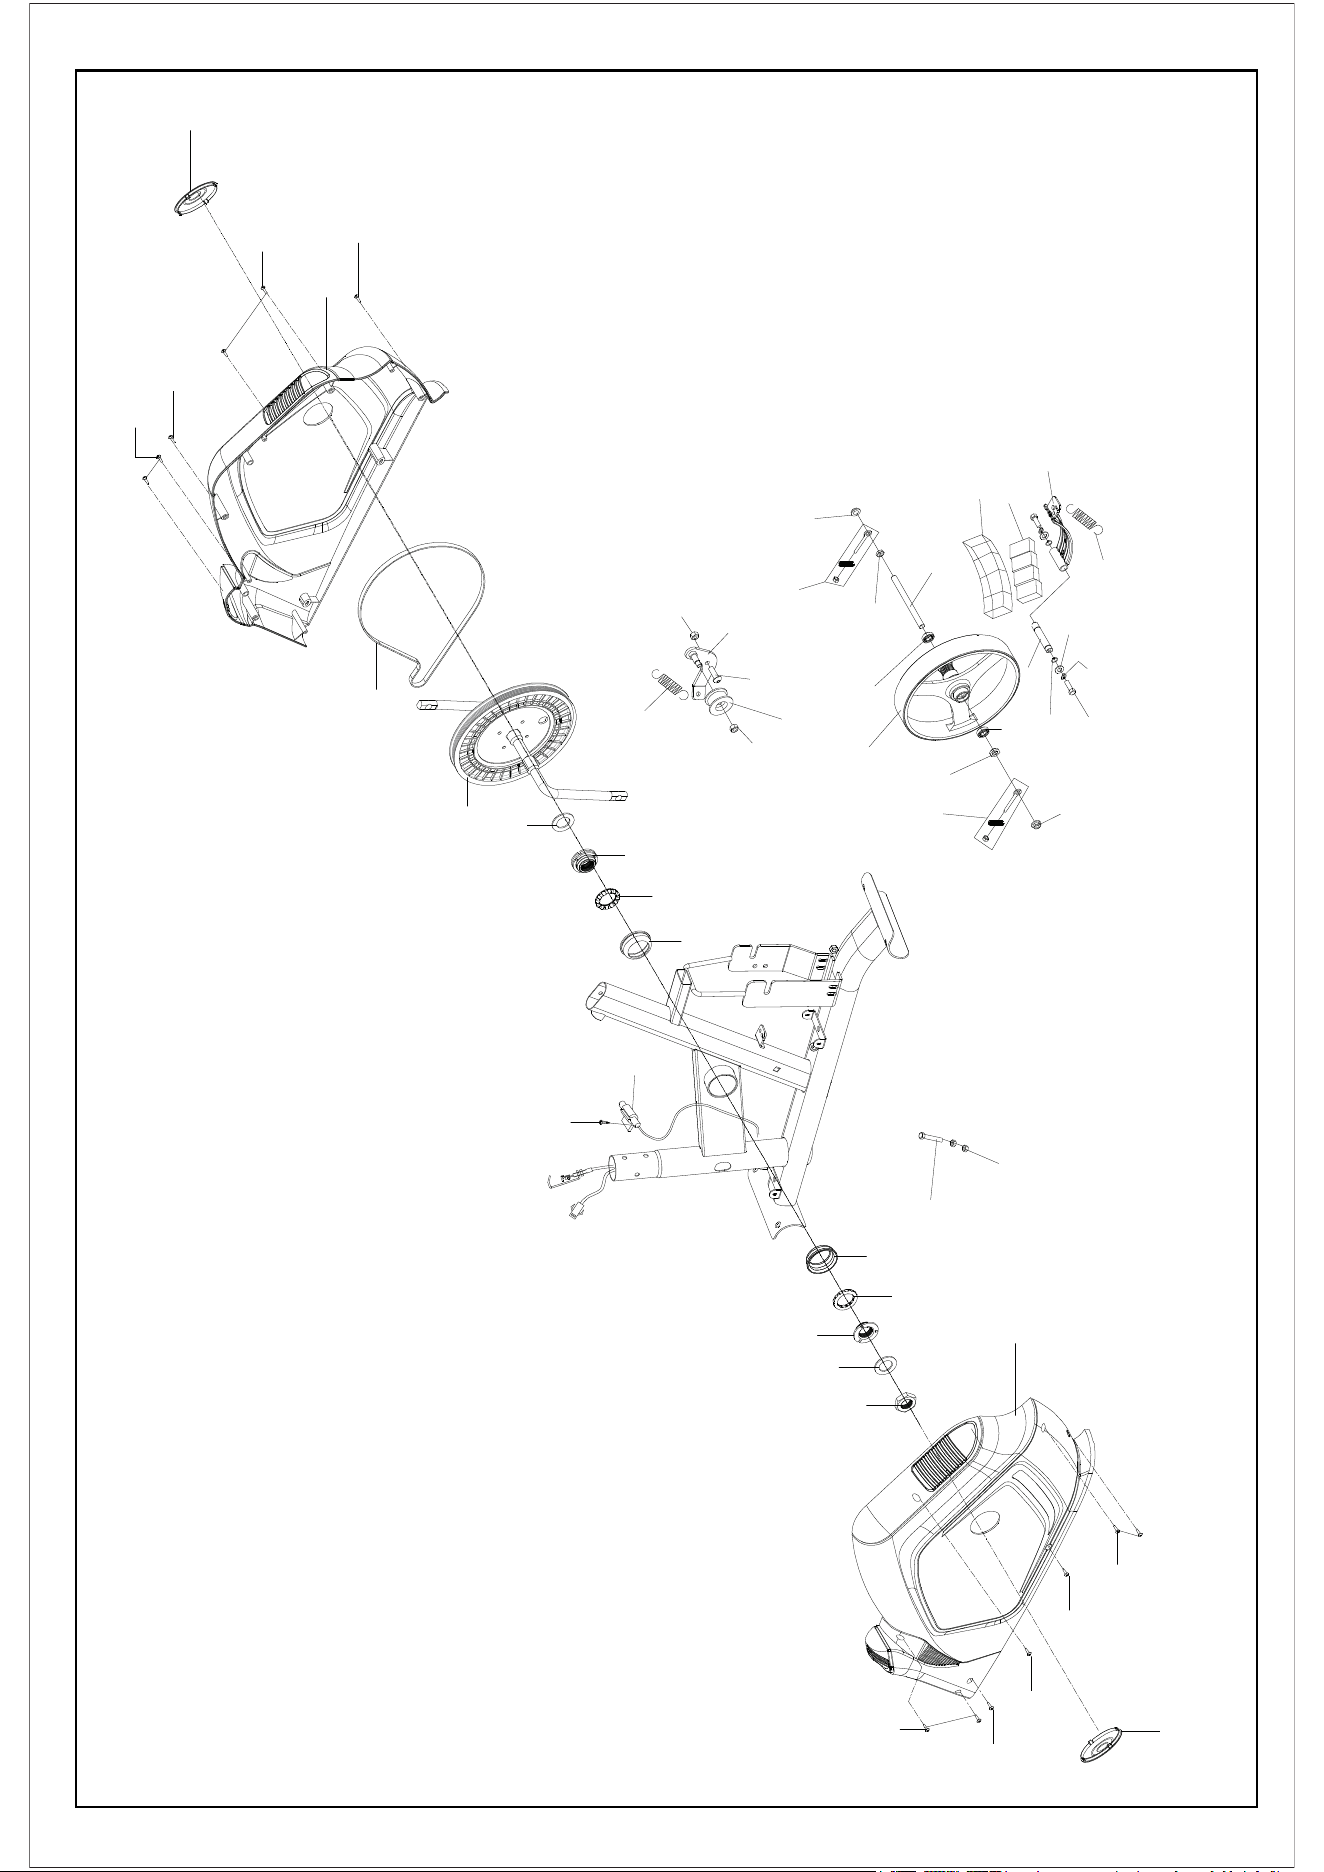
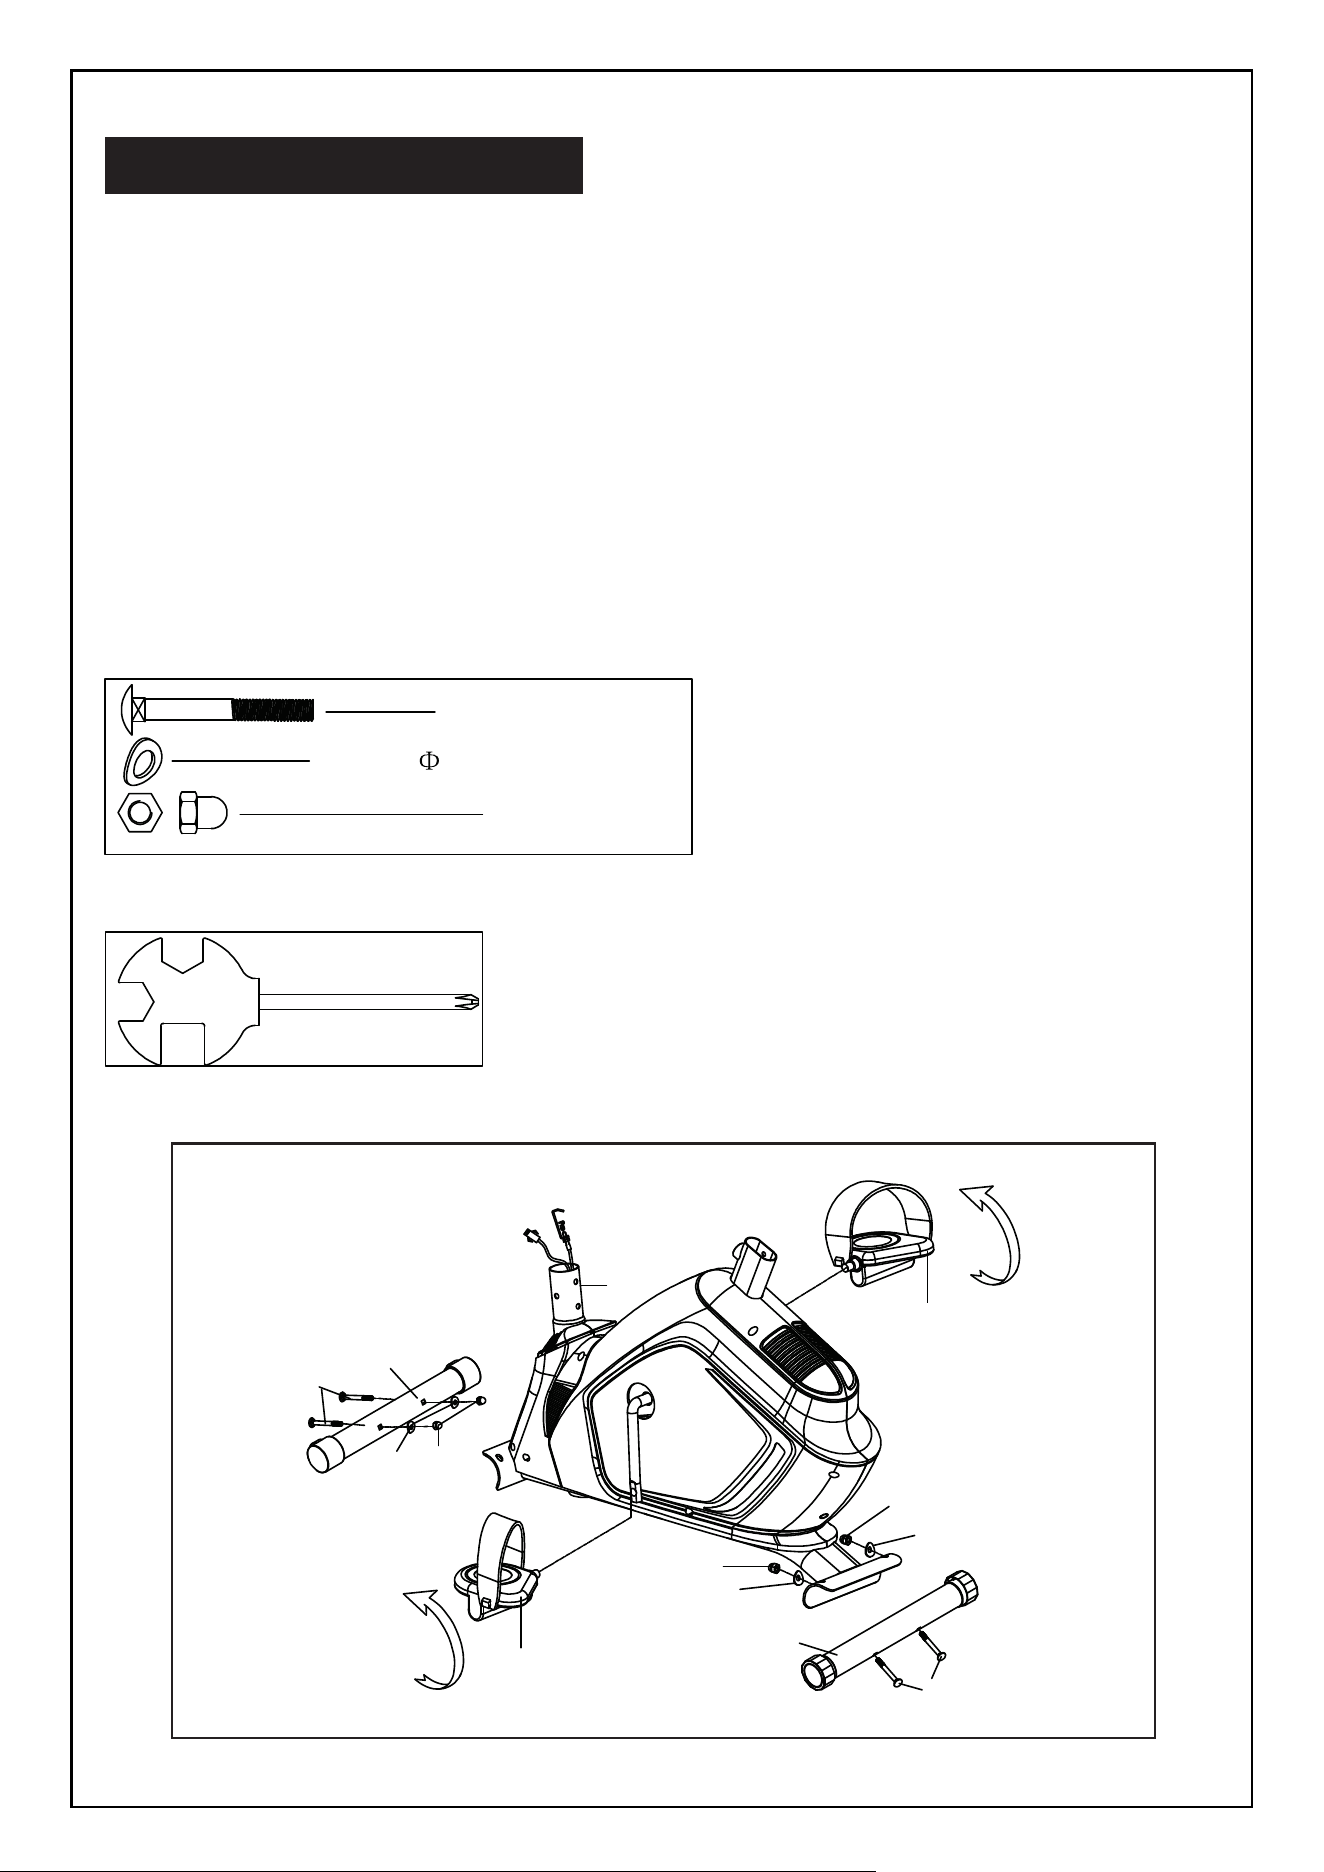
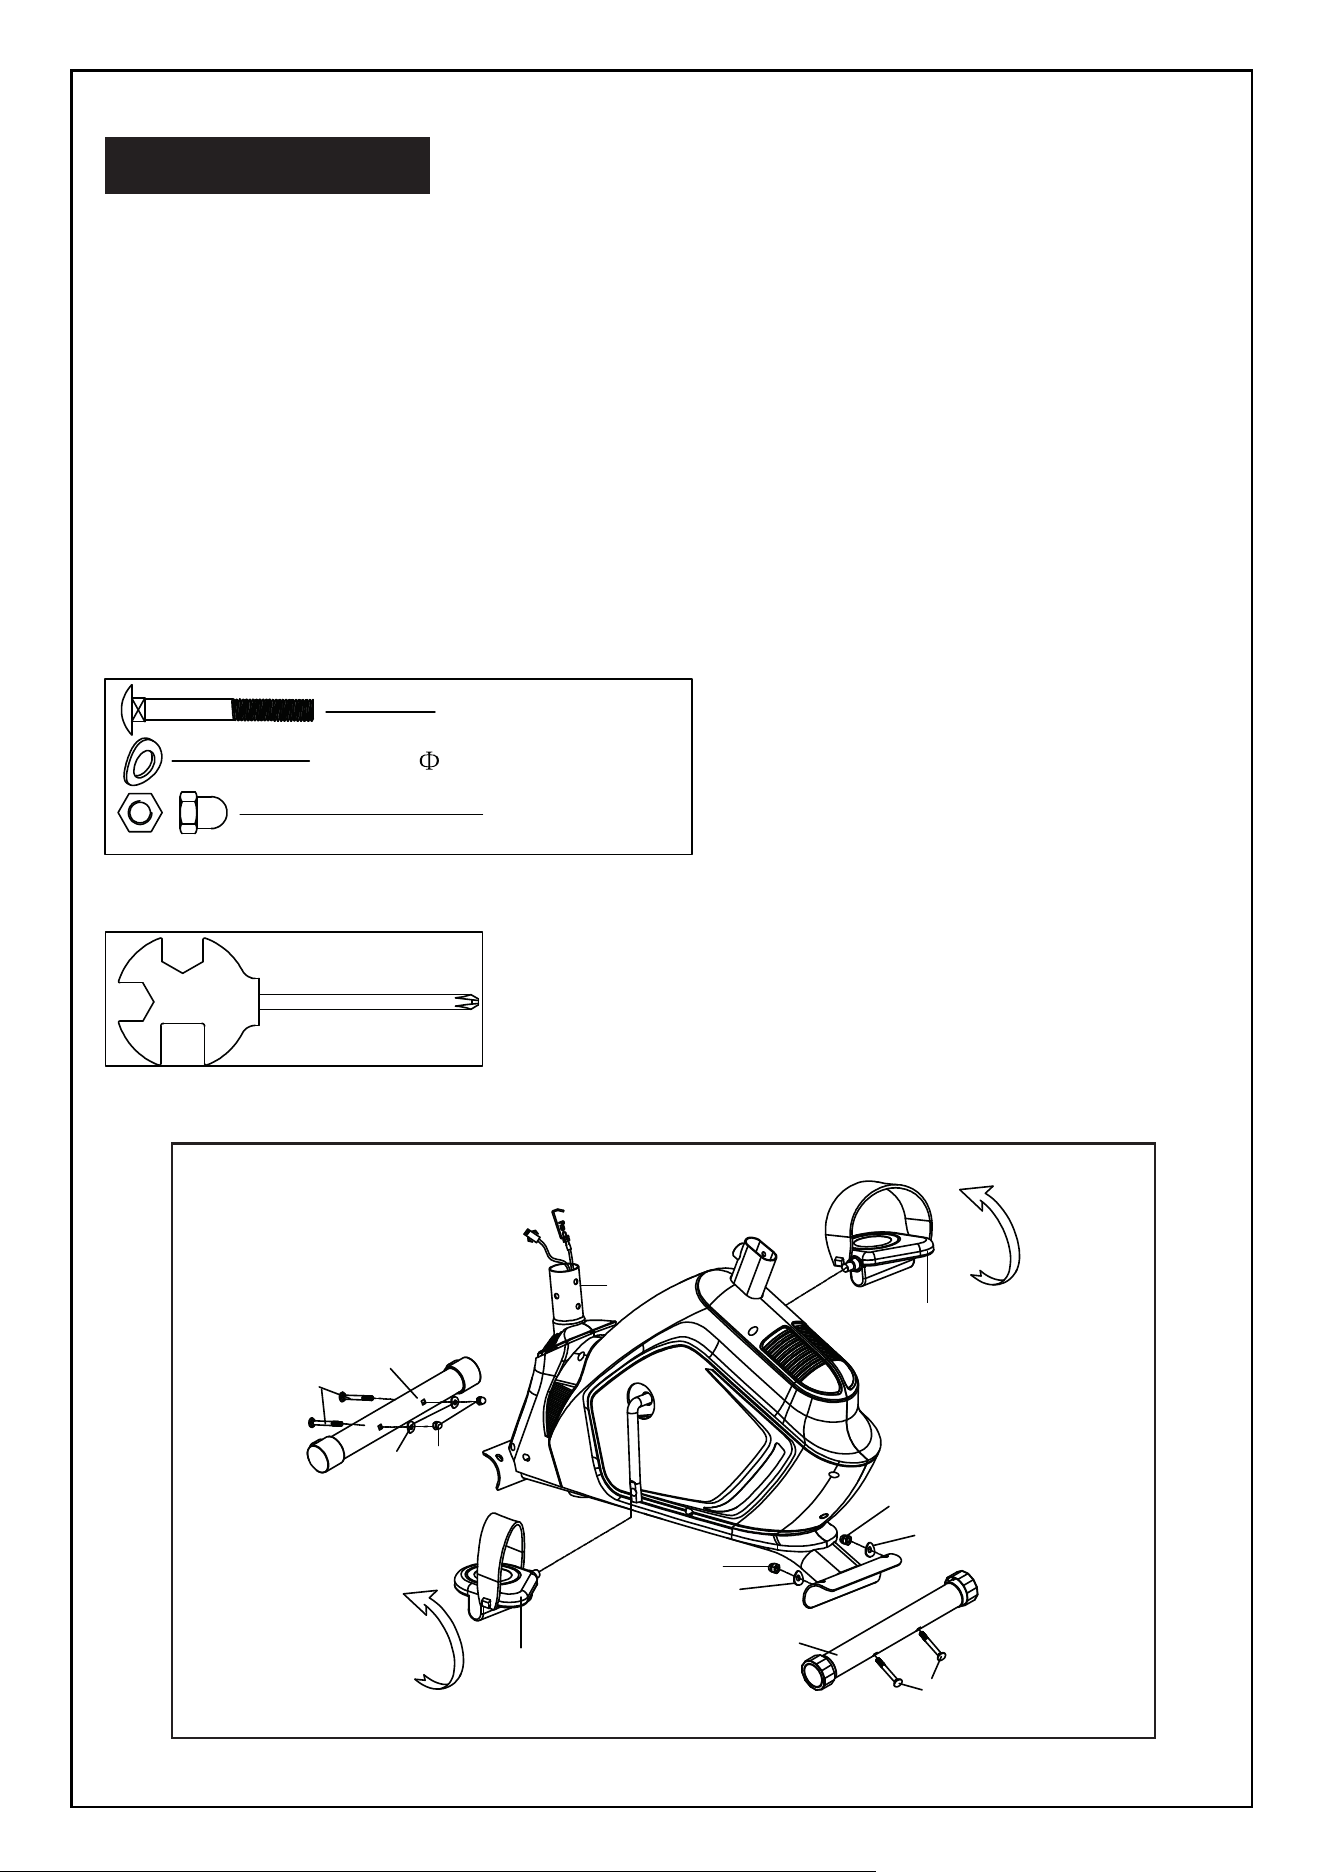
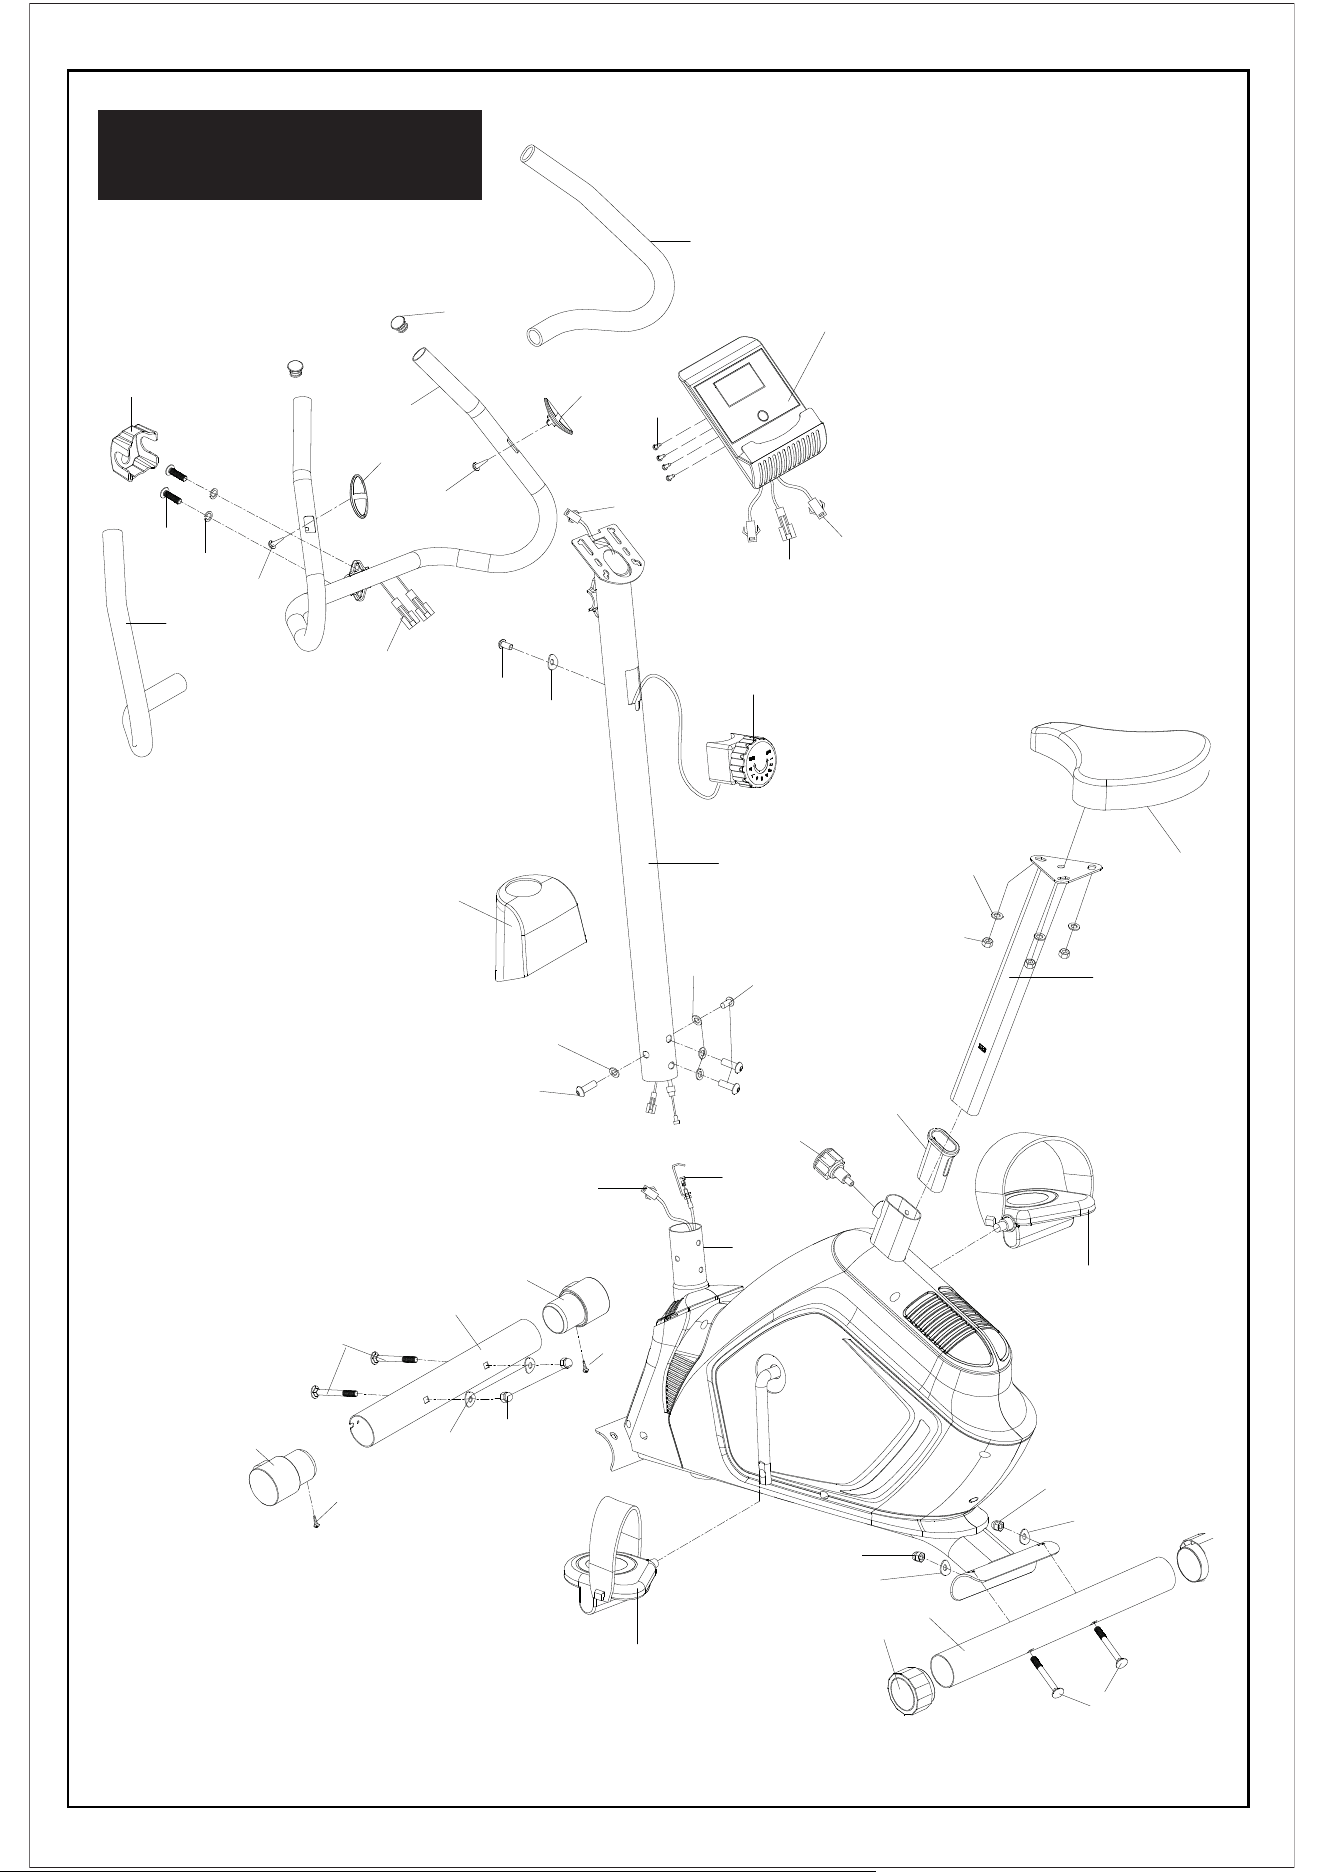
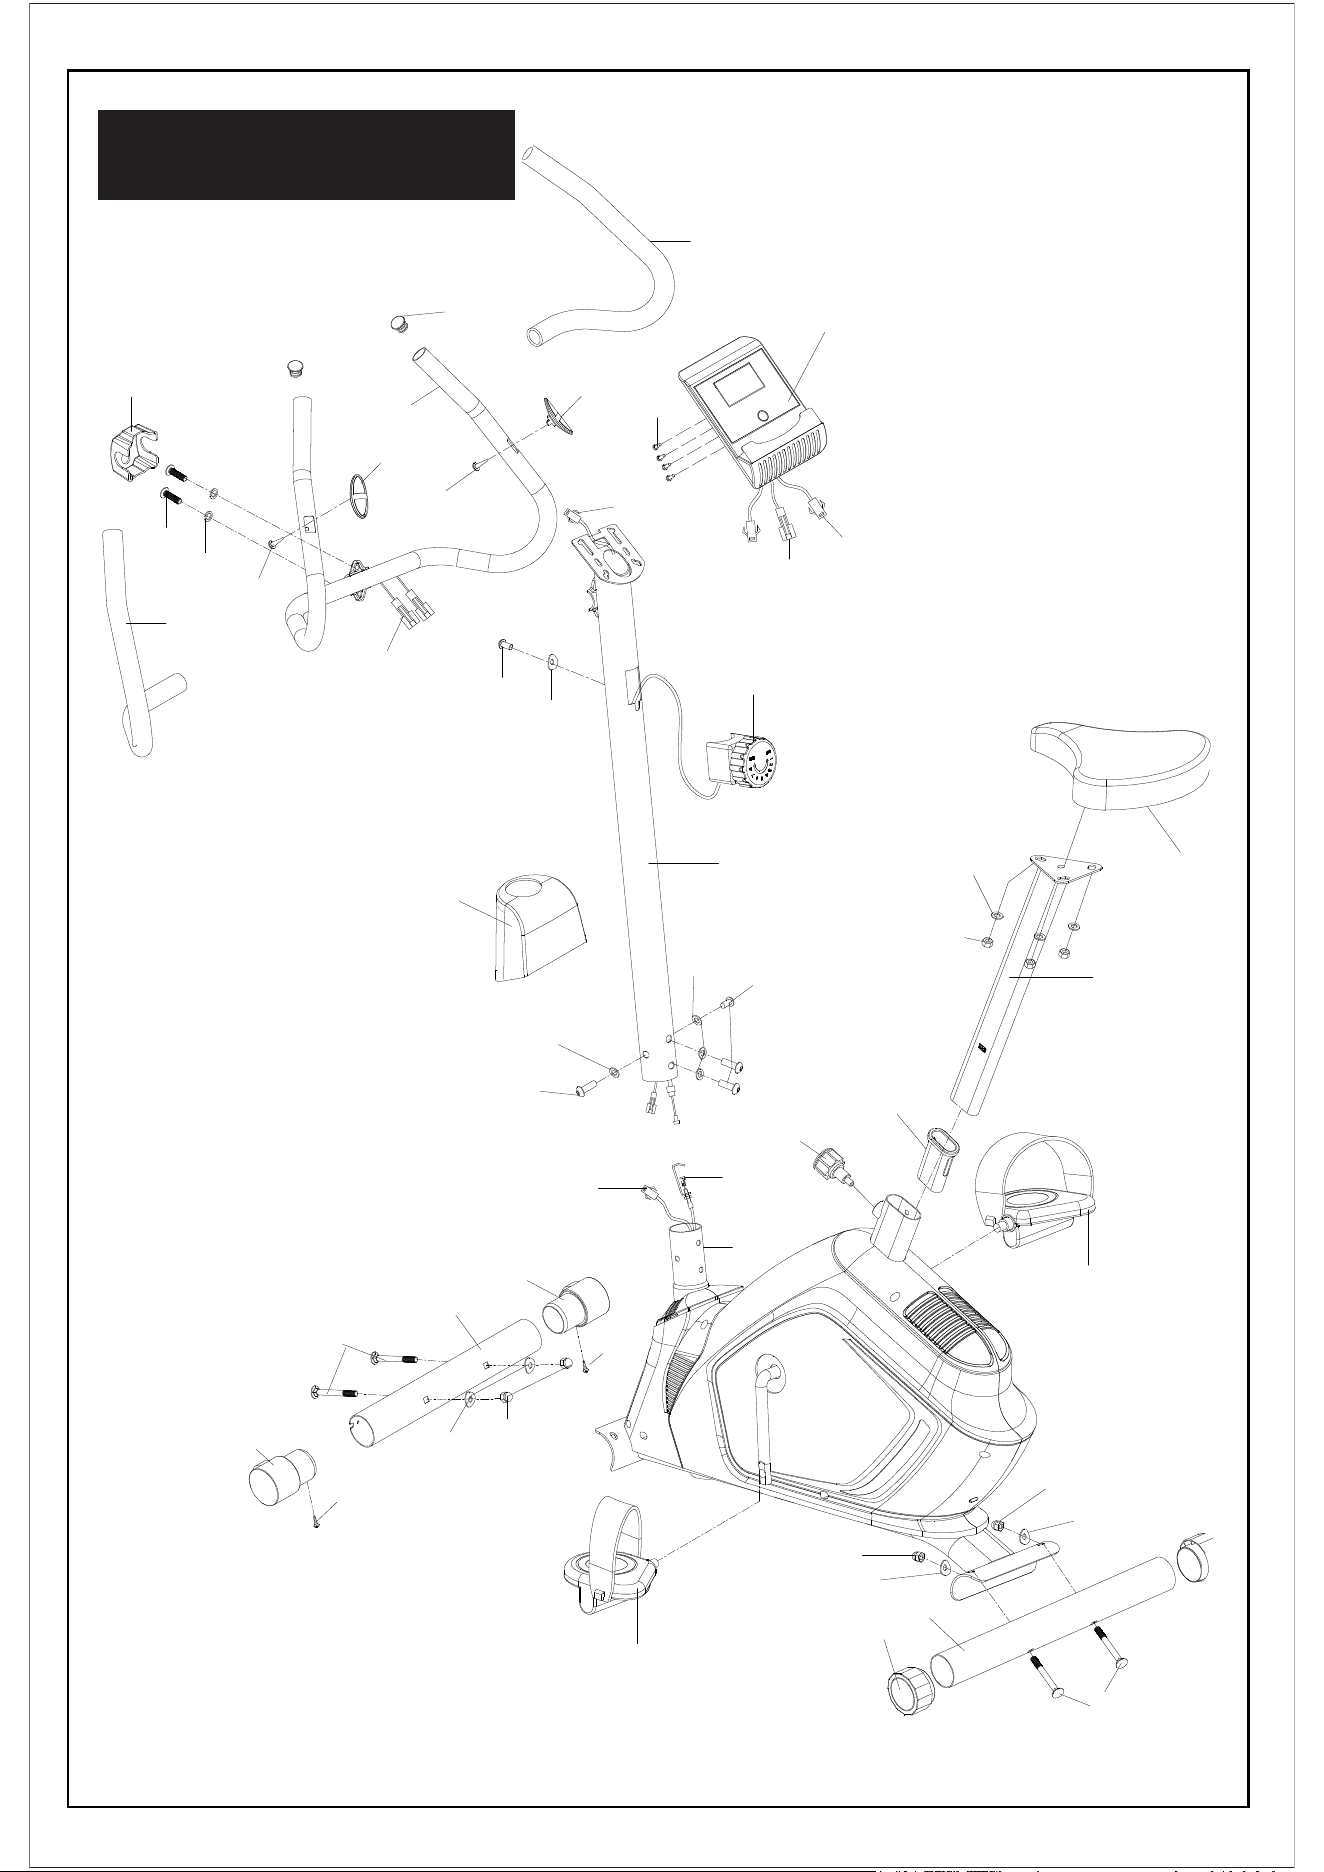
Exploded View & Parts List
1b
1a
2
12
11
10
21
22
23
24
25
21
26
2
7
2
7
2
3
1
4
5
6
7
8
9
4
7
8
13
14
15
16
17
18
19
20
18
28L
28R
29
30
31
31
33
32
40
18
17
25
18
25
18
38
39
57
03
64
63
65
66
67
68
60
61
62
63
64
56
58
58
59L
59R
56
64
42
41
75
48
55
75
54
76
69
72
74
69
73
73
70
70
71
47
53
43
44
49
46
45
51
50
52
58
58
58
58
58
58
58
77
78
04
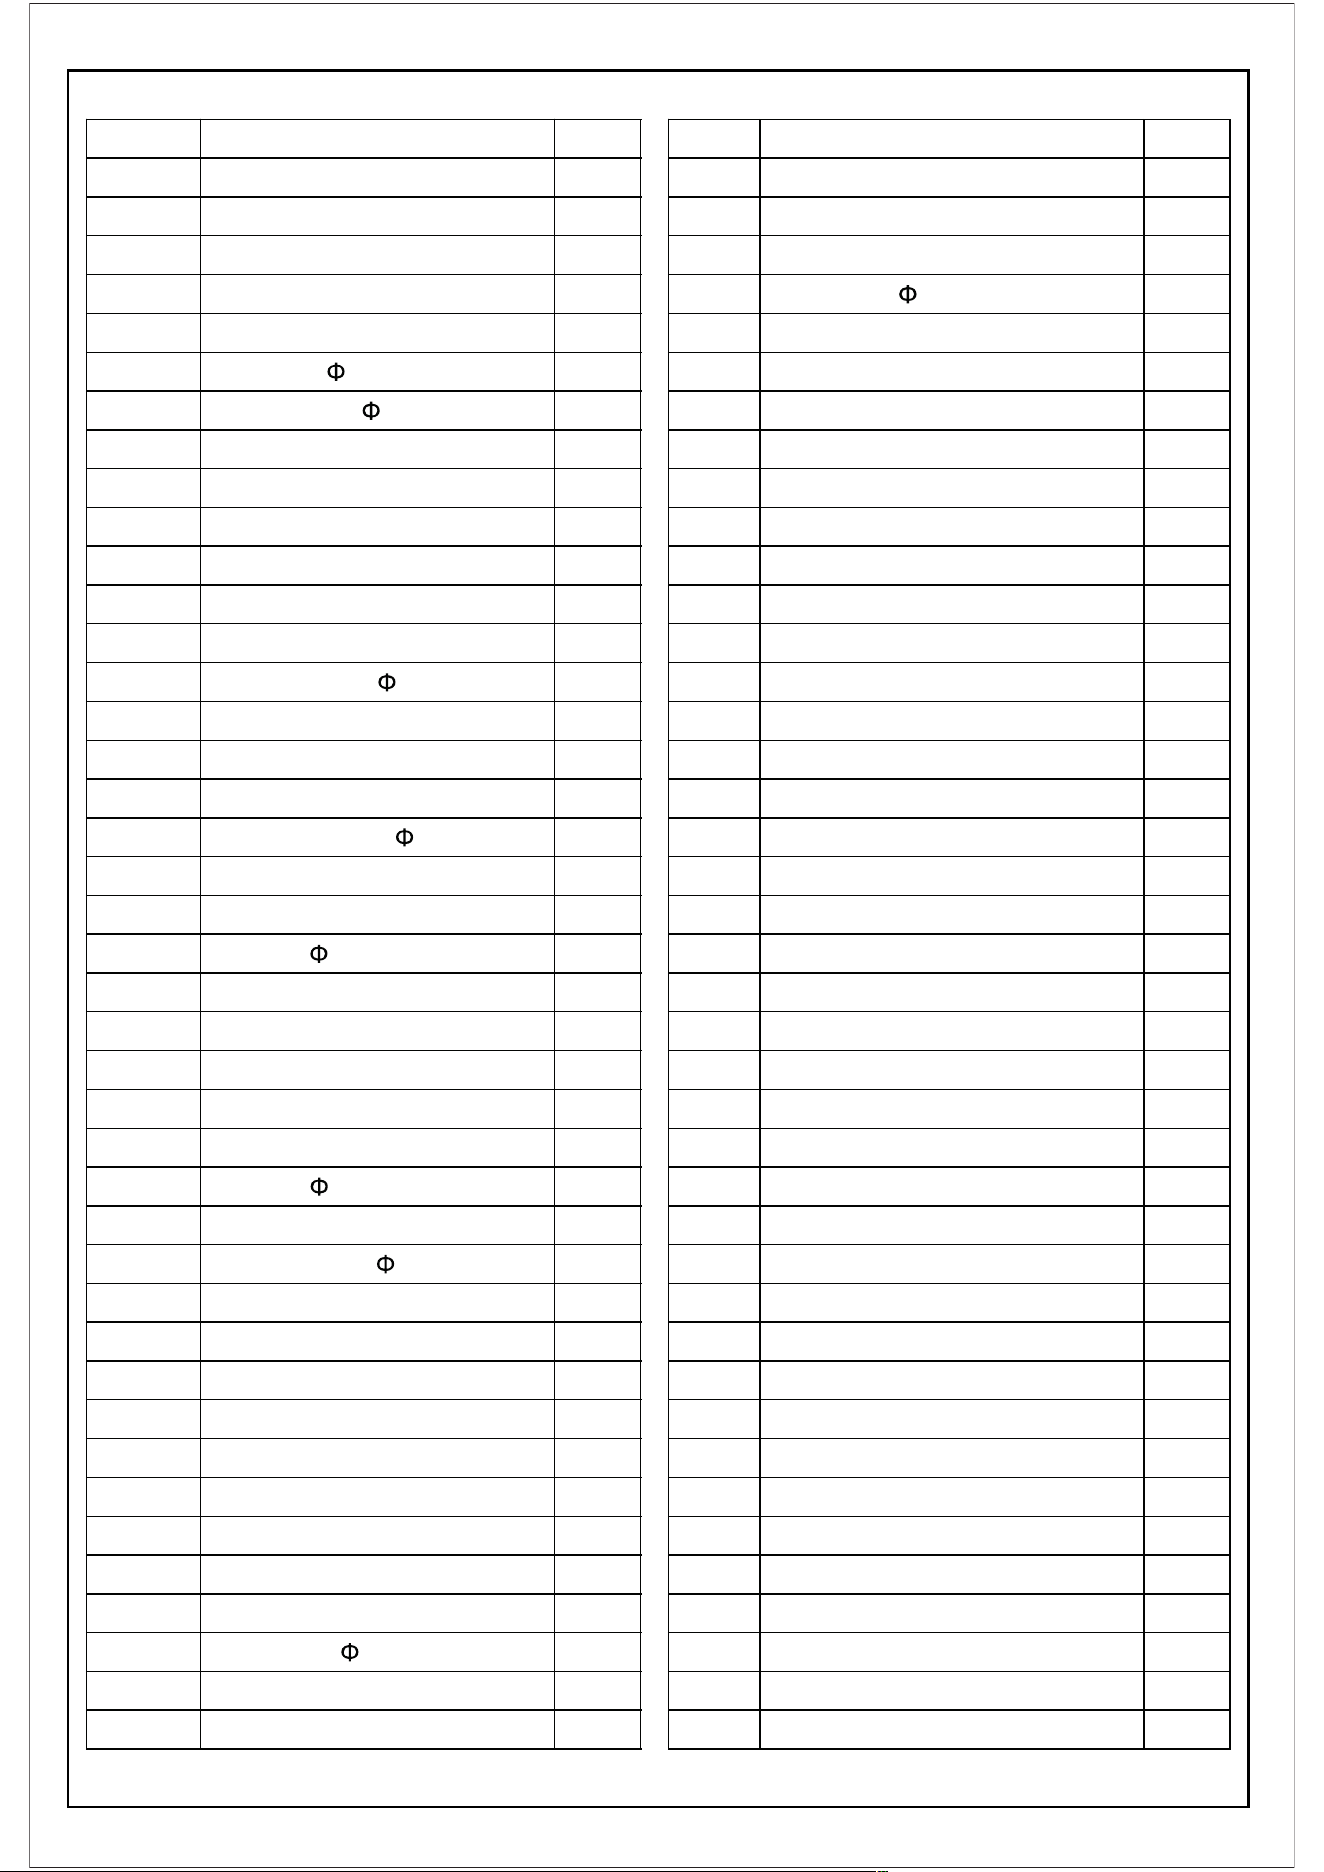
NO NAME QUA. NO NAME QUA.
1 1 42 Hexagon nut M6 2
2 Crosshead screw M5*10 4 43 Axle 1
3 / / 44 Snap ring d12 2
4 Foam 2 45 Washer d6* 16*1.5* 2
5 Handlebar 1 46 Spring washerd6 2
6 End cap 25 2 47 Hexagon thin nut M10*1.0 1
7 25 2 48 Pinch roller 1
8 Crosshead screw ST4.2*19 2 49 Hexagon bolt M6*20 2
9 2 50 Magnet 4
10 Spring washer d8 2 51 Plastic lattice 1
11 Screw M8*30 2 52 Tension spring 1
12 Small cover 1 53 Magnetic board 1
13 Crosshead screw M5*25 1 54 U bracket 1
14 Arc washer d6* 20*R25*1.5 1 55 Screw M8*19 1
15 Tension control 1 56 Crank cover 2
16 Support tube 1 57 Front cover 1
17 Bolt M8*16 4 58 Crosshead screw ST4.2*16 13
18 Arc washer d8* 20*1.5*R30 8 59L/R Chain cover 2
19 Middle wire 1 60 Nut 1
20 Sensor wire 1 61 Washer 1
21 End cap 60 2 62 Nut1 1
22 Front stabilizer 1 63 2
23 Carriage bolt M8*72 4 64 Collar housing 2
24 Tension wire 1 65 Nut 2 1
25 Domed nut M8 4 66 Washer 1
26 Rear stabilizer 1 67 Belt pulley 1
27 End cap 60 2 68 Belt 1
28L/R Pedal L/ R 1/1 69 Bolt group 2
29 Knob M16*1.5* 37 1 70 Bearing 2
30 Seat tube 1 71 Axle 1
31 Crosshead screw ST3.0*10 2 72 Hexagon flange nut M10*1.0 1
32 Bushing 1 73 Hexagon thin nut M10*1.0 1
33 Sliding tube 1 74 Flywheel 1
34 / / 75 Nylon nut M8 1
35 / / 76 Tension spring 1
36 / / 77 Crosshead screw ST4.2*16 1
37 / / 78 Sensor socket 1
38 Nylon nut M8 3 Cross-end wrench S13-14-15 1
39 Washer d8* 20 *1.5 3 Spanner S6 1
40 Seat 1
41 Hexagon bolt M6*30 1
Electronic meter
Pulse sensor
Pulse sensor wire
Collar ball bearing
05
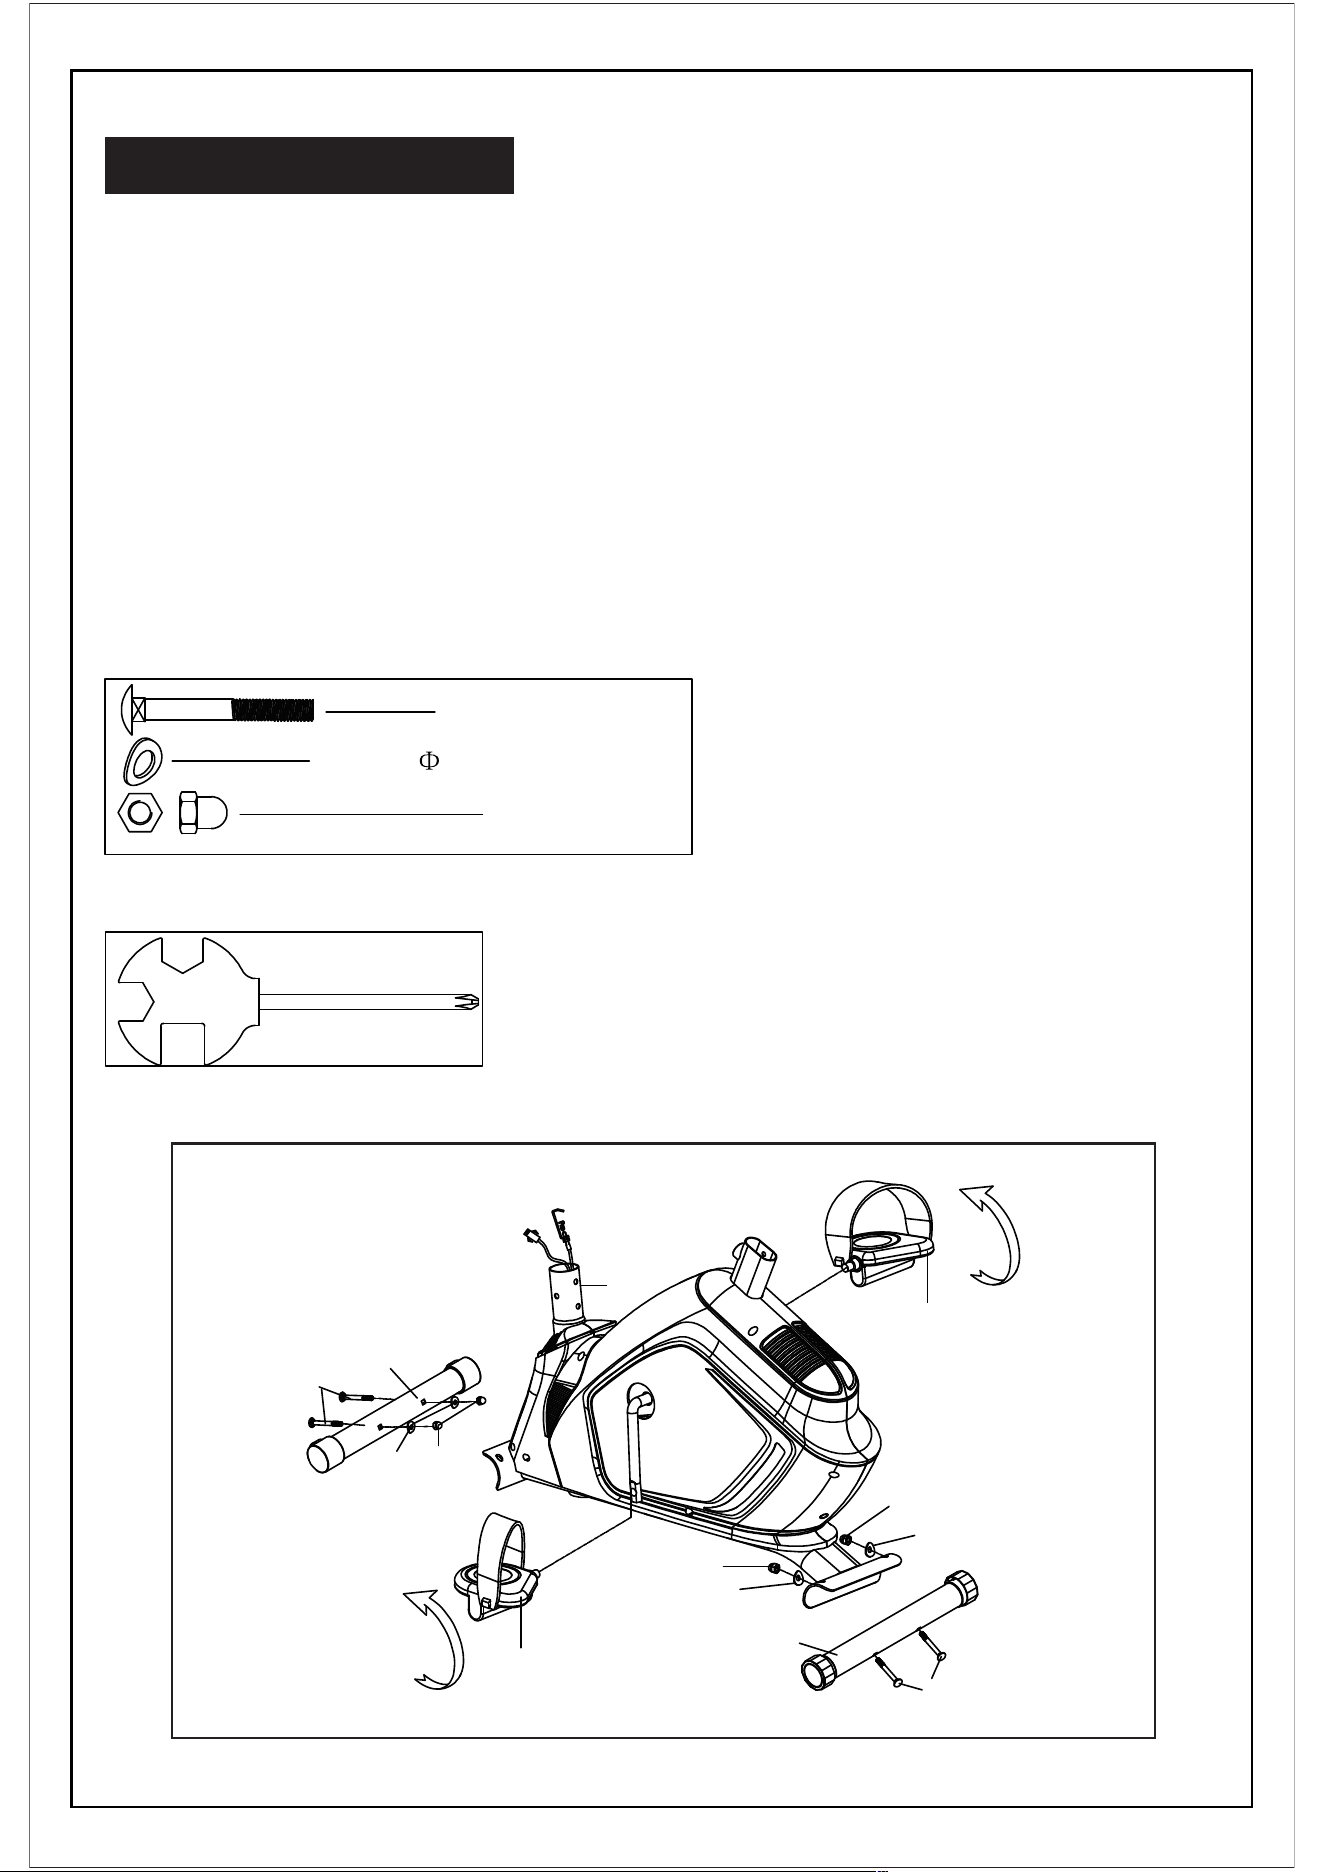
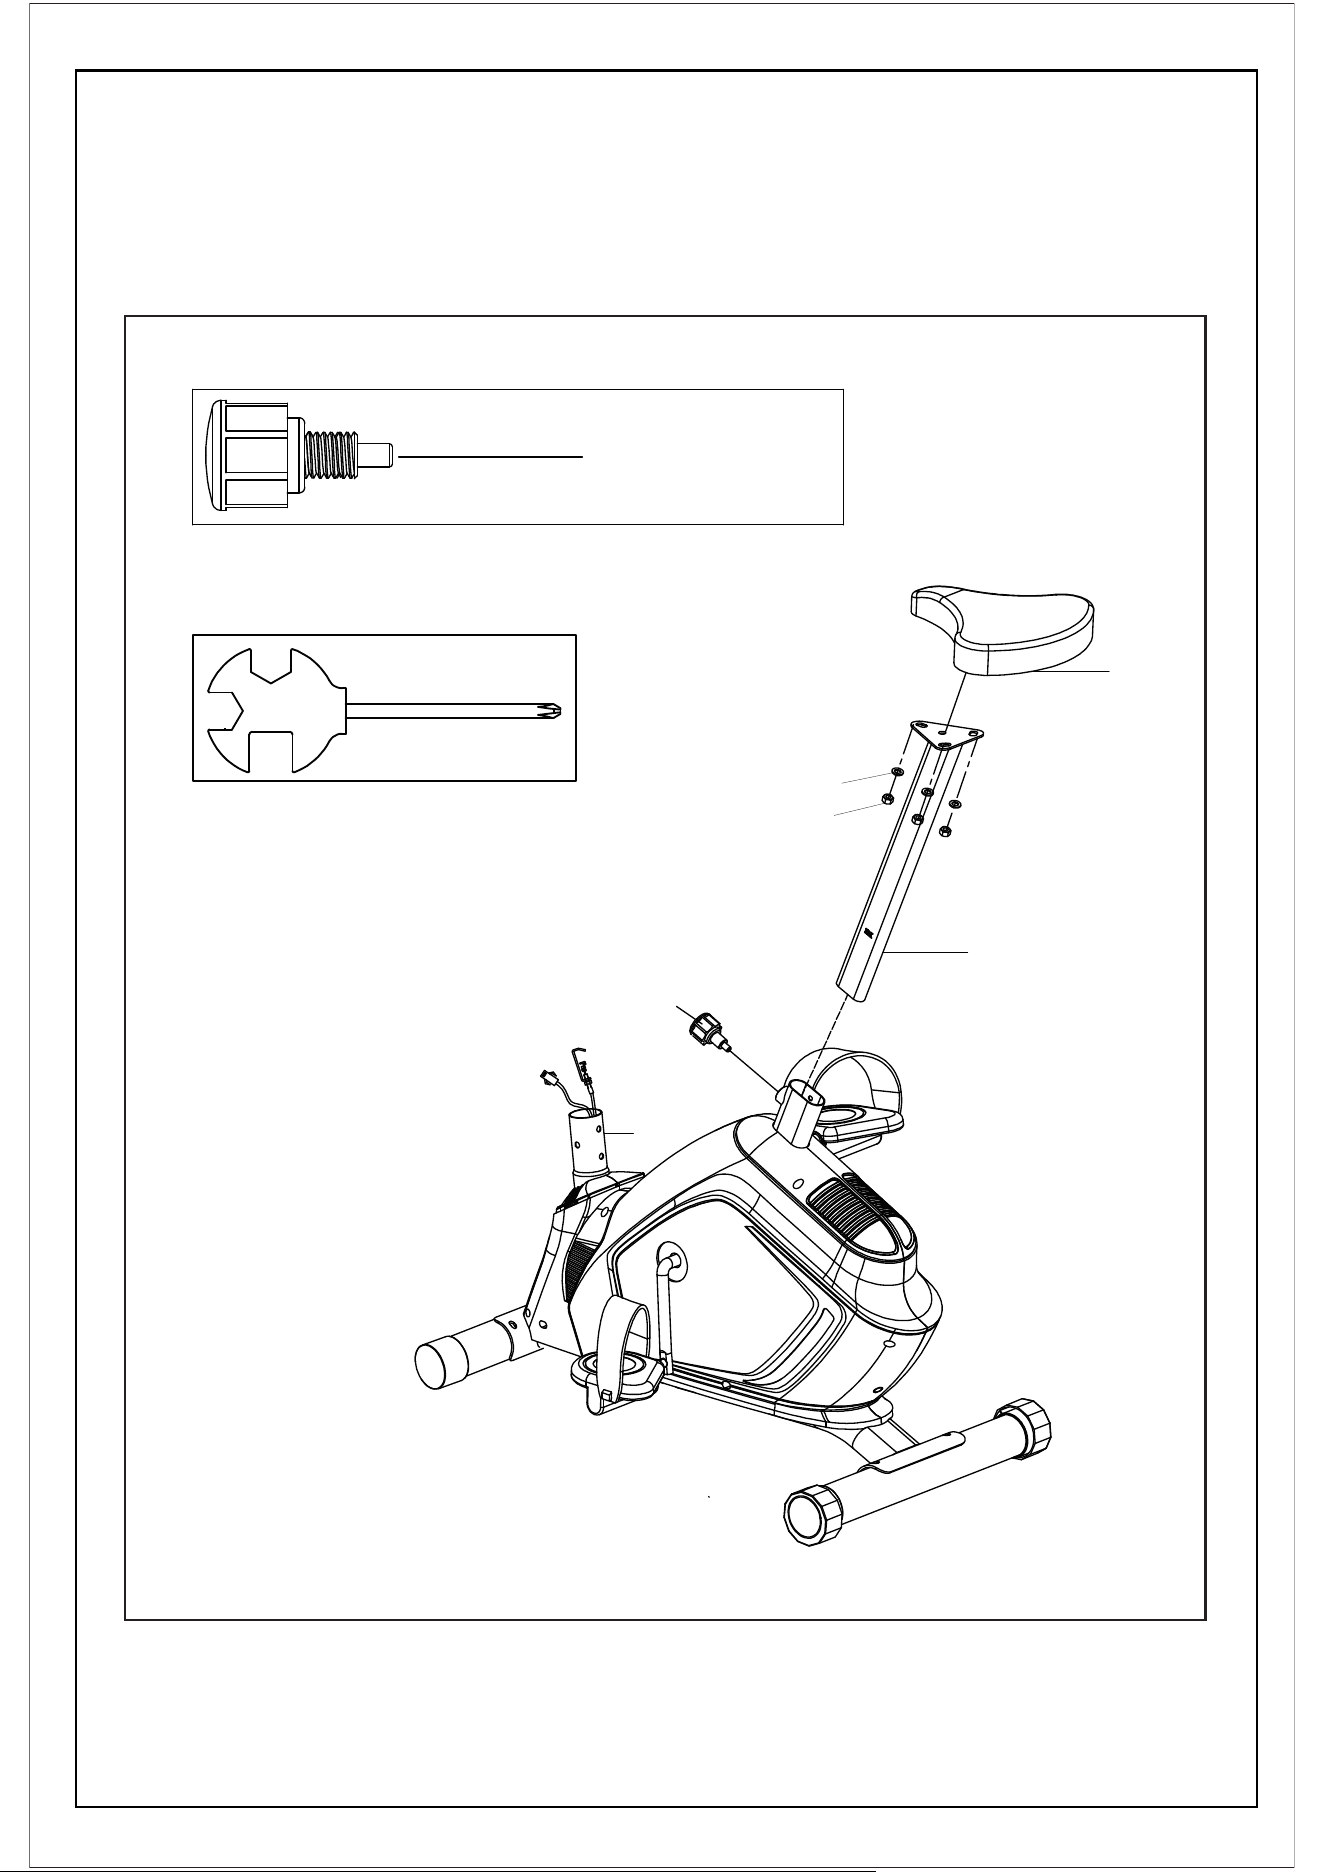
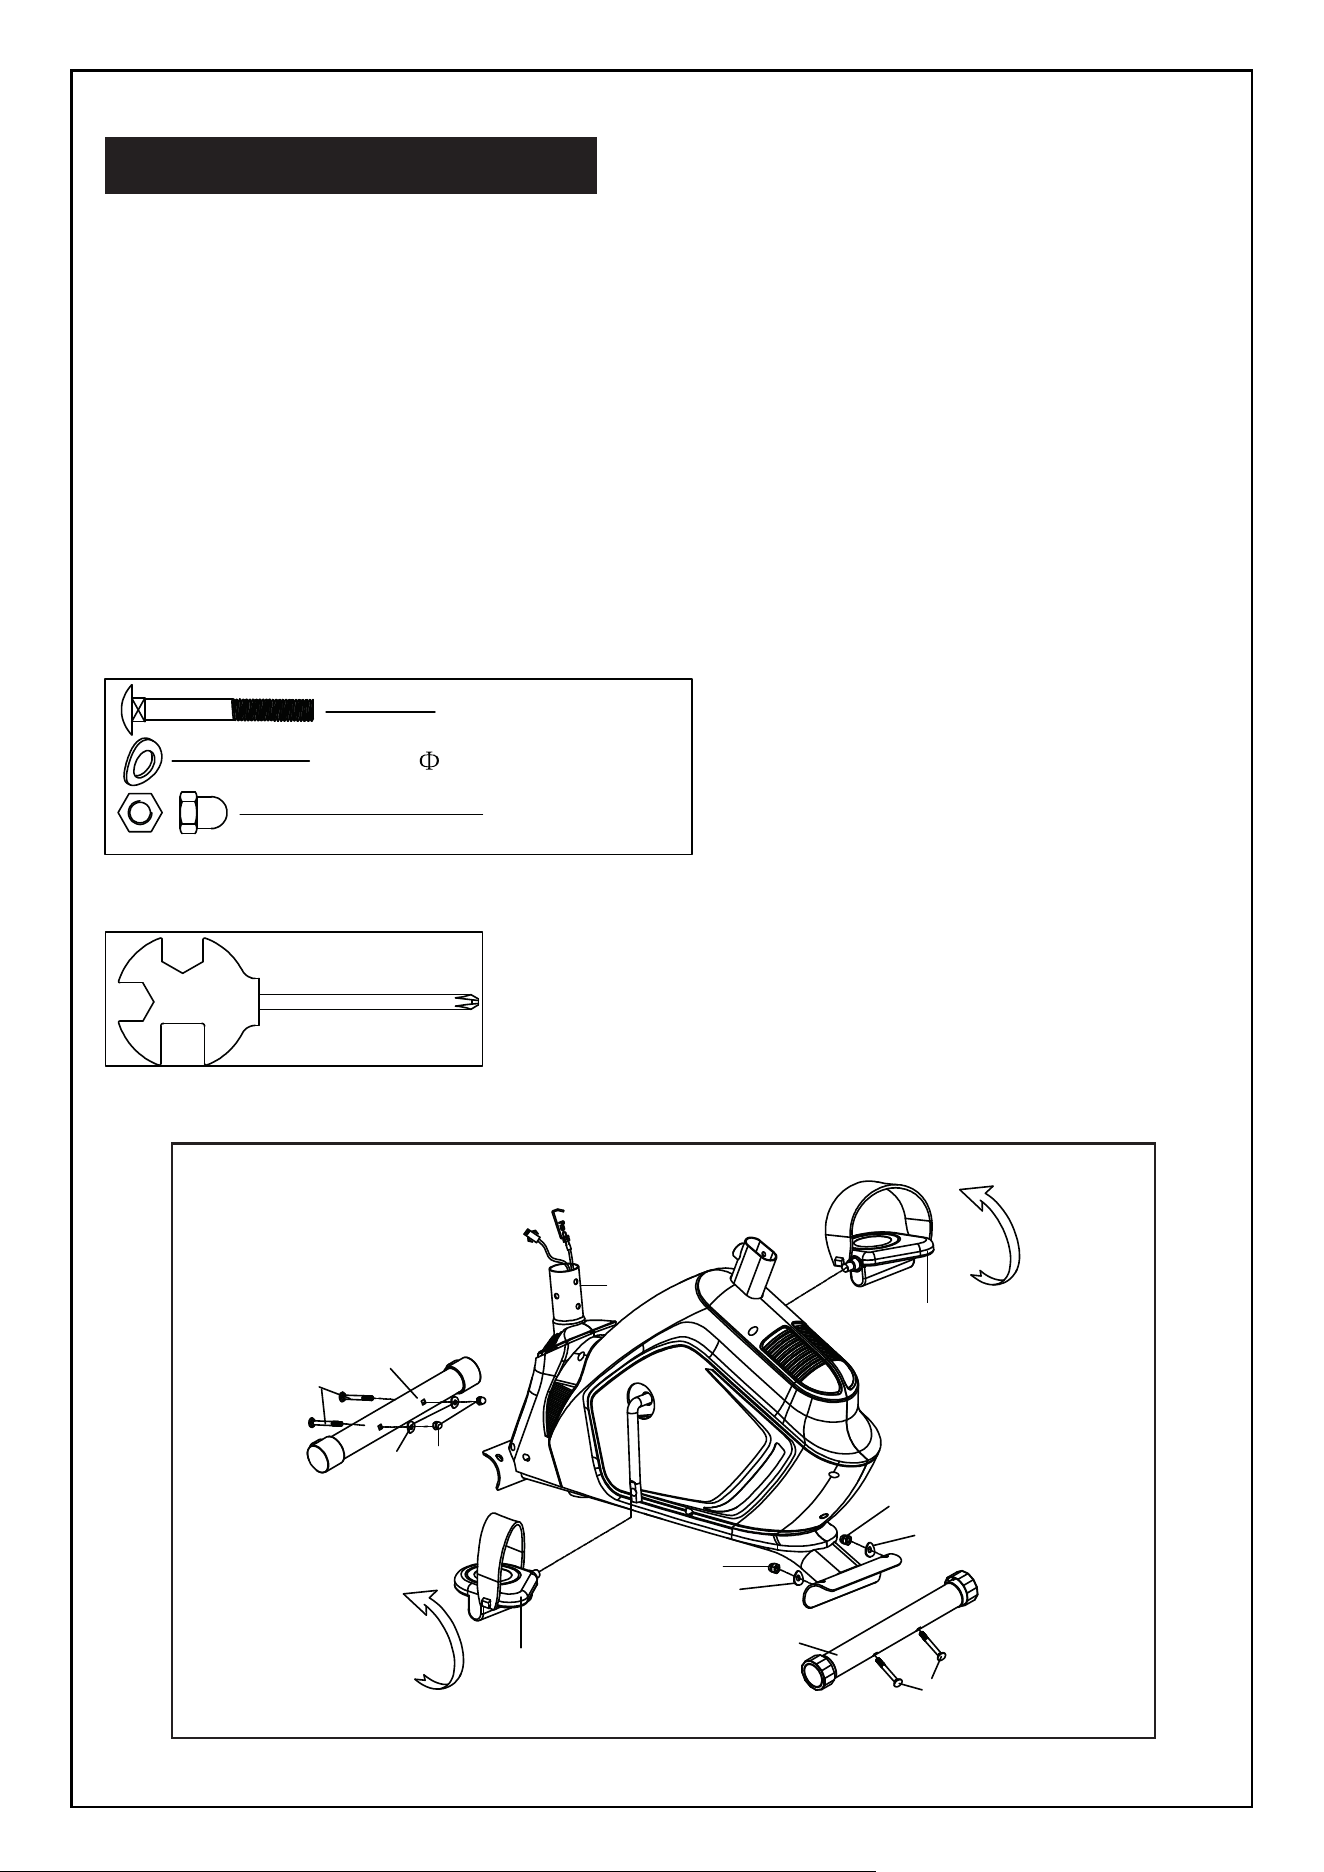
b. Attach pedal (28L/R) to the crank arms as shown above.
CAUTION: be sure the right pedal (28R) marked (R) is attached to the right crank arm and
tightened in the counterclockwise direction.
The left pedal (28L) marked (L) is attached to the left crank arm and tightened in the anticlockwise
direction.
STEP 1:
ASSEMBLY INSTRUCTION:
23# M8*72 4PCS
18# d8* 20*1.5*R30 4PCS
25# M8 4PCS
28L
28R
30
25
18
25
18
23
18
25
22
23
26
a. Attach front stabilizer (22) and rear stabilizer (26) to seat tube (30) with carriage bolts (23), arc
washers (18) and domed nuts (25).
06

29
30
33
38
39
40
29# M16 1PC
STEP 2:
a.Attach seat (40) to sliding tube (33) with nylon nuts (38) and washers (39).
b. Slide sliding tube (33) into seat tube (30). Secure and tighten with knob (29).
07

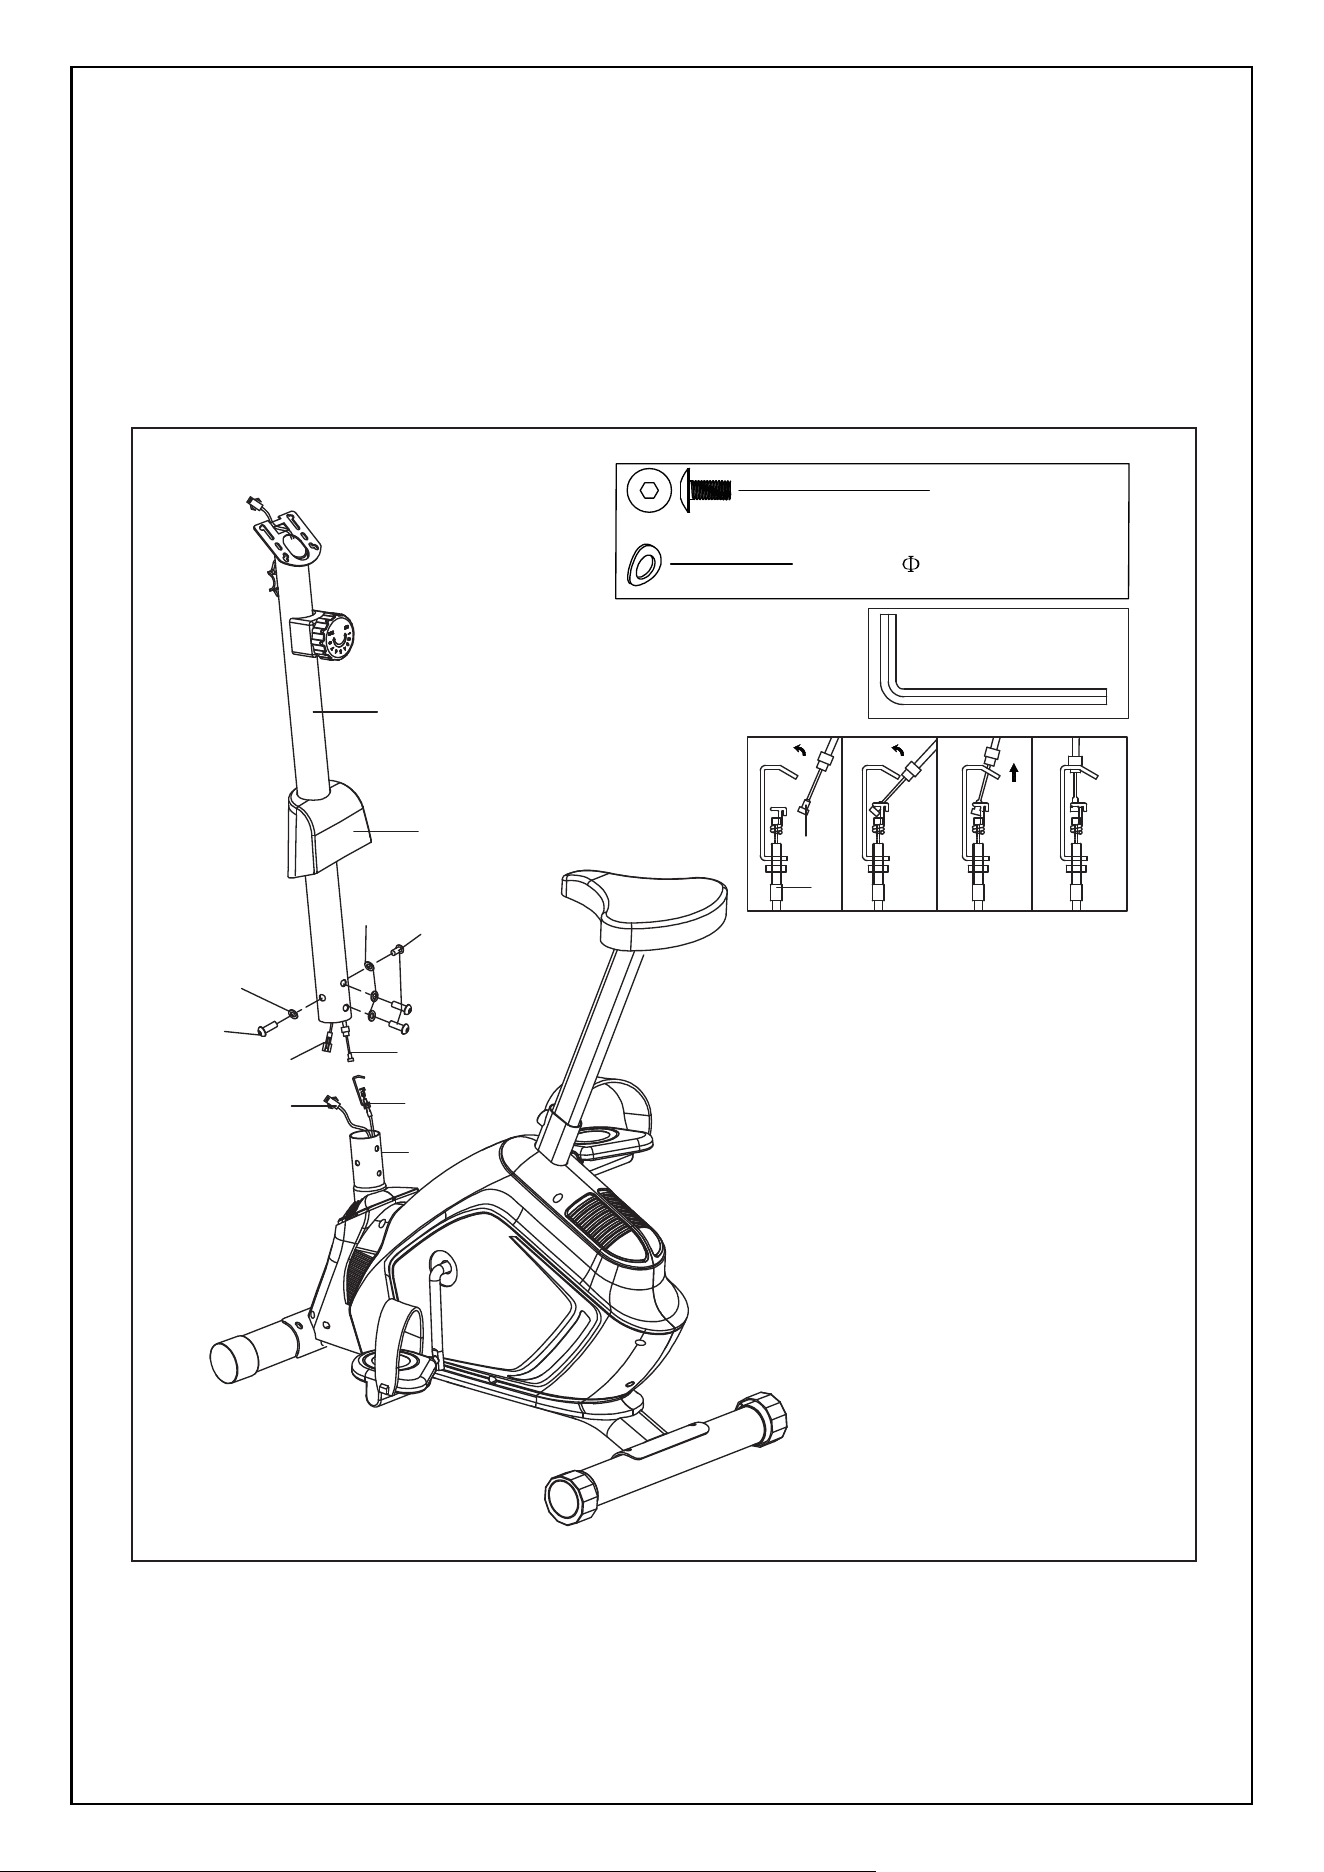
17# M8*16 4PCS
18# d8* 20*1.5*R30 4PCS
15
24
30
16
17
18
19
18
17
24
20
15
57
STEP 3:
a. Attach front cover (57) to the support tube (16). Connect tension control (15) with tension wire
(24). Connect sensor wire (20) with middle wire (19).
b.Attach support tube 16 to seat tube 30 with bolts (17) and arc washers (18).
08

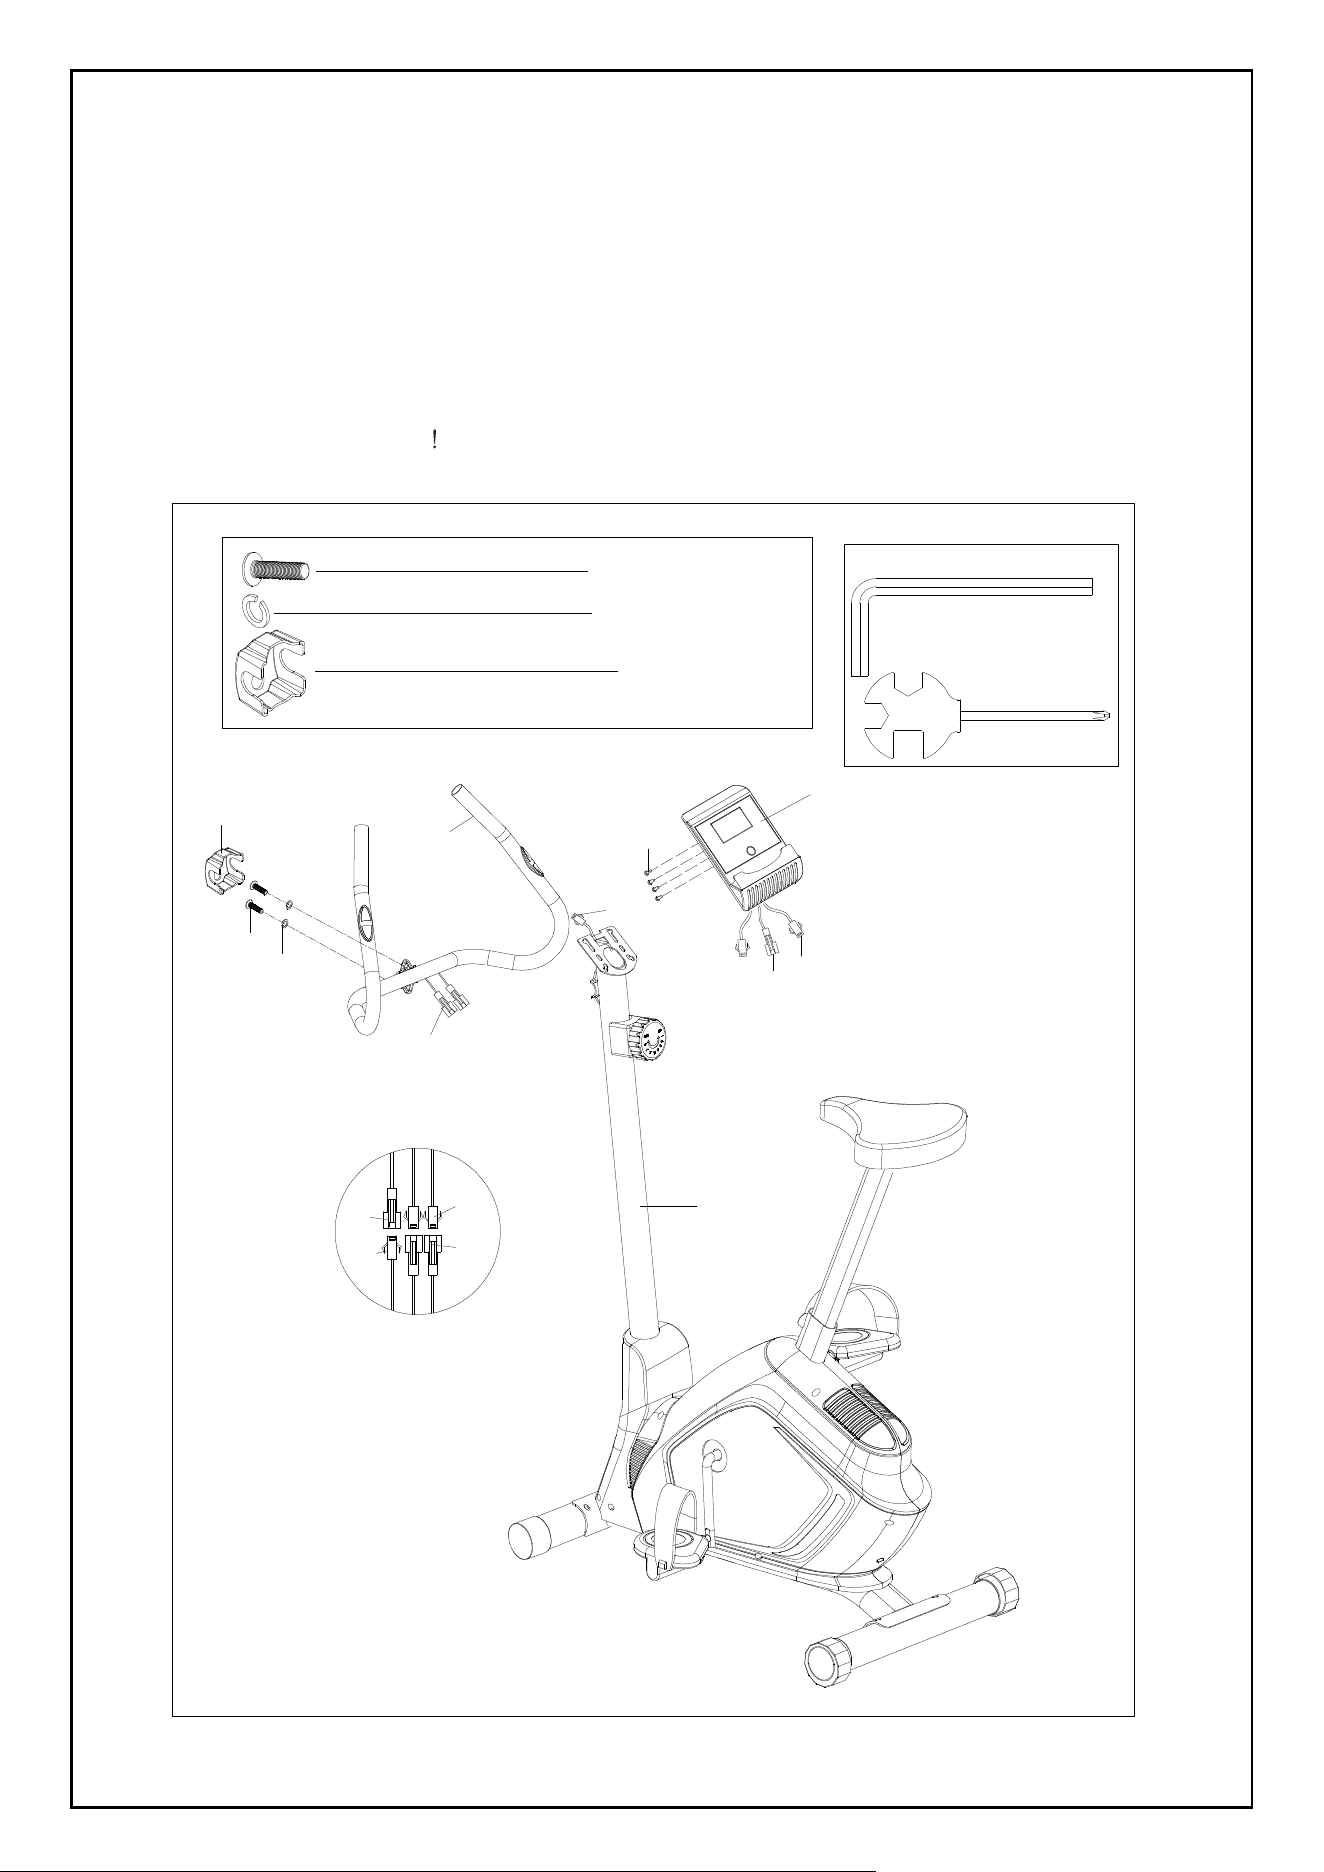
STEP 4:
a.Attach handlebar (5) onto support tube (16) with screws (11), spring washers (10) and small
cover (12). Then, get the pulse sensor wire (9) through the stopple.
b. Connect the pulse sensor wire (9) with electronic meter wire (1a). Connect the middle wire
(19) with electronic meter wire (1b)
c. Attach electronic meter (1) to support tube (16) with screws (2) and washers (3).
The assembly is completed.
16
1b
1a
2
12
11
10
1
5
9
19
#10 d8 2PCS
S6
#11 M8*30 2PCS
#12 1PC
1b
1a
9
19
09
EXERCISE INSTRUCTIONS
Using your Upright BIKE provides you with several benefits, it will improve your physical fitness,
tone muscle and in conjunction with calorie controlled diet help you lose weight.
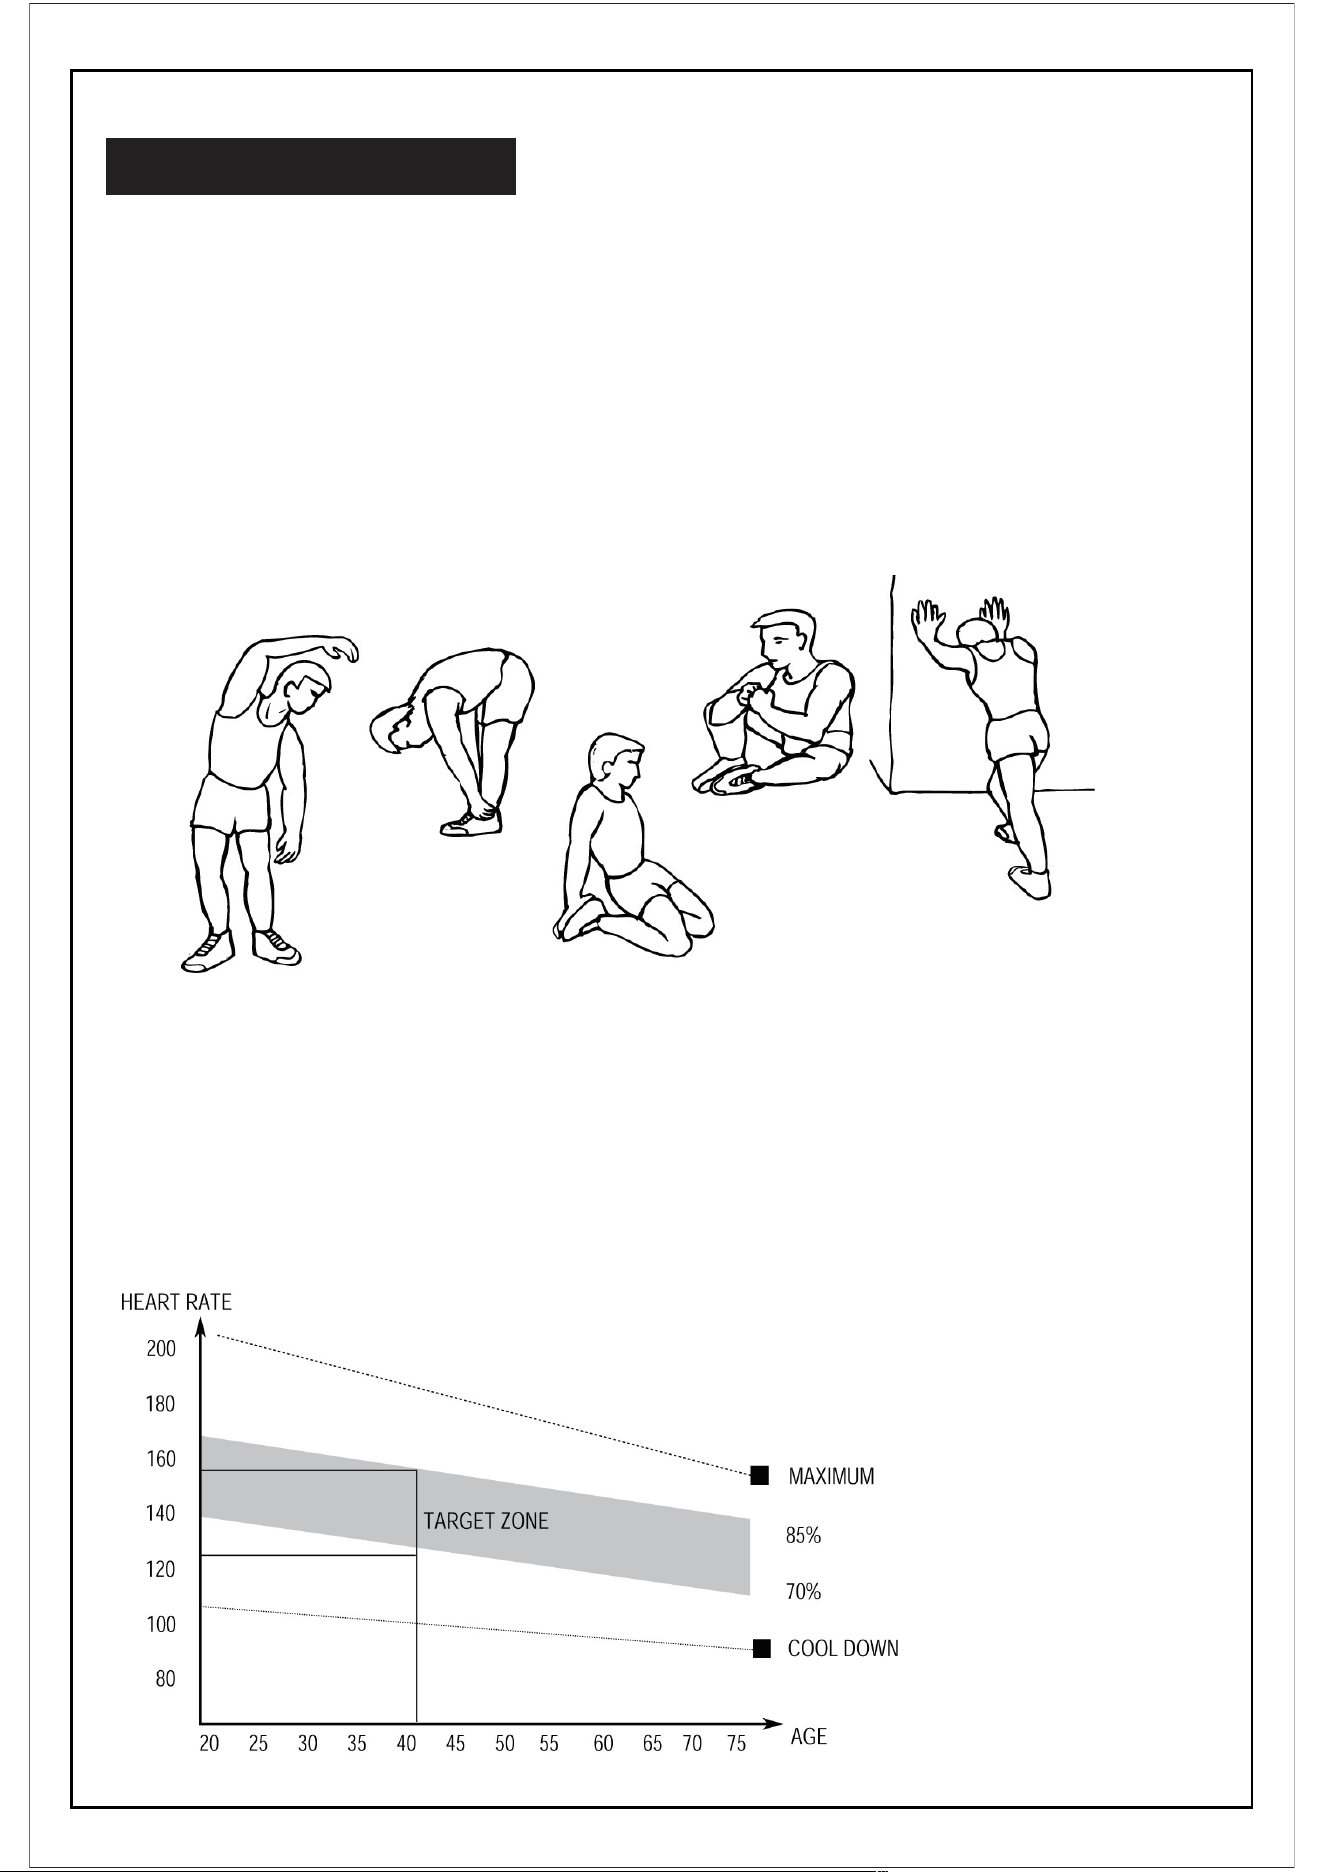
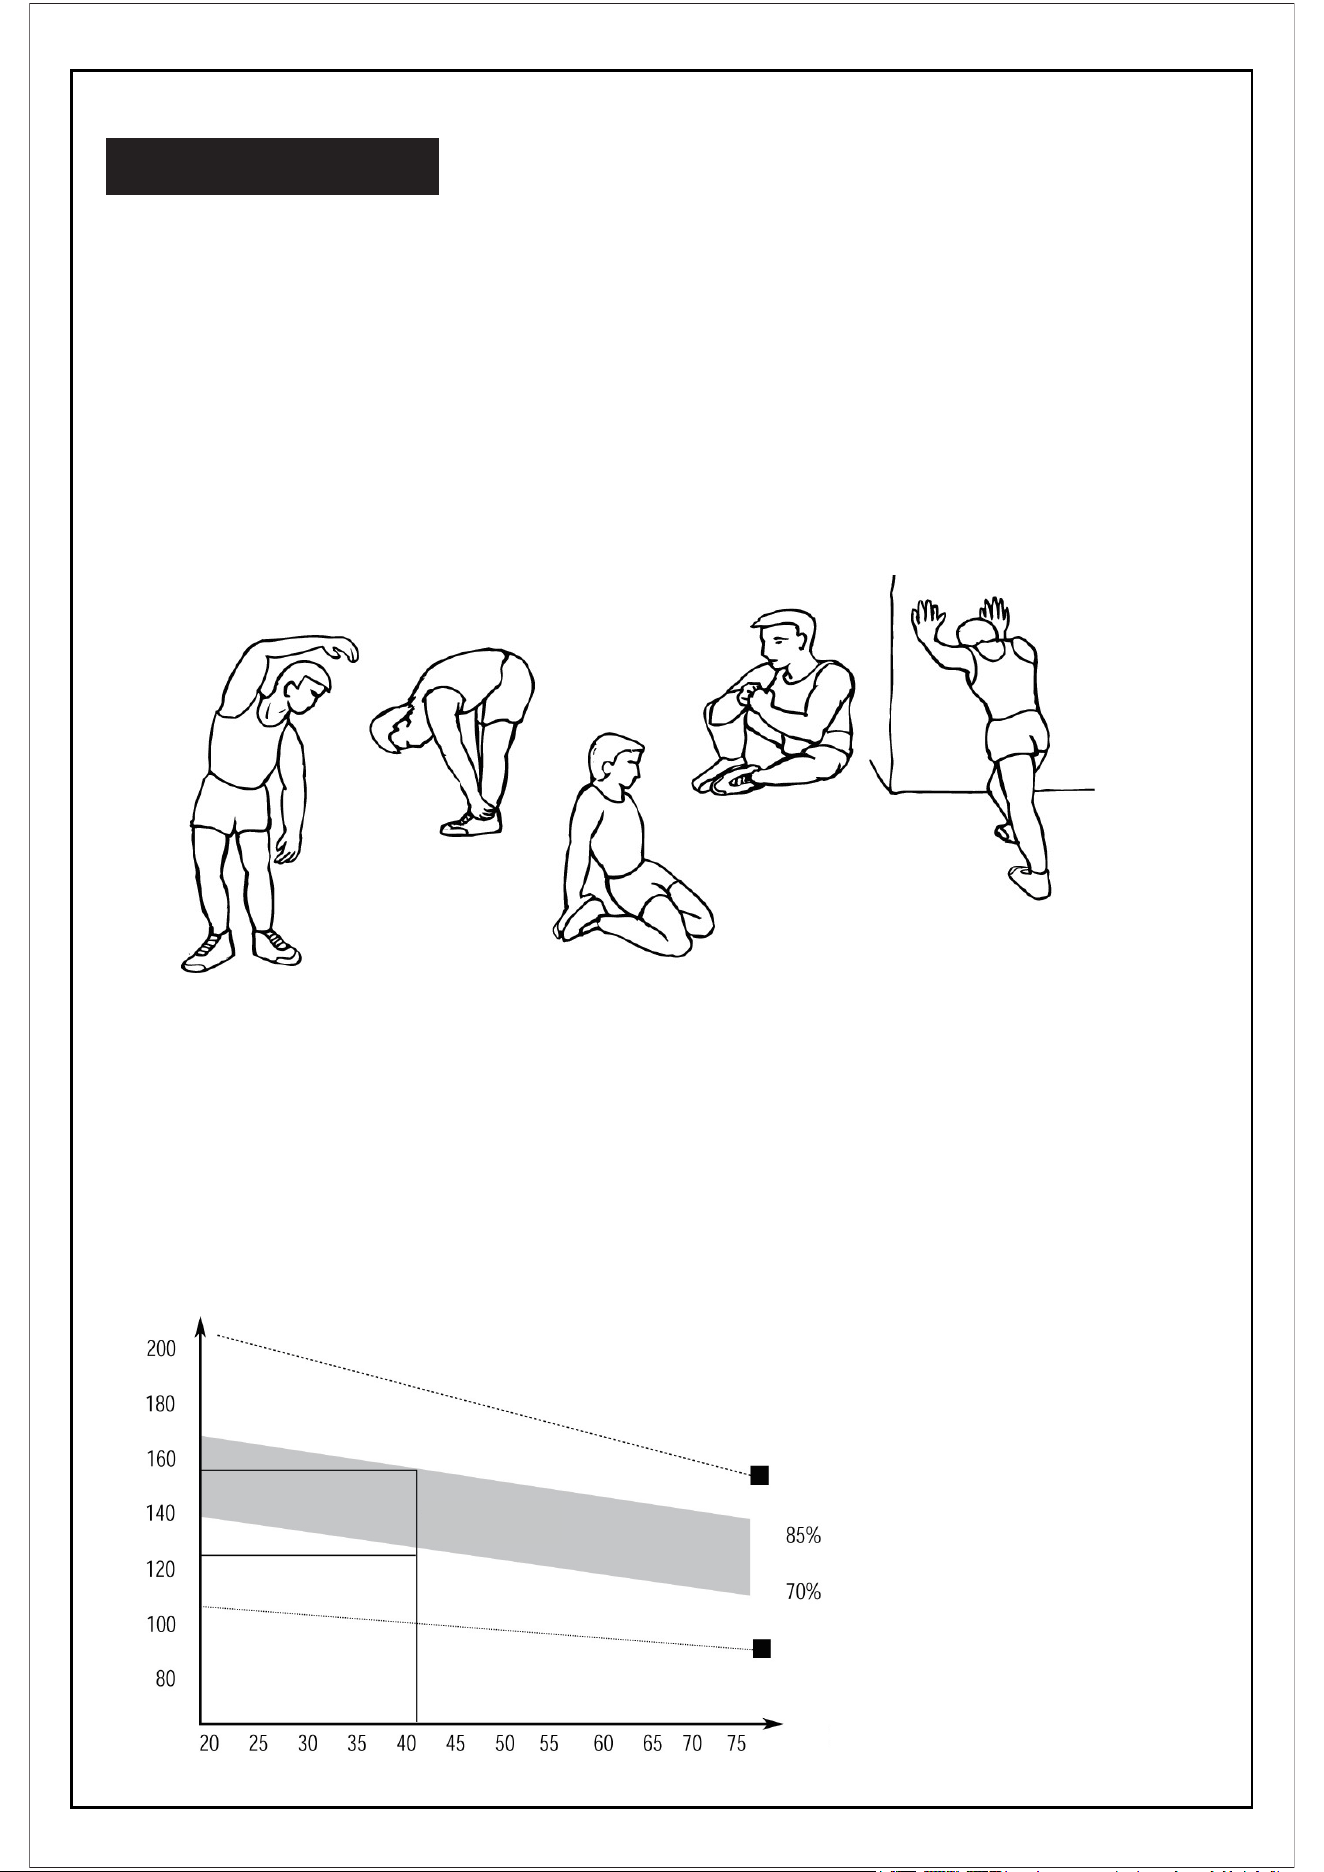
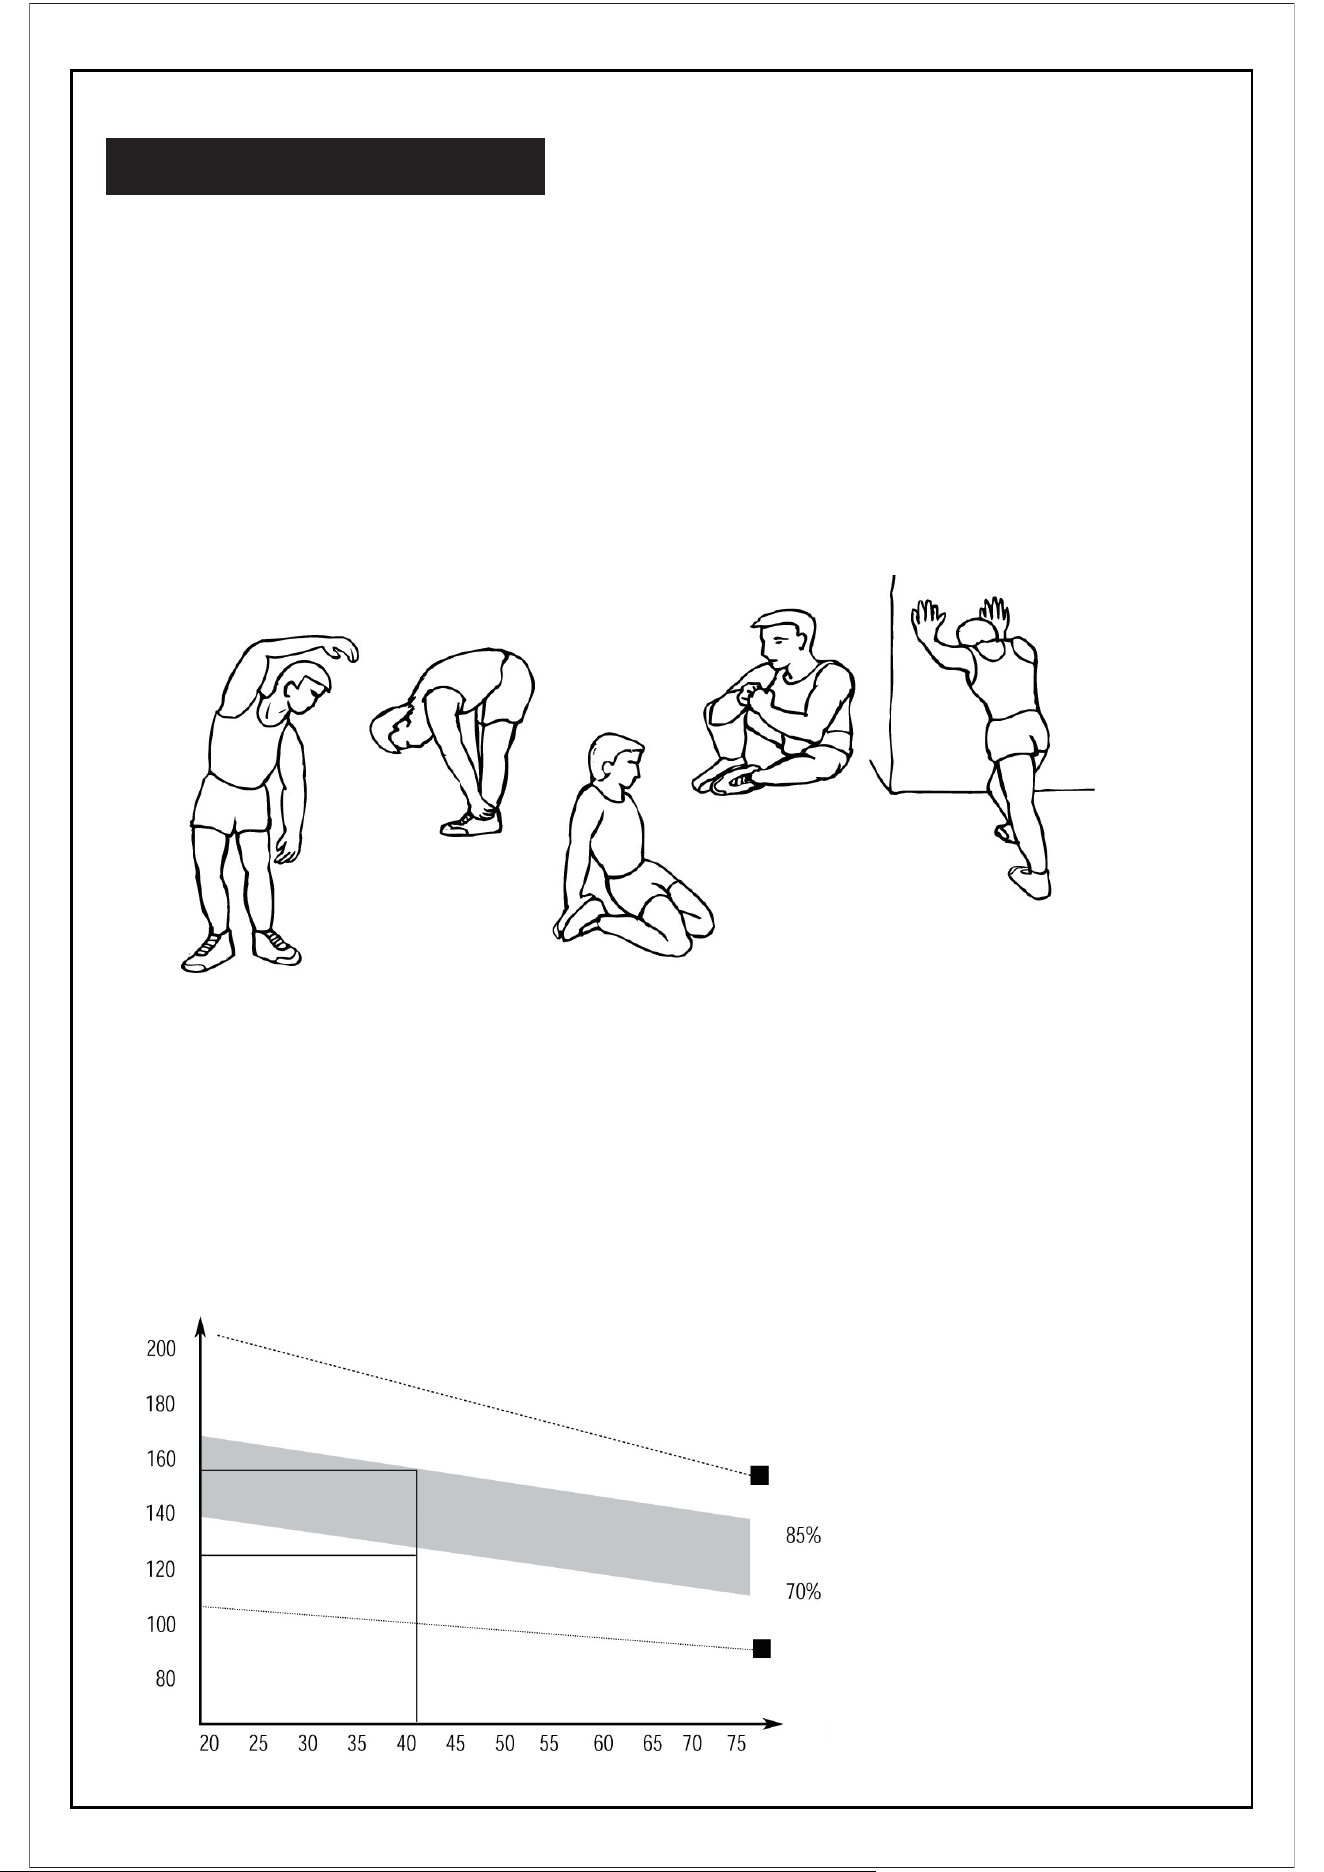
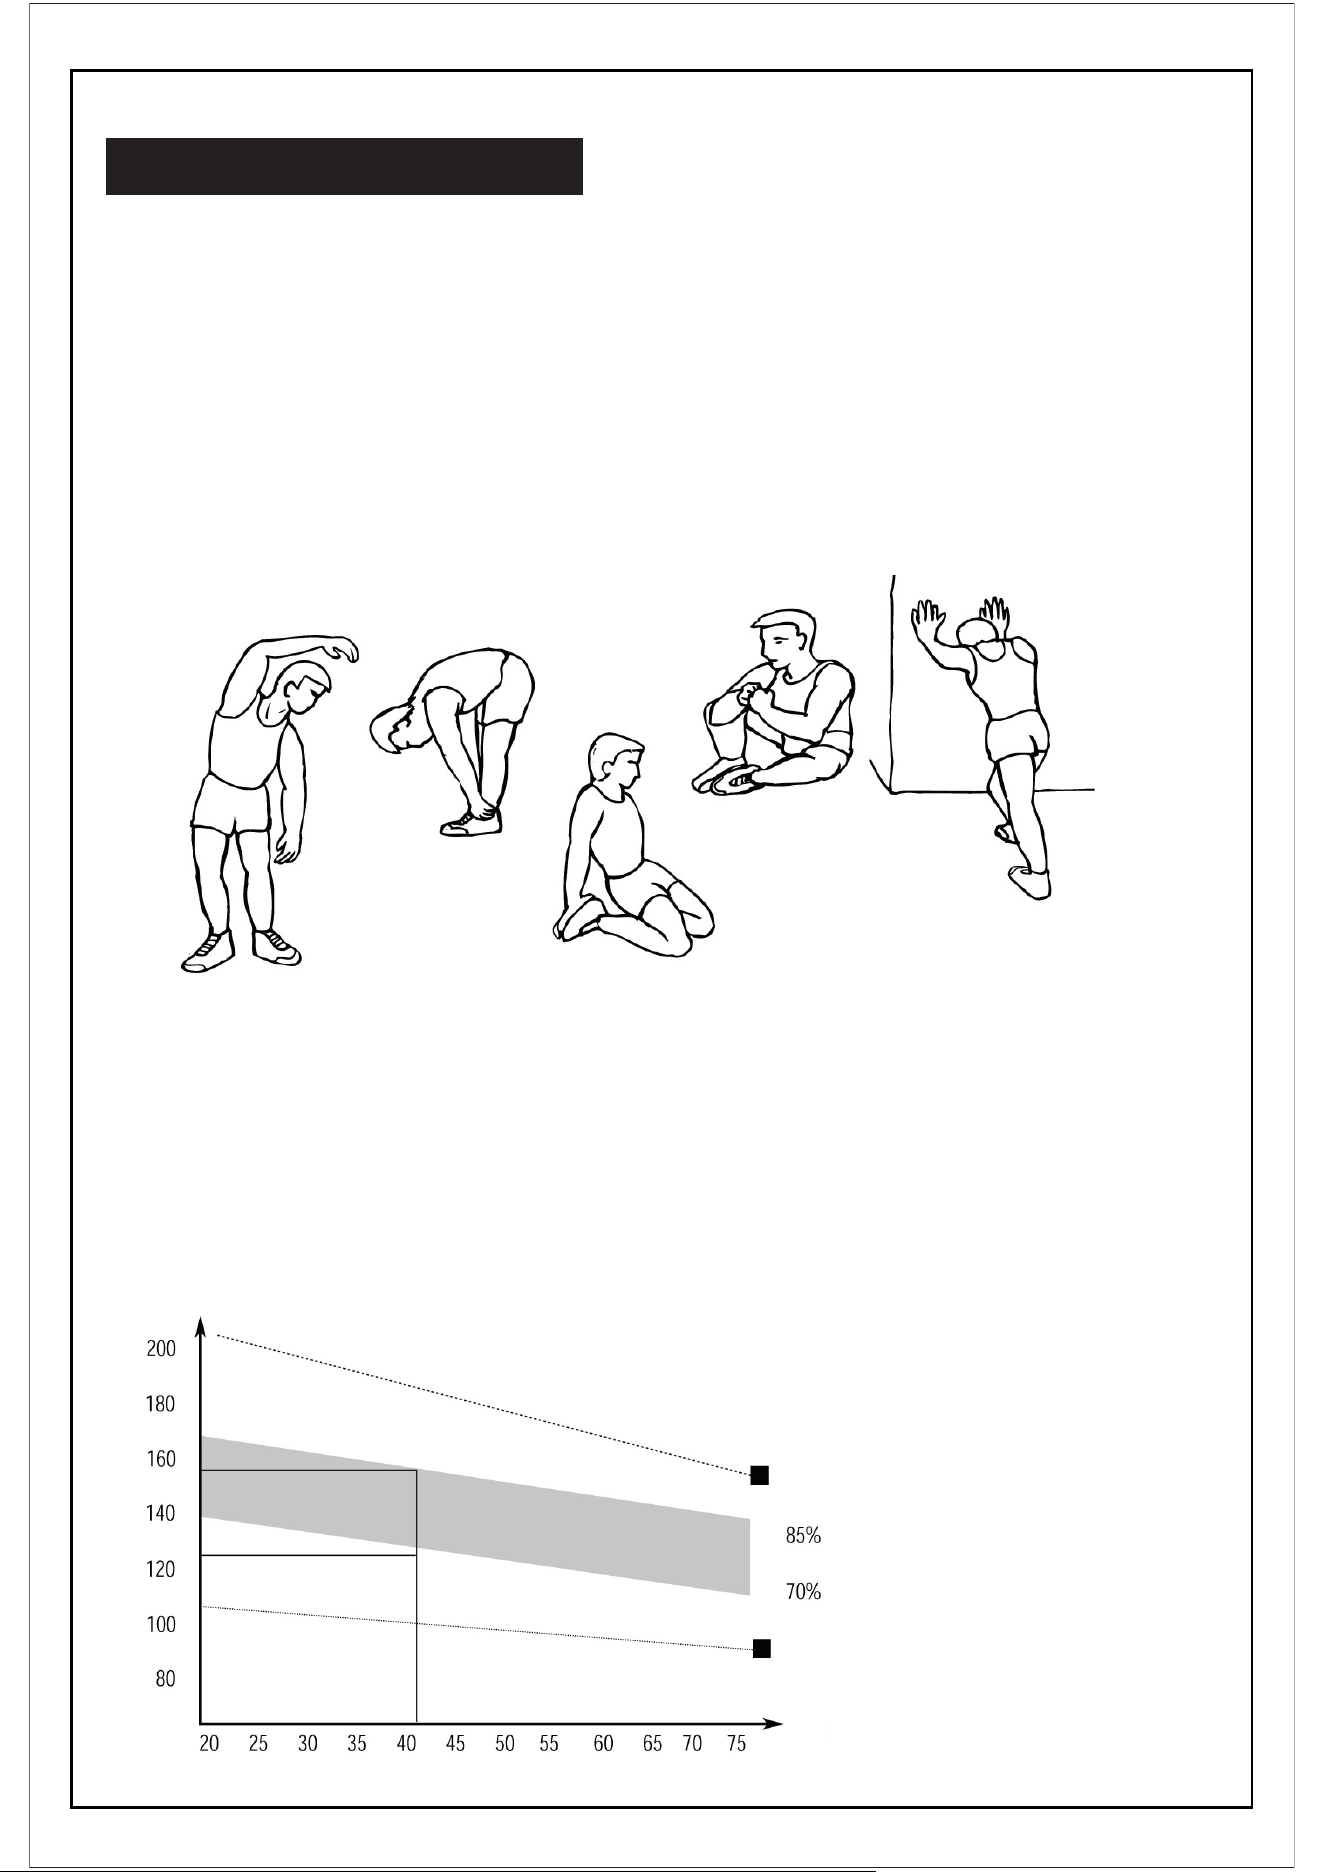
1.The Warm Up Phase
This stage helps get the blood flowing around the body and the muscles working properly. It will
also reduce the risk of cramp and muscle injury. It is advisable to do a few stretching exercises as
shown below. Each stretch should be held for approximately 30 seconds, do not force or jerk your
muscles into a stretch - if it hurts, STOP.
2.The Exercise Phase
This is the stage where you put the effort in. After regular use , the muscles in your legs will
become Stronger. Work to your routine,but it is very important to maintain a steady tempo
throughout. The rate of workout should be sufficient to raise your heart beat into the target zone
shown on the graph below.
This stage should
last for a minimum
of 12 minutes
though most people
start at about 15-20
minutes
SIDE BENDS OUTER THIGH
INNER THIGH
CALF / ANKLE
FORWARD
BENDS
10

3. The Cool Down Phase
This stage is to let your Cardio-vascular System and muscles wind down. This is a repeat of the
warm up exercise e.g. reduce your tempo, continue for approximately 5 minutes. The stretching
exercises should now be repeated, again remembering not to force or jerk your muscles into the
stretch.
As you get fitter you may need to train longer and harder. It is advisable to train at least three times
a week, and if possible space your workouts evenly throughout the week.
MUSCLE TONING
To tone muscle while on your Upright BIKE you will need to have the resistance set quite high.
This will put more strain on our leg muscles and may mean you cannot train for as long as you
would like. If you are also trying to improve your fitness you need to alter your training program.
You should train as normal during the warm up and cool down phases, but towards the end of the
exercise phase you should increase resistance, making your legs work harder than normal. You
may have to reduce your speed to keep your heart rate in the target zone.
WEIGHT LOSS
The important factor here is the amount of effort you put in. The harder and longer you work the
more calories you will burn. Effectively this is the same as if you were training to improve your
fitness, the difference is the goal.
USE
The tension control knob allows you to alter the resistance of the pedals. A high resistance makes
it more difficult to pedal, a low resistance makes it easier. For the best results, set the tension while
the bike is in use.
SPECIFICATIONS:
TIME----------------------------------------------------------------------------------00:00~99:59MIN
SPEED-------------------------------------------------------------------------------0.0~99.9KM/H(ML/H)
DISTANCE--------------------------------------------------------------------------0.00~999.9KM(ML)
ODOMETER------------------------------------------------------------------------0.0~9999KM or ML
PULSE ----------------------------------------------------------------------------40~240BPM
CALORIE----------------------------------------------------------------------------0.0~9999KCALs
KEY FUNCTIOINS:
MODE: This key lets you to select and lock on to a particular function you want.
OPERATION PROCEDURES:
EXERCISE MONITOR
11

1.AUTO ON/OFF
This system turns on when any key is pressed or when it receives an signal input from the speed
sensor.
The system turns off automatically when the sensor has no signal input or no key operation
for about 4 minutes.
2.RESET:
The unit can be reset by either changing battery or pressing the mode key for 3 seconds.
3.MODE:
To choose SCAN or LOCK if you do not want the scan mode, press the MODE key when
the pointer starts blinking on the function you want.
4.FUNCTIONS:
1.TIME: Press the MODE key until pointer locks on to TIME. The total working time will be
shown when starting exercise.
2.SPEED: Press the MODE key until pointer locks on to SPEED. Displays current speed during
workout time.
3.DISTANCE: Press the MODE key until pointer locks on to DISTANCE. The distance of each
workout will be displayed when starting exercise.
4.ODOMETER: Press the MODE key until the pointer advances to ODOMETER. The total
accumulated distance will be shown.
5.CALORIE: Press the MODE key until pointer lock on to CALORIE. The calorie burned will be
displayed when starting exercise.
6.(PULSE) : Press the MODE key until the pointer advances to PULSE function and put ear-clip
to ear or take hold of the sensor with your hands for about 3 seconds, the pulse will be displayed.
SCAN: Display changes according to the next diagram every 4 seconds. Automatically display
the following functions in the order shown:
TIME-SPEED-DISTANCE-CALORIE-PULSE
NOTE:
1.If no signal appears in 4-5 minutes, the LCD display will be shut off automatically.
2.When there is signal input, the monitor automatically turns on.
3.If there is a possibility to see an improper display on the monitor, please replace the batteries to
have a good result. You must be to replace the batteries at the same time.
4.The monitor uses 1.5V “AA” or “AAA” batteries.
12
USER'S MANUAL/HANDBUCH/MANUEL DE L'UTILISATEUR
/MANUALDELUSUARIO/MANUALEUTENTE/INSTRUKCJAOBSŁUGI
Ellipsentrainer Maschine
SP37363
EN DE FR ES IT PL
13

Sehr geehrte Kundinnen und Kunden,
Bitte lesen Sie diese Anleitung sorgfältig durch, bevor Sie den Artikel verwenden.
Beachten Sie die folgenden Vorsichtsmaßnahmen, bevor Sie die Maschine montieren oder in
Betrieb nehmen.
1. Bauen Sie die Maschine genau wie in der Bedienungsanleitung beschrieben zusammen.
2. Überprüfen Sie alle Schrauben, Muttern und sonstigen Verbindungen, bevor Sie die Maschine
zum ersten Mal verwenden, und vergewissern Sie sich, dass sich die Maschine in einem sicheren
Zustand befindet.
3. Stellen Sie das Gerät an einem trockenen, ebenen Ort auf und halten Sie es von Feuchtigkeit und
Wasser fern.
4. Stellen Sie im Bereich der Montage eine geeignete Unterlage (z.B. Gummimatte, Holzbrett usw.)
unter die Maschine, um Schmutz usw. zu vermeiden.
5. Entfernen Sie alle Gegenstände innerhalb eines Radius von 2 Metern von der Maschine, bevor
Sie mit dem Training beginnen.
6. Verwenden Sie keine aggressiven Reinigungsmittel zum Reinigen der Maschine. Verwenden Sie
nur die mitgelieferten oder geeigneten Werkzeuge, um die Maschine zusammenzubauen oder Teile
der Maschine zu reparieren. Schweißtropfen sofort nach dem Training vom Gerät entfernen.
7. Ihre Gesundheit kann durch falsches oder übermäßiges Training beeinträchtigt werden. Konsult-
ieren Sie einen Arzt, bevor Sie mit dem Training beginnen. Er kann die maximale Einstellung
(Puls. Watt Trainingsdauer usw.) festlegen, auf die Sie sich selbst trainieren können, und während
des Trainings genaue Informationen erhalten. Dieses Gerät ist nicht für therapeutische Zwecke
geeignet.
8. Trainieren Sie die Maschine nur, wenn sie ordnungsgemäß funktioniert. Verwenden Sie für
notwendige Reparaturen nur Originalersatzteile.
9. Dieses Gerät kann jeweils nur für das Training einer Person verwendet werden.
10. Tragen Sie Trainingskleidung und -schuhe, die für das Fitnesstraining mit dem Gerät geeignet
sind. Ihre Trainingsschuhe sollten für den Trainer geeignet sein.
11. Wenn Sie ein Gefühl von Schwindel, Übelkeit oder anderen anormalen Symptomen haben,
brechen Sie das Training ab und konsultieren Sie einen Arzt, so schnell wie möglich.
12. Personen wie Kinder und Behinderte sollten das Gerät nur in Gegenwart einer anderen Person
benutzen, die Hilfe und Rat geben kann.
13. Die Leistung der Maschine nimmt mit zunehmender Geschwindigkeit zu und umgekehrt. Die
Maschine ist mit einem einstellbaren Knopf ausgestattet, mit dem der Widerstand eingestellt
werden kann. Reduzieren Sie den Widerstand, indem Sie den Einstellknopf für die Widerstandsein-
stellung in Richtung Stufe 1 drehen. Erhöhen Sie den Widerstand, indem Sie den Einstellknopf für
die Widerstandseinstellung in Richtung Stufe 8 drehen. Das maximale Gewicht des Benutzers
beträgt 100 kg.
14. Gehen Sie beim Anheben oder Bewegen des Geräts vorsichtig vor, um Ihren Rücken nicht zu
verletzen. Verwenden Sie immer geeignete Hebetechniken und/oder verwenden Sie Unterstützung.
Die technischen Daten dieses Produkts können von diesem Foto abweichen und können ohne
vorherige Ankündigung geändert werden.
WICHTIGER SICHERHEITSHINWEIS:
14

EXPLODIERTE ANSICHT
& TEILLISTE:
1b
1a
2
12
11
10
21
22
23
24
25
21
26
2
7
2
7
2
3
1
4
5
6
7
8
9
4
7
8
13
14
15
16
17
18
19
20
18
28L
28R
29
30
31
31
33
32
40
18
17
25
18
25
18
38
39
57
15

64
63
65
66
67
68
60
61
62
63
64
56
58
58
59L
59R
56
64
42
41
75
48
55
75
54
76
69
72
74
69
73
73
70
70
71
47
53
43
44
49
46
45
51
50
52
58
58
58
58
58
58
58
77
78
16

1 1 42 2
2 4 43 1
3 / 44 2
4 2 45 2
5 1 46 2
6 2 47 1
7 2 48 1
8 2 49 2
9 2 50 4
10 2 51 1
11 2 52 1
12 1 53 1
13 1 54 1
14 1 55 1
15 1 56 2
16 1 57 1
17 4 58 13
18 8 59L/R 2
19 1 60 1
20 1 61 1
21 2 62 1
22 1 63 2
23 4 64 2
24 1 65 1
25 4 66 1
26 1 67 1
27 2 68 1
28L/R 1/1 69 2
29 1 70 2
30 1 71 1
31 2 72 1
32 1 73 1
33 1 74 1
34 / 75 1
35 / 76 1
36 / 77 1
37 / 78 1
38 3 1
39 3 1
40 1
41 1
Nr.
Menge
Beschreibung
Nr.
Menge
Beschreibung
Elektronisches Messgerät
Kreuzschlitzschraube M5 * 10
/
Schaum
Lenker
EndkappeΦ25
Pulssensor
Kreuzschlitzschraube ST4,2 * 19
Handle-Impulsdraht
Federscheibe d8
Schraube M8 * 30
Kleine Abdeckung
Kreuzschlitzschraube M5*25
Lichtbogenscheibed6*Φ20*R25*1,5
Spannungsregelung
Stützrohr
Bolzen M8 * 16
Lichtbogenscheibed8*Φ20*1,5*R30
Mitteldraht
Sensorkabel
EndkappeΦ60
Frontstabilisator
Bolzen M8 * 72
Spannungsdraht
Gewölbte Mutter M8
Hinter Stabilisator
EndkappeΦ60
Pedal L/ R
KnopfM16*1,5*Φ37
Sitzrohr
Kreuzschlitzschraube ST3,0 * 10
Buchse
Gleitrohr
/
/
/
/
Nylonmutter M8
Unterlegscheibed8*Φ20*1.5
Sitz
Sechskantschraube M6 * 30
Sechskantmutter M6
Achse
Sprengring d12
Unterlegscheibed6*Φ16*1,5*
Federscheibe d6
Sechskant dünne Mutter M10 * 1,0
Klemmrolle
Sechskantschraube M6 * 20
Magnet
Kunststoffgitter
Spannungsfeder
Magnetplatte
U-Halterung
Schraube M8 * 19
Kurbeldeckel
Vorderseite
Kreuzschlitzschraube ST4.2 * 16
Kettendeckel
Mutter
Unterlegscheibe
Mutter 1
Kragenball
Kragengehäuse
Mutter 2
Unterlegscheibe
Riemenscheibe
Gürtel
Bolzengruppe
Lager
Achse
Sechskantflanschmutter M10 * 1,0
Sechskant dünne Mutter M10 * 1,0
Schwungrad
Nylonmutter M8
Spannungsfeder
Kreuzschlitzschraube ST4.2 * 16
Sensorbuchse
Kreuzschlüssel S13-14-15
Schlüssel S6
17

Schritt 1:
BAUANLEITUNG:
23# M8*72
x4
x4
x4
18# d8* 20*1.5*R30
25# M8
28L
28R
30
25
18
25
18
23
18
25
22
23
26
a. Befestigen Sie den vorderen Stabilisator (22) und den hinteren Stabilisator (26) mit Schlitten-
schrauben (23), Lichtbogenscheiben (18) und gewölbten Muttern (25) am Sitzrohr (30).
b. Befestigen Sie das Pedal (28L / R) wie oben gezeigt an den Kurbelarmen.
VORSICHT: Stellen Sie sicher, dass das mit (R) gekennzeichnete rechte Pedal (28R) am rechten
Kurbelarm angebracht und gegen den Uhrzeigersinn festgezogen ist.
Das mit (L) gekennzeichnete linke Pedal (28L) ist am linken Kurbelarm angebracht und gegen
den Uhrzeigersinn festgezogen.
18

29
30
33
38
39
40
29# M16
Schritt 2:
a. Befestigen Sie den Sitz (40) mit Nylonmuttern (38) und Unterlegscheiben (39) am Gleitrohr
(33).
b. Schieben Sie das Gleitrohr (33) in das Sitzrohr (30). Mit Knopf (29) sichern und festziehen.
x1
19

17# M8*16
18# d8* 20*1.5*R30
15
24
30
16
17
18
19
18
17
24
20
15
57
Schritt 3:
a. Befestigen Sie die vordere Abdeckung (57) am Stützrohr (16). Spannungsregler (15) mit
Spanndraht (24) verbinden. Sensorkabel (20) mit Mitteldraht (19) verbinden.
b. Befestigen Sie das Stützrohr(16) mit den Schrauben (17) und den Lichtbogenscheiben (18) am
Sitzrohr (30).
x4
x4
20

Schritt 4:
a. Befestigen Sie den Lenker (5) mit Schrauben (11), Federringen (10) und kleiner Abdeckung
(12) am Stützrohr (16). Führen Sie dann den Impulssensorkabel (9) durch den Stopper.
b. Das Kabel des Impulssensors (9) mit dem Kabel des elektronischen Messgeräts (1a) verbind-
en. Das mittlere Kabel (19) mit dem elektronischen Messkabel (1b) verbinden
c. Befestigen Sie das elektronische Messgerät (1) mit Schrauben (2) und Unterlegscheiben (3)
am Stützrohr (16).
Die Montage ist abgeschlossen.
16
1b
1a
2
12
11
10
1
5
9
19
#10 d8 x2
S6
#11 M8*30 x2
#12 x1
1b
1a
9
19
21
Die Verwendung Ihrer Ellipsentrainer-Maschine bietet Ihnen mehrere Vorteile, sie verbessert Ihre
körperliche Fitness, stärkt die Muskeln und hilft Ihnen in Verbindung mit einer kalorienreduzier-
ten Ernährung beim Abnehmen.
In dieser Phase fließt das Blut durch den Körper, und die Muskeln arbeiten einwandfrei. Es wird
auch das Risiko von Krämpfen und Muskelverletzungen verringern. Es ist ratsam, ein paar
Dehnübungen wie unten gezeigt durchzuführen. Jede Dehnung sollte ungefähr 30 Sekunden lang
gehalten werden. Versuchen Sie nicht, Ihre Muskeln zu dehnen oder zu zwingen. Wenn es weh
tut, STOPPEN Sie.
Dies ist die Phase, in der Sie sich anstrengen. Nach regelmäßigem Gebrauch werden die Muskeln
in Ihren Beinen stärker. Trainiere weiter, aber es ist sehr wichtig, das Tempo konstant zu halten.
Die Arbeitsgeschwindigkeit sollte ausreichen, um Ihren Herzschlag in die in der folgenden
Grafik dargestellte Zielzone zu heben.
Diese Phase sollte
mindestens 12
Minuten dauern,
obwohl die meisten
Leute zu Beginn etwa
15 bis 20 Minuten
brauchen.
ÜBUNGSANLEITUNG:
1. Die Aufwärmphase
2. Die Übungsphase
SEITWÄRTSBEUGE ÄUßERER
OBERSCHENKEL
INNERER
OBERSCHENKEL
KALB/ACHILLEN
VORWÄRTSBEUGE
PULS
ZIELZONE
ABKÜHLEN
ALTER
MAXIMAL
22

Diese Phase soll Ihr Herz-Kreislauf-System und Ihre Muskeln entspannen. Dies ist eine
Wiederholung der Aufwärmübung, z.B. Verringern Sie Ihr Tempo und fahren Sie ungefähr 5
Minuten lang fort. Die Dehnübungen sollten jetzt noch einmal wiederholt werden, wobei darauf
zu achten ist, dass die Muskeln nicht unter Druck gesetzt oder gestreckt werden. Wenn Sie fitter
werden, müssen Sie möglicherweise länger und härter trainieren. Es ist ratsam, mindestens
dreimal pro Woche zu trainieren und wenn möglich das Training gleichmäßig über die Woche zu
verteilen.
Um die Muskeln auf Ihrem ELLIPSENTRAINER MASCHINE zu stärken, muss der Widerstand
ziemlich hoch eingestellt sein. Dadurch werden unsere Beinmuskeln stärker belastet und Sie
können möglicherweise nicht so lange trainieren, wie Sie möchten. Wenn Sie auch versuchen,
Ihre Fitness zu verbessern, müssen Sie Ihr Trainingsprogramm ändern. Während der Aufwärm-
und Abkühlphase sollten Sie wie gewohnt trainieren, aber gegen Ende der Trainingsphase sollten
Sie den Widerstand erhöhen, sodass Ihre Beine härter als normal arbeiten. Möglicherweise
müssen Sie die Geschwindigkeit reduzieren, um Ihre Herzfrequenz in der Zielzone zu halten.
Der wichtige Faktor hierbei ist die Menge an Anstrengung, die Sie investieren. Je härter und
länger Sie arbeiten, desto mehr Kalorien werden Sie verbrennen. Im Grunde ist dies das Gleiche,
als ob Sie trainieren würden, um Ihre Fitness zu verbessern. Der Unterschied ist das Ziel.
Mit dem Spannungsregler können Sie den Widerstand der Pedale ändern. Ein hoher Widerstand
erschwert das Treten, ein geringer Widerstand erleichtert das Treten. Um die besten Ergebnisse
zu erzielen, stellen Sie die Spannung ein, während das Fahrrad benutzt wird.
TIME(ZEIT)------------------------------------------------0:00—99:59 STUNDE
SPEED(GESCHWINDIGKEIT)-------------------------------------0,0—99,9 KM/H
DISTANCE(ENTFERNUNG)---------------------------------------0,00—999,9 KM
ODOMETER(GESAMTENTFERNUNG )---------------------0.0—9999 KM
PULSE(IMPULS ) --------------------------------------------------40—240BPM
CALORIE(KALORIE )----------------------------------------------0,0—9999 KCAL
3. Die Abkühlphase
MUSKELTON
GEWICHTSVERLUST
VERWENDUNG
SPEZIFIKATIONEN:
Die Hauptfunktion:
MODE: Mit dieser Taste können Sie eine bestimmte Funktion auswählen und festlegen.
ÜBUNGSÜBERWACHUNG
23

BETRIEBSVERFAHREN:
1.AUTO EIN / AUS:
Dieses System wird eingeschaltet, wenn eine Taste gedrückt wird oder wenn ein vom
Geschwindigkeitssensor eingegebenes Signal empfangen wird.
Das System schaltet sich automatisch aus, wenn der Sensor keinen Signaleingang hat oder ca. 4
Minuten lang keine Tasten gedrückt werden.
2. ZURÜCKSETZEN:
Das Gerät kann zurückgesetzt werden, indem entweder die Batterie gewechselt oder die Modu-
staste 3 Sekunden lang gedrückt wird.
3. MODUS:
Um SCAN oder LOCK zu wählen, wenn Sie den Scan-Modus nicht möchten, drücken Sie die
MODE-Taste, wenn der Zeiger auf der gewünschten Funktion zu blinken beginnt.
4. FUNKTIONEN:
1.ZEIT: Drücken Sie die MODE-Taste, bis der Zeiger auf ZEIT zeigt. Die Gesamtarbeitszeit wird
zu Beginn des Trainings angezeigt.
2.GESCHWINDIGKEIT: Drücken Sie die MODE-Taste, bis der Zeiger auf GESCHWIND-
IGKEIT zeigt. Zeigt die aktuelle Geschwindigkeit während der Trainingszeit an.
3.DISTANCE: Drücken Sie die MODE-Taste, bis der Zeiger auf ENTFERNUNG zeigt. Die
Entfernung jedes Trainings wird zu Beginn des Trainings angezeigt.
4.ODOMETER: Drücken Sie die MODE-Taste, bis der Zeiger auf ODO METER wechselt. Die
gesamte akkumulierte Entfernung wird angezeigt.
5.CALORIE: Drücken Sie die MODE-Taste, bis der Zeiger auf CALORIE zeigt. Der Kalorienver-
brauch wird zu Beginn des Trainings angezeigt.
6.(PULSE) : Drücken Sie die MODE-Taste, bis der Zeiger auf die PULSE-Funktion wechselt, und
legen Sie den Ohrclip an das Ohr oder halten Sie den Sensor etwa 3 Sekunden lang mit den
Händen fest. Der Impuls wird angezeigt.
SCAN: Alle 4 Sekunden werden Änderungen gemäß dem nächsten Diagramm angezeigt. Zeigen
Sie automatisch die folgenden Funktionen in der angegebenen Reihenfolge an:TIME-SPEED-DIS-
TANCE-CALORIE-PULSE
HINWEIS:
1.Wenn innerhalb von 4-5 Minuten kein Signal angezeigt wird, wird das LCD-Display automatisch
ausgeschaltet.
2.Wenn ein Signaleingang vorliegt, schaltet sich der Monitor automatisch ein.
3.Wenn die Möglichkeit besteht, dass auf dem Monitor eine falsche Anzeige angezeigt wird,
tauschen Sie die Batterien aus, um ein gutes Ergebnis zu erzielen. Sie müssen gleichzeitig die
Batterien austauschen.
4.Der Monitor verwendet 1,5-V-AA- oder AAA-Batterien.
24

USER'S MANUAL/HANDBUCH/MANUEL DE L'UTILISATEUR
/MANUALDELUSUARIO/MANUALEUTENTE/INSTRUKCJAOBSŁUGI
Vélo d’Appartement Magnétique
SP37363
EN DE FR ES IT PL
25

CHER CLIENT,
VEUILLEZ LIRE TRÈS ATTENTIVEMENT CETTE INSTRUCTION AVANT D’UTILISER LE
PRODUIT.
Notez les précautions suivantes avant d’assembler ou d’utiliser la machine.
1. Assemblez la machine exactement comme décrit dans le manuel d'utilisation.
2. Vérifiez toutes les vis, écrous et autres connexions avant d’utiliser la machine pour la première
fois et assurez-vous que la machine est dans un état sûr.
3. Installez la machine dans un endroit sec et au niveau et éloignez-la de l’humidité et de l’eau.
4. Placez un socle approprié (tapis en caoutchouc, panneau de bois, etc.) sous la machine dans la
zone de montage pour éviter les salissures, etc.
5. Avant de commencer l’entraînement, retirez tous les objets dans un rayon de 2 mètres de la
machine.
6. N’utilisez pas d’articles de nettoyage agressifs pour nettoyer la machine. Utilisez uniquement les
outils fournis ou des outils appropriés par vous-même pour assembler la machine ou en réparer les
pièces. Retirez les gouttes de sueur de la machine immédiatement après la fin de votre entraîne-
ment.
7. Votre santé peut être affectée par un entraînement incorrect ou excessif. Consultez un médecin
avant de commencer un programme de formation. Il peut définir le réglage maximum (les pouls,
les watts, la durée de la formation, etc.) auquel vous pouvez vous entraîner et obtenir des informa-
tions précises pendant la formation. Cette machine ne convient pas à des fins thérapeutiques.
8. Ne faites la formation sur la machine que si elle fonctionne correctement. N’utilisez que des
pièces de rechange d’origine pour les réparations nécessaires.
9. Cette machine ne peut être utilisée que par une seule personne à la fois.
10. Portez des vêtements et des chaussures d’entraînement qui conviennent à l’entraînement
physique avec la machine.
11. Si vous ressentez des vertiges, une maladie ou d’autres symptômes anormaux, arrêtez
l’entraînement et consultez un médecin au plus vite.
12. Les personnes telles que les enfants et les personnes handicapées ne doivent utiliser la machine
qu’en présence d’une autre personne capable de lui apporter aide et conseil.
13. La puissance de la machine augmente avec l’augmentation de la vitesse et vice versa. La
machine est équipée d’un bouton réglable qui permet de régler la résistance. Réduisez la résistance
en tournant le bouton de réglage de la résistance vers le niveau 1. Augmentez la résistance en
tournant le bouton de réglage de la résistance vers le niveau 8. Le poids maximum de l’utilisateur
est de 110 kg.
14. Des précautions doivent être prises lorsque vous soulevez ou déplacez l’équipement afin de ne
pas vous blesser au dos. Veuillez toujours utiliser des techniques de levage appropriées et / ou
utiliser une assistance.
AVIS IMPORTANT DE SÉCURITÉ
26

VUE ÉCLATÉE & LISTE
DE PIÈCES
1b
1a
2
12
11
10
21
22
23
24
25
21
26
2
7
2
7
2
3
1
4
5
6
7
8
9
4
7
8
13
14
15
16
17
18
19
20
18
28L
28R
29
30
31
31
33
32
40
18
17
25
18
25
18
38
39
57
27
64
63
65
66
67
68
60
61
62
63
64
56
58
58
59L
59R
56
64
42
41
75
48
55
75
54
76
69
72
74
69
73
73
70
70
71
47
53
43
44
49
46
45
51
50
52
58
58
58
58
58
58
58
77
78
28

1 1 42 2
2 4 43 1
3 / 44 2
4 2 45 2
5 1 46 2
6 2 47 1
7 2 48 1
8 2 49 2
9 2 50 4
10 2 51 1
11 2 52 1
12 1 53 1
13 1 54 1
14 1 55 1
15 1 56 2
16 1 57 1
17 4 58 13
18 8 59L/R 2
19 1 60 1
20 1 61 1
21 2 62 1
22 1 63 2
23 4 64 2
24 1 65 1
25 4 66 1
26 1 67 1
27 2 68 1
28L/R 1/1 69 2
29 1 70 2
30 1 71 1
31 2 72 1
32 1 73 1
33 1 74 1
34 / 75 1
35 / 76 1
36 / 77 1
37 / 78 1
38 3 1
39 3 1
40 1
41 1
N°
Qté
Description
N°
Qté
Description
Compteur électronique
Vis cruciforme M5*10
Mousse
Guidon
Capuchon
Capteur de pouls
Vis cruciforme ST4,2*19
Fil de capteur de pouls
Rondelle élastique d8
Vis M8*30
Petit couvercle
Vis cruciforme M5*25
Rondelle d’arc d6* 20*R25*1,5
Contrôleur de tension
Tube de support
Boulon M8*16
Rondelle d’arc d8* 20*R30*1,5
Fil du milieu
Fil de capteur
Capuchon 60
Stabilisateur avant
Boulon de carrosserie M8*72
Fil de tension
Écrou borgne M8
Stabilisateur arrière
Capuchon
Pédale L/R
Bouton M16*1,5 37
Tube de siège
Vis cruciforme ST3,0*10
Douille
Tube coulissant
Écrou en nylon M8
Rondelle d8* 20*1,5
Siège
Boulon hexagonal M6*30
Écrou hexagonal M6
Essieu
Anneau de blocage d12
Rondelle d6* 16*1,5
Rondelle élastique d6
Écrou hexagonal mince M10 * 1,0
Galet enrouleur
Boulon hexagonal M6 * 20
Aimant
Treillis en plastique
Ressort de tension
Panneau magnétique
Support en U
Vis M8*19
Couvercle de manivelle
Couvercle avant
Vis cruciforme ST4,2 * 16
Couvercle de chaîne
Écrou
Rondelle
Écrou 1
Roulement à billes du collier
Boîtier de collier
Écrou 2
Rondelle
Poulie à courroie
Courroie
Ensemble de boulon
Palier
Essieu
Écrou à bride hexagonale M10*1,0
Écrou hexagonal mince M10*1,0
Volant
Écrou en nylon M8
Ressort de tension
Vis cruciforme ST4,2 * 16
Douille de capteur
Clé S13-14-15
Clé S6
∅
∅
∅
∅
∅
∅
29
ÉTAPE 1 :
INSTRUCTION D’ASSEMBLAGE :
23# M8*72
x4
x4
x4
18# d8* 20*1.5*R30
25# M8
28L
28R
30
25
18
25
18
23
18
25
22
23
26
a. Fixez le stabilisateur avant (22) et le stabilisateur arrière (26) au tube de siège (30) à l’aide de
boulons de carrosserie (23), de rondelles en arc (18) et d’écrous borgnes (25).
b. Fixez la pédale (28L/R) aux bras de manivelle comme indiqué ci-dessus.
ATTENTION : assurez-vous que la pédale droite (28R) marquée (R) est bien fixée au bras de
manivelle droit et serrée dans le sens inverse des aiguilles d’une montre.
La pédale gauche (28L) marquée (L) est fixée au bras de manivelle gauche et serrée dans le sens
inverse des aiguilles d'une montre.
30

29
30
33
38
39
40
29# M16
ÉTAPE 2 :
a. Fixez le siège (40) au tube coulissant (33) avec des écrous en nylon (38) et des rondelles (39).
b. Faites glisser le tube coulissant (33) dans le tube du siège (30). Fixez et serrez avec le bouton
(29).
x1
31

17# M8*16
18# d8* 20*1.5*R30
15
24
30
16
17
18
19
18
17
24
20
15
57
ÉTAPE 3 :
a. Fixez le couvercle avant (57) au tube de support (16). Connectez le contrôleur de tension (15)
avec le fil de tension (24). Connectez le fil du capteur (20) avec le fil central (19).
b. Fixez le tube de support (16) au tube de siège (30) avec les boulons (17) et les rondelles d’arc
(18).
x4
x4
32

ÉTAPE 4 :
a. Fixez le guidon (5) sur le tube de support (16) avec les vis (11), les rondelles élastiques (10) et
le petit couvercle (12). Ensuite, faites passer le fil du capteur de pouls (9) à travers le bouchon.
b. Connectez le fil du capteur de pouls (9) avec le fil du compteur électronique (1a). Connectez le
fil du milieu (19) avec le fil du compteur électronique (1b).
c. Fixez le compteur électronique (1) au tube de support (16) avec les vis (2) et les rondelles (3).
L’assemblage est terminé.
16
1b
1a
2
12
11
10
1
5
9
19
#10 d8 x2
S6
#11 M8*30 x2
#12 x1
1b
1a
9
19
33
Ce produit vous offre de nombreux avantages. Il améliorera votre forme physique, votre tonus
musculaire et vous aidera à perdre du poids en association avec un régime hypocalorique.
Cette étape permet au sang de circuler autour du corps et au bon fonctionnement des muscles.
Cela réduira également le risque de crampe et de blessure musculaire. Il est recommandé
d’effectuer quelques exercices d’étirement, comme indiqué ci-dessous. Chaque étirement devrait
prendre environ 30 secondes. Ne forcez pas vos muscles. Si cela vous fait mal, ARRÊTEZ.
C’est l’étape que vous faites l’effort. Après une utilisation régulière, les muscles de vos jambes
deviendront plus forts. Il est également important de maintenir un rythme soutenu. Le rythme
devrait être suffisant pour augmenter votre fréquence cardiaque dans la zone cible, comme
indiqué sur le graphique ci-dessous.
Cette étape devrait
durer au moins 12
minutes, bien que la
plupart des gens
commencent à 15-20
minutes environ.
INSTRUCTIONS D’EXERCICE
1. Echauffement
2. Exercice
FLEXION LATÉRALE CUISSE EXTÉRIEURE
CUISSE INTÉRIEURE
MUSCLE DU MOLLET
/ TENDON D’ACHILLE
FLEXION AVANT
RYTHME CARDIAQUE
ZONE CIBLE
REFROIDISSEMENT
ÂGE
MAXIMAL
34

Cette étape aide à détendre votre système cardiovasculaire et vos muscles. Il s’agit d’une
répétition de l’exercice d’échauffement visant à réduire votre cadence et dure environ 5 minutes.
Les exercices d’étirement doivent maintenant être répétés, en vous rappelant encore une fois de
ne pas forcer ou secouer vos muscles dans l’étirement. Lorsque vous serez en meilleure forme,
vous devrez peut-être vous entraîner plus longtemps et plus fort. Il est conseillé de s’entraîner au
moins trois fois par semaine et, si possible, d’espacer vos séances d’entraînement de manière
uniforme tout au long de la semaine.
Pour tonifier vos muscles pendant votre cycle d’exercices, vous devrez régler la résistance assez
haut. Cela mettra plus de pression sur les muscles de vos jambes et pourrait vous empêcher de
vous entraîner aussi longtemps que vous le souhaitez. Si vous essayez également d’améliorer
votre condition physique, vous devez modifier votre programme d’entraînement. Vous devez
vous entraîner normalement pendant les phases d’échauffement et de récupération. Vers la fin de
la phase de pratique, cependant, vous devriez augmenter la résistance pour exercer davantage de
pression sur vos jambes. Vous devez maîtriser votre rythme pour maintenir votre fréquence
cardiaque dans la zone cible.
Le facteur important ici est la quantité d’effort que vous mettez. Plus vous travaillez dur et
longtemps, plus vous brûlerez de calories. Effectivement, c’est la même chose que si vous vous
entraîniez pour améliorer votre condition physique, la différence est l’objectif.
Le bouton de commande de tension vous permet de modifier la résistance des pédales. Une haute
résistance rend plus difficile la pédale, une faible résistance facilite. Pour de meilleurs résultats,
réglez la tension pendant l’utilisation de la machine.
FONCTION DE BOUTON :
MODE : Ce bouton vous permet de sélectionner et de verrouiller une fonction particulière
que vous souhaitez.
TIME (TEMPS)--------------------------------------------------------00:00~99:59 MIN
SPEED (VITESSE) ---------------------------------------------------0.0~99.9 KM/H
DISTANCE ------------------------------------------------------------0.00~999.9 KM
ODOMETER (ODOMÈTRE) ---------------------------------------0.0~9999KM
PULSE (POULS) ------------------------------------------------------40~240 BPM
CALORIE --------------------------------------------------------------0.0~9999 KCAL
3. Refroidissement
TONUS MUSCULAIRE
PERTE DE POIDS
UTILISATION
SPÉCIFICATIONS :
MONITEUR D’EXERCICE
35

PROCÉDURES D’OPÉRATION :
1. AUTO ON / OFF:
Ce système s’allume lorsque vous appuyez sur un bouton ou lorsqu’il reçoit un signal du
capteur de vitesse.
Le système s’éteint automatiquement lorsque le capteur n’a pas de signal ou aucun bouton n’a
été enfoncé pendant environ 4 minutes.
2. RESET (RÉINITIALISER) :
L’appareil peut être réinitialisé en remplaçant la pile ou en appuyant sur le bouton « Mode »
pendant 3 secondes.
3.MODE :
Pour choisir « SCAN » ou « LOCK », si vous ne souhaitez pas utiliser le mode « SCAN », appuyez
sur le bouton « MODE » lorsque le pointeur commence à clignoter sur la fonction que vous
souhaitez.
4. FONCTIONS :
1. TIME : Appuyez sur le bouton « MODE » jusqu’à ce que le pointeur se verrouille sur « TIME ».
Le temps de travail total sera indiqué au début de l’exercice.
2. SPEED : Appuyez sur le bouton « MODE » jusqu’à ce que le pointeur se verrouille sur «
SPEED ». L’écran affiche la vitesse actuelle pendant le temps d’entraînement.
3. DISTANCE : Appuyez sur le bouton « MODE » jusqu’à ce que le pointeur se verrouille sur «
DISTANCE ». La distance de chaque entraînement sera affichée au début de l’exercice.
4. ODOMETER : Appuyez sur le bouton « MODE » jusqu’à ce que le pointeur passe à « ODOME-
TER ». La distance totale accumulée sera affichée.
5. CALORIE : Appuyez sur le bouton « MODE » jusqu’à ce que le pointeur se verrouille sur «
CALORIE ». Les calories brûlées seront affichées au début de l’exercice.
6. PULSE (POULS) : Appuyez sur le bouton « MODE » jusqu’à ce que le pointeur passe à la
fonction « PULSE » et placez le clip d’oreille sur l’oreille ou saisissez le capteur avec vos mains
pendant environ 3 secondes, le pouls sera affiché.
SCAN (BALAYAGE) : L’affichage change selon le diagramme suivant toutes les 4 secondes.
L’écran affiche automatiquement les fonctions suivantes dans l’ordre indiqué :
TIME-SPEED-DISTANCE CALORIE-PULSE
(TEMPS - VITESSE - DISTANCE - CALORIE – POULS)
REMARQUE :
1. Si aucun signal n’apparaît dans les 4 à 5 minutes, l’écran LCD s’éteint automatiquement.
2. Lorsqu’il y a une entrée de signal, le moniteur s’allume automatiquement.
3. S’il est possible de voir un affichage incorrect sur le moniteur, veuillez remplacer les piles pour
obtenir un résultat satisfaisant.
4. Le moniteur utilise des piles « AA » ou « AAA » de 1,5 V.
36
USER'S MANUAL/HANDBUCH/MANUEL DE L'UTILISATEUR
/MANUALDELUSUARIO/MANUALEUTENTE/INSTRUKCJAOBSŁUGI
Bicicleta Estática Magnética
SP37363
EN DE FR ES IT PL
37

ESTIMADO CLIENTE,
POR FAVOR, LEA ESTAS INSTRUCCIONES DETENIDAMENTE ANTES DE UTILIZAR EL
PRODUCTO.
Tenga en cuenta las siguientes precauciones antes de ensamblar u operar la máquina.
1. Ensamble la máquina exactamente como se describe en el manual de instrucciones.
2. Verifique todos los tornillos, tuercas y otras conexiones antes de usar la máquina por primera vez
y asegúrese de que el entrenador esté en condiciones seguras.
3. Instale la máquina en un lugar seco y nivelado y déjela alejada de la humedad y del agua.
4. Coloque una base adecuada (por ejemplo, alfombra de goma, tabla de madera, etc.) debajo de la
máquina en el área de montaje para evitar suciedad, etc.
5. Antes de comenzar el entrenamiento, retire todos los objetos dentro de un radio de 2 metros de la
máquina.
6. No utilice productos de limpieza agresivos para limpiar la máquina. Utilice únicamente las
herramientas suministradas o las propias herramientas adecuadas para montar la máquina o reparar
cualquier pieza de la máquina. Elimine las gotas de sudor de la máquina inmediatamente después
de terminar el entrenamiento.
7. El entrenamiento incorrecto o excesivo puede afectar su salud. Consulte a un médico antes de
comenzar un programa de entrenamiento. Él puede definir el ajuste máximo (pulso, vatios,
duración del entrenamiento, etc.) con el que usted puede entrenarse y puede obtener información
precisa durante el entrenamiento. Esta máquina no es adecuada para fines terapéuticos.
8. Solo entrene en la máquina cuando esté en condiciones normales de trabajo. Utilice únicamente
repuestos originales para las reparaciones necesarias.
9. Esta máquina se puede utilizar para el entrenamiento de una sola persona a la vez.
10. Use ropa y calzado de entrenamiento, que sean adecuados para el entrenamiento físico con la
máquina. Sus zapatos de entrenamiento deben ser apropiados para el entrenador.
11. Si tiene una sensación de mareo, de malestar u otros síntomas anormales, deje de entrenar y
consulte a un médico lo antes posible.
12. Gente como los niños y las personas discapacitadas solo deben utilizar la máquina en presencia
de otra persona que pueda brindar ayuda y consejo.
13. La potencia de la máquina aumenta a medida que aumenta la velocidad y viceversa. La
máquina está equipada con una perilla ajustable, que puede ajustar la resistencia. Reduzca la
resistencia girando la perilla de ajuste para la configuración de resistencia hacia la etapa 1.
Aumente la resistencia girando la perilla de ajuste para la configuración de resistencia hacia la
etapa 8. El peso máximo del usuario es de 110 kg.
14. Se debe tener cuidado al levantar o mover el equipo para no lastimarse la espalda. Siempre
utilice las técnicas adecuadas para levantar objetos y / o utilice ayuda.
NOTAS DE SEGURIDAD IMPORTANTES:
38

Vista Detallada y Lista de
Piezas:
1b
1a
2
12
11
10
21
22
23
24
25
21
26
2
7
2
7
2
3
1
4
5
6
7
8
9
4
7
8
13
14
15
16
17
18
19
20
18
28L
28R
29
30
31
31
33
32
40
18
17
25
18
25
18
38
39
57
39

64
63
65
66
67
68
60
61
62
63
64
56
58
58
59L
59R
56
64
42
41
75
48
55
75
54
76
69
72
74
69
73
73
70
70
71
47
53
43
44
49
46
45
51
50
52
58
58
58
58
58
58
58
77
78
40

1 1 42 2
2 4 43 1
3 / 44 2
4 2 45 2
5 1 46 2
6 2 47 1
7 2 48 1
8 2 49 2
9 2 50 4
10 2 51 1
11 2 52 1
12 1 53 1
13 1 54 1
14 1 55 1
15 1 56 2
16 1 57 1
17 4 58 13
18 8 59L/R 2
19 1 60 1
20 1 61 1
21 2 62 1
22 1 63 2
23 4 64 2
24 1 65 1
25 4 66 1
26 1 67 1
27 2 68 1
28L/R 1/1 69 2
29 1 70 2
30 1 71 1
31 2 72 1
32 1 73 1
33 1 74 1
34 / 75 1
35 / 76 1
36 / 77 1
37 / 78 1
38 3 1
39 3 1
40 1
41 1
NÚM.
CANTIDAD
NOMBRE
NÚM.
CANTIDAD
NOMBRE
Medidor Electrónico
Tornillo de cruceta M5*10
Espuma
Manillar
TapadeextremoΦ25
SensordepulsoΦ25
Tornillo de cruceta ST4,2*19
Cable del sensor de pulso
Arandela elástica d8
Tornillo M8*30
Tapa pequeña
Tornillo de cruceta M5*25
Arandeladearcod6*Φ20*R25*1,5
Control de tensión
Tubo de soporte
Perno M8*16
Arandeladearcod8*Φ20*1,5*R30
Cable medio
Cable del sensor
TapadeextremoΦ60
Estabilizador delantero
Perno de carrocería M8*72
Cable de tensión
Tuerca abovedada M8
Estabilizador trasero
TapadeextremoΦ60
Pedal L/ R
PerillaM16*1,5*Φ37
Tubo de asiento
Tornillo de cruceta ST3,0*10
Cojinete
Tubo deslizante
Tuerca de nailon M8
Arandelad8*Φ20*1,5
Asiento
Perno hexagonal M6*30
Tuerca hexagonal M6
Eje
Anillo de retención d12
Arandelad6*Φ16*1,5
Arandela elástica d6
Tuerca hexagonal fina M10*1,0
Rodillo de tracción
Perno hexagonal M6*20
Imán
Celosía de plástico
Resorte de tensión
Tablero magnético
Soporte en U
Tornillo M8*19
Cubierta de manivela
Cubierta delantera
Tornillo de cruceta ST4,2*16
Cubierta de cadena
Tuerca
Arandela
Tuerca 1
Rodamiento de bolas de collar
Carcasa de collar
Tuerca 2
Arandela
Polea de correa
Cinturón
Grupo de pernos
Cojinete
Eje
Tuerca hexagonal con brida M10*10
Tuerca hexagonal fina M10*1,0
Volante
Tuerca de nailon M8
Resorte de tensión
Tornillo de cruceta ST4,2*16
Toma de sensor
Llave S13-14-15
Llave S6
41
PASO 1:
Instrucción de Montaje:
23# M8*72
x4
x4
x4
18# d8* 20*1.5*R30
25# M8
28L
28R
30
25
18
25
18
23
18
25
22
23
26
a. Fije el estabilizador delantero (22) y el estabilizador trasero (26) al tubo del asiento (30) con los
pernos de carrocería (23), las arandelas de arco (18) y las tuercas abovedadas (25).
b. Fije el pedal (28L / R) a los brazos de la manivela como se muestra.
PRECAUCIÓN: asegúrese de que el pedal derecho (28R) marcado (R) esté conectado al brazo de
la manivela derecha y apretado en la dirección de rotación en el sentido de las agujas del reloj.
El pedal izquierdo (28L) marcado (L) se fija al brazo de la manivela izquierda y se aprieta en
sentido antihorario.
42
29
30
33
38
39
40
29# M16
PASO 2:
a. Fije el asiento (40) al tubo deslizante (33) con las tuercas de nailon (38) y las arandelas (39).
b. Deslice el tubo deslizante (33) en el tubo del asiento (30). Asegure y apriete con la perilla (29).
x1
43

17# M8*16
18# d8* 20*1.5*R30
15
24
30
16
17
18
19
18
17
24
20
15
57
PASO 3:
a. Fije la cubierta delantera (57) al tubo de soporte (16). Conecte el control de tensión (15) con el
cable de tensión (24). Conecte el cable del sensor (20) con el cable del medio (19).
b. Fije el tubo de soporte (16) al tubo de asiento (30) con los pernos (17) y las arandelas de arco
(18).
x4
x4
44

PASO 4:
a. Fije el manillar (5) en el tubo de soporte (16) con los tornillos (11), las arandelas elásticas (10)
y la tapa pequeña (12). Luego, pase el cable del sensor de pulso (9) a través del tapón.
b. Conecte el cable del sensor de pulso (9) con el cable del medidor electrónico (1a). Conecte el
cable del medio (19) con el cable del medidor electrónico (1b).
c. Fije el medidor electrónico (1) al tubo de soporte (16) con los tornillos (2) y las arandelas (3).
El montaje está terminado.
16
1b
1a
2
12
11
10
1
5
9
19
#10 d8 x2
S6
#11 M8*30 x2
#12 x1
1b
1a
9
19
45
El uso de la BICICLETA Estática le proporciona muchos beneficios. Mejorará su condición
física, tonificará los músculos y le ayudará a perder peso junto con una dieta con control de
calorías.
Esta etapa permite que la sangre circule por el cuerpo y que los músculos funcionen correcta-
mente. También reducirá el riesgo de calambres y de lesiones musculares. Es recomendable
realizar algunos ejercicios de estiramiento como se muestra a continuación. Cada estiramiento
debe mantenerse durante aproximadamente 30 segundos, no fuerce ni tire demasiado de los
músculos en un estiramiento; si le duele, DETÉNGASE.
Esta es la etapa en la que hace esfuerzos. Después del uso regular, los músculos en las piernas se
fortalecerán. Trabaje con su rutina, pero es muy importante mantener un ritmo constante en todo
momento. El ritmo del entrenamiento debe ser suficiente para elevar su frecuencia cardíaca a la
zona objetivo, como se muestra en el gráfico a continuación.
Esta etapa debe durar
al menos 12 minutos,
aunque la mayoría de
las personas
comienzan entre los
15 y 20 minutos.
INSTRUCCIONES DE EJERCICIO
1. La Fase de Calentamiento
2. La Fase de Ejercicio
FLEXIÓN LATERAL MUSLO EXTERIOR
MUSLO INTERIOR
PIERNA / TOBILLO
FLEXIÓN HACIA
ADELANTE
FRECUENCIA CARDÍACA
ZONA OBJETIVO
ENFRIAMIENTO
EDAD
MÁXIMO
46

Esta etapa es para permitir que su sistema cardiovascular y sus músculos se relajen. Se trata de
una repetición del ejercicio de calentamiento, por ejemplo. reduzca su ritmo, continúe durante
aproximadamente 5 minutos. Los ejercicios de estiramiento ahora deben repetirse, nuevamente
recordando no forzar ni tirar demasiado de los músculos en el estiramiento.
A medida que se ponga en forma, es posible que deba entrenar más y más duro. Es recomendable
entrenar al menos tres veces por semana y, si es posible, espacie sus entrenamientos de manera
uniforme a lo largo de la semana.
Para tonificar los músculos mientras está en su BICICLETA Estática, necesitará establecer la
resistencia lo suficientemente alta. Esto ejercerá más presión en los músculos de las piernas y
puede significar que usetd no puede entrenar todo el tiempo que quisiera. Si también está
tratando de mejorar su estado físico, debe modificar su programa de entrenamiento. Debe
entrenar normalmente durante las fases de calentamiento y de enfriamiento, pero hacia el final de
la fase de ejercicio debe aumentar la resistencia, haciendo que sus piernas trabajen más de lo
normal. Es posible que deba controlar su velocidad para mantener su frecuencia cardíaca en la
zona objetivo.
El factor importante aquí es la cantidad de esfuerzo que dedica. Cuanto más duro y más tiempo
trabaje, más calorías quemará. Efectivamente, esto es lo mismo que si estuviera entrenando para
mejorar su condición física, la diferencia es el objetivo.
La perilla de control de tensión le permite alterar la resistencia de los pedales. Una alta resisten-
cia hace que sea más difícil pedalear, una baja resistencia lo hace más fácil. Para obtener los
mejores resultados, ajuste la tensión mientras la bicicleta está en uso.
FUNCIONES DE TECLA
MODE(MODO): Esta tecla le permite seleccionar y bloquear una función particular que
desee.
TIME (TIEMPO)--------------------------------------------------------00:00~99:59 MIN
SPEED (VELOCIDAD) ---------------------------------------------------0.0~99.9 KM/H
DISTANCE (DISTANCIA) --------------------------------------------------0.00~999.9 KM
ODOMETER (ODÓMETRO) ---------------------------------------0.0~9999 KM
PULSE (PULSO) ------------------------------------------------------40~240 BPM
CALORIE(CALORÍA) ----------------------------------------------------0.0~9999 KCAL
3. La Fase de Enfriamiento
Tonificación muscular
PÉRDIDA DE PESO
USO
ESPECIFICACIONES:
MONITOR DE EJERCICIO
47

PROCEDIMIENTOS DE OPERACIÓN:
1. AUTO ON/OFF (ENCENDIDO / APAGADO AUTOMÁTICO):
Este sistema se enciende cuando se presiona cualquier tecla o cuando recibe una entrada de
señal del sensor de velocidad.
El sistema se apaga automáticamente cuando el sensor no tiene entrada de señal o no se
presionan las teclas durante aproximadamente 4 minutos.
2. RESET (RESTABLECER):
La unidad se puede reiniciar cambiando la batería o presionando la tecla de modo durante 3
segundos.
3.MODE (MODO):
Para elegir "SCAN" ("ESCANEAR") o "LOCK" ("BLOQUEAR") si no desea el modo de escaneo,
presione la tecla "MODE" cuando el indicador comience a parpadear en la función que desea.
4. FUNCIONES:
TIME (TIEMPO): Presione la tecla "MODE" hasta que el indicador se bloquee en "TIME". El
tiempo total de trabajo se mostrará al iniciar el ejercicio.
SPEED (VELOCIDAD): Presione la tecla "MODE" hasta que el indicador se bloquee en
"SPEED". Muestra la velocidad actual durante el tiempo de entrenamiento.
DISTANCE (DISTANCIA): Presione la tecla "MODE" hasta que el indicador se bloquee en
"DISTANCE". La distancia de cada entrenamiento se mostrará al iniciar el ejercicio.
ODOMETER (ODÓMETRO): Presione la tecla "MODE" hasta que el indicador se bloquee en
"ODOMETER". Se mostrará la distancia total acumulada.
CALORIE (CALORÍA): Presione la tecla "MODE" hasta que el indicador se bloquee en
"CALORIE". Las calorías quemadas se mostrarán al iniciar el ejercicio.
PULSE (PULSO): Presione la tecla "MODE" hasta que el indicador avance a la función
"PULSE" y coloque el clip de oreja en la oreja o sujete el sensor con las manos durante aproxima-
damente 3 segundos, se mostrará el pulso.
SCAN(ESCANEAR):
La pantalla cambia de acuerdo con el siguiente diagrama cada 4 segundos. Automáticamente
muestra las siguientes funciones en el orden mostrado:
TIME-SPEED-DISTANCE-CALORIE-PULSE
(TIEMPO-VELOCIDAD-DISTANCIA-CALORÍAS-PULSO)
NOTA:
1. Si no aparece ninguna señal en 4-5 minutos, la pantalla LCD se apagará automáticamente.
2. Cuando hay una entrada de señal, el monitor se enciende automáticamente.
3. Si existe la posibilidad de ver una visualización incorrecta en el monitor, reemplace las baterías
para obtener un buen resultado. Debe reemplazar las baterías al mismo tiempo.
4. El monitor utiliza las baterías "AA" o "AAA" de 1,5 V.
48
USER'S MANUAL/HANDBUCH/MANUEL DE L'UTILISATEUR
/MANUALDELUSUARIO/MANUALEUTENTE/INSTRUKCJAOBSŁUGI
Cyclette per Fitness
SP37363
EN DE FR ES IT PL
49

CARO CLIENTE,
SI PREGA DI LEGGERE QUESTE ISTRUZIONI MOLTO ATTENTAMENTE PRIMA DI
UTILIZZARE.
Osservare la seguente precauzione prima di montare o mettere in funzione la macchina.
1. Montare la macchina esattamente come le descrizioni nel manuale di istruzioni.
2. Controllare tutte le viti, i dadi e gli altri collegamenti prima di utilizzare la macchina per la prima
volta e assicurarsi che il prodotto sia in condizioni di sicurezza.
3. Posizionare la macchina in un luogo piano e asciutto e lasciarla al riparo da umidità e acqua.
4. Posizionare una base adeguata (es. Tappetino in gomma, tavola di legno, ecc.) sotto la macchina
nell'area di assemblaggio per evitare sporco e così via
5. Prima di iniziare l'allenamento, rimuovere tutti gli oggetti entro un raggio di 2 metri dalla
macchina.
6. Non utilizzare articoli di pulizia aggressivi per pulire la macchina. Utilizzare solo gli strumenti
forniti o strumenti propri idonei per montare la macchina o riparare qualsiasi parte della macchina.
Rimuovere le gocce di sudore dalla macchina subito dopo aver terminato l'allenamento.
7. La tua salute può essere influenzata da un allenamento errato o eccessivo. Consultare un medico
prima di iniziare un programma di allenamento. Può definire l'impostazione massima (Impulso.
Watt. Durata dell'allenamento ecc.) a cui puoi allenarti e può ottenere informazioni precise durante
l'allenamento. Questa macchina non è adatta per scopi terapeutici.
8. Eseguire l'allenamento sulla macchina solo quando è in condizioni di lavoro normali. Utilizzare
solo ricambi originali per eventuali riparazioni necessarie.
9. Questa macchina può essere utilizzata per l'allenamento di una sola persona alla volta.
10. Indossare abiti e scarpe da allenamento adatti per l'allenamento fitness con la macchina. Le tue
scarpe da ginnastica dovrebbero essere appropriate per l'allenatore.
11. Se si ha una sensazione di capogiro, malattia o altri sintomi anormali, interrompere l'allenamen-
to e consultare un medico il prima possibile.
12. Le persone come bambini e disabili devono utilizzare la macchina solo in presenza di un'altra
persona che possa fornire assistenza e consulenza.
13. La potenza della macchina aumenta all'aumentare della velocità e viceversa. La macchina è
dotata di manopola regolabile, che può regolare la resistenza. Ridurre la resistenza ruotando la
manopola di regolazione dell'impostazione della resistenza verso la fase 1. Aumentare la resistenza
ruotando la manopola di regolazione dell'impostazione della resistenza verso la fase 8. Il peso
massimo dell'utente è 110 KG.
14. Prestare attenzione durante il sollevamento o lo spostamento dell'attrezzatura per non ferire la
schiena. Utilizzare sempre tecniche di sollevamento adeguate e / o utilizzare assistenza.
AVVISO IMPORTANTE PER LA SICUREZZA:
50
VISTA ESPLOSA E LISTA
DELLE PARTI:
1b
1a
2
12
11
10
21
22
23
24
25
21
26
2
7
2
7
2
3
1
4
5
6
7
8
9
4
7
8
13
14
15
16
17
18
19
20
18
28L
28R
29
30
31
31
33
32
40
18
17
25
18
25
18
38
39
57
51

64
63
65
66
67
68
60
61
62
63
64
56
58
58
59L
59R
56
64
42
41
75
48
55
75
54
76
69
72
74
69
73
73
70
70
71
47
53
43
44
49
46
45
51
50
52
58
58
58
58
58
58
58
77
78
52

1 1 42 2
2 4 43 1
3 / 44 2
4 2 45 2
5 1 46 2
6 2 47 1
7 2 48 1
8 2 49 2
9 2 50 4
10 2 51 1
11 2 52 1
12 1 53 1
13 1 54 1
14 1 55 1
15 1 56 2
16 1 57 1
17 4 58 13
18 8 59L/R 2
19 1 60 1
20 1 61 1
21 2 62 1
22 1 63 2
23 4 64 2
24 1 65 1
25 4 66 1
26 1 67 1
27 2 68 1
28L/R 1/1 69 2
29 1 70 2
30 1 71 1
31 2 72 1
32 1 73 1
33 1 74 1
34 / 75 1
35 / 76 1
36 / 77 1
37 / 78 1
38 3 1
39 3 1
40 1
41 1
N.
QUANTITÀ
DESCRIZIONE
N.
QUANTITÀ
DESCRIZIONE
Contatore elettronico
Vite a croce M5*10
Schiuma
Manubrio
TappodichiusuraΦ25
CavodelsensoredipulsazioneΦ25
Vite a croce ST4,2*19
Cavo del sensore di pulsazione
Rondella elastica d8
Vite M8*30
Copertura piccola
Vite a croce M5*25
Rondellaadarcod6*Φ20*R25*1,5
Controllo della tensione
Tubo di supporto
Bullone M8*16
Rondellaadarcod8*Φ20*R30*1,5
Cavo centrale
Cavo del sensore
TappodichiusuraΦ60
Stabilizzatore davanti
Bullone del carrello M8*72
Filo di tensione
Dado a cupola M8
Stabilizzatore posteriore
TappodichiusuraΦ60
Pedale L/R
ManopolaM16*1,5Φ37
Tubo di sedile
Vite a croce ST3,0*10
Boccola
Tubo scorrevole
Dado in nylon M8
Rondellad8*Φ20*1,5
Sedile
Bullone esagonale M6*30
Dado esagonale M6
Asse
Anello a scatto d12
Rondellad6*Φ16*1,5
Rondella elastica d6
Dado esagonale sottile M10 * 1,0
Rullo di presa
Bullone esagonale M6 * 20
Magnete
Reticolo di plastica
Molla di tensione
Piastra magnetica
Supporto a U
Vite M8*19
Coperchio della manovella
Coperchio davanti
Vite a croce ST4,2 * 16
Copricatena
Dado
Rondelle
Dado 1
Cuscinetto a sfere a collare
Alloggiamento del collare
Dado 2
Rondella
Puleggia della cinghia
Cinghia
Gruppo di bullone
Cuscinetto
Asse
Dado flangiato esagonale M10*1,0
Dado esagonale sottile M10*1,0
Volano
Dado in nylon M8
Molla di tensione
Vite a croce ST4,2 * 16
Presa del sensore
Chiave S13-14-15
Chiave S6
53
Passo 1:
ISTRUZIONI DI ASSEMBLAGGIO:
23# M8*72
x4
x4
x4
18# d8* 20*1.5*R30
25# M8
28L
28R
30
25
18
25
18
23
18
25
22
23
26
a. Attaccare lo stabilizzatore davanti (22) e lo stabilizzatore posteriore (26) al tubo del sedile (30)
con i bulloni del carrello (23), le rondelle ad arco (18) e i dadi a cupola (25).
b. Attaccare il pedale (28L / R) alle pedivelle come mostrato sopra.
ATTENZIONE: Assicurarsi che il pedale destro (28R) contrassegnato con (R) sia fissato alla
pedivella destra e serrato in senso antiorario.
Il pedale sinistro (28L) contrassegnato con (L) è fissato alla pedivella sinistra e serrato in senso
antiorario.
54

29
30
33
38
39
40
29# M16
Passo 2:
a. Attaccare il sedile (40) al tubo scorrevole (33) con dadi in nylon (38) e rondelle (39).
b. Far scorrere il tubo scorrevole (33) nel tubo di sedile (30). Fissare e serrare con la manopola
(29).
x1
55
17# M8*16
18# d8* 20*1.5*R30
15
24
30
16
17
18
19
18
17
24
20
15
57
Passo 3:
a. Attaccare la coperchio davanti (57) al tubo di supporto (16). Collegare il controllo della
tensione (15) con il filo di tensione (24). Collegare il cavo del sensore (20) con il cavo centrale
(19).
b. Fissare il tubo di supporto (16) al tubo verticale (30) con i bulloni (17) e le rondelle ad arco
(18).
x4
x4
56
Passo 4:
a. Fissare il manubrio (5) al tubo di supporto (16) con le viti (11), le rondelle elastiche (10) e la
copertura piccola (12). E poi, far passare il cavo del sensore di pulsazione (9) attraverso il tappo.
b. Collegare il cavo del sensore di pulsazione (9) con il filo del contatore elettronico (1a).
Collegare il cavo centrale (19) con il filo del contatore elettronico (1b).
c. Fissare il contatore elettronico (1) al tubo di supporto (16) con viti (2) e rondelle (3).
L'assemblaggio è completo
16
1b
1a
2
12
11
10
1
5
9
19
#10 d8 x2
S6
#11 M8*30 x2
#12 x1
1b
1a
9
19
57

L'uso del cyclette da allenamento ti offre numerosi vantaggi, migliorerà la tua forma fisica,
tonificherà i muscoli e, in combinazione con una dieta a calorie controllate, ti aiuterà a perdere
peso.
Questa fase aiuta a far scorrere il sangue nel corpo e a far funzionare correttamente i muscoli.
Ridurrà anche il rischio di crampi e lesioni muscolari. Si consiglia di eseguire alcuni esercizi di
allungamento come mostrato di seguito. Ogni allungamento deve essere mantenuto per circa 30
secondi, non forzare o tirare i muscoli in un allungamento - se fa male, FERMATI.
Questa è la fase in cui ti impegni. Dopo un uso regolare, i muscoli delle gambe diventeranno più
forti. Allenamento alla tua routine, ma è molto importante mantenere un ritmo costante per tutto
il tempo. La frequenza dell'allenamento dovrebbe essere sufficiente per aumentare il battito
cardiaco nella zona target mostrata nel grafico sottostante.
Questa fase dovrebbe
durare un minimo di
12 minuti, sebbene la
maggior parte delle
persone inizi a circa
15-20 minuti.
ISTRUZIONI PER L'ESERCIZIO
1. La fase di riscaldamento
2. La fase di esercizio
CURVARE A LATO COSCIA ESTERNA
COSCIA INTERNA
POLPACCIO / CAVIGLIA
CURVARE IN
AVANTI
FREQUENZA DEL BATTITO CARDIACO
ZONA
DELL’OBIETTIVO
RAFFREDDAMENTO
ETÀ
MASSIMO
58

Questa fase serve a far rilassare il sistema cardiovascolare e i muscoli. Questa è una ripetizione
dell'esercizio di riscaldamento, ad esempio ridurre il ritmo, continuare per circa 5 minuti. Gli
esercizi di allungamento dovrebbero ora essere ripetuti, ricordando di nuovo di non forzare o
tirare i muscoli nell'allungamento.
Man mano che diventi più in forma potresti dover allenarti più a lungo e più duramente. Si
consiglia di allenarsi almeno tre volte a settimana e, se possibile, distribuire gli allenamenti in
modo uniforme durante la settimana.
Per tonificare i muscoli mentre sei sul tuo cyclette dovrai avere una resistenza impostata
abbastanza alta. Questo metterà a dura prova i muscoli delle gambe e potrebbe significare che
non puoi allenarti per tutto il tempo che desideri. Se stai anche cercando di migliorare la tua
forma fisica, devi modificare il tuo programma di allenamento. Dovresti allenarti normalmente
durante le fasi di riscaldamento e defaticamento, ma verso la fine della fase di esercizio dovresti
aumentare la resistenza, facendo lavorare le gambe più del normale. Potrebbe essere necessario
ridurre la velocità per mantenere la frequenza del battito cardiaco nella zona dell’obiettivo.
Il fattore importante qui è la quantità di impegno che fai. Più duramente e più a lungo lavori, più
calorie brucerai. In effetti è come se ti stessi allenando per migliorare la tua forma fisica, la
differenza è l'obiettivo.
La manopola di controllo della tensione consente di modificare la resistenza dei pedali. Una
resistenza elevata rende più difficile pedalare, una resistenza bassa lo rende più facile. Per i
migliori risultati, impostare la tensione mentre la bici è in uso.
FUNZIONI CHIAVE:
MODALITÀ: Questo tasto consente di selezionare e bloccare una particolare funzione
desiderata.
TIME (TEMPO)--------------------------------------------------------00:00~99:59 MIN
SPEED (VELOCITÀ) ---------------------------------------------------0.0~99.9 KM/H
DISTANCE (DISTANZA) ----------------------------------------------0.00~999.9 KM
ODOMETER (ODOMETRO) ---------------------------------------0.0~9999KM
PULSE(PULSAZIONE)----------------------------------------------------------40~240 BPM
CALORIE(CALORIA) --------------------------------------------------0.0~9999 KCAL
3. La fase di raffreddamento
Tonificare i muscoli
PERDITA DI PESO
USO
SPECIFICHE:
MONITORE PER ESERCIZIO
59

PROCEDURE OPERATIVE:
1.AUTO ON/OFF:
Questo sistema si attiva quando viene premuto un tasto qualsiasi o quando riceve un segnale in
ingresso dal sensore di velocità.
Il sistema si spegne automaticamente quando il sensore non riceve alcun segnale in ingresso o
non viene premuto alcun tasto per circa 4 minuti.
2.RESET(RIPRISTINA):
La macchina può essere ripristinata cambiando la batteria o premendo il tasto modalità per 3
secondi.
3.MODE(MODALITÀ):
Per scegliere "SCAN" o "LOCK" se non si desidera la modalità di scansione, premere il tasto
"MODE" quando il puntatore inizia a lampeggiare sulla funzione desiderata.
4.FUNZIONI:
À
SCAN (SCANSIONE): Lo schermo cambia in base al diagramma successivo ogni 4 secondi.
Visualizzare automaticamente le seguenti funzioni nell'ordine mostrato:TEMPO-VELOCITÀ-DIS-
TANZA-CALORIA- PULSAZIONE
NOTA:
1. Se non viene visualizzato alcun segnale entro 4-5 minuti, lo schermo LCD si spegne automatica-
mente.
2. Quando c'è un segnale in ingresso, il monitore si accende automaticamente.
3. Se è possibile vedere una visualizzazione errata sul monitore, sostituire le batterie per ottenere
un buon risultato. È necessario sostituire contemporaneamente le batterie.
4. Il monitore utilizza batterie da 1,5 V "AA" o "AAA".
60
USER'S MANUAL/HANDBUCH/MANUEL DE L'UTILISATEUR
/MANUALDELUSUARIO/MANUALEUTENTE/INSTRUKCJAOBSŁUGI
Magnetyczny rower treningowy
SP37363
EN DE FR ES IT PL
61

DRODZY KLIENCI,
PROSIMYODOKŁADNEPRZECZYTANIENINIEJSZEJINSTRUKCJIPRZEDUŻYCIEM
URZĄDZENIA.
Przedmontażemluburuchomieniemurządzeniazwróćuwagęnanastępująceśrodkiostrożności:
1.Zmontujmaszynędokładnietak,jakopisanotowinstrukcjiobsługi.
2.Sprawdźwszystkieśruby,nakrętkiiinnepołączeniaprzedużyciemurządzeniaporazpierwszyi
upewnijsię,żemożnazniegobezpieczniekorzystać.
3.Ustawurządzeniewsuchym,stabilnymmiejscuizdalaodwilgociiwody.
4.Naczasmontażuumieśćurządzenienaodpowiedniejpodstawie(np.nagumowejmacie,
drewnianejdesceitp.),abyuniknąćzabrudzeniaitp.
5.Przedrozpoczęciemtreninguusuńwszystkieprzedmiotywpromieniu2metrówodurządzenia.
6.Nieużywajagresywnychśrodkówczyszczącychdoczyszczeniamaszyny,używajtylko
dostarczonychbądźodpowiednichnarzędzidomontażulubnaprawymaszyny.Usuńkroplepotuz
maszynyzarazpozakończeniutreningu.
7.Nieprawidłowylubnadmiernytreningmożewpłynąćnatwojezdrowie.Przedrozpoczęciem
programutreningowegoskonsultujsięzlekarzem.Pomożeonustawićmaksymalneobciążenia
(tętno,czastrwaniatreninguitp.).Urządzenienienadajesiędocelówterapeutycznych.
8.Trenujnamaszynietylkowtedy,gdyjestwnormalnymstaniegotowymdopracy.Używajtylko
oryginalnychczęścizamiennychdowszelkichniezbędnychnapraw.
9.Urządzeniemożebyćużywanetylkoprzezjednąosobęnaraz.
10.Nośodzieżibutytreningowe,któresąodpowiedniedotreningufitness.
11.Jeślimaszzawrotygłowy,nudnościlubinnenietypoweobjawy,przerwijtrening
ijaknajszybciejskonsultujsięzlekarzem.
12.Dzieciiosobyniepełnosprawnepowinnyobsługiwaćmaszynętylkowobecnościinnejosoby,
któramożeudzielićpomocyiporady.
13.Mocmaszynyrośniewrazzewzrostemprędkościiodwrotnie.Maszynajest
wyposażonawregulowanepokrętło,zapomocąktóregomożnaregulowaćopór.Zmniejszopór,
obracającpokrętłoregulacjioporuwkierunkustopnia1.Zwiększopór,obracając
pokrętłoregulacjioporuwkierunkustopnia8.Maksymalnawagaużytkownikato110kg.
14.Podczaspodnoszenialubprzenoszeniasprzętuzachowajostrożność,abynieuszkodzićpleców.
Zawszeużywajwłaściwejtechnikipodnoszenialubskorzystajzpomocy.
WAŻNEINFORMACJEDOTYCZĄCEBEZPIECZEŃSTWA:
62
Rysunek w widoku rozstrzelonym
ilistaczęści:
1b
1a
2
12
11
10
21
22
23
24
25
21
26
2
7
2
7
2
3
1
4
5
6
7
8
9
4
7
8
13
14
15
16
17
18
19
20
18
28L
28R
29
30
31
31
33
32
40
18
17
25
18
25
18
38
39
57
63

64
63
65
66
67
68
60
61
62
63
64
56
58
58
59L
59R
56
64
42
41
75
48
55
75
54
76
69
72
74
69
73
73
70
70
71
47
53
43
44
49
46
45
51
50
52
58
58
58
58
58
58
58
77
78
64

1 1 42 2
2 4 43 1
3 / 44 2
4 2 45 2
5 1 46 2
6 2 47 1
7 2 48 1
8 2 49 2
9 2 50 4
10 2 51 1
11 2 52 1
12 1 53 1
13 1 54 1
14 1 55 1
15 1 56 2
16 1 57 1
17 4 58 13
18 8 59L/R 2
19 1 60 1
20 1 61 1
21 2 62 1
22 1 63 2
23 4 64 2
24 1 65 1
25 4 66 1
26 1 67 1
27 2 68 1
28L/R 1/1 69 2
29 1 70 2
30 1 71 1
31 2 72 1
32 1 73 1
33 1 74 1
34 / 75 1
35 / 76 1
36 / 77 1
37 / 78 1
38 3 1
39 3 1
40 1
41 1
Nr
ILOŚĆ
OPIS
Nr
ILOŚĆ
OPIS
Wyświetlaczelektroniczny
ŚrubazłbemkrzyżowymM5*10
/
Pianka
Kierownica
Zaślepka 25
Czujniktętna
ŚrubakrzyżakowaST4,2*19
Przewódczujnikatętna
Podkładkasprężystad8
ŚrubaM8*30
Małaosłonka
MałanakładkaM5*25
Podkładkałukowad6* 20*R25*1,5
Kontrolernapięcia
Rura wsporcza
ŚrubaM8*16
Podkładkałukowad8* 20*R30*1,5
Przewód centralny
Przewód czujnika
Zaślepka 60
Stabilizator przedni
ŚrubawózkaM8*72
Drutnapinający
NakrętkakopułkowaM8
Stabilizator tylny
Zaślepka 60
PedałL/R
PokrętłoM16*1,5 37
Ramagłówna
ŚrubakrzyżakowaST3,0*10
Przepust izolacyjny
Rura przesuwna
/
/
/
/
NakrętkanylonowaM8
Okrągłapodkładkad8* 20*1,5
Siedzisko
ŚrubasześciokątnaM6*30
NakrętkasześciokątnaM6
Oś
Pierścieńosadczyd12
Okrągłapodkładkad6* 16*1,5
Podkładkasprężystad6
CienkanakrętkasześciokątnaM10*1,0
Rolkanawijająca
ŚrubasześciokątnaM6*20
Magnes
Plastikowa kratka
Sprężynanaciągowa
Tablica magnetyczna
Wspornik U
WkrętM8*19
Osłonakorby
Przedniaosłonka
ŚrubakrzyżakowaST4,2*16
Osłonałańcucha
Nakrętka
Okrągłąpodkładka
Nakrętka1
Kołnierzowełożyskokulkowe
Obudowakołnierza
Nakrętka2
Okrągłapodkładka
Kołopasowe
Pas
Zestawśrub
Łożysko
Oś
NakrętkakołnierzowasześciokątnaM10*1,0
CienkanakrętkasześciokątnaM10*1,0
Kołozamachowe
NakrętkanylonowaM8
Sprężynanaciągowa
ŚrubakrzyżakowaST4,2*16
Gniazdo czujnika
Klucz S13-14-15
Klucz S6
∅
∅
∅
∅
∅
∅
65
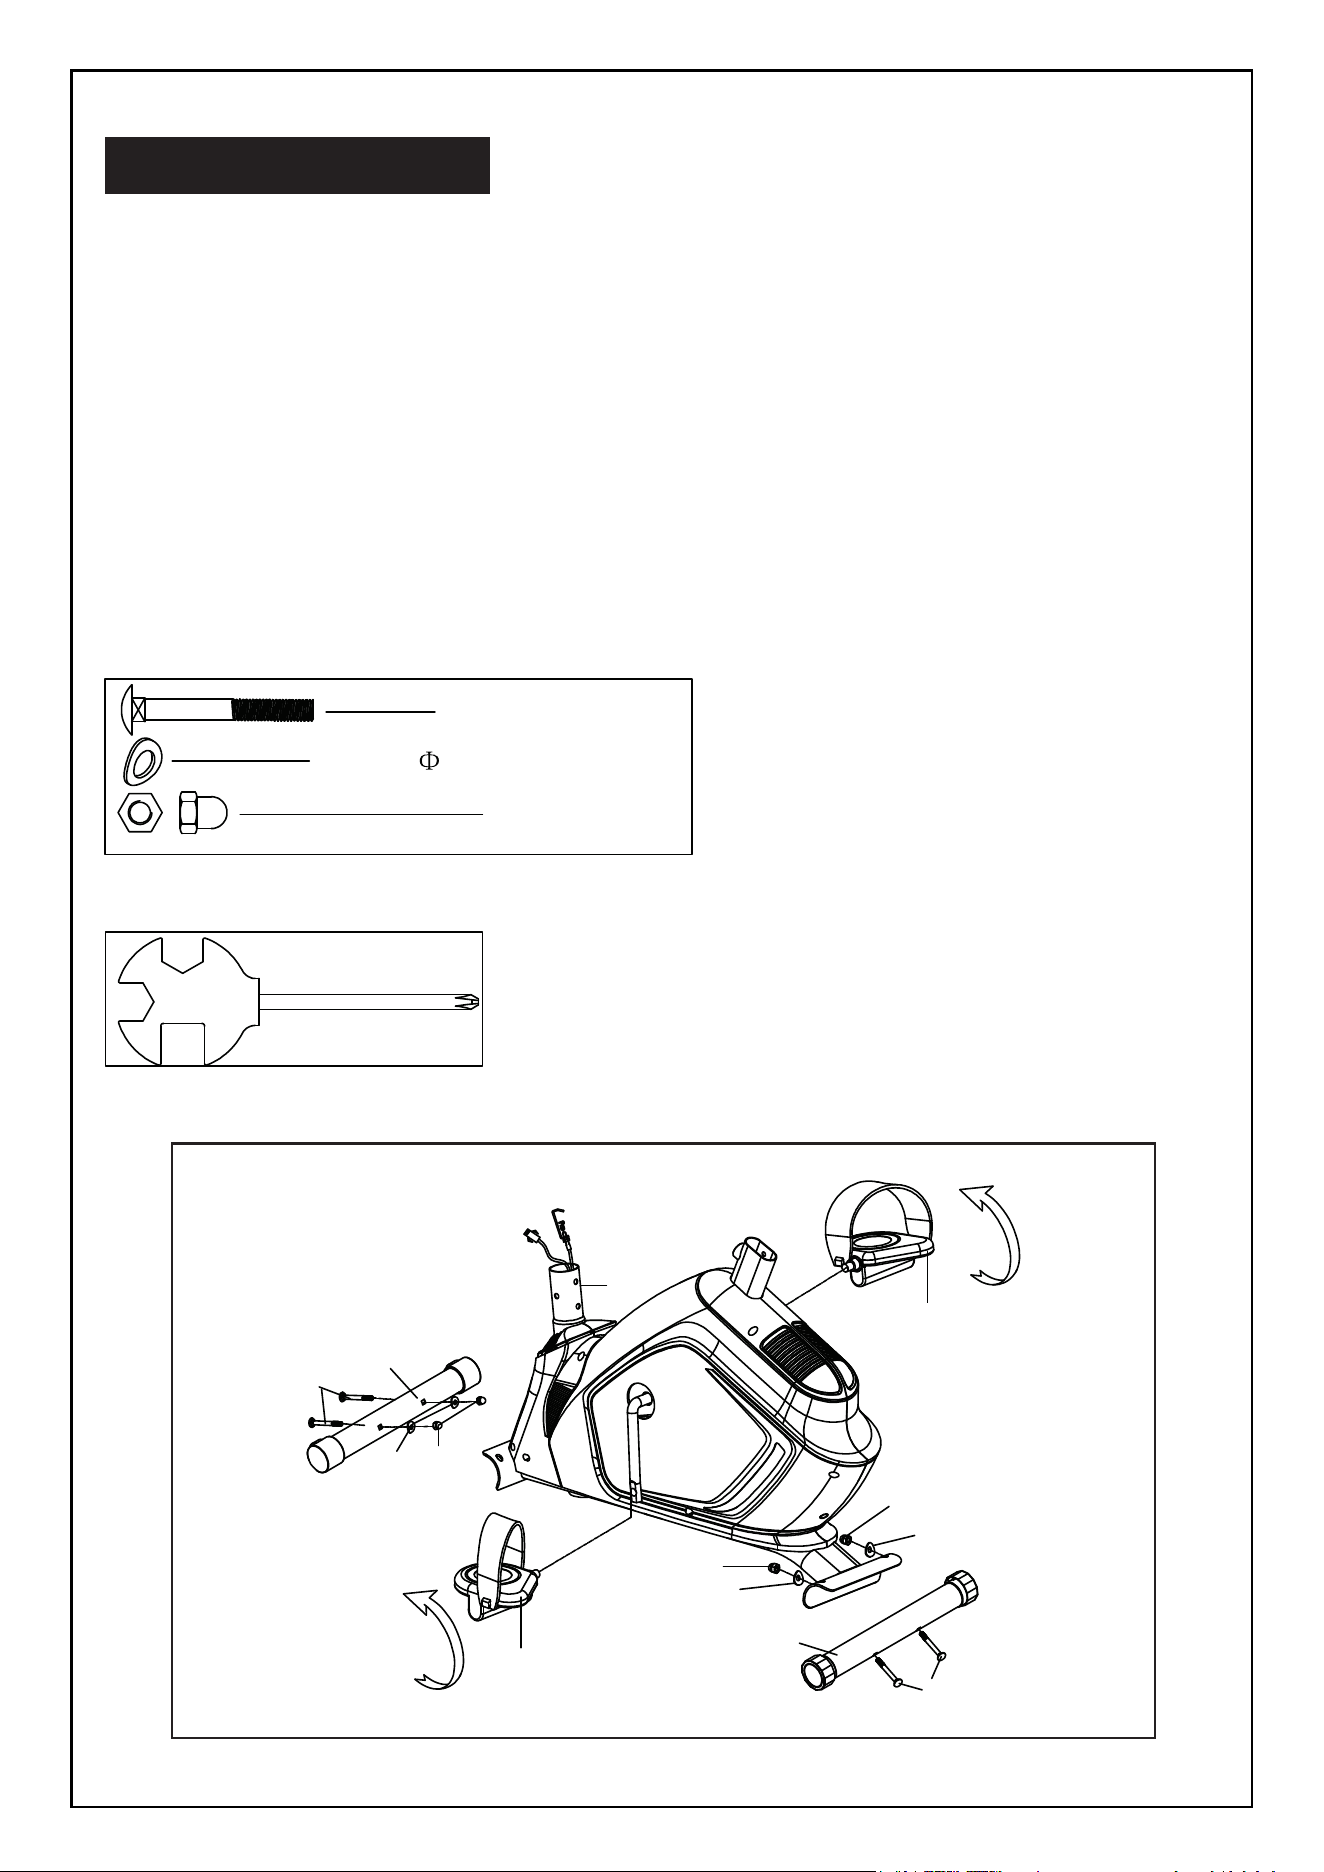
KROK 1:
INSTRUKCJAMONTAŻU:
23# M8*72
x4
x4
x4
18# d8* 20*1.5*R30
25# M8
28L
28R
30
25
18
25
18
23
18
25
22
23
26
a.Przymocujstabilizatorprzedni(22)istabilizatortylny(26)doramygłównej(30)zapomocą
śrubywózka(23),podkładkiłukowej(18)inakrętkikopułkowej(25).
b.Przymocujpedał(28L/P)doramionkorby,jakpokazanopowyżej.
UWAGA:upewnijsię,żeprawypedał(28R)oznaczony(R)jestprzymocowanydoprawego
ramieniakorbyidokręconywkierunkuprzeciwnymdoruchuwskazówekzegara,alewypedał
(28L)oznaczony(L)jestprzymocowanydolewegoramieniakorbyidokręconywkierunku
przeciwnym do ruchu wskazówek zegara.
66

29
30
33
38
39
40
29# M16
KROK 2:
a.Przymocujsiedzisko(40)doruryprzesuwnej(33)zapomocąnylonowejnakrętki(38)i
podkładki(39).
b.Wsuńruręprzesuwną(33)wramęgłówną(30).Zabezpieczidokręćpokrętłem(29).
x1
67

17# M8*16
18# d8* 20*1.5*R30
15
24
30
16
17
18
19
18
17
24
20
15
57
KROK 3:
a.Przymocujprzedniąosłonę(57)dorurywsporczej(16).Podłączkontrolernapięcia(15)z
drutemnapinającym(24).Połączprzewódczujnika(20)zprzewodemcentralnym(19).
b.Przymocujruręwsporczą(16)doramygłównej(30)zapomocąśruby(17)ipodkładki
łukowej(18).
x4
x4
68

KROK 4:
a.Przymocujkierownicę(5)dorurywsporczej(16)zapomocąśruby(11),podkładkisprężystej
(10)imałejnakładki(12).Następnieprzeprowadźprzewódczujnikatętna(9)przezstoper.
b.Podłączprzewódczujnikatętna(9)iprzewódwyświetlacza(1a).Podłączprzewódcentralny
(19) i przewód komputerowy (1b).
c.Przymocujwyświetlaczelektroniczny(1)dorurywsporczej(16)zapomocąśruby(2).
Montażzakończony
16
1b
1a
2
12
11
10
1
5
9
19
#10 d8 x2
S6
#11 M8*30 x2
#12 x1
1b
1a
9
19
69
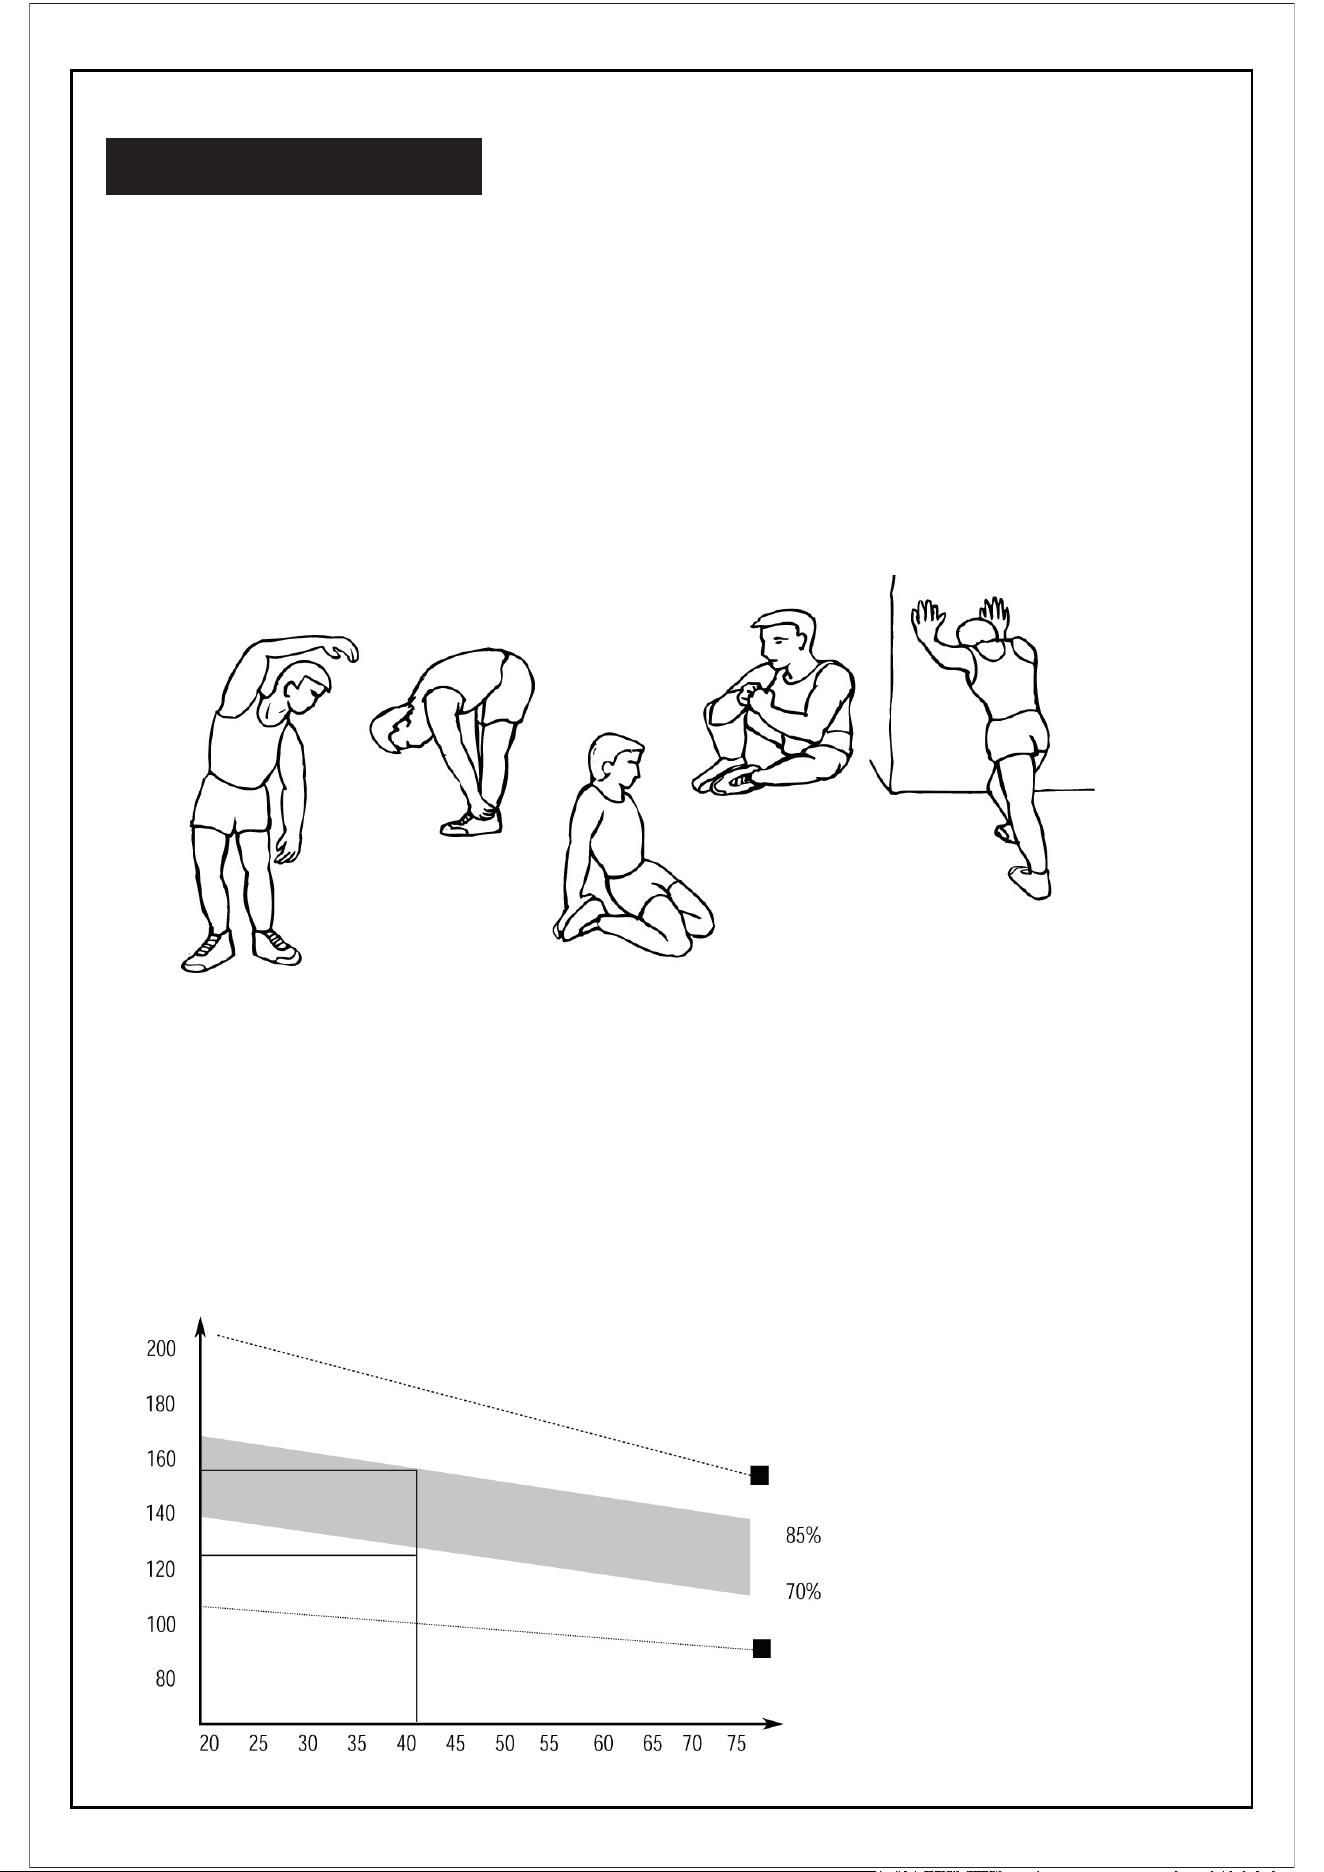
KorzystaniezROWERUSTOJĄCEGOzapewniakilkakorzyści,którepoprawiąTwoją
sprawnośćfizyczną,wzmocnimięśnieorazwpołączeniuzdietąokontrolowanejkaloryczności
pomożestracićwagę.
Tenetappomagawprawidłowymprzepływiekrwipocieleiprawidłowejpracymięśni.To
zmniejszyrównieżryzykoskurczówiurazówmięśni.Wskazanejestwykonaniekilkućwiczeń
rozciągających,np.tychpokazanychponiżej.Każdapozycjarozciągającamusibyćutrzymana
przezokoło30sekund,nieforsujaninieszarpmięśni-jeśliboli,zaprzestańaktywności.
Tojestetap,wktórywkładaszwysiłek.Poregularnympraktykowaniumięśnienógbędą
silniejsze.Ćwiczzgodniezeswojąrutyną,alebardzoważnejestutrzymaniestałegotempa
wczasiećwiczeń.Tempotreningupowinnobyćwystarczające,abypodnieśćbiciesercado
strefydocelowej,pokazanejnaponiższymwykresie.
Ten etap powinien
trwaćminimum12
minut,chociaż
większośćludzi
zaczyna od 15-20
minut.
INSTRUKCJAĆWICZEŃ:
1. Faza rozgrzewki
2.Fazaćwiczeń
SKŁONYWBOK SKŁONY
ĆWICZENIENA
ZEWNĘTRZNE
PARTIE UD
ĆWICZENIENAŁYDKI
/KOSTKI
SKŁONYW
PRZÓD
TĘTNO
STREFA DOCELOWA
FAZAOCHŁONIĘCIA
WIEK
MAKSIMUM
70

Tenetapmanacelurozluźnienieukładusercowo-naczyniowegoimięśni.Jesttopowtórzenie
rozgrzewkimającejnaceluzwolnienietętnaitrwaokoło5minut.Ćwiczeniarozciągające
należyterazpowtórzyć,ponowniepamiętając,abyniezmuszaćaninieszarpaćmięśni.
Gdystanieszsięsprawniejszy,byćmożebędzieszmusiałtrenowaćdłużejiintensywniej.
Wskazanejestćwiczenieminimumtrzyrazywtygodniuijeślitomożliwe,równomierne
rozłożenietreningówwciągutygodnia.
AbywzmocnićmięśnienaROWERZEELIPTYCZNYM,musiszmiećustawionywysokiopór.
Spowodujetowiększeobciążeniemięśninógimożeoznaczać,żeniebędzieszmógłtrenować
takdługojakbyśchciał.Jeślichceszpoprawićswojąkondycję,musiszzmienićswójprogram
treningowy.Powinieneśtrenowaćnormalniepodczasfazrozgrzewkiiochłonięcia,ale
podkoniecfazyćwiczeńnależyzwiększyćopór,sprawiając,żenogibędąpracowaćciężejniż
zwykle.Koniecznemożebyćzmniejszenieprędkości,abyutrzymaćtętnowstrefiedocelowej.
Ważnymczynnikiemjesttutajilośćwłożonegowysiłku.Imciężejidłużejpracujesz,tym
więcejkaloriispalisz.Działatotaksamo,jakbyśtrenowałdlawzmocnieniamięśni,aletutaj
celemjestschudnięcie.
Pokrętłoregulacjinapięciaumożliwiazmianęoporupedałów.Wysokaodpornośćsprawia,że
trudniejjestpedałować,niskiopórtoułatwia.Abyuzyskaćnajlepszewyniki,ustawopór
podczasużytkowaniaroweru.
FUNKCJE KLAWISZY:
MODE:Tenklawiszumożliwiawybranieizablokowanieokreślonejfunkcji.
CZAS------------------------------------------------------------------------------------ 00: 00 ~ 99: 59
MIN
PRĘDKOŚĆ--------------------------------------------------------------------0,0~99,9KM/H
DYSTANS----------------------------------------------------------------------------- 0,00 ~ 999,9 KM
DROGOMIERZ---------------------------------------------------------------------- 0,0 ~ 9999KM
PULS --------------------------------------------------------------------------------------- 40 ~ 240 BPM
KALORIE------------------------------------------------------------------------------- 0,0 ~ 9999 KCAL
3.Fazaochłonięcia
UJĘDRNIANIEMIĘŚNI
UTRATA WAGI
UŻYTKOWANIE
SPECYFIKACJA:
WYŚWIETLACZ
71

PROCEDURYOBSŁUGI:
1.AUTO ON / OFF:
Tensystemwłączasięponaciśnięciudowolnegoklawiszalubpootrzymaniusygnałuz
czujnikaprędkości.
Systemwyłączasięautomatycznie,gdyczujnikniemasygnałuwejściowegolubżaden
przyciskniebyłnaciśniętyprzezokoło4minuty.
2. RESET:
Urządzeniemożnazresetować,wymieniającbaterięlubnaciskającprzycisktrybuprzez3sekundy.
3. MODE:
AbywybraćSCANlubLOCK,jeśliniechcesztrybuskanowania,naciśnijprzyciskMODE,gdy
wskaźnikżądanejfunkcjizaczniemigaćnapożądanejprzezciebiefunkcji
4. FUNKCJE:
TIME:NaciśnijprzyciskMODE,ażwskaźnikzablokujesięnaTIME.Całkowityczaspracy
będziewyświetlanynapoczątkućwiczenia.
SPEED:WciśnijklawiszMODE,ażwskaźnikzablokujesięnaSPEED.Wyświetlanajest
aktualnaprędkośććwiczenia.
DISTANCE:NaciskajprzyciskMODE,ażwskaźnikzablokujesięnaDISTANCE.Długość
każdegoprogramućwiczeńzostaniewyświetlonaporozpoczęciućwiczeń.
ODOMETER:NaciskajprzyciskMODE,ażwskaźnikprzesuniesięnaODOMETER.Wyświet-
li
sięłącznaodległość.
CALORIE:WciskajklawiszMODE,ażwskaźnikzablokujesięnaCALORIE.Wyświetlisię
ilośćspalanychkalorii.
(PULSE):NaciskajklawiszMODE,ażwskaźnikprzejdziedofunkcjiPULSE,przytrzymaj
klipswuchulubnaręceprzezokoło3sekundy,ażzostaniewyświetlonypuls.
SCAN :Wyświetlaczzmieniasięco4sekundyzgodnieznastępnymschematem.Wyświetlaon
automatycznienastępującefunkcjewpodanejkolejności:
TIME-SPEED-DISTANCE-CALORIE-PULSE
UWAGA:
1.Jeśliwciągu4-5minutniepojawisiężadensygnał,wyświetlaczLCDwyłączysięautomaty-
cznie.
2.Gdypojawiasięsygnał,monitorwłączysięautomatycznie.
3.Jeślizauważysznieprawidłowyobraznawyświetlaczu,należywymienićbaterie(wszystkiew
tym samym czasie)
4.Wyświetlaczwykorzystujebaterie1,5V„AA”lub„AAA”.
72

UNITED STATES
CANADA
UNITEDKINGDOM
ITALY
SPAIN
JAPAN
RUSSIA
AUSTRALIA
With your inspiring rating, COSTWAY will be more consistent to offer you EASY
SHOPPING EXPERIENCE, GOOD PRODUCTS and EFFICIENT SERVICE!
Mit Ihrer inspirierenden Bewertung wird COSTWAY konsistenter sein, um Ihnen
EIN SCHÖNES EINKAUFSERLEBNIS, GUTE PRODUKTE und EFFIZIENTEN
SERVICE zu bieten!
Avec votre évaluation inspirante, COSTWAY continuera à fournir une
EXPÉRIENCE D’ACHAT PRATIQUE, des PRODUITS DE QUALITÉ et un
SERVICE EFFICACE !
Con su calificación inspiradora, COSTWAY será más consistente para ofrecerle
EXPERIENCIA DE COMPRA FÁCIL, BUENOS PRODUCTOS y SERVICIO
EFICIENTE.
Con la tua valutazione incoraggiante, COSTWAY sarà più coerente per offrirti
ESPERIENZA DI ACQUISTO FACILE, BUONI PRODOTTI e SERVIZIO
EFFICIENTE!
Dzięki twojej opinii COSTWAY będziemógł oferować jeszczeWYGODNIEJSZE
ZAKUPY,LEPSZEPRODUKTYiSPRAWNIEJSZĄOBSŁUGĘKLIENTA.
US office: Fontana
UK office: Ipswich
DE office: FDS GmbH, Neuer Höltigbaum 36, 22143 Hamburg, Deutschland
FR office : 26 RUE DU VERTUQUET, 59960 NEUVILLE EN FERRAIN, FRANCE
GERMANY
FRANCE