
BC10167
If you're having difficulty, our friendly
customer team is always here to help.
THIS INSTRUCTION BOOKLET CONTAINS IMPORTANT SAFETY INFORMATION. PLEASE READ AND KEEP FOR FUTURE REFERENCE.
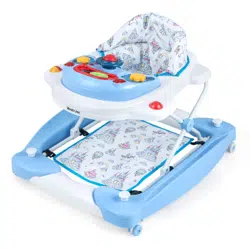
Baby Walker/Lauflernhilfe/
Trotteur pour Bébé/Andador para Bebés/
Girello per Bambini/Chodzik dla dziecka
AUS:cs.au@costway.com
FRA:cs.fr@costway.com
DEU:cs.de@costway.com
ITA:cs.it@costway.com ESP:cs.es@costway.com
POL:sklep@costway.com
GBR:cs.uk@costway.com
DEU office: FDS GmbH, Neuer Höltigbaum 36, 22143 Hamburg, Deutschland
ITA office: Milano
FRA office: Saint Vigor d'Ymonville
POL office: GdańskGBR office: IpswichAUS office: TruganinaUSA office: Fontana

Gefahr! Halten Sie alle kleinteile und Verpackungsmaterialien fern von
Babys und Kindern, ansonsten besteht Erstickungsgefahr.
Der Artikel muss unter der Aufsicht eines Erwachsenen montiert und
benutzt werden.
Lesen Sie jeden Schritt sorgfältig durch und befolgen Sie die richtige
Reihenfolge.
Entfernen Sie alle Verpackungen, Überprüfen Sie, ob alle Teile und
Zubehörteile vorhanden sind.
Bitte stellen Sie sicher, dass alle Teile richtig montiert sind, eine falsche
Montage kann zu einer Gefahr führen.
Wir empfehlen, alle Teile möglichst in der Nähe des Aufstellungsortes
zu montieren, um unnötige Bewegungen nach der Montage zu
vermeiden.
Achten Sie bei der Montage auf einen sicheren Untergrund und stellen
Sie den Artikel immer auf eine ebene, feste und stabile Fläche.
Danger! Keep all small parts and packaging materials for this product
away from babies and children, otherwise they may pose a choking
hazard.
The product must be installed and used under the supervision of an
adult.
Read through each step carefully and follow the proper order.
Remove all packaging, separate and count all parts and hardware
before installation.
Please ensure that all parts are correctly installed, incorrect installation
can lead to a danger.
We recommend that, where possible, all items are assembled near the
area in which they will be placed in use, to avoid moving the product
unnecessarily once assembled.
Ensure a secure surface during installation, and always place the
product on a flat, steady and stable surface.
Allgemeine Achtung
Before You Start Bevor Sie beginnen
Bitte sorgfältig lesen und zum späteren Nachschlagen aufbewahren.Please read all instructions carefully and keep it for future reference.
EN DE
General Warnings
02 03
Avant de Commencer
Veuillez lire attentivement toutes les instructions et les conserver pour la référence ultérieure.
Antes de Empezar
FR ES
Avertissements Généraux Advertencias Generales
Lea todas las instrucciones detenidamente y guárdelas para futuras referencias.
Danger ! Éloignez toutes les petites pièces et le matériel d'emballage
des bébés et des enfants pour éviter un risque d'étouffement.
Le produit doit être installé et utilisé sous la surveillance d'un adulte.
Lisez attentivement chaque étape et suivez le bon ordre.
Retirez tous les emballages, séparez et comptez toutes les pièces et
le matériel avant l'installation.
Assurez-vous que toutes les pièces sont correctement installées, une
installation incorrecte peut entraîner un danger.
Nous recommandons que, dans la mesure du possible, tous les
articles soient assemblés à proximité de la zone dans laquelle ils
seront utilisés, afin d'éviter de déplacer inutilement le produit une fois
assemblé.
Assurez une surface sûre pendant l'assemblage et placez le produit
toujours sur une surface plane et stable.
¡Peligro! Mantenga todas las piezas pequeñas y los materiales de
embalaje de este producto fuera del alcance de los bebés y los niños,
ya que de lo contrario pueden suponer un peligro de asfixia.
El producto debe instalarse y usarse bajo la supervisión de un adulto.
Lea cada paso cuidadosamente y siga el orden correcto.
Retire todo el embalaje, separe y cuente todas las piezas y los
accesorios antes de la instalación.
Asegúrese de que todas las piezas estén instaladas correctamente,
una instalación incorrecta puede provocar un peligro.
Recomendamos que, siempre que sea posible, todos los elementos se
monten cerca de la zona en la que se van a utilizar, para evitar mover
el producto innecesariamente una vez montado.
Asegure una superficie segura durante el montaje, y coloque el
producto siempre sobre una superficie plana, firme y estable.
04 05

Prima di Iniziare Zanim Zaczniesz
Przeczytaj uważnie wszystkie instrukcje i zachowaj je na przyszłość.Si prega di leggere attentamente tutte le istruzioni e conservarle per riferimento futuro.
PLIT
Avvertenze Generali Ogólne ostrzeżenia
Pericolo! Tenere tutte le piccole parti e i materiali di imballaggio di
questo prodotto lontano da neonati e bambini, altrimenti potrebbero
rappresentare un rischio di soffocamento.
Il prodotto deve essere installato e utilizzato sotto la supervisione di un
adulto.
Leggere attentamente ogni passo e seguire l'ordine corretto.
Rimuovere tutti gli imballaggi, separare e contare tutte le parti e tutti gli
accessori.
Si prega di assicurarsi che tutte le parti siano installate correttamente,
un'installazione errata può portare a un pericolo.
Si consiglia, ove possibile, di montare tutti gli articoli vicino alla zona in
cui verranno posti in uso, per evitare di spostare inutilmente il prodotto
una volta assemblato.
Garantire una superficie sicura durante il montaggio e posizionare il
prodotto sempre su una superficie piana, stabile.
Niebezpieczeństwo! Wszystkie małe części i materiały opakowaniowe
należy przechowywać z dala od niemowląt i dzieci, w przeciwnym razie
mogą stwarzać ryzyko zadławienia.
Produkt musi być zainstalowany i używany pod nadzorem osoby
dorosłej.
Przeczytaj uważnie każdy krok i postępuj we właściwej kolejności.
Usuń opakowanie i upewnij się, że zestaw zawiera wszystkie części i
elementy montażowe.
Upewnij się, że wszystkie części są zainstalowane poprawnie -
nieprawidłowa instalacja może prowadzić do wypadków.
Zalecamy, aby w miarę możliwości wszystkie elementy były
montowane w pobliżu miejsca, w którym będą używane, aby uniknąć
niepotrzebnego przenoszenia produktu po złożeniu.
Zapewnij bezpieczną przestrzeń roboczą podczas montażu i upewnij
się, że produkt znajduje się na płaskiej i stabilnej powierzchni.
06 07
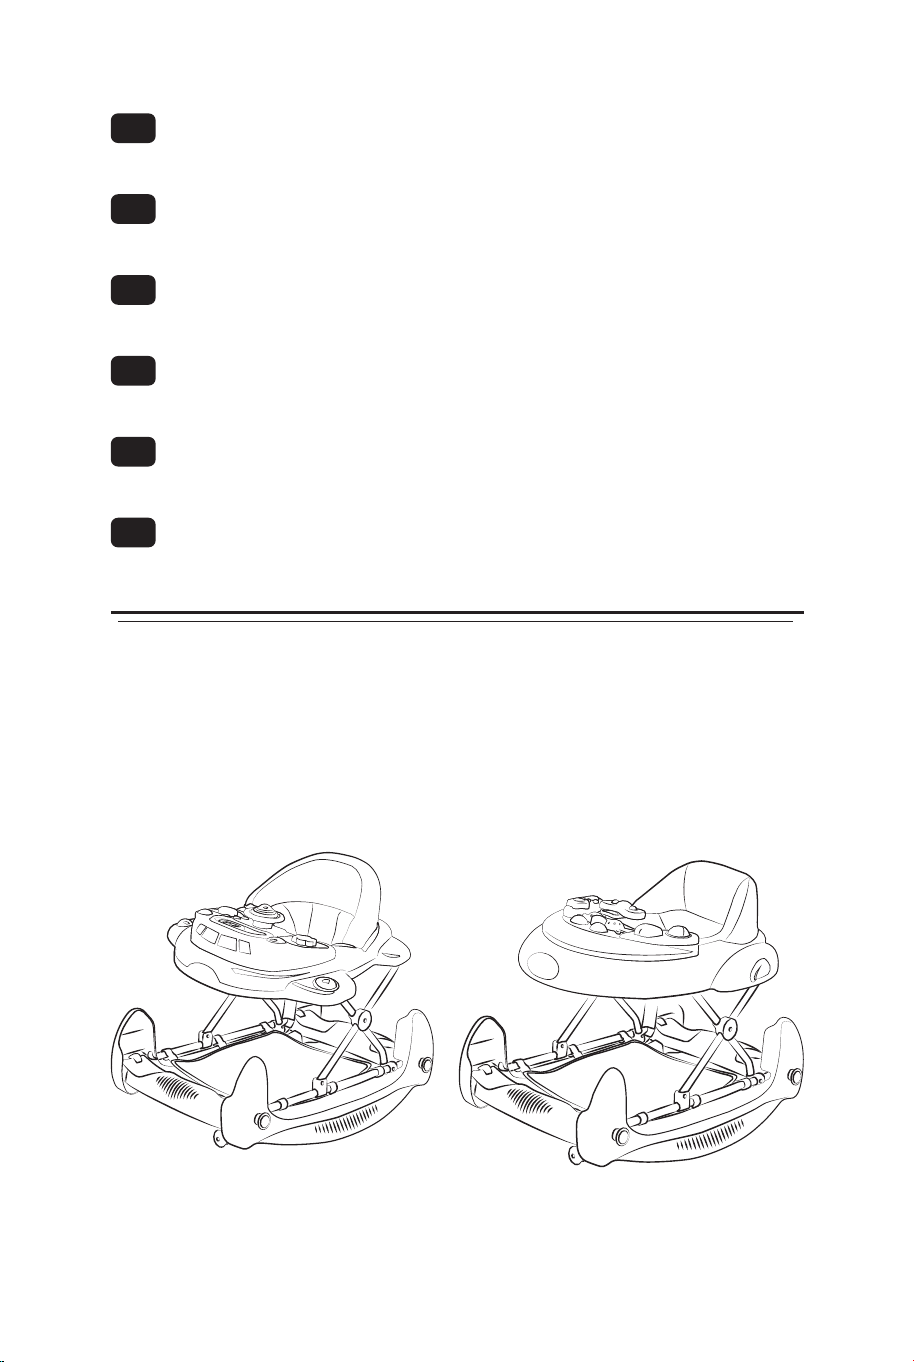
FOR SAFETY REASONS, PLEASE FOLLOW
THE INSTRUCTIONS BELOW.
EN: Assembly Instructions
DE: Montageanleitung
FR: Instructions de Montage
ES: Instrucciones de Montaje
IT: Istruzioni di Montaggio
PL: Instrukcja montażu
EN: IMPORTANT! READ CAREFULLY AND KEEP FOR
FUTURE REFERENCE
DRAWINGS IN THIS MANUAL ARE FOR ILLUSTRATION
PURPOSES ONLY - ACTUAL PRODUCT MAY VARY.
MANUFACTURER RESERVES THE RIGHT TO CHANGE ANY
SPECIFICATION OR FEATURES WITHOUT PRIOR NOTICE.
EN
DE: WICHTIG! SORGFÄLTIG LESEN UND FÜR
SPÄTERE VERWENDUNG AUFBEWAHREN
DIE ZEICHNUNGEN IN DIESEM HANDBUCH DIENEN NUR ZUR
ILLUSTRATION - DAS TATSÄCHLICHE PRODUKT KANN
ABWEICHEN. DER HERSTELLER BEHÄLT SICH DAS RECHT VOR,
SPEZIFIKATIONEN ODER MERKMALE OHNE VORHERIGE
ANKÜNDIGUNG ZU ÄNDERN.
FR: IMPORTANT ! LISEZ ATTENTIVEMENT ET
CONSERVEZ POUR RÉFÉRENCE ULTÉRIEURE
LES DESSINS DE CE MANUEL SONT À DES FINS
D’ILLUSTRATION UNIQUEMENT - LE PRODUIT RÉEL PEUT
VARIER, LE FABRICANT SE RÉSERVE LE DROIT DE MODIFIER
TOUTE SPÉCIFICATION OU CARACTÉRISTIQUE SANS PRÉAVIS.
POUR DES RAISONS DE SÉCURITÉ, VEUILLEZ
SUIVRE LES INSTRUCTIONS CI-DESSOUS.
FR
PER MOTIVI DI SICUREZZA, SEGUIRE LE
ISTRUZIONI RIPORTATE DI SEGUITO.
IT
AUS SICHERHEITSGRÜNDEN BEFOLGEN SIE
BITTE DIE NACHSTEHENDEN ANWEISUNGEN.
DE
POR RAZONES DE SEGURIDAD, POR FAVOR,
SIGA LAS SIGUIENTES INSTRUCCIONES.
ES
ZE WZGLĘDÓW BEZPIECZEŃSTWA
POSTĘPUJ ZGODNIE Z NINIEJSZĄ INSTRUKCJĄ.
PL
08 09

DE: 1. MONTAGE VON SICHERHEITSGUMMI UND
RÄDERN (BILD 1):
Stecken Sie alle Sicherheitsgummis und Räder in die richtigen Löcher
auf der Unterseite, siehe Bild 1.
EN: 1. ASSEMBLAGE DES COUSSINETS EN
CAOUTCHOUCS DE SÉCURITÉ ET DES ROUES (IMAGE 1) :
Insert all the safety rubbers and wheels into the correct holes on the
bottom, see pic 1.
ES: ¡IMPORTANTE! LEA ATENTAMENTE Y CONSERVE
PARA FUTURAS CONSULTAS
LOS DIBUJOS DE ESTE MANUAL SON SOLO PARA FINES
ILUSTRATIVOS - EL PRODUCTO REAL PUEDE VARIAR. EL
FABRICANTE SE RESERVA EL DERECHO DE MODIFICAR
CUALQUIER ESPECIFICACIÓN O CARACTERÍSTICA SIN PREVIO
AVISO.
ES: 1. MONTAJE DE LA GOMA DE SEGURIDAD Y LAS
RUEDAS (FIG. 1):
Inserte todas las gomas de seguridad y ruedas en los agujeros
correctos de la parte inferior, vea la fig. 1.
FR: 1. ASSEMBLAGE DES COUSSINETS EN
CAOUTCHOUCS DE SÉCURITÉ ET DES ROUES
(IMAGE 1) :
Insérer tous les coussinets en caoutchoucs de sécurité et les roues
dans les trous appropriés sur le fond, voir IMAGE 1.
IT: 1. MONTAGGIO DELLA GOMMA DI SICUREZZA E
DELLE RUOTE (FIG 1) :
Inserire tutti i gommini di sicurezza e le rotelle nei fori corretti sul
fondo, vedere fig 1.
IT: IMPORTANTE! LEGGERE ATTENTAMENTE E
CONSERVARE PER RIFERIMENTO FUTURO
I DISEGNI CONTENUTI IN QUESTO MANUALE SONO SOLO A
SCOPO ILLUSTRATIVO - IL PRODOTTO REALE PUÒ VARIARE, IL
PRODUTTORE SI RISERVA IL DIRITTO DI MODIFICARE
QUALSIASI SPECIFICA O CARATTERISTICA SENZA PREAVVISO.
PL: UWAGA! ZAPOZNAJ SIĘ Z INSTRUKCJĄ I
ZACHOWAJ JĄ DO UŻYTKU W PRZYSZŁOŚCI.
RYSUNKI ZAWARTE W NINIEJSZEJ INSTRUKCJI MAJĄ
CHARAKTER WYŁĄCZNIE POGLĄDOWY — RZECZYWISTY
WYGLĄD PRODUKTU MOŻE SIĘ RÓŻNIĆ. PRODUCENT
ZASTRZEGA SOBIE PRAWO DO ZMIANY SPECYFIKACJI LUB
FUNKCJI PRODUKTU BEZ ZAWIADOMIENIA.
PL: 1. MONTAŻ PODKŁADEK ZABEZPIECZAJĄCYCH I
KÓŁEK (RYS. 1):
Zamocuj podkładki zabezpieczające oraz kółka w odpowiednich
otworach na spodzie ramy, jak pokazano na rysunku 1.
10 11
A A
B B
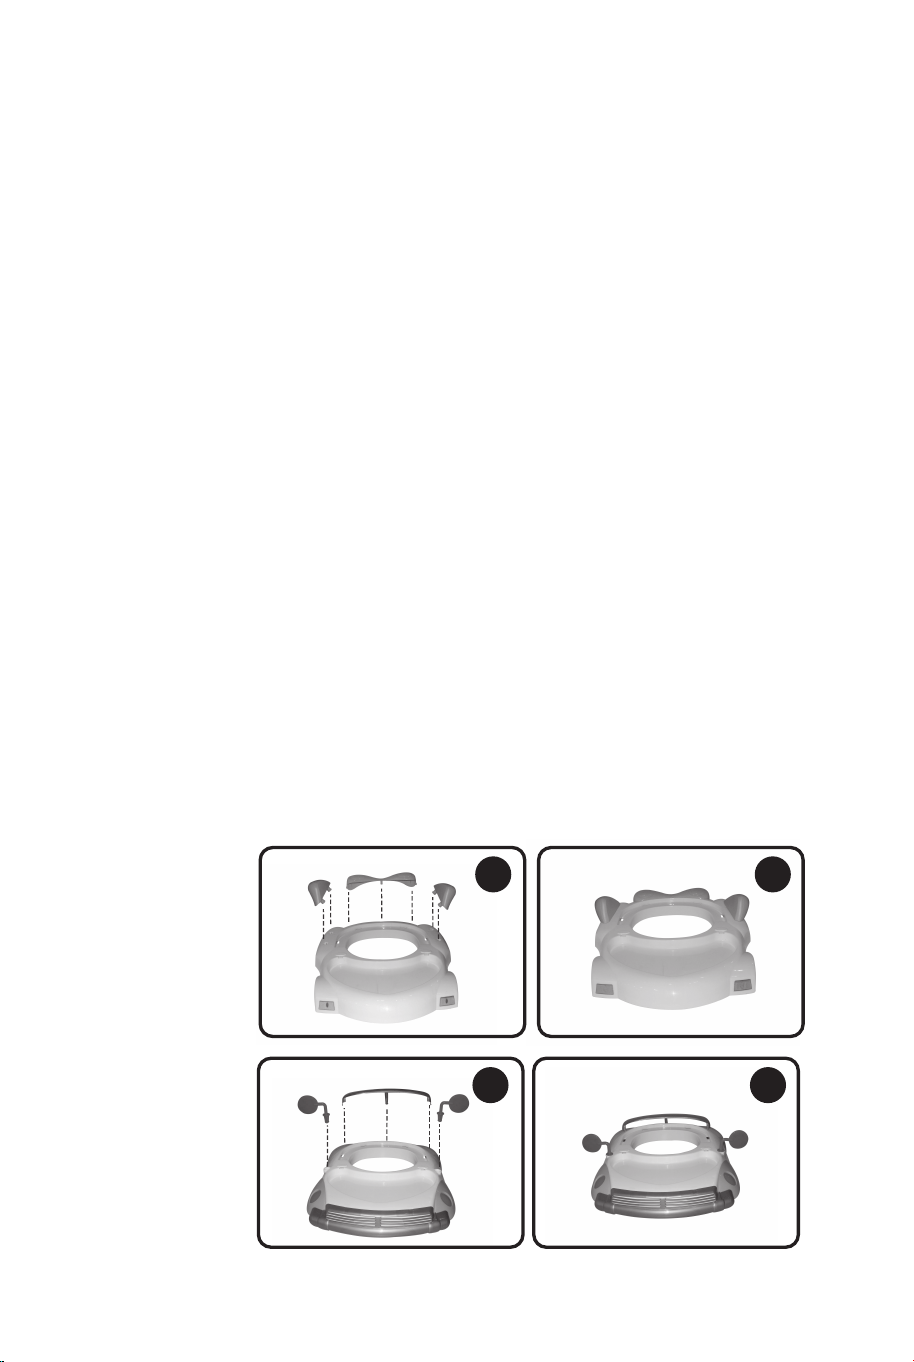
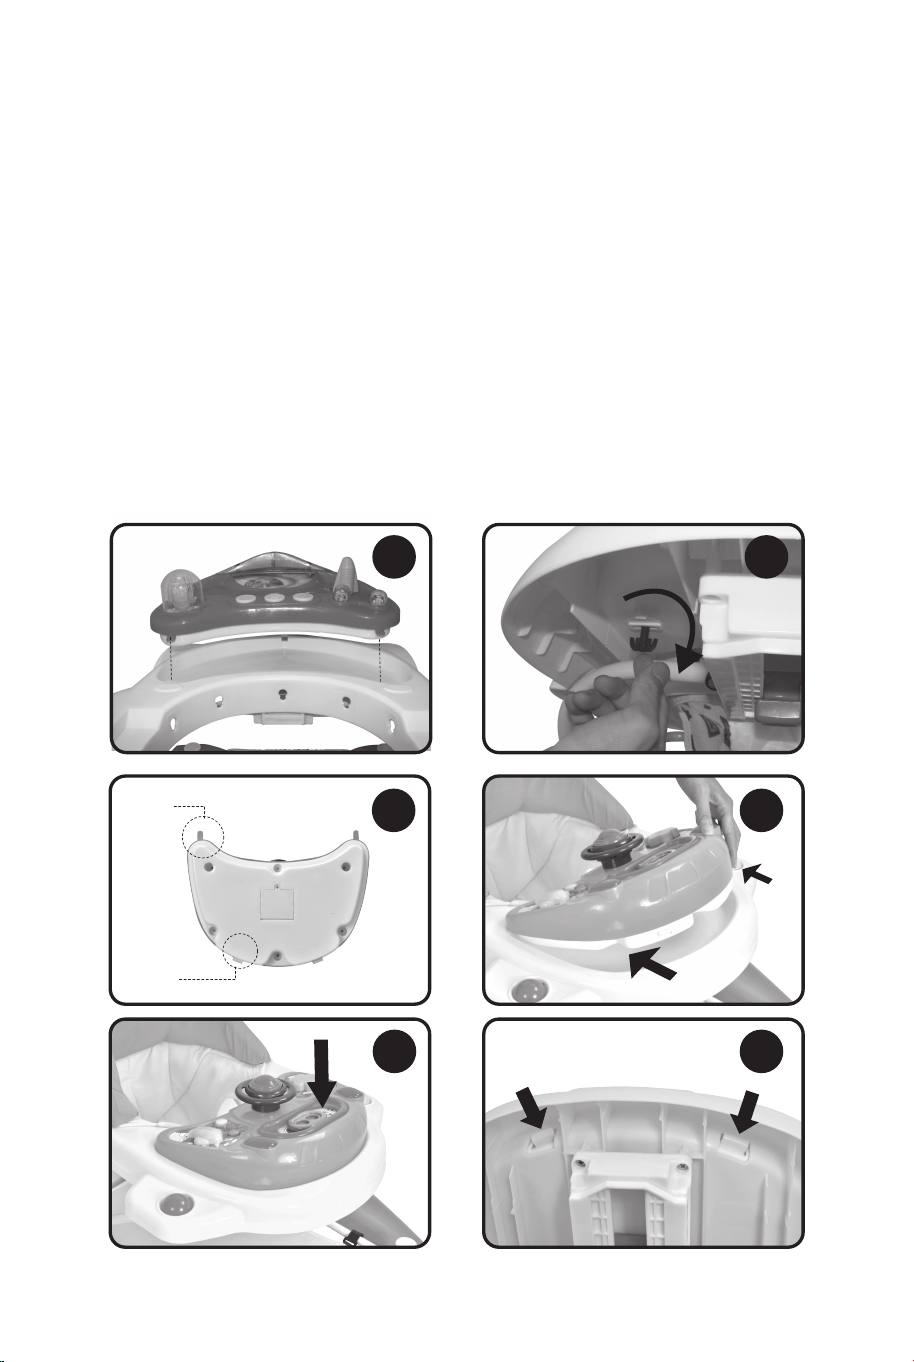
EN: 2. ASSEMBLY OF THE DECORATIVE PARTS (PIC
2):
(PLEASE CHOOSE METHOD A OR B ACCORDING TO DIFFERENT
PRODUCT STRUCTURE)
A: Insert the decorative parts into holes of the upper tray.
B: Insert the decorative parts into the holes on the upper tray like the
pic 2.
(PIC / BILD
/ IMAGE /
FIG / FIG
/ RYS 2)
(PIC / BILD / IMAGE /
FIG / FIG / RYS 1)
DE: 2. MONTAGE DER DEKORATIVEN TEILE (BILD 2):
(BITTE WÄHLEN SIE METHODE A ODER B ENTSPRECHEND DER
UNTERSCHIEDLICHEN PRODUKTSTRUKTUR)
A: Stecken Sie die dekorativen Teile in die Löcher der oberen Schale.
B: Setzen Sie die dekorativen Teile in die Löcher der oberen Schale
ein, wie in Bild 2 dargestellt.
FR: 2. ASSEMBLAGE DES PIÈCES DÉCORATIVES (IMAGE
2) :
(CHOISIR LA MÉTHODE A OU B EN FONCTION DE LA
STRUCTURE DU PRODUIT)
A : Insérer les pièces décoratives dans les trous du plateau supérieur.
B : Insérer les pièces décoratives dans les trous du plateau supérieur
comme sur IMAGE 2.
ES: 2. MONTAJE DE LAS PIEZAS DECORATIVAS
(FIG. 2):
(POR FAVOR, ELIJA EL MÉTODO A O B SEGÚN LA DIFERENTE
ESTRUCTURA DEL PRODUCTO)
A: Inserte las piezas decorativas en los agujeros de la bandeja
superior.
B: Inserte las piezas decorativas en los orificios de la bandeja
superior como en la figura 2.
IT: 2. MONTAGGIO DELLE PARTI DECORATIVE (FIG. 2):
(SCEGLIERE IL METODO A O B IN BASE ALLA STRUTTURA DEL
PRODOTTO)
A: Inserire le parti decorative nei fori del vassoio superiore.
B: Inserire le parti decorative nei fori del vassoio superiore come nella
fig 2.
PL: 2. MONTAŻE ELEMENTÓW DEKORACYJNYCH
(RYS 2):
(WYBIERZ WARIANT A LUB B W ZALEŻNOŚCI OD KONSTRUKCJI
PRODUKTU)
A: Zamocuj elementy ozdobne w otworach w górnej ramie.
B: Zamocuj elementy ozdobne w otworach w górnej ramie, jak
pokazano na rysunku 2.
12 13
A A
B B
EN: 2. ASSEMBLY OF THE DECORATIVE PARTS (PIC
2):
(PLEASE CHOOSE METHOD A OR B ACCORDING TO DIFFERENT
PRODUCT STRUCTURE)
A: Insert the decorative parts into holes of the upper tray.
B: Insert the decorative parts into the holes on the upper tray like the
pic 2.
(PIC / BILD
/ IMAGE /
FIG / FIG
/ RYS 2)
(PIC / BILD / IMAGE /
FIG / FIG / RYS 1)
DE: 2. MONTAGE DER DEKORATIVEN TEILE (BILD 2):
(BITTE WÄHLEN SIE METHODE A ODER B ENTSPRECHEND DER
UNTERSCHIEDLICHEN PRODUKTSTRUKTUR)
A: Stecken Sie die dekorativen Teile in die Löcher der oberen Schale.
B: Setzen Sie die dekorativen Teile in die Löcher der oberen Schale
ein, wie in Bild 2 dargestellt.
FR: 2. ASSEMBLAGE DES PIÈCES DÉCORATIVES (IMAGE
2) :
(CHOISIR LA MÉTHODE A OU B EN FONCTION DE LA
STRUCTURE DU PRODUIT)
A : Insérer les pièces décoratives dans les trous du plateau supérieur.
B : Insérer les pièces décoratives dans les trous du plateau supérieur
comme sur IMAGE 2.
ES: 2. MONTAJE DE LAS PIEZAS DECORATIVAS
(FIG. 2):
(POR FAVOR, ELIJA EL MÉTODO A O B SEGÚN LA DIFERENTE
ESTRUCTURA DEL PRODUCTO)
A: Inserte las piezas decorativas en los agujeros de la bandeja
superior.
B: Inserte las piezas decorativas en los orificios de la bandeja
superior como en la figura 2.
IT: 2. MONTAGGIO DELLE PARTI DECORATIVE (FIG. 2):
(SCEGLIERE IL METODO A O B IN BASE ALLA STRUTTURA DEL
PRODOTTO)
A: Inserire le parti decorative nei fori del vassoio superiore.
B: Inserire le parti decorative nei fori del vassoio superiore come nella
fig 2.
PL: 2. MONTAŻE ELEMENTÓW DEKORACYJNYCH
(RYS 2):
(WYBIERZ WARIANT A LUB B W ZALEŻNOŚCI OD KONSTRUKCJI
PRODUKTU)
A: Zamocuj elementy ozdobne w otworach w górnej ramie.
B: Zamocuj elementy ozdobne w otworach w górnej ramie, jak
pokazano na rysunku 2.
12 13

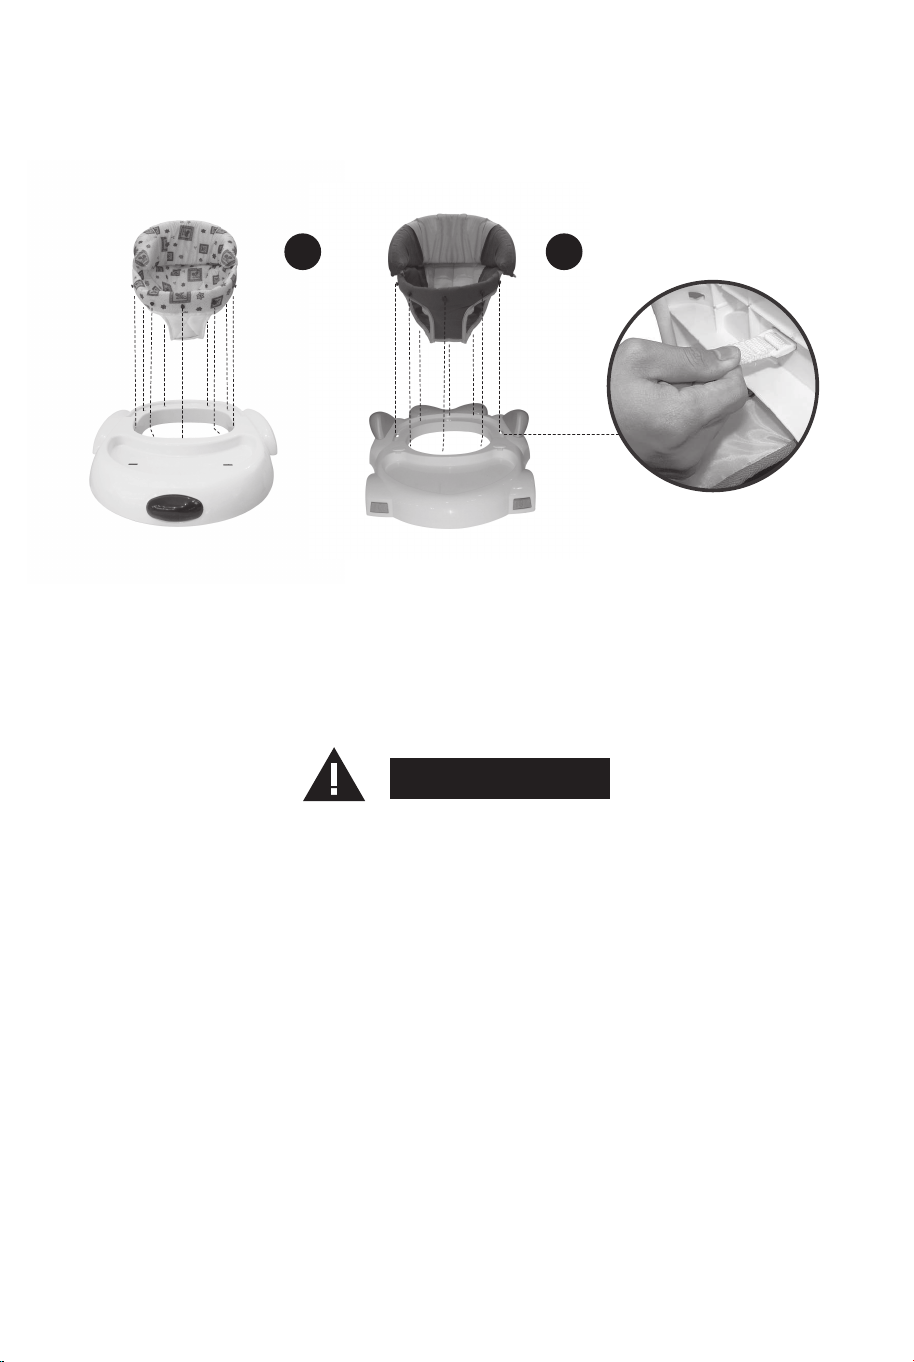
EN: 3. ASSEMBLY OF SEAT (PIC 3):
(PLEASE CHOOSE METHOD A OR B ACCORDING TO DIFFERENT
PRODUCT STRUCTURE)
A: Following A, insert the pins on the seat into the holes of the tray
completely.
B: Insert the pins on the seat into the holes of the tray completely. And
turn the white plastic clasp by 90 degree to ensure it was fixed tightly
on the tray.
DE: 3. MONTAGE DES SITZES (BILD 3):
(BITTE WÄHLEN SIE METHODE A ODER B ENTSPRECHEND DER
UNTERSCHIEDLICHEN PRODUKTSTRUKTUR)
A: Führen Sie die Stifte des Sitzes vollständig in die Löcher des
Tabletts ein (siehe A).
B: Stecken Sie die Stifte des Sitzes vollständig in die Löcher des
Tabletts. Drehen Sie die weiße Kunststoffklammer um 90 Grad, um
sicherzustellen, dass sie fest auf dem Tablett befestigt ist.
FR: 3. ASSEMBLAGE DU SIÈGE (IMAGE 3) :
(CHOISIR LA MÉTHODE A OU B EN FONCTION DE LA
STRUCTURE DU PRODUIT)
A : En suivant la méthode A, insérez complètement les goupilles du
siège dans les trous du plateau.
B. Insérez complètement les goupilles du siège dans les trous du
plateau. Tournez le fermoir en plastique blanc de 90 degrés pour vous
assurer qu'il est bien fixé sur le plateau.
ES: 3. MONTAJE DEL ASIENTO (FIG. 3):
(POR FAVOR, ELIJA EL MÉTODO A O B SEGÚN LA DIFERENTE
ESTRUCTURA DEL PRODUCTO)
A: Siguiendo el método A, inserte completamente los pasadores del
asiento en los orificios de la bandeja.
B: Inserte completamente los pasadores del asiento en los orificios de
la bandeja. Gire el cierre de plástico blanco 90 grados para
asegurarse de que queda bien fijado a la bandeja.
IT: 3. MONTAGGIO DEL SEDILE (FIG. 3):
(SCEGLIERE IL METODO A O B IN BASE ALLA DIVERSA
STRUTTURA DEL PRODOTTO)
A: Seguendo A, inserire completamente i perni del sedile nei fori del
vassoio.
B: Inserire completamente i perni del sedile nei fori del vassoio.
Ruotare la chiusura di plastica bianca di 90 gradi per assicurarsi che
sia fissata saldamente al vassoio.
PL: 3. MONTAŻ SIEDZISKA (RYS. 3):
(WYBIERZ WARIANT A LUB B W ZALEŻNOŚCI OD KONSTRUKCJI
PRODUKTU)
A: Zamocuj zaczepy siedziska w otworach w ramie, jak pokazano na
rysunku A.
B: Zamocuj zaczepy siedziska w otworach w ramie. Obróć białą
plastikową blokadę o 90 stopni, aby upewnić się, że siedzisko jest
dobrze zamocowane.
14 15
EN: 4. ASSEMBLY OF TOY TRAY (PIC 4):
(PLEASE CHOOSE METHOD A OR B ACCORDING TO DIFFERENT
PRODUCT STRUCTURE)
WARNING
1.Non-rechargeable batteries are not to be charged.
2.Different types of batteries or new and used batteries can not be
mixed.
3.Only batteries of the same or equivalent type as recommended
are to be used.
4.Batteries are to be inserted with the correct polarity.
5.Exhausted batteries are to be removed from the toy.
6.The supply terminals are not to be short-circuited.
7.Rechargeable batteries are to be removed from the toy before
being charged (if removable).
8.Rechargeable batteries are only to be charged under adult
supervision (if removable).
A B
ACHTUNG
DE: 4. MONTAGE DES SPIELZEUGTRÄGERS (BILD 4):
(BITTE WÄHLEN SIE METHODE A ODER B ENTSPRECHEND DER
UNTERSCHIEDLICHEN PRODUKTSTRUKTUR)
1. Nicht wiederaufladbare Batterien dürfen nicht geladen werden.
2. Verschiedene Batterietypen oder neue und gebrauchte Batterien
dürfen nicht gemischt werden.
3. Es dürfen nur Batterien des gleichen oder eines gleichwertigen
Typs wie empfohlen verwendet werden.
4. Die Batterien müssen mit der richtigen Polarität eingelegt
werden.
5. Erschöpfte Batterien sind aus dem Spielzeug zu entfernen.
6. Die Versorgungsklemmen dürfen nicht kurzgeschlossen
werden.
7. Wiederaufladbare Batterien müssen vor dem Aufladen aus
dem Spielzeug entfernt werden (falls sie herausnehmbar sind).
8. Wiederaufladbare Batterien dürfen nur unter Aufsicht von
Erwachsenen aufgeladen werden (wenn sie herausnehmbar
sind).
AVERTISSEMENT
FR: 4. ASSEMBLAGE DU PLATEAU DE JOUETS
(IMAGE 4) :
(CHOISIR LA MÉTHODE A OU B EN FONCTION DE LA
STRUCTURE DU PRODUIT)
(PIC / BILD / IMAGE / FIG / FIG / RYS 3)
16 17

1. Les piles non rechargeables ne doivent pas être chargées.
2. Les différents types de piles ou les piles neuves et usagées ne
peuvent pas être mélangés.
3. Seules des piles du même type ou d'un type équivalent à celui
recommandé doivent être utilisées.
4. Les piles doivent être insérées en respectant la polarité.
5. Les piles épuisées doivent être retirées du jouet.
6. Les bornes d'alimentation ne doivent pas être court-circuitées.
7. Les piles rechargeables doivent être retirées du jouet avant
d'être chargées (si elles sont amovibles).
8. Les piles rechargeables ne doivent être chargées que sous la
surveillance d'un adulte (si elles sont amovibles).
ADVERTENCIA
ES: 4. MONTAJE DE LA BANDEJA DE JUGUETES
(FIG. 4):
( POR FAVOR, ELIJA EL MÉTODO A O B SEGÚN LA DIFERENTE
ESTRUCTURA DEL PRODUCTO)
1. Las pilas no recargables no deben cargarse.
2. No se pueden mezclar diferentes tipos de pilas o pilas nuevas y
usadas.
3. Solo deben utilizarse pilas del mismo tipo o equivalente al
recomendado.
4. Las pilas deben colocarse con la polaridad correcta.
5. Las pilas gastadas deben retirarse del juguete.
6. Los terminales de alimentación no deben estar cortocircuitados.
7. Las baterías recargables deberán retirarse del juguete antes de
ser cargadas (si son extraíbles).
8. Las baterías recargables solo deben cargarse bajo la
supervisión de un adulto (si son extraíbles).
AVVERTENZA
IT: 4. MONTAGGIO DEL VASSOIO PORTAGIOCHI (FIG
4) :
(SCEGLIERE IL METODO A O B IN BASE ALLA STRUTTURA DEL
PRODOTTO)
1. Le batterie non ricaricabili non devono essere caricate.
2. Non è consentito mescolare tipi diversi di batterie o batterie
nuove e usate.
3. Si devono utilizzare solo batterie dello stesso tipo o di tipo
equivalente a quello raccomandato.
4. Le batterie devono essere inserite con la corretta polarità.
5. Le batterie scariche devono essere rimosse dal giocattolo.
6. I terminali di alimentazione non devono essere messi in
cortocircuito.
7. Le batterie ricaricabili devono essere rimosse dal giocattolo
prima della ricarica (se rimovibili).
8. Le batterie ricaricabili devono essere caricate solo sotto la
supervisione di un adulto (se rimovibili).
OSTRZEŻENIA
PL: 4. MONTAŻ PANELU Z ZABAWKAMI (RYS. 4):
(WYBIERZ WARIANT A LUB B W ZALEŻNOŚCI OD KONSTRUKCJI
PRODUKTU)
1. Nie należy ładować baterii jednorazowych.
2. Nie należy używać jednocześnie różnych rodzajów baterii ani
baterii nowych i starych.
3. Należy używać wyłącznie baterii tego samego rodzaju lub
zalecanego zamiennika.
4. Baterie należy wkładać z zachowaniem prawidłowej polaryzacji.
18 19
EN: 1.Use a screwdriver to unscrew the battery cover.
2.Insert batteries ensure correct polarity.
3.Screw battery cover back on.
a
b
A B
C1 C2
C4C3
FR: 1. Dévisser le couvercle de batterie à l'aide d'un tournevis.
2. Insérer les batteries en respectant la polarité.
3. Revisser le couvercle de batterie.
ES: 1. Utilice un destornillador para desatornillar la tapa de las pilas.
2. Inserte las pilas asegurándose de que la polaridad es correcta.
3. Vuelva a atornillar la tapa de las pilas.
IT: 1.Utilizzare un cacciavite per svitare il coperchio delle batterie.
2.Inserire le batterie rispettando la polarità.
3.Riavvitare il coperchio delle batterie.
PL: 1.Za pomocą śrubokrętu wykręć wkręt z pokrywy komory baterii.
2.Umieść w komorze baterie z zachowaniem prawidłowej polaryzacji.
3.Dokręć wkręt, aby zamocować pokrywę komory baterii.
5. Wyczerpane baterie należy bezzwłocznie wyjąć z zabawki.
6. Nie należy dopuszczać do zwarcia styków komory baterii.
7. Baterie wielokrotnego użytku (akumulatorki) należy wyjąć z
zabawki przed ładowaniem (jeśli są wyjmowane).
8. Baterie wielokrotnego użytku (akumulatorki) należy ładować
wyłącznie pod nadzorem osoby dorosłej (jeśli są wyjmowane).
DE: 1. Verwenden Sie einen Schraubendreher, um die
Batterieabdeckung abzuschrauben.
2. Achten Sie beim Einlegen der Batterien auf die richtige Polarität.
3. Batteriefachabdeckung wieder anschrauben.
(PIC / BILD / IMAGE / FIG / FIG / RYS 4)
20 21
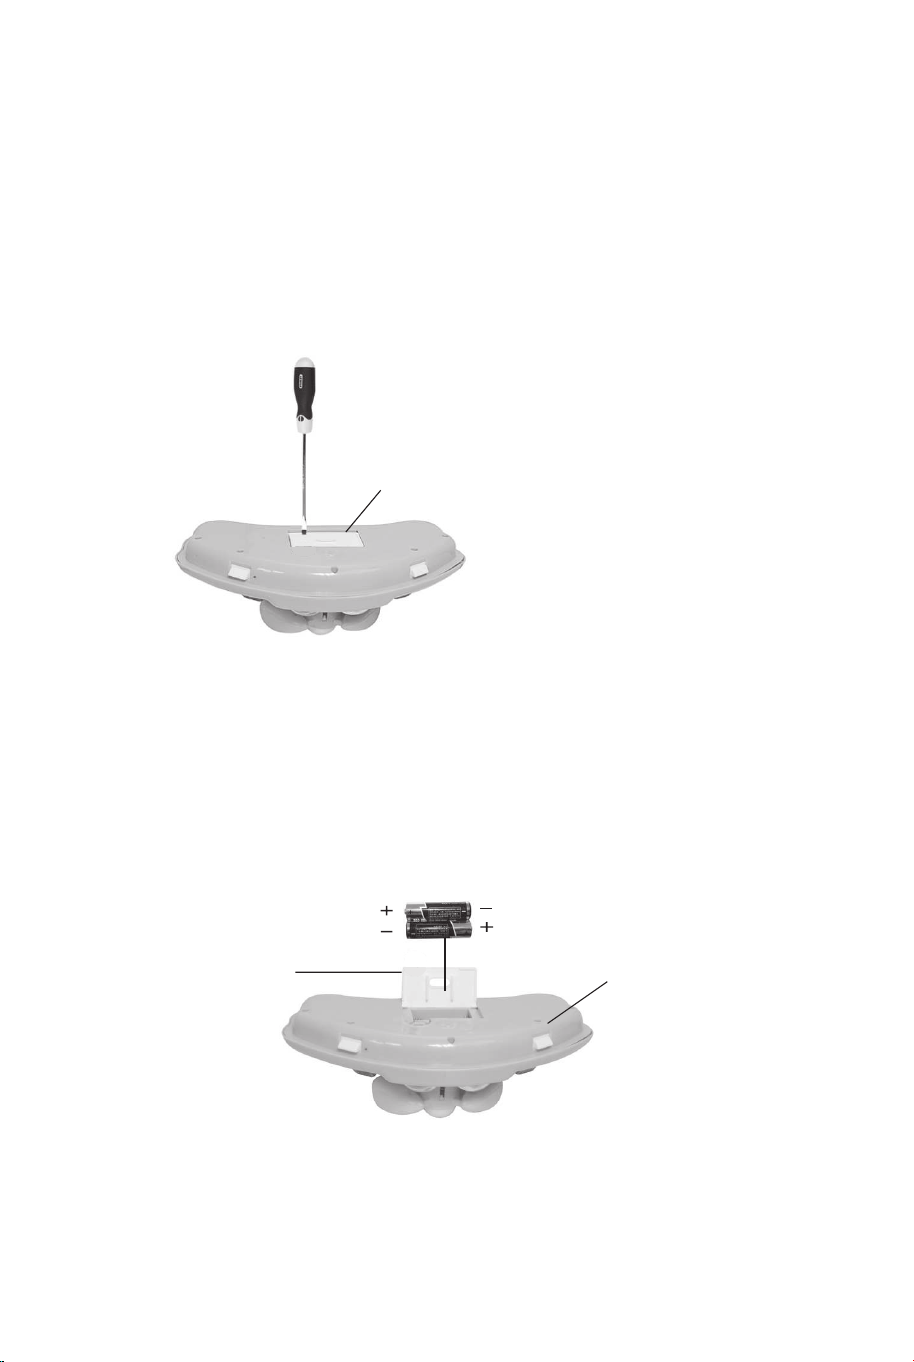
battery cover
/Batteriefachabdeckung
/Couvercle de batterie
/tapa de pilas
/Coperchio della batteria
/Pokrywa komory baterii
toy tray
/Spielzeugträger
/Plateau de jouets
/bandeja de juguetes
/Vassoio per giocattoli
/Panel z zabawkami
Toy Tray/Spielzeugträger/Plateau de jouets/
Bandeja de Juguete/Vassoio per giocattoli/
Panel z zabawkami
Battery cover
/Batterieabdeckung
/Couvercle de batterie
/Tapa de pilas
/Coperchio
della batteria
/Pokrywa
komory baterii
Unscrew (screw) battery cover
/Batterieabdeckung abschrauben (schrauben)
/Dévisser (vis) le couvercle de batterie
/Desatornillar (atornillar) tapa de las pilas
/Svitare(vite)il coperchio della batteria
/Wykręć wkręt z pokrywy komory baterii
Insert batteries/Batterien einlegen/Insérez les batteries
/Insertar pilas/Inserire le batterie/Włóż baterie
EN: Kindly remind: There are three kinds of toy trays are
optional, follow the methods A/B/C to assemble them
respectively.
A: Insert toy set into the tray and fix with nuts.
B: Press the nuts up and turn the nuts by 90 degree. C:
1).As the picture shown on Fig C1, there are 4 snap-fit components
(a, b) on both front and rear toy tray.
2).As the arrow shown on Fig C2, fix the rear toy tray onto the
upper tray, and then press down the front toy tray to fix the toy tray,
make sure the snap-fit components are fixed firmly on their position
(see Fig C3).
Press down simultaneously on the two snap-fit components on the
base of the toy section to release the toy tray (see Fig C4).
DE: Bitte beachten Sie: Es gibt drei Arten von
Spielzeugtabletts, die optional sind, folgen Sie den Methoden
A/B/C, um sie entsprechend zu montieren.
A: Legen Sie das Spielzeug in das Fach und befestigen Sie es mit
den Muttern.
B: Drücken Sie die Muttern nach oben und drehen Sie die Muttern
um 90 Grad. C:
1). Wie in Abb. C1 dargestellt, befinden sich sowohl an der
vorderen als auch an der hinteren Spielzeugablage 4 einrastbare
Teile (a, b).
2). Wie der Pfeil in Abb. C2 zeigt, befestigen Sie das hintere
Spielzeugtablett auf dem oberen Tablett, und drücken Sie dann das
vordere Spielzeugtablett nach unten, um das Spielzeugtablett zu
befestigen, vergewissern Sie sich, dass die Schnappteile fest in
ihrer Position sitzen (siehe Abb. C3).
Drücken Sie gleichzeitig auf die beiden Schnappverschlüsse an der
Unterseite des Spielzeugträgers, um den Spielzeugträger zu lösen
(siehe Abb. C4).
22 23

FR: Attention : Il existe trois types de plateaux de jouets
optionnels, suivez les méthodes A/B/C pour les assembler
respectivement.
A : Insérer les jouets dans le plateau et les fixer avec les écrous.
B : Presser les écrous vers le haut et les tourner de 90 degrés.
C :
1). Comme le montre l'image de la Fig. C1, il y a 4 pièces
d'encliquetage (a, b) à l'avant et à l'arrière du plateau de jouets.
2). Comme le montre la flèche sur la Fig. C2, fixer le plateau
arrière sur le plateau supérieur, puis appuyer sur le plateau avant
pour fixer le plateau, s'assurer que les pièces d'encliquetage sont
fermement fixés sur leur position (voir Fig. C3).
Appuyer simultanément sur les deux pièces d'encliquetage à la
base de la section des jouets pour libérer le plateau des jouets
(voir Fig. C4).
ES: Tenga en cuenta: Hay tres tipos de bandejas de juguetes
opcionales, siga los métodos A/B/C para montarlas
respectivamente.
A: Inserte el juego de juguetes en la bandeja y fíjelo con tuercas.
B: Presione las tuercas hacia arriba y gírelas 90 grados.
C:
1) Como se muestra en la figura C1, hay 4 componentes a presión
(a, b) en las bandejas de juguetes delantera y trasera.
2) Como se muestra en la flecha de la figura C2, fije la bandeja de
juguete trasera en la bandeja superior y, a continuación, presione
hacia abajo la bandeja de juguete delantera para fijar la bandeja
de juguete; asegúrese de que los componentes a presión estén
firmemente fijados en su posición ( vea Fig. C3).
Presione simultáneamente los dos componentes a presión de la
base de la sección de juguete para liberar la bandeja de juguete
(vea Fig. C4).
IT: Si ricorda che: Ci sono tre tipi di vassoi per giocattoli
opzionali, seguire i metodi A/B/C per assemblarli
rispettivamente.
A: Inserire il set di giocattoli nel vassoio e fissarlo con i dadi.
B: Premere i dadi verso l'alto e ruotarli di 90 gradi. C:
1).Come mostrato nella figura C1, ci sono 4 componenti a scatto
(a, b) sia sul vassoio anteriore che su quello posteriore.
2).Come indicato dalla freccia della Fig. C2, fissare il vassoio
portagiochi posteriore sul vassoio superiore, quindi premere il
vassoio portagiochi anteriore per fissare il vassoio portagiochi,
assicurandosi che i componenti a scatto siano fissati saldamente
nella loro posizione (vedere Fig. C3).
Premere contemporaneamente i due componenti a scatto sulla
base della sezione giocattoli per sganciare il vassoio (vedere Fig.
C4).
PL: Uwaga: Do wyboru masz 3 panele z zabawkami. Montaż
panelu z zabawkami jest opcjonalny. Postępuj zgodnie z
rysunkami A/B/C, aby zamocować panel z zabawkami.
A: Umieść panel z zabawkami na ramie i zamocuj za pomocą
nakrętek.
B: Dociśnij nakrętki w górę i obróć je o 90 stopni.
C:
1). Jak pokazano na rysunku C1, na przednim i tylnym panelu z
zabawkami znajdują się 4 zatrzaskowe elementy (a, b).
2). Zgodnie ze strzałką na rysunku C2, przymocuj tylny panel z
zabawkami na górnej ramie, a następnie dociśnij przedni panel z
zabawkami, aby go zamocować. Upewnij się, że elementy
zatrzaskowe zablokowały się na swoich miejscach (patrz rys. C3).
Nacisnąć jednocześnie dwa elementy zatrzaskowe na podstawie,
aby zdemontować panel z zabawkami (patrz rys. C4).
24 25

EN: 5. HEIGHT ADJUSTMENT (PIC 5):
To adjust walker to desired position (3 positions available), place one
hand on the top of walker, and turn the red button on the height
adjustment mechanism beneath the top tray by 90 degrees with other
hand, then push up the button to adjust height position. Release the
button, it will return to original position, the mechanism is locked
automatically. (PIC5)
FR: 5. RÉGLAGE DE LA HAUTEUR (IMAGE 5) :
Pour ajuster le trotteur à la position désirée (3 positions disponibles),
placez une main sur le dessus du trotteur, et tournez le bouton rouge
du mécanisme de réglage de la hauteur sous le plateau supérieur de
90 degrés avec l'autre main, puis poussez le bouton vers le haut
pour ajuster la position de la hauteur. Relâchez le bouton, il
reviendra à sa position initiale, le mécanisme se verrouille
automatiquement. (IMAGE 5)
ES: 5. AJUSTE DE ALTURA (FIG. 5):
Para ajustar el andador a la posición deseada (3 posiciones
disponibles), coloque una mano en la parte superior del andador, y
gire el botón rojo del mecanismo de ajuste de altura situado debajo de
la bandeja superior en 90 grados con la otra mano, luego presione
hacia arriba el botón para ajustar la posición de altura. Suelte el
botón, volverá a la posición original, el mecanismo se bloquea
automáticamente. ( FIG. 5)
IT: 5. REGOLAZIONE DELL'ALTEZZA (FIG. 5):
Per regolare il girello nella posizione desiderata (sono disponibili 3
posizioni), posizionare una mano sulla parte superiore del girello e
con l'altra mano ruotare di 90 gradi il pulsante rosso del meccanismo
di regolazione dell'altezza sotto il vassoio superiore, quindi premere
il pulsante per regolare la posizione in altezza. Rilasciando il
pulsante, il meccanismo torna alla posizione originale e si blocca
automaticamente. (FIG.5)
PL: 5. REGULACJA WYSOKOŚCI (RYS. 5):
Aby wyregulować chodzik do żądanej pozycji (dostępne są 3 pozycje),
połóż jedną rękę na chodziku, a drugą ręką obróć o 90 stopni
czerwony przycisk na mechanizmie regulacji wysokości pod górną
ramą. Następnie pchnij przycisk w górę, aby wyregulować wysokość.
Zwolnij przycisk, aby powrócił do pierwotnej pozycji, a mechanizm
zablokuje się automatycznie. (RYS. 5)
DE:5. HÖHENVERSTELLUNG (BILD 5):
Um die Lauflernhilfe in die gewünschte Position zu bringen (es stehen
3 Positionen zur Verfügung), legen Sie eine Hand auf die Oberseite
der Lauflernhilfe und drehen Sie mit der anderen Hand den roten
Knopf am Höhenverstellmechanismus unter dem oberen Tablett um
90 Grad. Lassen Sie den Knopf los, er kehrt in die Ausgangsposition
zurück, der Mechanismus ist automatisch verriegelt. (BILD 5)
26 27

1
2
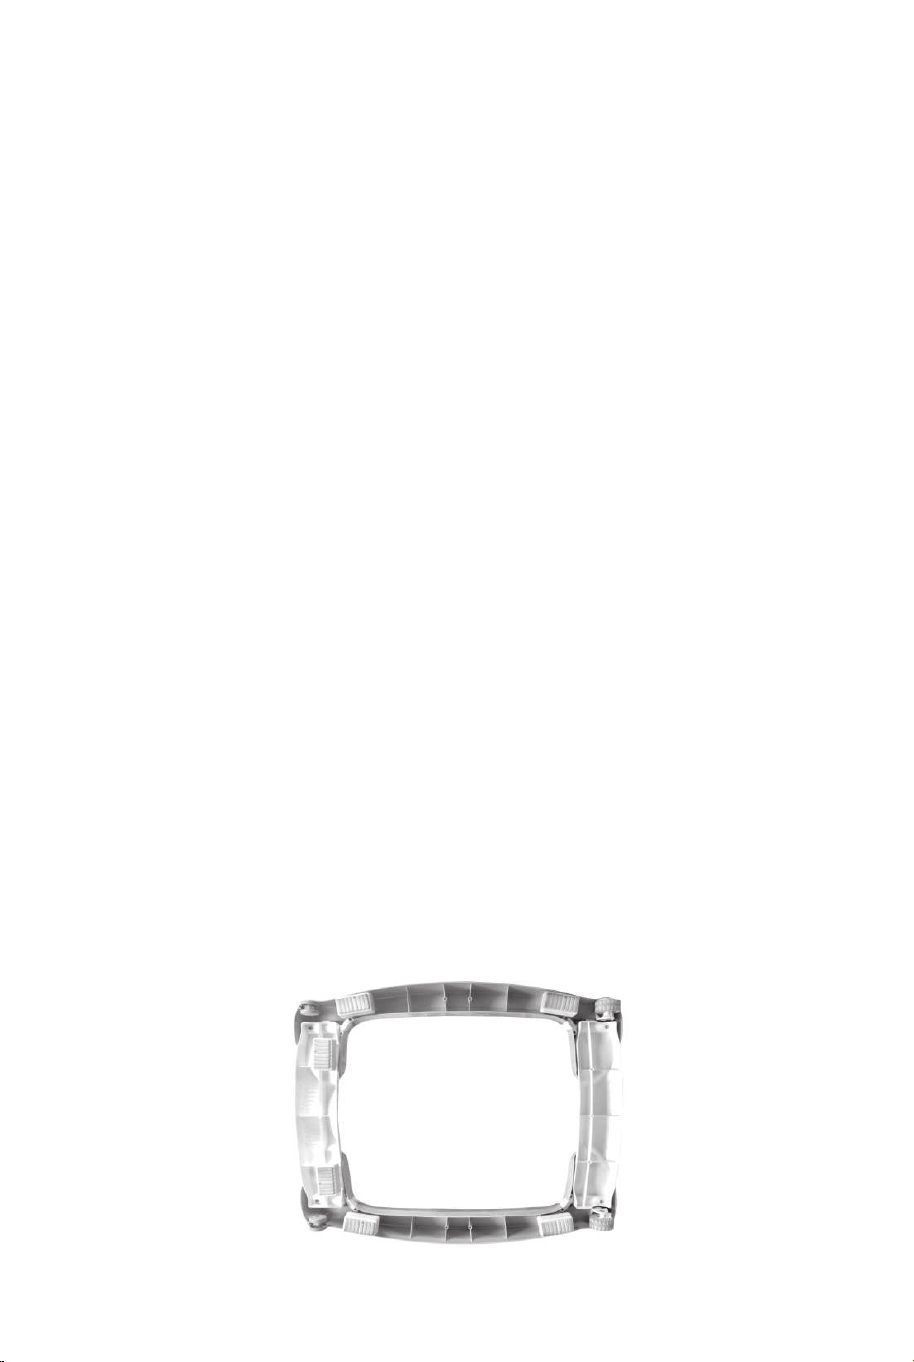
EN: 6. ROCKING FUNCTION (PIC6):
With safety rubber under the base and global wheels for avoiding kids
falling down the stairs or tipping over in walker.
STRAIGHT WHEELS:
The straight wheels will automatically brake when baby walker moves
backward too fast.
FR: 6. FONCTION DE BASCULEMENT (IMAGE 6) :
Avec caoutchouc de sécurité sous la base et roues globales pour
éviter que les enfants ne tombent dans les escaliers ou ne basculent
dans le trotteur.
ROUES DROITES :
Les roues droites freinent automatiquement lorsque le trotteur recule
trop rapidement.
ES: 6. FUNCIÓN DE BALANCÍN ( FIG. 6):
Con goma de seguridad bajo la base y ruedas universales para evitar
que los niños se caigan por las escaleras o vuelquen en el andador.
RUEDAS RECTAS:
Las ruedas rectas se frenan automáticamente cuando el andador se
mueve hacia atrás demasiado rápido.
IT: 6. FUNZIONE DI DONDOLO (FIG 6) :
Con gomma di sicurezza sotto la base e ruote globali per evitare che i
bambini cadano dalle scale o si ribaltino nel girello.
RUOTE DRITTE:
Le ruote dritte frenano automaticamente quando il girello si muove
all'indietro troppo velocemente.
PL: 6. FUNKCJA BUJACZKA (RYS. 6):
Gumowe podkładki pod podstawą i obrotowe kółka zabezpieczają
przed upadkiem dziecka ze schodów oraz przed przewróceniem się w
chodziku.
ZWYKŁE KÓŁKA:
Zwykłe kółka automatycznie hamują, gdy chodzik porusza się do tyłu
zbyt szybko.
DE: 6. SCHAUKELFUNKTION (BILD 6):
Mit Sicherheitsgummi unter der Basis und globalen Rädern, um zu
verhindern, dass Kinder die Treppe hinunterfallen oder mit der
Lauflernhilfe umkippen.
GERADE RÄDER:
Die geraden Räder bremsen automatisch, wenn sich die Lauflernhilfe
zu schnell rückwärts bewegt.
(PIC / BILD / IMAGE / FIG / FIG / RYS 5)
28 29
1
2
EN: 6. ROCKING FUNCTION (PIC6):
With safety rubber under the base and global wheels for avoiding kids
falling down the stairs or tipping over in walker.
STRAIGHT WHEELS:
The straight wheels will automatically brake when baby walker moves
backward too fast.
FR: 6. FONCTION DE BASCULEMENT (IMAGE 6) :
Avec caoutchouc de sécurité sous la base et roues globales pour
éviter que les enfants ne tombent dans les escaliers ou ne basculent
dans le trotteur.
ROUES DROITES :
Les roues droites freinent automatiquement lorsque le trotteur recule
trop rapidement.
ES: 6. FUNCIÓN DE BALANCÍN ( FIG. 6):
Con goma de seguridad bajo la base y ruedas universales para evitar
que los niños se caigan por las escaleras o vuelquen en el andador.
RUEDAS RECTAS:
Las ruedas rectas se frenan automáticamente cuando el andador se
mueve hacia atrás demasiado rápido.
IT: 6. FUNZIONE DI DONDOLO (FIG 6) :
Con gomma di sicurezza sotto la base e ruote globali per evitare che i
bambini cadano dalle scale o si ribaltino nel girello.
RUOTE DRITTE:
Le ruote dritte frenano automaticamente quando il girello si muove
all'indietro troppo velocemente.
PL: 6. FUNKCJA BUJACZKA (RYS. 6):
Gumowe podkładki pod podstawą i obrotowe kółka zabezpieczają
przed upadkiem dziecka ze schodów oraz przed przewróceniem się w
chodziku.
ZWYKŁE KÓŁKA:
Zwykłe kółka automatycznie hamują, gdy chodzik porusza się do tyłu
zbyt szybko.
DE: 6. SCHAUKELFUNKTION (BILD 6):
Mit Sicherheitsgummi unter der Basis und globalen Rädern, um zu
verhindern, dass Kinder die Treppe hinunterfallen oder mit der
Lauflernhilfe umkippen.
GERADE RÄDER:
Die geraden Räder bremsen automatisch, wenn sich die Lauflernhilfe
zu schnell rückwärts bewegt.
(PIC / BILD / IMAGE / FIG / FIG / RYS 5)
28 29
3
1
2
A
B
4
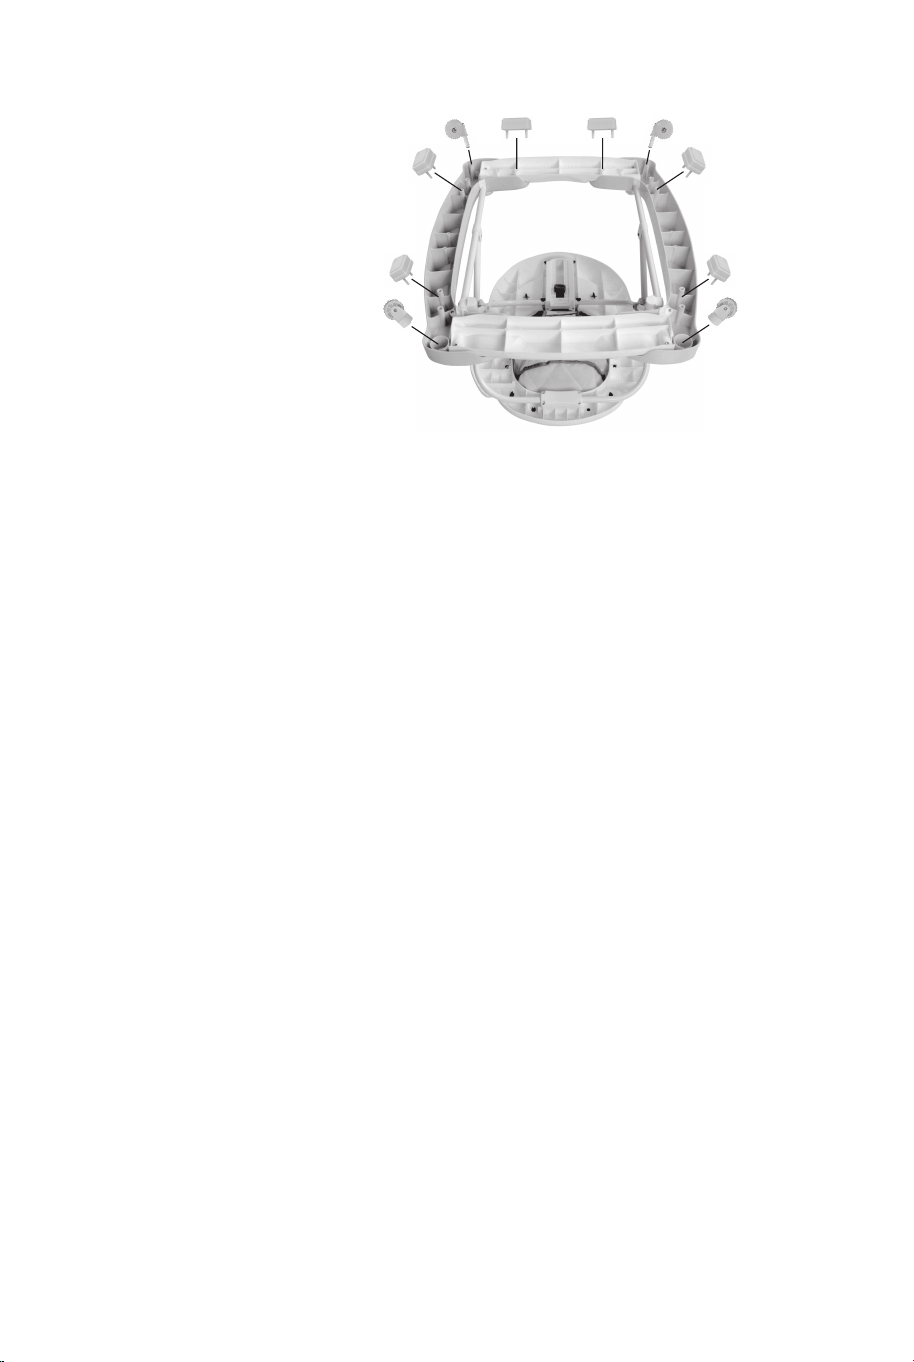
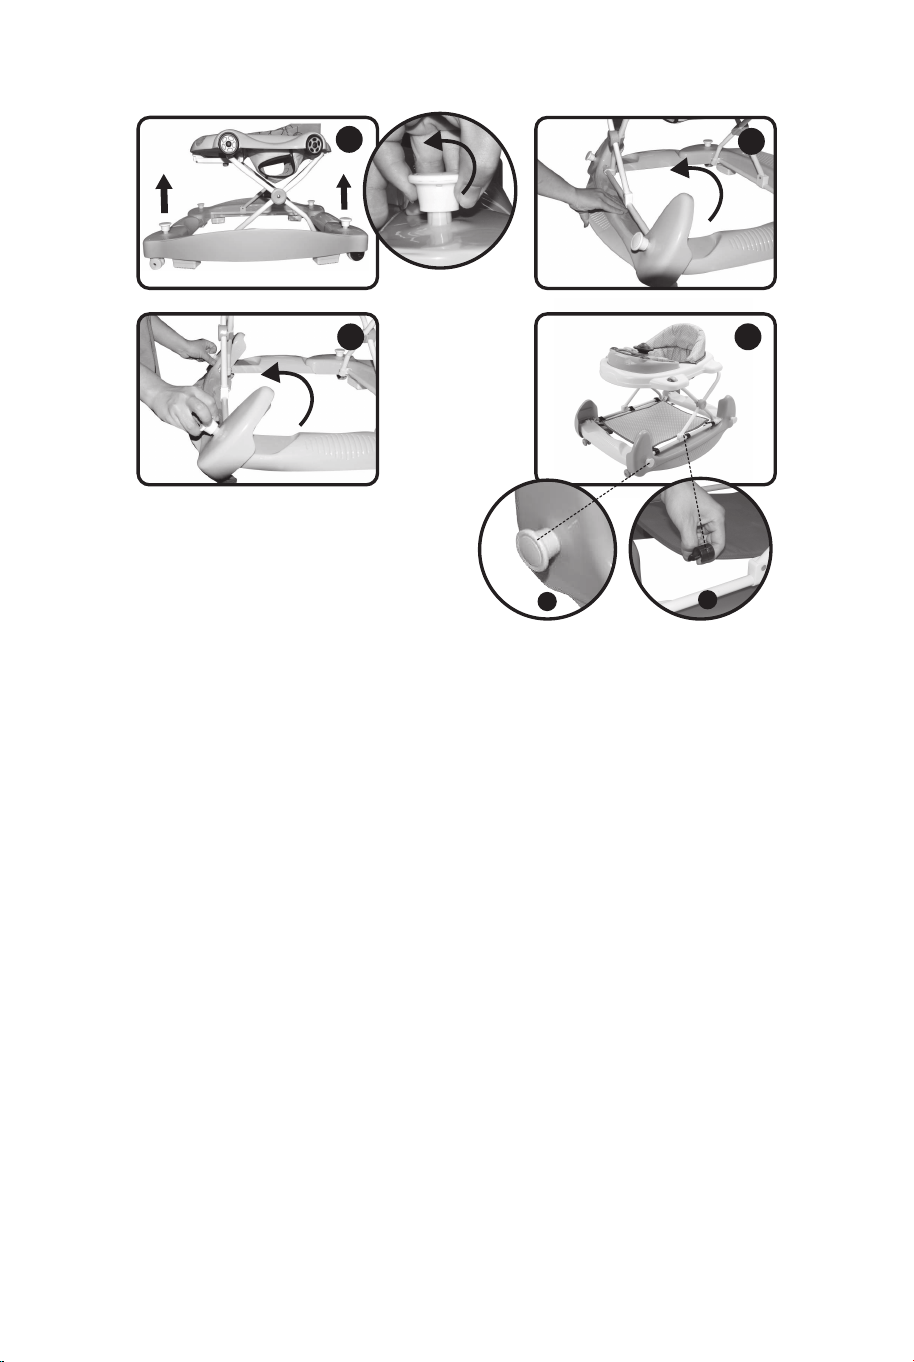
EN: 1. Tip one: Single hand operation, as shown in the Fig 1, pull
up the 2 white pulling buttons which on A B the bottom rim to the
highest point successively and rotate the head of pulling buttons
clockwise or counterclockwise, it will be stopped by the stuck-point.
Then turn the bottom rim over by 90°, as shown on Fig 2. After the
bottom rim is turned in place, as shown on Fig 4/a, rotate the head
of pulling button again, it will return automatically. Same operation
to the other side, the walker will be transformed into rocker. When
change it into a walker, operate it with counter direction. Tip two:
Double hands operation, as shown in the Fig 3/4, pull up the 2
white pulling buttons on the buttons simultaneously, then turn the
bottom rim over by 90°, the heads of pulling buttons should be kept
pulling until the transformation is completed. After the bottom rim is
converted in place, release the pulling buttons. The same operation
to the other side, the walker will be transformed into rocker.
2. When use it as walker, put the foot pad on the frame tube as
shown in Fig 4/b.
DE: 1. Tipp eins: Einhandbedienung, wie in Abb. 1 gezeigt, ziehen
Sie die 2 weißen Zugknöpfe am B A unteren Rand nacheinander
bis zum höchsten Punkt hoch und drehen Sie den Kopf der
Zugknöpfe im oder gegen den Uhrzeigersinn, er wird durch den
festsitzenden Punkt angehalten. Drehen Sie dann den unteren
Rand um 90°, wie in Abb. 2 gezeigt. Nachdem der untere Rand wie
in Abb. 4/a gezeigt gedreht wurde, drehen Sie den Kopf des
Zugknopfes erneut, er kehrt automatisch zurück. Der gleiche
Vorgang wird auf der anderen Seite durchgeführt und die Gehhilfe
wird in eine Wippe verwandelt. Wenn Sie ihn in einen Walker
umwandeln, betätigen Sie ihn in der entgegengesetzten Richtung.
Tipp zwei: Ziehen Sie, wie in Abb. 3/4 gezeigt, die beiden weißen
Zugknöpfe an den Knöpfen gleichzeitig nach oben, und drehen Sie
dann den unteren Rand um 90°.
Nachdem der untere Rand umgewandelt ist, lassen Sie die
Zugknöpfe los. Die gleiche Operation auf der anderen Seite, wird
der Wanderer in Wippe umgewandelt werden.
2. Wenn Sie die Gehhilfe als Wippe verwenden, setzen Sie das
Fußpolster auf das Rahmenrohr, wie in Abb. 4/b gezeigt.
FR: 1. Conseil 1 : D'une seule main, comme le montre la Fig. 1, tirez
successivement les deux boutons de traction blancs situés A B sur le
bord inférieur jusqu'au point le plus haut et tournez la tête des boutons
de traction dans le sens des aiguilles d'une montre ou dans le sens
inverse, elle sera arrêtée par le point de blocage. Retournez ensuite le
bord inférieur de 90°, comme le montre la Fig. 2. Une fois le bord
inférieur tourné en place, comme le montre la Fig. 4/a, tournez à
nouveau la tête du bouton de traction, il reviendra automatiquement.
Même opération de l'autre côté, le trotteur sera transformé en
bascule. Pour le transformer en trotteur, il faut l'actionner dans le sens
inverse.
Conseil 2 : Opération à deux mains, comme le montre la Fig.3/4, tirez
simultanément vers le haut les deux boutons de traction blancs sur les
boutons, puis tournez le bord inférieur de 90°, les têtes des boutons
de traction doivent continuer à tirer jusqu'à ce que la transformation
soit terminée.
Une fois le bord inférieur transformé en place, relâchez les boutons de
traction. Procédez de la même manière de l'autre côté, le trotteur sera
transformé en bascule.
2. Lorsqu'il est utilisé comme déambulateur, placer le repose-pied sur
le tube du cadre comme indiqué sur la Fig. 4/b.
30 31

3
1
2
A
B
4
EN: 1. Tip one: Single hand operation, as shown in the Fig 1, pull
up the 2 white pulling buttons which on A B the bottom rim to the
highest point successively and rotate the head of pulling buttons
clockwise or counterclockwise, it will be stopped by the stuck-point.
Then turn the bottom rim over by 90°, as shown on Fig 2. After the
bottom rim is turned in place, as shown on Fig 4/a, rotate the head
of pulling button again, it will return automatically. Same operation
to the other side, the walker will be transformed into rocker. When
change it into a walker, operate it with counter direction. Tip two:
Double hands operation, as shown in the Fig 3/4, pull up the 2
white pulling buttons on the buttons simultaneously, then turn the
bottom rim over by 90°, the heads of pulling buttons should be kept
pulling until the transformation is completed. After the bottom rim is
converted in place, release the pulling buttons. The same operation
to the other side, the walker will be transformed into rocker.
2. When use it as walker, put the foot pad on the frame tube as
shown in Fig 4/b.
DE: 1. Tipp eins: Einhandbedienung, wie in Abb. 1 gezeigt, ziehen
Sie die 2 weißen Zugknöpfe am B A unteren Rand nacheinander
bis zum höchsten Punkt hoch und drehen Sie den Kopf der
Zugknöpfe im oder gegen den Uhrzeigersinn, er wird durch den
festsitzenden Punkt angehalten. Drehen Sie dann den unteren
Rand um 90°, wie in Abb. 2 gezeigt. Nachdem der untere Rand wie
in Abb. 4/a gezeigt gedreht wurde, drehen Sie den Kopf des
Zugknopfes erneut, er kehrt automatisch zurück. Der gleiche
Vorgang wird auf der anderen Seite durchgeführt und die Gehhilfe
wird in eine Wippe verwandelt. Wenn Sie ihn in einen Walker
umwandeln, betätigen Sie ihn in der entgegengesetzten Richtung.
Tipp zwei: Ziehen Sie, wie in Abb. 3/4 gezeigt, die beiden weißen
Zugknöpfe an den Knöpfen gleichzeitig nach oben, und drehen Sie
dann den unteren Rand um 90°.
Nachdem der untere Rand umgewandelt ist, lassen Sie die
Zugknöpfe los. Die gleiche Operation auf der anderen Seite, wird
der Wanderer in Wippe umgewandelt werden.
2. Wenn Sie die Gehhilfe als Wippe verwenden, setzen Sie das
Fußpolster auf das Rahmenrohr, wie in Abb. 4/b gezeigt.
FR: 1. Conseil 1 : D'une seule main, comme le montre la Fig. 1, tirez
successivement les deux boutons de traction blancs situés A B sur le
bord inférieur jusqu'au point le plus haut et tournez la tête des boutons
de traction dans le sens des aiguilles d'une montre ou dans le sens
inverse, elle sera arrêtée par le point de blocage. Retournez ensuite le
bord inférieur de 90°, comme le montre la Fig. 2. Une fois le bord
inférieur tourné en place, comme le montre la Fig. 4/a, tournez à
nouveau la tête du bouton de traction, il reviendra automatiquement.
Même opération de l'autre côté, le trotteur sera transformé en
bascule. Pour le transformer en trotteur, il faut l'actionner dans le sens
inverse.
Conseil 2 : Opération à deux mains, comme le montre la Fig.3/4, tirez
simultanément vers le haut les deux boutons de traction blancs sur les
boutons, puis tournez le bord inférieur de 90°, les têtes des boutons
de traction doivent continuer à tirer jusqu'à ce que la transformation
soit terminée.
Une fois le bord inférieur transformé en place, relâchez les boutons de
traction. Procédez de la même manière de l'autre côté, le trotteur sera
transformé en bascule.
2. Lorsqu'il est utilisé comme déambulateur, placer le repose-pied sur
le tube du cadre comme indiqué sur la Fig. 4/b.
30 31

ES: 1. Consejo 1: Operación con una sola mano, como se muestra
en la Fig. 1, tire hacia arriba de los 2 B A botones de tracción
blancos que se encuentran en el borde inferior hasta el punto más
alto sucesivamente y gire la cabeza de los botones de tracción en
sentido horario o antihorario, se detendrá por el punto de atasco. A
continuación, gire el borde inferior en 90°, como se muestra en la
Fig.
2. Después de girar el borde inferior en su lugar, como se muestra
A B en la Fig 4/a, gire la cabeza del botón de tracción de nuevo,
volverá automáticamente. La misma operación al otro lado, el
andador se transformará en balancín. Cuando lo cambie a
andador, opérelo con la dirección contraria. Consejo 2: Operación
con dos manos, como se muestra en la Fig 3/4, tire hacia arriba de
los 2 botones blancos de los botones simultáneamente, luego gire
el borde inferior 90°, las cabezas de los botones de tracción deben
mantenerse tirando hasta que la transformación se haya
completado. Después de que el borde inferior se convierta en su
lugar, suelte los botones de tracción. La misma operación al otro
lado, el andador se transformará en balancín.
2. Cuando lo utilice como andador, coloque la almohadilla para los
pies en el tubo del armazón como se muestra en la fig. 4/b.
IT: 1. Suggerimento 1: con una mano, come mostrato nella Fig. 1,
tirare in successione i due pomelli A B bianchi del bordo inferiore fino
al punto più alto e ruotare la testa dei pomelli in senso orario o
antiorario finché non si ferma nel punto di bloccaggio. Quindi ruotare il
bordo inferiore di 90°, come mostrato nella Fig. 2. Una volta che il
bordo inferiore è stato girato in posizione, come mostrato nella Fig.
4/a, ruotare di nuovo la testa del pomello e questo ritornerà
automaticamente. Eseguendo la stessa operazione sull'altro lato, il
girello si trasformerà in un dondolo. Per trasformarlo in girello, ruotarlo
nella direzione opposta. Suggerimento 2: operazione a due mani,
come illustrato nella Fig. 3/4, tirare contemporaneamente verso l'alto i
due pulsanti bianchi sulle manopole, quindi ruotare il bordo inferiore di
90°; le teste dei pulsanti devono continuare a tirare fino al
completamento della trasformazione. Una volta che il bordo inferiore
trasformato è in posizione, rilasciare i pulsanti. Procedere allo stesso
modo sull'altro lato: il girello si trasformerà in un dondolo.
2.Quando viene utilizzato come girello, posizionare la pedana sul tubo
del telaio come mostrato nella Fig. 4/b.
PL: 1. Pierwsza uwaga: Przekształć chodzik w bujaczek jedną
ręką.
Jak pokazano na rys. 1, pociągnij A B maksymalnie w górę dwa
białe bolce, które znajdują się na dolnej ramie. Następnie obróć
główki bolców do oporu zgodnie z ruchem wskazówek zegara lub
przeciwnie do ruchu wskazówek zegara. Obróć dolną ramę o 90°,
jak pokazano na rys. 2. Po obróceniu dolnej ramy, przekręć w
przeciwną stronę główki bolców, aby je zablokować, jak pokazano
na rys. 4/a. Powtórz po drugiej stronie, aby przekształcić chodzik w
bujaczek. Aby przekształcić bujaczek z powrotem w chodzik,
wykonaj czynności w odwrotnej kolejności.
Druga uwaga: Przekształć chodzik w bujaczek dwiema rękami. Jak
pokazano na rys. 3/4, pociągnij jednocześnie 2 białe bolce, a
następnie obróć dolną ramę o 90°. Nie puszczaj bolców, dopóki nie
obrócisz ramy. Po ustawieniu ramy we właściwej pozycji puść
bolce. Powtórz po drugiej stronie, aby przekształcić chodzik w
bujaczek.
2. Gdy produkt jest używany jako chodzik, przypnij podnóżek do
ramy, jak pokazano na Rys. 4/b.
32 33
WARNING
1. The product shall be assembled by an adult; 2.Prevent access to
stairs,steps and uneven surface;
3. Read the instructions carefully before use and keep them for
future reference.The child maybe hurt if you do not follow these
instructions;
4. The child will be able to reach further and move faster than
before when in the baby walking frame;
5. Guard all fires, heating and cooking appliances;
6. Remove hot liquids,electrical cables and other potential hazards
from reach;
7. Prevent collision with glass in doors,windows and furniture;
8. Do not use the baby walking frame if any components are
broken or missing;
9. This baby walking frame should be used only for short periods of
time (e.g.20min);
10. This product is intended only for a child who can sit up by itself
and until it is able to walk by itself or weighs more than 12 kg/26.5
lbs;
11. Do not use replacement parts other than those approved by the
manufacturer;
12. Should you have any questions about your baby walker or
experience any difficulties,please contact us;
13. Executive standard:ASTMF977-22&EN1273:2020;
14. Always keep child in view while in walker;
15. Use only on flat surfaces free of objects that could cause the
walker to tip over;
16. To avoid burns, keep the child away from hot liquids, ranges,
radiators, space heaters, fireplaces,etc;
ACHTUNG
1. Das Produkt muss von einem Erwachsenen zusammengebaut
werden;
2. Verhindern Sie den Zugang zu Treppen, Stufen und unebenen
Flächen;
3. Lesen Sie die Anleitung vor dem Gebrauch sorgfältig durch und
bewahren Sie sie für spätere Verwendung auf;
4. Das Kind wird in der Lage sein, weiter zu reichen und sich
schneller zu bewegen als zuvor, wenn es sich in der Lauflernhilfe
befindet;
5. Schützen Sie alle Feuer, Heiz- und Kochgeräte;
6. Entfernen Sie heiße Flüssigkeiten, elektrische Kabel und andere
potenzielle Gefahren aus der Reichweite;
7. Vermeiden Sie Zusammenstöße mit Glas in Türen, Fenstern und
Möbeln;
8. Benutzen Sie die Lauflernhilfe nicht, wenn irgendwelche Teile
kaputt sind oder fehlen;
9. Diese Lauflernhilfe sollte nur für kurze Zeit verwendet werden
(z.B. 20 Minuten);
10. Dieses Produkt ist nur für Kinder gedacht, die sich selbständig
aufsetzen können, bis sie in der Lage sind, selbständig zu laufen
oder mehr als 12 kg wiegen;
11. Verwenden Sie keine anderen als die vom Hersteller
zugelassenen Ersatzteile;
12. Sollten Sie Fragen zu Ihrer Lauflernhilfe haben oder
irgendwelche Schwierigkeiten auftreten, kontaktieren Sie uns bitte;
13. Executive standard:ASTMF977-22&EN1273:2020;
14. Behalten Sie Ihr Kind immer im Blick, wenn Sie die
Lauflernhilfe benutzen;
15. Nur auf ebenen Flächen verwenden, die frei von Gegenständen
sind, die ein Umkippen der Lauflernhilfe verursachen könnten;
16. Um Verbrennungen zu vermeiden, halten Sie das Kind von
heißen Flüssigkeiten, Herden, Heizkörpern, Raumheizungen,
Kaminen usw. fern;
EN: DE:
34 35
ADVERTENCIA
1. El producto debe ser montado por un adulto;
2. Evite el acceso a escaleras, escalones y superficies irregulares;
3. Lea atentamente las instrucciones antes de utilizar el producto y
consérvelas para futuras consultas;
4. El niño podrá llegar más lejos y moverse más rápido que antes
cuando esté en el andador;
5. Evite todo tipo de fuegos, aparatos de calefacción y cocina;
6. Quite de su alcance líquidos calientes, cables eléctricos y otros
peligros potenciales;
7. Prevenga choques con cristales de puertas, ventanas y
muebles;
8. No utilice el andador si falta algún componente o está roto;
9. Este andador solo debe utilizarse durante cortos periodos de
tiempo (por ejemplo, 20 minutos);
10. Este producto está destinado únicamente a niños que puedan
sentarse por sí solos y hasta que puedan caminar por sí solos o
pesen más de 12 kg;
11. No utilice piezas de repuesto que no sean las aprobadas por el
fabricante;
12. Si tiene alguna pregunta sobre su andador o experimenta
alguna dificultad, por favor, póngase en contacto con nosotros;
13. Norma ejecutiva: ASTMF977-22&EN1273:2020;
14. Mantenga siempre al niño a la vista mientras esté en el
andador;
15. Utilícelo solo en superficies planas y libres de objetos que
puedan hacer que el andador vuelque;
16. Para evitar quemaduras, mantenga al niño alejado de líquidos
calientes, hornillos, radiadores, calefactores, chimeneas, etc;
AVERTISSEMENT
1. Le produit doit être assemblé par un adulte ;
2. Empêcher l'accès aux escaliers, aux marches et aux surfaces
inégales ;
3. Lisez attentivement les instructions avant l'utilisation et
conservez-les pour référence ultérieure. L'enfant peut se blesser si
vous ne suivez pas ces instructions ;
4. L'enfant pourra atteindre plus loin et se déplacer plus
rapidement qu’avant lorsqu'il est dans le trotteur pour bébé ;
5. Protégez tous les feux, appareils de chauffage et de cuisson ;
6. Éloignez les liquides chauds, les câbles électriques et autres
dangers potentiels ;
7. Empêcher les collisions avec les vitres des portes, des fenêtres
et des meubles ;
8. N'utilisez pas le trotteur pour bébé si l'un de ses composants est
cassé ou manquant ;
9. Ce trotteur pour bébé ne doit être utilisé que pendant de courtes
périodes (par exemple 20 minutes) ;
10. Ce produit est destiné uniquement à un enfant qui peut
s'asseoir tout seul et jusqu'à ce qu'il soit capable de marcher tout
seul ou qu'il pèse plus de 12 kg/26,5 lbs ;
11. Ne pas utiliser de pièces de rechange autres que celles
approuvées par le fabricant ;
12. Si vous avez des questions concernant votre trotteur ou si vous
rencontrez des difficultés, veuillez nous contacter.
13. Norme exécutive : ASTMF977-22&EN1273:2020 ;
14. Gardez toujours l'enfant à l'œil lorsqu'il est dans le trotteur ;
15. Utiliser uniquement sur des surfaces planes sans objets qui
pourraient faire basculer le trotteur ;
16. Pour éviter les brûlures, éloigner l'enfant des liquides chauds,
des cuisinières, des radiateurs, des chauffages d'appoint, des
cheminées, etc. ;
FR: ES:
36 37

AVVERTENZA
1. Il prodotto deve essere assemblato da un adulto;
2. Impedire l'accesso a scale, gradini e superfici irregolari;
3.Leggere attentamente le istruzioni prima dell'uso e conservarle
per future consultazioni. I bambini possono subire lesioni se non si
seguono queste istruzioni;
4. Il bambino sarà in grado di raggiungere più lontano e di
muoversi più velocemente di prima quando è nel girello;
5. Proteggere tutti i fuochi, le stufe e gli apparecchi di cottura;
6. Tenere lontano da liquidi caldi, cavi elettrici e altri potenziali
pericoli;
7. Evitare le collisioni con i vetri di porte, finestre e mobili;
8. Non utilizzare il girello se uno dei suoi componenti è rotto o
mancante;
9. Questo girello deve essere utilizzato solo per brevi periodi (ad
es. 20 minuti);
10. Questo prodotto è destinato solo a un bambino in grado di
stare seduto da solo e non è adatto a bambini che pesano più di 12
kg;
11. Non utilizzare parti di ricambio diverse da quelle approvate dal
produttore;
12. In caso di domande sul girello o di difficoltà, contattare noi o un
tecnico qualificato;
13. Standard esecutivo: ASTM F977-22& EN 1273:2020;
14. Tenere sempre d'occhio il bambino quando si utilizza il girello;
15. Utilizzare il girello solo su superfici piane, senza oggetti che
possano farlo ribaltare;
16. Per evitare scottature, tenere il bambino lontano da liquidi
caldi, fornelli, radiatori, stufe, caminetti, ecc;
OSTRZEŻENIA
1. Wymagany montaż przez osobę dorosłą.
2. Zabezpiecz schody, stopnie i nierówne powierzchnie przed
dzieckiem.
3. Przed przystąpieniem do użytku dokładnie zapoznaj się z
instrukcją. Zachowaj instrukcję do użytku w przyszłości.
Niezastosowanie się do tego ostrzeżenia może prowadzić do
powstania poważnych obrażeń.
4. Dziecko w chodziku jest w stanie poruszać się dużo szybciej i
docierać dużo dalej niż bez chodzika.
5. Trzymaj produkt z dala od ognia oraz źródeł silnego ciepła,
takich jak urządzenia kuchenne i urządzenia grzewcze.
6. Trzymaj produkt z dala od gorących substancji, kabli
elektrycznych i innych potencjalnych niebezpieczeństw.
7. Uważaj, aby dziecko nie uderzyło chodzikiem w szybę w
drzwiach, w okno lub w mebel.
8. Nie używaj chodzika w przypadku braku lub uszkodzenia
jakiejkolwiek części.
9. Zalecamy użytkowanie chodzika wyłącznie przez krótki czas (np.
20 minut).
10. Produkt jest przeznaczony wyłącznie dla dzieci, które siedzą
samodzielnie i może być użytkowany, dopóki dziecko nie chodzi
samodzielnie, a jego waga nie przekracza 12 kg.
11. Nie używaj części zamiennych innych niż te zatwierdzone przez
producenta.
12. Skontaktuj się z naszym działem obsługi klienta w przypadku
jakichkolwiek pytań dotyczących produktu lub jakichkolwiek
problemów napotkanych podczas montażu/użytkowania.
13. Produkt zgodny z normą: ASTM F977-22 i EN 1273:2020.
14. Zawsze miej dziecko w zasięgu wzroku, gdy znajduje się w
chodziku.
15. Używaj produktu wyłącznie na płaskich powierzchniach oraz z
dala od wszelkich przeszkód, które mogłyby doprowadzić do
upadku.
16. Aby uniknąć poparzeń, trzymaj dziecko z dala od wszelkich
gorących substancji, piecyków, kaloryferów, grzejników, kominków.
IT: PL:
38 39
AVVERTENZA
PERICOLO DI SCALE
Evitare lesioni gravi o morte.
Bloccare saldamente le scale
prima di utilizzare il girello.
OSTRZEŻENIE
ZACHOWAJ OSTROŻNOŚĆ W
POBLIŻU SCHODÓW
Aby uniknąć poważnych obrażeń lub
śmierci, przed przystąpieniem do
użytkowania produktu upewnij się, że
wszelkie schody i stopnie są
zabezpieczone przed dzieckiem.
WARNING
STAIR HAZARD
To avoid serious injury or death, block
stairs/steps securely before using walker.
1.Never force mechanisms or moving parts. If you are not sure
what to do, refer to the instructions.
2.Clean plastic and metal parts with a damp cloth or a light
detergent. Do not use solvents, ammonia or petrol.
3.Regularly check unit to ensure no parts are loose or broken.
4.Clean the rubber pad regularly to maintain stopping
performance.
EN: Care and Maintenance:
ADEVERTENCIA
RIESGO DE ESCALERAS
Para evitar lesiones graves o la
muerte, bloquee bien las
escaleras/escalones antes de
utilizar el andador.
ACHTUNG
TREPPENGEFAHR
Vermeiden Sie schwere Verletzungen oder
Tod.
Blockieren Sie die Treppe/Stufen sicher,
bevor Sie die Gehhilfe benutzen.
EN: NEVER LEAVE THE CHILD UNATTENDED
DE: LASSEN SIE DAS KIND NIEMALS UNBEAUFSICHTIGT
FR: NE LAISSEZ JAMAIS L’ENFANT SANS SURVEILLANCE
ES: NO DEJE NUNCA AL NIÑO SIN VIGILANCIA
IT: NON LASCIARE MAI IL BAMBINO INCUSTODITO
PL: POD ŻADNYM POZOREM NIE ZOSTAWIAJ DZIECKA BEZ
NADZORU
AVERTISSEMENT
DANGER D'ESCALIER
Pour éviter les blessures graves
ou la mort, bloquer solidement les
escaliers/marches avant d'utiliser
le trotteur.
EN:
DE:
FR:
ES:
IT:
PL:
40 41

1. Non forzare mai i meccanismi o le parti mobili. Se non siete
sicuri di cosa fare, consultate le istruzioni.
2. Pulire le parti in plastica e metallo con un panno umido o un
detergente delicato. Pulire regolarmente i gommini di sicurezza
per mantenere le prestazioni di frenata. Non utilizzare solventi,
ammoniaca o benzina.
3. Controllare regolarmente l'apparecchio per verificare che non
vi siano parti allentate o rotte.
4. Pulire regolarmente i gommini per mantenere le prestazioni di
arresto.
IT: Cura e Manutenzione :
1. Nunca fuerce los mecanismos ni las piezas móviles. Si no
está seguro de lo que debe hacer, consulte las instrucciones.
2. Limpie las piezas de plástico y metal con un paño húmedo o
un detergente suave. No utilice disolventes, amoniaco ni
gasolina.
3. Compruebe regularmente la unidad para asegurarse de que
no hay piezas sueltas o rotas.
4. Limpie la almohadilla de goma con regularidad para mantener
el rendimiento de parada.
ES: Cuidado y Mantenimiento:
1. Wenden Sie niemals Gewalt gegen Mechanismen oder
bewegliche Teile an. Wenn Sie sich nicht sicher sind, was Sie
tun sollen, lesen Sie in der Anleitung nach.
2. Reinigen Sie Kunststoff- und Metallteile mit einem feuchten
Tuch oder einem leichten Reinigungsmittel. Verwenden Sie
keine Lösungsmittel, Ammoniak oder Benzin.
3. Überprüfen Sie das Gerät regelmäßig, um sicherzustellen,
dass keine Teile lose oder gebrochen sind.
4. Reinigen Sie das Gummipolster regelmäßig, um die
Stoppleistung zu erhalten.
DE: Pflege und Wartung:
1.) Ne jamais forcer les mécanismes ou les pièces mobiles. Si
vous n'êtes pas sûr de ce qu'il faut faire, reportez-vous aux
instructions.
2.) Nettoyez les pièces en plastique et en métal avec un chiffon
humide ou un détergent léger. Ne pas utiliser de solvants,
d'ammoniaque ou d'essence.
3.) Vérifier régulièrement l'appareil pour s'assurer qu'aucune
pièce n'est desserrée ou cassée.
4.) Nettoyer régulièrement les coussinets en caoutchouc pour
maintenir les performances d'arrêt.
FR: Soin et Entretien :
42 43

1. Nie montuj mechanizmów ani ruchomych części na siłę. W
przypadku jakichkolwiek wątpliwości zapoznaj się z instrukcją.
2. Czyść plastikowe i metalowe części wilgotną ściereczką z
dodatkiem łagodnego detergentu.
Nie używaj rozpuszczalników ani środków na bazie amoniaku i
benzyny.
3. Regularnie sprawdzaj produkt, aby upewnić się, że żadna
część nie obluzowała się ani nie uległa uszkodzeniu.
4. Regularnie czyść gumowe podkładki, aby zachować
skuteczność hamowania.
PL: Czyszczenie i konserwacja:
In case a return is required, the item must be returned in original box. Without this
your return will not be accepted.
DO NOT discard the box / original packaging.
Take a photo of the box markings.
Take a photo of the damaged part (if applicable).
Send us an email with the images requested.
A photo of the markings (text) on the side of the box is required in case a part is
needed for replacement. This helps our staff identify your product number to
ensure you receive the correct parts.
A photo of the damage is always required to file a claim and get your replacement
or refund processed quickly. Please make sure you have the box even if it is
damaged.
Email us directly from marketplace where your item was purchased with the
attached images and a description of your claim.
Falls eine Rücksendung erforderlich ist, muss der Artikel in der
Originalverpackung zurückgeschickt werden. Andernfalls wird Ihre Rücksendung
nicht angenommen.
Werfen Sie den Karton / die Originalverpackung NICHT weg.
Machen Sie ein Foto von der Beschriftung des Kartons.
Machen Sie ein Foto des beschädigten Teils (falls zutreffend).
Schicken Sie uns eine E-Mail mit dem gewünschten Foto.
Für den Fall, dass ein Ersatzteil benötigt wird, benötigen wir ein Foto der
Beschriftung (Text) auf der Seite des Kartons. So können unsere Mitarbeiter Ihre
Artikelnummer identifizieren und sicherstellen, dass Sie die richtigen Teile
erhalten.
Ein Foto des beschädigten Teils ist immer erforderlich, um eine Reklamation
einzureichen und eine schnelle Bearbeitung Ihres Ersatzteils oder Ihrer
Rückerstattung zu gewährleisten. Bitte stellen Sie sicher, dass Sie den Karton
haben, auch wenn er beschädigt ist.
Schicken Sie uns eine E-Mail direkt vom Marktplatz, auf dem Sie den Artikel
gekauft haben, mit den angehängten Fotos und einer Beschreibung Ihrer
Reklamation.
EN
DE
Return / Damage Claim Instructions
Rücksendung / Beschädigung Anweisungen
44 45
Instructions De Retour / Réclamation De Dommages
Dans le cas où un retour est requis, l'article doit être retourné dans sa boîte
d'origine. Sans cela, votre retour ne sera pas accepté.
NE PAS jeter la boîte/l'emballage d'origine.
Prenez une photo des marquages de la boîte.
Prenez une photo des dommages (le cas échéant).
Envoyez-nous un e-mail avec les images demandées.
Une photo des marquages (texte) sur le côté de la boîte est requise au cas où une
pièce serait nécessaire pour le remplacement. Cela aide notre personnel à
identifier votre numéro de produit pour s'assurer que vous recevez les bonnes
pièces.
Une photo des dommages est toujours requise pour déposer une réclamation et
obtenir rapidement votre remplacement ou votre remboursement. Assurez-vous
d'avoir la boîte même si elle est endommagée.
Envoyez-nous un e-mail directement depuis le marché où votre article a été
acheté avec les images ci-jointes et une description de votre réclamation.
Instrucciones de Devolución / Reclamación de Daños
En caso de que se requiera una devolución, el artículo debe ser devuelto en la
caja original. Sin esto su devolución no será aceptada.
NO deseche la caja/embalaje original.
Tome una foto de las marcas de la caja.
Tome una foto de las piezas dañadas (si procede).
Envíenos un correo electrónico con las imágenes solicitadas.
Se requiere una foto de las marcas (texto) en el lado de la caja en caso de que se
necesite una pieza para reemplazarla. Esto ayuda a nuestro personal a identificar
su número de producto para asegurarse de que recibe las piezas correctas.
Una foto de los daños es siempre necesaria para presentar una reclamación y
conseguir que su reemplazo o reembolso sea procesado rápidamente. Por favor,
asegúrese de tener la caja aunque esté dañada.
Envíenos un correo electrónico directamente desde el mercado donde se compró
su artículo con las imágenes adjuntas y una descripción de su reclamación.
FR
ES
Nel caso in cui sia richiesto un reso, l'articolo deve essere restituito nella scatola
originale. Senza la scatola originale il tuo reso non sarà accettato.
NON scartare la scatola / confezione originale.
Fare una foto dei contrassegni sulla scatola.
Fare una foto di Danno (se è applicabile).
Inviarci una mail con le immagini richieste.
È necessaria una foto dei contrassegni (testo) sul lato della scatola nel caso in
cui la parte debba essere sostituita. Questo aiuta il nostro staff a identificare il
numero del tuo prodotto per assicurarti di ricevere le parti corrette.
Una foto del danno è sempre necessaria per presentare un reclamo e ottenere
rapidamente la sostituzione o il rimborso. Assicurati di avere la scatola anche se
è danneggiata.
Inviarci un'e-mail direttamente dal mercato in cui è stato acquistato il tuo articolo
con le immagini allegate e una descrizione del tuo reclamo.
Jeśli chcesz zwrócić produkt, musi znajdować się on w oryginalnym opakowaniu.
Towar zwrócony w nieoryginalnym opakowaniu nie zostanie przyjęty.
Nie wyrzucaj oryginalnego opakowania.
Zrób zdjęcie oznaczeń na opakowaniu.
Zrób zdjęcie uszkodzonej części (jeśli dotyczy).
Skontaktuj się z nami.
Jeśli jakakolwiek część wymaga wymiany, zrób zdjęcie oznaczeń kodu produktu,
który znajduje się na opakowaniu. Pozwoli nam to zidentyfikować produkt i
dostarczyć ci właściwą część.
Jeśli chcesz złożyć reklamację, zrób zdjęcie uszkodzonej części. Pozwoli nam to
zatwierdzić reklamację i zlecić zwrot środków na twoje konto. Do złożenia
reklamacji potrzebne będzie oryginalne opakowanie.
Skontaktuj się z nami telefonicznie, mailowo lub poprzez formularz kontaktowy.
Załącz zdjęcia produktu i opis roszczenia.
IT
PL
Istruzioni Per La Restituzione / Reclamo Per Danni
Zwroty i reklamacje
46 47

BC10167
If you're having difficulty, our friendly
customer team is always here to help.
THIS INSTRUCTION BOOKLET CONTAINS IMPORTANT SAFETY INFORMATION. PLEASE READ AND KEEP FOR FUTURE REFERENCE.
Baby Walker/Lauflernhilfe/
Trotteur pour Bébé/Andador para Bebés/
Girello per Bambini/Chodzik dla dziecka
AUS:cs.au@costway.com
FRA:cs.fr@costway.com
DEU:cs.de@costway.com
ITA:cs.it@costway.com ESP:cs.es@costway.com
POL:sklep@costway.com
GBR:cs.uk@costway.com
DEU office: FDS GmbH, Neuer Höltigbaum 36, 22143 Hamburg, Deutschland
ITA office: Milano
FRA office: Saint Vigor d'Ymonville
POL office: GdańskGBR office: IpswichAUS office: TruganinaUSA office: Fontana
