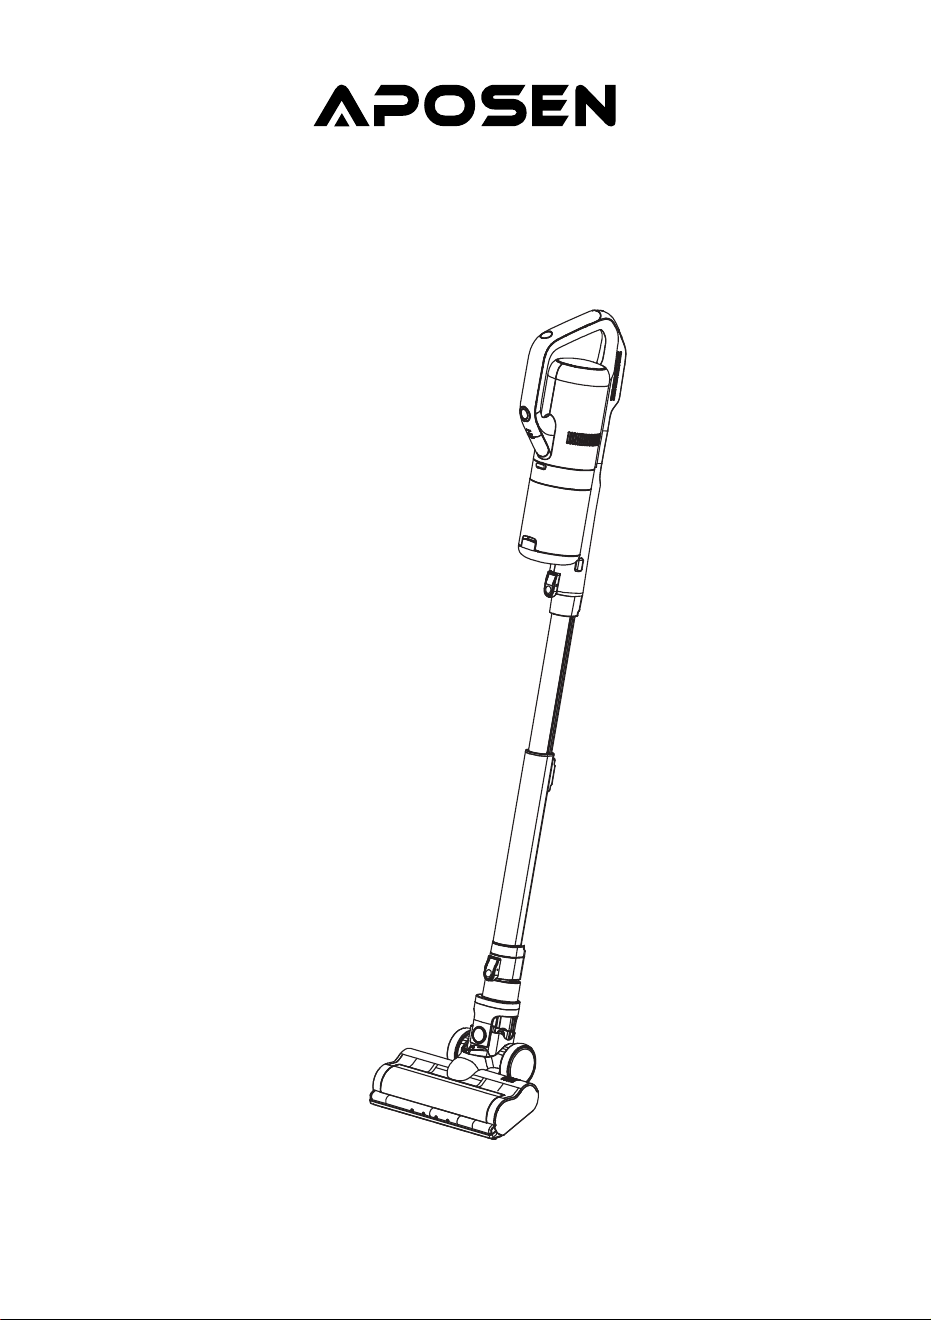
Instruction Manual
Wireless Vacuum Cleaner
MODEL NO.: H21s
Please read this user manual carefully before using the product and keep it properly for reference.
English
日本語
CONTENT
IMPORTANT SAFEGUARDS
PRODUCT DESCRIPTION
OPERATION INSTRUCTIONS
INSTRUCTIONS FOR MITE CLEANING FUNCTION
CLEANING AND MAINTENANCE
TROUBLESHOOTING
SPECIFICATIONS
01
02
04
07
09
11
12
English
日本語
安全上のご注意
製品について
操作説明について
ダニ除去性能の説明
お手入れ
FAQ
仕様
13
14
16
19
21
23
24

IMPORTANT SAFEGUARDS
When using your vacuum cleaner, basic safety precautions should always
be followed. Read all below instructions before using.
1. Please read all the contents of this manual carefully before using the product.
2. Any operation that does not conform to the instructions may result in serious personal injury,
property loss or damage to the product itself.
3. Our company is not liable for the loss caused by failing to operate in accordance with the instruc-
tions of this product.
Using Environment
1. The product is not waterproof. Do not let it inhale water or wet dust.
2. The product is a household vacuum cleaner. Please do not use it to absorb construction waste or
dust of heavy metal. It should not be used in industrial occasions.
Personnel Safety
1. Please operate cautiously to avoid danger when the product is working.
2. Do not stand or squat on this product.
3. Do not store the product in a high place to avoid the danger of accidental fall.
Safety Instructions for Product
1. This product can be used by children aged from 8 years and above and persons with reduced
physical, sensory or mental capabilities or lack of experience and knowledge if they have been
given supervision or instruction concerning use of this device in a safe way and understand the
hazards involved.
2. This product is only suitable for working in dry environment. Do not use it in humid environment.
3. Do not let it inhale high temperature substances (cigarette ends, matches or hot ash), superfine
substances (such as lime, cement, wood chips, gypsum powder, ash, carbon powder, etc.), large
pieces of sharp debris (such as glass, nails, pins, etc.), dangerous substances (such as solvents,
scale eliminators, etc.), chemical substances (such as acidic substances, detergents), flammable
and explosive liquids (gasoline, alcohol products).
4. Please keep the air inhalation duct and moving part away from hair, plush clothing, fingers and
other parts of body.
5. Please check the cleaning area before use. If pieces of paper, paper balls, plastic cloth or sharp
objects and things larger than the diameter of the suction pipe are found, please clean up them in
advance so as to avoid blockage of the suction pipe which affects the use of the product.
6. If electric leakage, excess temperature of motor, abnormal sound, overheating of main body,
abnormal smell or weak suction is found while using, users are supposed to stop using immediately.
01
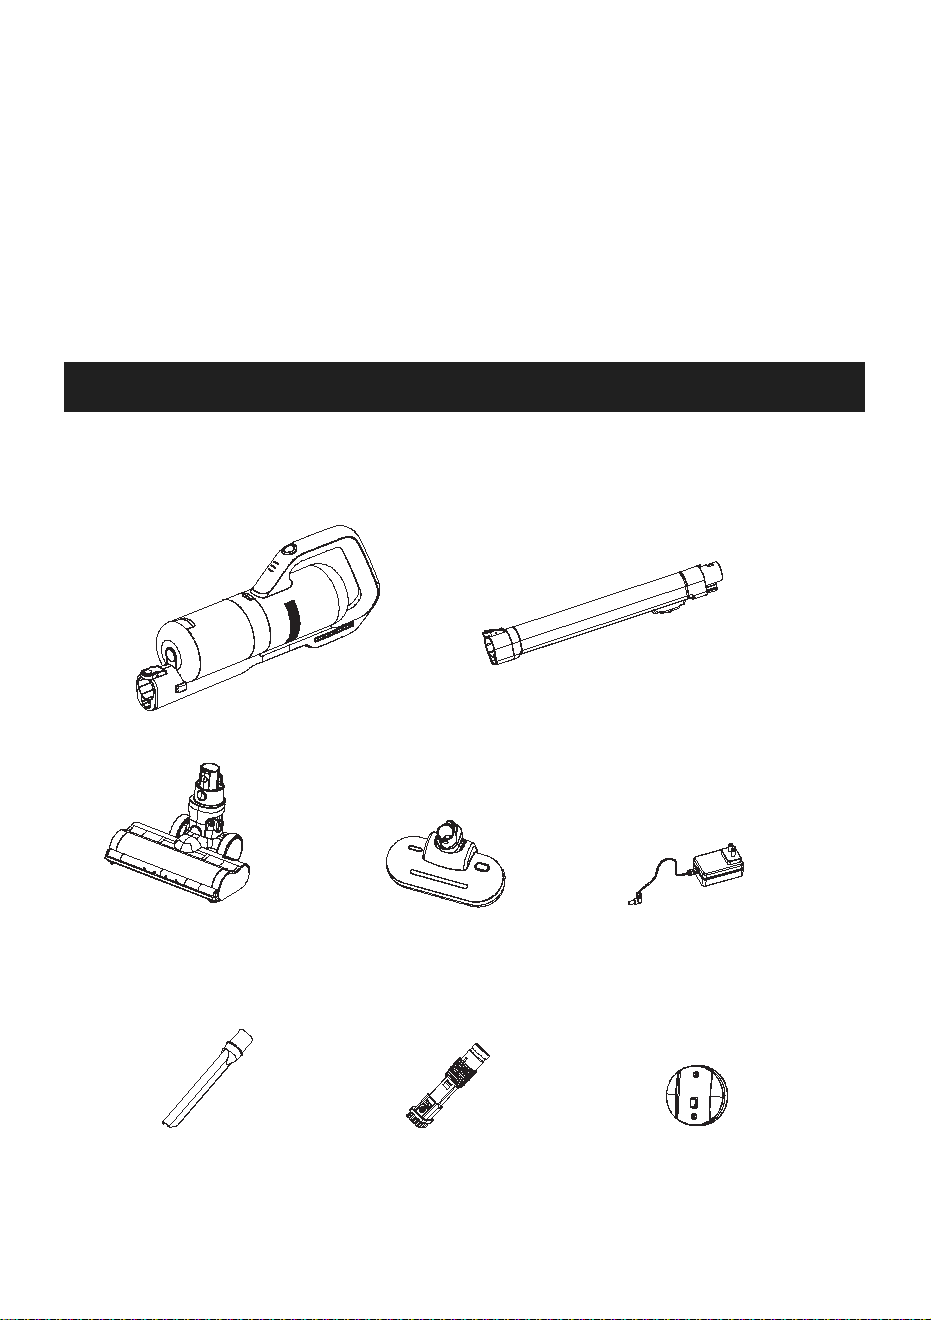
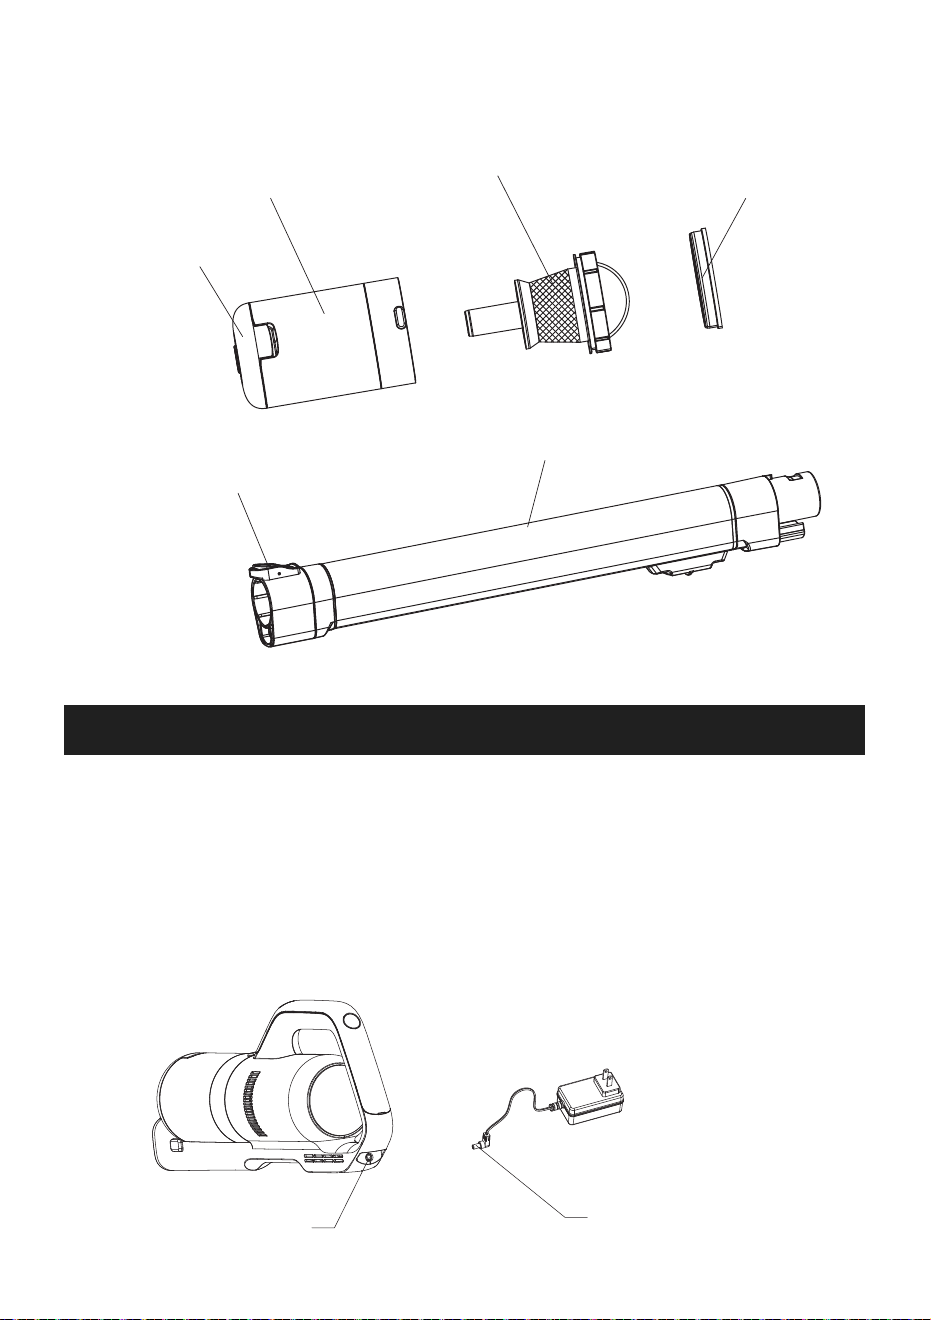
PRODUCT DESCRIPTION
Main Parts of Product
7. Please check the dust cup regularly. If there is too much rubbish in it, please clean it up in time.
Keep the ventilation aperture unblocked to avoid blockage which will reduce suction and cause
motor heating, affecting the service life of machine.
8. When cleaning the product, do not use lubricants, detergents, polishes and so on to clean any
parts.
9. When the machine malfunctions, don't repair it by yourself. Please call our after-sales department
for help.
02
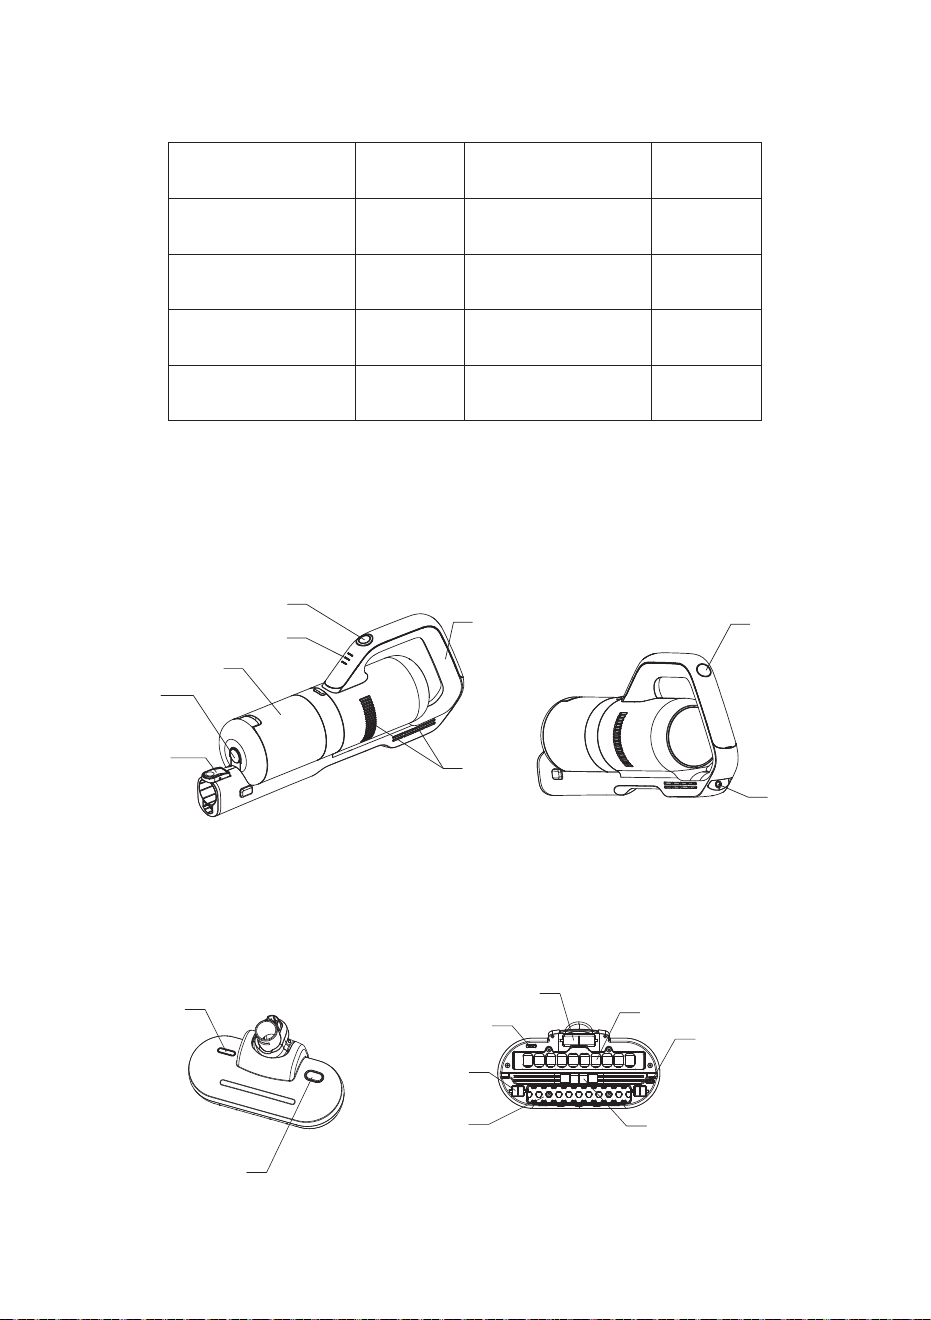
Main body
Power adapter
Wall hanger
Long crevice tool
Extension tube
Electric floor brush
Two-in-one brush
Mite cleaning brush
Packing List of Product
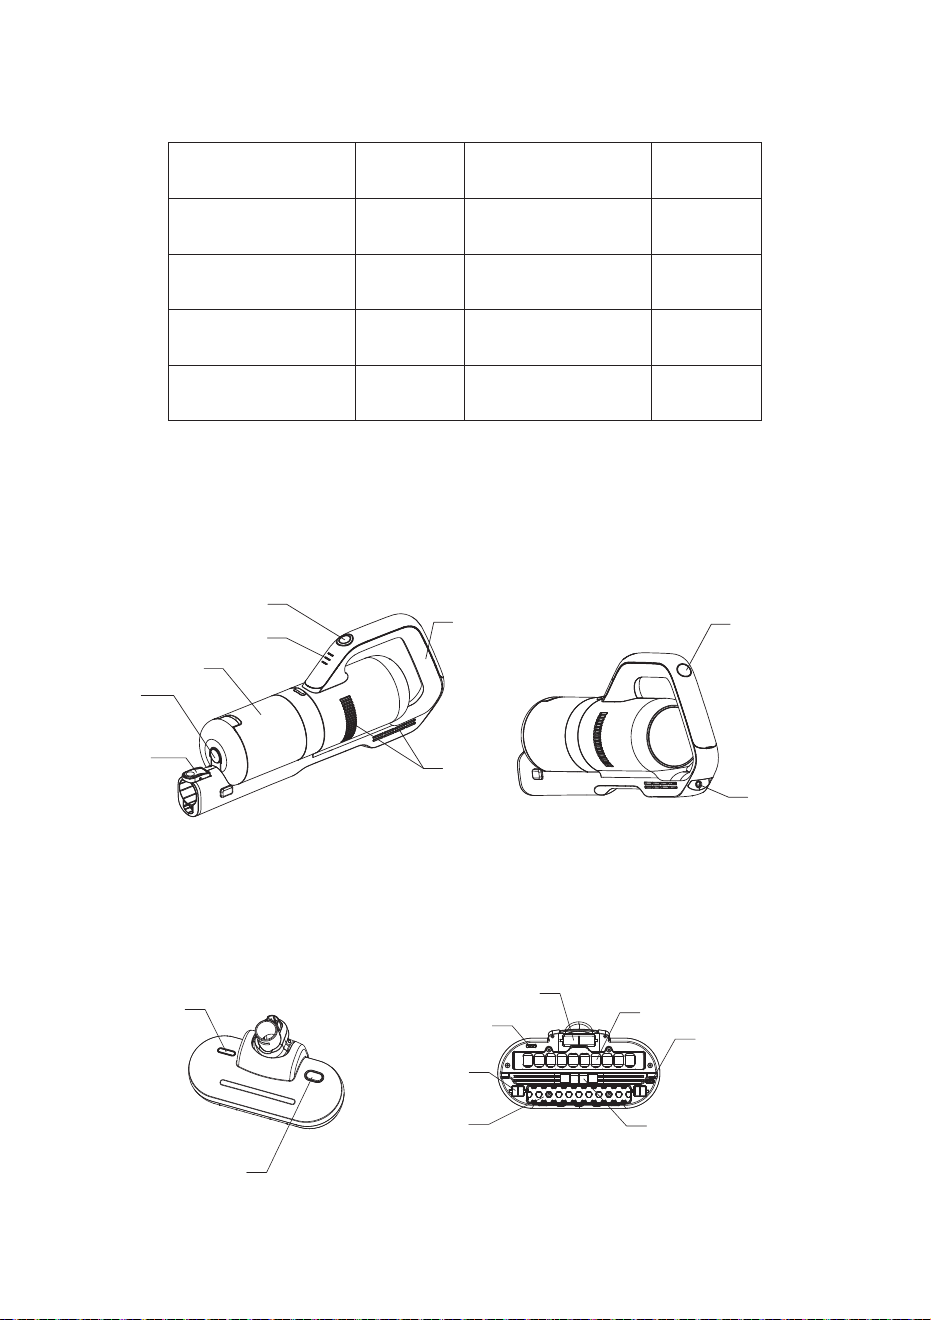
Name of Parts
03
Main Body
Extension
Tube
Electric Brush
Mite Cleaning
Brush
Wall Hanger
Power Adapter
Instruction
Manual
Long Crevice
Tool
Two-in-one
Brush
1
1
1
1
1
1
1
1
1
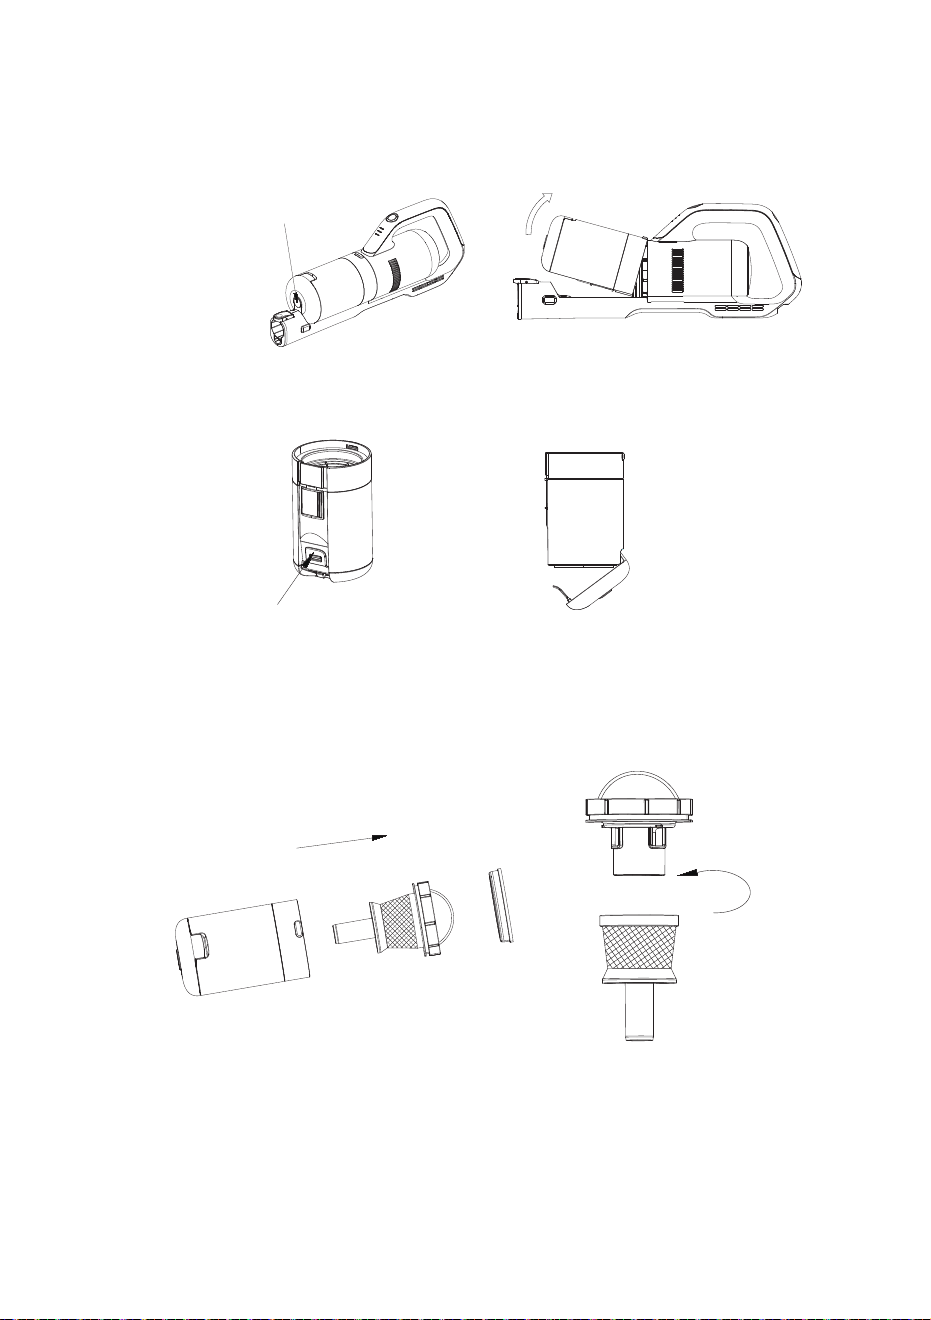
Power switch button
Power indicator
Dust cup
Handle
Air outlet
Gear switch button
Charging port
Dust cup
release button
Extension tube
release button
UV lamp window
Vibration switch
Main wheel
Light induction sensor
Second wheel
Vibration plate
UV lamp
Light induction sensor
Suction inlet

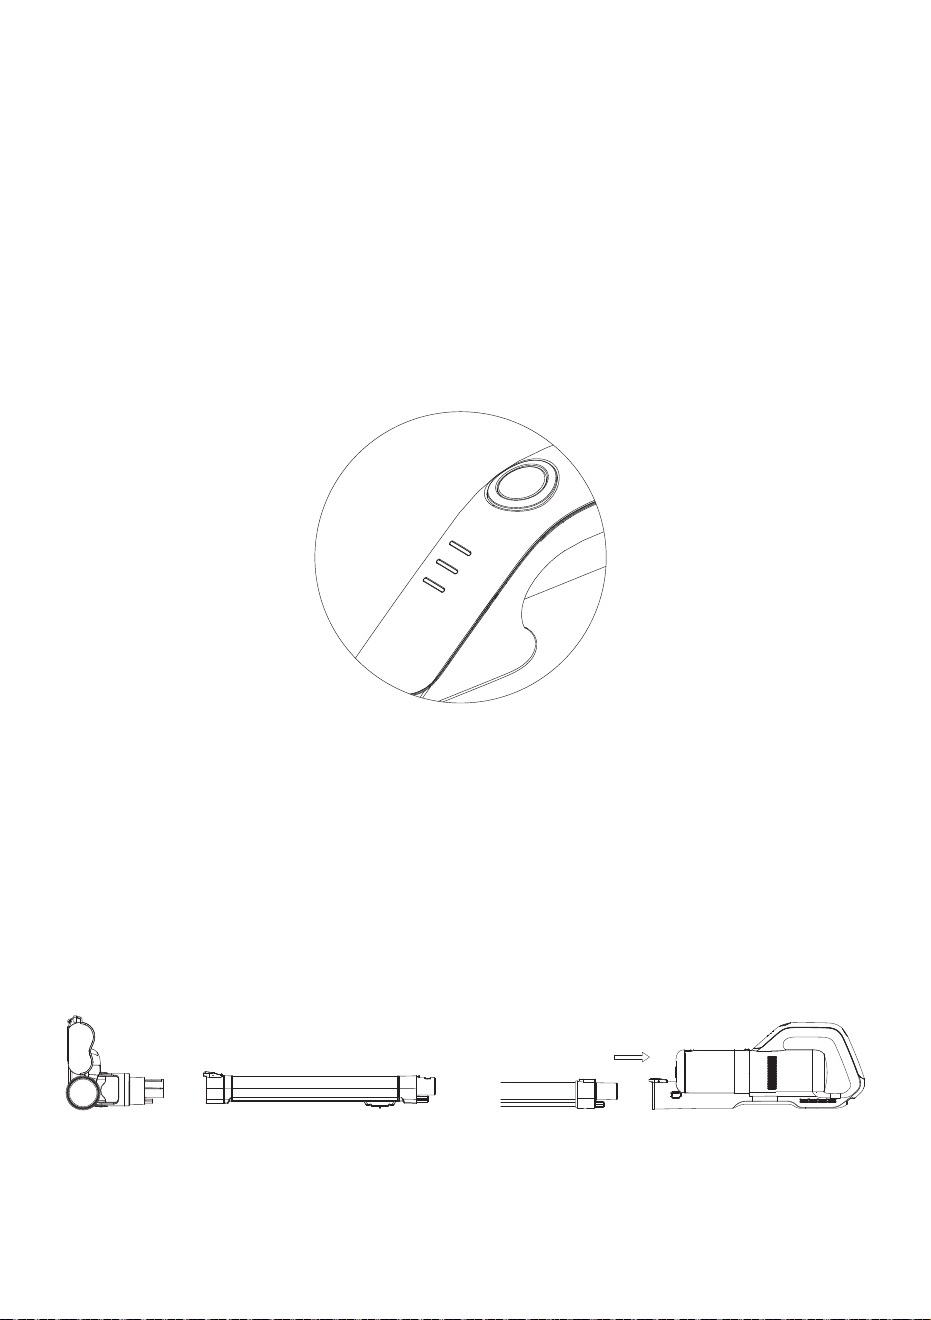
OPERATION INSTRUCTIONS
Charging Instructions
04
Check whether the electricity is sufficient. In order to ensure the normal use of the product, please
charge more than 3 hours before the first use.
The charging head on the power adapter is inserted into the charging port of the main body, and then
insert the power adapter into the power socket to start charging.
Charging port
Charging plug
Dust cup bottom lid
Dust cup
Stainless steel filter
Superfine filter
Extension tube
Floor brush release button
05
Notes:
1. When the green power indicator flashes on the main body, it indicates that it is charging. When all
three green lights are on, it indicates that the power is full. Please remove the power adapter in
time.
2. When the main body starts charging, the power switch button of the main body automatically locks
up and the main body stops working and cannot be started. When the charging head of the power
adapter is removed, the machine can work normally.
3. When charging normally, the green power indicator flashes according to the amount of electricity in
the battery. As shown in Fig. 1, 2 and 3, three lights represent the amount of electricity respectively.
When No. 1 light flashes, it shows that the power of the battery is relatively low which needs to
continue charging. When the second light flashes, the first light is always on. When the third light
flashes, and the second light is always on.When all three lights are always on, it indicates that the
power is full, please unplug the adapter from the power socket in time and stop charging.
Cleaning Function Instruction
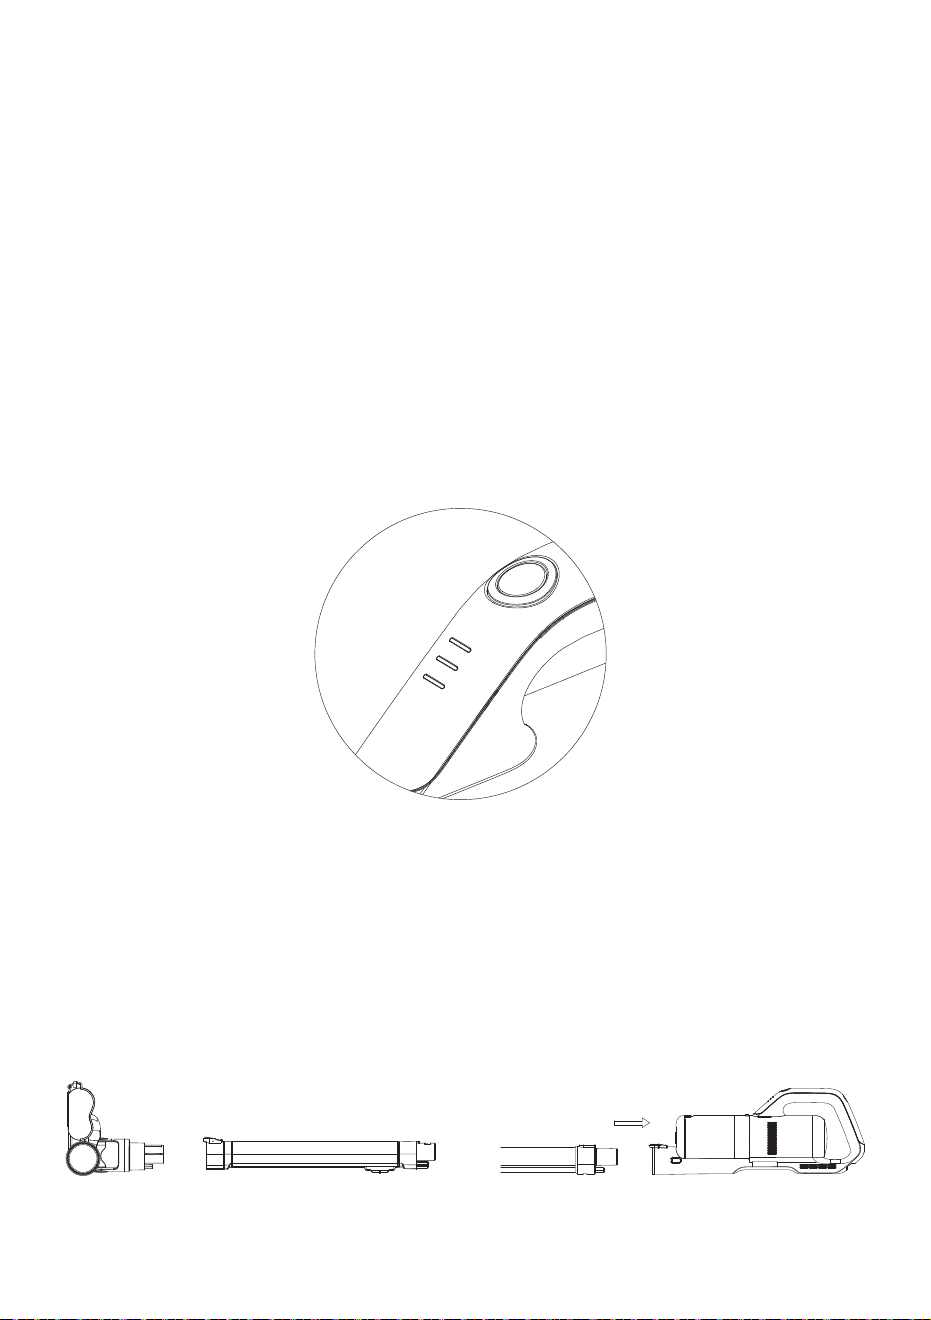
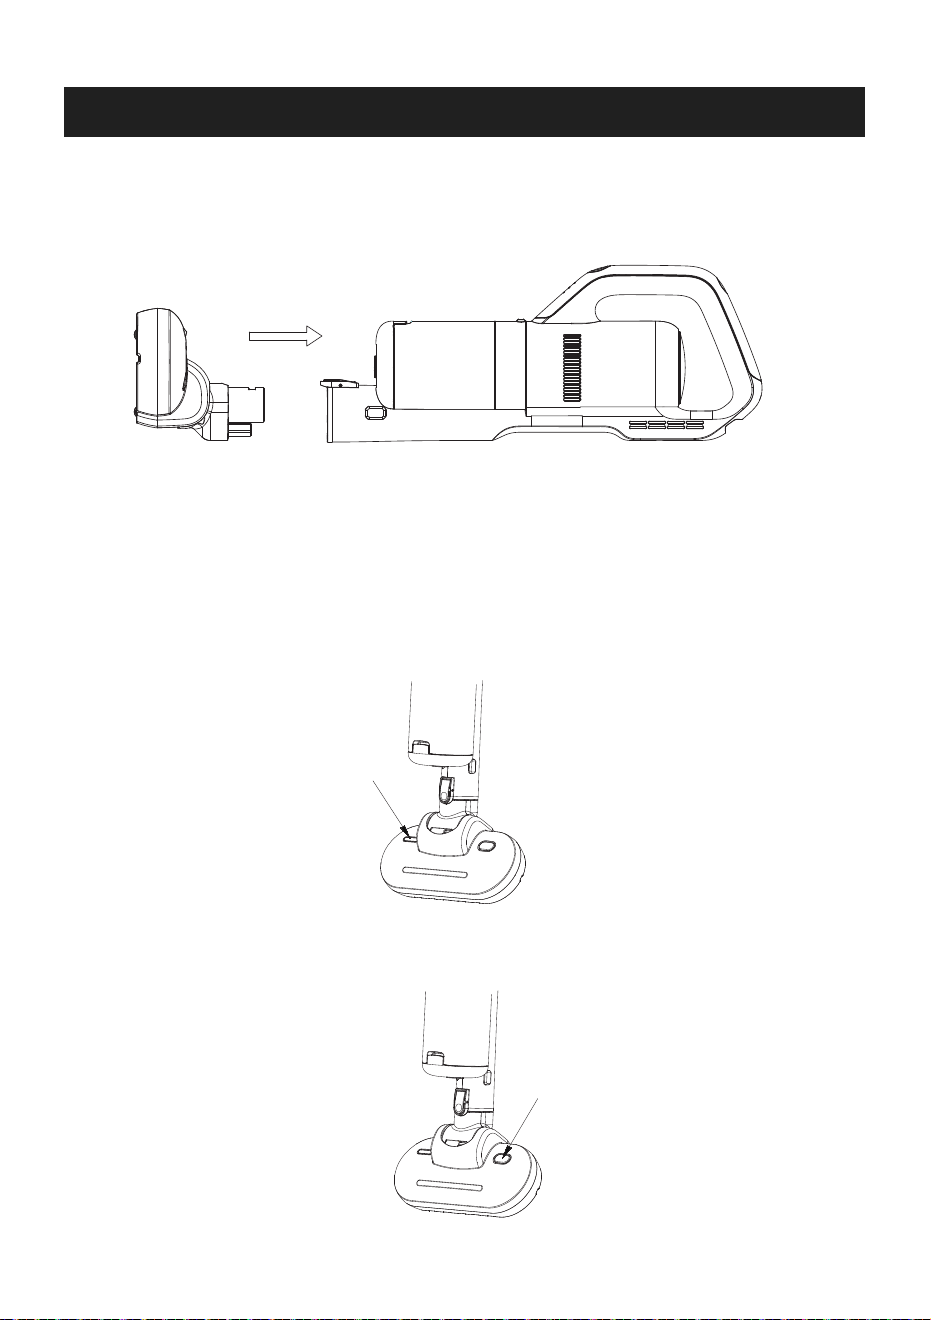
Component assembly
Connection of electric brush: insert one end of electric brush into one end of extension tube and hear
the locking sound of "click", then insert the other end of extension tube into interface of the main
body and hear the locking sound of "click". (as shown below)
1
2
3

06
1. Press the power switch button to turn on the cleaner as the motor inside will start working and the
green indicator lights would be on. Press the button again to stop the product working and all green
lights would go out.
2. Press the high and low gear switch button, the machine changes from low speed gear to high
speed gear as the sound of the motor becomes louder and the suction would be increased. Press
the switch again and the machine turns to low gear. Repeatedly press the high and low gear speed
switch, the machine switches between the high speed gear and low speed gear. The machine
works for more than 13 minutes in high gear and 30 minutes in low gear when it is full of electricity.
3. In the process of using the machine, the power indicator shows the amount of electricity. When all
three lights are on, it indicates that the power is full. In the process of power consumption, the
indicator light would go out as left quantity decrease. When only one light is on and flashes, it
indicates that the power is running out, and the machine should stop working to charge the battery.
Press the power switch button to start the working.
Indicator lights will show green.
Press the gear switch button
to switch between high and
low speed gear.
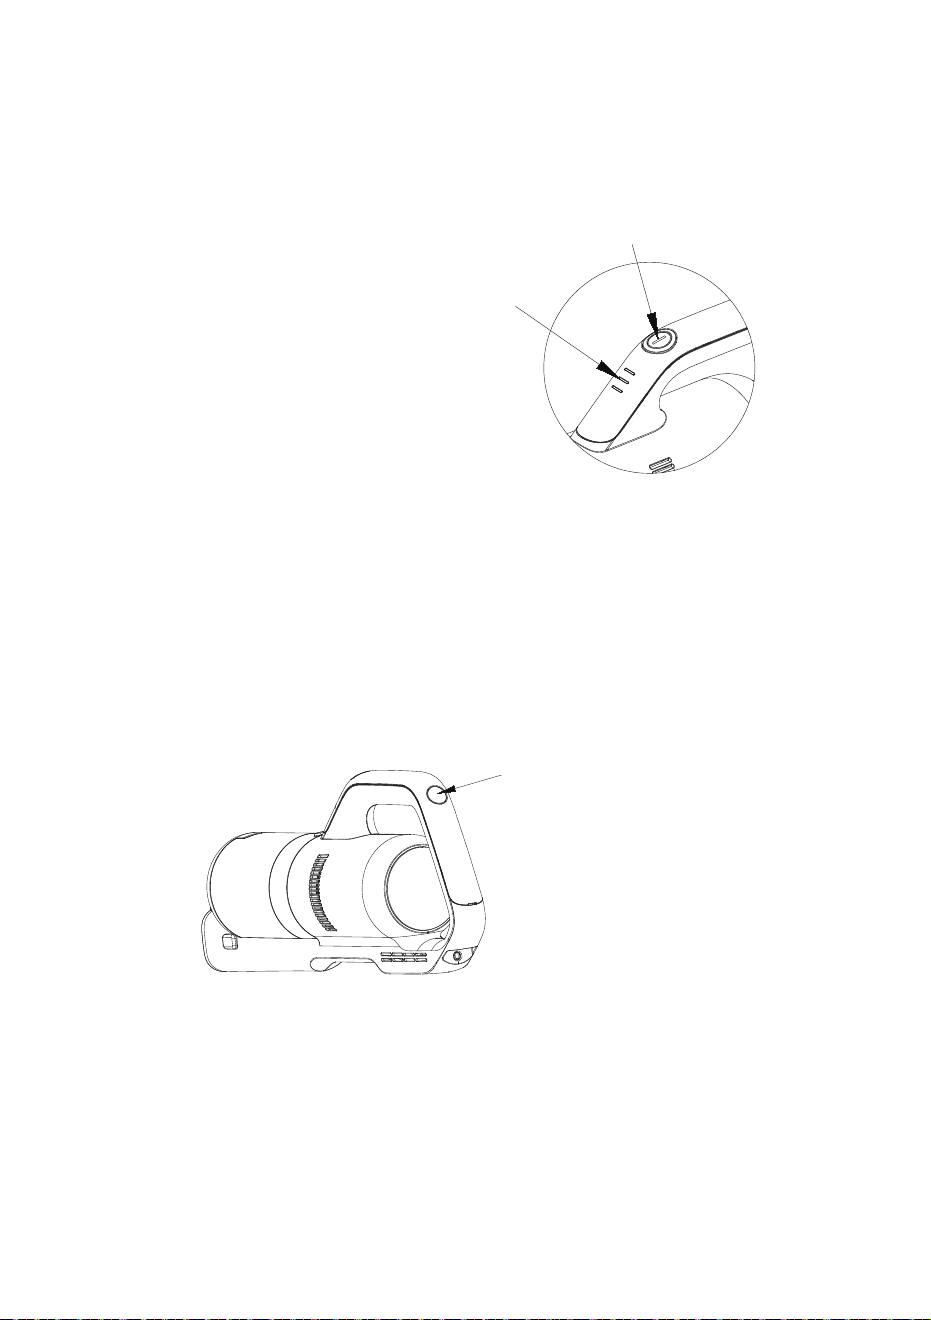
INSTRUCTIONS FOR MITE CLEANING FUNCTION
07
1. Assemble the mite cleaning brush with the main body as shown in the figure, and the locking sound
of “click”. The machine can perform the mite cleaning function .
2. Place the machine on the mattress and other objects that need cleaning. Place the mite cleaning
brush flat, press the power switch, push the machine to start the mite cleaning and sterilization
operation. Observe whether the UV lamp is on through UV lamp window. When the mite cleaning
brush is laid flat on the cleaning objects, the UV lamp is on normally. When the mite cleaning brush
leaves the objects 10-20 cm away or the brush is tilted more than 30 degrees, the UV lamp will
automatically turns off in order to avoid harming the human body.
3. Press the vibration switch and the vibration plate at the bottom of the mite cleaning brush starts to
vibrate. The mites and dust hidden in the deep part of the mattress can be shook out by continuous
vibration to achieve better cleaning effect.
UV lamp window
Vibration switch

08
4. UV lamp is turned on and off by two light induction sensors at the bottom of the machine. When the
bottom of the machine is in contact with objects, two light induction sensors receive the signal, and
the UV lamp lights up, and the sterilizing operation begins. When the machine leaves the object at
a certain distance or the machine tilts at a certain angle, the light induction sensor can not receive
the signal, the UV lamp turns off, and the sterilization operation stops. Both sides of the light
induction sensor need to sense the signal of the object at the same time to start the UV lamp. If
any side of the light induction sensor does not sense the signal, the UV lamp will not start, which
can effectively avoid the damage of ultraviolet light to the human body.
Note: When not performing mite cleaning and sterilization operation, do not use hands or other
objects to cover the light induction sensor in order to avoid the abnormal opening of UV sterilizing
lamp to cause accidental injury to human beings or animals and plants.
UV lamp will be switched on once both light induction sensor sense the signal
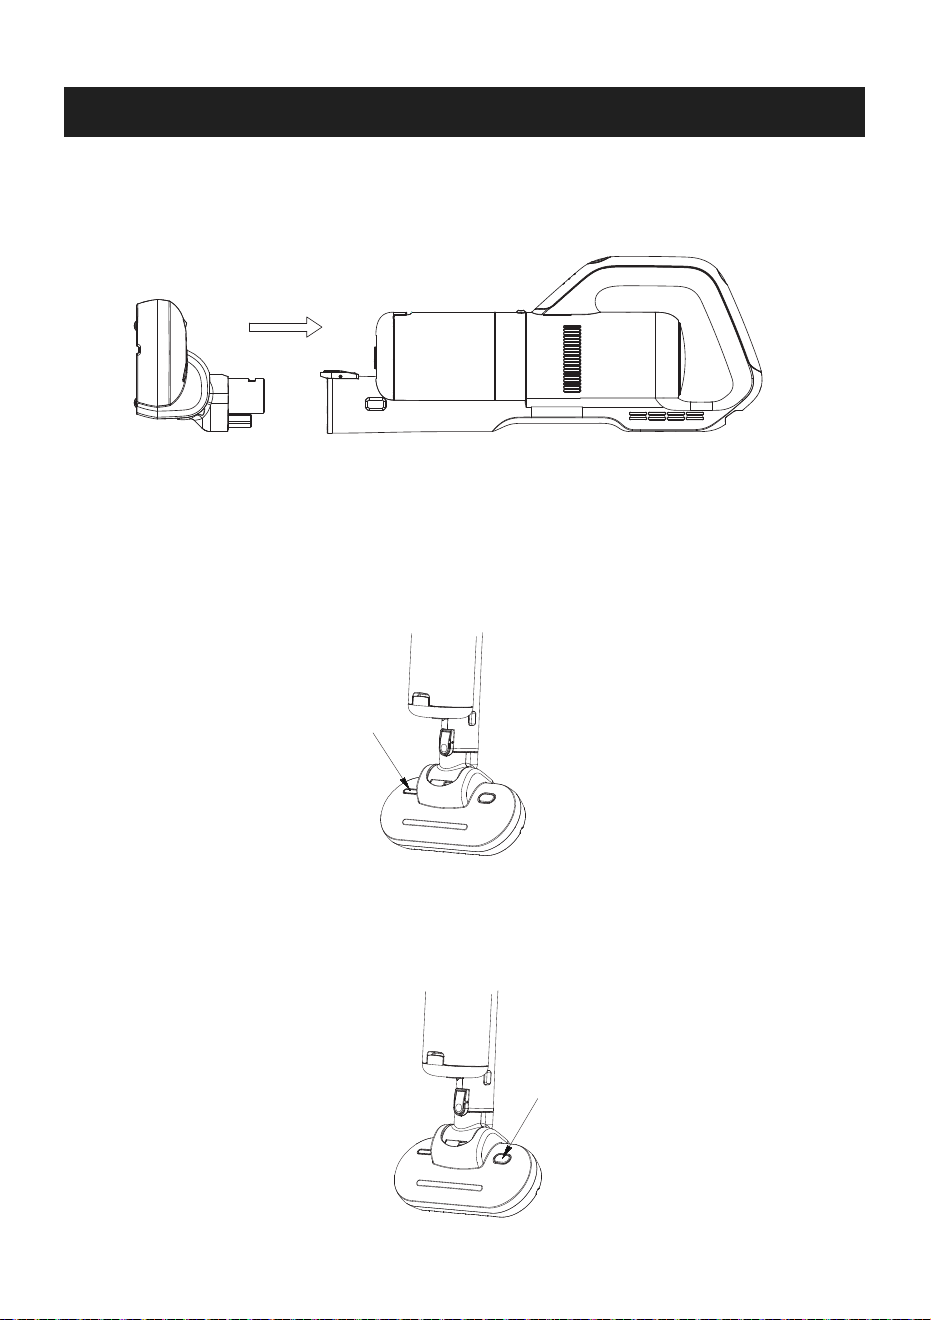
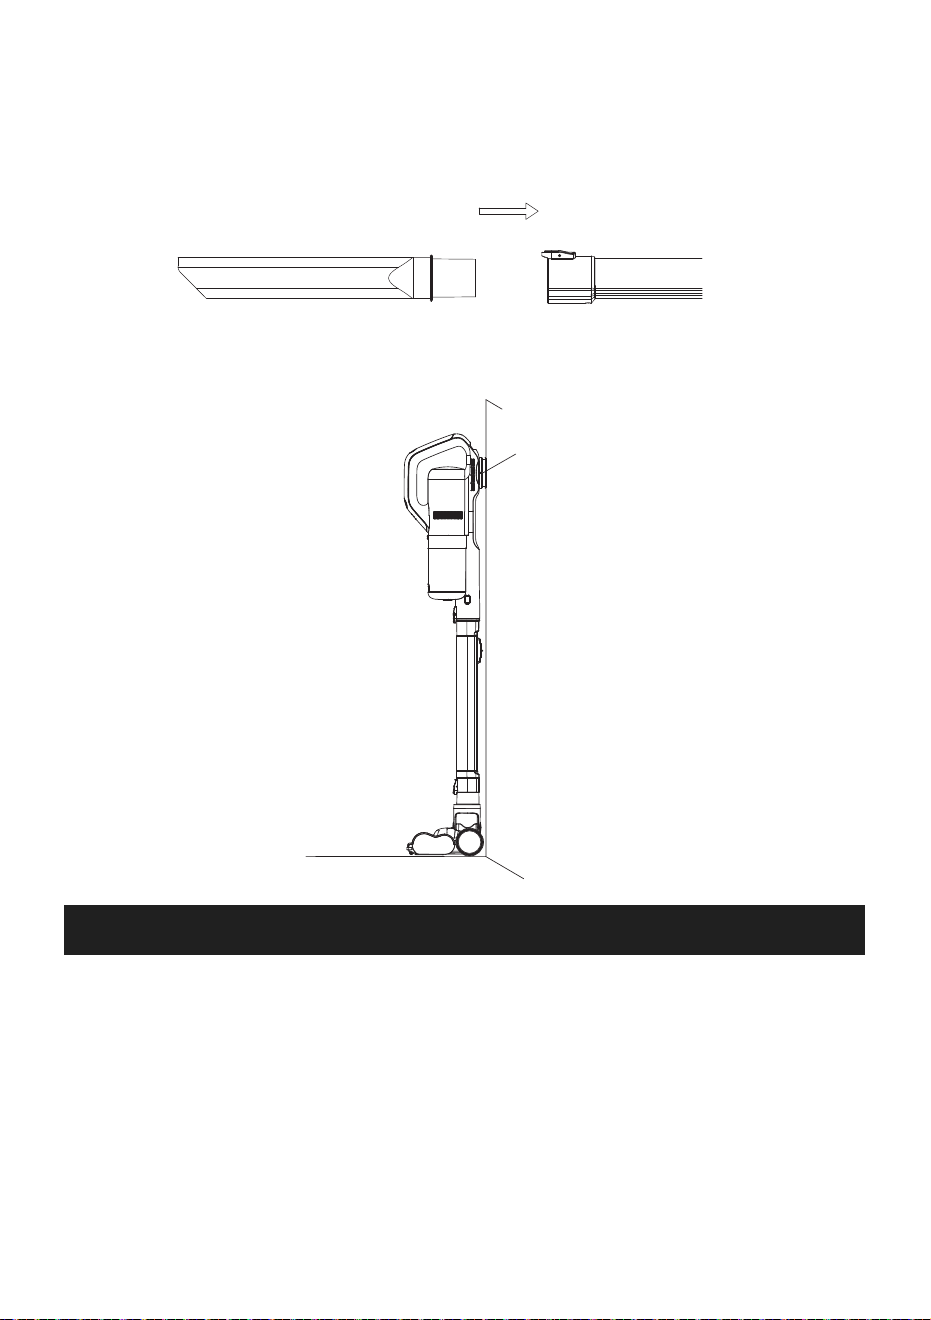
Instructions for Accessories
Please install the long crevice tool and the two-in-one brush on the main body as shown in the figure.
The sound of "click" indicates that the accessories are installed in place. Press the tube release
button of the main body when the accessories are needed to be removed.

CLEANING AND MAINTENANCE
09
When cleaning a distant place, the extension can be connected to the main body. Insert the accesso-
ries (long crevice tool and two-in-one brush)into one end of the extension tube, and hear the sound of
"click" indicating that the accessories are installed in place. Press the release button of the extension
tube when the accessories are needed to be removed.
Daily Storage
After using the machine, the machine should be placed in a cool and dry place. Please avoid direct
sunlight or storing in the humid environment. If it won't be used for a long time, the machine can be
packed in original bag and box and put in a cool and dry place.
Cleaning Machine
When the machine is turned off, the machine can be wiped with dry or semi-dry cotton cloth. Please
avoid the water flowing into the machine.
When installing the wall hanger, regulate the length of the appliance to make sure it will stick to the
ground when hung on the hanger as shown in the picture. Hang the appliance in the air may cause it
falling off and damaging to the appliance.

10
2. Hold the dust cup, open the clip of the bottom cover of the dust cup with hand, turn and open the
bottom cover of the dust cup, and pour out the dust and dirt inhaled in the dust cup.
3. When cleaning the superfine filter and stainless steel filter, take out the superfine filter cotton and
stainless steel filter frame in turn as shown in the figure. Separate the stainless steel filter and filter
cone counterclockwise as shown in the figure. Water can be used to wash the dust cup, stainless
steel filter and filter cone, and the machine can be used again when it is dry.
4. After removing the superfine filter, the dust can be lightly knocked down. Place the cotton under the
light, if the light transmits through the cotton, it indicates that the dust has been cleaned up. The
superfine filter cotton can be washed with water, but it can not be installed back until it is completely
dried.
5. After cleaning, install the dry dust cup and filter components in the dust cup in order, and fix the
dust cup on the main body. The machine can be used again for sweeping and mite cleaning.
Press the dust cup release button
Open the dust cup bottom lid clip.
Cleaning Dust Cup and Filter Components
1. Disassemble the dust cup: Press the dust cup release button on the cover of the dust cup, and
then remove the dust cup as shown in the figure.
TROUBLESHOOTING
11
PROBLEM POSSIBLE REASONS SOLUTIONS
Unable to start
The battery is run out
The temperature protection device
of the motor may be triggered
when the temperature is too high,
so the machine does not work
Internal line fault
Charge the battery
Cool the vacuum cleaner in the
ventilation area for 30 minutes
and then restart it
Contact customer service
Product has
abnormal sounds
Decreased
vacuum power
Dust blown out in
use
UV lamp does not
work
Vibration plate
does not work
Other faults
Dust cup is full, or air duct is
blocked.
Dust cup is full or filter is blocked
Filter device in dust cup is
damaged
The filter components are not
installed in place
The machine is not flattened or
two light induction sensors do not
simultaneously sense the signal.
UV lamp tube is broken
The vibrating motor malfunctions
Internal wiring or battery failure
Remove the dust cup and clean
up the garbage or clogs in it
Clean the dust cup and filter
components
(The cleaned filter components
should not be installed in the dust
cup before drying in order to
avoid damaging the motor)
Stop using immediately and
replace a new filter
Stop using immediately and install
the filter components in place
Place the machine on a flat object
to make both light induction
sensors sense the signal
Replace the UV lamp or contact
customer service
Contact customer service
Contact customer service
If you have a query about the APOSEN appliance, please contact the APOSEN customer service
email: [email protected]
SPECIFICATIONS
12
Model NO.
Name
Rated power
Voltage
Net weight
Dust cup capacity
Vacuum power
Runtime
H21S
Wireless Vacuum Cleaner
180W
DC 22.2V
2.4KG
0.5L
21Kpa at high speed gear/8Kpa at low
speed gear
Over 13 minutes at high speed gear/ 30
minutes at low speed gear

安全上のご注意
本製品をご使用になる前に、安全の為に記載されております以下の注意事項をよくお
読み下さい。
1.本製品をご使用になる前に、安全の為に本取扱説明書に記載された全ての注意事項をよくお読み頂き、
必ず守って下さい。
2.本取扱説明書を手元に保管するようにして下さい。本製品を他人に貸す際には、本取扱説明書も一緒
に送付するようにして下さい。
3.本取扱説明書に記載された注意事項に従わなく、正しくご使用頂けない場合には、不意の事故や故障
等 が 起こることが ありま す。
4.本取扱説明書に記載された通りにご使用しなく、不意の事故や故障等が起こる場合では、本社は一切
の責任を負うことしません。
使用場合について
1.本製品は水防止性能に備えませんので、水や液体等を吸い込まないで下さい。
2.本製品は家庭用の掃除機であり、業務用を意図したものではありませんので、使用目的にご注意下さい。
人身安全について
1.不意な人身事故を防ぐために、本製品をご使用になる前に、安全の為に本取扱説明書に記載された全
ての注意事項をよくお読み下さい。
2.本製品は、幼児やダニ除去の経験が不十分な方が使用するように設計されていませんので、保護者の
監督でない限り、使用させないようにして下さい。
3.本製品は運転中には、気をつけて操作するようにして下さい。
4.本製品に手をついて座ったり、立ち上がったり、衝撃を加えたりしないで下さい。
5.本製品を子供の手が届かない場所に保管するようにして下さい。
6.本製品を落下防止するために、高い所に置かないようにして下さい。
使用安全について
1.本製品は、幼児等の身体·知能·経験等が不十分な方が使用するように設計されていませんので、保護者
の監督でない限り、使用させないようにして下さい。
2.本製品は乾燥な環境のみご使用頂けますので、必ず濡れた所に使用しないようにご注意下さい。
3.液体、高温物(火が付いてる状態のタバコ、マッチ等)、可燃焼物(石膏、石灰、燃え残り等)、鋭利な物(ガ
ラス製品、クリップ、押しピン等)、危険物(可溶剤、腐食剤等)化学物(酸性物、洗剤等)、爆発物(ガスが
発生する物、アルコール製品等)を吸い込まないで下さい。
4.本製品の吸引口を髪の毛や綿繊維、指等から離れるようにして下さい。
5.本製品をご使用前に、掃除区域にあるプラスチックや大きな紙くず、鋭利物等を事前に片付けて下さい。
製品の吸引口が詰まる恐れがあります。
13

製品について
製品のメイン付属品
6.本製品を使用する際に、ファンモーターの温度が過熱になり、運転音に異常を感じる場合には、すぐご
使用を止めて下さい。
7.ダストボックスを定期的にお手入れすることがお勧めします。ダストボックスのゴミが多く溜まった場合
では、吸引力が低下になり、ファンモーターの温度が高くなり、製品の使用寿命に影響を与える恐れが
ありま す。
8.本製品をお手入れする際には、アルコールやベンゼン、可溶剤等の洗剤を使用しないで下さい、製品の
材質を破損する恐れがあります。
9.製品は故障があった場合には、ご自身で分解・修理をしないようにして下さい。ご購入頂いた販売店や
修理専門店にご連絡下さい。
14
本体
電源アダプタ
壁掛け隙間ノズル
延長パイプ
床ブラシ
2in1ブラシ
ダニ除去ブラシ
梱包中身
各部の名称
15
本体
延長パイプ
床ブラシ
ダニ除去ブラシ
壁掛け
電源アダプタ
取扱説明書
隙間ノズル
2in1ブラシ
1
1
1
1
1
1
1
1
1
電源スイッチ
電池残量表示ライト
ダストボックス
ハンドル
排気口
モード切替ボタン
充電接続口
ダストボックス
取り外しボタン
延長パイプ取り
外しボタン
UV表示ライト
振動ボタン
ローラー
感光センサー
小さいローラー
振動板
紫外線UVライト
感光センサー
吸引口
操作説明について
充電について
16
製品の性能を保つ為に、初回使用する前には、3時間以上を充電することがお勧めします。
電源プラグを本体の充電口に差し込んでから、電源アダプタをコンセントに差し込んで頂くと、充電が始ま
ります。
充電接続口
電源プラグ
ダストボックス 蓋
ダストボックス
金属製フィルターカバー
超微細型フィルタ−
延長パイプ
床ブラシ取り外しボタン
17
ご 注 意:
1.製品は充電している際には、電池残量表示ライトは緑色に点滅します。満充電の状態には、三つのライ
トは緑色に点灯します。満充電の状態になると、コンセントから電源アダプタを引き抜いて下さい。
2.製品は充電している際には、電源スイッチが自動的にロックされ、押しても起動できません。電源アダプ
タをコンセントから引き抜いてから、電源スイッチを押すと、製品は再び起動します。
3.製品は充電している際には、電池残量表示ライトは電池残量に伴って点滅変化します。図のように、1,2,3
段階があります。1段階のライトが点滅すると、電池残量がまもなく無くなるので、充電する必要がありま
す。暫く充電すると、1段階のライトが点灯になり、2段階のライトが点滅にます。それから、1.2段階のライ
トが点灯になり、3段階のライトが点滅します。満充電の状態は、三つの表示ライトは全部点灯です。
清掃機能の使用説明
各部の組み立て
床ブラシの接続:床ブラシを延長パイプの接続口に差し込み、「カチャ」と音がする、もう一方の延長パイプ
を本体に差し込みます。「カチャ」と音がすると、正しく取り付けられました。(下図のように)
1
2
3
18
1.電源スイッチを押し、電池残量表示ライトは緑色に点灯し、掃除機は運転開始します。電源スイッチをも
う一度押し、掃除機は運転中止します。
2.モード切替ボタンを押し、ローモードからハイモードに移行します。掃除機の運転音が大きくなり、吸引
力も増加します。もう一度押すと、ローモードに戻します。本製品はハイモード状態での稼働時間は20
分以上となり、ローモード状態での稼働時間は30分以上となります。
3.掃除機は運転中に、三つの電池残量表示ライトは点灯すると、満充電の意味と示します、電池残量は運
転に伴って減って行くますので、一つの表示ライトのみ点滅する際には、まもなく電池残量が無くなるの
で、充電して下さい。
電源スイッチを押し、掃除機は運転開始します。
電池残量表示ライトは緑色に点灯します。
モード切替ボタンを押し、ロー
モードやハイモードから選び
頂けます。
ダニ除去性能の説明
19
1.図のように、ダニ除去ブラシを本体の接続口に差し込み、「カチャ」と音がすると、正しく取り付けられまし
た。
2.ダニ除去ブラシを布団等掃除目標地に平らに置き、電源スイッチを押し、掃除機はダニ除去の運転が始
まります。掃除機は正常運転の状態では、UVライトは点灯になり、ダニ除去ブラシは掃除機目標地から
接触していませんの時には、人身事故を防ぐため、UVライトは自動的に消えます。
3.振動ボタンを押し、ダニ除去ブラシの底部にある振動板が振動します、強力な振動頻度で、布団等に隠
れているダニを打出できて、より良い清掃効果を求めます。
UV表示ライト
振動ボタン

20
4.紫外線UVライトは二つの感光センサーによる起動することがコントロールできます。ダニブラシは掃除
機目標地と接触したら、感光センサーが感じられ、UVライトは点灯になり、強力に除菌します。UVライト
は安全感光センサー付きで、掃除機目標地から離れると、UVライトが自動的に消える安全機能付きで
す 。
ご 注 意:ダニ除去作業しない場合には、UVライトが異常起動を防ぐ為に、手や他の物で感光ライトを隠れ
ないようにして下さい。
左右側の感光センサーが同時に接触の信号を受けた上で、UVライトは点灯になります。
各付属品の使用説明
隙間ノズルや2in1ブラシ等をお使いたい場合には、図のように、本体に取り付け、「カチャ」と音がすると、
正しく取り付けられました。付属品を取り外し対時 に、取り外しボタンを押して下さい。
お手入れ
21
腰を屈めても手が届かない所の掃除では、掃除機の長を伸ばすように、各付属品を本体に取り付けてご
使用下さい。「カチャ」と音がすると、正しく取り付けられました。付属品を取り外し対時に、取り外しボタン
を押して下さい。
日常の保管
使用完了後には、本製品を乾燥な所に置いて保管するようにして下さい。直射日光や濡れた環境で保管し
ないようにご注意下さい。長時間ご使用しない場合には、付着されたダンボールに入れて再びパッケージ
して、乾燥な所に置いて保管するようにして下さい。
掃除機のお手入れ
電源を切った場合に、乾燥の綺麗な雑巾で掃除機全体を拭くようにして下さい。
図のように、壁掛けを壁に固定する前に、製品の長さと合わせて調整するようにして下さい。製品を収納す
る際には、床面に接触しないと、落ちる恐れがあります。製品を落下防止するため、床面に接触できるよう
な所で壁掛けを壁に固定して下さい。
22
2.ダストボックスを手持ちにして、ダストボックスのロック部を開きます、ゴミ等を捨てます。
3.金属製フィルターカバーとHEPAフィルターをお手入れする際には、図のように、、まず、順番に超微細型
フィルターと金属製フィルターカバーを取り外します。図のように、反時計回りして金属製フィルターカ
バーとHEPAフィルターを分けます。金属製フィルターカバーとHEPAフィルターを水で洗うことができま
すが、完全乾燥した状態のみ元に取り付けられます、ご注意下さい。
4.超微細型フィルターを取り外した際には、ゴミ等が落ちるまで手で軽く叩いて下さい。水で洗うことがで
きますが、完全乾燥した状態のみ元に取り付けられます、ご注意下さい。
5.お手入れ完了後には、乾燥したフィルター付属品を元の手順でダストボックスに取り付け、ダストボック
スを本体に取り付けます。取り付け完成後に、掃除機で掃除やダニ除去することが再開できます。
ダストボックス の 取り外しボタンを押 す
ダストボックスのロック部を開きます
ダストボックスやフィルターのお手入れ
1.ダストボックスを取り外す時:ダストボックスの取り外しボタンを押し、図のように取り外します。
23
FAQ
故障現象 可能な原因 解決方法
掃除機は起動しま
せん
電池残量は無くなりました。
ファンモーターに過熱保護装置が
設計されておりますので、温度が高
まると、掃除機が起動しません。
電線電路に故障があります。
掃除機を充電します。
掃除機を30冷却させてから再び起
動してみます。
ご購入頂いた販売店や修理専門店
にご連絡下さい。
運転音に異常があ
ります
吸引力が低下にな
りました
使用中に、埃等が
出てきます
UVライトは運転し
ません
振動板は運転しま
せん
ほかの故障
ダストボックスのゴミ等がいっぱい
になりました。あるいは、吸引接続
口に絡まり付きました。
ダストボックスのゴミ等がいっぱい
になりました。あるいは、フィルター
付属品が詰まりました。
フィルターが破損しました。
フィルターが正しく取り付けられま
せんでした。
ダニ除去ブラシは平らに置いてま
せんので、感光センサーは信号を
受けられません
UVライトは破損しました。
振動板は破損しました
電線電路、又は、バッテリーが故障
があります
ダストボックス のゴミを 捨てて、
お手入れします。
フィルター付属品をお手入れしま
す。(水で洗ったフィルターを必ず
乾 燥 させ てからダストボックス に 取
り付けて下さい。)
ご使用を止め、新しいフィルターを
交換します。
フィルターを改めて取り付けます。
感光センサーは信号を受けれるよ
うに、ダニ除去ブラシは平らに置い
て下さい。
新しいUVライトを交換します。又は
、ご購入頂いた販売店や修理専門
店にご連絡下さい。
ご購入頂いた販売店や修理専門店
にご連絡下さい。
ご購入頂いた販売店や修理専門店
にご連絡下さい。
メールアドレス:
APOSEN製品に関するご質問がございましたら、LINEの友達追加で下記のQRコードをスキャンして頂くか、
下記アドレスのAPOSENカスタマーサービスまで電子メールをお送り下さい。
24
仕様
型番
名称
消費電力
定額電圧
重量
集塵容量
吸引力
稼働時間
H21s
コードレス掃除機
180W
DC22.2V
2.4KG
0.5L
ハイモードは21Kpa/ローモードは8Kpa
ハイモードは13分以上/ローモードは30分以上