VERTUO
LATTISSIMA

INSTALLATION
1. Machine overview 3
2. Packaging content 7
3. Connectivity 7
4. Water hardness seing 8
5. Open/close 10
6. Disassembling the milk carafe 10
7. Assembling the milk carafe 11
8. Cleaning the milk carafe 12
9. First use 13
USE
10. Coee Preparation 15
11. Milk Preparation & Daily rinsing 17
12. Milk recipes 22
SETTINGS
13. Energy saving 25
14. Seing the coee volume 26
15. Reset to factory seings 26
16. Turn on/o Bluetooth & Wi-Fi 27
MAINTENANCE
17. Emptying the system before a period of non-use 28
18. Aer a long period of non-use 30
19. Cleaning cycle 32
20. Descaling 35
21. Troubleshooting 38
TECHNICAL SPECIFICATIONS
22. Specifications 41
23. Disposal and environmental protection 41
2
1
1
3
9
10
5
6
8
4
7
11
1
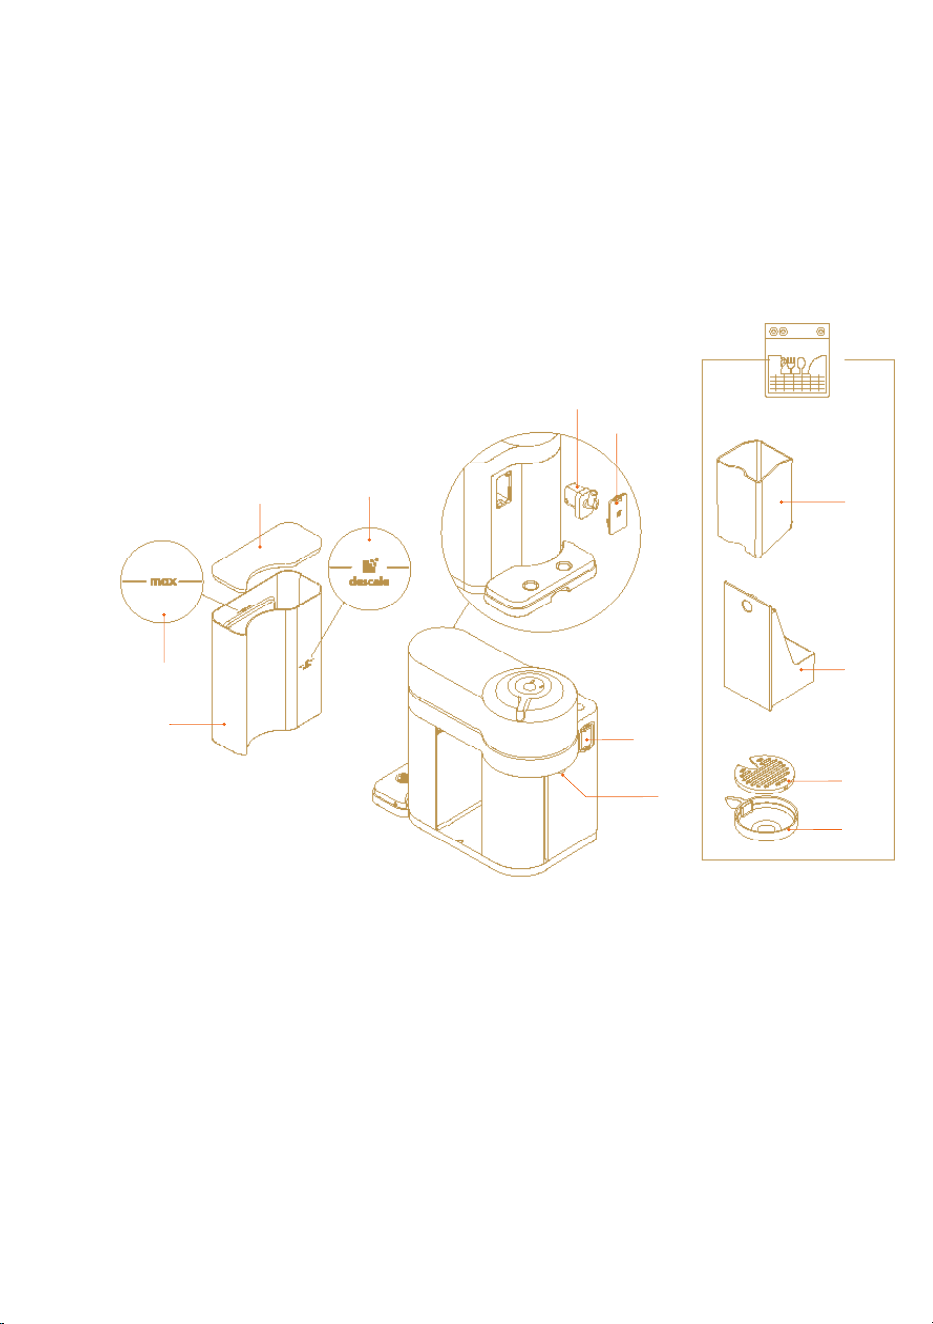
OVERVIEW
1 Water tank and lid
2 Descale mark
3 Maximum level mark
4 Milk carafe connector door
5 Coee outlet
6 Descaling pipe
7 Descaling pipe cover
8 Used capsule container
9 Drip tray
10 Drip grid
11 Adjustable cup support
Overview of machine

4
12
14
15
16
18
17
13
12 Coee buon - ON/OFF
13 Locking / Unlocking lever
14 Descale alert
15 Rinse alert
16 Hot foam buon
17 Lae macchiato buon
18 Cappuccino buon
Refer to “Descaling”
section
See recipes on page 23
Refer to “Milk
preparation” section
Unboxing: some dust may be present on the surface of the machine due
to the recycled materials used in the packaging. This is not dangerous,
simply clean with a so clean damp cloth.
Overview of display
5 6
25
26
21
29
19
22
27 28
23
20
24
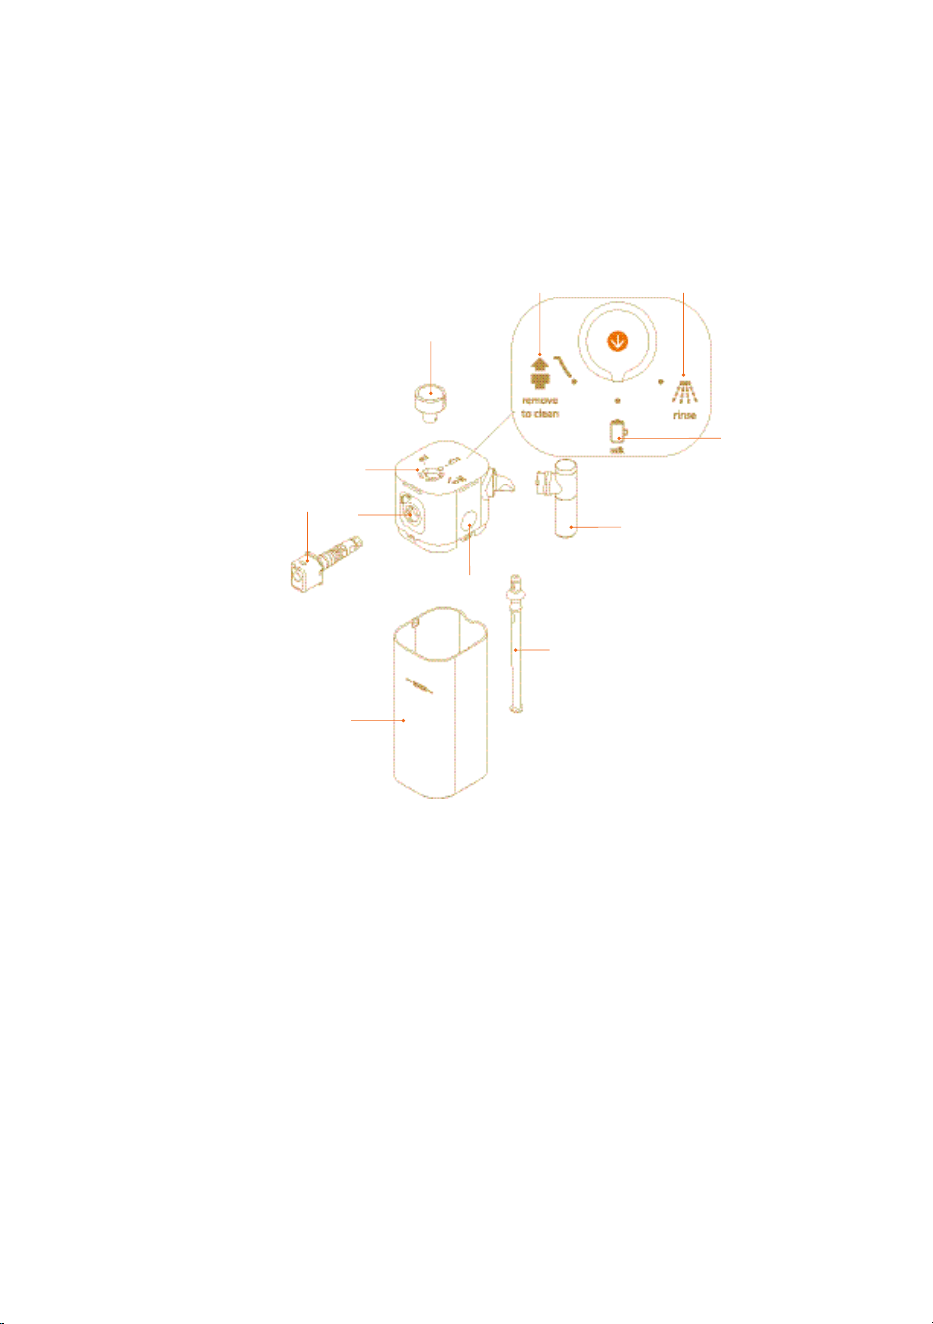
19 Milk carafe
20 Milk carafe lid
21 Milk spout
22 Milk action knob
23 Milk carafe connector
24 Connector housing
25 Milk aspiration tube
26 Lid removal buon
27 Remove to clean position
28 Rinsing position
29 Milk recipe position
Overview of milk carafe

5 6
HELP
www.nespresso.com/help
SAFETY
CAUTION: Before operating your coee machine, please refer to the
safety instructions leaflet to avoid possible harm and damage.
THANK YOU FOR CHOOSING
NESPRESSO.
FOLLOW THESE INSTRUCTIONS OR GO ONLINE FOR THE FULL
USER MANUAL AT WWW.NESPRESSO.COM/HELP .

7
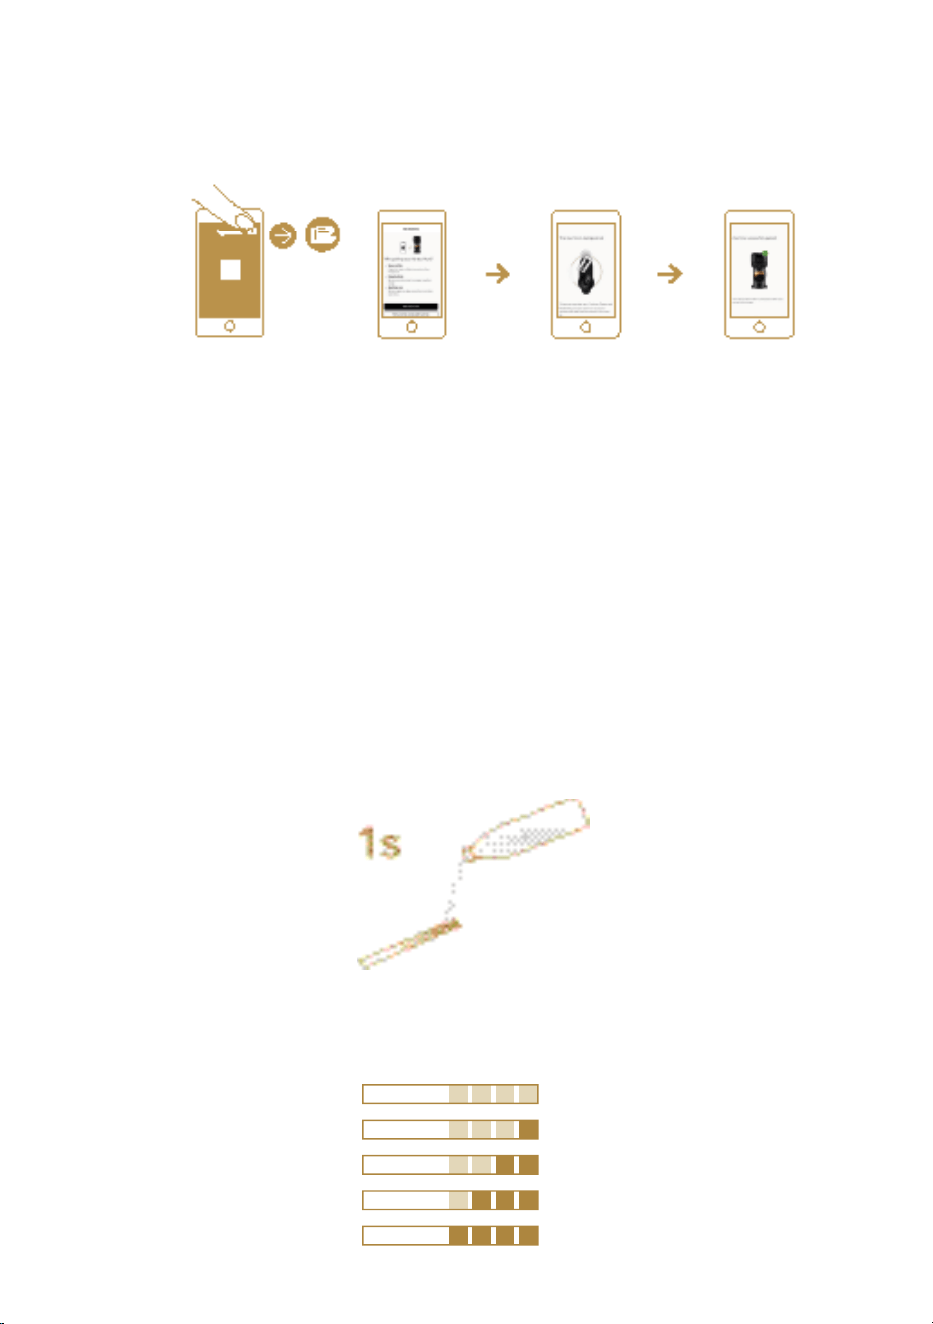
1. Download the Nespresso App.
2. Launch the App on your smartphone or tablet.
3. Click on the Machine icon.
4. Follow the instructions via the App.
3
2
Connectivity
BENEFITS OF CONNECTING YOUR MACHINE
Smart Coee: Enjoy the latest coee innovations from Nespresso by always
keeping your machine up to date.
Expert advices: Receive real-time tips thanks to step-by-step features such
as descaling, rinsing & cleaning your machine.
Machine care: Get support and tutorials for your machine care via your
smartphone.
How to connect your machine:
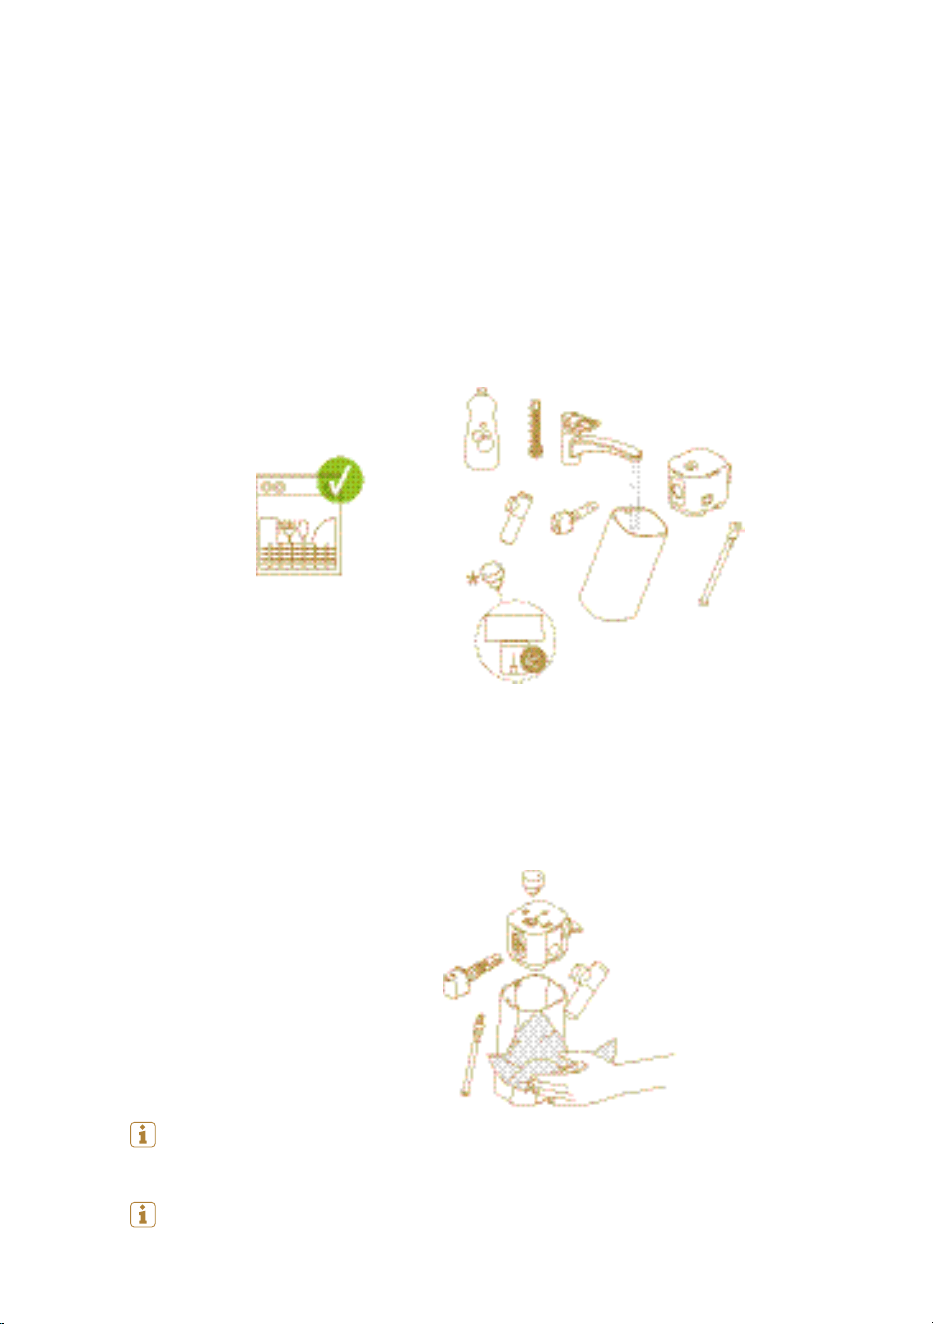
Package content
1. Coee machine
2. Nespresso welcome material
3. Nespresso capsules box
4. Safety instructions
5. Quick start guide + Water hardness test strip
6. Warranty
Smart
coee
Expert
advice
Machine
care
* AppStore
®
is a trademark of Apple Inc., registered in the U.S. and oth-
er countries.
** Google Play and the Google Play logo are trademarks of Google LLC.
8
4
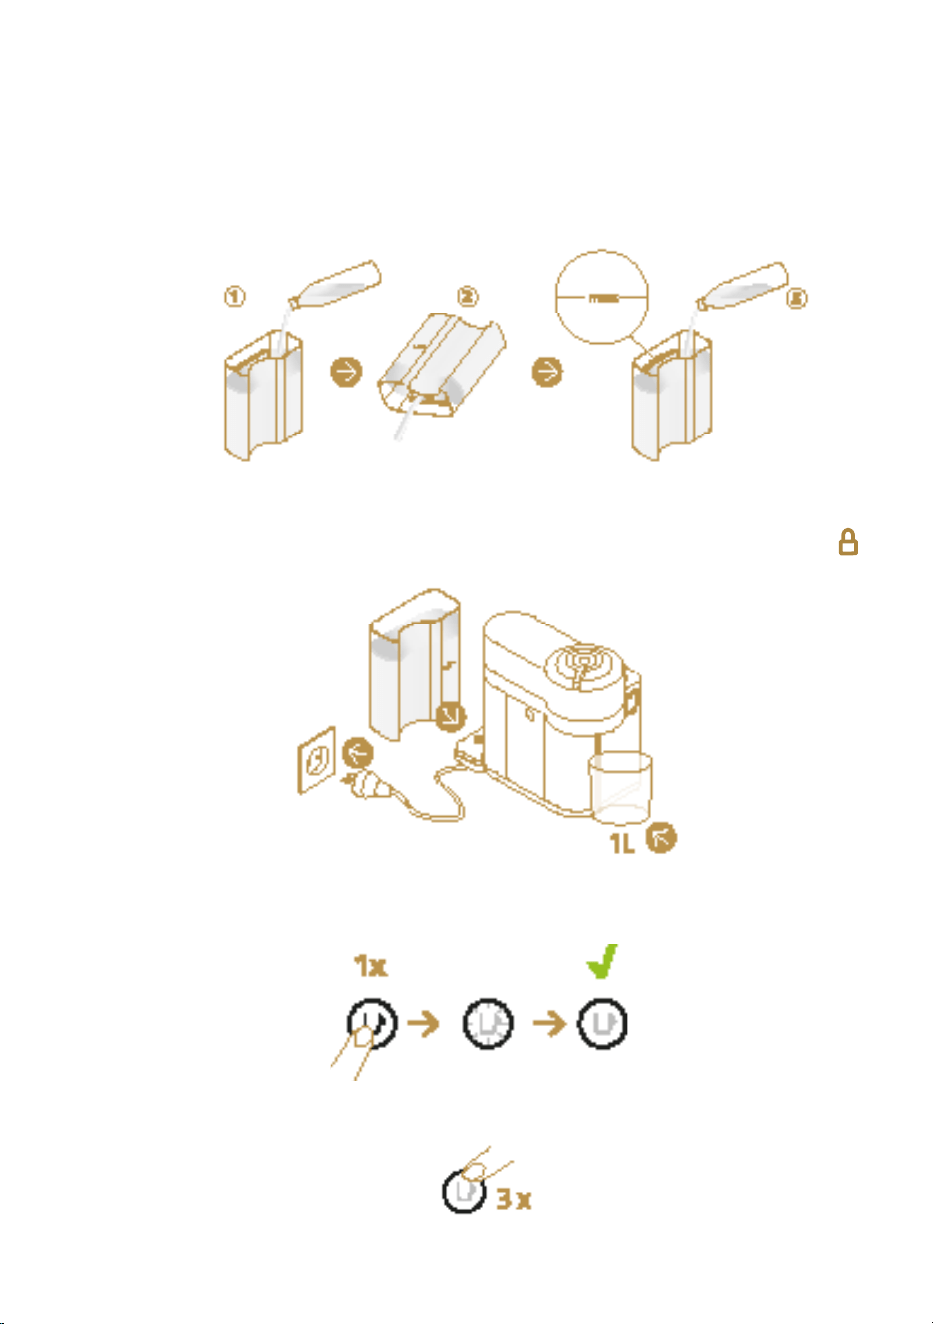
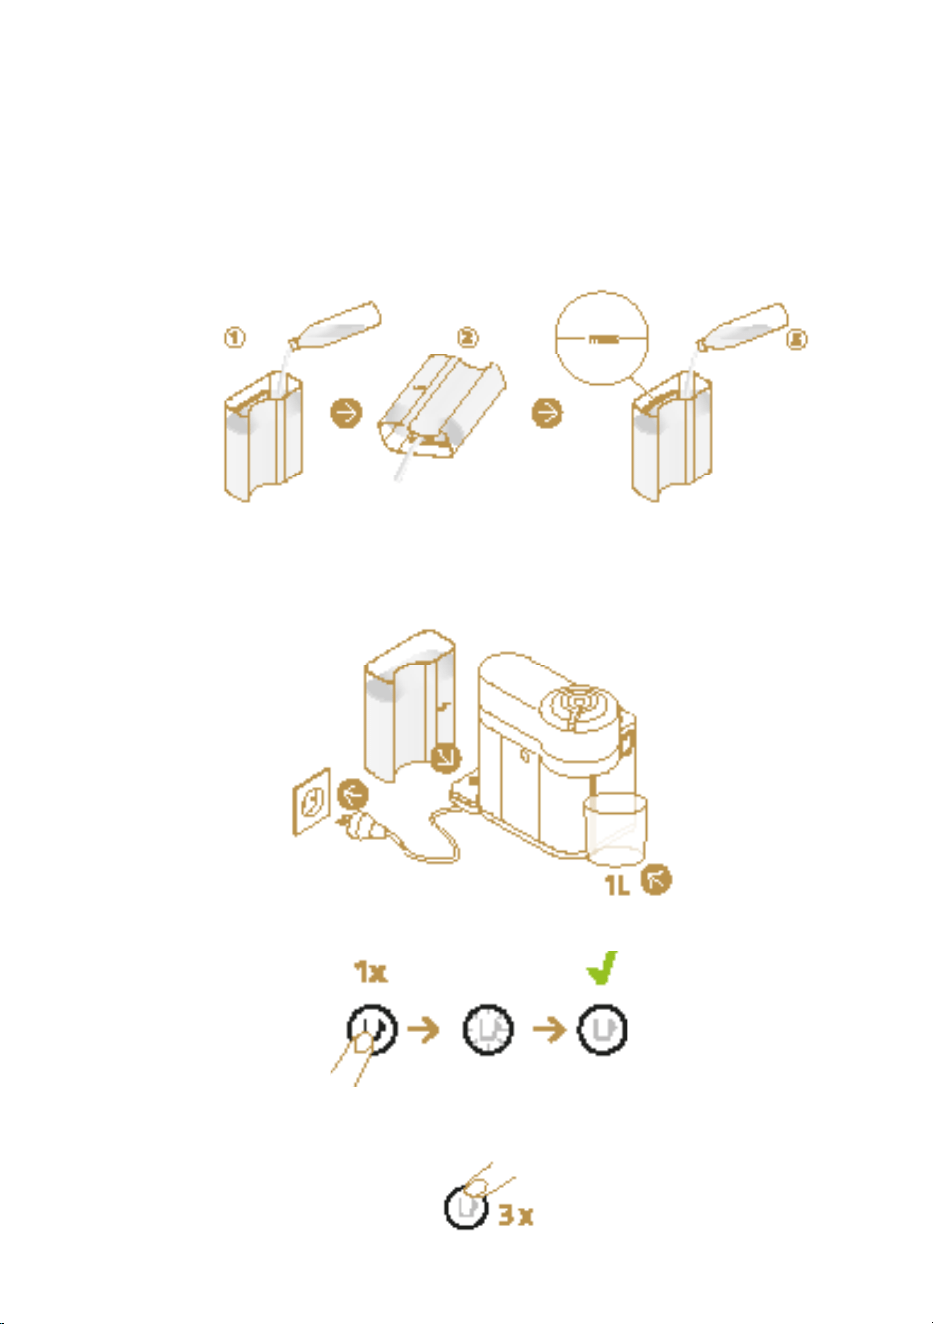
1. Take the water hardness test strip in the quick start guide and place it un-
der water for 1 second. Wait about one minute before reading test result.
2. The number of red squares indicates the water hardness level.
1.
0
1.
1
1. 2
1. 3
1.
4
3.
Water hardness seing
9
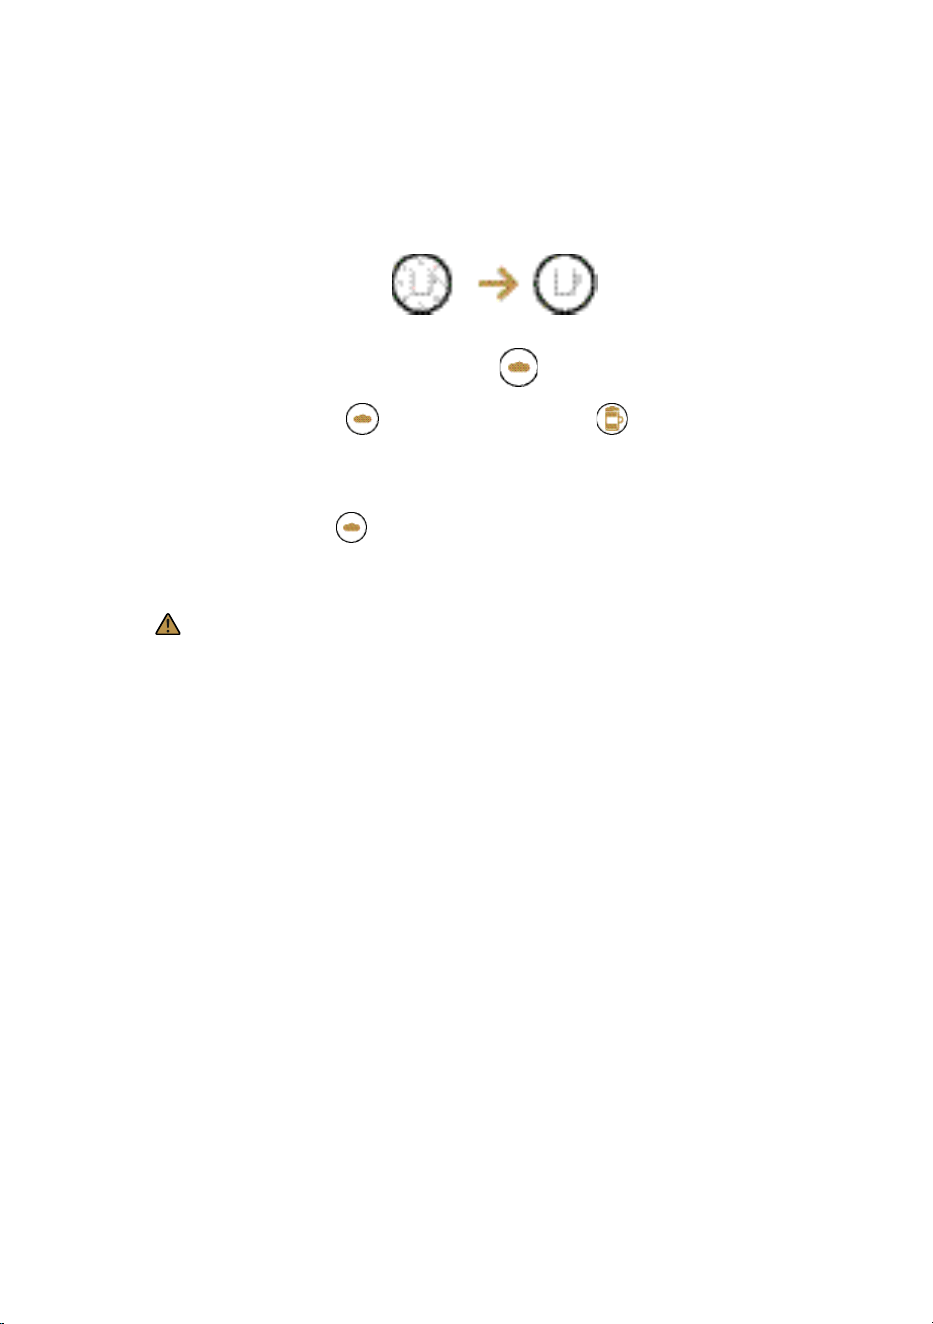
10. The buons blink three times rapidly to confirm new seing.
11. The machine is now reprogrammed with the new water hardness seing
and turns automatically in ready mode.
3. Plug the power cord.
4. Make sure that no accessory (milk carafe or descaling pipe) is connected
to the milk carafe connector door.
5. Turn the machine on.
NOTE: Programming the machine according to the actual hardness of the
local water supply warrants its lifetime and it needs to be descaled less oen.
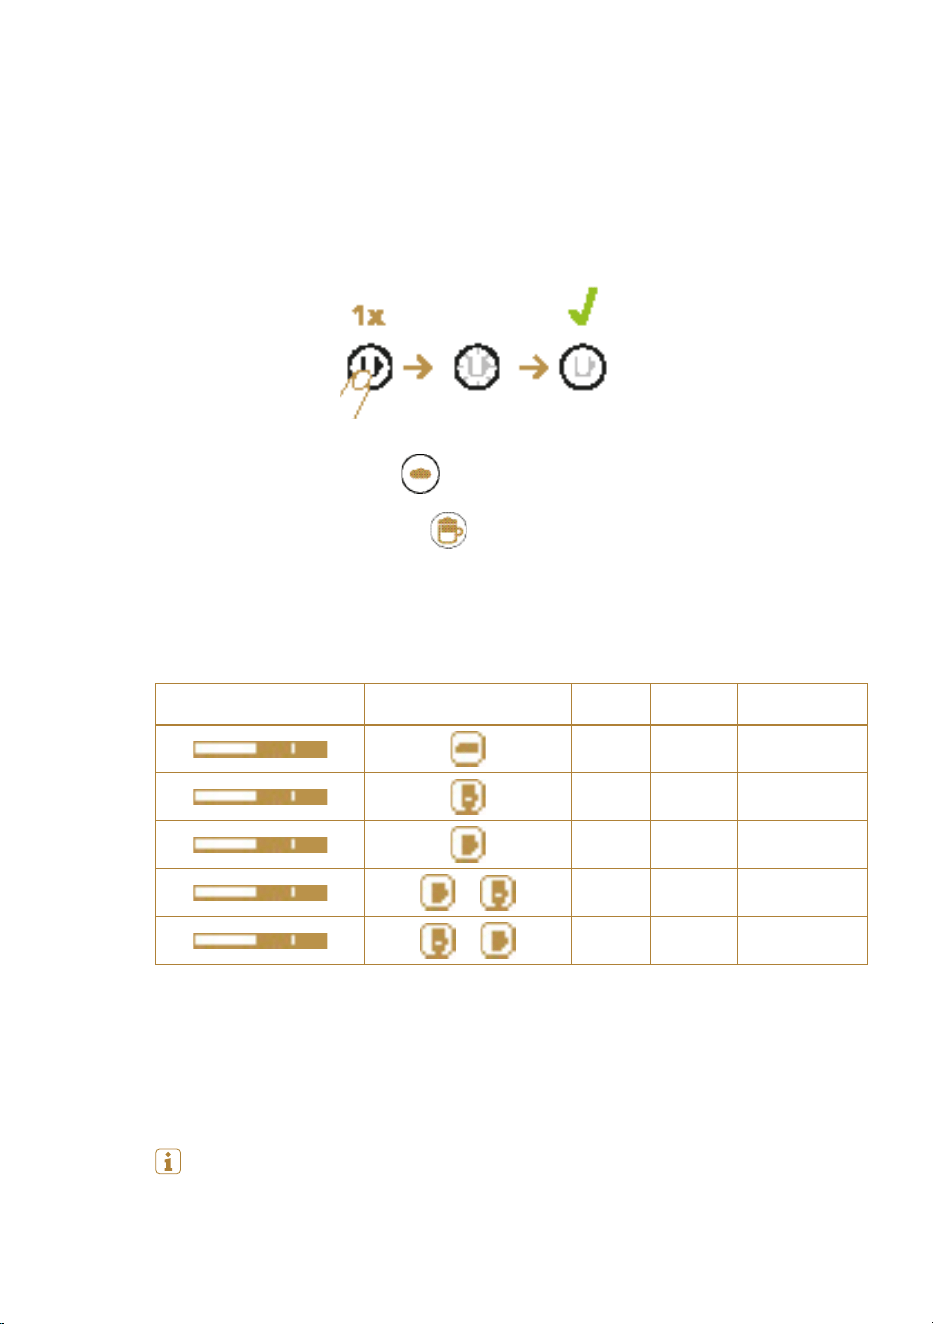
6. Press hot foam buon for three seconds to enter the menu mode.
7. Clean and descale alerts blink together.
8. Press cappuccino buon , the system proposes one out of the five
combinations. If the selection is not done within 15 sec., it exits automat-
ically.
9. Set the hardness level by pressing the corresponding buon in below ta-
ble (within 15 seconds).
Water hardness Buon to press fH dH CaCO3
< 5 < 3 < 50mg/l
> 7 > 4 > 70mg/l
> 13 > 7 > 130mg/l
+
> 25 > 14 > 250mg/l
+
> 38 > 21 > 380mg/l
10
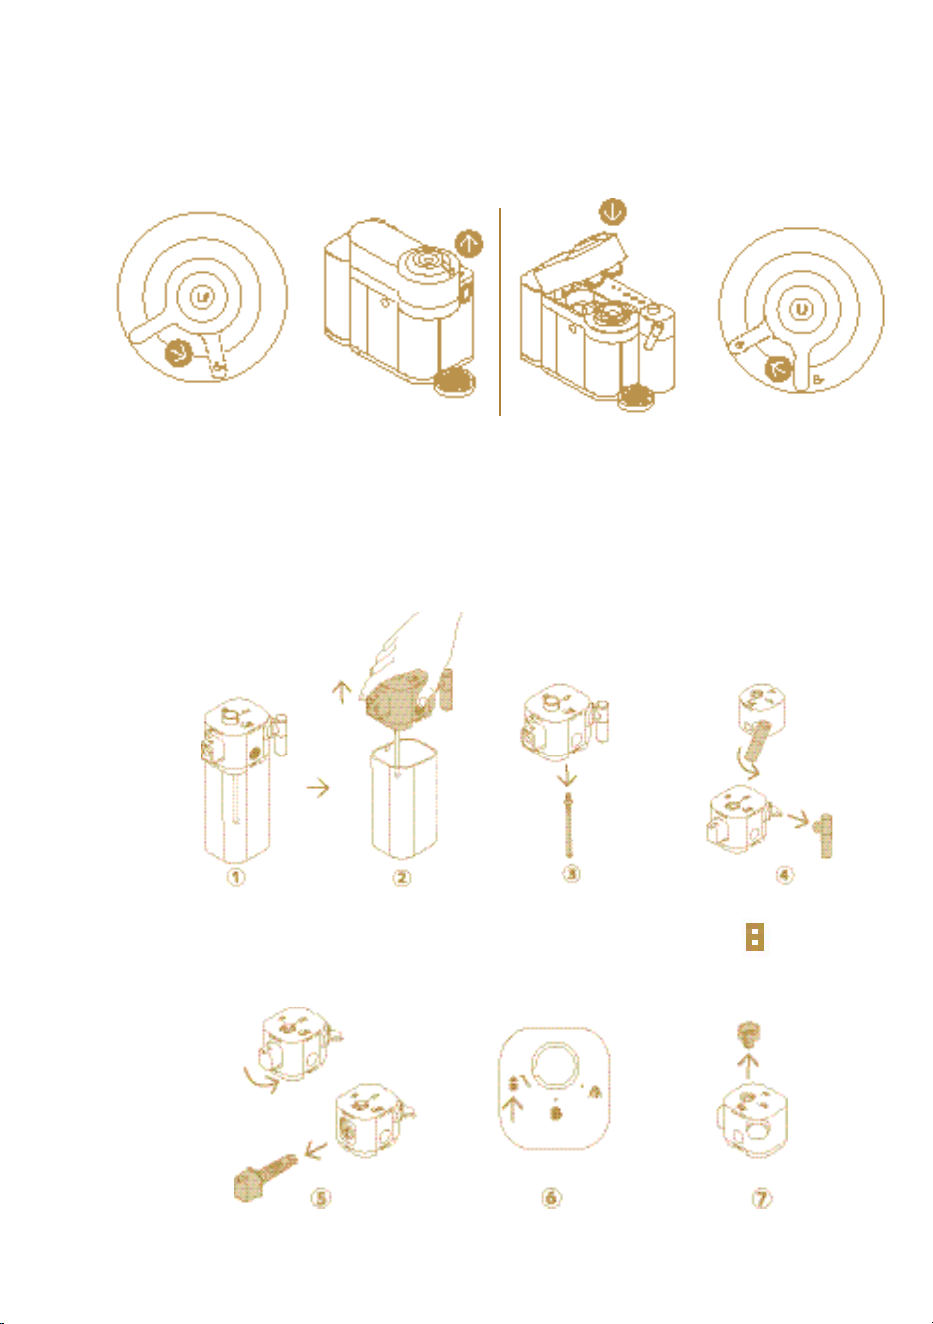
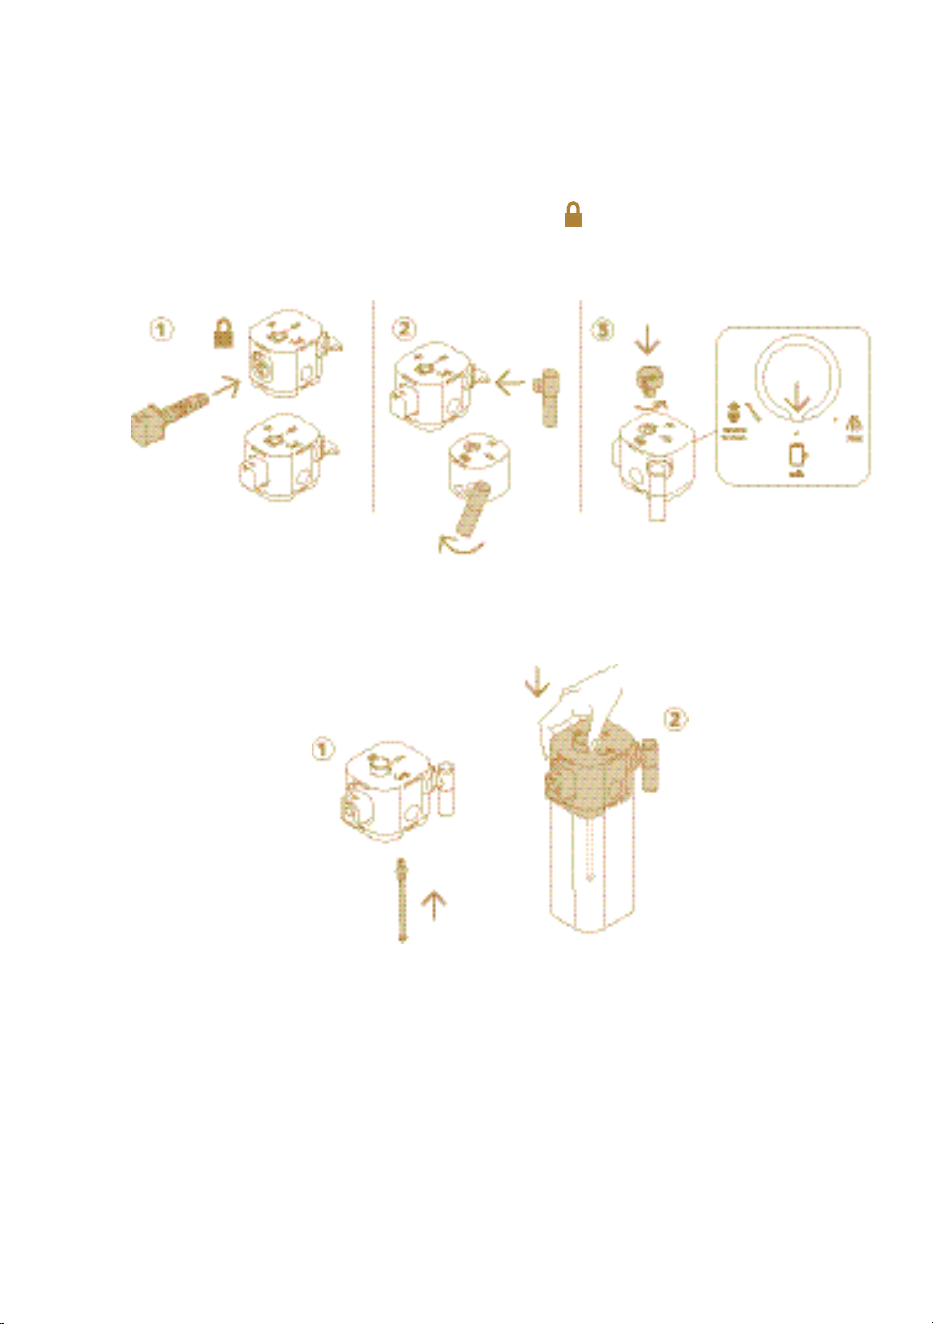
1. Press lid buon to remove the lid from the milk carafe. Disconnect the
aspiration tube. Turn the milk spout counter clockwise and pull it o.
2. Turn the milk carafe connector towards the unlock position and pull it
out. Turn the knob to “remove to clean” position and pull it out.
5
Open/close
6
Disassembling the milk carafe
11
1. Insert correctly the milk carafe connector into the milk carafe lid and turn
it clockwise towards the lock position . Insert the milk spout. Insert
the knob and turn it to the “milk” position.
7
Assembling the milk carafe
2. Insert the aspiration tube until its circular lip touches the boom of the
carafe lid. Plug the milk carafe lid to the milk carafe.
12
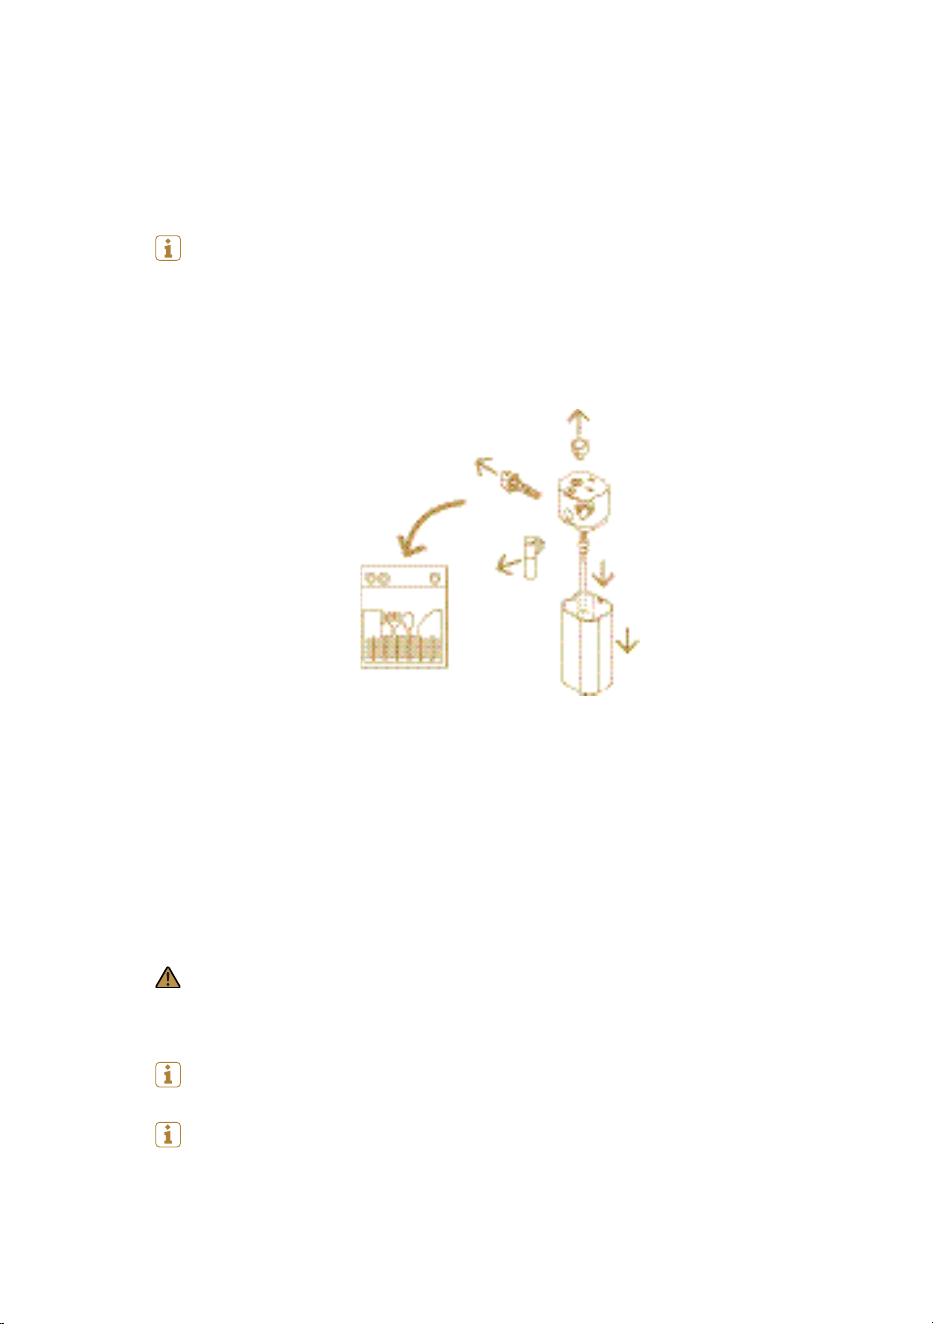
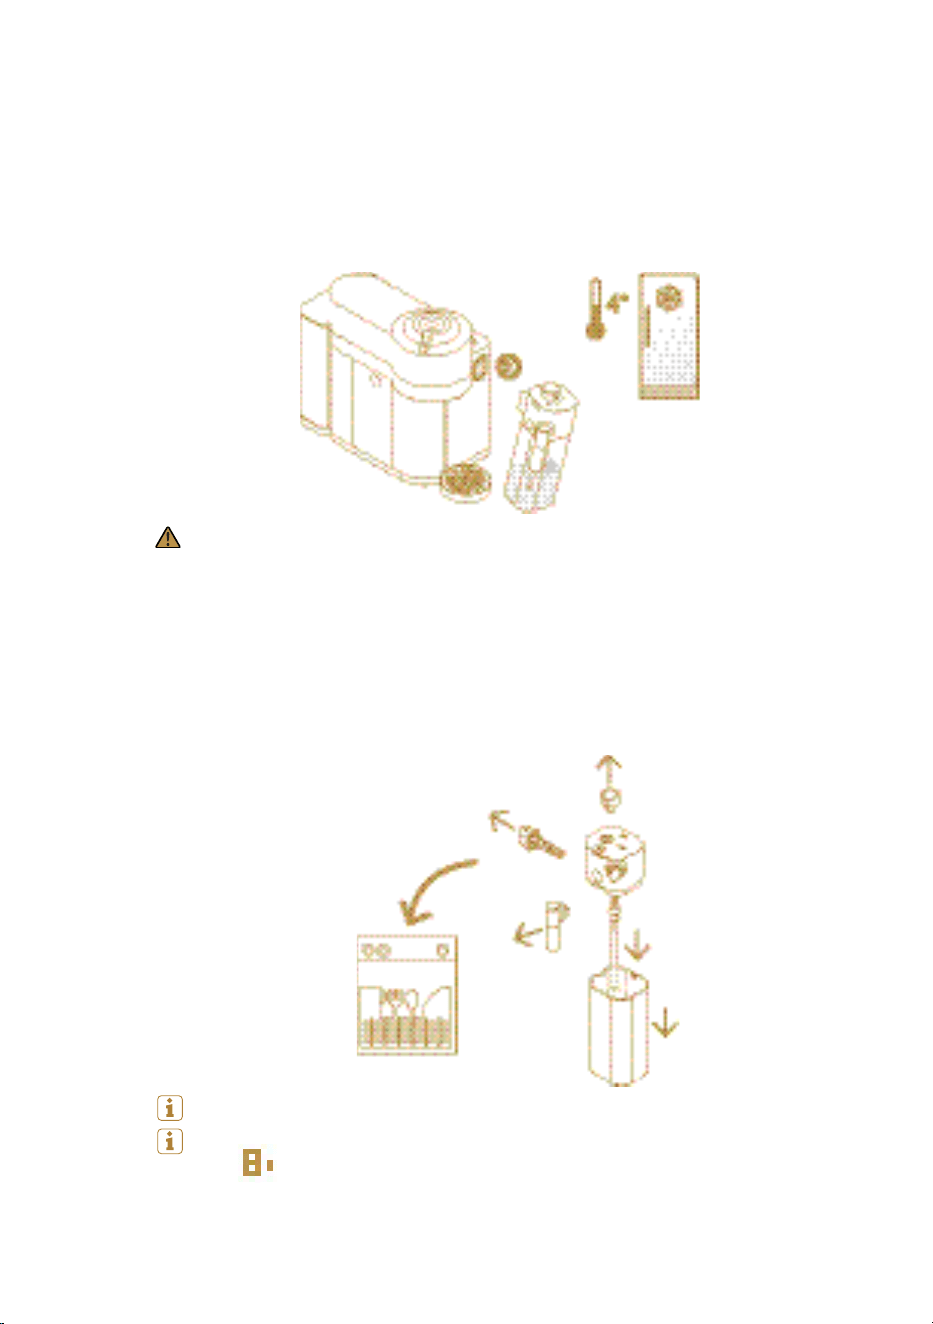
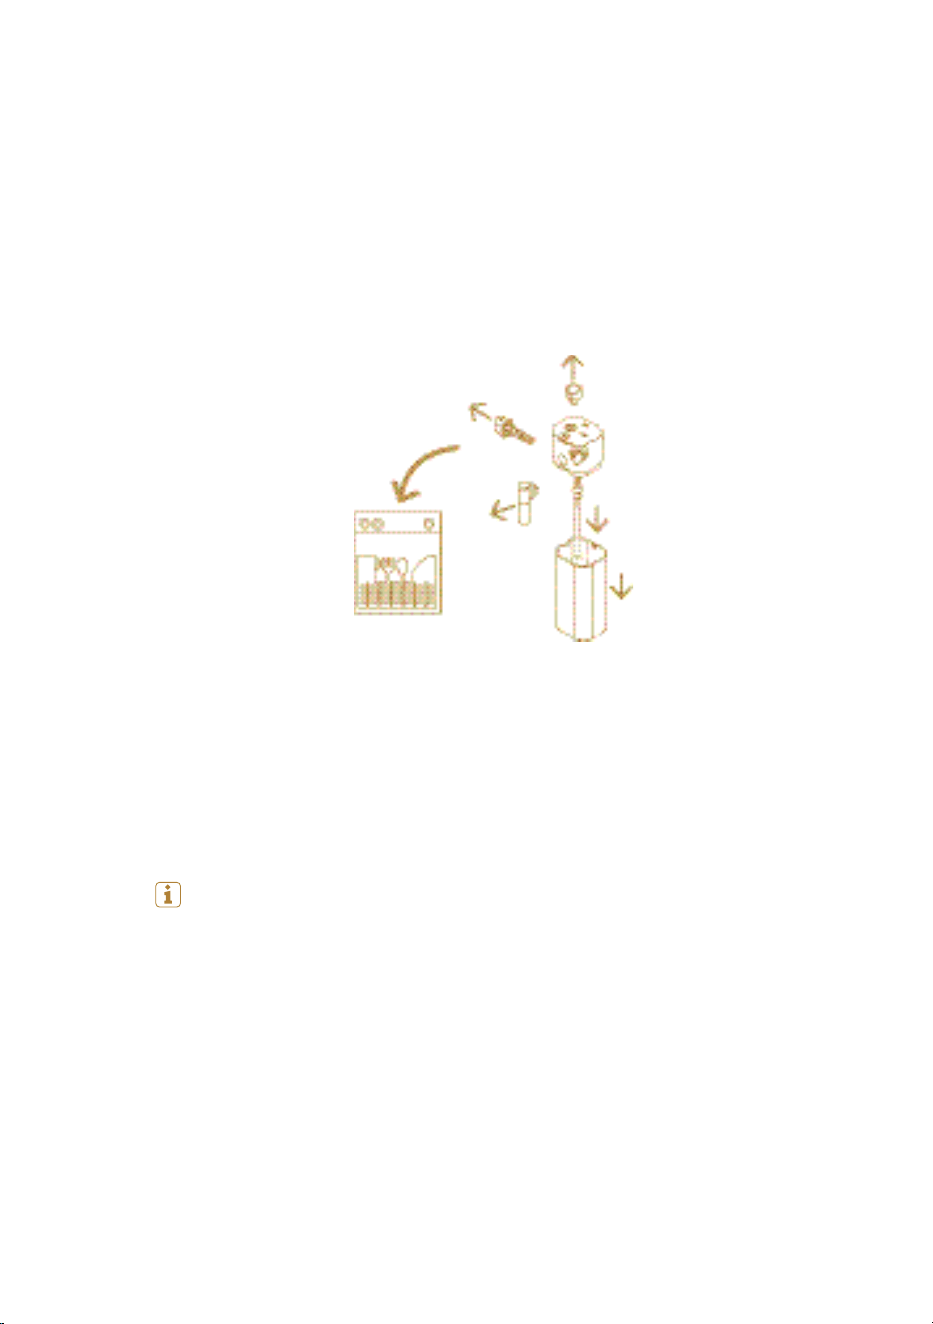
1. Disassemble the milk carafe. Refer to section “Disassembling the milk ca-
rafe”.
2. If a dishwasher is available: place all milk carafe components in the upper
part of your dishwasher.
If a dishwasher is not available: soak all components in hot potable water
(50°C / 122°F) together with a mild detergent for at least 30 minutes; then
rinse thoroughly with hot potable water (50°C / 122°F). Do not use scented
detergents.
8
Cleaning the milk carafe
The procedure must be performed aer each use. Dishwashing is recom-
mended. When a dishwasher is not available, the milk carafe components can
be washed by hand.
3. Clean the interior of the milk carafe, the milk spout and the knob with a mild
detergent and rinse with hot potable water.
* Make sure the Air inlet is clean, this will ensure beverage quality cup aer
cup.
Do not use abrasive material that might damage the surface of the equipment.
4. Dry all six components with a clean cloth and reassemble. Refer to section
“Assembling the milk carafe”.
Aer cleaning the milk carafe , if you still have issues with your milk frothing
performance, please proceed with a second rinsing cycle by turning the knob
to the rinsing position.
9
or
13
9
First use
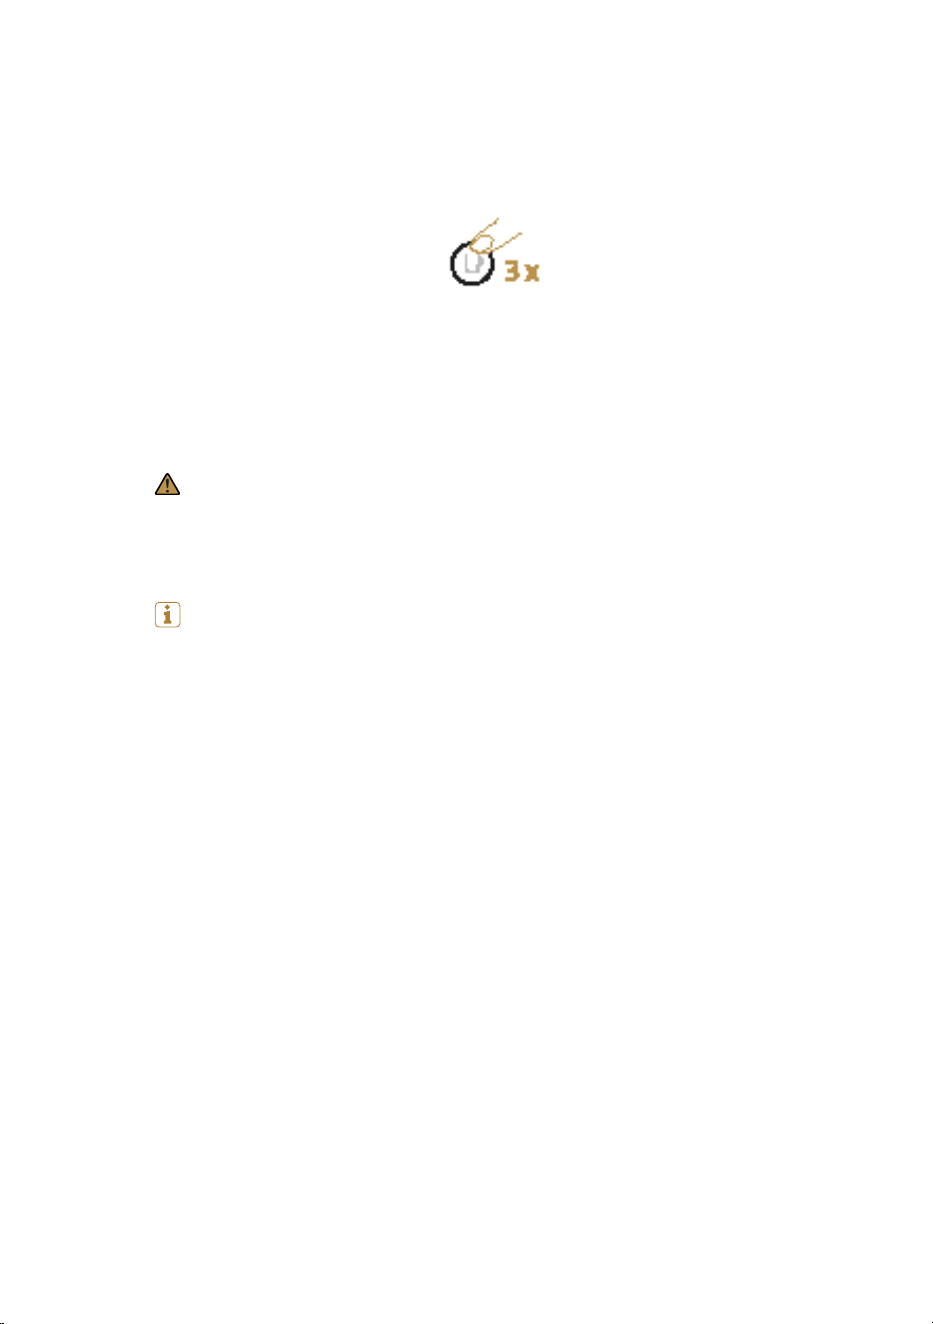
4. Press the coee buon three times within 2 seconds.
1. Rinse the water tank before filling with only fresh potable water up to the
maximum level.
2. Put the water tank back in position. Plug the power cord and place a con-
tainer under the coee outlet. Ensure the lever is in the lock position .
3. Turn on your machine.
14
7. Then reassemble all six dried components and re-aach the milk carafe
to the machine (refer to "Assembling / Disassembling the milk carafe"
section).
8. Your machine is now ready to use.
5. The machine will start rinsing. The cleaning procedure will run automati-
cally for 5 minutes.
NOTE: water may accumulate inside the machine’s head during cleaning.
If this happens please dry visible parts with a clean dry cloth.
6. Disassemble the milk carafe and clean all six components in the top rack
of your dishwasher. In case a dishwasher is not available, refer to “Clean-
ing the milk carafe” section.
CAUTION: first read the safety precautions to avoid risks of fatal electric
shock and fire. Please ensure ground continuity when plugging the machine
in the power outlet.
NOTE: to turn o the machine, press and hold the ON-OFF/Coee but-
ton until it switches o.
When unpacking the machine, remove the plastic film, water tank and
cup support. Adjust the cable length and store the excess in the cable guide
under the machine.
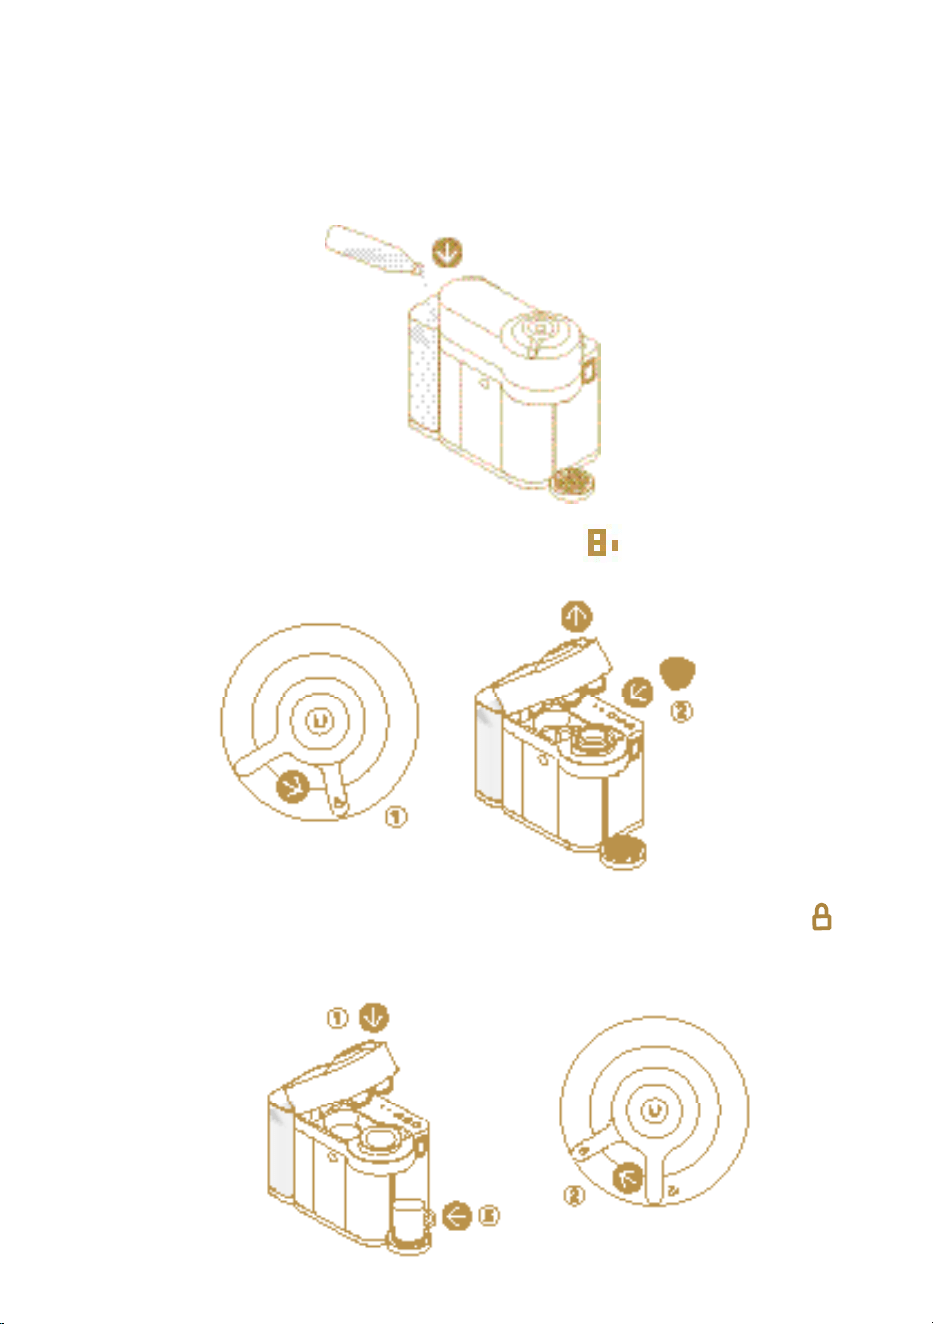
2. Turn the lever towards the unlock position (1) and insert a capsule (2).
3. Close the machine by turning the lever (1) until the lock position (2).
Place a cup on the support (3). Cup support height can be adjusted to
accommodate your cup size.
15
10
1. Fill the water tank with only fresh potable water.
Coee preparation
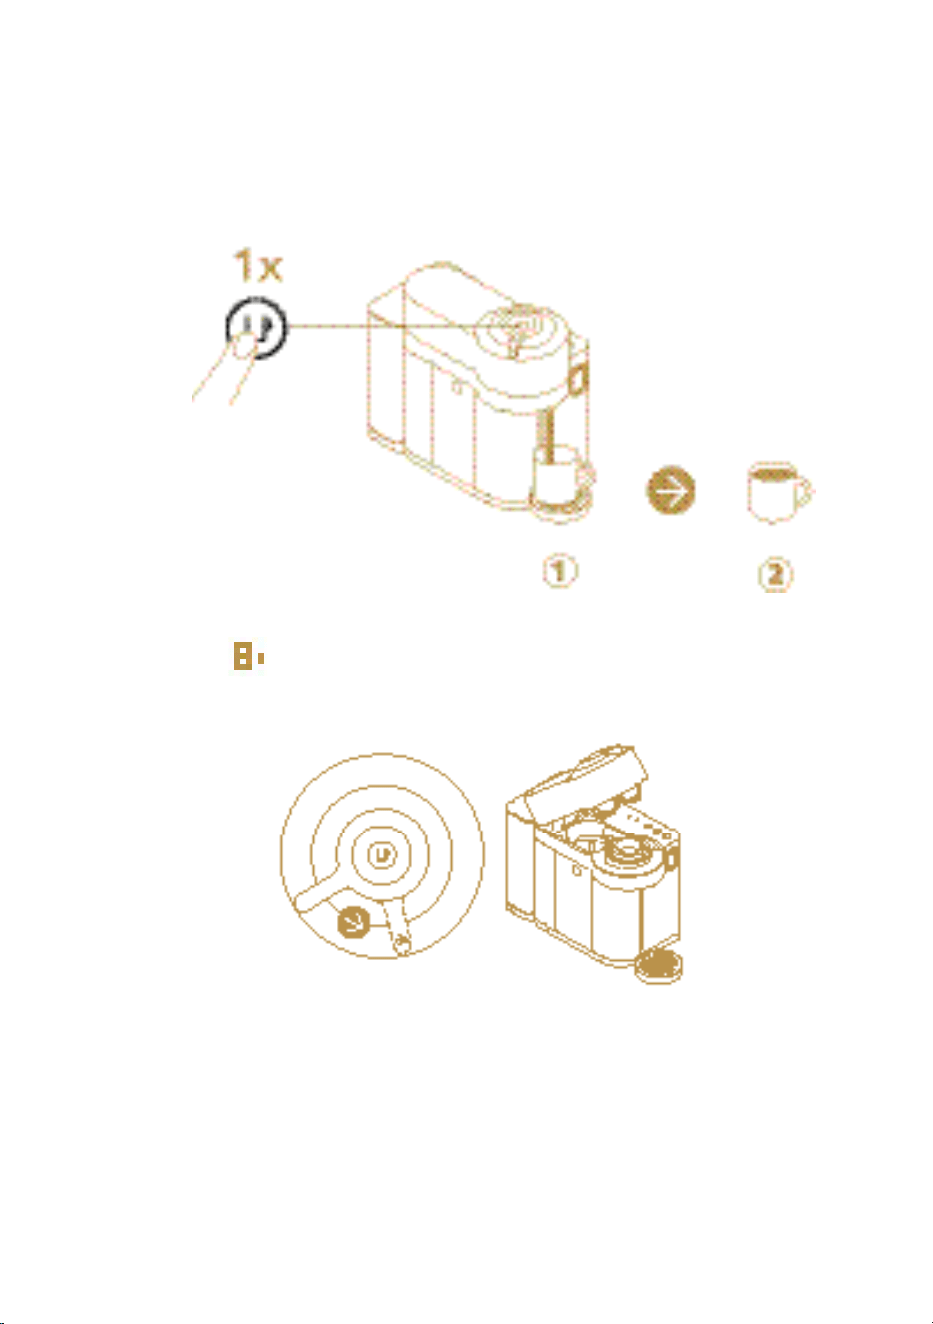
4. The coee buon starts blinking, as soon as light is steady white, press
coee buon to start the coee brewing.
16
5. When the coee stops brewing, turn the lever towards the unlock posi-
tion to open the machine and eject the capsule. Then close it.

17
WARNING: Plant-based beverages contain allergens (gluten, almond,
soy) and should be handled carefully by people suering from food aller-
gies. The volume of froth depends on the nature of the beverage used, and
its temperature.
For a perfect milk froth, use fresh semi-skimmed, pasteurized cow milk at
refrigerator temperature (about 4°C). It is recommended to clean the milk
carafe aer each use.
WARNING: Do not use liquids other than cow milk and plant-based
beverages.
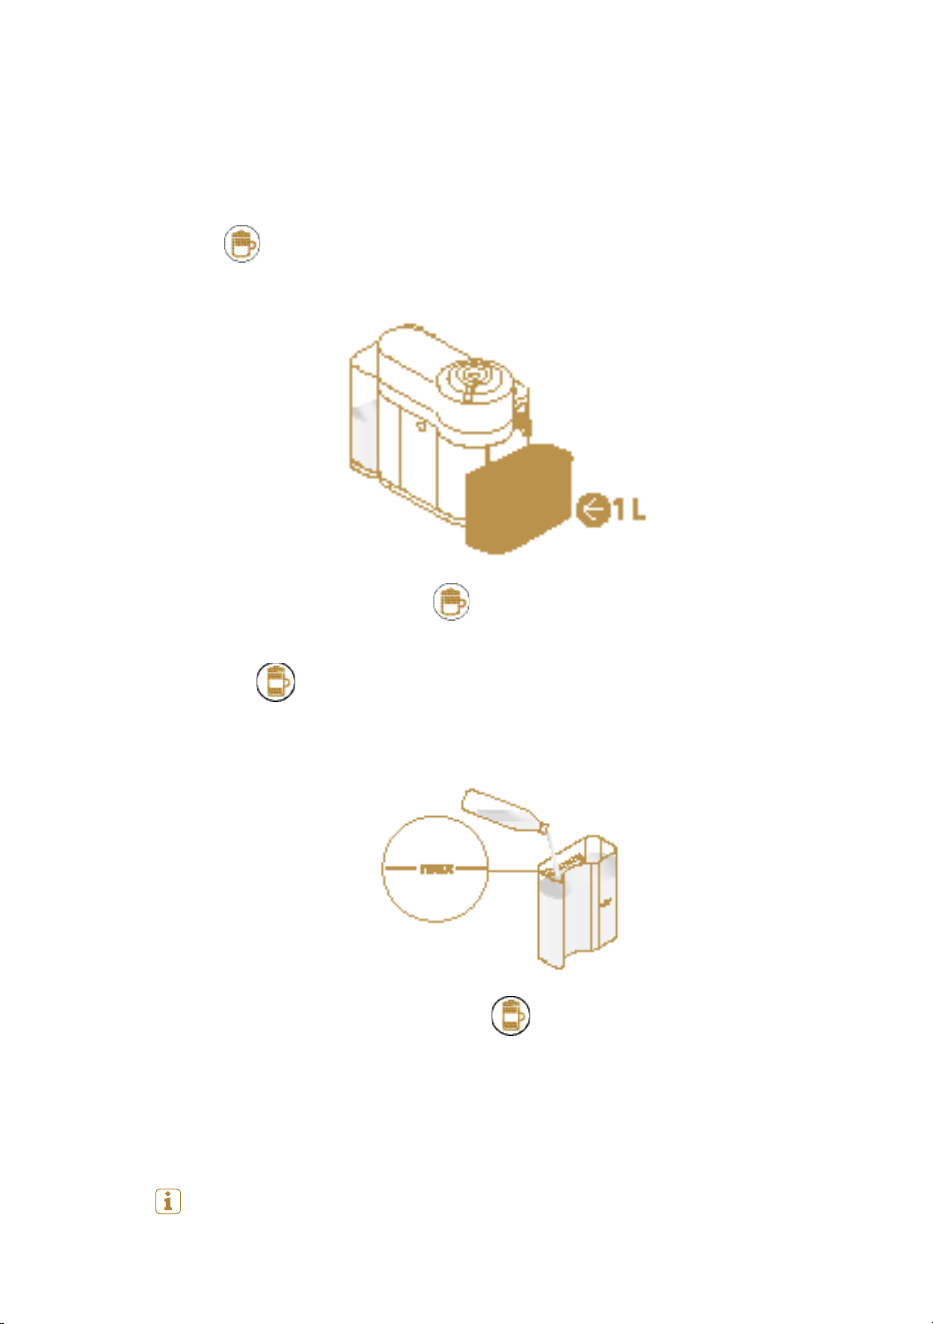
2. Fill the milk carafe up to the “MAX” level, do not overfill. Reassemble the
milk carafe.
1. Fill the water tank only with fresh potable water up to the “MAX” level
before preparing a coee or a milk recipe.
11
Milk Preparation & Daily Rinsing

18
5. Open the steam connector door by sliding it down. Connect the milk ca-
rafe to the machine.
3. Turn the lever to the unlock position and insert the capsule. Close the
machine and then push the lever towards the lock position . The machine
heats up for approximately 30 seconds (fading coee buon).
4. Turn the knob to the milk position.
19
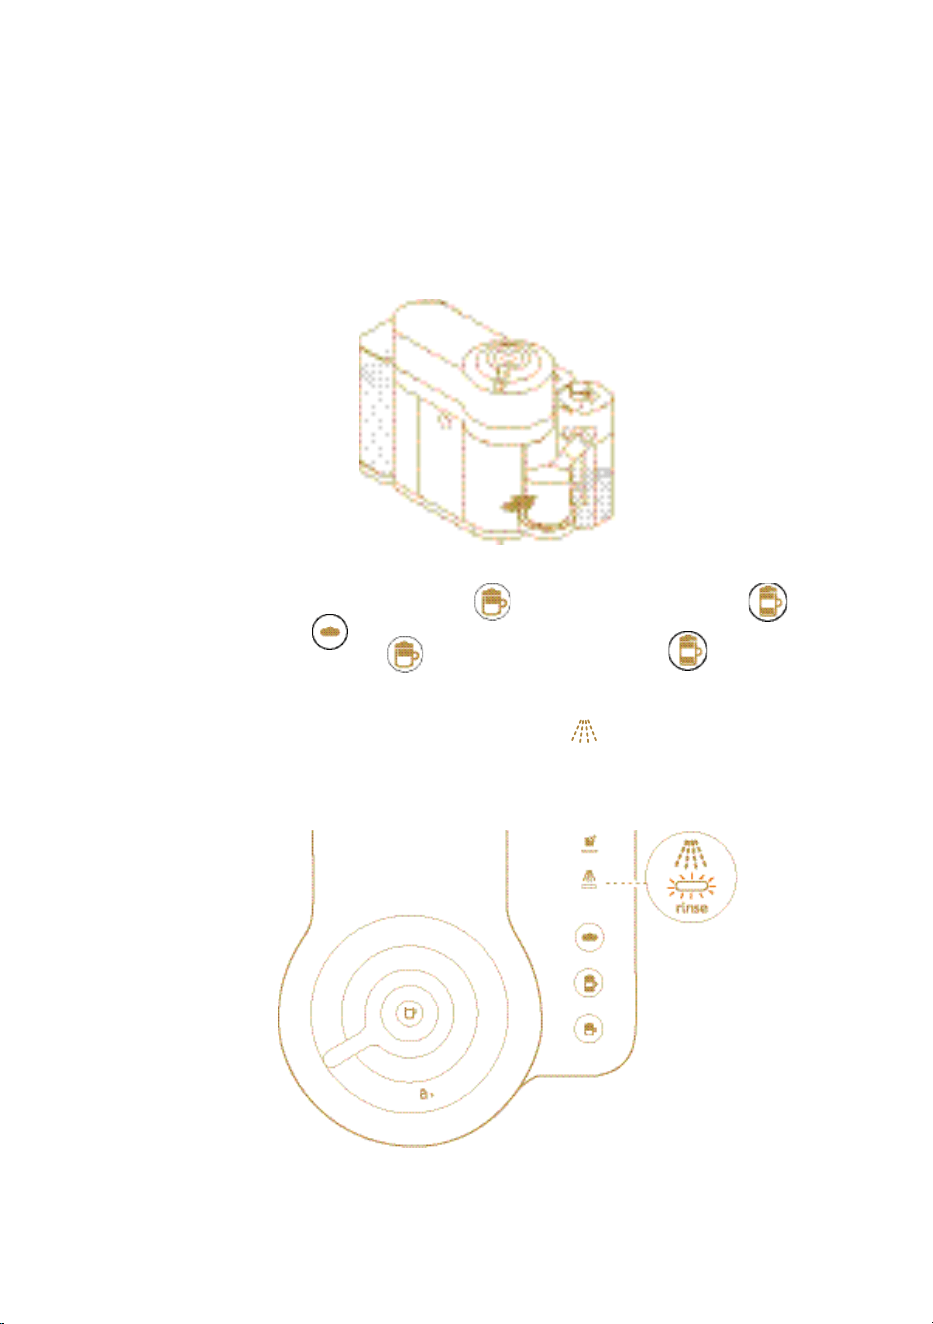
7. Wait until cappuccino buon , lae macchiato buon and hot
foam buon lights up.
8. Press the cappuccino or lae macchiato buon . The preparation
starts aer approx. 30 seconds (for cappuccino first coee then milk, for
lae macchiato first milk then coee) and will stop automatically.
9. At the end of the preparation, the rinse alert illuminates to indicate
that a rinsing cycle of the milk carafe is required .
6. Place a cappuccino cup or a lae macchiato glass under the coee outlet
and adjust milk spout position by rotating it up to the center of the cup.
Refer to section 12 for cup size selection according to recipe style and
capsule selected.
20
WARNING: the rinsing system does not remove the allergens. Disassem-
ble and clean the milk carafe before changing milks, preferably in the dish-
washer. When a dishwasher is not available, wash by hand.
Aer each milk or plant based beverage dispensing, the rinsing cycle of
the carafe is recommended.
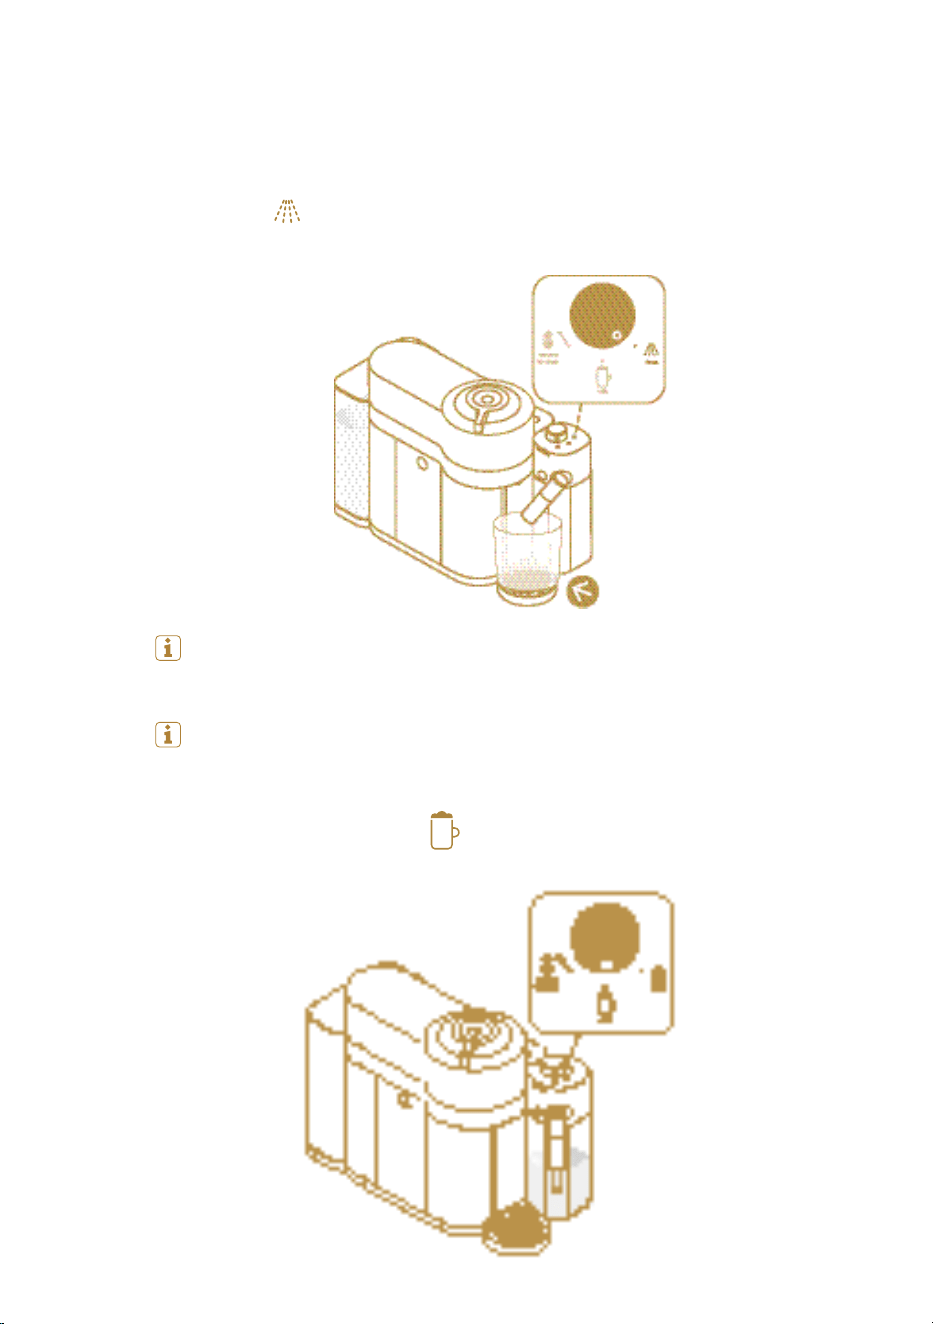
11. When the rinsing process is finished, the rinse alert turns o. Turn back
the knob to milk position .
10. Place a container (minimum 200 ml) under the milk spout. Turn the knob
to rinse position. Milk system rinsing process starts and hot water
combined with steam flows through the milk spout. The rinsing process
stops automatically.
21
12. If there is milk le in the milk carafe: Disconnect the milk carafe from
the machine and place it immediately in the refrigerator. Close the ma-
chine steam connector door by pulling it up.
CAUTION: aer rinsing, place the carafe in the refrigerator respecting
the storing instructions on the milk package. If the milk carafe is kept out-
side the refrigerator for longer than 30 min, disassemble the milk carafe and
clean all components (refer to "Cleaning the milk carafe" section).
13. If the milk carafe is empty or has been stored for more than 24 hours in
the fridge; before refilling it, disassemble all six milk carafe components
and clean them in the upper rack of your dishwasher. In case a dishwasher
is not available, refer to section “Cleaning the milk carafe”.
NOTE: refer to section “Disassembling the milk carafe”.
NOTE: At the end of the preparation, turn the lever towards the unlock
position to open the machine and eject the capsule. Then, close the
machine.
22
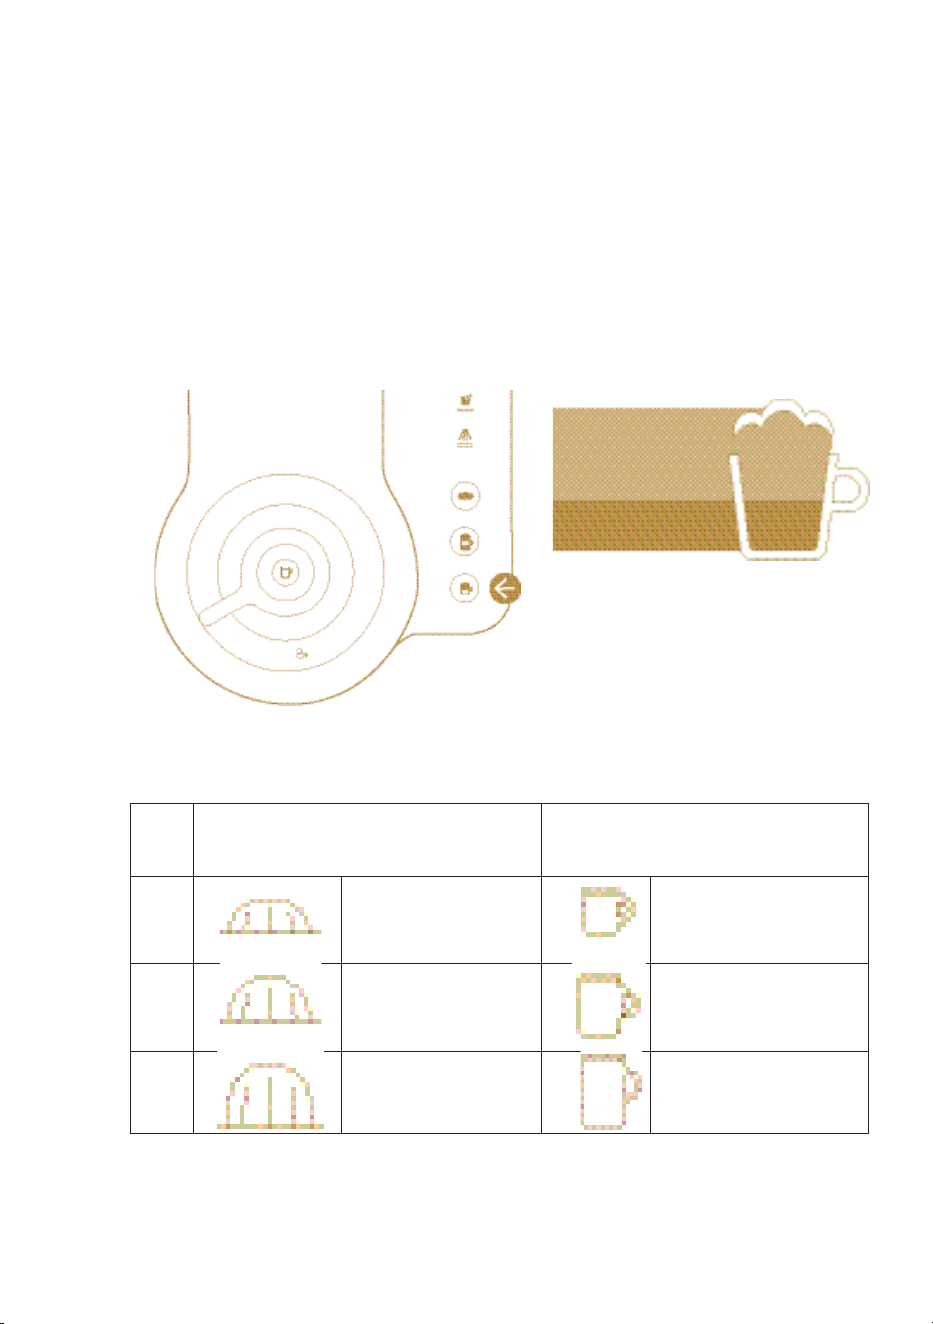
A cappuccino is characterized by a coee topped with a thick layer of milk
froth on the top.
CAPPUCCINO:
TIPS:
The milk froth quality and aspect could be aected by the type, freshness
and temperature of the milk (ideally stored at 4°C).
ESPRESSO RANGE CAPSULES
CHOICE OF COFFEE CHOICE OF CUP
S 25 ml / 0.84 fl oz Min 180 ml / 6 fl oz
M 40 ml / 1.35 fl oz Min 270 ml / 9 fl oz
L 80 ml / 2.7 fl oz Min 390 ml / 13 fl oz
Milk foam
Coee
12
Milk recipes
23
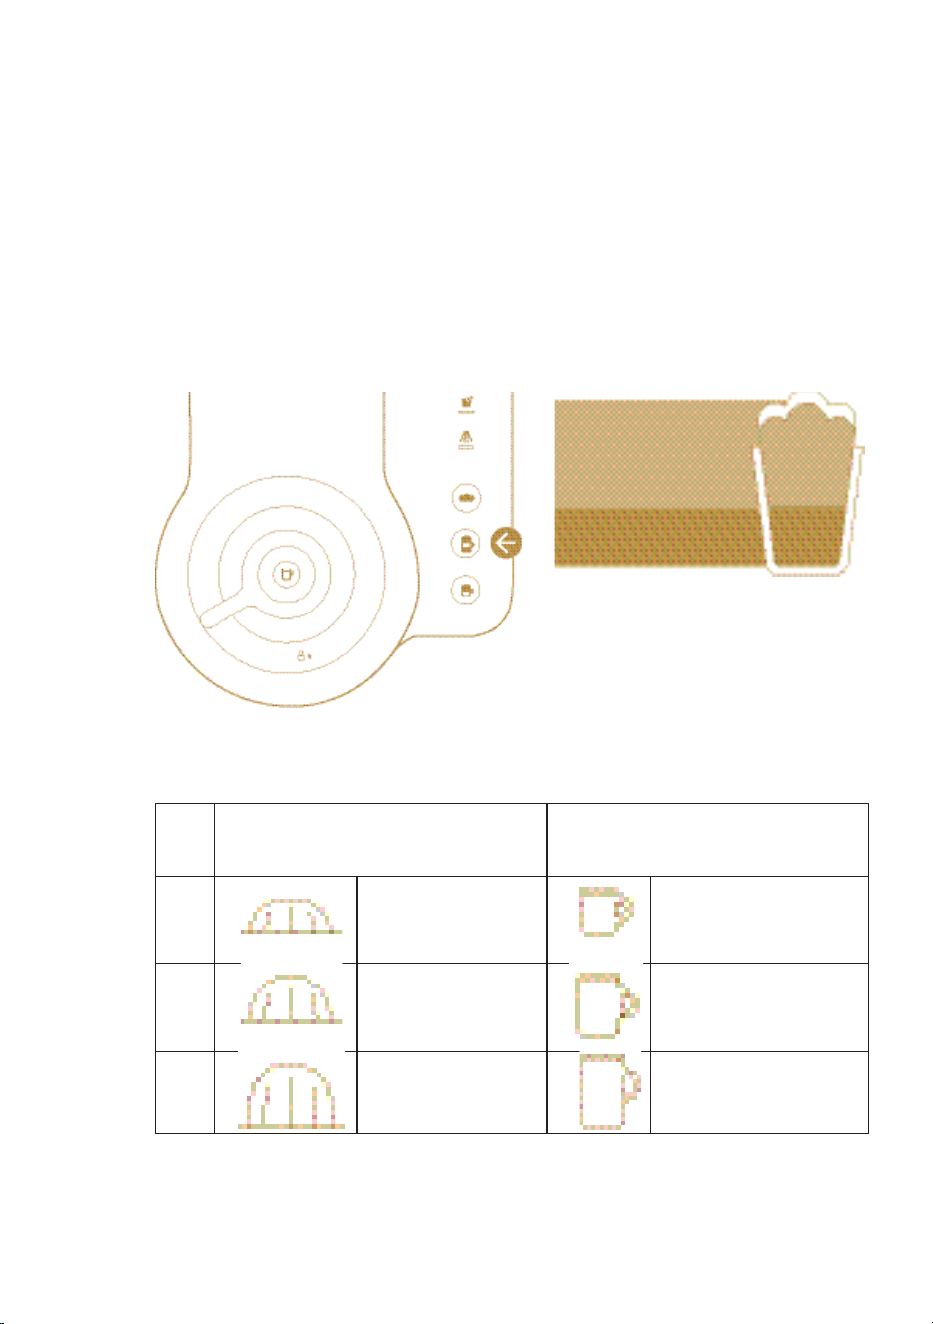
CHOICE OF COFFEE CHOICE OF CUP
S 25 ml / 0.84 fl oz Min 270 ml / 9 fl oz
M 40 ml / 1.35 fl oz Min 390 ml / 13 fl oz
L 80 ml / 2.7 fl oz Min 590 ml / 20 fl oz
A lae macchiato is a recipe in which coee is poured over a glass of froth
milk.
LATTE MACCHIATO:
TIPS:
The milk froth quality and aspect could be aected by the type, freshness
and temperature of the milk (ideally stored at 4°C).
ESPRESSO RANGE CAPSULES
Milk foam
Coee
24
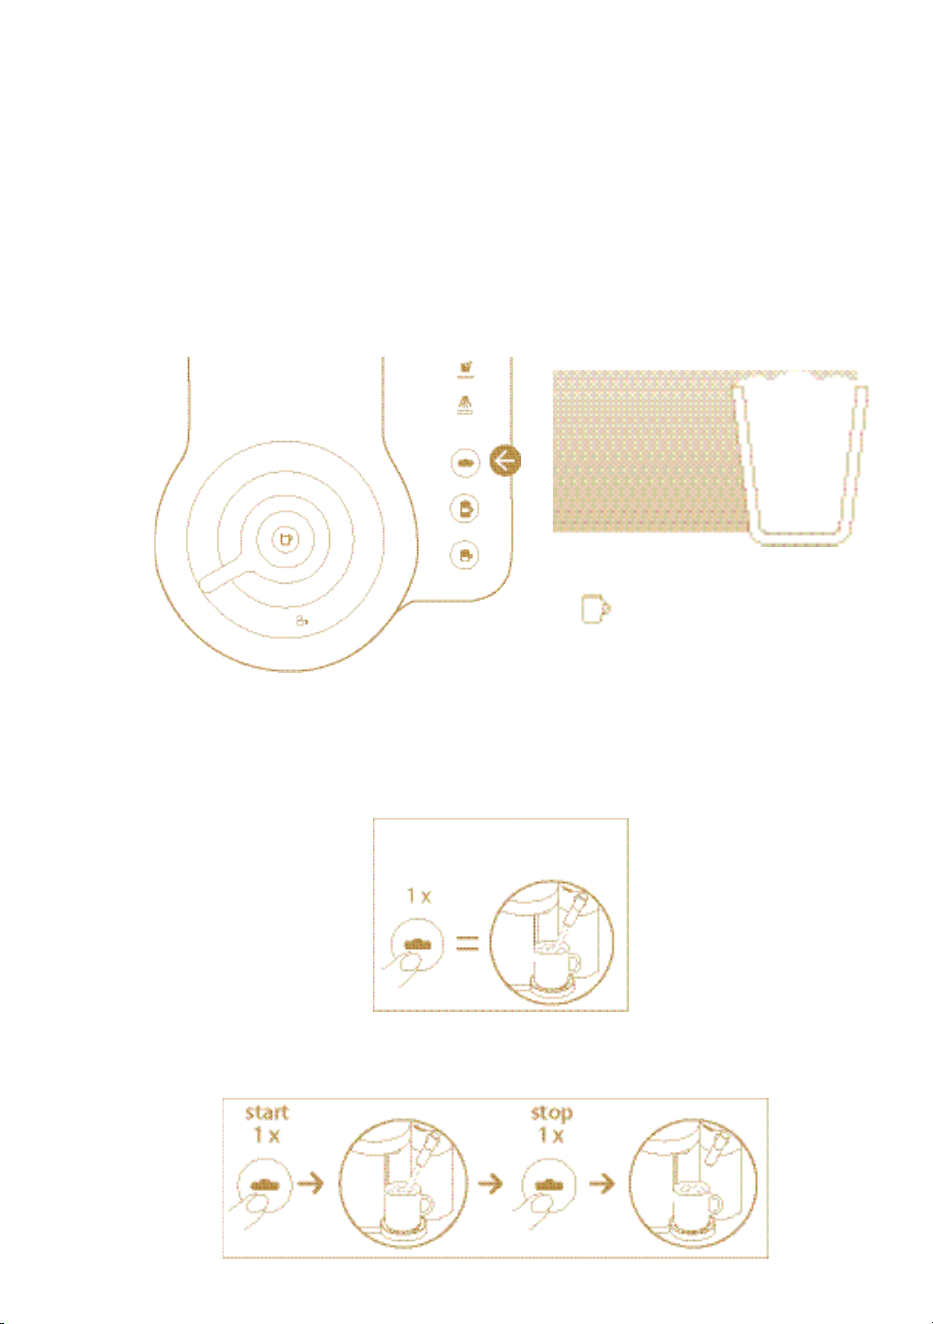
HOT FOAM:
CHOICE OF CUP:
M Min 270ml / 9fl oz
Hot foam function to tailor your perfect milk beverage: by simply topping
up your existing milk beverage with more foam, to have maxiumum flexibil-
ity to create your own milk beverage or just to enjoy a cup of hot milk foam.
A) Press the hot foam buon, when the default/programmed volume is
reached the machine will automatically stop.
B) Press the hot foam buon, when the desired quantity is reached stop the
process by pressing the buon again.
13
200 ml /
6.75 fl oz
Milk
25
13
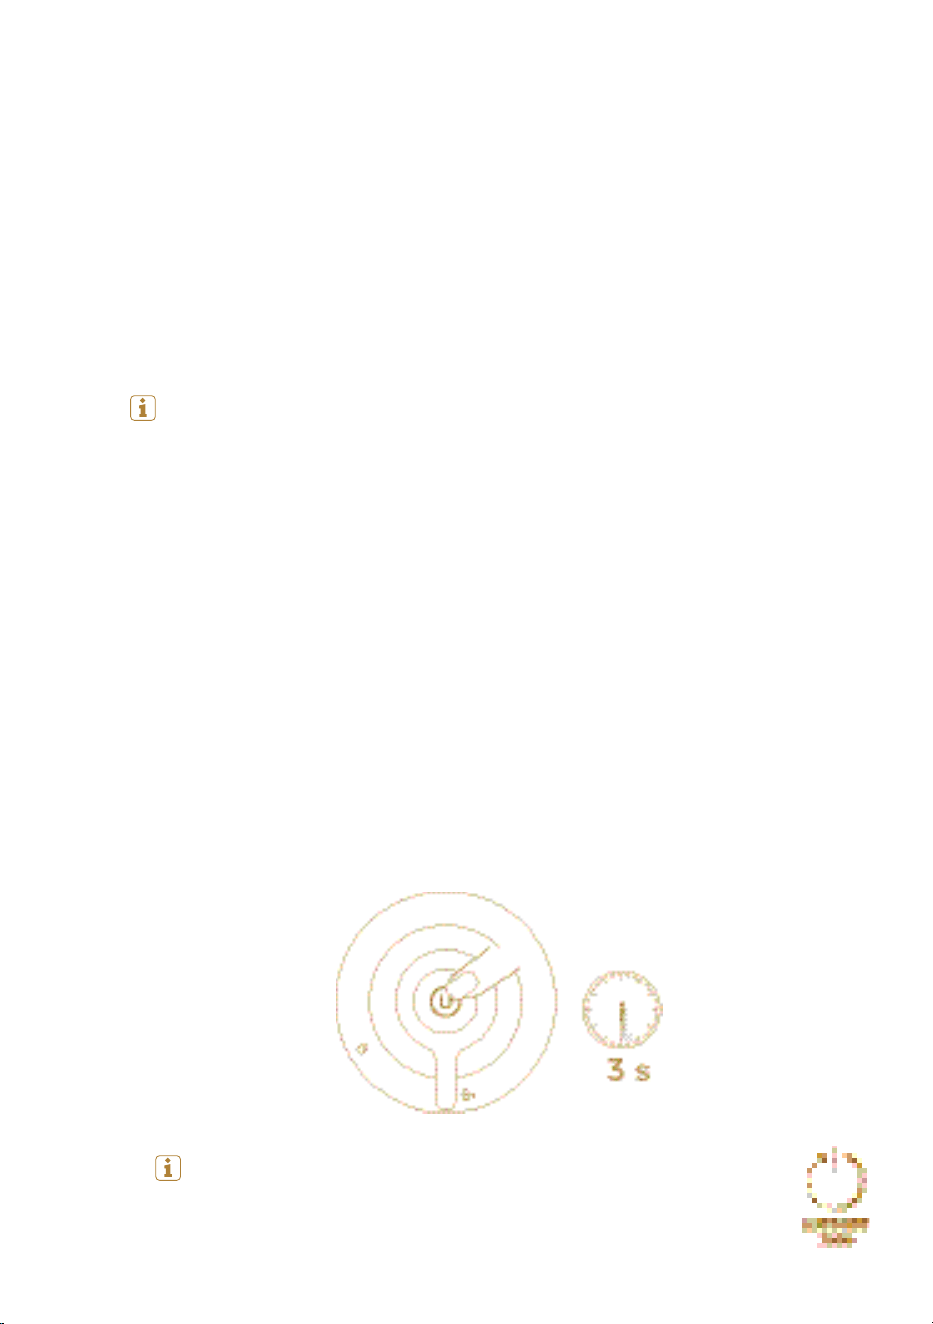
The machine can be turned “OFF” at any time (when not in use) by holding
the coee buon for three seconds.
Automatic “OFF” Mode: the machine will turn o automatically
aer 2 minutes of non-use.
Energy saving
Note:
• During the hot foam function it is possible to program a coee. When the
coee buon lights up, press it. When the milk beverage is completed, cof-
fee will automatically start brewing. Make sure a capsule has been inserted.
• During the coee brewing it is also possible program the hot foam function.
When the hot foam buon lights up, press it. When the coee is complet-
ed, milk will automatically start to flow. Make sure the milk carafe has been
inserted.
C) PROGRAMMING THE HOT FOAM VOLUME
1. Press and hold the hot foam buon for three seconds, until it starts flashing.
2. Once the desired quantity is reached, press again hot foam buon to save
the new programmed volume. Volume can be reprogrammed from 80ml
minimum to 200mL maximum.
Note: If you wish to come back to the default factory seings (200ml) see “Re-
set to factory seings” section.
26
14
Seing the coee volume
1. Programming the coee volume is specific to each capsule type: Espres-
so, Double Espresso, Gran Lungo, Mug or Carafe.
2. Open the machine, insert the capsule you want to program; close the
machine; turn the lever towards the locked position . Light will blink
while the machine is heating up. A steady light indicates the machine is
ready.
3. Then press and hold the buon until desired volume is reached.
4. A new coee volume is now stored for the capsule type used during the
seing.
Note: once a customer-specific volume is programmed by the user, every
time that capsule type is inserted in the machine, the preparation will stop
at the user-programmed cup size.
Note: if you wish to return to the default parameters see “Reset to facto-
ry seings” section.
15
Reset to factory seings
1. Plug the power cord.
2. Make sure that no accessory ( milk carafe or descaling pipe ) is connected
to the milk carafe connector door. Turn on your machine.
27
3. Press and hold hot foam buon until both descale and rinse alerts
blink (enter menu mode).
4. Press hot foam buon to enter in reset mode. If selection is not
done within 15 sec., it exits automatically.
5. Only hot foam buon will blink.
6. Press hot foam buon to reset to factory seings; all 3 milk recipe
leds blink three times to confirm factory reset (within 15 seconds).
7. The machine is now programmed with factory seings and turns auto-
matically in ready mode.
16
Turn on/o Bluetooth & Wi-Fi
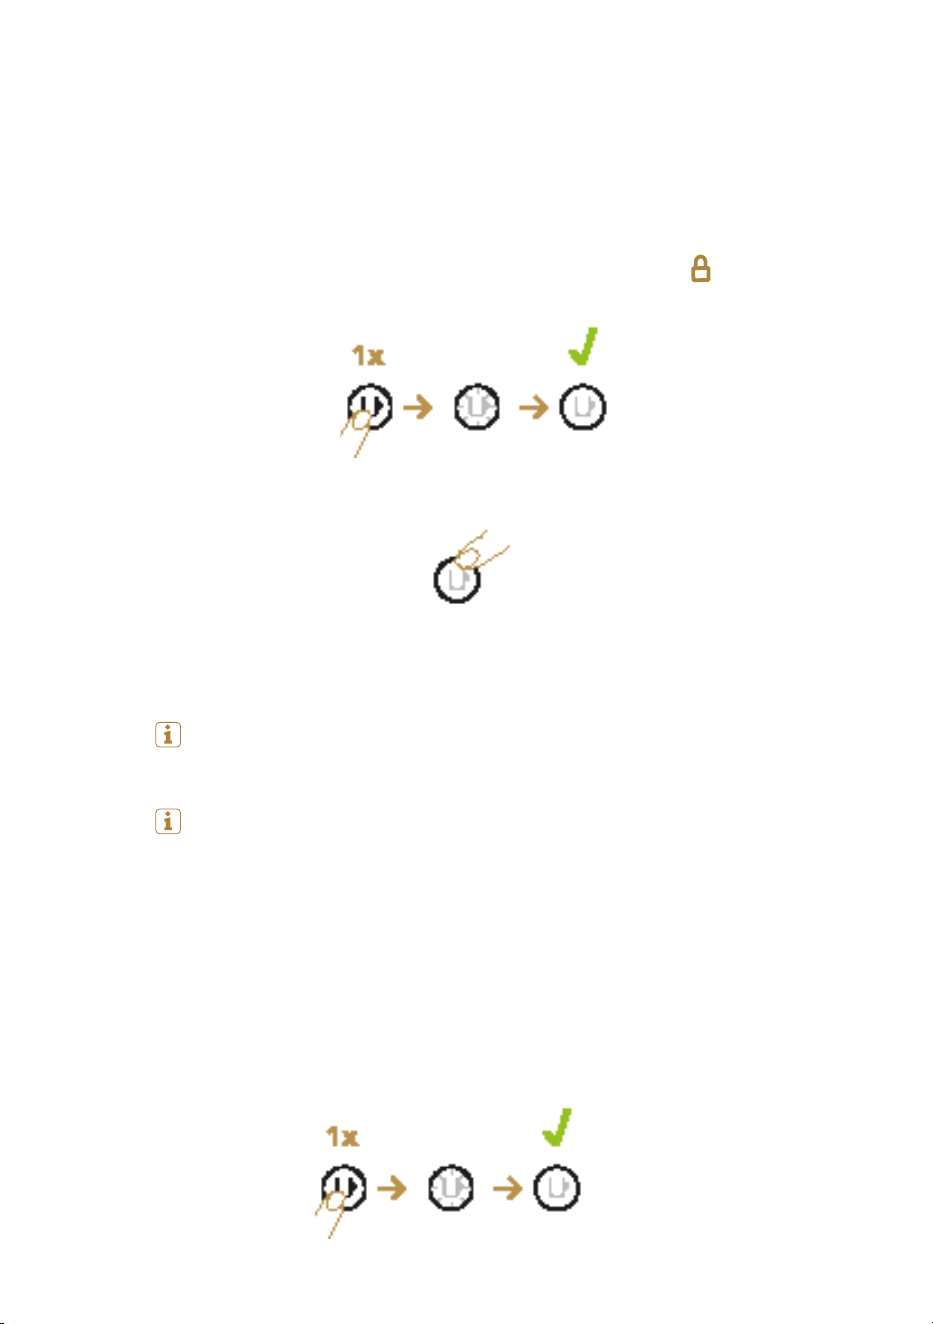
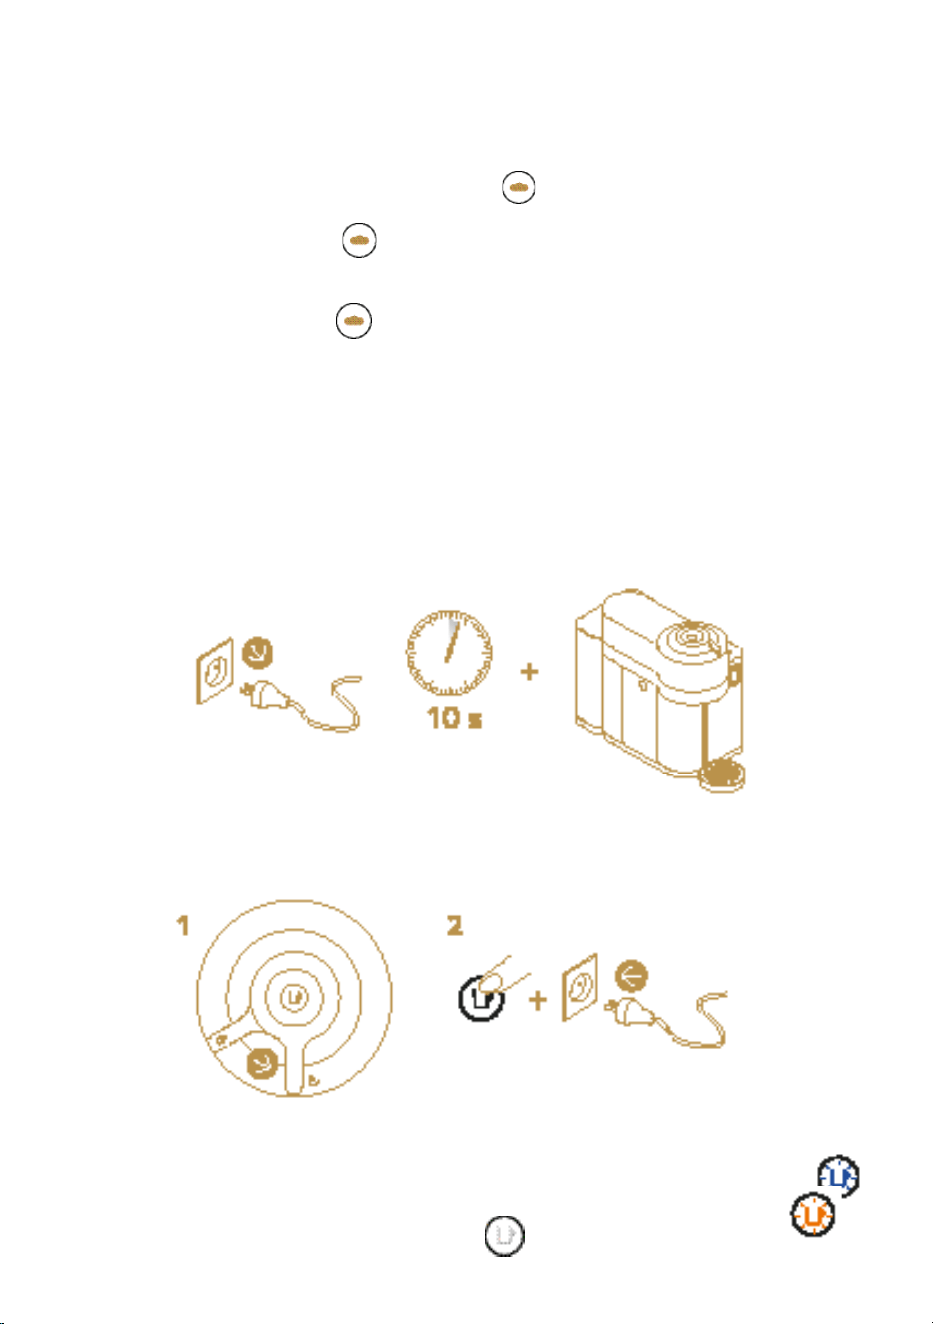
1. Unplug the machine
3. Selected operation:
-
TURN ON: the coee buon remains steady blue for a few seconds .
- TURN OFF: the coee buon remains orange for a few seconds .
4. Machine returns to ready mode .
2. Make sure lever is in middle position. Press and hold the coee buon
while plugging.
28
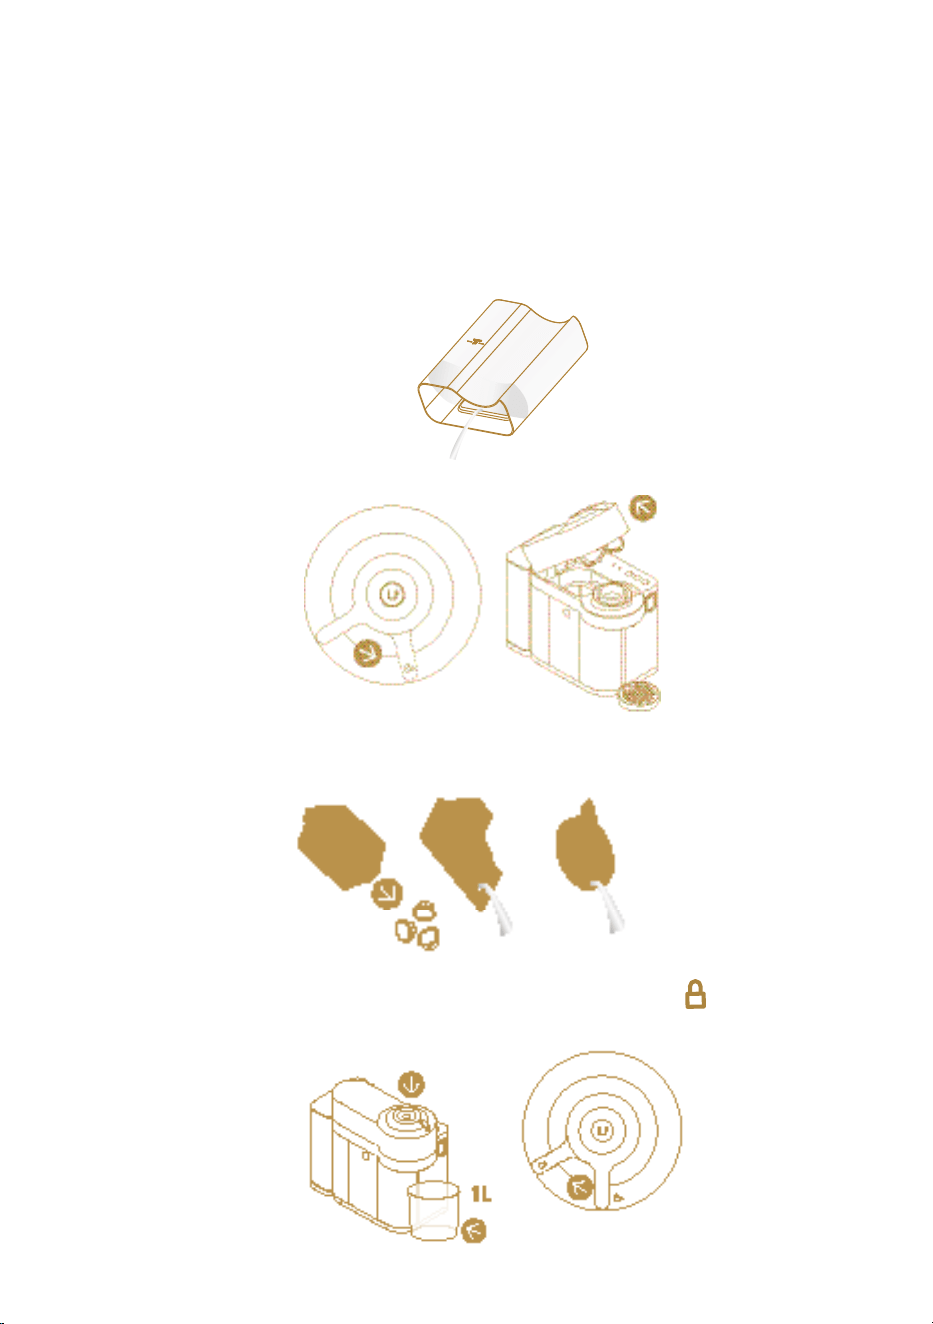
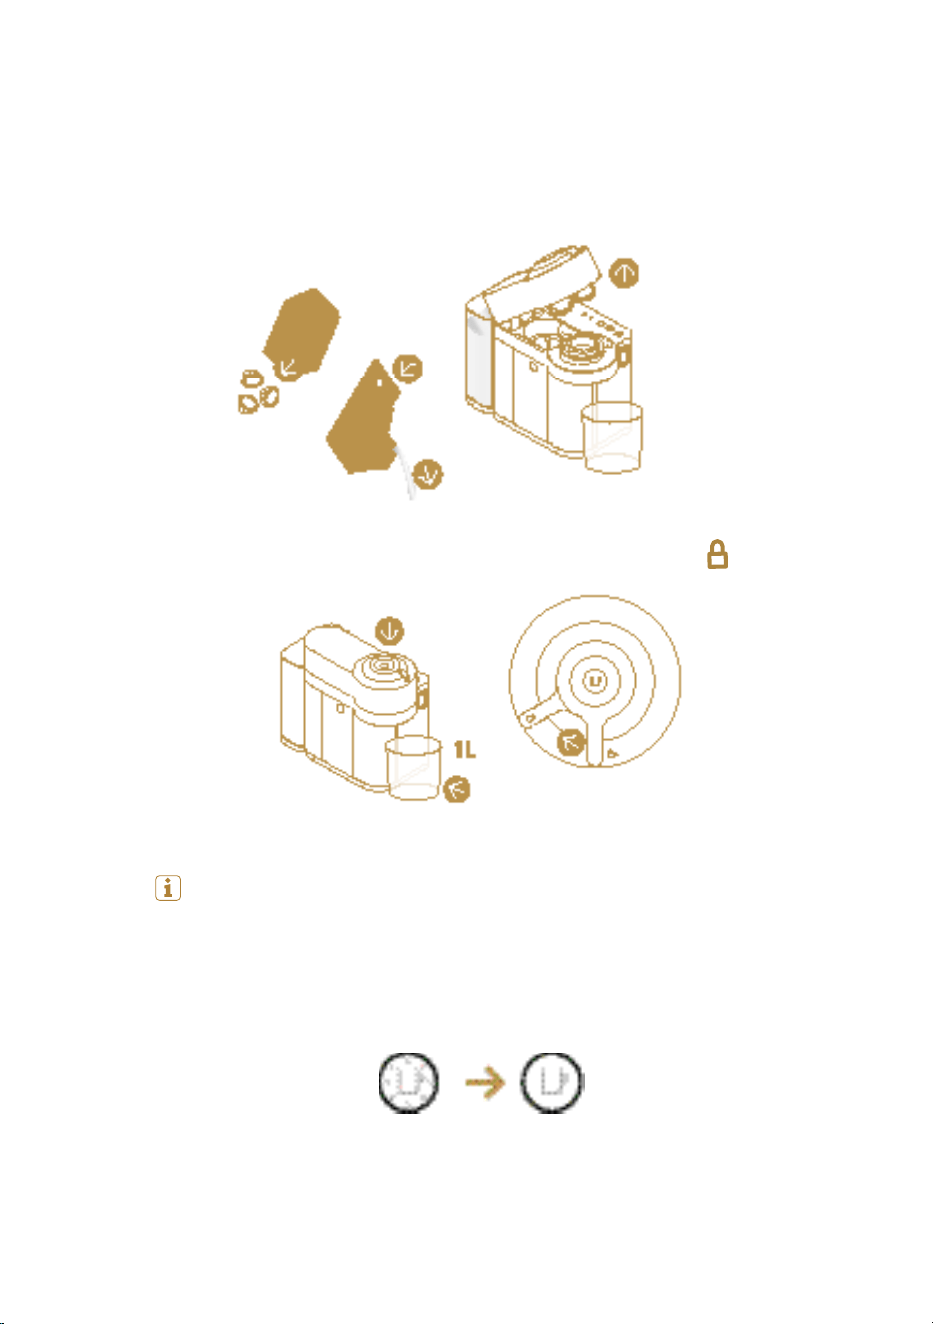
6. Close the head and turn lever le until lock position and place a con-
tainer (1L) under the coee outlet.
5. Empty capsule container, the drip tray and the cup support.
1. Plug the power cord.
2. Make sure that no accessory ( milk carafe or descaling pipe ) is connected
to the milk carafe connector door.
3. Empty the water tank and put it back.
Emptying the system before a period of non-
use, for frost protection or before a repair
4. Open the machine head to eject the capsule.
17
29
7. Light will blink while the machine is heating up. Steady light indicates the
machine is ready.
8. Press and hold hot foam buon until both rinse and descale alerts
blink at the same time (menu mode entry)
9. Press hot foam and lae macchiato simultaneously to enter
emptying mode. If selection is not done within 15 sec., it exits automati-
cally.
10. Hot foam buon blinks.
11. Press hot foam buon to start the emptying process (within 15 sec-
onds).
12. When the process is finished, machine switches o.
CAUTION: Small quantities of steam may escape from the machine as it
evacuates the remaining liquids.
3. Turn on your machine.
30
18
4. Press the coee buon three times within 2 seconds.
1. Rinse the water tank before filling with fresh potable water up to the
maximum level.
2. Put the water tank back in its position. Plug the power cord and place a
container under the coee outlet.
Aer a long period of non-use
31
7. Then reassemble all six dried components and re-aach the milk carafe
to the machine (refer to "Assembling / Disassembling the milk carafe"
section).
8. Your machine is now ready to use.
NOTE: water may accumulate inside the machine’s head during cleaning.
If this happens please dry visible parts with a clean dry cloth.
5. The machine will start rinsing. The cleaning procedure will run automati-
cally for 5 minutes.
6. Disassemble the milk carafe and clean all six components in the top rack
of your dishwasher. In case a dishwasher is not available, refer to "Clean-
ing the milk carafe" section.

19
32
1. Rinse and clean the water tank and the lid before filling it with fresh po-
table water up to the “max” level. Put the water tank in place.
The machine has a predefined cleaning procedure that can be launched at
user discretion.
2. Take out the cup support and clean it. Wash with hot water and mild un-
scented detergent.
3. Place a container of at least 1 L under the coee outlet.
Cleaning cycle
6. Light will blink while the machine is heating up. Steady light indicates the
machine is ready.
33
Please make sure no capsule is present in the machine before running the
cleaning cycle.
5. Close the head and turn lever le toward lock position .
4. Open the machine and let the used capsule be ejected. Empty and rinse
the capsule container and the drip tray.
7. Press the coee buon three times within 2 seconds.
8. The machine will start rinsing. The cleaning procedure will run automati-
cally for 5 minutes.
9. The procedure can be stopped at any time by pushing the coee buon
and turns automatically in ready mode.
CAUTION: do not use any strong or abrasive cleaning agent or solvent
cleaner. Do not put in a dishwasher. Never immerse the appliance or part of
it in water. Wipe the coee outlet regularly with a clean damp cloth. Always
use clean cloths to clean the machine.
NOTE: water may accumulate inside the machine’s head during cleaning.
If this happens please dry visible parts with a clean dry cloth.
34
20
35
20
To ensure the proper functioning of your machine over its lifetime, making
your coee experience as perfect as it was the first day, follow the process
below:
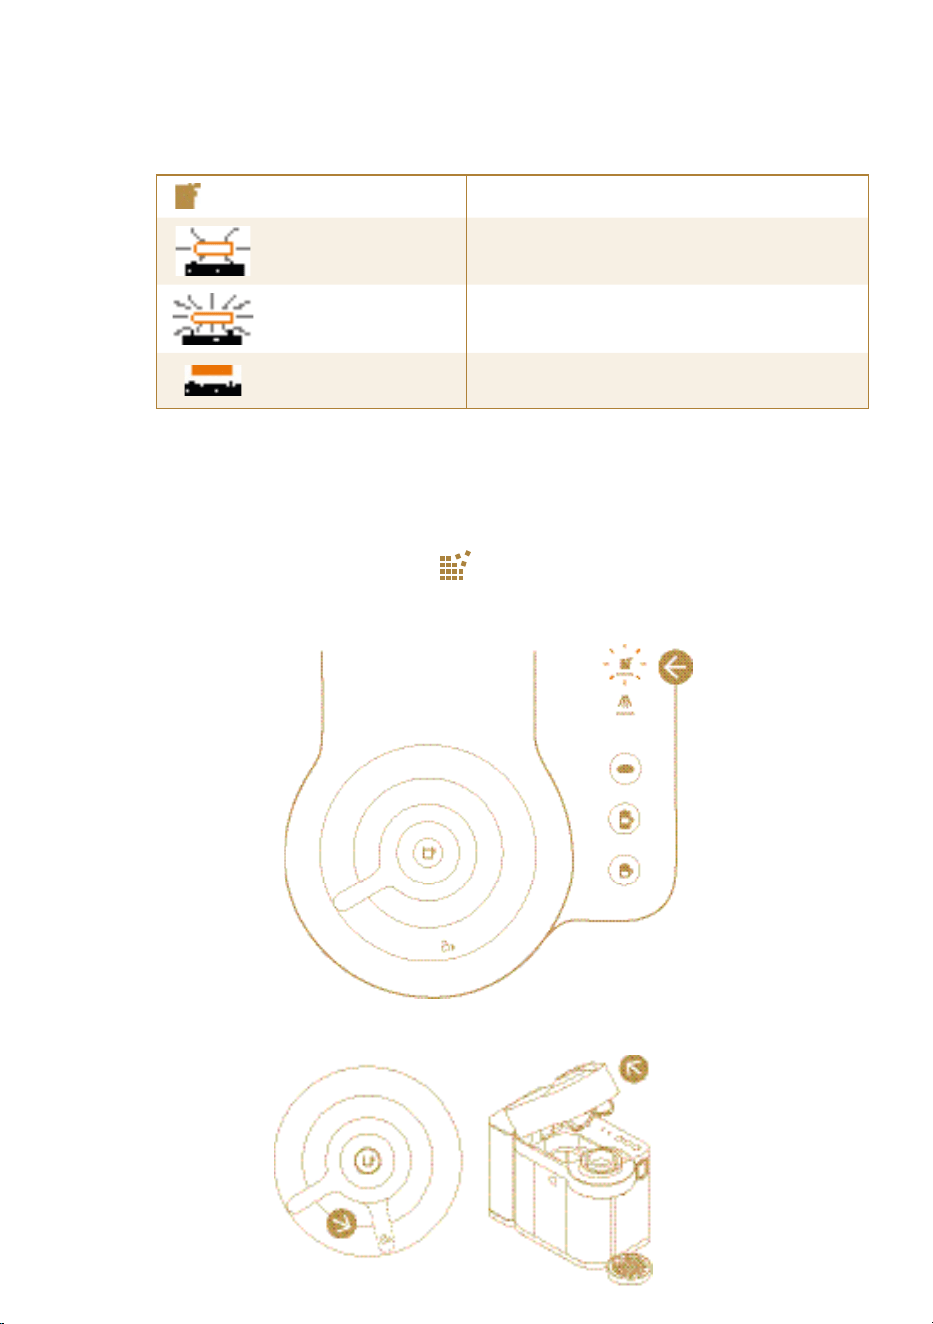
1. When the descaling alert starts to blink, it is time to descale your
machine. The descaling time is approximately 20 minutes.
2. Open the machine and let the capsule be ejected.
Descaling alert
Blinks orange Your machine must be descaled.
Fast blinking orange
Only few recipes before geing your machine
blocked. Proceed immediately to descaling.
Steady light
Your machine is blocked to prevent any damages.
Descale now.
Descaling
36
5. Take out the descaling pipe located at the back of the machine and plug
it into the milk carafe connector. Put the water tank back on the machine.
3. Close the head and turn the lever toward lock position .
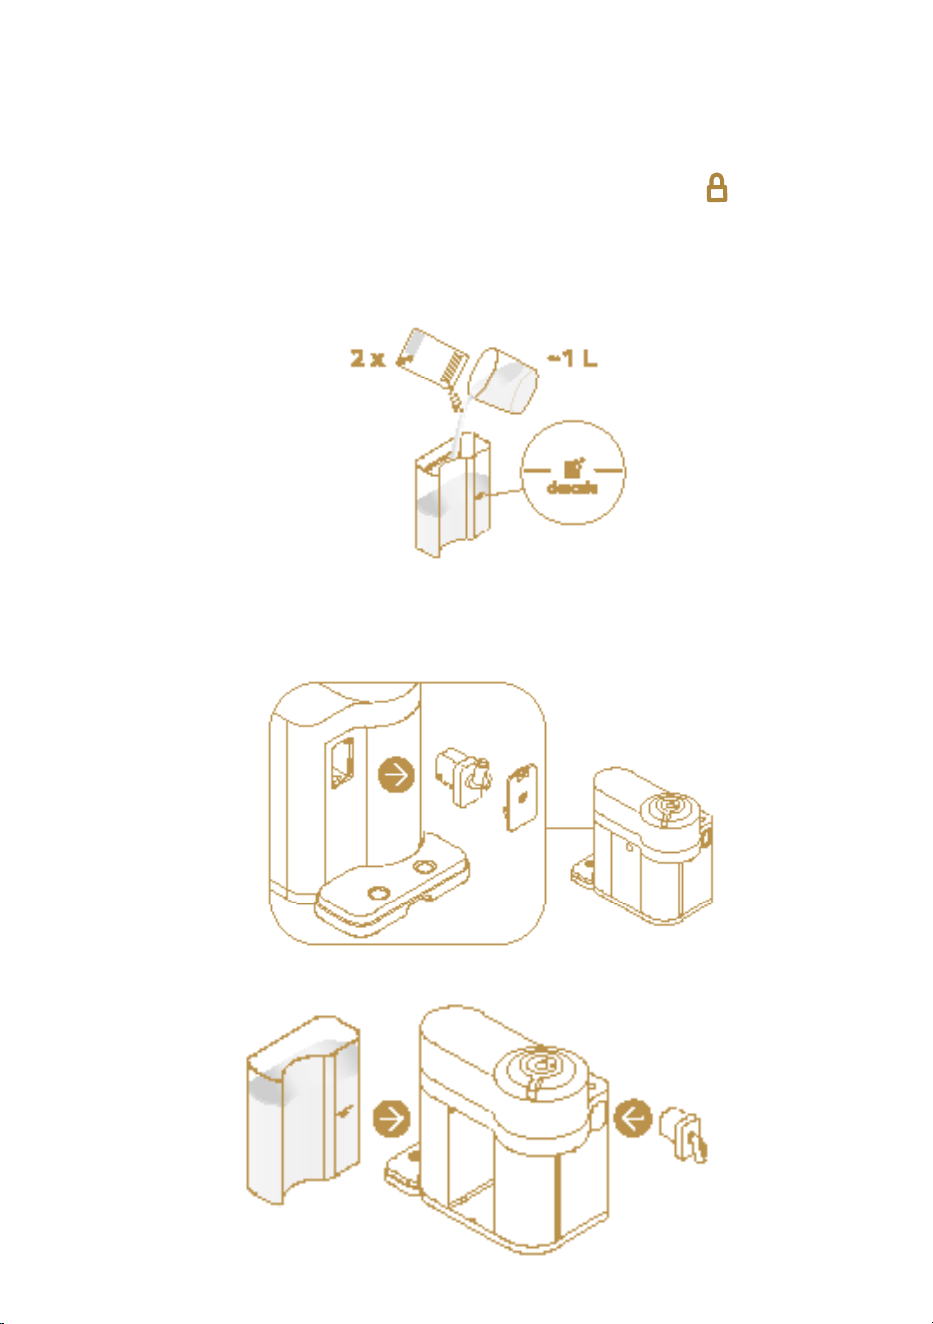
4. Empty the drip tray, used capsule container, cup support. Fill the water
tank with two units of Nespresso descaling agent. Add water up to the
“descale” mark on the water tank (~ 1000 ml / 1l / 33.81 fl oz).
37
8. Press cappuccino buon . The descaling product flows alternately
through the coee outlet, descaling pipe, and drip tray. When the des-
caling cycle is finished (the water tank runs empty), the lae macchiato
buon lights up.
9. Empty the drip tray, used capsule container, cup support and container.
Rinse and fill water tank up to “ Max” level with fresh and potable water.
Empty the 1L container and put it back under both outlets.
6. The machine automatically enters in descaling mode. The “descale” alert
blinks orange during the entire descaling process. The cappuccino but-
ton lights up.
7. Place a container with a minimum of 1L capacity under the coee and
descaling pipe nozzle.
10. Press the lae macchiato buon . The rinsing cycle continues through
the coee outlet, descaling pipe and drip tray until the water tank is
empty.
11. Once the rinsing process is finished, the machine goes back to ready
mode. Remove the descaling pipe and store it. Empty the drip tray and
used capsules container. Fill the water tank with fresh potable water.
NOTE: water may accumulate inside the machine’s head during cleaning.
If this happens dry visible parts with a clean cloth.

38
21
NOTE: Always respect descaling agent and water volumes in the tank to
ensure completion of the cycles.
The machine can still prepare several milk beverages before it is blocked
preventively. The blockage prevents any damage to the machine and en-
sures its proper functioning over its lifetime.
In case the machine is blocked, please descale it. Please make sure the entire
descaling procedure is completed. If it is not completed, the machine will
remain blocked.
Troubleshooting
No light on the buon. • The machine has turned OFF automatically; push the buon or
“UNLOCK” the machine.
• Check the mains, plug, voltage, and fuse.
No coee, no water, no milk. • Check that the water tank is filled.
• Check that a fresh capsule is inserted in correct position, that
the handle is properly locked and push the buon to start.
• Descale if necessary.
• Open the machine head and let the capsule be ejected. Then
perform a cleaning as per cleaning section.
• Check if milk carafe is inserted and filled.
Coee comes out very slowly. • Flow speed depends on the coee variety.
Coee is not hot enough. • Preheat cup with hot drinking water from the tap.
• Descale if necessary.
Leakage or unusual coee flow. • Check that the water tank is well positioned. Empty the drip
tray.
Machine turns to “OFF mode”. • To save energy the machine will turn o aer 2 minutes of
non-use.
• See section on “Energy Saving”.
Coee grounds in the cup. • Perform the cleaning procedure twice.
• See “Cleaning cycle” section.
The machine doesn’t start and has
lights steady on. If blinking, see
next points.
• Check that handle is properly locked.
• If you want to brew a Coee or Espresso, check that a fresh
capsule is inserted in correct position, that the handle is prop-
erly locked and push the buon to start.
• If you are cleaning, descaling or emptying the system, check
that no capsule has been le inside, lock the machine and
push the buon to start one of these operations.
39
The machine doesn’t start and the
lights blinks irregularly.
• Fill the water tank and push buon to start.
• Check that handle is properly locked.
Lights blink while machine is run-
ning.
• If coee or milk is flowing normally, this indicates the machine
is working properly.
• If only water is flowing, the machine is executing a user re-
quest for either cleaning, descaling or emptying the system.
Refer to the corresponding section in this user manual.
Lights blink and machine is not
running.
• It will take some time before the coee flow comes out (due to
code reading and pre-weing the coee).
• Check that a fresh capsule is inserted in correct position, that
the handle is properly locked and push the buon to start.
• Fill the water tank and push buon to start.
• Turn the machine to “OFF mode” by pushing the coee buon
for 3 seconds and then push it again to turn the machine ON.
Now wait approximately 20 minutes to allow the machine to
cool down aer extensive use.
Lights blink irregularly.
Machine is not running.
• During regular Coee/Espresso preparation: 1) Unlock the
handle and open the machine head to check that a fresh
undamaged capsule is inserted in the correct position.
2) Check that the handle is in “LOCKED” position. 3) Check
that the water tank is filled.
• During Descaling, Emptying and Cleaning: 1) Check that cap-
sule is ejected. 2) Check that the handle is in “LOCKED” po-
sition.
• During Programming Volume: 1) Check if a capsule has been
well inserted. 2) Please refer to the corresponding chapter.
• If problem persists:
• 1. Unlock the handle and open machine head.
• 2. Replace capsule (if needed).
• 3. Disconnect powercord from the outlet and plug the ma-
chine back into outlet aer 10 seconds.
• 4. Close the head and press the buon to turn ON and press
again to start brewing. If problem persists, call Nespresso.
Descaling alert blinks or is fixed
orange.
• Machine triggers descaling alert according to your beverage
consumption. Descale the machine. Refer to section “Descal-
ing” according to your beverage consumption.
Rinse alert blinks orange. • A rinsing cycle of the milk carafe is required, refer to section
“Milk Preparation & Daily rinsing”.
I cannot enter the Menu Mode
(Reset to factory seings/ Empty-
ing the system before a period of
non-use/Water hardness seing).
• Be sure to remove the milk carafe from the connector door.
• Be sure that the descaling pipe is not connected to the con-
nector door.
• Press and hold hot foam buon until descale and rinse
alerts blink.
Turn o the machine.
• Hold the coee buton for three seconds. See “ Energy
Saving “ section.

40
22
23
The brewed quantity is not
enough.
• Check that the water tank is filled.
• Check if milk carafe is filled.
• See section “Seing the coee volume“.
Lever cannot be closed complete-
ly.
• Empty capsule container. Make sure that no capsule is blocked
inside the capsule container.
Quality of the milk froth is
down-graded
• Use semi-skimmed cow milk at refrigerator temperature
(about 4° C).
• Milk action knob is on remove to clean position. Turn it to
milk position.
• Rinse aer each milk preparation and ensure the air inlet of
the milk action knob is clean. See section («Cleaning the milk
carafe»).
• Descale the machine (refer to section «Descaling»).
• Do not use either frozen milk or hot milk in the carafe.
• Ensure that all the components of the milk carafe are well as-
sembled. Refer to the section «Assembling the milk carafe».
Milk carafe cannot be dismantled. • Press the buon on the side of the milk carafe to remove the
milk carafe lid.
• Refer to section «Assembling / Disassembling of Milk carafe”.
Milk carafe is inserted but the milk
buons are not enabled.
• The milk action knob is on rinse position. Turn it to milk
position. Wait for the coee side to complete the heat up
• Make sure it is properly inserted.
When Hot foam , Lae mac-
chiato and Cappuccino
buons are blinking alternatively.
• Machine overheat, wait until machine cools down.
When Hot foam , Lae mac-
chiato and Cappuccino
buons are blinking together.
• Water tank is empty.
• Fill the tank.
→ INSTRUCTIONS ARE ALSO AVAILABLE ON
WWW.NESPRESSO.COM
41
22
23
Specifications
220-240 V, 50-60 Hz, 1300-1500 W USA, CA: 120 V, 60 Hz, 1500 W
Frequency 2.402 - 2.480 GHz
RF Output
power (EIRP)
4 dBm Max (Bluetooth), 20 dBm Max (WIFI)
Standby 0,50 W/h (230V/50 Hz, EN 60661)
6.3 kg
1.6 L
(WxDxH) 190 x 407 x 315 mm (with cup support and milk carafe)
Disposal and
environmental protection
This appliance complies with the EU Directive 2012/19/EC. Packaging materials and appliance con-
tain recyclable materials. Your appliance contains valuable materials that can be recovered or can be
recycled. Separation of the remaining waste materials into dierent types facilitates the recycling of
valuable raw materials. Leave the appliance at a collection point. You can obtain information on dis-
posal from your local authorities. To know more about Nespresso sustainability strategy, go to www.
nespresso.com/positive

www.nespresso.com
57132C8440_00_0523