
DB SCALE
Label Printing Scale
DB-300 Series
Document No. ELP-301016
Original :
January 2017
(Revised )
DB Scale Corporation

This equipment has been tested and found to comply with the limits for a Class A digital
device, pursuant to Part 15 of the FCC Rules. These limits are designed to provide
reasonable protection against harmful interference when the equipment is operated in a
commercial environment. This equipment generates, uses, and can radiate radio
frequency energy and, if not installed and used in accordance with the instruction manual,
may cause harmful interference to radio communications. Operations of this
equipment in a residential area is likely to cause harmful interference in which case the
user will be required to correct the interference at his own expense.
(For USA Only)
Changes or modifications not expressly approved by the manufacturer for compliance
could void the user’s authority to operate the equipment.
Some procedures described in this manual may be illegal in various state jurisdictions.
There are optional settings to enable or to disable various functions. Please ensure that the
optional settings for scale operations meet the local requirements of weights and
measures. If you are uncertain of specific items, contact the state or county office of
weights and measures for clarification.
Safety Summary ELP-301016
( i )
Safety Summary
Personal safety in handling or maintaining the equipment is extremely important. Warning and
Cautions necessary for safe handling of the equipment are included in this manual. All
warnings and cautions contained in this manual should be read and understood before handling
or maintaining the equipment. Do not attempt to repair or modify this equipment. If a fault
occurs that cannot be corrected using the procedures described in this manual, turn off the
power, unplug the equipment, and then contact your service representative for assistance.
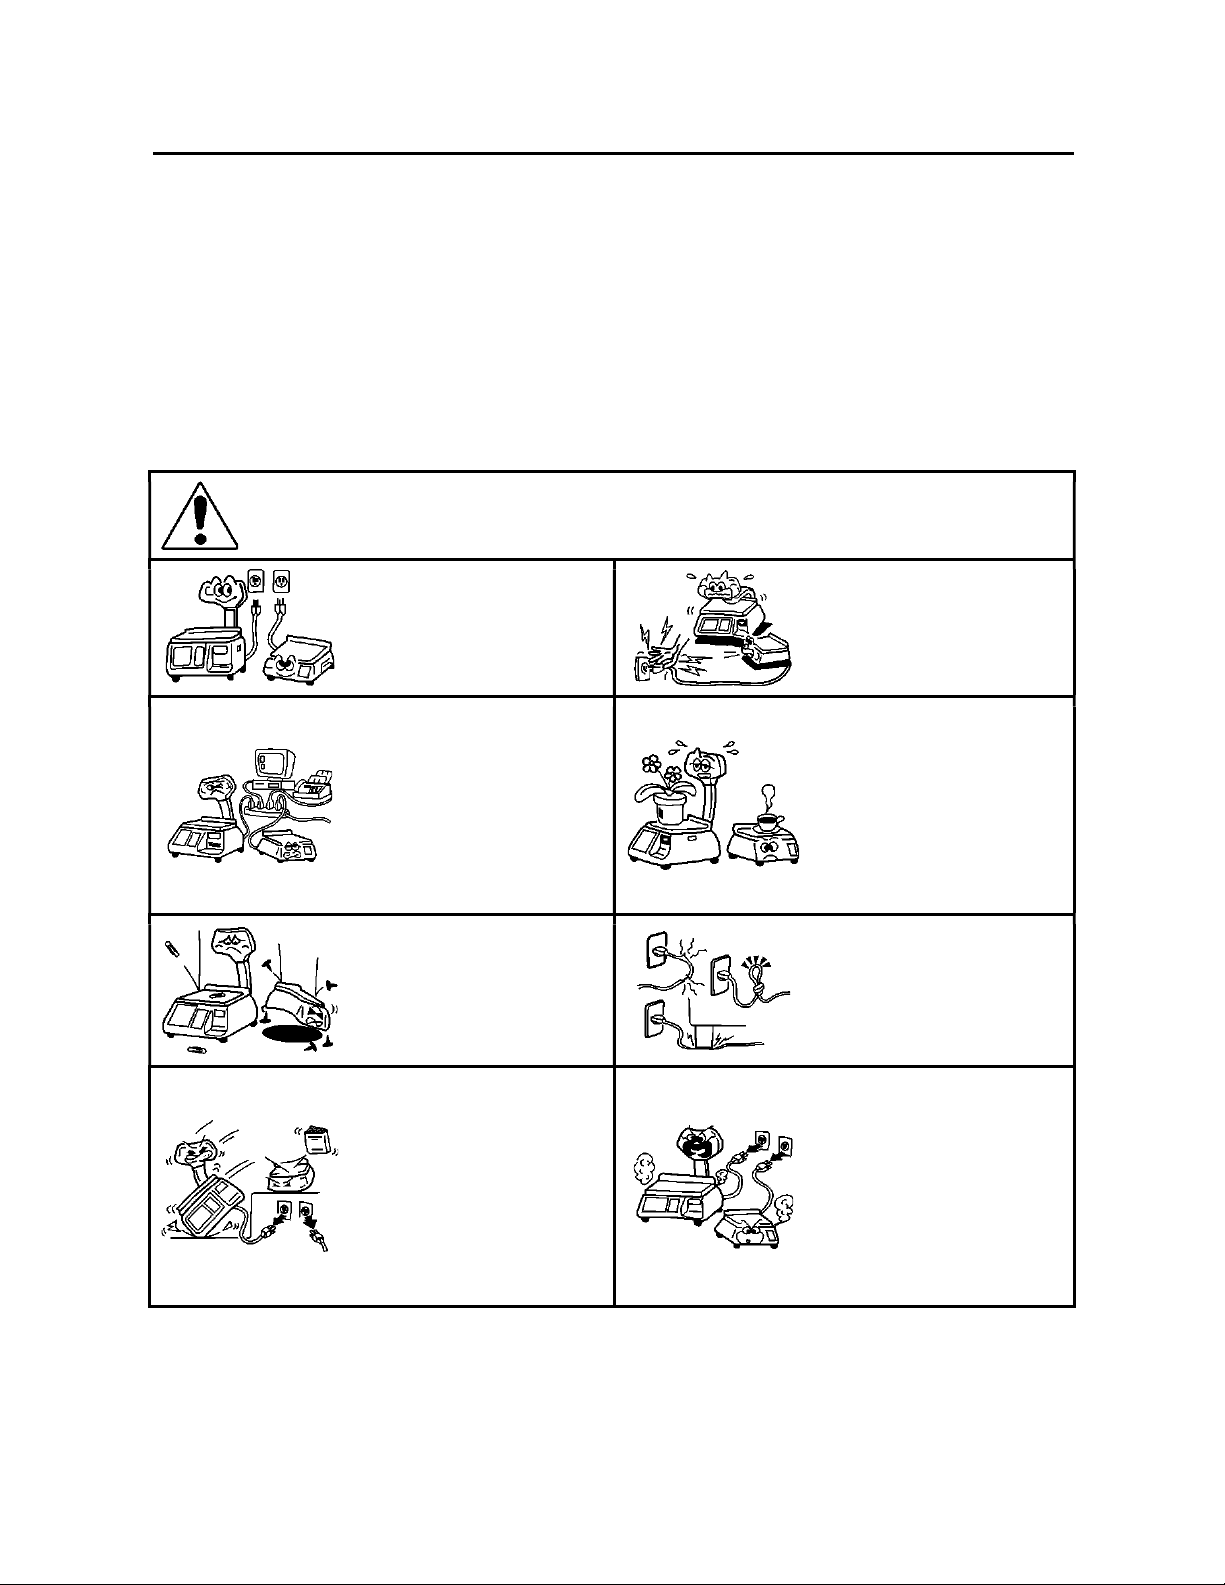
WARNING
This symbol indicates that there is the risk of death or serious personal
injury if the machine is improperly handled during this operation or action.
Do Not Use voltages other than
the voltage (AC) specified on the
rating plate, as this may cause
fire or electric shock.
Do Not plug in or unplug the
power cord plug with we hands
as this may cause electric shock.
If the machines share the same
outlet with any other electrical
appliances which consume large
amounts of power, the voltage
will fluctuate widely each time
these appliances operate. Be
sure to provide an exclusive
outlet for the machine as this
may cause fire or electric shock.
Do Not place metal objects or
water-filled containers such as
flower vases, flower pots or
mugs, etc. on top of the
machines. If metal objects or
spilled liquid enter the
machines, this may cause fire or
electric shock.
Do Not insert or drop metal,
flammable or other foreign
objects into the machines
through any openings, as this
may cause fire or electric shock.
Do Not scratch damage or
modify the power cords. Also,
Do Not place heavy objects on,
pull on, or excessively bend the
cords, as this may cause fire or
electric shock.
If the machines are dropped or
their cabinets are damaged, first
turn off the power switch and
disconnect the power cord plug
from the outlet, then call your
Service Representative.
Continued use of the machine in
a damaged condition may cause
fire or electric shock.
Continued use of the machine in
an abnormal condition such as
when the machine is producing
smoke or strange smells may
cause fire or electric shock. In
these cases, immediately turn
off the power switch and
disconnect the power cord plug
from the outlet. Then contact
your Service Representative.
Safety Summary ELP-301016
( ii )
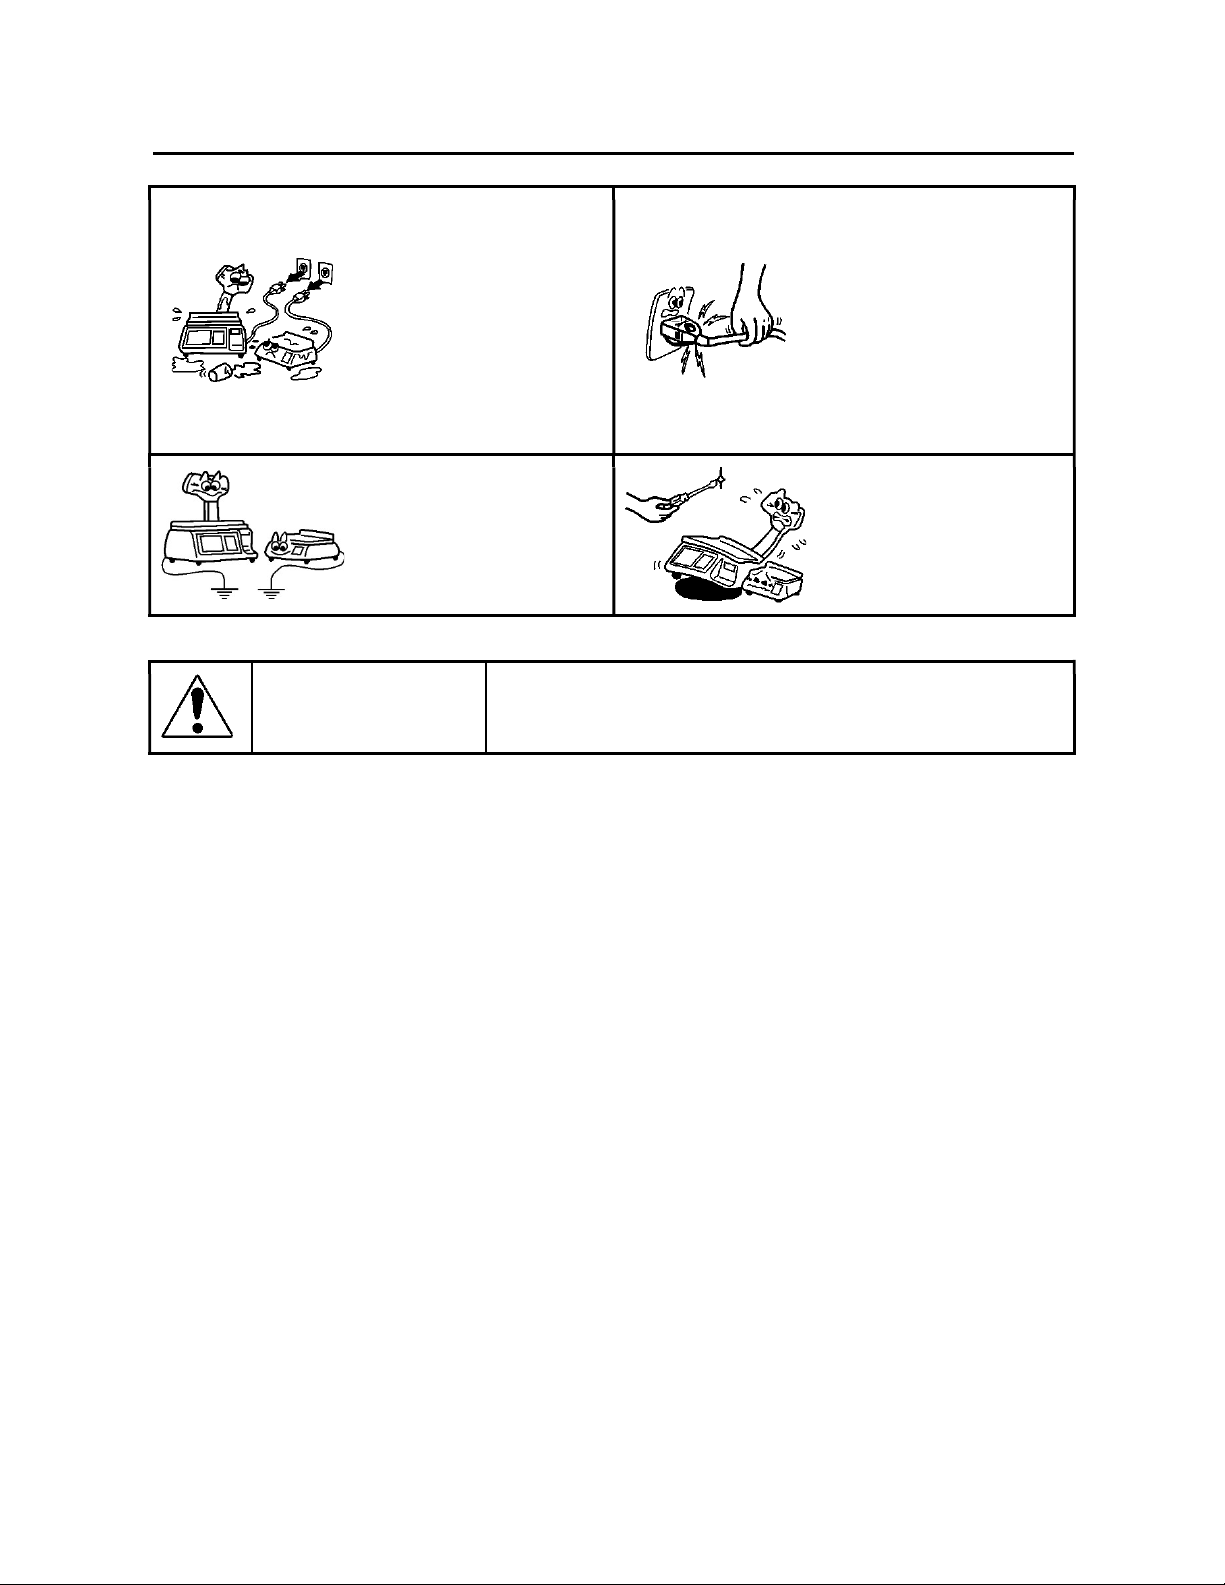
If foreign objects (metal
fragments, water, and liquids)
enter the machine, first turn off
the power switch and
disconnect the power cord
from the outlet, and then
contact your Service
Representative. Continued use
of the machine in that
condition may cause fire or
electric shock.
When unplugging the power
cord, be sure to hold and pull
on the plug portion. Pulling on
the cord portion may cut or
expose the internal wires and
cause fire or electric shock.
Ensure that the equipment is
properly grounded. Extension
cables should also be grounded.
Fire or electric shock could
occur on improperly grounded
equipment.
Do Not remove covers, repair
or modify the machine by
yourself. You may be injured by
high voltage, very hot parts or
sharp edges inside the
machine.
CAUTION
This symbol indicates that there is risk of personal injury or damage to
objects if the machine is improperly handled during this operation or
action.
Precautions
The following precautions will help to ensure that this machine will continue to function correctly.
• Try to avoid locations that have the following adverse conditions:
• Temperatures out of the Specification • Direct Sunlight • High Humidity
• Shared Power Source • Excessive vibration • Dust/Gas
Do Not subject the machine to sudden shocks.
Do Not press the keys too hard. Keys will operate correctly if they are touched lightly.
Clean the cover and keyboard, etc. by wiping with a dry cloth or a cloth soaked with detergent and wrung out
thoroughly. Never use thinner or other volatile solvent for cleaning.
To ensure that the scale is operating correctly, place a known weight on the platter and check it for correct weight
measurement. This should be done every morning before starting normal operations.
When moving the machine, take hold of the case and lift the machine. Never pick up the machine by the remote display
unit.
Do Not place the machine on an unstable or slanted surface as the machine may drop or fall and cause injury.
Use only
DB Scale approved thermal paper supplies. Do Not store thermal paper where it may be exposed to direct
sunlight, high temperatures, high humidity, dust or gas.
Ensure that the scale is operated on a level surface.
Any data stored in the machine may be lost or corrupted during a machine fault. Backup your critical information on a
regular basis.
Try to avoid using the scale on the same power source as high voltage equipment or equipment likely to cause mains
interference.
Unplug the machine whenever you are working inside it or cleaning it.
Do Not block the ventilation slots of the scale as this will cause overheating which may cause damage to the internal
circuit boards or even fire.

ELP-301016
Table of Contents
1. INTRODUCTION ................................................................................................................ 1
1.1 Applicable Model (s) ............................................................................................................ 2
1.2 Accessories ........................................................................................................................... 2
2. SPECIFICATION .................................................................................................................. 3
2.1 Scale Specifications .............................................................................................................. 3
3. APPEARANCE .................................................................................................................... 4
3.1 Scale Dimensions ................................................................................................................. 4
3.2 Label Cassette ...................................................................................................................... 5
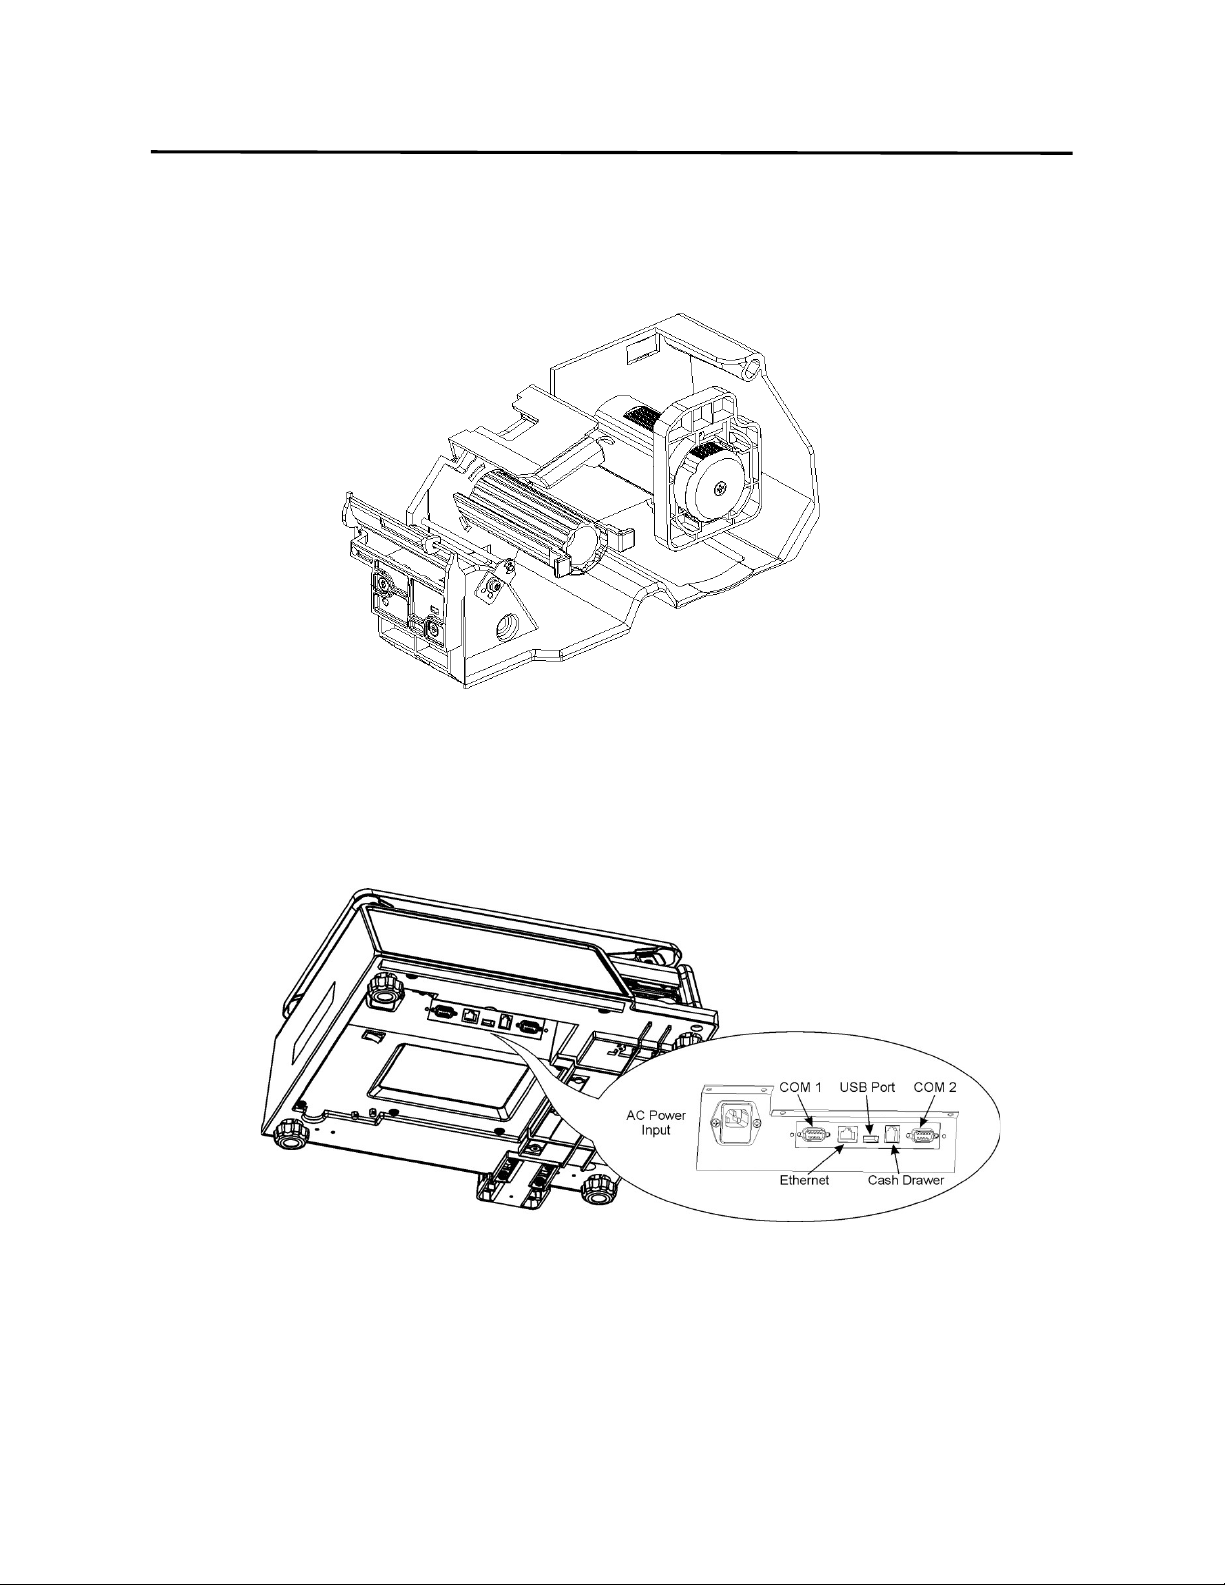
3.3 Connector Panel ................................................................................................................... 5
4. GETTING STARTED ............................................................................................................ 6
4.1 Installing the Scale ............................................................................................................... 6
4.2 Plugging in the Scale ............................................................................................................ 6
4.3 Level Adjustment ................................................................................................................. 7
4.4 Installing the Labels .............................................................................................................. 8
4.4.1 Removing Label Cassette ............................................................................................... 8
4.4.2 Loading the Labels ......................................................................................................... 9
4.5 Turning Power On / Off ...................................................................................................... 11
4.5.1 Turning the Power On ................................................................................................. 11
4.5.2 Turning the Power Off................................................................................................. 11
5. KEYBOARDS .................................................................................................................... 12
5.1 Operations Keyboard ......................................................................................................... 12
5.2 Programming Keyboard ..................................................................................................... 14
6. DISPLAYS AND INDICATORS ............................................................................................ 17
6.1 Operator and Customer Display ........................................................................................ 17
6.2 Individual Displays and Tri Mark Indicators ....................................................................... 18
7. MAIN MENU ................................................................................................................... 19
7.1 Main Menu Modes .............................................................................................................. 19
8. BASIC OPERATIONS ......................................................................................................... 21
8.1 Setting the ZERO point ....................................................................................................... 21
8.2 Recalling a Commodity (PLU) ............................................................................................. 21
8.2.1 Using the PLU key ....................................................................................................... 21

ELP-301016
8.2.2 Using the SPEED Keys .................................................................................................. 22
8.2.3 Using Automatic PLU Recall ........................................................................................ 23
8.3 Using Tare Weight .............................................................................................................. 24
8.3.1 Registering an Unknown Tare weight ......................................................................... 24
8.3.2 Registering a Known Tare weight ............................................................................... 24
8.3.3 Using a Preset Tare weight ......................................................................................... 25
8.3.4 Clearing Tare Weights ................................................................................................. 25
8.4 Sales Mode Operations ...................................................................................................... 26
8.4.1 Weigh Mode PLU ........................................................................................................ 26
8.4.2 Non Weigh Mode PLU ................................................................................................. 27
8.4.3 By Count Mode PLU .................................................................................................... 28
8.5 Using the Override Key ...................................................................................................... 29
8.5.1 Weigh Mode Override ................................................................................................ 29
8.5.2 Non Weigh Mode Override ......................................................................................... 31
8.5.3 By Count Mode Override ............................................................................................ 32
8.6 Miscellaneous PLU Operations .......................................................................................... 33
8.6.1 MISC Weigh Mode (without Tare Weight) ................................................................. 33
8.6.2 MISC Weigh Mode (with Tare Weight) ....................................................................... 33
8.6.3 MISC Non Weigh Mode ............................................................................................... 34
8.6.4 MISC By Count Mode .................................................................................................. 34
8.7 Preset Count Operations .................................................................................................... 35
8.7.1 Preset Count using Non Weight PLU .......................................................................... 35
8.7.2 Preset Count using By Count PLU ............................................................................... 36
8.8 SAVE Key Operations.......................................................................................................... 37
8.8.1 Weigh Mode Operations with SAVE key ..................................................................... 37
8.8.2 Non Weigh Mode Operations with SAVE key ............................................................. 38
8.8.3 By Count Mode Operations with SAVE Key ................................................................ 39
8.9 PLU Type Change Operations ............................................................................................. 40
9. Programming (S Mode) ................................................................................................... 41
9.1 PLU Fields Visible (S0 Mode) .............................................................................................. 42
9.1.1 Selecting PLU Fields .................................................................................................... 43
9.2 PLU File (S1 Mode) ............................................................................................................. 57
9.2.1 Programming a Weigh Mode PLU (S1 Mode) ............................................................. 57

ELP-301016
9.2.2 Programming a Non Weigh Mode PLU (S1 Mode) ..................................................... 63
9.2.3 Programming a By Count Mode PLU (S1 Mode) ......................................................... 69
9.2.4 Deleting a PLU ............................................................................................................. 75
9.3 Shop Name File (S2 Mode) ................................................................................................. 76
9.3.1 Entering Shop Name Information ............................................................................... 76
9.3.2 Deleting Shop Name Information ............................................................................... 78
9.4 Department File (S3 Mode)................................................................................................ 79
9.4.1 Entering Department Information .............................................................................. 79
9.4.2 Deleting Department Information .............................................................................. 81
9.5 Main Group File (S4 Mode) ................................................................................................ 82
9.5.1 Entering Main Group Information .............................................................................. 82
9.5.2 Deleting Main Group Information .............................................................................. 84
9.6 PLU Key File (S5 Mode) ...................................................................................................... 85
9.6.1 Programming a Speed Key on Level 1 ......................................................................... 85
9.6.2 Programming a Speed Key Using Multiple Levels ....................................................... 87
9.7 FUNC Key File (S6 Mode) ................................................................................................... 90
9.7.1 Assigning Function Keys .............................................................................................. 90
9.8 Upgrade (S7 Mode) ........................................................................................................... 93
9.9 System Time File (S8 Mode) .............................................................................................. 95
9.10 Browse System File (S9 Mode) ......................................................................................... 97
9.11 Browse CAL Record (S10 Mode) ................................................................................... 101
9.12 MMX – Discount Rate (S11 Mode) ................................................................................. 103
9.12.1 Entering a PLU using Discount Rate ........................................................................ 103
9.12.2 Deleting a Discount ................................................................................................. 106
9.13 MMX –New Price (S12 Mode) ........................................................................................ 107
9.13.1 Entering a PLU Discount using New Price ............................................................... 107
9.13.2 Deleting a Discount ................................................................................................. 110
9.14 Clerk Information (S13 Mode) ....................................................................................... 111

ELP-301016

1. Introduction ELP-301016
1. Introduction
1
1. INTRODUCTION
Thank you for purchasing the
DB Scale Corporation’s DB-300 Series Label Printing Scale. The DB-
300 Series has many features and functions designed for ease of operation and customer
satisfaction. We believe that all of your needs will now be fully satisfied. Please read and
understand this manual to help obtain maximum performance for this product.
Most queries can be answered from the information contained in this manual. Please keep it in
a safe and convenient place for future reference.
Scale Features Overview
60 lb Weighing Capacity
32 bit ARM Multi Core Processor
Program and maintain up to 30,000 PLU’s
Time and Date controlled Sales Promotions
Ethernet Interface is standard (WiFi optional)
USB Interface (max 8GB) for Backing Up and Restoring data
File Maintenance can be performed at the Scale or via Software
Print speeds up to 4ips (100mm)
Utilizes Label Cassette for quick and convenient label replacement
Custom Bar Code Formats can be programmed
Multi language label printing available
Store up to 50 custom label formats
The list above is just a few of the many features included in the DB-300 Series Label Printing
Scale. As you proceed through this manual you will find many more exciting and easy to use
functions and features that will help to maintain your pricing integrity.

1. Introduction ELP-301016
1.1 Applicable Model (s)
2
1.1 Applicable Model (s)
DB-300-B-60-US
DB-300-P-60-US
The description of the model number is as follows:
DB-300 – B – 60 – US
1.2 Accessories
While unpacking the scale, please check to make sure the following accessories are included.
Model Type:
B: Bench Model
P: Pole Model
Weighing Capacity:
60: 60 lb dual range
Destination Country:
US: United States
CA: Canada
Owner’s Manual
( 1 Copy )
Display Screws ( X4)
TR-4x10
Labels
( 1 roll )
Ethernet Cable
( Crossover )
Label Cassette
Sealing Wire

2. Specification ELP-301016
2.2 Scale Options
3
2. SPECIFICATION
2.1 Scale Specifications
Item 60 lb scale (US model)
Maximum Capacity 60 lb
Minimum Scale Division 0.01 lb ( 0 ~ 30 lb) 0.02 lb (31 ~ 60 lb)
Maximum Tare 2 lbs
Display Range 0 to 60.05 lb
Unit Price Pre-settable $ 0.01 to $ 99.99
Minimum Price Display $ 0.01
Display Operator and Customer
LED (White on Blue)
Weight 5 digits, Unit Price 6 digits,
Tare Weight 4 digits, Total Price 7 digits
Keyboard Operation and Built In Programming
Operation – 34 Function Keys
Speed Key - 168 Keys (56 x 3 Levels)
Capacity of PLU Memory 30,000 PLU’s
Print Head Type Thermal Print Head
Issue Method Strip, Receipt
Dot Density 202 Dots per inch (8dots/mm)
Print Speed 4 IPS (100mm/sec)
Available Media Width 40mm to 60mm (including backing paper)
Interface LAN, Wireless LAN
Dimensions (approx.) 17.7 inches (W) x 18.4 inches (D) x 6.1 inches (H)
Weight 36.6 lb (16.6 kg)
Power Requirement AC 85V to 138V, 50/60 Hz ±2%
Power Consumption 90W/1.5A (when printing) 40W/0.6A (Stand by)
Temperature Limits 23°F to 95°F (-5°C to +35°C)
Relative Humidity 30% to 80% (No condensation)

3. Appearance ELP-301016
3.1 Scale Dimensions
4
3. APPEARANCE
3.1 Scale Dimensions
3. Appearance ELP-301016
3.2 Label Cassette
5
3.2 Label Cassette
3.3 Connector Panel
4. Getting Started ELP-301016
4.1 Installing the Scale
6
4. GETTING STARTED
4.1 Installing the Scale
The scale should be installed on a sturdy level surface with an adequate ventilation area around
it. There should also be enough area around the scale to allow for easy operation of the scale,
meaning room to change label rolls when necessary, etc. Failure to do so will decrease the
overall operational efficiency of the scale.
CAUTION
This symbol indicates that there is risk of personal injury
or damage to objects if the machine is improperly
handled during this operation or action.
When installing the scale avoid locations that place the scale in areas of:
• direct sunlight • temperatures outside of the specifications • high humidity
• vibration • rapid temperature changes • open flame
• moisture • devices that produce electrical interference • dust
• wind
Failure to follow these suggestions may result in incorrect operation of the scale.
WARNING
This symbol indicates that there is risk of personal injury
or damage to objects if the machine is improperly
handled during this operation or action.
4.2 Plugging in the Scale
Only insert the plug into a properly rated outlet.
Do Not plug the scale into an outlet with other electrical appliances. Other electrical appliances
may consume a large amount of power when operating which may affect the scale’s operation.
Do Not use an extension cord.
Do Not insert or remove the plug with wet hands.
Do Not excessively bend, pull on, damage, place a heavy object on or heat the power cord.
Make sure to fully insert the plug into the AC outlet.
Make sure to only hold and pull on the plug when inserting or removing the power cord. Pulling
on the cord instead of the plug may bread the wires internally causing a fire or shock hazard.
Make sure the scale power is off prior to inserting the plug. Failure to do so may result in a short
circuit and machine failure.
4. Getting Started ELP-301016
4.3 Level Adjustment
7
CAUTION
This symbol indicates that there is risk of personal injury
or damage to objects if the machine is improperly handled
during this operation or action.
Use care when adjusting the scale legs to prevent squashing the power cord.
Damaging the power cord could cause fire or electrical shock.
To prevent the level adjustment from being changed accidentally, secure the
adjustable legs with the locking nut after leveling.
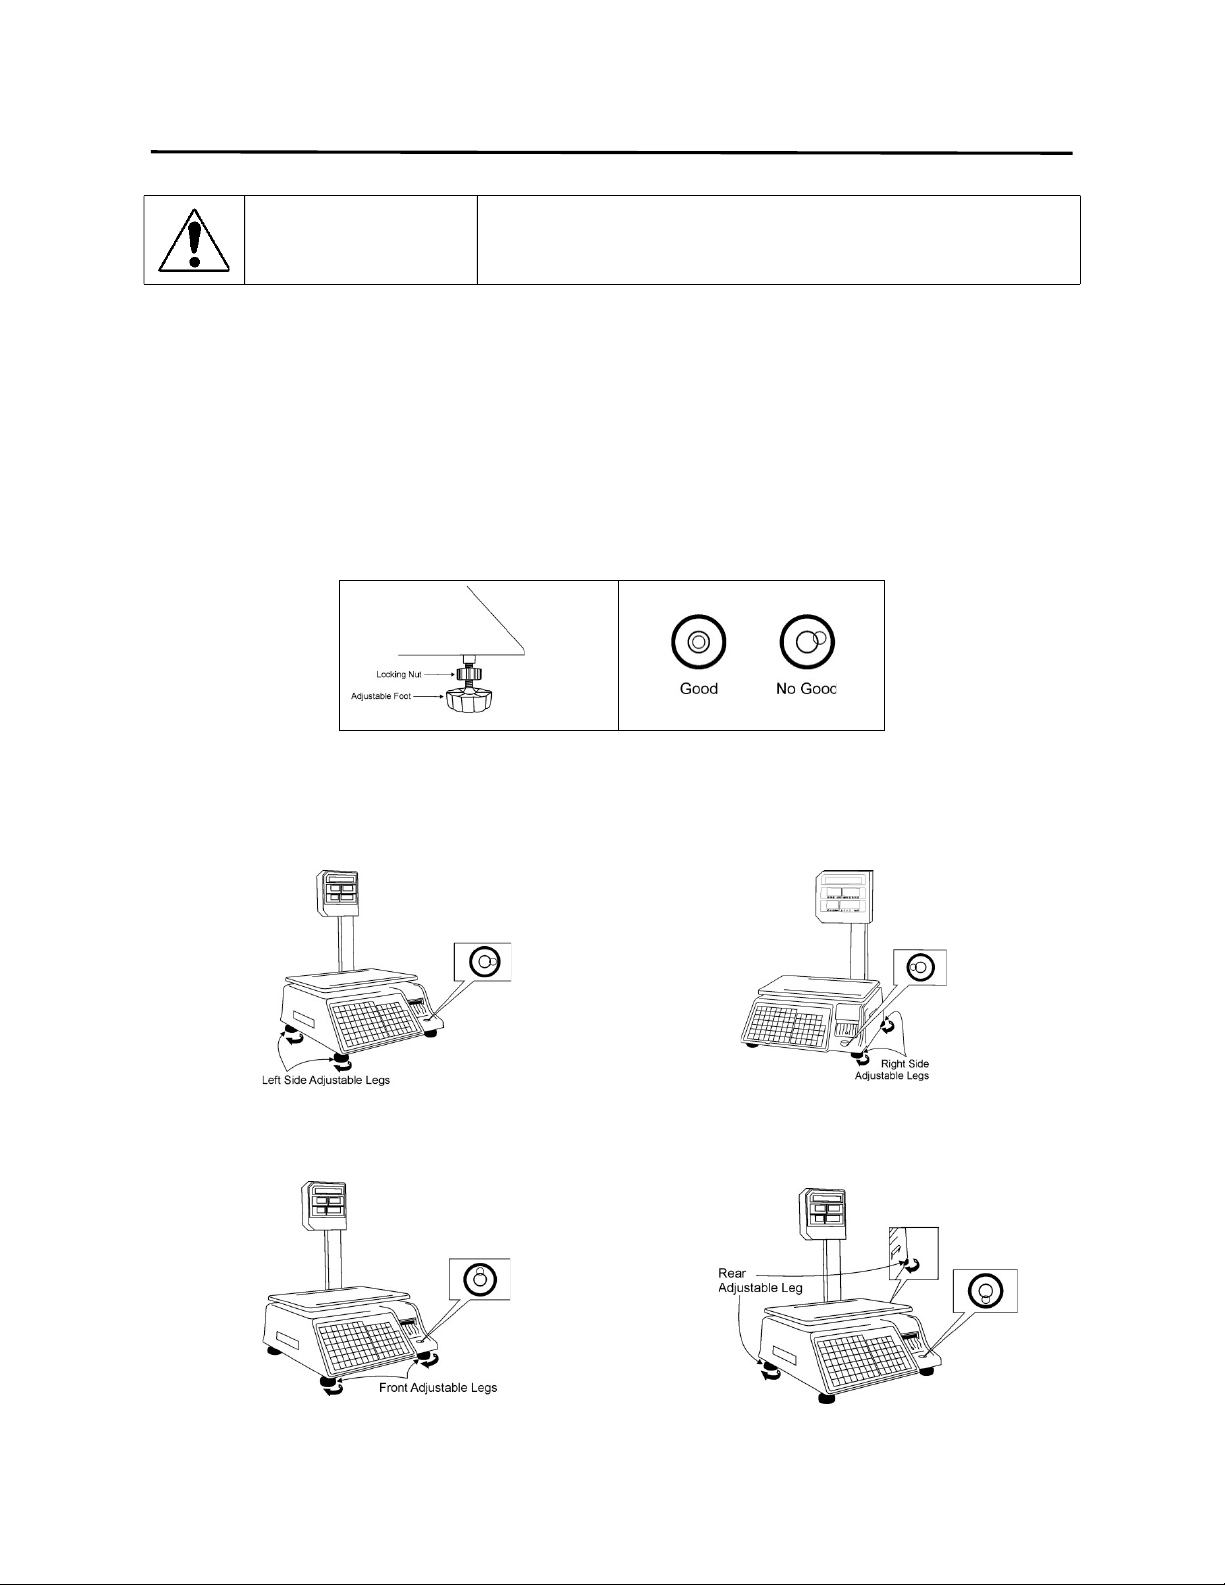
4.3 Level Adjustment
For correct weighing operations the scale should leveled prior to use. Turn the four adjustable
legs so that the bubble in the level gauge is positioned inside the center circle. Then secure the
locking nut.
When the Level Bubble is to the RIGHT.
Turn the Left Side Adjustable Legs Clockwise, or turn
the Right Side Adjustable Legs Counterclockwise.
When the Level Bubble is to the LEFT.
Turn the Right Side Adjustable Legs Clockwise, or
turn the Left Side Adjustable Legs Counterclockwise.
When the Level Bubble is to the BACK.
Turn the Front Side Adjustable Legs Clockwise, or turn
the Rear Adjustable Legs Counterclockwise.
When the Level Bubble is to the FRONT.
Turn the Rear Adjustable Legs Clockwise, or turn the
Front Side Adjustable Legs Counterclockwise.
4. Getting Started ELP-301016
4.4 Installing the Labels
8
4.4 Installing the Labels
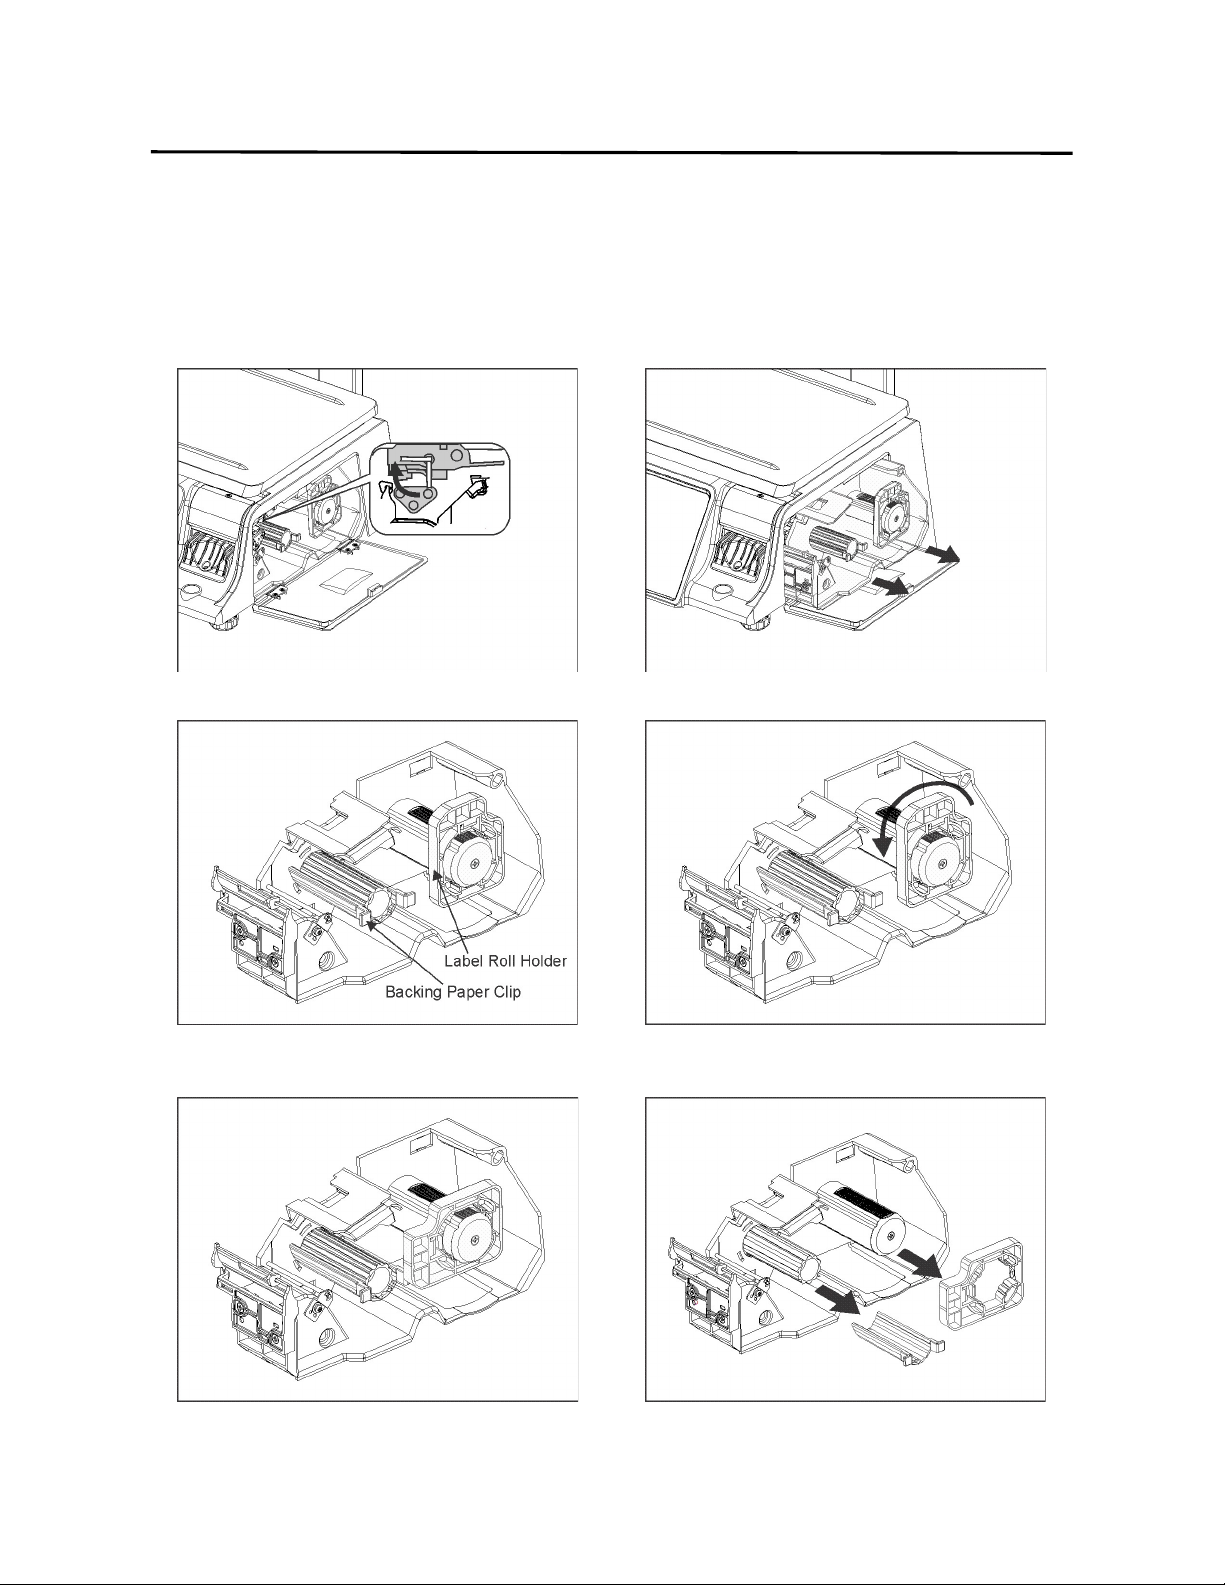
4.4.1 Removing Label Cassette
1. Open Side Door and Open the Print Head. 2. Slide Label Cassette Out of Scale.
3. Label Cassette (Complete) 4. Turn Label Roll Holder counterclockwise 90 degrees.
5. Label Roll Holder rotated 90 degrees.
6. Remove Label Roll Holder and the Backing Paper
Clip by pulling them in the direction of the arrows.

4. Getting Started ELP-301016
4.4 Installing the Labels
9
4.4.2 Loading the Labels
1. Empty Label Cassette (Complete) 2. Place the Roll of Labels on the Label Roll Spool.
3. Thread the Backing Paper Portion of the roll of
labels through the Sensor Plate.
4. Continue threading the backing paper over the
Label Stripping Bar and under the Take Up Spool.
5. While holding the backing paper around the Take
Up Spool, snap the Backing Paper Clip in place.
6. The Backing Paper Clip should be secured in place.
4. Getting Started ELP-301016
4.4 Installing the Labels
10
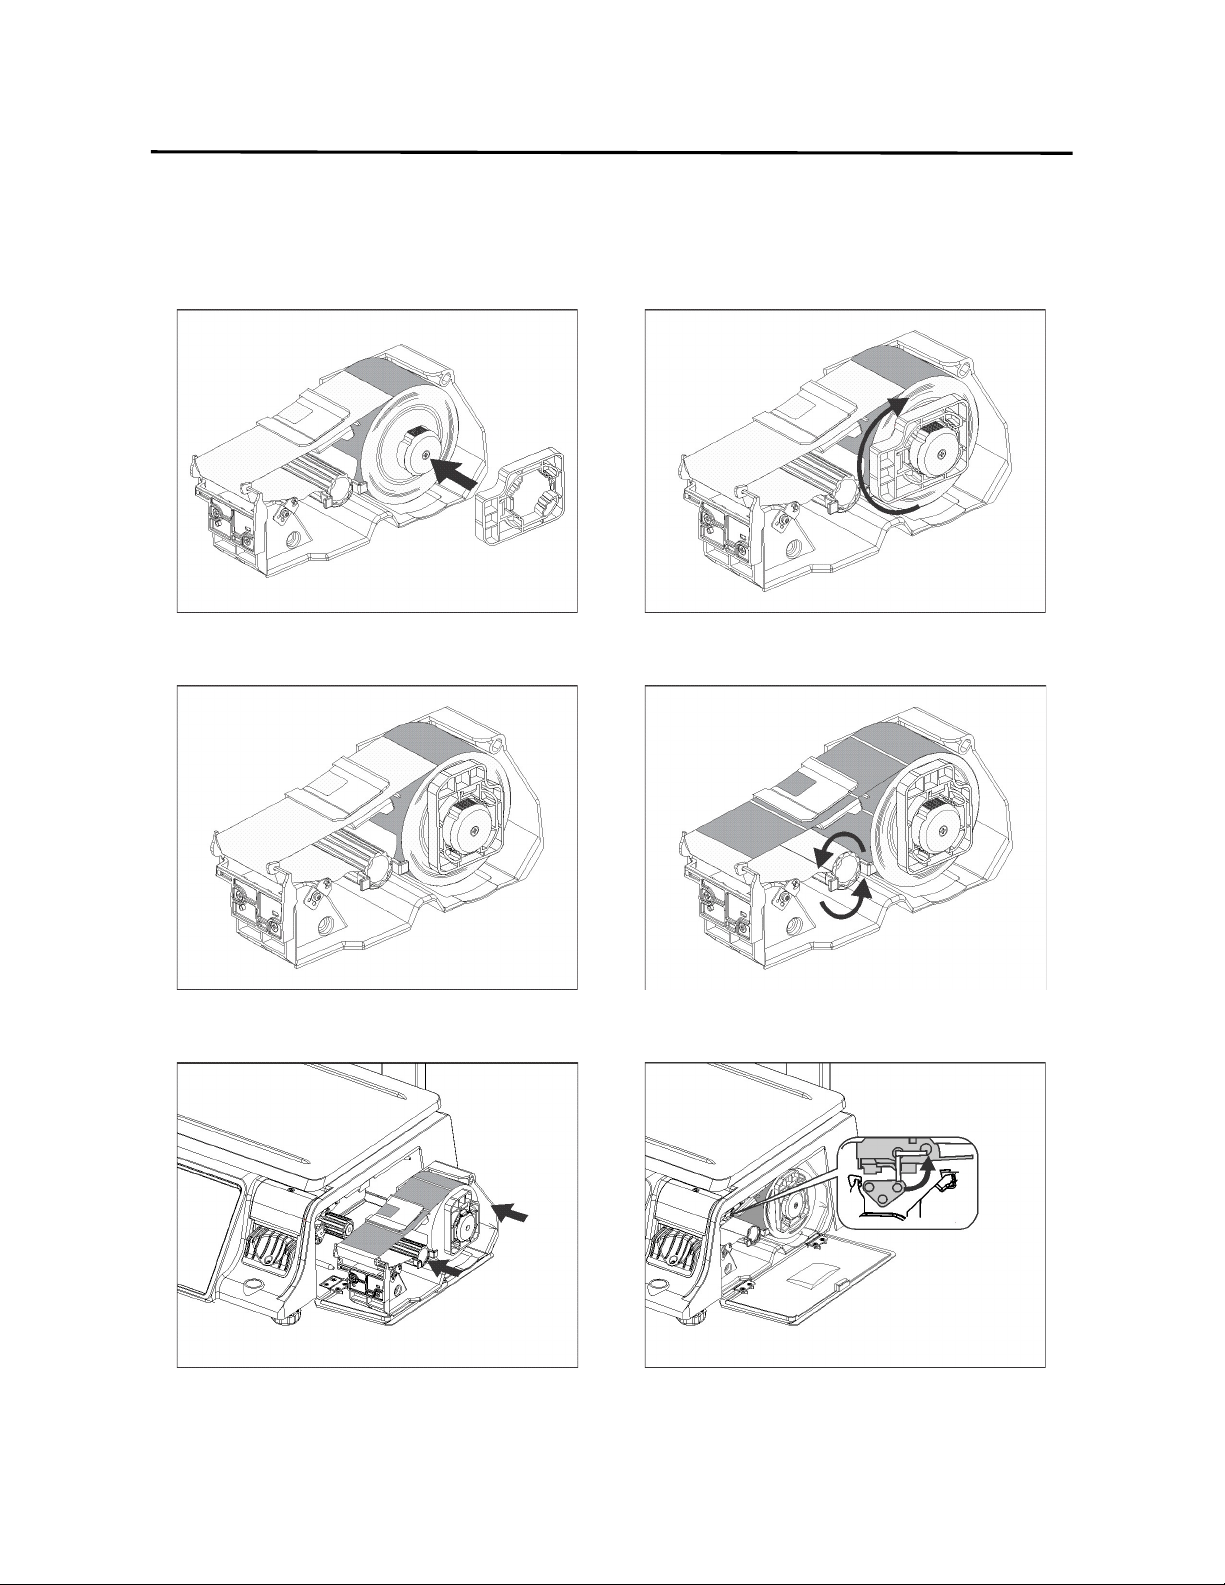
7. Place the Label Roll Holder on the Label Roll Spool
as shown below.
8. Rotate the Label Roll Holder clockwise 90 degrees
until it locks in place.
9. The Label Roll Holder should be secured in place. 10. Turn the Backing Paper Spool with Clip counter
clockwise to advance the labels as shown below.
11. Install the Label Cassette with labels into the scale. 12. Close the Print Head. Close the Side Door. Press
the Esc/Feed key one time.
4. Getting Started ELP-301016
4.5 Turning Power On/Off
11
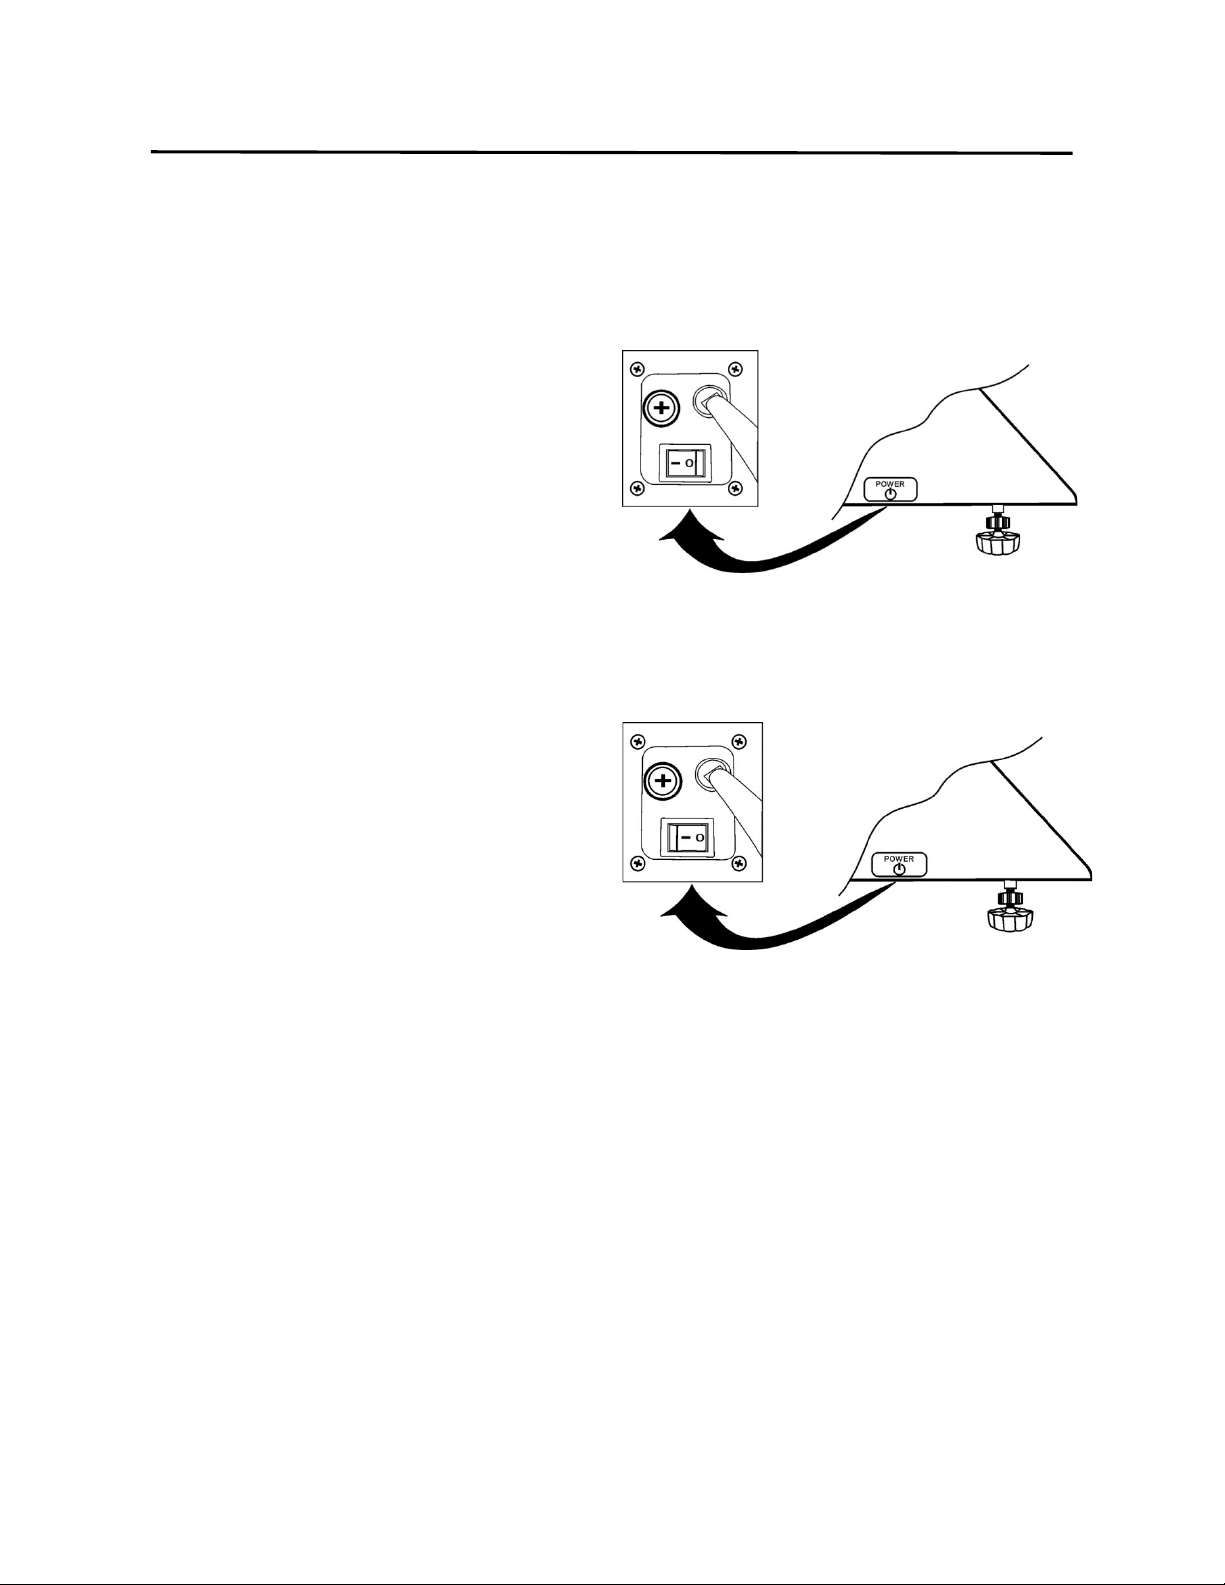
4.5 Turning Power On / Off
4.5.1 Turning the Power On
1. Make sure that the power plug is fully
inserted into the AC outlet.
2. Make sure that nothing is located on
the scale platter.
3. Turn the power switch to the ON ( 1 )
position.
4.5.2 Turning the Power Off
1. Do Not turn Off the power during
printing
2. Do Not turn Off the power in the
middle of an operation.
3. Turn the power switch to the OFF ( 0 )
position.
5. Keyboards ELP-301016
5.1 Operations Keyboard
12
5. KEYBOARDS
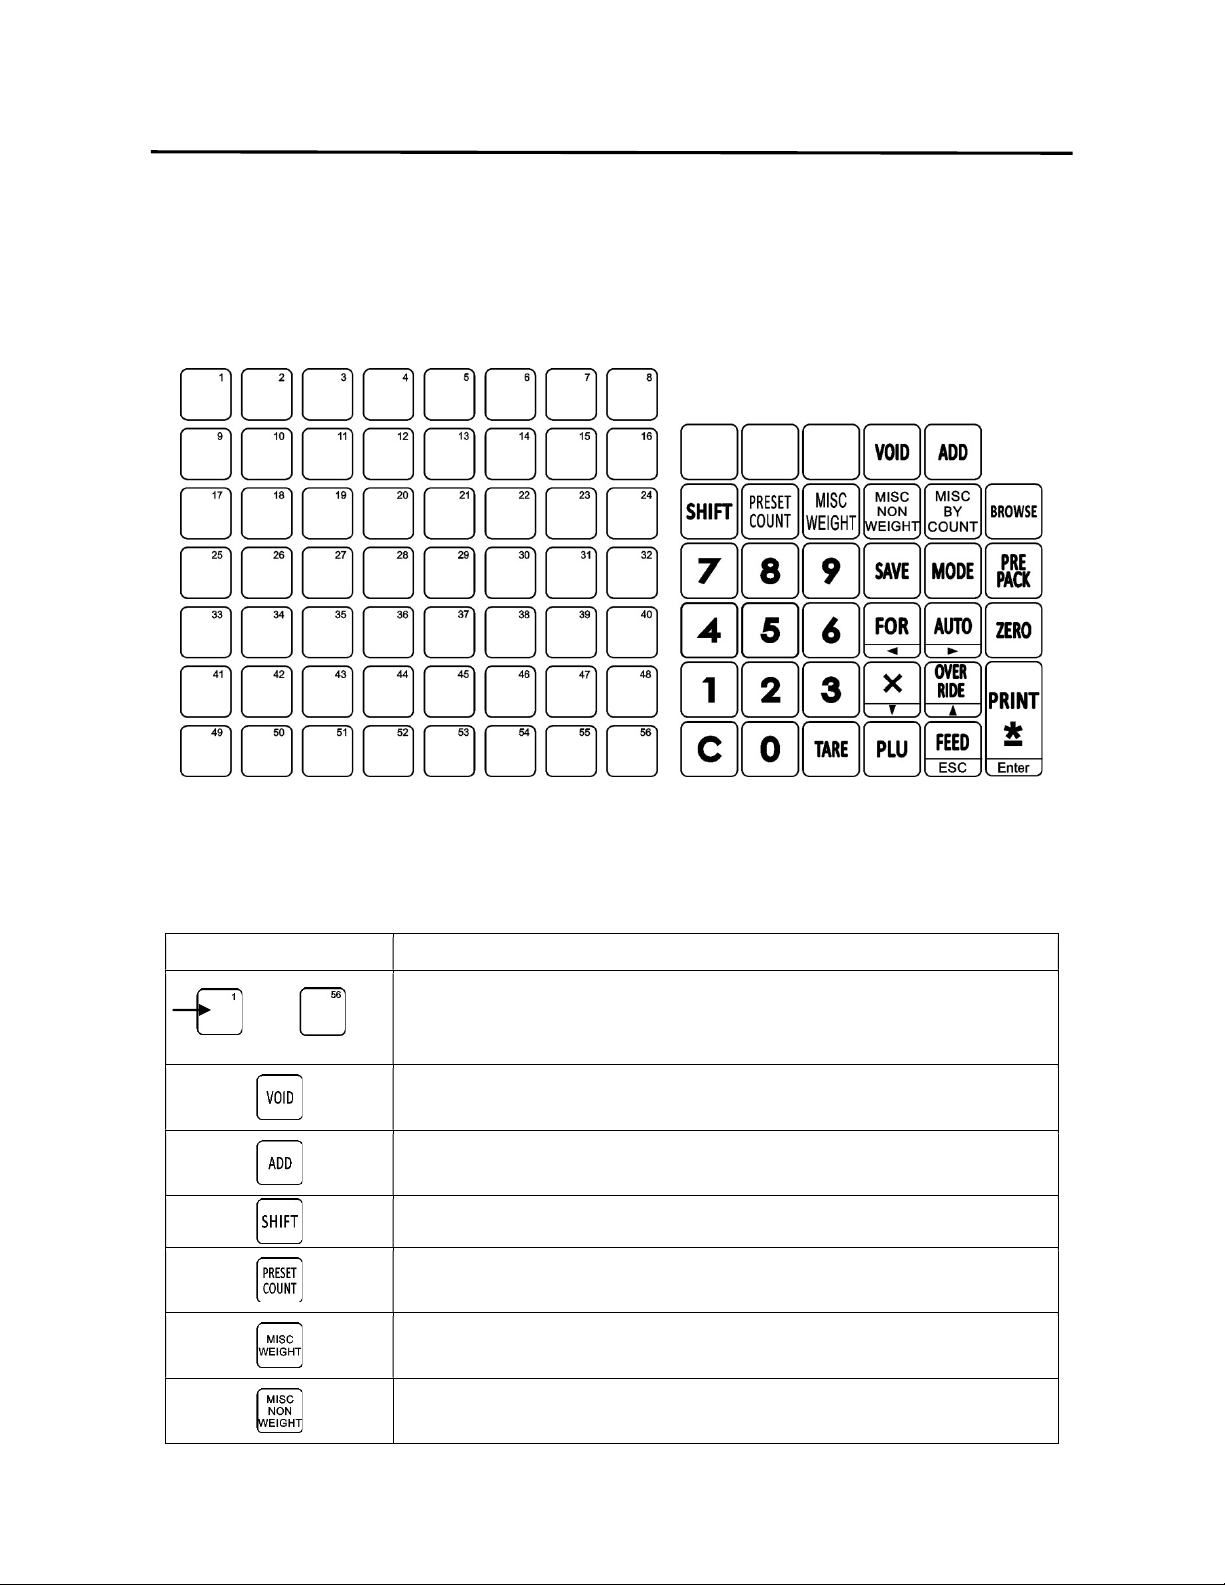
5.1 Operations Keyboard
The Operations Keyboard consists of 56 (x3 levels) Speed Keys and 34 Function Keys. All of the
key functions are explained below.
Several keys have multiple purposes; please refer to the appropriate keyboard section for the
correct key function explanation.
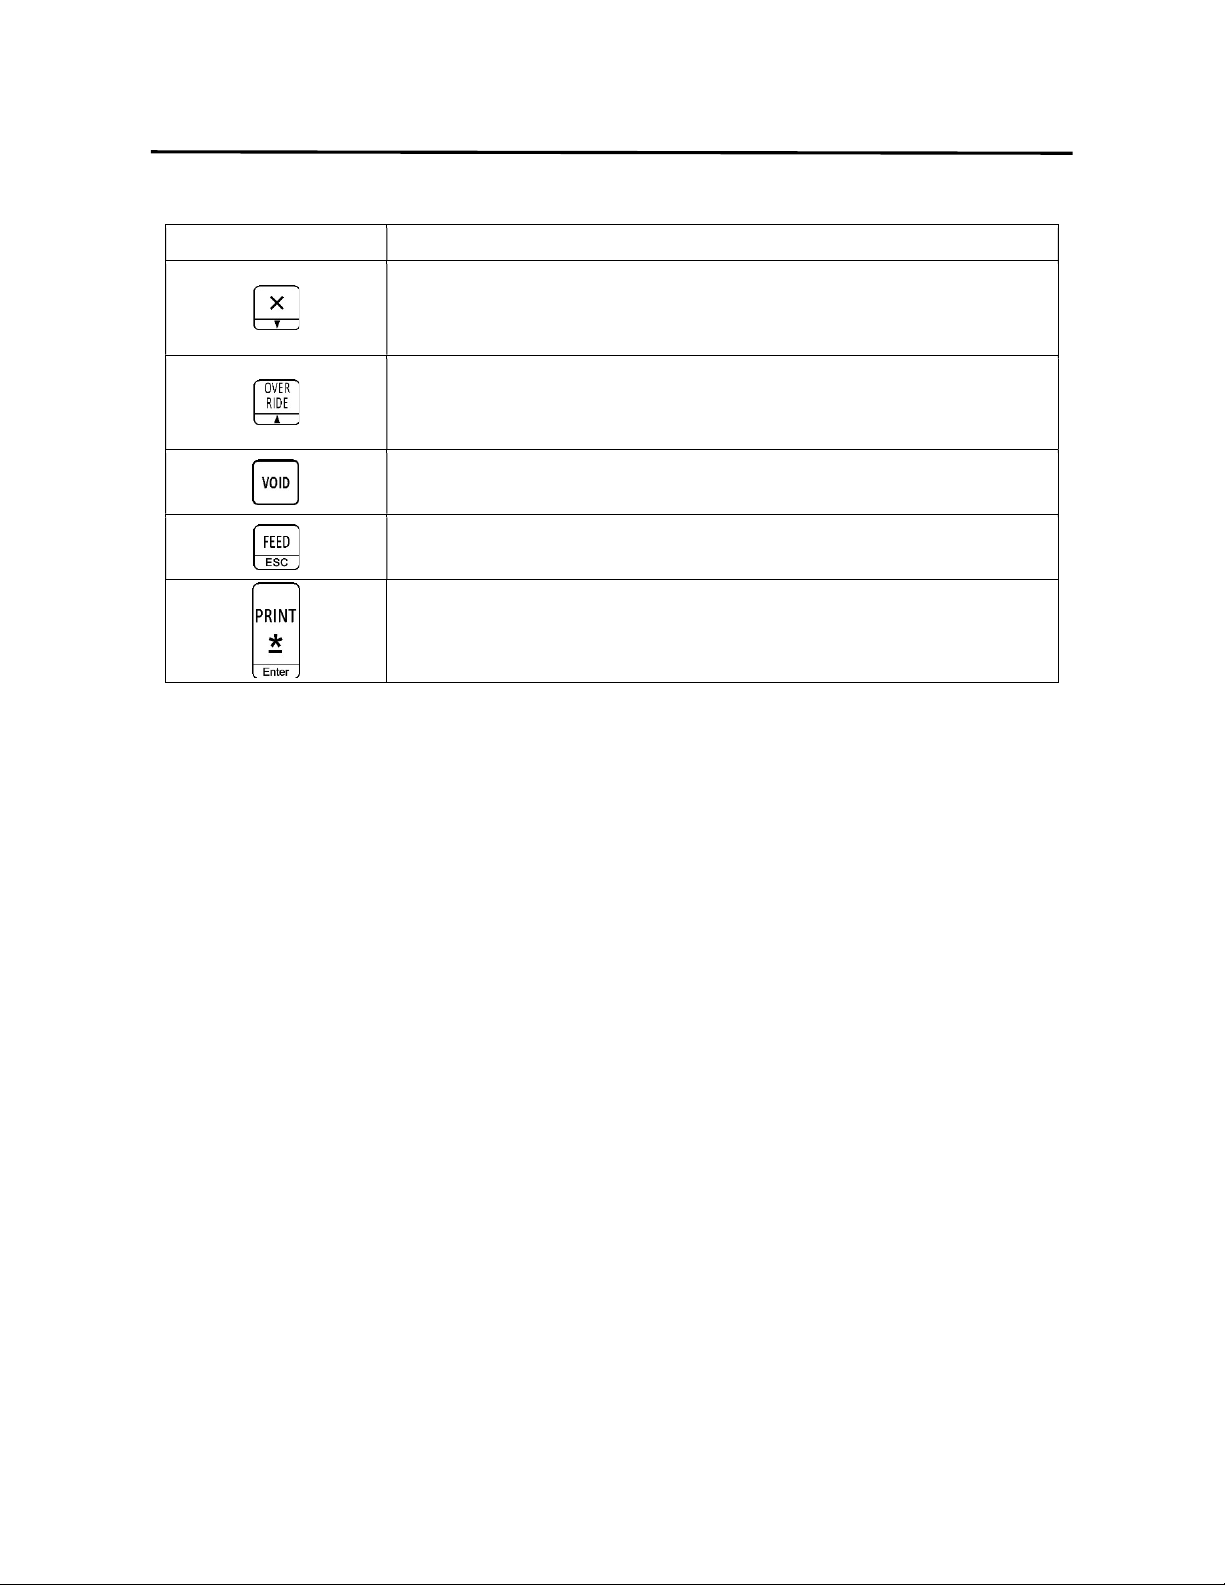
Key Function
Keys numbered 1 to 56 (3 levels) can be used for quick recall of
PLU’s or may be programmed as a special function key.
Used to Void or remove an item from an accumulated/sum
transaction.
Used to Add an item to the accumulated/sum transaction. Used
to issue a label in the accumulation/sum mode.
Used to access Level 2 and Level 3 of the Speed Keys.
Used to enter a known quantity of labels to be issued for a Non
Weight or By Count type PLU.
Used to conduct a transaction for a Weight item that is not
programmed in the scale’s memory.
Used to conduct a transaction for a Non Weight item that is not
programmed in the scale’s memory.
5. Keyboards ELP-301016
5.1 Operations Keyboard
13
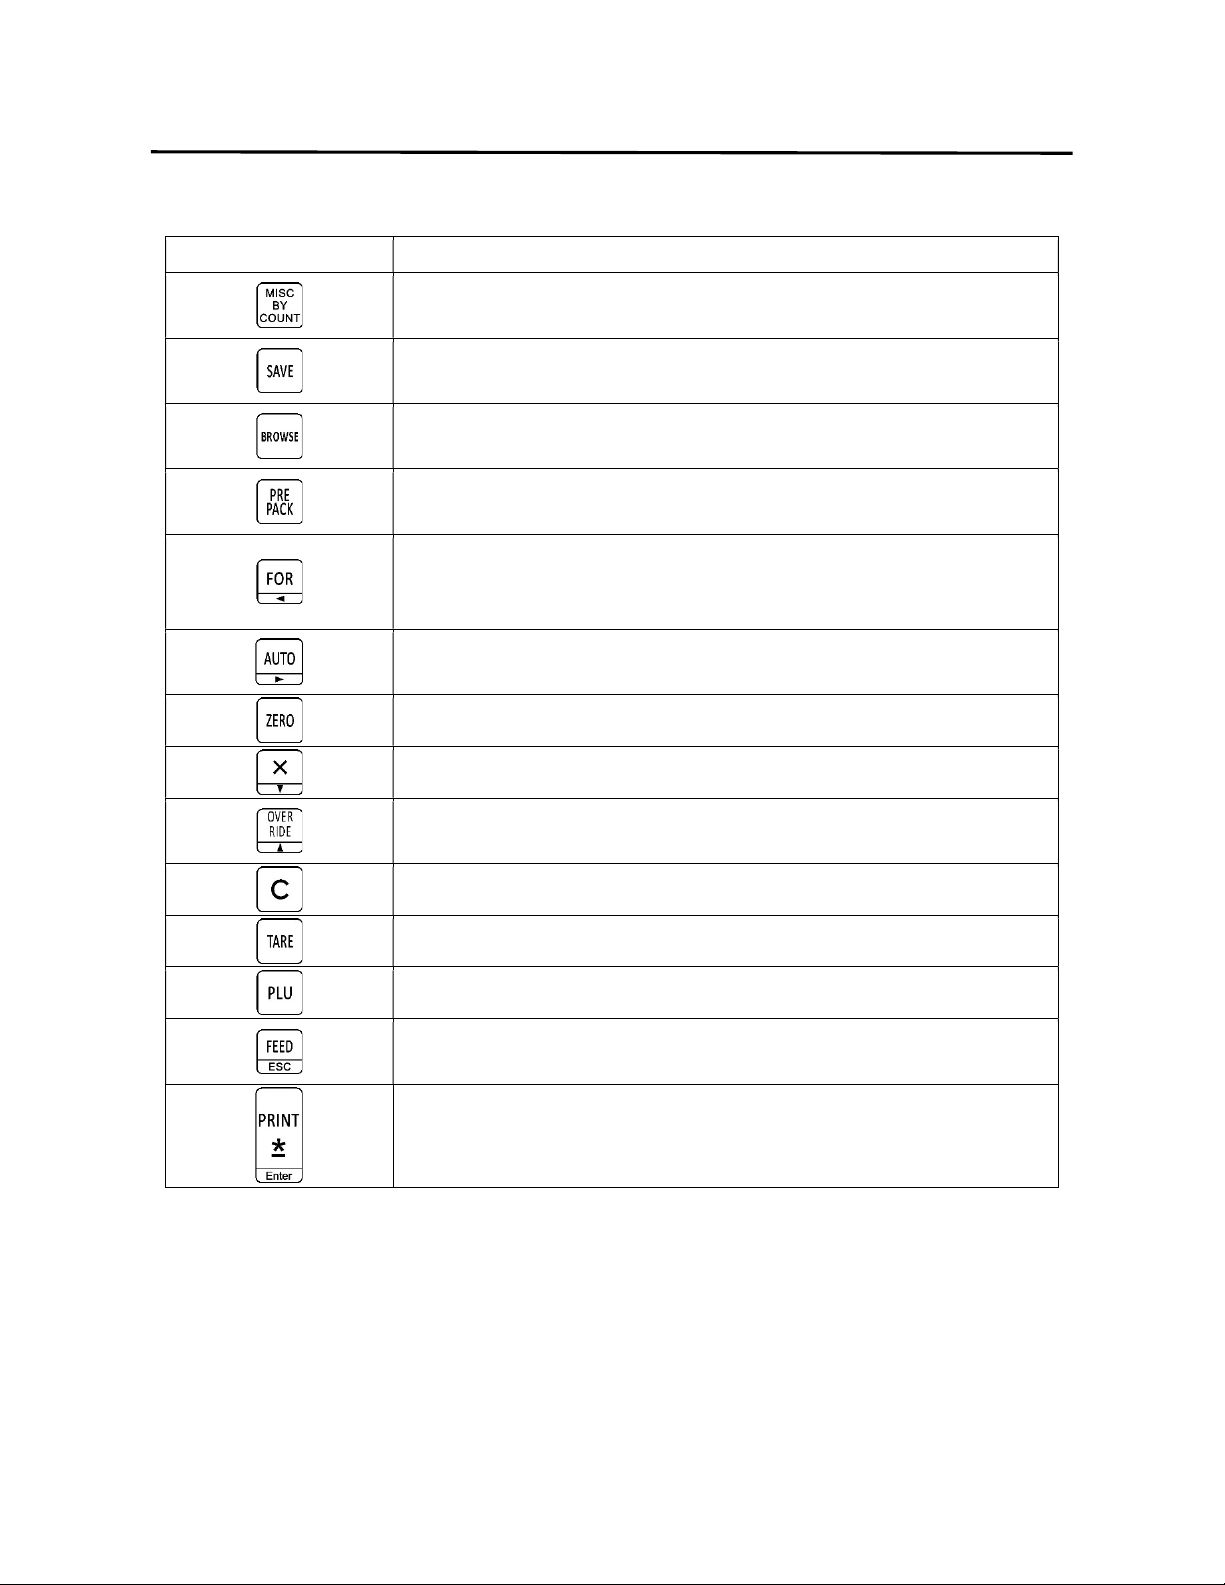
Key Function
Used to conduct a transaction for a By Count item that is not
programmed in the scale’s memory.
Used to save the Unit Price and Tare Weight of a recalled
commodity for use in multiple transactions.
Used to browse through the PLU file. Also used to step through
the communications setup. (based on scale model)
Used to place the scale in the Prepack mode for backroom
operations.
Used to enter the quantity of a commodity in Non Weight or By
Count modes of operation. Used to change the PLU Type of a
Weigh Mode PLU. Left arrow key is not used.
Used to place the scale in the Automatic Print mode. Right arrow
key is not used.
Used to reset the Zero reference count of the scale.
The X key is not used in the operations mode.
Used to implement Unit Price, Tare Weight or Quantity changes
in a recalled commodity. May be password protected.
Used to clear keyboard input errors.
Used to manually enter a Tare Weight for a commodity.
Used to recall a programmed commodity.
Used to issue a blank label. The ESC function is not used in the
operation mode.
Used to manually print a label. The Enter function is not used in
the operation mode.
5. Keyboards ELP-301016
5.2 Programming Keyboard
14
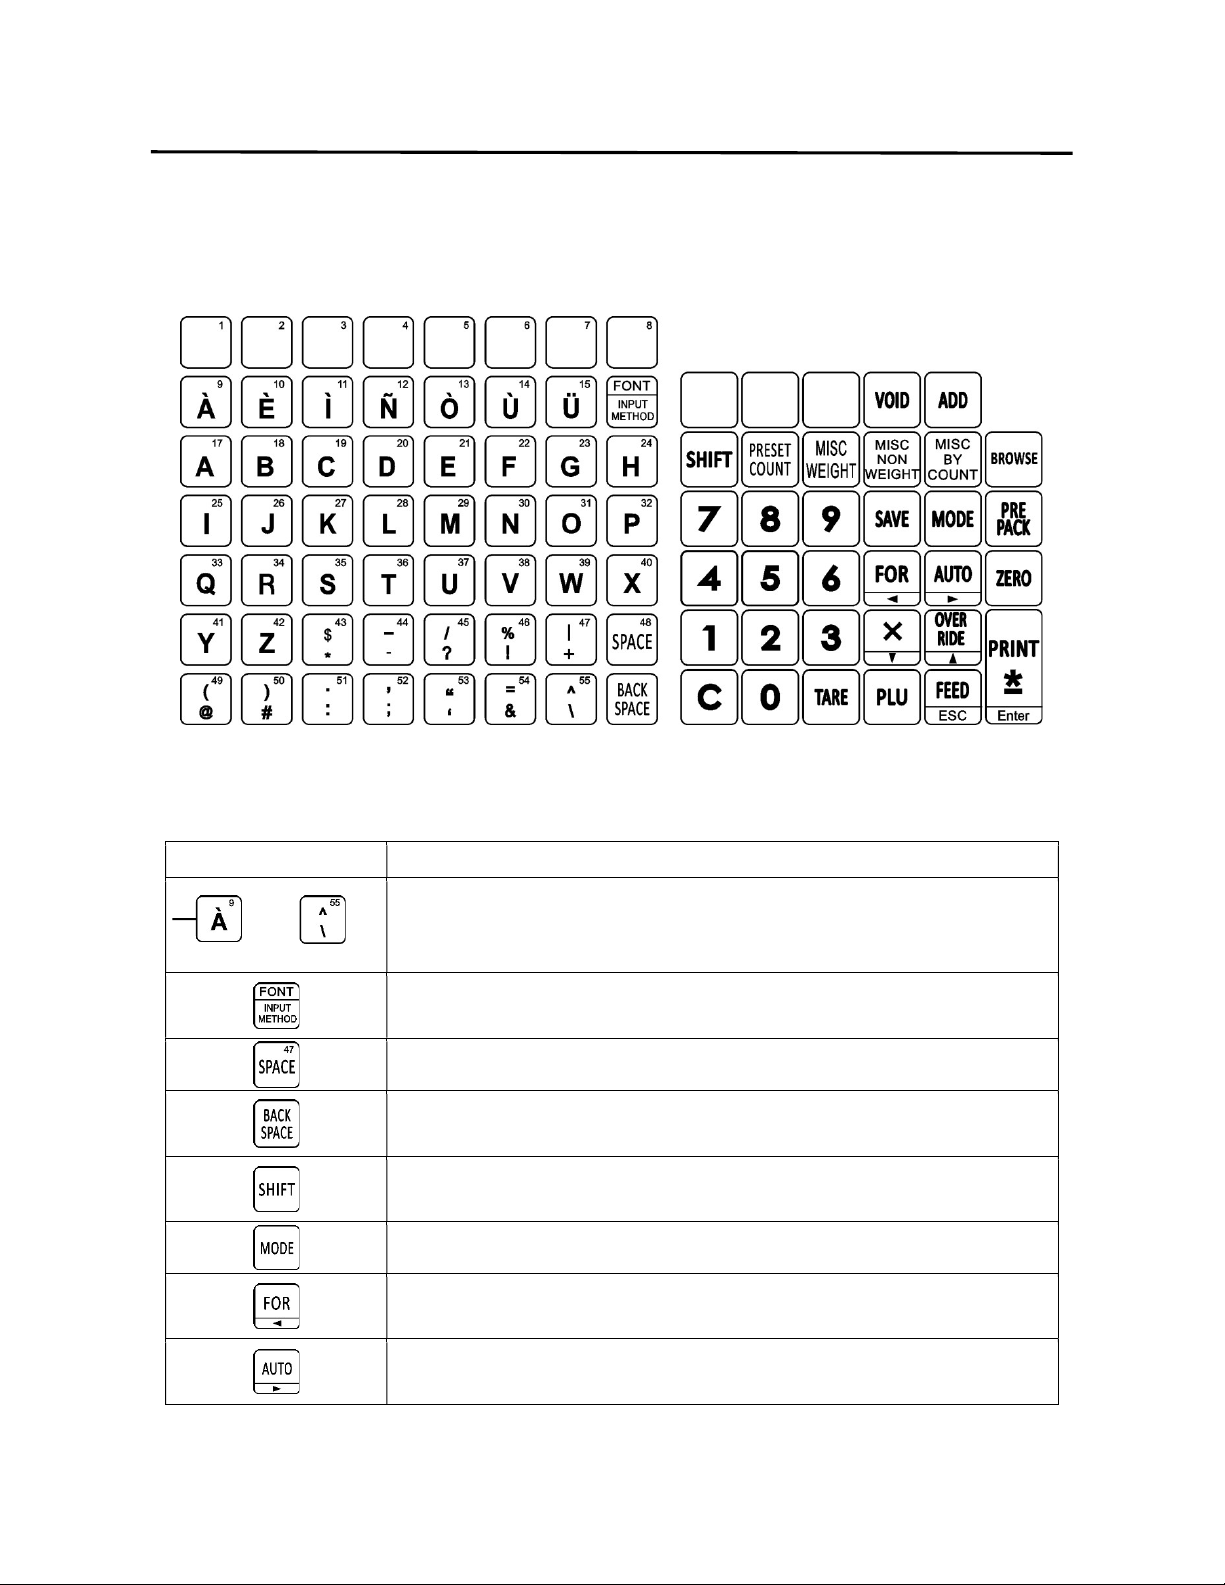
5.2 Programming Keyboard
The built in programming keyboard consists of the letter and symbol keys as well as some of
the Operations keyboard function keys.
Several keys have multiple purposes; please refer to the appropriate keyboard section for the
correct key function explanation.
Key Function
Used to enter text and symbols.
Used to change the text input method from the built in keyboard
characters to Unicode. Changes Font Size in text fields.
Used to insert a character space when entering text.
Used to move the cursor back one space and delete any character
in that space while editing text.
Used to access lower case letters and symbols. Acts like a shift
lock key.
Used to access the different programming modes.
Left arrow key used to navigate and move the cursor while editing
text fields. FOR has no function in programming modes.
Right arrow key is used to navigate and move the cursor while
editing text fields. AUTO has no function in programming modes.
5. Keyboards ELP-301016
5.2 Programming Keyboard
15
Key Function
Used to change lines downwards when programming text fields
with multiple lines available. Also used to navigate downwards
through certain programs.
Used to change lines upwards when programming text fields with
multiple lines available. Also used to navigate upwards through
certain programs.
Used to delete items from memory.
Feed function not used in program mode. ESC is used to move up
or back one level and to exit a program mode.
Print function is not used in program mode. Enter is used to enter
or store information.

5. Keyboards ELP-301016
5.2 Programming Keyboard
16
6. Displays and Indicators ELP-301016
6.1 Operator and Customer Display
17
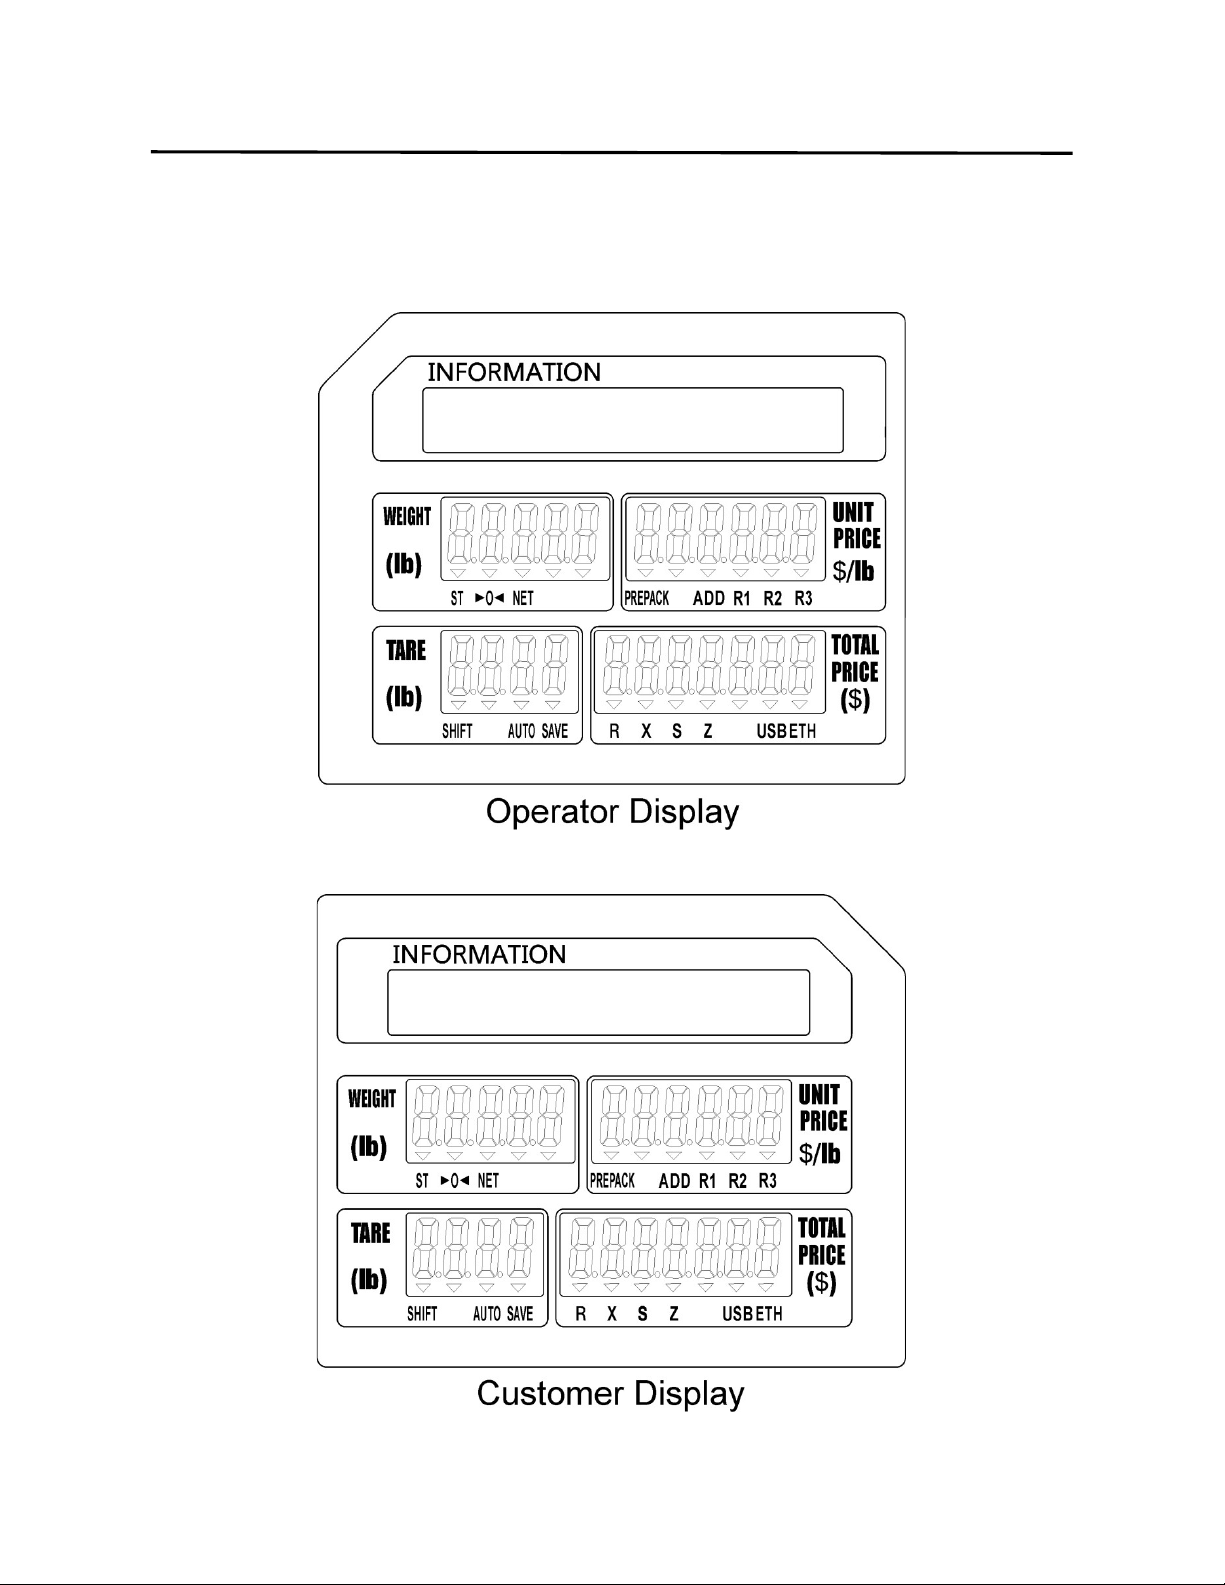
6. DISPLAYS AND INDICATORS
6.1 Operator and Customer Display
6. Displays and Indicators ELP-301016
6.2 Individual Displays and Tri Mark Indicators
18
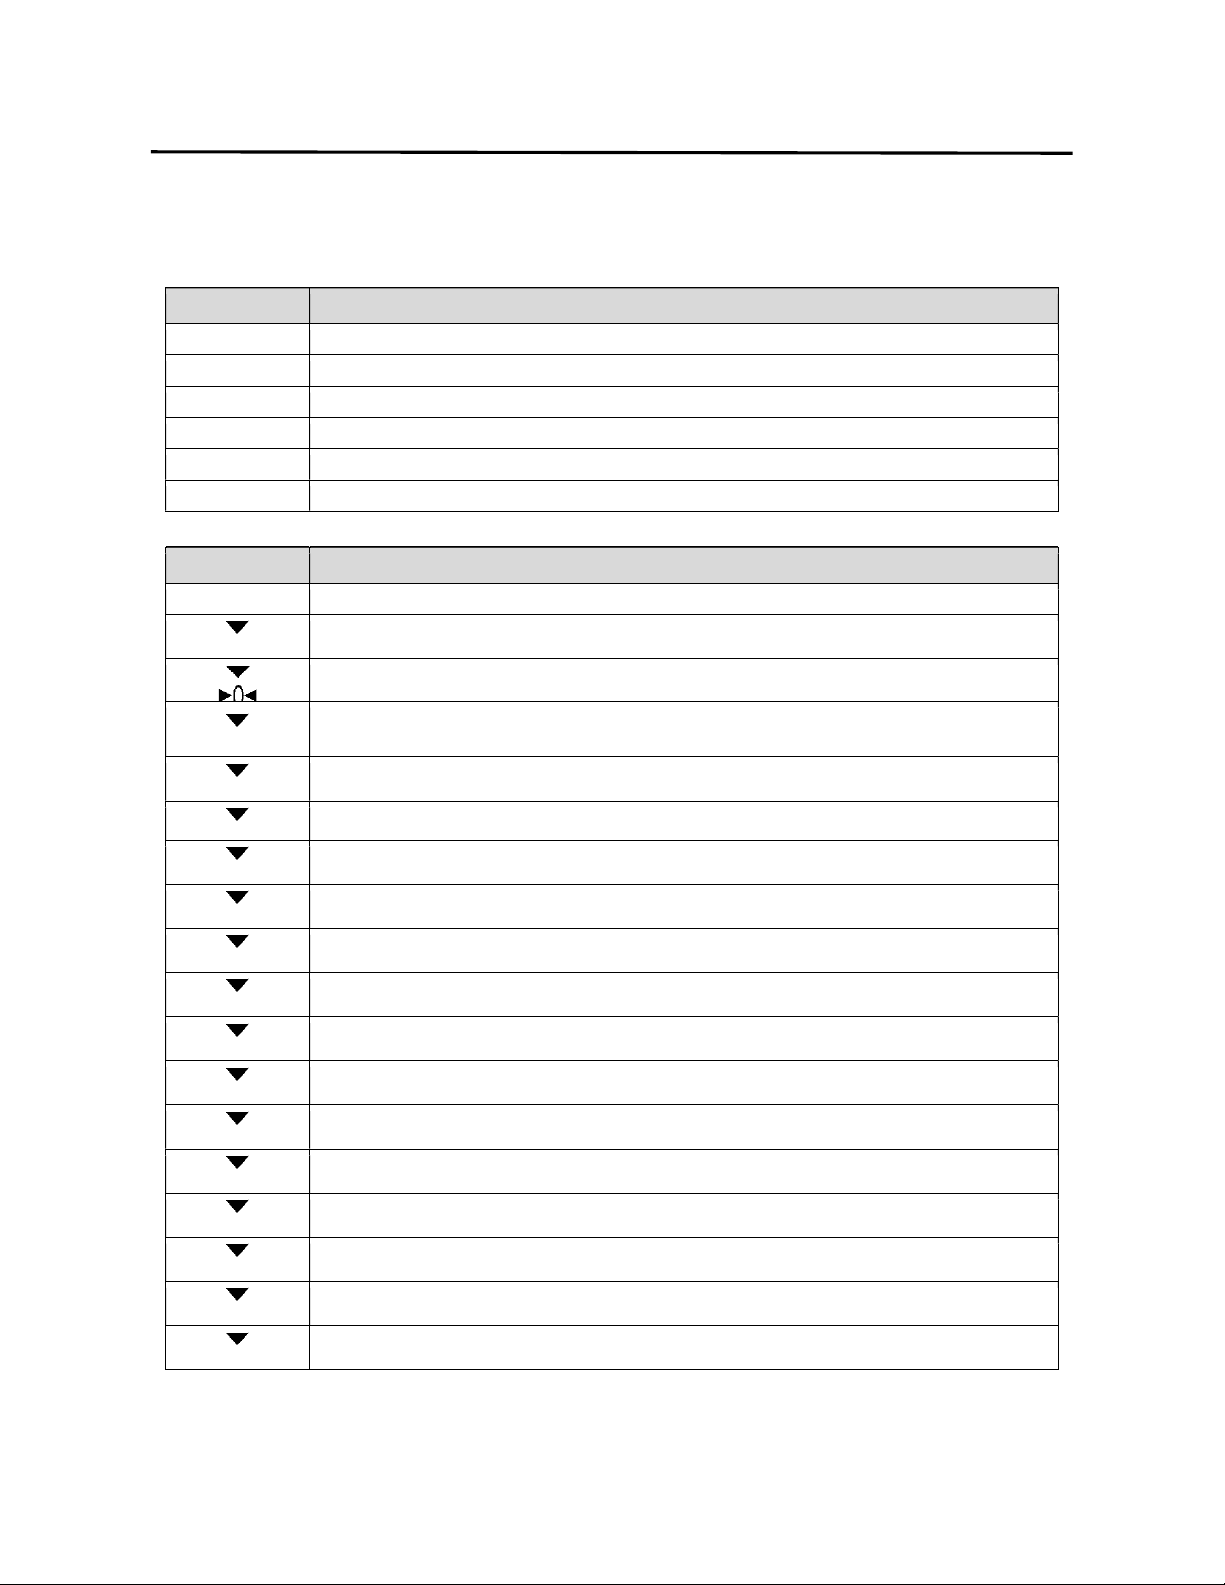
6.2 Individual Displays and Tri Mark Indicators
Display Information
INFORMATION Displays the Commodity Name. Displays Menu Titles.
WEIGHT Displays up to 5 digits of Weight information.
UNIT PRICE Displays Unit Price up to 5 digits or Pieces count of recalled Commodity.
TARE WEIGHT Displays up to 4 digits of Tare Weight information. Displays Program Mode steps.
TOTAL PRICE Displays up to 7 digits of Total Price information. Displays Program Mode text.
Indicator Function
ST
Indicates the platter is in a stable condition
Indicates that no Tare weight has been set and nothing has been placed on the platter.
NET
Indicates a Tare weight has been entered and that the displayed weight will be a net
weight.
PREPACK
Indicates the scale has been placed in the PrePack mode of operation.
ADD
Indicates the scale is in the Accumulation or SUM mode of operation.
R1
Indicates the transaction is in Override position one.
R2
Indicates the transaction is in Override position two.
R3
Indicates the transaction is in Override position three.
SHIFT
Indicates the Shift key has been depressed.
AUTO
Indicates the Automatic Print Mode is enabled.
SAVE
Indicates the Unit Price and Tare Weight will not be cleared automatically.
R
Indicates the scale is in the R mode of operation. This is normal weigh mode.
X
Indicates the scale is in the X mode of operation. This is the sales report mode.
S
Indicates the scale is in the S mode of operation. This is the main programming mode.
Z
Indicates the scale is in the Z mode of operation. This is the reset mode.
USB
Indicates a USB device has been inserted and detected.
ETH
Indicates the scale is using Ethernet mode communications.
7. Main Menu ELP-301016
7.1 Main Menu Modes
19
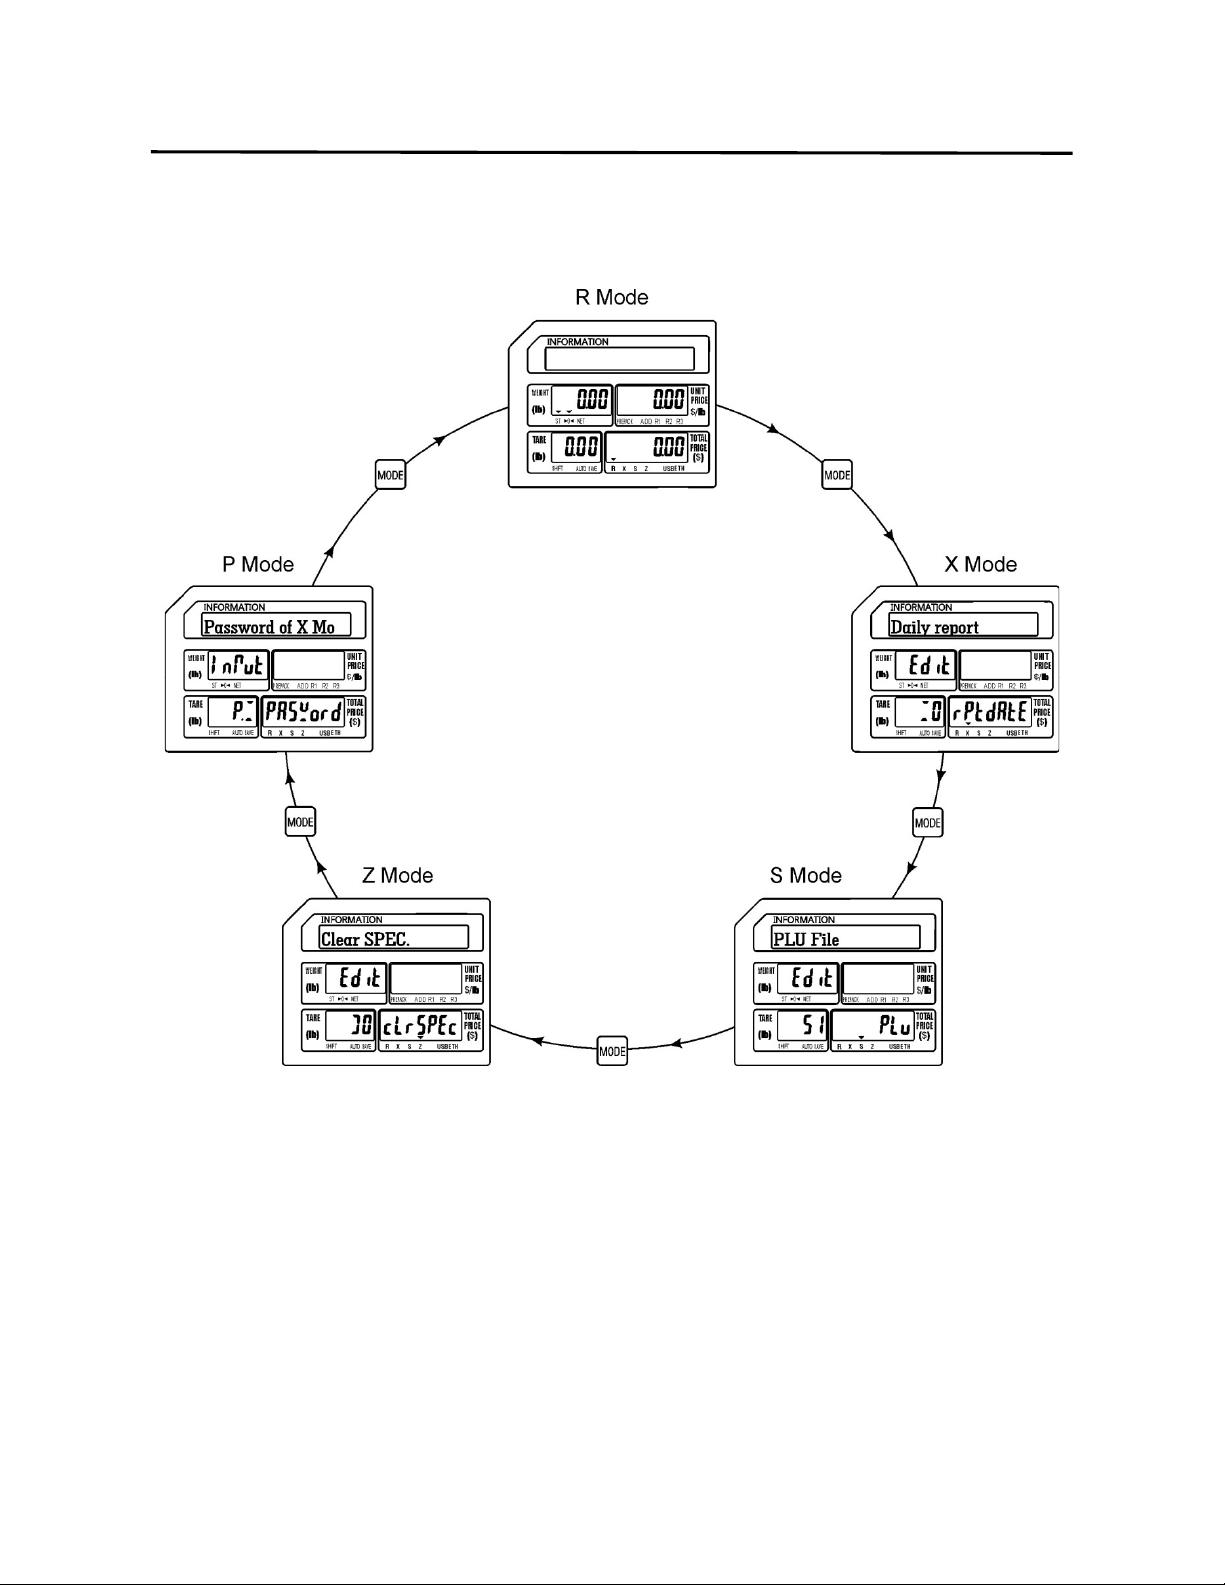
7. MAIN MENU
7.1 Main Menu Modes
R Mode
The R mode is used to perform most daily operations such as weighing commodities,
recalling programmed commodities and issuing labels. After normal power on
procedures the scale will be in the R mode. All transactions performed in this mode are
recorded and saved in memory for use by management for Sales Reports.

7. Main Menu ELP-301016
7.1 Main Menu Modes
20
X Mode
Pressing the MODE key once will take you to the X mode. The X mode is used to
perform Sales Reports using information obtained during normal daily operations of the
scale. Several types of reports are available in the X mode. There are both daily and
monthly reports available. Some report categories available are By PLU, By Department
and By Group. Some other special functions available are Exporting Sales Data and
printing a PLU List. For a detailed explanation of these functions please refer to the
appropriate section(s) of this manual.
S Mode
Pressing the MODE key twice will take you to the S mode. The S mode is where most of
the programmed information used during daily operations is directly entered at the
scale. (The same information may also be entered using the XDB Manager Software
program where available.) There are several programming items available, from
selecting which information fields are visible when programming a commodity or PLU to
programming date and time controlled discount sales. Each of the many functions is
explained in the S mode (Programming Mode) section of this manual.
Z Mode
Pressing the MODE key three times will take you to the Z mode. The Z mode is mainly
used to reset information in the scale back to a factory default configuration or clearing
the programmed information out of memory. Most types of programmed information
may be conveniently reset or cleared individually. Stored Sales Information can also be
reset/cleared using the Z mode. There are several other special functions available in
the Z mode such as compressing and recreating the commodity database, printing the
system activity log, printing the firmware upgrade information, printing the scale
calibration record and backing up and restoring programmed information.
P Mode
If the P mode has been enabled in the SPEC program, pressing the MODE key four times
will take you to the P mode. The P mode is used to provide some level of security when
accessing or programming information in the scale. It is not normally visible in the Main
Menu list and must be enabled using the SPEC configuration mode. When enabled and
configured correctly a password will be required to access the X, S and Z modes in the
scale.
8. Basic Operations ELP-301016
8.1 Setting the ZERO Point
21
8. BASIC OPERATIONS
In this section, basic R mode operations such as recalling a commodity, entering a tare weight,
weighing and issuing labels, etc. are explained.
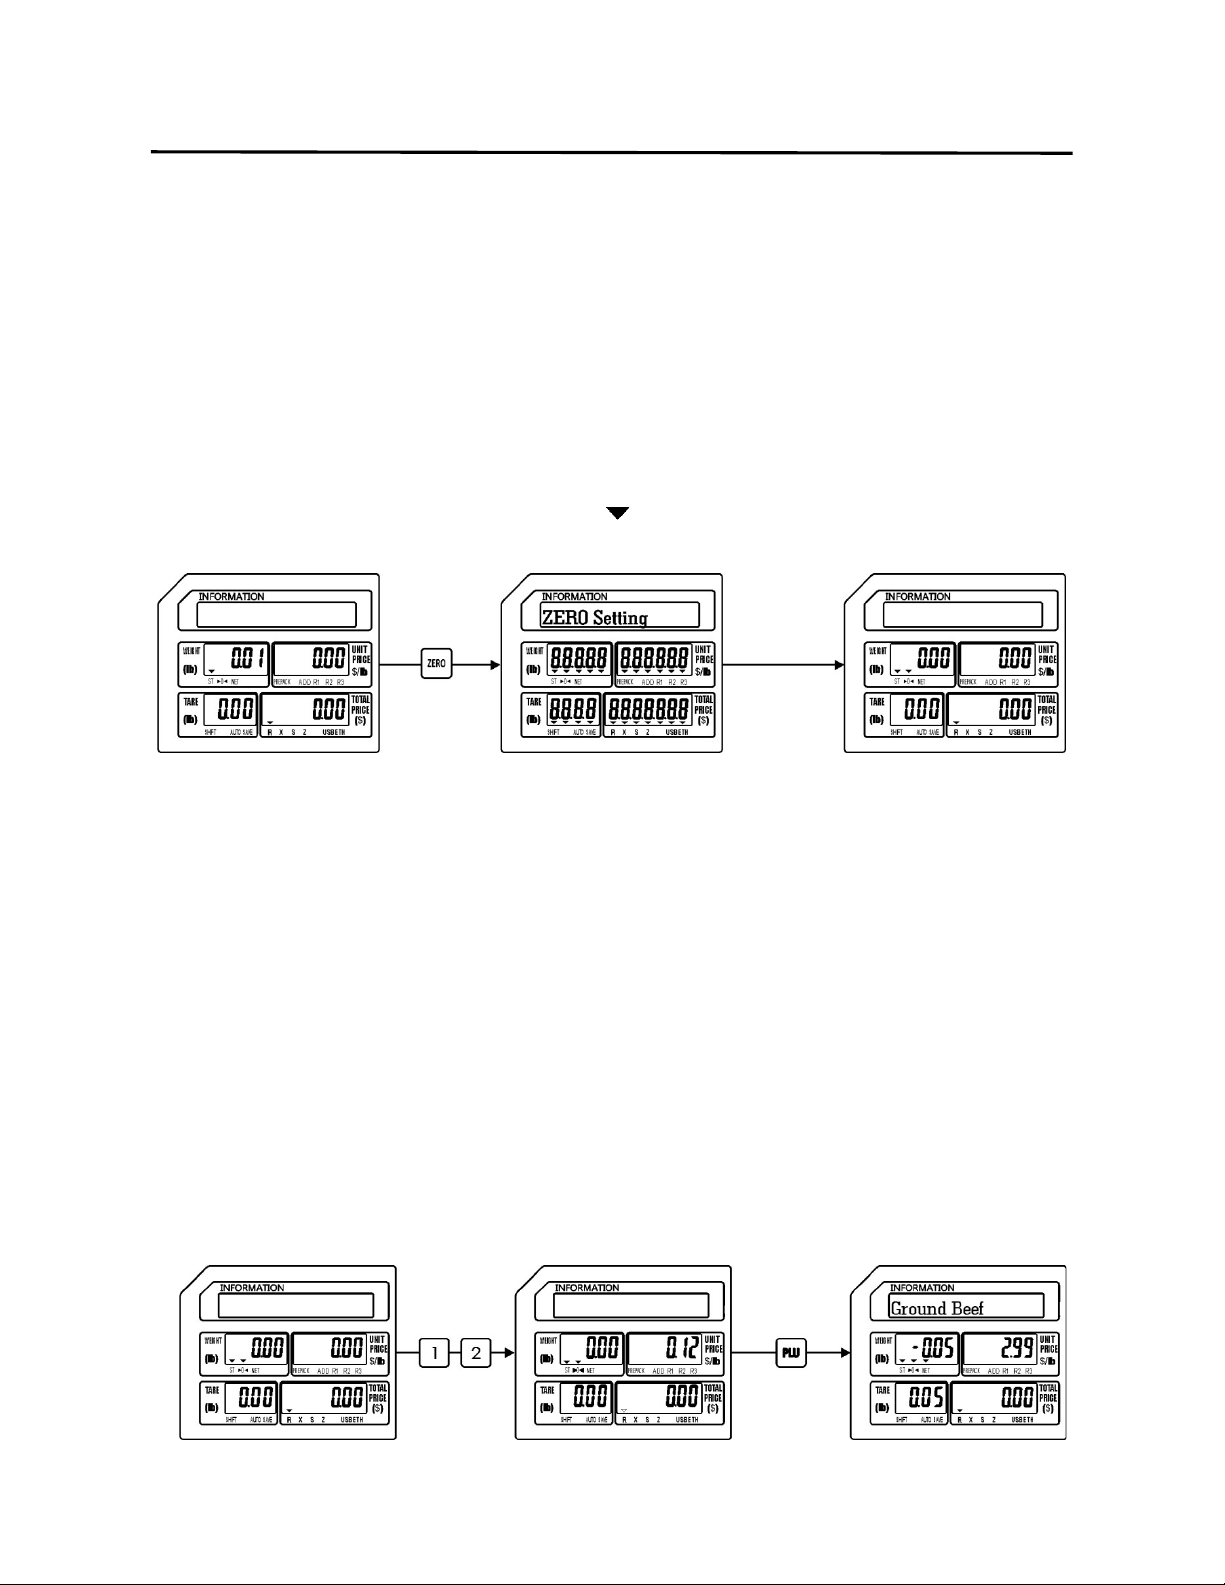
8.1 Setting the ZERO point
The ZERO key may be used to make corrections for minor deviations in the zero reference
point. The scale may drift from zero due to environmental conditions, debris on the platter or
leaving objects on the platter for long periods of time. To correct this, remove all objects and
debris from the platter. When the ST tri-mark ( ) is lit, press the ZERO key.
Ex.)
The scale Weight display should now show zero. If the scale will not return to Zero, contact
your authorized service representative.
8.2 Recalling a Commodity (PLU)
There are three methods of recalling a commodity or PLU. These methods are used to recall
Weigh, Non-Weigh and By Count mode commodities (PLU’s). The procedure is the same for all
of the PLU types.
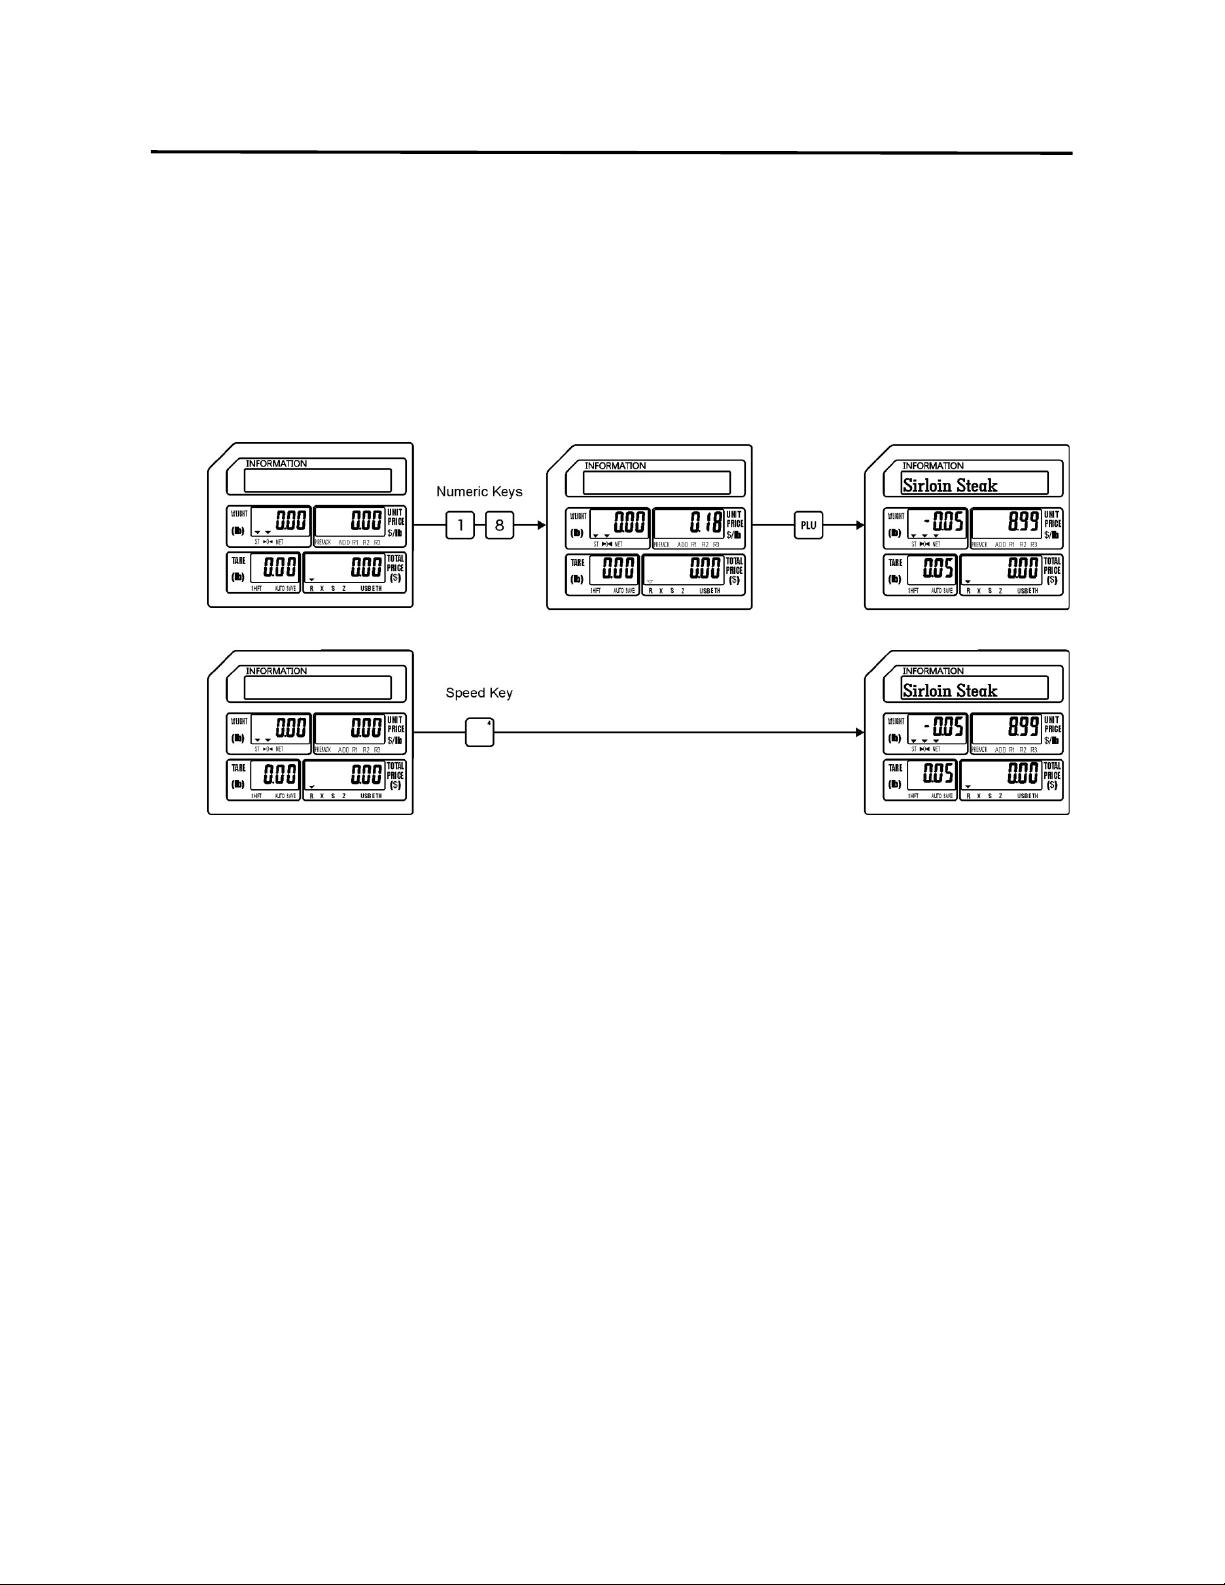
8.2.1 Using the PLU key
To recall a PLU from memory input the PLU number using the numeric keys and then
press the PLU key.
Ex.) Recall PLU #12
Action: Enter 12 using the numeric keypad, then press the PLU key.
8. Basic Operations ELP-301016
8.2.2 Using the SPEED Keys
22
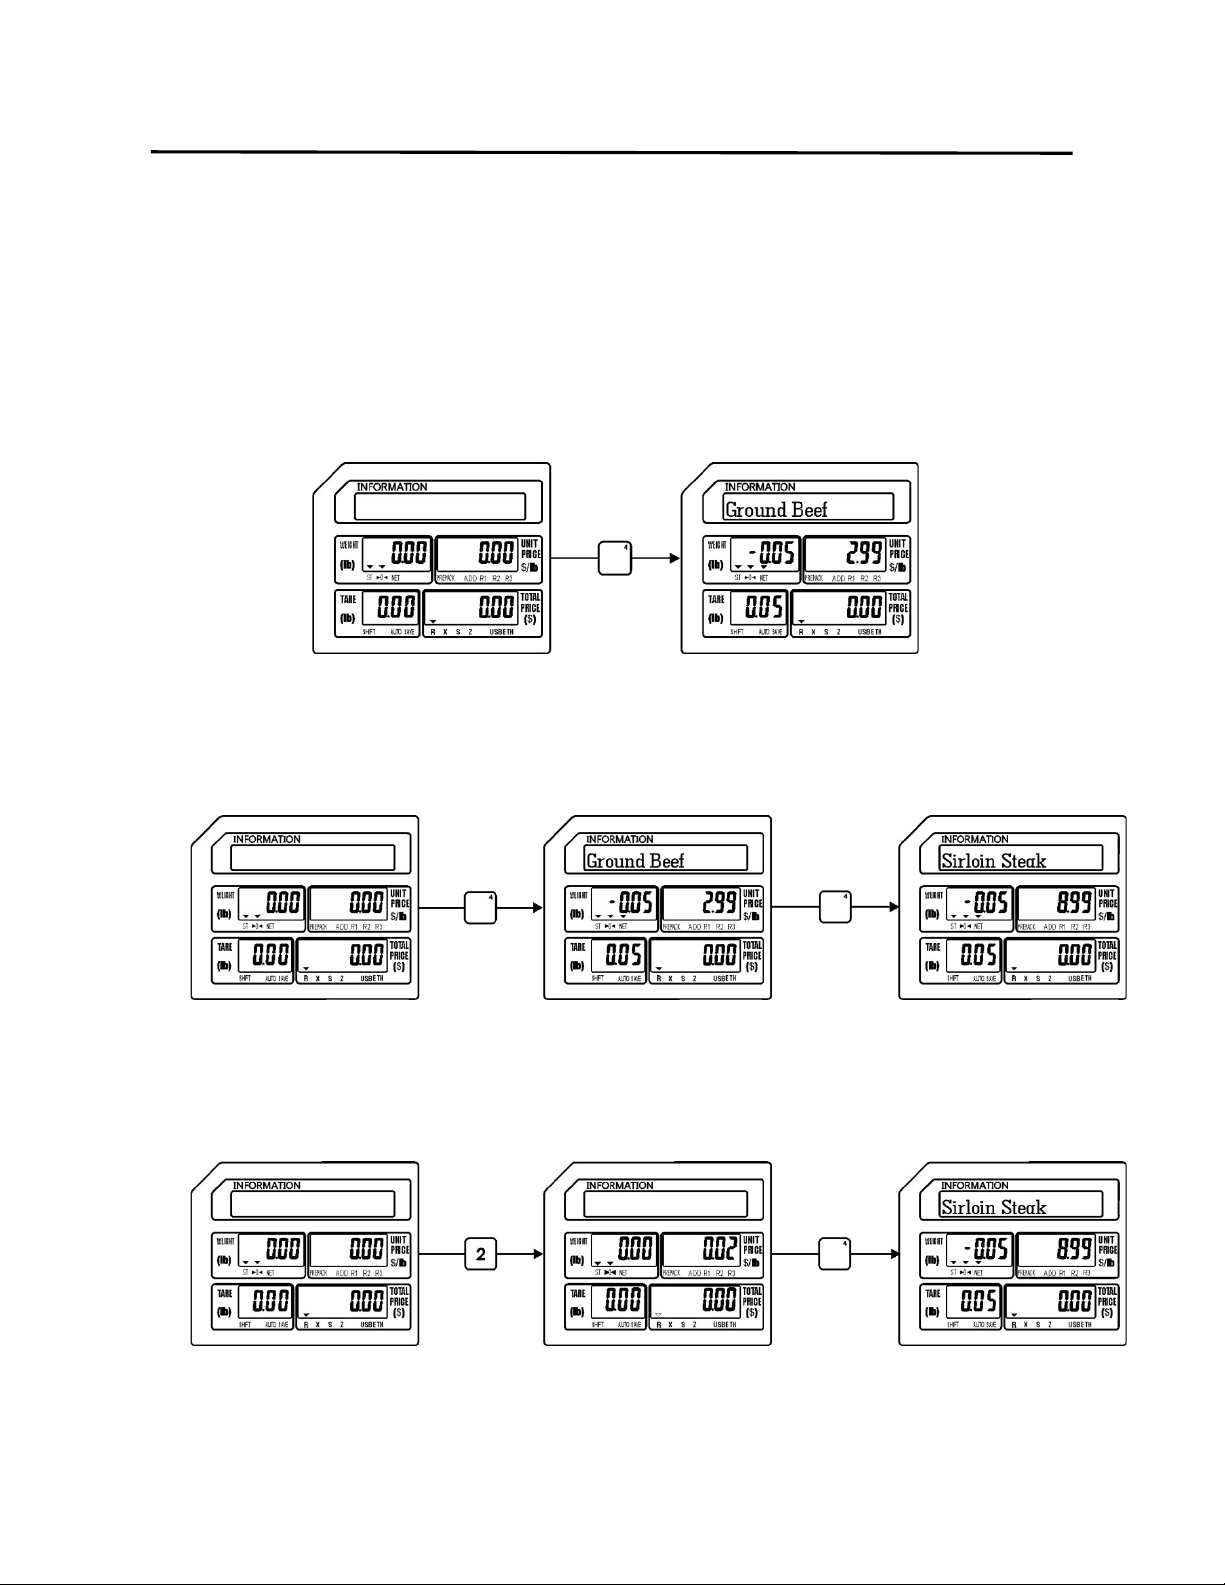
8.2.2 Using the SPEED Keys
To recall a PLU using the pre-programmed Speed Keys, simply press the Speed Key with
the desired PLU number assigned to it. Please note that when using multiple Speed Key
levels the operation is affected by the setting of SPEC 073 (Combination Recall)
Ex.) Recall PLU #12 assigned to Speed Key 4 on level 1. (SPEC 073 = 0 or 1)
Ex.) Recall PLU #18 assigned to Speed Key 4 on level 2. (SPEC 073 = 0)
Action: Press Speed Key #4 twice (within 1 second) to recall the PLU on level 2.
Ex.) Recall PLU #18 assigned to Speed Key 4 on level 2. (SPEC 073 = 1)
Action: Press the level number desired (level 2) using the numeric keypad, then press the
Speed Key desired (#4).
8. Basic Operations ELP-301016
8.2.3 Using Automatic PLU Recall
23
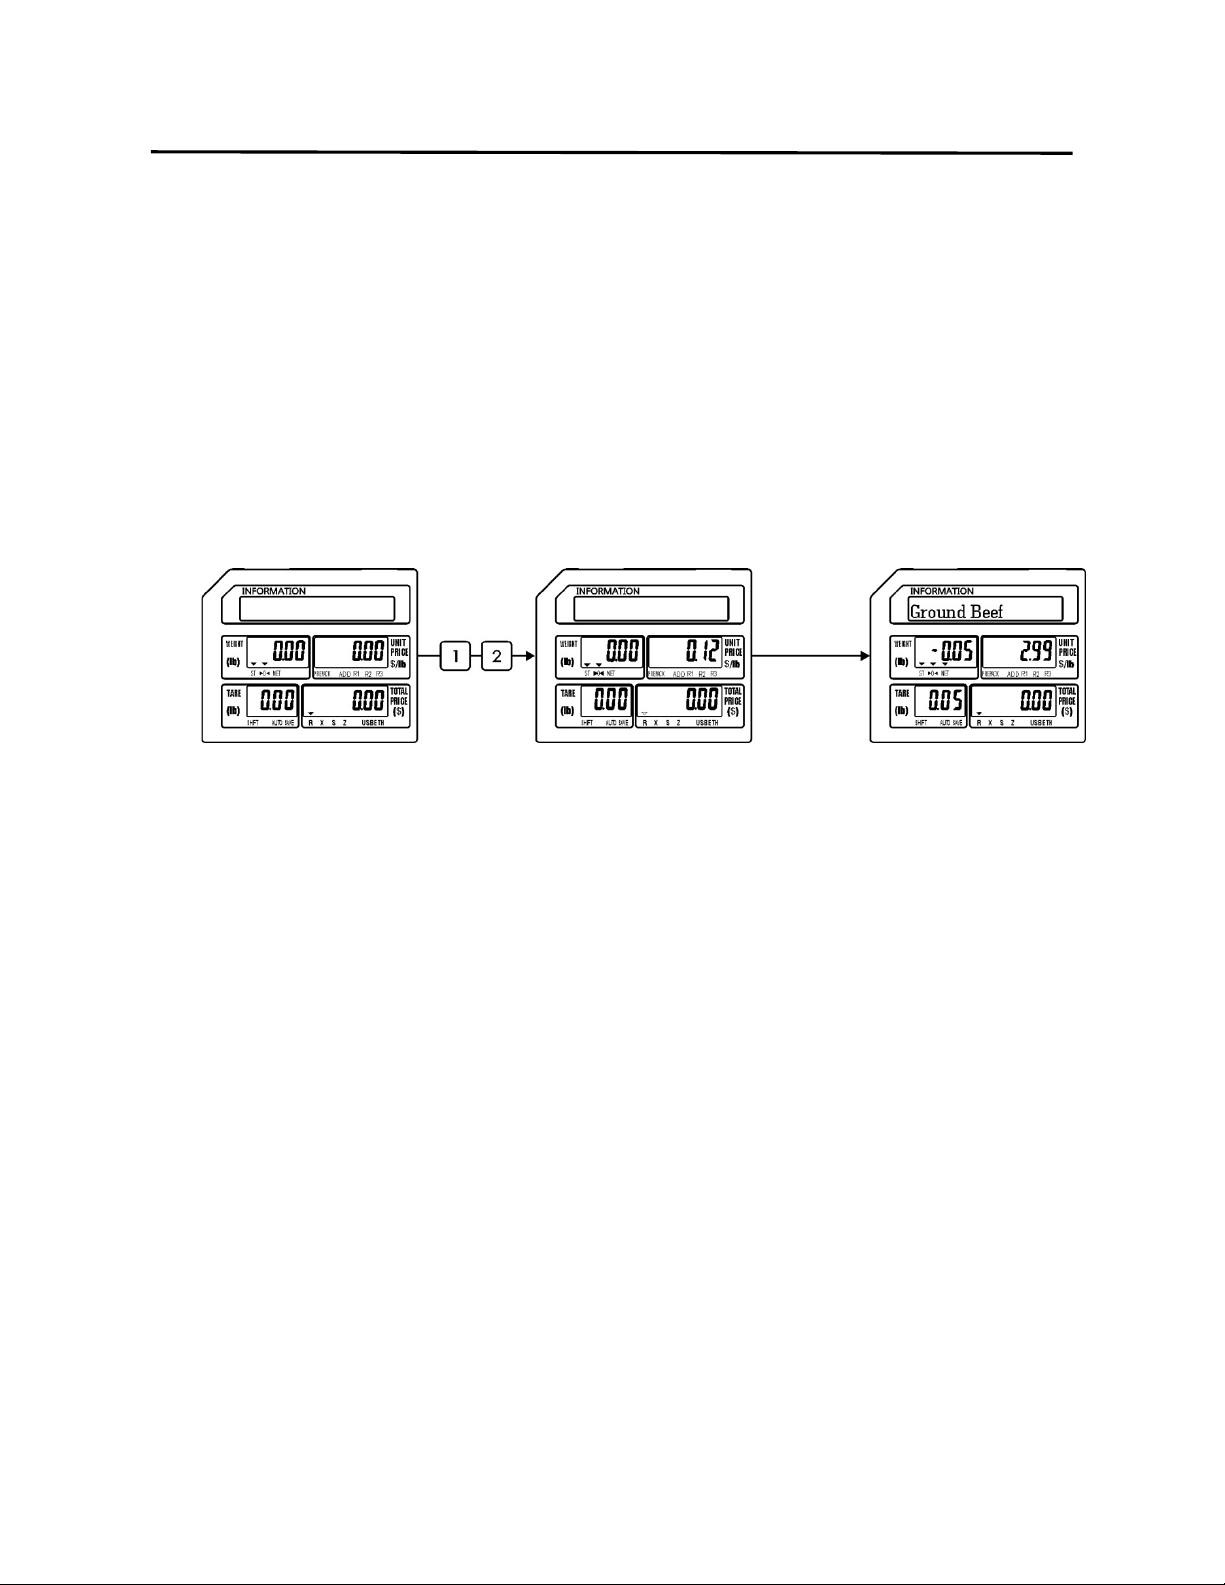
8.2.3 Using Automatic PLU Recall
Recalling a PLU automatically requires that the automatic recall function in the SPEC
program be enabled. (SPEC #071) When the function is enabled, you recall a PLU by
entering the PLU number using the numeric keys. After the last number of the PLU is
entered, there will be a slight delay (about 3 seconds) and then the PLU will be recalled
automatically.
Ex.) Recall PLU #12
8. Basic Operations ELP-301016
8.3.3 Using a Preset Tare Weight
24
8.3 Using Tare Weight
There are three different types of Tare weight, a known Tare weight, an unknown Tare weight
and a Preset Tare weight. The procedures to use and clear all three types are explained below.
Notes:
1. The NET Tri-mark ( ) will be lit whenever there is any Tare weight used.
2. To clear the Tare weight before weighing a PLU, remove the container
from the platter and then touch the Tare key.
3. The Tare weight will automatically be cleared after the transaction is
complete.
4. Touching the Save key while a Tare weight is present will retain the Tare
weight even after the commodity has been removed from the platter.
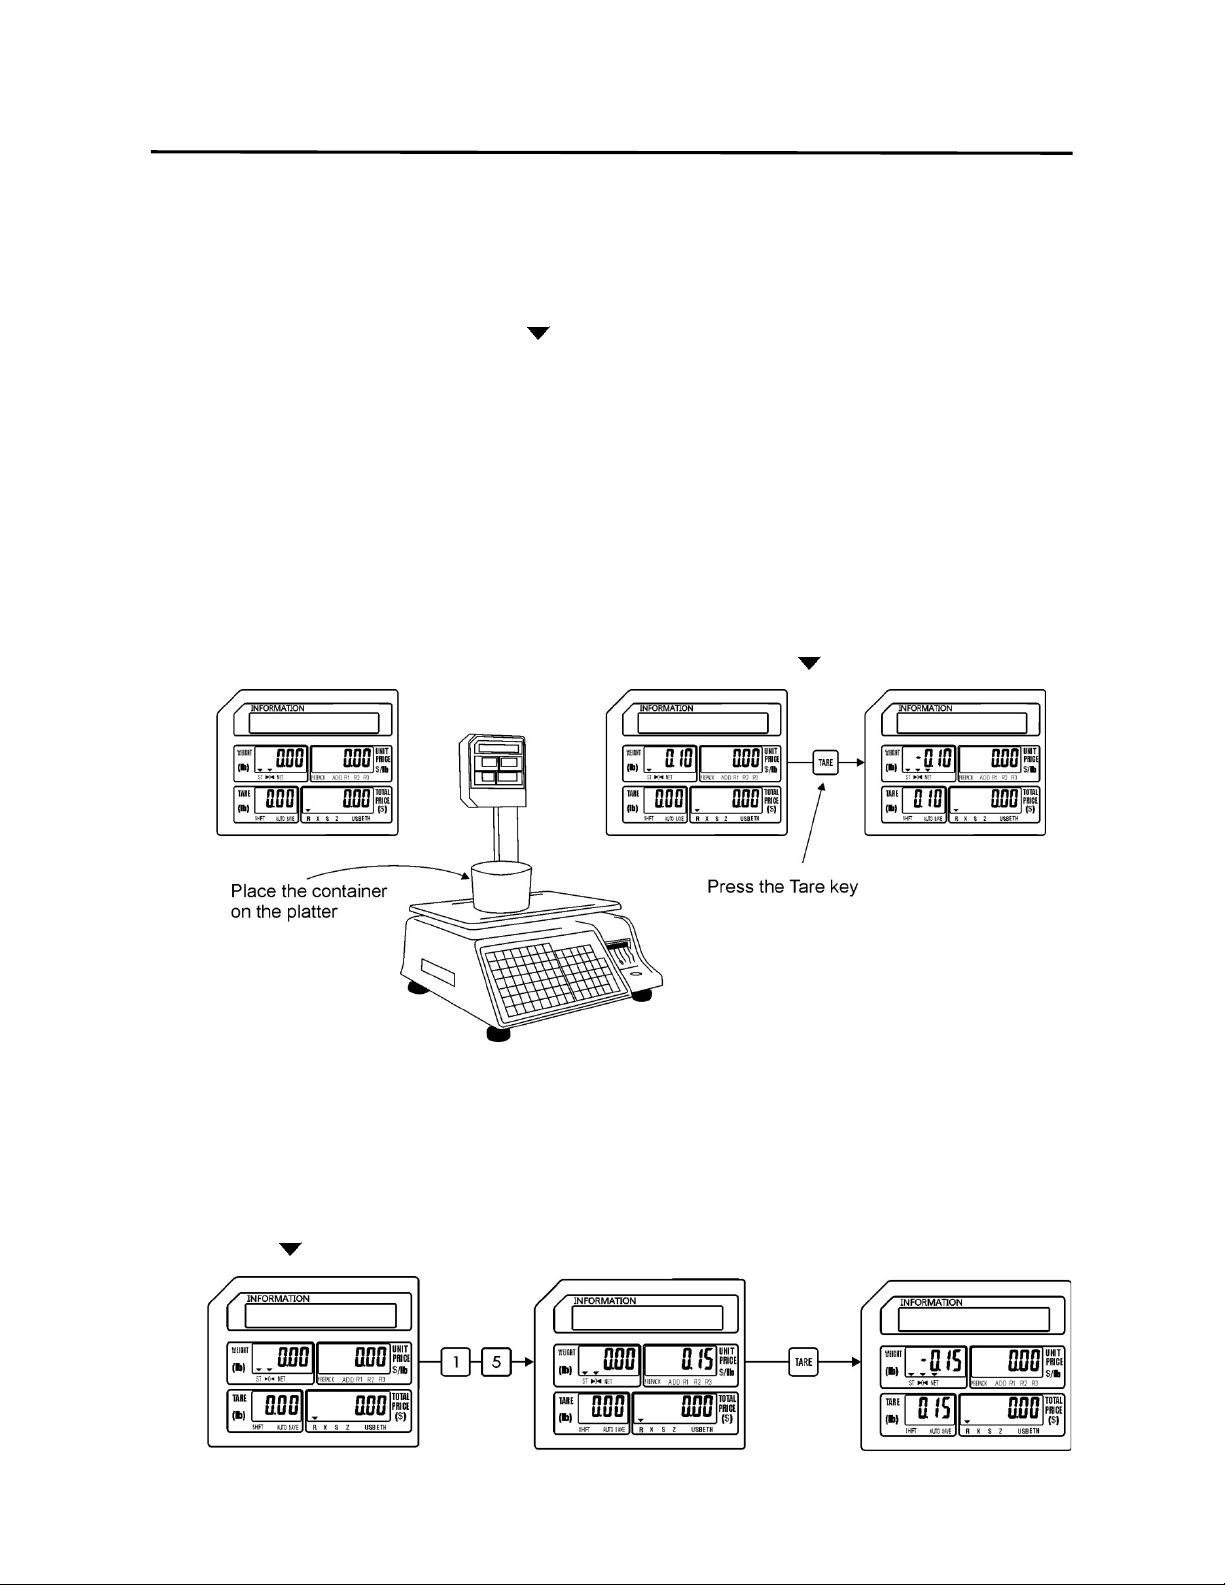
8.3.1 Registering an Unknown Tare weight
An unknown Tare weight may be entered by placing the container on the platter and
pressing the Tare key. After the Tare key has been pressed the Tare weight will be
displayed in the Tare display window and the NET tri-mark ( ) will be lit.
8.3.2 Registering a Known Tare weight
A known Tare weight may be entered using the numeric keys. Enter the Tare weight
value using the numeric keys and then press the Tare key. After the Tare key has been
depressed, the Tare weight will be displayed in the Tare display window and the Net tri-
mark ( ) will be lit.
8. Basic Operations ELP-301016
8.3.3 Using a Preset Tare Weight
25
8.3.3 Using a Preset Tare weight
Using a Preset Tare weight is accomplished by pre-programming the Tare weight for the
PLU during the PLU programming steps (refer to S Mode - S1 PLU File). When the PLU is
recalled, the Preset Tare weight is recalled with the PLU.
Ex.) Recall PLU #18 which has a Preset Tare weight of 0.10 lbs.
8.3.4 Clearing Tare Weights
All types of Tare weight will normally be cleared automatically upon completion of a
transaction. The only time this will not happen is if the Save key has been depressed
before the transaction or the scale is in the Prepack Mode of operation.
Note: The completion of a transaction is defined as the weighing of the commodity, the
issuing of the label and the removal of the commodity from the platter and the label
from the printer.
To manually clear a Tare weight before a transaction, simply remove the container (tare
weight) and press the Tare key.

8. Basic Operations ELP-301016
8.4 Sales Mode Operations
26
8.4 Sales Mode Operations
The procedures in the next sections explain the three normal modes of operation in the scale.
They are the Weigh Mode, Non Weigh Mode and the By Count Mode. Each mode has a specific
procedure that should be followed to ensure proper operation of the scale.
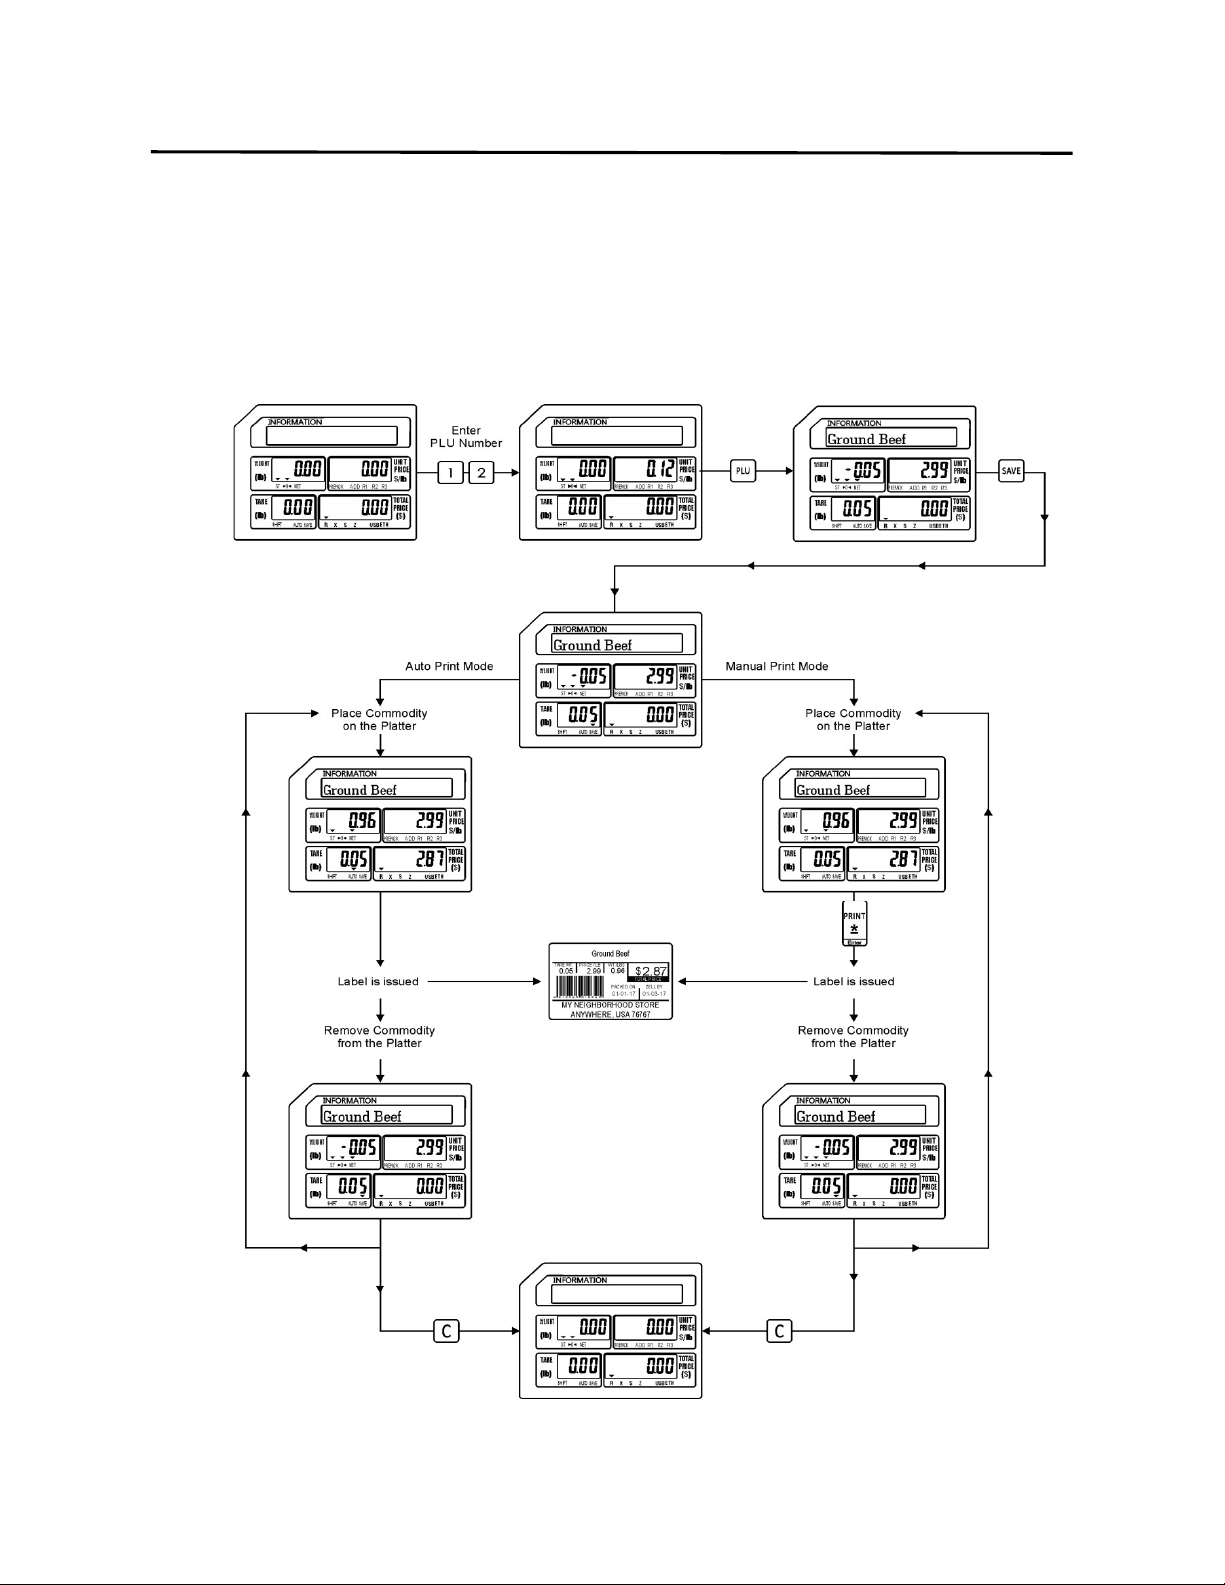
8.4.1 Weigh Mode PLU
The Weigh Mode is used to weigh an item for sale. An item that is to be weighed may
have a Tare Weight associated with it. (refer to Section 8.3 Using Tare Weight)
Ex.) Recall the PLU for Ground Beef (PLU #12) which is sold by weight at $2.99 per
pound. The PLU has a Preset Tare Weight of -0.05lbs.
Note: To use the AUTO Print Mode it must be enabled prior to recalling the PLU. To enable
the AUTO Print Mode simply press the AUTO key on the Operations keyboard. When
the AUTO Print Mode is enabled the AUTO tri-mark will be lit.
8. Basic Operations ELP-301016
8.4.2 Non Weigh Mode Operations
27
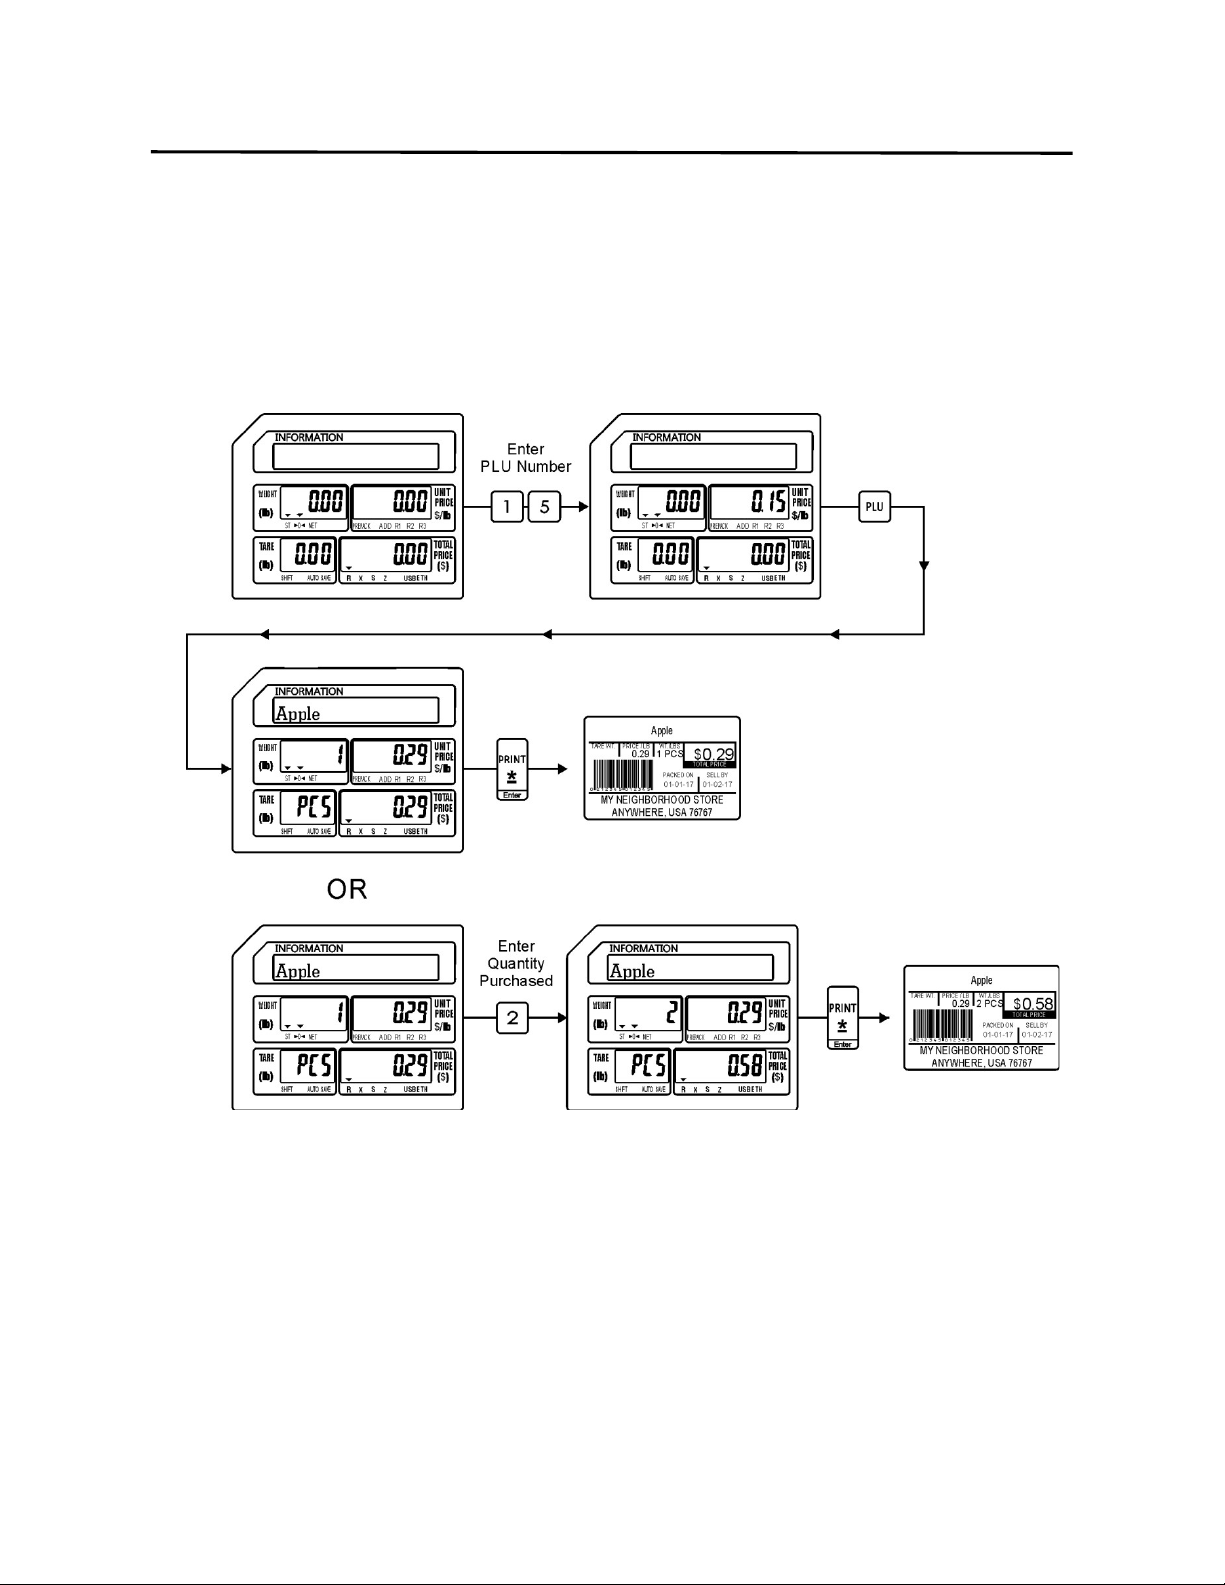
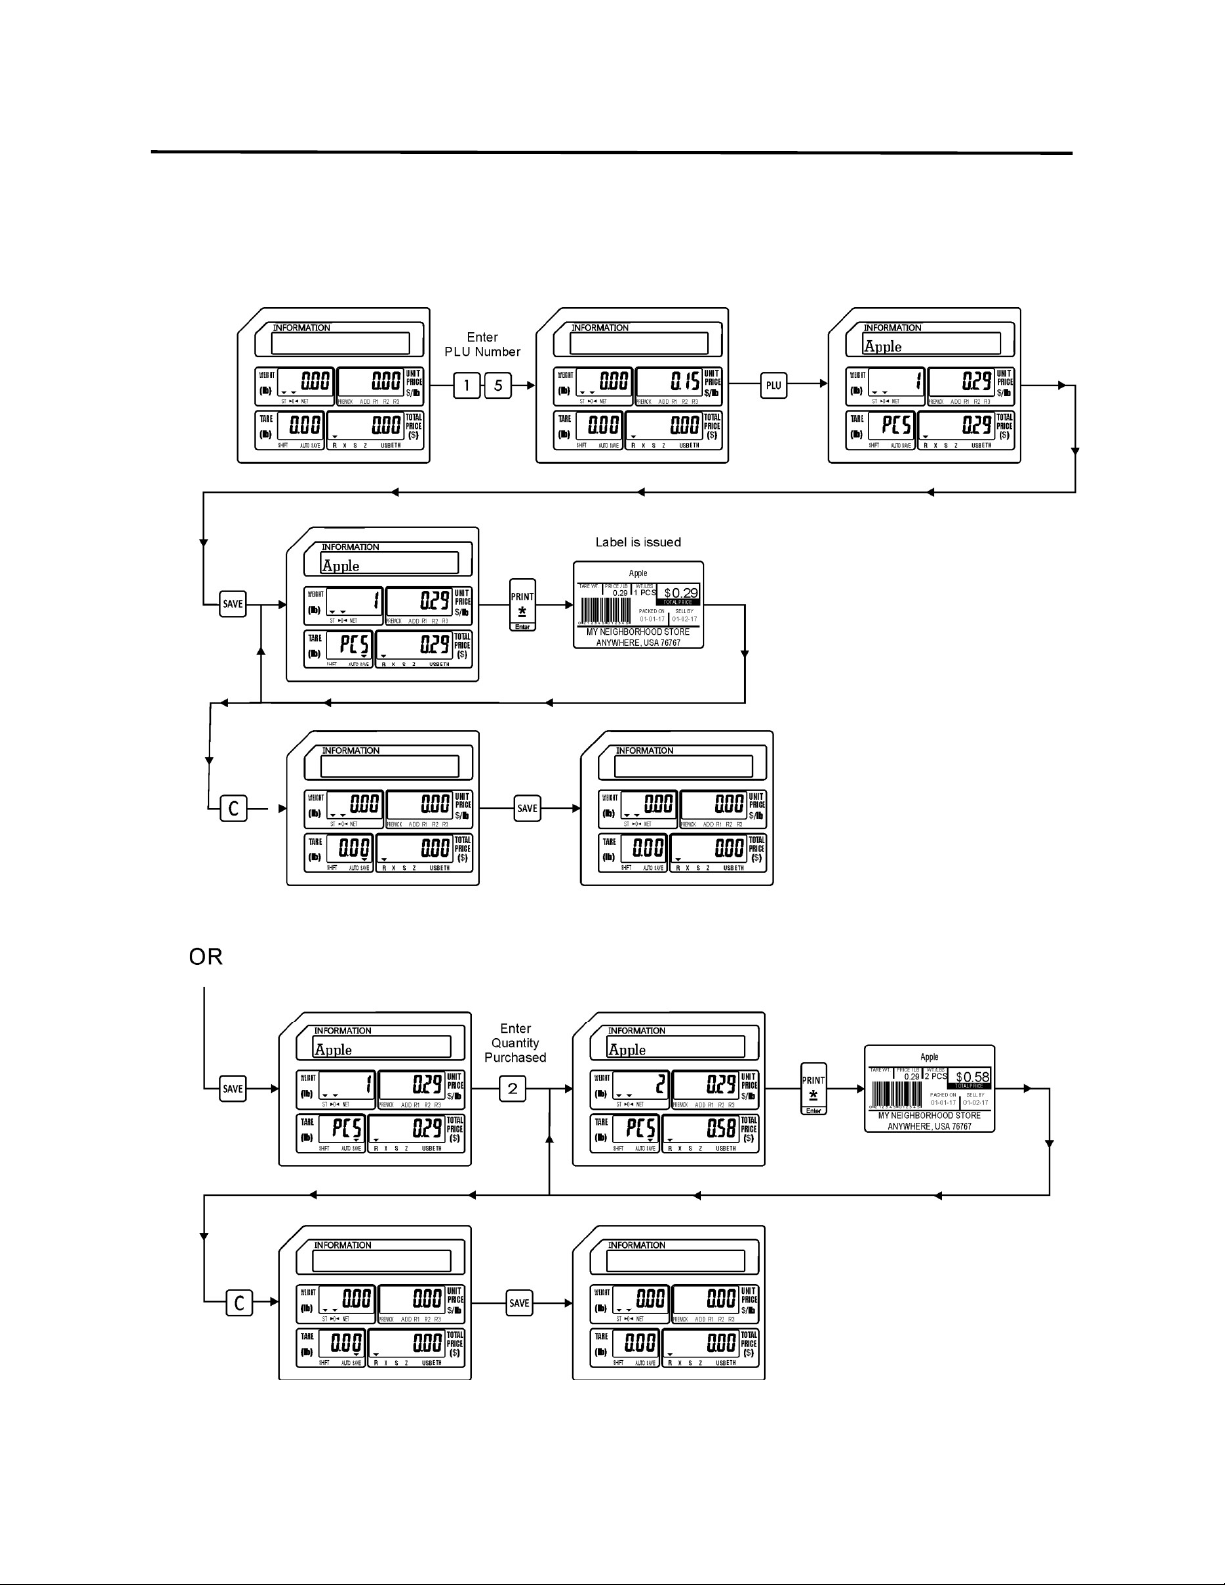
8.4.2 Non Weigh Mode PLU
The Non Weigh Mode is used to issue a label for an item that isn’t sold by weight.
Usually Non Weigh Mode items are sold by pieces with a certain value placed on each
piece. In the example below the Non Weigh item is Apples.
Ex.) Recall PLU#15 for Apples which is sold by the piece at a price of $0.29 each.
Note: There is no difference between the AUTO Print Mode and the Manual Print Mode in
the Non Weigh Mode operation. In the example there are two methods, one shows the
procedure used to sell a single item and the second shows the procedure to sell
multiple items at the same time to a customer.
8. Basic Operations ELP-301016
8.4.3 By Count Mode Operations
28
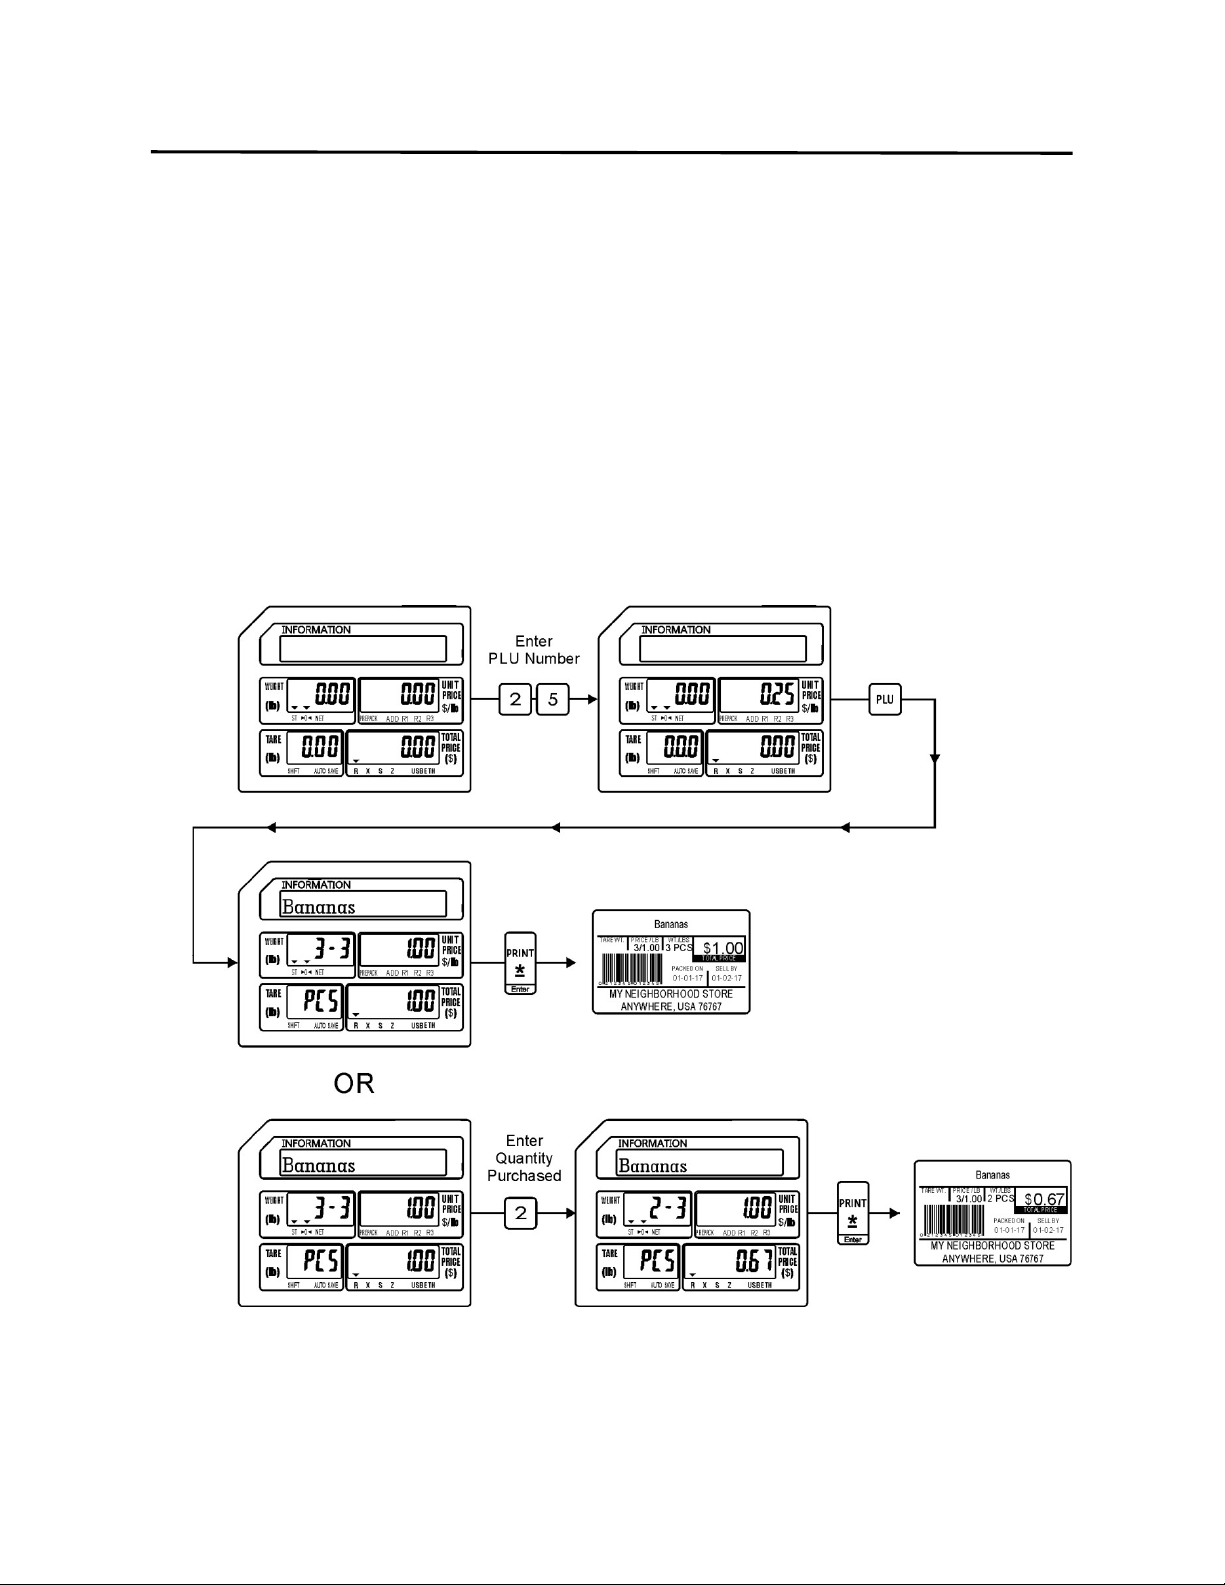
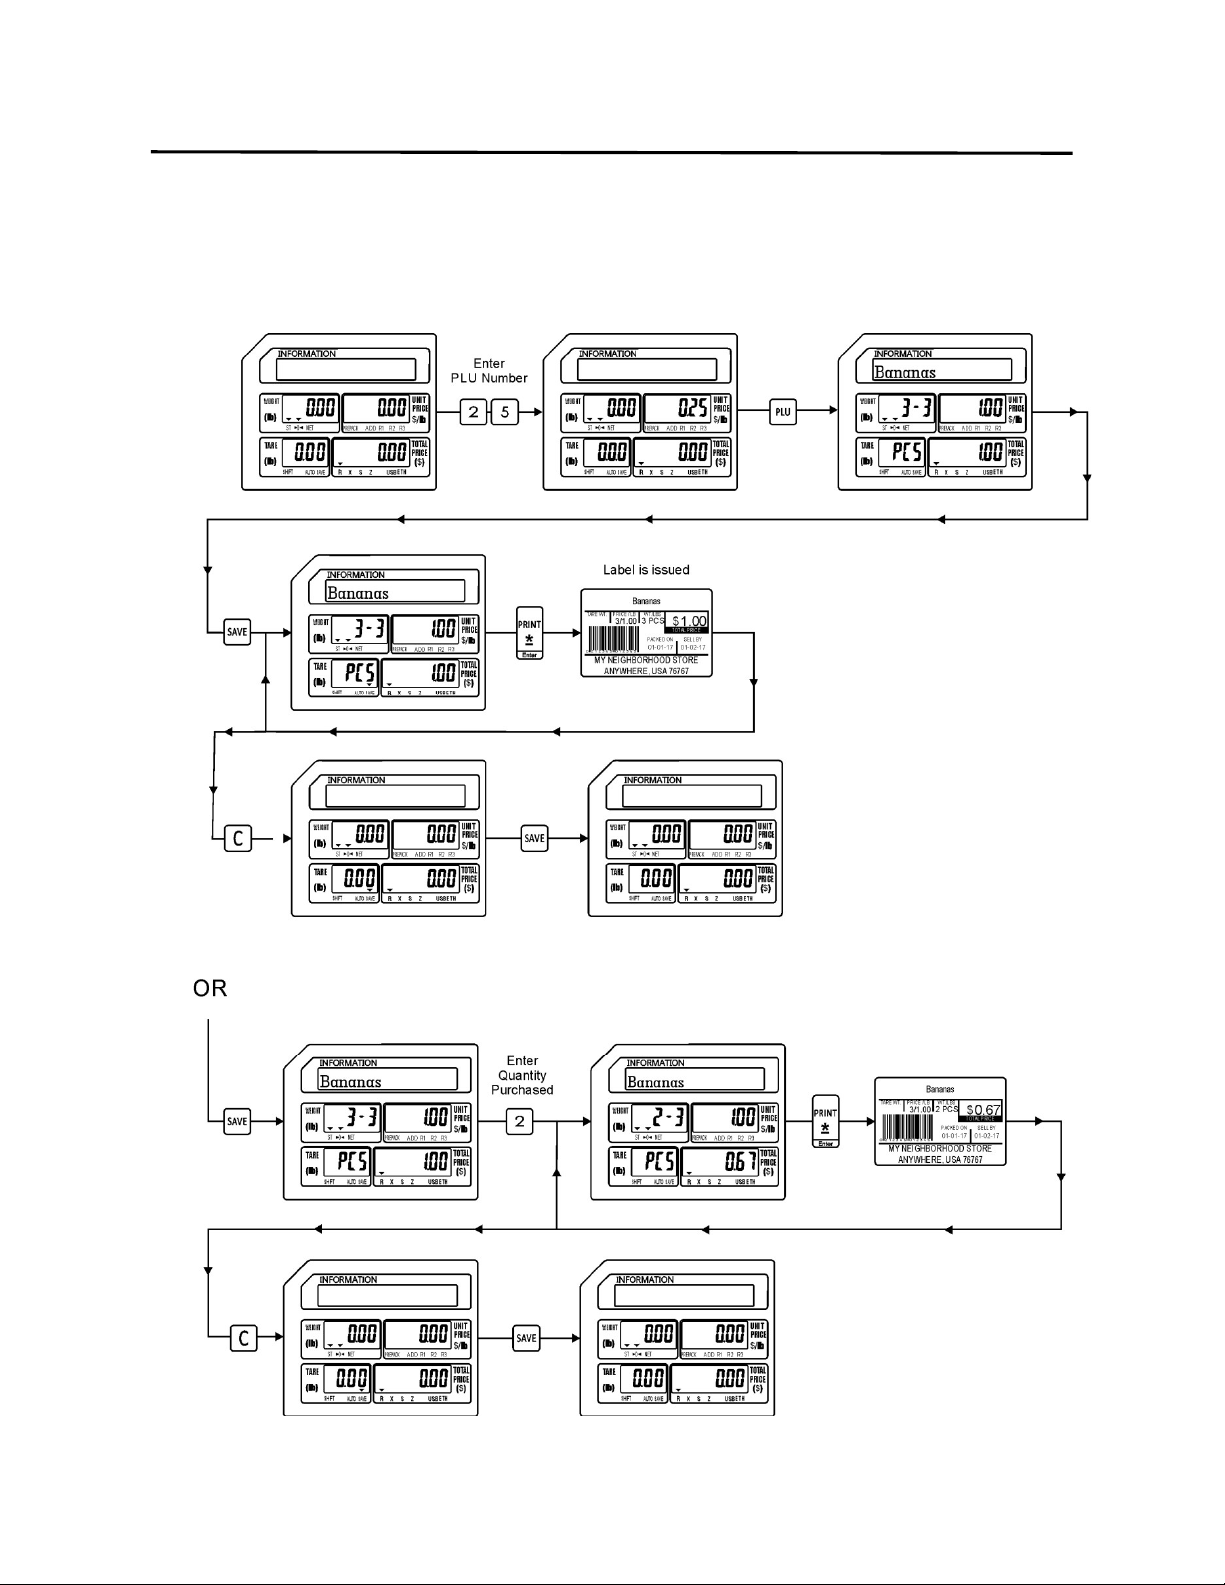
8.4.3 By Count Mode PLU
A By Count Mode PLU is an item that is similar to a Non Weigh Mode item because it is
also sold by pieces and not weight. The difference between the two modes is that the By
Count Item is usually sold or packaged in multiple pieces for a price. The By Count Mode
operation allows you to sell the whole packaged item or split the item and sell it based
on a per piece value.
Ex.) A customer is purchasing bananas that are priced at 3 for $1.00 and they are
purchasing 3 bananas. In the second part of the example the customer is purchasing
the same bananas priced at 3 for $1.00 but they only want to purchase 2 bananas
instead of 3. The By Count Mode allows you to split the item by simply entering the
quantity purchased by the customer.
Note: There is no difference between the AUTO Print Mode and the Manual Print Mode in
the By Count Mode operation.
8. Basic Operations ELP-301016
8.5 Using the Override Key
29
8.5 Using the Override Key
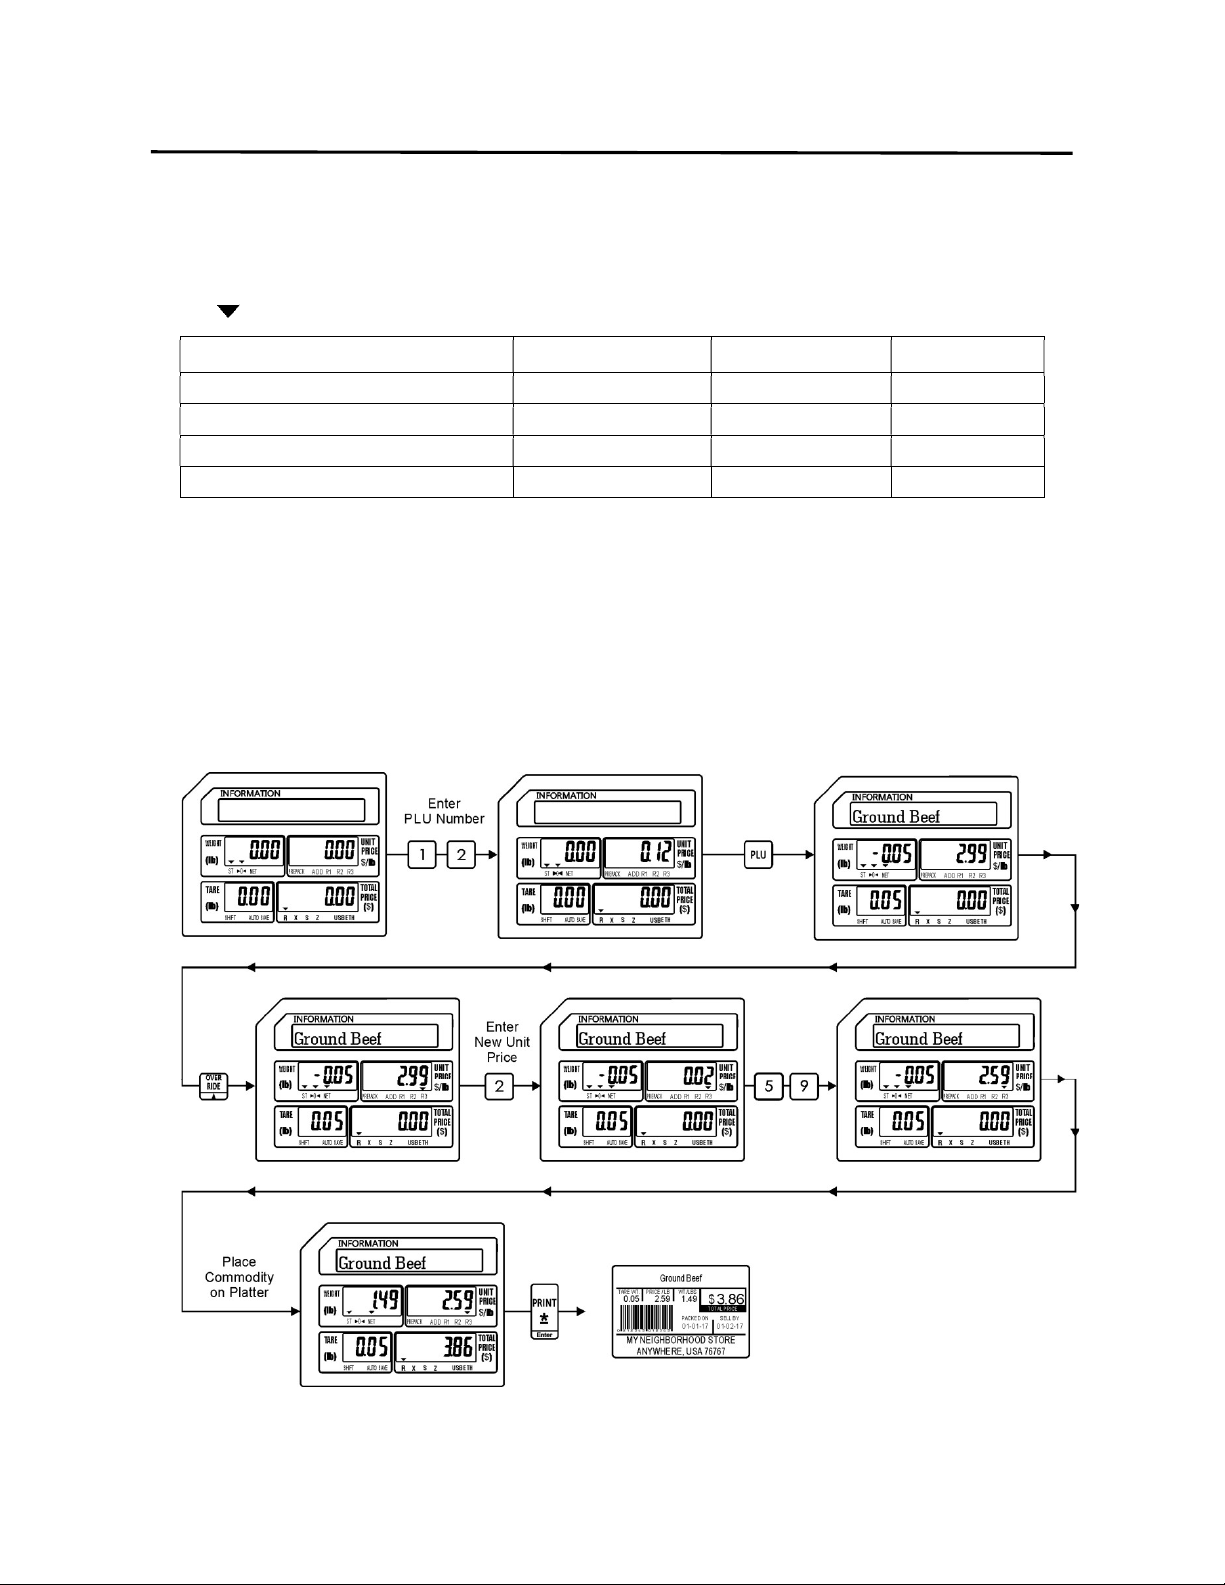
The Override key is usually used to temporarily make changes to the Unit Price, Tare weight or
Quantity information in a recalled PLU. When using the Override key the R1, R2 and R3 tri-
marks ( ) will be lit to signify which input area is being changed. Refer to the chart below.
R1 R2 R3
Weigh Mode (without Tare Override) Not Used Not Used Unit Price
Weigh Mode (with Tare Override) Tare Weight Not Used Unit Price
Non Weigh Mode Quantity Not Used Unit Price
By Count Mode Purchase Quantity Priced at Quantity Unit Price
Note: A password may be required to use the Override Key.
8.5.1 Weigh Mode Override
Using the Override key on a normal Weigh mode type PLU allows you to temporarily
change the Unit Price and Preset Tare weight for that PLU.
Ex.) Override just the Unit Price for PLU #12 Ground Beef which has a Preset Tare weight
of -0.05 lbs and a Unit Price of $2.99 /lb with a new Unit Price of $2.59 /lb.
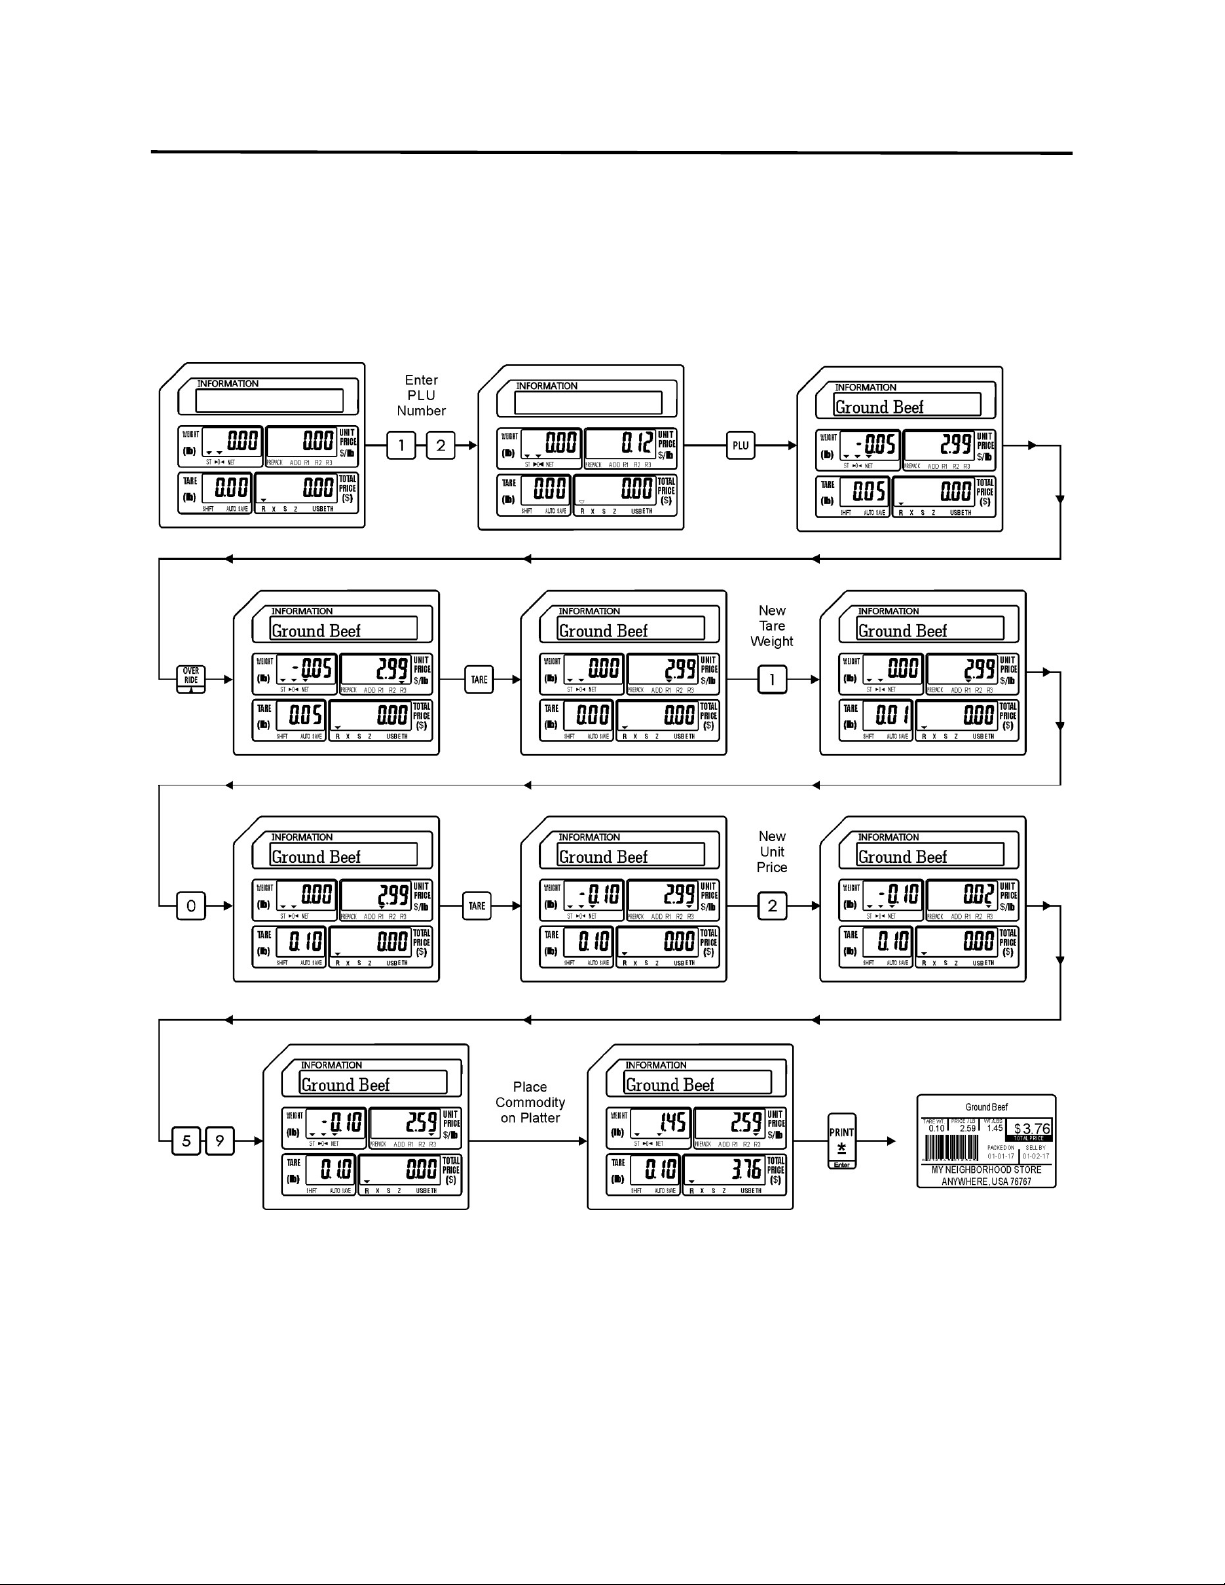
8. Basic Operations ELP-301016
8.5.1 Weigh Mode Override
30
Ex.) Override the Preset Tare weight and Unit Price for PLU #12 Ground Beef which has a
Preset Tare weight of -0.05 lbs and a Unit Price of $2.99 /lb with a new Tare weight
of -0.10 lbs and a new Unit Price of $2.59 /lb.

8. Basic Operations ELP-301016
8.5.2 Non Weigh Mode Override
31
8.5.2 Non Weigh Mode Override
In the Non Weigh mode the Override key can be used to change the Quantity Purchased
and the Unit Price of the recalled PLU.
Ex.) Override the Quantity Purchased and the Unit Price for PLU #15 Apple, which is
normally priced at 1 for 29 cents with a new Quantity of 2 and a new Unit Price of
20 cents.
8. Basic Operations ELP-301016
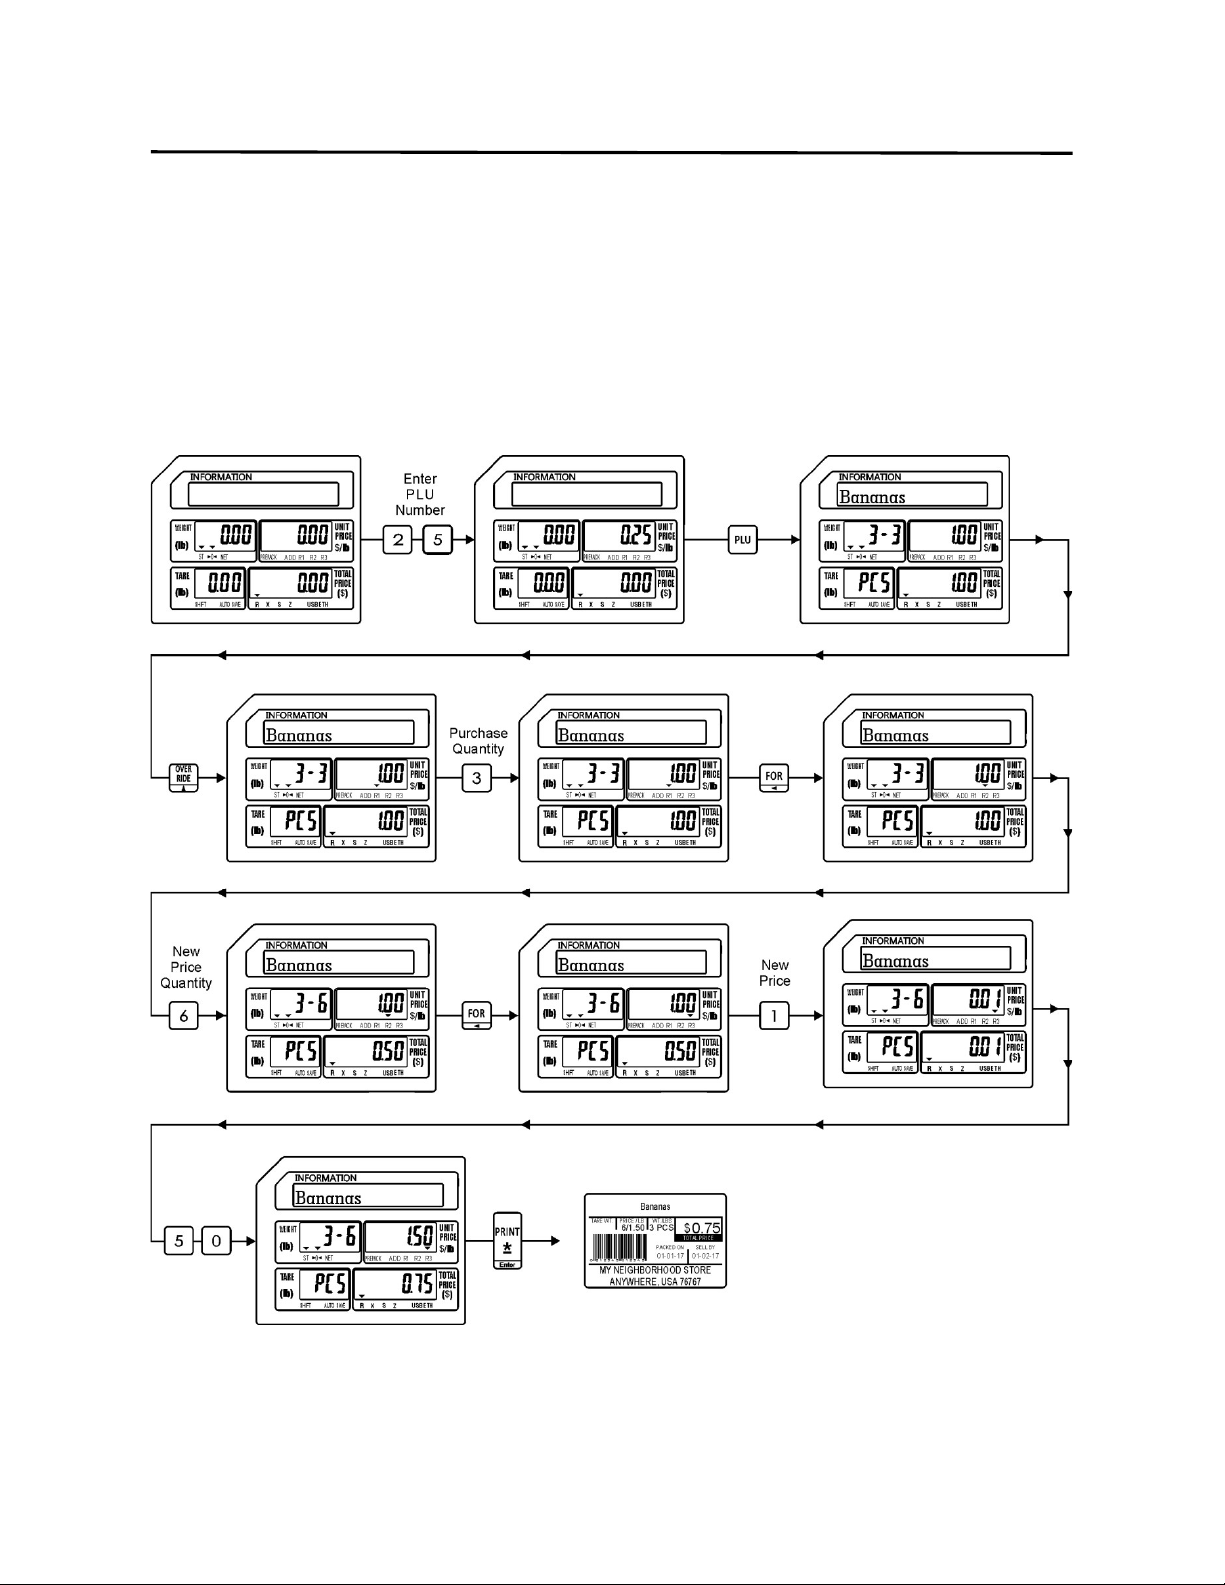
8.5.3 By Count Mode Override
32
8.5.3 By Count Mode Override
In the By Count mode the Override key allows you to change the Quantity Purchased,
the Priced at Quantity and the Unit Price of the recalled PLU.
Ex.) Override only the Priced at Quantity and the Unit Price of PLU #25 Bananas, which
are normally priced at 3 for $1.00 with a new Priced at Quantity of 6 and a new Unit
Price of $1.50.
8. Basic Operations ELP-301016
8.6 Miscellaneous PLU Operations
33
8.6 Miscellaneous PLU Operations
There are three Miscellaneous (MISC) PLU keys available to use when a PLU has not been
programmed for a particular item in the scale. By using one of the three individual MISC keys,
items may be sold as a Weighed, Non Weighed or By Count type PLU.
Note: The MISC keys may be programmed to require a password.
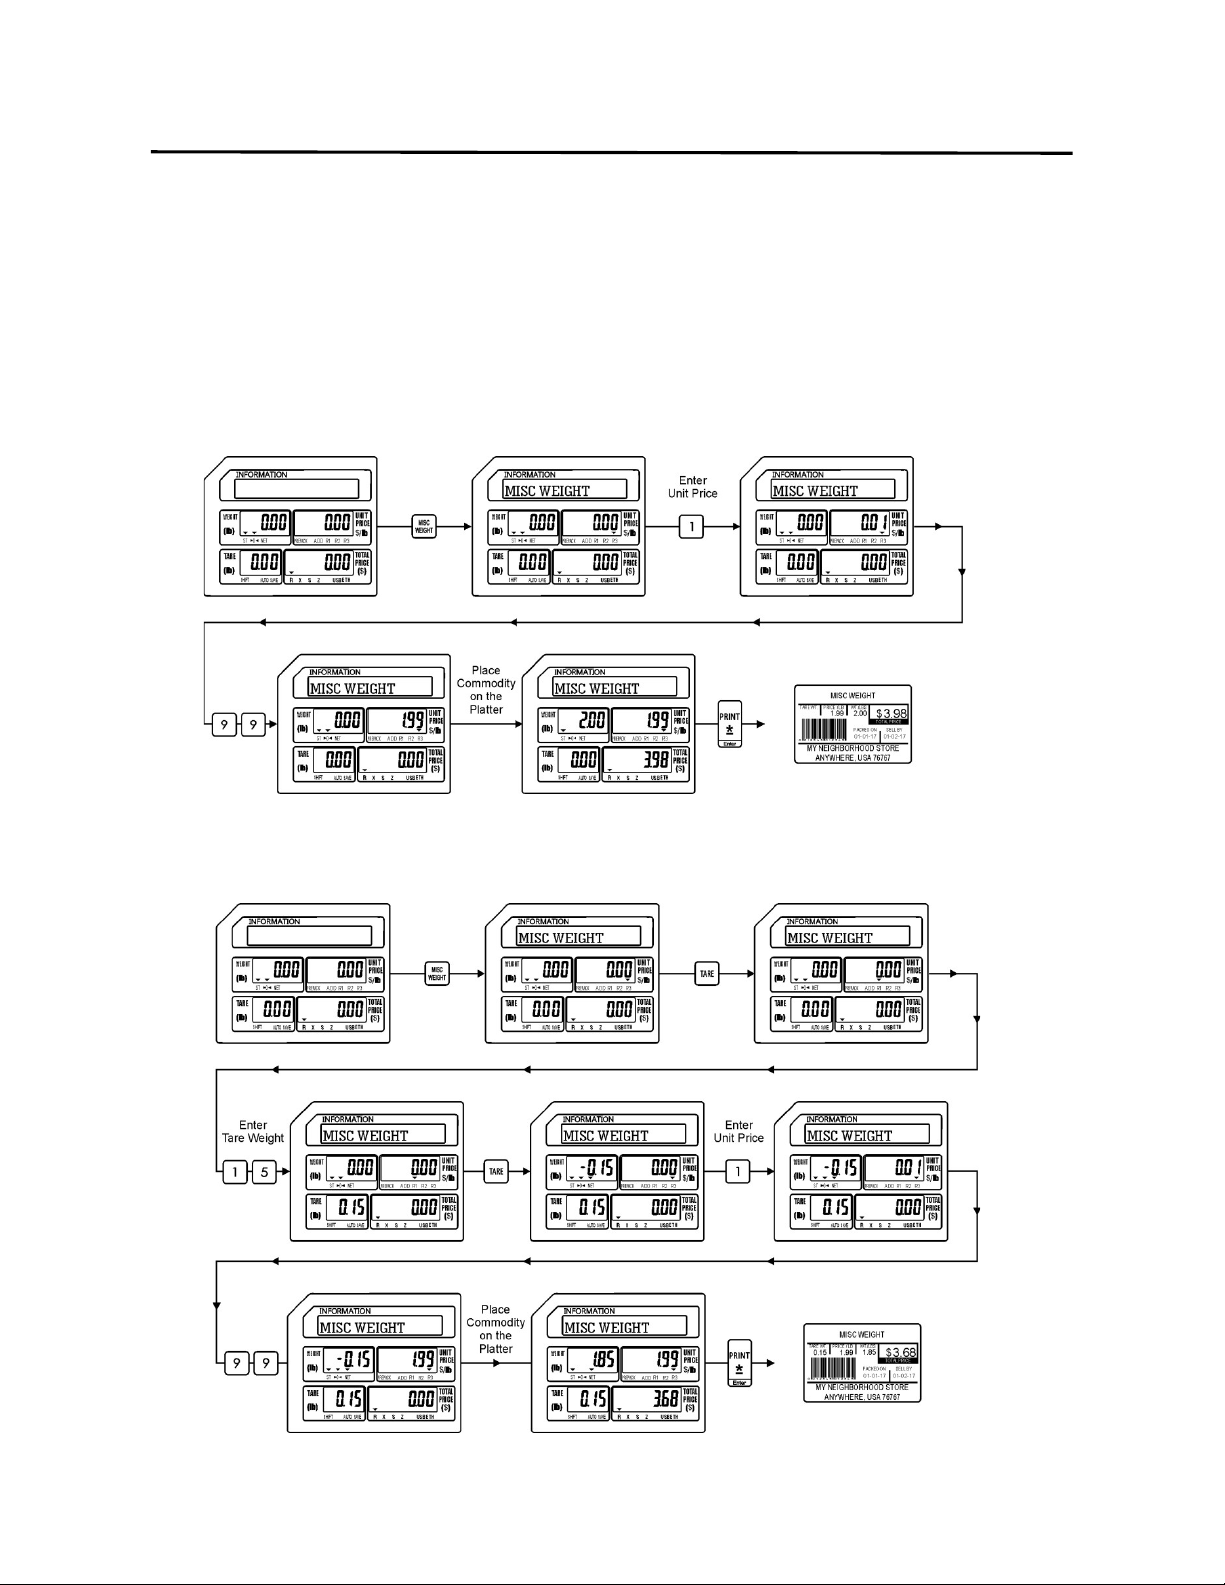
8.6.1 MISC Weigh Mode (without Tare Weight)
8.6.2 MISC Weigh Mode (with Tare Weight)
8. Basic Operations ELP-301016
8.6.3 MISC Non Weigh Mode Operations
34
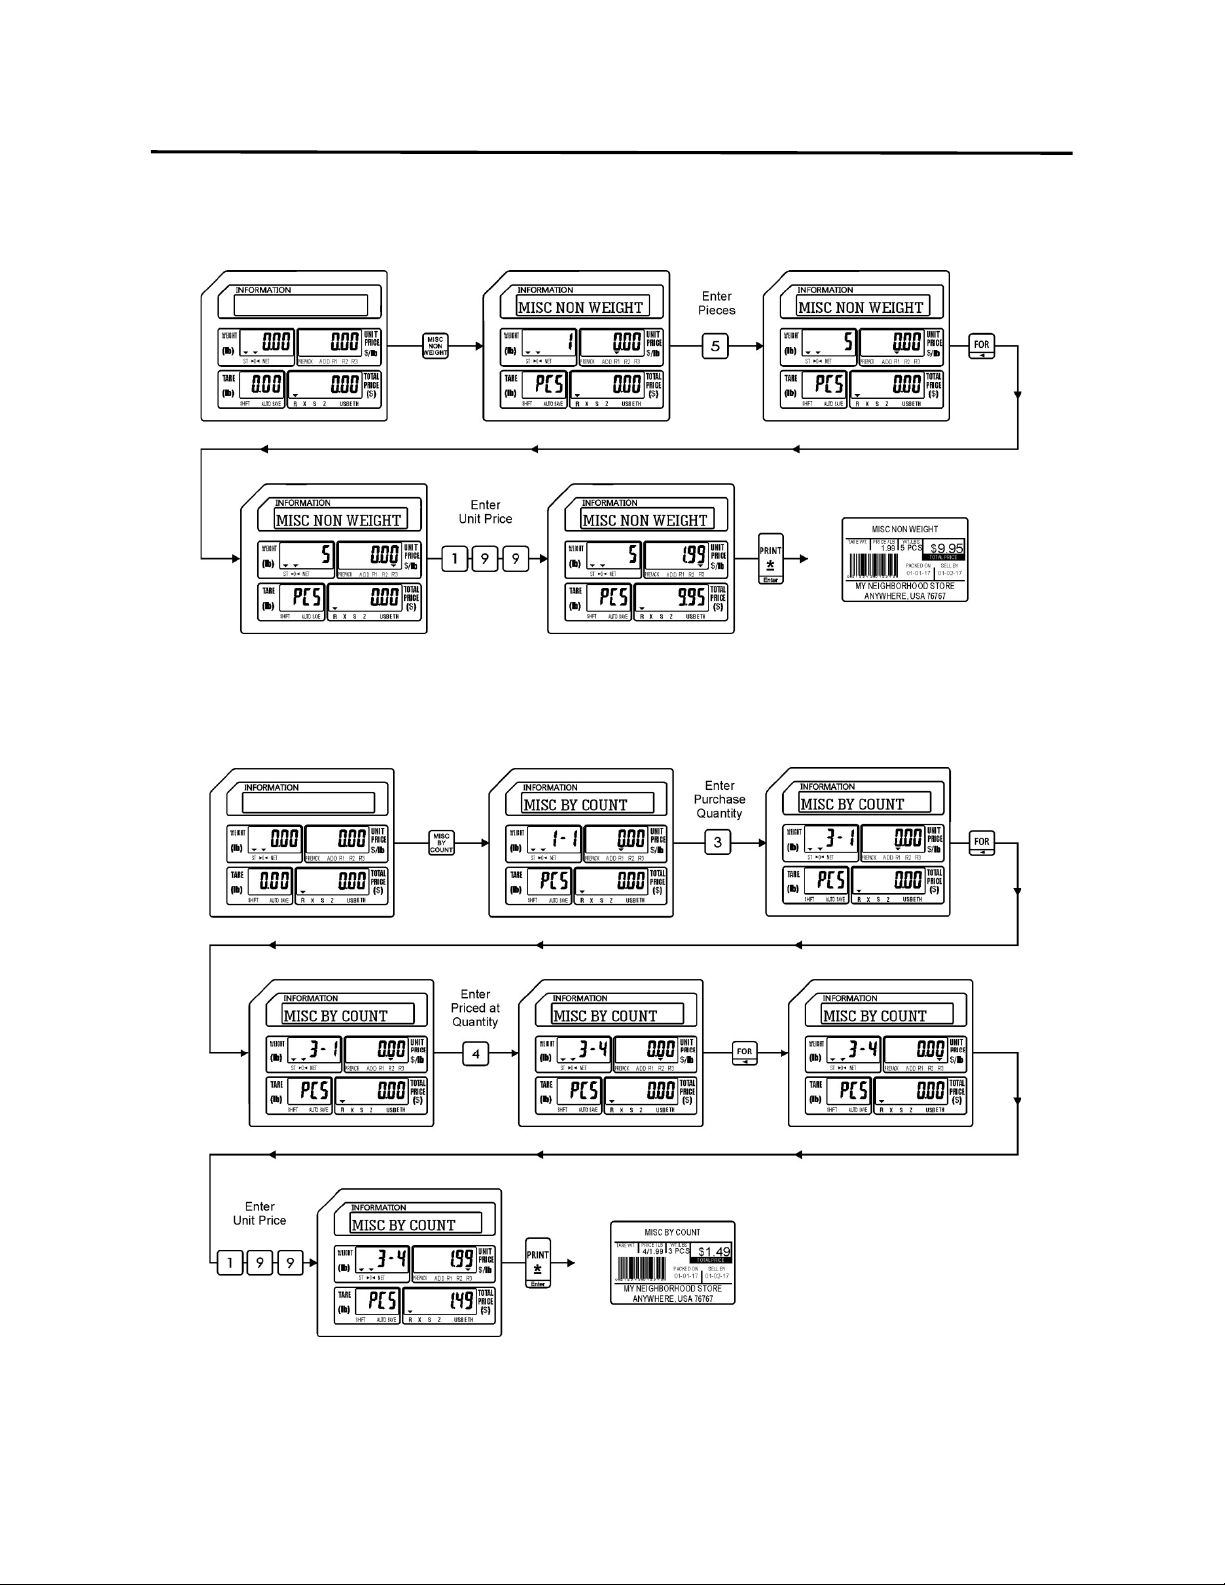
8.6.3 MISC Non Weigh Mode
8.6.4 MISC By Count Mode
8. Basic Operations ELP-301016
8.7 Preset Count Operations
35
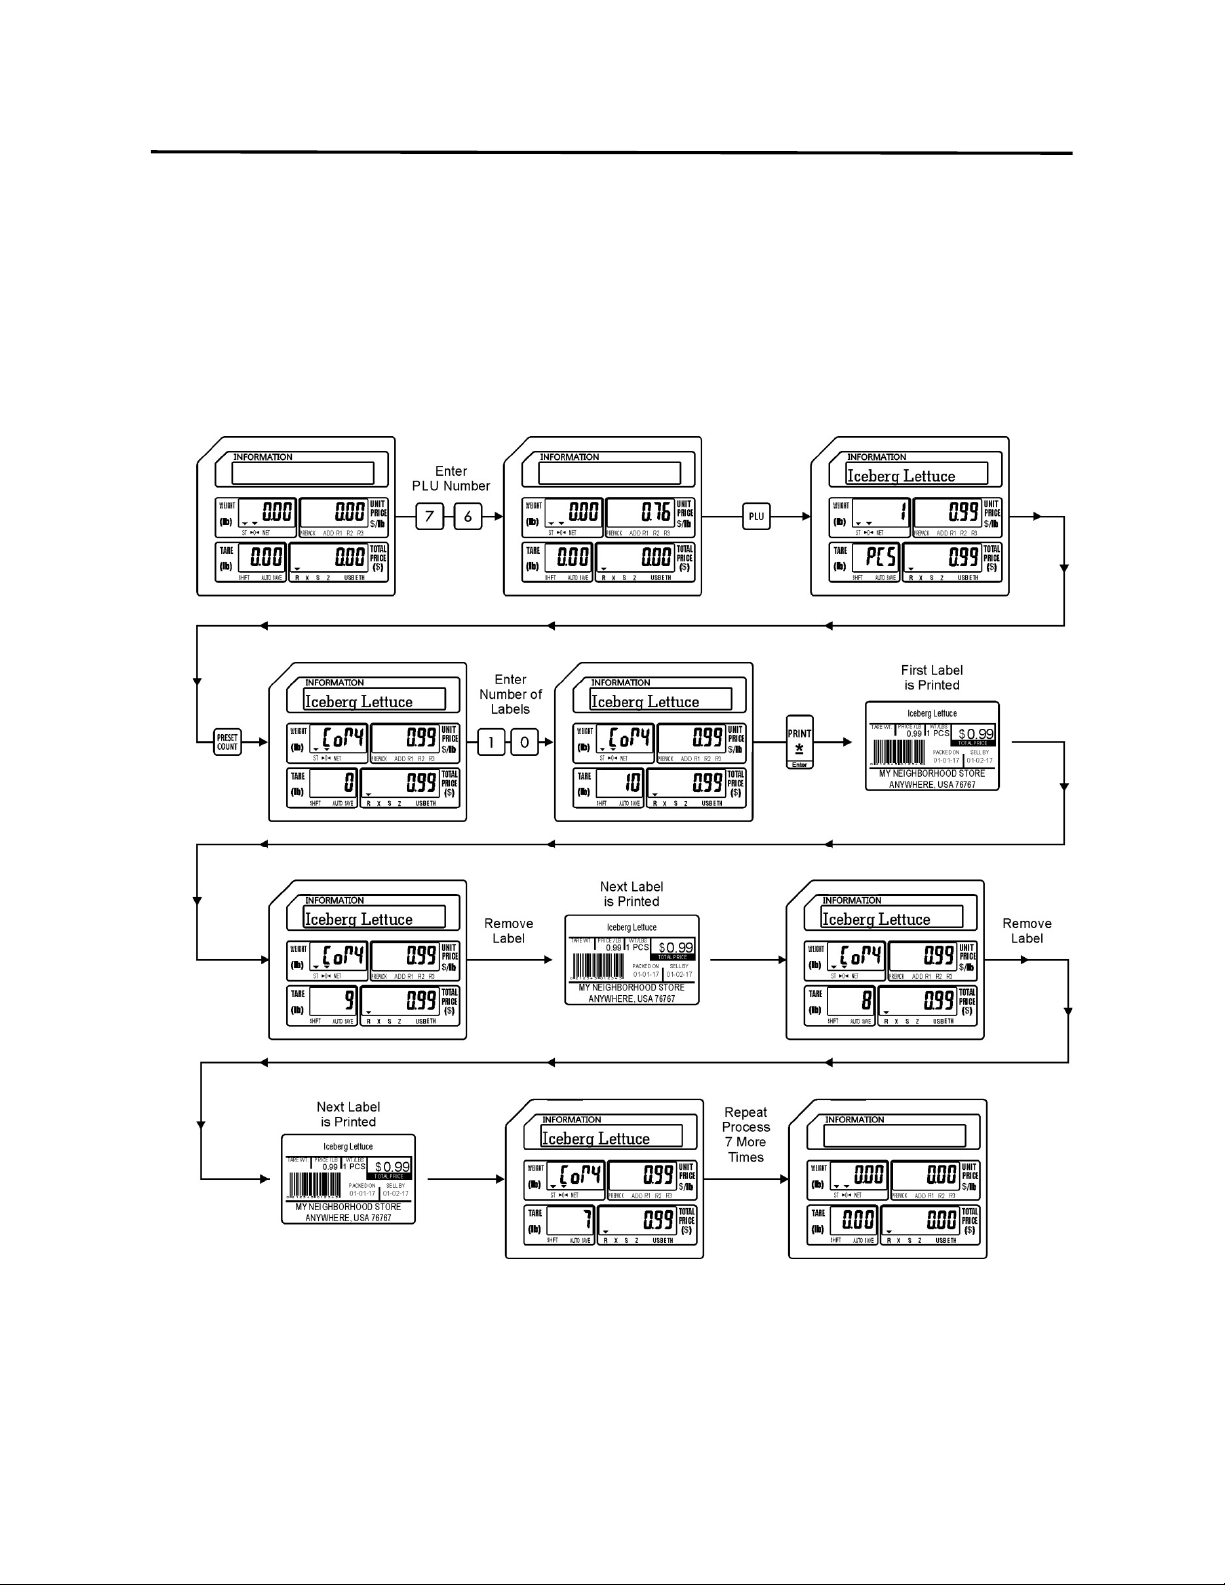
8.7 Preset Count Operations
The Preset Count key is used to issue multiple labels for a recalled PLU. It may only be used on
Non Weight and By Count type PLU’s.
8.7.1 Preset Count using Non Weight PLU
Ex.) A quantity of 10 labels are needed for lettuce.

8. Basic Operations ELP-301016
8.7.2 Preset Count using By Count PLU
36
8.7.2 Preset Count using By Count PLU
Ex.) A quantity of 10 labels is required for Bananas.
8. Basic Operations ELP-301016
8.8 Using the SAVE key
37
8.8 SAVE Key Operations
The SAVE key may be used to retain a recalled PLU’s information. The type of information that
is saved depends on the PLU type that is recalled.
8.8.1 Weigh Mode Operations with SAVE key
The information that is saved may be the Unit Price information and Preset Tare Weight.
8. Basic Operations ELP-301016
8.8.2 Non Weigh Mode using the SAVE key
38
8.8.2 Non Weigh Mode Operations with SAVE key
The information that is saved may be the Piece Count and the Unit Price.
8. Basic Operations ELP-301016
8.8.3 By Count Mode using the SAVE key
39
8.8.3 By Count Mode Operations with SAVE Key
The information saved may be the Quantity Purchased and Unit Price.
8. Basic Operations ELP-301016
8.9 PLU Type Change Operations
40
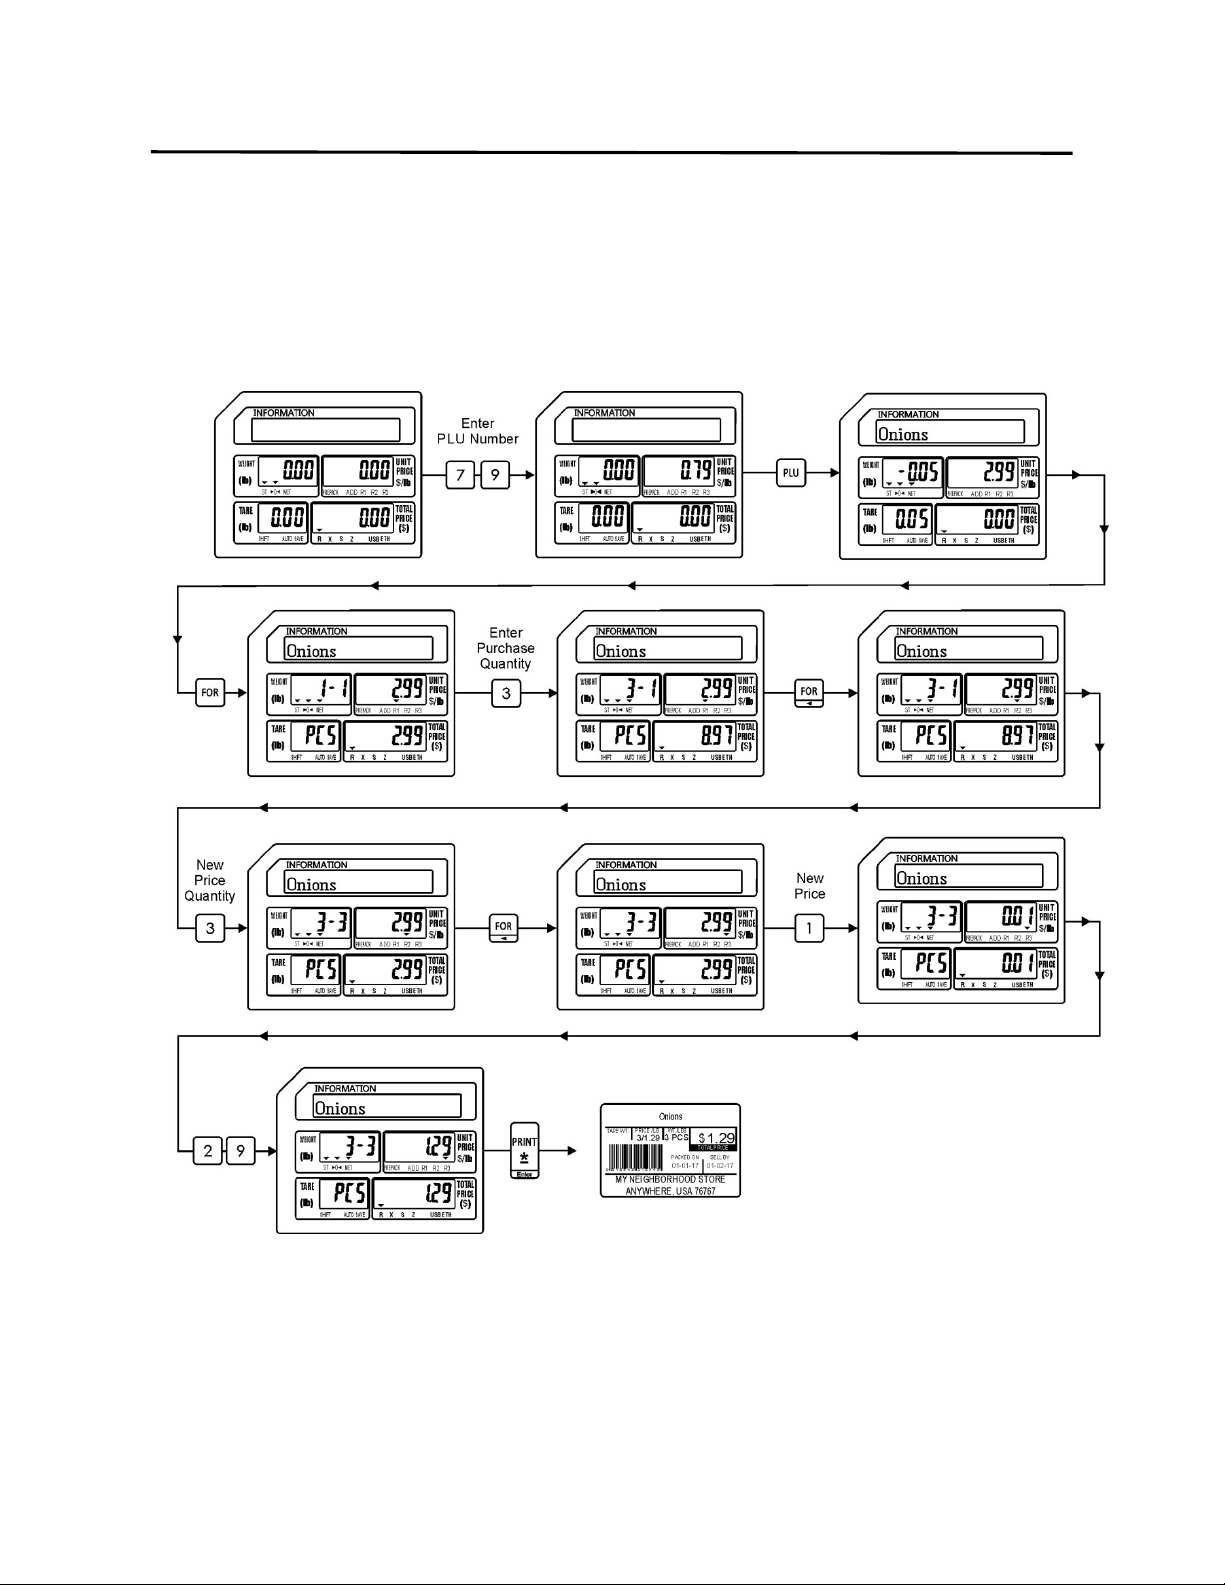
8.9 PLU Type Change Operations
This special operation allows the operator to temporarily change a Weigh Mode PLU to a By
Count Mode PLU.
Ex.) Change PLU #79 Onions from $2.99 per pound to 3 Onions for $1.29.
Note: PLU Type Change is only available for changing a Weigh Mode PLU into a By Count
PLU.
9. Programming (S Mode) ELP-301016
9 Programming (S Mode)
41
9. Programming (S Mode)
Most of the information used in the scale is entered using the S Mode. (To access the S Mode
press the twice.) Items like PLU or commodity information, Store Name and Address, Speed
Keys, Date/Time and Discount Information can be programmed using the built in programming
keyboard. The procedures used to program information into the scale are outlined in this
section of the manual.
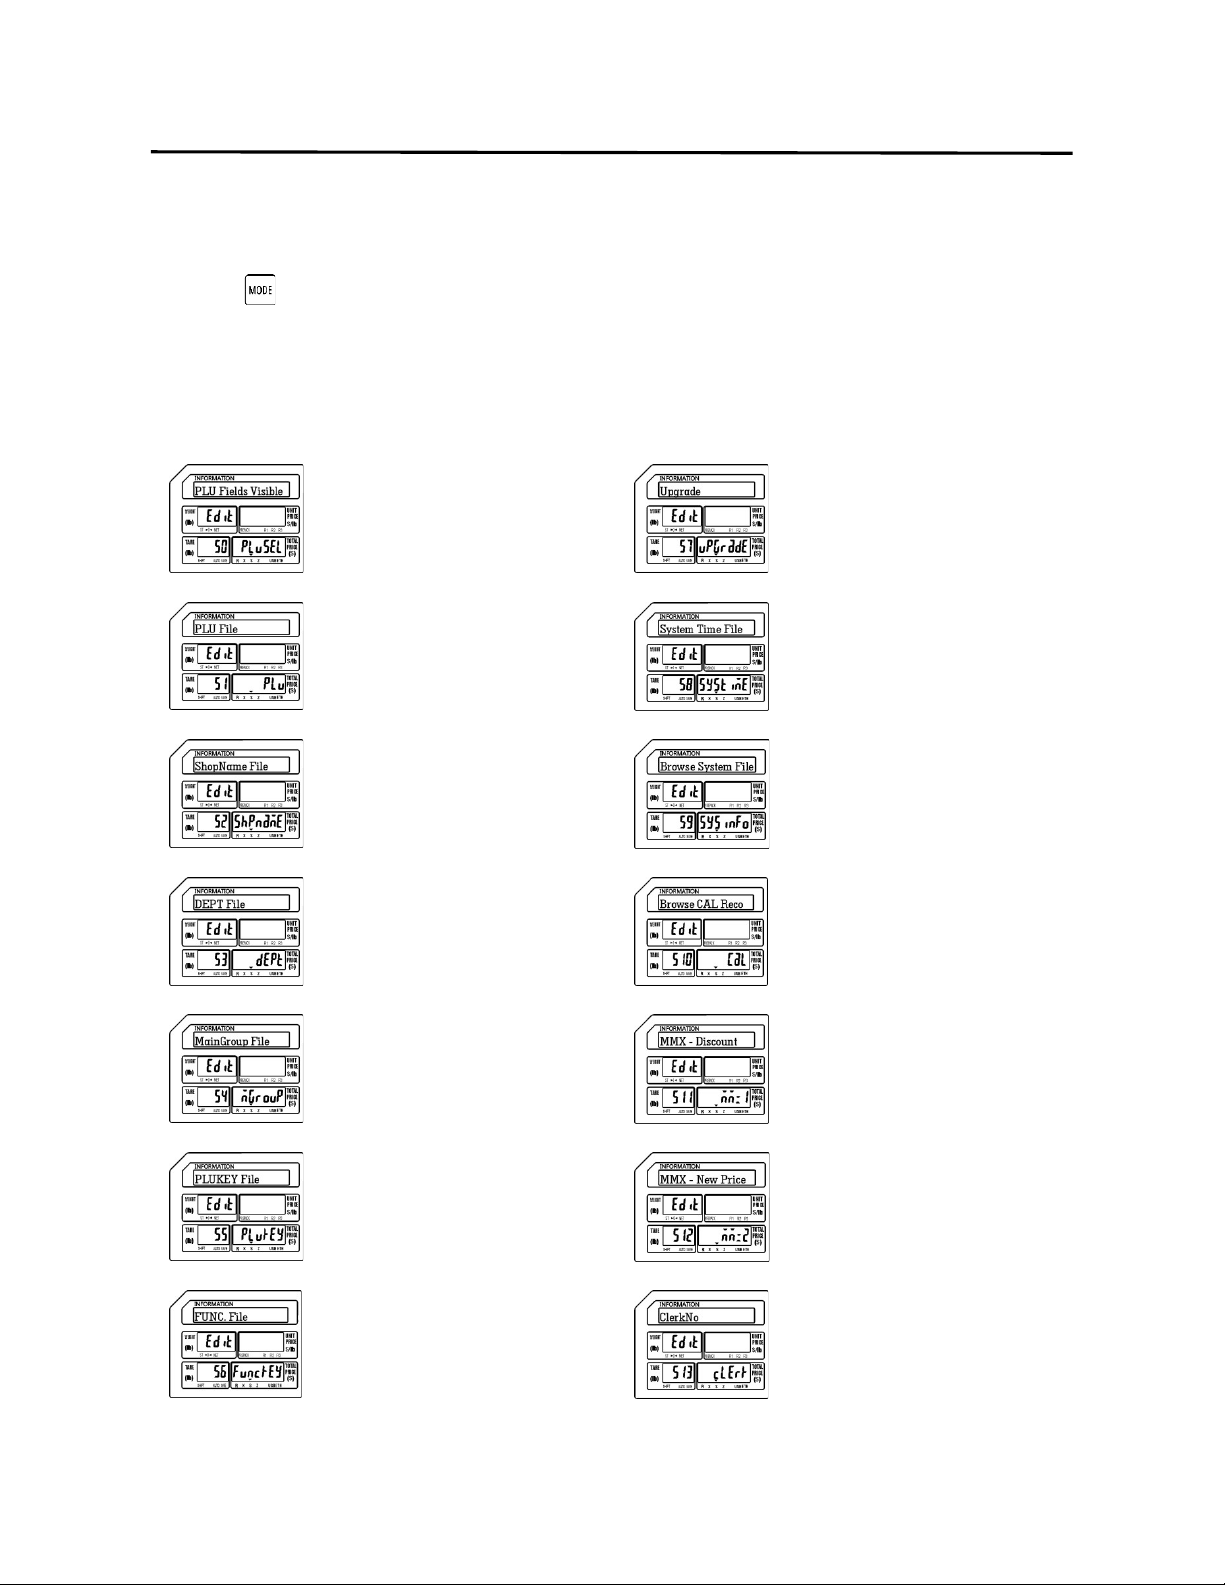
S0 PLU Fields Visible S7 Upgrade
Used to select which PLU fields
will be programmable while
programming PLU information.
Used to perform System
Upgrades.
S1 PLU File S8 System Time File
Used to program all PLU
information.
Used to program the Time and
Date information.
S2 Shop Name File S9 Browse System File
Used to program Store Names
and Addresses.
Used to Browse System File
information like number of
PLU’s, Departments, Groups,
Pictures, etc.
S3 Department File S10 Browse CAL Record
Used to program Department
information.
Used to Browse the Calibration
records of the scale.
S4 Main Group File S11 MMX Discount Rate
Used to program Main Group
information.
Used to assign PLU Discounts
by a percentage rate.
S5 PLU Key File S12 MMX Discount Price
Used to program PLU Speed
Key information.
Used to assign PLU Discounts
using a new unit price.
S6 Function Key File S13 Clerk Number
Used to assign special Function
Keys to the Speed Key
keyboard.
Used to program Clerk
information.
9. Programming (S Mode) ELP-301016
9.1 PLU Fields Visible (S0 Mode)
42
9.1 PLU Fields Visible (S0 Mode)
The PLU Fields Visible function allows you to select the PLU information fields that will be
displayed while programming PLU’s in the S Mode - S1 PLU File. This function should be
completed prior to programming any PLU information in the S Mode – S1 PLU File. Refer to the
list below for all of the possible PLU information fields available.
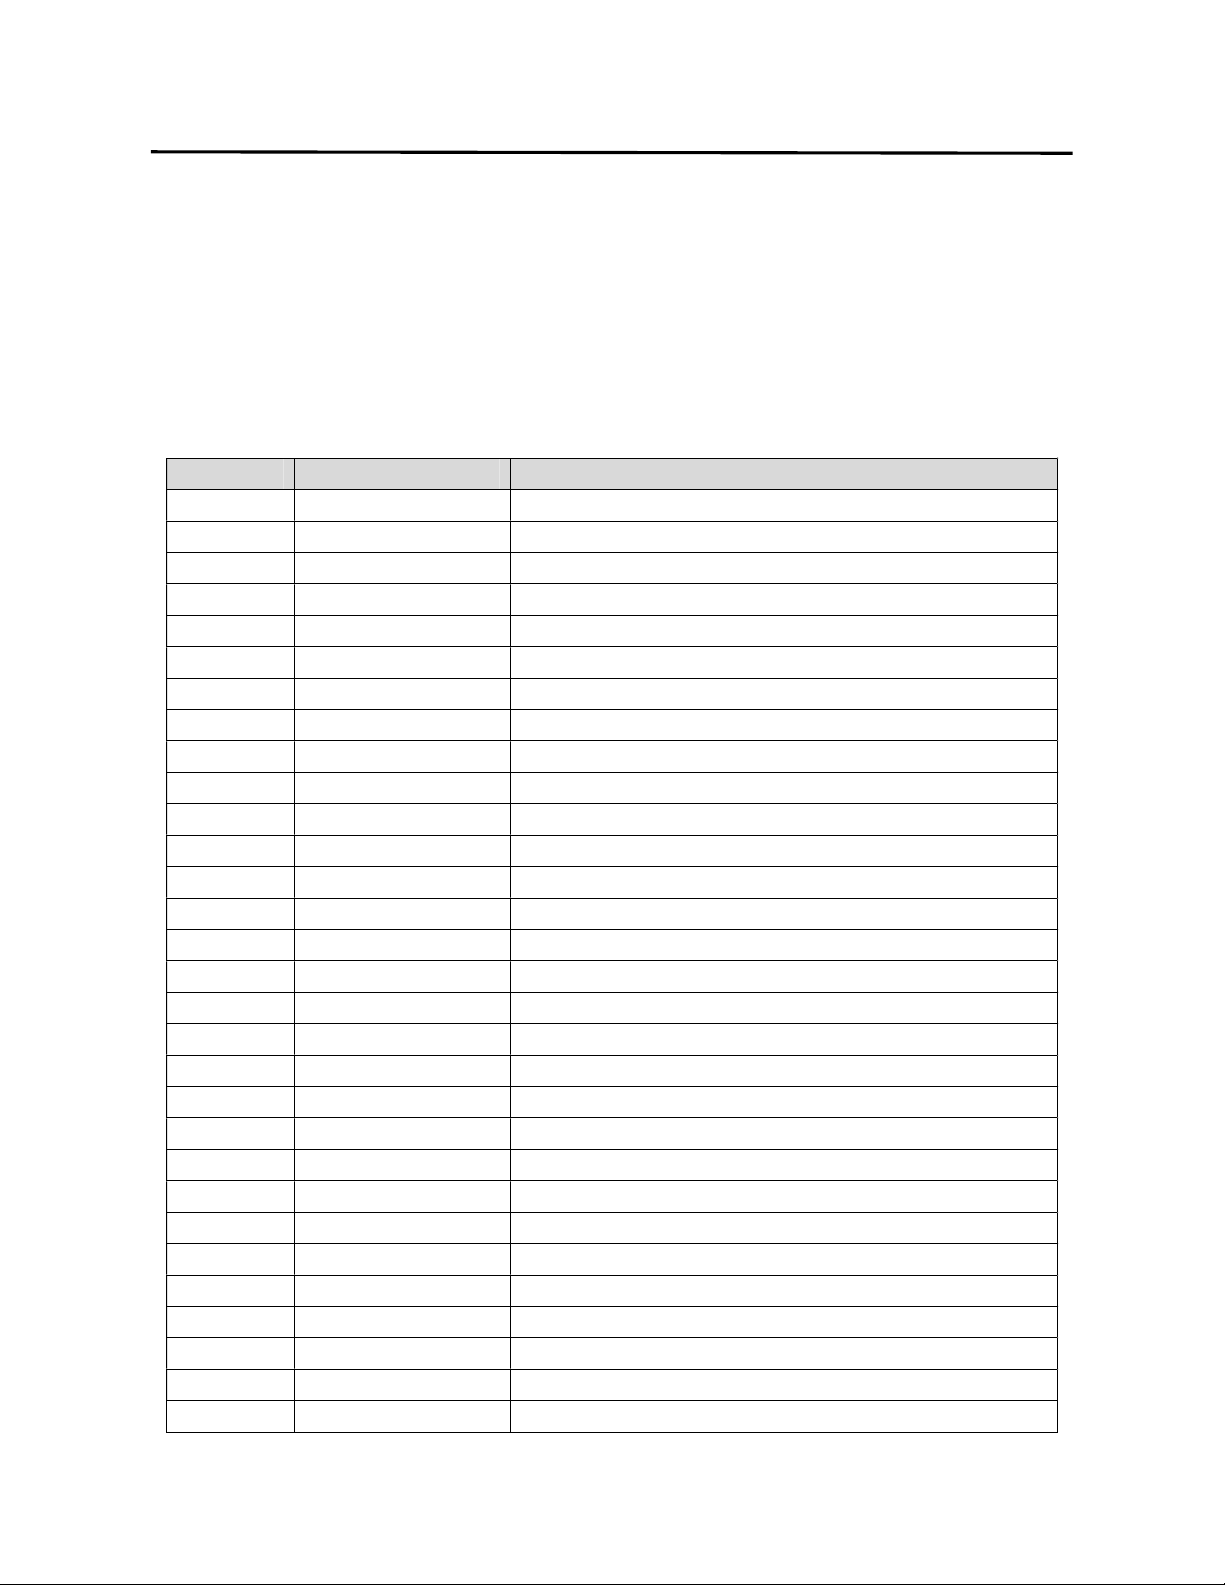
Mode No. Field Name Remarks
S0.0 PLU No. PLU Number (0-999999)
S0.1 Name PLU Name (1-4 Lines, 30 characters per line)
S0.2 Unit Price PLU Unit Price (0-9999.99)
S0.3 Price Max PLU Maximum Price
S0.4 PLU Type PLU Type (0-Weight, 1-Non Weight, 2-By Count)
S0.5 Label Format* PLU Label Format Number (0-99)
S0.6 Barcode Format* PLU Barcode Format Number(0-99)
S0.7 F1F2* PLU Barcode Flag Number (0-99)
S0.8 Item Code PLU Item Code (0-999999)
S0.9 BCD Type* Barcode Type (0-Weight, 1-Qty, 2-Price)
S0.10 Main Group No PLU Main Group Number (0-999999)
S0.11 Tax No Tax Number (0-9)
S0.12 BLC No N/A
S0.13 Tag No N/A
S0.14 WT Unit PLU Weight Unit
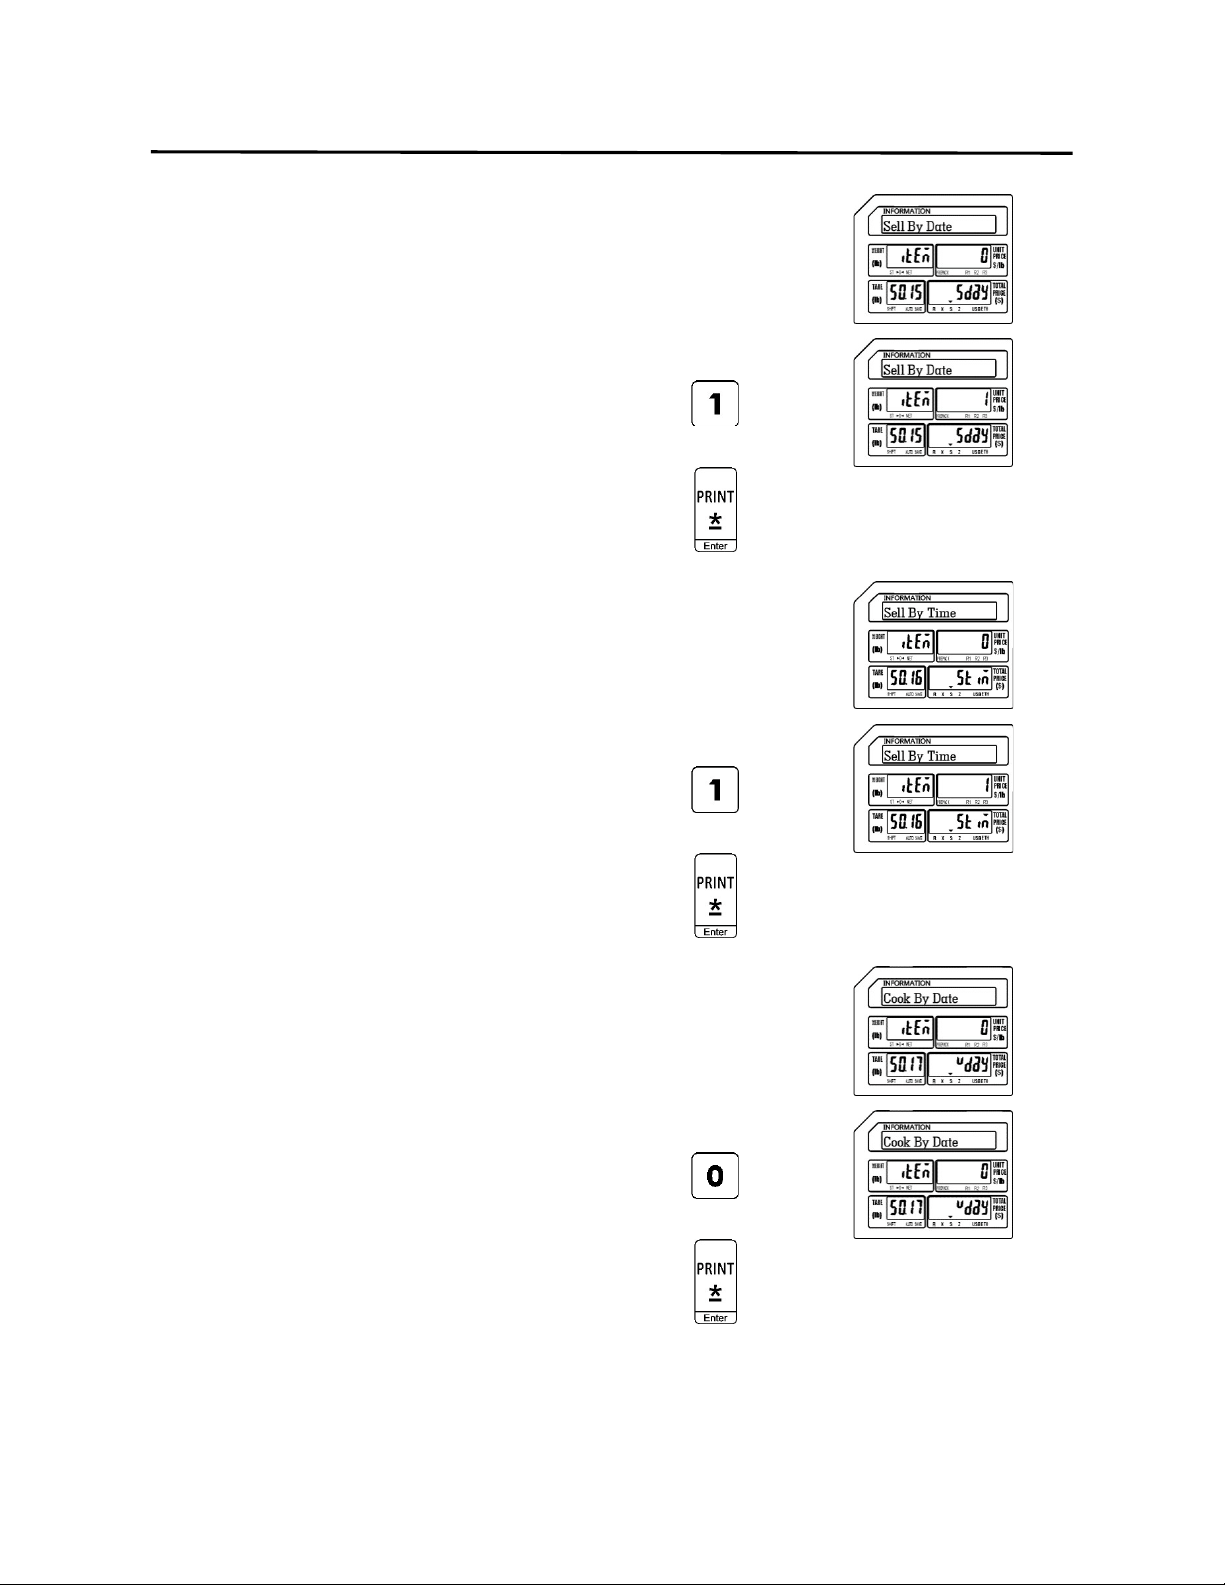
S0.15 Sell By Date PLU Sell By Date (0-999) added to Packed Date
S0.16 Sell By Time PLU Sell By Time (0-99) added to Packed Time
S0.17 Cook By Date PLU Cook By Date (0-999)added to Packed Date
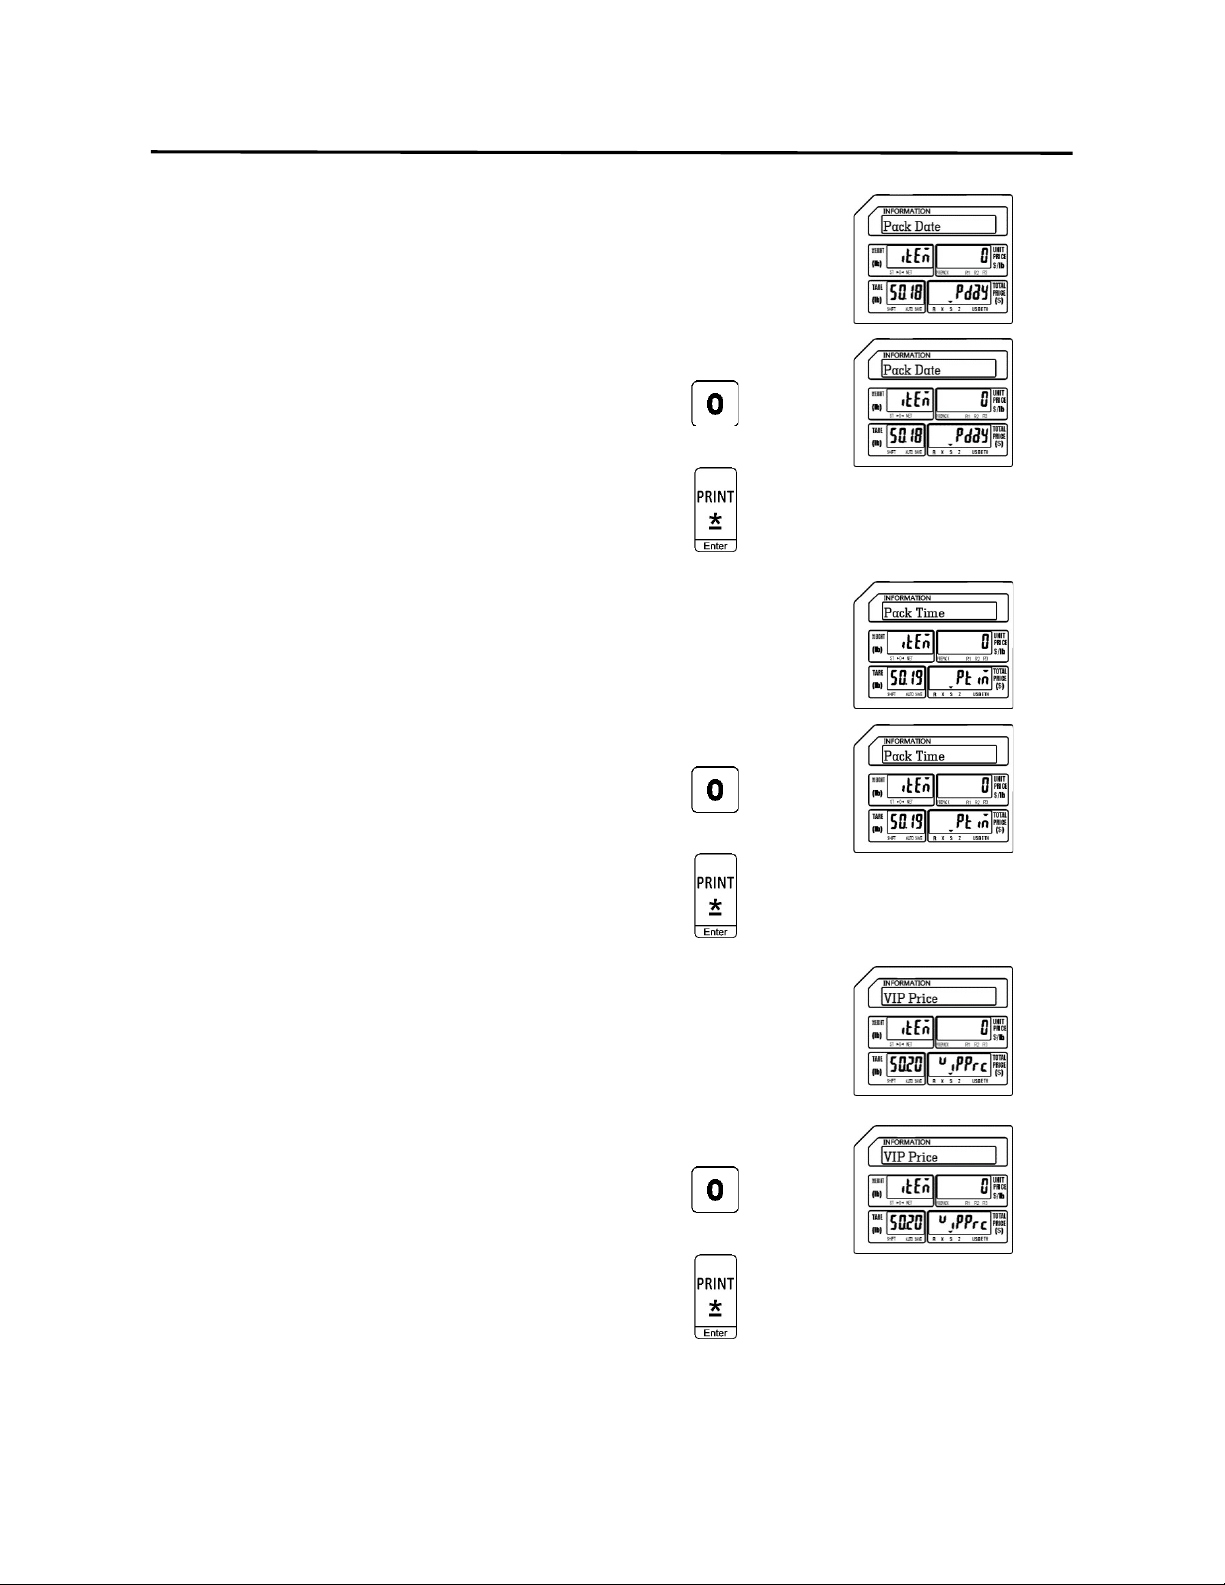
S0.18 Pack Date PLU Packed Date (0-999) added to current date
S0.19 Pack Time PLU Packed Time (0-99) added to current time
S0.20 VIP Price PLU Special Customer Price
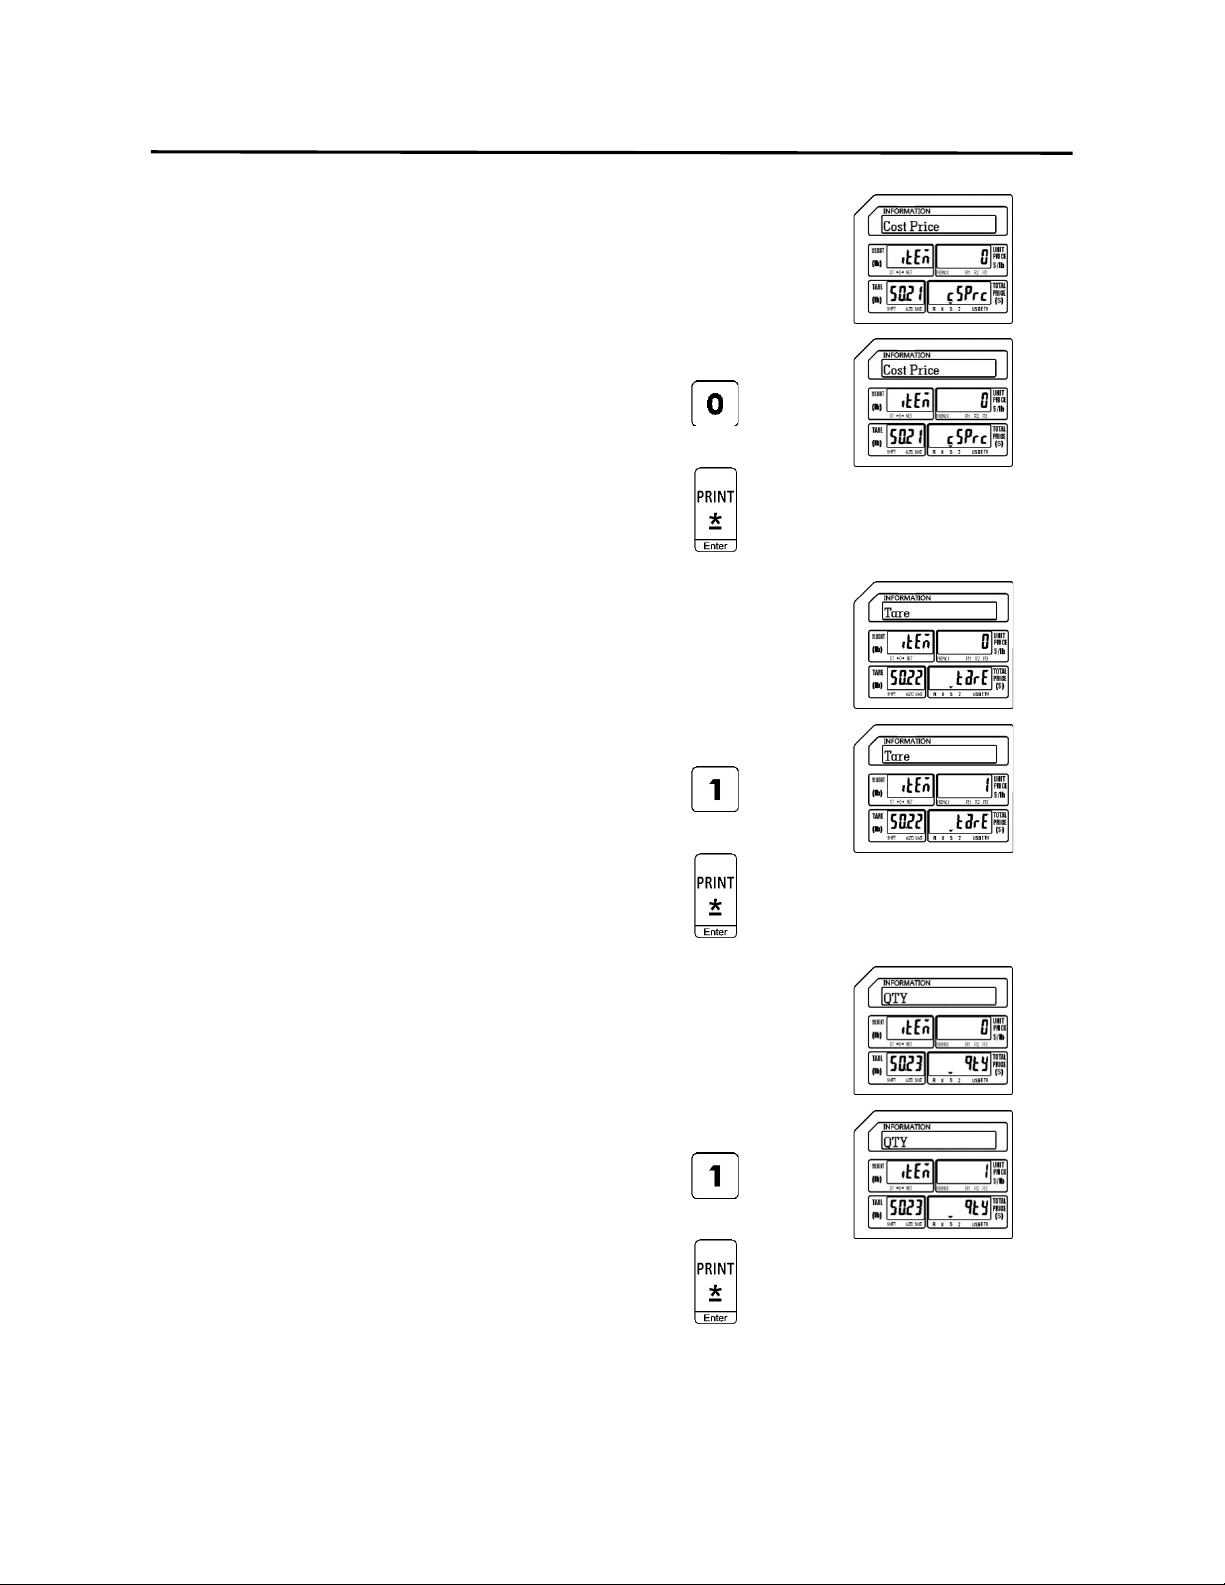
S0.21 Cost Price PLU Cost Price
S0.22 Tare Weight PLU Tare Weight
S0.23 Qty Non Weight or By Count PLU Piece Count
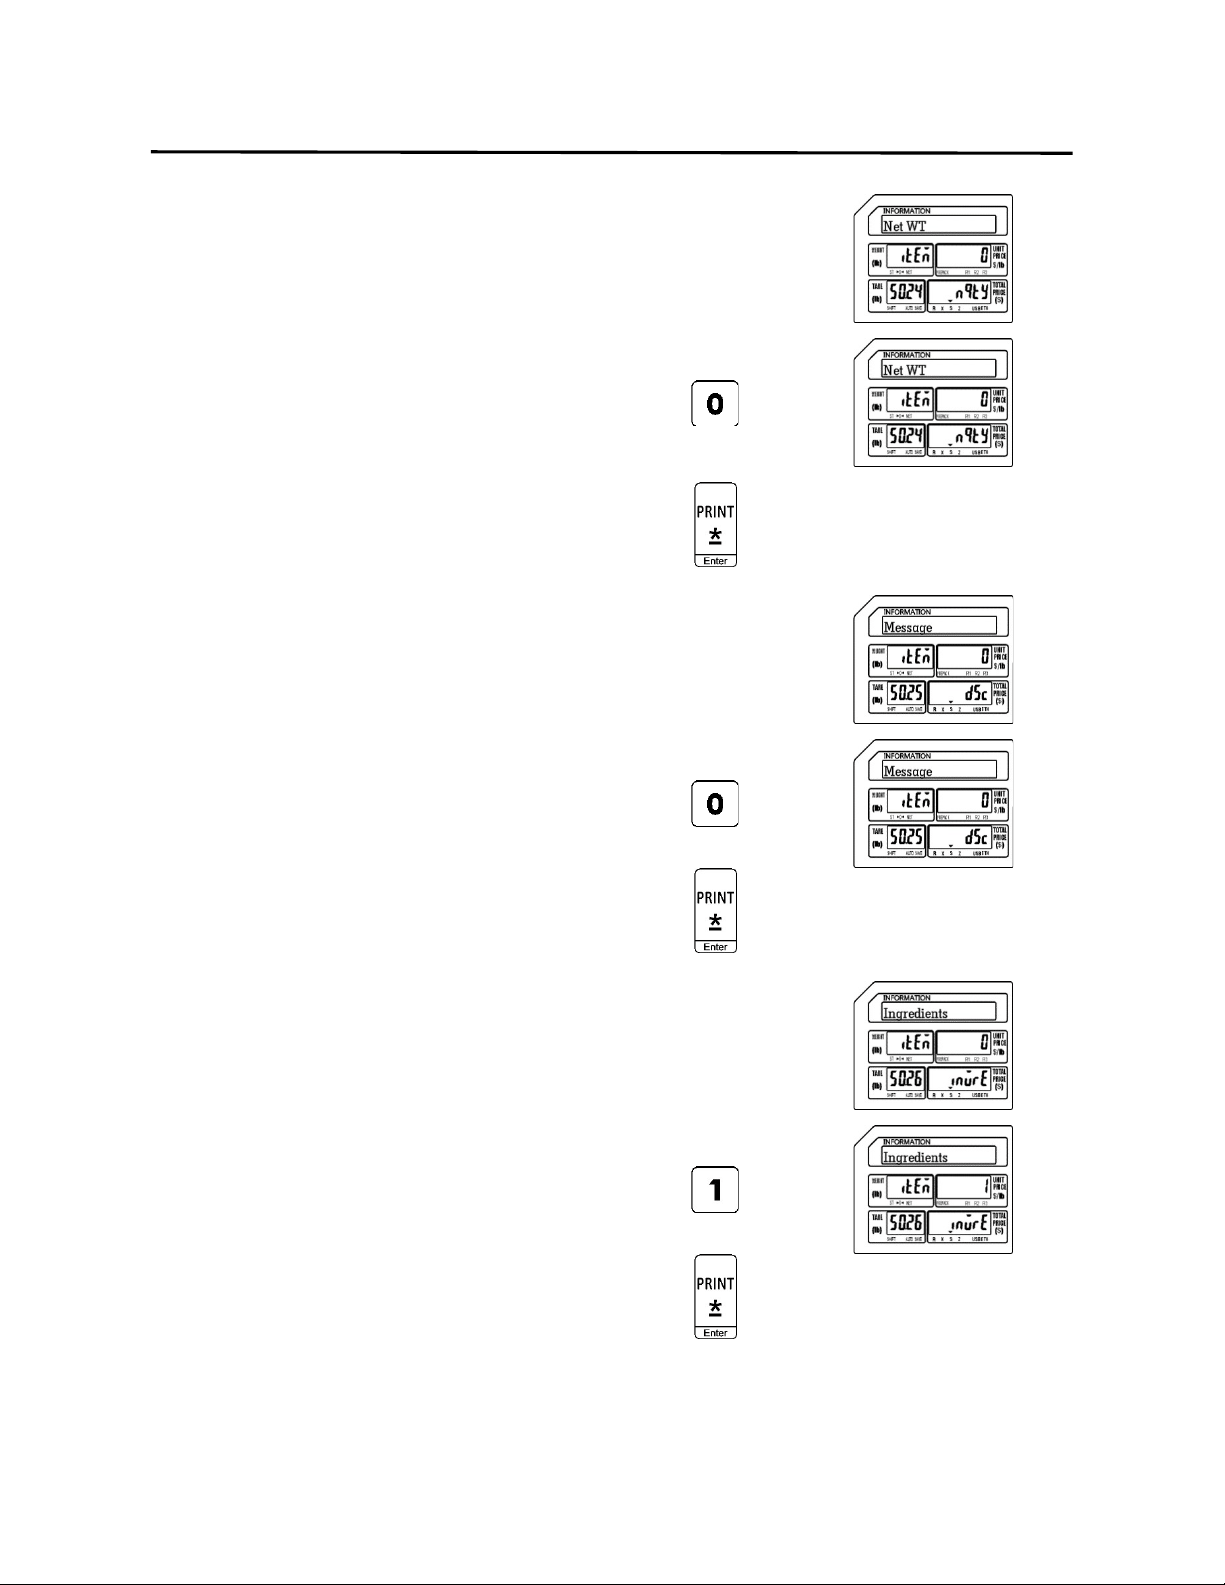
S0.24 Net Wt PLU Net Weight
S0.25 Message Special Sales Message
S0.26 Ingredients PLU Ingredients
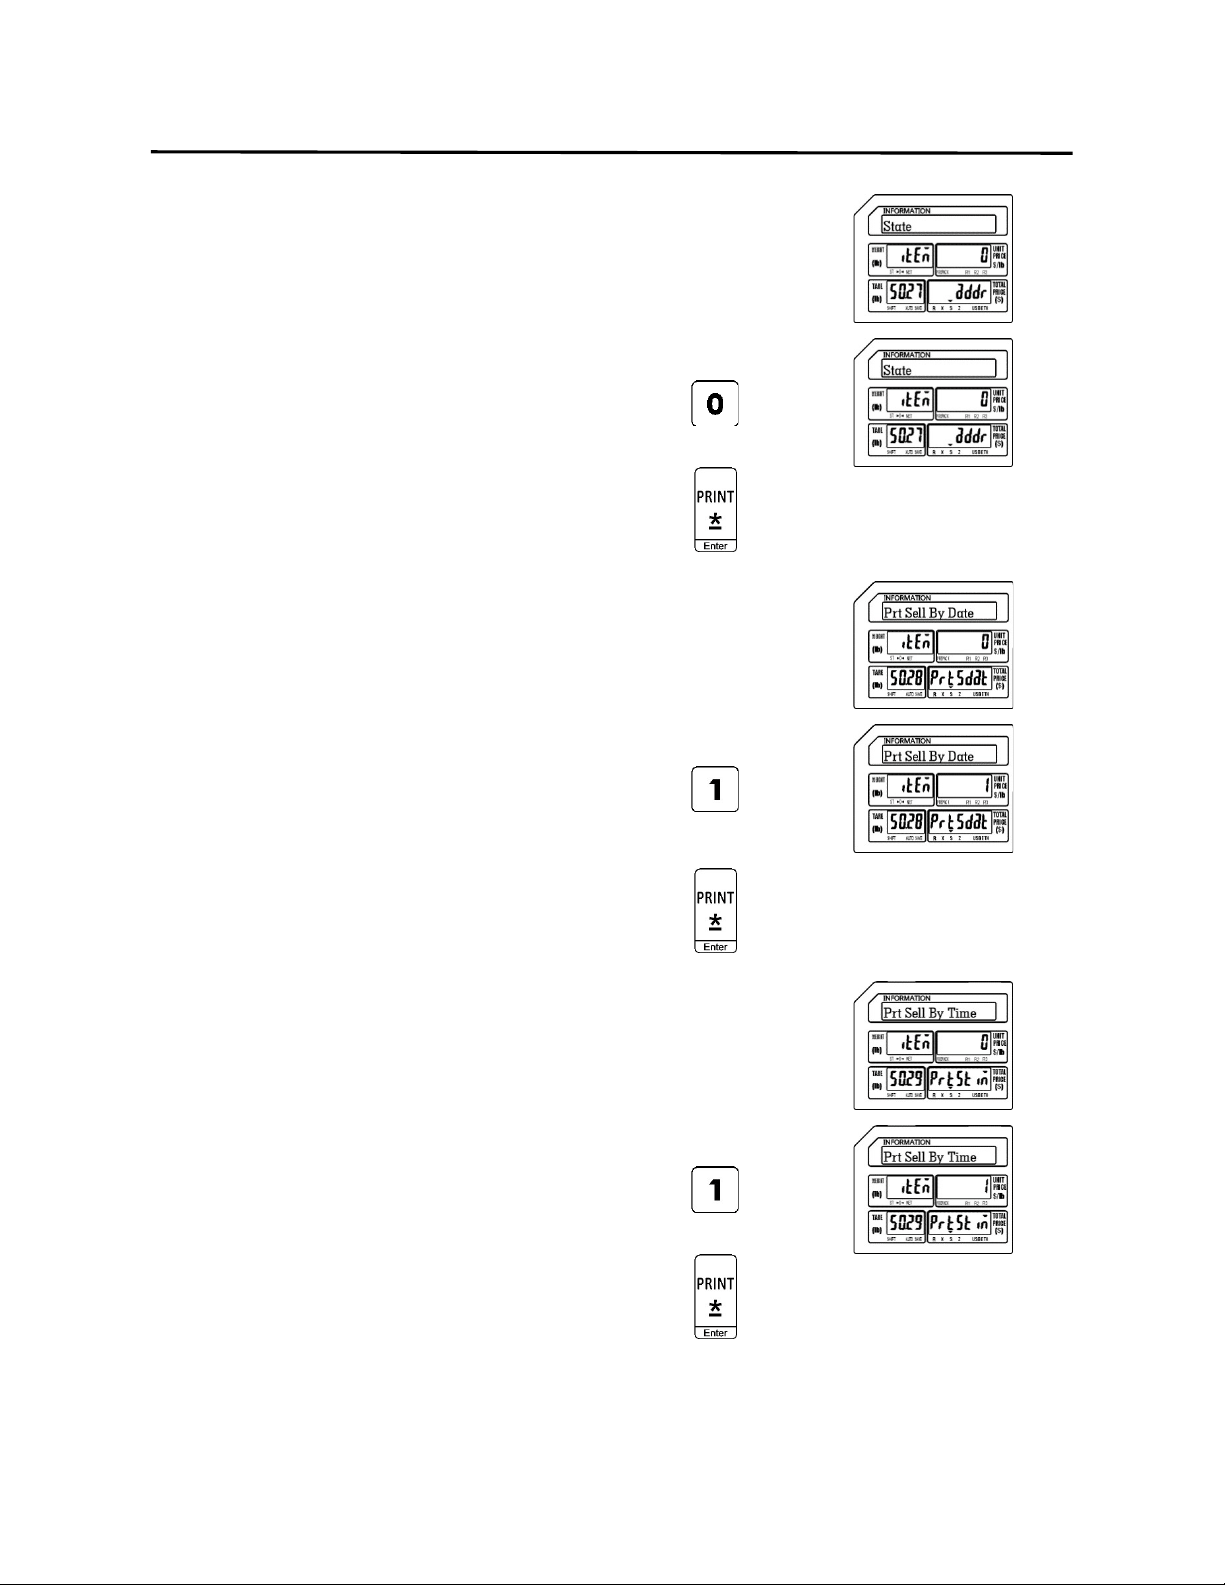
S0.27 State N/A
S0.28 Prt Sell By Date Print PLU Sell By Date
S0.29 Prt Sell By Time Print PLU Sell By Time
9. Programming (S Mode) ELP-301016
9.1 PLU Fields Visible (S0 Mode)
43
S0.30 Prt Cook By Date Print PLU Cook By Date
Mode No. Field Name Remarks
S0.31 Prt Pack Date Print PLU Packed Date
S0.32 Prt Pack Time Print PLU Packed Time
S0.33 Enable Discount Enable or Disable PLU Discount
S0.34 Can’t Sell PLU Sale Prohibit
S0.35 Enable Limit Price Enable PLU Price Limit
S0.36 Nutrition PLU Nutrition Information
Field Names marked with an “*” may appear or not appear during PLU programming based on
SPEC settings. These fields should be set to a “1” by default.
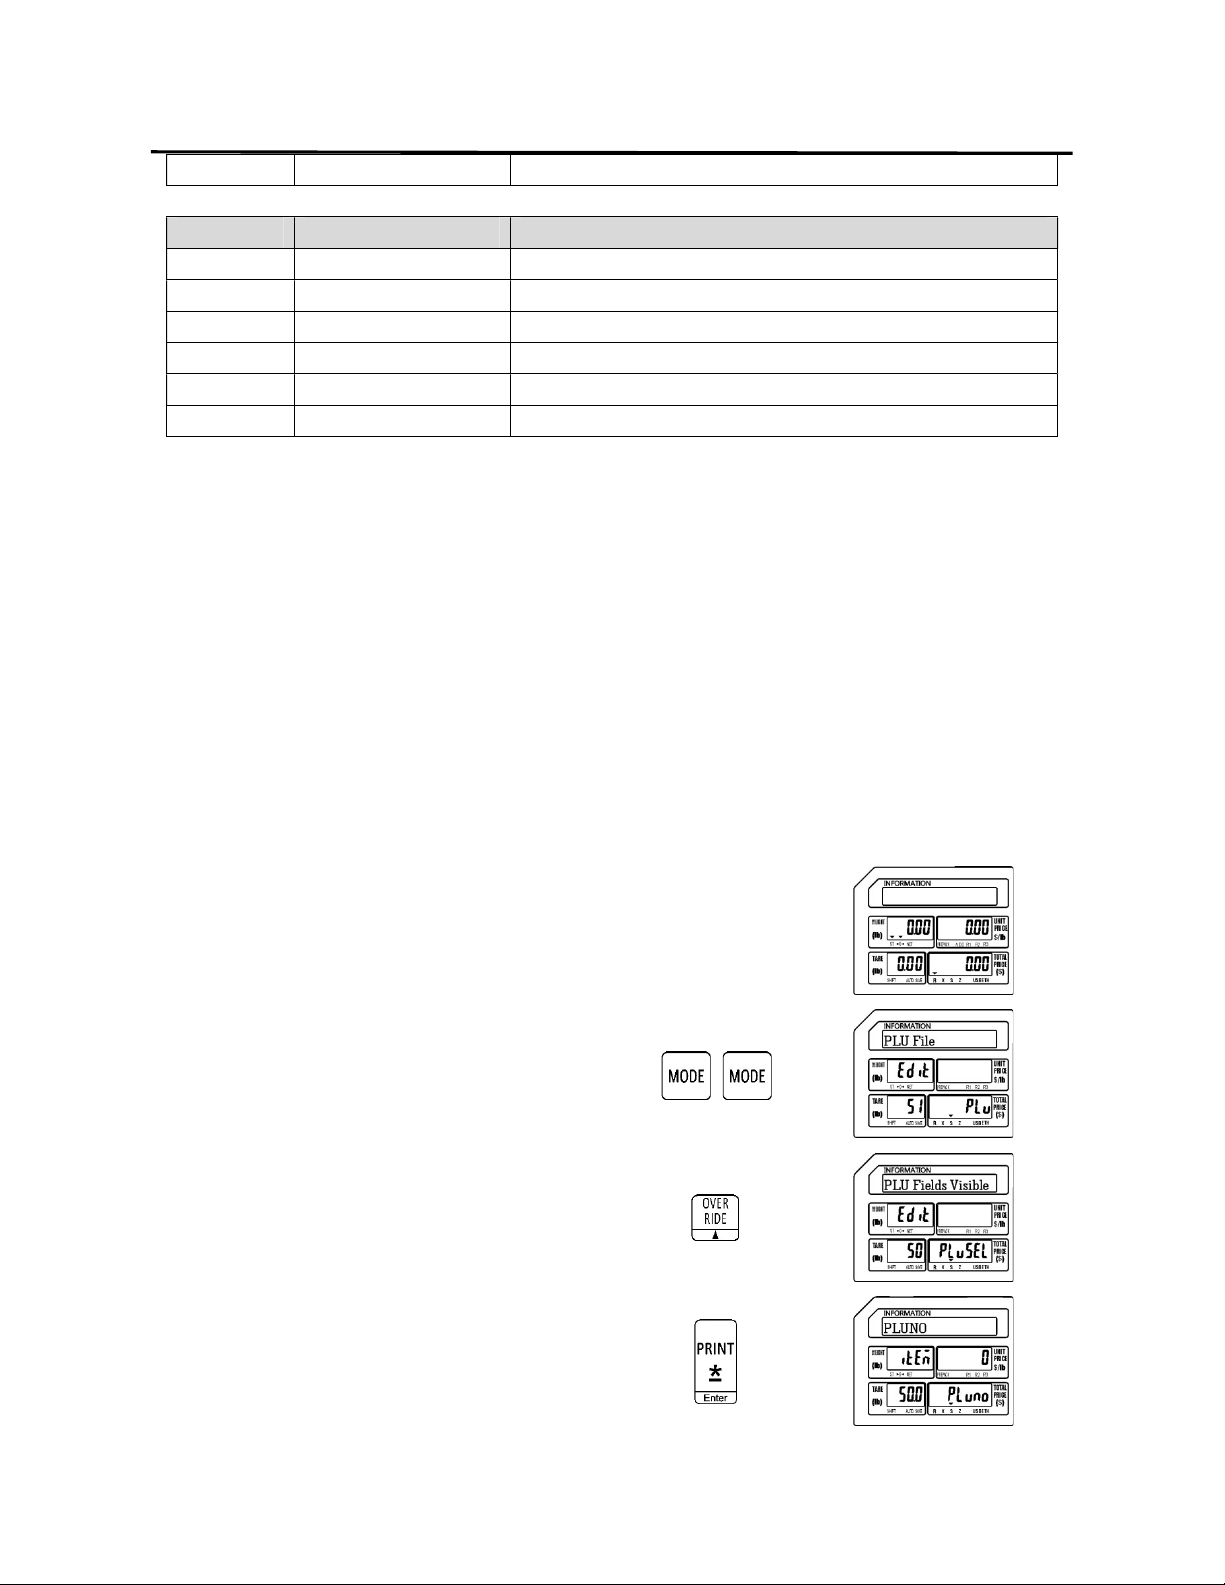
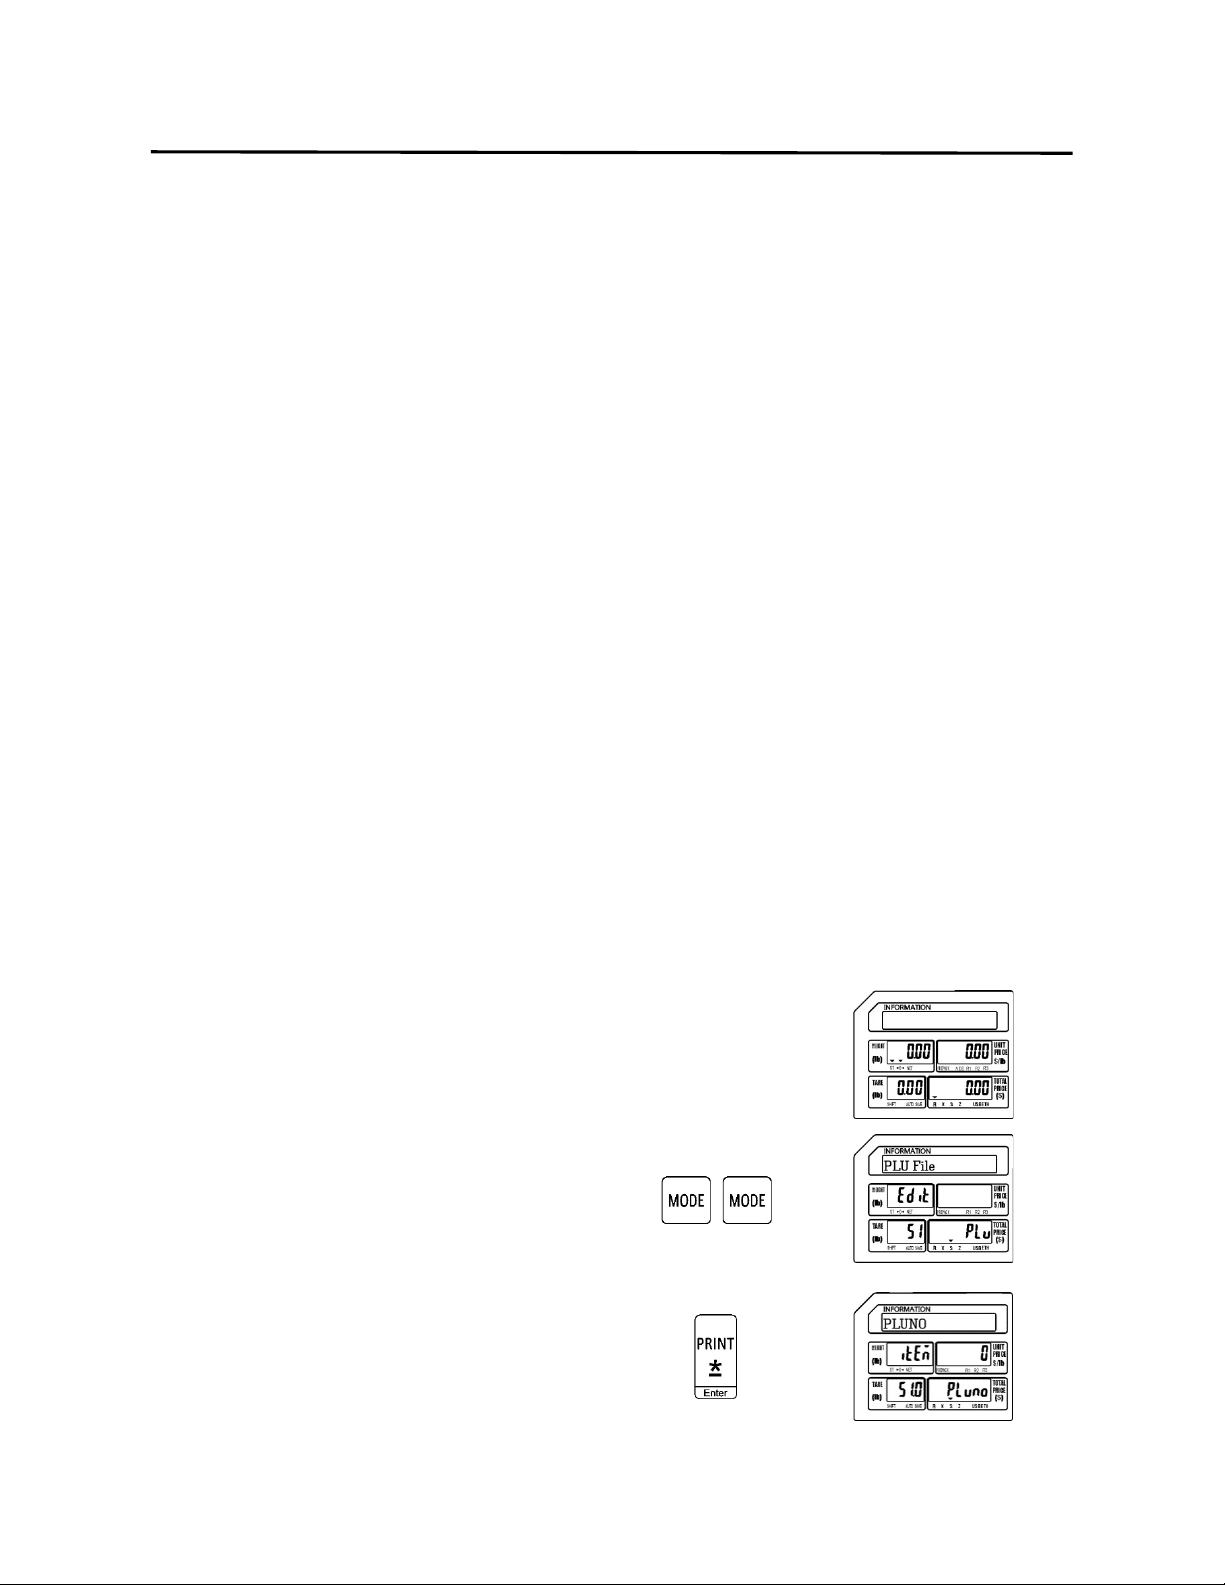
9.1.1 Selecting PLU Fields
To select the PLU Fields that will be used in the S Mode – S1 PLU File program follow the
procedures outlined below.
Note: You may save the information entered at any time and exit this program by pressing
the SAVE key then the FEED/ESC key. You may also exit this program without saving
any entered information by pressing the FEED/ESC key at any time.
1.) Start at the normal weigh mode screen
2.) Press the Mode Key twice
3.) Press the Override key once
4.) Press the Print/* key
9. Programming (S Mode) ELP-301016
9.1.1 Selecting PLU Fields (S0 Mode)
44
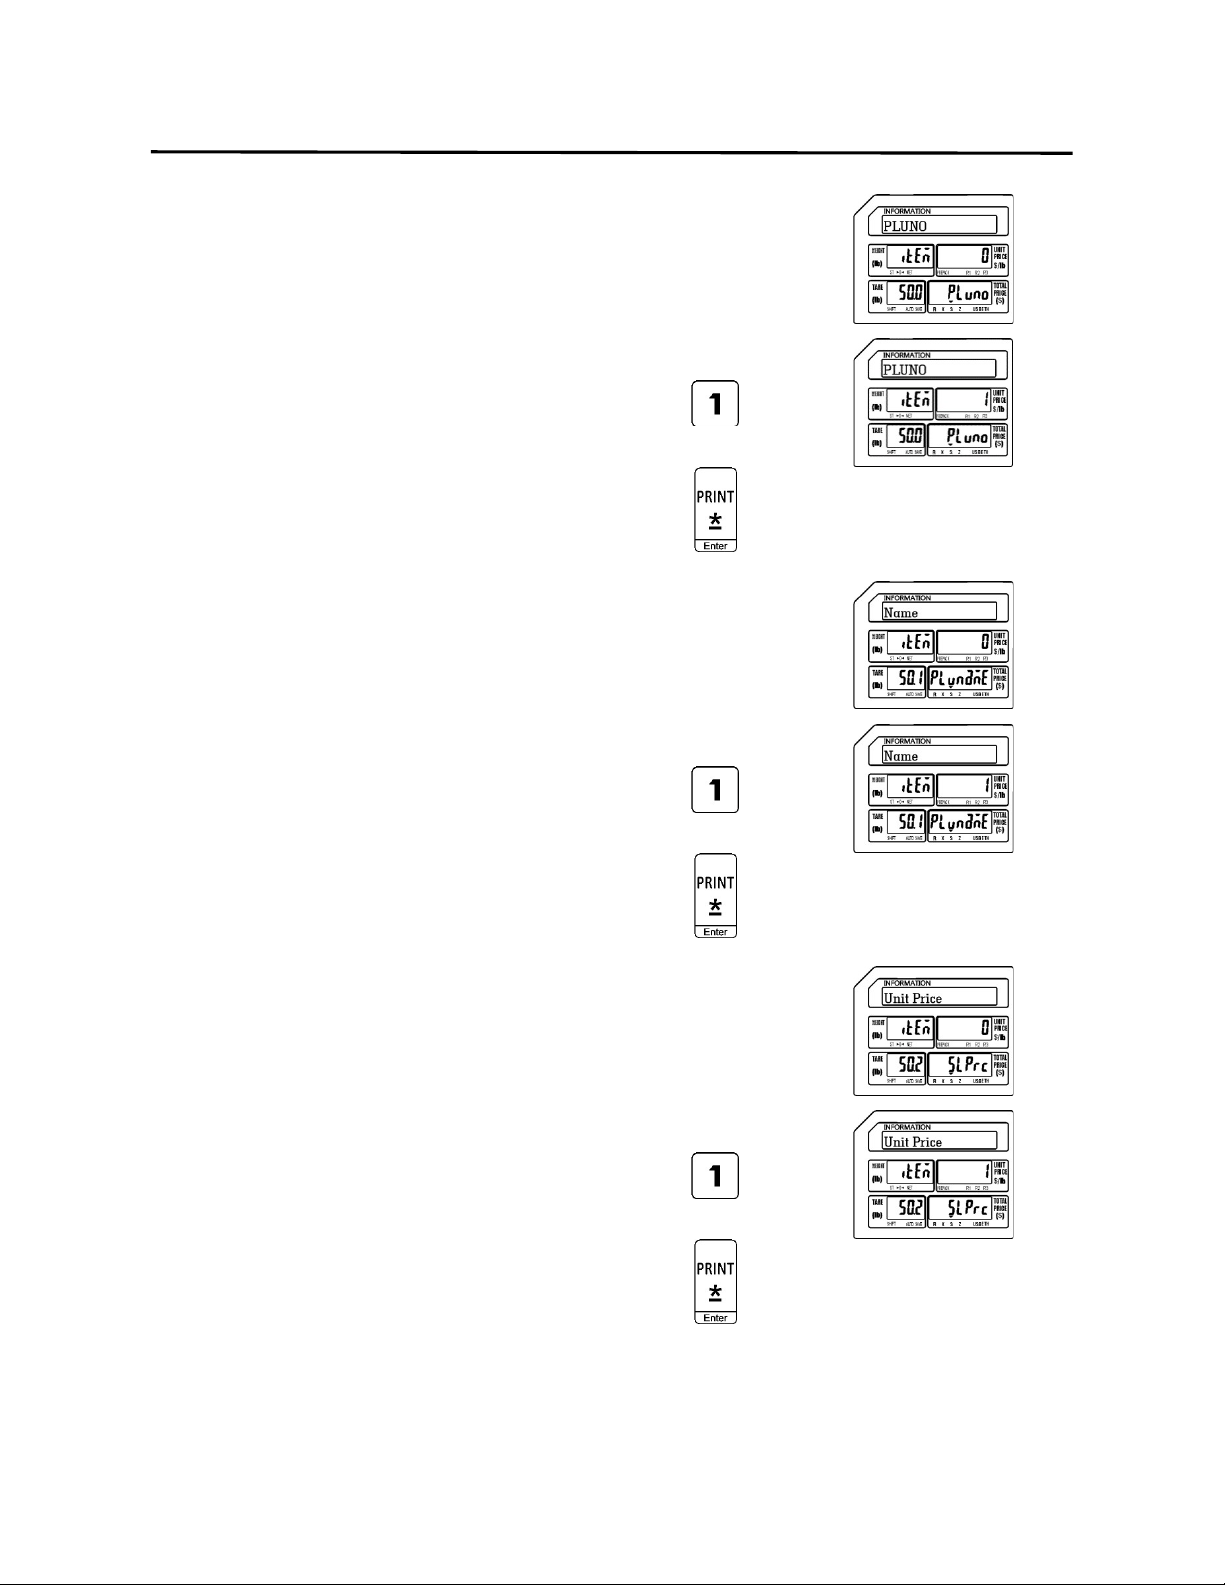
5.) Select PLU Number Field Status
0 = Not Visible
1 = Visible
Ex.) Make PLU Number Field visible by
pressing the number one key.
Press the Print/* key.
6.) Select PLU Name Field Status
0 = Not Visible
1 = Visible
Ex.) Make PLU Name Field visible by
pressing the number one key.
Press the Print/* key.
7.) Select Unit Price Field Status
0 = Not Visible
1 = Visible
Ex.) Make Unit Price Field visible by
pressing the number one key.
Press the Print/* key.
9. Programming (S Mode) ELP-301016
9.1.1 Selecting PLU Fields (S0 Mode)
45
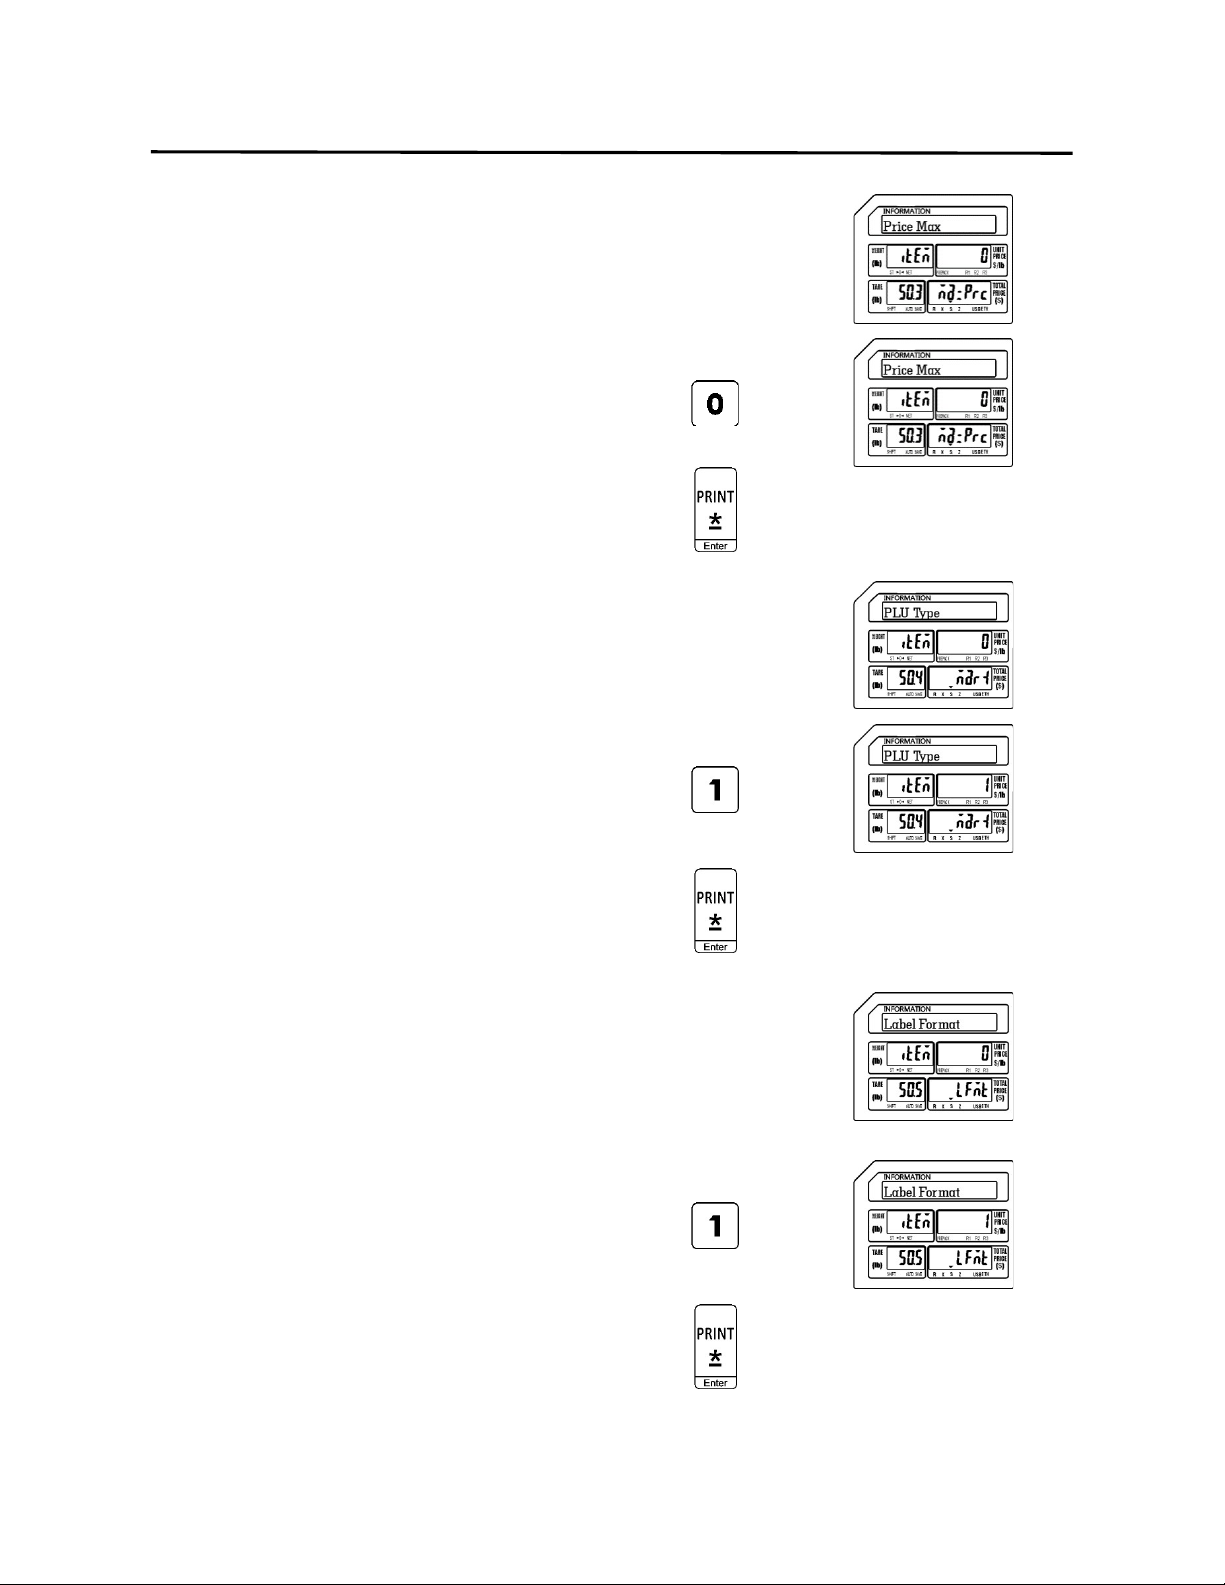
8.) Select Price Max Field Status
0 = Not Visible
1 = Visible
Ex.) Make Price Max Field Not Visible by
pressing the number zero key.
Press the Print/* key.
9.) Select PLU Type Field Status
0 = Not Visible
1 = Visible
Ex.) Make PLU Type Field visible by
pressing the number one key.
Press the Print/* key.
10.) Select Label Format Field Status
0 = Not Visible
1 = Visible
Note: If SPEC 14 is > 0 the Label Format Field will not
be visible in S Mode – S1 PLU File regardless of
this setting.
Ex.) Make Label Format Field visible by
pressing the number one key.
Press the Print/* key.
9. Programming (S Mode) ELP-301016
9.1.1 Selecting PLU Fields (S0 Mode)
46
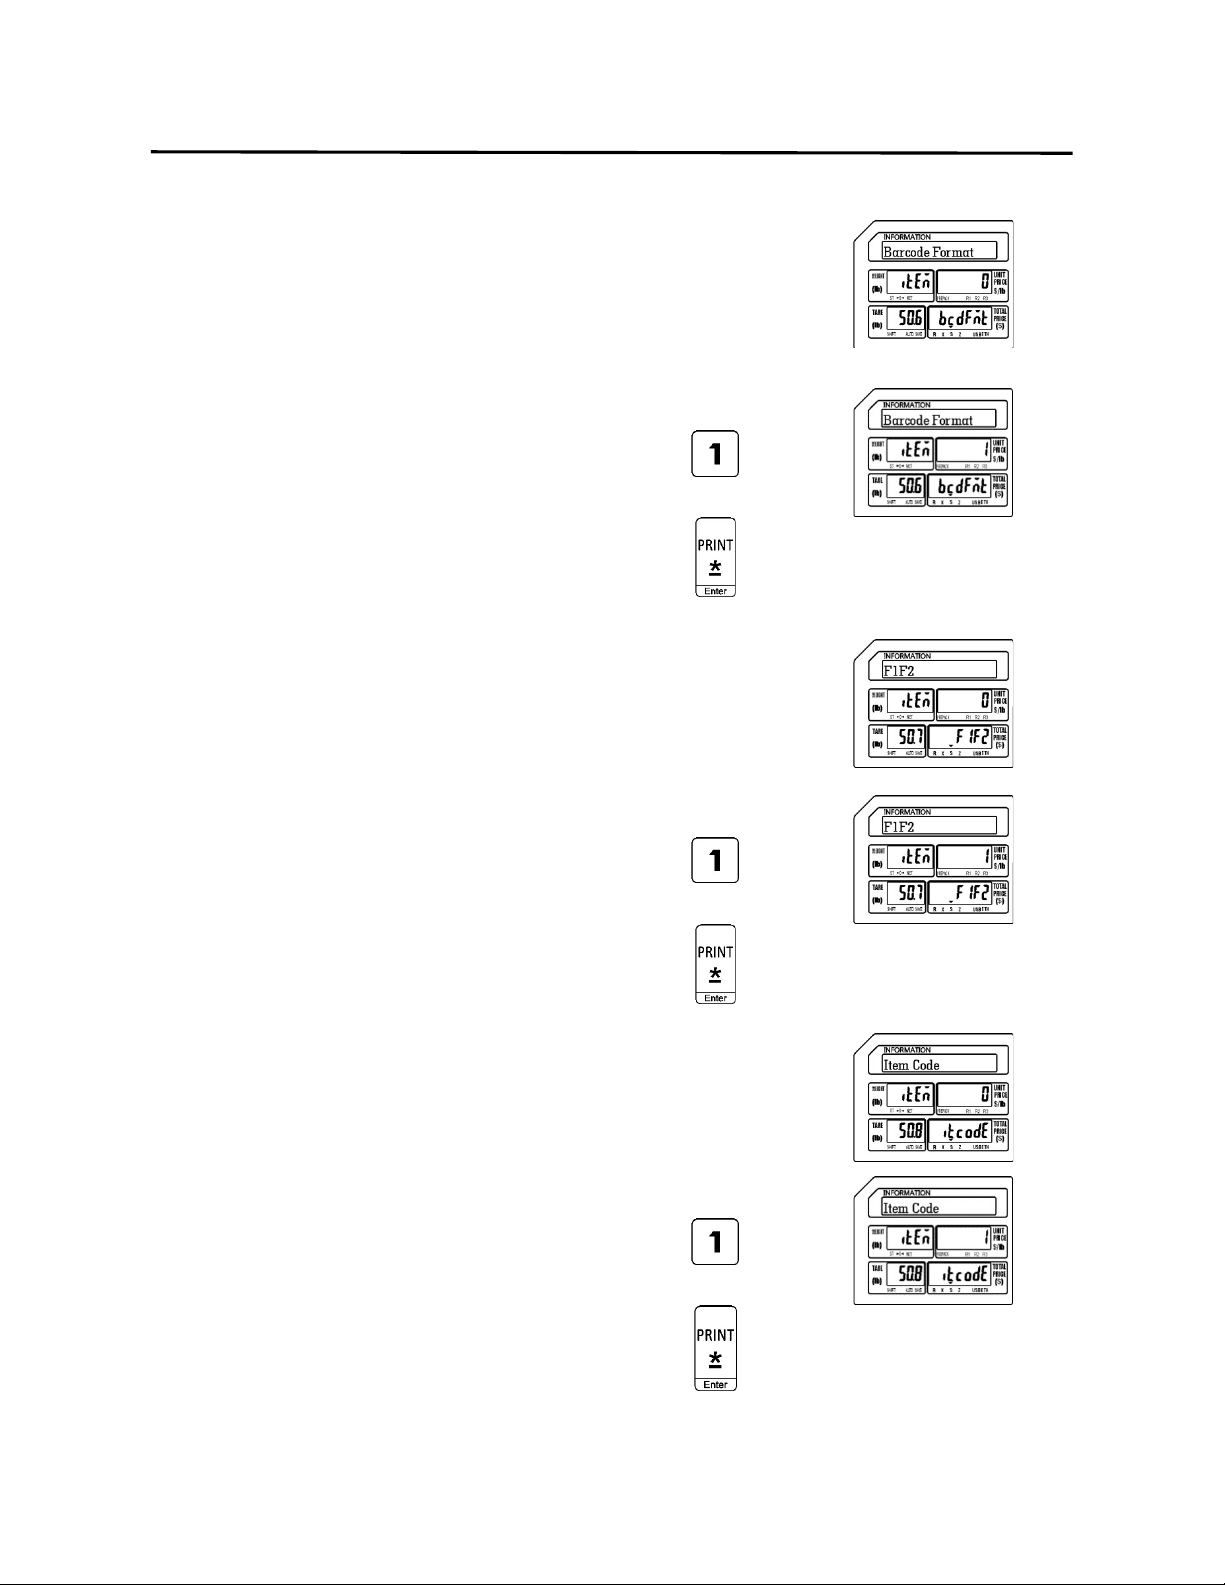
11.) Select Barcode Format Field Status
0 = Not Visible
1 = Visible
Note: If SPEC 0 is = 1 the Barcode Format Field will not
be visible in S Mode – S1 PLU File regardless of
this setting.
Ex.) Make Barcode Format Field visible by
pressing the number one key.
Press the Print/* key.
12.) Select F1F2 Field Status
0 = Not Visible
1 = Visible
Note: If SPEC 0 is = 1 the F1F2 Field will not be visible in
S Mode – S1 PLU File regardless of this setting.
Ex.) Make the F1F2 Field visible by
pressing the number one key.
Press the Print/* key.
13.) Select Item Code Field Status
0 = Not Visible
1 = Visible
Ex.) Make Item Code Field visible by
pressing the number one key.
Press the Print/* key.
9. Programming (S Mode) ELP-301016
9.1.1 Selecting PLU Fields (S0 Mode)
47
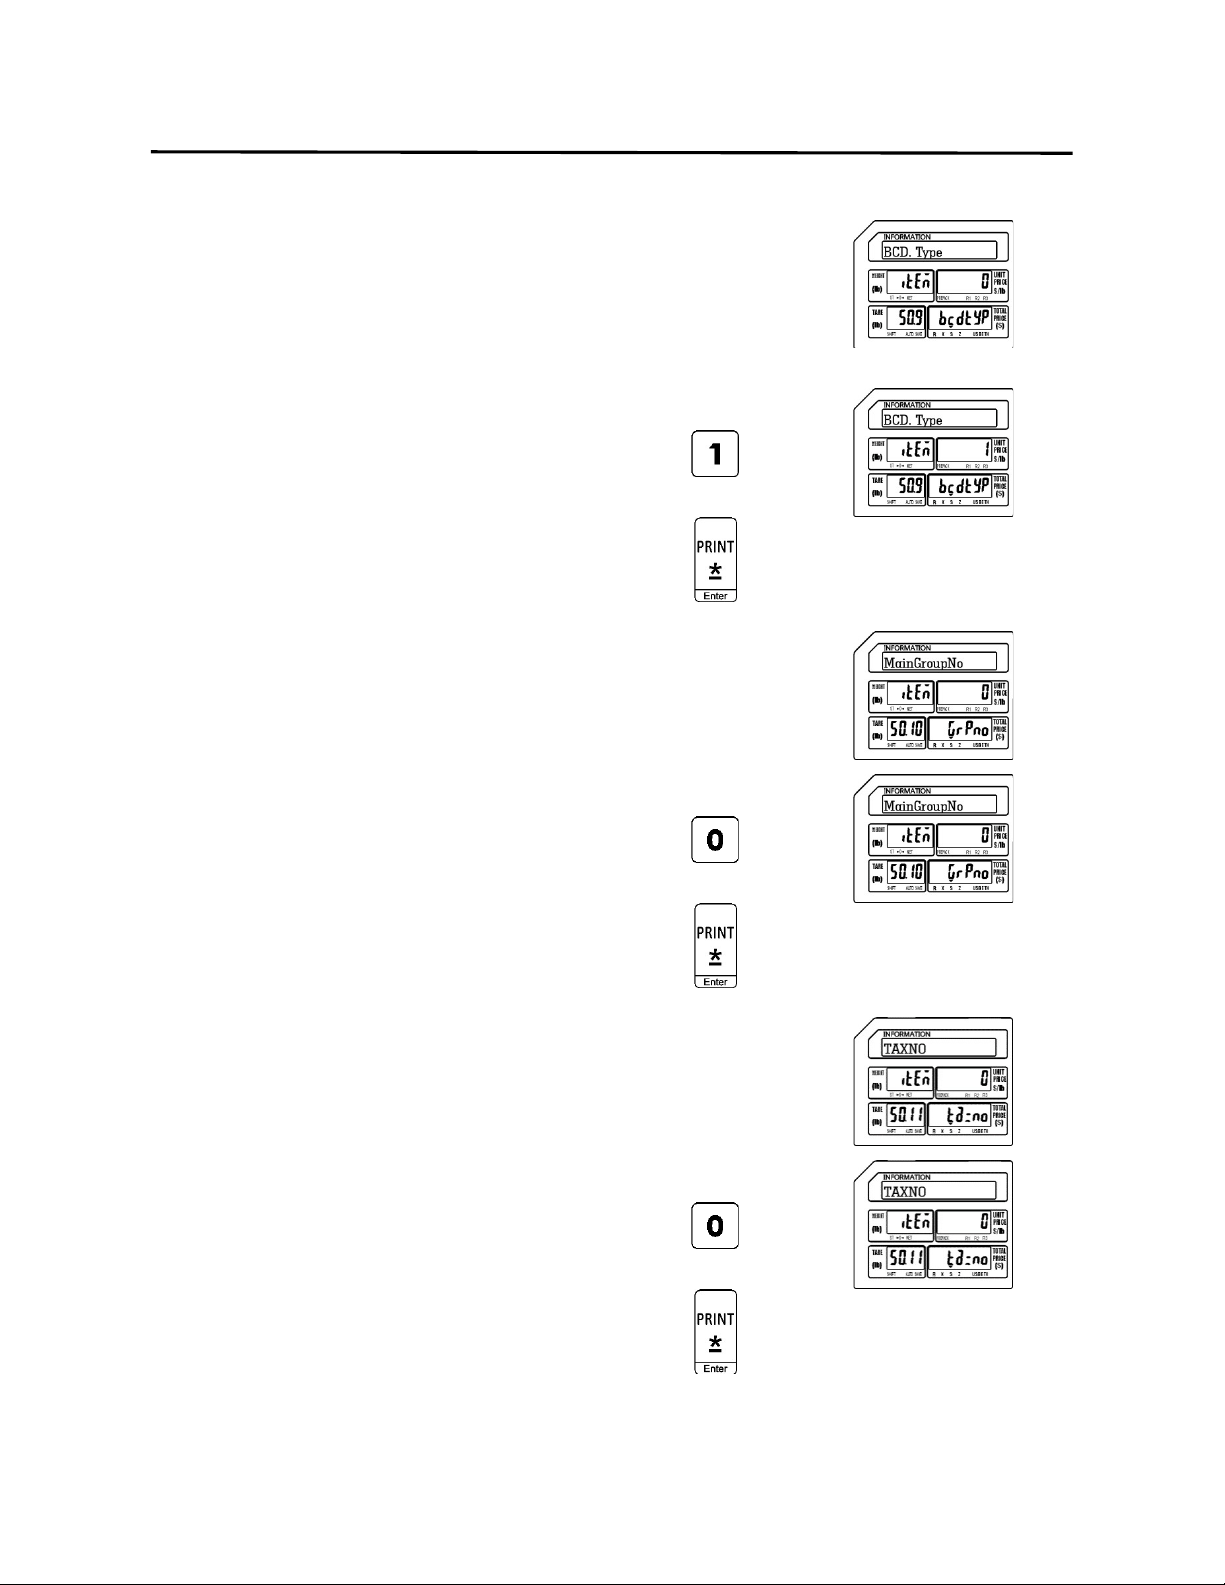
14.) Select Barcode Type Field Status
0 = Not Visible
1 = Visible
Note: If SPEC 0 is = 1 the Barcode Type Field will not be
visible in S Mode – S1 PLU File regardless of this
setting.
Ex.) Make Barcode Type Field visible by
pressing the number one key.
Press the Print/* key.
15.) Select Main Group No. Field Status
0 = Not Visible
1 = Visible
Ex.) Make Main Group No. Field not
visible by pressing the number zero
key.
Press the Print/* key.
16.) Select Tax Number Field Status
0 = Not Visible
1 = Visible
Ex.) Make Tax Number Field not visible by
pressing the number zero key.
Press the Print/* key.

9. Programming (S Mode) ELP-301016
9.1.1 Selecting PLU Fields (S0 Mode)
48
17.) Select BLC No. Field Status
0 = Not Visible
1 = Visible
Ex.) Make BLC No. Field not visible by
pressing the number zero key.
Press the Print/* key.
18.) Select Tag No. Field Status
0 = Not Visible
1 = Visible
Ex.) Make Tag No. Field not visible by
pressing the number zero key.
Press the Print/* key.
19.) Select Weight Unit Field Status
0 = Not Visible
1 = Visible
Ex.) Make Weight Unit Field not visible by
pressing the number zero key.
Press the Print/* key.
9. Programming (S Mode) ELP-301016
9.1.1 Selecting PLU Fields (S0 Mode)
49
20.) Select Sell By Date Field Status
0 = Not Visible
1 = Visible
Ex.) Make Sell By Date Field visible by
pressing the number one key.
Press the Print/* key.
21.) Select Sell By Time Field Status
0 = Not Visible
1 = Visible
Ex.) Make Sell By Time Field visible by
pressing the number one key.
Press the Print/* key.
22.) Select Cook By Date Field Status
0 = Not Visible
1 = Visible
Ex.) Make Cook By Date Field not visible
by pressing the number zero key.
Press the Print/* key.
9. Programming (S Mode) ELP-301016
9.1.1 Selecting PLU Fields (S0 Mode)
50
23.) Select Pack Date Field Status
0 = Not Visible
1 = Visible
Ex.) Make Pack Date Field not visible by
pressing the number zero key.
Press the Print/* key.
24.) Select Pack By Time Field Status
0 = Not Visible
1 = Visible
Ex.) Make Pack By Time Field not visible
by pressing the number zero key.
Press the Print/* key.
25.) Select VIP Price Field Status
0 = Not Visible
1 = Visible
Ex.) Make VIP Price Field not visible by
pressing the number zero key.
Press the Print/* key.
9. Programming (S Mode) ELP-301016
9.1.1 Selecting PLU Fields (S0 Mode)
51
26.) Select PLU Cost Price Field Status
0 = Not Visible
1 = Visible
Ex.) Make PLU Cost Price Field not visible
by pressing the number zero key.
Press the Print/* key.
27.) Select Tare Weight Field Status
0 = Not Visible
1 = Visible
Ex.) Make Tare Weight Field visible by
pressing the number one key.
Press the Print/* key.
28.) Select Quantity Field Status
0 = Not Visible
1 = Visible
Ex.) Make Quantity Field visible by
pressing the number one key.
Press the Print/* key.
9. Programming (S Mode) ELP-301016
9.1.1 Selecting PLU Fields (S0 Mode)
52
29.) Select Net Weight Field Status
0 = Not Visible
1 = Visible
Ex.) Make Net Weight Field not visible by
pressing the number zero key.
Press the Print/* key.
30.) Select Sales Message Field Status
0 = Not Visible
1 = Visible
Ex.) Make Sales Message Field not visible
by pressing the number zero key.
Press the Print/* key.
31.) Select Ingredients Field Status
0 = Not Visible
1 = Visible
Ex.) Make Ingredients Field visible by
pressing the number one key
Press the Print/* key.
9. Programming (S Mode) ELP-301016
9.1.1 Selecting PLU Fields (S0 Mode)
53
32.) Select State Field Status
0 = Not Visible
1 = Visible
Ex.) Make State Field not visible by
pressing the number zero key.
Press the Print/* key.
33.) Select Print Sell By Date Field Status
0 = Not Visible
1 = Visible
Ex.) Make Print Sell By Date Field visible
by pressing the number one key.
Press the Print/* key.
34.) Select Print Sell By Time Field Status
0 = Not Visible
1 = Visible
Ex.) Make Print Sell By Time Field visible
by pressing the number one key.
Press the Print/* key.

9. Programming (S Mode) ELP-301016
9.1.1 Selecting PLU Fields (S0 Mode)
54
35.) Select Print Cook By Date Field Status
0 = Not Visible
1 = Visible
Ex.) Make Print Cook By Date Field not
visible by pressing the number zero
key.
Press the Print/* key.
36.) Select Print Pack Date Field Status
0 = Not Visible
1 = Visible
Ex.) Make Print Pack Date Field visible by
pressing the number one key.
Press the Print/* key.
37.) Select Print Pack Time Field Status
0 = Not Visible
1 = Visible
Ex.) Make Print Pack Time Field not
visible by pressing the number zero
key.
Press the Print/* key.

9. Programming (S Mode) ELP-301016
9.1.1 Selecting PLU Fields (S0 Mode)
55
38.) Select Enable Discount Field Status
0 = Not Visible
1 = Visible
Ex.) Make Enable Discount Field visible by
pressing the number one key.
Press the Print/* key.
39.) Select Sale Inhibit Field Status
0 = Not Visible
1 = Visible
Ex.) Make Sale Inhibit Field not visible by
pressing the number zero key.
Press the Print/* key.
40.) Select Enable Price Limit Field Status
0 = Not Visible
1 = Visible
Ex.) Make Enable Price Limit Field not
visible by pressing the number zero
key.
Press the Print/* key.

9. Programming (S Mode) ELP-301016
9.1.1 Selecting PLU Fields (S0 Mode)
56
41.) Select Nutrition Field Status
0 = Not Visible
1 = Visible
Ex.) Make Nutrition Field not visible by
pressing the number zero key.
Press the SAVE key.
Press the FEED/ESC key.
9. Programming (S Mode) ELP-301016
9.2 PLU File (S1 Mode)
57
9.2 PLU File (S1 Mode)
The PLU File mode is used to program commodity or PLU information directly into the scale.
There are 3 different types of PLU’s available, Weigh Mode, Non Weigh Mode and By Count
Mode. Each of the different types contains information that is similar such as name, price,
expiration dates and ingredients. Each PLU type also contains some information that is unique
based on the PLU type selected. The programming of each PLU type is explained separately in
this section.
Note: Before entering any PLU information it is recommended to complete the programming
of the S Mode – S0 PLU Fields Visible. This will ensure that all of the necessary PLU
Fields will be available during the process of programming different types of PLU
information.
9.2.1 Programming a Weigh Mode PLU (S1 Mode)
In the example below the PLU Fields that will be used have been programmed using the
S Mode – PLU Fields Visible examples in the previous section.
Ex.) Create a Weigh Mode PLU for Ground Beef that has a Tare Weight of .05 lbs and a
Unit Price of $2.99/lb.
Note: You may save the information entered at any time and exit this program by pressing
the SAVE key then the FEED/ESC key. You may also exit this program without saving
any entered information by pressing the FEED/ESC key at any time.
1.) Start at the normal weigh mode screen
2.) Press the Mode Key twice
3.) Press the Print/* key
9. Programming (S Mode) ELP-301016
9.2.1 Programming a Weigh Mode PLU (S1 Mode)
58
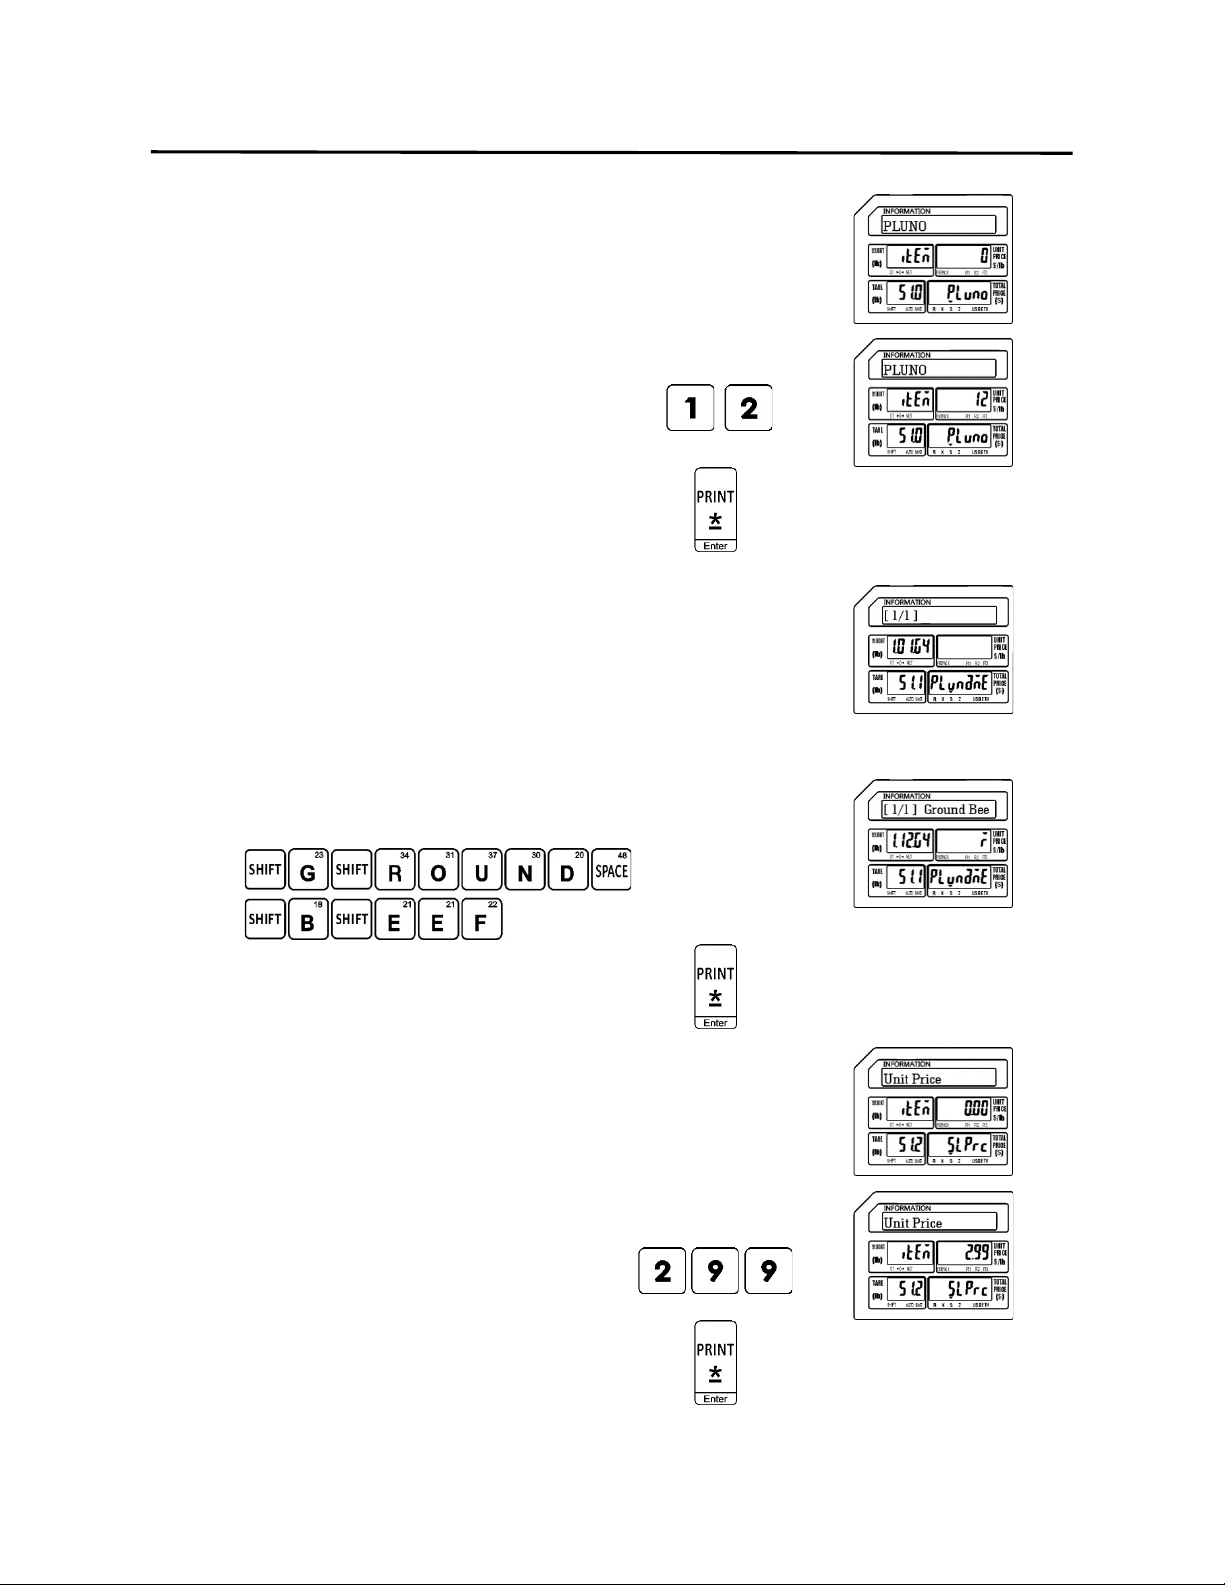
4.) Enter the PLU Number
Ex.) Enter PLU Number 12 by pressing the
number one key followed by the
number two key.
Press the Print/* key.
5.) Enter the PLU Name
Note: The PLU Name may be up to 4 lines of text. The
number of characters printed on each line is
determined by the font size of the PLU Name.
The larger the font size the less characters that
will be printed on each line
Ex.) Enter Ground Beef using the alpha keys on
the programming keyboard.
Press the Print/* key.
6.) Enter the Unit Price
Ex.) Enter a Unit Price of $2.99 by
pressing the number two key and
then the number nine key twice.
Press the Print/* key.
9. Programming (S Mode) ELP-301016
9.2.1 Programming a Weigh Mode PLU (S1 Mode)
59
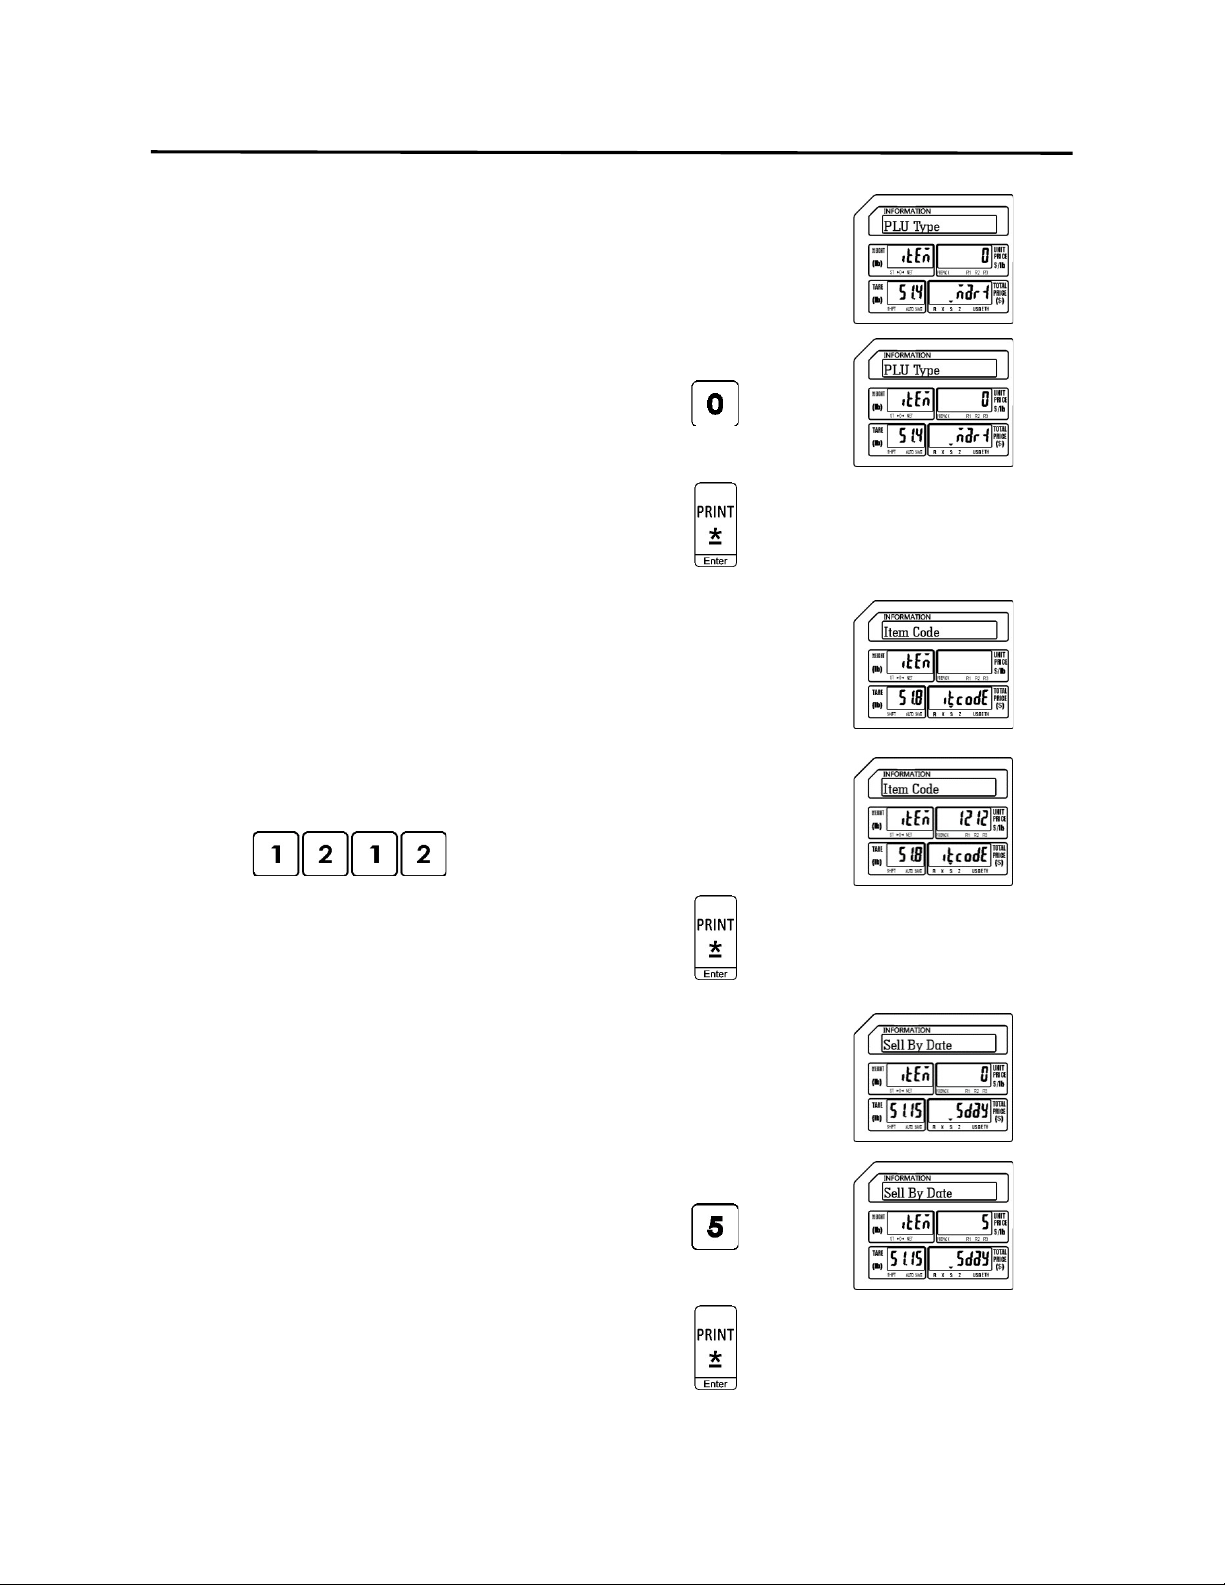
7.) Enter the PLU Type
0 = Weigh type
1 = Non Weigh type
2 = By Count type
Ex.) Enter 0 for Weigh mode PLU Type by
pressing the number zero key.
Press the Print/* key.
8.) Enter the Item Code
Note: The Item Code is used in the barcode to identify
the PLU. It may be the same number as the PLU
number or may be a different number.
Ex.) Enter an item code of 1212 using the
number keys.
Press the Print/* key.
9.) Enter the Sell By Date
Note: The Sell By Date that is printed on the label is a
result of adding the value (0 – 999 days) entered
here to the Pack Date.
Ex.) Enter a Sell By Date of 5 days by
pressing the number five key.
Press the Print/* key.
9. Programming (S Mode) ELP-301016
9.2.1 Programming a Weigh Mode PLU (S1 Mode)
60
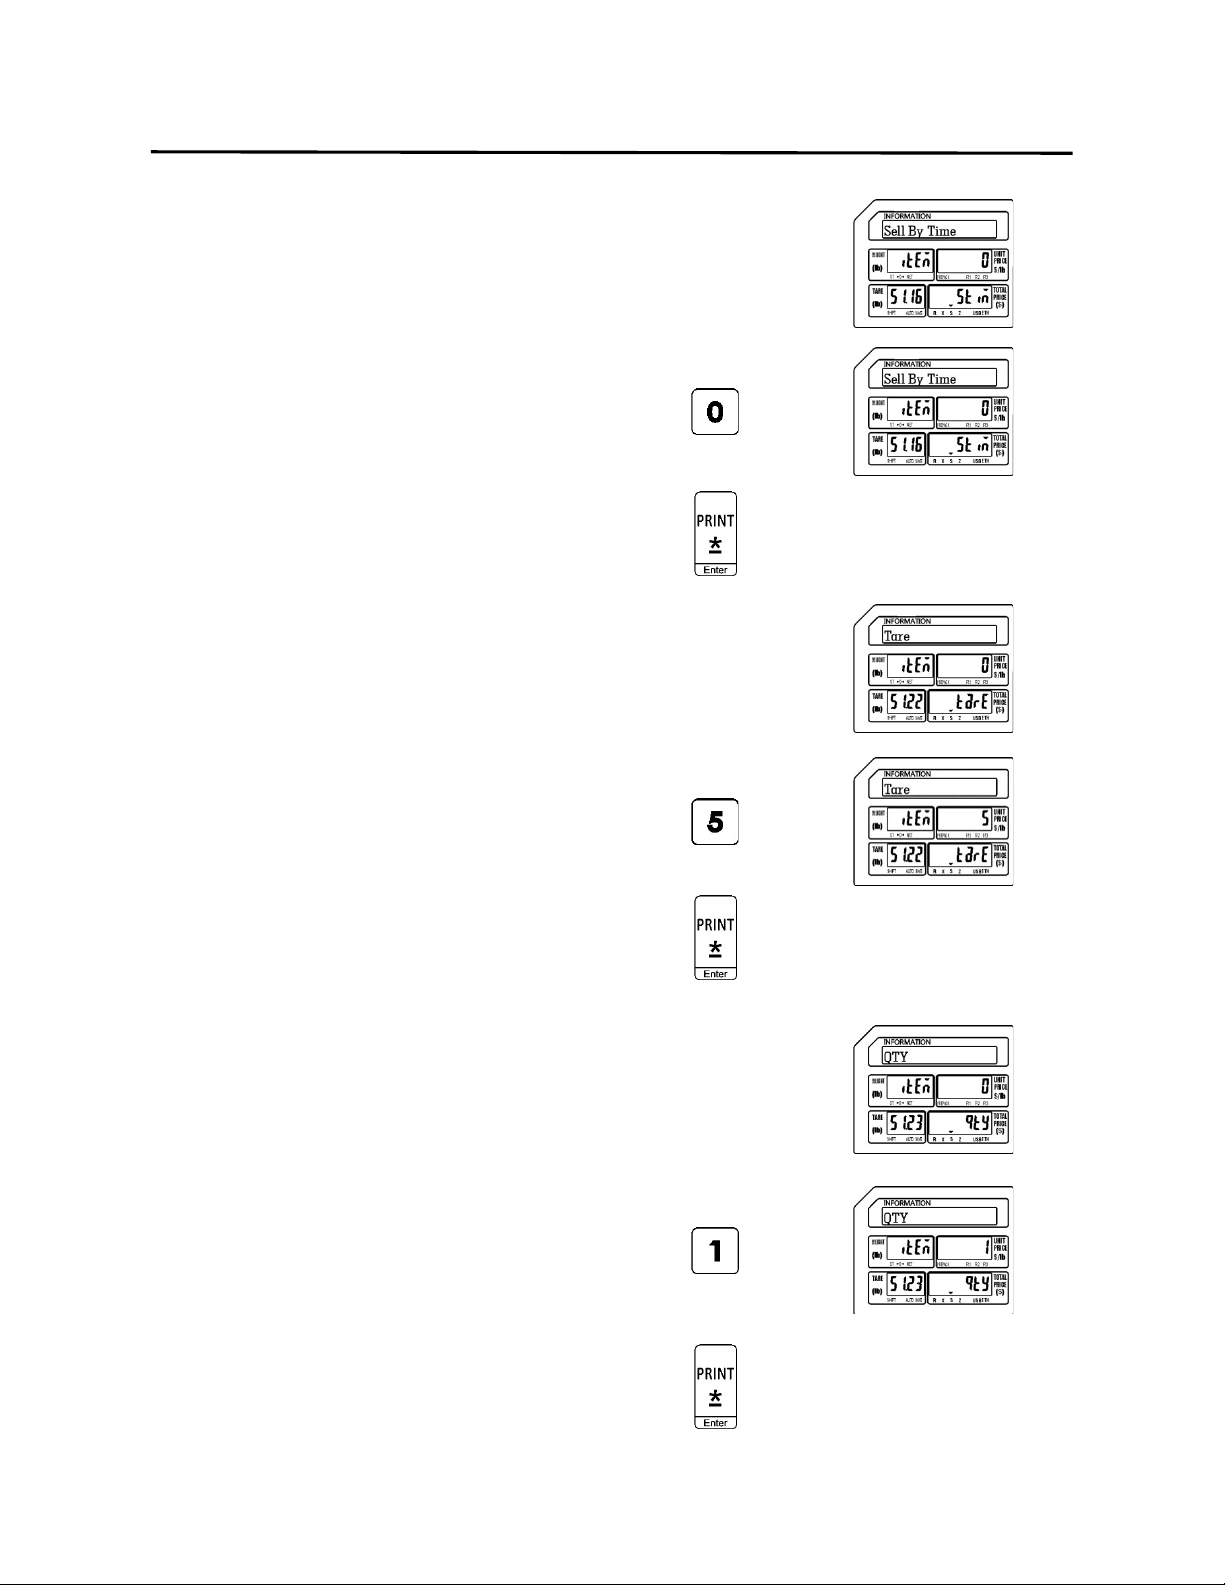
10.) Enter the Sell By Time
Note: The Sell By Time that is printed on the label is a
result of adding this value (0 – 99 hours) to the
Pack Time.
Ex.) Enter 0 for Sell By Time by pressing
the number zero key.
Press the Print/* key.
11.) Enter the Tare Weight
Note: The Tare Weight value must be in the resolution
value of the scale.
Ex.) Enter a Tare Weight value of .05 lbs
by press the number five key.
Press the Print/* key.
12.) Enter the Quantity
Note: The Quantity field is only used on Non Weight
and By Count type PLU’s. If a value is entered
here it will be used if this PLU is Type Changed.
(Section 8.9)
Ex.) Enter a Quantity of 1 by pressing the
number one key.
Press the Print/* key.

9. Programming (S Mode) ELP-301016
9.2.1 Programming a Weigh Mode PLU (S1 Mode)
61
13.) Enter the Ingredient Message
Ex.) The example PLU Ground Beef does
not have any ingredients.
Press the Print/* key.
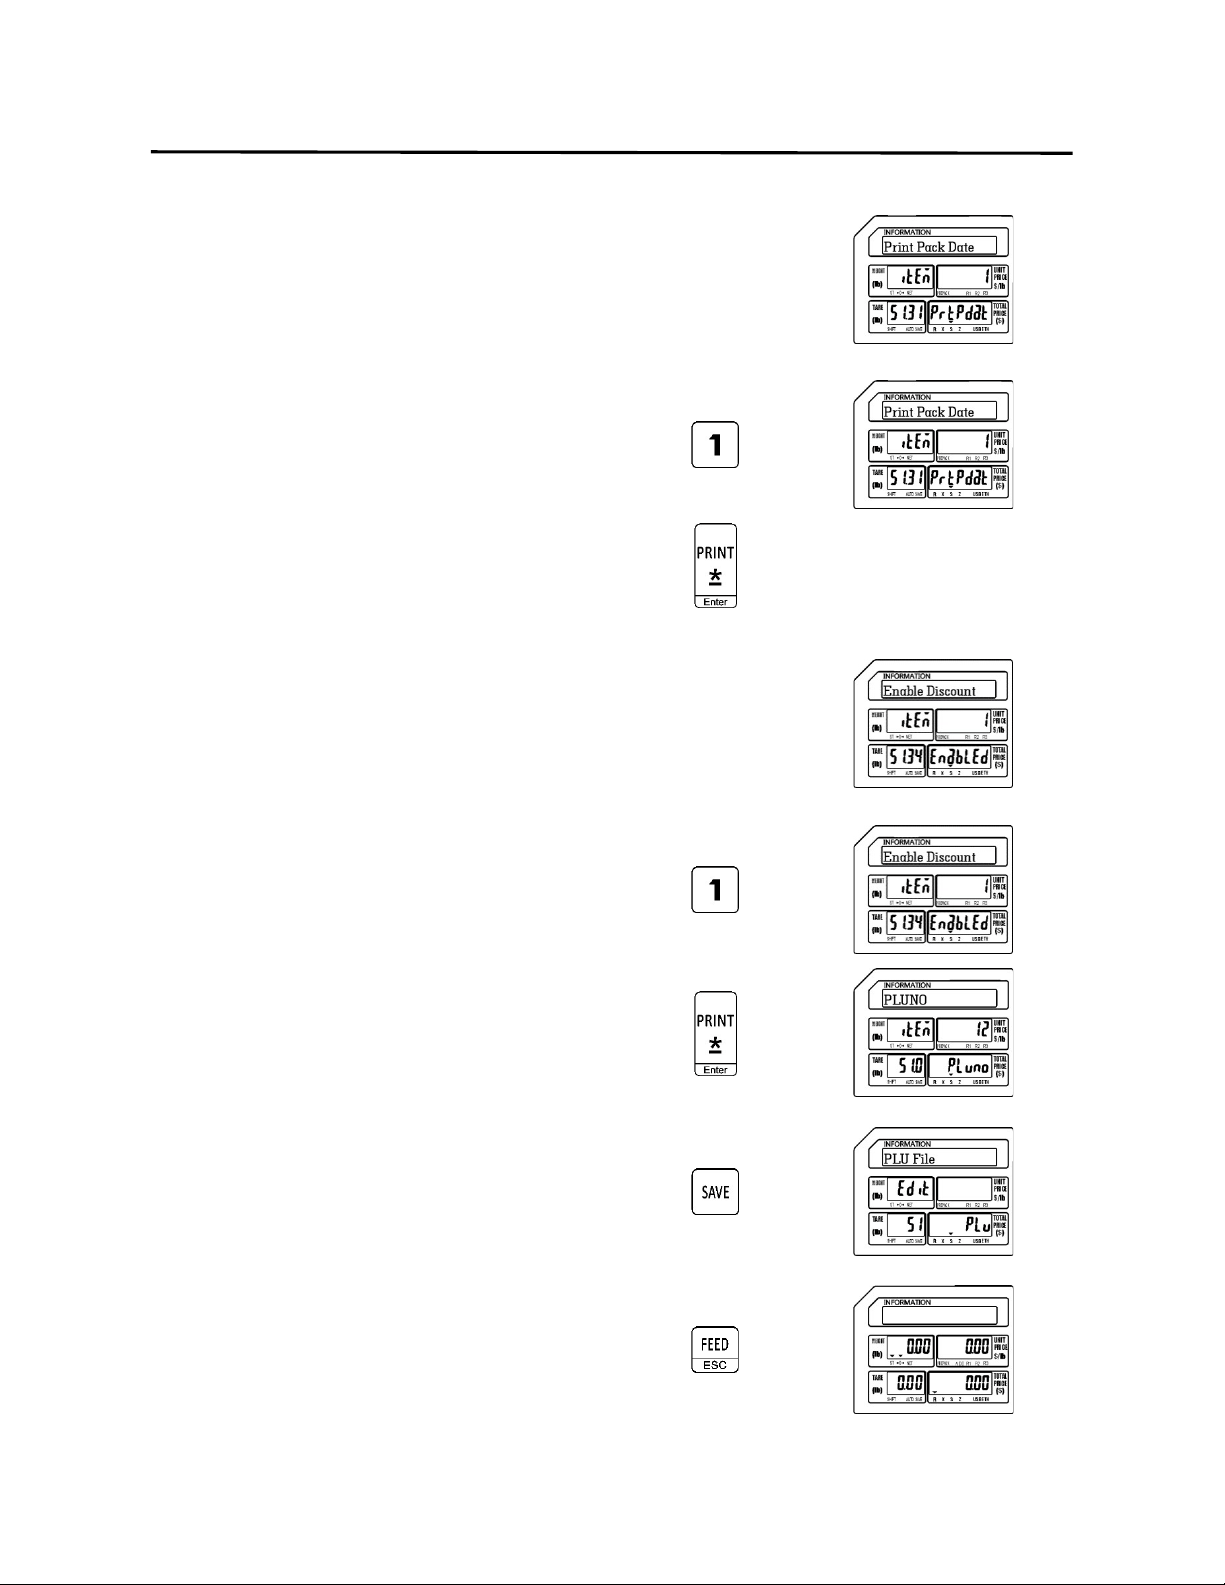
14.) Select Status of Print Sell By Date
0 = Don’t Print Sell By Date
1 = Print Sell By Date
Note: The Printing of the Sell By Date on the label is
controlled by this setting in each PLU.
Ex.) Select a status of Print the Sell by
Date by pressing the number one key.
Press the Print/* key.
15.) Select Status of Print Sell By Time
0 = Don’t Print Sell By Time
1 = Print Sell By Time
Note: The Printing of the Sell By Time on the label is
controlled by this setting in each PLU.
Ex.) Select a status of Don’t Print the Sell
By Time by pressing the number zero
key.
Press the Print/* key.
9. Programming (S Mode) ELP-301016
9.2.1 Programming a Weigh Mode PLU (S1 Mode)
62
16.) Select Status of Print Pack Date
0 = Don’t Print Pack Date
1 = Print Pack Date
Note: The Printing of the Pack Date on the label is
controlled by this setting in each PLU.
Ex.) Select a status of Print the Pack Date
by pressing the number one key.
Press the Print/* key.
17.) Select Status of Discount
0 = Disable PLU Discount
1 = Enable PLU Discount
Note: The Discount status of each PLU is controlled by
this setting.
Ex.) Select a status of Enable the PLU
Discount by pressing the number one
key.
Press the Print/* key.
Press the SAVE key.
Press the FEED/ESC key.
9. Programming (S Mode) ELP-301016
9.2.2 Programming a Non Weigh Mode PLU (S1 Mode)
63
9.2.2 Programming a Non Weigh Mode PLU (S1 Mode)
In the example below the PLU Fields that will be used have been programmed using the
S Mode – PLU Fields Visible examples in the previous section.
Ex.) Create a Non Weigh Mode PLU for Apple that has a price of 1 for $ 0.29.
Note: You may save the information entered at any time and exit this program by pressing
the SAVE key then the FEED/ESC key. You may also exit this program without saving
any entered information by pressing the FEED/ESC key at any time.
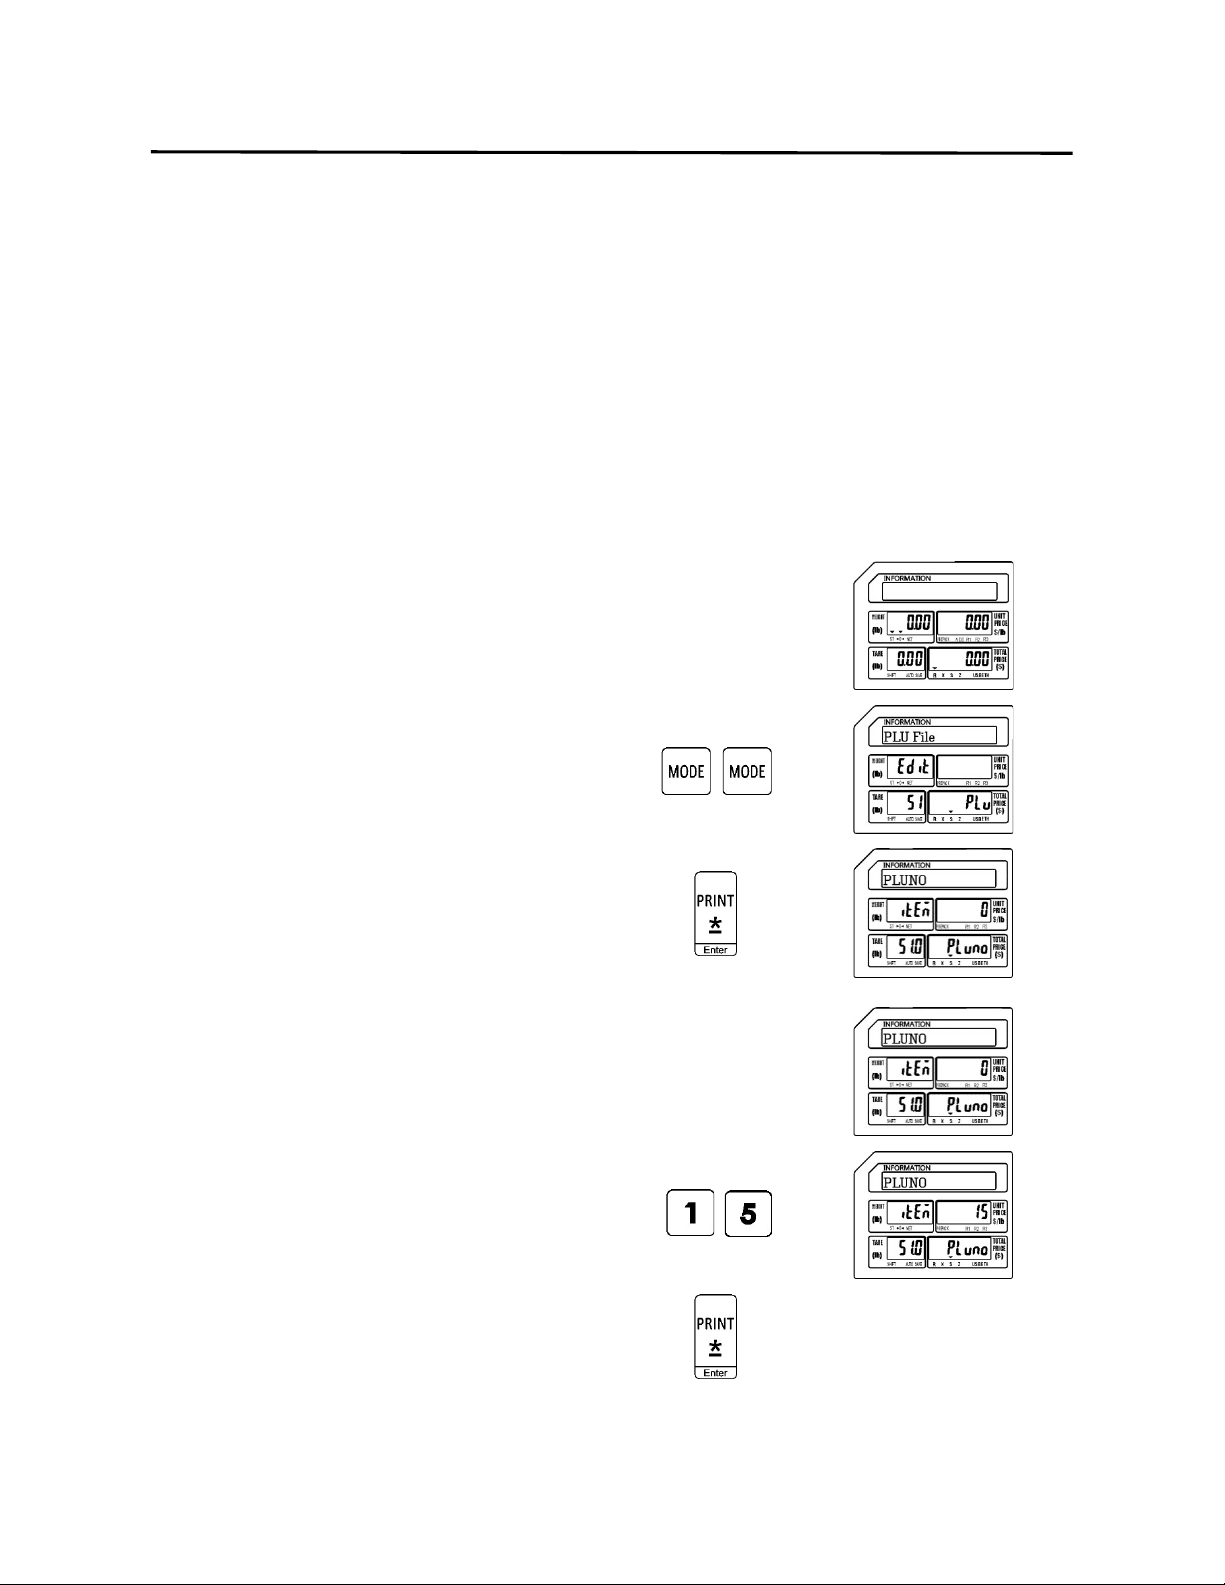
1.) Start at the normal weigh mode screen
2.) Press the Mode Key twice
3.) Press the Print/* key
4.) Enter the PLU Number
Ex.) Enter PLU Number 15 by pressing the
number one key followed by the
number five key.
Press the Print/* key.

9. Programming (S Mode) ELP-301016
9.2.2 Programming a Non Weigh Mode PLU (S1 Mode)
64
5.) Enter the PLU Name
Note: The PLU Name may be up to 4 lines of text. The
number of characters printed on each line is
determined by the font size of the PLU Name.
The larger the font size the less characters that
will be printed on each line
Ex.) Enter Apple using the alpha keys on the
programming keyboard.
Press the Print/* key.
6.) Enter the Unit Price
Ex.) Enter a Unit Price of $0.29 by
pressing the number two key and
then the number nine key.
Press the Print/* key.
7.) Enter the PLU Type
0 = Weigh type
1 = Non Weigh type
2 = By Count type
Ex.) Enter 1 for Non Weigh mode PLU
Type by pressing the number one key.
Press the Print/* key.
9. Programming (S Mode) ELP-301016
9.2.2 Programming a Non Weigh Mode PLU (S1 Mode)
65
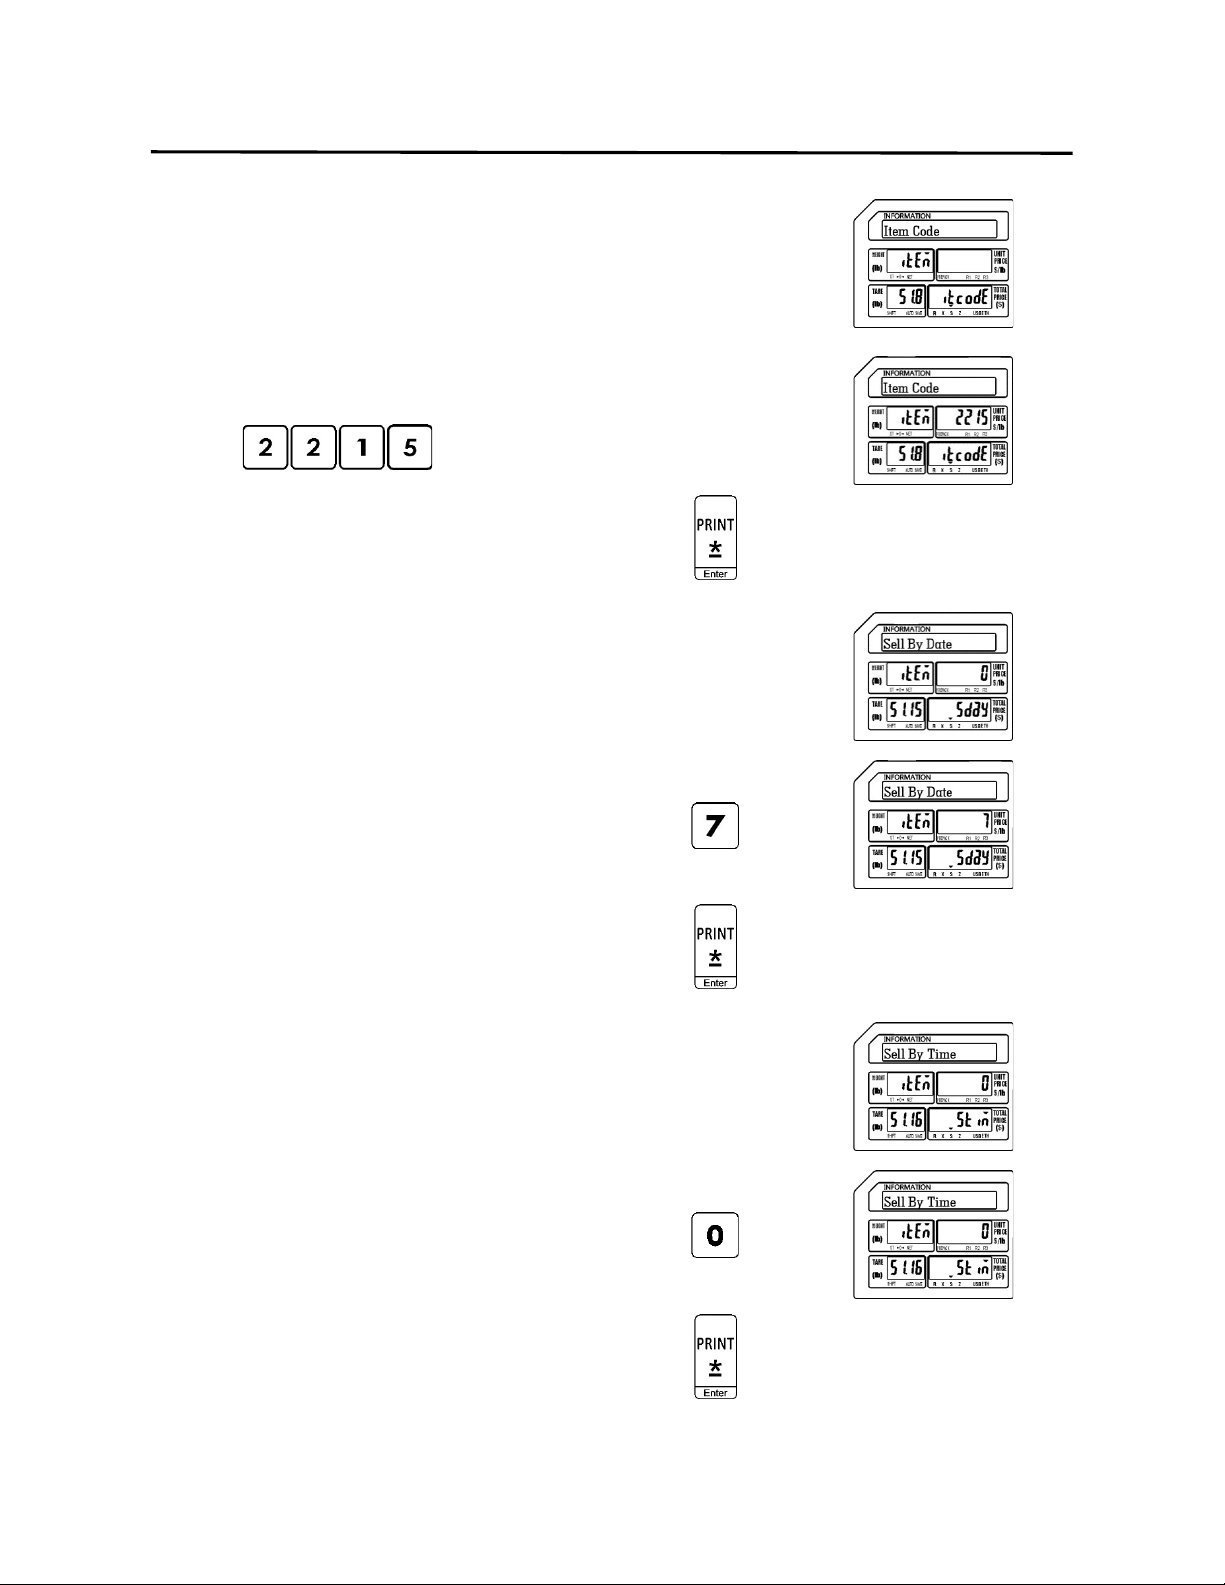
8.) Enter the Item Code
Note: The Item Code is used in the barcode to identify
the PLU. It may be the same number as the PLU
number or may be a different number.
Ex.) Enter an item code of 2215 using the
number keys.
Press the Print/* key.
9.) Enter the Sell By Date
Note: The Sell By Date that is printed on the label is a
result of adding the value (0 – 999 days) entered
here to the Pack Date.
Ex.) Enter a Sell By Date of 7 days by
pressing the number seven key.
Press the Print/* key.
10.) Enter the Sell By Time
Note: The Sell By Time that is printed on the label is a
result of adding the value (0 – 99 hours) entered
here to the Pack Time.
Ex.) Enter a Sell By Time of 0 by pressing
the number zero key.
Press the Print/* key.
9. Programming (S Mode) ELP-301016
9.2.2 Programming a Non Weigh Mode PLU (S1 Mode)
66
11.) Enter the Tare Weight
Note: The Tare Weight is not used in the Non Weigh
Mode.
Ex.) A Non Weight type PLU does not use
the Tare Weight field.
Press the Print/* key.
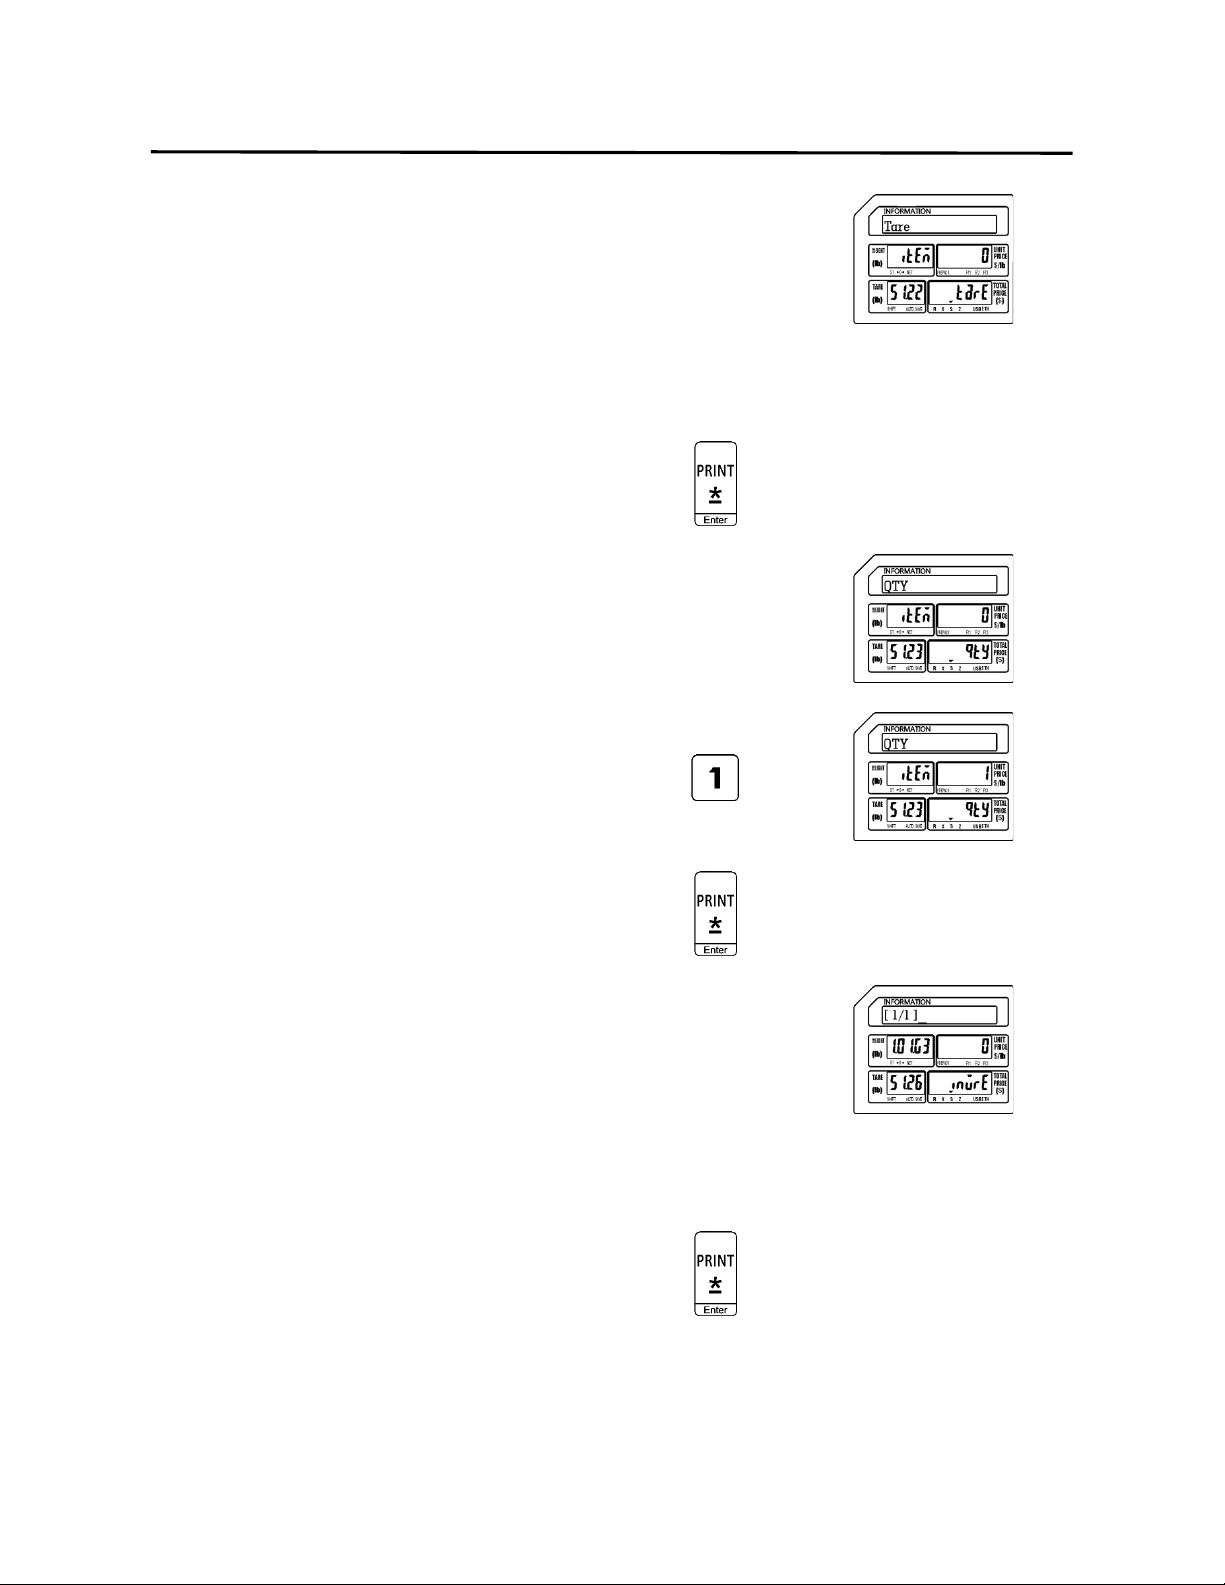
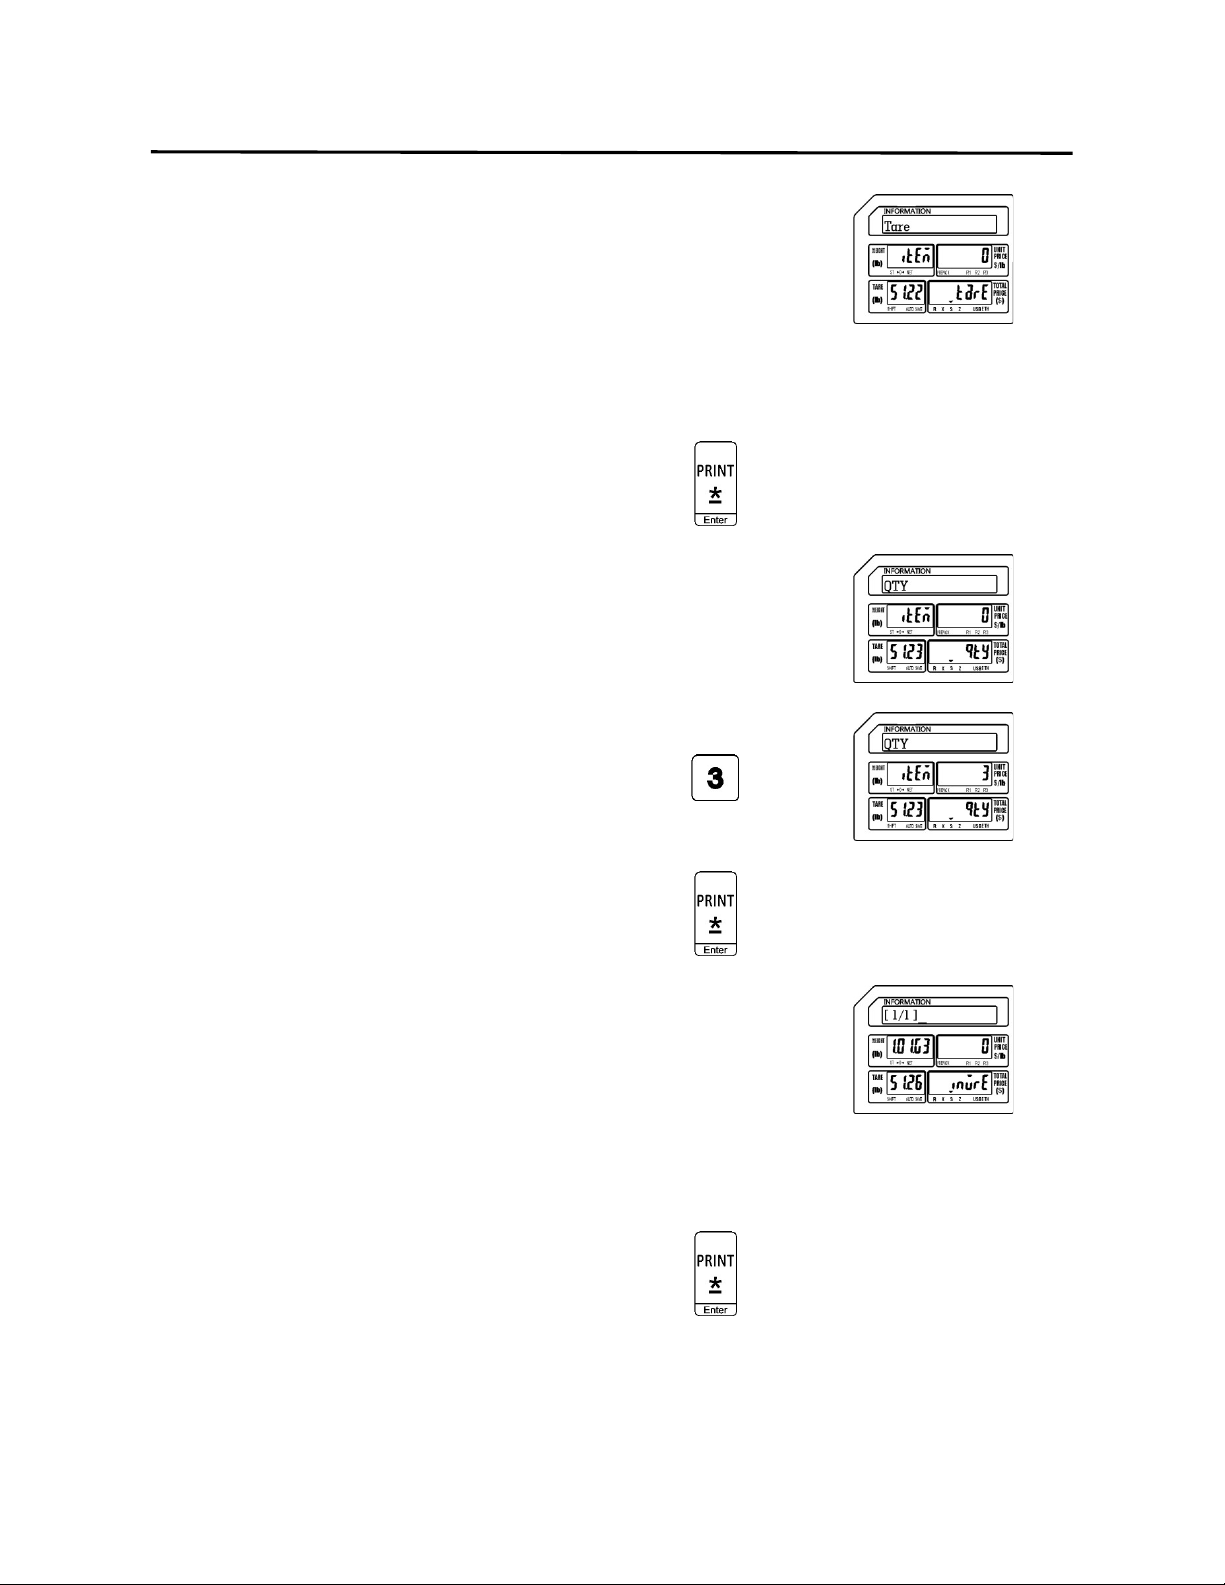
12.) Enter the Quantity
Ex.) Enter a Quantity of 1 by pressing the
number one key.
Press the Print/* key.
13.) Enter the Ingredient Message
Ex.) The example PLU Apple, does not
have any ingredients.
Press the Print/* key.
9. Programming (S Mode) ELP-301016
9.2.2 Programming a Non Weigh Mode PLU (S1 Mode)
67
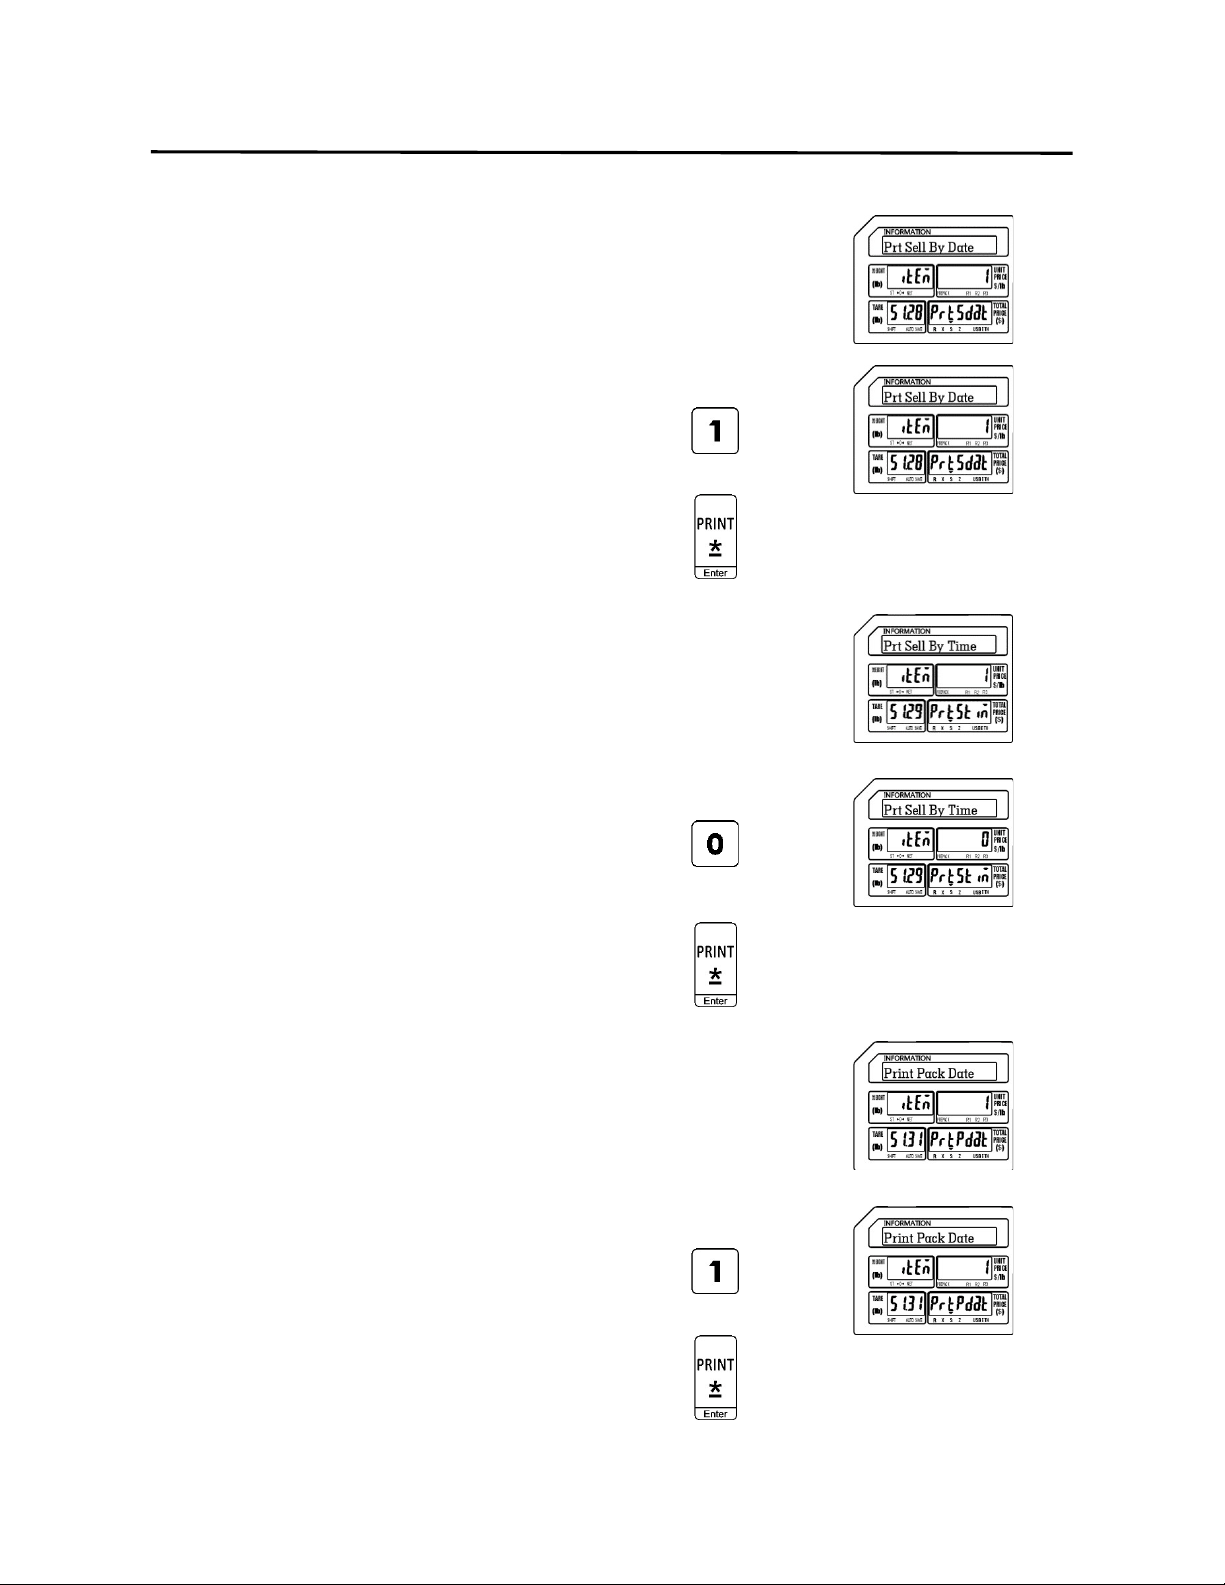
14.) Select Status of Print Sell By Date
0 = Don’t Print Sell By Date
1 = Print Sell By Date
Note: The Printing of the Sell By Date on the label is
controlled by this setting in each PLU.
Ex.) Select a status of Print the Sell by
Date by pressing the number one key.
Press the Print/* key.
15.) Select Status of Print Sell By Time
0 = Don’t Print Sell By Time
1 = Print Sell By Time
Note: The Printing of the Sell By Time on the label is
controlled by this setting in each PLU.
Ex.) Select a status of Don’t Print the Sell
By Time by pressing the number zero
key.
Press the Print/* key.
16.) Select Status of Print Pack Date
0 = Don’t Print Pack Date
1 = Print Pack Date
Note: The Printing of the Pack Date on the label is
controlled by this setting in each PLU.
Ex.) Select a status of Print the Pack Date
by pressing the number one key.
Press the Print/* key.

9. Programming (S Mode) ELP-301016
9.2.2 Programming a Non Weigh Mode PLU (S1 Mode)
68
17.) Select Status of Discount
0 = Disable PLU Discount
1 = Enable PLU Discount
Note: The Discount status of each PLU is controlled by
this setting.
Ex.) Select a status of Enable the PLU
Discount by pressing the number one
key.
Press the Print/* key.
Press the SAVE key.
Press the FEED/ESC key.
9. Programming (S Mode) ELP-301016
9.2.3 Programming a By Count Mode PLU (S1 Mode)
69
9.2.3 Programming a By Count Mode PLU (S1 Mode)
In the example below the PLU Fields that will be used have been programmed using the
S Mode – PLU Fields Visible examples in the previous section.
Ex.) Create a By Count Mode PLU for Bananas that has a price of 3 for $ 1.00.
Note: You may save the information entered at any time and exit this program by pressing
the SAVE key then the FEED/ESC key. You may also exit this program without saving
any entered information by pressing the FEED/ESC key at any time.
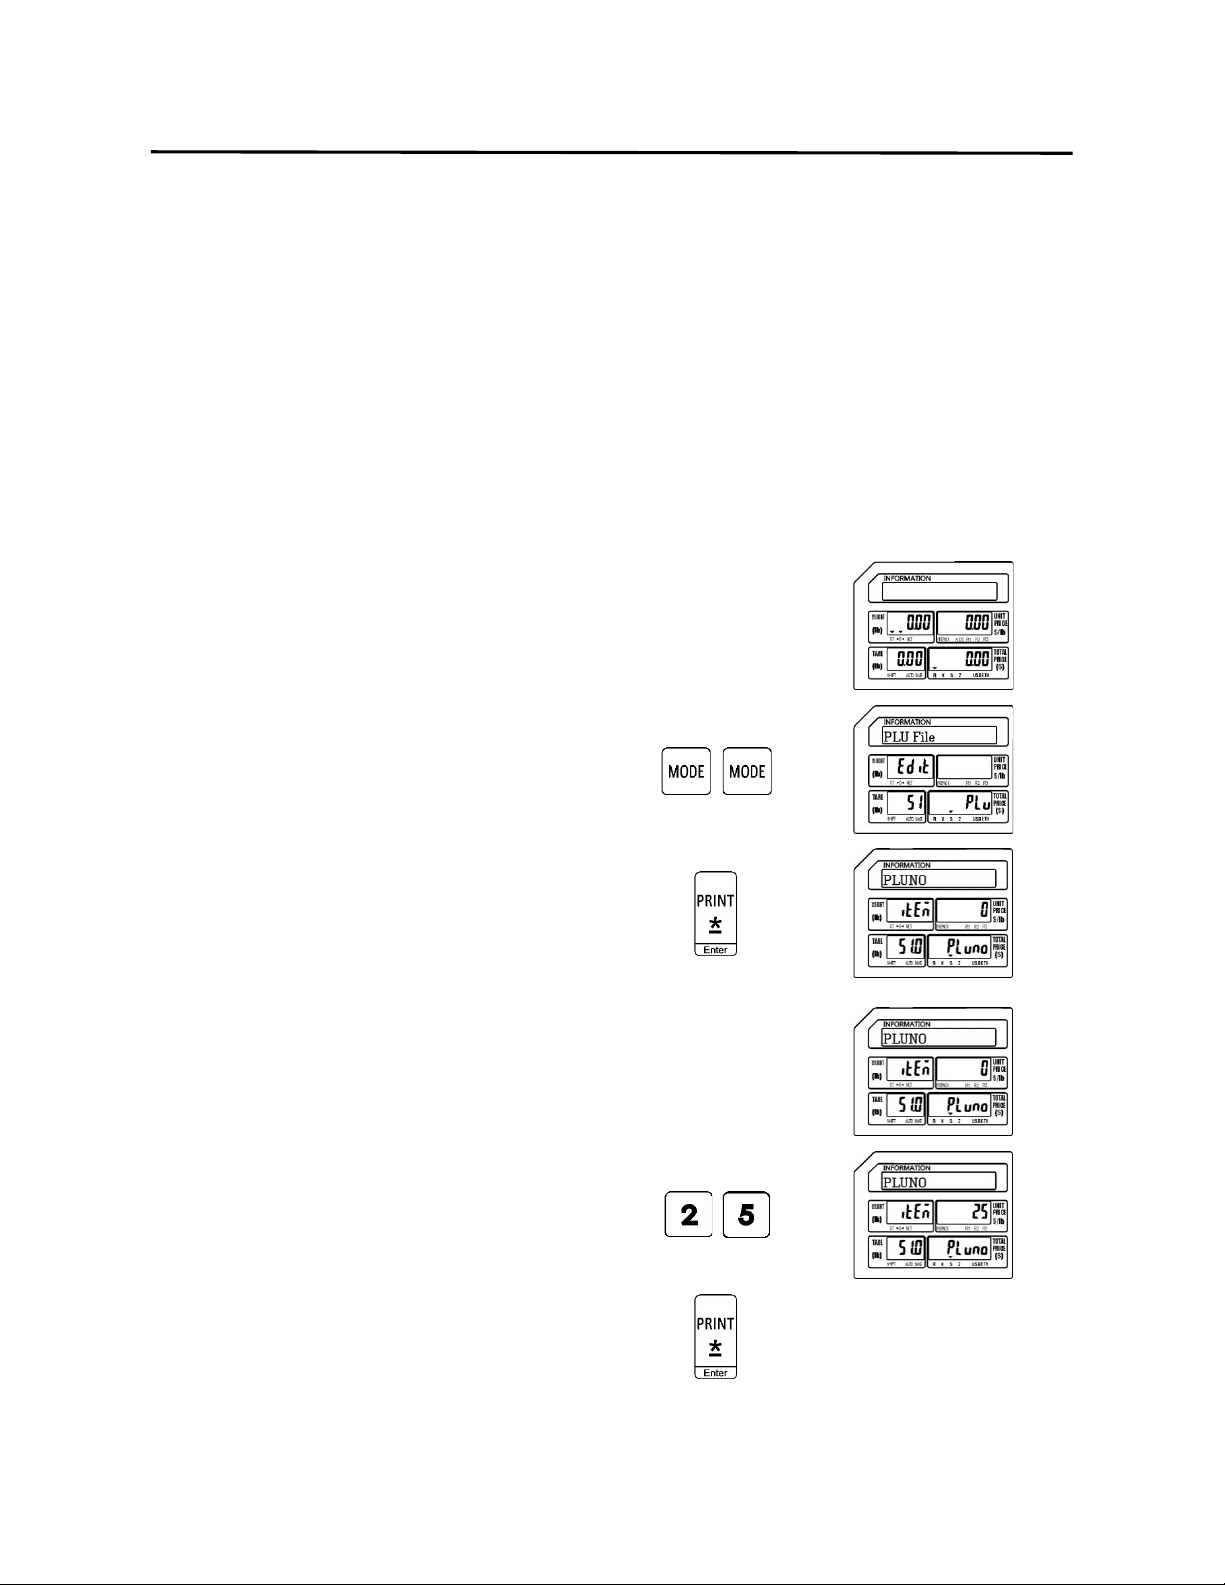
1.) Start at the normal weigh mode screen
2.) Press the Mode Key twice
3.) Press the Print/* key
4.) Enter the PLU Number
Ex.) Enter PLU Number 25 by pressing the
number two key followed by the
number five key.
Press the Print/* key.

9. Programming (S Mode) ELP-301016
9.2.3 Programming a By Count Mode PLU (S1 Mode)
70
5.) Enter the PLU Name
Note: The PLU Name may be up to 4 lines of text. The
number of characters printed on each line is
determined by the font size of the PLU Name.
The larger the font size the less characters that
will be printed on each line
Ex.) Enter Bananas using the alpha keys on the
programming keyboard.
Press the Print/* key.
6.) Enter the Unit Price
Ex.) Enter a Unit Price of $1.00 by
pressing the number 1 key and then
the number zero key twice.
Press the Print/* key.
7.) Enter the PLU Type
0 = Weigh type
1 = Non Weigh type
2 = By Count type
Ex.) Enter 2 for By Count mode PLU Type
by pressing the number two key.
Press the Print/* key.

9. Programming (S Mode) ELP-301016
9.2.3 Programming a By Count Mode PLU (S1 Mode)
71
8.) Enter the Item Code
Note: The Item Code is used in the barcode to identify
the PLU. It may be the same number as the PLU
number or may be a different number.
Ex.) Enter an item code of 2225 using the
number keys.
Press the Print/* key.
9.) Enter the Sell By Date
Note: The Sell By Date that is printed on the label is a
result of adding the value (0 – 999 days) entered
here to the Pack Date.
Ex.) Enter a Sell By Date of 7 days by
pressing the number seven key.
Press the Print/* key.
10.) Enter the Sell By Time
Note: The Sell By Time that is printed on the label is a
result of adding the value (0 – 99 hours) entered
here to the Pack Date.
Ex.) Enter a Sell By Time of 0 by pressing
the number zero key.
Press the Print/* key.
9. Programming (S Mode) ELP-301016
9.2.3 Programming a By Count Mode PLU (S1 Mode)
72
11.) Enter the Tare Weight
Note: The Tare Weight is not used in the By Count
Mode.
Ex.) A By Count type PLU does not use the
Tare Weight field.
Press the Print/* key.
12.) Enter the Quantity
Ex.) Enter a Quantity of 3 by pressing the
number three key.
Press the Print/* key.
13.) Enter the Ingredient Message
Ex.) The example PLU Bananas, does not
have any ingredients.
Press the Print/* key.

9. Programming (S Mode) ELP-301016
9.2.3 Programming a By Count Mode PLU (S1 Mode)
73
14.) Select Status of Print Sell By Date
0 = Don’t Print Sell By Date
1 = Print Sell By Date
Note: The Printing of the Sell By Date on the label is
controlled by this setting in each PLU.
Ex.) Select a status of Print the Sell by
Date by pressing the number one key.
Press the Print/* key.
15.) Select Status of Print Sell By Time
0 = Don’t Print Sell By Time
1 = Print Sell By Time
Note: The Printing of the Sell By Time on the label is
controlled by this setting in each PLU.
Ex.) Select a status of Don’t Print the Sell
By Time by pressing the number zero
key.
Press the Print/* key.
16.) Select Status of Print Pack Date
0 = Don’t Print Pack Date
1 = Print Pack Date
Note: The Printing of the Pack Date on the label is
controlled by this setting in each PLU.
Ex.) Select a status of Print the Pack Date
by pressing the number one key.
Press the Print/* key.
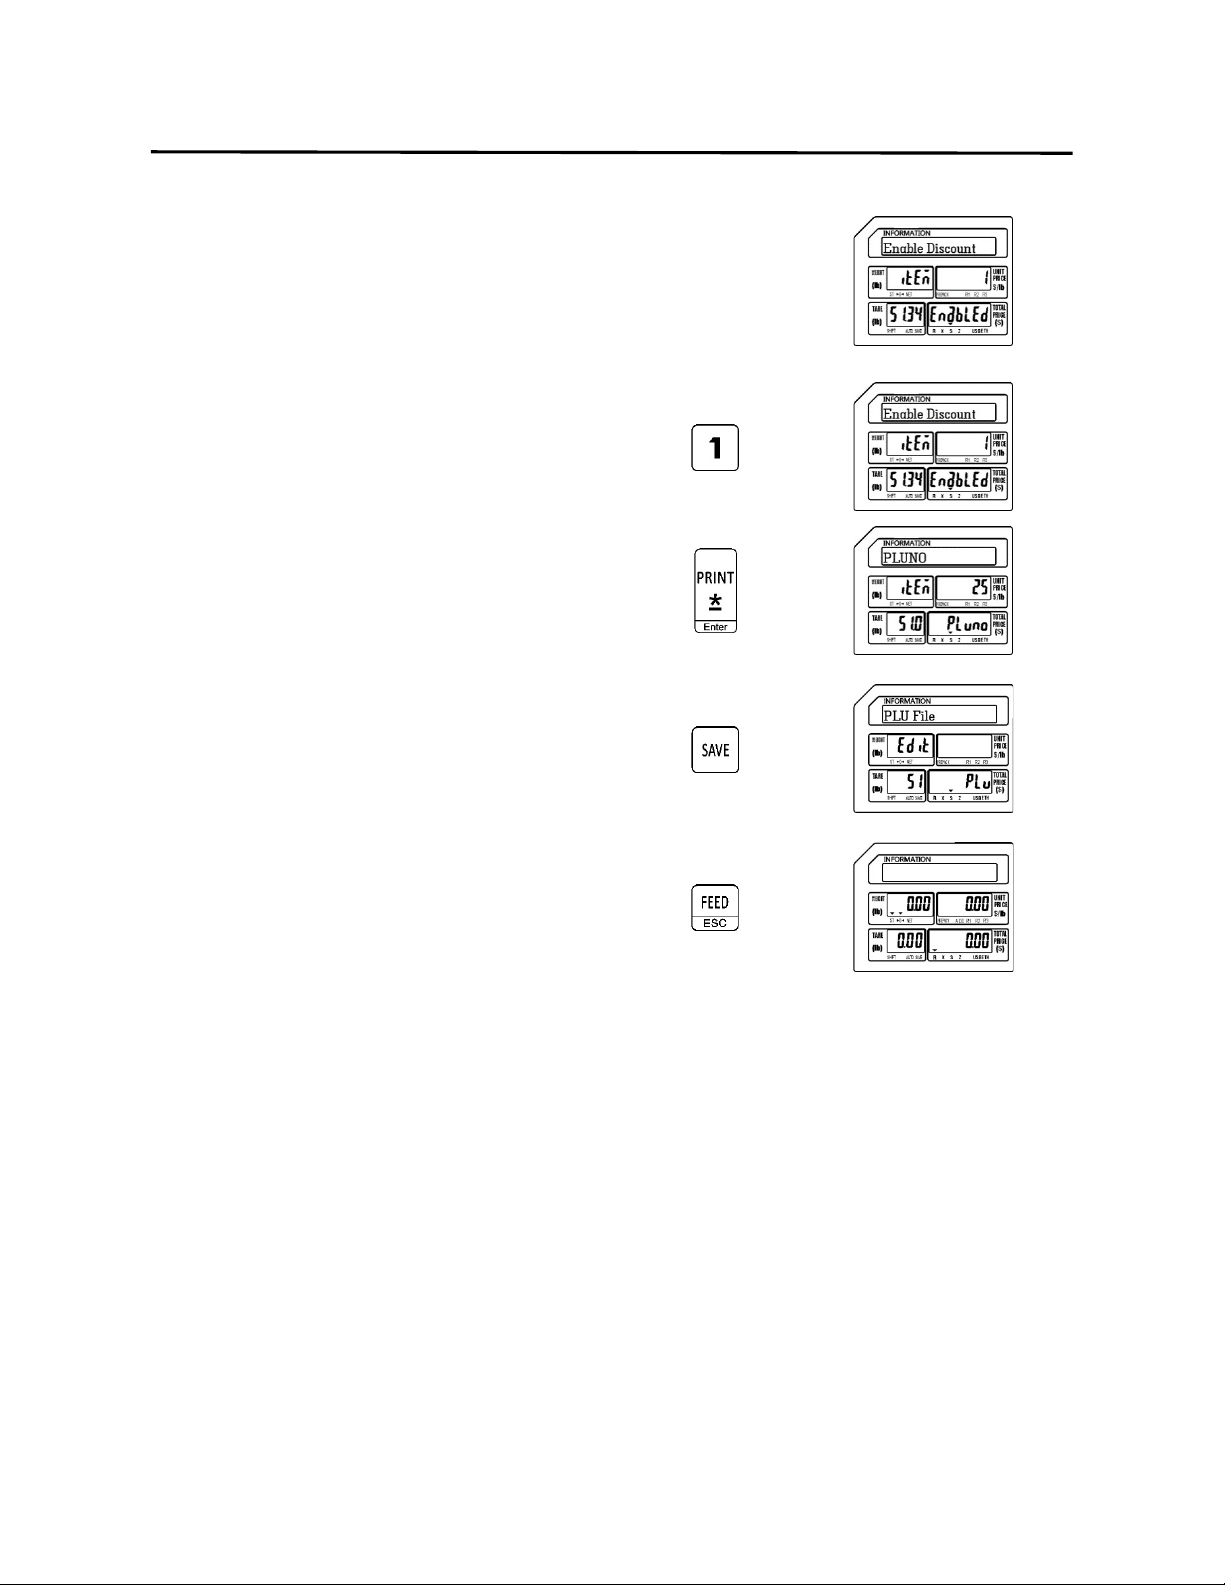
9. Programming (S Mode) ELP-301016
9.2.3 Programming a By Count Mode PLU (S1 Mode)
74
17.) Select Status of Discount
0 = Disable PLU Discount
1 = Enable PLU Discount
Note: The Discount status of each PLU is controlled by
this setting.
Ex.) Select a status of Enable the PLU
Discount by pressing the number one
key.
Press the Print/* key.
Press the SAVE key.
Press the FEED/ESC key.
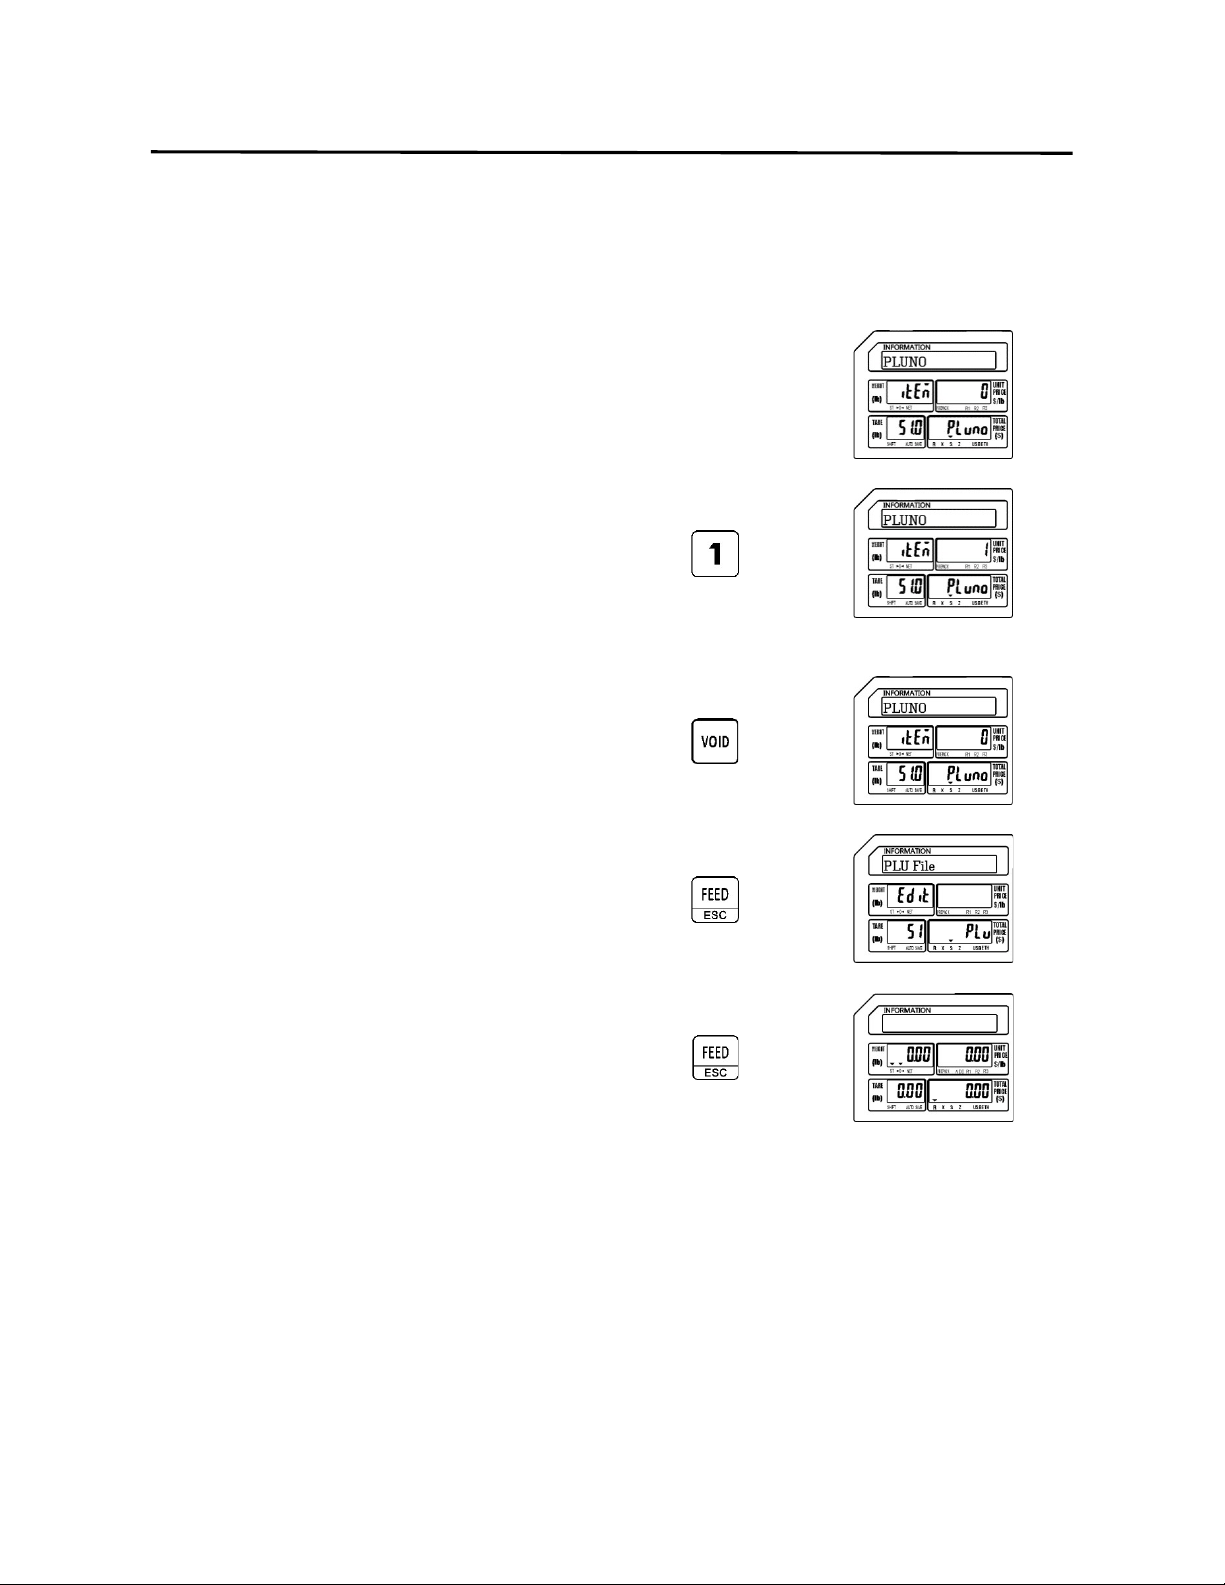
9. Programming (S Mode) ELP-301016
9.2.4 Deleting a PLU (S1 Mode)
75
9.2.4 Deleting a PLU
Follow the steps below to delete a PLU from the scale.
1.) From the PLU Number Screen
2.) Enter the PLU Number to delete
Ex.) Enter PLU Number 1 by pressing
the number one key
Press the VOID key
Press the FEED/ESC key
Press the FEED/ESC key.
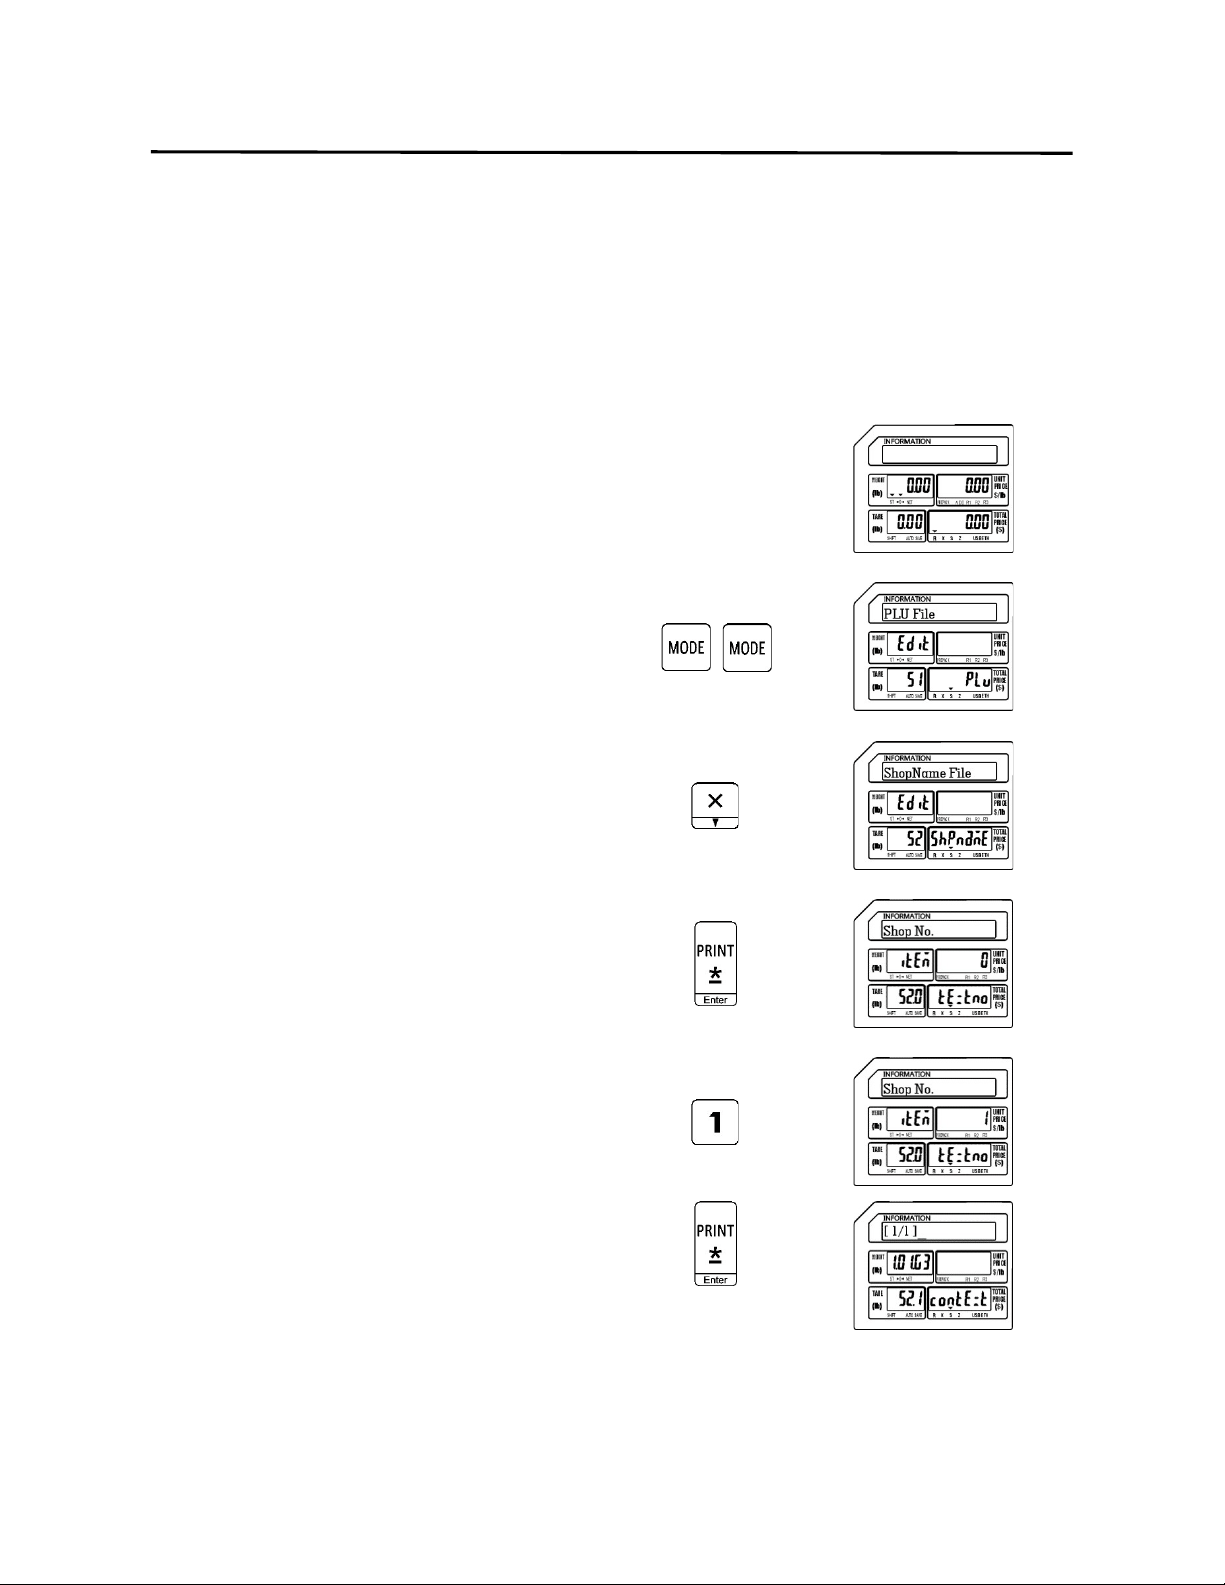
9. Programming (S Mode) ELP-301016
9.3 Shop Name File (S2 Mode)
76
9.3 Shop Name File (S2 Mode)
This programming mode allows you to enter up to 32 (1 – 32) different Shop or Store Names
and Addresses. Each Shop Name can have up to 4 lines of text. Each line of text may have up to
28 characters depending on the font size and label format that is being used.
9.3.1 Entering Shop Name Information
1.) Start at the normal weigh mode screen
2.) Press the Mode Key twice
3.) Press the X key
4.) Press the Print/* key
5.) Enter the Shop Number (1 – 32)
Ex.) Enter Shop Number 1 by pressing
the number 1 key
Press the Print/* key
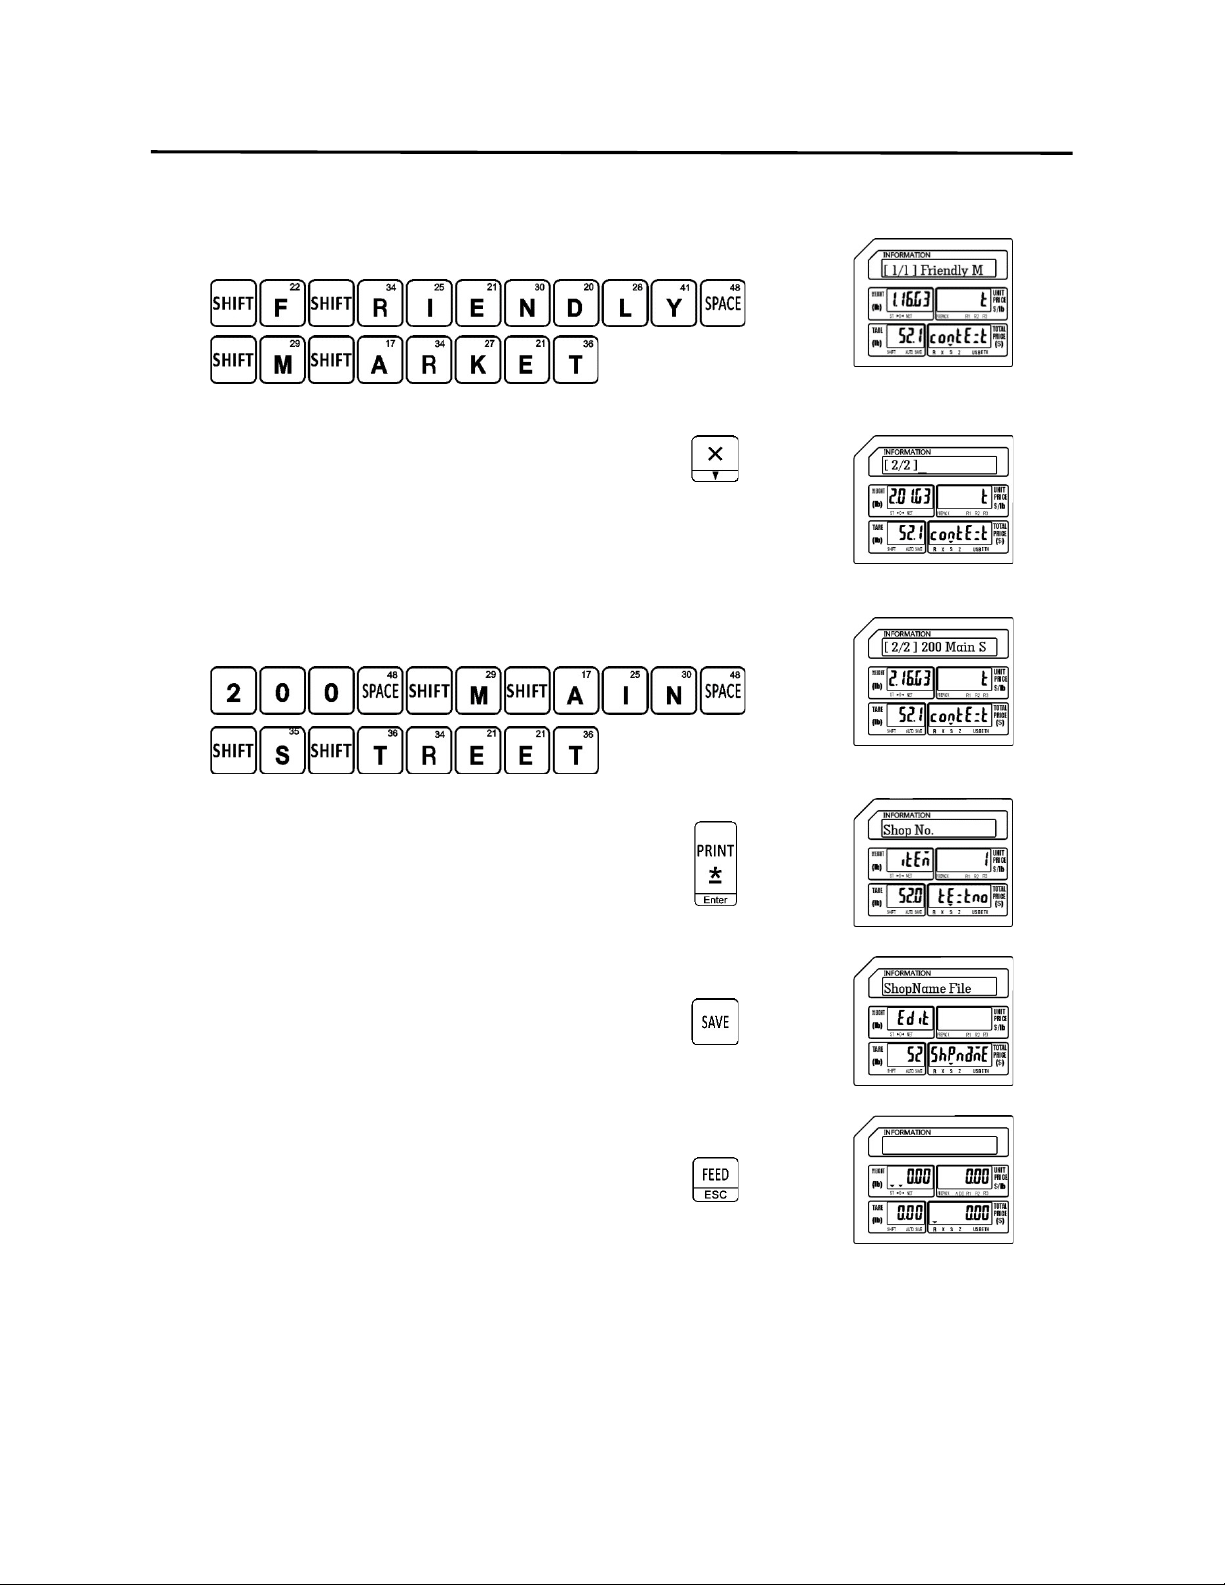
9. Programming (S Mode) ELP-301016
9.3.1 Entering Shop Name Information (S2 Mode)
77
6.) Enter First Line of Shop Information
Ex.) Store Name: Friendly Market
Change to the Second Line of text
7.) Enter Second Line of Shop Information
Ex.) Store Address: 200 Main Street
Press the Print/* key
8.) Press the SAVE key
Press the FEED/ESC key.
Note: Repeat the steps above as required to input all Store Information. Keep in mind that
there are 4 lines of information available.
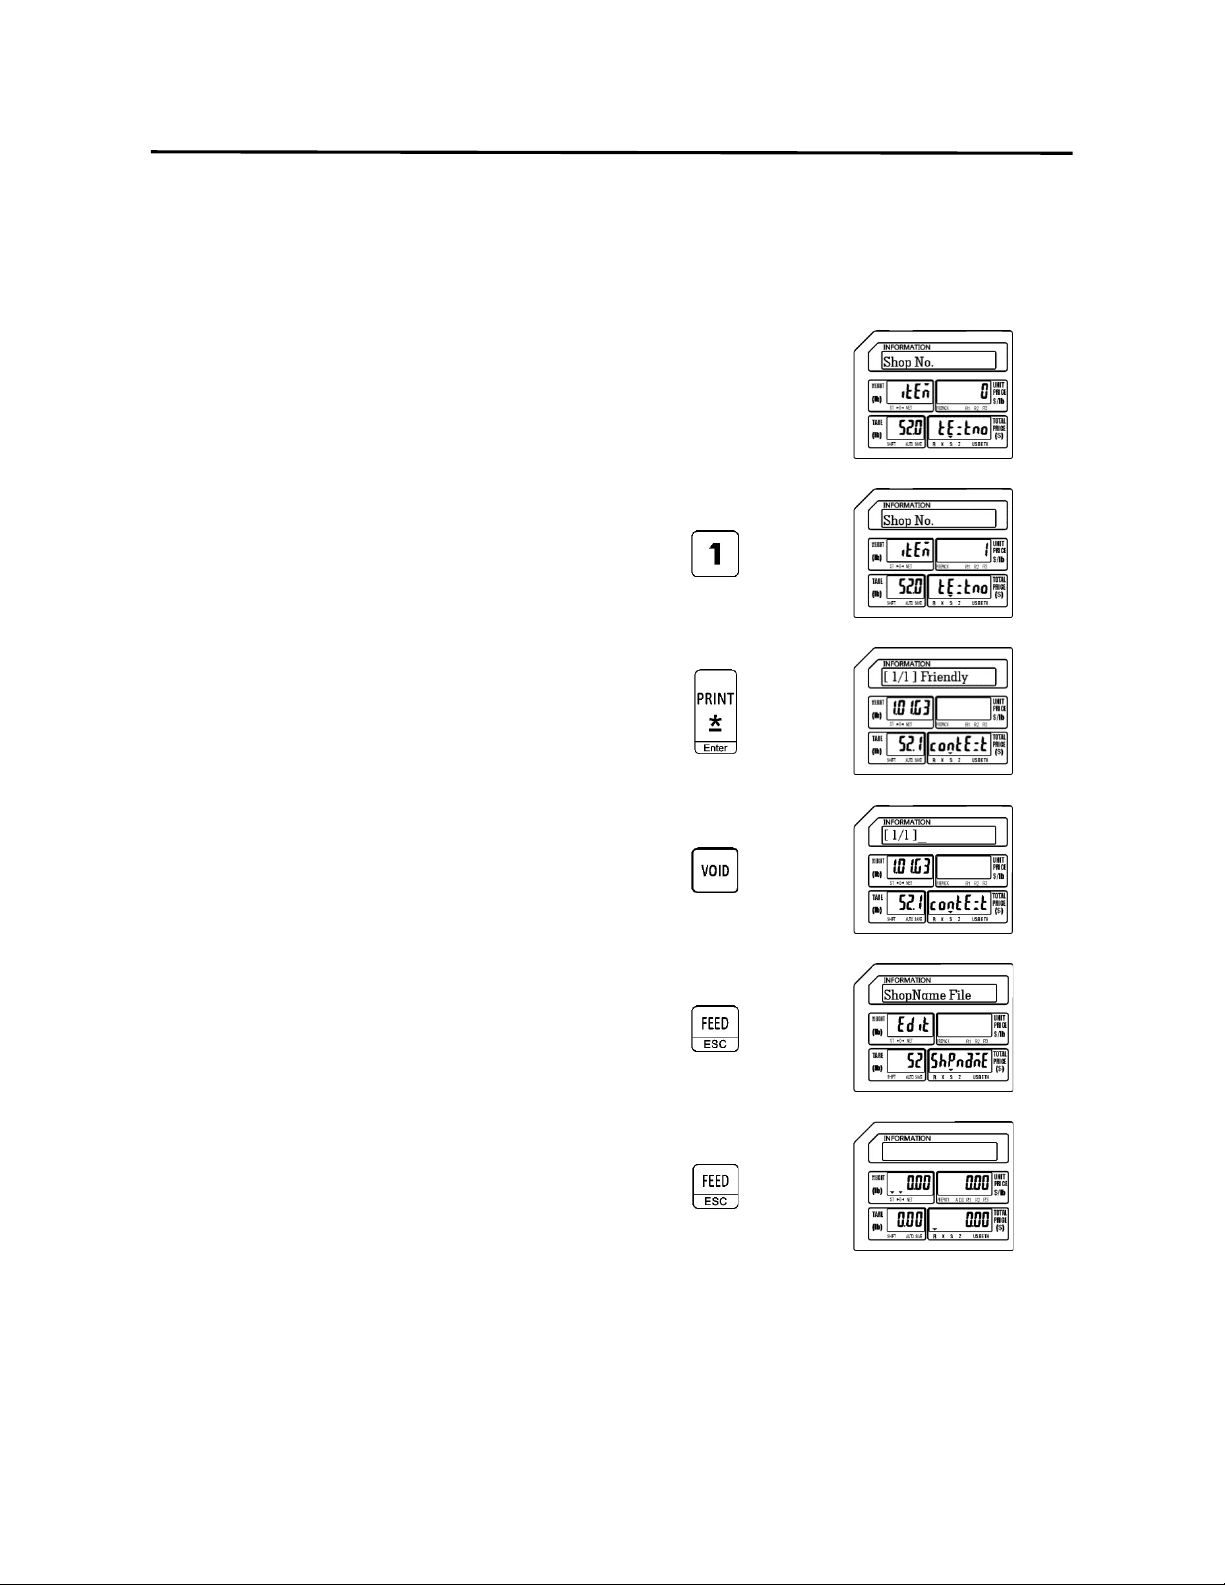
9. Programming (S Mode) ELP-301016
9.3.2 Deleting Shop Name Information (S2 Mode)
78
9.3.2 Deleting Shop Name Information
Follow the steps below to delete Shop Information from the scale.
1.) From the Shop Number Screen
2.) Enter the Shop Number to delete
Ex.) Enter Shop Number 1 by pressing
the number one key
Press the Print/* key
Press the VOID key
Press the FEED/ESC key
Press the FEED/ESC key.
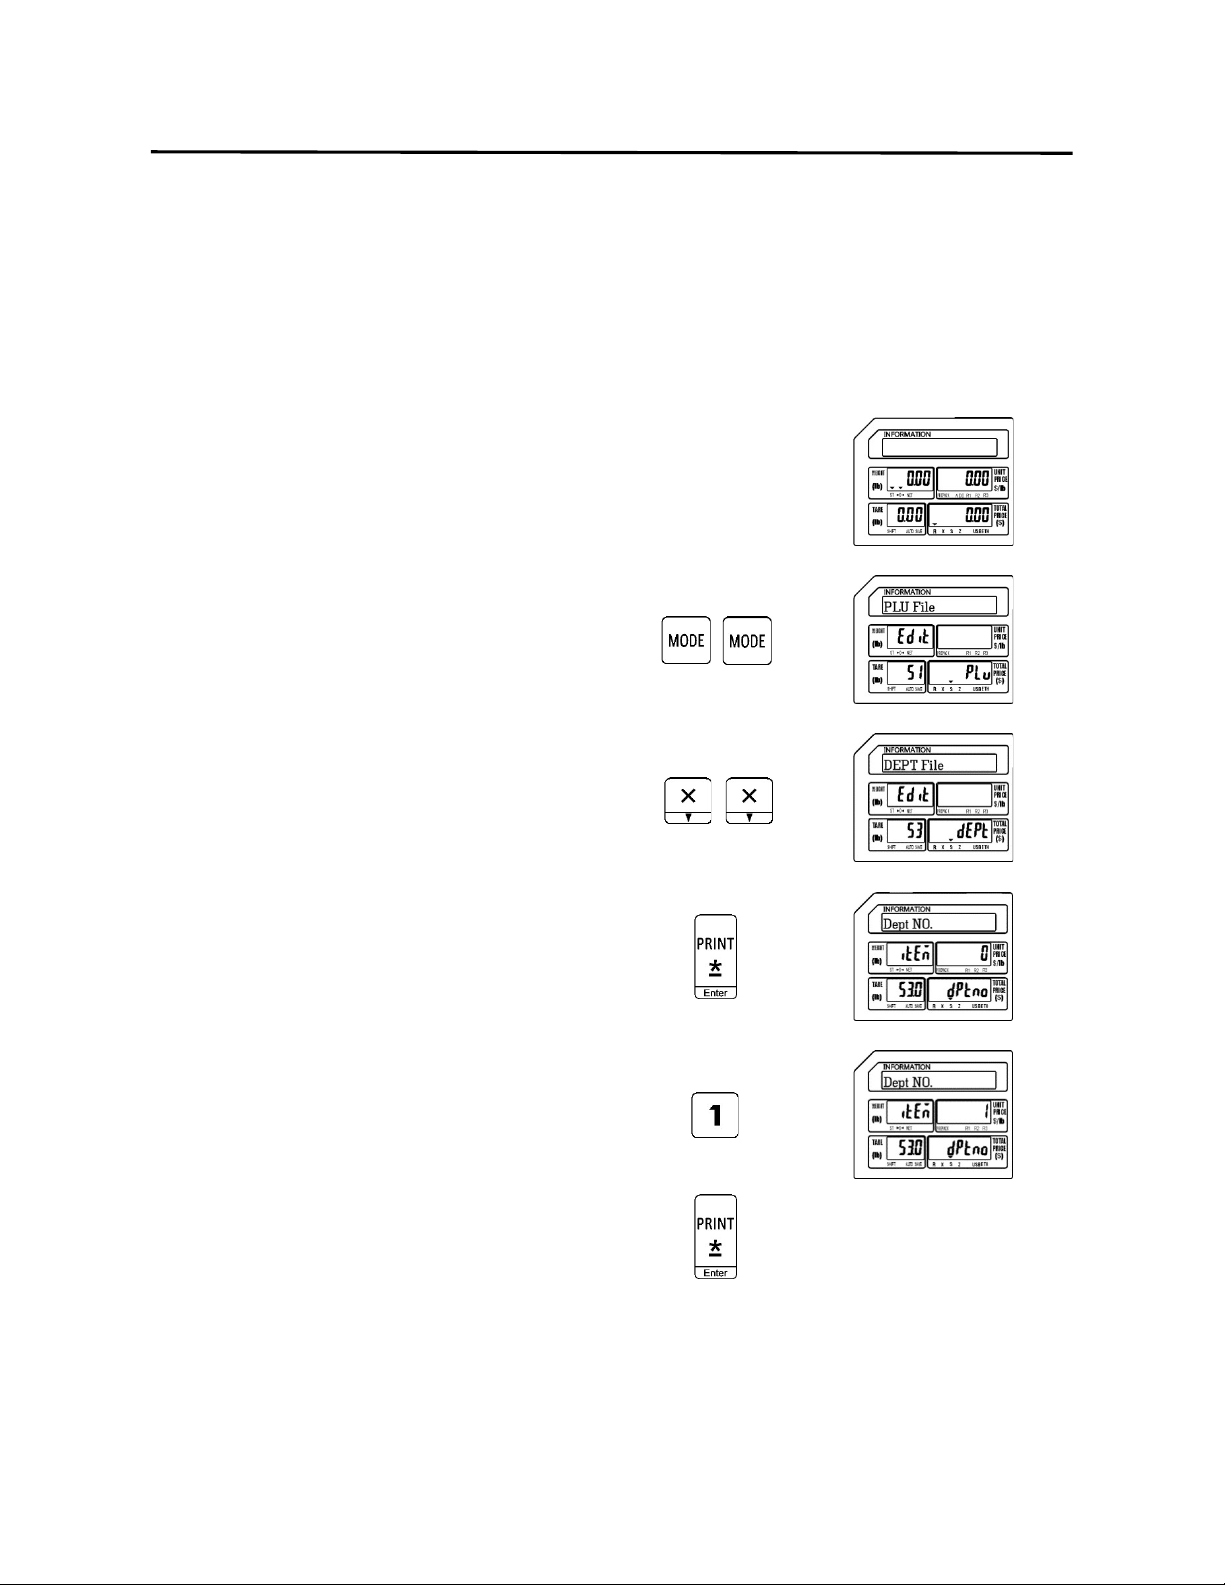
9. Programming (S Mode) ELP-301016
9.4 Department File (S3 Mode)
79
9.4 Department File (S3 Mode)
The Department File program allows you to categorize your PLU information into departments.
Departments may be numbered from 1 – 99. The departments that are defined may also be
assigned to groups using S Mode – S4 Main Group File.
9.4.1 Entering Department Information
1.) Start at the normal weigh mode screen
2.) Press the Mode Key twice
3.) Press the X key twice
4.) Press the Print/* key
5.) Enter the Department Number (1 – 99)
Ex.) Enter Department Number 1 by
pressing the number one key
Press the Print/* key
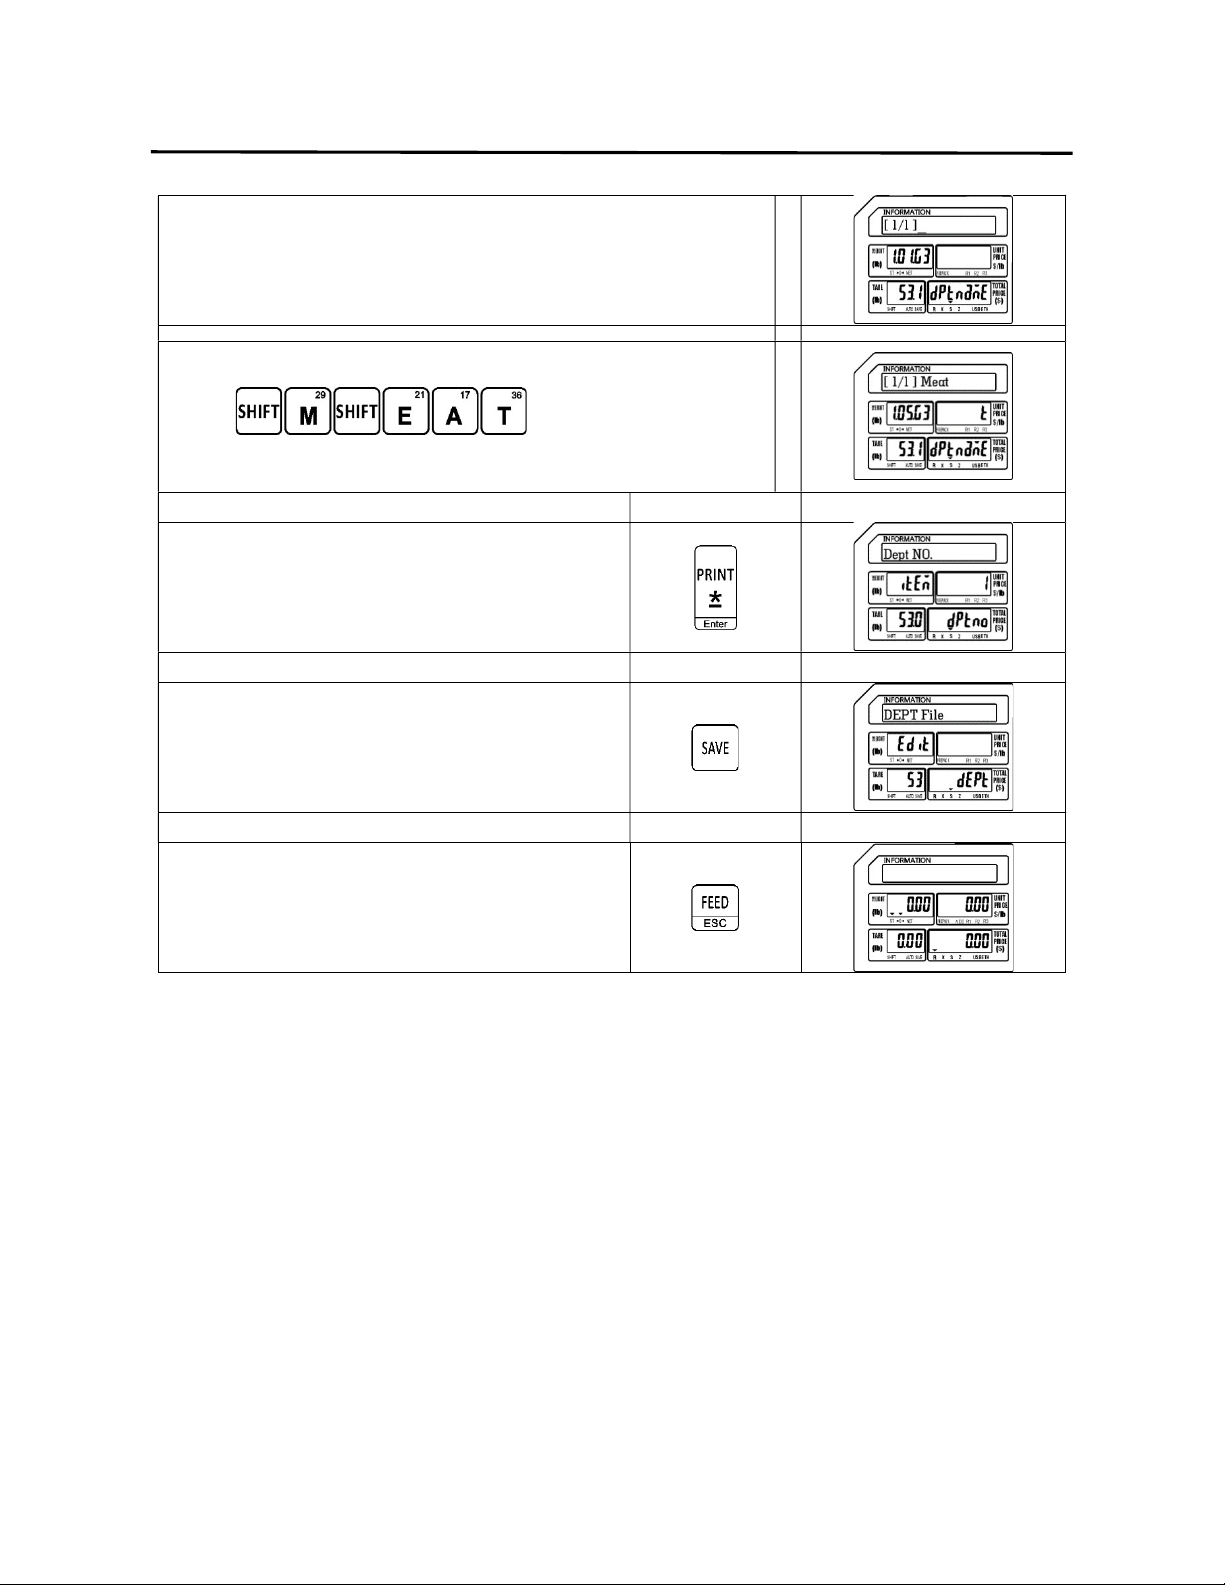
9. Programming (S Mode) ELP-301016
9.4 Department File (S3 Mode)
80
6.) Enter Department Name
Ex.) Department One Name: Meat
Press the Print/* key
7.) Press the SAVE key
Press the FEED/ESC key
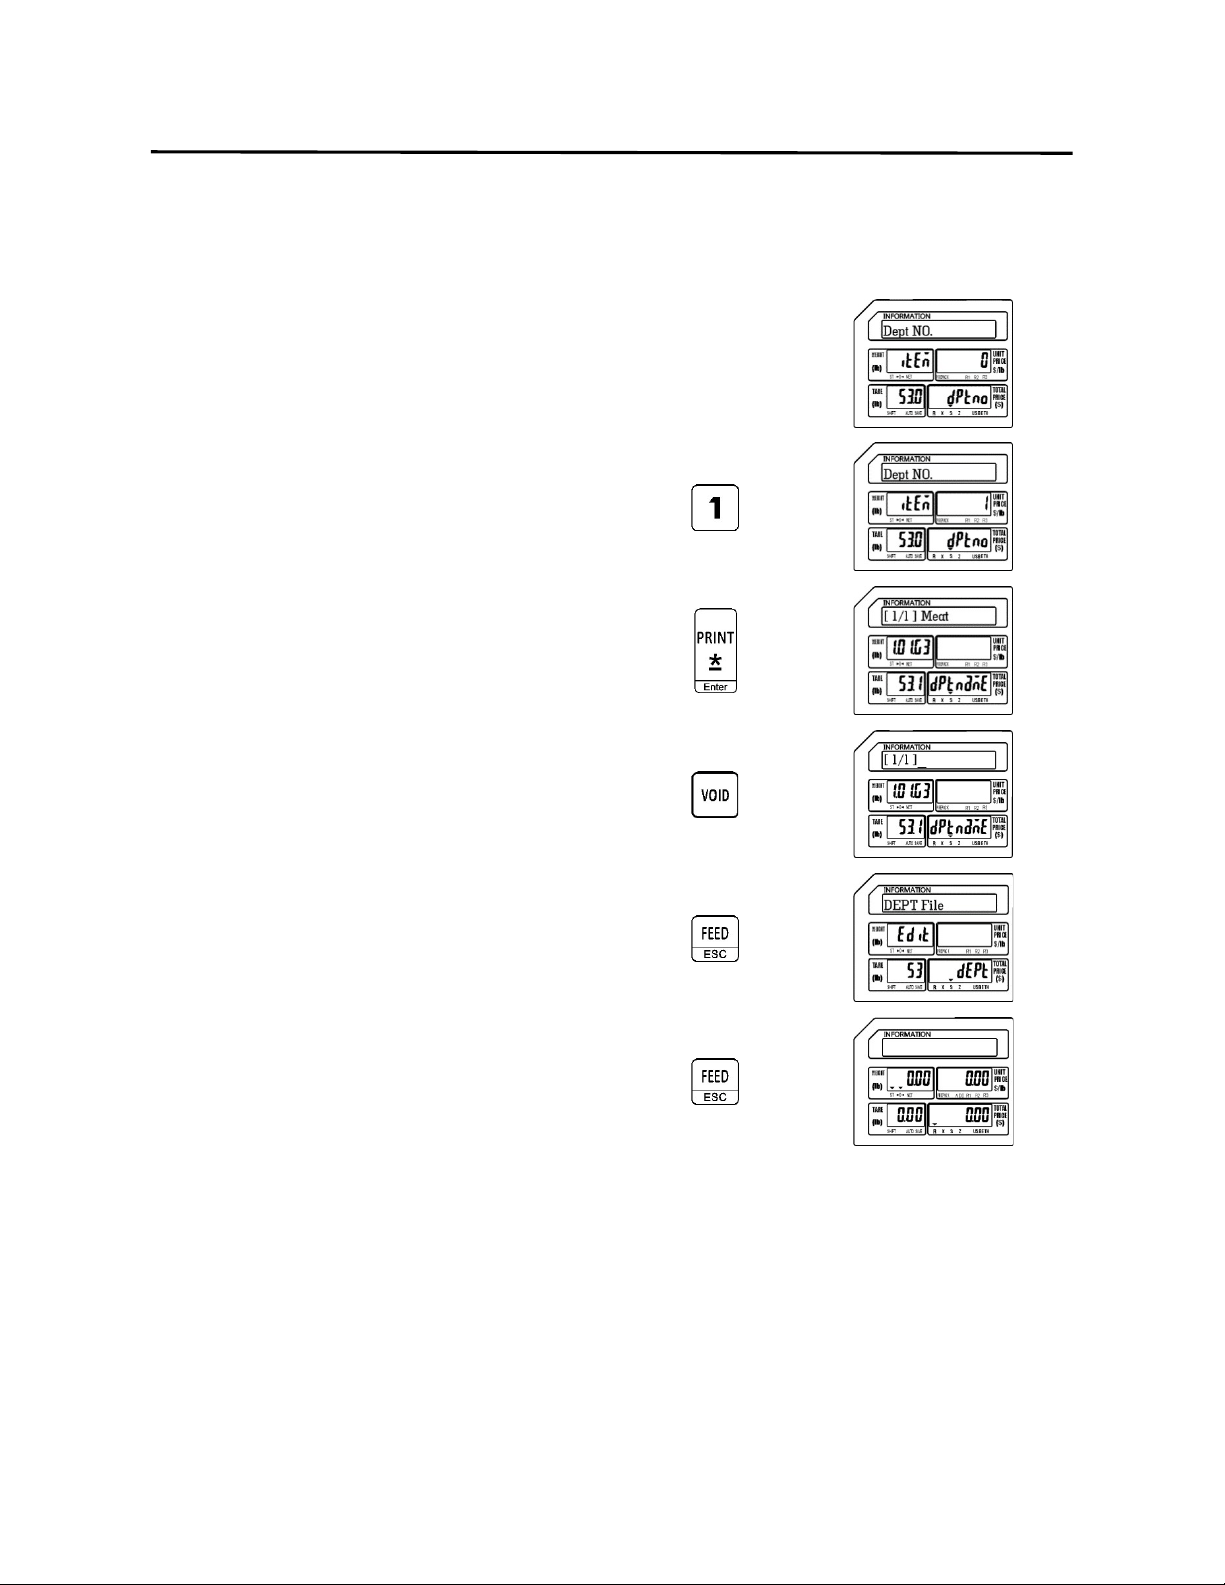
9. Programming (S Mode) ELP-301016
9.4.2 Deleting Department Information (S3 Mode)
81
9.4.2 Deleting Department Information
Follow the steps below to delete Shop Information from the scale.
1.) From the Department Number Screen
2.) Enter the Department Number
Ex.) Enter Department Number 1 by
pressing the number one key
Press the Print/* key
Press the VOID key
Press the FEED/ESC key
Press the FEED/ESC key
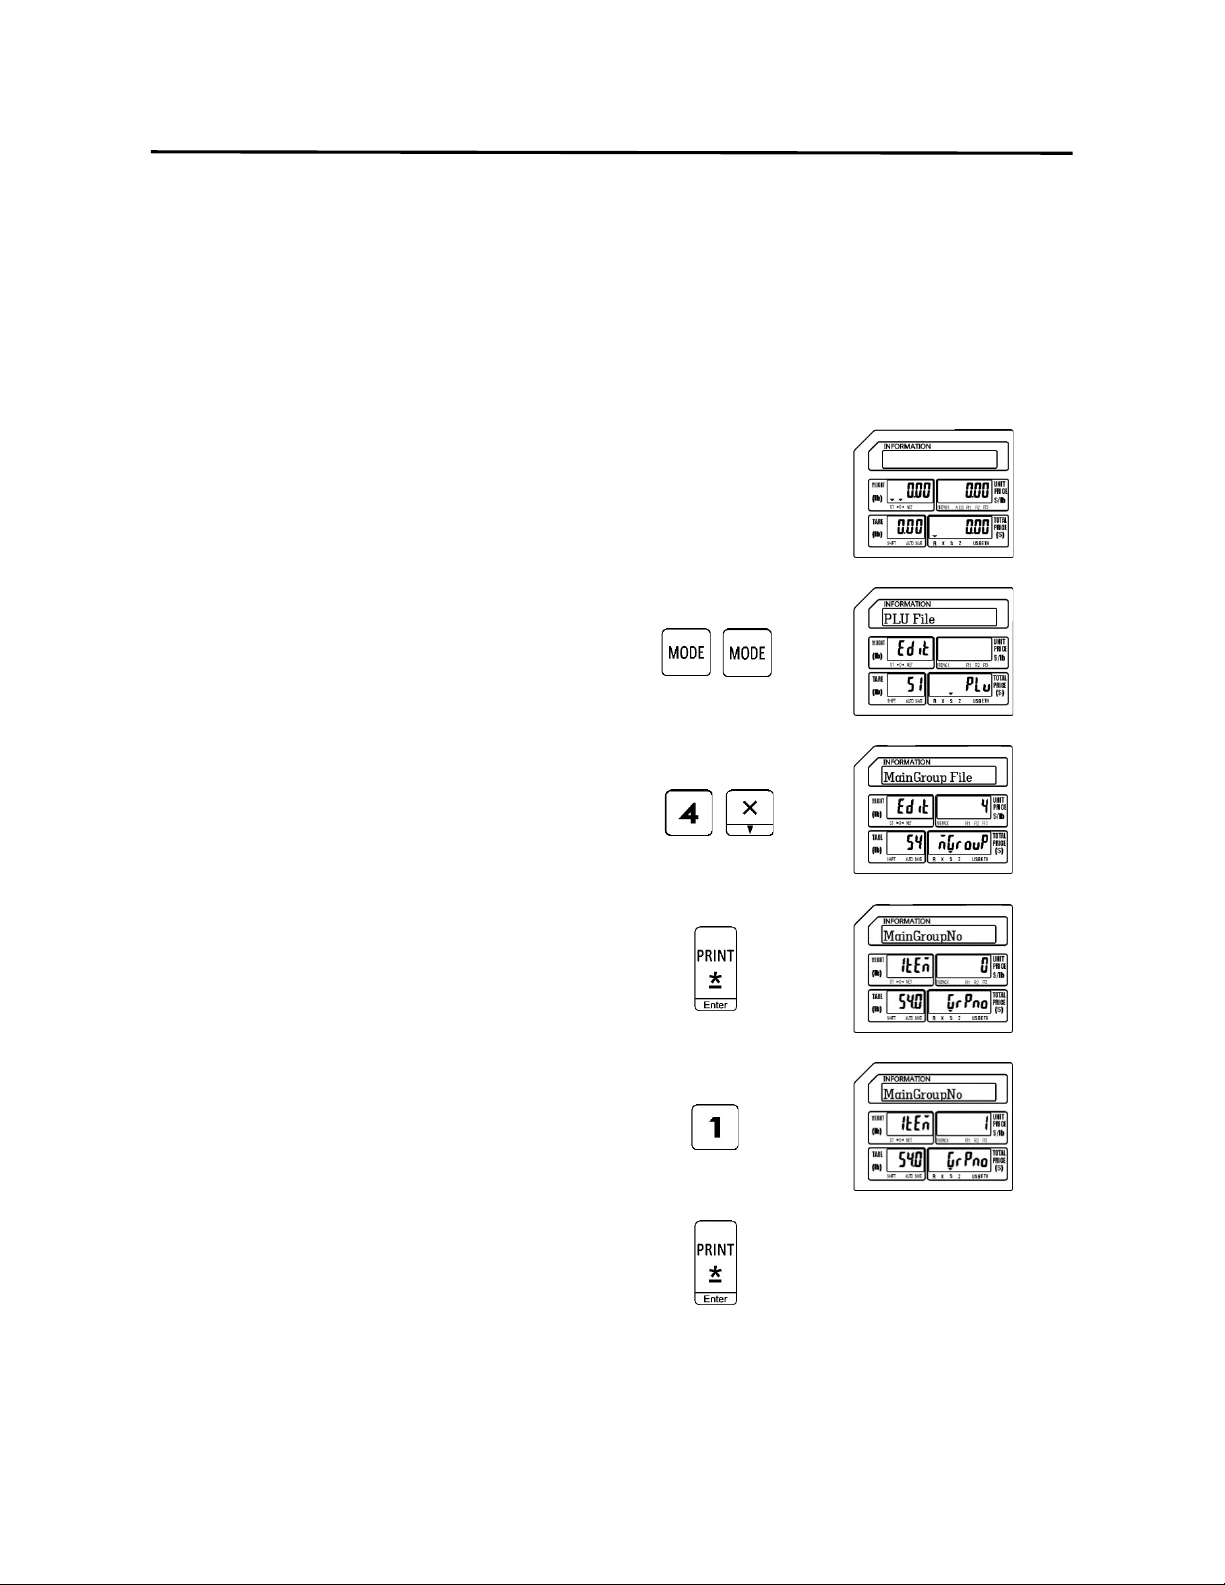
9. Programming (S Mode) ELP-301016
9.5 Main Group File (S4 Mode)
82
9.5 Main Group File (S4 Mode)
The Main Group File is used to further categorize the PLU information stored in the scale. Main
Groups are linked to Departments and can be linked to individual or multiple scales.
9.5.1 Entering Main Group Information
1.) Start at the normal weigh mode screen
2.) Press the Mode Key twice
3.) Press the number four key then press the
X key
Note: This has the same results as pressing the X key
three times.
4.) Press the Print/* key
5.) Enter the Main Group Number
Ex.) Enter Main Group Number 1 by
pressing the number one key
Press the Print/* key

9. Programming (S Mode) ELP-301016
9.5.1 Entering Main Group Information (S4 Mode)
83
6.) Enter Main Group Name
Ex.) Main Group One Name: Beef
Press the Print/* key
7.) Enter the Department Number
Ex.) Enter Department Number 1 by
pressing the number one key
Note: This will be the Department Number that the
Main Group is linked to.
Press the Print/* key
8.) Press the SAVE key
Press the FEED/ESC key
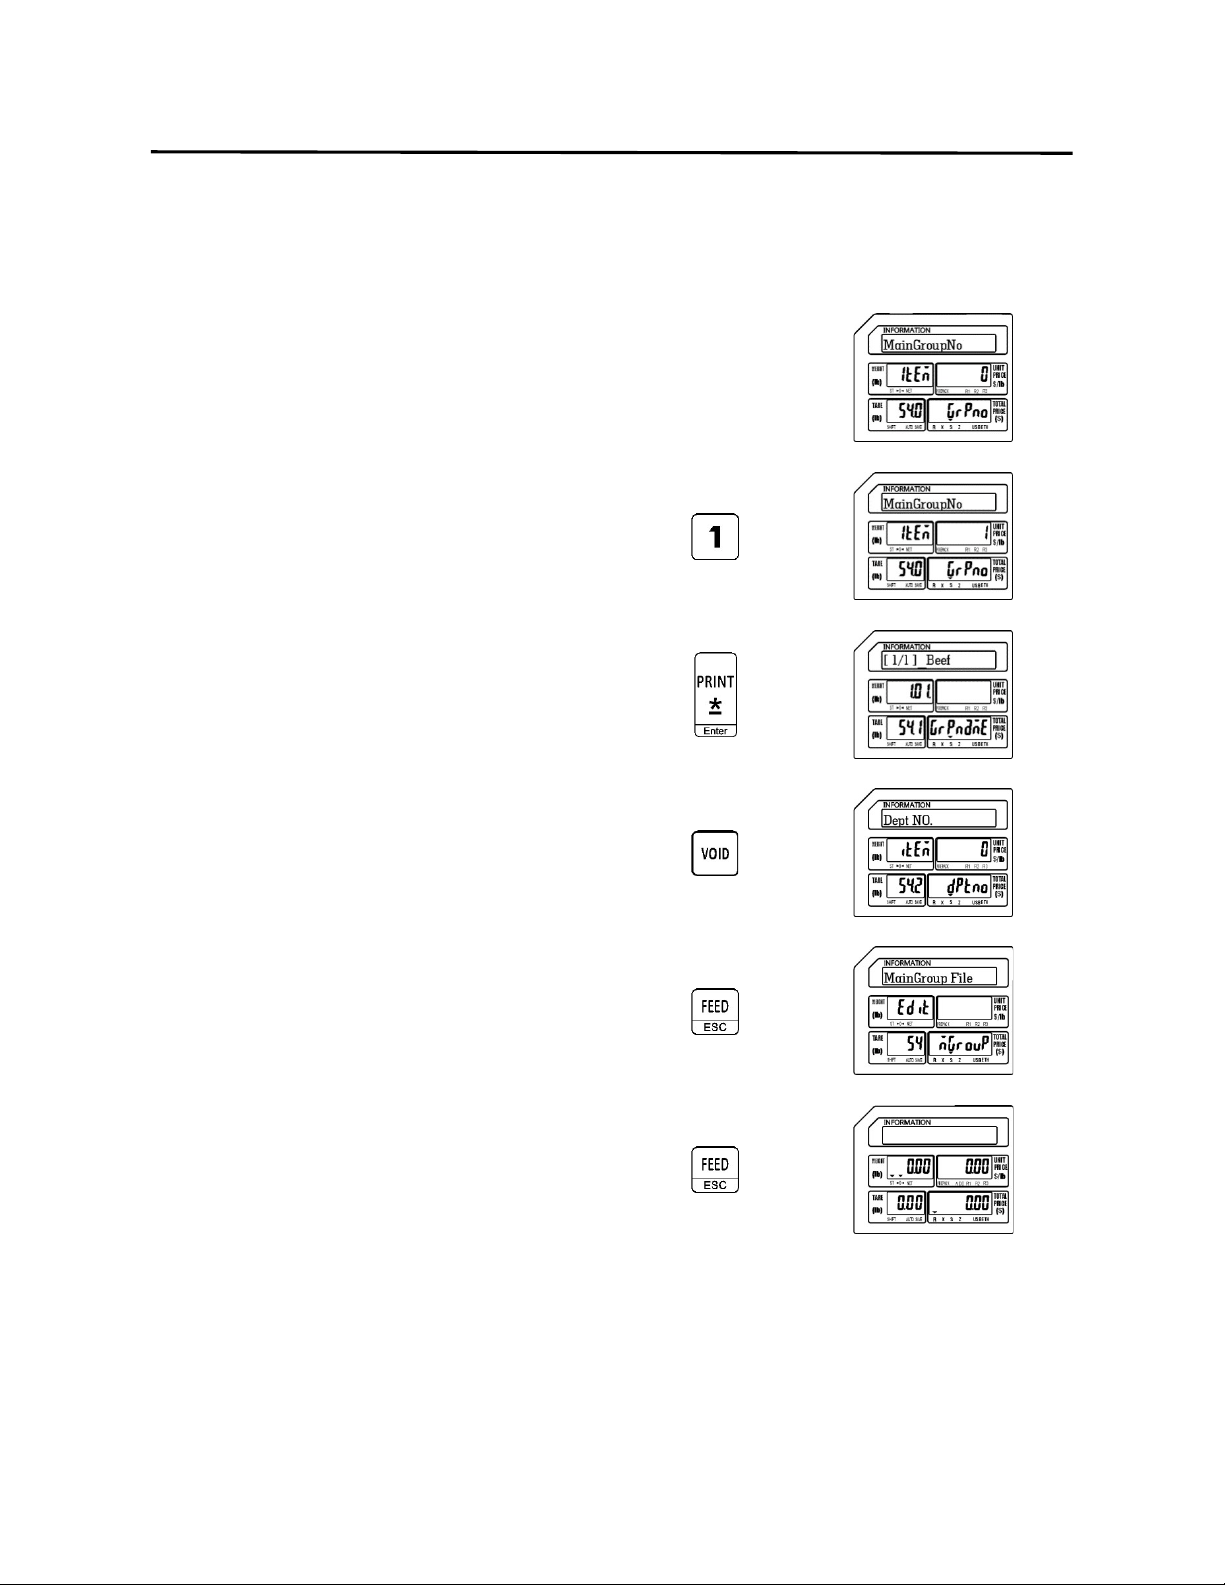
9. Programming (S Mode) ELP-301016
9.5.2 Deleting Main Group Information (S4 Mode)
84
9.5.2 Deleting Main Group Information
Follow the steps below to delete Main Group information.
1.) From the Main Group Number Screen
2.) Enter the Main Group Number to delete
Ex.) Enter Main Group Number 1 by
pressing the number one key
Press the Print/* key
Press the VOID key
Press the FEED/ESC key
Press the FEED/ESC key
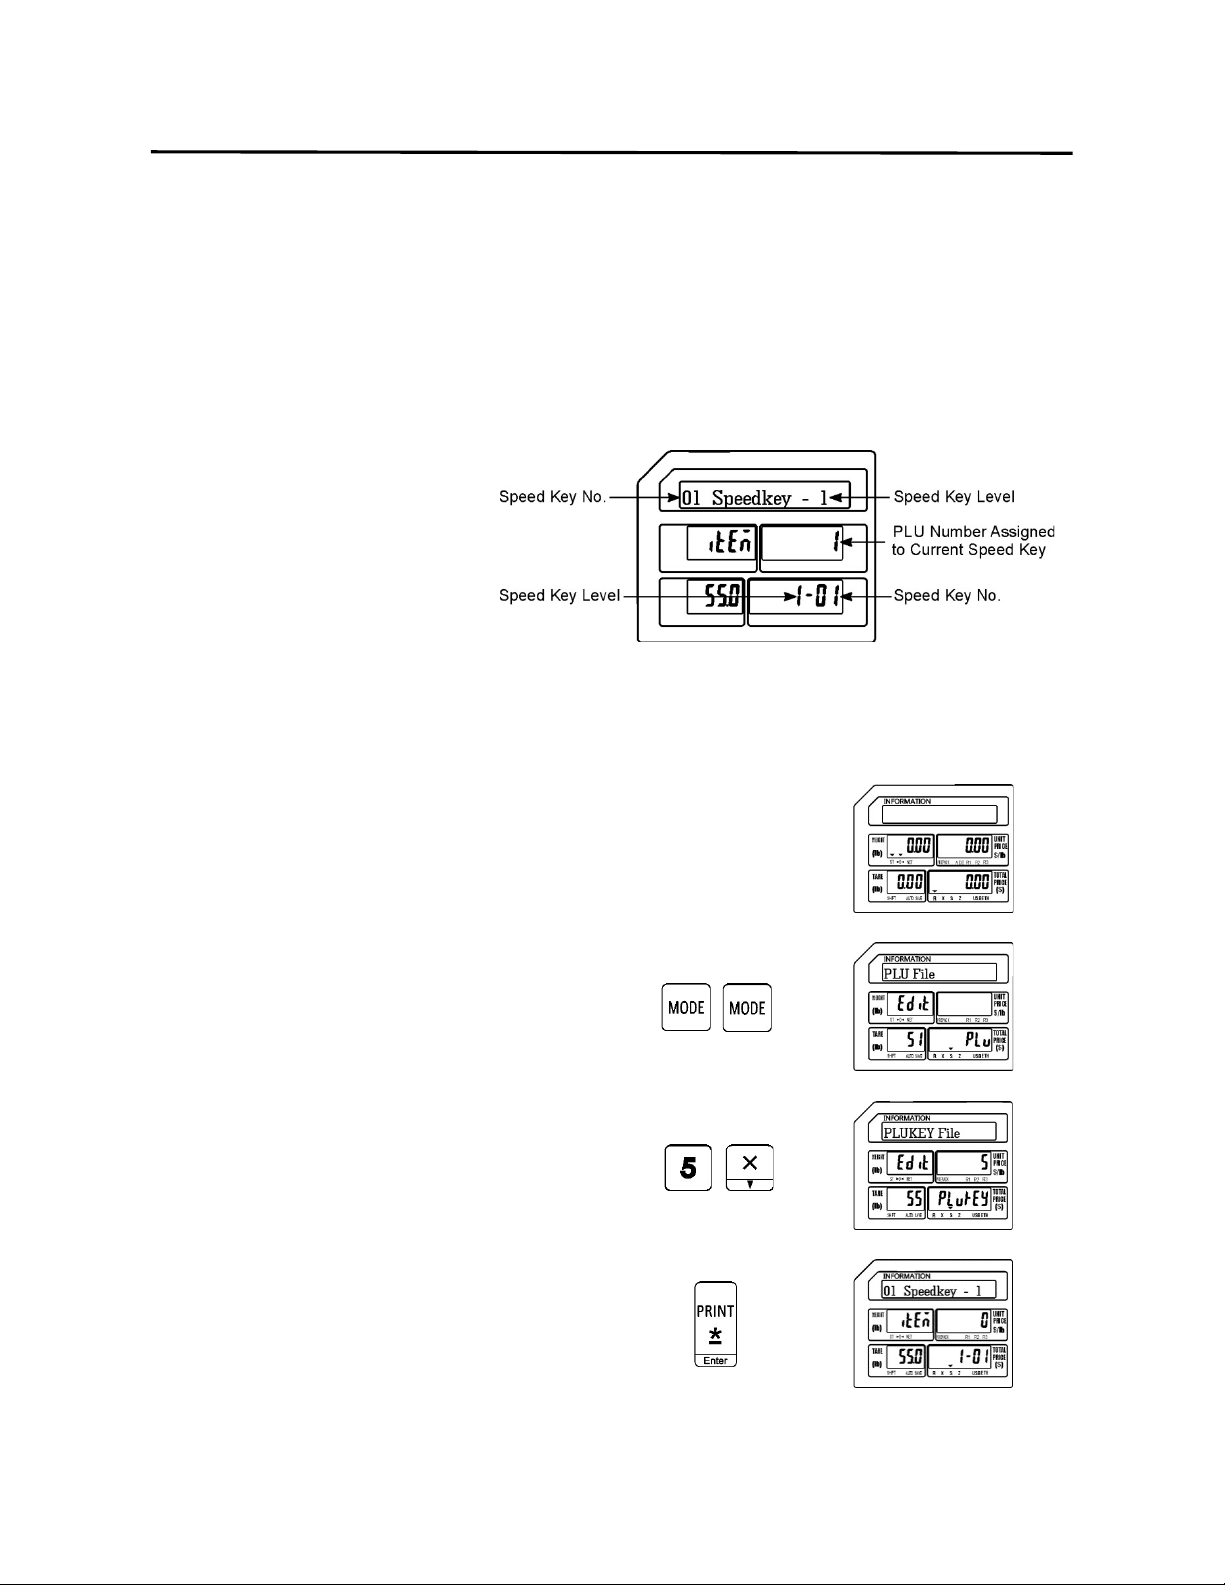
9. Programming (S Mode) ELP-301016
9.6 PLU Key File (S5 Mode)
85
9.6 PLU Key File (S5 Mode)
The PLU Key File mode is used to assign programmed PLU’s to the Speed Keys. The Speed Keys
are configured with 3 levels of 56 keys or a total of 168 possible Speed Keys available. Follow
the steps outlined below to assign PLU’s to the Speed Keys.
Note: Please keep in mind that if there is Function Key (S-Mode S6 FUNC. Key File) already
assigned to a Speed Key location that location cannot have a PLU assigned to it.
The figure to the right explains
the information in the display
while programming PLU Speed
Keys.
9.6.1 Programming a Speed Key on Level 1
1.) Start at the normal weigh mode screen
2.) Press the Mode Key twice
3.) Press the number five key then press the
X key
Note: This has the same results as pressing the X key
four times.
4.) Press the Print/* key
Note: Refer to the figure above for an explanation of
the display.
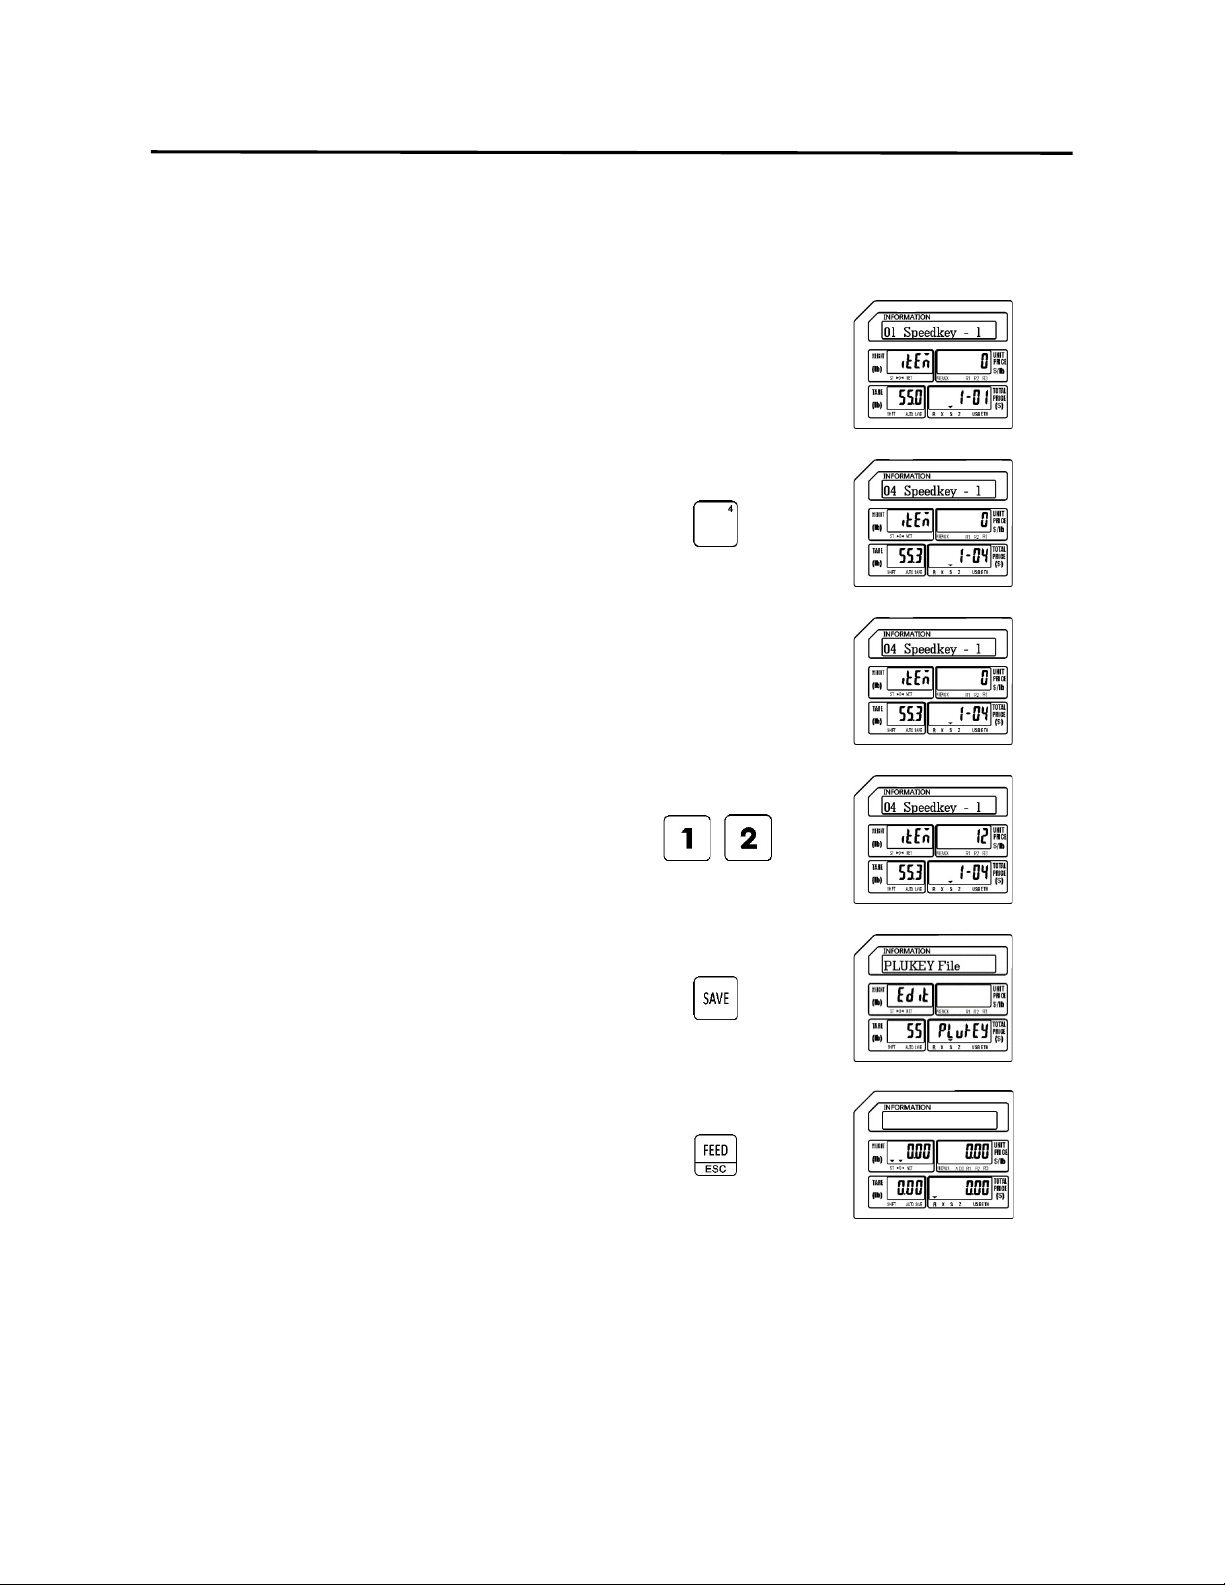
9. Programming (S Mode) ELP-301016
9.6.1 Programming a Speed Key on Level 1(S5 Mode)
86
Ex.) Assign PLU number 12 to Speed Key number 4 on Speed Key Level number 1.
5.) Enter the Speed Key Number
Ex.) Enter Speed Key number four by
pressing the Speed Key numbered 4
one time.
6.) Enter the PLU Number
Ex.) Enter PLU number by pressing the
number one key followed by the
number two key.
Press the SAVE key.
Press the FEED/ESC key
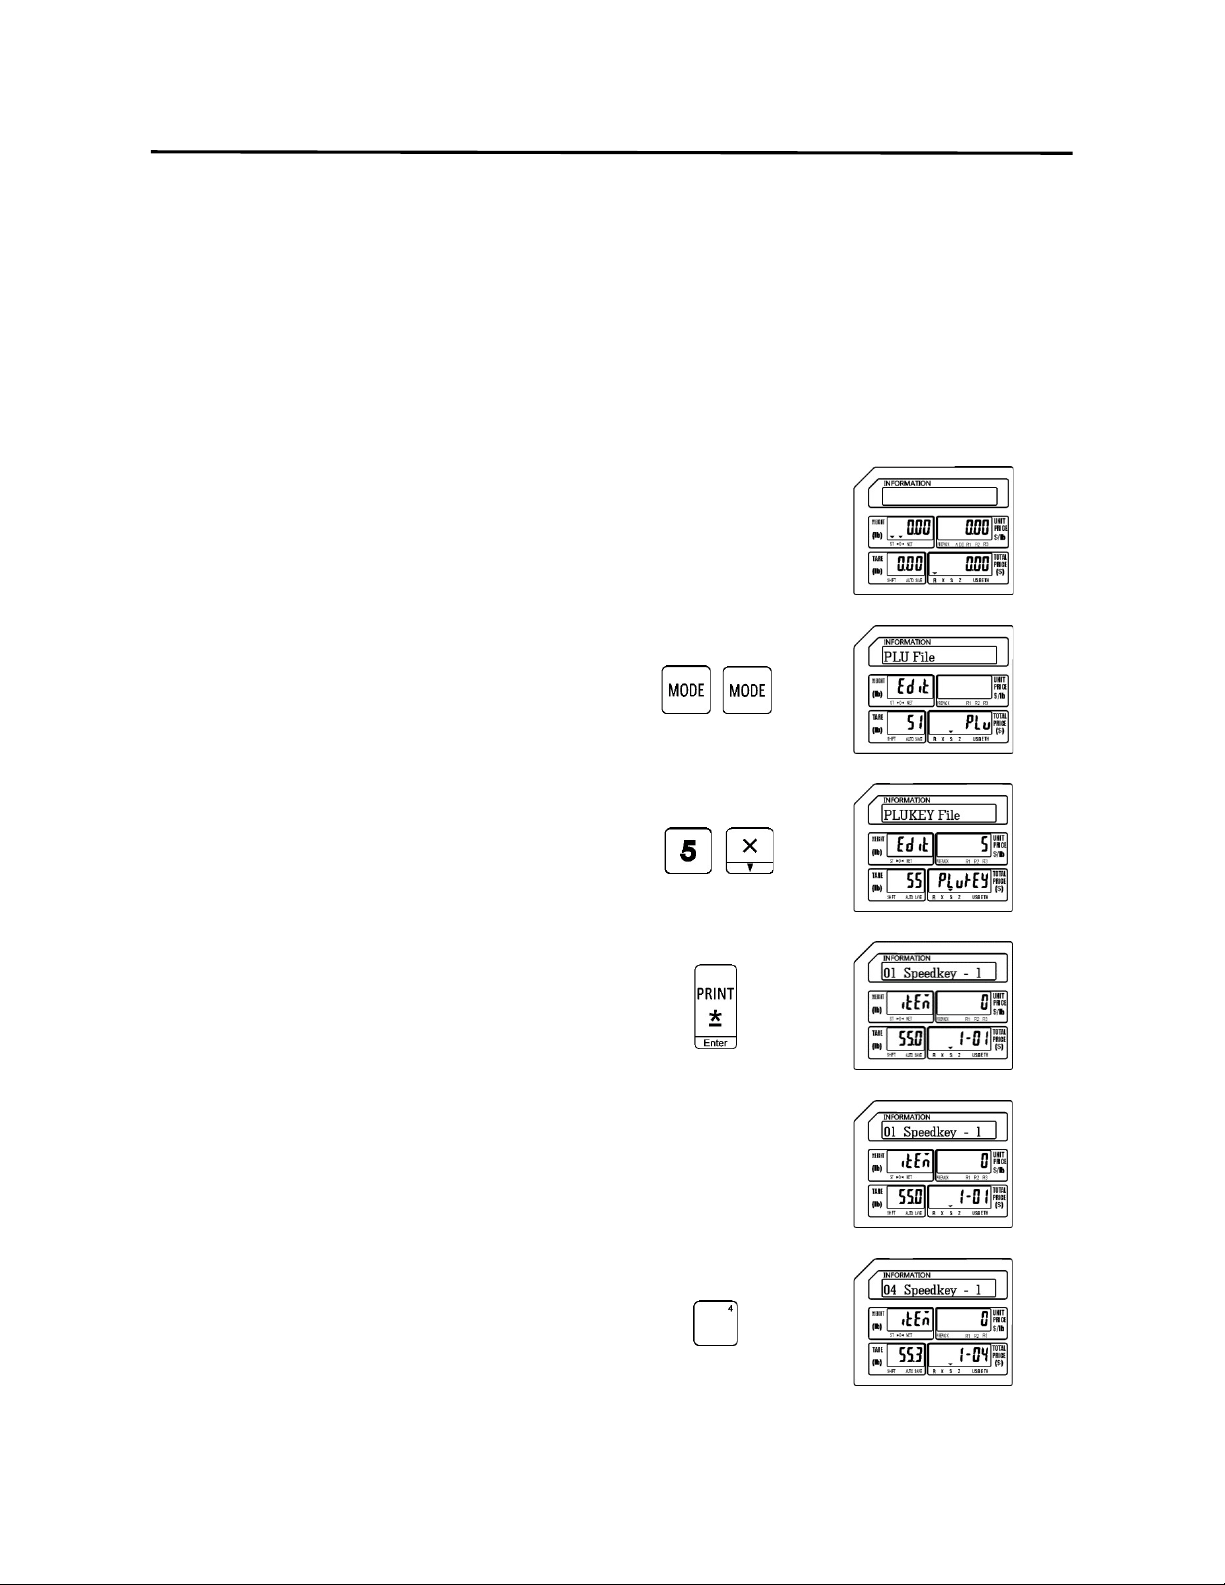
9. Programming (S Mode) ELP-301016
9.6.2 Programming a Speed Key Using Multiple Levels (S5 Mode)
87
9.6.2 Programming a Speed Key Using Multiple Levels
Ex.) Assign PLU number 12 to Speed Key number 4 on Speed Key Level number 1
Assign PLU number 18 to Speed Key number 4 on Speed Key Level number 2
Assign PLU number 25 to Speed Key number 4 on Speed Key Level number 3
1.) Start at the normal weigh mode screen
2.) Press the Mode Key twice
3.) Press the number five key then press the
X key
Note: This has the same results as pressing the X key
four times.
4.) Press the Print/* key
Note: Refer to the figure in Section 9.6 for an
explanation of the display.
5.) Enter the Speed Key Number
Ex.) Enter Speed Key number four by
pressing the Speed Key numbered 4
one time.
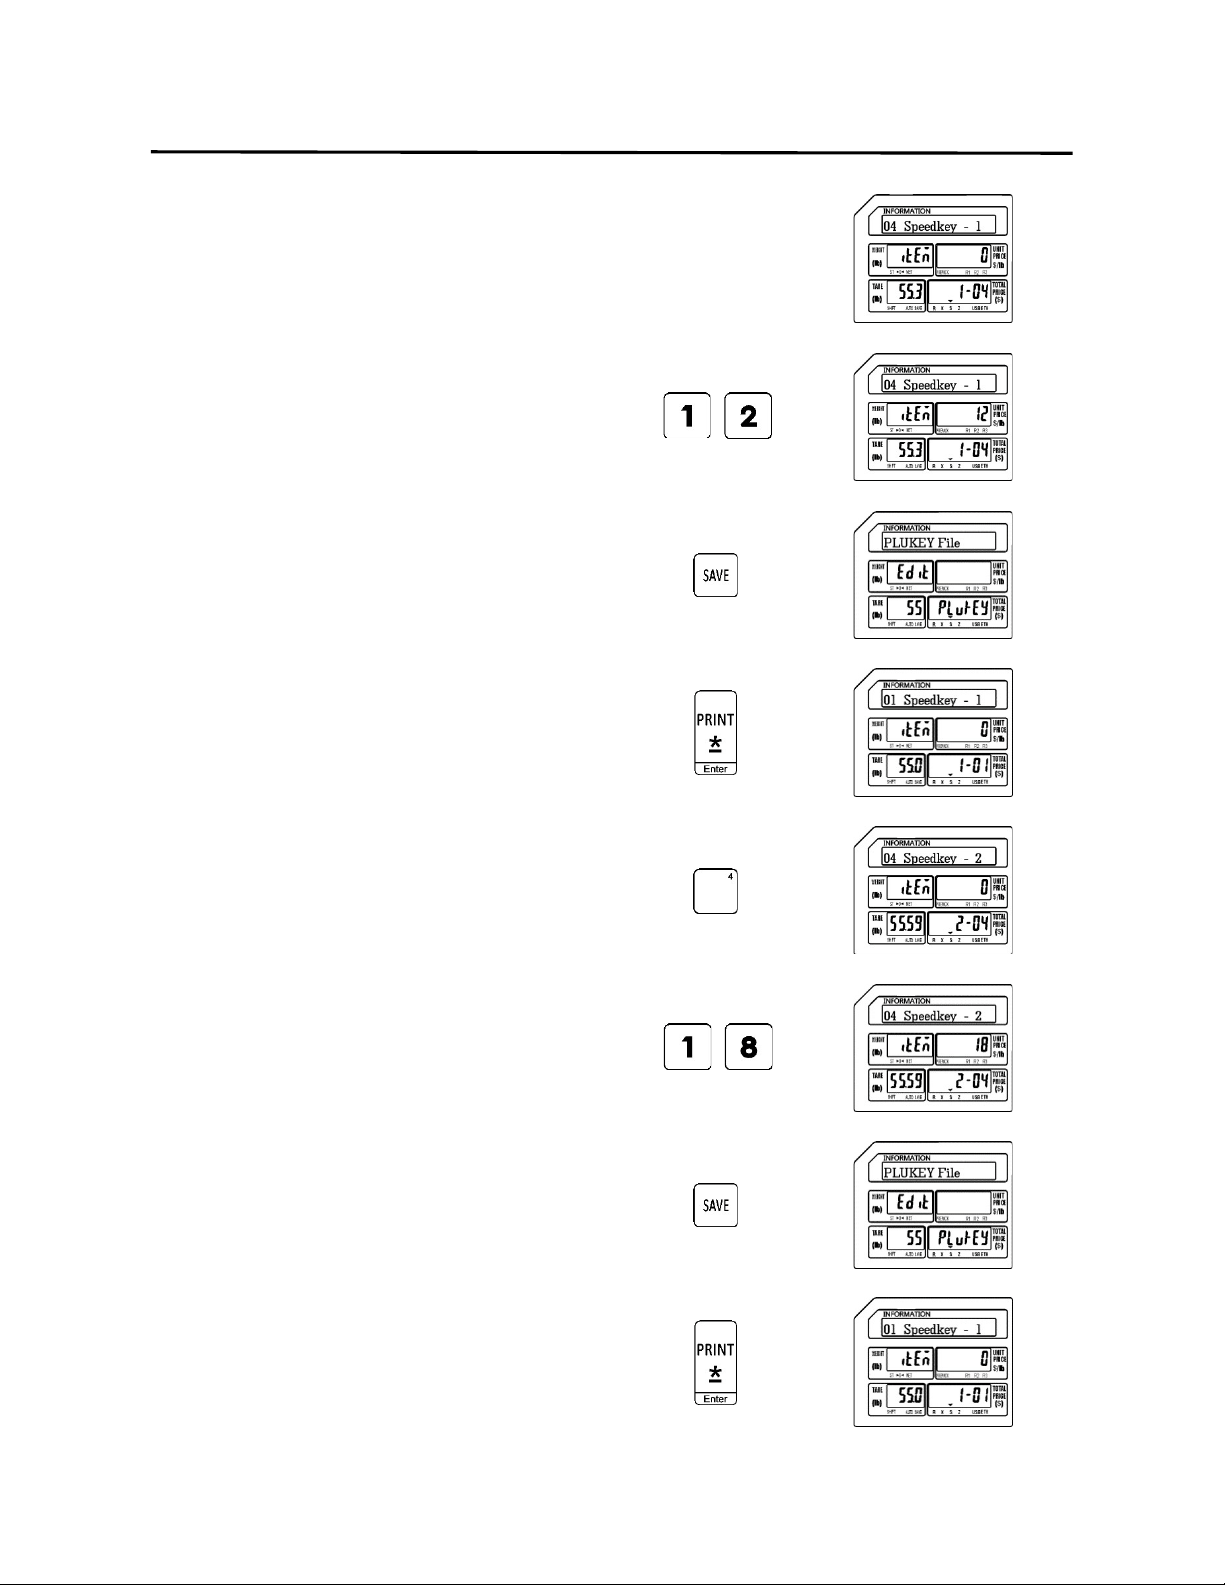
9. Programming (S Mode) ELP-301016
9.6.2 Programming a Speed Key Using Multiple Levels (S5 Mode)
88
6.) Enter the Level 1 PLU Number
Ex.) Enter Level 1 PLU number by pressing
the number one key followed by the
number two key.
Press the SAVE key.
Press the Print/* key
Press Speed Key number four again.
Note: Pressing Speed Key number four again
selects Level 2.
Ex.) Enter Level 2 PLU number by pressing
the number one key followed by the
number eight key.
Press the SAVE key.
Press the Print/* key
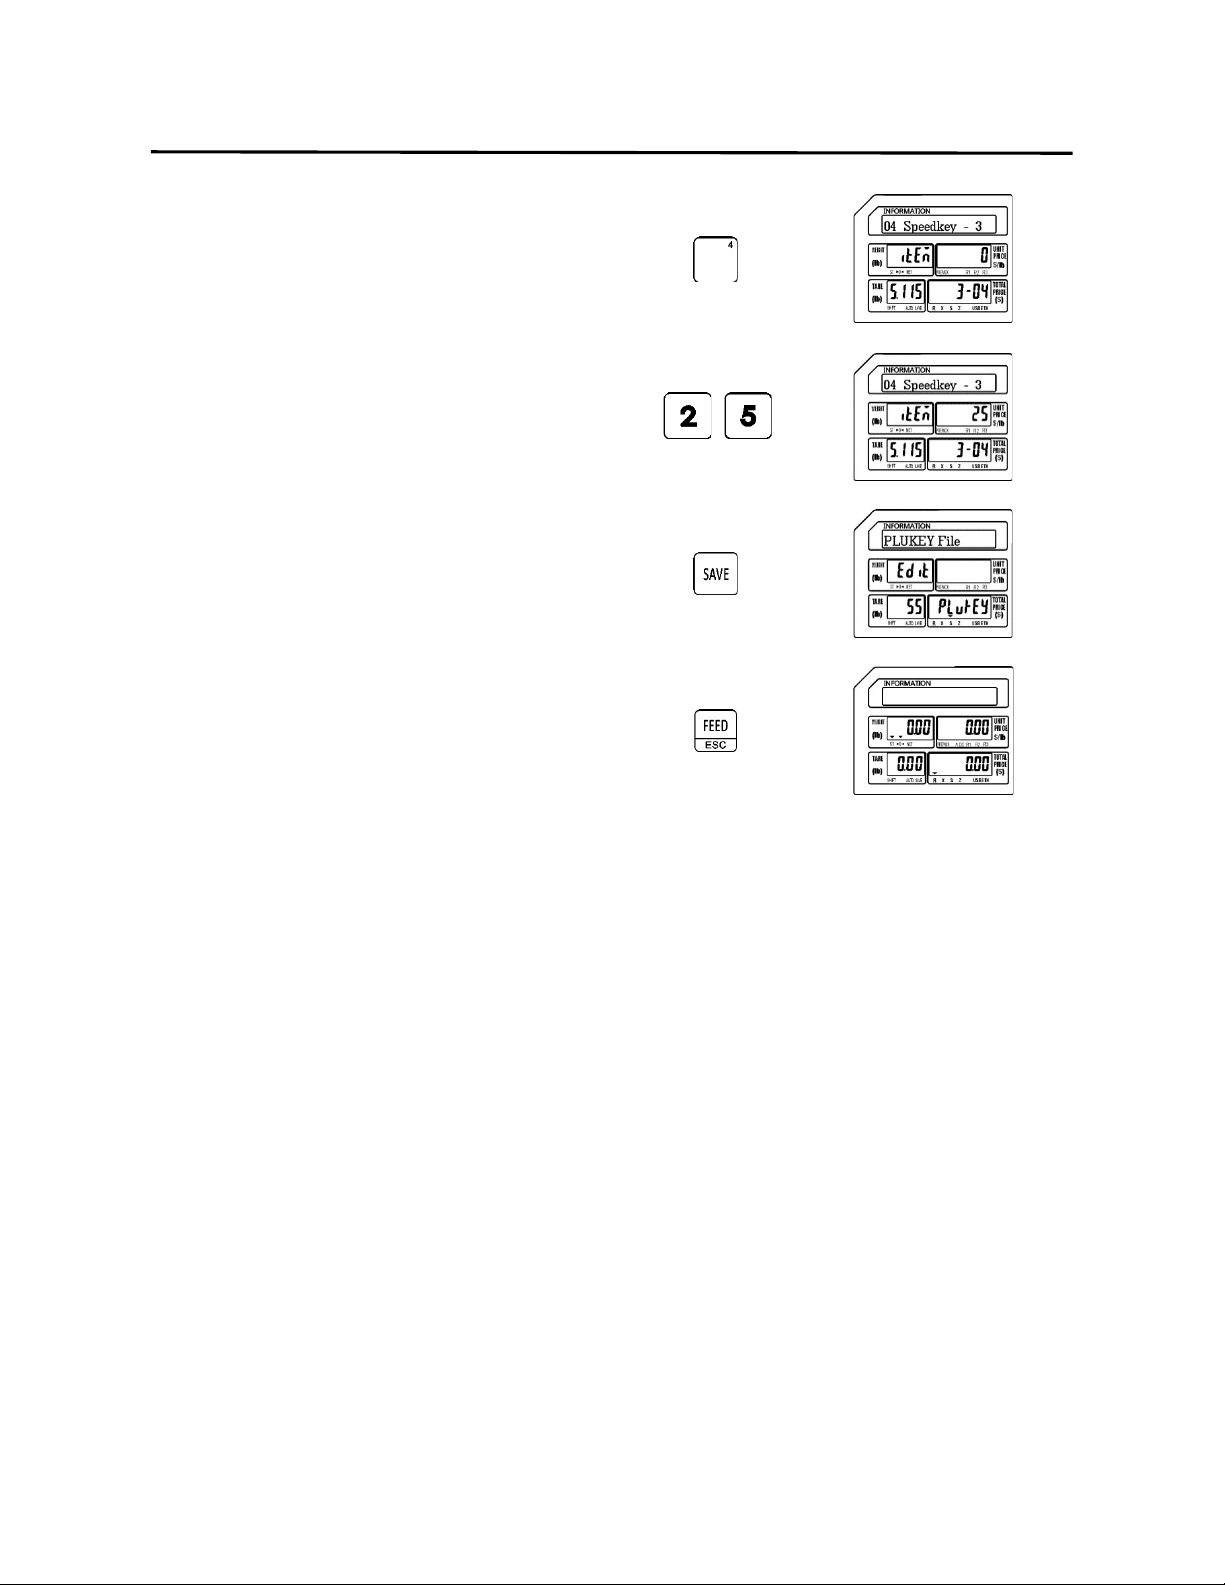
9. Programming (S Mode) ELP-301016
9.6.2 Programming a Speed Key Using Multiple Levels (S5 Mode)
89
Press Speed Key number four again.
Note: Pressing Speed Key number four again
selects Level 3.
Ex.) Enter Level 3 PLU number by pressing
the number two key followed by the
number five key.
Press the SAVE key.
Press the FEED/ESC key
Note: The Multiple Level Speed Key programming procedure must be executed without
interruption for the procedure to work as explained. If it is not executed without
interruption you may have to press the Speed Key 4 twice to access the Level 2 and
three times to access the Level 3 keys.
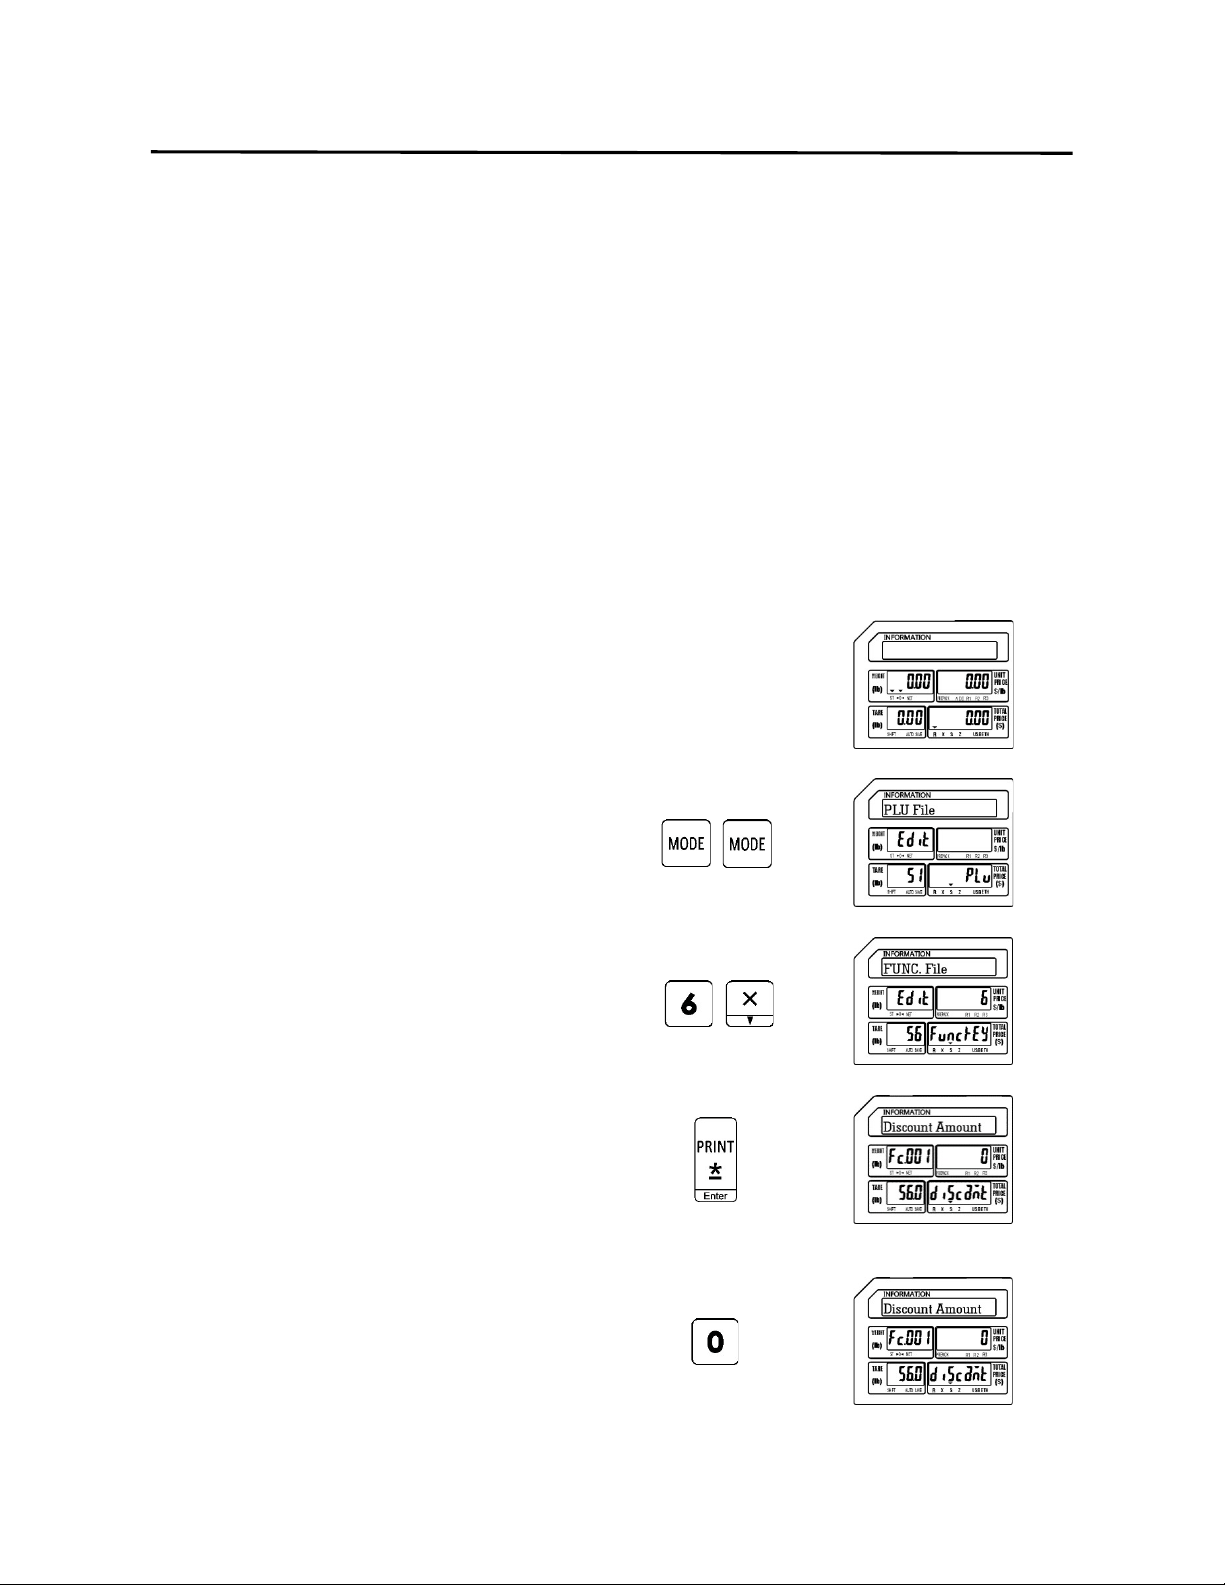
9. Programming (S Mode) ELP-301016
9.7 FUNC Key File (S6 Mode)
90
9.7 FUNC Key File (S6 Mode)
This mode is used to assign special functions to the Speed Keys. There are seven different
function keys that can be assigned to any of the Speed Keys. Once a function is assigned to a
Speed Key that key will no longer have multiple levels, it will only be that function.
Function Keys available are:
•Discount Amount •Discount Rate •Shop Number •Clerk Logon/Logoff
•Total Label •Subtotal Label •Label Format
9.7.1 Assigning Function Keys
Follow the procedures below to assign the special functions to the Speed Keys.
1.) Start at the normal weigh mode screen
2.) Press the Mode Key twice
3.) Press the number six key then press the
X key
Note: This has the same results as pressing the X key
five times.
4.) Press the Print/* key
5.) Assign the Discount Amount function to
a Speed Key
Ex.) Do Not Use the Discount Amount
function. Enter a 0 by pressing the
number zero key
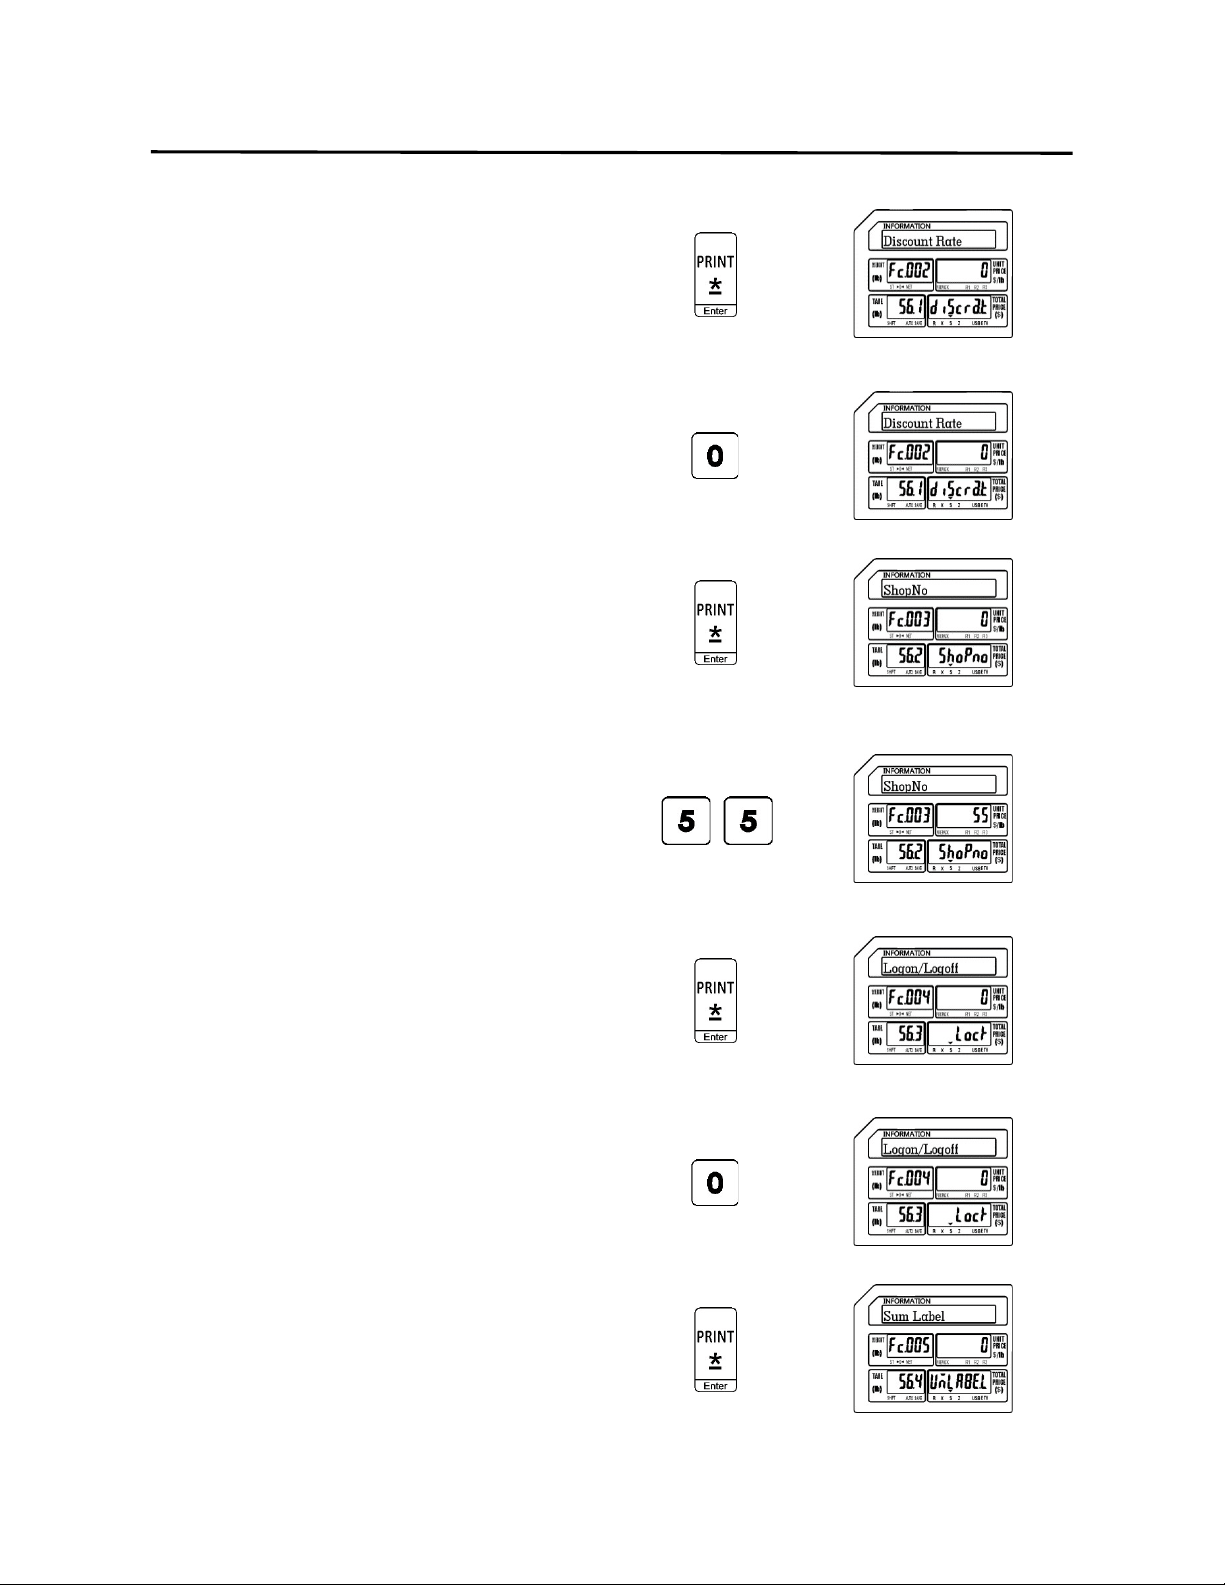
9. Programming (S Mode) ELP-301016
9.7 FUNC Key File (S6 Mode)
91
Press the Print/* key
6.) Assign the Discount Rate function to a
Speed Key
Ex.) Do Not Use the Discount Rate
function. Enter a 0 by pressing the
number zero key
Press the Print/* key
7.) Assign the Change Shop No. function to a
Speed Key
Ex.) Assign the Change Shop Number
function to Speed Key number fifty
five. Enter a 55 by pressing the
number five key twice.
Press the Print/* key
8.) Assign the Clerk Logon/Logoff function
to a Speed Key
Ex.) Do Not Use the Clerk Logon/
Logoff function. Enter a 0 by
pressing the number zero key
Press the Print/* key
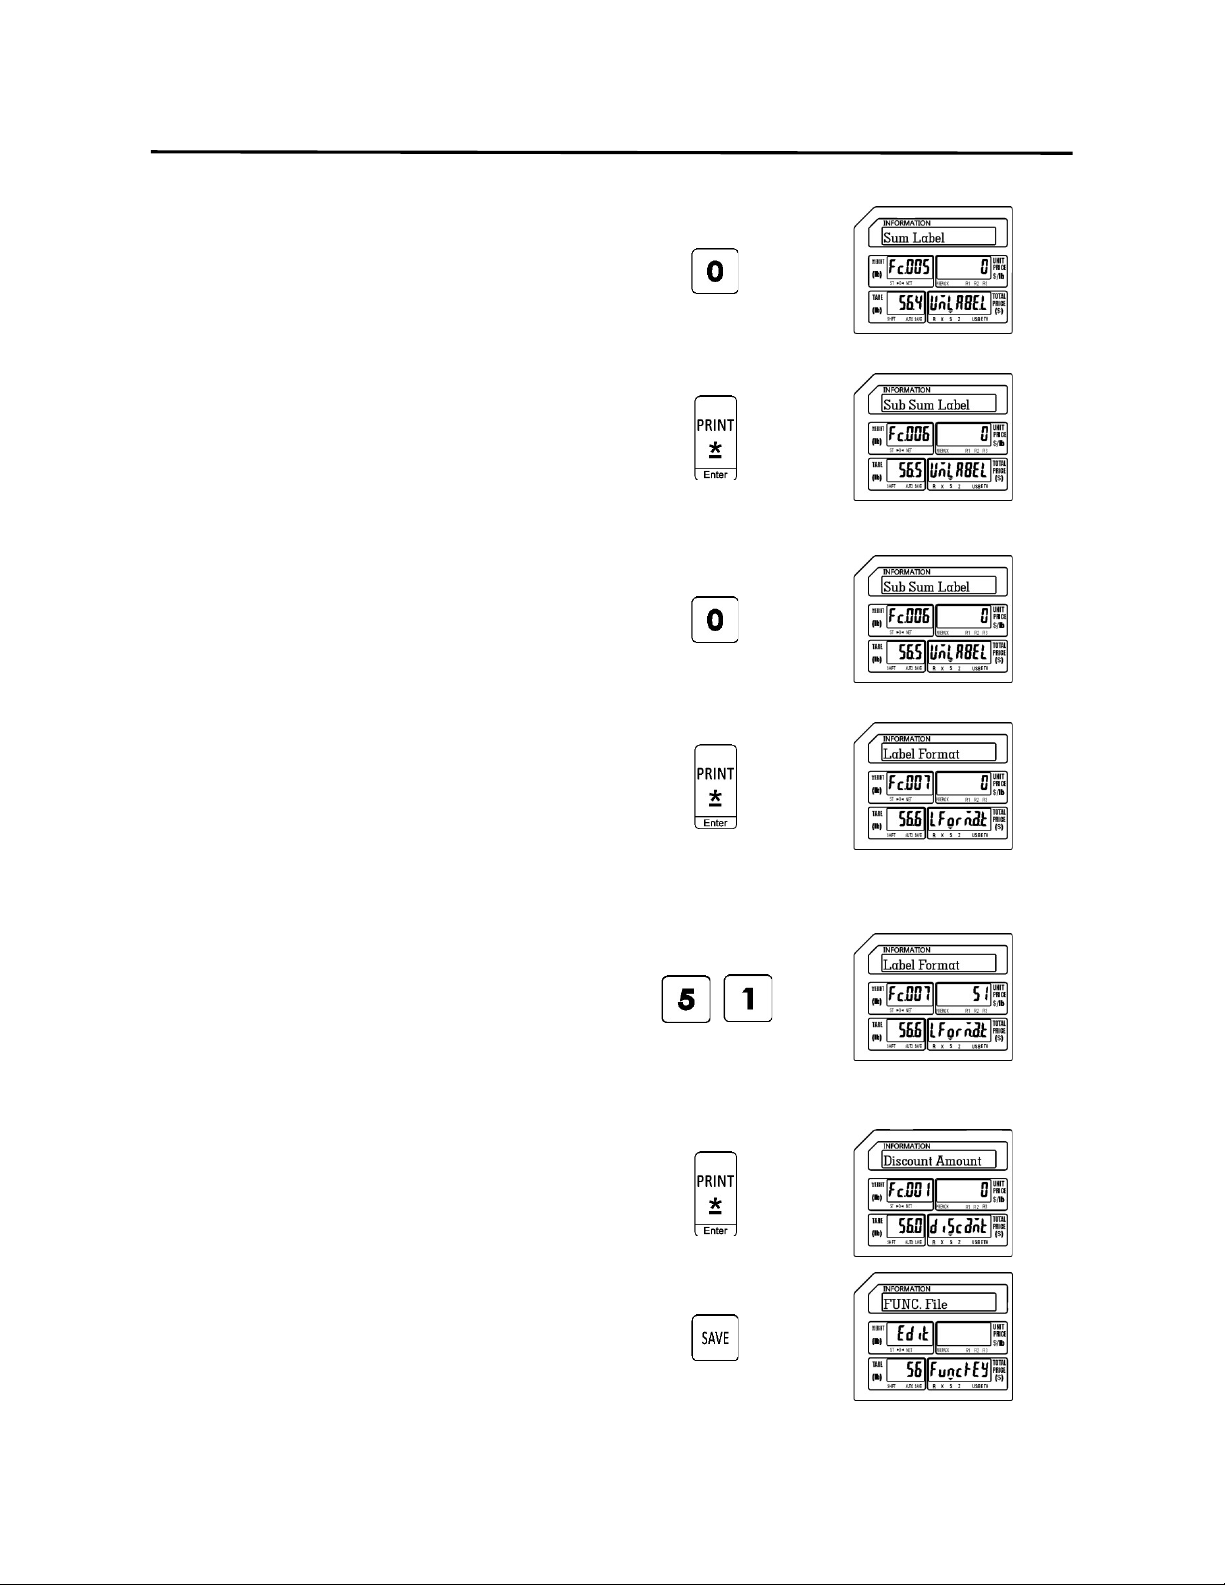
9. Programming (S Mode) ELP-301016
9.7 FUNC Key File (S6 Mode)
92
9.) Assign the Sum Label function to a Speed
Key
Ex.) Do Not Use the Sum Label function.
Enter a 0 by pressing the number zero
key
Press the Print/* key
10.) Assign the Sub Sum Label function to a
Speed Key
Ex.) Do Not Use the Sub Sum Label
function. Enter a 0 by pressing the
number zero key
Press the Print/* key
11.) Assign the Change Label Format No.
function to a Speed Key
Ex.) Assign the Change Label Format
Number function to Speed Key
number fifty one. Enter a 51 by
pressing the number five key and
the number one key.
Press the Print/* key
12.) Press the SAVE key
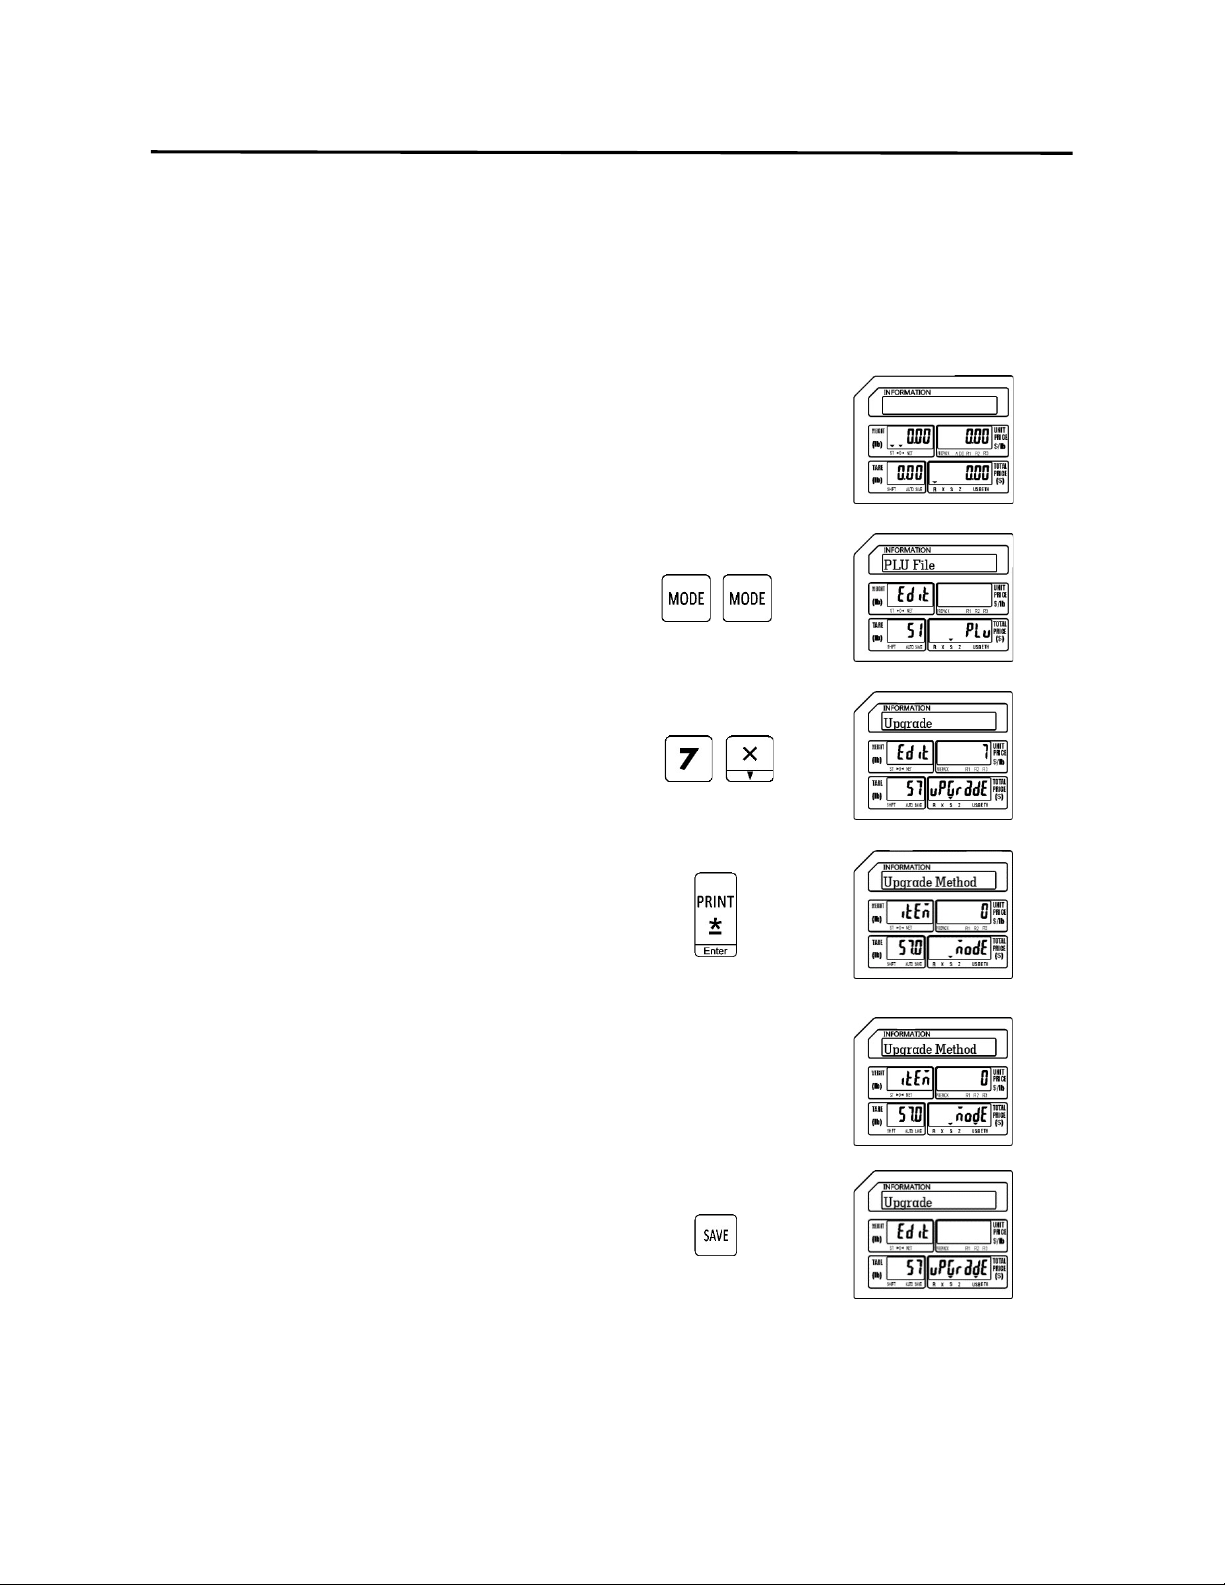
9. Programming (S Mode) ELP-301016
9.8 Upgrade (S7 Mode)
93
9.8 Upgrade (S7 Mode)
The Upgrade mode provides a method to update the scale’s firmware version. This function is
usually performed by a service technician. The new firmware file may be installed using a USB
memory stick.
1.) Start at the normal weigh mode screen
2.) Press the Mode Key twice
3.) Press the number seven key then press
the X key
Note: This has the same results as pressing the X key
six times.
4.) Press the Print/* key
5.) Insert the USB Memory Stick
Ex.) Insert the USB memory stick with
the upgrade file.
Note: USB tri mark should be lit.
Press the SAVE key.
Note S Mode tri mark will flash.
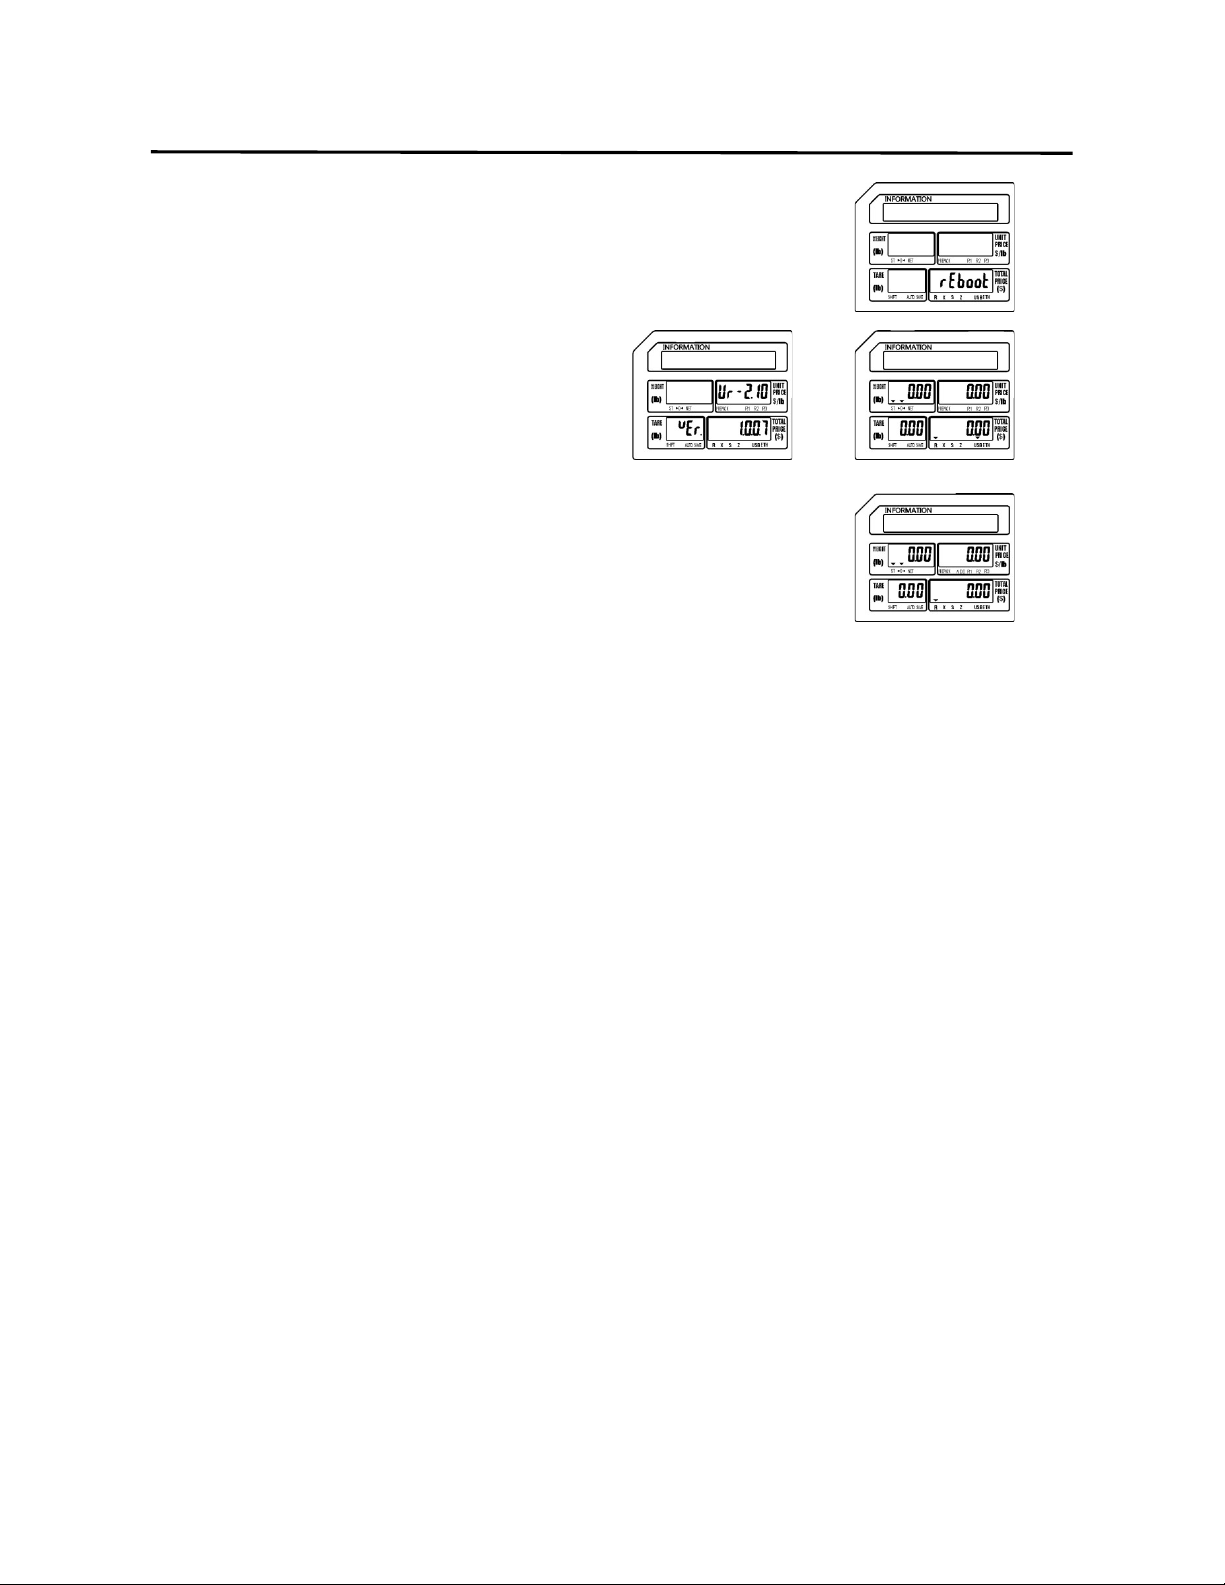
9. Programming (S Mode) ELP-301016
9.8 Upgrade (S7 Mode)
94
Screen changes to Reboot.
Scale reboots.
Note: During the reboot process the new firmware
version should be displayed. Picture may not
reflect your firmware version.
6.) Remove the USB Memory Stick.
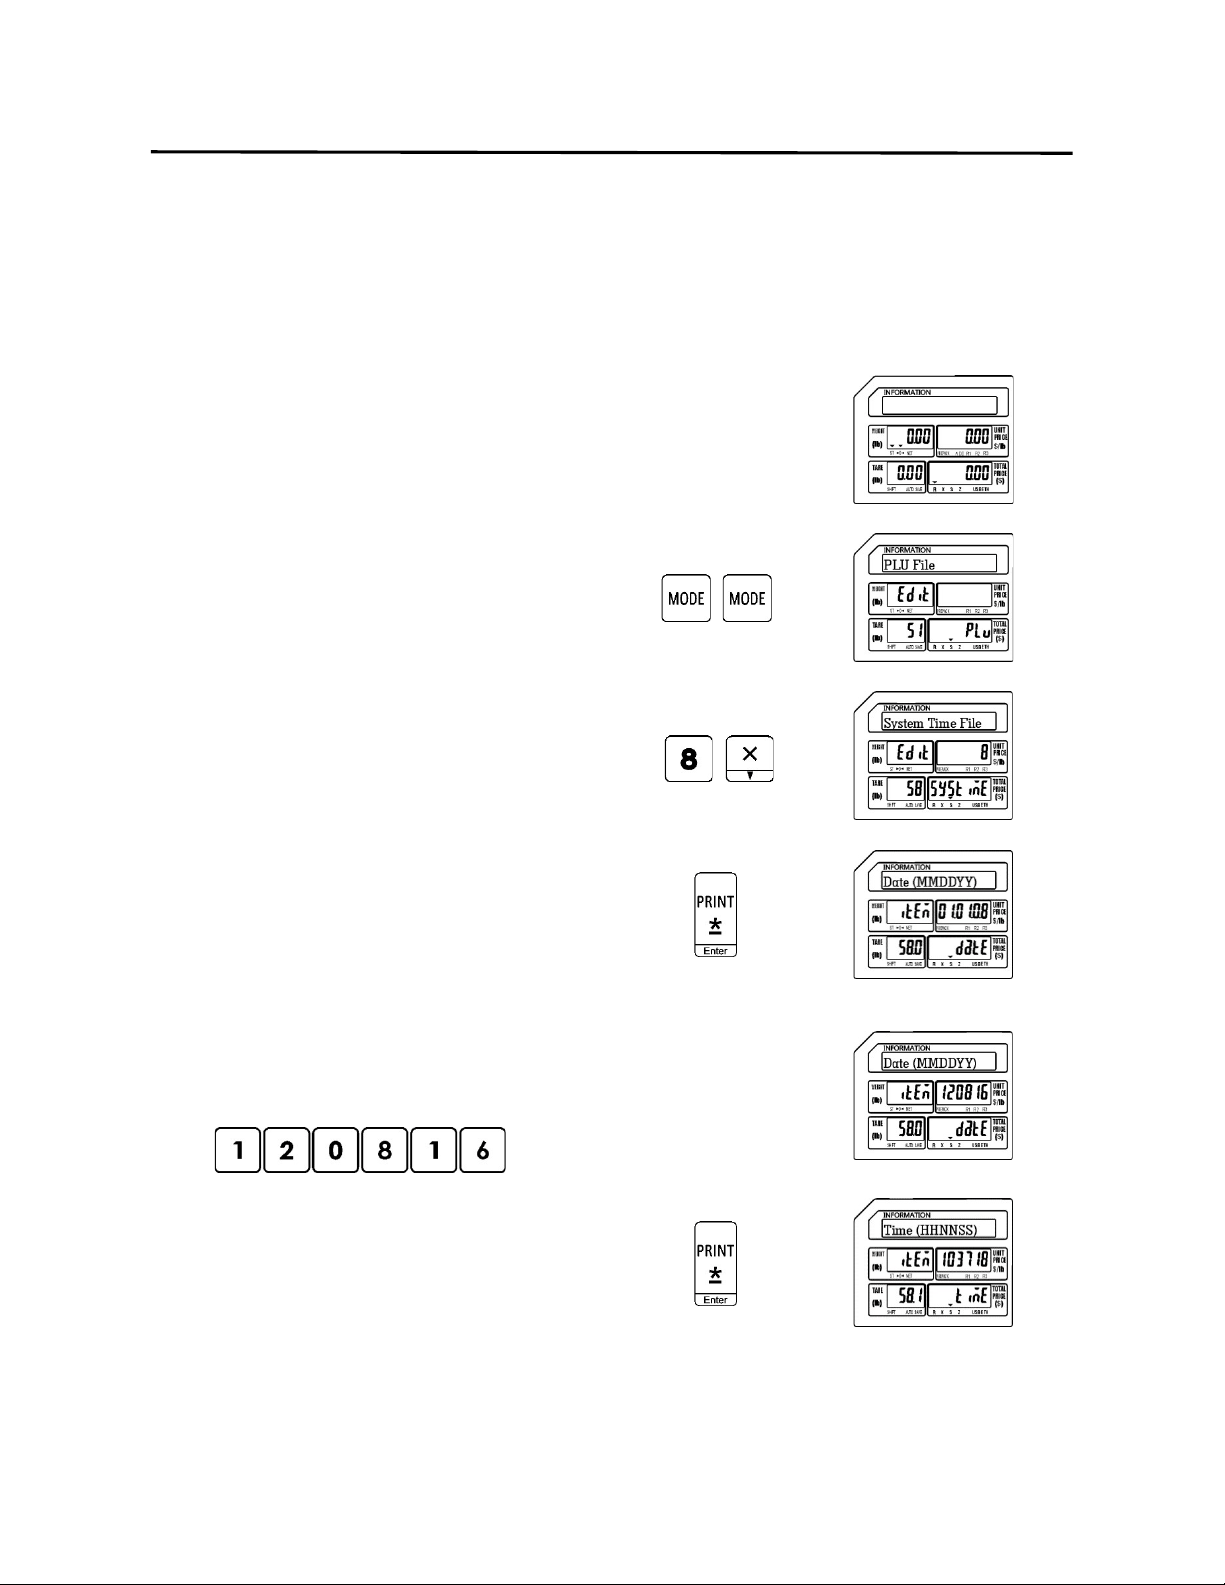
9. Programming (S Mode) ELP-301016
9.9 System Time File (S8 Mode)
95
9.9 System Time File (S8 Mode)
The System Time File is used to program the date and time in the scale. The input method must
follow the scale’s date and time format settings. This date and time setting is used as the
reference for all other date and time functions.
1.) Start at the normal weigh mode screen
2.) Press the Mode Key twice
3.) Press the number eight key then press
the X key
Note: This has the same results as pressing the X key
seven times.
4.) Press the Print/* key
5.) Enter New Date
Ex.) Enter new date of December 8 2016 (120816) using the
number keys.
Press the Print/* key
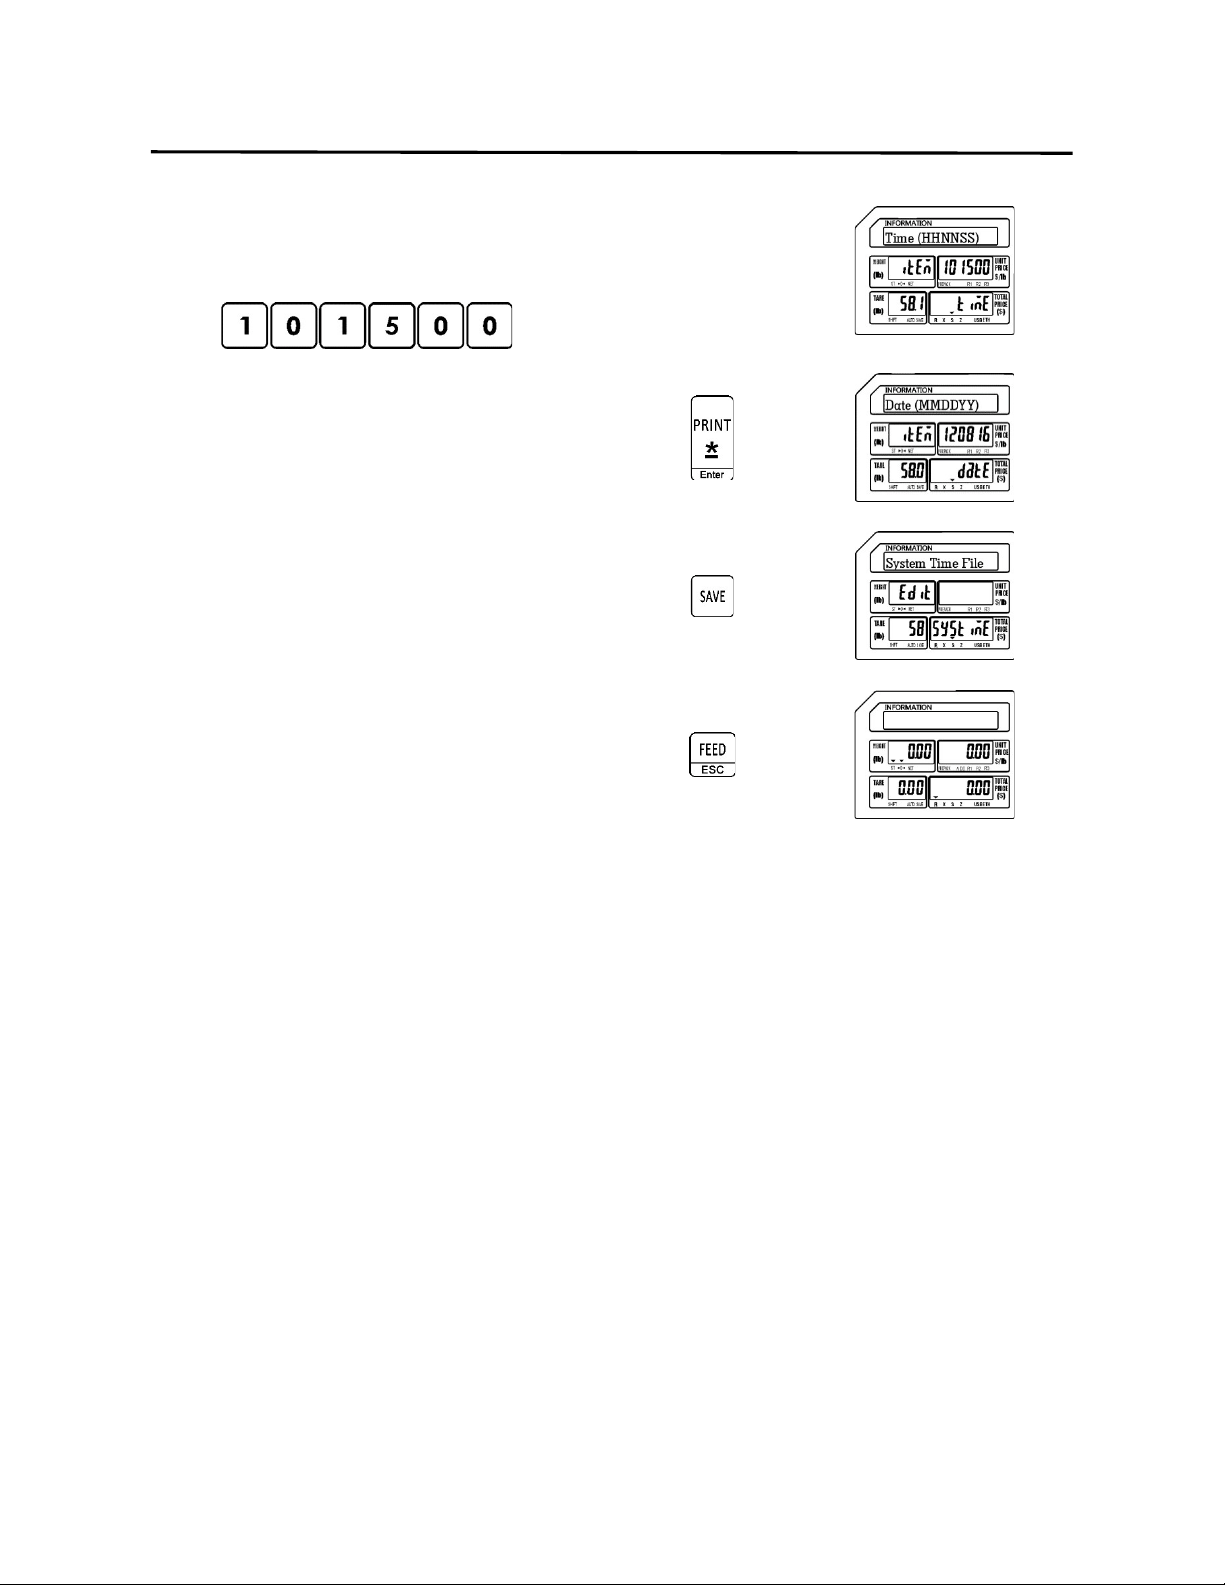
9. Programming (S Mode) ELP-301016
9.9 System Time File (S8 Mode)
96
6.) Enter New Time
Ex.) Enter new time of 10:15 AM
(101500) using the number keys.
Press the Print/* key
Press the SAVE key.
Press the FEED/ESC key.
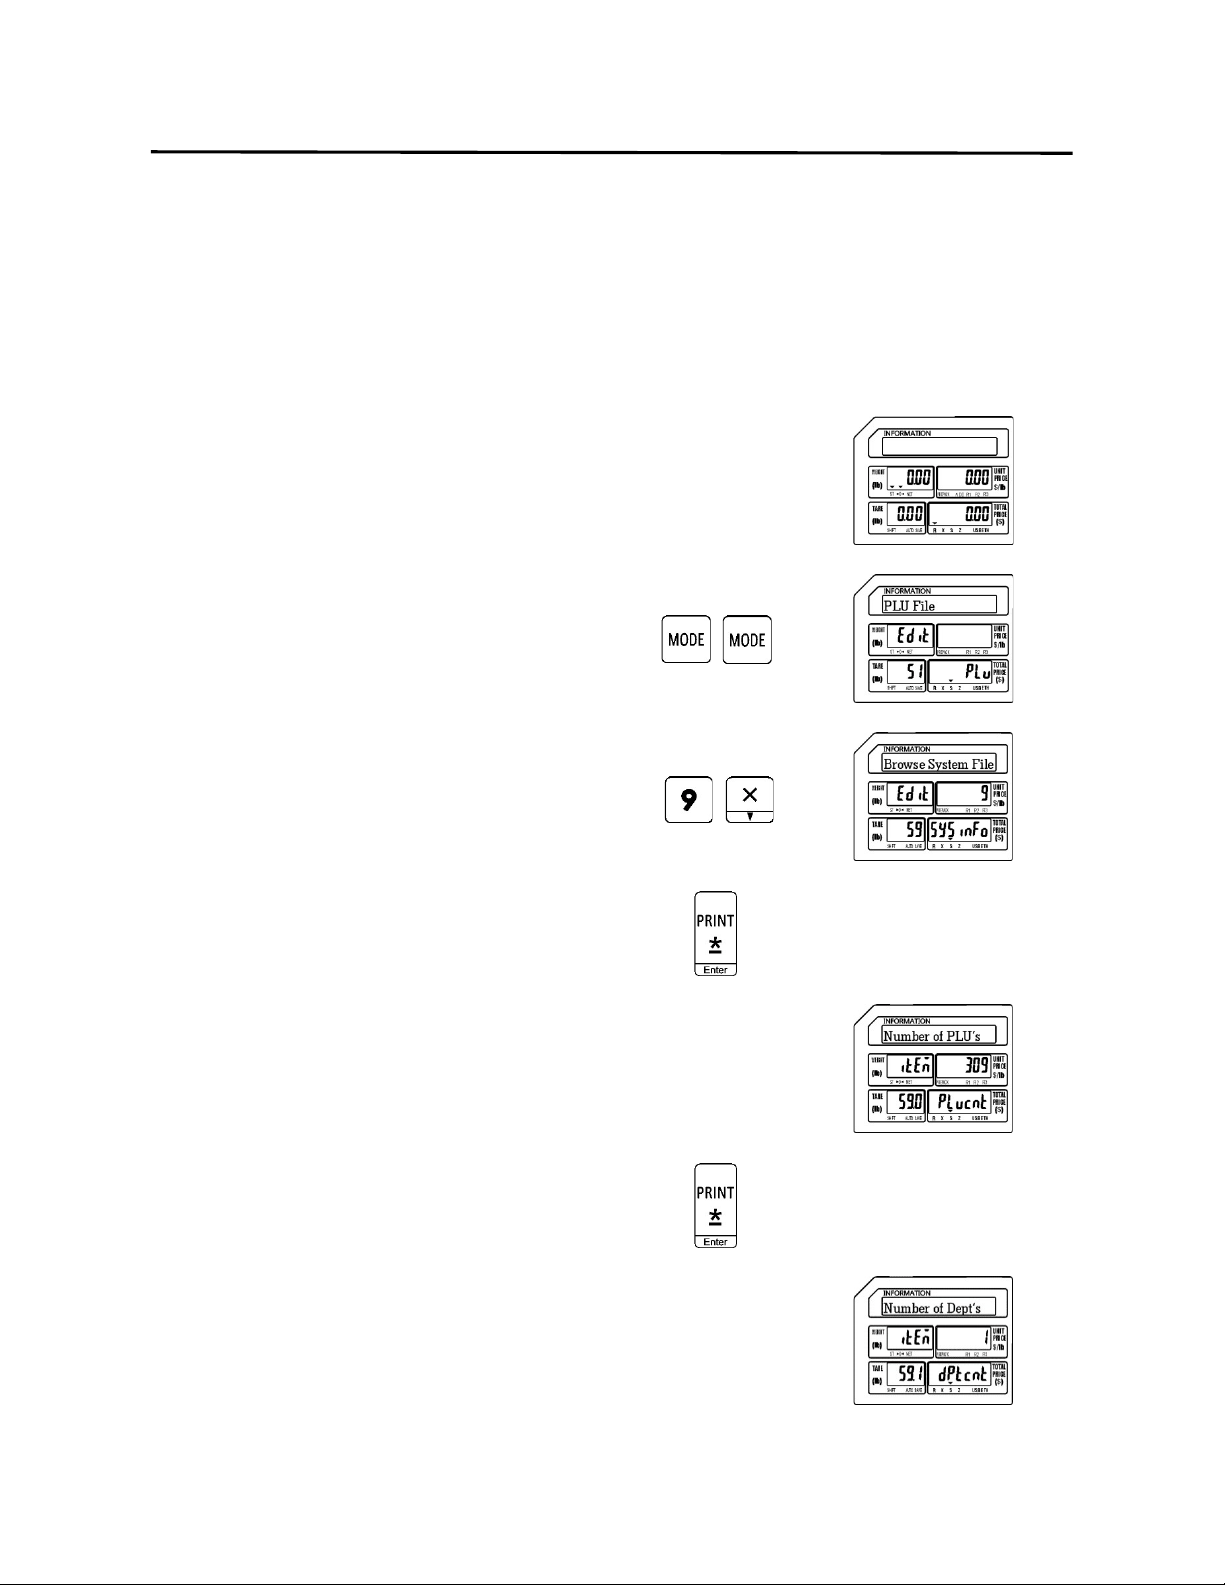
9. Programming (S Mode) ELP-301016
9.10 Browse System File (S9 Mode)
97
9.10 Browse System File (S9 Mode)
This mode is used to browse through the System information. It allows you to view items such
as the number of PLU’s, Departments and Main Groups that are programmed in the scale. You
can also view the number of logos or label formats that are in the scale.
1.) Start at the normal weigh mode screen
2.) Press the Mode Key twice
3.) Press the number 9 key then press the X
key
Note: This has the same results as pressing the X key
eight times.
4.) Press the Print/* key
5.) Display the number of PLU’s
Press the Print/* key
6.) Display the number of Departments
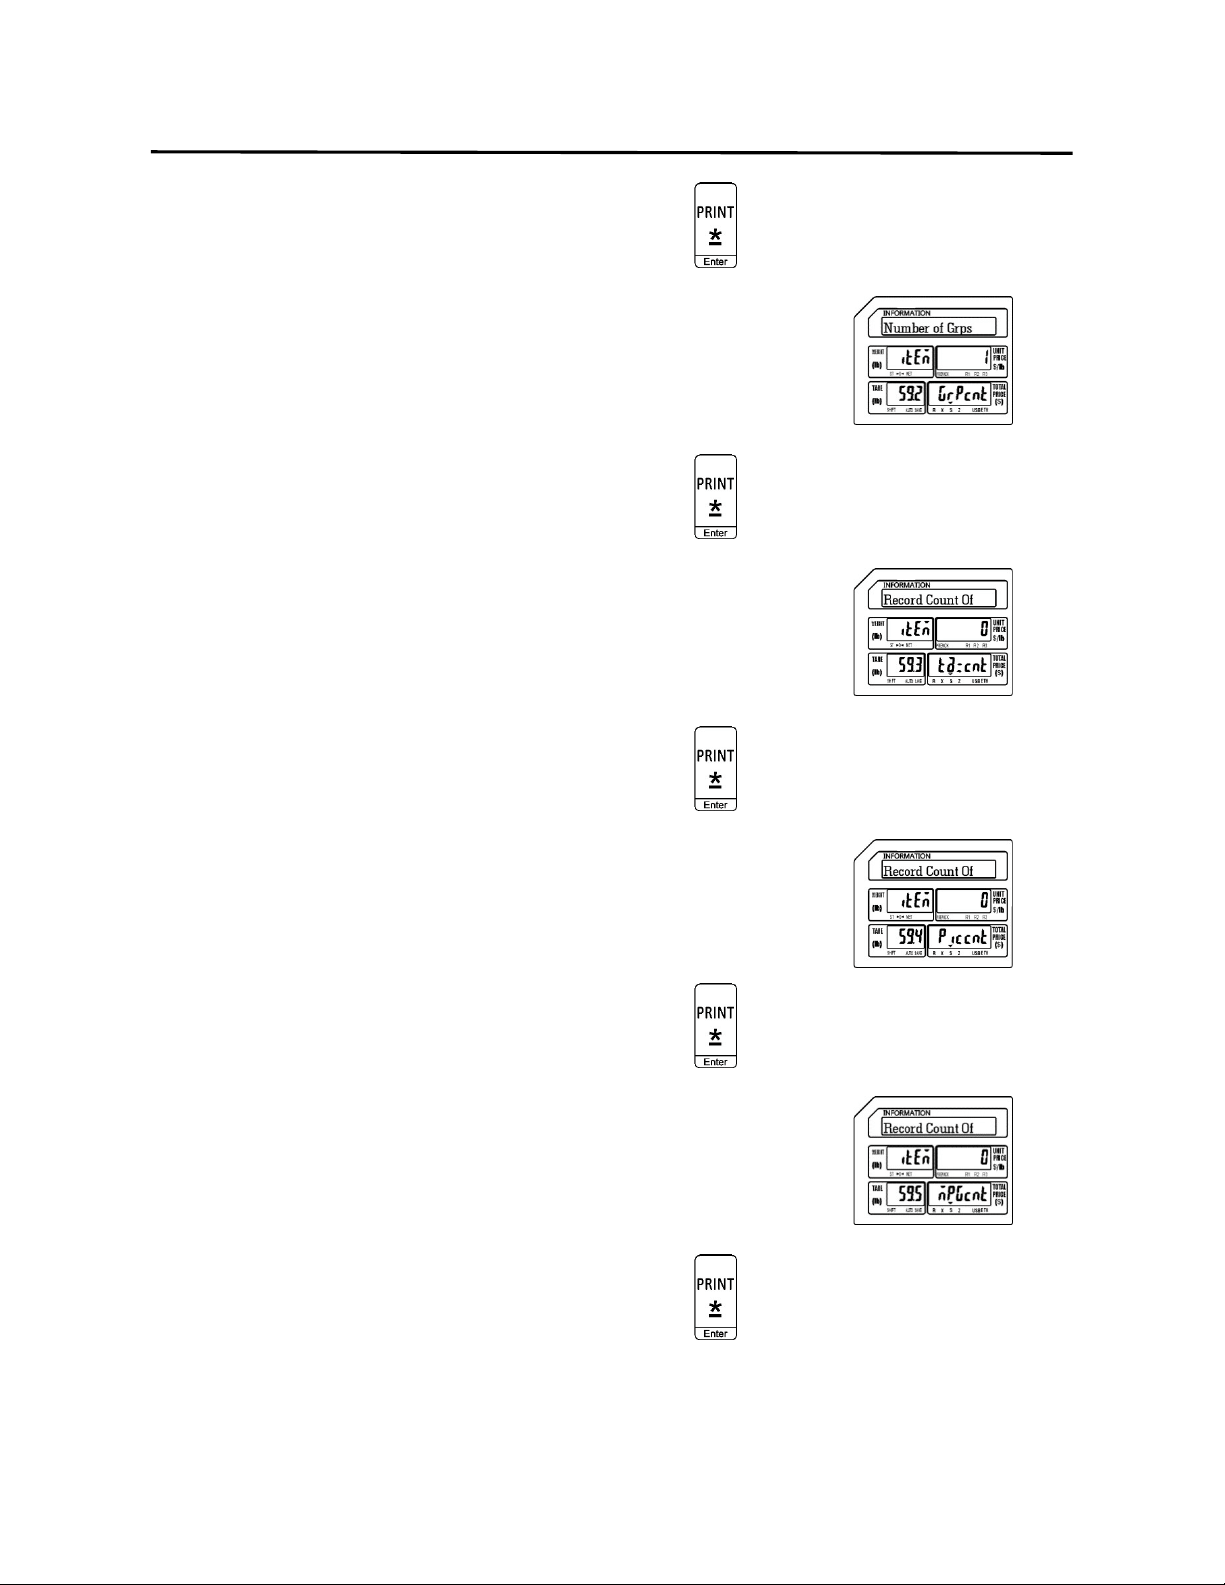
9. Programming (S Mode) ELP-301016
9.10 Browse System File (S9 Mode)
98
Press the Print/* key
7.) Display the number of Main Groups
Press the Print/* key
8.) Display the number of Tax Numbers
Press the Print/* key
9.) Display the number of Pictures
Press the Print/* key
10.) Display the number of MPEG’s
Press the Print/* key
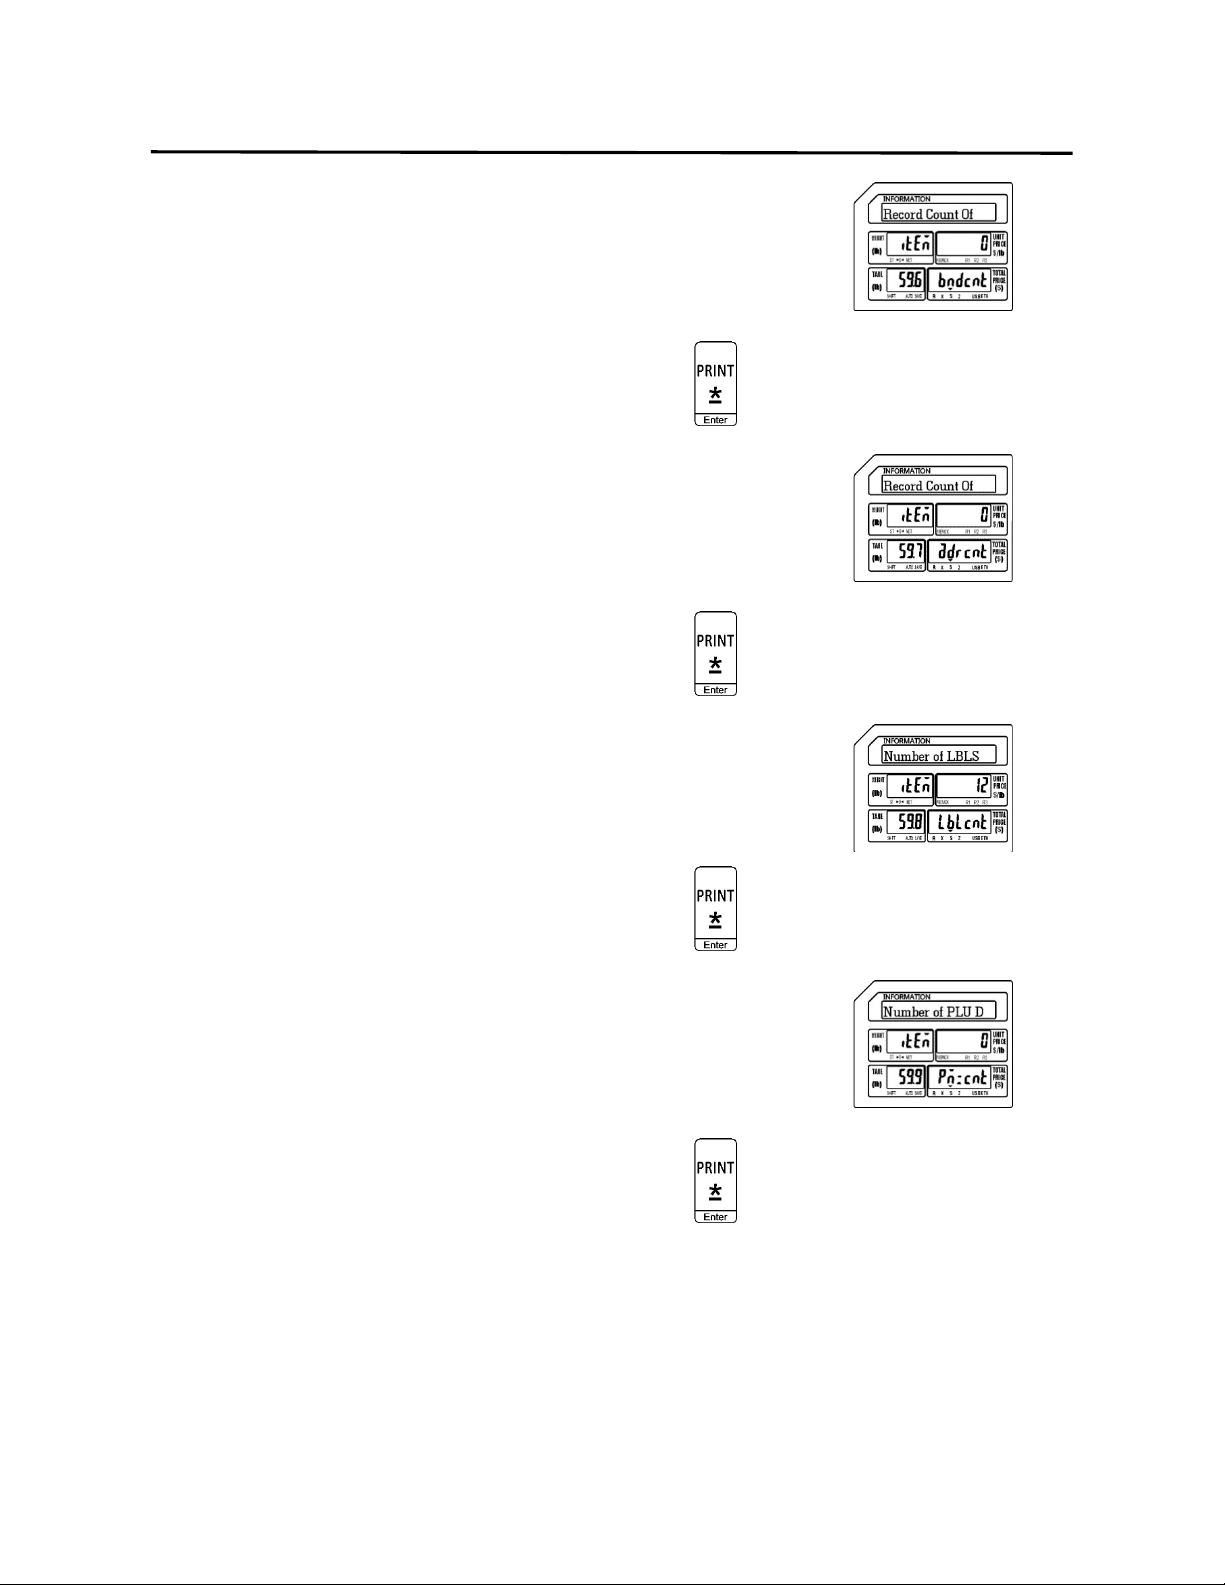
9. Programming (S Mode) ELP-301016
9.10 Browse System File (S9 Mode)
99
11.) Display the number of Bands
Press the Print/* key
12.) Display the number of Addresses
Press the Print/* key
13.) Display the number of Labels
Press the Print/* key
14.) Display the number of PLU D
Press the Print/* key
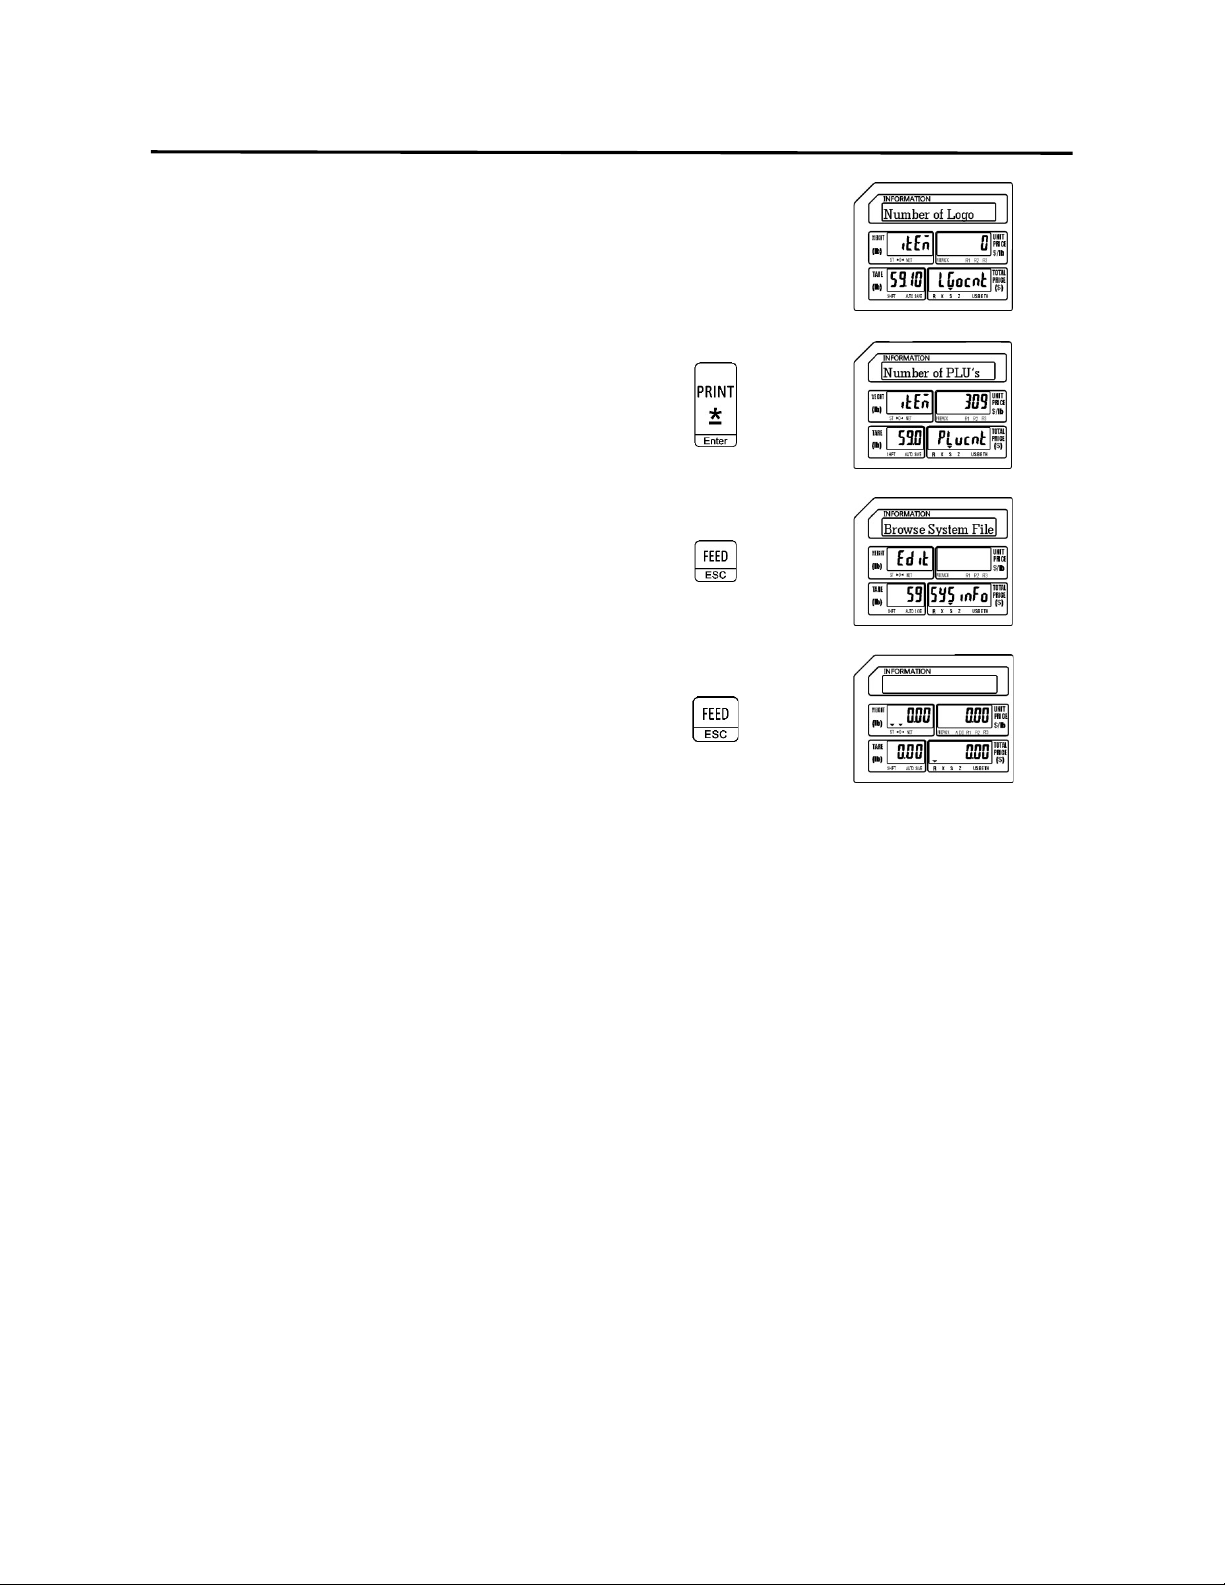
9. Programming (S Mode) ELP-301016
9.10 Browse System File (S9 Mode)
100
15.) Display the number of Logos
Press the Print/* key
Press the FEED/ESC key
Press the FEED/ESC key.
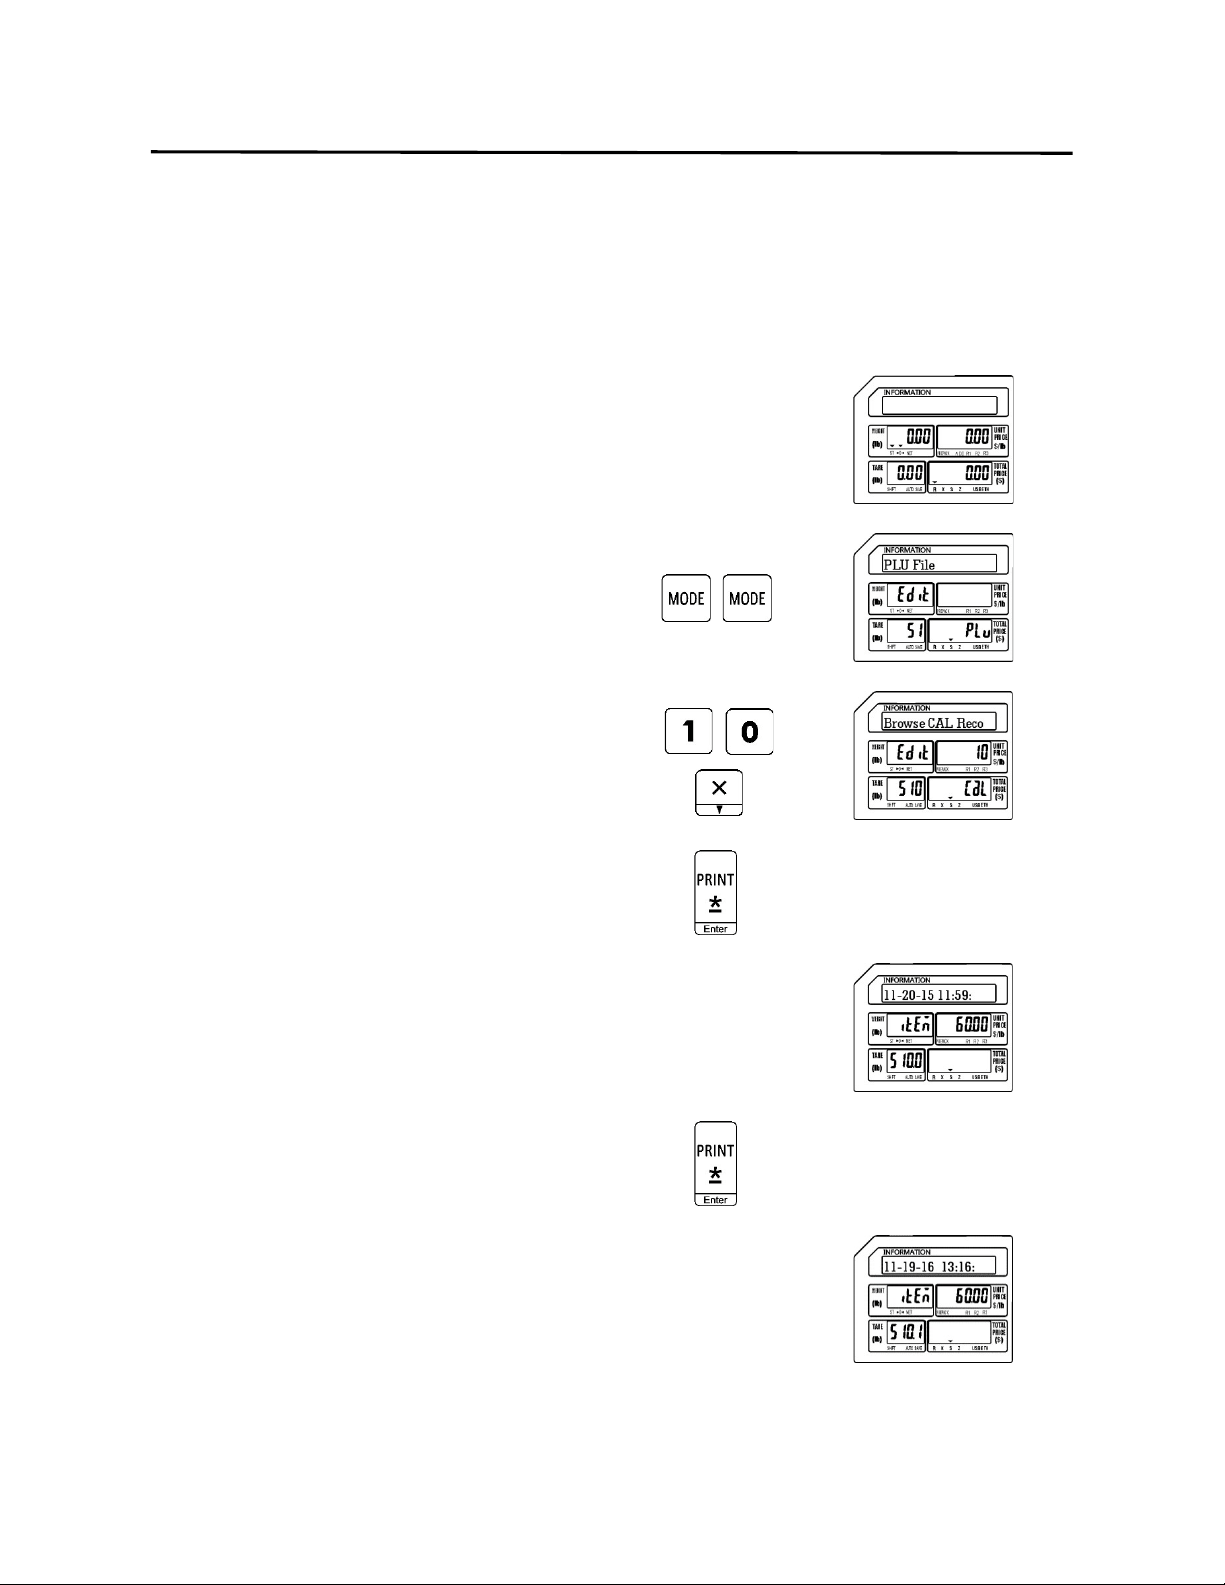
9. Programming (S Mode) ELP-301016
9.11 Browse CAL Record (S10 Mode)
101
9.11 Browse CAL Record (S10 Mode)
Using this mode allows you to view the Calibration record of the scale. Each record shows the
Date and Time of the Calibration as well as the amount of weight used to Calibrate the scale
during that session.
1.) Start at the normal weigh mode screen
2.) Press the Mode Key twice
3.) Press the number 1 and then number 0
key then press the X key
Note: This has the same results as pressing the X key
nine times.
4.) Press the Print/* key
5.) Display first Calibration record
Note: Record states the scale was calibrated
on November 20, 2015 at 11:59AM
using 60.00 pounds.
Press the Print/* key
6.) Display next Calibration record
Note: Record states the scale was calibrated
on November 19, 2016 at 13:16PM
using 60.00 pounds.
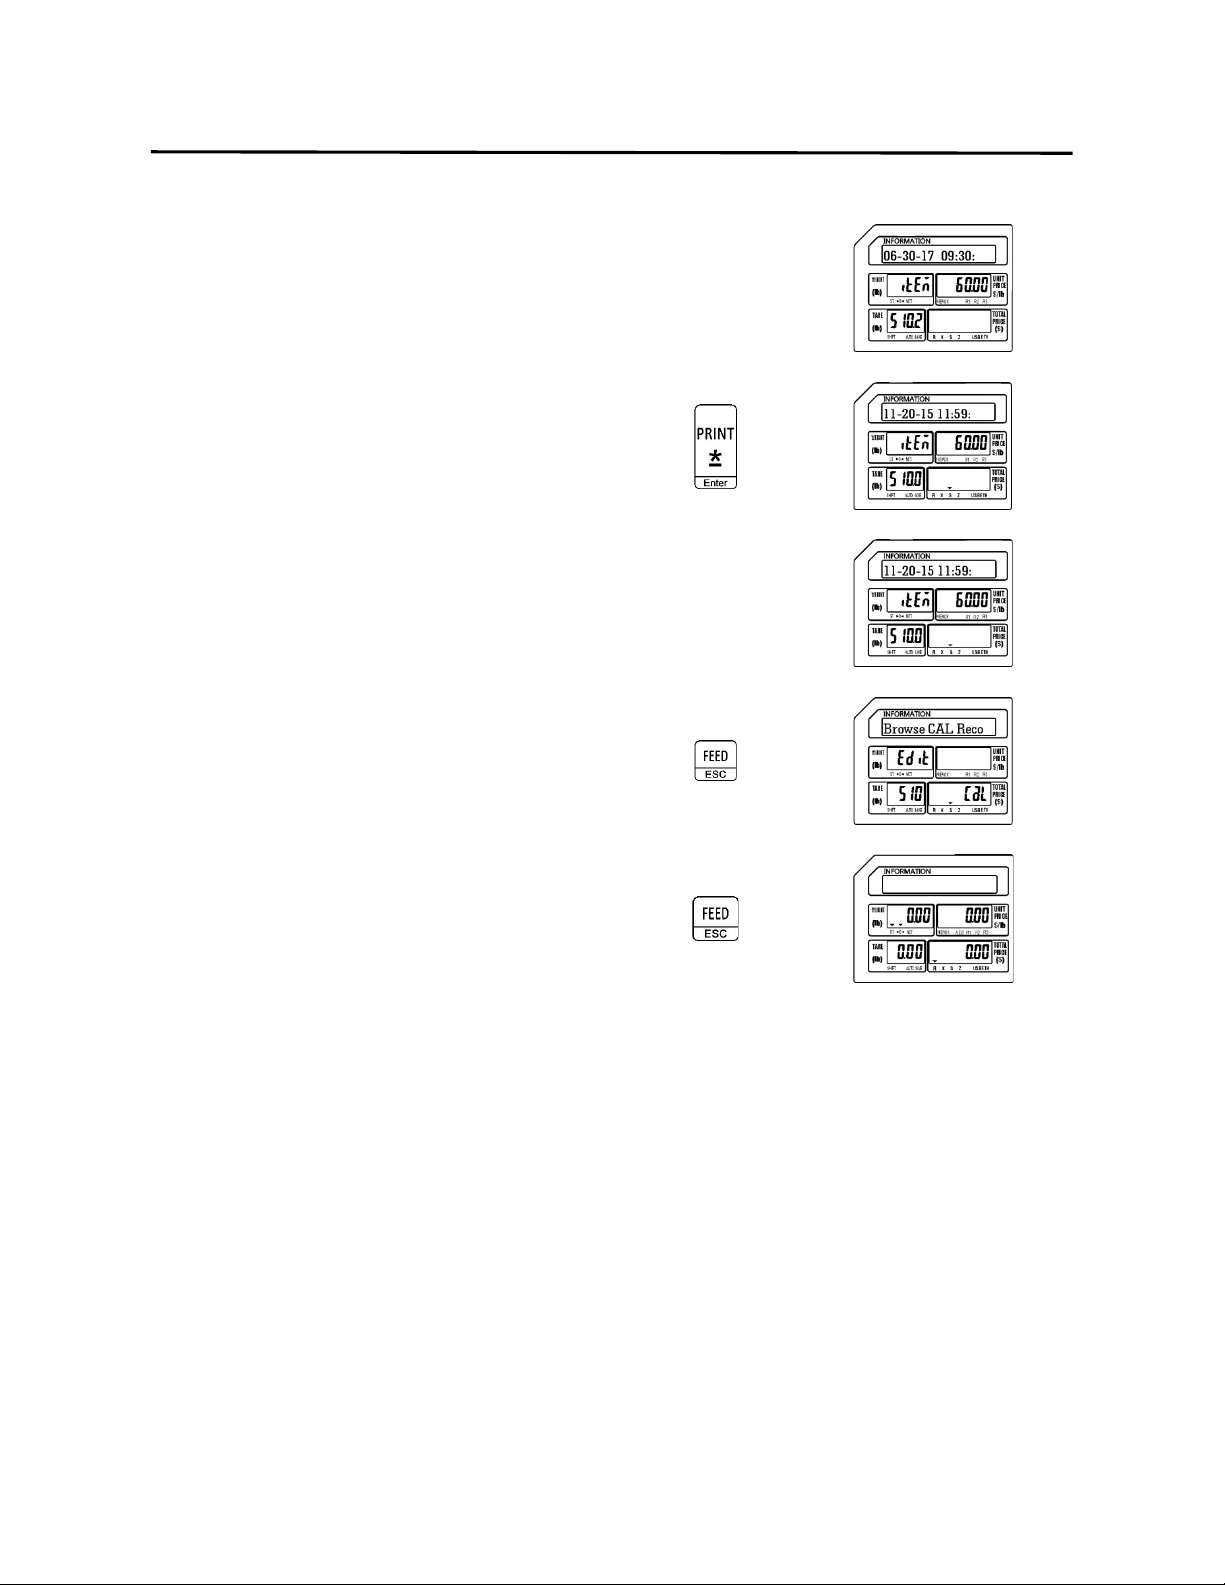
9. Programming (S Mode) ELP-301016
9.11 Browse CAL Record (S10 Mode)
102
7.) Display next Calibration record
Note: Record states the scale was calibrated
on June 30, 2017 at 09:30AM using
60.00 pounds.
Press the Print/* key
8.) Display next Calibration record
Note: This record is the first record viewed.
This scale had been calibrated 3 times.
Press the FEED/ESC key
Press the FEED/ESC key.
Note: This example scale had only been calibrated three times, your scale may have several
more records. The procedure to view all of them is the same as viewing these three.
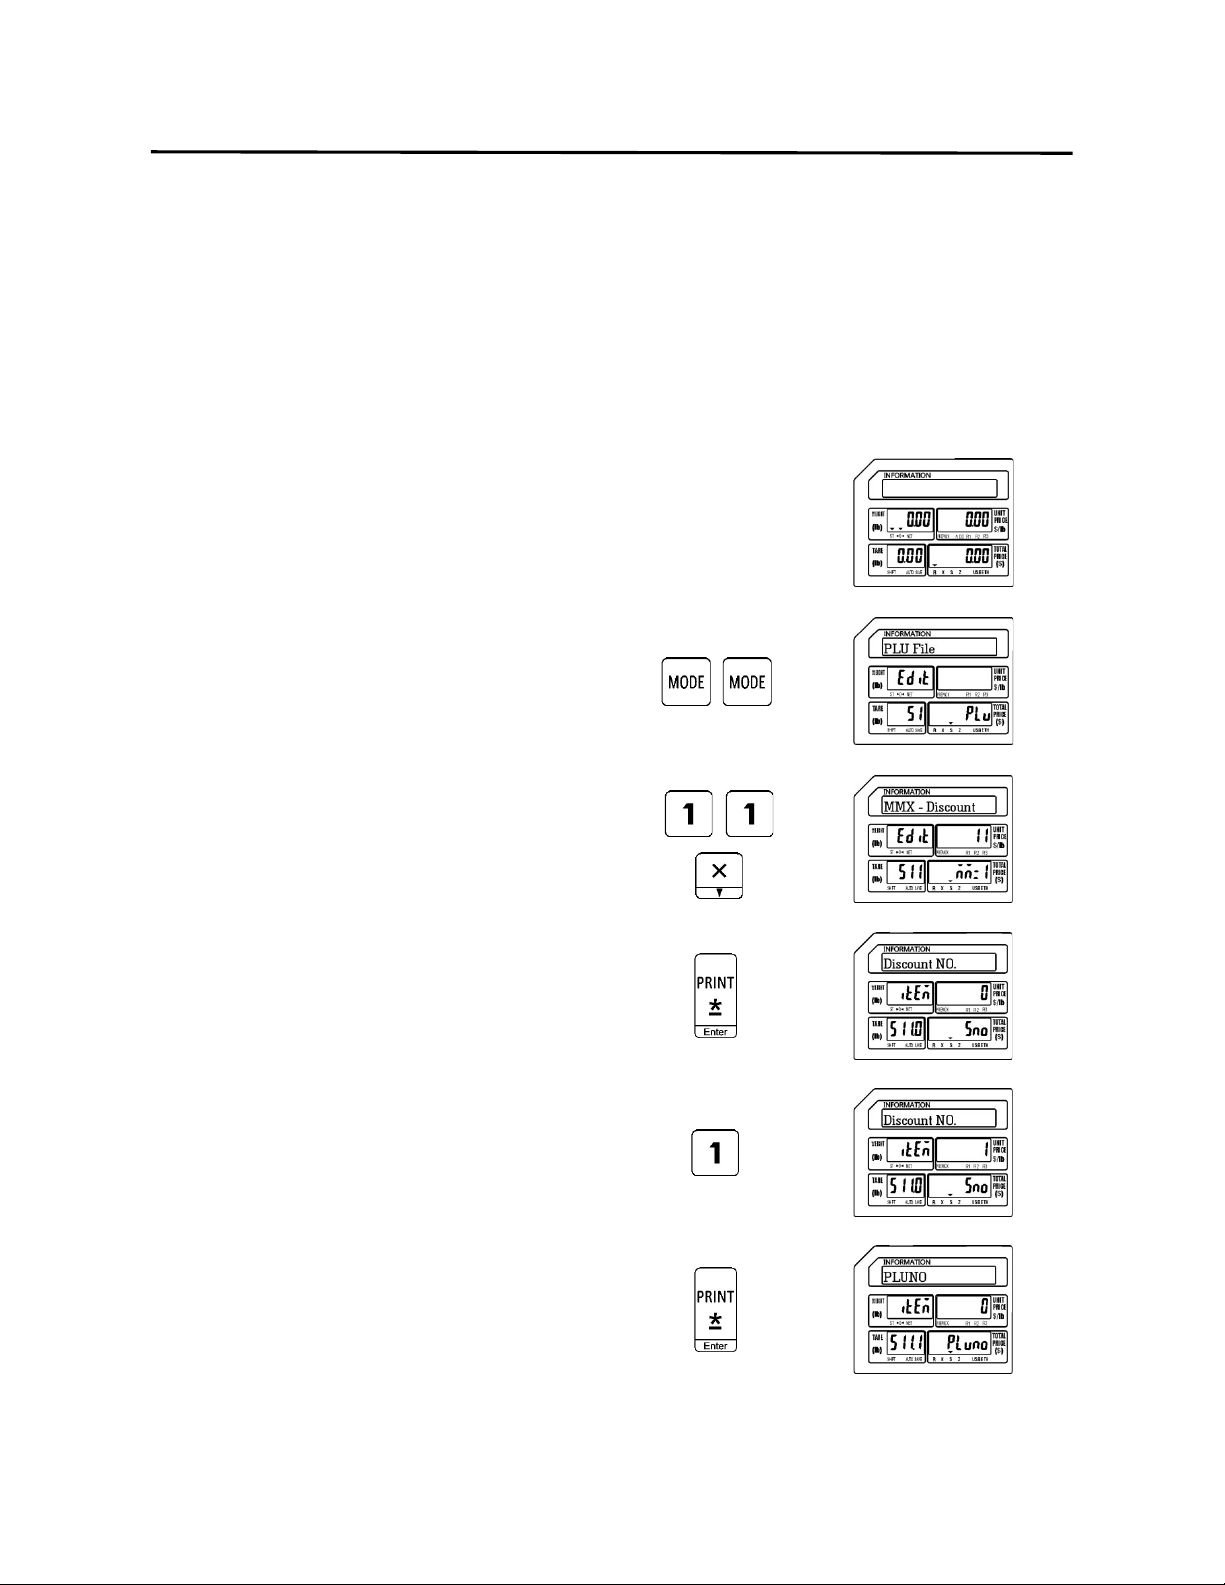
9. Programming (S Mode) ELP-301016
9.12 MMX – Discount Rate (S11 Mode)
103
9.12 MMX – Discount Rate (S11 Mode)
The MMX mode provides the ability to apply discounts to programmed PLU’s. The S11 Mode
allows you to discount PLU’s based on a Percentage Rate. The discounts may be programmed to
be active based on a date and time schedule.
9.12.1 Entering a PLU using Discount Rate
1.) Start at the normal weigh mode screen
2.) Press the Mode Key twice
3.) Press the number 1 key twice then press
the X key
Note: This has the same results as pressing the X key
ten times.
4.) Press the Print/* key
5.) Enter the Discount Number
Ex.) Enter Discount Number 1 by pressing
the number one key.
Press the Print/* key

9. Programming (S Mode) ELP-301016
9.12.1 Entering a PLU Using Discount Rate (S11 Mode)
104
6.) Enter the Discounted PLU Number
Ex.) Select PLU Number 12 for Discounting by
pressing the number one key and then the
number two key.
Press the Print/* key
7.) Enter the Discount Rate
Ex.)Use 5% as a Discount Rate by pressing the
number five key then the number zero key
twice.
Press the Print/* key
Note: The current date will be displayed. If you wish to
use the current date you can just press the
Print/* key again.
8.) Enter the Discount Start Date
Ex.) Enter a Start Date of December 9, 2016
(120916) using the number keys.
Press the Print/* key
Note: The current date will be displayed. If you wish to
use the current date you can just press the
Print/* key again.
9.) Enter the Discount End Date
Ex.) Enter an end Date of December15, 2016
(121516) using the number keys.
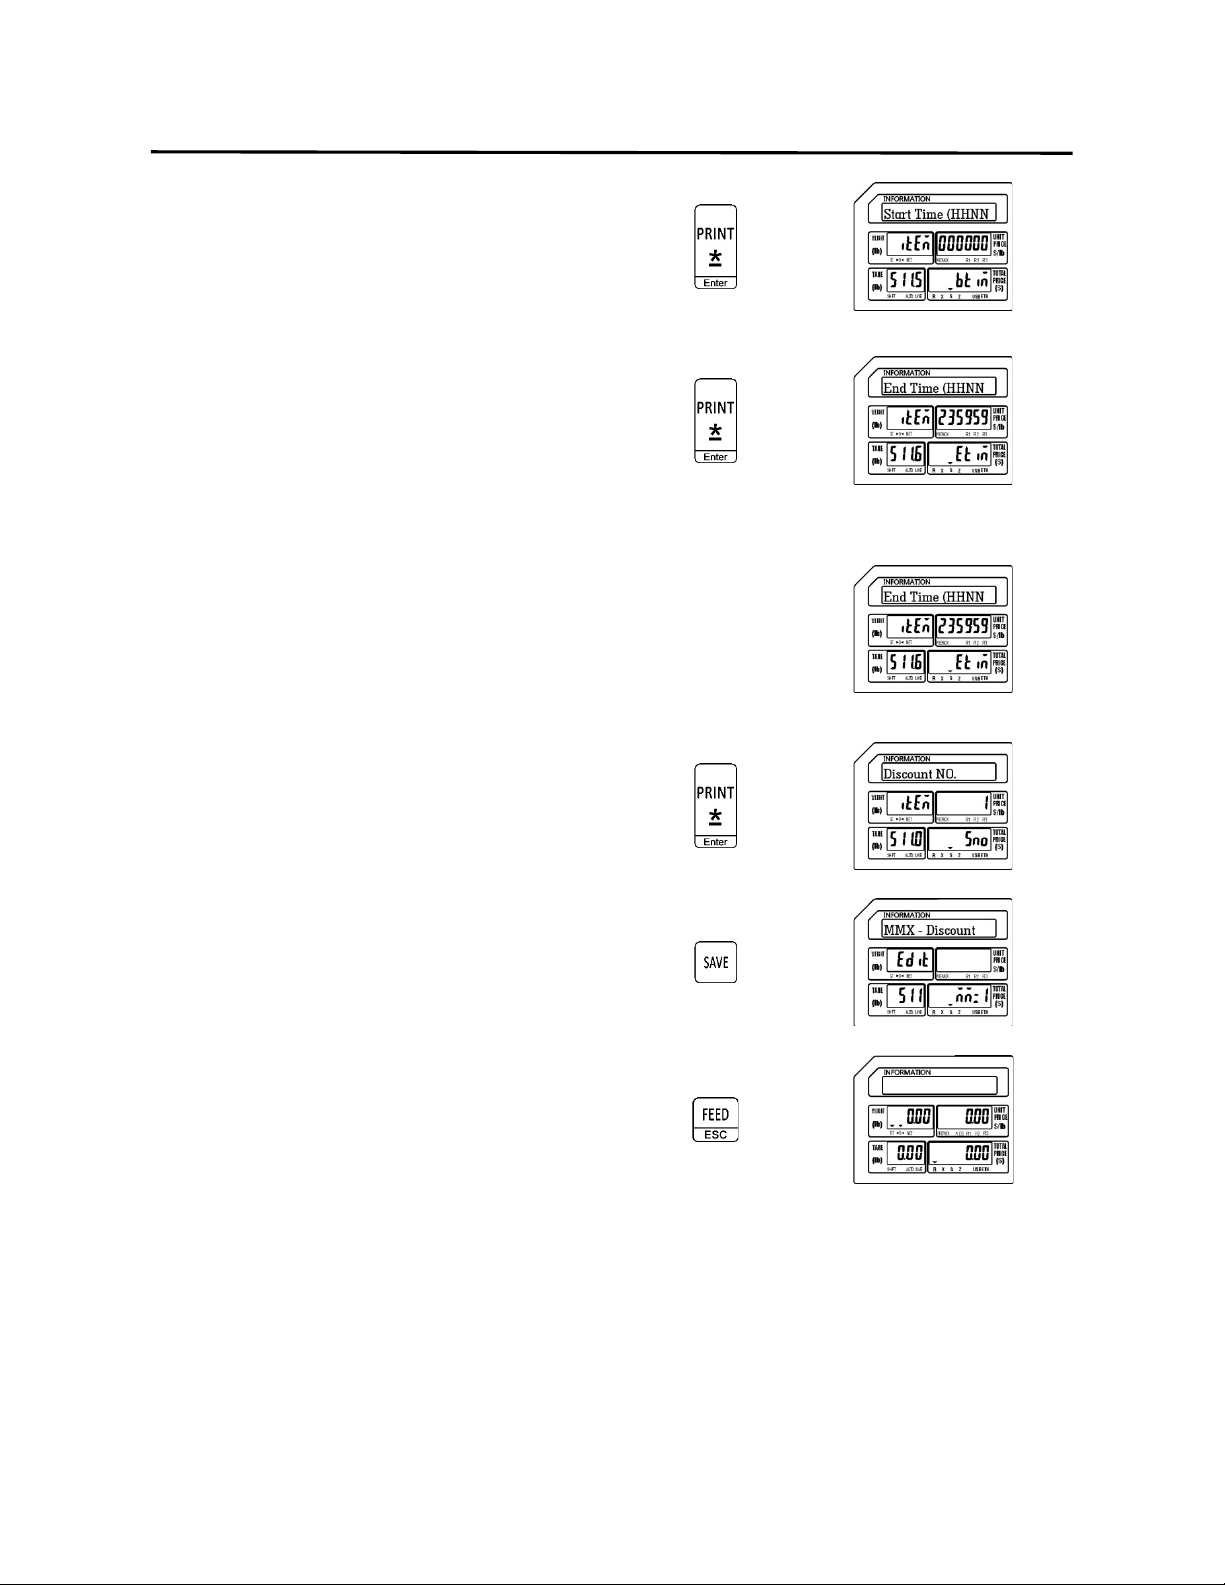
9. Programming (S Mode) ELP-301016
9.12.1 Entering a PLU Using Discount Rate (S11 Mode)
105
Press the Print/* key
10.) Enter the Discount Start Time on each
day in the date range
Ex.) Use the default Start Time of
midnight. (00:00:00)
Note: To use the default Start Time simply press
the Print/* key again.
11.) Enter the Discount End Time on each
day in the date range
Ex.) Use the default End Time of
11:59:59PM
Note: To use the default End Time simply press the
Print/* key again.
Press the SAVE key
Press the FEED/ESC key.
Note: After a discount has expired it must be manually deleted. Please refer to the Delete
Discount procedure for the proper method to delete a discount.
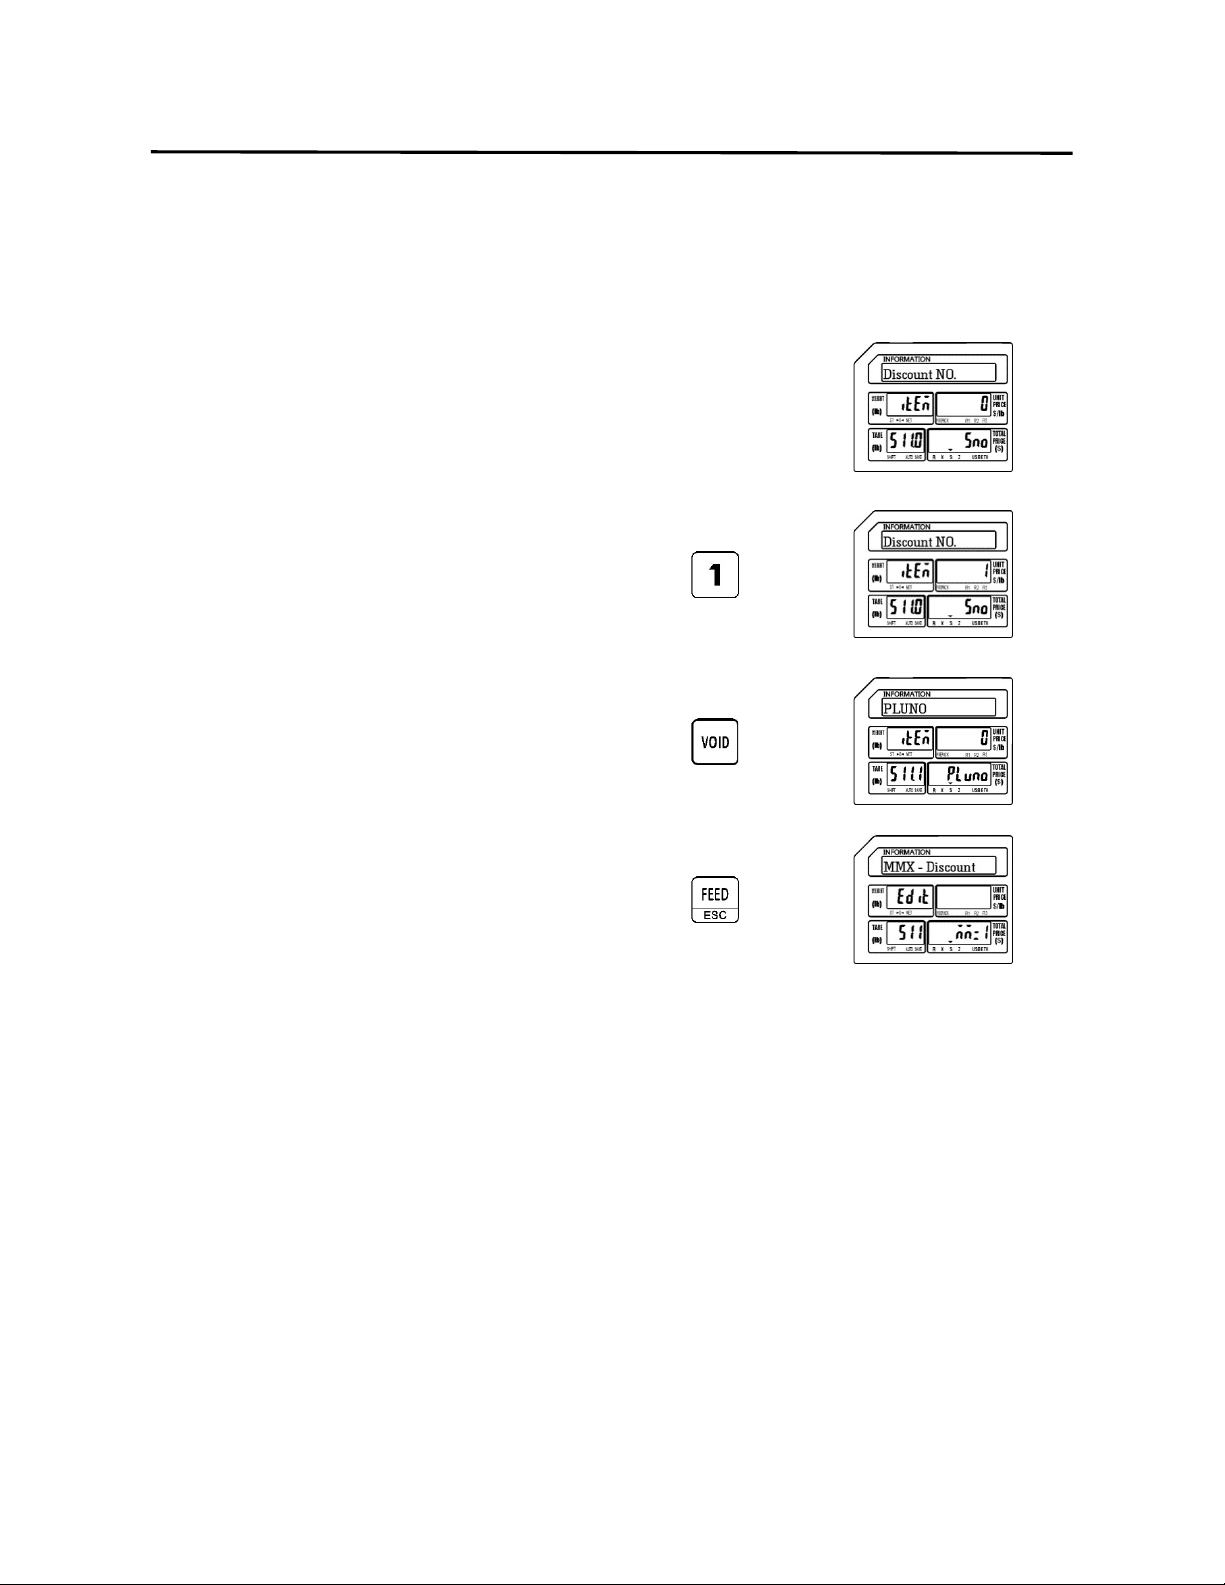
9. Programming (S Mode) ELP-301016
9.12.2 Deleting a Discount (S11 Mode)
106
9.12.2 Deleting a Discount
Follow the steps below to delete a Discount.
1.) From the Discount Number Screen
2.) Enter the Discount Number to delete
Ex.) Select Discount Number 1 to be
deleted by pressing the number
one key
Press the VOID key
Press the FEED/ESC key
Note: Each Discount programmed can be deleted individually using the method above.

9. Programming (S Mode) ELP-301016
9.13 MMX – New Price (S12 Mode)
107
9.13 MMX –New Price (S12 Mode)
The MMX mode provides the ability to apply discounts to programmed PLU’s. The S12 Mode
allows you to discount PLU’s based on a new Unit Price. This type of discount may also be
programmed to be active based on a date and time schedule.
9.13.1 Entering a PLU Discount using New Price
1.) Start at the normal weigh mode screen
2.) Press the Mode Key twice
3.) Press the number 1 key then the number
2 key then press the X key
Note: This has the same results as pressing the X key
eleven times.
4.) Press the Print/* key
5.) Enter the Discount Number
Ex.) Enter Discount Number 5 by pressing
the number five key.
Press the Print/* key
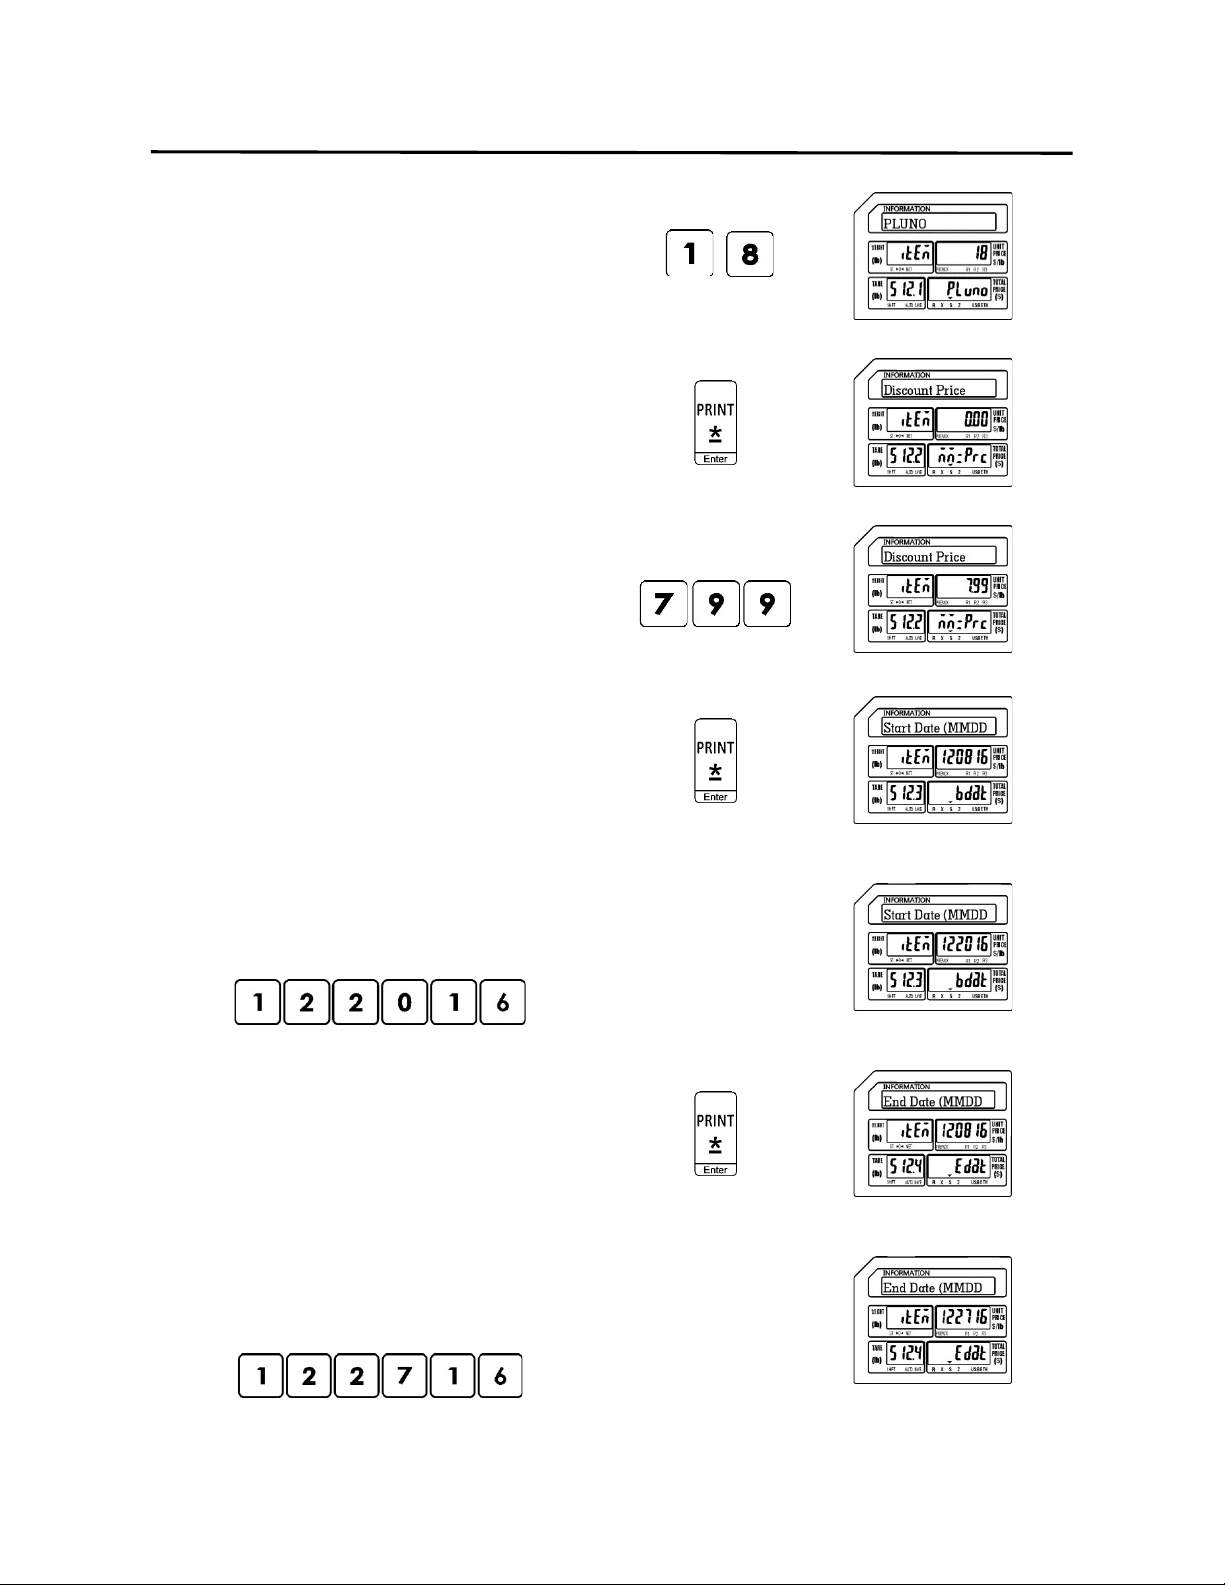
9. Programming (S Mode) ELP-301016
9.13.1 Entering a PLU Discount Using New Price (S12 Mode)
108
6.) Enter the Discounted PLU Number
Ex.) Select PLU Number 18 for Discounting by
pressing the number one key then the
number eight key.
Press the Print/* key
7.) Enter the New Price Discount
Ex.)Use $7.99 as the New Price Discount by
pressing the number seven key then the
number nine key twice.
Press the Print/* key
Note: The current date will be displayed. If you wish to
use the current date you can just press the
Print/* key again.
8.) Enter the Discount Start Date
Ex.) Enter a Start Date of December 20, 2016
(122016) using the number keys.
Press the Print/* key
Note: The current date will be displayed. If you wish to
use the current date you can just press the
Print/* key again.
9.) Enter the Discount End Date
Ex.) Enter an end Date of December27, 2016
(122716) using the number keys.
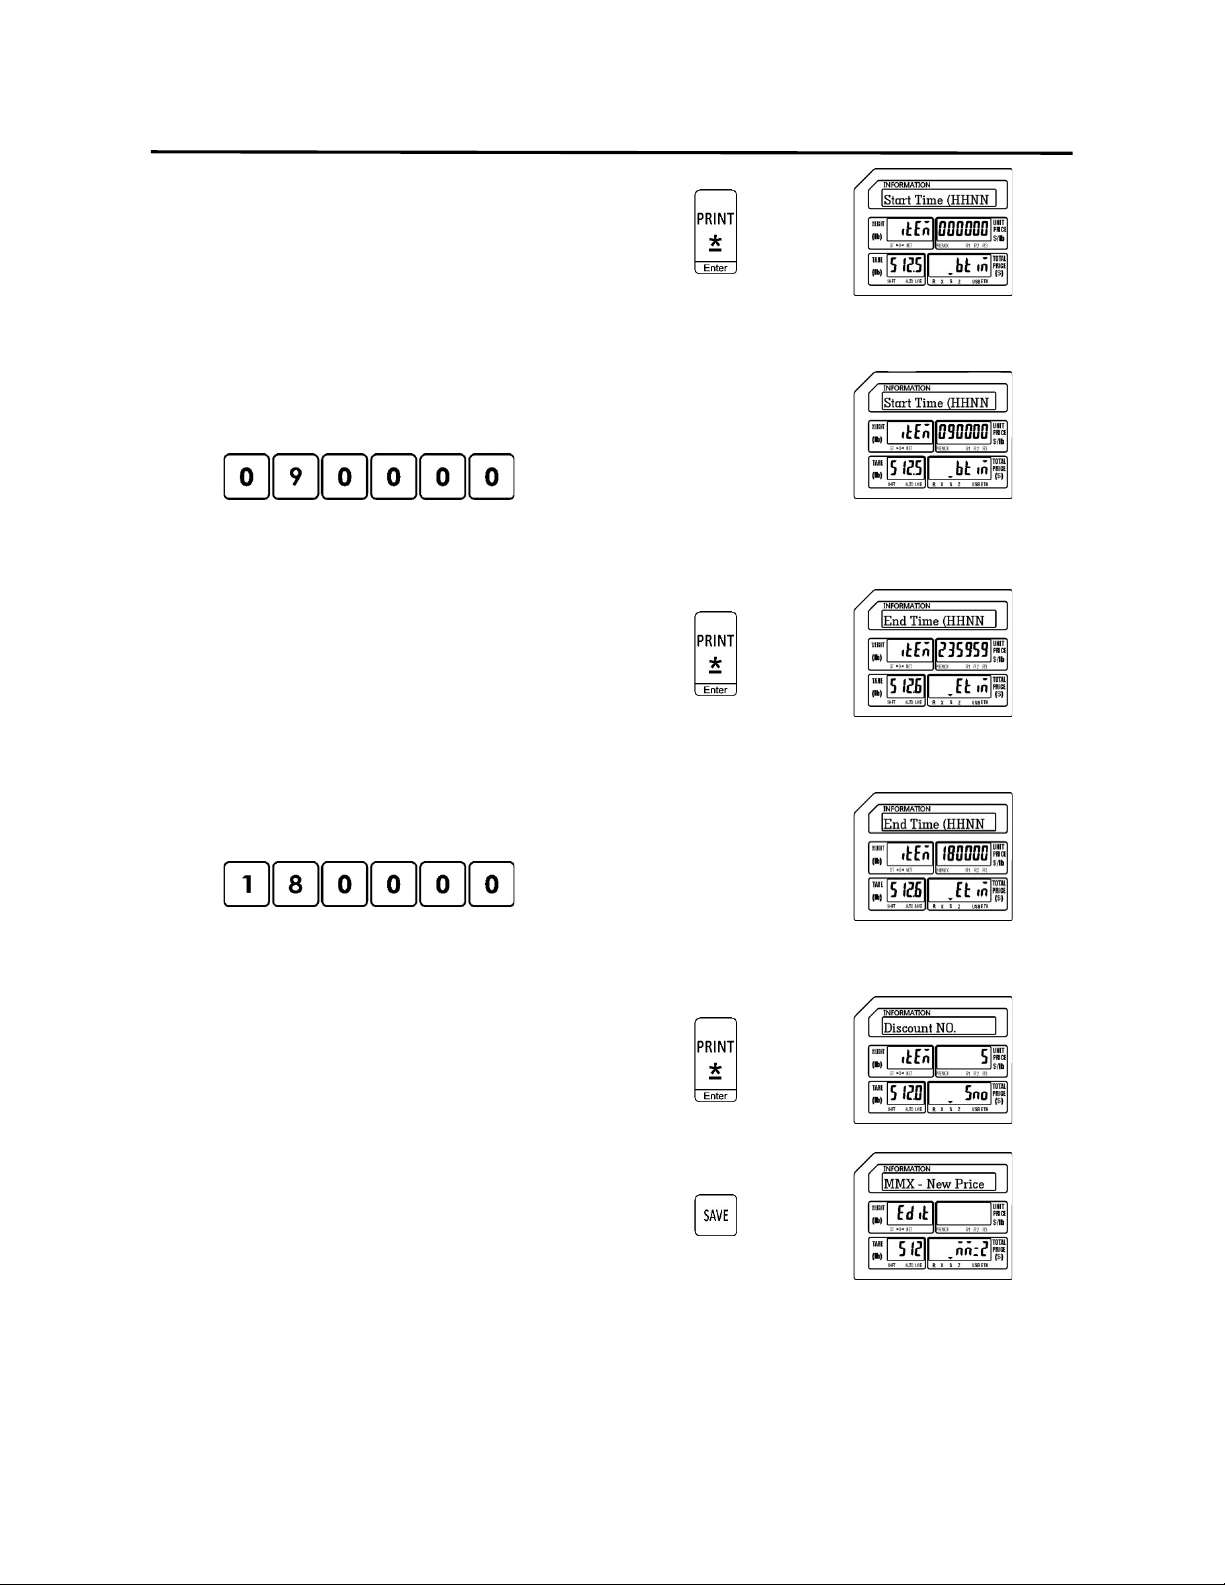
9. Programming (S Mode) ELP-301016
9.13.1 Entering a PLU Discount Using New Price (S12 Mode)
109
Press the Print/* key
10.) Enter the Discount Start Time on each
day in the date range
Ex.) Use the Start Time of 9:00AM
(09:00:00)
Note: To use the default Start Time simply press
the Print/* key again.
Press the Print/* key
11.) Enter the Discount End Time on each
day in the date range
Ex.) Use the End Time of 6:00PM
Note: To use the default End Time simply press
the Print/* key again.
Press the Print/* key
Press the SAVE key
Note: After a discount has expired it must be manually deleted. Please refer to the Delete
Discount procedure for the proper method to delete a discount.

9. Programming (S Mode) ELP-301016
9.13.2 Deleting a Discount (S12 Mode)
110
9.13.2 Deleting a Discount
Follow the steps below to delete a Discount.
1.) From the Discount Number Screen
2.) Enter the Discount Number to delete
Ex.) Select Discount Number 5 to be
deleted by pressing the number
five key
Press the VOID key
Press the FEED/ESC key
Note: Each Discount programmed can be deleted individually using the method above.
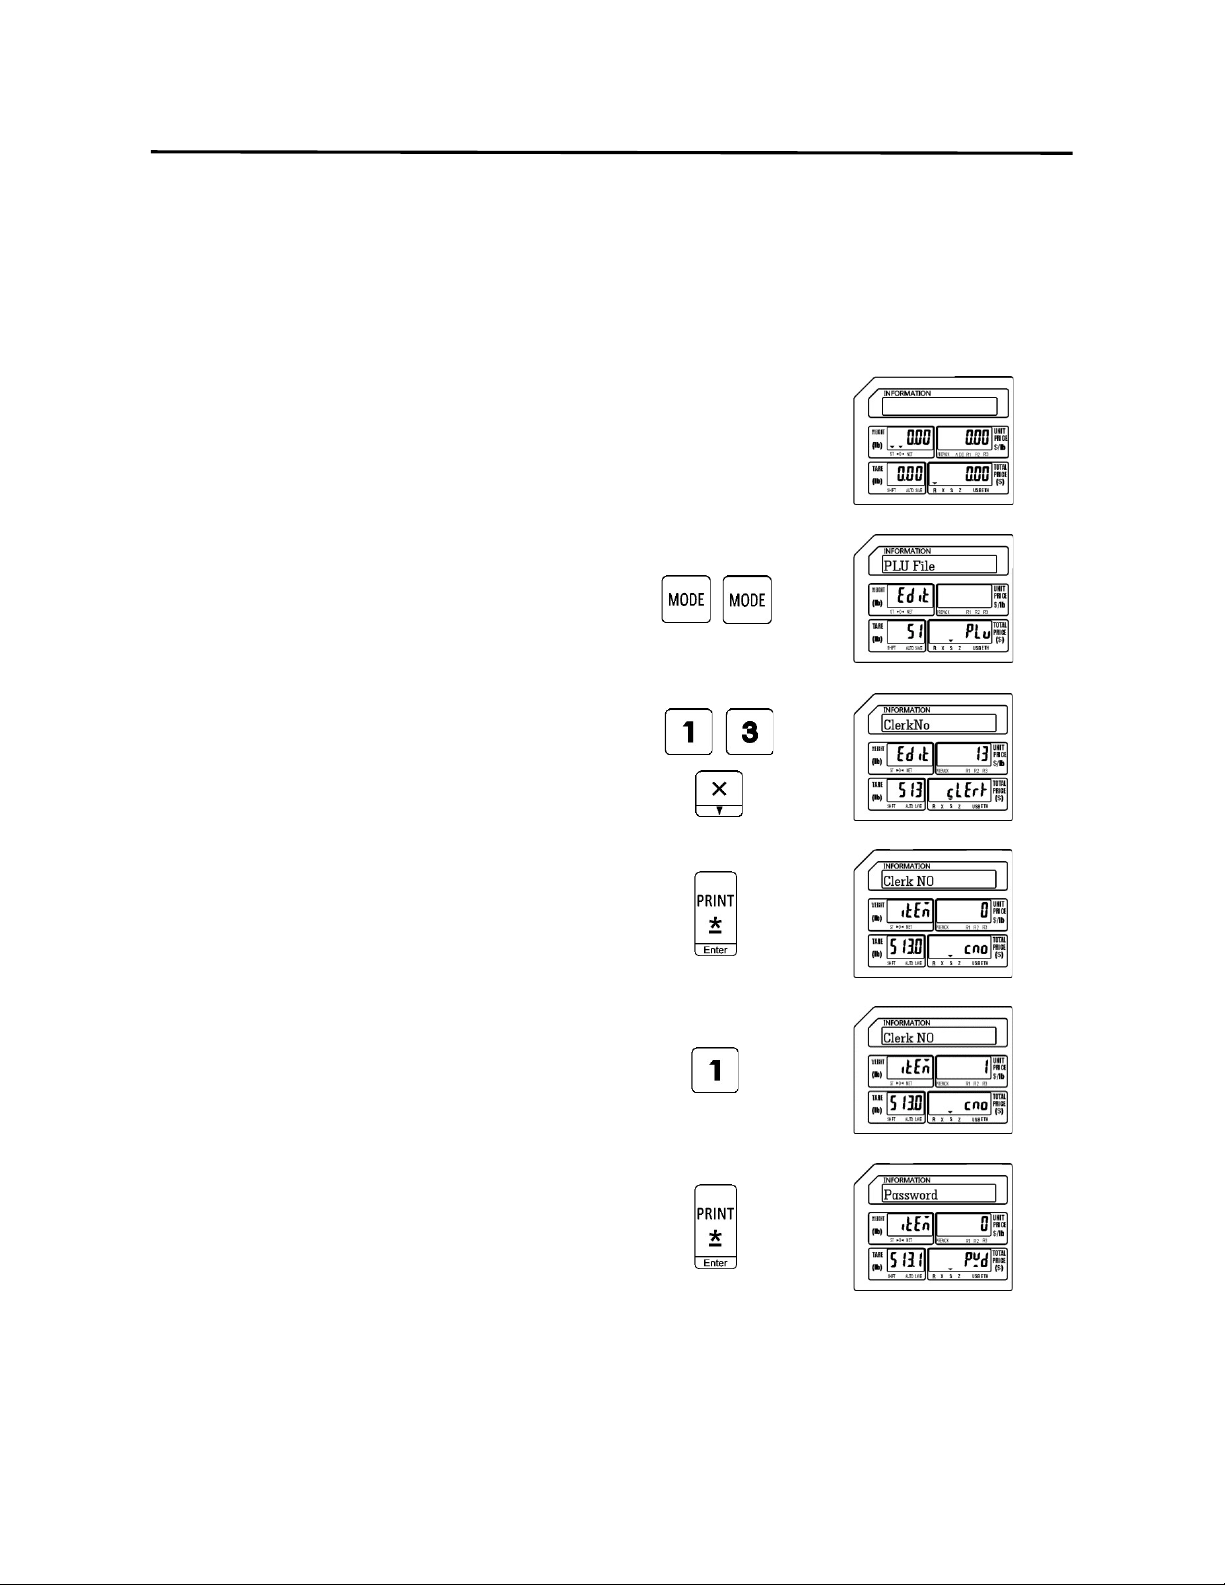
9. Programming (S Mode) ELP-301016
9.14 Clerk Information (S13 Mode)
111
9.14 Clerk Information (S13 Mode)
This mode allows you to enter Clerk Information such as Clerk No., Clerk Name and Clerk
Password.
Note: To use the Clerk function you must assign the function key of Logon/Logoff.
1.) Start at the normal weigh mode screen
2.) Press the Mode Key twice
3.) Press the number 1 key then the number
3 key then press the X key
Note: This has the same results as pressing the X key
twelve times.
4.) Press the Print/* key
5.) Enter the Clerk Number
Ex.) Enter Clerk Number1 by pressing the
number one key.
Press the Print/* key
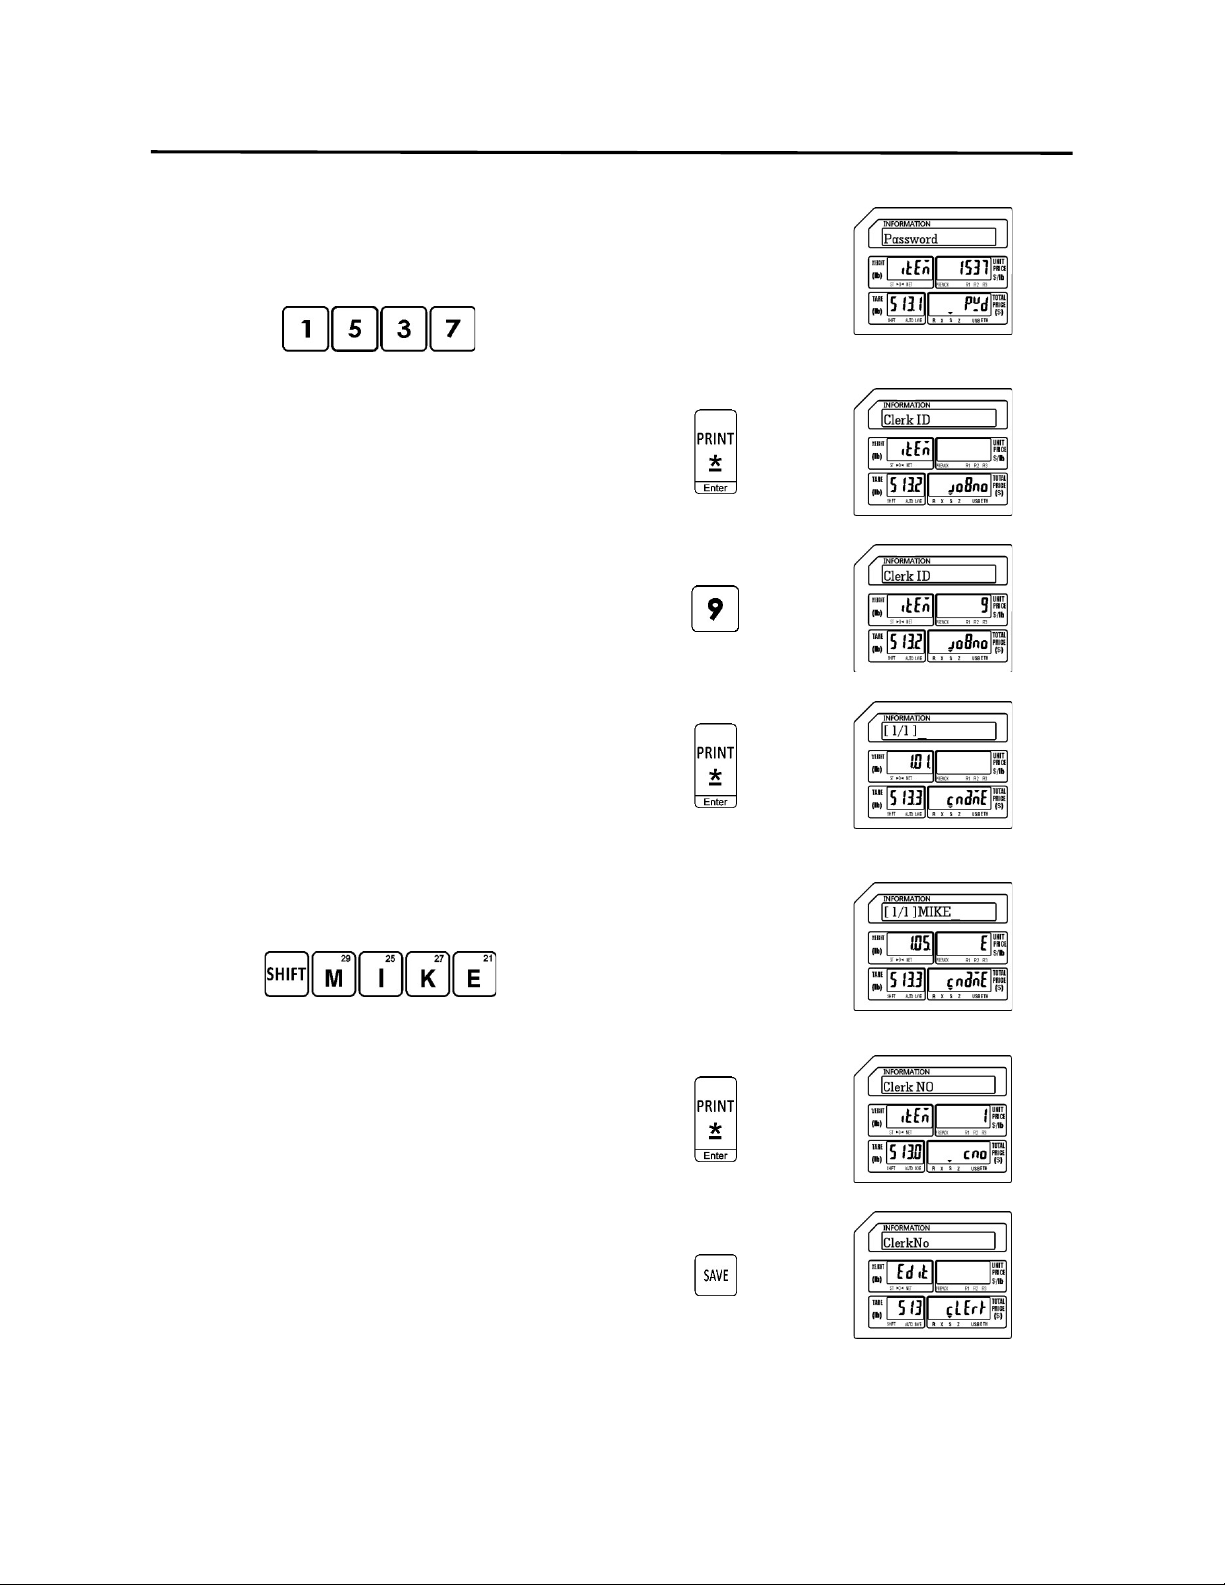
9. Programming (S Mode) ELP-301016
9.14 Clerk Information (S13 Mode)
112
6.) Enter the Clerk Password
Ex.) Enter 1537 for Clerk Number 1’s
password (1537)using the number keys.
Press the Print/* key
7.) Enter the Clerk Job ID Number
Ex.)Use 9 as the Clerk Job ID Number by
pressing the number nine key.
Press the Print/* key
8.) Enter the Clerk Name
Ex.) Enter Clerk 1’s Name as MIKE.
Press the Print/* key
Press the SAVE key

113
DB Scale Corporation
