
7.1.4 Channel Soundbar with Play-Fi / Dolby Atmos / DTS:X
X937U
User Manual

1
Contents
1 Before you begin ...................................................3
2 Welcome .................................................................6
What’s in the box ............................................................. 6
Overview of the soundbar ................................................ 8
Overview of the wireless subwoofer .............................. 10
Overview of the satellite speakers ................................. 11
Set up your soundbar system ........................................ 12
Position Your soundbar and subwoofer ......................... 12
Mount your soundbar on the wall .................................. 15
Mount satellite speakers on the wall .............................. 18
Install/replace the remote control batteries ................... 19
Overview of the remote control ...................................... 20
3 Connect your Soundbar system ........................22
Connect your soundbar to power supply ...................... 22
Connect your wireless subwoofer /satellite speakers to
the soundbar .................................................................. 23
Connect with the HDMI cable ........................................ 24
Optional: connect your Blu-ray player ........................... 26
Connect with the optical cable ...................................... 27
Direction for setting up your soundbar using an optical
cable .............................................................................. 28

2
Connect the soundbar with your Bluetooth device ....... 29
Add in Google home ...................................................... 30
Add in AirPlay 2 .............................................................. 31
Use spotify connect ....................................................... 32
Add in amazon alexa ...................................................... 34
Online rmware update .................................................. 36
4 Use your soundbar system .................................37
Use your soundbar with the top panel or remote control .... 37
Listen to music from your Bluetooth device .................. 39
Use the USB cable or device for music playback ......... 40
5 Specications ......................................................41
6 Notice ...................................................................42
Disposal of your old product and battery .......................... 42
Trademarks ........................................................................ 43
7 FAQ .......................................................................45

3
1 Before you begin
• Carefully read and observe all safety instructions in the
safety leaet.
• This soundbar is intended for indoor use only. In case it
accidentally gets in contact with small amounts of water,
unplug immediately and use a dry cloth to remove the
water.
• Unplug the soundbar if it is not used for long periods of
time or during lightning storms.
• Make sure the soundbar is installed on a solid surface
or solidly wall-mounted below your TV for the best
experience.
• Only use AAA 1,5V non-rechargeable batteries for the
remote control.
• In case any of the cables are visibly damaged or pinched,
unplug the soundbar and replace the cable.
• Be careful not to sharply bend the HDMI and optical
cable as they may affect the performance.
• Protect your hearing by adjusting to a proper volume.
Predefined and customizable sound settings are
available for your listening comfort.
4
The lightning flash with arrowhead symbol, within an equilateral triangle is
intended to alert the user to the presence of uninsulated dangerous voltage
within the product’s enclosure that may be of sufficient magnitude to
constitute a risk of electric shock.
The exclamation point within an equilateral triangle is intended to alert the
user to the presence of important operating and maintenance (servicing)
instructions in the literature accompanying the product.
This symbol indicates that this product incorporates double insulation
between hazardous main voltage and user accessible parts. When servicing,
use only identical replacement parts.
Warnings
CAUTION
RISK OF ELECTRIC SHOCK
DO NOT OPEN
CAUTION: TO REDUCE THE RISK OF ELECTRIC SHOCK, DO NOT
REMOVE COVER (OR BACK). NO USER-SERVICEABLE PARTS INSIDE.
REFER SERVICING TO QUALIFIED SERVICE PERSONNEL.
Make sure you read all the safety information before you use this product.
TCL ELECTRONICS AUSTRALIA PTY LTD bears no responsibility for accidents or damages caused by
unauthorized changes, modifications or improper use of the product.
User Manual can be found at www.tcl.com/au on the specific product page in the “Download” section.
滚滚长江东逝水
Important safety instructions
Safety
• Read these instructions - Read all the safety and operating instructions before operating the product.
• Retain these instructions - Retain the safety and operating instructions for future reference.
• Heed all warnings - Adhere to all warnings on the product and in the operating instructions.
• Follow all instructions - Follow all operating and use instructions.
• Do not use this apparatus near water - The appliance should not be used near water or moisture
– for example, in a wet basement or near a swimming pool and the like.
• Clean only with a dry cloth.
• Do not block any ventilation openings. Install in accordance with the manufacturer’s instructions.
• Do not install near any heat sources such as radiators, heat registers, stoves, or other apparatus
(including amplifiers) that produce heat.
• Do not defeat the safety purpose of the polarized or grounding-type plug. A polarized plug has two blades
with one wider than the other. A grounding type plug has two blades and a third grounding prong. The wide
blade or the third prong are provided for your safety. If the provided plug does not fit into your outlet, consult
an electrician for replacement of the obsolete outlet.
• Protect the power cord from being walked on or pinched particularly at plugs, convenience receptacles, and
the point where it exits from the product. If the cord set is damaged, it must be replaced by a special cord set
available from the manufacturer or its service agent.
• Use only attachments/accessories specified by the manufacturer.
• Use only with the cart, stand, tripod, bracket, or table specified by the manufacturer, or sold with the apparatus.
When a cart is used, use caution when moving the cart/apparatus combination to avoid injury from tip-over.
CAUTION
• To reduce the risk of fire or electric shock, do not expose this product to rain or moisture. This product
should not be exposed to dripping or splashing. No objects filled with liquids, such as vases, should be
placed on or near the product.
• The product is unstable if it is not properly placed or mounted to the wall. Be sure to follow the wall
mounting instructions provided in the user manual to ensure your safety.
• Do not expose batteries to excessive heat such as sunshine, fire, and so forth.
• To avoid the danger of suffocation, keep plastic packaging away from pets, babies, and children.
Do not use packaging bags in cribs, beds, carriages, or playpens.

5
• Unplug this apparatus during lightning storms or when unused for long periods of time.
• Refer all servicing
to qualified service personnel. Servicing is required when the apparatus has
been damaged in any way, such as power-supply cord or plug damaged, liquid has been spilled or
objects have fallen into the apparatus, the apparatus has been exposed to rain or moisture, does
not operate normally, or has been dropped.
• The user must maintain a minimum distance of 20CM from the device at all time.
• This appliance is not intended
for use by young children or infirm persons without supervision.
Young children should be supervised to ensure that they do not play with the appliance.
Cautions
• To prevent electric shock, match wide blade of plug to wide slot, fully insert.
• Do not place any sources of danger on the product (for example: liquid filled objects, lighted candles).
• Disconnect the power cord to shut off when find trouble or not in use. The power cord shall be readily
operable.
• Use of controls or adjustments or performance of procedures other than those described herein, may
result in hazardous radiation exposure or other unsafe operation.
• The power cord/appliance coupler is used as the disconnect device, the disconnect device must remain
readily operable.
• The use of apparatus in tropical and moderate climates.
• The rating label is located at the bottom or back of the product.
Battery precautions
• Do not mix batteries (old and new or carbon and alkaline).
• Do not dispose of batteries in fi
re or water.
• Recycle or dispose of batteries as per state and local guidelines.
• Danger of explosion if battery is incor
rectly replaced. Replace only with the same or
equivalent type.
• When the remote control is not to be used for a long time (mo
re than a month), r
emove the battery
from the remote control to p
revent it from leaking.
with
• If the batteries leak, wipe aw
ay the leakage inside the battery compartment and replace the batteries
new ones.
• Keep away the batteries f
rom heat or moisture.
• Do not carry or sto
re batteries with other metallic objects. Doing so could cause batteries to short ci
rcuit,
leak or explode.
• If the battery compartment does not close securely, stop using the product and keep it away from children.
• Never recharge a battery unless it is confirmed to be a rechargeable type.
Disposal of your old product and battery
Your product is designed and manufactured with high quality materials and components, which can be
recycled and reused.
This product may contain lead and mercury. Disposal of these materials may be regulated due to
environmental considerations. For disposal or recycling information, please contact your local authorities.
This product contains batteries:
• Do not incinerate. Batteries may explode if overheated.
• For disposal or recycling information, please contact your local authorities.
CAUTION: Risk of explosion if the battery is replaced by an incorrect type.
CAUTION: Replacement of a battery with an incorrect type that can defeat a safeguard.
CAUTION: Disposal of a battery into fire or a hot oven, or mechanically crushing or cutting of a battery,
that can result in an explosion.
CAUTION : Leaving a battery in an extremely high temperature surrounding environment that can result
in an explosion or the leakage of flammable liquid or gas.
CAUTION : A battery subjected to extremely low air pressure that may result in an explosion or the leakage of
flammable liquid or gas.
6
2 Welcome
Congratulations on the purchase of your new TCL
Soundbar! After it is set up and connected, you can
experience a superb sound quality and state-of-the-art
design to best t your home entertainment system. You are
recommended to read through this user manual which helps
you set up, connect and operate the product easily and
properly.
Let’s get started.
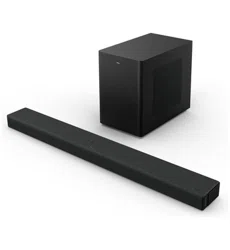
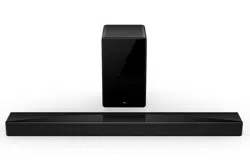
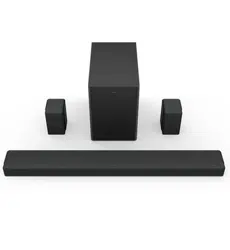
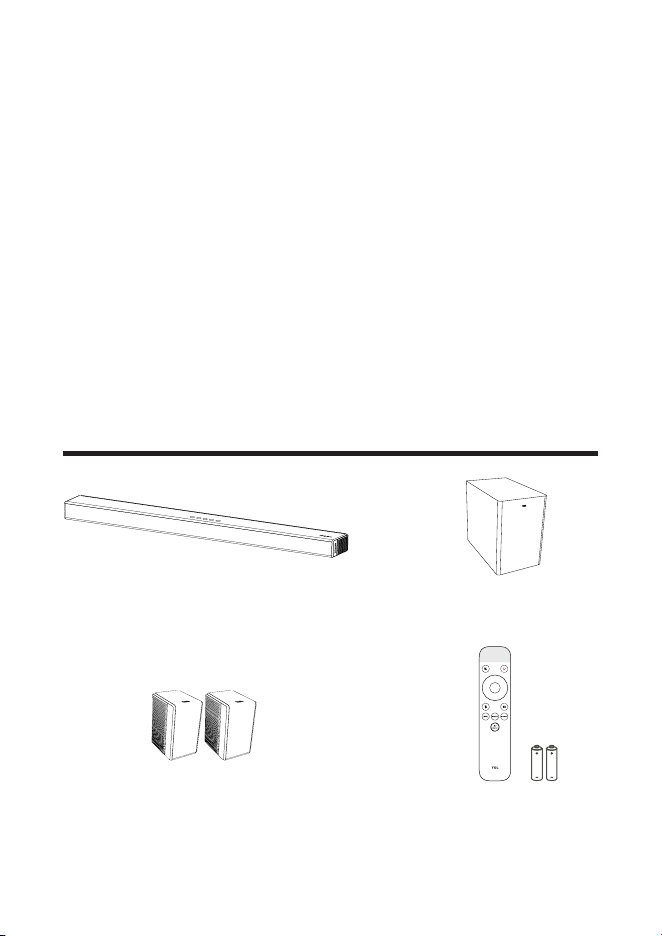
What’s in the box
Wireless SubwooferSoundbar
Satellite Speaker x 2 Remote control
AAA battery x 2

7
AC power cord x 2 AC power adapter x 2
HDMI cable
Wall mount kit (for
Soundbar)
Wall mount kit (for Satellite
Speaker)
Warranty card
Manual Wall mount template
Manual
8
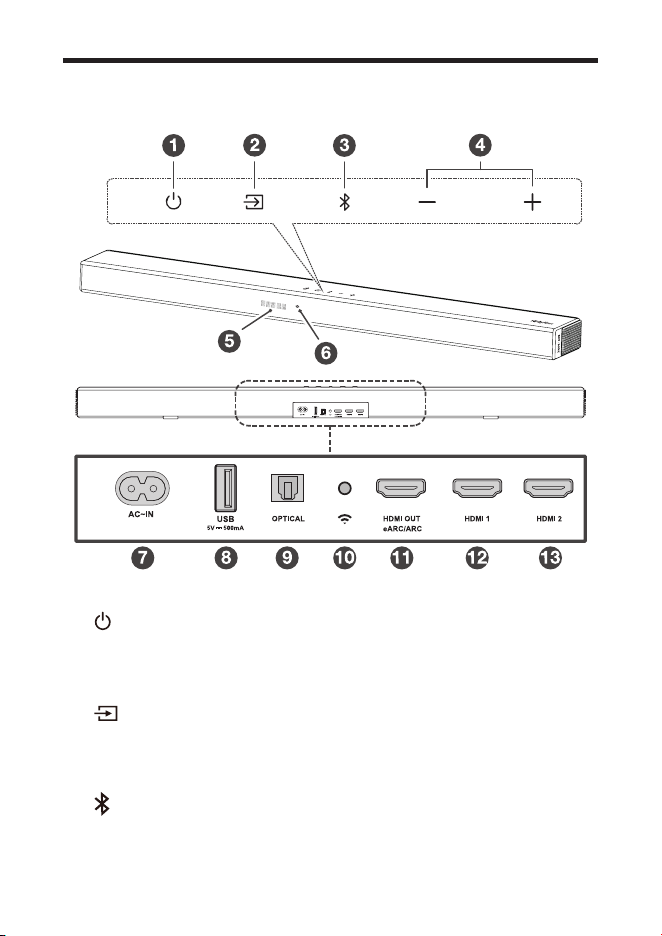
Overview of the Soundbar
1
Short press to enter Sleep mode.
Long press to enter Standby mode.
2
Press to switch the audio source among
HDMI ARC/HDMI IN/OPT/BT/USB modes.
3
Press to select the Bluetooth function. Press and hold to
enter the pairing mode.

9
4
Press to increase or decrease the volume level.
5 LED Display
It indicates the Soundbar status (e.g. volume level,
Soundbar status).
6 White LED:
It indicates Wi-Fi connection status.
7 AC input power connector
8 USB Type A connector (only for music playback)
9 Optical input connector
10 Wi-Fi setup button
11 HDMI OUT (eARC/ARC) connector
12 HDMI 1 IN connector
13 HDMI 2 IN connector
10
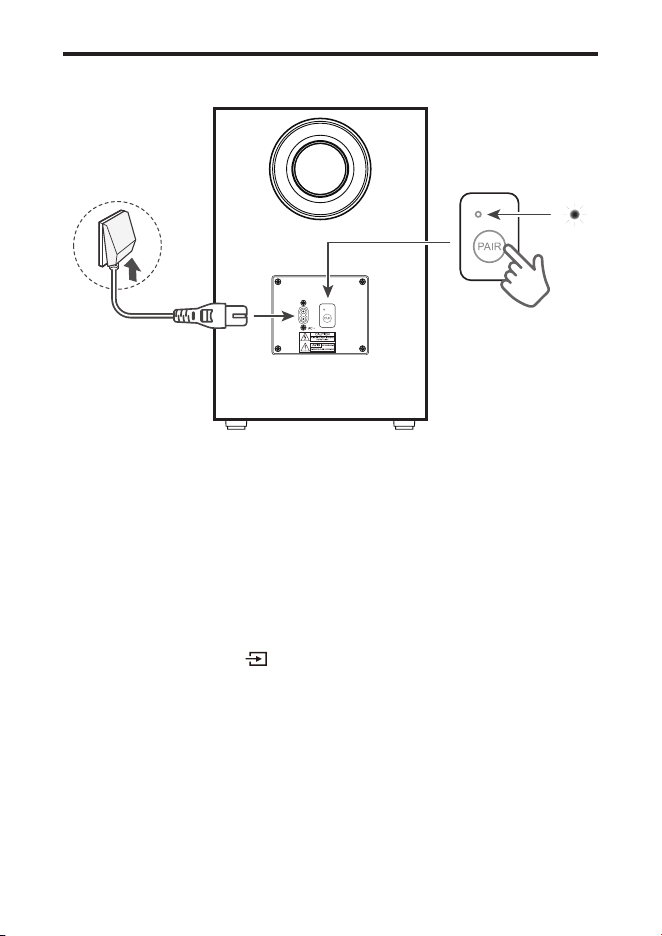
Overview of the wireless subwoofer
1 AC input power connector
2 Amber LED indicator
• flashes slowly when the subwoofer is in standby
mode.
• ashes quickly when pairing is in progress.
• remains on solidly when pairing is successful.
3 PAIR
Press and hold button on the Soundbar main unit
for 5 seconds. Press and hold PAIR button on the
subwoofer untill pairing is complete. And then the amber
LED light will be solid up on the subwoofer.
Note
• Manual pairing is needed only in case of troubleshooting.
11
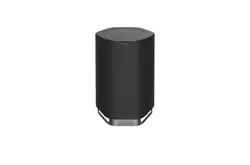
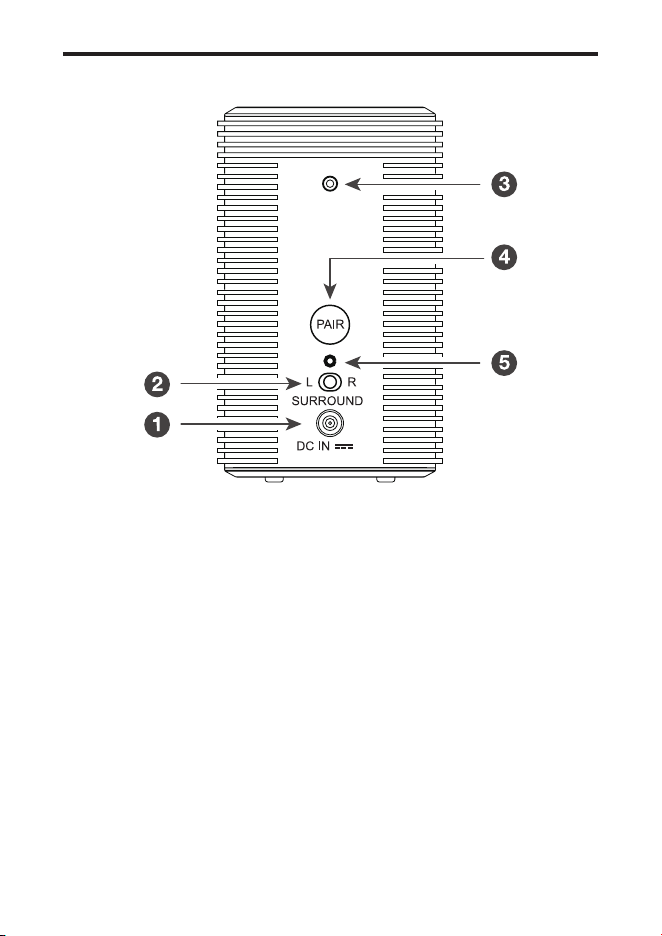
Overview of the satellite speakers
1 DC input power connector
2 Toggle switch: Set sound to Left or Right Surround
Speaker
3 Screw hole: Install the wall-mounting screws here.
4 Pairing button: Activate the pairing between the
satellite speaker and the main sound bar unit.
5 Pairing Display
• Slowly ashing: Not paired / to be paired
• Fast ashing: In pairing
• Constant on: Connected / Paired

12
Set up your Soundbar system
Notes
• Make sure you read all the safety information before you
mount the Soundbar main unit on the wall.
• Make sure you use screws provided or specied by the
authorized manufacturer.
• TCL AUSTRALIA bears no responsibility for accidents or
damage caused by improper wall mounting and screws
installation or insufcient wall strength, etc.
• Additional tools (not supplied) are required for
installation.
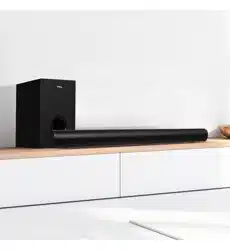
• You can choose to place your Soundbar below the
center of your TV or mount it on the wall.
Position Your Soundbar and
Subwoofer/Satellite Speaker
The ideal place to position the Soundbar main unit is
centered underneath your TV.
You are recommended to place the Soundbar main unit on
the top of the cabinet and right below the center of your TV.
The distance between the subwoofer/satellite speaker and
the Soundbar main unit should be less than 3 meters.

13
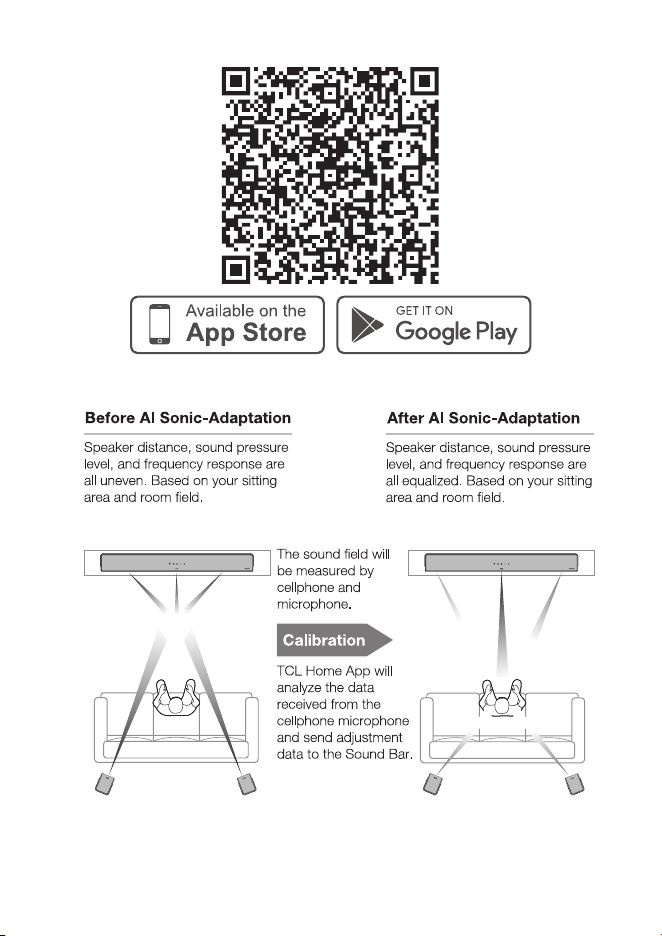
AI Sonic-Adaptation
AI Sonic-Adaptation is a Room Calibration Technology
developed by TCL Audio Lab. To use this function, you need
to download TCL Home App and follow the instructions.
This Sound Bar can be fully controlled by TCL-HOME App.
Features are not limited including power, volume, input,
effect, level, mode, AI Sonic-Adaptation etc. As well, TCL
Home App can help you to explore more smart features
without just a sound bar. Please download from App stores.
14
15
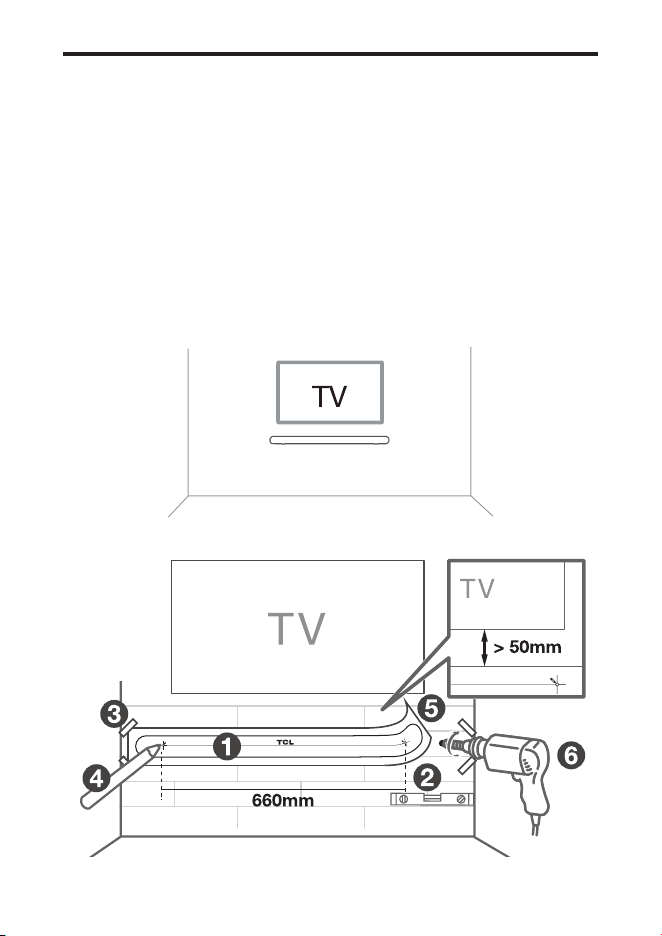
Mount your Soundbar on the wall
1 Place the supplied wall mount template on the wall.
Make sure the wall mount template is at least 5cm
below the center of the TV.
2 Use a level to make sure the wall mount template is
positioned accurately.
3 Use tape to stick the wall mount template rmly on the wall.
4 Mark on the wall using each marking on the template
through the mounting holes.
5 Take away the wall mount template.
6 Drill a screw hole at each marking on the wall.

16
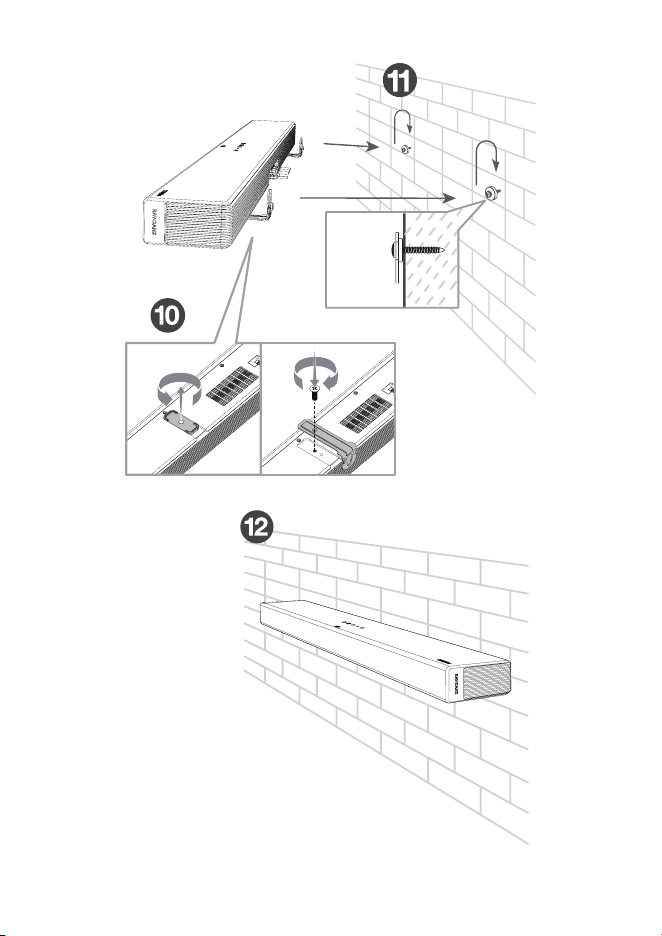
7 Insert the supplied screws into the hole of the wall
anchors.
8 Insert the sleeves into the hole of the wall anchors.
9 Fix and tighten the wall bracket screws on the wall.
10 Screw off the rubber cushions from the soundbar.
(Reserve the rubber cushions for future use)
* The rubber cushions can be used as soundbar mats
when you put the soundbar on the table.
Screw on the wall mount brackets to the soundbar.
11 Hang the Soundbar on the screws.
12 Ensure the soundbar is stable and safe hanging on the
wall.
17
18
Notes
• Check the installation location before you mount the
Soundbar on the wall (see ‘Mount your Soundbar on the
wall’ on page 15).
• You may consider to connect the cables first before
mounting the Soundbar on the wall.
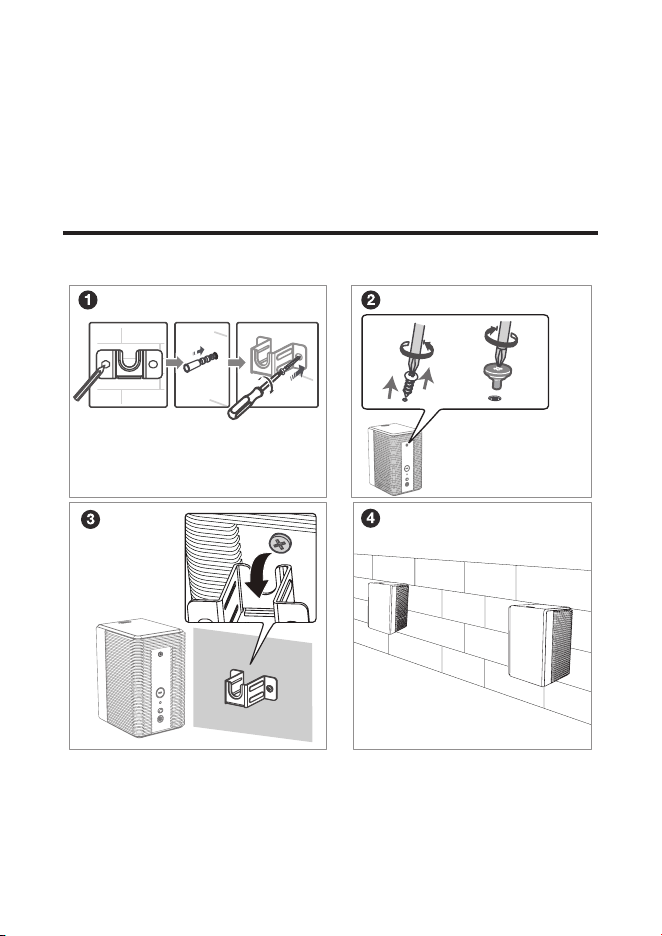
Mount satellite speakers on the wall
19
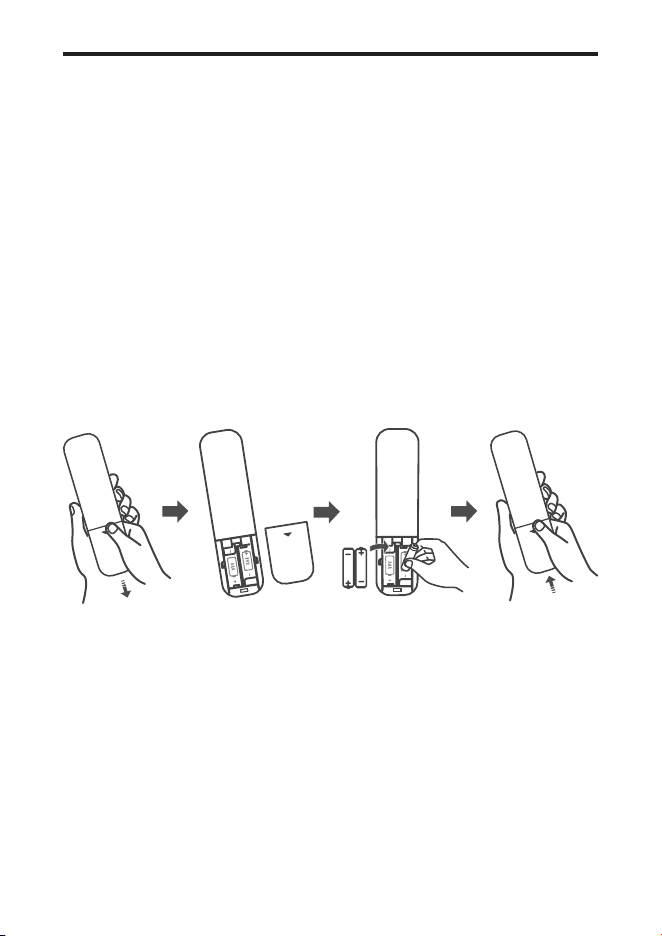
Install/replace the remote control
batteries
Warnings
• Danger of explosion if battery is incorrectly replaced.
Replace only with the same or equivalent type.
Caution
1 Open the battery compartment, remove the old batteries
if necessary.
2
Place two new AAA batteries into the battery compartment
with the correct polarity (+/-).
3 Close the battery compartment.
Setup is complete. Your Soundbar is ready to use. For
more information about how to access different connection
options on your Soundbar, see the following chapter.
20
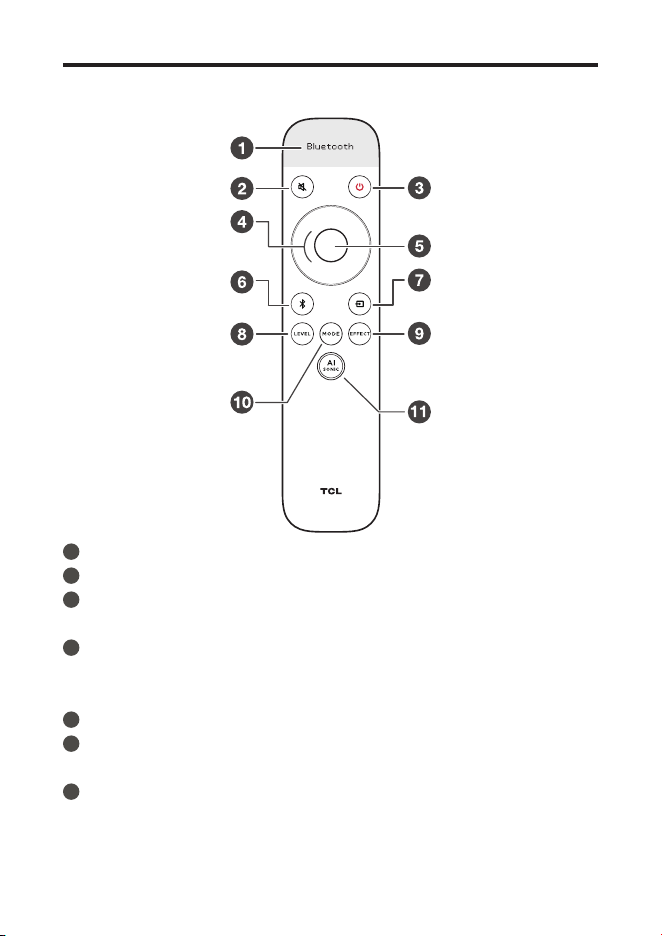
Overview of the Remote Control
1
Screen display.
2
Short press: mute / unmute the sound.
3
Short press: power on / sleep
Long press: standby.
4
Up/Down: increase/decrease the volume
Left/Right: Switch to previous/next music (Under
Bluetooth or USB mode).
5
Short press: Play / Pause.
6
Long press: Bluetooth Pairing
Short Press: switch to Bluetooth mode.
7
Short press to enter input source menu.
Keep short press or use Up/Down/Left/Right to switch:
HDMI-eARC/Optical/USB/Bluetooth/HDMI 1/HDMI 2.

21
8
Short press to enter the Level Menu. Switch different
Level Options
[1]
with Left/Right.
Use Up/Down to adjust the value.
9
Short press to enter Effect Menu.
Use Left/Right to switch different Effect Options
[2]
Use Up/Down to adjust Effect ON/OFF or 1/2/3 Effect.
10
Short Press to enter sound modes menu.
Keep short press or use Up/Down/Left/Right to switch
sound modes: Standard, Voice, Music, Movie, Game,
Sports.
11
Short Press to enter AI Sonic-Adaptation
[3]
Menu.
Short press “Up/Down” to switch different AI Sonic
Adaptation: Default / Sonic 1 / Sonic 2 / Sonic 3.
[1] Level Options: Bass, Treble, Dialogue, SurrVol, Av Sync.
[2] Effect Options: Bass Boost, Surround Enhance, Pass
through, Night, NEURALX, DRC, LED Dim.
[3] AI-Sonic Adaptation: Learn more on page 13.
Note:
Factory Mode: Long Press Mode+Mute together for 5
seconds.
22
3 Connect your
Soundbar system
After you have xed the position of the Soundbar, you can
start connecting it to your TV or other devices and listen
to the audio through your Soundbar. Make sure you have
muted the audio of your TV or device. For information,
check the user manual of your TV or device.
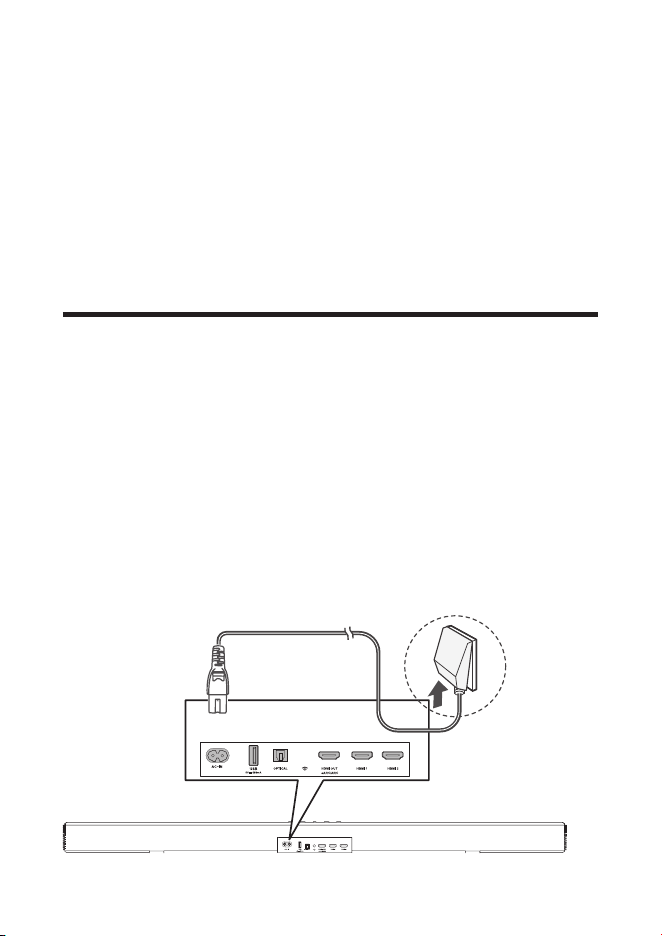
Connect your soundbar to power
supply
1 Make sure that you have completed all other
connections before connecting the Soundbar to power
supply.
2
Make sure the power supply voltage complies with your
country’s safety standards (see ‘Specications’ on page 41)
3 Connect one end of a supplied AC power cord to the
AC input connector on your Soundbar and another end
to the power socket on the wall.
23
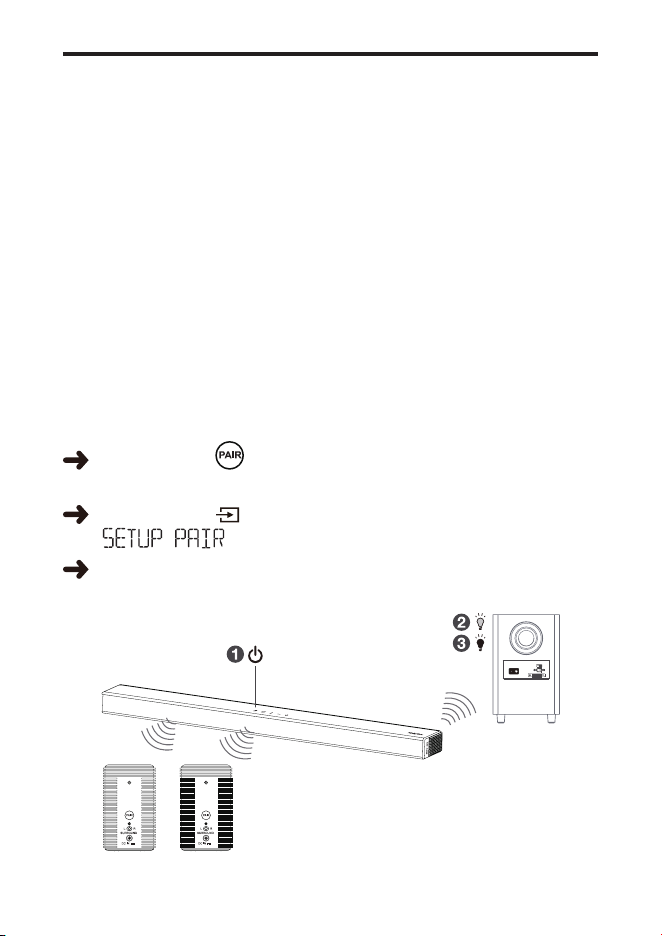
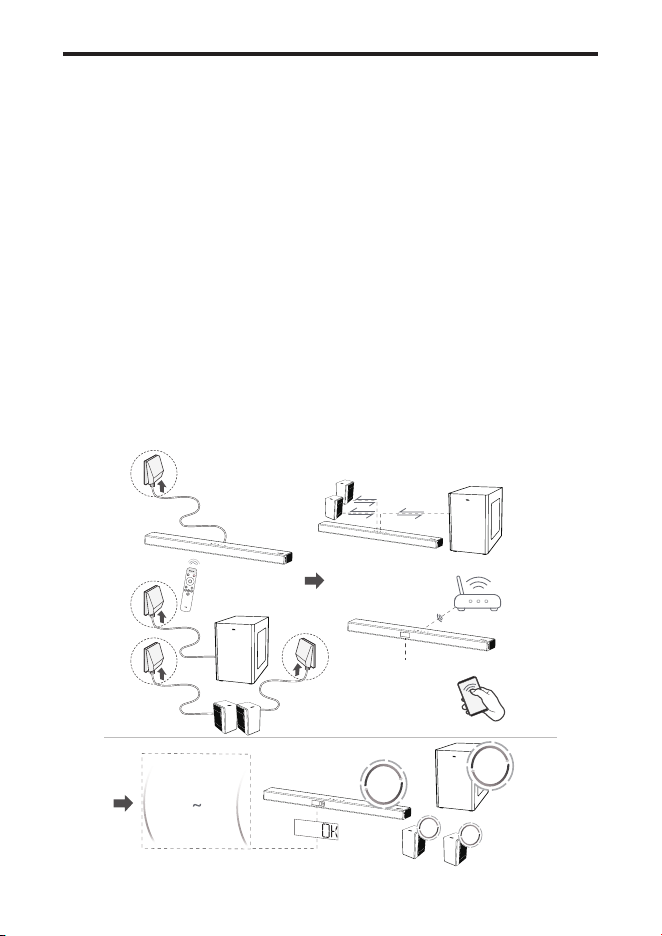
Connect your wireless subwoofer /
satellite speakers to the soundbar
When the wireless subwoofer / satellite speakers are
connected, you can enjoy powerful deep bass sounds and
a truly immersive audio experience.
THE SUBWOOFER AND SATELLITE SPEAKERS HAVE
BEEN PAIRED WITH THE SOUNDBAR MAIN UNIT UPON
FIRST USE. In case of a problem, take the following steps
to manually pair:
Make sure both the Soundbar and wireless subwoofer /
satellite speakers are connected to the power supply and
are turned on.
Long press buton on the subwoofer / satellite
speakers for 3 seconds until indicator light ashing fast.
Long press on the soundbar for 5 seconds till
" " displaying on the soundbar.
When indicator light turns solid on the subwoofer or the
satellite speakers, pairing is successful.
24
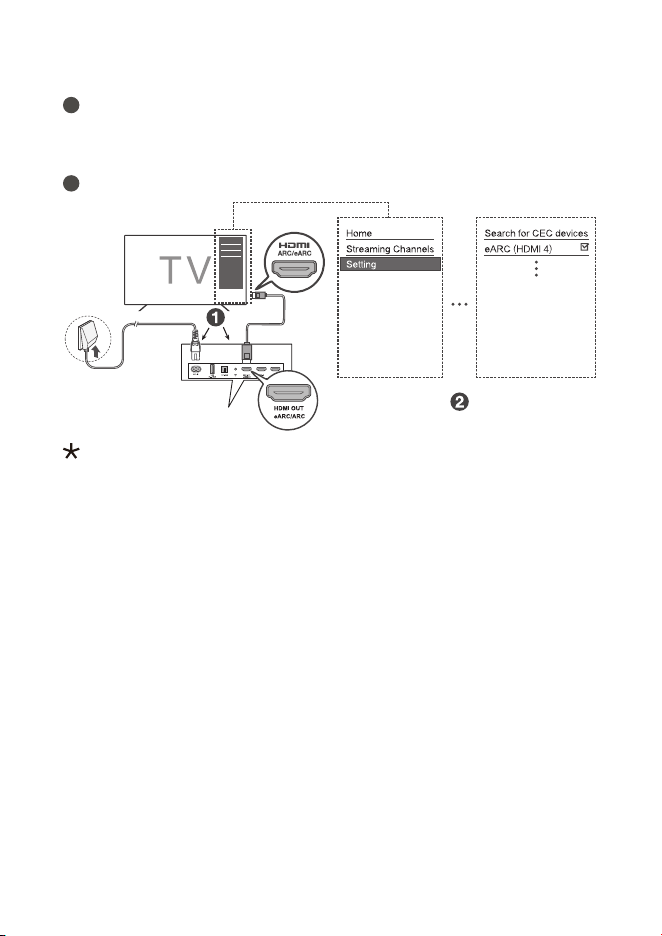
Connect with the HDMI cable
Note
• Make sure your TV or device supports the HDMI ARC
feature. For information, check the user manual of your
TV or device.
Connect one end of the HDMI cable to the HDMI ARC input
connector on your Soundbar and another end to the HDMI
ARC output connector of your TV or device.
To get the best possible audio experience using the HDMI
cable, follow below given steps:
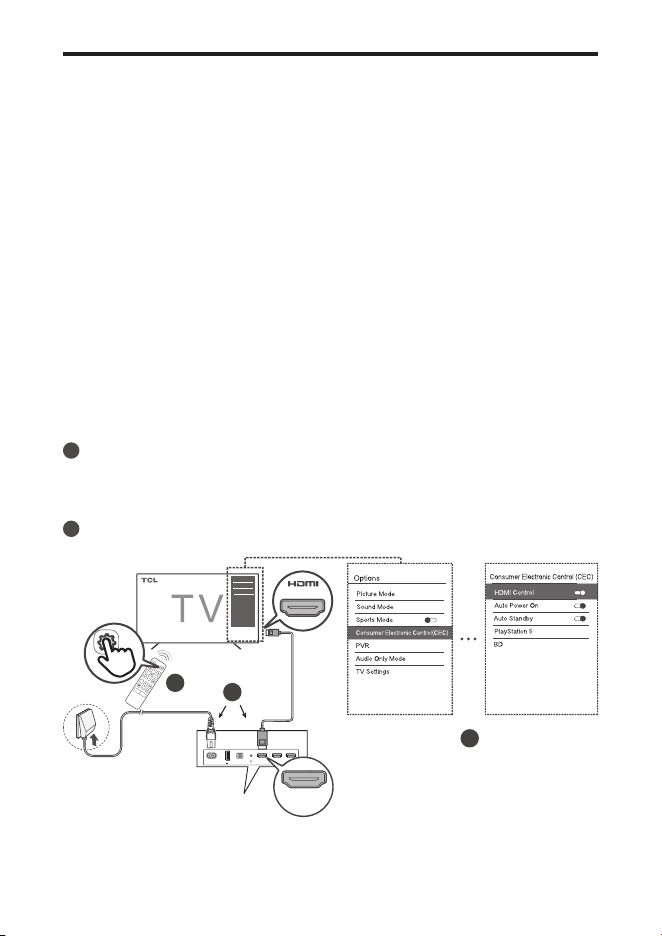
For TCL TV:
1
Connect HDMI cable from the HDMI (ARC) interface on
the Soundbar to the HDMI (ARC/eARC) interface on the
TV. Connect power cord.
2
Enable the CEC function in the settings of the TCL TV.
AC~IN
USB
OPTICAL HDMI OUT
eARC/ARC
HDMI 1 HDMI 2
5V 500mA
HDMI OUT
eARC/ARC
2
2
1
ARC/eARC
25
For other TV brands:
1
Connect HDMI cable from the HDMI (ARC) interface on
the Soundbar to the HDMI (ARC/eARC) interface on the
TV. Connect power cord.
2
Enable the CEC function in the settings of the TV.
CEC (Consumer Electronic Control) function naming may differ
by TV manuafacturer. This feature may be called CEC, Anynet+,
SimpLink, BRAVIA Link, EasyLink or VIERA Link. Please see
your TV's user manual for more information.
26
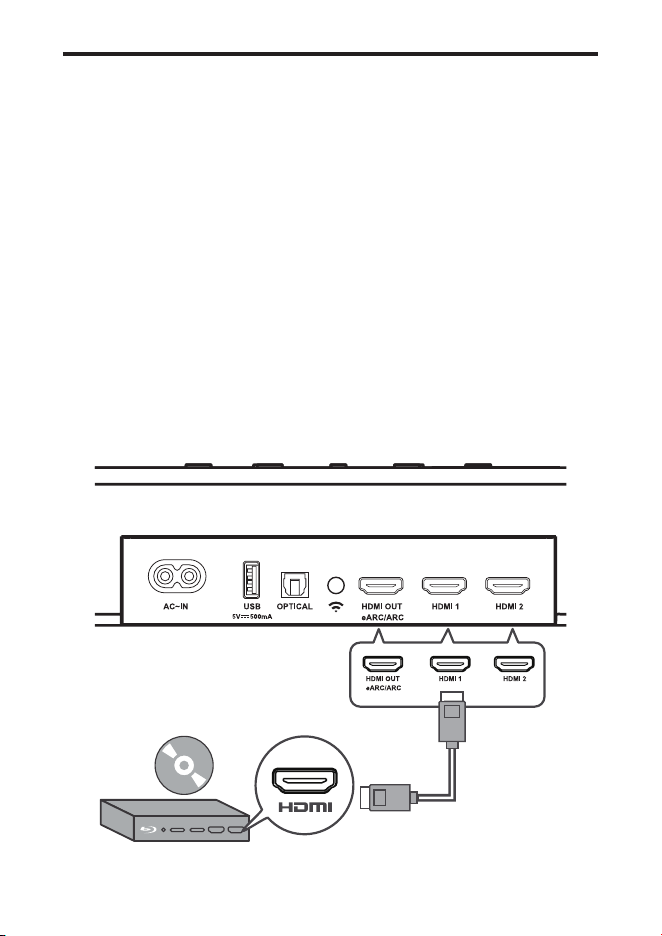
Optional: Connect your Blu-ray
player
For ease of use, you are advised to connect a Blu-ray player
to the TV and enjoy the Soundbar through HDMI-ARC.
However, in order to enjoy Dolby TrueHD based Atmos
content that not all TVs may support through HDMI-ARC,
you can optionally connect your Blu-ray player directly to
the Soundbar using the HDMI-in port.
Notes
• The Soundbar willl pass on the video signal to the TV. If
it is not successful, turn on the Soundbar and try again.
• The HDMI input supports UHD (4K) and that it can also
be used for game console to enjoy Dolby Atmos audio.
27
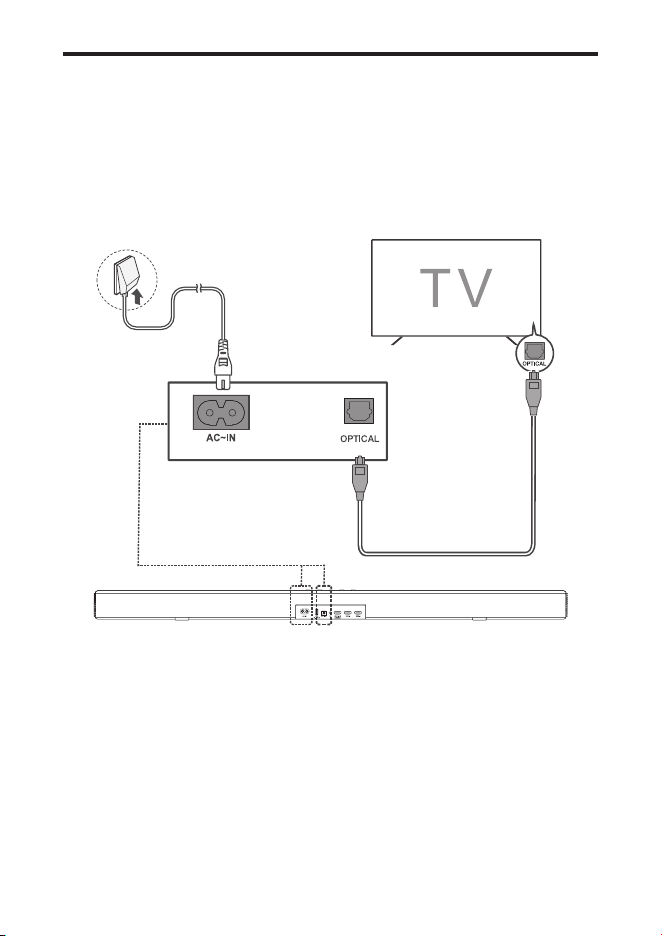
Connect with the optical cable
1 Remove the protective caps from the optical cable when
necessary.
2 Connect one end of the optical cable to the optical input
connector on your Soundbar and another end to the
optical output connector of your TV or device.
Note
• If there is no sound output from the Soundbar, try to
activate the PCM signal output on your TV or device.
PCM is used to convert analog audio signals into digital
audio signals in most devices. For more information of
how to activate the PCM signal output, check the user
manual of your TV or device.
28
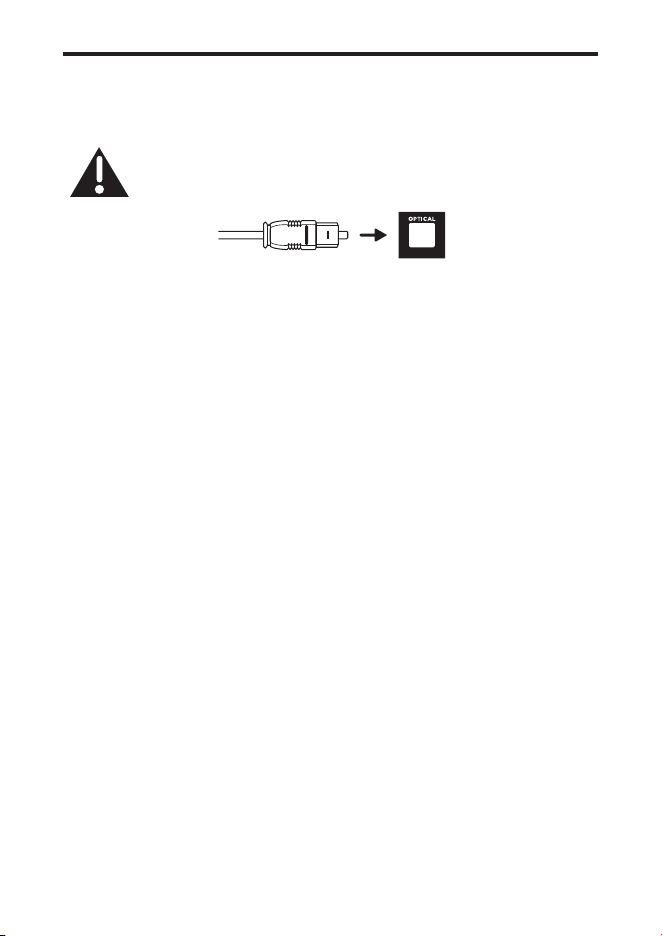
Direction for setting up your
Soundbar using an optical cable
Do not bend or kink the optical cable (SPDIF) as it
is fragile and can easily get damaged and broken.
To get the best possible audio experience using the optical
cable:
1 Press the Home button on your TCL TV Remote.
2 Navigate to Audio option under Settings.
3 Uncheck the “TV speaker enabled” option.
4 Under S/PDIF and ARC, select Auto.
Notes
• Different devices may have different menu options.
• Devices such as Blu-ray players, set-top boxes, etc., are
also applicable.
29
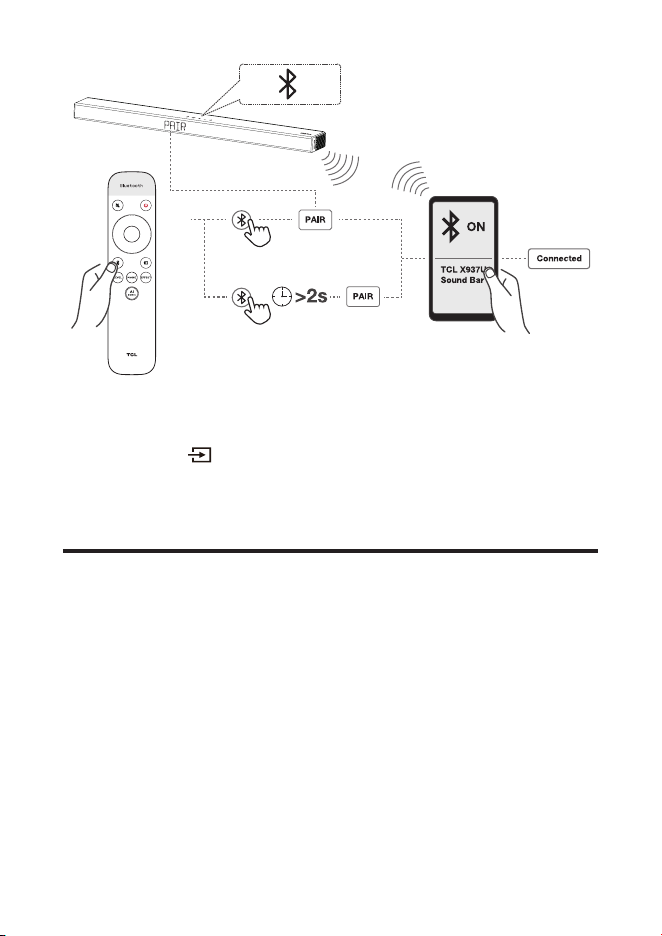
Connect the Soundbar with your
Bluetooth device
Notes
• Make sure your wireless device supports the Bluetooth
function.
• The operational range between the Soundbar and your
Bluetooth device is approximately 10 meters (without
any obstacle between the Bluetooth device and the
Soundbar).
1
Press on the top panel of your Soundbar or remote
control to power on the Soundbar.
2
Press and hold on the top panel of your Soundbar or
remote control.
PAIR
is displayed on the LED display. The Soundbar
is ready to pair.
3
Power on your Bluetooth device and activate its
Bluetooth function.
4
Select TCL X937U Sound Bar on the pairing list of your
Bluetooth device.
You hear distinct double beep sound.
You'll see "Connected" on the screen.
Tip
• If you cannot nd the model name TCL X937U Sound
Bar on your Bluetooth device, press and hold on the
remote control. You will see
PAIR
. Now the Soundbar
is coming into the pairing mode.
30
Your Soundbar system is now set up and ready to be used.
5
To disconnect the Bluetooth function, you can:
• press on the Soundbar or remote control to
switch to another source; or
• disable the Bluetooth function on your device.
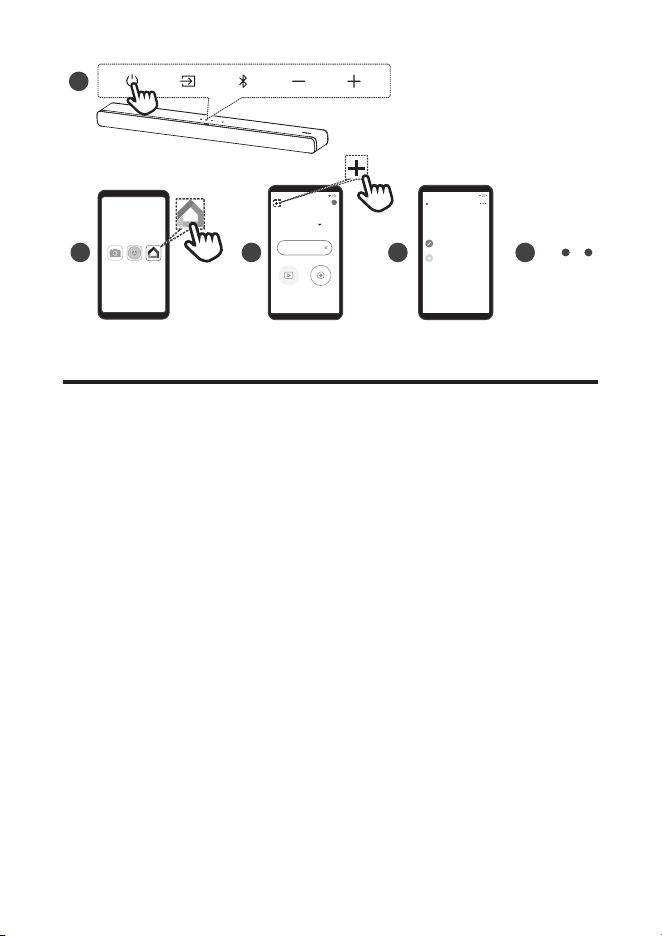
Add in Google home
1. Power on the Soundbar.
2. On an Android phone, open the Google Home app and
continue with step 3.
3. In the Google Home app, make sure you are signed in
and follow the on-screen instructions to complete the
setup process.
4. Once setup is complete via step 3, you are now
connected to your network and Wi-Fi. Now you can
enjoy Chromecast built-in from any device on the same
network.
31
2
1
Android
3 4 5
Home
Choose a home
You’ll be able to control the devices and services
in this home.
Create another home
Home
7:23
Set up 1 device
MediaSettings
7:23
Add in AirPlay 2
1. Power on the Soundbar.
2. On an iOS device, go to Settings > Wi-Fi and continue with
step 3.
3. For the Airplay 2, in Settings > Wi-Fi, look for "TCL X937U
Soundbar" under "SETUP AS NEW AIRPLAY SPEAKER" and
complete the setup process.
4. Once setup is complete via step 3, you are now connected to
your network and Wi-Fi. Now you can enjoy AirPlay from any
device on the same network.
32
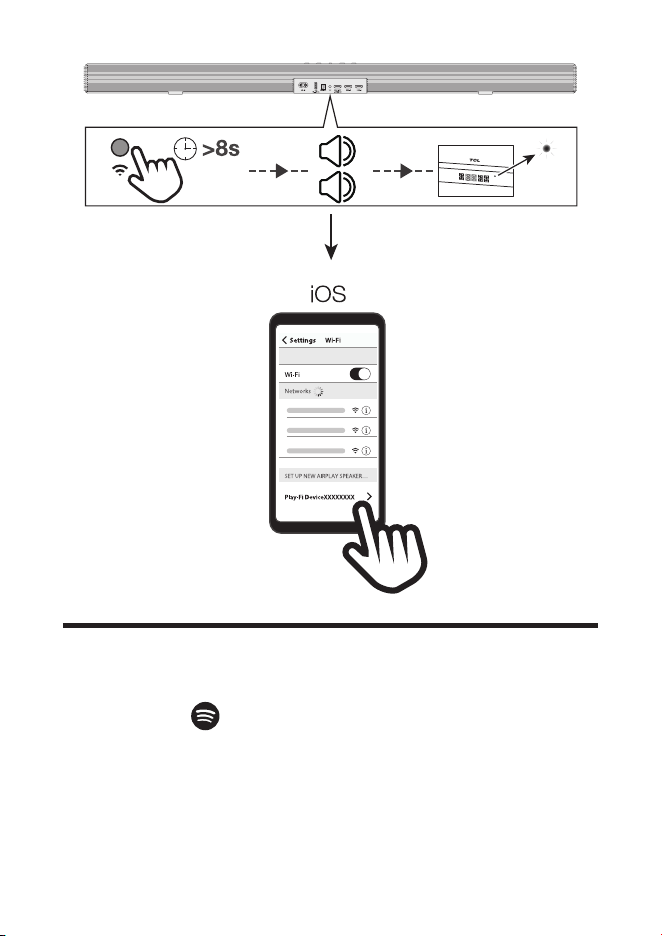
Use Spotify Connect
Use your phone, tablet or computer as a remote control for
Spotify. Go to Explore - Spotify to learn how:
1. Scan the QR code or search in App store to download
Spotify App.
2. Press the button on the back of the soundbar for more
than 8 seconds. You will hear two beeps and see the
LED from ashing to lighting up solidly.
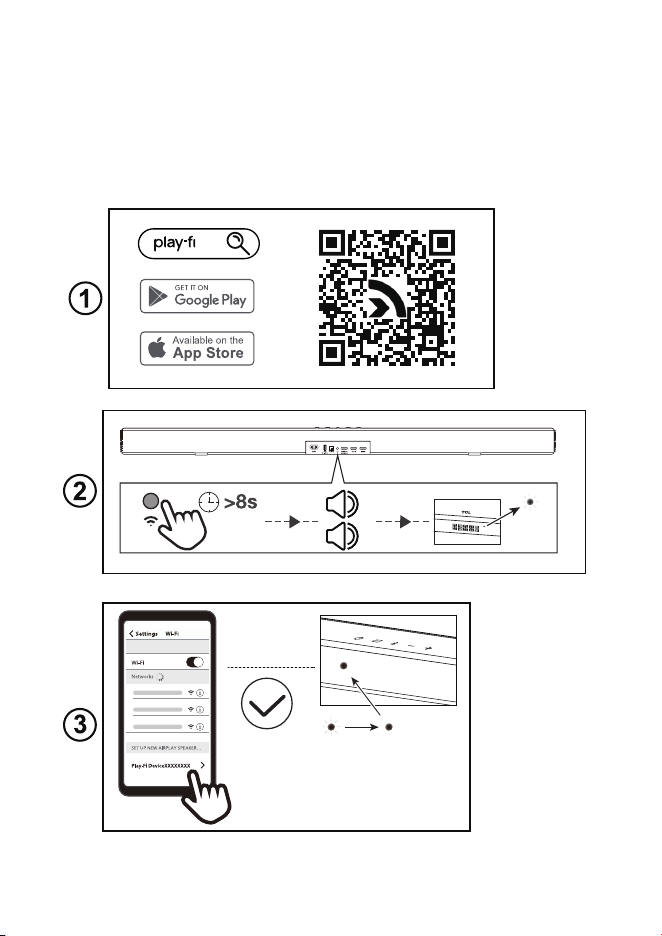
33
3. Select the Play-Fi device on your phone.
4. Open the Play-Fi App, connect Wi-Fi network.
5. Set up Wi-Fi device with a Wi-Fi network.
6. Download and update the Play-Fi App. And then you
can enjoy the functions of the new version App.
34
Add in Amazon Alexa
1. Fix the Play-Fi App and Wi-Fi Network and go through all the
update procedures.
2. The app should automatically prompt you to link it to your
Amazon account. Or by going into Settings in the Play-Fi app,
and selecting the Amazon Alexa option.
3. Depending on your location, you may be prompted to select
your default language for Alexa. Once ready to proceed, Alexa
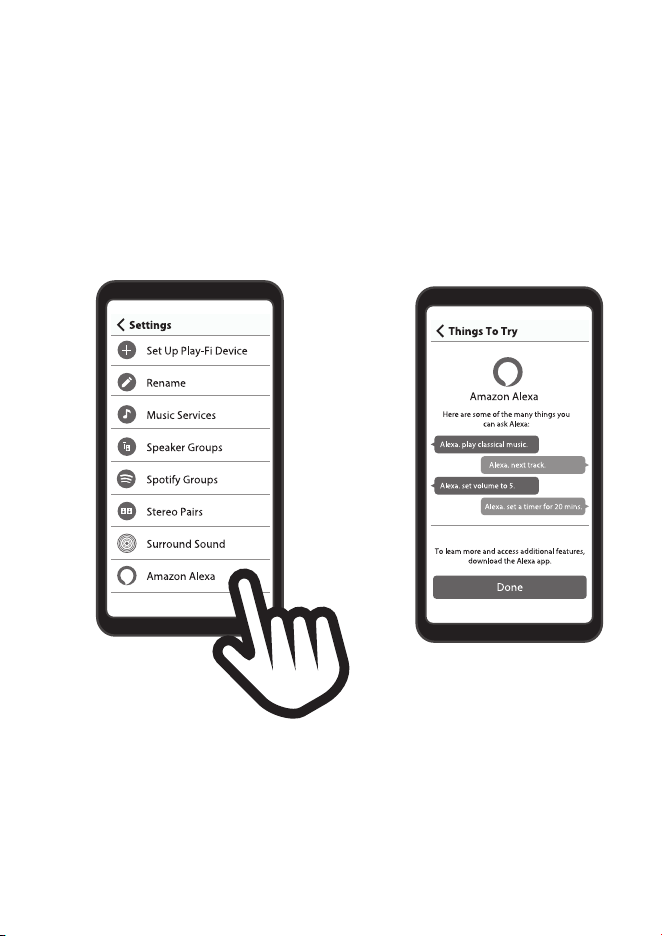
35
will prompt you for your Amazon account, but if you've already
used an Amazon sign-on or authentication on your device
before, it should automatically apply the credentials for you.
4. If you're linking your Amazon account to a Play-Fi products
without microphones, you'll have to ask an Echo, Dot, or similar
product to "Discover Devices" so that your new product can be
identied.
36
Online Firmware Update
Automatic detection and upgrade of Soundbar software:
1. Ensure your Soundbar, subwoofer and satellite speakers
are powered up.
2. Ensure your Soundbar, subwoofer and satellite speakers
pair successfully.
3. Ensure your Soundbar is connected to Wi-Fi network
successfully (Refer to Wi-Fi connection steps on page
30/31/32/34.)
4. You will see the following LED indications:
DOWNLOADING > > CHECK > UPGRADE > UPG00~99
> U OK > START
Note: Do not interrupt the Soundbar and subwoofer during
the upgrading.
WIFI
w
ifi C
onnect
e
d
U
U
Updating
H
E
L
L
O
CHECK
UPGRADE
Updating
DOWNLOADING
99upg00
u ok
START
Updating
Updating

37
4 Use your Soundbar
system
Use your Soundbar with the top
panel or remote control
1
Make sure the Soundbar is properly connected to the
power supply and sources.
2
Press
at the top panel of your Soundbar main unit or
remote control to switch to the correct source.
The LED display on the Soundbar gives you information
about the status of the Soundbar.

38

39
Note: After powering on your Soundbar, if there is no
operation performed on either the Soundbar or
remote control within 10 seconds, all LED indicators
on the Soundbar will turn off and light up again when
the operation is resumed.
Tip: You can use more advanced functions on the remote
control (see ‘Overview of the remote control’ on page
20).
Listen to music from your Bluetooth
device
1 Make sure that your device supports A2DP and/or
AVRCP. For information, check the specication of your
device.
2 Pair your Bluetooth device with the Soundbar (see
‘Connect the Soundbar with your Bluetooth device’ on
page 29).
3 Start listening to music stored in your Bluetooth device
through the Soundbar.
• If your Bluetooth device supports A2DP, you can
listen to music, but you cannot control the playback.
• If your Bluetooth device supports AVRCP, you can
listen to music and control music playback with the
remote control. Press the center button to pause or
resume music playback. Press left/right to skip to
the previous/next track.
Note
• The operational range between the Soundbar and your
Bluetooth device is approximately 10 meters (without
any obstacle between the Bluetooth device and
Soundbar).
40
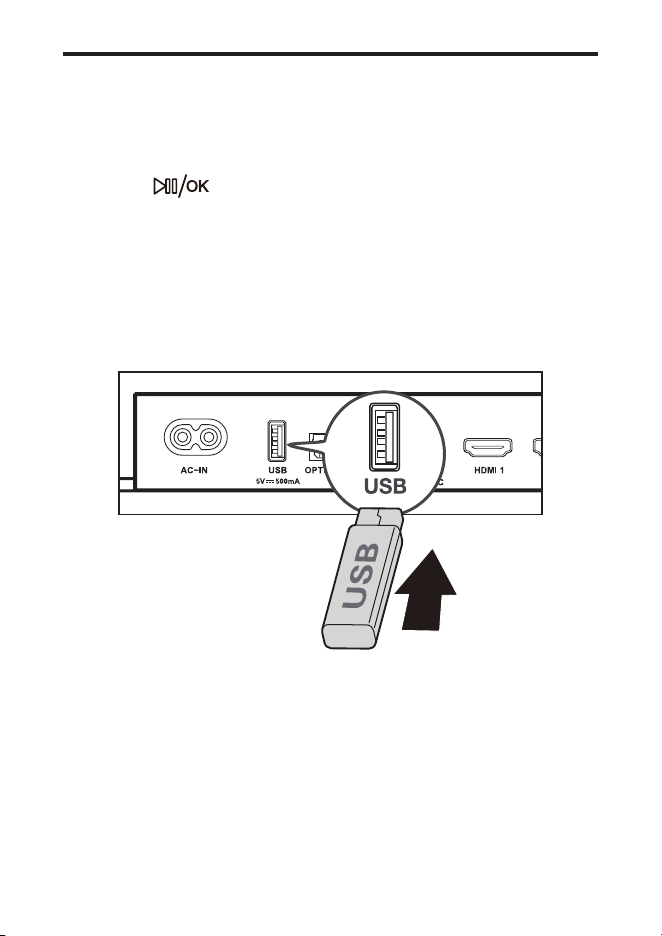
Use the USB cable or device for
music playback
• Press on the remote control to listen to/pause/
resume the music.
• Press left/right button on the remote control to skip to
the previous or next track.
• Press up/down button to increase or decrease the
volume level.
Tip
• This Soundbar can support USB devices of up to 64GB
memory and the supported le format is MP3.
• Music in folders of the USB device should be within
5 (including 5) directory levels. Otherwise, the Soundbar
can not detect the music.

41
5 Specications
Product Name
7.1.4 Channel Soundbar with Play-Fi / Dolby Atmos / DTS:X
Soundbar
• Power supply: AC 100-240V~50/60Hz
• Power consumption: 58W
• Power consumption at standby mode:
≤
0.5W
• Impedance: 8
Ω
x 7
• Frequency response: 160Hz-20KHz
• Dimensions (WxHxD): 1050 x 65 x 120 (mm)
• Weight: 4.1 kg
• Operating temperature: 0°C - 45°C
Wireless subwoofer
• Power supply: AC 100-240V~50/60Hz
• Power consumption: 40W
• Power consumption at standby mode:
≤
0.5W
• Impedance: 3
Ω
• Frequency response: 40 Hz-120 Hz
• Frequency range: 5732MHz-5848MHz
• Max transmitting power: 13dBm
• Dimensions (WxHxD): 240 x 400 x 365mm
• Weight: 7.8 kg
Satellite speakers
• Power supply: DC 24V 1.5A
• Power consumption: 20W
• Power consumption at standby mode:
≤
0.5W
• Impedance: 8
Ω
x 4 (2*2)
• Frequency response: 40 Hz-120 Hz
• Frequency range: 5732MHz-5848MHz
• Max transmitting power: 13dBm
• Dimensions (WxHxD): 96 x 120 x 160 (mm)
• Weight: 0.96 kg
Bluetooth
• Bluetooth version: 5.0, Bluetooth profile - Bluetooth
stereo supported (Advanced Audio Distribution Prole -
A2DP; Audio Video Remote Control Prole - AVRCP)

42
• Frequency range: 2402 Mhz – 2480 Mhz
• Max transmitting power: 15dBm
Remote control
• Distance/Angle: 6m/ 30°
• Battery type: 1.5V AAA battery x 2, user replaceable.
Wi-Fi
WLAN Standard IEEE802.11a/b/g/n/ac
Security WPA2TM/WPATM
Frequency range 2.4 GHz band (1-13 ch)/5 GHz
band
For EU
2412 MHz to 2472 MHz
5180 MHz to 5320 MHz
5500 MHz to 5700 MHz
5745 MHz to 5850 MHz
Maximum power(EIRP) 20 dBm
6 Notice
Disposal of your old product and battery
Your product is designed and manufactured with
high quality materials and components, which can
be recycled and reused.
Remove the disposable battery
To remove the disposable batteries, see the section ‘Install/
replace the remote control battery’.
Environmental protection and sustainability
We have omitted all unnecessary packaging and make sure
it is eco-friendly and sustainable.
43
Trademarks
The Bluetooth® word mark and logos are registered trademarks
owned by Bluetooth SIG, Inc. and any use of such marks by TTE
Corporation is under license. Other trademarks and trade names
are those of their respective owners.
For DTS patents, see http://patents.dts.com. Manufactured under
license from DTS, Inc. (for companies headquartered in the U.S./
Japan/Taiwan) or under license from DTS Licensing Limited (for all
other companies). DTS, DTS:X, the DTS:X logo, DTS, DTS Play-
Fi, Play-Fi and the DTS Play-Fi and Play-Fi logos are registered
trademarks or trademarks of DTS, Inc. in the United States and
other countries. © 2022 DTS, Inc. ALL RIGHTS RESERVED.
To control this AirPlay 2–enabled speaker, iOS 11.4 or later is
required. Apple, AirPlay, iPad, iPad Air, iPad Pro, and iPhone
are trademarks of Apple Inc., registered in the U.S. and other
countries.
The Spotify Software is subject to third party licenses found here:
https://www.spotify.com/connect/third-party-licenses

44
Google and Chromecast built-in are trademarks of Google LLC.
The Adopted Trademarks HDMI, HDMI High-Denition Multimedia
Interface, and the HDMI Logo are trademarks or registered
trademarks of HDMI Licensing Administrator, Inc. in the United
States and other countries.
Google and Chromecast built-in are trademarks of Google LLC.
Dolby, Dolby Vision, Dolby Atmos, and the double-D symbol
are registered trademarks of Dolby Laboratories Licensing
Corporation. Manufactured under license from Dolby Laboratories.
Confidential unpublished works. Copyright © 2012–2022 Dolby
Laboratories. All rights reserved.
Amazon, Alexa and all related logos are trademarks of Amazon.
com, Inc. or its afliates.

45
7 FAQ
No power
• Make sure the AC power cord and AC input connector
are connected properly.
• Make sure there is power supply.
• Make sure the Soundbar has turned on.
No sound
• Make sure the audio cable is connected to the Soundbar
and your device.
• Make sure you have selected the correct source.
• Press up button to increase the volume level.
• Make sure the Soundbar is not muted.
Low voice
• Use the remote control to adjust the volume.
• May opend Night mode, please press and use up/
down button to exit the Night mode.
* Other EQs cannot be selected in Night Mode.
The remote control does not work.
• Make sure you have selected the correct source.
• Make sure the distance of remote control and the
Soundbar is within operational range.
• Make sure the battery is correctly inserted and is
working.
• Make sure the remote control is close to the remote
control sensor of the Soundbar.
I hear distorted sound.
• Make sure all cables are properly connected.
• Make sure you have selected the correct source.
• Make sure the TV is muted if you play audio from the TV.
I cannot find the Bluetooth name of this Soundbar on
my Bluetooth device.
• Make sure the Bluetooth function is activated on your
Bluetooth device.
• Make sure the Soundbar has paired with your Bluetooth
device.


TCL support:
Please visit www.tcl.com/au & www.tclelectronics.co.nz
WE ARE
READY TO
HELP
contact us rst
with any questions
TAKE CARE WHEN
REMOVING THE Soundbar
Copyright © 2023 TCL. All rights reserved.
X937U_AU_UM_V1.1