CUT-OFF SAW 355MM, ABRASIVE DISC
pART NO: SM355D
Thank you for purchasing a Sealey product. Manufactured to a high standard, this product will, if used according to these
instructions, and properly maintained, give you years of trouble free performance.
IMPORTANT: PLEASE READ THESE INSTRUCTIONS CAREFULLY. NOTE THE SAFE OPERATIONAL REQUIREMENTS, WARNINGS & CAUTIONS. USE
THE PRODUCT CORRECTLY AND WITH CARE FOR THE PURPOSE FOR WHICH IT IS INTENDED. FAILURE TO DO SO MAY CAUSE DAMAGE AND/OR
PERSONAL INJURY AND WILL INVALIDATE THE WARRANTY. KEEP THESE INSTRUCTIONS SAFE FOR FUTURE USE.
1. SAFETy
1.1. ELECTRICAL SAFETy
WARNING! It is the user’s responsibility to check the following:
Check all electrical equipment and appliances to ensure that they are safe before using. Inspect power supply leads, plugs and
all electrical connections for wear and damage. Sealey recommend that an RCD (Residual Current Device) is used with all electrical
products. You may obtain an RCD by contacting your local Sealey dealer.
If the product is used in the course of business duties, it must be maintained in a safe condition and routinely pAT (portable
Appliance Test) tested.
Electrical safety information, it is important that the following information is read and understood.
1.1.1. Ensure that the insulation on all cables and on the appliance is safe before connecting it to the power supply.
1.1.2. Regularly inspect power supply cables and plugs for wear or damage and check all connections to ensure that they are secure.
1.1.3. Important: Ensure that the voltage rating on the appliance suits the power supply to be used and that the plug is tted with the
correct fuse - see fuse rating in these instructions.
8 DO NOT pull or carry the appliance by the power cable.
8 DO NOT pull the plug from the socket by the cable.
8 DO NOT use worn or damaged cables, plugs or connectors. Ensure that any faulty item is repaired or is
replaced immediately by a qualied electrician.
1.1.4. This product is tted with a BS1363/A 13 Amp 3 pin plug.
If the cable or plug is damaged during use, switch the electricity supply and remove from use.
Ensure that repairs are carried out by a qualied electrician.
Replace a damaged plug with a BS1363/A 13 Amp 3 pin plug. If in doubt contact a qualied electrician.
a) Connect the GREEN/YELLOW earth wire to the earth terminal ‘E’.
b) Connect the BROWN live wire to the live terminal ‘L’.
c) Connect the BLUE neutral wire to the neutral terminal ‘N’.
Ensure that the cable outer sheath extends inside the cable restraint and that the restraint is tight.
Sealey recommend that repairs are carried out by a qualied electrician.
1.2. GENERAL SAFETy.
WARNING! Disconnect the saw from the mains power, and ensure that the cutting disc is at a complete standstill before attempting
to change accessories, service or perform any maintenance.
99 99 Maintain the saw in good condition (use an authorised service agent).
9 Replace or repair damaged parts. Use recommended parts only. Unauthorised parts may be dangerous and will invalidate the warranty.
9 Locate the saw in a suitable work area. Ensure that the surface is flat and firm. Keep the area clean and tidy and free from unrelated
materials, and ensure that there is adequate lighting.
9 Keep the saw clean for best and safest performance and check moving parts alignment regularly.
WARNING! Before each use check that the cutting disc is secure and that it is not worn or damaged.
NOTE: Only persons qualified under the “Abrasive Wheels Regulations” holding a current grinding wheel certificate may change discs
(wheels).
9 Ensure that replacement discs are not damaged in any way - cracks, deformations or splinters etc. Also check the mounting flanges
to ensure that they are not deformed, burred or chipped. Damaged flanges must not be used as they may cause uneven pressure on
the disc which may cause the disc to break. DO NOT over tighten a disc and never tamper with a disc in order to adapt it to a different
size holder.
9 Always use a disc suitable for the material being cut. Ensure that the cutting discs specified maximum speed is equal to, or higher than,
that indicated on the machine data plate. Once mounted on the saw, test the disc before use by facing the cut-off saw in a safe direction
(point disc away from yourself, others and vulnerable items) and running it for a short time. DO NOT use circular saw blades.
WARNING! Keep guard and holding screws in place, tight and in good working order. Check regularly for damaged parts.
A guard or any other part that is damaged must be repaired or replaced before next use. The safety guard is a mandatory fitting when
the saw is used on premises covered by the Health & Safety at Work Act.
99 99 Remove adjusting keys and wrenches from the machine and its vicinity before turning it on.
WARNING! Wear approved safety eye protection, ear defenders, gauntlets and, if dust is generated, respiratory protection.
9 Remove ill fitting clothing. Remove ties, watches, rings and other loose jewellery and contain long hair.
9 Keep hands and body clear of the worktable when operating the saw, and DO NOT position your body in line with the abrasive
wheel.
SM355D Issue 4 (HF) 06/04/18
Original Language Version
© Jack Sealey Limited
Refer to
instructions
Wear eye
protection
Wear ear
protection
Wear safety
footwear
Wear protective
clothing
Recommended fuse rating
13 Amp
9 Maintain correct balance and footing. Ensure the floor is not slippery and wear non-slip shoes.
9 Keep children and unauthorised persons away from the work area.
9 Avoid subjecting disc to excessive strain, always ease disc down against workpiece (a harsh downward impact may break the disc
8 DO NOT apply undue force on the handle in order to cut workpiece. Maintain a controlled cutting speed through the workpiece.
8 DO NOT cover the motor or obstruct ventilation openings.
WARNING! DO NOT switch on the saw whilst the disc is in contact with the workpiece. Bring the rotating disc to the workpiece.
9 Avoid unintentional starting of the saw.
8 DO NOT hold the workpiece by hand. Use base vice to secure the workpiece.
8 DO NOT attempt to cut any material bigger than the maximum capacities stated in section 2: ‘Specifications’
8 DO NOT use the saw for a task it is not designed to perform.
8 DO NOT allow untrained persons to operate the saw.
8 DO NOT get the saw wet, or use in damp or wet locations or areas where there is condensation.
WARNING! DO NOT use the saw where there are flammable liquids, solids or gases such as paint solvents and including waste wiping
rags etc.
8 DO NOT operate the saw if any parts are missing or damaged as this may cause failure and/or personal injury.
8 DO NOT remove the safety guard whilst the saw is in use.
8 DO NOT attempt to remove a workpiece until the disc has stopped rotating.
8 DO NOT touch the workpiece close to the cut as it will be very hot. Allow to cool. The cut edge of the workpiece will also be very
sharp.
8 DO NOT leave the saw operating unattended.
8 DO NOT operate the saw when you are tired or under the influence of alcohol, drugs or intoxicating medication.
9 When not in use switch off the saw and remove the plug from the power supply.
9 To move the saw, lock the swing arm with the lock button and lift by the transportation handle.
2. INTRODUCTION
General purpose abrasive saw suitable for site use. Supplied with abrasive disc suitable for metal-cutting.
3. SpECIFICATION
4. CONTENTS
Unpack the product and check the contents. Ensure that there is no damage. If any problem is noted, contact your supplier immediately.
IMPORTANT: Abrasive disc MUST only be tted by a qualied person.
Motor .................. 2480W - 230V
No-load speed ................ 3800rpm
Double Insulated ...............Class II
Size of disc.......... Ø355 x 3 x 25.4mm
Disc part No. ............... PTC/355C
Cutting capacity @ 90°(bar).......105mm
Cutting capacity @ 90°(pipe) .....Ø120mm
Cutting capacity @ 45°(bar)........50mm
Cutting capacity @ 45°(pipe) ......Ø80mm
Mitre angles ................... 0° - 45°
Net Weight ....................21.85kg
Extraction Port (ID/OD) ......35mm/38mm
Noise power .................... 94dB
Noise pressure................ 107dB.A
Vibration (under load)........... 4.39m/s²
g.1
g.2
g.3
SM355D Issue 4 (HF) 06/04/18
Original Language Version
© Jack Sealey Limited
5. OpERATION
WARNING! Before cutting ensure that you wear approved safety goggles, ear
defenders, appropriate dust mask if cutting generates dust and safety gloves.
All safety instructions in Section 1 must be followed.
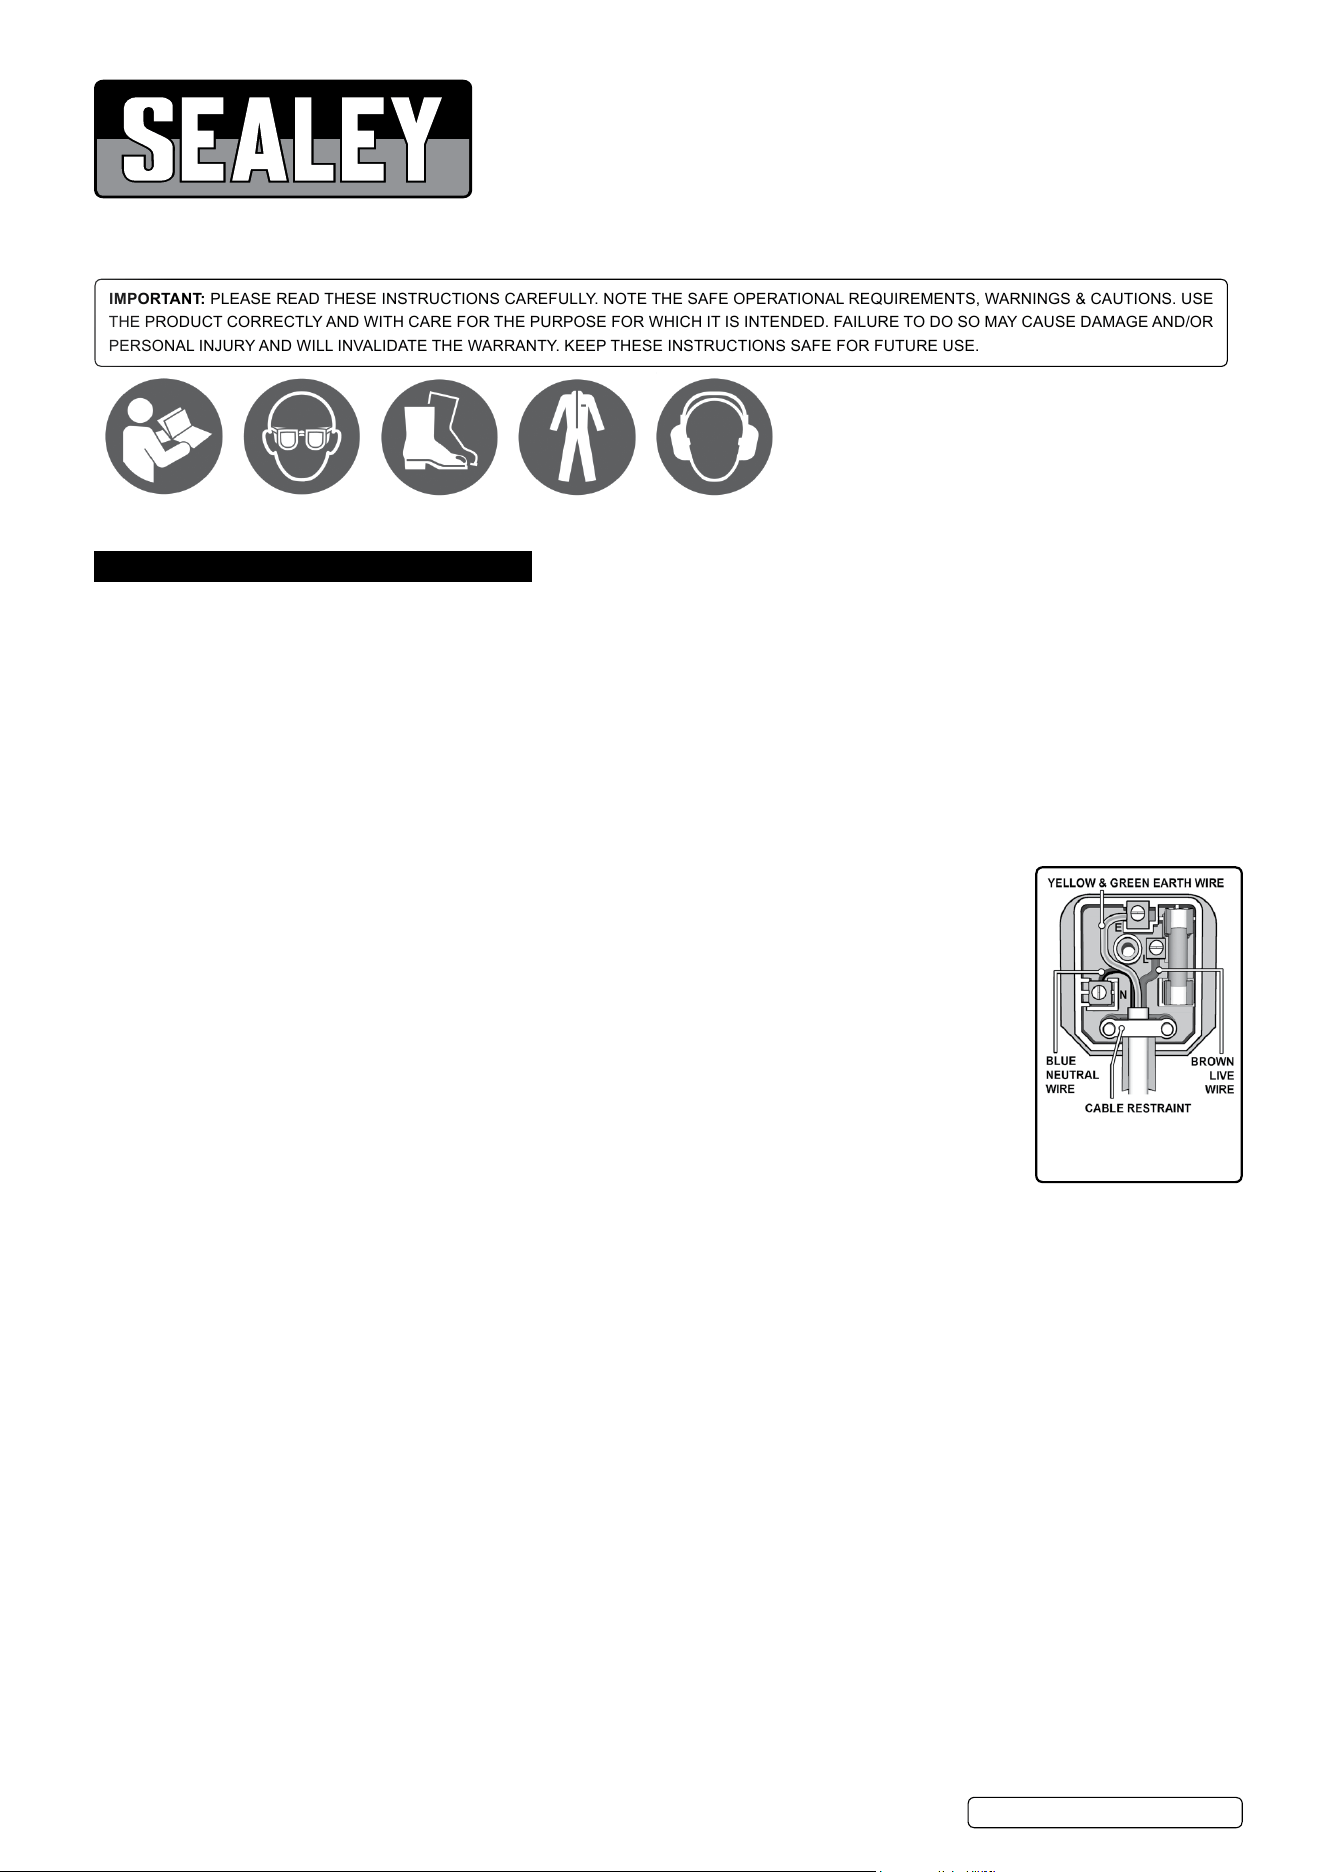
5.1. USING ThE LIFT ARM LOCk BUTTON.(g.2)
When not in use or when being transported the cutting arm should always be locked down. To
lock the arm down, pull it to its lowest position against the return spring pressure until it is
against the stop. Hold it in this position and push the button in. When the pressure on the arm
is released it will move up slightly and then hold.
To release the arm, push it down against the stop and hold it there. pull the locking button
outwards to free it and hold onto the operating handle whilst the arm rises.
If necessary the arm can be locked in the up position by pushing the knob back to the locked
position.
5.2. DUST EXTRACTION.
5.2.1. The SM355D cut off saw comes with a dust extraction port, situated at the rear of the cutting
table.
5.2.2. Attach dust extraction pipe (not included) to the port (See internal and external dimensions in
specification).
5.2.3. Activate dust extractor (not included), then activate cut off saw.
5.3. SECURING THE WORKPIECE.(g.3)
5.3.1. Ensure that the saw is unplugged from the power supply.
5.3.2. Check that the back stop is at 90° to the abrasive disc using a set square.
5.3.3. Ensure the back stop fixings are tight using the hex key provided.
5.3.4. To move the other jaw up to the workpiece, flip the thread lock open as shown in fig.6
and slide the jaw face up to the workpiece. Flip the thread lock back down and tighten the
workpiece in the vice.
5.3.5. For additional cutting capacity relocate the back stop (fig.3) in the alternative mounting holes
indicated and fully secure.
5.3.6. When cutting long workpieces use additional supports along the length.
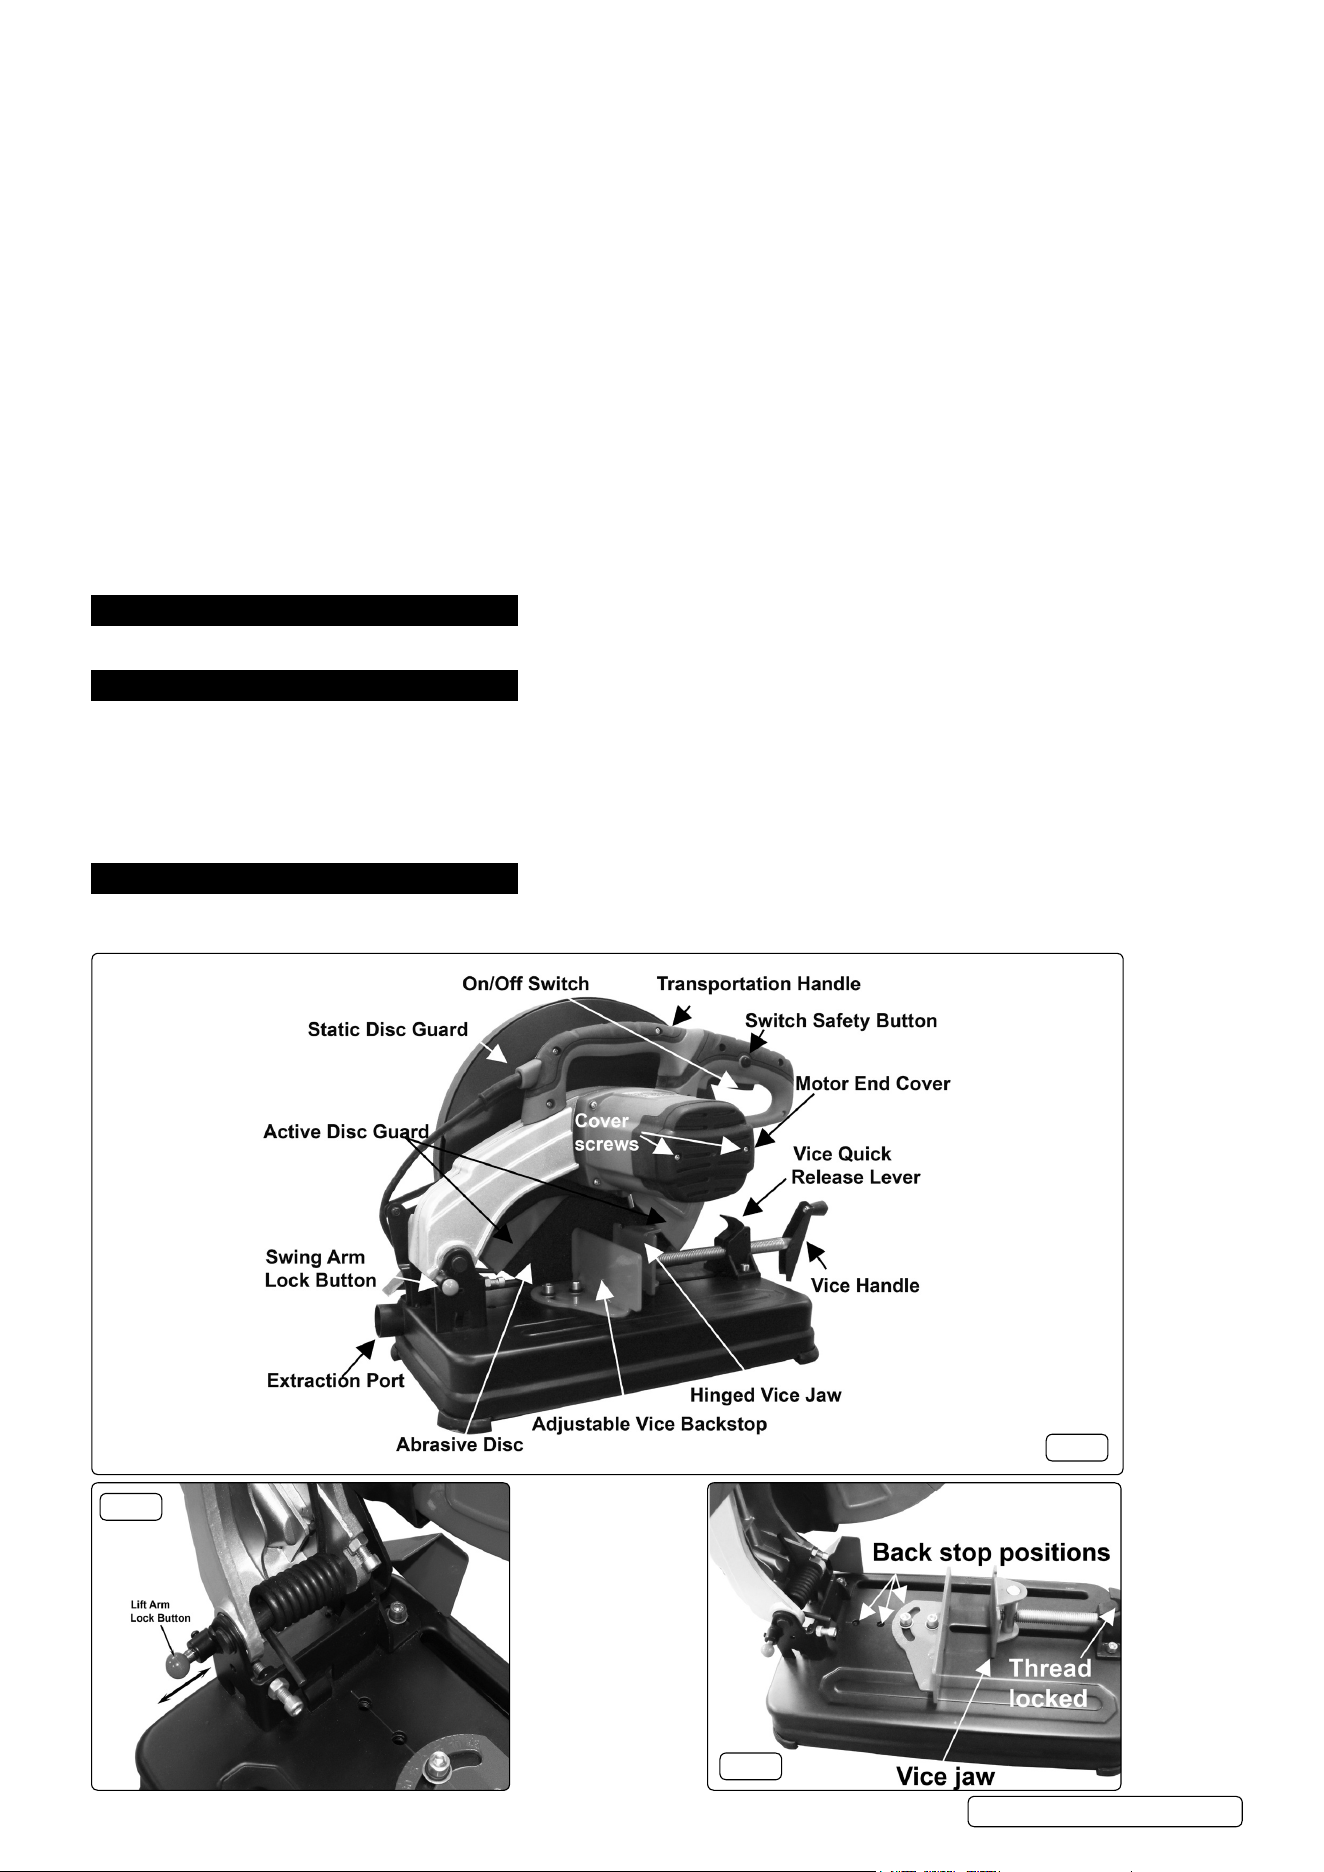
5.4. CUTTING DEpTh.
5.4.1. As the abrasive disc begins to wear down during use it may be necessary to adjust the cutting
depth. (See depth stop in fig.5) Only a small movement of the depth stop is required to increase/
decrease the depth.
5.5. MITRE CUTTING.
5.5.1. To cut at an angle loosen the two hex cap bolts on the back stop with the hex key provided and
rotate the back stop to the required angle using the graduated scale stamped on the back edge
of the back stop. Align the required angle with the index line on the base plate as shown in fig.4
and tighten down the back stop fixings. place the workpiece against the back stop and move the
other jaw up to it and tighten.
5.6. ON/OFF SWITCh.(g.7)
5.6.1. The On/Off switch is locked in the Off position. To turn On the saw you must press in the safety
button with your thumb before pulling the switch upwards. The switch is spring loaded and must
be held in the up position in order for the saw to continue running. As soon as the pressure on
the switch is released the saw will turn off.
5.7. OpERATION
WARNING! DO NOT switch on the saw whilst the disc is in contact with the workpiece.
Bring the rotating disc to the workpiece.
5.7.1. The cutting disc must be running at maximum speed before attempting to lower the cutting edge
onto the workpiece.
5.7.2. Lower the cutting disc slowly and smoothly down towards the workpiece (avoid jerky
movements).
5.7.3. Avoid subjecting the disc to excessive strain. Always ease the disc down against the workpiece (a harsh downward impact may
cause disc failure) and do not apply undue force on the handle when cutting the workpiece. Maintain a controlled cutting speed.
5.7.4. When cutting is complete, fully raise the cutting disc and release the On/Off switch.
5.7.5. Wait until the disc has stopped rotating before attempting to remove the workpiece.
g.4
g.5
g.6
g.7
g.10
g.8
g.9
SM355D Issue 4 (HF) 06/04/18
Original Language Version
© Jack Sealey Limited
Sealey Group, Kempson Way, Suffolk Business Park, Bury St Edmunds, Suffolk. IP32 7AR
01284 757500 01284 703534 sales@sealey.co.uk www.sealey.co.uk
ENVIRONMENT pROTECTION
Recycle unwanted materials instead of disposing of them as waste. All tools, accessories and packaging should be sorted, taken to
a recycling centre and disposed of in a manner which is compatible with the environment. When the product becomes completely
unserviceable and requires disposal, drain any fluids (if applicable) into approved containers and dispose of the product and fluids
according to local regulations.
WEEE REGULATIONS
Dispose of this product at the end of its working life in compliance with the EU Directive on Waste Electrical and Electronic Equipment
(WEEE). When the product is no longer required, it must be disposed of in an environmentally protective way. Contact your local solid
waste authority for recycling information.
Note: It is our policy to continually improve products and as such we reserve the right to alter data, specifications and component parts without prior
notice.
Important: No Liability is accepted for incorrect use of this product.
Warranty: Guarantee is 12 months from purchase date, proof of which is required for any claim.
6. ChANGING CUTTING DISk
▲ DANGER! The use of damaged discs is dangerous and may cause injury.
WARNING! Ensure that the saw is unplugged from the power supply before attempting to change the cutting disc.
6.1. IMpORTANT! Cutting discs used with this machine must be of an adequate speed rating and suitable for the task in hand.
(See specification). Only persons qualified under the “Abrasive Wheels Regulations” and holding a current grinding wheel
certificate are to change cutting discs.
6.1.1. Before using a cutting disc ensure that there are no fissures or cracks in it. Once mounted on the saw, test the disc before use by facing
the saw in a safe direction (turned away from yourself, others and vulnerable items) and run it for a short time.
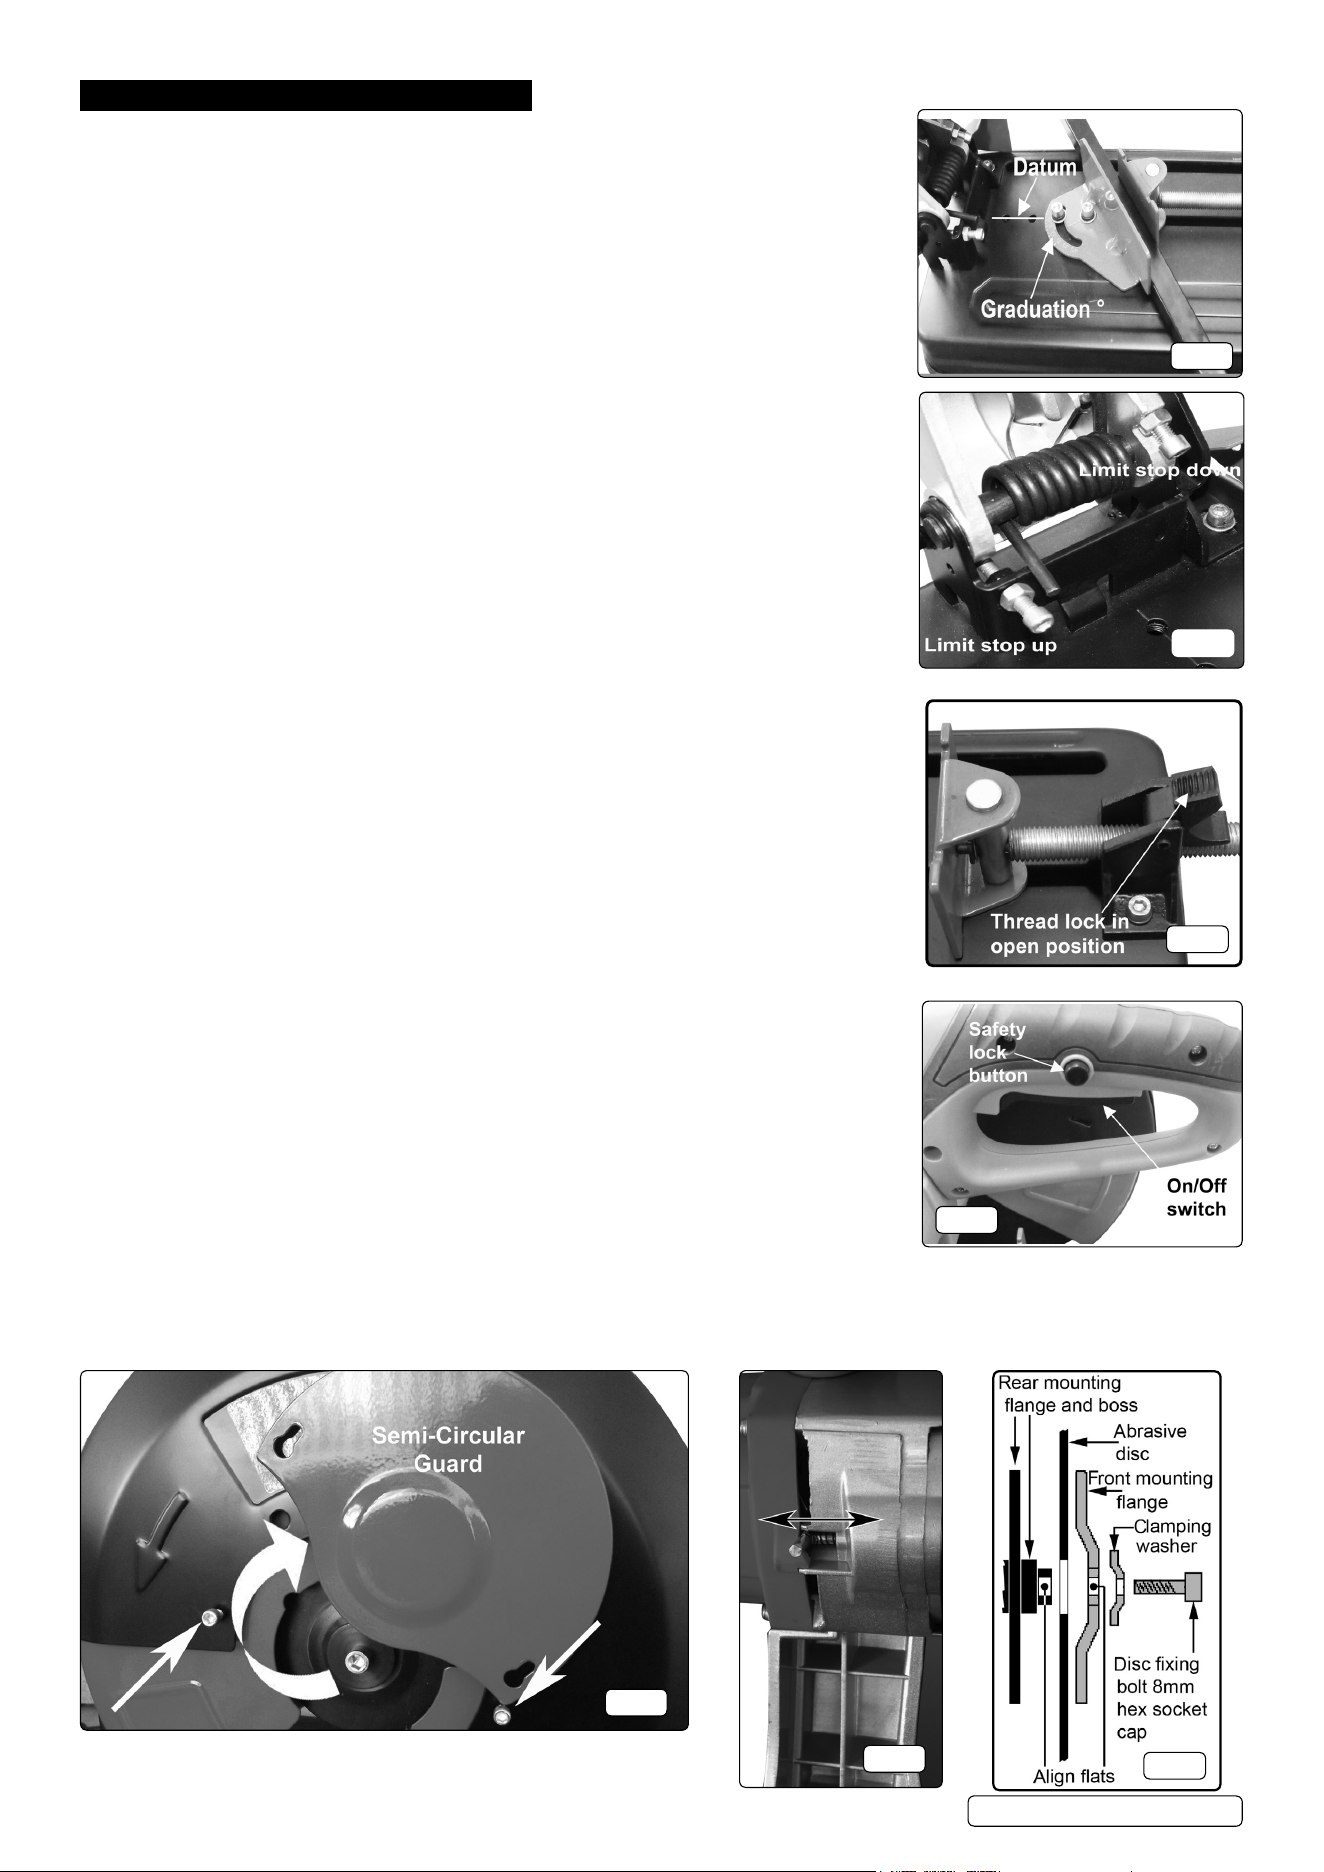
6.2. REMOVING AND INSTALLING CUTTING DISCS
NOTE: The use of protective gloves is recommended.
6.2.1. Remove the semi-circular guard by slackening the two hex head screws shown in g.9.
6.2.2. Raise the arm and hold the guard open.
6.2.3. Insert an 8mm hex key into the disc xing bolt and turn, holding the locking lever (g.10) until the lever is felt to lock the wheel.
6.2.4. Unfasten the bolt, releasing the components shown in g.9.
6.2.5. Ret the disc as in g.9. DO NOT overtighten.
7. MAINTENANCE
WARNING! Ensure that the saw is unplugged from the power supply before attempting any maintenance.
7.1. Regularly clean the dust which accumulates inside the protective guard and on the external parts.
7.2. periodically clean dust from motor ventilation openings with a soft brush.
7.3. periodically clean and oil the vice screw.
7.4. Change the abrasive disc when it is worn and/or does not operate efficiently.
7.5. Before each use, check for obvious signs of damage to the machine. Also check for loose screws and other moving parts, incorrectly
mounted or misaligned parts and any other factors that might create an unsafe working environment.
WARNING! Should excessive noise or vibration occur, cease use immediately. Turn off the machine and disconnect from power supply.
8 DO NOT use the machine again until the problem has been resolved fully.
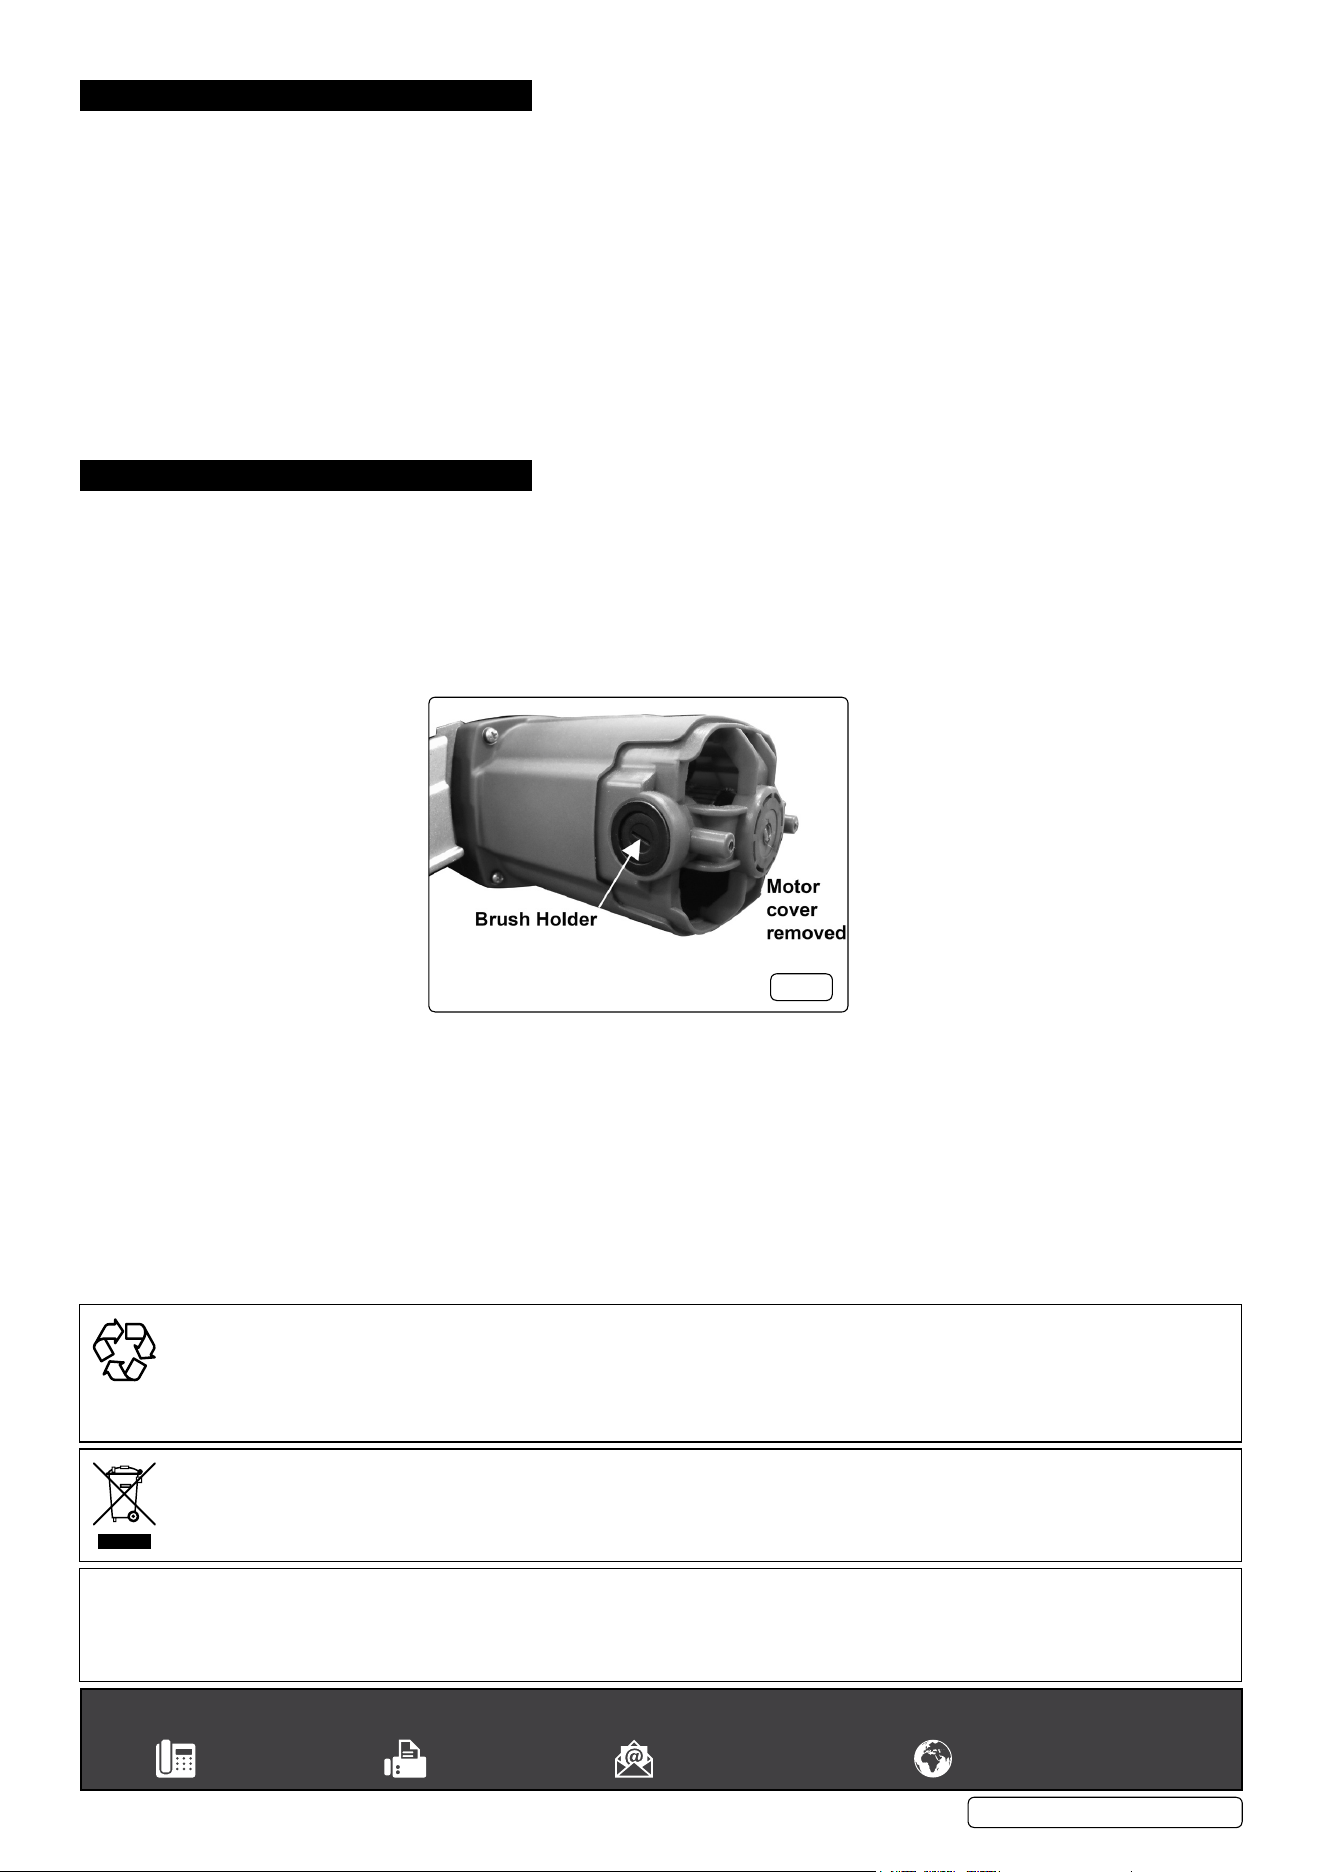
7.6. ChANGING ThE MOTOR BRUShES. (g.11)
The motor brushes should be checked periodically for wear and renewed when worn down or pitted. The brushes can be accessed by
undoing the cover securing screws and removing the motor end cover.(fig.1)
7.6.1. Unscrew the brush holders and withdraw the brush assemblies for inspection.Ffig.11)
7.6.2. Insert the new brush into the brush holder, if required. place the plastic cap over the head of the brush assembly and press the spring
downwards ensuring that the tabs on either side of the brush head enter the same keyway as the brush. Screw the caps back into
position.
7.6.3. Replace motor end cover.
g.11
SM355D Issue 4 (HF) 06/04/18
Original Language Version
© Jack Sealey Limited