
TP10124
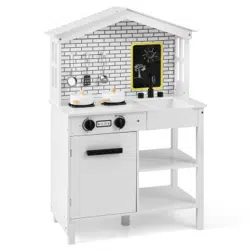
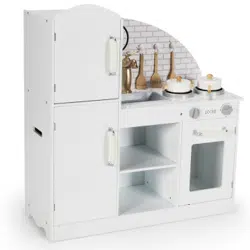
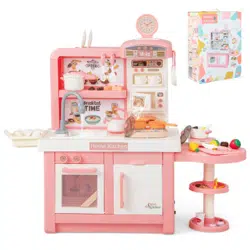
Kids Kitchen Playset
Kinderküche
Jeu de Cuisine pour Enfants
Kuchenka z akcesoriami dla dzieci
IMPORTANT! READ CAREFULLY AND KEEP FOR
FUTURE REFERENCE.
If you're having difficulty, our friendly customer team is always here to help.
FRA:cs.fr@costway.com
DEU:cs.de@costway.com
ESP:cs.es@costway.com
POL:sklep@costway.comUSA:[email protected]
AUS:cs.au@costway.com
ITA:cs.it@costway.com
GBR:cs.uk@costway.com
DEU office: FDS GmbH, Neuer Höltigbaum 36, 22143 Hamburg, Deutschland
ITA office: Milano
FRA office: Saint Vigor d'Ymonville
POL office: Gdańsk
GBR office: IpswichAUS office: TruganinaUSA office: Fontana
02 03
Before You Start
Caution: Children should use this product under the parental supervision.
Danger: Keep all small parts and packaging materials for this product
away from babies
and children, otherwise they may pose a choking hazard.
Danger: Lack of attachment may cause a risk of tipping.
Please read all instructions carefully and keep it for future reference.
Assembled only by adults
Remove all packaging, separate and count all parts and hardware.
Read through each step carefully and follow the proper order.
We recommend that, where possible, all items are assembled near the
area in which they will be placed in use, to avoid moving the product
unnecessarily once assembled.
Ensure a secure surface during installation, and always place the
product on a flat, steady and stable surface.
EN
Warning for Assembly
General Security Warning
WARNING:
CHOKING HAZARD
-Small parts.
Not for children under 3 years.
DE
Bevor Sie beginnen
Vorsicht: Kinder sollten diesen Artikel unter elterlicher Aufsicht benutzen.
Gefahr: Halten Sie alle Kleinteile und Verpackungsmaterialien, die
verschluckt werden können, von Babys und Kindern fern.
Gefahr: Unsachgemäße Montage kann zu Kippgefahr führen.
Bitte sorgfältig lesen und zum späteren Nachschlagen aufbewahren.
Montage nur durch Erwachsene
Entfernen Sie alle Verpackungen, Überprüfen Sie, ob alle Teile und
Zubehörteile vorhanden sind.
Lesen Sie jeden Montageschritt sorgfältig durch und folgen Sie den
Anleitungen.
Wir empfehlen, alle Teile möglichst in der Nähe des Aufstellungsortes
zu montieren, um unnötige Bewegungen nach der Montage zu
vermeiden.
Achten Sie bei der Montage auf einen sicheren Untergrund und stellen
Sie den Artikel immer auf eine ebene, feste und stabile Fläche.
Achtung bei Montage
Allgemeine Sicherheitswarnung
Achtung:
ERSTICKUNGSGEFAHR
-Kleine Teile.
Nicht für Kinder unter 3 Jahren.

04 05
Avant de Commencer
Attention : Les enfants doivent utiliser ce produit sous la surveillance de leurs
parents.
Danger : Gardez toutes les petites pièces et les matériaux d'emballage de ce
produit hors de la portée des bébés et des enfants pour éviter un risque
d'étouffement.
Danger : Le manque de la fixation pourrait entraîner un risque de basculement.
Construction seulement par des adultes
Retirez tous les emballages, séparez et comptez toutes les pièces et
le matériel.
Lisez attentivement chaque étape et suivez l'ordre correct.
Nous recommandons que, dans la mesure du possible, tous les
articles soient assemblés à proximité de la zone dans laquelle ils
seront utilisés, afin d'éviter de déplacer inutilement le produit une fois
assemblé.
Assurez-vous que la surface soit solide pendant la construction et
placez toujours le produit sur une surface plane et stable.
FR
Avertissement pour l'Assemblage
Avertissement de Sécurité Générale
AVERTISSEMENT :
RISQUE D'ÉTOUFFEMENT
– Les petites pièces.
Ne convient pas aux enfants de moins
de 3 ans.
Veuillez lire attentivement toutes les instructions et les conserver pour la
référence ultérieure.
Zanim Zaczniesz
Uwaga: Dzieci moga używać tego produktu jedynie pod nadzorem dorosłych.
Niebezpieczeństwo: Trzymaj wszystkie małe części i materiały
opakowaniowe dla tego produktu z dala od niemowląt i dzieci, w przeciwnym
razie mogą stwarzać ryzyko zadławienia.
Niebezpieczeństwo: Brak mocowania może spowodować ryzyko
przewrócenia.
Montażem powinny zająć się wyłącznie osoby dorosłe
Usuń opakowanie i upewnij się, że zestaw zawiera wszystkie części i
elementy montażowe.
Przeczytaj uważnie każdy krok i postępuj we właściwej kolejności.
Zalecamy, aby w miarę możliwości wszystkie elementy były
montowane w pobliżu miejsca, w którym będą używane, aby uniknąć
niepotrzebnego przenoszenia produktu po złożeniu.
Zapewnij bezpieczną powierzchnię podczas montażu i zawsze
umieszczaj produkt na płaskiej i stabilnej powierzchni.
PL
Ostrzeżenie
Ogólne ostrzeżenia dotyczące bezpieczeństwa
UWAGA:
RYZYKO ZADŁAWIENIA
- Produkt zawiera małe elementy.
Nieodpowiednie dla dzieci poniżej 3
roku życia.
Przeczytaj uważnie wszystkie instrukcje i zachowaj je na przyszłość.
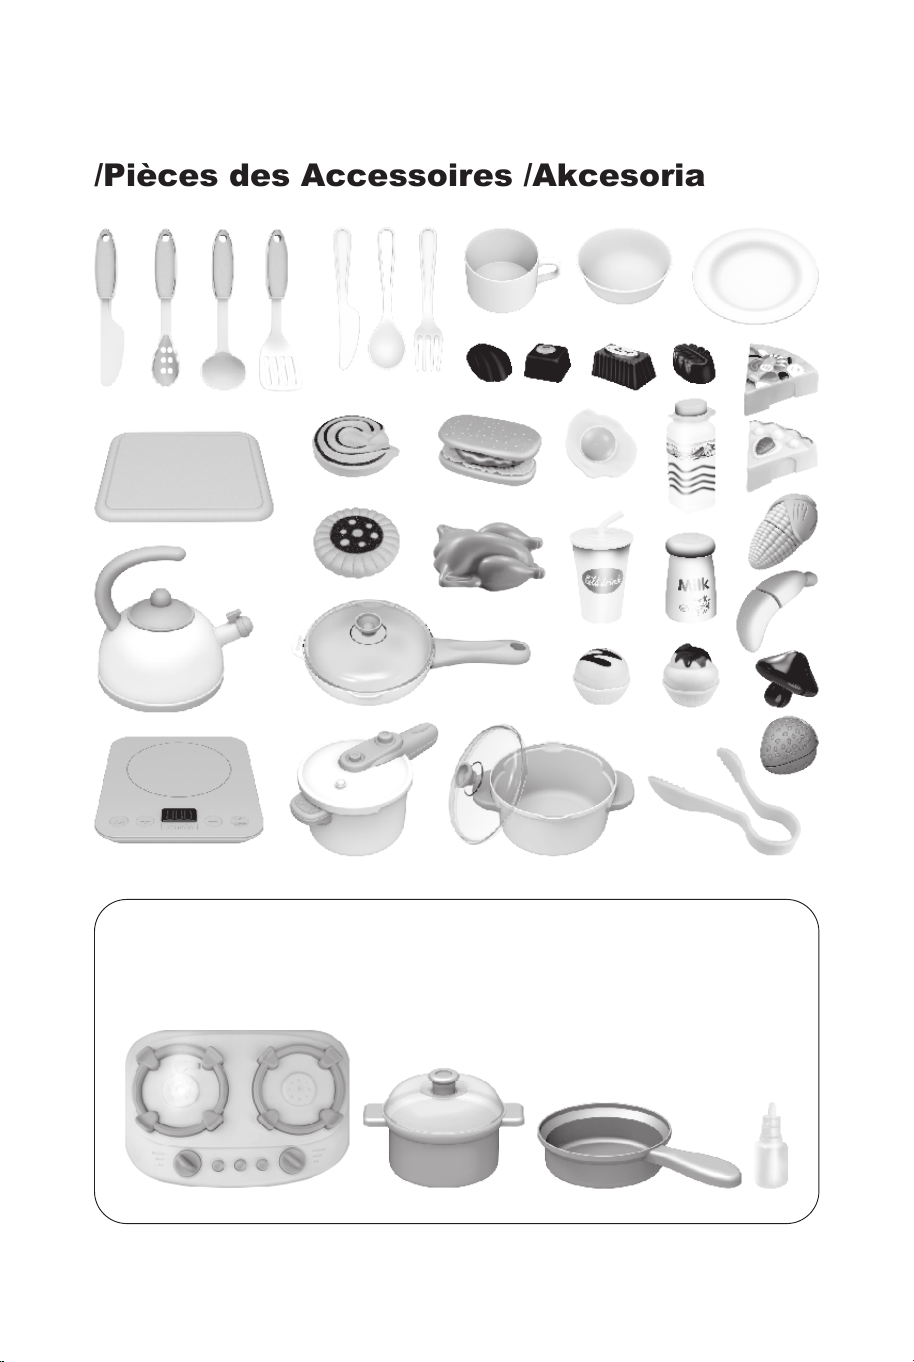
Accessory Parts /Zubehörteile
/Pièces des Accessoires /Akcesoria
Installation Method /Installationsmethode
/Méthode de Montage /Instrukcja montażu
1
2
x2
x2 x2 x2
x2
x2
x2
x2
Spraying Mist Stove with Light & Music
/Sprühnebelofen mit Licht und Musik
/Poêle à Brumisation avec Lumière & Musique
/Palniki z mgiełką, światełkami i muzyką
06 07
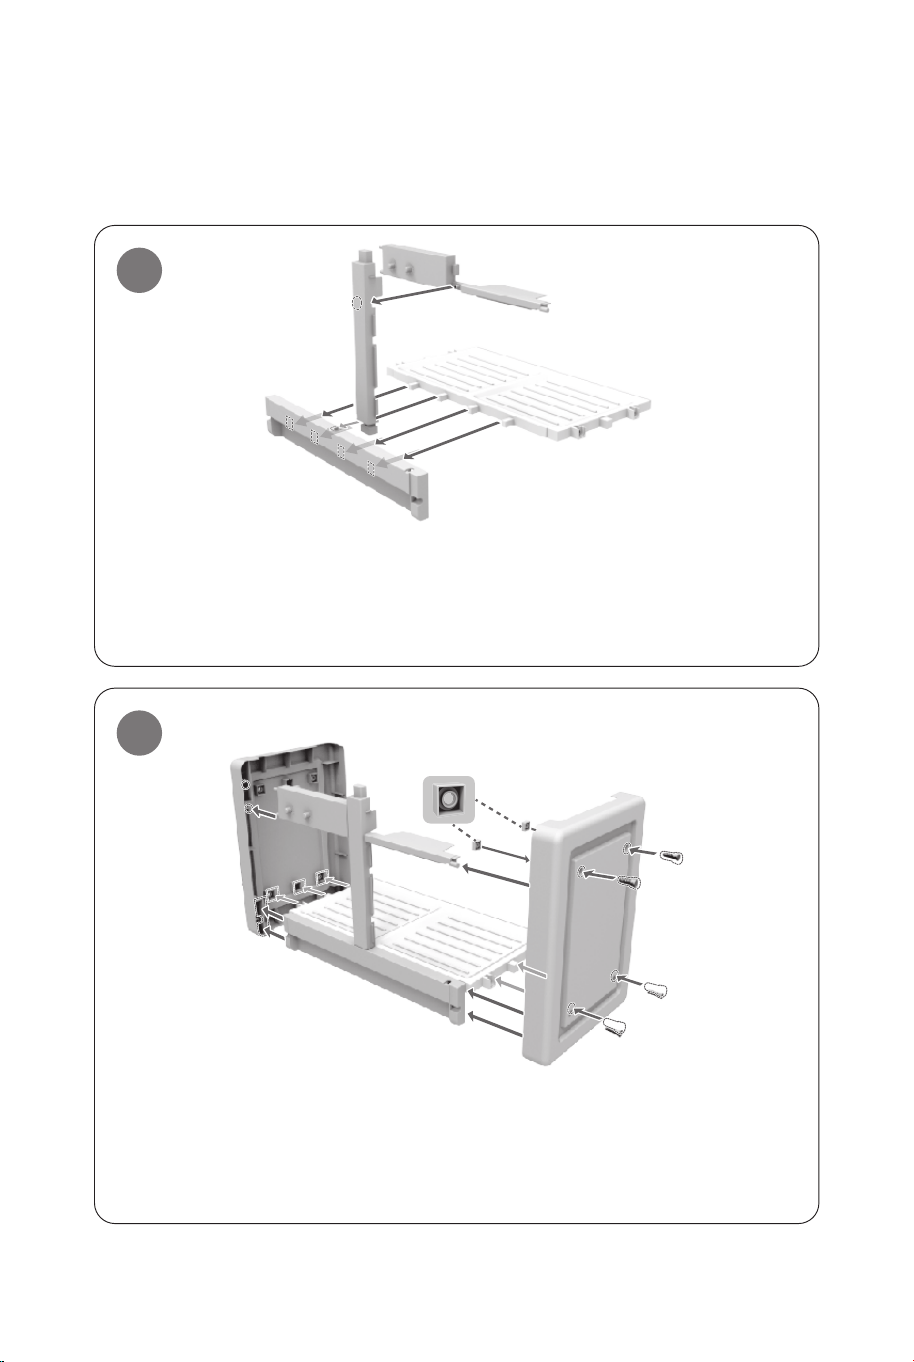
Install front feet and cabinet center column
/Installieren Sie die Vorderfüße und die Mittelsäule des Schranks
/Installez les pieds avant et la colonne centrale de l’armoire
/Zamontuj przednie nóżki i kolumnę środkową szafki
Install the main frame of the cabinet
/Installieren Sie den Hauptrahmen des Schranks
/Installez le cadre principal de l’armoire
/Zainstaluj ramę główną szafki
Accessory Parts /Zubehörteile
/Pièces des Accessoires /Akcesoria
Installation Method /Installationsmethode
/Méthode de Montage /Instrukcja montażu
1
2
x2
x2 x2 x2
x2
x2
x2
x2
Spraying Mist Stove with Light & Music
/Sprühnebelofen mit Licht und Musik
/Poêle à Brumisation avec Lumière & Musique
/Palniki z mgiełką, światełkami i muzyką
06 07
Install front feet and cabinet center column
/Installieren Sie die Vorderfüße und die Mittelsäule des Schranks
/Installez les pieds avant et la colonne centrale de l’armoire
/Zamontuj przednie nóżki i kolumnę środkową szafki
Install the main frame of the cabinet
/Installieren Sie den Hauptrahmen des Schranks
/Installez le cadre principal de l’armoire
/Zainstaluj ramę główną szafki
3
4
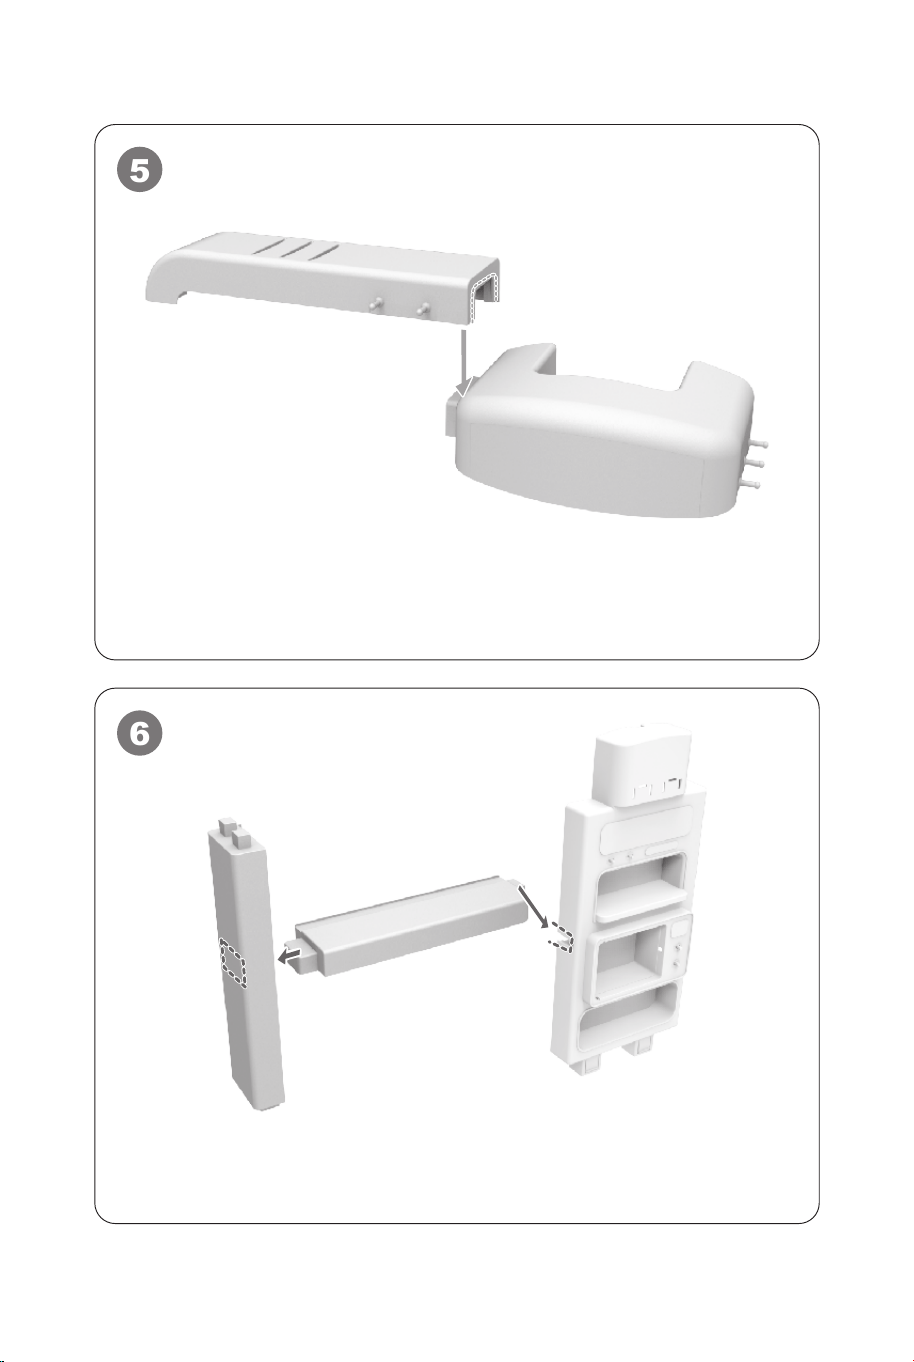
5
6
08 09
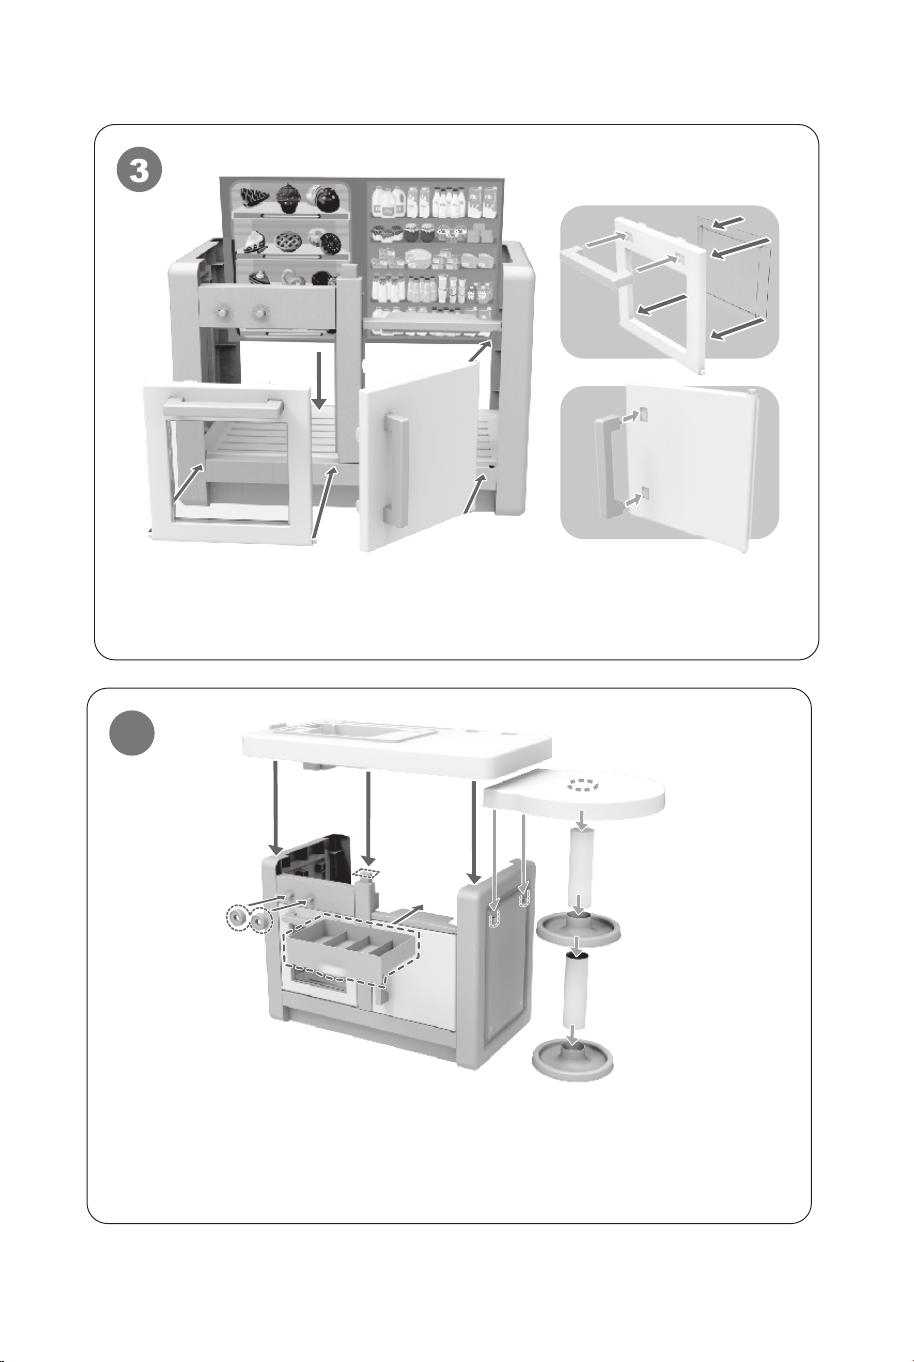
Install the top /Installieren Sie die Oberseite /Installez le haut
/Zainstaluj górną część
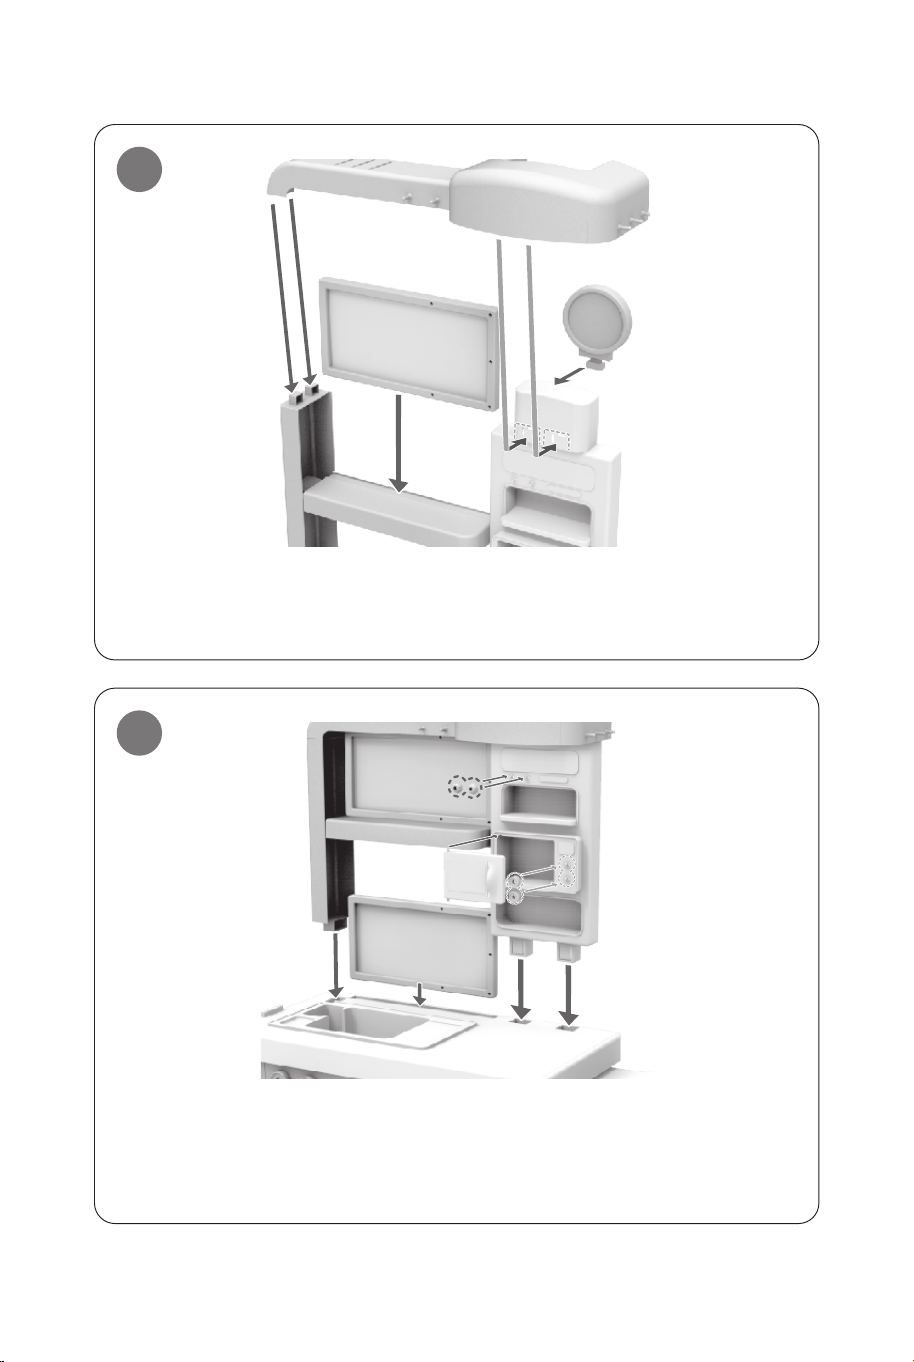
Install the upper shelf /Installieren Sie das obere Regal
/Installez l’étagère supérieure / Zamontuj górną półkę
Install the doors /Installieren Sie die Türen /Installez les portes
/Zamontuj drzwiczki
Install the tabletop and side shelf
/Installieren Sie die Tischplatte und die Seitenablage
/Installez le dessus de table et l’étagère latérale
/Zamontuj blat i półkę boczną
3
4
5
6
08 09
Install the top /Installieren Sie die Oberseite /Installez le haut
/Zainstaluj górną część
Install the upper shelf /Installieren Sie das obere Regal
/Installez l’étagère supérieure / Zamontuj górną półkę
Install the doors /Installieren Sie die Türen /Installez les portes
/Zamontuj drzwiczki
Install the tabletop and side shelf
/Installieren Sie die Tischplatte und die Seitenablage
/Installez le dessus de table et l’étagère latérale
/Zamontuj blat i półkę boczną
10 11
7
8
9
10
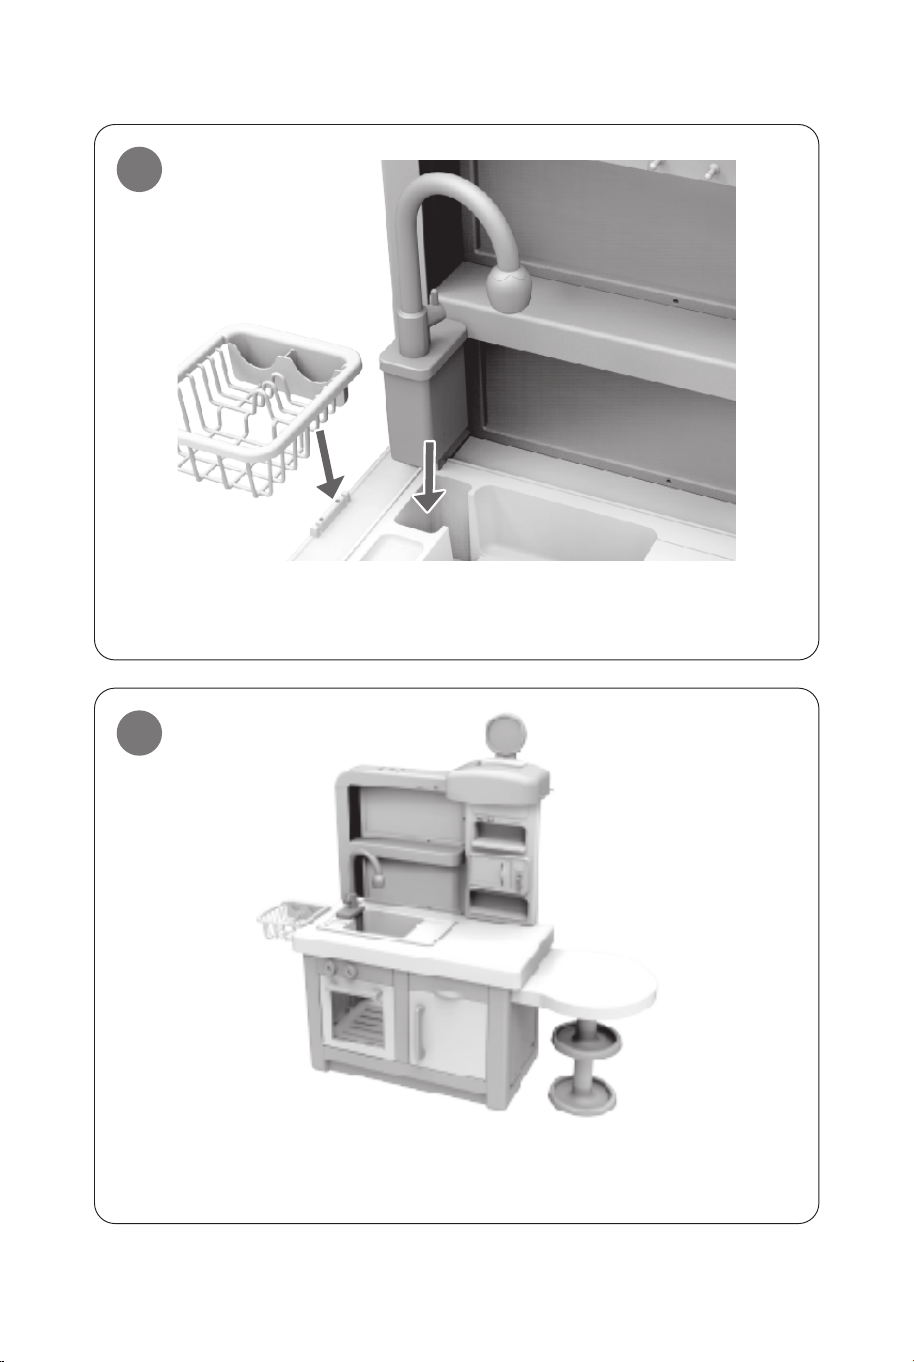
Install the storage basket /Installieren Sie den Aufbewahrungskorb
/Installez le panier de rangement /Zamontuj kosz do przechowywania
Installation complete /Installation abgeschlossen /Installation terminé
/Montaż zakończony
Install the upper frame /Installieren Sie den oberen Rahmen
/Installez le cadre supérieur / Zamontuj górną ramę
Install the upper frame on the main frame
/Installieren Sie den oberen Rahmen am Hauptrahmen
/Installez le cadre supérieur sur le cadre principal
/Zamontuj górną ramę na ramie głównej
10 11
7
8
9
10
Install the storage basket /Installieren Sie den Aufbewahrungskorb
/Installez le panier de rangement /Zamontuj kosz do przechowywania
Installation complete /Installation abgeschlossen /Installation terminé
/Montaż zakończony
Install the upper frame /Installieren Sie den oberen Rahmen
/Installez le cadre supérieur / Zamontuj górną ramę
Install the upper frame on the main frame
/Installieren Sie den oberen Rahmen am Hauptrahmen
/Installez le cadre supérieur sur le cadre principal
/Zamontuj górną ramę na ramie głównej
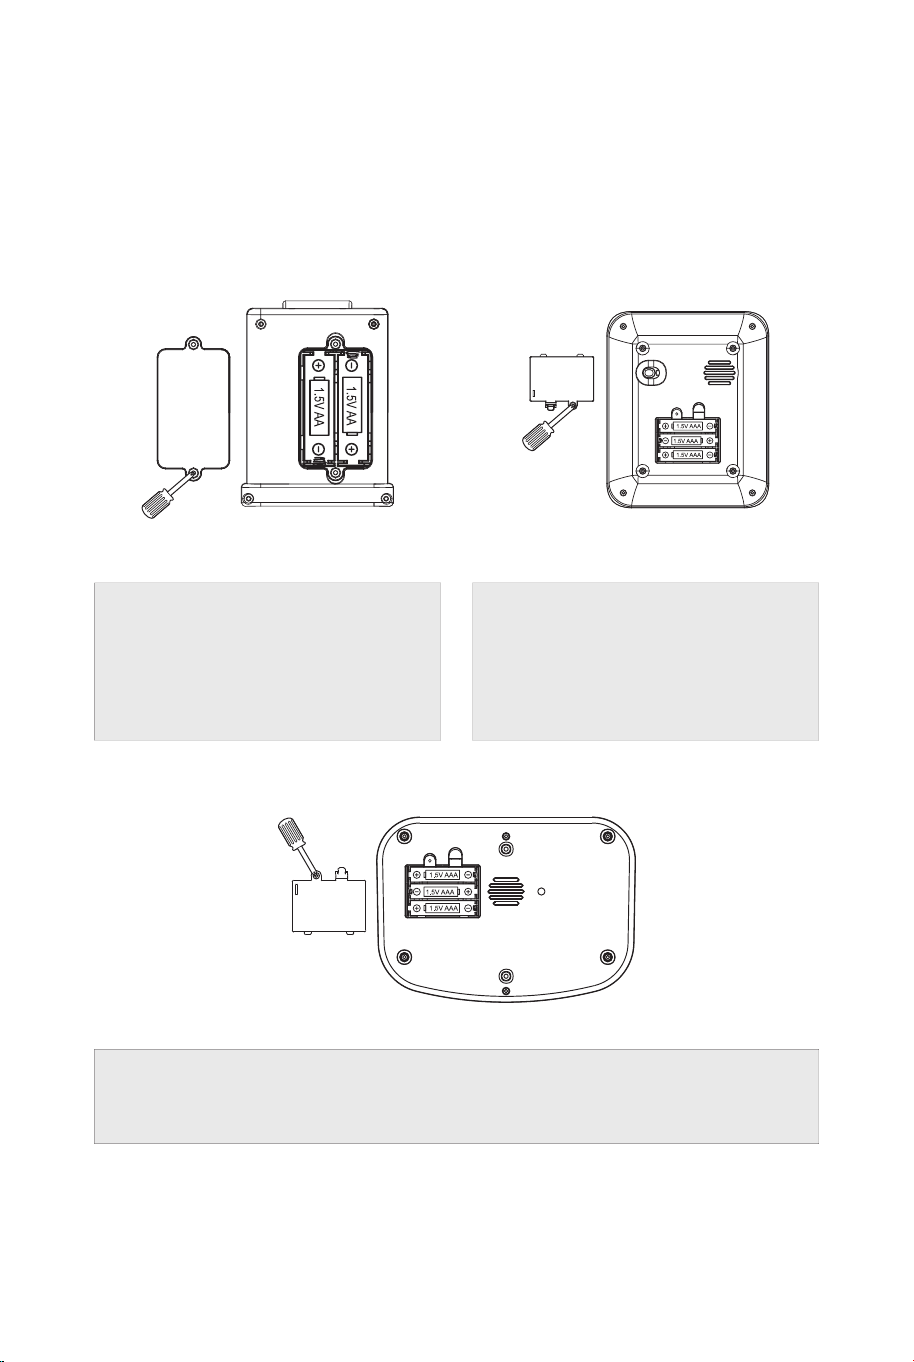
Battery Installation Diagram
/Batterieinstallationsdiagramm
/Schéma d’Assemblage de la Pile
/Montaż baterii
Water tap /Wasserhahn
/Robinet /Kran
Induction cooktop
/Induktionskochfeld
/Plaque d’Induction
/Płyta indukcyjna
Spray mist stove /Sprühnebelofen
/Poêle à Brumisation /Palniki
12 13
EN: Open the battery cover under the bottom and put the batteries in it.
Then cover it and screw on screw. Battery not included.
CAUTION:
1. Don't place the anode and cathode wrongly when put in the batteries!
2. Do not mix alkaline, standard (carbon-zinc) and rechargeable batteries
(nickel hydride).
3. Do not mix old and new batteries.
4. Removed batteries if it is not turned on for a long time.
DE: Öffnen Sie die Batterieabdeckung unten und legen Sie die Batterien
ein. Dann abdecken und mit einer Schraube festschrauben. Batterie nicht
enthalten.
VORSICHT:
1. Platzieren Sie Anode und Kathode beim Einlegen der Batterien nicht
falsch!
2. Mischen Sie keine Alkalibatterien, Standardbatterien (Kohlenstoff-Zink)
und wiederaufladbare Batterien (Nickelhydrid).
3. Mischen Sie keine alten und neuen Batterien.
4. Entfernen Sie die Batterien, wenn das Gerät längere Zeit nicht
eingeschaltet ist.
FR: Ouvrez le couvercle de la batterie situé sous le fond et insérez-les.
Ensuite, couvrez-le et vissez-le. Piles non incluses.
PRÉCAUTION :
1. Veuillez ne pas égarer l’anode et la cathode lorsque vous mettez les piles.
2. Ne mélangez pas des piles alcalines, standard (carbone-zinc) et
rechargeables (nickel-hydrure).
3. Ne mélangez pas les anciennes et les nouvelles piles.
4. Veuillez retirer les piles si elles ne s’allument pas pendant une longue
période.
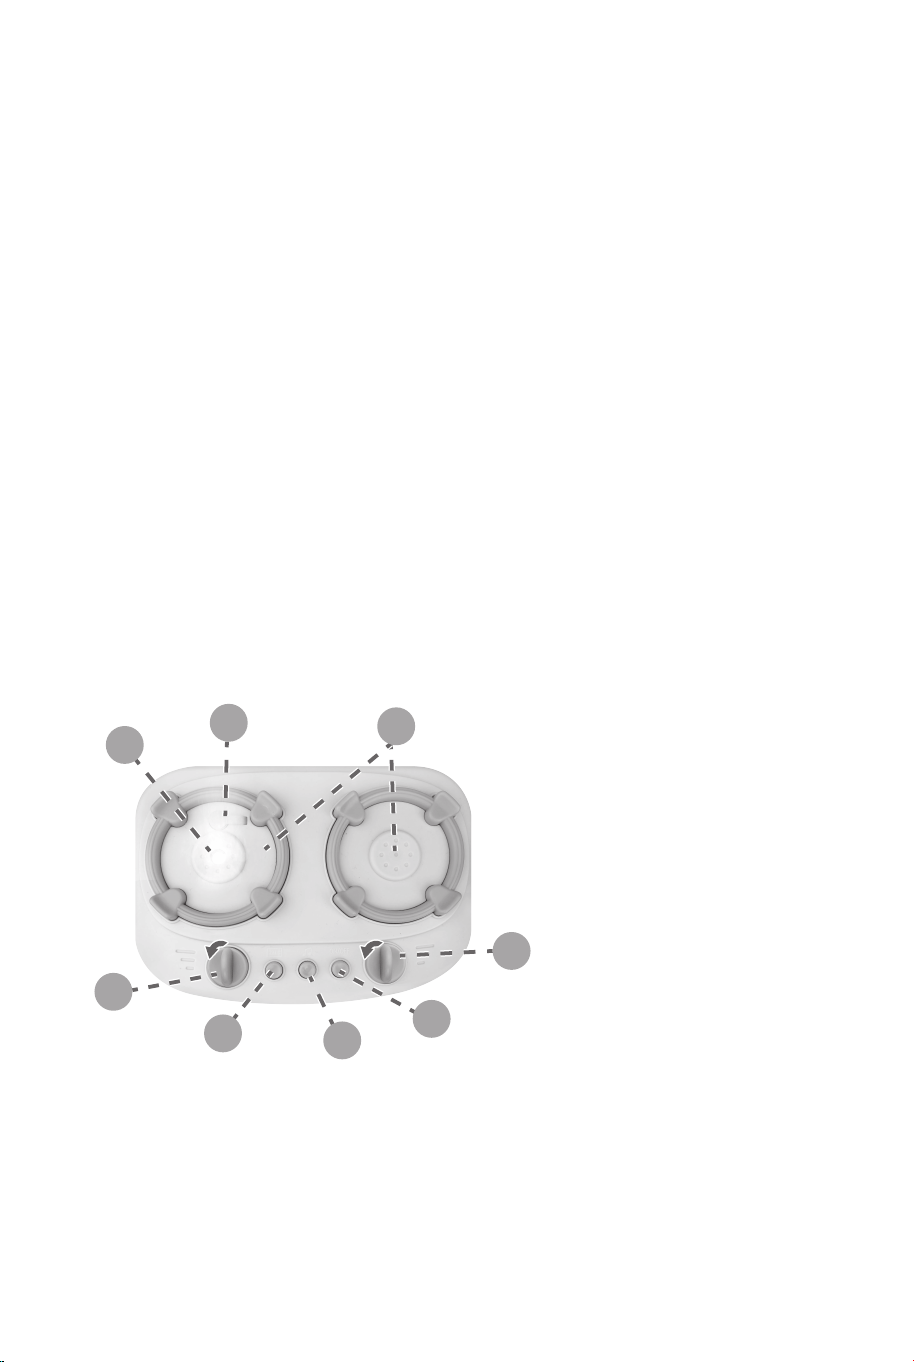
SPRAY MIST HOLE /SPRÜHNEBELLOCH
/ORIFICE DE PULVÉRISATION /OTWOREK ZAMGŁAWIACZA
CAUTION: Spray mist hole should be dried, any water on it will affect the
spray function.
/ACHTUNG: Das Sprühnebelloch sollte getrocknet werden, da darauf
befindliches Wasser die Sprühfunktion beeinträchtigt.
ATTENTION : Le trou de pulvérisation doit être sec, toute eau restante
affectera la fonction de pulvérisation.
/Uwaga: Aby zamgławiacz działał prawidłowo, otworek musi być suchy.
1
WATER ADDING HOLE /WASSERZUGABELOCH
/TROU POUR AJOUTER DE L’EAU /WLEW WODY
2
FUN SOUNDS AND LIGHTS
/LUSTIGE KLÄNGE UND LICHTER
/SONS ET LUMIÈRES AMUSANTS
/EFEKTY DŹWIĘKOWE I ŚWIETLNE
3
ROTATE LEFT HANDSIDE SPIN BUTTON TO THE LEFT FOR
SIMULATED BOILING WATER SOUND AND SPRAY MIST
FUNCTION
/DREHEN SIE DEN LINKEN DREHKNOPF NACH LINKS, UM DEN
KILLENDEN WASSER-KLANG UND DIE SPRÜHNEBELFUNKTION ZU
SIMULIEREN
/TOURNEZ LE BOUTON ROTATIF GAUCHE VERS LA GAUCHE
POUR SIMULER LE BRUIT DE L’EAU BOUILLANTE ET LA
FONCTION BRUME DE PULVÉRISATION.
/PRZEKRĘĆ LEWE POKRĘTŁO W LEWO, ABY WŁĄCZYĆ DŹWIĘK
GOTUJĄCEJ SIĘ WODY I MGIEŁKĘ
4
14 15
PL: Otwórz klapkę komory baterii znajdującej się od spodu i włóż
baterie. Umieść klapkę na miejscu i wkręć śrubkę. Baterii brak w zestawie.
UWAGA:
1. Uważaj na właściwą polaryzację baterii (nie pomyl + i -)!
2. Nie łącz baterii alkalicznych ze standardowymi
(karbonowo-cynkowymi) i z akumulatorkami wielokrotnego użytku.
3. Nie łącz starych i nowych baterii.
4. Wyjmij baterie, jeśli kuchenka nie jest używana przez dłuższy czas.
Spray Mist Stove Operation Instructions
/Bedienungsanleitung für den Sprühnebelofen
/Mode d’Emploi du Poêle à Brumisation
/Obsługa palników
1
2
3
4
5
6
7
8

SIMULATED SOUND AND LIGHT OF MICROWAVE OVEN
/SIMULIERTER TON UND LICHT EINES MIKROWELLENOFENS
/SON ET LUMIÈRE SIMULÉS DU FOUR À MICRO-ONDES
/NACIŚNIJ, ABY WŁĄCZYĆ DŹWIĘK I ŚWIATŁO KUCHENKI
MIKROFALOWEJ
5
MUSIC ON/OFF
Press the button for switching 8 melodies.
MUSIK EIN/AUS
Drücken Sie die Taste zum Umschalten von 8 Melodien.
MUSIQUE MARCHE/ARRÊT
Appuyez sur le bouton pour basculer entre 8 mélodies.
WŁĄCZANIE/WYŁĄCZANIE MUZYKI
Naciśnij przycisk, aby odtworzyć kolejno 8 melodyjek.
6
ON/OFF /EIN/AUS /ALLUMÉ/ÉTEINT
/WŁĄCZANIE/WYŁĄCZANIE
7
ROTATE RIGHT HANDSIDE SPIN BUTTON TO THE LEFT FOR
SIMULATED STIR FRY SOUND AND LIGHT
/DREHEN SIE DEN RECHTEN DREHKNOPF NACH LINKS, UM
GERÄUSCHFRITTIERENDEN TON UND LICHT ZU SIMULIEREN
/TOURNEZ LE BOUTON ROTATIF DROIT VERS LA GAUCHE POUR
SIMULER LE SON ET LA LUMIÈRE DU STIRPING
/PRZEKRĘĆ PRAWE POKRĘTŁO W LEWO, ABY WŁĄCZYĆ DŹWIĘK
I EFEKT ŚWIETLNY SMAŻENIA
8
IMPORTANT NOTE:
1. Button panel must be waterproof, otherwise will easily cause the circuit
board to be short-circuited.
2. Spray mist stove will automatically shut down if no any operation in 2
minutes to use again, please repress the “ON” button.
EN
WICHTIGER HINWEIS:
1. Das Tastenfeld muss wasserdicht sein, da es sonst leicht zu einem
Kurzschluss auf der Leiterplatte kommt.
2. Der Sprühnebelofen schaltet sich automatisch ab, wenn innerhalb von
2 Minuten keine Bedienung erfolgt. Um ihn wieder zu verwenden,
drücken Sie bitte erneut die „EIN“-Taste.
DE
NOTE IMPORTANTE
1. Le panneau de boutons doit être étanche, sinon il provoquera
facilement un court-circuit sur le circuit imprimé.
2. Le poêle à brouillard de pulvérisation s’éteindra automatiquement s’il
n’y a pas d’opération dans les 2 minutes, pour l’utiliser à nouveau,
veuillez appuyer à nouveau sur le bouton « ON ».
FR
WAŻNE:
1. Panel z przyciskami należy chronić przed wodą; w przeciwnym razie
może dość do zwarcia i uszkodzenia obwodów elektrycznych.
2. Efekt mgiełki wyłączy się automatycznie po 2 minutach, jeśli kuchenka
nie jest obsługiwana. Aby włączyć go ponownie naciśnij przycisk „ON”
(włącz).
PL
16 17
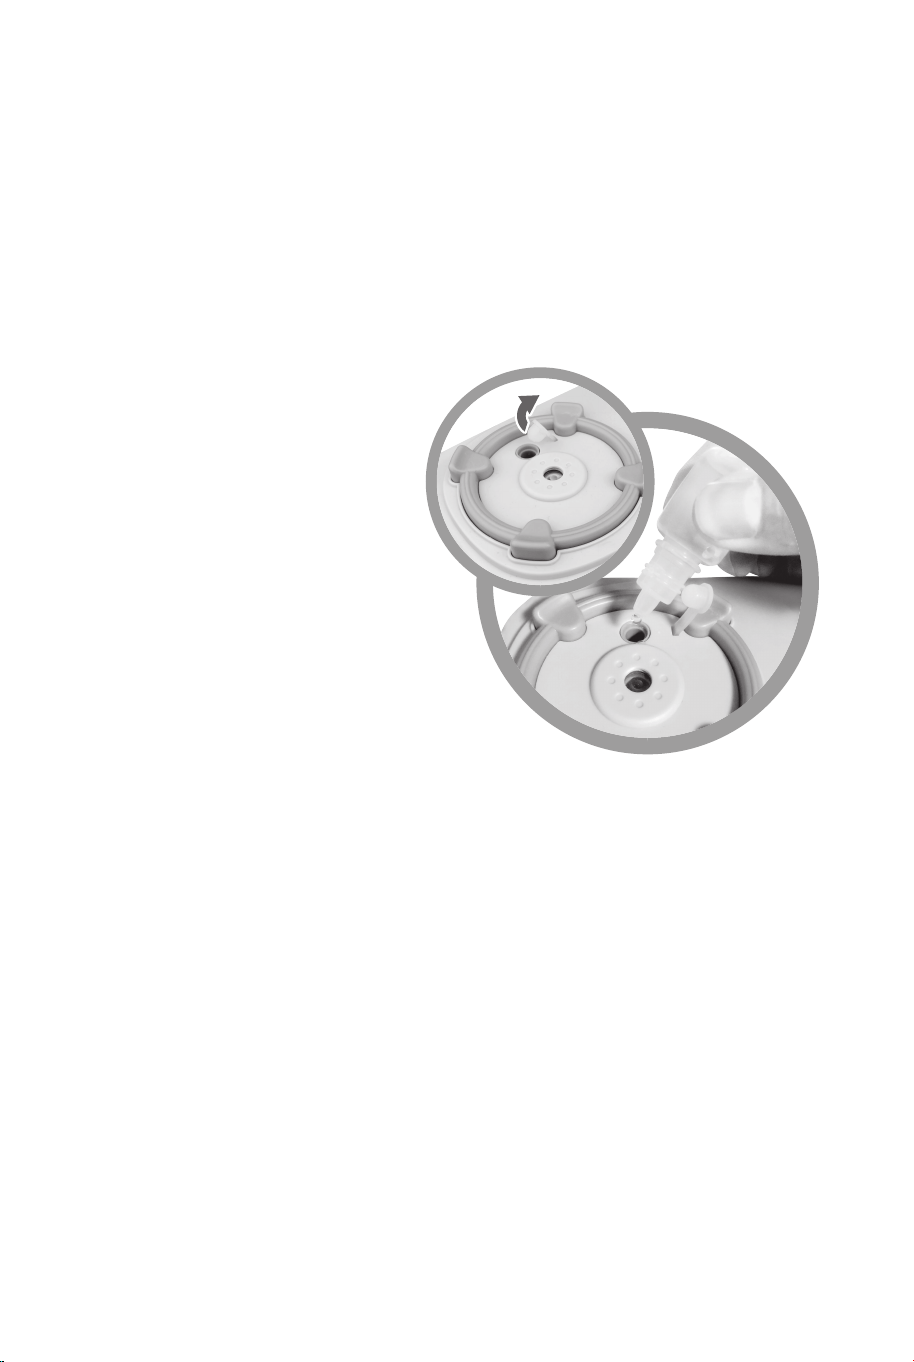
STEPS OF ADDING WATER FOR SPRAY
MIST STOVE /SCHRITTE ZUM
HINZUFÜGEN VON WASSER FÜR DEN
SPRÜHNEBELOFEN /ÉTAPES POUR
AJOUTER DE L’EAU AU POÊLE À
BRUMISAGE PAR PULVÉRISATION
/DOLEWANIE WODY DO ZAMGŁAWIACZA
EN: Fill up the drop bottle with
water, open the rubber cap and
add water into the hole.
Please turn OFF the stove
when adding water.
CAUTION: If no spray
mist comes out when other
functions are working properly,
you can check the problems and
eliminate it yourself according to
below methods.
1. Please check if the spin button is
rotate in correct position.
2. Please check if the spray tank is short of
water.
3. Please check if water is in spray mist hole, if so, please use tissue to
dry it.
If no use of above methods, and other functions are working properly, but
just no spray mist coming out, please replace the batteries.
DE: Füllen Sie die Tropfflasche mit Wasser, öffnen Sie die Gummikappe
und geben Sie Wasser in die Öffnung.
Bitte schalten Sie den Herd aus, wenn Sie Wasser hinzufügen.
ACHTUNG: Wenn bei ordnungsgemäßer Funktion anderer
Funktionen kein Sprühnebel austritt, können Sie die Probleme anhand
der folgenden Methoden überprüfen und selbst beheben.
1. Bitte überprüfen Sie, ob sich der Drehknopf in der richtigen Position
dreht.
2. Bitte prüfen Sie, ob im Sprühtank kein Wasser mehr vorhanden ist.
PL: Napełnij zakraplacz wodą, otwórz gumowy korek wlewu i nalej
wody.
Przed nalaniem wody WYŁĄCZ kuchenkę.
UWAGA: Jeśli zamgławiacz nie działa mimo prawidłowego działania
innych funkcji, spróbuj wykonać poniższe czynności:
1. Sprawdź, czy pokrętło przekręcone jest we właściwym kierunku.
2. Sprawdź, czy w zbiorniczku zamgławiacza jet woda.
3. Sprawdź, czy otworek zamgławiacza nie jest zalany. Jeśli tak, osusz
go chusteczką higieniczną.
Jeśli żaden z powyższych sposobów nie rozwiąże problemu a inne
funkcje działają prawidłowo, wymień baterie zamgławiacza.
FR: Remplissez la bouteille d’eau, ouvrez le bouchon en caoutchouc et
ajoutez de l’eau dans le trou.
Éteignez le poêle lorsque vous ajoutez de l’eau.
ATTENTION : S’il n’y a pas de brouillard de pulvérisation lorsque
d’autres fonctions fonctionnent correctement, vous pouvez vérifier les
problèmes et les éliminer vous-même en suivant les méthodes
ci-dessous.
1. Veuillez vérifier si le bouton rotatif est dans la bonne position.
2. Veuillez vérifier si le réservoir du pulvérisateur manque d’eau.
3. Veuillez vérifier si l’eau est dans le trou de brumisation, si c’est le cas,
veuillez utiliser un mouchoir pour le sécher.
Si vous n’utilisez pas les méthodes ci-dessus et que les autres fonctions
fonctionnent correctement, mais qu’aucun brouillard de pulvérisation ne
sort, veuillez changer les piles.
3. Bitte überprüfen Sie, ob sich Wasser im Sprühnebelloch befindet.
Wenn ja, verwenden Sie bitte ein Tuch zum Trocknen.
Wenn die oben genannten Methoden nicht angewendet werden und
andere Funktionen ordnungsgemäß funktionieren, aber kein Sprühnebel
austritt, tauschen Sie bitte die Batterien aus.
18 19
20 21
EN
Return
/ Damage Claim Instructions
In case a return is required, the item must be returned in original
box. Without this your return will not be accepted.
DO NOT discard the box / original packaging.
A photo of the markings (text) on the side of the box is required in
case a part is needed for replacement. This helps our staff identify
your product number to ensure you receive the correct parts.
Take a photo of the box markings.
A photo of the damage is always required to file a claim and get
your replacement or refund processed quickly. Please make sure
you have the box even if it is damaged.
Take a photo of the damaged part (if applicable).
Email us directly from marketplace where your item was purchased
with the attached images and a description of your claim.
Send us an email with the images requested.
DE
Rücksendung
/ Beschädigung Anweisungen
Falls eine Rücksendung erforderlich ist, muss der Artikel in der
Originalverpackung zurückgeschickt werden. Andernfalls wird Ihre
Rücksendung nicht angenommen.
Werfen Sie den Karton / die Originalverpackung NICHT weg.
Für den Fall, dass ein Ersatzteil benötigt wird, benötigen wir ein
Foto der Beschriftung (Text) auf der Seite des Kartons. So können
unsere Mitarbeiter Ihre Artikelnummer identifizieren und
sicherstellen, dass Sie die richtigen Teile erhalten.
Machen Sie ein Foto von der Beschriftung des Kartons.
Ein Foto des beschädigten Teils ist immer erforderlich, um eine
Reklamation einzureichen und eine schnelle Bearbeitung Ihres
Ersatzteils oder Ihrer Rückerstattung zu gewährleisten. Bitte stellen
Sie sicher, dass Sie den Karton haben, auch wenn er beschädigt ist.
Machen Sie ein Foto des beschädigten Teils (falls zutreffend).
Schicken Sie uns eine E-Mail direkt vom Marktplatz, auf dem Sie
den Artikel gekauft haben, mit den angehängten Fotos und einer
Beschreibung Ihrer Reklamation.
Schicken Sie uns eine E-Mail mit dem gewünschten Foto.

22 23
PL
Zwroty i reklamacje
Jeśli chcesz zwrócić produkt, musi znajdować się on w oryginalnym
opakowaniu. Towar zwrócony w nieoryginalnym opakowaniu nie
zostanie przyjęty.
Nie wyrzucaj oryginalnego opakowania.
Jeśli jakakolwiek część wymaga wymiany, zrób zdjęcie oznaczeń
kodu produktu, który znajduje się na opakowaniu. Pozwoli nam to
zidentyfikować produkt i dostarczyć ci właściwą część.
Zrób zdjęcie oznaczeń na opakowaniu.
Jeśli chcesz złożyć reklamację, zrób zdjęcie uszkodzonej części.
Pozwoli nam to zatwierdzić reklamację i zlecić zwrot środków na
twoje konto. Do złożenia reklamacji potrzebne będzie oryginalne
opakowanie.
Zrób zdjęcie uszkodzonej części (jeśli dotyczy).
Skontaktuj się z nami telefonicznie, mailowo lub poprzez formularz
kontaktowy. Załącz zdjęcia produktu i opis roszczenia.
Skontaktuj się z nami.
FR
Instructions De Retour
/ Réclamation De Dommages
Dans le cas où un retour est requis, l'article doit être retourné dans
sa boîte d'origine. Sans cela, votre retour ne sera pas accepté.
NE PAS jeter la boîte/l'emballage d'origine.
Une photo des marquages (texte) sur le côté de la boîte est requise
au cas où une pièce serait nécessaire pour le remplacement. Cela
aide notre personnel à identifier votre numéro de produit pour
s'assurer que vous recevez les bonnes pièces.
Prenez une photo des marquages de la boîte.
Une photo des dommages est toujours requise pour déposer une
réclamation et obtenir rapidement votre remplacement ou votre
remboursement. Assurez-vous d'avoir la boîte même si elle est
endommagée.
Prenez une photo des dommages (le cas échéant).
Envoyez-nous un e-mail directement depuis le marché où votre
article a été acheté avec les images ci-jointes et une description de
votre réclamation.
Envoyez-nous un e-mail avec les images demandées.

TP10124
Kids Kitchen Playset
Kinderküche
Jeu de Cuisine pour Enfants
Kuchenka z akcesoriami dla dzieci
IMPORTANT! READ CAREFULLY AND KEEP FOR
FUTURE REFERENCE.
If you're having difficulty, our friendly customer team is always here to help.
FRA:cs.fr@costway.com
DEU:cs.de@costway.com
ESP:cs.es@costway.com
POL:sklep@costway.comUSA:[email protected]
AUS:cs.au@costway.com
ITA:cs.it@costway.com
GBR:cs.uk@costway.com
DEU office: FDS GmbH, Neuer Höltigbaum 36, 22143 Hamburg, Deutschland
ITA office: Milano
FRA office: Saint Vigor d'Ymonville
POL office: Gdańsk
GBR office: IpswichAUS office: TruganinaUSA office: Fontana