Page 1
INSTRUCTION MANUAL
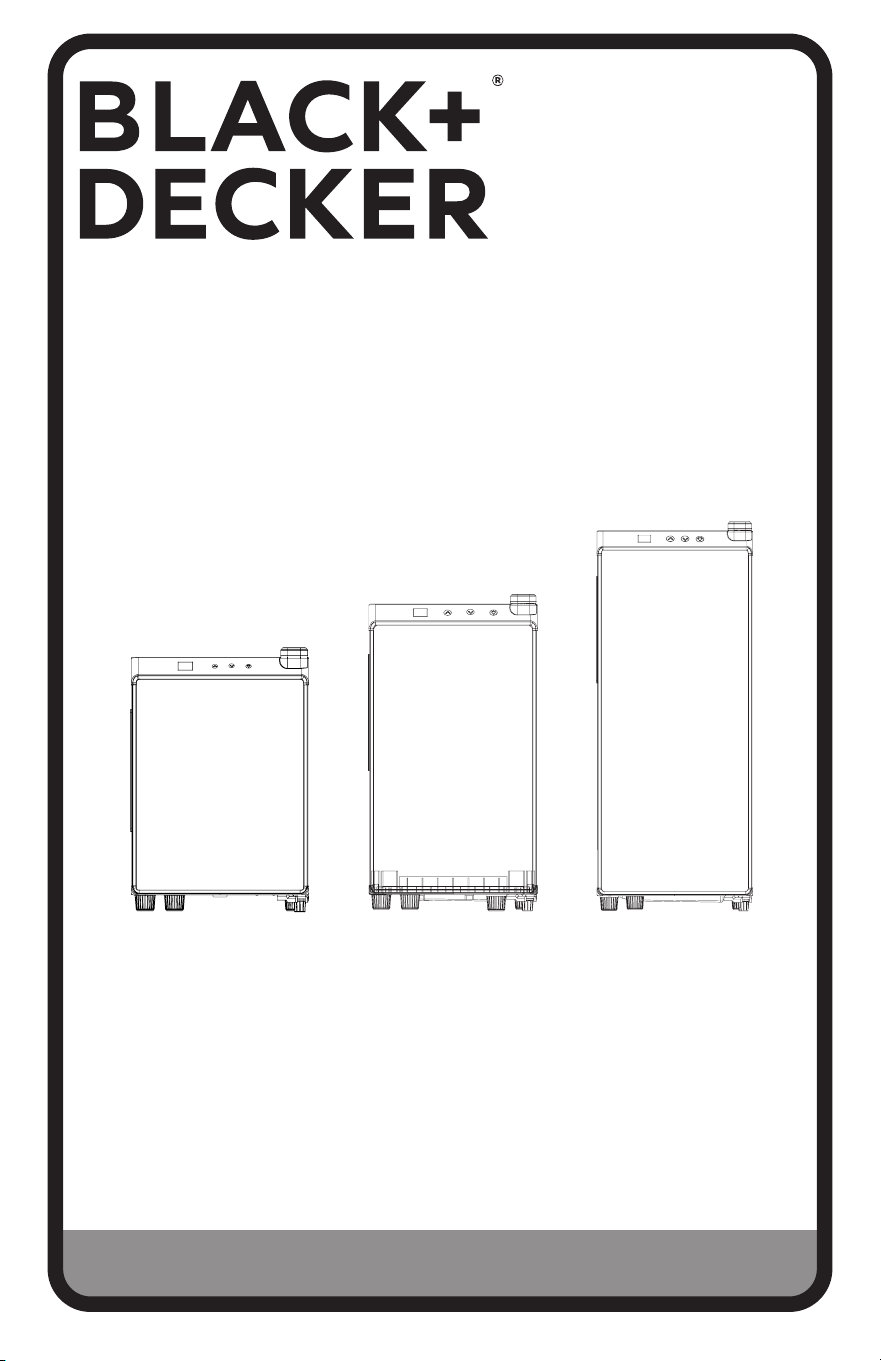
6-BOTTLE, 8-BOTTLE, 12-BOTTLE
CAPACITY WINE CELLAR
Thank you for choosing BLACK+DECKER!
PLEASE READ BEFORE RETURNING THIS PRODUCT FOR
ANY REASON.
If you have a question or experience a problem with your BLACK+DECKER
purchase, go to www.blackanddecker.com/instantanswers
If you can’t find the answer or do not have access to the Internet, call
844-299-0879 from 10:30 a.m. to 6:30 p.m. EST Mon. - Fri. to speak with an
agent. Please have the catalog number available when you call.
SAVE THIS MANUAL FOR FUTURE REFERENCE.
CATALOG NUMBER
BD60316, BD60326, BD60336

Page 2

Page 3
CONTENTS
PRODUCT REGISTRATION
SAFETY INFORMATION
Important Safety Instructions ......................................................................................................................................... 4-6
Grounding Instructions ...........................................................................................................................................................5
SET UP & USE
Parts & Features .....................................................................................................................................................................7-9
Installation Guide .....................................................................................................................................................................10
Operation Guide ...................................................................................................................................................................10-11
Benefits of Thermal Electric Cooling ...............................................................................................................................11
CLEANING & CARE ............................................................................................................................................... 12
TROUBLE SHOOTING & WARRANTY...................................................................................13-14
Before You Call For Service .................................................................................................................................................13
Customer Service......................................................................................................................................................................13
Troubleshooting.........................................................................................................................................................................13
Limited Warranty ..................................................................................................................................................................... 14
Staple your receipt to your manual.
You will need it to obtain warranty service.
Thank you for purchasing our
BLACK+DECKER product. This
easy-to-use manual will guide you
in getting the best use of your wine
cellar.
Remember to record the model and
serial numbers. They are on a label
on the back of the product.
_____________________________
Model number
_____________________________
Serial number
_____________________________
Date of purchase

Page 4
SAFETY INFORMATION
DANGER
DANGER - Immediate hazards
which WILL result in severe
personal injury or death
WARNING
WARNING - Hazards or unsafe
practices which COULD result in
severe personal injury or death
CAUTION
CAUTION - Hazards or unsafe
practices which COULD result in
minor personal injury
1. Read all of the instructions before using this appliance.
2. This wine cellar must be properly installed in accordance with the installation
instructions before is it used. See grounding instructions in the installation section.
3. Never unplug the wine cellar by pulling on the power cord. Always grasp the plug
firmly and pull straight out from the outlet.
4. Repair or replace immediately, all electric service cords that have become frayed
or otherwise damaged. Do not use a cord that shows cracks or abrasion damage
along its length, the plug or the connector end.
5. Unplug the wine cellar before cleaning or before making any repairs.
NOTE: If for any reason this product requires service, we strongly recommend
that a certified technician performs the service.
6. If the wine cellar is not being used, we recommend to remove the door and leave
the shelves in place. This will reduce the possibility of danger to children.
7. This wine cellar should not be recessed or built-in an enclosed cabinet. It is
designed for freestanding installation only. Allow 2” of space between the cooler’s
side and wall and 4” between the back and wall.
8. Do not operate wine cellar in the presence of explosive fumes.
9. Do not store foods in wine cellar as interior temperature may not be cool enough
to prevent spoilage.
IMPORTANT SAFETY INSTRUCTIONS
WARNING
When using electrical appliances, basic safety precautions
should be followed, including the following:
READ ALL INSTRUCTIONS BEFORE USING THE UNIT
SAVE THESE INSTRUCTIONS
HOUSEHOLD USE ONLY
DANGER
Risk of child entrapment. Before disposing of any refrigerator or freezer, remove all doors.
Leave any shelves in place so that children may not easily climb inside.
Page 5
SAFETY INFORMATION
GROUNDING INSTRUCTIONS
ELECTRICAL REQUIREMENTS
In the event of malfunction or breakdown, grounding provides a path of
least resistance for electric current to reduce the risk of electric shock.
The appliance must be connected to a cord having an equipment-
grounding conductor and a grounding plug. The plug must be plugged
into an appropriate outlet that is properly installed and grounded in
accordance with all local codes and ordinances.
DANGER - Improper connection of the equipment grounding
conductor can result in a risk of electric shock. The conductor with
insulation having an outer surface that is green with or without
yellow stripes is the equipment grounding conductor. If repair or
replacement of the cord or plug is necessary, do not connect the
equipment-grounding conductor to a live terminal. Check with a
qualified electrician or service person if the grounding instructions
are not completely understood, or if in doubt as to whether the [tool/
appliance] is properly grounded. Do not modify the plug connected to
the [tool/appliance] – if it will not fit the outlet, have a proper outlet
installed by a qualified electrician.
FOR GROUNDED, CORD-CONNECTED [TOOL/APPLIANCE] RATED
LESS THAN 15A AND INTENDED FOR USE ON A NOMINAL 120V
SUPPLY CIRCUIT
The appliance is for use on a nominal 120V circuit and should be
connected to a grounding outlet that looks like the one illustrated
below. The use of a temporary adaptor is not recommended.
Page 5
SAFETY INFORMATION
GROUNDING INSTRUCTIONS
ELECTRICAL REQUIREMENTS
In the event of malfunction or breakdown, grounding provides a path of
least resistance for electric current to reduce the risk of electric shock.
The appliance must be connected to a cord having an equipment-
grounding conductor and a grounding plug. The plug must be plugged
into an appropriate outlet that is properly installed and grounded in
accordance with all local codes and ordinances.
DANGER - Improper connection of the equipment grounding conductor
can result in a risk of electric shock. The conductor with insulation
having an outer surface that is green with or without yellow stripes is
the equipment grounding conductor. If repair or replacement of the
cord or plug is necessary, do not connect the equipment-grounding
conductor to a live terminal. Check with a qualified electrician or
service person if the grounding instructions are not completely
understood, or if in doubt as to whether the [tool/appliance] is properly
grounded. Do not modify the plug connected to the [tool/appliance] –
if it will not fit the outlet, have a proper outlet installed by a qualified
electrician.
FOR GROUNDED, CORD-CONNECTED [TOOL/APPLIANCE] RATED
LESS THAN 15A AND INTENDED FOR USE ON A NOMINAL 120V
SUPPLY CIRCUIT
The appliance is for use on a nominal 120V circuit and should be
connected to a grounding outlet that looks like the one illustrated
below. The use of a temporary adaptor is not recommended.

Page 6
SAFETY INFORMATION
POWER SUPPLY CORD
1. Avoid the use of an extension cord because of potential safety hazards under
certain conditions. Have a qualified electrician or serviceman to install an
outlet near the appliance.
2. If it is absolutely necessary to use an extension cord, extreme care must be
exercised.
a) Use only a grounding type 3-wire extension cord that has a 3-blade
grounding plug and a 3-slot receptacle that will accept the plug on the
appliance.
b) The marked electrical rating of the extension cord must equal to or greater
than the electrical rating of the appliance. The longer cord should be
arranged so that it will not drape over the counter top or table top where it
can be pulled on by children or tripped over unintentionally.
NOTE: Neither BLACK+DECKER nor the dealer can accept any liability for damage
to the product or personal injury resulting from failure to observe the
electrical connection procedures.

Page 7
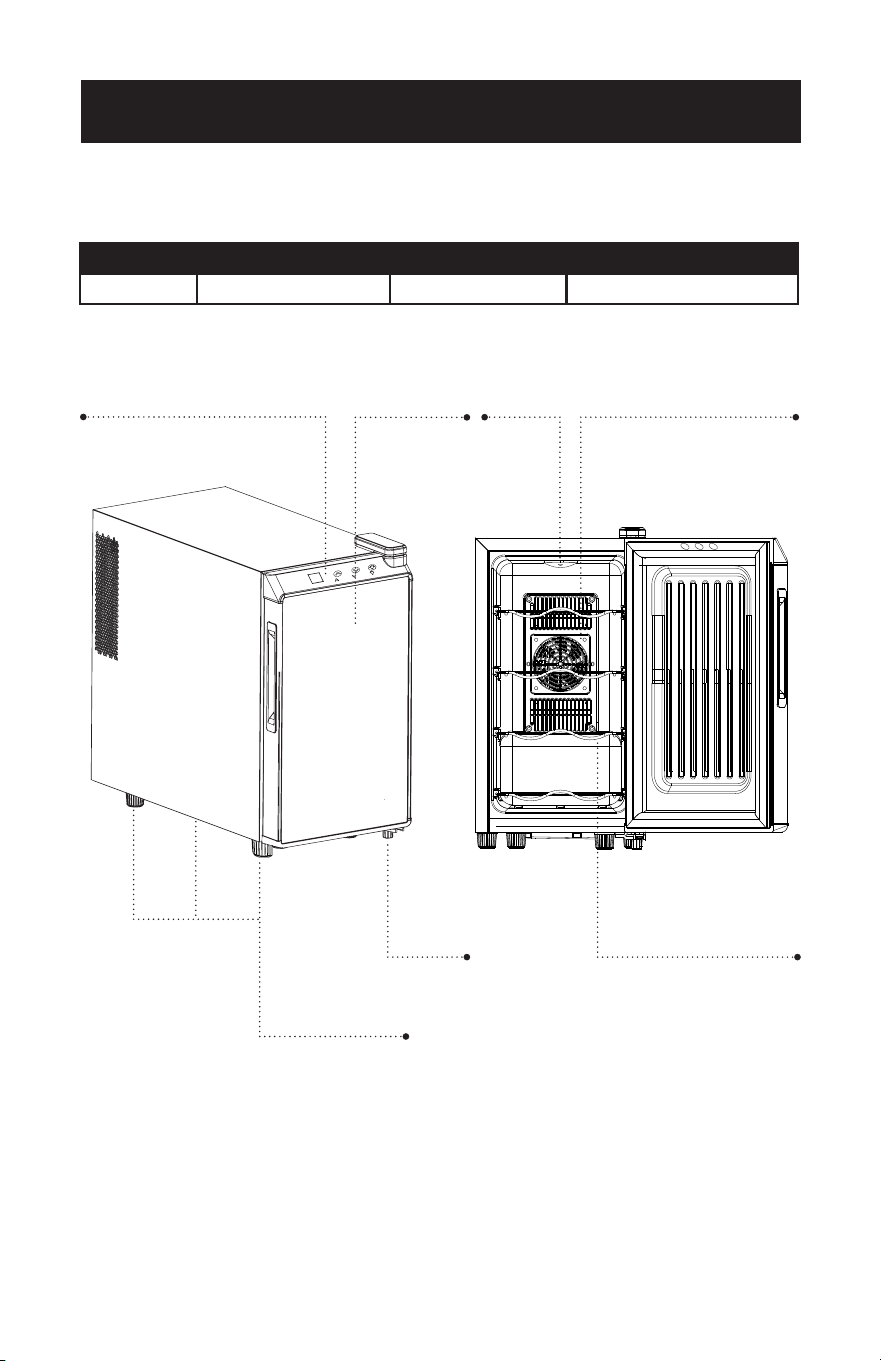
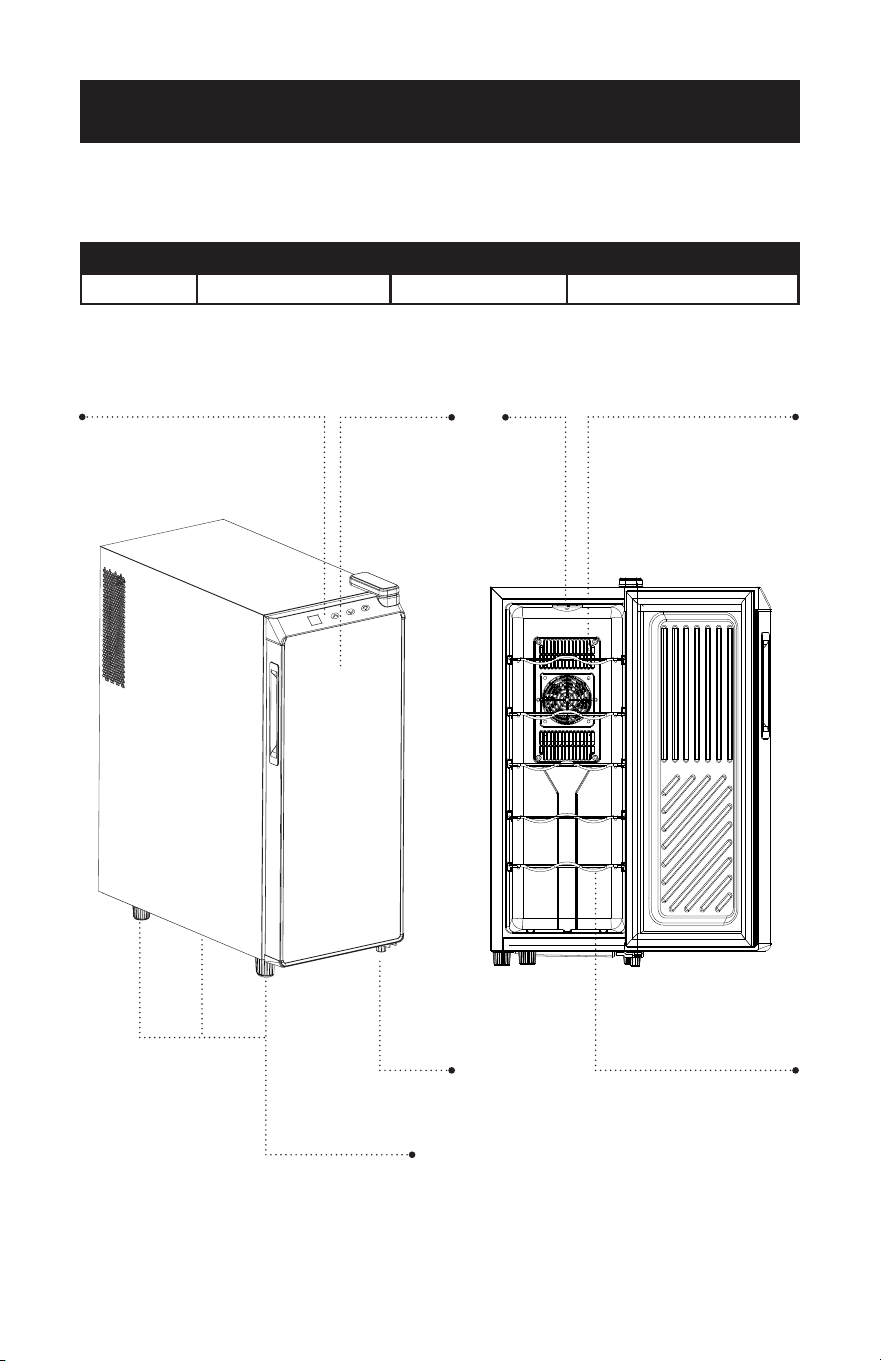
SET UP & USE
PARTS & FEATURES
Leg
Front Control Panel
Leveling Leg (3)
Fan Grill
Chrome Wire Shelves
Light
Model Bottle Capacity Number of Shelves Temperature Range
BD60316 6 2 46˚ - 66˚F
Solid Mirrored
Door

Page 8
SET UP & USE
PARTS & FEATURES
Model Bottle Capacity Number of Shelves Temperature Range
BD60326 8 4 46˚ - 66˚F
Front Control Panel
Chrome Wire Shelves
Solid Mirrored
Door
Leg
Fan Grill
Light
Leveling Leg (3)

Page 9
SET UP & USE
PARTS & FEATURES
Model Bottle Capacity Number of Shelves Temperature Range
BD60336 12 5 46˚ - 66˚F
Front Control Panel
Fan Grill
Light
Chrome Wire Shelves
SolidMirrored
Door
Leg
Leveling Leg (3)

Page 10
INSTALLATION GUIDE
1. Unpack your wine cellar by removing all packaging materials like carton, base,
foams, adhesive tape, etc.
2. Remove all accessories, internal packaging material that was used to hold shelves,
etc., in place during transport.
3. Clean the remains of all adhesive tape used and remove all printed material
supplied.
4. Install the wine cellar in a convenient location away from extreme heat and cold.
Allow sucient clearance between the wine cellar and side wall so the door(s)
will open without obstruction. Wine cellar is not designed for recessed or built-in
installation.
5. The floor on which the wine cellar should be placed must be flat, hard, solid, and
even. The wine cellar should not be placed on any soft material such as carpet,
foam, plastic, etc.
6. To level your wine cellar, use the two leveling legs in the rear and one in the front
left of your wine cellar. Adjust by turning the legs counter clockwise to raise or
counterclockwise to lower your wine cellar.
NOTE: The front right leg that is part of the door hinge bracket is not adjustable.
7. The following are recommended minimum clearances around the wine cellar for
proper air circulation:
Sides: 2” (50mm)
Top: 4” (100mm)
Back: 4” (100mm)
Proper air circulation will help your wine cellar work at maximum eciency.
NOTE: · Allow enough space in the front of the unit to open door to at least 120˚.
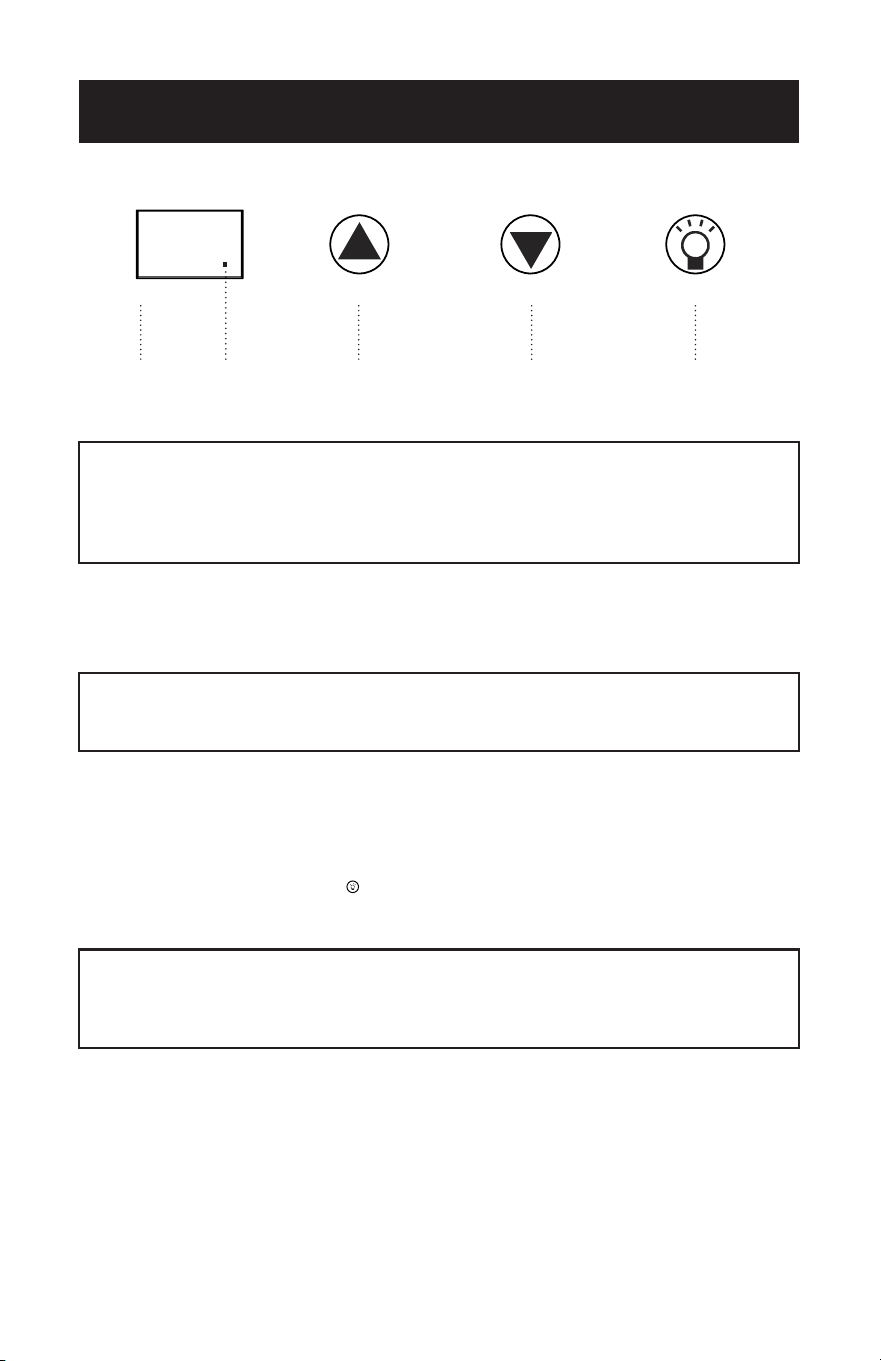
OPERATION GUIDE
1. Plug in the wine cellar to power the unit on.
2. You may choose a temperature setting for your wine cellar within the range of 46° to
66° Fahrenheit . The temperature of your wine cellar can be set by pressing the up
arrow on the exterior of the door you can raise the temperature. By pressing the
down arrow on the exterior of the door you can lower the temperature. Once you
have completed your set temperature selection, the temperature readout will revert to
the actual temperature.
SET UP & USE
Page 11
SET UP & USE
As an example, when the ambient temperature is 72°F, the lowest interior cabinet
temperature that can be reached is 46-48°F. When the ambient temperature is 89°F, the
lowest interior cabinet temperature that can be reached is 50-56°F.
3. Allow the wine cellar to operate empty for approximately one hour. This should allow
the unit to reach the desired temperature.
4. Fill the wine cellar with your choice of wine bottles. Allow 1-2 hours of operation to
reach the desired temperature.
5. Your wine cellar has a light to display your wine bottles. The manually operated light
switch is located on the touch control panel. A small illuminated circle will appear on
the bottom right side on the temperature display to indicate the light is on.
BENEFITS OF THERMAL ELECTRIC COOLING
Thermal Electric or semiconductor technology is an environmentally friendly cooling
process which does not use any CFC, HCFC or HCF-type of refrigerants which are
harmful to the environment.
The absence of a compressor reduces the noise and vibration usually associated with
refrigerated appliances.
Please note that the actual interior cabinet temperature in a thermal
electric unit is dependent on the ambient (room) temperature. You may set
the cabinet temperature within the operational range but due to high ambient
temperature the unit may not reach the selected temperature.
NOTE: When the ambient (room) temperature is below the set temperature, the
wine cellar will not operate until the ambient temperature increases higher
than the set temperature.
NOTE: The interior light should not be kept ON when the door is closed and not
in use. Touch the Interior Light Switch Symbol to shut it OFF and close the
door. The interior light indicator will not appear on the bottom right of the
temperature display.
Interior
Light
Switch
Warmer
setting
Colder
setting
Temperature
display
Interior
Light
Indicator
47

Page 12
CLEANING AND CARE
CLEANING AND MAINTENANCE
WARNING: To avoid electric shock always unplug the wine cellar before cleaning.
Ignoring this warning may result in death or injury.
CAUTION: Before using cleaning products, always read and follow manufacturer’s
instructions and warnings to avoid personal injury or product damage.
General: • Prepare a cleaning solution of 3-4 tablespoons of baking soda mixed
with warm water. Use sponge or soft cloth, dampened with the cleaning
solution to wipe down your wine cellar.
• Rinse with clean warm water and dry with a soft cloth.
• Do not use harsh chemicals, abrasives, ammonia, chlorine bleach,
concentrate detergents, solvents or metal scouring pads. SOME of these
chemicals may dissolve, damage and / or discolor your wine cellar.
Power Interruptions
Occasionally there may be power interruptions due to thunderstorms or other events.
Remove the power cord from AC outlet when a power outage occurs. When power
has been restored, replug power cord to AC outlet.
Vacation and Moving Care
For long vacations or absences, unplug the unit, empty contents from wine cellar and
clean the wine cellar and door gaskets according to “General Cleaning” section. Prop
doors open, so air can circulate inside. When moving always move the wine cellar
vertically. Do not move or store the unit on its side.
Page 13
TROUBLESHOOTING & WARRANTY
BEFORE YOU CALL FOR SERVICE
IF THE UNIT FAILS TO OPERATE:
A) Check to make sure that the unit is plugged in securely. If it is not, remove the plug
from the outlet, wait 10 seconds and plug it in again securely.
B) Check for a blown circuit fuse or a tripped main circuit breaker. If these seem to be
operating properly, test the outlet with another appliance.
IF NONE OF THE ABOVE SOLVES THE PROBLEM, CONTACT A QUALIFIED
TECHNICIAN. DO NOT TRY TO ADJUST OR REPAIR THE WINE CELLAR YOURSELF
IMPORTANT
DO NOT RETURN THIS PRODUCT TO THE STORE
If you have a problem with this product, please contact the
BLACK+DECKER Customer Satisfaction Center at
844-299-0879 or service@equitybrands.com
DATED PROOF OF PURCHASE, MODEL # AND SERIAL #
REQUIRED FOR WARRANTY SERVICE
TROUBLESHOOTING
Troubleshoot your problem by using the chart below. If the unit still does not work
properly, contact customer service center or the nearest authorized service center.
Customer must never troubleshoot internal components.
SYMPTOMS POSSIBLE CAUSE SOLUTIONS
The wine cellar
does not work.
There is a power failure.
A circuit breaker has
activated.
Ensure the cellar is plugged in and
the power socket is turned on.
Reset circuit breaker.
Wine cellar is
not reaching
the desired
temperature
The cellar is placed too
close to a heat source
No sucient ventilation
The door is opened too
frequently or for a long
period of time.
Keep the cellar away from sunshine
or other heat sources.
Place the wine cellar in good
ventilation and keep any items away
from the fans.
Close the door tightly and do not
open the door too frequently or for a
long period of time.
Frost forming in
the wine cellar
Too much humidity.
The ambient
temperature is too low.
Unplug to defrost, plug again after
the frost thaws.

Page 14
LIMITED WARRANTY
LIMITED WARRANTY
Any repair, replacement, or warranty service,
and all questions about this product should be
directed to BLACK+DECKER at 844-299-0879
from the USA or Puerto Rico.
BLACK+DECKER warrants to the original purchaser
that the product will be free from defects in material,
parts and workmanship for the period designated for
this product. The warranty commences the day the
product is purchased and covers up to a period of
1 year (12 months) for labor/1 year (12 months) for
parts (manufacturing defects only). BLACK+DECKER
agrees that it will, at its option, replace the defective
product with either a new or remanufactured unit
equivalent to your original purchase during the
warranty period.
Exclusions: This warranty does not apply to the
below:
1. If the appearance or exterior of
the product has been damaged or
defaced, altered or modified in design or
construction.
2. If the product original serial number
has been altered or removed or cannot
be readily determined.
3. If there is damaged due to power line
surge, user damage to the AC power
cord or connection to improper voltage
source.
4. If damage is due to general misuse,
accidents or acts of God.
5. If repair attempts are done by
unauthorized service agents, use of
parts other than genuine parts or parts
obtained from persons other than
authorized service companies.
6. On units that have been transferred
from the original owner.
7. On products that have been purchased
as refurbished, like new, second-hand, in
a “As-Is” or “Final Sale” terms.
8. To products used in a commercial or
rental setting.
9. To products used in settings other than
ordinary household use or used other
than in accordance with the provided
instructions.
10. To damages for service calls for
improper installations.
11. Transportation and shipping costs
associated with the replacement of the
unit.
12. Service calls to instruct you how to use
your product.
13. Service calls to repair or replace the
house fuse, reset the circuit breaker or
correct the wiring in the house.
REPAIR OR REPLACEMENT AS PROVIDED UNDER
THIS WARRANTY IS THE EXCLUSIVE REMEDY OF
THE CUSTOMER; BLACK+DECKER. SHALL NOT BE
LIABLE FOR ANY INCIDENTAL OR CONSEQUENTIAL
DAMAGES FOR BREACH OF ANY EXPRESS OR
IMPLIED WARRANTY ON THIS PRODUCT, EXCEPT
TO THE EXTENT PROHIBITED BY APPLICABLE LAW.
ANY IMPLIED WARRANTY OF MERCHANTABILITY
OF FITNESS FOR A PARTICULAR PURPOSE ON THIS
PRODUCT IS LIMITED TO THE DURATION OF THE
WARRANTY.
Some states do not allow the exclusion or limitations
of incidental or consequential damages, or limitations
on how long the warranty lasts. In these cases the
above exclusions or limitations may not apply to you.
This warranty gives you specific legal rights and you
may also have other rights which vary from state to
state.
Obtaining Service: To obtain service, product
literature, supplies or accessories please call
844-299-0879 to create a ticket for exchange/repair.
Please make sure to provide the date of purchase,
model number and a brief description of the problem.
Our customer service representative
will contact you or send detailed return instructions.
BLACK+DECKER does not warrant that the appliance will work
properly in all environmental conditions, and makes no warranty
and representation, either implied or expressed, with respect
to the quality, performance, merchantability, or fitness for a
particular purpose other than the purpose identified within this
user’s manual. BLACK+DECKER has made every eort to ensure
that this user’s manual is accurate and disclaims liability for any
inaccuracies or omissions that may have occurred. Information in
this user’s manual is subject to change without notice and does
not represent a commitment on the part of BLACK+DECKER.
BLACK+DECKER reserves the right to make improvements to
this user’s manual and/or to the products described in this user’s
manual at any time without notice. If you find information in this
manual that is incorrect, misleading, or incomplete, please contact
us at 844-299-0879.
W Appliance Co.
1356 Broadway
New York, NY 10018

Page 15
Thisapplianceisdesignedforfreestandinginstallationonly.
•Thisapplianceisintendedtobeusedinhouseholdandsimilar
applications:
•Staffkitchenareasinshops,ofcesandotherworking
environments;
•Farmhousesandbyclientsinhotels,motelsandotherresidential
typeenvironments;
•Bedandbreakfasttypeenvironments;
•Cateringandsimilarnon-retailapplications.

Page 16

Page 17
BLACK & DECKER, BLACK+DECKER, the BLACK & DECKER and
BLACK+DECKER logos and product names and the orange and black color
scheme are trademarks of The Black & Decker Corporation, used under license.
All rights reserved.
Product in this box may differ slightly from that pictured. Does not affect
function. Not all accessories shown in photography are included in this
package.
Imported by W Appliance, Inc., 1356 Broadway, New York, NY 10018
July 2020 Printed in China

Page 18
Page 19
MANUAL DE INSTRUCCIONES
BODEGA PARA VINOS CON CAPACIDAD DE
6, 8, Y 12 BOTELLAS
¡Gracias por elegir BLACK+DECKER!
POR FAVOR, LEA ESTE MANUAL ANTES DE DEVOLVER ESTE
PRODUCTO POR CUALQUIER MOTIVO.
Si tiene alguna pregunta o tiene algún problema con su producto de
BLACK+DECKER vaya a www.blackanddecker.com/instantanswers
Si no puede encontrar la respuesta a su pregunta o no tiene acceso a Internet,
llame al 844-299-0879 de 10:30 a 18:30 EST de lunes a viernes para hablar con
un agente. Por favor, tenga el número de catálogo a mano cuando llame.
GUARDE ESTE MANUAL PARA SU REFERENCIA EN EL
FUTURO.
NÚMERO DE CATÁLOGO
BD60316, BD60326, BD60336

Page 20

Page 21
CONTENIDO
REGISTRO DEL PRODUCTO
INFORMACIÓN DE SEGURIDAD
Instrucciones importantes de seguridad ..............................................................................................................22-24
Instrucciones de conexión a tierra...................................................................................................................................23
CONFIGURACIÓN Y USO
Partes y funcionalidades ...............................................................................................................................................25-27
Guía de instalación ..................................................................................................................................................................28
Guía de operación ........................................................................................................................................................... 28-29
Beneficios del enfriamiento térmico eléctrico.......................................................................................................... 29
LIMPIEZA Y CUIDADO....................................................................................................................................30
SOLUCIÓN DE PROBLEMAS Y GARANTÍA .................................................................31-32
Antes de llamar al Servicio Técnico .................................................................................................................................31
Atención al cliente ....................................................................................................................................................................31
Resolución de problemas .....................................................................................................................................................31
Garantía limitada ......................................................................................................................................................................32
Grape o adjunte su recibo a su manual.
Lo necesitará para acceder el servicio de
garantía.
¡Gracias por comprar nuestro
producto BLACK+DECKER! Este
manual fácil de usar le guiará
para darle el mejor uso a su
bodega para botellas de vino.
Recuerde anotar el número de
modelo y el número de serie.
Están en una etiqueta en la parte
posteriordel producto.
__________________________
Nº de modelo
_____________________________
Nº de serie
_____________________________
Fecha de compra
Page 22
INFORMACIÓN DE SEGURIDAD
PELIGRO
PELIGRO - Amenazas inmediatas
que resultarán en lesiones
personales graves o la muerte
ADVERTENCIA
ADVERTENCIA - Peligros o
prácticas inseguras que pueden
resultar en lesiones personales
graves o la muerte
PRECAUCIÓN
PRECAUCIÓN - Peligros o
prácticas inseguras que
PODRÍAN resultar en lesiones
personales menores
1. Lea todas las instrucciones antes de usar este electrodoméstico.
2. Esta bodega para vinos debe ser instalada debidamente de acuerdo con las
instrucciones de instalación antes de ser utilizada. Vea las instrucciones de
conexión a tierra en la sección de instalación.
3. Nunca desconecte su bodega para vinos tirando del cable de alimentación.
Siempre tome el enchufe firmemente y tire hacia afuera de la toma.
4. Repare o reemplace de inmediato todos los cables de alimentación eléctrica que
se hayan pelado o dañado de otra manera. No use un cable que presente grietas
o daños de abrasión a lo largo del cable, el enchufe o el extremo del conector.
5. Desconecte su bodega para vinos antes de limpiarla o realizar cualquier
reparación.
NOTA: Si por alguna razón este producto requiere servicio, le recomendamos
encarecidamente que un técnico certificado lo lleve a cabo.
6. Si no está usando su bodega para vinos, le recomendamos que quite la puerta y
deje los estantes en su lugar. Esto reducirá las posibilidades de peligro para los
niños.
7. Esta bodega para vinos no debe ser empotrada o colocada en un armario
cerrado. Está diseñada solamente para su instalación de manera independiente.
Deje 2” (5 cm) de espacio entre los lados de la bodega y la pared y 4” (10cm)
entre la parte posterior y la pared.
8. No opere su bodega para vinos en la presencia de gases explosivos.
9. No almacene alimentos en la bodega para vinos ya que su temperatura interior
puede no ser suficiente para prevenir que se echen a perder.
INSTRUCCIONES IMPORTANTES DE SEGURIDAD
ADVERTENCIA
Cuando utilice electrodomésticos, debe seguir algunas medidas
básicas de seguridad, entre las que se incluyen:
LEA TODAS LAS INSTRUCCIONES ANTES DE USAR LA UNIDAD
CONSERVE ESTAS INSTRUCCIONES
SOLO PARA USO DOMÉSTICO
PELIGRO
Riesgo de atrapamiento de niños. Antes de desechar cualquier congelador
o refrigerador, retire la(s) puerta(s).
Deje los estantes en su lugar para que los niños no puedan meterse dentro.

Page 23
INFORMACIÓN DE SEGURIDAD
INSTRUCCIONES DE CONEXIÓN A TIERRA
REQUISITOS ELÉCTRICOS
En caso de mal funcionamiento o avería, la conexión a tierra reducirá
el riesgo de descarga eléctrica al proporcionar una ruta de menor
resistencia para la corriente eléctrica. Este aparato debe estar
conectado con un cable que posea un conductor de conexión a tierra
y enchufe con conexión a tierra. El enchufe debe estar enchufado en
una toma de corriente apropiada que esté correctamente instalada
y conectada a tierra de acuerdo con todos los códigos y ordenanzas
locales.
PELIGRO - Una conexión incorrecta del conductor para la conexión
a tierra puede causar una descarga eléctrica. El conductor con
aislamiento de color verde con o sin franjas amarillas es el conductor
de puesta a tierra del equipo. Si es necesario reparar o reemplazar
el cable eléctrico o el enchufe, no conecte el conductor de conexión
a tierra del equipo a un terminal activo. Consulte a un electricista
calificado o personal de servicio si las instrucciones de conexión a
tierra no se comprenden completamente o si tiene dudas sobre si el
electrodoméstico está conectado a tierra correctamente. No modifique
el enchufe que viene con el electrodoméstico. Si este no encaja en
la toma de corriente, pida a un electricista que instale una toma de
corriente adecuada. Este aparato debe estar conectado con un cable
que posea un conductor de conexión a tierra y enchufe con conexión
a tierra. El enchufe debe estar enchufado en una toma de corriente
apropiada que esté correctamente instalada y conectada a tierra de
acuerdo con todos los códigos y ordenanzas locales.
PARA ELECTRODOMÉSTICOS CON CONEXIÓN A TIERRA MEDIANTE
CABLE CON CONSUMO NOMINAL INFERIOR A 15 AMPERIOS Y
DISEÑADOS PARA SU USO EN UNA RED ELÉCTRICA DE 120V
NOMINALES
El electrodoméstico debe usarse en un circuito de 120V nominales y
debe conectarse a una toma de tierra que se parezca a la que se ilustra
a continuación. No se recomienda el uso de un adaptador inclusive de
forma temporal.
Page 5
SAFETY INFORMATION
GROUNDING INSTRUCTIONS
ELECTRICAL REQUIREMENTS
In the event of malfunction or breakdown, grounding provides a path of
least resistance for electric current to reduce the risk of electric shock.
The appliance must be connected to a cord having an equipment-
grounding conductor and a grounding plug. The plug must be plugged
into an appropriate outlet that is properly installed and grounded in
accordance with all local codes and ordinances.
DANGER - Improper connection of the equipment grounding conductor
can result in a risk of electric shock. The conductor with insulation
having an outer surface that is green with or without yellow stripes is
the equipment grounding conductor. If repair or replacement of the
cord or plug is necessary, do not connect the equipment-grounding
conductor to a live terminal. Check with a qualified electrician or
service person if the grounding instructions are not completely
understood, or if in doubt as to whether the [tool/appliance] is properly
grounded. Do not modify the plug connected to the [tool/appliance] –
if it will not fit the outlet, have a proper outlet installed by a qualified
electrician.
FOR GROUNDED, CORD-CONNECTED [TOOL/APPLIANCE] RATED
LESS THAN 15A AND INTENDED FOR USE ON A NOMINAL 120V
SUPPLY CIRCUIT
The appliance is for use on a nominal 120V circuit and should be
connected to a grounding outlet that looks like the one illustrated
below. The use of a temporary adaptor is not recommended.

Page 24
INFORMACIÓN DE SEGURIDAD
CABLE DE ALIMENTACIÓN
1. Evite el uso de un cable de extensión debido a los potenciales riesgos de
seguridad bajo ciertas condiciones. Pida a un electricista o técnico calificado
que instale una toma de corriente cerca del electrodoméstico.
2. Si fuese absolutamente necesario utilizar un alargue o una regleta, se debe
tener cuidado extremo.
a) Utilice solamente un cable de tensión con 3 hilos conectado a tierra que
tenga un enchufe de tres clavijas conectado a tierra en una toma que
acepte el tipo de enchufe del electrodoméstico.
b) La capacidad eléctrica marcada en el alargue o regleta debe ser igual a, o
mayor que, la capacidad eléctrica del aparato. El cable más largo debe ser
dispuesto de manera tal que no cuelgue de la mesada o la mesa para evitar
que los niños tiren de él o que alguien se tropiece accidentalmente.
NOTA: Ni BLACK+DECKER ni el distribuidor pueden aceptar ninguna
responsabilidad por daños al producto o daños personales que resulten de
no respetar los procedimientos de conexión eléctrica.

Page 25
CONFIGURACIÓN Y USO
PARTES Y FUNCIONALIDADES
Pata
Panel de control frontal
Pata de
nivelación (3)
Rejilla del ventilador
Estantes de
alambre cromado
Luz
Modelo Capacidad de botellas Número de estantes Rango de temperatura
BD60316 6 2 46˚Fa 66˚F (8˚C a 19˚C)
Puerta espejada
maciza
Page 26
CONFIGURACIÓN Y USO
PARTES Y FUNCIONALIDADES
Modelo Capacidad de botellas Número de estantes Rango de temperatura
BD60326 8 4 46˚Fa 66˚F (8˚C a 19˚C)
Panel de control frontal
Estantes de
alambre cromado
Puerta
espejada maciza
Pata
Rejilla del ventilador
Luz
Pata de
nivelación (3)
Page 27
CONFIGURACIÓN Y USO
PARTES Y FUNCIONALIDADES
Modelo Capacidad de botellas Número de estantes Rango de temperatura
BD60336 12 5 46˚Fa 66˚F (8˚C a 19˚C)
Panel de control frontal
Rejilla del ventilador
Luz
Estantes de
alambre cromado
Puerta espejada
maciza
Pata
Pata de
nivelación (3)

Page 28
GUÍA DE INSTALACIÓN
1. Desempaque su bodega para vinos quitando todo el material de embalaje como
cartón, base, espumas, cinta adhesiva, etc.
2. Quite todos los accesorios, material de embalaje interno para sostener los
estantes y demás en su lugar durante el transporte.
3. Limpie los restos de toda la cinta adhesiva y quite todo el material impreso
incluido.
4. Instale la bodega para vinos en un lugar conveniente lejos del calor y frío
extremos. Deje un espacio suficiente entre la bodega para vinos y las paredes
laterales para que la(s) puerta(s) abran sin obstrucciones. La bodega de vinos no
está diseñada para su instalación empotrada.
5. El piso donde la bodega para vinos ha de ser colocada deber ser plano, duro,
sólido y nivelado. La bodega para vinos no debe ser colocada sobre ningún
material blando como alfombras, espuma, plástico, etc.
6. Para nivelar su bodega para vinos, utilice las dos patas niveladoras ubicadas en
la parte trasera y la que se encuentra al frente a la izquierda de la misma. Ajuste
girando las patas en sentido horario para elevar o en sentido antihorario para
bajar su bodega para vinos.
NOTA: La pata delantera derecha que es parte de la bisagra de la puerta no es
ajustable.
7. Lo siguiente es el espacio mínimo recomendado que deberá quedar libre
alrededor de la bodega para vinos para una circulación de aire adecuada:
Lados: 2” (50mm)
Arriba: 4” (100mm)
Atrás: 4” (100mm)
Una circulación de aire adecuada ayudará a que su bodega para vino trabaje con
la máxima eficiencia.
NOTA: · Deje el espacio suficiente al frente de la unidad para poder abrir la puerta por lo menos
120˚.
GUÍA DE OPERACIÓN
1. Enchufe la bodega para vinos a la corriente para encender la unidad.
2. Puede elegir la temperatura de su bodega para vinos dentro del rango de 46°F a
66°F. La temperatura de su bodega para vinos puede ser establecida presionando la
tecla de la flecha hacia arriba en el exterior de la puerta de vidrio para aumentar
la temperatura. Al presionar la tecla de la flecha hacia abajo en el exterior de la
puerta de vidrio puede reducir la temperatura. Una vez que haya seleccionado su
temperatura, el indicador de temperatura volverá a mostrar la temperatura actual.
CONFIGURACIÓN Y USO
Page 29
CONFIGURACIÓN Y USO
Como ejemplo, cuando la temperatura ambiente es de 72°F (22°C), la temperatura
interior del gabinete mínima que puede ser alcanzada es 46~48°F (8~9°C). Cuando la
temperatura ambiente es de 89°F (32°C), la temperatura interior del gabinete mínima que
puede ser alcanzada es 50-56°F (10~13°C).
3. Permita que la bodega para vinos opere vacía por aproximadamente una hora. Esto
debería permitirle a la unidad alcanzar la temperatura deseada.
4. Llene la bodega para vinos con su selección de botellas de vinos. Permita que opere 1 a
2 horas para alcanzar la temperatura deseada.
5. Su bodega de vinos tiene una luz para visualizar sus botellas de vino. El interruptor
manual para controlar la luz se encuentra en el panel de control táctil. Un pequeño
círculo luminoso aparecerá en la parte inferior derecha de la pantalla de temperatura
para indicar que la luz está encendida.
BENEFICIOS DEL ENFRIAMIENTO TÉRMICO
ELÉCTRICO
La tecnología Térmica Eléctrica es un proceso de enfriamiento amigable con el medio
ambiente que no usa CFC, HCFC, o refrigerantes del tipo HCF, los cuales son dañinos para
el medio ambiente.
La ausencia de un compresor reduce el ruido y las vibraciones típicamente asociadas con
electrodomésticos refrigerados.
Por favor tenga en cuenta que la temperatura interior real dentro del gabinete en
una unidad térmica eléctrica depende de la temperatura ambiente.
Puede establecer la temperatura del gabinete dentro del rango
operacional pero, debido a altas temperaturas ambiente,
la unidad puede no alcanzar la temperatura seleccionada.
NOTA: Cuando la temperatura ambiente es menor que la temperatura
seleccionada, la bodega para vinos no operará hasta que la temperatura
ambiente sea mayor que la temperatura seleccionada.
NOTA: La luz interior no debe mantenerse encendida cuando la puerta está
cerrada y no está en uso. Toque el símbolo del interruptor de luz interior
para apagarlo y cerrar la puerta. El indicador de la luz interior no
desaparecerá de la parte inferior derecha de la pantalla de temperatura.
Interruptor
de luz
interior
Ajuste
más cálido
Ajuste
más frío
Pantalla de
temperatura
Indicador
de luz
interior
47

Page 30
LIMPIEZA Y CUIDADO
LIMPIEZA Y MANTENIMIENTO
ADVERTENCIA: Desconecte su bodega para vinos antes de limpiarla para evitar
descargas eléctricas. Ignorar esta advertencia puede resultar en
lesiones o la muerte.
PRECAUCIÓN: Antes de utilizar productos de limpieza, siempre lea y siga las
instrucciones y advertencias del fabricante para evitar lesiones
personales o daños al producto.
General: • Prepare una solución de limpieza de 3 o 4 cucharadas de bicarbonato
de sodio en agua tibia. Utilice una esponja o paño suave, mojado con la
solución de limpieza para limpiar su bodega para vinos.
• Enjuague con agua limpia y tibia y seque con un paño seco y suave.
• No use químicos fuertes, abrasivos, amoniaco, lejía, detergentes
concentrados, solventes o esponjas de fibras metálicas. Algunos de estos
químicos pueden disolver, dañar y/o decolorar su bodega para vinos.
Interrupciones de suministro eléctrico
Ocasionalmente, puede haber interrupciones de suministro eléctrico debido a
tormentas u otras causas. Desconecte el cable de alimentación de la toma de
corriente alterna en caso de interrupción de suminstro eléctrico. Una vez que el
suministro eléctrico haya sido restablecido, reconecte el cable de alimentación a la
toma de corriente.
Cuidados para vacaciones y mudanzas
Para vacaciones o ausencias largas, desenchufe la unidad, vacíe los contenidos de
la bodega para vinos y limpie el gabinete y los burletes de la puerta de acuerdo a
la sección de “Limpieza general”. Abra las puertas, para que el aire pueda circular.
Cuando mueva la bodega para vinos, hágalo siempre de manera
vertical. No mueva ni guarde la unidad de lado.

Page 31
SOLUCIÓN DE PROBLEMAS Y GARANTÍA
ANTES DE LLAMAR AL SERVICIO TÉCNICO
SI LA UNIDAD FALLA AL OPERAR:
A) Verifique para asegurarse que el electrodoméstico esté enchufado de forma
segura. Si no lo está, retire el enchufe de la toma de corriente, espere 10 segundos
y conéctelo nuevamente de forma segura.
B) Compruebe si hay un fusible quemado o un disyuntor principal disparado. Si éstos
parecen estar operando como es debido, pruebe la toma de corriente con otro
aparato.
SI NINGUNO DE LOS PASOS ANTERIORES RESUELVE EL PROBLEMA, CONTACTE
A UN TÉCNICO CALIFICADO. NO INTENTE AJUSTAR O REPARAR LA BODEGA
PARA VINOS USTED MISMO
IMPORTANTE
NO DEVUELVA ESTE PRODUCTO A LA TIENDA
Si tiene problemas con este producto, por favor, contacte al
Centro da Satisfacción del Cliente de BLACK+DECKER a través
del al 844-299-0879 o a service@equitybrands.com
UN COMPROBANTE DE COMPRA CON FECHA, No. DE MODELO
Y No. DE SERIE ES REQUERIDO PARA EL SERVICIO DE
GARANTÍA
RESOLUCIÓN DE PROBLEMAS
Solucione su problema utilizando el cuadro a continuación. Si la unidad aún no
funciona correctamente, comuníquese con el centro de servicio al cliente o con
el centro de servicio autorizado más cercano. El cliente nunca debe solucionar
problemas de componentes internos.
SÍNTOMAS CAUSA POSIBLE SOLUCIONES
La bodega para
vinos no funciona.
Hay una interrupción de
suministro.
Se ha disparado un
disyuntor.
Asegúrese de que la bodega para vinos
esté enchufada y que la toma de corriente
esté activa.
Reinicie el disyuntor.
La bodega para
vinos no está
alcanzando la
temperatura
deseada
La bodega para vinos está
colocada demasiado cerca
de una fuente de calor.
No hay ventilación
suficiente.
La puerta se abre
demasiado seguido o por
demasiado tiempo.
Mantenga la bodega para vinos alejada de
la luz del sol u otras fuentes de calor.
Coloque la bodega para vinos en un lugar
con buena ventilación y mantenga los
ventiladores despejados.
Cierre la puerta herméticamente y no abra
la puerta con demasiada frecuencia o por
demasiado tiempo.
Formación de
escarcha en la
bodega para vinos
Hay demasiada humedad.
La temperatura ambiente es
demasiado baja.
Desenchufe para descongelar, vuelva
a enchufar luego de que la escarcha se
derrita.

Page 32
GARANTÍA LIMITADA
Cualquier reparación, recambio, o servicio
de garantía, y todas las preguntas sobre este
producto deben ser dirigidas BLACK+DECKER
al 844-299-0879 desde EE.UU. o Puerto Rico.
BLACK+DECKER garantiza al comprador original que
el producto estará libre de defectos de materiales,
partes y mano de obra por el período designado para
este producto. La garantía comienza el día en que se
compra el producto y cubre hasta un período de 1 año
(12 meses) por mano de obra / 1 año (12 meses) por
piezas (solo defectos de fabricación).
BLACK+DECKER acepta que, de acuerdo con su
criterio, remplazará el producto defectuoso por
uno nuevo o uno remanufacturado equivalente a su
compra original durante el período de garantía.
Exclusiones: Esta garantía no se aplica a lo siguiente:
1. Si la apariencia o el exterior de el
producto ha sido dañado o cambiado,
alterado o modificado en diseño o
construcción.
2. Si el número de serie original del
producto ha sido alterado o eliminado
o no puede ser fácilmente determinado.
3. Si está dañado debido a una
sobrecarga de la línea eléctrica, daño al
cable de alimentación de CA por parte
del usuario o conexión a una fuente de
voltaje incorrecta.
4. Si el daño se debe a un mal uso
general, accidentes o actos de Dios.
5. Si los intentos de reparación son
realizados por agentes de servicio
no autorizados, el uso de piezas que
no sean piezas originales o piezas
obtenidas de personas que no sean
empresas de servicios autorizadas.
6. En unidades que han sido transferidas
del propietario original.
7. En productos que han sido comprados
como reacondicionados, como nuevos,
de segunda mano, en términos de “tal
como es” o “venta final”.
8. A los productos utilizados en un
entorno comercial o de alquiler.
9. A productos utilizados en condiciones
distintas a las ordinarias de uso
doméstico normal o usado de otra
manera que no sea de acuerdo con las
instrucciones provistas.
10. A los daños por las llamadas al servicio
por instalaciones inadecuadas.
11. A costos de transporte y envío
asociados con el reemplazo de la
unidad.
12. A llamadas de servicio para instruirlo
sobre cómo usar su producto.
13. Llamadas de servicio para reparar
o reemplazar el fusible de la casa,
reiniciar el disyuntor o corregir el
cableado de la casa.
LA REPARACIÓN O EL REMPLAZO COMO SE
ESTABLECE EN ESTA GARANTÍA SON LA SOLUCIÓN
EXCLUSIVA DEL CLIENTE; BLACK+DECKER NO SERÁ
RESPONSABLE POR NINGÚN DAÑO INCIDENTAL
O EN CONSECUENCIA POR INCUMPLIMIENTO DE
CUALQUIER GARANTÍA EXPRESA O IMPLÍCITA DE
ESTE PRODUCTO, EXCEPTO EN LA MEDIDA EN
QUE LO PROHÍBA LA LEY APLICABLE. CUALQUIER
GARANTÍA IMPLÍCITA DE COMERCIABILIDAD O
IDONEIDAD PARA UN PROPÓSITO PARTICULAR
SOBRE ESTE PRODUCTO TIENE UNA DURACIÓN
LIMITADA A LA DURACIÓN DE ESTA GARANTÍA.
Algunos estados no permiten la exclusión o
limitaciones de daños incidentales o consecuentes,
o limitaciones en la duración de la garantía. En estos
casos, las exclusiones o limitaciones anteriores pueden
no aplicarse en su caso. Esta garantía le otorga
derechos legales específicos, y también puede tener
otros derechos que varían de estado a estado.
Obtención de servicio: Para obtener servicio,
documentación del producto, suministros o
accesorios, llame al 844-299-0879 para crear un ticket
de cambio/reparación. Asegúrese de proporcionar la
fecha de compra, el número de modelo y una breve
descripción del problema. Nuestros representantes de
servicio al cliente se comunicarán con usted o enviarán
instrucciones detalladas de devolución.
BLACK+DECKER no garantiza que el aparato funcionará
adecuadamente en todas las condiciones ambientales, y no
otorga garantía alguna ni defensa, ya sea implícita o expresada,
con respecto a la calidad, desempeño, comerciabilidad, o aptitud
para un propósito particular más allá del propósito identificado
en este manual de usuario. BLACK+DECKER ha realizado todos
los esfuerzos para asegurarse de que este manual es preciso
y renuncia a la responsabilidad sobre cualquier imprecisión
u omisión que pueda haber ocurrido. La información en este
manual de usuario está sujeta a cambiar sin aviso previo y no
representa un compromiso por parte de BLACK+DECKER.
BLACK+DECKER se reserva el derecho de hacer mejoras a este
manual de usuario y/o al producto descrito en este manual de
usuario en cualquier momento sin aviso previo. Si encuentra
información en este manual que es incorrecta, engañosa o
incompleta, comuníquese con nosotros al 844-299-0879.
W Appliance Co.
1356 Broadway
New York, NY 10018
SOLUCIÓN DE PROBLEMAS Y GARANTÍA

Page 33
Esteaparatoestádiseñadoparalainstalaciónindependiente
solamente.
•esteaparatoestádestinadoparaserutilizadoenelhogary
similaresAplicaciones:
•áreasdecocinadelpersonalentiendas,ocinasyotroslugares
detrabajoMedioambiente;
•casasruralesyporclientesenhoteles,motelesyotros
residencialesTiposdeambientes;
•alojamientoydesayuno;
•restauraciónyotrasaplicacionessimilaresnocomerciales.

Page 34

Page 35
BLACK & DECKER, BLACK+DECKER, y los logos y nombres de productos
de BLACK & DECKER y el esquema de color naranja y negro son marcas
registradas de The Black & Decker Corporation, usados bajo licencia.
Todos los derechos reservados.
El producto en esta caja puede diferir levemente de la imagen. No afecta
su función. No todos los accesorios que se muestran en la fotografía están
incluidos en este paquete.
Importado por W Appliance, Inc., 1356 Broadway, Nueva York, NY 10018
Julio de 2020 Impreso en China