

Contents
Copyright, trademarks, and disclaimer 4
XProtect Rapid REVIEW 5
Installation and deployment steps 6
Prerequisites 6
STEP 1 - Run the Installer 7
Firewall Consideration and Ports Availability 19
Installation Troubleshooting 20
HASP Message 20
Activate licenses 21
Licensing warning 21
Online activation 21
Offline activation 23
Activate via the BriefCam License Activation application 24
Activate via the Gemalto application. 25
System expansion (adding additional device licenses) 26
STEP 2 – Set up the deployment 27
STEP 3 – Define and activate the cameras 31
STEP 4 – Disable face recognition and license plate recognition (optional) 34
STEP 5 – Install BriefCam Embedded Client for Milestone XProtect plug-in 34
STEP 6 – Using an HTTPS host (optional) 38
Recommendations 38
Prerequisites 38
Steps 38
Generic configurations 42
Logging 43
Network security considerations 44
Upgrade Steps 44
Troubleshooting 46
Failed fetching camera plugins error 46
Symptom 46
Installation and deployment guide | XProtect® Rapid REVIEW
2 |

Possible root causes 46
Solution 47
White screen displayed 49
Symptom 49
Possible root causes 50
Solution 50
Missing license 55
Environment settings not configured properly 55
Server unavailable error 56
Symptom 56
Possible root causes 57
Solution 57
BriefCam tab is missing 59
Symptom 59
Possible root causes 59
Solution 59
APPENDIX: XProtect Rapid REVIEW hardware recommendations 60
All-in-One configurations 60
Throughput example 62
RAID redundancy 62
Distributed deployments 62
Larger deployments 67
GPU lifecycle 67
Installation and deployment guide | XProtect® Rapid REVIEW
3 |

Copyright, trademarks, and disclaimer
Copyright © 2023 Milestone Systems A/S
Trademarks
XProtect is a registered trademark of Milestone Systems A/S.
Microsoft and Windows are registered trademarks of Microsoft Corporation. App Store is a service mark of
Apple Inc. Android is a trademark of Google Inc.
All other trademarks mentioned in this document are trademarks of their respective owners.
Disclaimer
This text is intended for general information purposes only, and due care has been taken in its preparation.
Any risk arising from the use of this information rests with the recipient, and nothing herein should be
construed as constituting any kind of warranty.
Milestone Systems A/S reserves the right to make adjustments without prior notification.
All names of people and organizations used in the examples in this text are fictitious. Any resemblance to any
actual organization or person, living or dead, is purely coincidental and unintended.
This product may make use of third-party software for which specific terms and conditions may apply. When
that is the case, you can find more information in the file 3rd_party_software_terms_and_conditions.txt located
in your Milestone system installation folder.
Installation and deployment guide | XProtect® Rapid REVIEW
4 | Copyright, trademarks, and disclaimer

XProtect Rapid REVIEW
This installation and deployment guide outlines the installation and deployment of XProtect Rapid REVIEW for
rapid time-to-value.
Get started and accelerate investigations with XProtect Rapid REVIEW
l
Review hours of video in minutes with VIDEO SYNOPSIS
®
l
Pinpoint objects of interest with robust multi-camera search capabilities supporting 29 classes and
attributes, face recognition, appearance similarity, color, size, speed, path, direction, and dwell time
l
Quickly and effectively organize all video assets of an investigation with collaborative case management
l
Rapidly visualize activity level, dwell time, common paths and background changes with powerful visual
layers
Installation and deployment guide | XProtect® Rapid REVIEW
5 | XProtect Rapid REVIEW

Installation and deployment steps
1. Run the installer
2. Set up the deployment
3. Define and activate the cameras
4. Disable face recognition and license plate recognition (optional)
5. Install BriefCam Embedded Client for Milestone XProtect plug-in
6. Using an HTTPS host (optional)
Prerequisites
Before you install, please check the following list of prerequisites.
Server
At least one dedicated server for XProtect Rapid REVIEW (it cannot be installed on the
same server with the VMS).
Memory At least 64GB of RAM
Storage
l
At least 250GB of free space for the application
l
At least 250GB for the database (on SSD drives)
l
At least 500GB drive for data storage (video and metadata)
Refer to the APPENDIX: XProtect Rapid REVIEW hardware recommendations on page 60
for recommended storage size.
GPUs
At least one supported GPU. For additional information, see the list of recommended
GPUs which is available on the specification sheet that you can download from the
Milestone Content Portal: Collections / Rapid REVIEW.
The GPU should not be used for any system task such as connecting a monitor to the
GPU or running applications, such as Chrome, using the GPU.
CPU For each GPU, at least 4 cores at base (non-turbo) frequency of 2.5GHz and above.
Drivers
For the server with the GPU, make sure to download a supported version of the NVIDIA
driver (470.94 or higher).
Make sure to restart the computer after installing the NVIDIA driver.
Installation and deployment guide | XProtect® Rapid REVIEW
6 | Installation and deployment steps

Network
connectivity
between
BriefCam and
the VMS
Ensure a minimum of 1 Gbps of throughput is available. This is relevant for
deployments with less than 300 cameras on site. For larger deployments, consult with
your BriefCam Account Manager.
Operating
System
Windows 11, Windows 10 Pro version 1803 or higher, Windows Server 2016 or Windows
Server 2019 (You can check the Windows versions by running winver.exe.) For the
Windows 10 'N' edition, you need to install 'Media Feature Pack' and 'Windows Media
Player' via the Windows optional features menu. For more information, click here.
Windows
Updates
Make sure that the latest Windows updates are installed.
.NET
Framework
If the computer is running Windows 10 or Windows Server 2016, download and install
.NET Framework 4.7.2 Runtime or higher.
Make sure to restart the computer after installing .NET Framework.
Permissions
Current logged in user has full local admin rights and full Registry Read/Write
permissions.
Browsers
Mozilla Firefox version 69.* and above
Google Chrome version 77.* and above
Microsoft Edge version 80 and above
Ports See the Firewall Consideration and Ports Availability section below.
STEP 1 - Run the Installer
XProtect Rapid REVIEW will not work if the minimum requirements are not met. For
additional information, see the APPENDIX: XProtect Rapid REVIEW hardware
recommendations on page 60.
Installation and deployment guide | XProtect® Rapid REVIEW
7 | Installation and deployment steps

1. Extract the XProtect Rapid REVIEW package (RapidREVIEW <version>.zip).
The extracted folder includes the XProtect Rapid REVIEW installer, multiple BriefCam installer files and
an installation and configuration guide. You do not need to run any of the BriefCam installers (except
for the embedded client installer at a later stage).
BriefCam uses port 80 for its application. If you want to use a different port,
change it in the config.json file before running the installer. The config.json file is
one of the files in the installation package.
2. Right-click the MilestoneXProtectRapidReview2022R2Installer.exe file and select Run as administrator.
3. Read and accept the License Agreement terms and click NEXT.
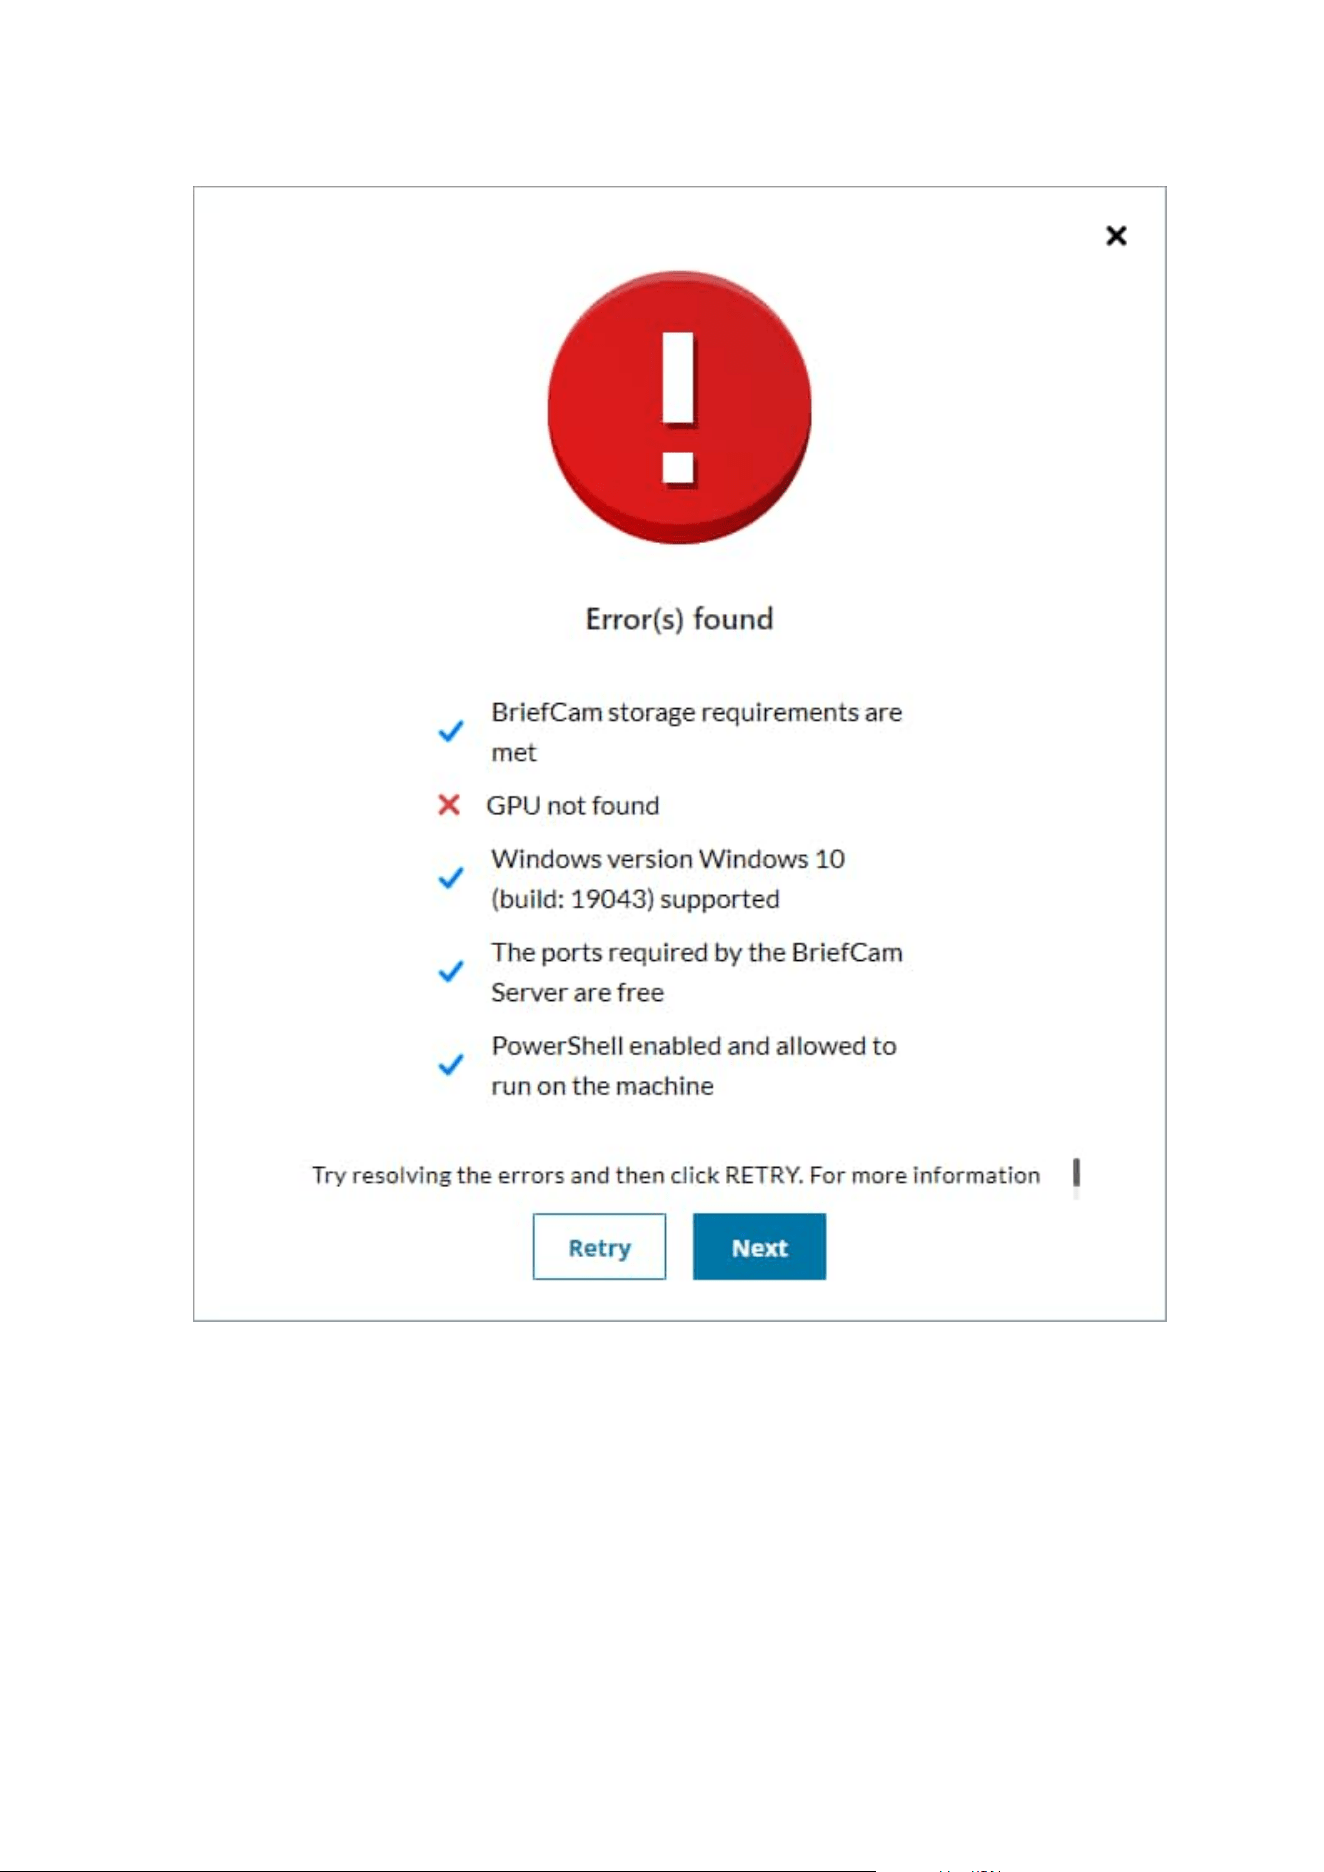
The installer will check to see if your computer meets the minimum prerequisites.
l
If all the prerequisites are met, you’ll see a “Your system is fine” message.
l
If any of the prerequisites are not met, you will see a screen describing the errors. Try resolving
the errors and then click RETRY or run the installer again.
If there are still errors and you click NEXT , the installation will continue. However, BriefCam may not
run properly on your computer since it does not meet the minimum requirements.
Installation and deployment guide | XProtect® Rapid REVIEW
8 | Installation and deployment steps
4. Select whether you want to install, upgrade, or uninstall XProtect Rapid REVIEW.
Installation and deployment guide | XProtect® Rapid REVIEW
9 | Installation and deployment steps

If you select INSTALL or UPGRADE, the following screen appears.
Installation and deployment guide | XProtect® Rapid REVIEW
10 | Installation and deployment steps
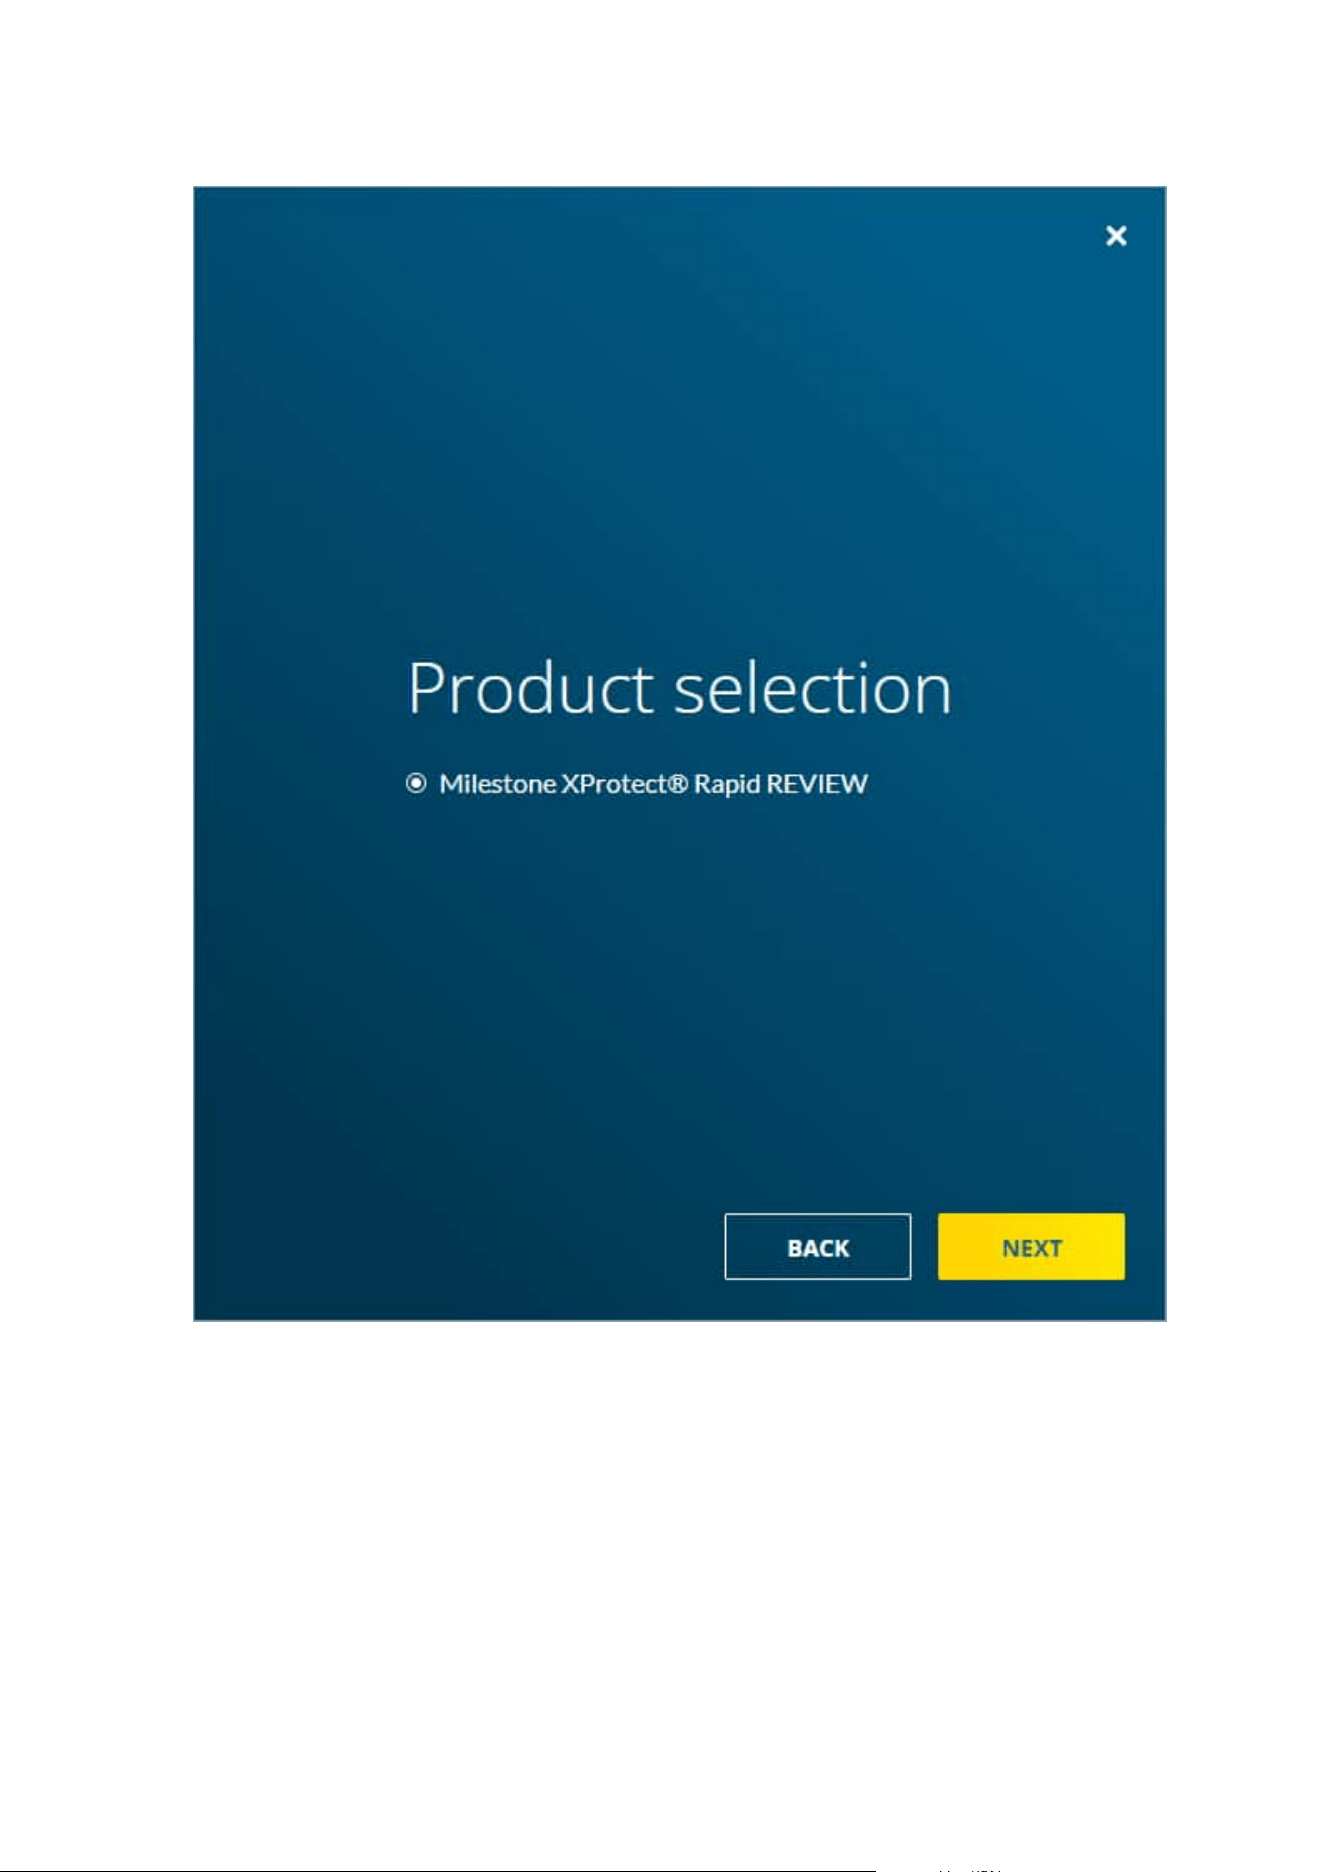
5. Click NEXT.
The following screen opens where you’ll enter the necessary credentials and settings.
Installation and deployment guide | XProtect® Rapid REVIEW
11 | Installation and deployment steps
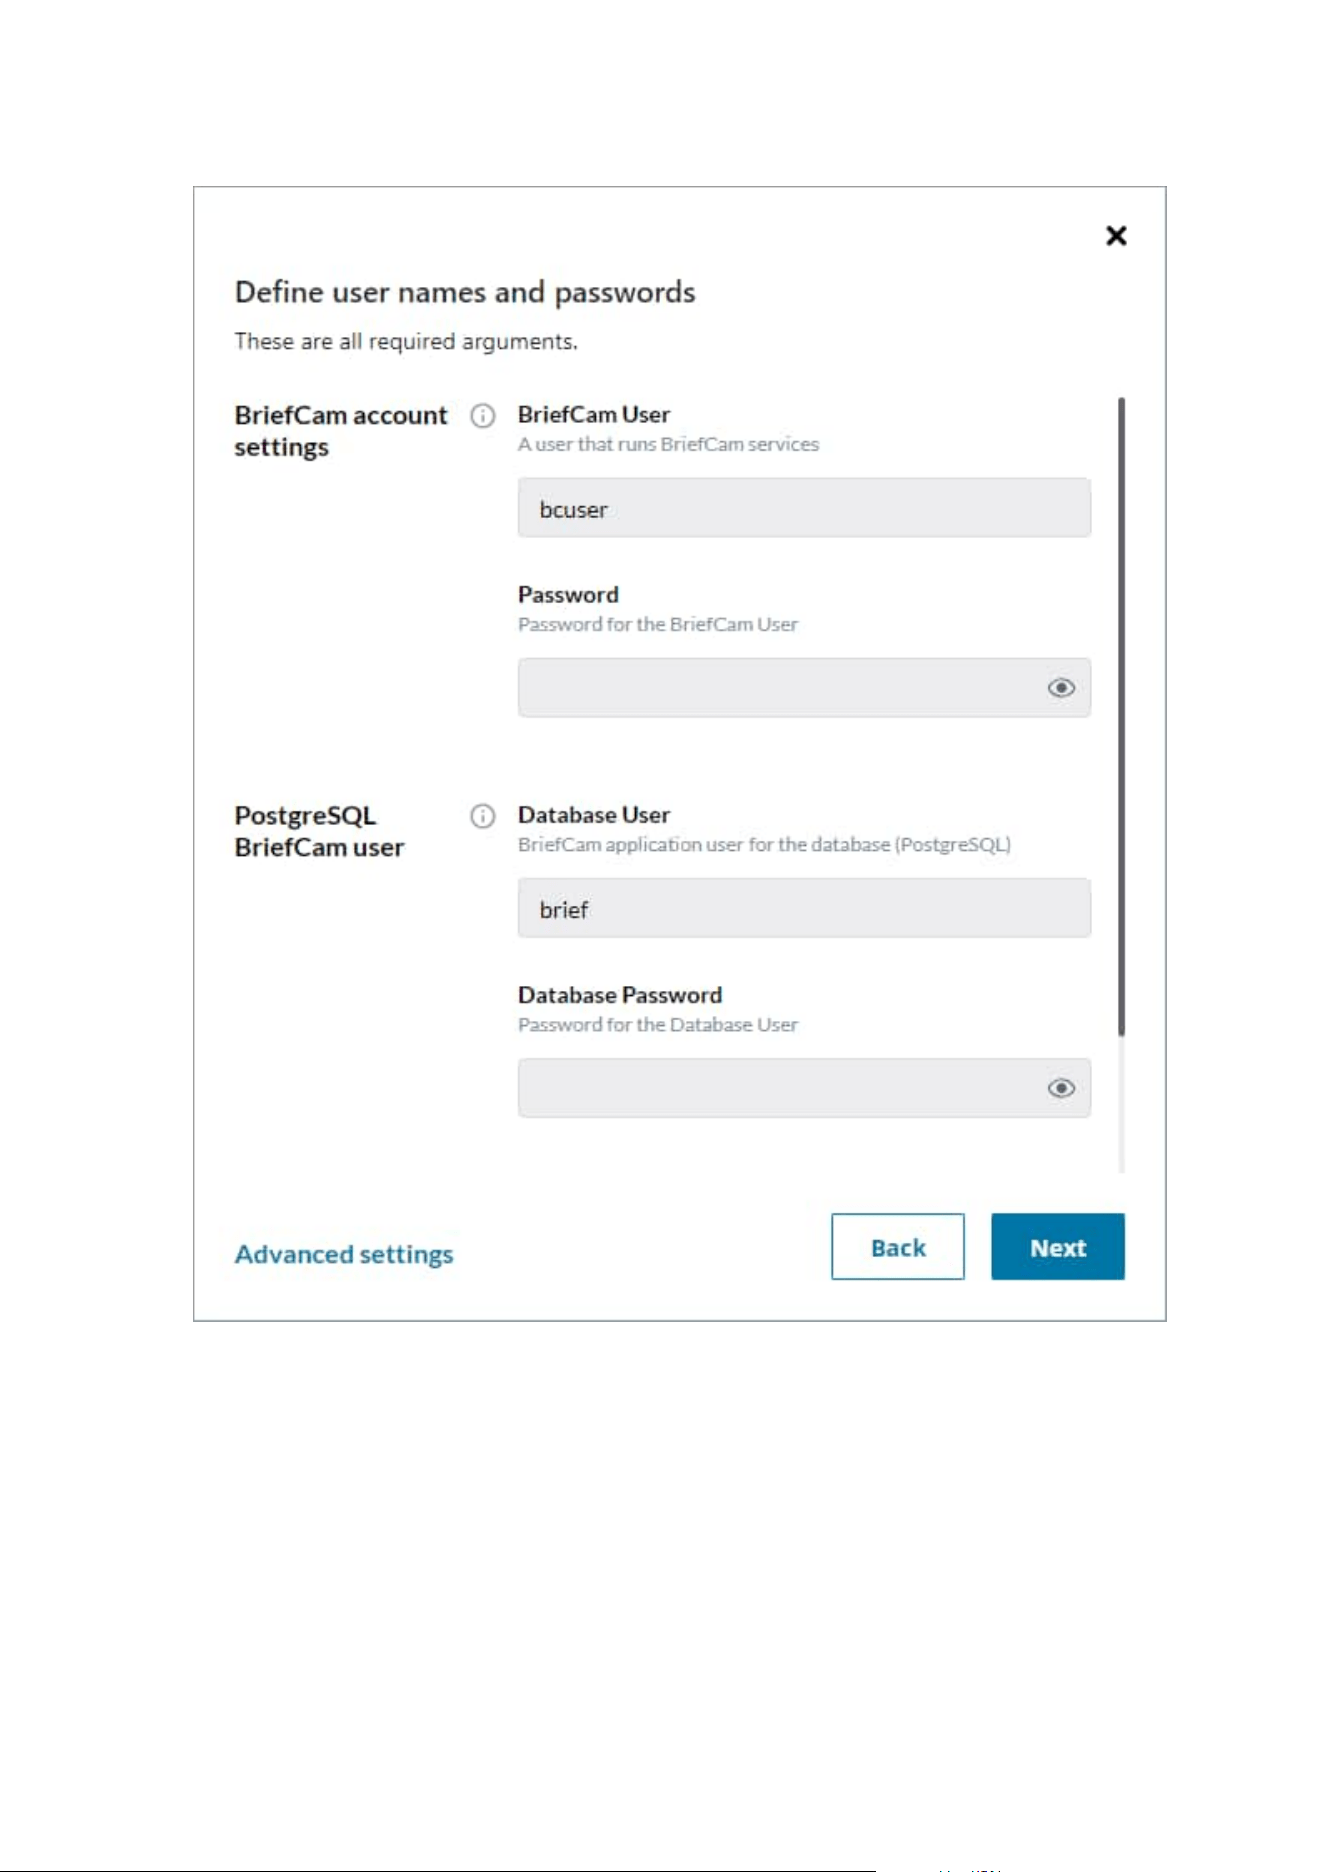
6. Fill in the following fields.
Installation and deployment guide | XProtect® Rapid REVIEW
12 | Installation and deployment steps

Field Description
BriefCam account settings
BriefCam
User
The Windows user that runs the services. If this user does not yet exist, the
installer will create it for you.
This user must have local administrator permissions.
Password
The password of the user above (BriefCam User). Note that apostrophes are not
supported in the Password field.
Use a password that is compliant with your organization’s password policy.
A password may fail for a variety of reasons:
l
The password does not meet the password policy of the operating system
and/or organization.
l
Domain accounts cannot be created using this dialog. Contact the relevant
IT person if a new domain account is required.
l
The user is disabled, locked, or otherwise limited.
PostgreSQL BriefCam User
Database
User
The PostgreSQL user that accesses the application database.
Note that the user name is case sensitive.
Database
Password
The password of the user above (Database User). Note that apostrophes are not
supported in the Password field.
License activation key (Optional)
Software
activation
key
The license activation key provided by Milestone. This is an optional field.
If provided, the license will be activated if the machine is online. If it is not online,
you can activate the license using the BriefCam License Activation tool, which you
can access by clicking the following icon after the installation completes.
Installation and deployment guide | XProtect® Rapid REVIEW
13 | Installation and deployment steps
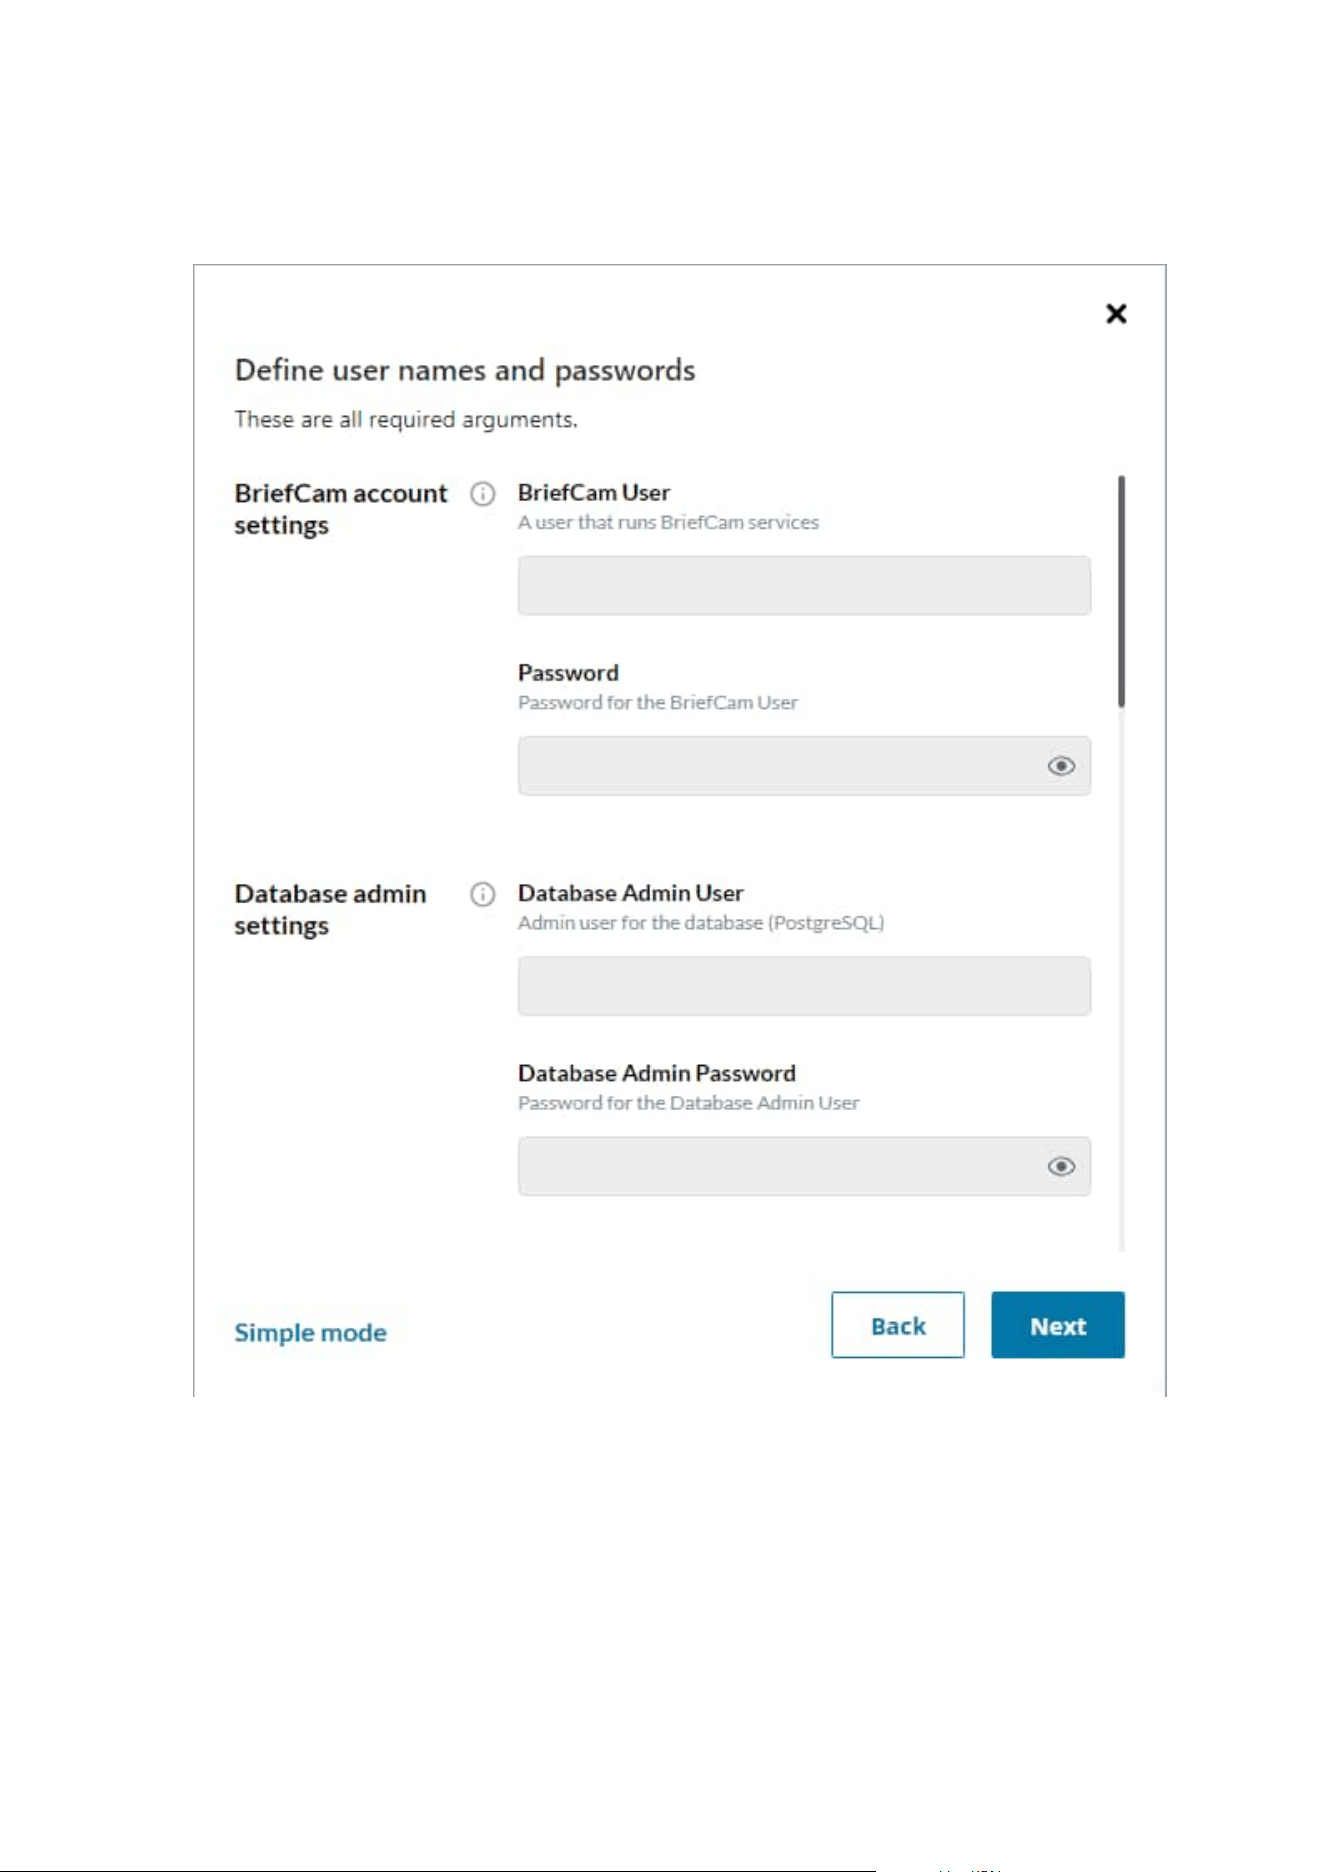
7. Select the Advanced settings option to view additional fields. If you want to already configure the
connection to the Milestone VMS, fill in the Milestone VMS Address field. It is recommended to fill it in.
The following table describes all the additional fields that are in the Advanced settings.
Installation and deployment guide | XProtect® Rapid REVIEW
14 | Installation and deployment steps

Field Description
Database admin settings
Database
Admin User
The admin user for the PostgreSQL database. This cannot be the same as the
Database User in the previous table.
Database
Admin
Password
The password of the user above (Database Admin User). A database admin
password is automatically generated. Note that apostrophes are not supported
in the Password field.
Authentication Key
Passphrase
This passphrase will be used to generate an encryption key to secure connection
strings and other sensitive data.
Domain Name
Domain Name
If the BriefCam user you specified in the previous table is a domain user, enter
the domain name and make sure that the domain user has full admin privileges
on the server. If the user is a local user, enter a period (.)
Note that the domain name is case sensitive.
Paths
Root path The path where you want to install BriefCam applications.
Shared
directory
The path for the shared data folder. This folder will store longer blobs, database
backups, rendered synopsis files, and more.
It’s recommended to select the drive with the most available space.
If you select an existing shared network folder, make sure that the user has
permissions to the shared network folder.
If you want to select a mapped drive, make sure to first map the drive before
installing BriefCam.
In the properties of the drive you select, make sure that you cleared the Allow
files on this drive to have contents indexed in addition to file properties check
box (as shown in the image below).
Installation and deployment guide | XProtect® Rapid REVIEW
15 | Installation and deployment steps

Postgres data
directory
The path where you want to store PostgreSQL data. It is strongly recommended
to set this path to an SSD drive.
This field cannot contain special characters, such as space, ~, and %.
Milestone
MilestoneSSO
Provider
Leave as-is. This is the endpoint of theRapid REVIEW-Milestone integration
service.
MilestoneVMS
Address
Enter the host or IP address of the Milestone VMS.
Installation and deployment guide | XProtect® Rapid REVIEW
16 | Installation and deployment steps
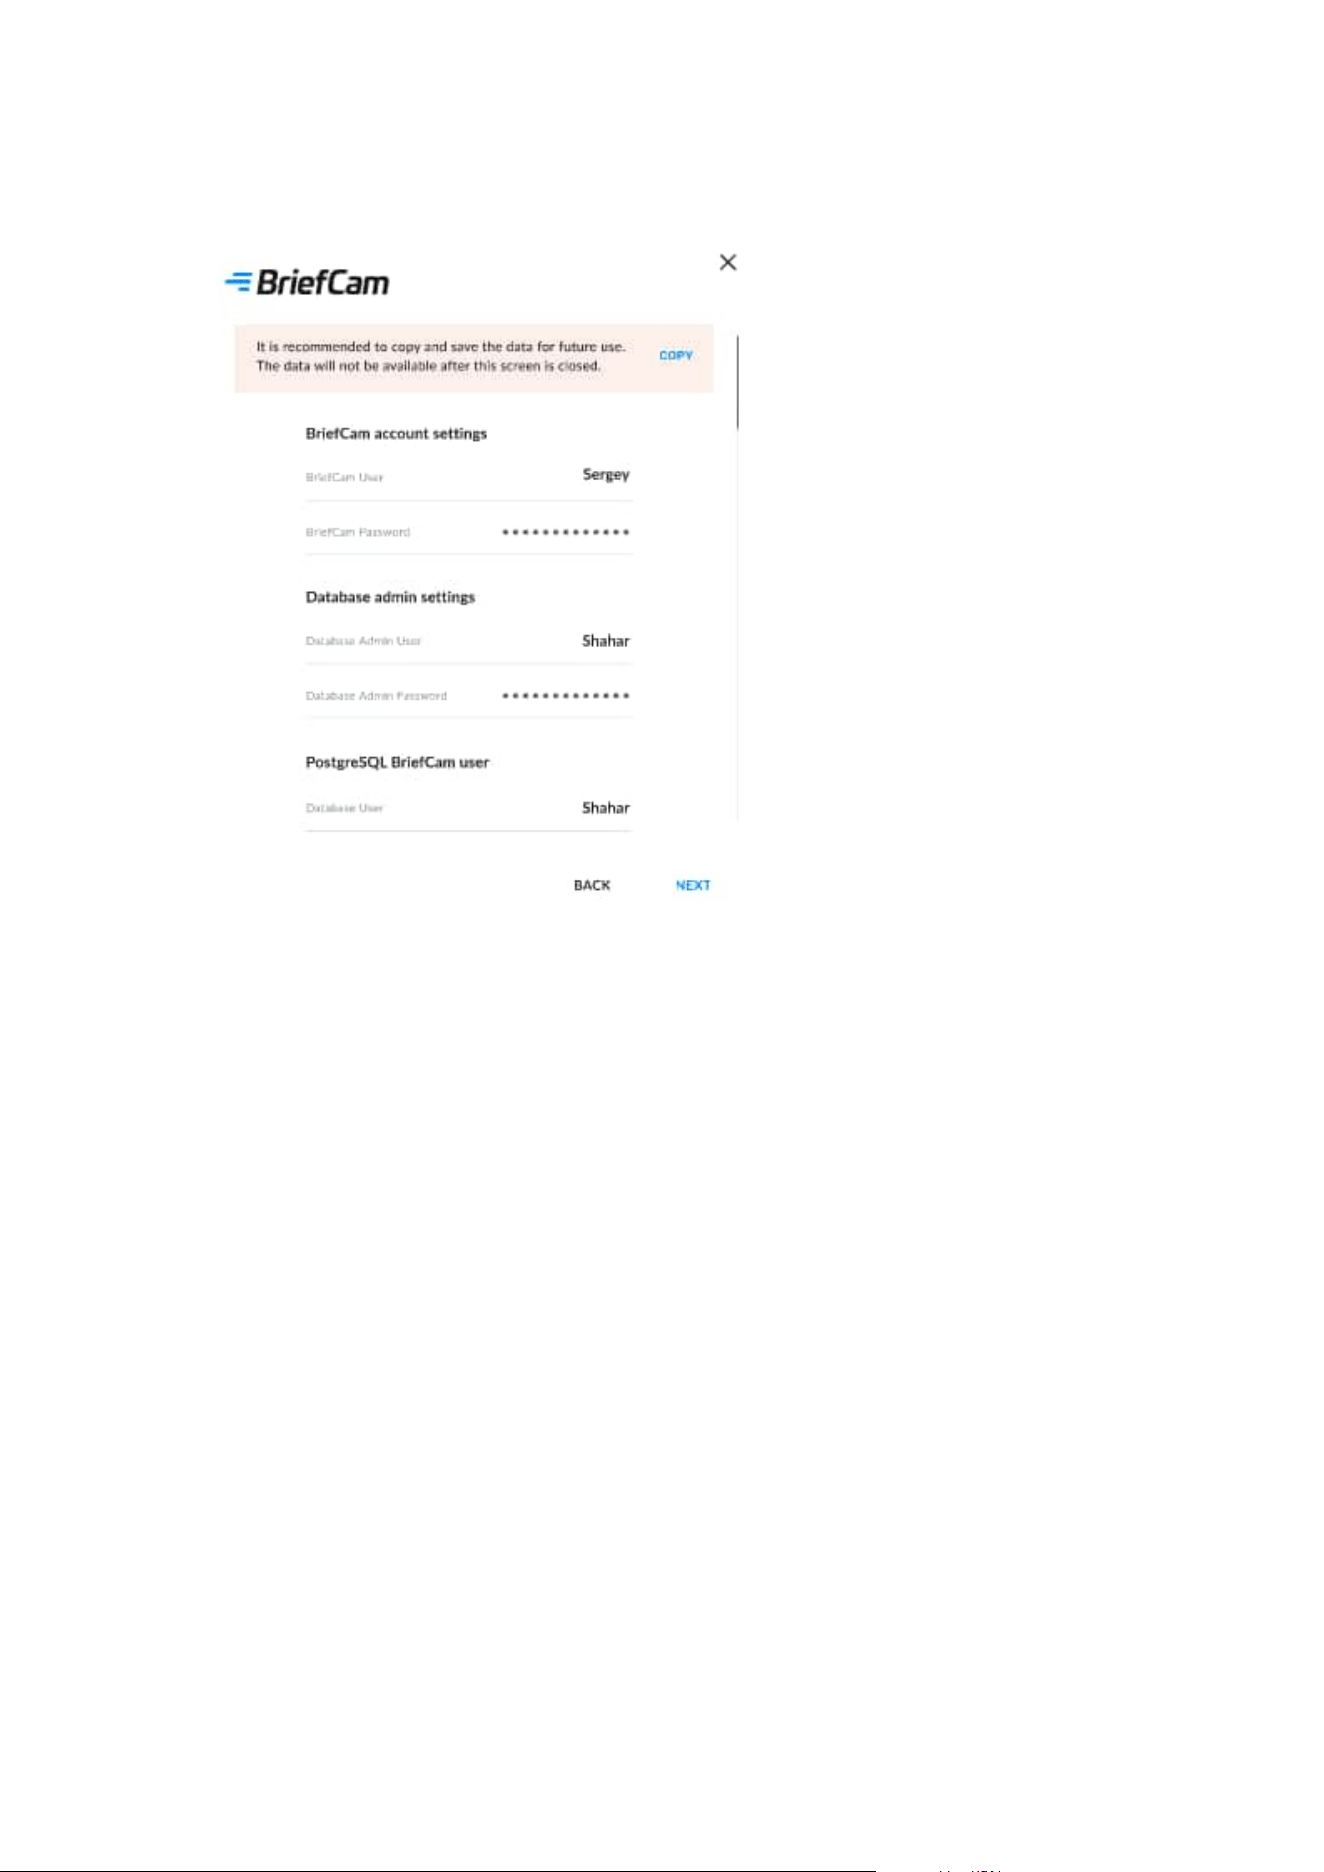
8. Click NEXT and a summary screen will appear.
9. Review the settings and save the settings for future use by clicking the COPY button.
10. Click NEXT to complete the installation.
The installation may take 10-25 minutes. Note that after the installation is complete, the services will be
automatically restarted.
Installation and deployment guide | XProtect® Rapid REVIEW
17 | Installation and deployment steps

If you did not fill in the VMS address After the installation finished, you must open the
MilestoneSSOProvider.exe.config file and update the MilestoneAddress value to the VMS address.
By default, this file is located in C:\Program Files\BriefCam\BriefCam Server.
Installation and deployment guide | XProtect® Rapid REVIEW
18 | Installation and deployment steps

Firewall Consideration and Ports Availability
Internal (Local) Ports
On each server, the following ports should be opened for internal communication:
l
On each server, all outbound ports should be opened, to allow communicating with other servers as
needed.
l
On each server, the following inbound ports should be opened according to the installed services. The
BriefCam application listens for incoming traffic from these ports. The installer will create the relevant
Windows firewall rules for these ports.
Component Port #
BI Face Recognition Service TCP 13004
Face Recognition Matching Service TCP 13002
Filtering Service TCP 13001
License Service TCP 1947
Lighthouse Service TCP 2553, TCP 2554, TCP 2555, TCP 2556, TCP 2557
LPR Matching Service TCP 13003
Milestone TCP 554, TCP 8080
MilestoneSSOProvider TCP 8030
Notification Service TCP 7080
PostgreSQL Redis TCP 5432
Redis TCP 6379
Storage TCP 139, TCP 445
Video Streaming Gateway Service TCP 5010
Installation and deployment guide | XProtect® Rapid REVIEW
19 | Installation and deployment steps

VSServer Service TCP 1112, TCP 1113
Web Services (BOA, ProWebApi, AdminWebApi) HTTP (80)
External Ports
The following ports should be opened to traffic coming from the end users’ browsers.
Component Port #
Comment
Web Services HTTP (80)
Video Streaming Gateway Service TCP 5010
Not needed when using a load balancer
Notification Service TCP 7080
Additionally recommended prerequisites
l
Set the default system language to English during the installation. If the language is a language other
than English, the installation may end with an error. The system language can be set to any preferred
language after the installation.
l
Disable antivirus scans from all BriefCam folders. For more information, see the Antivirus guidelines
from BriefCam.
Installation Troubleshooting
HASP Message
If the installation failed:
1. Investigate the log files (deploy.log and the MilestoneXProtectRapidReview2022R2Installer_
<version>.log) to see which component of the installation has failed. The log files are in the folder
where you extracted the installation files.
2. Investigate the relevant component’s log file and fix the issue according to the error in the log.
3. Uninstall Rapid REVIEW using the UNINSTALL option in the installer.
4. Restart the computer.
5. Reinstall Rapid REVIEW.
Installation and deployment guide | XProtect® Rapid REVIEW
20 | Installation and deployment steps

Activate licenses
This information assists you in activating an XProtect Rapid REVIEW license. You can complete activation in
both online and offline modes.
It also assists you in modifying and re-activating an existing license for system expansion if, for example, you
want to add additional device licenses.
All steps listed below should be performed on the server where you installed XProtect
Rapid REVIEW.
Licensing warning
Be aware that licensing with BriefCam is sensitive. A product key can be activated only once. If you try to
activate it again, it will fail with error code 831. Furthermore, if certain components are missing on your
BriefCam installation, there is a chance that the license is activated on the BriefCam licensing server without
being applied on your system. If this happens, you must open a support case with ,BriefCam requesting an
extra activation for the license.
To prevent problems with license activation:
l
Make sure that the Sentinel LDK License Manager service is available in Windows Services.
l
Verify that you can access the URL http://localhost:1947 to get to the GEMALTO application site.
l
All IIS AppPools must be in place: AdminApiPool, AdminClientPool, BoaPool, ProWebApiPool,
ProWebApiStoragePool, ProWebClientPool, VideProcessingGateway
l
All BriefCam components must be available in Control Panel – Programs: BriefCam PostgreSQL,
BriefCam Web Services, BriefCam Server, BriefCam Milestone Plugin.
If any of the preconditions mentioned above are not accomplished, please open a case with Milestone
Technical Support providing your license product key and tag ID.
Once the license is activated successfully, you can uninstall and re-install as many times as you wish. The
license will remain on the server so you don't need to re-activate it. A request for an extra activation for the
license will only be required in the case of a re-installation of the Windows OS or if the license is deleted by a
disk formatting .
Online activation
Online activation requires an active Internet connection.
Installation and deployment guide | XProtect® Rapid REVIEW
21 | Installation and deployment steps

1. From the desktop, do one of the following
l
Click the BriefCam License Activation application.
l
From the Start menu, type BriefCam License Activation and launch the application.
2. Enter your product key and click Activate.
When the activation is successful, the following dialog box will appear. Here you’ll find your Tag ID,
which you’ll need when you open a support ticket.
Installation and deployment guide | XProtect® Rapid REVIEW
22 | Installation and deployment steps

3. Click OK to close the dialog box and then click Close in the main application window to close the License
Activation application.
Offline activation
Offline activation is useful in cases where internet connectivity is not available on the computer where you are
installing BriefCam.
To perform offline activation:
1. From the desktop, do one of the following:
l
Click the BriefCam License Activation application.
l
From the Start menu, type BriefCam License Activation and launch the application.
l
Click the Offline tab to access offline activation.
2. Click 1. Collect Information to generate a C2V (client to vendor) file, select or approve the destination
in which it is to be stored, and click Save.
Installation and deployment guide | XProtect® Rapid REVIEW
23 | Installation and deployment steps

3. Send the C2V file to the Support team by logging into Milestone Support to open a ticket and attaching
the C2V file. The product key number you received from Milestone needs to be mentioned in the ticket.
This will help the support team generate the relevant V2C file (vendor to client), which is required to
activate the product offline.
After receiving the V2C, there are two ways to activate the product offline:
You can activate via the BriefCam License Activation application or you can use the Gemalto application.
Activate via the BriefCam License Activation application
1. Open the BriefCam License Activation application.
2. Click the Offline tab.
3. Click 3. Apply license.
4. Select the V2C file provided by the support team, and click Open.
Installation and deployment guide | XProtect® Rapid REVIEW
24 | Installation and deployment steps

5. When you see a message that the product was activated successfully, click OK and close the License
Activation application. BriefCam will now be activated.
Activate via the Gemalto application.
1. Open a web browser.
2. Open http://localhost:1947/_int_/checkin.html.
3. Select the Update/Attach option.
4. Click Choose File.
5. Select the V2C file provided by the support team.
6. Click Apply File.
Installation and deployment guide | XProtect® Rapid REVIEW
25 | Installation and deployment steps

System expansion (adding additional device licenses)
To make any modifications to the license, such as adding cameras to the license, you need to:
1. Activate the license.
2. Place an order and mention the system Tag ID and the Key ID, which can be found in the Gemalto
application:
a. Open your browser.
b. Go to the Sentinel Admin Control Center
c. Copy the Key ID.
The Milestone team will then generate the relevant V2C with the requested modification(s).
3. Activate the V2C on the server:
a. Open a web browser.
b. Go to the Sentinel Admin Control Centerl.
c. Select the Update/Attach option.
Installation and deployment guide | XProtect® Rapid REVIEW
26 | Installation and deployment steps

d. Click Choose File.
e. Select the V2C file provided by the Milestone support team.
f. Click Apply File.
STEP 2 – Set up the deployment
1. In a browser, enter the hostname of the computer where XProtect Rapid REVIEW was installed followed
by slash (/) and the word admin, that is: http://[computer name]/admin. The BriefCam Administrator
Console will open.
2. Log into the administrator console. The user name is Administrator and the default password is
changeit.
3. Change the default password.
You’ll now set up the deployment from the Deployment section.
Installation and deployment guide | XProtect® Rapid REVIEW
27 | Installation and deployment steps

Installation and deployment guide | XProtect® Rapid REVIEW
28 | Installation and deployment steps

4. From the Deployment section, click Hosts.
5.
Next to the host name, click on the settings icon .
6. From the Templates menu, select All In One.
7. Clear the Alert Processing Server, BI Face Recognition Service, and BI Rule Engine Service check
boxes (these options will not be needed).
8. Click Apply.
9. From the Deployment section, click GPUs and then select GPU OX5.
Installation and deployment guide | XProtect® Rapid REVIEW
29 | Installation and deployment steps
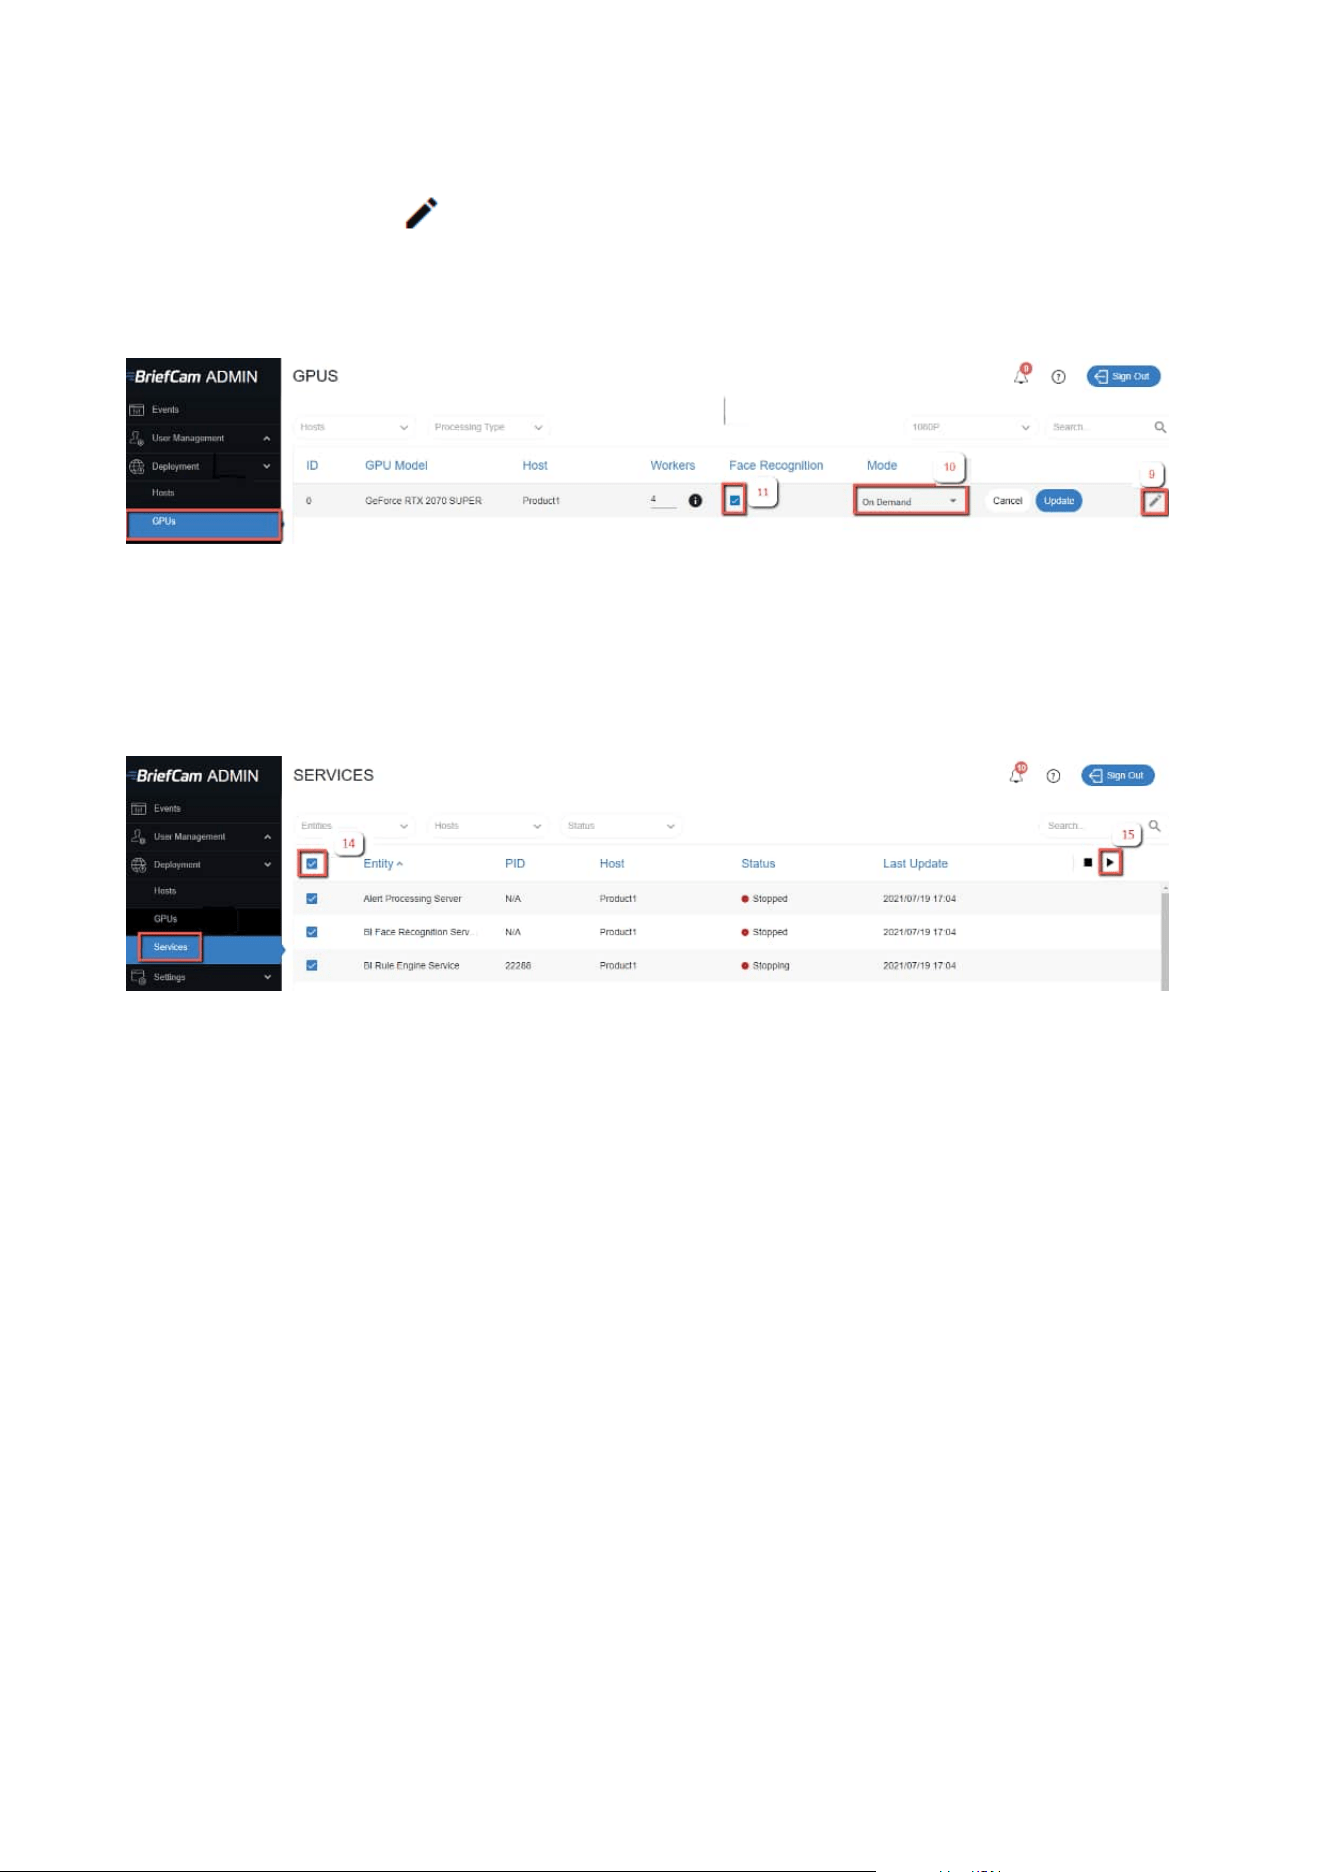
10.
Click on the edit icon ( ).
11. If face recognition will be used, select the Face Recognition check box.
12. In the Mode column, select On Demand.
13. Verify that the number of workers under Workers is set to 4.
14. From the Deployment section, click Services.
15. Select the check box at the top left of the table.
16. Click the start button.
Installation and deployment guide | XProtect® Rapid REVIEW
30 | Installation and deployment steps

STEP 3 – Define and activate the cameras
1. Open the Settings section and click Camera Management (as shown in the image below).
Installation and deployment guide | XProtect® Rapid REVIEW
31 | Installation and deployment steps

2. Click Add directory. The Add Directory dialog box opens.
3. From the Video Integration field, select Milestone Integration.
4. In the Directory Name field, enter a display name for the user directory.
5. In the Address field, enter the IP address of the Milestone VMS server.
6. In the User Name and Password fields, enter an administrator user name and password of the VMS
server. With an admin user you can make sure that all the cameras can be accessed.
7. Click Add to add the directory.
Installation and deployment guide | XProtect® Rapid REVIEW
32 | Installation and deployment steps

8.
Click the zoom ( ) icon to the right of the new directory and select the Add / Edit Cameras option.
9. For all of the cameras, select the check box in the camera’s Activated column and click the Activate
button (located in the bottom right corner), as shown in the image below.
Installation and deployment guide | XProtect® Rapid REVIEW
33 | Installation and deployment steps

10. The Camera Activation pane shown below will appear. If you are sure you want to activate the
cameras, click Yes. Note that Camera activation is irreversible. It cannot be reset unless a special
approved request is opened with BriefCam support.
STEP 4 – Disable face recognition and license plate recognition
(optional)
If you want to disable face recognition and/or license plate recognition:
1. In the BriefCam Administrator Console, open the Settings section and click Environment Settings
2. Set the clientEnableFaceRecognition environment setting to false. This removes the Face Recognition
functionality from the UI.
3. Set the MetaData.EnableFaceRecognition environment setting to false. This disables the Face
Recognition engine.
4. Set the EnableLPR environment setting to false. This removers the License Plate Recognition
functionality from the UI.
STEP 5 – Install BriefCam Embedded Client for Milestone XProtect
plug-in
On each XProtect Rapid REVIEW client computer, install BriefCam’s embedded client for Milestone XProtect
plugin.
1. Click the BriefCam Embedded Client for Milestone XProtect plug-in file to download it and then run it.
You’ll find the plugin in the XProtect Rapid REVIEW zip file.
2. The installation checks for prerequisites, such as Microsoft .NET Framework 4.7.2 Full and Microsoft
Visual C++ 2015 2017 2019 Redistributable Package (x64).
Installation and deployment guide | XProtect® Rapid REVIEW
34 | Installation and deployment steps

3. If anything is missing, you will be prompted to install the missing prerequisites and click Install.
4. In the Welcome screen, click Get Started.
5. Read the license, accept the License Agreement terms, and click Next.
6. Select the installation destination path and click Next.
Note that the installation path must be the same directory where Milestone XProtect Smart Client is
installed. (This may vary slightly between client computers and between Milestone versions.)
7. Enter the BriefCam Web Application URL (which is the hostname or IP address of the BriefCam
computer followed by /synopsis and verify that the provided URL is correct by clicking the Verify URL
button (as shown below).
Installation and deployment guide | XProtect® Rapid REVIEW
35 | Installation and deployment steps

8. In the BriefCam Open API (BOA) Server Address field, enter the hostname or IP address of the
BriefCam computer followed by /BOA.
9. Click Next.
10. Click Install and then click Finish.
11. In the BriefCam Administrator Console, restart the services by selecting all of the services, clicking the
stop button ( ) and then the start button ( ), as shown in the image below.
12. Restart IIS on the Rapid REVIEW server by opening the Windows services and right-click the World Wide
Web Publishing Service. Then click Restart.
Installation and deployment guide | XProtect® Rapid REVIEW
36 | Installation and deployment steps
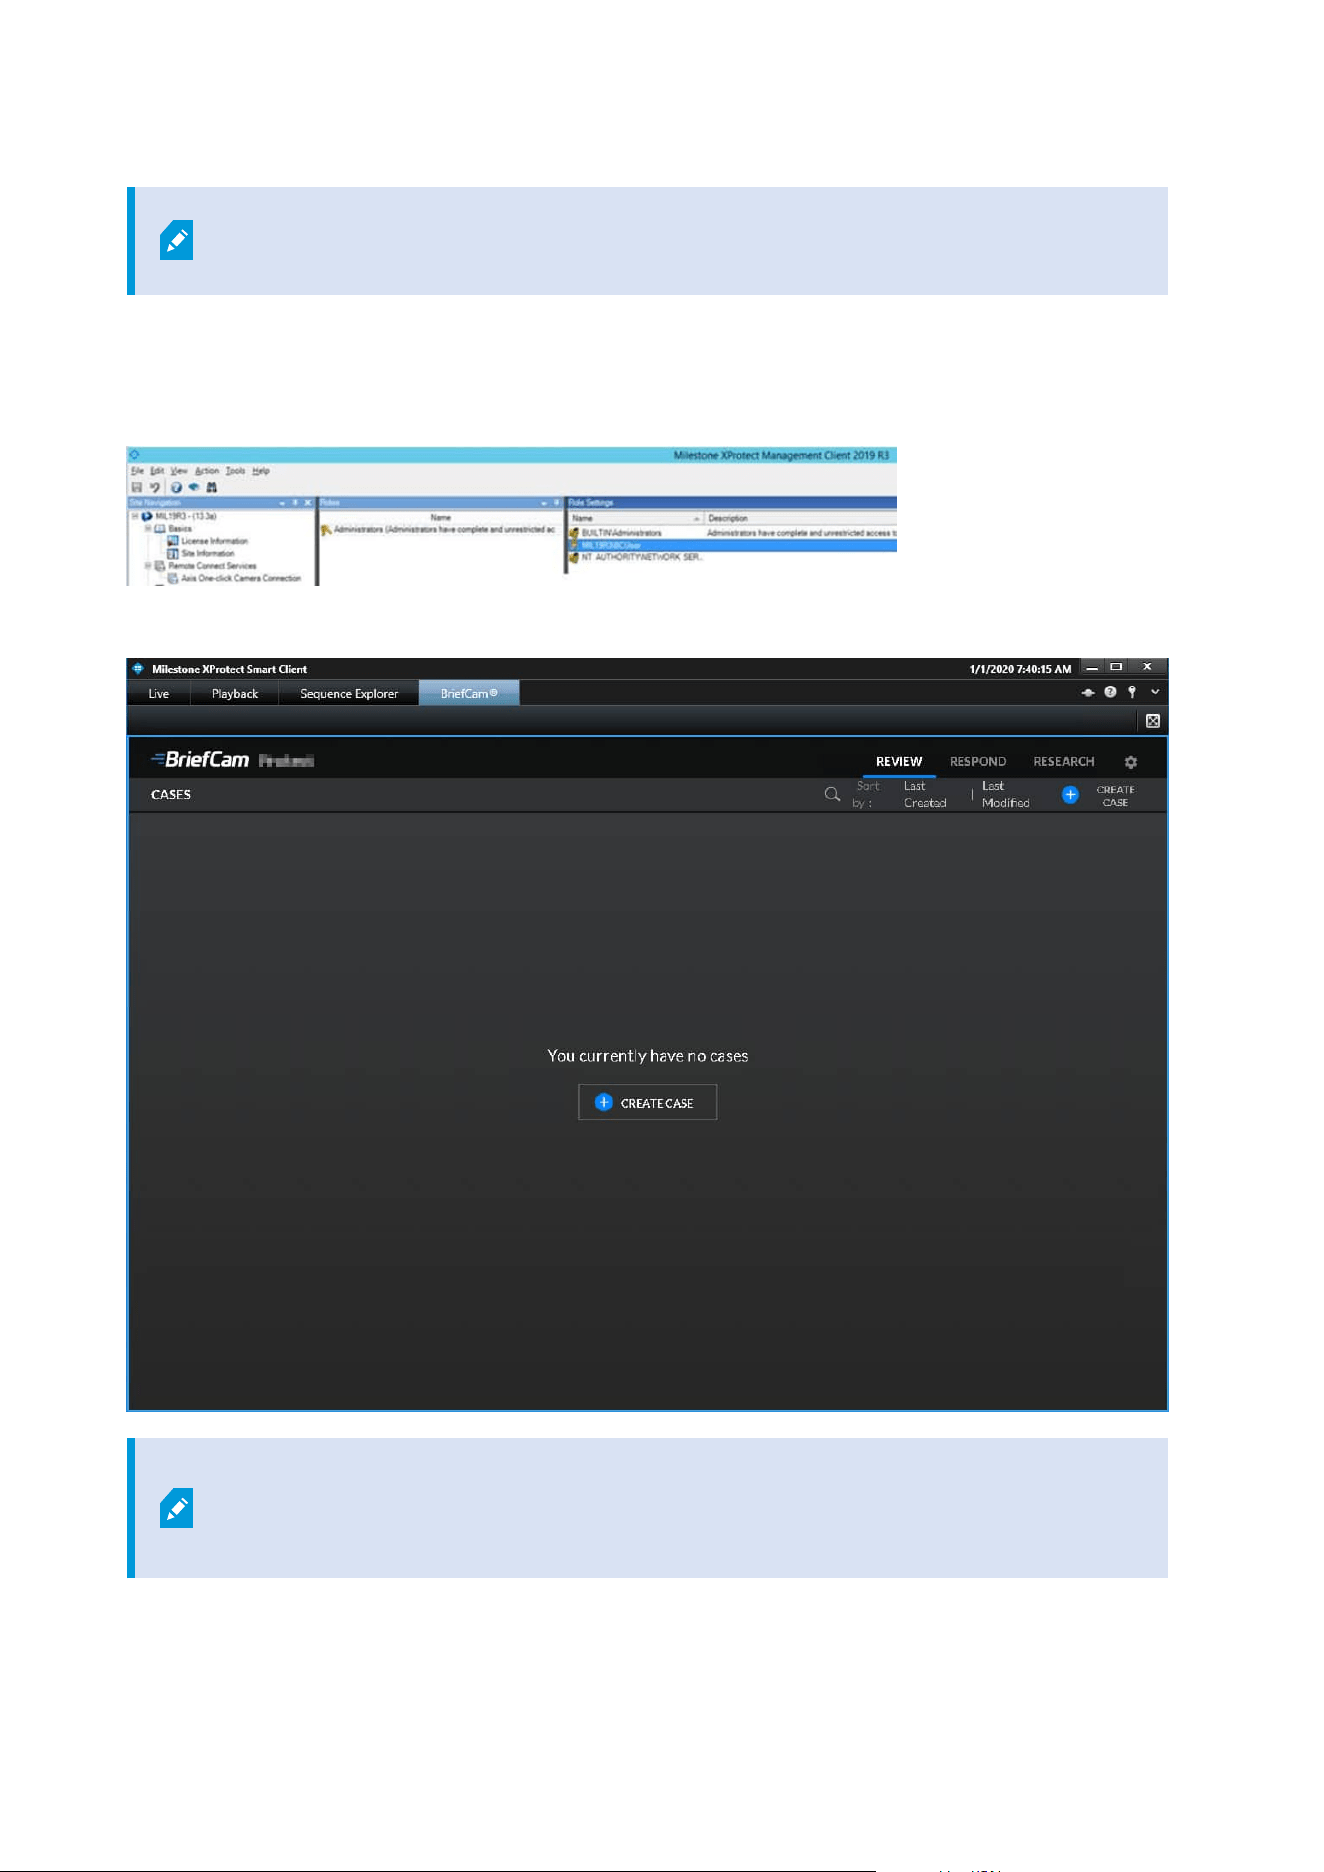
Note: An admin user is automatically created by the SSO when logging into the
Milestone client using the Basic authentication or Windows authentication method.
If you want to log into the Milestone client using the Windows authentication (current user) option, add the
BriefCam user that you used to install BriefCam services to the Administrators group in Milestone XProtect
Management Client.
When you have completed the steps, a BriefCam tab will appear in the Milestone XProtect Smart Client.
In BriefCam, for security reasons, users are automatically logged out if no activity is
detected for 20 minutes. Therefore, a user may be automatically logged off the BriefCam
functionality while the Milestone VMS is still running.
Installation and deployment guide | XProtect® Rapid REVIEW
37 | Installation and deployment steps

STEP 6 – Using an HTTPS host (optional)
To work with SSL and BriefCam, using a load balancer is required.
This section describes the steps to take to use the NGINX load balancer as an https host for BriefCam services.
Recommendations
BriefCam recommends using NGINX.
It is recommended to install the load balancer on a separate computer.
If you are working in a virtualized environment, the load balancer must be on a separate computer.
If you are working in a non-virtualized (physical servers) environment, you can have the load balancer on the
same computer as the Web Services (although it is not recommended). However, if you install the load
balancer on the same computer as the Web Services, IIS must be on a different port than port 80, since port 80
is for NGINX.
Prerequisites
l
Make sure that port 80 is not in use by another application.
l
If IIS is installed, make sure to stop it or change its default port.
Steps
1. Download NGINX 1.19.x load balancer or later from this link: https://nginx.org/en/download.html.
2. Extract the NGINX zip files to drive C:\. It is important to have the NGINX extracted so that the path is:
C:\NGINX.
3. Create or use an already created self-signed certificate separated into two files: .crt and .key:
For information about how to create a certificate, see one of these links:
l
https://slproweb.com/products/Win32OpenSSL.html
l
https://helpcenter.gsx.com/hc/en-us/articles/115015960428-How-to-Generate-a-Self-Signed-
Certificate-and-Private-Key-using-OpenSSL
l
https://www.akadia.com/services/ssh_test_certificate.html
To use an already created certificate from the current folder, place both the certificate’s .crt and .key
files in the following path: C:\NGINX\certificates\.
Installation and deployment guide | XProtect® Rapid REVIEW
38 | Installation and deployment steps

4. Download the nginx.conf file from:
(replacing the existing file).
5. In the nginx.conf file’s http section, modify the server name where the components are running (web
services, notification services, and Video Streaming Gateway Services).
6. If you have multiple nodes of a service, add a semicolon (;) after the first node and add a second row
with the name of the second node. In the example below, there are two Web Services nodes.
Installation and deployment guide | XProtect® Rapid REVIEW
39 | Installation and deployment steps

7. In the nginx.conf file’s BriefCam System using SSL certificate section you set up HTTPS as follows:
a. In the server_name node, replace www.example.com with the address of the load balancer.
b. Comment the alias node by adding an ampersand (#) at the beginning of the row.
c. In the ssl_certificate row, enter the full path to the .crt file including the file name.
d. In the ssl_certificate_key row, enter the full path to the .key file including the file name.
8. If your SSL certificate is protected by a password, you need to configure NGINX to read a list of
passwords that are stored in a separate file. If the private key is not in this file, NGINX will not start. You
do this as follows:
a. Create a new text file named ssl_passwords.txt and save it to a separate folder than where the
SSL certificate is located.
b. Set the file to be readable only to the user running NGINX.
c. Enter the certificate password into the first line of the ssl_passwords.txt file.
d. In the nginx config file, add the following line above the existing certificate lines: ssl_
password_file /var/lib/nginx/ssl_passwords.txt;
e. Distribute this file separately from the configuration file.
For additional security measurements for SSL private keys, see the NGINX documentation.
9. Download the latest release of the NSSM zip files from this link: https://nssm.cc/download and place
them on the load balancer computer.
10. Extract the NSSM zip file to a folder, for example: C:\NSSM\.
11. Open CMD as administrator, navigate to the new NSSM\win32 folder and run the following
commands:
Installation and deployment guide | XProtect® Rapid REVIEW
40 | Installation and deployment steps

l
nssm install NGINX “C:\nginx\nginx.exe”
l
nssm set NGINX AppDirectory C:\nginx
l
nssm set NGINX DisplayName “NGINX Web Server”
l
nssm set NGINX Description “NGINX Web Server”
l
nssm set NGINX Start SERVICE_AUTO_START
In the examples below, replace the string www.example.com with the address of the
load balancer.
For example: Load balancer = LB01.briefcam.com.
12. On any host that is running the application (browser), make sure the domains (or host name) can be
resolved by the DNS. If no DNS is available, you can edit the hosts file and add the IP address of the
load balancer using the following syntax:
• 10.x.x.x www.example.com
For example: 10.0.0.143 www.example.com
13. Restart the load balancer computer, open services.msc and try to start the newly created NGINX Web
Server service.
l
If the service does not start, there may be an issue with its path. To try and solve this issue, run
NSSM install on the same folder as described under step 8 and define the service via the NSSM
GUI (making sure to specify the parameters properly).
14. Edit both web config .js files on the BriefCam server (located at C:\Program
Files\BriefCam\WebServices\ProWebClient\webConfig.js and C:\Program
Files\BriefCam\WebServices\ProWebAdminClient\web.config.js) using the syntax below. This syntax
refers to the load balancer address. The endpoints in both files must point to the load balancer.
• //www.example.com/ProWebApi/
• //www.example.com/AdminApi/
15. In the BriefCam Administrator Console, set the environment settings with the following values:
• DB.LocalStorageAddress : “//www.example.com/ProWebApiStorage"
• BaseVideoUrl: “https://www.example.com/vsg”
• ClientNotificationEndPoint: “//www.example.com/signalr" (without port 7080)
VideoProcessingGatewayUrl in https is not supported.
Installation and deployment guide | XProtect® Rapid REVIEW
41 | Installation and deployment steps

VideoProcessingGateWayUrl will use http and not https because it is
communicating between two internal processes (real-time engine and Video
Processing gateway web service). This is on purpose to save resources.
16. You now need to update certain parameters, so that the embedded client will reach BriefCam using an
HTTPS protocol. In order to do this:
a. Open the BriefCam.MilestoneEmbeddedViewer.dll.config file, which is located at: C:\Program
Files\Milestone\XProtect Smart Client\MIPPlugins\BriefCam.
b. Change the URLs (highlighted below) to include HTTPS:
<appSettings>
<!--Client site address-->
<add key="serverAddress" value="https://SMB29/Synopsis/" />
<!--Boa site address-->
<add key="boaServerAddress" value="https://SMB29/BOA" />
<!--add key="boaVersion" value="1.0" /-->
<!--add key="keepAliveIntervalMS" value="60000" /-->
<!--add key="httpTimeout" value="5000" /-->
<!--add key="pageLoadTimeoutMS" value="1000" /-->
<!--add key="BrowserLogLocation" value="c:\DotNetBrowserLog.txt" /-->
</appSettings>
17. Browse to the application and make sure that it works with https requests.
For example:
l
https://www.example.com/synopsis
l
https://www.example.com/admin
Generic configurations
For any other type of load balancer, you need to configure the following redirect rules based on the URL:
1. Notification Service
Search for: /signalr
Redirect to: notification-server:7080
2. Video Streaming Gateway
Search for: /vsg
Use rewrite rule to remove /vsg from the url
Redirect to: videostreaming-server:5010
Installation and deployment guide | XProtect® Rapid REVIEW
42 | Installation and deployment steps

3. Web Services>
Search for: /
Redirect to: briefcam-webserver
Logging
To handle the log rotation:
1. Download the log rotation text from here: Log rotation script and create a bat file:
a. Copy the text from the link to a .txt file and name it LogRotation.
b. Change the file extension from .txt to .bat.
2. Save the script (.bat file) to C:\NGINX.
3. Create an OS user (such as bcuser), a user on the OS level, or create a Windows user account. The user
does not need admin rights.
4. Edit the C:\NGINX folder’s security options and assign full control to the user that you created in step 3.
5. Click Start (Windows key) and type secpol.msc to open the Local Security Policy utility.
6. Go to Security settings > Local Policies > User Rights Assignment.
7. Right-click Log on as a batch job and add the user.
Installation and deployment guide | XProtect® Rapid REVIEW
43 | Installation and deployment steps

8. Add a daily scheduled task to run the C:\NGINX\LogRotation.bat file. Make sure to select Run whether
user is logged on or not. By default, the last 10 days will be retained (retention period in days). If you
want a different number of days, when running the batch file, enter the required number of days as a
command line argument. For example, for 20 days, use: C:\NGINX\LogRotation.bat 20.
Network security considerations
l
The network segment hosting the BriefCam servers / virtual computers should be separated from other
networks by a firewall and access should be granted only via ports configured in NGINX. For additional
information, see the Using an HTTPS Host.
l
Administrative access to the servers, such as RDP, should be allowed either over VPN or from
administration bastion hosts. A bastion host is a server that allows access to a private network from a
public network, such as the internet. Bastion hosts are vulnerable to potential attacks and should be
kept as secure as possible.
l
If DPI / WAF/ URL protection are required – they should be implemented on the firewall when pointing
to the operational BriefCam NGINX host.
Upgrade Steps
Note that using this installer to upgrade XProtect Rapid REVIEW, you can only upgrade from version 6.1 or
above:
Installation and deployment guide | XProtect® Rapid REVIEW
44 | Installation and deployment steps

1. Stop all BriefCam services and close all open applications before starting the upgrade process.
2. Select the UPGRADE option on the installer screen as shown below.
Installation and deployment guide | XProtect® Rapid REVIEW
45 | Installation and deployment steps

Troubleshooting
To troubleshoot issues with the installation, see the Installation Troubleshooting on page 20 section.
Failed fetching camera plugins error
Symptom
In the Camera management section of the BriefCam Administrator Console when trying to add a directory, the
Milestone Integration option is not available and the Failed fetching camera plugins error appears at the
bottom of the screen.
Possible root causes
l
A shadow AKKA service is running in the background.
l
Ports are blocked in the firewall.
l
An antivirus/anti-spam ware is preventing reading/writing to BriefCam folders.
l
The BriefCam shared folder is missing sufficient read/write permissions.
Installation and deployment guide | XProtect® Rapid REVIEW
46 | Troubleshooting

l
The permissions issue is possibly because of one of the following (but not limited to):
a. GPO applied on the server
b. Current logged in user lacking admin privileges
c. Antivirus/antimalware restriction
d. Target drive out of space
Solution
1. In the Services pane of the BriefCam Administrator Console, check that the PID is not constantly
changing for one or more of the AKKA services:
l
Lighthouse
l
LPR Matching
l
BI Face Recognition
l
Face Recognition Matching
l
Filtering
2. If one or more of the AKKA service’s PID is constantly changing, this may be because a shadow AKKA
service is running in the background. In this case:
a. From the BriefCam Administrator Console, stop the BriefCam AKKA services.
b. From the Task Manager, stop the relevant service.
c. From the BriefCam Administrator Console, restart the services.
Installation and deployment guide | XProtect® Rapid REVIEW
47 | Troubleshooting

3. Check that the relevant port is opened in the firewall. You can do this using the Telnet command:
l
In the Control Panel, go to Programs and Features (or Programs).
l
Click Turn Windows Features on or off.
l
Select the box for Telnet Client.
l
Click OK.
l
In the command prompt (type CMD in the Windows search box), type: telnet <IP address of
server> <port> and press Enter.
l
If you see a blank cursor, the connection is fine
4. Check the Data folder for sufficient permissions. The current logged in user should have read/write
permissions.
Installation and deployment guide | XProtect® Rapid REVIEW
48 | Troubleshooting

5. Check the relevant log for errors. The logs can be found at: C:\Program Files\BriefCam\BriefCam
Server\logs. You may find, for example, information that the AKKA service failed to start.
White screen displayed
Symptom
XProtect Rapid REVIEWwas installed without any errors. However, the embedded client shows a white/blank
screen.
Installation and deployment guide | XProtect® Rapid REVIEW
49 | Troubleshooting

Possible root causes
The root cause is often a networking issue (that can be caused by, but is not limited to, an incorrect
configuration).
Before you proceed with the drill-down and the different troubleshooting procedures described below,
perform the most basic checks of networking. Use Powershell TNC (TestNetConnection) to verify that port 80 is
listening where the BOA is installed and that port 8030 is listening where the SSO provider is installed. The
majority of instances where a white screen issue is encountered, will be resolved by a network/firewall
modification, or by a BOA/SSO config file modification (BOA/SSO address correction in the relevant config file
as detailed in the Environment settings not configured properly on page 55 section).
Other items to check include:
l
Milestone user permissions
l
Server-side/client-side cache issues
l
The BriefCam server or Milestone smart client computers have two NICs (Network interfaces)
l
Missing XProtect Rapid REVIEW license
l
Environment settings not configured properly
Solution
Milestone user permissions
In order to view the BriefCam tab embedded in the Milestone XProtect Smart Client, the user who accesses the
client has to have at least 'Read' permissions defined on the Milestone Management Client.
Installation and deployment guide | XProtect® Rapid REVIEW
50 | Troubleshooting

1. In the Milestone XProtect Smart Client, check that the user accessing the XProtect Smart Client has Read
permissions.
l
If the user exists but does not have Read permissions – assign the user the necessary permissions.
l
If the user does not exist:
a. Create the user by accessing XProtect Management Client. The user will be created automatically
in BriefCam when the user accesses XProtect.
Do not manually create the user in the BriefCam Administrator Console. If the user is created
manually and has the same user name in Milestone XProtect, you will see a white screen in
XProtect Smart Client.
b. You can log into the BriefCam Administrator Console’s Users section and verify that the
Milestone user is there with the type set to SAML.
2. Try to access the smart client using this user and check the BriefCam tab.
Note that by default the user who runs the BriefCam services is the
BCUser. You may still see the white screen issue if the user configured as
BCUser was disabled, for example, after moving to a domain. To solve this
issue:
Installation and deployment guide | XProtect® Rapid REVIEW
51 | Troubleshooting

l
From the Windows Services, try restarting the BriefCam VSService.
l
If the service fails to start, then check the BCUser settings in the Computer Management
console.
3. If the issue still is not solved, check the Milestone client-side logs at C: \Users\[CURRENT
USER]\AppData\Roaming\BriefCam\Client\logs.
Clearing Server/Client Cache
Sometimes on a system where not all the components were installed correctly and the embedded client
previously showed a white screen, clearing the Milestone client cache can solve the issue.
To clear the cache on the BriefCam server-side:
1. Go to: C:\Users\CurrentLogedInUser\AppData\Roaming\Milestone.
Installation and deployment guide | XProtect® Rapid REVIEW
52 | Troubleshooting
Note that the AppData folder is a hidden folder. If you do not have hidden folders
enabled on your machine, you can open the AppData folder by going to the search bar
on your Windows Toolbar, typing %appdata% and pressing Enter.
2. Delete all the contents of this folder.
The next time you start a Milestone XProtect client, the contents of this folder will be recreated.
To clear the cache on the XProtect Smart Client side:
a. Go to: C:\Users\CurrentLogedInUser \AppData\Roaming\BriefCam\MilestoneEmbedded.
b. Delete all the contents of this folder.
The next time you start a Milestone XProtect client, the contents of this folder will be recreated.
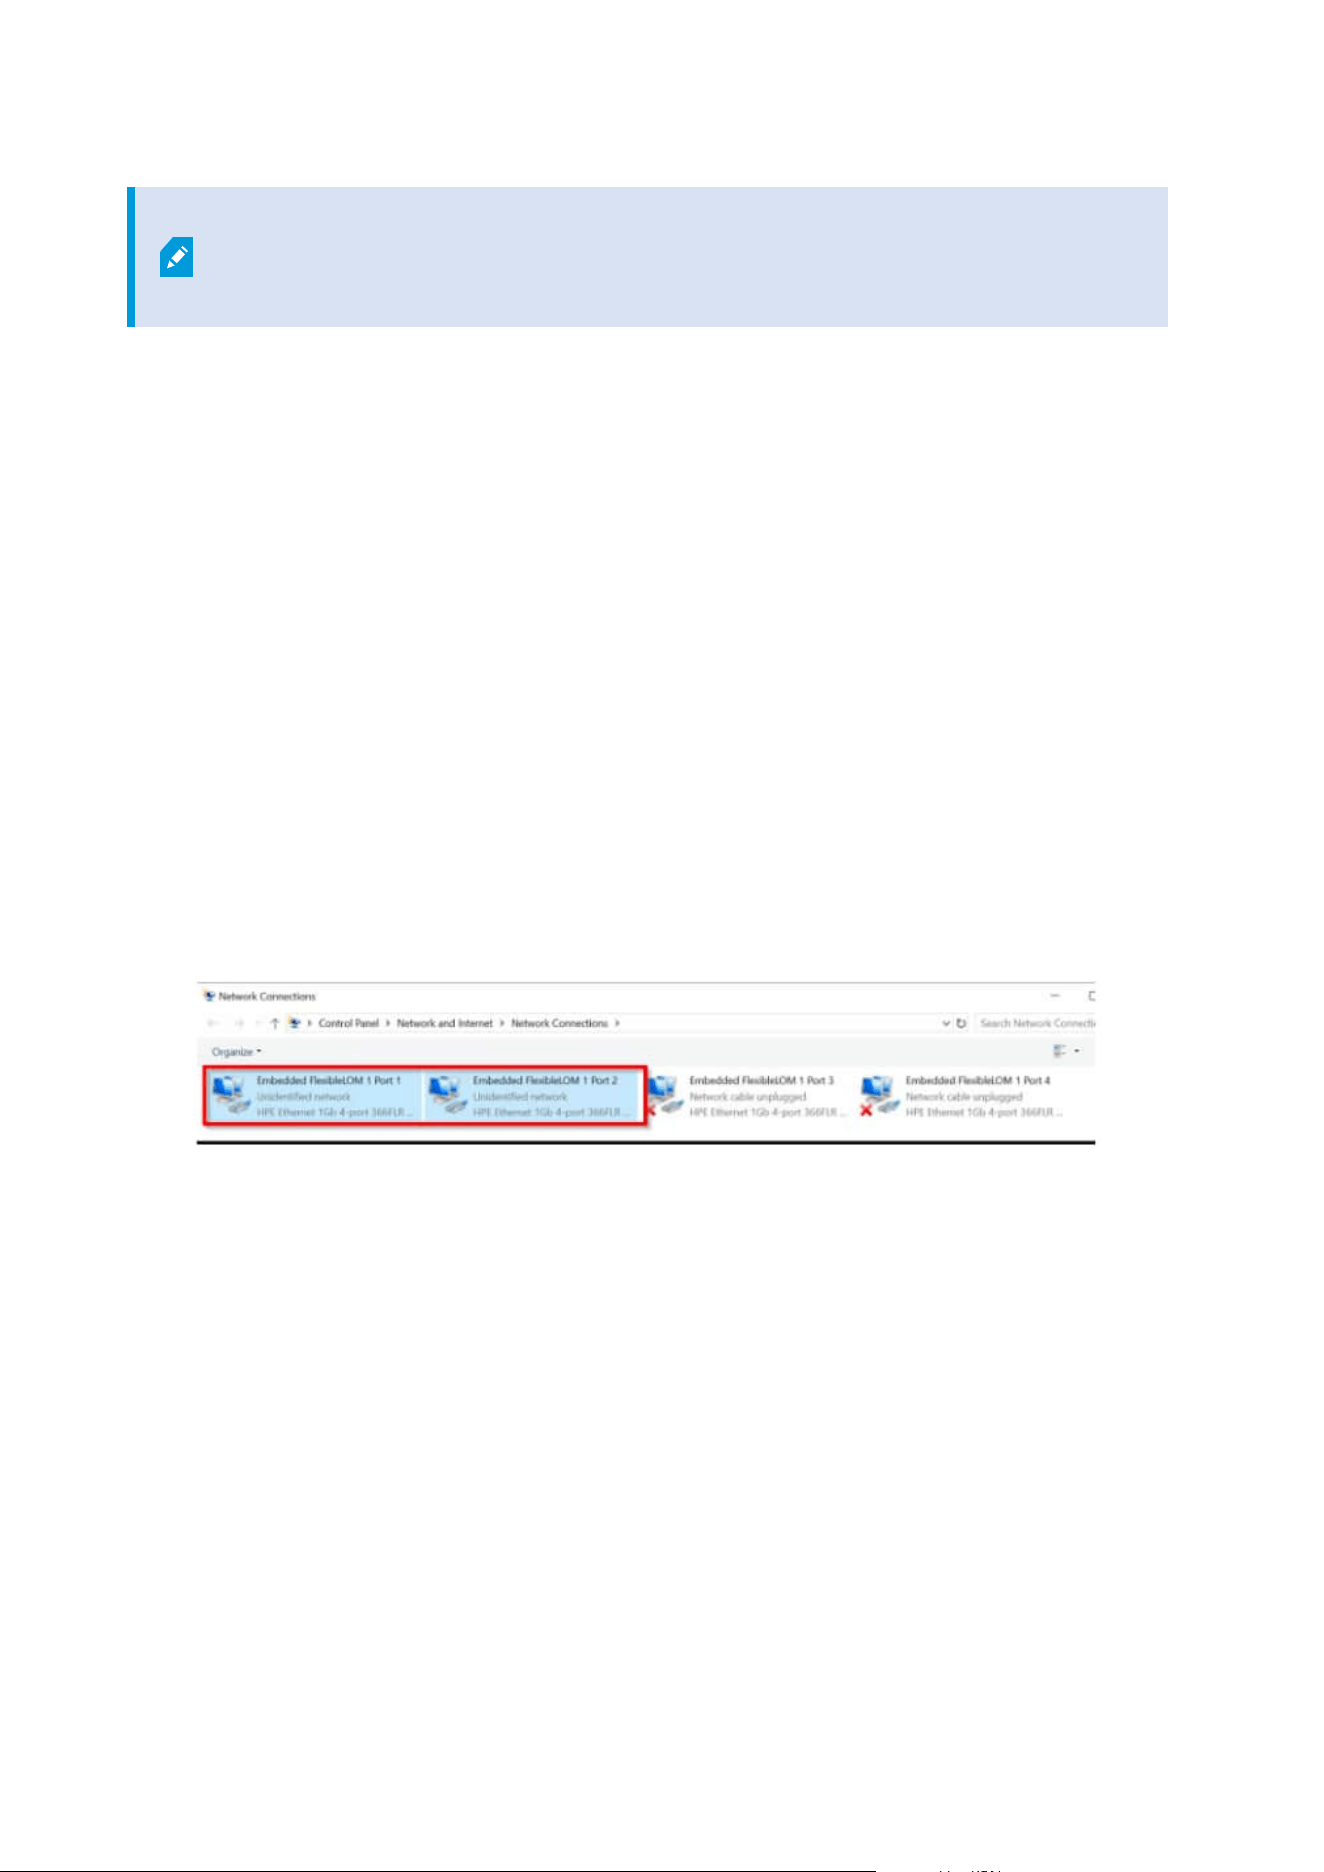
Two NICs
The white screen might display if either the BriefCam server of Milestone smart client computer has two NICs
(network interfaces) are attached to it and the SSO communication looks for the local host.
As a result, there are issues loading BriefCam’s iFrame in the Milestone embedded client.
To solve this issue:
1. Check how many activated NICs exist, by going to Control Panel>Network and Sharing Center>
Change adapter settings.
2. If there is more than one NIC activated, if possible, inactivate one of the NICs.
If the above did not resolve the issue, you need to change the value in several locations so that it does not
point to localhost but rather to the BriefCam server’s IP address (the IP address of the NIC configured to
communicate between the BriefCam server and the Milestoneserver):
3. On the BriefCam server, open the Milestone SSOProvider.exe.config file (located by default at:
C:\Program Files\BriefCam\BriefCam Server) and find the AuthenticatorAddress value.
4. If the value is set to localhost, change the value to point to the Milestone server’s IPaddress.
Installation and deployment guide | XProtect® Rapid REVIEW
53 | Troubleshooting

By default the MilestoneSSOProvider.log file is locatedat C:\Program
Files\BriefCam\BriefCam Server\logs\MilestoneSSOProvider-0.
5. On the Milestone XProtect Smart Client computer, open the
BriefCam.MilestoneEmbeddedViewer.dll.config file (located at: C:\Program Files\Milestone\XProtect
Smart Client\MIPPlugins\BriefCam).
6. If the value of the serverAddress or boaServerAddress key is set to localhost, change the values to
point to the BriefCam server’s IP address.
Installation and deployment guide | XProtect® Rapid REVIEW
54 | Troubleshooting
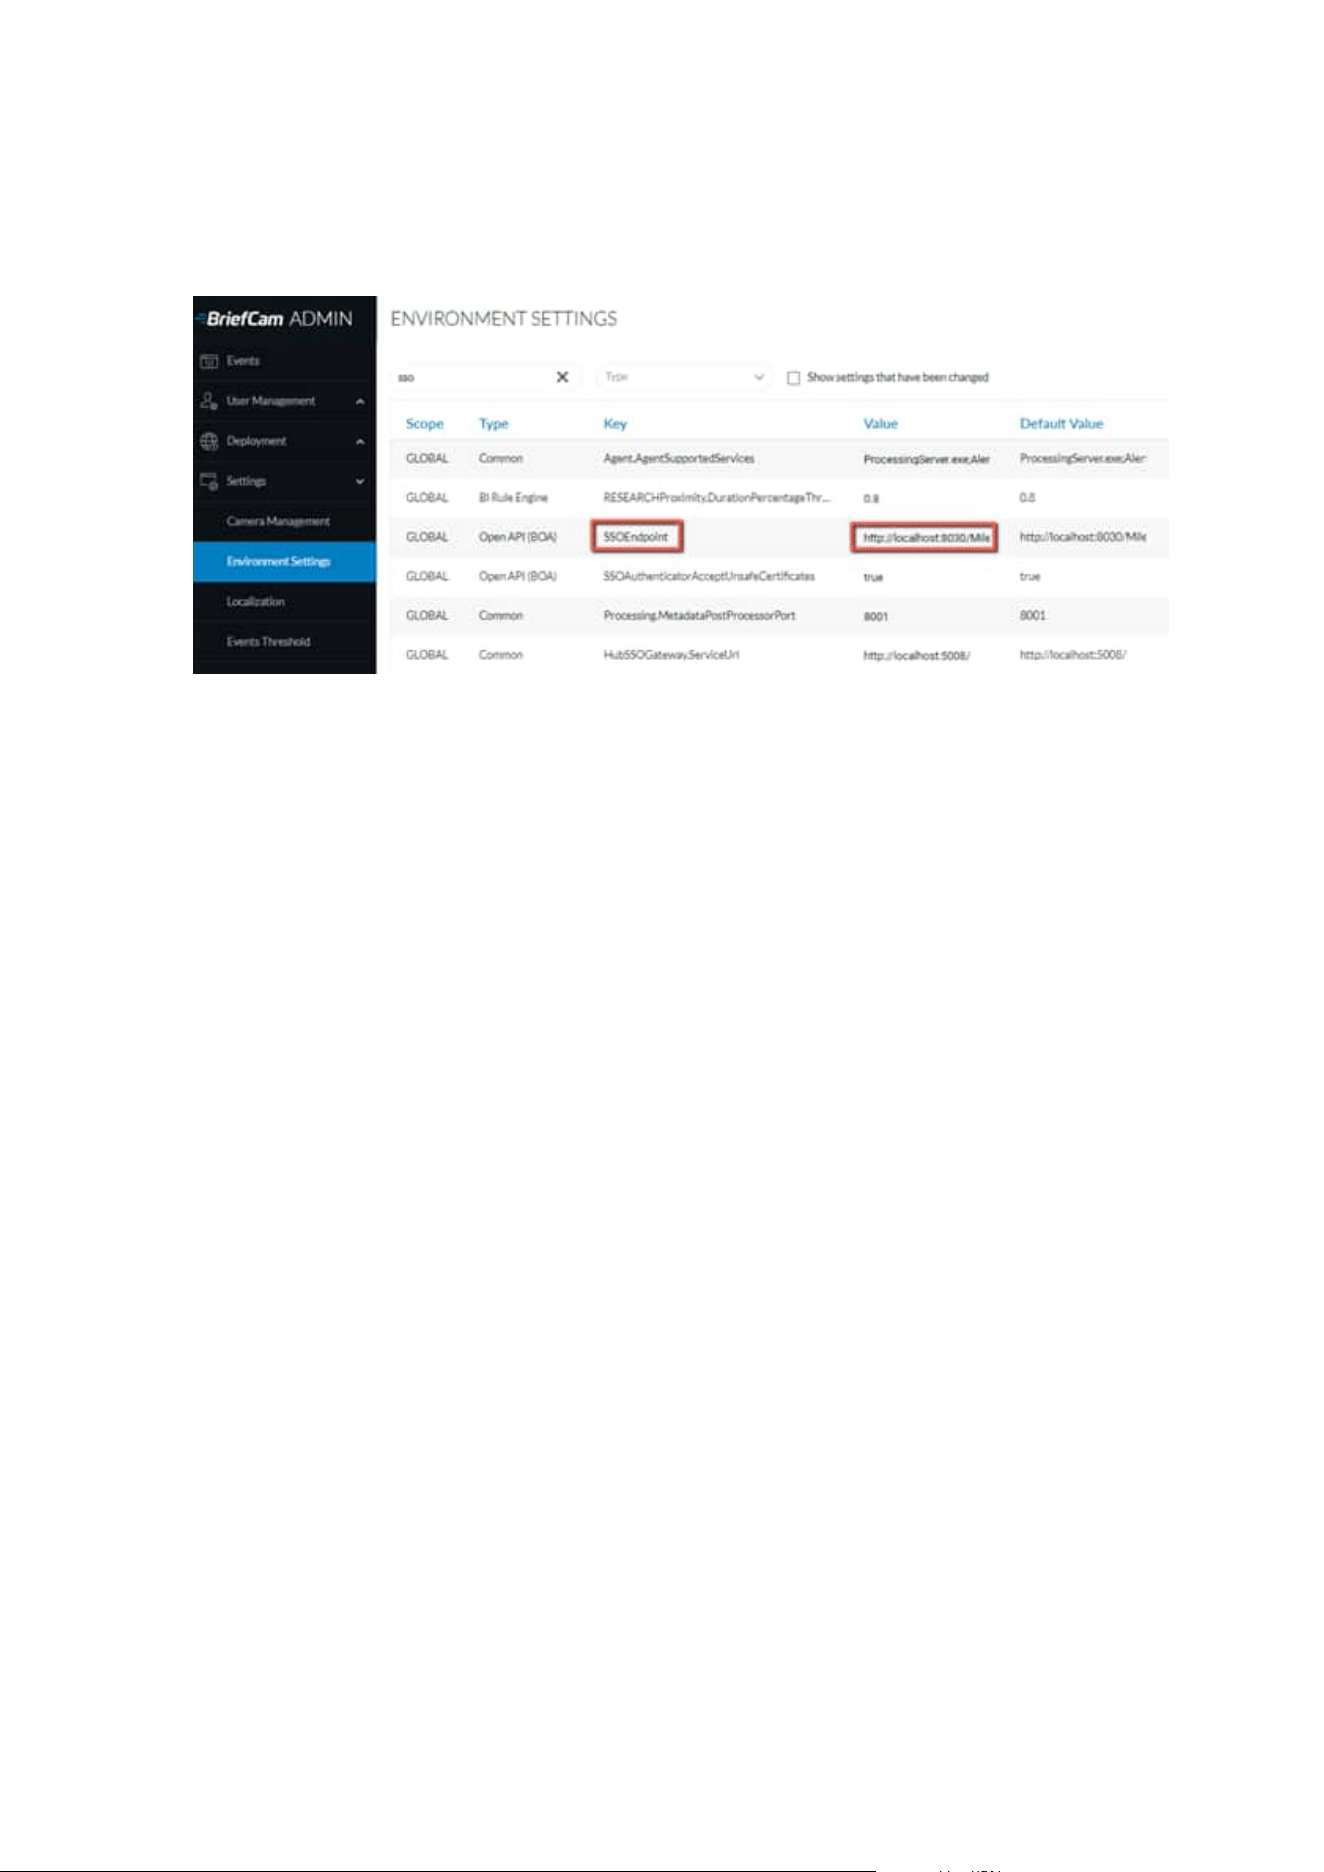
7. In the BriefCam Administrator Console, go to Settings > Environment settings and search for the
SSOEndpoint setting. If the value is set to localhost, change it to the BriefCam server’s IPaddress, that
is: http://[BriefCam server IPaddress]:8030/Milestone.
8. Restart the following:
a. In the BriefCam Administrator: the Milestone SSO Provider service and the VS Server service.
b. The BOA application pool of the IIS.
c. Milestone XProtect Smart Client.
9. Clear the cache as described in the Clearing Server/Client Cache on page 52 section.
Missing license
The BriefCam Open API (BOA) is the communication between BriefCam and the Milestone SSO.
1. Check the BOA log at C:\Logs\Milestone\BOA – It could, for example, point to a missing license.
2. Check that the BOA license product exists at localhost:1947.
Environment settings not configured properly
In rare scenarios, you’ll need to manually configure SSO-related settings making sure that each of the config
file's settings are pointing to the proper server hostname.
1. In the BriefCam Administrator Console, go to Settings>Environment settings and search for the
SSOEndpoint setting. If the value is set to localhost, change it to the BriefCam server’s IPaddress, that
is:http://[BriefCam server IPaddress]:8030/Milestone.
2. Open the MilestoneSSOProvider.exe.config file (located at: C:\Program Files\BriefCam\BriefCam Server)
and find the AuthenticatorAddress value.
3. If the value is set to localhost, change the value to the BriefCam server. If there are multiple NICs, this
should point to the Milestoneserver.
Installation and deployment guide | XProtect® Rapid REVIEW
55 | Troubleshooting

4. In the BriefCam.MilestoneEmbeddedViewer.dll.config file (located at: C:\Program
Files\Milestone\XProtect Smart Client\MIPPlugins\BriefCam), both the serverAddress and the
boaServer address need to point to the BriefCam server. If there is more than one NIC, use the IP
address of the BriefCam server. Below are detailed instructions of how to do this:
a. Scroll to the bottom of the file and look for the following lines: <add key=”serverAddress”
value=”http://computer’s_hostname/synopsis/” />
b. Change the values to match your BriefCam server (the XPRR Computer). For example, if the
BriefCam XPRR computer is called RapRev, the value will look as follows:
http://RapRev/synopsis/
c. Find this row: <add key=”boaServerAddress” value=”http://cmputer’s_hostname/BOA/” />
d. Change the value point to your Milestone server. For example: http://RapRev/BOA/
5. Restart the following:
a. In the BriefCam Administrator: the Milestone SSO Provider service and the VS Server service.
b. The BOA application pool of the IIS.
c. Milestone XProtect Smart Client.
6. Clear the cache as described in the Clearing Server/Client Cache on page 52 section.
Server unavailable error
Symptom
After installing BriefCam and trying to open the BriefCam Administrator Console, a Server Unavailable error
appears. When opening F12 (debug mode), the following is seen:
Installation and deployment guide | XProtect® Rapid REVIEW
56 | Troubleshooting

Possible root causes
l
BriefCam and Milestone are installed on the same computer, which causes the IIS services to conflict
since the same ports are in use. As detailed in the prerequisites, a dedicated machine for BriefCam is
required.
l
The IIS components are not configured on the current server. This may be because of a custom
operating system image that includes certain restrictions, such as the IIS is not installed, only a
restricted list of components was installed, or the Sysadmin restricted those components to be
installed/configured by external installers.
Solution
1. From the Windows Control Panel, open Programs and Features.
2. Click Turn Windows features on or off.
3. From the list, make sure that all the Internet Information Services that appear in the illustration below
are available.
l
If any of the below is missing, add it.
l
Restart the computer.
Installation and deployment guide | XProtect® Rapid REVIEW
57 | Troubleshooting

Installation and deployment guide | XProtect® Rapid REVIEW
58 | Troubleshooting

BriefCam tab is missing
Symptom
The BriefCam tab is missing from the Milestone XProtect embedded client.
Possible root causes
l
Visual Studio X64 redistributable package is not installed. This can be caused by a GPO or other
restrictions applied by the System Administrator.
l
Windows is not up to date (even though this is one of the prerequisites).
Solution
1. On the XProtect Smart Client computer, download the vc_redist.x64.exe runtime component for Visual
C++: Microsoft Download Center.
2. Run the executable file as Admin.
3. Clear the cache on the MilestoneXProtect Smart Client side:
a. Go to:
C:\Users\CurrentLogedInUser\AppData\Roaming\Milestone\BriefCam\MilestoneEmbedded.
Note that the AppData folder is a hidden folder. If you do not have hidden
folders enabled on your machine, you can open the AppData folder by
going to the search bar on your Windows Toolbar, typing %appdata% and
pressing Enter.
b. Delete all the contents of this folder. The next time you start a Milestone XProtect client, the
contents of this folder will be re-created.
c. Access the Milestone XProtect embedded client.
4. If this does not work, install the latest Windows update.
Installation and deployment guide | XProtect® Rapid REVIEW
59 | Troubleshooting

APPENDIX: XProtect Rapid REVIEW hardware
recommendations
This section aims to assist in selecting hardware for a system that will run XProtect Rapid REVIEW.
At the core of these systems are the graphical processing units (GPUs) that are responsible for processing the
original video and extracting metadata. The number/type of GPUs, the resolution of the original video, frame
rate, and activity determine the number of hours of original video that can be processed per day (or per hour).
The more GPUs (and processing servers) a system has, the more original video it can process in an hour.
In addition to the GPUs, the system also relies on the CPU to support this video processing and the
investigations that follow the processing – when the user filters through the various objects, measures
proximity, and plays a VIDEO SYNOPSIS®.
The all-in-one, single server systems, cover a range of CPUs and a number of GPUs (from 1 to 4).
For systems that require more GPUs, BriefCam offers distributed architecture where the GPUs are located on
dedicated Processing Servers alongside additional servers that run the BriefCam services (such as perform
filtering and play a VIDEO SYNOPSIS®).
These hardware specs can be defined by their processing throughput (the number of hours of original video
that can be processed within an hour of processing or per day). These are measured under certain input video
characteristics, such as resolution and activity level.
When we refer to an activity level, we refer to the number of objects that pass through the scene in an hour,
under certain movement patterns.
We benchmarked the throughputs in this document under medium activity – which refers to roughly 1,000
objects (people and vehicles detected by the analytics engine) per hour.
The throughputs listed below each hardware spec relate to the throughput of the machine (based on the
throughput of the GPUs) – the VMS and network architecture and infrastructure need to support this
throughput as well.
Several users can use the system concurrently, but this will increase the load on the system. Our
recommendations and design assumptions are for a maximum of 2 concurrent users.
Face Recognition and License Plate Recognition Watchlist searches require resources. Our recommendations
assume watchlists of less than 10,000 identities in total (across all of the used watchlists combined).
All-in-One configurations
This section aims to assist in selecting hardware for a system that runs XProtect Rapid REVIEW in All-in-One
Configurations.
Installation and deployment guide | XProtect® Rapid REVIEW
60 | APPENDIX: XProtect Rapid REVIEW hardware recommendations

Medium
Form factor: 1U
CPU: Intel i9-9900K
Memory: 64GB RAM
Hard drive 1: 256GB SSD (operating system)
Hard drive 2: 480GB Mixed-use SSD (database)
Hard drive 3: 8TB HDD (processed video)
GPU: 1 x RTX 4000
Throughput: Up to 23 hours per hour (552 hours per day) at 1080p medium activity, 8 hours per hour (192
hours per day) at 4K medium activity.
Large
Form factor: 2U
CPU: 2 x Xeon Silver 4215R
Memory: 128GB RAM
Hard drive 1: 480GB SSD (operating system)
Hard drive 2: 1TB Mixed-use SSD (database)
Hard drives: 2 x 8TB HDD (processed video)
GPU: 2 x RTX 4000
Throughput: Up to 46 hours per hour (1,104 hours per day) at 1080p medium activity, 17 hours per hour (408
hours per day) at 4K medium activity.
Installation and deployment guide | XProtect® Rapid REVIEW
61 | APPENDIX: XProtect Rapid REVIEW hardware recommendations

Extra-large
Form factor: 2U
CPU: 2 x Xeon Gold 6248R
Memory: 256GB RAM
Hard drive 1: 480GB SSD (operating system)
Hard drive 2: 2TB Mixed-use SSD (database)
Hard drive 3: 2 x 8TB HDD (processed video)
GPU: 2 x RTX 4000
Throughput: Up to 92 hours per hour (2,208 hours per day) at 1080p medium activity, 34 hours per hour (816
hours per day) at 4K medium activity.
Throughput example
24 hours of original 1080p video at medium activity will take about 2.5 hours with the small build, 1 hour with
the medium build, 30 minutes with the large build, and 15 minutes with the extra-large build.
RAID redundancy
If bays are available, RAID1 redundancy can be applied with extra OS and DB drives, if desired.
Distributed deployments
These distributed deployment specifications come with RAID1 redundancy for the OS and DB drives.
8 GPU Deployment (4 servers)
l
VS server:
Installation and deployment guide | XProtect® Rapid REVIEW
62 | APPENDIX: XProtect Rapid REVIEW hardware recommendations

Form factor: 2U
CPU: 2 x Xeon Silver 4215R
Memory: 128GB RAM
Hard drive 1: 2 x 480GB SSD RAID1 (operating system)
Hard drive 2: 2 x 2TB Mixed-use SSD RAID1 (database)
Hard drives: 4 x 8TB HDD RAID0 (processed video)
l
Fetching server:
Form factor: 1U
CPU: Intel i9-9900K
Memory: 64GB RAM
Hard drives: 2 x 256GB SSD RAID1 (operating system)
l
2 x Processing servers, each with:
Form factor: 2U
CPU: 2 x Xeon Silver 4215R
Memory: 256GB RAM
Hard drives: 2 x 480GB SSD RAID1 (operating system)
GPU: 4 x RTX 4000
Installation and deployment guide | XProtect® Rapid REVIEW
63 | APPENDIX: XProtect Rapid REVIEW hardware recommendations

Throughput: Up to 184 hours per hour (4,416 hours per day) at 1080p medium activity, 68 hours per hour
(1,632 hours per day) at 4K medium activity.
16 GPU Deployment (8 servers)
l
VS server:
Form factor: 1U
CPU: Intel i9-9900K
Memory: 128GB RAM
Hard drives: 2 x 256GB SSD RAID1 (operating system)
Hard drives: 3 x 12TB HDD RAID0 (processed video )
l
2 Fetching servers, each with:
Form factor: 1U
CPU: Intel i9-9900K
Memory: 64GB RAM
Hard drives: 2 x 256GB SSD RAID1 (operating system)
l
Database Sever:
Form factor: 1U
CPU: Intel i9-9900K
Installation and deployment guide | XProtect® Rapid REVIEW
64 | APPENDIX: XProtect Rapid REVIEW hardware recommendations

Memory: 64GB RAM
Hard drives: 2 x 256GB SSD RAID1 (operating system)
Hard drives: 2 x 2TB Mixed-use SSD RAID1 (database)
l
4 Processing servers, each with:
Form factor: 2U
CPU: 2 x Xeon Silver 4215R
Memory: 256GB RAM
Hard drives: 2 x 480GB SSD RAID1 (operating system)
GPU: 4 x RTX 4000
Throughput: Up to 368 hours per hour (8,832 hours per day) at 1080p medium activity, 136 hours per hour
(3,264 hours per day) at 4K medium activity.
32 GPU Deployment (14 servers)
l
VS server:
Form factor: 1U
CPU: Intel i9-9900K
Memory: 128GB RAM
Hard drives: 2 x 256GB SSD RAID1 (operating system)
Hard drives: 3 x 12TB HDD RAID0 (processed video )
Installation and deployment guide | XProtect® Rapid REVIEW
65 | APPENDIX: XProtect Rapid REVIEW hardware recommendations

l
3 Fetching servers, each with:
Form factor: 1U
CPU: Intel i9-9900K
Memory: 64GB RAM
Hard drives: 2 x 256GB SSD RAID1 (operating system)
l
Queue Management sever:
Form factor: 1U
CPU: Intel i9-9900K
Memory: 64GB RAM
Hard drives: 2 x 256GB SSD RAID1 (operating system)
l
Database sever:
Form factor: 2U
CPU: 2 x Xeon Silver 4215R
Memory: 128GB RAM
Hard drives: 2 x 480GB SSD RAID1 (operating system)
Hard drives: 4 x 2TB Mixed-use SSD RAID1 (database)
l
8 Processing servers, each with:
Installation and deployment guide | XProtect® Rapid REVIEW
66 | APPENDIX: XProtect Rapid REVIEW hardware recommendations

Form factor: 2U
CPU: 2 x Xeon Silver 4215R
Memory: 256GB RAM
Hard drives: 2 x 480GB SSD RAID1 (operating system)
GPU: 4 x RTX 4000
Larger deployments
GPU lifecycle
In the upcoming months, the RTX 4000 GPU will be considered end-of-life and we plan to start transitioning to
the RTX A4000s. This will improve the throughput of the system – although it may require stronger CPUs and
more Fetching servers – along with the necessary infrastructure, to support the increased throughput.
For an overview of recommended GPUs, please refer to the specification sheet for XProtect Rapid REVIEW on
the Milestone content portal: Specification Sheet.
Installation and deployment guide | XProtect® Rapid REVIEW
67 | APPENDIX: XProtect Rapid REVIEW hardware recommendations

About Milestone
Milestone Systems is a leading provider of open platform video management software; technology that
helps the world see how to ensure safety, protect assets and increase business efficiency. Milestone
Systems enables an open platform community that drives collaboration and innovation in the development
and use of network video technology, with reliable and scalable solutions that are proven in more than
150,000 sites worldwide. Founded in 1998, Milestone Systems is a stand-alone company in the Canon
Group. For more information, visit https://www.milestonesys.com/.