
User Manual
Version 1.0.0 Version 1.0.0
User Manual
Version 1.0.0 Version 1.0.0

Contents
1.0. Product Introduction
1.1. What’s in the box
1.2. Product Features
2
3
5
6
7
16
16
16
17
….........................................................…………………
2
.............................................…………………
….........................................................…………………
……........................................................…………
……………..........................………
……………….……
8
……………….…........................................................................…
………………….......…
………………...........................................……
………………….........................…
…………………...........................................................…
18
…………………..................................................................................…
24
………………….........................................................................…
25
…………………........................................................…
2.0. Quick connection
2.1. Download Munbyn Print APP
2.2. Connect the printer via Munbyn Printer
2.3. First print
3.1. Power Indicator Status
3.2. Function of the power button
3.0. Power Button and indicator status
4.0. Specification
5.0. FAQ
6.0. Support
7.0. FCC statement
Page 1 of 26 Page 2 of 26
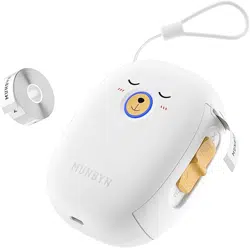
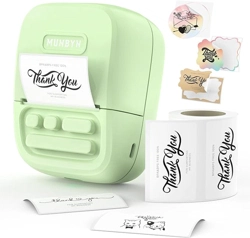
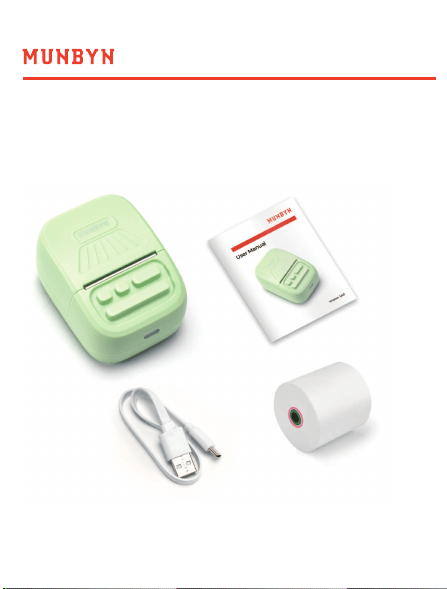
Label Maker
User Manual
Power Cable
1.1. What’s in the box
1.0 Packing Introduction
Contents
1.0. Product Introduction
1.1. What’s in the box
1.2. Product Features
2
3
5
6
7
16
16
16
17
….........................................................…………………
2
.............................................…………………
….........................................................…………………
……........................................................…………
……………..........................………
……………….……
8
……………….…........................................................................…
………………….......…
………………...........................................……
………………….........................…
…………………...........................................................…
18
…………………..................................................................................…
24
………………….........................................................................…
25
…………………........................................................…
2.0. Quick connection
2.1. Download Munbyn Print APP
2.2. Connect the printer via Munbyn Printer
2.3. First print
3.1. Power Indicator Status
3.2. Function of the power button
3.0. Power Button and indicator status
4.0. Specification
5.0. FAQ
6.0. Support
7.0. FCC statement
Page 1 of 26 Page 2 of 26
Label Maker
User Manual
Power Cable
1.1. What’s in the box
1.0 Packing Introduction
Page 4 of 26
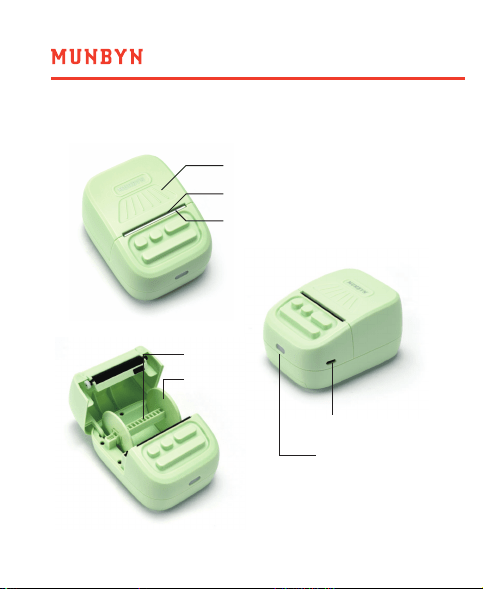
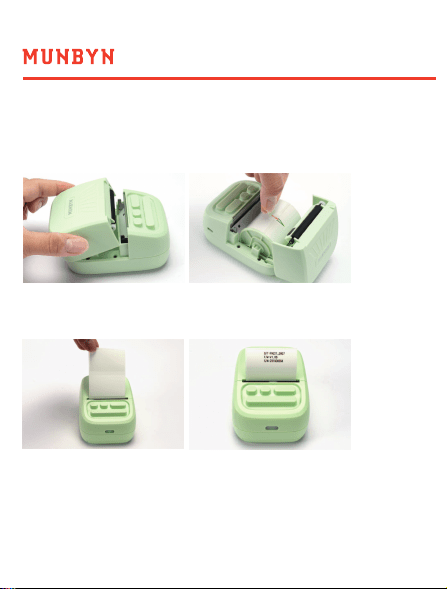
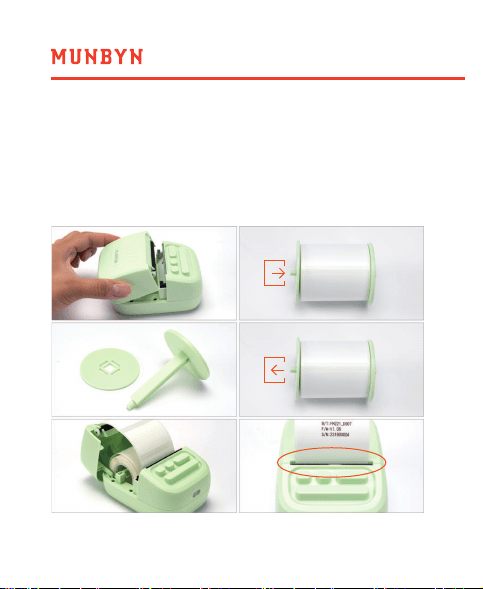
1.2.1. Load paper1.2. Product Features
纸仓盖
纸口
切纸刀
接口
电源按键+指示灯
Page 3 of 26
滚轴
活动板
1.Open the lid and peel off the label seal.
2.Make sure the label paper is placed in the direction shown
in the figure below, and the cover is closed.
Note: After the paper is put in, you need to press the power
button once to calibrate the paper(printer is power on),
otherwise the printing will not be correct.
Page 4 of 26
1.2.1. Load paper1.2. Product Features
纸仓盖
纸口
切纸刀
接口
电源按键+指示灯
Page 3 of 26
滚轴
活动板
1.Open the lid and peel off the label seal.
2.Make sure the label paper is placed in the direction shown
in the figure below, and the cover is closed.
Note: After the paper is put in, you need to press the power
button once to calibrate the paper(printer is power on),
otherwise the printing will not be correct.
Page 6 of 26
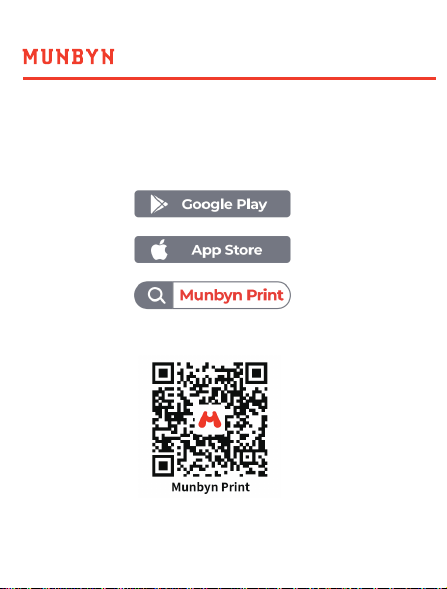
2.1. Download Munbyn Print APP
2.0 Quick connection
Page 5 of 26
① Search "Munbyn Print" on APP Store or Google Play to
get the APP.
② Or please scan the QR code to download the app.
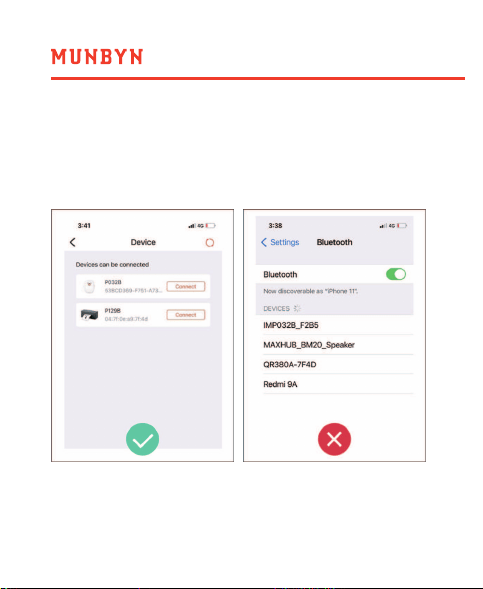
Note: The printer needs to be connected in the Munbyn Print APP,
and cannot be connected directly from the Bluetooth in the
mobile phone settings.
Page 6 of 26
2.1. Download Munbyn Print APP
2.0 Quick connection
Page 5 of 26
① Search "Munbyn Print" on APP Store or Google Play to
get the APP.
② Or please scan the QR code to download the app.
Note: The printer needs to be connected in the Munbyn Print APP,
and cannot be connected directly from the Bluetooth in the
mobile phone settings.
Page 8 of 26
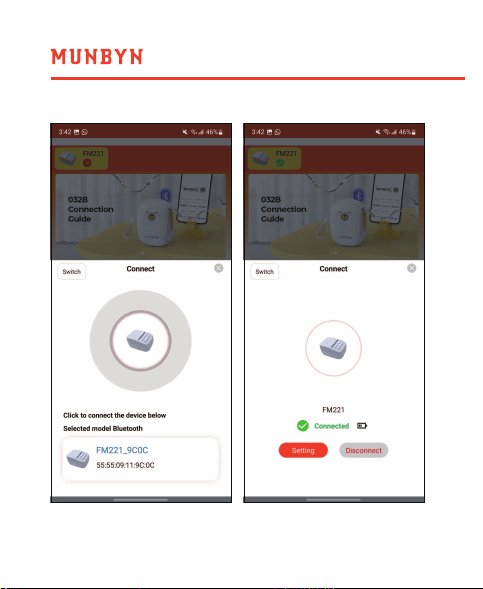
2.2. Connect the printer via Munbyn Printer
Page 7 of 26
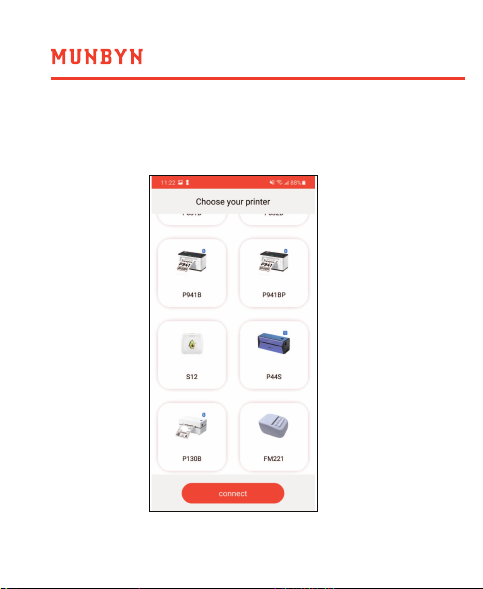
① Open the App, select your printer and connect.
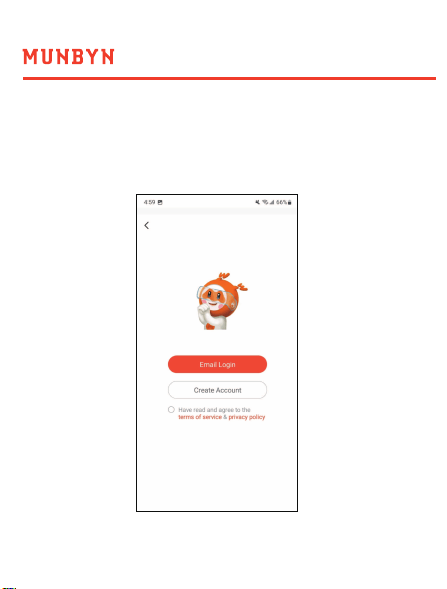
2.3. Create Account
Log in or register your MUNBYN account, you can also choose
to go back and register later.
Page 8 of 26
2.2. Connect the printer via Munbyn Printer
Page 7 of 26
① Open the App, select your printer and connect.
2.3. Create Account
Log in or register your MUNBYN account, you can also choose
to go back and register later.
Page 10 of 26
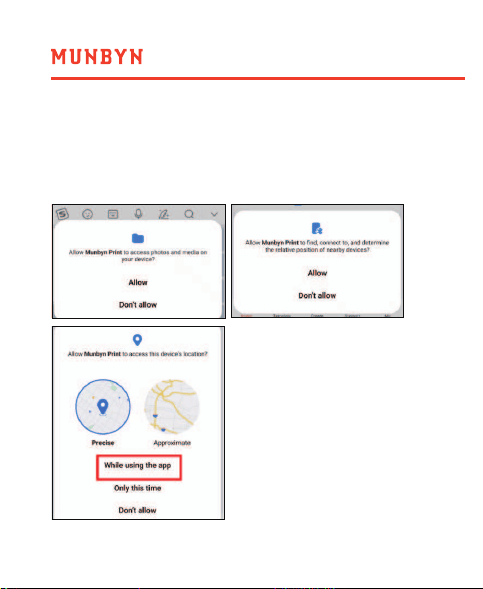
2.4. Open permission
Page 9 of 26
App needs to obtain local file access and Bluetooth
function to run normally, please follow the guide to
grant App permissions.
2.5. First print
Note: Before starting to print, please make sure that the printer
is connected. If you are in the error state as shown in the figure
below, you need to check whether the printer is turned on and
click the icon in the upper left corner to reconnect the printer.
Page 10 of 26
2.4. Open permission
Page 9 of 26
App needs to obtain local file access and Bluetooth
function to run normally, please follow the guide to
grant App permissions.
2.5. First print
Note: Before starting to print, please make sure that the printer
is connected. If you are in the error state as shown in the figure
below, you need to check whether the printer is turned on and
click the icon in the upper left corner to reconnect the printer.
Page 12 of 26Page 11 of 26
After the device is successfully connected, we start creating
and printing.
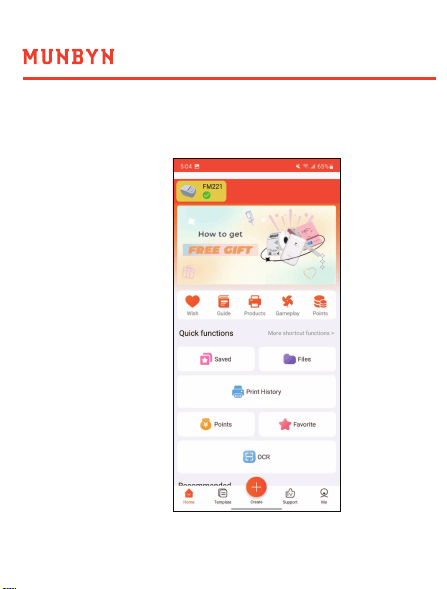
① Click Create on the
Home page.
Page 12 of 26Page 11 of 26
After the device is successfully connected, we start creating
and printing.
① Click Create on the
Home page.

Page 14 of 26Page 13 of 26
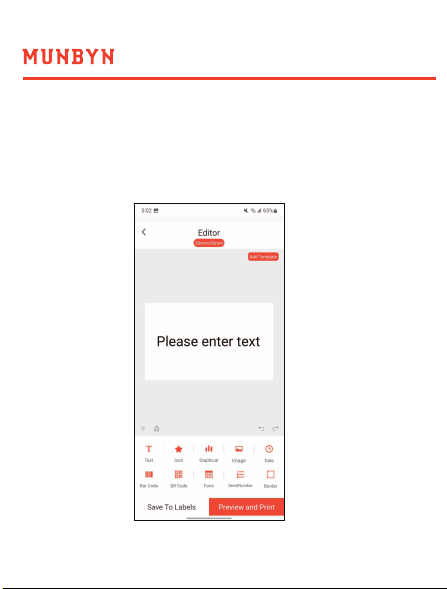
③ Design label.
Note: The size of the label that comes with the labeis 50mmX30mm,
if you use other labels, please pay attention to their size.
Note:The template is created successfully, and the design is
carried out within the template area, and the content beyond
the area will not be printed.
② Enter the length and width of the label.
Page 14 of 26Page 13 of 26
③ Design label.
Note: The size of the label that comes with the labeis 50mmX30mm,
if you use other labels, please pay attention to their size.
Note:The template is created successfully, and the design is
carried out within the template area, and the content beyond
the area will not be printed.
② Enter the length and width of the label.
Page 16 of 26
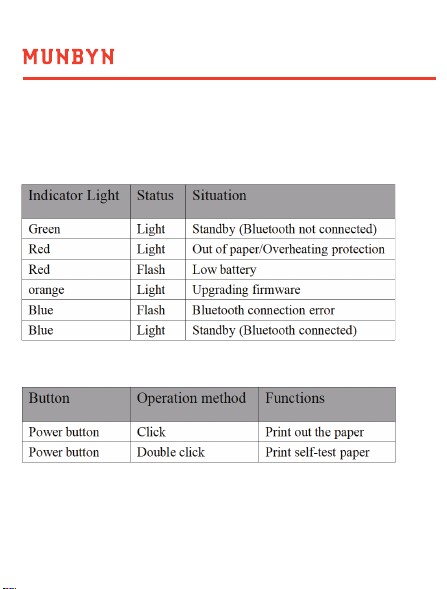
3.1. Power Indicator Status
3.2. Function of the power button
3.0 Power Button and indicator status
Page 15 of 26
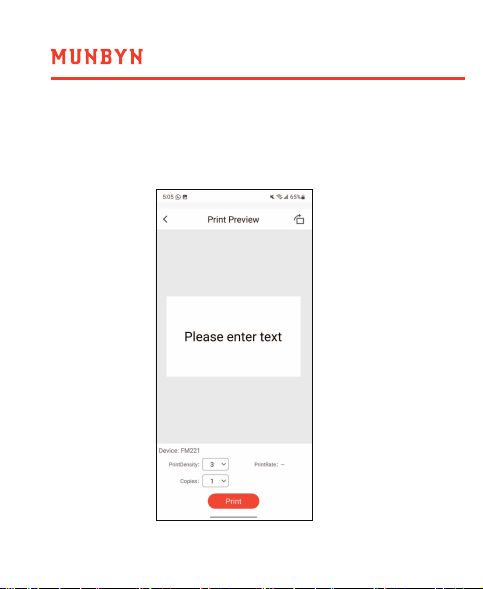
Click “Preview and Print” to check that the label preview
matches the preset and click “Print” without adjustments.
④ Print label.
Page 16 of 26
3.1. Power Indicator Status
3.2. Function of the power button
3.0 Power Button and indicator status
Page 15 of 26
Click “Preview and Print” to check that the label preview
matches the preset and click “Print” without adjustments.
④ Print label.
Page 18 of 26
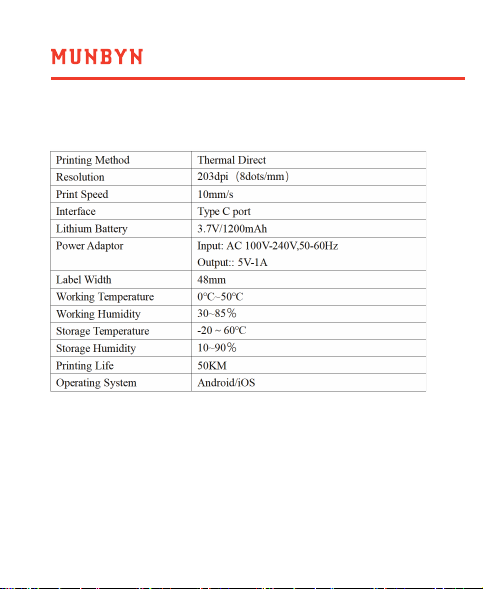
4.0 Specification
Page 17 of 26
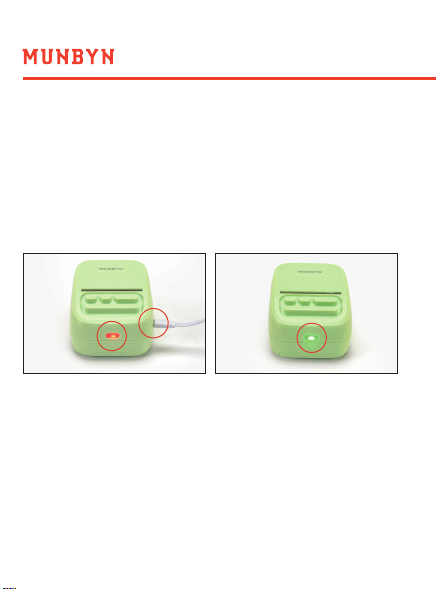
5.1. why doesn't my printer turn on?
5.0 FAQ
Use the Type-C cable to connect an external power supply of
5V/1A or above to charge the printer. During the charging
process, the printer's indicator light is red, and the printer's
indicator light will turn green when it is fully charged.
Make sure the printer has enough power, then press and
hold the power button for three seconds to turn on.
If the indicator light does not display when the printer is
charging or the printer still does not turn on after charging,
please contact us to replace the printer through the following
methods.
WhatsApp: +86 17817881067 | Phone: +1-4034771911
Email: support@munbyn.com
Page 18 of 26
4.0 Specification
Page 17 of 26
5.1. why doesn't my printer turn on?
5.0 FAQ
Use the Type-C cable to connect an external power supply of
5V/1A or above to charge the printer. During the charging
process, the printer's indicator light is red, and the printer's
indicator light will turn green when it is fully charged.
Make sure the printer has enough power, then press and
hold the power button for three seconds to turn on.
If the indicator light does not display when the printer is
charging or the printer still does not turn on after charging,
please contact us to replace the printer through the following
methods.
WhatsApp: +86 17817881067 | Phone: +1-4034771911
Email: [email protected]
Page 20 of 26Page 19 of 26
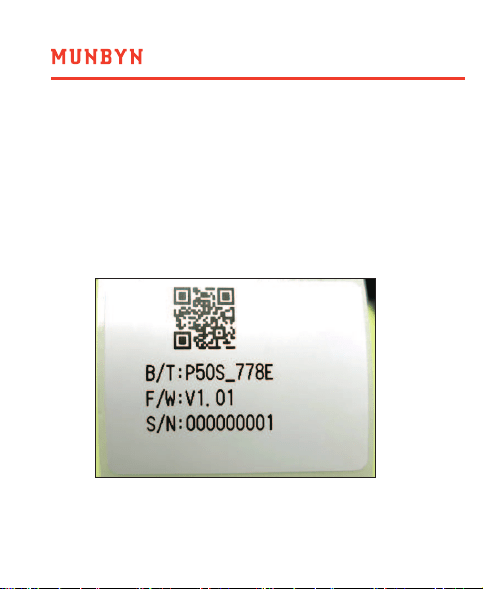
5.2. How do I print a self-test page?
Click the indicator light twice, the printer will print a self-test
page, you can get the following information from the
self-test page.
1. printer bluetooth name
2. Printer firmware version
3. Printer S/N
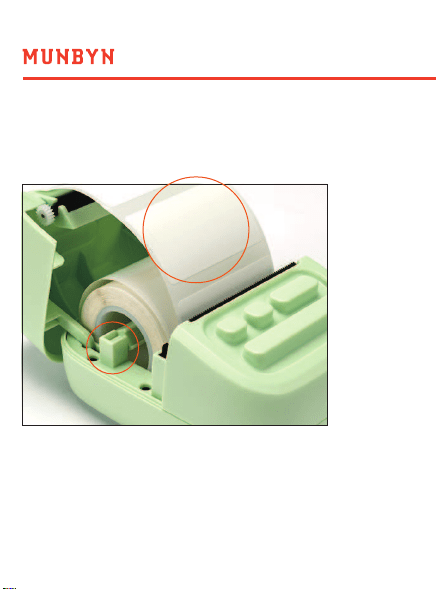
5.3. Why is my label printed crooked?
Check whether the label stock is placed correctly.
The stopper holds the label paper
The gap between the labels is flush with the outlet
Page 20 of 26Page 19 of 26
5.2. How do I print a self-test page?
Click the indicator light twice, the printer will print a self-test
page, you can get the following information from the
self-test page.
1. printer bluetooth name
2. Printer firmware version
3. Printer S/N
5.3. Why is my label printed crooked?
Check whether the label stock is placed correctly.
The stopper holds the label paper
The gap between the labels is flush with the outlet
Page 22 of 26Page 21 of 26
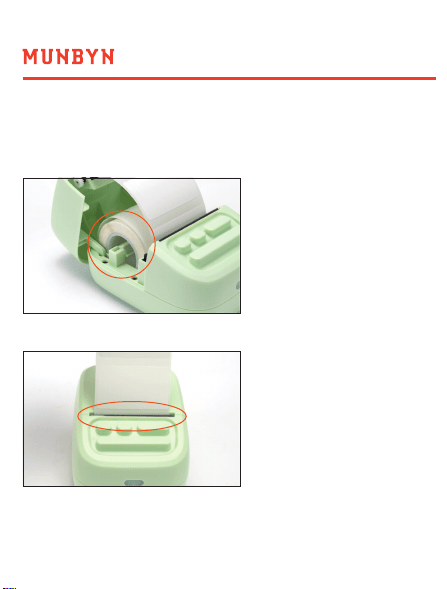
5.4. How to replace label paper?
Open the cover of the printer -> Take out the original label
paper -> Remove the stopper -> Insert the label paper ->
Install the stopper to fix the label paper -> Make sure the
label paper is flush with the outlet.
5.5. Why is my label printing blank?
1.Check that the tear-off side of the label paper is facing you.
2.Make sure that your label paper is a thermal material.
Thermal printers can only print on thermal label paper.
Page 22 of 26Page 21 of 26
5.4. How to replace label paper?
Open the cover of the printer -> Take out the original label
paper -> Remove the stopper -> Insert the label paper ->
Install the stopper to fix the label paper -> Make sure the
label paper is flush with the outlet.
5.5. Why is my label printing blank?
1.Check that the tear-off side of the label paper is facing you.
2.Make sure that your label paper is a thermal material.
Thermal printers can only print on thermal label paper.

Page 24 of 26Page 23 of 26
6.0 Support
MUNBYN provides 18 months warranty and lifetime free service.
If you encounter any issues with the product,
please contact the MUNBYN team to promptly receive
troubleshooting tips or a replacement.
Email: support@munbyn.com (24-7 online support)
Website: www.munbyn.com (how-to videos)
WhatsApp: + 8 6 13 3 5 2 9 5 0 4 9 0
Phone:
3.After making the above confirmation, if the printer still
prints blank labels, please print a self-test page.
If the self-test page can be printed, your text or image contrast
is too low, please use darker text or image.
If the self-test page cannot be printed, please contact us.
WhatsApp: + 8 6 13 3 5 2 9 5 0 4 9 0
Phone: +1 6 5 0 2 0 6 2 2 5 0
Email: [email protected]
5.6. What label sizes can the printer print?
Paper Thickness: 0.08-0.2mm
Paper width: MAX 58mm
+1 650 206 2250

Page 24 of 26Page 23 of 26
6.0 Support
MUNBYN provides 18 months warranty and lifetime free service.
If you encounter any issues with the product,
please contact the MUNBYN team to promptly receive
troubleshooting tips or a replacement.
Email: [email protected] (24-7 online support)
Website: www.munbyn.com (how-to videos)
WhatsApp: + 8 6 13 3 5 2 9 5 0 4 9 0
Phone:
3.After making the above confirmation, if the printer still
prints blank labels, please print a self-test page.
If the self-test page can be printed, your text or image contrast
is too low, please use darker text or image.
If the self-test page cannot be printed, please contact us.
WhatsApp: + 8 6 13 3 5 2 9 5 0 4 9 0
Phone: +1 6 5 0 2 0 6 2 2 5 0
Email: [email protected]
5.6. What label sizes can the printer print?
Paper Thickness: 0.08-0.2mm
Paper width: MAX 58mm
+1 650 206 2250

Page 26 of 26Page 25 of 26
7.0 FCC statement
Changes or modifications not expressly approved by the party
responsible for compliance could void the user's authority to
operate the equipment.
This equipment has been tested and found to comply with the
limits for a Class B digital device,pursuant to Part 15 of the FCC
Rules. These limits are designed to provide reasonable
protection against harmful interference in a residential
installation. This equipment generates uses and can radiate
radio frequency energy and, if not installed and used in
accordance with the instructions, may cause harmful
interference to radio communications. However,there is no
guarantee that interference will not occur in a particular
installation. If this equipment does cause harmful interference
to radio or television reception,which can be determined by
turning the equipment off and on,the user is encouraged to try
to correct the interference by one or more of the following
measures:
-- Reorient or relocate the receiving antenna.
-- Increase the separation between the equipment and receiver.
-- Connect the equipment into an outlet on a circuit different
from that to which the receiver is connected.
-- Consult the dealer or an experienced radio/TV technician for
help
This device complies with part 15 of the FCC rules. Operation is
subject to the following two conditions (1) this device may not
cause harmful interference,and (2) this device must accept any
interference received, including interference that may cause
undesired operation.This equipment complies with FCC
radiation exposure limits set forth for an uncontrolled
environment.