THIS INSTRUCTION BOOKLET CONTAINS IMPORTANT SAFETY INFORMATION. PLEASE READ AND KEEP FOR FUTURE REFERENCE.
EN DE FR ES IT PL
USER'S MANUAL/HANDBUCH
/MANUEL DE L'UTILISATEUR/MANUAL DEL USUARIO
/MANUALE UTENTE/INSTRUKCJA OBSŁUGI
NP10734
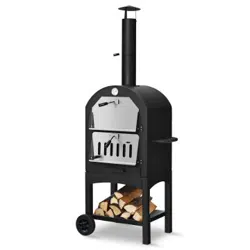
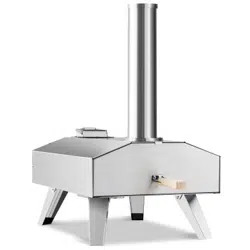
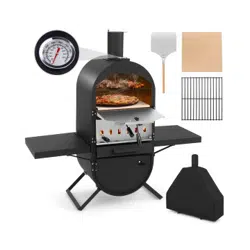
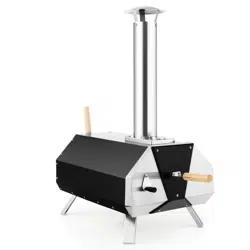
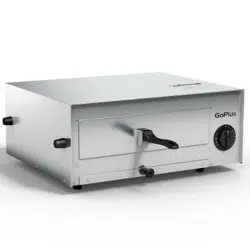
Pizza oven / Pizzaofen
/ Four à Pizza / Horno para Pizzas
/ Forno per Pizza / Piec do pizzy
EN
DE
FR
ES
IT
PL
With your inspiring rating, COSTWAY will be more consistent to offer you EASY
SHOPPING EXPERIENCE, GOOD PRODUCTS and EFFICIENT SERVICE!
Mit Ihrer inspirierenden Bewertung wird COSTWAY konsistenter sein, um Ihnen EIN
SCHÖNES EINKAUFSERLEBNIS, GUTE PRODUKTE und EFFIZIENTEN SERVICE zu
bieten!
Avec votre évaluation inspirante, COSTWAY continuera à fournir une EXPÉRIENCE
D’ACHAT PRATIQUE, des PRODUITS DE QUALITÉ e
t un SERVICE EFFICACE !
Con su calificación inspiradora, COSTWAY será más consistente para ofrecerle
EXPERIENCIA DE COMPRA FÁCIL, BUENOS PRODUCTOS y SERVICIO EFICIENTE.
Con la tua valutazione incoraggiante, COSTWAY sarà più coerente per offrirti
ESPERIENZA DI ACQUISTO FACILE, BUONI PRODOTTI e SERVIZIO EFFICIENTE!
Dzięki twojej opinii COSTWAY będzie mógł oferować jeszcze WYGODNIEJSZE
ZAKUPY, LEPSZE PRODUKTY i SPRAWNIEJ
SZĄ OBSŁUGĘ KLIENTA.
US office: Fontana UK office: Ipswich AU office: Truganina
DE office: FDS GmbH, Neuer Höltigbaum 36, 22143 Hamburg, Deutschland
FR office: Saint Vigor d'Ymonville
PL office: Gdańsk
THIS INSTRUCTION BOOKLET CONTAINS IMPORTANT SAFETY INFORMATION. PLEASE READ AND KEEP FOR FUTURE REFERENCE.
EN DE FR ES IT PL
USER'S MANUAL/HANDBUCH
/MANUEL DE L'UTILISATEUR/MANUAL DEL USUARIO
/MANUALE UTENTE/INSTRUKCJA OBSŁUGI
NP10734
Pizza oven / Pizzaofen
/ Four à Pizza / Horno para Pizzas
/ Forno per Pizza / Piec do pizzy
EN
DE
FR
ES
IT
PL
With your inspiring rating, COSTWAY will be more consistent to offer you EASY
SHOPPING EXPERIENCE, GOOD PRODUCTS and EFFICIENT SERVICE!
Mit Ihrer inspirierenden Bewertung wird COSTWAY konsistenter sein, um Ihnen EIN
SCHÖNES EINKAUFSERLEBNIS, GUTE PRODUKTE und EFFIZIENTEN SERVICE zu
bieten!
Avec votre évaluation inspirante, COSTWAY continuera à fournir une EXPÉRIENCE
D’ACHAT PRATIQUE, des PRODUITS DE QUALITÉ e
t un SERVICE EFFICACE !
Con su calificación inspiradora, COSTWAY será más consistente para ofrecerle
EXPERIENCIA DE COMPRA FÁCIL, BUENOS PRODUCTOS y SERVICIO EFICIENTE.
Con la tua valutazione incoraggiante, COSTWAY sarà più coerente per offrirti
ESPERIENZA DI ACQUISTO FACILE, BUONI PRODOTTI e SERVIZIO EFFICIENTE!
Dzięki twojej opinii COSTWAY będzie mógł oferować jeszcze WYGODNIEJSZE
ZAKUPY, LEPSZE PRODUKTY i SPRAWNIEJ
SZĄ OBSŁUGĘ KLIENTA.
US office: Fontana UK office: Ipswich AU office: Truganina
DE office: FDS GmbH, Neuer Höltigbaum 36, 22143 Hamburg, Deutschland
FR office: Saint Vigor d'Ymonville
PL office: Gdańsk

02
03
O
TABLE OF CONTENTS / Teileliste
/ LISTE DES PIÈCES / LISTA DE PIEZAS
/ LISTA DI PARTI / WYKAZ CZĘŚCI
EN:
Size(W/ D/ H): 36*33.5*43.5 CM
Oven Weight: 10.7 KG
Oven Floor Area: 0.12 m²
Max Oven Temperature: 300℃
DE:
Größe (B/ T/ H): 36*33.5*43.5 CM
Gewicht des Ofens: 10.7 KG
Backofen Bodenfläche: 0.12 m²
Maximale Ofentemperatur: 300℃
FR:
Dimensions (L x P x H): 36 x 33,5 x 43,5 cm
Poids: 10,7 kg
Surface du four: 0,12 m²
Température maximale du four: 300℃
ES:
Tamaño (Ancho/Profundidad/Altura): 36*33,5*43,5 CM
Peso del horno: 10,7 KG
Superficie de suelo del horno: 0,12 m²
Temperatura máxima del horno: 300℃
IT:
Dimensioni(L/ P/ A): 36*33.5*43.5 CM
Peso di Forno: 10.7 KG
Superficie di Fondo di Forno: 0.12 m²
Temperatura Massima di Forno: 300℃
PL:
Wymiary (szer. x gł. x wys.): 36 x 33,5 x 43,5 cm
Waga: 10,7 kg
Powierzchnia pieca: 0,12 m²
Maksymalna temperatura pieca: 300℃
EN:
Important: Retain these instructions for the future use.
DE:
Wichtig! Bewahren Sie diese Anleitung für den späteren Gebrauch auf.
FR:
Important: Conservez ce manuel pour référence future.
ES:
Importante: Conserve estas instrucciones para uso futuro.
IT:
Importante: Conservare questo manuale per il riferimento futuro.
PL:
Ważne: Zachowaj instrukcję do wykorzystania w przyszłości.
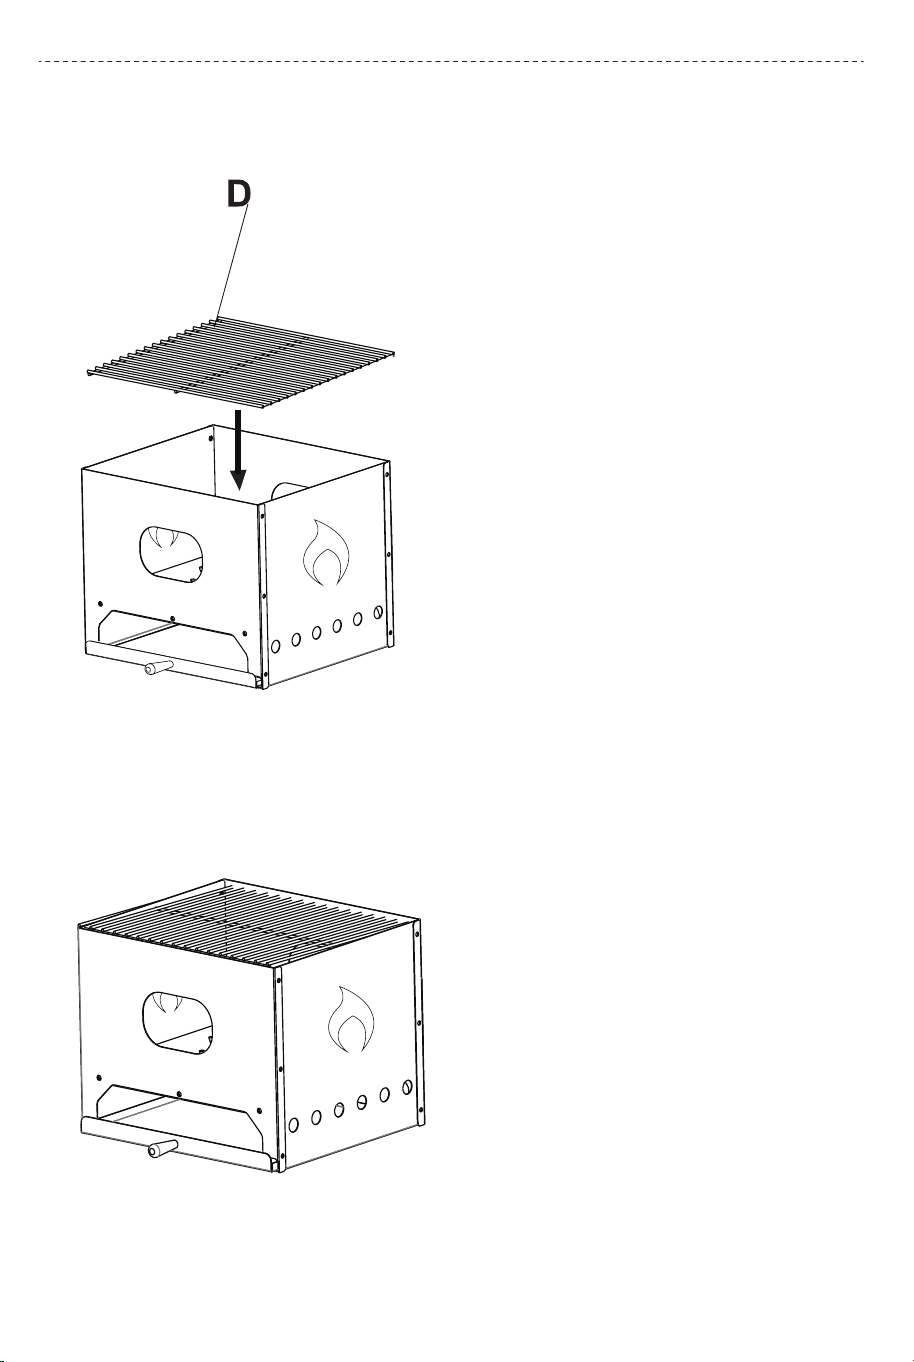
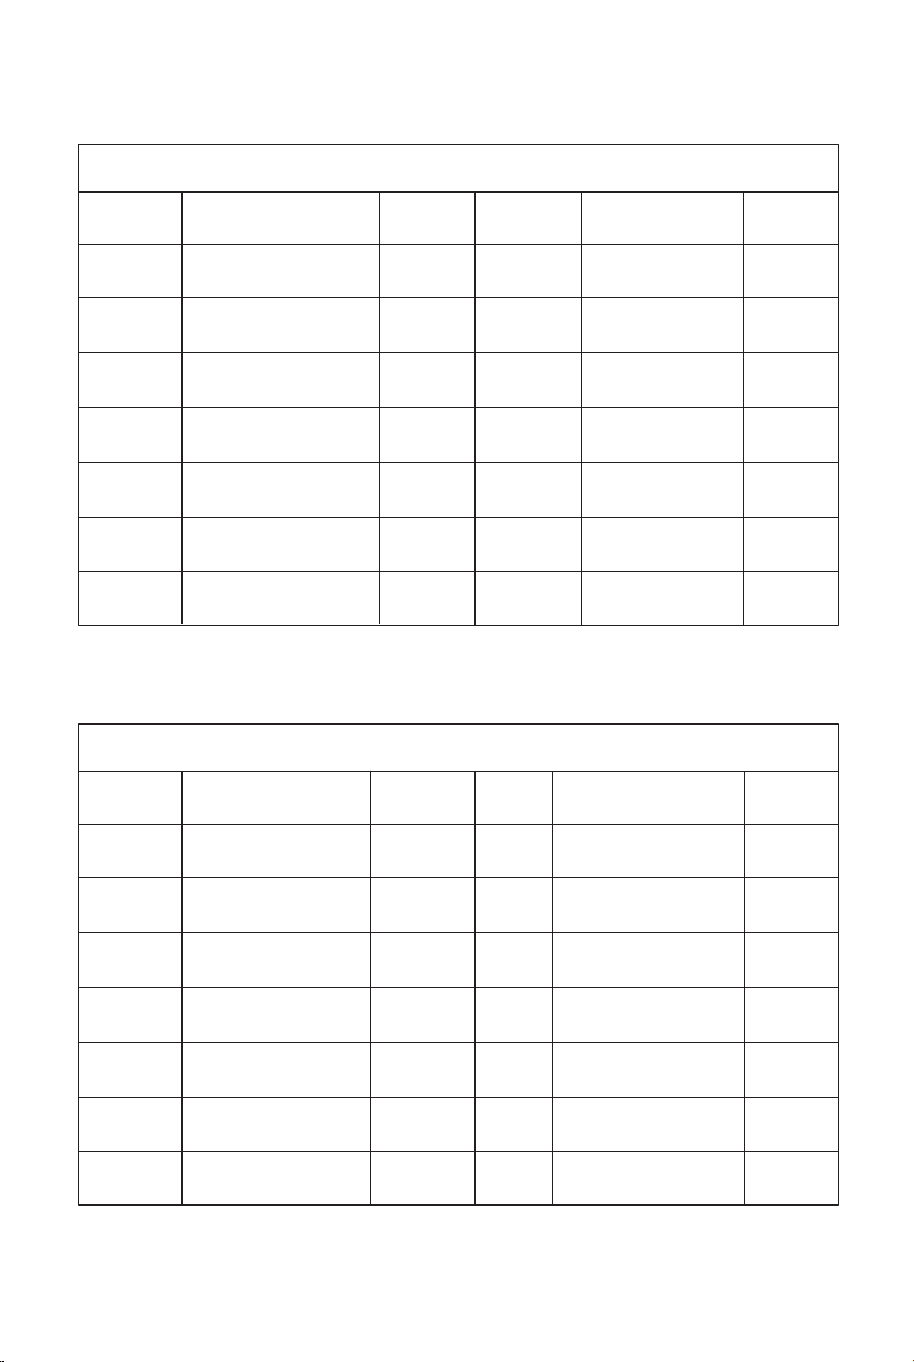
EN
Ref
A
B
C
D
E
F
M
Part
Body
Plate with Handle Hole
Side Plate
Cooking Gnid
Charcoal Pan
Ash Tray Pan
Pizza Stone
Quantity
1
2
2
1
1
1
1
Ref
G
H&O
J
K
L
N
Part
Tray Handle
Pizza Peel
Screw M5*12
Screw M4*12
Nut M4
Screw M6*12
Quantity
1
1
18
3
3
1
10
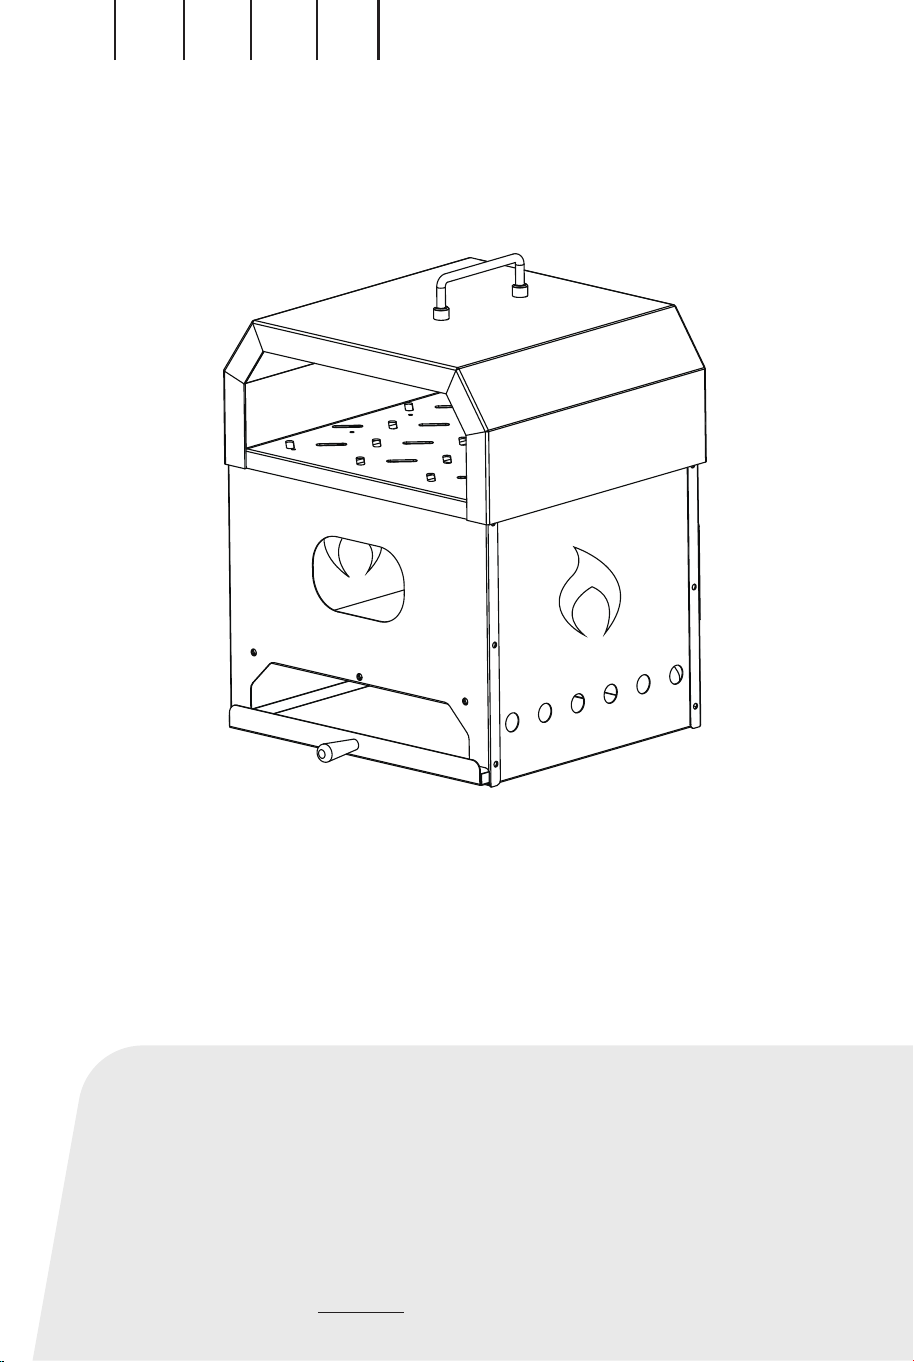
EN: TIPS: How to use the grill?
- Remove pizza body A
- Put on the cooking grid D on top.
DE: HINWEISE: Wie benutzt man den
Grillrost?
- Pizzagehäuse A abnehmen
- Legen Sie den Grillrost D oben auf.
FR: REMARQUE : Comment utiliser la
grille?
- Déposer le corps (A).
- Placez la grille de cuisson (D) sur le
dessus.
ES: CONSEJO: ¿Cómo utilizar la rejilla?
- Retire el cuerpo (A).
- Coloque la rejilla de cocción (D) en la
parte superior.
IT: CONSIGLIO: Come usare la griglia ?
- Rimuovere il corpo (A).
- Mettere la griglia di cottura (D) sulla
parte superiore.
PL: Użytkowanie grilla:
Zdejmij pokrywę (A) i umieść ruszt (D)
w górnej części korpusu pieca.
EN:
Now you are ready for the cooking.
DE:
Jetzt sind Sie bereit für Grillen.
FR:
Il est maintenant prêt pour la cuisson.
ES:
Ahora está listo para la cocción.
IT:
Ora il forno è pronto per la cottura.
PL:
Grill jest gotowy do użytku!

02
03
O
TABLE OF CONTENTS / Teileliste
/ LISTE DES PIÈCES / LISTA DE PIEZAS
/ LISTA DI PARTI / WYKAZ CZĘŚCI
EN:
Size(W/ D/ H): 36*33.5*43.5 CM
Oven Weight: 10.7 KG
Oven Floor Area: 0.12 m²
Max Oven Temperature: 300℃
DE:
Größe (B/ T/ H): 36*33.5*43.5 CM
Gewicht des Ofens: 10.7 KG
Backofen Bodenfläche: 0.12 m²
Maximale Ofentemperatur: 300℃
FR:
Dimensions (L x P x H): 36 x 33,5 x 43,5 cm
Poids: 10,7 kg
Surface du four: 0,12 m²
Température maximale du four: 300℃
ES:
Tamaño (Ancho/Profundidad/Altura): 36*33,5*43,5 CM
Peso del horno: 10,7 KG
Superficie de suelo del horno: 0,12 m²
Temperatura máxima del horno: 300℃
IT:
Dimensioni(L/ P/ A): 36*33.5*43.5 CM
Peso di Forno: 10.7 KG
Superficie di Fondo di Forno: 0.12 m²
Temperatura Massima di Forno: 300℃
PL:
Wymiary (szer. x gł. x wys.): 36 x 33,5 x 43,5 cm
Waga: 10,7 kg
Powierzchnia pieca: 0,12 m²
Maksymalna temperatura pieca: 300℃
EN:
Important: Retain these instructions for the future use.
DE:
Wichtig! Bewahren Sie diese Anleitung für den späteren Gebrauch auf.
FR:
Important: Conservez ce manuel pour référence future.
ES:
Importante: Conserve estas instrucciones para uso futuro.
IT:
Importante: Conservare questo manuale per il riferimento futuro.
PL:
Ważne: Zachowaj instrukcję do wykorzystania w przyszłości.
EN
Ref
A
B
C
D
E
F
M
Part
Body
Plate with Handle Hole
Side Plate
Cooking Gnid
Charcoal Pan
Ash Tray Pan
Pizza Stone
Quantity
1
2
2
1
1
1
1
Ref
G
H&O
J
K
L
N
Part
Tray Handle
Pizza Peel
Screw M5*12
Screw M4*12
Nut M4
Screw M6*12
Quantity
1
1
18
3
3
1
10
EN: TIPS: How to use the grill?
- Remove pizza body A
- Put on the cooking grid D on top.
DE: HINWEISE: Wie benutzt man den
Grillrost?
- Pizzagehäuse A abnehmen
- Legen Sie den Grillrost D oben auf.
FR: REMARQUE : Comment utiliser la
grille?
- Déposer le corps (A).
- Placez la grille de cuisson (D) sur le
dessus.
ES: CONSEJO: ¿Cómo utilizar la rejilla?
- Retire el cuerpo (A).
- Coloque la rejilla de cocción (D) en la
parte superior.
IT: CONSIGLIO: Come usare la griglia ?
- Rimuovere il corpo (A).
- Mettere la griglia di cottura (D) sulla
parte superiore.
PL: Użytkowanie grilla:
Zdejmij pokrywę (A) i umieść ruszt (D)
w górnej części korpusu pieca.
EN:
Now you are ready for the cooking.
DE:
Jetzt sind Sie bereit für Grillen.
FR:
Il est maintenant prêt pour la cuisson.
ES:
Ahora está listo para la cocción.
IT:
Ora il forno è pronto per la cottura.
PL:
Grill jest gotowy do użytku!
02
03
O
TABLE OF CONTENTS / Teileliste
/ LISTE DES PIÈCES / LISTA DE PIEZAS
/ LISTA DI PARTI / WYKAZ CZĘŚCI
EN:
Size(W/ D/ H): 36*33.5*43.5 CM
Oven Weight: 12.2 KG
Oven Floor Area: 0.12 m²
Max Oven Temperature: 300℃
DE:
Größe (B/ T/ H): 36*33.5*43.5 CM
Gewicht des Ofens: 12.2 KG
Backofen Bodenfläche: 0.12 m²
Maximale Ofentemperatur: 300℃
FR:
Dimensions (L x P x H): 36 x 33,5 x 43,5 cm
Poids: 12,2 kg
Surface du four: 0,12 m²
Température maximale du four: 300℃
ES:
Tamaño (Ancho/Profundidad/Altura): 36*33,5*43,5 CM
Peso del horno: 12,2 KG
Superficie de suelo del horno: 0,12 m²
Temperatura máxima del horno: 300℃
IT:
Dimensioni(L/ P/ A): 36*33.5*43.5 CM
Peso di Forno: 12.2 KG
Superficie di Fondo di Forno: 0.12 m²
Temperatura Massima di Forno: 300℃
PL:
Wymiary (szer. x gł. x wys.): 36 x 33,5 x 43,5 cm
Waga: 12,2 kg
Powierzchnia pieca: 0,12 m²
Maksymalna temperatura pieca: 300℃
EN:
Important: Retain these instructions for the future use.
DE:
Wichtig! Bewahren Sie diese Anleitung für den späteren Gebrauch auf.
FR:
Important: Conservez ce manuel pour référence future.
ES:
Importante: Conserve estas instrucciones para uso futuro.
IT:
Importante: Conservare questo manuale per il riferimento futuro.
PL:
Ważne: Zachowaj instrukcję do wykorzystania w przyszłości.
EN
Ref
A
B
C
D
E
F
M
Part
Body
Plate with Handle Hole
Side Plate
Cooking Gnid
Charcoal Pan
Ash Tray Pan
Pizza Stone
Quantity
1
2
2
1
1
1
1
Ref
G
H&O
J
K
L
N
Part
Tray Handle
Pizza Peel
Screw M5*12
Screw M4*8
Nut M4
Screw M6*8
Quantity
1
1
18
I Cover 1
3
3
1
04
05
Referenz
A
B
C
D
E
F
M
Teil
Gehäuse
Platte mit Griffloch
Seitenplatte
Grillrost
Holzkohlepfanne
Aschenbehälter
Pizzastein
Menge
1
2
2
1
1
1
1
Referenz
G
H&O
J
K
L
N
Teil
Griff für Tablett
Pizzaschieber
Schraube M5*12
Schraube M4*8
Mutter M4
Schraube M6*8
Menge
1
1
18
I Cover 1
3
3
1
DE
Réf
A
B
C
D
E
F
M
Nom
Corps
Plaque latérale
Grille
Plateau à charbon
Cendrier
Pierre à pizza
Quantité
1
2
2
1
1
1
1
Réf
G
H&O
J
K
L
N
Nom
Poignée du plateau
Pelle à pizza
Vis M5*12
Vis M4*8
Écrou M4
Vis M6*8
Quantité
1
1
18
I Couverture 1
3
3
1
FR
Núm.
A
B
C
D
E
F
M
Pieza
Cuerpo
Placa lateral
Rejilla de cocción
Bandeja de carbón
Bandeja de cenizas
Placa para pizza
Cantidad
1
2
2
1
1
1
1
Núm.
G
H&O
J
K
L
N
Pieza
Mango de bandeja
Pala de pizza
Tornillo M5*12
Tornillo M4*12
Tuerca M4
Tornillo M6*12
Cantidad
1
1
18
3
3
1
ES
N.
A
B
C
D
E
F
M
Parte
Corpo
Piastra con Foro di Manico
Piastra Laterale
Griglia di Cottura
Vassoio di Carbone
Portacenere
Piatto per Pizza
Quantità
1
2
2
1
1
1
1
N.
G
H&O
J
K
L
N
Parte
Manico di Vassoio
Pala per Pizza
Vite M5*12
Vite M4*12
Dado M4
Vite M6*12
Quantità
1
1
18
3
3
1
IT
Plaque avec trou
pour poignée
Placa con agujero
para asa
08
09
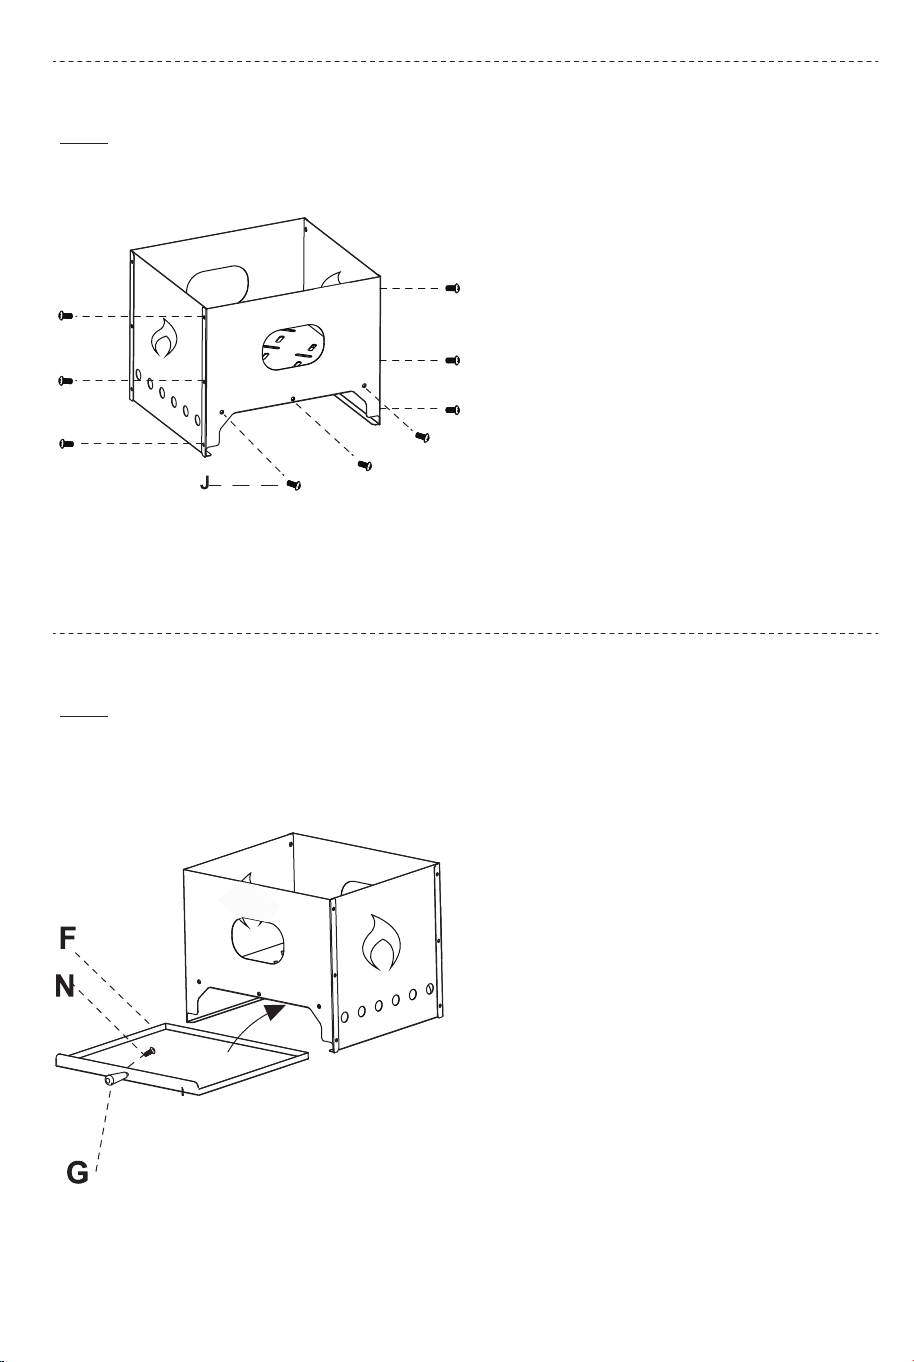
EN: Assemble the other plate B with
handle hole to the side plates with 9
screws J.
DE: Montieren Sie die andere Platte B
mit Griffloch mit 9 Schrauben J an den
Seitenplatten.
FR: Montez l'autre plaque avec trou de
poignée (B) sur les plaques latérales
avec 9 vis (J).
ES: Monte la otra placa (B) con
agujero para asa a las placas laterales
con 9 tornillos (J).
IT: Montre l’altra piastra con foro di
manico (B) sulle piastre laterali con 9
viti (J).
PL: Przymocuj drugą płytę z otworem
na popielnik (B) do płyt bocznych (C)
za pomocą 9 śrub (J).
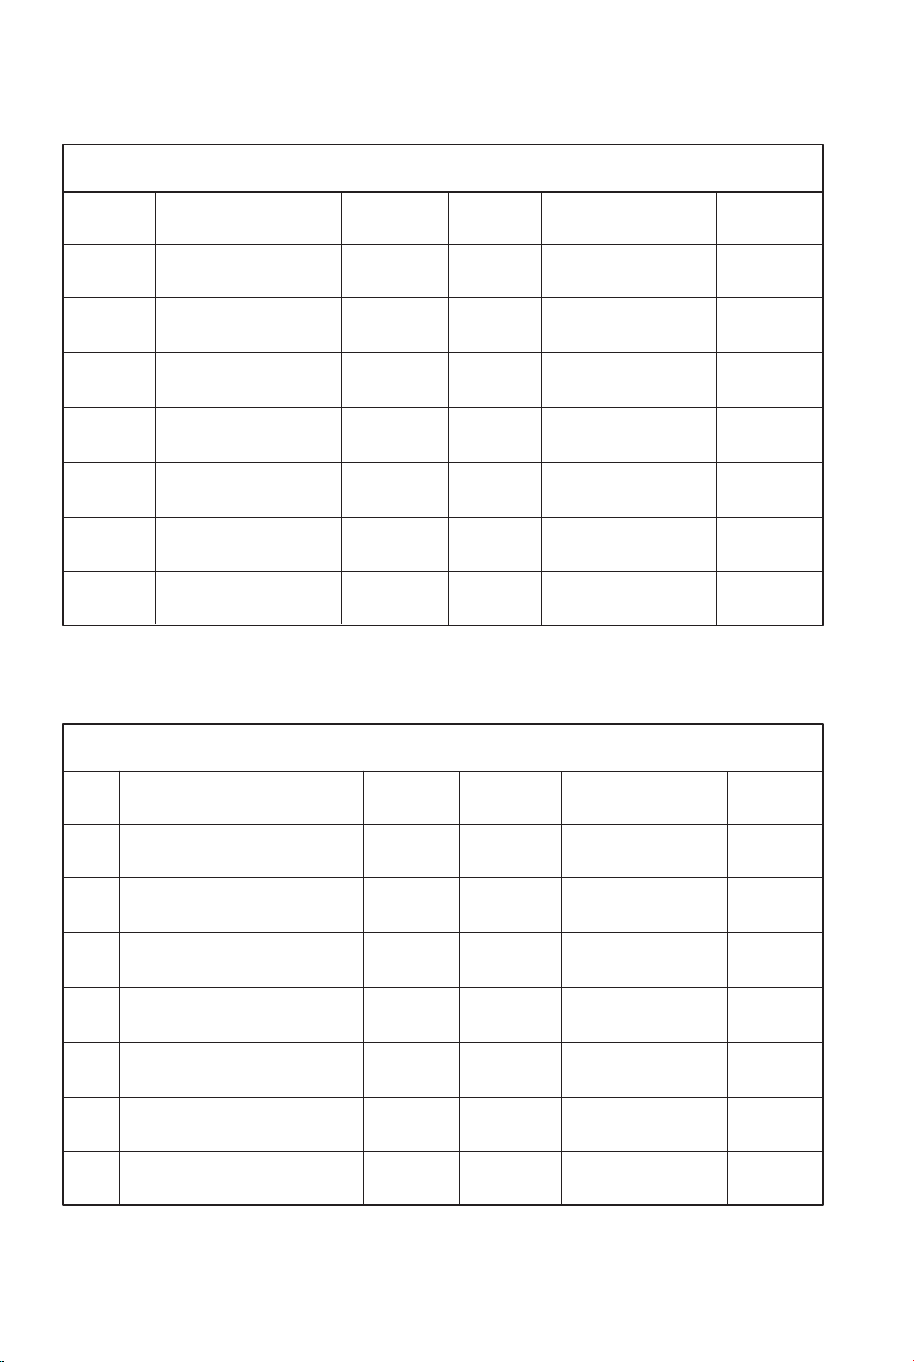
EN: Install the handle G to the ash
tray F with 1 screw N, then install the
ash tray into the body.
DE: Befestigen Sie den Griff G mit 1
Schraube N am Aschenbehälter F und
setzen Sie dann den Aschenbecher in
das Gehäuse ein.
FR: Installez la poignée (G) sur le
cendrier (F) avec 1 vis (N), puis
installez le cendrier sur le corps.
ES: Instale el mango (G) en la
bandeja de cenizas (F) con 1 tornillo
(N), y luego instale la bandeja de
cenizas en el cuerpo.
IT: Installare il manico (G) sul
portacenere (F) con 1 vite (N), quindi
installare il portacenere sul corpo.
PL: Przymocuj uchwyt (G) do
popielnika (F) za pomocą 1 śruby (N),
a następnie zainstaluj popielnik w
korpusie pieca.
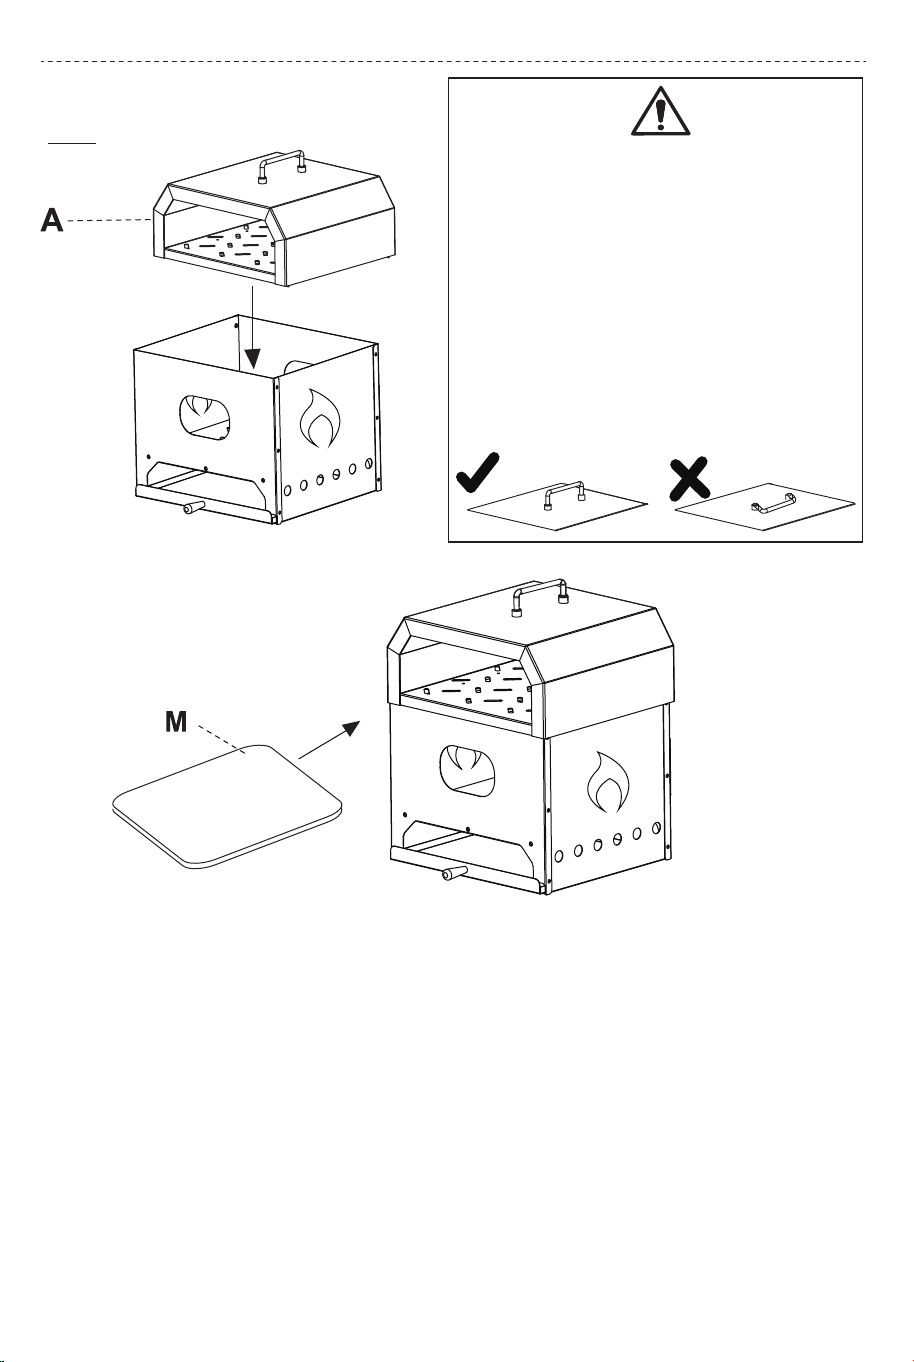
EN: Put the pizza body A on top. and place the pizza stone M in the oven. Then
you can use the pizza oven.
DE: Setzen Sie das Gehäuse A auf, und legen Sie den Pizzastein M in den Ofen.
Dann können Sie den Pizzaofen benutzen.
FR: Placez le corps (A) sur le dessus et placez la pierre à pizza (M) dans le four.
Vous pouvez alors utiliser le four à pizza.
ES: Ponga el cuerpo (A) en la parte superior, y coloque la placa para pizza (M)
en el horno. A continuación, puede utilizar el horno para pizzas.
IT: Mettere il corpo (A) sulla parte superiore e il piatto per pizza (M) nel forno.
Quindi, puoi utilizzare il forno per pizza.
PL: Umieść pokrywę (A) na korpusie pieca. Następnie umieść kamień do pizzy
(M) w piekarniku. Piec jest gotowy do użytku!
EN:
WARNING: Don't put the top handle down while using
the pizza oven.
DE:
WARNUNG: Lassen Sie den oberen Griff nicht herunter,
wenn Sie den Pizzaofen benutzen.
FR:
AVERTISSEMENT: Ne baissez pas la poignée
supérieure lorsque vous utilisez le four à pizza.
ES:
ADVERTENCIA: No ponga la manija superior hacia
abajo mientras usa el horno para pizzas.
IT:
AVVERTENZA: Non abbassare il manico superiore
durante l'utilizzo del forno per pizza.
PL:
OSTRZEŻENIE: Nie opuszczaj uchwytu na pokrywie (A)
podczas korzystania z pieca do pizzy.
03
05
04
04
05
Referenz
A
B
C
D
E
F
M
Teil
Gehäuse
Platte mit Griffloch
Seitenplatte
Grillrost
Holzkohlepfanne
Aschenbehälter
Pizzastein
Menge
1
2
2
1
1
1
1
Referenz
G
H&O
J
K
L
N
Teil
Griff für Tablett
Pizzaschieber
Schraube M5*12
Schraube M4*8
Mutter M4
Schraube M6*8
Menge
1
1
18
I Cover 1
3
3
1
DE
Réf
A
B
C
D
E
F
M
Nom
Corps
Plaque latérale
Grille
Plateau à charbon
Cendrier
Pierre à pizza
Quantité
1
2
2
1
1
1
1
Réf
G
H&O
J
K
L
N
Nom
Poignée du plateau
Pelle à pizza
Vis M5*12
Vis M4*8
Écrou M4
Vis M6*8
Quantité
1
1
18
I Couverture 1
3
3
1
FR
Núm.
A
B
C
D
E
F
M
Pieza
Cuerpo
Placa lateral
Rejilla de cocción
Bandeja de carbón
Bandeja de cenizas
Placa para pizza
Cantidad
1
2
2
1
1
1
1
Núm.
G
H&O
J
K
L
N
Pieza
Mango de bandeja
Pala de pizza
Tornillo M5*12
Tornillo M4*12
Tuerca M4
Tornillo M6*12
Cantidad
1
1
18
3
3
1
ES
N.
A
B
C
D
E
F
M
Parte
Corpo
Piastra con Foro di Manico
Piastra Laterale
Griglia di Cottura
Vassoio di Carbone
Portacenere
Piatto per Pizza
Quantità
1
2
2
1
1
1
1
N.
G
H&O
J
K
L
N
Parte
Manico di Vassoio
Pala per Pizza
Vite M5*12
Vite M4*12
Dado M4
Vite M6*12
Quantità
1
1
18
3
3
1
IT
Plaque avec trou
pour poignée
Placa con agujero
para asa
08
09
EN: Assemble the other plate B with
handle hole to the side plates with 9
screws J.
DE: Montieren Sie die andere Platte B
mit Griffloch mit 9 Schrauben J an den
Seitenplatten.
FR: Montez l'autre plaque avec trou de
poignée (B) sur les plaques latérales
avec 9 vis (J).
ES: Monte la otra placa (B) con
agujero para asa a las placas laterales
con 9 tornillos (J).
IT: Montre l’altra piastra con foro di
manico (B) sulle piastre laterali con 9
viti (J).
PL: Przymocuj drugą płytę z otworem
na popielnik (B) do płyt bocznych (C)
za pomocą 9 śrub (J).
EN: Install the handle G to the ash
tray F with 1 screw N, then install the
ash tray into the body.
DE: Befestigen Sie den Griff G mit 1
Schraube N am Aschenbehälter F und
setzen Sie dann den Aschenbecher in
das Gehäuse ein.
FR: Installez la poignée (G) sur le
cendrier (F) avec 1 vis (N), puis
installez le cendrier sur le corps.
ES: Instale el mango (G) en la
bandeja de cenizas (F) con 1 tornillo
(N), y luego instale la bandeja de
cenizas en el cuerpo.
IT: Installare il manico (G) sul
portacenere (F) con 1 vite (N), quindi
installare il portacenere sul corpo.
PL: Przymocuj uchwyt (G) do
popielnika (F) za pomocą 1 śruby (N),
a następnie zainstaluj popielnik w
korpusie pieca.
EN: Put the pizza body A on top. and place the pizza stone M in the oven. Then
you can use the pizza oven.
DE: Setzen Sie das Gehäuse A auf, und legen Sie den Pizzastein M in den Ofen.
Dann können Sie den Pizzaofen benutzen.
FR: Placez le corps (A) sur le dessus et placez la pierre à pizza (M) dans le four.
Vous pouvez alors utiliser le four à pizza.
ES: Ponga el cuerpo (A) en la parte superior, y coloque la placa para pizza (M)
en el horno. A continuación, puede utilizar el horno para pizzas.
IT: Mettere il corpo (A) sulla parte superiore e il piatto per pizza (M) nel forno.
Quindi, puoi utilizzare il forno per pizza.
PL: Umieść pokrywę (A) na korpusie pieca. Następnie umieść kamień do pizzy
(M) w piekarniku. Piec jest gotowy do użytku!
EN:
WARNING: Don't put the top handle down while using
the pizza oven.
DE:
WARNUNG: Lassen Sie den oberen Griff nicht herunter,
wenn Sie den Pizzaofen benutzen.
FR:
AVERTISSEMENT: Ne baissez pas la poignée
supérieure lorsque vous utilisez le four à pizza.
ES:
ADVERTENCIA: No ponga la manija superior hacia
abajo mientras usa el horno para pizzas.
IT:
AVVERTENZA: Non abbassare il manico superiore
durante l'utilizzo del forno per pizza.
PL:
OSTRZEŻENIE: Nie opuszczaj uchwytu na pokrywie (A)
podczas korzystania z pieca do pizzy.
03
05
04
04
05
Referenz
A
B
C
D
E
F
M
Teil
Gehäuse
Platte mit Griffloch
Seitenplatte
Grillrost
Holzkohlepfanne
Aschenbehälter
Pizzastein
Menge
1
2
2
1
1
1
1
Referenz
G
H&O
J
K
L
N
Teil
Griff für Tablett
Pizzaschieber
Schraube M5*12
Schraube M4*12
Mutter M4
Schraube M6*12
Menge
1
1
18
3
3
1
DE
Réf
A
B
C
D
E
F
M
Nom
Corps
Plaque latérale
Grille
Plateau à charbon
Cendrier
Pierre à pizza
Quantité
1
2
2
1
1
1
1
Réf
G
H&O
J
K
L
N
Nom
Poignée du plateau
Pelle à pizza
Vis M5*12
Vis M4*12
Écrou M4
Vis M6*12
Quantité
1
1
18
3
3
1
FR
Núm.
A
B
C
D
E
F
M
Pieza
Cuerpo
Placa lateral
Rejilla de cocción
Bandeja de carbón
Bandeja de cenizas
Placa para pizza
Cantidad
1
2
2
1
1
1
1
Núm.
G
H&O
J
K
L
N
Pieza
Mango de bandeja
Pala de pizza
Tornillo M5*12
Tornillo M4*8
Tuerca M4
Tornillo M6*8
Cantidad
1
1
18
3
3
1
I Cubrir 1
ES
N.
A
B
C
D
E
F
M
Parte
Corpo
Piastra con Foro di Manico
Piastra Laterale
Griglia di Cottura
Vassoio di Carbone
Portacenere
Piatto per Pizza
Quantità
1
2
2
1
1
1
1
N.
G
H&O
J
K
L
N
Parte
Manico di Vassoio
Pala per Pizza
Vite M5*12
Vite M4*8
Dado M4
Vite M6*8
Quantità
1
1
18
3
3
1
I Copertura 1
IT
Plaque avec trou
pour poignée
Placa con agujero
para asa
08
09
EN: Assemble the other plate B with
handle hole to the side plates with 9
screws J.
DE: Montieren Sie die andere Platte B
mit Griffloch mit 9 Schrauben J an den
Seitenplatten.
FR: Montez l'autre plaque avec trou de
poignée (B) sur les plaques latérales
avec 9 vis (J).
ES: Monte la otra placa (B) con
agujero para asa a las placas laterales
con 9 tornillos (J).
IT: Montre l’altra piastra con foro di
manico (B) sulle piastre laterali con 9
viti (J).
PL: Przymocuj drugą płytę z otworem
na popielnik (B) do płyt bocznych (C)
za pomocą 9 śrub (J).
EN: Install the handle G to the ash
tray F with 1 screw N, then install the
ash tray into the body.
DE: Befestigen Sie den Griff G mit 1
Schraube N am Aschenbehälter F und
setzen Sie dann den Aschenbecher in
das Gehäuse ein.
FR: Installez la poignée (G) sur le
cendrier (F) avec 1 vis (N), puis
installez le cendrier sur le corps.
ES: Instale el mango (G) en la
bandeja de cenizas (F) con 1 tornillo
(N), y luego instale la bandeja de
cenizas en el cuerpo.
IT: Installare il manico (G) sul
portacenere (F) con 1 vite (N), quindi
installare il portacenere sul corpo.
PL: Przymocuj uchwyt (G) do
popielnika (F) za pomocą 1 śruby (N),
a następnie zainstaluj popielnik w
korpusie pieca.
EN: Put the pizza body A on top. and place the pizza stone M in the oven. Then
you can use the pizza oven.
DE: Setzen Sie das Gehäuse A auf, und legen Sie den Pizzastein M in den Ofen.
Dann können Sie den Pizzaofen benutzen.
FR: Placez le corps (A) sur le dessus et placez la pierre à pizza (M) dans le four.
Vous pouvez alors utiliser le four à pizza.
ES: Ponga el cuerpo (A) en la parte superior, y coloque la placa para pizza (M)
en el horno. A continuación, puede utilizar el horno para pizzas.
IT: Mettere il corpo (A) sulla parte superiore e il piatto per pizza (M) nel forno.
Quindi, puoi utilizzare il forno per pizza.
PL: Umieść pokrywę (A) na korpusie pieca. Następnie umieść kamień do pizzy
(M) w piekarniku. Piec jest gotowy do użytku!
EN:
WARNING: Don't put the top handle down while using
the pizza oven.
DE:
WARNUNG: Lassen Sie den oberen Griff nicht herunter,
wenn Sie den Pizzaofen benutzen.
FR:
AVERTISSEMENT: Ne baissez pas la poignée
supérieure lorsque vous utilisez le four à pizza.
ES:
ADVERTENCIA: No ponga la manija superior hacia
abajo mientras usa el horno para pizzas.
IT:
AVVERTENZA: Non abbassare il manico superiore
durante l'utilizzo del forno per pizza.
PL:
OSTRZEŻENIE: Nie opuszczaj uchwytu na pokrywie (A)
podczas korzystania z pieca do pizzy.
03
05
04
04
05
Referenz
A
B
C
D
E
F
M
Teil
Gehäuse
Platte mit Griffloch
Seitenplatte
Grillrost
Holzkohlepfanne
Aschenbehälter
Pizzastein
Menge
1
2
2
1
1
1
1
Referenz
G
H&O
J
K
L
N
Teil
Griff für Tablett
Pizzaschieber
Schraube M5*12
Schraube M4*12
Mutter M4
Schraube M6*12
Menge
1
1
18
3
3
1
DE
Réf
A
B
C
D
E
F
M
Nom
Corps
Plaque latérale
Grille
Plateau à charbon
Cendrier
Pierre à pizza
Quantité
1
2
2
1
1
1
1
Réf
G
H&O
J
K
L
N
Nom
Poignée du plateau
Pelle à pizza
Vis M5*12
Vis M4*12
Écrou M4
Vis M6*12
Quantité
1
1
18
3
3
1
FR
Núm.
A
B
C
D
E
F
M
Pieza
Cuerpo
Placa lateral
Rejilla de cocción
Bandeja de carbón
Bandeja de cenizas
Placa para pizza
Cantidad
1
2
2
1
1
1
1
Núm.
G
H&O
J
K
L
N
Pieza
Mango de bandeja
Pala de pizza
Tornillo M5*12
Tornillo M4*8
Tuerca M4
Tornillo M6*8
Cantidad
1
1
18
3
3
1
I Cubrir 1
ES
N.
A
B
C
D
E
F
M
Parte
Corpo
Piastra con Foro di Manico
Piastra Laterale
Griglia di Cottura
Vassoio di Carbone
Portacenere
Piatto per Pizza
Quantità
1
2
2
1
1
1
1
N.
G
H&O
J
K
L
N
Parte
Manico di Vassoio
Pala per Pizza
Vite M5*12
Vite M4*8
Dado M4
Vite M6*8
Quantità
1
1
18
3
3
1
I Copertura 1
IT
Plaque avec trou
pour poignée
Placa con agujero
para asa
O
H
Assembly Instructions / Montageanleitung
/ INSTRUCTIONS DE MONTAGE / Instrucciones de
Montaje / Istruzioni di Assemblaggio / INSTRUKCJE
MONTAŻU
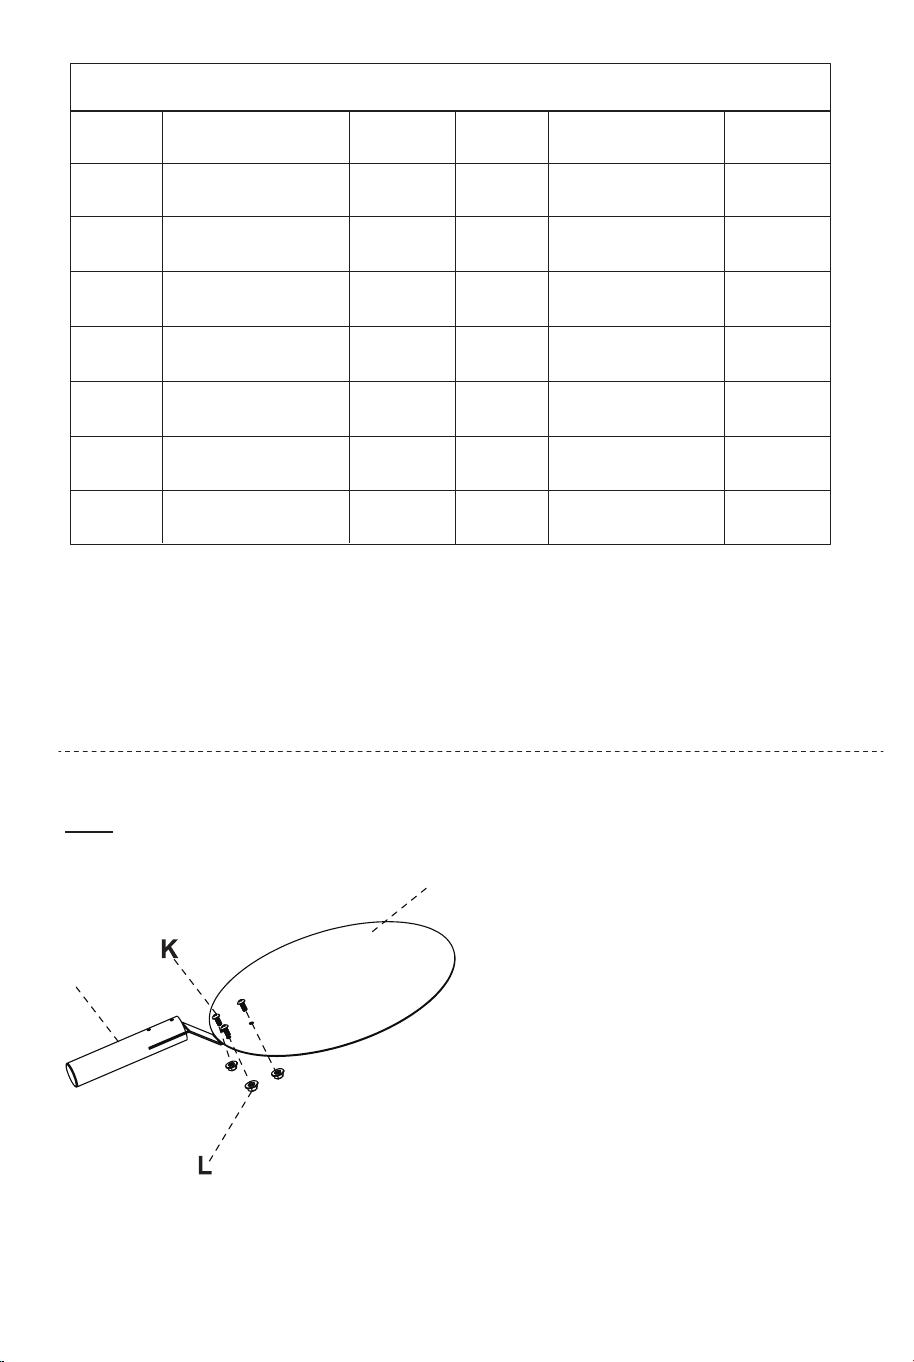
EN: Assemble the peel pan with the
wood handle with 3 pcs screws (K)
and nuts (L).
DE: Montieren Sie den Pizzaschieber
mit dem Holzgriff mit 3 Schrauben (k)
und Muttern (L).
FR: Assemblez le plateau de la pelle
avec le manche en bois avec 3 Vis (K)
et écrous (L).
ES: Monte la bandeja de pala con el
mango de madera con 3 tornillos (K) y
tuercas (L).
IT: Montare la pala con il manico in
legno con 3 viti (K) e dadi (L).
PL: Za pomocą 3 śrub (K) i 3 nakrętek
(L) przymocuj uchwyt (O) do łopaty
do pizzy (H).
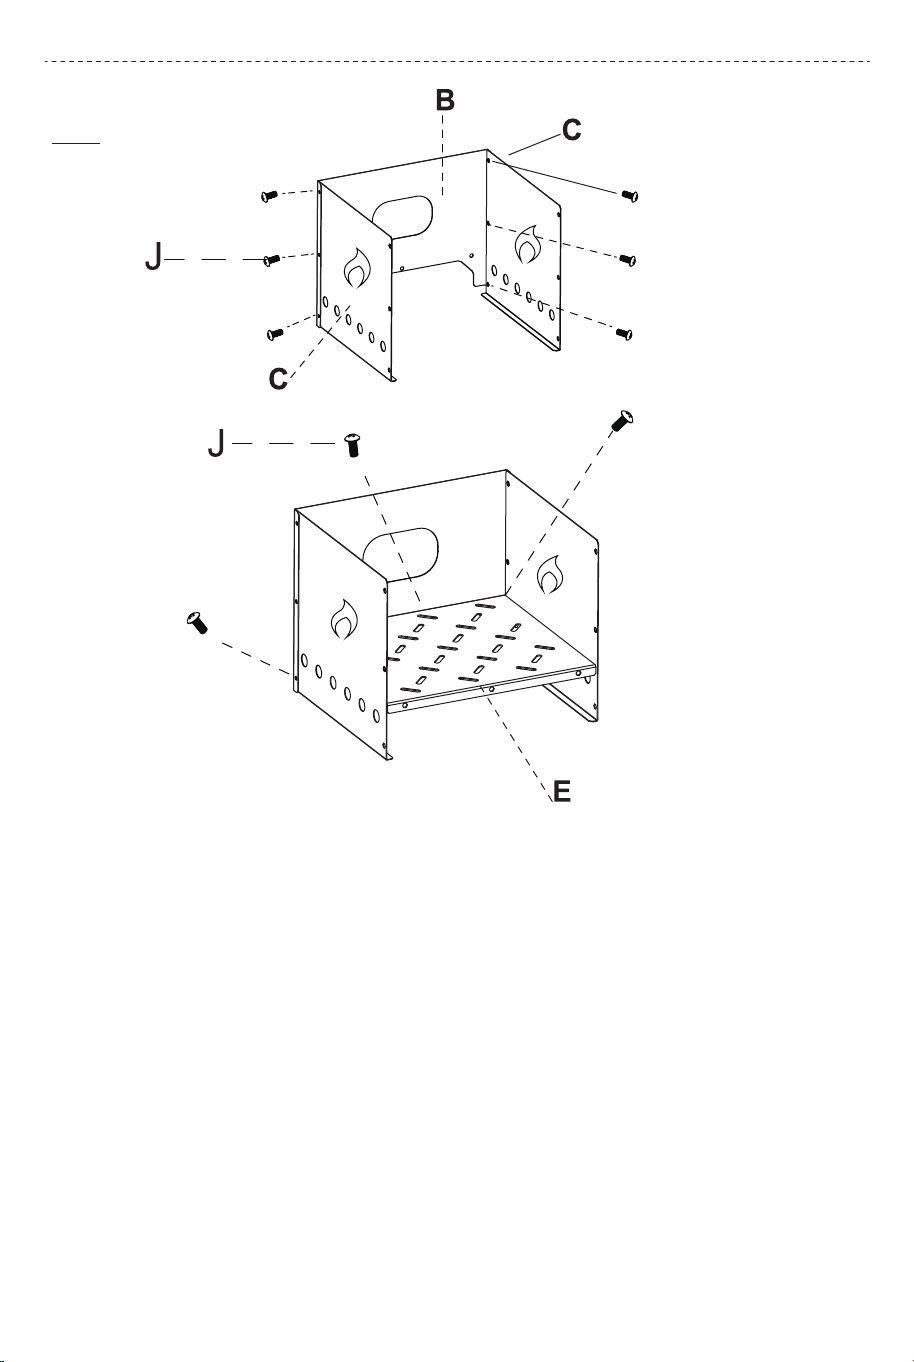
EN: Assemble the 2 side plates C to a Plate B with handle hole with 6pcs screws
J. Then assembling the Charcoal Pan E to the side plates C with 3pcs screws J.
DE: Befestigen Sie die 2 Seitenplatten C mit 6 Schrauben J an einer Platte B mit
Griffloch. Dann montieren Sie die Holzkohlepfanne E an den Seitenplatten C mit
3 Schrauben J.
FR: Montez les 2 plaques latérales (C) sur une plaque avec trou pour poignée
(B) avec 6 vis (J). Ensuite, montez le plateau à charbon (E) sur les plaques
latérales (C ) avec 3 vis (J).
ES: Monte las 2 placas laterales (C) en una placa (B) con agujero para asa con 6
tornillos (J). A continuación, monte la bandeja de carbón (E) a las placas
laterales (C ) con 3 tornillos (J).
IT: Montare le due piastre laterali (C) su una piastra con foro di manico (B) con
6 viti (J). Quindi montare il vassoio di carbone (E) sulle piastre laterali (C ) con 3
viti (J).
PL: Połącz 2 płyty boczne (C) z 1 płytą z otworem na popielnik (B) za pomocą 6
śrub (J). Następnie przymocuj tacę na węgiel (E) do płyt bocznych (C) za
pomocą 3 śrub (J).
06
07
Płyta z otworem
na popielnik
Łopata do pizzy
z uchwytem
Część
A
B
C
D
E
F
M
Nazwa
Pokrywa
Płyta boczna
Ruszt
Taca na węgiel
Popielnik
Kamień do pizzy
Ilość
1
2
2
1
1
1
1
Część
G
H&O
J
K
L
N
Nazwa
Uchwyt popielnika
Śruba M5x12
Śruba M4x8
Nakrętka M4
Śruba M6x8
Ilość
1
1
18
3
3
1
I Okładka 1
PL
01
02
O
H
Assembly Instructions / Montageanleitung
/ INSTRUCTIONS DE MONTAGE / Instrucciones de
Montaje / Istruzioni di Assemblaggio / INSTRUKCJE
MONTAŻU
EN: Assemble the peel pan with the
wood handle with 3 pcs screws (K)
and nuts (L).
DE: Montieren Sie den Pizzaschieber
mit dem Holzgriff mit 3 Schrauben (k)
und Muttern (L).
FR: Assemblez le plateau de la pelle
avec le manche en bois avec 3 Vis (K)
et écrous (L).
ES: Monte la bandeja de pala con el
mango de madera con 3 tornillos (K) y
tuercas (L).
IT: Montare la pala con il manico in
legno con 3 viti (K) e dadi (L).
PL: Za pomocą 3 śrub (K) i 3 nakrętek
(L) przymocuj uchwyt (O) do łopaty
do pizzy (H).
EN: Assemble the 2 side plates C to a Plate B with handle hole with 6pcs screws
J. Then assembling the Charcoal Pan E to the side plates C with 3pcs screws J.
DE: Befestigen Sie die 2 Seitenplatten C mit 6 Schrauben J an einer Platte B mit
Griffloch. Dann montieren Sie die Holzkohlepfanne E an den Seitenplatten C mit
3 Schrauben J.
FR: Montez les 2 plaques latérales (C) sur une plaque avec trou pour poignée
(B) avec 6 vis (J). Ensuite, montez le plateau à charbon (E) sur les plaques
latérales (C ) avec 3 vis (J).
ES: Monte las 2 placas laterales (C) en una placa (B) con agujero para asa con 6
tornillos (J). A continuación, monte la bandeja de carbón (E) a las placas
laterales (C ) con 3 tornillos (J).
IT: Montare le due piastre laterali (C) su una piastra con foro di manico (B) con
6 viti (J). Quindi montare il vassoio di carbone (E) sulle piastre laterali (C ) con 3
viti (J).
PL: Połącz 2 płyty boczne (C) z 1 płytą z otworem na popielnik (B) za pomocą 6
śrub (J). Następnie przymocuj tacę na węgiel (E) do płyt bocznych (C) za
pomocą 3 śrub (J).
06
07
Płyta z otworem
na popielnik
Łopata do pizzy
z uchwytem
Część
A
B
C
D
E
F
M
Nazwa
Pokrywa
Płyta boczna
Ruszt
Taca na węgiel
Popielnik
Kamień do pizzy
Ilość
1
2
2
1
1
1
1
Część
G
H&O
J
K
L
N
Nazwa
Uchwyt popielnika
Śruba M5x12
Śruba M4x12
Nakrętka M4
Śruba M6x12
Ilość
1
1
18
3
3
1
PL
01
02
O
H
Assembly Instructions / Montageanleitung
/ INSTRUCTIONS DE MONTAGE / Instrucciones de
Montaje / Istruzioni di Assemblaggio / INSTRUKCJE
MONTAŻU
EN: Assemble the peel pan with the
wood handle with 3 pcs screws (K)
and nuts (L).
DE: Montieren Sie den Pizzaschieber
mit dem Holzgriff mit 3 Schrauben (k)
und Muttern (L).
FR: Assemblez le plateau de la pelle
avec le manche en bois avec 3 Vis (K)
et écrous (L).
ES: Monte la bandeja de pala con el
mango de madera con 3 tornillos (K) y
tuercas (L).
IT: Montare la pala con il manico in
legno con 3 viti (K) e dadi (L).
PL: Za pomocą 3 śrub (K) i 3 nakrętek
(L) przymocuj uchwyt (O) do łopaty
do pizzy (H).
EN: Assemble the 2 side plates C to a Plate B with handle hole with 6pcs screws
J. Then assembling the Charcoal Pan E to the side plates C with 3pcs screws J.
DE: Befestigen Sie die 2 Seitenplatten C mit 6 Schrauben J an einer Platte B mit
Griffloch. Dann montieren Sie die Holzkohlepfanne E an den Seitenplatten C mit
3 Schrauben J.
FR: Montez les 2 plaques latérales (C) sur une plaque avec trou pour poignée
(B) avec 6 vis (J). Ensuite, montez le plateau à charbon (E) sur les plaques
latérales (C ) avec 3 vis (J).
ES: Monte las 2 placas laterales (C) en una placa (B) con agujero para asa con 6
tornillos (J). A continuación, monte la bandeja de carbón (E) a las placas
laterales (C ) con 3 tornillos (J).
IT: Montare le due piastre laterali (C) su una piastra con foro di manico (B) con
6 viti (J). Quindi montare il vassoio di carbone (E) sulle piastre laterali (C ) con 3
viti (J).
PL: Połącz 2 płyty boczne (C) z 1 płytą z otworem na popielnik (B) za pomocą 6
śrub (J). Następnie przymocuj tacę na węgiel (E) do płyt bocznych (C) za
pomocą 3 śrub (J).
06
07
Płyta z otworem
na popielnik
Łopata do pizzy
z uchwytem
Część
A
B
C
D
E
F
M
Nazwa
Pokrywa
Płyta boczna
Ruszt
Taca na węgiel
Popielnik
Kamień do pizzy
Ilość
1
2
2
1
1
1
1
Część
G
H&O
J
K
L
N
Nazwa
Uchwyt popielnika
Śruba M5x12
Śruba M4x8
Nakrętka M4
Śruba M6x8
Ilość
1
1
18
3
3
1
I Okładka 1
PL
01
02
O
H
Assembly Instructions / Montageanleitung
/ INSTRUCTIONS DE MONTAGE / Instrucciones de
Montaje / Istruzioni di Assemblaggio / INSTRUKCJE
MONTAŻU
EN: Assemble the peel pan with the
wood handle with 3 pcs screws (K)
and nuts (L).
DE: Montieren Sie den Pizzaschieber
mit dem Holzgriff mit 3 Schrauben (k)
und Muttern (L).
FR: Assemblez le plateau de la pelle
avec le manche en bois avec 3 Vis (K)
et écrous (L).
ES: Monte la bandeja de pala con el
mango de madera con 3 tornillos (K) y
tuercas (L).
IT: Montare la pala con il manico in
legno con 3 viti (K) e dadi (L).
PL: Za pomocą 3 śrub (K) i 3 nakrętek
(L) przymocuj uchwyt (O) do łopaty
do pizzy (H).
EN: Assemble the 2 side plates C to a Plate B with handle hole with 6pcs screws
J. Then assembling the Charcoal Pan E to the side plates C with 3pcs screws J.
DE: Befestigen Sie die 2 Seitenplatten C mit 6 Schrauben J an einer Platte B mit
Griffloch. Dann montieren Sie die Holzkohlepfanne E an den Seitenplatten C mit
3 Schrauben J.
FR: Montez les 2 plaques latérales (C) sur une plaque avec trou pour poignée
(B) avec 6 vis (J). Ensuite, montez le plateau à charbon (E) sur les plaques
latérales (C ) avec 3 vis (J).
ES: Monte las 2 placas laterales (C) en una placa (B) con agujero para asa con 6
tornillos (J). A continuación, monte la bandeja de carbón (E) a las placas
laterales (C ) con 3 tornillos (J).
IT: Montare le due piastre laterali (C) su una piastra con foro di manico (B) con
6 viti (J). Quindi montare il vassoio di carbone (E) sulle piastre laterali (C ) con 3
viti (J).
PL: Połącz 2 płyty boczne (C) z 1 płytą z otworem na popielnik (B) za pomocą 6
śrub (J). Następnie przymocuj tacę na węgiel (E) do płyt bocznych (C) za
pomocą 3 śrub (J).
06
07
Płyta z otworem
na popielnik
Łopata do pizzy
z uchwytem
Część
A
B
C
D
E
F
M
Nazwa
Pokrywa
Płyta boczna
Ruszt
Taca na węgiel
Popielnik
Kamień do pizzy
Ilość
1
2
2
1
1
1
1
Część
G
H&O
J
K
L
N
Nazwa
Uchwyt popielnika
Śruba M5x12
Śruba M4x12
Nakrętka M4
Śruba M6x12
Ilość
1
1
18
3
3
1
PL
01
02

THIS INSTRUCTION BOOKLET CONTAINS IMPORTANT SAFETY INFORMATION. PLEASE READ AND KEEP FOR FUTURE REFERENCE.
EN DE FR ES IT PL
USER'S MANUAL/HANDBUCH
/MANUEL DE L'UTILISATEUR/MANUAL DEL USUARIO
/MANUALE UTENTE/INSTRUKCJA OBSŁUGI
NP10734
Pizza oven / Pizzaofen
/ Four à Pizza / Horno para Pizzas
/ Forno per Pizza / Piec do pizzy
EN
DE
FR
ES
IT
PL
With your inspiring rating, COSTWAY will be more consistent to offer you EASY
SHOPPING EXPERIENCE, GOOD PRODUCTS and EFFICIENT SERVICE!
Mit Ihrer inspirierenden Bewertung wird COSTWAY konsistenter sein, um Ihnen EIN
SCHÖNES EINKAUFSERLEBNIS, GUTE PRODUKTE und EFFIZIENTEN SERVICE zu
bieten!
Avec votre évaluation inspirante, COSTWAY continuera à fournir une EXPÉRIENCE
D’ACHAT PRATIQUE, des PRODUITS DE QUALITÉ e
t un SERVICE EFFICACE !
Con su calificación inspiradora, COSTWAY será más consistente para ofrecerle
EXPERIENCIA DE COMPRA FÁCIL, BUENOS PRODUCTOS y SERVICIO EFICIENTE.
Con la tua valutazione incoraggiante, COSTWAY sarà più coerente per offrirti
ESPERIENZA DI ACQUISTO FACILE, BUONI PRODOTTI e SERVIZIO EFFICIENTE!
Dzięki twojej opinii COSTWAY będzie mógł oferować jeszcze WYGODNIEJSZE
ZAKUPY, LEPSZE PRODUKTY i SPRAWNIEJ
SZĄ OBSŁUGĘ KLIENTA.
US office: Fontana UK office: Ipswich AU office: Truganina
DE office: FDS GmbH, Neuer Höltigbaum 36, 22143 Hamburg, Deutschland
FR office: Saint Vigor d'Ymonville
PL office: Gdańsk