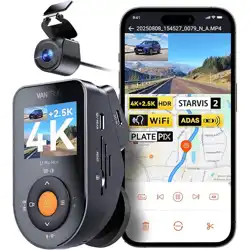

On Dash S2
Vantrue Touch Screen
WiFi Dash Cam
User Manual
122mmX130mm
70g

Hey, find us here:
www.vantrue.net/contact
facebook.com/vantrue.live

CONTENTS
VERZEICHNIS
CONTENU
ÍNDICE
SPIS TREŚCI
目次
目录
1
32
64
97
131
163
193
What’s in the box?
Was ist in der Box?
Qu'ya-t-ildanslaboîte?
¿Qué hay en la caja?
Co znajdziemy w pudełku?
梱包内容
盒内物品清单
1.
14
45
77
110
144
176
206
Basic Operation
Vorstellung der Funktion
Opérationdebase
Operación Básica
Podstawowe funkcje
機能紹介
功能亮点
4.
5
36
Installation3.
Installations- und
Gebrauchsanweisung
Installation
Instalación
Instalacja
取り付け/使用の方法
安装及使用说明
68
101
135
167
197
Camera Overview
Kameraübersicht
Vued'ensembledelacaméra
2
33
65
98
2.
Descripción General de la
Cámara
Budowa kamery
各部の名称とはたらき
机身部件说明
132
164
194

CONTENTS
VERZEICHNIS
CONTENU
ÍNDICE
SPIS TREŚCI
目次
目录
30
62
94
128
160
190
219
Specification
Spezifikation
Spécification
Especificación
Dane techniczne
主な仕様
产品规格参数
5. 31
63
96
130
161
192
220
Warranty & Support
Garantie & Support
Garantie & Support
Garantía y Soporte
Gwarancja & wsparcie
保証とアフターサービス
售后服务
6.
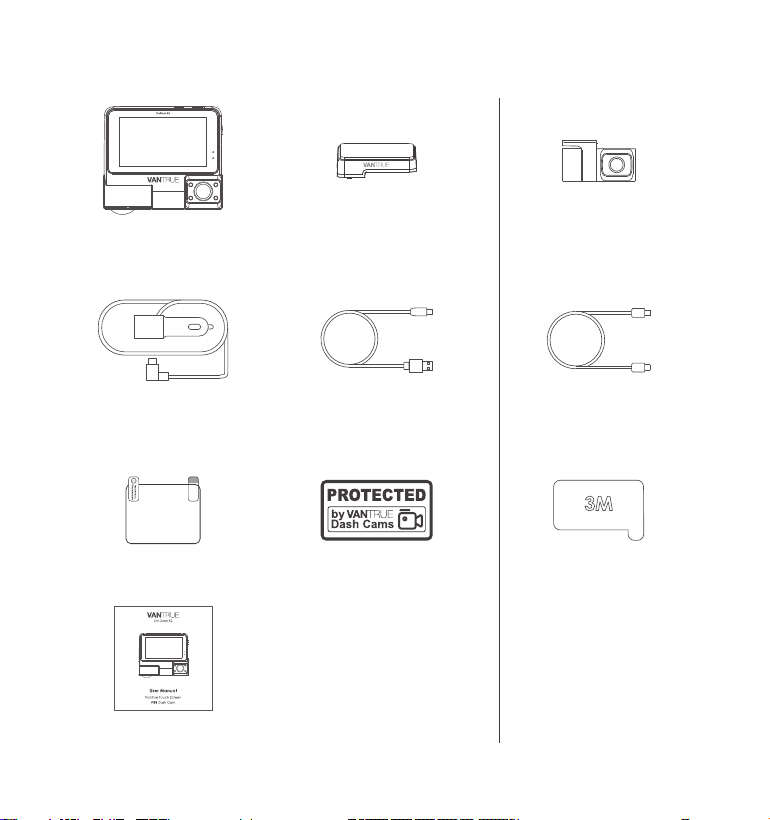
1.What'sinthebox?
I. RC02 Rear Camera
J. Type C Cable for Rear
Camera(20ft)
C. Car Charger with
Built-in Type C
Cable(11.5ft)
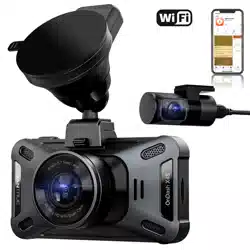
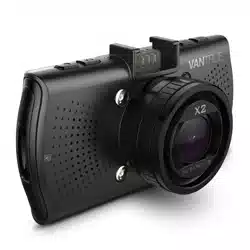
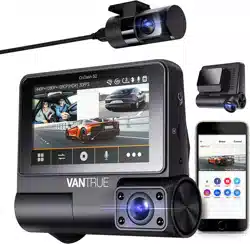
A. Vantrue S2
Dash Cam
E. Electrostatic sticker
B. GPS Adhesive
Mount
D.Type C Data Cable
(3.3ft, for transferring
files only)
F. Warning Sticker
G. User Manual
Optional Accessories
K. Adhesive Sticker
- 1 -

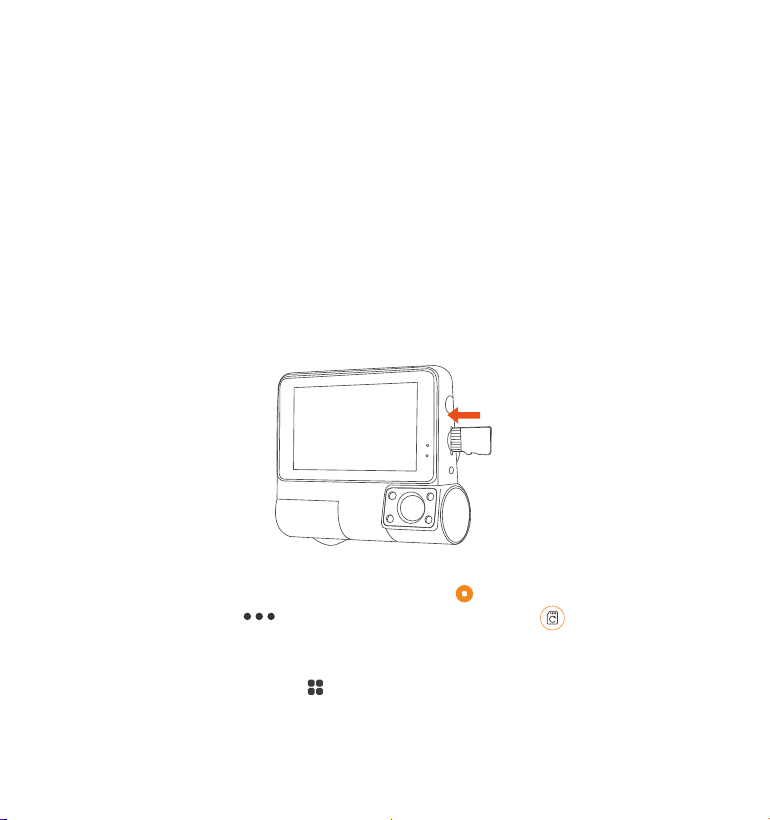
2. Camera Overview
NO. DescriptionName
1 Power ON/OFF; Long press to turn on/off the dash
cam; short press during recording to enter event
recording mode; short press to capture pictures
during event recording.
Power Button
2 Position for installing the memory card. Support
Micro SD Card up to 512GB in FAT32, Class 10.
SD Card Slot
4
5
11
3
10 12
6
2
1
7
8
9
- 2 -

3 Connect to Type C cable or car charger for
external power supply.
Power Port
4
6
7
8
9
10
11
12
5
Screen
Front Camera
Cabin Camera
GPS Mount
Speaker Record
Microphone
3” LCD Display Screen.
Record road events in front of the car.
Cabin camera for in-car video recording.
Fix the camera; Receive GPS signals.
Serial Number Serial Number for Warranty Registration.
Delivers sound during video playback.
Record clear audio with the video footage.
Type C Port for
Rear Camera
Connect the Rear Camera into this Port;
connect the data cable for data transferring.
Record road events behind the car.
Rear Camera
(Optional)
Note: The Vantrue S2 dash cam does not have a "reset" button. If the
camera gets stuck or doesn't respond, you can quickly restart the
camera by simply unplugging and replugging the power cord.
LED Status
Solid Red
Flashing Red
WiFi is connected.
WiFi is not connected.
Inthe standbystatus.
Camera is recording.
Description
Solid Blue
Flashing Blue
LED
REC
WiFi
- 3 -
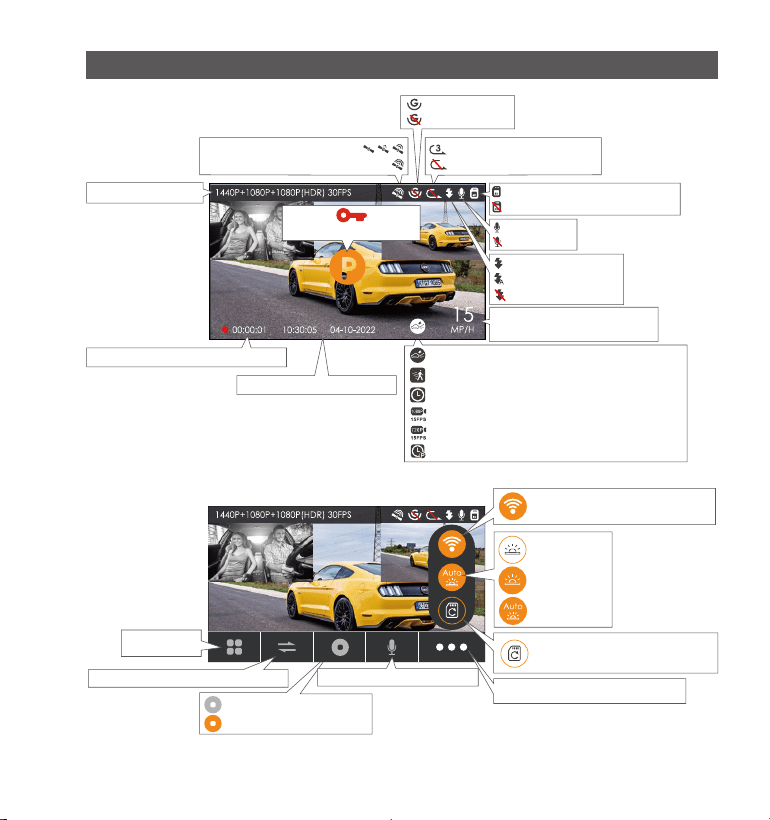
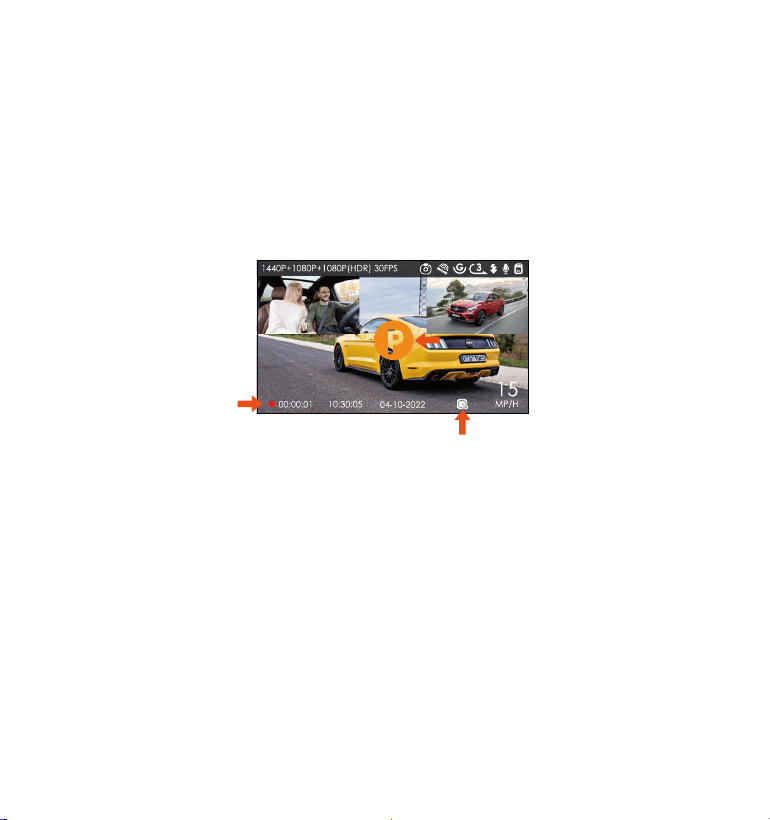
Screen Overview
Infrared LED ON
Infrared LED Auto
Mic is ON
Mic is OFF
Memory card inserted
NO Memory card inserted
Infrared LED OFF
Loop Recording OFF
Loop Recording Time
G-Sensor ON
G-Sensor OFF
GPS Signal Connecting
GPS Signal Locked
Recording Time (Current Clip)
Recorded Driving Speed
(KMH or MPH)
Current Date and Time
Collision Detection ON
Motion Detection ON
Time lapse On
1080P 15FPS Low Bitrates Recording ON
720P 15FPS Low Bitrates Recording ON
Low Frame Rate Mode
Emergency File Lock
Microphone switch icon
Start Recording icon
Pause Recording icon
Display screen switching icons
Menu icon
Shortcut keys for menu icons
Shortcut keys for formatting
cards
IR LED OFF
IR ON
IR Auto
Shortcut keys to turn on WiFi
Video Resolution
- 4 -
3. Installation
3.1 Installing a Memory Card (Recommend Vantrue U3 high-speed microSD
card).
Please insert a memory card (memory card capacity: 32GB-512GB, card
speed: U3/Class10/A2), because the dashcam has certain requirements
on the card speed of the memory card. For reliable operation, we
recommend using VANTRUE SD card(sold separately).
Memory Card Installation: There is an icon indicating the insertion
direction of the memory card. Please push the memory card into the
card slot according to the direction indicated by the icon, until a "click"
sound is heard in the card slot, indicating that the memory card is
inserted properly
Before using this card, please follow the steps below to format it properly:
If the camera is recording, please click the icon to pause the record-
ing, then click the icon to select the format card , and confirm to
format the memory card until it prompts "Formatted successfully".
If it prompts "Card error, please format" after you insert the memory card,
you can directly click the icon to enter the menus setting and start the
formatting process.
- 5 -
3.2 Installing the camera
We recommend formatting the card once a month to ensure the normal
use of the dash cam.
Do not remove or insert the memory card during recording to avoid
losing important videos.
Please do not use bad cards or low-speed cards on the dash cam, as it is
easy to stop or lose the recording due to the failure of the memory card.
REMINDER:
1.
2.
3.
Thoroughly clean the windshield with water or alcohol, then wipe it with
a dry cloth. Attach the electrostatic sticker on the windshield.
2.
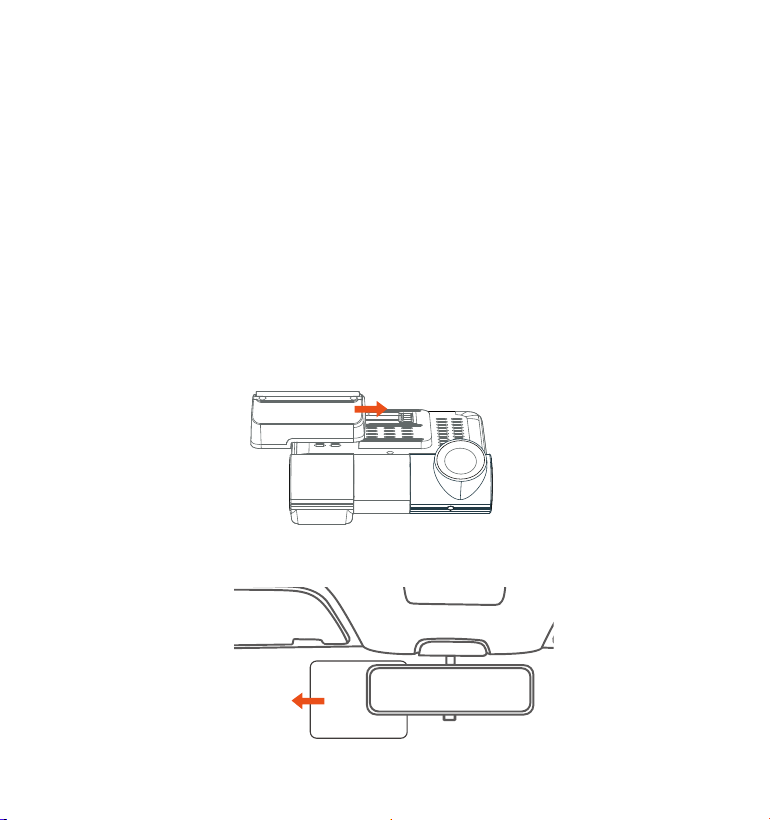
Steps 1 Camera Installation
1. Slide the GPS mount horizontally into the slot of the back of the camera.
Electrostatic sticker
- 6 -
Remove the 3M tape and stick the Front Dash cam behind rear view
mirror, which is the recommended position to prevent blocking our view
while driving, then fix the front camera on the electrostatic sticker.
3.
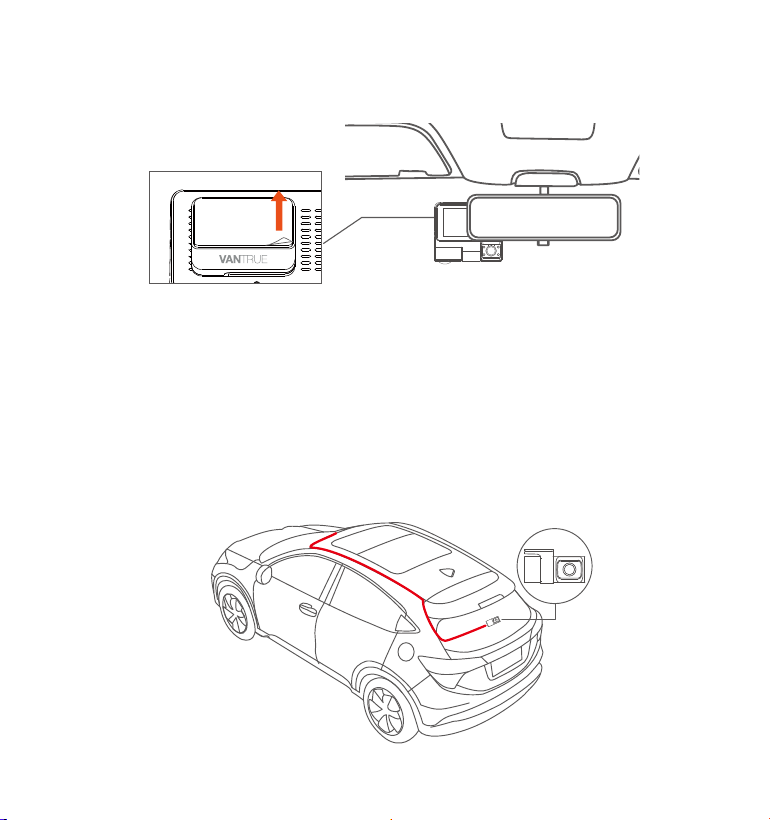
4. Rear Camera Installation (Optional): Please select the installation
position on the rear windshield. We recommend that you select a
position close to the center of the rear windshield, and avoid the
defogging line on the rear windshield, so as not to affect the video
effect. Remove the protection film of the sticky pad and rear camera
lens. Fix the rear camera in the selected position and adjust the lens,
then use the rear camera cable to connect the rear camera with the
main front camera.
- 7 -
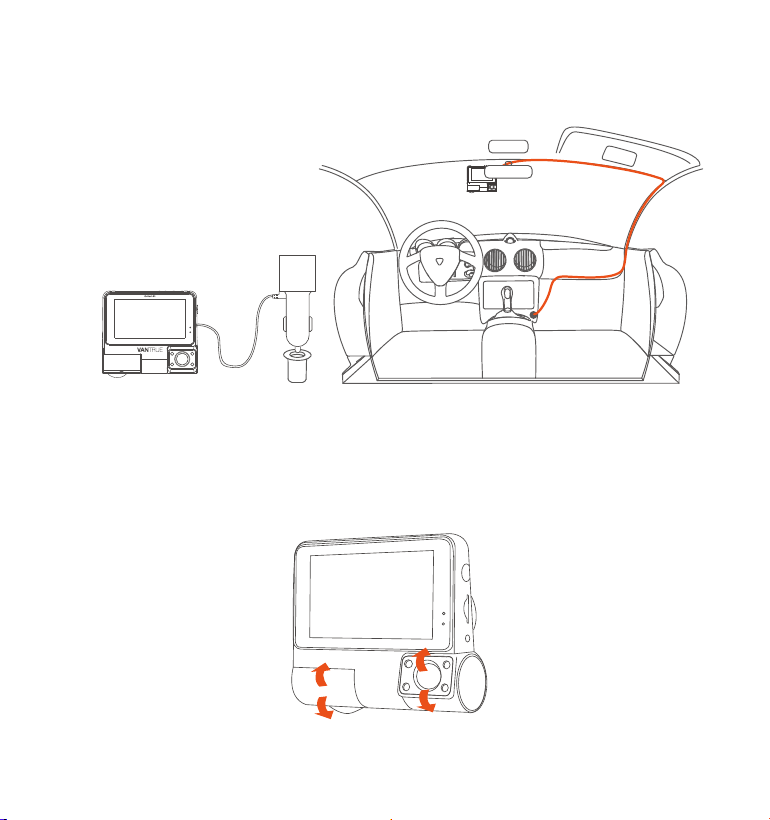
5. Connect one end of the car charger to the car cigarette lighter, then
connect the other end of to the Type C port on GPS mount of the front
camera.
6. After the camera is turned on, you can adjust the lens angle of front,
cabin and rear camera
-Look at the live view on the LCD screen.
- Adjust the angle of the lens up/down if necessary
- 8 -

Please scan the relevant version QR code below to download the APP
and install it.
Search for "Vantrue Cam" APP in App Store or Google Play Store to find
the App and then download and install it on your phone.
Note: After this camera is successfully connected to the mobile phone
through WiFi, it can realize real-time video preview, change recorder
settings, download files without Internet connection, and play back
videos on the mobile phone. However, the GPS track playback and video
sharing functions will depend on the Internet or telecom value-added
services(requires you to turn off/disconnect the camera WiFi).
Steps 2 APP Download
- 9 -
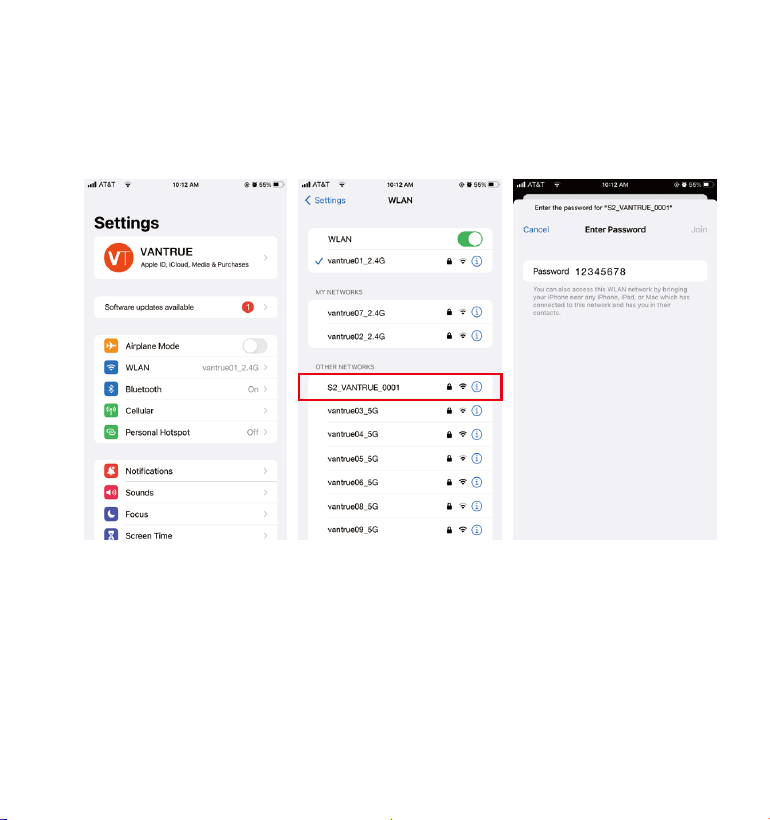
Turn on the WiFi function of the camera, enter the WiFi settings of the
mobile phone, and then find the WiFi name such as: S2_VANTRUE_XXXX,
and enter the WiFi default password: 12345678 to connect to WiFi.
Steps 3 WiFi Connection
- 10 -
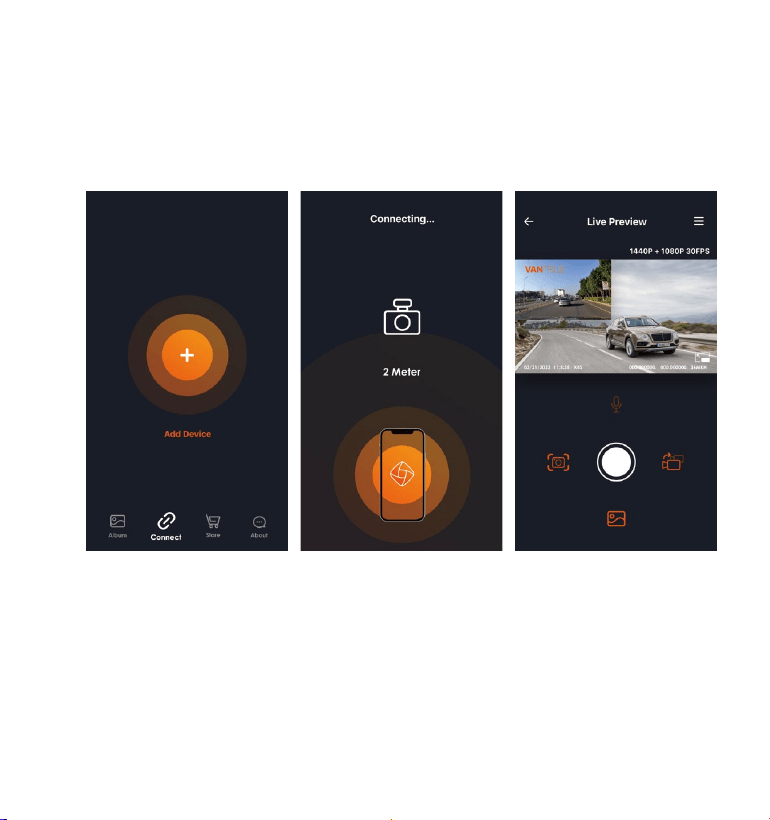
After the WiFi connection is successful, click "+" when opening the APP for
the first time, add the camera model, and then the APP will automatically
connect to the camera and display the current real-time recording
situation of the camera.
Steps 4 APP Connection
Note:
If you do not connect to WiFi before opening the APP, the APP will
prompt you "Please connect to WiFi first", and will automatically jump to
the WiFi settings, please complete the steps to connect to WiFi first.
If the WiFi is already connected, but the APP jumps to the application
permission of the APP after selecting the model, please check whether
the wireless network permission of the APP is turned on.
1.
2.
- 11 -
Steps 5 APP Operation
The initial password of this device is only used for initial login. In order to
prevent potential security risks, please be sure to change the initial
password in time after the initial login to prevent others from logging
into your device without authorization or other adverse consequences.
If you forget the WiFi password, you can restore the default setting of
the device, and the Wi-Fi password of the device will also be restored
to the default password(12345678).
If the connected WiFi name does not match your dash cam model, the
APP will prompt "Please select the correct model" and automatically
jump back to the model selection interface.
3.
4.
5.
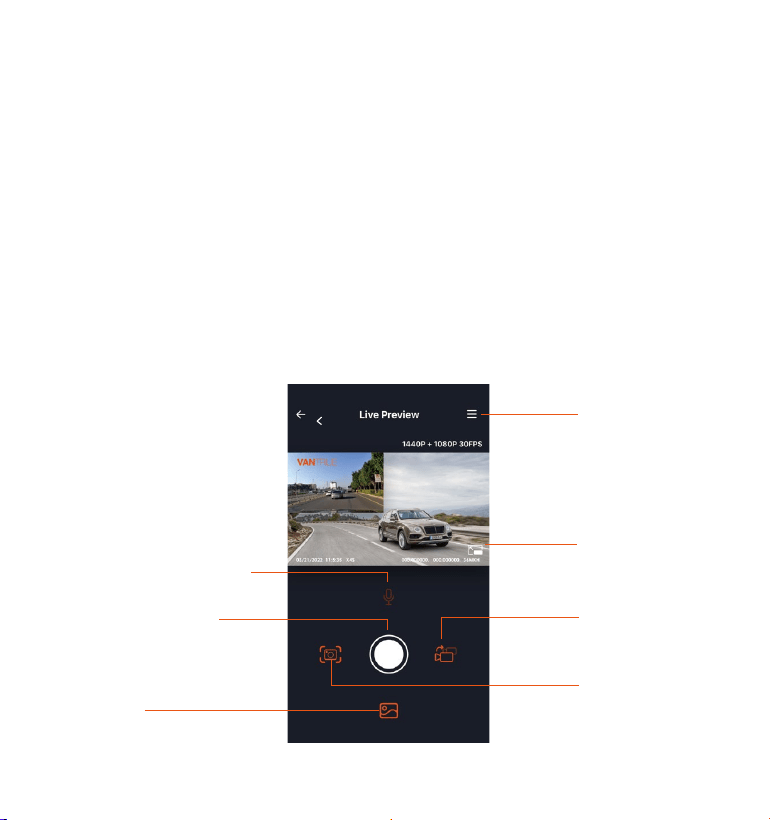
Camera Setting
Full-Screen icon
Front and Rear
Display Switch
Snapshot
Album
Stop Recording
icon
Microphone switch
- 12 -

Video preview: After the APP is successfully connected to the camera,
enter the real-time preview page, click the icon or place the phone
horizontally, and the real-time screen will automatically switch to the
full-screen preview mode. Click the icon to switch the front and rear
video windows.
Video playback: The video and photo files recorded on the SD card can
be viewed in the APP, and the video can be played back after clicking
the file.
Video download: You can select the video or picture you want to
download in the SD card browsing interface or in the video playback.
After downloading the video, if you play it in the local file of the App, you
can view the GPS track of the video.
Video snapshot: You can capture the current screen in the real-time
preview interface of the app.
Steps 6 APP Upgrade
Open the "Vantrue Cam" App, connect to the Wi-Fi, and enter "Settings>
About> Detect New Version", the App will automatically detect whether
the App version is the latest version. If there is a new version of the App,
follow the App prompts and upgrade the version.
- 13 -

A. Record Setup
-Resolution:
Front + Cabin + Rear Recording Mode: 1440P+1080P+1080P (HDR) 30FPS
(Default); 1080P+1080P+1080P (HDR) 30FPS; 720P+720P+720P (HDR) 30FPS;
1440P+1080P+1080P 30FPS; 1080P+1080P+1080P 30FPS; 720P+720P+720P
30FPS (Please note that this three-way recording mode must be connect-
ed to the rear camera which needs to be purchased separately. The
three-way menu will be automatically displayed only after connecting
the rear camera.
Front + Cabin Recording Mode: 1440P+ 1080P 30FPS; 1080P+ 1080P 30FPS;
1080P+720P 30FPS; 720P+1080P 30FPS; 720P+720P 30FPS.
Single Front Recording Mode: 2560x1440P 30FPS; 1920x1080P 30FPS;
1280x720P 30FPS.
-Loop Recording: Default setting is 3 min. You can choose the options
Record System Files
The Vantrue S2 dash cam has 3 function menus, which are record settings,
system settings and file browsing. You can set your dash cam according
to your requirements in this function setting.
After powering ON the camera, click the icon to enter the setup
process.
(If the camera is recording video, click the icon to stop recording
before click the icon.)
4. Basic Operation
4.1 Menu Settings
- 14 -

from 1/2/3/4/5 min and OFF.
-IR LED: Default setting is ON, you can choose to turn on/off the infrared
light.
-REC Status Light: Default setting is ON, you can choose to turn on/off the
REC Status Light.
-G-Sensor: Select the level of G-sensor you need, and you can set 3
directions (Front & Back/Left & Right/Up & Down). The G-sensor value in
each direction can be selected as 1/2/3/4/5/Off. The higher the sensitivity
level, the easier it is to trigger emergency recording. G-sensor is the most
sensitive when set to 5.
-Audio Recording: The default is ON, you can set the recording ON /OFF.
-Parking Mode: You can swipe up and down the screen to select the
parking mode you need, including Collision Detection/ Motion Detection/
Low Bitrates Recording/ Low Frame Rate Mode / OFF.
-Exposure: The default value is +0.0. This option can adjust the exposure
level of the front, cabin and rear camera separately.
Front: +2.0, +1.6, +1.3, +1.0, +0.6, +0.3, +0.0, -0.3, -0.6, -1.0, -1.3, -1.6, -2.0
Cabin: +2.0, +1.6, +1.3, +1.0, +0.6, +0.3, +0.0, -0.3, -0.6, -1.0, -1.3, -1.6, -2.0
Rear: +2.0, +1.6, +1.3, +1.0, +0.6, +0.3, +0.0, -0.3, -0.6, -1.0, -1.3, -1.6, -2.0
-Number Plate: After setting, your license plate number can be displayed
in the recorded video.
-Stamp: Enable or disable the watermark stamp of the video and photos.
The watermark stamp includes date and time label, VANTRUE label,
license plate number, GPS location information, speed label. All enabled
by default.
-Rotate Display: Default is off. You can choose the upside-down display
of the front + cabin screen, or the upside-down display of the rear
camera. If turned on, the video screen will be reversed 180 degree.
-Time Lapse: The default value is disabled. You can choose to enable
1FPS/5FPS/10FPS/15FPS.
-GPS Setting: GPS is enabled by default. This option can set GPS on and
- 15 -

off, speed unit Settings, GPS information.
B. System Setup
-Language: Available languages are Engish/ Français/ Español/ Deutsch/
Italiano/简体中文/русский/ 日本語/ Polski.
-WiFi: The default setting is Off. After WiFi is enabled, mobile phones can
connect to WiFi and operate the dash cam through mobile phones.
-Format memory Card: Format all data on the memory card
-Format Reminder Setup: Select the reminder options: 15 Days, 1 Month,
and Off. Default is off.
To prevent you from forgetting to format the memory card regularly, we
have added a format reminder time setting. You can choose to be
reminded after 15 days or 1 month, and calculate 15 days or 1 month
from the set date. When the time is up, you can choose "OK" to format, or
choose "Next".
Note: If you changing the format reminder option, the timing will restart as
soon as the option is changed.
-Date & Time: There are two ways to set the time and date: 1. GPS
automatic update; 2 Manual date/time setting. GPS automatic update is
enabled by default.
GPS automatically updates the date and time based on your time zone,
so you need to select the correct time zone first; you can also choose to
turn off GPS automatic update, turn on Manual date/time setting, and
manually correct date and time.
-Auto LCD Off: Set the time to automatically turn off the LCD display after
no operation.
If you set the Auto LCD Off to 3 min, the camera’s LCD screen will auto
light off after 3 min but recording will continue. If the setup is Off, the
screen will not turn off. Swipe up and down the screen to tap the option
you want: 1Min, 3Min, 5Min and OFF.
- 16 -

-Device Sound: Set the volume of the device. The default volume level is
3, the lowest is 0, and the highest is 5.
-Prompt Tone: According to different situations, the dash cam is set with 5
kinds of prompt tones, which are power-on/off sound, button tone, lock
tone, formatting tone, and abnormal recording tone. All prompt tones
are turned on by default.
-Frequency: Different countries have different frequency, in order to
avoid affecting the video, you can choose 50Hz or 60Hz frequency
according to different regions.
-System Info: Check the current model, firmware version and Vantrue
official website.
-Default Setting: Reset the device back to factory settings.
C. Files
Review and delete videos stored in file folders.
-Event: Critical event videos detected by G-Sensor activity or manually
locked by user.
The file name format is 20210128_140633_0008_E_A.MP4
-Normal: Standard videos recorded. This folder saves loop recording
video, parking mode video, and time-lapse video. The file name format
of Loop Recording video is 20210128_140633_0008_N_A.MP4; the file
name format of Parking Mode video is 20210128_140633_0007_P_A.MP4;
the file name format of Time-Lapse video is
20210128_140633_0006_T_A.MP4.
-Photo: Snapshot file.
-All: All the standard videos and critical event videos were recorded.
Note: The suffix A represents the files recorded by the front camera, the
suffix B represents the files recorded by the cabin camera, and the suffix
C represents the files recorded by the rear camera. Standard files are
stored in the "Normal" folder.
- 17 -
4.2. Main Functions
After inserting the memory card and connecting the power, the S2 dash
cam will auto turn on and enter loop recording. The duration of each
recorded video will be saved based on the loop recording time you set,
saved in the normal video folder.
When the capacity of the normal video folder reaches 80% of the total
4.2.2 Loop Recording
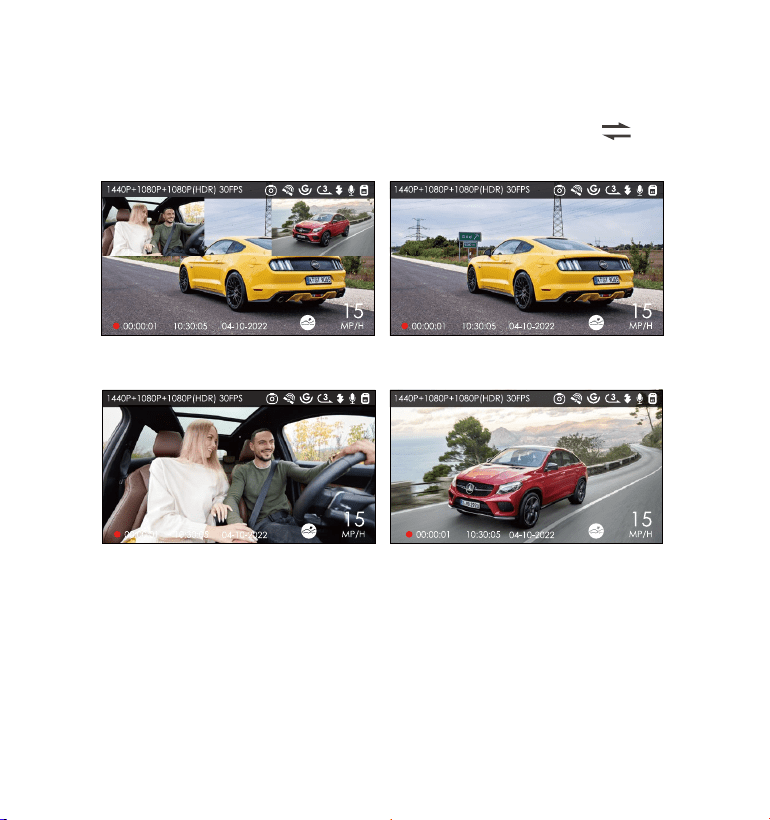
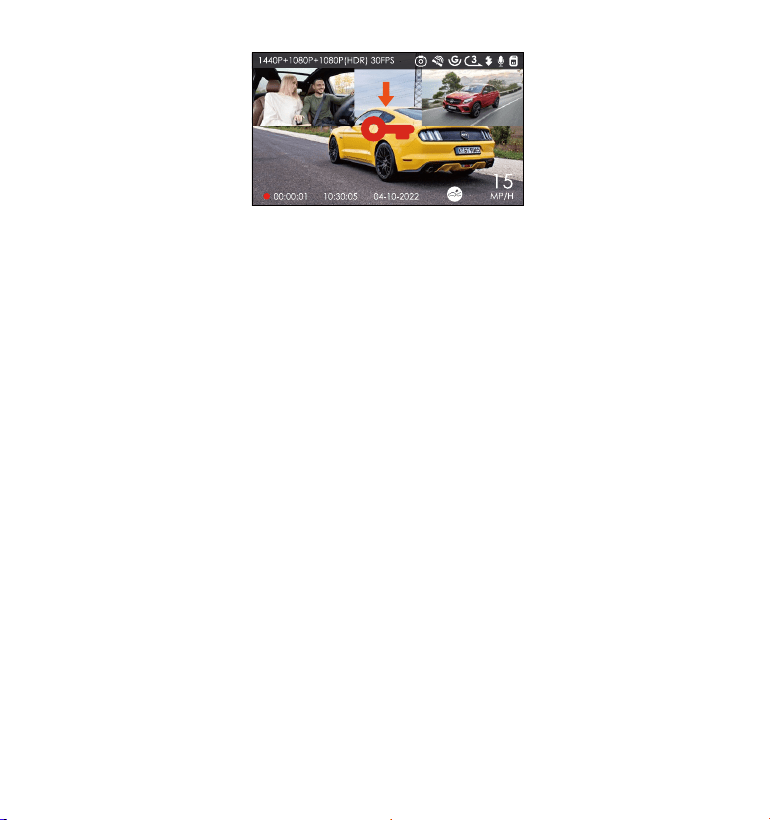
4.2.1 Switch the Front, cabin and rear camera window display
Single Cabin Recording Display Single Rear Recording Display
Front+Cabin+Rear
Picture-in-Picture
Single Front Recording Display
In three way or two-way recording mode, you can click the icon to
switch display so front/cabin/rear camera shows bigger on the LCD.
- 18 -

Note:
The normal operation of the loop recording function is very dependent
on the speed of the memory card, so please format the memory card
regularly to avoid problems such as excessive memory card files and
card aging that affect the normal loop recording.
Please check the loop recording video regularly to avoid the necessary
video being overwritten by loop.
After loop recording is turned off, the lock recording function will no
longer work.
After the loop recording is turned off, the duration of each video will be
5 minutes, and the recording will stop when the memory card capacity
is full.
1.
The event video is triggered by the G-sensor(Gravity Sensor), which can
be automatically triggered or manually locked.
To manually lock the video, just short press the Button to lock the
current video(A key icon will appear at the center of the screen), and
it will be automatically saved in the event video folder after the video is
finished. Automatic locking event video is triggered when the car is
hit/shaken, the dash cam detects the vibration and automatically locks
the current video(If the current recording is 1 minute, the 1-minute video
will be locked), which is saved in the event video folder.
4.2.3 Event Recording
2.
3.
4.
capacity, the new loop recording file will automatically overwrite the
original loop recording file. After this function is enabled, the video file will
automatically overwrite the loop, so as not to stop recording in the driving
process.
- 19 -
To ensure the camera works properly in park mode, please use the
hardwire kits or other stable and continuous power supply to power the
dash cam.
Note:
The sensitivity of the automatic locking video trigger is determined by
the sensitivity of the collision. The higher the sensitivity setting, the
greater the probability of being triggered.
The total capacity of the event video file accounts for 20% of the total
capacity of the current memory card. When the event video file
reaches the upper limit, the new event video file will automatically
overwrite the original event video file. It is recommended to periodical-
ly check and save your event video files to avoid loss.
Lock recording will not trigger in either of the following situations: Turn
off loop recording or turn on time-lapse recording.
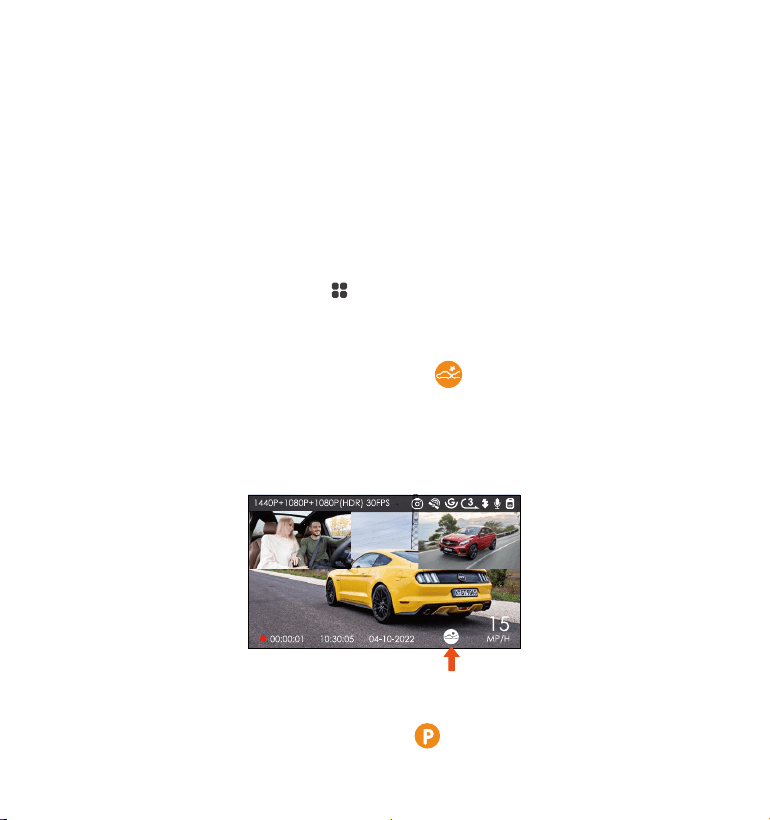
Parking Mode operates as a sentry function under different situations. You
can switch to different parking modes according to different parking
situations.
1.
2.
3.
Note:
1.
4.2.4 Parking Mode (When the parking mode is turned on, the time-lapse
video function will not work. These two functions cannot run at the same
time)
- 20 -
Collision Detection mode is recommended for high temperature in
summer. When the temperature inside the car is as high as 60°C(140°F),
it is recommended that you turn off the camera to avoid abnormal
operation of the camera caused by the high temperature.
Parking mode (including collision detection, motion detection, low bit
rate recording, and low frame rate mode) and Time-lapse recording
can only be enabled for one of them. When one is enabled, the other
will be automatically disabled.
After the parking mode is turned on, you can wait for 5 minutes to enter
automatically, or click the icon to enter manually.
2.
3.
4.
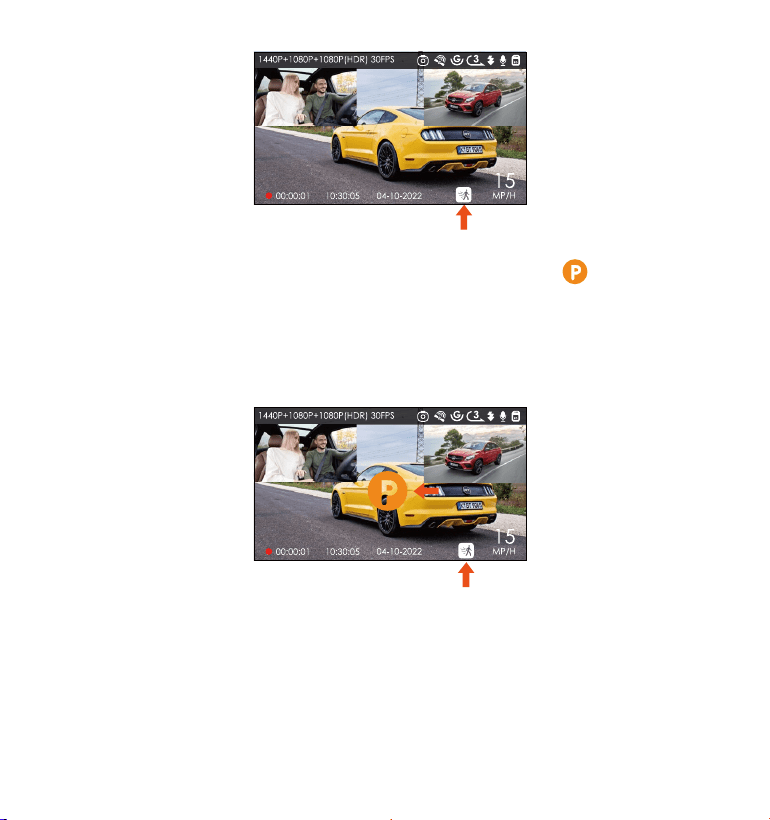
A. Collision Detection
When collision detection is enabled, the icon will be displayed on the
recording interface, indicating that the camera is currently using collision
detection mode. Collision detection sensitivity can be adjusted from 1 to
5 level, you can adjust according to your usage habit, as well as the
surroundings of the car.
When the Collision Detection is turned on, and no movement is detected
after 5 minutes of recording (5-minute entry mechanism for short), then
Collision Detection is activated with a icon appearing in the center of
- 21 -

B. Motion Detection
When the motion detection is turned on, the icon will be displayed on
the recording interface, indicating that the dash cam is currently in
motion detection mode. Motion detection has three levels of low/medi-
um/high that can be adjusted, and the corresponding detection range
of motion detection is 6.6ft/13ft/19.7ft.
Note:
If the dash cam continues to be hit during the collision detection
recording, it will exit the collision detection mode and enter the normal
recording, restarting the 5-minute entry mechanism.
The collision detection video will be saved in the Normal folder. In order
to prevent the video from being looped, please check it in time and
save the required collision detection file to prevent loss.
1.
2.
the screen, and the camera automatically turn off. When the dash cam is
turned off, it will start to record for 1 minute after being shaken, and then
turn off the dash cam again.
- 22 -
When the motion Detection was turned on, and no movement is
detected after 5 minutes of recording, then an orange icon will
appear in the center of the screen. The dashcam enters the standby
mode, and the screen turns off after 30 seconds. When the dash cam
(any camera in front / inside/rear of the car) detects the movement of
the object, it will auto start recording for 30 seconds and save the
recording in the Normal folder.
Note: Motion detection mode requires the camera to be turned on.
Once the camera is turned off, the motion detection mode will not work.
- 23 -
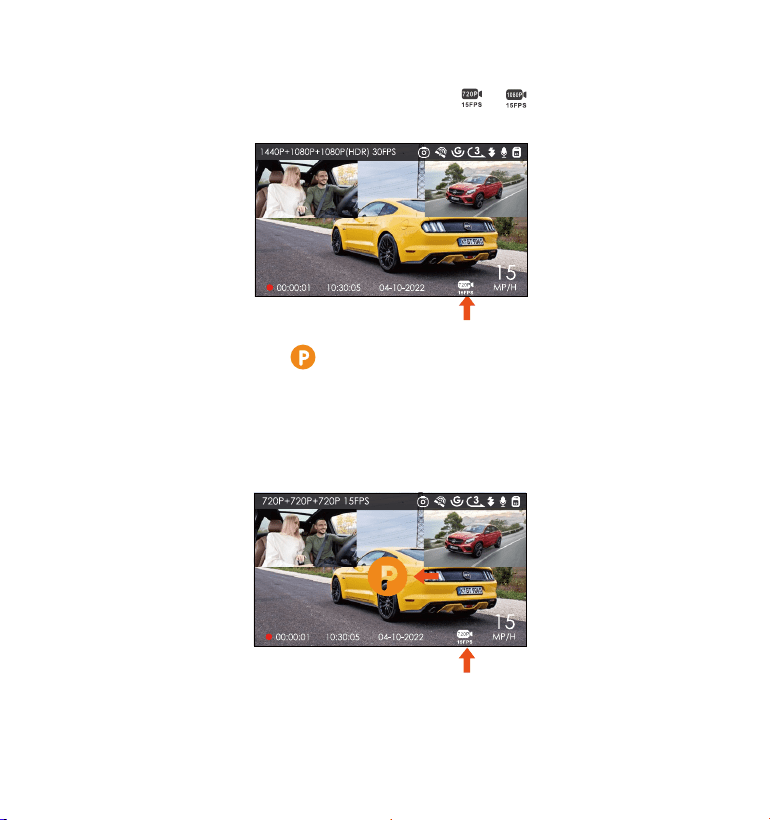
After parking, if no movement is detected after 5 minutes of recording,
there will be an orange icon that appears in the center of the screen
which means Low Bitrates recording is activated. The current resolution
of all camera will be automatically switched to 1080P 15FPS or 720P 15FPS
for recording, and the recording duration is determined by the currently
set loop recording. When the camera is vibrated or moved, it will
automatically exit, wait five minutes and enter again.
C.Low Bitrate Recording
When Low Bitrate recording is enabled, the or icon will be displayed
on the screen, depending on whether you choose 1080P 15FPS or 720P
15FPS.
Note: Low Bitrate Recording mode requires the camera to be turned on.
Once the camera is turned off, the Low Bitrate Recording mode will not
work.
- 24 -
D.Low Frame Rate mode
If Low Frame Rate mode is selected, the 5-minute entry mechanism will
be enabled on the dash cam after the car is stopped, and the low frame
rate mode will enter automatically.
For example, if you select 1FPS and the current video resolution frame
rate is 30FPS, the recorder will generate a 30FPS video per second. Low
frame rate mode can greatly preserve the integrity of the video and save
space on the memory card.
Note:
1.
2.
3.
The time unit of the calculation formula is seconds, so the final normal
recording time calculated is also seconds. If you need to convert it into
other time units, please check and convert by yourself.
[Normal Recording Time = Time Lapse Recording Time (Sec) x Record-
ing Frame Rate FPS x Time Lapse Option]
In low frame rate mode, the camera also requires a stable power
supply. Once the power is turned off or drained, the camera will shut
down.
- 25 -

4.2.5 GPS Function
The GPS function is also one of the important functions of the dash cam.
GPS is enabled by default, and the camera receives GPS signals through
the GPS mount. It can automatically correct the time and date in your
area, recording the location where the video was recorded and the
speed of the car at the time.
Note:
The GPS connection will be completed within 1 minute after you turn
on the device. If the GPS connection is not successful within 1 minute,
please check whether the DEVICE has turned on the GPS function,
whether the GPS bracket is properly connected, and your environment
(underground parking lot, densely populated residential area, subway,
tunnel, etc.) will also affect the reception of GPS signal.
1.
GPS information will be recorded in the recorded video in the form of
video watermark. The GPS watermark is enabled by default. If you find
that there is no GPS watermark in your recorded video, you can first
check whether the watermark has been turned on or whether the GPS
mount has been successfully connected. If you have other questions,
please contact our customer service team in time, we will be happy to
solve the problem for you.
- 26 -
2.
4.2.6 Viewing Video/Photos
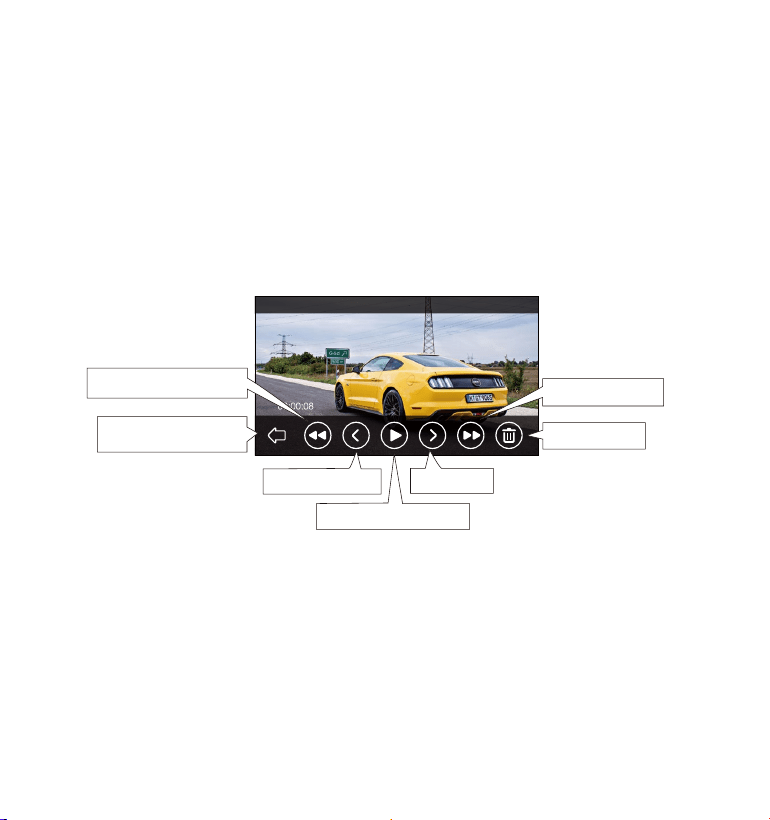
a.Viewing files on the Camera
After clicking to enter the file, enter any folder, and after opening the
video file, you can choose to play at double speed and delete the file.
Connect the camera to your computer using the supplied Type C Data
cable.
After the connection is successful, "USB Connecting" will appear on the
display of the camera to transfer data, and then you can view the
video files in the computer folder.
b.Viewing files on a Computer
1.
2.
GPS information is recorded in the video you recorded. To view it,
please download and install VANTRUE Cam APP and VANTRUE GPS
Player (available for download on www.vantrue.net).
Return to File List
Previous File
Pause Playback
Next File
Delete File
Fast Forward
Resume Playback
2022_04_10_083600_A.MP4
- 27 -

After the camera is successfully connected to the mobile phone through
WiFi, it can play back, download and delete files in the mobile APP. To
play back files in the APP, you can choose to playback the files in the SD
card, or download the files to the local and play them back.
Note: Standard camera settings and operations will be disabled when the
camera is connected to your computer in the "USB Connecting" state.
4.
3.
5.
c.View on “Vantrue Cam” APP
Note:
Video playback in APP, or download to SD card, there will be no data
traffic consumption.
You can view GPS track information only after the video file is down-
loaded and played back locally. At the same time, you need to
disconnect the WIFI of the dash cam, otherwise the map information will
be blank.
1.
2.
Depending on the computer system of different users, after the camera
is connected to the computer, it will be displayed as a removable drive
or a removable folder in the computer.
To view the file on the computer, you can directly right-click to open the
menu and delete it.
You can also use a USB card reader to read the memory card informa-
tion.
- 28 -

The system will automatically update if the micro SD card contains the
firmware upgrade file. The camera will restart once the upgrade has
been completed.
The latest firmware version is always available at the official VANTRUE
website (www.vantrue.net). We strongly recommend registering your
product (www.vantrue.net/register) to receive a notification email when
a new firmware update is available.
The camera is designed to operate in temperatures from14 to 140°F (-10
to 60°C), temperatures outside this range risk degrading the camera’s
performance work and causing damage.
To avoid damage
When parking for a long time in a hot and high temperature environ-
ment, please use the collision detection mode or suspend the use of the
recorder.
In an extremely cold environment, the activity of the battery of the
camera will decrease. If the camera is not used for a long time, please
remove the camera and place it in the armrest box to ensure the normal
use of the recorder.
4.2.7 Upgrading the Firmware
4.2.8 Working Temperature
- 29 -

5. Specification
S2Model
Screen
Front: 160°wide viewing angle; F/1. 4 wide aperture
Inside: 165°wide viewing angle; F/2.0 wide aperture
Rear: 160°wide viewing angle; F/2.0 wide aperture
(Optional)
Lens
Front + Cabin + Rear Recording Mode:
1440P+1080P+1080P(HDR) 30FPS(Default);
1080P+1080P+1080P(HDR) 30FPS;
720P+720P+720P(HDR) 30FPS;
1440P+1080P+1080P 30FPS;
1080P+1080P+1080P 30FPS;
720P+720P+720P 30FPS
Front + Cabin Recording Mode:
1440P+1080P 30FPS(Default);
1080P+1080P 30FPS; 1080P+720P 30FPS;
720P+1080P 30FPS; 720P+720P 30FPS
Single Recording Mode:
2560x1440P 30FPS; 1920x1080P 30FPS; 1280x720P 30FPS
Video Resolution
3" IPS Touchscreen LCD Screen
WiFi Built-in WiFi (2.4G)
Audio Built in Microphone and speaker
Memory Storage External: 32GB-512GB Micro SD Card, Class 10
(not included in the box)
Power Source Built in super capacitor
Video File Format MP4
Engish/ Français/ Español/ Deutsch/ Italiano/
简体中文/русский/日本語/ Polski
Languages
- 30 -

USB Port Type C
Supply voltage
current
DC 5V 2A
Operating
voltage current
DC 5V 800mA
Supply voltage
current
-4°F to 158°F(-20°C to 70°C)
Working
Temperature
14°F to 140°F(-10°C to 60°C)
6. Warranty & Support
Warranty
The VANTRUE
®
S2 Dash Cam comes with a full 12 months warranty. If you
register your product on our official site (www.vantrue.net/register), you
can extend the warranty to 18 months.
Support new
If you have any questions regarding your product, please do not hesitate
to contact us at [email protected], or drop us a message through the
live chat box at www.vantrue.net.
Queries are typically answered within 12-24hours.
Your opinion matters
VANTRUE
®
is firmly committed to always improving our products, services,
and user experience. If you have any thoughts on how we can do even
better, we welcome your constructive feedback and suggestions.
Connect with us today at [email protected].
- 31 -