1
MASTER FORGE and logo design are trademarks or
registered trademarks of LF, LLC. All rights reserved.
WARNING
FOR YOUR SAFETY:
For Outdoor Use Only!
(outside any enclosure)
WARNING
FOR YOUR SAFETY:
Improper installation, adjustment,
alteration, service or maintenance can
cause injury or property damage. Read
this instruction manual thoroughly before
installing or servicing this equipment.
DANGER
Never operate this appliance unattended.
WARNING
FOR YOUR SAFETY:
DO NOT LEAVE THIS APPLIANCE UNATTENDED
WHILE IN USE, ESPECIALLY COOKING THE FAT-
TY MEAT AND CLOSE THE LID TOO LONG TIME.
WARNING:
This product can expose
you to chemicals including carbon
monoxide and soot, which are known to
the State of California to cause cancer
and birth defects or other reproductive
harm. For more information go to
www.P65Warnings.ca.gov.
WARNING
• Do NOT store or use gasoline or other
flammable liquids or vapors in the vicinity
of this or any other appliance.
• When cooking with oil/grease, do not allow
the oil/grease to exceed 350ºF (176.5ºC).
Do not store or use extra cooking oil in the
vicinity of this or any other appliance.
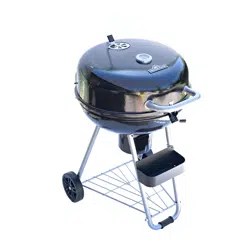
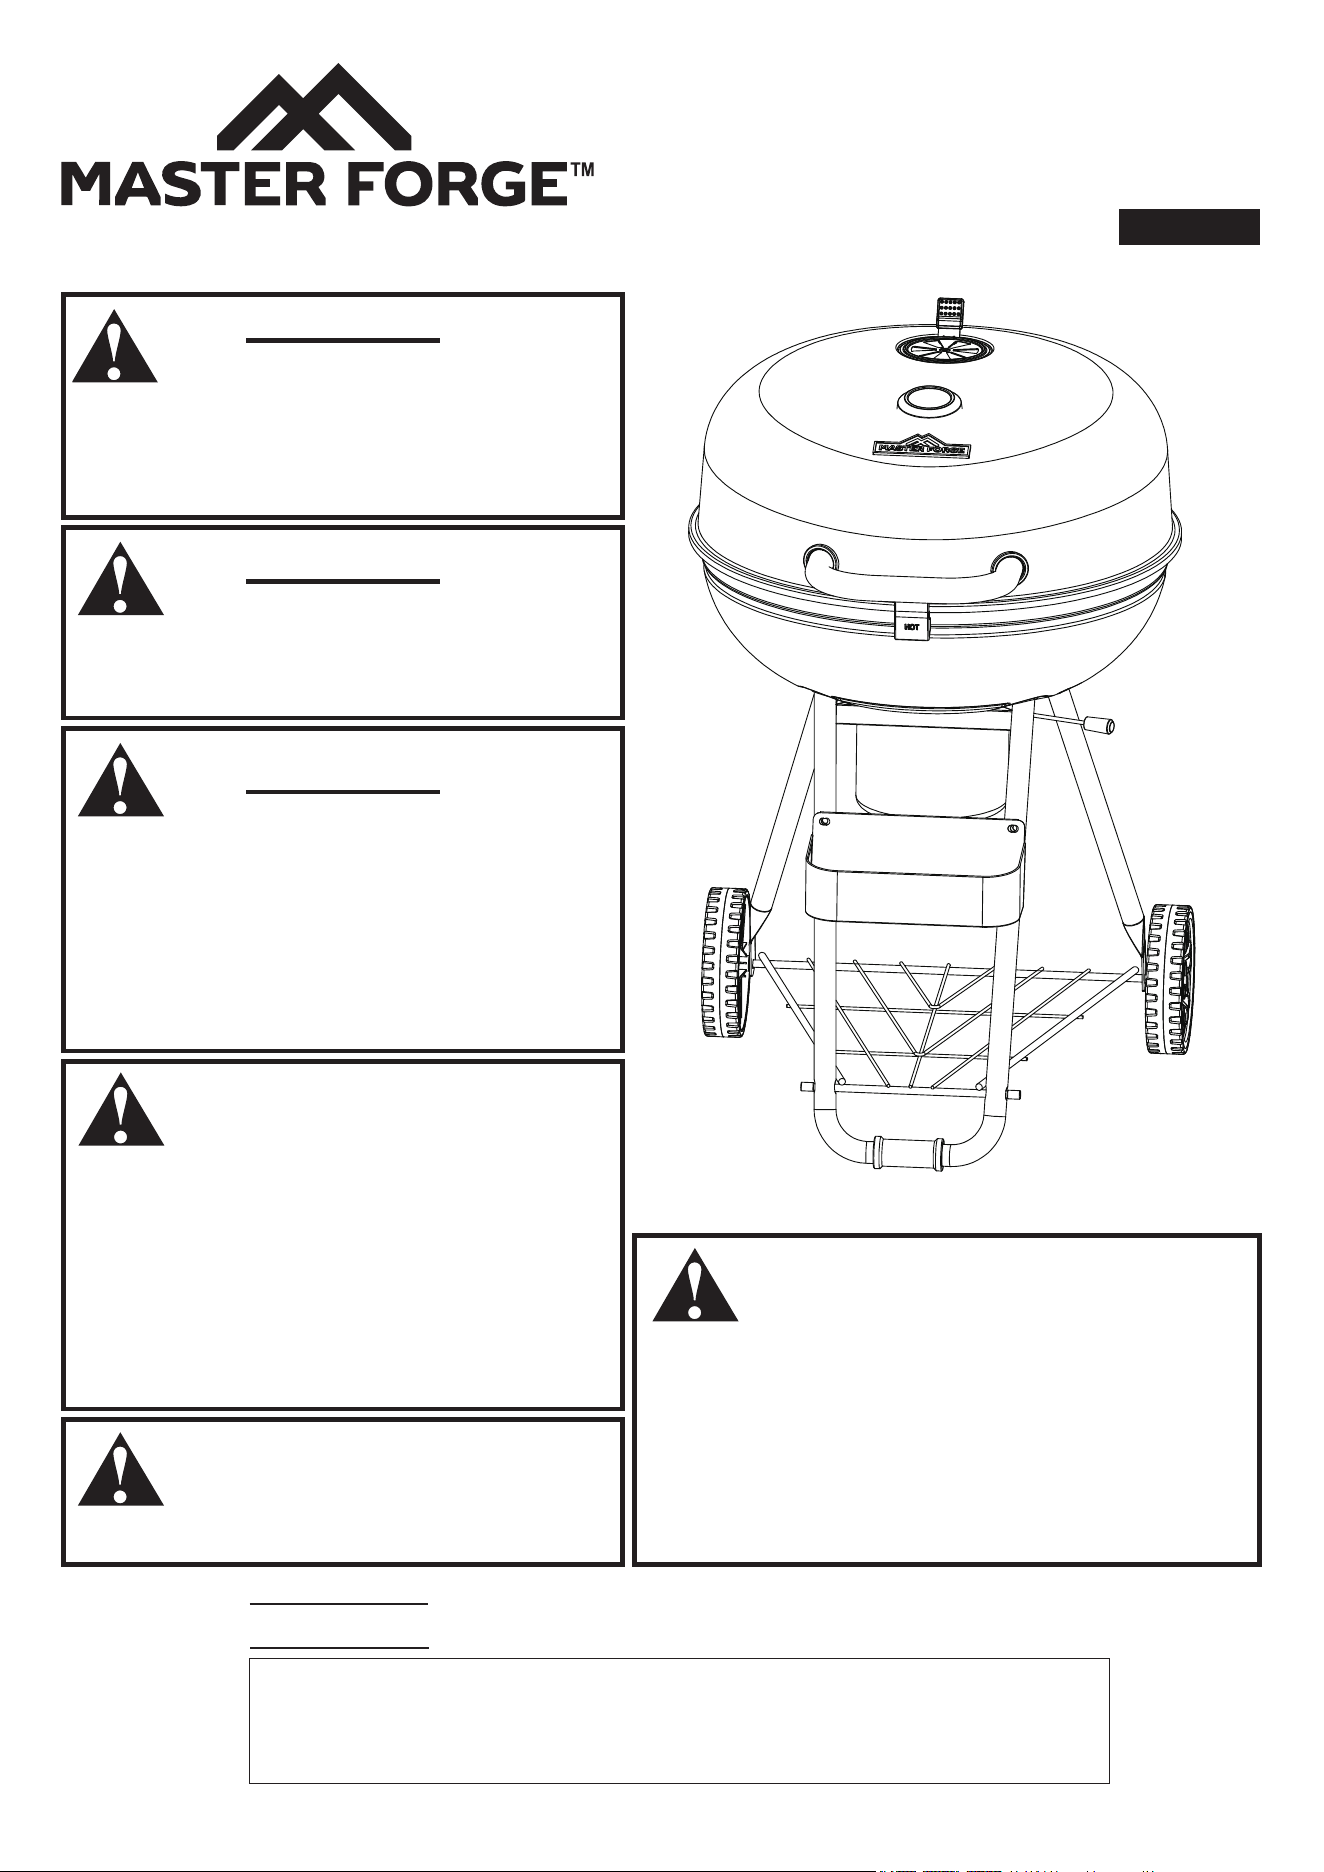
ITEM #5139534
22-IN PORTABLE KETTLE GRILL
MODEL #CBC23043L
ATTACH YOUR RECEIPT HERE
Español p.17
Thank you for purchasing this MASTER FORGE product.
Questions, problems or missing parts?
Before returning, contact us on:
800-963-0211, 8 a.m. - 8 p.m., EST, Monday - Sunday or [email protected].
Serial Number
Purchase Date
AS23388
CBC23043L-RA-ES-OM-F101

2
W This grill is for outdoor use only, and should
NOT be used in a building, garage or any
other enclosed area.
W Do NOT operate, light or use this appliance
within ten feet (3.05 m) of walls, structures or
buildings.
W For residential use only. This grill is NOT for
commercial use.
W This is not a tabletop grill. Therefore, do
not operate this grill on any type of tabletop
surface.
W Never use charcoal that has been pre-treated
with lighter fluid. Use only a high grade
plain charcoal, charcoal/wood mixture, lump
charcoal or cooking wood. The conversion to
or attempted use of any other fuel source in
this charcoal grill is dangerous and will void
your warranty.
W This grill is NOT intended for and should
never be used as a heater. TOXIC fumes can
accumulate and cause asphyxiation.
W Do NOT use grill for indoor cooking. TOXIC
carbon monoxide fumes can accumulate and
cause asphyxiation.
W This grill is safety certified for use in the
United States and/or Canada only. Do
NOT modify for use in any other location.
Modification will result in a safety hazard and
will void your warranty.
W Apartment dwellers: Check with management
to learn the requirements and fire codes
for using a charcoal grill in your apartment
complex. If allowed, use outside on the
ground floor with a ten foot (3.05 m) clearance
from any structure. Do NOT use on or under
balconies.
W Minimum clearance from sides and back of
unit to combustible construction is 36 inches
(91.4 cm). Do NOT use this appliance under
any type of overhang or roof.
W Do NOT use gasoline, kerosene or alcohol for
lighting.
W Do NOT use in an explosive atmosphere.
Keep grill area clear and free from
combustible materials, gasoline and other
flammable vapors and liquids.
W Do NOT store or use gasoline or other
flammable liquids or vapors within 25 feet
(7.62 m) of this appliance.
W Do NOT block holes in sides or back of grill.
W Inspect grill before each use.
W Do NOT alter grill in any manner. Any
alteration will void your warranty.
W Do NOT build this model of grill in any built-in
or slide-in construction. Ignoring this warning
could cause a fire or an explosion that can
damage property and cause serious bodily
injury or death.
W Do NOT use the grill unless it is
COMPLETELY assembled and all parts are
securely fastened and tightened.
W This grill should be thoroughly cleaned and
inspected on a regular basis.
W Use only Lowe's Home Centers LLC
authorized parts. The use of any part that is
not factory-authorized can be dangerous and
will void your warranty.
W Do NOT operate this appliance without
reading “Operating Instructions” in this
manual.
W To avoid burns, do NOT touch metal parts of
grill until they have completely cooled, unless
you are wearing protective gear (pot holders,
Safety Information ............................................................... 2
Package Contents .............................................................. 4
Hardware Contents .............................................................. 5
Preparation .................................................................... 5
Assembly Instructions ............................................................ 6
Operating Instructions ........................................................... 13
Care and Maintenance .......................................................... 14
Limited Warranty ............................................................... 15
Replacement Parts List ......................................................... 16
W DANGER: Failure to follow the dangers, warnings and cautions in this manual may result in
serious bodily injury or death, or in a fire or an explosion causing damage to property.
W WARNINGS:
SAFETY INFORMATION
TABLE OF CONTENTS

3
gloves, BBQ mittens, etc.).
W Never touch grids (charcoal, cooking or
warming), ashes or coals to see if they are
hot.
W Do NOT use on wooden decks, wooden
furniture or other combustible surfaces.
W This grill is NOT to be used in or on boats or
recreational vehicles.
W Position grill so wind cannot carry ashes to
combustible surfaces.
W Do NOT use in high winds.
W Never lean over the grill when lighting.
W Do NOT leave a lit grill unattended. Keep
children and pets away from grill at all times.
W Do NOT attempt to move grill when in use.
Allow the grill to cool before moving or
storing.
W Do NOT leave grill unattended while
preheating or burning off food residue.
W When cooking, fire extinguishing materials
should be readily accessible. In the event
of an oil/grease fire, do NOT attempt to
extinguish with water. Use type BC dry
chemical fire extinguisher or smother with dirt,
sand or baking soda.
W Always open grill lid carefully and slowly
as heat and steam trapped within grill can
severely burn you.
W If grill has not been cleaned, a grease fire can
occur that may damage the product.
W Do NOT place empty cooking vessels on the
appliance while in operation.
W Use caution when placing anything on the grill
while the appliance is in operation.
W Never add lighting fluid to hot or warm coals
as a flashback may occur causing serious
injury or damage to property.
W Always place your grill on a hard, non-
combustible level surface. An asphalt or
blacktop surface may not be acceptable for
this purpose.
W Do NOT remove the ashes until they are
completely and fully extinguished.
W Live hot briquettes and coals can create a fire
hazard.
W Always empty the bottom bowl and grill after
each use.
W Do NOT place fuel (charcoal briquettes, wood
or lump charcoal) directly into bottom of grill.
Place fuel only on the charcoal pan/grid.
W Do NOT allow charcoal to rest on the walls of
grill. Doing so will greatly reduce the life of the
metal and finish of your grill.
W Check to make sure the air vents are free of
debris and ash before using the grill.
W Extinguished coals and ashes should be
placed a safe distance from all structures and
combustible materials.
W With a garden hose, completely wet the
surface beneath and around grill to extinguish
any ashes, coals or embers that may have
fallen during the cooking or cleaning process.
W The use of alcohol, prescription or non-
prescription drugs may impair the consumer’s
ability to properly assemble and/or safely
operate this grill.
W Always wear protective gloves when adding
fuel (charcoal briquettes, wood or lump
charcoal) to retain desired heat level.
W Keep all electrical cords away from a hot grill.
W Always use a meat thermometer to ensure
food is cooked to a safe temperature.
W Never cover entire cooking area with
aluminum foil. Laying the foil on the grates
can restrict the intended air flow inside the
grill, create barriers to the proper flow of
grease to the catch pan, which sets the stage
for lots of it to build up on the bottom tray,
which in turn, builds the potential for grease
fires and flare ups.
W Use protective gloves when assembling this
product.
W Do NOT force parts together as this can result
in personal injury or damage to the product.
W Do NOT touch ash receiver or ash receiver
handle until grill has completely cooled,
unless you are wearing protective gear.
W Do NOT touch air vent or air vent handle until
grill has completely cooled, unless you are
wearing protective gear.
W Death, serious injury or damage to property
may occur if the above is not followed exactly.
SAFETY INFORMATION
4
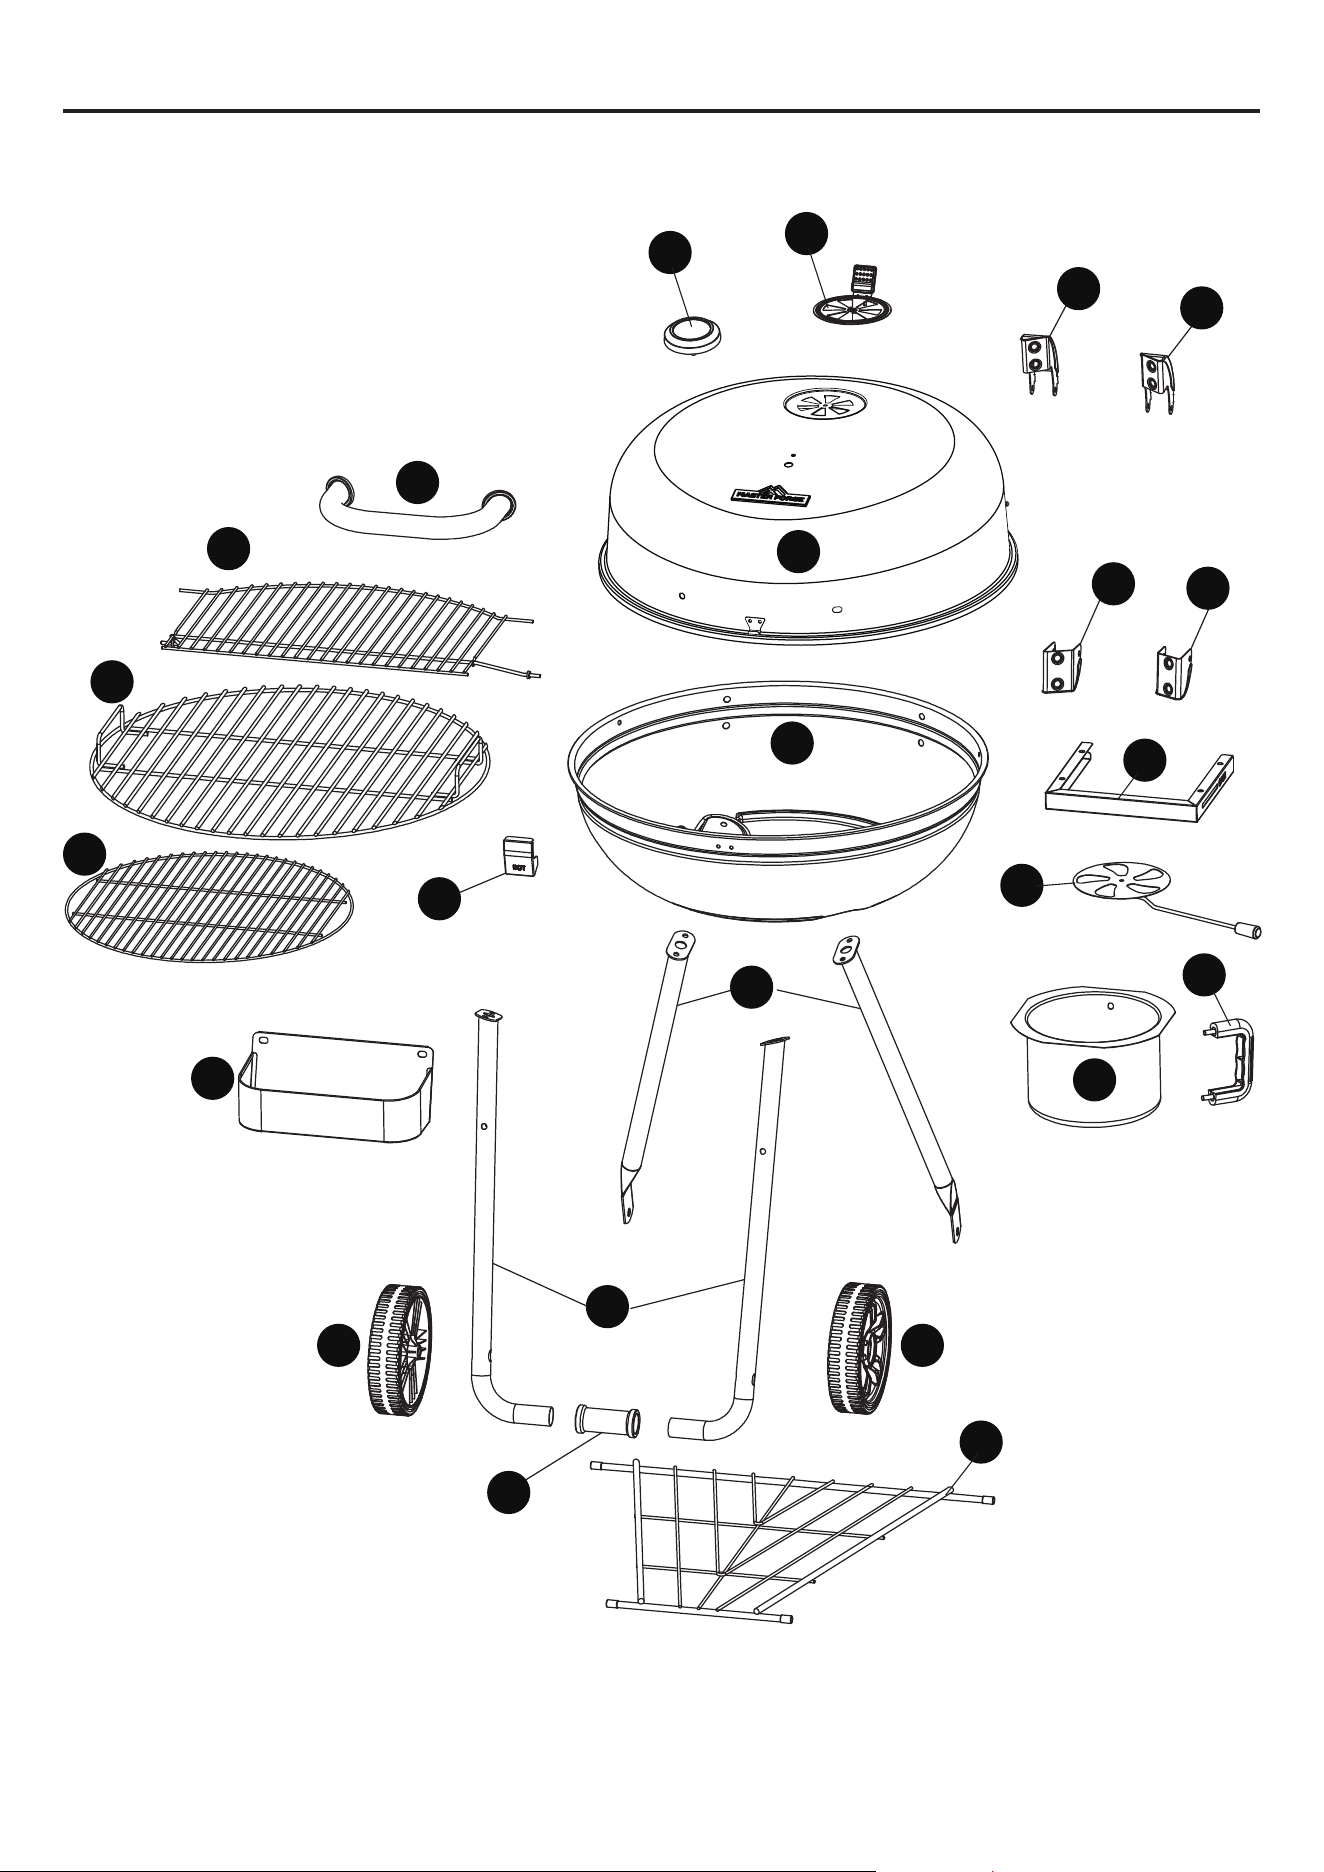
PACKAGE CONTENTS
C
D
F
E
B
J
K
L
M
A
G
H
I
N
O
P
Q
S
T
V
W
UU
R
5
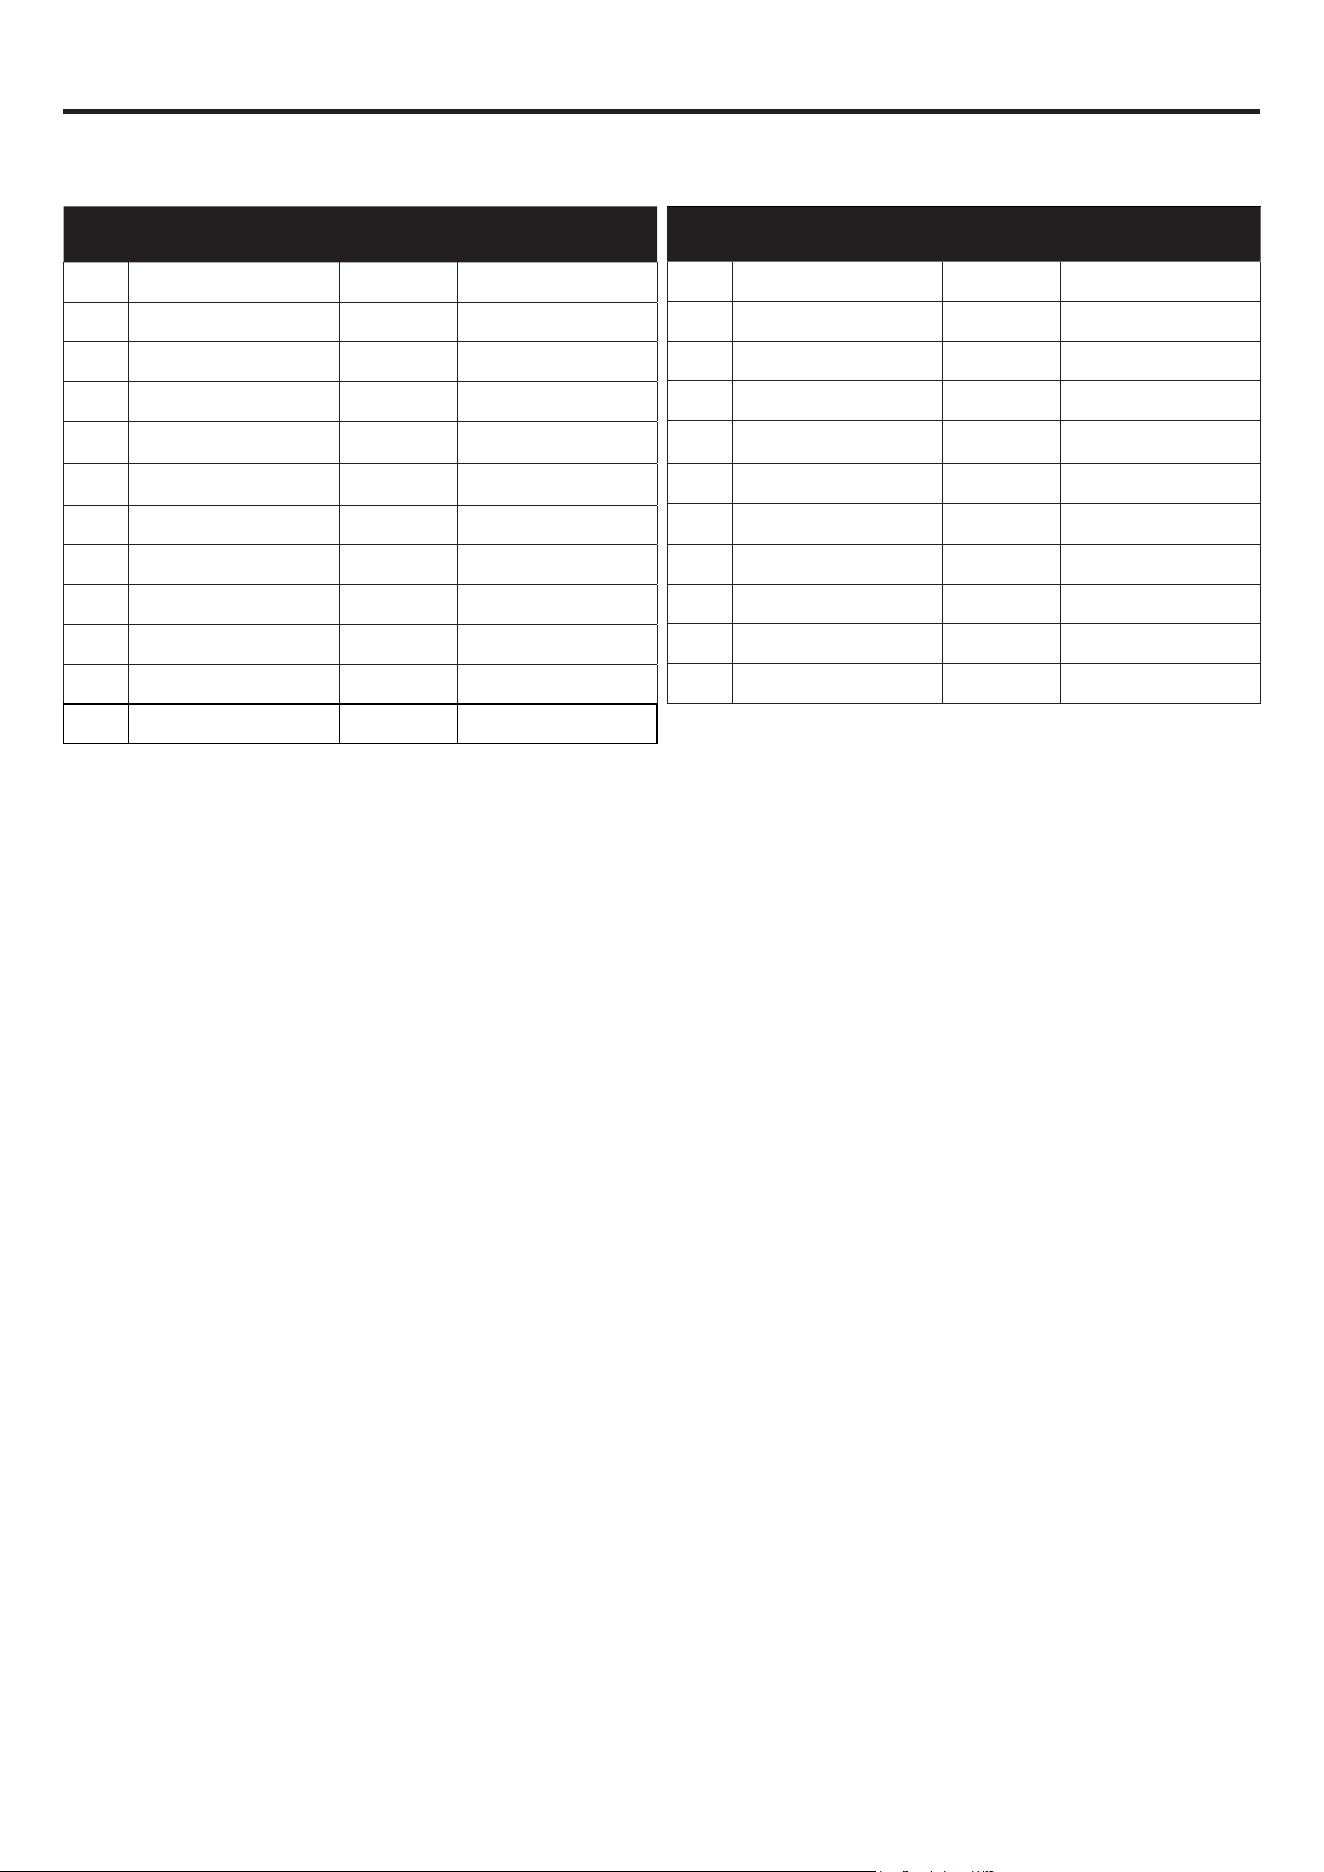
PART DESCRIPTION QUANTITY
A Lid 1
B Lid Handle 1
C Left Top Hinge 1
D Right Top Hinge 1
E Air Vent 1
F Temperature Gauge 1
G Bottom Bowl 1
H Left Bottom Hinge 1
I Right Bottom Hinge 1
J Warming Rack 1
K Cooking Grid 1
L Charcoal Grid 1
PART DESCRIPTION QUANTITY
M Condiment Holder 1
N Lock 1
O Ash Receiver Slide 1
P Bottom Air Damper 1
Q Ash Receiver 1
R Receiver Handle* 1
S Wheel Leg 2
T Front Leg 2
U Wheel 2
V Leg Connector 1
W Bottom Mesh 1
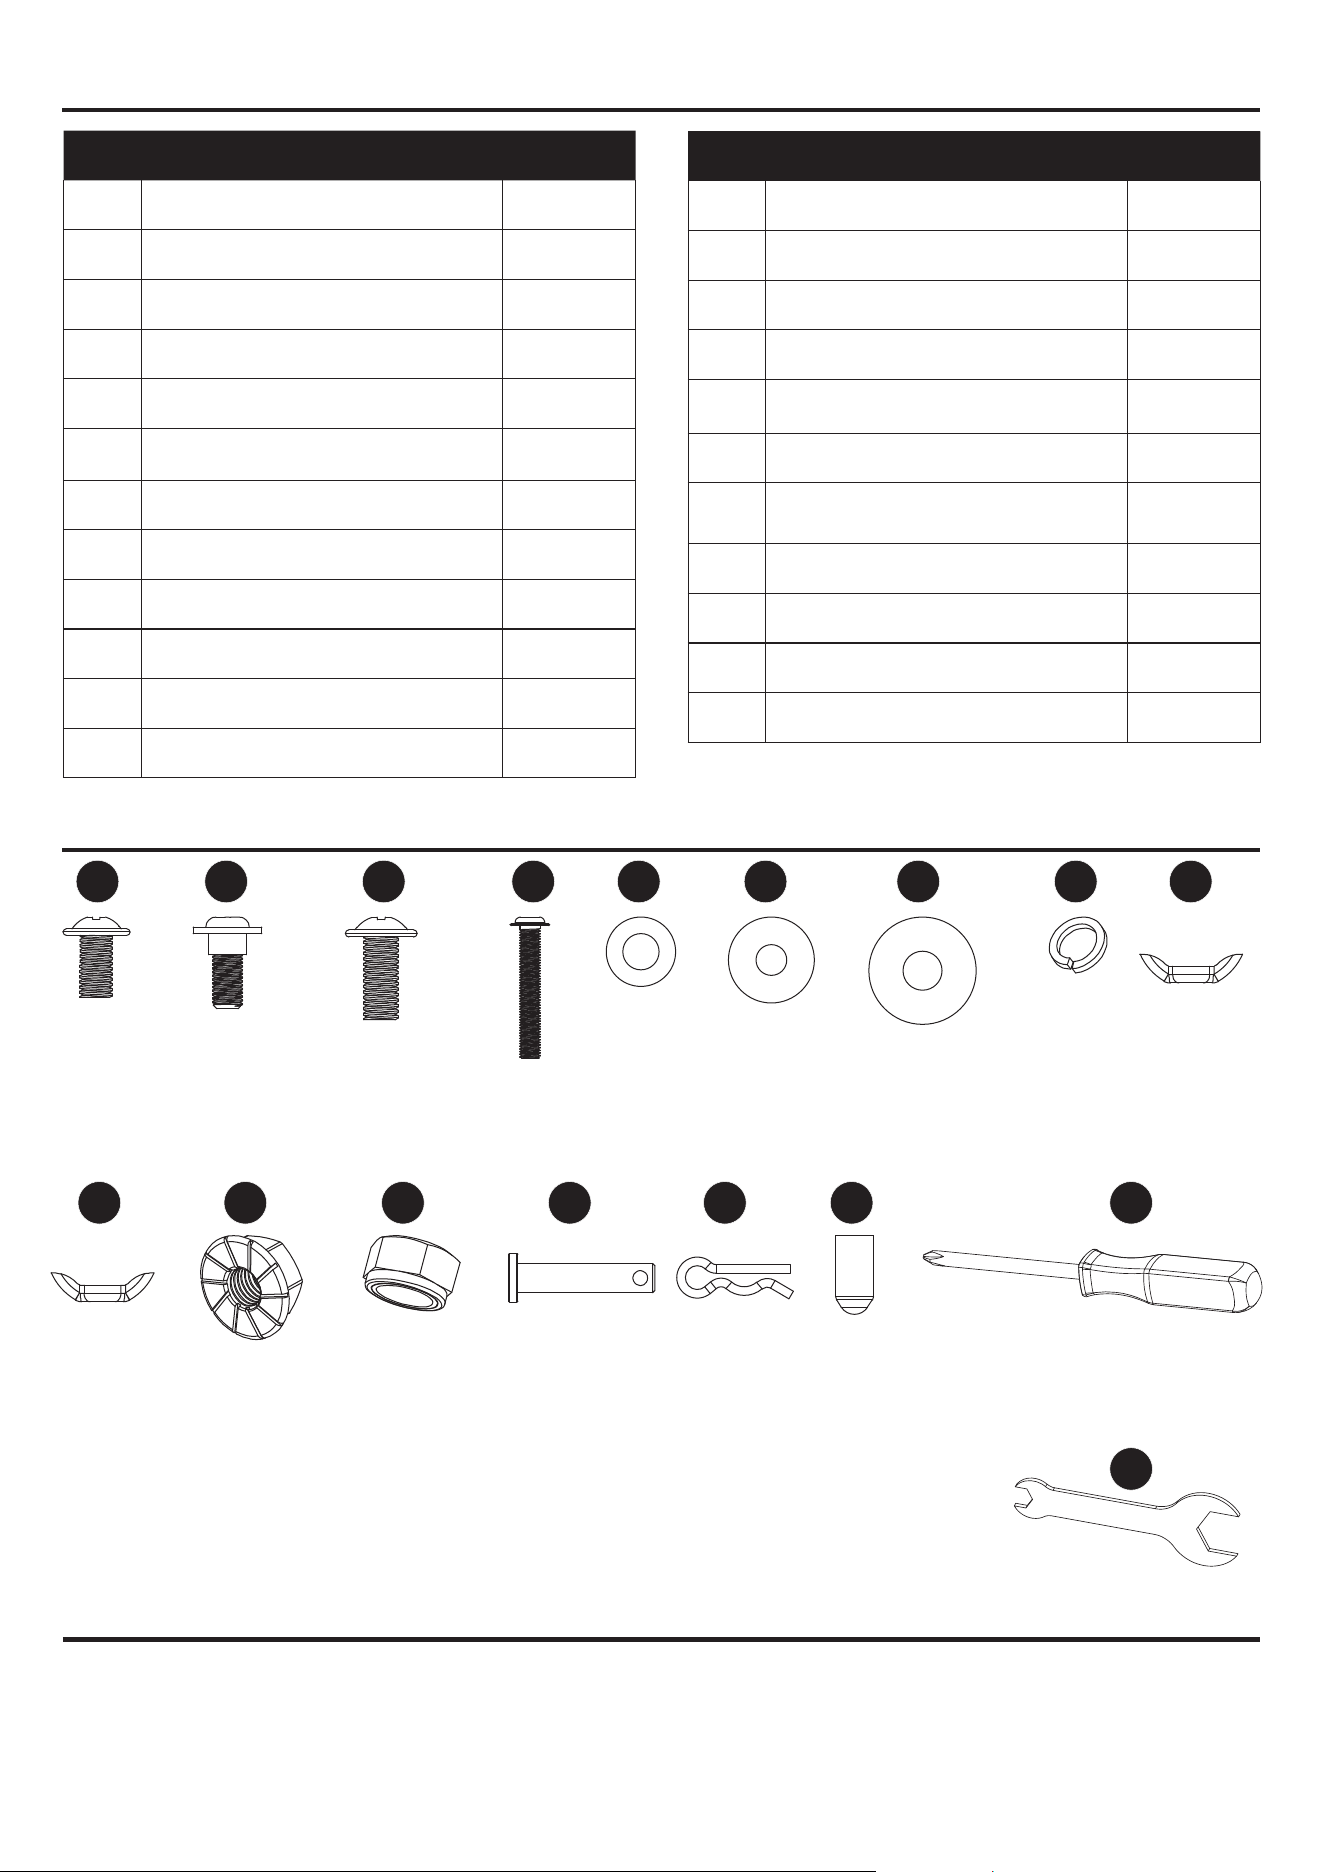
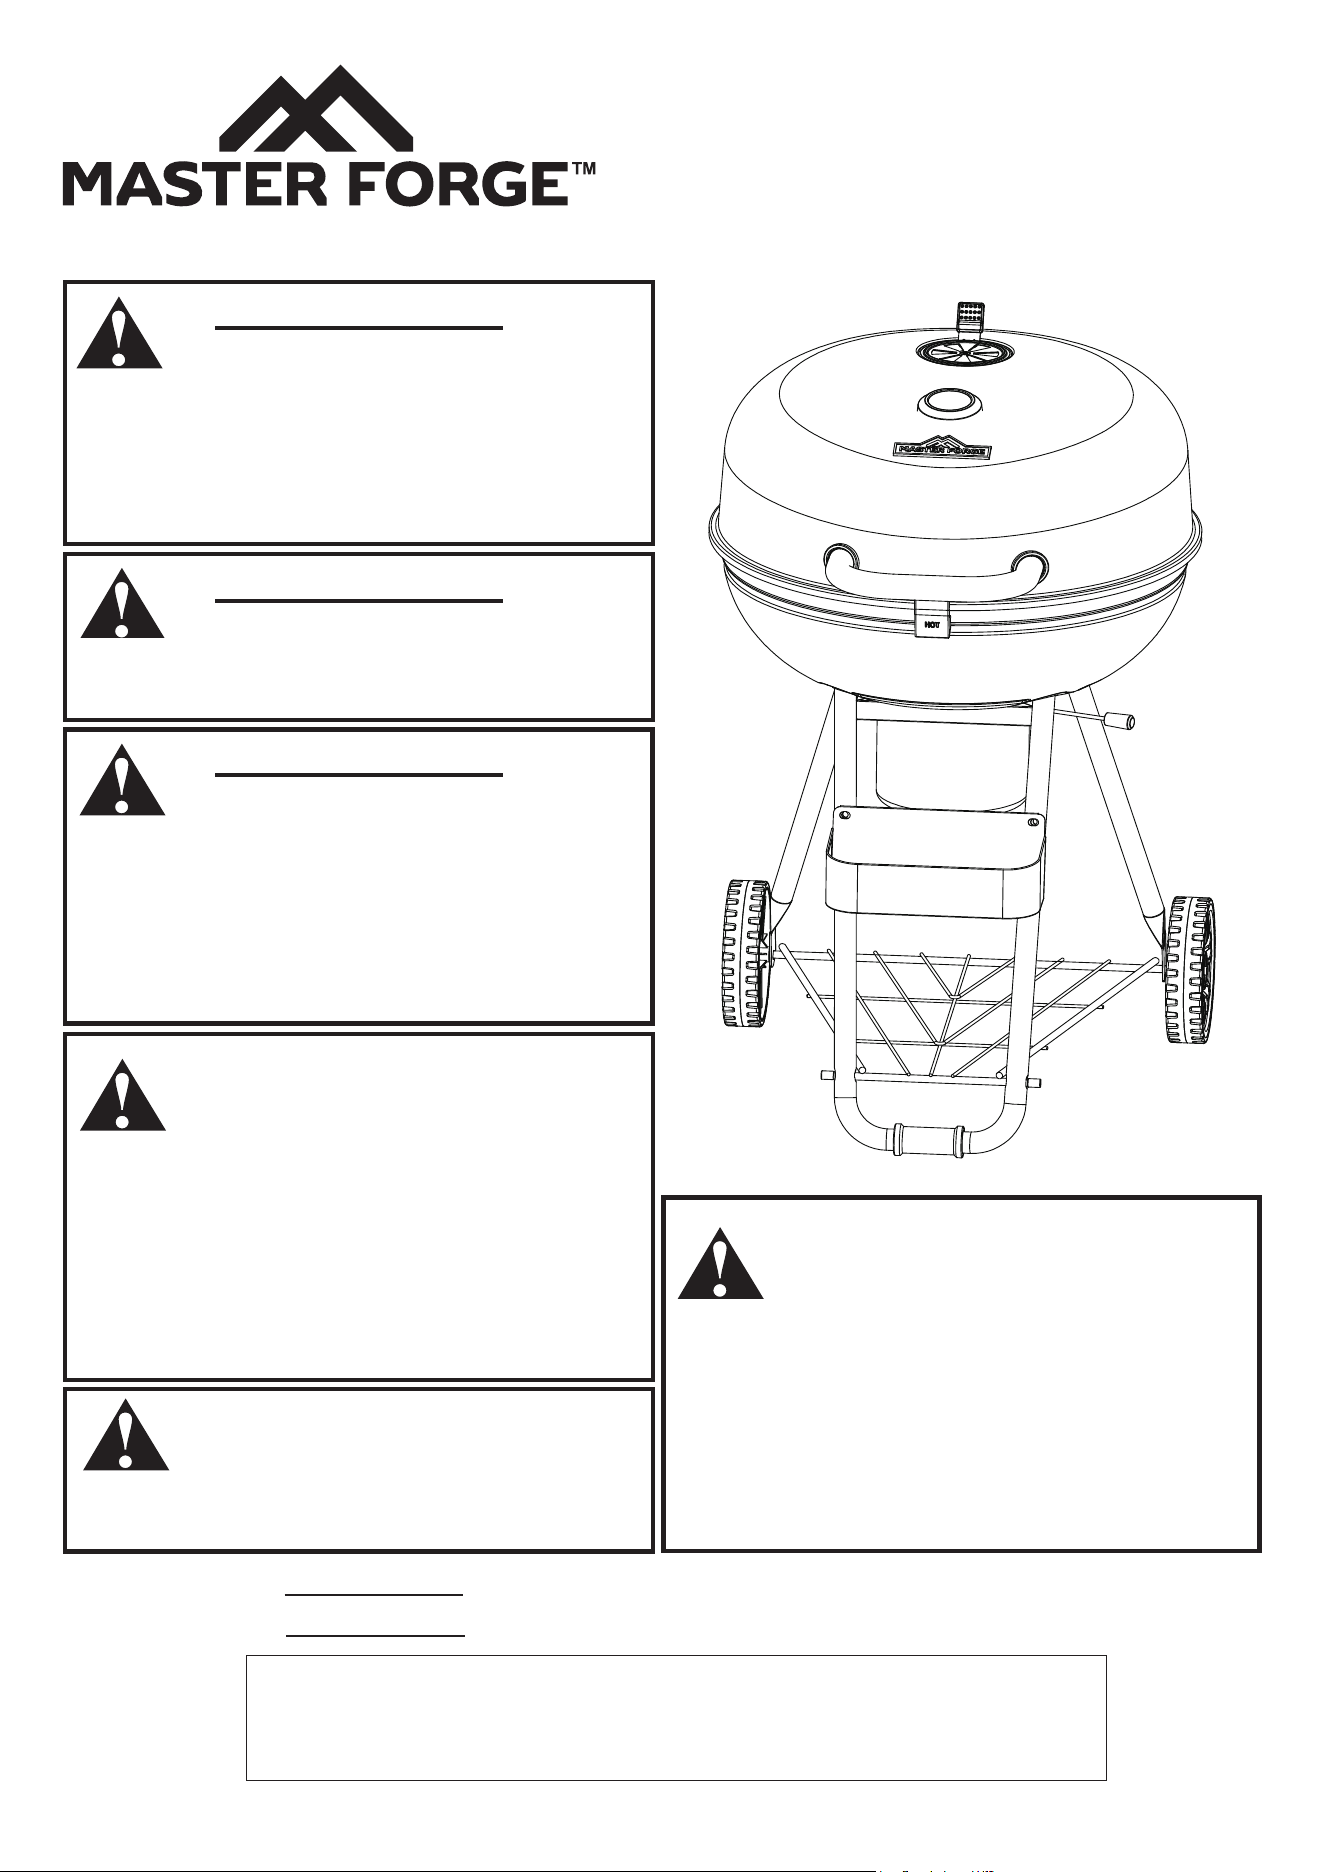
M5x8
Screw
Qty:6
M5x10
Step Screw
Qty:2
M6x12
Screw
Qty:18
Ø6
Washer
Qty:16
Ø5
Washer
Qty:8
#2 Philips Head
Screwdriver
Qty:1
Before beginning assembly of product, make sure all parts are present. Compare parts with package
contents list and hardware contents list. If any part is missing or damaged, do not attempt to assemble
the product.
Estimated assembly time: 35 minutes by one people.
Tools required for assembly: Wrench included and Philips screwdriver is not included.
PACKAGE CONTENTS
HARDWARE CONTENTS
Preparation
M6x35
Screw
Qty:2
* Pre-assembled
Ø6x22
Large Washer
Qty:2
M5
Wing Nut
Qty:2
Ø6
Lock Washer
Qty:2
Ø1.4x38
Cotter Pin
Qty:2
M6
Wing Nut
Qty:2
M6
Nut
Qty:8
M10
Nut
Qty:4
Ø5x45
Pin
Qty:2
Ø3
Rubber Stopper
Qty:4
M6-M10
Wrench
Qty:1
AA BB CC DD EE FF GG HH II
JJ KK LL MM OONN PP
QQ
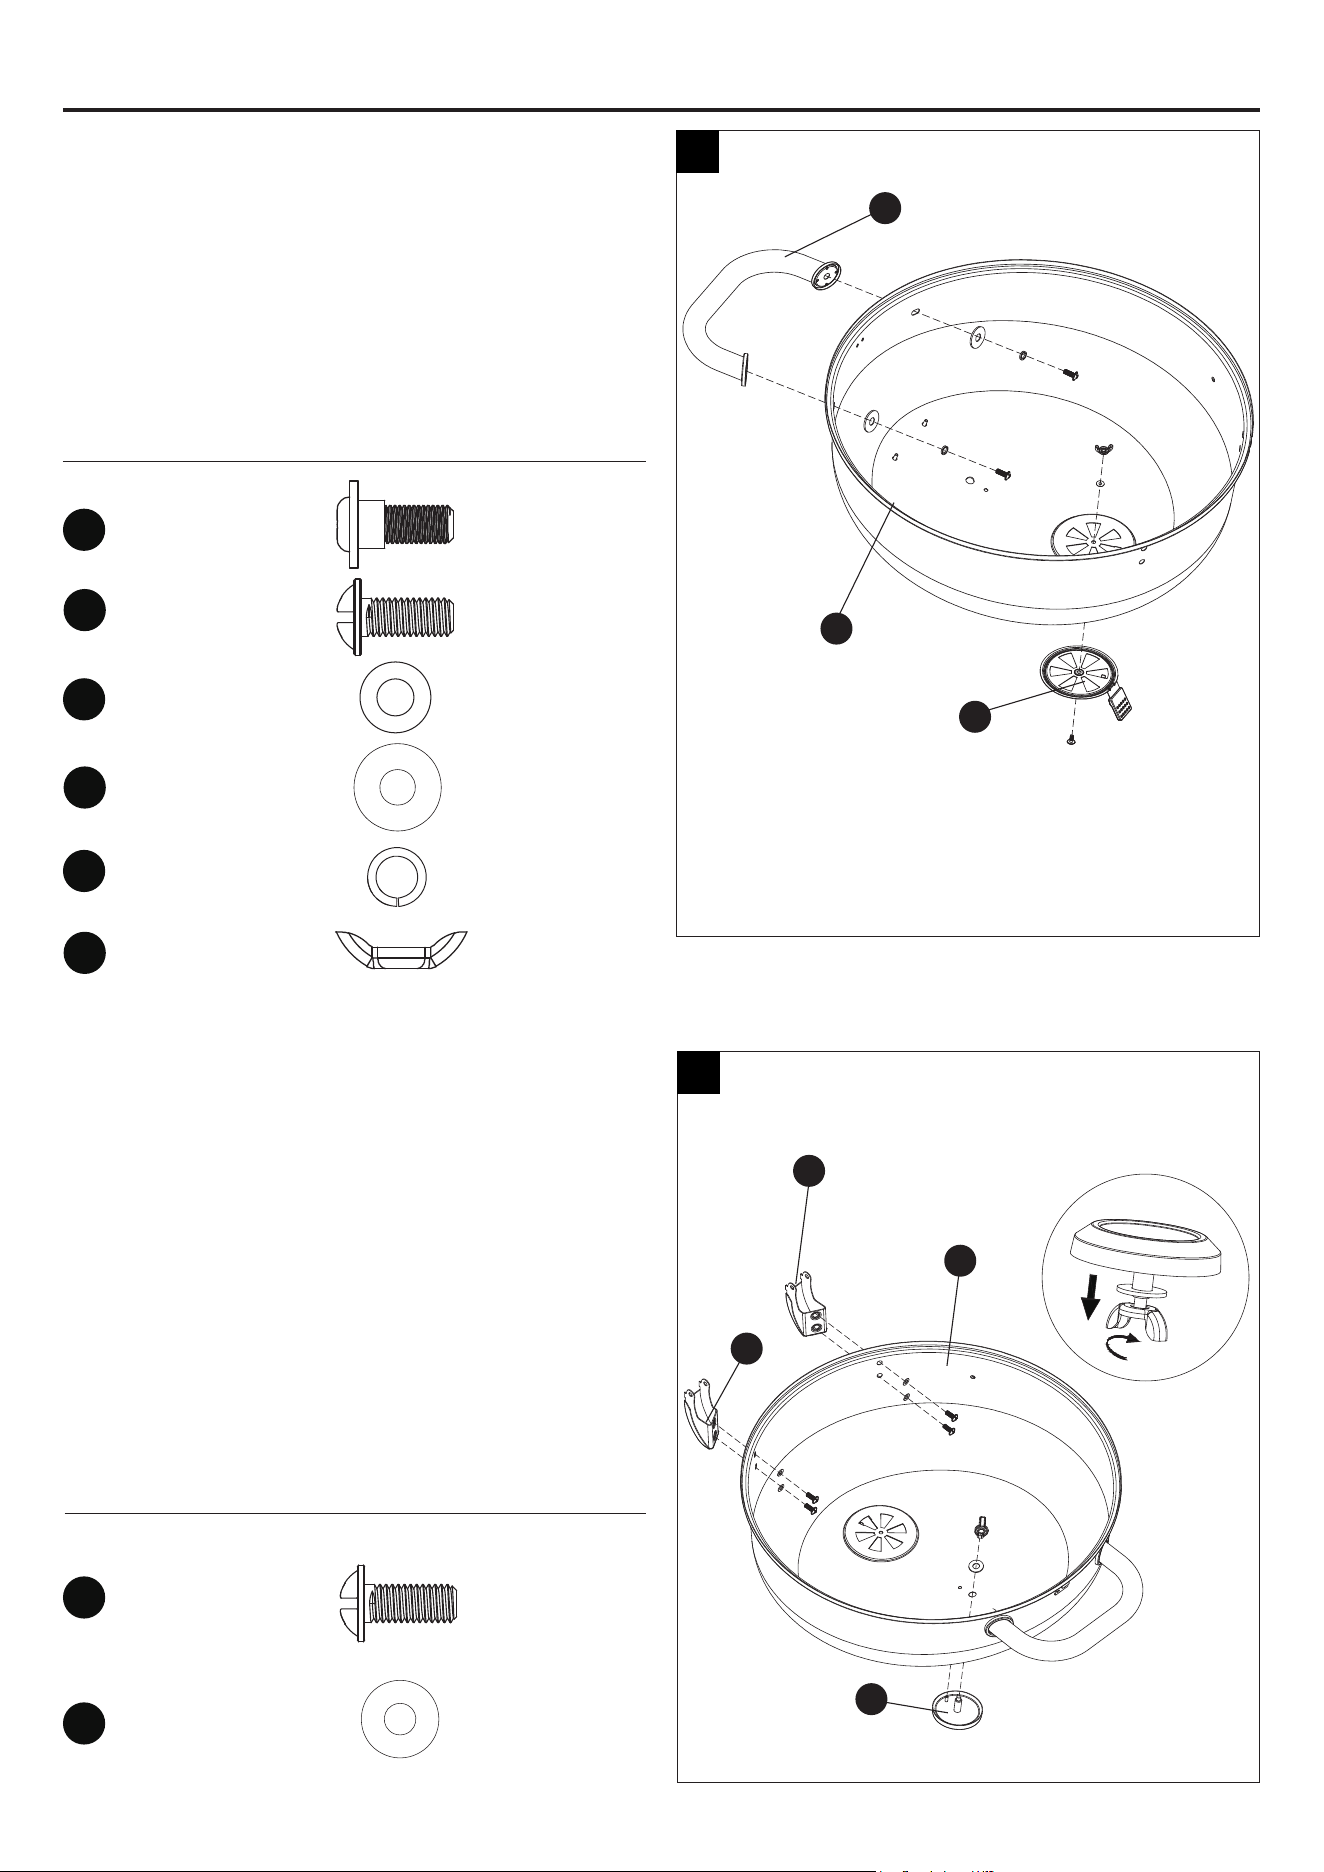
6
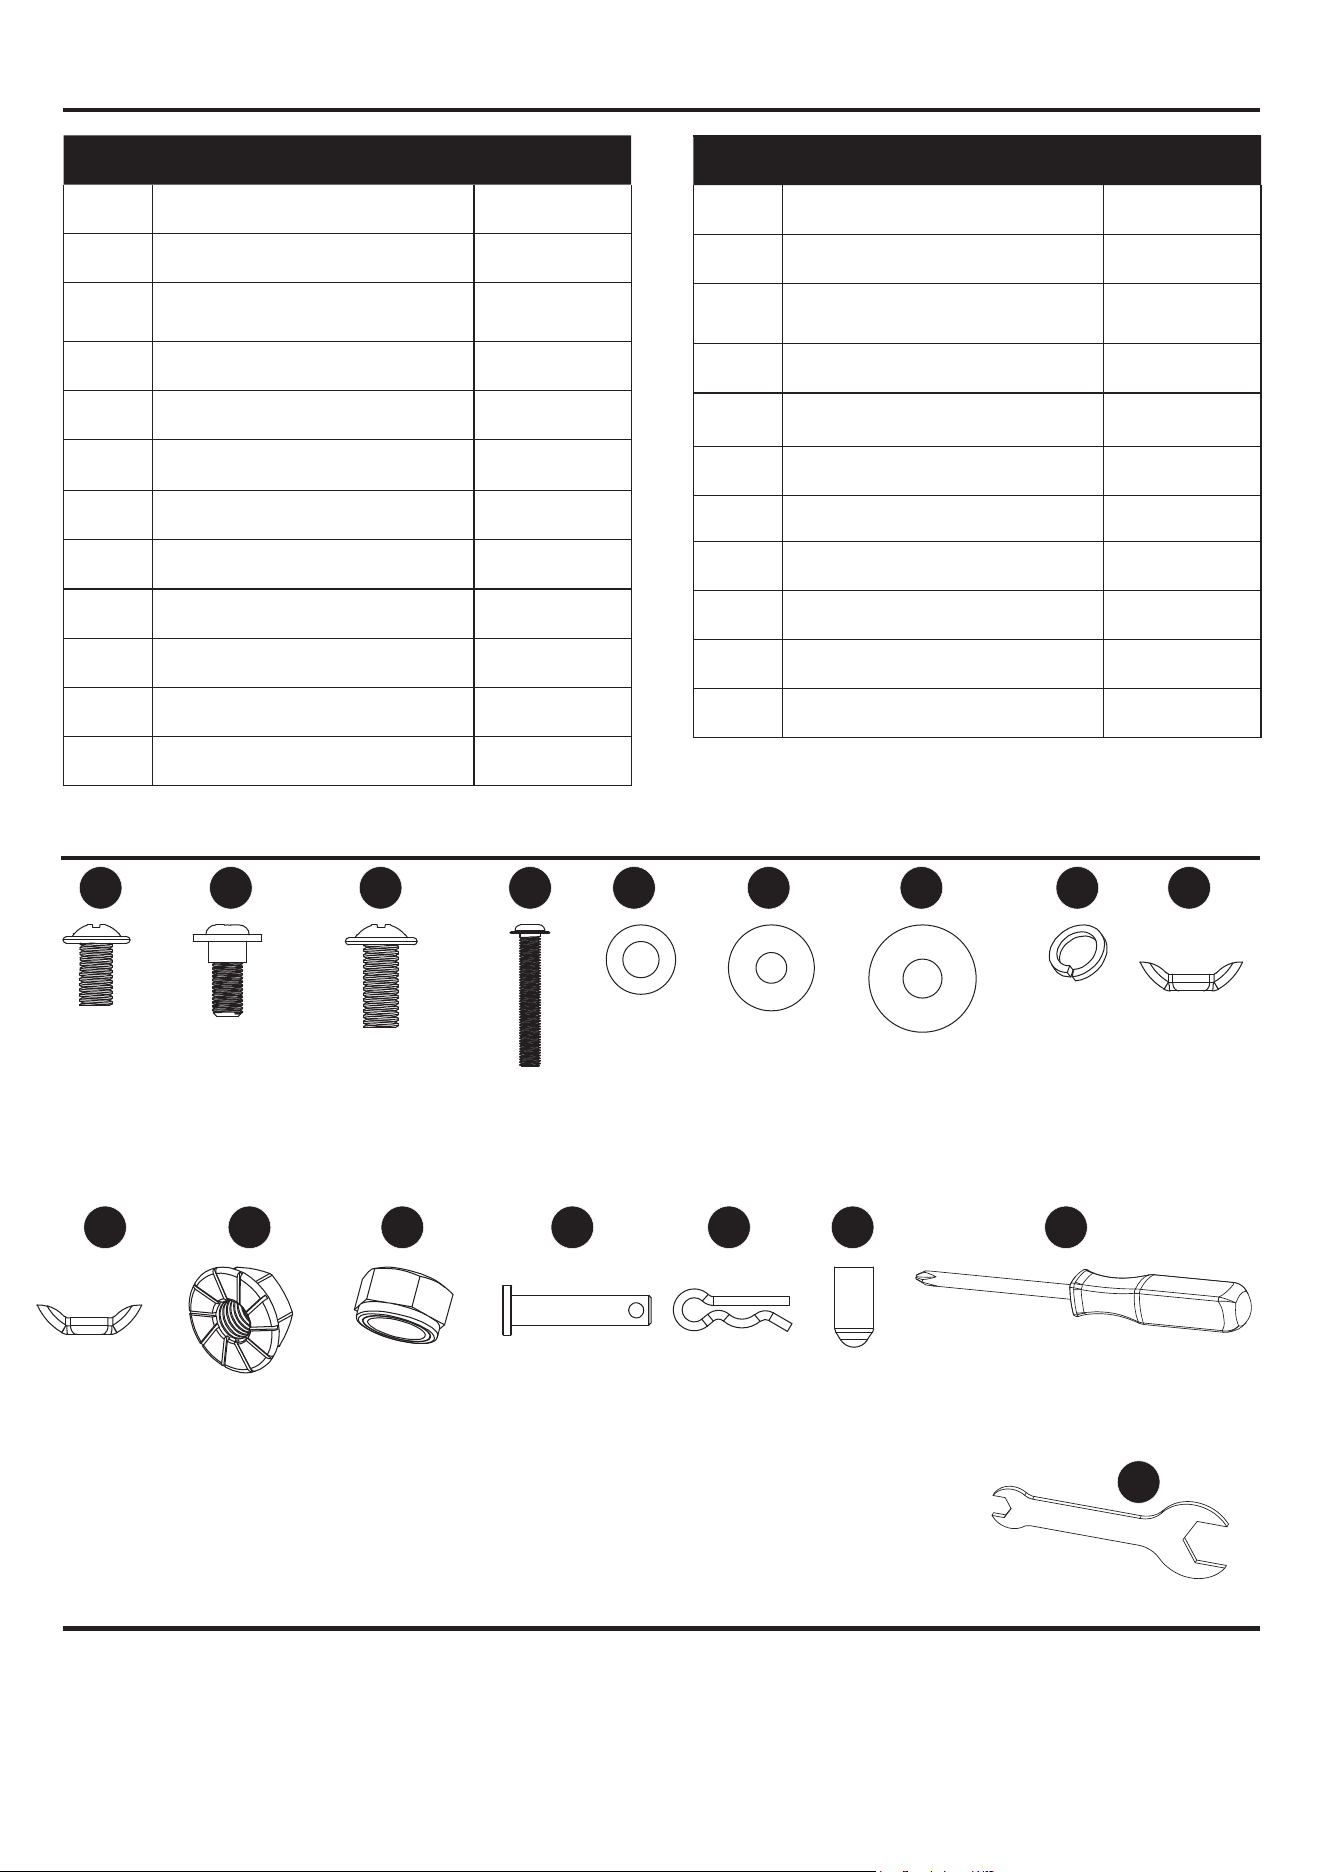
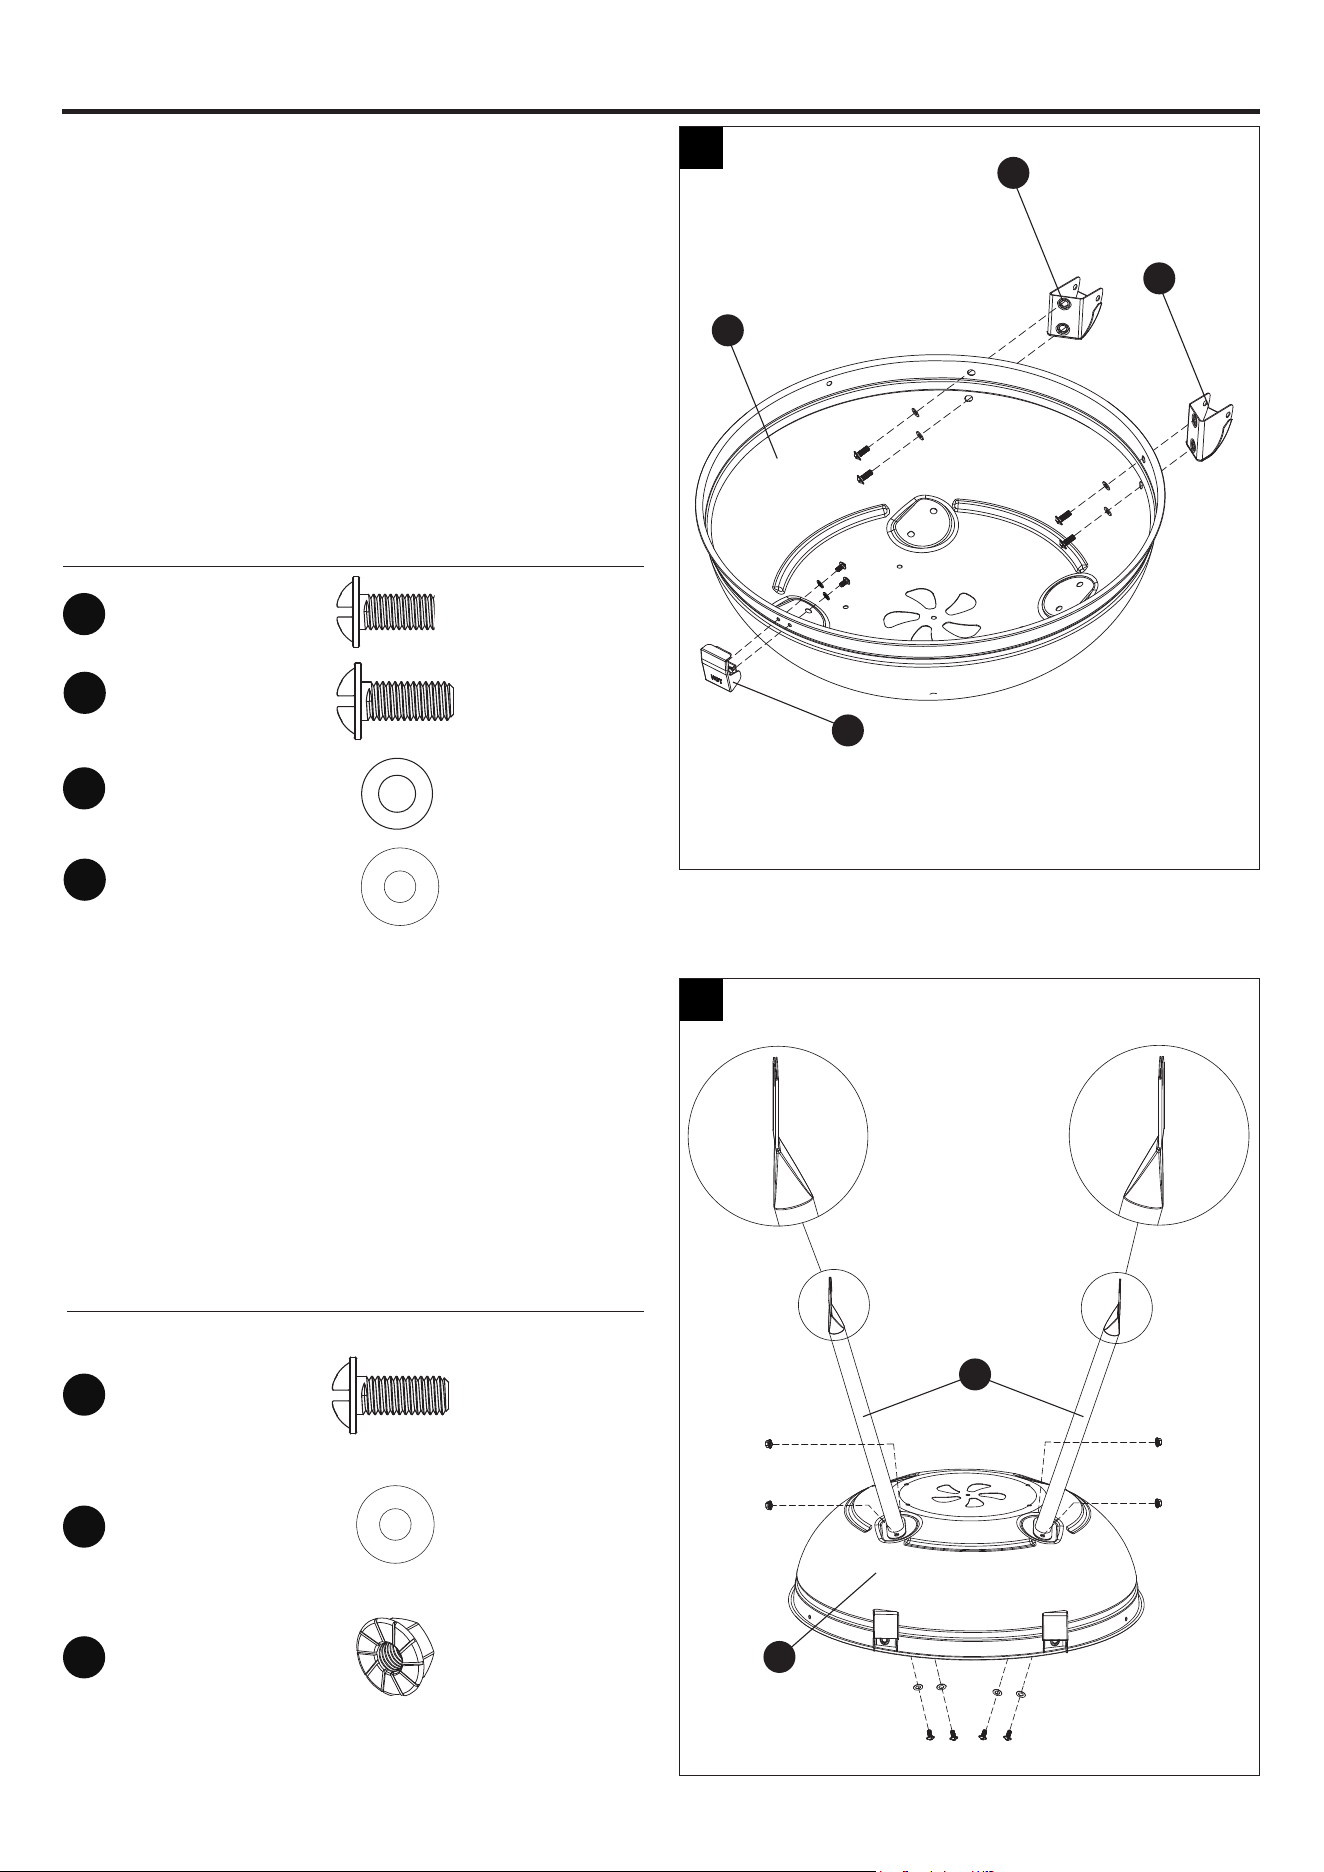
Step 1: Attach Lid Handle and Air Vent
Attach the lid handle (B) onto the lid (A) with two
M6x12 screws (CC), Ø6x22 large washers (GG)
and Ø6 lock washers (HH).
Attach the air vent (E) onto the lid (A) with one
M5x10 step screw (BB), Ø5 washer (EE) and M5
wing nut (II).
Hardware Used
Step 2: Attach Top Hinges and Temperature Gauge
Attach the left top hinge (C) and right top hinge (D)
onto the lid (A) with four M6x12 screws (CC) and
Ø6 washers (FF).
Attach temperature gauge (F) onto the lid (A).
NOTE: Remove the washer and wing nut pre-
assembled on the temperature gauge (F) in rst.
NOTE: Please do not fully tighten the screws
initially. Leave them slightly loose to allow for easier
alignment of the hinge pins.
Hardware Used
ASSEMBLY INSTRUCTIONS
M5x10
Step Screw
x 1
M6x12
Screw
x 2
Ø5
Washer
x 1
Ø6x22
Large Washer
x 2
Ø6
Lock Washer
x 2
M5
Wing Nut
x 1
Ø6
Washer
x 4
First
M6x12
Screw
x 4
BB
EE
HH
CC
CC
FF
GG
II
1
2
B
A
E
D
C
A
F

7
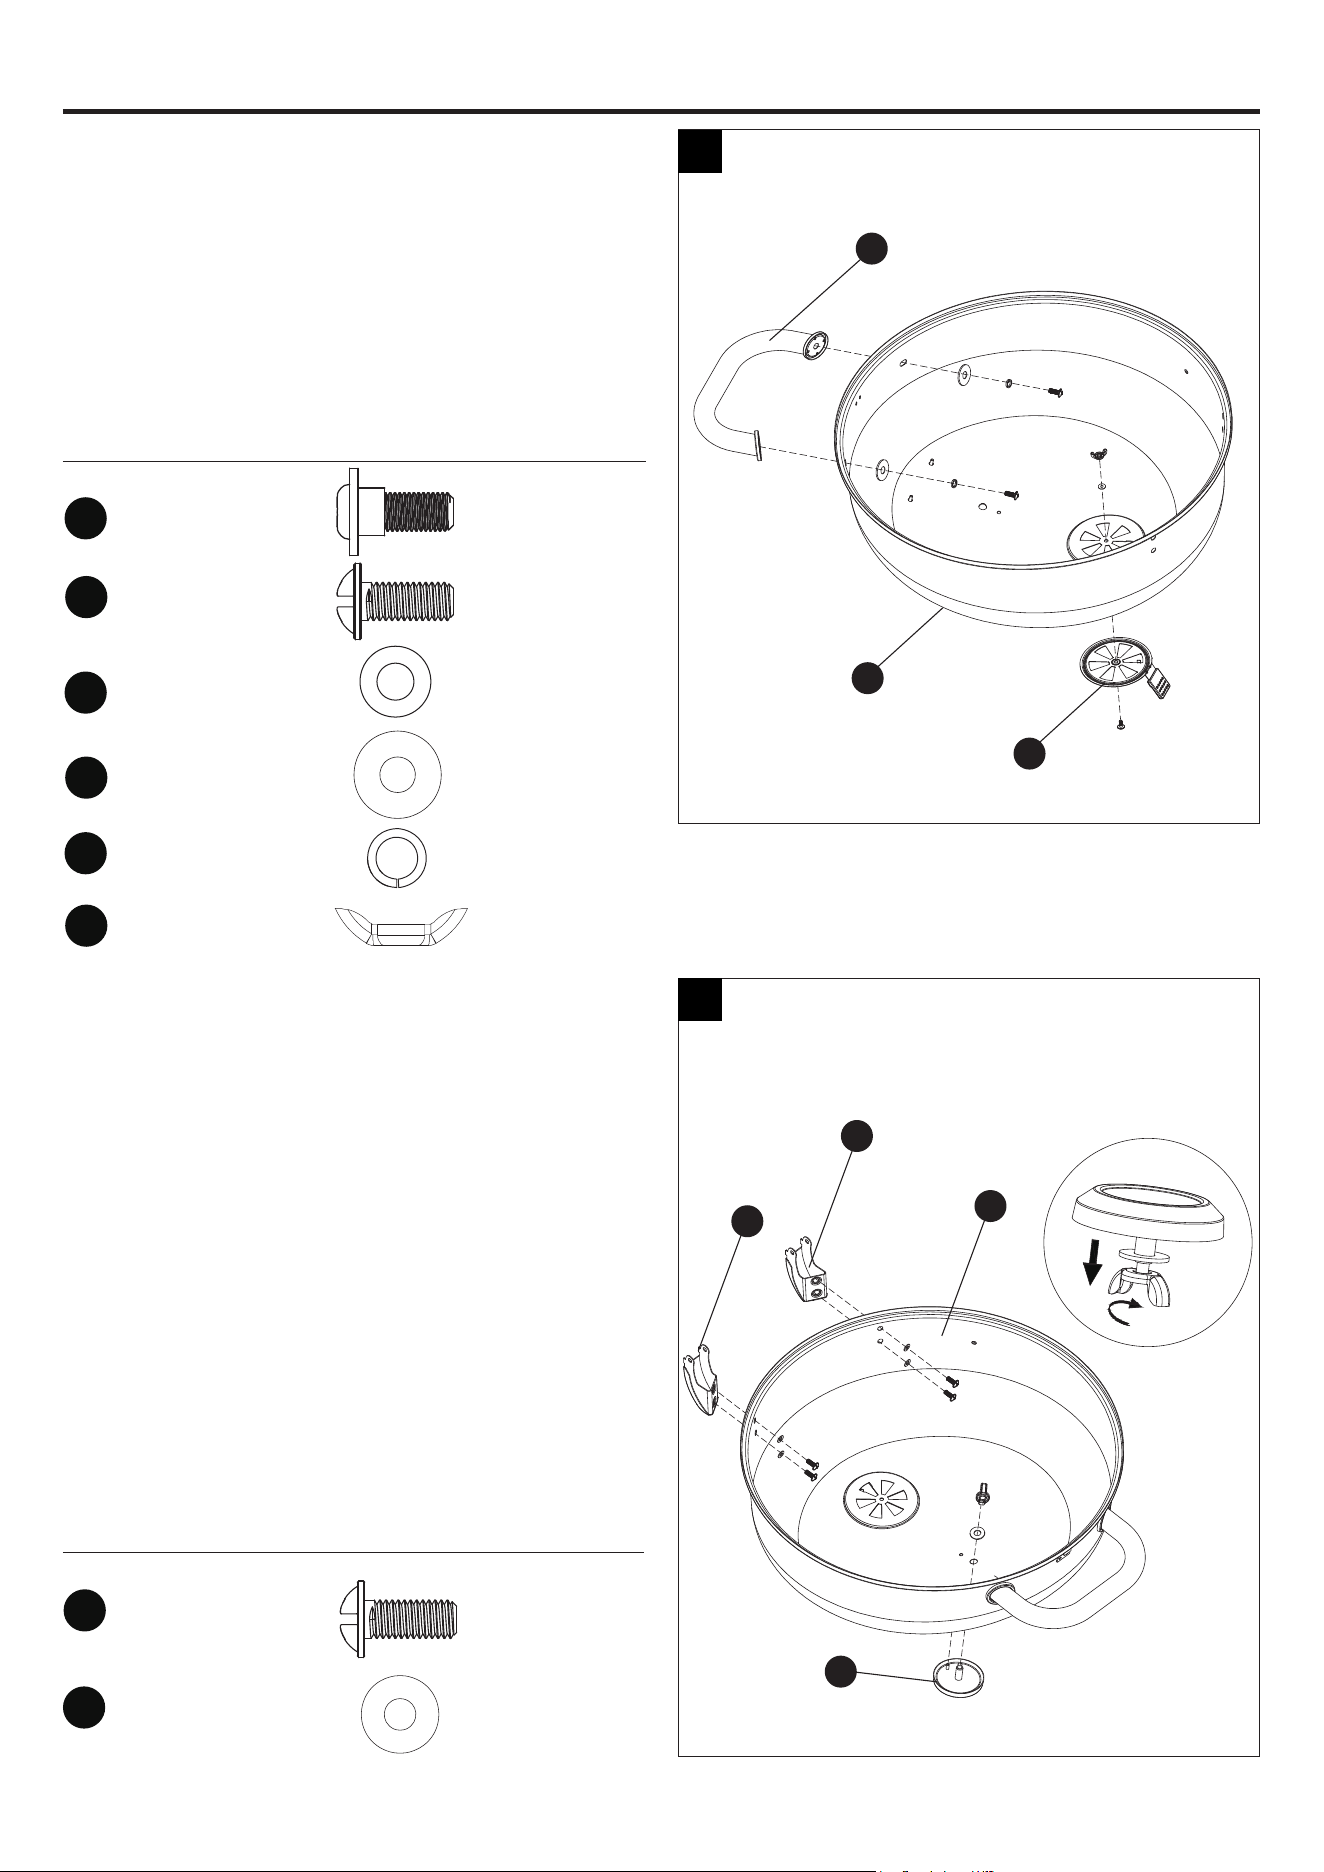
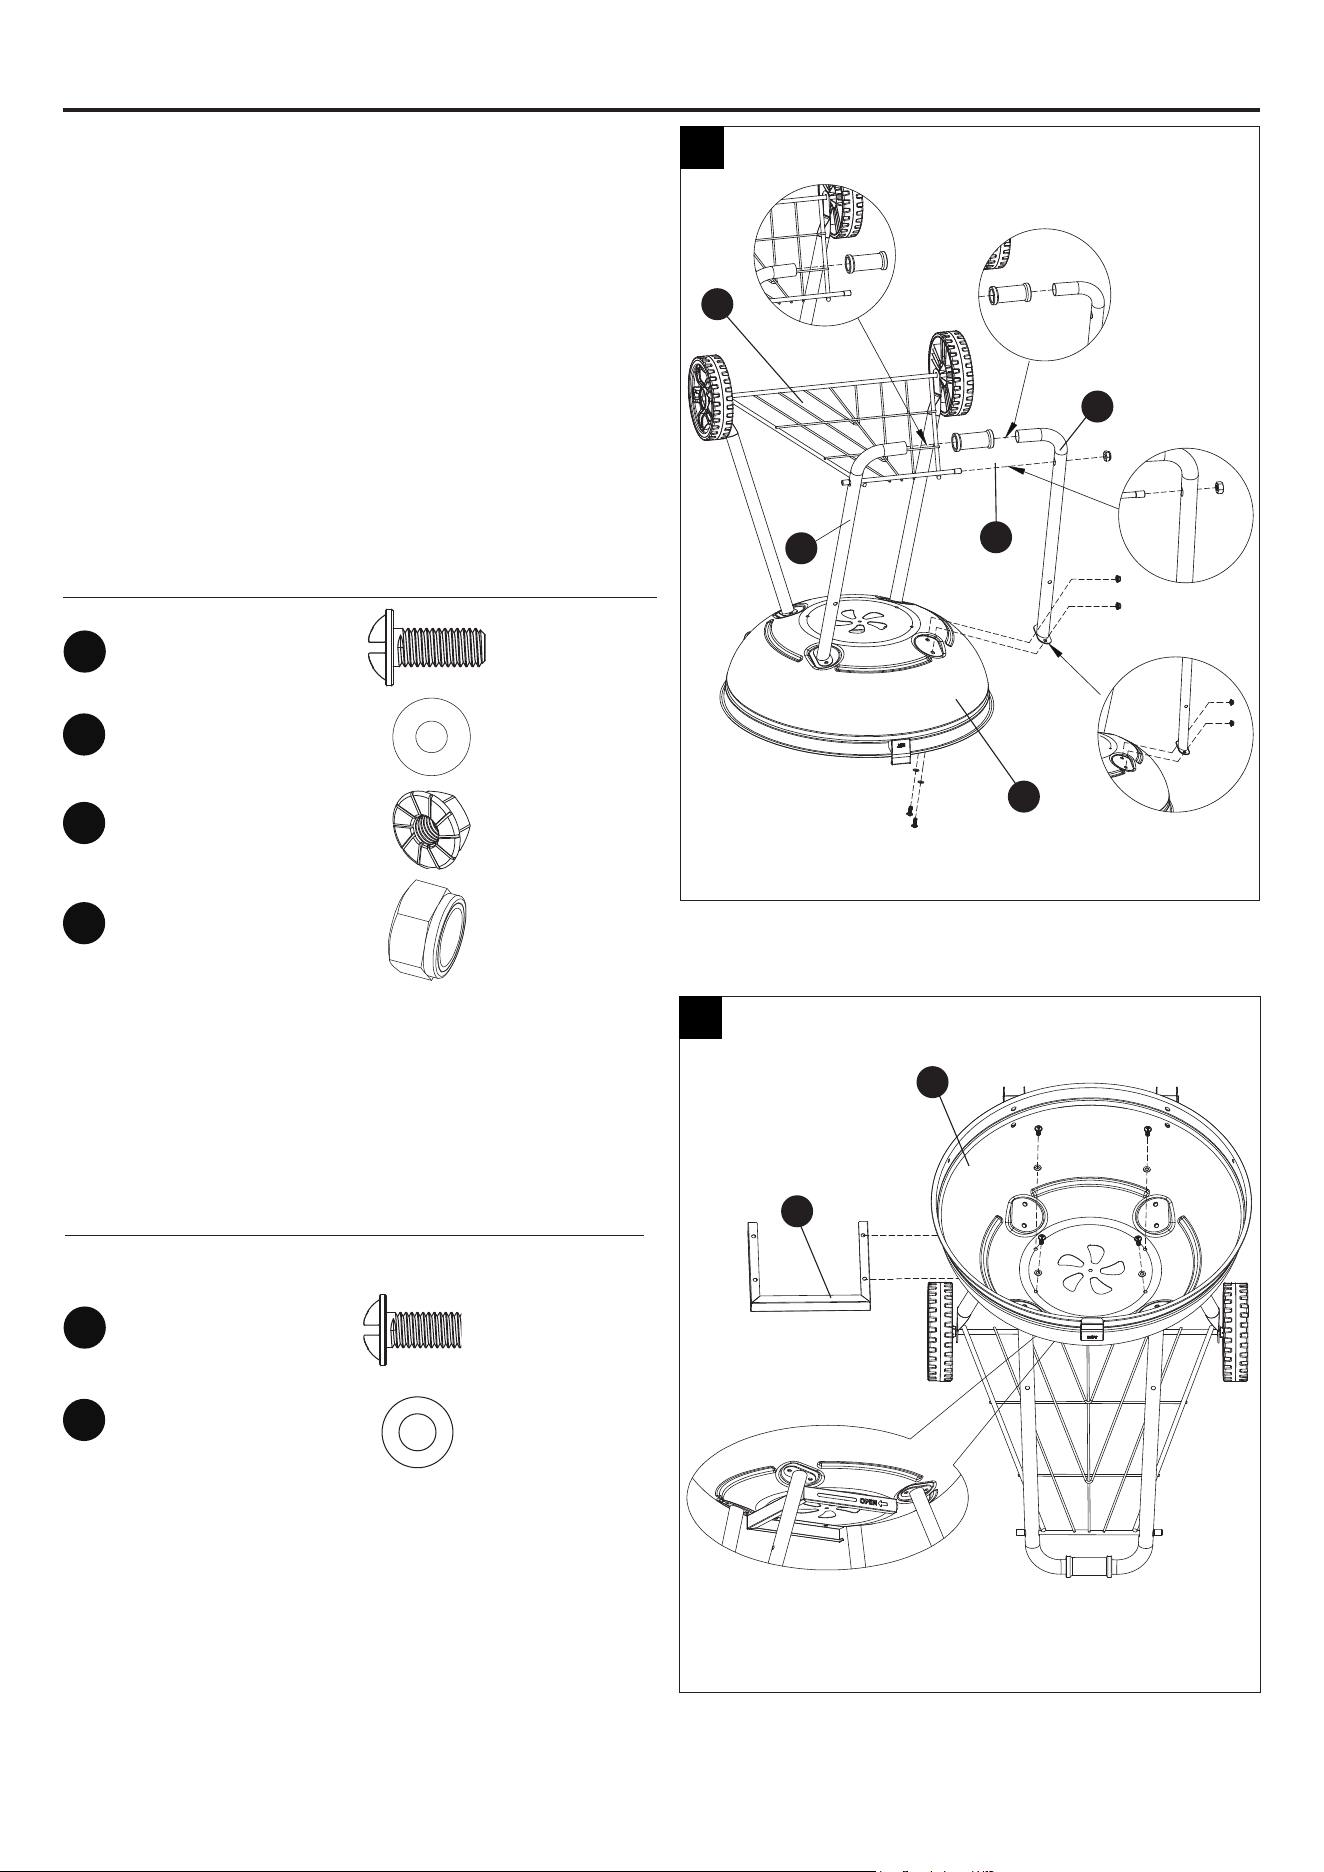
Step 3: Attach Bottom Hinges and Lock
Attach the left bottom hinge (H) and right bottom
hinge (I) onto the bottom bowl (G) with four M6x12
screws (CC) and Ø6 washers (FF).
Attach the lock (N) onto the bottom bowl (G) with
two M5x8 screws (AA) and Ø5 washers (EE).
NOTE: Please do not fully tighten the screws
initially. Leave them slightly loose to allow for easier
alignment of the hinge pins.
Hardware Used
ASSEMBLY INSTRUCTIONS
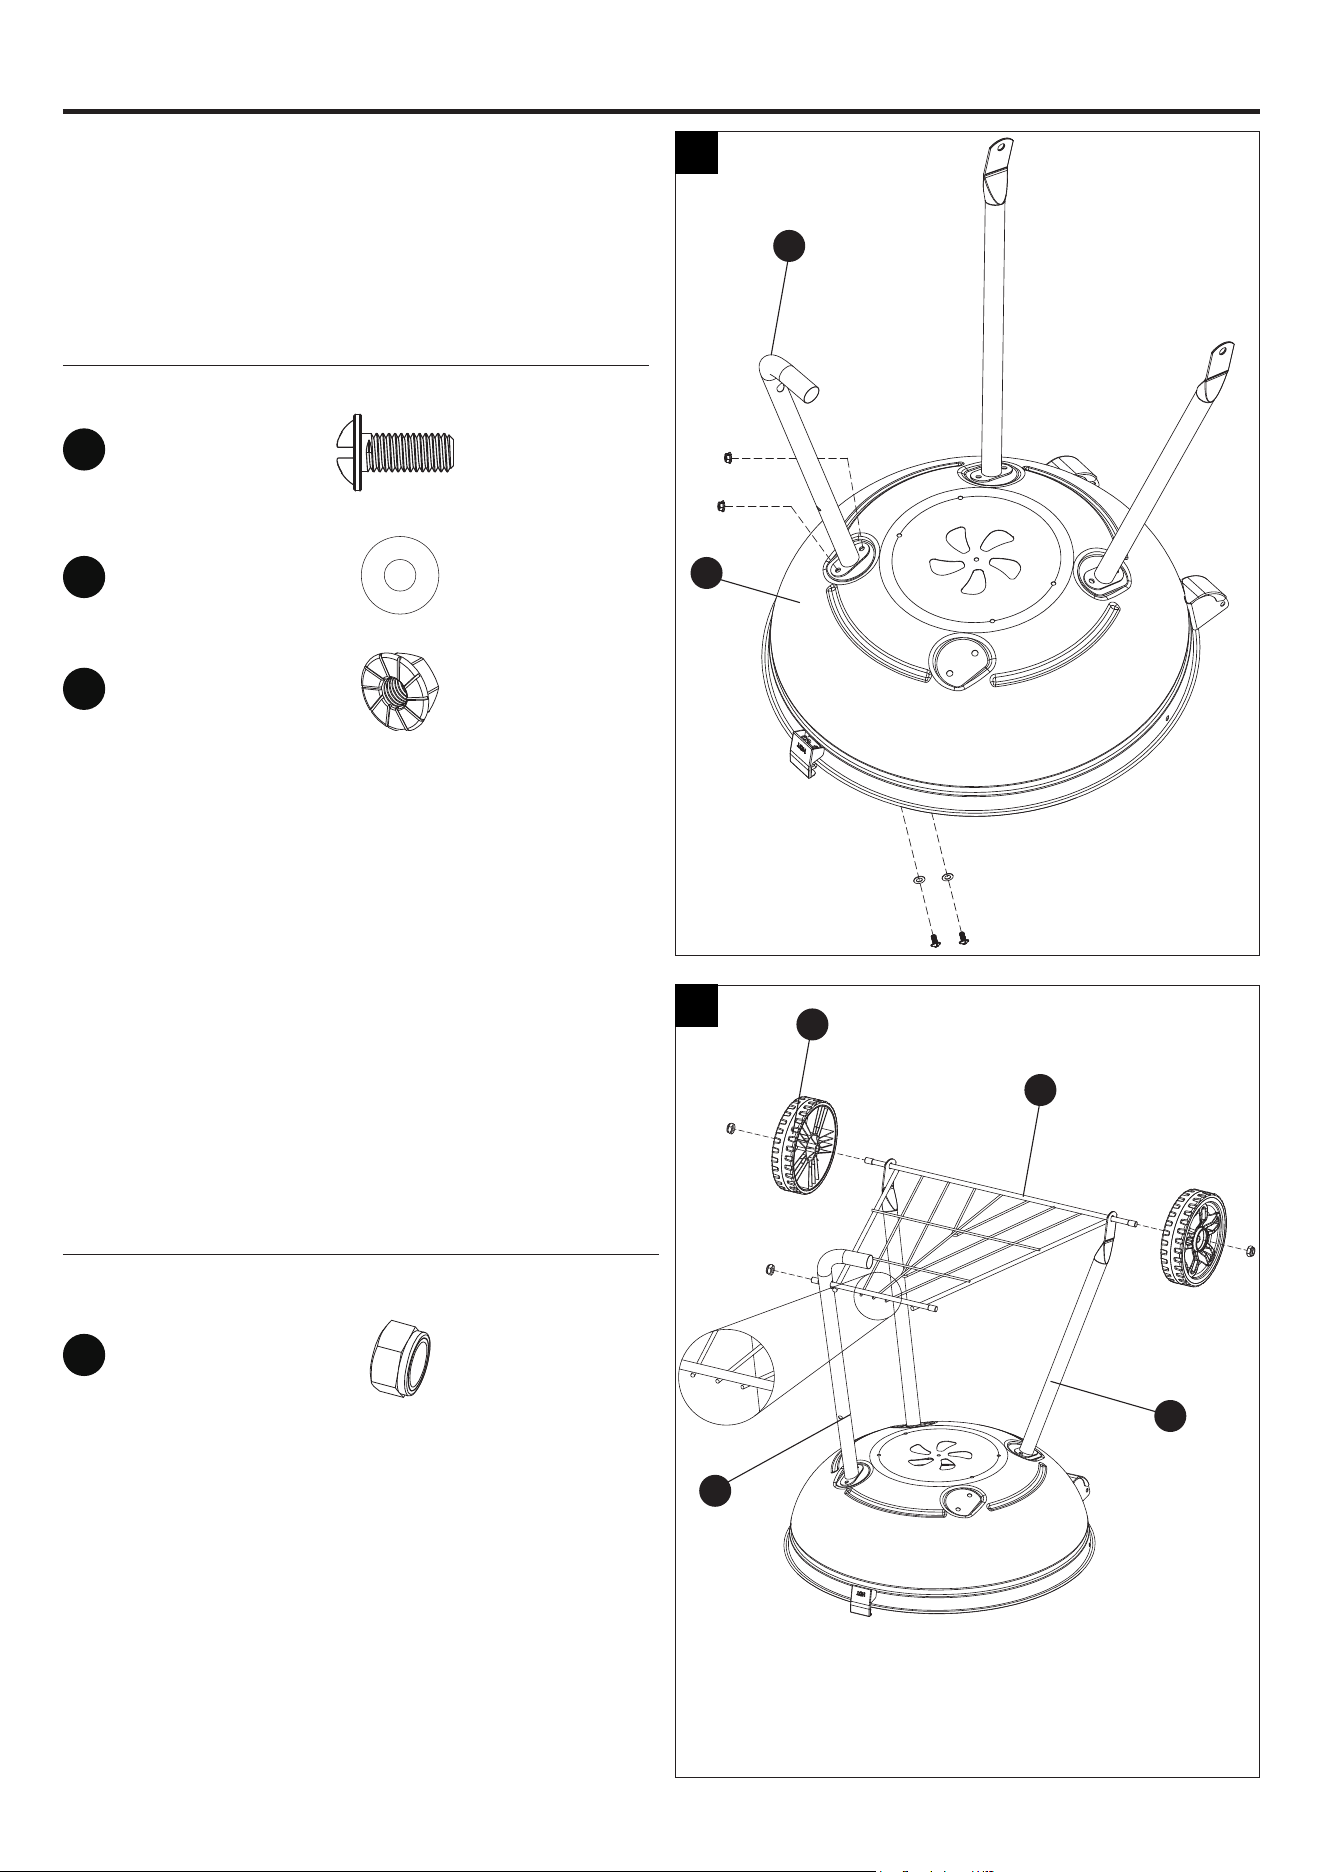
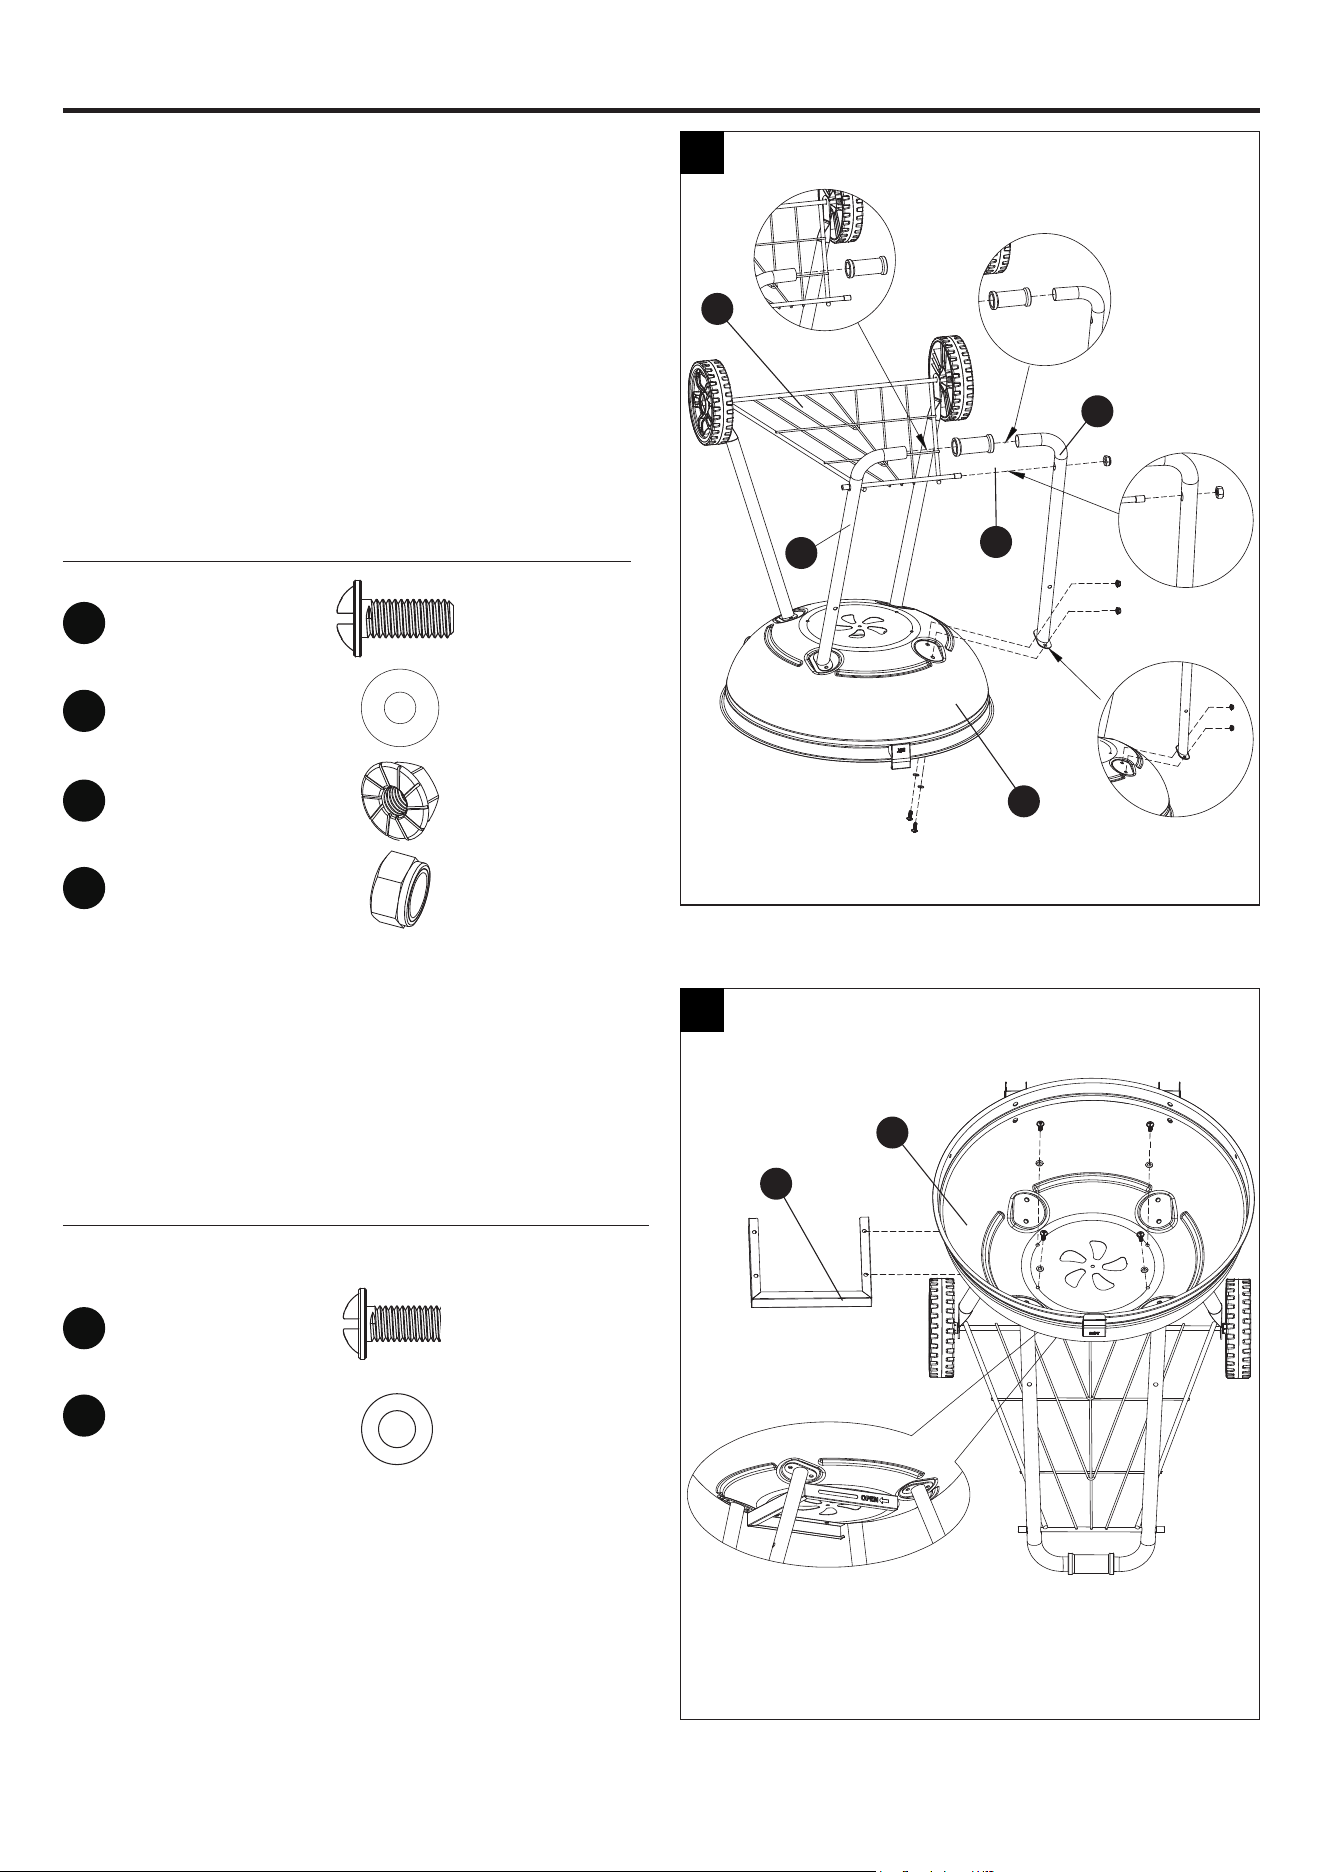
Step 4: Attach Wheel Legs
Align the holes in the wheel legs (S) and
bottom bowl (G). And then attach them onto
the bottom bowl (G) with four M6x12 screws
(CC), Ø6 washers (FF) and M6 nuts (KK).
NOTE: Do not fully tighten screws until bottom
mesh is attached.
Hardware Used
Ø6
Washer
x 4
M5x8
Screw
x 2
M6x12
Screw
x 4
Ø6
Washer
x 4
M6
nut
x 4
M6x12
Screw
x 4
Ø5
Washer
x 2
3
4
EE
CC
CC
AA
FF
FF
KK
N
G
H
I
G
S
8
Step 5: Attach Front Leg
Align the holes in one front leg (T) and bottom
bowl (G). And then attach it onto the bottom bowl
(G) with two M6x12 screws (CC), Ø6 washers (FF)
and M6 nuts (KK).
Hardware Used
ASSEMBLY INSTRUCTIONS
Step 6: Attach Bottom Mesh and Wheels
Attach the bottom mesh (W) onto the wheel legs (S)
and one front leg (T) with one M10 nut (LL).
Attach the wheels (U) onto the axle of the bottom
mesh (W) with two M10 nuts (LL).
Hardware Used
M6x12
Screw
x 2
Ø6
Washer
x 2
M10
Nut
x 3
M6
nut
x 2
CC
FF
KK
LL
5
6
G
T
U
W
T
S
9
ASSEMBLY INSTRUCTIONS
1 2
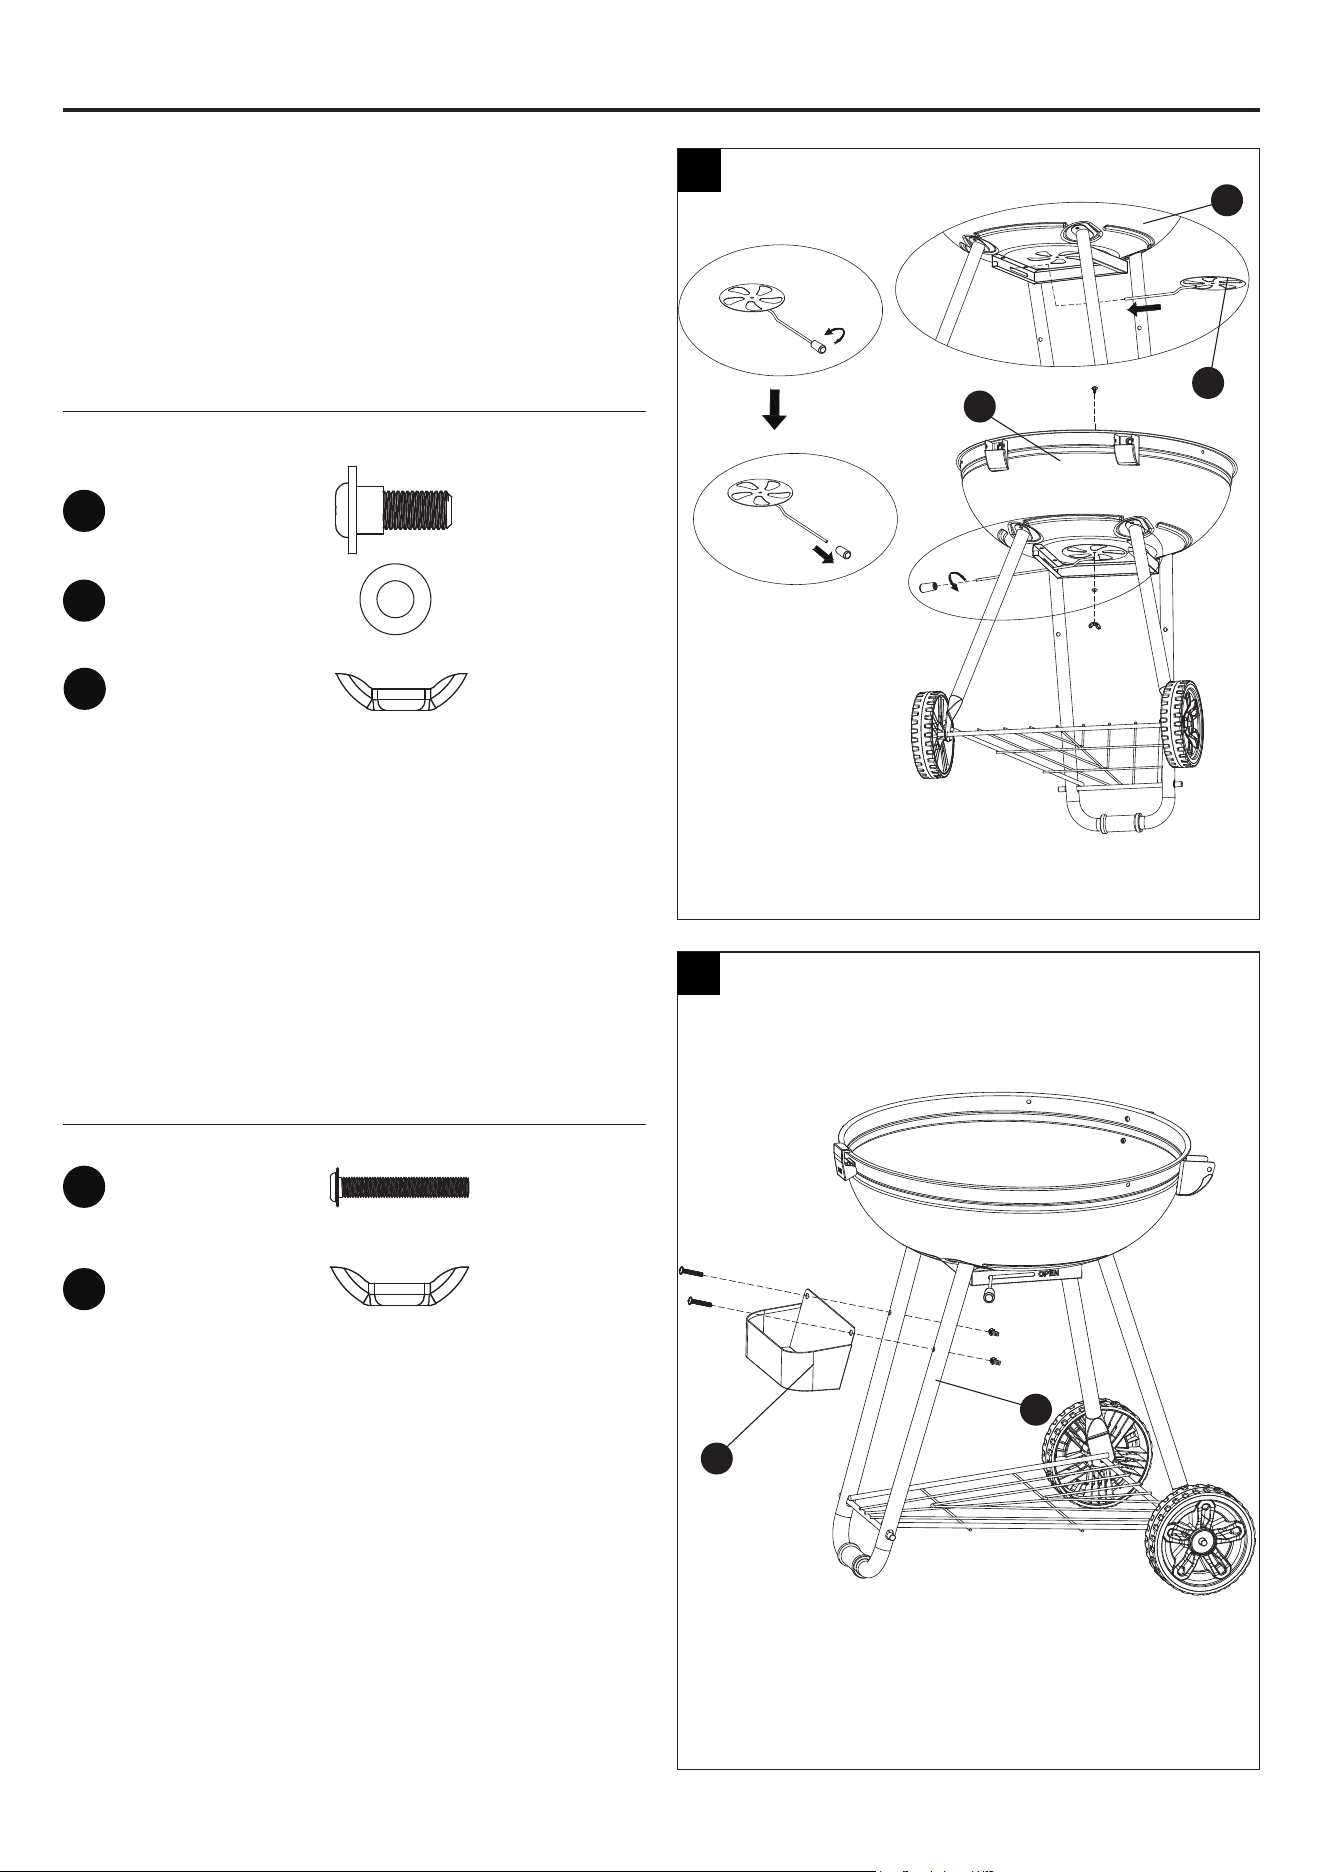
Step 7: Attach Leg Connector and Front Leg
Connect the front legs (T) with the leg connector
(V).
Align the holes in the other front legs (T) and
bottom bowl (G). And then attach it onto the
bottom bowl (G) with two M6x12 screws (CC),
Ø6 washers (FF) and M6 nuts (KK).
Attach the bottom mesh (W) onto the other front
leg (T) with one M10 nut (LL).
Hardware Used
Step 8: Attach Ash Receiver Slide
Align the holes in the ash receiver slide (O) and
bottom bowl (G). And then attach it onto the
bottom bowl (G) with four M5x8 screws (AA) and
Ø5 washers (EE).
Hardware Used
3
4
M6x12
Screw
x 2
Ø6
Washer
x 2
M6
nut
x 2
M10
Nut
x 1
M5x8
Screw
x 4
Ø5
Washer
x 4
CC
FF
KK
AA
LL
EE
7
8
V
T
W
T
G
G
O
10
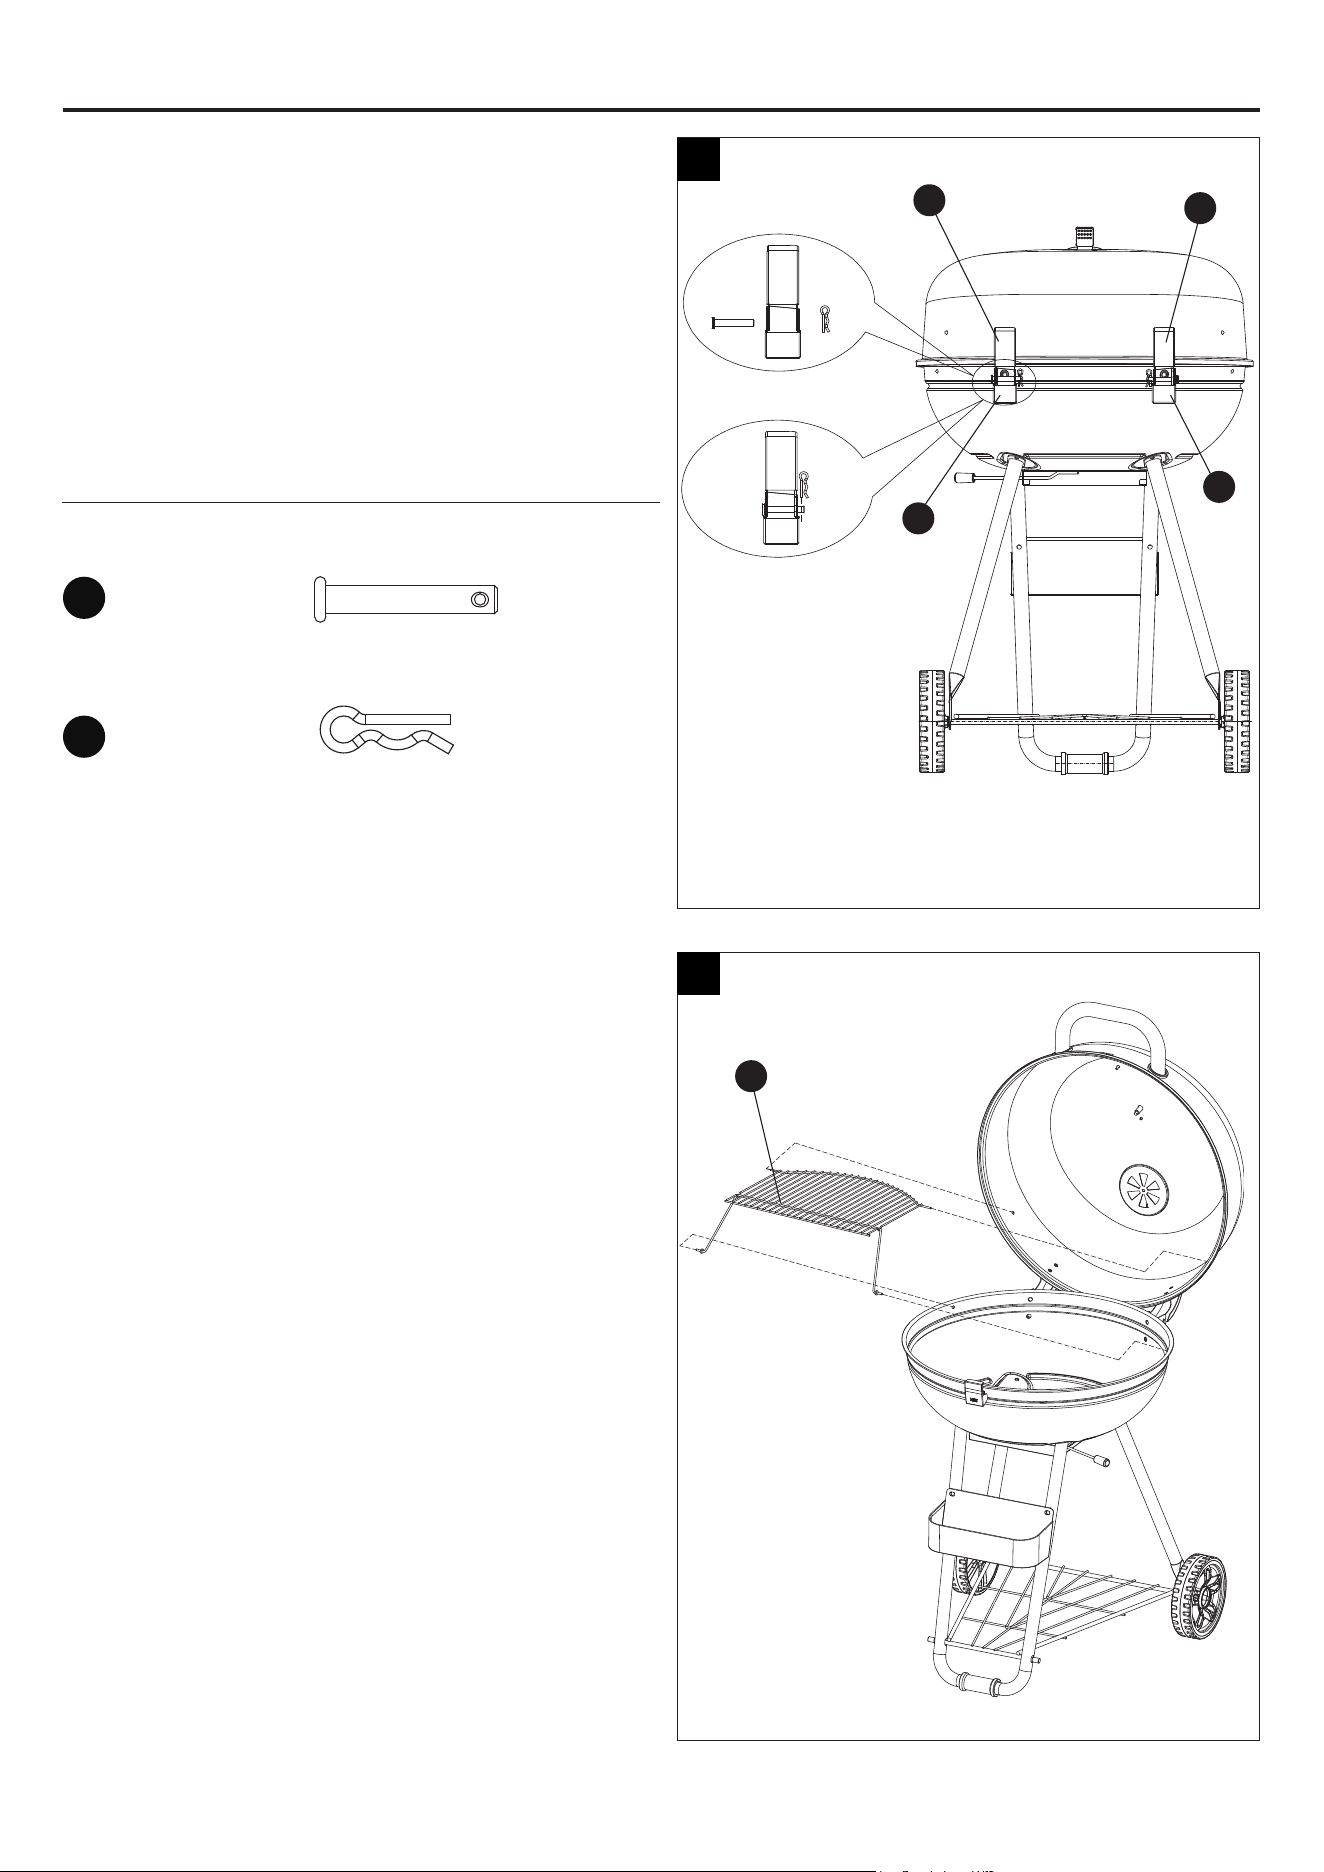
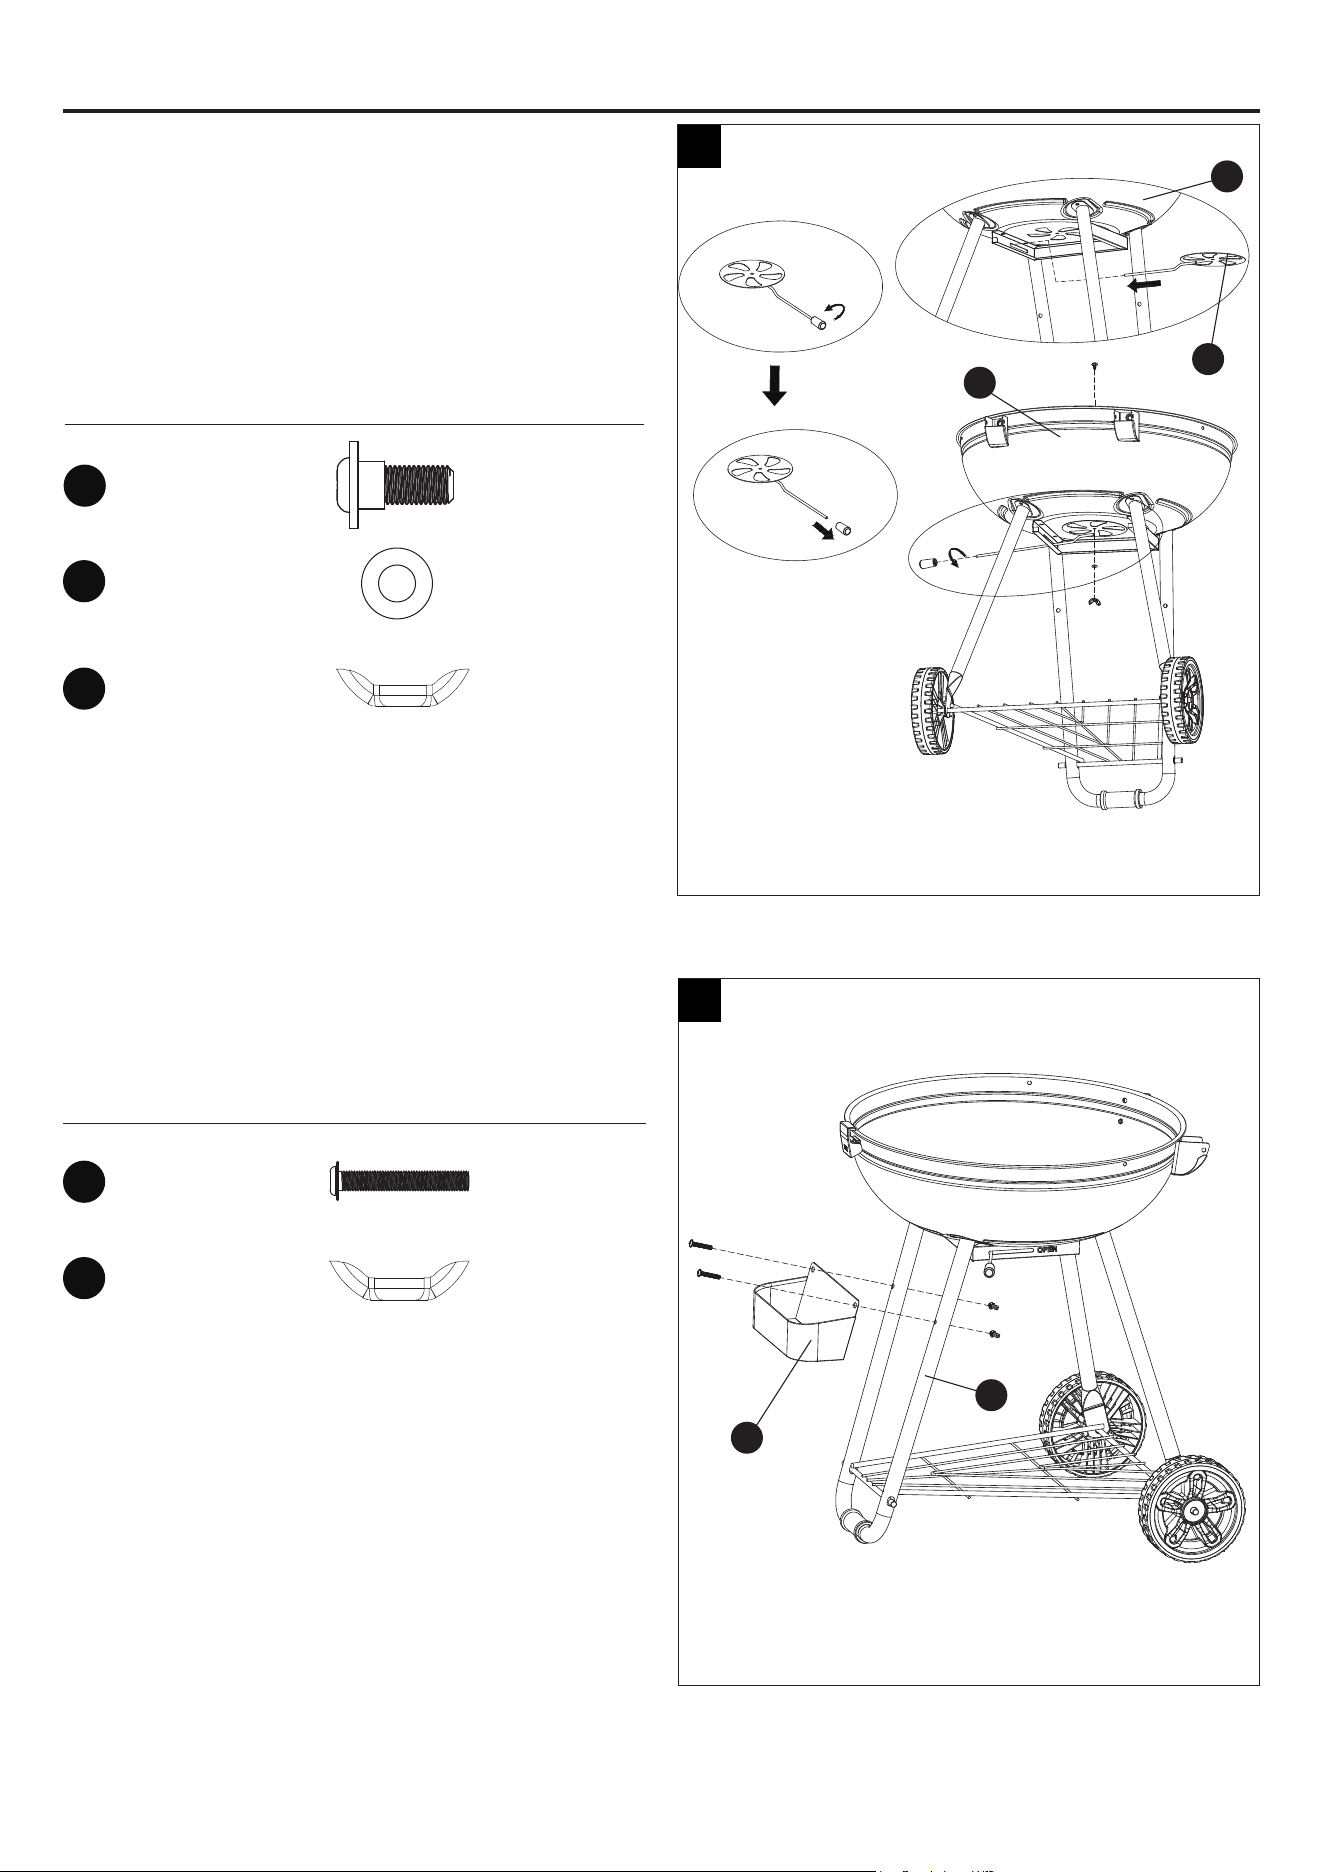
Step 9: Attach Bottom Air Damper
Remove the handle from the bottom air damper (P).
Pass the rod of the bottom air damper (P) through
the ash receiver slide (O) and then attach it onto
the bottom bowl (G) with one M5x10 step screw
(BB), Ø5 washer (EE) and M5 wing nut (II).
Hardware Used
ASSEMBLY INSTRUCTIONS
Step 10: Attach Condiment Holder
Attach the condiment holder (M) onto the front
legs (T).
Hardware Used
1
2
3
4
M5x10
Step Screw
x 1
Ø5
Washer
x 1
M5
Wing Nut
x 1
M6x35
Screw
x 2
M6
Wing Nut
x 2
G
M
T
O
P
BB
EE
DD
JJ
II
9
10
11
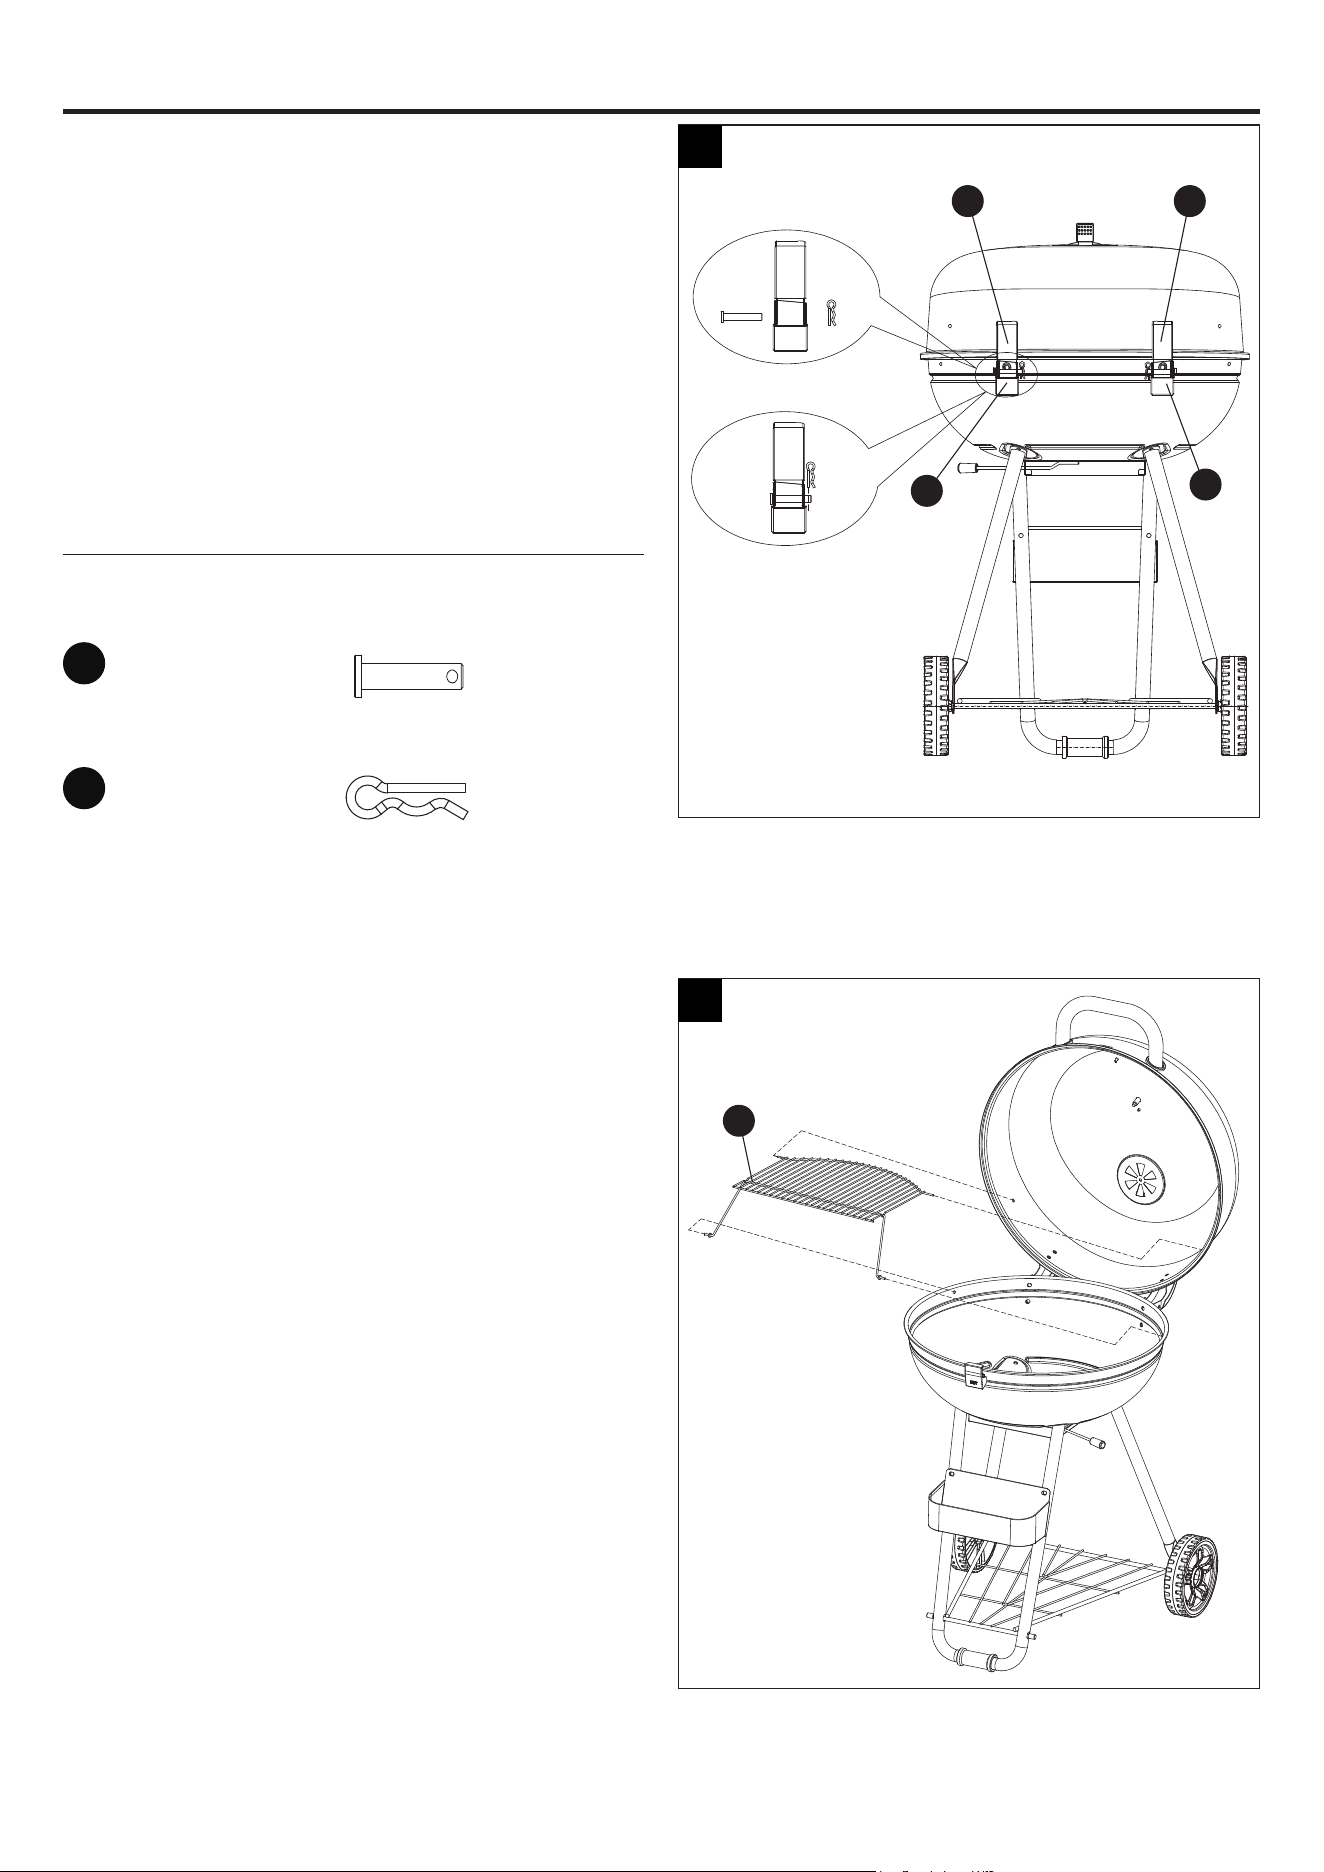
Step 11: Place Lid onto Bottom Bowl
Align the holes in the left top hinge (C), right top
hinge (D), left bottom hinge (H) and right bottom
hinge (I). Then insert the Ø5x45 pins (MM) and
Ø1.4x38 cotter pins (NN).
NOTE: Once the hinge pins are in place, go ahead
and tighten all screws rmly for a sturdy and safe
BBQ grill.
Hardware Used
ASSEMBLY INSTRUCTIONS
Step 12: Attach Warming Rack
Put the warming rack (J) into place.
Ø5x45
Pin
x 2
Ø1.4x38
Cotter Pin
x 2
MM
NN
11
12
C
D
H
J
I
12
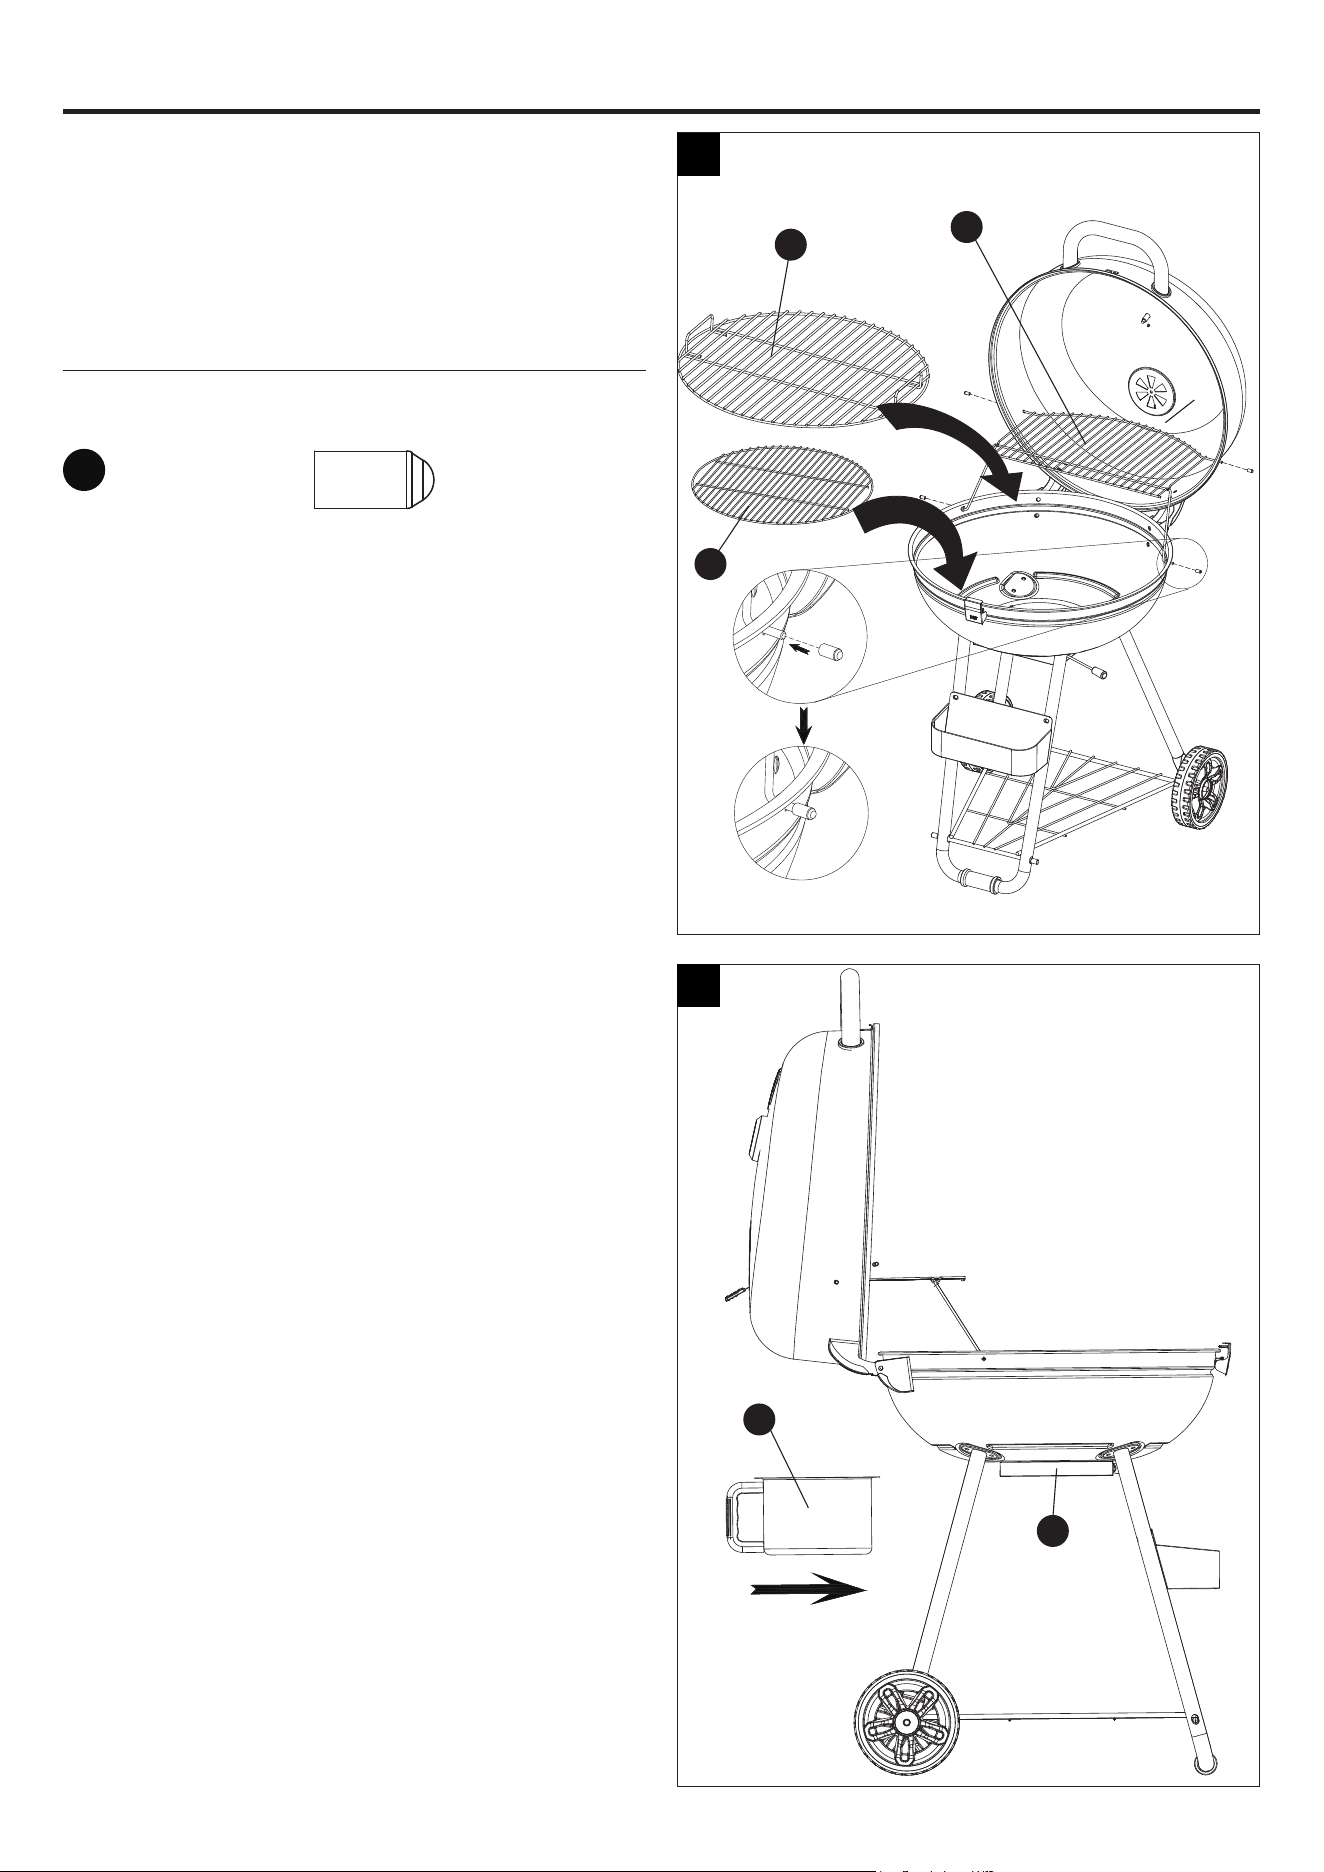
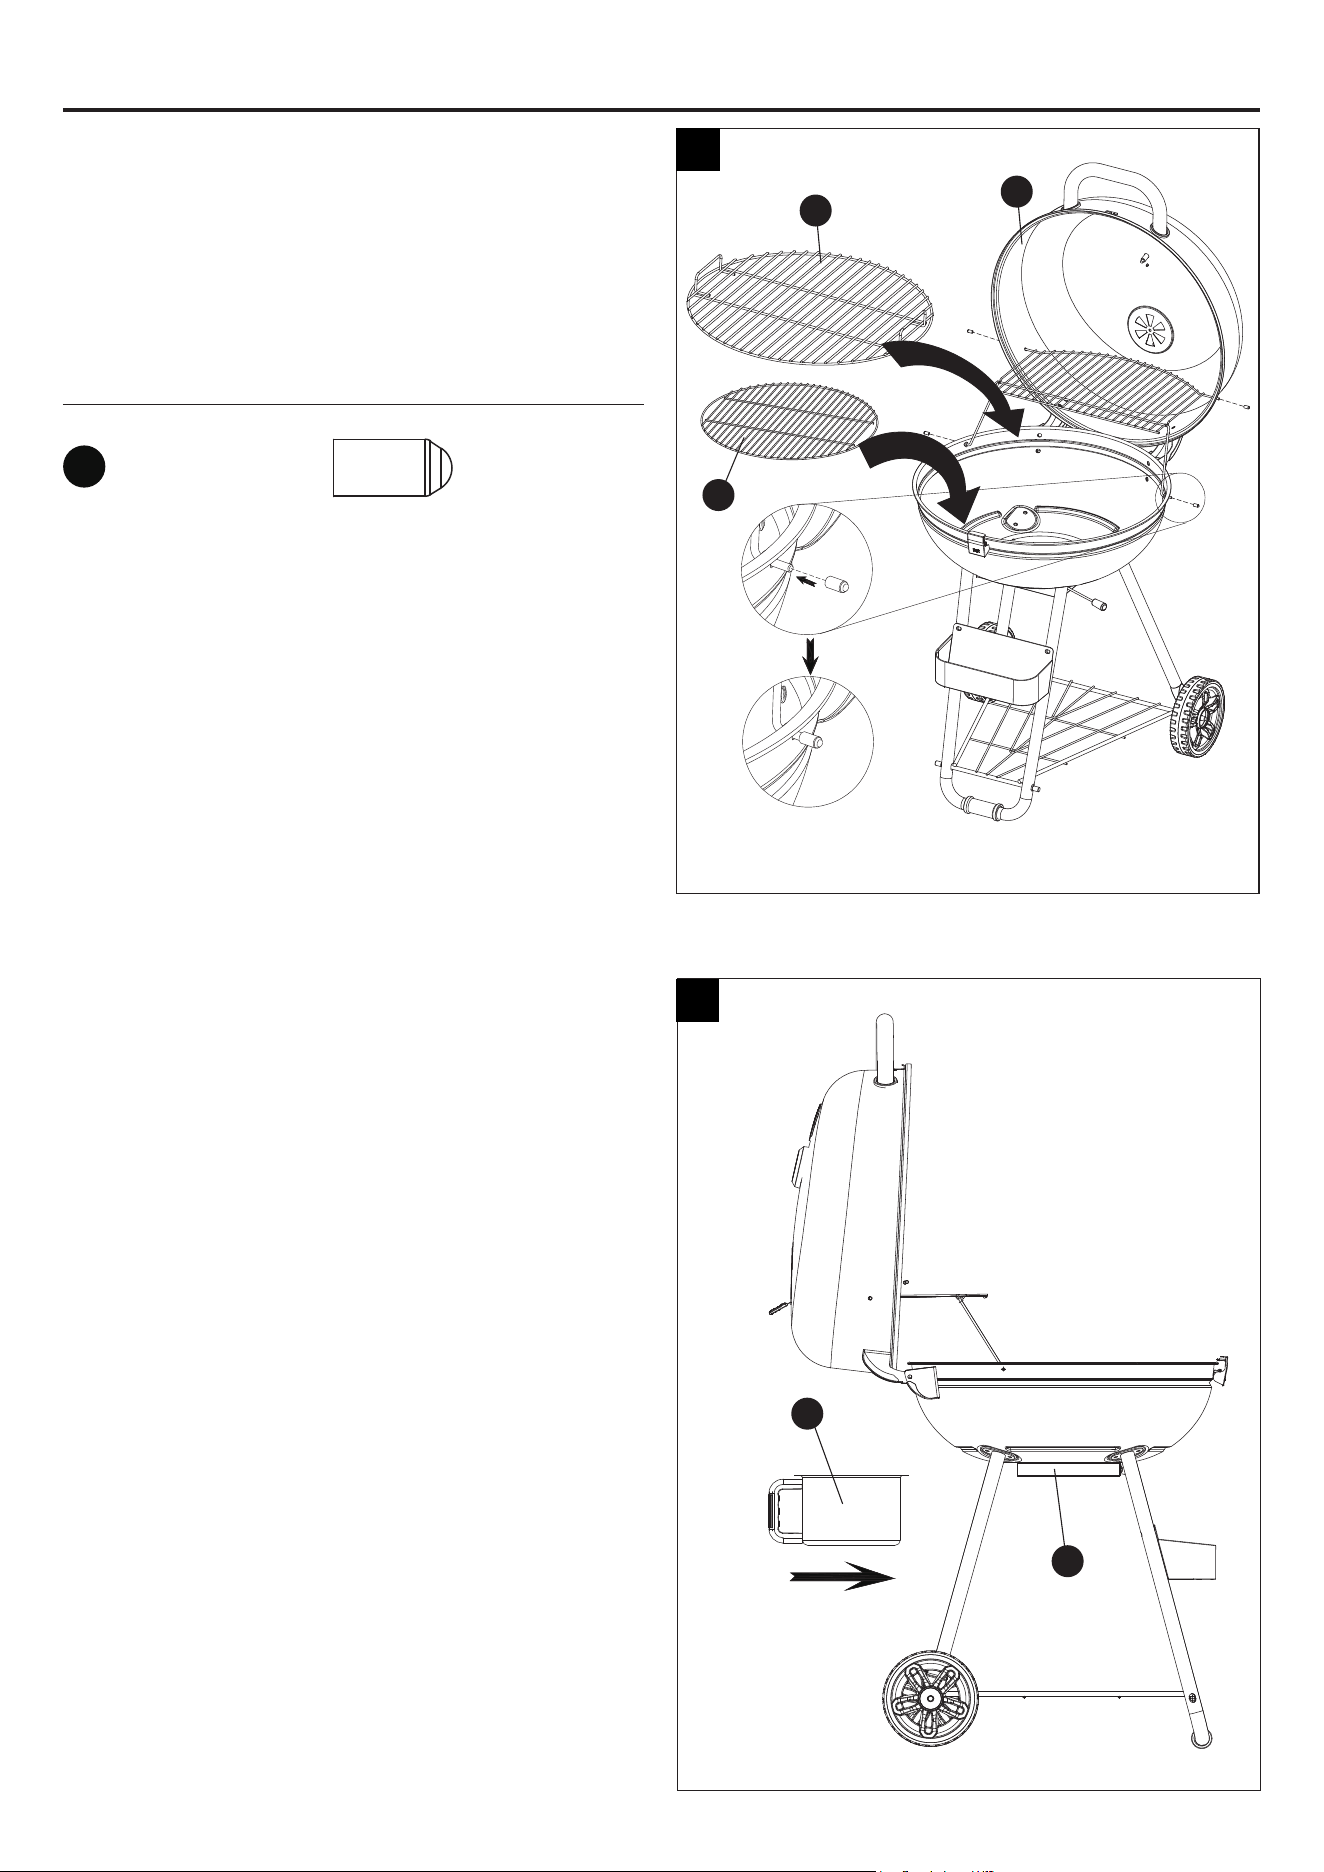
Step 13: Attach Charcoal Grid and Cooking Grid
Put the charcoal grid (L) into place.
Put the cooking grid (K) into place.
Fix the Ø3 rubber stopper(OO) onto the four ends
of warming rack.
Hardware Used
ASSEMBLY INSTRUCTIONS
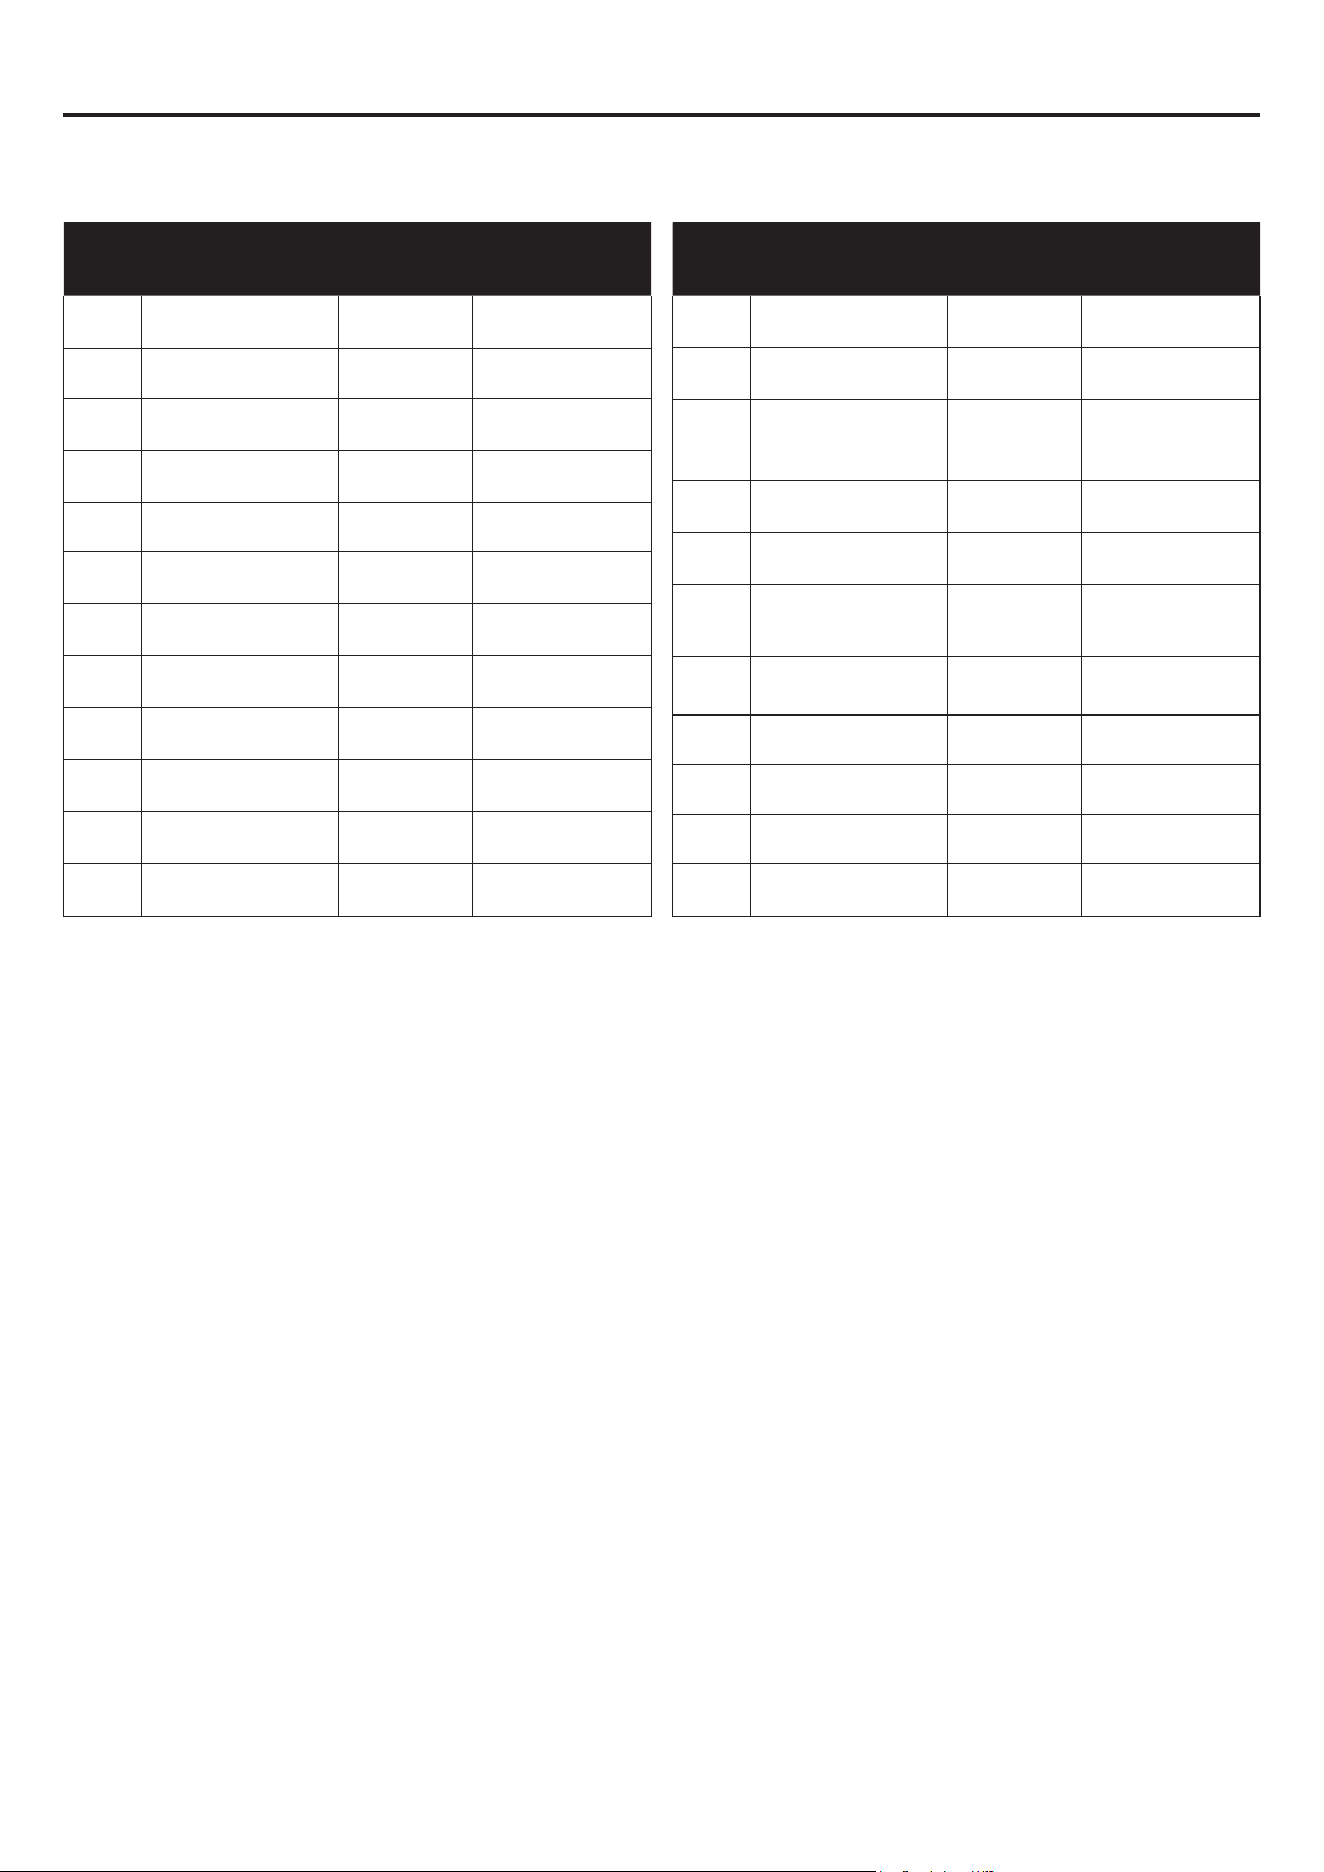
Step 14: Attach Ash Receiver
Slide the ash receiver into the ash receiver slide.
Ø3
Rubber
Stopper
x 4
13
14
K
O
Q
L
J
OO

W CAUTION: Never use charcoal that has been pre-treated with lighter fluid. Use only a high
grade plain charcoal, charcoal/wood mixture, lump charcoal or cooking wood.
First Use
1. Make sure all labels, packaging and protective films have been removed from the grill.
2. Remove manufacturing oils before cooking on this grill for the first time, by operating the grill for at least 15 minutes
with the lid closed. This will “heat clean” the internal parts and dissipate odors.
Lighting Instructions
W CAUTION: Keep outdoor cooking appliance area clear and free from combustible materials,
gasoline and other flammable vapors and liquids.
W CAUTION: Check to make sure the air vents are free of debris and ash before using the
grill.
W CAUTION: Attempting to light the grill with the lid closed may cause an explosion.
W CAUTION: When using a liquid starter, always check bottom bowl and ash receiver
before lighting. Fluid can collect in the bottom bowl and/or ash receiver and could ignite,
resulting in a fire.
W CAUTION: Never add lighting fluid to hot or warm coals as flashback may occur, causing
serious injury or damage to property.
W CAUTION: Always open the legs completely and lock them in place before opening the lid
or lighting the grill.
1. Open lid and vents.
2. Make sure ash receiver is empty and secure.
3. Remove cooking grid.
4. Arrange charcoal briquettes or other fuel on the charcoal grid.
5. Light per instructions on fuel package.
6. Allow fuel to become glowing coals before cooking.
Direct Cooking
Cooking directly over hot coals is ideal for searing in juices and grilling food requiring less than 25 minutes of grilling time
such as steaks, hamburgers, hot dogs, chicken parts, vegetables and fruit.
1. Open lid and remove cooking grid.
2. Load and light charcoal per “Lighting” section. Leave lid open.
3. While wearing protective gloves, carefully spread hot coals evenly across charcoal grid with a long-handled tool.
4. While wearing protective gloves, replace cooking grid, close lid and allow grill to preheat.
5. While wearing protective gloves, open lid and place food onto cooking grids above the hot coals with long handle
tongs.
6. With lid open or closed, cook until desired internal food temperatures are achieved.
NOTE: If additional briquettes are needed, remove food from cooking grid and, while wearing protective gloves, remove
the cooking grid and place additional briquettes without disturbing the hot coals. Carefully replace cooking grid and food.
7. Allow charcoal to burn out by closing lid and all vents. Except in the case of an emergency, do NOT pour water on hot
coals.
Indirect Cooking
Not cooking directly over hot coals is ideal for slow cooking and grilling foods requiring more than 25 minutes, such as
most roasts,loins, chops, whole chickens, turkey, fish and baked goods.
1. Open lid and remove cooking grid.
2. Load and light charcoal per “Lighting” section. Leave lid open.
3. While wearing protective gloves, carefully spread hot coals to the outsides of charcoal grid with a long-handle tool.
4. While wearing protective gloves, replace cooking grid, close lid and allow grill to preheat.
5. Wear protective gloves, to open lid. Use long-handled tools to place food onto cooking grids above the areas without
hot coals.
6. With lid closed, cook until desired internal food temperatures are achieved.
13
OPERATING INSTRUCTIONS

NOTE: If additional briquettes are needed, remove food from cooking grid and, while wearing protective gloves, remove
the cooking grid and place additional briquettes without disturbing the hot coals. Carefully replace cooking grid and food.
7. Allow charcoal to burn out by closing lid and all vents. Except in the case of an emergency, do NOT pour water on hot
coals.
Turning Off
1. Allow charcoal to completely extinguish itself.
W WARNING: Do NOT use water to extinguish. This can be dangerous and cause damage.
2. Dispose of the ashes in a proper location.
Controlling Flare-ups:
W CAUTION: Do NOT use water on a grease fire. This can cause the grease to splatter and
could result in serious burns, bodily harm or other damage.
W CAUTION: Do NOT leave grill unattended while preheating or burning off food residue. If
grill has not been cleaned, a grease fire can occur that may damage the product.
W WARNING: When cooking, fire extinguishing materials should be readily accessible. In the
event of an oil/grease fire, use a type BC dry chemical fire extinguisher or smother with
dirt, sand or baking soda. Do NOT attempt to extinguish with water.
Flare-ups are a part of cooking meats on a grill and add to the unique flavor of grilling.
Excessive flare-ups can over-cook your food and be dangerous.
Important: Excessive flare-ups result from the build-up of grease in the bottom of your grill.
If a grease fire occurs, close the lid until the grease burns out. Use caution when opening the lid as sudden flare-ups may
occur.
If excessive flare-ups occur, do NOT pour water onto the flames.
Minimize Flare-ups:
1. Trim excess fat from meats prior to cooking.
2. Cook high fat content meats indirectly.
3. Ensure that your grill is on a hard, level, non-combustible surface.
W CAUTION:
1. All cleaning and maintenance should be done when grill is cool and with the ashes
properly disposed of.
2. Do NOT clean any grill part in a self-cleaning oven. The extreme heat will damage the
finish.
Notices
1. This grill should be thoroughly cleaned and inspected on a regular basis.
2. Abrasive cleaners will damage this product.
3. Never use oven cleaner to clean any part of grill.
Before Each Use
1. Keep the grill area free and clear from any combustible materials, gasoline, and other flammable vapors and liquids.
2. See below for proper cleaning instructions.
Cleaning Surfaces
1. Wait for grill to fully cool.
CARE AND MAINTENANCE
14
OPERATING INSTRUCTIONS (CONTINUED)

CARE AND MAINTENANCE (CONTINUED)
2. Wipe surfaces clean with a mild dishwashing detergent or baking soda mixed with water.
3. For stubborn stains, use a citrus-based degreaser and a nylon scrubbing brush.
4. Rinse clean with water.
5. Allow to air dry.
Before Storing
1. Wait for grill to fully cool.
2. Clean all surfaces.
3. If storing the grill indoors, cover the grill and store in a cool dry place.
4. If storing the grill outdoors, cover the grill with a grill cover for protection from the weather.
15
LIMITED WARRANTY
Proof of purchase is required to access this warranty program, which is in effect from the date of
purchase. Customers will be subject to parts, shipping, and handling fees if unable to provide proof
of the purchase or after the warranty has expired.
If you have any questions or problems, you can call our customer service department at
800-963-0211, 8 a.m. - 8 p.m., EST, Monday - Sunday. You could also contact us at
Limited Warranty
1-Year Warranty on all parts affecting the operation of the gas grill due to damage.
Warranty Provisions:
This warranty is non-transferable and does not cover failures due to misuse or improper installation
or maintenance.
This Warranty is for replacement of defective parts only. We are not responsible for incidental or
consequential damages or labor costs.
This warranty does not cover corrosion or discoloration after the grill is used, or due to lack of
maintenance, hostile environment, accidents, alterations, abuse or neglect.
This warranty does not cover damage caused by heat, abrasive and chemical cleaners, or any
damage to other components used in the installation or operation of the gas grill.
Some states do not allow the limitation or exclusion of incidental or consequential damages, so the
above limitations or exclusions may not apply to you. This warranty gives you specific legal rights,
and you may also have other rights that vary from state to state.
REPLACEMENT PARTS LIST
Printed in China
PART DESCRIPTION PART#
COVERED UNDER
WARRANTY
1 Lid C2304-010 YES
2 Lid Handle C2304-020 YES
3 Left Top Hinge C1843-030 YES
4 Right Top Hinge C1843-040 YES
5 Air Vent B0105-A01 YES
6 Temperature Gauge B0104-M13 YES
7 Bottom Bowl C2304-030 YES
8 Left Bottom Hinge C1843-050 YES
9 Right Bottom Hinge C1843-060 YES
10 Warming Rack C2243-030 YES
11 Cooking Grid C1843-090 YES
12 Charcoal Grid C1843-100 YES
PART DESCRIPTION PART#
COVERED UNDER
WARRANTY
13 Condiment Holder C2304-040 YES
14 Lock C2304-050 YES
15 Ash Receiver Slide C2304-060 YES
16 Bottom Air Damper C1943-110 YES
17 Ash Receiver C1843-130 YES
18 Receiver Handle* C1843-140 YES
19 Wheel Leg C1943-140 YES
20 Front Leg C2304-070 YES
21 Wheel C2304-080 YES
22 Leg Connector C2304-090 YES
23 Bottom Mesh C2304-100 YES
For replacement parts, call the customer service department at 800-963-0211, 8 a.m. - 8 p.m., EST, Monday - Sunday.
You could also contact us at [email protected].
16
* Pre-assembled
17
ARTÍCULO #5139534
PARRILLA TIPO TETERA
PORTÁTIL DE 55.88 CM
MODELO #CBC23043L
ADJUNTE SU RECIBO AQUÍ
MASTER FORGE y el diseño del logotipo son marcas comerciales
o marcas registradas de LF, LLC. Todos los derechos reservados.
Número de serie
Fecha de la compra
ADVERTENCIA
PARA SU SEGURIDAD:
¡Solo para uso en exteriores! (fuera de
cualquier estructura exterior)
ADVERTENCIA
PARA SU SEGURIDAD:
La instalación, el ajuste, la alteración, la
reparación o el mantenimiento inadecuados
pueden producir lesiones o daños
materiales. Lea detenidamente este manual
de instrucciones antes de instalar o reparar
este equipo.
PELIGRO
Nunca deje este electrodoméstico sin
supervisión.
ADVERTENCIA
PARA SU SEGURIDAD:
NO DEJE ESTE ELECTRODOMÉSTICO SIN
SUPERVISIÓN MIENTRAS ESTE EN USO,
ESPECIALMENTE, SI COCINA CARNE
GRASA Y CIERRA LA TAPA DEMASIADO
TIEMPO.
ADVERTENCIA:
Este producto puede exponerlo
a productos químicos,
incluidos el monóxido de carbono y el
hollín, reconocidos por el estado de
California como causantes de cáncer y
defectos congénitos u otros daños en el
aparato reproductivo. Para obtener más
información, visite
www.P65Warnings.ca.gov.
ADVERTENCIA
• No almacene ni use gasolina u otros
vapores o líquidos inflamables cerca de
este u otro electrodoméstico.
• Cuando cocine con aceite o grasa, no
permita que supere los 177 °C (350 °F) de
temperatura. No almacene ni utilice aceite
de cocina cerca de este ni de ningún otro
electrodoméstico.
AS23388
CBC23043L-RA-ES-OM-F101
¿Tiene preguntas o problemas? ¿Falta alguna pieza? Antes de volver a la
tienda, llame a nuestro Departamento de Servicio al Cliente al 800-963-0211,
de lunes a domingo de 8 a.m. a 8 p.m., hora estándar del Este. También
puede ponerse en contacto con nosotros a través de [email protected].

18
W Esta parrilla es solo para uso en exteriores y NO
se debe usar en edificios, garajes ni en ninguna
otra área cerrada.
W NO opere, encienda ni use este electrodoméstico
a menos de 3.04 m (10 pies) de distancia de
paredes, estructuras o edificios.
W Solo para uso residencial. Esta parrilla NO es
para uso comercial.
W Esta no es una parrilla de mesa. Por lo tanto, no
use esta parrilla sobre ningún tipo de superficie
de cubierta de mesa.
W No utilice carbón que se haya pretratado con
líquido encendedor. Use solo carbón puro, mezcla
de carbón y madera, carbón de leña o madera
para leña de alta calidad. La conversión o el uso
de otra fuente de combustible en esta parrilla a
carbón es peligroso y anulará la garantía.
W Esta parrilla NO está diseñada para usarse como
calentador y nunca debe utilizarse como tal. Los
gases TÓXICOS pueden acumularse y causar
asfixia.
W NO utilice la parrilla para la cocción en interiores.
Las emanaciones TÓXICAS de monóxido de
carbono pueden acumularse y causar asfixia.
W Esta parrilla está certificada para utilizarse con
seguridad en los EE.UU. y Canadá solamente.
NO la modifique para usarla en otro lugar.
Cualquier modificación tendrá como resultado un
riesgo para la seguridad y anulará la garantía.
W Para quienes viven en departamentos: consulte
con el administrador los requisitos y códigos
de incendio para usar una parrilla a carbón en
su complejo de departamentos. Utilícelo en el
exterior, en la planta baja, a una distancia de
3.04 m (10 pies) de cualquier estructura, en
caso de estar permitido. NO lo utilice debajo de
balcones ni sobre estos.
W Debe haber un espacio de separación mínimo
de 91.44 cm (36 pulg.) entre construcciones
de material combustible y los lados y la
parte posterior de la unidad. NO utilice este
electrodoméstico debajo de ningún tipo de alero
o techo.
W NO use gasolina, queroseno ni alcohol para
encender la parrilla.
W NO utilice el electrodoméstico en un entorno
explosivo. Mantenga el área de la parrilla libre
de materiales combustibles, gasolina y otros
vapores o líquidos inflamables.
W NO almacene ni utilice gasolina ni otros vapores
o líquidos inflamables a menos de 7.62 m (25
pies) de distancia de este electrodoméstico.
W NO bloquee los orificios de los lados ni de la
parte posterior de la parrilla.
W Inspeccione la parrilla antes de cada uso.
W NO altere la parrilla de ninguna manera.
Cualquier alteración anulará la garantía.
W NO arme este modelo de parrilla sobre una
construcción empotrada o deslizante. Si no sigue
esta advertencia, podría provocar un incendio o
una explosión que ocasione lesiones personales
graves, la muerte o daños materiales.
W NO use la parrilla a menos que esté
COMPLETAMENTE ensamblada y todas las
piezas estén bien ajustadas y apretadas.
W Esta parrilla se debe limpiar e inspeccionar
minuciosamente en forma periódica.
W Utilice solo piezas autorizadas por Lowe's Home
Centers LLC. El uso de piezas que no estén
autorizadas por la fábrica puede ser peligroso y
anulará la garantía.
W NO use este electrodoméstico sin antes leer
las "Instrucciones de funcionamiento" en este
manual.
W Para evitar sufrir quemaduras, NO toque las
Información de seguridad..........................................................18
Contenido del paquete .......................................................... 20
Aditamentos . . . . . . . . . . . . . . . . . . . . . . . . . . . . . . . . . . . . . . . . . . . . . . . . . . . . . . . . . . . . . . . . . . . 21
Preparación ....................................................................21
Instrucciones de ensamblaje ...................................................... 22
Instrucciones de funcionamiento ................................................... 29
Cuidado y mantenimiento......................................................... 30
Garantía limitada ............................................................... 31
Lista de piezas de repuesto ...................................................... 32
W PELIGRO: no seguir los avisos de peligro, las advertencias y las precauciones de este manual
podría causar lesiones personales graves o la muerte, o incendios o explosiones que
causen daños materiales.
W ADVERTENCIAS:
INFORMACIÓN DE SEGURIDAD
ÍNDICE

19
piezas metálicas de la parrilla hasta que se
hayan enfriado completamente, a menos que
utilice un equipo de protección (agarraderas,
guantes, almohadillas para horno, etc.).
W Nunca toque las rejillas (para el carbón, de
cocción o para calentar), las cenizas ni el carbón
para comprobar si están calientes.
W NO use la parrilla sobre plataformas o muebles
de madera u otra superficie combustible.
W Esta parrilla NO debe usarse en vehículos
recreativos ni en botes.
W Coloque la parrilla de manera tal que el viento
no pueda soplar las cenizas hacia superficies
combustibles.
W NO use la parrilla si hay viento fuerte.
W Nunca se incline sobre la parrilla al encenderla.
W NO deje la parrilla encendida sin supervisión.
Mantenga a los niños y las mascotas alejados de
la parrilla en todo momento.
W NO intente mover la parrilla mientras la está
usando. Deje que la parrilla se enfríe antes de
moverla o almacenarla.
W NO deje la parrilla sin supervisión mientras la
precalienta o quema residuos de alimentos.
W Cuando cocine, tenga a su alcance materiales
para la extinción del fuego. En caso de que se
produzca un incendio por aceite o grasa, NO
intente apagarlo con agua. Use un extintor de
incendios a base de polvo químico seco tipo BC
o apáguelo con tierra, arena o bicarbonato.
W Siempre abra la tapa de la parrilla lentamente y
con cuidado, ya que el calor y el vapor atrapados
dentro de ella pueden causarle quemaduras
graves.
W Si la parrilla no se ha limpiado, podría ocurrir
un incendio provocado por la grasa que puede
dañar el producto.
W NO coloque recipientes de cocción vacíos
sobre el electrodoméstico mientras está en
funcionamiento.
W Tenga cuidado al colocar objetos sobre la parrilla
mientras está en funcionamiento.
W Nunca agregue líquido para encendedor a las
cenizas calientes ni tibias, ya que se pueden
producir retrocesos de la llama y ocasionar
lesiones graves o daños materiales.
W Siempre coloque la parrilla sobre una superficie
sólida, nivelada y no combustible. Una superficie
de asfalto podría no ser apta para este objetivo.
W NO retire las cenizas hasta que se hayan
apagado total y completamente.
W Las briquetas y las cenizas encendidas y
calientes pueden crear un riesgo de incendio.
W Siempre vacíe la fuente inferior y la parrilla
después de cada uso.
W NO coloque combustibles (briquetas de carbón,
madera ni carbón de leña) directamente en el
fondo de la parrilla. Coloque combustible solo en
la bandeja o rejilla para carbón.
W NO permita que el carbón permanezca en
las paredes de la parrilla. Hacerlo reducirá
enormemente la vida útil del metal y acabado de
su parrilla.
W Asegúrese de que no haya desechos ni cenizas
en el orificio de ventilación antes del uso de la
parrilla.
W Los carbones y cenizas apagados deben
colocarse a una distancia segura de todas las
estructuras y materiales combustibles.
W Con una manguera para jardín, moje
completamente la superficie debajo y alrededor
de la parrilla para extinguir cualquier ceniza,
carbón o brasa que pueda haber caído durante
el proceso de cocción o de limpieza.
W El consumo de alcohol o medicamentos
recetados o sin receta puede disminuir la
capacidad del consumidor para ensamblar o
usar esta parrilla de manera segura y correcta.
W Siempre use guantes de protección cuando
agregue combustible (briquetas de carbón,
madera o carbón de leña) para mantener el nivel
de calor deseado.
W Mantenga todos los cables eléctricos lejos de la
parrilla caliente.
W Siempre use un termómetro para carne para
asegurarse de que los alimentos se estén
cocinando a una temperatura segura.
W Nunca cubra completamente el área de cocción
con papel de aluminio. Colocar el papel de
aluminio sobre las rejillas puede restringir el
flujo de aire previsto dentro de la parrilla y crear
barreras para el flujo adecuado de grasa a la
bandeja colectora. Esto permite la acumulación
de mucha grasa en la bandeja inferior, lo que,
a su vez, aumenta la posibilidad de que se
produzcan llamaradas o llamas producidas por
grasa.
W Use guantes de protección cuando ensamble
este producto.
W NO una las piezas a la fuerza, ya que podría
provocar heridas personales o daños al
producto.
W NO toque el receptor de cenizas ni el mango del
receptor de cenizas hasta que la parrilla se haya
enfriado por completo, a menos que esté usando
un equipo de protección.
W NO toque el respiradero ni el mango del
respiradero hasta que la parrilla se haya enfriado
por completo, a menos que esté usando un
equipo de protección.
W Si no sigue la instrucción anterior al pie de la
letra, podría ocasionar lesiones graves, muerte o
daños materiales.
INFORMACIÓN DE SEGURIDAD

20
CONTENIDO DEL PAQUETE
C
D
F
E
B
J
K
L
M
A
G
H
I
N
O
P
R
Q
S
T
V
W
UU
AA
JJ
BB
KK
CC
LL
DD
MM
EE
OO
FF
NN
GG
PP
QQ
HH II
21
PIEZA DESCRIPCIÓN CANTIDAD
A Tapa 1
B Manija de la tapa 1
C Bisagra superior izquierda 1
D Bisagra superior derecha 1
E Respiradero 1
F Medidor de temperatura 1
G Fuente inferior 1
H Bisagra inferior izquierda 1
I Bisagra inferior derecha 1
J Rejilla para calentar 1
K Rejilla de cocción 1
L Rejilla para el carbón 1
PIEZA DESCRIPCIÓN CANTIDAD
M Especiero 1
N Seguro 1
O
Deslizador del recibidor de
cenizas
1
P Regulador de tiro inferior 1
Q Colector de cenizas 1
R Mango del recibidor* 1
S Pata con ruedas 2
T Pata delantera 2
U Rueda 2
V Conector de patas 1
W Malla inferior 1
Tornillo
M5x8
Cant.: 6
Tornillo de
grada
M5x10
Cant.: 2
Tornillo
M6x12
Cant.: 18
Arandela
Ø6
Cant.: 16
Arandela
Ø5
Cant.: 8
Destornillador
Philips #2
Cant.: 1
Antes de comenzar a ensamblar el producto, asegúrese de tener todas las piezas. Compare las piezas con la
lista del contenido del paquete y la lista de aditamentos. No intente ensamblar el producto si falta alguna pieza
o si están dañadas.
Tiempo estimado de ensamblaje: 35 minutos por una persona.
Herramientas necesarias para el ensamblaje: llave inglesa (incluida) y destornillador Phillips (no se
incluye).
CONTENIDO DEL PAQUETE
ADITAMENTOS
Preparación
Tornillo
M6x35
Cant.: 2
* Preensamblada
Arandela
grande
Ø6x22
Cant.: 2
Tuerca
mariposa
M5
Cant.: 2
Arandela de
seguridad
Ø6
Cant.: 2
Pasador
de chaveta
Ø1.4x38
Cant.: 2
Tuerca
mariposa
M6
Cant.: 2
Tuerca
M6
Cant.: 8
Perno
M10
Cant. 4
Pasador
Ø5x45
Cant.: 2
Tope de goma
Ø3
Cant. 4
Llave inglesa M6-M10
Cant.: 1
1
B
A
E
2
D
C
A
F
22
Paso 1: je la manija de la tapa y la ventila
Coloque la manija de la tapa (B) en la tapa (A)
con dos tornillos M6x12 (CC), arandelas grandes
Ø6x22 (GG) y arandelas de seguridad Ø6 (HH).
Fije la ventila (E) en la tapa (A) con un tornillo de
grada M5x10 (BB), una arandela Ø5 (EE) y una
tuerca mariposa M5 (II).
Aditamentos utilizados
Paso 2: je las bisagras superiores y el medidor
de temperatura
Fije la bisagra superior izquierda (C) y la bisagra
superior derecha (D) en la tapa (A) con cuatro
tornillos M6x12 (CC) y arandelas Ø6 (FF).
Fije el medidor de temperatura (F) en la tapa (A).
NOTA: retire primero la arandela y la tuerca
mariposa preensambladas en el medidor de
temperatura (F).
NOTA: no apriete completamente los tornillos
inicialmente. Déjelos ligeramente sueltos para
facilitar la alineación de los pasadores de
bisagra.
Aditamentos utilizados
INSTRUCCIONES DE ENSAMBLAJE
Tornillo de grada
M5x10
x 1
Tornillo
M6x12
x 2
Arandela
Ø5
x 1
Arandela grande
Ø6x22
x 2
Arandela de
seguridad
Ø6
x 2
Tuerca mariposa
M5
x 1
Arandela
Ø6
x 4
Primer piso
Tornillo
M6x12
x 4
BB
EE
FF
HH
CC
CC
GG
II
4
3
N
G
G
H
I
S
23
Paso 3: je las bisagras inferiores y el bloqueo
Fije la bisagra inferior izquierda (H) y la bisagra
inferior derecha (I) en la fuente inferior (G) con
cuatro tornillos M6x12 (CC) y arandelas Ø6 (FF).
Fije la cerradura (N) en la fuente inferior (G) con
dos tornillos M5x8 (AA) y arandelas Ø5 (EE).
NOTA: no apriete completamente los tornillos
inicialmente. Déjelos ligeramente sueltos para
facilitar la alineación de los pasadores de
bisagra.
Aditamentos utilizados
INSTRUCCIONES DE ENSAMBLAJE
Paso 4: je las patas con ruedas
Alinee los oricios de las patas con ruedas (S) y
de la fuente inferior (G). A continuación, fíjelos en
la fuente inferior (G) con cuatro tornillos M6x12
(CC), arandelas Ø6 (FF) y tuercas M6 (KK).
NOTA: no apriete completamente los tornillos
hasta que la malla inferior esté colocada.
Aditamentos utilizados
Arandela
Ø6
x 4
Tornillo
M5x8
x 2
Tornillo
M6x12
x 4
Arandela
Ø6
x 4
Tuerca
M6
x 4
Tornillo
M6x12
x 4
Arandela
Ø5
x 2
AA
EE
KK
CC
CC
FF
FF

5
6
G
U
W
T
S
T
24
Paso 5: je las patas delanteras
Alinee los oricios de una pata delantera (T) y de
la fuente inferior (G). A continuación, fíjela en la
fuente inferior (G) con dos tornillos M6x12 (CC),
arandelas Ø6 (FF) y tuercas M6 (KK).
Aditamentos utilizados
INSTRUCCIONES DE ENSAMBLAJE
Paso 6: je la malla inferior y las ruedas
Fije la malla inferior (W) en las patas con ruedas
(S) y una pata delantera (T) con una tuerca M10
(LL).
Fije las ruedas (U) en el eje de la malla inferior
(W) con dos tuercas M10 (LL).
Aditamentos utilizados
Tornillo
M6x12
x 2
Arandela
Ø6
x 2
Perno
M10
x 3
Tuerca
M6
x 2
FF
KK
LL
CC
8
G
O
25
INSTRUCCIONES DE ENSAMBLAJE
Paso 7: je el conector de patas y las patas
delanteras
Conecte las patas delanteras (T) con el conector
de patas (V).
Alinee los oricios de las demás patas delanteras
(T) y de la fuente inferior (G). A continuación, fíjela
en la fuente inferior (G) con dos tornillos M6x12
(CC), arandelas Ø6 (FF) y tuercas M6 (KK).
Fije la malla inferior (W) en la otra pata delantera
(T) con una tuerca M10 (LL).
Aditamentos utilizados
Paso 8: je el deslizador del recibidor de cenizas
Alinee los oricios del deslizador del recibidor de
cenizas (O) y de la fuente inferior (G). Luego, fíjelo
en la fuente inferior (G) con cuatro tornillos M5x8
(AA) y arandelas Ø5 (EE).
Aditamentos utilizados
Perno
M10
x 1
Tornillo
M6x12
x 2
Arandela
Ø6
x 2
Tuerca
M6
x 2
Tornillo
M5x8
x 4
Arandela
Ø5
x 4
FF
EE
KK
LL
CC
AA
1 2
3
4
7
V
T
W
T
G
10
M
T
1
2
3
4
G
O
P
9
26
Paso 9: je el regulador de tiro inferior
Retire el mango del regulador de tiro inferior (P).
Pase la varilla del regulador de tiro (P) por el
deslizador del recibidor de cenizas (O) y fíjela
en la fuente inferior (G) con un tornillo de grada
M5x10 (BB), una arandela Ø5 (EE) y una tuerca
mariposa M5 (II).
Aditamentos utilizados
INSTRUCCIONES DE ENSAMBLAJE
Paso 10: je el especiero
Fije el especiero (M) en las patas delanteras (T).
Aditamentos utilizados
Tornillo de grada
M5x10
x 1
Arandela
Ø5
x 1
Tuerca mariposa
M5
x 1
Tornillo
M6x35
x 2
Tuerca mariposa
M6
x 2
EE
DD
II
JJ
BB
Pasador
Ø5x45
x 2
Pasador
de chaveta
Ø1.4x38
x 2
MM
NN
12
11
CD
H
I
J
27
Paso 11: coloque la tapa en la fuente inferior
Alinee los oricios de la bisagra superior
izquierda (C), la bisagra superior derecha (D), la
bisagra inferior izquierda (H) y la bisagra inferior
derecha (I). Luego, inserte los pasadores Ø5x45
(MM) y los pasadores de chaveta Ø1.4x38 (NN).
NOTA: una vez que los pasadores de las
bisagras estén en su lugar, apriete todos los
tornillos rmemente para obtener una parrilla
resistente y segura.
Aditamentos utilizados
INSTRUCCIONES DE ENSAMBLAJE
Paso 12: je la rejilla para calentar
Coloque la rejilla para calentar (J) en su lugar.
13
14
L
K
J
Q
O
28
Paso 13: je la rejilla para el carbón y la rejilla de
cocción
Coloque la rejilla para el carbón (L) en su lugar.
Coloque la rejilla de cocción (K) en su lugar.
Fije el tapón de goma Ø3 (OO) en los cuatro
extremos de la rejilla para calentar.
Aditamentos utilizados
INSTRUCCIONES DE ENSAMBLAJE
Paso 14: je el recibidor de cenizas
Deslice el recibidor de cenizas en el deslizador
del recibidor de cenizas.
OO
Tope de goma
Ø3
x 4

W PRECAUCIÓN: no utilice carbón que se haya pretratado con líquido encendedor. Use solo carbón
puro, mezcla de carbón y madera, carbón de leña o madera para leña de alta calidad.
Primer uso
1. Asegúrese de que se hayan retirado todas las etiquetas, láminas protectoras y de embalaje de la parrilla.
2. Antes de cocinar por primera vez en esta parrilla, manténgala encendida durante al menos 15 minutos con la tapa
cerrada para eliminar los aceites de fabricación. El calor generado limpiará las piezas internas y disipará los olores.
Instrucciones de encendido
W PRECAUCIÓN: no debe haber materiales combustibles, gasolina ni otros vapores o líquidos
inflamables cerca de la zona exterior donde se va a utilizar el electrodoméstico para cocción a gas.
W PRECAUCIÓN: asegúrese de que no haya desechos ni cenizas en el orificio de ventilación antes
del uso de la parrilla.
W PRECAUCIÓN: intentar encender la parrilla con la tapa cerrada puede causar una explosión.
W PRECAUCIÓN: siempre revise la fuente inferior y el recibidor de cenizas antes de encender cuando
use un cebador líquido. El fluido se puede acumular en la fuente inferior o en el colector de
cenizas y encenderse, lo que podría provocar un incendio.
W PRECAUCIÓN: nunca agregue líquido para encendedor a las cenizas calientes ni tibias, ya que se
pueden producir retrocesos de la llama y ocasionar lesiones graves o daños materiales.
W PRECAUCIÓN: abra siempre las patas por completo y bloquéelas antes de abrir la tapa o encender
la parrilla.
1. Abra la tapa y los orificios de ventilación.
2. Asegúrese de que el colector de cenizas esté vacío y firme en su posición.
3. Retire la rejilla para cocción.
4. Disponga las briquetas de carbón u otro combustible en la rejilla para el carbón.
5. Encienda siguiendo las instrucciones en el empaque del combustible.
6. Deje que el combustible quede como cenizas al rojo vivo antes de cocinar.
Cocción directa
Cocinar directamente sobre las cenizas calientes es ideal para dorar los jugos y asar alimentos que requieren un tiempo de
asado menor a los 25 minutos, como bistec, hamburguesas, salchichas, pollo en trozos, verduras y frutas.
1. Abra la tapa y retire la rejilla para cocción.
2. Agregue y encienda el carbón según las instrucciones de la sección “Encendido”. Deje la tapa abierta.
3. Usando guantes de protección y una herramienta manual larga, esparza con cuidado y en forma pareja las cenizas
calientes por toda la superficie de la rejilla para carbón.
4. Con la ayuda de guantes de protección, vuelva a poner la rejilla para cocción, cierre la tapa y permita que la parrilla se
caliente un poco.
5. Con la ayuda de guantes de protección, abra la tapa y use unas tenazas largas para colocar la comida en las rejillas para
cocción sobre las cenizas calientes.
6. Con la tapa abierta o cerrada, cocine hasta que los alimentos alcancen la temperatura interna deseada.
NOTA: si necesita briquetas adicionales, saque la comida de la rejilla de cocción y, usando guantes de protección, retire la
rejilla de cocción. Coloque briquetas adicionales sin mover las cenizas calientes. Con cuidado, vuelva a colocar la rejilla para
cocción y los alimentos.
7. Cierre la tapa y todos los orificios de ventilación para permitir que el carbón se queme completamente. NO vierta agua
sobre las cenizas calientes, a menos que se trate de una emergencia.
Cocción indirecta
No cocinar directamente sobre las cenizas calientes es ideal para cocción lenta y para asar comidas que requieren más de
25 minutos, como trozos grandes de carne, lomo, chuletas, pollos, pavo y pescados enteros y productos horneados.
1. Abra la tapa y retire la rejilla para cocción.
2. Agregue y encienda el carbón según las instrucciones de la sección “Encendido”. Deje la tapa abierta.
3. Usando guantes de protección y una herramienta manual larga, esparza con cuidado las cenizas calientes hacia los
costados de la parrilla a carbón.
29
INSTRUCCIONES DE FUNCIONAMIENTO

4. Con la ayuda de guantes de protección, vuelva a poner la rejilla para cocción, cierre la tapa y permita que la parrilla se
caliente un poco.
5. Use los guantes de protección para abrir la tapa. Use herramientas manuales largas para colocar la comida en las rejillas
para cocción sobre las áreas donde no hay cenizas calientes.
6. Con la tapa cerrada, cocine hasta que la comida alcance la temperatura interna deseada.
NOTA: si necesita briquetas adicionales, saque la comida de la rejilla de cocción y, usando guantes de protección, retire la
rejilla de cocción. Coloque briquetas adicionales sin mover las cenizas calientes. Con cuidado, vuelva a colocar la rejilla para
cocción y los alimentos.
7. Cierre la tapa y todos los orificios de ventilación para permitir que el carbón se queme completamente. NO vierta agua
sobre las cenizas calientes, a menos que se trate de una emergencia.
Apagado
1. Deje que el carbón se extinga solo.
W ADVERTENCIA: NO use agua para extinguirlo. Esto puede ser peligroso y causar daños.
2. Deseche las cenizas en un lugar adecuado.
Control de las llamaradas:
W PRECAUCIÓN: NO use agua sobre un incendio provocado por grasa. Esto puede hacer que la
grasa salpique pudiendo ocasionar quemaduras, lesiones corporales u otros daños graves.
W PRECAUCIÓN: NO deje la parrilla sin supervisión mientras la precalienta o quema residuos de
alimentos. Si la parrilla no se ha limpiado, podría ocurrir un incendio provocado por la grasa que
puede dañar el producto.
W ADVERTENCIA: cuando cocine, tenga a su alcance materiales para la extinción del fuego. En caso
de incendio provocado por aceite o grasa, use un extintor de incendios a base de polvo químico
seco tipo BC o apague el fuego con tierra, arena o bicarbonato. NO intente extinguirlo con agua.
Las llamaradas son parte de la cocción de carnes en una parrilla y aderezos del sabor único que da asar un alimento.
Las llamaradas en exceso pueden cocinar demasiado la comida y ser peligrosas.
Importante: el exceso de llamaradas es el resultado de la acumulación de grasa en la parte inferior de la parrilla.
Si se produce un incendio por grasa, cierre la tapa hasta que esta se queme completamente. Tenga cuidado al abrir la tapa,
puesto que puede haber llamaradas repentinas.
Si se producen llamaradas en exceso, NO vierta agua a las llamas.
Minimice las llamaradas:
1. Corte el exceso de grasa de las carnes antes de la cocción.
2. Cocine las carnes con un alto contenido de grasa de manera indirecta.
3. Asegúrese de que la parrilla esté sobre una superficie sólida, nivelada y no combustible.
W PRECAUCIÓN.
1. La limpieza y el mantenimiento deben realizarse cuando la parrilla está fría y una vez que se hayan
quitado las cenizas correctamente.
2. NO limpie ninguna pieza de la parrilla en un horno con autolimpieza. El calor extremo daña el
acabado.
Avisos
1. Esta parrilla se debe limpiar e inspeccionar minuciosamente en forma periódica.
2. Los limpiadores abrasivos dañarán este producto.
3. Nunca use limpiador de hornos para limpiar ninguna pieza de esta parrilla.
Antes de cada uso
1. Mantenga el área de la parrilla limpia y libre de materiales combustibles, gasolina y otros vapores o líquidos inflamables.
2. Consulte las instrucciones de limpieza adecuadas a continuación.
CUIDADO Y MANTENIMIENTO
30
INSTRUCCIONES DE FUNCIONAMIENTO (CONTINUACIÓN)

CUIDADO Y MANTENIMIENTO (CONTINUACIÓN)
Limpieza de superficies
1. Espere a que la parrilla se enfríe por completo.
2. Limpie las superficies con un detergente para vajilla suave o bicarbonato de sodio mezclado con agua.
3. Para las manchas difíciles, use un desengrasante cítrico y una escobilla de nailon.
4. Limpie y enjuague con agua.
5. Deje secar al aire.
Antes de almacenar
1. Espere a que la parrilla se enfríe por completo.
2. Limpie todas las superficies.
3. Si almacena la parrilla en el interior, cúbrala y almacénela en un lugar fresco y seco.
4. Si almacena la parrilla en el exterior, cúbrala con una cubierta para parrilla para protegerla del clima.
31
GARANTÍA LIMITADA
Se requiere un comprobante de compra para acceder a este programa de garantía, que entra en
vigencia a partir de la fecha de compra. Los clientes deberán abonar costos de piezas, envío y
manipulación si no pueden proporcionar el comprobante de compra o una vez vencida la garantía.
Si tiene preguntas o problemas, puede llamar al Departamento de Servicio al Cliente al
800-963-0211, de lunes a domingo de 8 a.m. a 8 p.m., hora estándar del Este. También puede
ponerse en contacto con nosotros a través de [email protected].
Garantía limitada
1 año de garantía para todas las piezas que afectan el funcionamiento de la parrilla a gas debido a
daños.
Provisiones de la garantía:
Esta garantía no es transferible y no cubre fallas causadas por mal uso, o instalación y
mantenimiento inadecuados.
Esta garantía se limita al reemplazo de piezas defectuosas. No nos hacemos responsables de
daños accidentales o resultantes ni de costos de mano de obra.
Esta garantía no cubre la corrosión ni la decoloración una vez utilizada la parrilla, o debido a la
falta de mantenimiento, los entornos adversos, los accidentes, las alteraciones, el abuso ni la
negligencia.
Esta garantía no cubre ningún daño causado por el calor, los limpiadores abrasivos y químicos ni
ningún daño en otros componentes utilizados en la instalación u operación de la parrilla a gas.
Algunos estados no permiten la exclusión o limitación de los daños accidentales o resultantes, de
modo que las exclusiones o limitaciones de estos daños pueden no aplicarse en su caso. Esta
garantía le otorga derechos legales específicos, pero podría tener también otros derechos que
varían según el estado.
LISTA DE PIEZAS DE REPUESTO
Impreso en China
Para obtener piezas de repuesto, llame al Departamento de Servicio al Cliente al 800-963-0211, de lunes a domingo de 8 a.m. a 8 p.m.,
hora estándar del Este. También puede ponerse en contacto con nosotros a través de [email protected].
PIEZA DESCRIPCIÓN PIEZA#
CUBIERTO POR
LA GARANTÍA
1 Tapa C2304-010 Sí
2 Manija de la tapa C2304-020 Sí
3
Bisagra superior
izquierda
C1843-030 Sí
4
Bisagra superior
derecha
C1843-040 Sí
5 Respiradero B0105-A01 Sí
6
Medidor de
temperatura
B0104-M13 Sí
7 Fuente inferior C2304-030 Sí
8
Bisagra inferior
izquierda
C1843-050 Sí
9
Bisagra inferior
derecha
C1843-060 Sí
10
Rejilla para
calentar
C2243-030 Sí
11 Rejilla de cocción C1843-090 Sí
12
Rejilla para el
carbón
C1843-100 Sí
PIEZA DESCRIPCIÓN PIEZA#
CUBIERTO POR
LA GARANTÍA
13 Especiero C2304-040 Sí
14 Seguro C2304-050 Sí
15
Deslizador del
recibidor de
cenizas
C2304-060 Sí
16
Regulador de tiro
inferior
C1943-110 Sí
17
Colector de
cenizas
C1843-130 Sí
18
Mango del
recibidor*
C1843-140 Sí
19 Pata con ruedas C1943-140 Sí
20 Pata delantera C2304-070 Sí
21 Rueda C2304-080 Sí
22 Conector de patas C2304-090 Sí
23 Malla inferior C2304-100 Sí
32
* Preensamblada