THIS INSTRUCTION BOOKLET CONTAINS IMPORTANT SAFETY INFORMATION. PLEASE READ AND KEEP FOR FUTURE REFERENCE.
EN
DE
FR
ES
IT
PL
With your inspiring rating, COSTWAY will be more consistent to offer you EASY
SHOPPING EXPERIENCE, GOOD PRODUCTS and EFFICIENT SERVICE!
Mit Ihrer inspirierenden Bewertung wird COSTWAY konsistenter sein, um Ihnen EIN
SCHÖNES EINKAUFSERLEBNIS, GUTE PRODUKTE und EFFIZIENTEN SERVICE zu
bieten!
Avec votre évaluation inspirante, COSTWAY continuera à fournir une EXPÉRIENCE
D’ACHAT PRATIQUE, des PRODUITS DE QUALITÉ et un SERVICE EFFICACE !
Con su calificación inspiradora, COSTWAY será más consistente para ofrecerle
EXPERIENCIA DE COMPRA FÁCIL, BUENOS PRODUCTOS y SERVICIO EFICIENTE.
Con la tua valutazione incoraggiante, COSTWAY sarà più coerente per offrirti
ESPERIENZA DI ACQUISTO FACILE, BUONI PRODOTTI e SERVIZIO EFFICIENTE!
Dzięki twojej opinii COSTWAY będzie mógł oferować jeszcze WYGODNIEJSZE
ZAKUPY, LEPSZE PRODUKTY i SPRAWNIEJSZĄ OBSŁUGĘ KLIENTA.
USER’S MANUAL
US office: Fontana UK office: Ipswich AU office: Truganina
DE office: Hamburg
FR office: Saint Vigor d'Ymonville
PL office: Gdańsk
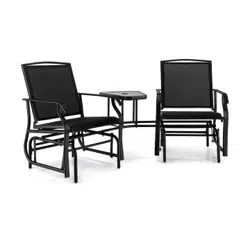
Patio Furniture Set 3 Pieces
NP10188
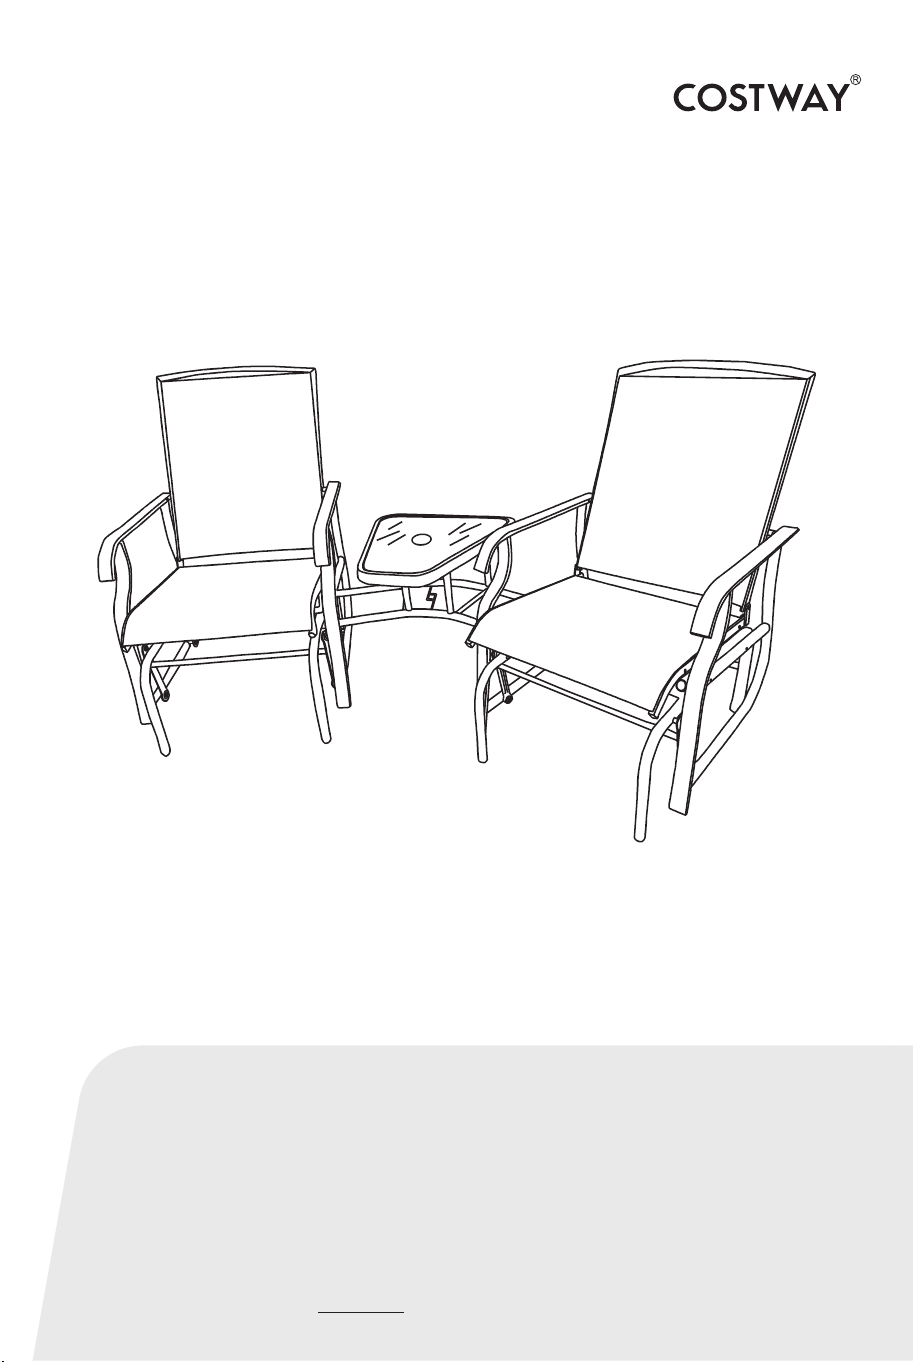
PARTS LIST
Ax2
Left Armrest
Bx2
Right Armrest
Cx2
Back Cross Bar
Dx4
Sway Bar
Ex1
Front Support Bar
(for Glass Table Top)
Fx1
Back Support Bar
(for Glass Table Top)
Gx1
Table Cross Bar
Hx1
Glass Table Top
Ix2
Chair Seat & Back
Jx2
Le Leg Tube
Kx2
Right Leg Tube
Lx4
Chair Cross Bar
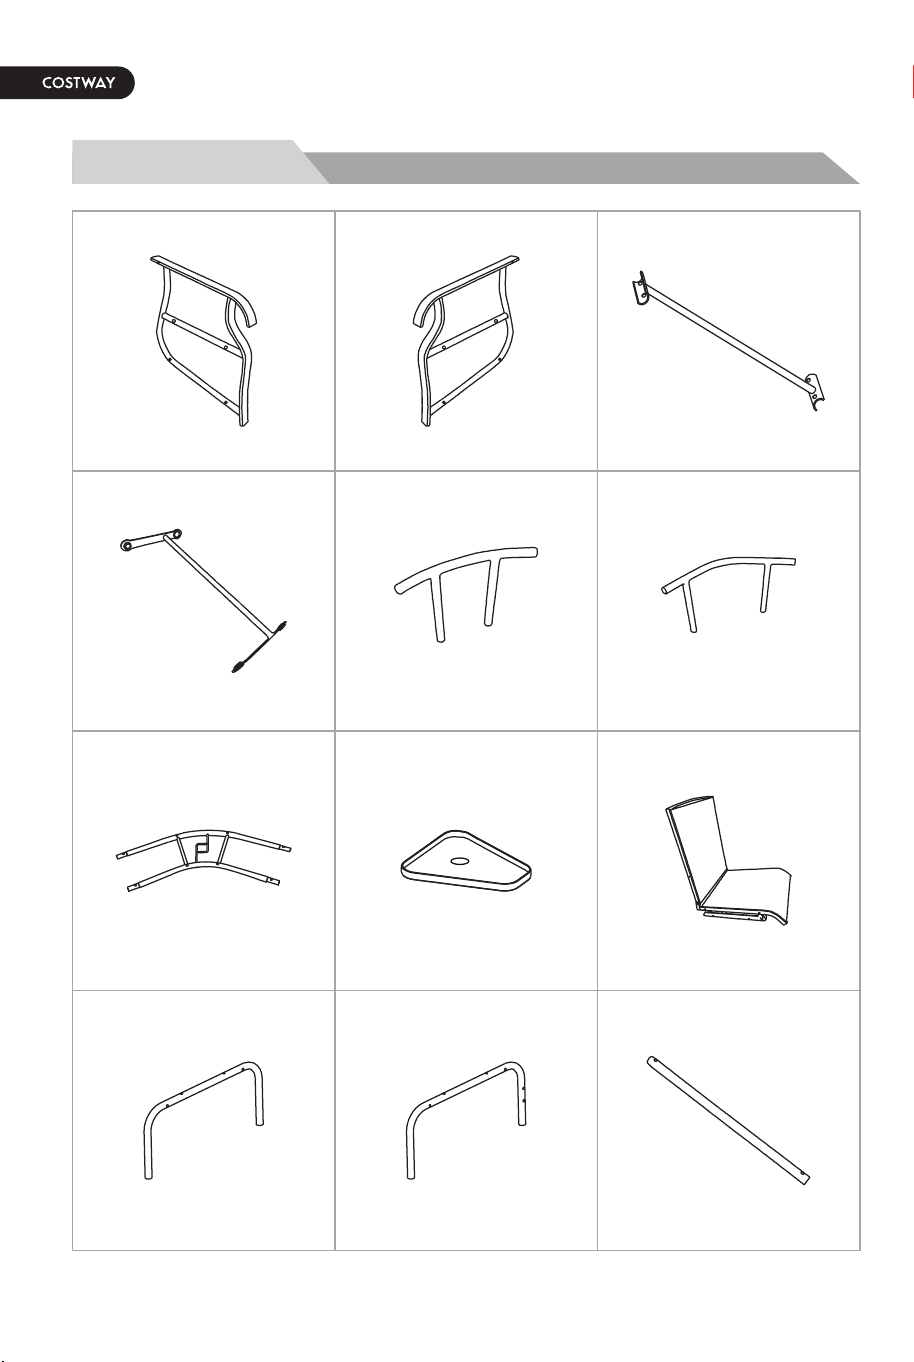
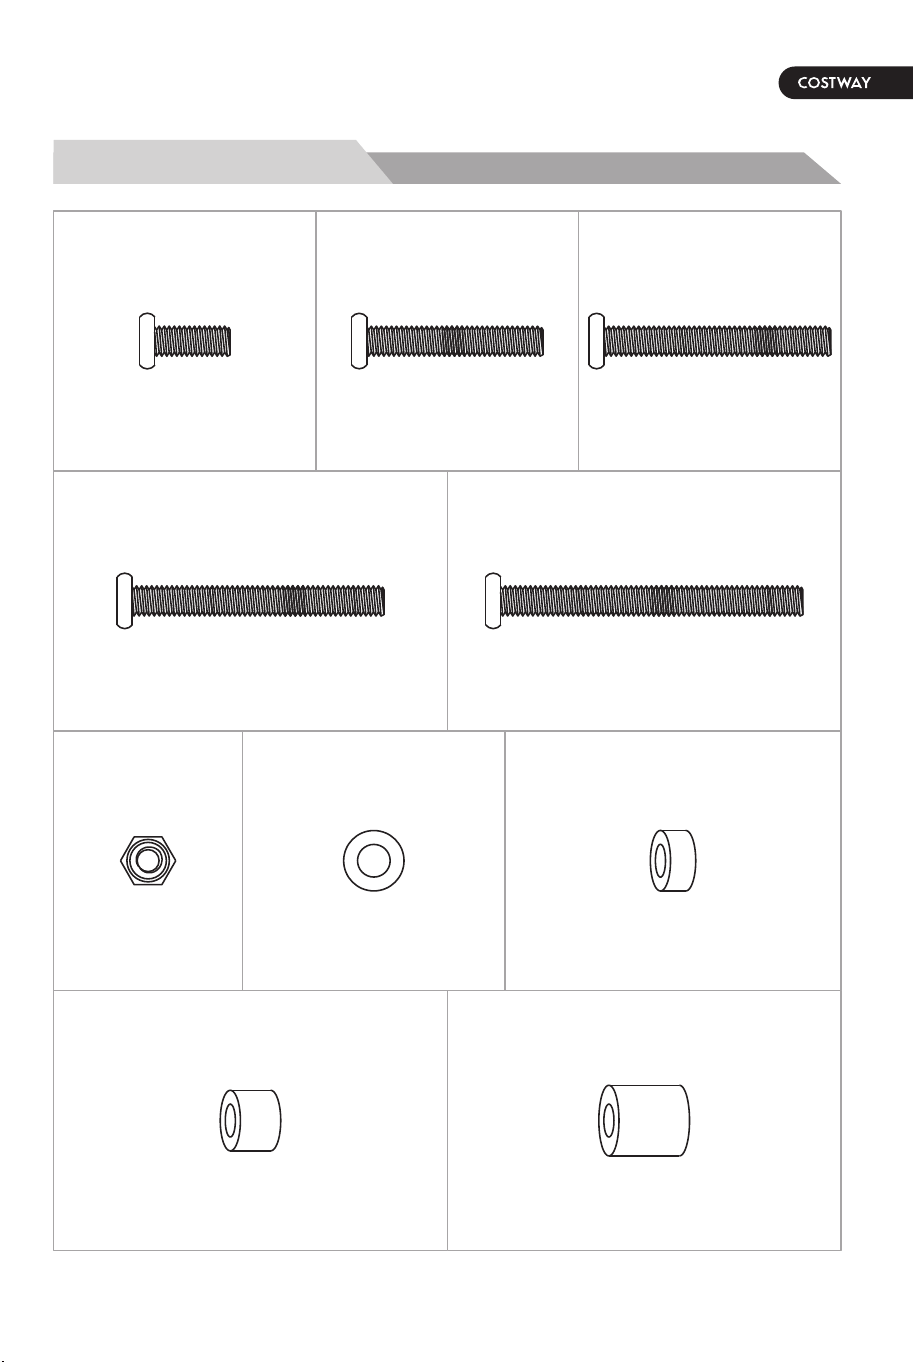
HARDWARE LIST
Mx12
Px8
Rx32 Tx8
Qx16
Nx4 Ox12
M6x15mm Bolt M6x35mm Bolt M6x45mm Bolt
M6x50mm Bolt
M6 Nut
5mm
Plastic Washer
Sx48
Steel Washer
M6x60mm Bolt
Ux8 Vx4
8mm
Plastic Washer
14mm
Plastic Washer
02 03
PARTS LIST
Ax2
Left Armrest
Bx2
Right Armrest
Cx2
Back Cross Bar
Dx4
Sway Bar
Ex1
Front Support Bar
(for Glass Table Top)
Fx1
Back Support Bar
(for Glass Table Top)
Gx1
Table Cross Bar
Hx1
Glass Table Top
Ix2
Chair Seat & Back
Jx2
Le Leg Tube
Kx2
Right Leg Tube
Lx4
Chair Cross Bar
HARDWARE LIST
Mx12
Px8
Rx32 Tx8
Qx16
Nx4 Ox12
M6x15mm Bolt M6x35mm Bolt M6x45mm Bolt
M6x50mm Bolt
M6 Nut
5mm
Plastic Washer
Sx48
Steel Washer
M6x60mm Bolt
Ux8 Vx4
8mm
Plastic Washer
14mm
Plastic Washer
02 03
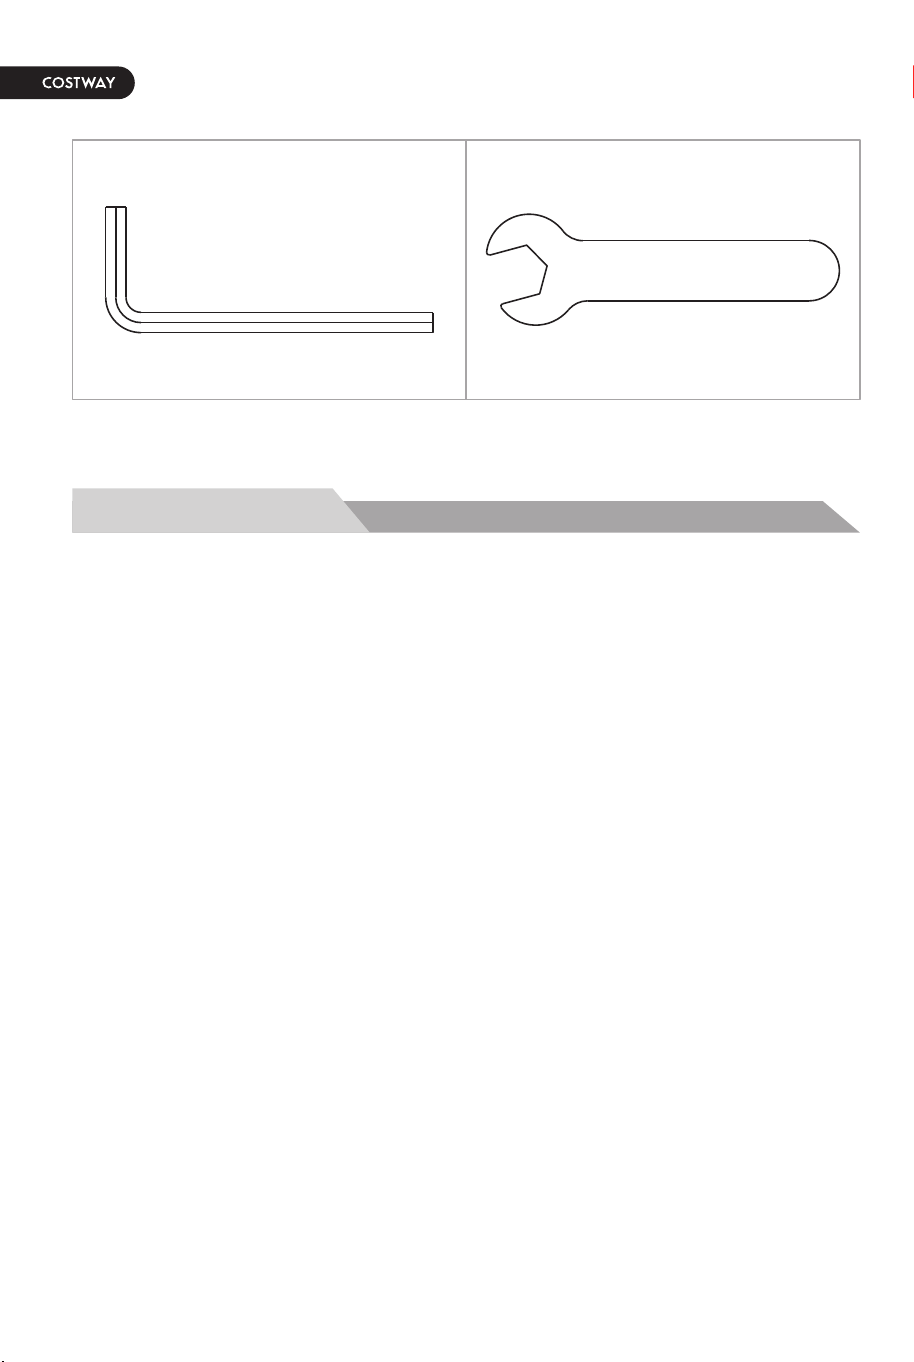
Wx2 Xx2
Hex Wrench Open-end Wrench
PREPARATION
Before beginning assembly of product, make sure all parts are
present.
Compare parts with parts list and hardware list above. If any part is
missing or damaged, do not attempt to assemble. Contact customer
service for replacement parts.
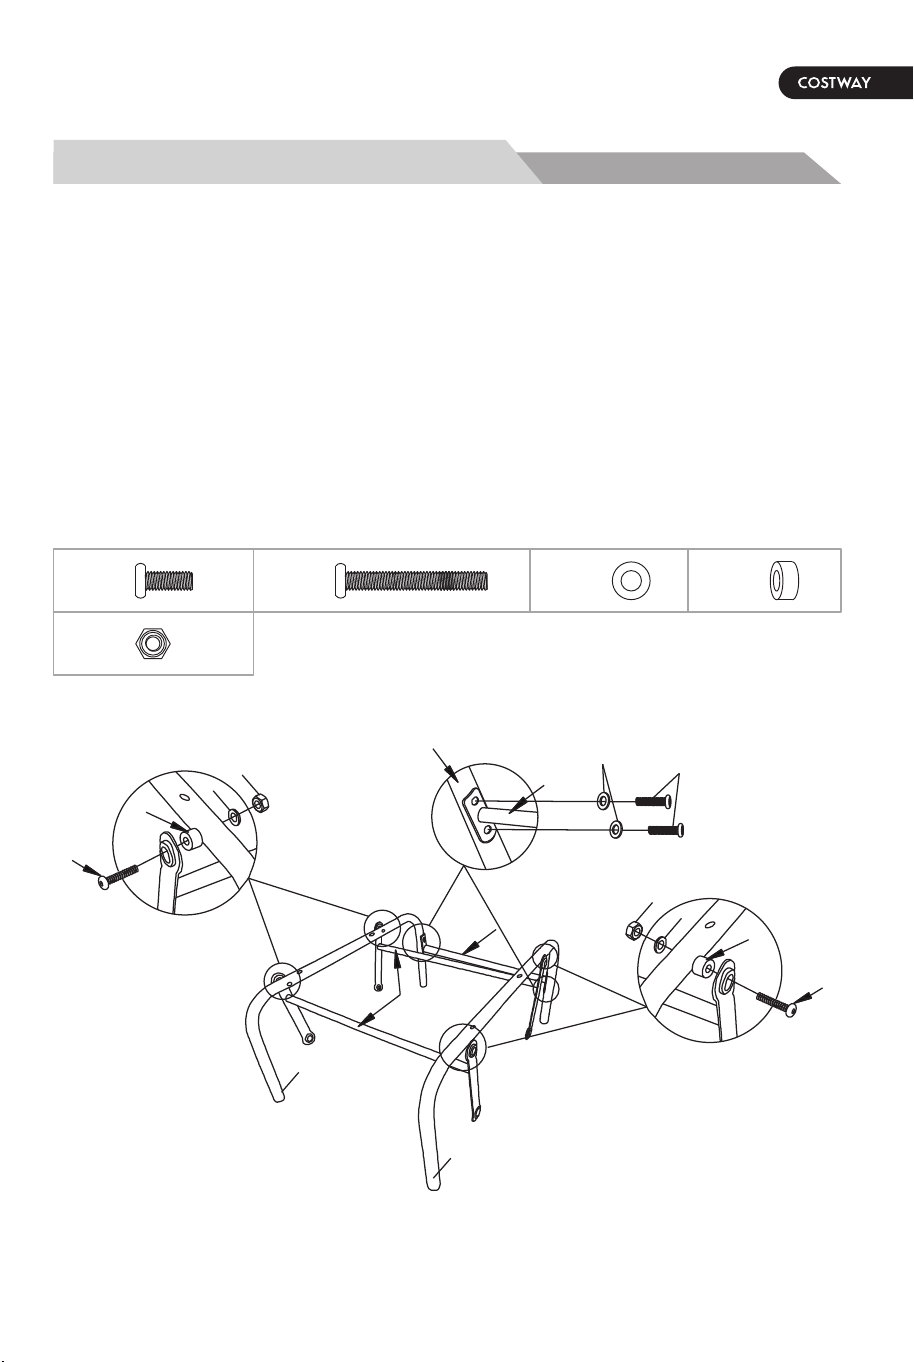
ASSEMBLY INSTRUCTIONS
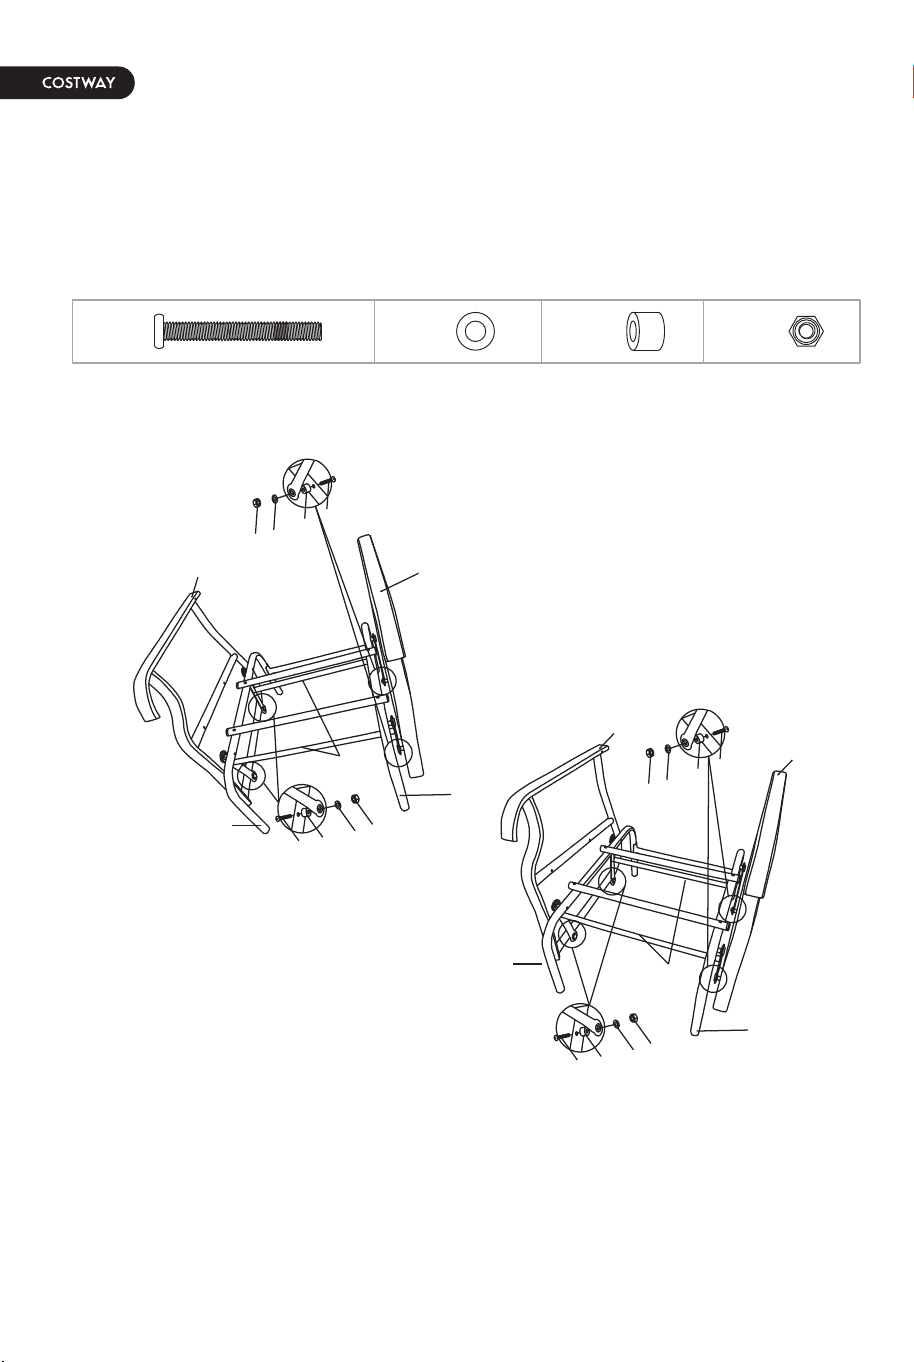
STEP 1 : Place all chair parts on a protected flat surface. Assemble
Sway Bar (D) to Left Leg Tube (J) with M6 x 45mm Bolt (O), 5mm
Plastic Washer (T), Steel Washer (S) and M6 Nut (R). Do not tighten
the bolt fully at this moment.
Repeat for right Leg Tube (K). Once it is done, repeat for another
Sway Bar (D) at back. Next, assemble Back Cross Bar (C) to Right
Leg Tube (K) using M6 X 15mm Bolt (M) and Steel Washer (S). Do
not tighten the bolt fully at this moment. Repeat for Left Leg
Tube (J). See Figure 1.
Figure 1
D
J
K
S
S
R
R
T
O
C
S
M
K
C
T
O
Mx4
Sx8
Rx4
Tx4
Ox4
04 05
Wx2 Xx2
Hex Wrench Open-end Wrench
PREPARATION
Before beginning assembly of product, make sure all parts are
present.
Compare parts with parts list and hardware list above. If any part is
missing or damaged, do not attempt to assemble. Contact customer
service for replacement parts.
ASSEMBLY INSTRUCTIONS
STEP 1 : Place all chair parts on a protected flat surface. Assemble
Sway Bar (D) to Left Leg Tube (J) with M6 x 45mm Bolt (O), 5mm
Plastic Washer (T), Steel Washer (S) and M6 Nut (R). Do not tighten
the bolt fully at this moment.
Repeat for right Leg Tube (K). Once it is done, repeat for another
Sway Bar (D) at back. Next, assemble Back Cross Bar (C) to Right
Leg Tube (K) using M6 X 15mm Bolt (M) and Steel Washer (S). Do
not tighten the bolt fully at this moment. Repeat for Left Leg
Tube (J). See Figure 1.
Figure 1
D
J
K
S
S
R
R
T
O
C
S
M
K
C
T
O
Mx4
Sx8
Rx4
Tx4
Ox4
04 05
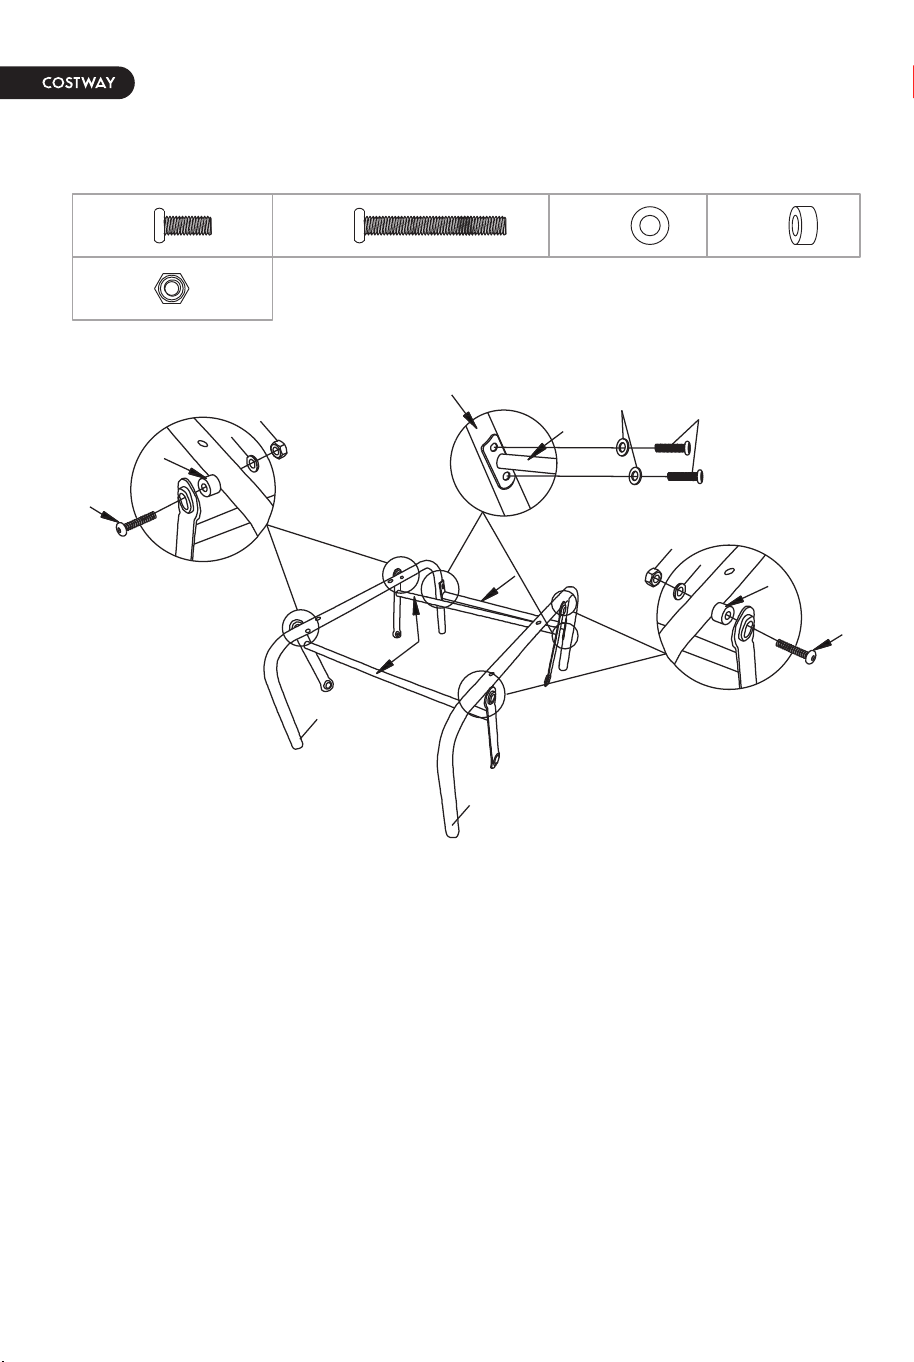
STEP 2 : Repeat STEP 1 for another chair.
Figure 1
D
J
K
S
S
R
R
T
O
C
S
M
K
C
T
O
Mx4 Sx8
Rx4
Tx4Ox4
STEP 3 : Assemble Chair Cross Bars(L) to Leg Tube (K or J) on the
outside of chair seat using M6 x 60mm Bolts (Q), Steel Washers (S)
and M6 Nuts (R). Do not tighten the bolts fully yet. See Figure 2.
Repeat for another chair.
NOTE : DO NOT ASSEMBL E CHAIR CROSS BAR (L) TO LEG TUB
ES ON THE INSIDE OF CHAIR SEAT UNTIL STEP 7 WHEN TABLE
CROSS BAR (G) IS INSERTED INTO BOTH CHAIR CROSS BARS
(L).
Qx4 Sx4 Rx4
Part L.
Outside
Inside
Figure 2
K
D
R
Q
Q
R
S
S
L
L
J
K
D
J
Outside
Outside
Inside
Inside
06 07
STEP 4 : Assemble Right Armrest (B) and Left Armrest (A) to Sway
Bars (D) using ; M6 X 50mm Bolts (P), 8mm Plastic Washers (U),
Steel Washers (S) and M6 Nuts (R). Do not tighten the bolts yet. See
Figure 3. Repeat for another chair.
Px8 Sx8 Rx8Ux8
Figure 3
Outside
Inside
J
D
R
R
S
S
U
U
P
P
B
A
K
Inside
Outside
J
K
R
R
S
S
U
U
P
P
B
A
D
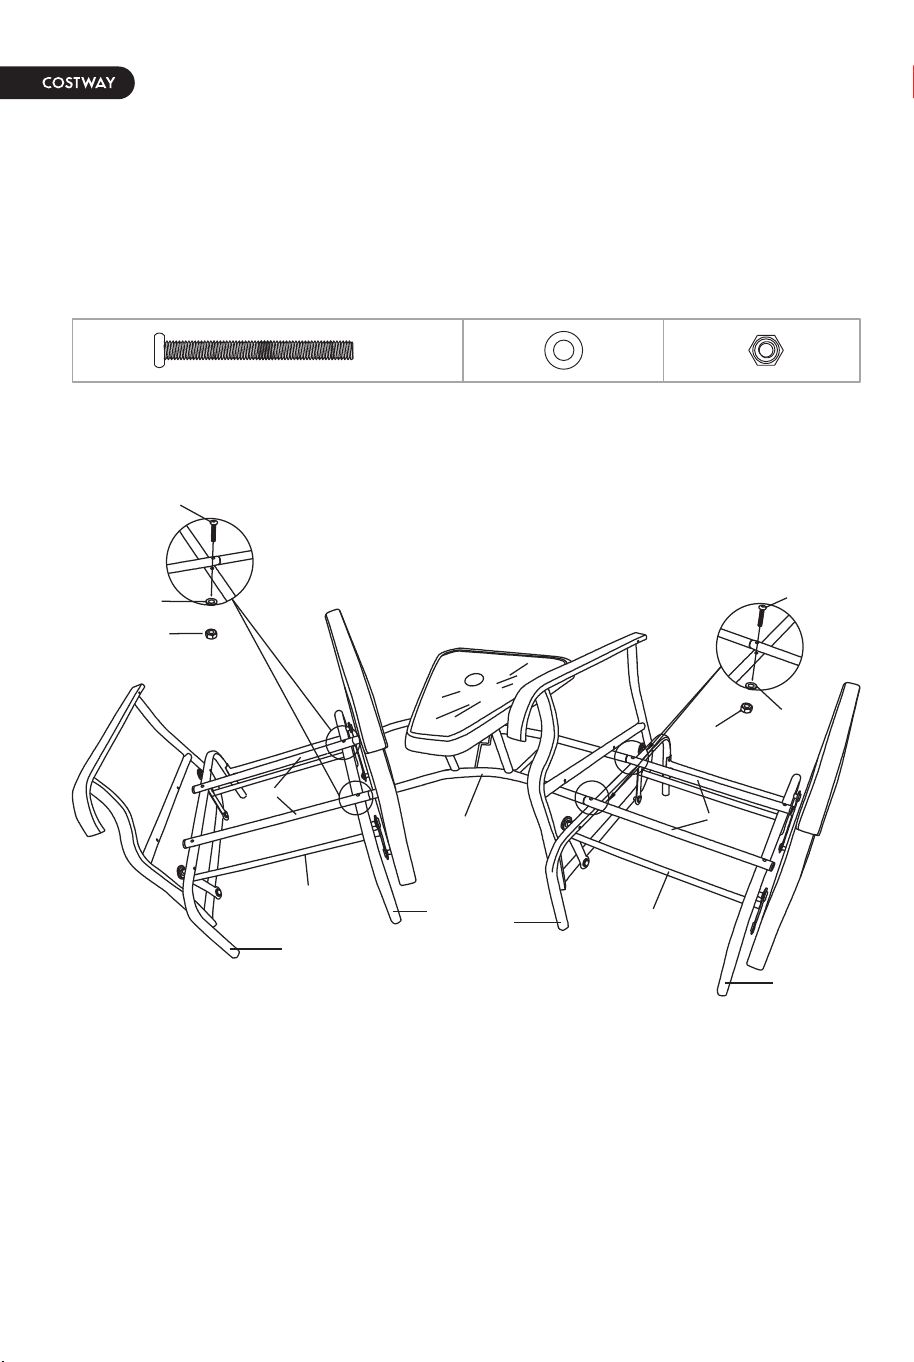
STEP 5 : Put Glass Table Top (H) upside down on a protected flat
surface. Assemble Front Support Bar (E) to the Glass Table Top (H)
with M6* 15mm Bolt (M) .Repeat for Back Support Bar (F). See
Figure 4.
STEP 6 : Assemble Table Cross Bar (G) to Front Support Bar (E) and
Back Support Bar (F) using M6 X 35mm Bolts (N) and Steel Washers
(S). See Figure 5.
Mx4
Figure 4
F
M
E
H
Nx4 Sx4
G
N
S
Figure 5
08 09

STEP 4 : Assemble Right Armrest (B) and Left Armrest (A) to Sway
Bars (D) using ; M6 X 50mm Bolts (P), 8mm Plastic Washers (U),
Steel Washers (S) and M6 Nuts (R). Do not tighten the bolts yet. See
Figure 3. Repeat for another chair.
Px8 Sx8 Rx8Ux8
Figure 3
Outside
Inside
J
D
R
R
S
S
U
U
P
P
B
A
K
Inside
Outside
J
K
R
R
S
S
U
U
P
P
B
A
D
STEP 5 : Put Glass Table Top (H) upside down on a protected flat
surface. Assemble Front Support Bar (E) to the Glass Table Top (H)
with M6* 15mm Bolt (M) .Repeat for Back Support Bar (F). See
Figure 4.
STEP 6 : Assemble Table Cross Bar (G) to Front Support Bar (E) and
Back Support Bar (F) using M6 X 35mm Bolts (N) and Steel Washers
(S). See Figure 5.
Mx4
Figure 4
F
M
E
H
Nx4 Sx4
G
N
S
Figure 5
08 09
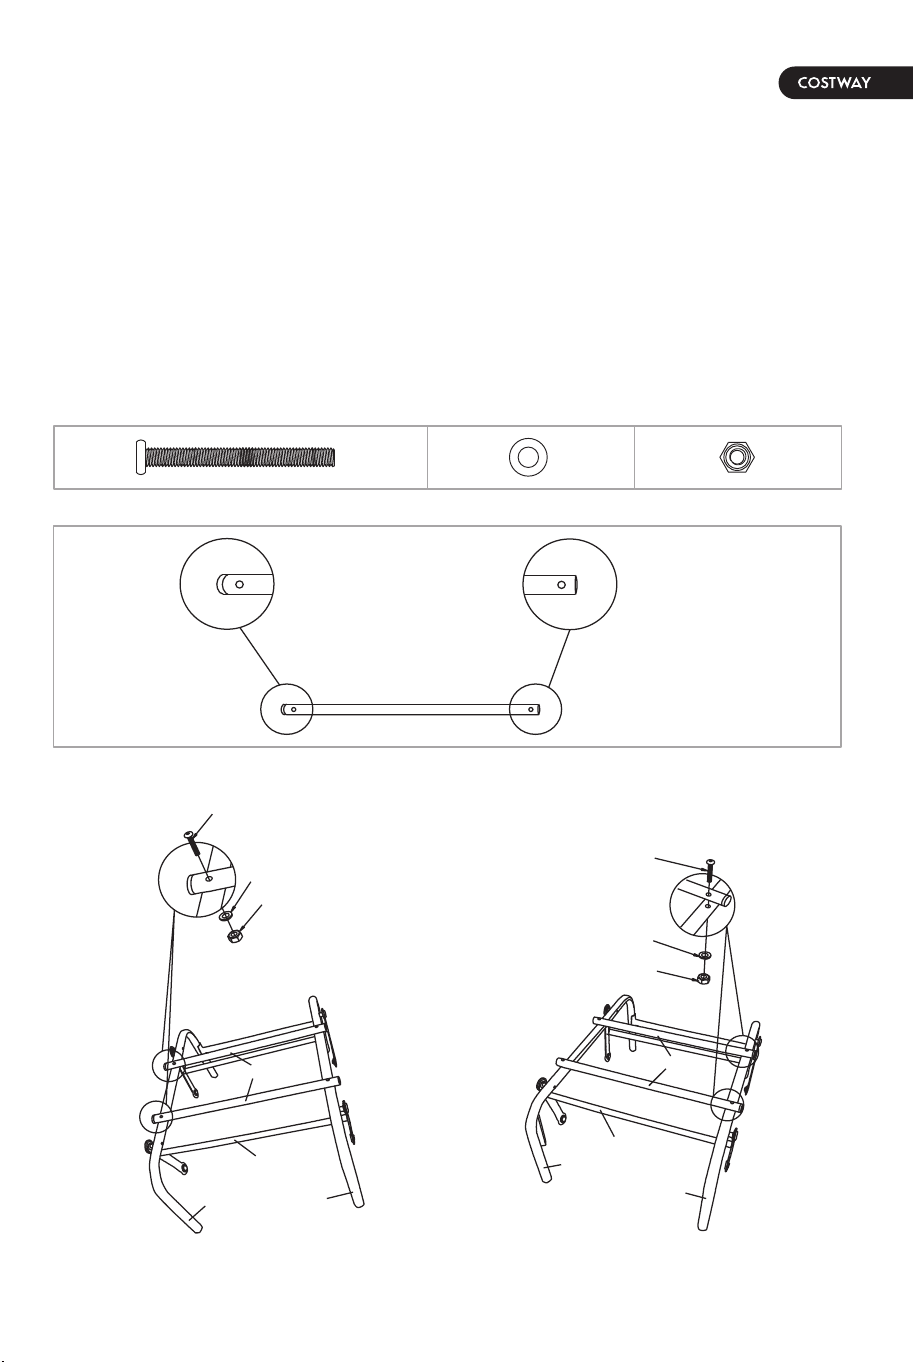
STEP 7 : Connect glass table top to one chair by inserting Table
Cross Bar (G) into Chair Cross Bars (L). Assemble Table Cross Bar
(G), Chair Cross Bar (L) and Leg Tube (K or J) altogether using M6 x
60mm Bolts (Q), Steel Washer (S) and M6 Nuts (R). Do not fasten
the bolts completely yet. See Figure 6. Repeat for another chair.
Qx4 Sx4 Rx4
Figure 6
L
G
L
D
R
R
S
S
Q
Q
D
J
K
J
K
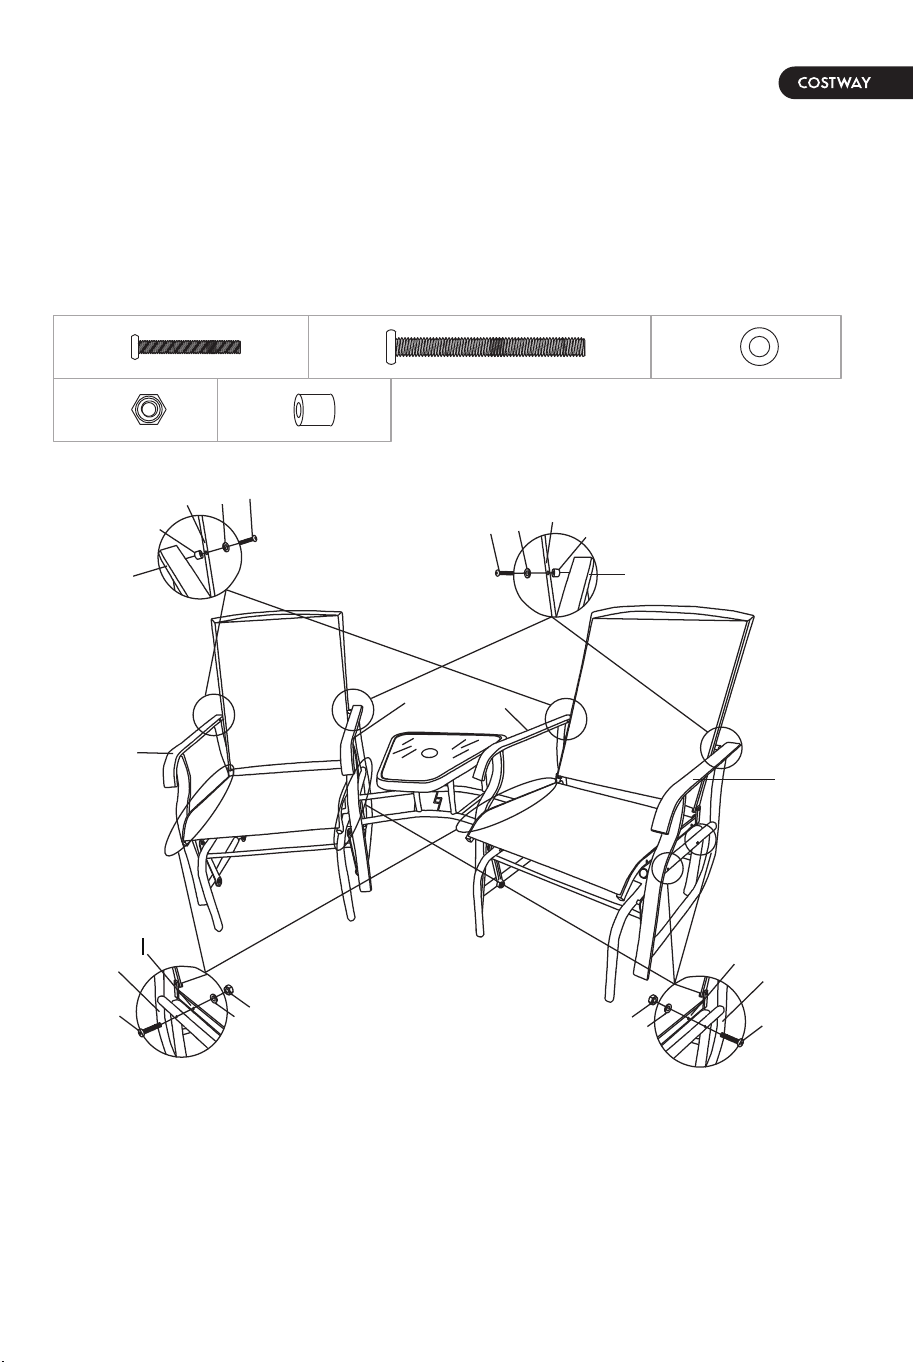
STEP 8 : Assemble Chair Back (I) to Le Armrest (A) and Right
Armrest (B) using M6 x 45mm Bolts (O), Steel Washers (S) and
14mm Plastic Washers (V). See Figure 7. Assemble Chair Seat (I) to
Le Armrest (A) and Right Armrest (B) using M6 x 60mm Bolts (Q),
Steel Washers (S) and M6 Nuts (R). See Figure 8.
STEP 9 : Check Alignment and make adjustment if necessary.
Tighten all bolts and nuts with Hex Wrench (W) and Open-end
Wrench (X) provided.
Rx8
Vx4
Ox4 Qx8
Sx12
Figure 7
Figure 8
A
B
O
O
Q
Q
R
R
S
S
S
S
V
V
A
B
A
A
A
A
I
I
I
I
I
I
10 11
STEP 7 : Connect glass table top to one chair by inserting Table
Cross Bar (G) into Chair Cross Bars (L). Assemble Table Cross Bar
(G), Chair Cross Bar (L) and Leg Tube (K or J) altogether using M6 x
60mm Bolts (Q), Steel Washer (S) and M6 Nuts (R). Do not fasten
the bolts completely yet. See Figure 6. Repeat for another chair.
Qx4 Sx4 Rx4
Figure 6
L
G
L
D
R
R
S
S
Q
Q
D
J
K
J
K
STEP 8 : Assemble Chair Back (I) to Le Armrest (A) and Right
Armrest (B) using M6 x 45mm Bolts (O), Steel Washers (S) and
14mm Plastic Washers (V). See Figure 7. Assemble Chair Seat (I) to
Le Armrest (A) and Right Armrest (B) using M6 x 60mm Bolts (Q),
Steel Washers (S) and M6 Nuts (R). See Figure 8.
STEP 9 : Check Alignment and make adjustment if necessary.
Tighten all bolts and nuts with Hex Wrench (W) and Open-end
Wrench (X) provided.
Rx8
Vx4
Ox4 Qx8
Sx12
Figure 7
Figure 8
A
B
O
O
Q
Q
R
R
S
S
S
S
V
V
A
B
A
A
A
A
I
I
I
I
I
I
10 11
THIS INSTRUCTION BOOKLET CONTAINS IMPORTANT SAFETY INFORMATION. PLEASE READ AND KEEP FOR FUTURE REFERENCE.
EN
DE
FR
ES
IT
PL
With your inspiring rating, COSTWAY will be more consistent to offer you EASY
SHOPPING EXPERIENCE, GOOD PRODUCTS and EFFICIENT SERVICE!
Mit Ihrer inspirierenden Bewertung wird COSTWAY konsistenter sein, um Ihnen EIN
SCHÖNES EINKAUFSERLEBNIS, GUTE PRODUKTE und EFFIZIENTEN SERVICE zu
bieten!
Avec votre évaluation inspirante, COSTWAY continuera à fournir une EXPÉRIENCE
D’ACHAT PRATIQUE, des PRODUITS DE QUALITÉ et un SERVICE EFFICACE !
Con su calificación inspiradora, COSTWAY será más consistente para ofrecerle
EXPERIENCIA DE COMPRA FÁCIL, BUENOS PRODUCTOS y SERVICIO EFICIENTE.
Con la tua valutazione incoraggiante, COSTWAY sarà più coerente per offrirti
ESPERIENZA DI ACQUISTO FACILE, BUONI PRODOTTI e SERVIZIO EFFICIENTE!
Dzięki twojej opinii COSTWAY będzie mógł oferować jeszcze WYGODNIEJSZE
ZAKUPY, LEPSZE PRODUKTY i SPRAWNIEJSZĄ OBSŁUGĘ KLIENTA.
USER’S MANUAL
US office: Fontana UK office: Ipswich AU office: Truganina
DE office: Hamburg
FR office: Saint Vigor d'Ymonville
PL office: Gdańsk
Patio Furniture Set 3 Pieces
NP10188
