User Manual
BUILT-UNDER REFRIGERATOR
CF1PN85INTEG

1
Contents Page
1 Protecting the environment and advice for disposal ................................................................................... 2
2 Deciding where to locate your fridge / freezer. ........................................................................................... 2
4 Installing your appliance. ............................................................................................................................ 2
5 Rating plate ................................................................................................................................................. 5
6 Connecting your appliance to the mains ..................................................................................................... 5
7 Using your appliance. .................................................................................................................................. 5
Switching on/off and selecting the temperature .......................................................................................... 5
8 Starting up the appliance. ........................................................................................................................... 5
9 Freezing/storing of fresh food ..................................................................................................................... 5
Maximum capacity ...................................................................................................................................... 6
Storage time ................................................................................................................................................ 6
10 Cleaning and maintenance ......................................................................................................................... 6
Defrosting .................................................................................................................................................... 7
11 Change the LED light .................................................................................................................................. 7
12 Troubleshooting guide. ...................................................................................................................................... 8
What to do when... / Please check. ............................................................................................................. 8
13 Energy Saving Advice ................................................................................................................................. 9
14 Getting your appliance serviced .................................................................................................................. 9
15 Warranty… .................................................................................................................................................. 9
16 Product overview ......................................................................................................................................... 10
17 Problem shooting ........................................................................................................................................ 11
18 Disposal of the appliance............................................................................................................................... 12
3 Reverse the door hinge . ........................................................................................................................... 2
19 Storage table ............................................................................................................................................... 13
User’s manual
The user manual apply to several models, for this reason
there may be some differences in the details given,
according to the type of the appliance.
1
Protecting the environment / advice for disposal
Packing
serves to protect the appliance during transportation and
recyclable materials have been used for packaging.
Corrugated board/cardboard (mainly from waste paper)
• shaped parts in PS (foamed CFC-free polystyrene)
• foils and bags in PE (polyethylene)
• strapping tapes in PP (polypropylene)
• Please hand over all packaging to the nearest official
collection point, so that all the different materials can be re-
used or recycled as far as possible and any illegal
depositing of such materials is thus avoided.
2
Deciding where to locate your appliance
In order to avoid any damage or injury to persons or things,
the appliance should be unpacked by two people and placed
in the chosen location
Before positioning it, check that your new appliance has
no visible outer damage.
On no account should you start up your appliance if it
is damaged.
Check the appliance carefully for:
• Damage to the packaging, which might indicate that the
appliance has been mishandled during transportation.
• Damage to the outer casing
• Any visible damage to the cable / plug
If in any doubt let, the customer service department check
the appliance.
It must at all costs be avoided, that any environmentally
damaging refrigerant leaks out by starting up the appliance.
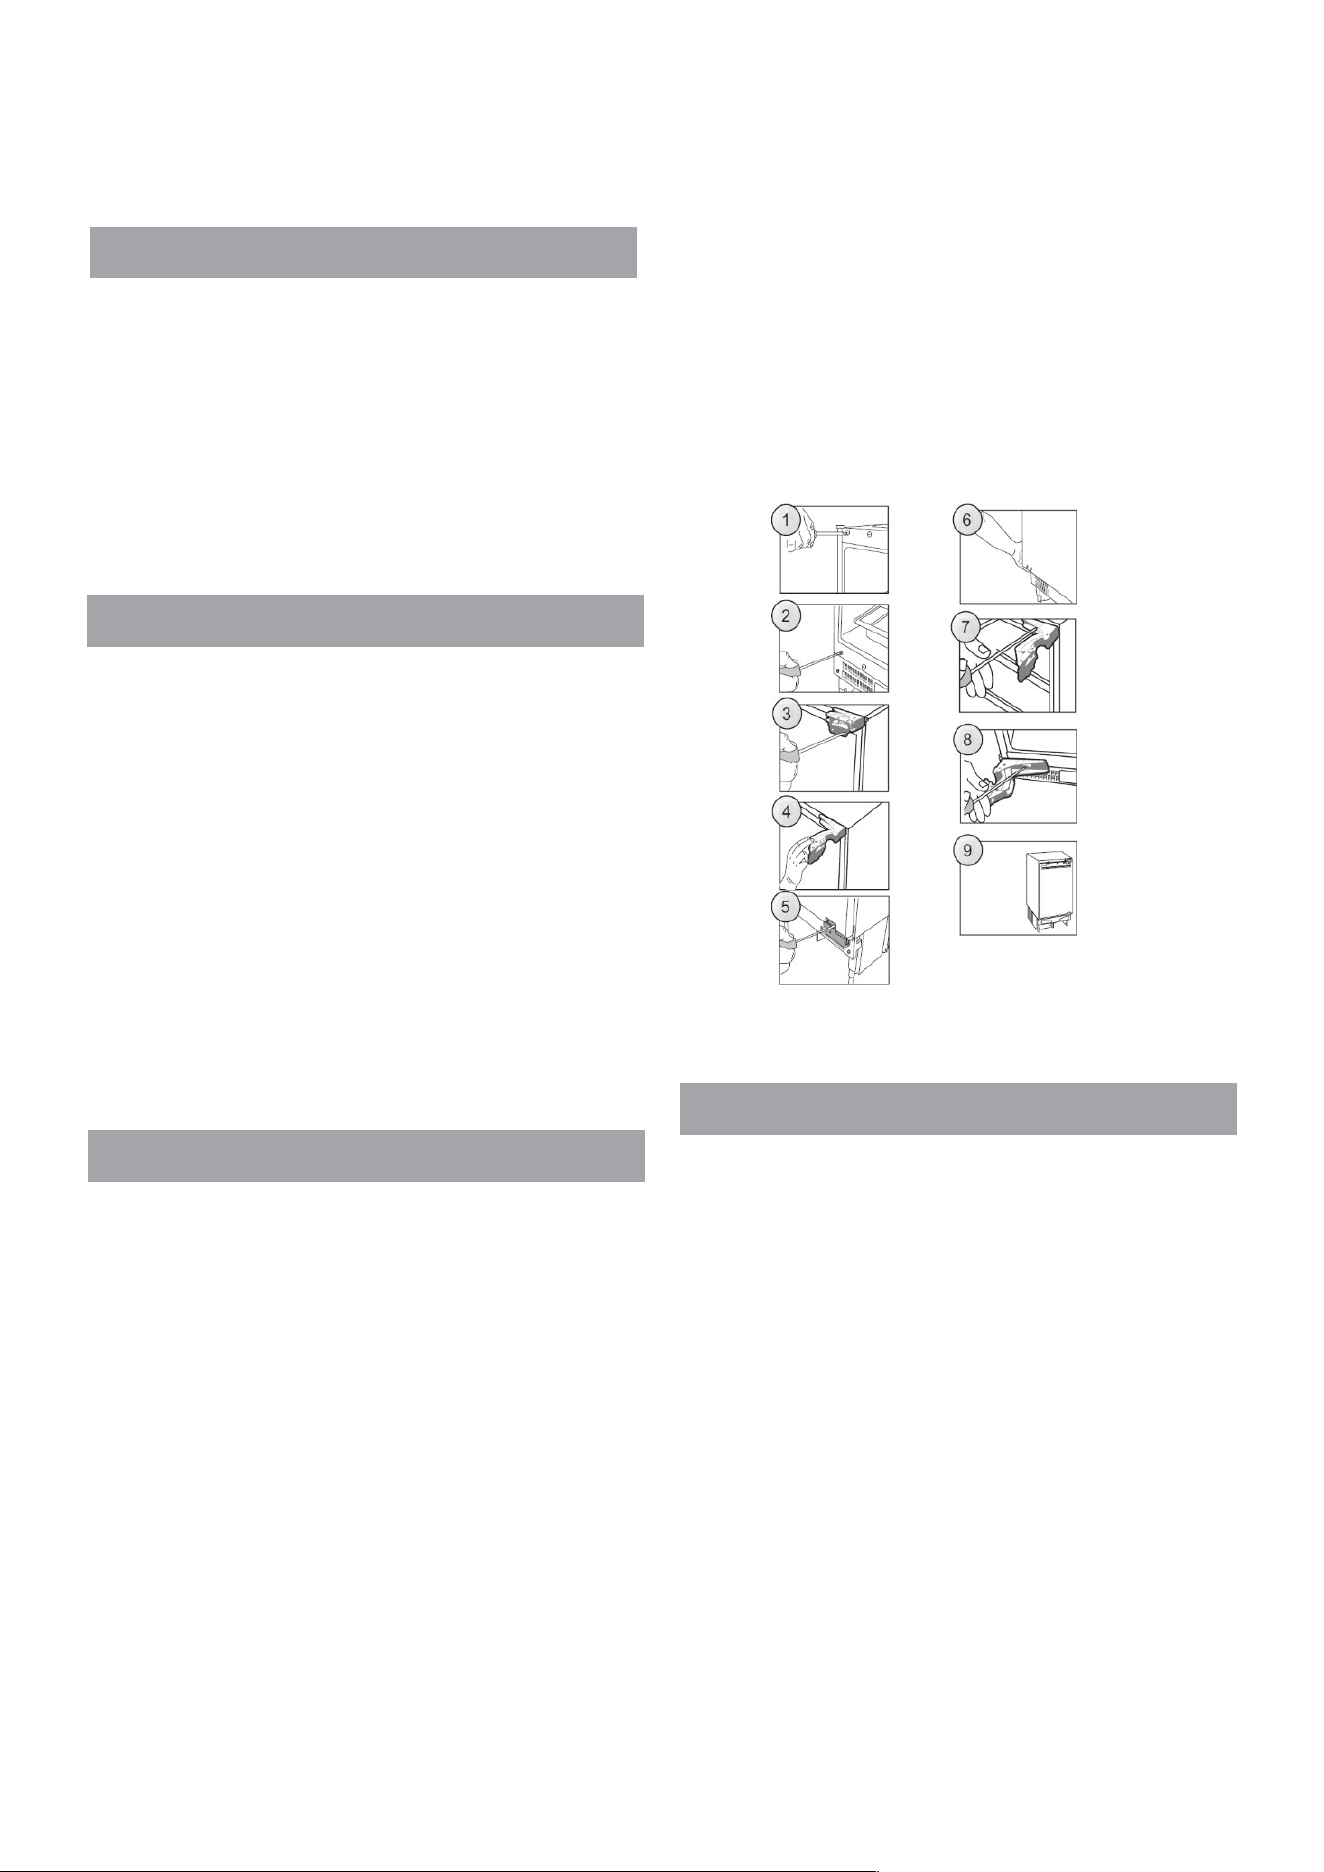
4
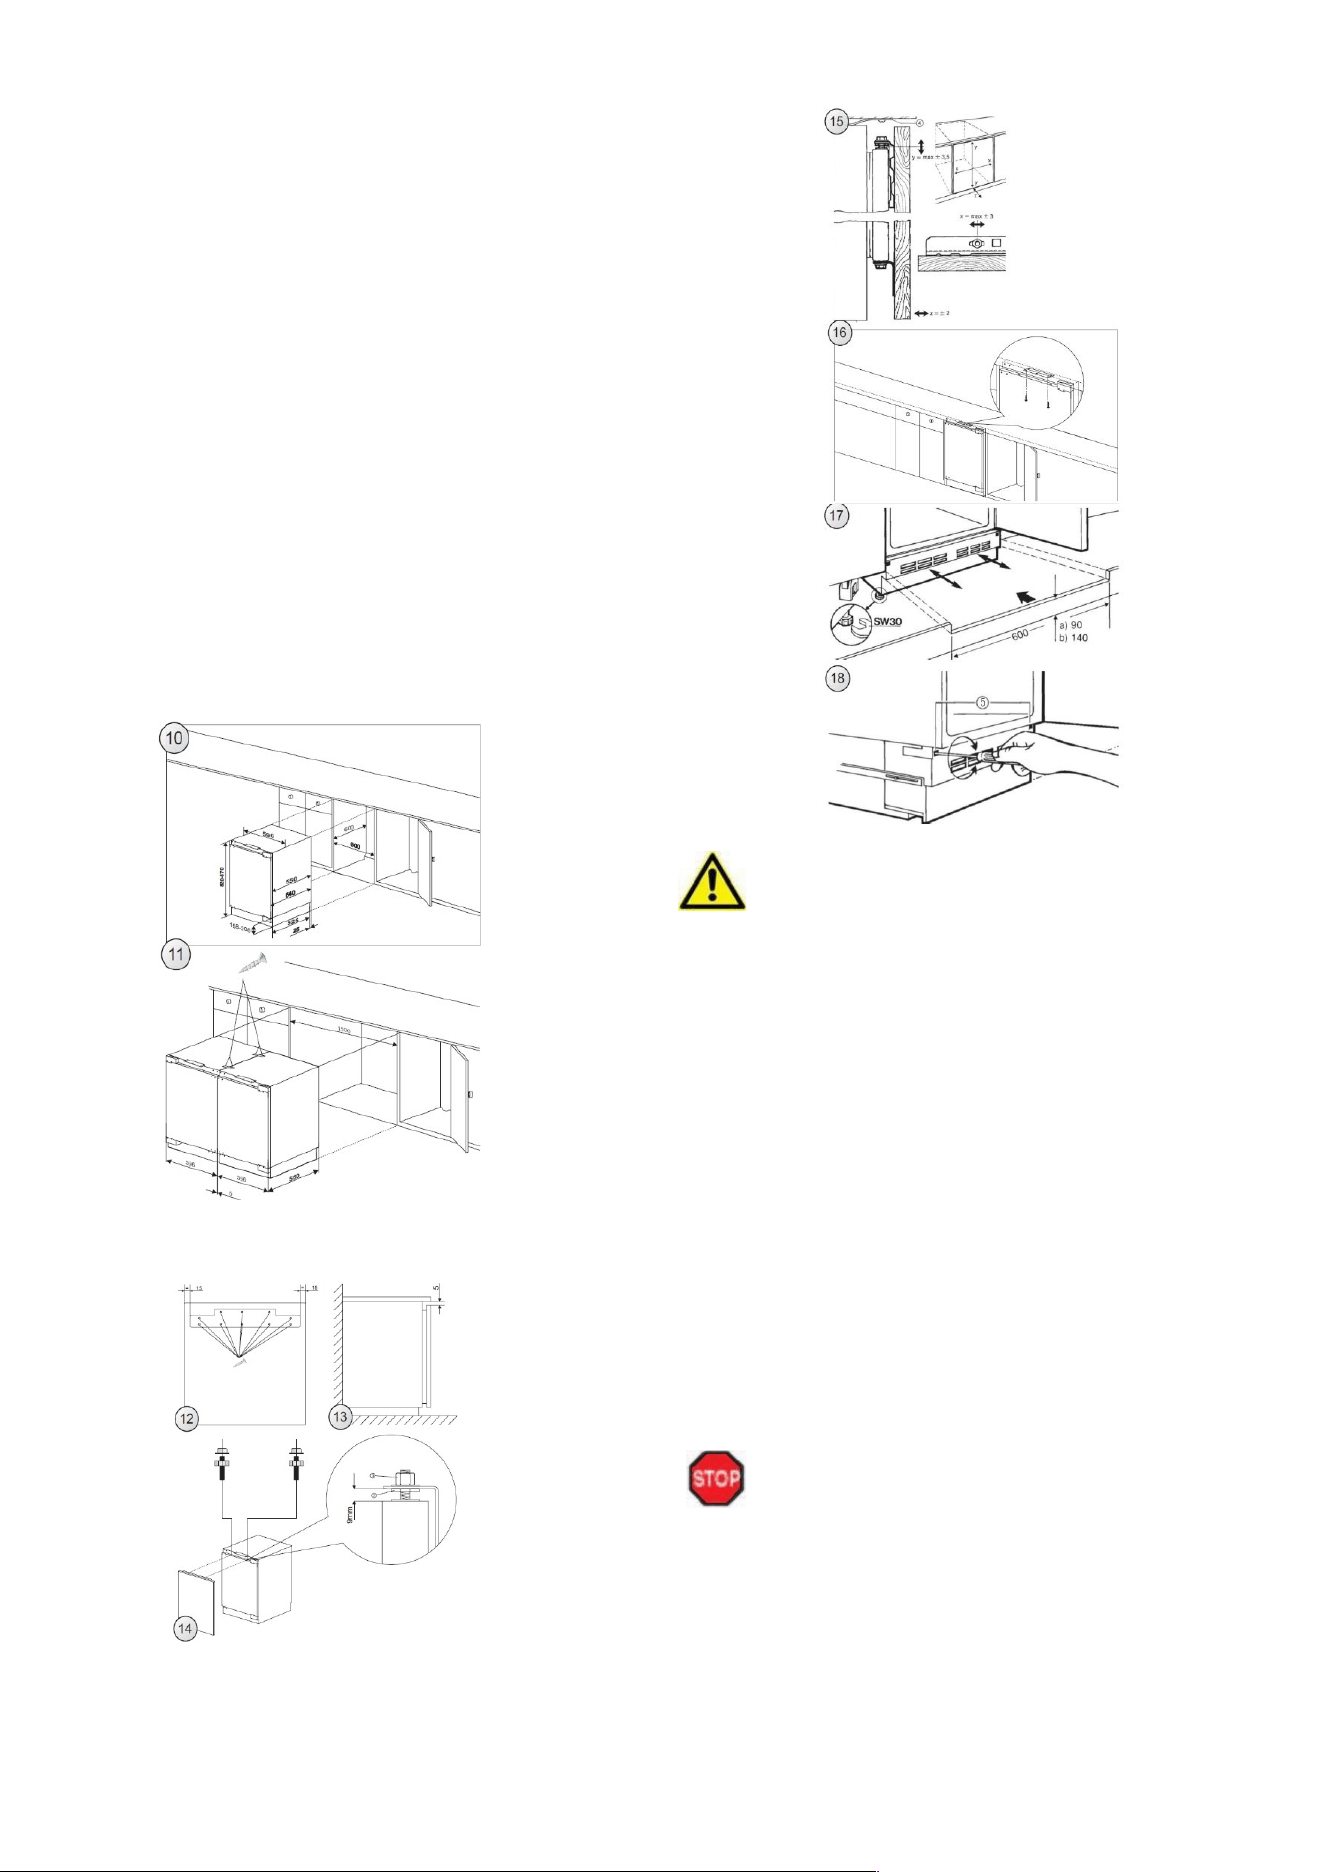
Installing your appliance
3
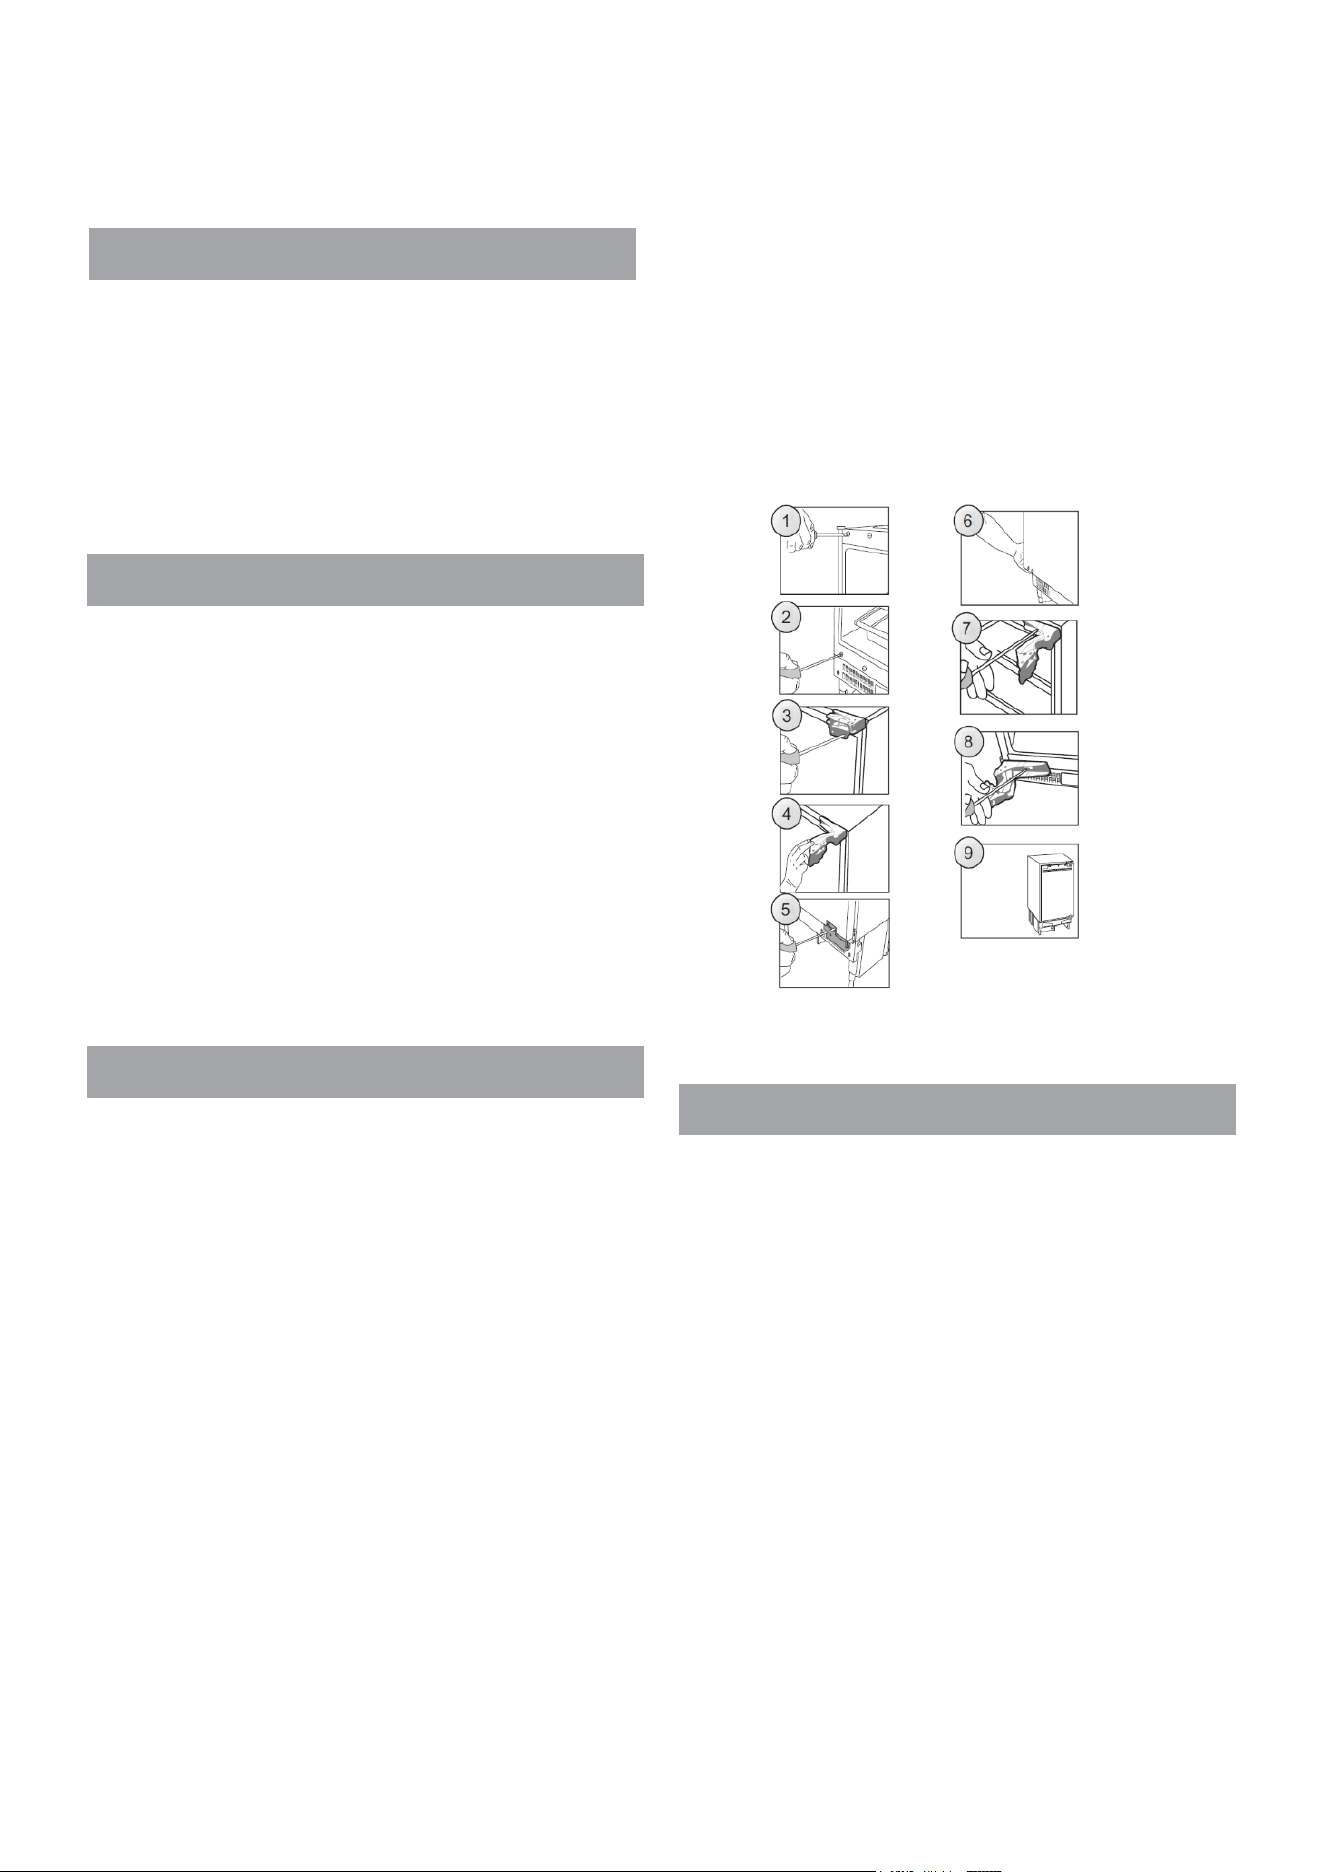
Reverse the door hinge
2
1. Unplug the appliance before reversing the door
opening
direction.
2. Remove food from the appliance.
3. Remove caps on the front of the refrigerator body
(Fig. 1, Fig 2).
4. Remove the two screws, which attach the upper
hinge to the appliance door (Fig. 3). Take special care
and hold the appliance door vertically.
5. Holding the door, swing the upper door hinge away
from the door using the other hand (Fig. 4).
Be especially careful during this step, as the hinge
may close and cause injury.
6. Remove the two screws, which attach the lower hinge
to the appliance door (Fig. 5). Take special care and
hold the appliance door with the other hand.
7. Holding the door, swing the lower door hinge away
from the door using the other hand, then detach the door
from the appliance body (Fig. 6).
8. Remove the two screws , which attach the upper
hinge to the body and the two screws holding the lower
hinge to the appliance body (Fig. 7).
9. Screw the upper and lower hinge on the opposite
side of the appliance body using suitable screws (Fig.
8). Upper hinge should be mounted on the other side of
the appliance as the lower hinge. The lower hinge
should be mounted on the other side of the appliance
as the upper hinge.
With the hinges open, hold the door parallel to the
appliance body and screw the hinges to the door using
suitable screws while taking proper care.
10。 Make sure that the door is properly aligned with
the appliance body (Fig.
9).
INSTALLATION OF THE APPLIANCE
Installation of the appliance should be performed by a
qualified installer. The appliance should be placed in
furniture case (Fig. 10). Once the appliance is placed
correctly, adjust the height of the appliance by turning
the 4 adjustable feet as appropriate. If necessary,
appliances should be braced with a bracket fixed by
screws and fitted in furniture (Fig. 11). There is a special
strip at the top of the appliance. Attach it to the
underside of the cabinet with appropriate screws
supplied with the assembly kit (Fig. 16).
Decorative strip must not block the vents located in the
bottom casing unit, the strip must be cut to size (Fig.
17). The depth of the bottom casing unit can be
adjusted by moving it forwards or backwards. Once
properly adjusted, tighten the mounting screws (located
in the openings on both sides of the casing unit) with a
cross-head screwdriver.
This will permanently attach the casing unit (Fig. 18).

Do not use washing liquids, sharp or abrasive household
products or any other cleaning agents containing soda.
• Make sure that the pipes for the circulation of the
refrigerant are not damaged in any way during installation
of the appliance.
• The appliance must only be used for the purpose for which
it is intended.
• The appliance must be placed on a firm, level surface.
This is the only way to ensure that the refrigerant can
circulate freely and thus ensure that your appliance will
work efficiently.
• If possible, place your appliance in a cool, well-aired,
dry room.
• Do not place your appliance in direct sunlight, nor in a
room at high temperature.
• Do not place your appliance in the vicinity of any sources
of direct heat such as heating, ovens, cooking stove etc.
(This would mean the compressor would have to work
harder and as a result the power consumption would be
considerably higher).
Do not place any appliances, such as
microwaves, toasters etc. which give off heat on the
appliance.
• Never obstruct the ventilation grille.
• Always pull out the plug itself and never pull the cable
when cutting the appliance off from the mains supply.
• Leave the appliance standing in its final position for
at least 2 –4 hours before switching it on, so that the
circulation of the refrigerant stabilises and no
operating problems occur.
3
FITTING FURNITURE BOARD TO APPLIANCE DOOR
Place the mounting bracket on furniture board and
position it a
ccordingly (Fig. 12). The distance between
the furniture board and the underside of the worktop
should be 5 mm (Fig. 13). Attach the mounting bracket
using suitable screws supplied in the installation kit. Pull
out the mounting bracket cover and screw in the two
special screws (2) in the appliance doors (Fig. 14).
Attach furniture board with the fixed mounting bracket to
the appliance door. Secure the furniture board with
suitable nuts (item 3, Figure 14). Make sure the furniture
board assembly is positioned correctly relative to the
appliance (Fig. 15). Using the supplied screws, attach
the furniture board assembly to the bottom of the
appliance door (Fig. 15). Replace the mounting bracket
cover in its original location.

• Before connecting up the appliance, make sure
that it is absolutely dry inside - especially in the
corners.
• Depending on its composition, the refrigerant can be
easily inflammable. The refrigerant circuit has been
hermetically sealed and has been tested many times
for possible leaks.
• Any inexpert interference might well create a fire
hazard. Make sure nothing mechanically effects the
circulation of the refrigerant, nor, in particular, the
accessible parts around the compressor.
Only expert professional personnel should intervene
on the refrigerating system.
• Any refrigerant spilling out can injure your eyes.
• In the event of eye contact with the refrigerant,
wash your eyes instantly under plenty of running
water and call/consult a doctor (an eye specialist)
immediately.
Climate category:
The appliance, according to its climate category, is meant
for use at certain room temperatures.
These temperatures should not be exceeded! The climate
category for your particular appliance is marked on the
rating plate. The categories are:
name of climate
category
SN
N
ST
T
suitable
room temperatures
+ 10° C to + 32°C
+ 16° C to +
32°C
+ 16° C to + 38° C
+ 16° C to + 43° C
4

5
Rating plate
The rating plate with the technical data is located on the side
of the appliance inner wall or outside, on the rear side of the
unit.
6
Connecting your appliance
to the mains
• Your appliance must be connected only to a grounded
power socket, which complies with relevant standards
and has been installed by an authorised specialist.
• Before you plug in your appliance to the power socket,
make absolutely sure that the voltage (V) and the safety
fuse (A) for the main fuse box stated on the appliance’s
rating plate match your electrical supply. If these do not
match, notify the nearest service department or your
dealer immediately.
• The appliance must not be connected up to an
inverse rectifier (eg. solar panels).
7
Using your appliance
Switching on/off and selecting the temperature
Temperature controller (thermostat controller)
The device is switched on and off with the temperature
controller and the fridge-freezer temperature is set.
Turn on a device:
After it has been connected to the power supply, the
device is switched on via the temperature controller.
8
Starting up the appliance
There are total 5 temperature settings for the refrigerator.
After connecting to the power supply, the refrigerator will be
set on setting 3, which is the default setting.
Button “power”: Located on the left side, functioned as
switching on/ off the refrigerator by pressing 3s.
Button “Adjust”: located on the right side, functioned as
adjusting the temperature settings for the refrigerator. By
pressing the button, the settings 1 to 5 represent different
temperatures from the highest to the lowest.
Picture of Light and Temperature controller
Warning!
• Do not store any bottled liquids in the freezer. Liquids
expand when frozen and the bottle may explode.
• Never keep explosive substances or aerosol cans with
inflammable propellants such as butane, propane,
pentane etc. in the freezer. Any escaping gases could be
ignited by electrical components. Such aerosol cans can
be recognised by the list of contents or by the inflammable
symbols printed on the can itself.
• When storing ready frozen food, you must follow the
manufacturer’s instructions on the food packaging.
• Deep frozen ice-cream and ice-lollies must not be eaten
until a few minutes after being taken from the freezer to
avoid injury to lips and tongue (danger of
• skin detachment). For the same reason, avoid touching
the frozen inside walls of the freezer with wet hands.
• Defrosted or slightly frozen products should be used
immediately. As a rule, such products are not suitable for
re-freezing.
• Packaging should be dry to avoid things freezing together.
• Ready frozen foods should be stored so that they do not
come into contact with newly added foods that have not
yet frozen.
9
Freezing / Storing fresh food
Almost all fresh products are suitable for freezing and
storing in the freezer.
For the most common of these products, a storage guide
with details of acceptable storage times and the most
suitable packaging is provided. (See “Food storage guide”
at the back of this user manual).
Label fresh products clearly, as they are not easy to identify
when deep-frozen in transparent freezer-bags.
We recommend using commercially available labels for
frozen foods.
Pack fresh products in portions suitable for your needs to
avoid defrosting quantities that are too big for you to use up
in one day.
Label the portions with at least the following information:
• Product name (e.g. beef fillet)
• Weight of the Portion
• Quantity (number of pieces)
• Freezing date
• Use by date (see “Food storage guide”)
5
Position Conditions
1-2 Summer or ambient
temperature between 25-
35 °C
3-4 Spring, autumn or ambient
temperature between 15-
25 °C
5 Winter, or ambient
temperature between 5-15
°C
Quick freeze
Super freezing function
To activate the Super Freezing function:
set the thermostat in position 5, press door switch and
temperature adjustment button together, wait until the
LED of position 5 blinks continuously, the SF function
has been activated
Note: During the SF period, the Led of position 5 will
keep blinking.
Then continue as follows:
a) Berries, fruits with peel, herbs etc. should be laid out
loose for freezing on the freezing tray (not all models are
supplied with this) in the upper part of the freezer and
then put into freezer bags after about 12 hours. Store the
filled freezer bags in one of the available drawers. Fresh
food should be placed in the top drawer and moved
down to one of the lower drawers after approx. 24
hours.
Avoid putting fresh foods directly in contact with deep
frozen food. The deep frozen food could defrost and may
not last out the normal storage time.
b) Within a period of 24 hours, fill up the freezer only with
the adequate quantities of fresh food for the freezing
capacity of your freezer.
Consult the information on the rating plate (XX
kg/24h).
c) If your freezer is equipped with a SUPER FREEZE
SWITCH, switch it on, this is not strictly necessary
when filling up with already frozen foods (e.g. deep
frozen foods).
WARNING! Switch off the SUPER FREEZE SWITCH
after 24 hours at the latest.
d) Set the temperature dial to a medium to high setting.
e) Keep the temperature in the freezing compartment under
control preferably by placing a suitable
thermometer with a scale range of up to -26°C. The
storage temperature must always be at least - 18°C.
Refilling the freezer compartment with fresh (not frozen)
food
Make sure that you wait at least 24 hours before refilling
with fresh food, in adequate quantities for the freezing
capacity of your freezer (XX kg/24h).
Maximum capacity
In order to ensure correct storage of frozen food, never fill the
freezer up to the top.
Set the temperature dial strictly according to the filling
capacity.
To save energy in normal room temperatures ( + 18°C to +
22°C) we recommend setting the temperature dial to a
medium setting.
Storage time
The storage time for ready deep-frozen products depends
on the type of product and on its ingredients. For this reason,
you should strictly follow the producer’s instructions on the
packaging.
When you want to freeze fresh foods yourself, consult the
Storage table (chapter 17).
Once frozen foods have been defrosted, they should be
used up within between 12 to 24 hours.
Do not eat any food beyond its storage time; this
could lead to food poisoning.
Refrigerating storage battery
(Not supplied with all appliances)
Refrigerating storage batteries serve two functions:
• In the event of a power cut, the storage battery prevents
the temperature inside the appliance from going up too
much – this preserves the quality of the food for longer.
• Put storage batteries with the flat side in contact with the
uppermost evaporation panel or in the top compartment.
• Storage batteries can also be used to keep foods cool in a
cool box.
• Storage batteries reach their maximum refrigerating
• capacity after they have been in the freezer for about 24
hours at - 18° C or lower and are then placed in one of the
cool boxes that are commercially available.
Precautions and advice
• Whenever cleaning or defrosting, remove the power plug
or switch off the main fuse.
• After closing the freezer door, do not open it immediately
and do not force it open under any circumstances. The
vacuum created by the sealing of the door is dispersed
after about 1 - 2 minutes, so that the door can be opened
normally again.
• To prevent condensation and ice forming, allow cooked
food to cool down to room temperature before closing the
lid of the dish and before storage.
• Leave the freezer door open as briefly as possible to
avoid wasting energy and to prevent an excessive
amount of ice forming in the freezer compartment.
• If the red pilot light comes on unexpectedly or stays on for
a long period, do not open the door on any account and
take appropriate measures immediately (see “What to
do when...“ at the back of the user manual).
• Never use a screwdriver or any other sharp-edged metal
tool to remove the layers of ice. The inside walls are very
delicate and can be easily damaged by sharp edges. Use
only plastic or wooden scrapers with no sharp edges.
10
Cleaning and maintenance
As a firm rule, unplug the power plug or switch off at the
mains.
For the upkeep of the external appearance of your fridge /
freezer, clean the outside every now and again with furniture
polish or with an enamel protecting product (never, on any
account use it inside). Clean the door seal with warm water
now and again but do not use any cleaning products.
Clean your appliance regularly.
• The various parts inside the fridge / freezer are generally
not suitable for dishwashers. These should be washed by
hand with warm water and a little washing-up liquid.
Never use the cleaning agent neat and on no
account use any abrasive or acid, i.e. chemical cleaning
products. A general all-purpose pH neutral cleaning agent
is recommended.
• The rating plate inside or outside your appliance should
not be damaged and should never be removed - this is
essential for servicing. Make sure, when cleaning, that no
water runs onto any electrical parts inside theappliance.
• If there is a heat exchanger -called condenser- on the
back of your fridge / freezer, this should be cleaned
regularly. Dust and dirt impede the release of heat from
the inside and considerably increase energy consumption.
For best results, use a soft brush or a duster to remove
dust from the condenser.
Special tip for cleaning the fridge
Clean the drain hole in the fridge from time to time with, for
example, cotton buds, in order to keep it clear.
Switching off the appliance
If your appliance is going to be switched off for longer
periods (such as during holidays), it should be left open to
6

a)
b)
c)
d)
e)
Preserves
pastries, ready cooked foods
Dairy produce / meats and
sausages
Meats and sausages
Vegetables, fruits,
salad
Advice
prevent odours from building up inside. If your appliance has
a lock, set the lock in the “closed” position with the doors
open and keep the key well away from small children to
prevent accidents.
Ice and frost layers which build up to a certain thickness on
the inside walls, act as insulation and prevent the dispersion
of the coldness. These must be removed from time to time.
To remove the layers of ice from the inside walls, use a
plastic or wood scraper with no sharp edges.
When doing this, remove the drawers and lay a cloth on the
bottom of the appliance to catch the ice as it is scraped off so
that it can be easily removed.
The method least likely to damage your appliance when
removing the layers of ice is to defrost it.
Defrosting (Not applicable for NO FROST devices)
In normal circumstances (opening the freezer 4 – 5 times a
day), the freezer compartment should be defrosted once or
twice a year (more often in other circumstances).
The fridge compartment is defrosted automatically.
Danger warnings
• Never use electrical appliances to defrost your appliance,
such as a hair dryer, fan heater, dehumidifiers, de-icing
sprays or anything with a naked flame (e.g. candles).
• The plastic inside of your appliance could melt and the
escaping gas or foam could be ignited by sparks or by the
naked flame.
• On no account should a steam-cleaning device be
used to defrost the layers of ice in the appliance
(great risk of an electric shock).
Proceed as follows to defrost your appliance:
1. Provide a suitable non-metallic container (a plastic
container or wash-basket).
2. Make sure that you remove the plug from the power
socket.
3. Dry your hands thoroughly to prevent skin damage from
contact with ice
(It is advisable to use gloves).
4. Remove all frozen food from the freezer and roll it firmly
in newspaper place it in the container already prepared
and place the container in a cool, dry room.
5. Cover the container all around with a thick blanket.
6. Remove the drawers by pulling them as far out as
possible and then raising them slightly.
7. As described previously, scrape the thickest ice carefully
from inside the freezer and put it in the kitchen sink.
8. If your appliance is equipped with a drip duct at the
bottom of the appliance, pull it out and place a bowl to
catch the dripping water underneath it.
9. If necessary, speed up defrosting by placing a large bowl
of warm (not too hot) water on the bottom of the
appliance and close the door.
10. If your appliance is not equipped with a drip duct, place
an absorbent cloth underneath the front of the appliance
and wipe up the defrosting water with a sponge.
11. Thoroughly clean the inside. Wipe it out with warm water
and a little vinegar and then rinse it out with clear water.
12. Dry it thoroughly with a soft cloth and air it for 3-4 minutes.
13. Close the door and plug the appliance back in.
14. Reset the temperature dial to the maximum setting.
(If your appliance is equipped with green and red
pilot lights, these will come on) and if the SUPER
FREEZE SWITCH is provided, switch it on .
15. Now refill the drawers with the frozen food - the oldest
items at the top.
To prevent the frozen food from defrosting, carry out the
steps described above within two hours at the most.
16. When the red pilot light goes off, reset the temperature
dial to a medium setting.
If provided, switch off the SUPER FREEZE SWITCH
after about 12, but no later than 24 hours.
11
Changing the light bulb:
Under no circumstances should you use a lamp with a
wattage greater than that specified on the original lamp.
This product contains a light source of energy
efficiency class G.
LED lights may only be replaced by a qualified
specialist.
In general, no warranty is given on lamps.
Temperature settings:
The temperature must be set according to:
• room temperature
• quantity of stored food
• how often the appliance is opened
We recommend a medium setting. You will soon learn,
through observation, which is the most suitable setting for
your requirements.
Interior lighting (not available on all models)
For those models equipped with interior lighting, a
Switch has been built in.
When the appliance has been switched on at the
temperature dial, the light automatically comes on when the
fridge door is opened and automatically goes off when the
door is closed.
The light bulb is protected by a transparent cover.
Temperature range
Thanks to the natural air circulation in the fridge
compartment there is a range of differing temperatures that
is suitable for the storage of different food. The coldest
areas are directly over the salad crispers, in the lowest part
of the fridge and against the back wall (suitable e.g. for
sausages and meats); the warmest areas are in the front
upper part and on the door (suitable for spread able butter
and cheese).
Arrange the food according to the following table and store it
not too tightly packed so that the air can circulate freely.
Storing food in the fridge (from the top to the bottom)
1. Door storage compartments
a) Butter, cheese
b) Eggs
c) Small jars or bottles, tins, seasonings
d) Large bottles, tins
2. Fridge compartment (shelving / glass plates)
7
• Food that gives off, or absorb, slight odour or taste, as
well as liquids, should always be kept in sealed
containers or in their own packaging; high proof spirits
should be stored upright and tightly closed.
• Vegetables, fruits, salad can be stored unpacked in the
salad crispers.
• Plastic and aluminium foils, which can be reused, are
suitable for packing food, as are metal or glass containers.
• Hot foods and drinks should always be allowed to cool
down out of the fridge.
Switching the fridge off
If the fridge has to be switched off for a long time,
press "power" button for 3 seconds and the fridge cleaned
as instructed above.
While the fridge is off, leave the doors open to
prevent odours from building up.
12
Troubleshooting guide
High quality manufacturing processes and the use of the
latest refrigerating and freezing technology will ensure the
trouble-free functioning of your appliance.
If you suspect any fault, before contacting your nearest
service department directly or via your dealer, make sure
you have followed all instructions and advice given in this
user manual.
Please note:
The compressor (also known as the refrigerating motor)
must not operate continuously.
It is controlled by a thermostat, which you set on the
temperature dial and switches on automatically when the set
temperature in the appliance is exceeded and switches off
automatically when it is reached again.
Noise can be heard in every compressor - refrigerating
system when it is switched on. These noises are produced
when the motor in the compressor is running and by the
refrigerant flowing through the refrigerating system circuit.
These noises are normal and do not indicate any fault in the
functioning of your appliance.
In unheated rooms and in cold weather conditions,
condensation can build up on the outer walls of the
appliance.
This does not mean there is a fault and it will disappear
when the temperature increases.
Only call the service department, if after analysis of the
possible fault factors, you cannot find any cause for the
defect or you are not able to eliminate the fault.
Therefore first check under: „what to do
when ...“ What to do when...:
a) The appliance does not function (it is not running).
Please check:
• Is the plug in good order and is it plugged in the socket
properly?
• Is the electricity coming through?
• (check this by possibly plugging in a small appliance such
as a hand mixer or hair dryer etc.).
• Is the appliance switched on?
Warning!
In the event of a fault or of a power failure, the insulation
of the appliance’s walls provides 11 hours storage time for
the frozen foods after the beginning of such failures.
Considerably more time is granted in specially insulated
appliances. Ask your dealer what is the relevant: “Storage
time in an emergency“.
If it takes longer to eliminate a problem, the frozen food in
the appliance begins to defrost. Therefore, take prompt
action to eliminate the problem and, if necessary, move
the frozen food to another freezer.
b) Your appliance is not cooling sufficiently.
The freezing process is taking too long.
The compressor is running too often.
Please check:
• Did you make sure that the fridge / freezer was left to
stand for at least 2 hours before switching it on? (To
stabilise the circulation of the refrigerating fluid) see:
“starting up“.
If not; unplug your appliance and lift it to one side,
with the door closed, for a short while, i.e. tilt it and then
place it back down on its feet again. After 2 hours plug it,
back in. Do not open the door again for about 12 hours
(i.e. until the red light - if provided - has gone off).
• The door does not close tightly and is not sealing properly.
• Test: place a sheet of paper between the seal and the
casing and close the door. It should be difficult to pull out
the sheet of paper on all sides.
• If the paper slides out easily on one or more sides, call
your nearest service department.
• Heavy ice formation on the inside walls of the freezer
compartment (see:“ cleaning and maintenance“).
• The appliance is exposed to direct sunlight or is sited
near a direct heat source (oven, radiator etc.).
• Protect the appliance against direct sunlight / check the
distance from the heat source / place an insulation plate
between the appliance and the source of heat
(See “Choosing where to install your appliance“).
• The freezer has been filled up with a quantity of fresh food,
which does not comply with the freezing capacity
indicated on the rating plate (XX kg /24h).
• Is the ventilation working properly, the ventilation grille
covered or is the condenser on the outer rear wall full of
dust?
c) Your appliance is excessively noisy.
Please check:
• Is the cabinet standing level and steady, are any nearby
objects or items of furniture being vibrated by
the cabinet? Make sure everything at the rear is free,
carefully bend back any parts touching.
For further information see chapter: 16 "Problem shooting"
Warning
On no account should you undertake any technical
interventions or attempts at repair on your appliance.
8
13
Energy Saving Advice
•
Do not install the appliance close to sources of heat, such
as a cooker, dishwasher or radiator.
•
Locate the appliance in a cool well-ventilated room and
make sure that the air vents are clear.
•
Try to avoid keeping the doors open for a long time, as
warm air will enter the cabinet and may cause a build-up of
ice as well as affecting the energy consumption. Ensure
there are no obstructions preventing the doors from closing
properly.
•
Ensure that the door seals are clean and there are no tears
or splits.
•
Keep the most perishable foods, (those with a short shelf-
life, such as cooked meats), in the coldest part of the fridge.
The Salad Crisper Box is the warmest part of your fridge
and should be used for vegetables, salads and fruits etc.
•
Do not overload the appliance: the cooling air that
circulates and keeps the appliance cold gets blocked, and
pockets of warm air form.
•
Do not put hot food into the fridge or freezer – let it cool
down first.
14
Getting your appliance serviced
Any repairs or interventions on the appliance should
only be carried out by your nearest service department,
as otherwise the user may run considerable risks and
the guarantee may no longer be valid.
Consult the enclosed guarantee card or the separately
enclosed list of after sales centres, to see which company is
responsible for servicing your appliance.
If there is no indication of the nearest service department in
the documentation provided, then contact your dealer.
Repairs by the service department to eliminate
faults that have occurred because of non-adherence to the
information and advice given in this user manual, have to be
charged to the customer and are not covered by your
dealer’s guarantee.
In order to receive immediate help, make sure you have
ready the following essential data to identify your appliance:
Appliance type and model (see the rating plate)
• Date of purchase
• Name and place of your dealer
• Description of the fault
15
Warranty
Note the general warranty conditions and the warranty
period in the enclosed warranty card or the warranty card
handed over by the seller on the occasion of purchase and
the warranty conditions on the last page of this manual.
The manufacturer works constantly at the further
development of all products. Please therefore bear this in
mind as the form, set up and technology are subject to
change, without prior notice.
Your purchase receipt is important to the warranty
proof.
9
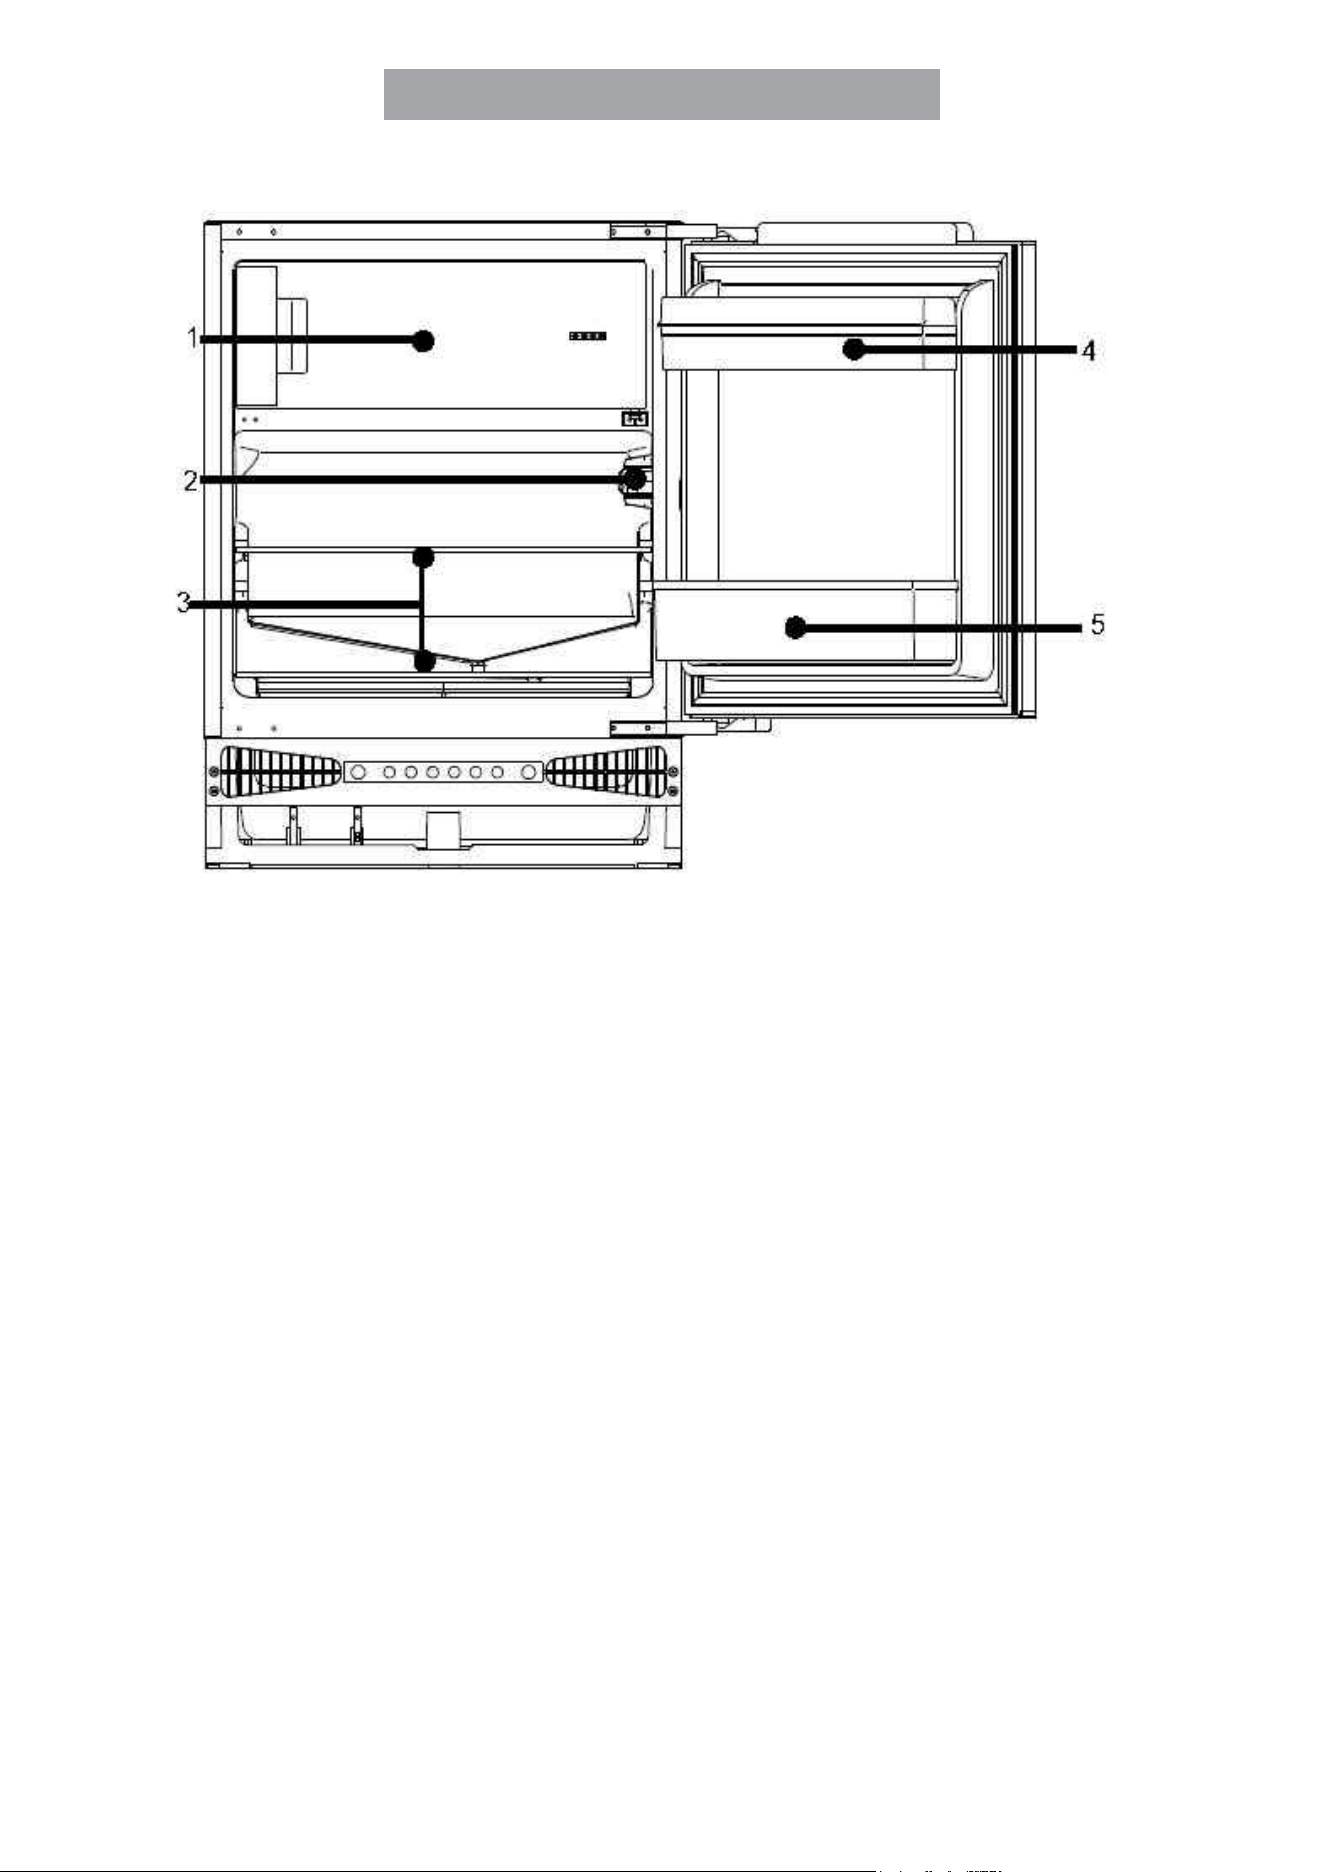
16 Product overview
10
1.Fr
eezing compartment
2.Temperature Controller
3.Shelves
4.Egg tray/door rack
5.Bottle rack
17 Problem shooting
PROBLEM
POSSIBLE CAUSE / SOLUTION
The appliance does'
work
Check that the appliance is connected to the mains.
Check that the plug is not faulty.
Check that the appliance is switched on.
Check the fuse
Check that the voltage for the appliance is correct
Are there any faults with the socket? For this purpose connect an other electric appliance
e.g.. a Hairdryer to the socket.
The temperature inside
the appliance is not
cool enough
Check that there is not to much food in the appliance.
Check that the Temperature controller is set to a suitable temperature.
Check that the appliance is not placed in direct sunlight, or too near to a heating source.
Check that the ambient temperature is within the operating limits of the appliance.
Are the doors of the appliance opened frequently.
Check that you have not filled more fresh food at ones in the freezer then allowed.
The inside temperature
is too cold
Increase the temperature by adjusting the temperature to a lower (warmer) setting.
The coldest setting should only be used as a rapid cool/freeze setting minimum two
hours before a large amount of fresh food is placed in the appliance. If this is not done
the temperature the fridge compartment could fall below 0°C, as the compressor will run
continuously.
The inner surfaces of
the appliance are wet.
Caused by condensation - dry the inside of the appliance.
The outer surfaces of
the appliance are wet.
Caused by condensation - dry the outer door of the appliance carefully.
Smell odour
Check all the food and drinks that is in the fridge is in date and correctly packed. If it isn't
it should be removed from the appliance immediately or repacked.
Check for spillages on each shelf, rack and drawer. You may need to remove the
drawers to check that no spillages have settled underneath them.
Check the drainage pipe is not clocced or the trip tray at the back of the appliance is full.
The pipe can be cleared by pouring hot water trough, but please ensure that the
appliance is turned off, the plug is removed from the socket and a jug or bucket is on
place to catch the flow of water.
The door does not
close properly
Ensure there are no obstructions preventing door closure.
Check the door compartments and shelfes are correctly in place.
Check the door seal is not warped or torn.
Check the appliance is level.
Unusual noises
Check the appliance is on a flat level surface and stable.
Check the spacing's around the appliance and insure it is not touching other items.
Bubbling and gurgling sound: This noise is emitted as the coolant fluid flows trough
the pipes within the cooling system. This is normal.
Water flowing sound: This is the normal sound of water flowing into the drain trough
the defrosting process.
If the appliance is operating noising ( compressor noise): This is normal. This noise
indicates that the compressor is operating normally. As the compressor is being
energized, it might run a bit more noisily for a short pride of time.
11
It is prohibited to dispose of this appliance as household waste.
Packaging materials
Packaging materials with the recycle symbol are recyclable. Dispose of the
packaging into a suitable waste collection container to recycle it
Before disposal of the appliance
1. Pull out the mains plug from the mains socket.
2. Cut off the power cord and discard with the mains plug.
Warning! Refrigerators contain refrigerant and gases in the insulation.
Refrigerant and
gases must be disposed of professionally as they may cause eye injuries or
ignition.
Ensure that tubing of the refrigerant circuit is not damage prior to proper
disposal.
18 Disposal of the appliance
Correct Disposal of this product
This symbol on the product or in its packing indicates that this
product may not be treated as household waste. Instead, it
should be taken to the appropriate waste collection point for
the recycling of electrical and electronic equipment. By
ensuring this product is disposed of correctly, you will help
prevent potential negative consequences for the environment
and human health, which could otherwise be caused by the
inappropriate waste handling of this product. For more
detailed information about the recycling of this product, please
contact your local council your household waste disposal
service, or the shop where you purchased the product.
12
19 STORAGE TABLE
For Feezer compartments
with -18°C <
Fresh food
Suitable packaging
approx. storage time in months
2-3
4
6
8
10-12
Mincemeat
>
Polyethylene freezer bag
>
Sausages
>
Polyethylene freezer bag
>
Small fish
>
Polyethylene freezer bag
>
Heart / liver
>
Polyethylene freezer bag
>
Ice cream
>
Plastic container
>
Fruit
>
Plastic container
>
Cheese
>
Polyethylene freezer bag
>
Bread
>
Polyethylene freezer bag
>
Large fish
>
Polyethylene freezer bag
>
Cake / biscuits
>
Glass container
>
Pork
>
Aluminium foil
>
Beef
>
Aluminium foil
>
Rabbit
>
Aluminium foil
>
Lamb
>
Aluminium foil
>
Mushrooms
>
Polyethylene freezer bag
>
Asparagus
>
Polyethylene freezer bag
>
Vegetables (cut)
>
Polyethylene freezer bag
>
Strawberries
>
Polyethylene freezer bag
>
Flans
>
Aluminium foil
>
Chicken
>
Aluminium foil
>
Turkey
>
Aluminium foil
>
Duck
>
Aluminium foil
>
Goose
>
Aluminium foil
>
Cauliflower
>
Polyethylene freezer bag
>
Beans
>
Polyethylene freezer bag
>
Pepperoni
>
Polyethylene freezer bag
>
Preserves
>
Glass container
>
Preserved fruit
>
Glass container
>
Ice lollies
>
Aluminium foil
>
13
Manual del usuario
FRIGORÍFICO BAJO ENCIMERA
CF1PN85INTEG

1
Contenido Página
1 Protección del medio ambiente e instrucciones de eliminación ................................................................ 2
2 Elección del emplazamiento del frigorífico / congelador. ................................................................................... 2
3 Cambio del sentido de apertura de la puerta ....................................................................................................... 2
4 Instalación del aparato. ............................................................................................................................................ 2
5 Placa de características ........................................................................................................................................... 5
6 Conexión del aparato a la red eléctrica ...................................................................................................... 5
7 Uso del aparato. ........................................................................................................................................................ 5
Encendido/apagado y selección de la temperatura ................................................................................... 5
8 Puesta en marcha del aparato. ............................................................................................................................... 5
9 Congelación/conservación de alimentos frescos ................................................................................................. 5
Capacidad máxima ................................................................................................................................................... 6
Tiempo de conservación .......................................................................................................................................... 6
10 Limpieza y mantenimiento ....................................................................................................................................... 6
Descongelación ......................................................................................................................................................... 7
11 Cambio de la bombilla LED ..................................................................................................................................... 7
12 Guía de solución de problemas. ............................................................................................................................. 8
Qué hacer cuando... / Comprobar. ......................................................................................................................... 8
13 Consejos de ahorro de energía .............................................................................................................................. 9
14 Reparación de su aparato ....................................................................................................................................... 9
15 Garantía… .................................................................................................................................................................. 9
16 Visión general del producto ..................................................................................................................................... 10
17 Solución de problemas ............................................................................................................................................ 11
18 Eliminación del aparato .............................................................................................................................. 12
19 Tabla de conservación ............................................................................................................................................. 13
2
4 Instalación del aparato
Manual del usuario
El manual del usuario se aplica a varios modelos, por esta
razón puede haber algunas diferencias en los detalles
indicados, según el tipo del aparato.
Embalaje
Sirve para proteger el aparato durante el transporte y se han
utilizado en él materiales reciclables.
Cartón corrugado/liso (principalmente de papel reciclado)
•
piezas conformadas de PS (espuma de poliestireno sin
CFC)
•
films y bolsas de PE (polietileno)
•
cintas de flejado de PP ( polipropileno)
•
Por favor, entregue todos los embalajes en el punto de
recogida oficial más próximo, para que todos los diferentes
materiales puedan ser reutilizados o reciclados en la
medida de lo posible y se evite así cualquier eliminación
ilegal de los mismos.
Con el fin de evitar daños personales o materiales, el
aparato debe ser desembalado y colocado en el lugar
escogido por dos personas
Antes de instalarlo, compruebe que su nuevo aparato no
presente daños externos.
Bajo ningún concepto debe poner en marcha el aparato
si está dañado.
Inspecciónelo cuidadosamente para detectar:
•
Daños en el embalaje que puedan indicar que el
aparato se ha tratado inadecuadamente durante el
transporte.
•
Daños externos
•
Daños visibles en el cable/enchufe
En caso de duda, haga que el departamento de servicio
al cliente revise el aparato.
Debe evitarse a toda costa que pueda producirse una
fuga de refrigerante contaminante del medio ambiente si
se pone en marcha el aparato.
1. Desenchufe el aparato antes de cambiar el
sentido de apertura de la puerta.
2. Retire los alimentos de su interior.
3. Quite los tapones de la parte delantera del
frigorífico (Fig. 1, Fig. 2).
4. Extraiga los dos tornillos que fijan la bisagra
superior a la puerta del aparato (Fig. 3). Tenga
especial cuidado y sujete la puerta del aparato
verticalmente.
5. Sujetando la puerta, bascule la bisagra superior de
la misma para sacarla de ella con la otra mano (Fig. 4).
Tenga especial cuidado durante este paso, ya que la
bisagra puede cerrarse y causar lesiones.
6. Extraiga los dos tornillos que fijan la bisagra inferior
a la puerta del aparato (Fig. 5). Tenga especial cuidado
y sujete la puerta del aparato con la otra mano.
7. Sujetando la puerta, bascule la bisagra Inferior de la
puerta para sacarla de ella con la otra mano, después
separe la puerta del cuerpo del aparato (Fig. 6).
8. Extraiga los dos tornillos que fijan la bisagra
superior al cuerpo y los dos de la inferior (Fig. 7).
9. Atornille las bisagras superior e inferior en el lado
opuesto del cuerpo del aparato, usando los tornillos
apropiados (Fig. 8). La bisagra superior debe montarse
en el otro lado del aparato, pasando a ser la inferior. La
bisagra inferior debe montarse en el otro lado del
aparato, pasando a ser la superior.
Con las bisagras abiertas, sujete la puerta paralela al
cuerpo del aparato y atornille las bisagras a la puerta
usando los tornillos apropiados, con el debido cuidado.
10.!Compruebe que la puerta esté correctamente alineada
con el cuerpo del aparato (Fig. 9).
INSTALACIÓN DEL APARATO
La instalación del aparato debe realizarla un instalador
cualificado. El aparato debe empotrarse en un armario
(Fig. 10). Cuando esté correctamente colocado, ajuste
la altura del mismo regulando las 4 patas ajustables
según convenga. Si es necesario, el aparato debe
fijarse al mueble con una abrazadera atornillada (Fig.
11). En la parte superior del aparato hay un perfil
especial. Fíjelo a la parte inferior del armario con los
tornillos apropiados suministrados con el kit de montaje
(Fig. 16).
El perfil decorativo no debe bloquear los orificios de
ventilación de la parte inferior de la carcasa, el perfil
debe cortarse a la medida (Fig. 17). La profundidad de
la carcasa inferior puede ajustarse moviendo el
aparato adelante o atrás. Después de ajustarlo
adecuadamente, apriete los tornillos de montaje
(situados en las aberturas de ambos lados de la
carcasa) con un destornillador de estrella.
De este modo se fijará el aparato permanentemente (Fig. 18).
1 Protección del medio ambiente / instrucciones de
eliminación
2 Elección del emplazamiento del aparato
3 Cambio del sentido de apertura de la puerta
3
MONTAJE DEL PANEL DEL MUEBLE EN LA
PUERTA DEL APARATO
Coloque la abrazadera de montaje en el panel del
mueble y posiciónelo del modo apropiado (Fig. 12). La
distancia entre el panel del mueble y la parte inferior de
la encimera debe ser de 5 mm (Fig. 13). Fije la
abrazadera de montaje usando los tornillos apropiados
suministrados con el kit de instalación. Quite la tapa de
la abrazadera de montaje y atornille los dos tornillos
especiales (2) en las puertas del aparato (Fig. 14).
Fije el panel del mueble a la puerta del aparato con la
abrazadera de montaje. Fije el panel del mueble con las
tuercas apropiadas (elemento 3, Figura 14). Compruebe
que el conjunto del panel del mueble esté posicionado
correctamente respecto al aparato (Fig. 15). Usando los
tornillos suministrados, fije el conjunto del panel del
mueble a la parte inferior de la puerta del aparato (Fig.
15). Coloque de nuevo la tapa de la abrazadera de
montaje en su ubicación original.
No utilice jabones líquidos ni productos limpiadores
abrasivos o agresivos, ni productos que contengan
sosa.
•
Compruebe que los tubos de circulación del refrigerante no
estén dañados de ningún modo durante la instalación del
aparato.
•
El aparato solo debe utilizarse para el uso previsto.
•
El aparato debe instalarse sobre una superficie
resistente y nivelada. Es el único modo de asegurarse
de que el refrigerante pueda circular libremente y, de este
modo, garantizar que el aparato funcionará
eficientemente.
•
Si es posible, instale el aparato en un lugar fresco,
seco y bien ventilado.
•
No instale el aparato expuesto a la luz solar directa ni a
altas temperaturas.
•
No instale el aparato cerca de fuentes de calor directo,
como calefacciones, hornos, aparatos de cocina, etc.
(esto haría que el compresor tuviese que trabajar forzado
y, debido a ello, aumentaría considerablemente el
consumo eléctrico).
No coloque cerca aparatos como microondas,
tostadoras, etc. que desprendan calor hacia el aparato.
•
No obstruya nunca la rejilla de ventilación.
•
Para separar el aparato de la alimentación eléctrica,
desconecte siempre el enchufe tirando de él, nunca del
cable.
•
Deje reposar el aparato en su ubicación definitiva
durante un mínimo de 2-4 horas antes de encenderlo,
para que se estabilice la circulación de refrigerante y
que no haya problemas de funcionamiento.

4
•
Antes de conectar el aparato, compruebe que el
interior esté completamente seco - especialmente
en los rincones.
•
Dependiendo de su composición, el refrigerante
puede ser fácilmente inflamable. El circuito de
refrigerante está sellado herméticamente y se ha
probado repetidamente para detectar posibles fugas.
•
Si se produce una manipulación no profesional
puede existir peligro de incendio. Compruebe que
no haya elementos mecánicos que afecten a la
circulación de refrigerante ni, en particular, a las
piezas accesibles en torno al compresor.
Solo deben intervenir en el sistema de refrigerante
profesionales experimentados.
•
Las salpicaduras de refrigerante pueden causar daños en los ojos.
•
Si el refrigerante entra en contacto con los ojos,
lávelos inmediatamente con agua corriente
abundante y consulte con un médico
(oftalmólogo) lo antes posible.
Categoría de clima:
El aparato, de acuerdo con su categoría de clima, está
diseñado para usarse con determinadas temperaturas
ambiente.
¡Estas temperaturas no deben superarse! La categoría de
clima para su aparato en particular se indica en la placa de
características. Las categorías son:
Nombre de la
categoría de clima
SN
N
ST
T
Temperaturas
ambiente apropiadas
+ 10°C a + 32°C
+ 16°C a + 32°C
+ 16°C a + 38°C
+ 16°C a + 43°C
5
La placa de características con los datos técnicos se
encuentra en la parte interior del lateral del aparato o en la
parte trasera exterior del mismo.
•
El aparato solo puede conectarse a una toma de
corriente conectada a tierra que cumpla con las normas
relevantes y que haya sido instalada por un profesional
autorizado.
•
Antes de enchufar el aparato a la toma de corriente, debe
comprobar con toda seguridad que el voltaje (V) y el
fusible de seguridad (A) de la caja de fusibles principal
indicados en la placa de características del aparato
coincidan con los de su red eléctrica. Si no coinciden,
informe de ello inmediatamente al departamento de
servicio más próximo o a su distribuidor.
•
El aparato no debe conectarse a un convertidor
inversor (p. ej. paneles solares).
Encendido/apagado y selección de la temperatura
Controlador de temperatura (termostato)
El dispositivo se enciende y apaga con el controlador de
temperatura y la temperatura ajustada en el
frigorífico/congelador.
Encendido del aparato:
Después de conectarse a la red eléctrica, el aparato se
enciende por medio del controlador de temperatura.
El frigorífico tiene cinco ajustes de temperatura. Después de
conectar a la red eléctrica, el frigorífico se pondrá en el
ajuste 3 que es el establecido por defecto.
Botón “Power”: Situado en el lado izquierdo, sirve para
encender/apagar el frigorífico pulsándolo 3s.
Botón “Adjust”: Situado en el lado derecho, sirve para
establecer los ajustes de temperatura del frigorífico.
Pulsando el botón, los ajustes 1 a 5 representan diferentes
temperaturas, desde la más alta a la más baja.
Luz y controlador de temperatura
Función de congelación rápida
Para activar la función de congelación rápida:
Ajuste el termostato en la posición 5, pulse el
interruptor de puerta y el botón de ajuste de la
temperatura conjuntamente, espere hasta que el LED
de la posición 5 parpadee continuamente, la función
SF se ha activado.
Nota: Durante el periodo de SF, el LED de la posición 5
seguirá parpadeando.
¡Atención!
•
No ponga botellas con líquidos en el congelador. Los
líquidos se expanden al congelarse y las botellas pueden
explotar.
•
No ponga nunca en el congelador sustancias explosivas
ni botes de aerosoles con propelentes inflamables como
butano, propano, pentano, etc. Los gases que escapen
pueden inflamarse debido a los componentes eléctricos.
Los botes de aerosoles pueden reconocerse por la lista
de componentes o por los símbolos de inflamabilidad
impresos en el propio bote.
•
Cuando se conserven alimentos congelados debe seguir
las instrucciones del fabricante que figuren en el envase.
•
Los helados y polos ultracongelados no deben
consumirse hasta pasados unos minutos desde que se
extrajeron del congelador, para evitar lesiones en los
labios y la lengua
•
(peligro de desprendimiento de la piel). Por el mismo
motivo, debe evitarse tocar las paredes interiores del
congelador con las manos húmedas.
•
Los productos descongelados total o parcialmente deben
consumirse inmediatamente. Como norma, estos
productos no deben volver a congelarse.
•
Los envases deben estar secos, para evitar que se peguen
al congelarse.
•
Los productos ya congelados deben conservarse de
modo que no entren en contacto con los que no lo estén
todavía.
Casi todos los alimentos frescos pueden congelarse y
conservarse en el congelador.
Para los más comunes, se proporciona una guía con
indicaciones de los tiempos de conservación aceptables y
el envase más apropiado para ello. (Véase “Guía de
conservación de alimentos”
en la parte final de este manual del usuario).
Etiquete claramente los alimentos frescos, ya que no serán
fáciles de identificar cuando se ultracongelen en bolsas
transparentes de congelación.
Recomendamos usar las etiquetas disponibles
comercialmente para alimentos congelados.
Envase los alimentos frescos en porciones adecuadas para
sus necesidades, con el fin de evitar descongelar
cantidades excesivas para consumirse en un día.
Etiquete las porciones con la información siguiente, como
mínimo:
5 Placa de características
6 Conexión del aparato a la red eléctrica
9 Congelación/conservación de alimentos frescos
8 Puesta en marcha del aparato
7 Uso del aparato
Posición
Condiciones
1-2
Verano o temperatura ambiente
entre 25-35 ℃
3-4
Primavera, otoño o temperatura
ambiente entre 15-25 ℃
5
Invierno o temperatura ambiente
entre 5-15 °C
Congelación rápida (SF)
6
10 Limpieza y mantenimiento
•
Nombre del producto (p. ej. filete de tercera)
•
Peso de la porción
•
Cantidad (número de piezas)
•
Fecha de congelación
•
Usar por fecha (véase “Guía de conservación de
alimentos”)
Después continúe del modo siguiente:
a) Los frutos del bosque, las frutas con piel, hierbas, etc.
deben disponerse sueltas en la bandeja de congelación
(no todos los modelos la tienen incluida) en la parte
superior del congelador y después de 12 horas,
aproximadamente, ponerse en bolsas de congelación.
Las bolsas llenas deben guardarse en los cajones. Los
alimentos frescos deben colocarse en el cajón superior y
cambiarse a uno de los inferiores después de 24 horas
aprox.
Debe evitarse poner los alimentos frescos directamente
en contacto con los ultracongelados. Los alimentos
ultracongelados podrían descongelarse y después no
durarían más del tiempo de conservación normal.
b) Dentro de un periodo de 24 horas, llenar el congelador
solo con las cantidades adecuadas de alimentos frescos
para la capacidad de congelación de su congelador.
Consulte la información de la placa de
características (XX kg/24h).
c) Si su congelador cuenta con INTERRUPTOR DE
CONGELACIÓN RÁPIDA (SUPER FREEZE), actívelo,
aunque no es imprescindible cuando se pongan
alimentos ya congelados (por ejemplo, alimentos
ultracongelados).
¡ADVERTENCIA! Desactive el INTERRUPTOR DE
CONGELACIÓN RÁPIDA después de 24 horas, como
máximo.
d) Ajuste el controlador de temperatura en una posición de
media a alta.
e) Controle la temperatura del congelador, preferiblemente
con un termómetro apropiado, que tenga una
graduación hasta -26°C. La temperatura de
conservación debe ser siempre de - 18°C, como
mínimo.
Colocación de nuevos alimentos frescos (no congelados)
en el congelador
Debe esperar un mínimo de 24 horas antes de colocar
alimentos frescos y hacerlo en las cantidades adecuadas
para la capacidad de congelación de su congelador (XX
kg/24h).
Capacidad máxima
Para garantizar la conservación correcta de los alimentos
congelados, no llene nunca el congelador al máximo.
Ajuste el controlador de temperatura estrictamente de
acuerdo con la capacidad de llenado.
Para ahorrar energía con temperaturas ambiente normales
(+ 18°C a + 22°C) recomendamos ajustar el controlador de
temperatura en un ajuste medio.
Tiempo de conservación
El tiempo de conservación para los productos
ultracongelados depende del tipo de producto y de sus
ingredientes. Por este motivo, debe seguir estrictamente las
instrucciones del fabricante en el envase.
Cuando desee congelar alimentos frescos, consulte la
Tabla de conservación (capítulo 17).
Cuando se hayan descongelado los alimentos congelados,
deben consumirse en un plazo de 12 a 24 horas.
No consuma ningún alimento después de transcurrir su
tiempo de conservación, ya que existe peligro de intoxicación.
Acumulador de frío
(No suministrado con todos los aparatos)
Los acumuladores de frío tienen dos funciones:
•
Si se produce un corte eléctrico, el acumulador evita que la
temperatura en el interior del aparato baje excesivamente,
preservando la calidad de los alimentos más tiempo.
•
Coloque los acumuladores de frío con la cara plana en
contacto con el panel de evaporación más alto o en el
compartimento superior.
•
Los acumuladores de frío pueden usarse también para
mantener los alimentos refrigerados en una nevera
portátil.
•
Los acumuladores de frío alcanzan su capacidad máxima de
•
refrigeración después de estar en el congelador unas 24
horas a - 18° C o menos y después se colocan en una
nevera portátil normal.
Precauciones y consejos
•
Cuando limpie o descongele el aparato, desconecte el
enchufe de alimentación o apague el fusible principal.
•
Después de cerrar la puerta del congelador, no la abra
inmediatamente ni lo haga de manera forzada, bajo
ninguna circunstancia. El vacío creado al sellarse la
puerta se dispersa al cabo de 1-2 minutos, por lo que la
puerta puede abrirse normalmente.
•
Para evitar la condensación y la formación de hielo, deje
que los alimentos cocinados se enfríen a temperatura
ambiente antes de cerrar la tapa del recipiente y
guardarlo.
•
Deje la puerta del congelador abierta el mínimo tiempo
posible, para ahorrar energía y evitar que se forme hielo
excesivo en el interior del mismo.
•
Si se ilumina el piloto rojo inesperadamente o se mantiene
encendido un periodo prolongado, no abra la puerta en
ningún caso y adopte inmediatamente las medidas
apropiadas (véase “Qué hacer cuando...“ en la parte
final del manual del usuario).
•
No utilice nunca un destornillador ni ninguna herramienta
metálica afilada para quitar el hielo. Las paredes
interiores son muy delicadas y los objetos afilados pueden
dañarlas fácilmente. Use solo rascadores de plástico o
madera sin bordes afilados.
Como norma, debe desconectar el enchufe de
alimentación o apagar la corriente de red.
Para preservar el estado externo de su
frigorífico/congelador, limpie el exterior siempre con un
pulimento para muebles o un producto que proteja el
esmaltado (no debe usarse nunca en el interior). Limpie la
junta de la puerta siempre con agua tibia, pero no use
productos limpiadores.
Limpie el aparato regularmente.
•
Los elementos interiores del frigorífico/congelador,
generalmente, no son apropiados para lavavajillas. Deben
lavarse manualmente con agua tibia y un poco de
lavavajillas líquido.
No utilice nunca el producto de limpieza puro y en

7
11 Cambio de la bombilla:
ningún caso utilice productos de limpieza abrasivos o
ácidos, es decir, productos químicos. Se recomienda
usar un producto limpiador de uso general con pH
neutro.
•
No debe dañarse ni quitarse nunca la placa de
características del interior o el exterior del aparato, ya
que es esencial para el servicio. Cuando limpie el
aparato, tenga cuidado siempre de que no entre agua
en las partes eléctricas del interior.
•
Si hay un intercambiador de calor, llamado
condensador, en la parte posterior del
frigorífico/congelador, debe limpiarse regularmente. El
polvo y la suciedad impiden la liberación de calor desde
el interior y aumentan considerablemente el consumo
de energía. Para obtener los mejores resultados, use
un cepillo suave o un plumero para eliminar el polvo del
condensador.
Consejo especial para limpiar el frigorífico
Limpie el orificio de drenaje del frigorífico periódicamente,
por ejemplo, con bastoncillos de algodón, para mantenerlo
despejado.
Desconexión del aparato
Si su aparato va a estar desconectado durante periodos
prolongados (por ejemplo, en vacaciones), debe dejarse
abierto para evitar que se formen olores en el interior. Si su
aparato tiene cerradura, póngala en la posición "cerrada"
con las puertas abiertas y guarde la llave fuera del alcance
de los niños, para evitar accidentes.
El hielo y la escarcha que se acumulan hasta un cierto
grosor en las paredes interiores hacen de aislante e impide
la dispersión del frío. Por ello, deben eliminarse
periódicamente. Para eliminar el hielo de las paredes
interiores, use un rascador de plástico o madera sin bordes
afilados.
Cuando lo haga, extraiga los cajones y ponga un paño en la
parte inferior del aparato para recoger el hielo desprendido
y poder quitarlo fácilmente.
El método que es menos probable que dañe el aparato para
quitar el hielo es descongelarlo.
Descongelación (No aplicable en los aparatos NO FROST)
En circunstancias normales (apertura del congelador 4-5
veces al día), el congelador tiene que descongelarse una o
dos veces al año (más frecuentemente si las circunstancias
son otras).
El frigorífico se descongela automáticamente.
Advertencias de peligro
•
No use nunca dispositivos eléctricos para descongelar su
aparato, tales como un secador de cabello, calefactor,
deshumidificador, sprays descongeladores ni nada que
tenga llamas abiertas (p. ej. velas).
•
El interior de plástico de su aparato podría fundirse y el
gas o la espuma que escape puede inflamarse por las
chispas o las llamas desnudas.
•
Bajo ninguna circunstancia debe utilizarse un
dispositivo de limpieza con vapor para descongelar
el hielo del aparato (existe gran riesgo de descarga
eléctrica).
Para descongelar su aparato proceda del modo
siguiente:
1. Prepare un recipiente apropiado, no metálico (de
plástico o una cesta para la colada).
2. El enchufe debe estar desconectado de la toma de
corriente.
3. Séquese bien las manos para evitar dañarse la piel
por el contacto con el hielo
(es recomendable usar guantes).
4. Extraiga todos los alimentos congelados del congelador,
envuélvalos firmemente en papel de periódico, colóquelos
en el recipiente ya preparado y coloque éste en una
habitación fresca y seca.
5. Cubra el recipiente con una manta fina por todos los lados.
6. Extraiga los cajones al máximo posible, tirando de ellos y
levántelos ligeramente.
7. Como se ha descrito anteriormente, rasque con cuidado el
hielo acumulado más grueso del interior del congelador y
póngalo en el fregadero.
8. Si su aparato tiene tubo de goteo en la parte inferior,
sáquelo y póngalo en un recipiente para recoger el agua
que gotee del mismo.
9. Si es necesario, acelere la descongelación colocando un
recipiente grande de agua tibia (no demasiado caliente) en
la parte inferior del aparato y cierre la puerta.
10. Si su aparato no tiene tubo de goteo, ponga un paño
absorbente debajo de la parte frontal del aparato y limpie el
agua de descongelación con una esponja.
11. Limpie a fondo el interior. Limpie con agua tibia y un poco
de vinagre y después aclare con agua limpia.
12. Seque a fondo con un paño suave y al aire durante 3-4
minutos.
13. Cierre la puerta y enchufe de nuevo el aparato.
14. Ajuste el controlador de temperatura en la posición máxima.
(Si su aparato tiene pilotos luminosos verde y rojo, se
iluminarán) y si hay INTERRUPTOR DE CONGELACIÓN
RÁPIDA enciéndalo.
15. A continuación, ponga de nuevo los alimentos
congelados en los cajones - los más antiguos encima.
Para evitar que los alimentos congelados se descongelen,
ejecute los pasos descritos anteriormente en un tiempo
máximo de dos horas.
16. Cuando se apague el piloto luminoso rojo, ajuste el
controlador de temperatura en una posición media.
Si lo hay, apague el INTERRUPTOR DE CONGELACIÓN
RÁPIDA después de 12 ahoras aprox., pero no más tarde de
24 horas.
No debe usar, bajo ninguna circunstancia, una bombilla con
un vatiaje mayor al especificado en la original.
Este producto contiene una fuente de luz de clase de
eficiencia energética G.
Las bombillas LED solo puede cambiarlas un
profesional cualificado.
En general, las bombillas no tienen garantía.
Ajustes de la temperatura:
La temperatura debe ajustarse de acuerdo con:
•
la temperatura ambiente
•
la cantidad de alimentos almacenados
•
la frecuencia de apertura del aparato
Recomendamos usar un ajuste medio. Mediante la
observación, pronto aprenderá cuál es el ajuste más
apropiado para sus necesidades.
Iluminación interior (no disponible en todos los modelos)
En el caso de los modelos que tengan iluminación
interior, hay integrado un interruptor.
Cuando el aparato se haya encendido a la temperatura del
controlador, la luz se enciende automáticamente cuando se
abre la puerta del frigorífico y se apaga automáticamente
cuando se cierra.
8
La bombilla está protegida por una tapa transparente.
Rango de temperatura
Gracias a la circulación natural del aire en el frigorífico,
hay una gama de temperaturas diferentes apropiada para
la conservación de distintos alimentos. Las áreas más
frías están directamente sobre los verduleros, en la parte
más baja del frigorífico y hacia la parte trasera (apropiada,
por ejemplo, para embutidos y carnes); las áreas menos
frías están en la parte delantera superior y en la puerta
(apropiadas para mantequilla y quesos untables).
Disponga los alimentos de acuerdo con la tabla siguiente
y no demasiado juntos, para que el aire pueda circular
libremente.
Conservación de alimentos en el frigorífico (de arriba
abajo)
1. Bandejas de la puerta
a) Mantequilla, queso
b) Huevos
c) Botes o botellas pequeños, latas, aliños
d) Botellas grandes, latas
2. Frigorífico (estantes de rejilla/vidrio)
a) Conservas
b) Repostería, alimentos precocinados
c) Lácteos/carnes y embutidos
d) Carnes y embutidos
e) Verduras, frutas, ensaladas
Consejo
•
Los alimentos que desprenden o absorben ligeros
olores o sabores, así como los líquidos, deben
conservarse siempre en recipientes cerrados
herméticamente o en su propio envase; los licores de
alta graduación deben conservarse verticales y
cerrados herméticamente.
•
Las verduras, frutas y ensaladas pueden conservarse
sueltas en los verduleros.
•
Los films plásticos y el papel aluminio, que pueden
reutilizarse, son apropiados para envasar alimentos,
cono los contenedores metálicos o de vidrio.
•
Los alimentos y las bebidas calientes deben dejarse
enfriar siempre fuera del frigorífico.
Desconexión del frigorífico
Si el frigorífico tiene que desconectarse durante un periodo
prolongado, pulse el botón "Power" durante 3 segundos y
limpie el frigorífico según las instrucciones anteriores.
Con el frigorífico desconectado, deje las puertas abiertas
para evitar que se formen olores en el interior.
Los procesos de fabricación de alta calidad y el uso de la
tecnología de refrigeración y congelación más avanzada
garantizarán el funcionamiento sin problemas de su aparato.
Si sospecha que existe cualquier fallo, antes de contactar
con su departamento de servicio más próximo, directamente
o a través de su distribuidor, compruebe que ha seguido
todas las instrucciones y los consejos proporcionados en
este manual del usuario.
Debe tener en cuenta:
El compresor (conocido también como "el motor") no debe
funcionar continuamente.
Está controlado por un termostato que se ajusta por medio
del controlador de temperatura y se enciende automáticamente
cuando se supera la temperatura ajustada en el aparato y se
apaga automáticamente cuando se alcanza de nuevo.
Cuando el compresor/sistema de refrigeración se activa puede
escucharse el ruido. Estos ruidos se producen cuando el motor
del compresor funciona y el refrigerante fluye a través del
circuito del sistema de refrigeración. Estos ruidos son normales
y no indican ningún fallo de funcionamiento de su aparato.
En las habitaciones sin calefacción y cuando el clima es frío,
puede formarse condensación en las paredes exteriores del
aparato.
Esto no significa que exista un fallo y desaparecerá cuando
aumente la temperatura.
Solo debe llamar al departamento de servicio si después de
analizar los posibles factores de fallos no puede encontrar
ninguna causa para el defecto o no puede solucionarlo.
Por lo tanto, en primer lugar compruebe lo siguiente:
"qué hacer cuando ...“ Qué hacer cuando...:
a) El aparato no funciona (no se pone en marcha).
Comprobar:
•
¿Está el enchufe en buen estado y conectado
correctamente en la toma?
•
¿Hay alimentación eléctrica?
•
(compruébelo conectando un aparato pequeño, como una
batidora manual, un secador de cabello, etc.).
•
¿Está encendido el aparato?
¡Advertencia!
En el caso de un fallo o corte eléctrico, el aislamiento de las
paredes del aparato proporciona 11 horas de tiempo de
conservación de los alimentos congelados después de que
empiecen dichos fallos.
En los aparatos especialmente aislados el tiempo es mucho
mayor. Consulte con su distribuidor lo que sea relevante:
“Tiempo de conservación en caso de emergencia“.
Si se tarda más tiempo en solucionar un problema, los
alimentos congelados que haya en el aparato empiezan a
descongelarse. Por lo tanto, debe actuarse rápidamente
para solucionar el problema y, si es necesario, cambie los
alimentos congelados a otro congelador.
b) Su aparato no enfría suficientemente. El proceso de
congelación tarda mucho. El compresor funciona con
demasiada frecuencia:
Comprobar:
•
¿Está seguro de que el frigorífico/congelador se ha
dejado reposar durante un mínimo de 2 horas antes de
encenderlo? (Para que se estabilice la circulación del
fluido de refrigeración) véase: “Puesta en marcha“.
Si no es así; desenchufe el aparato y levante por un
lado, con la puerta cerrada, brevemente, es decir,
inclínelo y vuelva a dejar que descanse de nuevo sobre
las patas. Después de 2 horas, enchúfelo de nuevo. No
vuelva a abrir la puerta durante un periodo de 12 horas
(es decir, hasta que el piloto rojo, si lo hay, se haya
apagado).
•
La puerta no se cierra herméticamente y no sella
adecuadamente.
•
Pruebe lo siguiente: Coloque una hoja de papel entre la
junta y la carcasa del aparato y cierre la puerta. Debe
costar extraer la hoja de papel por todos los lados.
•
Si el papel se extrae fácilmente por uno o más lados,
llame a su departamento de servicio más próximo.
12 Guía de solución de problemas

9
•
Si se forma mucho hielo en las paredes interiores del
congelador (véase: “Limpieza y mantenimiento“).
•
Si el aparato está expuesto a la luz solar directa o
instalado cerca de una fuente de calor directa (horno,
radiador, etc.).
•
Proteja el aparato de la luz solar directa / compruebe
la distancia de la fuente de calor / coloque una placa
de aislamiento entre el aparato y la fuente de calor
(Véase “Elección del lugar de instalación del aparato“).
•
Se ha colocado en el congelador una cantidad de
alimentos frescos que no cumple con la capacidad de
congelación indicada en la placa de características (XX
kg /24h).
•
¿Funciona correctamente la ventilación, está cubierta
la rejilla de ventilación o está lleno o con polvo el
condensador de la pared trasera exterior?
c) Su aparato hace demasiado ruido.
Comprobar:
•
¿Está nivelado y estable el armario, hay objetos o
muebles próximos que hagan vibrar el armario?
Compruebe que todo esté libre en la parte trasera, doble
cuidadosamente hacia atrás las posibles piezas que
toquen.
Para obtener más información, véase el capítulo: 16
"Solución de problemas"
Advertencia
Bajo ningún concepto deben realizarse intervenciones
técnicas ni intentar reparar el aparato.

10
15 Garantía
•
No instale el aparato cerca de fuentes de calor, como una
cocina, lavaplatos o radiador.
•
Instale el aparato en un lugar bien ventilado y compruebe
que los orificios de ventilación estén despejados.
•
Intente evitar mantener las puertas abiertas más tiempo del
necesario, ya que el aire caliente entrará y producirá
formación de hielo, además de afectar al consumo de
energía. Compruebe que no haya obstrucciones que
impidan que las puertas cierren correctamente.
•
Compruebe que las juntas de las puertas estén limpias y
que no haya roturas o grietas.
•
Mantenga los alimentos más perecederos (con una
duración corta, como las carnes cocinadas) en la parte más
fría del frigorífico. El verdulero es la parte menos fría del
frigorífico y debe usarse para verduras, ensaladas y frutas,
etc.
•
No sobrecargue el aparato, ya que el aire frío que circula y
mantiene frío el aparato se bloqueará y se formarán bolsas
de aire caliente.
•
No introduzca alimentos calientes en el frigorífico ni en el
congelador, deje que se enfríen antes.
Para reclamar la aplicación de la garantía es necesario
el justificante de compra.
El fabricante trabaja constantemente en la mejora de
los productos. Por lo tanto, tenga en cuenta que la forma,
configuración y tecnología están sujetas a cambios sin
previo aviso.
Las reparaciones o intervenciones en el aparato solo
deben ser realizadas por su departamento de servicio
más próximo ya que, de lo contrario, el usuario puede
correr riesgos considerables y la garantía puede quedar
invalidada.
Consulte la tarjeta de garantía adjunta o la lista adjunta
aparte de centros de servicio posventa, para localizar la
empresa que debe realizar el servicio de su aparato.
Si no se indica el departamento de servicio más próximo en
la documentación proporcionada, póngase en contacto con
su distribuidor.
Las reparaciones del departamento de servicio
para solucionar fallos que se hayan producido debido al
incumplimiento de la información y las recomendaciones
proporcionadas en este manual se cobrarán al cliente y no
están cubiertas por la garantía del distribuidor.
Para recibir ayuda inmediata, tenga preparados los datos
esenciales siguientes de identificación de su aparato: Tipo y
modelo del aparato (véase la placa de características)
•
Fecha de compra
•
Nombre y dirección de su distribuidor
•
Descripción del fallo
Tenga en cuenta las condiciones generales y el período de
garantía que figuran en la tarjeta de garantía adjunta o en la
entregada por el vendedor al realizar la compra, así como
las condiciones de garantía que figuran en la última página
de este manual.
14 Reparación de su aparato
13 Consejos de ahorro de energía

11
1. Congelador
2. Controlador de temperatura
3. Estantes
4. Huevera/bandeja
5. Botellero
16 Visión general del producto
12
PROBLEMA
CAUSA POSIBLE / SOLUCIÓN
El aparato no funciona
Compruebe que el aparato esté conectado a la red eléctrica.
Compruebe que el enchufe esté en buen estado.
Compruebe que el aparato esté encendido.
Compruebe el fusible
Compruebe que la tensión del aparato sea correcta
¿Hay algún defecto en la toma? Para este propósito, conecte en ella otro aparato
eléctrico, por ejemplo, un secador de cabello.
La temperatura del
interior del aparato no
es lo bastante fría
Compruebe que no haya demasiados alimentos dentro del aparato.
Compruebe que el controlador de temperatura esté ajustado en la temperatura
apropiada.
Compruebe que el aparato no esté instalado bajo luz solar directa o demasiado cerca de
una fuente de calor.
Compruebe que la temperatura ambiente esté dentro de los límites de funcionamiento
del aparato.
¿Se abren con demasiada frecuencia las puertas del aparato?
Compruebe que no haya demasiados alimentos frescos a la vez en el congelador.
La temperatura interior
es demasiado fría
Aumente la temperatura ajustándola en una posición más baja (menos fría).
El ajuste más frío solo debe usarse como posición de refrigeración/congelación rápida,
como mínimo, dos horas antes de colocar dentro del aparato una gran cantidad de
alimentos frescos. Si no se hace así, la temperatura del frigorífico puede bajar de 0°C,
ya que el compresor funcionará continuamente.
Las superficies
interiores del aparato
están húmedas.
Lo produce la condensación, seque el interior del aparato.
Las superficies
exteriores del aparato
están húmedas.
Lo produce la condensación, seque la puerta exterior del aparato con cuidado.
Olores
Compruebe que todos los alimentos y las bebidas que haya en el frigorífico no estén
caducados y estén correctamente envasados. Si no es así, deben sacarse
inmediatamente del aparato o volver a envasarse.
Compruebe todos los estantes, las bandejas y los cajones para ver si hay vertidos.
Quizá deba extraer los cajones para comprobar que no haya vertidos debajo de ellos.
Compruebe que el tubo de drenaje no esté obstruido o que la bandeja de goteo de la
parte trasera del aparato no esté llena. El tubo puede despejarse haciendo pasar por él
agua caliente, pero debe asegurarse de que el aparato esté apagado, el enchufe
desconectado de la toma y que se haya colocado una jarra o cubo para recoger el agua
que fluya.
La puerta no cierra
correctamente
Asegúrese de que no haya obstrucciones que impidan que cierre la puerta.
Compruebe que las bandejas de la puerta y los estantes estén correctamente colocados.
Compruebe que la junta de la puerta no esté deformada o rota.
Compruebe que el aparato esté nivelado.
Ruido inusual.
Compruebe que el aparato esté instalado sobre una superficie niveladada, plana y
estable.
Compruebe que haya espacio en torno al aparato y que no toque otros elementos.
Sonido burbujeante y gorgoteo: Este ruido se emite cuando fluye el fluido
refrigerante a través de los tubos dentro del sistema de refrigeración. Esto es normal.
Sonido de flujo de agua: Éste es el sonido normal de agua fluyendo en el drenaje a
través del proceso de descongelación.
Si el aparato hace ruido cuando funciona (ruido del compresor): Esto es normal. Este
ruido indica que el compresor funciona normalmente. Cuando el compresor recibe
energía, puede hacer un poco más de ruido al funcionar durante un breve tiempo.
17 Solución de problemas
13
Está prohibido desechar este aparato como residuo doméstico.
Embalaje
Los materiales de embalaje con el símbolo de reciclaje son reciclables.
Deseche el embalaje en un contenedor de recogida de residuos adecuado
para reciclarlo.
Antes de desechar el aparato
1. Extraiga el enchufe de la toma de corriente.
2. Corte el cable de alimentación y deséchelo junto con el enchufe de red.
¡Advertencia! Los refrigeradores contienen refrigerante y gases.
Los refrigerantes y gases deben eliminarse de manera profesional, ya que
pueden causar lesiones oculares o ignición.
Asegúrese de que la tubería del circuito de refrigerante no esté dañada antes
de desecharla correctamente.
Eliminación correcta del
producto
Este símbolo en el producto o en los documentos adjuntos al mismo indica que este
producto no debe tratarse como un residuo doméstico. En su lugar, deberá
entregarse en el punto de recogida correspondiente para el reciclado de aparatos
eléctricos y electrónicos. La eliminación debe realizarse de acuerdo con las
normativas medioambientales locales para la eliminación de residuos. Para
información más detallada sobre el tratamiento, el reciclaje y la recuperación de
este producto, póngase en contacto con el Ayuntamiento o el servicio de recogida
de basuras de su localidad o con el comercio en el que adquirió el producto.
18 Cómo eliminar el dispositivo
14
Para congeladores con
-18°C <
Alimentos frescos
Envasado correcto
Tiempo de conservación aprox. en
meses
2-3
4
6
8
10-12
Carne picada
>
Bolsa de congelación de polietileno
>
«
Embutidos
>
Bolsa de congelación de polietileno
>
«
Pescados pequeños
>
Bolsa de congelación de polietileno
>
«
Corazón / hígado
>
Bolsa de congelación de polietileno
>
«
Helados
>
Recipientes de plástico
>
«
Frutas
>
Recipientes de plástico
>
«
Queso
>
Bolsa de congelación de polietileno
>
«
Pan
>
Bolsa de congelación de polietileno
>
«
Pescados grandes
>
Bolsa de congelación de polietileno
>
«
Pasteles / galletas
>
Recipientes de vidrio
>
«
Cerdo
>
Papel aluminio
>
«
Ternera
>
Papel aluminio
>
«
Conejo
>
Papel aluminio
>
«
Cordero
>
Papel aluminio
>
«
Setas
>
Bolsa de congelación de polietileno
>
«
Espárragos
>
Bolsa de congelación de polietileno
>
«
Verduras (cortadas)
>
Bolsa de congelación de polietileno
>
«
Fresas
>
Bolsa de congelación de polietileno
>
«
Flanes
>
Papel aluminio
>
«
Pollo
>
Papel aluminio
>
«
Pavo
>
Papel aluminio
>
«
Pato
>
Papel aluminio
>
«
Ganso
>
Papel aluminio
>
«
Coliflor
>
Bolsa de congelación de polietileno
>
«
Judías
>
Bolsa de congelación de polietileno
>
«
Pimientos
>
Bolsa de congelación de polietileno
>
«
Conservas
>
Recipientes de vidrio
>
«
Frutas en conserva
>
Recipientes de vidrio
>
«
Polos
>
Papel aluminio
>
«
19 TABLA DE CONSERVACIÓN

CERTIFICADO DE GARANTÍA
Imprescindible la presentación de la factura de compra acompañada del presente certicado de garantía.
Riesgos cubiertos.
Este aparato está garantizado contra cualquier defecto de funcionamiento, siempre que se destine a uso doméstico,
procediéndose a su reparación dentro del plazo de garantía y sólo por la red de SAT autorizados.
Nuestros electrodomésticos Corberó cuentan con la garantía legal del fabricante que cubre cualquier avería o defecto durante36
meses, desde su fecha factura de 1 de enero del 2022. En caso de que fuera necesario, nosotros nos ocupamos de cualquier posible
incidencia siempre que se deba a un componente defectuoso o fallo de fabricación.
Excepciones de garantía.
• Que la fecha del certicado no coincida con la fecha de venta de la factura original.
• Averías producidas por golpe, por caída o cualquier otra causa de fuerza mayor.
• Si el apa
rato ha sido manipulado por personal no autorizado.
• Las averías producidas o derivadas como consecuencia de un uso inadecuado, por defectos de instalación,
por introducir modicaciones en el aparato que alteren su funcionamiento.
• Puestas en marcha, mantenimiento, limpiezas, componentes sujetos a desgaste, lámparas, piezas estéticas,
oxidaciones, plásticos, gomas, carcasas y cristales.
“ESTAS EXCEPCIONES ANULAN LA GARANTÍA, SIENDO LA REPARACIÓN CON CARGO AL CLIENTE”
Periodo amparado en aparatos según ley de garantias en la venta de bienes de consumo Ley vigente es “RD 7/2021”
Horario de atención Lunes a Viernes de 9h00 a 19h00. Teléfono de contacto_ 911 08 08 08 Mail de contacto_ [email protected] web_ www.corbero.es
Dirección de Servicio técnico oficial_Vidal i Ribes 8-10 08950 Esplugues de Llobregat Barcelona
Sevicio Técnico Ocial: 911 08 08 08
Los hornos microondas (a excepción de los integrables) y los hornos sobremesa en el caso de cualquier incidencia de
funcionamiento, deben de llevarse al servicio técnico más próximo por parte del cliente. No se recojen ni reparan en el
domicilio.
•
Garantía termos eléctricos. Garantía de 3 años incluyendo los costes de desplazamiento y mano de obra que
correspondan de la reparación del producto, teniendo que tener un mantenimiento una vez cada 12 meses.
Especialmente si Ud. ha instalado un aparato a gas, tenga presente como titular de la instalación, la obligatoriedad de
realizar una revisión completa de los equipos, (según Real Decreto 238 / 2013, del 5 Abril. RITE. IT3, M. Lo termos
eléctricos y calderas que incluyen depósitos acumuladores de agua caliente, para que se aplique la prestación de la
Garantía, es obligatorio que el ánodo de magnesio esté operativo y que realice la función de protección
adecuadamente. Para ello es recomendable que el ánodo se revise bianualmente por el Servicio Oficial y sea renovado
cuando fuera necesario. Periodicidad que deberá ser anual en aquellas zonas con aguas críticas (contenido de CaCO3
superiores a 200mg/L, es decir a partir de 20ºfH de dureza). Depósitos sin el correcto estado del ánodo de protección, no
tienen la cobertura de la garantía. Independientemente del tipo de depósito o producto, todas las válvulas de
sobrepresión de calefacción o a.c.s., deberán ser canalizadas para evitar daños en Ia vivienda por descargas de agua. La
garantía del producto no asume los daños causados por Ia no canalización del agua derramada por esta válvula.
•
CERTIFICATE OF GUARANTEE
The presentation of the purchase invoice accompanied by this guarantee certificate is essential.
Covered Risks.
This appliance is guaranteed against any malfunction, provided that it is intended for domestic use, proceeding to its repair within
the warranty period and only by the authorized SAT network.
Our Corberó appliances have the manufacturer's legal warranty that covers any breakdown or defect for 36 months, from the
invoice date of January 1, 2022. If necessary, we take care of any possible incident whenever it is due to a defective component or
manufacturing fault. Warranty Exceptions
Warranty Exceptions
•
That the date of the certificate does not coincide with the date of sale of the original invoice.
•
Faults produced by blow, by fall or any other cause of force majeure.
•
If the device has been manipulated by unauthorized personnel.
•
Faults produced or derived as a consequence of improper use, installation defects, or modifications to the device that
alter its operation.
•
Start-up, maintenance, cleaning, components subject to wear, lamps, aesthetic parts,
oxidation, plastics, rubbers, housings and crystals.
“THESE EXCEPTIONS VOID THE WARRANTY, THE REPAIR BEING CHARGED TO THE CUSTOMER”
Period covered in devices according to the law of guarantees in the sale of consumer goods Current law is “RD 7/2021”
Hours of operation Monday to Friday from9h00 a 19h00. Telephone contact_ 911 08 08 08 Contact email_ [email protected] web_ www.corbero.es
Official Technical Service Address_Vidal i Ribes 8-10 08950 Esplugues de Llobregat Barcelona
Official Technical Service: 911 08 08 08
Microwave ovens (with the exception of built-in ones) and tabletop ovens in the event of any incident of
operation, they must be taken to the nearest technical service by the customer. They are not collected or repaired at
home.
•
Electric thermos guarantee. 3-year warranty including travel and labor costs that correspond to the repair of the
product, having to have maintenance once every 12 months. Especially if you have installed a gas appliance, keep in
mind as the owner of the installation, the obligation to carry out a complete review of the equipment, (according to
Royal Decree 238 / 2013, of April 5. RITE. IT3, M. Lo thermos electrical and boilers that include hot water storage tanks,
for the benefit of the Guarantee to apply, it is mandatory that the magnesium anode is operational and that it performs
the protection function adequately.For this, it is recommended that the anode be checked biannually by the Official
Service and is renewed when necessary Periodicity that must be annual in those areas with critical waters (CaCO3
content greater than 200mg/L, that is, from 20ºfH of hardness) Deposits without the correct state of the protection
anode are not covered by the warranty Regardless of the type of tank or product, all heating or DHW overpressure
valves must be channeled to avoid damage and n the house due to water discharges. The product warranty does not
cover damages caused by not channeling the water spilled by this valve.
•

CERTIFICADO DE GARANTIA
A apresentação da factura de compra acompanhada deste certificado de garantia é indispensável.
Riscos cobertos.
Este aparelho está garantido contra qualquer avaria, desde que se destine ao uso doméstico, reparando-o dentro do período de
garantia e apenas pela rede SAT autorizada.
Nossos eletrodomésticos Corberó têm garantia legal do fabricante que cobre qualquer avaria ou defeito por 36 meses, a partir da
data da fatura de 1º de janeiro de 2022. Se necessário, cuidamos de qualquer eventual incidente desde que seja devido a um
componente ou fabricação defeituoso falta.
Exceções de garantia.
•
Que a data do certificado não coincida com a data de venda da fatura original.
•
Avarias causadas por pancadas, quedas ou qualquer outra causa de força maior.
•
Se o dispositivo foi adulterado por pessoal não autorizado.
•
Avarias produzidas ou derivadas como resultado de uso indevido, defeitos de instalação, fazendo alterações no
dispositivo que alteram seu funcionamento.
•
Comissionamento, manutenção, limpeza, componentes sujeitos a desgaste, lâmpadas, peças estéticas,
oxidação, plásticos, borrachas, invólucros e vidros.
“ESTAS EXCEÇÕES ANULAM A GARANTIA, SENDO A REPARAÇÃO POR CONTA DO CLIENTE.” Período
abrangido em dispositivos de acordo com a lei de garantias na venda de bens de consumo A lei atual é "Decreto-Lei n.º 84/2021
"
Horário de atendimento de segunda a sexta das 9h às 19h. Telefone de contato_ 351 961 789 806 Email de contato_ [email protected]
web_ www.corbero.es Serviço Técnico Oficial Endereço_Vidal i Ribes 8-10 08950 Esplugues de Llobregat Barcelona
Serviço Técnico Oficial: 351 961 789 806
Fornos de microondas (exceto os embutidos) e fornos de mesa em caso de qualquer incidência de
operação, devem ser levados ao serviço técnico mais próximo pelo cliente. Eles não são recolhidos ou reparados em
casa.
•
Garantia térmica elétrica. Garantia de 3 anos incluindo despesas de deslocação e mão-de-obra que correspondam à
reparação do produto, devendo ter manutenção a cada 12 meses. Especialmente se instalou um aparelho a gás, tenha
em atenção como proprietário da instalação, a obrigação de realizar uma revisão completa do equipamento, (de acordo
com o Decreto-Lei n.º 84/2021. Lo thermos eléctricos e caldeiras que incluam acumuladores de água quente, para o
benefício da Garantia a aplicar, é obrigatório que o ânodo de magnésio esteja operacional e que desempenhe a função
de protecção de forma adequada. ser verificado a cada dois anos no Serviço Oficial e renovado quando necessário
Periodicidade que deve ser anual nas áreas com águas críticas (teor de CaCO3 superior a 200mg/L,
ou seja, a partir de 20ºfH de dureza) Depósitos sem o estado correto do ânodo de proteção não estão cobertos pela
garantia Independentemente do tipo de tanque ou produto, todas as válvulas de aquecimento ou de sobrepressão de
água quente sanitária devem ser canalizadas para evitar danos e na casa devido a descargas de água. A garantia do
produto não cobre danos causados pela não canalização da água derramada por esta válvula.
•