User Guide
HIGH-FIDELITY TWEETERS
PNW-1
FEATURES
• High delity silk dome diaphragm
• Precision aluminum housing
• Embedded sonic damping pad
• Neodymium magnet
• Detachable assembly for OE applications
• Rear dampened hybrid silk dome tweeter for extended frequency response
• Includes multiple mounting accessories
• Umbrella not included
2
User Guide
PNW-1
Tweeter Installation
Wow! Look how far we have come, you made it to page 2! For those brave
enough to tackle the installation on their own, proceed to the next steps. For
those feeling out of their comfort zone, don't be threatened, help is available.
Our suggestion is that you seek out a qualied AudioControl dealer. They
have the skill set and experience to get your new PNW-1 installed properly.
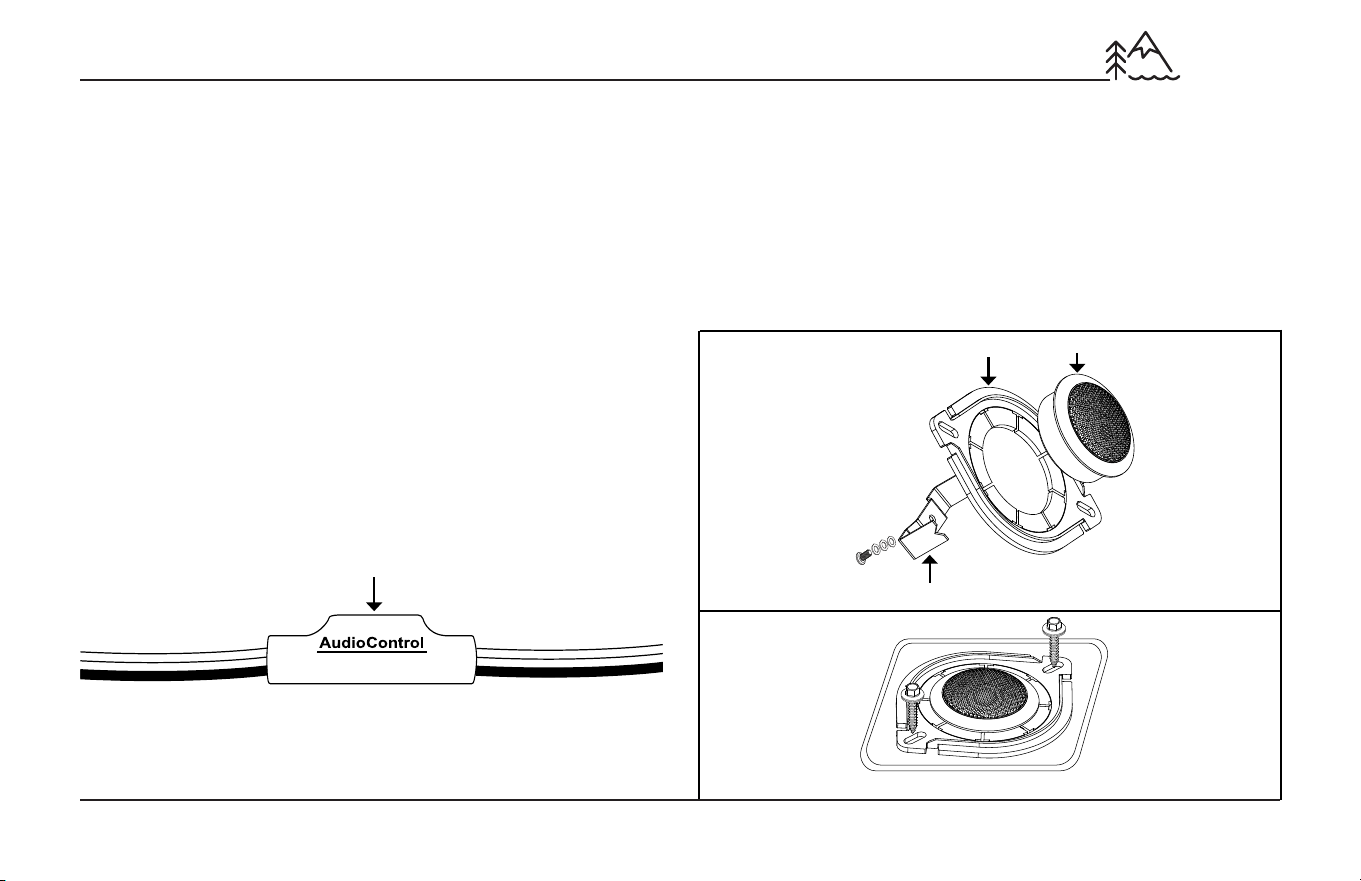
• Blue wire = positive (+).
• Black wire = negative (-).
High-Pass Crossover
Tweeter
U-Bracket
PNW-adapter
Screws
and
Washers
Flush mount
First, remove the factory grille or panel to gain access to the factory driver.
Next, remove the factory driver and disconnect the necessary wiring. Before
installing the new tweeter, decide whether your system will be wired as
passive or active. With a Passive system, the included High-Pass Crossover will
be required. With an Active system, we recommend not using the included in-
line crossover, but using the crossover in your digital signal processor instead.
When setting up your DSP, ensure your crossover is set so that the PNW-1 will
play frequencies above 3000Hz. After the driver has been wired, mount the
speaker where you removed the factory driver using the factory hardware.
Fig 1
Fig 2
Dash mount
1. Insert the tweeter into the PNW-adapter (Fig 1)
Place the U-bracket on the back side of the tweeter and adapter. (Fig 1)
Use the supplied screw and washers to secure the U-bracket. (Fig 1)
2. Mount assembly using factory hardware. (Fig 2)
3
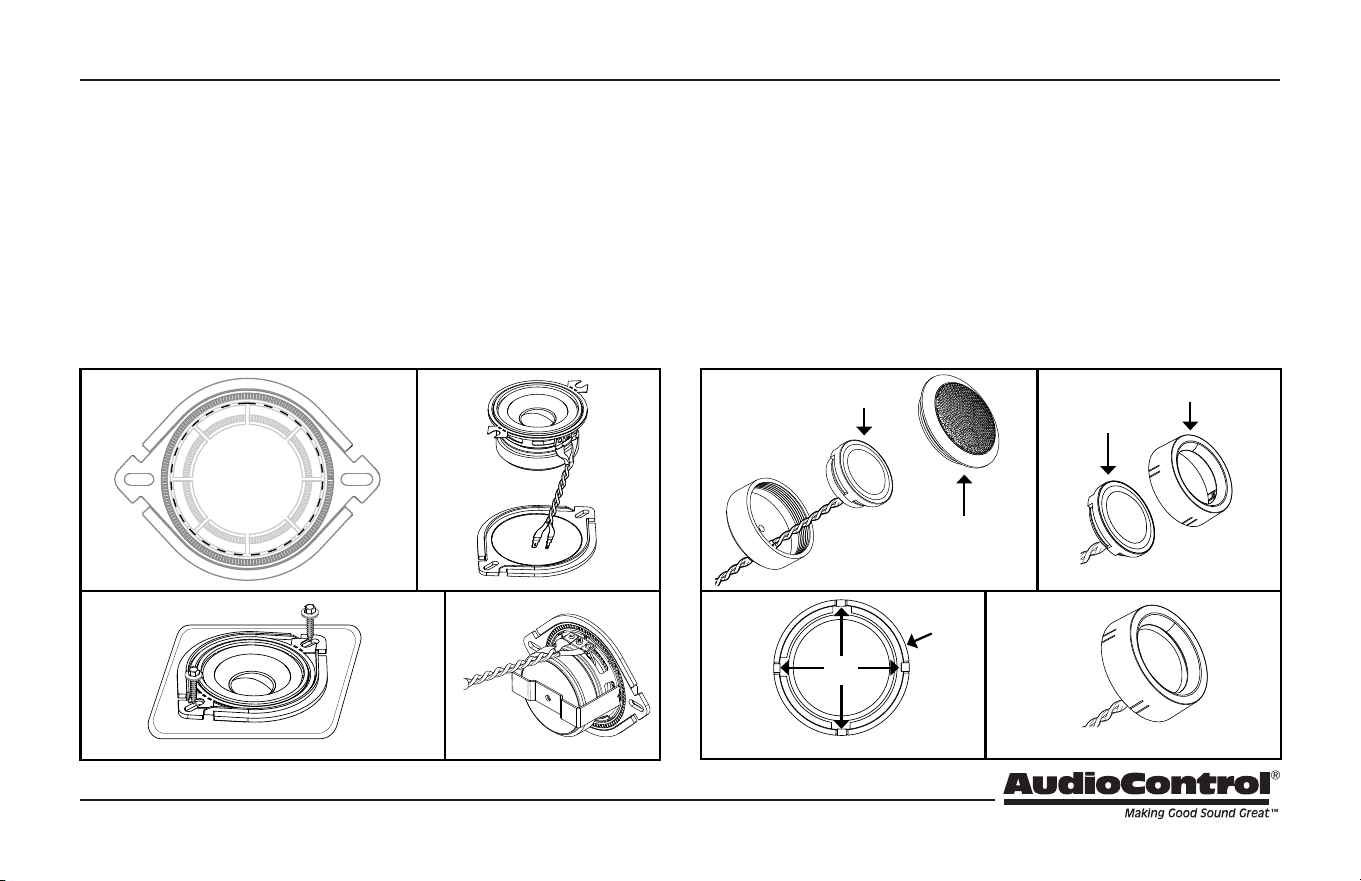
Dash mount installation (PNW-275)
*PNW-275 sold separately
1. Break o the inside plastic tabs on the PNW adapter: (Fig 1)
2. Insert the PNW-275 onto the top of the adapter. (Fig 2)
3. Mount assembly using factory hardware. (Fig 3)
4. The U-bracket can also mount the PNW-275 to the adapter if needed. (Fig 4)
OE mount installation using PNW-1
1. Unscrew the top housing in a counterclockwise direction. (Fig 4)
2. Insert the PNW-1 into the OE mount plastic housing. (Fig 5)
3. Push the tweeter into the housing until all 4 spots snap in place. (Fig 6)
4. Mount the assembly into the OE factory location using original hardware or
snap t to factory panel. (Fig 7)
PNW Adapter (Included w/PNW-1 & PNW-65CS2 / 69CS2 Models)
Snap
locations
Break o
Dotted lines
PNW-1
tweeter
Top housing
PNW-1
tweeter
OE plastic
housing
Fig 1
Fig 4
Fig 3
Fig 4
Fig 6
Fig 7
Fig 2
Fig 5
Back of
tweeter
4
User Guide
PNW-1
PNW-1 Specications
In-line crossover Specications
*In-line crossover is Not Included in 2 way component set
DC Resistance (Re) ...............................................................................2.3 ohms
Nominal Impedance (Z) ......................................................................... 3 Ohms
Resonance Freq. (Fs) ...........................................................................1.621 kHz
Mechanical Q Factor (Qms) ...................................................................6.92
Electrical Q Factor (Qes) ................................................................... 2.3091
Total Q Factor (Qts) ........................................................................... 1.7314
Frequency Response .....................................................................1k-20kHz
Tweeter Voice Coil Diameter ................................................................... 25 mm
Crossover Type ...........................................................1st order Butterworth
Crossover Frequency ........................................................................ 3.5kHz HP
Slope (Octave) ...........................................................................................-6 dB
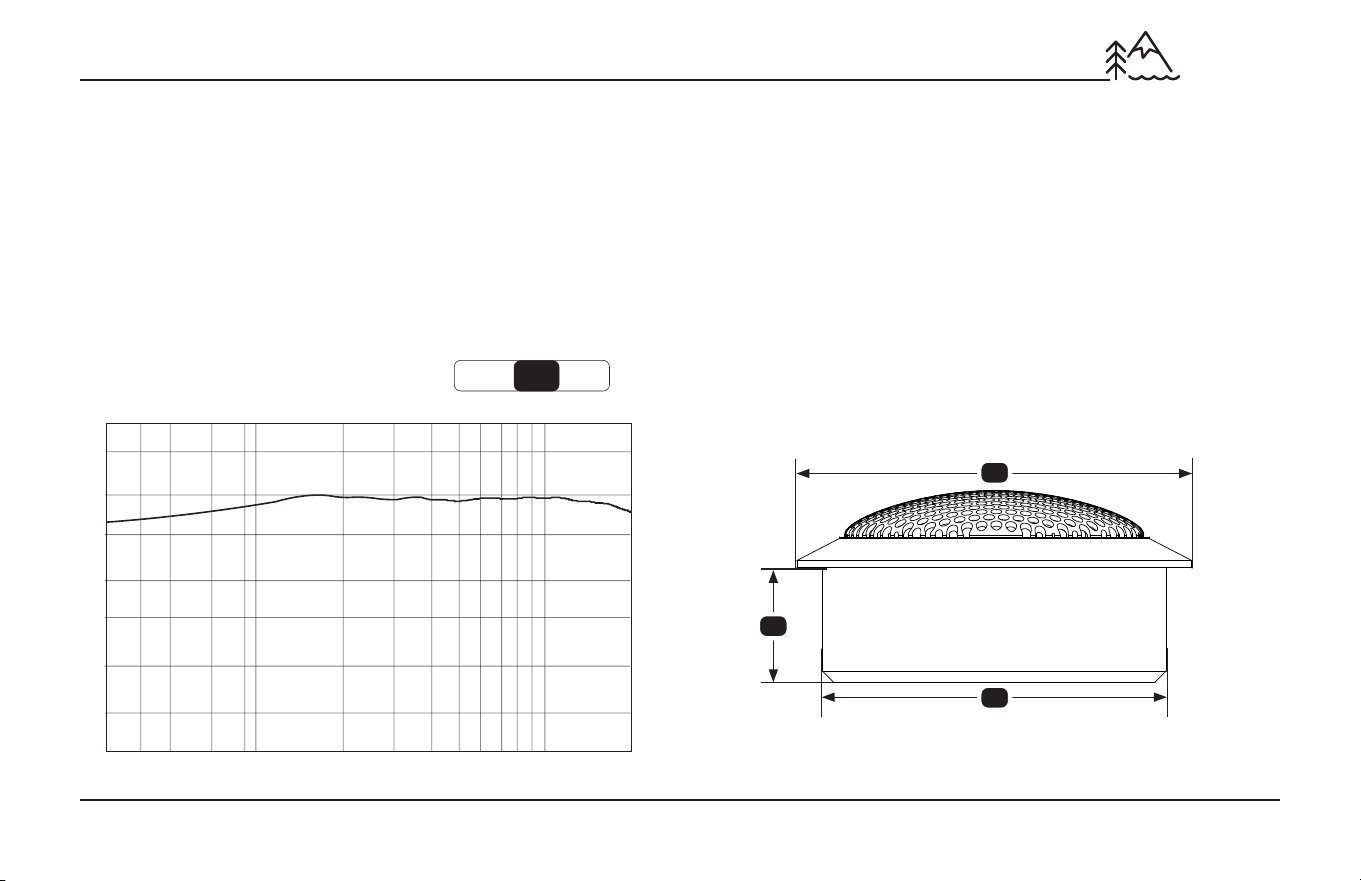
Dimensions
Overall Diameter (w Grille) (A) ...........................................2.13 in / 54 mm
Cut Out Diameter (B) .........................................................1.85 in / 47 mm
Mounting Depth (C).......................................................0.63 in / 16 mm
A
B
C
75 100 125
MIN IDEAL MAX
Continuous Power Handling (watts RMS)
150
100
50
0
-50
-100
-150
20 30 40 50 60 70 80 90 100 200
300 400 500 600 700 800 900 1k 2k 3k 4k 5k 6k 7k 8k 9k 10k 20kHz

5
The Warranty
In just the same way as being covered in honey and thrown into a dark pit
full of hungry woodchucks, people are scared of warranties. Lots of ne print.
Months of waiting around. Well, fear no more. This warranty is designed to
make you rave about AudioControl. It’s a warranty that looks out for you and
your client, plus helps you resist the temptation to have your friend Sparky,
who’s “good with electronics,” try to repair your AudioControl product. So go
ahead, read this warranty, then register the information at www.audiocontrol.
com/product-registration and include your comments.
Our warranty has conditional conditions! “Conditional” doesn’t mean
anything ominous. The Federal Trade Commission tells all manufacturers to
use the term to indicate that certain conditions have to be met before they’ll
honor the warranty. If you meet all of these conditions, AudioControl will,
at its discretion, repair or replace any AudioControl speaker products that
exhibit defects in materials and/or workmanship for one (1) year from the
date you bought it. We will repair or replace it, at our option, during that
time.
Here are the conditional conditions:
1. You must fully register your purchase within 15 days of the purchase date
by going to the AudioControl product registration page at:
www.audiocontrol.com/product-registration
Failure to register your product will negate the warranty.
2. You need to hold on to your sales receipt! All warranty service requires
original sales receipt documentation. The warranty only applies to
the original purchaser from an authorized AudioControl dealer. Note:
Products purchased from unauthorized dealers are not covered under
warranty.
3. The AudioControl speaker products must have originally been purchased
from an authorized AudioControl dealer. If an authorized AudioControl
dealer installs your AudioControl product, the warranty is extended to
two (2) years.
4. Our warranty covers AudioControl products that have been installed
according to the instructions in this manual.
5. You cannot let anyone who isn’t: (A) the AudioControl factory; or
(B) someone authorized in writing by AudioControl, service your
AudioControl product. If anyone other than (A), or (B) messes with your
AudioControl product, the warranty is void.
6. The warranty is void if the serial number is altered, defaced or removed,
or if your product has been used improperly. Now that may sound like a
big loophole, but here is what we mean by this: Unwarranted abuse is:
(A) physical damage (don’t use your product to pound in fence posts);
(B) improper connections (120 volts into the speaker terminals can fry
the poor thing). This is the best product we know how to build, but for
example, if you mount it to the front bumper of your car, drop it over
Niagara Falls, or use it for anchoring your boat, something will go wrong.
Assuming you conform to 1 through 6, and it really isn’t all that hard to do,
we get the option of xing your product, or replacing it with a new one, at our
discretion.
In the event that your product is out of warranty or not covered under our
warranty, you may request to have any damage repaired at our normal “Out of
Warranty” repair cost.

6
User Guide
PNW-1
Legalese
The warranty above is the only warranty issued by AudioControl. This
warranty gives you specic legal rights, and you may also have rights that
vary from state to state.
Promises of how well your AudioControl product will work are not implied by
this warranty. Other than what we’ve said we’ll do in this warranty, we have
no obligation, express or implied. We make no warranty of merchantability or
tness for any particular purpose. Also neither we nor anyone else who has
been involved in the development or manufacture of the unit will have any
liability of any incidental, consequential, special or punitive damages,
including but not limited to any lost prots or damage to other parts of your
system by hooking up to the unit (whether the claim is one for breach of
warranty, negligence of other tort, or any other kind of claim). Some states do
not allow limitations of consequential damages.
And Now a Word from our Legal Department
For more information about this ne product, and for additional details of the limited
warranty and repair services, please visit www.audiocontrol.com
For technical questions, please visit www.audiocontrol.com/knowledge-base/
AudioControl, Inc.
Phone: 425-777-7723
Email: [email protected]
©2023 AudioControl. All rights reserved. AudioControl is a brand of AAMP
Global.
All specications are subject to being covered in hot sauce without notice.
As technology advances, AudioControl reserves the right to continuously change our
specications, like our Pacic Northwest weather, although we are working on changing
that as well.

7
Complimentary Layout Page (tape measure and calculator not included)
PNW-1
User Guide PN 913-190-0 Rev A