� Seicio al cliente
1-888-921-4088
---• [Lunes-Viernes, 9AM-5PM EST]
Visite https://www.jensenmobile.com
Diseado y fabricado en EE. UU.
JEE
Namsung America Inc.
©2026 Namsung America Inc.
Todos los derechos reservados.
Todos Los derechos reservados. Ninguna parte de esta pub
licaci6n puede reproducirse, distribuirse o transmitirse de
ninguna forma ni par ningn media, incluidas fotocopias,
grabaciones u otros metodos electr6nicos a mecnicos, sin
el permiso previo por escrito de NAMSUNG AMERICA INC.
NSA0226-V01
JENSEN
®
�:�
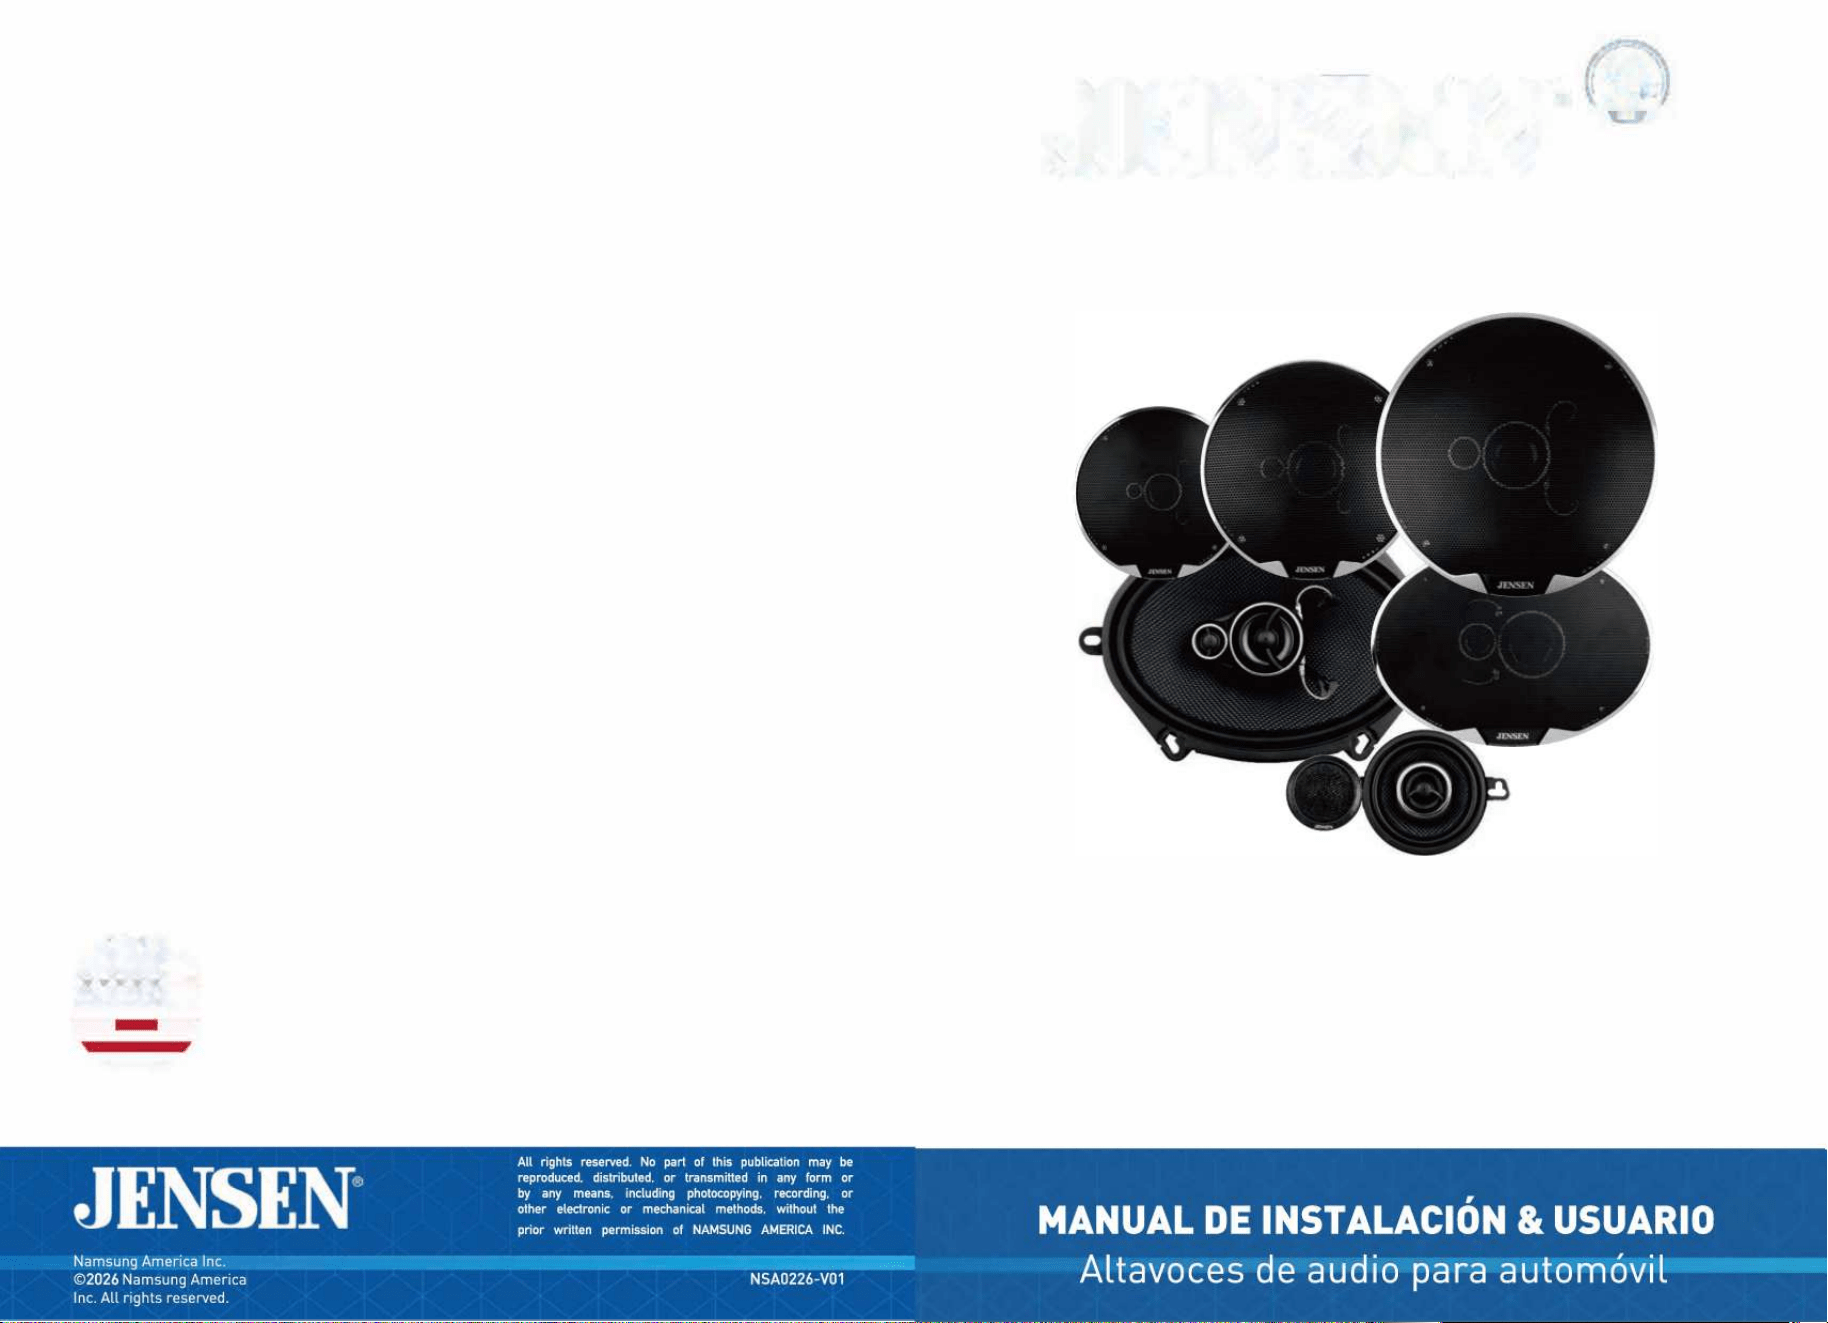
JS52K
JS65K
JS68K
APEX SERIES
INSLLATI0N/0WNER
1
S MANUAL
r Audio Speake
JS69K
JS2

PREPATION
Safe Guidelines
Thank you for purchasing the Jensen JS Triaxial Series Car Speake. Although
Jensen has attempted to make sure all of the information contained within this
manual is accurate, please be aware that any pa of it is subject to change without
notice.
The following instructions should be used a general guideline only.
CAUTION
If you are unsure about performing any of the procedures listed
below. please consult a professional car audio installation center.
Be installation, please llow these guidelines,
1. Be sure to carefully read and understand the instructions before attempting to install
this product.
2. For safety, disconnect the negative terminal from the batte prior to beginning the
installation.
3. To ensure an obstacle-free fit. check and double check mounting depth of the
speakers against available depth. as well as the location of window mechanics, door
handles, and window handles.
4. Use caution before you drill or cut! Be careful not to cut or drill into gas tanks. fuel
lines, brake or hydraulic lines, vacuum lines or electrical wiring when working on any
vehicle.
5. Never run speaker wires underneath your vehicle. Running speaker wires inside the
vehicle provides the best protection from exhaust heat and environmental elements.
6. oid running wires over, near. or through sharp edged surfaces. Use rubber
grommets to protect any wires routed through metal.
7. When running the speaker cable from the amplifier, avoid running it near sources of
high current (i.e. wiring harnesses, battery cables).
8. If using provided grilles. be sure mounting location is suicient distance from door
and/or window handles.
2
GARANTiA
Garantia limitada de dos aos*
Esta garantia le otorga derechos legates especificos. Tambien puede tener otros derechos
que varian de un estado a otro.
Jensen garantiza este producto al comprador original contra defectos de material y mano
de obra por un perfodo de dos aos a partir de la fecha de compra original.
Jensen. acepta, a nuestra opcion, durante el perfodo de garantia, reparar cualquier defecto
en el material o la mano de obra o proporcionar un producto igual nuevo, renovado o
comparable (cualquiera que se considere necesario) a cambio sin cargos, sujeto a
verificacion. del defecto o mal funcionamiento y prueba de la fecha de compra. Los
productos de reemplazo subsiguientes estan garantizados por el resto del perfodo de
garantia original.
0ue esta cubierto? Esta garantfa cubre todos Los defectos en el material y la mano de obra
de este producto. Lo siguiente no esta cubierto: software, costos de instalacion/remocion,
daos resultantes de accidentes, uso indebido, abuso, negligencia, modificacion del
producto, instalacion incorrecta, voltaje de lfnea incorrecto, reparacion no autorizada o
incumplimiento de las instrucciones proporcionadas con el producto, o dao que ocurra
durante el envfo de devolucion del producto. Las condiciones de licencia especificas y Los
avisos de derechos de autor para el software se pueden encontrar en
www.jensenmobile.com.
Cobertura de garantia
* Garantia limitada de 2 aos. (Se requiere comprobante de compra)
•
Cobertura extendida: Extienda su garantfa de 2 ao a 4 aos cuando se registre en
lfnea en w.jensenmobile.com. El registro debe completarse dentro de Los 60
dfas posteriores a la fecha de compra original para calificar para esta extension.
0ue hacer?
1.
Antes de llamar al servicio tecnico, consulte la gufa de solucion de problemas en
el manual del propietario. Un ligero ajuste de cualquier control personalizado
puede ahorrarle una llamada de servicio.
2.
Si necesita servicio durante el periodo de garantia, debe empacar
cuidadosamente el producto (preferiblemente en el paquete original) y enviarlo
por transporte prepago con una copia del recibo original del minorista a un centro
de servicio autorizado.
3.
Describa su problema por escrito e incluya su nombre, una direccion de envfo de
devolucion de UPS (no se acepta un apartado de correos) y un numero de telefono
durante el dfa con su envfo.
4.
Para obtener mas informacion y la ubicacion del centro de servicio autorizado
mas cercano, comunfquese con nosotros a traves de uno de Los siguientes
metodos:
a.
Llamenos sin cargo al 1-888-921-4088
(Lunes a viernes, de 9:00 a. m. a 5:00 p. m., hora del este)
b.
Envfenos un correo electronico a [email protected]
Exclusion de ciertos daos: esta garantia es exclusiva y sustituye a cualquier otra garantia,
expresa o implfcita, incluidas, entre otras, las garantias implfcitas de comerciabilidad e
idoneidad para un proposito particular y cualquier obligacion, responsabilidad, derecho,
reclamo o recurso en el contrato. o agravio, ya sea que surja o no de la negligencia de la
empresa, real o imputada. Ninguna persona o representante esta autorizado a asumir en
nombre de la empresa cualquier otra responsabilidad en relacion con la venta de este
producto. En ningun caso la empresa sera responsable por daos indirectos, incidentales o
consecuentes.
9
ESPECIFICACIONES Y CARACTERiSTICAS
JSTW2
Tamao del altavoz
2"
RMS / Pico de potencia
5W/15W
Tamao de tweeter Isl
0.98"
Tipo de tweeter Isl
Cupula de Seda
Tipo de bobina de voz
KSV
Tamao de la bobina
0.98"
de voz
Sensibilidad
90d8
Respuesta frecuente
1 000Hz-20kHz
lmpedancia nominal
4ohmios
Rejillas induidas
N/A
8
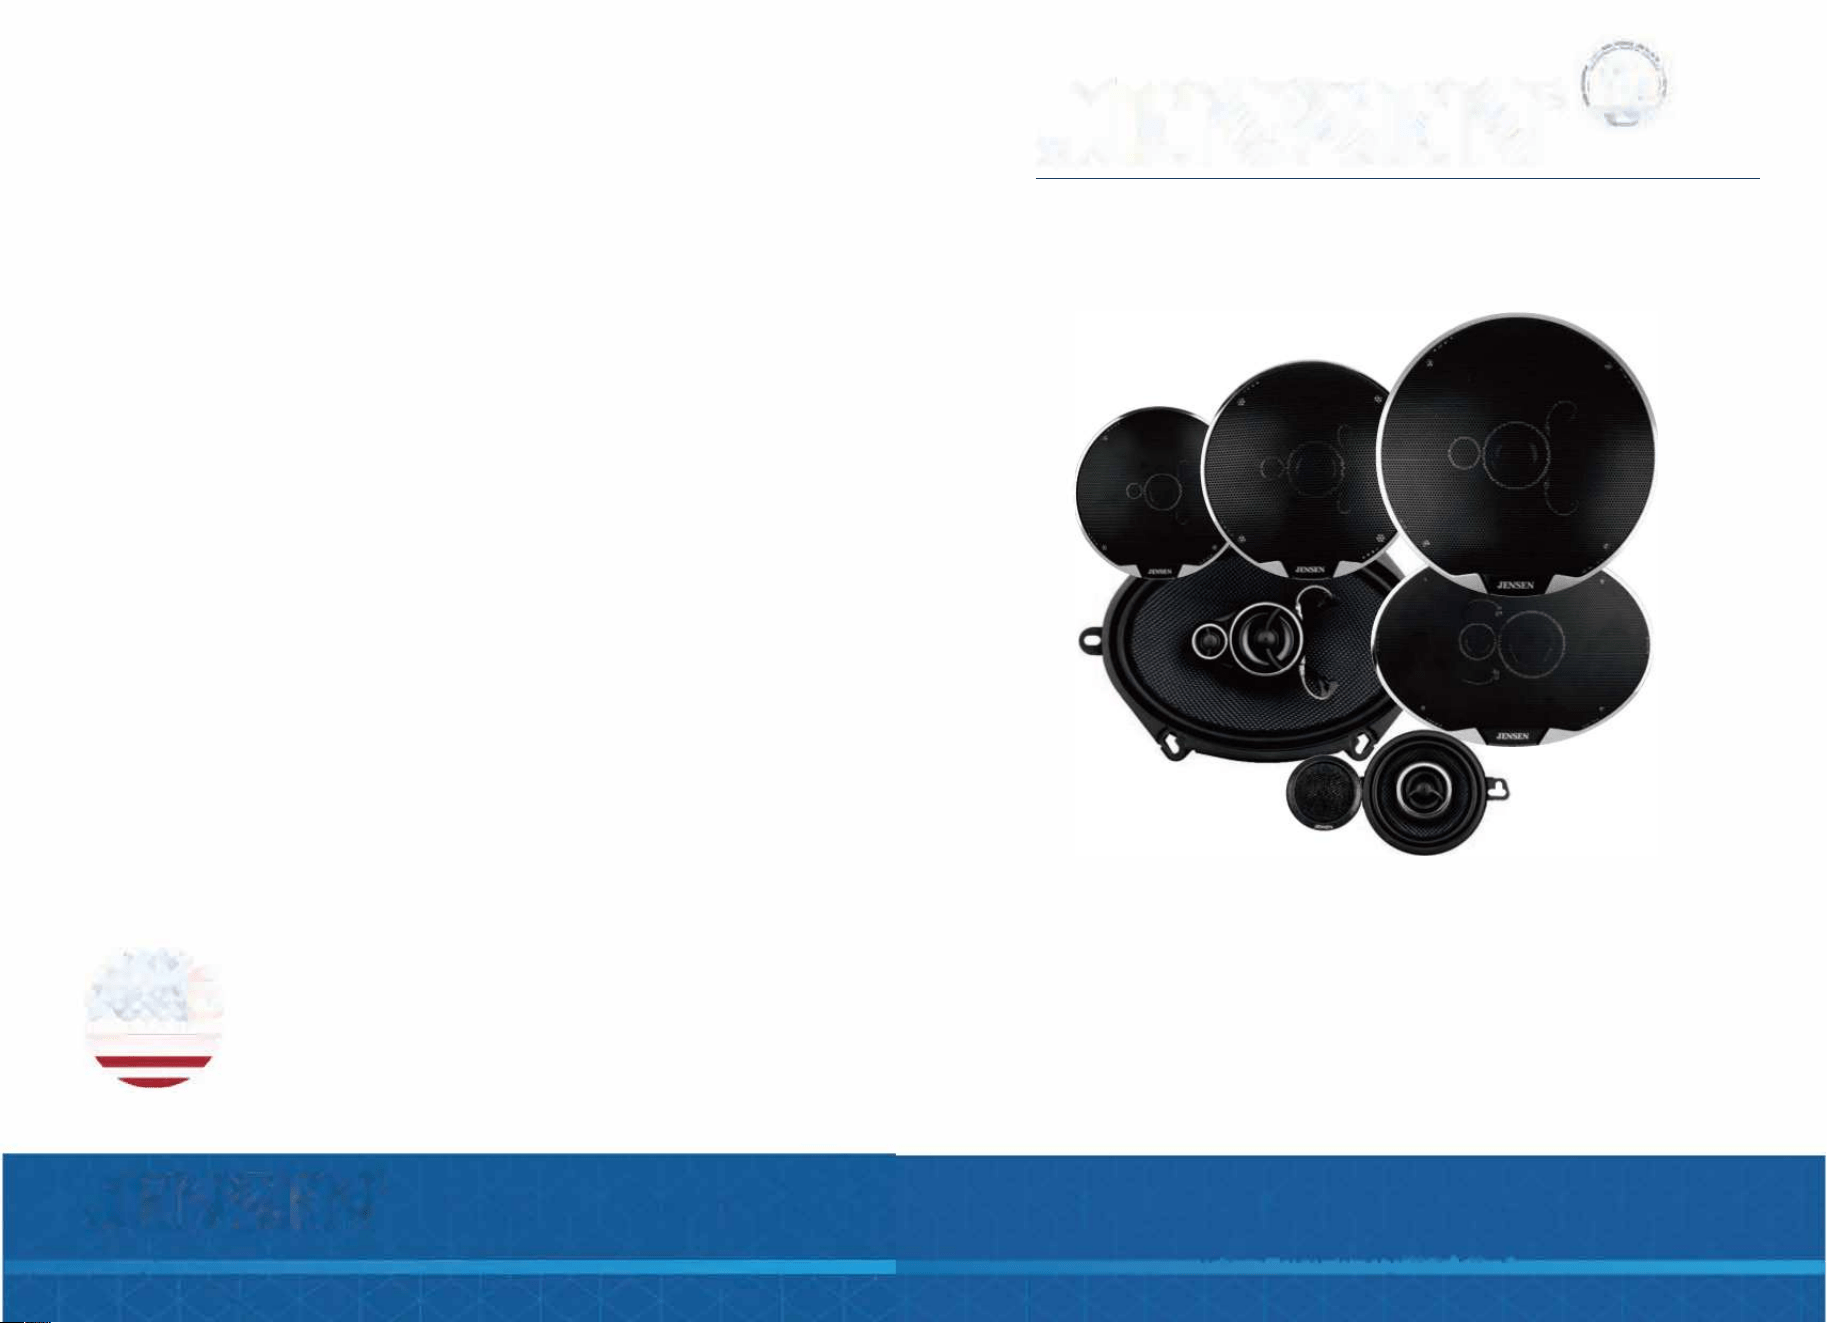
INSLTION
Basic Installation Steps
Step 1: Remove existing speaker.
Step 2, Position new speaker and align with existing mounting holes.
Step 3: Attach the positive (+) and negative (-) speaker terminals
(see FIGURE 2). Be sure to obsee proper polarity when connecting the wires
(the striped wire is the negative lead).
FIGURE 1 - DOOR NEL INSLLATION
Grille
Speaker
i
i
FIGURE 2 - CONNECTING SPEAKER WIRES
• Connect the speaker outputs from the head unit to the speakers.
• In some vehicles. it may be possible to utilize the existing speaker wiring. When doing
this. be cautious of the polarity(+/-) of the speaker wires. as these wire colors vary for
each vehicle.
Tip: Using factory wiring harness adapters for the head unit and speakers can help
eliminate wiring issues.
• In some vehicles. it may be necessary to run new speaker wire throughout the vehicle.
Obsee caution when routing wires.
• Always use quality connectors that fit tightly, or solder each connection. It may be
necessary to waterproof connections made inside door panels.
• Wiring speakers out-of-phase (the polarity of one speaker is wrong) will cause the
speakers to sound poor. and have very little bass response.
3
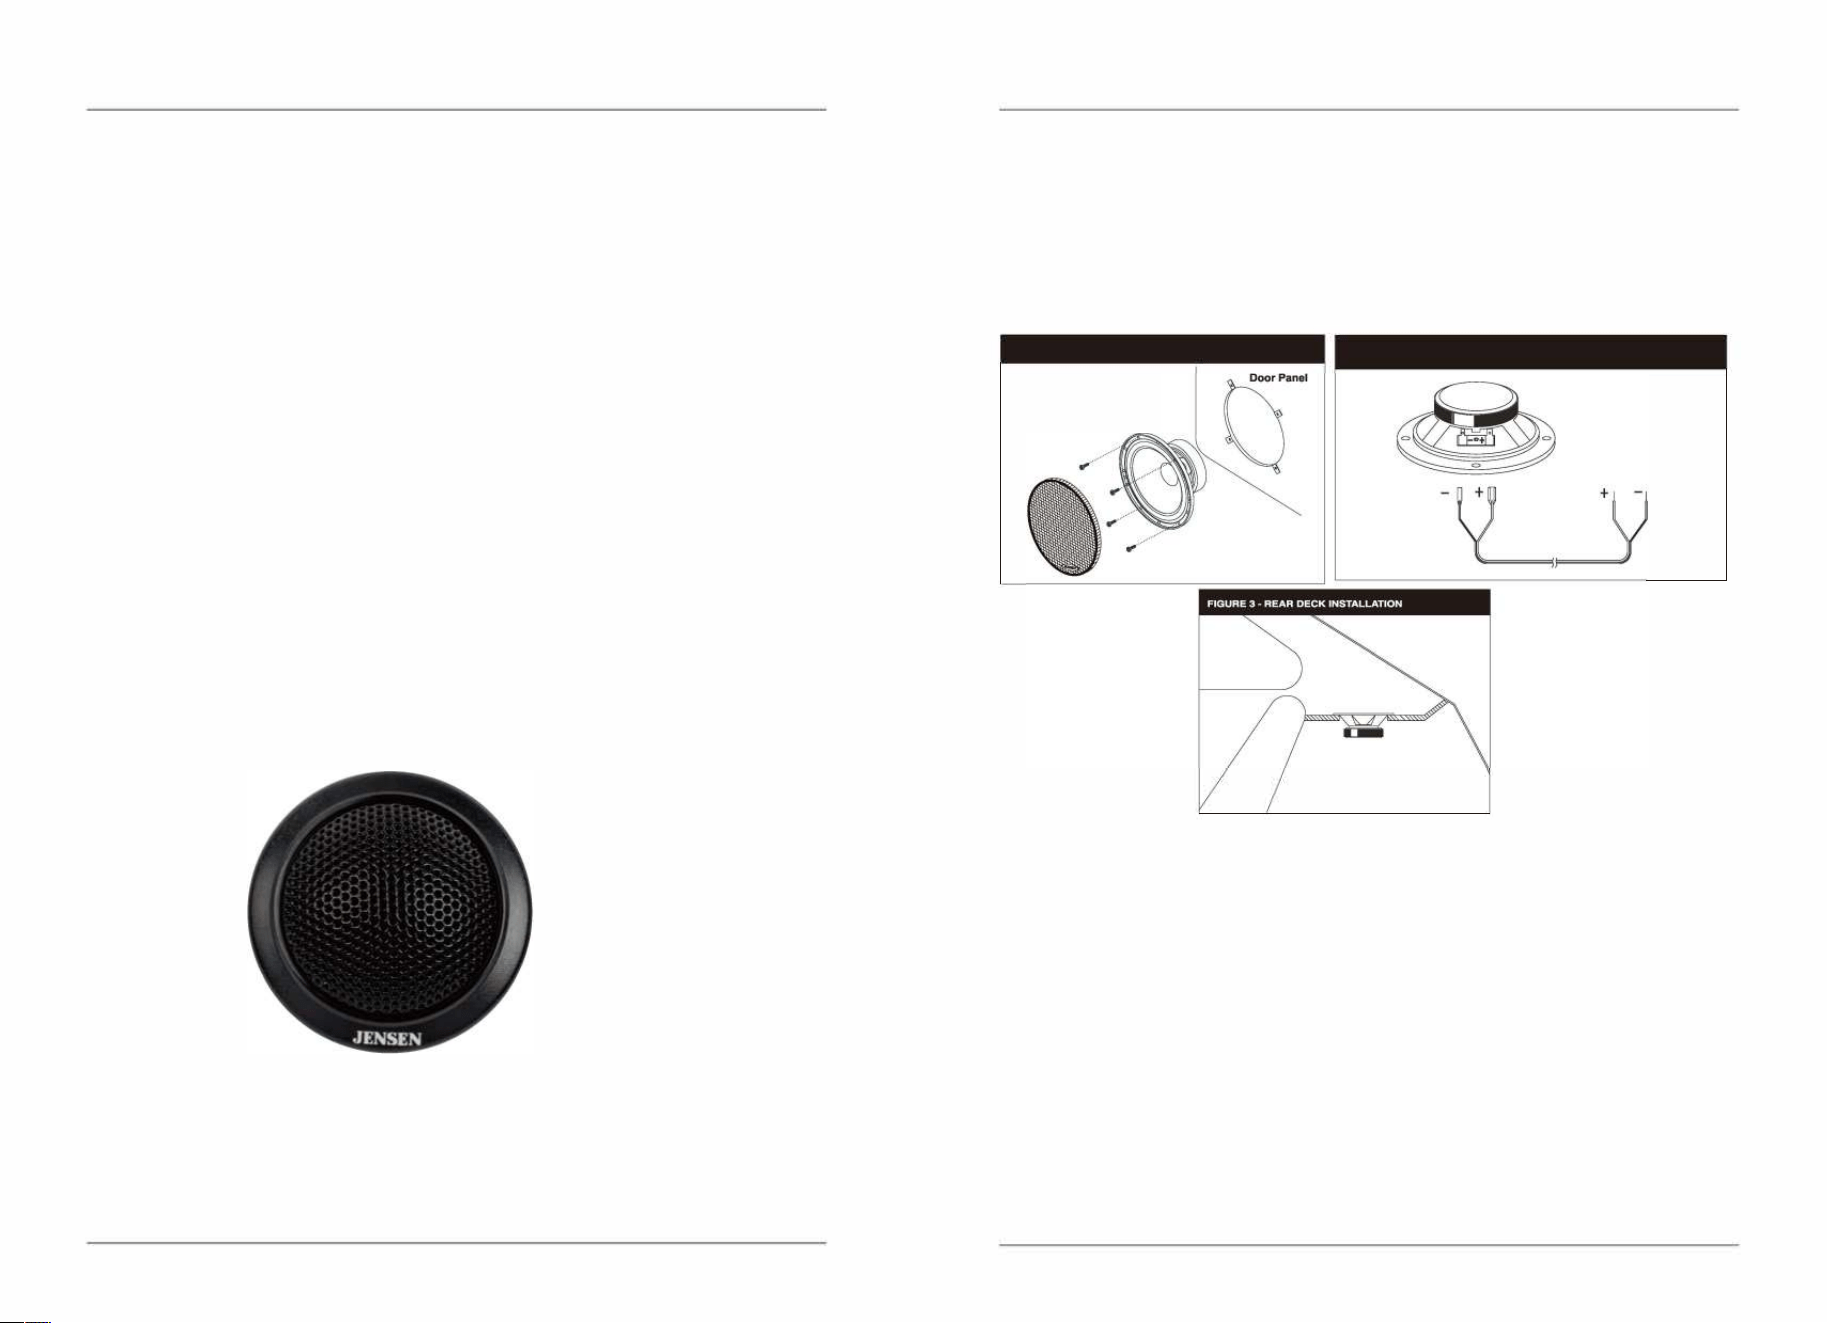
INSLLATION
Mounting
4
1. Determine where the speake will be mounted. Make sure the area is large enough
for the speaker to mount evenly. Also ensure the mounting location is deep enough
for the speaker to fit.
2. Refer to the specification chart to determine the proper diameter hole to cut for your
speaker model.
3. If needed. use the grille as a template to mark the locations for the mounting screws.
Drill the holes with a 3/32" bit.
4. Fit the speaker to the hole cut-out. Mount the speaker using the supplied screws.
If the speaker grille is to be used, insert 4 screws into the grille insert holes and then
mount the speaker.
• The JS40K can be made to a 4"x6" size hole if you use the supplied plastic adapter
ring.
• The JS65K can fit 6½" and 6¾" mounting locations if you use the supplied plastic
adapter ring.
JS35K
Speaker
Mounting Hole
Cut-out
JS65K
J2
Speaker
Mounting Hole
Cut-out
JK
JS68K
JS52K
Grille
Speaker
Mounting Hole
Cut-out
Grille
Speaker
JS69K
Mounting Hole
Cut-out
ESPECIFICACIONES Y CARACTERiSTICAS
JS35K
JS40K JS52K
Tamao del altavoz
31/2
""
4"
51/4
""
RMS/ Pico de potencia
25W/75W 35W/150W
45W/200W
Tipo de altavoz de
Caucho Caucho Caucho
graves envolvente
Material del woofer
Aramid Fiber Aramid Fiber Aramid Fiber
Tamao de rango medio
1 3/1
6
""
1 3/1
6
""
Material de rango medio
cupula PEI cupula PEI
Tamao de tweeter Isl
1/2" 1/2" 1/2"
Tipo de tweeter Isl
Cupula de Seda cupula PEI cupula PEI
Tipo de bobina de voz
Bobina mil de smto Bobina mil de silite Bobina mil de smto
de b de vidrio de b de vidrio de b de vidrio
Tamao de la bobina
0.79"
1"
1"
de voz
Sensibilidad
83dB 85dB 88dB
Respuesta frecuente
150Hz-20kHz 123Hz-20kHz 75Hz-20kHz
lmpedancia nominal
4ohmios 4ohmios 4ohmios
Rejillas incluidas
No
Si
Si
7
ESPECIFICACIONES Y CARACTERiSTICAS
JS65K
JS68K JS69K
Tamao del altavoz
61/2"
6" X 8",5" X 7" 6" X 9"
RMS/ Pico de potencia
60W/250W 60W/250W
100W/375W
Tipo de altavoz de
Caucho Caucho Caucho
graves envolvente
Material del woofer
Aramid Fiber Aramid Fiber Aramid Fiber
Tamao de rango medio
1 3/ 8" 1 3/ 8"
21/4"
Material de rango medio
cupula PEI cupula PEI cupula PEI
Tamao de tweeter Isl
9/16" 9/16"
1 3/ 16"
Tipo de tweeter Isl
cupula PEI cupula PEI cupula PEI
Tipo de bobina de voz
Bobina mil de silite Bobina mil de siUto Bobina mil de silite
de b de vidrio de b de vidrio de b de vidrio
Tamao de la bobina
0.98" 0.98"
1.38"
de voz
Sensibilidad
88dB 88dB 89dB
Respuesta frecuente
70Hz-20kHz 70Hz-20kHz 50Hz-20kHz
lmpedancia nominal
4ohmios 4ohmios 4ohmios
Rejillas incluidas
Si
No
Si
6
OPETION
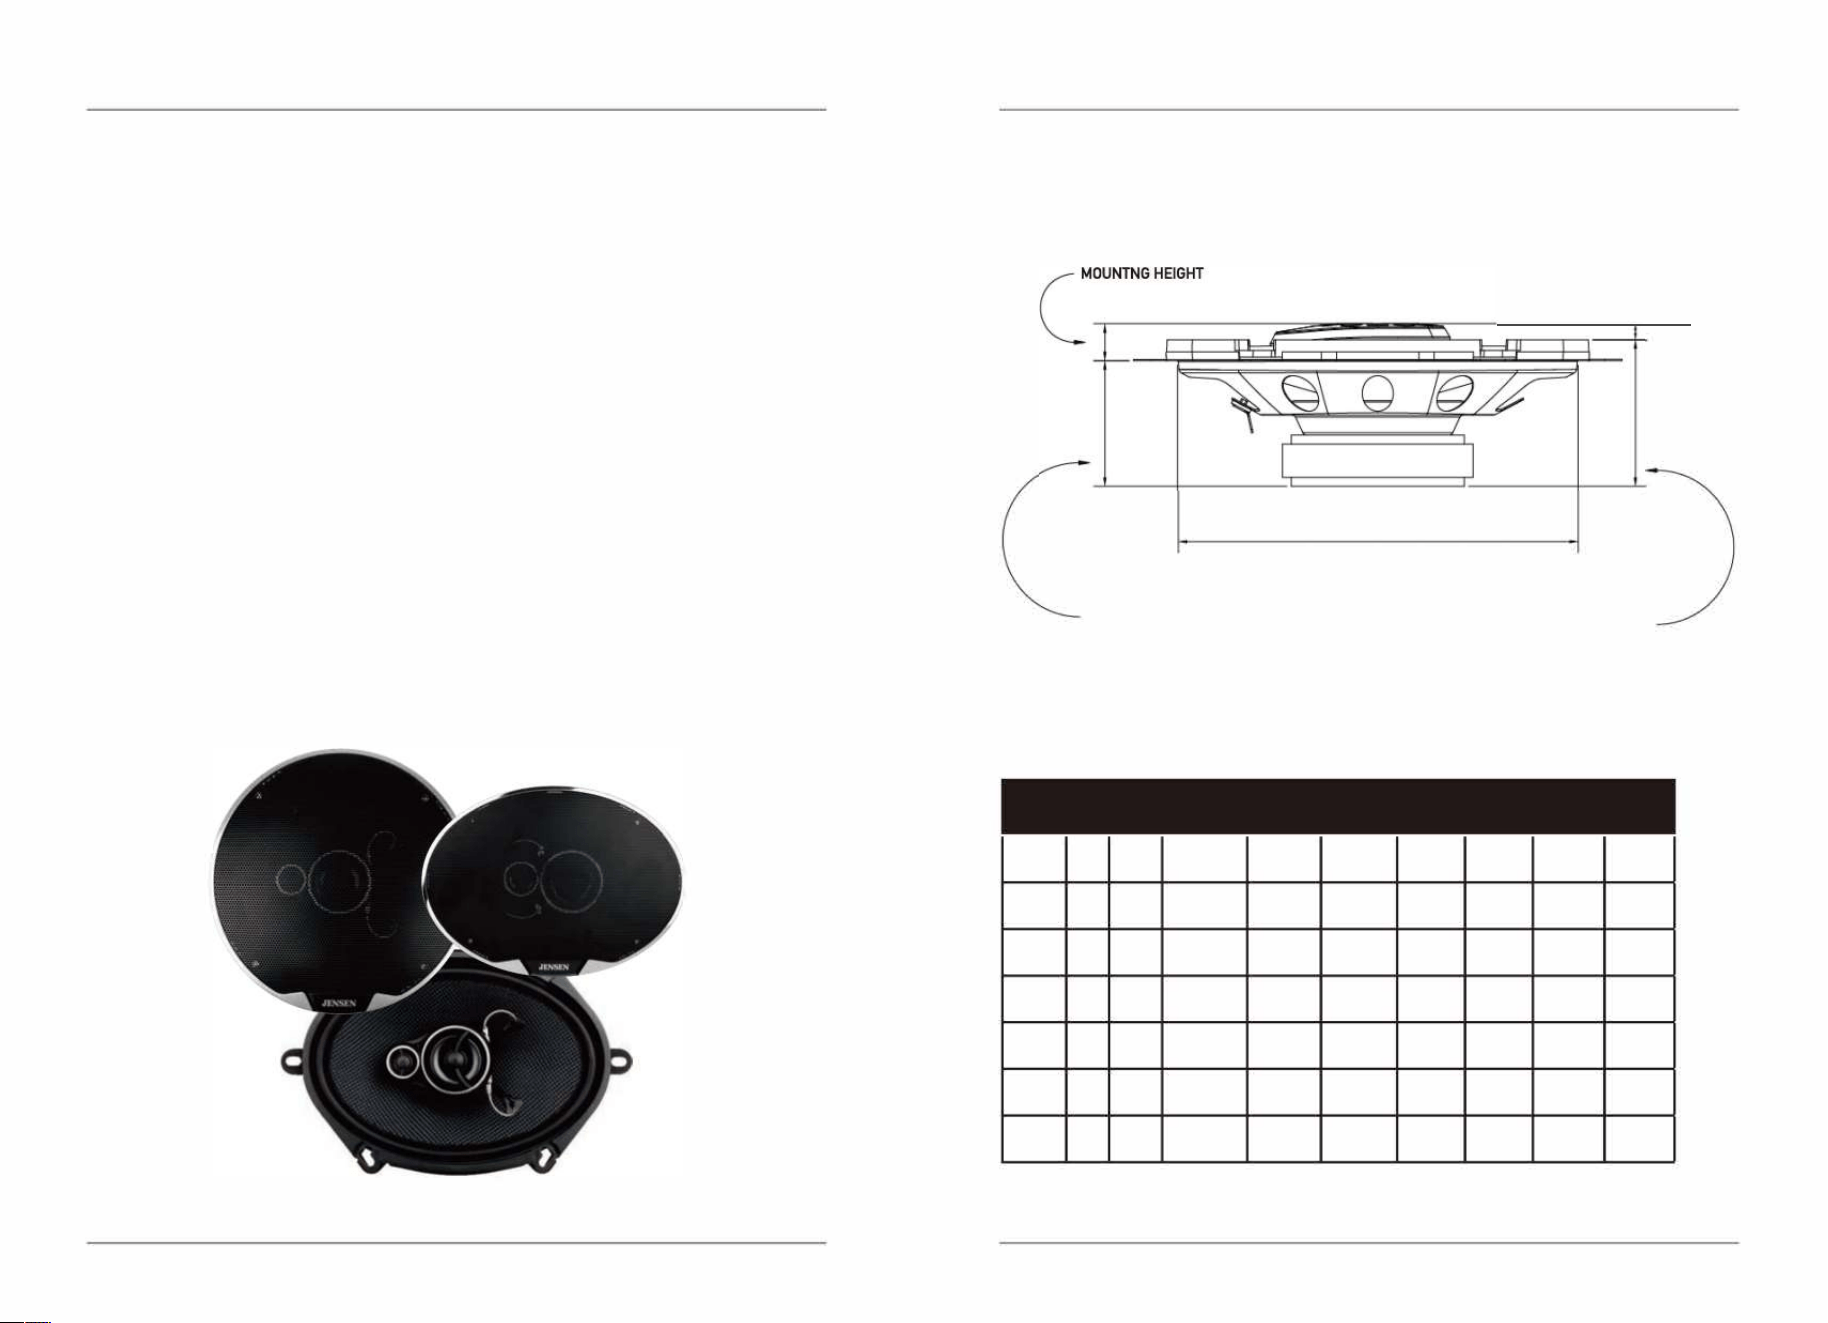
Specifitions
ETER PROTRUSIO
)
CUT-OUT DIAMETER
TOP-MOUNTING DEPTH
BOOM-MOUNTING DEPTH
The above diagram is to be used with the specifications matrix guide below.
Design and specifications subject to change without notice.
Power
Fquen Cutout
Top Bom
Mounting
Model
Size
Te
Rating SensitM
Response Diameter
Mounting Mounting
Height
(RMS/Pea Depth Depth
JS35K
3 1/2"
2Way
25W/75W
83dB
150Hz-
3. 11" 1.65"
1.89"
0.57"
20kHz
JS40K
4"
3Way
35 W/150W
85dB
123Hz-
3. 7"
1.97"
2.08"
0.63"
20kHz
JS52K 51/4"
3Way
45W/200W
88dB
75Hz-
4.57" 2.13" 2.26"
0.45"
20kHz
JS65K 61/2"
3Way
60W/250W
88dB
70Hz-
5.59"
2.32"
2.44"
0.51"
20kHz
JS68K
6"x8"
3Way
60W/250W
88dB
70Hz- 5.03
2.36"
2.76" 0.59"
5"x7"
20kHz 7.09"
JS69K
6"x9"
3Way
100W/375W
89dB
50Hz-
5.94"
3. 19"
3. 58" 0.65"
20kHz
'8.7"
JSTW2
2"
tweeter
5W/15W
90dB
1 OOOHz-
1.78" 0.71"
0.87"
0.47"
20kHz
5
SPECIFICATIONS & FEATURES
JS65K
JS68K JS69K
speaker Size
61/2" 6"x 8",5" x7"
6" X 9"
RMS/Peak Power
60W/250W 60W/250W 100W/375W
Woofer Surround Type Rubber Rubber Rubber
Woofer Material
Aramid Fiber Aramid Fiber Aramid Fiber
Midrange Size
1 3/8" 1 3/8"
21/4"
Midrange Materials
PEI dome PEI dome PEI dome
Tweeter(s) Size
9/16" 9/16"
1 3/16"
Tweeter(s) Type
PEI dome PEI dome PEI dome
Voice Coil Type
Glass Fiber Silicate
Glass Fiber Silicate
Glass Fiber Silicate
Voice Coil
Voice Coil
Voice Coil
Voice Coil Size
1"
1"
1 3/8"
Sensistivity
88dB 88dB 89dB
Frequen Response
70Hz-20kHz 70Hz-20kHz 50Hz-20kHz
Nominal Impedance
4ohms 4ohms 4ohms
Grilles Included
Yes No Yes
6
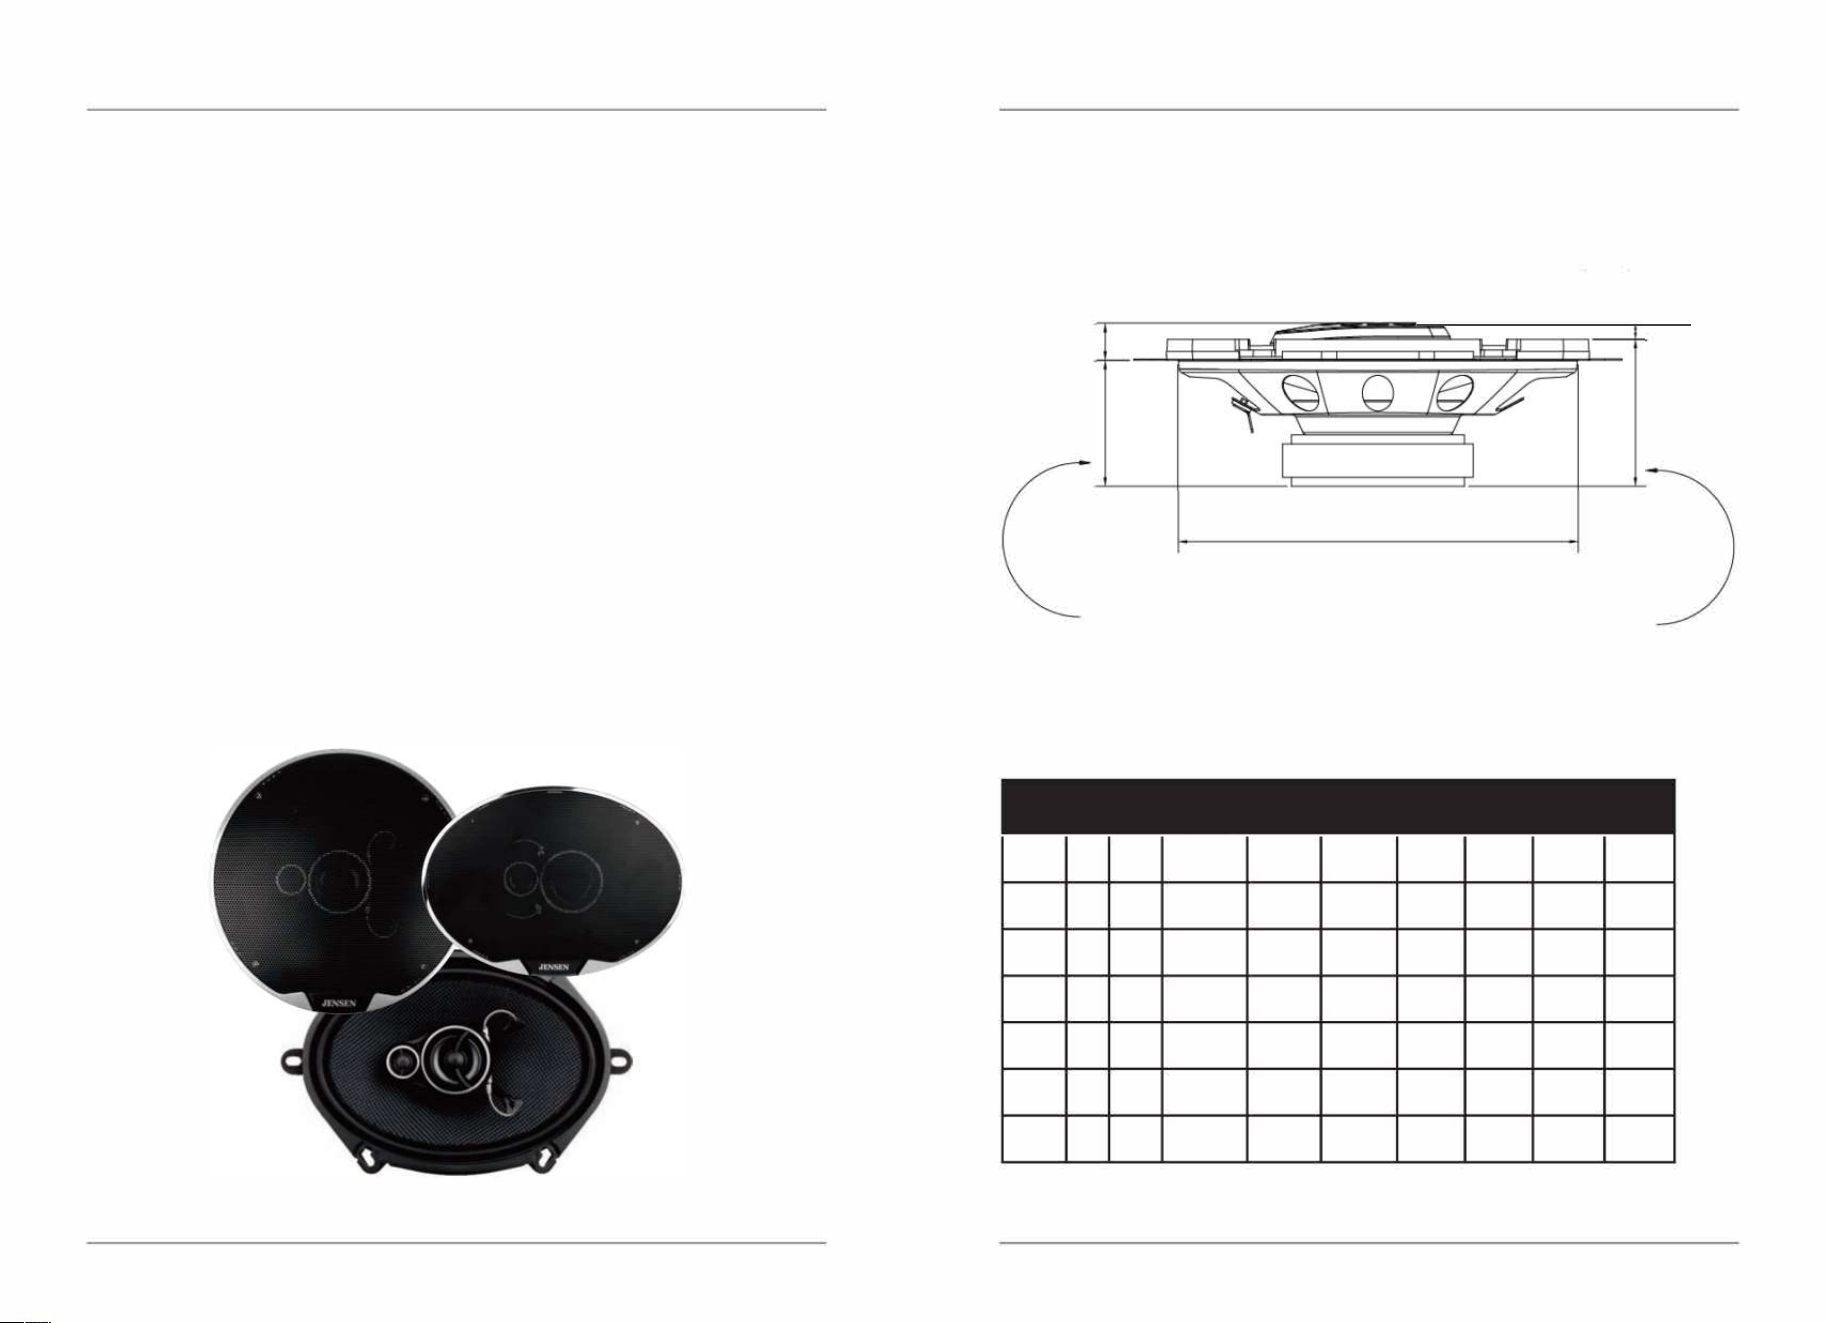
FUNCIONAMIENTO
Especificaciones
C
AIMa de montaje
Profundidad de
montaje superior
Protuberanda del tweete
)
Diametro de corte
Profundidad de
montaje inferior
El diagrama anterior se debe utilizar con las especificaciones siguientes.
El diseo y las especificaciones estan sujetos a cambios sin previo aviso.
Potencia
Respuesta
Modelo Tamano Tipo
nominal
Sensibilidad
de
(pico RMS) frecuencia
JS35K
3 1/2"
2Way
25W/75W
83dB
150Hz-
20kHz
JS40K
4"
3Way
35W/150W
85dB
123Hz-
20kHz
JS52K 51/4"
3Way
45W/200W
88dB
75Hz-
20kHz
JS65K
61/2"
3Way
60W/250W
BBdB
70Hz-
20kHz
JS68K
6"x8"
3Way
60W/250W
BBdB
70Hz-
5"x7"
20kHz
JS69K
6"x9"
3Way
100W/375W
89dB
50Hz-
20kHz
JSTW2
2"
tweeter
5W/15W
90dB
1 000Hz-
20kHz
D
.
.
1
Profundidad Profundidad
iame ro
de montaje
demontaje
de corte
superior
3.11"
1.65"
3.7"
1.97"
4.57"
2.13"
5.59"
2.32"
5.03"'
2.3 6"
7.09"
5.94"
3.19"
'8.T
1.78"
0.71"
inferior
1.89"
2.08"
2.26"
2.44"
2.76"
3.58"
0.87"
Altura
de
montaje
0.57"
0.63"
0.45"
0.51"
0.59"
0.65"
0.47"
5
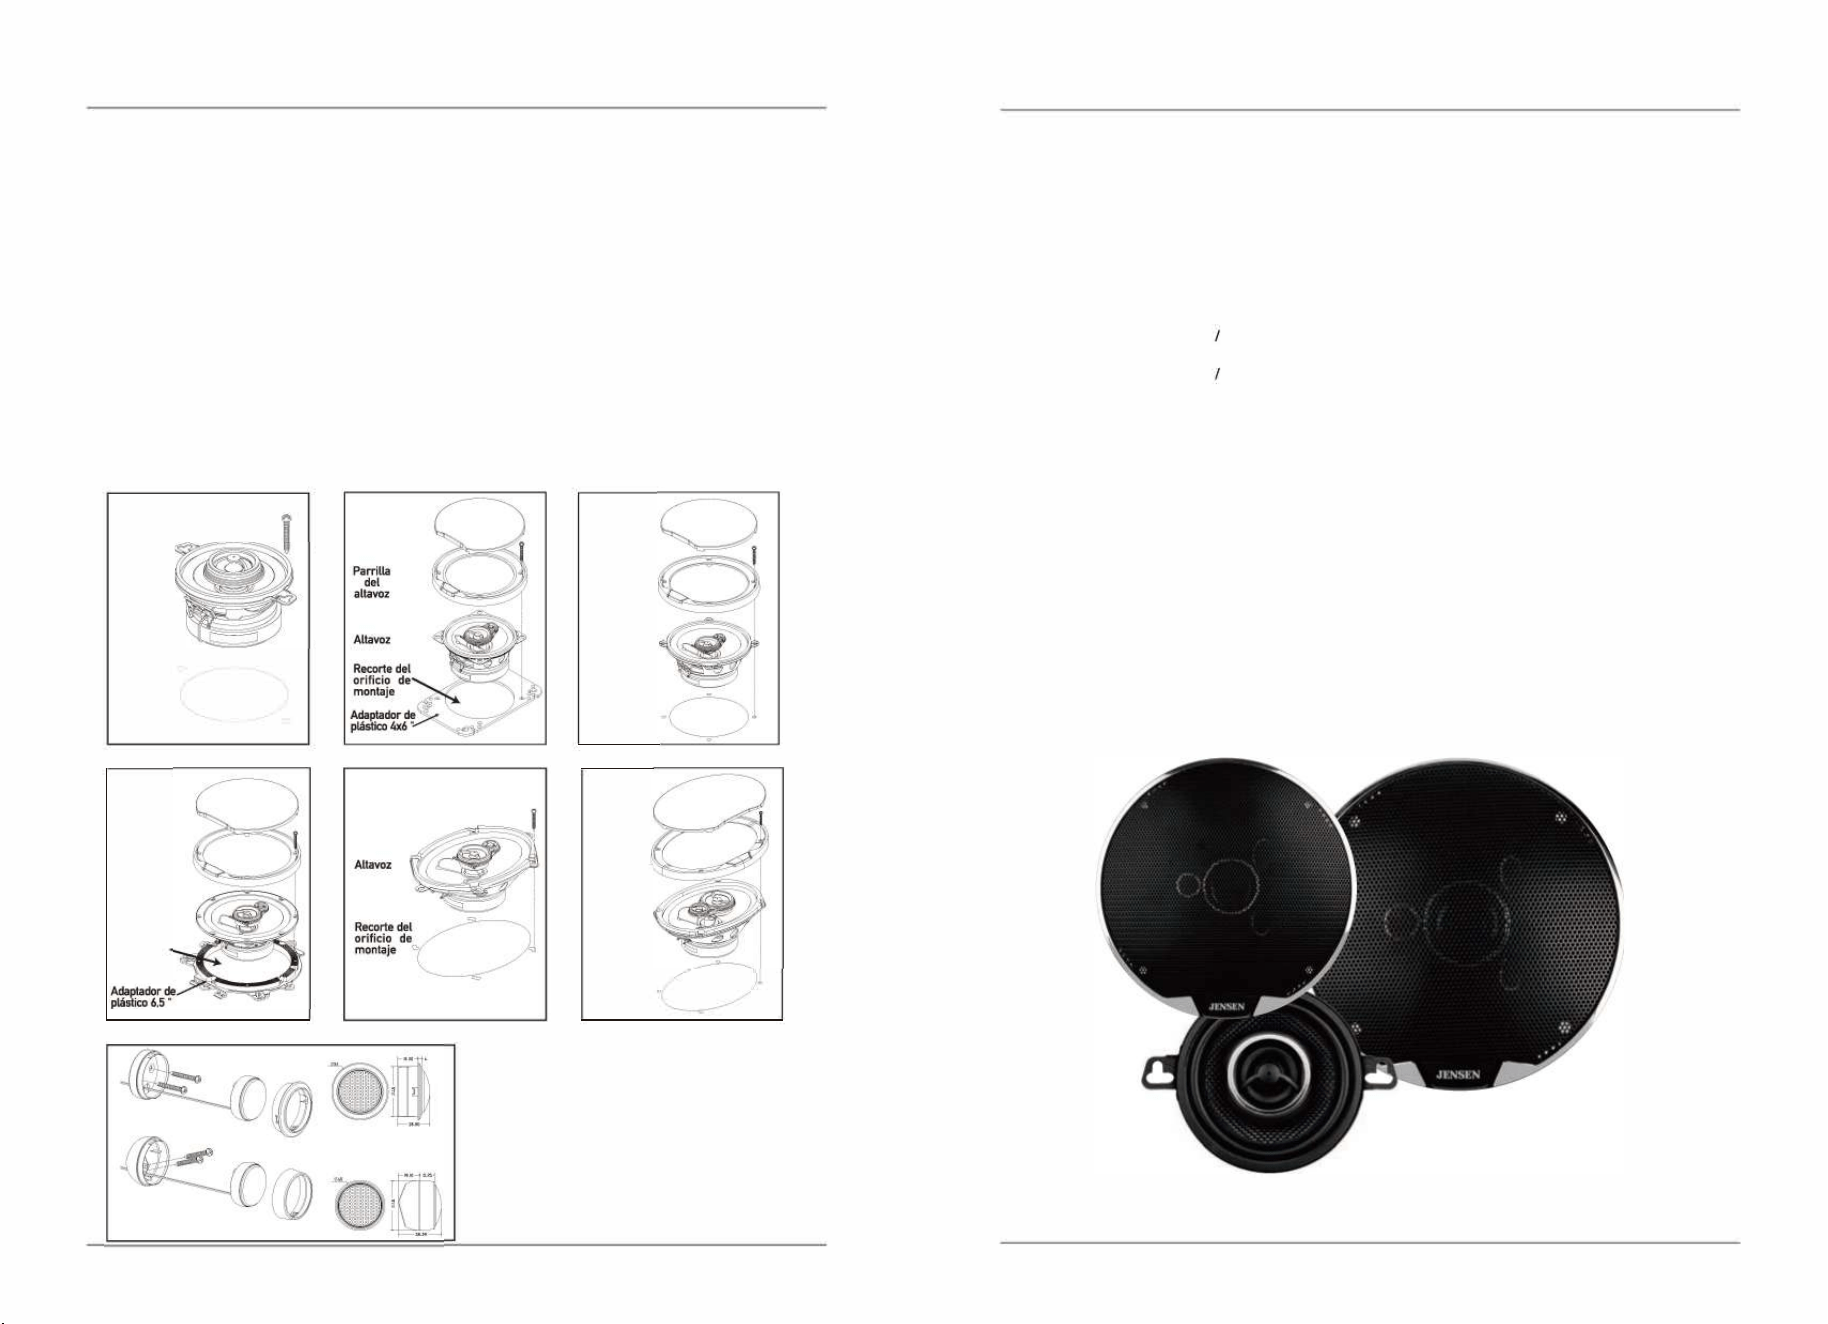
INSTALACION
Montaje
1. Seleccione la ubicaci6n de montaje, asegurandose de que el area sea lo
suficientemente grande para que el altavoz se monte de manera uniforme y
lo suficientemente profunda para que encaje.
2. Consulte la tabla de especificaciones para determinar el diametro correcto
para cortar el orificio segun el modelo de su altavoz.
3. Si es necesario, use la rejilla como plantilla para marcar las ubicaciones de
Los tornillos de montaje. Taladre Los agujeros con una broca de 3/32 ".
4. Coloque el altavoz en el corte. Monte el altavoz con Los tornillos incluidos. Si
se va a utilizar la rejilla del altavoz, inserte 4 tornillos en Los orificios de
inserci6n de la rejilla y luego monte el
altavoz
.
• El JS40K se puede adaptar a un orificio de 4"x6" si se utiliza el anillo adaptador
de plastico suministrado.
• El JS65K es compatible con ubicaciones de montaje de 6 ½" y 6¾" si se utiliza el
anillo adaptador de plastico suministrado.
4
Altavoz
Recorte del
orificio de
montaje
Parrilla
del
altavoz
Altavoz
Recorte del
orificio de
montaje
JS35K JK
JS52K
JS65K
JS68K
J
Parrilla
del
altavoz
Altavoz
Recorte del
orificio de
montaje
Parrilla
del
altavoz
Altavoz
Recorte del
orificio de
montaje
JS69K
speaker Size
RMS/Peak Power
Woofer Surround Type
Woofer Material
Midrange Size
Midrange Materials
Tweeter(s) Size
Tweeter(s) Type
Voice Coil Type
Voice Coil Size
Sensistivity
Frequen Response
Nominal Impedance
Grilles Included
SPECIFIIONS & FEATURES
JS35K
JS40K JS52K
3 1/2""
4··
51/4'"
25W/75W 35W/150W
45W/200W
Rubber Rubber Rubber
Aramid Fiber
Aramid Fiber
Aramid Fiber
13/8"
13/8"
PEI dome PEI dome
1/2" 1/2" 1/2"
Silk Dome PEI dome PEI dome
Glass Fiber Silicate Glass Fiber Silicate
Glass Fiber Silicate
Voice Coil Voice Coil Voice Coil
0.79"
1" 1"
83dB
85dB
88dB
150Hz-20kHz 123Hz-20kHz 75Hz-20kHz
4ohms 4ohms 4ohms
No
Yes Yes
7
speaker Size
RMS/Peak Power
Tweeter(s) Size
Tweeter(s) Type
Voice Coil Type
Voice Coil Size
Sensistivity
Frequen Response
Nominal Impedance
Grilles Included
8
SPECIFICATIONS & FEATURES
JSTW2
2"
5W/15W
0.98"
Silk Dome
KSV
0.98"
90d8
1 000Hz-20kHz
4ohms
N/A
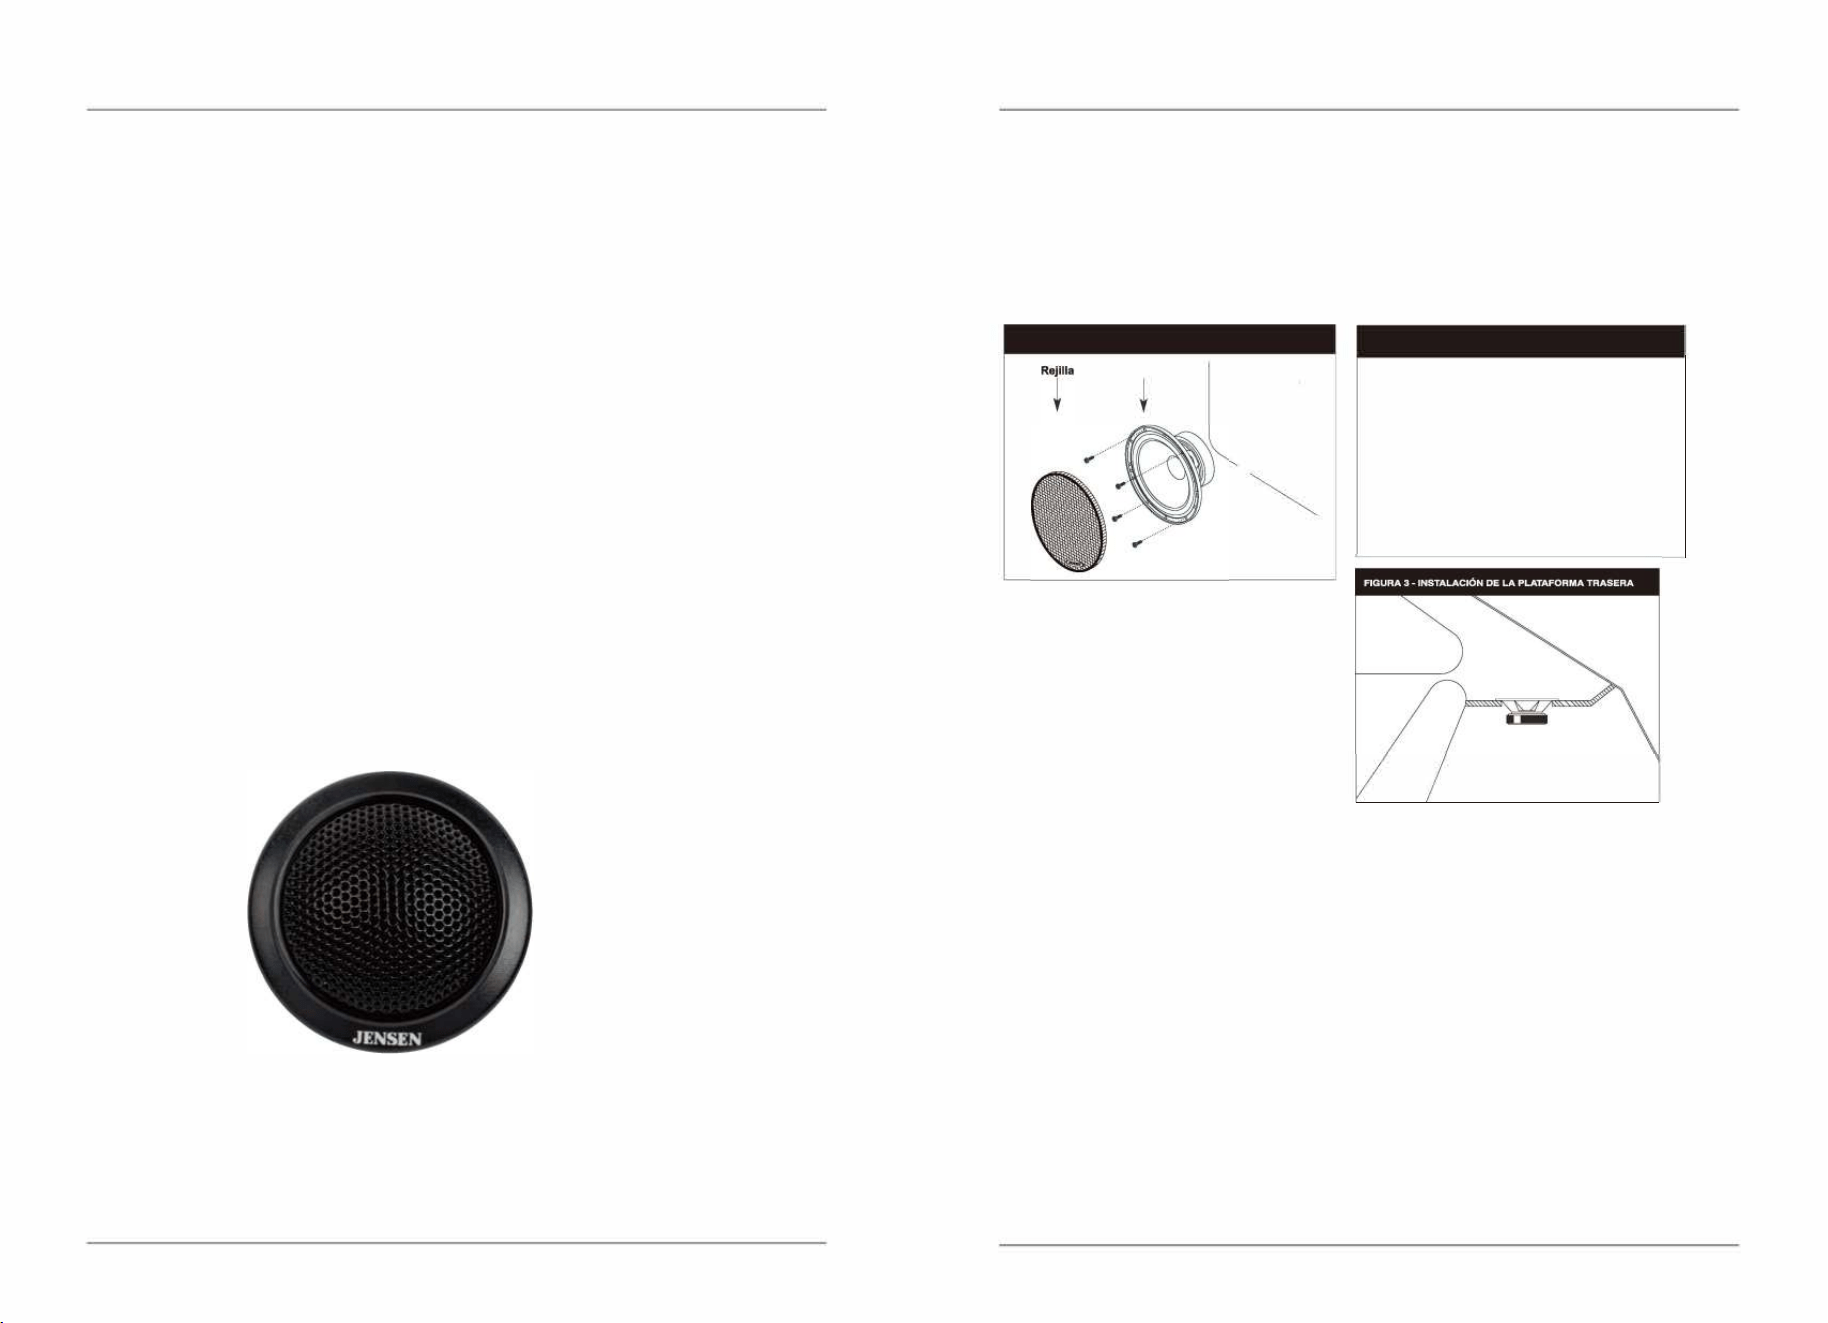
INSTALACION
Pasos de lnstalaci6n Basicos
Paso 11 Retire el altavoz existente.
Paso 21 Coloque el nuevo altavoz y alineelo con las orificios de montaje existentes.
Paso 31 conecte las terminales de altavoz positive I+] y negative 1-1 Iver FIGURA 21. Asegurese
de observar la polaridad adecuada al conectar las cables. El cable rayado es el cable negative.
FIGURA 1 - INSLACl6N DEL PANEL DE LA PUER
FIGURA 2 - CONECTANDO LOS CABLES DEL AOZ
Altavoz
dela �
uea
= o+ o =
-L
• Conecte las salidas de altavoz de la unidad principal a los altavoces.
• En algunos vehfculos, es posible utilizar el cableado de altavoz existente. Al hacer
esto, tenga cuidado con la polaridad (+/-] de los cables de los altavoces, ya que los
colores de estos cables varfan para cada vehfculo.
Consejo: El uso de adaptadores de arnes de cableado de fabrica para la unidad
principal y los altavoces puede ayudar a eliminar los problemas de cableado.
• En algunos vehfculos, puede ser necesario instalar un nuevo cable de altavoz en
todo el vehfculo. Tenga cuidado al enrutar los cables.
• Utilice conectores de calidad que se ajusten bien o suelde cada conexi6n. Puede
ser necesario impermeabilizar las conexiones realizadas dentro de los paneles de
las puertas.
• El cableado de los altavoces fuera de fase (la polaridad de un altavoz es incorrectal
hara que los altavoces suenen mal y tengan muy poca respuesta de graves.
3

PREPARACION
Aviso de seguridad
Gracias por comprar Los altavoces triaxiales para autom6vil de la serie JS de Jensen.
Aunque Jensen ha intentado asegurarse de que toda la informaci6n contenida en este
manual sea precisa, cualquier parte del mismo esta sujeta a cambios sin previo aviso.
ADVERTENCIA
Las siguientes instrucciones deben usarse solo como una gufa
general. Si no esta seguro de realizar alguno de Los
procedimientos, consulte a un instalador profesional de audio
para autom6viles.
Antes de la instalacion, siga estas instrucciones:
1. Lea atentamente y comprenda las instrucciones antes de comenzar la instalaci6n.
2. Por seguridad, desconecte el terminal negativo de la baterfa antes de comenzar
la instalaci6n.
3. Para asegurar un ajuste adecuado, verifique la profundidad de montaje de Los
altavoces con la profundidad disponible, asf como la ubicaci6n de la mecanica de las
ventanas, las manijas de las puertas y las manijas de las ventanas.
4.
i
Tenga cuidado antes de perforar o cortar! Tenga cuidado de no cortar ni perforar
tanques de gasolina, lfneas de combustible, lfneas de frenos o hidraulicas, lfneas de
vacfo o cableado electrico.
5. Nunca coloque cables de altavoces debajo de su vehfculo. Colocar Los cables de Los
altavoces dentro del vehfculo proporciona la mejor protecci6n contra el calor del
escape y Los elementos ambientales.
6. Evite pasar cables sobre, cerca o a traves de superficies afiladas. Utilice arandelas
de goma para proteger Los cables que atraviesan el metal.
7. Cuando instale el cable del altavoz desde el amplificador, evite tenderlo cerca de
fuentes de alta corriente [mazos de cables, cables de la baterfa, etc.]
8. Si usa las rejillas provistas, asegurese de que la ubicaci6n de montaje este a
suficiente distancia de las manijas de las puertas y / o ventanas.
2
WARN
Limited Two Year* Warranty
This warranty gives you specific legal rights. You may also have other rights which vary
from state to state.
Jensen warrants this product to the original purchaser to be free from defects in
material and workmanship for a period of two years from the date of the original
purchase.
Jensen agrees, at our option, during the warranty period, to repair any defect in
material or workmanship or to furnish an equal new, renewed, or comparable product
(whichever is deemed necessary) in exchange without charges, subject to verification
of the defect or malfunction and proof of the date of purchase. Subsequent
replacement products are warranted for the balance of the original warranty period.
What is covered? This warranty covers all defects in the material and workmanship in
this product. The following are not covered: software, installation/removal costs,
damage resulting from accident, misuse, abuse, neglect, product modification,
improper installation, incorrect line voltage, unauthorized repair, or failure to follow
instructions supplied with the product, or damage occurring during return shipment of
the product. Specific license conditions and copyright notices for the software can be
found via www.jensenmobile.com.
Warranty Coverage
* Limited 2-year warranty. (Proof of purchase required)
•
Extended Coverage: Extend your warranty from 2 years to 4 years when you
register online at www.jensenmobile.com. Registration must be completed
within 60 days of the original purchase date to qualify for this extension.
What to do?
1.
Before you call for service, check the troubleshooting guide in your owner's
manual. A slight adjustment of any custom controls may save you a service
call.
2.
If you require service during the warranty period, you must carefully pack the
product (preferably in the original package) and ship it by prepaid
transportation with a copy of the original receipt from the retailer to an
authorized service center.
3.
Please describe your problem in writing and include your name, a return UPS
shipping address (P.O. Box not acceptable), and a daytime phone number
with your shipment.
4.
For more information and for the location of the nearest authorized service
center please contact us by one of the following methods:
a. Call us toll-free at 1-888-921-4088
(Monday-Friday, 9:00 am, to 5:00 pm, EST)
b.
E-mail us at [email protected]
Exclusion of Certain Damages: This warranty is exclusive and in lieu of any and all
other warranties, expressed or implied, including without limitation the implied
warranties of merchantability and fitness for a particular purpose and any obligation,
liability, right, claim or remedy in contract or tort, whether or not arising from the
company's negligence, actual or imputed. No person or representative is authorized to
assume for the company any other liability in connection with the sale of this product.
In no event shall the company be liable for indirect, incidental, or consequential
damages.
9
� Customer Support
1-888-921-4088
--- [Monday-Friday, 9AM-5PM EST]
https://www.jensenmobile.com
Designed and Engineered in USA
JENSEN
®
��:�
APEX SERIES
JS52K
JS65K
JS68K
JS69K
JS2