HomePod User Guide
Everything you need to know about
HomePod and HomePod mini.
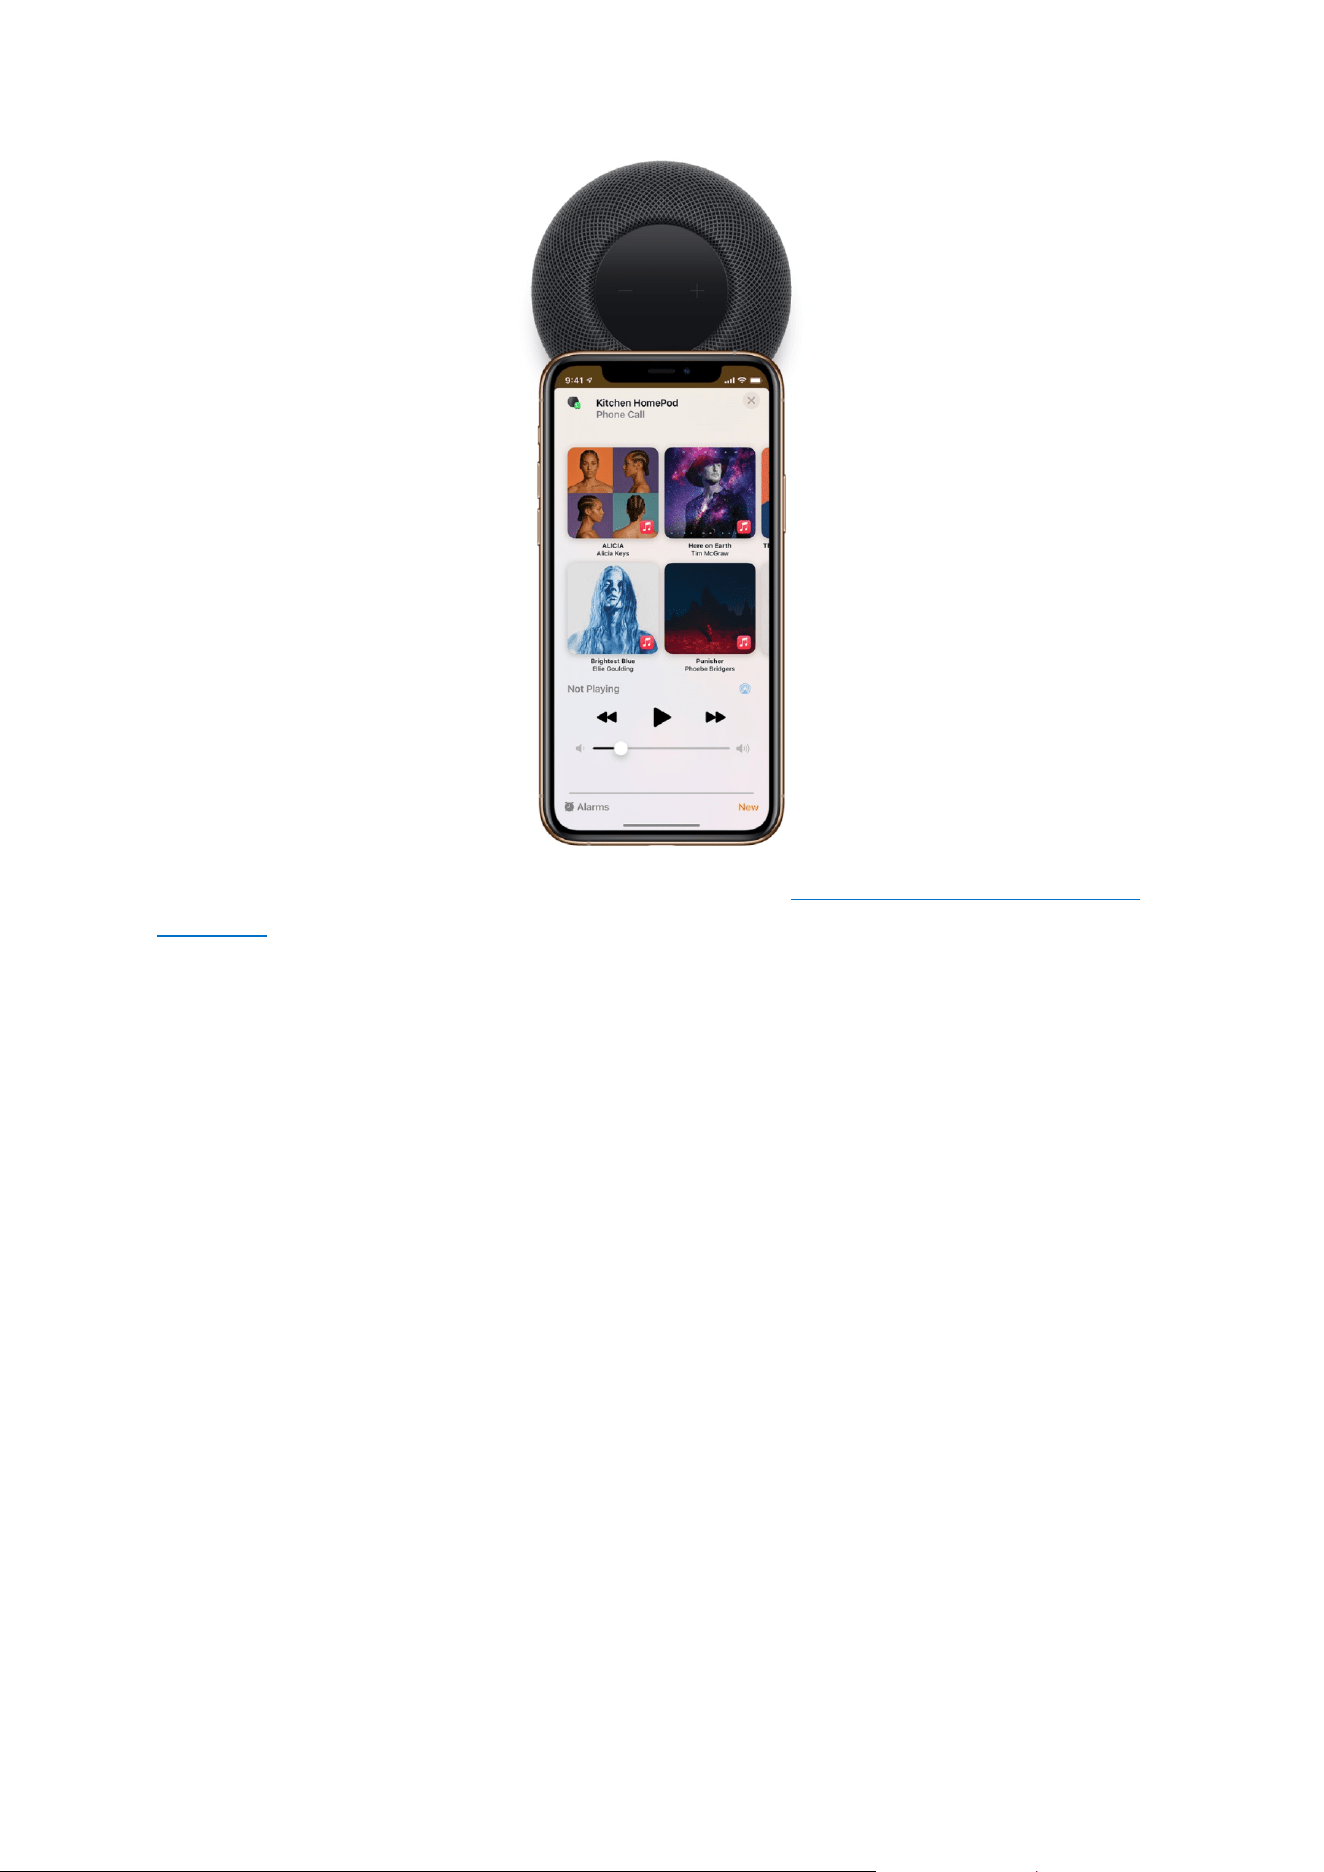
Start your day
Set an alarm on HomePod and wake up to your favorite morning tune. To keep the good
vibes going all morning, just say “Hey Siri, play something upbeat.” With one of the world’s
largest music catalogs at your command—thanks to your Apple Music subscription—there
are more than 70 million songs to hear.
Hear about your weather, news, calendar events, and more while you get ready. Just
say “Hey Siri, what’s my update?”
Unwind after work
If you unwind to music or podcasts on your evening stroll, keep listening when you get home
by holding your iPhone near the top of HomePod. Or hear a personalized selection created
just for you by Apple Music. Say “Hey Siri, play some relaxing music.”
HomePod can also help you prepare dinner. Say “Hey Siri, set a 12 minute pizza
timer” or “Hey Siri, how many cups are in a pint?” And with more than one HomePod, you
can bring everyone to the table by saying “Hey Siri, intercom ‘Dinner is ready!’”
Time for bed
As you wind down for the night, listen to soothing soundscapes. Say, “Hey Siri, play rain
sounds.” To make sure it doesn’t play all night, say “Hey Siri, stop playing in 30 minutes.” And
remember to say “Hey Siri, set an alarm for 7 o’clock tomorrow.”
Before you retire for the evening, say “Hey Siri, good night” to run a scene you created in the
Home app that turns off all the lights, locks the front door, and lowers the temperature.
Sweet dreams.

2
Table of Contents
Set up HomePod 3
Set up HomePod stereo pairing 6
Use HomePod with Apple TV 4K 7
Change HomePod settings 7
HomePod privacy and security 9
Play audio using Siri on HomePod 10
Play audio on HomePod using an iOS or iPadOS device 13
Use HomePod touch controls 16
Ask Siri for information 16
Make Personal Requests on HomePod 18
Control your home with Siri on HomePod 19
Use HomePod for phone calls 19
Use HomePod as an Intercom 21
Use alarms, clocks, and timers 23
3
Set up HomePod
HomePod and HomePod mini are smart speakers with the intelligence of Siri. With Siri, it’s
easy to control HomePod through natural voice interaction, allowing you to play your
favorite music and podcasts, get help with everyday questions or tasks, and control your
smart home accessories—all with just your voice.
Before you begin, update your iPhone or iPod touch to iOS 14.1 or later, or update your iPad
to iPadOS 14.1 or later. Make sure that your iOS or iPadOS device has Bluetooth® turned on,
and that it’s connected to the Wi-Fi network that you want HomePod to use.
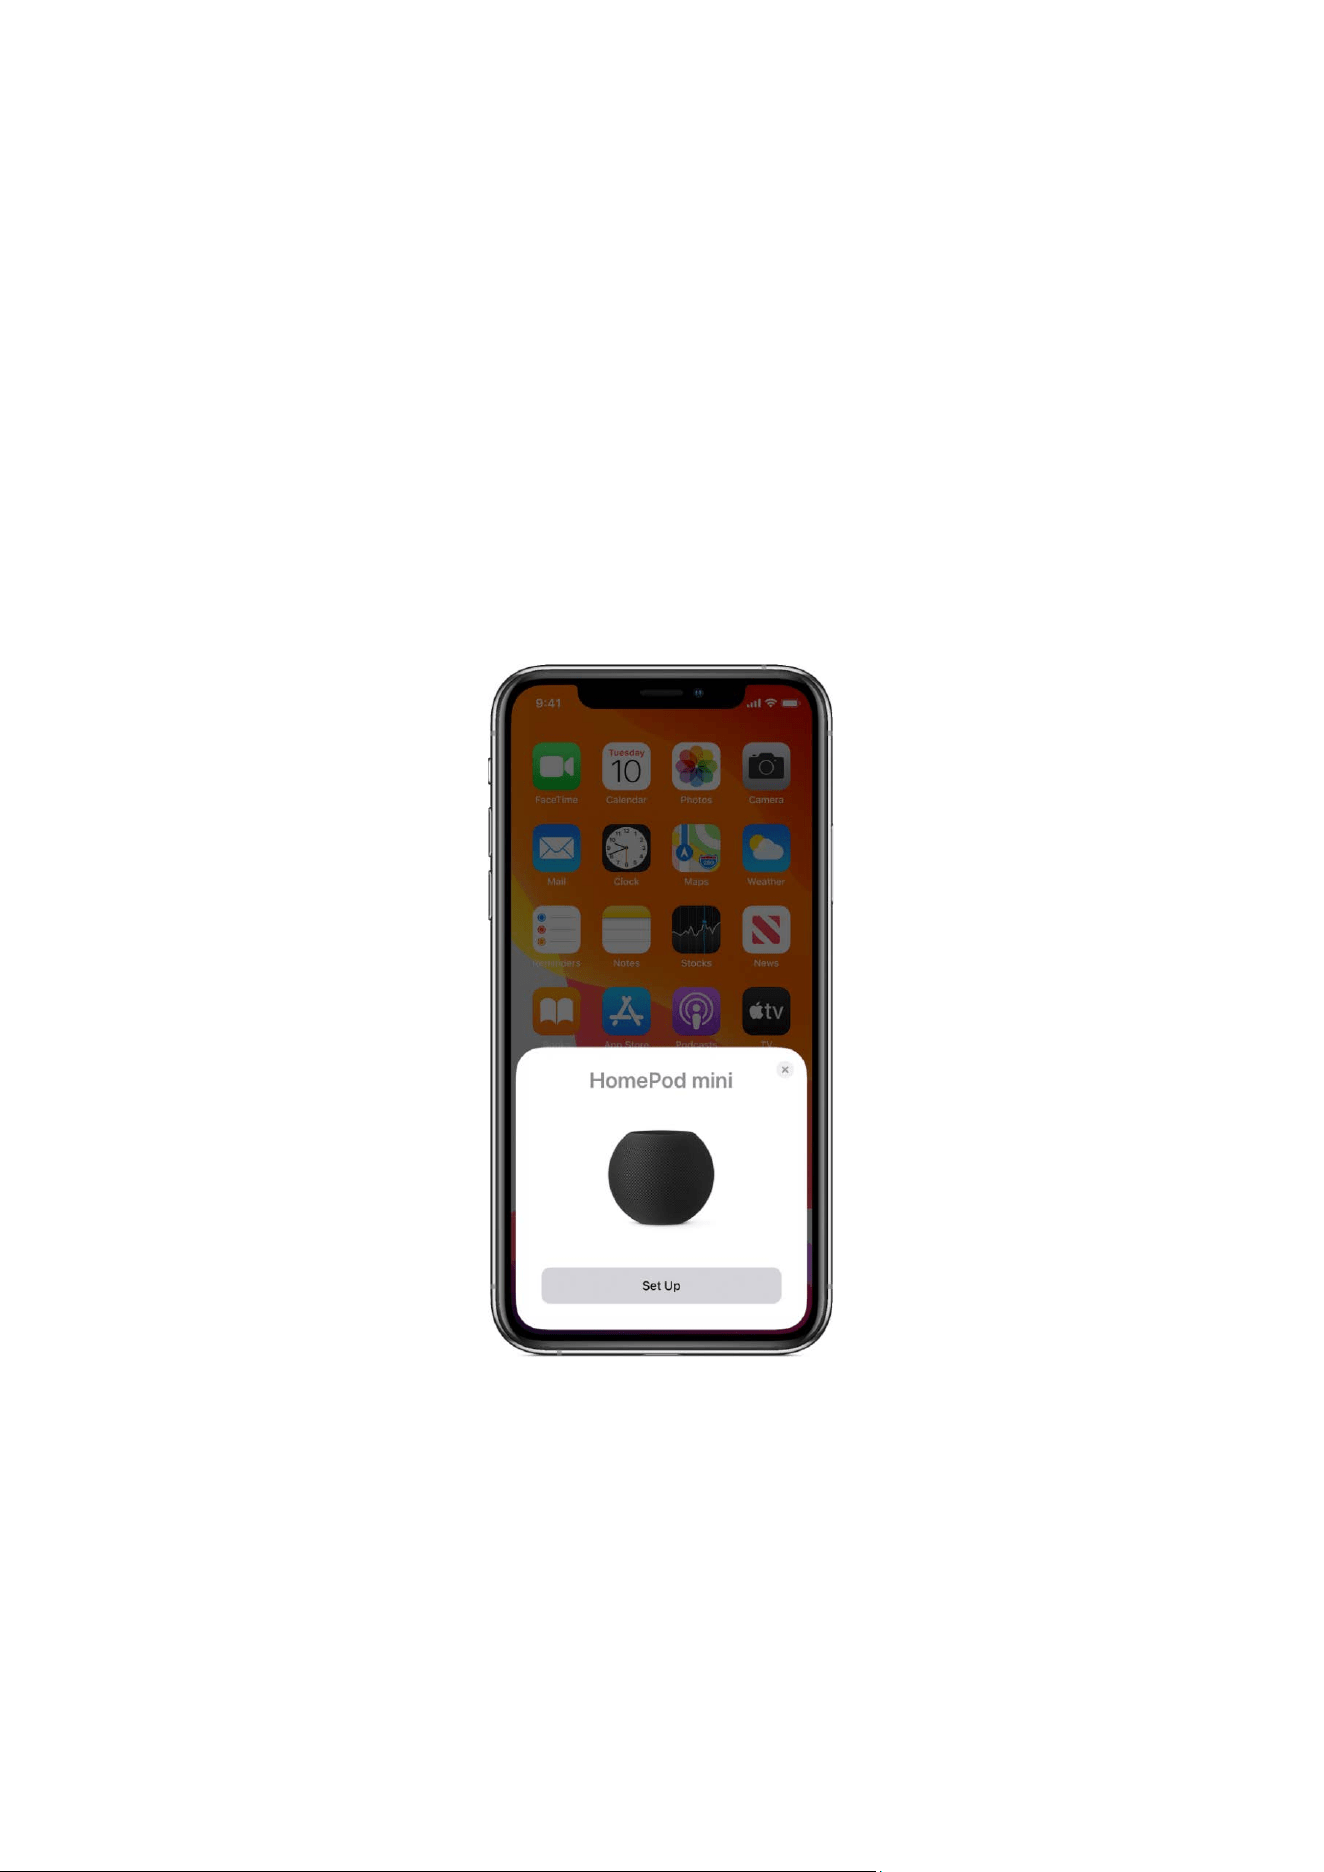
Set up HomePod for the first time
1. Plug in HomePod and wait until the light on top pulses white.
2. Hold your unlocked iOS or iPadOS device within a few inches of HomePod until the
setup screen appears.
3. Tap Set Up and follow the onscreen instructions.

4
If the setup screen doesn’t appear automatically
1. Open the Home app on your iOS or iPadOS device, then tap .
2. Tap Add Accessory, then tap “I Don’t Have a Code or Cannot Scan.”
3. Tap HomePod in the Nearby Accessories list.
4. Tap Set Up and follow the onscreen instructions.
If HomePod doesn’t appear in the Nearby Accessories list, see the Apple Support
article If you can’t set up HomePod.
Set up voice recognition
You can teach Siri to recognize different voices in your home. If you’ve invited others to
share your home (in the Home app), members of your home can request their own
music and make Personal Requests. To learn more about Personal Requests, see the
task below.
To learn how to add someone to your home, see
Allow others to control accessories in
your home in the iPhone, iPad, or iPod touch User Guide.
Note: Voice recognition is not available in all languages and regions.
To set up voice recognition on HomePod, each member of the home must do the
following on their iOS or iPadOS device:
1. Go to Settings > [user name] > Password & Security, then make sure Two-Factor
Authentication is turned on.
2. In the Home app, touch and hold a HomePod, scroll down, tap , then make
sure Listen for “Hey Siri” is turned on.
3. Tap , then follow the onscreen instructions.
If setup instructions do not appear, tap , tap Home Settings, tap a user
profile under People, then turn on Recognize My Voice.
During setup, each person is asked to enable Siri and change their device language to
match the HomePod language, if they haven’t already done so.

5
Set up Personal Requests
Personal Requests are Siri commands that use info from apps on your iOS or iPadOS
device, including Messages, Reminders, Contacts, Calendar, Notes, and other apps
you’ve installed that work with Siri.
Before you can turn on Personal Requests, you need to set up voice recognition. See the
task above.
To set up Personal Requests, do the following on your iOS or iPadOS device:
1. Connect your iOS or iPadOS device and HomePod to the same Wi-Fi network.
2. Go to Settings > Siri & Search, then turn on the following:
• Listen for “Hey Siri”
• Press Side Button for Siri (on an iPhone with Face ID), Press Top Button for
Siri (on an iPad with Face ID), or Press Home for Siri (on an iPhone, iPad, or
iPod touch with a Home button)
• Allow Siri When Locked
3. Go to Settings > [your name] > Find My, then make sure My Location is set to This
Device.
4. In the Home app, tap , then tap Home Settings.
Note: If you have more than one home, you see settings for your current home
(based on your location). To edit a different home, tap Homes, then tap the home
you want to edit.
5. Tap your name, tap Personal Requests, then turn on Personal Requests for your
HomePod.
If you don’t see Personal Requests, turn on Recognize My Voice to set up voice
recognition. Personal Requests can be turned on during setup.
6. If you want to use HomePod to access the contents of Calendar, Notes,
Reminders, voicemail, and call history, choose Never under Require
Authentication.
To learn more about what you can do with Personal Requests, see
Make Personal
Requests on HomePod.
For enhanced security and network performance you may be asked to enable two-factor
authentication for your Apple ID, or set your Wi-Fi network to use WPA/WPA2 security, if you
haven’t already done so.
During setup, the Wi-Fi settings, Siri preferences, Apple ID, Analytics preferences,
Location Services preferences, and Apple Music subscription currently configured for
your iOS or iPadOS device are copied to HomePod. You’ll also set up Siri, if you haven’t
already done so. After HomePod is up and running, you can use the Home app to
change its name, its room assignment, and other settings.

6
Set up HomePod stereo pairing
For a wider, more immersive sound stage, you can join two HomePod speakers as a stereo
pair when you initially set up HomePod
, or you can later join two speakers that you’ve
already set up using the Home app.
When two HomePod speakers are joined, only one responds to Siri requests, plays alarms,
and acts as a speakerphone.
Create a stereo pair
You can create a stereo pair with two HomePod speakers or two HomePod mini speakers.
(You can’t create a stereo pair with a HomePod and a HomePod mini.) To create a stereo
pair, both HomePod speakers need to be assigned to the same room.
1. In the Home app on your iOS or iPadOS device, touch and hold a HomePod.
2. Scroll down, then tap .
3. Tap Create Stereo Pair and follow the onscreen instructions.
View details about each paired speaker
1. In the Home app on your iOS or iPadOS device, touch and hold the HomePod pair.
2. Scroll down, then tap .
3. Tap Speakers, then touch and hold a speaker.
Switch left and right channel assignments
1. In the Home app on your iOS or iPadOS device, touch and hold the HomePod pair.
2. Scroll down, then tap .
3. Tap Audio Settings, then follow the onscreen instructions.
Unlink a stereo pair
1. In the Home app on your iOS or iPadOS device, touch and hold the HomePod pair.
2. Scroll down, then tap .
3. Tap Ungroup Accessories.

7
Use HomePod with Apple TV 4K
If you have an Apple TV 4K and HomePod (2018), you can create an immersive experience
with a single HomePod or a stereo pair
. When you set up home theater, you can enjoy Dolby
Atmos, Dolby Digital 7.1, or Dolby Digital 5.1 surround sound. HomePod mini does not
support home theater surround sound, but you can stream audio from Apple TV to
HomePod mini or a HomePod mini stereo pair using AirPlay.
Note: Home theater requires Apple TV 4K with tvOS 14.2 or later. For more information about
setting up Apple TV, see the Apple TV User Guide.
To set up home theater, you need an iPhone or iPod touch with iOS 14.2 or later, or an iPad
with iPadOS 14.2 or later. Make sure that Apple TV is assigned to the same room as
HomePod in the Home app.
Alternatively, you can set up the home theater on your Apple TV 4K with tvOS 14.2 or later
(for details, see the Apple TV User Guide
.)
1. In the Home app on your iOS or iPadOS device, touch and hold Apple TV.
2. Scroll down, then tap .
3. Tap Default Audio Output, then tap the room with your HomePod or HomePod
stereo pair.
Note: This setting routes all sound, including navigation clicks, from Apple TV to your
HomePod.
For the best surround sound, place HomePod within 10 inches (25 centimeters) of a wall and
as close to the center of your TV as possible. If you use a HomePod stereo pair, place the
speakers on either side of the TV. For optimal surround sound, the HomePod speakers
should be about 4 feet (1.2 meters) apart from each other.
Change HomePod settings
The person who set up HomePod can use the Home app on their iOS or iPadOS device to
change HomePod settings. There are individual settings for each HomePod you have, as well
as settings that apply to all of the HomePod speakers in your home.
For information about Home app settings, see the Home chapter in the
iPhone User
Guide, iPod touch User Guide, or iPad User Guide.
Change settings for a HomePod
1. In the Home app on your iOS or iPadOS device, touch and hold a HomePod.
2. Scroll down, tap , then do any of the following:
• Assign HomePod to a different room: Tap Room, then choose a new room.
• Change the default account for music and podcasts: Tap Primary User, then
choose which account should be used when someone’s voice isn’t recognized.

8
• Avoid explicit content: Turn off Allow Explicit Content to prevent HomePod from
playing songs, albums, and podcast episodes that are identified as having
explicit content.
• Keep the volume consistent: Turn on Sound Check to adjust for variances in
songs so they all play at the same volume.
• Allow access to Personal Requests: Tap Personal Requests, then turn on each
HomePod you want to use Personal Requests on. To learn how to enable Siri
commands that use info from apps on your iOS or iPadOS device, like
Messages or Calendar, see Set up Personal Requests
.
• Keep songs out of your listening history: If Apple Music is the default music
service for your HomePod, songs you play on HomePod influence how Apple
Music identifies music you like, and they’re visible to your followers on Apple
Music. To prevent this, turn off Update Listening History. This also disables
your podcast history and subscriptions until you turn the setting back on.
• Disable “Hey Siri” requests: Turn off Listen for “Hey Siri.”
• Disable summoning Siri using HomePod touch controls: Turn off Touch and Hold
for Siri.
• Disable indicator light when Siri is listening: Turn off Light When Using Siri.
• Hear a chime when Siri is listening: Turn on Sound When Using Siri.
• Change Siri’s language or voice on HomePod: Tap Language or Siri Voice, then
tap an option.
• View network information: Tap Wi-Fi Address to switch between viewing the
HomePod network identifier and the name of the Wi-Fi network it’s connected
to. HomePod automatically connects to the same Wi-Fi network as your iOS or
iPadOS device.
• Allow speaker access: For information about letting others send audio to your
HomePod, see Allow others to control audio on HomePod
.
• Turn on VoiceOver: Tap Accessibility to access settings for VoiceOver and for
Touch Accommodations. See Use HomePod touch controls
.
• Use HomePod with a doorbell: If you have a HomeKit accessory that you use for
a doorbell, tap Chime on HomePod, then choose which HomePod speakers
should chime when someone rings the doorbell. And, if you have HomeKit
Secure Video with Face Recognition turned on, HomePod will announce who’s
there.
To learn how to add someone to your home, see
Allow others to control accessories in your
home in the iPhone, iPad, or iPod touch User Guide.
Turn automatic HomePod software updates on or off
1. In the Home app on your iOS or iPadOS device, tap , then tap Home Settings.
Note: If you have more than one home, you see settings for your current home
(based on your location). To edit a different home, tap Homes, then tap the home you
want to edit.

9
2. Tap Software Update, then turn on Install Updates Automatically.
Restart HomePod
If HomePod isn’t responding normally, you can restart it. You need to be near HomePod to
restart it.
1. In the Home app on your iOS or iPadOS device, touch and hold HomePod.
2. Scroll down, then tap .
3. Do one of the following:
• For a single HomePod: Tap Reset HomePod, then tap Restart HomePod.
• For a stereo pair: Tap Restart HomePod.
HomePod privacy and security
Security and privacy are fundamental to the design of HomePod. Nothing you say is sent to
Apple servers until HomePod recognizes “Hey Siri” or until you touch and hold the top of
HomePod before a request. The light on top of HomePod indicates that HomePod has
recognized “Hey Siri.” All communication between HomePod and Apple servers is encrypted,
and anonymous IDs protect your identity. For detailed information about privacy and Siri,
see the Apple Support article Ask Siri, Dictation & Privacy
.
Turn off “Hey Siri” on HomePod
• Say “Hey Siri, stop listening.”
When “Hey Siri” is turned off, touch and hold the top of HomePod to talk to Siri. To turn “Hey
Siri” back on, see Change HomePod settings
.
Turn off Location Services on HomePod
Siri uses your HomePod location to provide local information such as traffic, weather, and
nearby businesses.
1. In the Home app on your iOS or iPadOS device, touch and hold HomePod.
2. Scroll down, then tap .
3. Turn off Location Services.
Remove HomePod before selling it or giving it away
Before you give HomePod to someone else, you should remove it from the Home app.
1. In the Home app on your iOS or iPadOS device, touch and hold HomePod.
2. Scroll down, then tap .
3. Do one of the following:
• If you’re near HomePod: Tap Reset HomePod, then tap Remove Accessory.
• If you’re not near HomePod: Tap Remove Accessory.

10
Play audio using Siri on HomePod
Everyone in your household can control HomePod simply by asking Siri. If you set up voice
recognition, Siri can recognize multiple voices so that everyone can access their own music
and play their own personalized recommendations.
Control audio
Try any of the following examples:
• Activate Siri: Say “Hey Siri,” followed by your request.
For example, say “Hey Siri, play some music.” HomePod hears you—even from across
the room or when it’s playing music.
• Adjust the volume: Say something like “Hey Siri, make it louder.” Or set a specific
volume level with “Hey Siri, set the volume to 50 percent.”
• Pause and resume playback: Say “Hey Siri, stop.” To resume, say “Hey Siri, play.”
• Set a sleep timer: Stop music, podcasts, and other audio after a certain amount of
time. Say something like “Hey Siri, stop playing in 30 minutes.”
Control multiple speakers
Try any of the following examples:
• Play in a room: Refer to the room where the HomePod is. For example, say “Hey Siri,
play music in the living room.” Play in multiple rooms by saying “Hey Siri, play this in
the living room and kitchen.”
• Move audio to a room: To stop playing on a speaker and start playing on another, say
something like “Hey Siri, move this to the bedroom.”
• Add a room: To add a room when audio is already playing, say “Hey Siri, add the
kitchen” or “Hey Siri, play music from the kitchen here.”
Other things you can say:
• “Hey Siri, play everywhere.”
• “Hey Siri, stop playing in the office and game room.”
• “Hey Siri, what’s playing downstairs?”
• “Hey Siri, set the upstairs volume to 20 percent.”
Play Apple Music or other music services
Apple Music requires a subscription. To learn how to subscribe, see Subscribe to Apple
Music in the iPhone, iPad, or iPod touch User Guide.
To add a music service to your HomePod, see the task below. Once a music service is added
to your HomePod, try the examples below, and specify which app to use. For example, say
something like “Hey Siri, play The 1975 on Pandora.” Or, to learn how to use a music app by
default, see Set a default music service on HomePod, below. Some music services require a
subscription.
Note: Some requests may not work with all music apps.

11
Try any of the following examples:
• Hear something you’ll like: Say “Hey Siri, play some music.” If you like what you hear,
say “Hey Siri, I like this” to help the music service learn what you like. (You can also
say “Hey Siri, I don’t like this music.”)
• Ask for something specific: Got some music in mind? Just ask. Say, for example, “Hey
Siri, play Tame Impala’s newest album.”
• Say what to hear next: Say, for example, “Hey Siri, play ‘Complexities’ next.”
• Hear a different version: To hear the same song as recorded by a different artist, if one
is available, say “Hey Siri, play the other version.”
• Go to the next or previous track: Say “Hey Siri, next song” or “Hey Siri, previous track.”
• Listen by genre, mood, or decade: Ask for a specific genre of music, such as Latin jazz, or
ask for the vibe you want. For example, say “Hey Siri, play some party music,” or get
even more specific with “Hey Siri, play hip-hop from the 1990s.” Or let Siri decide
what’s next with “Hey Siri, play something totally different.”
• Play a broadcast radio station: Say “Hey Siri, play Classic FM.”
• Find a song by its lyrics: If you don’t know the name of a song, you can say something
like “Hey Siri, what’s the song that goes ‘I travel the world and the seven seas?’”
• Note: Lyric search is not available in all languages.
• Listen to Apple Music radio: Explore new music and listen to exclusive interviews on
stations created by experts. Say “Hey Siri, play Apple Music 1 radio,” or ask for Apple
Music Country or Apple Music Hits.
• Learn about the music: Try saying “Hey Siri, tell me about this artist” or “Hey Siri, what
album is this?” You can also say “Hey Siri, when was this song released?” For bands,
you can ask who’s playing a certain instrument. For many popular songs, you can ask
about the writer and producer.
Add a music service to HomePod
You can play music from other supported music apps on HomePod. Some music services
require a subscription.
Note: Not all music services are supported on HomePod.
1. On your iOS or iPadOS device, sign in to the supported music service app.
2. In the music service app, go to settings, then add the music service to your HomePod.
3. In the Home app, tap , then tap Home Settings.
Note: If you have more than one home, you see settings for your current home
(based on your location). To edit a different home, tap Homes, then tap the home you
want to edit.
4. Tap your user profile under People.
5. Under Media, tap the music service.
6. If you want to update and personalize your profile based on what you listen to on the
HomePod, turn on Update Listening History.

12
If you don’t want to use a music service with HomePod, you can remove it. In the Home app,
tap , tap Home Settings, then tap your user profile. Tap the music service, then tap
Remove from Home.
Set a default music service on HomePod
You can set a default music service on HomePod so that you don’t have to say the name of
the service (Pandora, for example) when you ask Siri to play something. You can still play
music from other supported services that you add to HomePod, too, by saying the name of
the service when you make your Siri request.
To add a music service to HomePod, see the task above.
Note: Not all music services are supported on HomePod.
1. In the Home app, tap , then tap Home Settings.
Note: If you have more than one home, you see settings for your current home
(based on your location). To edit a different home, tap Homes, then tap the home you
want to edit.
2. Tap your user profile under People.
3. Under Media, tap Default Service.
4. Tap the music service you want to set as your default service.
You can also change which user account should be used when someone’s voice isn’t
recognized. In the Home app on your iOS or iPadOS device, touch and hold a HomePod,
scroll down, tap , then tap Primary User.
Play Apple Podcasts
Try any of the following examples:
• Listen to a podcast: Say, for example, “Hey Siri, play the latest ‘BrainStuff’ podcast.” Or
say “Hey Siri, continue playing ‘The Daily’ podcast.”
• Skip ahead or back: Say, for example, “Hey Siri, skip forward 30 seconds” or “Hey Siri,
go back 10 seconds.”
• Subscribe to a podcast: Say “Hey Siri, subscribe to this podcast” to add it to your library.
When new episodes are available, they appear in Listen Now in the Podcasts app on
your devices.
• Play faster or slower: To listen to news and podcasts at a pace you’re most comfortable
with, say “Hey Siri, play this faster” or “Hey Siri, play this slower.” Or say “Hey Siri, play
at normal speed.”
Get news
Note: Apple News is not available in all languages and regions.
Try any of the following examples:

13
• Hear the latest headlines: Say “Hey Siri, what’s the news today?” to hear what’s going on
in the world. Siri suggests other news sources, and you can switch to one at any time.
Say something like “Hey Siri, switch to CNN instead.”
• Get specific news: Say, for example, “Hey Siri, give me the latest sports news.”
Play Ambient Sounds
You can play background soundscapes when you need to focus, relax, or fall asleep. Listen to
rain, forest, ocean, white noise, night, fireplace, or stream sounds.
• Say, for example, “Hey Siri, play Ambient Sounds” or “Hey Siri, play forest sounds.”
Play audio on HomePod using an iOS or iPadOS device
You can quickly hand off audio from your iOS device to your HomePod. HomePod can also
play audio sent from an iOS or iPadOS device, Apple TV, or Mac using AirPlay 2.
For details about using the Music app, the Podcasts app, and Control Center, see the
iPhone
User Guide, iPod touch User Guide, or iPad User Guide.
Hand off audio to HomePod
You and members of your home can transfer audio from your iPhone or iPod touch to your
HomePod to keep playing from where you left off.
To change who can hand off audio to HomePod, see “Allow others to control audio on
HomePod,” below.
Note: To hand off audio, your device must have Bluetooth turned on and be on the same Wi-
Fi network as HomePod.
14
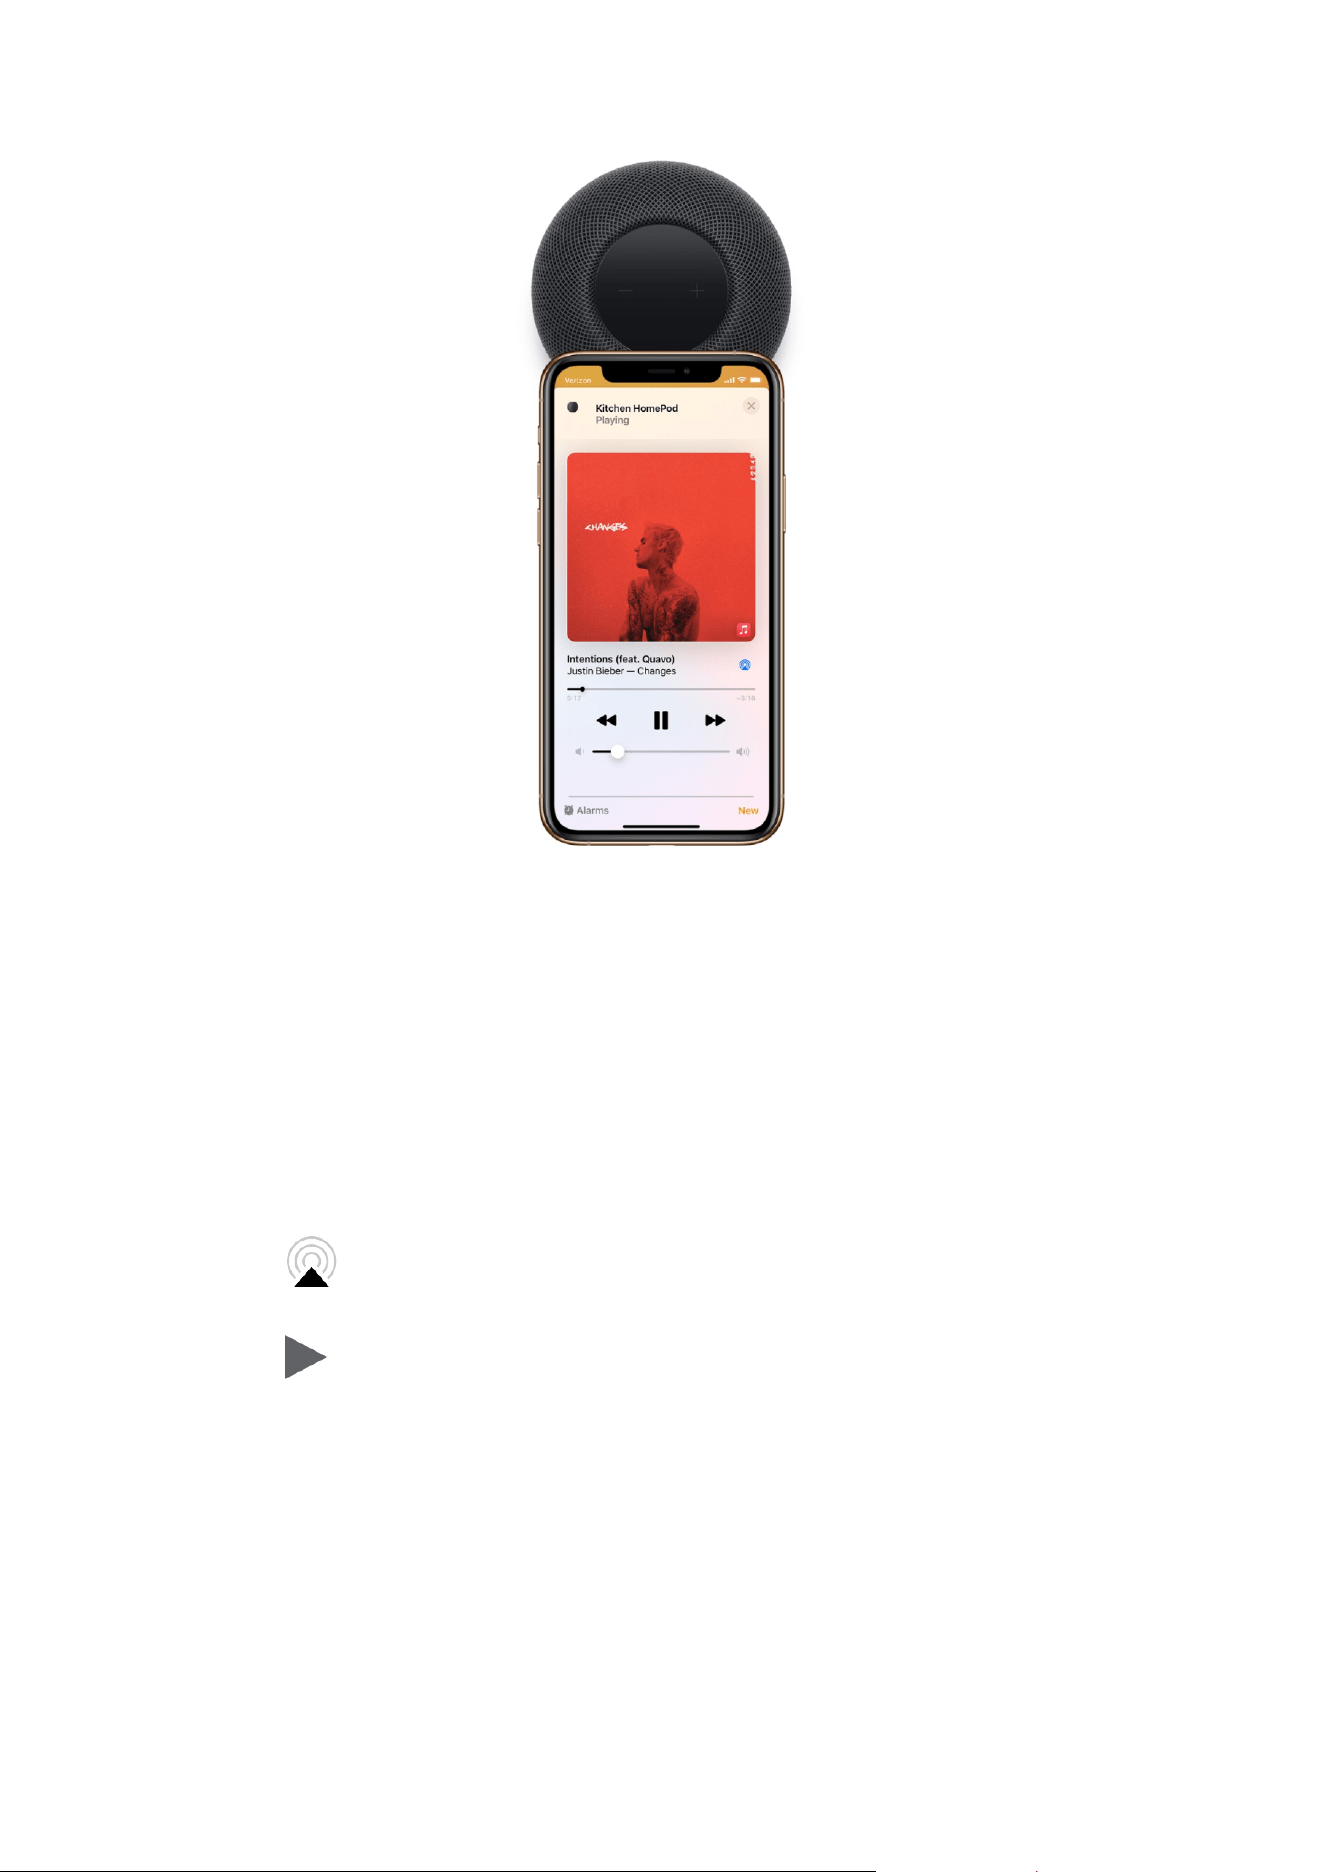
1. On your iPhone or iPod touch, go to Settings > General > AirPlay & Handoff, then
make sure Transfer to HomePod is turned on.
2. Hold your iPhone or iPod touch near the top of HomePod.
To move audio from HomePod to your iOS device, hold your iPhone or iPod touch near the
top of HomePod. On iPhone 11 and iPhone 12 models, hold your iPhone near the top of
HomePod, then tap Transfer to iPhone.
Control HomePod from Apple Music or Apple Podcasts
1. Open the Music or Podcasts app on your iOS or iPadOS device, then tap the playback
controls.
2. Tap , then select your HomePod.
3. To return to the playback screen, tap outside of the AirPlay options.
4. Tap to play the current item, or swipe down from the top of the screen, then
select a different item to play.
5. To add an item to the Playing Next queue on HomePod, touch and hold the item,
then tap either Play Next or Play Last.
Play audio on a HomePod using Control Center
1. To open Control Center on your iOS or iPadOS device, do one of the following:
• On an iPhone with Face ID or on an iPad: Swipe down from the top-right edge.
• On an iPhone or iPod touch with a Home button: Swipe up from the bottom.
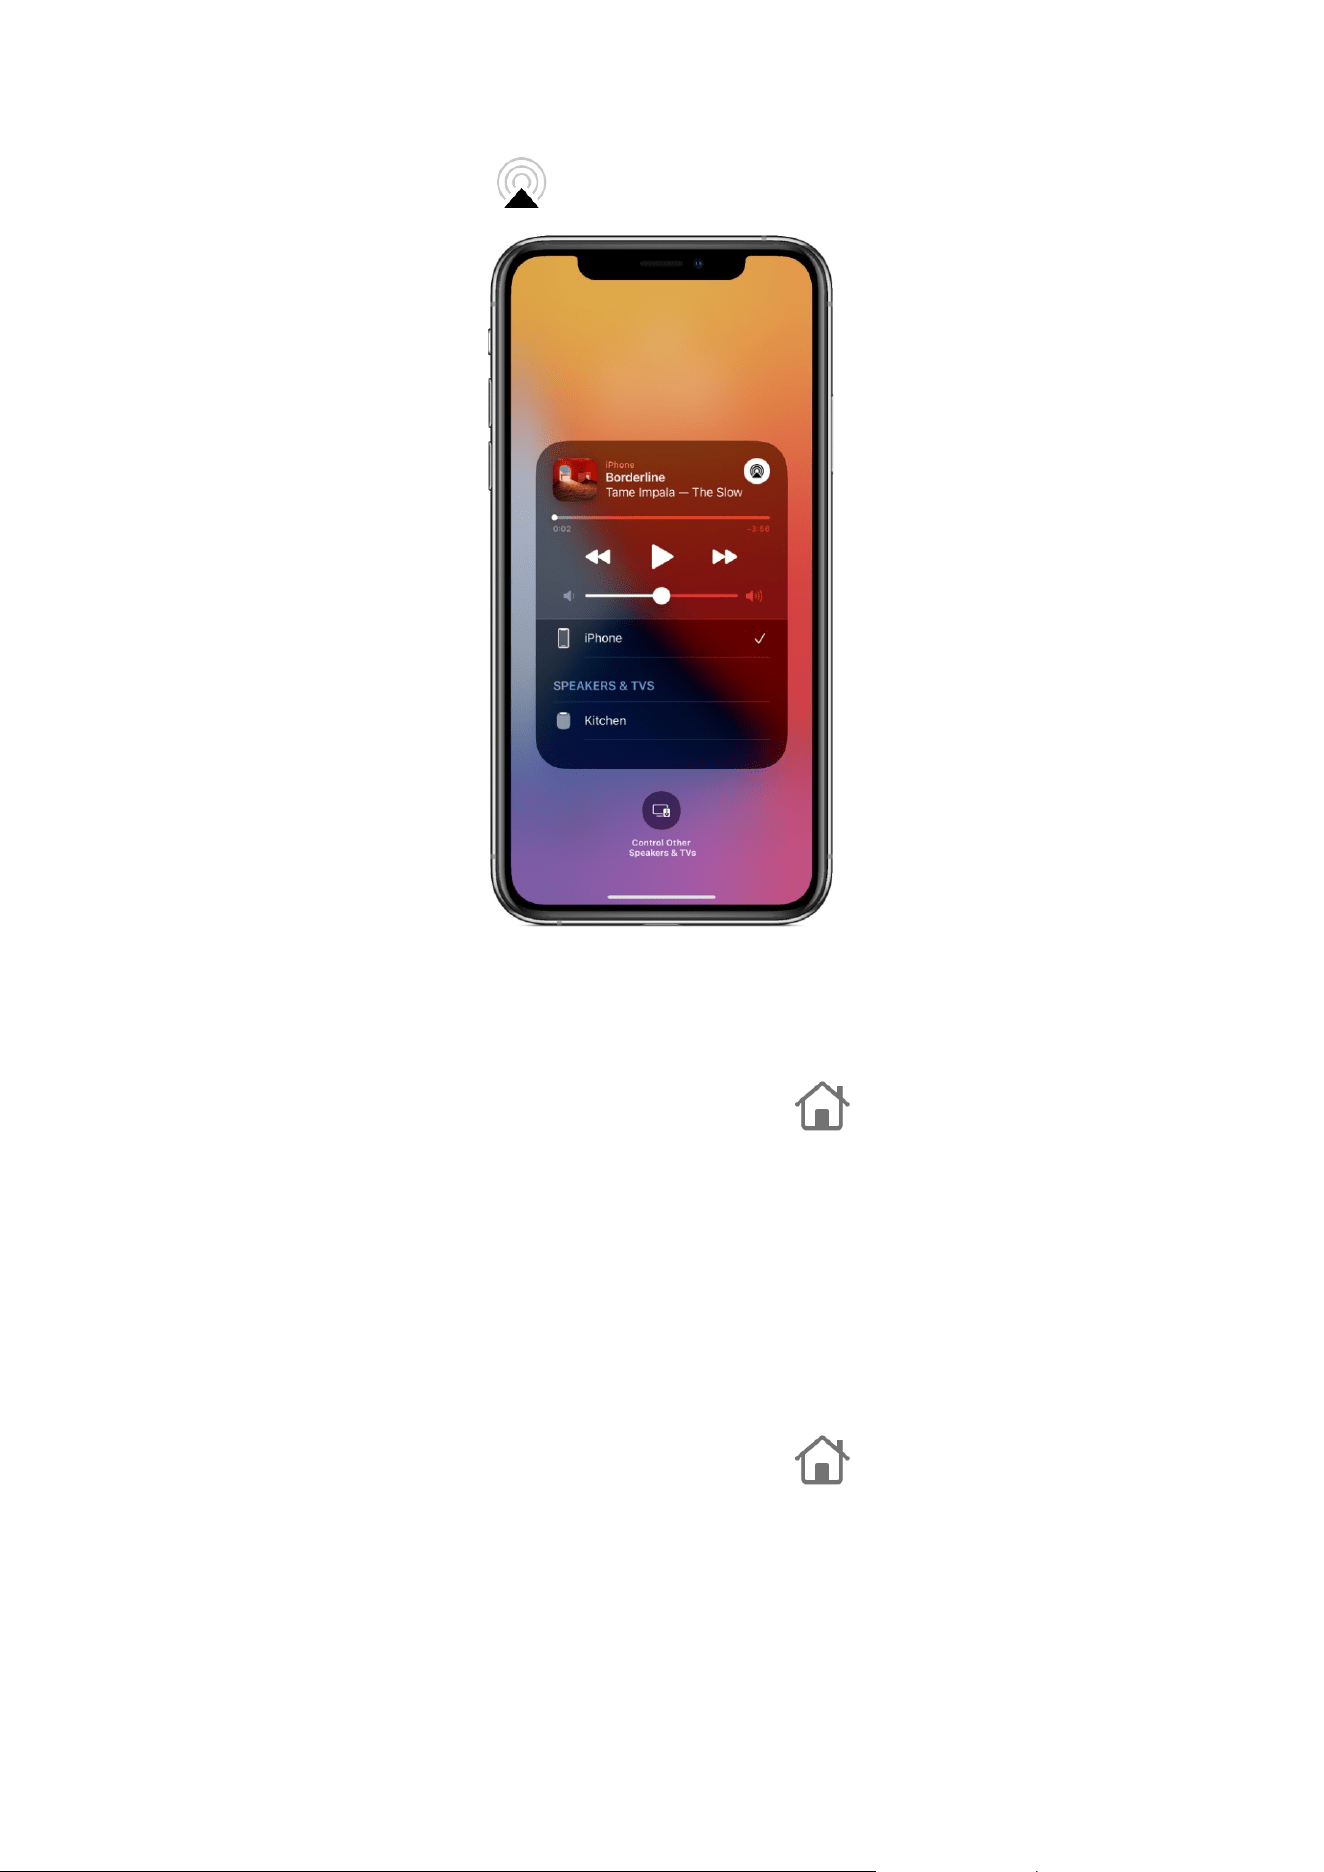
15
2. Tap the audio card, tap , then select one or more HomePod speakers.
To play audio from other devices that support AirPlay 2, see the documentation for that
device for details about selecting an audio destination.
Require a password to play audio on HomePod
1. In the Home app on your iOS or iPadOS device, tap , then tap Home Settings.
Note: If you have more than one home, you see settings for your current home
(based on your location). To edit a different home, tap Homes, then tap the home you
want to edit.
2. Tap Allow Speaker & TV Access.
3. Turn on Require Password.
If you have more than one HomePod, this setting applies to all of them.
Allow others to control audio on HomePod
1. In the Home app on your iOS or iPadOS device, tap , then tap Home Settings.
Note: If you have more than one home, you see settings for your current home
(based on your location). To edit a different home, tap Homes, then tap the home you
want to edit.
2. Tap Allow Speaker & TV Access and choose one of the following options:
• Everyone: Gives access to everyone nearby.

16
• Anyone On the Same Network: Gives access to those connected to your Wi-Fi
network.
• Only People Sharing This Home: Gives access to those you’ve invited to share
your home (in the Home app) and who are connected to your Wi-Fi network.
The setting you choose also controls who can add to the Playing Next queue for HomePod in
the Music app and Podcasts app, and who can hand off audio to HomePod. If you have more
than one HomePod, the option you choose applies to all of them.
Members of your home can access their own music from your HomePod. To learn more,
see Set up Personal Requests
.
Use HomePod touch controls
You can also control HomePod by touching the top of it.
Do any of the following:
• Activate Siri: Touch and hold the top of HomePod. When you activate Siri this way,
there’s no need to say “Hey Siri”—just say your command.
• Adjust the volume during playback: Tap, or touch and hold, the + or – on the top of
HomePod.
• Pause and resume playback: Tap the top of HomePod to pause playback. Tap again to
resume.
• Go to the next track: Double-tap the top of HomePod to skip the song that’s currently
playing.
• Go to the previous track: Triple-tap the top of HomePod. This control works only when
you’re listening to a playlist or an album.
• Dismiss an alarm: Tap anywhere on the top of HomePod.
• Use touch controls with VoiceOver: As with iOS and iPadOS devices, the controls require
an extra tap when VoiceOver is turned on. For example, tap twice to pause playback.
To turn VoiceOver on or off, see Change HomePod settings
.
Ask Siri for information
Siri on HomePod is great at answering questions about the things you want to know. Siri can
help you:
Get answers to general questions
• “Hey Siri, who was the 13th president of the United States?”
• “Hey Siri, what does a cello sound like?”
• “Hey Siri, what’s the tallest mountain in Germany?”
• “Hey Siri, what does ‘happenstance’ mean?”
• “Hey Siri, how many calories are in a potato?”

17
With some questions, Siri will send the answer right to your iOS or iPadOS device. For
example, say “Hey Siri, how do I cut a mango?” This is especially helpful when the answer is
long or visual.
Get location and traffic information
• “Hey Siri, where’s the nearest coffee shop?”
• “Hey Siri, how long will it take me to drive to Milwaukee?”
• “Hey Siri, what time does The Meatball Shop close?”
When you ask about a place on HomePod, that place appears as a Siri Suggestion in Maps on
your iPhone or iPad. To quickly get directions, open Maps, then tap the location under Siri
Suggestions.
Get weather information
• “Hey Siri, what’s the weather going to be like today?”
• “Hey Siri, when is sunrise in Paris?”
• “Hey Siri, what will the weather be like in Yosemite this weekend?”
• “Hey Siri, will it snow in Denver today?”
Get unit conversions and math solutions
• “Hey Siri, what’s 38 percent of 299?”
• “Hey Siri, how many cups are in a quart?”
• “Hey Siri, what’s 50 dollars in euros?”
Get sports information
• “Hey Siri, what was the score the last time the Twins played the Brewers?”
• “Hey Siri, who has scored the most goals in Spanish soccer?”
Get stock information
• “Hey Siri, what’s the market capitalization of Apple?”
• “Hey Siri, how is the stock market doing today?”
• “Hey Siri, where’s the NASDAQ today?”
Translate words and phrases
Siri can translate from English into Arabic, Brazilian Portuguese, French, German, Italian,
Japanese, Mandarin Chinese, Russian, and Spanish.
• “Hey Siri, translate ‘this is delicious’ into Chinese.”
• “Hey Siri, how do you say ‘I love you’ in French?”
For more about what you can do with Siri on HomePod, just ask Siri. Say “Hey Siri, what can
you do?” Also, check out the Tips app on the iOS or iPadOS device you used to set up
HomePod.

18
Make Personal Requests on HomePod
Personal Requests are Siri commands that use info from apps on your iOS or iPadOS device,
including Messages, Reminders, Contacts, Calendar, Notes, and from other apps you’ve
installed that work with Siri.
To learn how to set up Personal Requests, see Set up Personal Requests
.
Make Personal Requests on HomePod
Try any of the following examples:
• Hear about your day: Say “Hey Siri, what’s my update?” Siri will tell you about your
weather, news, reminders, calendar events, and more.
• Send a message: Say “Hey Siri, send a message to Anuj saying that I’ll bring the vacuum
cleaner with me.” If the recipient replies within a few minutes, you’ll hear a chime.
• To send a message with a different messaging app, say something like “Hey Siri, send
a WhatsApp message to Fabiano.”
• Read messages: Say “Hey Siri, read my unread messages” or “Hey Siri, read my
messages from Kim.”
• Work with Reminders: Say “Hey Siri, remind me to buy garlic.” You can also refer to
places that are in Contacts on your iOS or iPadOS device. For example, say “Hey Siri,
remind me to call Mom on Tuesday.” You can ask about items in Reminders too.
Say “Hey Siri, what’s on my shopping list?” To check off a reminder, say “Hey Siri, mark
‘water the plants’ as complete.”
• Work with Notes: Say things like “Hey Siri, add a note called ‘birthday presents’” or “Hey
Siri, add Twain to my ‘favorite authors’ note.”
• Work with Calendar: Say “Hey Siri, what’s on my calendar for today?” You can also say
things like “Hey Siri, when is my meal with Edwina?”; “Hey Siri, what time is my first
meeting tomorrow?”; and “Hey Siri, add an appointment to my calendar on Monday
at 9 a.m. called ‘marketing presentation.’”
Find your devices
You can ask HomePod to find iOS, iPadOS, watchOS, and macOS devices that are connected
to the same network as HomePod. If you have Family Sharing set up, you can also find
devices for your family.
Say something like:
• “Hey Siri, where is my iPhone?”
• “Hey Siri, ping my iPad.”
• “Hey Siri, find Lisa’s watch.”

19
Control your home with Siri on HomePod
HomePod automatically acts as a home hub, letting you control HomeKit accessories such as
lights, thermostats, and window shades with your voice. Set up these accessories in the
Home app on your iOS or iPadOS device and they automatically work with HomePod. (For
details about using the Home app, see the Home chapter in the iPhone User Guide,
iPod
touch User Guide, or iPad User Guide). Using the Home app, you can also control your
home’s accessories when you’re away and trigger accessories based on time of day, your
location, or the action of another accessory, such as a sensor.
The spoken commands that work with HomePod depend on which smart home accessories
you’ve set up. For more information about HomeKit and available accessories, see the
Home
app webpage.
Control accessories using HomePod
• Control a single accessory: Say a command using the name you gave the accessory in
the Home app. For example, say “Hey Siri, turn on the porch light.”
• Check accessory status: Say something like “Hey Siri, is the porch light on?”
• Control accessories in a room: Say, for example, “Hey Siri, turn off the lights in here” to
control the accessories that are in the same room as HomePod. Say something
like “Hey Siri, turn off the lights in the bedroom” to specify another location.
• Check the status of a security accessory: You can use HomePod to lock or check the
status of door locks and other HomeKit security accessories. Say something like “Hey
Siri, is the front door locked?” To unlock security accessories, you must use your iOS
or iPadOS device because unlocking requires authentication using Face ID, Touch ID,
or a passcode.
• Activate a scene: Set up scenes in the Home app to control a number of accessories all
at once. After a scene is defined, refer to it by name. For example, say “Hey Siri, good
night” to run a scene named “good night” that turns off your lights, sets the
thermostat, and draws the window shades.
To allow others to control HomePod using the Home app on their own devices, invite them
to share your home, which you do in the Home app on your iOS or iPadOS device. For
details, see Allow others to control accessories in your home
in the iPhone, iPad, or iPod
touch User Guide.
Use HomePod for phone calls
HomePod uses your iOS or iPadOS device to place and receive telephone and FaceTime
audio calls. (iPhone is required for telephone calls.) To use these features, you need to set up
your iOS or iPadOS device to make Personal Requests on HomePod
.
The light on top of HomePod turns green when HomePod is being used a speakerphone.
Use the controls on top of HomePod to change the speakerphone volume.

20
Important: If you call emergency services (“Hey Siri, call 911” or “Hey Siri, call emergency
services”), HomePod attempts to place a telephone call using the iPhone you’ve set up to
make Personal Requests on HomePod. If that iPhone isn’t available, or if your device for
Personal Requests is an iPad or iPod touch, HomePod attempts to hand off the call to any
other iPhone on the same network as HomePod. See Make emergency calls
in the iPhone
User Guide for additional information about calling emergency services using iPhone.
Use HomePod for phone calls
Try any of the following examples:
• Place a call: Say, for example, “Hey Siri, call Henri.” To place a FaceTime audio call
instead, say “Hey Siri, FaceTime Henri.” To call someone not in your Contacts, say “Hey
Siri, call 4089961010.”
• Redial the last number: Say “Hey Siri, redial the last number.”
• Answer a call: When your iOS or iPadOS device rings, say “Hey Siri, answer the
phone.” Before answering, you can ask “Hey Siri, who’s calling?”
• End a call: Tap the top of HomePod, hang up using your iOS or iPadOS device, or
say “Hey Siri, hang up.” (Other Siri requests aren’t supported during phone calls.)
Route the audio of an existing call through HomePod
Do either of the following:
• On your iOS or iPadOS device, tap Audio in the Phone or FaceTime app, then choose
your HomePod.
• Hold your iPhone near the top of HomePod.
To hand off audio, your device must have Bluetooth turned on and be on the same Wi-Fi
network as HomePod. You must also turn on Transfer to HomePod in Settings > General >
AirPlay & Handoff.
21
To change who can hand off phone calls to HomePod, see
Allow others to control audio on
HomePod.
Manage multiple calls on HomePod
1. Tap the top of HomePod to put the current call on hold and answer the new one.
2. Double-tap the top of HomePod to switch between calls.
Use HomePod as an Intercom
To keep everyone on the same page, you can send an Intercom message to all members of
your home. For example, say “Hey Siri, intercom ‘Time for dinner!’” to bring them all to the
table. You can also send Intercom messages to specific rooms or zones.
Note: To use Intercom, your iOS device needs iOS 14.2 or later, your iPadOS device needs
iPadOS 14.2 or later, or your Apple Watch needs watchOS 7.1 or later.
Send an Intercom message
When you send an Intercom message, a recording of your voice is sent to all the HomePod
speakers in your home, and to the iOS, iPadOS, and watchOS devices of all members of your
home. By default, all members of your home receive Intercom notifications on their devices
while they’re at home.
Try any of the following examples using HomePod, your iOS or iPadOS device, your
Apple Watch, or CarPlay:

22
• “Hey Siri, intercom ‘Who ate the last cookie?’”
• “Hey Siri, announce ‘I’m home!’”
• “Hey Siri, ask everyone ‘Where are my glasses?’”
• “Hey Siri, let everyone know ‘I found my glasses.’”
• “Hey Siri, tell everyone ‘I’m taking the dog for a walk.’”
• “Hey Siri, intercom ‘On my way home, want me to pick anything up?’”
To send a message to a HomePod in a specific room or zone, say something like “Hey Siri, tell
the office ‘The movie is starting’” or “Hey Siri, announce upstairs ‘I’m going to the store.’”
Reply to an Intercom message
After you play an Intercom message or hear a message on HomePod, you can reply back. If
the message was shared with the whole home, your reply is sent back to all the HomePod
speakers in your home, and to the iOS, iPadOS, and watchOS devices of all members of your
home. If the message was sent to your specific room, your reply is sent only to the HomePod
or device that sent the original message.
Try any of the following examples using HomePod, your iOS or iPadOS device, your
Apple Watch, or CarPlay:
• “Hey Siri, reply ‘I’ll be right there.’”
• “Hey Siri, announce back ‘Just finishing my homework.’”
Turn off or limit Intercom notifications
By default, all members of your home receive Intercom notifications on their devices while
they’re at home. You can turn off Intercom notifications for your iOS, iPadOS, and watchOS
devices; choose to get them only while you’re at home; or choose to always get them.
Note: To receive Intercom notifications on your device, you need to turn on Location Services.
Go to Settings > Privacy > Location Services.
1. In the Home app, tap , then tap Home Settings.
Note: If you have more than one home, you see settings for your current home
(based on your location). To edit a different home, tap Homes, then tap the home you
want to edit.
2. Tap Intercom.
3. Do any of the following:
• Turn off notifications: Tap Never.
• Get notifications only while you’re at home: Tap When I’m Home.
• Always get notifications: Tap Anywhere.

23
Disable Intercom
You can disable Intercom on some or all of your HomePod speakers, or disable it for
individual members of your home.
1. In the Home app, tap , then tap Home Settings.
Note: If you have more than one home, you see settings for your current home
(based on your location). To edit a different home, tap Homes, then tap the home you
want to edit.
2. Tap Intercom.
3. Do either of the following:
• Disable Intercom for a HomePod: Under HomePod, turn off a HomePod.
• Disable Intercom for a member of your home: Under People, turn off the member of
your home who should not send or receive Intercom messages on their iOS,
iPadOS, and watchOS devices.
Use alarms, clocks, and timers
HomePod can wake you up to your favorite song, keep track of multiple timers, and more.
Set an alarm
Say something like:
• “Hey Siri, wake me up at 5 a.m.”
Snooze an extra few minutes
When your alarm sounds, say:
• “Hey Siri, snooze.”
Change your alarm sound
If you have Apple Music, you can choose a song, playlist, or radio station to wake you up.
1. In the Home app on your iOS or iPadOS device, touch and hold a HomePod.
2. Tap an alarm, or tap New to create an alarm.
3. Tap Play Media, then tap Choose Media.
4. Navigate to a song, playlist, or radio station, then tap it.
5. To have the song or playlist repeat once it ends, turn on Repeat.
6. To have a playlist play in a random order, turn on Shuffle.
7. To set a custom volume for the alarm, tap Use Custom Volume, then drag the slider.
8. Tap Done.
To learn how to subscribe, see Subscribe to Apple Music
in the iPhone, iPad, or iPod touch
User Guide.

24
Ask about the time
You can ask Siri for the time around the world. Say something like:
• “Hey Siri, what time is it in Stockholm?”
Set a timer
You can set multiple timers at once. Try any of the following examples:
• “Hey Siri, set a 3-minute timer.”
• “Hey Siri, set a pasta timer for 8 minutes.”
• “Hey Siri, how much time is left for the pasta timer?”
• “Hey Siri, pause my exercise timer.” (Timers are deleted after 48 hours.)
• “Hey Siri, what timers do I have running?”
• “Hey Siri, resume my exercise timer.”
• “Hey Siri, stop.”
You can stop alarms and timers using Siri on any HomePod, your iOS or iPadOS device, or
the iOS or iPadOS device of a member of your home. (Devices need to be on the same Wi-Fi
network.)
To learn how to set a sleep timer for music and podcasts, see Control audio
.
© 2021 Alza.cz