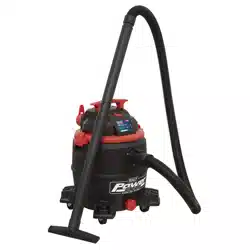
Vacuum Cleaner Industrial Wet & Dry 77ltr
Stainless 2400W Swivel Drum
Model no: PC477, PC477AK1
Thank you for purchasing a Sealey product. Manufactured to a high standard, this product will, if used according to these
instructions, and properly maintained, give you years of trouble free performance.
IMPORTANT: PLEASE READ THESE INSTRUCTIONS CAREFULLY. NOTE THE SAFE OPERATIONAL REQUIREMENTS, WARNINGS & CAUTIONS. USE
THE PRODUCT CORRECTLY AND WITH CARE FOR THE PURPOSE FOR WHICH IT IS INTENDED. FAILURE TO DO SO MAY CAUSE DAMAGE AND/OR
PERSONAL INJURY AND WILL INVALIDATE THE WARRANTY. KEEP THESE INSTRUCTIONS SAFE FOR FUTURE USE.
1. SAfeTy
1.1. eLeCTRICAL SAfeTy
WARNING! It is the responsibility of the owner and the operator to read, understand and comply with the following:
You must check all electrical products, before use, to ensure that they are safe. You must inspect power cables, plugs, sockets
and any other connectors for wear or damage. You must ensure that the risk of electric shock is minimised by the installation of
appropriate safety devices. A Residual Current Circuit Breaker (RCCB) should be incorporated in the main distribution board. You
must also read and understand the following instructions concerning electrical safety.
9 ensure that cables are always protected against short circuit and overload.
9 Regularly inspect power supply cables and plugs for wear or damage and check all connections
to ensure that none are loose.
9 ensure that the voltage marked on the appliance matches the power supply to be
usedandthattheplugisttedwiththecorrectfuse-seefuseratingatright.
8 DO NOT use worn or damaged cables, plugs or connectors. Have any faulty item repaired or
replaced immediately by a competent electrician.
9 It is recommended that this heater is wired directly to a fused isolator switch. If, however, a plug
istted,thefollowingapplies:
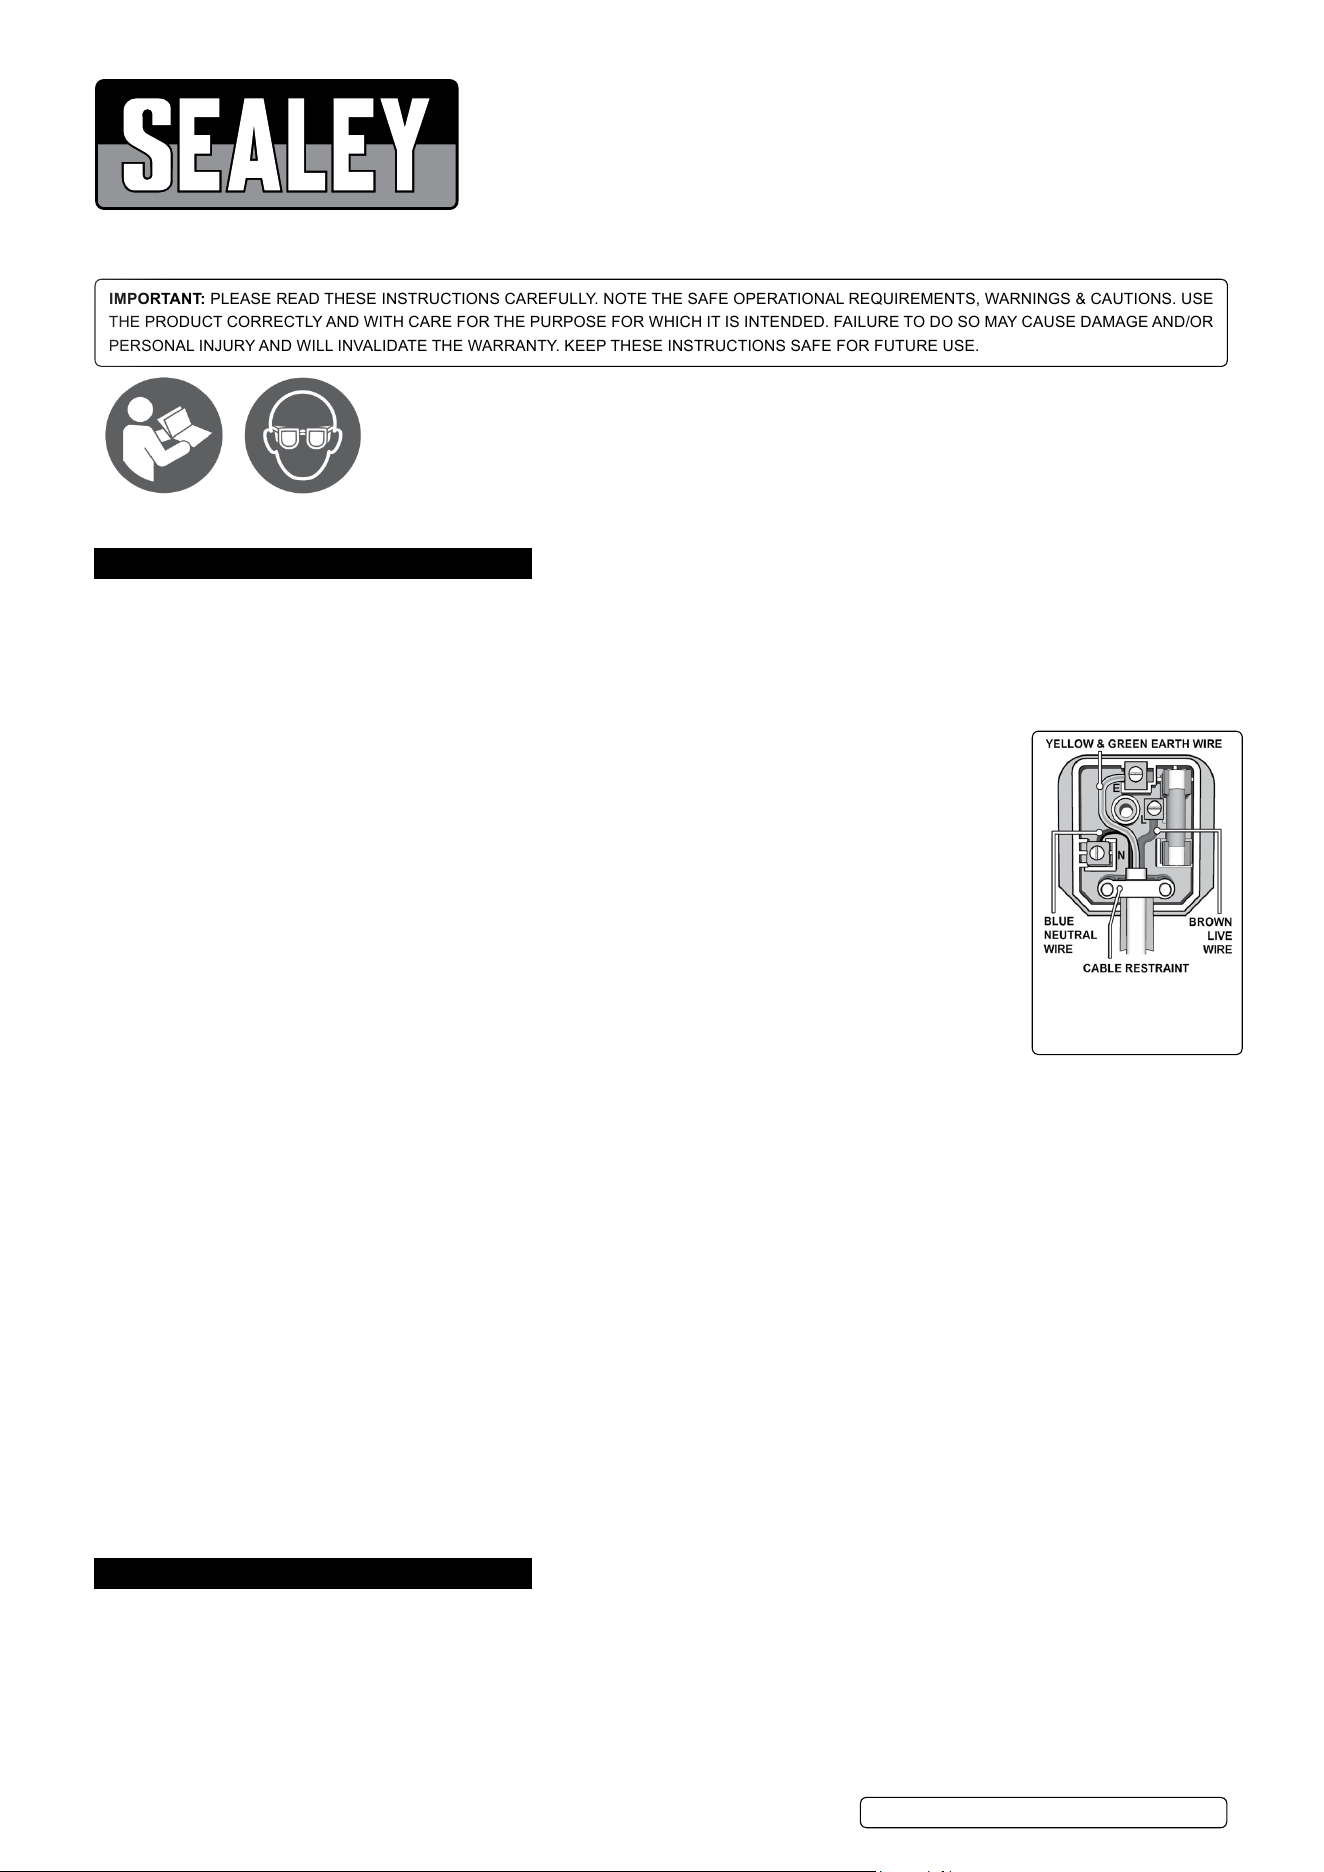
9 Fit a new plug according to the following instructions (UK only).
a) Connect the GReen/YelloW earth wire to the earth terminal ‘e’.
b) Connect the BRoWn live wire to the live terminal ‘l’.
c) Connect the BlUe neutral wire to the neutral terminal ‘n’.
d) After wiring, check that there are no bare wires, that all wires have been correctly connected,
that the cable restraint is tight.
1.2. GeNeRAL SAfeTy
9 disconnect the cleaner from the power supply before servicing, changing accessories, or performing any maintenance.
9 Use only genuine parts and accessories. Unauthorised parts and accessories may be dangerous and will invalidate your warranty.
9 Maintain the cleaner in good condition. Use an authorised agent for servicing. Keep machine clean, but DO NOT use solvents.
8 DO NOT operate the unit without a filter in place as this will cause machine faults and will invalidate your warranty.
9 Use only the paper cartridge filter specified for dry vacuuming.
9 Use only the cloth filter specified for wet vacuuming.
9 Wear protective clothing and gloves.
8 DO NOT allow children or untrained persons to operate the cleaner.
8 DO NOT place attachments close to your face (especially eyes, ears).
8 DO NOT point the hose end at other persons or animals.
▲ DANGeR! DO NOT vacuum very fine powders,hot or glowing ash, inflammable, explosive, corrosive or other dangerous substances.
8 DO NOT leave the machine running unattended, turn power supply oFF.
8 DO NOT leave the vicinity until motor has come to a complete stop.
8 DO NOT operate the cleaner when you are tired or under the influence of alcohol, drugs or intoxicating medication.
8 DO NOT use the cleaner in the rain or in very damp conditions.
8 DO NOT use the cleaner for a task it is not designed to perform.
8 DO NOT tilt or drop the cleaner.
8 DO NOT place the cleaner close to a heat source.
9 When not in use, store the cleaner in a safe, dry, childproof location.
2. INTRODuCTION
Highpowered,lightweightindustrialunit.Stainlesssteeldrumwithdualfiltrationsystemforsuperiorperformance.Featuressafetyshut-offfor
wet operation. Trolley with swivel drum and two rear locking wheels for easy emptying plus front swivel castors for added manoeuvrability. Foot
operationforsqueegeeadjustment.SuppliedwithØ38mmaccessorykit,3.2mcablewiththree-pinplug,clothandcartridgefilters.Fittedwith
twin motors offering superior vacuuming power. Particularly suitable for industrial and commercial applications where extra capacity and power
are required. optional front mounting squeegee available, as illustrated in fig.8.
Recommended fuse rating
13 Amp
PC477, PC477AKI Issue 3 (HF) 07/02/19
Original Language Version
© Jack Sealey limited
Refer to
instructions
Wear eye
protection
3. SPeCIfICATION
Model no: .......................................................................PC477
Airflow: ........................................................................ 174m³/hr
drum Size: ..........................................................................77ltr
Filter Type: ....................................................... Cartridge, Cloth
Maximum Vacuum Pressure:............................................... null
Motor Power: ........................................................... 2 x 1200W
nett Weight: ....................................................................... 39kg
Cartridge Filter .......................................................... PC477.PF
Cloth Filter Assembly ................................................PC477.CF
Supply: ............................................................................. 230V
Vacuum Accessories diameter: ....................................Ø38mm
optional Squeegee: .............................................. PC477AK1
nett Weight: ................................................................6.32Kg
4. ASSeMbLy
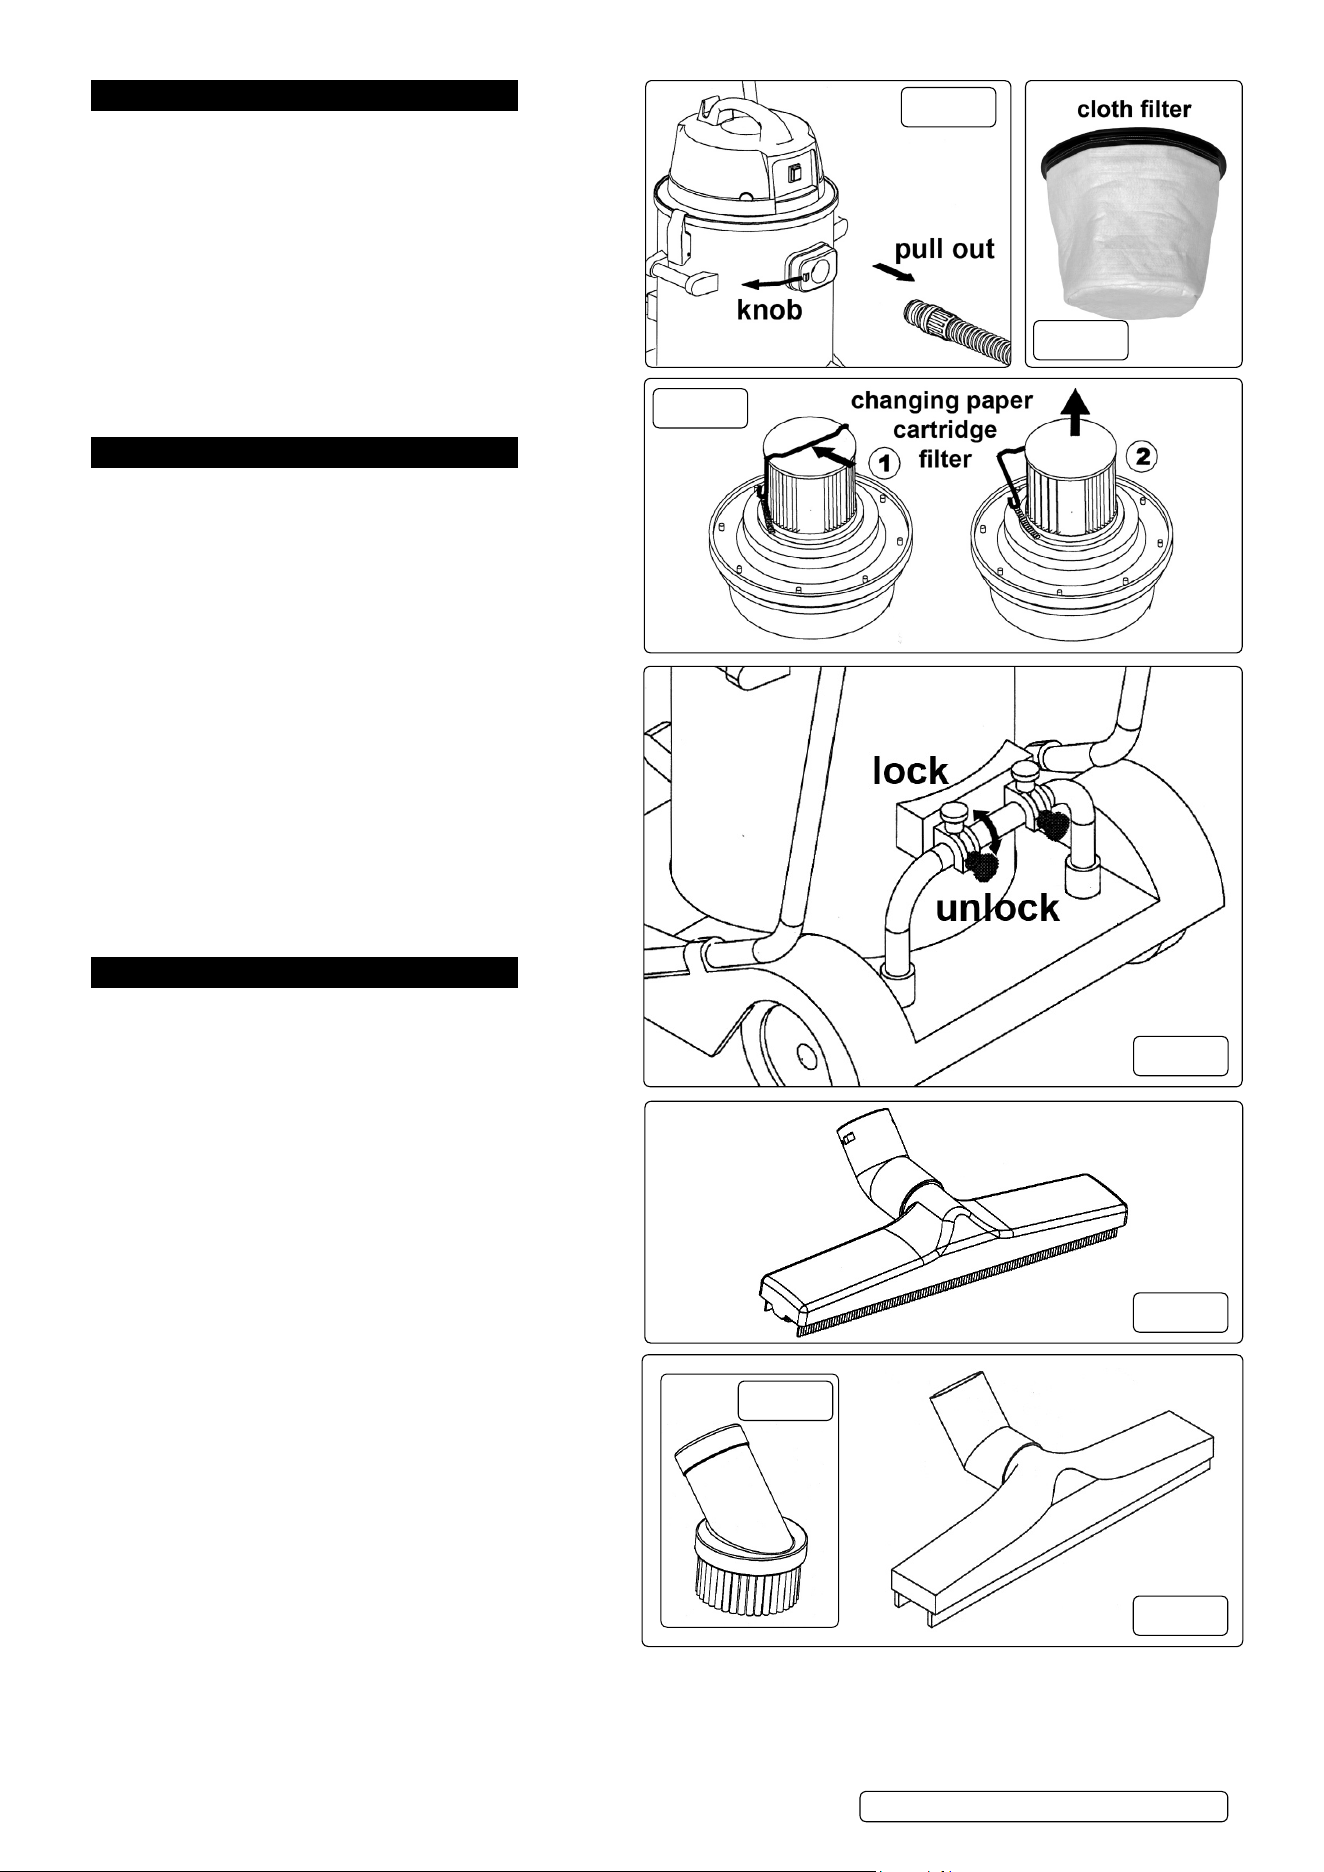
4.1. Hose Installation. fig. 1.
4.1.1. Fully insert the hose into the suction coupler on the main
drum. It will automatically snap into place.
4.1.2. To release the hose, slide the release knob in the direction
of the arrow and pull the hose out of the suction coupler.
4.2. filter Removal. fig. 2a/2b
4.2.1. To access the filter, unclip and remove the upper part of the
cleaner from the metal tank.
4.2.2. To change the paper cartridge filter push the retaining clip in the direction of the arrow (fig.2b) and remove the filter
from the motor unit.
4.2.3. For wet vacuuming remove the paper cartridge filter and install the fabric filter over the filter basket. The filter
basket (fig.2a) sits in the top of the drum and is held in place when the upper part of the vacuum cleaner is clipped
onto the tank.
4.3. Locking and unlocking the Tank. fig. 4.
4.3.1. lock the tank to the frame support by pushing the knobs doWn.
4.3.2. Unlock the tank from the frame support by pushing the
knobs UP.
4.3.3. When the tank is unlocked it can be lifted from the frame.
4.3.4. The tank must only be tipped for emptying in the locked
position. See fig.13.
5. OPeRATION
5.1. Nozzles
5.1.1. The brush nozzle is used on large, dry areas such as a floor
or a bed. Refer to Fig. 4.
5.1.2. The squeegee nozzle is used on water, cement or other
non-volatilesubstances.RefertoFig.5.
5.1.3. The round brush is used on small areas such as a sofa,
window or the corner of a floor. Refer to Fig. 6.
5.1.4. The crevice tool is used on narrow grooves or windows.
Refer to Fig. 7.
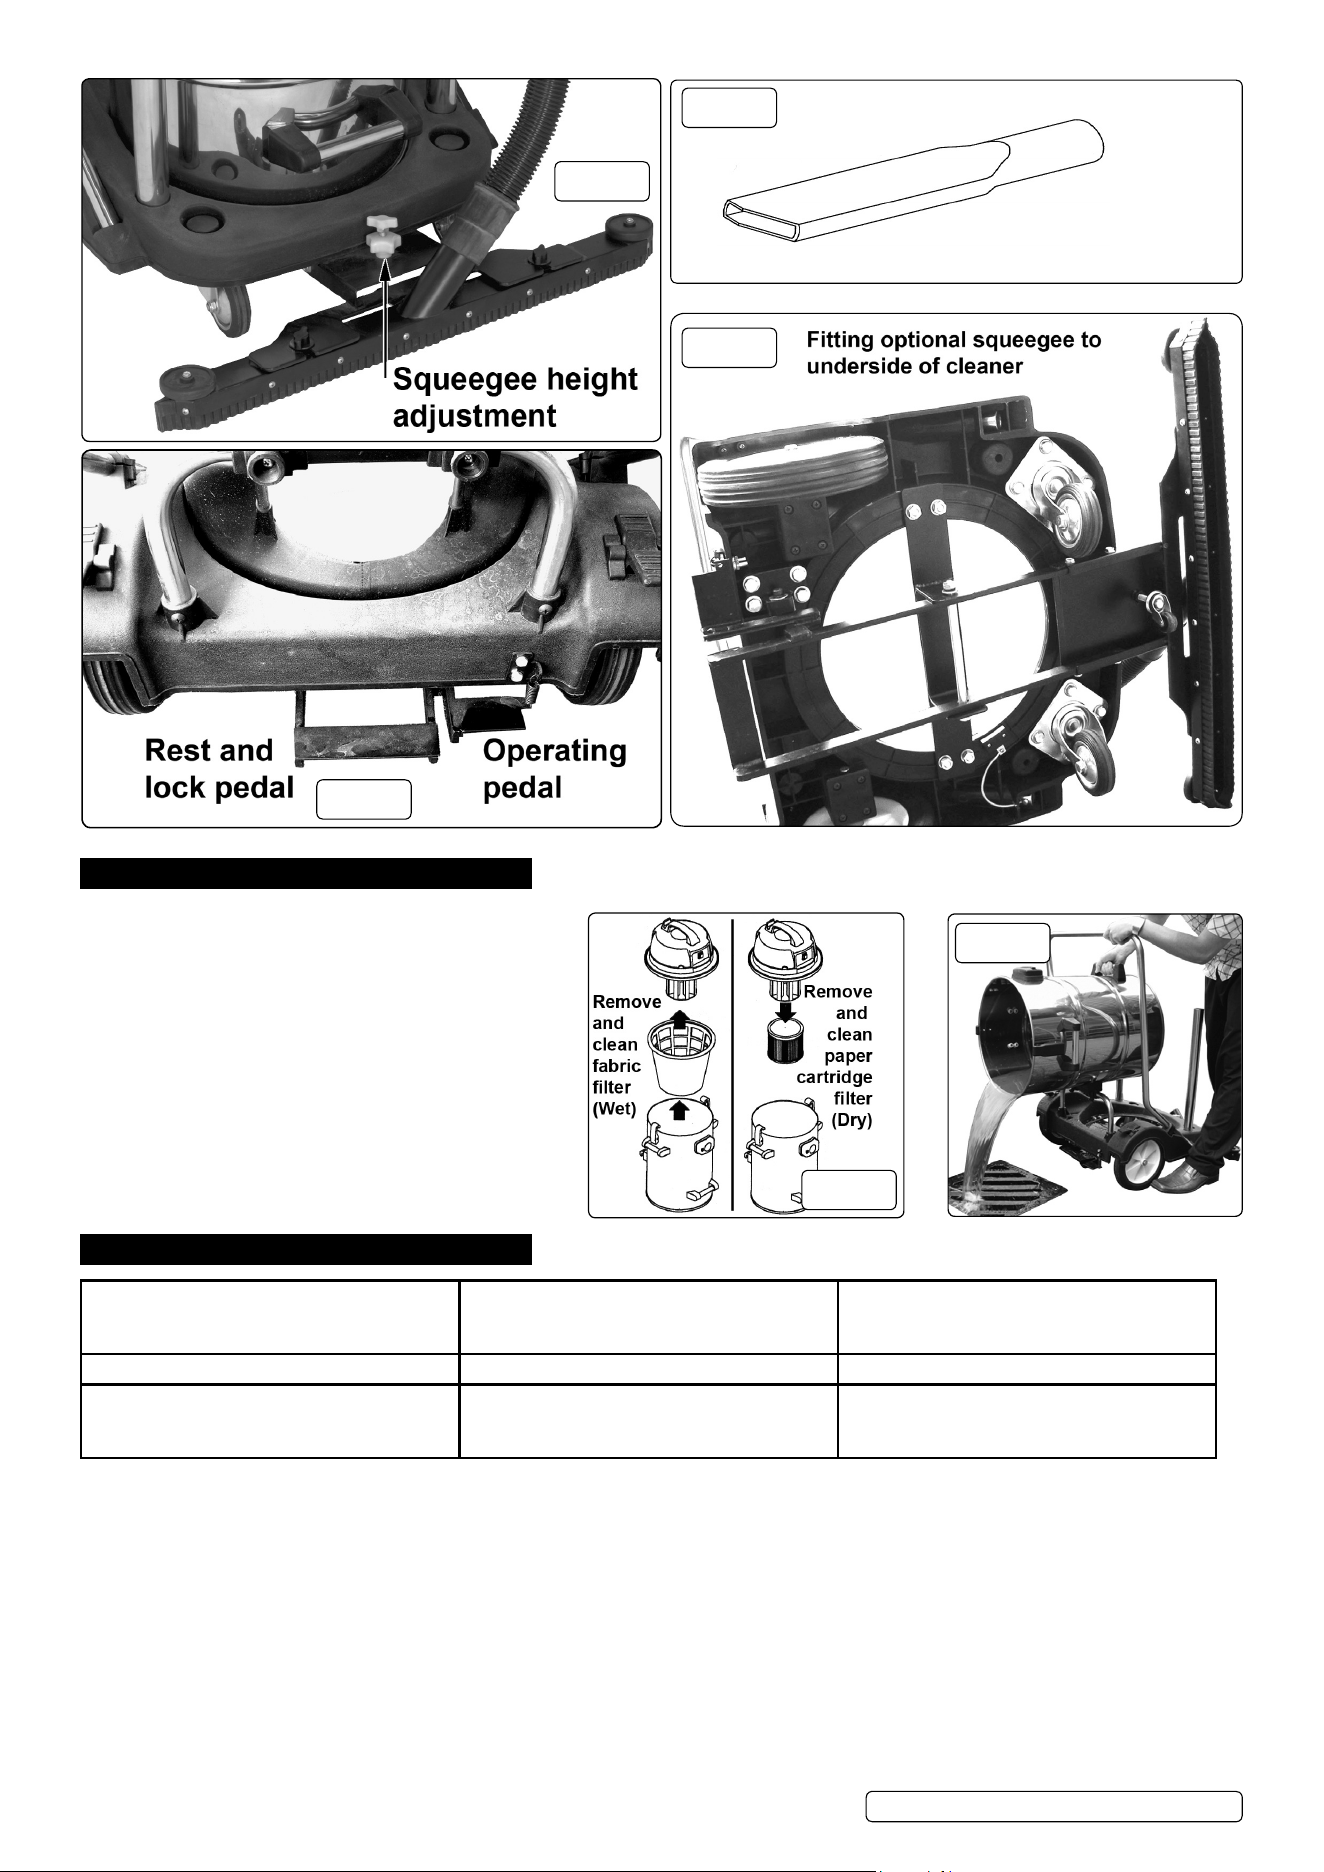
5.2. Optional Squeegee. figs. 8, 9 and 10.
5.2.1. The optional squeegee should be attached to the underside
of the vacuum cleaner as shown in Fig. 10.
5.2.2. depress the operating pedal. The squeegee will drop on to
the surface to be cleaned. Refer to Fig. 9.
5.2.3. If necessary, adjust the height of the squeegee using the
butterfly nut at the front of the cleaner. This sets the height
of the front guide wheel. Refer to Fig. 8.
5.2.4. With the squeegee in contact with the surface to be
cleaned, lock the guide in position.
5.2.5. operate the squeegee by pushing the vacuum cleaner
across the area to be cleaned.
5.2.6. When cleaning is completed, raise and lock the squeegee
by depressing the rest and lock pedal.
g.1
g.2a
g.2b
g.3
g.5
g.6
g.4
PC477, PC477AKI Issue 3 (HF) 07/02/19
Original Language Version
© Jack Sealey limited
6. MAINTeNANCe
6.1. Cleaning
NOTe: If the suction is weak, remove the paper or fabric
filterandremovethedustbyhand-pattingthefilter.
6.1.1. Remove the vacuum cleaner head to access the
filter. Refer to Fig. 11.
6.1.2. Remove all dust on the filter. Clean and if necessary
air-drythefilterforfurtheruse.
6.2. emptying the Tank
6.2.1. Position the cleaner next to a suitable container or
drain. lock tank onto frame as shown in fig.3. Put the
rear wheel locks on. Hold the frame handle with one
hand and lift the tank to the emptying position using
the tank handle. Refer to Fig. 12.
7. TROubLeSHOOTING
Cleaner will not operate. no power supply.
Faulty power cable, switch or motor.
Container full of liquid.
Check supply.
Check and repair or replace faulty item.
empty container.
dust comes from the motor cover. Filter missing or damaged. Fit or replace.
Reduced efficiency and increased
motor speed/vibration.
Filter clogged.
nozzle, hose or bin inlet blocked.
Replace or clean filter.
Check nozzle, hose and bin inlet for
blockage.
g.7
g.8
g.9
g.10
g.11
g.12
PC477, PC477AKI Issue 3 (HF) 07/02/19
Original Language Version
© Jack Sealey limited

Sealey Group, Kempson Way, Suffolk business Park, bury St edmunds, Suffolk. IP32 7AR
01284 757500 01284 703534 sales@sealey.co.uk www.sealey.co.uk
eNVIRONMeNT PROTeCTION
Recycle unwanted materials instead of disposing of them as waste. All tools, accessories and packaging should be sorted, taken to
a recycling centre and disposed of in a manner which is compatible with the environment. When the product becomes completely
unserviceable and requires disposal, drain any fluids (if applicable) into approved containers and dispose of the product and fluids
according to local regulations.
Weee ReGuLATIONS
dispose of this product at the end of its working life in compliance with the eU directive on Waste electrical and electronic equipment
(Weee). When the product is no longer required, it must be disposed of in an environmentally protective way. Contact your local solid
waste authority for recycling information.
Note: It is our policy to continually improve products and as such we reserve the right to alter data, specifications and component parts without prior
notice.
Important: no liability is accepted for incorrect use of this product.
Warranty: Guarantee is 12 months from purchase date, proof of which is required for any claim.
PC477, PC477AKI Issue 3 (HF) 07/02/19
Original Language Version
© Jack Sealey limited