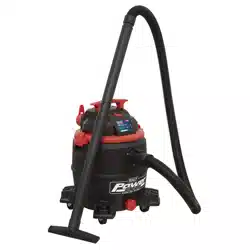
30L BAGLESS WET & DRY INDUSTRIAL VACUUM
CLEANER 1200W STAINLESS STEEL DRUM
MODEL NO: PC300BL
Thank you for purchasing a Sealey product. Manufactured to a high standard, this product will, if used according to these instructions,
and properly maintained, give you years of trouble free performance.
IMPORTANT: PLEASE READ THESE INSTRUCTIONS CAREFULLY. NOTE THE SAFE OPERATIONAL REQUIREMENTS, WARNINGS & CAUTIONS. USE
THE PRODUCT CORRECTLY AND WITH CARE FOR THE PURPOSE FOR WHICH IT IS INTENDED. FAILURE TO DO SO MAY CAUSE DAMAGE AND/OR
PERSONAL INJURY AND WILL INVALIDATE THE WARRANTY. KEEP THESE INSTRUCTIONS SAFE FOR FUTURE USE.
1. SAFETY
1.1. ELECTRICAL SAFETY
WARNING! It is the user’s responsibility to check the following:
Check all electrical equipment and appliances to ensure that they are safe before using. Inspect power supply leads, plugs and all
electrical connections for wear and damage. Sealey recommend that an RCD (Residual Current Device) is used with all electrical
products. You may obtain an RCD by contacting your local Sealey stockist.
If the product is used in the course of business duties, it must be maintained in a safe condition and routinely PAT (Portable Appliance
Test) tested.
Electrical safety information: it is important that the following information is read and understood.
1.1.1. Ensure that the insulation on all cables and on the appliance is safe before connecting it to the power supply.
1.1.2. Regularly inspect power supply cables and plugs for wear or damage and check all connections to ensure that they are secure.
1.1.3. Important: Ensure that the voltage rating on the appliance suits the power supply to be used and that the plug is tted with the correct
fuse - see fuse rating in these instructions.
8 DO NOT pull or carry the appliance by the power cable.
8 DO NOT pull the plug from the socket by the cable.
8 DO NOT use worn or damaged cables, plugs or connectors. Ensure that any faulty item is repaired or
replaced immediately by a qualied electrician.
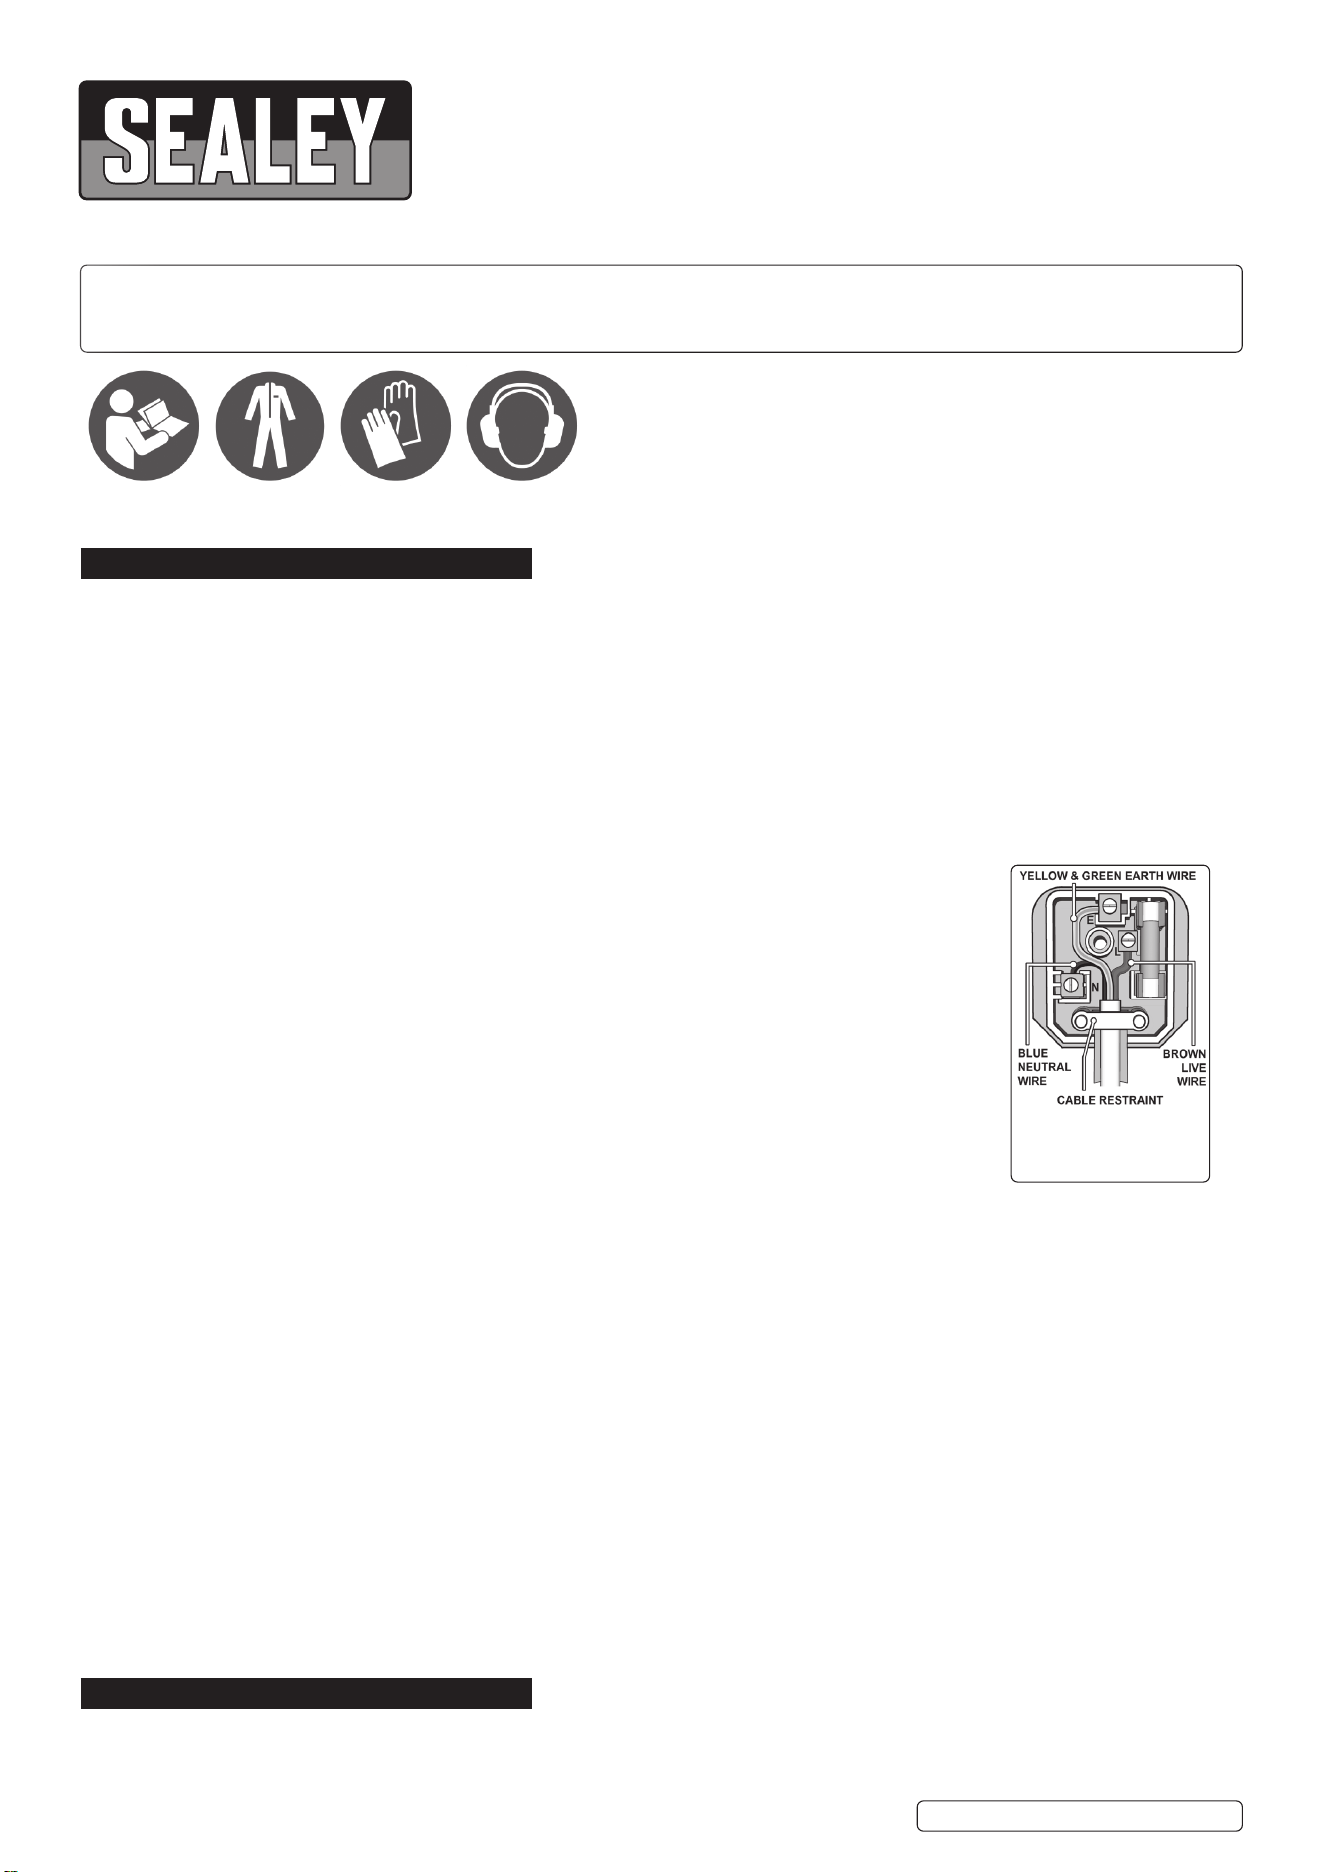
1.1.4. This product is tted with a BS1363/A 13 Amp 3 pin plug.
If the cable or plug is damaged during use, switch the electricity supply off and remove from use.
Ensure that repairs are carried out by a qualied electrician.
Replace a damaged plug with a BS1363/A 13 Amp 3 pin plug. If in doubt contact a qualied electrician.
A) Connect the GREEN/YELLOW earth wire to the earth terminal ‘E’.
B) Connect the BROWN live wire to the live terminal ‘L’.
C) Connect the BLUE neutral wire to the neutral terminal ‘N’.
Ensure that the cable outer sheath extends inside the cable restraint and that the restraint is tight.
Sealey recommend that repairs are carried out by a qualied electrician.
1.2. GENERAL SAFETY
9 Disconnect the cleaner from the power supply before servicing, changing accessories, or performing any maintenance.
9 Use only genuine parts and accessories. Unauthorised parts and accessories may be dangerous and will invalidate your warranty.
9
Maintain the cleaner in good condition. Use an authorised agent for servicing. Keep machine clean, but
DO NOT
use solvents.
9
For dry vacuuming ensure the cartridge filter is firmly in place before operating the cleaner.
8 DO NOT operate the unit without the cartridge filter in place (except when wet vacuuming). Using the cleaner without a cartridge
filter will cause machine faults and will invalidate your warranty.
9 Wear protective clothing and gloves.
8 DO NOT allow untrained persons to operate the cleaner.
9 NOTE: This appliance can be used by children aged from 8 years and above and persons with reduced physical, sensory or mental
capabilities or lack of experience and knowledge if they have been given supervision or instruction concerning use of the appliance in a
safe way and understand the hazards involved. Children shall not play with the appliance. Cleaning and user maintenance shall not be
made by children without supervision.
8 DO NOT place attachments close to your face (especially eyes, ears, etc). DO NOT point the hose end at other persons or animals.
▲ DANGER! DO NOT vacuum hot or glowing ash, cigarette ends, inflammable, explosive, corrosive or other dangerous substances.
8 DO NOT operate the unit without the dust bag or optional cartridge filter (except when wet vacuuming).
8 DO NOT leave machine running unattended. Turn power supply OFF, and DO NOT leave the vicinity until motor has come to a
complete stop.
8 DO NOT operate the cleaner while under the influence of drugs, alcohol or impairing medication, or if you are tired.
8 DO NOT use the cleaner in the rain or in very damp conditions.
8 DO NOT use the cleaner for a task it is not designed to perform.
9 When not in use, store the cleaner in a safe, dry, childproof location.
2. INTRODUCTION
High powered industrial unit features cyclonic technology. Bagless design prevents loss of suction improving efciency. Outlet produces clean air
suitable for use as a blower. Features safety shut-off for wet operation. Includes a strong, comfortable handle, hose brackets, accessory storage
base, durable stainless steel tank, liquid drainage device and an ‘auto power take off’ socket. Supplied with 3.8m cable.
Replacement fuse
13A rating:
Original Language Version
© Jack Sealey Limited
Refer to
instruction
manual
Wear
protective
clothing
Wear
protective
gloves
Wear ear
protection
PC300BL Issue 3 (3) 15/11/21
3. SPECIFICATION
Model No: ...............................................................PC300BL
Airow: .....................................................................158m³/hr
Drum size: ........................................................................30L
Filter Type: .............................................................. Cartridge
Maximum Vacuum Pressure: ....................................180mbar
Motor Power: ............................................................... 1200W
Supply: ...........................................................................230V
Vacuum Accessories Diameter: ................................. Ø35mm
4. ASSEMBLY
4.1. CARTON CONTENT (fig.1)
4.1.1. Carefully unpack the carton.
4.1.2. Locate the two side clasps (g.1.2) which hold the top section in place.
4.1.3. Undo the clasps, remove the top section and take out the items in the container.
4.1.4. Check and identify each component as listed. If anything is missing or damaged please contact your Sealey stockist.
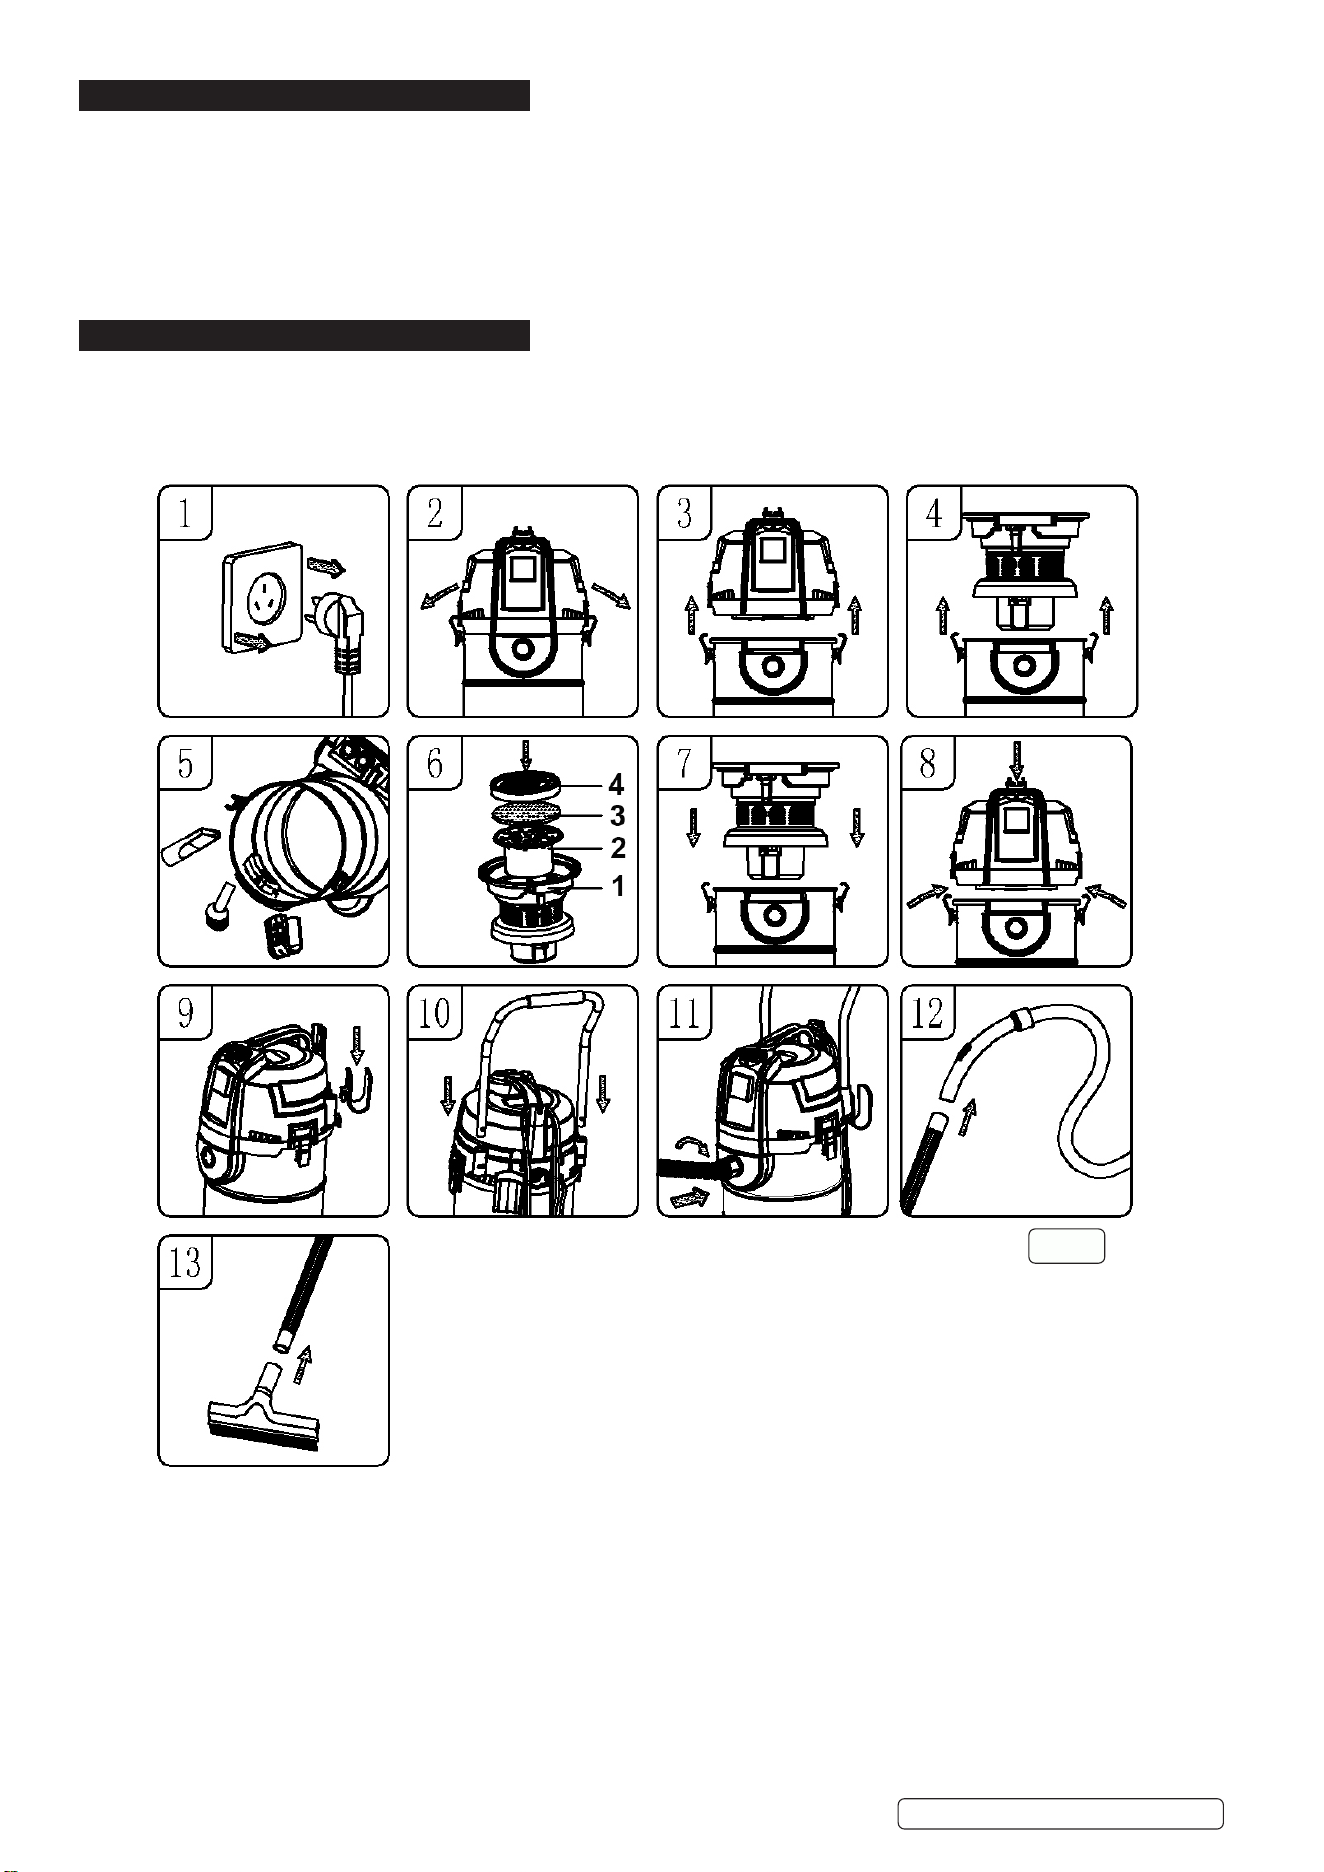
4.2. ASSEMBLY (g.1)
4.2.1. Ensure the mains plug is disconnected. (fig.1.1).
4.2.2. Undo clasps. (fig.1.2) .
4.2.3. Lift off the top section assembly and filter assembly. Remove contents from inside the container. (fig.1.3) (fig.1.4) (fig.1.5).
4.2.4. Check filter components are complete in the order as shown. (fig.1.6).
4.2.5. Replace the filter assembly and top section assembly onto the container. (fig.1.7).
4.2.6. Align up the top section with the clasps and snap into place by applying pressure at the mid point of the clasps. (fig.1.8)
4.2.7. Attach hose rack to the corresponding position on head assembly. (fig.1.9).
4.2.8. Insert handle into corresponding position on top cover. (fig.1.10).
4.2.9. Insert the large end of the hose into the front inlet of the container and lock in place by turning clockwise a quarter turn. (fig.1.11).
4.2.10. Choose the desired extension tubes and nozzle and connect onto the hose. (fig.1.12) (fig.1.13).
Original Language Version
© Jack Sealey Limited
PC300BL Issue 3 (3) 15/11/21
g.1

5. OPERATION
WARNING! Ensure you read, understand and apply Section 1 ‘Safety Instructions’. Reminder: DO NOT vacuum hazardous substances.
Use of an incorrect cartridge filter will invalidate your warranty.
5.1. DRY VACUUMING (fig.2)
5.1.1. Ensure the machine is unplugged from the power supply. (fig.2.1)
5.1.2. Loosen clips (fig.2.2) and remove the top section and filter assembly. (fig.2.3) (fig.2.4)
5.1.3. Check that filter components are present and assembled correctly. (fig.2.5).
5.1.4. Place assembled unit into the body (fig.2.6) and clip in place using side clips (fig.2.7).
5.1.5. Connect hose to body and rotate clockwise for a quarter of a turn to lock in place. (fig.2.8).
5.1.6. Assemble required tube and hose arrangement. (fig.2.9) (fig.2.10).
5.1.7. Plug into power supply (fig.2.11). Turn on and commence cleaning. (fig.2.12) (fig.2.13).
5.1.8. When you have completed vacuuming, press the switch to ‘Off’
5.2. EMPTYING DUST TANK (fig.3)
5.2.1. Turn off cleaner and disconnect from power
supply. (fig.3.2) (fig.3.3)
5.2.2. Release side clips (fig.3.4) and lift off top
assembly and filter assembly. (fig.3.5)
(fig.3.6)
5.2.3. Carefully empty contents of cleaner body
into suitable receptacle. (fig.3.7)
5.2.4. Separate filter assembly and clean off
(brush gently or shake) into suitable
receptacle. (fig.3.8)
5.2.5. Reassemble filter and replace into cleaner
body. (fig.3.9) (fig.3.6)
g.3
Original Language Version
© Jack Sealey Limited
PC300BL Issue 3 (3) 15/11/21
g.2
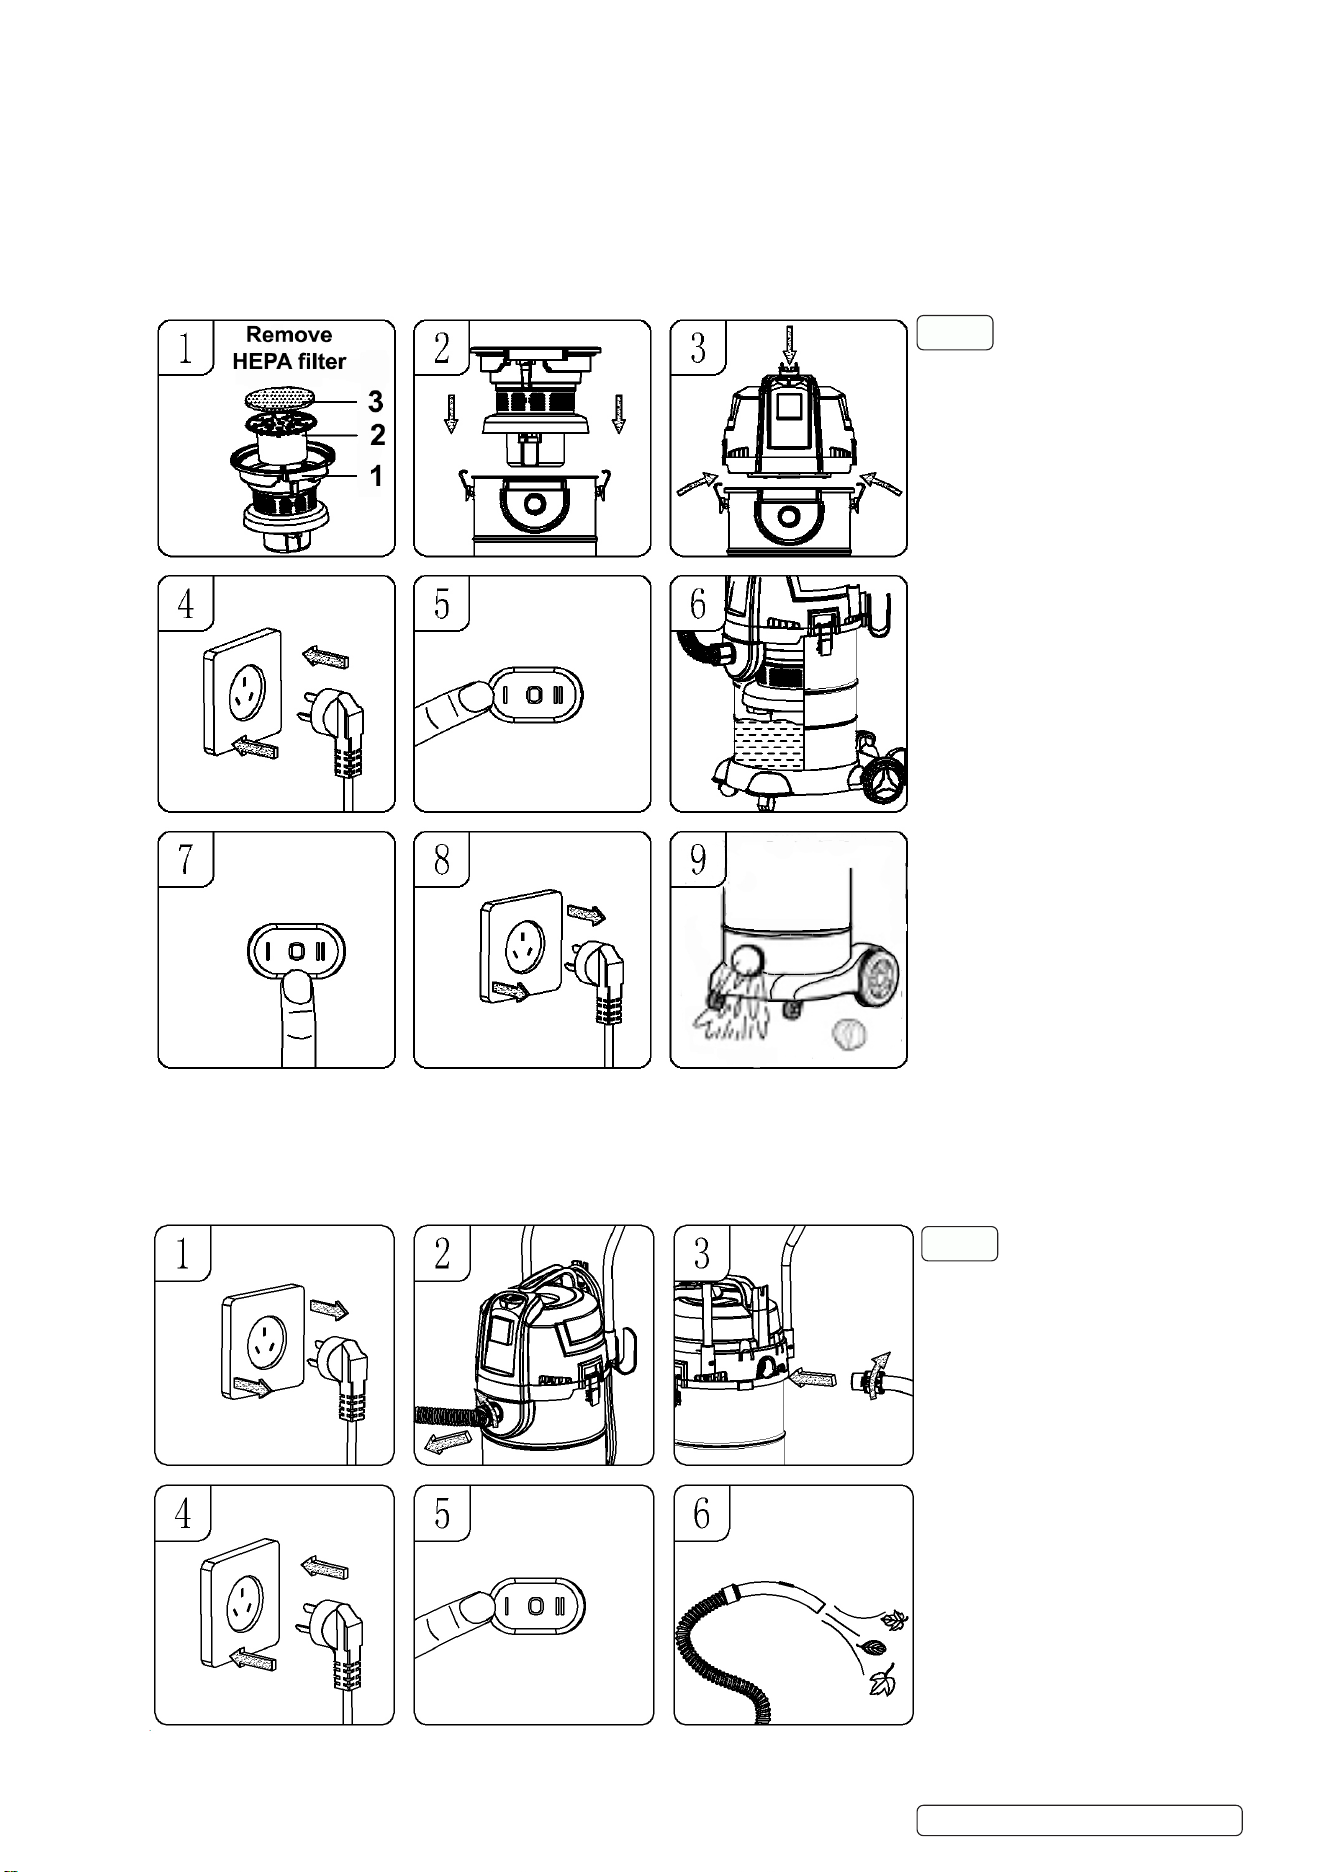
5.3. WET VACUMMING (fig.4)
5.3.1. Ensure machine is disconnected from power supply.
5.3.2. ` Remove HEPA filter from filter arrangement.
5.3.3. Check that filter components are assembled correctly. (fig.4.1)
5.3.4. Install filter assembly into cleaner body. (fig.4.2)
5.3.5. Install top assembly and lock in place. (fig.4.3)
5.3.6. Connect to power supply and power on. (fig.4.4) (fig.4.5)
5.3.7. When maximum capacity is reached the machine will stop running. (fig.4.6)
5.3.8. Turn off the power and disconnect from the power supply. (fig.4.7) (fig.4.8)
5.3.9. Unscrew drain cover and carefully empty contents of cleaner body into suitable receptacle. (fig.4.9)
5.4. BLOWER OPERATION (fig.5)
5.4.1. Ensure machine is disconnected from power supply. (fig.5.1)
5.4.2. Remove hose assembly from suction port. (g.5.2)
5.4.3. Attach hose assembly to air outlet on rear of top assembly. (g.5.3)
5.4.4. Connect to power supply and power on. (fig.5.4) (fig.5.5)
5.4.5. Aim hose assembly at area to be cleared. (fig.5.6)
Original Language Version
© Jack Sealey Limited
PC300BL Issue 3 (3) 15/11/21
g.5
g.4
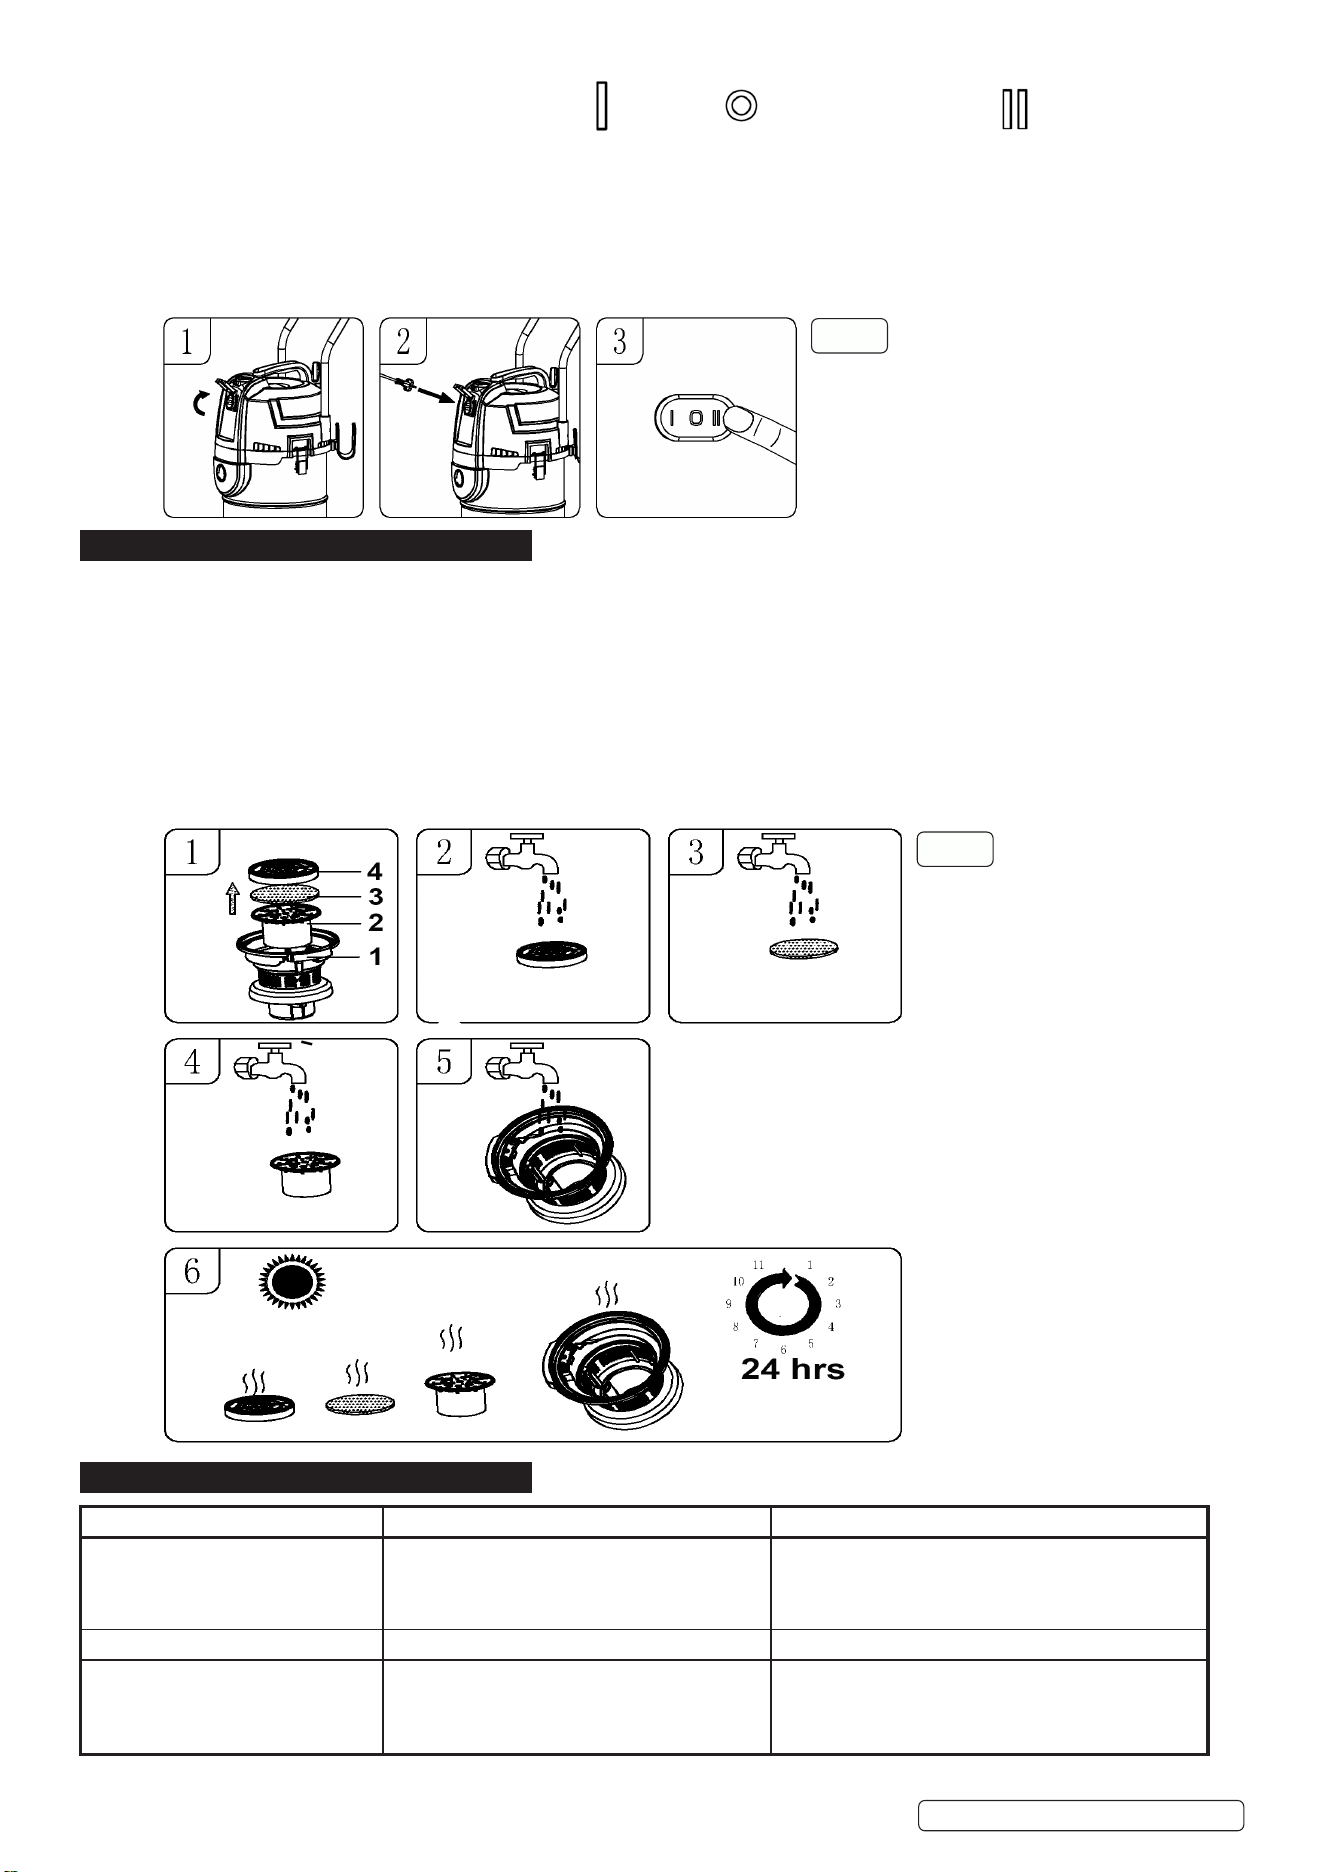
5.5. SWITCH AND AUXILIARY SOCKET USE (fig.6)
5.5.1. Switch operation: Start vacuum “ “, Turn off “ “, Auxiliary power control “ “
5.5.2. To run vacuum select Start vacuum.
5.5.3. To run auxiliary power supply ensure machine is disconnected from power supply. fig.6.1)
5.5.4. Lift socket cover (fig.6.1) and insert auxiliary equipment plug (fig.6.2).
5.5.5. Connect to power supply and set rocker switch to Auxiliary power control (fig.6.3).
5.5.6. To switch on vacuum and auxiliary power simultaneously select Start vacuum followed
by Auxiliary power.
5.5.7. The vacuum will switch off when power is not being drawn through by the auxiliary
device within approximately 10 seconds.
6. MAINTENANCE
6.1. Ensure the machine is unplugged from the power supply.
6.2. Disconnect the hose from the container.
6.3. Undo the clasps and remove motor head from the container.
6.4. Clear out any dirt or debris from the container and hose.
6.5. Check the power cable to make sure it has not received any damage.
6.6. Handle the filters carefully when cleaning or installing.
6.7. The filter assembly contains four washable parts: plastic lter cover (g.7.1.1) , lter core (g.7.1.2), air-in sponge (g.7.1.3)
HEPA assembly (g.7.1.4)
6.8. Wash the elements with cold or lukewarm water without use of detergent. (g.7.2, g.7.3, g.7.4, g.7.5).
6.9. Allow elements to air dry (g.7.6). DO NOT use heating equipment.
6.10. Check all elements for damage and replace if necessary.
7. TROUBLESHOOTING
Original Language Version
© Jack Sealey Limited
PC300BL Issue 3 (3) 15/11/21
g.6
g.7
Problem Cause Remedy
Cleaner will not operate. No power supply. Check supply.
Faulty power cable, switch or motor. Check and repair or replace faulty item.
Container full. Empty container.
Dust comes from the motor cover. Cartridge lter missing or damaged. Fit or replace cartridge lter.
Reduced efciency and increased
motor speed/vibration.
Dust container full. Empty container.
Filter clogged. Clean or replace cartridge lter.
Nozzle, hose or container inlet blocked. Check nozzle, hose and container inlet for blockage.

Sealey Group, Kempson Way, Suffolk Business Park, Bury St Edmunds, Suffolk. IP32 7AR
01284 757500 01284 703534 sales@sealey.co.uk www.sealey.co.uk
ENVIRONMENT PROTECTION
Recycle unwanted materials instead of disposing of them as waste. All tools, accessories and packaging should be sorted, taken to
a recycling centre and disposed of in a manner which is compatible with the environment. When the product becomes completely
unserviceable and requires disposal, drain any fluids (if applicable) into approved containers and dispose of the product and fluids
according to local regulations.
Note: It is our policy to continually improve products and as such we reserve the right to alter data, specifications and component parts without prior
notice.
Important: No Liability is accepted for incorrect use of this product.
Warranty: Guarantee is 12 months from purchase date, proof of which is required for any claim.
WEEE REGULATIONS
Dispose of this product at the end of its working life in compliance with the EU Directive on Waste Electrical and Electronic Equipment
(WEEE). When the product is no longer required, it must be disposed of in an environmentally protective way. Contact your local solid
waste authority for recycling information.
Original Language Version
© Jack Sealey Limited
PC300BL Issue 3 (3) 15/11/21