1. SAFETY
WARNING: The warnings, cautions and instructions discussed in this instruction manual cannot
cover all possible conditions and situations that may occur. It must be understood that common sense
and caution are factors which cannot be built into this product, but must be applied by the operator.
WARNING! Ensure all preliminary checks are carefully carried out before use of jack. Immediately
repair or replace damaged parts (use authorised service agent). Ensure use of genuine parts only.
Unauthorised parts may be dangerous and will invalidate the warranty.
WARNING! Use jack on level, solid ground, preferably concrete. Ensure the floor over which the jack will
be transported is swept clean.
▲ DANGER! DO NOT use on tarmacadam, or any other soft surface as jack may sink or topple. Serious
injury may result if ignored.
▲ DANGER! If jack tips or leans STOP WHAT YOUR ARE DOING. MOVE QUICKLY TO A SAFE
DISTANCE. DO NOT TRY TO HOLD OR STEADY JACK.
9 Use jack in a suitable work area. Keep the area clean and tidy and free from unrelated materials. Ensure
there is adequate lighting.
9 Before use ensure the gearbox weight and size does not exceed the capacity of the jack.
9 Ensure the vehicle is raised and stabilised at the correct height before attempting to move the jack
under the vehicle.
9 Ensure the jack saddle is fully lowered and is clean, dry, and oil free before attempting to transport the
jack with or without a load.
9 Keep all unauthorised persons away from the jack during lifting and lowering and when in transit.
9 Maintain correct balance and footing. Ensure the floor is not slippery and wear non-slip shoes.
9 Remove ill fitting clothing. Remove ties, watches, rings and other loose jewellery, and contain and/or tie
back long hair.
WARNING! Ensure that the load is placed level and centrally on the jack saddle and that it is fixed in
place before attempting to lift, lower or transport the load.
9 The lowering speed is now regulated by a slow release mechasim so turn and hold handle until at required hight then release.
9 The user shall work in accordance with the instruction handbook
9 It is necessary that the operator can watch the lifting device and the load during all movements.
9 It is not allowed to work under the raised load until it is secured by suitable means.
9 The operator shall be provided with all necessary information about training and about pumping and translating forces.
9 If more than 400N of effort is generated in lifting, the efforts shall be lowered by an additional person.
9 Should the jack make any abnormal sounds during use, STOP IMMEDIATELY and contact your local service agent.
9 Ensure the jack is in sound condition and good working order. Take action for immediate repair or replacement of damaged parts. Use
genuine parts only. DO NOT modify the jack. The use of non-genuine parts may be dangerous and will invalidate the warranty.
8 DO NOT exceed the rated capacity of the jack.
8 DO NOT raise/lower vehicle lifting platform whilst the transmission jack is being used.
8 DO NOT transport the jack with/without a load, with the saddle in the raised position.
8 DO NOT get the jack wet, or use it in damp or wet locations or areas where there is condensation.
8 DO NOT operate the jack when you are tired or under the influence of alcohol, drugs or intoxicating medication.
8 DO NOT lift or support vehicles with the jack and DO NOT use the jack as a load sustaining device.
8 DO NOT use the jack for any purpose other than removal, transportation and the installation of transmissions.
8 DO NOT adjust, or tamper with, the safety valve.
8 DO NOT remove any labels from the jack. If the labels are damaged or unclear, replace them.
8 DO NOT use brake fluid to top up the hydraulic unit.
9 Use Sealey hydraulic oil only.
9 Use a qualified person to lubricate and maintain the jack.
9 Before storing the jack in a safe area, ensure that all parts, especially the saddle are clean and free of grease and oil.
9 Only use accessories and adapters provided by the manufacturer.
9 The transmission jack can only be operated and used by person trained or familiar with this operation manual.
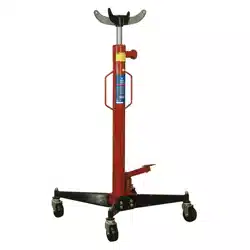
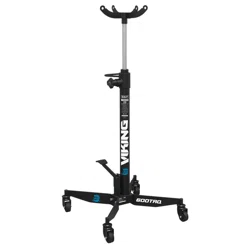
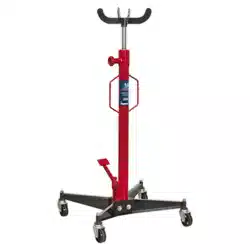
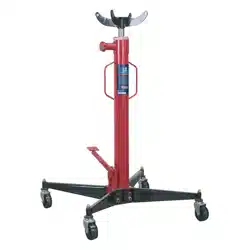
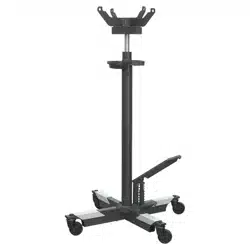
TELESCOPIC VERTICAL TRANSMISSION JACKS
MODEL NO: 500TTJ.V3, 800TTJ.V2
Thank you for purchasing a Sealey product. Manufactured to a high standard, this product will, if used according to these
instructions, and properly maintained, give you years of trouble free performance.
IMPORTANT: PLEASE READ THESE INSTRUCTIONS CAREFULLY. NOTE THE SAFE OPERATIONAL REQUIREMENTS, WARNINGS & CAUTIONS. USE
THE PRODUCT CORRECTLY AND WITH CARE FOR THE PURPOSE FOR WHICH IT IS INTENDED. FAILURE TO DO SO MAY CAUSE DAMAGE AND/OR
PERSONAL INJURY AND WILL INVALIDATE THE WARRANTY. KEEP THESE INSTRUCTIONS SAFE FOR FUTURE USE.
Refer to
instructions
Wear
safety
footwear
Original Language Version
© Jack Sealey Limited
500TTJ.V3, 800TTJ.V2 Issue 1 02/10/23
Bleed
before
use
9 The weight of the workpieces to be removed, moved or installed should never exceed the rated capacity of the transmission jack and
those of its accessories, and the lifting height should never exceed the maximum stroke of the jack that is indicated on the label.
9 This transmission jack can only be supported on a solid, level and horizontal surface that can withstand the load.
2. INTRODUCTION
Twin axis saddle adjusters allow the gearbox support to be angled in any direction. A 2-stage telescopic piston for reduced clearance
lifts. A harden chrome plated piston rod. Foot pedal operation keeps hands-free. Spring loaded dead man’s safety release control
reduces the risk of inadvertent lowering. Four heavy duty castors, with non-marking nylon wheels, on a sturdy base, make for easy
manoeuvrability.
3. SPECIFICATION
Model No .......................................................500TTJ.V3 ...................................................................800TTJ.V2
Base Size: ................................................ 600 x 600mm ................................................................600 x 600mm
Capacity: ..............................................................600kg ......................................................................... 1000kg
Fixed/Adjustable Saddle: .............................. Adjustable ..................................................................... Adjustable
Maximum Saddle Height: ................................. 1905mm ........................................................................ 1930mm
Minimum Saddle Height: .................................... 885mm .......................................................................... 910mm
Ram Extensions: .......................................................... 2 .................................................................................... 2
Saddle Tilt - Backward:.................................. ............10° ................................................................................. 10°
Saddle Tilt - Forward: ................................................10° ................................................................................. 10°
Standard: ..........................................................EN1494 ...........................................................................EN1494
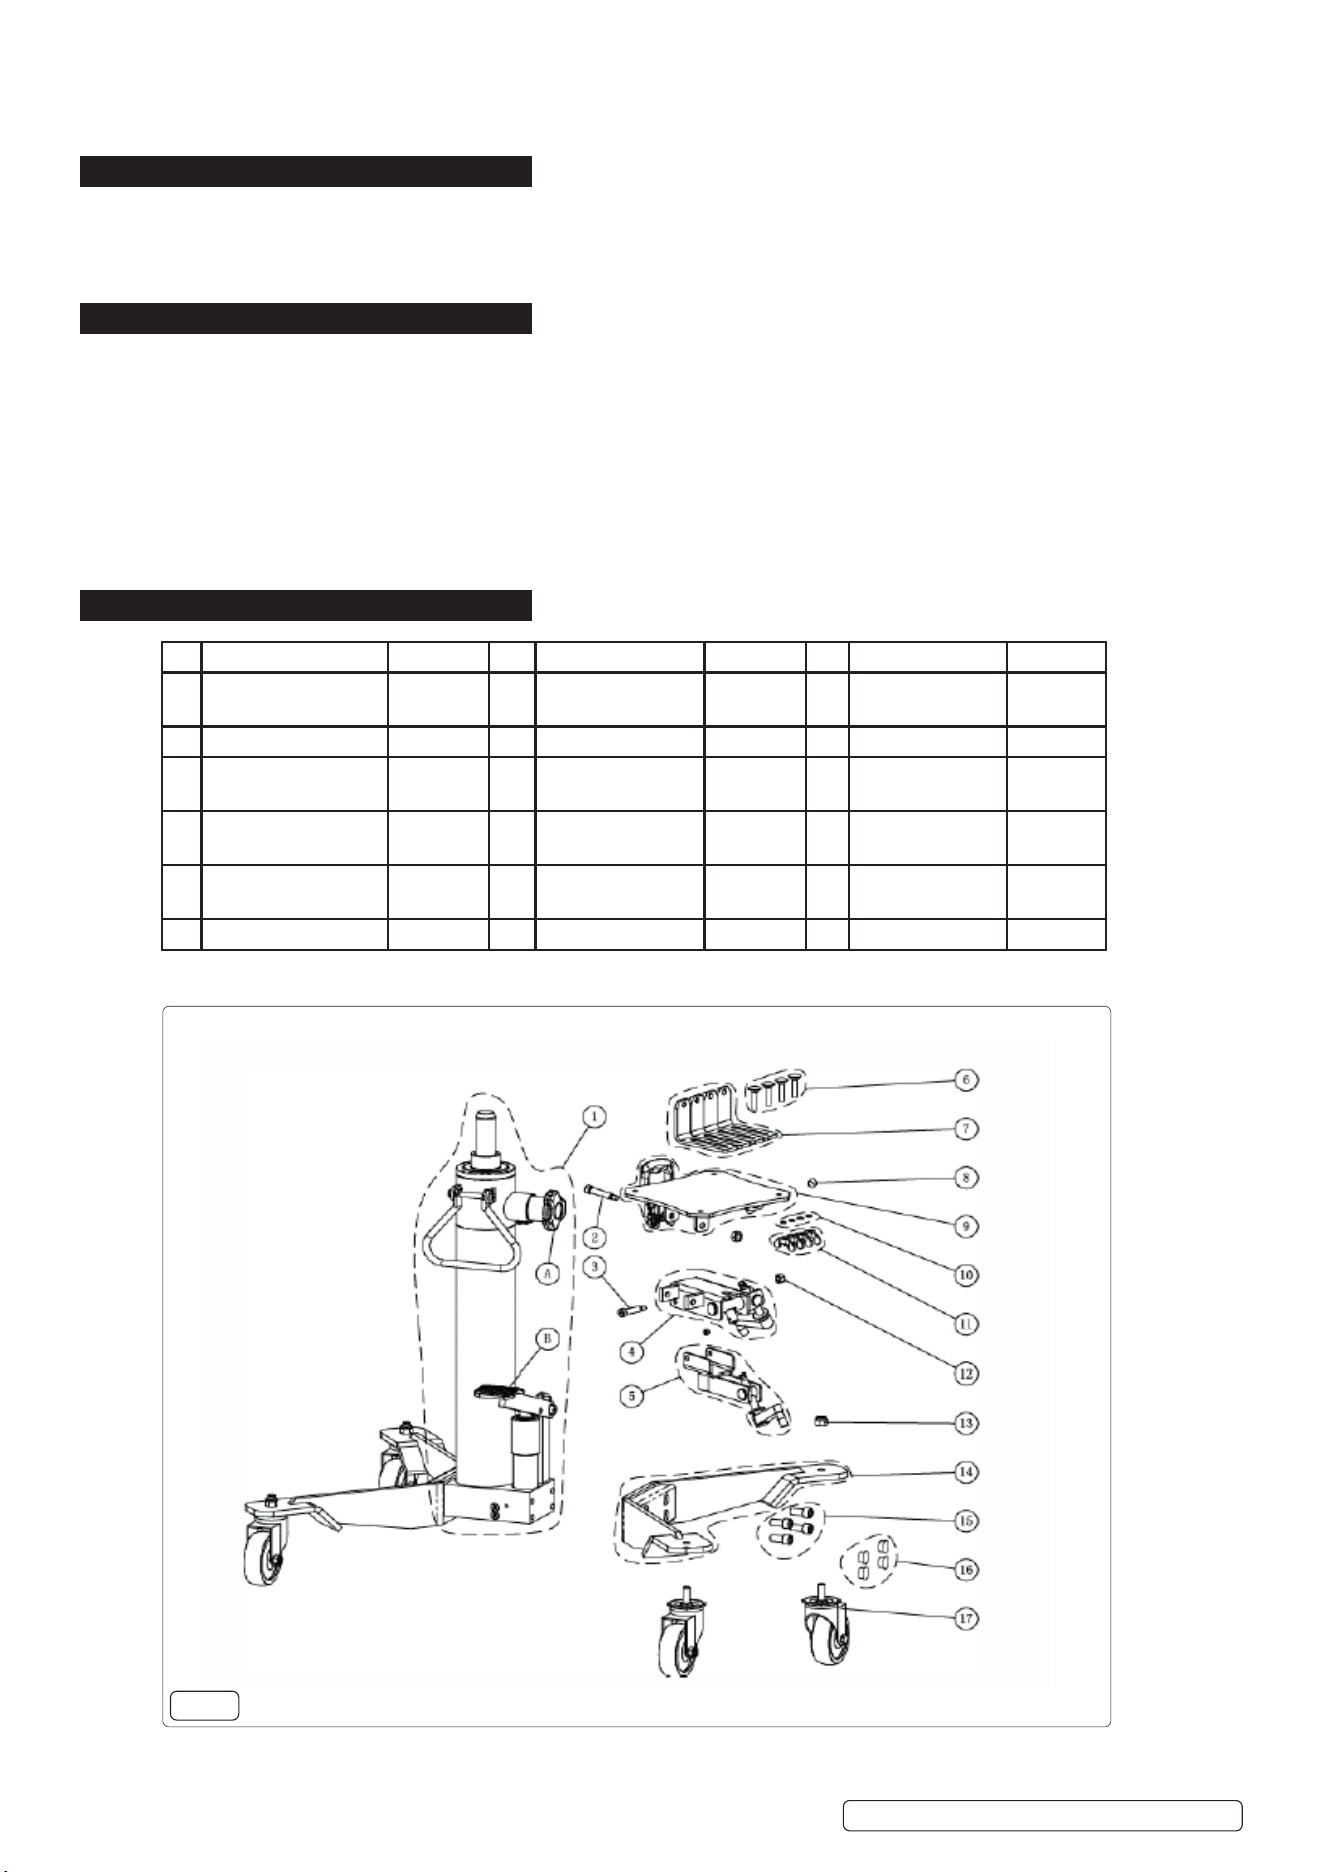
4. ASSEMBLY
Original Language Version
© Jack Sealey Limited
Parts Quantities Parts Quantities Parts Quantities
1 Oil cylinder 1 7 Support strip 4 13 Nylon locking
screw
4
2 Shoulder screw 1 8 Set screw 2 14 Foot base 2
3 Shoulder screw 1 9 Panel assembly 1 15 Inner hexagonal
screw M12x25
8
4 Y-axis bracket
assembly
1 10 Spacer 4 16 Hole plug 8
5 X-axis bracket
assembly
1 11 Wing nuts 4 17 Wheel 4
6 Square neck bolt 4 12 Screw nut 2
g.1
500TTJ.V3, 800TTJ.V2 Issue 1 02/10/23
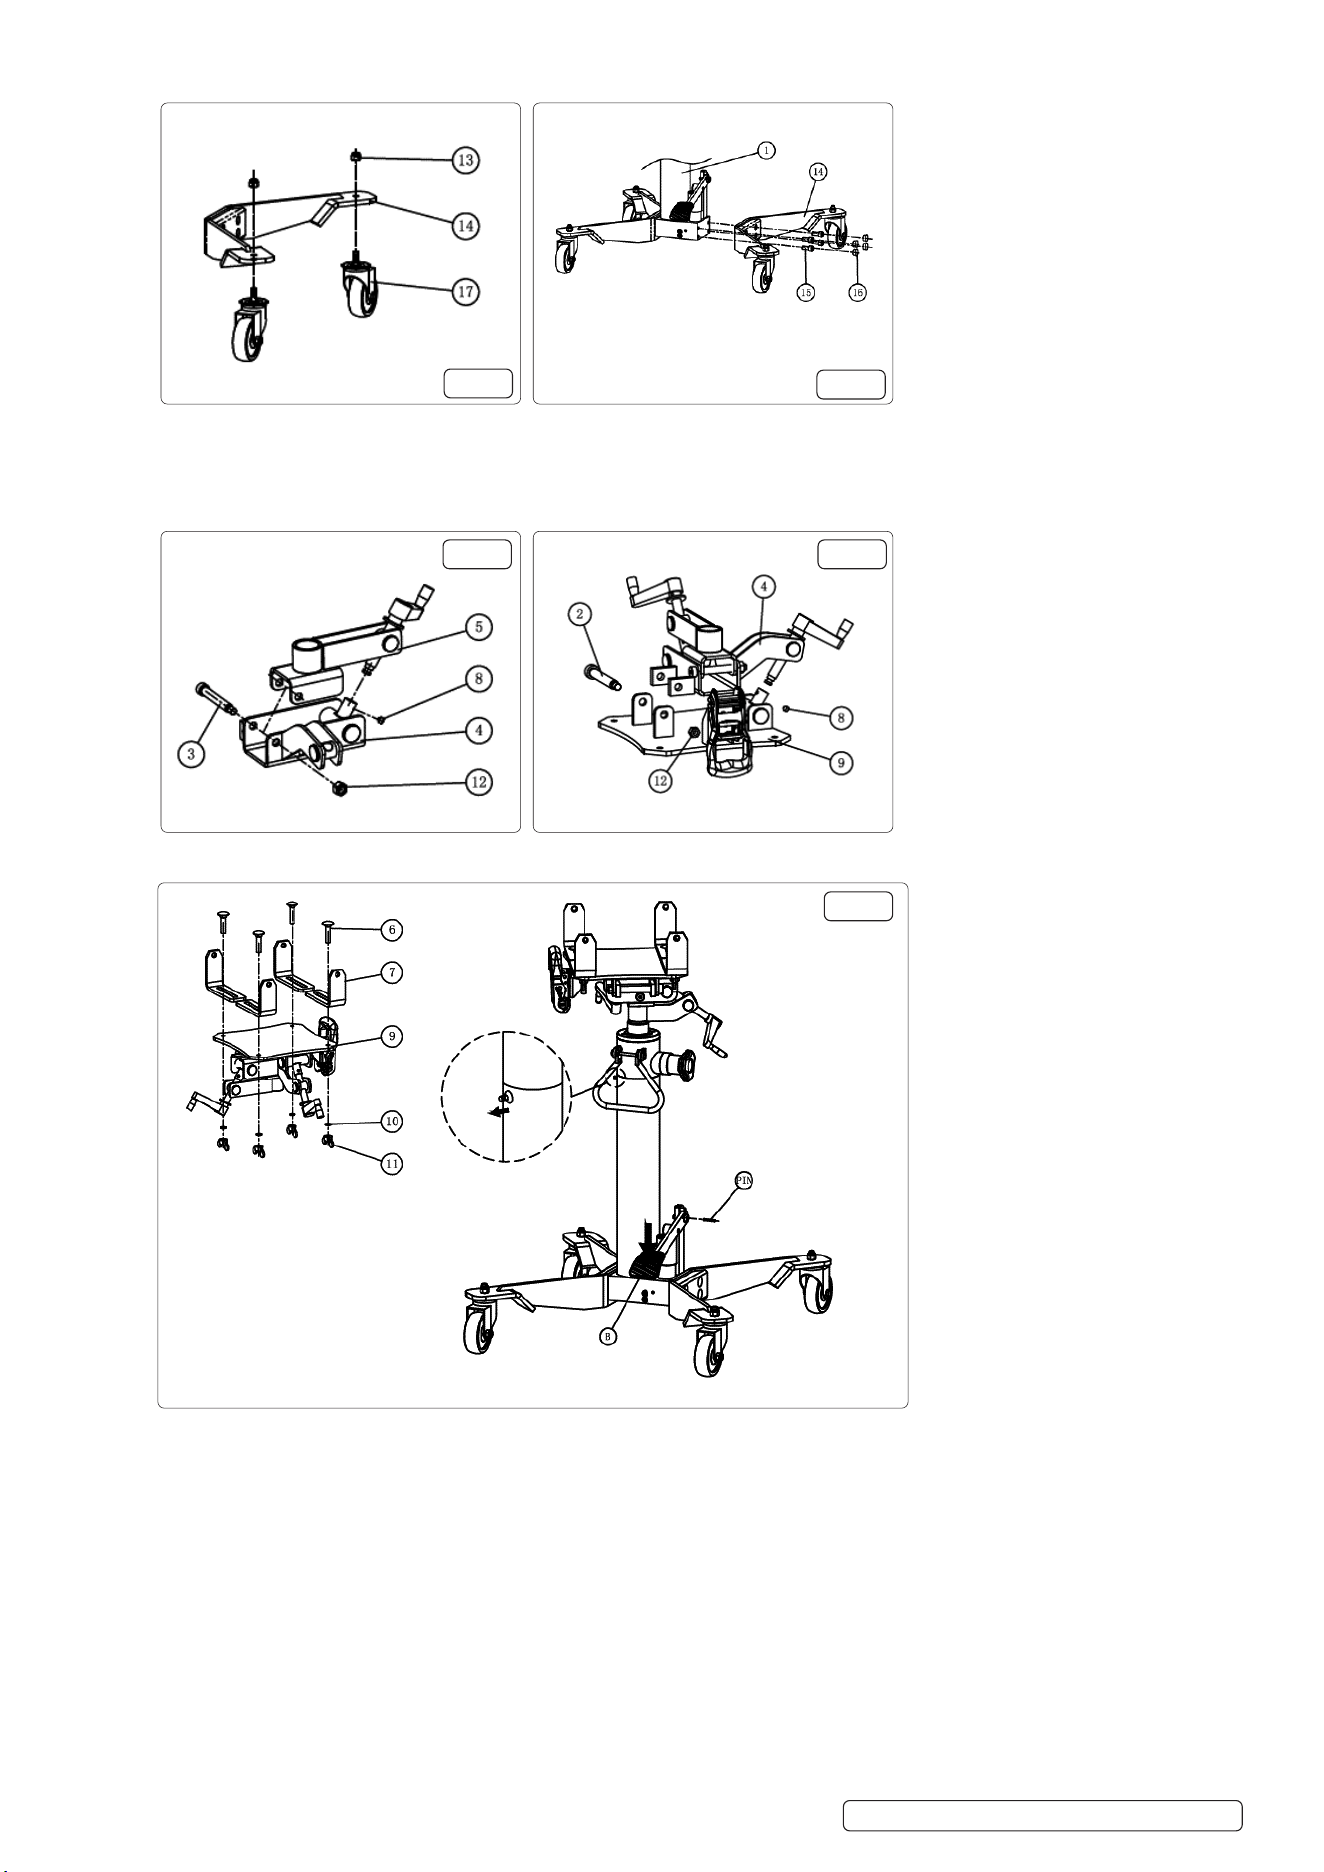
4.1. Usescrew13toinstallthewheel17ontothefootbase14andtightenthescrew(g.2).
4.2. Install the assembled foot base 14 onto the cylinder 1 with the screws 15. When all four wheels are on the ground , lock the screws in
turnandcovertheholeplug16(g.3).
4.3. InstalltheX-axisbracketassembly5ontotheYaxsisbracketassembly4andxthemwithplugscrewsx3andscrewnuts12.Then
install,andlockthesetscrews8asshowning.3
4.4. Installasshowning.4ttheinstaledY-axisbracketassembly4ontothepanel9andxthemwithsetscrews2andscrewnuts12.
4.5. Fixthesupportstrip7onthepanelassembly9withroundheadsquareneckbolts6,atwashers10andwingnuts11,placethe
assembledbracketontheoilcylinder1asshowning.5.Thenpullouttheexhaustrod,pressdownonthefootpedalBandremove
the pin.
NOTE: The exhaust rod cannot completly come out of the rubber plug.
© Jack Sealey Limited
Original Language Version
g.2
g.3
g.4 g.5
g.6
500TTJ.V3, 800TTJ.V2 Issue 1 02/10/23
5. PRE-USE CHECK LIST
5.1. Before each use, check jack is in sound working order, use following list to form a habitual pre-check procedure. Check items are not:
damaged, broken, cracked, bent, malfunctioning, distorted, worn, loose, damage to welds, leaking, dirty, noisy or missing.
WARNING! DO NOT use jack if any suspect part is found, or if believed to have been subjected to abnormal load or shock.
Immediately remove from service and contact an authorised service agent.
5.2. PURGE THE AIR FROM THE HYDRAULIC CYLINDER
5.2.1. Using the Pump Pedal, slowly pump the cylinder. You will observe trapped air escaping from the valve in the Air Vent Valve assembly.
Continue to pump until all air is purged.
6. OPERATION
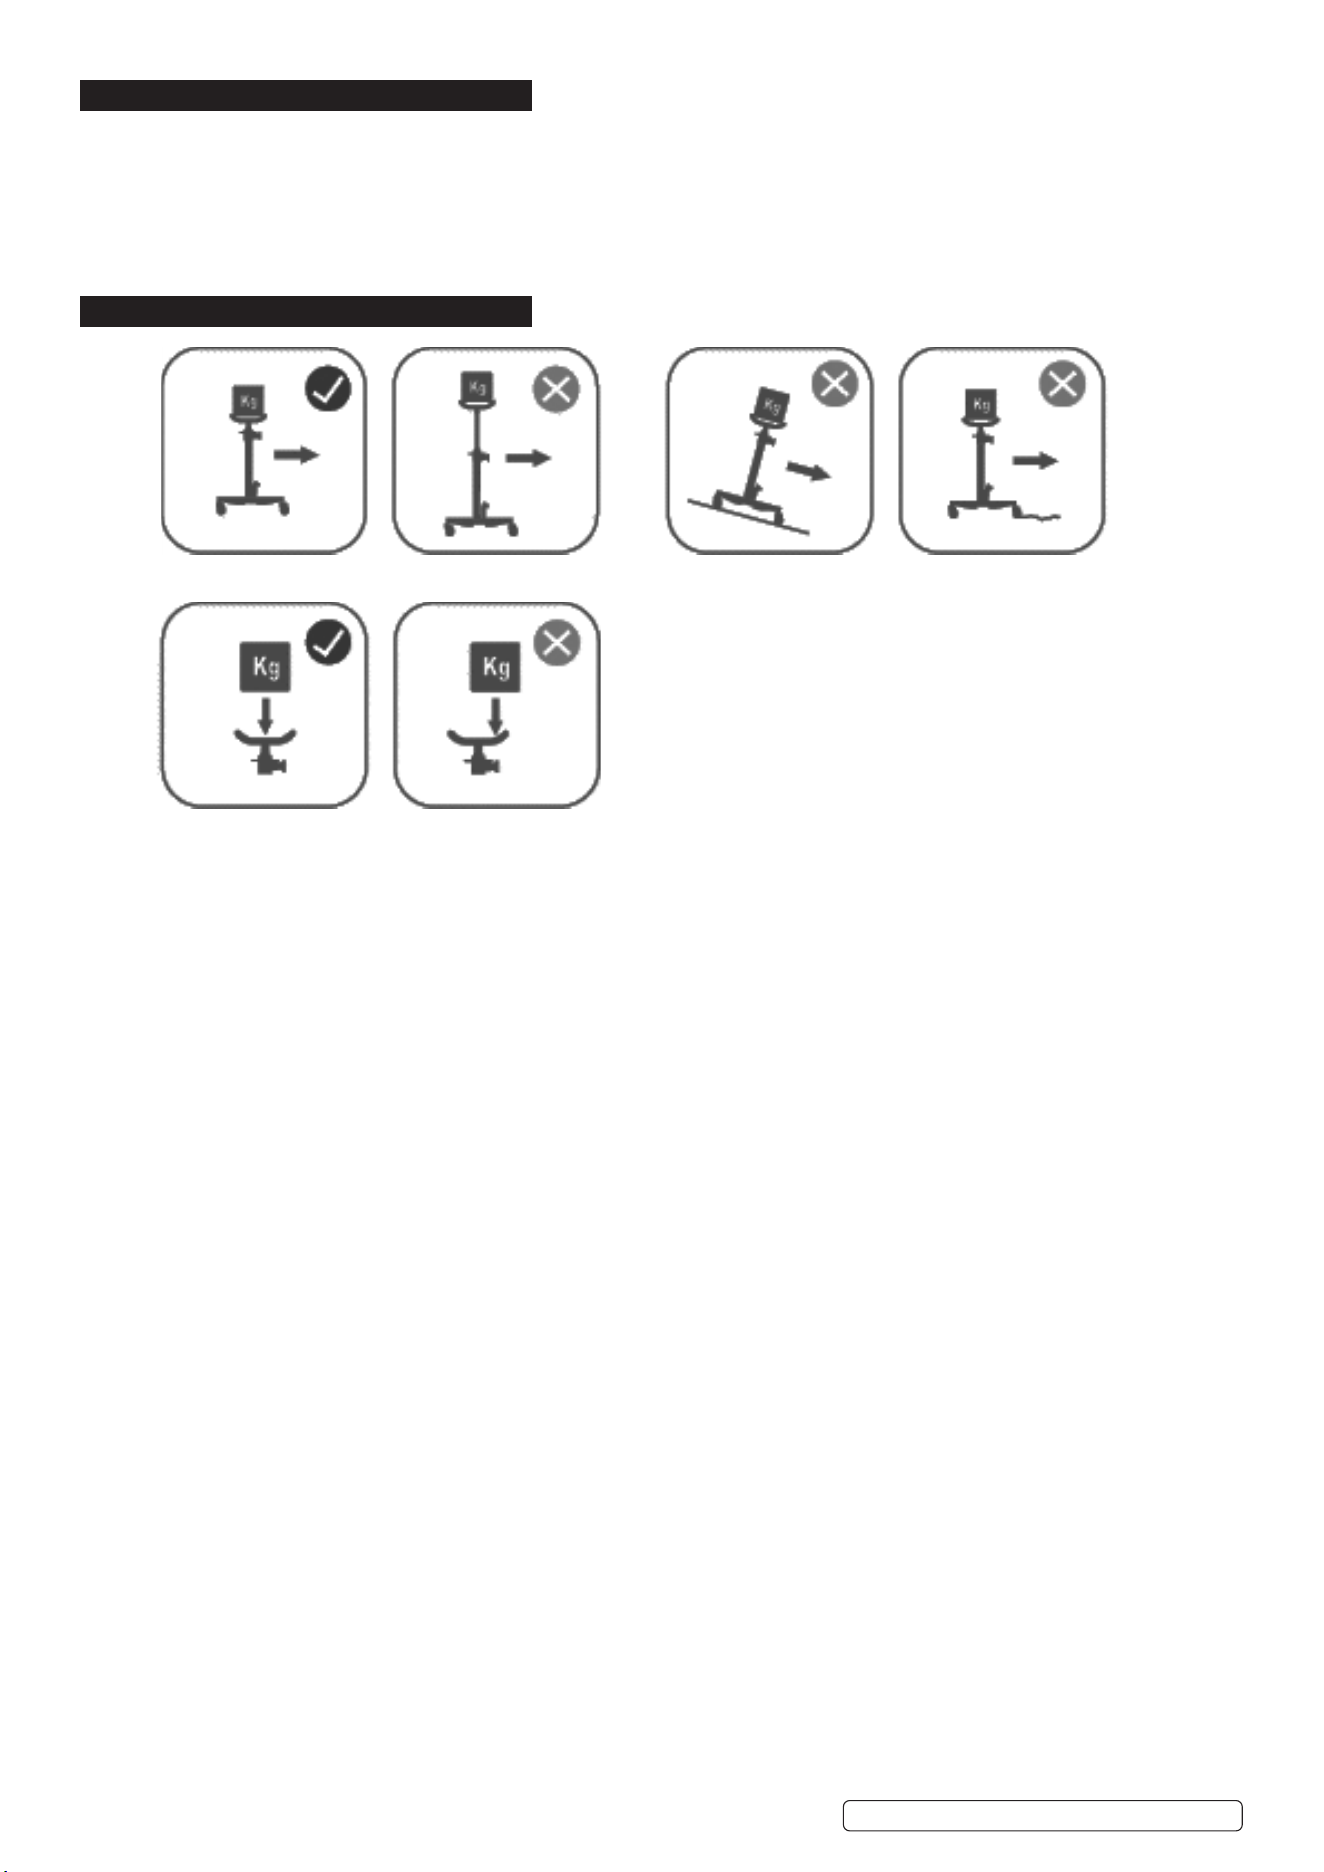
Lower to the lowest position during transporting. Do not use on inclined and uneven ground
Do not place eccentrically
WARNING! The warnings, cautions and instructions discussed in this instruction manual cannot cover all possible conditions
and situations that may occur. It must be understood that common sense and caution are factors which cannot be built into this
product, but must be applied by the operator.
WARNING! Before use, ensure that you read, understand and apply the Safety Instructions in Section 1.
WARNING! Ensure you prepare the vehicle correctly before attempting to use the Hydraulic Transmission Jack.
6.1. POSITIONING THE JACK BENEATH THE LOAD
NOTE: Before use, ensure that the transmission weight and size does not exceed the capacity of the jack.
6.1.1. Ensure the vehicle from which the gearbox or transmission is to be removed is correctly positioned, raised and locked on an
appropriate lift system.
6.1.2. Ensure that there are no other persons around, or under, the vehicle.
6.1.3. Ensure the saddle is in the lowest position. Use the handle to transport and centrally position the jack beneath the transmission.
6.1.4. Raise the saddle by pumping the jack foot pedal.
6.1.5. When the saddle is just beneath the transmission, re-adjust the alignment if necessary to centralise the saddle.
6.2. LIFTING OF TRANSMISSION JACK
6.2.1. ClosereliefvalvehandleAg.1
6.2.2. PressoilpumppedalBg.1.
Warning! Ensure the load is central and stable on the jack saddle and that it is fixed securely.
Before you loosen the mounting bolts, wrap the rachet strap over the top of the transmission, and attach the strap tightly
before attempting to lift, lower, or transport it.
6.3. LOWERING OF TRANSMISSION JACK
6.3.1. Rotate the pressure relief handle counterclockwise to loose the handle, and the pressure relief valve will be closed automatically.
6.4. TRANSPORTING THE LOAD
WARNING! Ensure you read, understand and apply the safety instructions in Section 1.
6.4.1. Ensure the jack saddle is fully lowered and the load is fixed in place before attempting to lift, lower, or transport the load.
6.4.2. Transport the load over level and solid ground, preferably concrete, and ensure that the floor is swept clean beforehand.
6.4.3. Be diligent in continually monitoring the load in transit.
6.4.4. Keep all other personnel at a safe distance.
▲ DANGER! DO NOT use on tarmacadam, or any soft surface as jack may sink or topple. Serious injury or death may result.
▲ DANGER! If the jack tips or leans, STOP WHAT YOUR ARE DOING AND MOVE QUICKLY TO A SAFE DISTANCE. DO NOT TRY
TO HOLD OR STEADY THE JACK. Serious injury or death may result.
6.5. RE-INSTALLING A GEARBOX
6.5.1. To transport, reposition beneath a vehicle, and raise a load up, reverse the procedures outlined above.
Original Language Version
© Jack Sealey Limited
500TTJ.V3, 800TTJ.V2 Issue 1 02/10/23

7. MAINTENANCE
NOTE: Jacks shall be maintained and repaired in accordance with the manufacturers, instructions. Such maintenance and repair shall
becarriedoutbyqualiedpersons.
7.1. STORAGE
7.1.1. When the jack is not in use, the saddle must be in the lowest position to minimise ram and piston corrosion and stored in a dry place.
7.2. Check whether the parts of the transmission jack are oil leakage, deformation, damage, etc. everyday.
7.3. When refilling the hydraulic system, the characteristics of the hydraulic fluid used in the jack and the level of hydraulic fluid as it is given
by the manufacturer shall be observed
7.4. Keep the jack clean and wipe off any oil or grease. Lubricate all moving parts with acid free oil. Clean exposed areas with a clean oiled
cloth.
7.5. The oil cylinder is a sealed unit and must not be accessed. For service contact your authorised stockist.
WARNING! Only a good quality Jack oil, such as SEALEY HYDRAULIC JACK OIL must be used.
7.6. The hydraulic oil volume for the model is as follows: STL1000 : 2.0L STL600 :1.8L
8 DO NOT use brake fluid.
7.7. Before each use, follow the pre-check list to ensure components are not damaged, broken, cracked, bent, malfunctioning, distorted,
worn or loose.
7.8. Ensure there is no visible damage to welds. If any suspect item is found, remove the jack from service and take the necessary action
to remedy the problem.
8 DO NOT use the jack if you believe it to have been subjected to abnormal load or shock.
7.9. Periodically check the pump piston and piston rod for signs of corrosion.
NOTE: NO RESPONSIBILITY IS ACCEPTED FOR INCORRECT USE OF THE JACK.
7.10. No modifications shall be carried out which adversely affect the compliance of the jack with this standard.
7.11. Hydraulic products are only repaired by local service agents. We have service/repair agents in all parts of the UK.
8 DO NOT Return the jack to us. Please telephone 01284 757500 to obtain the address and ‘phone number of your local agent. If the jack
is under guarantee, please contact your local stockist.
8. TROUBLESHOOTING
8.1. The jack cannot be lifted to the highest position: check and add hydraulic oil.
8.2. Poor oil pump (empty pump): check whether the exhaust rod is pulled out.
8.3. Lowering under load (not keeping pressure well): check whether the pressure relief knob is closed tightly.
© Jack Sealey Limited
Original Language Version
Sealey Group, Kempson Way, Suffolk Business Park, Bury St Edmunds, Suffolk. IP32 7AR
01284 757500 sales@sealey.co.uk www.sealey.co.uk
Note: It is our policy to continually improve products and as such we reserve the right to alter data, specifications and component parts without prior
notice. Please note that other versions of this product are available. If you require documentation for alternative versions, please email or call
our technical team on technical@sealey.co.uk or 01284 757505.
Important: No Liability is accepted for incorrect use of this product.
Warranty: Guarantee is 12 months from purchase date, proof of which is required for any claim.
ENVIRONMENT PROTECTION
Recycle unwanted materials instead of disposing of them as waste. All tools, accessories and packaging should be sorted,
taken to a recycling centre and disposed of in a manner which is compatible with the environment. When the product
becomes completely unserviceable and requires disposal, drain any fluids (if applicable) into approved containers and
dispose of the product and fluids according to local regulations.
REGISTER YOUR
PURCHASE HERE
500TTJ.V3, 800TTJ.V2 Issue 1 02/10/23