
THIS INSTRUCTION BOOKLET CONTAINS IMPORTANT SAFETY INFORMATION. PLEASE READ AND KEEP FOR FUTURE REFERENCE.
USER’S MANUAL
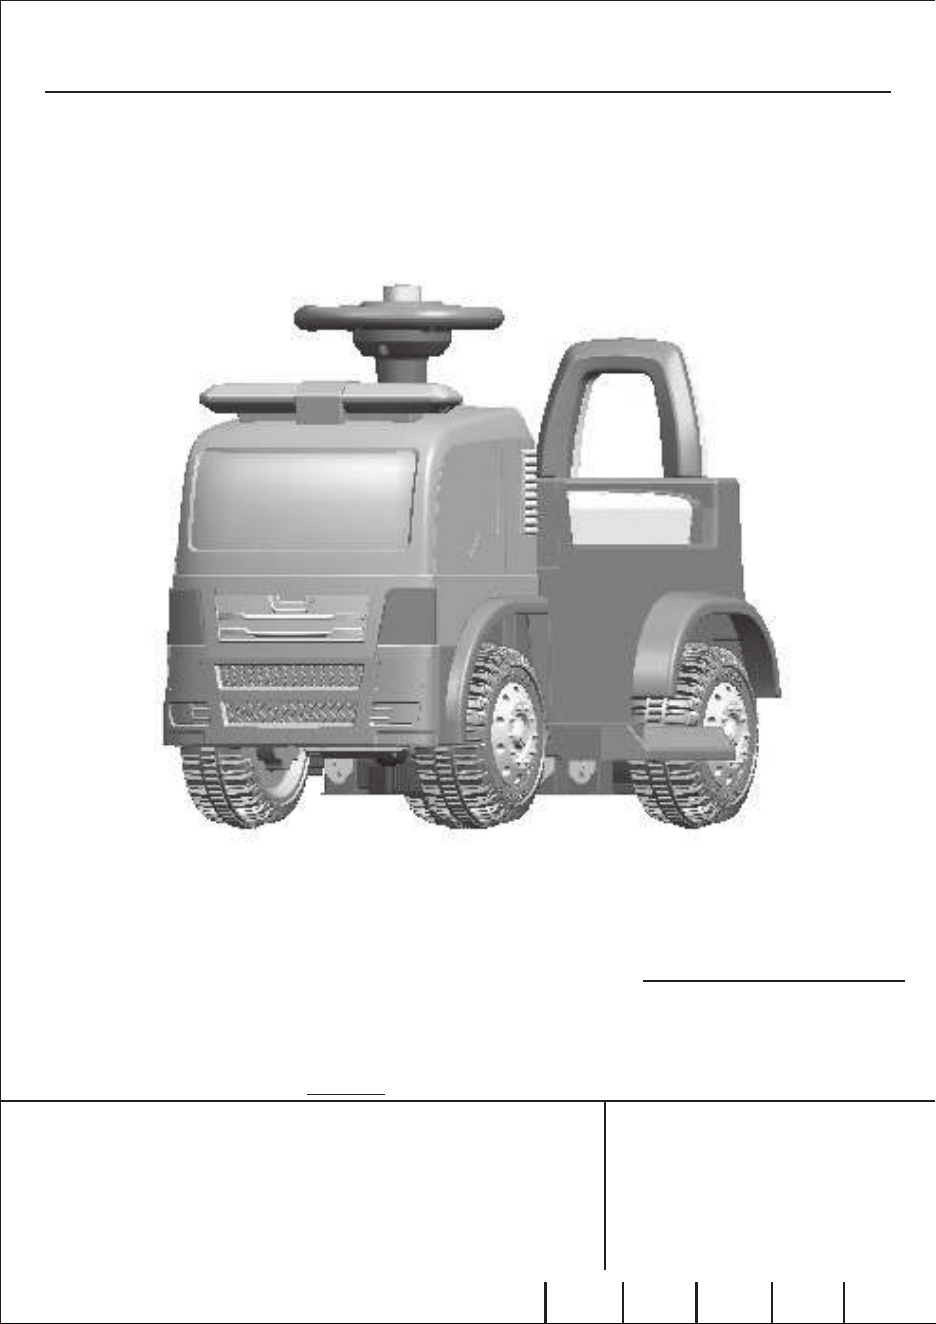
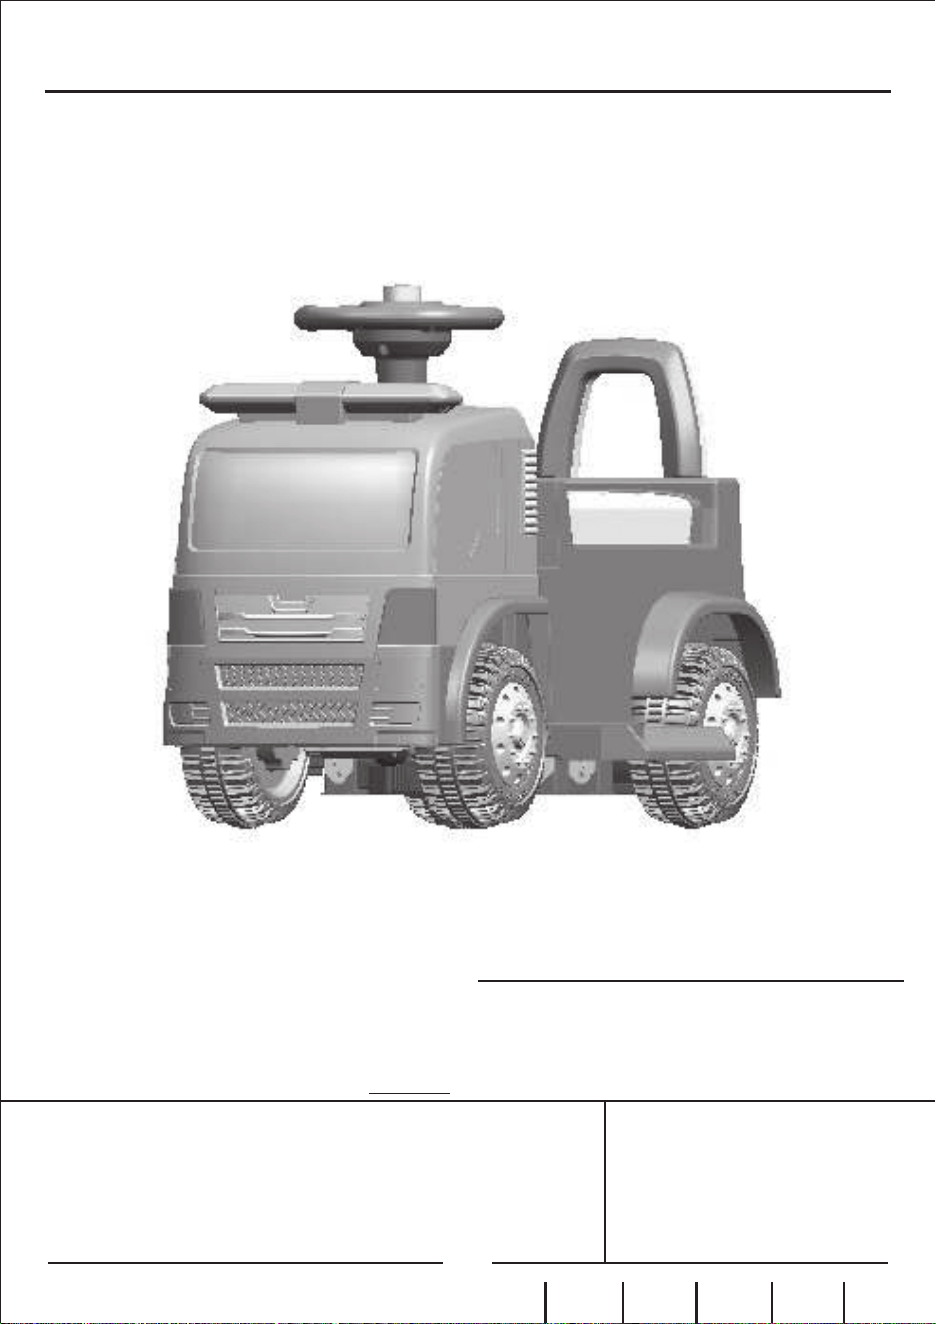
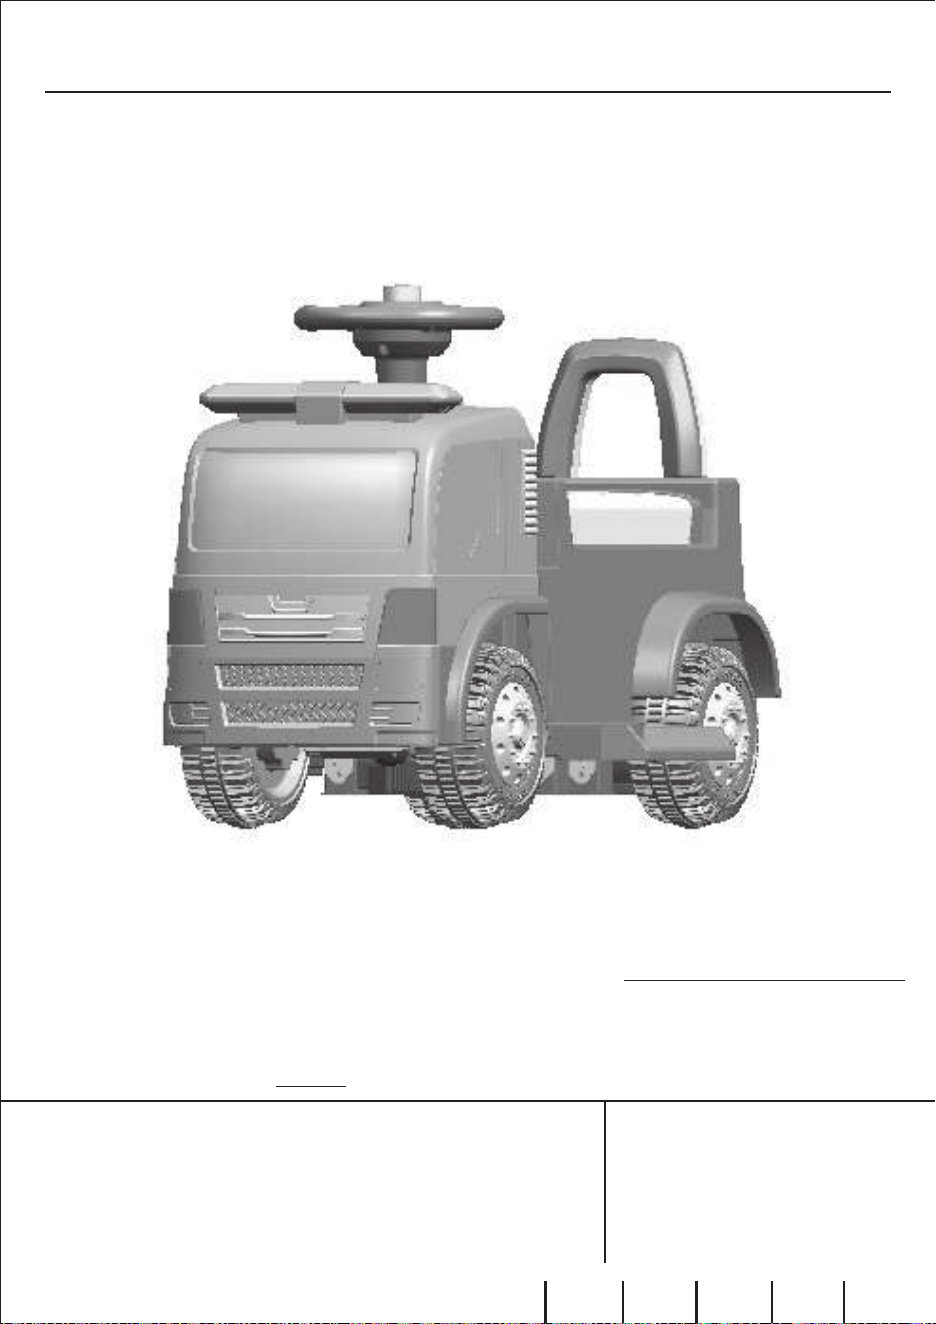
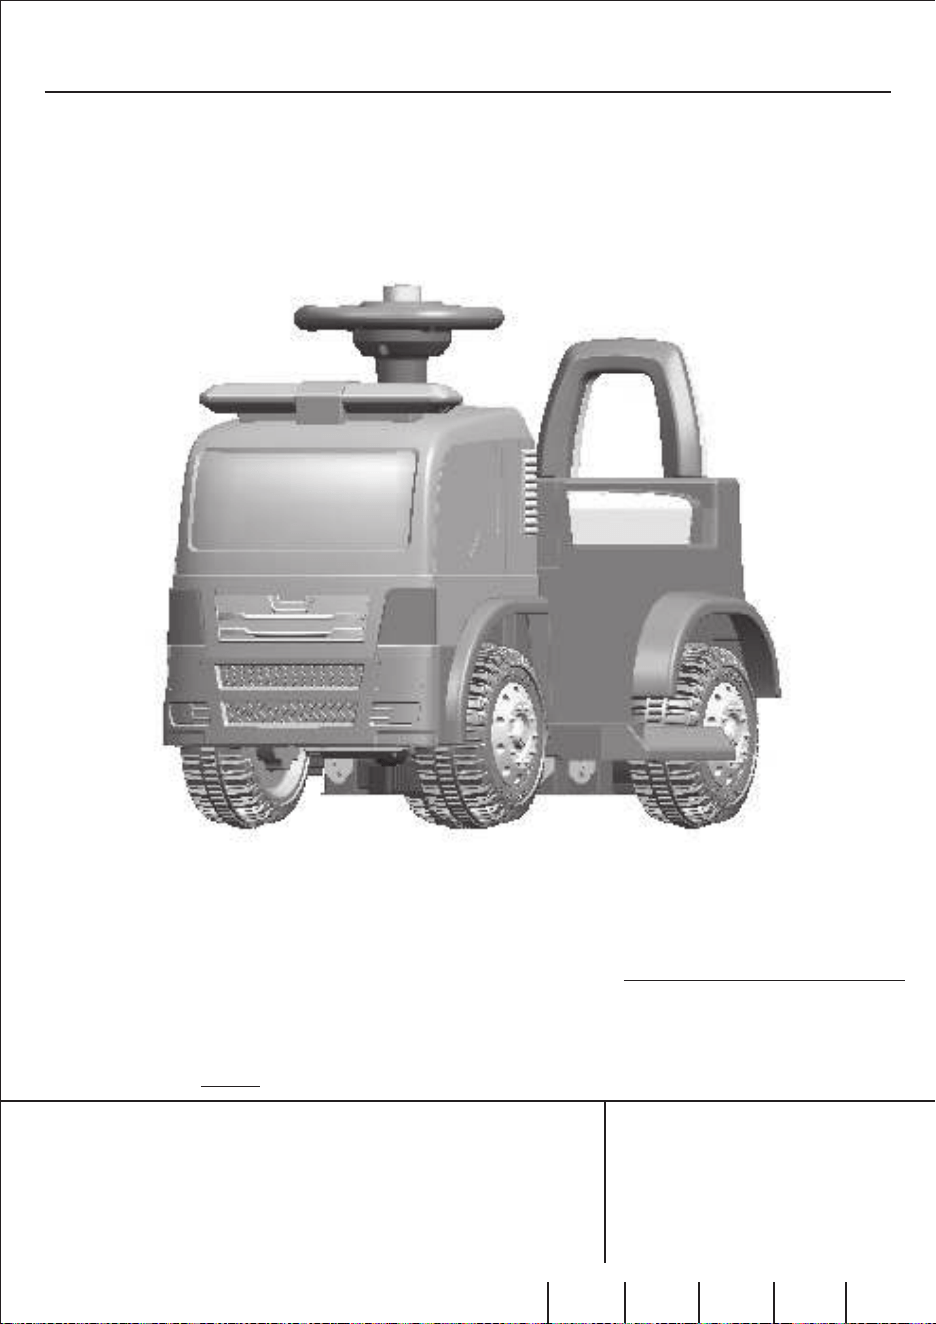
Ride On Firetruck
TY327063DE
EN DE FR ES IT PL
2 3
Before You StartBefore You Start
Please read all instructions carefully.
Retain instructions for future reference.
Seperate and count all parts and hardware.
Read through each step carefully and follow the proper order.
We recommend that, where possible, all items are assembled near to the
area in which they will be placed in use, to avoid moving the product
unnecessarily once assembled.
Always place the product on a flat, steady and stable surface.
Keep all small parts and packaging materials for this product away from
babies and children as they potentially pose a serious choking hazard.

4
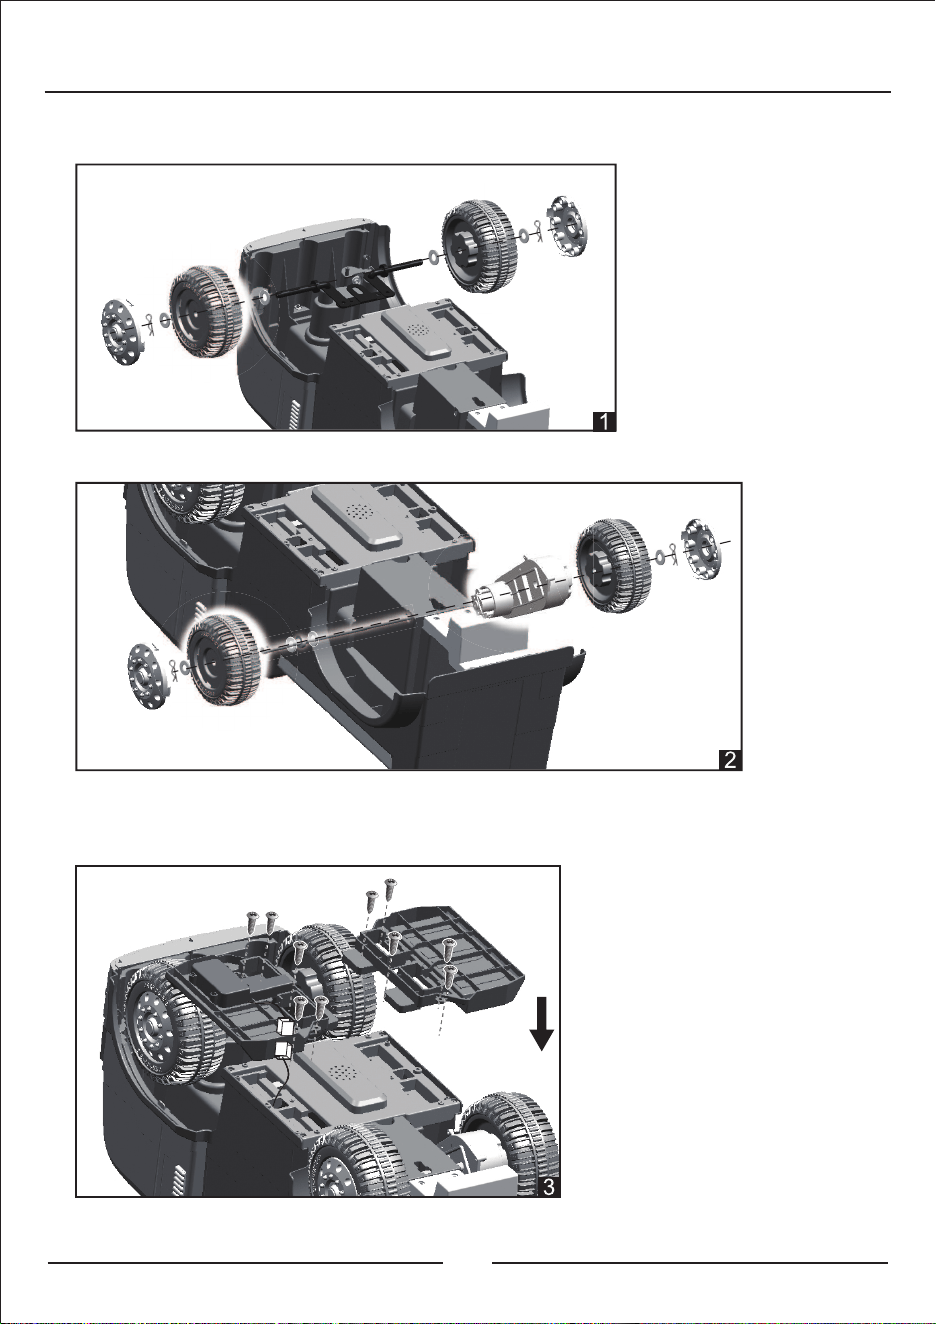
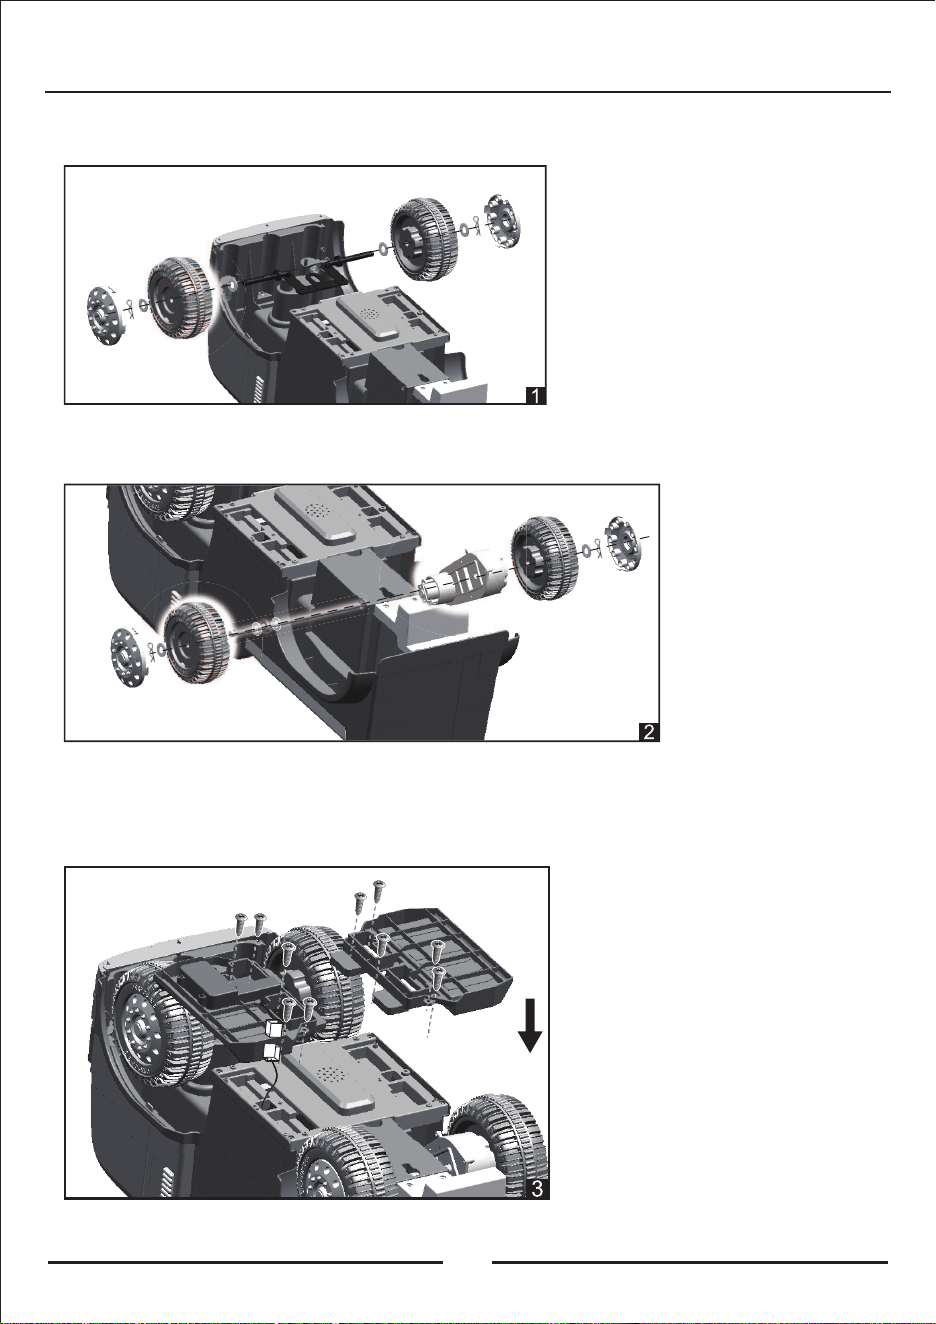
How to assemble
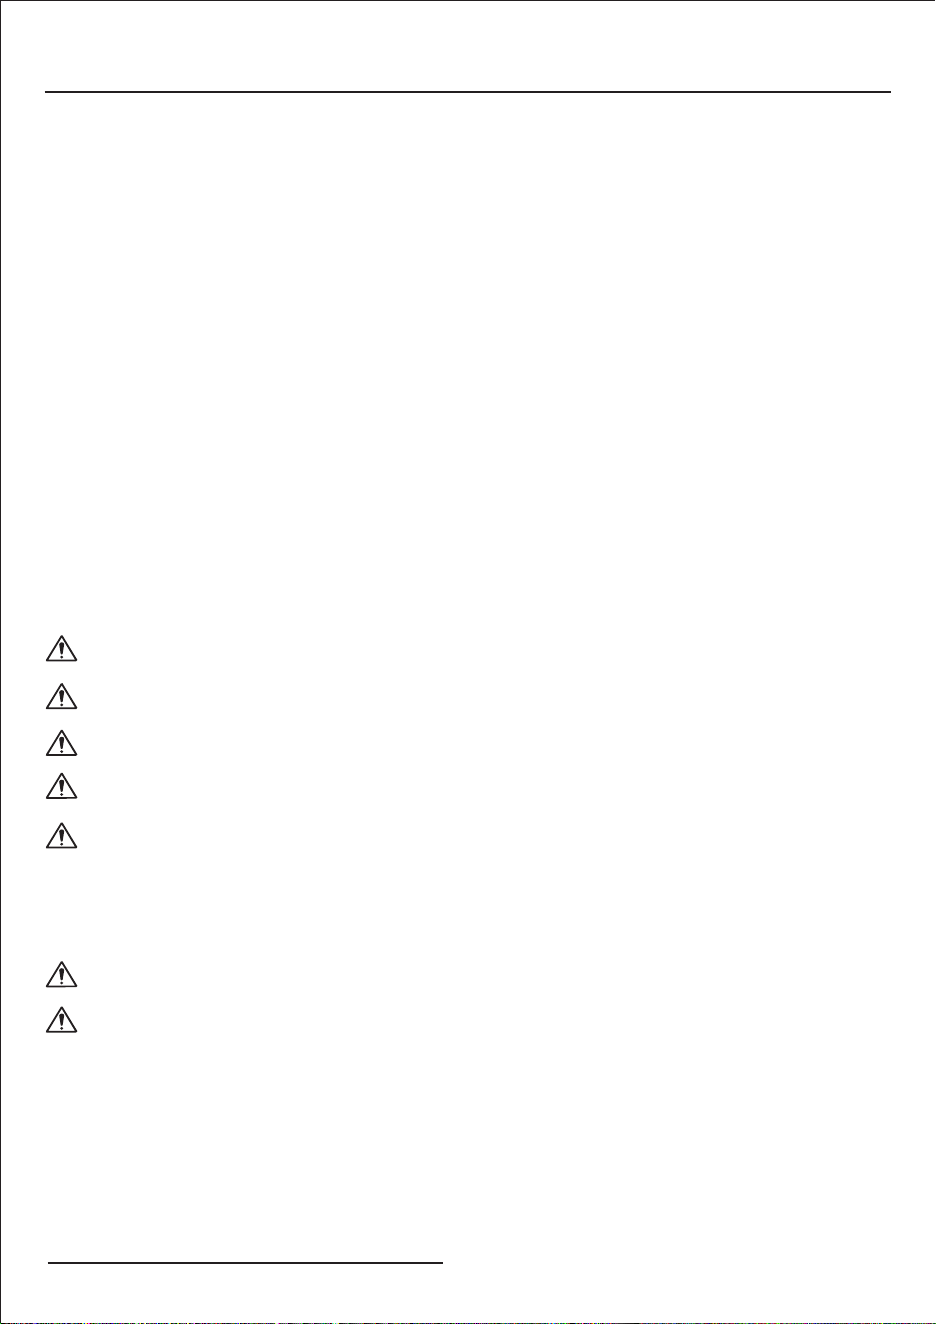
1. Add gasket, wheel, gasket, cotter and wheel cover to each side of
steering wheel one by one. ( Figure 1 )
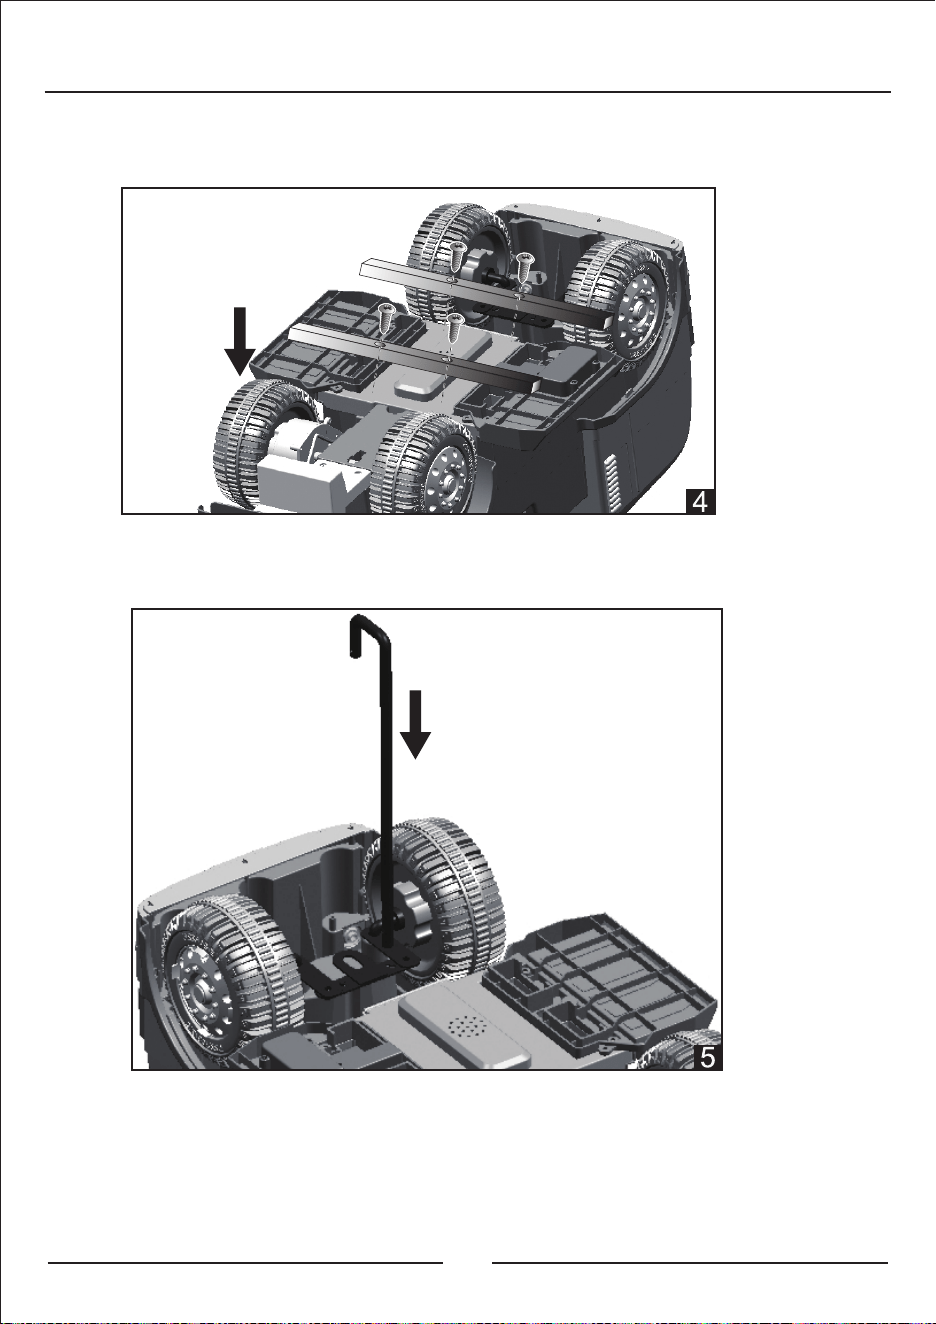
2. Add one gasket to rear axle from the right side, insert rear axle to car body.
Add motor to the right side and add gasket to the left side. Then add wheel,
gasket, cotter and wheel cover one by one. ( Figure 2 )
3. Connect two terminals
of car body and foot rest,
then assemble two foot
rest according to the
arrow and use 10pcs
M4*12 screw to tighten.
( Figure 3 )
5
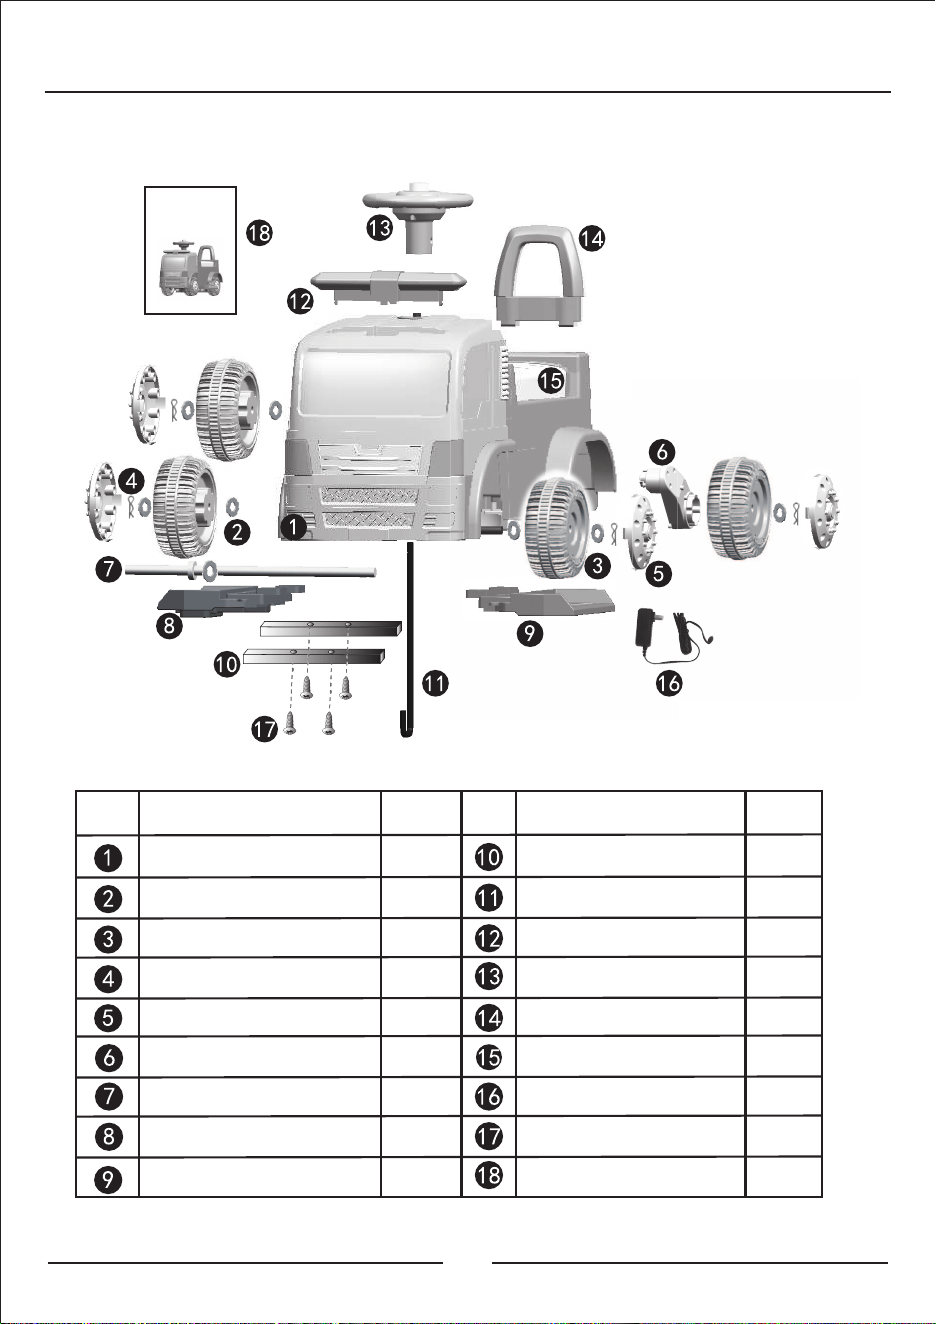
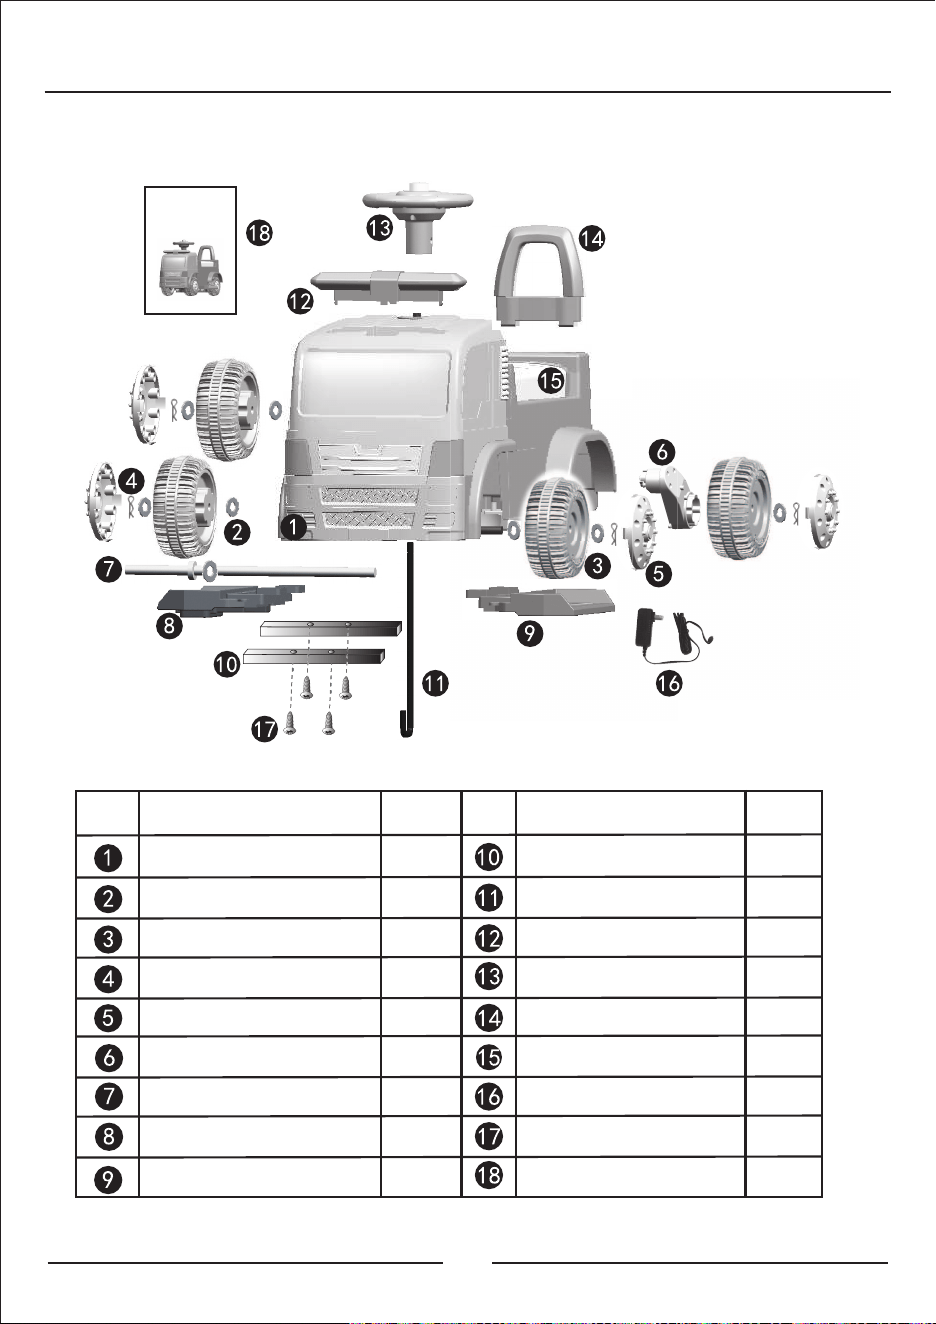
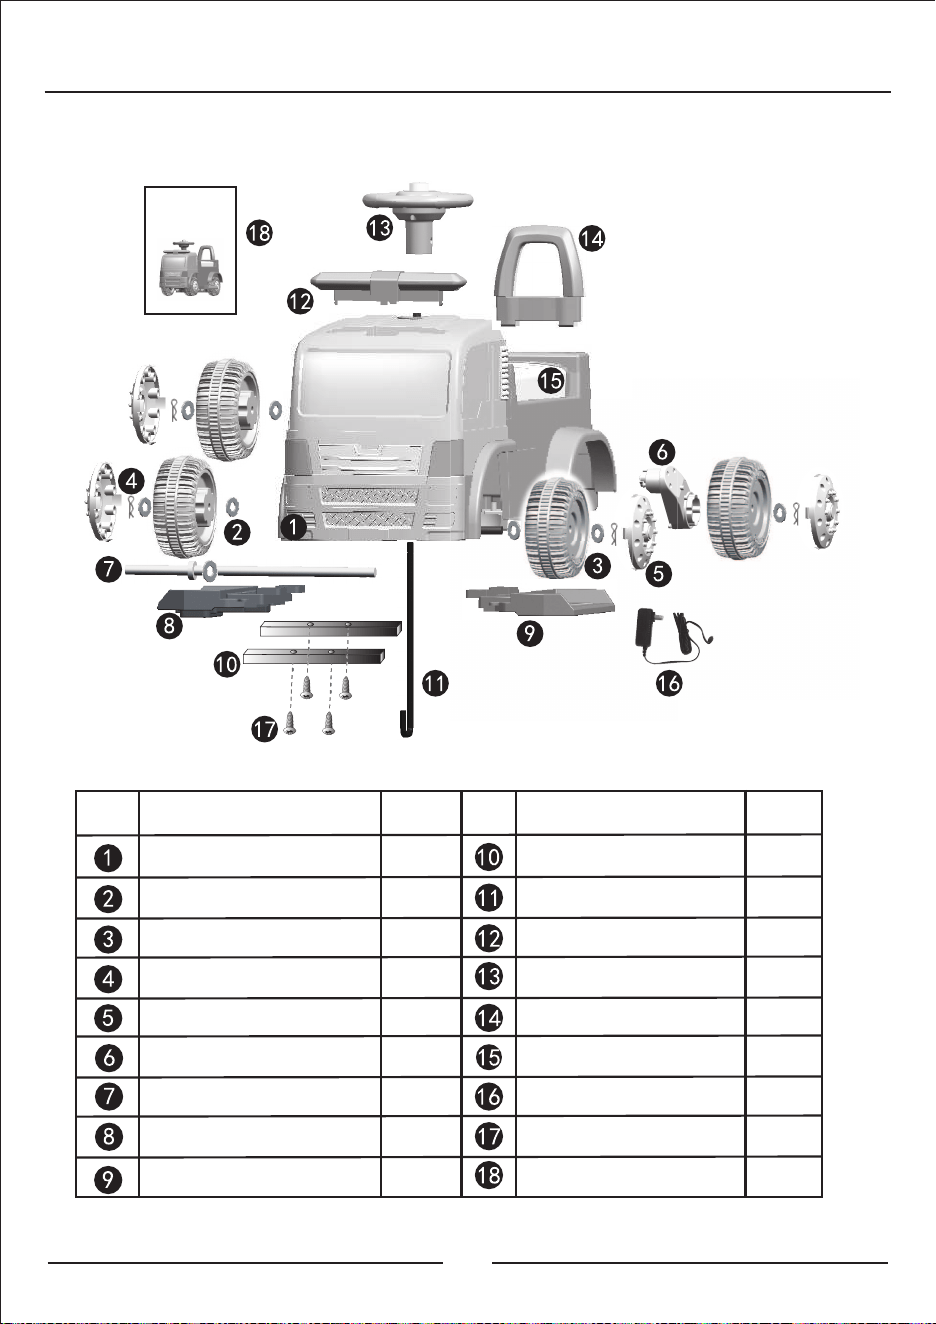
No. QtyPart name No. QtyPart name
Car body
Wheel
Left foot rest
Right foot rest
Rear axle
Motor
Wheel cover
Cotter
Gasket
1
4
1
1
1
1
4
4
8
2
1
1
4
1
1
1
1
1
Square tube
Alarm lamp
Guide book
M4*12 Screw
Charger
Seat
Back rest
Steering wheel
Steering lever
Part name
4
How to assemble
1. Add gasket, wheel, gasket, cotter and wheel cover to each side of
steering wheel one by one. ( Figure 1 )
2. Add one gasket to rear axle from the right side, insert rear axle to car body.
Add motor to the right side and add gasket to the left side. Then add wheel,
gasket, cotter and wheel cover one by one. ( Figure 2 )
3. Connect two terminals
of car body and foot rest,
then assemble two foot
rest according to the
arrow and use 10pcs
M4*12 screw to tighten.
( Figure 3 )
5
No. QtyPart name No. QtyPart name
Car body
Wheel
Left foot rest
Right foot rest
Rear axle
Motor
Wheel cover
Cotter
Gasket
1
4
1
1
1
1
4
4
8
2
1
1
4
1
1
1
1
1
Square tube
Alarm lamp
Guide book
M4*12 Screw
Charger
Seat
Back rest
Steering wheel
Steering lever
Part name
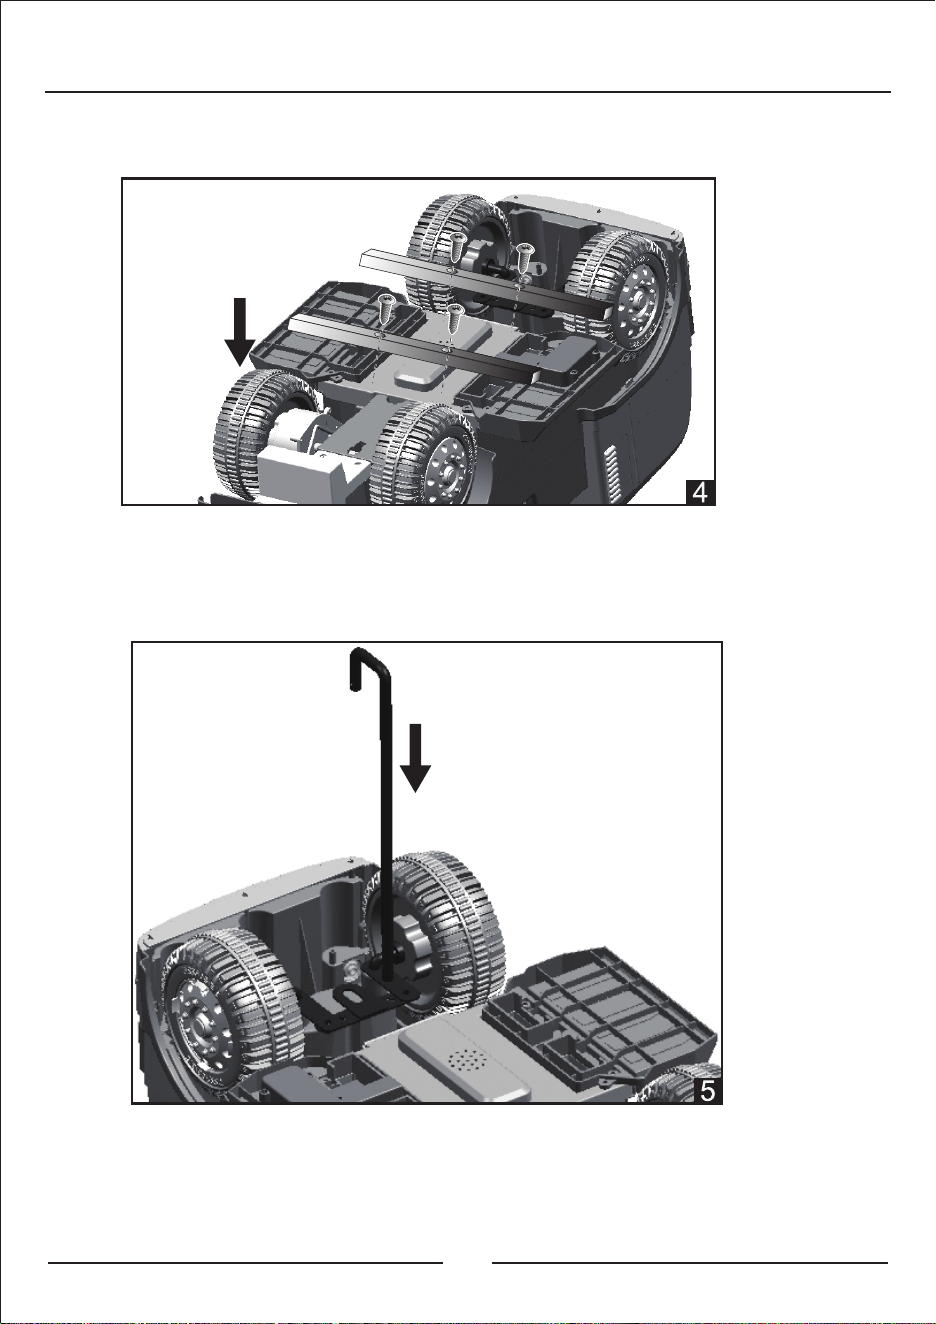
7
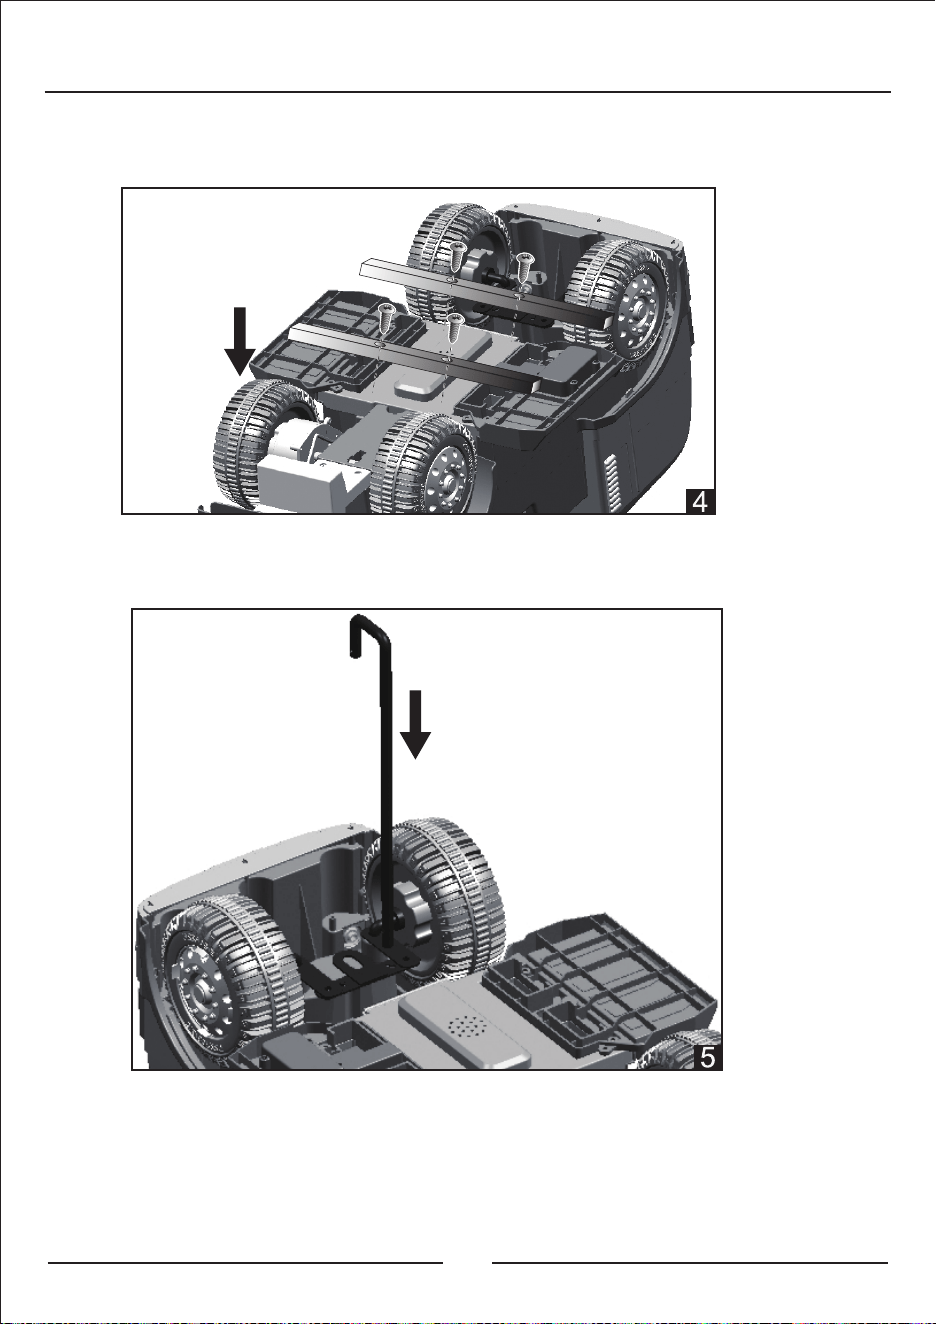
How to assemble
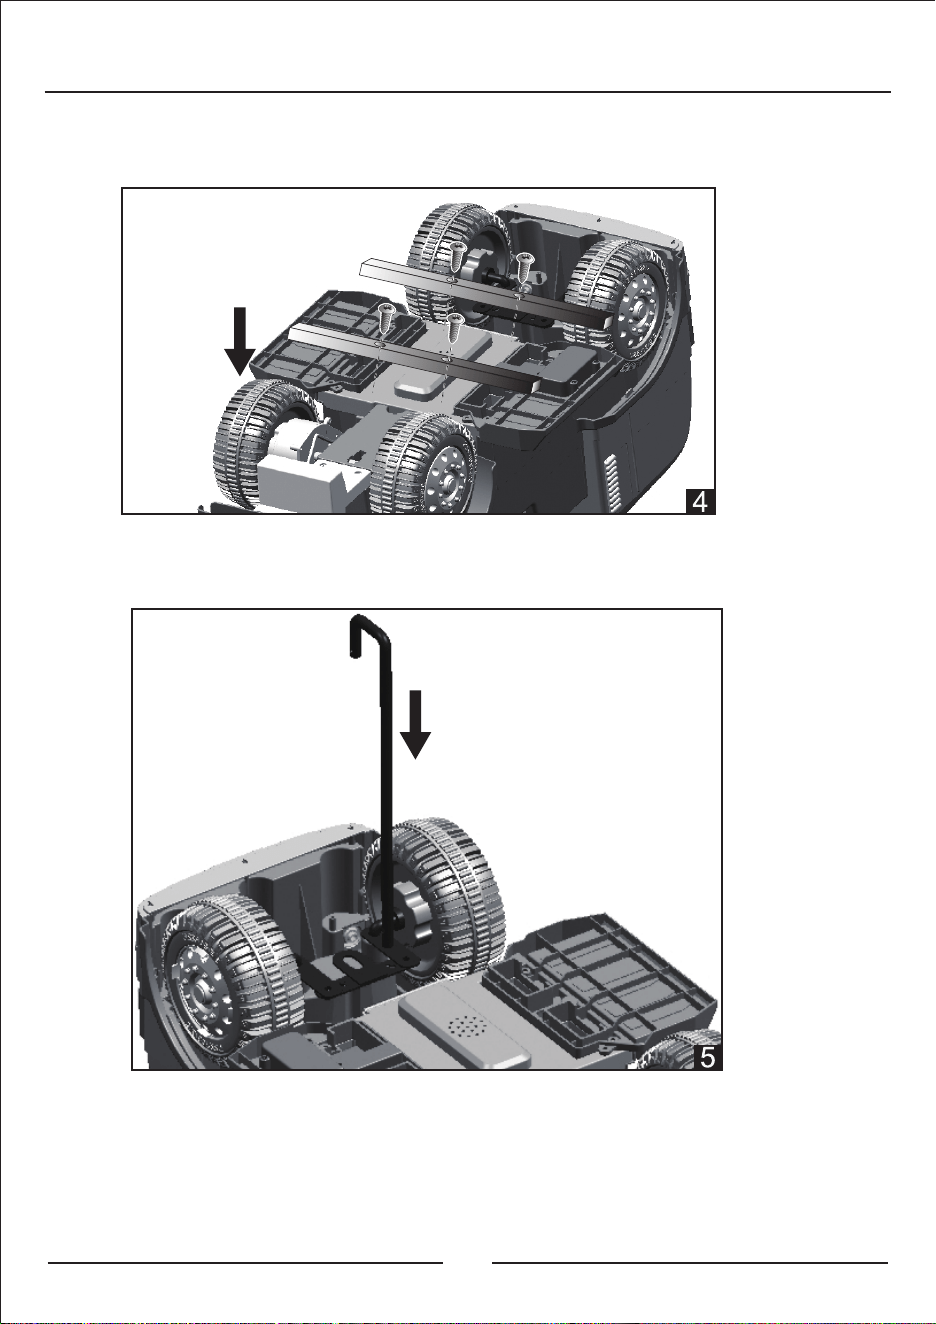
4. Assemble two square tubes to the car body according
to the arrow, then use 4pcs M4*12 screw to tighten.
( Figure 4 )
5. Insert the steering lever to the car body according to
the arrow, then turn over body by holding up steering
lever to make it fall. ( Figure 5 )
6
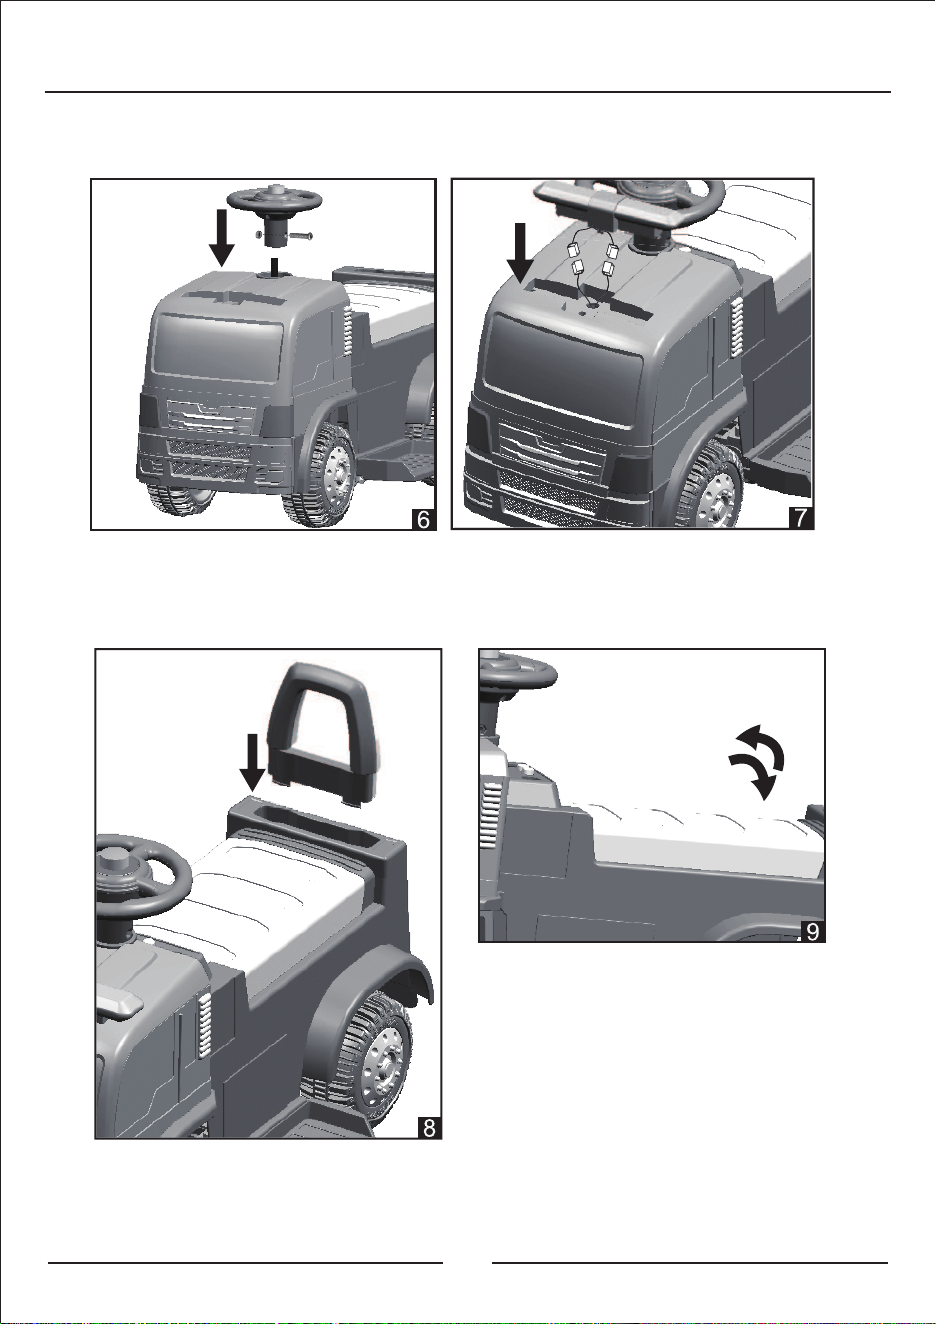
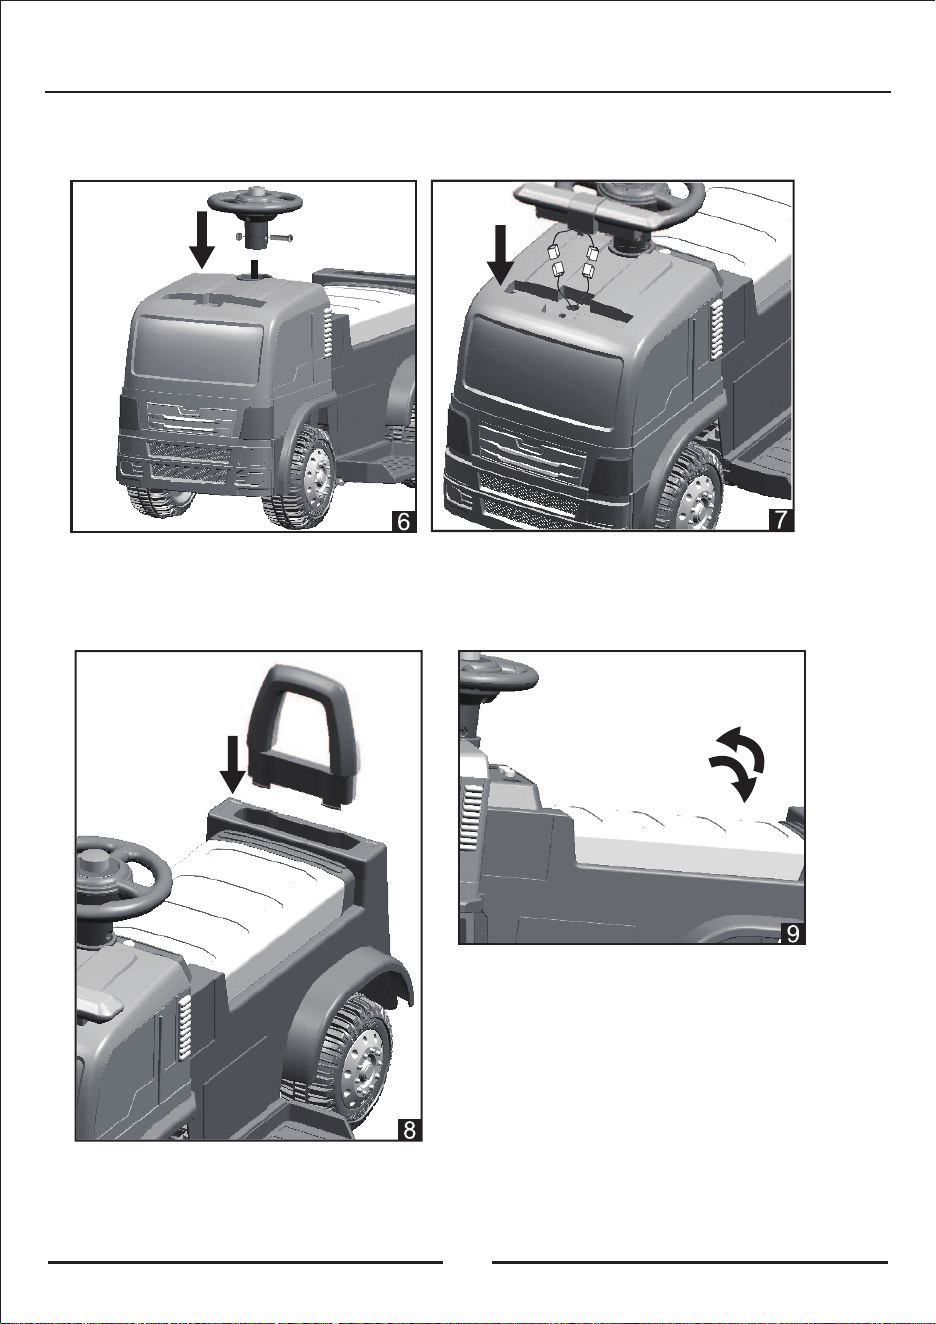
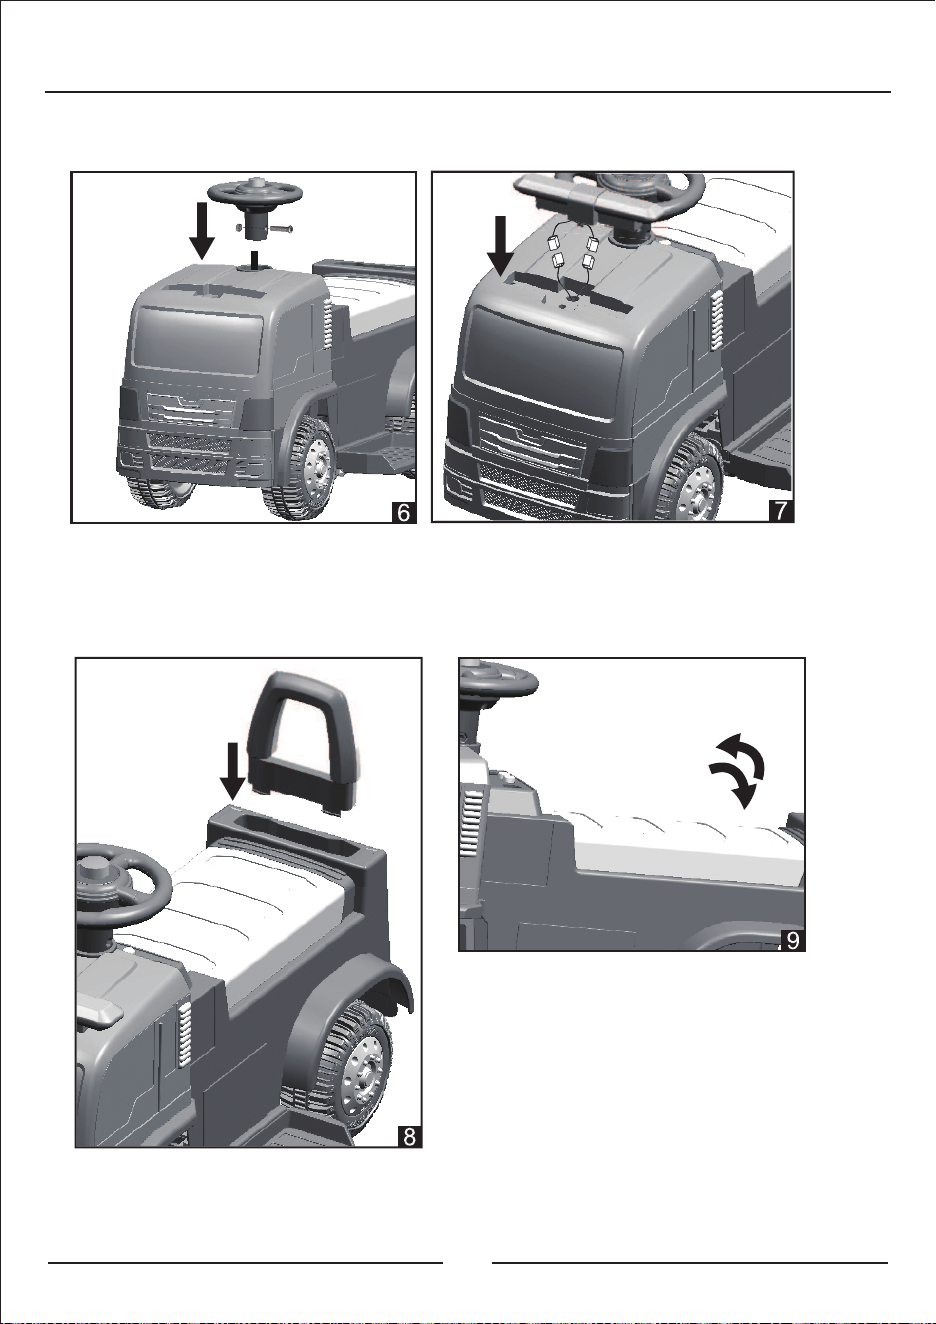
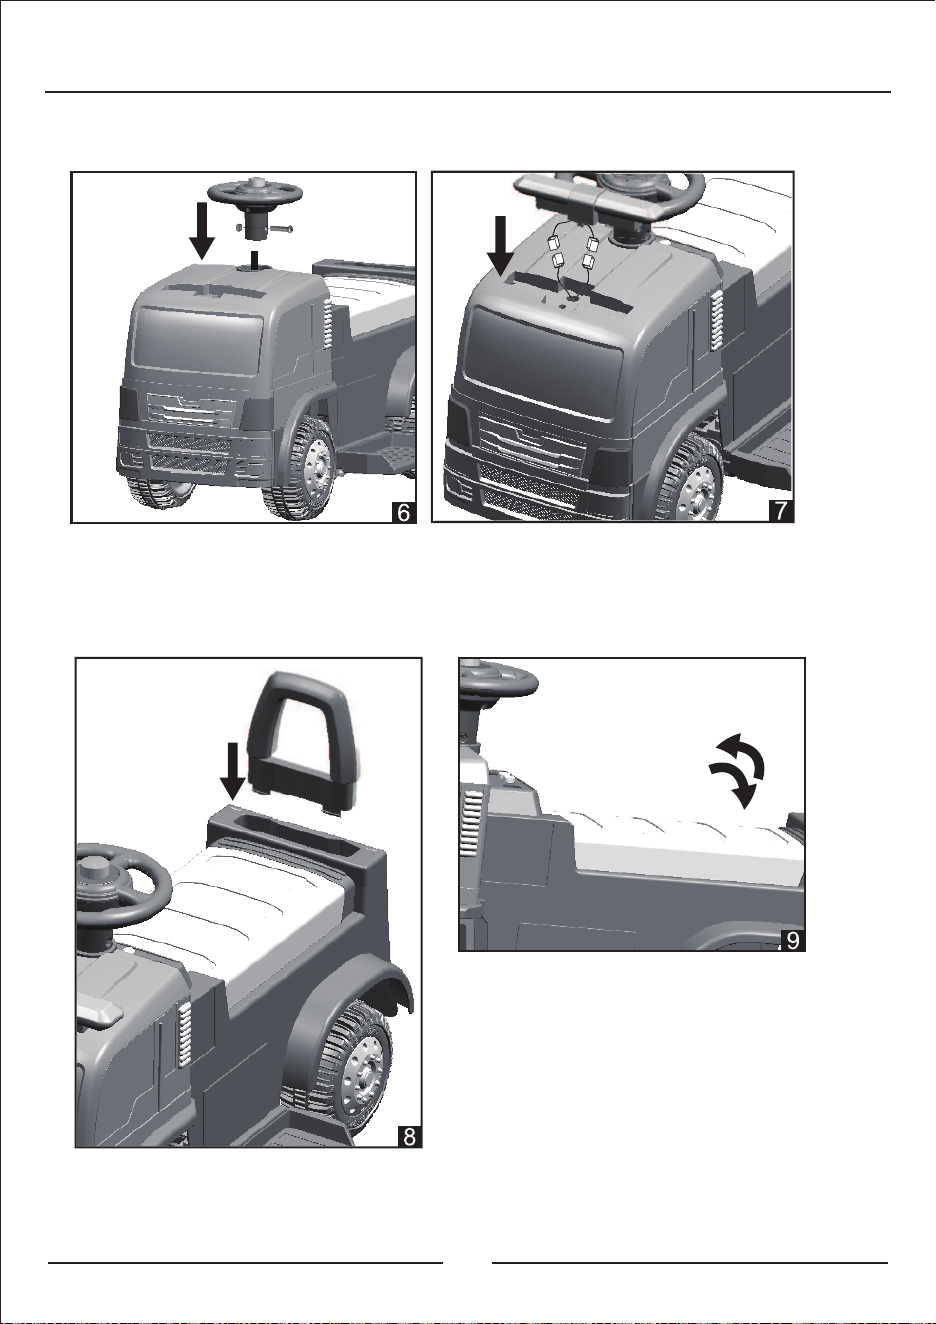
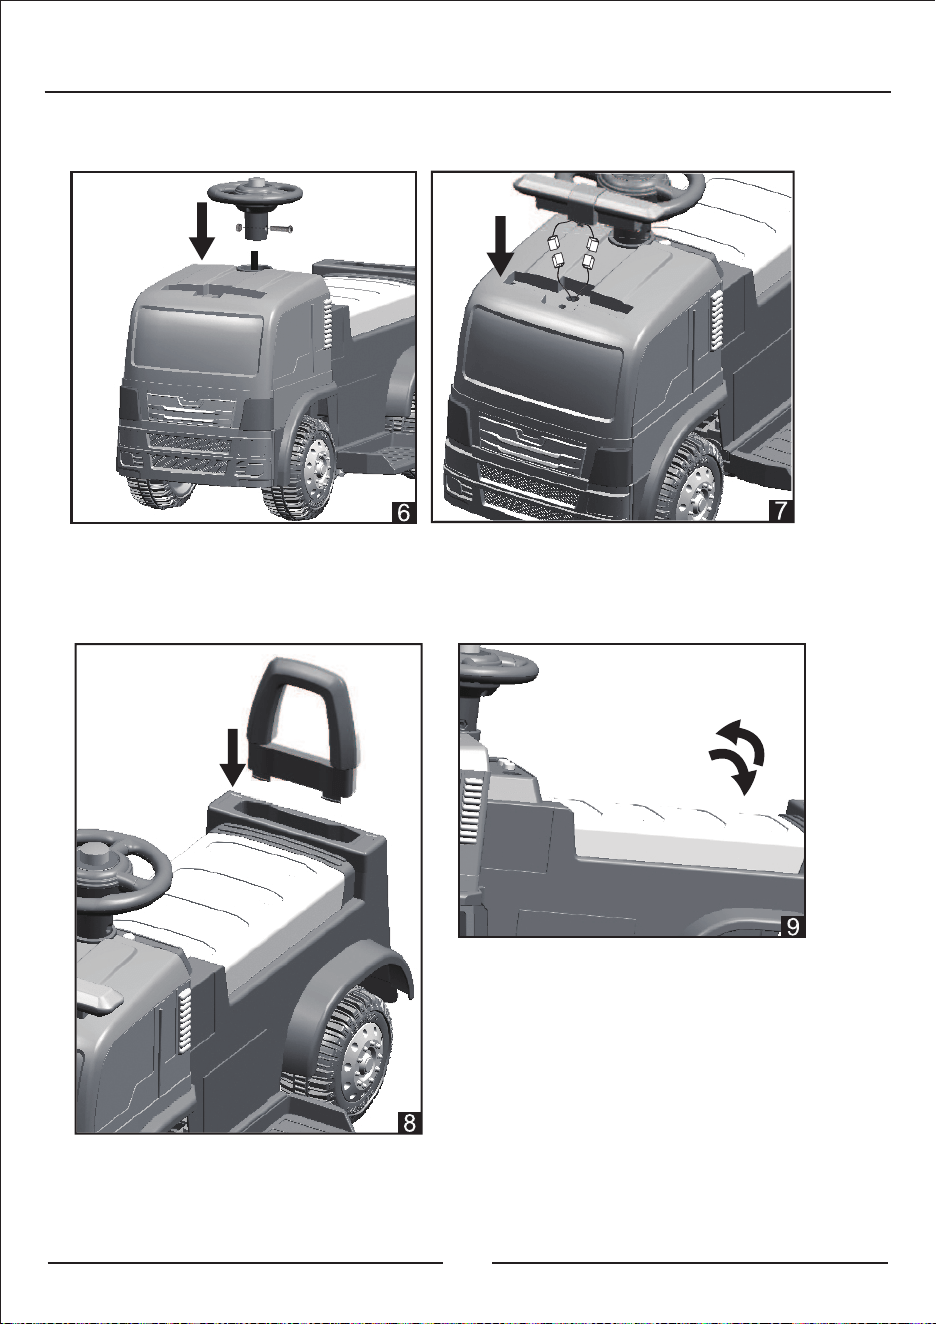
How to assemble
6. Insert steering wheel into the steering lever, then use screw to tighten.
( Figure 6 )
7. Connect two terminals of the alarm lamp and car body, insert alarm lamp
to the car body according to the arrow. ( Figure 7 )
8. Insert the back rest in the car body.
( Figure 8 )
9. Open the seat according to the
arrow. ( Figure 8 )
7
How to assemble
4. Assemble two square tubes to the car body according
to the arrow, then use 4pcs M4*12 screw to tighten.
( Figure 4 )
5. Insert the steering lever to the car body according to
the arrow, then turn over body by holding up steering
lever to make it fall. ( Figure 5 )
6
How to assemble
6. Insert steering wheel into the steering lever, then use screw to tighten.
( Figure 6 )
7. Connect two terminals of the alarm lamp and car body, insert alarm lamp
to the car body according to the arrow. ( Figure 7 )
8. Insert the back rest in the car body.
( Figure 8 )
9. Open the seat according to the
arrow. ( Figure 8 )
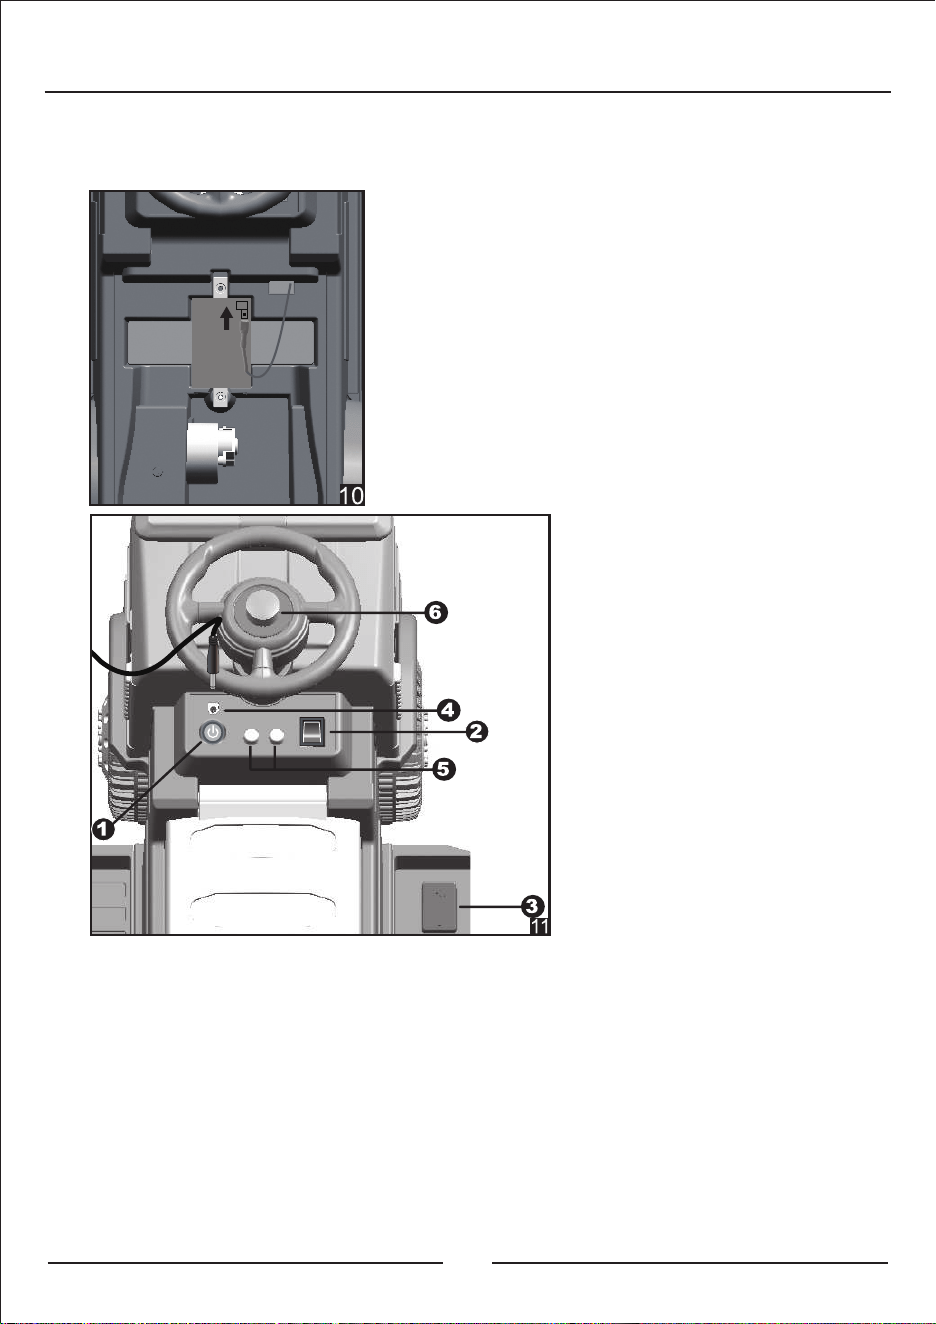
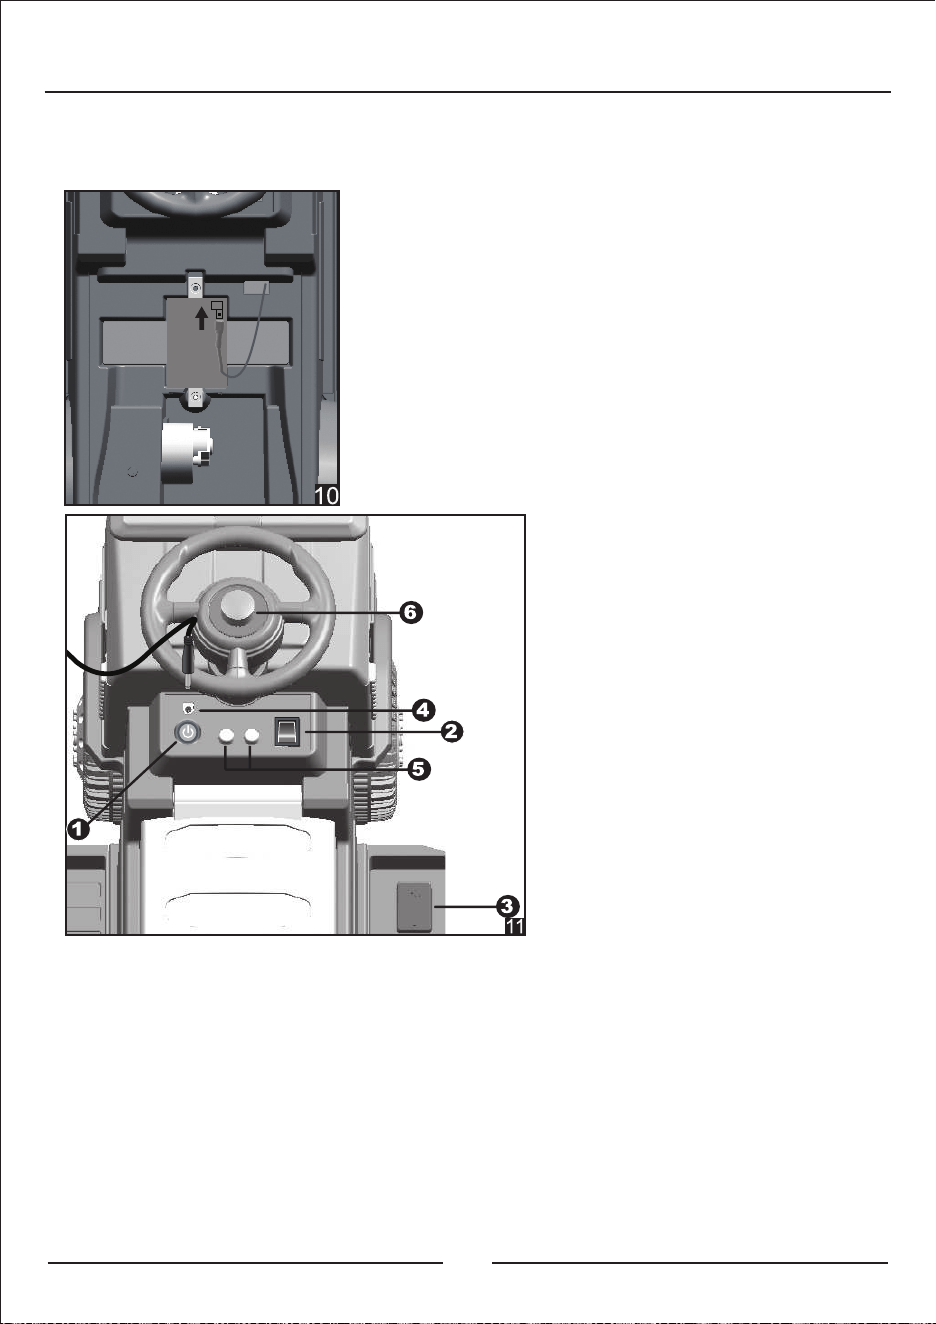
9
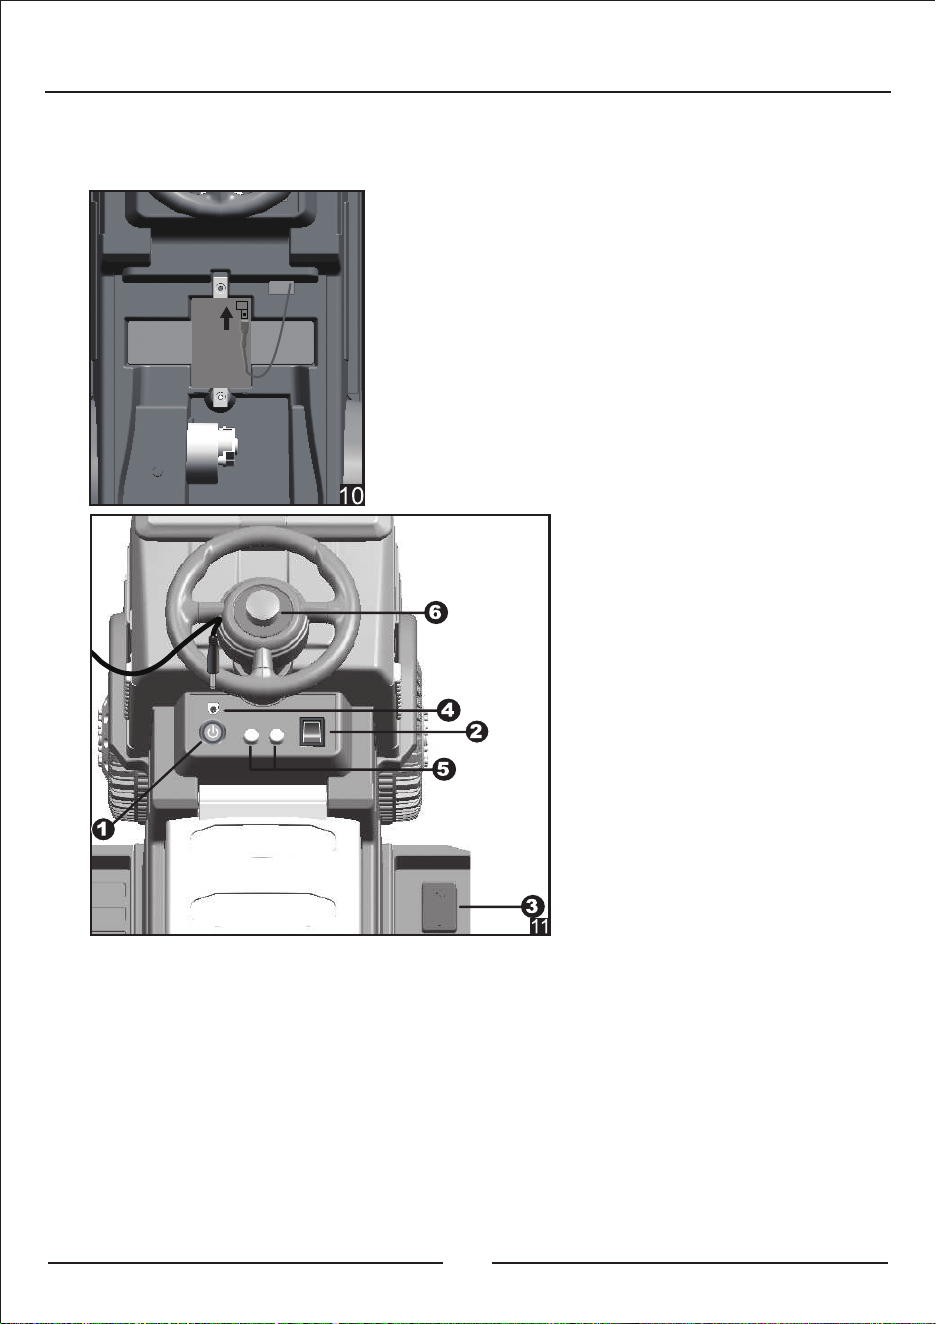
1. Turn on the power switch, and the vehicle is powered on.
2. The forward and backward switch controls the car to go forward and
backward.
3. Press and hold the foot switch to start the car, release it to stop the car.
4. The charging hole is located above the power switch. When the car is out
of power, insert the charger into the hole to charge. The vehicle has no
function in the charging state.
5. Press the music horn or the alarm button to make a sound.
6. Press the air horn to make a sound.
Function
10. Connect the red line to the red
terminal of battery. ( Figure 10 )
8
9
1. Turn on the power switch, and the vehicle is powered on.
2. The forward and backward switch controls the car to go forward and
backward.
3. Press and hold the foot switch to start the car, release it to stop the car.
4. The charging hole is located above the power switch. When the car is out
of power, insert the charger into the hole to charge. The vehicle has no
function in the charging state.
5. Press the music horn or the alarm button to make a sound.
6. Press the air horn to make a sound.
Function
10. Connect the red line to the red
terminal of battery. ( Figure 10 )
8

10
DAS HANDBUCH ENTHÄLT WICHTIGE SICHERHEITSHINWEISE. BITTE LESEN UND BEWAHREN SIE FÜR DIE ZUKÜNFTIGE VERWENDUNG AUF.
HANDBUCH
11
Elektroauto für Kinder
TY327063DE
EN DE FR ES IT PL
10
DAS HANDBUCH ENTHÄLT WICHTIGE SICHERHEITSHINWEISE. BITTE LESEN UND BEWAHREN SIE FÜR DIE ZUKÜNFTIGE VERWENDUNG AUF.
HANDBUCH
11
Elektroauto für Kinder
TY327063DE
EN DE FR ES IT PL

13
VERLETZUNGEN UND TOD VERMEIDEN:
LASSEN SIE DAS KIND NIEMALS UNBEAUFSICHTIGT. DIREKTE
ÜBERWACHUNG FÜR ERWACHSENE IST ERFORDERLICH.
Behalten Sie das Kind
immer im Auge, wenn sich das Kind im Fahrzeug befindet.
Dieses Spielzeug sollte mit Vorsicht verwendet werden, da Stürze oder Kollisionen, die zu
Verletzungen des Benutzers oder Dritter führen, nur mit Sachkenntnis vermieden werden
können.
Schutzausrüstung sollte getragen werden.
Darf nicht im Straßenverkehr verwendet werden.
Dieses Spielzeug ist für Kinder unter 36 Monaten aufgrund seiner maximalen Geschwindigkeit
ungeeignet: Das maximale Benutzergewicht beträgt 20 kg.
Dieses Spielzeug hat keine Bremse.
Entsorgung der Batterie
Ihre versiegelte Blei-Säure-Batterie muss recycelt oder umweltgerecht
entsorgt werden.
Entsorgen Sie Ihre Blei-Säure-Batterie nicht im normalen Hausmüll. Das
Verbrennen, Deponieren oder Mischen von versiegelten
Blei-Säure-Batterien mit Hausmüll ist gesetzlich verboten.
Über Ihr neues Fahrzeug
Specifikation
Beim Kauf Ihres neuen Elektroauto.
Dieses Elektroauto bietet Ihrem Kind viele Kilometer Fahrspaß. Um Ihnen
und Ihrem Fahrer eine sichere Fahrt zu gewährleisten, bitten wir Sie, dieses
Handbuch sorgfältig zu lesen und zum späteren Nachschlagen
aufzubewahren.
Geeignetes Alter: 36-95 Monate
Batterie: 6V 4,5AH x 1
Aufladezeit: 8~12 Stunden
Aufladen: Eingang: abhängig von der örtlichen Spannung
Ausgang: DC 6V 500mA
Ladekapazität: 20 KG
Größe des Autos: 6x40x45 cm
Geschwindigkeit: 3km/h
14
15
Wie man zusammenbaut
1. Die Dichtung, das Rad, die Dichtung, den Splint und die Radabdeckung
nacheinander auf jeder Seite des Lenkrads anbringen (Abbildung 1).
2. Eine Dichtung von rechts auf die Hinterachse legen und die Hinterachse
in die Karosserie einsetzen. Fügen Sie den Motor auf der rechten Seite und
die Dichtung auf der linken Seite hinzu. Fügen Sie dann nacheinander Rad,
Dichtung, Splint und Radabdeckung hinzu (Abbildung 2).
3. Verbinden Sie die beiden
Anschlüsse von Karosserie
und Fußstütze, setzen Sie
dann die beiden Fußstützen
gemäß Pfeil zusammen und
ziehen Sie sie mit der
Schraube 10 Stück
M4 * 12 fest (Abbildung 3).
Nr. MengeTeilname Nr. MengeTeilname
Karosserie
Rad
Linke Fußstütze
Rechte Fußstütze
Hinterachse
Motor
Reifenabdeckung
Splint
Dichtung
1
4
1
1
1
1
4
4
8
2
1
1
4
1
1
1
1
1
Quadratische Röhre
Alarmleuchte
Handbuch
M4*12 Schraube
Ladegerät
Sitz
Rückenlehne
Lenkrad
Lenkhebel
Teilname

17
16
Wie man zusammenbaut
4. Montieren Sie zwei Vierkantrohre gemäß Pfeil an der Karosserie
und ziehen Sie sie mit 4 Stück M4 * 12 Schrauben fest. (Abbildung 4)
5. Den Lenkhebel gemäß dem Pfeil in die Karosserie einsetzen,
dann die Karosserie gemäß dem Pfeil umdrehen und die Karosserie
durch Halten des Lenkhebels umdrehen, damit sie herunterfällt.
(Abbildung 5)
Wie man zusammenbaut
6. Setzen Sie das Lenkrad in den Lenkhebel ein und ziehen Sie es mit der
Schraube fest (Abbildung 6).
7. Verbinden Sie die beiden Anschlüsse der Alarmleuchte und der Karosserie,
und setzen Sie die Alarmleuchte gemäß Pfeil in die Karosserie ein (Abbildung 7).
8. Setzen Sie die Rückenlehne in die
Karosserie ein (Abbildung 8).
9. Öffnen Sie den Sitz gemäß dem Pfeil
(Abbildung 9)
19
18
1. Schalten Sie den Netzschalter ein und das Fahrzeug ist eingeschaltet.
2. Der Vorwärts- und Rückwärtsschalter steuert das Fahrzeug so, dass es
vorwärts und rückwärts fährt.
3. Halten Sie den Fußschalter gedrückt, um das Auto zu starten, und lassen
Sie ihn los, um das Auto anzuhalten.
4. Das Ladeloch befindet sich über dem Netzschalter. Wenn das Auto keinen
Strom mehr hat, stecken Sie das Ladegerät in die Öffnung, um es
aufzuladen. Das Fahrzeug hat im Ladezustand keine Funktion.
5. Drücken Sie die Hupe oder die Alarmtaste, um einen Ton zu erzeugen.
6. Drücken Sie die Hupe, um einen Ton zu erzeugen.
Funktion
10. Verbinden Sie die rote Leitung mit dem
roten Anschluss der Batterie (Abbildung 10).
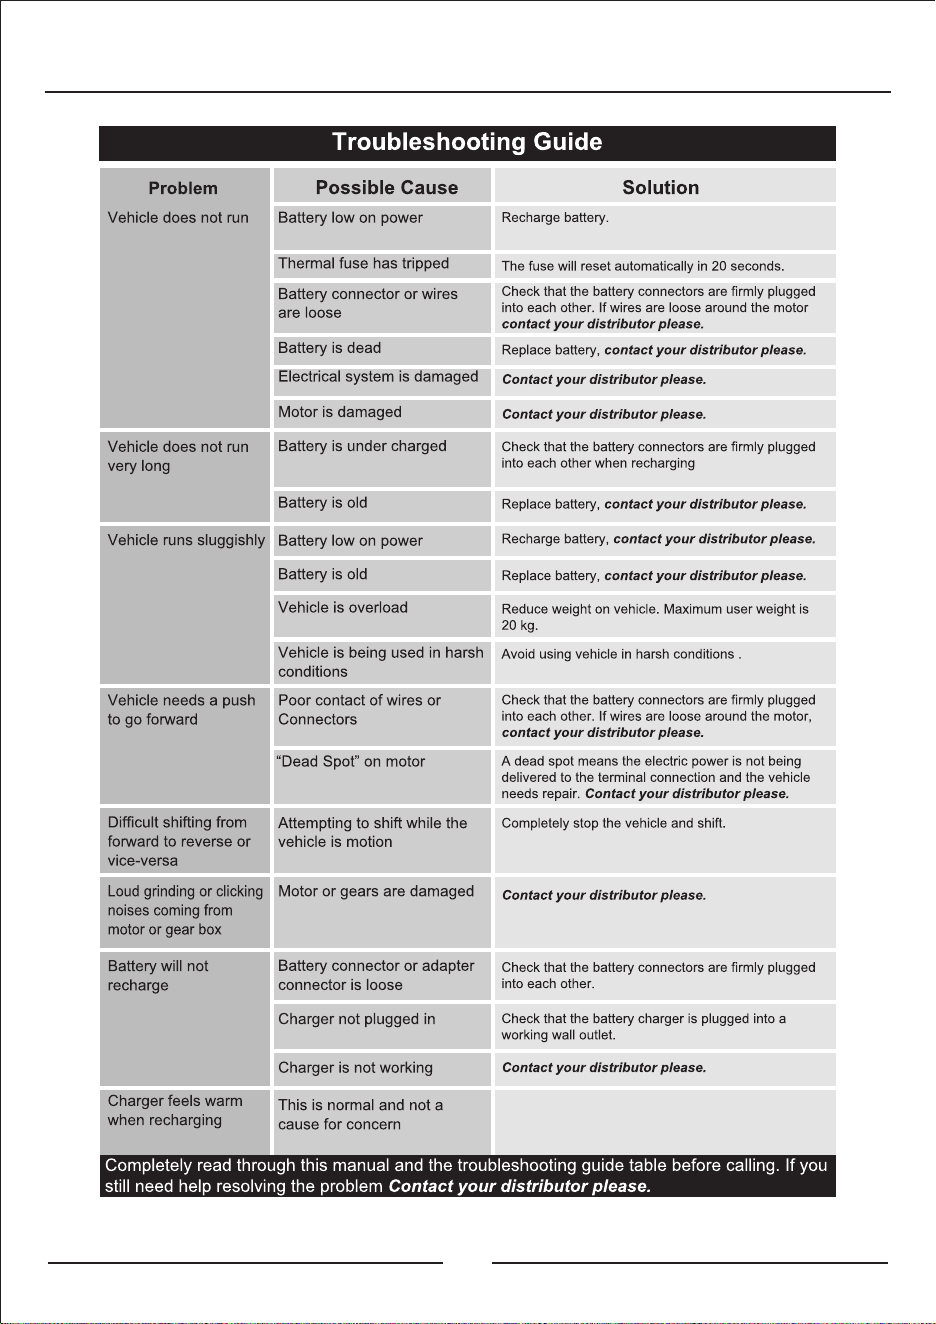
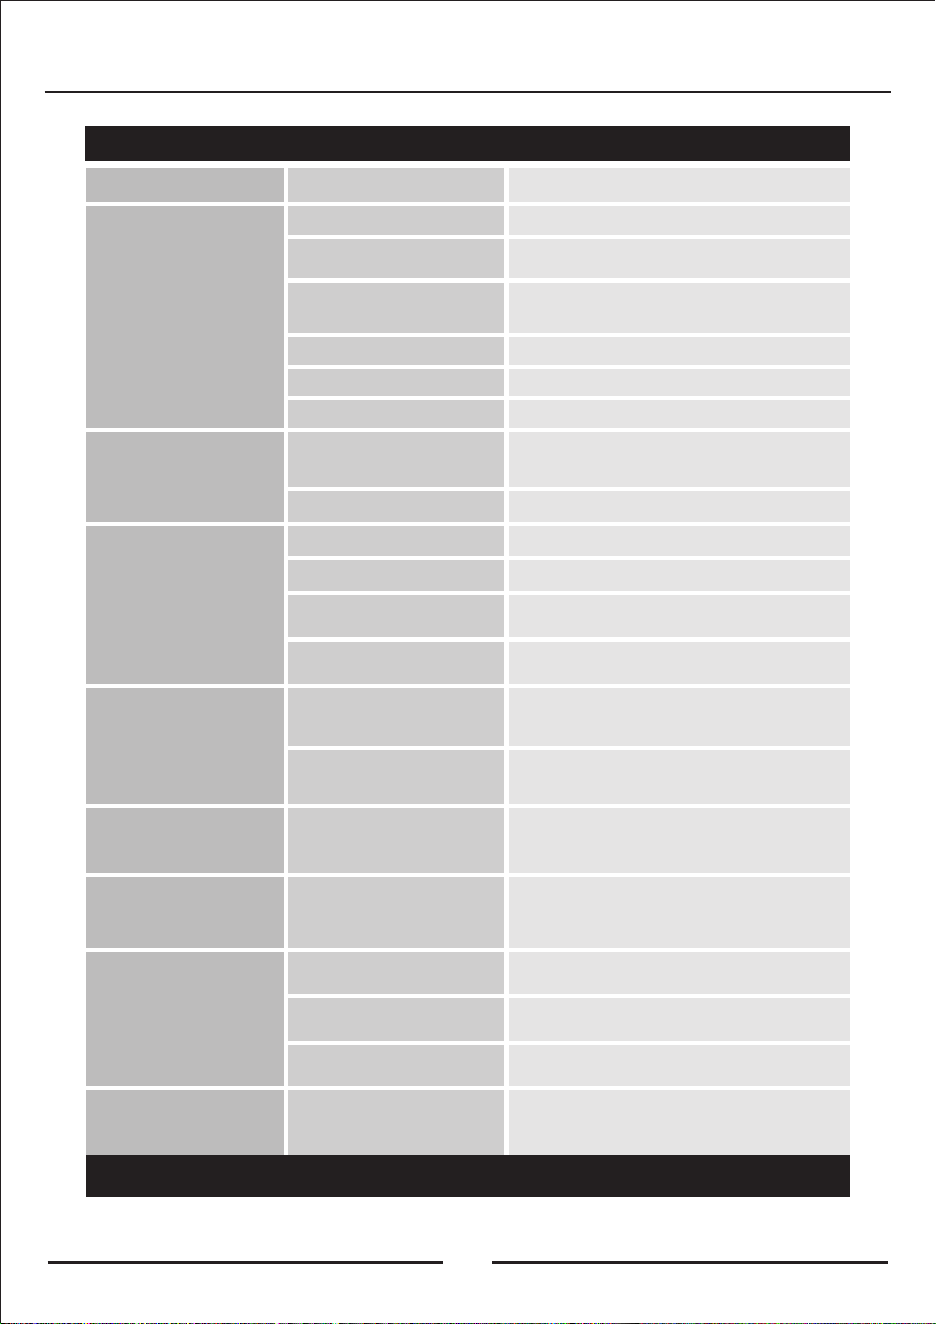
Anleitung zur Fehlerbehebung
Mögliche UrsacheProblem
Elektroauto
funktioniert nicht.
Die Batterie ist schwach.
Der Batterieanschluss oder
das Kabel ist locker.
Die Batterie ist leer.
Elektrik ist beschädigt.
Der Motor ist beschädigt.
Die Batterie ist schwach.
Die Batterie ist alt.
Die Batterie ist schwach.
Die Batterie ist alt.
Fahrzeug ist überladen.
Schlechter Kontakt von
Drähten oder Steckern.
„Dead Spot“ am Motor.
Versuchen Sie, während der
Fahrt den Gang zu wechseln.
Motor oder Getriebe ist
beschädigt.
Der Batteriestecker oder
Adapterstecker ist locker.
Das Ladegerät ist nicht
angeschlossen.
Das Ladegerät funktioniert
nicht richtig.
Das ist normal und keine
Sorge.
Das Fahrzeug wird unter
rauen Bedingungen eingesetzt.
Fahrzeug fährt nicht
sehr lange.
Elektroauto fährt träge.
Elektroauto braucht
einen Schub,
um voranzukommen.
Es ist schwierig, von
vorwärts nach rückwärts
und umgekehrt zu wechseln.
Laute Schleif- oder
Klickgeräusche von Motor
oder Getriebe.
Der Akku wird nicht
aufgeladen.
Das Ladegerät wird beim
Laden warm.
Lesen Sie dieses Handbuch und die Tabelle mit den Anleitungen zur Fehlerbehebung vollständig durch.
Wenn Sie weiterhin Hilfe bei der Behebung des Problems benötigen, wenden Sie sich bitte an uns.
Thermosicherung hat ausgelöst.
Laden Sie den Akku auf.
Überprüfen Sie, ob der Batteriestecker fest
eingesteckt ist. Wenn die Drähte rund um den
Motor locker sind, kontaktieren Sie uns bitte.
Um die Batterie zu ersetzen, kontaktieren Sie uns bitte.
Bitte nehmen Sie mit uns Kontakt auf.
Bitte nehmen Sie mit uns Kontakt auf.
Stellen Sie sicher, dass die Akkuanschlüsse
beim Aufladen fest ineinander gesteckt sind.
Ersetzen Sie die Batterie, kontaktieren Sie uns bitte.
Laden Sie den Akku auf, kontaktieren Sie uns bitte.
Ersetzen Sie die Batterie, kontaktieren Sie uns bitte.
Fahrzeug entlasten. Das maximale
Benutzergewicht beträgt 20 kg.
Überprüfen Sie, ob die Akkuanschlüsse fest
ineinander gesteckt sind. Wenn Drähte rund um den
Motor verloren gehen, kontaktieren Sie uns bitte.
Ein „Dead Spot“ bedeutet, dass der Anschluss
nicht mit Strom versorgt wird und das Fahrzeug
repariert werden muss. Kontaktieren Sie uns bitte.
Schalten Sie nach dem Anhalten von
Elektroauto um.
Bitte nehmen Sie mit uns Kontakt auf.
Überprüfen Sie, ob der Batteriestecker
fest eingesteckt ist.
Überprüfen Sie, ob das Ladegerät an eine
funktionierende Steckdose angeschlossen ist.
Halten Sie das Fahrzeug vollständig an und
schalten Sie den Gang.
Vermeiden Sie es, das Fahrzeug unter rauen
Bedingungen zu benutzen.
Die Sicherung wird nach 20 Sekunden
automatisch zurückgesetzt.
Lösung
19
18
1. Schalten Sie den Netzschalter ein und das Fahrzeug ist eingeschaltet.
2. Der Vorwärts- und Rückwärtsschalter steuert das Fahrzeug so, dass es
vorwärts und rückwärts fährt.
3. Halten Sie den Fußschalter gedrückt, um das Auto zu starten, und lassen
Sie ihn los, um das Auto anzuhalten.
4. Das Ladeloch befindet sich über dem Netzschalter. Wenn das Auto keinen
Strom mehr hat, stecken Sie das Ladegerät in die Öffnung, um es
aufzuladen. Das Fahrzeug hat im Ladezustand keine Funktion.
5. Drücken Sie die Hupe oder die Alarmtaste, um einen Ton zu erzeugen.
6. Drücken Sie die Hupe, um einen Ton zu erzeugen.
Funktion
10. Verbinden Sie die rote Leitung mit dem
roten Anschluss der Batterie (Abbildung 10).
Anleitung zur Fehlerbehebung
Mögliche UrsacheProblem
Elektroauto
funktioniert nicht.
Die Batterie ist schwach.
Der Batterieanschluss oder
das Kabel ist locker.
Die Batterie ist leer.
Elektrik ist beschädigt.
Der Motor ist beschädigt.
Die Batterie ist schwach.
Die Batterie ist alt.
Die Batterie ist schwach.
Die Batterie ist alt.
Fahrzeug ist überladen.
Schlechter Kontakt von
Drähten oder Steckern.
„Dead Spot“ am Motor.
Versuchen Sie, während der
Fahrt den Gang zu wechseln.
Motor oder Getriebe ist
beschädigt.
Der Batteriestecker oder
Adapterstecker ist locker.
Das Ladegerät ist nicht
angeschlossen.
Das Ladegerät funktioniert
nicht richtig.
Das ist normal und keine
Sorge.
Das Fahrzeug wird unter
rauen Bedingungen eingesetzt.
Fahrzeug fährt nicht
sehr lange.
Elektroauto fährt träge.
Elektroauto braucht
einen Schub,
um voranzukommen.
Es ist schwierig, von
vorwärts nach rückwärts
und umgekehrt zu wechseln.
Laute Schleif- oder
Klickgeräusche von Motor
oder Getriebe.
Der Akku wird nicht
aufgeladen.
Das Ladegerät wird beim
Laden warm.
Lesen Sie dieses Handbuch und die Tabelle mit den Anleitungen zur Fehlerbehebung vollständig durch.
Wenn Sie weiterhin Hilfe bei der Behebung des Problems benötigen, wenden Sie sich bitte an uns.
Thermosicherung hat ausgelöst.
Laden Sie den Akku auf.
Überprüfen Sie, ob der Batteriestecker fest
eingesteckt ist. Wenn die Drähte rund um den
Motor locker sind, kontaktieren Sie uns bitte.
Um die Batterie zu ersetzen, kontaktieren Sie uns bitte.
Bitte nehmen Sie mit uns Kontakt auf.
Bitte nehmen Sie mit uns Kontakt auf.
Stellen Sie sicher, dass die Akkuanschlüsse
beim Aufladen fest ineinander gesteckt sind.
Ersetzen Sie die Batterie, kontaktieren Sie uns bitte.
Laden Sie den Akku auf, kontaktieren Sie uns bitte.
Ersetzen Sie die Batterie, kontaktieren Sie uns bitte.
Fahrzeug entlasten. Das maximale
Benutzergewicht beträgt 20 kg.
Überprüfen Sie, ob die Akkuanschlüsse fest
ineinander gesteckt sind. Wenn Drähte rund um den
Motor verloren gehen, kontaktieren Sie uns bitte.
Ein „Dead Spot“ bedeutet, dass der Anschluss
nicht mit Strom versorgt wird und das Fahrzeug
repariert werden muss. Kontaktieren Sie uns bitte.
Schalten Sie nach dem Anhalten von
Elektroauto um.
Bitte nehmen Sie mit uns Kontakt auf.
Überprüfen Sie, ob der Batteriestecker
fest eingesteckt ist.
Überprüfen Sie, ob das Ladegerät an eine
funktionierende Steckdose angeschlossen ist.
Halten Sie das Fahrzeug vollständig an und
schalten Sie den Gang.
Vermeiden Sie es, das Fahrzeug unter rauen
Bedingungen zu benutzen.
Die Sicherung wird nach 20 Sekunden
automatisch zurückgesetzt.
Lösung

CE MANUEL D’INSTRUCTIONS CONTIENT DES INFORMATIONS IMPORTANTES SUR LA SÉCURITÉ. VEUILLEZ LIRE ET CONSERVER POUR LA RÉFÉRENCE FUTURE.
MANUEL DE L’UTILISATEUR
21
Voiture Électrique pour Enfants
TY327063DE
EN DE FR ES IT PL
CE MANUEL D’INSTRUCTIONS CONTIENT DES INFORMATIONS IMPORTANTES SUR LA SÉCURITÉ. VEUILLEZ LIRE ET CONSERVER POUR LA RÉFÉRENCE FUTURE.
MANUEL DE L’UTILISATEUR
21
Voiture Électrique pour Enfants
TY327063DE
EN DE FR ES IT PL
23
PRÉVENIR LES BLESSURES ET LES MORTS :
NE JAMAIS LAISSER L’ENFANT SANS SURVEILLANCE. LA SURVEILLANCE
DIRECTE D’UN ADULTE EST REQUISE.
Toujours garder l’enfant à la vue lorsque
l’enfant est dans le véhicule.
Ce jouet doit être utilisé avec prudence car il faut être habile pour éviter les
chutes ou les collisions qui pourraient causer des blessures à l’utilisateur ou à
des tiers.
Il faut porter un équipement de protection.
Ne pas utiliser dans la circulation.
Ce jouet ne convient pas aux enfants de moins de 36 mois en raison de sa
vitesse maximale ; le poids maximal de l’utilisateur est de 20 kg.
Ce jouet n’a pas de frein.
Élimination de la Batterie
Votre batterie au plomb scellée doit être recyclée ou éliminée de façon
écologique.
Ne jetez pas votre batterie au plomb dans un feu. La batterie peut
exploser ou fuir.
Ne jetez pas une batterie au plomb dans les ordures ménagères.
L’incinération, la mise en décharge ou le mélange de batteries au plomb
scellées avec les ordures ménagères est interdit par la loi.
À propos de votre nouveau véhicule
Spécification
À l’achat de votre nouveau véhicule.
Cette voiture procurera à votre enfant de nombreux kilomètres de plaisir.
Pour vous assurer, à vous et à votre enfant, une conduite sûre, nous vous
demandons de lire attentivement ce manuel et de le conserver pour toute
référence ultérieure.
Âge approprié : 36-95 mois
Batterie : 6V 4,5AH x1
Temps de charge : 8~12 heures
Charge : Entrée : dépend de la tension locale
Sortie: DC6V 500mA
Capacité de charge : 20 kg
Dimensions de la voiture : 68 x 40 x 45 cm
Vitesse : 3 km/h

25
24
Comment assembler
1. Ajoutez le joint, la roue, le joint, la clavette et l’enjoliveur de roue de
chaque côté du volant, un par un. (Fig. 1)
2. Ajoutez un joint à l’essieu arrière par le côté droit, insérez l’essieu arrière
dans la carrosserie. Ajoutez le moteur du côté droit et ajoutez le joint
d’étanchéité du côté gauche. Ajoutez ensuite la roue, le joint, la clavette
et l’enjoliveur de roue un par un. (Fig. 2)
3. Connectez deux bornes
de la carrosserie et du
repose-pieds, puis
assemblez les deux
repose-pieds selon la flèche
et utilisez 10 vis M4*12 pour
les serrer. (Fig. 3)
N° QtéNom de pièce N° QtéNom de pièce
Carrosserie de voiture
Roue
Repose-pied gauche
Repose-pied droit
Essieu arrière
Moteur
Enjoliveur de roue
Clavette
Joint d’étanchéité
1
4
1
1
1
1
4
4
8
2
1
1
4
1
1
1
1
1
Tube carré
Lampe d’alarme
Manuel d’instruction
Vis M4 x 12
Siège
Siège
Dossier
Volant
Levier de direction
Liste des Pièces
26
27
Comment assembler
4. Assemblez deux tubes carrés à la carrosserie de la voiture en suivant
la flèche, puis utilisez 4 vis M4*12 pour les serrer.
5. Insérez le levier de direction sur la carrosserie selon la flèche,
puis retournez la carrosserie en tenant le levier de direction vers le haut,
afin qu’il tombe.
Comment assembler
6. Insérez le volant dans le levier de direction, puis utilisez la vis pour le
serrer. (Fig.6)
7. Connectez deux bornes de la lampe d’alarme et de la carrosserie de la
voiture, insérez la lampe d’alarme dans la carrosserie de la voiture en suivant
la flèche. (Fig.7)
8. Insérez le dossier dans la
carrosserie de la voiture. (Fig. 8)
9. Ouvrez le siège en suivant la flèche.
(Fig. 9)

28
29
1.Allumez la voiture.
2.Bouton de commande pour marche avant, stop, marche arrière
3.Interrupteur à pédale, appuyez sur le bouton d’avance, la voiture avance,
appuyez sur le bouton d’arrêt, la voiture s’arrête, appuyez sur le bouton de
recul, la voiture recule.
4.Le trou de chargement est au-dessus de l’interrupteur. Lorsque la
puissance est faible, veuillez recharger la voiture, il ne faut pas la jouer
quand elle est en charge. Le chargement doit être fait par des adultes).
5.Appuyez sur le bouton de musique pour le son de l’alarme et la chanson.
6.Appuyez sur le bouton pour le bip sonore.
Fonction
10. Connectez la ligne rouge à la borne
rouge de la batterie. (Fig. 10)
Guide de Dépannage
Cause possibleProblème
Le véhicule ne roule pas
Le connecteur ou les fils de
la batterie sont lâches
La batterie est morte
Le système électrique est endommagé
Le moteur est endommagé
La batterie est sous-chargée
La batterie est vieille
Batterie faible sur l’alimentation
La batterie est vieille
Le véhicule est en surcharge
Mauvais contact des fils ou
des connecteurs
"Point mort" sur le moteur
Veuillez essayer de changer
pendant que le véhicule est
en mouvement
Bruits de grincement ou de
cliquetis provenant du moteur
ou de la boîte de vitesses
Le connecteur de la batterie ou le
connecteur de l’adaptateur est desserré
Le chargeur n’est pas
branché
Le chargeur ne
fonctionne pas
C’est normal et ce n’est pas
une cause d’inquiétude
Le véhicule est utilisé dans
des conditions difficiles
Le véhicule ne roule pas
très longtemps
Le véhicule roule
lentement
Le véhicule a besoin
d’un coup de poussée
pour avancer
Passage difficile de la
marche avant à la marche
arrière ou vice-versa
Bruits de grincement ou de
cliquetis provenant du moteur
ou de la boîte de vitesses
La batterie ne peut pas
être rechargée
Le chargeur est chaud
lorsqu’il est rechargé
Lisez entièrement ce manuel et le tableau du guide de dépannage avant de nous contacter.
Si vous avez toujours besoin d’aide pour résoudre le problème, contactez-nous.
Le fusible thermique s’est
déclenché
Rechargez la batterie.
Vérifiez que les connecteurs de la batterie sont
bien emboîtés les uns dans les autres. Si des fils
sont lâches autour du moteur, contactez-nous.
Remplacez la batterie. Contactez-nous.
Contactez-nous.
Contactez-nous.
Vérifiez que les connecteurs de la batterie sont
bien branchés l'un dans l’autre lors de la recharge
Remplacez la batterie. Contactez-nous.
Remplacez la batterie. Contactez-nous.
Remplacez la batterie. Contactez-nous.
Réduire le poids sur le véhicule. Le poids
maximum de l’utilisateur est de 20 kg.
Vérifiez que les connecteurs de la batterie sont bien
emboîtés les uns dans les autres. Si des fils sont
lâches autour du moteur, contactez-nous.
Un point mort signifie que le courant électrique n’est
pas acheminé à la borne de raccordement et que le
véhicule doit être réparé.
Arrêtez complètement le véhicule et
changez la marche.
Contactez-nous.
Vérifiez que les connecteurs de la batterie
sont bien emboîtés les uns dans les autres.
Vérifiez que le chargeur de batterie est branché
dans une prise murale en état de marche.
Contactez-nous.
Évitez d’utiliser le véhicule dans des
conditions difficiles.
Le fusible se rétablira automatiquement dans
20 secondes.
Solution
Batterie faible sur l’alimentation

MANUAL DEL USUARIO
ESTE MANUAL DE INSTRUCCIONES CONTIENE IMPORTANTES INFORMACIONES DE SEGURIDAD, POR FAVOR LO LEA Y GUARDE PARA REFERENCIAS FUTURAS.
Juguete de Camión de Bomberos
TY327063DE
MANUAL DEL USUARIO
ESTE MANUAL DE INSTRUCCIONES CONTIENE IMPORTANTES INFORMACIONES DE SEGURIDAD, POR FAVOR LO LEA Y GUARDE PARA REFERENCIAS FUTURAS.
Juguete de Camión de Bomberos
TY327063DE

33
PREVENIR LESIONES Y MUERTES:
NUNCA DEJE AL NIÑO DESATENDIDO. SE REQUIERE SUPERVISIÓN DIRECTA
PARA ADULTOS.
Mantenga siempre al niño a la vista cuando esté en el
vehículo.
Este juguete debe usarse con precaución ya que se requiere habilidad para
evitar caídas o colisiones que causen lesiones al usuario o a terceros.
Se debe usar equipo de protección.
No debe usarse en el tráfico.
Este juguete no es apto para niños menores de 36 meses debido a su
velocidad máxima: el peso máximo del usuario es de 20 kg.
Este juguete no tiene freno.
Eliminación de la Batería
Su batería sellada de plomo-ácido debe reciclarse o eliminarse de
manera ambientalmente adecuada.
No deseche la batería de plomo-ácido en la basura doméstica habitual.
La ley prohíbe la incineración, el relleno en el suelo o la mezcla de
baterías selladas de plomo-ácido con basura doméstica.
Sobre su nuevo vehículo
Especificación
En la compra de su nuevo camión.
Este automóvil le brindará a su hijo de diversión a muchas distancias. Para
ayudar a asegurarle a usted y a su conductor un viaje seguro, le pedimos
que lea este manual detenidamente y lo guarde para futuras referencias.
Edad adecuada: 36-95 meses.
Batería: 6V 4,5AH x 1
Tiempo de carga: 8 ~ 12 horas
Carga: entrada: depende del voltaje local
salida: DC 6V 500mA
Capacidad de carga: 20 KG
Tamaño del auto: 68 x 40 x 45 cm
Velocidad: 3 km/ h
35
34
Cómo montar
1. Agregue la junta, la rueda, la junta, la chaveta y la cubierta de la rueda
a cada lado del volante una por una. (Figura 1)
2. Agregue una junta al eje trasero desde el lado derecho, inserte el eje trasero
al cuerpo del automóvil. Agregue el motor al lado derecho y agregue la junta al
lado izquierdo. Luego agregue la rueda, la junta, la chaveta y la cubierta de la
rueda una por una. (Figura 2)
3. Conecte dos terminales
del cuerpo del automóvil y
el reposapiés, luego monte
dos reposapiés de acuerdo
con la flecha y use 10 piezas
de tornillo M4 * 12 para
apretar. (Figura 3)
Número
Cantidad
Nombre
Número
Cantidad
Nombre
Cuerpo del auto
Rueda
Reposapiés izquierdo
Reposapiés derecho
Eje posterior
Motor
Cubierta de la rueda
Chaveta
Empaquetadura
1
4
1
1
1
1
4
4
8
2
1
1
4
1
1
1
1
1
Tubo cuadrado
Lámpara de alarma
Instrucciones
M4 * 12 tornillo
Cargador
Asiento
Respaldo
Volante
Palanca de dirección
Nombre de piezas

3736
Cómo montar
4. Monte los dos tubos cuadrados en el cuerpo del automóvil de acuerdo
con la flecha, luego use 4 tornillos M4 * 12 para apretarlos. (Figura 4)
5. Inserte la palanca de dirección en el cuerpo del automóvil de acuerdo
con la flecha, luego gire el cuerpo de acuerdo con la flecha, luego gire lo
mismo sosteniendo la palanca de dirección para hacerla caer. (Figura 5)
Cómo montar
6. Inserte el volante en la palanca de dirección, luego use el tornillo para
apretar. (Figura 6)
7. Conecte dos terminales de la lámpara de alarma y el cuerpo del automóvil,
inserte la lámpara de alarma en el cuerpo del automóvil de acuerdo con la
flecha. (Figura 7)
8. Inserte el respaldo en el cuerpo
del automóvil. (Figura 8)
9. Abra el asiento de acuerdo con la
flecha. (Figura 9)

39
38
1. Encienda el interruptor de encendido y el vehículo se encenderá.
2. El interruptor de avance y retroceso controla el automóvil para avanzar y
retroceder.
3. Mantenga presionado el interruptor de pie para encender el automóvil,
suéltelo para detenerlo.
4. El orificio de carga se encuentra sobre el interruptor de encendido.
Cuando el automóvil se quede sin energía, inserte el cargador en el orificio
para cargarlo. El vehículo no tiene función en el estado de carga.
5. Presione la bocina de música o el botón de alarma para hacer un sonido.
6. Presione la bocina de aire para hacer un sonido.
Función
10. Conecte la línea roja al terminal rojo
de la batería. (Figura 10)
Guía para resolver problemas
Causa posibleProblema
El vehículo no funciona
Batería baja en energía
El conector de la batería o
los cables están flojos
La batería está agotada
El sistema eléctrico está dañado
El motor está dañado
La batería está bajo carga
La batería está vieja
Batería baja en energía
La batería está vieja
El vehículo está sobrecargado
Mal contacto de cables o
conectores
"Punto muerto" en el motor
Intentando cambiar mientras
el vehículo está en
movimiento
El motor o los engranajes
están dañados
El conector de la batería o el conector
del adaptador están flojos
El cargador no está enchufado
El cargador no funciona
Esto es normal y no es
motivo de preocupación
El vehículo se está utilizando
en condiciones difíciles
El vehículo no conduce
mucho tiempo
El vehículo funciona
lentamente
Los vehículos necesitan
un empujón para avanzar
Difícil cambio de avance
a retroceso o viceversa
Ruidos fuertes de rechinar o
chasquidos provenientes del
motor o caja de cambios
La batería no se recargará
El cargador se siente
caliente cuando se carga
Lea completamente este manual y la tabla de la guía de solución de problemas antes de llamar.
Si aún necesita ayuda para resolver el problema. Póngase en contacto con nosotros por favor.
El fusible térmico se ha
disparado
Recarga la batería
Compruebe que los conectores de la batería estén firmemente
conectados entre sí. Si hay cables sueltos alrededor del motor,
comuníquese con nosotros, por favor
Reemplace la batería, contacte a nosotros por favor
Póngase en contacto con su nosotros por favor
Póngase en contacto con su nosotros por favor
Verifique que los conectores de la batería estén
firmemente enchufados en otro durante la recarga
Reemplace la batería, contacte a nosotros por favor
Recarga la batería, contacte a nosotros por favor
Reemplace la batería, contacte a su distribuidor por favor
Reduzca el peso en el vehículo.
El peso máximo del usuario es de 20 kg
Compruebe que los conectores de la batería estén
firmemente conectados entre sí. Si se pierden cables
alrededor del motor, comuníquese con nosotros por favor
Un punto muerto significa que la energía eléctrica no se
entrega a la conexión de la terminal y el vehículo necesita
reparación. Póngase en contacto con nosotros por favor
Pare completamente el vehículo y cambie
Póngase en contacto con nosotros por favor
Compruebe que los conectores de la batería
estén firmemente conectados entre sí
Compruebe que el cargador de batería esté
enchufado a una toma de corriente que funcione
Pare completamente el vehículo y cambie
Evite usar el vehículo en condiciones difíciles
El fusible se reiniciará automáticamente
en 20 segundos
Solución

40
QUESTO MANUALE DI ISTRUZIONI CONTIENE IMPORTANTI INFORMAZIONI SULLA SICUREZZA. SI PREGA DI LEGGERE E CONSERVARE PER RIFERIMENTO FUTURO.
Visitateci: www.costway.it
Seguire Costway
MANUALE UTENTE
41
Camion dei Pompieri
TY327063DE
EN DE FR ES IT PL
40
QUESTO MANUALE DI ISTRUZIONI CONTIENE IMPORTANTI INFORMAZIONI SULLA SICUREZZA. SI PREGA DI LEGGERE E CONSERVARE PER RIFERIMENTO FUTURO.
Visitateci: www.costway.it
Seguire Costway
MANUALE UTENTE
41
Camion dei Pompieri
TY327063DE
EN DE FR ES IT PL

43
PREVENIRE LESIONI E MORTE:
NON LASCIARE MAI IL BAMBINO SENZA DISPOSIZIONE. È NECESSARIA LA
SUPERVISIONE DIRETTA ADULTA.
Tenere sempre il bambino in vista quando il
bambino è nel veicolo.
Questo giocattolo deve essere usato con cautela poiché è necessaria abilità
per evitare cadute o collisioni che causano lesioni all'utente o a terzi.
Indossare dispositivi di protezione.
Non utilizzare nel traffico.
Questo giocattolo non è adatto a bambini di età inferiore a 36 mesi a causa
della sua velocità massima; Il peso massimo dell'utente è di 20 kg. .
Questo giocattolo non ha freno.
Smaltimento della batteria
La batteria al piombo-acido sigillata deve essere riciclata o smaltita nel
rispetto dell'ambiente.
Non gettare la batteria al piombo-acido nel fuoco. La batteria potrebbe
esplodere o perdere liquido.
Non gettare le batterie al piombo acido nei normali rifiuti domestici.
L'incenerimento, lo spargimento di terra o la miscelazione di batterie al
piombo sigillate con rifiuti domestici è vietato dalla legge.
Informazioni sul tuo nuovo veicolo
Specificazione
All'acquisto del tuo nuovo veicolo.
Questa macchina a bordo fornirà a tuo figlio molte miglia di divertimento. Per
garantire a te e al tuo ciclista una guida sicura, vi preghiamo di leggere
attentamente questo manuale e di conservarlo per riferimenti futuri.
Età adatta: 36 - 95 mesi
Batteria: 6V 4,5AH x1
Tempo di ricarica: 8 ~ 12 ore
Carica: Ingresso: dipende dalla tensione locale
Uscita: DC6V 500mA
Capacità di carico: 20 kg
Dimensioni dell'auto: 68 x 40 x 45 cm
Velocità: 3 km / h

44
45
Guida
1. Aggiungere la guarnizione, la ruota, la guarnizione, lo spinotto e il copriruota
su ciascun lato del volante uno alla volta. (Figura 1)
2. Aggiungere una guarnizione all'asse posteriore dal lato destro, inserire l'asse
posteriore nella carrozzeria. Aggiungi il motore sul lato destro e aggiungi la
guarnizione sul lato sinistro. Quindi aggiungere ruota, guarnizione, spinotto e
copricerchio uno per uno. (Figura 2)
3. Collegare due terminali
della carrozzeria e del
poggiapiedi, quindi
assemblare due poggiapiedi
secondo la freccia e utilizzare
una vite M4 x 12 da 10 pezzi
per serrare. (Figura 3)
No.
Quantità
Nome della parte No.
Quantità
Nome della parte
Carrozzeria
Ruota
Poggiapiedi sinistro
Poggiapiedi destro
Asse posteriore
Motore
Copriruota
Spinotto
Guarnizione
1
4
1
1
1
1
4
4
8
2
1
1
4
1
1
1
1
1
Tubo quadrato
Lampada di allarme
Guida
Vite M4 * 12
Caricabatterie
Posto a sedere
Schienale
Volante
Leva dello sterzo
Nome della parte
46
47
Guida
4. Montare due tubi quadrati sulla carrozzeria secondo la freccia,
quindi utilizzare la vite 4 pezzi M4 x 12 per serrare. (Figura 4)
5. Inserire la leva dello sterzo sulla carrozzeria secondo la freccia,
quindi capovolgere il corpo sollevando la leva dello sterzo per farlo
cadere. (Figura 5)
Guida
6. Inserire il volante nella leva dello sterzo, quindi utilizzare la vite per
serrare. (Figura 6)
7. Collegare due terminali della lampada di allarme e della carrozzeria,
inserire la lampada di allarme sulla carrozzeria secondo la freccia. (Figura 7)
8. Inserire lo schienale nella
carrozzeria. (Figura 8)
9. Aprire il sedile secondo la freccia.
(Figura 9)

48
49
1. Accendere l'interruttore di alimentazione e il veicolo è acceso.
2. L'interruttore avanti e indietro controlla l'auto per andare avanti e indietro.
3. Premere e tenere premuto l'interruttore a pedale per avviare l'auto,
rilasciarlo per fermare l'auto.
4. Il foro di ricarica si trova sopra l'interruttore di alimentazione. Quando
l'automobile è scarica, inserire il caricabatterie nel foro per caricare. Il veicolo
non ha alcuna funzione nello stato di carica.
5. Premere il clacson o il pulsante della sveglia per emettere un suono.
6. Premere il clacson per emettere un suono.
Funzione
10. Collegare la linea rossa al terminale
rosso della batteria. (Figura 10)
Guida alla risoluzione dei problemi
Causa possibileProblema
Il veicolo non funziona
Batteria scarica
Il connettore oi fili della
batteria sono allentati
La batteria è scarica
L'impianto elettrico è danneggiato
Il motore è danneggiato
La batteria è sotto carica
La batteria è vecchia
Batteria scarica
La batteria è vecchia
Il veicolo è sovraccarico
Scarso contatto di fili o
connettori
"Punto morto" sul motore
Tentativo di cambiare marcia
mentre il veicolo è in
movimento
Motore o ingranaggi
danneggiati
Il connettore della batteria o del
connettore dell'adattatore è allentato
Caricabatterie non collegato
Il caricabatterie non funziona
Questo è normale e non è
motivo di preoccupazione
Il veicolo viene utilizzato in
condizioni difficili
Il veicolo non funziona
molto a lungo
Il veicolo gira lentamente
Il veicolo ha bisogno di
una spinta per andare
avanti
Il veicolo ha bisogno di una
spinta per andare avanti
Vivi rumori di smerigliatura o
di clic provenienti dal motore
o dalla scatola degli ingranaggi
La batteria non si ricarica
Il caricabatterie si sente
caldo durante la ricarica
Leggere completamente questo manuale e la tabella della guida alla risoluzione dei problemi prima di chiamare.
Se hai ancora bisogno di aiuto per risolvere il problema, contatta il tuo distributore, per favore.
Il fusibile termico è scattato
Ricaricare la batteria.
Verificare che i connettori della batteria siano collegati
saldamente l'uno nell'altro. Se i fili sono allentati attorno al
motore, contattare il distributore per favore.
Sostituire la batteria, contattare il proprio distributore, per favore.
Contattare il tuo distributore per favore.
Contattare il tuo distributore per favore.
Verificare che i connettori della batteria siano
collegati saldamente l'uno all'altro durante la ricarica
Sostituire la batteria, contattare il proprio distributore, per favore.
Sostituire la batteria, contattare il proprio distributore, per favore.
Sostituire la batteria, contattare il proprio distributore, per favore.
Ridurre il peso sul veicolo. Il peso massimo
dell'utente è di 20 kg.
Verificare che i connettori della batteria siano collegati
saldamente l'uno nell'altro. Se i fili sono allentati attorno
al motore, contattare il proprio distributore, per favore.
Un punto morto indica che l'energia elettrica non viene
erogata alla connessione del terminale e il veicolo deve
essere riparato. Contattare il tuo distributore per favore.
Fermare completamente il veicolo e
cambiare marcia.
Contattare il tuo distributore per favore.
Verificare che i connettori della batteria
siano collegati saldamente l'uno nell'altro.
Verificare che il caricabatterie sia collegato a
una presa a muro funzionante.
Contattare il tuo distributore per favore.
Evitare l'uso del veicolo in condizioni difficili.
Il fusibile si ripristinerà automaticamente in
20 secondi.
Soluzione

50
NINIEJSZA INSTRUKCJA ZAWIERA
ISTOTNE
INFORMACJE DOTYCZĄCE BEZPIECZEŃSTWA. PROSIMY O ZAPOZNANIE SIĘ Z NIĄ I ZACHOWANIE JEJ DO WGLĄDU W PRZYSZŁOŚCI.
INSTRUKCJA OBSŁUGI
EN DE FR ES IT PL
Jeździk wóz strażacki
TY327063DE
50
NINIEJSZA INSTRUKCJA ZAWIERA
ISTOTNE
INFORMACJE DOTYCZĄCE BEZPIECZEŃSTWA. PROSIMY O ZAPOZNANIE SIĘ Z NIĄ I ZACHOWANIE JEJ DO WGLĄDU W PRZYSZŁOŚCI.
INSTRUKCJA OBSŁUGI
EN DE FR ES IT PL
Jeździk wóz strażacki
TY327063DE

52 53
ZAPOBIEGAJ SZKODOM I ŚMIERCI:
NIGDY NIE POZOSTAWIAJ DZIECI BEZ OPIEKI. WYMAGANY JEST
BEZPOŚREDNI NADZÓR OSOBY DOROSŁEJ.
Upewnij się, że dziecko znajduje
się w polu twojego widzenia, gdy korzysta z zabawki.
Podczas korzystania z zabawki należy zachować ostrożność, by uniknąć
upadków lub kolizji powodujących obrażenia użytkownika lub osób trzecich.
Podczas jazdy należy nosić sprzęt ochronny.
Nie należy używać w ruchu ulicznym.
Ta zabawka nie nadaje się dla dzieci poniżej 36 miesięcy ze względu na jej
maksymalną prędkość; Maksymalna waga użytkownika to 20 kg.
Ta zabawka nie ma hamulca.
Utylizacja baterii
Bateria kwasowo-ołowiowa (zamknięta) zasilająca produkt musi zostać
poddana recyklingowi lub utylizowana w sposób przyjazny dla
środowiska.
Nie wrzucaj akumulatora kwasowo-ołowiowego do ognia. Akumulator
może wybuchnąć lub wyciec.
Nie wyrzucaj baterii kwasowo-ołowiowych do zwykłych domowych
śmieci. Spalanie, składowanie lub mieszanie akumulatorów
ołowiowo-kwasowych z odpadami domowymi jest prawnie zabronione.
O Twoim nowym pojeździe
Specyfikacja
Przy zakupie nowego produktu.
Ten produkt sprawi Twojemu dziecku wiele radości. Aby zapewnić dziecku
bezpieczną jazdę, prosimy o uważne przeczytanie niniejszej instrukcji i
zachowanie jej do wglądu.
Odpowiedni wiek: 36-95 miesięcy
Bateria: 6V4,5AH x1
Czas ładowania: 8-12 godzin
Ładowanie: Wejście: zależy od lokalnego napięcia
wyjście: DC6V500mA
Ładowność: 20 kg
Rozmiar samochodu: 68 x 40 x 45 cm
Prędkość: 3 km / h
54 55
Sposób montażu
1. Dodaj uszczelkę, koło, uszczelkę, zawleczkę i osłonę koła po każdej
stronie koła kierownicy jeden po drugim. (ryc.1)
2. Dodaj jedną uszczelkę do tylnej osi z prawej strony, włóż tylną oś do
nadwozia. Dodaj silnik po prawej stronie i uszczelkę po lewej stronie.
Następnie dodaj kolejno koło, uszczelkę, zawleczkę i osłonę koła. (ryc.2)
3. Połącz dwa zaciski
korpusu zabawki i podnóżka,
a następnie zamontuj dwa
podnóżki zgodnie ze strzałką.
Dokręć śrubą 10 sztuk
M4 * 12. (ryc.3)
Nr. Ilośćnazwa Nr. Ilośćnazwa
Korpus samochodu
Koło
Podnóżek lewej stopy
Podnóżek prawej stopy
Tylna oś
Silnik
Kołpak
Zawleczka
Uszczelka
1
4
1
1
1
1
4
4
8
2
1
1
4
1
1
1
1
1
Kwadratowa rura
Lampka alarmowa
Przewodnik
Śruba M4 * 12
Ładowarka
Siedzenie
Oparcie
Kierownica
Dźwignia sterująca
Nazwa elementu
5756
Sposób montażu
4. Zamontuj dwie kwadratowe rurki do nadwozia samochodu zgodnie
ze strzałką, a następnie dokręć za pomocą 4 śrub M4 * 12. (ryc.4)
5. Włóż dźwignię kierownicy do nadwozia samochodu zgodnie ze
strzałką, a następnie obróć nadwozie, podnosząc dźwignię kierownicy,
aby opadła. (ryc.5)
Instrukcja montażu
6. Włóż kierownicę do dźwigni kierownicy, a następnie dokręć śrubą. (ryc.6)
7. Podłącz dwa zaciski lampy alarmowej i korpusu zabawki.
Umieść lampkę alarmową w korpusie zgodnie ze strzałką. (ryc.7)
8.Włóż oparcie do korpusu
samochodu. (ryc.8)
9. Otwórz siedzenie zgodnie ze strzałką.
(ryc.9)
5958
1. Włącz zasilanie - samochód jest gotowy do użycia.
2. Przycisk do przodu, stop, wstecz służy do sterowania (do przodu, stop, do tyłu).
3. Pedał - naciśnij przycisk do przodu, samochód porusza się do przodu, naciśnij
stop, samochód zatrzymuje się, naciśnij do tyłu, samochód porusza się do tyłu.
4. Wejście ładowania znajduje się nad wyłącznikiem zasilania. Gdy moc jest niska,
proszę naładować. Samochód nie może być używany, gdy jest ładowany.
Ładowanie powinno być wykonywane przez osoby dorosłe.
5. Naciśnij przycisk muzyki, aby włączyć dźwięk alarmu i utwór.
6. Naciśnij przycisk klaksonu, aby uzyskać dźwięk „BEEP”
Sposób działania
10. Podłącz czerwoną linię do czerwonego
zacisku akumulatora (ryc.10).
Rozwiązywanie problemów
Możliwe przyczynyProblem
Pojazd nie działa
Niski poziom naładowania baterii
Złącze akumulatora lub
przewody są luźne
Bateria jest wyczerpana
Układ elektryczny jest uszkodzony
Silnik jest uszkodzony
Akumulator jest słabo
naładowany
Bateria jest stara
Niski poziom naładowania baterii
Bateria jest stara
Pojazd jest przeciążony
Słaby kontakt przewodów
lub złączy
„martwy punkt” na silniku
Próba zmiany biegów,
gdy pojazd jest w ruchu
Silnik lub przekładnia są
uszkodzone
Złącze akumulatora lub
adapter jest poluzowany
Ładowarka nie jest
podłączona
Ładowarka nie działa
Jest to normalne zjawisko
Pojazd jest używany w
Pojazd działa zbyt krótko
Pojazd jedzie wolno
Pojazd potrzebuje pomocy
by ruszyć
Pojazd potrzebuje pomocy
by ruszyć
Głośne odgłosy szlifowania
lub klikania dobiegające z
silnika lub przekładni
Bateria się nie ładuje
Ładowarka nagrzewa się
podczas ładowania
Zanim zadzwonisz, przeczytaj dokładnie niniejszą instrukcję i tabelę rozwiązywania problemów.
Jeśli nadal potrzebujesz pomocy w rozwiązaniu problemu, skontaktuj się z dystrybutorem.
Zadziałał bezpiecznik
termiczny
Naładuj akumulator.
Sprawdź, czy złącza akumulatora są mocno
ze sobą połączone. Jeśli przewody wokół
silnika są luźne, skontaktuj się z dystrybutorem.
Wymień baterię, skontaktuj się z dystrybutorem.re.
Proszę skontaktować się z dystrybutorem.
Proszę skontaktować się z dystrybutorem.
Sprawdź, czy złącza akumulatora są dobrze
podłączone do siebie podczas ładowania
Wymień baterię, skontaktuj się z dystrybutorem.
Naładuj baterię, skontaktuj się z dystrybutorem.
Wymień baterię, skontaktuj się z dystrybutorem.
Zmniejsz ciężar pojazdu. Maksymalna
waga użytkownika to 20 kg.
Sprawdź, czy złącza akumulatora są mocno
ze sobą połączone. Jeśli przewody wokół
silnika są luźne, skontaktuj się z dystrybutorem.
Martwy punkt oznacza, że energia elektryczna nie jest
dostarczana do złącza końcowego i pojazd wymaga
naprawy. Proszę skontaktować się z dystrybutorem.
Całkowicie zatrzymaj pojazd i zmień bieg.
Proszę skontaktować się z dystrybutorem.
Sprawdź, czy złącza akumulatora są
mocno ze sobą połączone.
Sprawdź, czy ładowarka jest podłączona
do sprawnego gniazdka elektrycznego.
Proszę skontaktować się z dystrybutorem.
Unikaj używania pojazdu w trudnych warunkach.
Bezpiecznik zresetuje się automatycznie
po 20 sekundach.
Rozwiązanie
