
1 Introduction
Luxriot video analytics (VA) is a real-time video analytics engine that utilizes neural networks to turn video into
actionable intelligence. The VA engine is seamlessly built into the Luxriot EVO software and a part of the unified
Luxriot EVO licensing system. At the core of the product there is a state-of-the-art object tracking engine that
detects and classifies objects, and continually tracks moving and stationary targets. The tracking engine features
built-in robustness to environmental nuisance conditions such as changing illumination, precipitation, moving
foliage, rippling water, etc.
Luxriot EVO VA offers:
object detection and classification
new object detectionevents for the Event & Action rules
unique objectcounting using built-in software counters
VA zones and lines with counters
rule triggering
With only a few settings to adjust, it is possible to quickly and easily define the rules that generate real-time alerts
when triggered. This user guide will help you get Luxriot Video Analytics quickly configured, as well as lead you
through some of the advanced features provided by the product.
Luxriot VA is a part of Luxriot EVO core, therefore:
VA is installed together with Luxriot EVO and no additional installation is required
VA cannot operate on its own without Luxriot EVO channels
triggered rules can be used in the Event & Action scenarios in Luxriot EVO S and Luxriot EVO Global to
create complex and flexible automated behaviour patterns
VA metadata overlay is present in Luxriot EVO Monitor for the user to see the tracked objects both in live
view and in playback
Evo Video Analytics 2
©2021 A&H Software House. All Rights Reserved.
2 Getting Started
Luxriot VA operates as a part of Luxriot EVO core so no extra installation is required yet there are
certain prerequisites.
In order to get up and running as fast as possible, do the following:
ensure that you have installed your Luxriot EVO server, version 1.18.0 or newer, 64-bit version
activate your Luxriot EVO server with a license key that allows VA usage (every license includes 1 VA
channel for free by default, additional channels can be purchased by contacting us at
https://www.luxriot.com/purchase/inquiry-form/),
add video sources to be analyzed (please check with the main Luxriot EVO manual for details),
enable and configure VA for the desired channels,
configure E&A rules, if necessary,
enjoy.
Luxriot EVO VA is enabled and configured via Luxriot EVO Console. After you set it up, it is possible to add
Event & Action scenarios based on the VA detections in Luxriot EVO Console, and see the VA metadata
overlaying the video in Luxriot EVO Monitor.
Once you finish with these steps, you should be perfectly able to use Luxriot VA detection as a basis for the event
rules in the Event&Action Configurator in Luxriot EVO Console, as well as see VA metadata overlaying the video
streams in Luxriot EVO Monitor.
Evo Video Analytics 3
©2021 A&H Software House. All Rights Reserved.
3 Prerequisites
HardwareRequirements
This section defines the minimal system requirements for VA operation. The listed hardware must be provided on
top of Luxriot EVO server requirements. The OS load is not taken into account.
Hardware
CPU: with AVX/AVX2support (produced after 2011)
1x physical core 3.0GHz+ per 1 VA channel
1GB RAM per 1 VA channel, DDR4 RAM strongly recommended
Support for the AVX/AVX2 instruction set is mandatory! Please check your CPU model before installation
if you intend to run VA on the server.
OSandSoftware
Basically, the requierments here are the same as for the Luxriot EVO itself, please refer to the main product
administration guide for details.
Microsoft Windows operating system (7 SP1, 8, 8.1, 10, Server 2012 R2, Server 2016, Server 2019), real or
virtual machine
64-bit OS only (no support for 32-bit operating systems)
VA is only supported for 64-bit Luxriot EVO server architecture!
CameraPosition
The neural network behind the VA engine has been trained on different datasets that use common (human-like)
point of view as a basis. This means, for the best results of, e.g., person detection, you camera should see people like
human-like silhouettes; top-down (from above) view will produce poor results.
For vehicle detection, a view field of 1-2 lanes is recommended. Environments with a lot of non-essential objects and
interference may affect VA accuracy. For advice on VA fine tuning, kindly contact [email protected].
Evo Video Analytics 4
©2021 A&H Software House. All Rights Reserved.
4 Activation
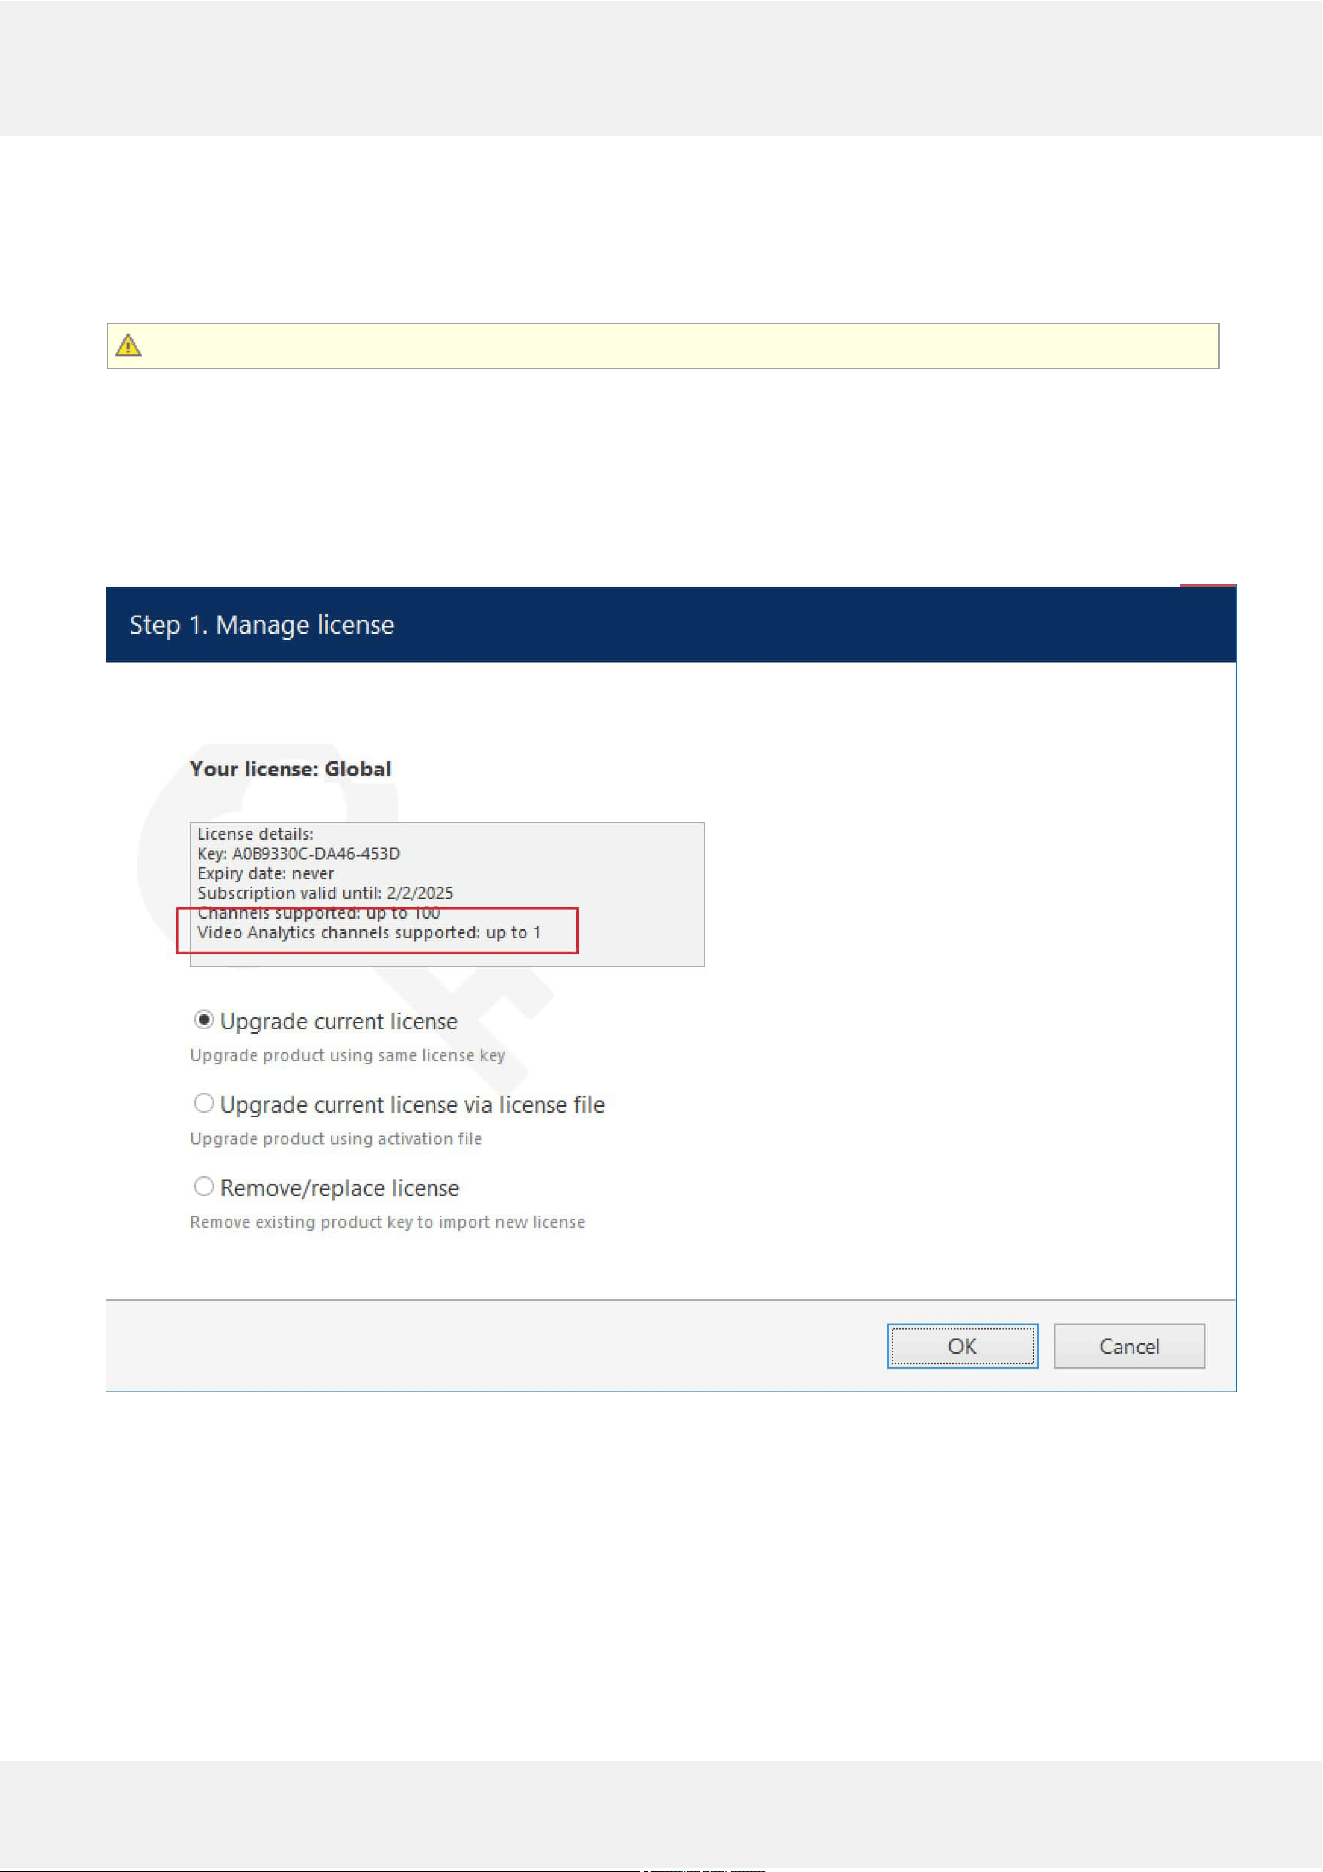
Each Luxriot EVO license already includes 1 (one) full videoanalyticslicense for free, and you can use it on any
video channel in the system. One VA license channel can be used on one video channel.
The free license version of Luxriot EVO, Luxriot EVO (complimentary edition) does not support VA!
To obtain more VA channels, purchase a licenseupgrade by contacting your distributor or Luxriot manager
directly, or apply for the upgrade via https://www.luxriot.com/purchase/inquiry-form/. Upgrades are available for
the Luxriot EVO S and Luxriot EVO Global license editions!
After that, run the Activation Wizard on your Luxriot EVO server and upgrade the license. The activation manager
will connect to the Luxriot activation server and fetch the new license contents. If you are purchasing a new Luxriot
EVO license, you can order a certain number of channels to be included with it, so you will only have to activate it
once.
A Luxriot EVO license including one VA channel
To run the activationmanager, locate the Activation Wizard in the Windows start menu. Alternatively, right-
click the Luxriot EVO server tray icon and select About, then click the Manage License button. All license
management operations can be only performed locally.
Evo Video Analytics 5
©2021 A&H Software House. All Rights Reserved.
5 Configuration
EnablingVideoAnalytics
After you have applied the license, you can enable VA for as many channels as the license allows. By default, VA is
disabled for all channels.
In Luxriot EVO Console, open the target channel settings by double-clicking the channel in the list. Go to the Video
Analytics tab tab and put a check mark in the Enable option. Click OK to saveandclose the dialog box, or click
Apply to continue configuring the channel.
To disable VCA functionality for the selected channel, simply uncheck the Enable option and save. The rest of the
settings will be preserved.
Important: disablingVA for the target channel doesnotresetthesettings. Thus, you can pre-configure
the video analytics for more channels than your license allows, and then apply the license later.
Once VA engine has been activated and enabled, you can proceed with its configuration: choose the object classes to
be tracked, create zones etc. Once you do that, VA elements (bounding boxes) will be available in Luxriot EVO
Monitor (overlaying live video, instant playback and playback) and VA rules will be also available in the Event &
Action Configurator in Luxriot EVO Console as event basis.
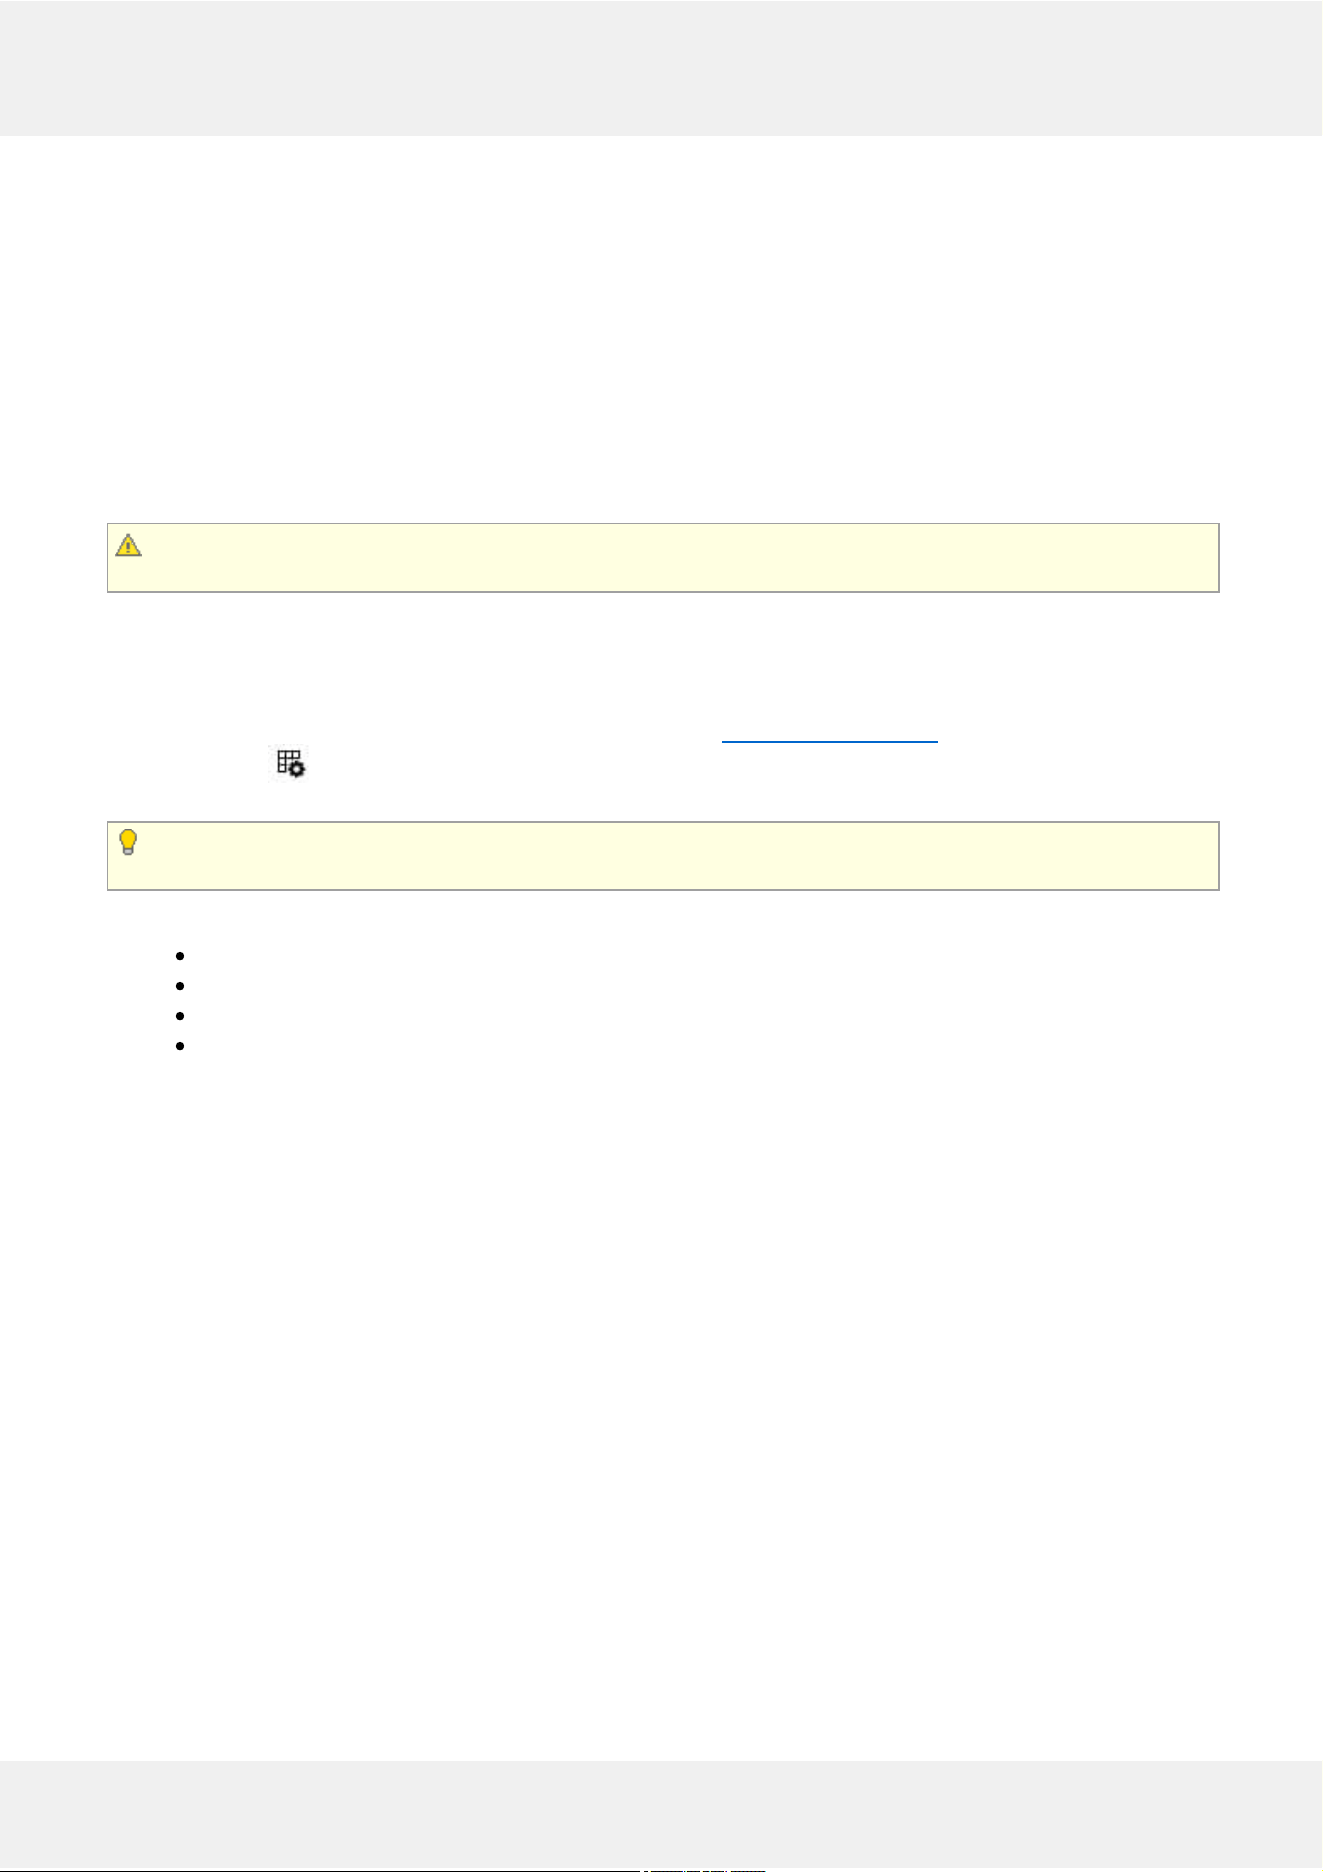
You can check what channels are using VA license by adding the corresponding column in the Channels section. To
do this, click the grid icon in the upper right corner of Luxriot EVO Console and move the Video
Analytics column to the list on the left, then click OK.
VCA metadata overlay is displayed in Luxriot EVO Monitor in live, instantplayback and playback modes.
Other modes (e.g., Sequence playback) and video export donotsupport VCA overlay at this point.
The overall logic of VA setup is as follows:
enable VA
enable metadata overlay, if required
set up general engine parameters
add zones and rules
EnablingMetadataOverlay
VA metadata is disabled by default for all channels. To enable bounding boxes for the current video channel for all
Luxriot EVO Monitor applications, turn ON the Enable metadata display option in the VA settings. On the Luxriot
EVO Monitor side, it is possible to enable/disable separate overlay elements via application settings. Further details
on this can be found in the Luxriot EVO Monitor application user guide.
Evo Video Analytics 6
©2021 A&H Software House. All Rights Reserved.
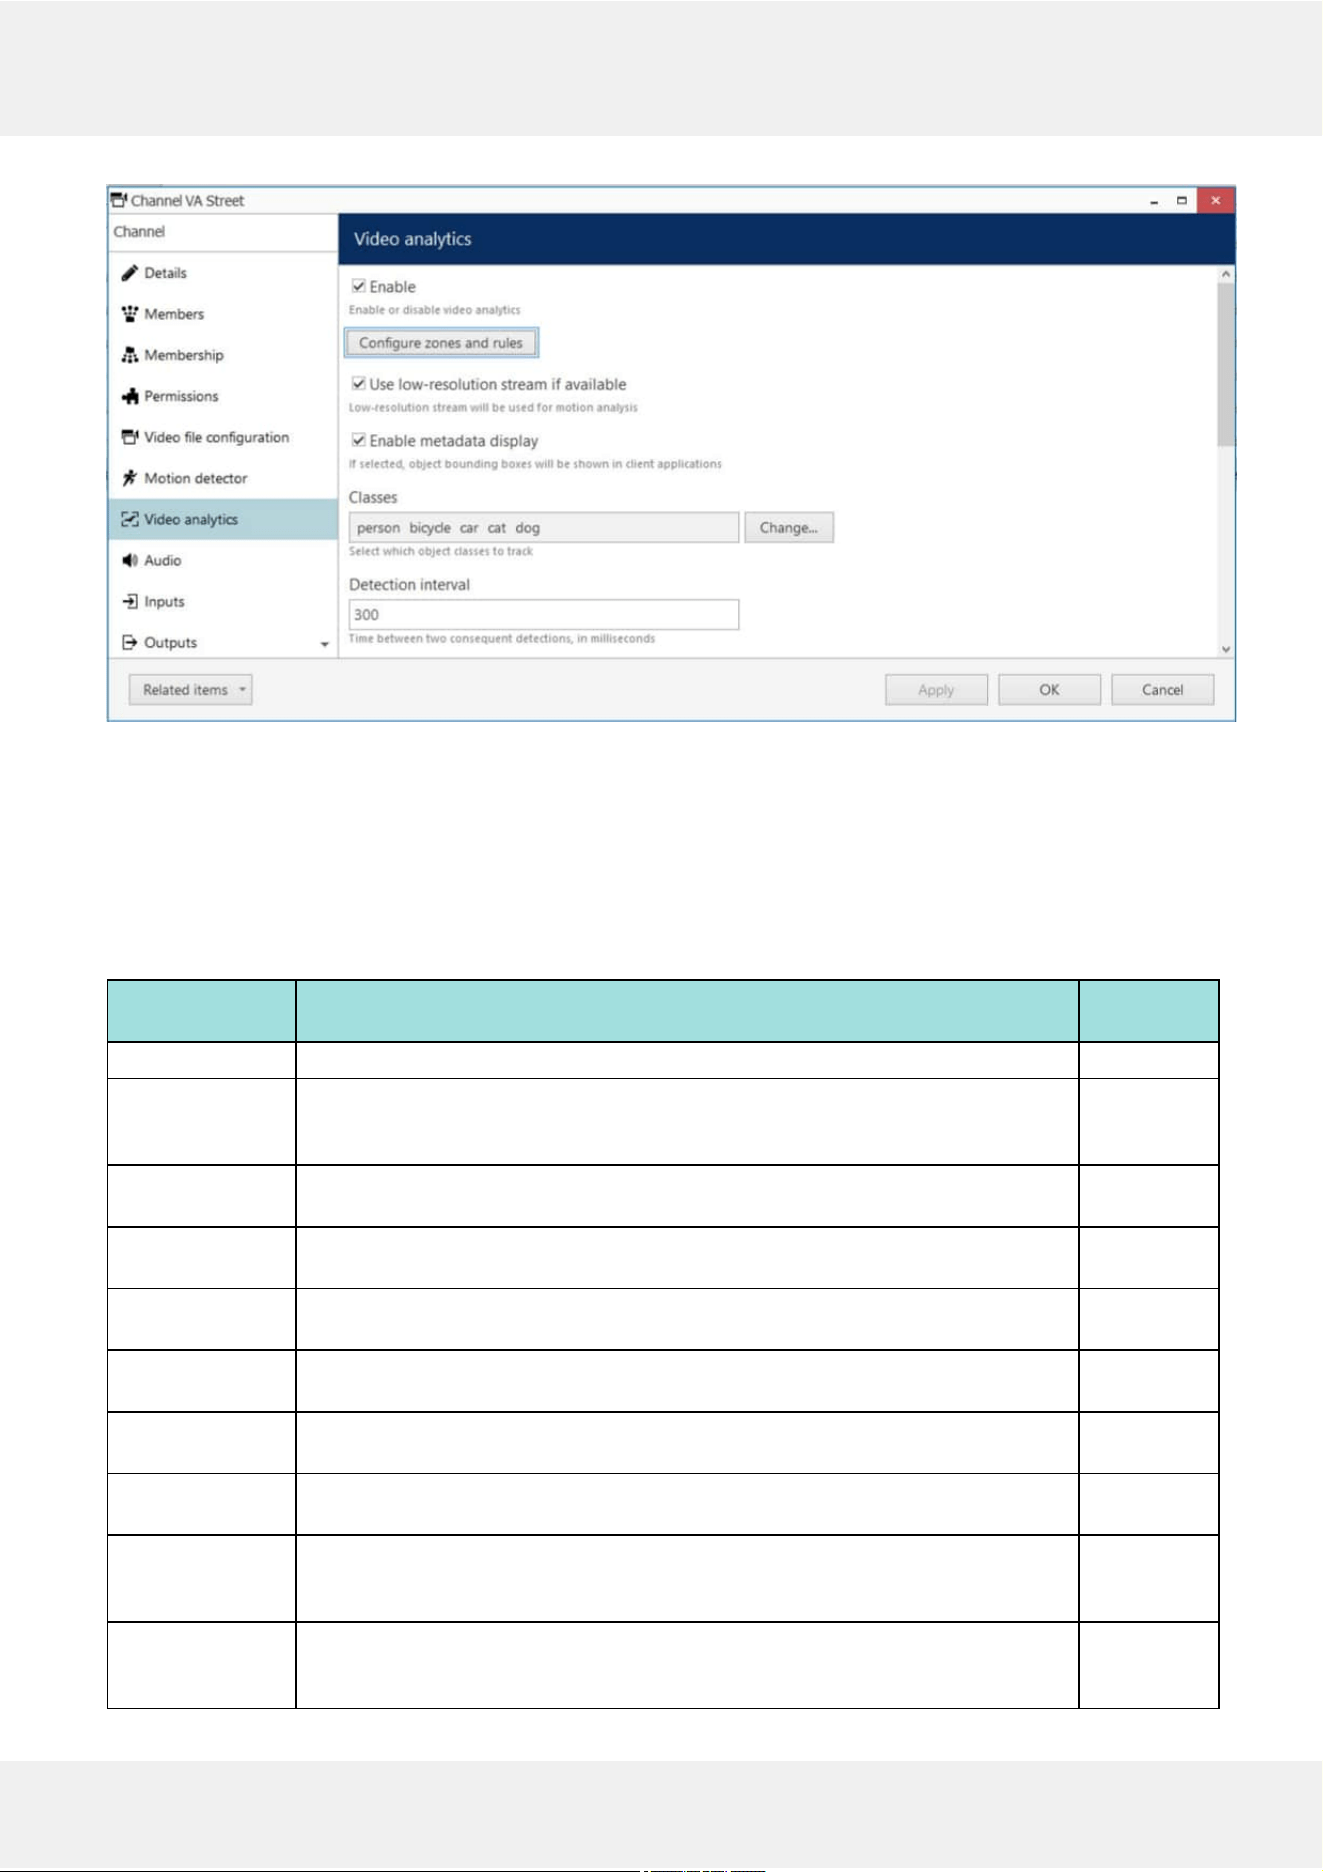
VA settings in the channel configuration dialog box
GeneralVASettings
The rest of the VA settings are in the same tab. Some of them must be adjusted in order to proceed (e.g., no object
classes are selected by default); other settings already have default values. If you are not sure what values should be
used for that particular video channel, leave the default (pre-configured) value, check how VA works, then slowly
adjust the value until you see which one works best for your scene.
Please adjust the overall engine settings here first before adding zones and rules.
Setting Description Default
Value
Enable VA state for the current channel, ON/OFF Disabled
Use low-
resolution stream
if available*
Similarly to motion detection, use smaller image for detection in order to save
server resources.
Enabled
Enable metadata
overlay
Select this option to turn ON the metadata overlay on the Luxriot EVO Monitor
side (affects all connected Luxriot EVO Monitor applications)
Disabled
Classes Choose the object classes that you want to be detected in the target video
(further class choice will be limited to this list)
None
Detection
interval**
Time (delay) in milliseconds between two successive detections (similar to MD) 200
milliseconds
Object loss
timeout
The amount of time in seconds before the lost/disappeared object is not tracked
anymore
6 seconds
Scene
dynamics***
Relative speed of the objects in the scene, i.e., how fast the object crosses the
screen; in more dynamic scenes, objects appear in less frames
Normal
(average)
Confidence
threshold
The minimum level of confidence to decide if the object belongs to a class
(detections with lower confidence will be ignored)
70%
Object similarity
threshold****
The minimal level of object similarity between two detections to decide that it is
the same object (objects with lower similarity will be detected as new), optimal
range: 50-90%
85%
Maximum object
size
Larger objects will not be detected. Click the Select button to set the size using
visual adjustment. (Use this setting to eliminate false detections of non-existing
large objects).
50%, 50%
Evo Video Analytics 7
©2021 A&H Software House. All Rights Reserved.
*Only use this option if you camera delivers both high and low resolution streams as same picture. If the secondary
stream is a cropped version of the hi-res image, the detection results will be inaccurate.
**This is the minimum time between two detections. If the video stream FPS is low, the actual interval may be
longer.
***This setting teaches the VA engine where to look for the same object in the next frame. Slower option means the
object is present in more frames. Faster means the object is present in less frames during its appearance. Choose
slower options for calm scenes with low-speed objects (e.g., people walking), and faster for dynamic scenes (highway
etc.).
****Highly affects the engine ability to track the objects. If the value is too low for the target scene, different objects
may be considered one. Too high (close to 100) causes each detection to produce a new object each time. We
recommend that you start with the default value, and change it slowly when testing. Scenes with many similar
objects (e.g., items on the conveyor belt) require slightly higher similarity and correct object speed (see above).
ZonesandRules
Finally, set up visual detection elements - zones and lines - and add counters and rules for them.
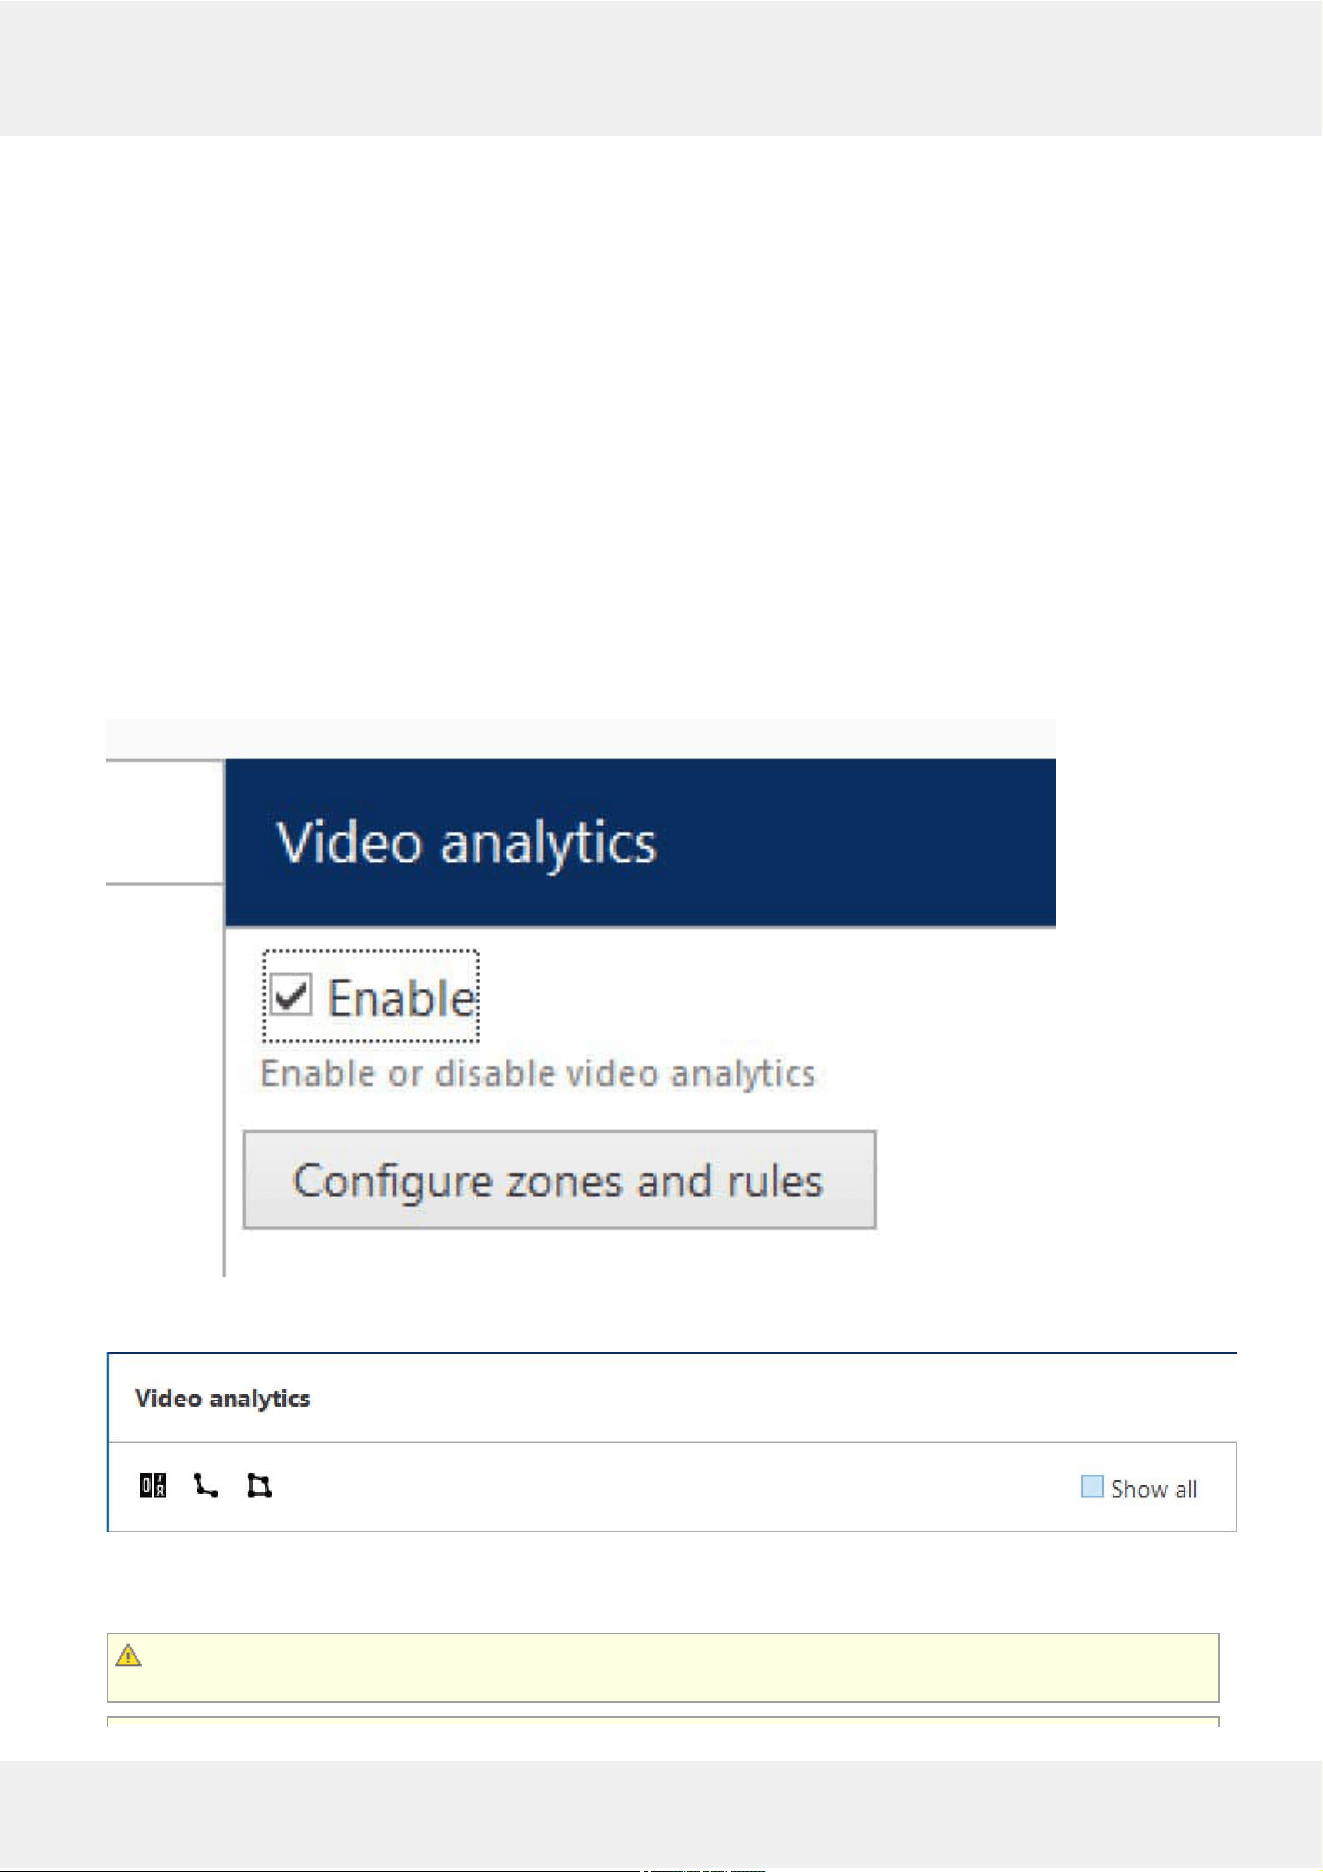
Click the Configure zones and rules button to bring up the video overlay dialog box. By default, only VA overlays are
displayed, but you can use the Show all checkbox to see if there are other overlays (e.g., data sources) configured for
this channel.
In the top right corner, there are VA markers: counter, counting line, and polygonal zone. Drag and drop any
marker onto the picture to place it, then adjust its size and position.
If you want to see all visual elements of the current channel (channel shortcuts, data sources), click the Show all
option next to the markers. In this way, you can check that the channel shortcuts and data output fields,
if configured, do not overlap with VA elements.
Please note that markers are just visual elements: you need to add rules and then create E&Arules to
trigger some event chains.
Evo Video Analytics 8
©2021 A&H Software House. All Rights Reserved.
Zones are rectangular by default but you can add newnodes by right-clicking on the zone border and
selecting Add.
For each zone or line, you can create rules, which can be later used to trigger events in E&A. For example, such
rules can increment counters:
for reflecting the current number of objects in the zone, use the special Zone counter type,
for other rules, create new counters and then go to the E&A configurator to add rules that will increment
those counters.
For each countermarker in VA, you will need to map it to a real counter to make it work.
to trackthenumberofpeopleinanyzone: create Zone counter under the zone, then drag and drop
a counter marker, and bind it to the zone counter
to countobjects appearances for lines or zones: create a new counter (or choose an existing E&A
counter from the list), then drag and drop the counter marker and bind it to the counter
In such a way, you can use the same counters from E&A for multiple channels' VA, for example, to count the total
number of customers coming via different doors.
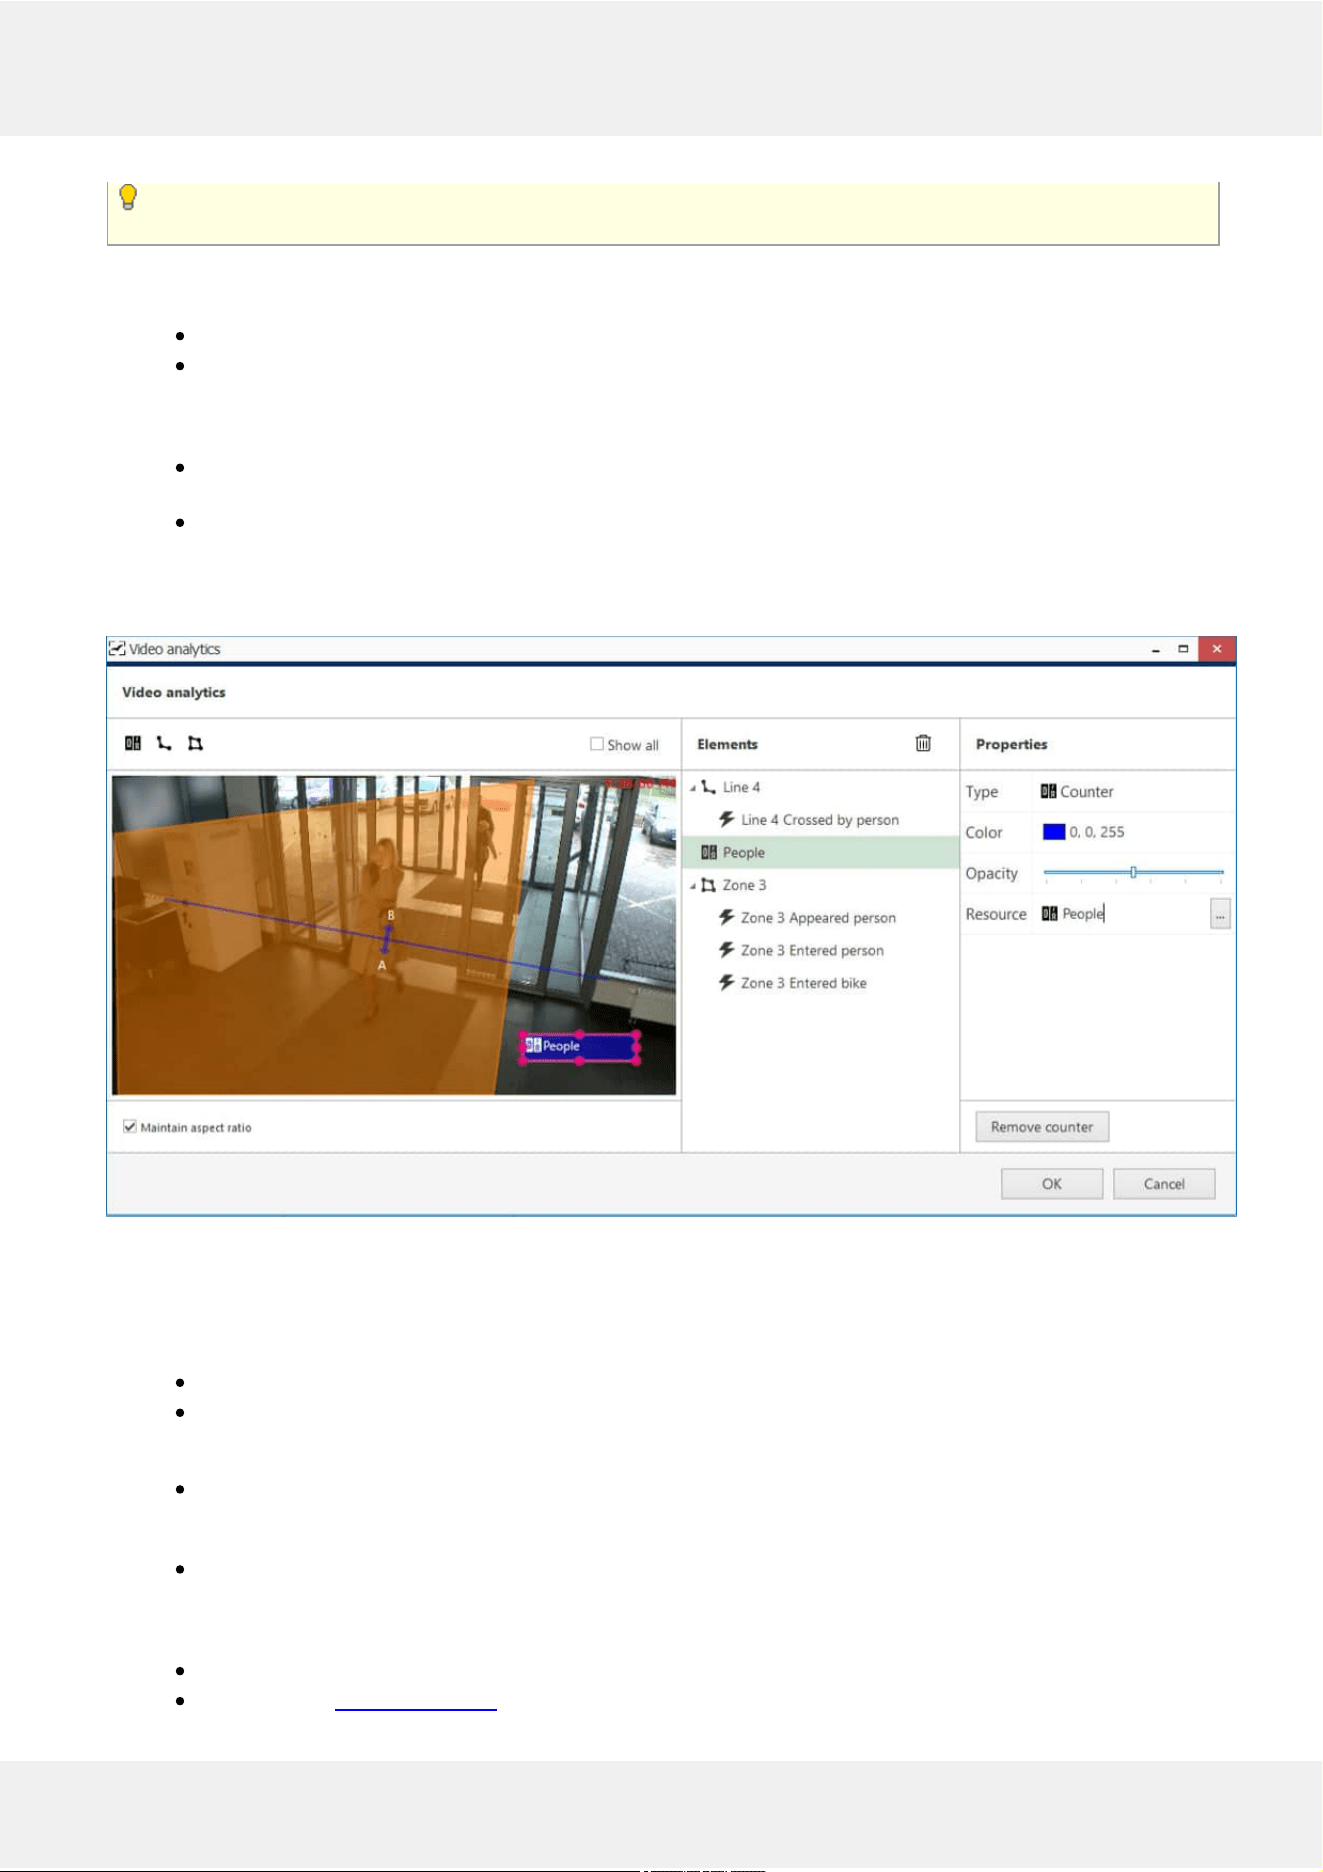
Add zones, lines, counters, and rules
For each zone/line rule, you can choose one or multiple objectclasses to be tracked. You can only choose among
classes that have been enabled for the current channel in the previous dialog box.
Available linerules:
Crossed AB or Crossed BA: object has crossed the line in the specified direction
Crossed: object has crossed the line in any direction
Available zoneevents:
Entered or appeared: the object appeared in the zone either by crossing its border from outside to inside,
or appeared directly inside (e.g., if the zone order is equal to the frame border, or there is a door inside the
zone)
Leaved or disappeared: the object departed from the zone either by crossing its border from inside out, or
simply disappeared inside the zone (e.g., there is a door inside the zone)
Available counter types:
zone counter: reflects the current number of certain objects in the zone
counter: E&A software counter
Evo Video Analytics 9
©2021 A&H Software House. All Rights Reserved.
Use the buttons below the objects and their properties to create and remove rules. Note that these rules only exist in
VA configuration; in order to set up reactions, go to the Events&Actions section of Luxriot EVO Console. The VA
rules are converted to E&A events automatically for E&A so you just need to set up required actions - e.g., increment
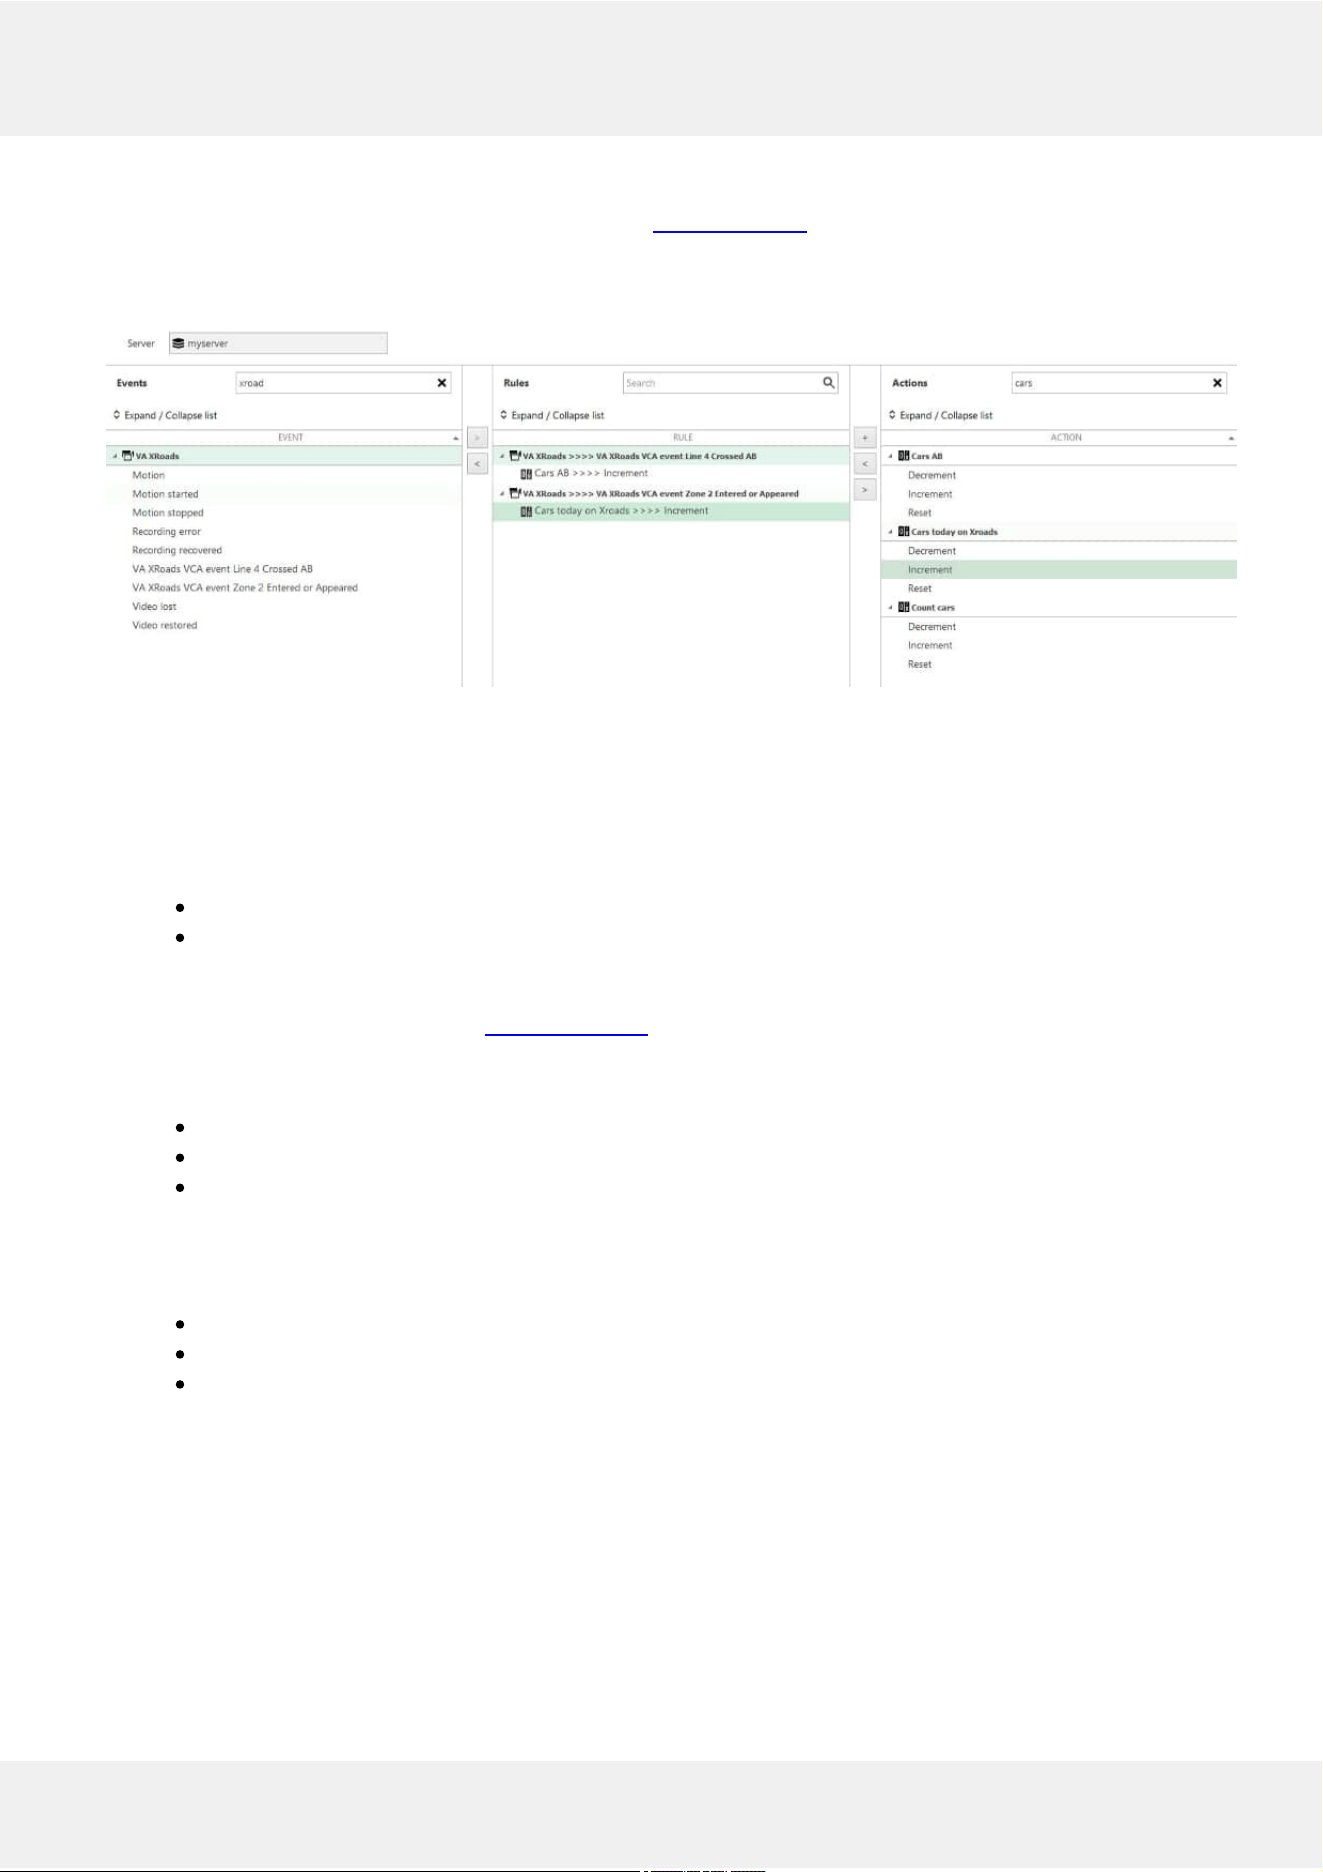
counters. In the example below, the VA events have been created automatically for the given channel, but the rules
(middle column) have been created by user.
E&A Configurator events created based on VA rules
Please see the consequent sections of this document on how to create E&A items.
Counters
Counters are entities that contain a certain integer value, which can be altered based on some occurred event - in
this case, VA rule event. VA has two types of counters available:
softwarecounters (system-wide counters) for counting the number of any event occurrences
VCAcounters, or zone counters (created specifically for VA and intended to reflect the current number
of VA objects in a zone)
You can create new counters from VA configuration, when binding visual elements to actual counters. Alternatively,
you can add new counter entities in the Events & Actions section of Luxriot EVO Console, under the Counters
subsection. Each new counter will have a starting value of 0 (zero).
In the E&A Configurator, each counter will appear in the right-hand column with three built-inactions:
Increment: increase counter value by one
Decrement: decrease counter value by one
Reset: set the counter's value to zero
CountersinVAConfiguration
The overall logic using counters is as follows (the order of steps is not very important):
Create a counter (either from VA config or E&A section)
Bind the counter to its visual representation in VA overlay, if desired
Bind VA rules to it in E&A section
You can create a new counter of any type right from the VA configuration dialog box. So, start by draggingand
droppingthevisualelement from the panel above the video and position the box where you want the counter to
be displayed. By default, it will have no linked counters, i.e., the box is just a visual container. You need to link it to
an existing counter or create a new one. In this example, two boxes are bound to counters, and the green one is
empty.
Evo Video Analytics 10
©2021 A&H Software House. All Rights Reserved.
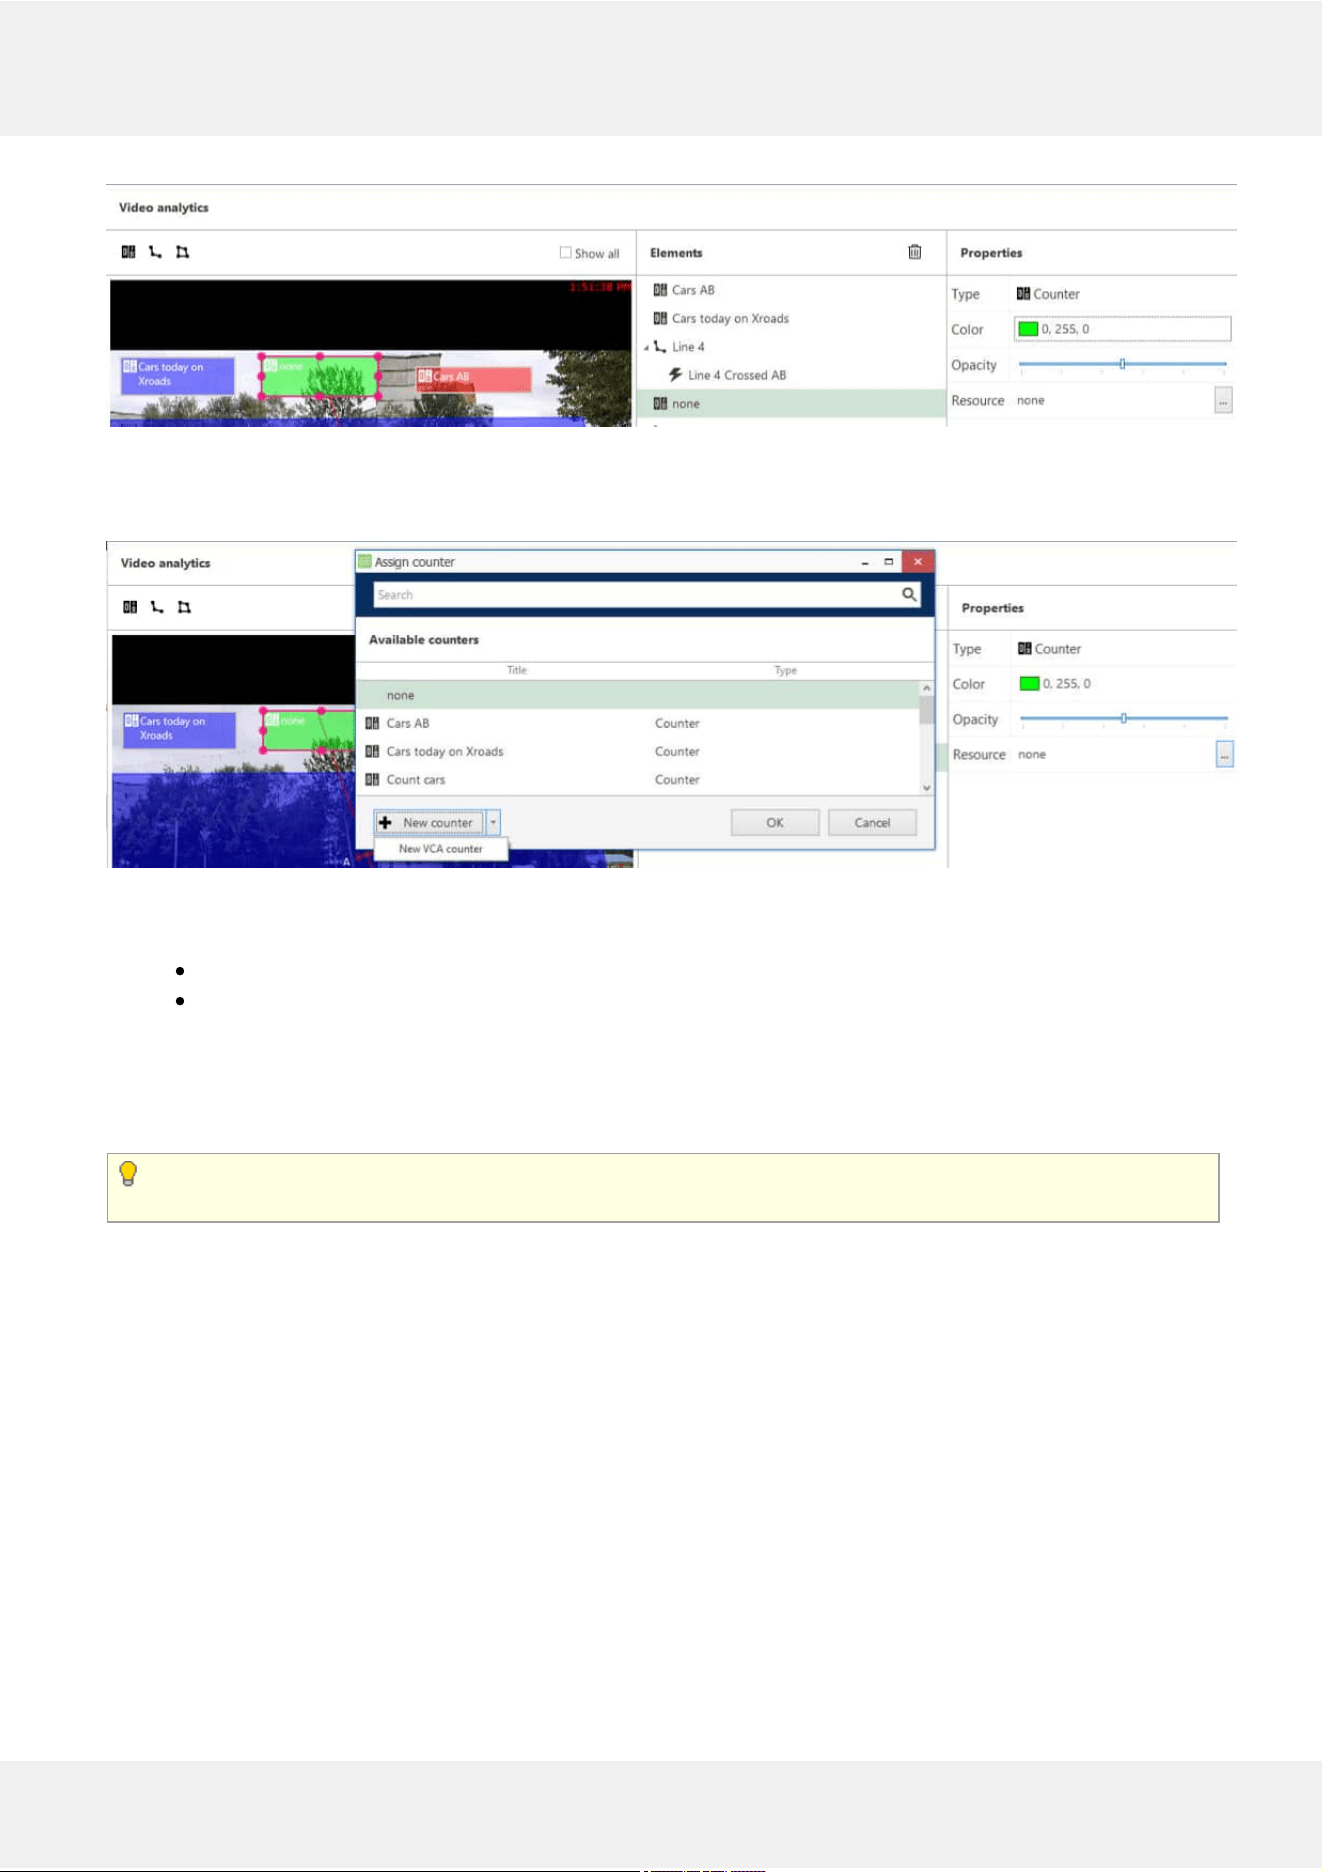
Drag the very first overlay control to visualize counters
Click the ... three dot button next to the Resource on the right, and either choose an existing counter, or create a new
one using the buttons below.
Create a new counter from VA configuration window
You have two buttons here:
clicking +New counter will create a new software counter, available outside VA
click the arrow next to that button to create a +New VCA counter, which will count the current number of
specified objects in the zone
To add new VCA counters for the specified zone, you can also click a zone, then click the +New zone counter below.
Finally, to bindVArulestocounters, go to the E&A section of Luxriot EVO Console as described in the next
section of this document. E&A (Events and Actions) is a tool for the centralized event & action management.
In VA configuration, you create desired VA rules that further trigger E&A events. VA rules do not do anything
themselves other than just provide the event source.
Again, here is the difference between "zone" counters and "regular" software counters:
Softwarecounters can be used to count anything (any event occurrences). Use software counters to estimate the
number of passing cars, incoming customers, the number of customers in the shopping mall etc. You can increment
and/or decrement software counters based on VA events from many different channels, even if they use different
video analytics types.
Zonecounters are solely intended for reflecting the current number of objects in the zone. Object class is taken
into account. You can use this for queue length or traffic estimation.
Evo Video Analytics 11
©2021 A&H Software House. All Rights Reserved.
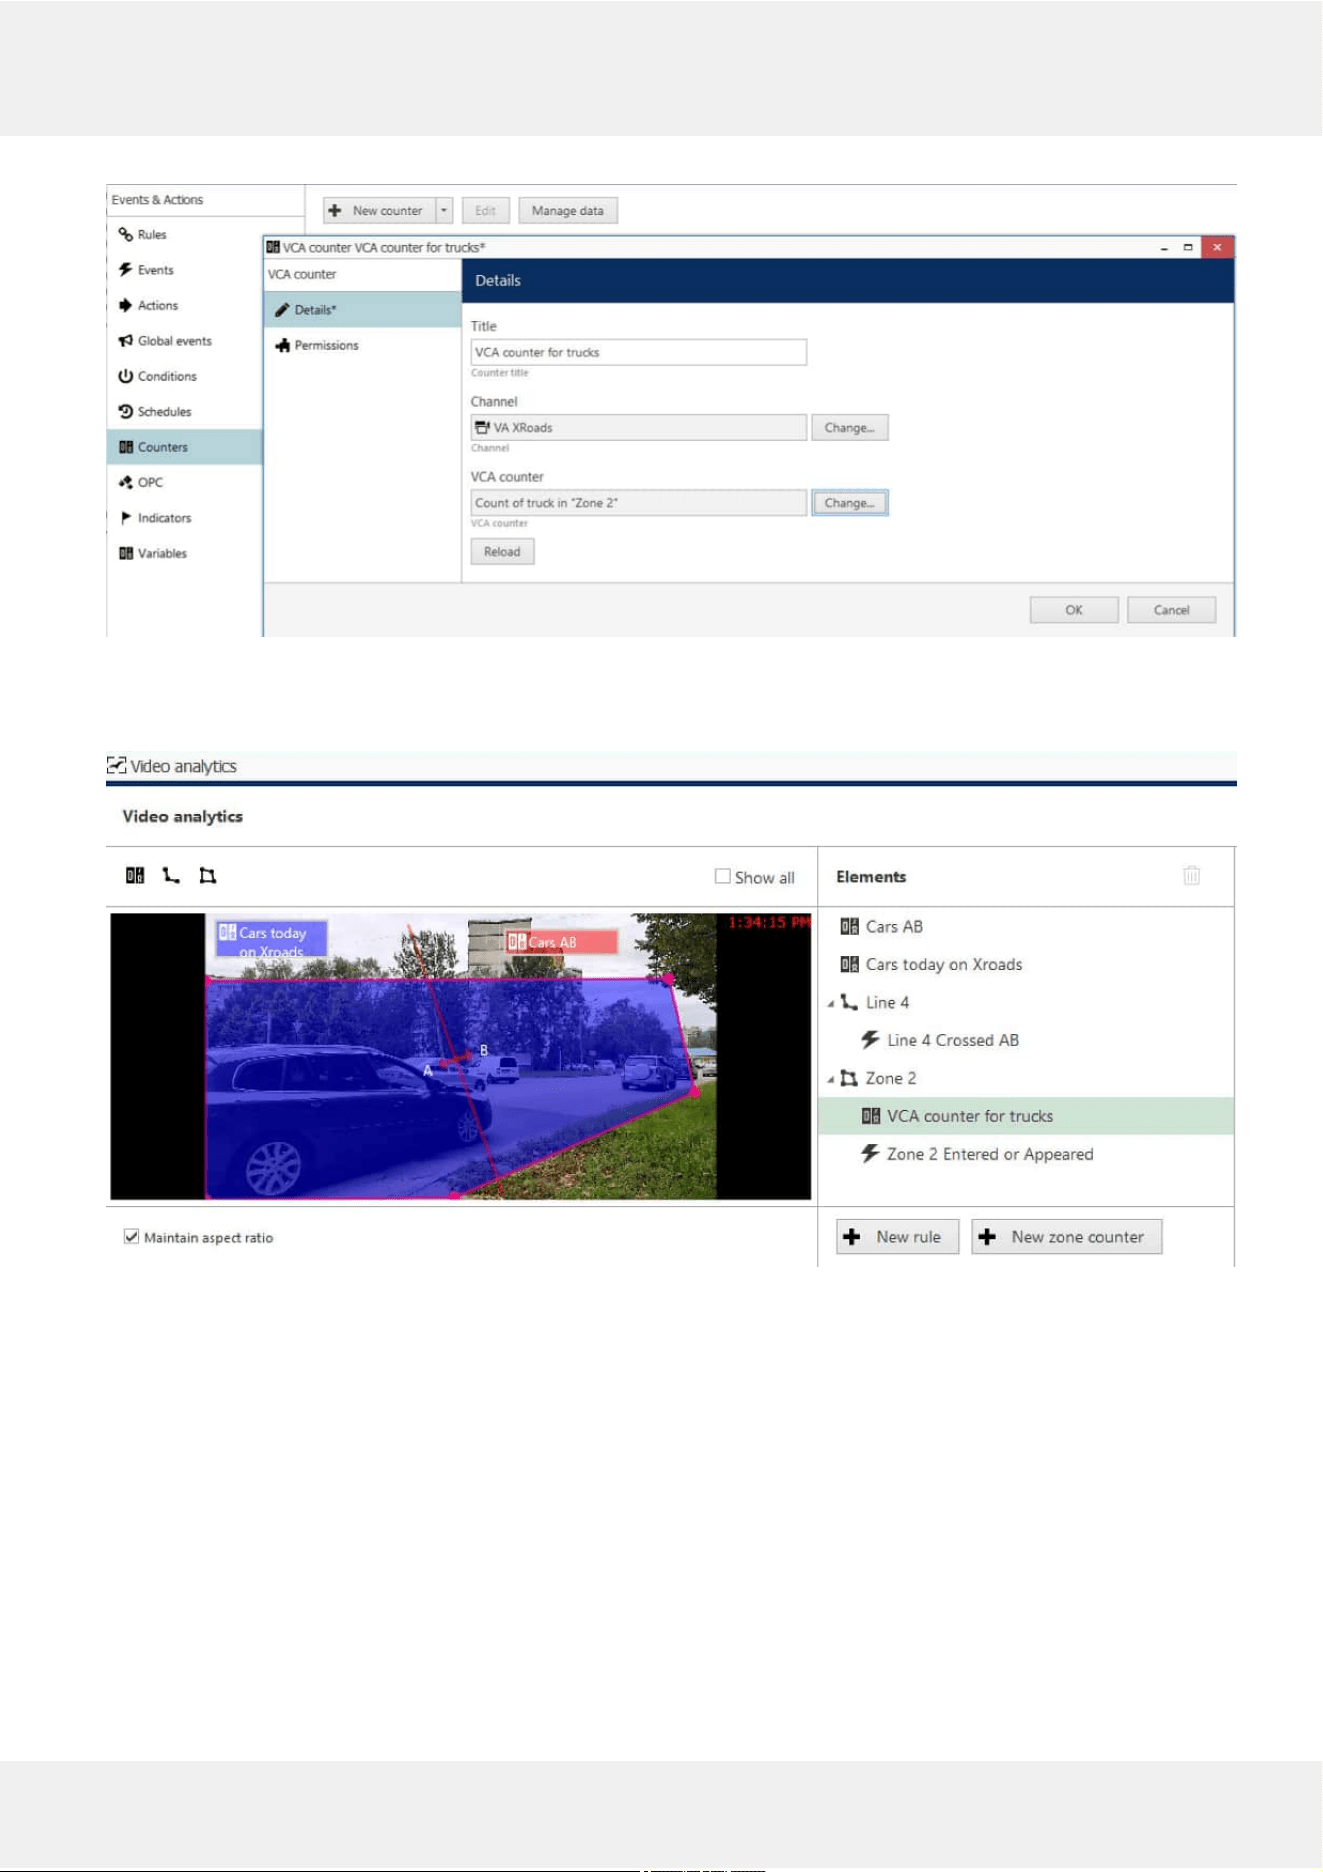
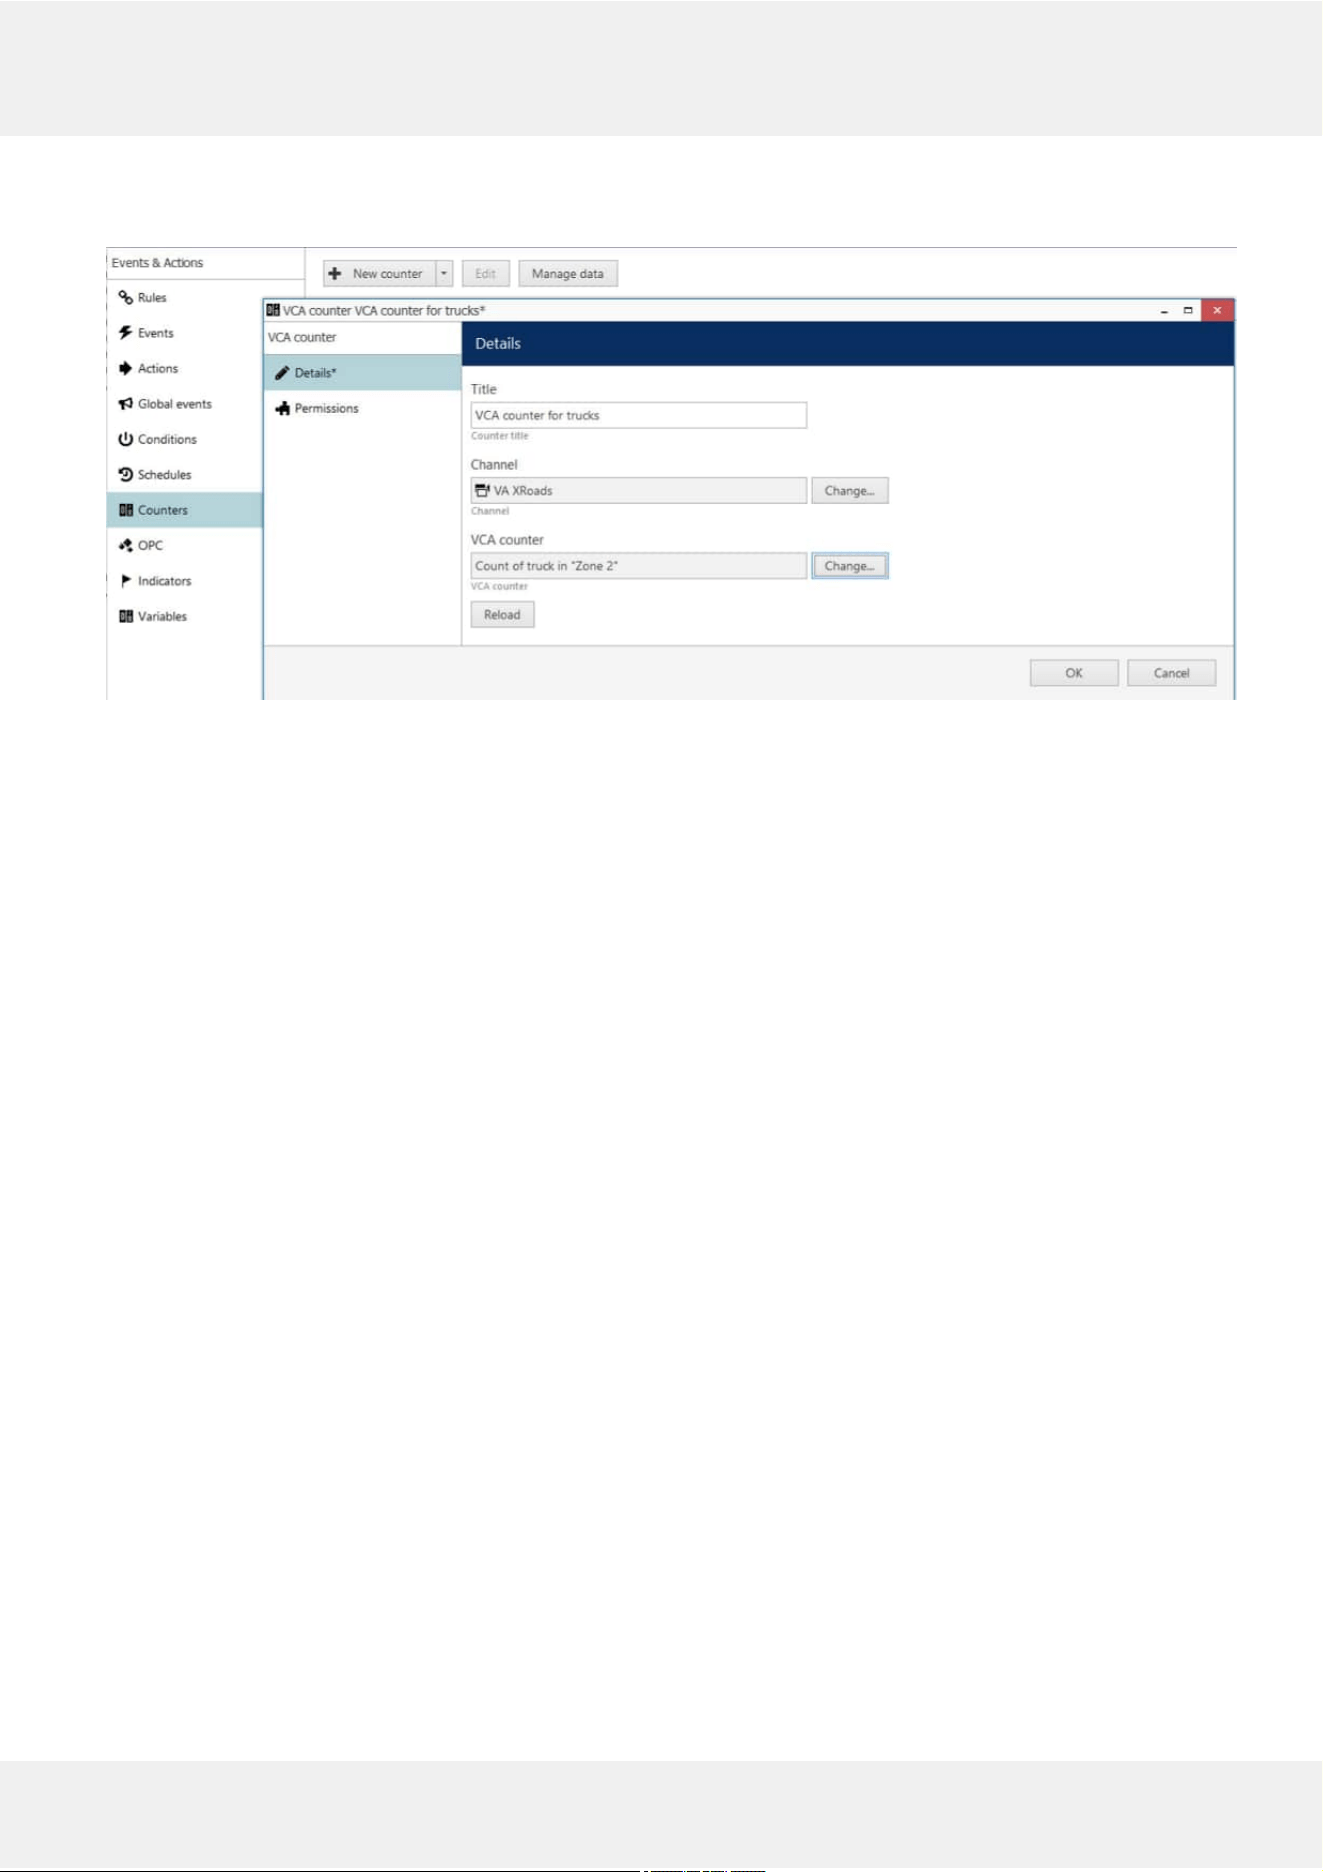
Create new VCA (zone) counter from E&A section of Luxriot EVO Console for reflecting the zone state
Such counters can be also added from the VA configuration dialog box using the +New zone counter button. The
counters added from E&A will appear under corresponding zones in the VA configuration.
Zone counter and a button for adding a new zone counter in VA settings
See the sections below on how to add rules using the created counters and VA events.
Evo Video Analytics 12
©2021 A&H Software House. All Rights Reserved.
6 Video Analytics Events
Once you have enabled and configured VA for the desired channel(s), you can add rules in the E&A Configurator and
build different flexible rules to cover your automated scenarios.
All VA objectdetections can be used as eventsources in Luxriot EVO and are available in the configurable
event list in Luxriot EVO Console for each channel that has VA enabled. Thus, VA events can be used for triggering
one or multiple standard actions, such as: start or stop recording, send an email, pop up camera in Luxriot EVO
Monitor, run a third-party application and others. Also, VA metadata can be recorded alongside with the video
stream.
For the VA rules you add in the channel configuration, events are added automaticallymeaning you do not
have to add them in the E&A section. If you want to add extra rules, follow the steps below.
EnableRecording
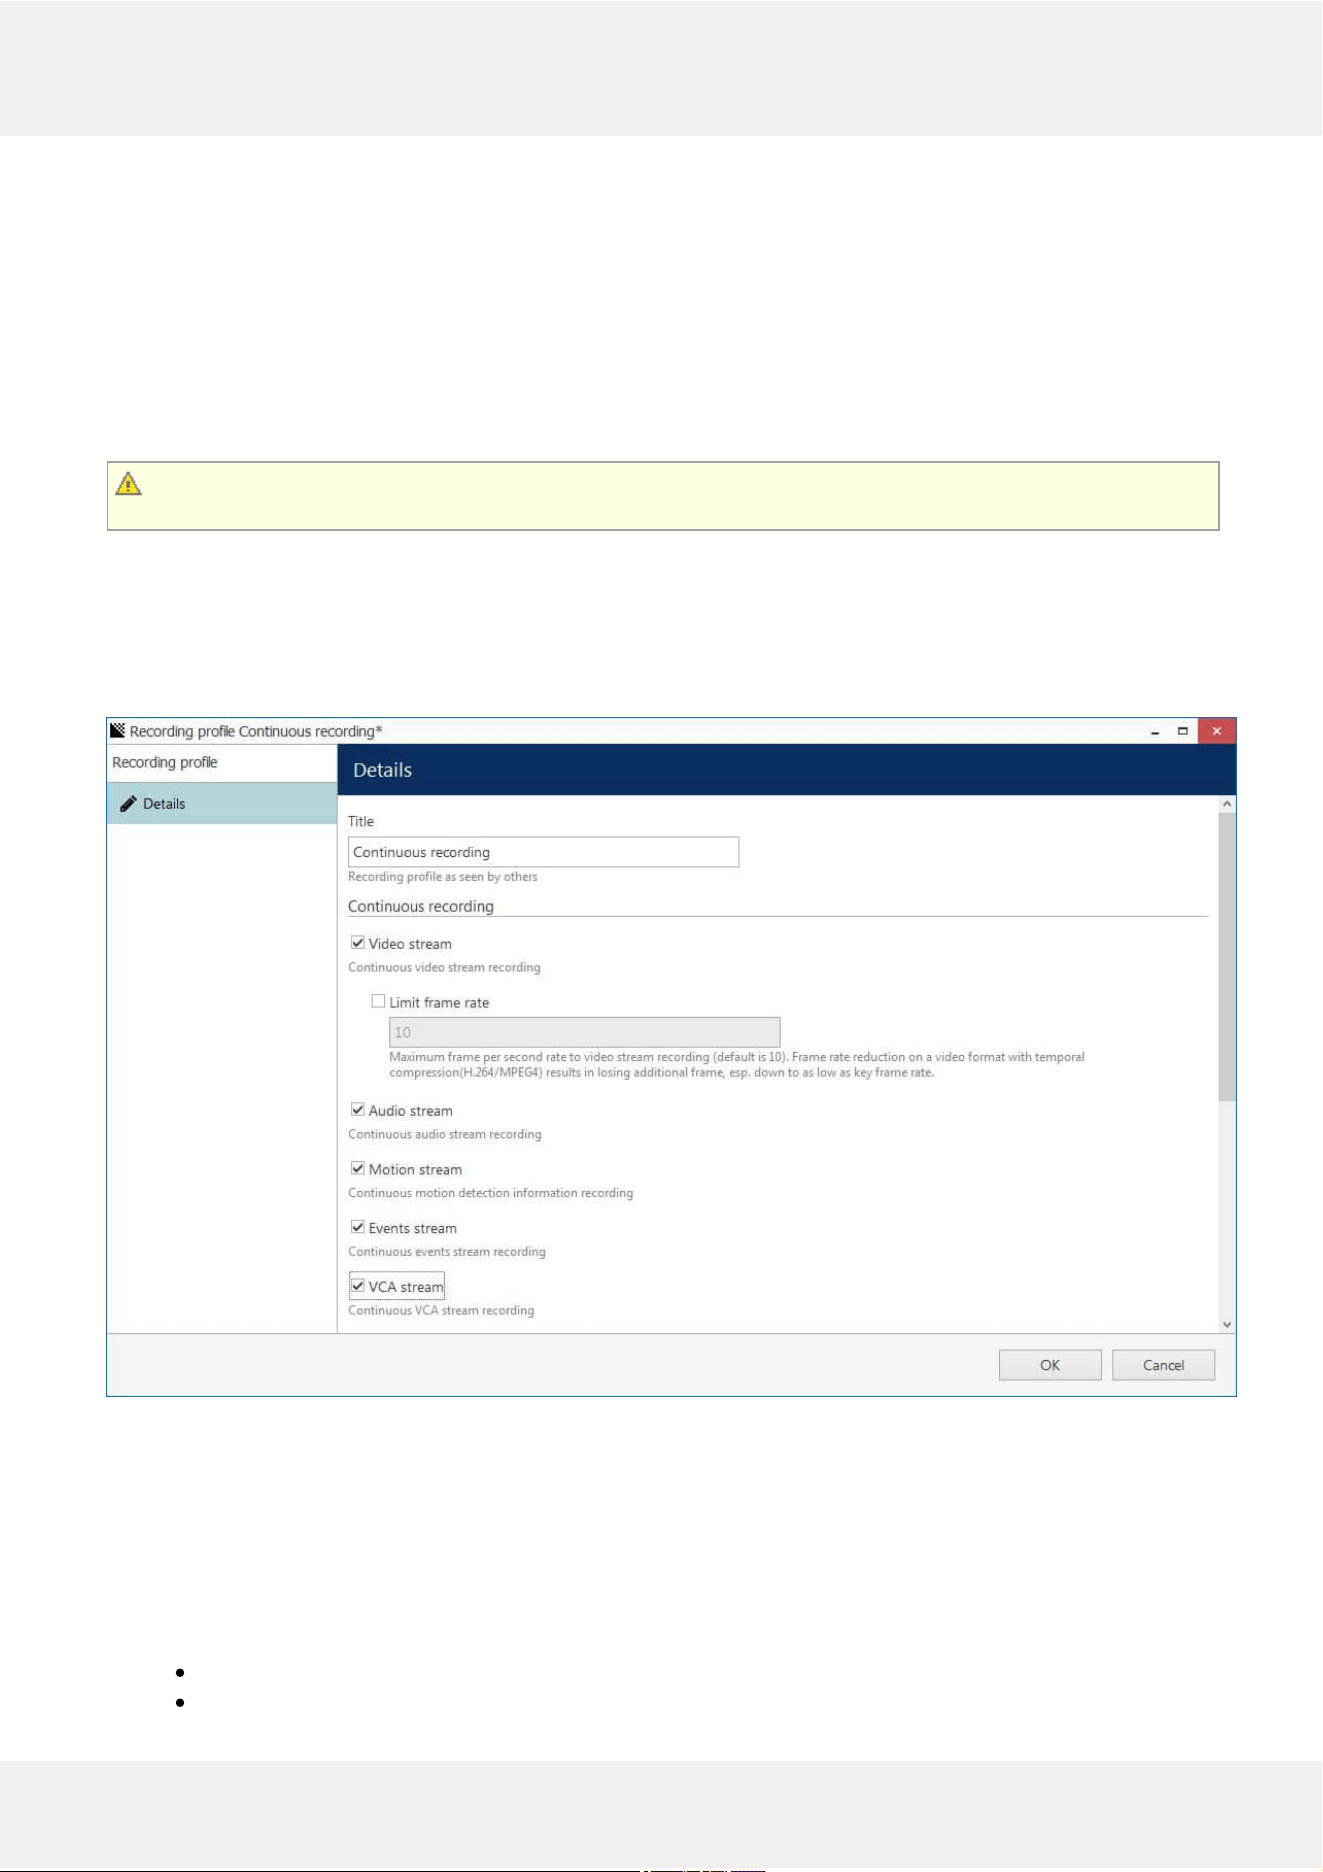
VA metadata recording is enabled by default for the built-in recording profile Continuous Recording. If you are
creating a new recording profile in Luxriot EVO Console and you wish to save the VA metadata with the video
archive, make sure to mark the VCA stream option in the recording profile properties. If enabled, VA metadata will
be displayed in the playback and instant playback modes in Luxriot EVO Monitor.
Built-in recording profile with VCA stream enabled
AddEvents
In order to set up system reaction based on the video analytics events, either usethe automatically created VA
events, or create new ones. For this, go to Luxriot EVO Console, choose the Events & Actions section in the bottom
left corner and then select the Events component from the menu on the left. Click the + New event button on the
upper panel and select the VCA event item from the drop-down list.
At this point, the available events include
new objectdetections: each new detection of an object of the selected type will trigger an event.
zone and line rules (those created for the target item in VA settings) - these are added automatically!
Evo Video Analytics 13
©2021 A&H Software House. All Rights Reserved.
Again, do not need to create zone and line rules here expicitly, these appear listed under the relevant channel in the
configurator automatically after you create them in VA settings.
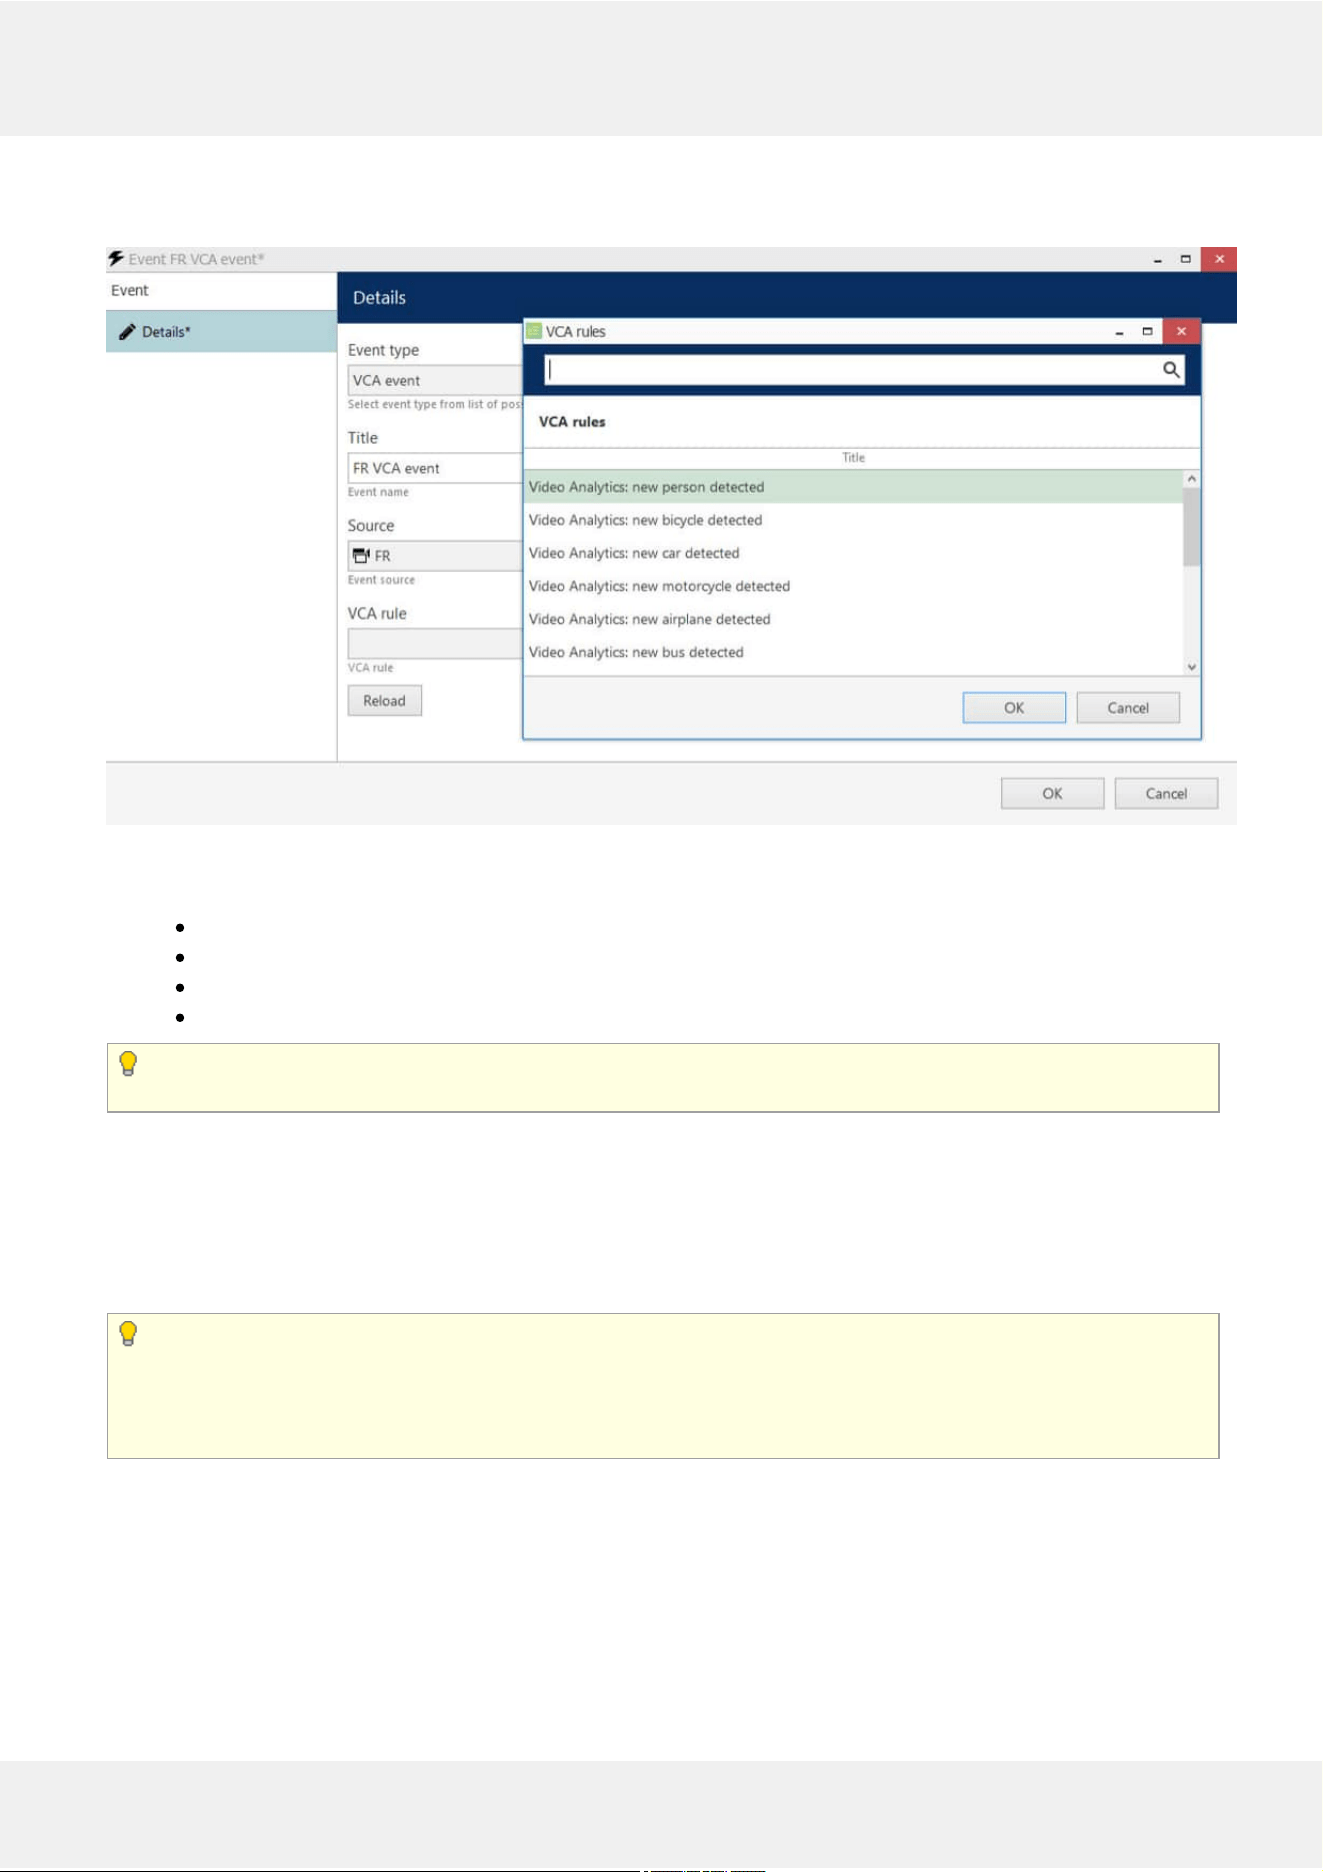
Video analytics event from VA
The settings available here will be as follows:
eventtype: VCA event
eventtitle will be composed automatically and you can change it to anything you want.
event source: the channel that has VA enabled,
VCArule: one of the VA rules
If the target channel has device-side VCA enabled and configured, the VCA rule list will include both Luxriot
VA (software-side) and device own VCA (hardware-side).
When ready with the event settings, click OK to save: your newly created event will appear in the list and will be
ready to be used in the E&A scenarios.
CreateRules
Switch to the Rules section, choose the target server from the upper panel and click the Configurator button to open
the Event & Action Configurator dialog box.
Events and actions are associated with servers. Target server is the server where the VCA-enabled channel
resides; other servers will not see any events or actions related to this channel.
To pass the events from server to server in Luxriot EVO Global, use global events: you will find more
information on these under the corresponding section of your Luxriot EVO Global management manual.
You can add new events and actions and edit existing ones from the Configurator window as well, without going to
these sections separately.
When you have all the necessary events and actions, you can combine them to create rules - automated scenarios
that will be executed as long as the Luxriot EVO server is running. The example on the picture here shows how a new
person detection triggers camera popup on screen on weekends only, increments the people counter, and creates a
bookmark for the target channel.
Evo Video Analytics 14
©2021 A&H Software House. All Rights Reserved.
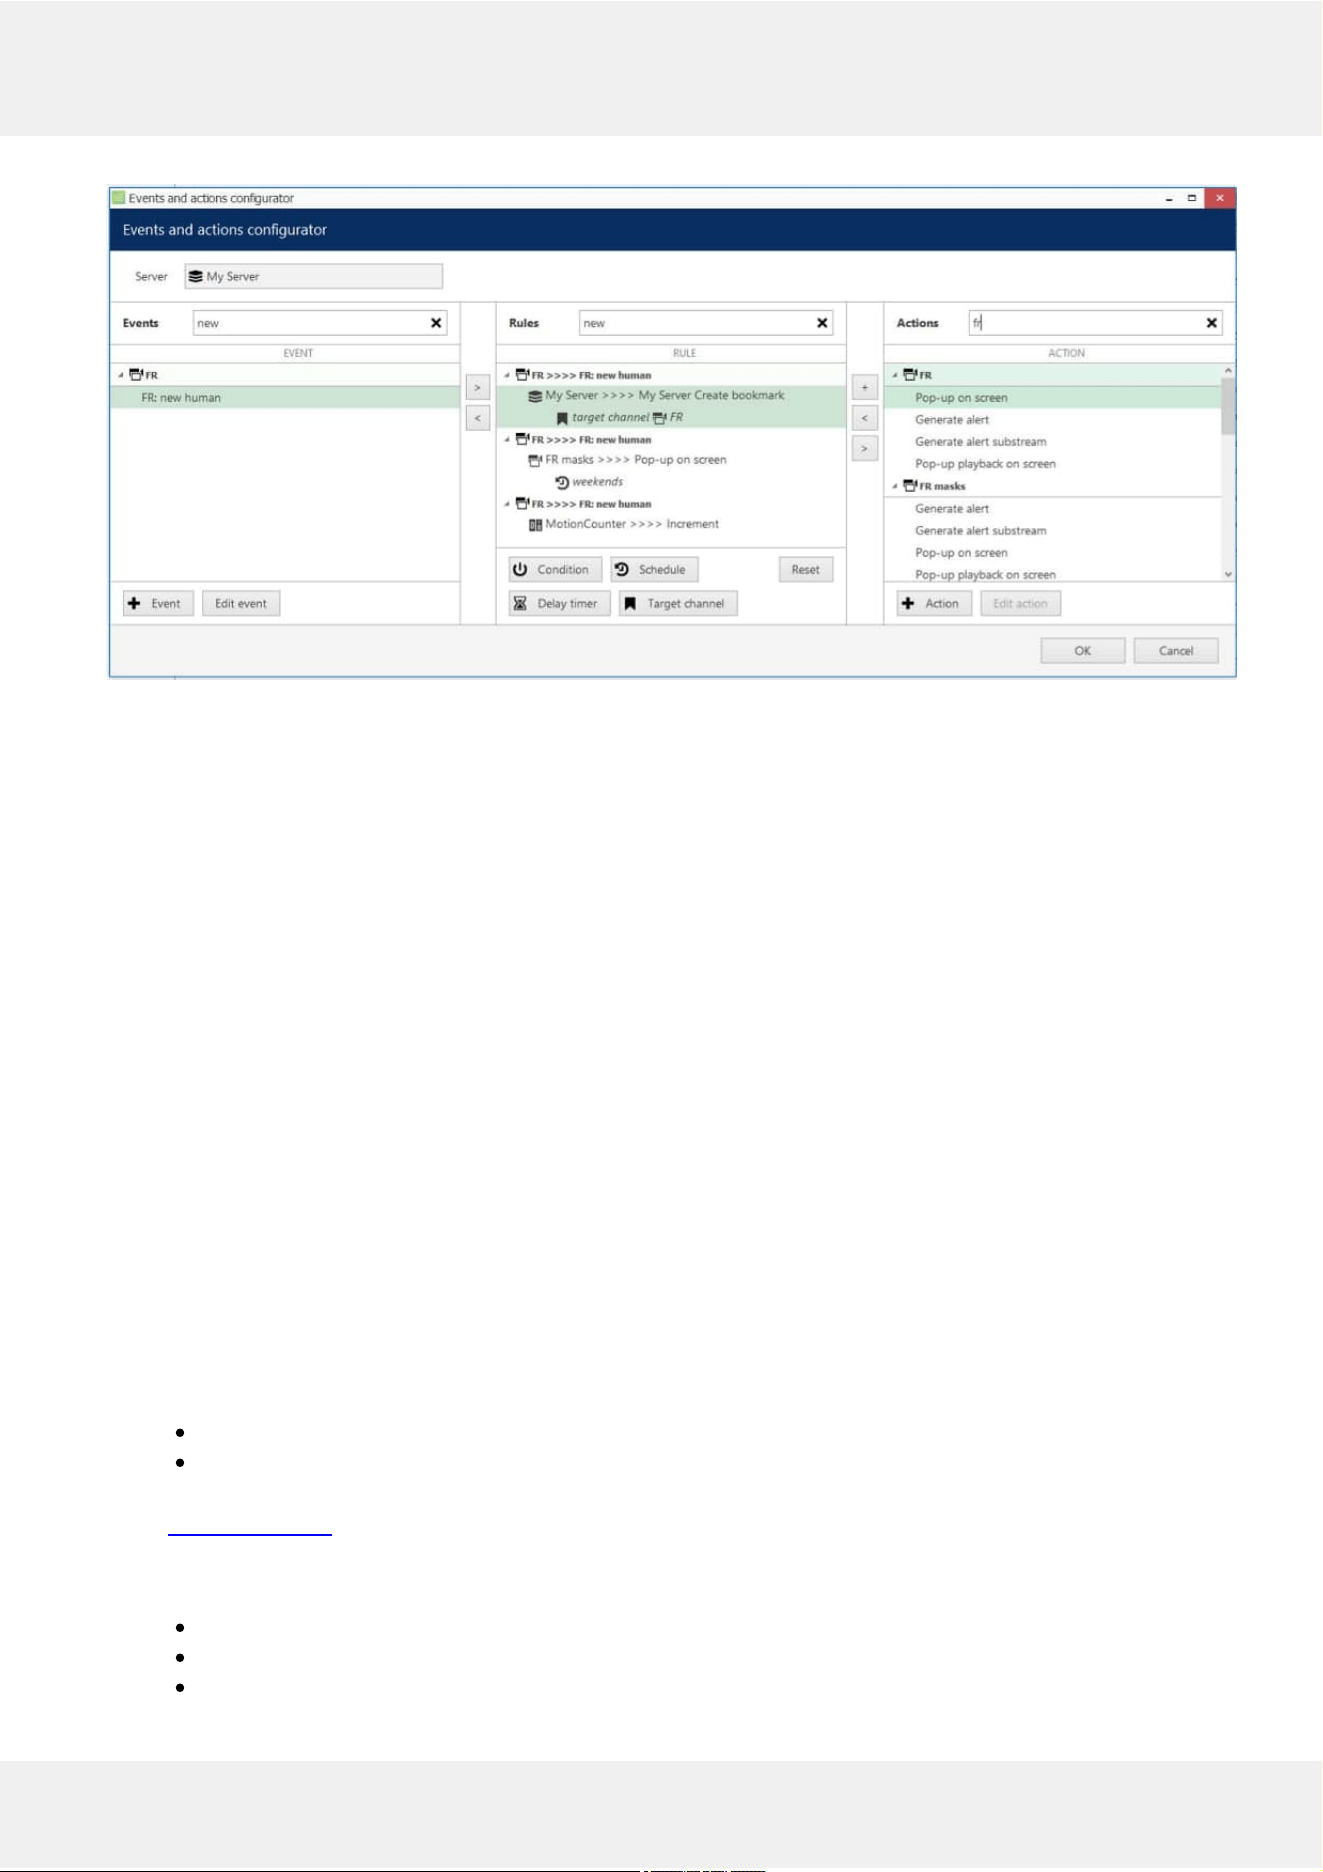
FR event triggering 3 different actions
Start with addingevents: select one or more events from the column on the left (use CTRL+click to select multiple
items) and move them to the central column (rule map): single items can be moved with a mouse double-click,
single/multiple items - by clicking the > arrow button between the columns.
Similarly, attachactions to the target events by selecting the desired actions in the column on the right and using
the < arrow or + plus button between the central and the right columns. The + plus button should be used when you
wish to attach more than one action to the same source event. To replace an action, use the > arrow to remove the
selected action from the Rules column and select a new action instead.
To deletetherules one by one, remove the source events from the Rules column using the < arrow between the
central and the left columns; to clear the Rules section, use CTRL+A to select all items and then use the < arrow to
remove all source events.
Each VA-based rule, just as any other rule, can have extra items controlling the rule behaviour. These are:
conditions, schedules, delay timers and snapshot source (the latter is only applicable to the Send Email action). You
will find more details on these items in the corresponding section of the Luxriot EVO management manual.
Once you have created the desired rules, click OK to save and exit the E&A Configurator.
RuleList
All the created rules will appear under the corresponding section in Luxriot EVO Console. Using the upper panel,
you can disable any rule and enable it back; also, any enabled rule can be tested so that you do not have to wait
until the event is triggered to check if the rule is operational.
Counters
Counters are entities that contain a certain integer value, which can be altered based on some occurred event - in
this case, VA rule event. VA has two types of counters available:
softwarecounters (system-wide counters)
VCAcounters, or zone counters (created specifically for VA and intended to reflect the current number
of VA objects in a zone)
In the Events & Actions section of Luxriot EVO Console, you can create new counters under the Counters
subsection. Each new counter will have a starting value of 0 (zero).
Then, in the E&A Configurator, the counter will appear in the right-hand column with three built-inactions:
Increment: increase counter value by one
Decrement: decrease counter value by one
Reset: set the counter's value to zero
Evo Video Analytics 15
©2021 A&H Software House. All Rights Reserved.
Software counters will allow you to build automaticandmanualreports. For more details on the counters,
please refer to the E&A section of the main Luxriot EVO administration guide.
Create new VCA (zone) counter from E&A section of Console for reflecting the zone state
Evo Video Analytics 16
©2021 A&H Software House. All Rights Reserved.
7 Live and Playback
MetadataOverlay
VA metadata elements are displayed in the Luxriot EVO Monitor application for user reference: VA bounding boxes
overlay the video feeds, allowing the user to see the tracked objects.
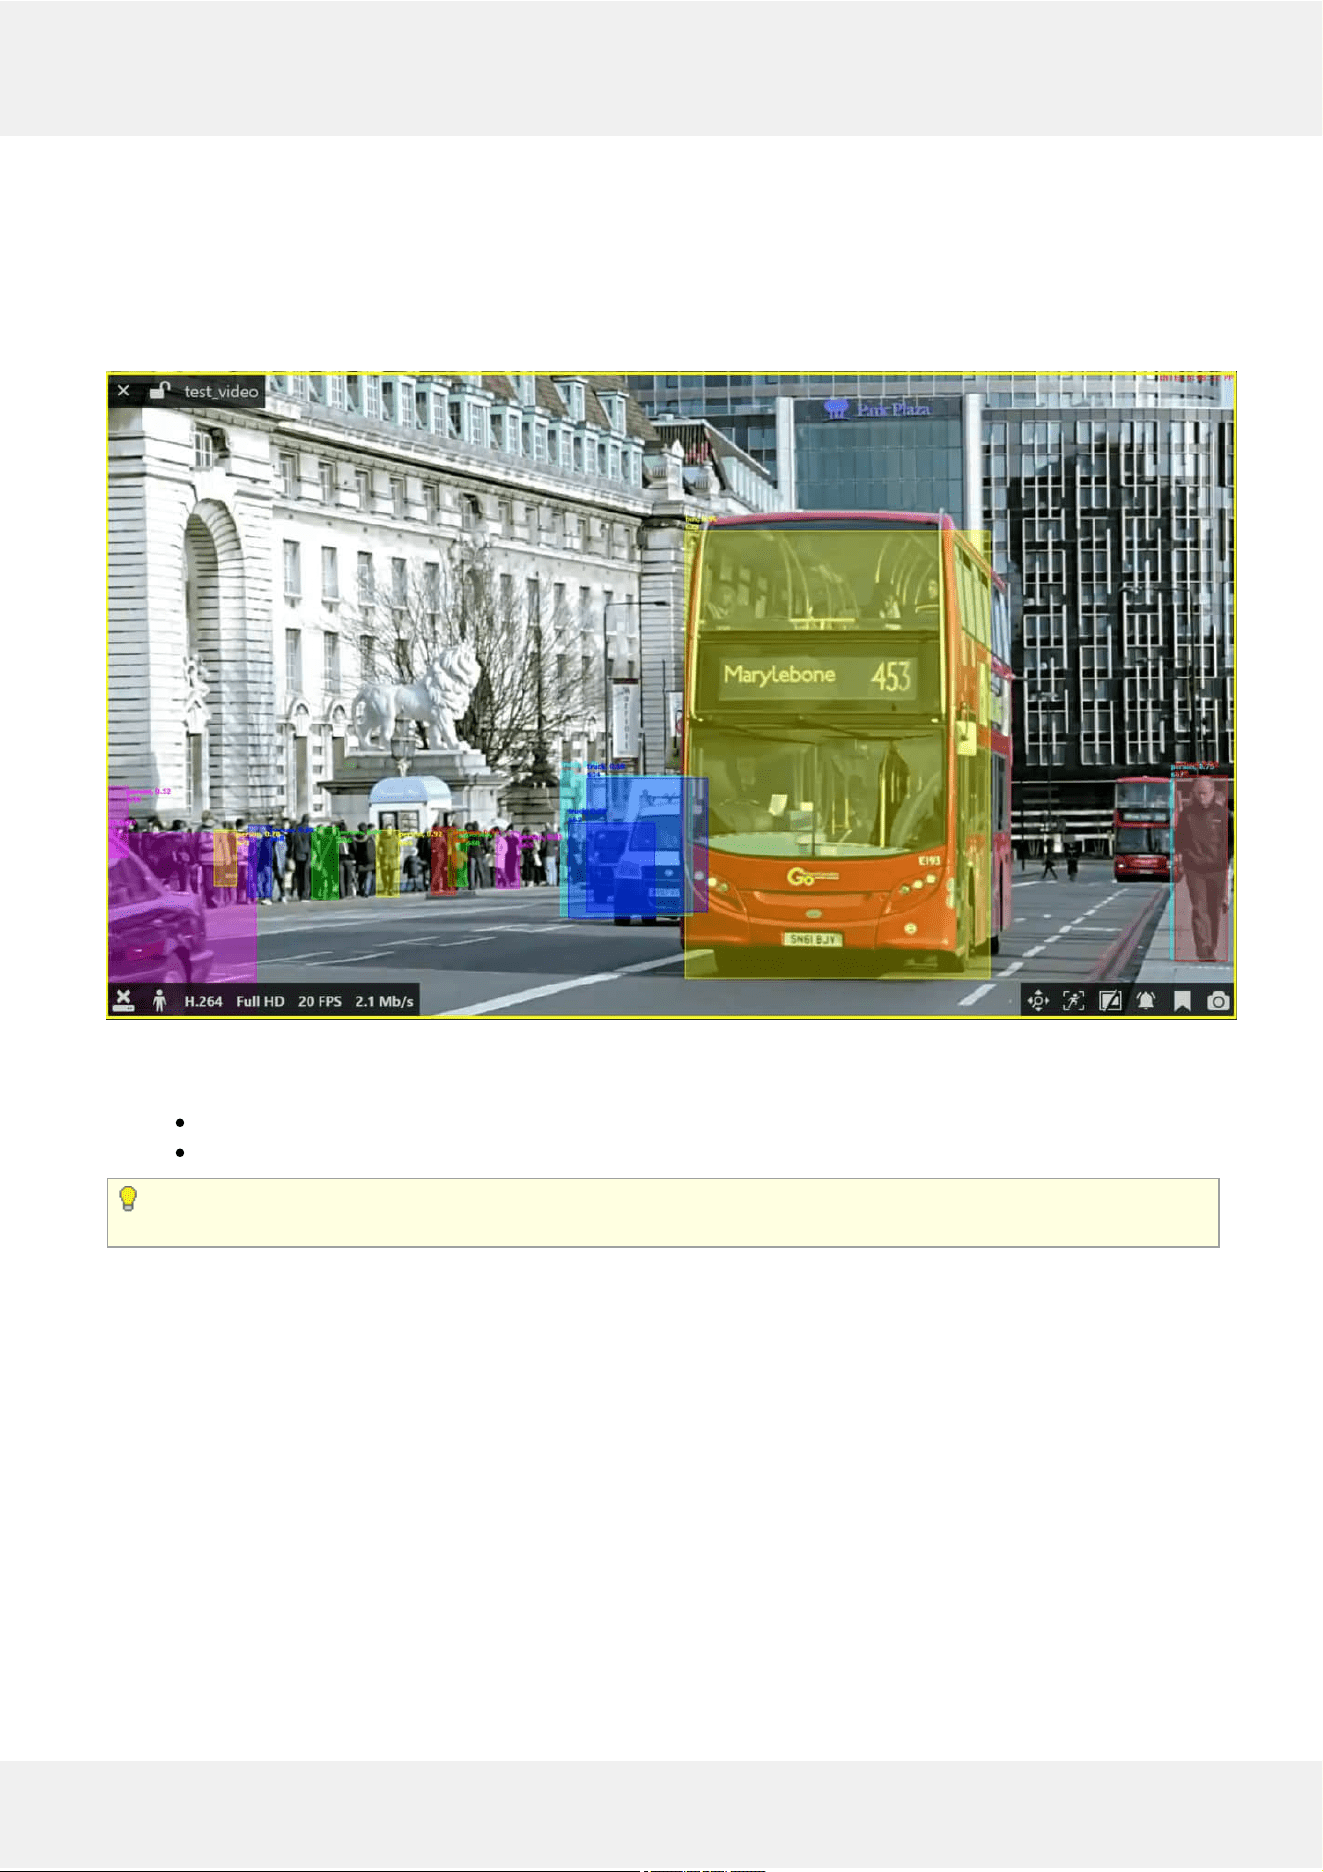
VA overlay in live view
The following items are displayed in the live, instant playback and regular playback modes:
trackedobjects - moving bounding boxes
object classification and detection details
VA metadata overlay is displayed in Luxriot EVO Monitor in live, instantplayback and playback modes.
Other modes (e.g., Sequence playback) and video export donotsupport VA overlay at this point.
Item presentation can be selectively turned ON or OFF via Luxriot EVO Monitor application settings via main menu
Edit -> Settings -> Viewport Overlays tab -> VCA section. Some of the items here are not relevant for VA (e.g.,
zones), as these settings cover both VA and Open VCA metadata.
Evo Video Analytics 17
©2021 A&H Software House. All Rights Reserved.
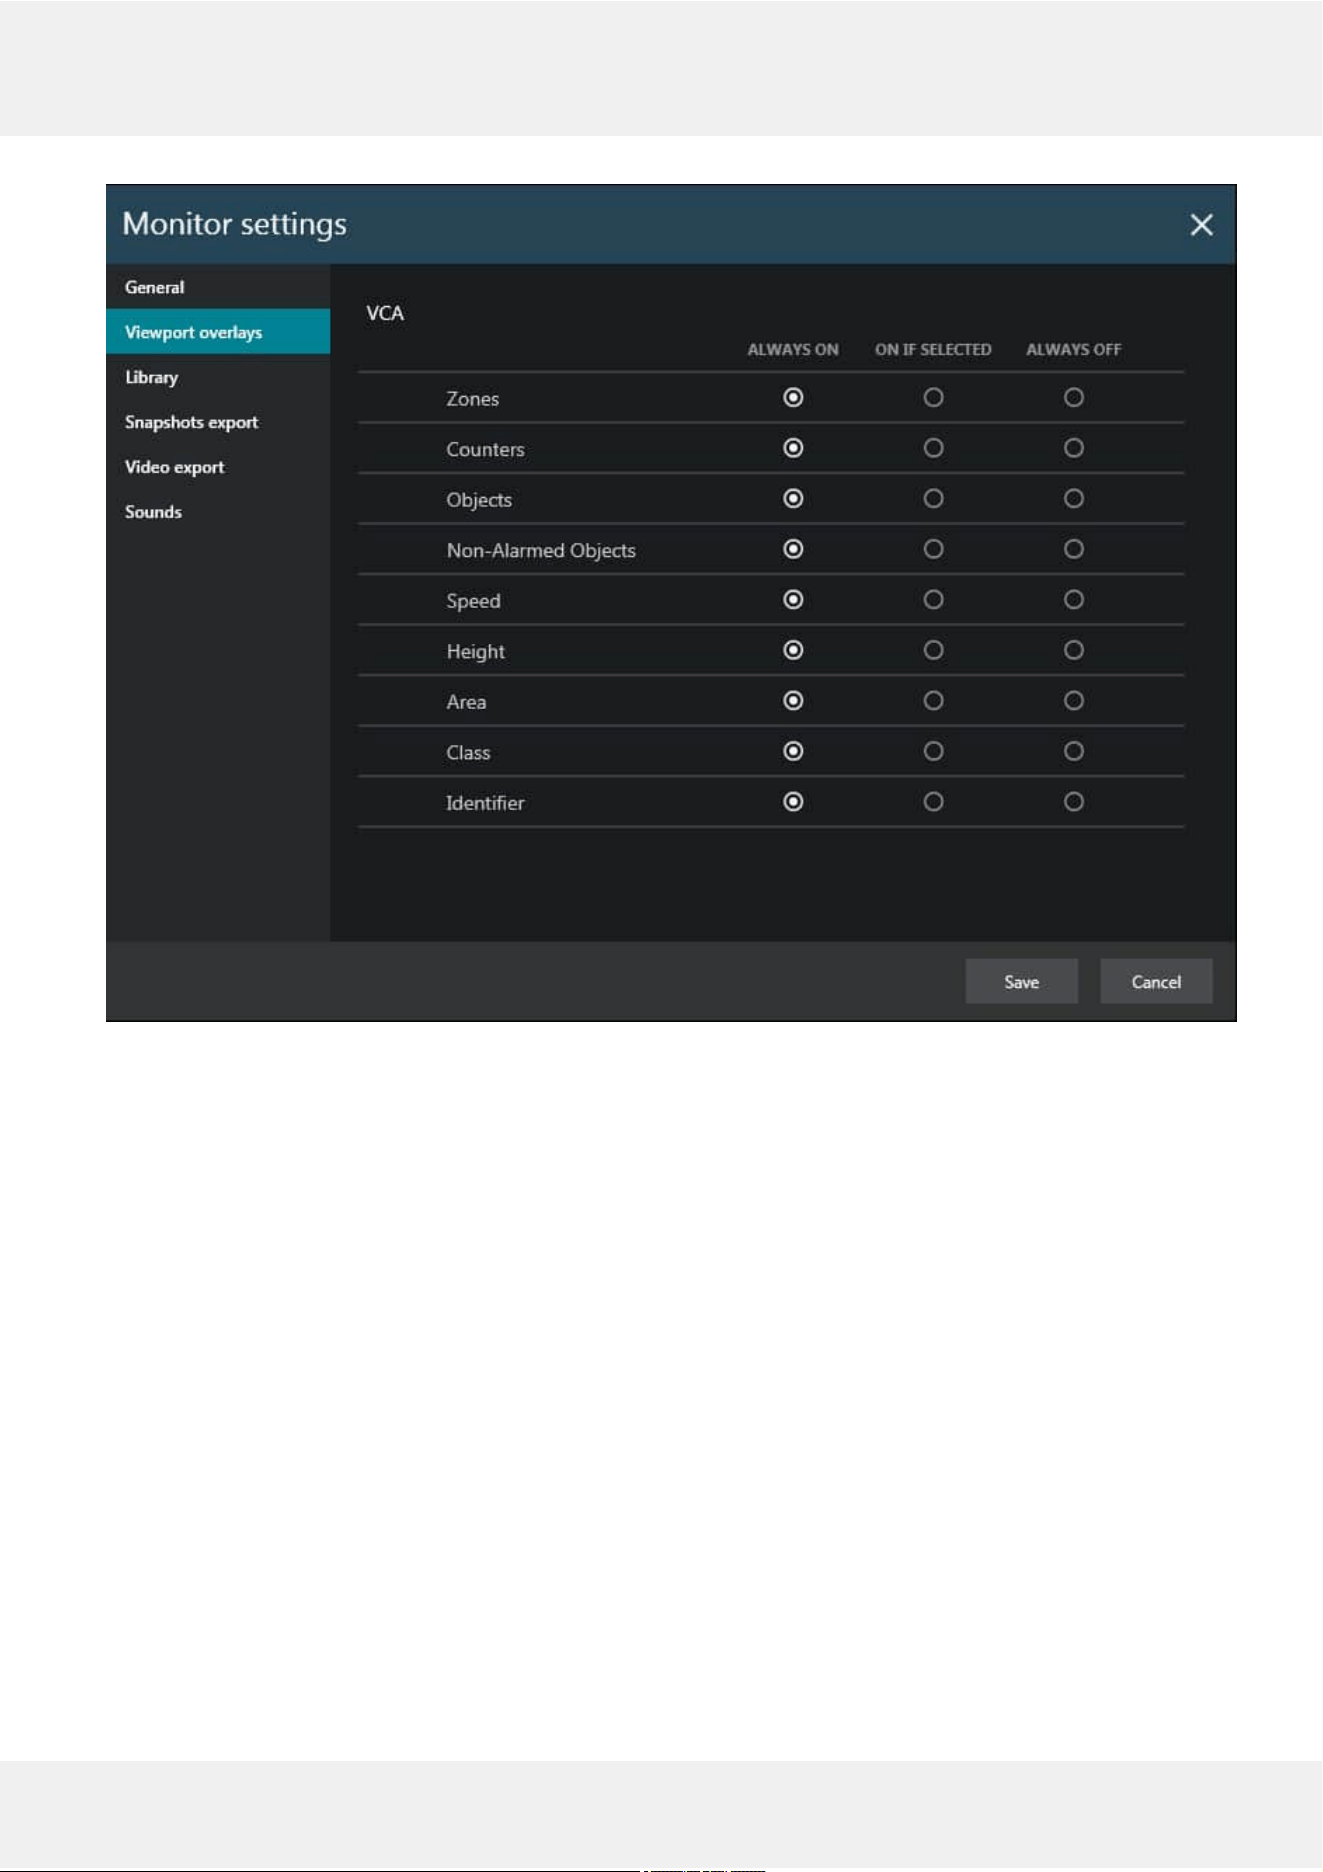
Overlay settings for VA elements
Each element can be set to be displayed always or only when the viewport is selected, or turned OFF at all. Note that
display settings are applied to live, instant playback and playback modes at once.
Playback
In playback, there is a special investigation mode that involves VA objects. To use it, switch to the Playback tab, then
click the VCA button in the upper right corner.
Evo Video Analytics 18
©2021 A&H Software House. All Rights Reserved.
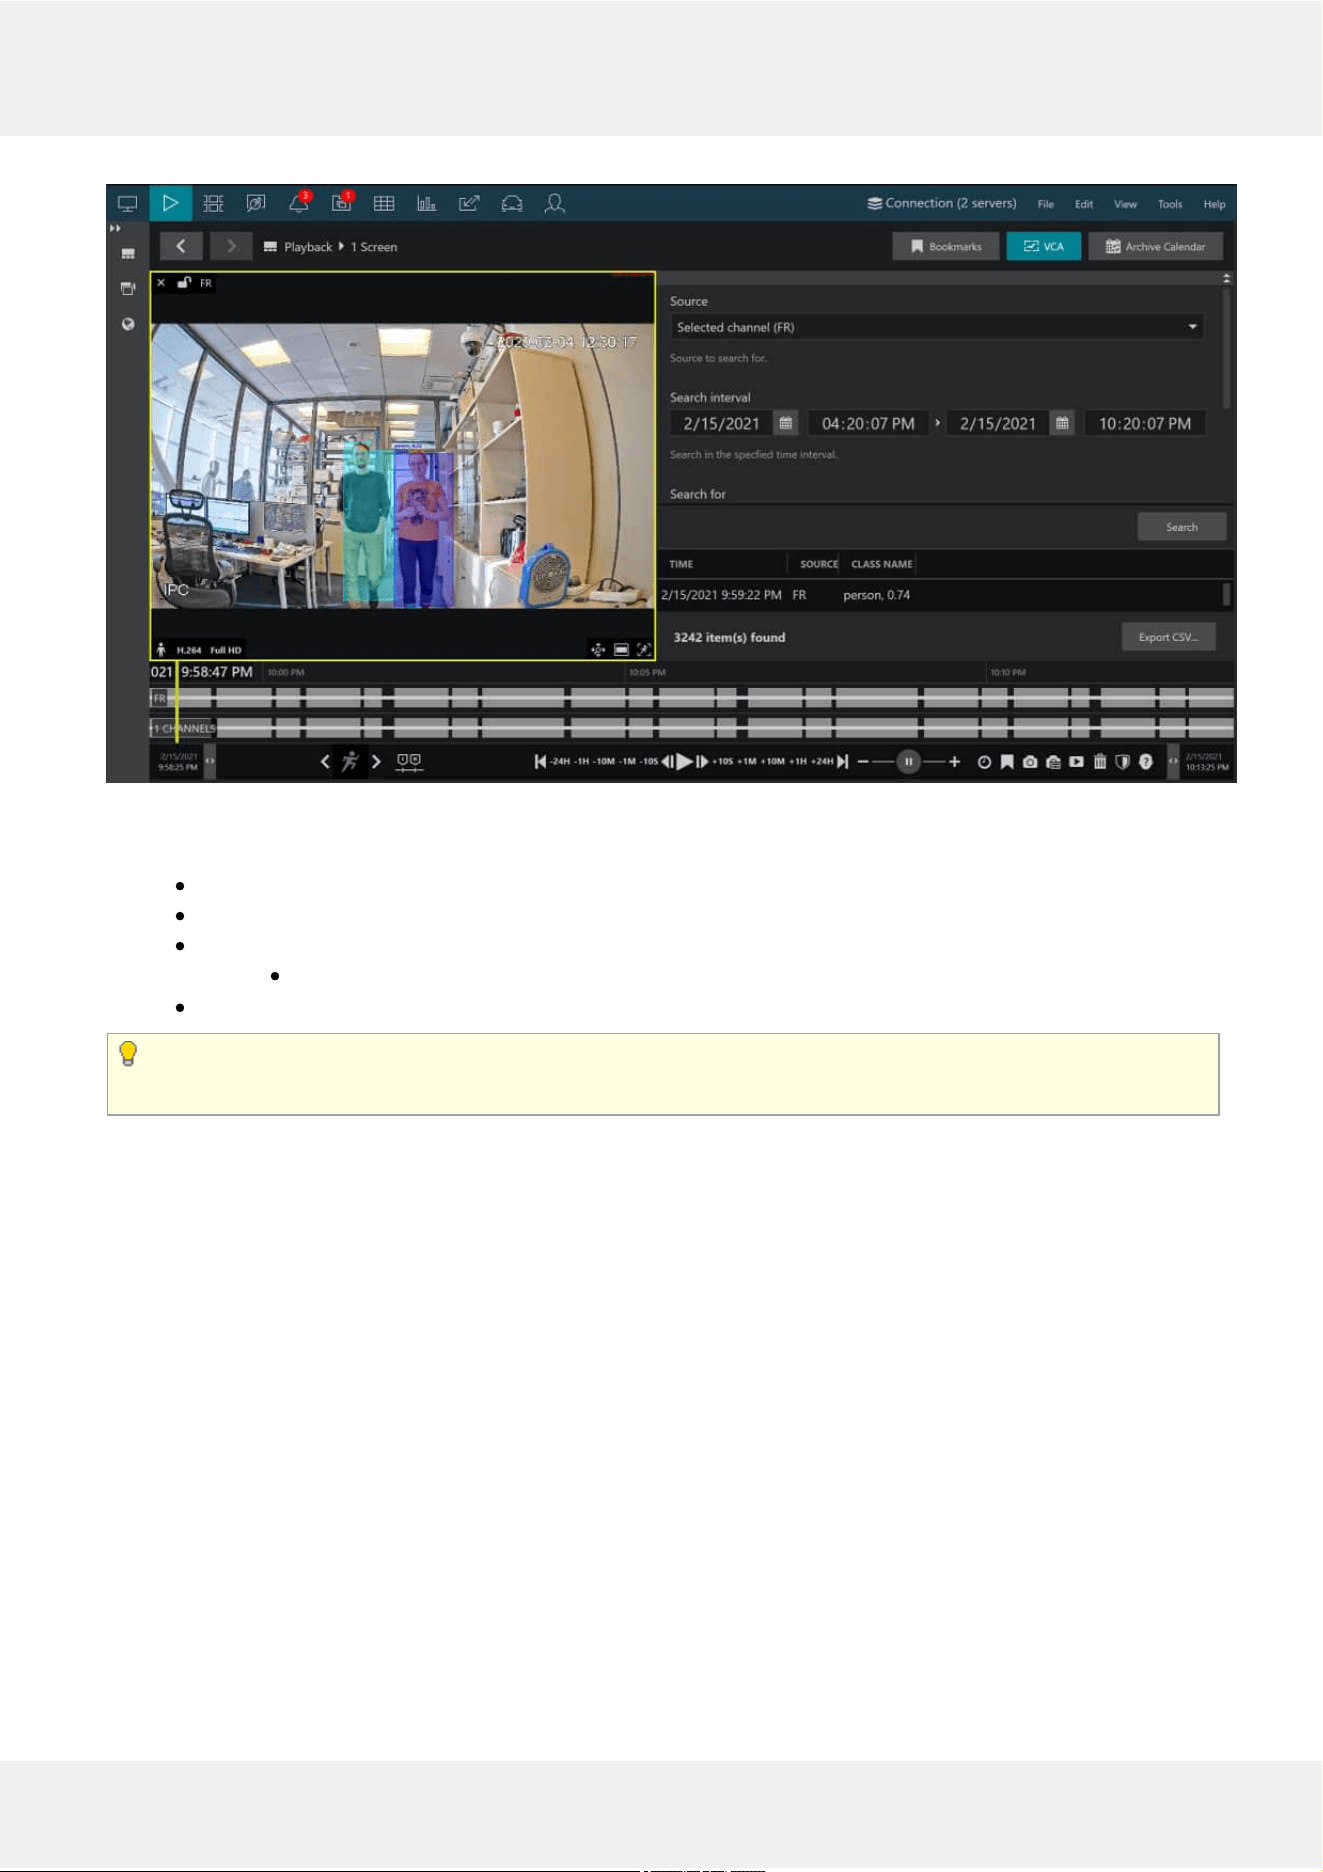
VA search in the Playback mode
The appeared panel will allow you to specify the search criteria, which are:
Source: a channel currently present in the layout that has VA enabled
Searchinterval: time range to look for the events in
Searchfor: VA item to search for
Object: all entries containing object appearance according to the VCA object classification
Classname: VA class name (full or partial) according to the VA internal object classification
At this point, only VA object search is possible. Other search options are for Open VCA. More functionality is
coming in the next software releases.
When ready, press Search to get the results based on your refinements. Click any result in the list to jump to it in
playback, then press the play button below the timeline to start viewing the footage.
Found data can be savedintoaCSV file (comma-separated values) that can be later parsed or opened with MS
Excel-like applications. To do this, simply click the Export CSV... button below the search result list and specify your
desired file name and path.
Evo Video Analytics 19
©2021 A&H Software House. All Rights Reserved.

8 Automatic Reports
Data received from software counters based on VA events can be used to buildandsendautomaticreports
from Luxriot EVO servers.
Reports can have different periods and are configured using Luxriot EVO Console. Depending on the collected
information context, these reports can be used, for example, to estimate the average number of customers during
specific hours, compare the number of passing cars to the number of trucks etc.
The report creation process is similar to the manual procedure of reporting in the Luxriot EVO Monitor application,
with the difference that here the settings are defined once and then are used by the Luxriot EVO servers for
automatic report generation.
General
There are three report types: bar, line and pie diagram. Regardless of the chosen type, all reports are based on the
counters and have configurable report interval and days and times of interest. Counter values are compared for the
given period and with the specified scale, and the results are then reflected in the chart of the selected type. Reports
can be configured to be created automatically on a daily, weekly or monthly basis and then emailed to the
specified email address.
If the report interval is previous day with specific hours, the report will be sent immediately after the selected
time period is over. For weeks/months, the report will be emailed after the selected report interval has ended.
Example 1: the report interval is previous day with time filter set to 8AM to 6PM. The report will be emailed
the same day 6:01PM.
Example 2: the report interval is previous week with only working days selected (weekends deselected). The
report will be emailed 12:01AM next Monday, i.e., when the week is over.
Prerequisites
Reporting in Luxriot EVO Console is primarily aimed at automatic report sending via email. In order to achieve this,
you need to configure a mail server in Luxriot EVO Console for the emails to be sent through, according to the steps
explained in the corresponding section of the main Luxriot EVO administration guide. You can do this prior or after
the report setup. If you need a one-time report for a custom time interval, you are welcome to use the reporting
function in the Luxriot EVO Monitor application.
For a report to be created successfully, there must be some counter data present in the database, so make sure to
collect some data from the counters before scheduling the reports.
ReportConfiguration
In order to start report setup, go to the Configuration section of Luxriot EVO Console and choose Reports from the
menu on the left. Press the + New counters report button on the top panel to bring up the report configuration
dialog box.
Evo Video Analytics 20
©2021 A&H Software House. All Rights Reserved.
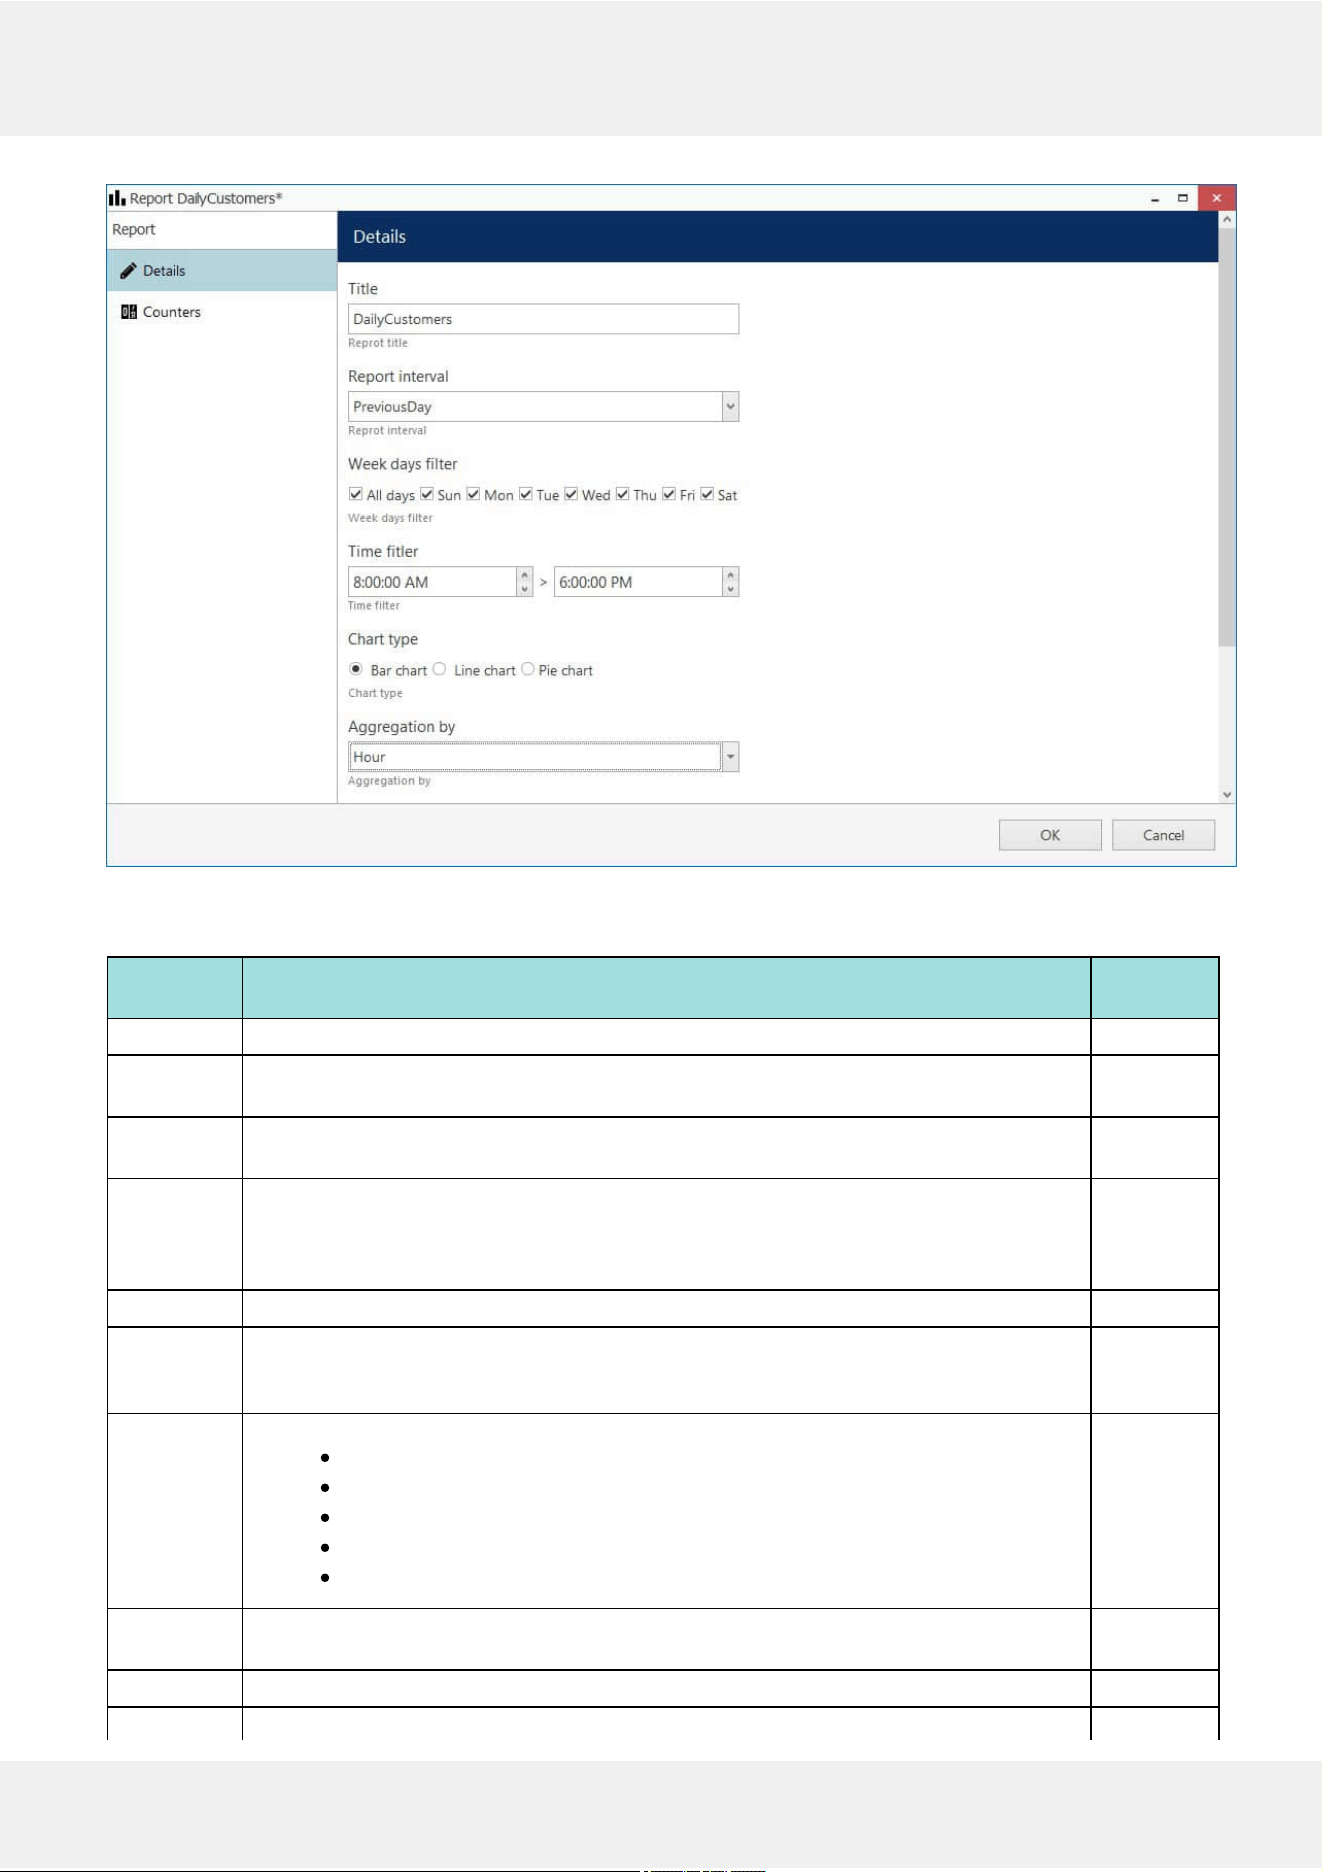
Edit report dialog box
Specify the reportingcriteria in the Details tab; the following settings are available:
Setting Description Default
Value
Title User defined title for the report [empty]
Report
interval
Time interval to be represented in the report; can be previous day, week or month Previous
day
Week days
filter
Days of the week to be included in the report (e.g., ignore weekends) All days
Time filter Target audit interval to be analysed for each of the selected days 12AM >
12AM
(whole
day)
Chart type Diagram type: bar, line or pie Line chart
Aggregation
by
Scale factor for the target diagram - results can be presented for months, weeks, days,
hours or minutes (also, the data can be aggregated by counters if the selected chart
type is pie diagram)
Day
Value Counter value to be taken for each report time interval on the X axis (day etc.):
Absolute: actual counter value
Relative: difference compared to the previous interval
Average: arithmetic mean of the given interval
Minimum: minimal value during the given interval
Maximum: maximal value during the given interval
Absolute
Sum
counters
Choose whether you want each counter to be represented separately or all counters are
to be added up (for bar and line type diagrams only)
Disabled
Show labels Display value labels on the chart Disabled
File type Choose whether you want the report to be in PDF of CSV format PDF
Evo Video Analytics 21
©2021 A&H Software House. All Rights Reserved.
Automatic Generate the report and send it automatically to the specified email Disabled
Mail server A pre-configured SMTP server to be used for email sending (the setting is revealed
when automatic report sending is enabled)
[none]
To Email recipient the report to be emailed to; enter exactly one valid email address here
(the setting is revealed when automatic report sending is enabled)
[empty]
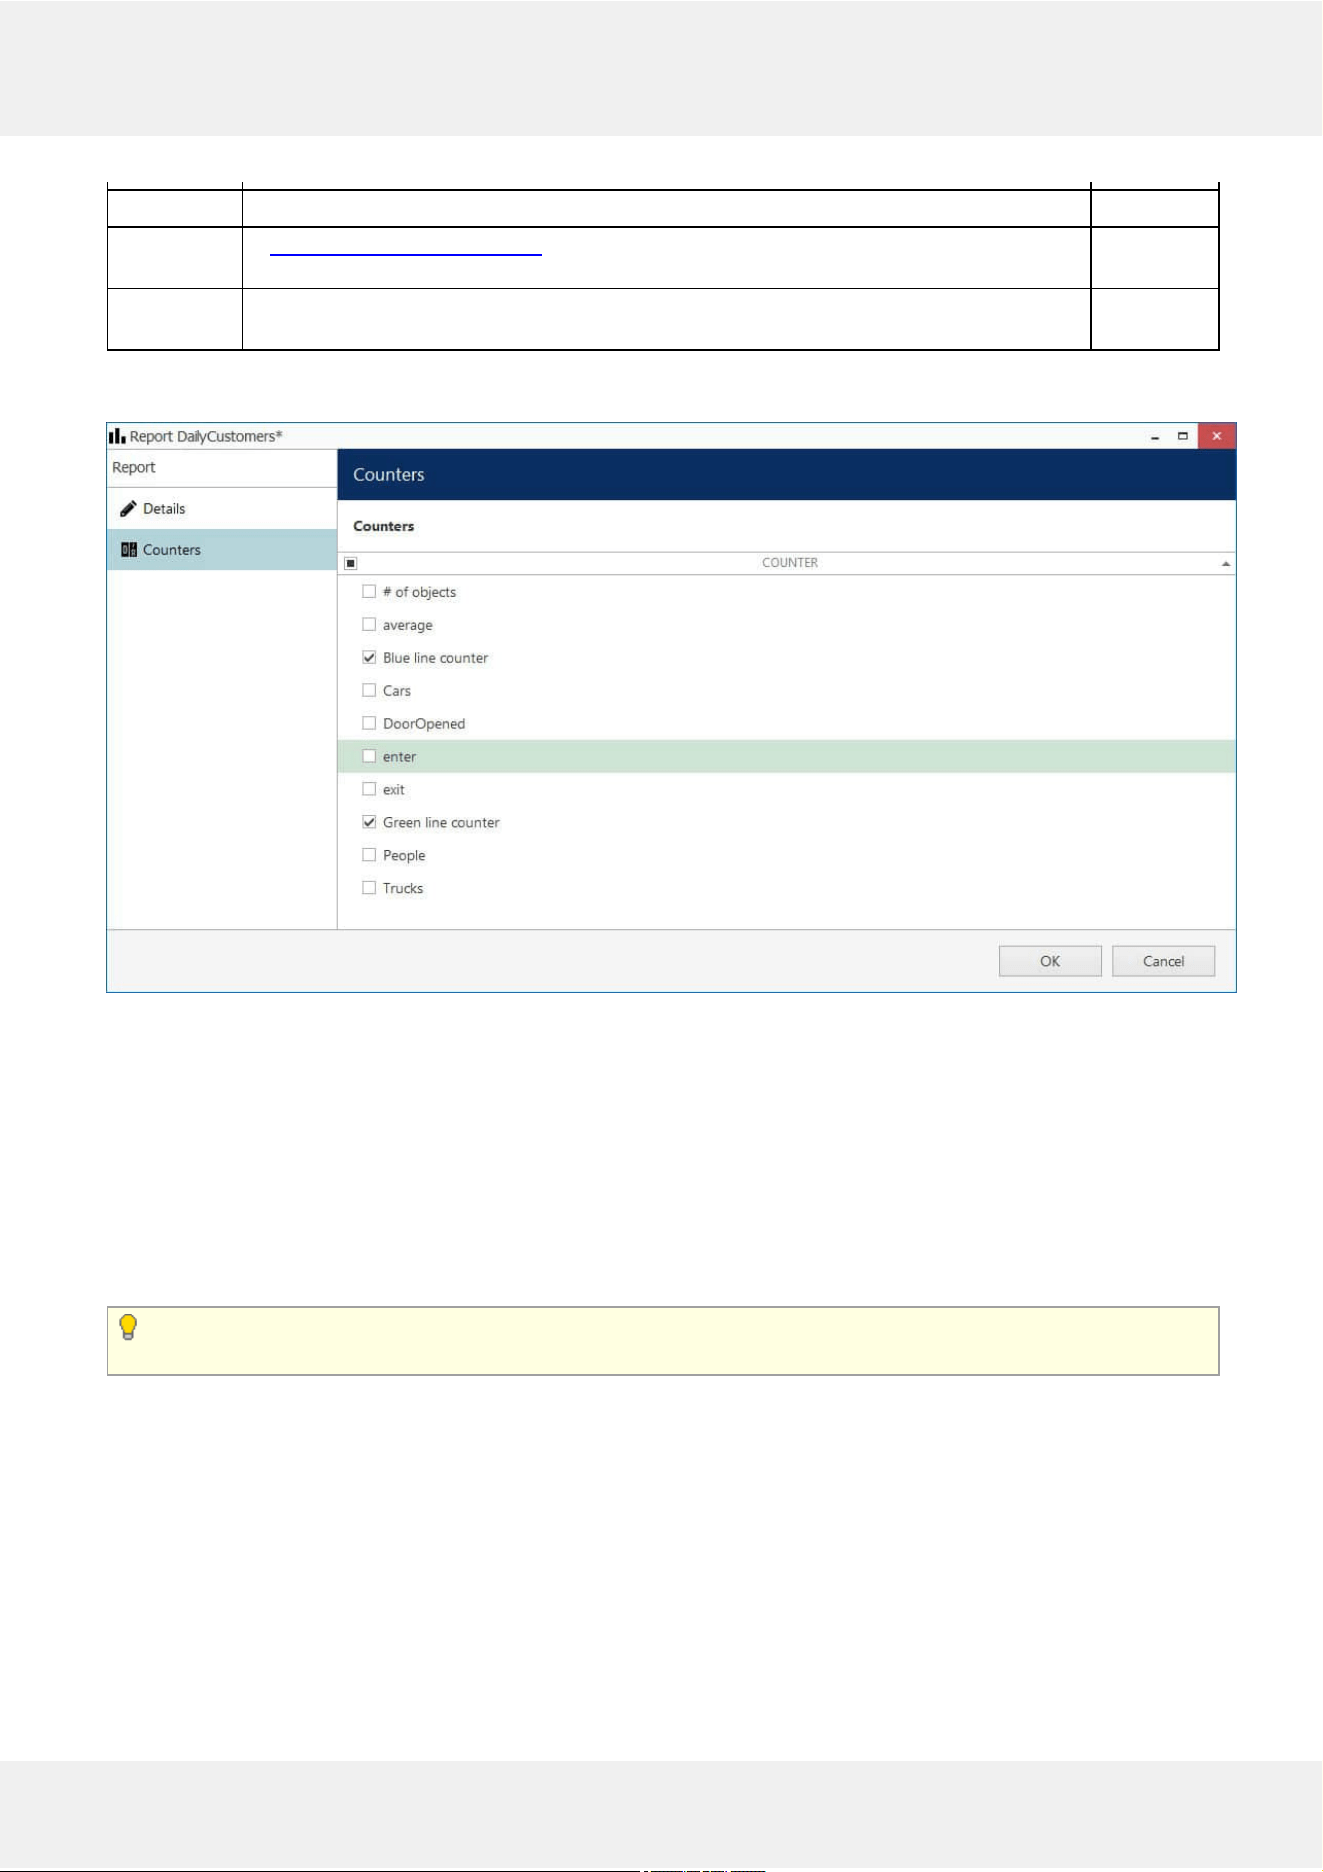
Next, switch to the Counters tab: here, you can select the required counters from the list. All the counters available
in the system are listed here in case their data is present in the database.
The list of counters available for report
When ready, hit the OK button in the bottom to save the report configuration based on your selected criteria. To edit
and remove reports, use the corresponding buttons on the upper panel.
ReportPreview
After you have created a report, you can check how it will look like by using the Preview and Test buttons on the
upper panel. The preview button will generate a report and display it on your screen; the test option will create a
report and email it to the specified address in PDF format immediately. In either case, the report preview will be
based on its configured time interval, so, if you get an empty report, make sure that counter data are present for the
previous day, week or month, whichever specified.
When you have created a newreport and wish to test it, please wait about 10-30 seconds before pressing the
Test button: this time is required to retrieve the counter information from the database.
Evo Video Analytics 22
©2021 A&H Software House. All Rights Reserved.
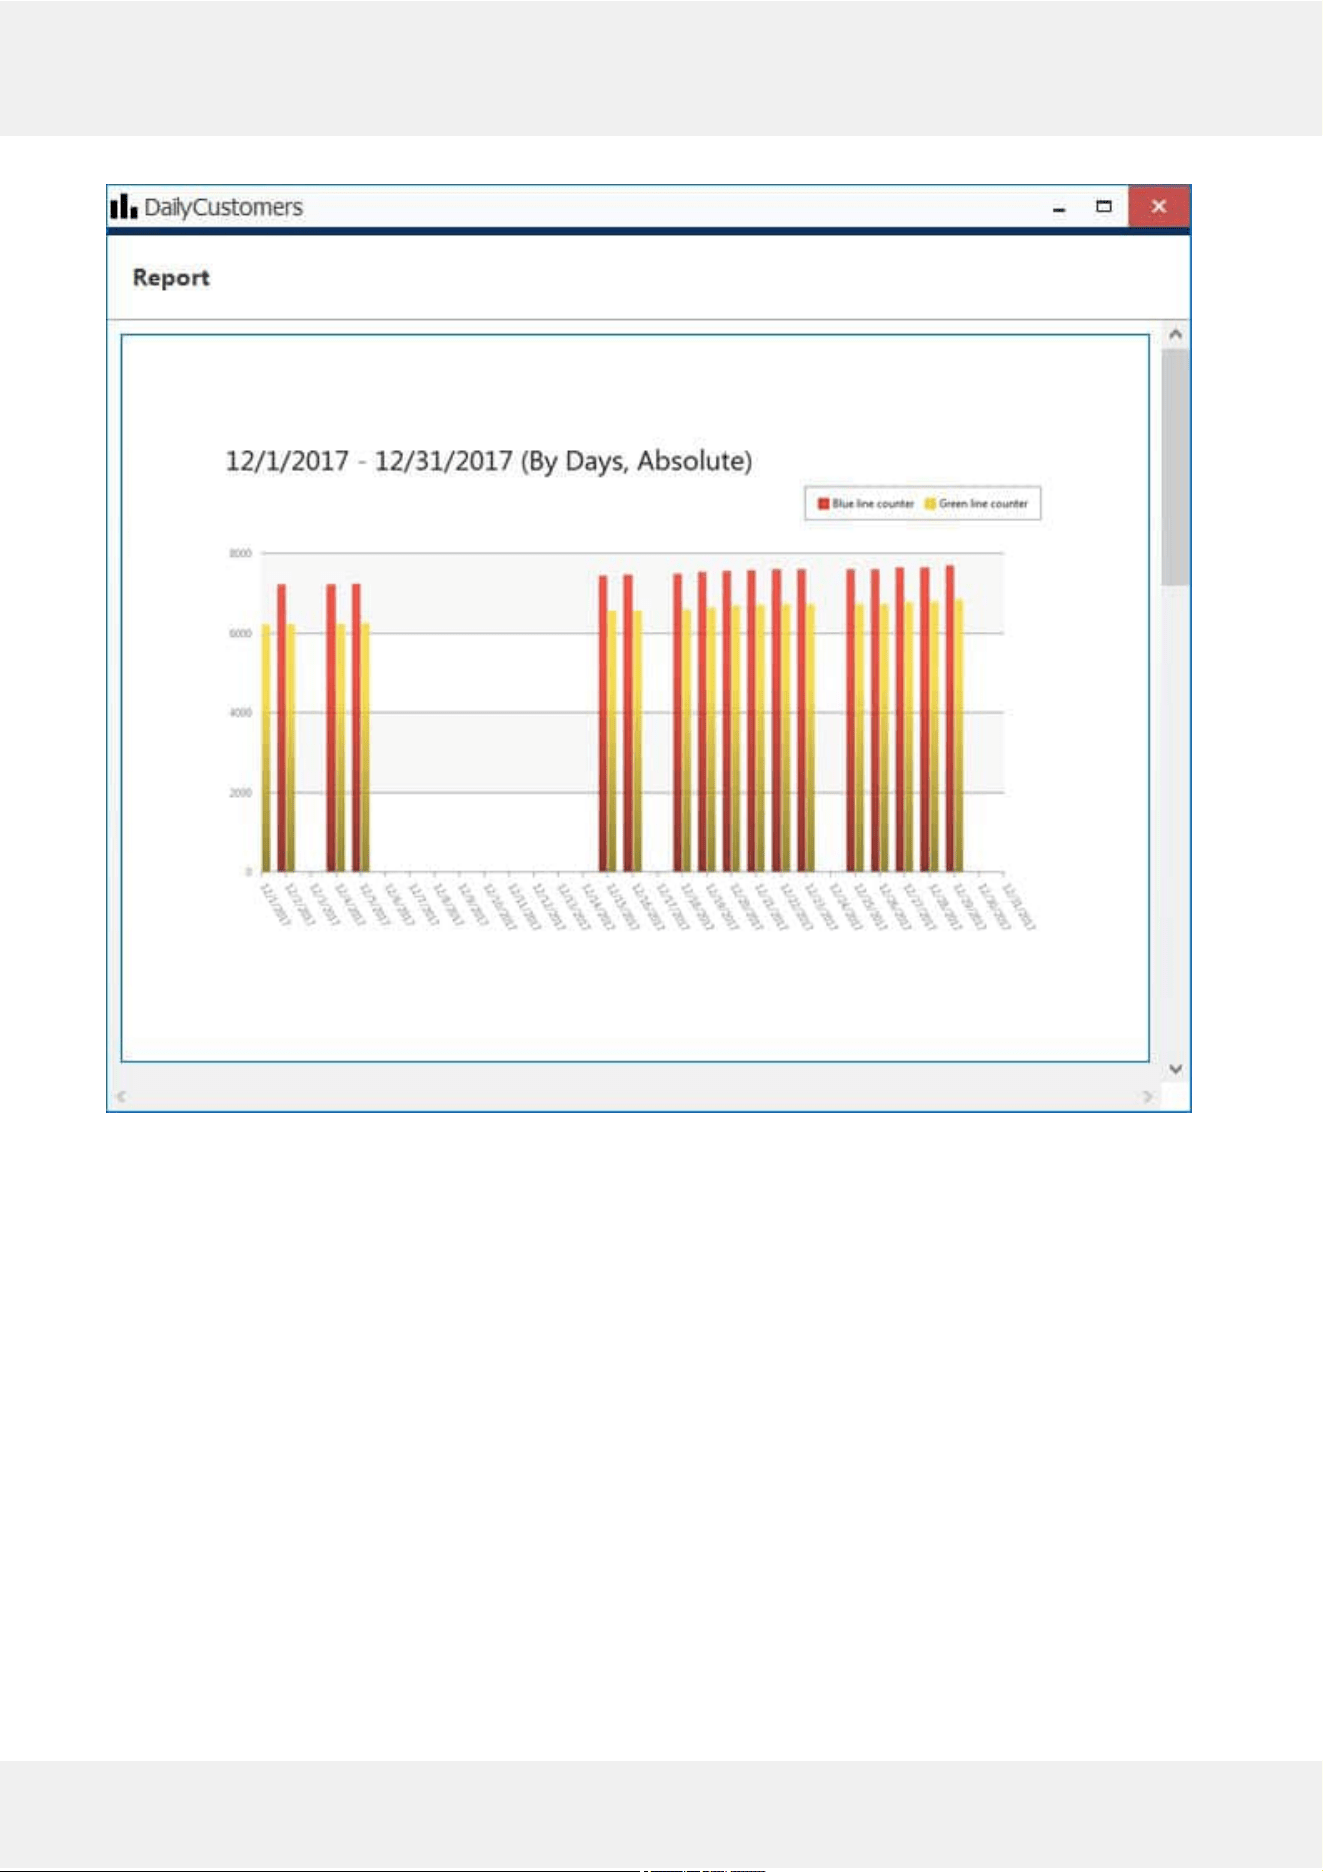
Report preview
On each diagram, the horizontalaxis (X) represents time in the specified scale, and the verticalaxis (Y) reflects
counter values. The counter values for each time interval are calculated based on the selected setting and can reflect
absolute, relative, average, minimum or maximum counter value for the given interval. In the piediagram type,
each sector can represent either a time interval or a counter, depending on the aggregation setting parameter.
Evo Video Analytics 23
©2021 A&H Software House. All Rights Reserved.
Each chart also contains a legend that provides information about colours used in the diagram:
if you have selected to analyse every counter separately, each counter will be represented with its own
colour and the legend will reflect counter titles
if you have chosen to sum the counter values:
bar diagram will have just one column for each interval, every column consisting of specified
counters and its total height reflecting the total
line diagram will contain graphs for each individual counter and the total
pie chart will reflect the counter sum for each time interval if aggregation by time intervals is chosen, so
the legend will contain timestamps; if aggregation by counters is selected, the pie will reflect the
proportion of the counter values for the whole selected audit interval
Apart from the diagram itself, each report in PDF format will also contain a table with the reference counter values.
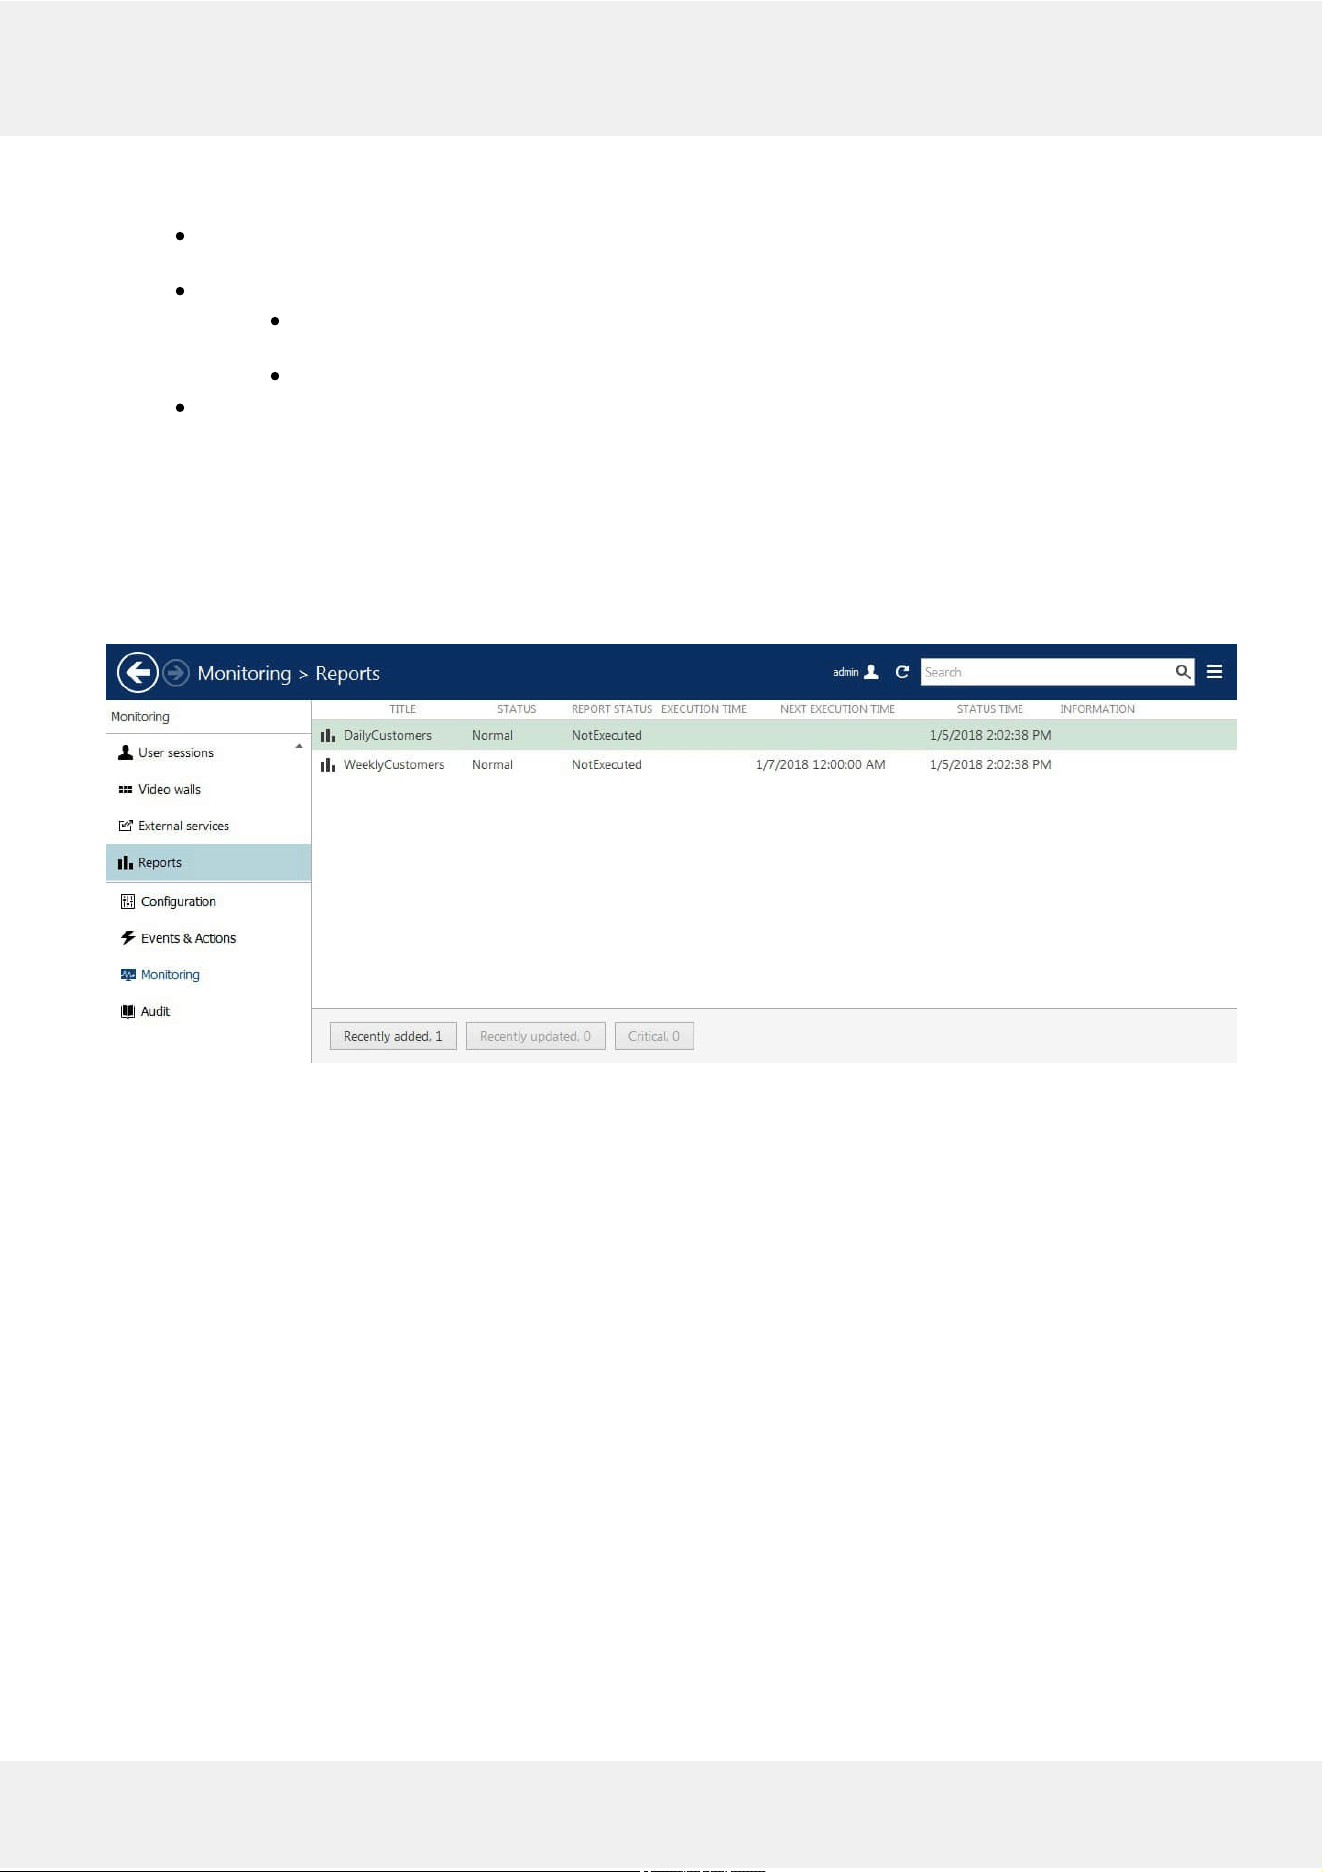
ReportStatusMonitoring
Report execution status can be tracked from the Monitoring section of Luxriot EVO Console, by choosing Reports in
the menu on the left.
Report status
If a report has been sent at least once (by schedule, not as a test), the last execution time is shown here. For the
reports that are currently set to be emailed automatically, the next (scheduled) execution time is also displayed.
Evo Video Analytics 24
©2021 A&H Software House. All Rights Reserved.

9 Manual Reports
Luxriot EVO Monitor application provides an opportunity to make reports based on the VA counters, which
data has been recorded with the video stream(s). Reports can be built manually, for any period, provided that some
data from the counters is available. Automatic reports can be configured in a similar manner; see the next chapter
for details.
There are three report types: bar, line and pie diagram. Regardless of the chosen type, all reports are based on the
counters and have configurable report interval and days and times of interest. Counter values are compared for the
given period and with the specified scale, and the results are then reflected in the chart of the selected type. Any
report can be also exported as PDF.
Bar diagram report example
CreateReports
In your Luxriot EVO Monitor application, switch to the Reports tab and stay in the Charts section. Note that this
functionality will be available when at least one of the connected servers has VA operating and software counters
configured for at least one of its channels, and the used user account has sufficient privileges to access the recorded
counter metadata. Otherwise, there will be no counters in the list.
You do not need to select VA channels manually: all the available counters are listed automatically in the right-hand
panel, under Counters.
Specify the reportingcriteria in the right-hand panel, which is divided into three sections:
Counters:
Select desired one or more software counters to be included in the report (none are selected
by default)
All the counters present in the system are listed, including camera-side VCA and server-side
Open VCA
Reporttimeinterval:
Choose the startandend date and time for the target report
Reportfilters:
Weekdays: select daysoftheweek that you want to be included in the report (e.g., ignore
Evo Video Analytics 25
©2021 A&H Software House. All Rights Reserved.
weekends) (all days are selected by default, marked blue)
Daytimeinterval: choose the target auditinterval to be analysed for each of the selected
days
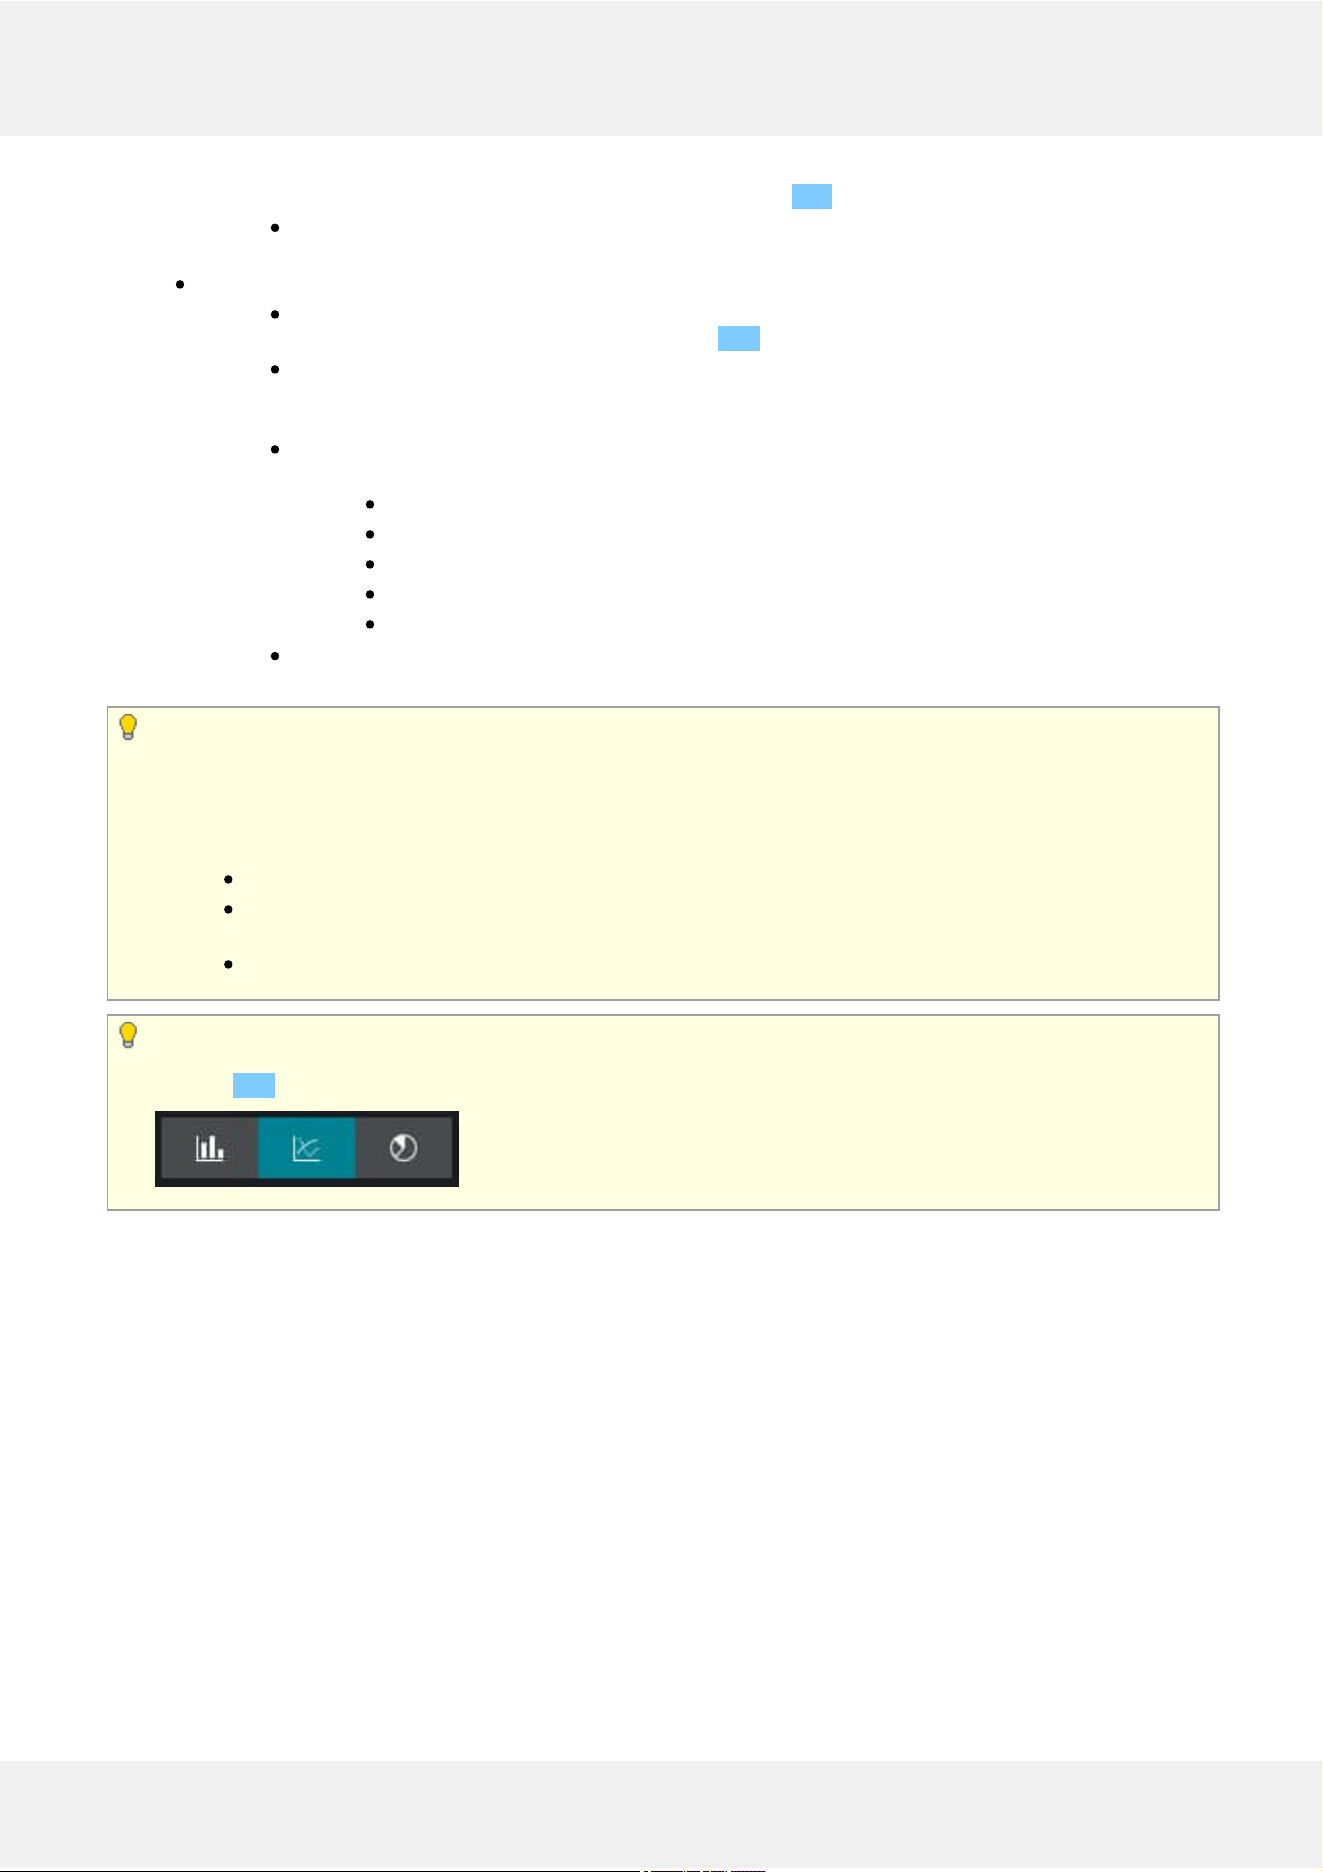
Reportvisualisation settings:
Select the diagramtype by toggling the icons: from left to right, these are bar, line and pie
type; the currently selected mode is marked blue
Aggregation: specify the scalefactor for the target diagram - results can be presented for
months, weeks, days, hours or minutes (also, the data can be aggregated by counters if the
selected chart type is pie diagram)
The countervalue setting lets you choose, what value is taken for each report time interval on
the X axis (day etc.):
Absolute: actual counter value
Relative: difference compared to the previous interval
Average: arithmetic mean of the given interval
Minimum: minimal value during the given interval
Maximum: maximal value during the given interval
Choose whether you want each counter to be represented separately or all counters are to be
addedup
Reportinterval defines the whole period to be reflected in the report. Reportfilters specify which
exact time period should be analysed for each of the selected days of the time window specified as the report
time interval.
For example, if you wish to examine customer flow during working hours for the past two months, you need to
set:
two months' period in the Report interval section
only mark working days in the Report filters section (unmark the weekend as all the days are pre-
selected by default)
set the time interval under Time filter in the Report filters section to your target working hours
Choose the diagramtype by toggling the icons in the bottom of the right-hand panel in the Report
visualisation section: from left to right, these are bar, line and pie type. The currently selected mode is
marked blue.
When ready, hit the Make report button in the bottom of the right-hand panel to display the report diagram based
on your selected criteria. Note that the chart will be built step-by-step and you will see how the newer data appears
on it: if the requested report interval is large, the total time required for the chart construction may increase to
several minutes. You will see the Loading... status in the right-hand panel indicating that reporting is in progress.
You can modify the report criteria and restart the reporting process without having to wait until the current diagram
is finished.
InterpretReports
On each diagram, the horizontalaxis (X) represents time in the specified scale, and the verticalaxis (Y) reflects
counter values. The counter values for each time interval are calculated based on the selected setting and can reflect
absolute, relative, average, minimum or maximum counter value for the given interval. In the piediagram type,
each sector can represent either a time interval or a counter, depending on the aggregation setting parameter.
Evo Video Analytics 26
©2021 A&H Software House. All Rights Reserved.
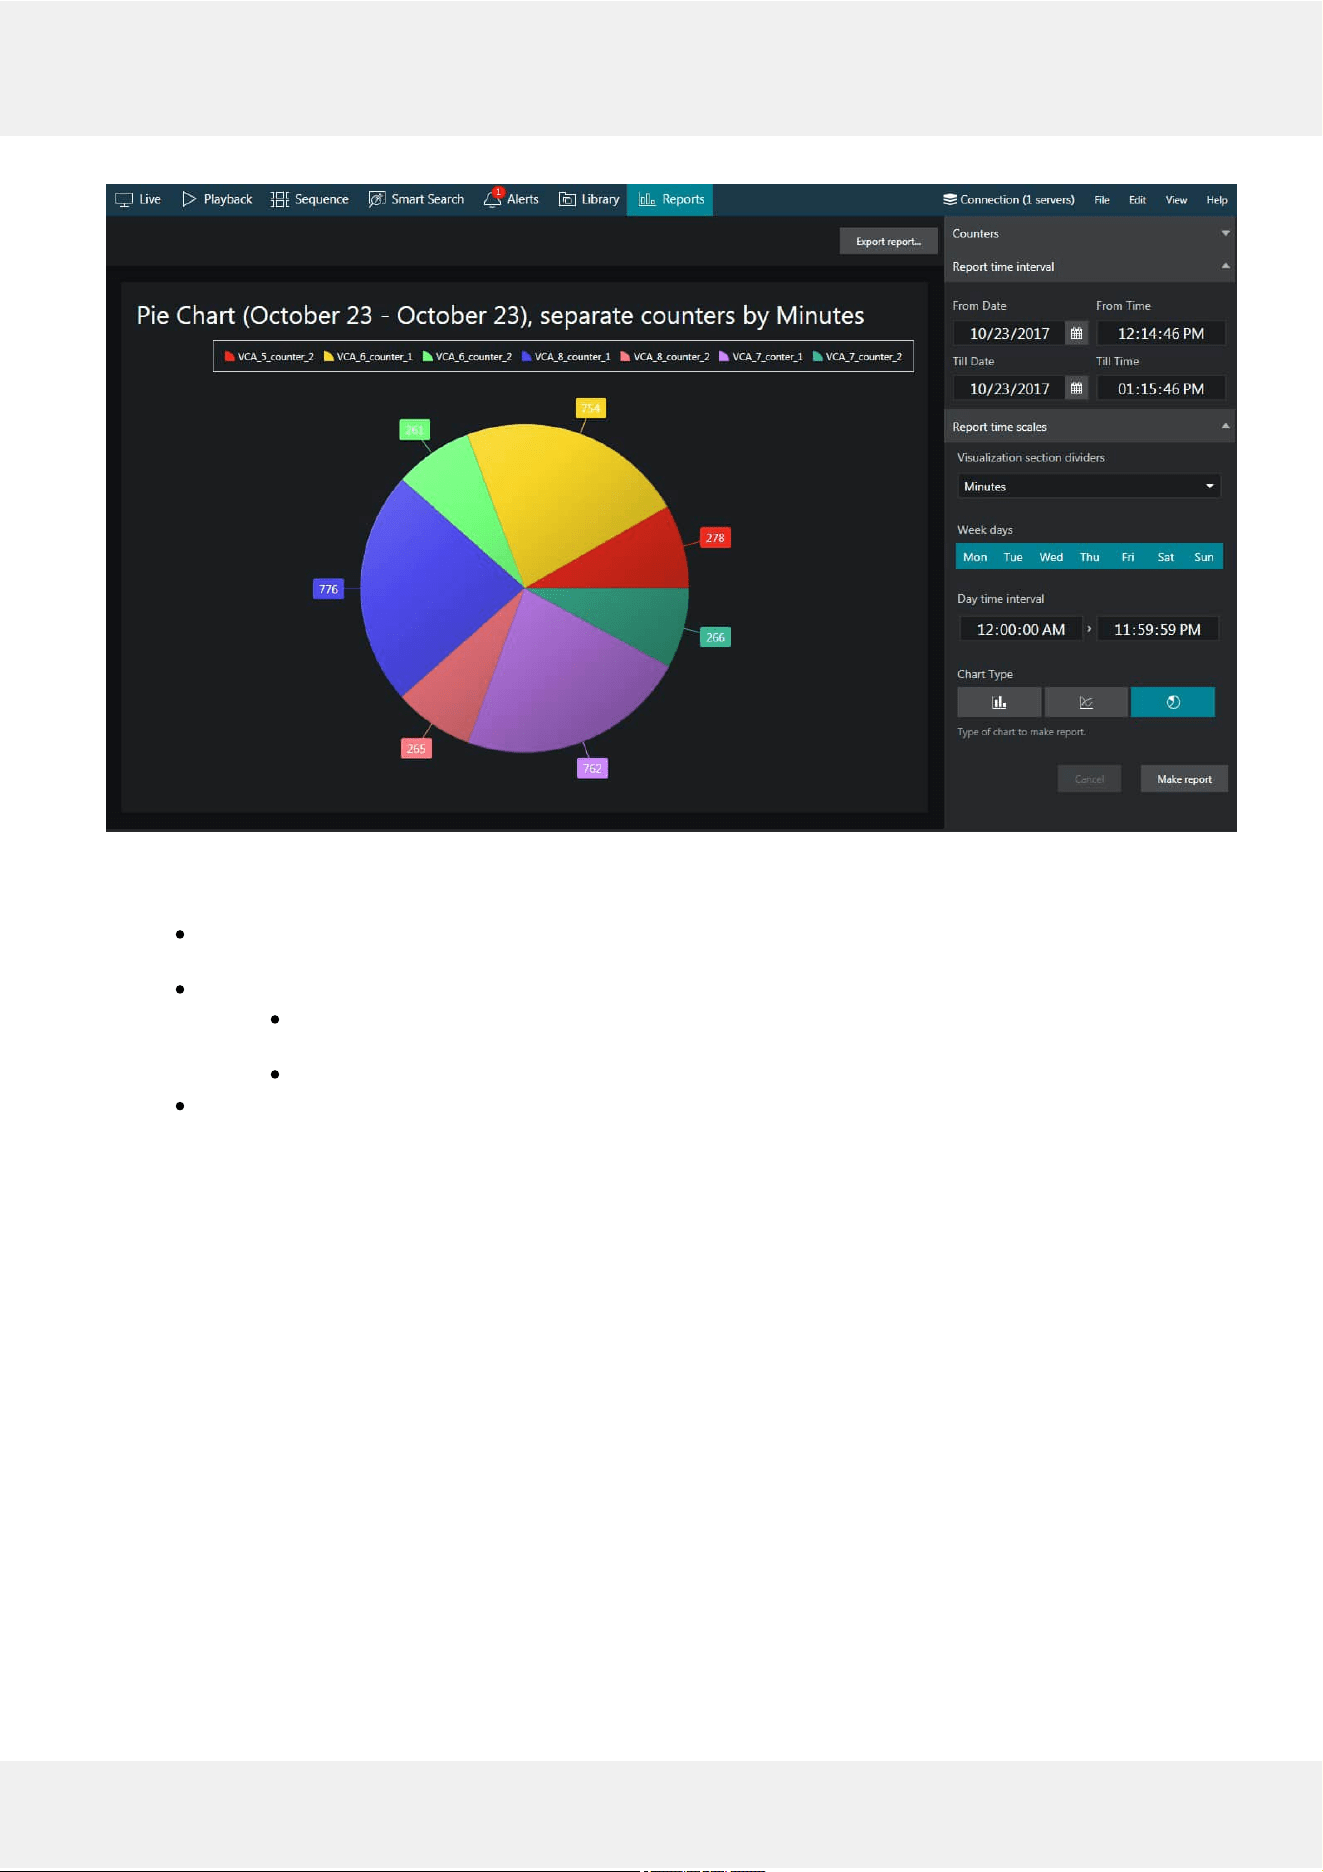
Pie diagram report example
Each chart also contains a legend that provides information about colours used in the diagram:
if you have selected to analyse every counter separately, each counter will be represented with its own
colour and the legend will reflect counter titles
if you have chosen to sum the counter values:
bar diagram will have just one column for each interval, every column consisting of specified
counters and its total height reflecting the total
line diagram will contain graphs for each individual counter and the total
pie chart will reflect the counter sum for each time interval if aggregation by time intervals is chosen, so
the legend will contain timestamps; if aggregation by counters is selected, the pie will reflect the
proportion of the counter values for the whole selected audit interval
Any report can be also savedinPDForCSVformat. To do so, click the Export report button above the diagram
and specify the file name, type, and path for the report to be exported to in the dialog box that appears; then, click
the Export report button in the dialog box to create the file.
Evo Video Analytics 27
©2021 A&H Software House. All Rights Reserved.