Loading ...
Loading ...
Loading ...

4
Rear Panel
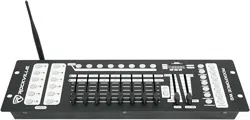
12. MIDI/ADD: MIDI: Turns MIDI mode on/off and selects the MIDI address.
ADD: In program mode pushing the MIDI/ADD button will record a chase step or
scene setting on the display showing when music trigger mode is active.
13. Program: Used to place the unit in programming mode to create /record
scenes and chases. Press and hold for 3 seconds to turn programming mode
on /off. An indicator on the display shows when program mode is active. The
unit will go into blackout mode when exiting program mode. Push the blackout
button (item 14) to turn it off.
14. Bank Up/Bank Down Buttons: Selects a scene bank. The third and fourth
digits on the display show the currently active bank number (01 – 30). Also used
for some chase programming operations.
15. Scene Selectors: These buttons allow you to select a scene in the scene
bank for programming or playback. The current scene is shown on the display.
16. Fixture (Scanner) Selectors: Used to select one or more of the 24 xtures.
Each one is a block of 16 DMX channels. These selectors are used in program-
ming mode and manual mode.
1. MIDI IN: For external triggering of banks and chases using a MIDI device .
2. DMX OUT: Outputs main control signal to xtures and other DMX devices.
3. DC Input Connector: plug in the external power supply here. DC 9V – 12V,
300mA minimum.
4. USB Lamp Socket
5. Power Switch: Turns the unit on/off and can be used with other buttons to
erase scenes and chases.
6. Wireless Mode Power: turns wireless mode on/off.
7. Wireless ID Button: Press this button to activate wireless connectivity and to
set the wireless group.
8. Antenna Port: plug in antenna for wireless functionality.
1 2 3 4 6 7 85
Loading ...
Loading ...
Loading ...