BOYO VTHUDpro
Car Head-up Display
Installation & User Manual
- 1 -
Thank you for choosing Head-up Display from BOYO Vision.
Please read this Manual carefully before installing and using
the Product to enhance driving pleasure.
Warning: Do not use the head-up display, if it causes
distraction while driving.

- 2 -
About VTHUDpro
Through innovative product design concepts, VTHUDpro is an
interactive device, designed to improve driving experience.
While keeping eyes on the road and hands on the steering wheel, get
a best direction and navigate to your destination, make or answer phone
calls, listen to music, and even send/receive messages while driving.
Key Features:
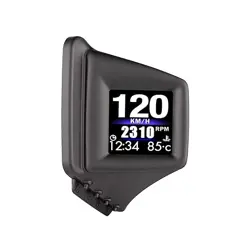
• 15” virtual image size with clear vibrant head up display
• Actual vehicle speed and RPM display from OBDII
• iOS CarPlay and Android Auto (Plug and Play) compatible
• Bluetooth microphone, FM Car Radio used as a speaker
• Hands-free and eyes on the road
Make or receive phone calls
Get directions and navigate
Listen to music, and audio books
Use other Apps developed for CarPlay and Google Auto
with Voice command and steering wheel remote control
• OBDII Connector or Cigarette Lighter Adapter
- 3 -
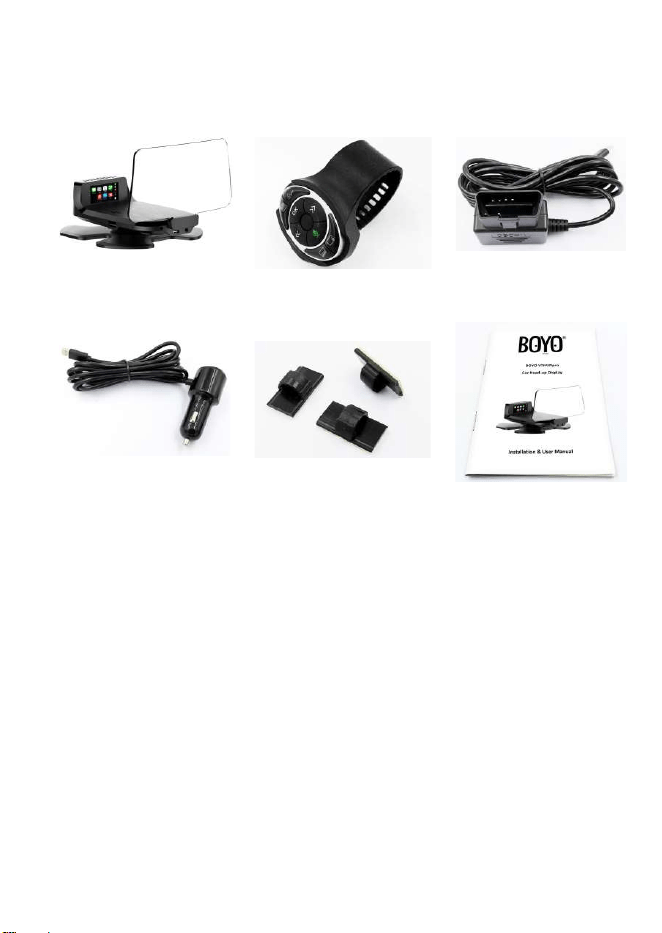
Package Contents
Please check the package contents.
①
Main unit
②
Remote control
③
OBDII Cable
④
12V Power Cable
⑤
Cable clips
⑥
User manual
- 2 -
About VTHUDpro
Through innovative product design concepts, VTHUDpro is an
interactive device, designed to improve driving experience.
While keeping eyes on the road and hands on the steering wheel, get
a best direction and navigate to your destination, make or answer phone
calls, listen to music, and even send/receive messages while driving.
Key Features:
• 15” virtual image size with clear vibrant head up display
• Actual vehicle speed and RPM display from OBDII
• iOS CarPlay and Android Auto (Plug and Play) compatible
• Bluetooth microphone, FM Car Radio used as a speaker
• Hands-free and eyes on the road
Make or receive phone calls
Get directions and navigate
Listen to music, and audio books
Use other Apps developed for CarPlay and Google Auto
with Voice command and steering wheel remote control
• OBDII Connector or Cigarette Lighter Adapter
- 3 -
Package Contents
Please check the package contents.
①
Main unit
②
Remote control
③
OBDII Cable
④
12V Power Cable
⑤
Cable clips
⑥
User manual
- 4 -
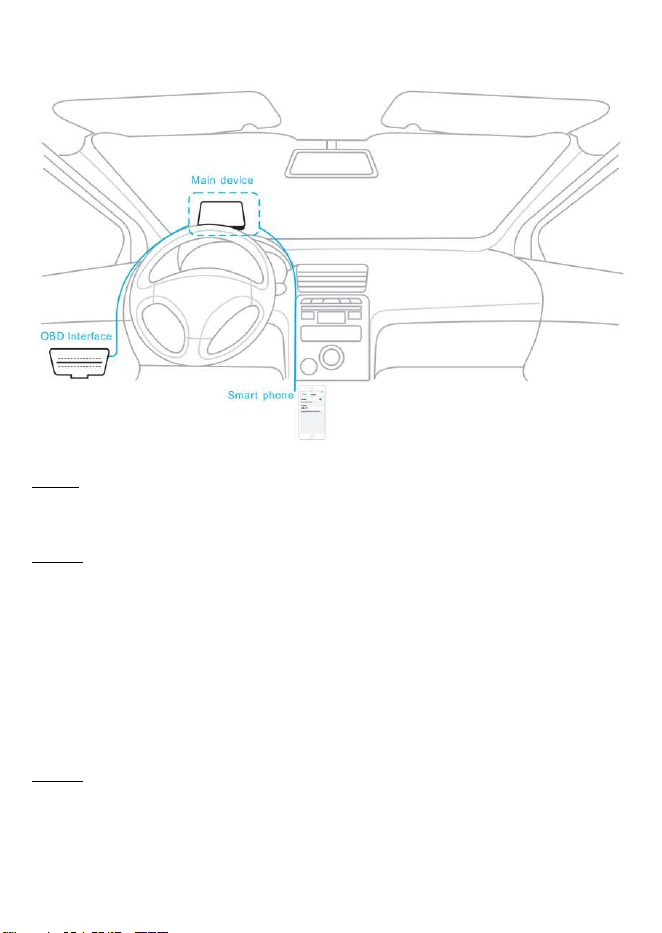
1. Installation
Step1. HUD installation. Assemble the base unit and the main body.
Find position on dashboard. Remove adhesive protection cover
from the bottom of the base unit and fix on the dashboard.
Step 2. Connect power
• If your car has OBD-II port, find and connect using the OBD-II
cable. OBD-II will provide vehicle speed and engine speed.
Check your vehicle manual for the OBD-II connector location.
• If your car does not have OBD-II port, use 12V adaptor to
connect. There will be no access to the vehicle speed nor the
engine speed.
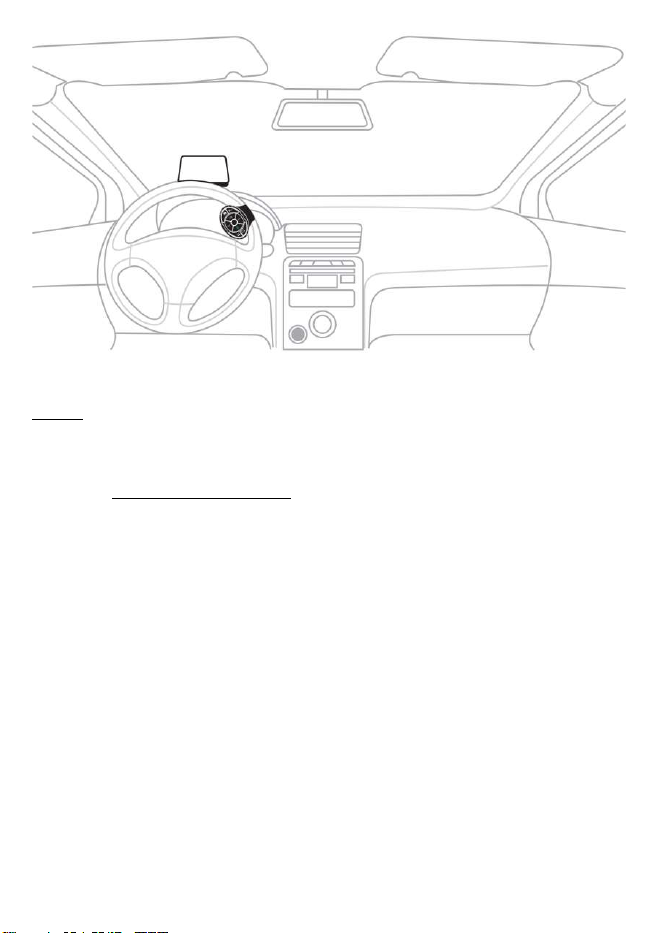
Step 3. Mount the remote on the steering wheel.
- 5 -
Step 4. Connect iOS mobile device with CarPlay or Android mobile
device with Android Auto to VTHUDpro. USB connection is on
the right side of the main unit.
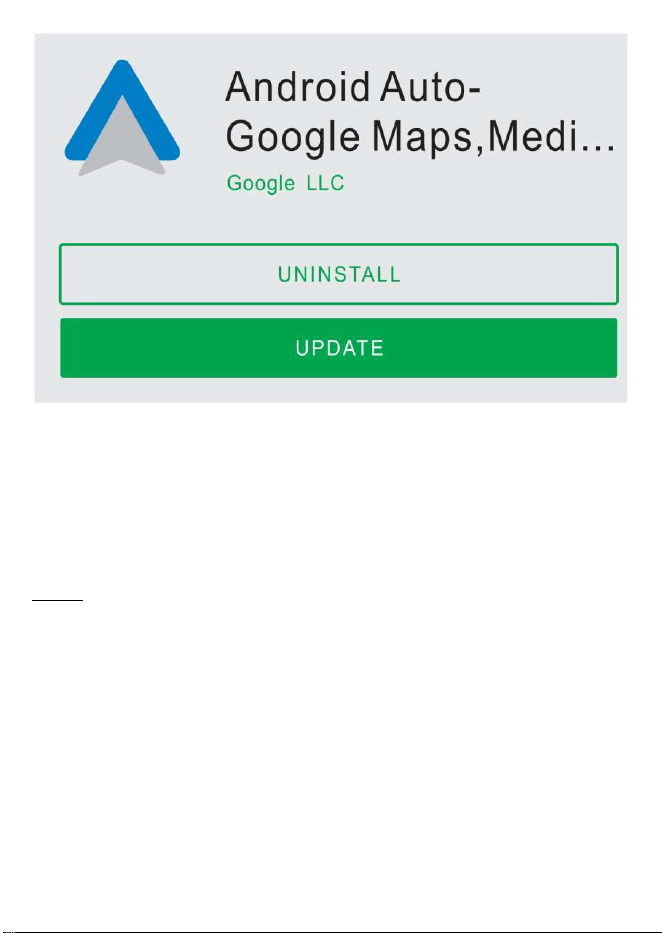
For Google Auto users: For some mobile phones, you may also
be asked to install supporting Apps.
Apps for Android Auto are available from the Google Play store.
Please go to the Google App market place and search
for ”Android Auto-...” and download.
- 4 -
1. Installation
Step1. HUD installation. Assemble the base unit and the main body.
Find position on dashboard. Remove adhesive protection cover
from the bottom of the base unit and fix on the dashboard.
Step 2. Connect power
• If your car has OBD-II port, find and connect using the OBD-II
cable. OBD-II will provide vehicle speed and engine speed.
Check your vehicle manual for the OBD-II connector location.
• If your car does not have OBD-II port, use 12V adaptor to
connect. There will be no access to the vehicle speed nor the
engine speed.
Step 3. Mount the remote on the steering wheel.
- 5 -
Step 4. Connect iOS mobile device with CarPlay or Android mobile
device with Android Auto to VTHUDpro. USB connection is on
the right side of the main unit.
For Google Auto users: For some mobile phones, you may also
be asked to install supporting Apps.
Apps for Android Auto are available from the Google Play store.
Please go to the Google App market place and search
for ”Android Auto-...” and download.
- 6 -
When Android phone is connect to the phone, VTHUDpro
automatically launches the Google Auto interface and projects it
onto the image combiner.
Open the phone’s Bluetooth settings interface, search for
HUD_BT Bluetooth device, and connect. Enter 0000, Bluetooth
PIN code is needed for connection,
Step 5. Turn ‘on’ the VTHUDpro switch. The switch is located on top side
of the main unit.
Turn on the engine and you are ready to use the VTHUDpro.
- 7 -
2. Before Using
2.1. Know your remote-control buttons
① Upper Selections(For Android Auto)
② Function/Menu Button:
Short Press = to switch between App(Apple CarPlay/Android Auto)
and vehicle information(OBDII)
Long Press = enter menu
③ OK
④ Previous item
⑤ Voice assistant – call voice assistance
⑥ Lower Selections(For Android Auto)
⑦ Screen on and off
⑧ Next item
- 6 -
When Android phone is connect to the phone, VTHUDpro
automatically launches the Google Auto interface and projects it
onto the image combiner.
Open the phone’s Bluetooth settings interface, search for
HUD_BT Bluetooth device, and connect. Enter 0000, Bluetooth
PIN code is needed for connection,
Step 5. Turn ‘on’ the VTHUDpro switch. The switch is located on top side
of the main unit.
Turn on the engine and you are ready to use the VTHUDpro.
- 7 -
2. Before Using
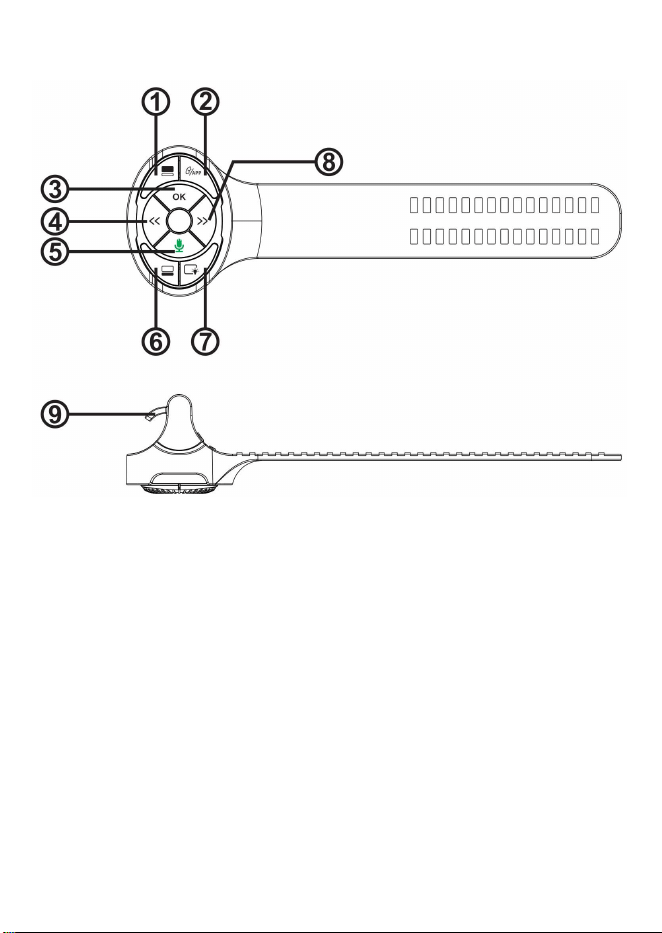
2.1. Know your remote-control buttons
① Upper Selections(For Android Auto)
② Function/Menu Button:
Short Press = to switch between App(Apple CarPlay/Android Auto)
and vehicle information(OBDII)
Long Press = enter menu
③ OK
④ Previous item
⑤ Voice assistant – call voice assistance
⑥ Lower Selections(For Android Auto)
⑦ Screen on and off
⑧ Next item

- 8 -
Remote control pairing: The remote control and the HUD main body
are connected via Bluetooth. If the remote-control buttons are not
working, manual pairing may be required.
To pair:
1. Power Off / On
a. If HUD is powered through ODB II,
- turn the key to off position and then
- turn the key to on position
b. If HUD is powered through a cigarette
lighter adapter,
- unplug the adapter and then
- plug the adapter
2. Pairing
- Within the first 8 seconds of power on,
press both keys (lower and upper
selection keys) at the same time.
- Keep both keys processed for over 8
seconds.
If the remote control is still not working, please check the battery.
Battery (CR2016) in the remote control may need to be replaced.
2.2. Know your setup menu
Press and hold the “APP and vehicle information switch” button to
open the setup menu.
Change “Language”, “Speed unit” and FM frequency,
2.3. Know your initial settings
FM Frequency Setting: There is no built-in speaker in VTHUDpro.
Please turn on your car’s FM radio, if you can’t hear any sound, you
may need to set FM transmission frequency and vehicle radio’s FM
receiving frequency.
To set the matching FM frequency, long press the “Function/Menu
Button” of the remote control to enter the setting menu. In FM
Frequency sub menu, you can use the “Previous item” and “Next item”
key and the “Upper Selections” button or the “Lower Selections”
buttons to select transmit frequency. “OK key” to confirm your setting.
Then dial your FM radio frequency to the matching FM frequency.
- 9 -
3. Using VTHUDpro
3.1. Use the “voice assistant” as much as possible.
VTHUDpro supports voice control. Press the “Voice assistant” button
to activate the voice assistant.
Then say a command.
For example, “call Charles”, “send massage ‘give me a call’ to Ester”
or “start Waze” to make a phone or to start Waze app. etc.
3.2. Using the remote control buttons
Apple CarPlay Interface
Use remote control buttons, “Previous item” and “Next item” and “OK”
to select from displayed options.
-
10
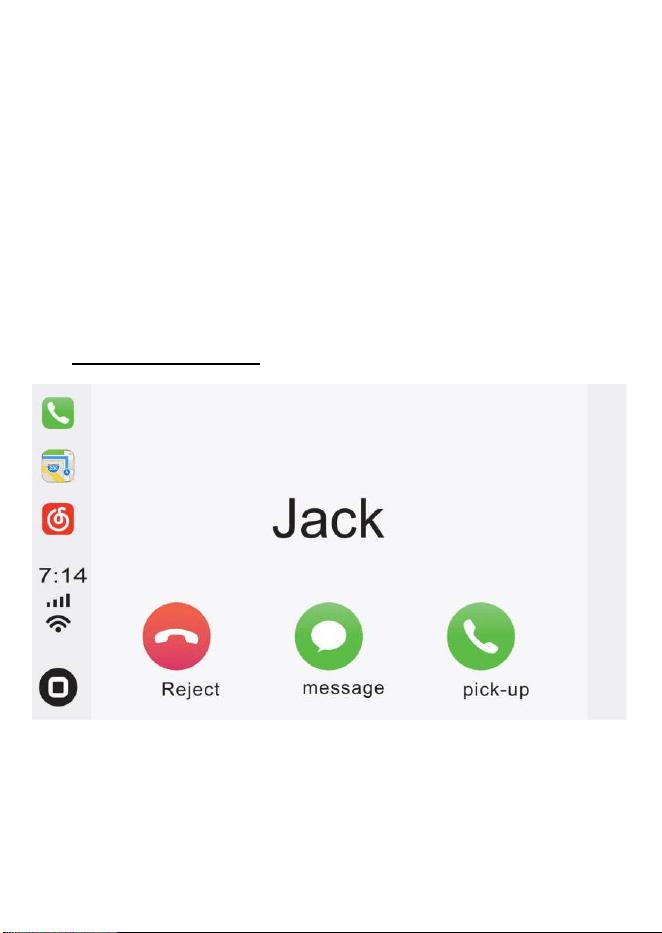
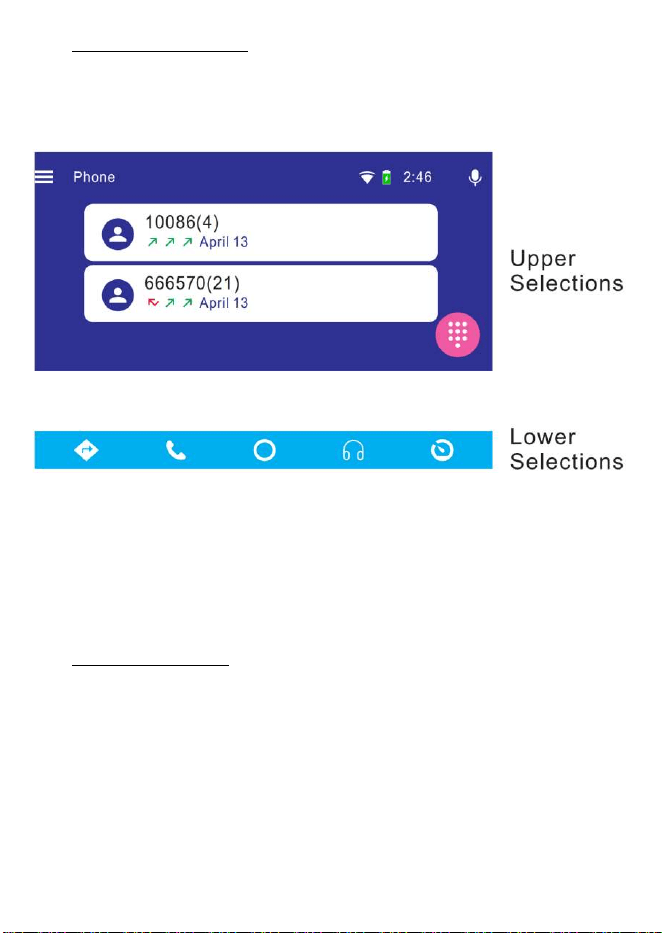
Android Auto Interface
The Google Auto screen is divided into two areas; Upper and Lower
Selections.
Use the "Upper Selections" and "Lower Selections" buttons to switch
between two selections, and then use “Previous item” and “Next item”
and “OK” button to make a selection.
Screen Saver Mode
In some cases, listening to music or an audio book, you may want to
turn off the screen. It will be less distracting. The screen can be
turned off by pressing the "Off screen" button.
Active app will continue to run with screen off with audio on, including
the navigation apps.
Press “Off Screen” button to toggle the display on or off.
-
11
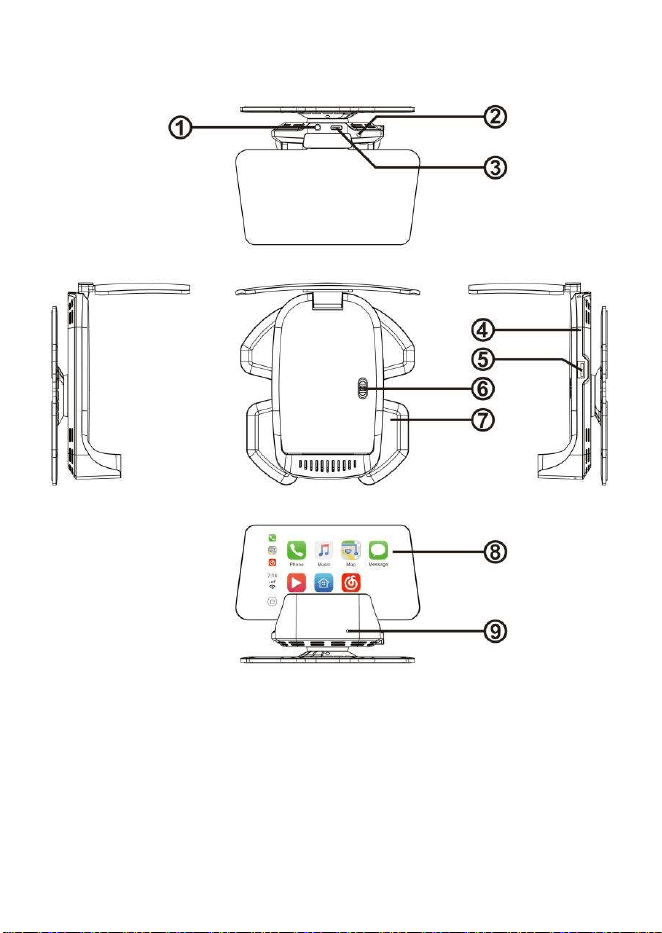
4. VTHUDpro Product Diagram
4.1. The main body
① 3.5 mm audio output interface
② Ambient light sensor detection hole
③ OBDII connector
④ Reset hole
⑤ USB socket
⑥
Switch on/off
-
10
Android Auto Interface
The Google Auto screen is divided into two areas; Upper and Lower
Selections.
Use the "Upper Selections" and "Lower Selections" buttons to switch
between two selections, and then use “Previous item” and “Next item”
and “OK” button to make a selection.
Screen Saver Mode
In some cases, listening to music or an audio book, you may want to
turn off the screen. It will be less distracting. The screen can be
turned off by pressing the "Off screen" button.
Active app will continue to run with screen off with audio on, including
the navigation apps.
Press “Off Screen” button to toggle the display on or off.
-
11
4. VTHUDpro Product Diagram
4.1. The main body
① 3.5 mm audio output interface
② Ambient light sensor detection hole
③ OBDII connector
④ Reset hole
⑤ USB socket
⑥
Switch on/off

-
12
⑦
Base
⑧ Image combiner (Combiner)
⑨ MIC
4.2. The Composition of Base
① Adhesive pad
② Universal support table
③ Universal support table fastening screw (the screw has been
adjusted to the fine adjustment of the universal support table
before leaving the factory)
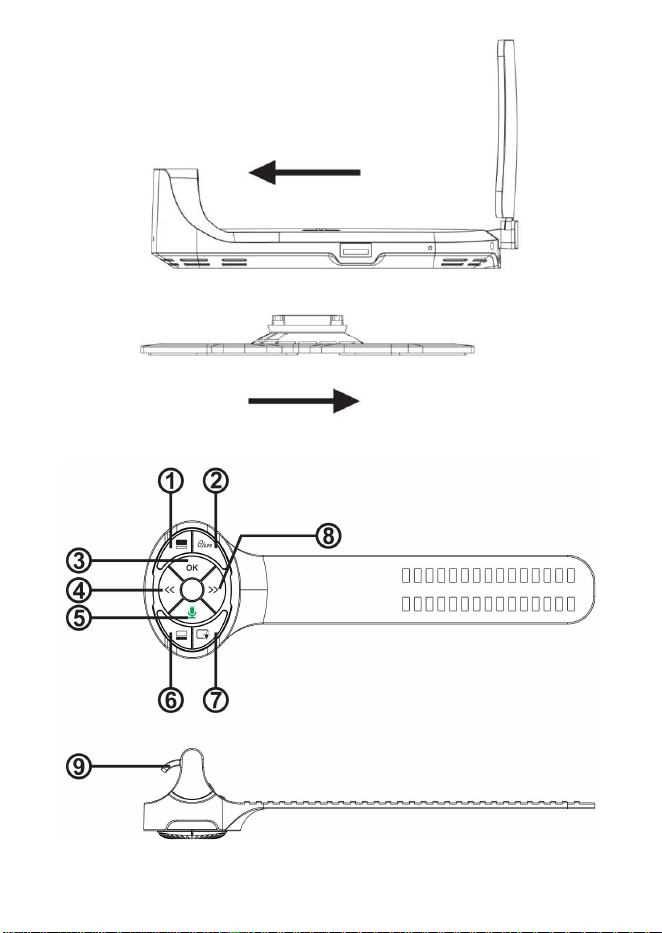
How to Separate the Base
-
13
4.3 Remote Control
-
12
⑦
Base
⑧ Image combiner (Combiner)
⑨ MIC
4.2. The Composition of Base
① Adhesive pad
② Universal support table
③ Universal support table fastening screw (the screw has been
adjusted to the fine adjustment of the universal support table
before leaving the factory)
How to Separate the Base
-
13
4.3 Remote Control
-
14
①
Upper Selections(For Android Auto)
② Function / Menus switch (long press enter menu)
③ OK
④ Previous item
⑤ Voice assistant
⑥ Lower Selections(For Android Auto)
⑦ Screen on and off
⑧ Next item
⑨ Buckle
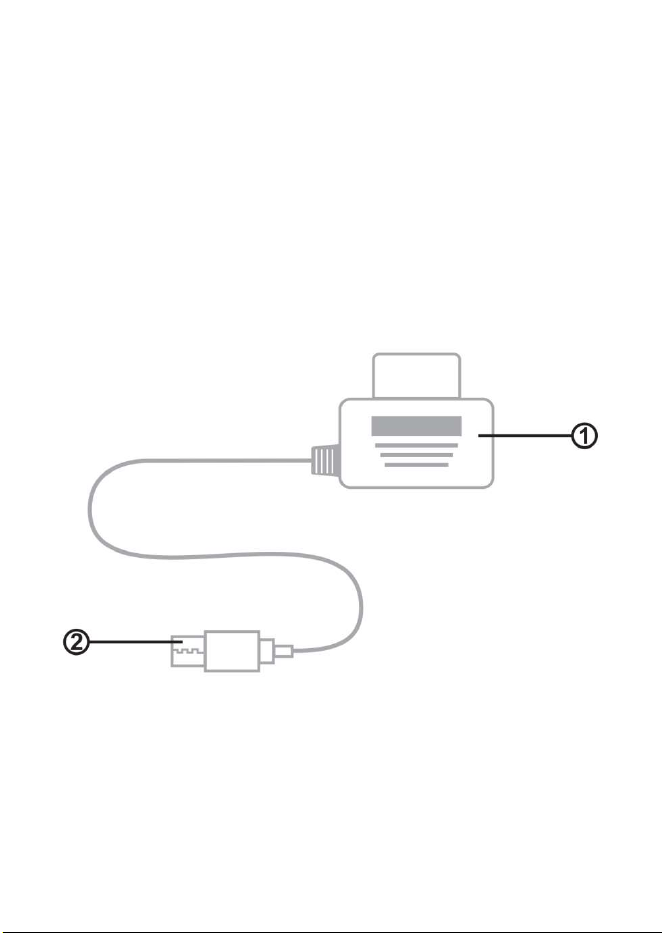
4.4 OBD II
① OBDII Male and OBD Readout Circuit
② Type-C
-
15
5. Technical Specification
Rated working voltage
11.5V-16.5V
Limit working voltage 11-18V
USB output 500ma
Working temperature 0-75 degrees
TFT screen resolution 480*240
Projection size
15-inch virtual image two meters
away
SNR >60dB
Degree of distortion <0.1%
Frequency response 20Hz-15Khz
Left and right channel
separation
〉60dB
Bluetooth version Version4.2+EDR
Bluetooth sound processing
A2DP(Advance Audio Distribution
Profile)
Bluetooth effective distance <10M
Effective distance of
Bluetooth microphone
0.5-2M
FM frequency 88.1-107.9MHZ
Transmit FM mode Stereo digital PLL lock frequency

-
14
①
Upper Selections(For Android Auto)
② Function / Menus switch (long press enter menu)
③ OK
④ Previous item
⑤ Voice assistant
⑥ Lower Selections(For Android Auto)
⑦ Screen on and off
⑧ Next item
⑨ Buckle
4.4 OBD II
① OBDII Male and OBD Readout Circuit
② Type-C
-
15
5. Technical Specification
Rated working voltage
11.5V-16.5V
Limit working voltage 11-18V
USB output 500ma
Working temperature 0-75 degrees
TFT screen resolution 480*240
Projection size
15-inch virtual image two meters
away
SNR >60dB
Degree of distortion <0.1%
Frequency response 20Hz-15Khz
Left and right channel
separation
〉60dB
Bluetooth version Version4.2+EDR
Bluetooth sound processing
A2DP(Advance Audio Distribution
Profile)
Bluetooth effective distance <10M
Effective distance of
Bluetooth microphone
0.5-2M
FM frequency 88.1-107.9MHZ
Transmit FM mode Stereo digital PLL lock frequency

-
16
NOTE: This equipment has been tested and found to comply with the limits for a
Class B digital device, pursuant to part 15 of the FCC Rules. These limits are
designed to provide reasonable protection against harmful interference in a
residential installation. This equipment generates uses and can radiate radio
frequency energy and, if not installed and used in accordance with the instructions,
may cause harmful interference to radio communications. However, there is no
guarantee that interference will not occur in a particular installation. If this
equipment does cause harmful interference to radio or television reception, which
can be determined by turning the equipment off and on, the user is encouraged to
try to correct the interference by one or more of the following measures:
- Reorient or relocate the receiving antenna.
- Increase the separation between the equipment and receiver.
-Connect the equipment into an outlet on a circuit different from that to which the
receiver is connected.
-Consult the dealer or an experienced radio/TV technician for help
Changes or modifications not expressly approved by the party responsible for
compliance
could void the user's authority to operate the equipment.
This device complies with Part 15 of the FCC Rules. Operation is subject to the
following two conditions:
(1) this device may not cause harmful interference, and
(2) this device must accept any interference received, including interference that may
cause undesired operation.
-
17
For technical support contact:
Call 888-941-3060
Email info@visiontechamerica.com
Visit www.VisionTechAmerica.com

-
16
NOTE: This equipment has been tested and found to comply with the limits for a
Class B digital device, pursuant to part 15 of the FCC Rules. These limits are
designed to provide reasonable protection against harmful interference in a
residential installation. This equipment generates uses and can radiate radio
frequency energy and, if not installed and used in accordance with the instructions,
may cause harmful interference to radio communications. However, there is no
guarantee that interference will not occur in a particular installation. If this
equipment does cause harmful interference to radio or television reception, which
can be determined by turning the equipment off and on, the user is encouraged to
try to correct the interference by one or more of the following measures:
- Reorient or relocate the receiving antenna.
- Increase the separation between the equipment and receiver.
-Connect the equipment into an outlet on a circuit different from that to which the
receiver is connected.
-Consult the dealer or an experienced radio/TV technician for help
Changes or modifications not expressly approved by the party responsible for
compliance
could void the user's authority to operate the equipment.
This device complies with Part 15 of the FCC Rules. Operation is subject to the
following two conditions:
(1) this device may not cause harmful interference, and
(2) this device must accept any interference received, including interference that may
cause undesired operation.
-
17
For technical support contact:
Call 888-941-3060
Email info@visiontechamerica.com
Visit www.VisionTechAmerica.com