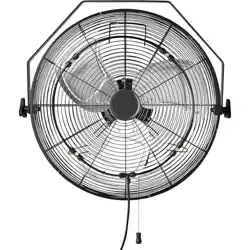
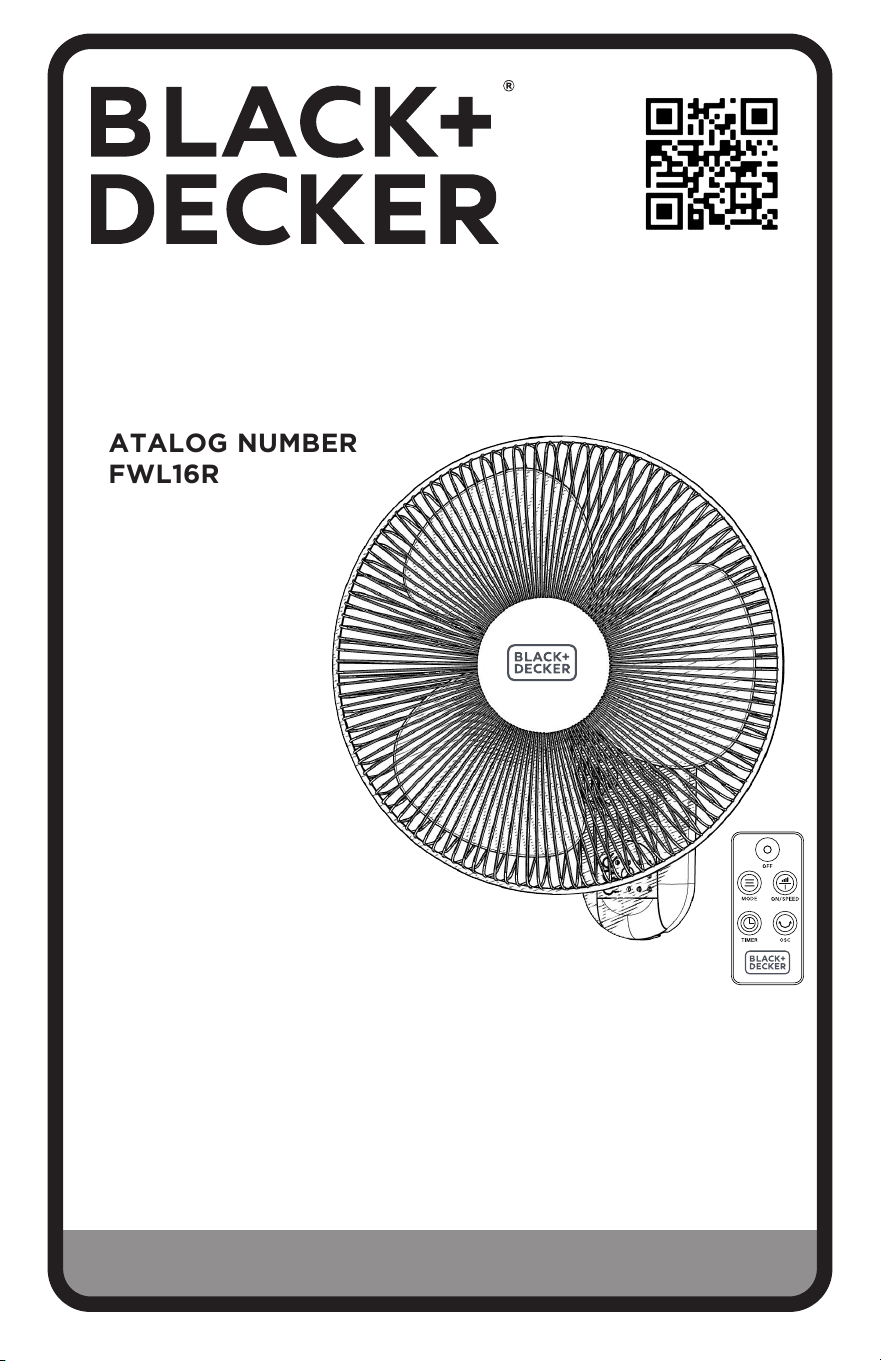
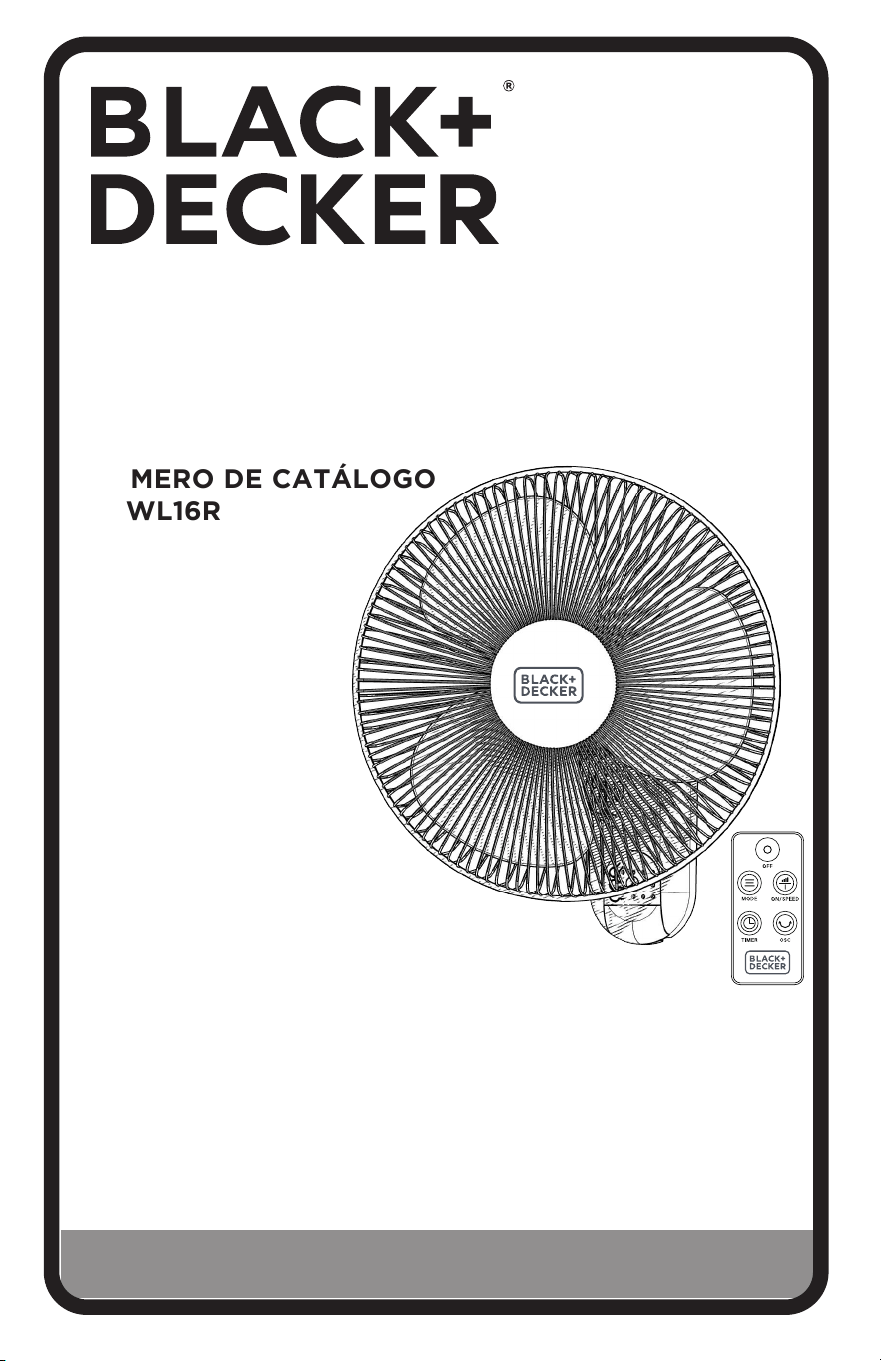
16 IN. WALL FAN
INSTRUCTION MANUAL
CATALOG NUMBER
BFWL16R
Thank you for choosing BLACK+DECKER!
PLEASE READ BEFORE RETURNING THIS PRODUCT FOR
ANY REASON.
If you have a question or experience a problem with your BLACK+DECKER
purchase, go to www.blackanddecker.com/instantanswers
If you can’t find the answer or do not have access to the Internet, call
844-299-0879 from 10:30 a.m. to 6:30 p.m. EST Mon. - Fri. to speak with an
agent. Please have the catalog number available when you call.
SAVE THIS MANUAL FOR FUTURE REFERENCE.

Page 2
CONTENTS
SAFETY INFORMATION
Important Safety Instructions .............................................................................................................................................. 3
Electrical Requirements ....................................................................................................................................................... 4
Power Supply Cord .................................................................................................................................................................4
Battery Information ................................................................................................................................................................ 5
SET UP & USE
Parts & Features .......................................................................................................................................................................6
Fan Assembly ......................................................................................................................................................7-8
Wall Installation ....................................................................................................................................................... 9
Operation of Your Fan ....................................................................................................................................10-11
Control Panel ...........................................................................................................................................................12
CLEANING & CARE ..............................................................................................................................................13
TROUBLESHOOTING & WARRANTY
Before You Call for Service ................................................................................................................................14
Customer Service ...................................................................................................................................................14
Troubleshooting .....................................................................................................................................................14
Limited Warranty ....................................................................................................................................................................15
Thank you for purchasing our
BLACK+DECKER product. This
easy-to-use manual will guide you
in getting the best use of your fan.
Remember to record the model and
serial numbers. They are on a label
on the rear.
Staple your receipt to your manual.
You will need it to obtain warranty service.
Model number
Serial number
Date of purchase
PRODUCT REGISTRATION

Page 3
DANGER
DANGER - Immediate hazards
which WILL result in severe
personal injury or death
WARNING
WARNING - Hazards or unsafe
practices which COULD result in
severe personal injury or death
CAUTION
CAUTION - Hazards or unsafe
practices which COULD result in
minor personal injury
IMPORTANT SAFETY INSTRUCTIONS
WARNING
When using electrical appliances, basic safety precautions should always be followed to
reduce the risk of re, electric shock and personal injury.
:
READ ALL INSTRUCTIONS BEFORE USING THE PRODUCT
SAFETY INFORMATION
1. READ ALL INSTRUCTIONS BEFORE USE
2. Never insert ngers, pencils, or any other object through the grill when
fan is running.
3. Disconnect fan when moving from one location to another.
4. Disconnect fan when not in use and before cleaning.
5. To protect against risk of electrical shock, do not immerse fan in water
or any other liquid.
6. Do not let cord hang over edge of table or counter.
7. Be sure fan is on a stable surface when operating to avoid overturning.
8. Do not use fan in window. Rain may create electrical hazard.
9. Close supervision is necessary when any appliance is used by or near
children.
10. This product employs overload protection (fuse). A blown fuse indicates
an overload or short-circuit situation. If the fuse blows, unplug the
product from the outlet. Replace the fuse as per the user manual (follow
product marking for proper fuse rating) and check the product. If the
replacement fuse blows, a short-circuit may be present and the product
should be discarded or returned to an authorized service facility for
examination and/or repair.
11. Do not operate any fan with a damaged cord or plug. Discard fan or
return to an authorized service facility for examination and/or repair.
12. Do not run cord under carpeting. Do not cover cord with throw rugs,
runners, or similar coverings. Do not route cord under furniture or
appliances. Arrange cord away from trafc area and where it will not be
tripped over.
13. To reduce the risk of re or electric shock, DO NOT use this fan with any
solid state speed control devices.
14. Do not use outdoors.
SAVE THESE INSTRUCTIONS
HOUSEHOLD USE ONLY

Page 4
SAFETY INFORMATION
ELECTRICAL REQUIREMENTS
This appliance has a polarized plug (one blade is wider than the other). To reduce the risk
of electric shock, this plug is intended to t into a polarized outlet only one way. If the
plug does not t into the outlet, reverse the plug. If it still does not t, contact a qualied
electrician. Do not attempt to modify the plug in any way.
POWER SUPPLY CORD
1. If it is absolutely necessary to use longer cord sets or an extension cord, extreme care
must be exercised.
a) The marked electrical rating of the cord set or extension cord must equal to or be
greater than the electrical rating of the appliance. The longer cord should be arranged
so that it will not drape over the counter top or table top where it can be pulled on by
children or tripped over unintentionally.
NOTE: Neither Black&Decker nor the dealer can accept any liability for damage to the product or
personal injury resulting from failure to observe the electrical connection procedures.
SPECIFICATIONS
• Unit Dimensions (W x D x H): 17” x 12” x 18”
• Net Weight: Approx. 4.9 lbs.
This device complies with part 15 of the FCC rules. Operation is subject to the following two
conditions: 1) This device may not cause harmful interference, and 2) This device must accept
any interference received, including interference that may cause undesired operation. This
equipment has been tested and found to comply with the limits for a Class B digital device,
pursuant to Part 15 of the FCC rules. These limits are designed to provide reasonable protection
against harmful interference in a residential installation. This equipment generates, uses and can
radiate radio frequency energy and, if not installed and used in accordance with the instructions,
may cause harmful interference to radio communications. However, there is no guarantee that
the interference will not occur in a particular installation. If this equipment does cause harmful
interference to radio or television reception, which can be determined by turning the equipment
off and on, the user is encouraged to try to correct the interference by one or more of the
following measures: a) Reorient or relocate the receiving antenna. b) Increase the separation
between the equipment and the receiver. c) Connect the equipment into an outlet different
from that which the receiver is connected. d) Consult the dealer or an experienced radio/TV
technician for help.
Page 5
SAFETY INFORMATION
BATTERY INFORMATION
WARNING
• Chemical Burn Hazard. Keep batteries away from children. This product contains a
lithium button/coin cell battery. If a new or used lithium button/coin cell battery is
swallowed or enters the body, it can cause severe internal burns and can lead to death
in as little as 2 hours. Always completely secure the battery compartment. If the battery
compartment does not close securley, stop using the product, remove the batteries and
keep it away from children. If you think batteries might have been swallowed or placed
inside any part of the body, seek immediate medical attention.
NOTE: Even used batteries may cause injury.
• LITHIUM COIN CELL SAFETY NOTICE:
Keep lithium coin batteries out of the reach of small children; coin cell batteries can be
accidentally ingested. If ingested, these batteries may leak harmful contents causing
chemical burns, perforation of soft tissue, and in severe cases may cause death. Lithium
coin batteries must be removed immediately if swallowed. Seek medical attention
immediately. If you or your doctor suspects that a battery has been ingested for
assistance in the US call the NATIONAL BATTERY INGESTION HOTLINE any time at
(202) 625-3333: in Canada call 416-813-5900.
• Remove and immediately recycle or dispose of used batteries according to local
regulations and keep away from children. Do NOT dispose of batteries in household
trash or incinerate.
• Even used batteries may cause severe injury or death.
• Call a local poison control center for treatment information.
• CR2025 battery has a high voltage of 3V.
• Non-rechargeable batteries are not to be recharged.
• Do not force discharge, recharge, disassemble, heat or incinerate. Doing so may result in
injury due to venting, leakage or explosion resulting in chemical burns
• Ensure the batteries are installed correctly according to polarity (+ and -).”
• Do not mix old and new batteries, different brands or types of batteries, such as alkaline,
carbon-zinc, or rechargeable batteries.
• Remove and immediately recycle or dispose of batteries from equipment not used for
an extended period of time according to local regulations.
• Always completely secure the battery compartment. If the battery compartment does
not close securely, stop using the product, remove the batteries, and keep them away
from children.”
WARNING
• INGESTION HAZARD: This product contains a button cell or coin battery.
• DEATH or serious injury can occur if ingested.
• A swallowed button cell or coin battery can cause Internal
Chemical Burns in as little as 2 hours.
• KEEP new and used batteries OUT OF REACH of CHILDREN
• Seek immediate medical attention if a battery is suspected to be
swallowed or inserted inside any part of the body.
Page 6
SET UP & USE
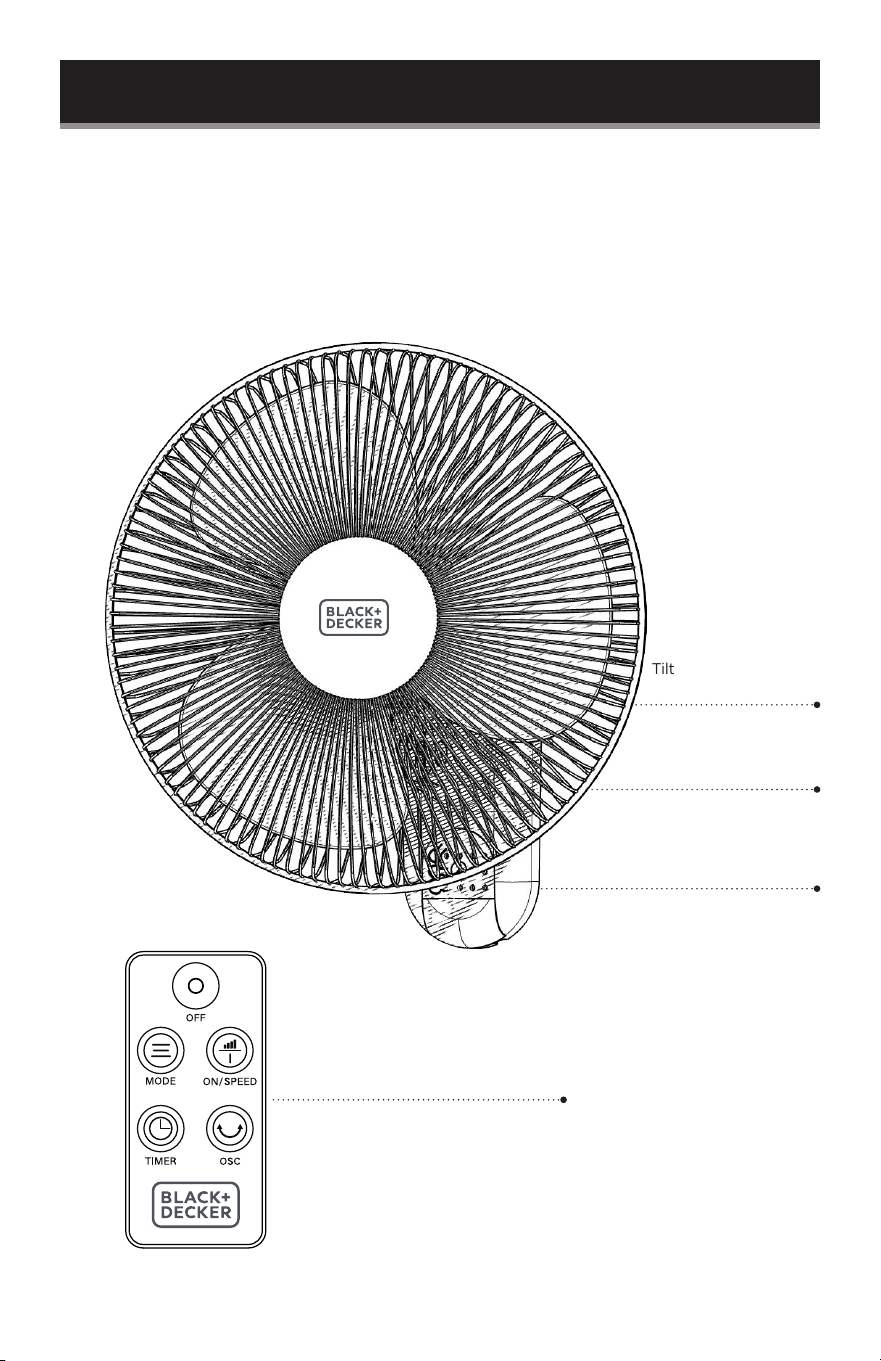
PARTS & FEATURES
Front Guard
Tilt Adjustment Knob
(Not shown)
Base
Remote

Page 7
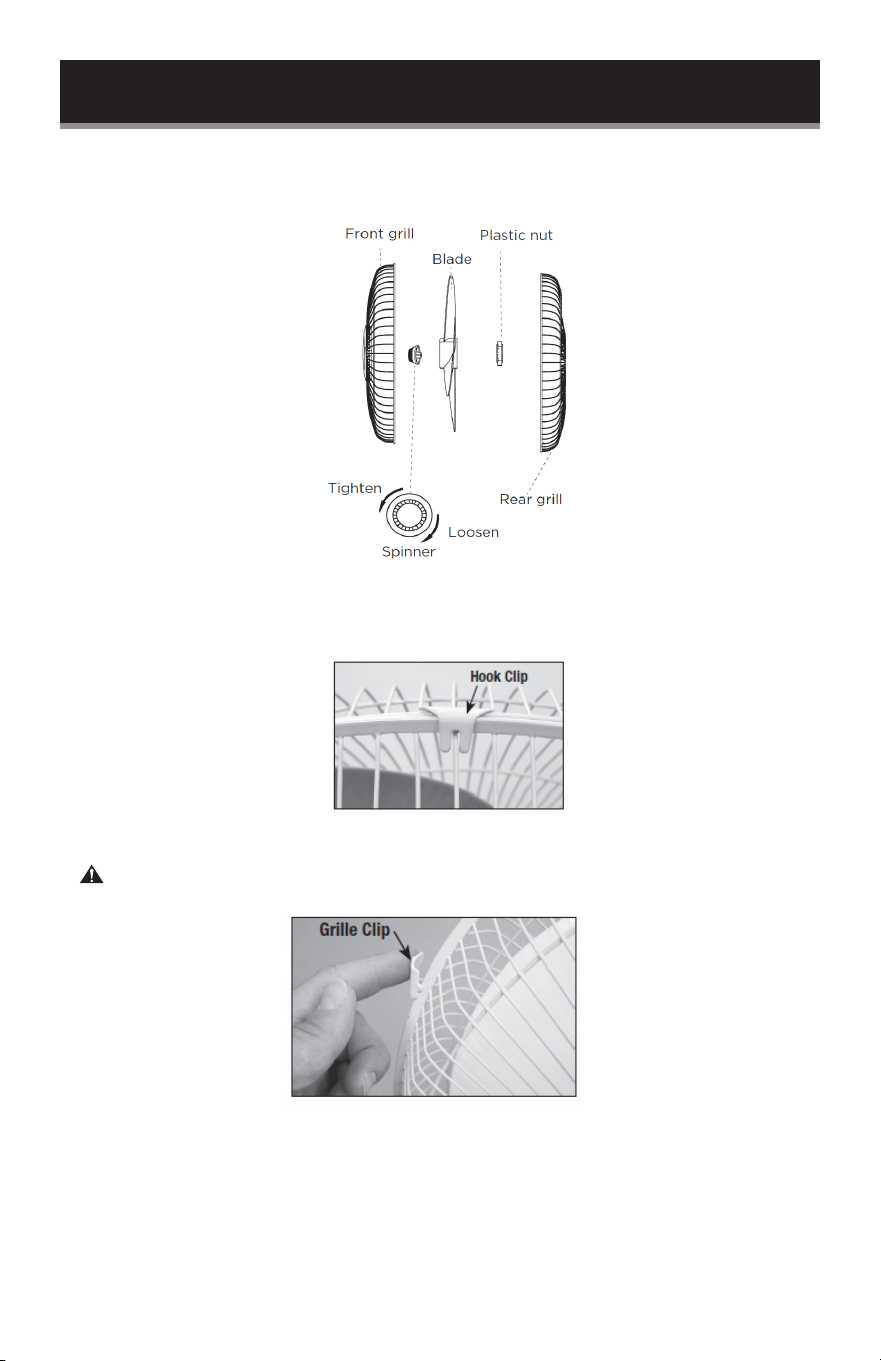
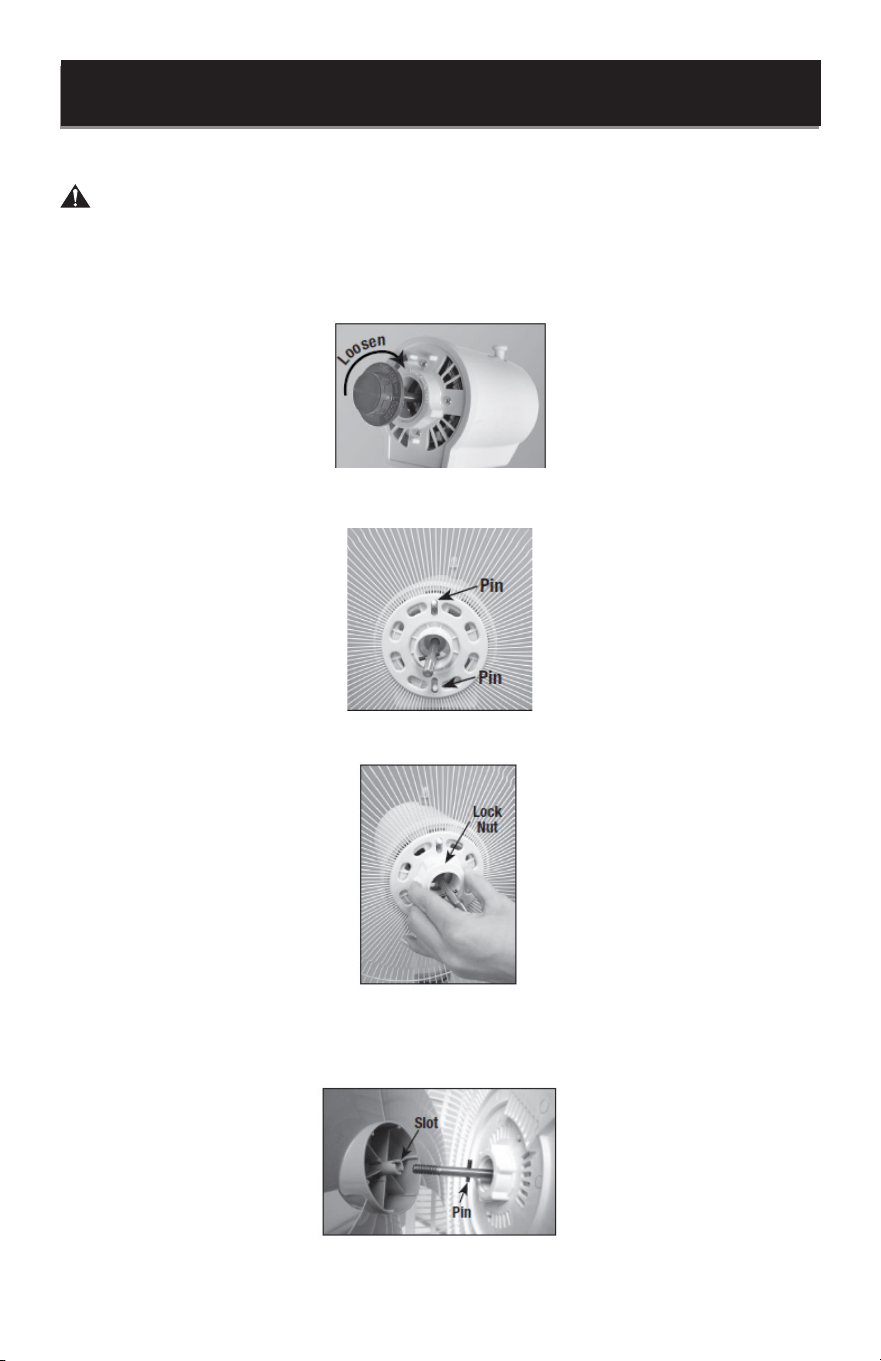
FAN ASSEMBLY
WARNING: Never attempt to run the fan without the grill in place and properly
secured. Failure to have the grill in place can result in serious injury.
1. Remove the rear grill plastic nut from the motor shaft pin by turning it clockwise, while
holding the motor housing tightly.
2. Thread the rear grill nut onto the motor housing to lock the rear grille securely in place.
3. Thread the rear grill nut onto the motor housing to lock the rear grille securely in place.
4. Remove any protective covering over the shaft before fan blade installation. Place the
fan blade onto the motor shaft. The pin on the motor shaft should be inserted into the
slot of the fan blade assembly.
SET UP & USE
Page 8
SET UP & USE
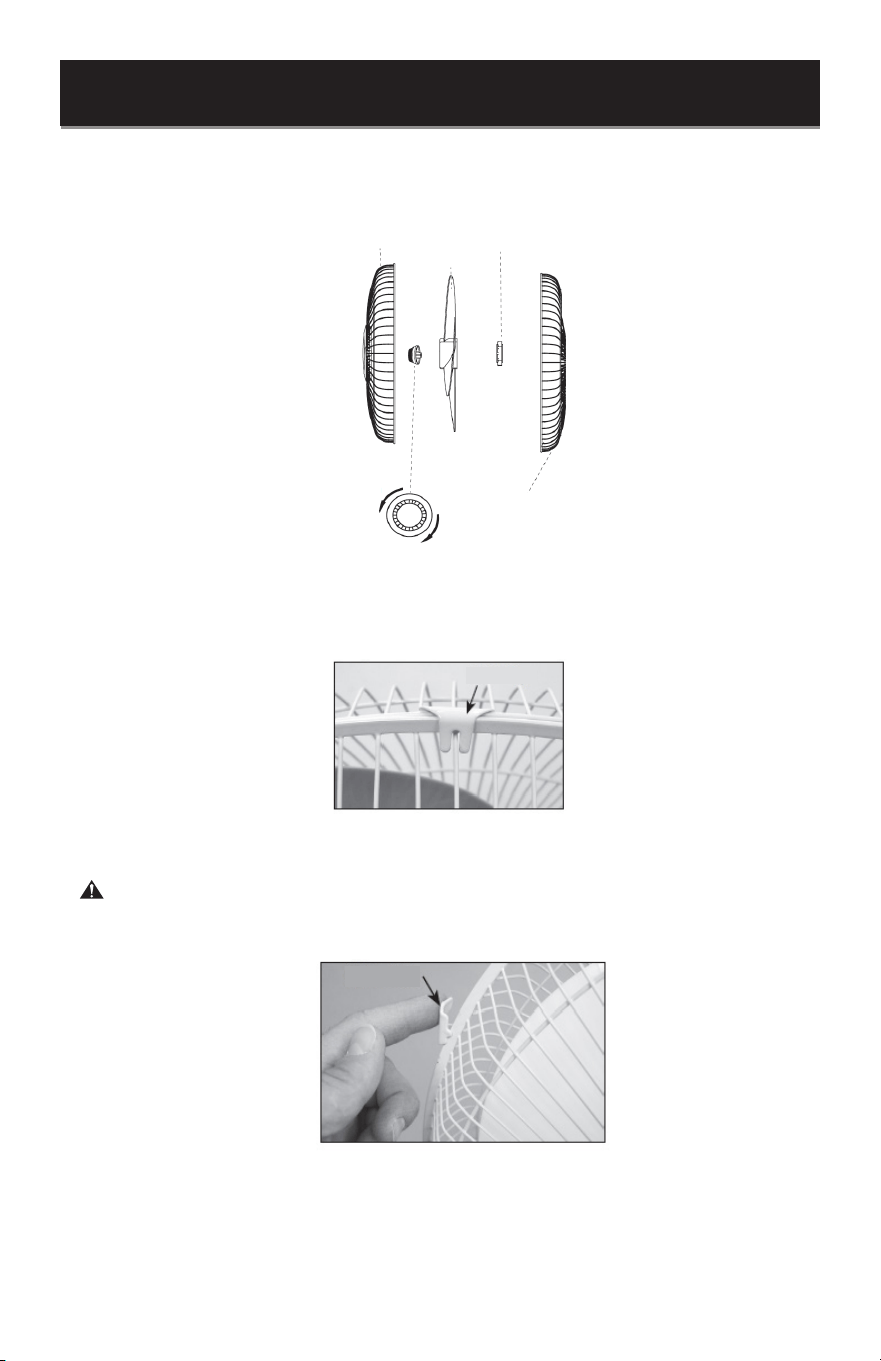
Secure the fan blades by threading the spinner onto the end of the motor shaft. Turn
the fan spinner counter-clockwise to tighten.
5. Attach the front grille to the rear grille with the hook clip centered on the top above the
wire handle.
6. Press the remaining grille clips onto the rear grill to securely attach the front grille.
WARNING: Do not operate the fan without grille in place.
Page 9
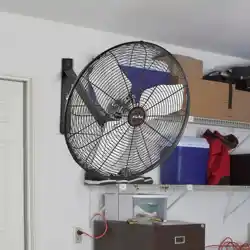
SET UP & USE
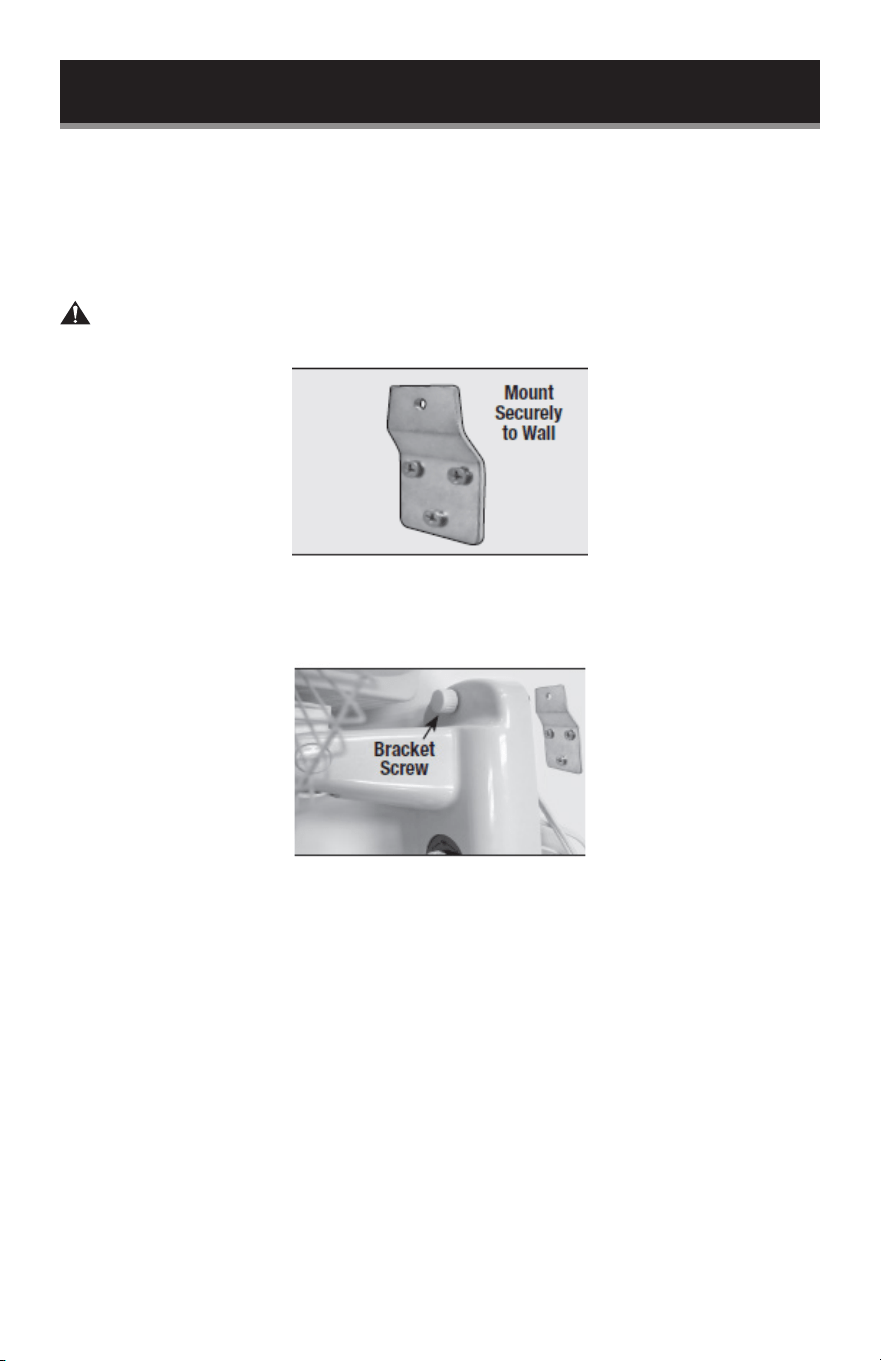
WALL INSTALLATION
Install your wall fan near a properly functioning wall outlet.
1. Secure Wall Bracket to the wall in the desired location by inserting 3 screws through the
3 holes in the wall bracket as shown. 3 screws are provided for use if suitable for the wall
type the fan is being installed on. Wall anchors are not included.
WARNING: Use proper anchors for the wall material. It is recommended to mount
the bracket to wall studs.
2. Hang the fan on the wall bracket by placing the bracket screw through the fan and
threading the screw through the top center hole of the wall bracket.
Page 10
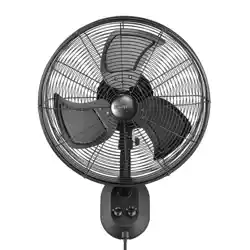
OPERATION OF YOUR FAN
TILT ADJUSTMENT
To adjust the air flow upward or downward, push the grill section lightly to the desired
direction.
REMOTE CONTROL
Point the remote control at the receiver on body of the fan and press the desired button.
The remote control will work at distances of up to roughly 16 feet (5 meters) and an angle
of 30 degrees left and right of the control panel.
SET UP & USE
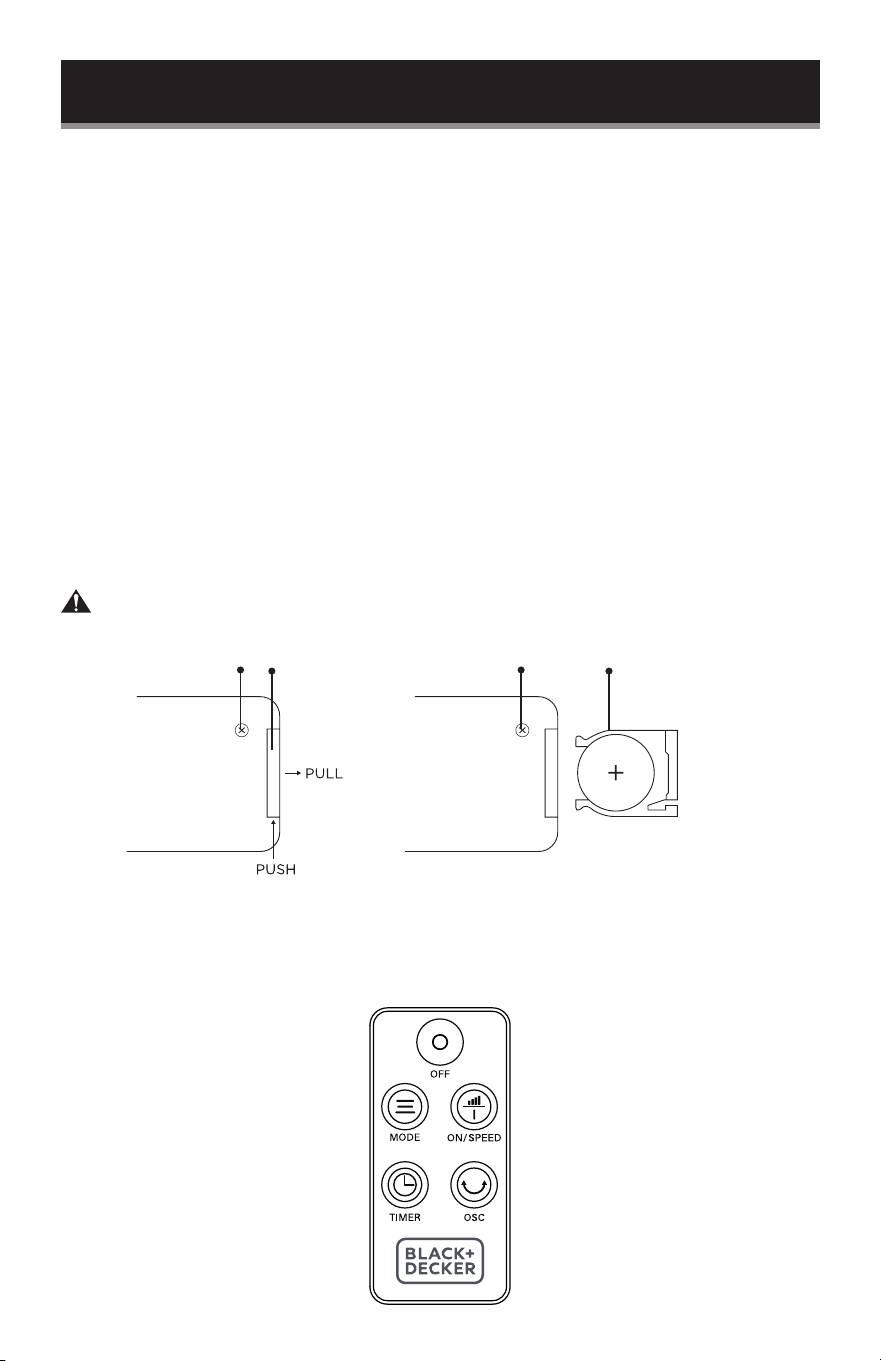
BATTERY INSTRUCTIONS
(Batteries not included)
The remote control requires a CR2025 Lithium Battery to operate.
1. Using a small Philips Head screwdriver, remove the screw by turning counterclockwise
until it releases from the remote.
2. Push the button at the base of the battery cover to release the cover. Pull out the
battery cover as shown in the diagram.
3. Insert the battery making sure the “+” side is facing up.
4. Once the battery is installed, push the battery cover closed.
5. Again, using the small Philips Head screwdriver, add the screw back by turning
clockwise until it is locked in place.
WARNING: Chemical Burn Hazard. Keep batteries away from children.
CR2025
Battery
Remote Control
Battery Cover
ScrewScrew

Page 11
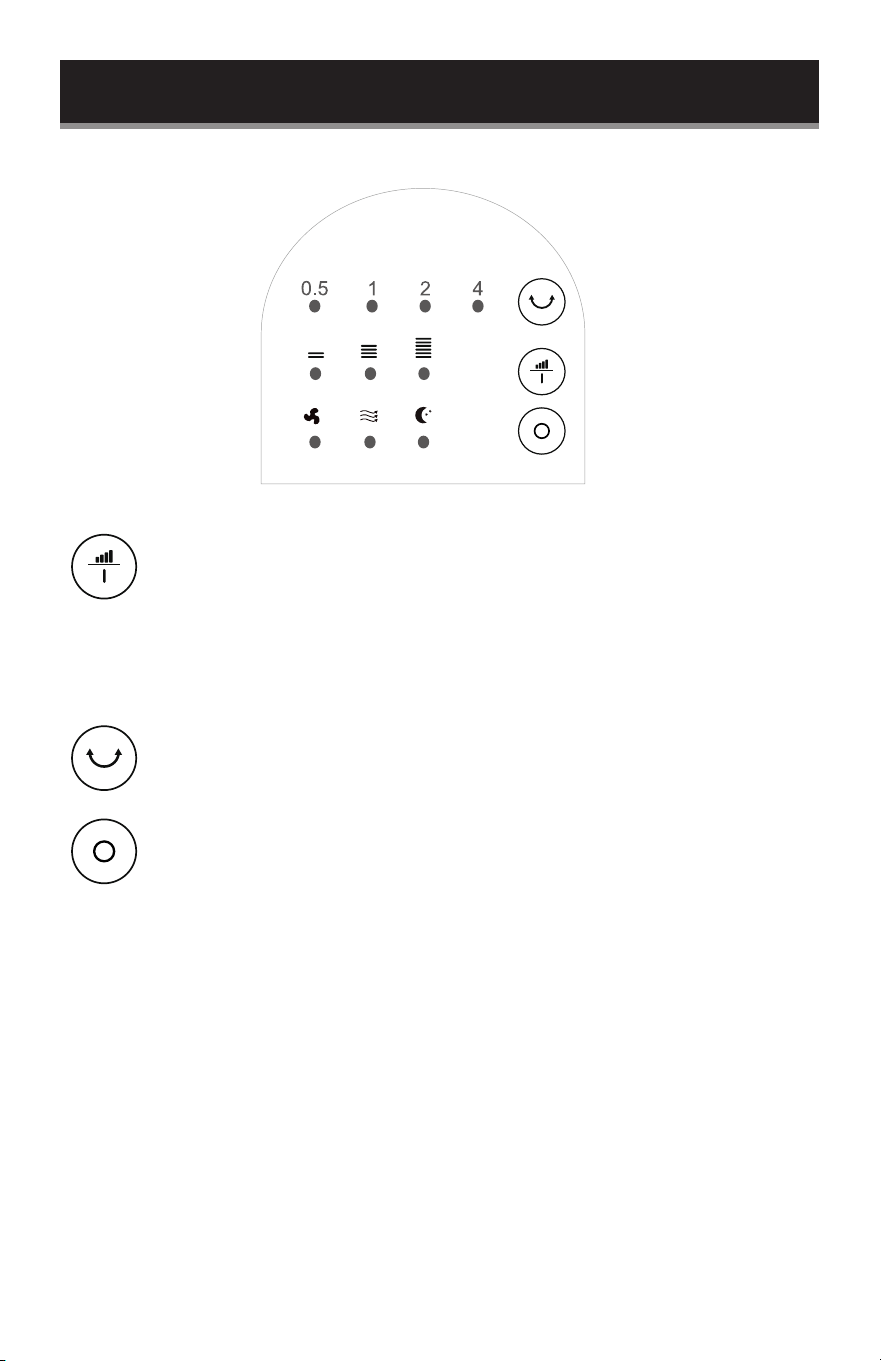
ON / SPEED
• Press this button to turn the fan ON, as it will make an initial beep sound. The fan will
begin to operate at low speed if it is the rst time you have plugged it in. If the fan was
plugged in previously, it will operate at the speed setting when last turned off. Press the
button to turn the fan OFF at any time.
• Continue to press the key to scroll through the SPEED settings. The corresponding LED
light Low, Medium or High will illuminate on the control panel to indicate the selected
speed.
MODE
• Pressing the “MODE” button repeatedly will select NORMAL, NATURAL or SLEEP
modes.
• NORMAL mode provides steady airow and cycles through high, medium and low fan
speeds.
• NATURAL mode simulates a breeze and cycles through the high to low fan speed.
• SLEEP mode simulates a breeze like natural mode but will cycle to a lower speed after a
period of time. When the unit is in SLEEP mode the unit will not have any sound and the
lights will go off after 30 seconds.
TIMER
• The fan is equipped with a shut-off timer that allows you to set its length of operation
from .5 hour to 7.5 hours. Continue to press the TIMER button to scroll through the
different time selections of .5 hour, 1 hour, 2 hours, and 4 hours. The combination of
selections .5, 1, 2 and 4 will be illuminated. The fan will automatically shut-off after the
selected duration.
OSC
• Pressing the ‘OSC’ button will start and stop the oscillation function.
OFF
• Press this button to turn the fan off at any time.
SET UP & USE
Page 12
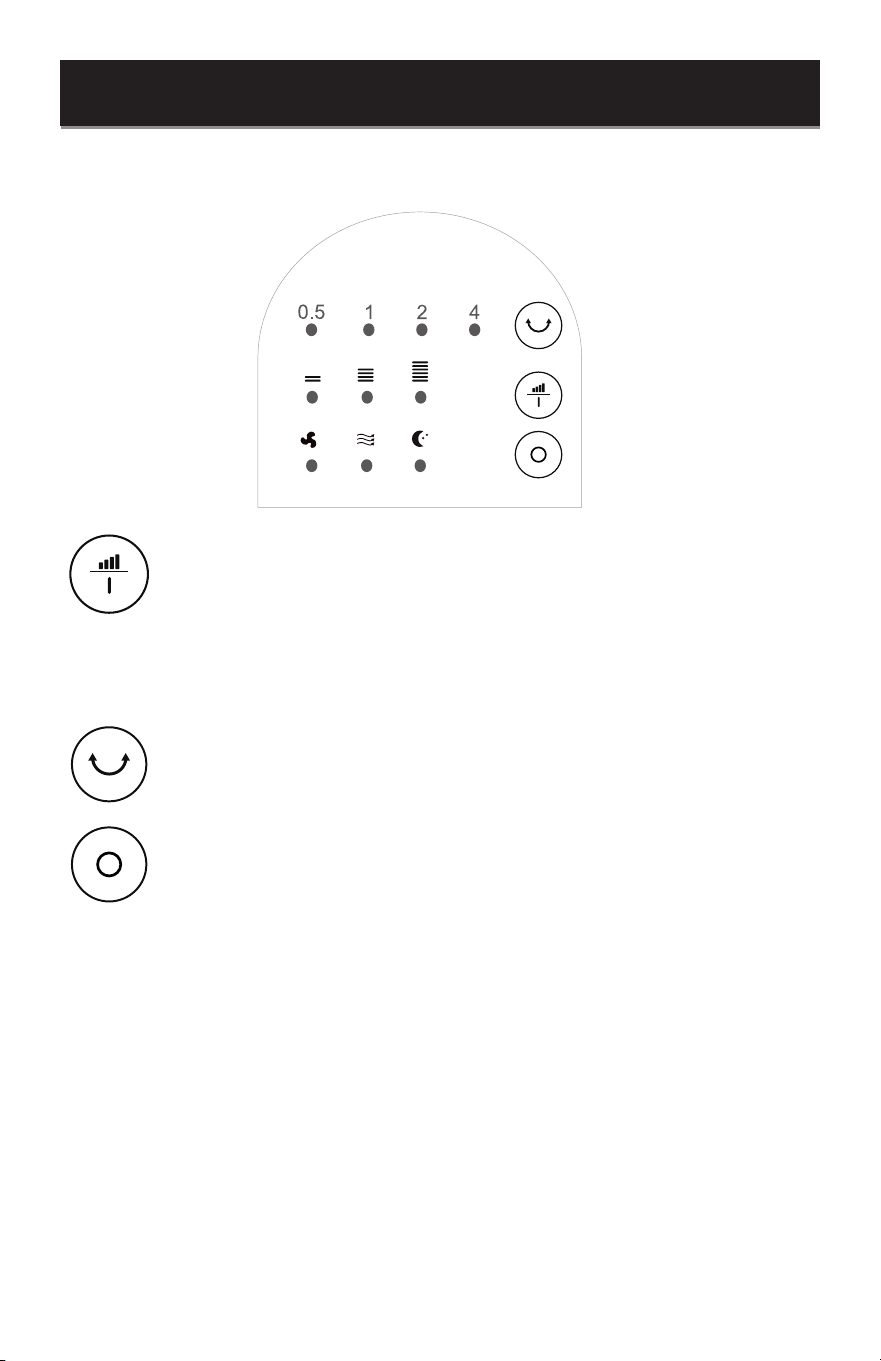
CONTROL PANEL
• Press this button to turn the fan ON. The fan will begin to operate at low
speed if it is the rst time you have plugged it in. If the fan was plugged in
previously, it will operate at the speed setting when last turned off.
• Continue to press the key to scroll through the SPEED settings. The
corresponding LED light Low, Medium or High will illuminate to indicate the
selected speed.
• Pressing this button will start and stop the oscillation function.
• Press this button to power off the fan at any time.
SET UP & USE
SLEEPNATURALNORMAL
LOW MEDIUM HIGH
SPEED
ON
OSC
OFF

Page 13
CLEANING & CARE
CLEANING AND MAINTENANCE
WARNING: Before cleaning and assembling, unplug the fan.
• To ensure adequate air circulation to the motor, keep vents at the rear of the motor
housing free of dust, debris, etc. Unplug fan before using a vacuum cleaner to clean
these vents. Do not disassemble the fan motor to clean.
• Plastic parts of the fan should be cleaned with mild soap and a damp cloth or sponge.
Rinse with clean water to remove any soapy lm residue.
• Be sure not to get water or any other liquid inside the motor.
Page 14
BEFORE YOU CALL FOR SERVICE
IF THE APPLIANCE FAILS TO OPERATE:
A) Check to make sure that the appliance is plugged in securely. If it is not, remove
the plug from the outlet, wait 10 seconds and plug it in again securely.
B) Check for a blown circuit fuse or a tripped main circuit breaker. If these seem to
be operating properly, test the outlet with another appliance.
IF NONE OF THE ABOVE SOLVES THE PROBLEM, CONTACT A QUALIFIED
TECHNICIAN. DO NOT TRY TO ADJUST OR REPAIR THE APPLIANCE YOURSELF.
CUSTOMER SERVICE
IMPORTANT
DO NOT RETURN THIS PRODUCT TO THE STORE
If you have a problem with this product, please contact the
BLACK+DECKER Customer Satisfaction Center at
844-299-0879 or [email protected].
DATED PROOF OF PURCHASE, MODEL # AND SERIAL #
REQUIRED FOR WARRANTY SERVICE
TROUBLESHOOTING
Troubleshoot your problem by using the chart below. If the appliance still does not work
properly, contact W Appliance Co. customer service center or the nearest authorized
service center. Customers must never troubleshoot internal components.
TROUBLE POSSIBLE CAUSE POSSIBLE REMEDY
Appliance does not turn on
Appliance is not plugged in Check that appliance is
plugged into a working outlet
The fuse cover may be open Disconnect the plug from
outlet and close the cover of
the fuse.
TROUBLESHOOTING & WARRANTY

Page 15
TROUBLESHOOTING & WARRANTY
LIMITED WARRANTY
Any repair, replacement, or warranty service,
and all questions about this product should be
directed to W Appliance Co. at 844-299-0879
from the USA or Puerto Rico.
W Appliance Co. warrants to the original purchaser
that the product will be free from defects in material,
parts and workmanship for the period designated for
this product. The warranty commences the day the
product is purchased and covers up to a period of
1 year (12 months) for labor/1 year (12 months) for
parts (manufacturing defects only).
W Appliance Co. agrees that it will, at its option,
replace the defective product with either a new
or remanufactured unit equivalent to your original
purchase during the warranty period.
Exclusions: This warranty does not apply to the
below:
1. If the appearance or exterior of
the product has been damaged or
defaced, altered or modied in design or
construction.
2. If the product original serial number
has been altered or removed or cannot
be readily determined.
3. If there is damaged due to power line
surge, user damage to the AC power
cord or connection to improper voltage
source.
4. If damage is due to general misuse,
accidents or acts of God.
5. If repair attempts are done by
unauthorized service agents, use of
parts other than genuine parts or parts
obtained from persons other than
authorized service companies.
6. On units that have been transferred
from the original owner.
7. On products that have been purchased
as refurbished, like new, second-hand, in
a “As-Is” or “Final Sale” terms.
8. To products used in a commercial or
rental setting.
9. To products used in settings other than
ordinary household use or used other
than in accordance with the provided
instructions.
10. To damages for service calls for
improper installations.
11. Transportation and shipping costs
associated with the replacement of the
unit.
12. Service calls to instruct you how to use
your product.
13. Service calls to repair or replace the
house fuse, reset the circuit breaker or
correct the wiring in the house.
REPAIR OR REPLACEMENT AS PROVIDED UNDER
THIS WARRANTY IS THE EXCLUSIVE REMEDY OF
THE CUSTOMER; W Appliance Co. SHALL NOT BE
LIABLE FOR ANY INCIDENTAL OR CONSEQUENTIAL
DAMAGES FOR BREACH OF ANY EXPRESS OR
IMPLIED WARRANTY ON THIS PRODUCT, EXCEPT
TO THE EXTENT PROHIBITED BY APPLICABLE LAW.
ANY IMPLIED WARRANTY OF MERCHANTABILITY
OF FITNESS FOR A PARTICULAR PURPOSE ON THIS
PRODUCT IS LIMITED TO THE DURATION OF THE
WARRANTY.
Some states do not allow the exclusion or limitations
of incidental or consequential damages, or limitations
on how long the warranty lasts. In these cases the
above exclusions or limitations may not apply to you.
This warranty gives you specic legal rights and you
may also have other rights which vary from state to
state.
Obtaining Service: To obtain service, product
literature, supplies or accessories please call
844-299-0879 to create a ticket for exchange/repair.
Please make sure to provide the date of purchase,
model number and a brief description of the problem.
Our customer service representative will contact you
or send detailed return instructions.
W Appliance Co. does not warrant that the appliance will work
properly in all environmental conditions, and makes no warranty
and representation, either implied or expressed, with respect
to the quality, performance, merchantability, or tness for a
particular purpose other than the purpose identied within this
user’s manual. W Appliance Co. has made every effort to ensure
that this user’s manual is accurate and disclaims liability for any
inaccuracies or omissions that may have occurred. Information
in this user’s manual is subject to change without notice and
does not represent a commitment on the part of W Appliance
Co.. W Appliance Co. reserves the right to make improvements
to this user’s manual and/or to the products described in this
user’s manual at any time without notice. If you nd information
in this manual that is incorrect, misleading, or incomplete, please
contact us at 844-299-0879.
W Appliance Co.
1356 Broadway
New York, NY 10018
BLACK & DECKER, BLACK+DECKER, the BLACK & DECKER and
BLACK+DECKER logos and product names are trademarks of
The Black & Decker Corporation, used under license. All rights reserved.
Product in this box may differ slightly from that pictured. Does not affect
function. Not all accessories shown in photography are included in this
package.
Imported by W Appliance, Inc., 1356 Broadway, New York, NY 10018
December 2023 Printed in China
Support
Warranty
equitybrands.onsitesupport.io
Scan for
Page 17
VENTILADOR DE
PARED 16”.
MANUAL DE
INSTRUCCIONES
NÚMERO DE CATÁLOGO
BFWL16R
¡Gracias por elegir BLACK+DECKER!
POR FAVOR, LEA ESTE MANUAL ANTES DE DEVOLVER ESTE
PRODUCTO POR CUALQUIER MOTIVO.
Si tiene alguna pregunta o experimenta un problema con su compra de
BLACK+DECKER, vaya a www.blackanddecker.com/instantanswers.
Si no puede encontrar la respuesta o no tiene acceso a Internet, llame al
844-299-0879 desde 10:30 a.m. a 6:30 p.m. EST de lunes a viernes para hablar
con un agente. Por favor, tenga el número de catálogo a mano cuando llame.
GUARDE ESTE MANUAL PARA CONSULTARLO NUEVAMENTE
MÁS ADELANTE.

Page 18
INFORMACIÓN DE SEGURIDAD
Instrucciones importantes de seguridad ......................................................................................................................19
Requisitos eléctricos ............................................................................................................................................................. 20
Cable de corriente ..................................................................................................................................................................20
Información sobre la batería ...............................................................................................................................................21
CONFIGURACIÓN Y USO
Piezas y características .........................................................................................................................................................22
Instalación del ventilador ..............................................................................................................................23-24
Instalación en pared .............................................................................................................................................25
Funcionamiento del ventilador .................................................................................................................26-27
Panel de Control .................................................................................................................................................... 28
LIMPIEZA Y CUIDADO .................................................................................................................................. 29
SOLUCIÓN DE PROBLEMAS Y GARANTÍA
Antes de llamar al servicio técnico ................................................................................................................... 30
Servicio al cliente ................................................................................................................................................. 30
Solución de problemas ...................................................................................................................................... 30
Garantía limitada .....................................................................................................................................................................31
CONTENIDO
Gracias por comprar nuestro
producto BLACK+DECKER. Este
manual fácil de usar le guiará para
hacer el mejor uso de su calentador.
Recuerde anotar los números de
modelo y de serie. Están en una
etiqueta en la parte trasera.
Grape o adjunte su recibo de compra a este manual.
Lo necesitará para acceder el servicio de garantía.
Número de modelo
Número de serie
Fecha de compra
REGISTRO DEL PRODUCTO
Page 19
INSTRUCCIONES IMPORTANTES DE SEGURIDAD
ADVERTENCIA
Al utilizar aparatos eléctricos, deben seguirse siempre las precauciones básicas de
seguridad para reducir el riesgo de incendio, descarga eléctrica y lesiones personales.
LEA TODAS LAS INSTRUCCIONES ANTES DE UTILIZAR EL PRODUCTO
1. LEA TODAS LAS INSTRUCCIONES ANTES DE UTILIZAR EL PRODUCTO
2. Nunca introduzca los dedos, lápices o cualquier otro objeto a través de
la rejilla cuando el ventilador esté en funcionamiento.
3. Desconecte el ventilador cuando se traslade de un lugar a otro.
4. Desconecte el ventilador cuando no esté en uso y antes de limpiarlo.
5. Para protegerse contra el riesgo de descarga eléctrica, no sumerja el
ventilador en agua ni en ningún otro líquido.
6. No deje que el cable cuelgue del borde de una mesa o mostrador.
7. Asegúrese de que el ventilador esté sobre una supercie estable cuando
lo utilice para evitar que vuelque.
8. No utilice el ventilador en una ventana. La lluvia puede crear peligro
eléctrico.
9. Es necesaria una supervisión cuidadosa cuando cualquier aparato sea
utilizado por niños o cerca de ellos.
10. Este producto cuenta con protección contra sobrecargas (fusible). Un
fusible fundido indica una situación de sobrecarga o cortocircuito. Si
el fusible se funde, desenchufe el producto de la toma de corriente.
Sustituya el fusible de acuerdo con el manual del usuario (consulte las
especicaciones del producto para conocer la capacidad del fusible) y
compruebe el producto. Si el fusible de repuesto se funde, es posible
que haya un cortocircuito y el producto debe desecharse o devolverse a
un servicio técnico autorizado para su revisión y/o reparación.
11. No haga funcionar ningún ventilador con un cable o enchufe dañado.
Deseche el ventilador o devuélvalo a un servicio técnico autorizado para
su examen y/o reparación.
12. No pase el cable por debajo de alfombras. No cubra el cable con
alfombras o cubiertas similares. No pase el cable por debajo de muebles
o electrodomésticos. Coloque el cable lejos de zonas de tránsito y donde
no se pueda tropezar con él.
13. Para reducir el riesgo de incendio o descarga eléctrica, NO utilice este
ventilador con ningún dispositivo de control de velocidad de estado
sólido.
14. No lo utilice al aire libre.
INFORMACIÓN DE SEGURIDAD
PELIGRO
PELIGRO - Amenazas inmediatas
que RESULTARÁN en lesiones
personales graves o la muerte
ADVERTENCIA
ADVERTENCIA - Peligros o
prácticas inseguras que PUEDEN
RESULTAR en lesiones personales
graves o la muerte
PRECAUCIÓN
PRECAUCIÓN - Peligros o prácticas
inseguras que PODRÍAN resultar en
lesiones personales menores

Page 20
GUARDE ESTAS INSTRUCCIONES
USO EXCLUSIVAMENTE DOMÉSTICO
REQUISITOS ELÉCTRICOS
Este aparato tiene un enchufe polarizado (una clavija es más ancha que la otra). Para
reducir el riesgo de descarga eléctrica, este enchufe está diseñado para encajar en una
toma de corriente polarizada sólo en un sentido. Si el enchufe no encaja en la toma
de corriente, inviértalo. Si sigue sin encajar, póngase en contacto con un electricista
cualicado. No intente modicar el enchufe de ninguna manera.
CABLE DE CORRIENTE
1. Si es absolutamente necesario utilizar juegos de cables más largos o una extensión, se
debe tener extremo cuidado.
a) La capacidad eléctrica marcada del juego de cables o de la extensión debe ser igual
o superior a la capacidad eléctrica del aparato. El cable más largo debe colocarse de
manera que no quede tendido sobre el mostrador o la mesa, donde los niños puedan
tirar de él o tropezar involuntariamente.
NOTA: Ni Black & Decker ni el distribuidor pueden aceptar ninguna responsabilidad por daños al
producto o lesiones personales resultantes del incumplimiento de los procedimientos de
conexión eléctrica.
ESPECIFICACIONES
• Dimensiones de la unidad (ancho x fondo x alto): 17” x 12” x 18”
• Peso Neto: Aprox. 4.9 lbs.
Este dispositivo cumple con la sección 15 de las normas de la FCC. Su funcionamiento está
sujeto a las siguientes dos condiciones: 1) Este dispositivo no puede causar interferencias
perjudiciales, y 2) Este dispositivo debe aceptar cualquier interferencia recibida, incluidas las
interferencias que puedan causar un funcionamiento no deseado. Este equipo ha sido probado
y cumple los límites establecidos para los dispositivos digitales de Clase B, de conformidad
con la Parte 15 de las normas de la FCC. Estos límites están diseñados para proporcionar una
protección razonable contra interferencias perjudiciales en una instalación residencial. Este
equipo genera, utiliza y puede irradiar energía de radiofrecuencia y, si no se instala y utiliza de
acuerdo con las instrucciones, puede causar interferencias perjudiciales en las comunicaciones
por radio. No obstante, no se garantiza que no se produzcan interferencias en una instalación
concreta. Si este equipo causa interferencias perjudiciales a la recepción de radio o televisión,
lo cual puede determinarse apagando y encendiendo el equipo, se recomienda al usuario que
intente corregir la interferencia mediante una o más de las siguientes medidas: a) Reorientar o
cambiar de lugar la antena receptora. b) Aumentar la separación entre el equipo y el receptor,
c) Conectar el equipo a una toma de corriente diferente a la que está conectado el receptor. d)
Consultar al distribuidor o a un técnico de radio/TV experimentado para obtener ayuda.
INFORMACIÓN DE SEGURIDAD
Page 21
INFORMACIÓN SOBRE LA BATERÍA
ADVERTENCIA
• Peligro de quemaduras químicas. Mantenga las pilas fuera del alcance de los niños.
Este producto contiene una pila de botón/moneda de litio. Sí una pila de litio
tipo botón/moneda nueva o usada se ingiere o entra en el cuerpo, puede causar
quemaduras internas graves y provocar la muerte en tan sólo 2 horas. Asegure siempre
completamente el compartimento de la pila. Si el compartimento de las pilas no cierra
bien, deje de utilizar el producto, extraiga las pilas y manténgalo fuera del alcance de los
niños. Si cree que las pilas pueden haber sido ingeridas o colocadas dentro de cualquier
parte del cuerpo, solicite atención médica inmediata.
NOTA: Incluso las pilas usadas pueden causar lesiones.
• AVISO DE SEGURIDAD SOBRE LAS PILAS DE LITIO TIPO BOTÓN:
Mantenga las pilas de litio tipo botón fuera del alcance de los niños pequeños; las pilas
tipo botón pueden ingerirse accidentalmente. si se ingieren, estas pilas pueden derramar
contenidos nocivos causando quemaduras químicas, perforación de tejidos blandos y,
en casos graves, pueden causar la muerte. Las pilas de litio tipo botón deben extraerse
inmediatamente en caso de ingestión. Busque atención médica inmediatamente. Si
usted o su médico sospechan que se ha ingerido una pila, llame en cualquier momento a
la LÍNEA DIRECTA NACIONAL DE INGESTIÓN DE PILAS de EE.UU. (202)625-3333: en
Canadá llame al 416-813-5900.
• Retire las pilas usadas y recíclelas o deséchelas inmediatamente de acuerdo con la
normativa local y manténgalas fuera del alcance de los niños. NO tire las pilas a la
basura doméstica ni las incinere.
• Incluso las pilas usadas pueden causar lesiones graves o la muerte.
• Llame a un centro de toxicología local para obtener información sobre el tratamiento.
• La pila CR2025 tiene un alto voltaje de 3V.
• Las pilas no recargables no deben recargarse.
• No fuerce la descarga, recarga, desarme, caliente ni incinere. De lo contrario, podrían
producirse lesiones debido a ventilación, fugas o explosiones que provoquen
quemaduras químicas.
• Asegúrese de que las pilas están instaladas correctamente según la polaridad (+ y -).
• No mezcle pilas nuevas y usadas, ni pilas de marcas o tipos diferentes, como pilas
alcalinas, de carbono-zinc o recargables.
• Retire e inmediatamente recicle o deseche las pilas del equipo que no haya utilizado
durante un período prolongado de tiempo, de acuerdo con la normativa local.
• Cierre siempre completamente el compartimento de las pilas. Si el compartimento
de las pilas no está bien cerrado, deje de utilizar el producto, retire las pilas y
manténgalas fuera del alcance de los niños.
ADVERTENCIA
• PELIGRO DE INGESTIÓN Este producto contiene una pila tipo botón/moneda.
• En caso de ingestión puede producirse la MUERTE o lesiones graves.
• La ingestión de una pila de tipo botón/moneda puede provocar
quemaduras químicas internas en tan sólo 2 horas.
• MANTENGA LAS PILAS NUEVAS Y USADAS FUERA DEL
ALCANCE DE LOS NIÑOS.
• Busque atención médica inmediata si sospecha que se ha tragado o
introducido una pila en cualquier parte del cuerpo.
INFORMACIÓN DE SEGURIDAD

Page 22
PIEZAS Y CARACTERÍSTICAS
Protector frontal
Perilla de ajuste de
inclinación (No se
muestra)
Base
Control remoto
CONFIGURACIÓN Y USO
Page 23
ENSAMBLADO DEL VENTILADOR
ADVERTENCIA: Nunca intente hacer funcionar el ventilador sin que la rejilla esté en
su lugar y debidamente asegurada. El no tener la rejilla en su lugar
puede resultar en lesiones graves.
1. Retire la tuerca de plástico de la rejilla trasera del pasador del eje del motor girándola en
el sentido de las agujas del reloj, mientras sujeta rmemente la carcasa del motor.
2. Enrosque la tuerca de la rejilla trasera en el alojamiento del motor para bloquear la rejilla
trasera rmemente en su lugar.
3. Enrosque la tuerca de la rejilla trasera en el alojamiento del motor para bloquear la rejilla
trasera rmemente en su lugar.
4. Retire cualquier cubierta protectora del eje antes de instalar las aspas del ventilador.
Coloque el aspa del ventilador en el eje del motor. El pasador del eje del motor debe
introducirse en la ranura del conjunto del aspa del ventilador.
CONFIGURACIÓN Y USO
AFLOJAR
ALFILER
ALFILER
RANURA
ALFILER
TUERCA DE
BLOQUEO
Page 24
Asegure las aspas del ventilador enroscando el rotor en el extremo del eje del motor.
Gire el rotor del ventilador en sentido contrario a las agujas del reloj para apretarlo.
5. Acople la rejilla delantera a la rejilla trasera con el clip de gancho centrado en la parte
superior por encima del asa de alambre.
6. Presione los clips de rejilla restantes en la rejilla trasera para jar rmemente la rejilla
delantera.
ADVERTENCIA: No haga funcionar el ventilador sin la rejilla colocada.
CONFIGURACIÓN Y USO
Parrilla delantera
Tuerca de plastico
Cuchilla
Apretar
Hilandero
Aojar
Parrilla trasera
Clip de gancho
Clip de rejilla

Page 25
INSTALACIÓN EN LA PARED
Instale su ventilador de pared cerca de un tomacorriente de pared que funcione
correctamente.
1. Fije el soporte de pared a la pared en la ubicación deseada insertando 3 tornillos a
través de los 3 oricios en el soporte de pared como se muestra. Se incluyen 3 tornillos
para utilizar si son adecuados para el tipo de pared en la que se está instalando el venti-
lador. Los anclajes de pared no están incluidos.
ADVERTENCIA: Utilice anclajes adecuados para el material de la pared. Se recomien-
da montar el soporte en los montantes de la pared.
2. Cuelgue el ventilador en el soporte de pared colocando el tornillo del soporte a
través del ventilador y enroscando el tornillo a través del oricio central superior
del soporte de pared.
CONFIGURACIÓN Y USO
Montar de
forma segura
en la pared
Tornillo del
soporte

Page 26
FUNCIONAMIENTO DE SU VENTILADOR
AJUSTE DE LA INCLINACIÓN
Para ajustar el flujo de aire hacia arriba o hacia abajo, empuje ligeramente la sección de la
rejilla en la dirección deseada.
CONTROL REMOTO
Apunte con el control remoto al receptor situado en el cuerpo del ventilador y pulse el
botón deseado. El control remoto funcionará a distancias de hasta aproximadamente 16
pies (5 metros) y un ángulo de 30 grados a la izquierda y derecha del panel de control.
INSTRUCCIONES PARA LAS PILAS
(Batteries not included)
El control remoto necesita una pila de litio CR2025 para funcionar.
1. Utilizando un destornillador pequeño de cabeza Philips, retire el tornillo girando en
sentido contrario a las agujas del reloj hasta que se suelte del control remoto.
2. Pulse el botón situado en la base de la tapa de las pilas para liberarla. Tire de la tapa
de las pilas como se muestra en la imagen.
3. Inserte la pila asegurándose de que el lado “+” quede hacia arriba.
4. Una vez instalada la batería, empuje la tapa de la batería para cerrarla.
5. De nuevo, utilizando el destornillador pequeño de cabeza Philips, vuelva a colocar el
tornillo girándolo en el sentido de las agujas del reloj hasta que quede bloqueado en
su sitio.
ADVERTENCIA: Peligro de quemaduras químicas. Mantenga las pilas fuera del
alcance de los niños.
CR2025
Batería
Tapa de las pilas
del control remoto
Tornillo
Tornillo
JALAR
EMPUJAR
CONFIGURACIÓN Y USO

Page 27
ENCENDIDO/VELOCIDAD (ON/SPEED)
• Pulse este botón para encender el ventilador, ya que emitirá un sonido inicial. El
ventilador comenzará a funcionar a baja velocidad si es la primera vez que lo enchufa.
Si el ventilador estaba enchufado anteriormente, funcionará a la velocidad ajustada la
última vez que se apagó. Pulse la tecla para apagar el ventilador en cualquier momento.
• Continúe pulsando la tecla para desplazarse por los ajustes de VELOCIDAD. La luz LED
correspondiente Baja (Low), Media (Medium) o Alta (High) se iluminará en el panel de
control para indicar la velocidad seleccionada.
MODO (MODE)
• Pulsando repetidamente el botón “MODE” seleccionará los modos NORMAL, NATURAL
o SLEEP.
• El modo NORMAL proporciona un flujo de aire constante y circula a través de las
velocidades alta, media y baja del ventilador.
• El modo NATURAL simula una brisa y circula entre las velocidades alta y baja del
ventilador.
• El modo SLEEP simula una brisa como el modo natural, pero pasa a una velocidad más
baja después de un período de tiempo. Cuando la unidad está en modo SLEEP la unidad
no tendrá ningún sonido y las luces se apagarán después de 30 segundos.
TEMPORIZADOR (TIMER)
• El ventilador está equipado con un temporizador de apagado que le permite ajustar su
duración de funcionamiento desde 0,5 horas hasta 7,5 horas. Siga pulsando el botón
TlMER para desplazarse por las diferentes selecciones de tiempo de 0,5 horas, 1 hora, 2
horas y 4 horas. La combinación de las selecciones .5, 1, 2 y 4 se iluminará. El ventilador
se apagará automáticamente después de la duración seleccionada.
OSC
• Pulsando el botón ‘OSC’ se iniciará y detendrá la función de oscilación.
OFF
• Pulse este botón para apagar el ventilador en cualquier momento.
CONFIGURACIÓN Y USO
Page 28
PANEL DE CONTROL (CONTROL PANEL)
• Pulse este botón para encender el ventilador. El ventilador comenzará a
funcionar a baja velocidad si es la primera vez que lo enchufa. si el ventilador
se enchufó anteriormente, funcionará a la velocidad ajustada la última vez
que se apagó.
• Continúe pulsando la tecla para desplazarse por los ajustes de VELOCIDAD
(SPEED). La luz LED correspondiente a Baja (Low), Media (Medium) o Alta
(High) se iluminará para indicar la velocidad seleccionada.
• Al presionar esta tecla se iniciará y detendrá la función de oscilación.
• Presione este botón en cualquier momento para apagar el ventilador.
CONFIGURACIÓN Y USO
SLEEPNATURALNORMAL
LOW MEDIUM HIGH
SPEED
ON
OSC
OFF

Page 29
LIMPIEZA Y CUIDADO
LIMPIEZA Y MANTENIMIENTO
ADVERTENCIA: Antes de limpiar y desmontar el ventilador, desenchúfelo.
• Para garantizar una circulación de aire adecuada hacia el motor, mantenga las rejillas
de ventilación de la parte trasera de la carcasa del motor libres de polvo, residuos, etc.
Desenchufe el ventilador antes de utilizar un aspirador para limpiar estas rejillas. No
desmonte el motor del ventilador para limpiarlo.
• Las piezas de plástico del ventilador deben limpiarse con jabón suave y un paño o
esponja húmedos. Enjuague con agua limpia para eliminar cualquier residuo de película
jabonosa.
• Asegúrese de que no entre agua ni ningún otro líquido en el interior del motor.

Page 30
ANTES DE LLAMAR AL SERVICIO TÉCNICO
SI EL APARATO NO FUNCIONA:
A) Compruebe que el aparato está bien enchufado. Si no lo está, desenchúfelo de la
toma de corriente, espere 10 segundos y vuelva a enchufarlo rmemente.
B) Compruebe si se ha fundido un fusible o se ha disparado el disyuntor principal.
Si éstos parecen funcionar correctamente, pruebe la toma de corriente con otro
aparato.
SI NADA DE LO ANTERIOR RESUELVE EL PROBLEMA, PÓNGASE EN
CONTACTO CON UN TÉCNICO CUALIFICADO. NO INTENTE AJUSTAR O
REPARAR EL APARATO USTED MISMO.
CUSTOMER SERVICE
IMPORTANT
DO NOT RETURN THIS PRODUCT TO THE STORE
If you have a problem with this product, please contact the
BLACK+DECKER Customer Satisfaction Center at
844-299-0879 or [email protected].
DATED PROOF OF PURCHASE, MODEL # AND SERIAL #
REQUIRED FOR WARRANTY SERVICE
SOLUCIÓN DE PROBLEMAS
Solucione el problema utilizando la siguiente tabla. Si el aparato sigue sin funcionar
correctamente, póngase en contacto con el centro de atención al cliente de W Appliance
Co. o con el centro de servicio autorizado más cercano. Los clientes nunca deben
solucionar los problemas de los componentes internos.
PROBLEMA POSIBLE CAUSA POSIBLE SOLUCIÓN
El aparato no enciende
El aparato no está enchufado Compruebe que el aparato
esté enchufado a una toma
de corriente que funcione.
La tapa del fusible puede
estar abierta
Desconecte el enchufe de la
toma de corriente y cierre la
tapa del fusible.
RESOLUCIÓN DE PROBLEMAS Y GARANTÍA

Page 31
RESOLUCIÓN DE PROBLEMAS Y GARANTÍA
GARANTÍA LIMITADA
Cualquier reparación, recambio, o servicio
de garantía, y todas las preguntas sobre este
producto deben ser dirigidas a W Appliance Co.
al 844-299-0879 desde EE.UU. o Puerto Rico.
W Appliance Co. garantiza al comprador original que el
producto estará libre de defectos de material, piezas y
mano de obra durante el período designado para este
producto. La garantía comienza el día en que se compra
el producto y cubre hasta un período de 1 año (12 meses)
por mano de obra / 1 año (12 meses) por piezas (solo
defectos de fabricación).
W Appliance Co. acepta que, de acuerdo con su criterio,
remplazará el producto defectuoso por uno nuevo o uno
remanufacturado equivalente a su compra origial durante
el período de garantía.
Exclusiones: This warranty does not apply to the
below:
1. Si la apariencia o el exterior del producto
han sido dañados o desgurados,
alterados o modicados en su diseño o
construcción.
2. Si el número de serie original del
producto ha sido alterado o eliminado o
no puede determinarse fácilmente.
3. Si hay daños debidos a sobretensión de
la línea eléctrica, daños causados por el
usuario en el cable de corriente alterna
o conexión a una fuente de tensión
inadecuada.
4. Si el daño se debe a un mal uso general,
accidentes o casos fortuitos.
5. Si los intentos de reparación son
realizados por agentes de servicio
no autorizados, uso de piezas que no
sean genuinas o piezas obtenidas de
personas que no sean compañías de
servicio autorizadas.
6. En unidades que han sido transferidas
del propietario original.
7. En productos que hayan sido adquiridos
como reacondicionados, como nuevos,
de segunda mano, en condiciones de
“Tal cual” o “Venta nal”.
8. En productos utilizados en un entorno
comercial o de alquiler.
9. En productos utilizados en entornos
distintos al uso doméstico ordinario
o utilizados de forma distinta a las
instrucciones proporcionadas.
10. A los daños por llamadas al servicio
técnico por instalaciones inadecuadas.
11. A los gastos de transporte y envío
asociados a la sustitución de la unidad.
12. Llamadas de servicio para instruirle en
el uso de su producto.
13. Llamadas al servicio técnico para
reparar o sustituir el fusible de la
vivienda, restablecer el disyuntor o
corregir el cableado de la vivienda.
REPAIR OR REPLACEMENT AS PROVIDED UNDER
LA REPARACIÓN O EL REEMPLAZO SEGÚN LO
DISPUESTO BAJO ESTA GARANTÍA ES EL RECURSO
EXCLUSIVO DEL CLIENTE; W Appliance Co. NO SERÁ
RESPONSABLE POR NINGÚN DAÑO INCIDENTAL
O CONSECUENCIAL POR INCUMPLIMIENTO DE
CUALQUIER GARANTÍA EXPRESA O IMPLÍCITA DE
ESTE PRODUCTO, EXCEPTO EN LA MEDIDA EN QUE LO
PROHÍBA LA LEY APLICABLE. CUALQUIER GARANTÍA
IMPLÍCITA DE COMERCIABILIDAD O IDONEIDAD PARA
UN PROPÓSITO PARTICULAR SOBRE ESTE PRODUCTO
TIENE UNA DURACIÓN LIMITADA A LA DURACIÓN DE
ESTA GARANTÍA.
Algunos estados no permiten la exclusión o limitaciones
de daños incidentales o consecuentes, o limitaciones en
la duración de la garantía. En estos casos, las exclusiones
o limitaciones anteriores pueden no aplicarse en su caso.
Esta garantía le otorga derechos legales específicos,
y también puede tener otros derechos que varían de
estado a estado.
Obtención de servicio: para obtener servicio,
documentación del producto, suministros o accesorios,
llame al 844-299-0879 para crear un ticket de cambio/
reparación. Asegúrese de proporcionar la fecha de
compra, el número de modelo y una breve descripción
del problema. Nuestros representantes de servicio al
cliente se comunicarán con usted o enviarán instrucciones
detalladas de devolución.
W Appliance Co. no garantiza que el aparato funcionará
adecuadamente en todas las condiciones ambientales, y no otorga
garantía alguna ni defensa, ya sea implícita o expresada, con respecto
a la calidad, desempeño, comerciabilidad, o aptitud para un propósito
particular más allá del propósito identificado en este manual de
usuario. W Appliance Co. ha hecho todos los esfuerzos posibles para
garantizar que este manual del usuario sea preciso y se exime de
toda responsabilidad por cualquier inexactitud u omisión que pueda
haber ocurrido. La información en este manual del usuario está
sujeta a cambios sin previo aviso y no representa un compromiso
por parte de W Appliance Co. W Appliance Co. se reserva el derecho
de realizar mejoras en este manual del usuario y/o en los productos
descritos en este manual del usuario en cualquier momento sin previo
aviso. Si encuentra información en este manual que es incorrecta,
engañosa o incompleta, comuníquese con nosotros al 844-299-0879.
W Appliance Co.
1356 Broadway
New York, NY 10018

Page 32
BLACK & DECKER, BLACK + DECKER, los logotipos y nombres de productos de
BLACK & DECKER y BLACK+DECKER son marcas comerciales de The Black &
Decker Corporation, utilizadas bajo licencia. Reservados todos los derechos.
El producto de esta caja puede diferir ligeramente del de la foto. No afecta al
funcionamiento. No todos los accesorios mostrados en la fotografía están incluidos
en este paquete.
lmportado por W Appliance, Inc, 1356 Broadway Nueva York, NY 10018
Diciembre 2023 Impreso en China
Support
Warranty
equitybrands.onsitesupport.io
Scan for